Dimensional Accuracy and Surface Quality of AZ91D Magnesium Alloy Components after Precision Milling
Abstract
1. Introduction
2. Materials and Methods
3. Results and Discussion
3.1. Dimensional Accuracy
3.2. Surface Roughness
4. Conclusions
- Obtained dimension values deviate from the assumed nominal depth along with successive tool passes.
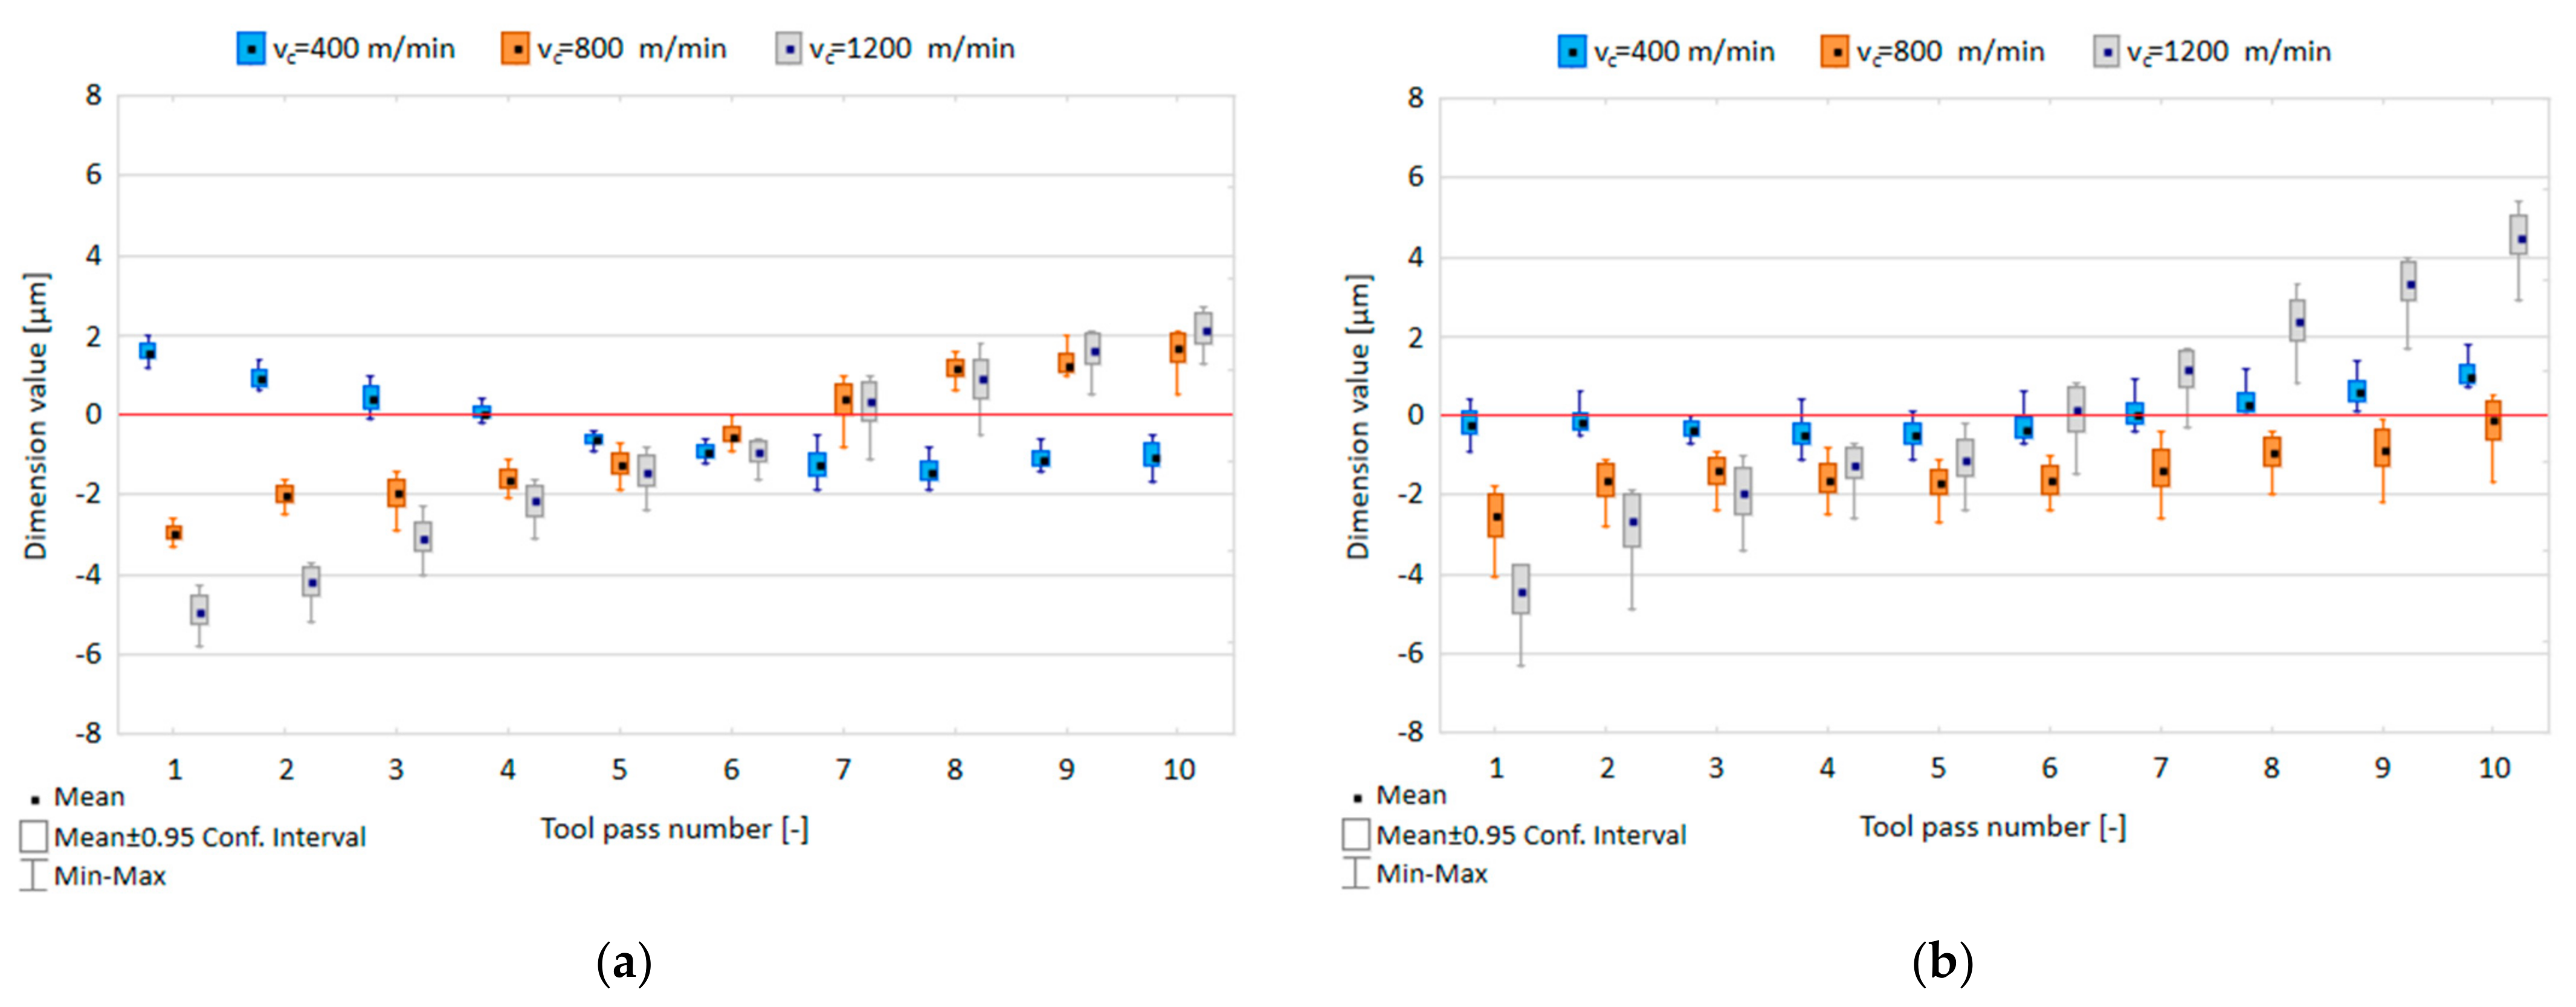
- Increase in cutting speed causes an increased scatter of dimension values with successive tool passes and their higher deviation from the nominal depth, thus increasing the range of dimension values for the entire surface.
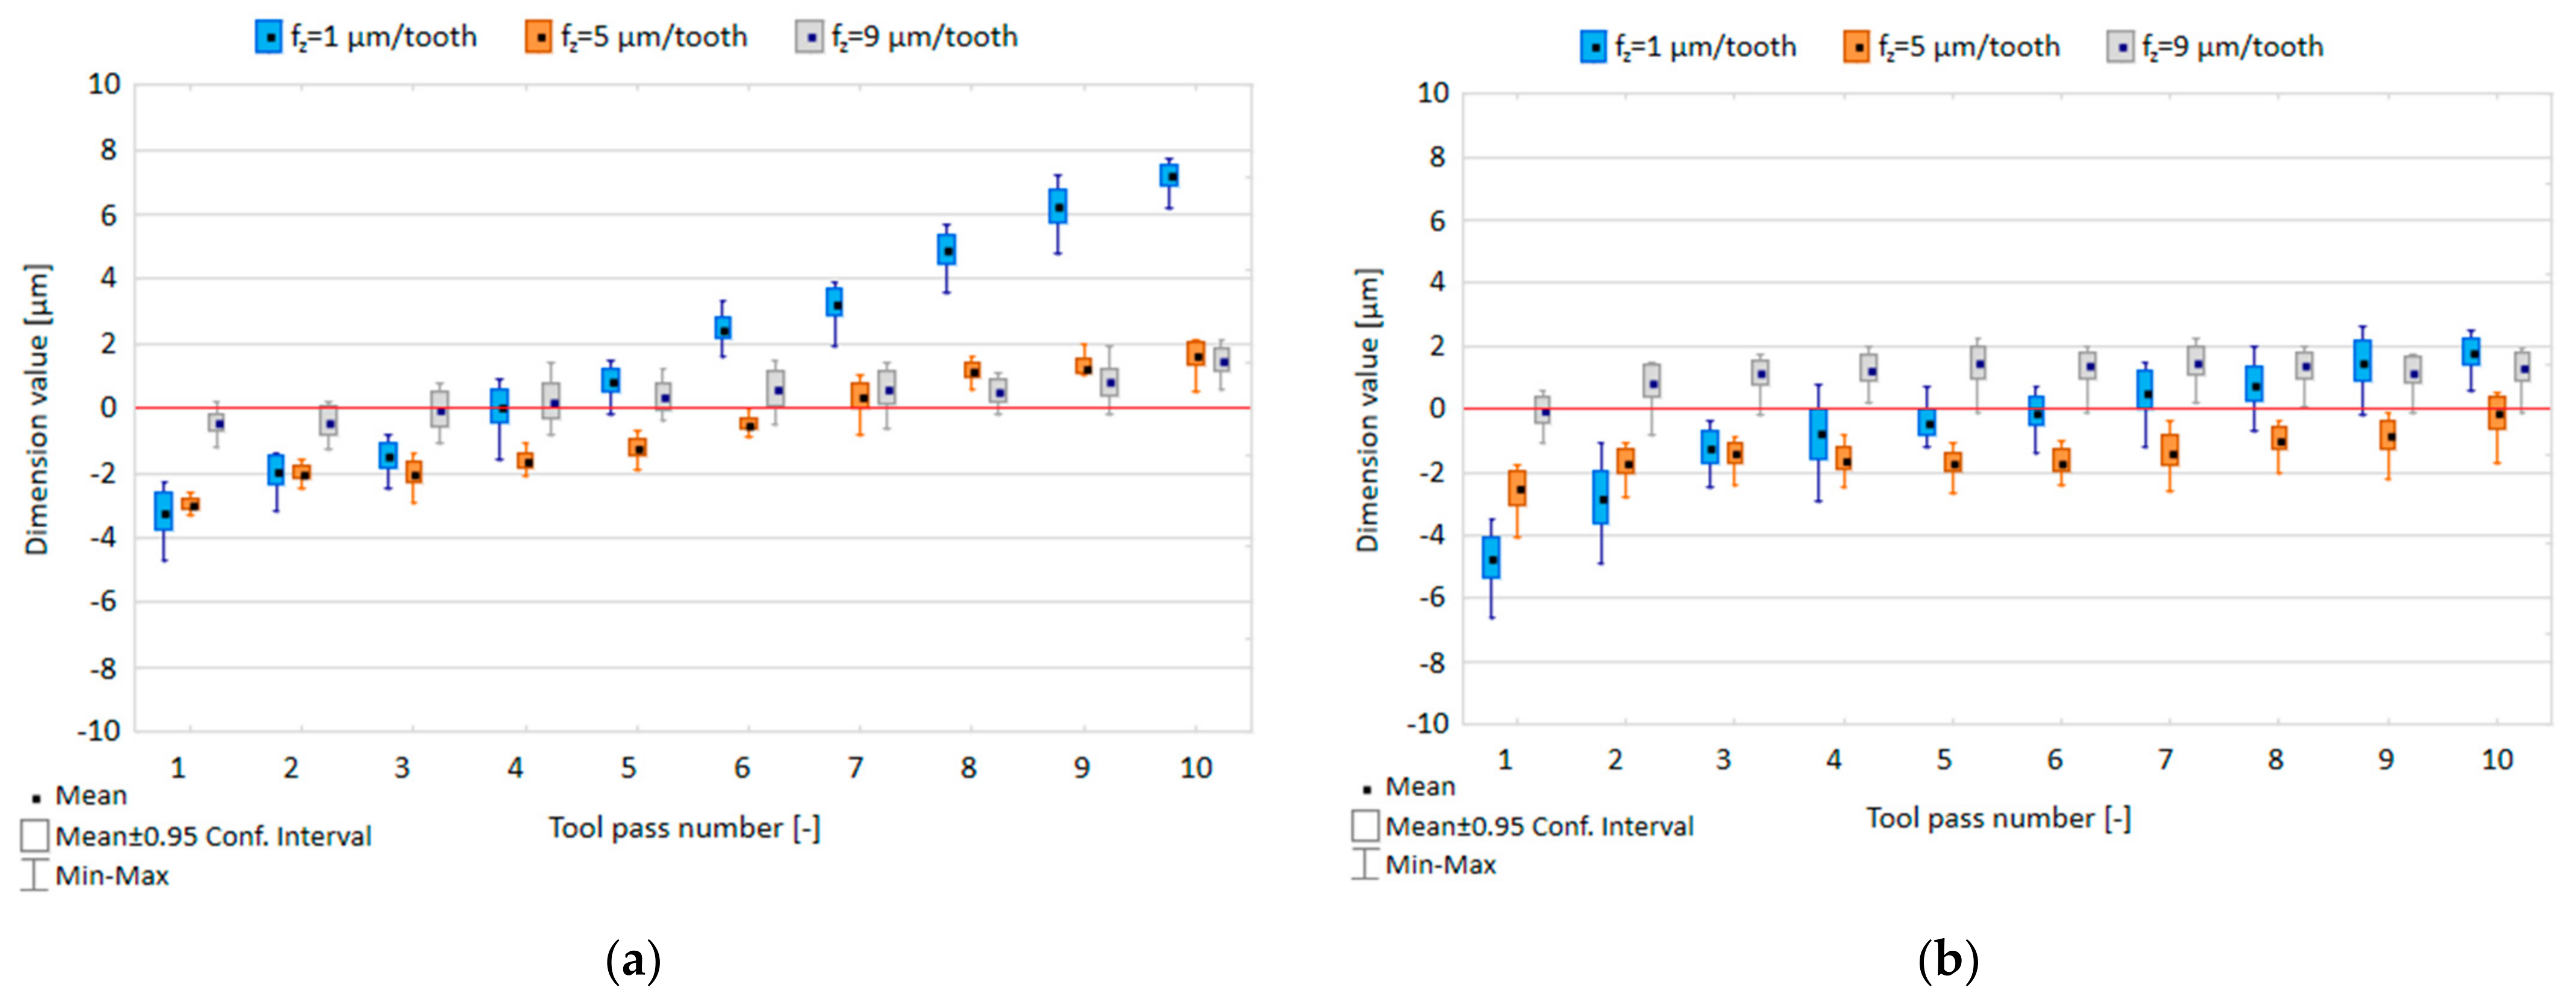
- Increase in feed per tooth reduces the deviation of dimension values from the nominal depth and reduces the scatter of dimension values occurring with successive tool passes, leading to a lower range of dimension variation for the entire surface.
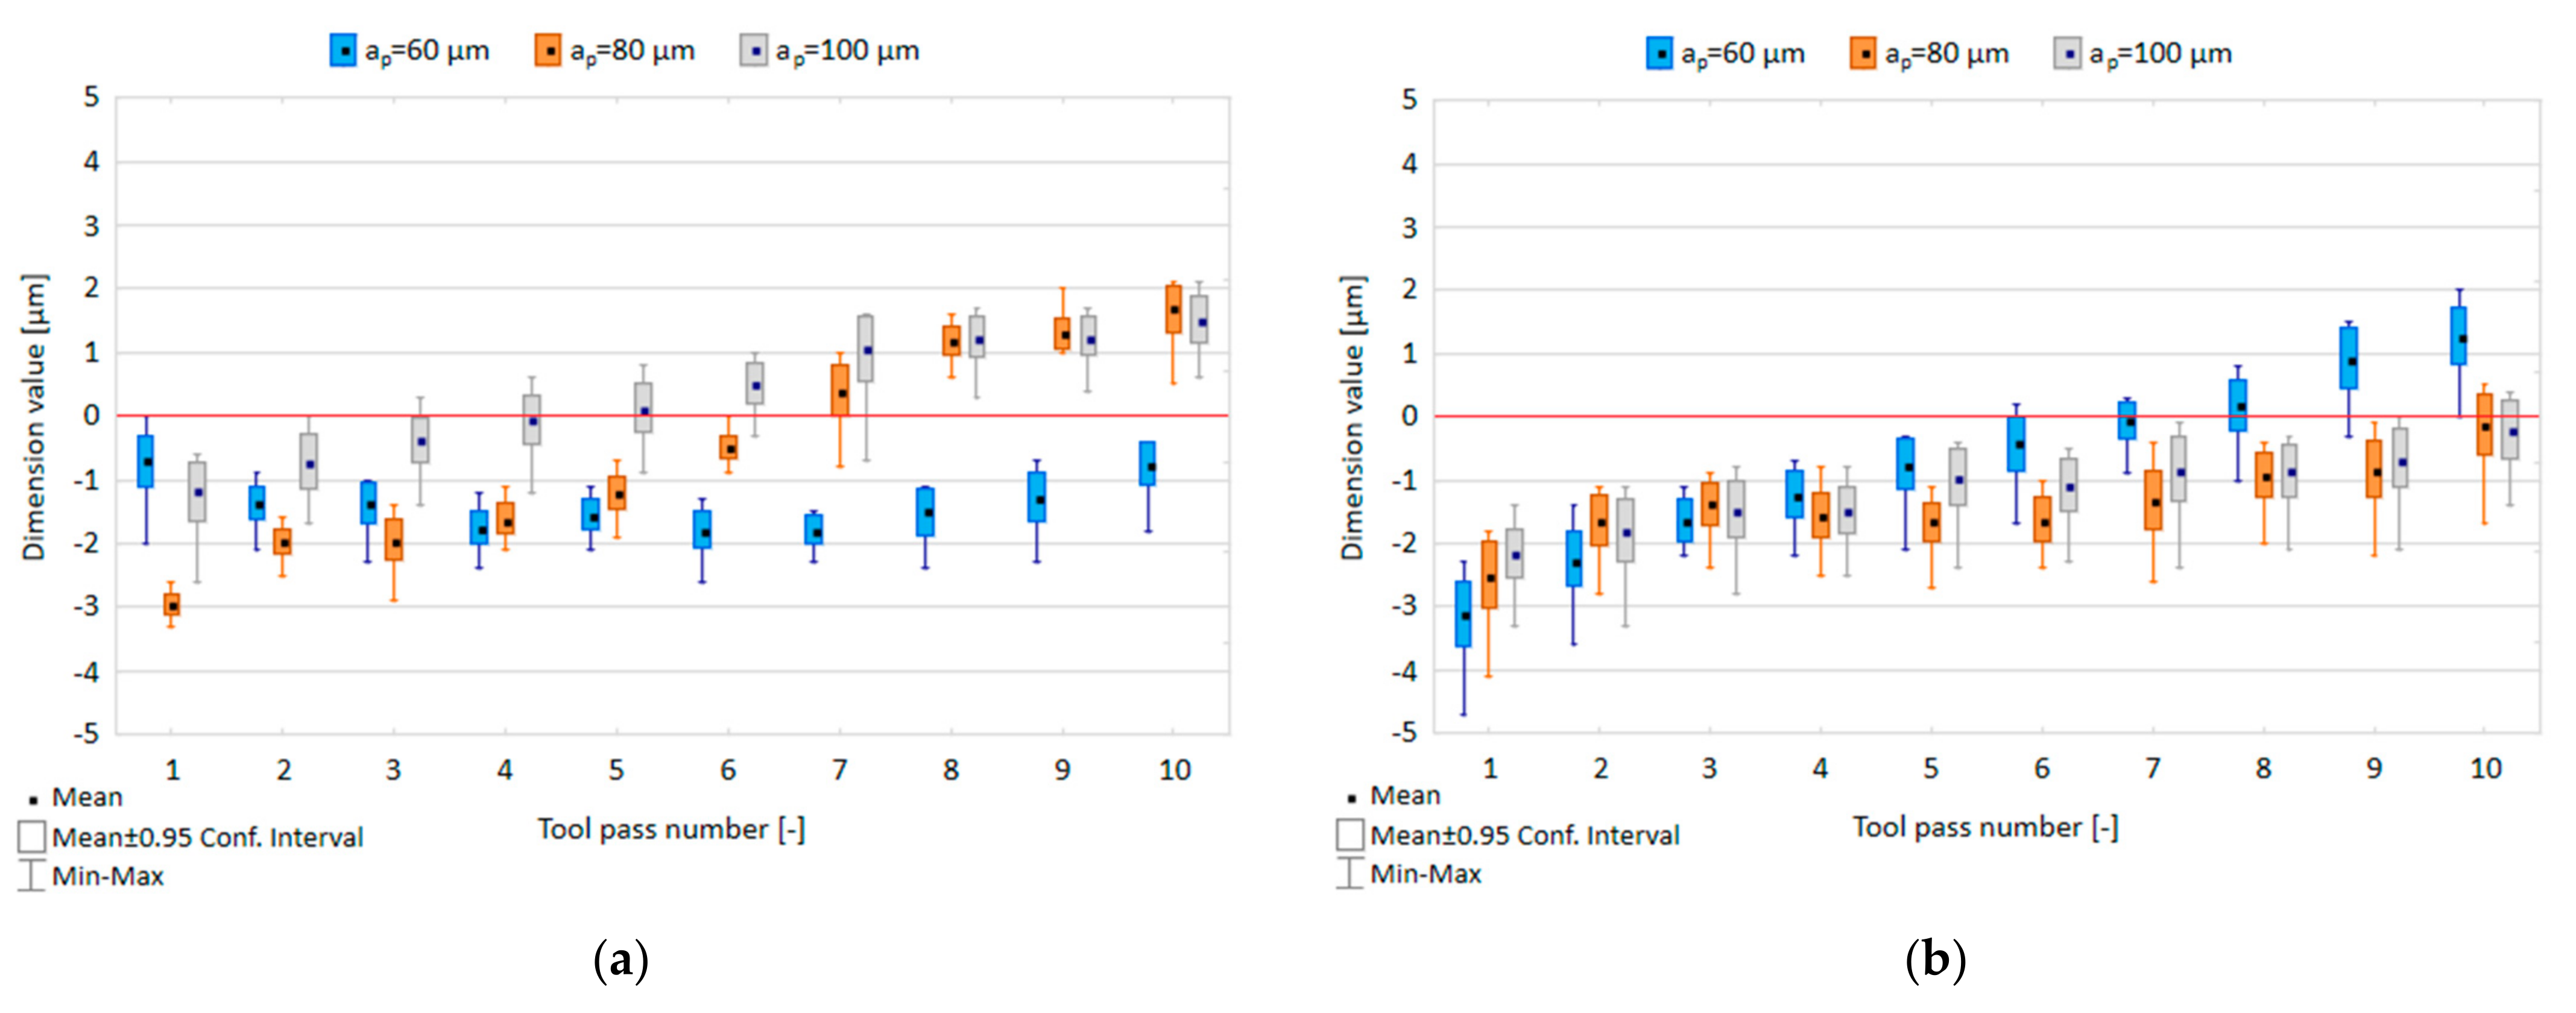
- Change in the axial depth of cut does not have a significant impact on obtained dimension values.
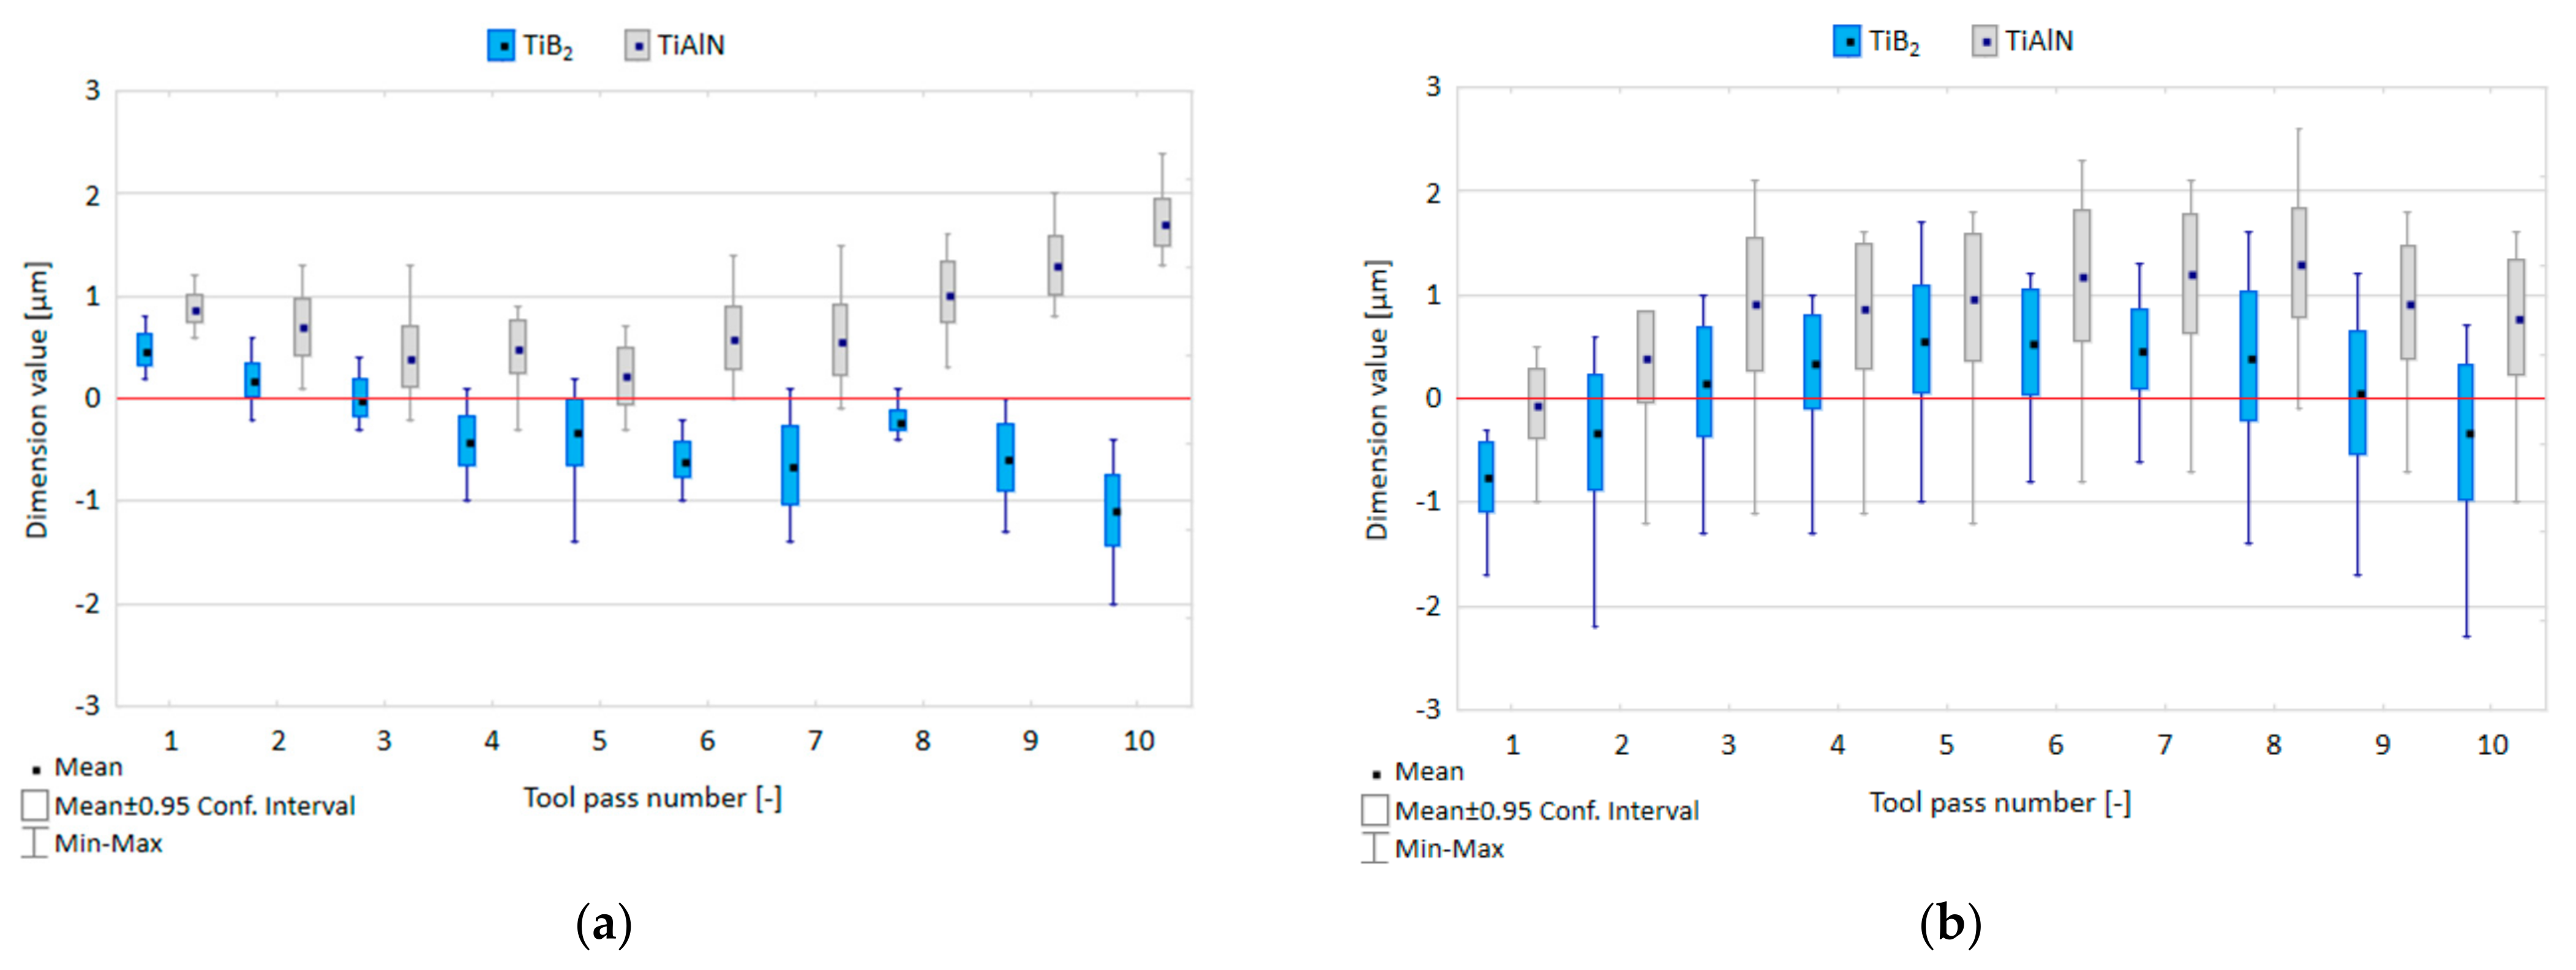
- Similar dimension values are obtained for both tested tool coating types, these values being slightly more favourable for the TiB2-coated tool.
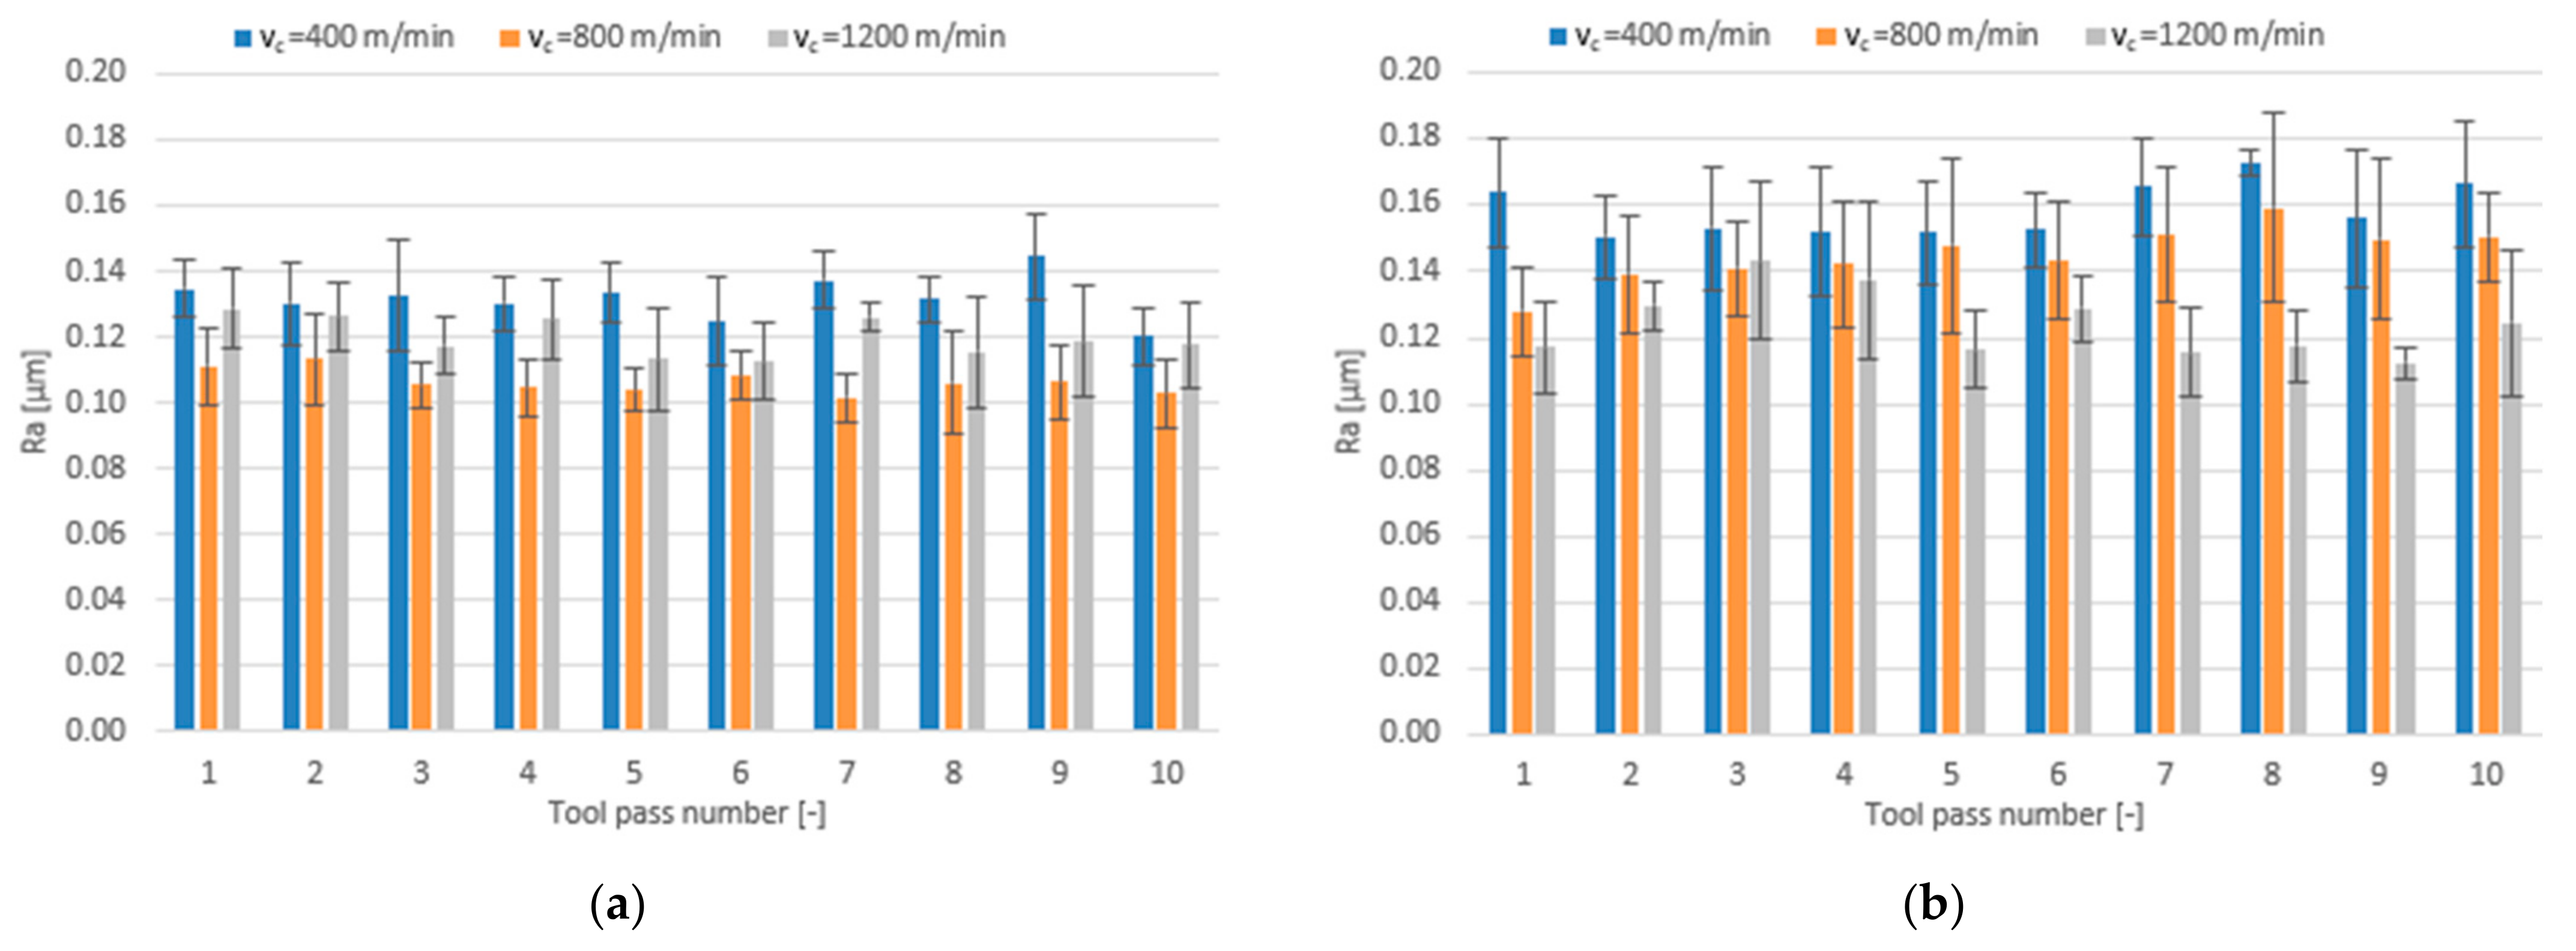
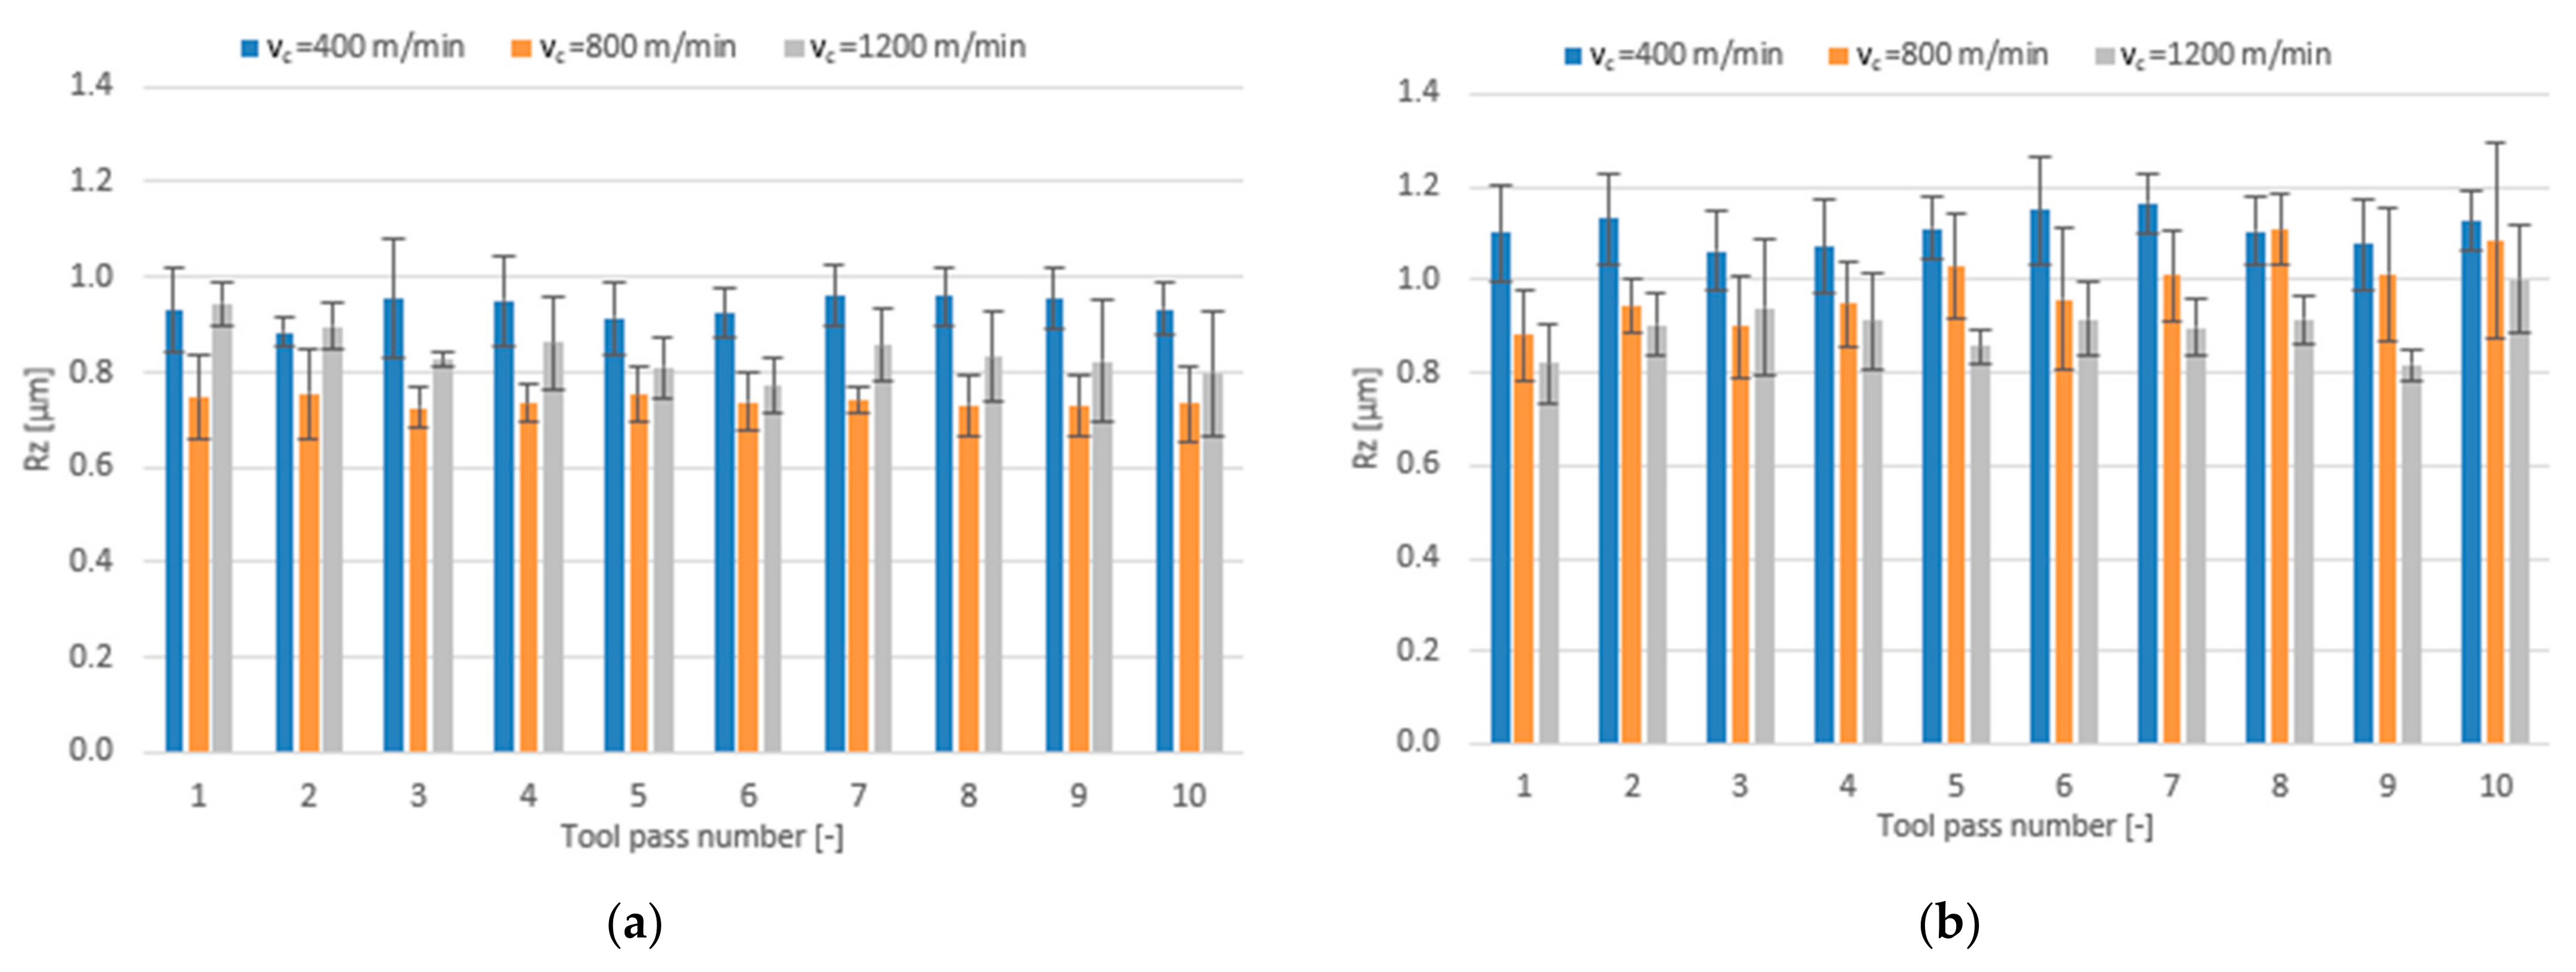
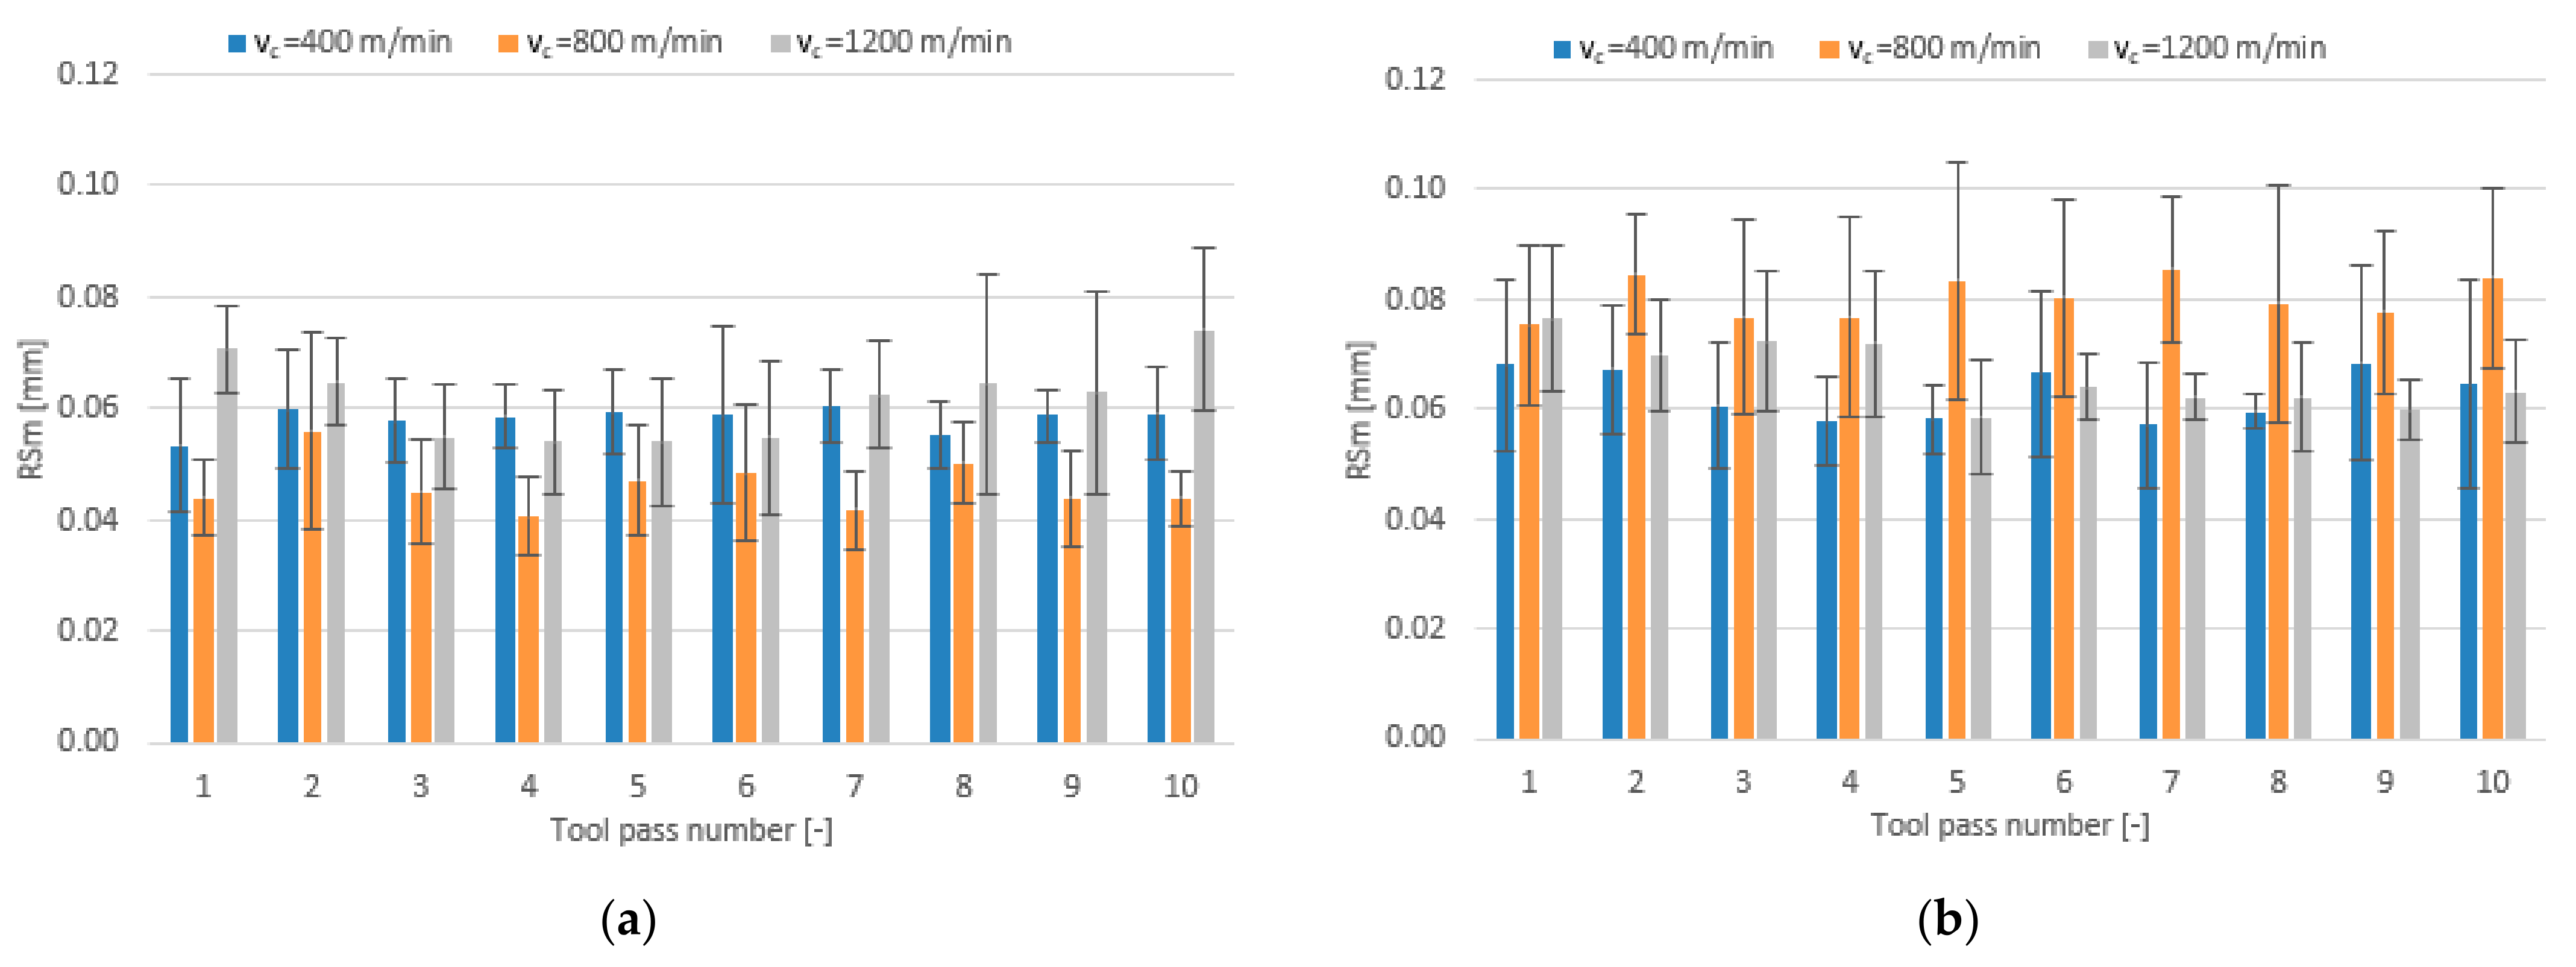
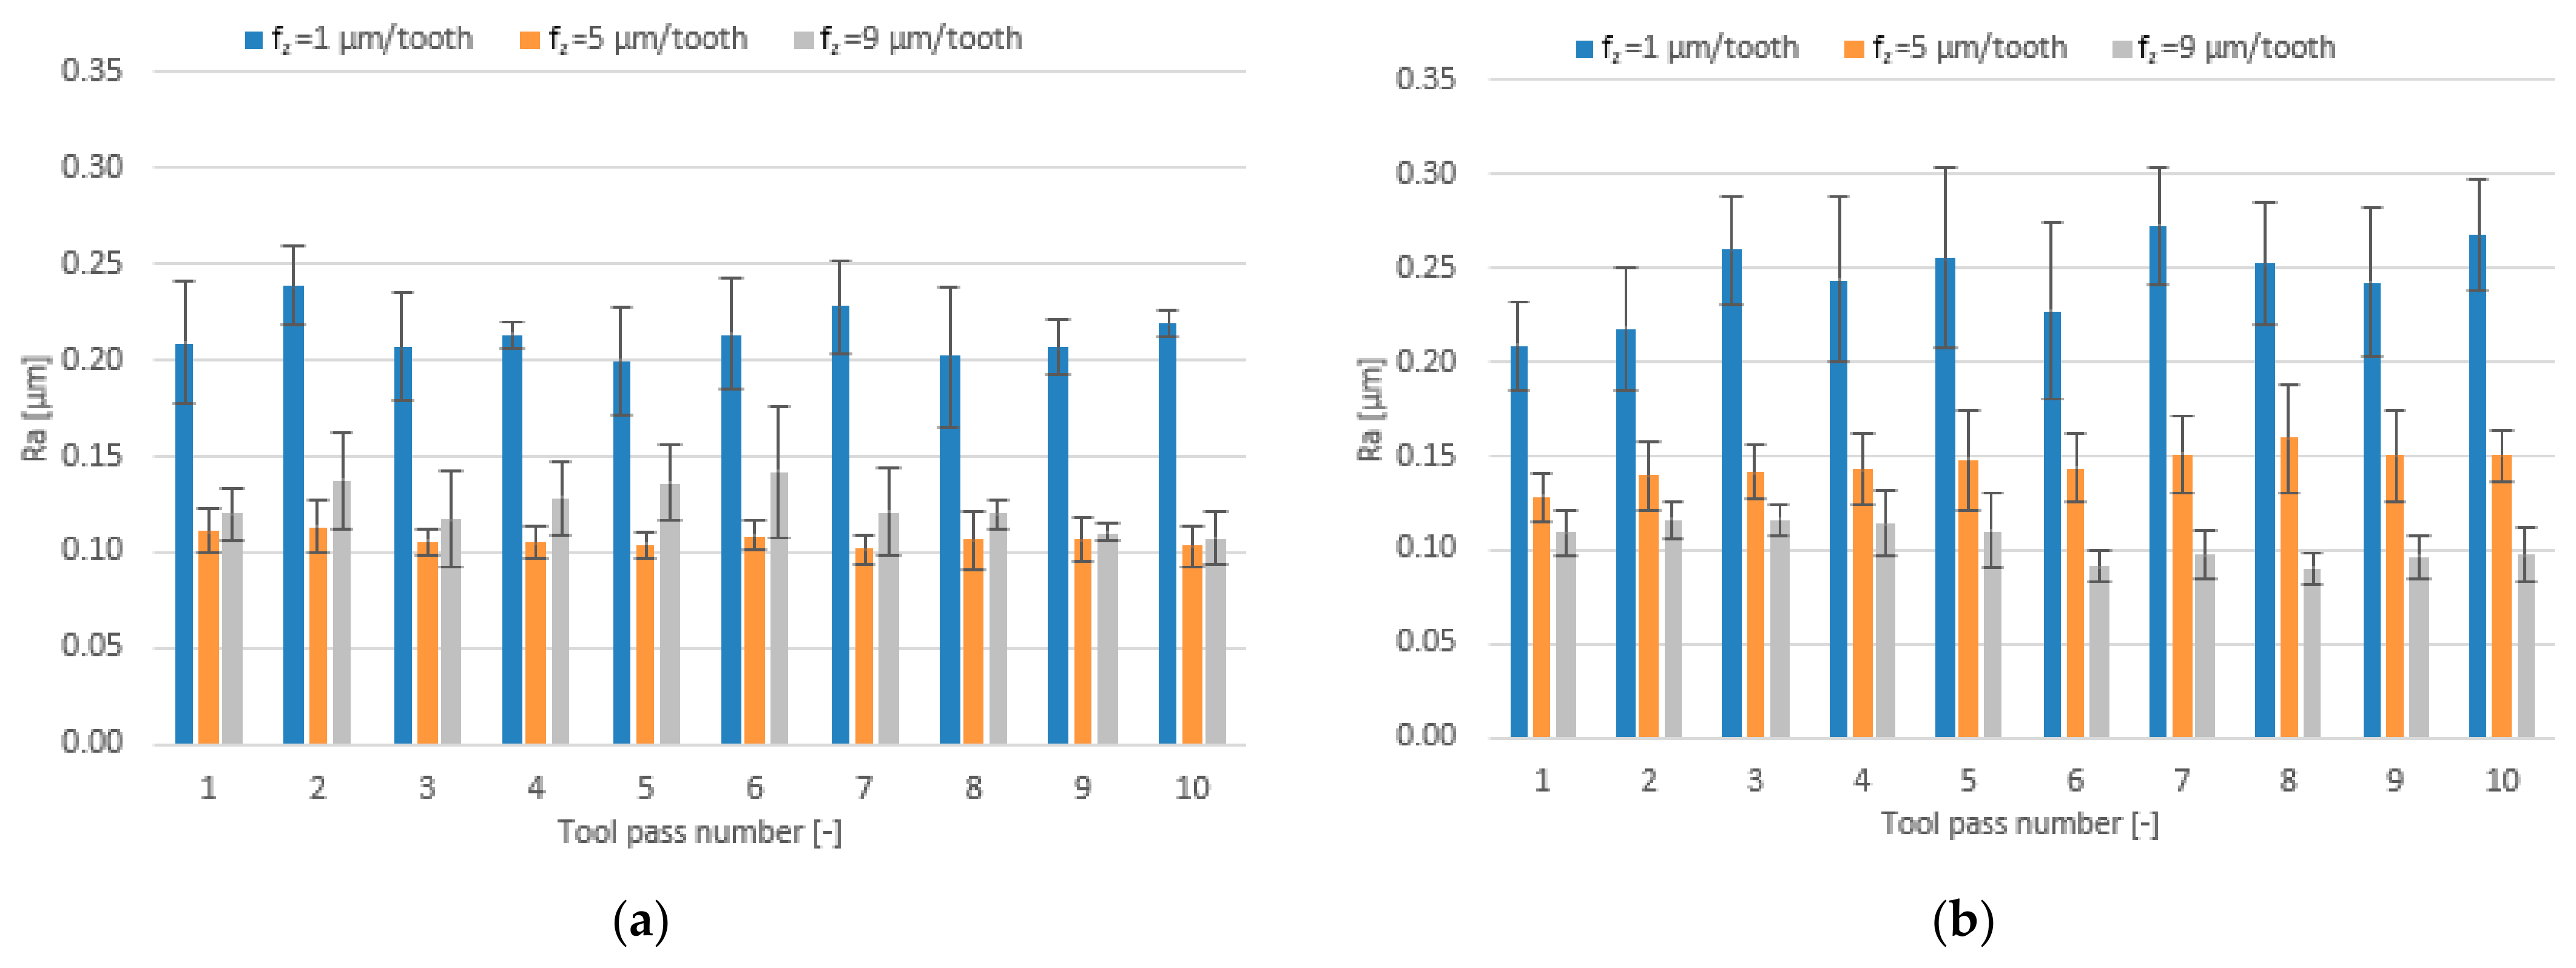
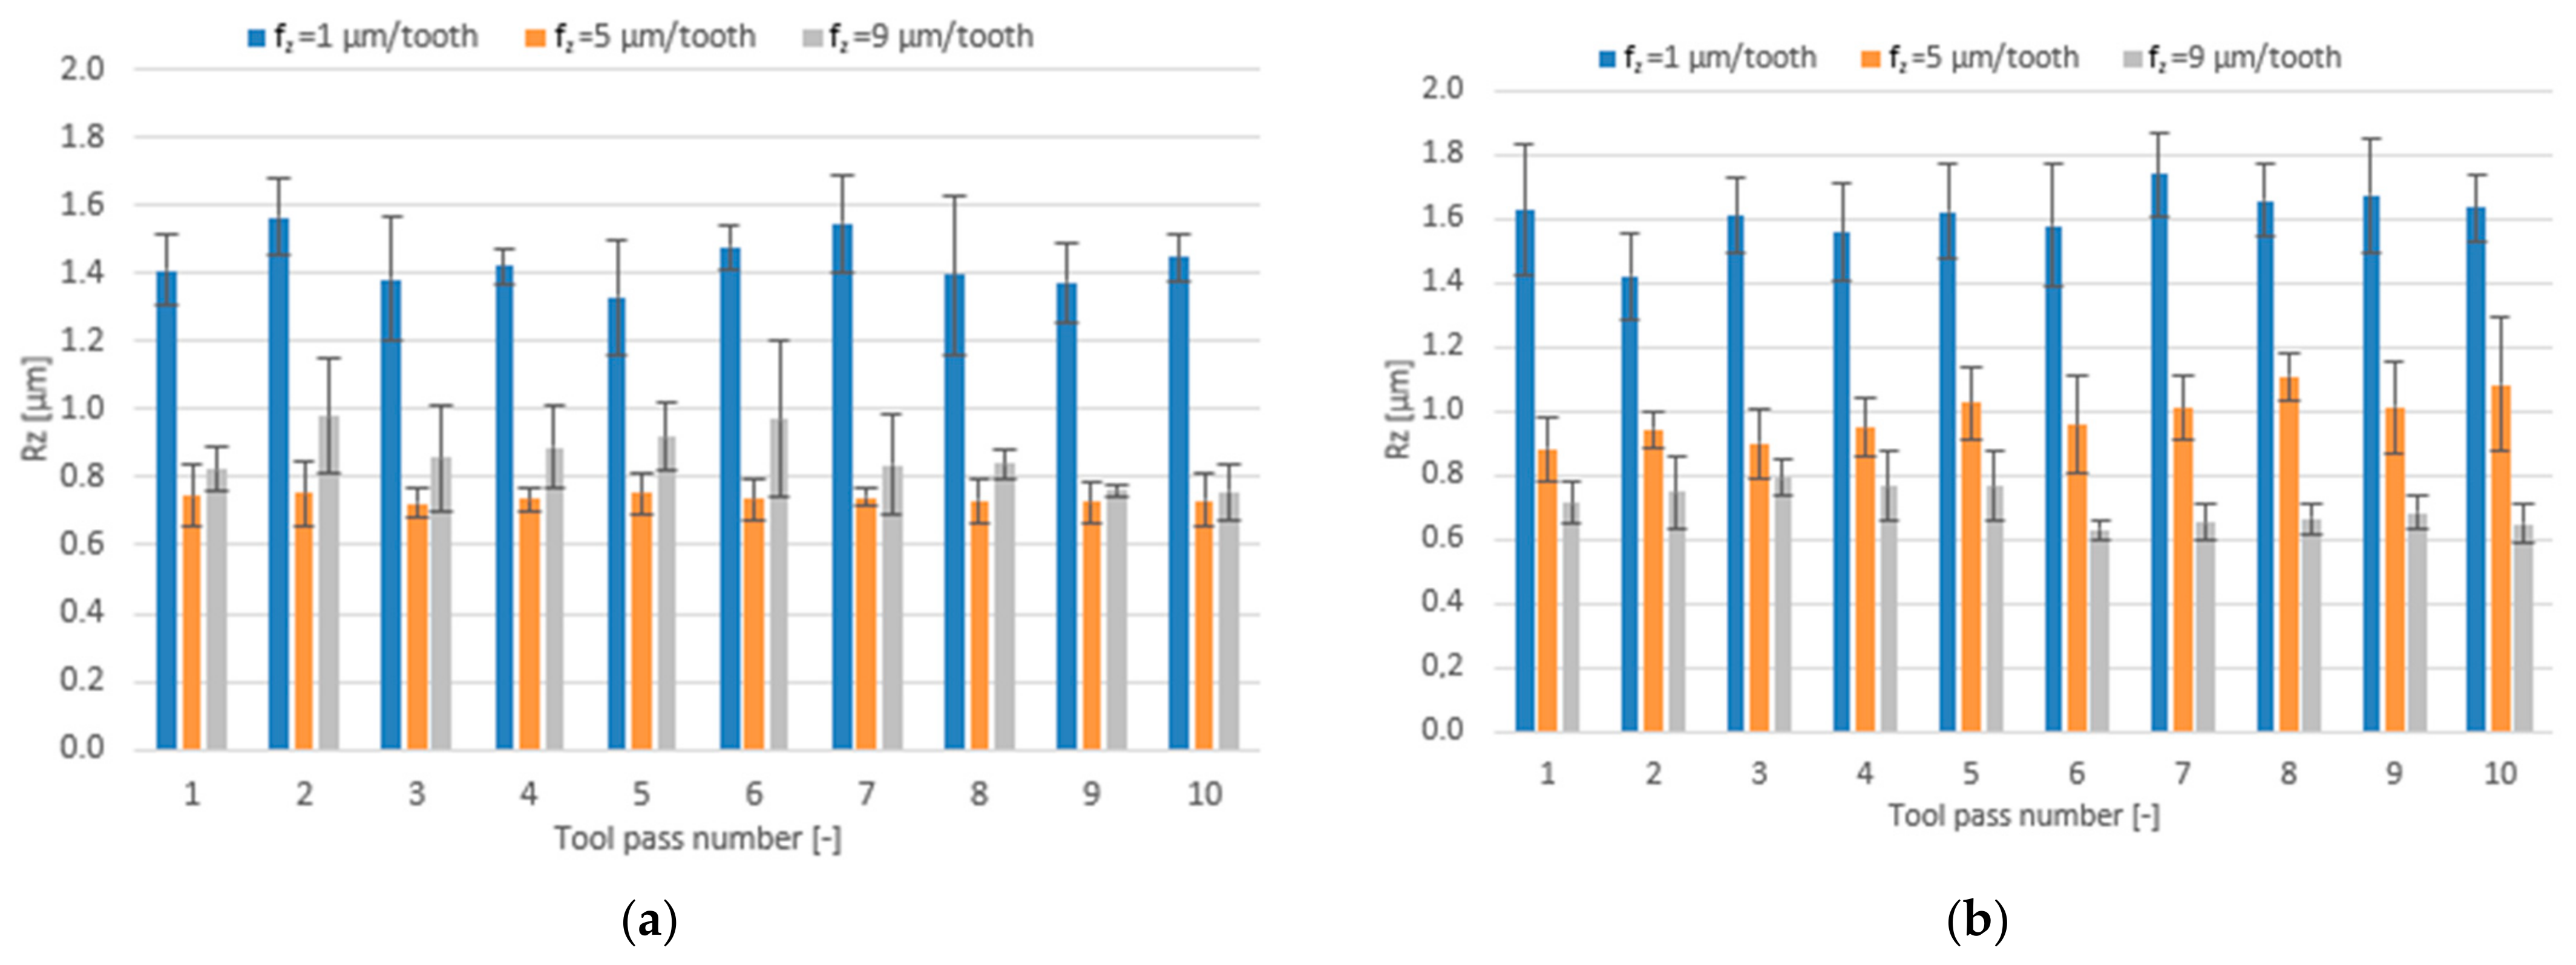
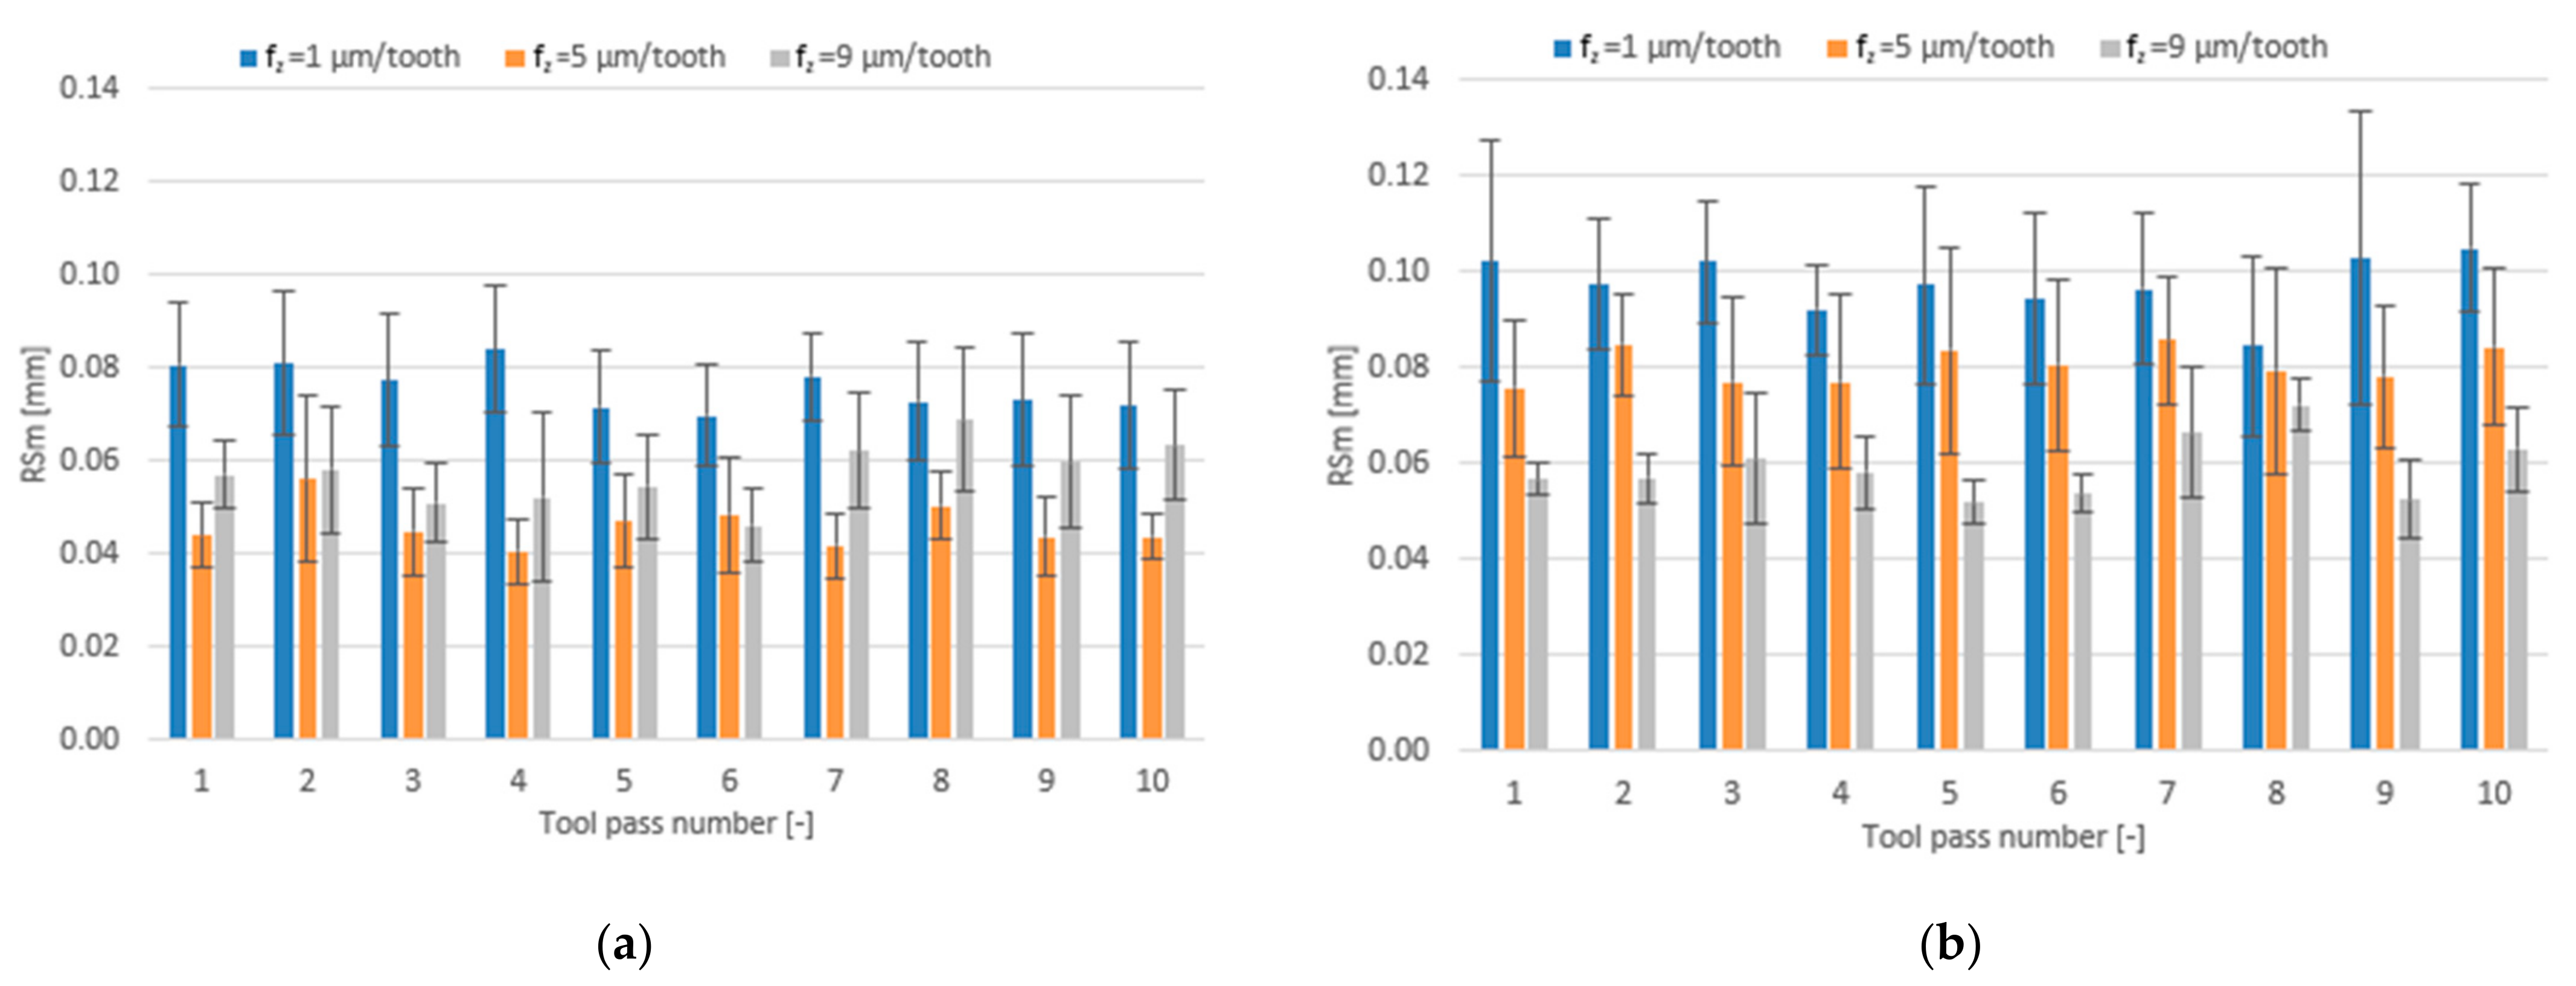
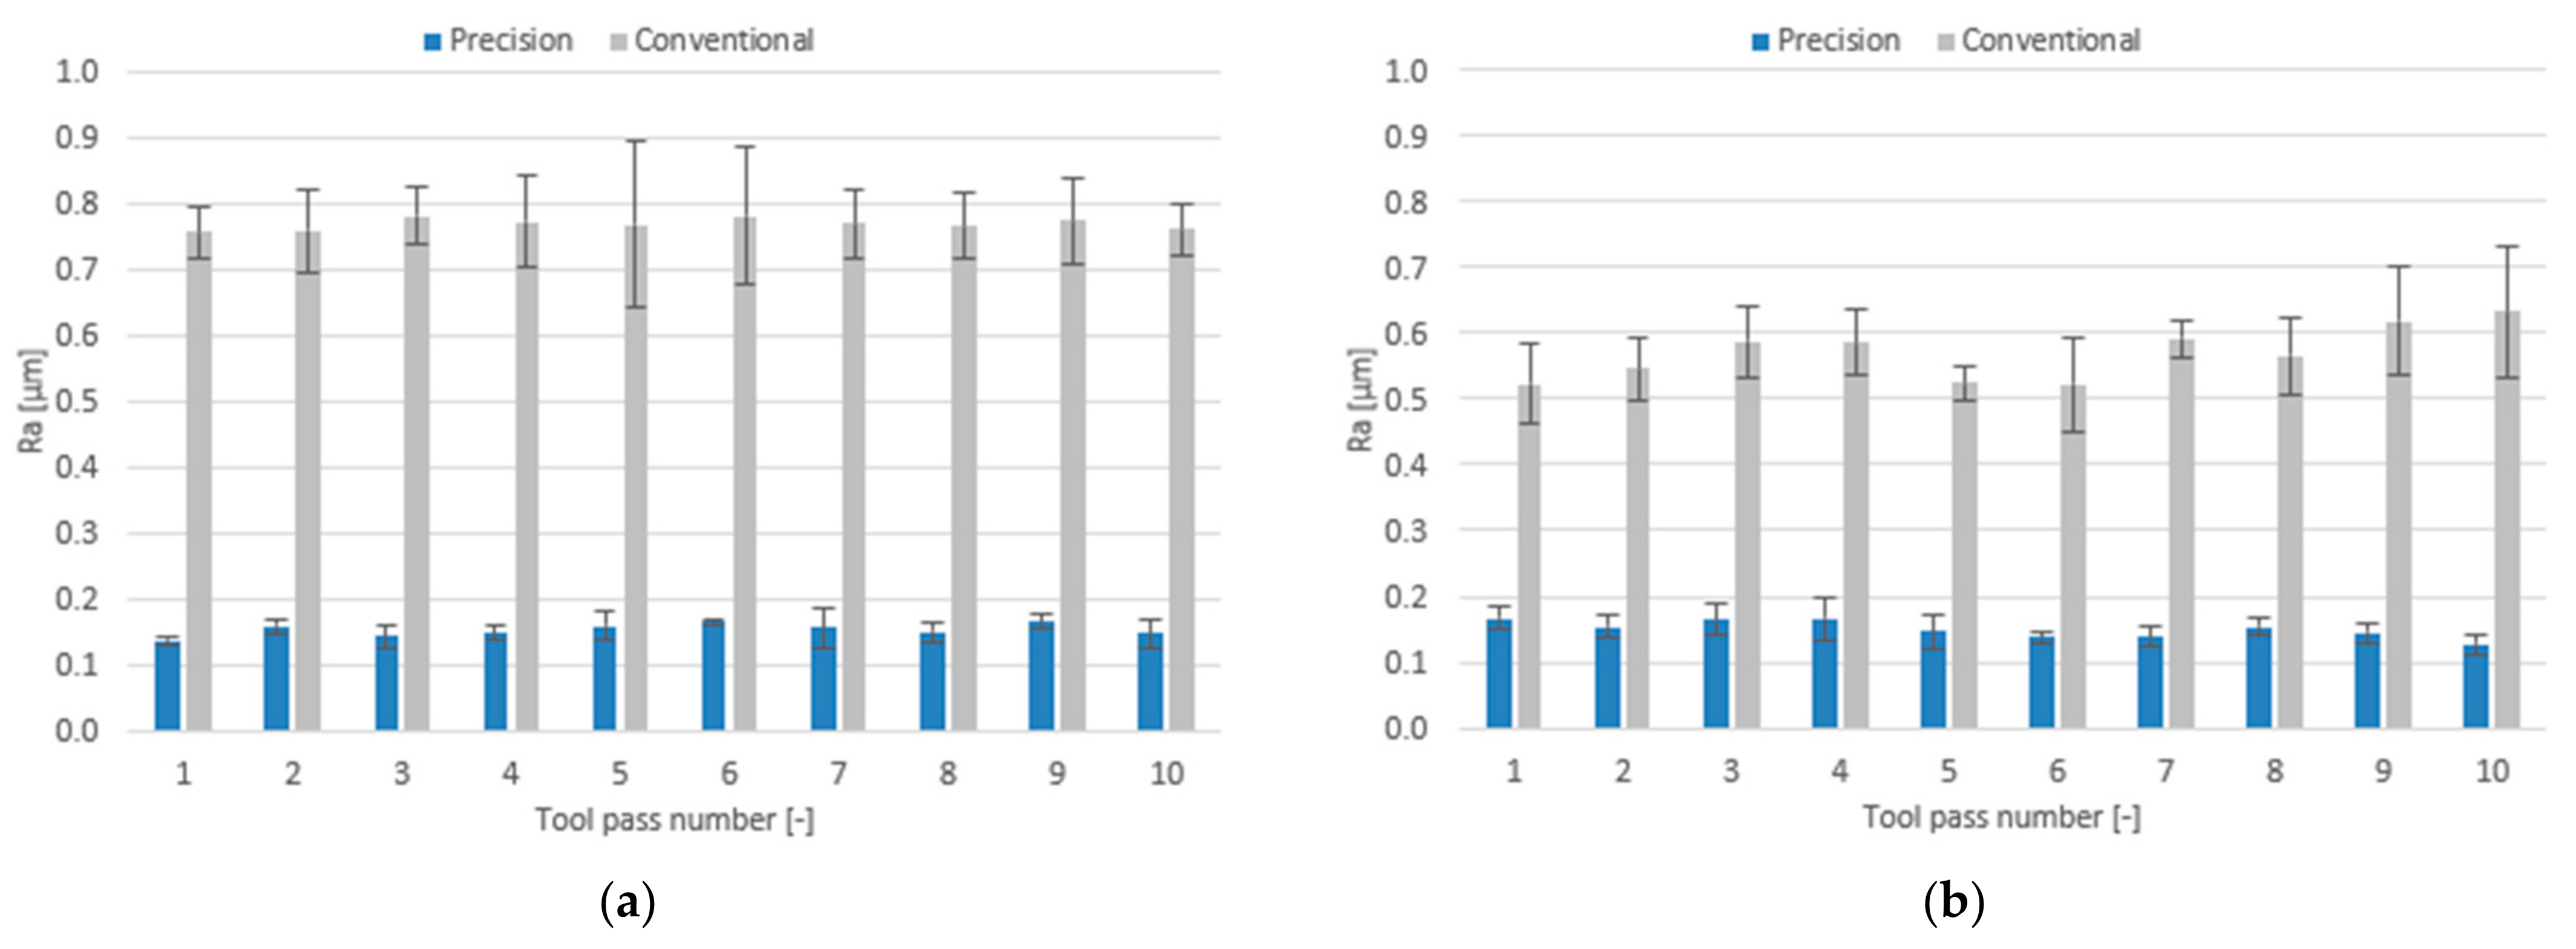
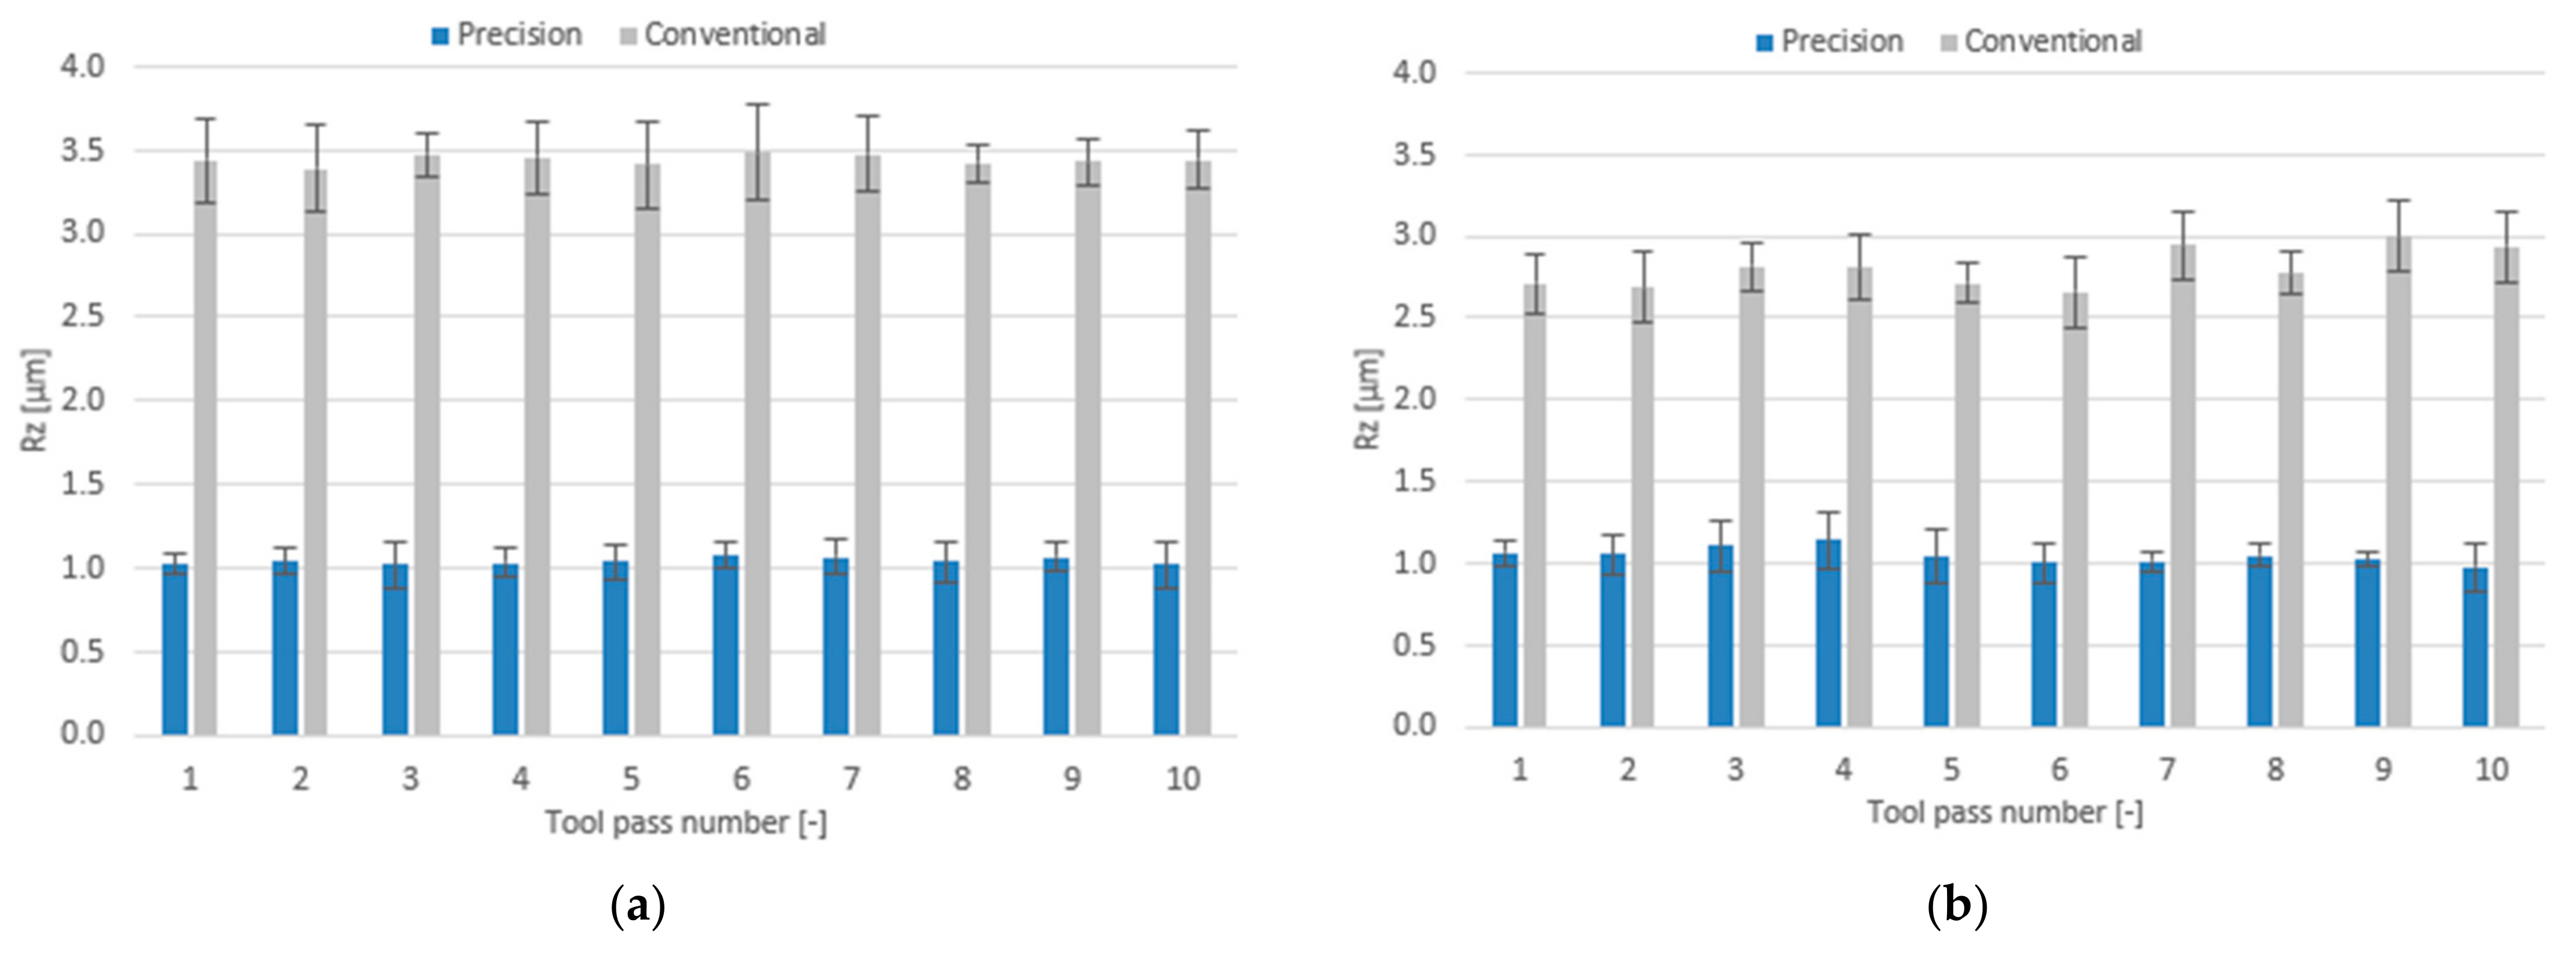
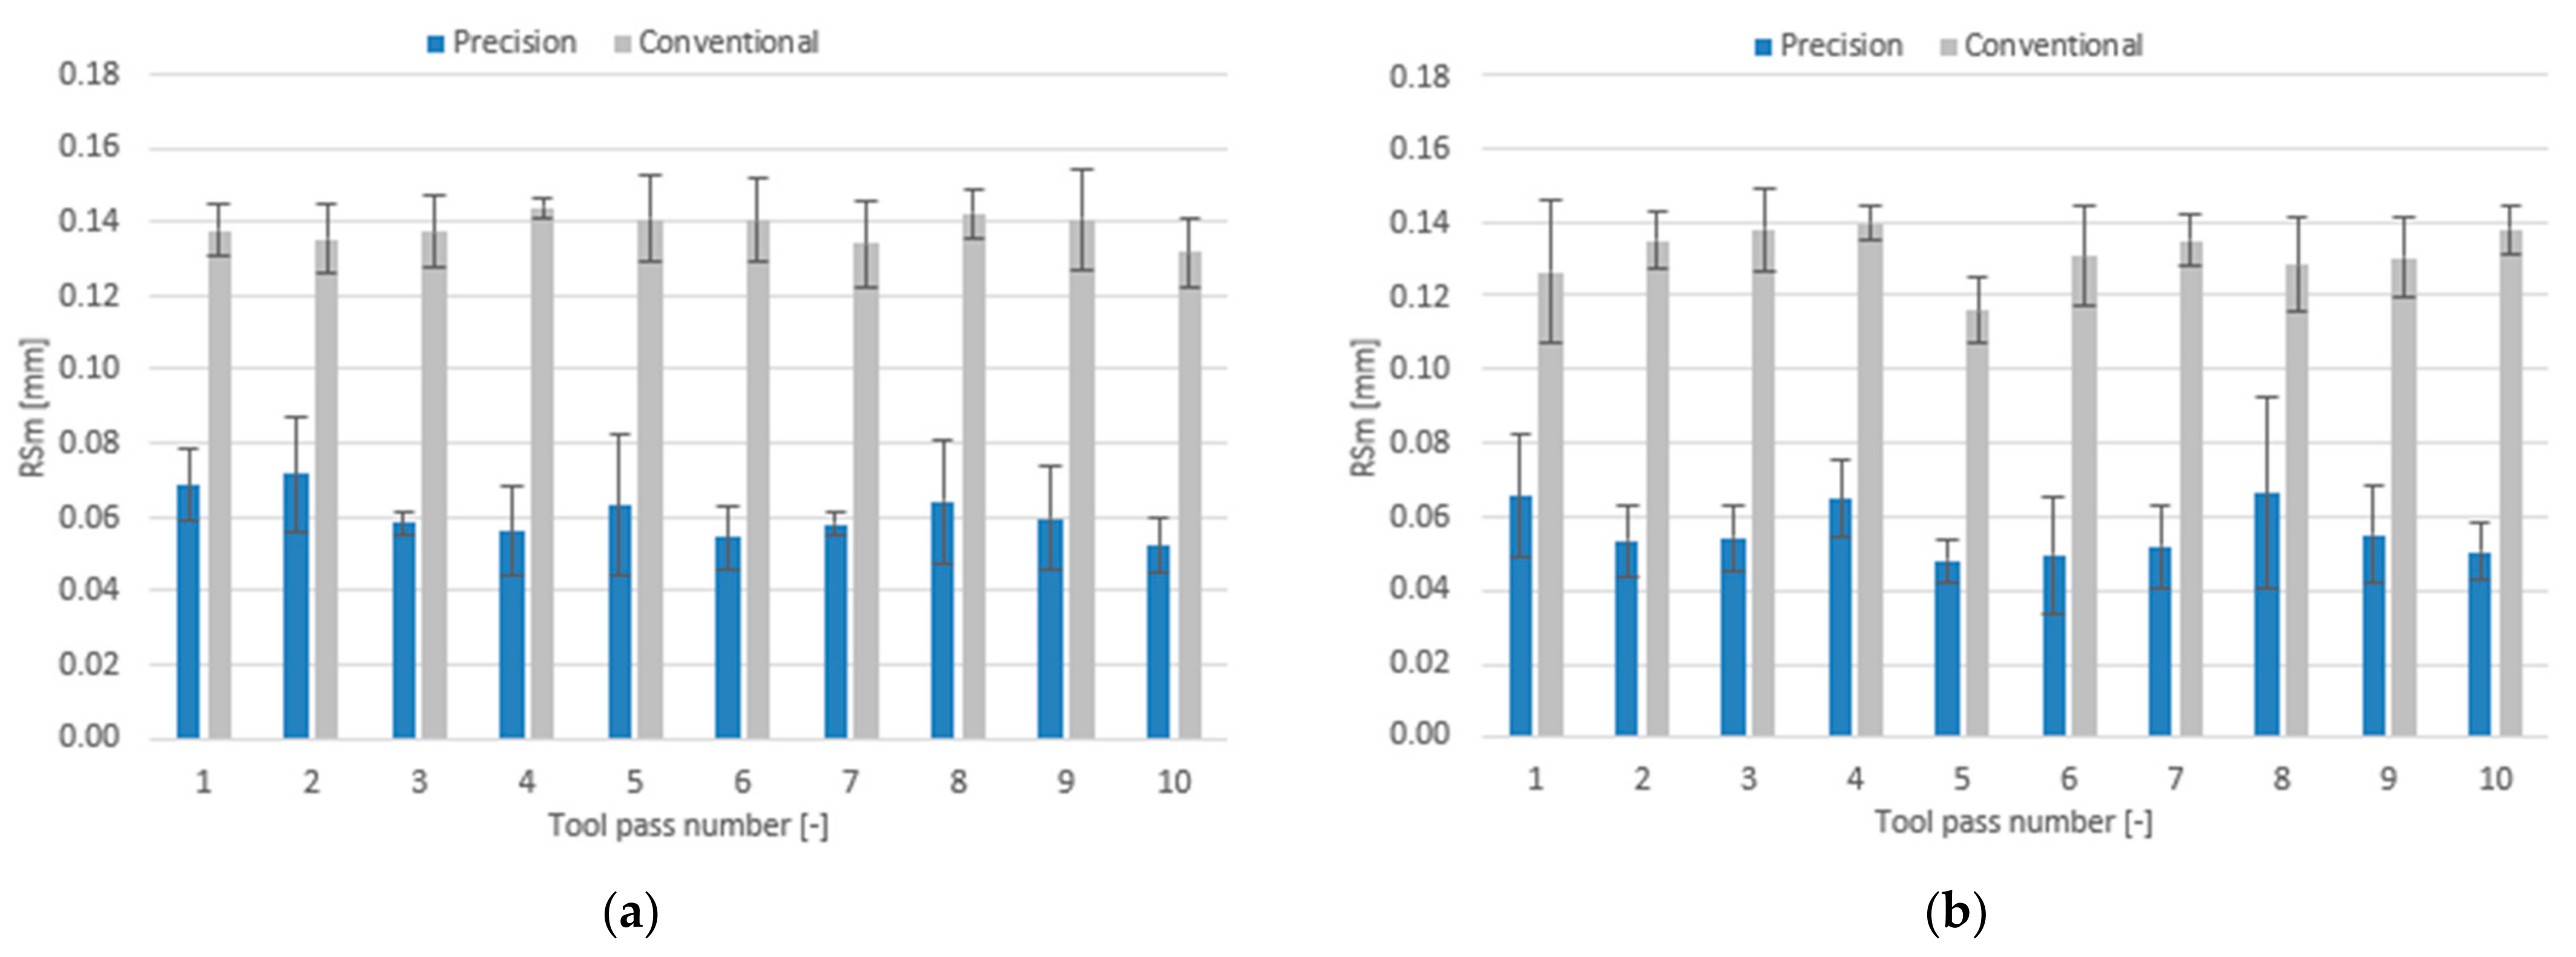
- Compared to conventional milling, the precision milling process makes it possible to produce surfaces with several fold lower values of the analysed surface roughness parameters and their high repeatability at individual tool passes, irrespective of the technological parameters and tool coating type used.
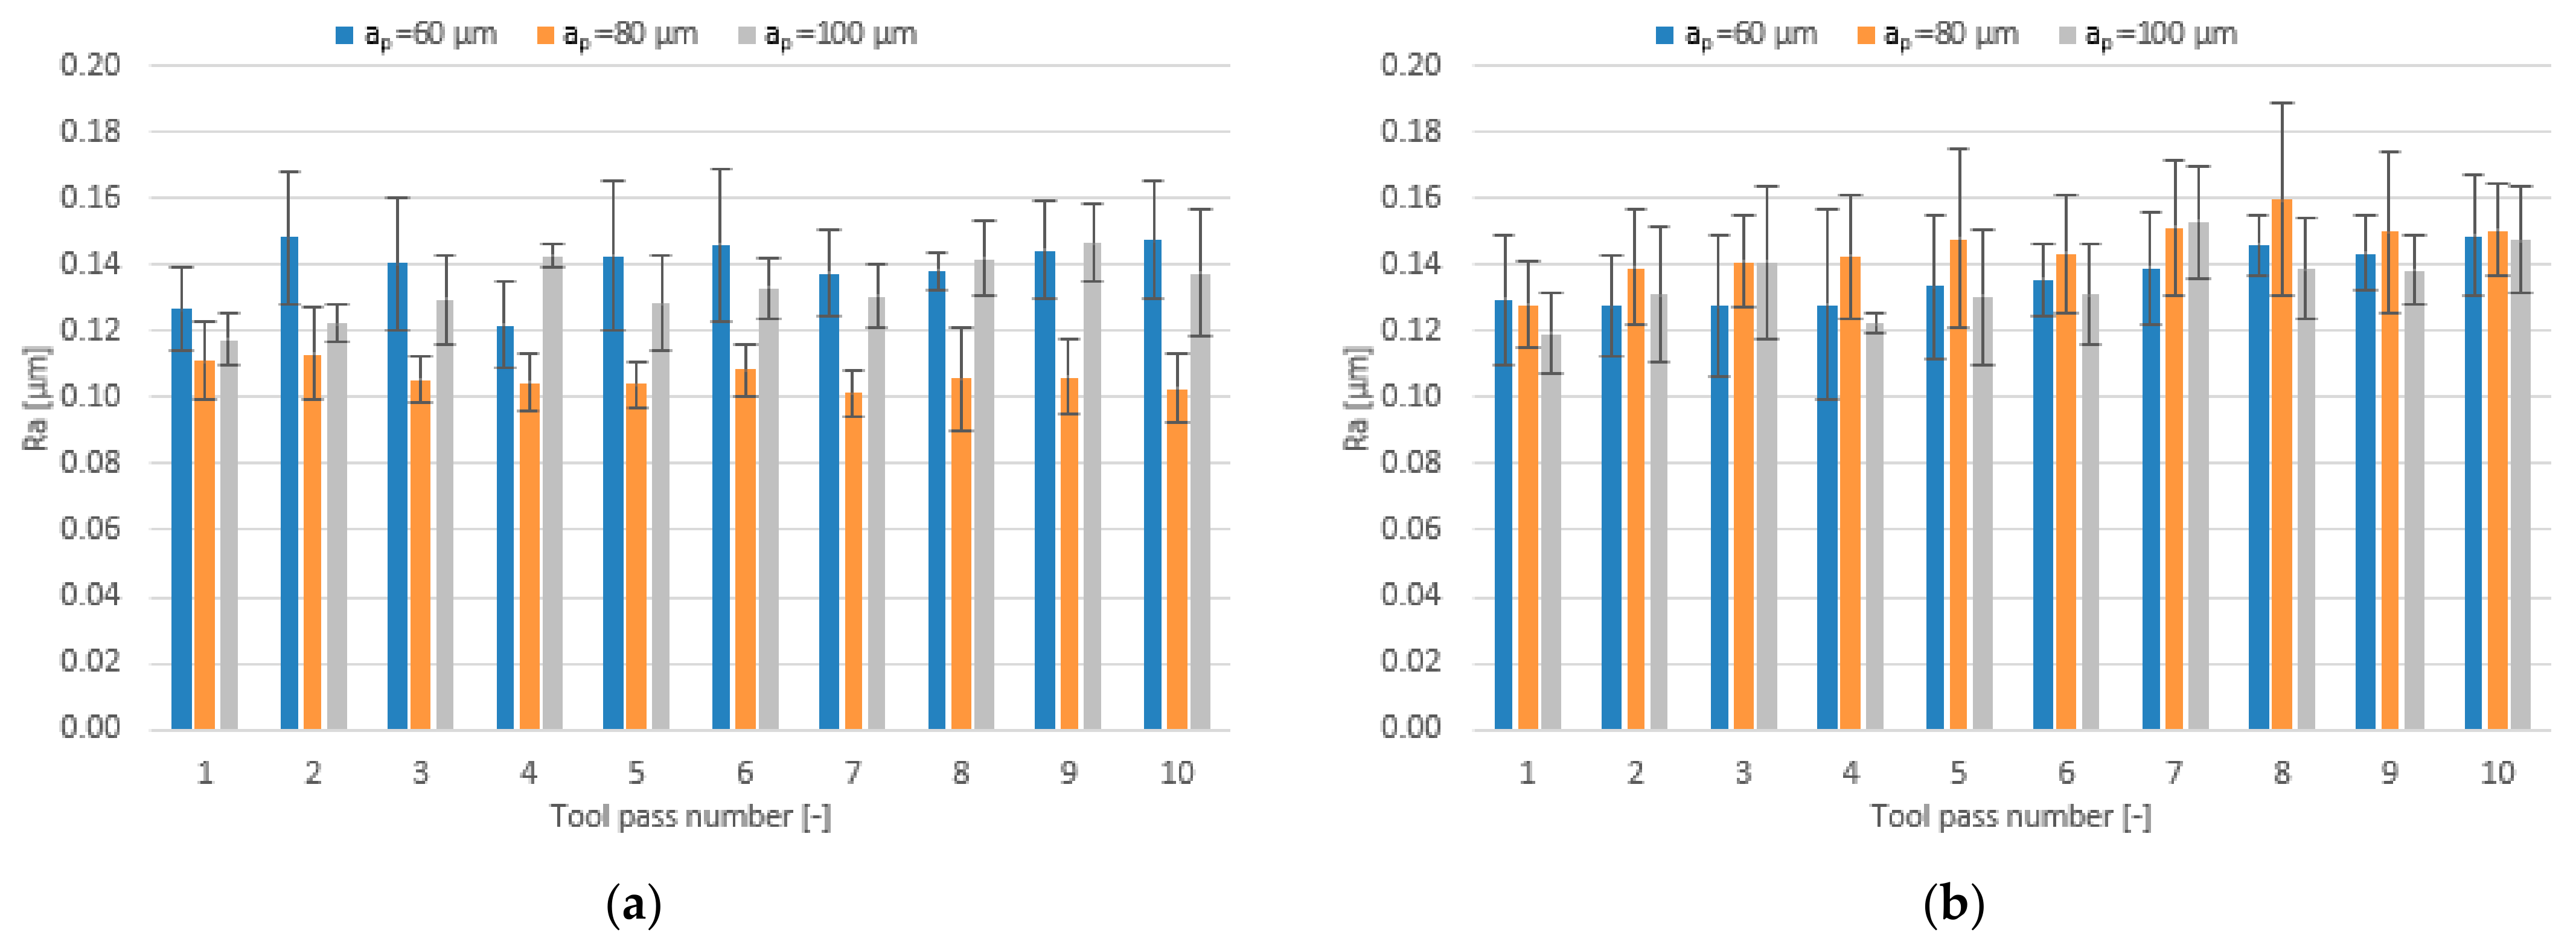
- Increase in cutting speed and feed per tooth leads to reduced surface roughness parameters values measured on the surfaces milled with the TiAlN-coated tool, whereas a change in the axial depth of cut does not have a direct impact on these parameters.
- For the milling performed using the TiB2-coated tool, the lowest values of the analysed surface roughness parameters were obtained when the milling process was conducted with intermediate values of the technological parameters.
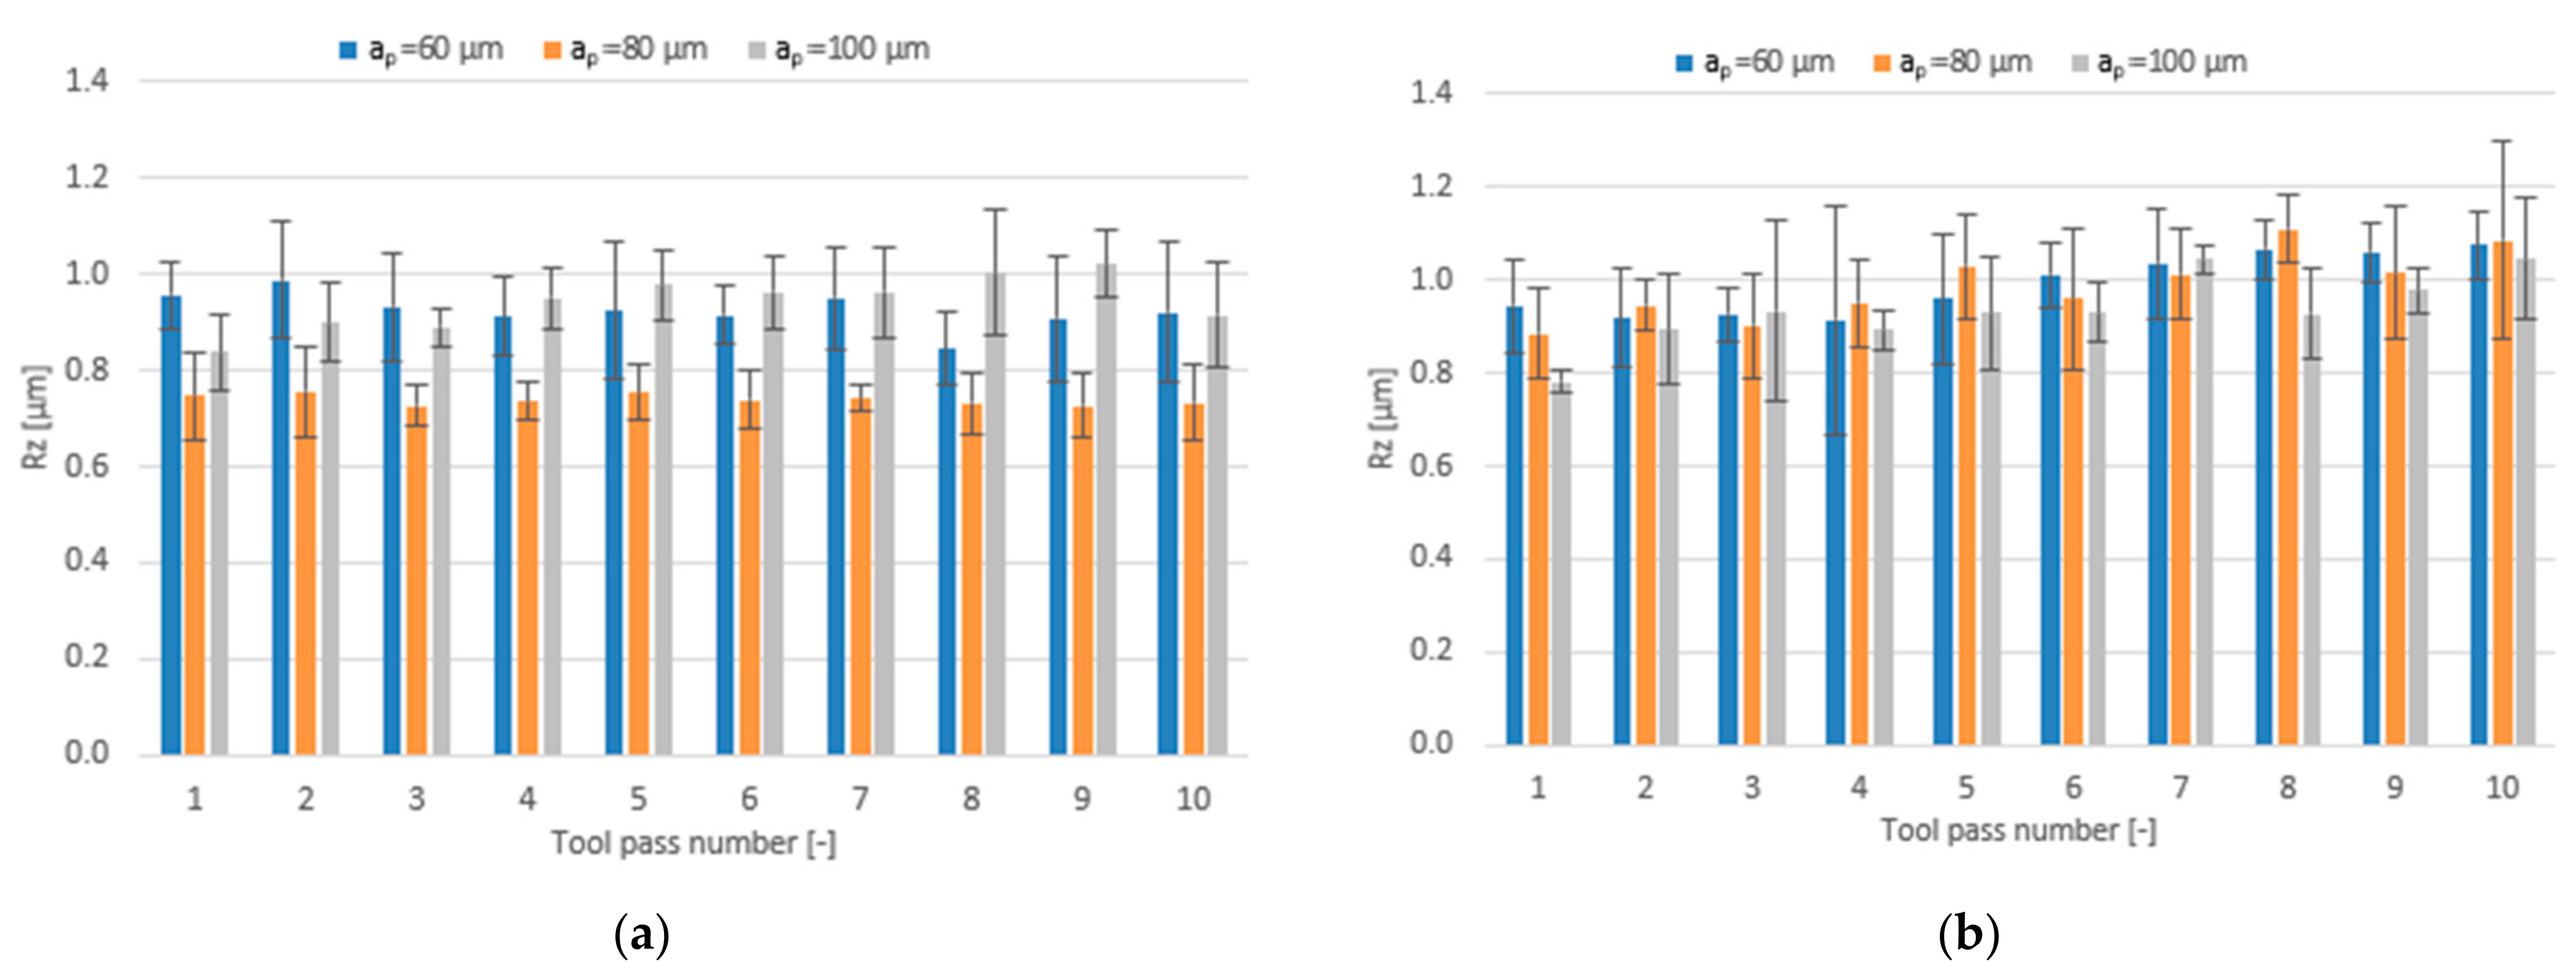
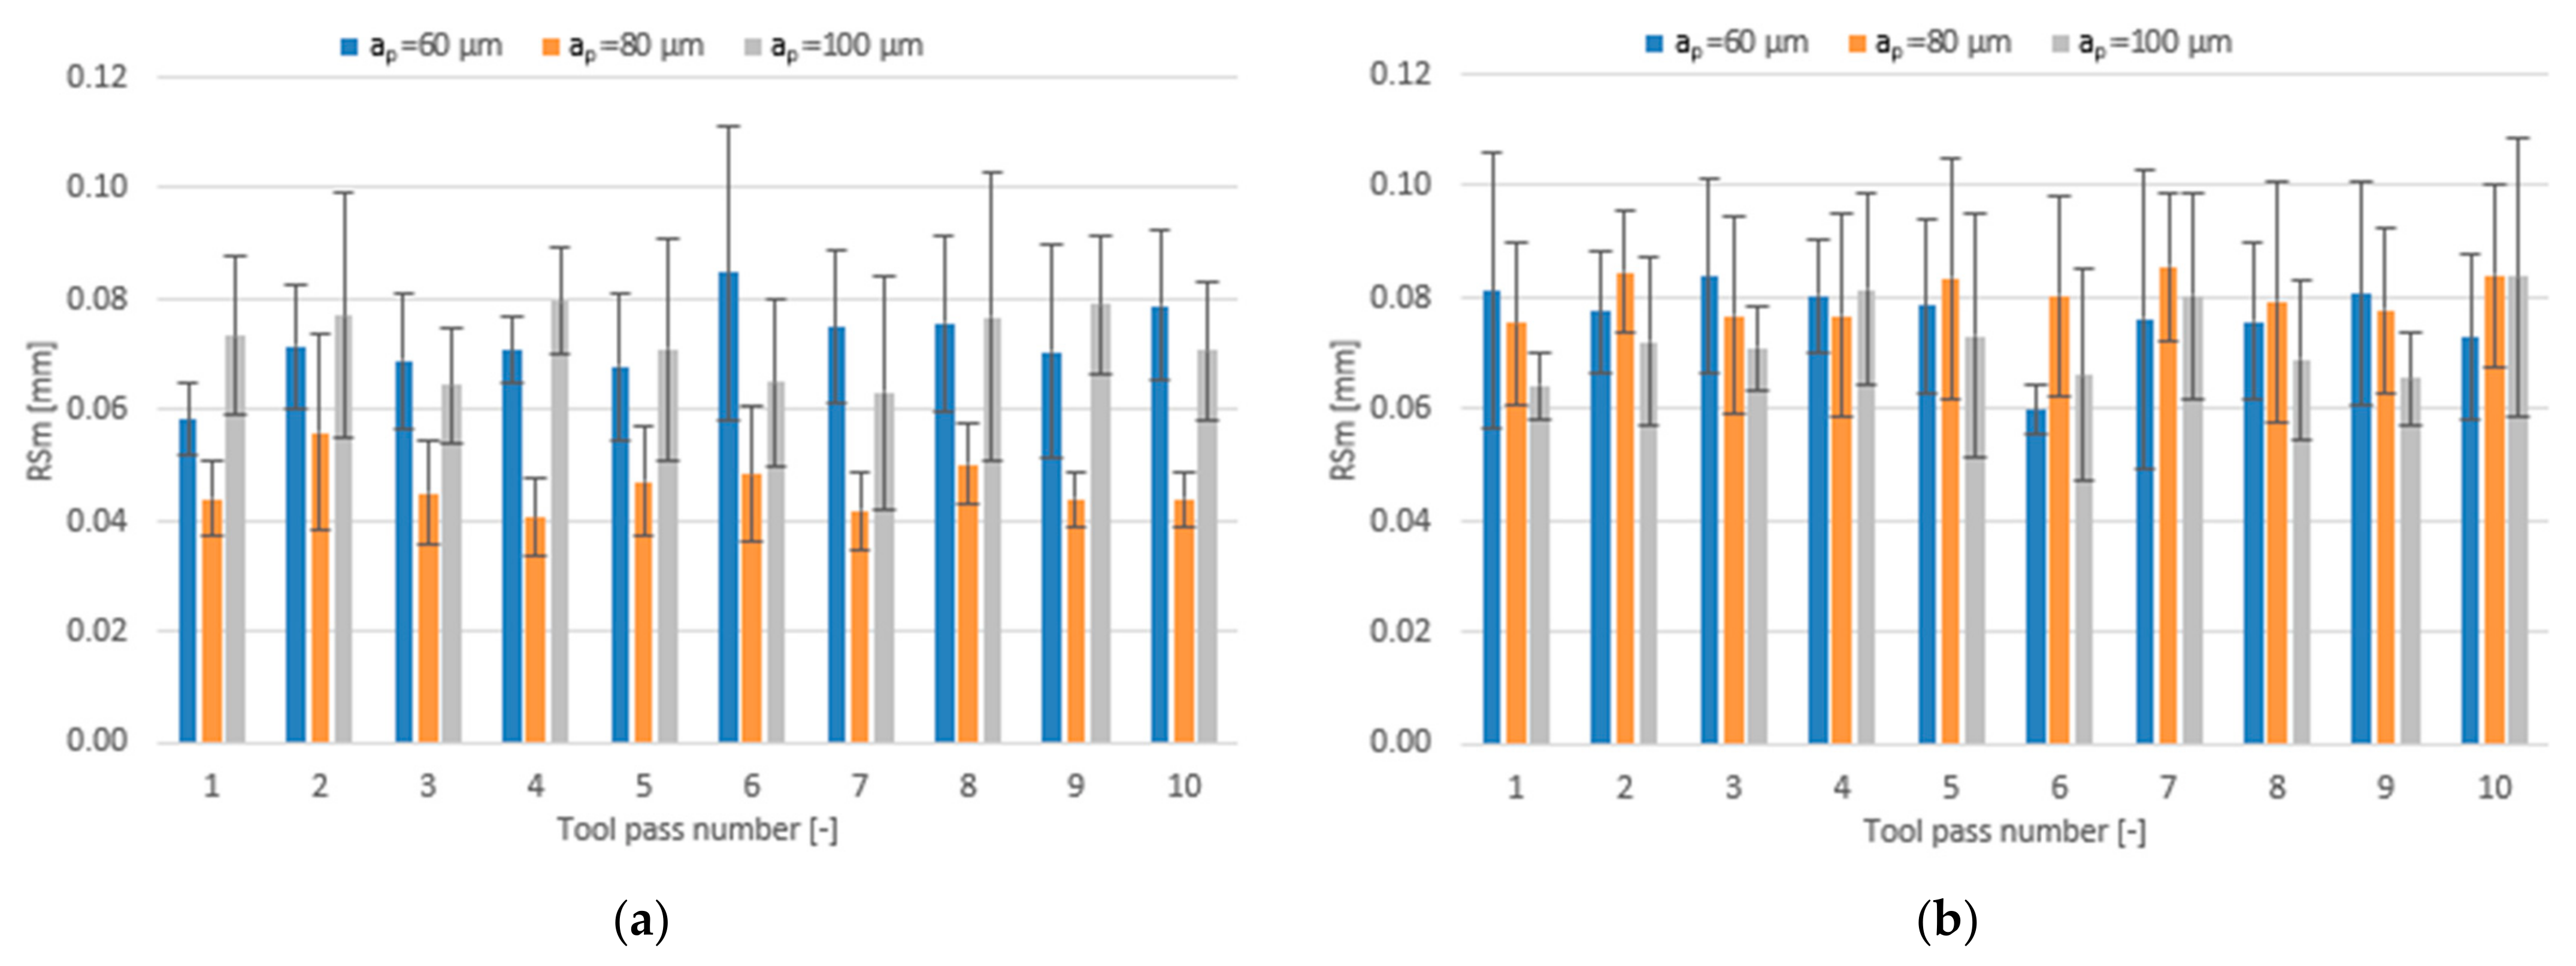
- Similar values of the surface roughness parameters are obtained for both tested tool coating types; nevertheless, the scatter of results is smaller when the milling process is conducted with the use of the tool with a TiB2 coating.
- In conventional milling conditions, better surface quality is obtained when the process is performed using the tool with a TiAlN coating.
- The precision milling of magnesium alloys can be conducted with the use of conventional cutting tools and a standard CNC machine tool.
Author Contributions
Funding
Institutional Review Board Statement
Informed Consent Statement
Data Availability Statement
Conflicts of Interest
References
- Tekumalla, S.; Gupta, M. Introductory chapter: An insight into fascinating potential of magnesium. In Magnesium—The Wonder Element for Engineering/Biomedical Applications, 1st ed.; Gupta, M., Ed.; IntechOpen: London, UK, 2020; pp. 1–10. [Google Scholar] [CrossRef]
- Kuczmaszewski, J.; Zaleski, K. Obróbka Skrawaniem Stopów Aluminium i Magnezu, 1st ed.; Politechnika Lubelska: Lublin, Poland, 2015; pp. 27–68. [Google Scholar]
- Monteiro, W.A.; Buso, S.J.; Silva, L.V. Application of magnesium alloys in transport. In New Features on Magnesium Alloys, 1st ed.; Monteiro, W.A., Ed.; IntechOpen: London, UK, 2012; pp. 1–14. [Google Scholar] [CrossRef]
- Ruslan, M.S.; Othman, K.; Ghani, J.A.; Kassim, M.S.; Haron, C.H.C. Surface roughness of magnesium alloy AZ91D in high speed milling. J. Teknol. 2016, 78, 115–119. [Google Scholar] [CrossRef][Green Version]
- Zagórski, I.; Korpysa, J. Surface quality assessment after milling AZ91D magnesium alloy using PCD tool. Materials 2020, 13, 617. [Google Scholar] [CrossRef] [PubMed]
- Oczoś, K.E.; Kawalec, A. Kształtowanie Metali Lekkich, 1st ed.; Wydawnictwo Naukowe PWN: Warsaw, Poland, 2012; pp. 417–468. [Google Scholar]
- Dornfeld, D.; Lee, D.E. Precision Manufacturing, 1st ed.; Springer US: New York, NY, USA, 2008; pp. 455–554. [Google Scholar] [CrossRef]
- Wojciechowski, S. Zagadnienia Mechaniki Precyzyjnego Frezowania Narzędziami Monolitycznymi, 1st ed.; Wydawnictwo Politechniki Poznańskiej: Poznań, Poland, 2018; pp. 13–115. [Google Scholar]
- Câmara, M.A.; Rubio, J.C.C.; Abrão, A.M.; Davim, J.P. State of the art on micromilling of materials, a review. J. Mater. Sci. Technol. 2012, 28, 673–685. [Google Scholar] [CrossRef]
- Rezaei, H.; Sadeghi, M.H.; Budak, E. Determination of minimum uncut chip thickness under various machining conditions during micro-milling of Ti-6Al-4V. Int. J. Adv. Manuf. Technol. 2018, 95, 1617–1634. [Google Scholar] [CrossRef]
- Sun, Z.; To, S. Effect of machining parameters and tool wear on surface uniformity in micro-milling. Micromachines 2018, 9, 268. [Google Scholar] [CrossRef] [PubMed]
- Aramcharoen, A.; Mativenga, P.T. Size effect and tool geometry in micromilling of tool steel. Precis. Eng. 2009, 33, 402–407. [Google Scholar] [CrossRef]
- De Oliveira, F.B.; Rodrigues, A.R.; Coelho, R.T.; Souza, A.F. Size effect and minimum chip thickness in micromilling. Int. J. Mach. Tools Manuf. 2015, 89, 39–54. [Google Scholar] [CrossRef]
- Dib, M.H.M.; Duduch, J.G.; Jasinevicius, R.G. Minimum chip thickness determination by means of cutting force signal in micro endmilling. Precis. Eng. 2018, 51, 244–262. [Google Scholar] [CrossRef]
- Rahman, M.A.; Amrun, M.R.; Rahman, M.; Kumar, A.S. Variation of surface generation mechanisms in ultra-precision machining due to relative tool sharpness (RTS) and material properties. Int. J. Mach. Tools Manuf. 2017, 115, 15–28. [Google Scholar] [CrossRef]
- Yao, Y.; Zhu, H.; Huang, C.; Wang, J.; Zhang, P.; Yao, P. Investigation on chip formation and surface integrity in micro end milling of maraging steel. Int. J. Adv. Manuf. Technol. 2019, 102, 1973–1984. [Google Scholar] [CrossRef]
- Wojciechowski, S.; Nowakowski, Z.; Majchrowski, R.; Królczyk, G. Surface texture formation in precision machining of direct laser deposited tungsten carbide. Adv. Manuf. 2017, 5, 251–260. [Google Scholar] [CrossRef]
- Gao, Q.; Li, W.; Chen, X. Surface quality and tool wear in micro-milling of single-crystal aluminum. Proc. Inst. Mech. Eng. Part. C J. Mech. Eng. Sci. 2019, 233, 5597–5609. [Google Scholar] [CrossRef]
- Kuram, E.; Ozcelik, B. Multi-objective optimization using Taguchi based grey relational analysis for micro-milling of Al 7075 material with ball nose end mill. Measurement 2013, 46, 1849–1864. [Google Scholar] [CrossRef]
- Llanos, I.; Agirre, A.; Urreta, H.; Thepsonthi, T.; Özel, T. Micromilling high aspect ratio features using tungsten carbide tools. Proc. Inst. Mech. Eng. Part. B J. Eng. Manuf. 2014, 228, 1350–1358. [Google Scholar] [CrossRef]
- Sun, Z.; To, S.; Zhang, S.; Zhang, G. Theoretical and experimental investigation into non-uniformity of surface generation in micro-milling. Int. J. Mech. Sci. 2018, 140, 313–324. [Google Scholar] [CrossRef]
- Zhang, J.; Feng, C.; Wang, H.; Gong, Y. Analytical Investigation of the Micro Groove Surface Topography by Micro-Milling. Micromachines 2019, 10, 582. [Google Scholar] [CrossRef] [PubMed]
- Zhang, X.; Yu, T.; Zhao, J. Surface generation modeling of micro milling process with stochastic tool wear. Precis. Eng. 2020, 61, 170–181. [Google Scholar] [CrossRef]
- Yao, Y.; Zhu, H.T.; Huang, C.Z.; Zhang, D.C.; Wang, J.; Zhang, P.; Yao, P. Surface roughness and topography analysis in precision milling of 3J33 maraging steel. Mater. Sci. Forum 2016, 874, 497–502. [Google Scholar] [CrossRef]
- Zagórski, I.; Korpysa, J. Surface quality in milling of AZ91D magnesium alloy. Adv. Sci. Technol. Res. J. 2019, 13, 119–129. [Google Scholar] [CrossRef]
- Aslantas, K.; Hopa, H.E.; Percin, M.; Ucun, I.; Çicek, A. Cutting performance of nano-crystalline diamond (NCD) coating in micro-milling of Ti6Al4V alloy. Precis. Eng. 2016, 45, 55–66. [Google Scholar] [CrossRef]
- Liang, Z.; Gao, P.; Wang, X.; Li, S.; Zhou, T.; Xiang, J. Cutting Performance of Different Coated Micro End Mills in Machining of Ti-6Al-4V. Micromachines 2018, 9, 568. [Google Scholar] [CrossRef] [PubMed]
- Özel, T.; Thepsonthi, T.; Ulutan, D.; Kaftanolu, B. Experiments and finite element simulations on micro-milling of Ti-6Al-4V alloy with uncoated and cBN coated micro-tools. CIRP Ann.-Manuf. Technol. 2011, 60, 85–88. [Google Scholar] [CrossRef]
- Ali, M.Y.; Jailani, W.N.; Rahman, M.; Hasan, M.H.; Banu, A. Effect of minimum quantity lubrication on surface roughness in tool-based micromilling. IIUM Eng. J. 2017, 18, 147–154. [Google Scholar] [CrossRef][Green Version]
- Wojciechowski, S.; Maruda, R.W.; Królczyk, G.M.; Niesłony, P. Application of signal to noise ratio and grey relational analysis to minimize forces and vibrations during precise ball end milling. Precis. Eng. 2018, 51, 582–596. [Google Scholar] [CrossRef]
- Wojciechowski, S.; Twardowski, P.; Wieczorowski, M. Surface texture analysis after ball end milling with various surface inclination of hardened steel. Metrol. Meas. Syst. 2014, 21, 145–156. [Google Scholar] [CrossRef]
- Wojciechowski, S.; Wiąckiewicz, M.; Królczyk, G.M. Study on metrological relations between instant tool displacements and surface roughness during precise ball end milling. Measurement 2018, 129, 686–694. [Google Scholar] [CrossRef]
| vc [m/min] | fz [µm/tooth] | ap [µm] | |||||||
| 400 | 800 | 1200 | 1 | 5 | 9 | 60 | 80 | 100 | |
| TiB2 | |||||||||
| 24.0 | 13.6 | 9.9 | 11.6 | 13.6 | 25.4 | 35.5 | 13.6 | 20.0 | |
| TiAlN | |||||||||
| 38.3 | 21.5 | 7.7 | 17.5 | 21.5 | 21.5 | 14.8 | 21.5 | 25.2 | |
Publisher’s Note: MDPI stays neutral with regard to jurisdictional claims in published maps and institutional affiliations. |
© 2021 by the authors. Licensee MDPI, Basel, Switzerland. This article is an open access article distributed under the terms and conditions of the Creative Commons Attribution (CC BY) license (https://creativecommons.org/licenses/by/4.0/).
Share and Cite
Korpysa, J.; Kuczmaszewski, J.; Zagórski, I. Dimensional Accuracy and Surface Quality of AZ91D Magnesium Alloy Components after Precision Milling. Materials 2021, 14, 6446. https://doi.org/10.3390/ma14216446
Korpysa J, Kuczmaszewski J, Zagórski I. Dimensional Accuracy and Surface Quality of AZ91D Magnesium Alloy Components after Precision Milling. Materials. 2021; 14(21):6446. https://doi.org/10.3390/ma14216446
Chicago/Turabian StyleKorpysa, Jarosław, Józef Kuczmaszewski, and Ireneusz Zagórski. 2021. "Dimensional Accuracy and Surface Quality of AZ91D Magnesium Alloy Components after Precision Milling" Materials 14, no. 21: 6446. https://doi.org/10.3390/ma14216446
APA StyleKorpysa, J., Kuczmaszewski, J., & Zagórski, I. (2021). Dimensional Accuracy and Surface Quality of AZ91D Magnesium Alloy Components after Precision Milling. Materials, 14(21), 6446. https://doi.org/10.3390/ma14216446


