Article

Hydrogen Cooling of Turbo Aggregates and the Problem of Rotor Shafts Materials Degradation Evaluation

by
Alexander I. Balitskii
1,2,*,
Andriy M. Syrotyuk
1,
Maria R. Havrilyuk
1,
Valentina O. Balitska
3,
Valerii O. Kolesnikov
1,4 and
Ljubomyr M. Ivaskevych
1
1
Department of Strength of the Materials and Structures in Hydrogen-Containing Environments, Karpenko Physico-Mechanical Institute, National Academy of Sciences of Ukraine, 5 Naukova Str., 79601 Lviv, Ukraine
2
Department of Mechanical Engineering and Mechatronics, West Pomeranian University of Technology in Szczecin, 19 Piastow Av., 70-310 Szczecin, Poland
3
Department of Physics and Chemistry of Combustion, Lviv State University of Life Safety, 35 Kleparivska, 79000 Lviv, Ukraine
4
Department of Production Technology and Professional Education, Taras Shevchenko National University of Lugansk, Kovalya Str. 3, 36000 Poltava, Ukraine
*
Author to whom correspondence should be addressed.
Energies 2023, 16(23), 7851; https://doi.org/10.3390/en16237851
Submission received: 16 October 2023 / Revised: 23 November 2023 / Accepted: 28 November 2023 / Published: 30 November 2023

Abstract

:
Changes in the properties of 38KhN3MFA steel, from which the rotor shaft is made, were investigated by comparing the hardness of the shaft surface and hydrogen concentration in the chips and analyzing changes in the morphology of the chips under the influence of various factors. The microstructures obtained from the surface of the rotor shaft samples are presented, and histograms reflecting the parameters of the structural components are constructed. An abbreviated diagram of the “life cycle” of the turbine rotor shaft is given. It was found that, during long-term operation (up to 250 thousand hours), the hardness of the rotor shaft surface decreases from 290 HB to 250 HB. It was recorded that, in the microstructure of the shaft during 250 thousand hours of operation, the amount of cementite decreased from 87% to 62%, and the proportion of free ferrite increased from 5% to 20%. The average values of ferrite microhardness decreased from 1.9 GPa to 1.5 GPa. An increase in the content of alloying elements in carbides was recorded: Cr and V—by 1.15–1.6 times; and Mo—by 2.2–2.8 times. With the help of the developed program (using computer vision methods), changes in their microrelief were detected to study photos of chips.

1. Introduction

During long-term operation of power equipment, due to changes in loads, temperatures, and hydrogen-containing media, the structural and phase compositions and properties of steels of this equipment (especially the hydrogen-cooled turbogenerator (HCTG)) change [1,2,3,4,5,6,7]. If the surface and subsurface layers of the rotor shaft (including retaining rings and turbo aggregate (TA) rotor body) during long-term service decrease the operating characteristics, it becomes necessary to carry out repair work, namely machining [8,9,10,11].
The purpose of this paper is to show the effect of a hydrogen-containing environment after long-term operation (and LCL during machining) on the change in the structural–phase state and properties of rotor shaft steel by studying cutting products (chips) as a fracture identifier, using the computer vision method. It is necessary to determine the content of hydrogen in the chips, as doing so helps to roughly determine the content of hydrogen in the surface and subsurface layers of the TA rotor shaft. Conducting fractographic studies of the surface of the chips helps us to determine the damaged areas of the rotor shaft more accurately when accumulating a certain database, thus helping us avoid long technological operations. Moreover, we need to apply the developed software to determine the degree of chip damage, and we need to associate the amount of hydrogen in the material with the structural–phase state and the probability of the development of degradation processes in the material of the rotor shaft depending on the amount of absorbed hydrogen.

2. Literature Survey: State-of-the-Art

High-strength alloy steels with high fatigue resistance at high loads and temperatures are used to manufacture rotor shafts for power plants. We studied the chromium–nickel–molybdenum–vanadium steel 38KhN3MFA [11,12,13,14,15,16,17,18,19,20,21,22,23]. The rotor shafts for power plant equipment undergo changes in their microstructure as a result of long-term operation. To keep them in good working order, it is necessary to carry out comprehensive diagnostic measures that may include the following technical procedures: (a) non-destructive testing—ultrasonic, eddy current, and magnetic particle flaw detection is used to detect surface and subsurface defects in rotor shafts [24,25,26,27]; and (b) a microstructural analysis [28,29,30,31,32,33,34,35].
To ensure uninterrupted operation and prevent damage of the rotor shaft components, it is necessary to balance it [36,37,38,39]. In some cases, it may be necessary to replace the rotor-shaft components [40,41,42,43,44,45,46,47].
The fracture mechanics approach to the operation of turbine unit rotor shafts includes not only the correction of technological processes but also the consideration of the structural and phase composition properties [48,49,50,51,52,53,54,55,56,57,58,59,60,61].
One investigation of hydrogen diffusion in 42CrMo4 steel [62] subjected to various heat treatments was based on different microstructures that were obtained with a wide range of hardness levels. The results [62] show that the parameters of hydrogen penetration are closely related to the hardness of steel, and the type of microstructure has less of an effect on them.
It should be noted that the deterioration of mechanical properties—a decrease in fracture toughness, strength, and ductility, as well as an increase in crack growth rate [63,64] (due to the presence of internal hydrogen)—increases with the strength of the steel [65]. The degree of hydrogen embrittlement and the corresponding character of fracture are strongly influenced by the chemical composition of the microstructure and the mechanical properties of the steels. The microstructure and fracture mode of the steel are correlated [66]. The strength and ductility of the steels are affected by hydrogen embrittlement, which can cause a loss of strength [67]. The hydrogen content in the strained region at the root of the notch is critical for the occurrence of a fracture. The mechanical properties of steel subjected to mechanical loading in hydrogen, including the tensile strength, fracture toughness, and fatigue, are also important factors for consideration [68].
It is well known that steel, after intense plastic deformation, can absorb much more hydrogen than the same steel in the normal coarse-grained state [69,70,71,72]. This indicates that hydrogen is trapped by grain boundaries and dislocations, since both of these types of traps have a higher binding energy to hydrogen than between lattice nodes [73]. Hydrogen at the grain boundaries can weaken them through one of the various mechanisms of hydrogen embrittlement, thus promoting crack initiation and propagation. Hydrogen can lead to the weakening of interatomic bonds along grain and sub-grain boundaries via a decohesion mechanism. In addition to increasing the density of hydrogen traps, such as grain boundaries, dislocations, vacancies, etc., where hydrogen remains in atomic form, intense plastic deformation can produce various discontinuities, such as vacancies and voids, acting as unsaturated traps that absorb hydrogen in its molecular form [74].
The inclusions in the steels and alloys can have a significant impact on the initiation and propagation of cracks. For example, Reference [75] reports that, in model AHHS (advanced high-strength steels) steels based on Fe-Ti-Mo and Fe-V-Mo, strengthened by interfacial inclusions, defects and cracks were observed. Flooding of the steels led to an increase in the dislocation density and expansion of the strain field around the precipitates, which led to an increase in the residual stresses. This was much greater for Ti-Mo steel compared to V-Mo. Important differences in hydrogen capture behavior were found between the two steels, with hydrogen believed to be captured at the matrix/sediment interface for the Ti-Mo steel but within the sediment for the V-Mo steel. The effect of hydrogen was investigated in detail in tensile tests at slow strain rates and in tensile tests of double-notched specimens. Hydrogen saturation resulted in a loss of strength and ductility, with Ti-Mo steel failing at the yield strength, while V-Mo steel showed a loss of strength up to 13% and ductility up to 35%.
In order to increase the resistance of high-strength steels [76] to high temperatures, it is necessary to increase the number of small cementite particles in bainite to provide irreversible traps for migrating hydrogen during plastic deformation. Among the steels studied, where the Ni content was in the range of (0, 0.9, and 1.8% wt.), the steel with 1.8% nickel had the highest bainite fraction and showed excellent resistance to high temperatures. This resistance is explained by the retention of hydrogen in irreversible trapping sites, which were considered to be cementite/ferrite interfaces with interfacial dislocations.
The effect of hydrogen on fracture processes [77] has shown that hydrogen embrittlement occurs through a previously unidentified mechanism. When hydrogen enters the microstructure, it promotes the formation of low-energy dislocation nanostructures. They are characterized by a cellular structure whose disorientation increases with the strain (which simultaneously attracts additional hydrogen to a critical amount that causes fracture). The appearance of the fracture zone resembles a fisheye, which is associated with inclusions as stress concentrators.
The presence of inclusions and nanostructures can increase the hydrogen resistance and fracture toughness of steel [78,79,80]. For example, chemical heterogeneity in high-strength steel can significantly increase fracture resistance and ductility in hydrogen-containing environments [78]. The effect of heterogeneous and homogeneous nanostructures on the resistance to hydrogen embrittlement in steel [79] in a thermodynamic-based model to analyze hydrogen capture at the inclusion–matrix interface showed its dependence on the strength of the steel matrix [80]. An examination of the effect of sulfide inclusions on the mechanical properties of steel showed that inclusions have a detrimental effect on fatigue resistance [81]. Therefore, controlling the type and content of inclusions in steel is an important feature of secondary steelmaking to improve its hydrogen resistance [82,83,84].
Rotor shafts are periodically machined using LCLs. It is known that the use of various LCLs can significantly affect a number of processes in the surface and subsurface layers, for example, the stress–strain state and the course of destructive processes [85,86,87,88,89,90,91,92,93].
Another important and separate scientific and technological area is the use of a minimum amount of LCL, including aerosol ones, which have organic components and are environmentally friendly [94,95,96,97,98,99,100].
For long-term operations, we need to take into account the fact that, during the operation of power equipment, various types of friction occur, resulting in the separation of material particles. Also, process hydrogen-containing media can make a significant contribution to the hydrogen saturation of the part material. And chips and wear particles can be used as identifiers that can provide information about changes in the condition of a part. Some authors emphasize the need to consider the morphology of both chips and wear particles as diagnostic features that allow us to monitor equipment operation [101,102,103,104,105,106,107,108,109,110,111,112,113,114,115,116,117,118,119,120,121,122,123,124,125].
In [126], a method for classifying wear products using feature fusion and CBR (case-based reasoning) is proposed. The method integrates the local feature LBPs (local binary patterns), global feature FD (fractal dimension), and Tamura coarseness, and then the fused features are applied in a CBR system with different weights and different similarities; this method is adaptive, extensible, modular, and fast. The results show that dividing the wear debris images into parts when calculating LBPs is useful for improving classification, and combining local and global features can obtain better results. Comparative experimental results of different classification methods show that the CBR system takes the least time while maintaining high classification accuracy.
The analysis of chips formed during machining can be used to detect defects in steel parts. For this purpose, various research methods are used: the detection of material defects based on measurements of force and acoustic emission during processing [127,128,129,130,131,132,133,134,135,136,137,138,139,140,141]; a metallographic analysis; a surface roughness analysis; and various types of computer modeling [132,133,134,135,136,137,138,139,140,141,142] and machine learning, including artificial intelligence [143,144,145,146,147,148,149,150,151,152].
Machine and computer vision is an important technology in Industry 4.0, as it enables the automation of quality control and defect detection in manufacturing. Machine vision systems use cameras and image processing algorithms to capture and analyze images of products in real time to detect defects or anomalies that are difficult to detect with the naked eye [153,154,155,156].
In machining, machine and computer vision can be used to detect defects in manufactured components, such as cracks, burrs, scratches, and other imperfections. By using machine and computer vision to automate the quality control process, manufacturers can detect defects at early stages of production, reducing waste and improving the overall quality of the finished product [157,158,159,160,161,162,163,164,165,166,167,168,169,170,171,172,173,174,175,176,177,178,179,180,181].
The introduction of machine and computer vision technologies is the application of 6G communication technologies and the next stage of the technological revolution, as Industry 4.0 and Industry 5.0 [163,165].

3. Formulation of the Problem: Materials and Methodology

The analysis of microstructures (with the construction of histograms and use of the methods of mathematical statistics), taken with the help of replicas from the surfaces of shafts in different areas, was carried out. They were conditionally divided into 3 categories: (1) those that were not subject to active degradation processes, including studies with witness samples that correspond to the conditionally initial state; (2) those that have a transitional character—between the conditionally initial state and areas that have undergone intensive degradation processes; and (3) areas subjected to intensive degradation processes. In [5], a model was proposed according to which, during the operation of ferritic–pearlitic steels, a continuous network of carbide/hydride grain boundary nanosegregations (type Fe2CH0.6…2) with a thickness of ~1 nm was formed which can interact with hydrogen and metal surface. Their formation is determined by the diffusion of the required number of excess carbon atoms from ferritic grains to their limits. Its duration, in many cases, is at least 10 years. In this case, the diffusion of carbon from the grain body to its limits at a distance of only ~1 μm is sufficient [6]. Hydrogen released from a hydrogen-containing environment has a significant effect on the properties of materials during long-term operation [8]. As a result, material degradation may occur in some areas of the equipment [5,8]. To change the conditions of mechanical processing, various methods of hydrogenation of materials are used [6,8]. Therefore, there is an urgent need to consider the changes in the structural–phase state and properties under the action of hydrogen-containing media for steels used in power engineering.
The chemical composition of 38KhN3MFA steel in accordance with GOST 4543-2016 and its properties are shown in Table 1 and Table 2 [1,12].
To continue the microstructure, replicas were taken from the surface of the exploited rotor shaft. When taking replicas, plates with polypropylene were victorious, and drops of benzene were applied in front of the surface. The microstructure of steels and cutting products were examined using microscopes, namely LOMO EC METAMPB-21 (Petersburg, Russia), Zeiss Stemi 2000—C Stereo Microscopes (Jenna, Germany); and digital cameras, namely SIGETA Industrial color digital camera UCMOS 1300, 1.3 MPa, and SIGETA International Color Digital Camera MCMOS 5100 5.1 MP.1 (Muster, Germany).
To obtain an image of the rotor shaft microstructure, an SM 500 portable microscope (Mechelem, Belgium) was used, which was attached to the eyepiece through a special nozzle with a Canon A 490 digital camera (Japan). If necessary, a 4% nitric acid solution was applied to the prepared area.
The witness samples supplied to power generating companies, together with the rotor shaft, were tested. These samples were subjected to LCL testing, and the surface roughness was determined.
The chips were obtained by turning the witness samples with a diameter of 28 mm and a thickness of 4 mm. The cutter was equipped with a VK-6 carbide insert. To create the same turning conditions, the cutter was sharpened, and the same angle between it and the workpiece was used. The experiments were carried out in dry conditions. Turning was performed with water, LCLs, and LCLo at 200 RPM. We also used chips that were collected during the repair work on the TA rotor shaft.
The cutting surface and chips were examined on an EVO-40XV Pelectron microscope (Jenna, Germany) with an INCA Energy 350 microanalysis system (Oxford Instruments, Abingdon, UK).
The hardness on the rotor shaft surface was measured using a portable hardness tester, TDM-1.
The hydrogen content of the samples was determined using a LECOO NH 836 instrument (St. Joseph, MI, USA). Samples weighing about 400 mg were used for analysis [54]. They were washed 3 times with acetone in an ultrasonicator after 15 min, and then they were dried in a forced-circulation dryer at 50 °C.
The roughness of the surface obtained after turning the witness samples and samples from the rotor shaft was measured on a profilograph–profilometer model 201 and evaluated by the height of microbulges Rz, determined on the normalized base length, respectively. New LCL samples based on sunflower oil (LCLs) and petroleum oil (LCLo) were used for grinding [1,8,53,54]. The chips were examined using the developed program [112]. The program is written in the Object Pascal programming language in the Delphi visual programming environment.

4. Results and Discussions

4.1. “Life Cycle” of the Rotor Shaft during Operation

The temperature on the rotor shaft of the K-1000-60/3000 turbine operating in the flow section at the NPP is about 265 °C near the first stage and 155 °C near the last five stages. In the area of the end seals, the temperatures are lower, and in the area of the bearings, they are about 55–60 °C. If we talk specifically about the high-pressure rotor shaft of the K-200-130 turbine operating at a thermal power plant and in the flow area, it is about 510 °C near the first stage and 280 °C near the last 12 stages. Scheduled preventive maintenance should be performed every 25 thousand hours of operation at both FPPs and NPPs. In this case, the shaft is subjected to machining by the decision of the expert technical commission in case of defects [13,14,15,16,17,18,19,20,21,22,23].
As a result of analyzing and summarizing scientific and technical information, we developed a diagram that summarizes the “life cycle” of the rotors shaft (Figure 1). The following main “life stages” of the rotor shaft can be sequentially distinguished: casting, forging, heat treatment, machining during manufacturing, operation, and machining during repair, which affect the microstructure of rotor steel. For casting, the shaft microstructure is ferrite–pearlite, and then, during heat treatment, bainite or sorbitic microstructures are obtained. There is room for further improvement of the microstructure. After machining LCL steels, an increased hydrogen content was found in the chips, which can actively participate in the destructive processes of steel [53,121].

4.2. Evolution of Microstructure and Microhardness of Rotor Steel during Operation

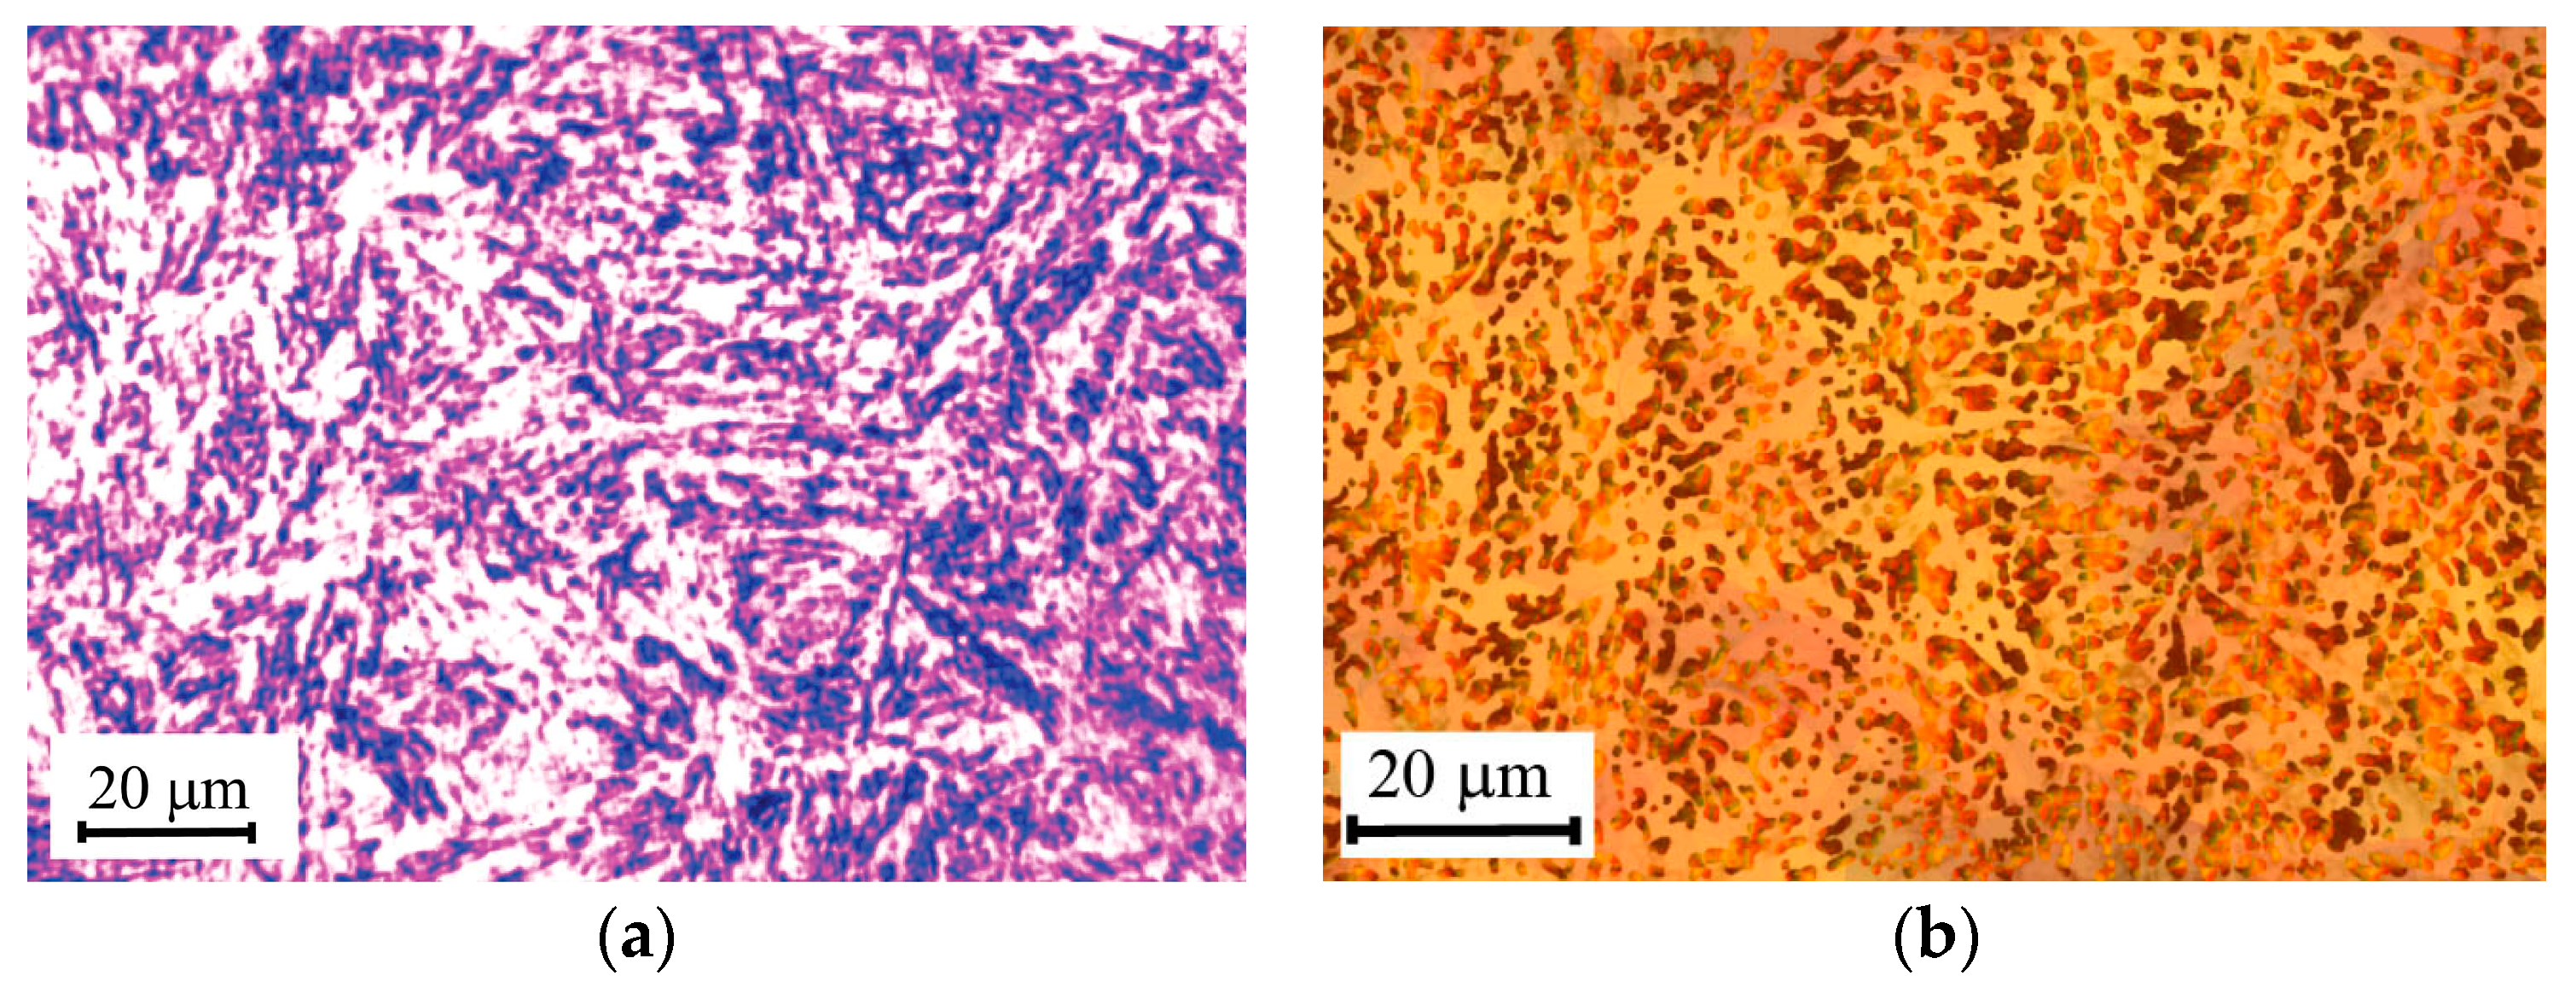
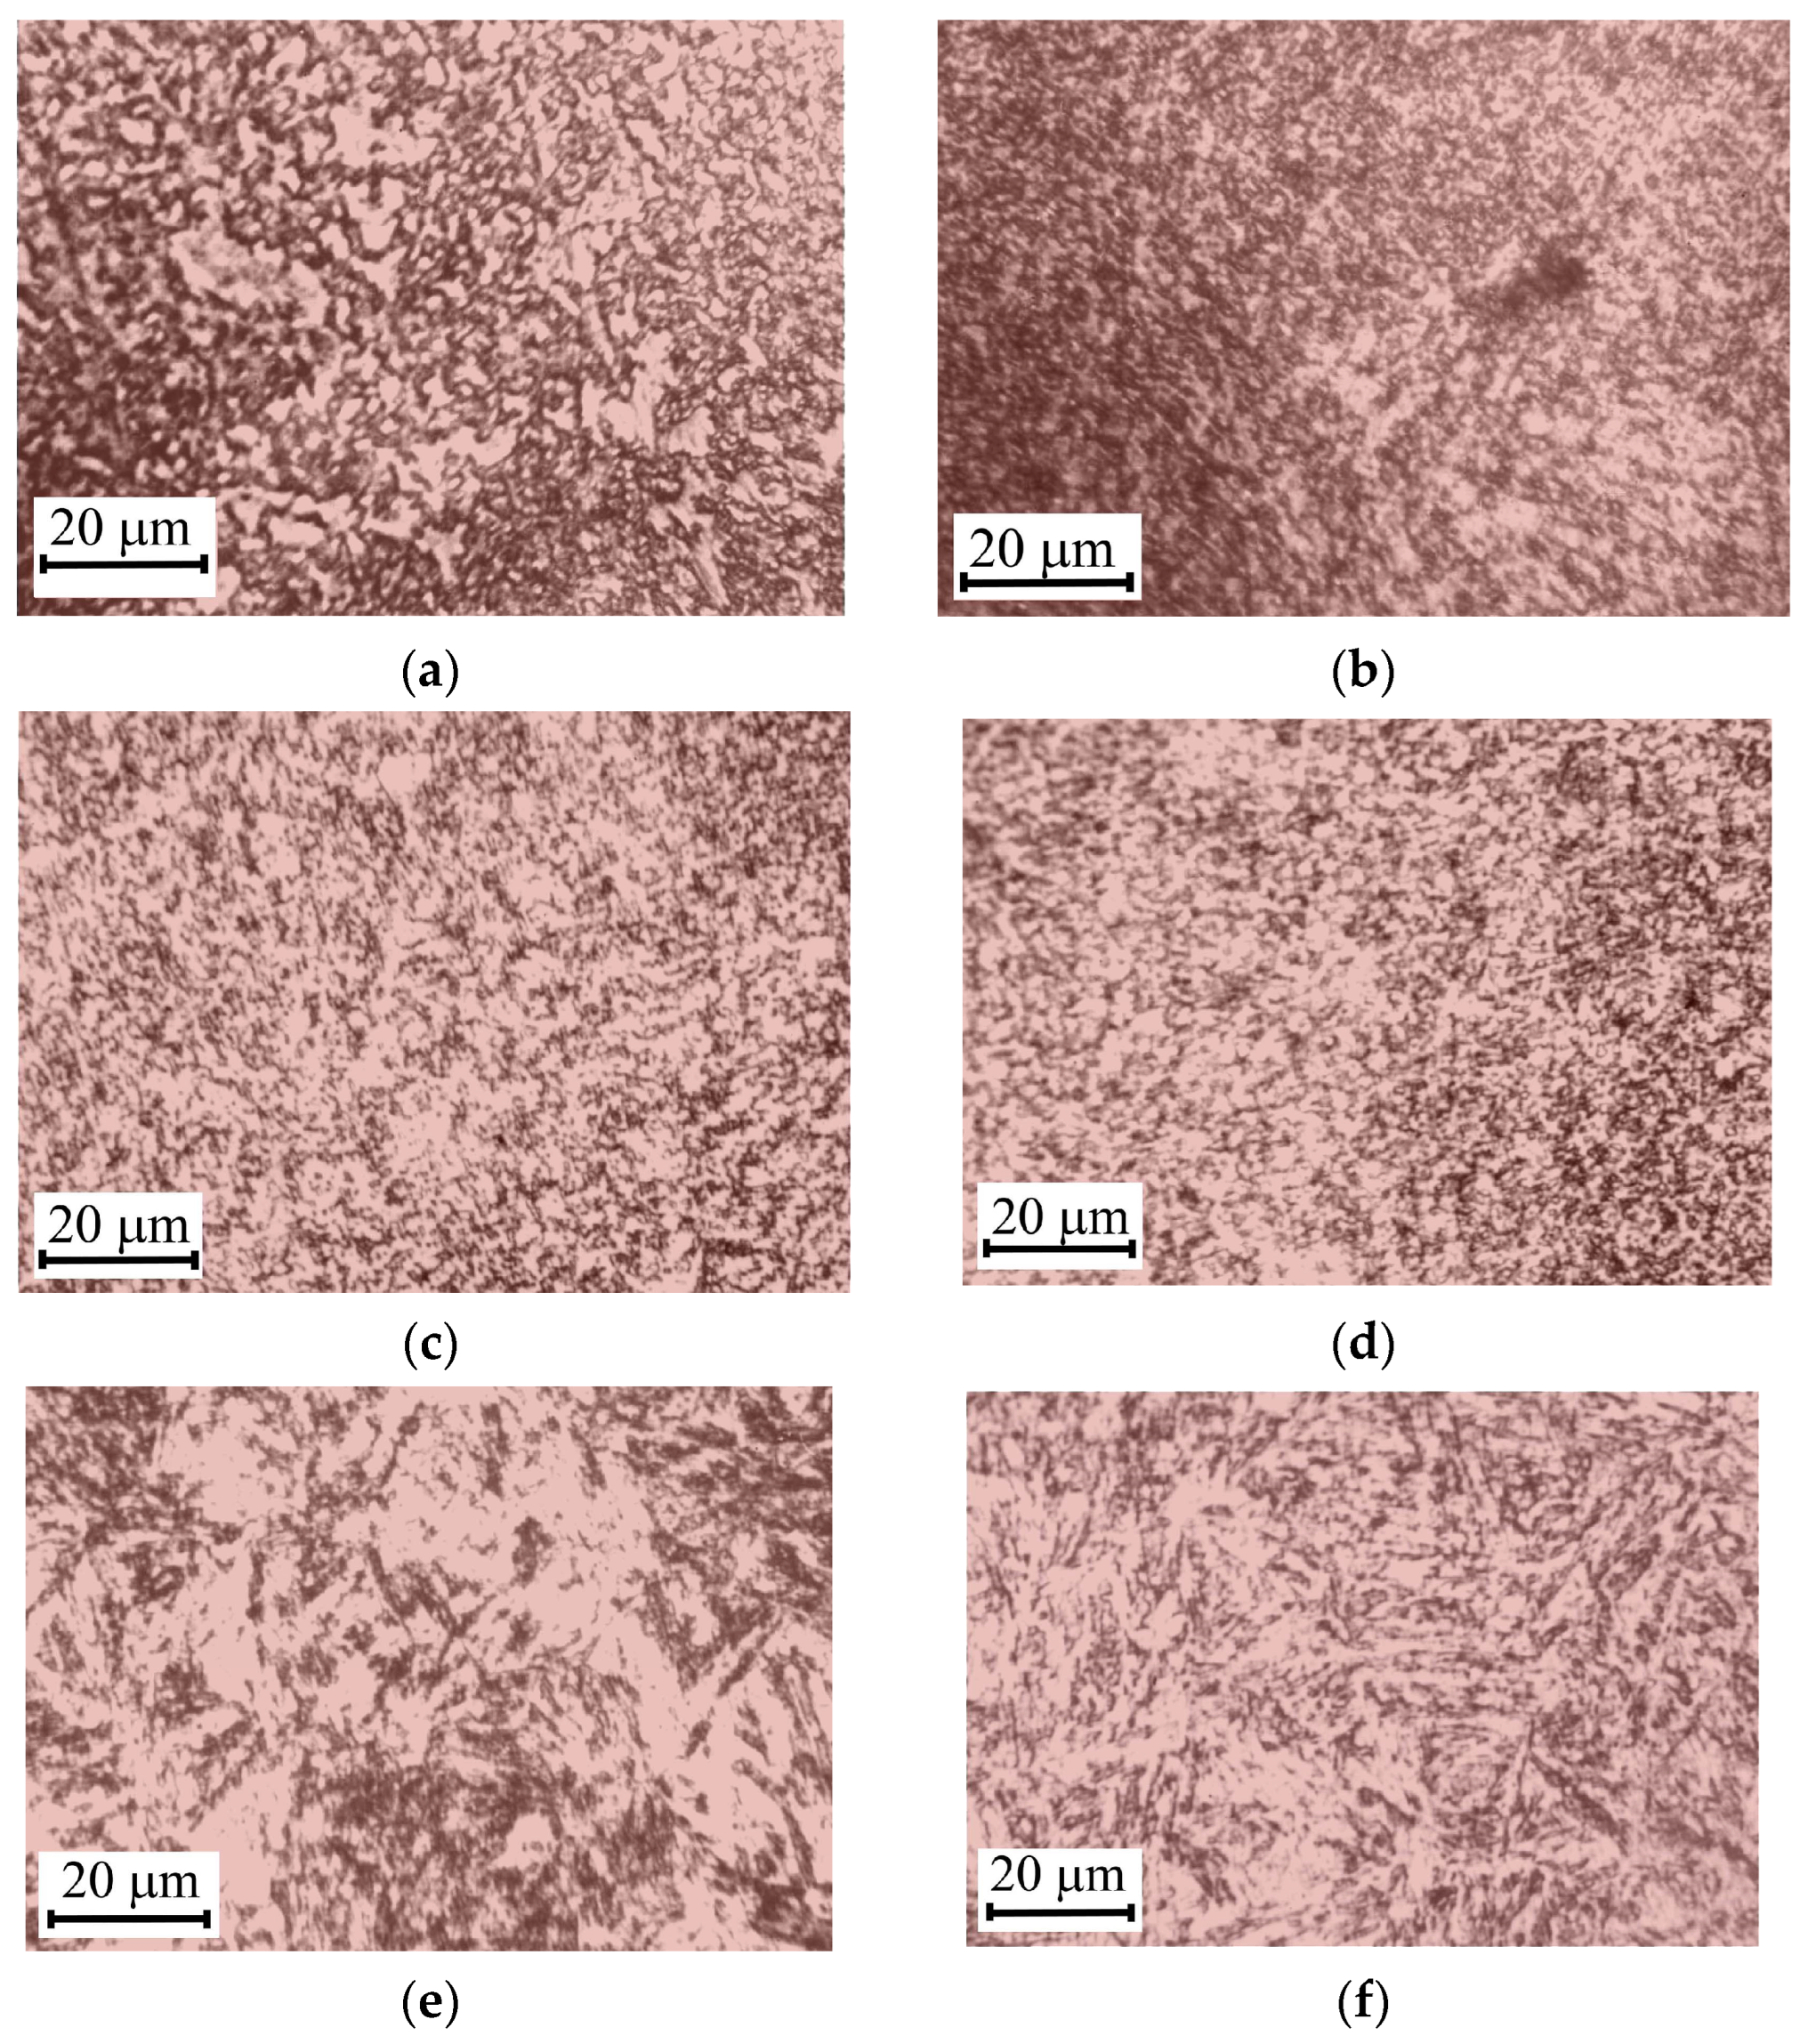
To identify the mechanisms of rotor degradation, changes in the structure and surface hardness of the rotor shaft of the TVF-60 generator which occurred during the operation of the rotor after 250 thousand hours were investigated. The typical microstructure of a rotor shaft is made of 38KhN3MFA steel (Figure 2).
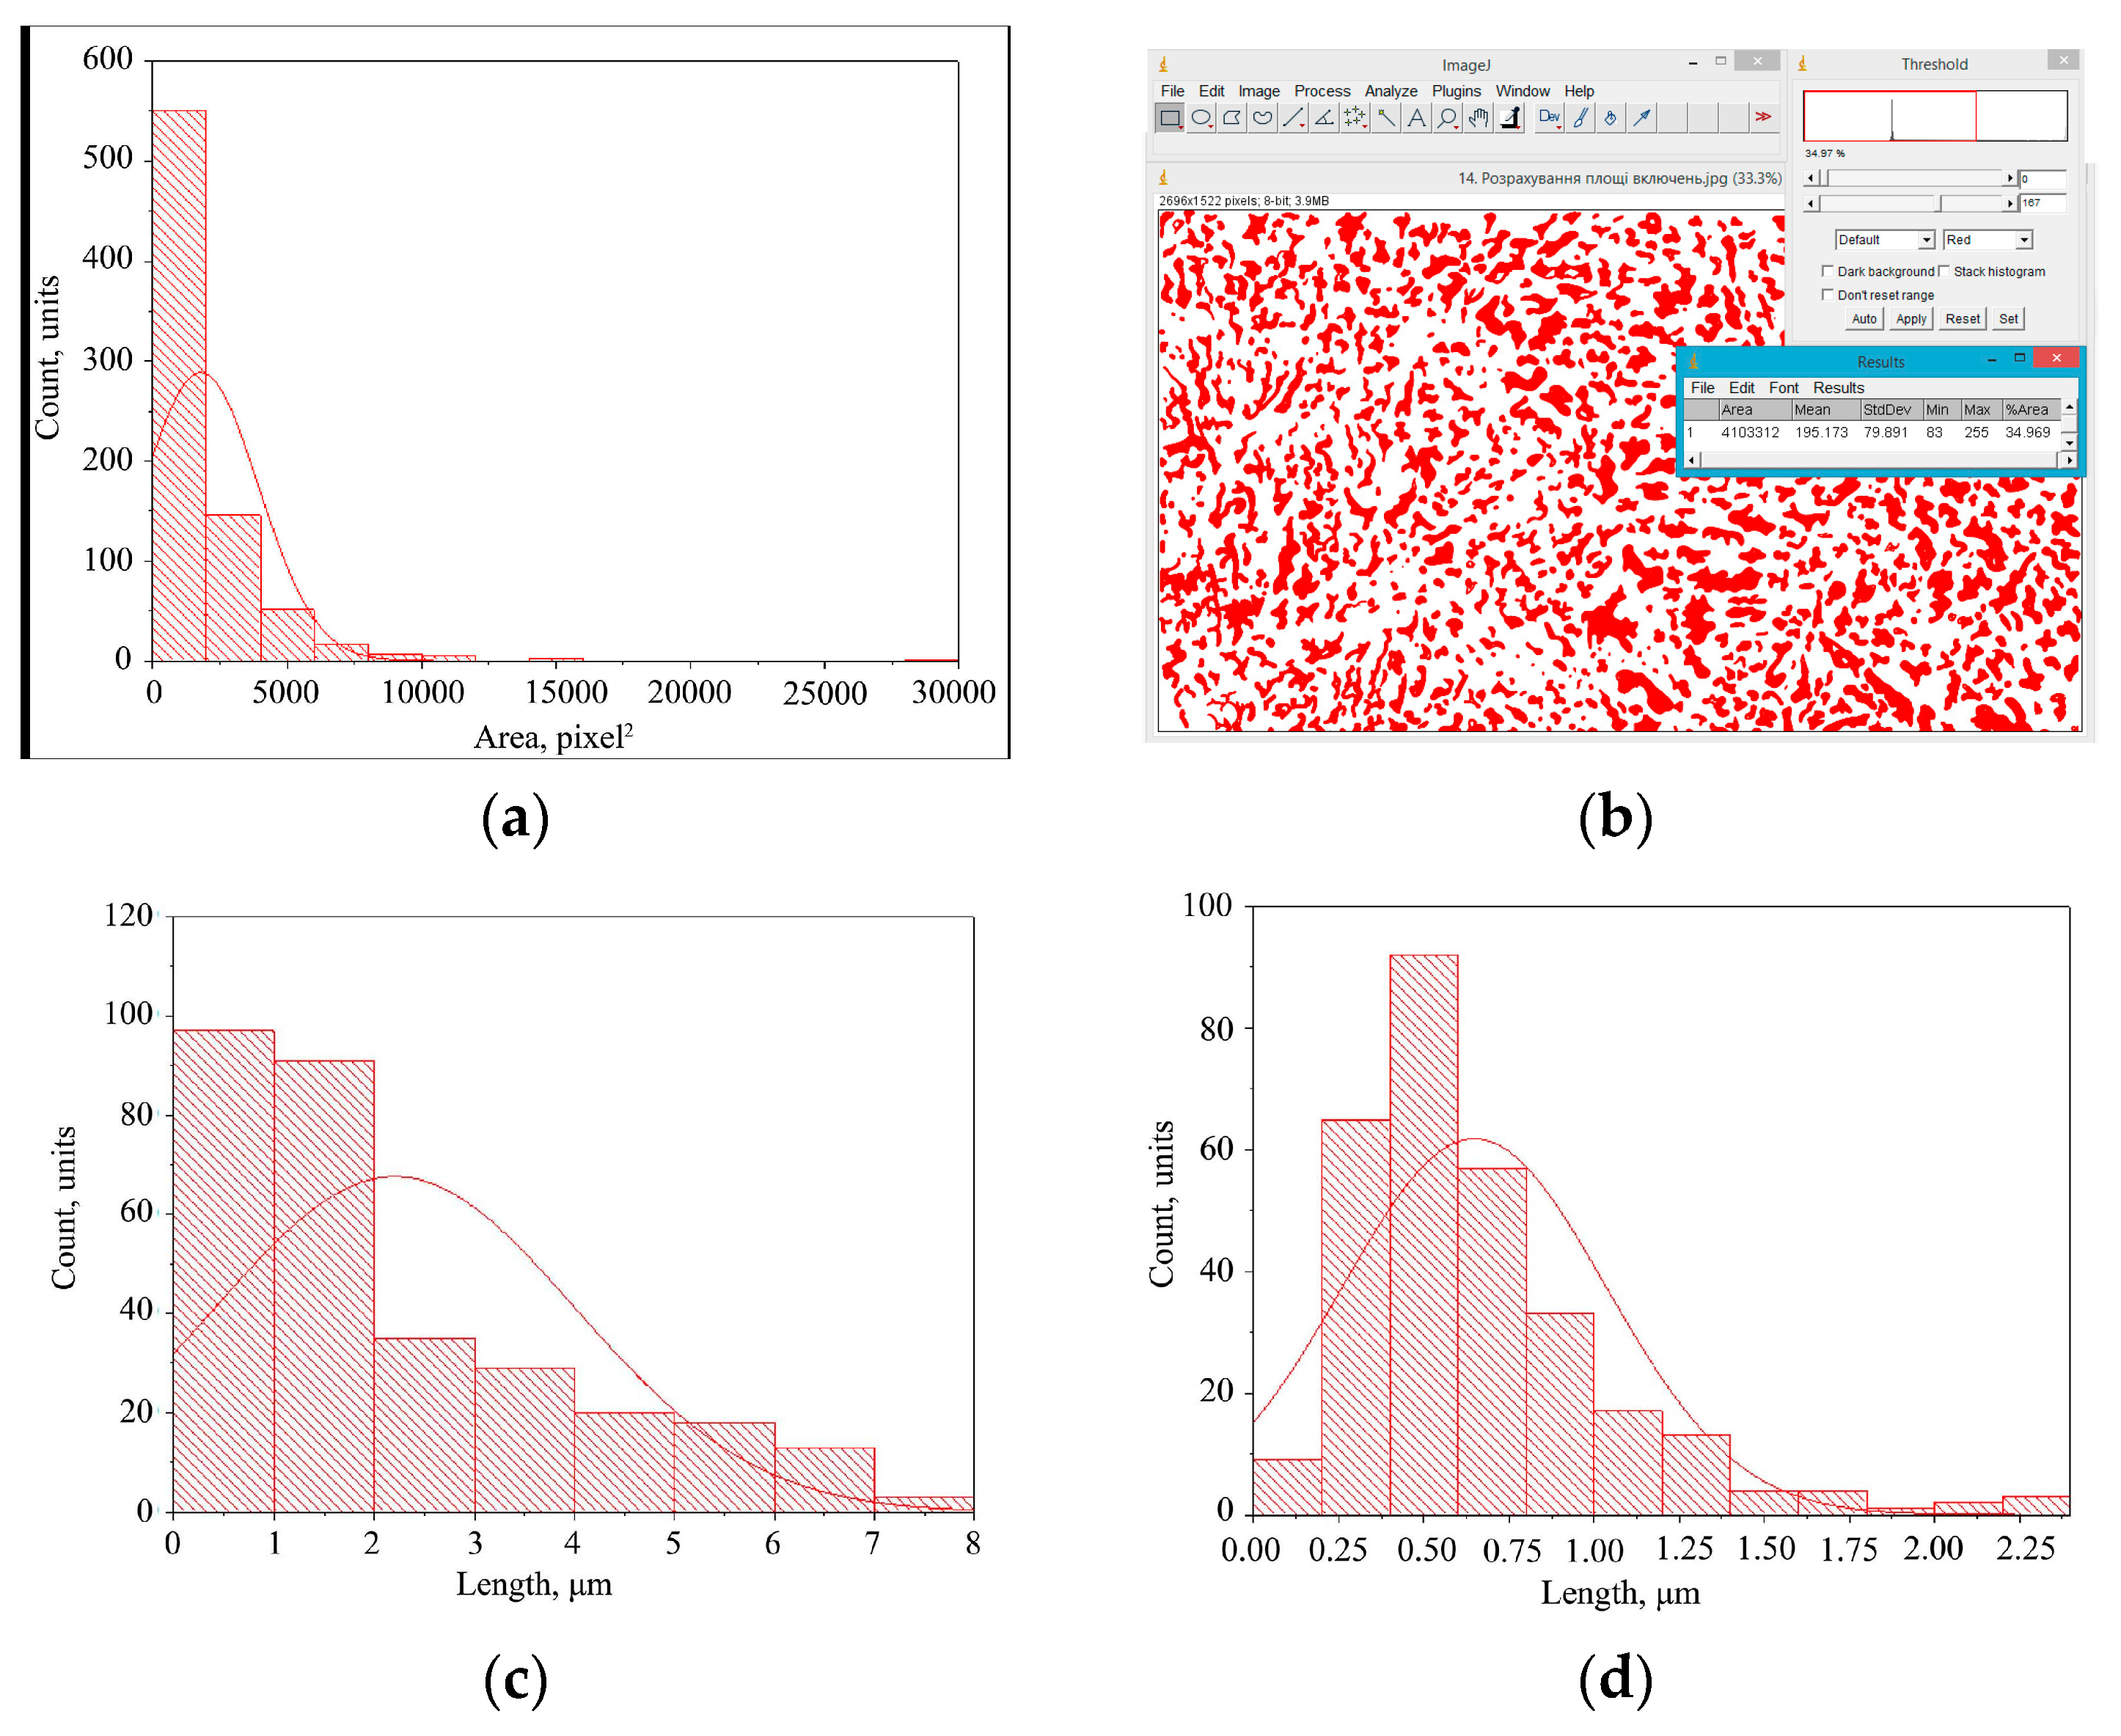
Histograms showing the calculated data: the area (a) occupied by bainite (pixels2) and the linear dimensions (length) of bainite colonies (c) and (width) of bainite colonies (d) are shown on Figure 3.
The grain size in the rotor shaft steel after the final heat treatment was in the range of 25–35 µm. After structural transformations and deformation processes that occurred during long-term operation, the grain size was 15–20 µm.
As a result of analyzing and summarizing scientific and technical information, we developed a diagram that summarizes the “life cycle” of the rotors shaft (Figure 3).
The following main “life stages” of the rotor shaft can be sequentially distinguished: casting, forging, heat treatment, machining during manufacturing, operation, and machining during repair, which affect the microstructure of rotor steel. For casting, the shaft microstructure is ferrite–pearlite, and then, during heat treatment, bainite or sorbitic microstructures are obtained. There is room for further improvement of the microstructure. After machining LCL steels, an increased hydrogen content was found in the chips, which can actively participate in the destructive processes of steel [114].
As a result of intensive diffusion processes during long-term operation under the interaction of technological media, the redistribution of alloying elements occurs. This results in ferrite depletion and the partial disintegration of pearlite; the redistribution of the carbide-noise phase; and the formation of carbides containing alloying elements, aggregation, and, in some cases, spheroidization. Both the release and growth of carbides are structurally related to the redistribution and accumulation of dislocations in the grain microstructure. These processes are accompanied by the formation of pores at the boundaries of carbides (non-metallic inclusions) and the metal matrix and in ferrite grains at sub-boundaries. Thus, over time, chains of pores are formed, from which intercrystalline cracks arise.
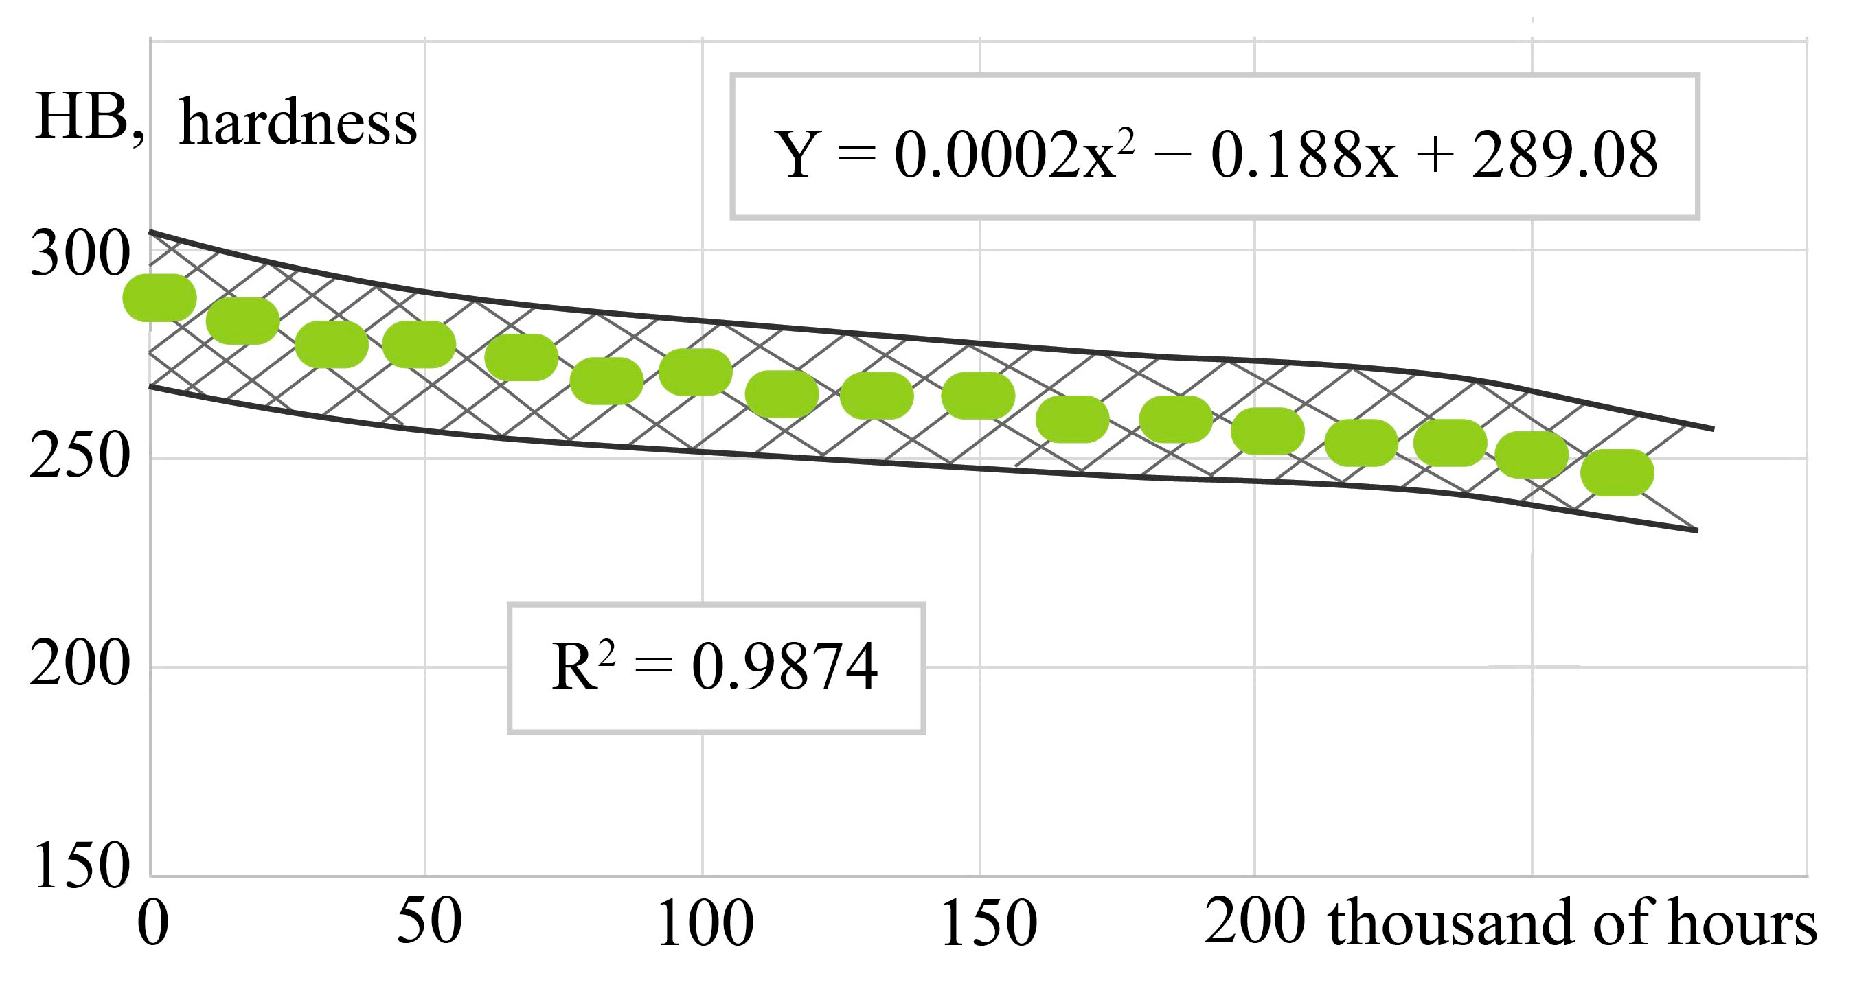
It was found that, during the long-term operation of a rotor shaft made of 38KhN3MFA steel for 250 thousand hours, the bainite decomposes, and the hardness decreases by 15% (Figure 4). Thus, the hardness in the initial state was 290 HB (cementite was 80…87%), and after 250 thousand operation hours, it decreased to 250 HB (cementite component increased up to 62%, and the proportion of free ferrite increased from 5 to 20%).
Changes in microhardness for such structural components as ferrite were also recorded (Figure 5). Moreover, the proportion of free ferrite increases significantly with the time of operation, but, at the same time, its microhardness decreases (Figure 5b).
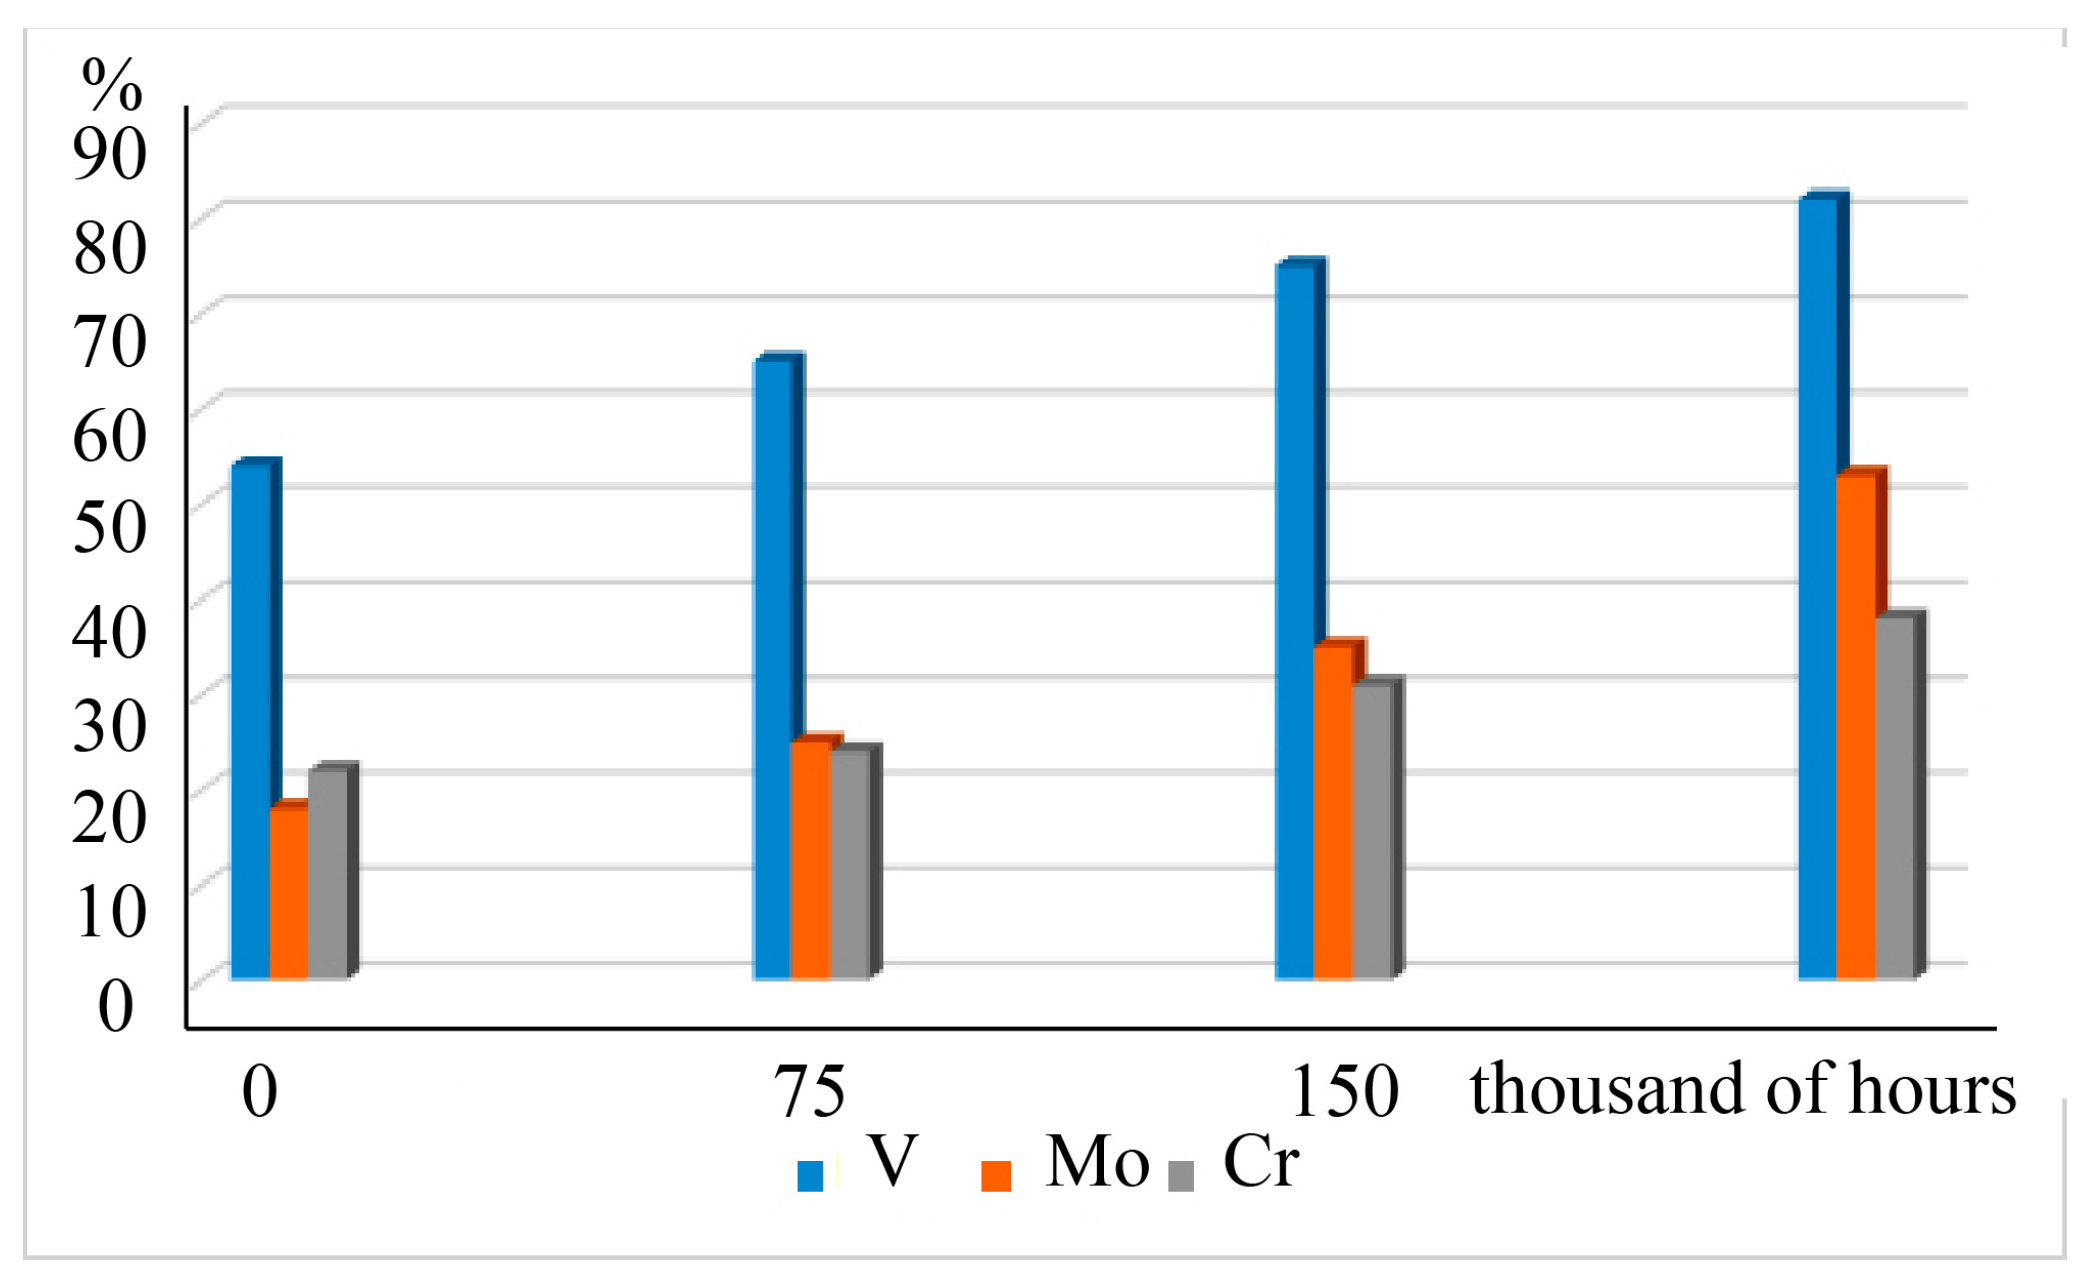
Under the action of temperature and force factors, the alloying elements are redistributed due to intensive diffusion processes. Much of the chromium, molybdenum, and vanadium is converted from a solid solution to complex carbides. The content of alloying elements in the solid solution of degraded steels compared with the original decreases, and in carbides, it increases. It is found that the content of alloying elements in the carbide phase increases, and in the solid solution of the metal matrix, it decreases compared to the initial state. The intensification of the diffusion processes increases the concentration of carbide-forming elements: both in carbides and near the grain boundaries. An increase in the content of special carbides was recorded: Cr and V—by 1.15–1.6 times; and Mo—by 2.2–2.8 times (Figure 6). At the same time, bainite decomposition occurs due to the transition to the carbide phase. The transformation was monitored for 250 thousand hours in cooperation with the NPP and FPP technical diagnostics service.
Studies of the rotor shaft surface revealed changes in the structure and properties. The microstructure of the shaft in the initial state is fine-grained and bainitic (Figure 7a,b) in the places of the greatest mechanical and thermal effects, and the allocation of finely dispersed carbides along the body and grain boundaries is traced (Figure 7c,d), as well as a certain orientation of pearlite due to the relocation of structural components (Figure 7e,f).
The structural–phase state of the studied complex alloyed steels significantly affects their performance properties and machining. Exceeding the average statistical concentration from 3 to 10% by volume of carbides at grain boundaries increases the brittleness in these areas and, as a result, increases the fracture toughness of the material.
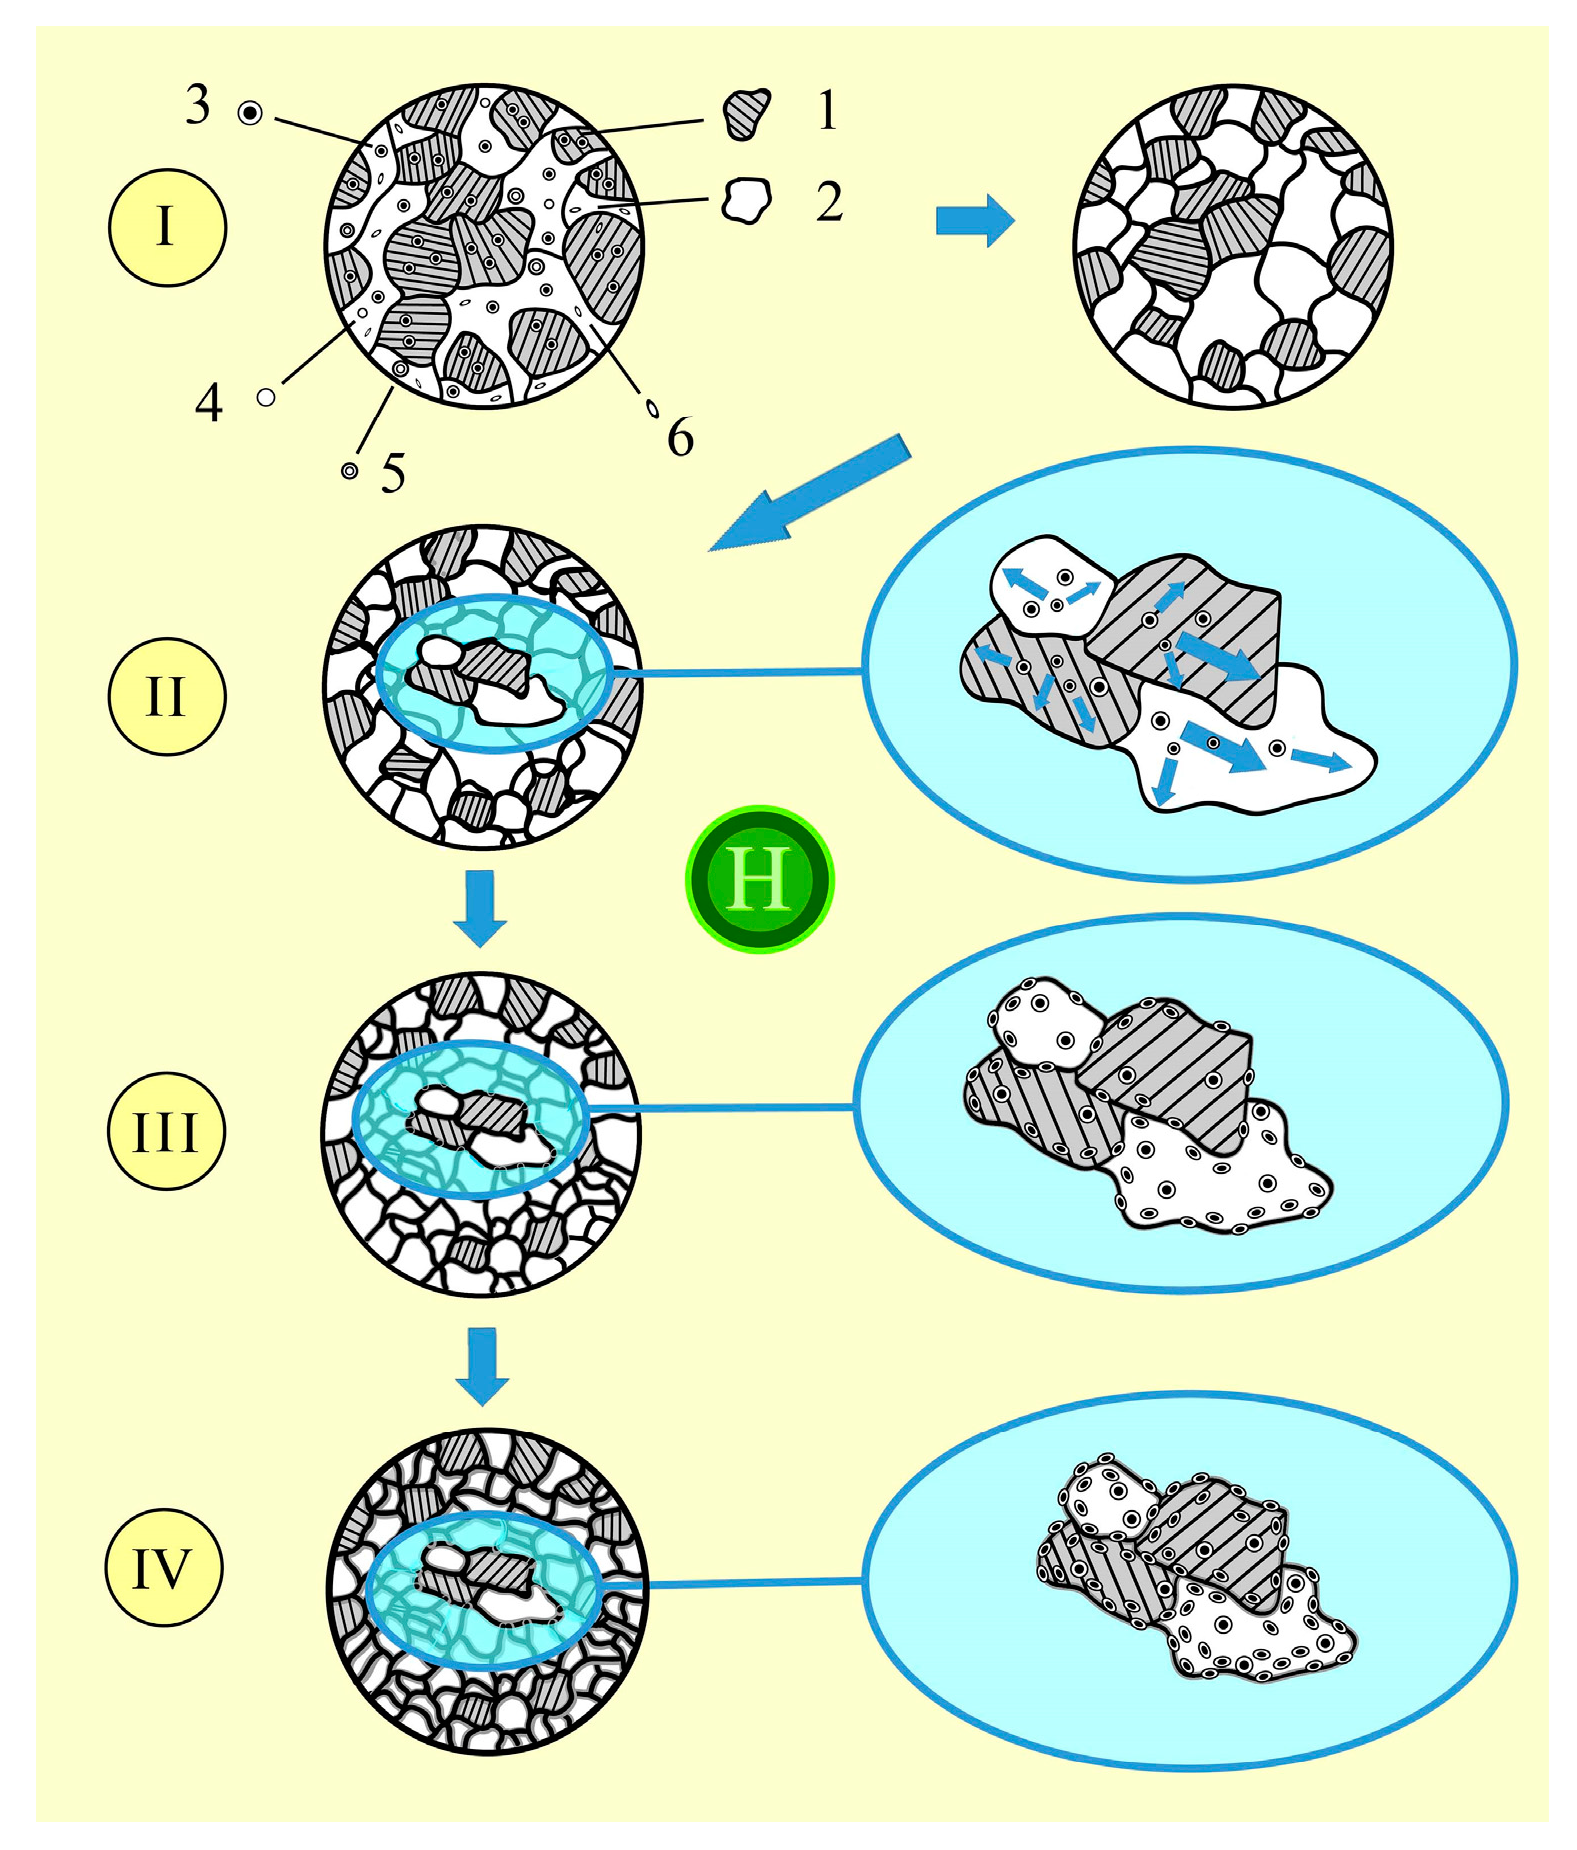
Based on analyses of the existing data [167,168,169,170,171,172,173,174,175,176,177,178,179,180,181] and our own research, we propose a scheme of the “evolution” of the microstructure for 38KhN3MFA steel from which the TA rotor shaft was made which assumes that, during long-term operation, due to the complex action of factors—temperature increase and exposure to hydrogen-containing media—there is a change in the properties and parameters of the microstructure (Figure 8). It was recorded that there is a migration of complex carbides and VC carbides from the central part of the grain (Figure 8II) to the periphery and grain boundaries (Figure 8III). It was recorded that the pearlite phase decreases and the ferrite phase increases. It was found that, in the conditionally initial state, the cementitious component was 87%, and after 250 thousand hours of operation, it became 62%. The number of free ferrite grains increases significantly. Along the boundaries of ferrite grains and on the periphery of pearlite colonies, coagulated carbides are recorded, and they have a slightly deformed elongated appearance (Figure 8III). Also significant is the influence of hydrogen, which is recorded on the newly formed damages and traps and dispersed components of the microstructure of steels due to the development of degradation processes. In addition, in some areas of the rotor shaft, the boundaries of pearlite colonies were blurred (Figure 8IV), and there was a significant increase in the number of carbides, including those deformed along the boundaries and vicinities of grains. The fact that, during prolonged operation, the microstructure is refined was taken into account in all images. To illustrate the significance of hydrogen’s influence on the steel properties, a symbol with hydrogen is shown in the central part of the figure.
Studies have shown that the presence of inclusions and nanostructures can affect steel-strength characteristics [78,79,80].
Thus, we can hypothesize that, if nanocarbides are formed during prolonged exposure, or if they are present in the steel microstructure, they also have a significant impact on the steel’s properties.

4.3. Analysis of Particles of Degraded Material That Separated from the Rotor Shaft

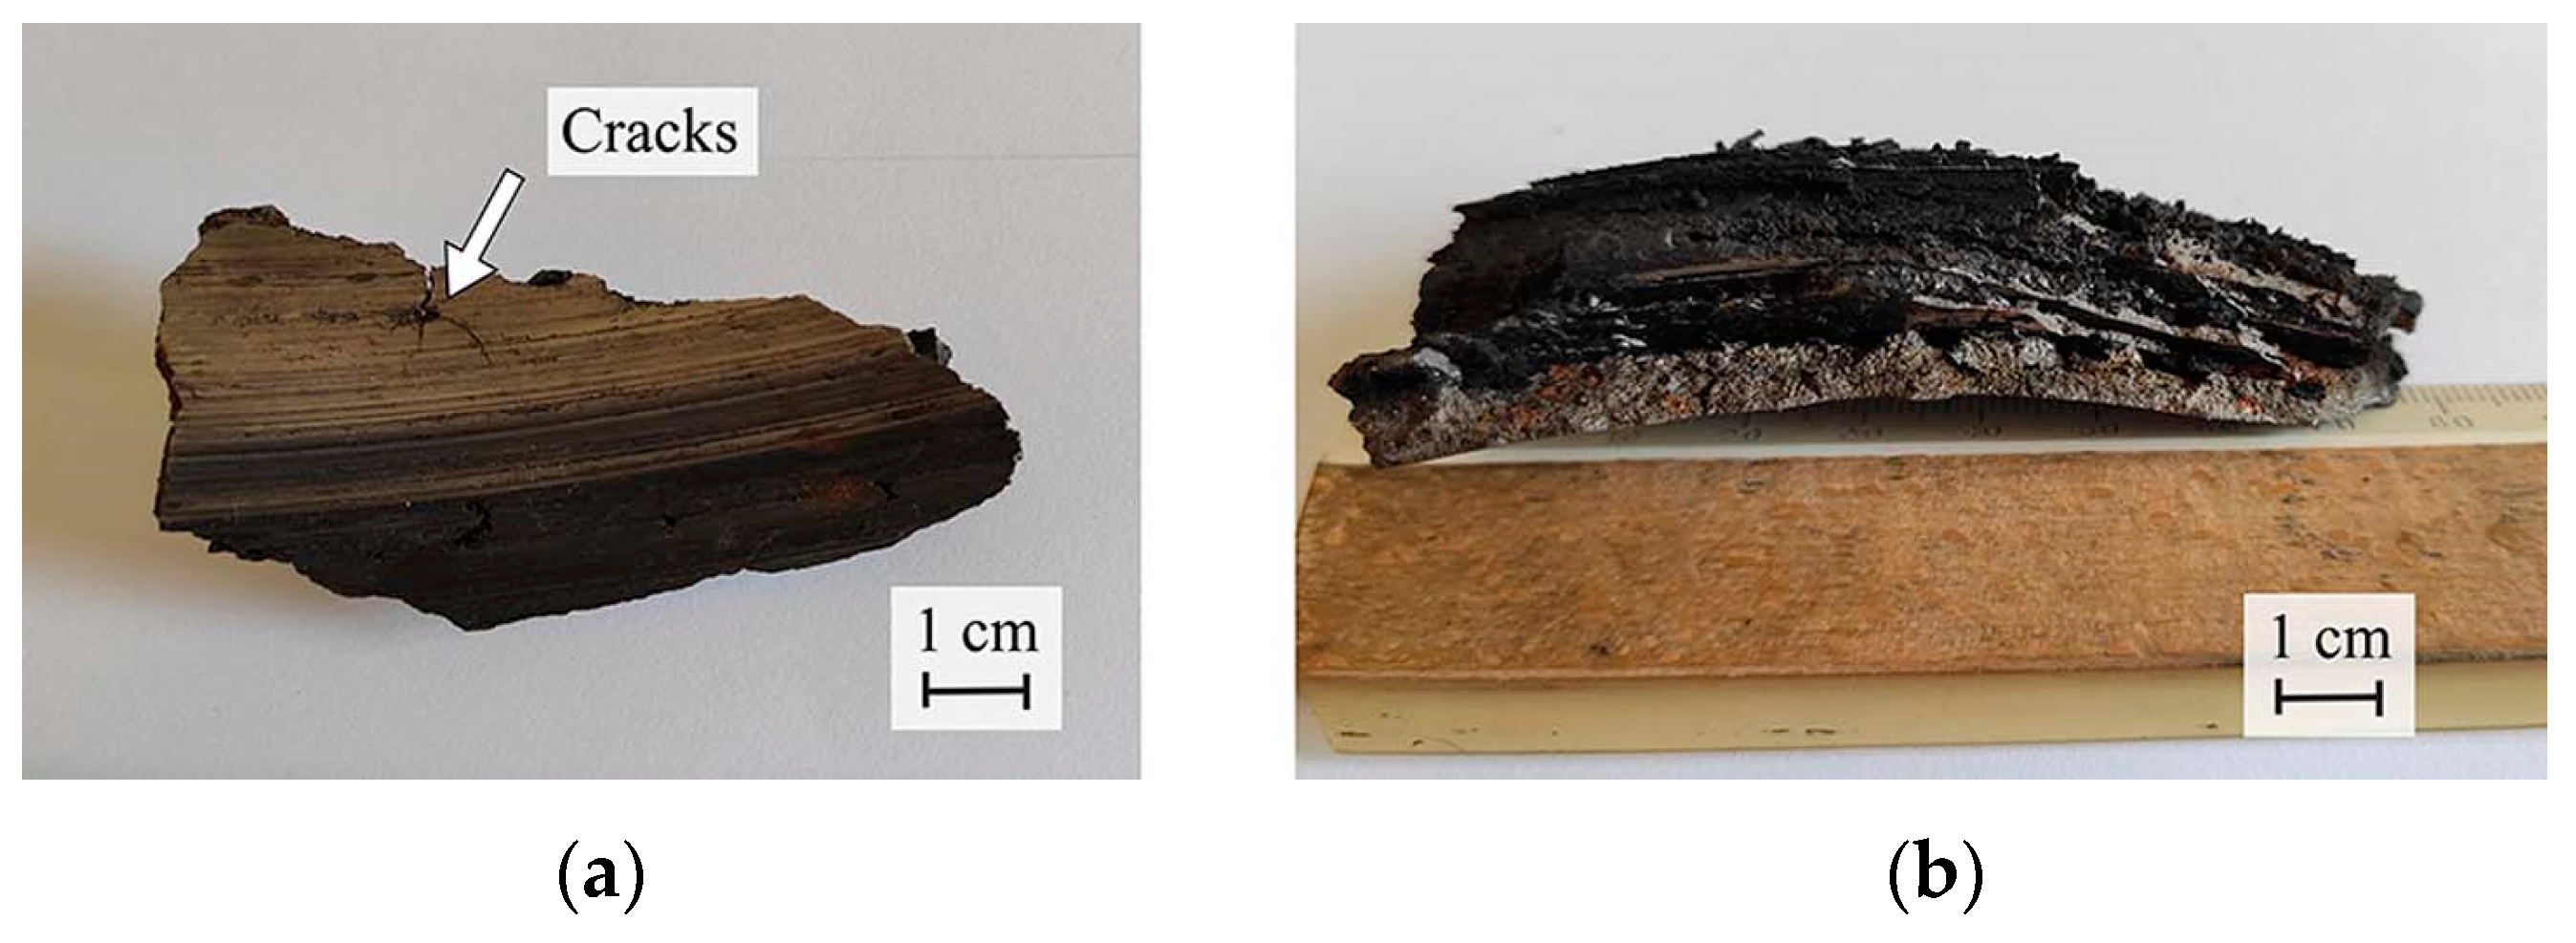
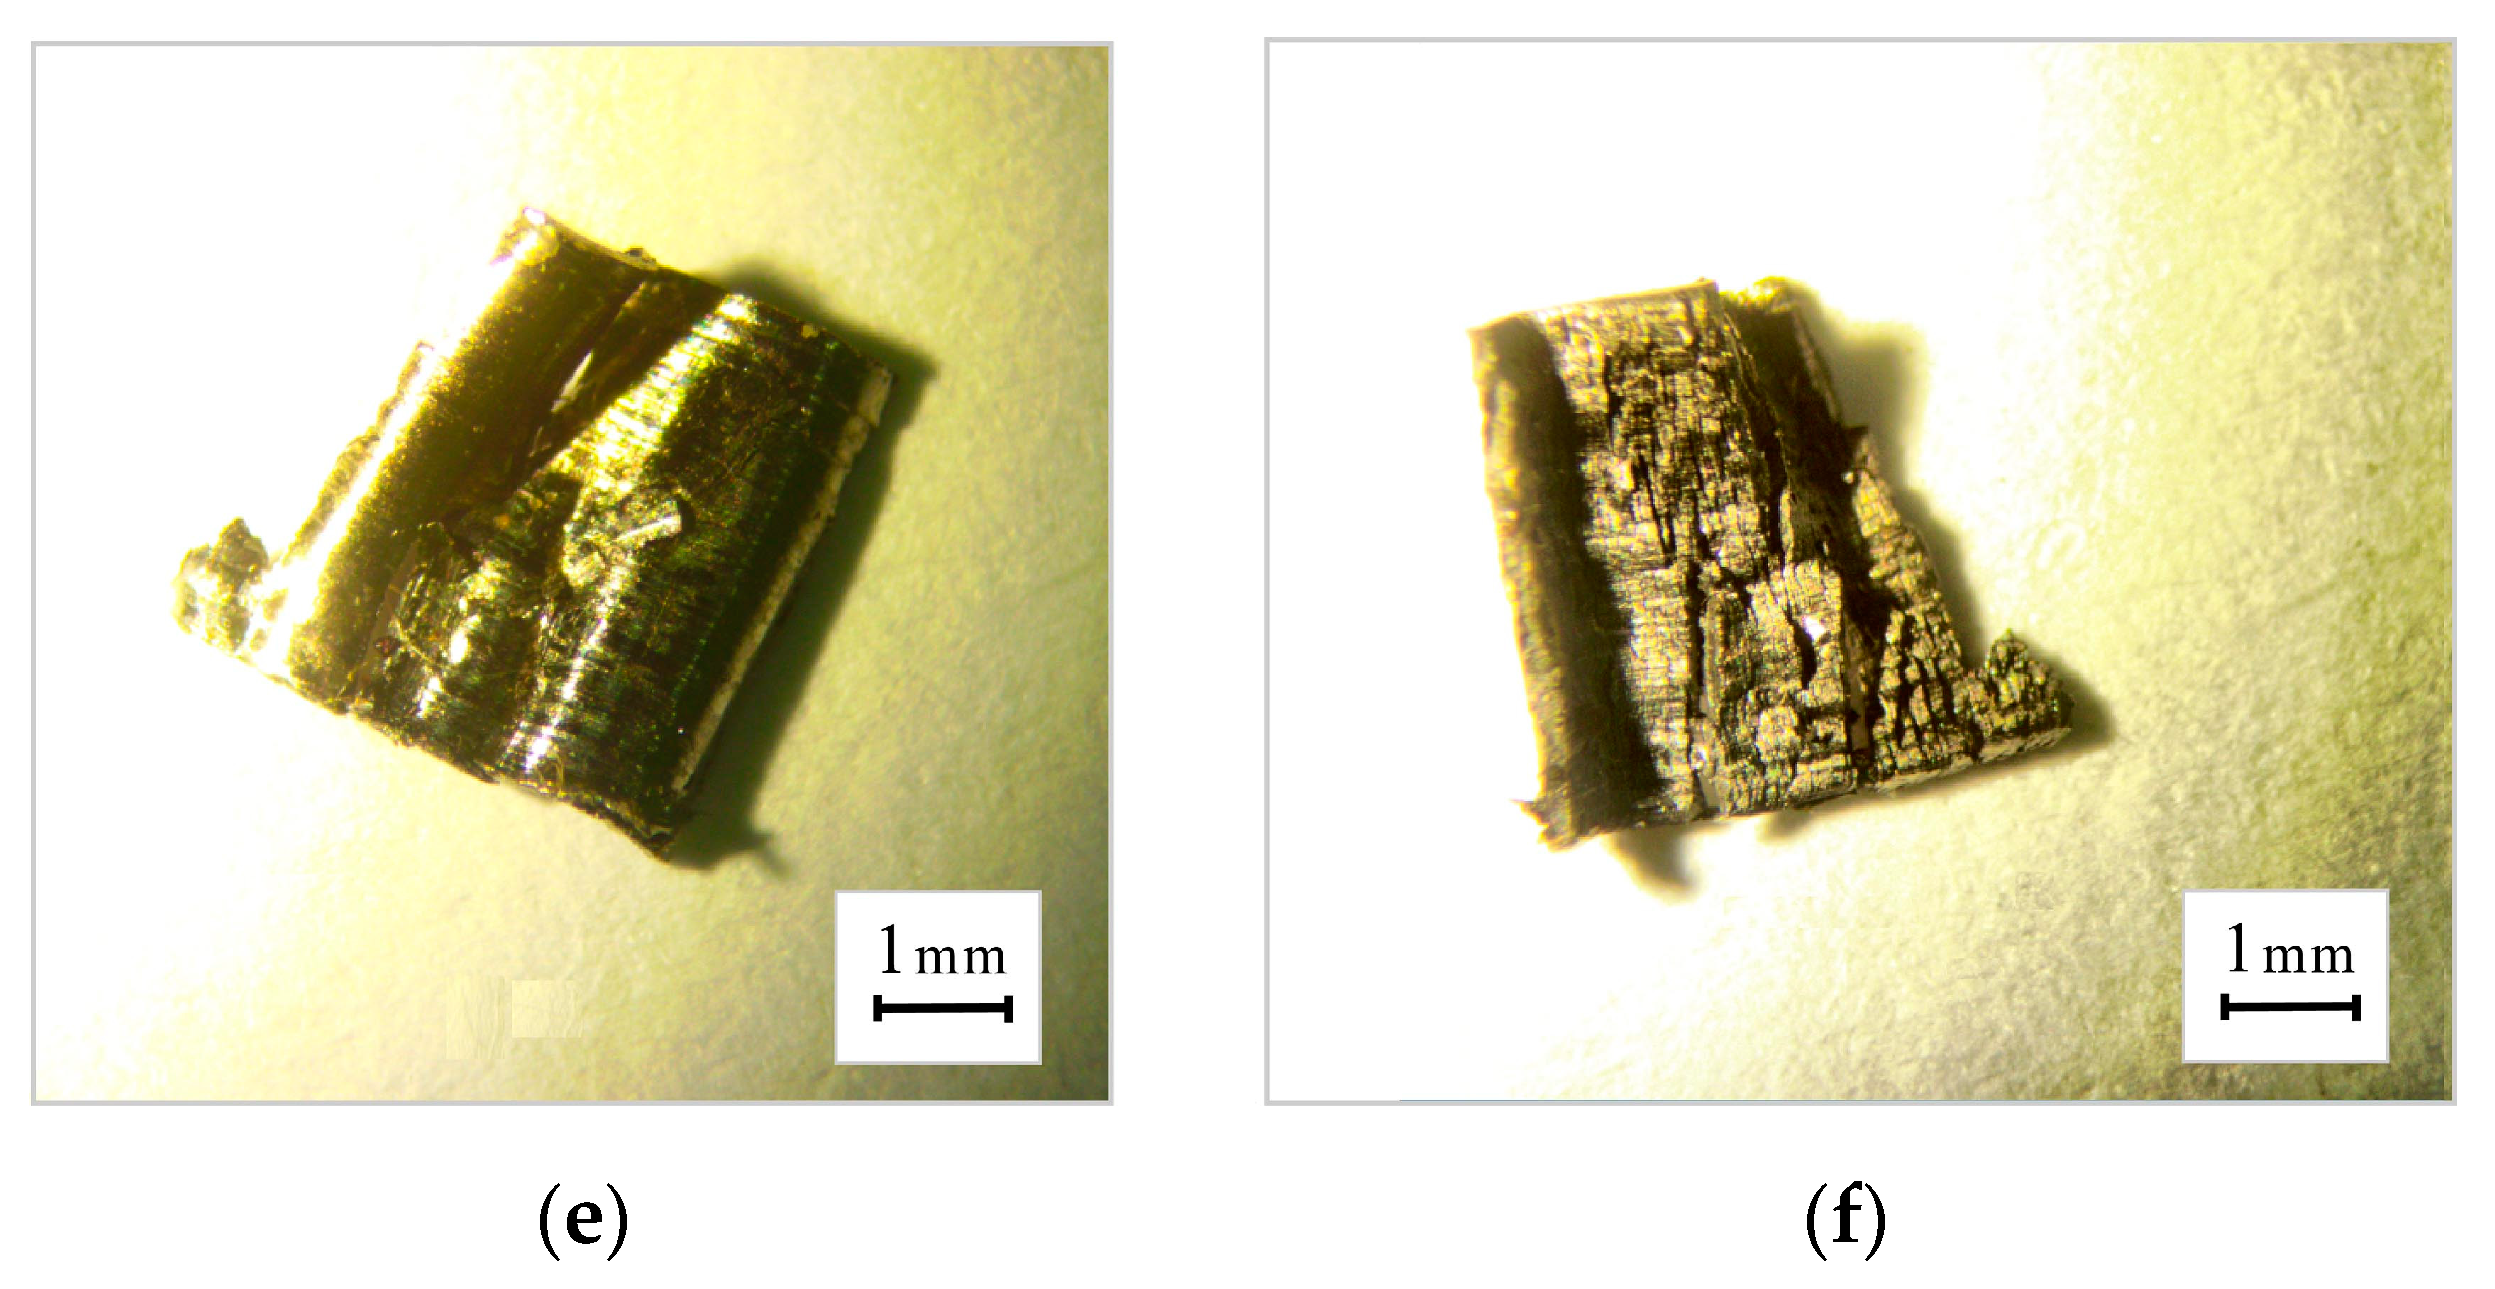
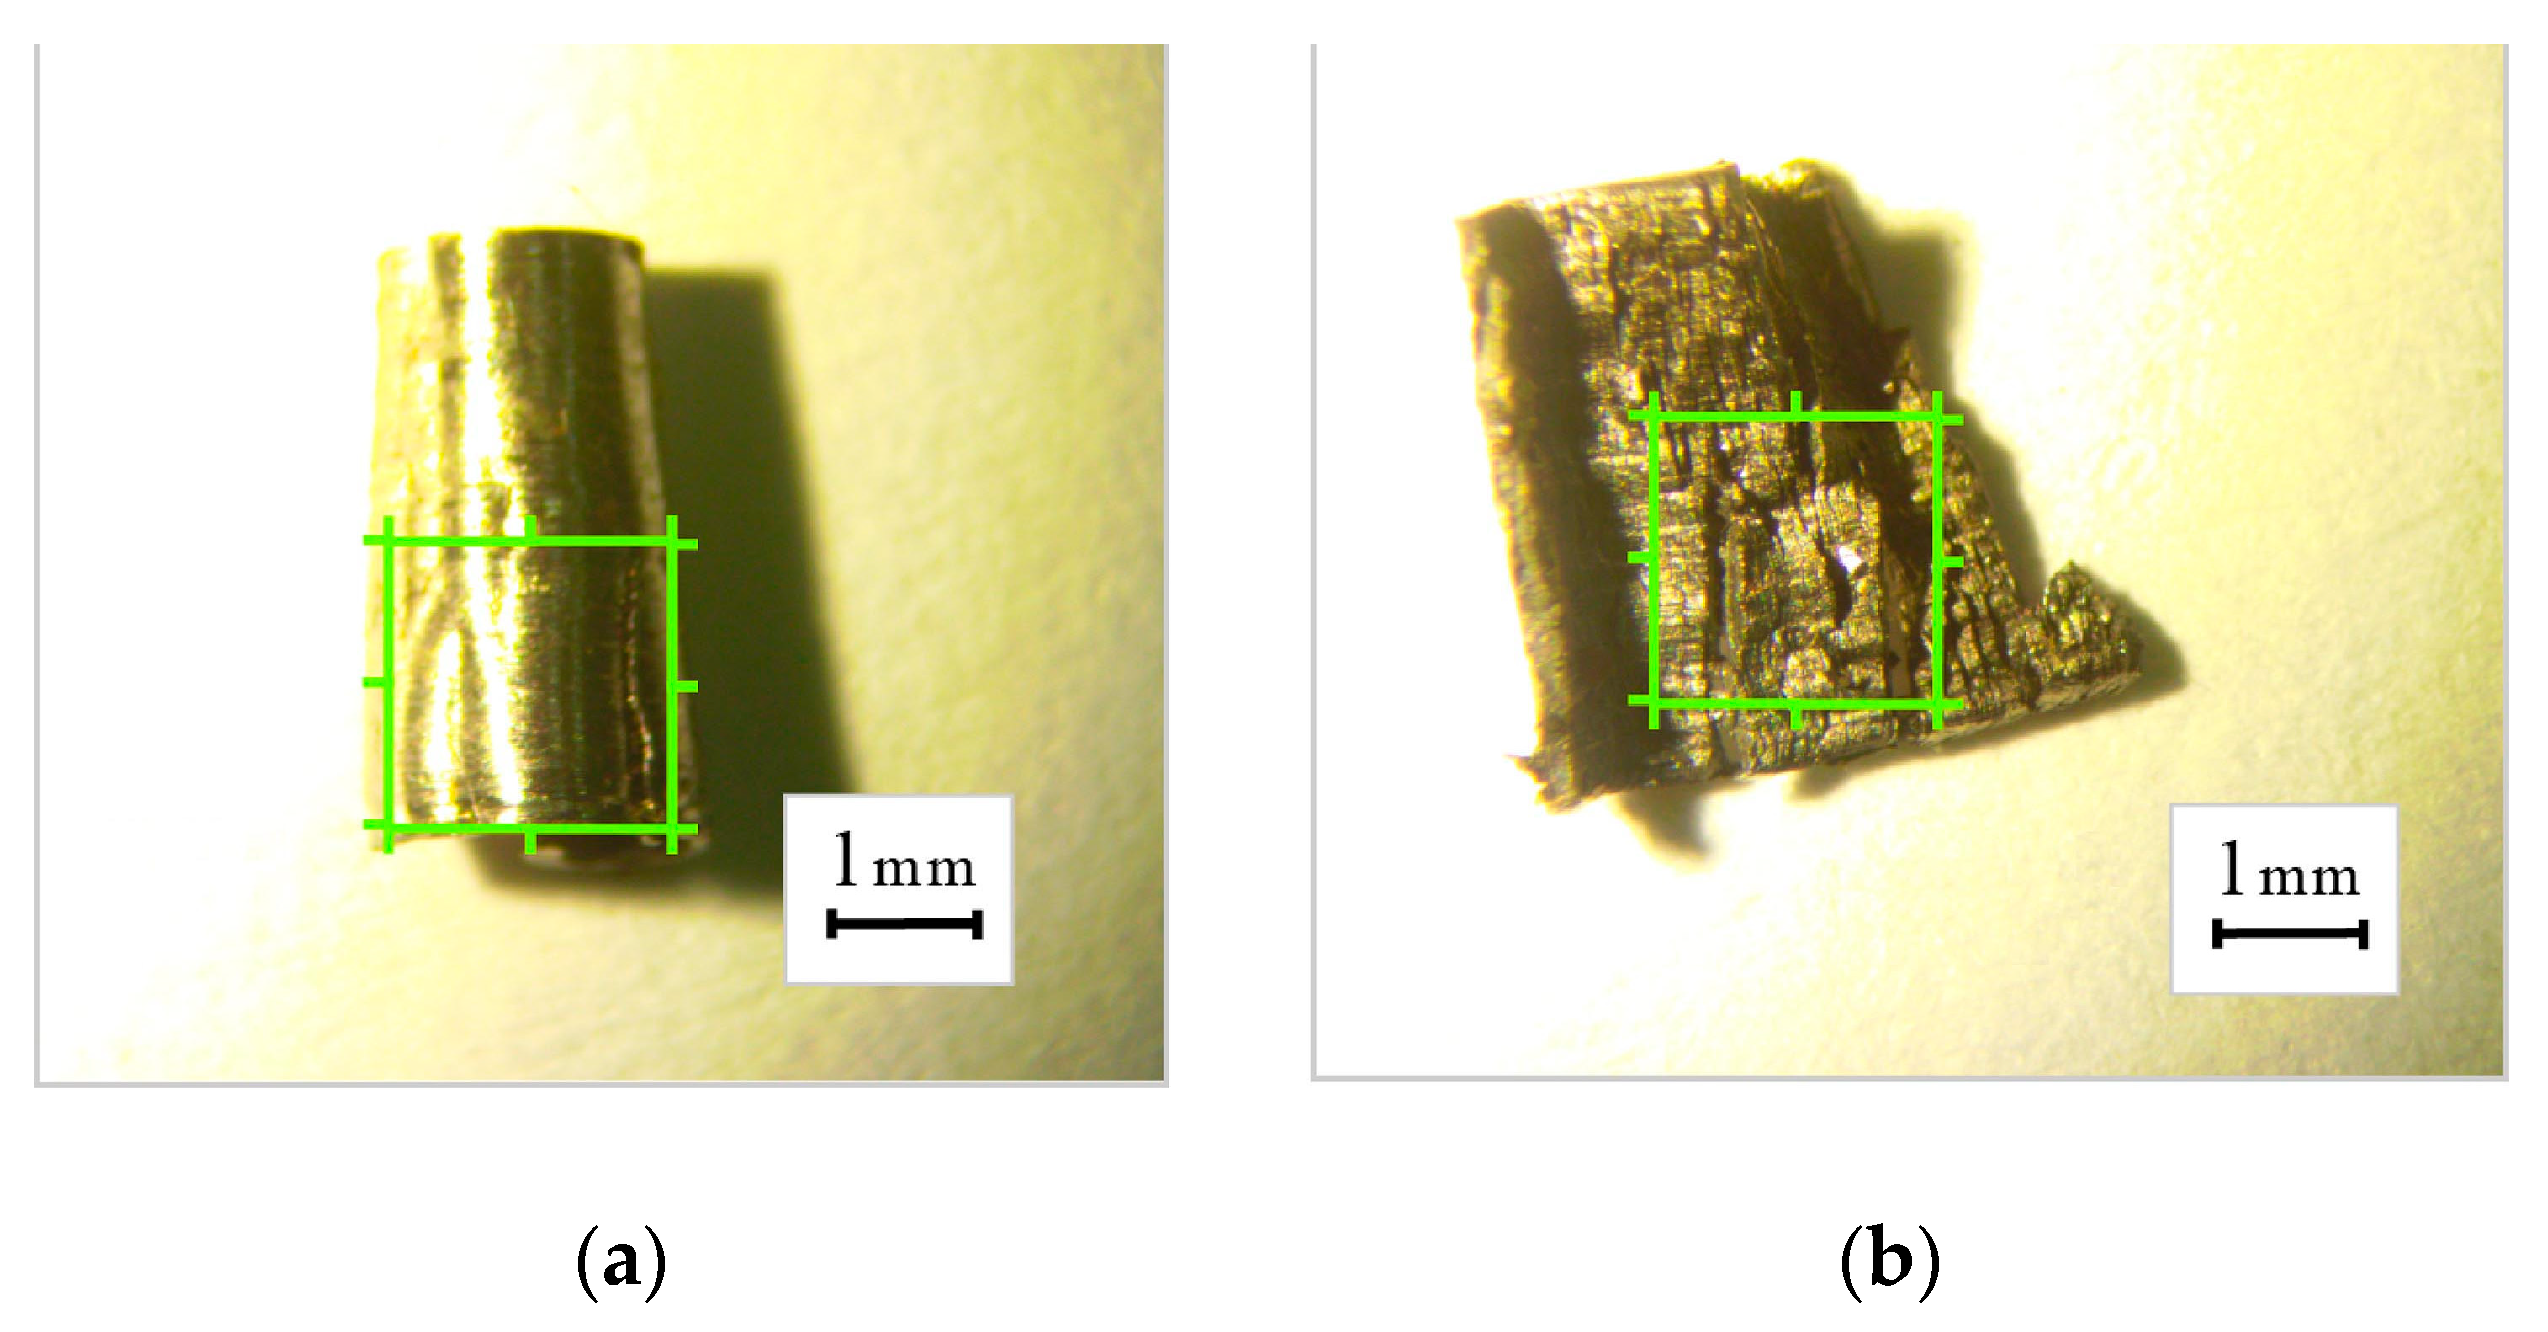
A particle of degraded material that was separated from the rotor shaft as a result of the intensification of destructive processes caused by the complex action of aging factors and technological environments is shown in Figure 9. Cracks are recorded on the surface of the fragment that branch out from the point where an increased content of non-metallic inclusions was recorded. The fragment shown in Figure 9a is the outer working surface of the shaft, which has sliding pits and cracks. The particle (Figure 9b) is an internal surface formed under conditions of intense degradation, and it has numerous damages and a complex microrelief on the surface.
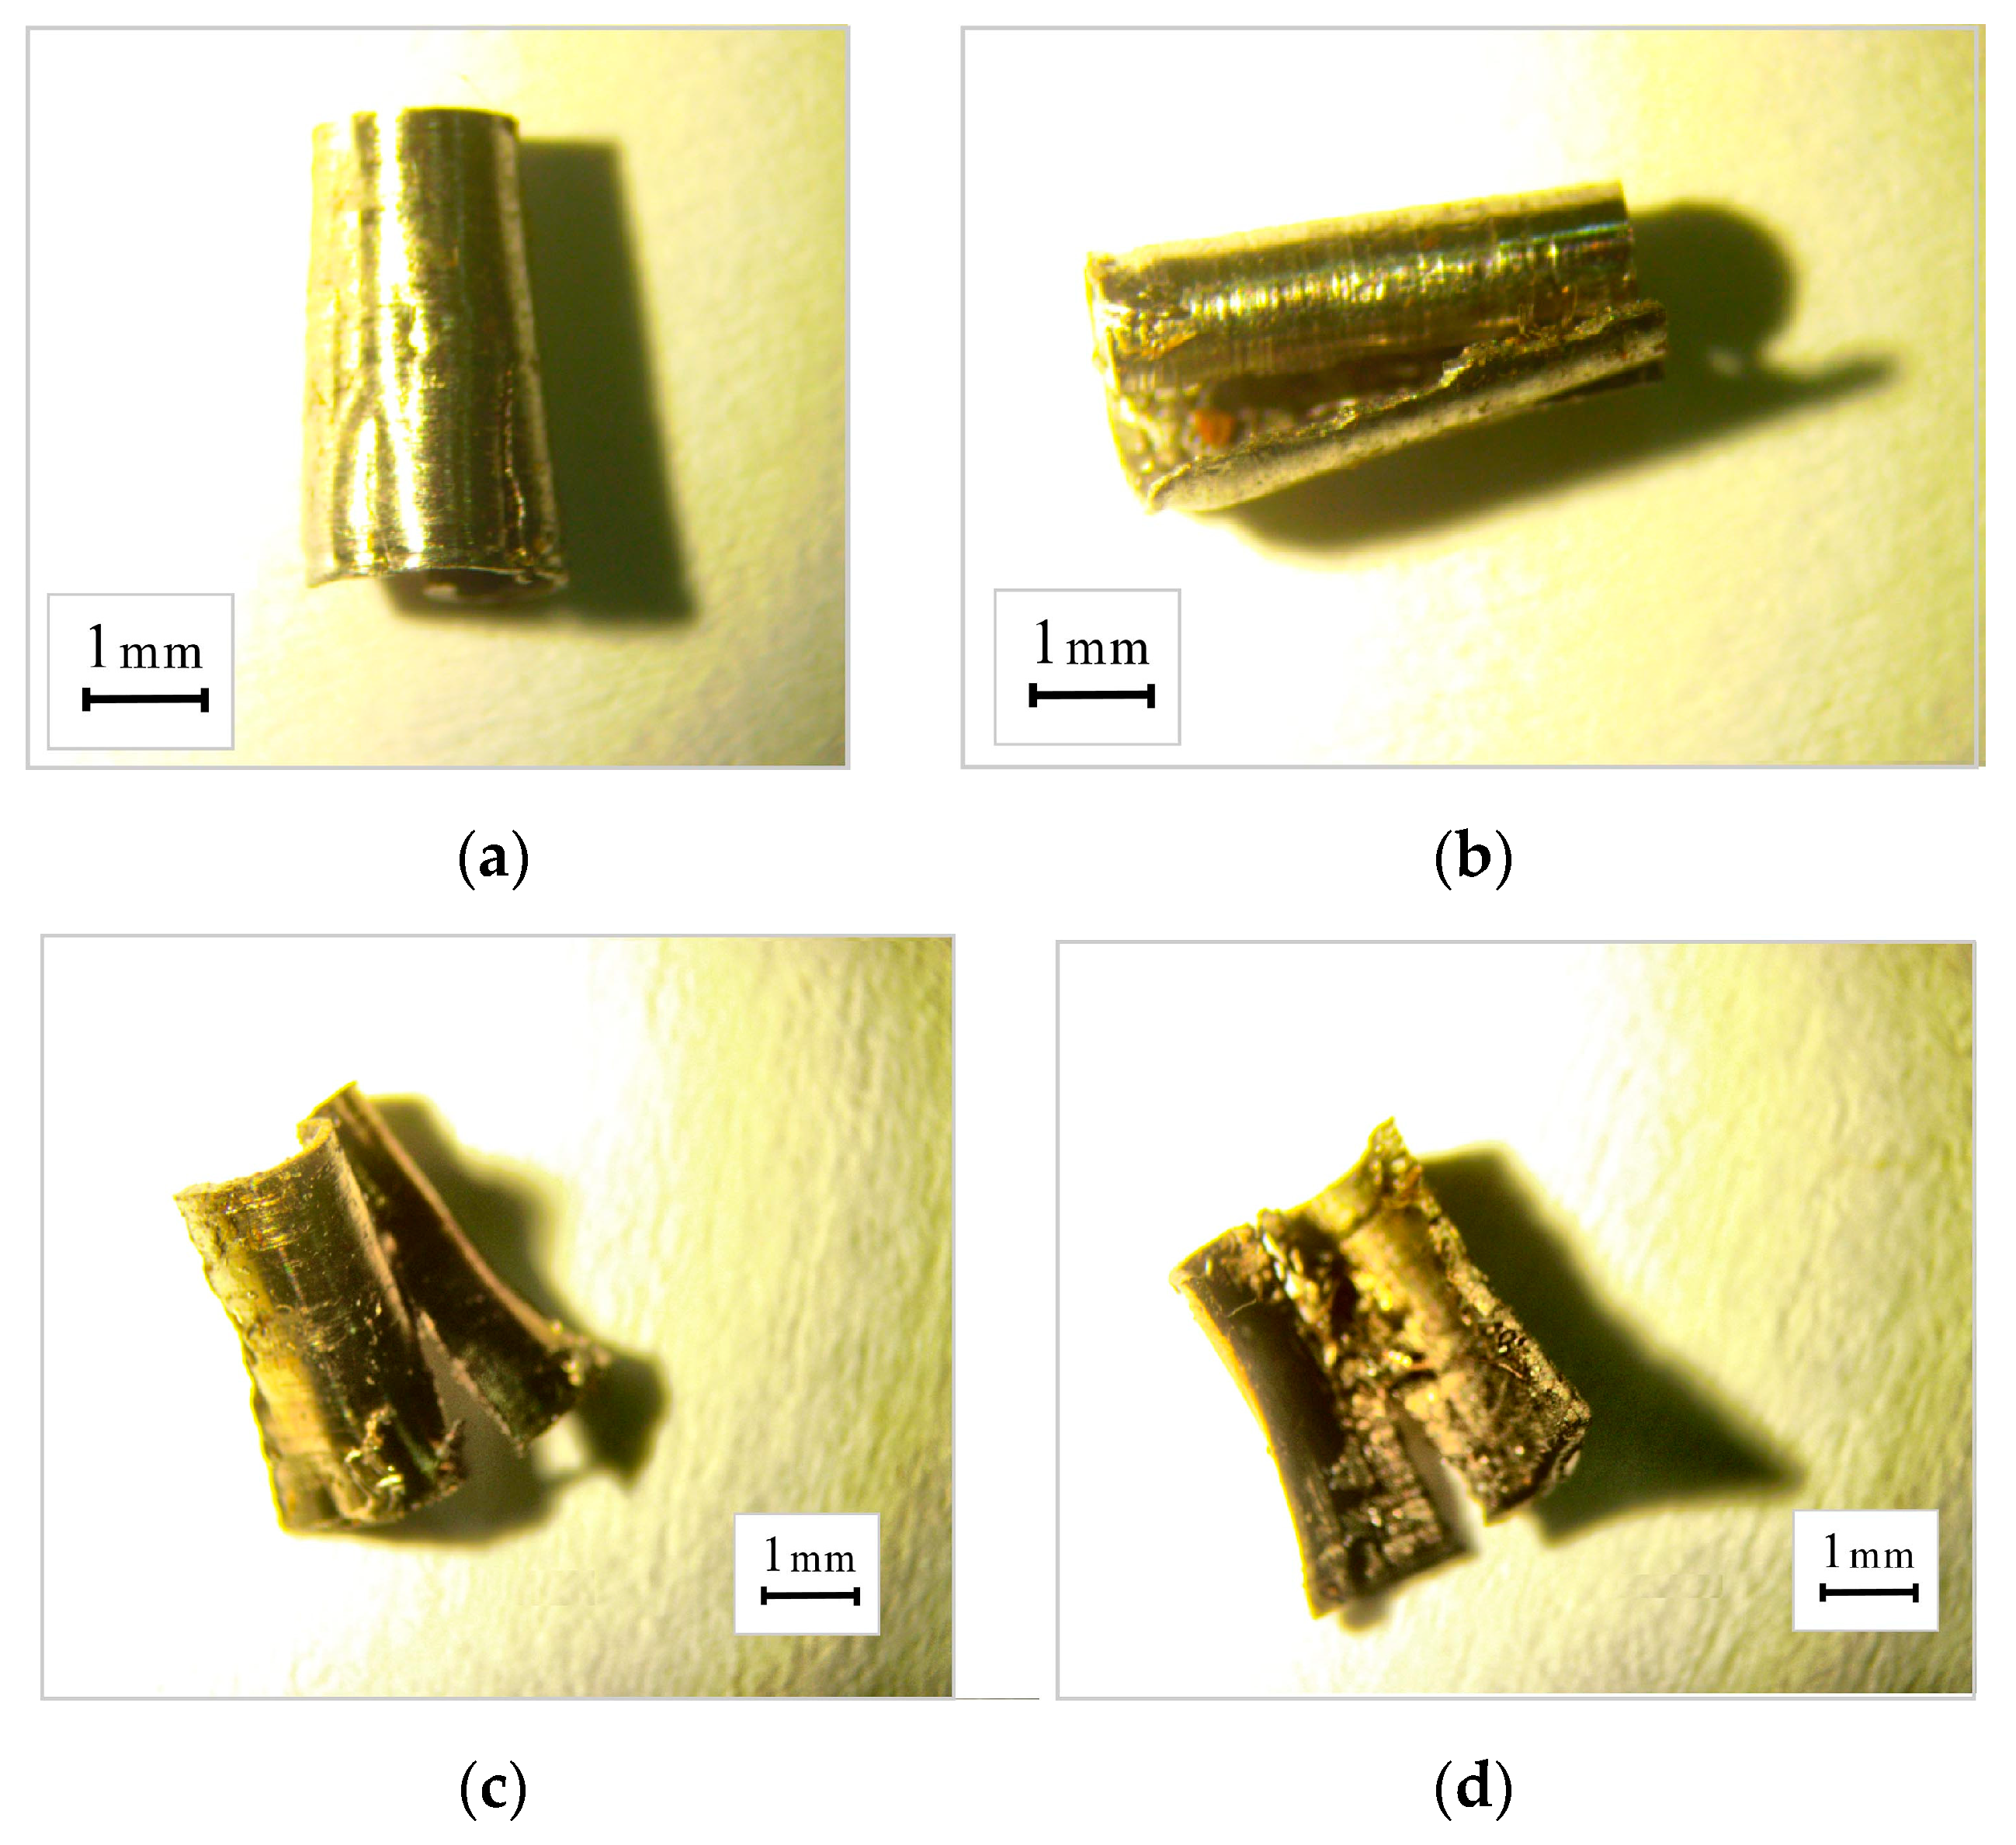
During the long-term operation of the turbine unit, repair and maintenance work is carried out, including screening analyzes. When turning surfaces that have not been subjected to degradation processes using LCL, the chips have a compact appearance (Figure 10a,b); the chips obtained by turning a witness sample whose microstructure is considered to be in the conditionally initial state have the same appearance [109]. For the surface of the TA shaft, the degradation processes of the chips the nature of the microrelief with the presence of cracks can be repaired (Figure 10c,e), as well as the visible nature of the surface on the inner side (Figure 10e). For shavings that were torn during the hour of processing of degraded wood, there are more tears in the microrelief, as well as the presence of deformation cracks on the outer side (Figure 10e) and the textured inner side on the same (Figure 10d).
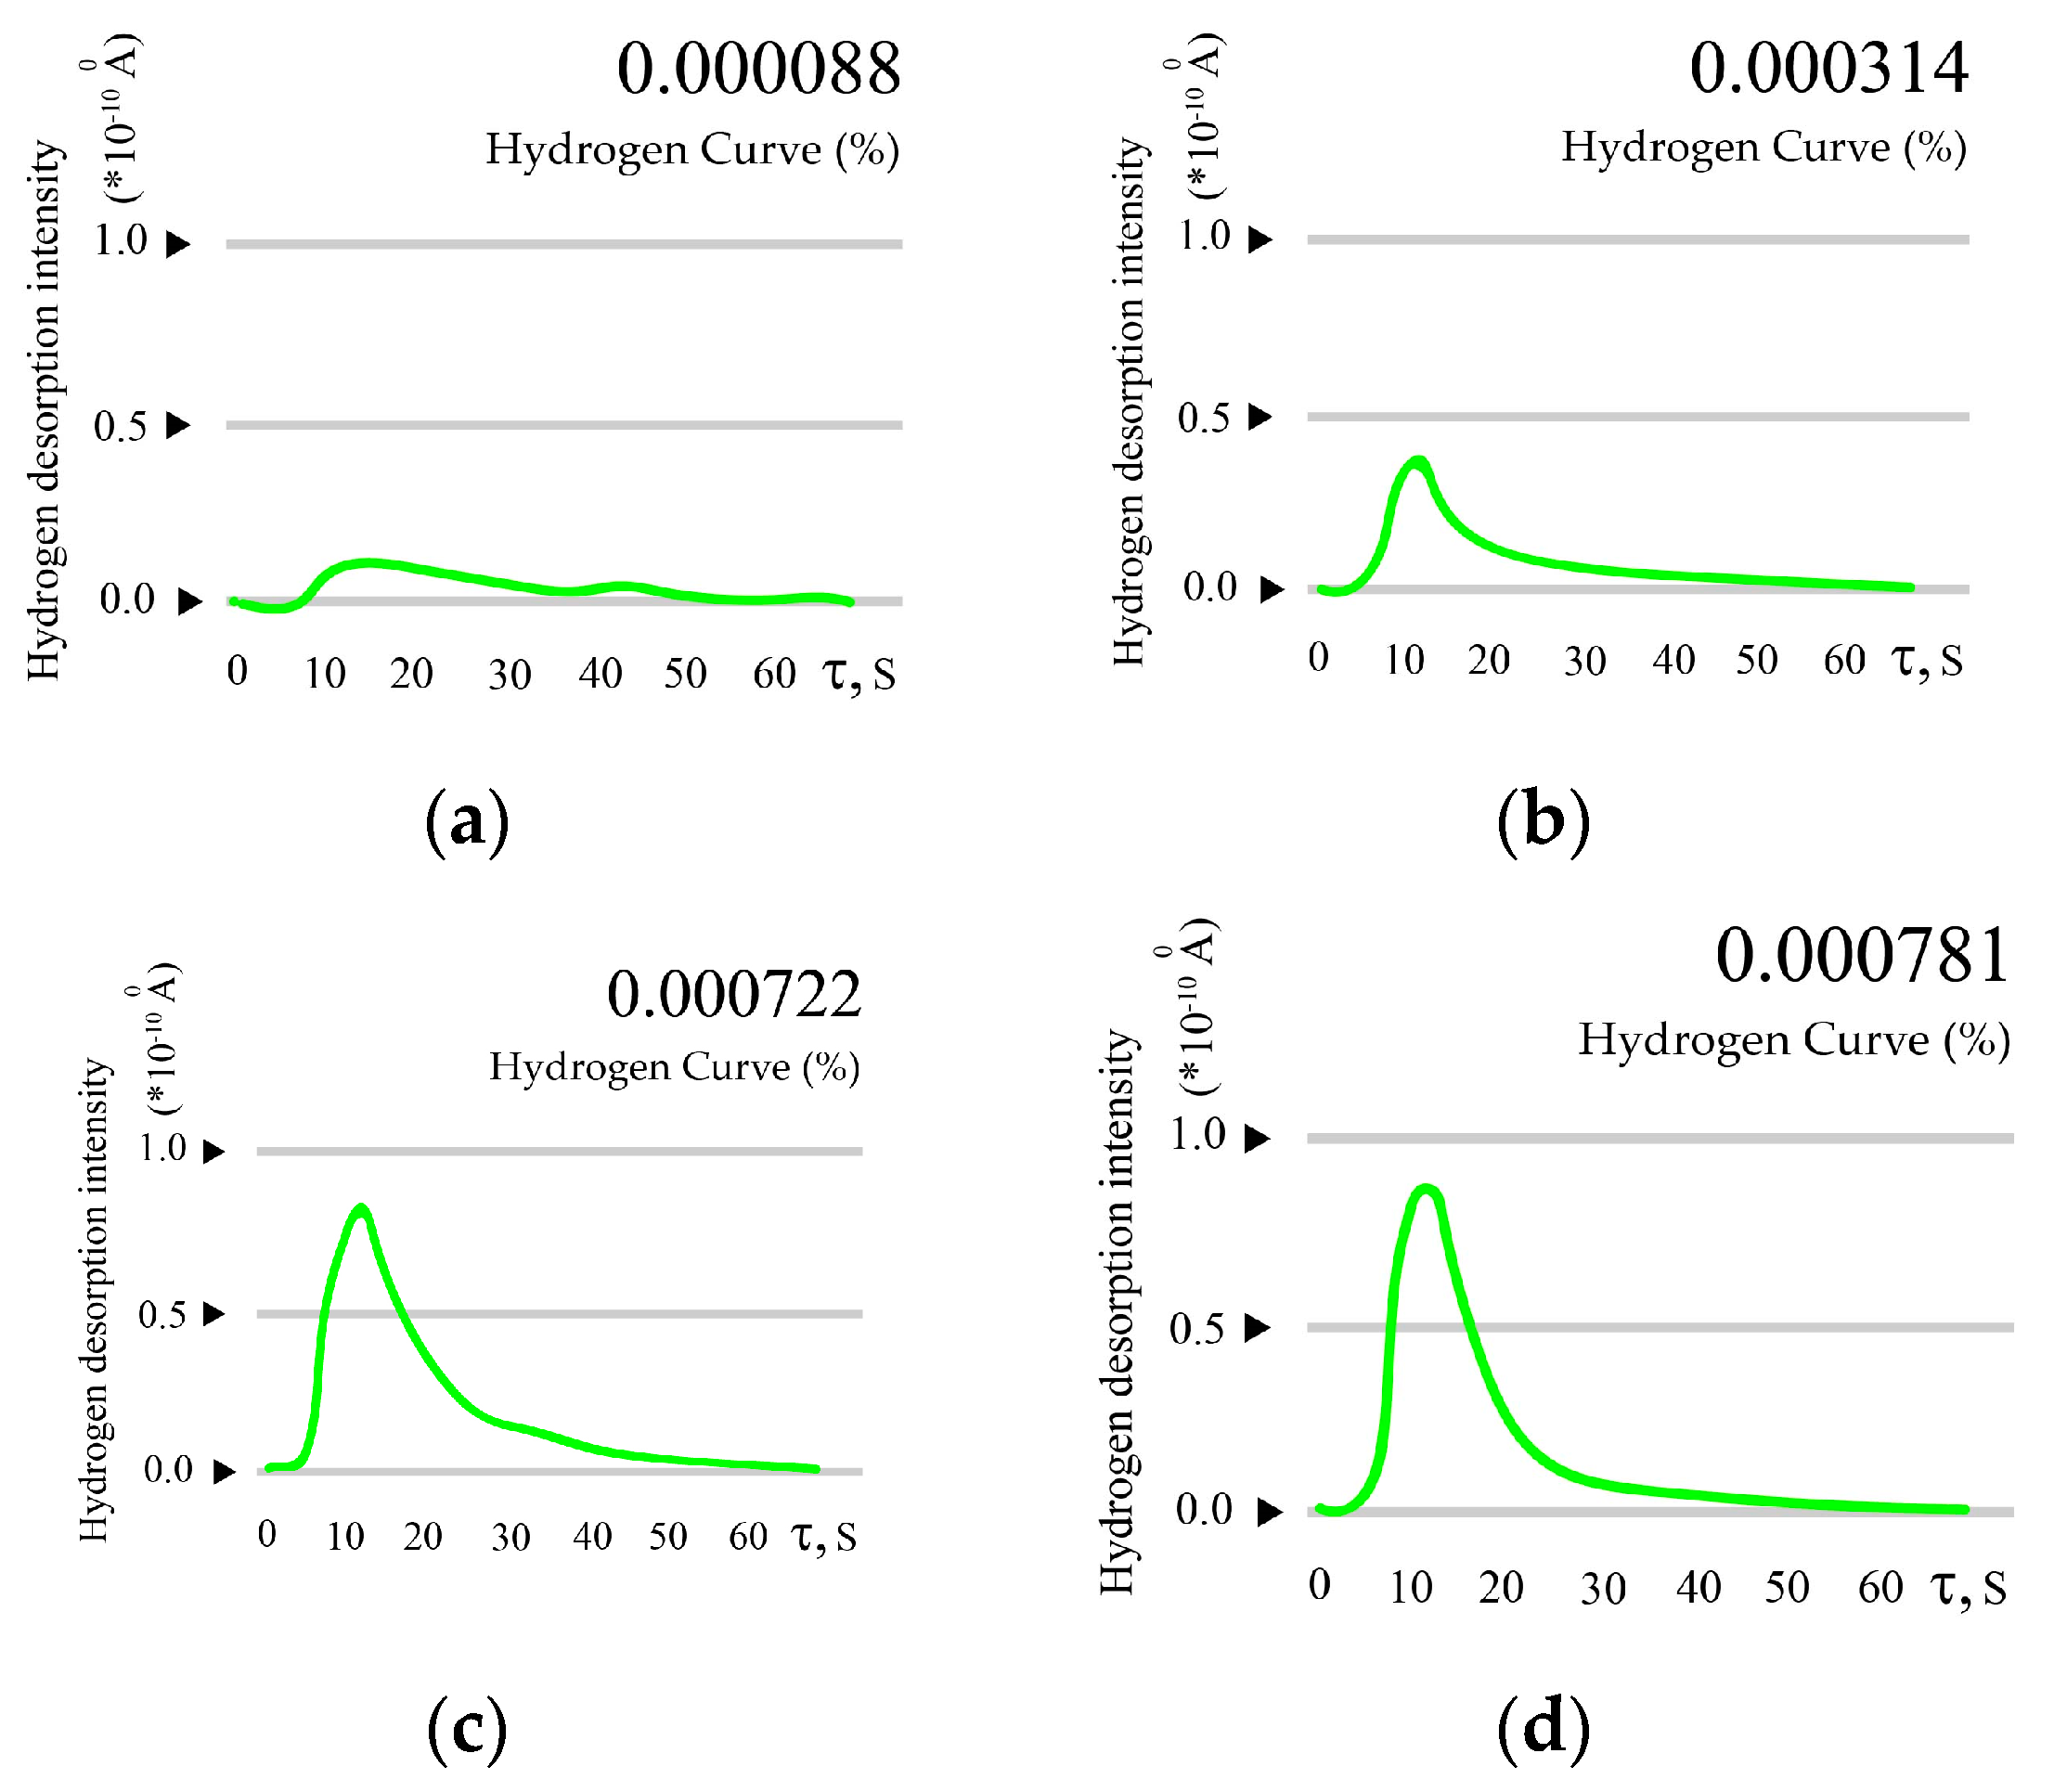
During operation, the rotor shaft is saturated with hydrogen, which significantly affects the fracture processes during cutting. The experimentally determined values of the hydrogen concentration in the chips show that, after the use of water and coolant, the hydrogen concentration in the chips increases (Figure 11 and Table 1).
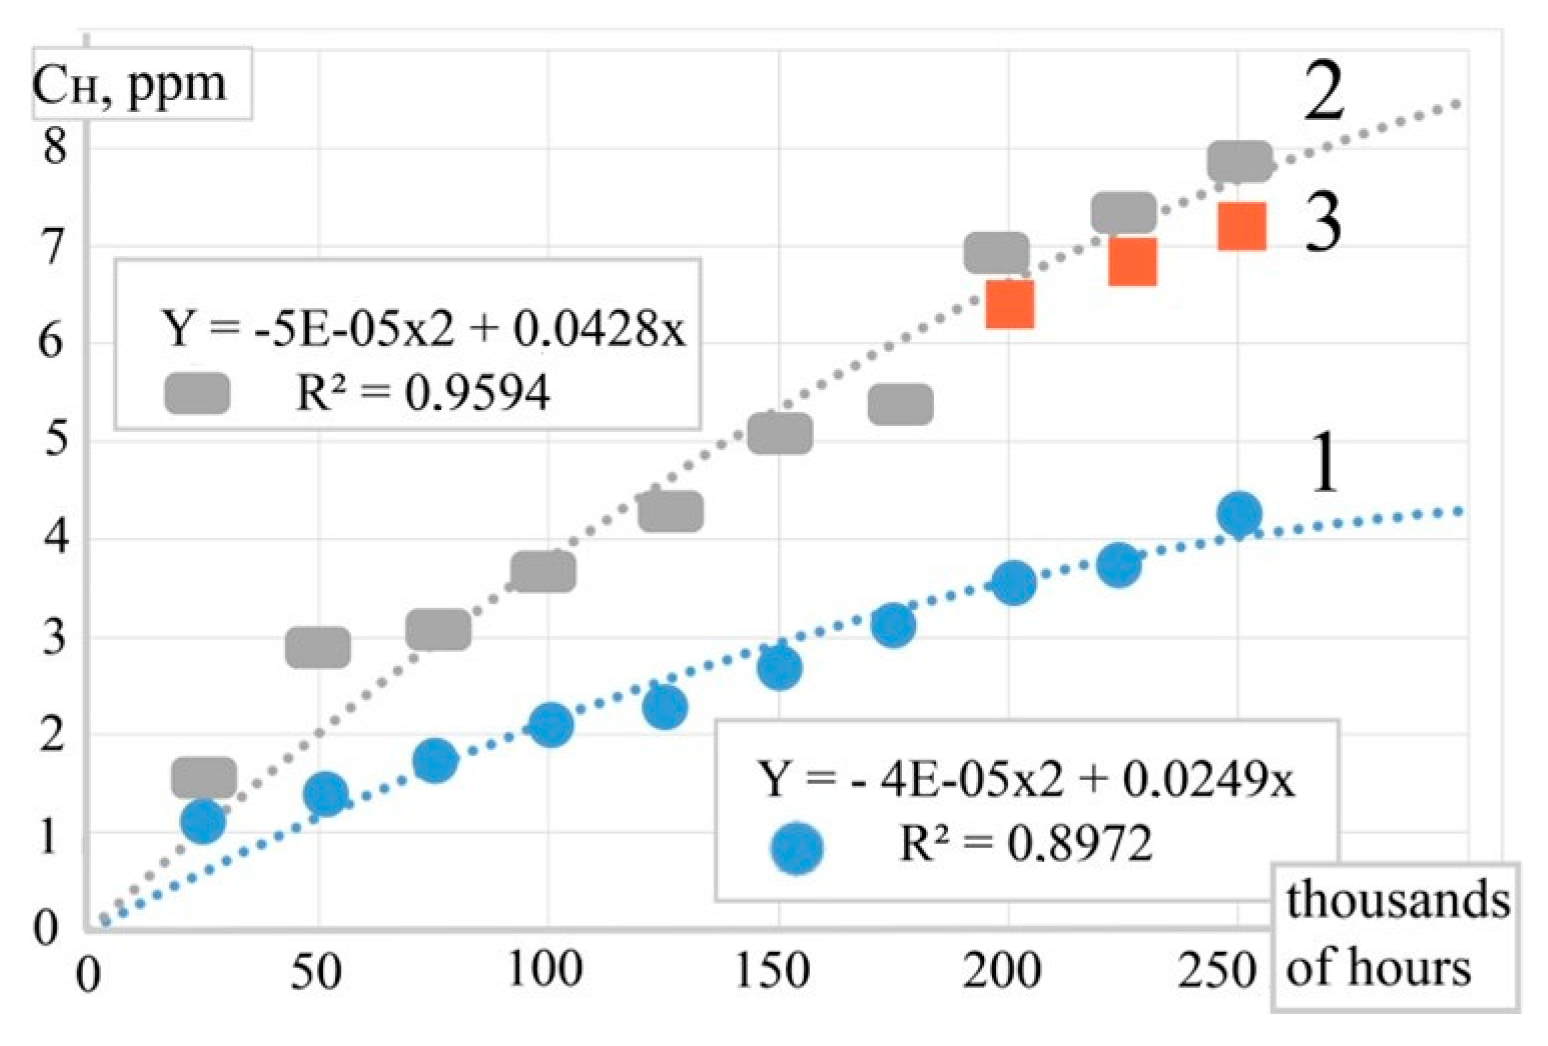
It should be noted that the concentration of hydrogen in the chips formed during cutting with LCLo is higher (Figure 12, curve 2) than that in the chips with LCLs, and, in general, it is higher than that for conventional samples taken during the operation of the rotor shaft (Figure 12, curve 1).
The use of LCL results in a microrelief that has a lower roughness compared to dry cutting [1,10,11]. The use of LCL facilitates the processing of steel, among other things, due to the action of hydrogen, which facilitates machining (Figure 13a) [114]. The degradation of the rotor shaft contributes to its saturation with hydrogen and changes the properties of the surface and subsurface layers, generally leading to the embrittlement of some areas of the rotor shaft (Figure 13b). Developed methods make it possible to more carefully approach the determination of the locations of the rotor shaft, which has degraded sections. Timely diagnostics will save money on repairs and prevent catastrophic rotor shaft damage. Fixation of the hydrogen content in the chips allows to determine its amount in the surface and subsurface layers of the robot shaft. The modern paradigm [4] claims that a critical concentration of hydrogen can lead to catastrophic destruction of the object of operation. Also, this technique can prevent the performance an expensive technological operation like dismantling the rotor shaft and carrying out repair work related to the performance of mechanical turning directly on the rotor shaft. A detailed and painstaking study of the fractographic signs of damage to the chip material during the accumulation of a volume of data, together with the development of the use of computer vision techniques, makes it possible to more accurately diagnose the flow and development of damage.
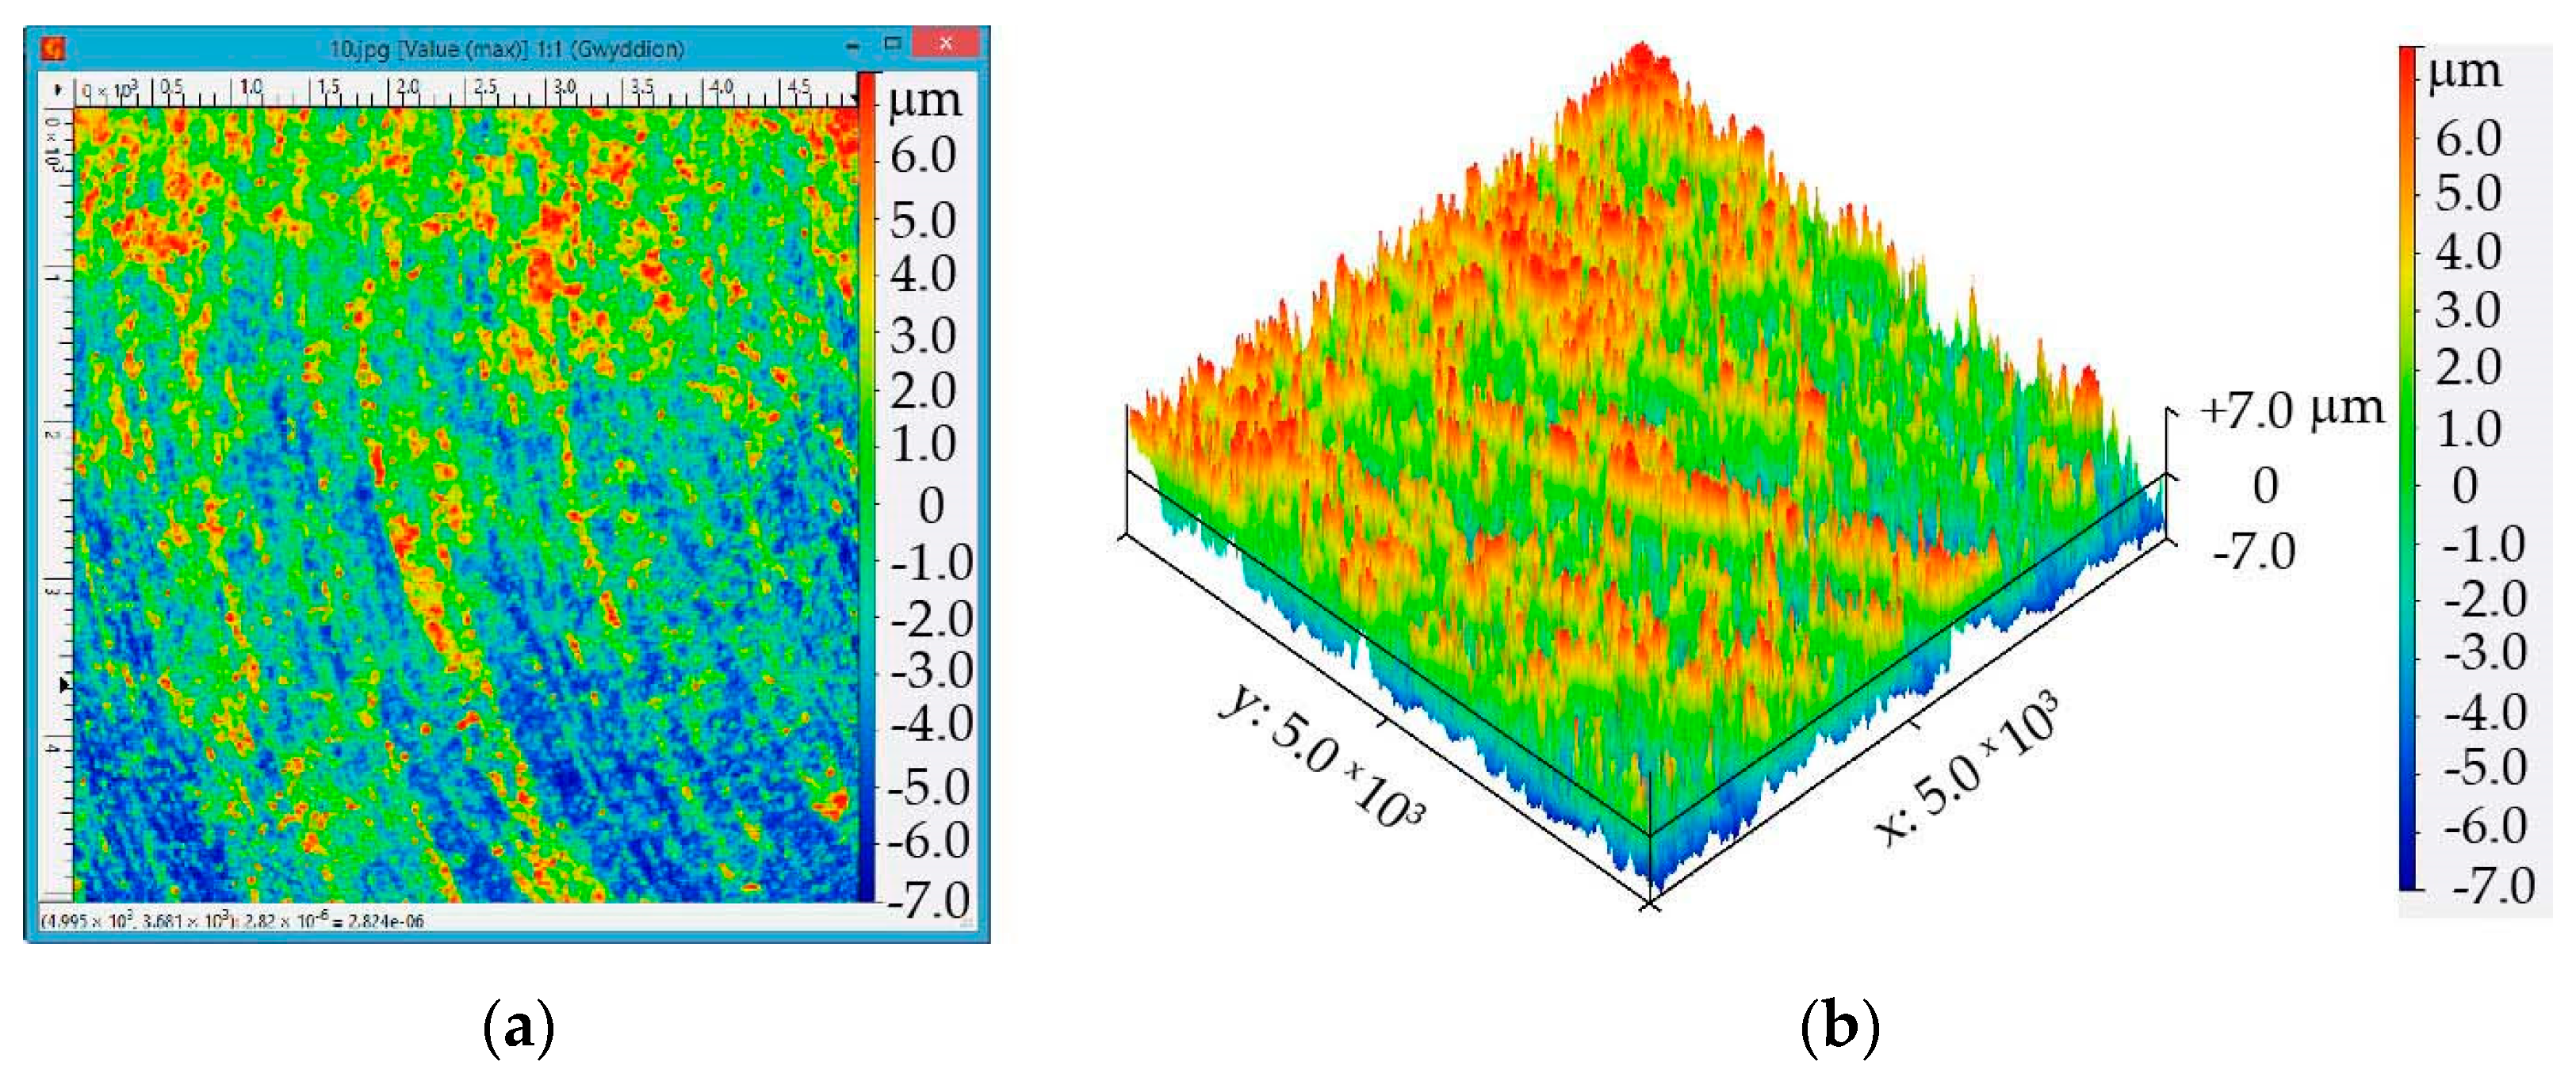
The roughness of the machined surface of the sample cut from the rotor shaft was measured using a profilometer. For the area that did not undergo degradation processes and was treated with LCLs, the surface roughness (Rz) was in the range of 4–8 μm (Figure 14). The number of peaks with the highest height of 5–7 μm is concentrated in the upper part of the visualized surface. The lower part contains depressions from 1 to 5 μm which occupy approximately 60 percent of the observed surface.
For the area that underwent intensive degradation processes and was treated with LCLs, the surface roughness (Rz) was in the range of 20-to-40 microns (Figure 15). In the central part, there is a depression with a depth of 20…30 μm. To the left of it are peaks with a height of 20…30 μm. On the bottom right, we can see multiple inclusions, and these inclusions are obviously also the result of selective degradation in the form of honeycombs.
A comparison of the appearance of the surface that was not subjected to intensive degradation processes and the surface where the degradation processes were intensified shows their significant difference: the influence of hydrogen-containing media contributes to the creation of conditions for the “rupture” of the material during machining.
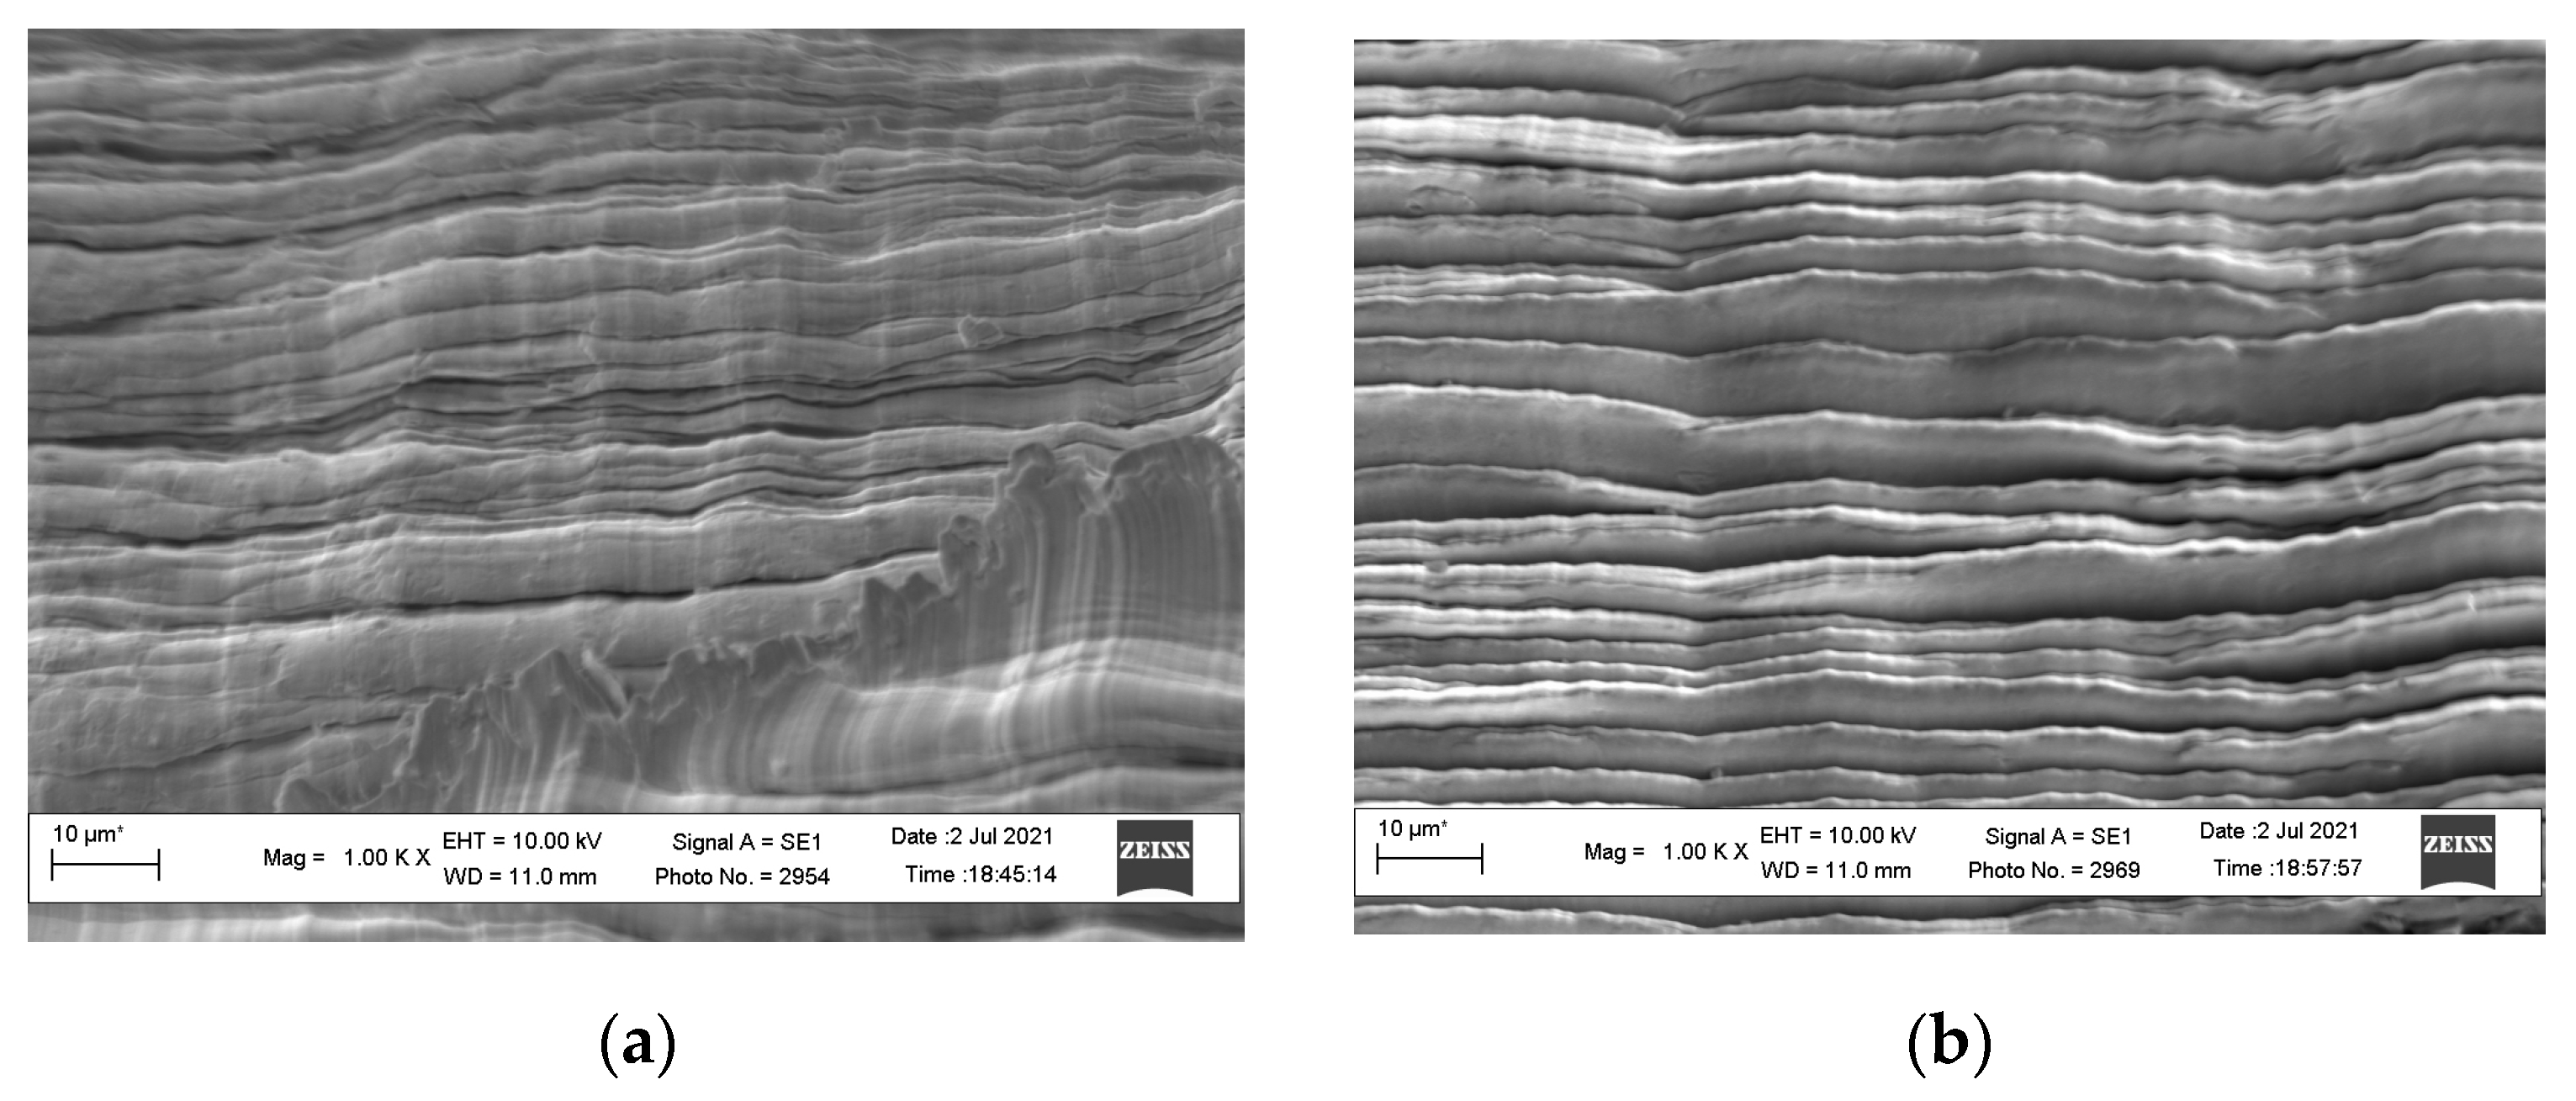
Comparing the surfaces of chips from an unhydrated 38KhN3MFA steel sample (Figure 16a) and a hydrated one (Figure 16b), it is clear that the hydrated one has significantly more striations (which are deeper, and the material itself is more textured), which were formed during the chip formation process, and this is one of the proofs that the hydrated material undergoes greater deformation and has a greater potential for fracture under the influence of hydrogen.
A comparison of the cutting surfaces of 38KhN3MFA steel samples after machining with LCLs shows that it has a smoother microrelief (Figure 17a) than the flooded sample (Figure 17b). The latter shows damage containing depressions in the central part of the image. But, in the lower part, we see a flat, smooth area, which is probably also a confirmation of the possibility of obtaining a smooth microrelief for flooded samples. That is, hydrogen contributed to the smooth surface.
In the turning zone, there are conditions (temperature, high pressures, catalytic effect of juvenile metal surfaces, etc.) under which a chemical interaction between environmental molecules and the metal being processed is possible. Due to the thermomechanical destruction of organic hydrogen-containing compounds of the coolant, active fatty acid radicals, hydrocarbon radicals, and atomic hydrogen are formed during the treatment process [114].
Hydrogen localizes and intensifies plastic deformation processes and facilitates fractures by penetrating the advanced microcracks that have formed. Active radicals interact with the juvenile surface, workpiece, and tool through chemisorption, reducing energy consumption during turning [114].
Chips that experienced a complex impact from hydrogen-containing process media (removed after repair work from degraded areas of turbine generator rotors) were more “textured” than chips that were flooded in laboratory conditions.
In the growing Industry 4.0 market, there is an urgent need to implement automatic control methods in the processes of machining materials. One of the indicators of the quality of technological processes can be chip control using machine and computer vision methods.
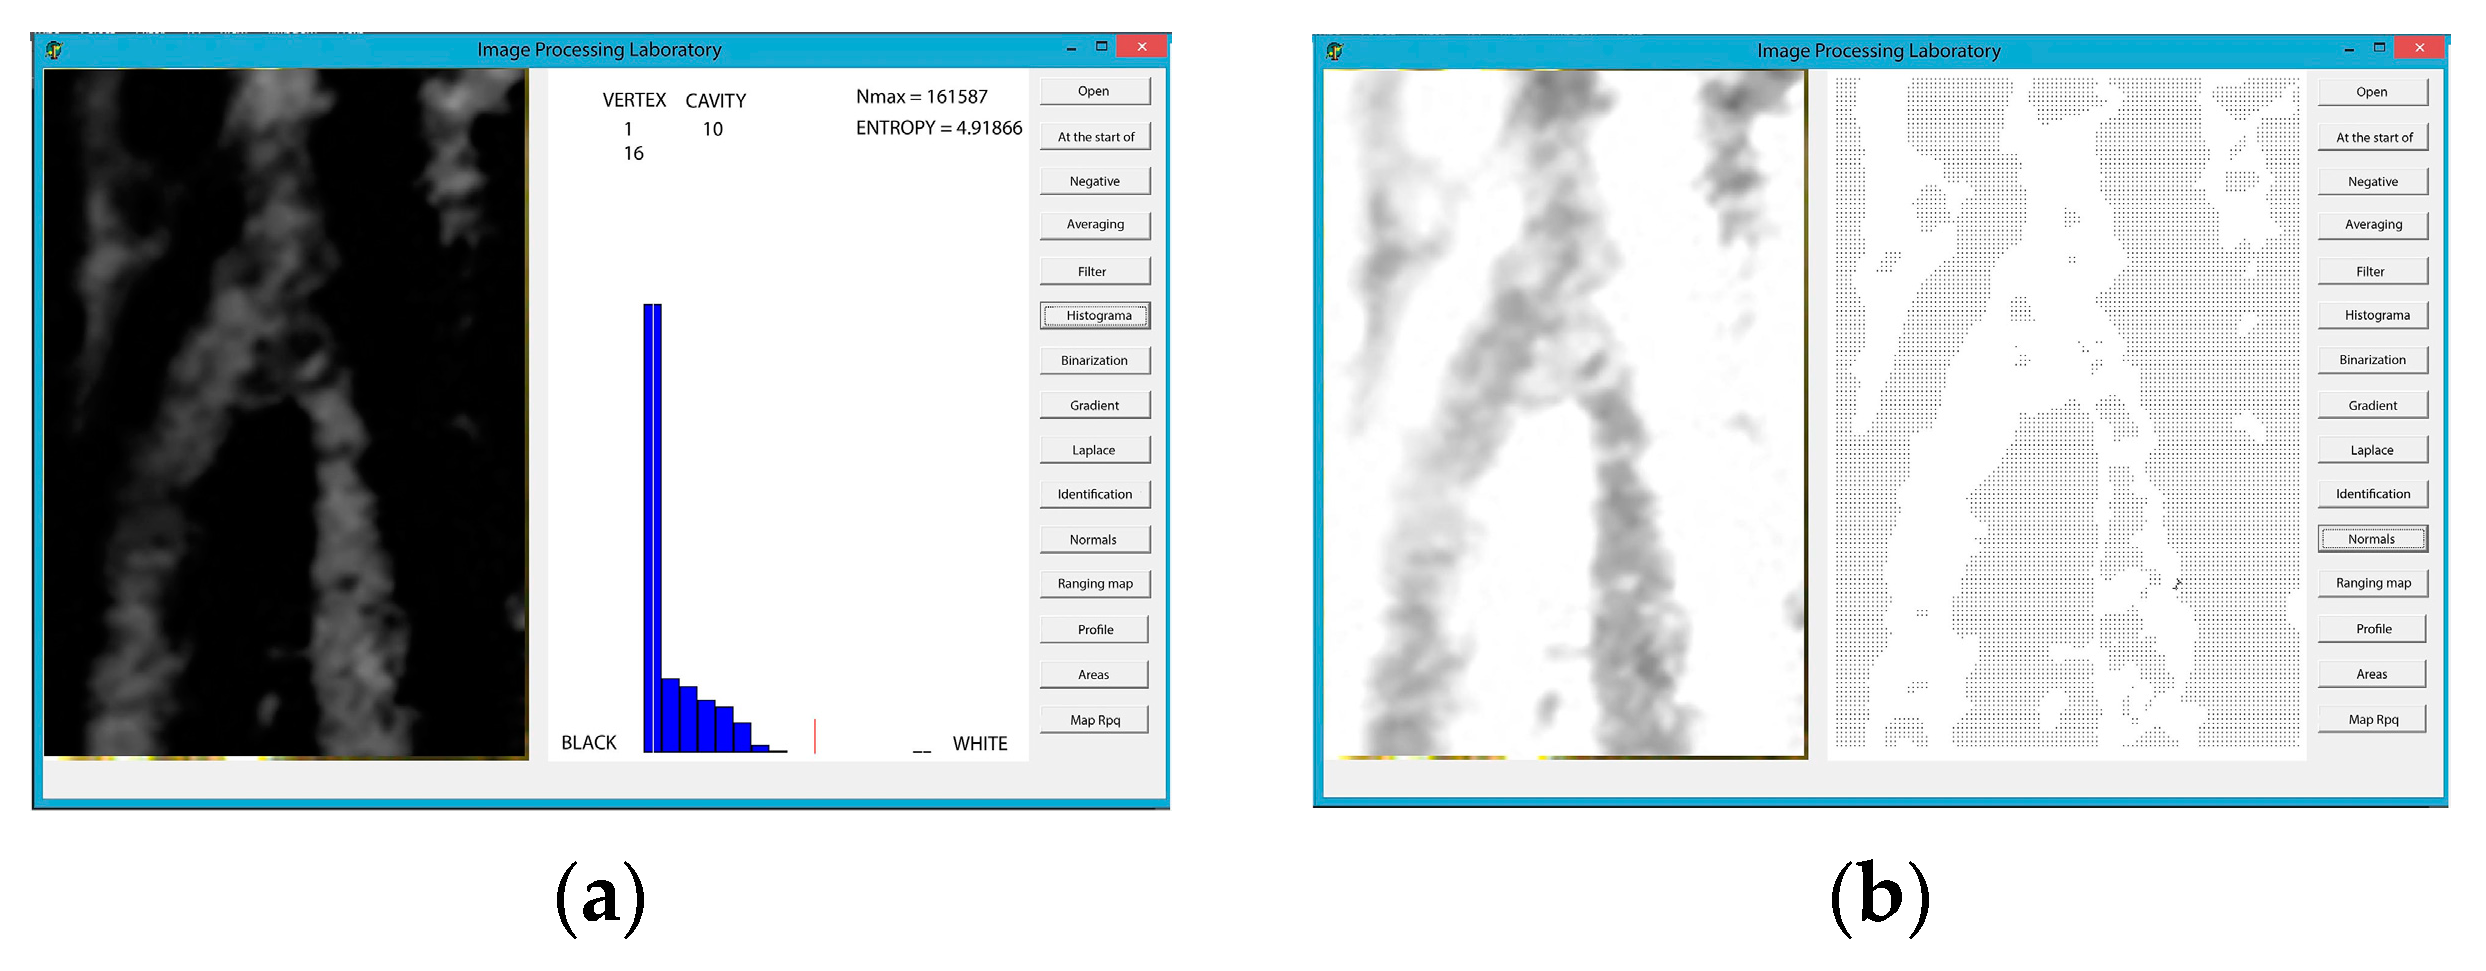
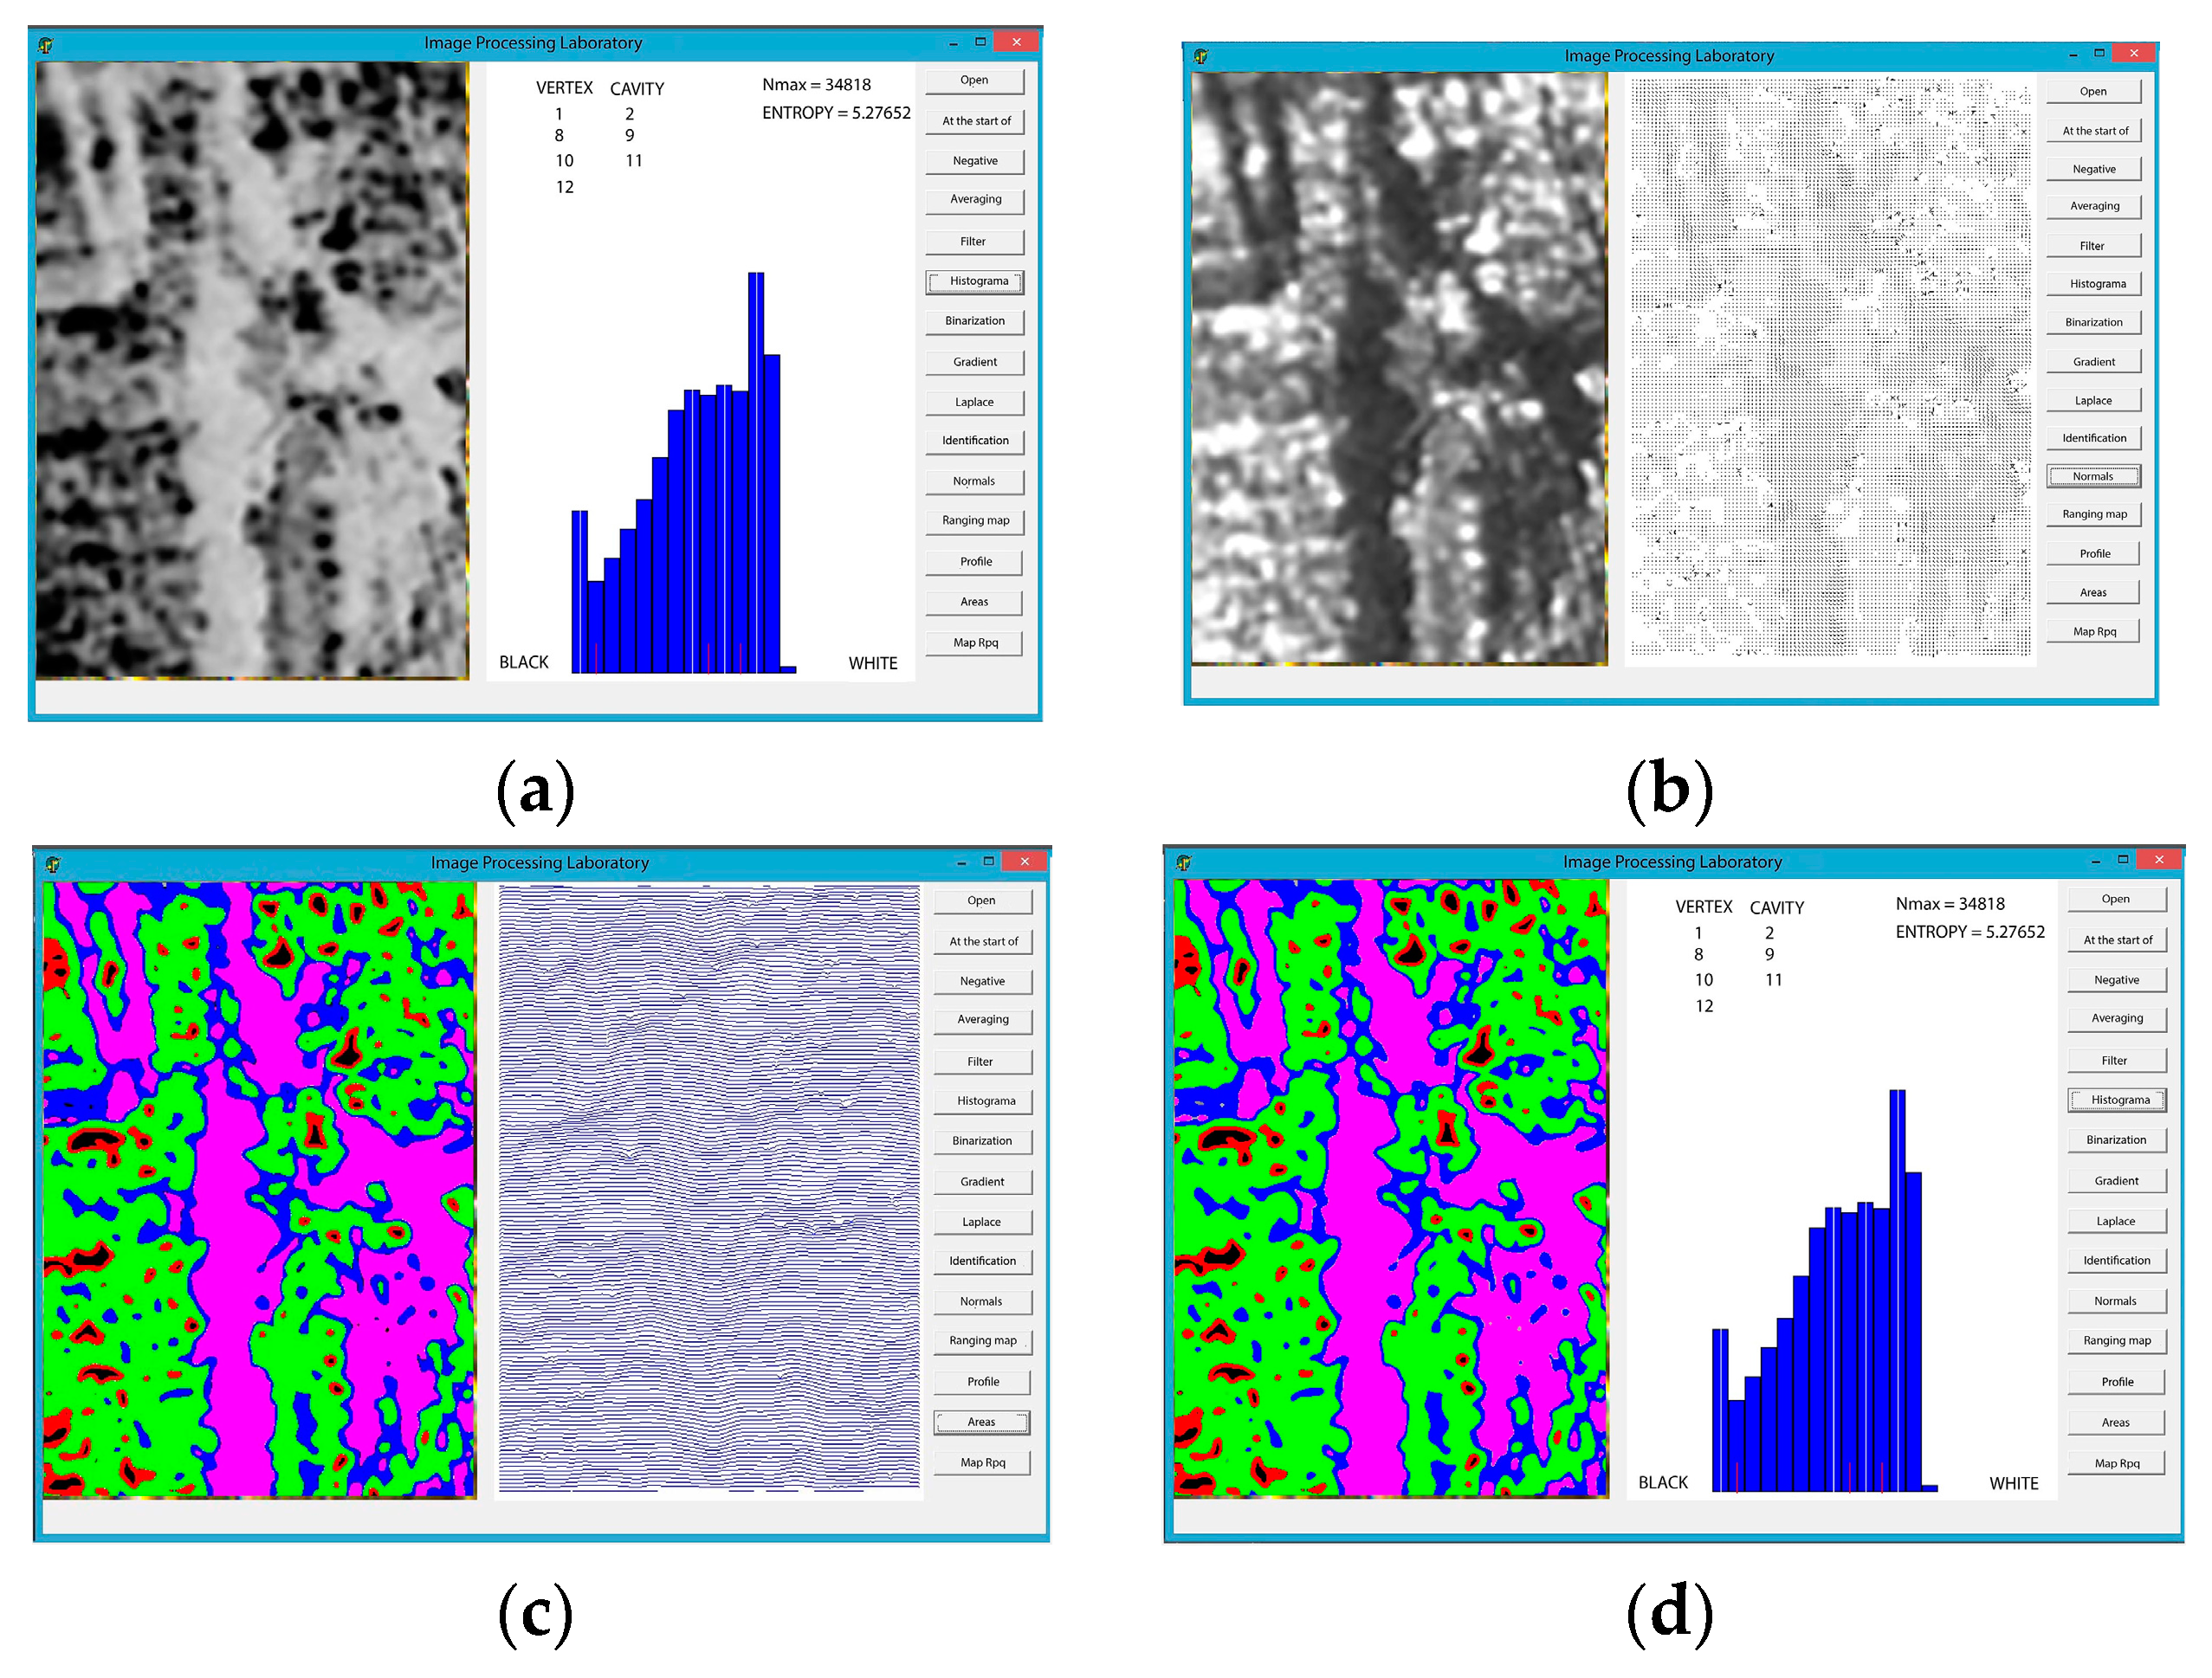
The computer program [122] was used to determine the differences in the damageability of the chip surface. We compared chips obtained from a non-degraded surface (Figure 18a) and chips containing a much larger number of cracks and damage from a degraded area (Figure 18b), using the following algorithm. In the original image (Figure 18), the area corresponding to the object under investigation was highlighted. Both the high reflectivity of the chips compared to the background and the thresholding methods were used. Then, the needle diagram of the object was calculated, based on which the range map was calculated. The range map is presented in such a way that the lighter the pixel in the image, the closer the object’s surface is to the observer at that location. The range map contains information about the surface shape of the chip particle, which, in this system, is the output [122].
The computer program also allows for other stages of image processing: creating a negative image, averaging data, filtering, obtaining a binary image, building a brightness histogram, applying the Laplacian operator, identifying, building an Rpq map, etc.
For example, here are print screens of the program’s dialog boxes that show some intermediate stages of image processing (Figure 19 and Figure 20). Also, the following parameters are defined (shown in the figure next to the histograms of Figure 19a,d and Figure 20a,d): (1) vertex, (2) cavity, (3) Nmax, and (4) entropy. The dialog box also shows histograms that show the number of black and white pixels that the program calculates when calculating the gradient for each pixel of the input image.
In computer vision, the term “vertex” is used to refer to vertices (points) in three-dimensional space. Vertices define the shape of an object and are used in computer graphics algorithms to construct the surface of an object from lines and triangles.
Each vertex has its own coordinates in three-dimensional space and can have other parameters, such as normals (vectors that show the direction of the surface at each point), texture coordinates (indicating which parts of the texture are displayed at that vertex), and other attributes. Vertices are used to build meshes (or grids) of three-dimensional objects, which consist of surfaces that are connected by vertex junctions.
The term “cavity” is used to refer to a cavity or area in a three-dimensional object. It can be a cavity in the middle of an object or a hole on its surface. To detect a cavity, segmentation and object analysis algorithms are used. In this case, the image object is divided into separate parts, and then their shape, size, brightness, and other characteristics are analyzed to identify the cavity. The term “Nmax” in computer vision is used to refer to the largest number of objects that can be recognized or identified in an image. Typically, the term “Nmax” is used in the context of analyzing objects in an image, for example, when you need to determine the number of objects in a photo or detect all the cliques in a microscope image. In this case, the Nmax is equal to the maximum number of objects that can be detected in the image. To determine the Nmax, segmentation algorithms are used to help distinguish objects from each other. Then, object analysis is applied to determine the number of objects in the image.
The term “entropy” is used to measure the uncertainty of data in an image. In many cases, entropy is used to assess the complexity of an image; thus, more complex images have higher entropy. The simplest images that consist of a few identical regions will have low entropy. Other examples of how entropy is used in computer vision include data compression and object recognition. In data compression, entropy is used to reduce the size of an image while maintaining image quality. In object recognition, entropy can be used to highlight areas of an image that contain important information about objects.
Information on the values of the parameters after reading the range map is given in Table 2. Comparing the values allows us to compare the damageability of the objects under study based on the data obtained.
The average values of the parameters obtained via image processing showed that the degraded surface has a much more damaged microrelief than the non-hydrogenated chip sample. The entropy value for the degraded sample was two times higher than that for the undegraded sample.
It is worth noting that, although the appearance of the chips can provide valuable information about the material, it should not be relied upon as the sole means of determining the condition of the material and its service life. Other factors, such as material composition, processing history, and service conditions, can also play a significant role in determining the performance and life of a material.
The data presented in this article allow for a more comprehensive assessment of the microstructure of fracture surfaces and chips and for monitoring the performance and durability of rotor shafts. These data can be processed faster with the help of big data, computer vision systems, neural networks, artificial intelligence, and 5G and 6G communication systems. Such a comprehensive combination, including wear (lubrication, fatigue, and flooding), is especially relevant in connection with the development and implementation of the ideology of such technological trends as Industry 4.0 and Industry 5.0.

5. Conclusions

  • A decrease in the hardness of the 38KhN3MFA rotor steel surface after long-term operation was shown. It was found that, after its operation up to 250 thousand hours, bainite decomposition occurs, and the hardness decreases by 15%. Thus, the hardness of the steel in the initial state is 290 HB (cementite—80…87%), and after 250 thousand hours of operation, it decreases to 250 HB (cementite component—up to 62%; ferrite grains are detected).
  • The intensification of the diffusion processes increases the concentration of carbide-forming elements: both in carbides and near grain boundaries. An increase in the content of alloying elements in carbides was recorded: Cr and V—by 1.15–1.6 times; Mo—by 2.2–2.8 times after 250 thousand hours of operation.
  • The analysis of the rotor shaft surface microstructures showed that such shaft microstructures in the initial state are fine-grained and bainitic. For the operated state, in the presence of the greatest mechanical and thermal impacts, the release of finely dispersed carbides along the grain boundaries is observed, as well as a certain orientation of pearlite due to deformation.
  • A life cycle diagram of the rotor shaft of a turbine unit was developed. According to this scheme, in the course of long-term operation, due to the complex action of factors, there is a need for repair work, including machining, and in the most extreme case, the rotor shaft may fail.
  • A scheme of the microstructure “evolution” for 38KhN3MFA steel, from which the rotor shaft is made, was proposed. It shows that there is a migration of complex carbides and VC carbides from the central part of the grain to the periphery and grain boundaries; the amount of pearlite phase decreases, and the ferrite phase increases. Along the boundaries of ferrite grains and on the periphery of pearlite colonies, coagulated carbides are recorded, which have a slightly deformed, elongated appearance. In some areas of the rotor shaft, the boundaries of pearlite colonies were blurred.
  • The concentration of hydrogen in the chips formed during the use of LCL based on sunflower oil LCLs is 7.22 ppm, and on the basis of petroleum oil LCLo—7.81 ppm. Thus, the use of LCLs reduces the amount of hydrogen that is concentrated in the surface layer of the rotor shaft and participates in destructive processes during machining.
  • The surface profiles (2D and 3D reconstruction) after machining of the studied samples made from 38KhN3MFA steel (cut from the rotor shaft surface) were compared: those that did not undergo intensive degradation processes and those that underwent intensive degradation. For the undegraded surface, the roughness (Rz) is in the range of 4-to-8 microns. And for a surface that has undergone intensive degradation, it is 20…40 microns. The analysis of the cutting surface confirms the fact of the brittle nature of fracture during degradation processes.
  • The developed program was used to compare the chips corresponding to the undegraded state and the chips obtained from the degraded section of the rotor shaft. This makes it possible to identify damaged areas of the rotor shaft online. The fixation on an increased number of cracks and other microrelief indicates the occurrence of intensive degradation processes and is a signal for rotor repair work. The use of machine and computer vision methods is an integral trend that will be used in the Industry 4.0 and Industry 5.0 paradigms.

Author Contributions

The scope of work of individual authors during the performance of this project was the same. The authors performed the study together and then analyzed its findings. They wrote the paper together. The authors equally contributed to the paper assembly. Partially: conceptualization, A.I.B., M.R.H. and L.M.I.; data curation, A.I.B., A.M.S., M.R.H.,V.O.B. and V.O.K.; formal analysis, A.I.B., A.M.S., L.M.I., M.R.H., V.O.B. and V.O.K.; investigation, L.M.I., V.O.K., M.R.H. and V.O.B.; methodology, A.I.B., M.R.H., V.O.K. and L.M.I.; writing—original draft, A.I.B.; writing—review and editing, A.I.B. and L.M.I.; software, V.O.K.; validation, A.I.B., M.R.H. and L.M.I.; resources, L.M.I., A.I.B., A.M.S., V.O.B. and V.O.K.; visualization, V.O.K.; supervision, A.I.B.; project administration, A.I.B.; validation, A.I.B.; writing—original draft; funding acquisition, A.I.B. All authors have read and agreed to the published version of the manuscript.

Funding

This research received no external funding for the full project.

Data Availability Statement

Data are contained within the article.

Acknowledgments

The authors acknowledge the Polish National Agency for Academic Exchange (NAWA) and Ministry of Education and Science of Ukraine for partial support in the framework of project BPN/BUA/2021/1/00003/U/00001 (Contract M/34-2023), “Evaluation of the long-term new materials durability for structural elements of ‘green’ hydrogen production and transportation infrastructure”.

Conflicts of Interest

The authors declare no personal circumstance or interest that may be perceived as inappropriately influencing the representation or interpretation of reported research results.

Nomenclature and Abbreviations

LCLlubricating cooling liquids
LCLolubricating cooling liquids based on petroleum oil
LCLslubricating cooling liquids based on sunflower oil
LCLrlubricating cooling liquids based on rapeseed oil
CHhydrogen concentration
ppmparts per millions
TAturbo aggregate (turbine + turbogenerator)
HCTGhydrogen-cooled turbogenerator

References

  1. Balitski, A.; Krohmalny, O.; Ripey, I. Hydrogen cooling of turbogenerators and the problem of rotor retaining ring materials degradation. Int. J. Hydrogen Energy 2000, 25, 167–171. [Google Scholar] [CrossRef]
  2. Balitskii, A.I.; Havrilyuk, M.R.; Balitska, V.O.; Kolesnikov, V.O.; Ivaskevych, L.M. Increasing turbine hall safety by using fire-resistant, hydrogen-containing lubricant cooling liquid for rotor steel mechanical treatment. Energies 2023, 16, 535. [Google Scholar] [CrossRef]
  3. Liu, J.; Li, Y. Influence of 12Cr1MoV Material on tissue properties at high temperature and long operating time. Processes 2022, 10, 192. [Google Scholar] [CrossRef]
  4. Dmytrakh, I.M.; Syrotyuk, A.M.; Leshchak, R.L. Specific features of the deformation and fracture of low-alloy steels in hydrogen-containing media: Influence of hydrogen concentration in the metal. Mater. Sci. 2018, 54, 295–308. [Google Scholar] [CrossRef]
  5. Nykyforchyn, H.M.; Student, O.Z.; Krechkovs’ka, H.V.; Markov, A.D. Evaluation of the influence of shutdowns of a technological process on changes in the in-service state of the metal of main steam pipelines of thermal power plants. Mater. Sci. 2010, 46, 177–189. [Google Scholar] [CrossRef]
  6. Krasowsky, A.Y.; Dolgiy, A.A.; Torop, V.M. Charpy testing to estimate pipeline steel degradation after 30 years of operation. In Proceedings of the Charpy Centary Conference, Poitiers, France, 2–5 October 2001; Volume 1, pp. 489–495. [Google Scholar]
  7. Nagano, S.; Kitajima, T.; Yoshida, K.; Kazao, Y.; Kabata, Y.; Murata, D.; Nagakura, K. Development of world’s largest hydrogen cooled turbine generator. In Proceedings of the IEEE Power Engineering Society Summer Meeting, Chicago, IL, USA, 21–25 July 2002; Volume 2, pp. 657–663. Available online: https://ieeexplore.ieee.org/document/1043376 (accessed on 16 October 2023).
  8. Xu, H.; Huang, X.-K.; Yang, Z.; Pan, J.-T. Property changes of 12Cr1MoV with 10CrMo910 main steam piping after long-term high-temperature service. Eng. Fail. Anal. 2003, 10, 245–250. [Google Scholar] [CrossRef]
  9. Zhuang, K.; Fu, C.; Weng, J.; Cheng, H. Cutting edge microgeometries in metal cutting: A review. Int. J. Adv. Manuf. Technol. 2021, 116, 2045–2092. [Google Scholar] [CrossRef]
  10. Balyts’kyi, O.I.; Kolesnikov, V.O.; Havrylyuk, M.R. Influence of lubricating liquid on the formation of the products of cutting of 38KhN3MFA steel. Mater. Sci. 2019, 54, 722–727. [Google Scholar] [CrossRef]
  11. Balyts’kyi, O.I.; Kolesnikov, V.O.; Havrylyuk, M.R. Influence of modification of 38KhN3MFA steel on the structural-phase state and cutting products under variable technological conditions. Mater. Sci. 2020, 55, 915–920. [Google Scholar] [CrossRef]
  12. Balitskii, A.I.; Ivaskevich, L.M.; Balitskii, O.A. Rotor steels crack resistance and fracture behavior for hydrogen targeted materials ever-widening database. Eng. Fract. Mech. 2022, 260, 108168. [Google Scholar] [CrossRef]
  13. Chernousenko, O.; Rindyuk, D.; Peshko, V.; Goryazhenko, V. Development of a technological approach to the control of turbine casings resource for supercritical steam parameters. East. Eur. J. Enterp. Technol. 2018, 2, 51–56. [Google Scholar] [CrossRef]
  14. Chernousenko, O.; Rindyuk, D.; Peshko, V.; Bednarska, I. Effect of start-up operating modes on the cyclic damage of thermal power plant units. In Proceedings of the 2022 IEEE 8th International Conference on Energy Smart Systems (ESS), Kyiv, Ukraine, 7–9 September 2022; pp. 233–238. [Google Scholar] [CrossRef]
  15. Chernousenko, O.; Peshko, V.; Marisyuk, B.; Bovsunovsky, A. Estimation of steam turbine shafts fatigue damage caused by torsional vibrations. In Proceedings of the 8th International Conference on Fracture, Fatigue and Wear (FFW 2020), Virtual, 26–27 August 2020; Springer: Singapore, 2021; pp. 533–541. [Google Scholar] [CrossRef]
  16. Chernousenko, O.; Peshko, V.; Nikulenkova, T.; Rindyuk, D. Extension of the operating time of high-speed turbines of nuclear power plants. In Proceedings of the 2020 IEEE 7th International Conference on Energy Smart Systems (ESS), Kyiv, Ukraine, 2–4 November 2020; pp. 101–104. [Google Scholar] [CrossRef]
  17. Chernousenko, O.; Nikulenkova, T.; Peshko, V.; Nikulenkov, A. Maintaining electricity production through a comprehensive approach to service life extension of steam turbines. In Proceedings of the 2020 IEEE 7th International Conference on Energy Smart Systems (ESS), Kyiv, Ukraine, 2–4 November 2020; pp. 54–57. [Google Scholar] [CrossRef]
  18. Peshko, V.; Chernousenko, O.; Nikulenkova, T.; Nikulenkov, A. Comprehensive rotor service life study for high & intermediate pressure cylinders of high power steam turbines. Propuls. Power Res. 2016, 5, 302–309. [Google Scholar] [CrossRef]
  19. Chernousenko, O.Y.; Ryndiuk, D.V.; Peshko, V.A. The Stress-strain state of the K-1000-60/3000 turbine rotor at typical operating modes. Bull. Natl. Tech. Univ. "KhPI" Ser. Energy Heat Eng. Process. Equip. 2019, 3, 4–10. [Google Scholar] [CrossRef]
  20. Chernousenko, O.; Krylova, I.; Shramko, A.; Borodavka, O.; Kozlov, A. Research on residual service life of automatic locking valve of turbine K-200-130. East. Eur. J. Enterp. Technol. 2017, 5, 39–44. [Google Scholar] [CrossRef]
  21. Tretiak, O.; Kritskiy, D.; Kobzar, I.; Sokolova, V.; Arefieva, M.; Tretiak, I.; Denys, H.; Nazarenko, V. Modeling of the stress–strain of the suspensions of the stators of high-power turbogenerators. Computation 2022, 10, 191. [Google Scholar] [CrossRef]
  22. Tretiak, O.; Kritskiy, D.; Kobzar, I.; Arefieva, M.; Nazarenko, V. The methods of three-dimensional modeling of the hydrogenerator thrust bearing. Computation 2022, 10, 152. [Google Scholar] [CrossRef]
  23. Gakal, P.; Ovsiannykova, O.; Przybysz, J.; Tretiak, O. Analysis of the temperature field of the rotor of 550-MW turbogenerator with direct hydrogen cooling. Prz. Elektrotech. 2017, 93, 43–47. Available online: http://pe.org.pl/articles/2017/2/11.pdf (accessed on 16 October 2023).
  24. Abdul Rahman, A.G.; Noroozi, S.; Dupac, M.; Syed Mohd Al-Attas, S.M.; Vinney, J.E. A Hybrid approach for nondestructive assessment and design optimisation and testing of in-service machinery. Nondestruct. Test. Eval. 2013, 28, 44–57. [Google Scholar] [CrossRef]
  25. Training Guidelines in Non-Destructive Testing Testing Techniques: Manual for Ultrasonic Testing at Level 2; IAEA-TCS-67; IAEA: Vienna, Austria, 2018; Available online: https://www-pub.iaea.org/MTCD/Publications/PDF/TCS-67web.pdf/ (accessed on 16 October 2023).
  26. Siegel, M.; Rauschenbach, H.; Metzner, B. Nondestructive examination of turbine and generator components: Experience with mechanized examination techniques. In Proceedings of the VGB-ESKOM International Materials Conference, Pretoria, South Africa, 18–20 September 2000; Available online: https://www.imia.com/wp-content/uploads/2023/07/EP05_2003-NonDestructiveExamination-4.pdf (accessed on 16 October 2023).
  27. Golis, M.J.; Brown, S.D. Nondestructive Evaluation of Steam Turbine Rotors: An Analysis of the Systems and Techniques Utilized for In-Service Inspection. Interim Report; United States. 1978. Available online: https://www.osti.gov/servlets/purl/6874849 (accessed on 16 October 2023).
  28. Poursaeidi, E.; Mohammadi Arhani, M.R. Failure investigation of an auxiliary steam turbine. Eng. Fail. Anal. 2010, 17, 1328–1336. [Google Scholar] [CrossRef]
  29. Mazur, Z.; Illescas, R.G.; Romano, J.A.; Rodrigue, N.P. Steam turbine blade failure analysis. Eng. Fail. Anal. 2008, 15, 129–141. [Google Scholar] [CrossRef]
  30. Sărăcin, I.; Paraschiv, G.; Pandia, O.; Bozgă, I.; Toma, D. Researches on corrosion cracking phenomenon that occurs on welded of agricultural equipment. Metalurgija 2015, 54, 395–398. [Google Scholar]
  31. Barella, S.; Bellogini, M.; Boniardi, M.; Cincera, S. Failure analysis of a steam turbine rotor. Eng. Fail. Anal. 2011, 18, 511–519. [Google Scholar] [CrossRef]
  32. Balitskii, O.I.; Kvasnytska, Y.H.; Ivaskevych, L.M.; Mialnitsa, H.P.; Kvasnytska, K.H. Fatigue fracture of the blades of gas turbine engine made of a new refractory nickel alloy. Mater. Sci. 2022, 57, 475–483. [Google Scholar] [CrossRef]
  33. Trebuňa, P.; Pástor, M.; Trebuňa, F.; Šimčák, F. The analysis of failure causes of the rotor shaft of steam turbines. Metalurgija 2017, 56, 233–236. Available online: http://hrcak.srce.hr/file/249341 (accessed on 16 October 2023).
  34. Zhu, M.-L.; Mei, L.-B.; Xuan, F.-Z. Effect of microstructure on mechanical behavior of a combined steam turbine rotor steel. In Proceedings of the ASME Turbo Expo 2015: Turbine Technical Conference and Exposition. Volume 7A: Structures and Dynamics, Montreal, QC, Canada, 15–19 June 2015; GT2015-44132; V07AT28A018. ASME: New York, NY, USA, 2015; p. 7. [Google Scholar] [CrossRef]
  35. Zhu, M.-L.; Xuan, F.-Z.; Wang, G.-Z. Effect of microstructure on fatigue crack propagation behavior in a steam turbine rotor steel. Mater. Sci. Eng. A 2009, 515, 85–92. [Google Scholar] [CrossRef]
  36. Racic, Z.; Hidalgo, J. Practical balancing of flexible rotors for power. In Proceedings of the ASME 2007 International Design Engineering Technical Conferences and Computers and Information in Engineering Conference, Las Vegas, NV, USA, 4–7 September 2007; DETC2007-34333. ASME: New York, NY, USA, 2009; pp. 1143–1152. [Google Scholar] [CrossRef]
  37. Ranjan, G.; Tiwari, R. On-site high-speed balancing of flexible rotor-bearing system using virtual trial unbalances at slow run. Int. J. Mech. Sci. 2020, 183, 105786. [Google Scholar] [CrossRef]
  38. Racic, Z.; Racic, M. Development of a new balancing approach for significantly eccentric or bowed rotors. In Proceedings of the 9th IFToMM International Conference on Rotor Dynamics, Milan, Italy, 22–25 September 2014; Pennacchi, P., Ed.; Springer: Cham, Switzerland, 2015; p. 21. [Google Scholar] [CrossRef]
  39. Hidalgo, J.; Racic, Z. Diagnosis and treatment of bowed, misalign, and eccentric rotor trains. In Proceedings of the 22nd Biennial Conference on Mechanical Vibration and Noise, San Diego, CA, USA, 30 August–2 September 2009; IDETC-CIE, DETC 2009-86307. ASME: New York, NY, USA, 2010; pp. 987–998. [Google Scholar] [CrossRef]
  40. Fatsis, A. Design point analysis of two-shaft gas turbine engines topped by four-port wave rotors for power generation systems. Propuls. Power Res. 2019, 8, 183–193. [Google Scholar] [CrossRef]
  41. Rauschenbach, H.; Opheys, M. Experience with advanced NDT methods in turbine field service. In Proceedings of the 19th World Conference on Non-Destructive Testing, Munich, Germany, 13–17 June 2016; Available online: https://www.ndt.net/article/wcndt2016/papers/th4a3.pdf (accessed on 16 October 2023).
  42. Nurbanasari, M. Integrity inspection of a steam turbine rotor in a geothermal power plant. In Proceedings of the 2015 International Conference on Electrical, Automation and Mechanical Engineering (EAME 2015), Phuket, Thailand, 26–27 July 2015. Advances in Engineering Research. [Google Scholar] [CrossRef]
  43. Kim, T.; Kim, T. Optimization of hammer peening process for gas turbine rotor straightening. Machines 2022, 10, 950. [Google Scholar] [CrossRef]
  44. Burhani, A.; Rozaq, F.; Supriyanto, E. Case study application of cold peening in combination with thermal stress relieving as effective method for straightening large turbine rotor. In Proceedings of the International Conference on Power, Energy, Control and Transmission Systems (ICPECTS), Chennai, India, 10–11 December 2020; pp. 1–6. [Google Scholar] [CrossRef]
  45. Pei, Y.C.; Wang, J.W.; Tan, Q.C.; Yuan, D.Z.; Zhang, F. An investigation on the bending straightening process of D-type cross section shaft. Int. J. Mech. Sci. 2017, 131–132, 1082–1091. [Google Scholar] [CrossRef]
  46. Lopez, R.H.; Ritto, T.G.; Sampaio, R.; De Cursi, J.S. A new algorithm for the robust optimization of rotor-bearing systems. Eng. Optim. 2014, 46, 1123–1138. [Google Scholar] [CrossRef]
  47. Heinz, P.; Murari, B.; Singh, P. Steam Turbines: Design, Applications, and Rerating, 2nd ed.; The McGraw-Hill Companies, Inc.: New York, NY, USA, 2009; ISBN 9780071508216. [Google Scholar]
  48. Kvasnytska, Y.H.; Ivaskevych, L.M.; Balytskyi, O.I.; Maksyuta, I.I.; Myalnitsa, H.P. High-temperature salt corrosion of a heat-resistant nickel alloy. Mater. Sci. 2020, 56, 432. [Google Scholar] [CrossRef]
  49. Glotka, A.A.; Ol’shanetskii, V.E. Prediction thermo-physical characteristics of heat-resistant nickel alloys directional crystallization. Acta Metall. Slovaca 2021, 27, 68–71. [Google Scholar] [CrossRef]
  50. Glotka, O.A.; Haiduk, S.V. Distribution of elements in carbides of multicomponent superalloys. Metallofiz. Noveishie Tekhnol. 2020, 42, 869–884. [Google Scholar] [CrossRef]
  51. Glotka, A.A.; Moroz, A.N. Comparison of the effects of carbides and nonmetallic inclusions on formation of fatigue microcracks in steels. Metal Sci. Heat Treat. 2019, 61, 521–524. [Google Scholar] [CrossRef]
  52. Balyts’kyi, O.I.; Kolesnikov, V.O.; Kubicki, E. Enhancement of the crack resistance of manganese cast irons. Mater. Sci. 2005, 41, 67–73. [Google Scholar] [CrossRef]
  53. Balitskii, A.; Kolesnikov, V.; Abramek, K.F.; Balitskii, O.; Eliasz, J.; Havrilyuk, M.; Ivaskevych, L.; Kolesnikova, I. Influence of hydrogen-containing fuels and environmentally friendly lubricating coolant on nitrogen steels wear resistance for spark ingnition engine pistons and rings kit gasket set. Energies 2021, 14, 7583. [Google Scholar] [CrossRef]
  54. Korniy, S.A.; Zin, I.M.; Danyliak, M.O. Eco-friendly metal corrosion inhibitors based on natural polymers (A Review). Mater. Sci. 2023, 58, 567–578. [Google Scholar] [CrossRef]
  55. Zhu, M.-L.; Xuan, F.-Z. Effect of microstructure on appearance of near-threshold fatigue fracture in Cr–Mo–V steel. Int. J. Fract. 2009, 159, 111–120. [Google Scholar] [CrossRef]
  56. Niu, L.-B.; Kobayashi, M.; Takaku, H.; Azuma, T. Aging effect on creep rupture properties of super-clean 9%CrMoV steel for steam turbine rotors of combined cycle power plants. Key Eng. Mater. 2004, 274–276, 931–936. [Google Scholar] [CrossRef]
  57. Poon, C.; Vitale, D.; Singh, M.; Hoeppner, D. Fatigue crack propagation behaviour of rotor and wheel materials used in steam turbines. Int. J. Fatigue 1983, 5, 87–93. [Google Scholar] [CrossRef]
  58. Liu, P.; Lu, F.; Liu, X.; Ji, H.; Gao, Y. Study on fatigue property and microstructure characteristics of welded nuclear power rotor with heavy section. J. Alloys Compd. 2014, 584, 430–437. [Google Scholar] [CrossRef]
  59. Papadopoulos, C.A. The strain energy release approach for modeling cracks in rotors: A state of the art review. Mech. Syst. Signal Process. 2008, 22, 763–789. [Google Scholar] [CrossRef]
  60. Wang, D.; Cao, H.; Yang, Y.; Du, M. Dynamic modeling and vibration analysis of cracked rotor-bearing system based on rigid body element method. Mech. Syst. Signal Process. 2023, 191, 110152. [Google Scholar] [CrossRef]
  61. Abbasi, A.; Nazari, F.; Nataraj, C. Adaptive modeling of vibrations and structural fatigue for analyzing crack propagation in a rotating system. J. Sound Vib. 2022, 541, 117276. [Google Scholar] [CrossRef]
  62. Imdad, A.; Zafra, A.; Arniella, V.; Belzunce, J. Hydrogen diffusivity in different microstructures of 42CrMo4 steel. Hydrogen 2021, 2, 414–427. [Google Scholar] [CrossRef]
  63. Sun, Z.; Moriconi, C.; Benoit, G.; Halm, D.; Henaff, G. Fatigue crack grow thunder high pressure of gaseous hydrogen in a 15-5PH martensitic stain less steel: Influence of pressure and loading frequency. Metall. Mater. Trans. A 2013, 44, 1320–1330. [Google Scholar] [CrossRef]
  64. Bhadeshia, H.K.D.H. Prevention of hydrogen embrittlement in steels. ISIJ Int. 2016, 56, 24–36. [Google Scholar] [CrossRef]
  65. Kimura, Y.; Sakai, Y.; Hara, T.; Belyakov, A.; Tsuzaki, K. Hydrogen-induced delayed fracture of ultrafine grained 0.6% O steel with dispersed oxide particles. Scripta Mater. 2003, 49, 1111–1116. [Google Scholar] [CrossRef]
  66. Robertson, I.M.; Sofronis, P.; Nagao, A.; Martin, M.L.; Wang, S.; Gross, D.W.; Nygren, K.E. Hydrogen embrittlement understood. Metall. Mater. Trans. B 2015, 46, 1085–1103. [Google Scholar] [CrossRef]
  67. Brahimi, S.V.; Yue, S.; Sriraman, K.R. Alloy and composition dependence of hydrogen embrittlement susceptibility in high-strength steel fasteners. Phil. Trans. R. Soc. A 2017, 375, 20160407. [Google Scholar] [CrossRef]
  68. Martin, M.L.; Connolly, M.J.; DelRio, F.W.; Slifka, A.J. Hydrogen embrittlement in ferritic steels. Appl. Phys. Rev. 2020, 7, 041301. [Google Scholar] [CrossRef] [PubMed]
  69. Ohaeri, E.; Eduok, U.; Szpunar, J. Hydrogen related degradation in pipeline steel: A review. Int. J. Hydrogen Energy 2018, 43, 14584–14617. [Google Scholar] [CrossRef]
  70. Mine, Y.; Tachibana, K.; Horita, Z. Effect of hydrogen on tensile properties of ultrafine-grained type 310S austenitic stainless steel processed by high-pressure torsion. Metall. Mater. Trans. A 2011, 42, 1619–1629. [Google Scholar] [CrossRef]
  71. Mine, Y.; Tsumagari, T.; Horita, Z. Hydrogen trapping on lattice defects produced by high-pressure torsion in Fe–0.01 mass % C Alloy. Scripta Mater. 2010, 63, 552–555. [Google Scholar] [CrossRef]
  72. Balitskii, A.; Ivaskevich, L.; Mochulskyi, V.; Eliasz, J.; Skolozdra, O. Influence of high pressure and high temperature hydrogen on fracture toughness of Ni-containing steels and alloys. Arch. Mech. Eng. 2014, 61, 129–138. [Google Scholar] [CrossRef]
  73. Choo, W.Y.; Lee, J. Hydrogen trapping phenomena in carbon steel. J. Mater. Sci. 1982, 17, 1930–1938. [Google Scholar] [CrossRef]
  74. Krom, A.H.M.; Bakker, A. Hydrogen Trapping Models in Steel. Metall. Mater. Trans. B 2000, 31, 1475–1482. [Google Scholar] [CrossRef]
  75. Gong, P.; Turk, A.; Nutter, J.; Yu, F.; Wynne, B.; Rivera-Diaz-del-Castillo, P.; Rainforth, W.M. Hydrogen embrittlement mechanisms in advanced high strength steel. Acta Mater. 2023, 223, 117488. [Google Scholar] [CrossRef]
  76. Jang, W.J.; Seo, H.J.; Jung, B.-I.; Choi, S.; Lee, C.S. Effect of Bainite Fraction on Hydrogen Embrittlement of Bainite/Martensite Steel. Mater. Sci. Eng. A 2021, 814, 141226. [Google Scholar] [CrossRef]
  77. Gong, P.; Nutter, J.; Rivera-Diaz-Del-Castillo, P.E.J.; Rainforth, W.M. Hydrogen embrittlement through the formation of low-energy dislocation nanostructures in nanoprecipitation-strengthened steels. Sci. Adv. 2020, 6, 6152. [Google Scholar] [CrossRef]
  78. Sun, B.; Lu, W.; Gault, B.; Bei, H.; Tasan, C.C. Chemical Heterogeneity Enhances Hydrogen Resistance in High-Strength Steels. Nat. Mater. 2021, 20, 1629–1634. [Google Scholar] [CrossRef] [PubMed]
  79. Mweta, F.J.; Adachi, N.; Todaka, Y.; Ueno, A.; Ikenaga, A.; Nakamura, H.; Takahashi, S.; Tsuzaki, K. Effect of hetero- and homo-nanostructure on the hydrogen embrittlement resistance in heavily deformed 316LN austenitic stainless steel. MRS Adv. 2021, 6, 682–688. [Google Scholar] [CrossRef]
  80. Rahman, K.M.M.; Qin, W.; Szpunar, J.A.; Kozinski, J.; Song, M.; Zhu, N. New insight into the role of inclusions in hydrogen-induced degradation of fracture toughness: Three-dimensional imaging and modeling of materials. Philos. Mag. Part A 2021, 101, 976–996. [Google Scholar] [CrossRef]
  81. Jin, T.Y.; Liu, Z.Y.; Cheng, Y.F. Effect of non-metallic inclusions on hydrogen-induced cracking of API5L X100 steel. Int. J. Hydrogen Energy 2010, 35, 8014–8021. [Google Scholar] [CrossRef]
  82. Singh, V.; Khan, R.; Bandi, B.; Roy, G.G.; Srirangam, P. Effect of non-metallic inclusions (NMI) on crack formation in forged steel. Mater. Today Proc. 2021, 41, 1096–1102. [Google Scholar] [CrossRef]
  83. Abraham, S.; Bodnar, R.; Raines, J.; Schwerdt, B.; Chumbley, L.; Yin, F. Inclusion engineering and metallurgy of calcium treatment. J. Iron Steel Res. Int. 2018, 25, 133–145. [Google Scholar] [CrossRef]
  84. Wang, W.; Zhang, L.; Ren, Y.; Luo, Y.; Sun, X. Effect of calcium treatment on non-metallic inclusions in steel during refining process. In Proceedings of the 12th International Symposium on High-Temperature Metallurgical Processing; The Minerals, Metals & Materials Series; Springer: Cham, Switzerland, 2022; Volume 30, pp. 265–274. [Google Scholar] [CrossRef]
  85. Nagumo, M.; Takai, K. The predominant role of strain-induced vacancies in hydrogen embrittlement of steels: Overview. Acta Mater. 2019, 165, 722–733. [Google Scholar] [CrossRef]
  86. Schoop, J. In-situ calibrated modeling of residual stresses induced in machining under various cooling and lubricating environments. Lubricants 2021, 9, 28. [Google Scholar] [CrossRef]
  87. Cai, L.; Feng, Y.; Liang, S.Y. Analytical modeling of residual stress in end-milling with minimum quantity lubrication. Mech. Ind. 2022, 23, 5. [Google Scholar] [CrossRef]
  88. Schoop, J.; Adeniji, D.; Brown, I. Computationally efficient, multi-domain hybrid modeling of surface integrity in machining and related thermomechanical finishing processes. Procedia CIRP 2019, 82, 356–361. [Google Scholar] [CrossRef]
  89. Liu, X.; Devor, R.E.; Kapoor, S.G. An analytical model for the prediction of minimum chip thickness in micromachining. J. Manuf. Sci. Eng. 2006, 128, 474–481. [Google Scholar] [CrossRef]
  90. Arrazola, P.; Özel, T.; Umbrello, D.; Davies, M.; Jawahir, I. Recent advances in modelling of metal machining processes. CIRP Ann. 2013, 62, 695–718. [Google Scholar] [CrossRef]
  91. Li, B.; Deng, H.; Hui, D.; Hu, Z.; Zhang, W. A semi-analytical model for predicting the machining deformation of thin-walled parts considering machining-induced and blank initial residual stress. Int. J. Adv. Manuf. Technol. 2020, 110, 139–161. [Google Scholar] [CrossRef]
  92. Pan, Z.; Feng, Y.; Ji, X.; Liang, S.Y. Turning induced residual stress prediction of AISI 4130 considering dynamic recrystallization. Mach. Sci. Technol. 2017, 22, 507–521. [Google Scholar] [CrossRef]
  93. Brown, A.A.; Kostka, T.D.; Antoun, B.R.; Beghini, L.L. Predicting Residual Stresses Due to Forging and Machining Processes. Available online: https://www.osti.gov/servlets/purl/1106210 (accessed on 16 October 2023).
  94. Makhesana, M.A.; Baravaliya, J.A.; Parmar, R.J.; Patel, V.R.; Vyas, D.B. Machinability improvement and sustainability assessment during machining of AISI 4140 using vegetable oil-based MQL. J. Braz. Soc. Mech. Sci. Eng. 2021, 43, 535. [Google Scholar] [CrossRef]
  95. Lawal, S.A.; Choudhury, I.A.; Nukman, Y. A Critical assessment of lubrication techniques in machining processes: A case for minimum quantity lubrication using vegetable oil-based lubricant. J. Clean. Prod. 2013, 41, 210–221. [Google Scholar] [CrossRef]
  96. Wang, W.; Saifullah, M.K.; Aßmuth, R.; Biermann, D.; Arif, A.F.M.; Veldhuis, S.C. Effect of edge preparation technologies on cutting edge properties and tool performance. Int. J. Adv. Manuf. Technol. 2020, 106, 1823–1838. [Google Scholar] [CrossRef]
  97. Pereira, O.; Rodríguez, A.; Fernández-Abia, A.I.; Barreiro, J.; López de Lacalle, L.N. Cryogenic and minimum quantity lubrication for an eco-efficiency turning of AISI 304. J. Clean. Prod. 2016, 139, 440–449. [Google Scholar] [CrossRef]
  98. Park, D. The occupational exposure limit for fluid aerosol generated in metalworking operations: Limitations and recommendations. Saf. Health Work. 2012, 3, 1–10. [Google Scholar] [CrossRef]
  99. Padmini, R.; Vamsi Krishna, P.; Krishna Mohana Rao, G. Effectiveness of vegetable oil based nanofluids as potential cutting fluids in turning AISI 1040 steel. Tribol. Int. 2016, 94, 490–501. [Google Scholar] [CrossRef]
  100. Balitskii, O.; Borowiak-Palen, E.; Konicki, W. Synthesis and characterization of colloidal gallium selenide nanowires. Cryst. Res. Technol. 2011, 46, 417–420. [Google Scholar] [CrossRef]
  101. Williams, J.A. Wear and wear particles—Some fundamentals. Tribol. Int. 2005, 38, 863–870. [Google Scholar] [CrossRef]
  102. Howe, A.A. Wear resistant steels. Mater. Sci. Technol. 2016, 32, 255–256. [Google Scholar] [CrossRef]
  103. Safyari, M.; Mori, G.; Ucsnik, S.; Moshtaghi, M. Mechanisms of hydrogen absorption, trapping and release during galvanostatic anodization of high-strength aluminum alloys. J. Mater. Res. Technol. 2023, 22, 80–88. [Google Scholar] [CrossRef]
  104. Moshtaghi, M.; Safyari, M.; Mori, G. Combined thermal desorption spectroscopy, hydrogen visualization, HRTEM and EBSD investigation of a Ni–Fe–Cr Alloy: The role of hydrogen trapping behavior in hydrogen-assisted fracture. Mater. Sci. Eng. A 2022, 848, 143428. [Google Scholar] [CrossRef]
  105. Takakuwa, O.; Ogawa, Y.; Okazaki, S.; Nakamura, M.; Matsunaga, H. A mechanism behind hydrogen-assisted fatigue crack growth in ferrite-pearlite steel focusing on its behavior in gaseous environment at elevated temperature. Corros. Sci. 2020, 168, 108558. [Google Scholar] [CrossRef]
  106. Ogawa, Y.; Iwata, K. Resistance of pearlite against hydrogen-assisted fatigue crack growth. Int. J. Hydrogen Energy 2022, 47, 31703–31708. [Google Scholar] [CrossRef]
  107. Thebault, F.; Designolle, V. Hydrogen Stress Cracking Resistance of Seamless Pipes for Hydrogen Storage and Transport Applications; ADIPEC: Abu Dhabi, United Arab Emirates, 2022. [Google Scholar] [CrossRef]
  108. Balyts’kyi, O.I.; Kolesnikov, V.O.; Eliasz, Y.; Havrylyuk, M.R. Specific features of the fracture of hydrogenated high-nitrogen manganese steels under conditions of rolling friction. Mater. Sci. 2015, 50, 604–611. [Google Scholar] [CrossRef]
  109. Balitskii, O.A.; Kolesnikov, V.O.; Balitskii, A.I. Wear resistance of hydrogenated high nitrogen steel at dry and solid state lubricants assist ant friction. Arch. Mater. Sci. Eng. 2019, 98, 57–67. [Google Scholar] [CrossRef]
  110. Balitskii, A.; Kindrachuk, M.; Volchenko, D.; Abramek, K.F.; Balitskii, O.; Skrypnyk, V.; Zhuravlev, D.; Bekish, I.; Ostashuk, M.; Kolesnikov, V. Hydrogen containing nano fluids in the spark engine’s cylinder head cooling system. Energies 2022, 15, 59. [Google Scholar] [CrossRef]
  111. Balitskii, A.A.; Kolesnikov, V.A.; Vus, O.B. Tribotechnical properties of nitrogen manganese steels under rolling friction at addition of (GaSe)xIn1-x powders into contact zone. Metallofiz. Noveishie Tekhnologii 2010, 32, 685–695. [Google Scholar] [CrossRef]
  112. Korniy, S.A.; Zin, I.M.; Tymus, M.B. Steel corrosion inhibition by microbial polysaccharide and tartrate mixture. J. Bio Tribo-Corros. 2022, 8, 6. [Google Scholar] [CrossRef]
  113. Balyts’kyi, O.I.; Kolesnikov, V.O.; Kawiak, P. Tribo engineering properties of austenitic manganese steels and castirons under the conditions of sliding friction. Mater. Sci. 2005, 41, 624–630. [Google Scholar] [CrossRef]
  114. Protsenko, V.S.; Butyrina, T.E.; Bobrova, L.S.; Korniy, S.A.; Danilov, F.I. Enhancing corrosion resistance of nickel surface by electropolishing in a deep eutectic solvent. Mater. Lett. 2020, 270, 127719. [Google Scholar] [CrossRef]
  115. Slobodyan, Z.V.; Zin, I.M.; Korniy, S.A. New environment friendly corrosion inhibitor based on plant extracts and technology of chemical cleaning of thermal power equipment with its use. Sci. Innov. 2021, 17, 15–24. [Google Scholar] [CrossRef]
  116. Balyts’kyi, A.I.; Kvasnyts’ka, Y.H.; Ivas’kevich, L.M.; Myal’nitsa, H.P. Corrosion and hydrogen-resistance of heat-resistant blade nickel-cobalt alloys. Mater. Sci. 2018, 54, 230–239. [Google Scholar] [CrossRef]
  117. Zin’, I.M.; Karpenko, O.V.; Pokyn’broda, T.Y.; Korets’ka, N.; Tymus’, M.B.; Kwiatkowski, L.; Kornii, S. Inhibition of the corrosion of carbon steels by trehalose lipid surfactants. Mater. Sci. 2019, 54, 477–484. [Google Scholar] [CrossRef]
  118. Pokhmurs’kyi, V.I.; Kornii, S.A.; Kosarevych, B.P. Investigation of the adsorption and diffusion of hydrogen in iron clusters by the method of density functional. Mater. Sci. 2014, 49, 485–492. [Google Scholar] [CrossRef]
  119. Billi, F.; Benya, P.; Ebramzadeh, E.; Campbell, P.; Chan, F.; Mc Kellop, H.A. Metal wear particles: What we know, what we do not know, and why. SAS J. 2009, 3, 133–142. [Google Scholar] [CrossRef]
  120. Laghari, M.S.; Hassan, A. Wear Particle Texture Analysis. Proceedings 2019, 43, 67–72. [Google Scholar]
  121. Balitskii, O.; Kolesnikov, V. Identification of wear products in the automotive tribotechnical system using computer vision methods, artificial intelligence and Big Data. In Proceedings of the 2019 XIth International Scientific and Practical Conference on Electronics and Information Technologies (ELIT), Lviv, Ukraine, 16–18 September 2019; pp. 24–27. [Google Scholar] [CrossRef]
  122. Suraj, R.; Jithish, K.S. Wear analysis on EN8, EN9, and EN24. World J. Eng. 2017, 14, 188–192. [Google Scholar] [CrossRef]
  123. Hsu, S.M.; Shen, M.C.; Ruff, A.W. Wear prediction for metals. Tribol. Int. 1997, 30, 377–383. [Google Scholar] [CrossRef]
  124. Li, H.; Li, L.; Wang, H. Defect detection for wear debris based on few-shot contrastive learning. Appl. Sci. 2022, 12, 11893. [Google Scholar] [CrossRef]
  125. Wang, H.; Huang, R.; Gao, L.; Wang, W.; Xu, A.; Yuan, F. Wear debris classification of steel production equipment using feature fusion and case-based reasoning. ISIJ Int. 2018, 58, 1293–1299. [Google Scholar] [CrossRef]
  126. Pfirrmann, D.; Baumann, J.; Krebs, E.; Biermann, D.; Wiederkehr, P. Material defects detection based on in-process measurements in milling of Ti6246 alloy. Procedia CIRP 2021, 99, 165–170. [Google Scholar] [CrossRef]
  127. Govekar, E.; Gradišek, J.; Grabec, I. Analysis of acoustic emission signals and monitoring of machining processes. Ultrasonics 2000, 38, 598–603. [Google Scholar] [CrossRef]
  128. Axinte, D.A.; Natarajan, D.R.; Gindy, N.N.Z. An approach to use an array of three acoustic emission sensors to locate uneven events in machining.Part 1: Method and validation. Int. J. Mach. Tools Manuf. 2005, 45, 1605–1613. [Google Scholar] [CrossRef]
  129. Tönshoff, H.K.; Jung, M.; Männel, S.; Rietz, W. Using acoustic emission signals for monitoring of production processes. Ultrasonics 2000, 37, 681–686. [Google Scholar] [CrossRef]
  130. Marinescu, I.; Dragos, A.; Axinte, A. Critical analysis of effectiveness of acoustic emission signals to detect tool and workpiece malfunctions in milling operations. Int. J. Mach. Tools Manuf. 2008, 48, 1148–1160. [Google Scholar] [CrossRef]
  131. Courbon, C.; Arrieta, I.M.; Cabanettes, F.; Rech, J.; Arrazola, P.-J. The contribution of microstructure and friction in broaching ferrite–pearlite steels. CIRP Ann. 2020, 69, 57–60. [Google Scholar] [CrossRef]
  132. Chaudhari, A.; Soh, Z.Y.; Wang, H.; Kumar, A.S. Rehbinder effect in ultraprecision machining of ductile materials. Int. J. Mach. Tools Manuf. 2018, 133, 47–60. [Google Scholar] [CrossRef]
  133. He, Y.; Zhang, J.; Qi, Y.; Liu, H.; Memon, A.R.; Zhao, W. Numerical study of microstructural effects on chip formation in high-speed cutting of ductile iron with discrete element method. J. Mater. Process. Technol. 2017, 249, 291–301. [Google Scholar] [CrossRef]
  134. Fabre, D.; Bonnet, C.; Rech, J.; Mabrouki, T. Optimization of surface roughness in broaching. CIRP J. Manuf. Sci. Technol. 2017, 18, 115–127. [Google Scholar] [CrossRef]
  135. Lin, J.; Yang, J.; Huang, Y.; Wang, F.; Hu, X.; Zhang, Y. Defect identification of metal additive manufacturing parts based on laser-induced breakdown spectroscopy and machine learning. Appl. Phys. B 2021, 127, 173. [Google Scholar] [CrossRef]
  136. Mabrouki, T.; Courbon, C.; Fabre, D.; Arrieta, I.; Arrazola, P.-J.; Rech, J. Influence of microstructure on chip formation when broaching ferritic-pearlitic steels. Procedia CIRP 2017, 58, 43–48. [Google Scholar] [CrossRef]
  137. Choi, Y. Influence of feed rate on surface integrity and fatigue performance of machined surfaces. Int. J. Fatigue 2015, 78, 46–52. [Google Scholar] [CrossRef]
  138. Ma, J.; Duong, N.H.; Lei, S. Numerical investigation of the performance of microbump textured cutting tool in dry machining of AISI 1045 steel. J. Manuf. Process. 2015, 19, 194–204. [Google Scholar] [CrossRef]
  139. Rahman, M.A.; Rahman, M.; Kumar, A.S. Modelling of flow stress by correlating the material grain size and chip thickness in ultra-precision machining. Int. J. Mach. Tools Manuf. 2017, 123, 57–75. [Google Scholar] [CrossRef]
  140. Gupta, M.K.; Song, Q.; Liu, Z.; Sarikaya, M.; Jamil, M.; Mia, M.; Singla, A.K.; Khan, A.M.; Khanna, N.; Pimenov, D.Y. Environment and economic burden of sustainable cooling/lubrication methods in machining of Inconel-800. J. Clean. Prod. 2021, 287, 125074. [Google Scholar] [CrossRef]
  141. Bag, R.; Panda, A.; Sahoo, A.K.; Kumar, R. A perspective review on surface integrity and its machining behavior of AISI 4340 hardened alloy steel. Mater. Today Proc. 2019, 18, 3532–3538. [Google Scholar] [CrossRef]
  142. Aggogeri, F.; Pellegrini, N.; Tagliani, F.L. Recent advances on machine learning applications in machining processes. Appl. Sci. 2021, 11, 8764. [Google Scholar] [CrossRef]
  143. Yang, J.; Li, S.; Wang, Z.; Dong, H.; Wang, J.; Tang, S. Using deep learning to detect defects in manufacturing: A comprehensive survey and current challenges. Materials 2020, 13, 5755. [Google Scholar] [CrossRef] [PubMed]
  144. Cioffi, R.; Travaglioni, M.; Piscitelli, G.; Petrillo, A.; De Felice, F. Artificial intelligence and machine learning applications in smart production: Progress, trends, and directions. Sustainability 2020, 12, 492. [Google Scholar] [CrossRef]
  145. Van de Schoot, R.; de Bruin, J.; Schram, R.; Zahedi, P.; de Boer, M.R.; Weijdema, F.; Ten Have, W.; Borsboom, D. An open source machine learning framework for efficient and transparent systematic reviews. Nat. Mach. Intell. 2021, 3, 125–133. [Google Scholar] [CrossRef]
  146. Wu, X.; Liu, Y.; Zhou, X.; Mou, A. Automatic identification of tool wear based on convolutional neural network in face milling. Process Sens. 2019, 19, 3817. [Google Scholar] [CrossRef]
  147. He, Y.; Wu, P.; Li, Y.; Wang, Y.; Tao, F.; Wang, Y. A generic energy prediction model of machine tools using deep learning algorithms. Appl. Energy 2020, 275, 115402. [Google Scholar] [CrossRef]
  148. Kim, D.-H.; Kim, T.J.Y.; Wang, X.; Kim, M.; Quan, Y.-J.; Oh, J.W.; Min, S.-H.; Kim, H.; Bhandari, B.; Yang, I.; et al. Smart machining process using machine learning: A review and perspective on machining industry. Int. J. Precis. Eng. Manuf. Technol. 2018, 5, 555–568. [Google Scholar] [CrossRef]
  149. Pan, Y.; Kang, R.; Dong, Z.; Du, W.; Yin, S.; Bao, Y. On-line prediction of ultrasonic elliptical vibration cutting surface roughness of tungsten heavy alloy based on deep learning. J. Intell. Manuf. 2020, 33, 675–685. [Google Scholar] [CrossRef]
  150. Thankachan, T.; Prakash, K.S.; Malini, R.; Ramu, S.; Sundararaj, P.; Rajandran, S.; Ramasamy, D.; Jothi, S. Prediction of surface roughness and material removal rate in wire electrical discharge machining on aluminum based alloys/composites using Taguchi coupled grey relational analysis and artificial neural networks. Appl. Surf. Sci. 2019, 472, 22–35. [Google Scholar] [CrossRef]
  151. Rai, R.; Tiwari, M.K.; Ivanov, D.; Dolgui, A. Machine learning in manufacturing and industry 4.0 Applications. Int. J. Prod. Res. 2021, 59, 4773–4778. [Google Scholar] [CrossRef]
  152. Javaid, M.; Haleem, A.; Singh, R.P.; Rab, S.; Suman, R. Exploring impact and features of machine vision for progressive Industry 4.0 culture. Sensors 2022, 3, 100132. [Google Scholar] [CrossRef]
  153. Penumuru, D.P.; Muthuswamy, S.; Karumbu, P. Identification and classification of materials using machine vision and machine learning in the context of industry 4.0. J. Intell. Manuf. 2020, 31, 1229–1241. [Google Scholar] [CrossRef]
  154. Varshney, A.; Garg, N.; Nagla, K.S.; Nair, T.S.; Jaiswal, S.K.; Yadav, S.; Aswal, D.K. Challenges in sensors technology for industry 4.0 for futuristic metrological applications. MAPAN 2021, 36, 215–226. [Google Scholar] [CrossRef]
  155. Shpotyuk, O.I.; Balitska, V.O.; Vakiv, M.M.; Shpotyuk, L.I. Sensors of high-energy radiation based on amorphous chalcogenides. Sens. Actuators A Phys. 1998, 68, 356–358. [Google Scholar] [CrossRef]
  156. Strelkova, T.A.; Lytyuga, A.P.; Kalmykov, A.S. Statistical characteristics of optical signals and images in machine vision systems. In Examining Optoelectronics in Machine Vision and Applications in Industry 4.0; IGI Global: Hershey, PA, USA, 2021; pp. 134–162. [Google Scholar] [CrossRef]
  157. Moreno, A.; Velez, G.; Ardanza, A.; Barandiaran, I.; de Infante, Á.R.; Chopitea, R. Virtualisation process of a sheet metal punching machine within the Industry 4.0 Vision. Int. J. Interact. Des. Manuf. 2017, 11, 365–373. [Google Scholar] [CrossRef]
  158. Silva, R.L.; Rudek, M.; Szejka, A.L.; Junior, O.C. Machine vision systems for industrial quality control inspections. In Proceedings of the IFIP International Conference on Product Lifecycle Management; Springer: Cham, Switzerland, 2018; pp. 631–641. [Google Scholar] [CrossRef]
  159. Miranda-Vega, J.E.; Rivera-Castillo, J.; Rivas-López, M.; Flores-Fuentes, W.; Sergiyenko, O.; Rodríguez-Quiñonez, J.C.; Hernández-Balbuena, D. Reducing the optical noise of machine vision optical scanners for landslide monitoring. In Examining Optoelectronics in Machine Vision and Applications in Industry 4.0; IGI Global: Hershey, PA, USA, 2021; pp. 103–133. [Google Scholar] [CrossRef]
  160. Balitska, V.; Filipecki, J.; Shpotyuk, O.; Swiatek, J.; Vakiv, M. Dynamic radiation-induced effects in chalcogenide vitreous compounds. J. Non-Cryst. Solids 2001, 287, 216–221. [Google Scholar] [CrossRef]
  161. Balitska, V.; Shpotyuk, Y.; Filipecki, J.; Shpotyuk, O.; Iovu, M. Post-irradiation relaxation in vitreous arsenic/antimony trisulphides. J. Non-Cryst. Solids 2011, 357, 487–489. [Google Scholar] [CrossRef]
  162. Kindrachuk, M.; Volchenko, D.; Balitskii, A.; Abramek, K.F.; Volchenko, M.; Balitskii, O.; Skrypnyk, V.; Zhuravlev, D.; Yurchuk, A.; Kolesnikov, V. Wear resistance of spark ignition engine piston rings in hydrogen-containing environments. Energies 2021, 14, 4801. [Google Scholar] [CrossRef]
  163. Massaro, A.; Contuzzi, N.; Galiano, A. Intelligent processes in automated production involving Industry 4.0 technologies and artificial intelligence. In Advanced Robotics and Intelligent Automation in Manufacturing; IGI Global: Hershey, PA, USA, 2020; pp. 97–122. [Google Scholar] [CrossRef]
  164. Adeyeri, M.K.; Mpofu, K.; Olukorede, T.A. Integration of agent technology into manufacturing enterprise: A review and platform for Industry 4.0. In Proceedings of the 2015 International Conference on Industrial Engineering and Operations Management (IEOM), Dubai, United Arab Emirates, 3–5 March 2015; pp. 1–10. [Google Scholar] [CrossRef]
  165. Cejnek, M.; Oswald, C. Machine vision object measurement in difficult industry environment. Proceedings 2019, 37, 26. [Google Scholar] [CrossRef]
  166. Oztemel, E.; Gursev, S. Literature review of Industry 4.0 and related technologies. J. Intell. Manuf. 2020, 31, 127–182. [Google Scholar] [CrossRef]
  167. Banafaa, M.; Shayea, I.; Din, J.; Azmi, M.H.; Alashbi, A.; Daradkeh, Y.I.; Alhammadi, A. 6G mobile communication technology: Requirements, targets, applications, challenges, advantages, and opportunities. Alex. Eng. J. 2023, 64, 245–274. [Google Scholar] [CrossRef]
  168. Maddikunta, P.K.R.; Pham, Q.-V.; Prabadevi, B.; Deepa, N.; Dev, K.; Gadekallu, T.R.; Ruby, R.; Liyanage, M. Industry 5.0: A survey on enabling technologies and potential applications. J. Ind. Inf. Integr. 2022, 26, 100257. [Google Scholar] [CrossRef]
  169. Tkachov, V.I.; Ivas’kevych, L.M.; Vutvyts’kyi, V.I. Methodological aspects of determination of hydrogen resistance of steels. Mater. Sci. 2002, 38, 484–493. [Google Scholar] [CrossRef]
  170. Ostash, O.P.; Vol’demarov, O.V.; Hladysh, P.V. Cyclic crack Resistance of the Steels of Bends of Steam Pipelines After Long-Term Operation. Mater. Sci. 2013, 48, 427–437. [Google Scholar] [CrossRef]
  171. Balyts’kyi, O.I.; Ivas’kevich, L.M.; Mochulskyi, V.M. Mechanical properties of martensitic steels in gaseous hydrogen. Strength Mater. 2012, 44, 64–71. [Google Scholar] [CrossRef]
  172. Ostash, O.P.; Vol’demarov, O.V.; Hladysh, P.V.; Ivasyshyn, A.D. Evaluation of the degradation of steels of steam pipelines according to their structural, mechanical, and electrochemical characteristics. Mater. Sci. 2011, 46, 431–439. [Google Scholar] [CrossRef]
  173. Balitskii, A.I.; Panasyuk, V.V. Workability assessment of structural steels of power plant units in hydrogen environments. Strength Mater. 2009, 41, 52–57. [Google Scholar] [CrossRef]
  174. Krechkovs’ka, H.V.; Student, O.Z.; Nykyforchyn, H.M. Diagnostics of the engineering state of steam pipeline of thermal power plants by the hardness and crack resistance of steel. Mater. Sci. 2019, 54, 627–637. [Google Scholar] [CrossRef]
  175. Pokhmurs’kyi, V.I.; Kopylets’, V.I.; Kornii, S.A. Modeling of the corrosion-electrochemical processes on the metal–electrolyte interface. Mater. Sci. 2013, 49, 59–62. [Google Scholar] [CrossRef]
  176. Krechkovska, H.; Student, O.; Hredil, M.; Tsybailo, I.; Holovchuk, M.; Shtoyko, I. Visualization of fractographic signs of operational degradation of heat-resistant steel for estimating its actual structure-mechanical state. Procedia Struct. Integr. 2022, 42, 1398–1405. [Google Scholar] [CrossRef]
  177. Balyts’kyi, O.I.; Kostyuk, I.F. Strength of welded joints of Cr-Mn steels with elevated content of nitrogen in hydrogen-containing media. Mater. Sci. 2009, 45, 97–107. [Google Scholar] [CrossRef]
  178. Djukic, M.B.; Bakic, G.M.; Zeravcic, V.S.; Rajicic, B.; Sedmak, A.; Mitrovic, R.; Miskovic, Z. Towards a Unified and Practical Industrial Model for Prediction of Hydrogen Embrittlement and Damagein Steels. Procedia Struct. Integr. 2016, 2, 604–611. [Google Scholar] [CrossRef]
  179. Balitskii, A.I.; Vytvytskyi, V.I.; Ivaskevich, L.M. The low-cycle fatigue of corrosion-resistant steels in high pressure hydrogen. Procedia Eng. 2010, 2, 2367–2371. [Google Scholar] [CrossRef]
  180. Zvirko, O.; Dzioba, I.; Hredil, M.; Pała, R.; Oliynyk, O.; Furmańczyk, P. Specimen Size Effectonthe Tensile Properties of Rolled Steel of Long-Term-Operated Portal Crane. Materials 2023, 16, 3017. [Google Scholar] [CrossRef]
  181. Balitskii, O.I.; Ivaskevich, L.M.; Mochulskyi, V.M. Temperature dependences of age-hardening austenitic steels mechanical properties in gaseous hydrogen. In Proceedings of the 12th International Conference on Fracture, ICF-12, Ottawa, ON, Canada, 12–17 July 2009; Elboujdaini, M., Ed.; NRC: Ottawa, ON, Canada, 2009. Paper No. T19.001; Code 93954. Volume 8, pp. 5786–5792. Available online: https://www.researchgate.net/publication/281269596_Temperature_Dependences_of_Age-hardening_Austenitic_Steels_Mechanical_Properties_in_Gaseous_Hydrogen (accessed on 16 October 2023).
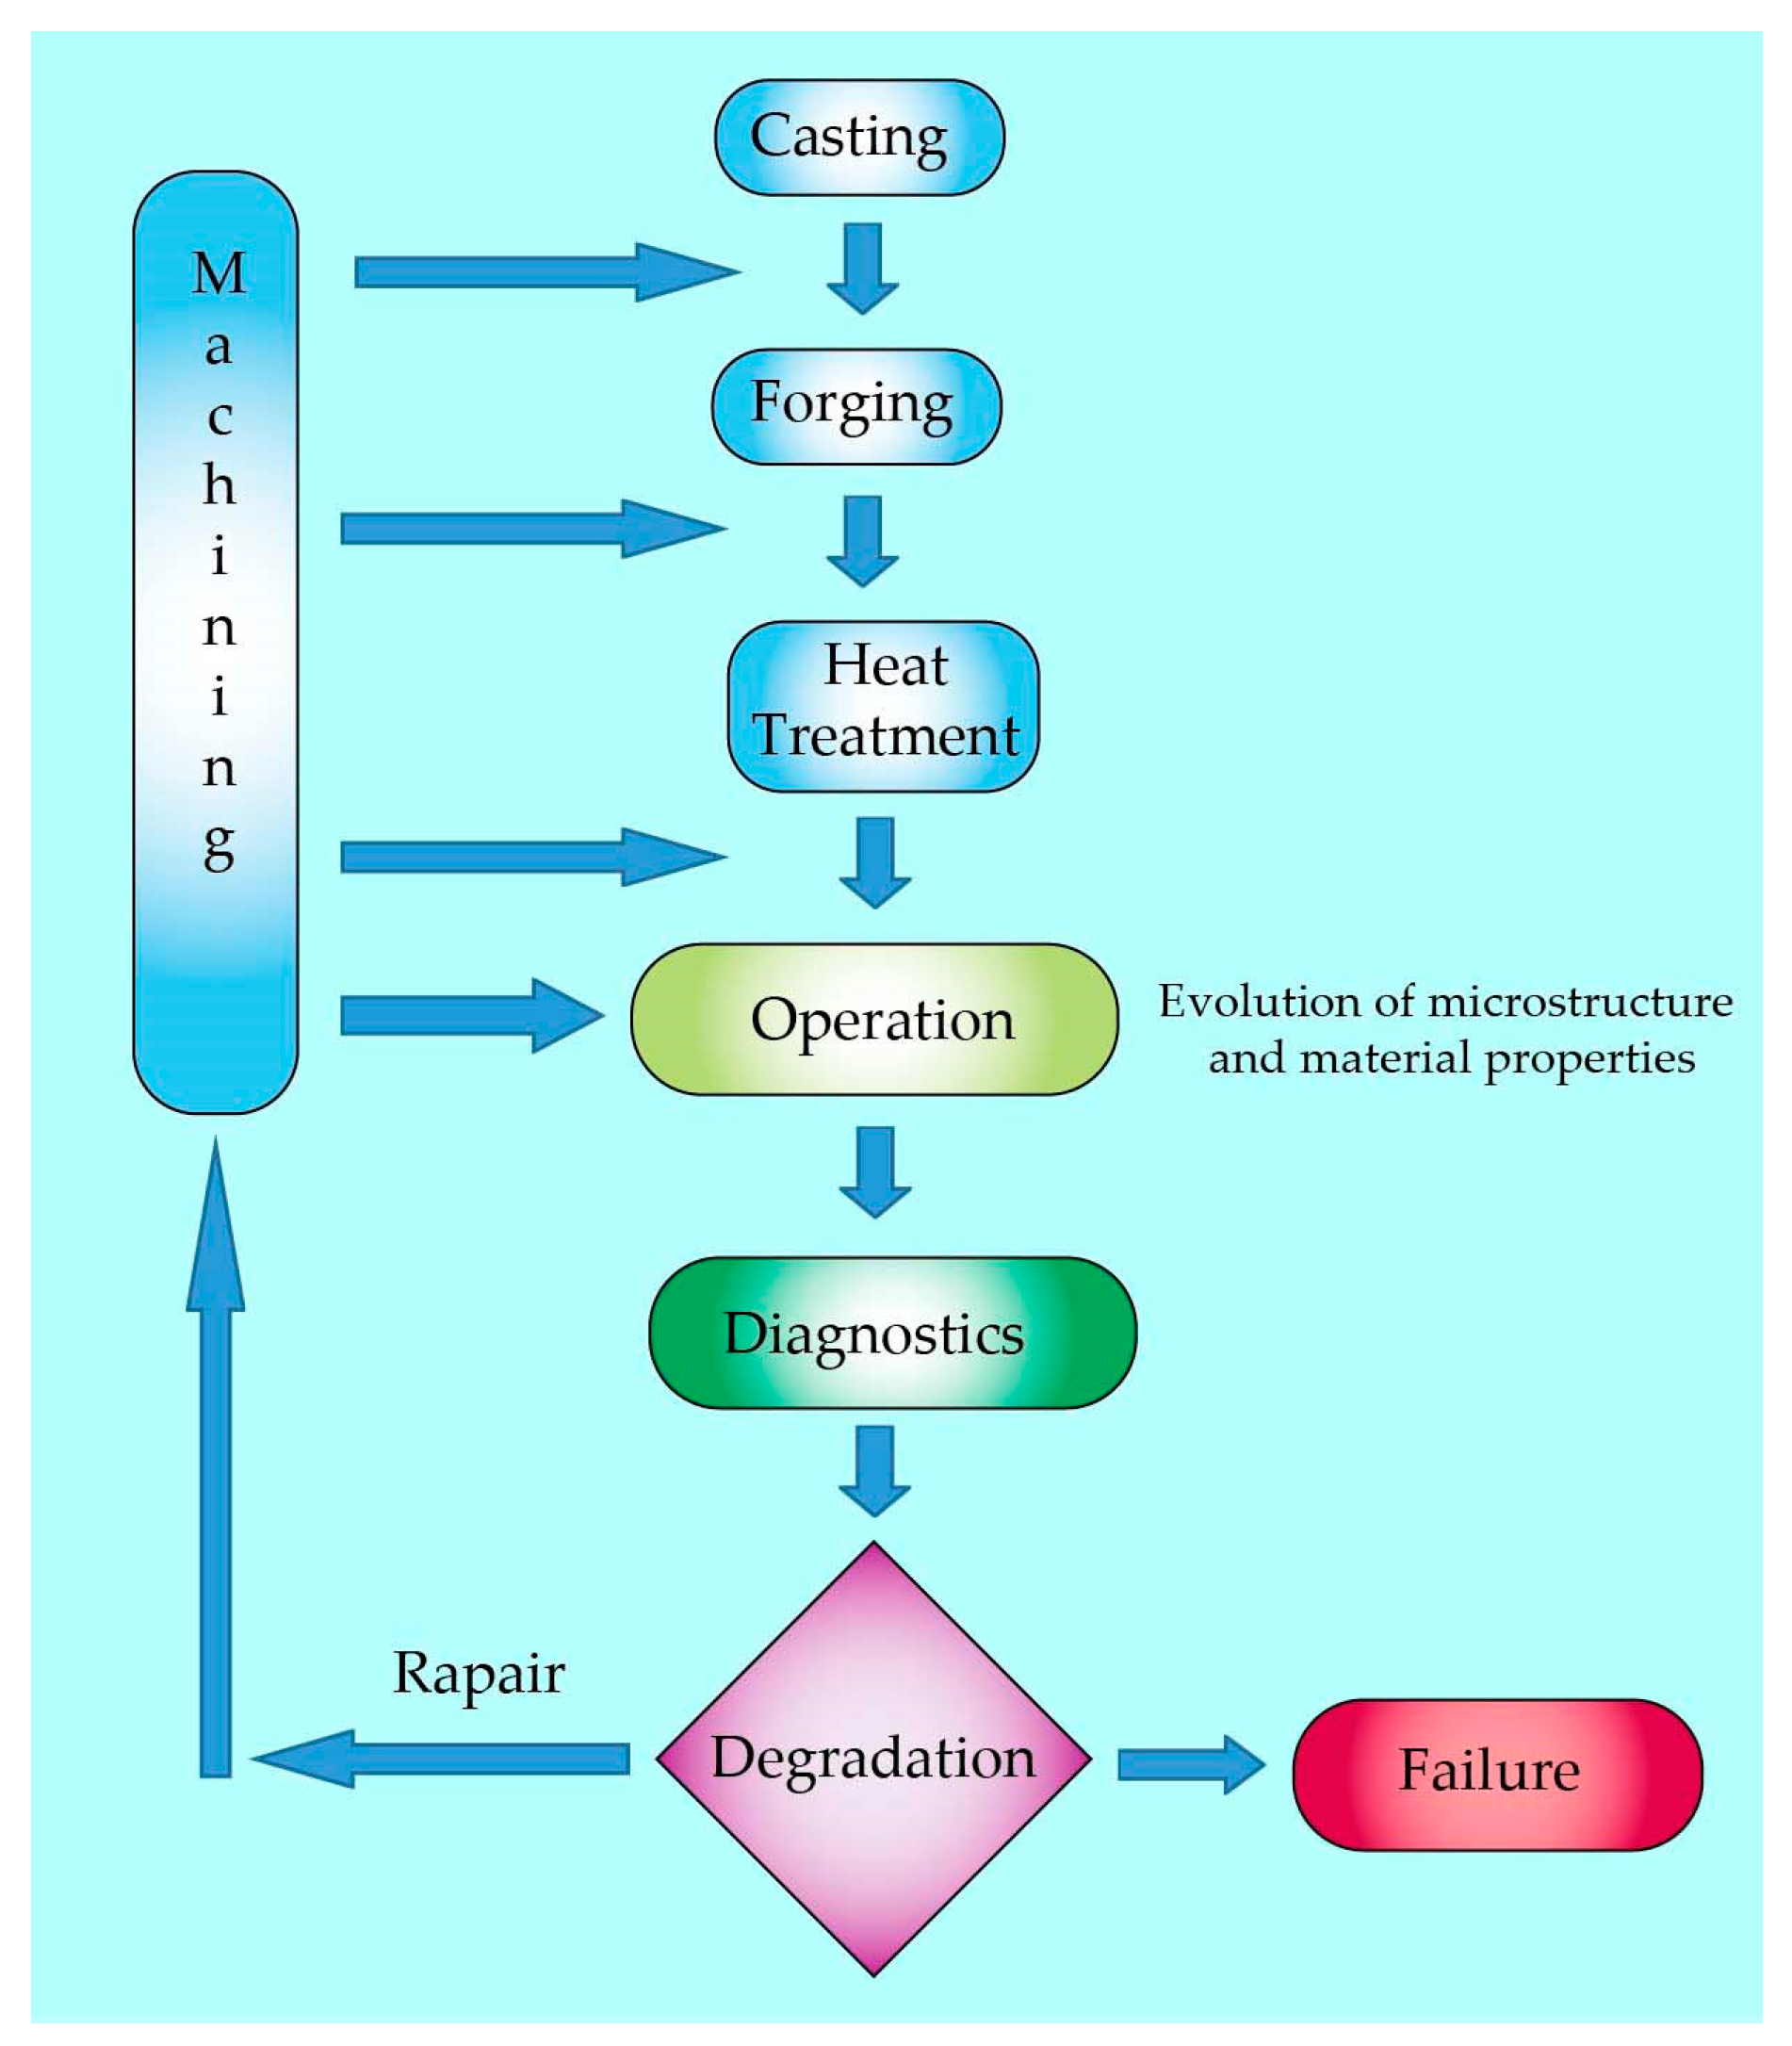
Figure 1. Abbreviated diagram of the “life cycle” of the rotor shaft during operation and before failure.
Energies 16 07851 g001
Figure 2. Microstructure of the rotor shaft surface from the obtained replica before (a) and after additional etching and computer image processing (b).
Energies 16 07851 g002
Figure 3. Histograms with normal distribution curves highlighting the calculated data: the area occupied by bainite (pixels2) (a), the appearance of the ImageJ program dial window (the area of the pearlite structural component is shown in red) (b), the linear dimensions (length) of bainite (c), and the width of bainite (d) colonies.
Energies 16 07851 g003
Figure 4. Changes in the hardness of a rotor shaft made of 38XH3MFA steel during long-term operation.
Energies 16 07851 g004
Figure 5. Microhardness of ferrite grains: initial state (a) and degraded state (b).
Energies 16 07851 g005
Figure 6. Changes in the content of alloying elements in 38KhN3MFA steel carbides over time.
Energies 16 07851 g006
Figure 7. Microstructure of the generator rotor shaft surface. The microstructure in the initial state (a,b), in the places of the greatest mechanical and thermal stresses (c,d), and change in pearlite orientation due to relocation of structural components (e,f).
Energies 16 07851 g007
Figure 8. “Evolution of microstructure” of 38KhN3MFA steel from which the rotor shaft is made: 1—perlite; 2—ferrite; 3—carbides; 4—non-metallic particles; 5—intermetallics; 6—sulfides.
Energies 16 07851 g008
Figure 9. Part of degraded material from the TA rotor shaft: outer surface (a) and separated surface (b).
Energies 16 07851 g009
Figure 10. Chips from a non-degraded surface, which was exposed during the mechanical processing of the rotor shaft, as it was operated in a watery medium: outside view (a) and internal view (b). Chips from the transitional zone between the non-degraded surface and the degraded surface: external view (c) and internal view (d). Chips from a degraded surface: external appearance (e) and internal appearance (f).
Energies 16 07851 g010aEnergies 16 07851 g010b
Figure 11. Changes in the intensity of hydrogen desorption from 38KhN3MFA steel chips after surface treatment: on air (a), water (b), LCLs (c), and LCLo (d).
Energies 16 07851 g011
Figure 12. The amount of hydrogen in chips taken during the repair of a shaft made of 38KhN3MFA steel: 1—from samples taken under operating conditions; 2—from samples of chips formed during the repair of LCLo; and 3—from chips during the repair of LCLs.
Energies 16 07851 g012
Figure 13. Cutting surfaces of 38KhH3MFA steel samples with LCLs: from a sample cut from the surface of a shaft that did not undergo degradation processes (a) and from a sample cut from the surface of a shaft undergoing degradation processes (b). The squares indicate the areas for the reproduction of 2D and 3D images measuring 5 × 5 mm.
Energies 16 07851 g013
Figure 14. Cutting surface of a sample cut from a shaft surface that has not undergone degradation processes: 2D visualization (a) and 3D visualization (b) in the Gwyddion computer package.
Energies 16 07851 g014
Figure 15. Cutting surfaces of a sample cut from the surface of a shaft subjected to degradation processes: 2D visualization (a) and 3D visualization (b) in the Gwyddion computer package.
Energies 16 07851 g015
Figure 16. The surface of a chip from a witness sample made of 38KhN3MFA steel obtained by grinding at 200 rpm and applying coolant: before hydrogen charging (a) and after hydrogen charging (b).
Energies 16 07851 g016
Figure 17. Cutting surface of witness specimens made from 38KhN3MFA steel: specimen without hydrogenation (a) and specimen with hydrogenation (b) (turning at 200 RPM using LCLs).
Energies 16 07851 g017
Figure 18. Photos of chips for research: from the undegraded section of the rotor shaft (a) and from the degraded section of the rotor shaft (b). Green color indicates the selected 2-by-2 mm areas for research.
Energies 16 07851 g018
Figure 19. Examination of digital images of 38KhN3MFA steel chips from the undegraded part of the rotor shaft, using the developed computer program. Histogram construction operation (a). The operation of constructing normals (b). Creating a surface profile (c). Calculation of the surface profile with the construction of histograms (d).
Energies 16 07851 g019aEnergies 16 07851 g019b
Figure 20. Examination of digital images of 38KhN3MFA steel chips (from the degraded part of the rotor shaft), using the developed computer program. Histogram construction operation (a). The operation of constructing normals (b). Creating a surface profile (c). Calculation of the surface profile with the construction of histograms (d).
Energies 16 07851 g020
Table 1. Hydrogen content in the steel 38HN3MFA chips.
No. ExperimentsRzCH (ppm)
1Air 37.080.88
2Water5.013.14
3LCLs4.437.22
4LCLo6.367.81
Table 2. Average values of the data obtained using a computer program.
No.SampleVertexCavityNmaxEntropy
1Not hydrogenated16853,4284.22754
2Degraded341974,5397.833468
Disclaimer/Publisher’s Note: The statements, opinions and data contained in all publications are solely those of the individual author(s) and contributor(s) and not of MDPI and/or the editor(s). MDPI and/or the editor(s) disclaim responsibility for any injury to people or property resulting from any ideas, methods, instructions or products referred to in the content.