1. Introduction
Round-link chains are used in many industries to stabilize or move heavy machinery components or to transport material. Mining chains have been used since the 1940s for the most demanding tasks during the operation of mining machines (ploughs) and removal of extracted material. Their failure is associated with costly downtimes and is not a rare occurrence due to the very harsh working conditions and high and unstable tensile forces they are under. Failures of mining and conveying equipment account for the vast majority of causes of longwall stoppages [
1].
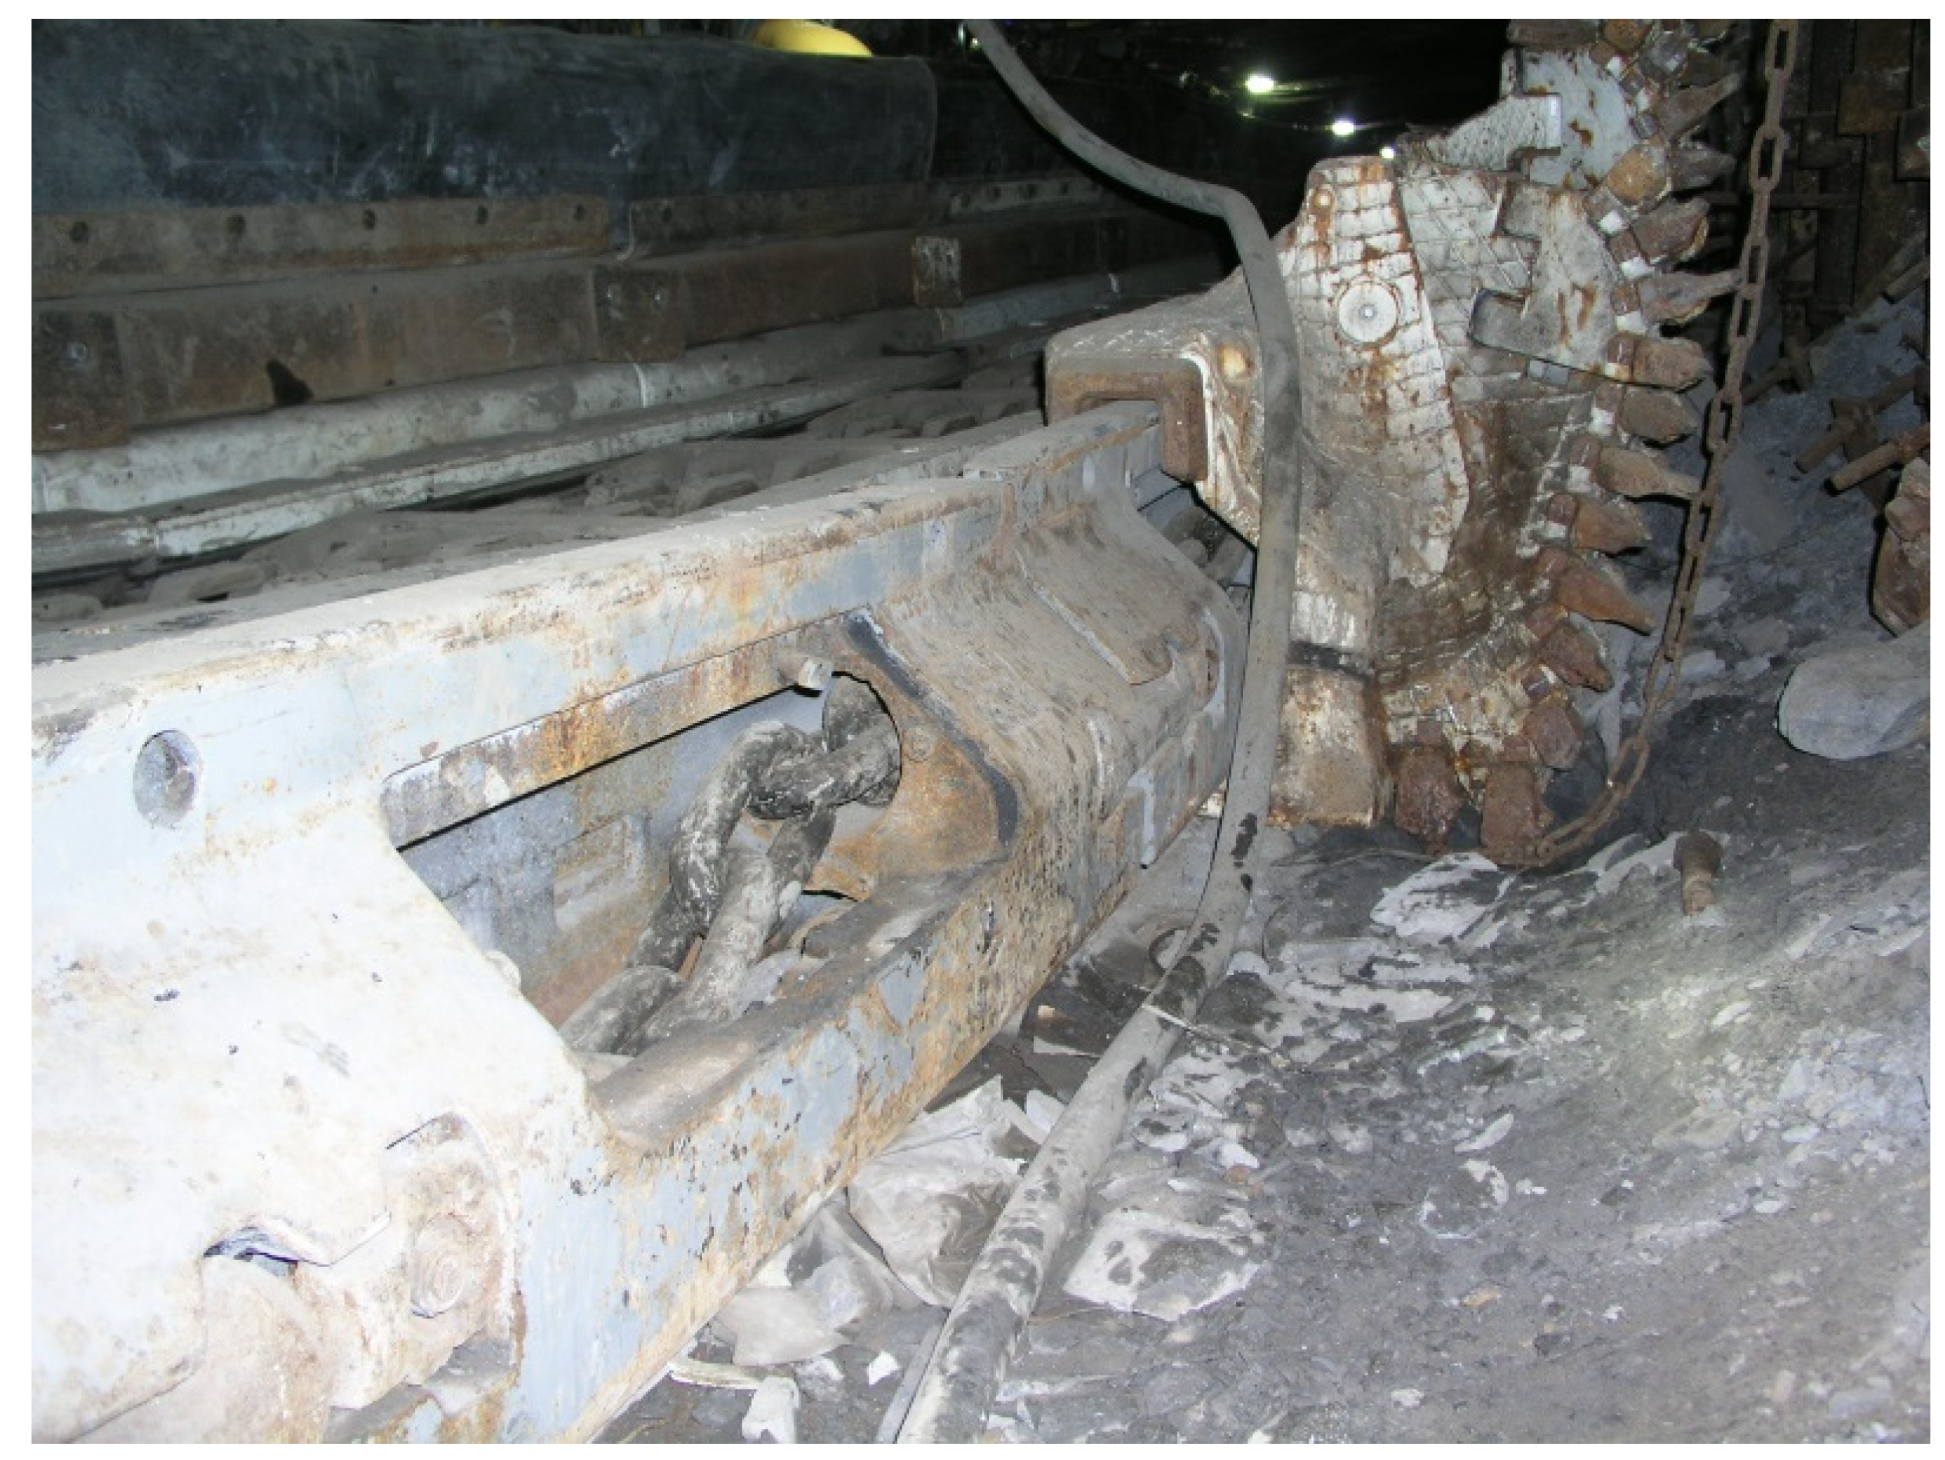
High-performance mining plough systems (
Figure 1) have the potential to achieve high productivity in low coal seams with good economics of operation in combination with partial or total automation, of which sensors of the actual forces in the chain should be an important part [
2,
3].
The working cycle of a ploughing system at LW Bogdanka mine comprises:
- ₋
Bruising the coal seam (1) with the plough head (2) to a pre-set cutting depth, which averages about 5 cm along the linear sections. The head, approaching the end of the longwall face, gradually decreases its speed from 3 to 0 m/s, at the same time doubling the cutting depth for the purpose of sumping. After stopping, it changes its direction of movement and gradually increases the speed and depth of cut.
- ₋
After making a total cut of 0.7 m, the powered sections (7) automatically move to a new position securing the roof.
Significant advances have already been made in plough technology in the areas of power supply, control, automation and visualization of machine operation [
4]. Longwall automation is of particular importance in the exploitation of deposits of a difficult character, e.g., steep slopes [
5]. Centralized control stations have access to the current data on the operation of the drives, the position and speed of the plough, as well as the properties of the coal stream. This degree of automation has been achieved at the LW Bogdanka mine [
6]. After supplementing these data with the forces occurring in the mechanically loaded parts of the system, the view of the extraction process is complete.
The moving mining chain undergoes surface degradation, which, combined with the fatigue nature of the loads, especially that of the plough chain, contributes to chain rupture as a result of advancing fatigue cracks [
7,
8]. Determining the actual forces occurring in a chain in service can be used to define the fatigue criteria (range of forces and number of cycles) to be met by a chain operating in a given wall, or to verify the requirements included in relative standards.
Loads on mining machinery components, including pull chains, are often a subject of simulation and mathematical analysis, as well as experimental studies in a laboratory environment [
9,
10,
11,
12,
13,
14]. However, their verification through real-life tests is undertaken much less frequently.
The most common way to measure forces in structural components and operating machinery is to use flat, adhesive, resistance strain gauges in a Wheatstone bridge connection [
15]. Suitable for measurement in clean and controlled environments [
16,
17], they require good surface preparation and pose problems in installation and operation when the machine component under test is subjected to external surface friction, high vibration, dust, moisture and water.
The measurements of forces occurring in mining chains conducted to date have been related to chains of a scraper conveyor moving at a typical speed of 1.3 m/s.
First, attempts to measure the actual forces occurring in a mining chain did not involve the integration of a strain gauge sensor with a link in the chain under consideration. Instead, the measuring system on a scraper conveyor link made use of the closing of the arms of the link during its stretching, which resulted in the application of force on sensors placed on their internal surfaces [
18]. The resulting 10 bit resolution signal with 10 Hz sampling was then sent via a cable to a battery-powered transmitter and transmitted to a receiver and then forwarded to a recorder. The complexity of the sensor and the extensive communication and data transmission system in this solution is not applicable to the plough chain due to the design of the guides in which it moves.
The measurements of the conveyor chain with dimensions of 34 × 126, conducted by using autonomous measuring cells consisting of a full-strain gauge bridge, a signal amplifier, a recorder and a power source, made it possible to collect data on forces in the range of up to 100 kN for a period of 2 h. A sampling rate of 50 Hz was achieved. A total of eight measuring cells were used, synchronized by the external recorder’s radio pulse with other conveyor data, including the torques of the drives [
19]. This solution, suitable for a conveyor with a drive power of 250 kW, offered a measurement range, which was too limited for the purposes of recording the loads on the plough chain. A plough works in both directions and is subjected to greater forces of a more dynamic nature, and since the pulling chain moves inside the conveyor guide, radio synchronization of the measurements is not possible.
The measurements of the forces in links of a 42 × 146 flat chain in a scraper conveyor were conducted using two strain gauge half-bridges in the form of strips glued to the inside of the links. A special miniaturized ADC and recorder operating at 100 Hz were made. Radio communication and a non-stabilized battery power supply were used. Force waveforms were recorded over a period of more than 200 h, allowing conclusions to be drawn about load asymmetry, heavy starting conditions and vibration frequencies [
20]. This solution, however, required a highly miniaturized measuring system, which was made for the purpose of the current research. In the case of a plough chain, radio communication cannot be realized in this way.
The aim of this work is to design and build the first measuring system for forces occurring in the plough chain of the CAT GH1600 ploughing system in the LW Bogdanka mine (
Figure 2) capable of recording the actual forces occurring during coal extraction throughout an entire shift, and to conduct on-field tests in order to determine the nature of loads acting on the chain. The applied plough chain was manufactured according to the requirements stipulated in the DIN standard (
Table 1).
2. Methodology
Cylindrical strain gauges [
21] originally designed for measuring forces in bolts, are an excellent solution in all cases where gluing flat-strain gauges is impossible or inadvisable, and where it is possible to pierce a channel with a diameter of 2 mm through places of stress concentration being measured. The sensor of this design was perfectly integrated with the tested element and isolated from the external environment.
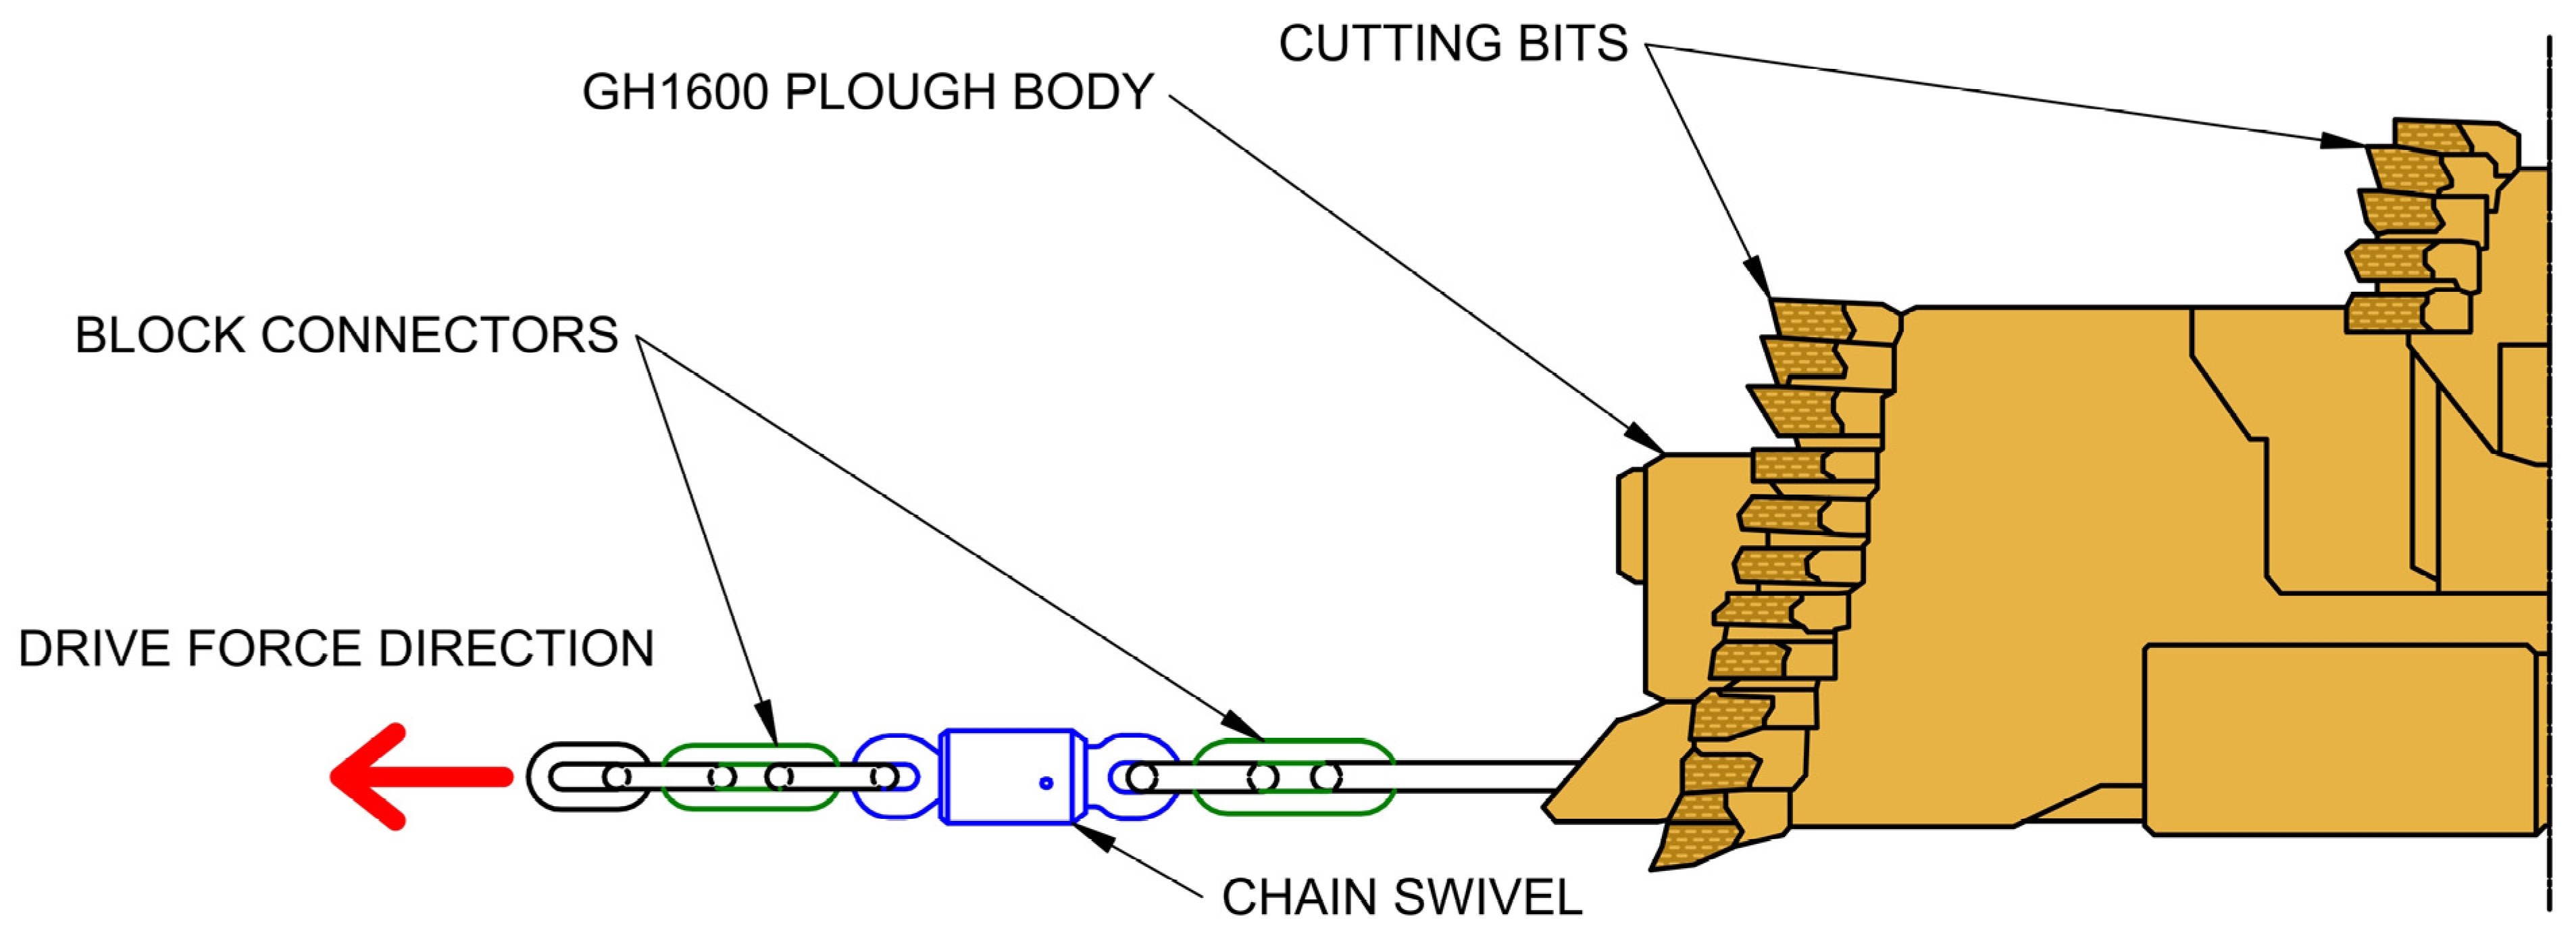
The work involved the selection of the installation location along the chain for a strain gauge of this type, along with a necessary amplifier, recorder and power supply systems, in such a way as to minimize the loss of strength of the plough chain. A chain swivel, located near the chain connection to the planer, was identified as the optimal location (
Figure 3).
Used to neutralize chain torsion moments, it was joined by a 118 mm diameter threaded cylinder. Designed for connecting a plough body equipped with 48 mm chain connectors to the actual 42 mm working chain, it was designed with a reserve of strength and had internal volumes that transferred little tension (
Figure 4).
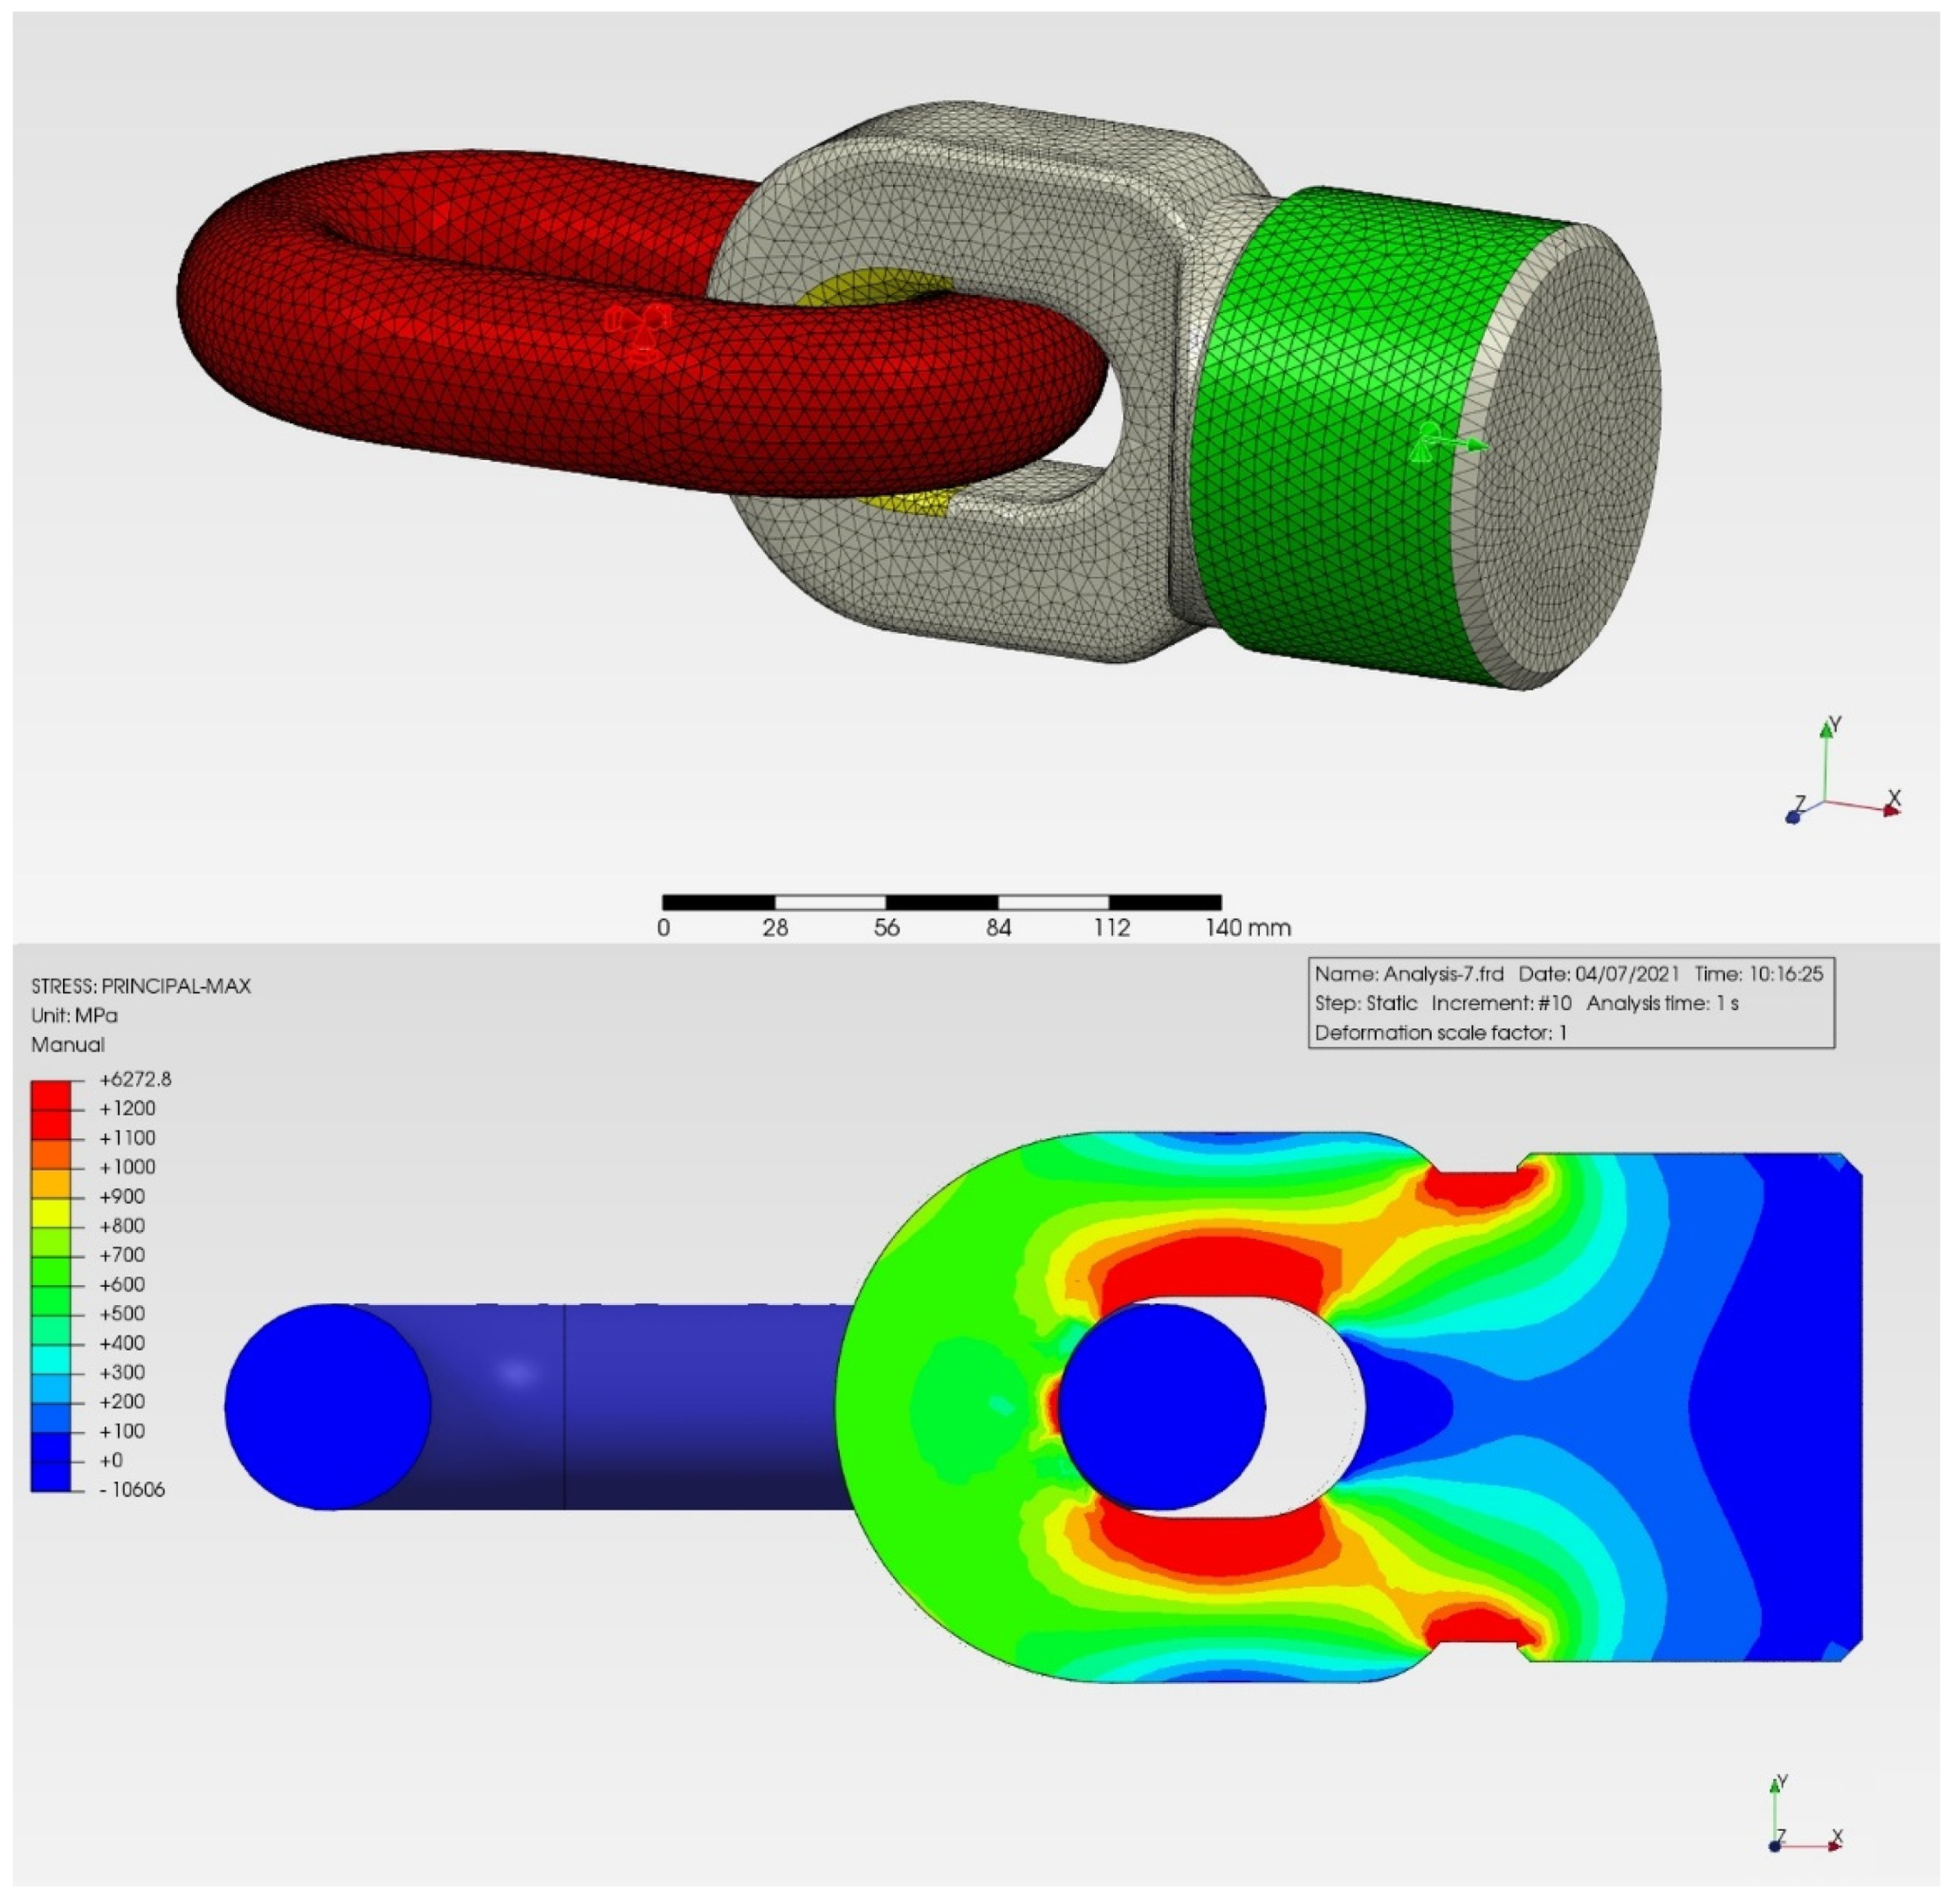
To aid in choosing a location of the strain gauge within the swivel, an approximate CAD model of the male part of the swivel was made and subjected to an FEA analysis in PrePoMax software (
Figure 5). The model of the swivel contained 63,547 tetrahedral C3D10-type elements, with sizes between 2 and 5 mm. The material properties chosen for the calculations were Young’s modulus of 210 GPa and Poisson’s ratio of 0.28. Open-source CalculiX solver was used to perform statical analysis with geometrically nonlinear calculation NLgeom enabled to account for deformation. Boundary conditions were set as:
- ₋
Displacement of threaded connector portion of the swivel by 2.5 mm along the x axis;
- ₋
Static, 48 mm chain link inserted into the eye of the swivel;
- ₋
Hard contact surface interaction between the static link and inner surface of the eye.
The total step of the analysis was 1 s with 0.1 s increments.
An analysis of the swivel eye that was deformed by approximately 1.25 mm showed that the interior of the connecting cylinder was characterized by low stresses, with stress-concentration areas occurring in the eye near the inner surface, which indicated a suitable location for the strain gauge. The low-stress internal volume of the cylinder was deemed suitable for the placement of electronic components.
A circuit consisting of an ATmega328P microprocessor and HX711 24-bit analogue-to-digital converter was selected and constructed to perform the measurements. A microprocessor was used to satisfy the communication needs and to transfer data to a serial terminal or SD card. Additionally, the chip contained a USB-UART FTDI FT231 converter, which enabled communication between the aforementioned serial interfaces, making it possible to exchange data between the computer and microprocessor at a configurable baud rate ranging from 1200 to 1,000,000 bps. This made it easy to configure the system and check its operation. For the temperature compensation, the system included a TMP102 temperature sensor. Due to the working conditions and the lack of possibility to connect the system to a permanent power supply, the system was powered by an industrial grade 6RL61 alkaline battery with a voltage of 9 V and capacity of approx. 570 mAh. Due to the necessity of supplying the microprocessor and A/D converter with a stabilized voltage of 5 V, a circuit lowering the voltage from 9 = to 5 V using an LM7805 voltage stabilizer was made. The circuit diagram is presented in
Figure 6.
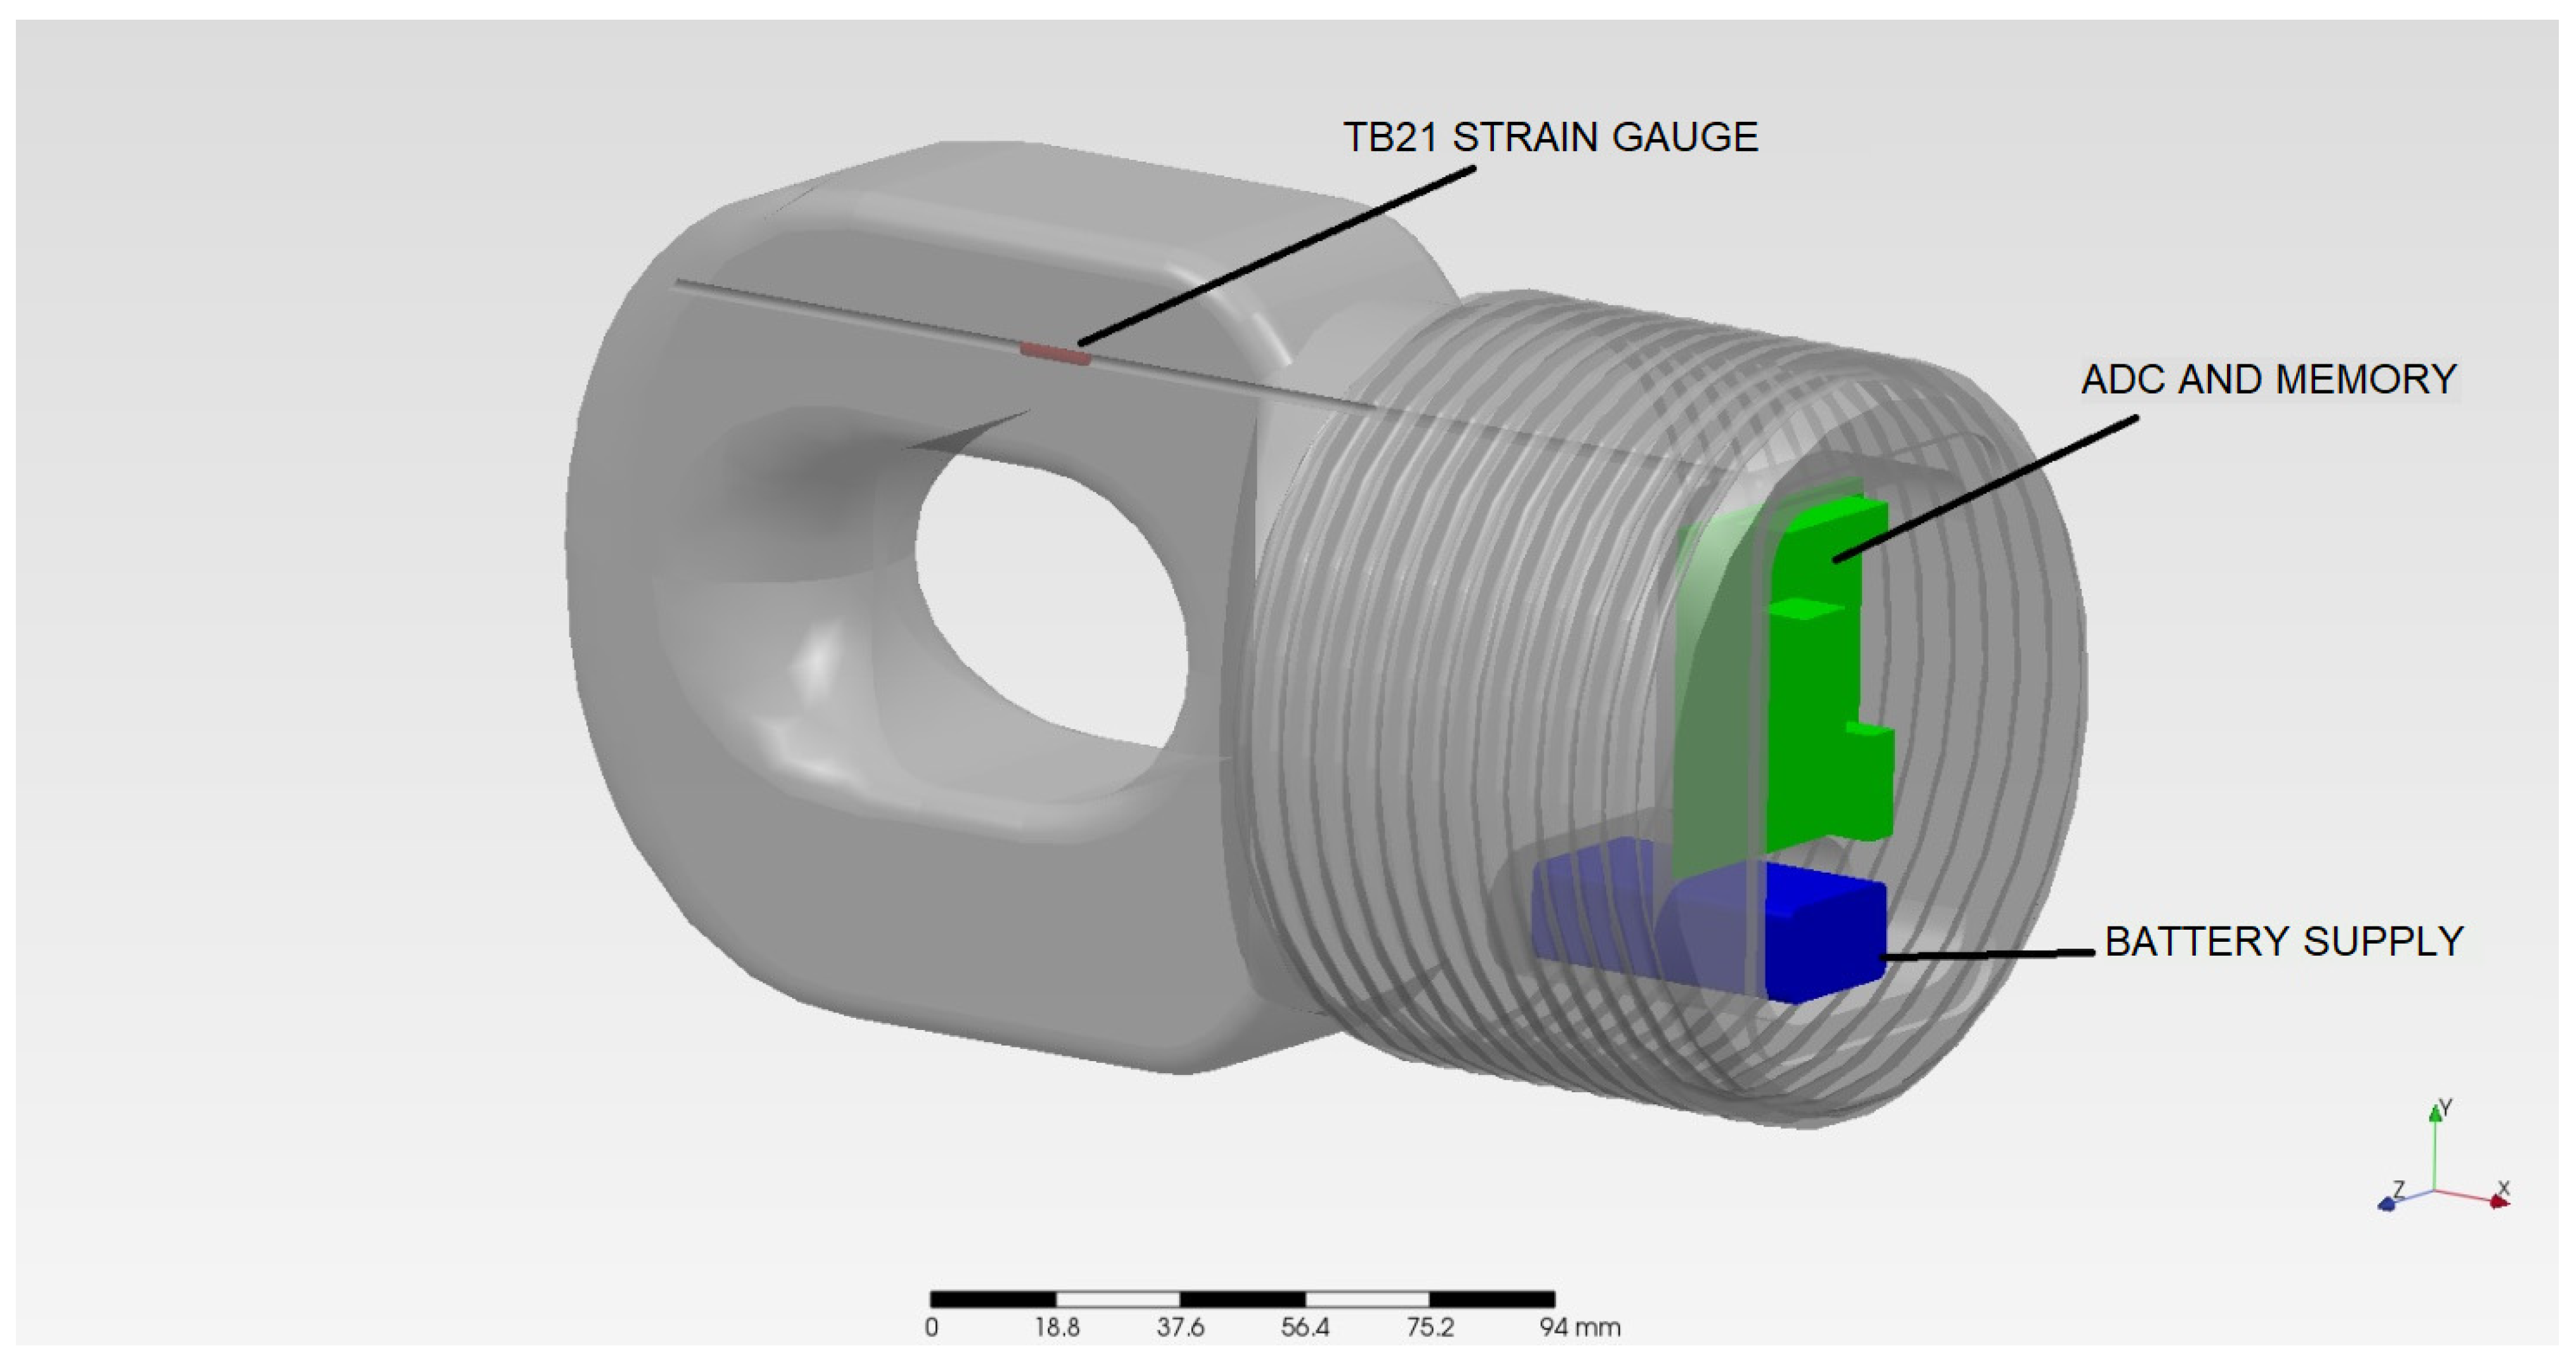
The position of the components was presented on a 3D model (
Figure 7) and appropriate chambers were machined in the swivel. The hole for the installation of the strain gauge, with a nominal diameter of 2 mm, was made by electrical discharge machining in such a way that it passed through the identified area of high-stress concentration. The strain gauge was installed in this area in accordance with the manufacturer’s instructions using an EP 150 temperature-cured epoxy adhesive. The initial verification of the strain gauge installation was performed using an HBM MGC+ amplifier and ZMLK 500 testing machine. A linear response was obtained, and the installation was verified as correct. Once the measuring system was complete, it was embedded in the chambers using silicone. The device was started up by connecting a battery, which was sufficient for the continuous operation of the device for approx. 14 h in a 50 Hz signal-recording mode, resulting in a real power consumption of approx. 40 mA.
A target measurement range of the developed sensor reflected a force range specified for fatigue life testing according to DIN 22252 [
22] i.e., from 139 to 693 kN.
The determination of a measurement function, i.e., the relationship between the sensor signal stored in the memory and the actual value of the chain load, was conducted on na ZMLK 500 horizontal testing machine. The procedure was based on the ISO 376 standard. The procedure consisted of:
- ₋
Preloading the system three times to 900 kN, unloading the system and waiting 3 min;
- ₋
Conducting two series of measurements, X1 and X2, by loading incrementally to nine force levels evenly distributed between 100 and 900 kN, unloading the system and waiting 3 min;
- ₋
Performing two further test series, X3 and X4, after rotating the test system by 180° around the force application axis. The system was limited to these two positions due to the design of the chain connection of the testing machine;
- ₋
Removing the instrument from the testing machine and removing the memory card. Routing the data for analysis.
The data recorded in the device memory and the data obtained from the testing machine were combined by maximizing the Pearson’s correlation coefficient to 0.99985. The deflection (defined as the difference in the signal between zero load and load at calibration force) of the sensor readings corresponding to the adopted calibration levels is presented in
Table 2 and
Figure 8. The measurement function was a linear regression function, fitted by the method of least squares to mean readings at calibration points obtained in all 4 series.
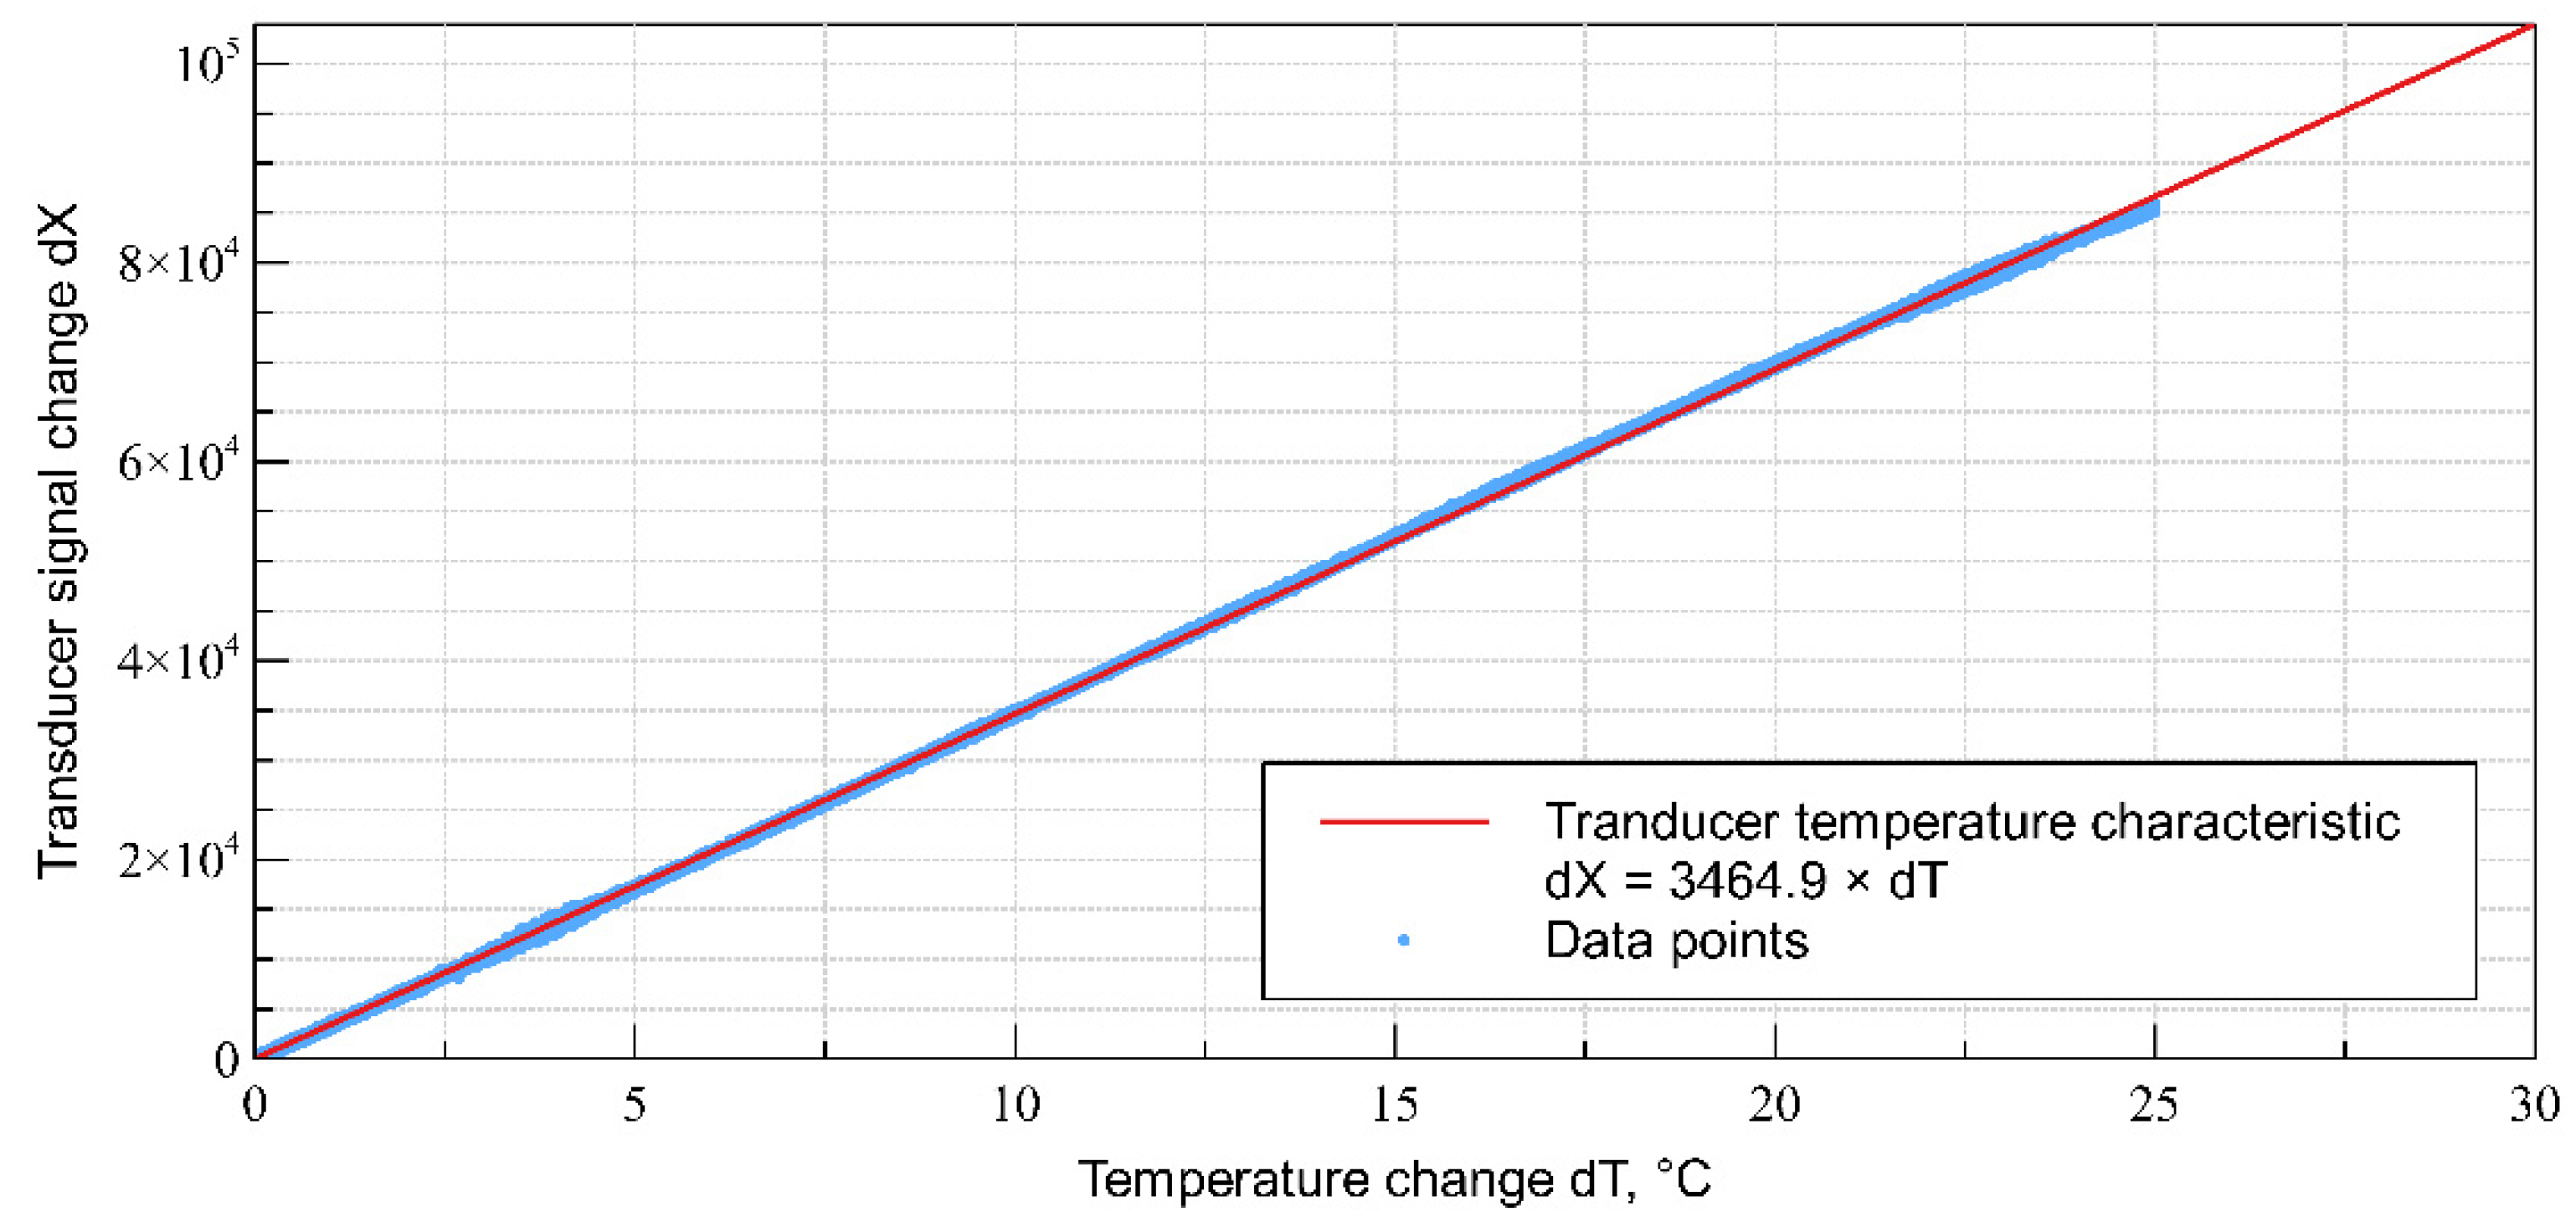
Due to the considerable, expected temperature fluctuations occurring in the place of measurement during the operation of the plough, the temperature characteristic was determined for the purpose of applying corrections to the measurement data by placing the complete device in a chamber heated from 25 to 50 °C. Indications of the integrated TMP102 temperature sensor allowed us to determine the temperature characteristics of the device by linear interpolation (
Figure 9).
Based on the collected measurements, an uncertainty analysis was performed using the methods described in Annex C of ISO 376. The uncertainty budget consisted of 8 factors: calibration power, repeatability, reproducibility, resolution, creep, zero error, temperature and interpolation. Its results are presented in
Table 3.
The asymmetrical nature of the device (strain gauge located in one of the arms of the swivel eye) resulted in the greatest contribution to the measurement uncertainty being the reproducibility error occurring between the measurements in the 0 and 180 degrees of rotation configurations. Since it is difficult to ensure that the device is always mounted in the intended orientation under longwall conditions, this error should be taken into account in the calculation.
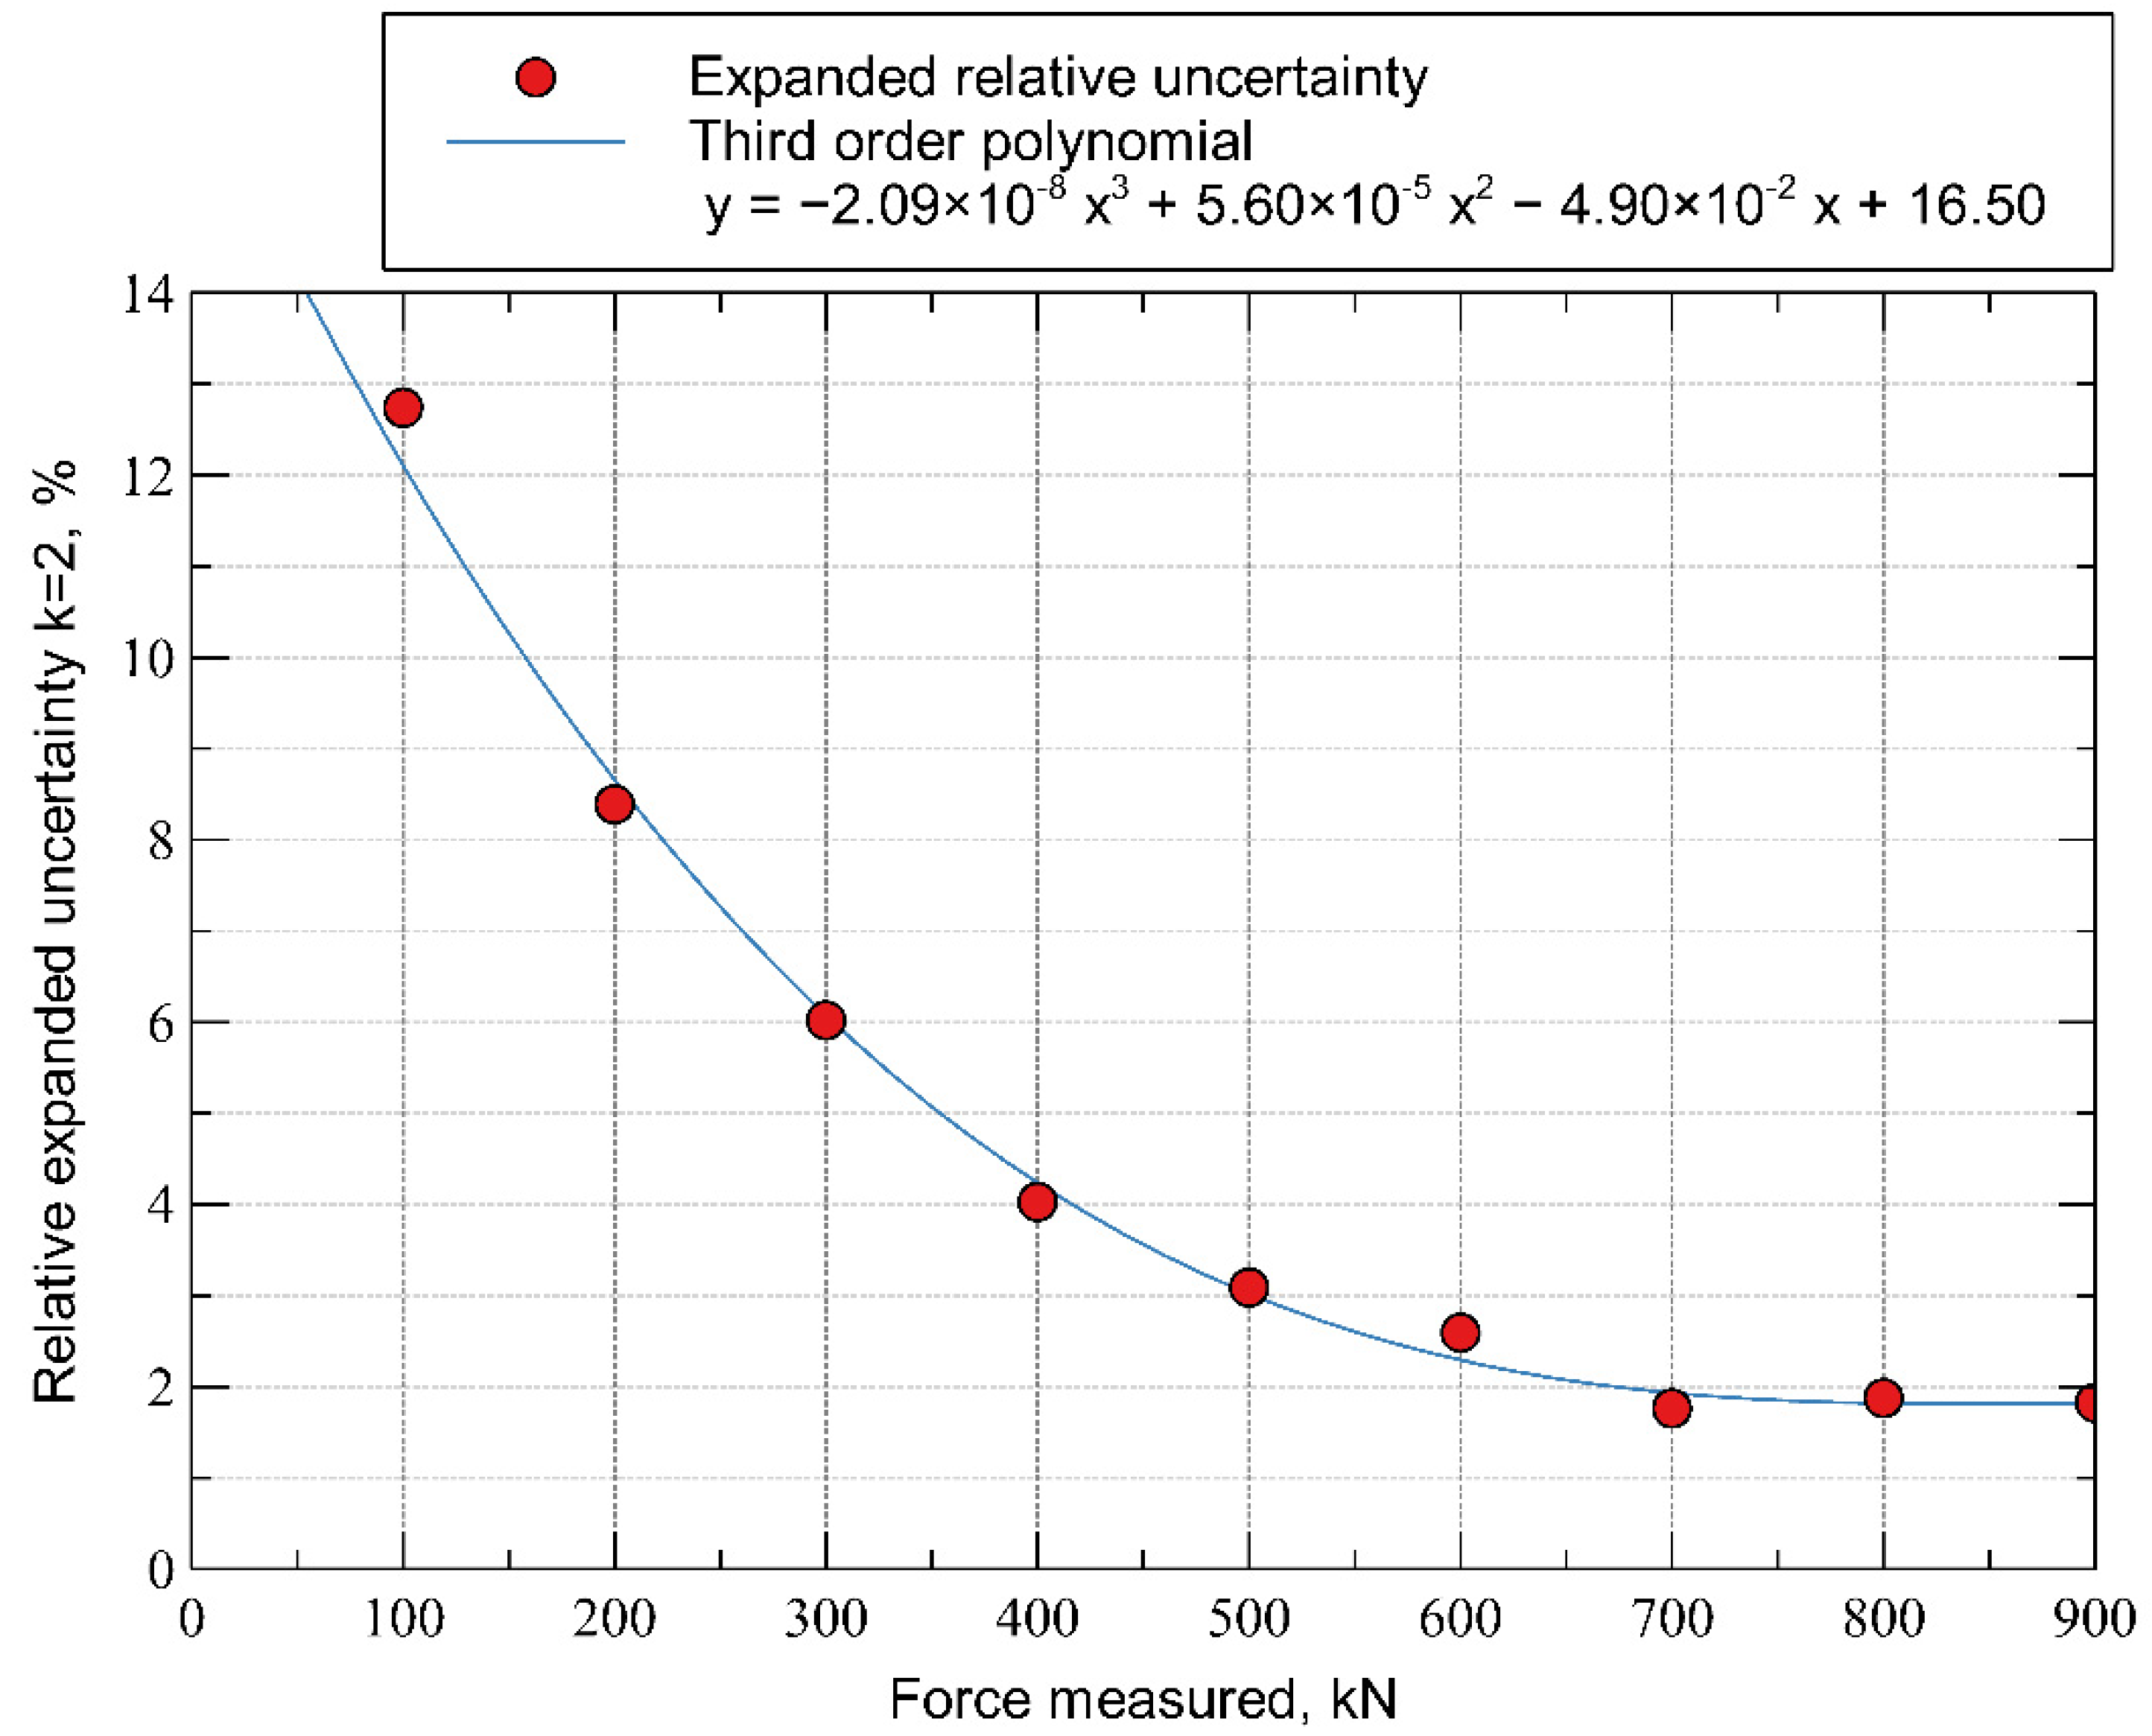
The distribution of the expanded, relative uncertainty for the test forces is presented in
Figure 10.
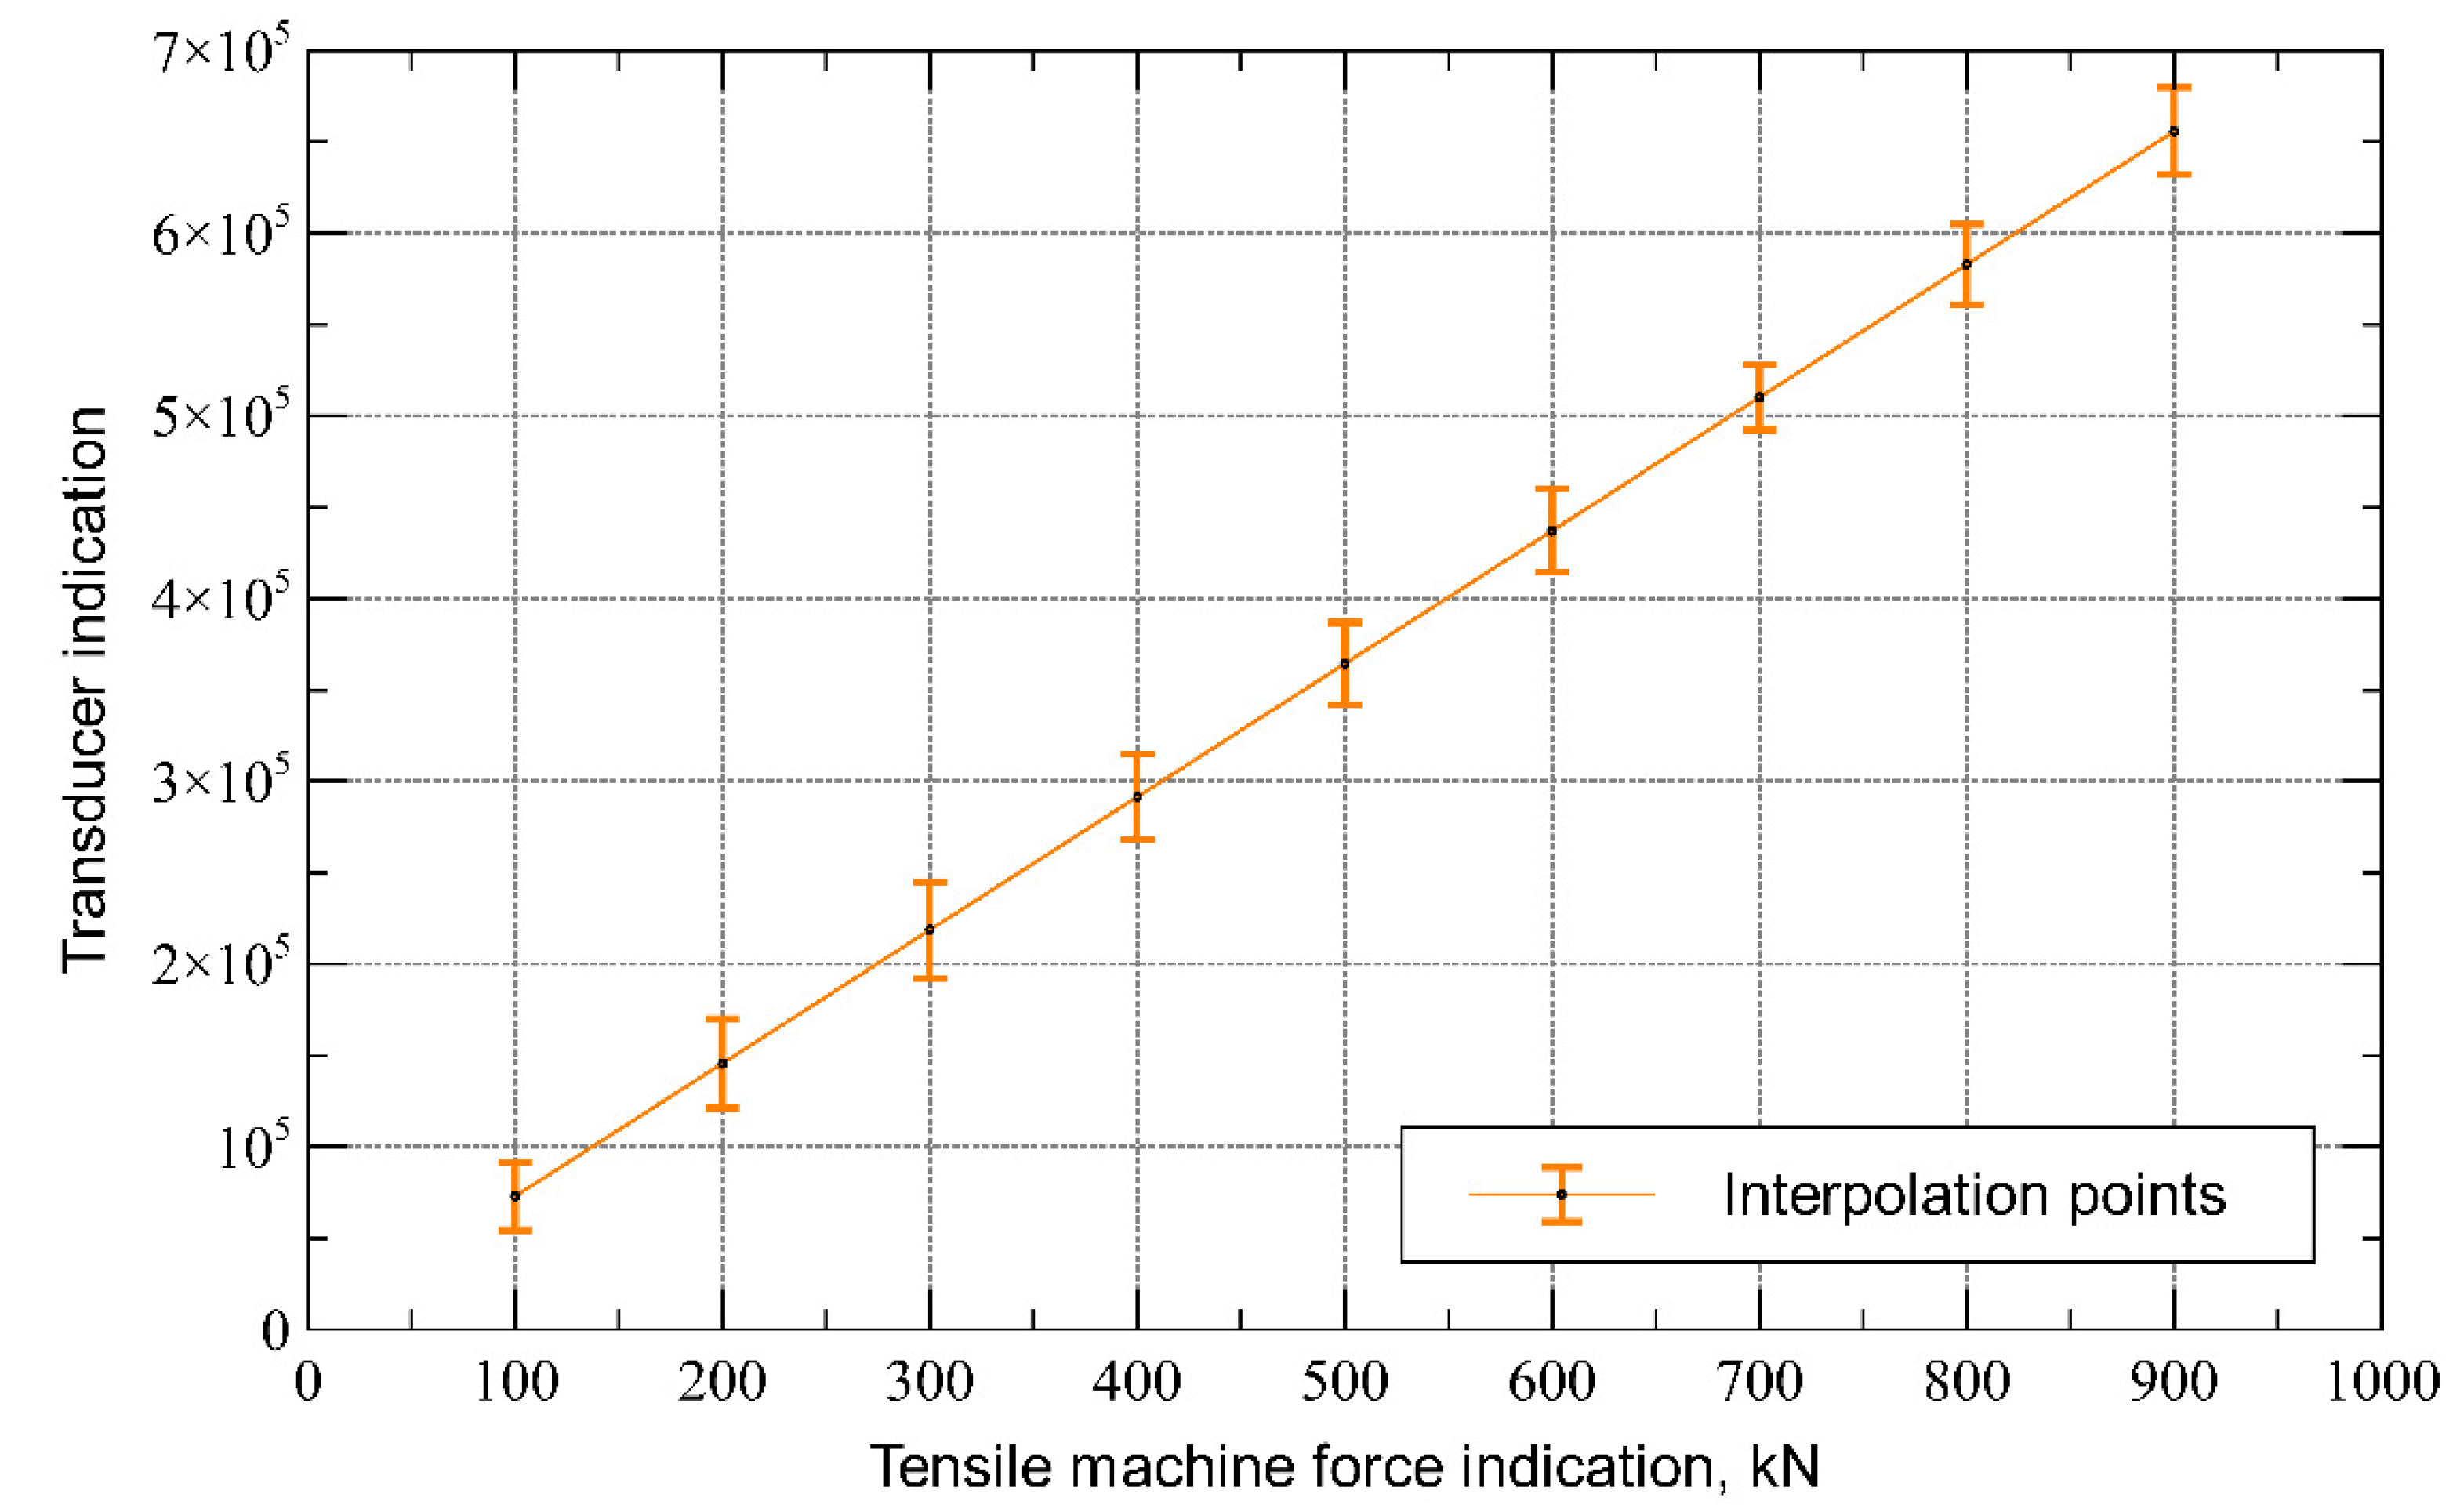
The least squares interpolation curve (
Figure 11), which is a measurement function of the dependence of the signal on the force acting on the swivel, had the following form:
3. Measurements under Real Conditions
Field measurements were performed in the LW Bogdanka mine on the longwall 4/VIII/385 exploiting seam 385/2 at the level from 870 to 920 m. The longwall was 305 m long and its run-out was 3175 m. The average value of the Rc uniaxial compressive strength acquired by the in situ penetrometric measurements of the coal in the seam 385/2 was approximately 12 MPa. The value of the workability index according to Protodiakonov ranged from 0.75 to 1.2.
The force measurement was conducted twice during night shifts by installing the apparatus on the sides of the main drive and the auxiliary drive of the plough. The measuring device was installed along the chain of the plough and the workers of the next shift removed it and brought it to the surface. The device was then opened, the recorded measurement data downloaded and an analysis was performed, which included:
- ₋
The determination of the zero-force signal: set as the signal recorded 300 s after the device was started, when it remained under zero load before it was mounted on the ploughing chain;
- ₋
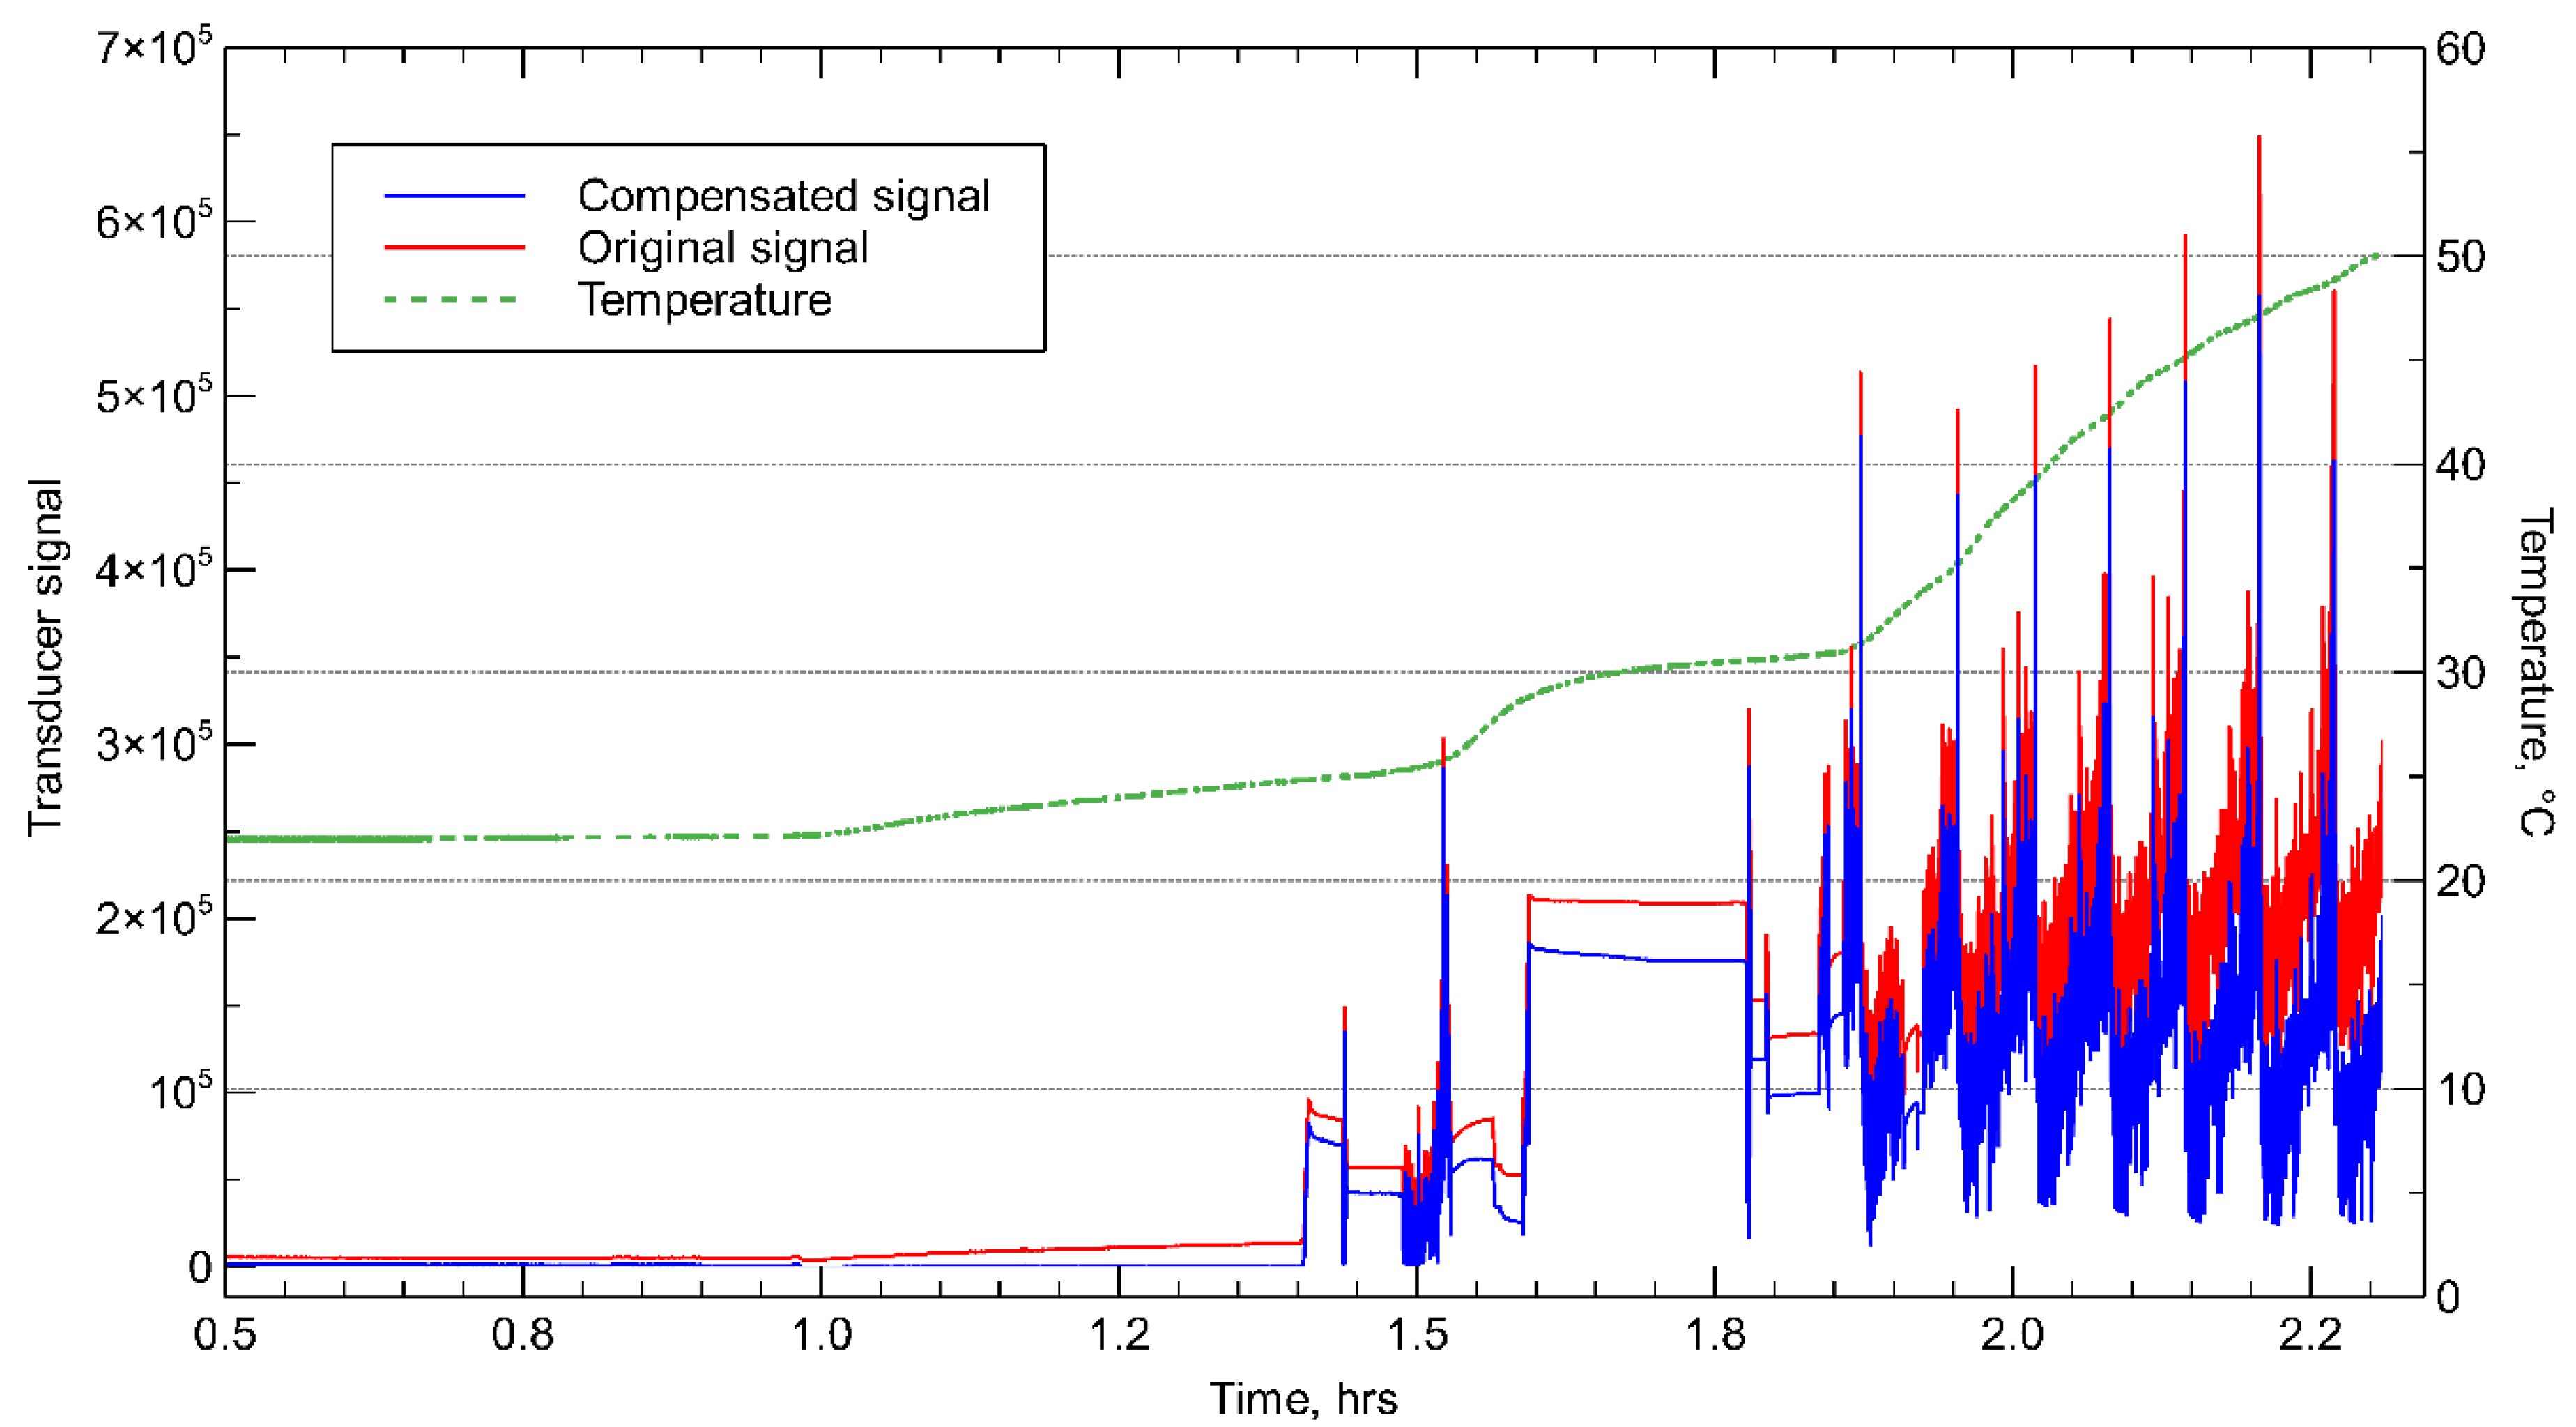
The determination of the temperature compensation: the temperature changes dT recorded by the integrated thermometer during the shift were used to calculate the temperature correction of signal X using the relation dX = 3464.9 * dT. The measurements were characterized by a significant influence of the temperature, which reached above 50 °C during the operation of the plough. The effect of temperature compensation on the signal by example of the measurement performed on the main drive side is presented in
Figure 12.
- ₋
Conversion of the conditioned signal into force indications using measuring Function (1), which produces the following relation:
where F—force acting on the chain (kN); X—sensor indication.
- ₋
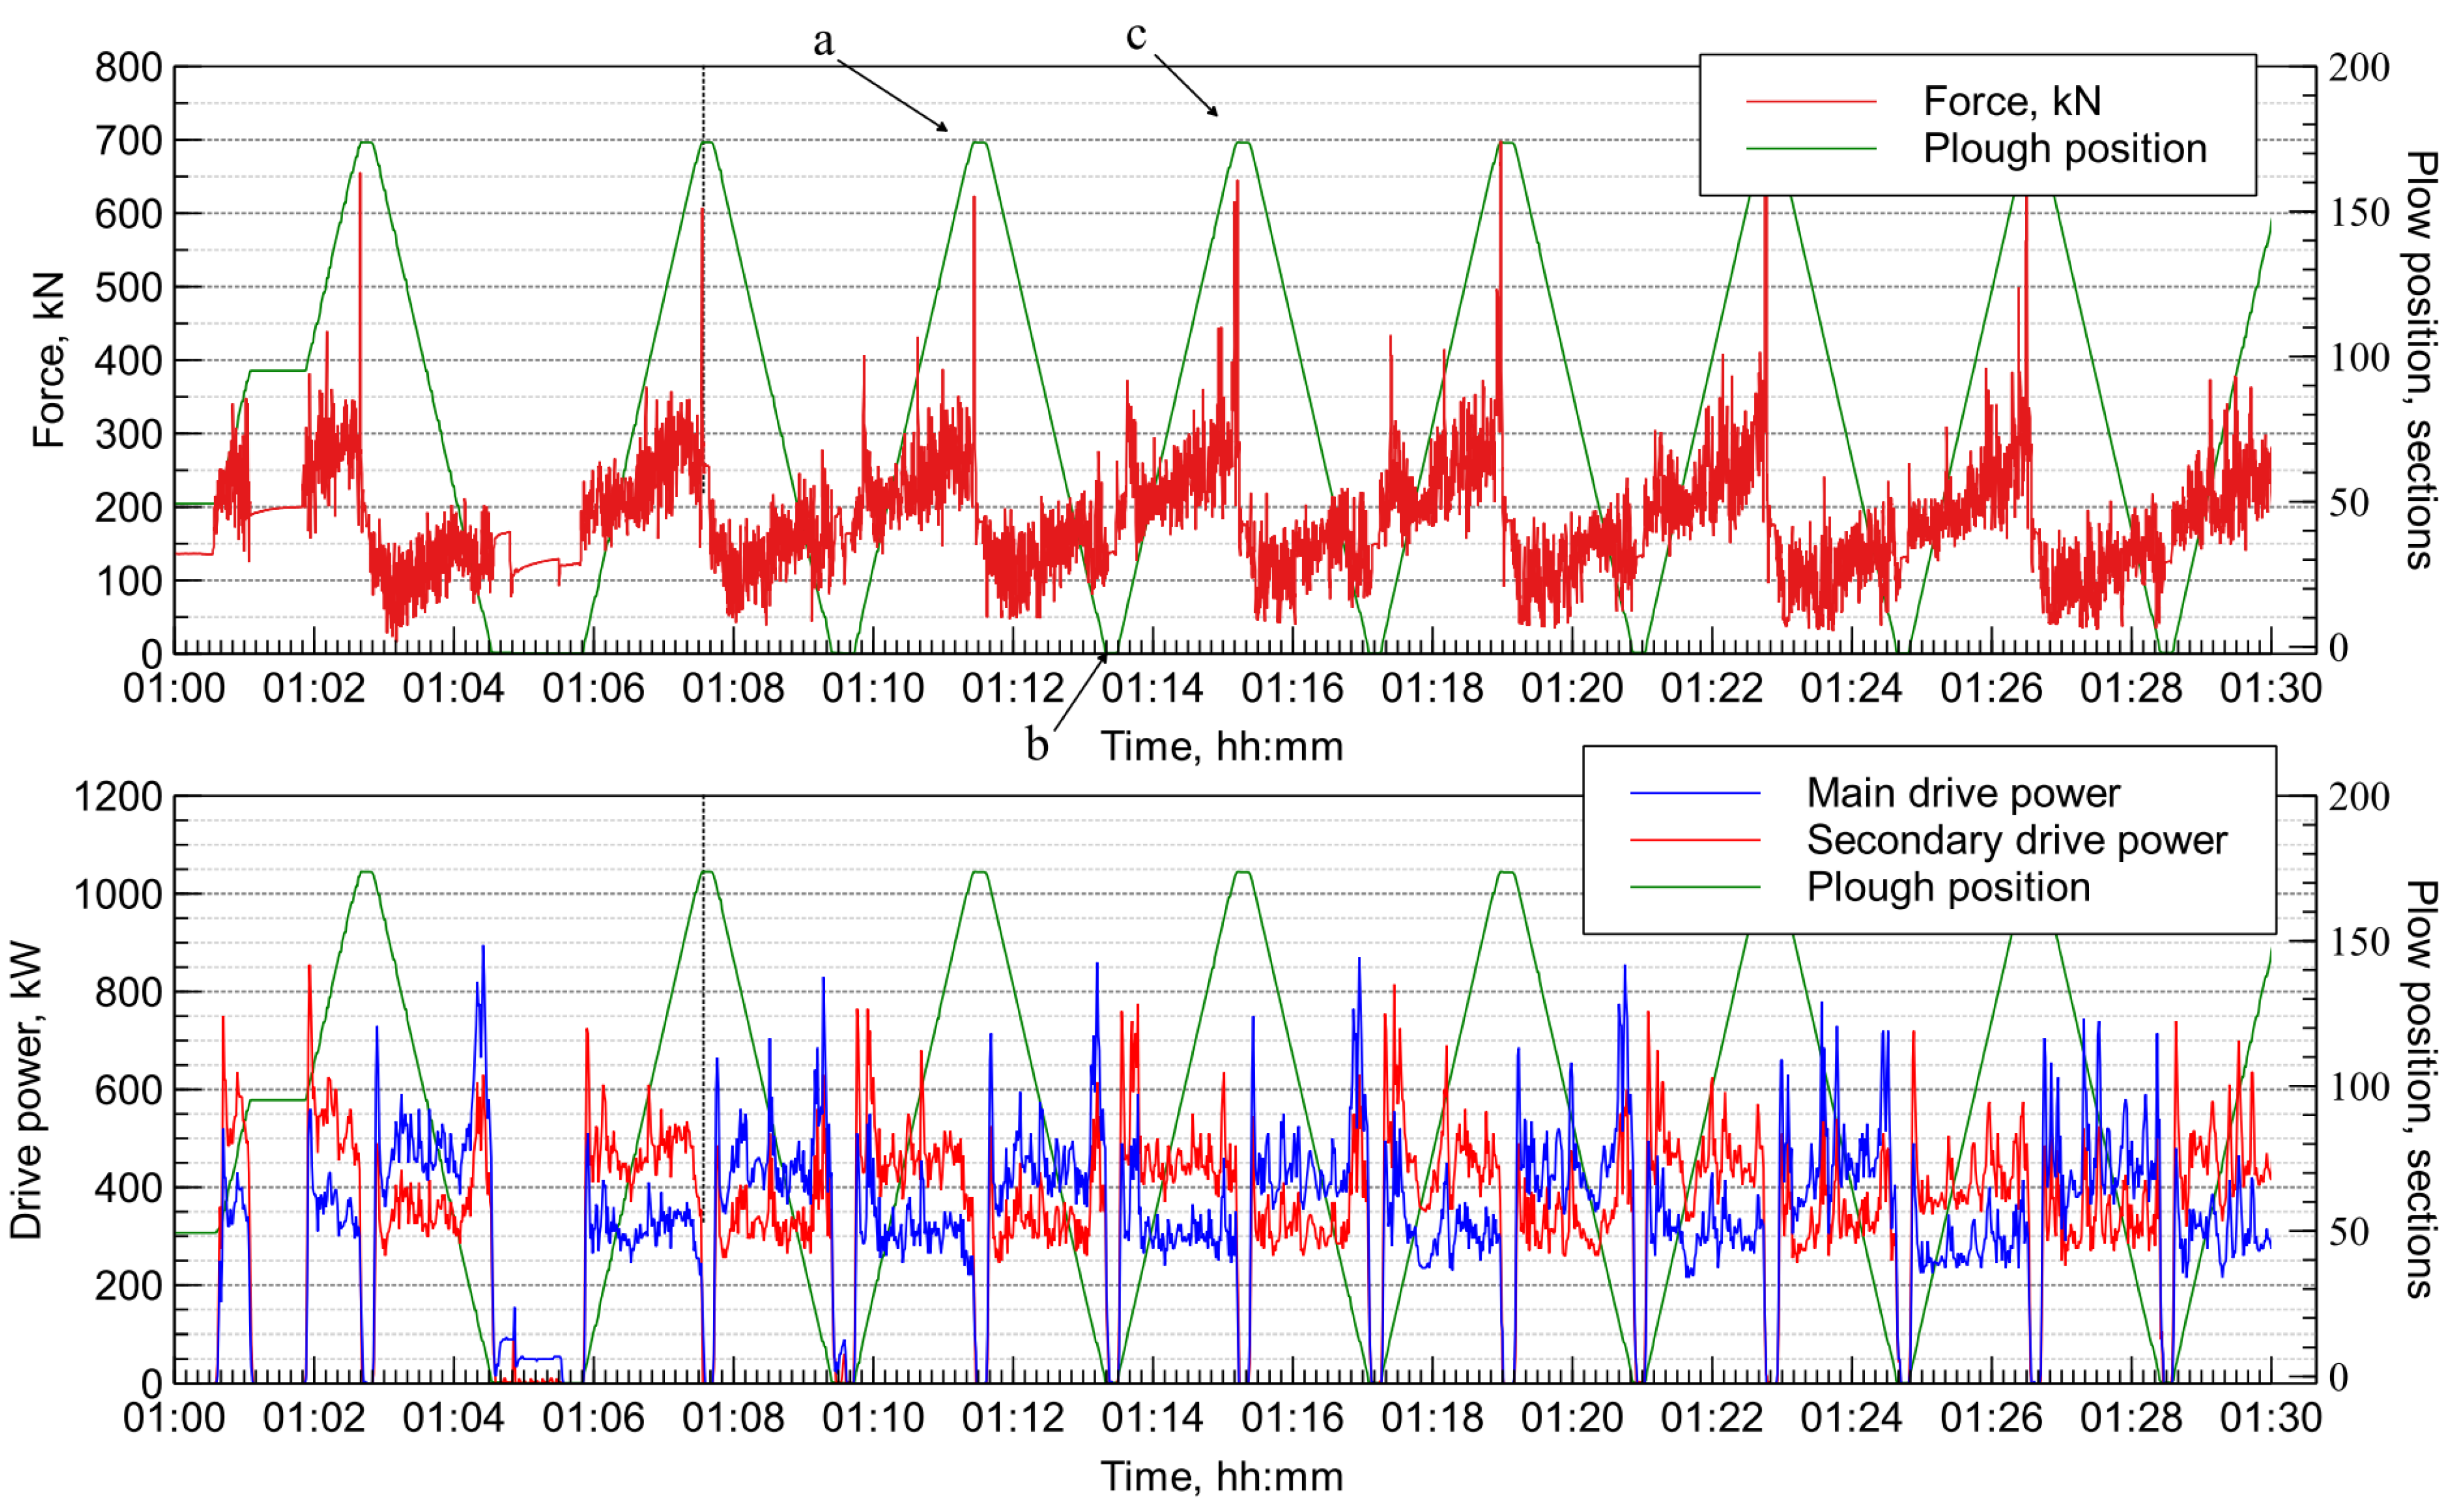
Comparison of the obtained results with the data from the plough control system provided by LW Bogdanka, concerning the position of the plough and power of its drives. These data were recorded with a frequency of 1 Hz.
The representative fragments of the collected data, related to the common absolute time in hh:mm format, are presented in
Figure 13 and
Figure 14.
The data collected provided the first information on the actual forces occurring in the plough chain during its operation in real conditions.
The forces acting on the chain during the ploughing run mostly did not exceed 400 ± 16 kN, well below the static working force of 1385 kN predicted for the chain. Their course, however, indicated a one-sided pulsating character, caused by the change in the load of the plough as it encountered parts of the excavated seam of varying hardness.
The normative requirements provided by the standard [
22] set the pulsation levels of fatigue tests at 139 kN for lower force and 692 kN for upper force. The measurements obtained allowed us to verify that the actual levels of pulsating forces during the steady cutting of the coal face were of a fatigue nature and lay within the range provided by the standard.
The measurements also revealed peaks of impact-type forces (
Figure 13 and
Figure 14, point a), occurring when the direction of the moving plough was changed (points b and c). Probably caused by the inertia of the whole system and the action of the opposite drive motor to stop the plough, these forces reached maximum levels, 728.6 ± 12.8 kN, when measured on the main drive side, and 686.2 ± 12.65 kN when measured on the auxiliary drive side. They are not proportionally reflected in the drive-power data provided to the operator by the plough system. These events, occurring in every working cycle of the plough, i.e., every 1.5 to 2 min and up to 500 times a day, may significantly contribute to the fatigue wear of the chain and propagation of cracks formed during its normal operation or emergency events.
4. Discussion and Conclusions
The presented work resulted in producing the first successful measurements of tensile forces occurring in a mining plough chain in real operation conditions. The device constructed for this purpose did not alter the plough pulling system as it was perfectly integrated with its existing element. It was also low cost and withstood harsh working conditions of vibration, dynamic forces and temperature. Due to the careful calibration, it provided reliable data within known uncertainty.
The data collected provided new insights into the real characteristics of forces withstood by a plough chain. The levels recorded during the steady operation along the longwall face fell well within ranges described by applicable standards and did not provide an answer to the problem of chain breakages that often occur much faster than expected. The most probable reason for this rapid deterioration was peaks of force levels of up to 729 kN recorded at the end of each plough run. As is visible from the comparison with the data obtained from the drives, the scope of these events is not visible in the data accessible, at present, to the operator. The sudden stoppage of the inert mass of the plow and power of a drive that starts pulling in the opposite direction results in an impact exerted on the chain that accelerates the propagation of any cracks resulting from the friction wear of the chain. Furthermore, any slack or misalignment of the chain links that may exist at this moment would result in damage to or indentations of the links, which considerably reduces their fatigue resistance in the future. This information, provided by the measurements conducted in just two shifts, can serve as guidance for plough operators. It suggests that performing direction changes in a gentler way could considerably increase the lifespan of a chain.
A significant drawback of the presented device was a necessity of the time-consuming installation for each of the measurements and the lack of a live data transfer to the plough control station. The collected data proved that it is well-founded to develop force-measurement systems further for the plough chain that would be permanently integrated with the system, constantly powered and linked to an existing control system data stream.

