Abstract
A new transient technique of the thermal conductivity and diffusivity measurement for anisotropic materials is presented and validated. It is based on measuring the through-plane properties using the extended dynamic plane source (EDPS) method and in-plane conductivity employing the transient plane source (TPS) and modified dynamic plane source (MDPS) methods. The key advantage of this technique is that only one pair of specimens is required for measurements. While the EDPS method is implemented on real measurements, the TPS and MDPS are applied to the finite elements method (FEM) simulation of the experiment. The accuracy of the results is enhanced by the application of the FEM and is better than 1% for materials with through-plane conductivity of less than 2 W m−1 K−1 and a specimen thickness of 9 mm.
1. Introduction
The transient methods [1,2,3,4,5,6,7] for measuring material thermal properties are characterized by dynamic heat flow generation inside the specimen, resulting in a temperature dependence on time that is referred to as a temperature response. The theoretical temperature function, which is a solution of the heat equation, is then fitted to the temperature response to obtain the values of the material parameters. The differences between the theoretical model and the real experimental setup cause systematic errors in the determination of the material parameters. Therefore, the more accurate the theoretical model is, the better the material parameter estimates are. However, the analytical solution can become very complex, so it is impractical or completely unknown, and the problem must be solved numerically.
The TPS method was developed by Gustafsson [8] and has been employed to measure isotropic thermal conductivity and diffusivity in bulk, slab, and film specimens. In comparison to other methods, it offers several advantages. For instance, the TPS method apparatus can measure thermal conductivity and diffusivity simultaneously in a short time and with small specimens [9]. Materials like wood, paper, laminates, polymer composites, crystalline, and nanomaterials are anisotropic in nature [10,11,12]. To understand the heat behavior of such materials, it is essential to determine the heat conductivity in various directions. The TPS method can also be used to measure anisotropic thermal conductivity [13,14] and became an ISO standard in 2008 [15]. The described technique assumes that thermal properties along two of the orthogonal principal axes should be identical (in-plane direction) but different from those along the third axis (through-plane direction). However, a separate measurement of the volumetric specific heat capacity is required, as this is a prerequisite for the anisotropic TPS model. One potential solution to this problem involves affixing the TPS sensor to a specimen container that is encased in insulation. Nevertheless, this approach tends to underestimate specific heat capacity and introduces additional operational complications [16].
Zhang et al. [17,18,19] conducted numerical studies to investigate the impact of the thermal contact resistance, the insulation layer, and the sensor material on the uncertainty of TPS measurement. Further studies were conducted to determine the accuracy of TPS measurement of thin films and anisotropic materials. The analysis showed that for specimens with high thermal conductivity and diffusivity, a large radius of the sensor is necessary to achieve a satisfactory level of accuracy. These early works indicate a relative uncertainty of the thermophysical parameter values between 3 and 6 percent. A comprehensive 3D simulation of the TPS setup was presented by Mihiretie [20]. Still, the determination of the material parameters has not been attempted, probably due to the high numerical demands of such simulations. In our own work [21], we considered a 2D model for the TPS measurement. The study demonstrated that the FEM simulation could be employed to derive a corrected analytical formula, which could be used to obtain thermophysical parameters from the measured temperature response.
In their study, Elkholy et al. [22] proposed a methodology for obtaining the thermal properties of anisotropic materials using the TPS technique, negating the need to predetermine the volumetric thermal capacity. The viability of this method was verified numerically by simulating the proposed approach for ABS polymer composite materials. The main disadvantage of this methodology is the necessity of preparing three pairs of specimens of the material under testing. The predicted error in testing this approach experimentally will be approximately less than 8%.
This study presents an alternative method, where only a single pair of specimens is used. The measurements in the through-plane direction are conducted using the EDPS method, while the TPS and MDPS methods are used to determine the in-plane conductivity. The methods utilize a thin plane heat source, a sensor sandwiched between two identical slab specimens, and two pieces of good heat-conducting material that act as heat sinks. It is recommended that the heating power in all three methods be set to cause a temperature increase of about 1 K. This allows measurement of the temperature dependence of the specimen thermophysical parameters.
The EDPS method employs specimens with a diameter equivalent to that of the sensor to apply the one-dimensional heat flow assumption. In the original EDPS method, the temperature of the sensor is determined by measuring its electrical resistance [23]. However, the measurement is affected by the heat loss from the specimen surface, which is eliminated by measuring the temperature in the middle of the sensor by a thermocouple [24,25]. The MDPS method is a modification of the TPS method for sheet-formed specimens. In contrast, the sensor in the MDPS method has a significantly smaller diameter than the specimen to apply the infinite condition in the in-plane direction. The main issue with the MDPS method is the complex analytical solution of the model. To date, only the solution for an ideal heat sink has been developed, and its application to a non-ideal heat sink leads to imprecise results.
The objective of this research is to enhance the precision of the EDPS and MDPS methods through the application of FEM. The developed approach entails the computation of an improved temperature function using FEM simulation of the actual experimental setup. This is followed by the estimation of thermal conductivity and diffusivity using the least squares fitting of this function to the measured temperature response.
2. Materials and Methods
2.1. Transient Plane Source (TPS) Method
The TPS experimental arrangement uses a one-sensor system, where the heat source simultaneously serves as the thermometer. This sensor is sandwiched between two identical specimens of the material under test. Heat is generated by the passage of an electrical current in the form of a stepwise function through the sensor. The temperature of the sensor is determined by measuring its electrical resistance. In accordance with ISO [15], the specimen size should be selected such that the distance of any part of the sensor to any part of the outside boundary of the specimen is larger than the radius of the sensor. In other words, the specimen size must be sufficiently large to ensure that the heat flow does not reach the outer surface of the specimen within the time window used for calculation.
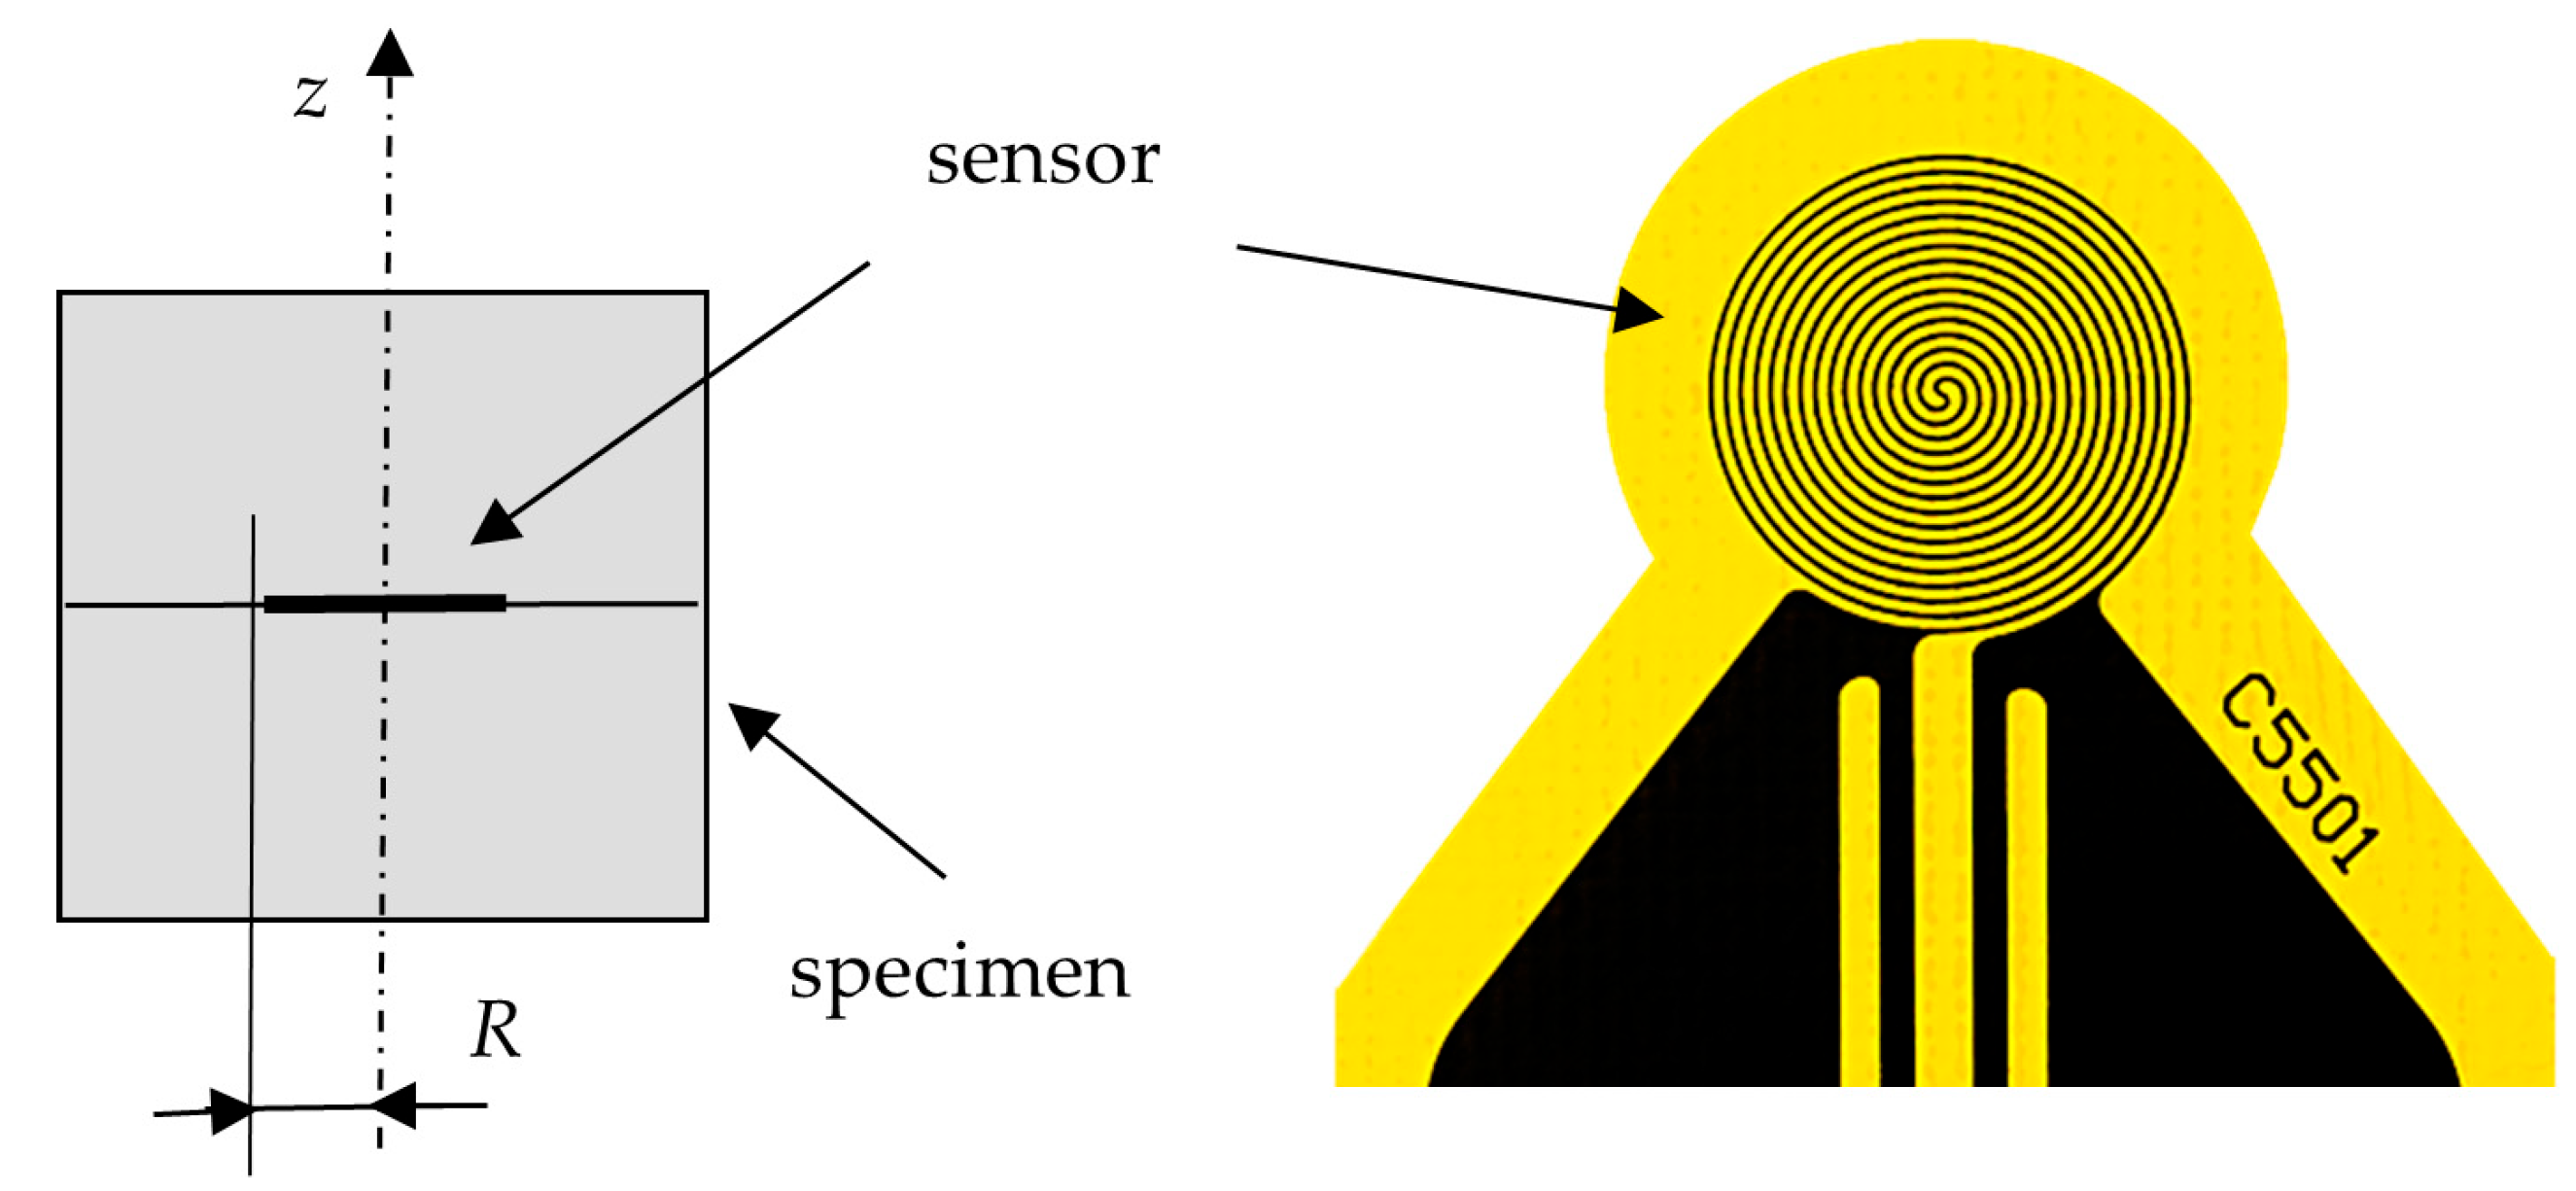
Gustafsson [8] presented a model of a certain number of concentric ring sources (rings model) and a model with infinitely small openings between circular strips (disk model). As illustrated in Figure 1, the width of the strips in the real sensor is identical to the width of the gaps. The theoretical model of the TPS method is based on the following conditions:

Figure 1.
Schematic diagram of the TPS setup and bifilar spiral structure of the sensor Hot Disk Type 5501 (−253 to 300 °C) [26].
- The sensor consists of a set of concentric circular strips.
- The thickness and the heat capacity of the sensor are negligible.
- There is no thermal resistance between the sensor and the specimen.
- The specimen is infinite in all directions.
- The input power in the sensor is stepwise.
The temperature increase in the sensor can be determined by solving the heat conduction equation and has the form [27]
where
and the dimensionless time parameter is expressed as
The specimen thermal diffusivity and conductivity are represented by a and λ, respectively. R is the radius of the sensor, P is the input heat power, I0 is the modified Bessel function, and m is the number of strips. The shape function (2) for l = 1/4 corresponds to the strip model of the sensor. The use of the ring model, given by l = 0, can cause a systematic error of up to 3% [27].
The TPS method can measure orthotropic materials in a manner analogous to isotropic ones. When the heat flux enters the specimen through the plane surface, the direction perpendicular to this plane will be indicated as the through-plane (z-axial) direction. All directions perpendicular to the z-axis are in-plane (r-radial) directions. If the properties of the specimen along all in-plane directions are identical, the temperature function is given by Equation (1), where
As outlined in the ISO (22007-2, 2008) [15], the specific heat capacity per unit volume of the specimen Cv must be obtained from another experiment in order to compute all four thermophysical parameters, az, ar, λz, and λr.
2.2. Extended Dynamic Plane Source (EDPS) Method
This study concerns the determination of the through-plane thermal diffusivity and conductivity of the specimen using the EDPS method. Consequently, the specimen heat capacity can be readily calculated (Cv = λz/az). The theoretical model of the EDPS method is as follows:
- The sensor is an infinite homogeneous plane with negligible thickness and heat capacity.
- The specimen is an infinite parallel slab.
- The heat sink is semi-infinite in the axial direction and infinite in the radial direction.
- The heat sink’s thermal properties are known.
- Both thermal resistances between the sensor and specimen and between the specimen and heat sink are neglected.
- The input heat power is stepwise.
The temperature increase (analytical temperature function) of the sensor has the form [23]
where the shape function is
and
q is the heat current density at the sensor, and h is the specimen thickness. The index HS denotes the thermal properties of the heat sink.
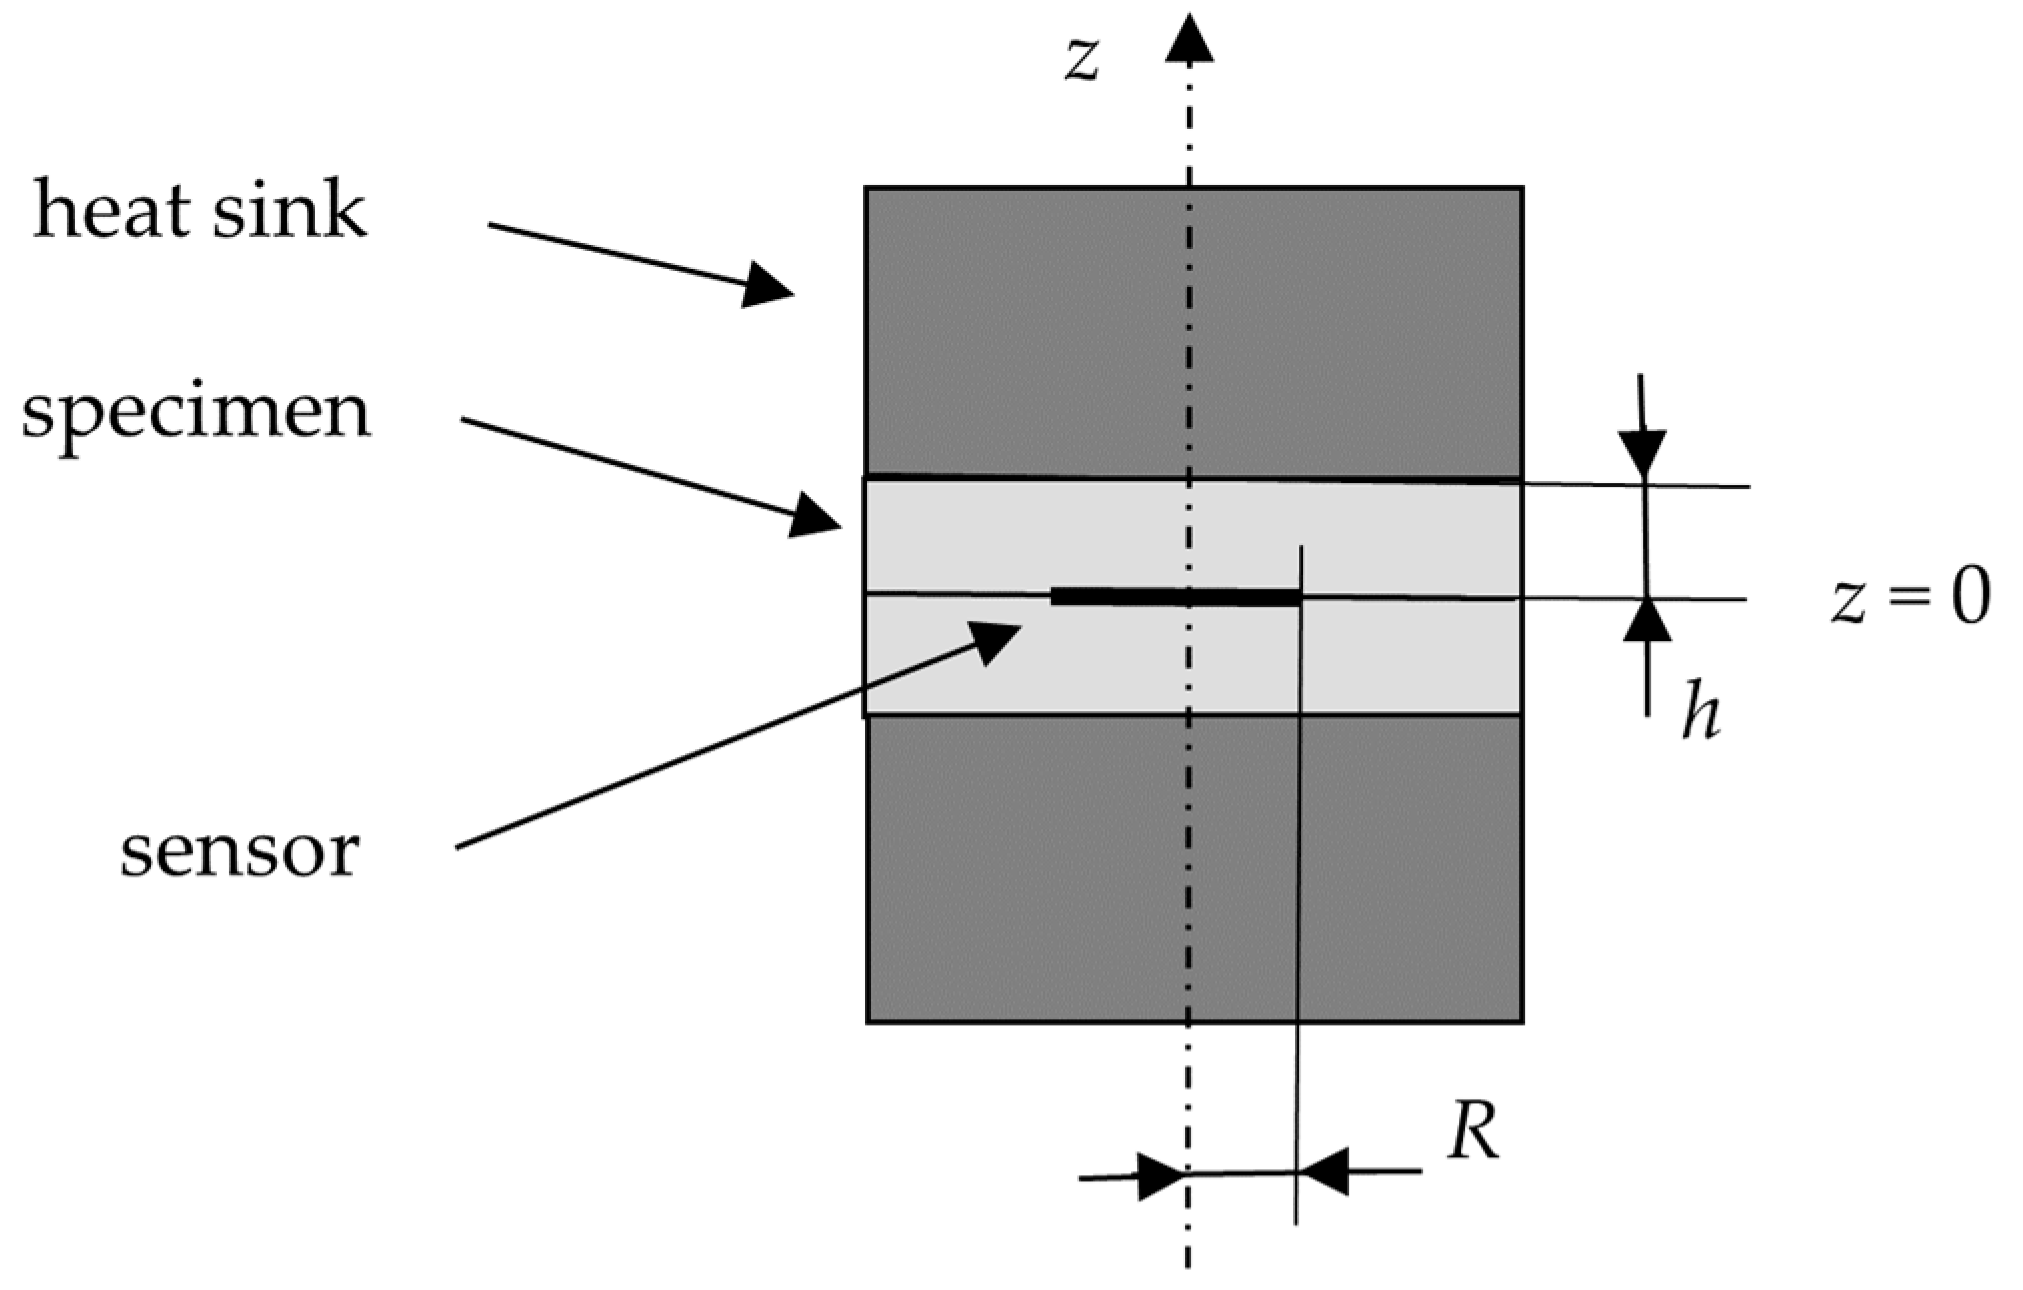
As seen in Figure 2, the sensor is sandwiched between two identical specimens and two pieces of good heat-conducting material that act as heat sinks. The dynamic temperature field is generated by the Hot Disk Instruments Type 7281 (−253 to 300 °C) sensor with a diameter of 61 mm. The sensor is made of nickel foil with a thickness of 12 μm in the form of a double spiral with 33 μm Kapton layers on both sides.
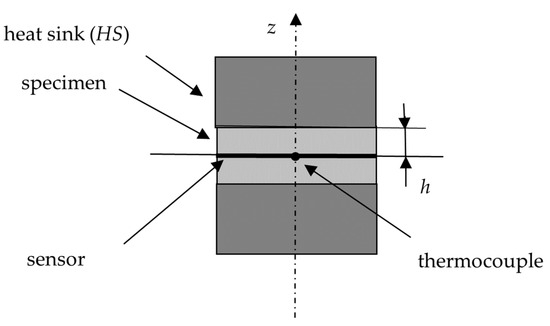
Figure 2.
Schematic diagram of the EDPS setup.
The diameter of the specimen is 61 mm and is composed of n = 1, 2, or 3 cylinders with a height of 2.95 mm for glass and 2.84 mm for PMMA. The cylinders are firmly screwed between the heat sink consisting of two copper blocks with a diameter of 60 mm and a height of 50 mm. The influence of the heat loss from the specimen surface is eliminated by measuring the temperature at the center of the sensor with a thermocouple, which is made of chromel and alumel wires with a diameter of 25 μm. The wires are electrically connected by an aluminum circle with a thickness of 10 μm and a diameter of 6 mm. The temperature response is measured using a dual-channel nanovoltmeter (Keithly 2181A). The experimental temperature is set to 25.0 °C.
The differences between the theoretical EDPS model and the real experimental setup can cause unpredictable systematic errors. The impact of the thermal resistances between the sensor and the specimen and between the specimen and the heat sink can be reduced by increasing the specimen thickness and covering the surfaces with silicone oil. However, the thermal conductivity of the oil must not be too different from that of the specimen. Thus, the range of specimen conductivity is limited up to 2 W/mK. In the experimental practice, the measured data are usually fitted by the following function [23]:
where w is the variable shift in temperature, which serves to suppress the influence of the sensor imperfections, such as the contact thermal resistance between the sensor and the specimen.
2.3. FEM-Improved EDPS Method
The analytical model of the EDPS method considers an ideal sensor and an infinitely long heat sink, which are not consistent with the real experiment (thermal capacity of the sensor, finite heat sink). This discrepancy can be removed through an FEM simulation that considers the geometrical and material parameters of the real experimental setup.
The FEM model of the EDPS method is one-dimensional since the heat flow in the central part of the specimen in the radial direction is negligible. Only one-half of the experimental setup is modeled due to its mirror symmetry with respect to the sensor. Although the sensor has a double spiral structure, it is modeled as a full disk. This is because the inhomogeneity in the temperature field generated by the striped structure of the sensor is removed by the aluminum circle that forms the thermocouple. Table 1 presents the values of material parameters that are used in the simulation.

Table 1.
Material parameters used for the FEM simulations.
The Gmsh program [28] is used to generate a sufficiently fine mesh for subsequent Elmer FEM simulation [29]. The adaptive minimal time step is set to 10−4 s, while the adaptive time error is set to 10−5 to create a high-quality temperature response. All surface areas of the setup are considered in the simulation as zero-flux boundaries.
The FEM offers the advantage of straightforward integration of experimental setups into the model. However, the resulting numerical data cannot be directly employed to fit the measured temperature response. Consequently, an elaborate algorithm must be used, as described and verified in the literature [25].
The initial stage of the evaluation entails fitting the analytical temperature function (8) to the measured temperature response, thereby obtaining the initial guesses of the unknown parameters, az1 and λz1. The second stage involves computing the FEM temperature response in numerical form as points [ti, Ti], utilizing the initial estimates of the parameters. Finally, the improved analytical formula of the temperature function is expected to be similar to Equation (5) and to have the following form:
where the shape function E(x) is unknown but can be determined in the form of points [xi, E(xi)] as follows:
Quantities q and h used in (5) and (7) must be identical to those employed in the FEM calculation and incorporated into the function E(x). It is important to note that the impact of β in Equation (6) is relatively weak and can be considered constant. Once the improved shape function is obtained as points [xi, E(xi)], it can be transformed into an analytical form through spline interpolation. Finally, Equation (9) and the shape function E(x) in an analytical form are fitted to the measured temperature response, yielding new estimates az2, λz2 that are better than the initial guesses az1, λz1.
2.4. FEM-Improved MDPS (Modified Dynamic Plane Source) Method
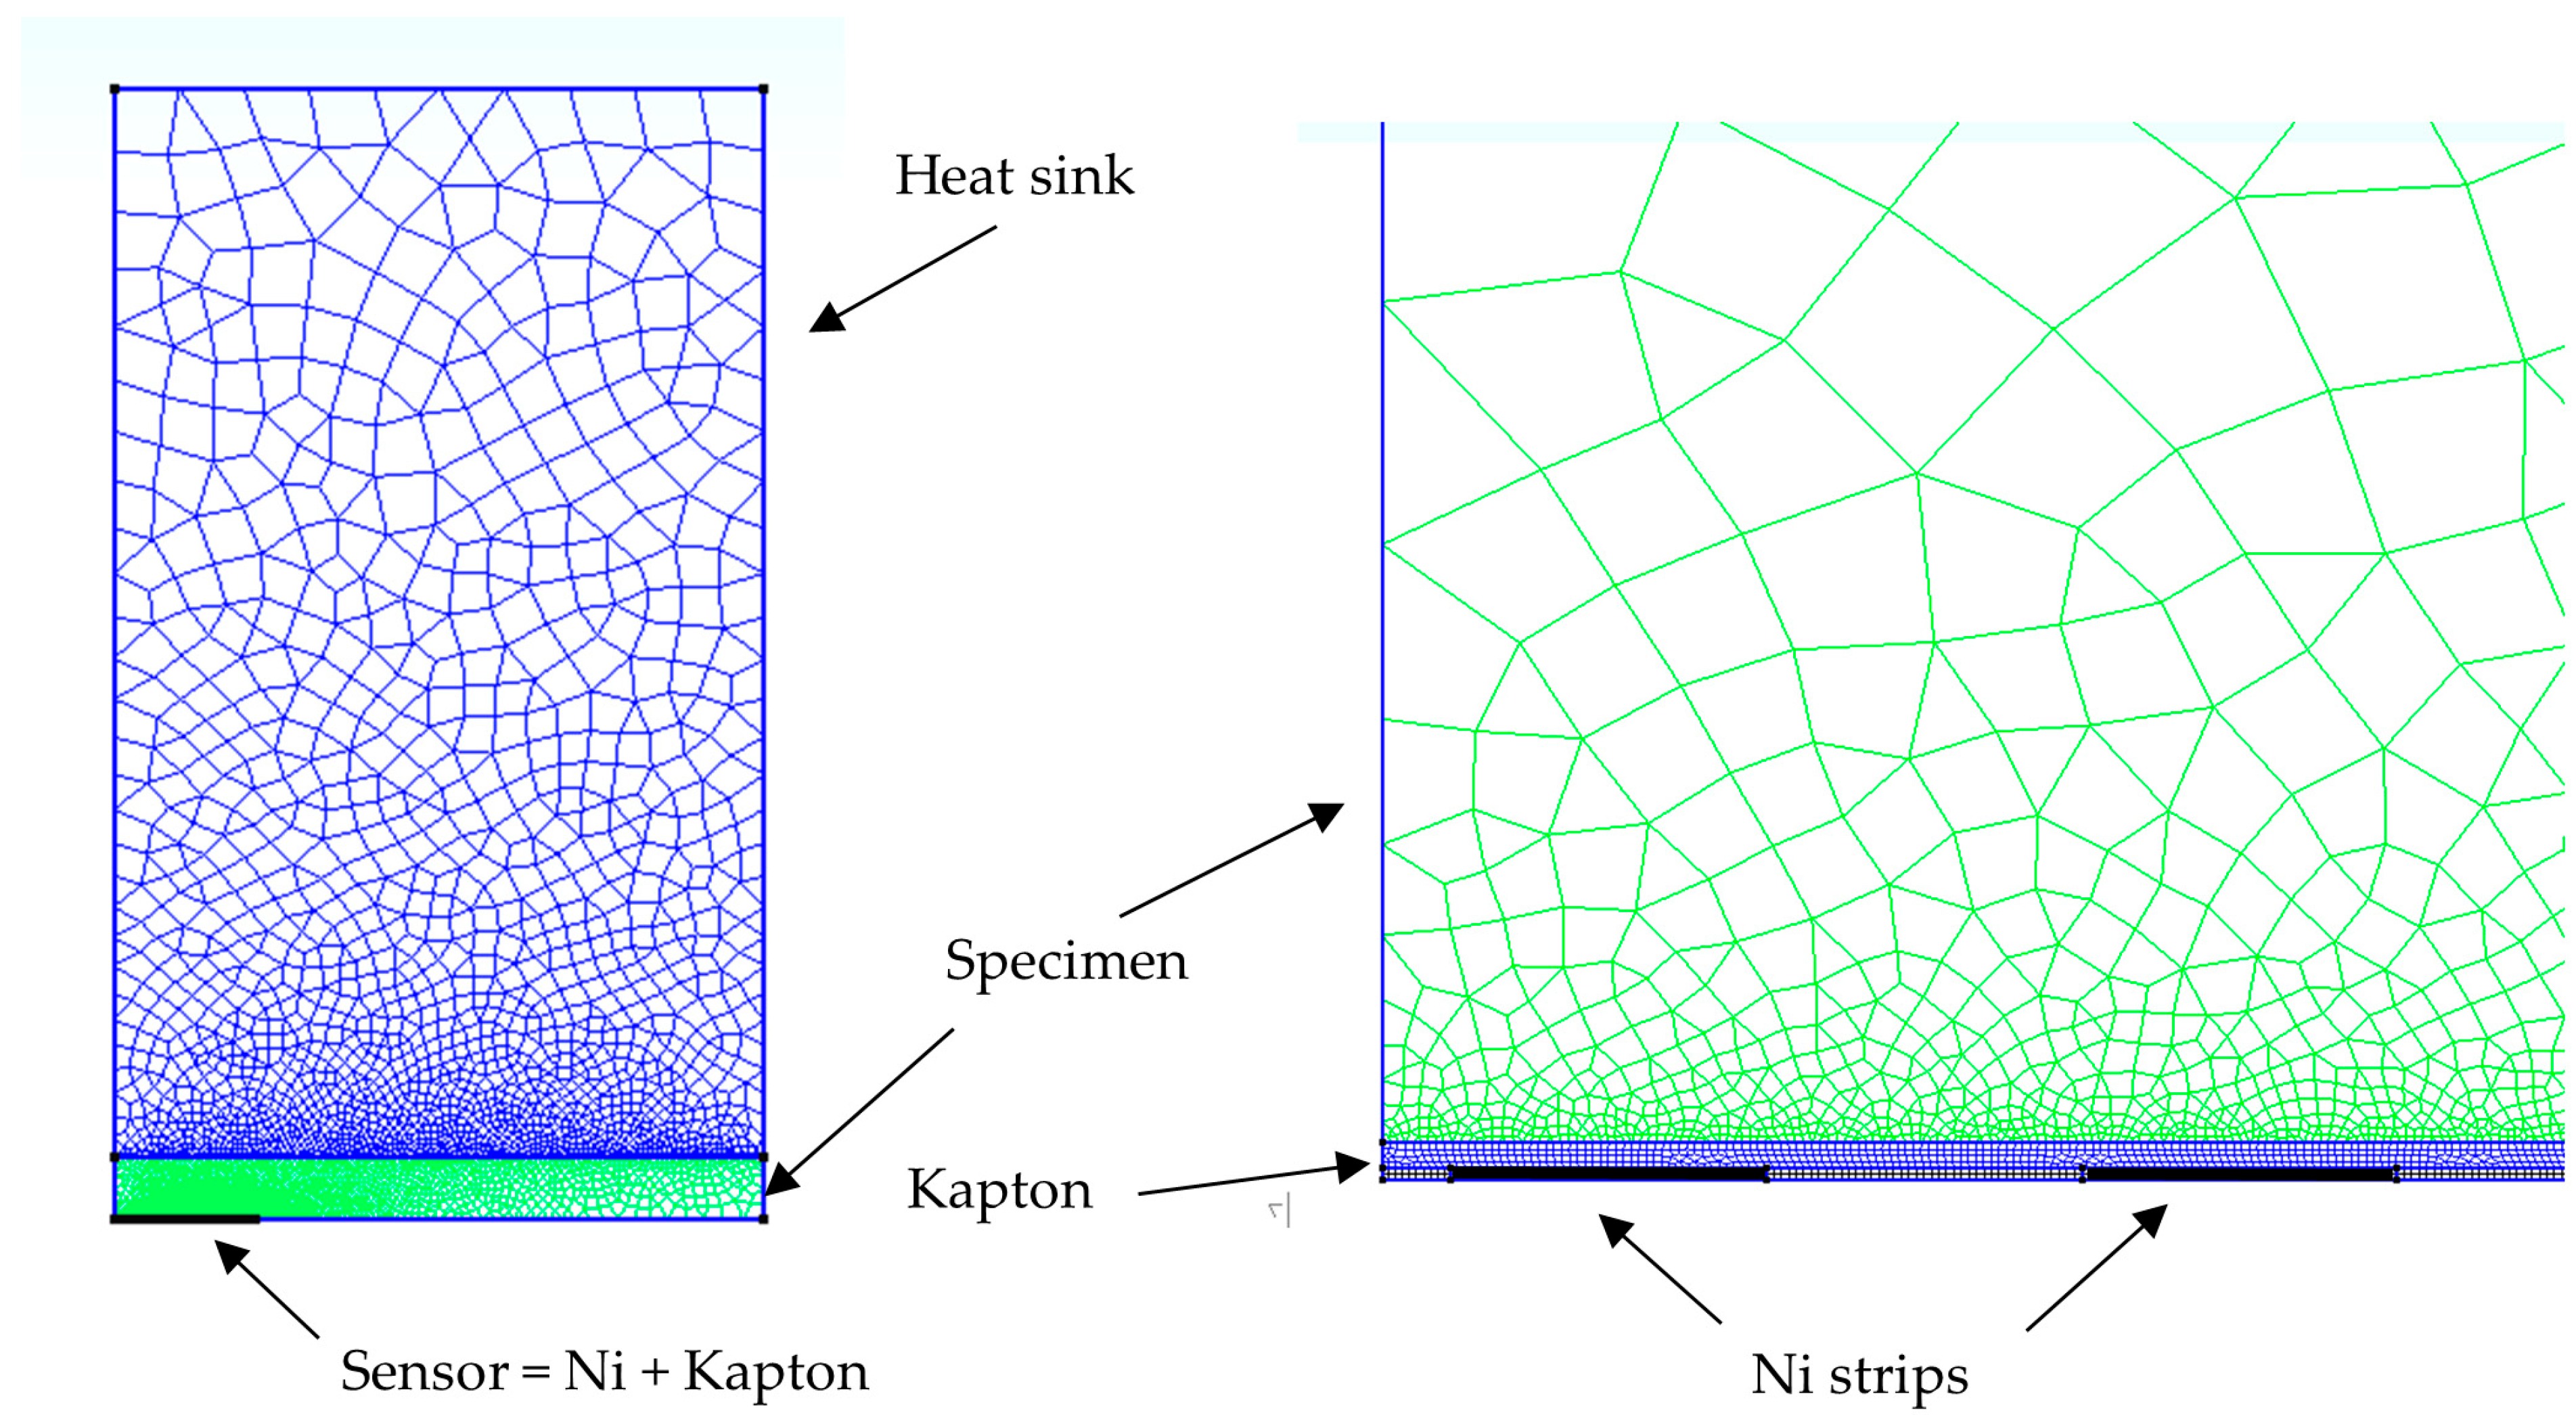
Figure 3 depicts the MDPS method configuration. The theoretical model of the MDPS method is defined by the following conditions:

Figure 3.
The experimental setup of the MDPS method.
- The sensor consists of a set of concentric circular strips.
- The thickness and heat capacity of the sensor are negligible.
- Both thermal resistances between the sensor and specimen and between the specimen and heat sink are neglected.
- The specimen is an infinite parallel slab.
- The temperature of the heat sink is constant.
- The input heat power is stepwise.
The theoretical model of the MDPS method considers an ideal heat sink with a constant temperature. However, the technical realization of such a heat sink is extremely difficult. The issue is addressed by employing a finite but large heat sink made of good heat-conducting material with known thermal properties, which will be reflected in our FEM model of the MDPS method.
In the MDPS method, the specimen and the heat sink are identical to those used in the EDPS method. The sensor is identical to that used in the TPS, with a diameter of 13 mm. Although the sensor has a double spiral form, the FEM model is an approximation that is composed of 16 circular strips measuring approximately 0.2 mm in width and separated by gaps of the same width. The thickness of the strips is 7 μm, while the thickness of the Kapton insulation is 16 μm. Figure 4 illustrates the geometry of the FEM model for the MDPS method.
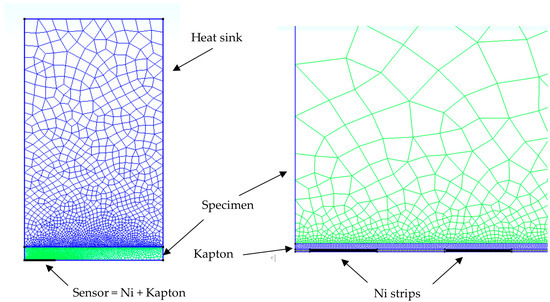
Figure 4.
The numerical mesh in MDPS method simulation.
The through-plane specimen parameters are known from EDPS measurements and can be used to determine the in-plane parameters using the MDPS method. As we do not have materials with varying anisotropies, the temperature measurement is simulated with FEM using the actual geometrical and virtual material setup of the experiment and in-plane conductivity λr0. Thus, instead of a measured temperature response, we have a simulated temperature response, which is designated as the “input response”. To enhance the realism of the simulation, the measurement noise is generated as a uniformly distributed random number between −v and v, where v represents 0.05% of the maximum value of the input response, which corresponds to the actual measurements. The estimation of the in-plane conductivity from the input response is conducted in accordance with the following steps:
- The initial guess of the in-plane diffusivity ar1 is determined by fitting the analytical temperature function of the TPS method, given by Equation (1), to the input response. The initial guess is not accurate because it can only be determined within the short time interval until the heat flux reaches the heat sink. Subsequently, the initial guess of the in-plane conductivity λr1 is computed using Equation (4), as the specimen heat capacity is known from the EDPS measurement.
- Three temperature responses are computed by the FEM simulation of the MDPS methods for three in-plane conductivities λr1−, λr1, and λr1+, where λr1− = λr1 − d, and λr1+ = λr1 + d. The value of d is set to a sufficiently large magnitude so that the true value λr0 will lie within the interval (λr1−, λr1+) with a high degree of probability. These temperature responses are transformed into analytical functions f0(t), f1(t), and f2(t) through the application of spline interpolation.
- The dependence between the conductivities and analytical functions is expressed by the following polynomial:where the coefficients a(t), b(t), and c(t) are determined by solving three equations with three unknowns
- Equation (11) represents a new temperature function with a single parameter: in-plane conductivity. Finally, an improved estimate λr2 of this parameter is computed by fitting the new temperature function to the input response.
It is important to note that the FEM simulation of the temperature response is applied for two distinct purposes. Initially, this method is employed to determine the input response, which acts as a substitute for the measured temperature response. Then, it is used to determine the three responses to create the polynomial (11), which is a numerically calculated temperature function of the MDPS method.
3. Results and Discussion
Table 2 presents the results of thermal diffusivity and conductivity measurements of silicate glass by using EDPS methods for several different thicknesses of the specimens. Initial guesses az1 and λz1 of the parameters are computed by fitting the analytical temperature function (8) to the measured temperature responses. Then, the FEM-improved estimates az2 and λz2 are determined by fitting the temperature function (9). The table shows the mean values of six independent measurements. The results are compared with those of other methods [24], which are used as reference values in the form of relative differences.

Table 2.
Comparison of EDPS measurement results of glass with reference values. Δ is the relative difference between the results of both methods. The specimen thickness is n x 2.95 mm. az1 and λz1 are the initial guesses, and az2 and λz2 are the FEM-improved results.
It is observed that the initial guesses az1 and λz1 are considerably smaller than the reference values. However, the differences between the results and the reference values diminish with increasing specimen thickness. This can be attributed to the fact that the greater the specimen thickness, the smaller the impact of sensor imperfections on the results. The improved estimates az2 and λz2 are found to be considerably closer to the reference values than those obtained through analytical shape function.
Similarly, Table 3 shows the PMMA results of the analytical and FEM-improved calculations. It is observed that the values obtained using the analytical shape function are also much smaller than the reference ones. The FEM-improved calculation results are in good agreement with the reference values and differ by less than 0.6%.

Table 3.
Comparison of EDPS measurement results of PMMA with reference values. Δ is the relative difference between the results of both methods. The specimen thickness is n x 2.84 mm.
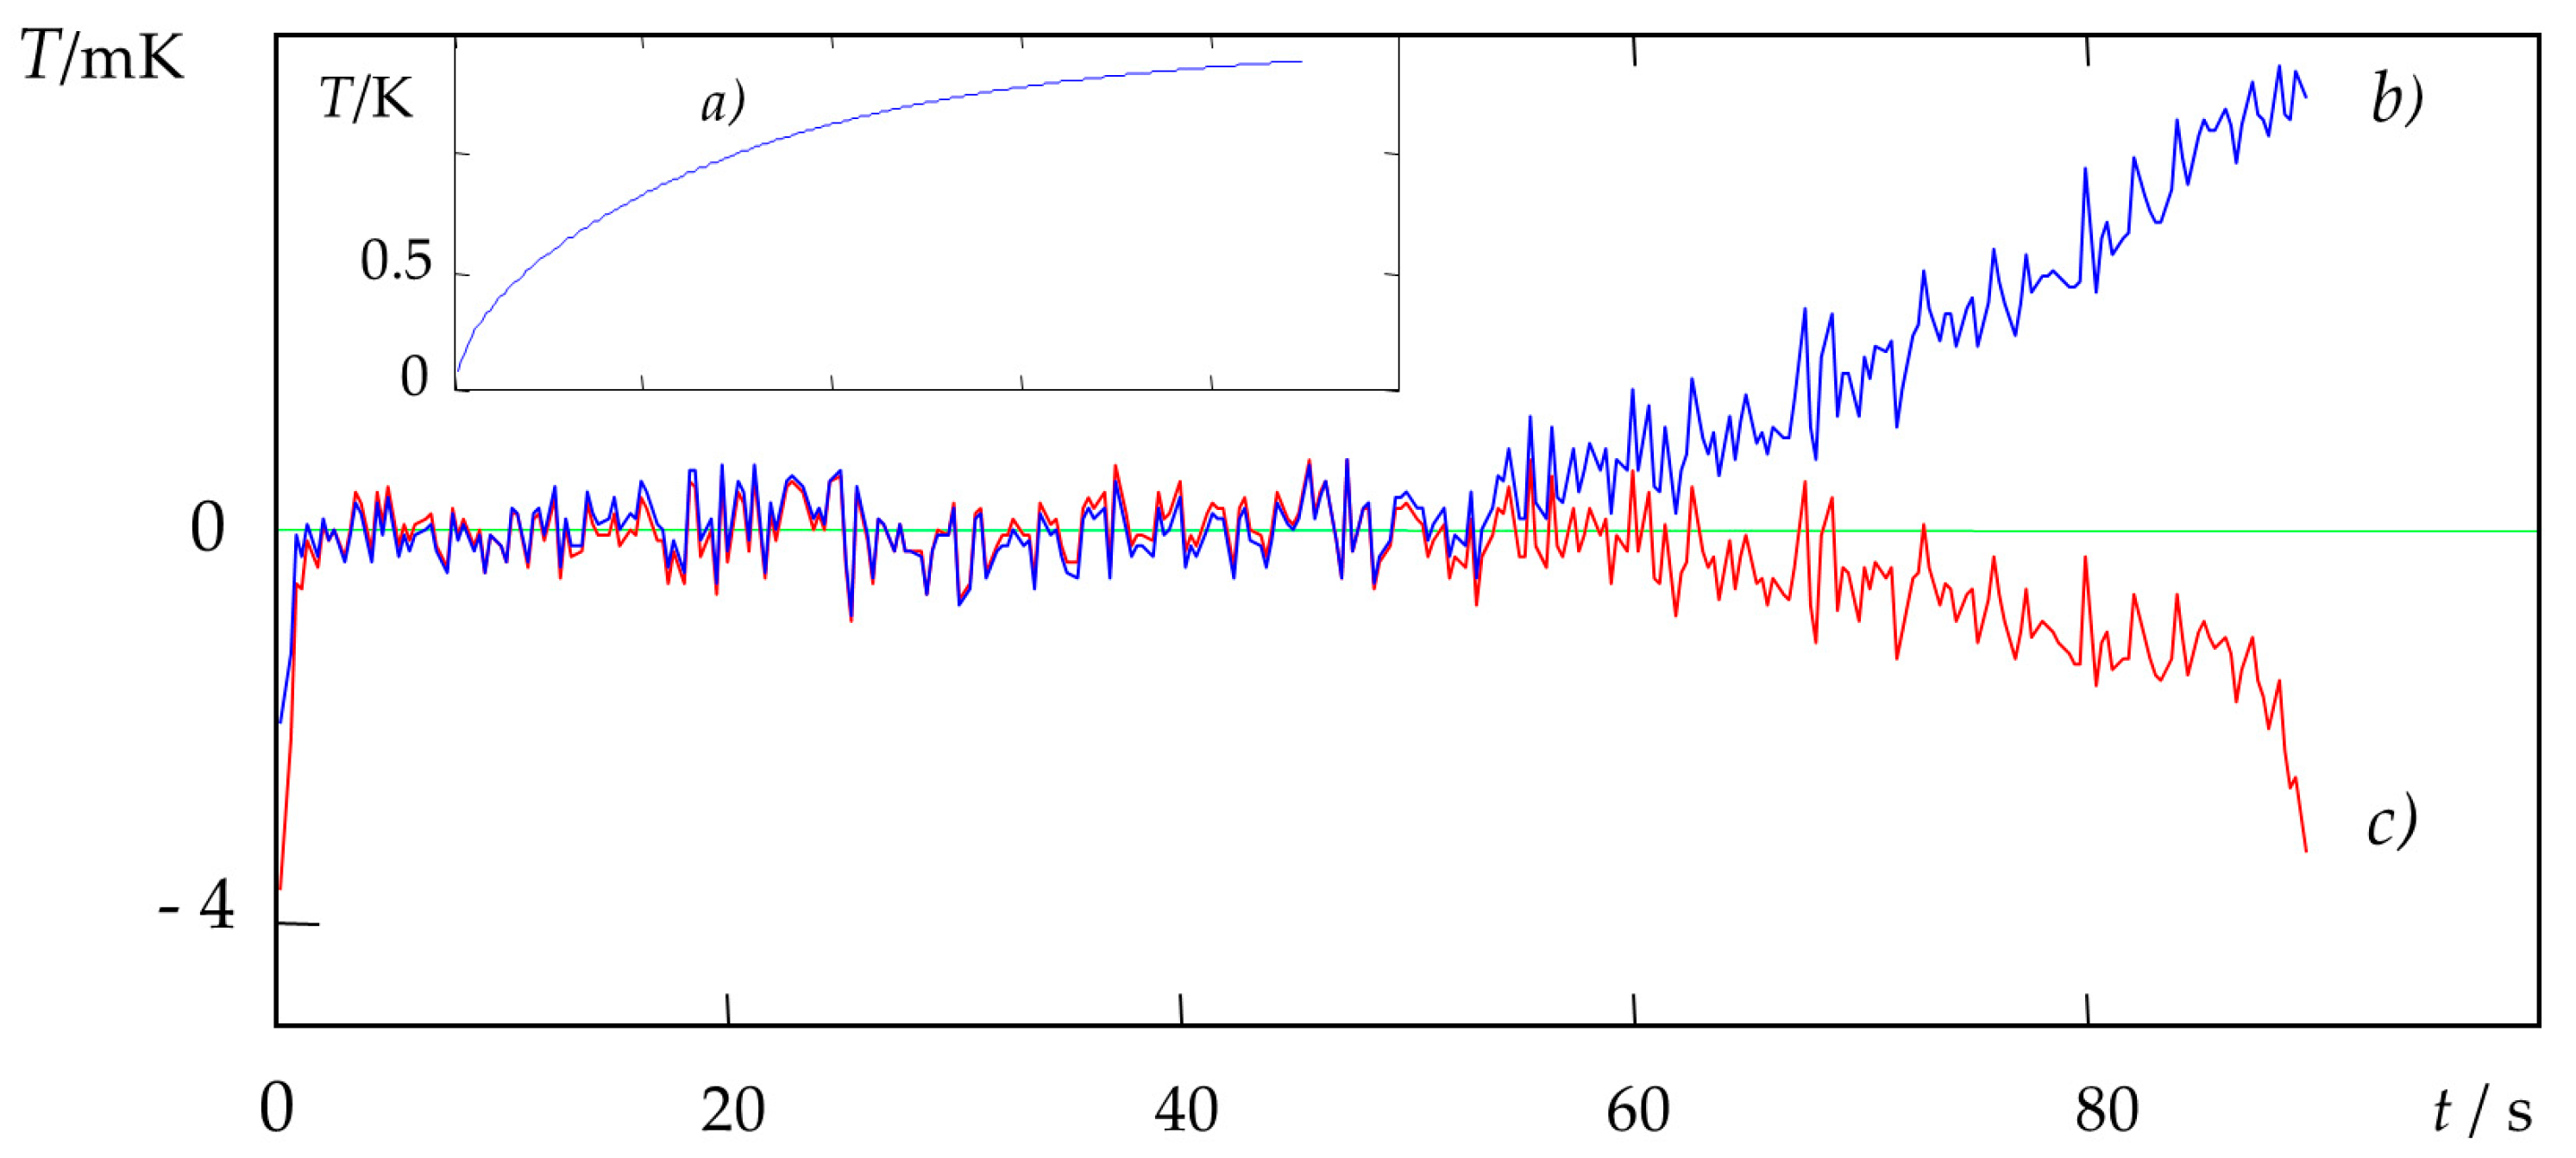
Figure 5 shows the measured temperature response for the EDPS measurement of PMMA (a). Since the measured, analytical, and FEM-calculated responses are very close, the difference between them is only visible in the form of residuals. These are the measured values minus the predicted values. The residuals plot for the analytical model fit is curve (b), and for the FEM model it is curve (c).
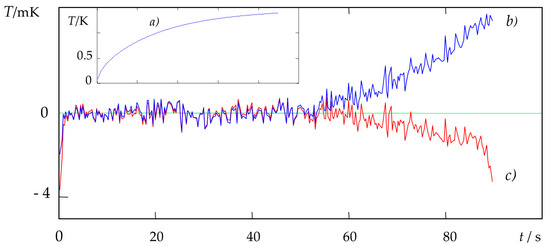
Figure 5.
Comparison between analytical and FEM temperature responses for PMMA at 2.84 mm specimen thickness.
The FEM-improved calculation of EDPS measurement results demonstrated that the through-plane parameters of orthotropic materials can be determined with high accuracy. Table 2 and Table 3 illustrate that using a specimen thickness of approximately 9 mm yielded relative errors in the results less than 0.2%. Therefore, specimens with a thickness of 9 mm should also be employed in the measurement of in-plane conductivity using the MDPS method.
Table 4 presents the results of a simulation of the experiment with seven different anisotropic virtual materials. These materials are defined by λz (through-plane) and λr0 (in-plane) thermal conductivities, where specimen heat capacity is always Cv = 2.106 J K−1 m−3. Then, λr1 is an initial guess computed by fitting the analytical temperature function of the TPS method to the initial response. The values λr1−, λr1, and λr1+ are used to determine the polynomial (11), and λr2 is an improved estimation of the in-plane conductivity. The symbol Δ represents the relative difference between λr2 and λr0, which predicts the error of the evaluation.

Table 4.
The results of the in-plane conductivity calculations using the MDPS method for a specimen thickness of 9 mm. λr2 is the FEM-improved in-plane conductivity of the material, and Δ is the relative difference between λr2 and reference value λr0. λr3 is the in-plane conductivity considering the gap between the specimen and heat sink, and δ is the relative difference between λr3 and λr0.
In a real experiment, the MDPS method encounters a problem similar to that faced by the EDPS method, which is the thermal resistance between the specimen and the heat sink. Both surfaces should be flat and smooth and covered by silicone oil to reduce thermal resistance. However, its value cannot be inserted into the simulation because the thickness of the gap between the specimen and the heat sink is not possible to measure. The effect of the gap is investigated by estimating its thickness at 5 μm and inserting it into the model.
Table 4 presents the results of the FEM-improved calculations considering the effect of the silicone oil layer on the in-plane conductivity λr3 and the relative differences δ between λr3 and λr0. It can be seen that the influence of the gap is only observable at the highest value of through-plane conductivity, λz = 2 W m−1 K−1. In other cases, the differences in thermal conductivities of the specimen and silicone oil are so similar that the gap is considered an extension of the specimen.
As seen in Table 2 and Table 3, the results of the FEM-improved EDPS measurements of the material parameters for the specimens with thicknesses of approximately 3 mm are considerably worse because the influence of the gap between the specimen and the heat sink is stronger. A comparable effect can be anticipated for the MDPS method. Table 5 presents the calculation results for a specimen thickness of 3 mm in a similar manner to Table 4. The most striking result is the value of the relative difference δ for material number 4. The large error is caused by the small specimen thickness and the large value of its through-plane conductivity. Thus, the materials numbered 6 and 7 are not included in the calculations at a thickness of 3 mm.

Table 5.
The results of the in-plane conductivity calculations using the MDPS method for a specimen thickness of 3 mm.
In the EDPS method, the analytical temperature function does not consider the sensor capacity. Thus, the rise in the sensor temperature is steeper. This causes the values of the thermal conductivity and diffusivity to be smaller than the values obtained using FEM improvement. For MDPS measurements at the specimen thickness of 9 mm, the results obtained using the analytical temperature function for the TPS method are very close to those obtained using the FEM refinements. Since this thickness is sufficient for the TPS method, the MDPS method converges to the TPS method.
4. Conclusions
This work presents a new transient technique of the thermal conductivity and diffusivity measurement of anisotropic materials. The EDPS method is used to measure the through-plane properties, while the in-plane conductivity is determined by the TPS and MDPS methods. The principal advantage of the technique is that it requires only a single pair of specimens for both measurements, with the results exhibiting high accuracy. The disadvantage of this technique is that it is limited to the measurement of materials with thermal conductivity less than 2 W m−1 K−1. This is caused mainly by the thermal contact between the specimen and the heat sink.
The conventional analytical formula for the EDPS method used for the calculation of material parameters has limited accuracy because it does not consider the sensor capacity and heat sink dimensions. These shortcomings are eliminated by improving the analytical formula with the FEM simulation of the experiment. The accuracy of these results is verified by comparing them with reference values obtained with other methods. The relative errors for specimen thicknesses of 9 and 3 mm were found to be less than 0.2% and 1.4%, respectively.
Since materials with different anisotropy are not available to us, the MDPS method measurement is substituted by FEM simulation. The initial guesses of the in-plane conductivity are estimated by the TPS method, and the accuracy of the results is increased by applying the numerical simulation of the MDPS method. To enhance the realism of the simulation, the impact of the thermal resistance between the specimen and heat sink is investigated by estimating the gap to be 5 μm. In addition, the measurement noise is added to the input response.
It should be stressed that the real values of the thermal parameters do not depend on the specimen thickness. Thus, the different values at various thicknesses are caused only by the systematic error of the measurement method. Two values of the specimen thickness were used (3 and 9 mm) to illustrate the possibility of using the method for specimens with smaller thicknesses. In practice, this is the case when larger specimens are not available.
The MDPS technique may achieve an error rate of less than 0.8% for specimens with a thickness of 9 mm and a through-plane conductivity of less than 2 W m−1 K−1. However, for the specimen thickness of 3 mm, the results are considerably worse, with a relative error reaching up to 6% for through-plane conductivity of 1 W m−1 K−1.
The scientific contribution of this work is to demonstrate that very accurate measurements of the thermal diffusivity and conductivity of an anisotropic material with properties similar to those considered in this work can be obtained using a combination of EDPS and MDPS methods.
The subsequent stage of this research will concentrate on materials with elevated thermal conductivity. The through-plane conductivity and diffusivity can be measured by the dynamic plane source method [30], which was designed for metallic specimens. Instead of a heat sink, thermally isolating material, such as PMMA, will be used with parameters that are known. The influence of the Kapton layer and the sensor capacity will be accounted for by FEM. The in-plane conductivity will be measured using the TPS and MDPS methods. However, the smaller specimen thickness will cause a problem with the short time of measurement. The accuracy of the measurements can only be ascertained following the completion of the experiments or simulations.
Author Contributions
Conceptualization and methodology, S.M.; software, P.B. and G.B.; writing—original draft preparation, S.M. All authors have read and agreed to the published version of the manuscript.
Funding
This research received no external funding.
Data Availability Statement
The raw data supporting the conclusions of this article will be made available by the authors upon request.
Conflicts of Interest
The authors declare no conflicts of interest.
References
- Kubičár, Ľ. Pulse method of measuring basic thermophysical parameters. In Comprehensive Analytical Chemistry, 12th ed.; Svehla, G., Ed.; Elsevier: Amsterdam, The Netherlands; Tokyo, Japan; Oxford, UK; New York, NY, USA, 1990; p. 350. [Google Scholar]
- Kubičár, Ľ.; Boháč, V. Review of several dynamic methods of measuring thermophysical parameters. In Proceedings of 24th International Conference on Thermal Conductivity/12th International Thermal Expansion Symposium, 1999; Gaal, P.S., Apostolescu, D.E., Eds.; Technomic Publishing Company: Lancaster, UK, 1999; pp. 135–149. [Google Scholar]
- Kubičár, Ľ.; Boháč, V. A step-wise method for measuring thermophysical parameters of materials. Meas. Sci. Technol. 2000, 11, 252–258. [Google Scholar] [CrossRef]
- Hammerschmidt, U.; Sabuga, W. Transient Hot Strip (THS) Method: Uncertainty Assessment. Int. J. Thermophys. 2000, 21, 217–248. [Google Scholar] [CrossRef]
- Hammerschmidt, U.; Sabuga, W. Transient Hot Wire (THW) Method: Uncertainty Assessment. Int. J. Thermophys. 2000, 21, 1256–1278. [Google Scholar]
- Hammerschmidt, U.; Meier, V. New Transient Hot-Bridge Sensor to Measure Thermal Conductivity, Thermal Diffusivity, and Volumetric Specific Heat. Int. J. Thermophys. 2006, 27, 840–865. [Google Scholar] [CrossRef]
- Boháč, V.; Gustavsson, M.K.; Kubičár, Ľ.; Gustafsson, S.E. Parameter estimation for measurements of thermal transport properties with the disk thermal constants analyzer. Rev. Sci. Instrum. 2000, 71, 2452–2455. [Google Scholar] [CrossRef]
- Gustafsson, S.E. Transient plane source techniques for thermal conductivity and thermal diffusivity measurements of solid materials. Rev. Sci. Instrum. 1991, 62, 797–804. [Google Scholar] [CrossRef]
- Jannot, Y.; Acem, Z.; Kanmogne, A. Transient hot plate method with two temperature measurements for thermal characterization of metals. Meas. Sci. Technol. 2005, 17, 69–74. [Google Scholar] [CrossRef]
- Gobbe, C.; Iserna, S.; Ladevie, B. Hot strip method: Application to thermal characterization of orthotropic media. Int. J. Therm. Sci. 2004, 43, 951–958. [Google Scholar] [CrossRef]
- Ohmura, T.; Tsuboi, M.; Tomimura, T. Estimation of the mean thermal conductivity of anisotropic materials. Int. J. Thermophys. 2002, 23, 843–853. [Google Scholar] [CrossRef]
- Shemelya, C.; De La Rosa, A.; Torrado, A.R.; Yu, K.; Domanowski, J.; Bonacuse, P.J.; Roberson, D.A. Anisotropy of thermal conductivity in 3D printed polymer matrix composites for space based cube satellites. Addit. Manufac. 2017, 16, 186–196. [Google Scholar] [CrossRef]
- Gustafsson, S.; Gustavsson, M.; Gustavsson, J. Method of Measuring Thermal Properties of Materials with Direction Dependent Properties. WO2000070333A1, 4 May 2000. [Google Scholar]
- Fang, W.-Z.; Chen, L.; Gou, J.-J.; Tao, W.-Q. Predictions of effective thermal conductivities for three-dimensional four-directional braided composites using the lattice Boltzmann method. Int. J. Heat Mass Transf. 2016, 92, 120–130. [Google Scholar] [CrossRef]
- ISO 22007-2 2008; Plastics—Determination of Thermal Conductivity and Thermal Diffusivity—Part 2: Transient Plane Heat Source (Hot Disc) Method. International Organization for Standardization: Geneva, Switzerland, 2008.
- Berge, A.; Adl-Zarrabi, B.; Hagentoft, C.E. Determination of specific heat capacity by transient plane source. Front. Archit. Res. 2013, 4, 476–482. [Google Scholar] [CrossRef]
- Zhang, H.; Jin, Y.; Gu, W.; Li, Z.-Y.; Tao, W.-Q. A numerical study on the influence of insulating layer of the hot disk sensor on the thermal conductivity measuring accuracy. Prog. Comput. Fluid Dyn. 2013, 13, 191–201. [Google Scholar] [CrossRef]
- Zhang, H.; Li, M.J.; Fang, W.Z.; Dan, D.; Li, Z.Y.; Tao, W.Q. A numerical study on the theoretical accuracy of film thermal conductivity using transient plane source method. Appl. Therm. Eng. 2014, 72, 62–69. [Google Scholar] [CrossRef]
- Zhang, H.; Li, Y.-M.; Tao, W.-Q. Theoretical accuracy of anisotropic thermal conductivity determined by transient plane source method. Int. J. Heat Mass Tran. 2017, 108, 1634–1644. [Google Scholar] [CrossRef]
- Mihiretie, B.M.; Cederkrantz, D.; Rosén, A.; Otterberg, H.; Sundin, M.; Gustafsson, S.E.; Karlsteen, M. Finite Element Modeling of the Hot Disc Method. Int. J. Heat Mass Transf. 2017, 115, 216–223. [Google Scholar] [CrossRef]
- Malinarič, S.; Bokes, P. Impact of the Heat Source Model on Transient Methods of Conductivity and Diffusivity Measurement. Int. J. Thermophys. 2022, 43, 27. [Google Scholar] [CrossRef]
- Elkholy, A.; Sadek, H.; Kempers, R. An improved transient plane source technique and methodology for measuring the thermal properties of anisotropic materials. Int. J. Therm. Sci. 2019, 135, 362–374. [Google Scholar] [CrossRef]
- Karawacki, E.; Suleiman, B.M.; ul-Haq, I.; Nhi, B. An extension to the dynamic plane source technique for measuring thermal conductivity, thermal diffusivity, and specific heat of dielectric solids. Rev. Sci. Instrum. 1992, 63, 4390–4397. [Google Scholar] [CrossRef]
- Malinarič, S.; Elkholy, A. Comparison of the new plane source method to the step wise transient method for thermal conductivity and diffusivity measurement. Int. J. Therm. Sci. 2021, 164, 106901. [Google Scholar] [CrossRef]
- Malinarič, S. The Application of the Finite Elements Method in the Transient Measurements of Thermophysical Parameters. Int. J. Thermophys. 2024, 45, 22. [Google Scholar] [CrossRef]
- Available online: www.hotdiskinstruments.com/products/#hot-disk-sensors (accessed on 7 August 2024).
- Malinarič, S.; Dieška, P. Concentric Circular Strips Model of the Transient Plane Source-Sensor. Int. J. Thermophys. 2015, 36, 692–700. [Google Scholar] [CrossRef]
- Geuzaine, C.; Remacle, J.F. Gmsh: A 3-D finite element mesh generator with built-in pre- and post-processing facilities. Int. J. Numer. Methods Eng. 2009, 79, 1309–1331. Available online: https://gmsh.info (accessed on 7 August 2024). [CrossRef]
- Elmer: An Open Source Multiphysical Simulation Software. Available online: https://www.csc.fi/web/elmer (accessed on 7 August 2024).
- Karawacki, E.; Suleiman, B.M. Dynamic plane source technique for simultaneous determination of specific heat, thermal conductivity and thermal diffusivity of metallic samples. Meas. Sci. Technol. 1991, 2, 744. [Google Scholar] [CrossRef]
Disclaimer/Publisher’s Note: The statements, opinions and data contained in all publications are solely those of the individual author(s) and contributor(s) and not of MDPI and/or the editor(s). MDPI and/or the editor(s) disclaim responsibility for any injury to people or property resulting from any ideas, methods, instructions or products referred to in the content. |
© 2024 by the authors. Licensee MDPI, Basel, Switzerland. This article is an open access article distributed under the terms and conditions of the Creative Commons Attribution (CC BY) license (https://creativecommons.org/licenses/by/4.0/).

