Abstract
Protective coatings can prolong the lifespan of engineering components. Electroless Ni-P coating is a very hard coating with high corrosion resistance, but low toughness. The addition of NiTi nanoparticles into the coating has shown the potential to increase the toughness of electroless Ni-P and could expand its usability as a protective coating for more applications. However, the study of the tribological behaviour and wear mechanisms of Ni-P-NiTi composite coating has been minimal. Furthermore, there is no studies on the effect of coating thickness on monolithic and composite electroless Ni-P coating wear behaviour. The wear rates of each coating were found by measuring the volume loss form multi-pass wear tests. The wear tracks were examine using a confocal microscope to observe the wear mechanisms. Each sample was tested using a spherical indenter and sharp indenter. It was found that the NiTi nanoparticle addition displayed toughening mechanisms and did improve the coating’s wear resistance. The 9 μm thick Ni-P-NiTi coating had less cracking and more uniform wear than the 9 μm thick Ni-P coating. For both the monolithic and composite coatings, their thicker version had higher wear resistance than their thinner counterpart. This was explained by the often observed trend in coatings where it has higher tensile stress near the substrate interface, which decreases and becomes compressive as thickness increases. Overall, the 9 μm thick Ni-P-NiTi coating had the highest wear resistance out of all the coatings tested.
1. Introduction
Engineering components that are subjected to wear and corrosion during their performance are required to have frequent maintenance, which can be costly [1,2]. However, their lifespan can be prolonged by the application of a surface coating [3]. A protective coating protects the component against wear and corrosion while preserving the substrate material’s mechanical properties [4,5,6]. Electroless Ni-P coating is already widely used due to its high adhesion, excellent wear and corrosion resistance, and many other additional specific properties [1,7,8]. The addition of secondary particles further improves a specific existing property to cater to the intended use [7,9]. For example, Ni-P coating hardness and wear resistance can be improved with the addition of nanoparticles. In recent years, the wear resistance of Ni-P has been studied with the addition of various ceramic carbide or oxide particles [1,10,11,12,13,14,15]. However, a major disadvantage of Ni-P coating is its brittleness, and the hard particle additions do little to improve Ni-P’s toughness [2,3]. However, developing a composite that uses a ductile particle addition could enhance toughness to a significant degree. The enhanced toughness along with Ni-P’s high hardness and high corrosion resistance would allow the use of Ni-P-based protective coatings to be expanded to even more applications [2,16]. The super-elastic NiTi alloy has uniquely high toughness and ductility, allowing it to be a potential candidate for an addition to Ni-P coating. In fact, electroless Ni-P composite coating with NiTi nanoparticles has been developed, and its characterization has shown promise for improving toughness [2,16,17,18].
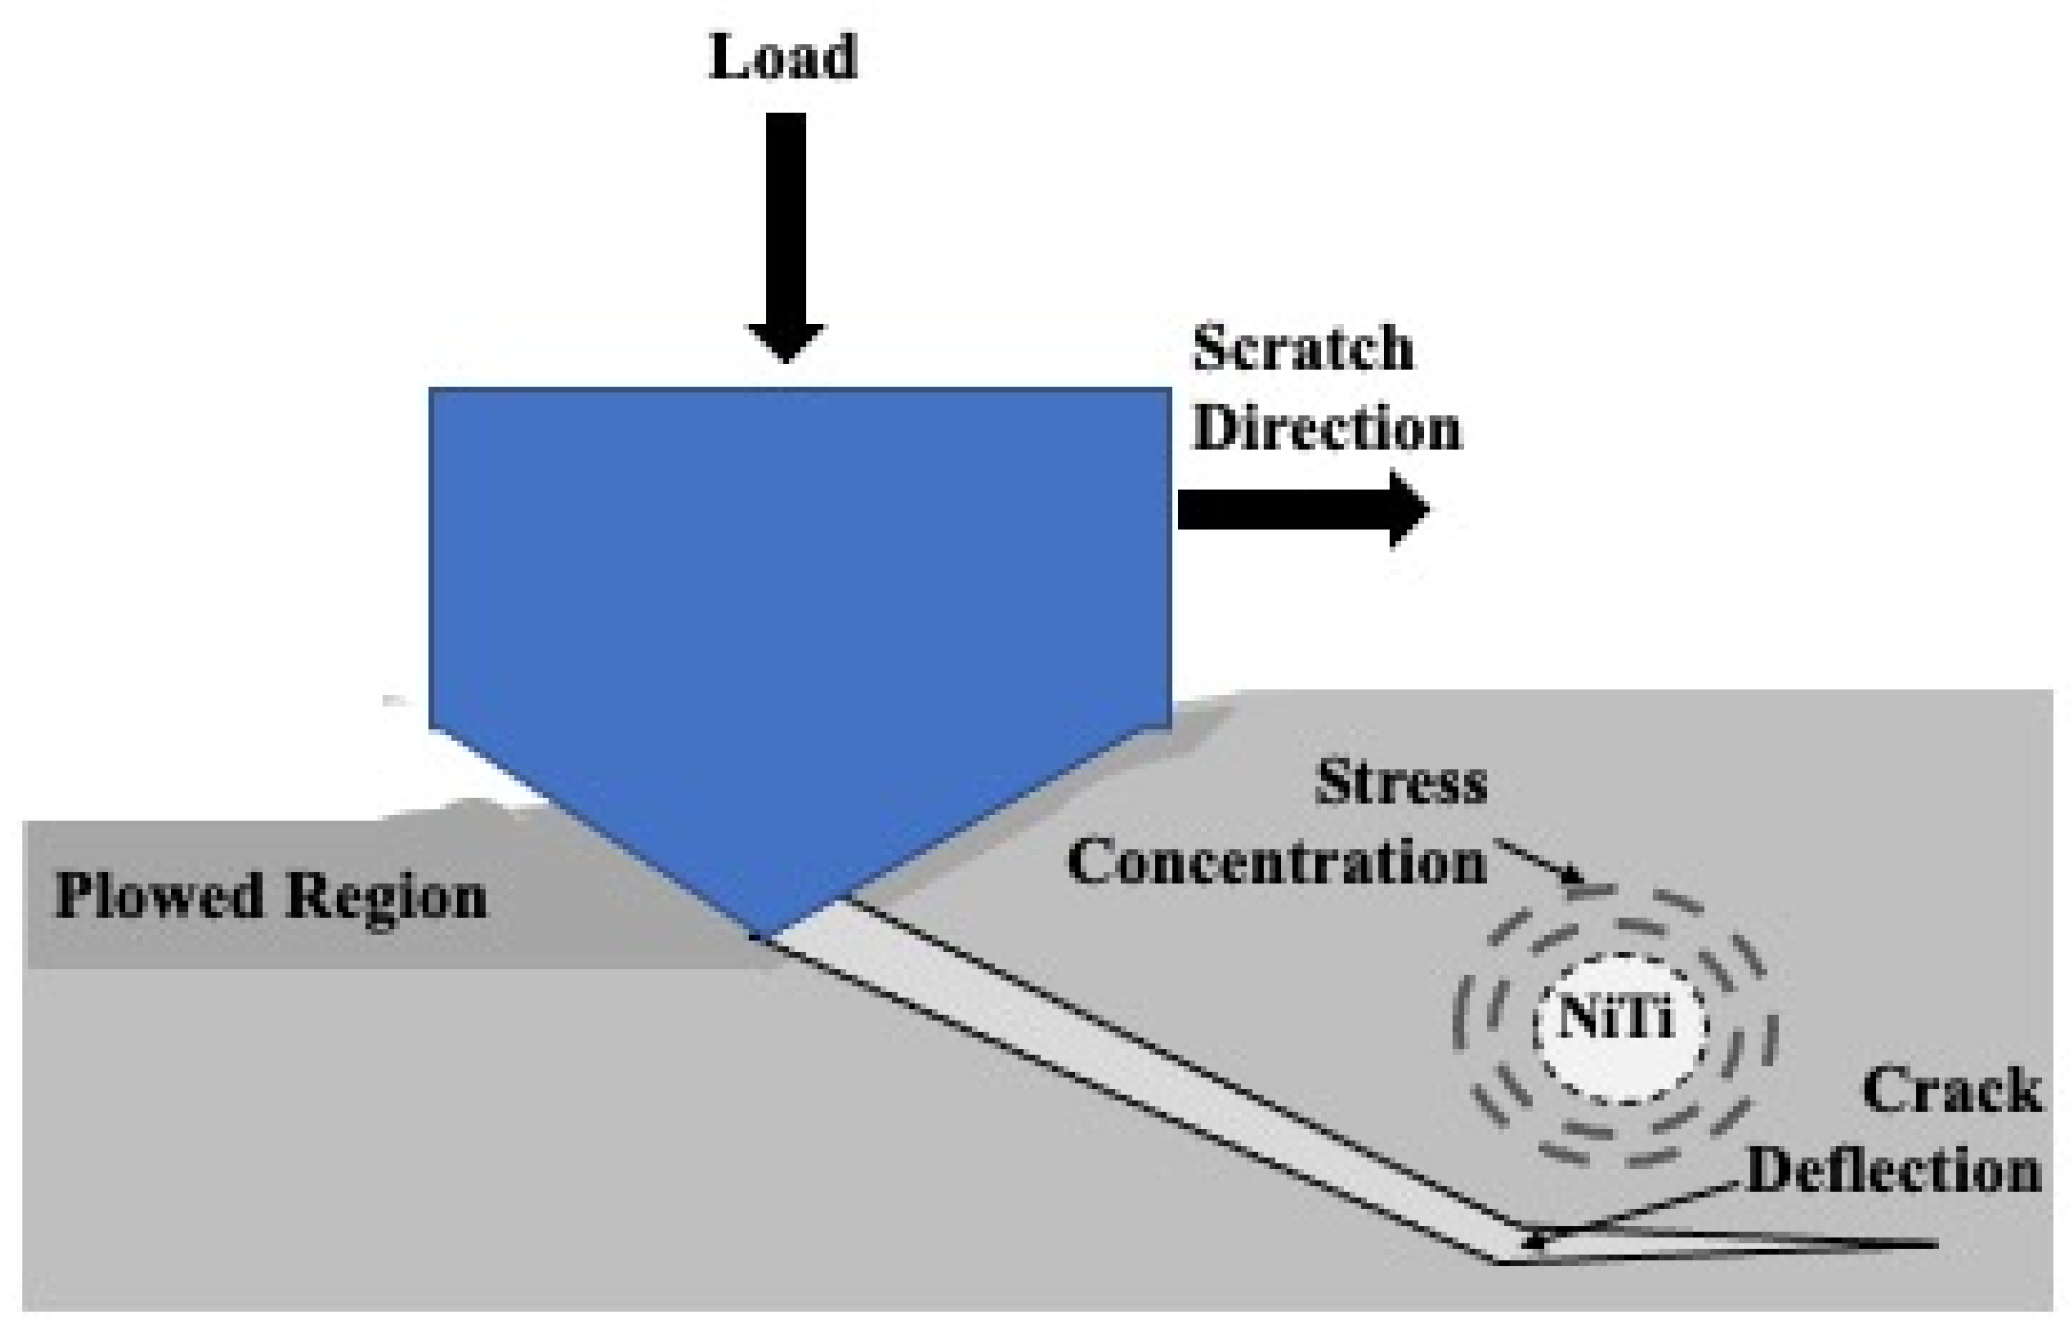
When a composite material is composed of a brittle matrix with a particle addition, it typically experiences an increase in toughness. This occurs because when a crack forms in the brittle matrix, it loses propagation energy when it interacts with a particle causing the crack to lose its driving force [16,17]. There are different types of particle-crack interactions, which includes crack bridging, crack deflection, micro-cracking, and transformation toughening [19,20].
Transformation toughening is a unique toughening mechanism that occurs exclusively when the particle material exhibits stress-induced phase transformation mechanisms [16,21]. The propagation energy is absorbed from the phase transformation caused by applied stress on the particle during crack-particle interaction. Additionally, a compressive stress field develops in the matrix surrounding the particle. This occurs from the new phase increasing the volume of the particle, and the compressive stress reduces the tensile stresses associated with crack opening [20,21]. The Nickel-Titanium (NiTi) alloy is a common example of a material that has this property [16,21].
The wear and indentation of Ni-P-NiTi having different amounts of NiTi particles have been investigated [16]. However, there is a gap in the understanding of Ni-P-NiTi behavior under various wear conditions. Although the initial results are promising for NiTi toughening the coating, it is unknown how the coating withstands higher amounts of wear damage compared to the monolithic.
Another consideration that has not been investigated is the effect of coating thickness on the tribological behaviour of the Ni-P-NiTi coating. There are studies that have found that the state of internal stress in many coatings is correlated with its thickness [22,23]. It is possible that the thickness of a Ni-P coating influences the presence of internal stresses, and consequently its wear behaviour [23,24]. Furthermore, due to stress concentrations of the particles, the influence of thickness could differ in a nanocomposite Ni-P coating as opposed to monolithic Ni-P. There has been minimal work investigating how thickness affects electroless Ni-P composite coatings and none for Ni-P nanocomposite coatings.
Therefore, the objective of this study is to investigate the tribological behaviour and wear mechanisms of Ni-P-NiTi composite coating with varied thicknesses and compare it to Ni-P coating. Hardness measurements and indentation were taken to verify the toughening of the coating due to the presence of NiTi nanoparticles. Additionally, multi-pass sliding wear tests using two different indenter types were conducted to evaluate wear resistance.
2. Materials and Methods
2.1. Coating Preparation
The coated samples for hardness testing had an AISI 1018 substrate with dimensions of 18 mm × 10 mm × 6 mm. For the samples used in wear testing, API X100 steel was used as a substrate. It was cylindrical with a diameter of 10 mm with a thickness of 5 mm. Prior to coating, the sample surfaces were prepared to be clean and smooth. The compositions of AISI 1018 and API X100 are shown in Table 1 [25]. It is followed by Table 2, which shows the steps of substrate preparation and pretreatment.

Table 1.
Monolithic Ni-P Coating Vickers Hardness Measurement [25].

Table 2.
Substrate Preparation.
Short and long deposit times were used for both the Ni-P and Ni-P-NiTi to create coatings of various thicknesses. The Ni-P plating solutions were composed of distilled water, nickel sulphate, and sodium hypophosphite. For composite coating baths, 1 g of NiTi nanopowder was added per 1 L of solution. US Research Nanomaterials Inc. (Houston, TX, USA) supplied the NiTi alloy nanopowder that was used as the secondary addition in the composite coatings. It was advertised to be 99.9% 60 nm and had a Ni:Ti ratio of 1:1. Prior to plating the composite, the substates had a Ni-P pre-coating applied to increase the coating’s adhesion. The pH and temperature of the coating bath was closely monitored and were maintained at 88 ± 2 °C and a pH of 4.7 ± 0.2.
2.2. Coating Characterization
X-ray Diffractometry (XRD) analysis was conducted on API X100 steel, NiTi nanopowder, Ni-P coating surface, and Ni-P-NiTi composite coating surface to identify the phases present. A Bruker D8 Advanced X-ray Diffraction System was used with Cu Kα radiation. The scan went from 20° to 120° and the generated peaks were identified using Powder Diffraction Files (PDF) to evaluate their crystal structure. The coating compositions were then confirmed using energy dispersive spectrometry (EDS).
2.3. Hardness
Micro-hardness tests were conducted on the monolithic Ni-P and nanocomposite Ni-P-NiTi coatings. A Vickers indenter was used with an applied load of 6 N. The tests were repeated multiple times over the surfaces to ensure the reproducibility of results. Indentations on both monolithic and composite coating samples using a Rockwell hardness tester with a 60 kg load were conducted to observe their indentation behavior. Images and 3D profiles of the indents made from both the Rockwell tester and the Vickers micro-hardness tester were taken using a Keyence confocal laser microscope.
2.4. Sliding Wear
The wear resistance of the Ni-P and Ni-P-NiTi coatings with varied thicknesses were evaluated using a Universal Micro-Tribometer (UMT). Multiple pass wear tests were used to evaluate how the coefficient of friction (CoF), acoustic emission (AE), and wear volume loss progressed with sliding distance. The number of passes tested were 1, 25, 50, 75, and 100 which all had a constant load with a pass length of 5 mm. One pass was made in 30 s, making the indenter speed 0.17 mm/second. An acoustic emission sensor was used during the tests to monitor the crack development during the passes. This test was repeated with two different styles of indenters. A sharp diamond indenter with a diameter of 0.4 mm and a spherical WC-6Co indenter with a diameter of 1.59 mm. The diamond indenter used a load of 1 kg and the spherical WC-6Co indenter used a load of 4 kg.
After the tests were completed, a Keyence confocal laser microscope was used to measure the wear scar width and depth. Volume loss was calculated based on the indenter radius and scar width, shown in Equation (1). ‘D’ is the diameter of the wear indenter tip, ‘t’ is the wear length, and ‘b’ is the width of the wear scar [26]. The number of passes was multiplied by the wear length to determine the sliding distance. The volume loss per sliding distance is then graphed to observe how wear progresses. The wear rate of the coating was then calculated using the slope of the curve of volume loss at a steady state divided by the wear distance.
After wear testing and imaging were completed, the samples were sectioned using a Buehler IsoMet 1000 Precision Saw. Low loads and speed were used with an IsoMet Diamond Wafering Blade to damage the coating. Images of the cross-sections were taken on the same Keyence laser confocal microscope.
3. Results
3.1. Characterization
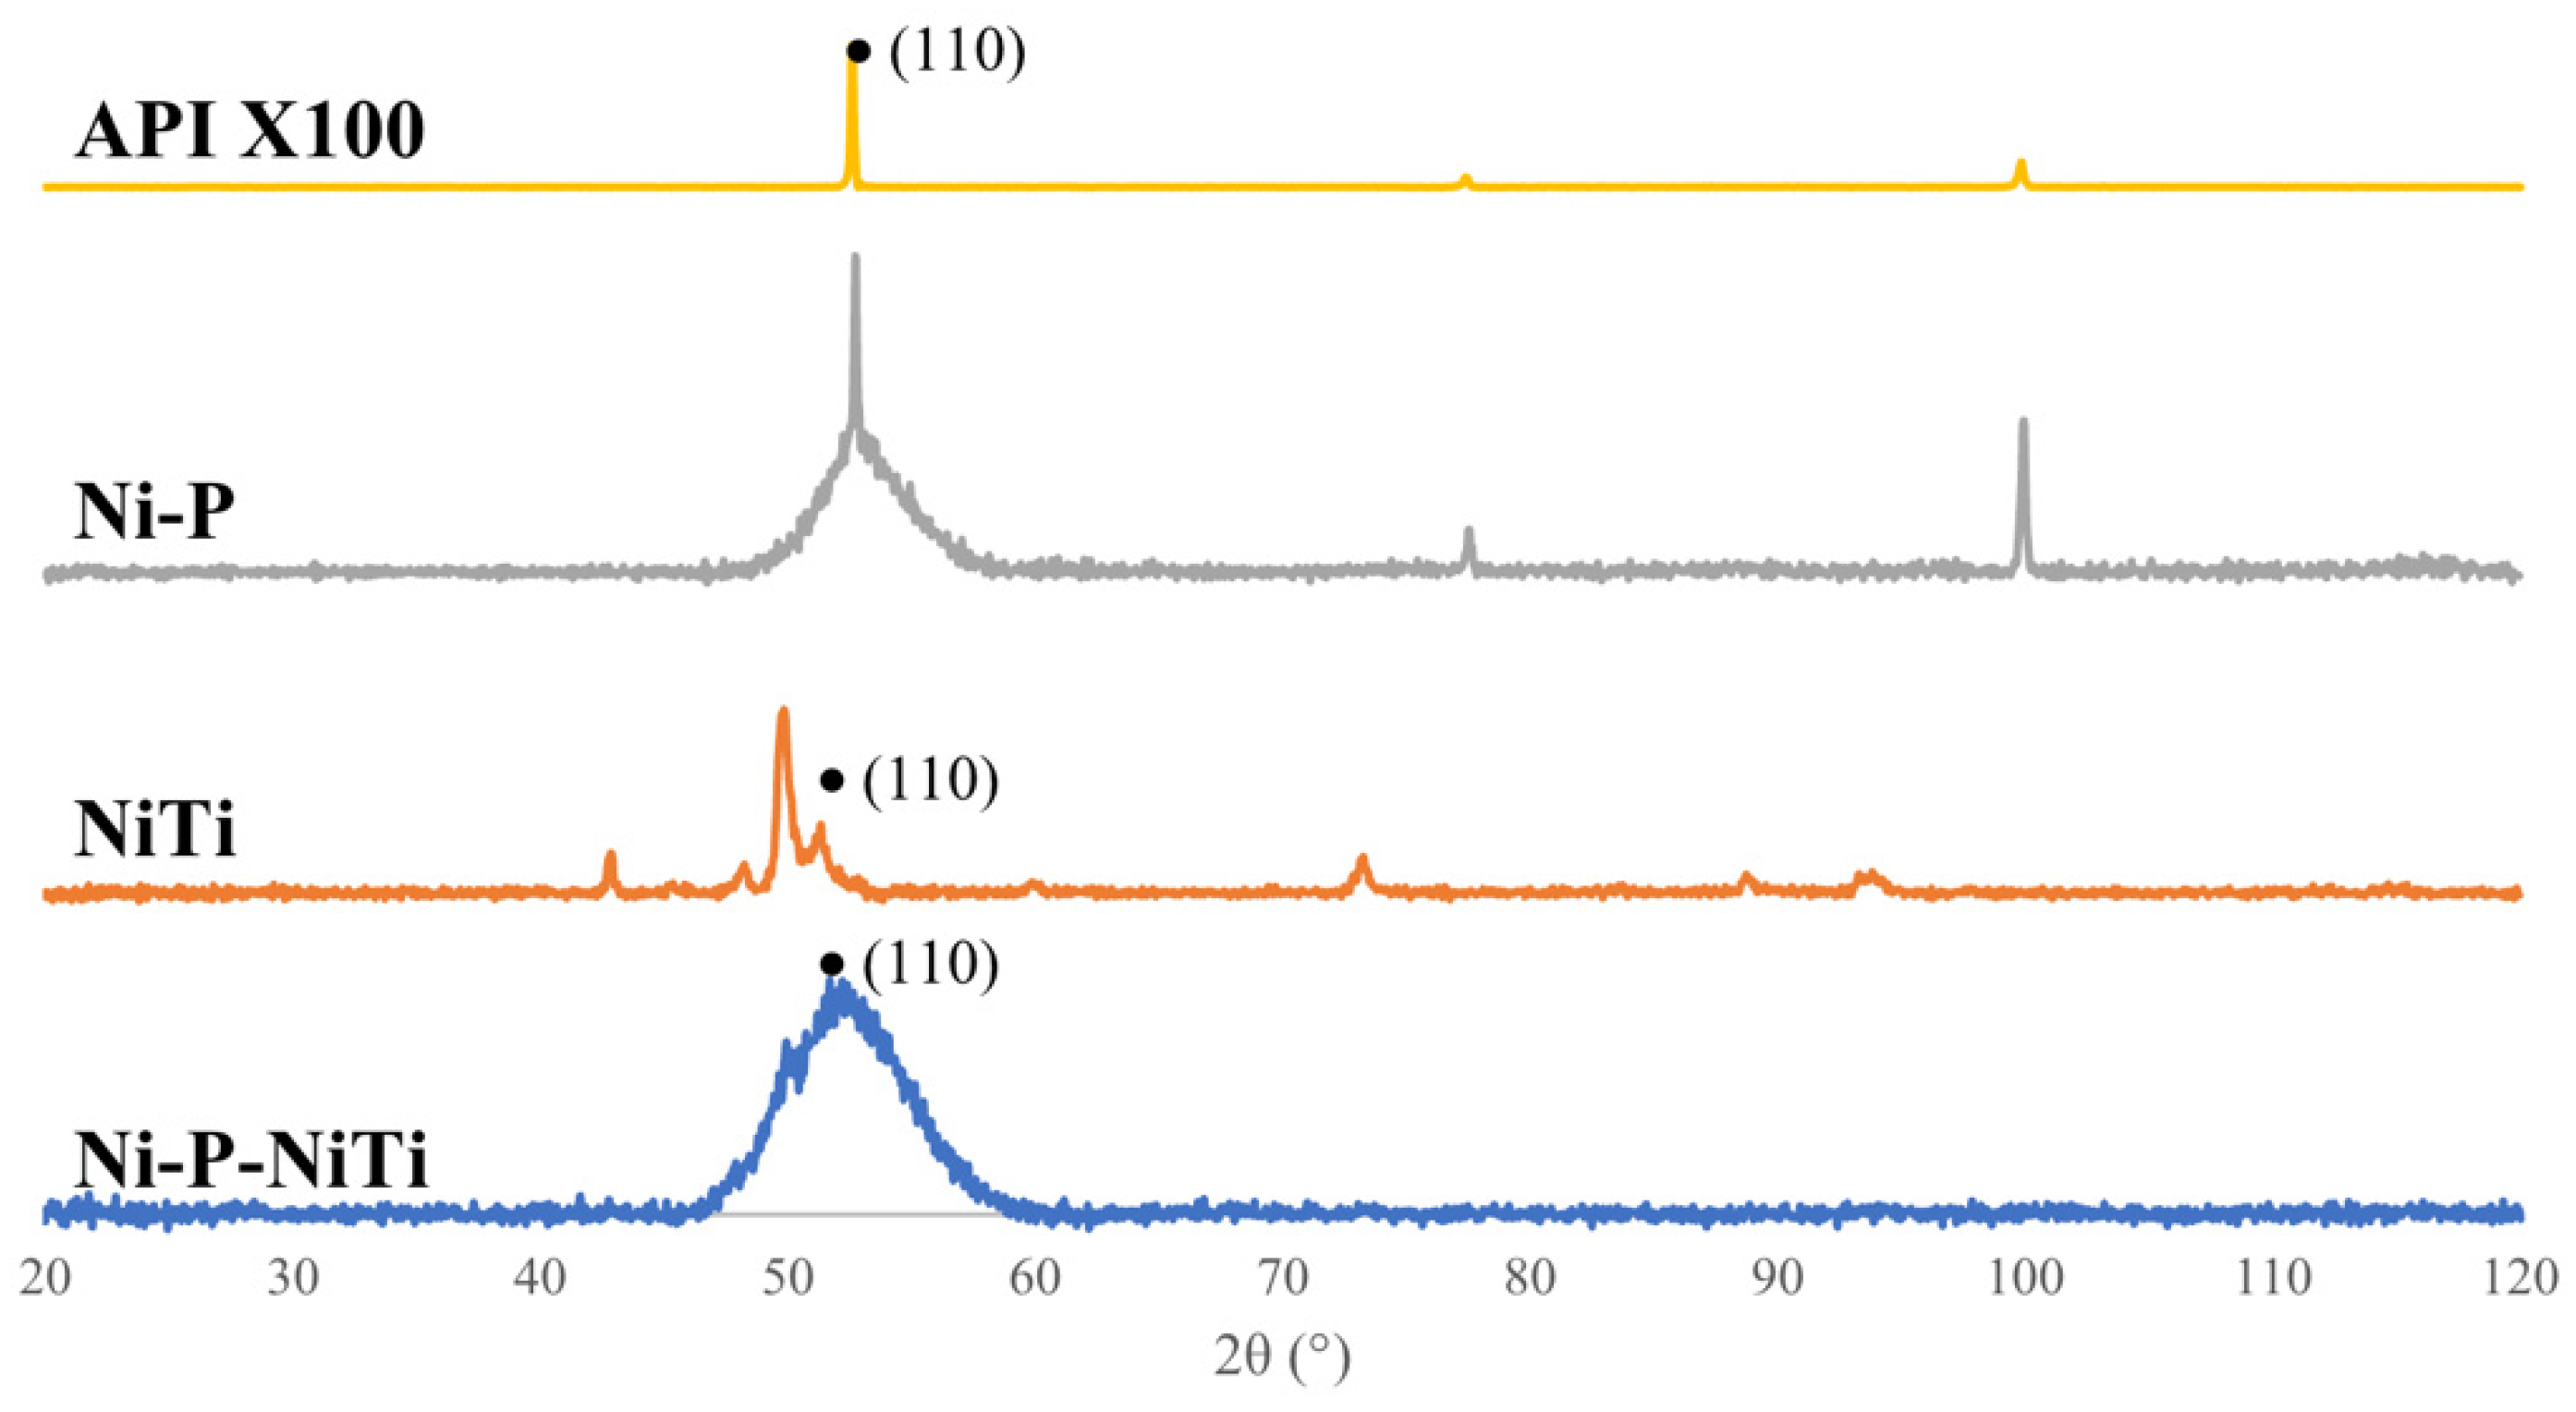
X-ray diffraction patterns of the API X100 substrate, NiTi nano-particle powder, monolithic Ni-P coating, and Ni-P-NiTi composite coating are shown in Figure 1. The Ni-P XRD pattern shows mostly an amorphous structure, but the pattern had a broad peak that covered the 52° to 56° 2θ, which was a close match to a nickel phosphide PDF (PDF 04-003-6331). Both Fe and NiTi are cubic structures that would diffract at the 110 plane, which happens around 45–55°. This very clearly is present in the API X100 pattern, which has a high intensity peak at 52°. The NiTi powder matches a nickel-titanium powder diffraction file (PDF ID: 04-020-1330 [27]) that has a peak at 49.8° from the 110 plane. This crystal structure is documented to have a weight percent ratio of 54.08Ni:45.92Ti. The Ni-P-NiTi coating resembles the Ni-P broad peak that extended from 52° to 55° and includes a visible smaller 49.8° peak which reflects what was seen in the powder’s pattern.
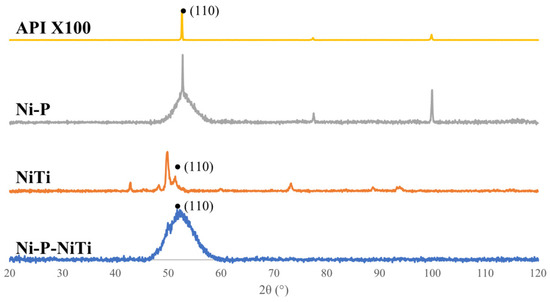
Figure 1.
Micro-Indentation Load-Depth Curve Examples.
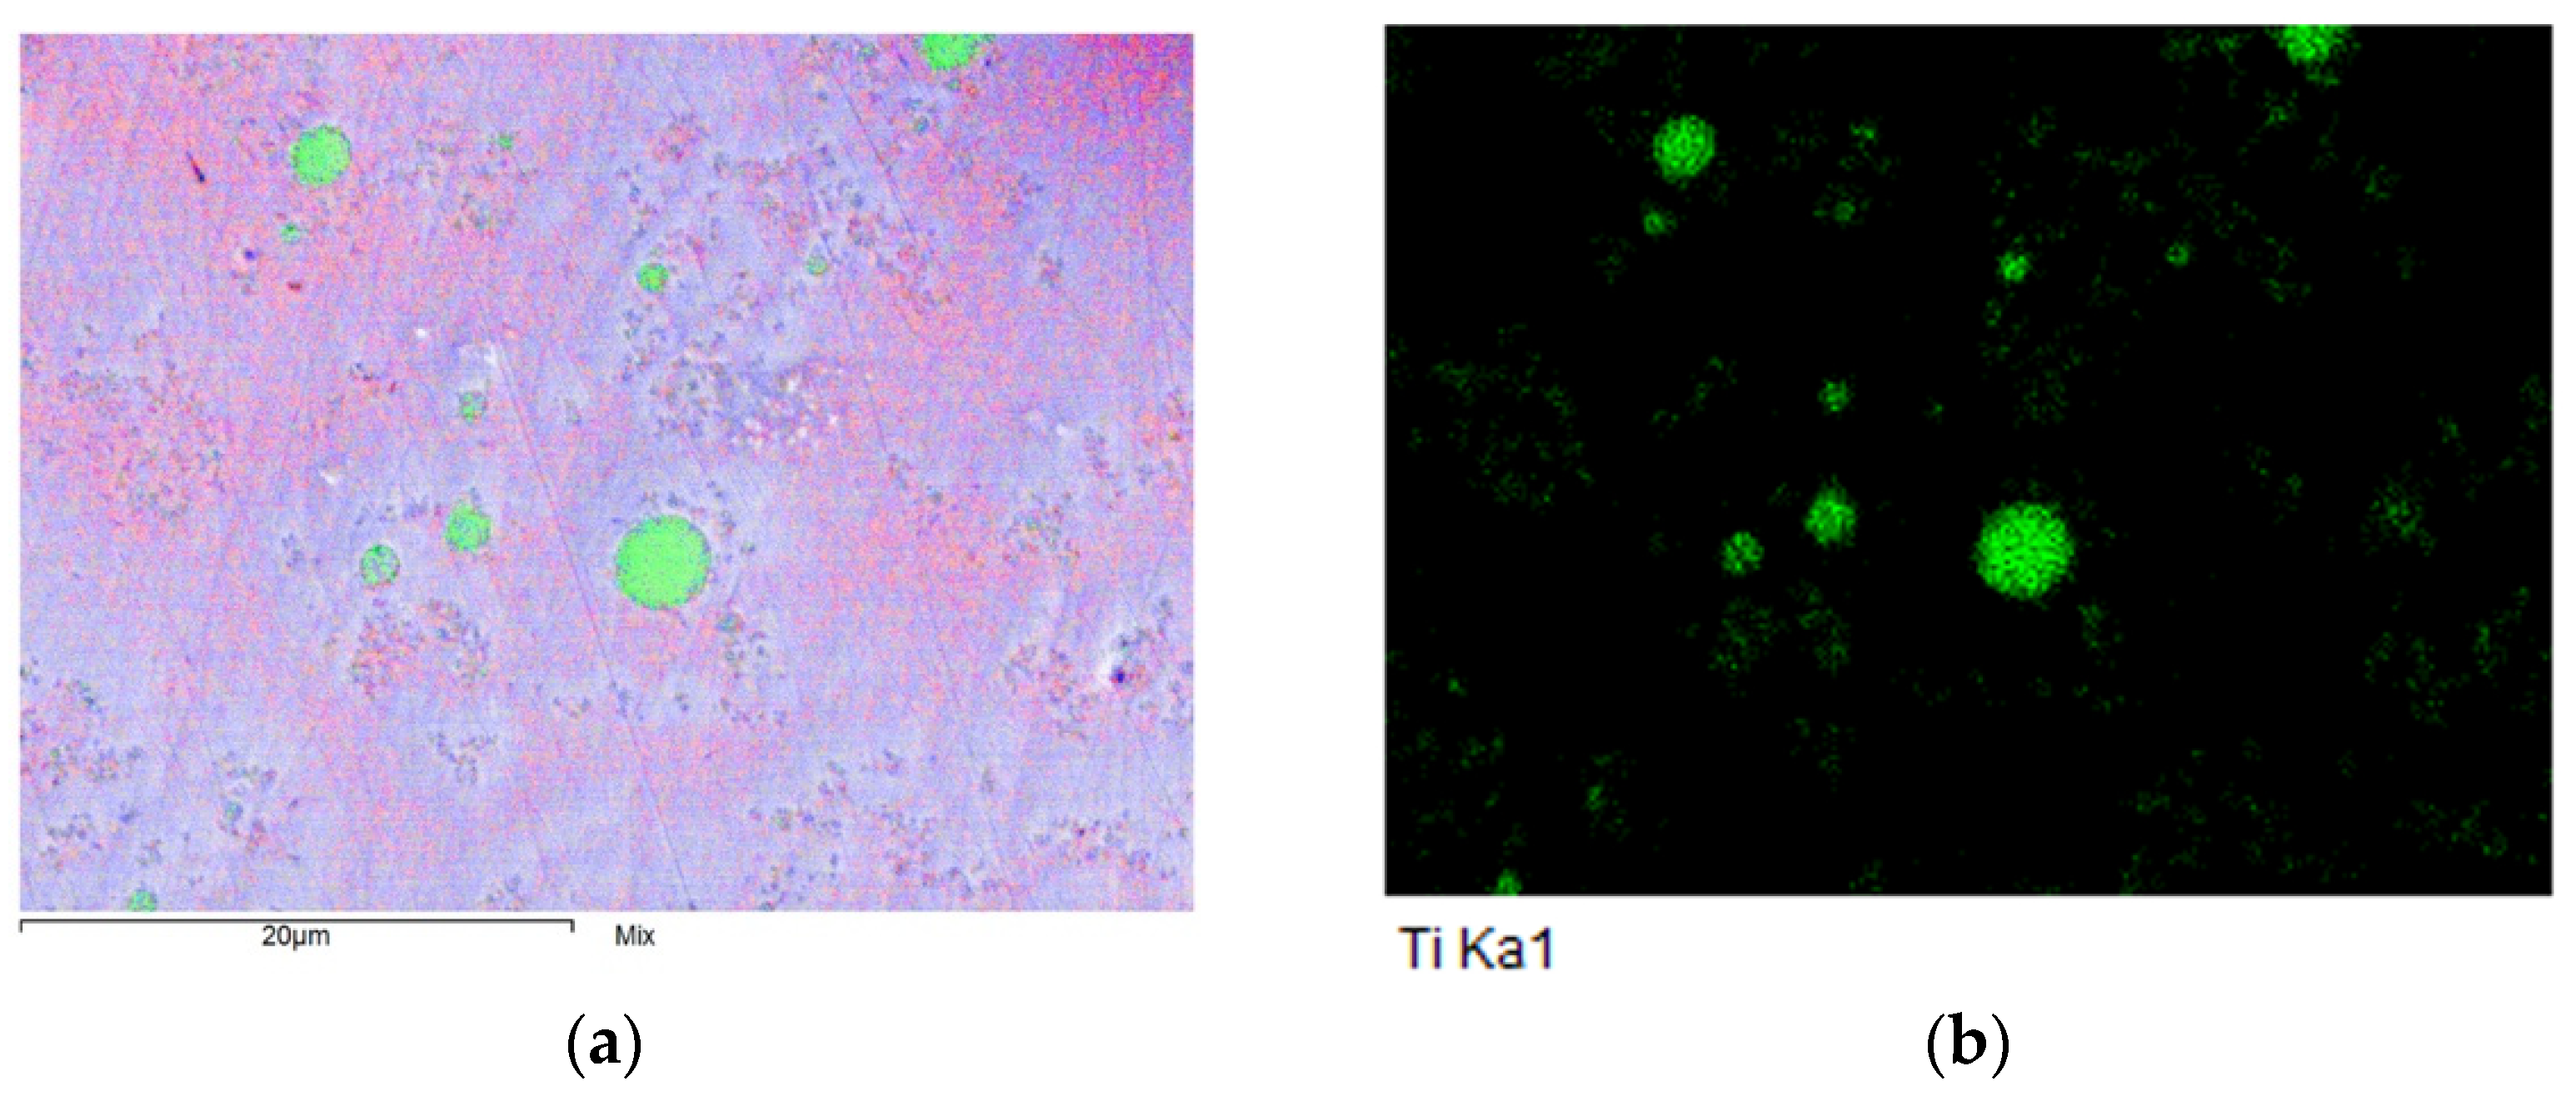
The cross-sections of the composite coatings showed a relatively even distribution of particles. An example of the composite coating cross-sectional EDS analysis is shown as an EDS map in Figure 2. Both Figure 2a,b show the same area of the cross-section of thick Ni-P-NiTi composite coating. Figure 2a shows multiple elements as different colors, where nickel is in blue, phosphorus is in red, and titanium is in green. Figure 2b shows only the placement of the element titanium, where the green dots represent the titanium particles. Table 3 shows the averaged chemical compositions in each type of coating found from the EDS Analysis.
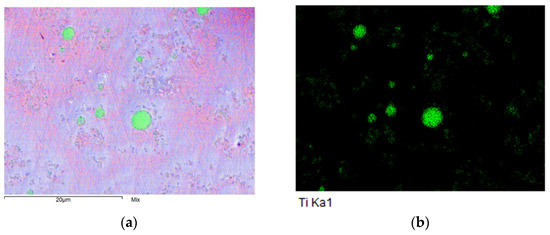
Figure 2.
Thick Ni-P-NiTi cross-sectional EDS map. (a) Map including Ni, P, and Ti. (b) Map showing Ti exclusively.

Table 3.
Coating Compositions from EDS Analysis.
The weight percent of NiTi present in the composite coatings was calculated using Equation (2). The weight percent ratio of nickel to titanium was from the XRD PDF match, 54.08Ni:45.92Ti.
The thinner composite was found to be Ni-P-2.97wt%NiTi while the thicker composite was Ni-P-3.53wt%NiTi. Therefore, the average composite composition would be Ni-P-3.25wt%Ti.
3.2. Hardness
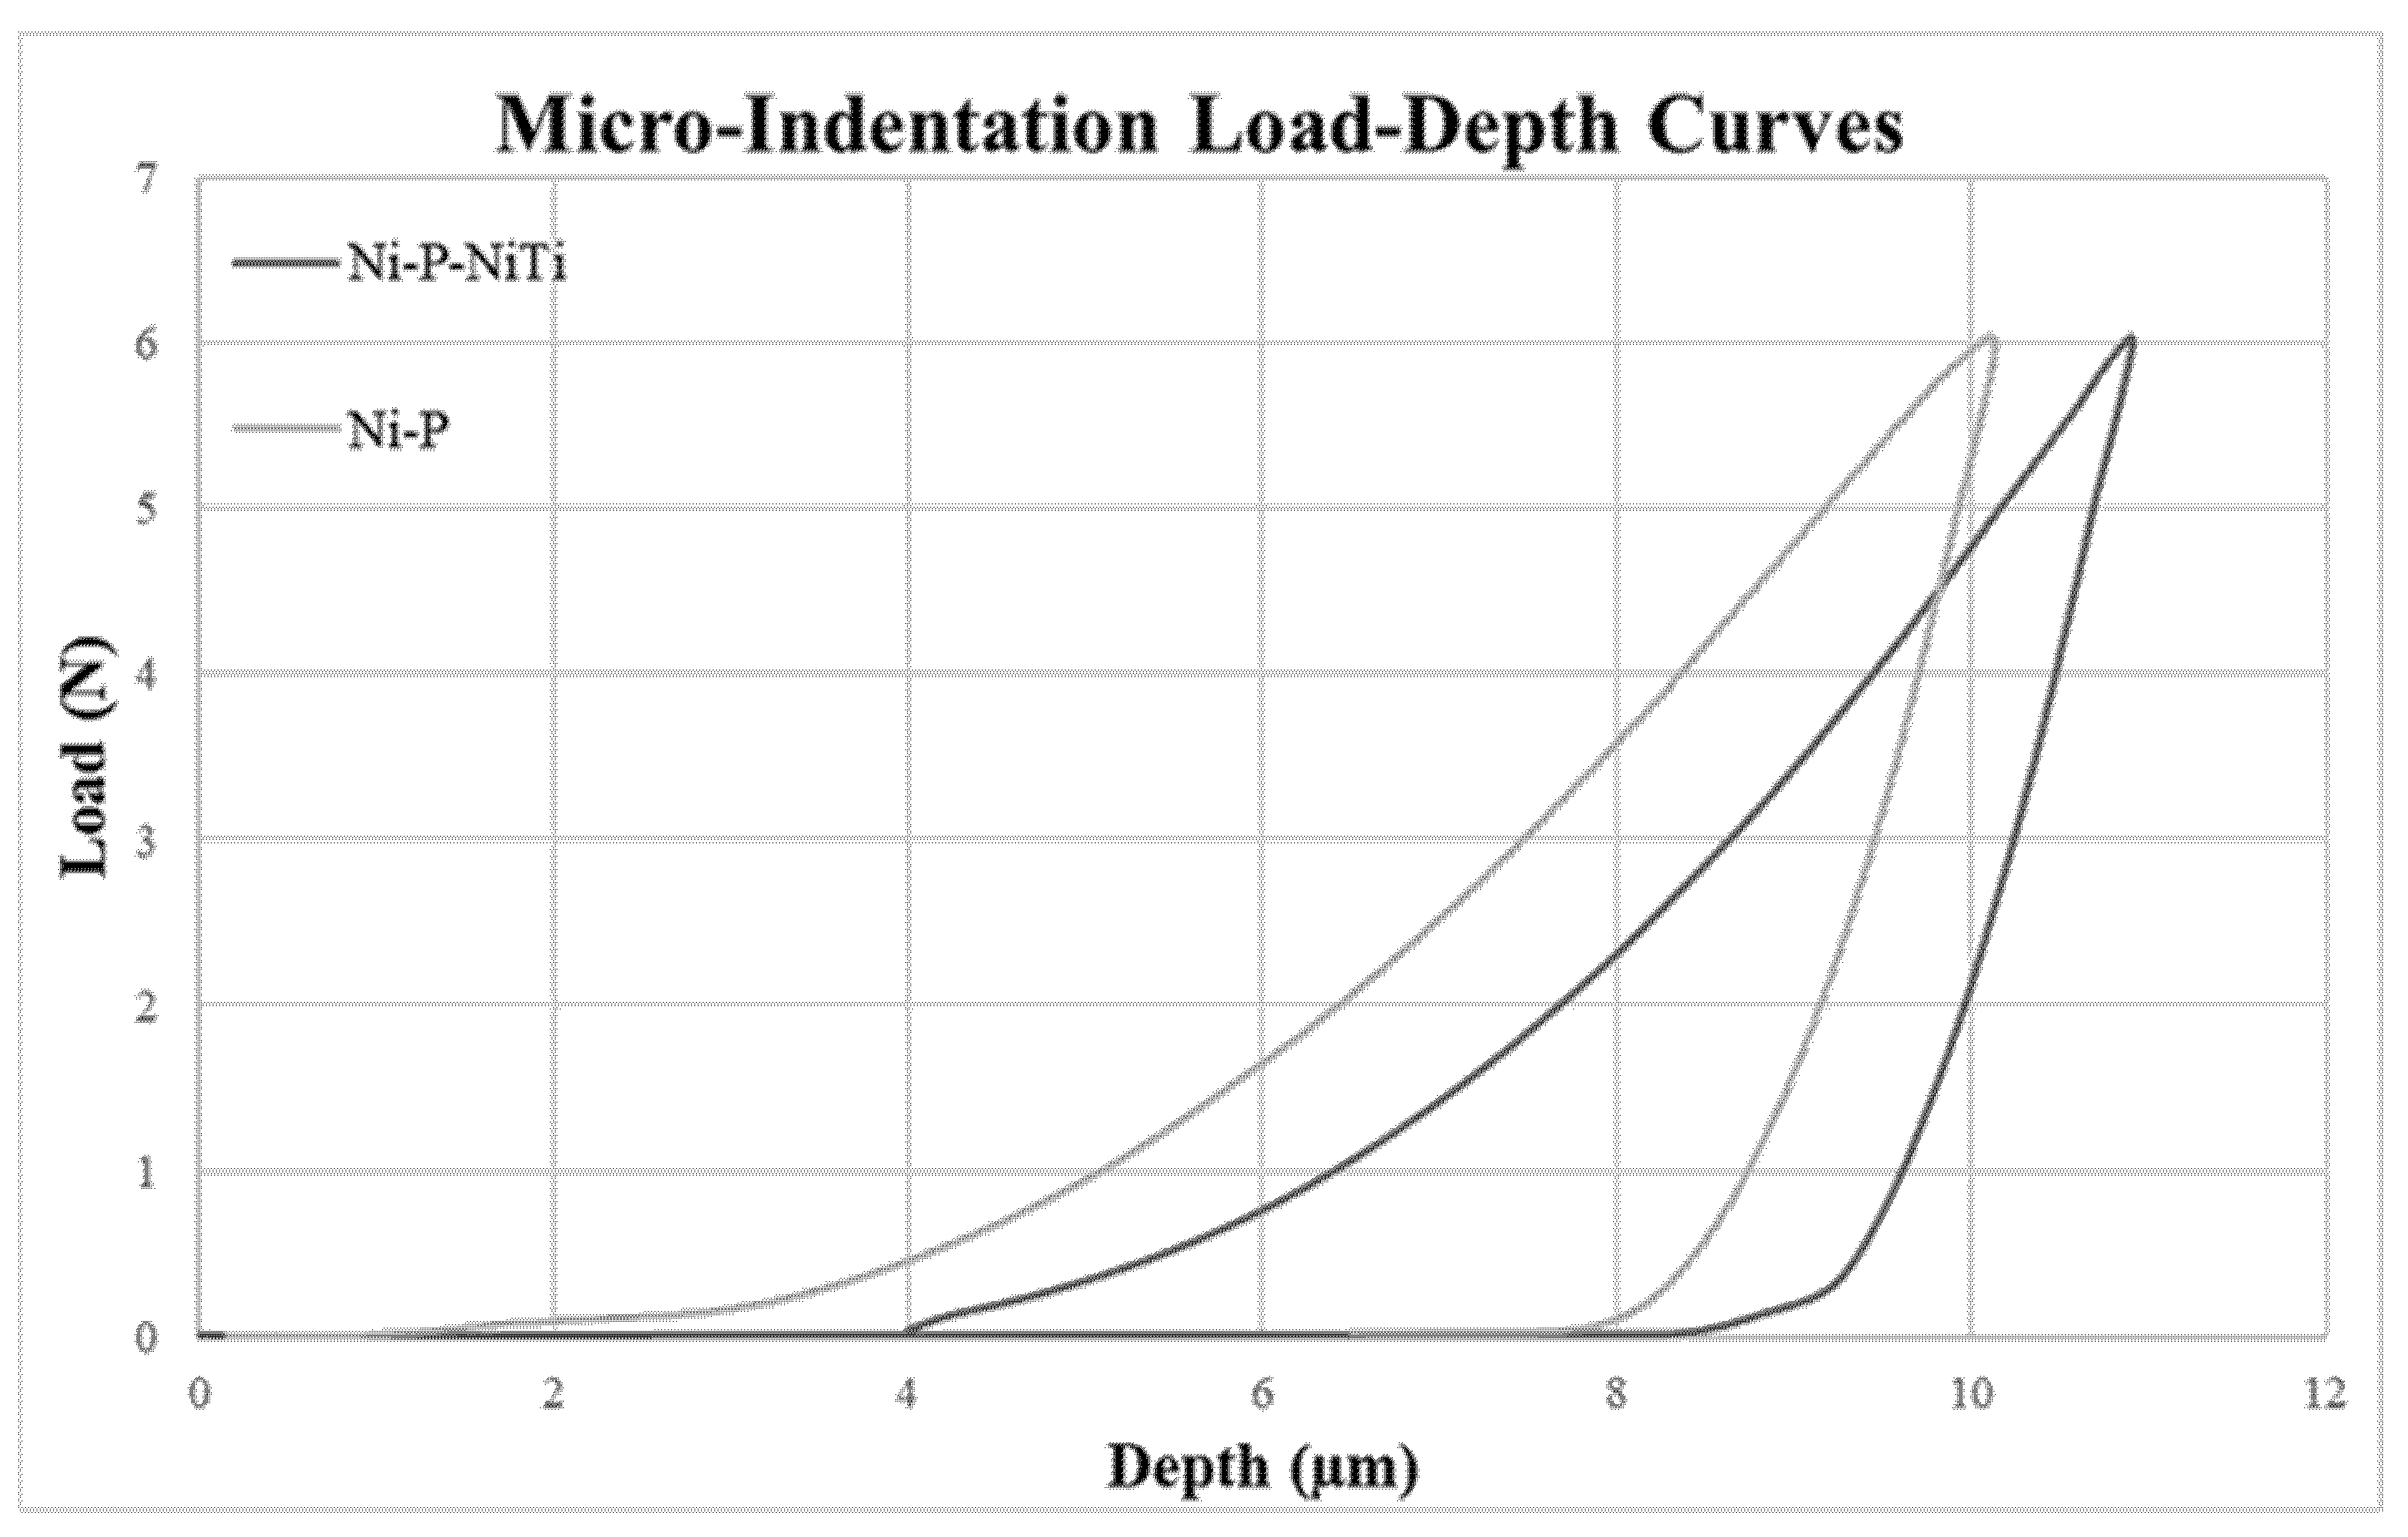
Monolithic Ni-P coating had seven load-depth measurements shown in Table 4 and Ni-P-NiTi composite coating had six, shown in Table 5. Ni-P had an average hardness of 5.75 GPa and an average elastic modulus of 142.68 GPa. These were higher values than the composite Ni-P-NiTi, which had an average hardness of 3.55 GPa and an average elastic modulus of 99.80 GPa. The indenter penetrated deeper into the composite coating than the monolithic, which is expected given the difference in hardness.

Table 4.
Monolithic Ni-P Coating Vickers Hardness Measurement.

Table 5.
Ni-P-NiTi Composite Coating Vickers Hardness Measurements.
Figure 3 shows representative examples of the load-depth curves using point 5 on the Ni-P coating and point 4 on the Ni-P-NiTi coating.
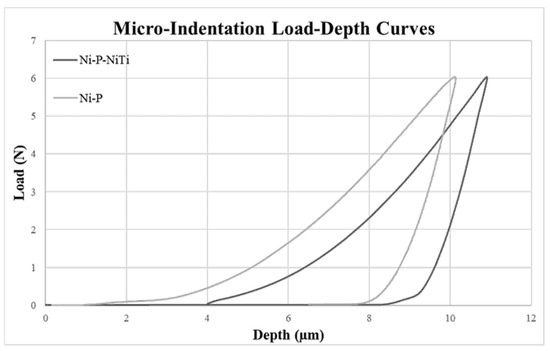
Figure 3.
Micro-Indentation Load-Depth Curve Examples.
Table 6 compares the hardness and elastic modulus values of the Ni-P and Ni-P-NiTi coatings found experimentally to the typical values found in the literature on Ni-P coating [6,16,28,29], the NiTi alloy [16,30,31], and the AISI 1018 substrate [29,32]. Both coatings had considerably higher values than the typical range of AISI 1018. The monolithic coating experimental values were within the range of the typical values. The experimental values of Ni-P-NiTi composite coating were lower than the typical ranges of Ni-P but higher than the NiTi alloy. This indicates that the coating did lose some hardness by the NiTi addition; however, the lower elastic modulus shows that in return it gained some elasticity.

Table 6.
Experimental Data Compared to Typical Values.
Figure 4 shows Vickers measurement points on the monolithic coating compared to the composite. Figure 4a is a point on the monolithic Ni-P coating and shows how the indent has a smaller width than the indent in the Ni-P-NiTi composite coating shown in Figure 4b. This is what was implied by the difference in hardness, elastic modulus, and indentation depth between the two coating types.

Figure 4.
Vickers Indent on Coating Surface: (a) Monolithic Ni-P, (b) Ni-P-NiTi Composite Coating.
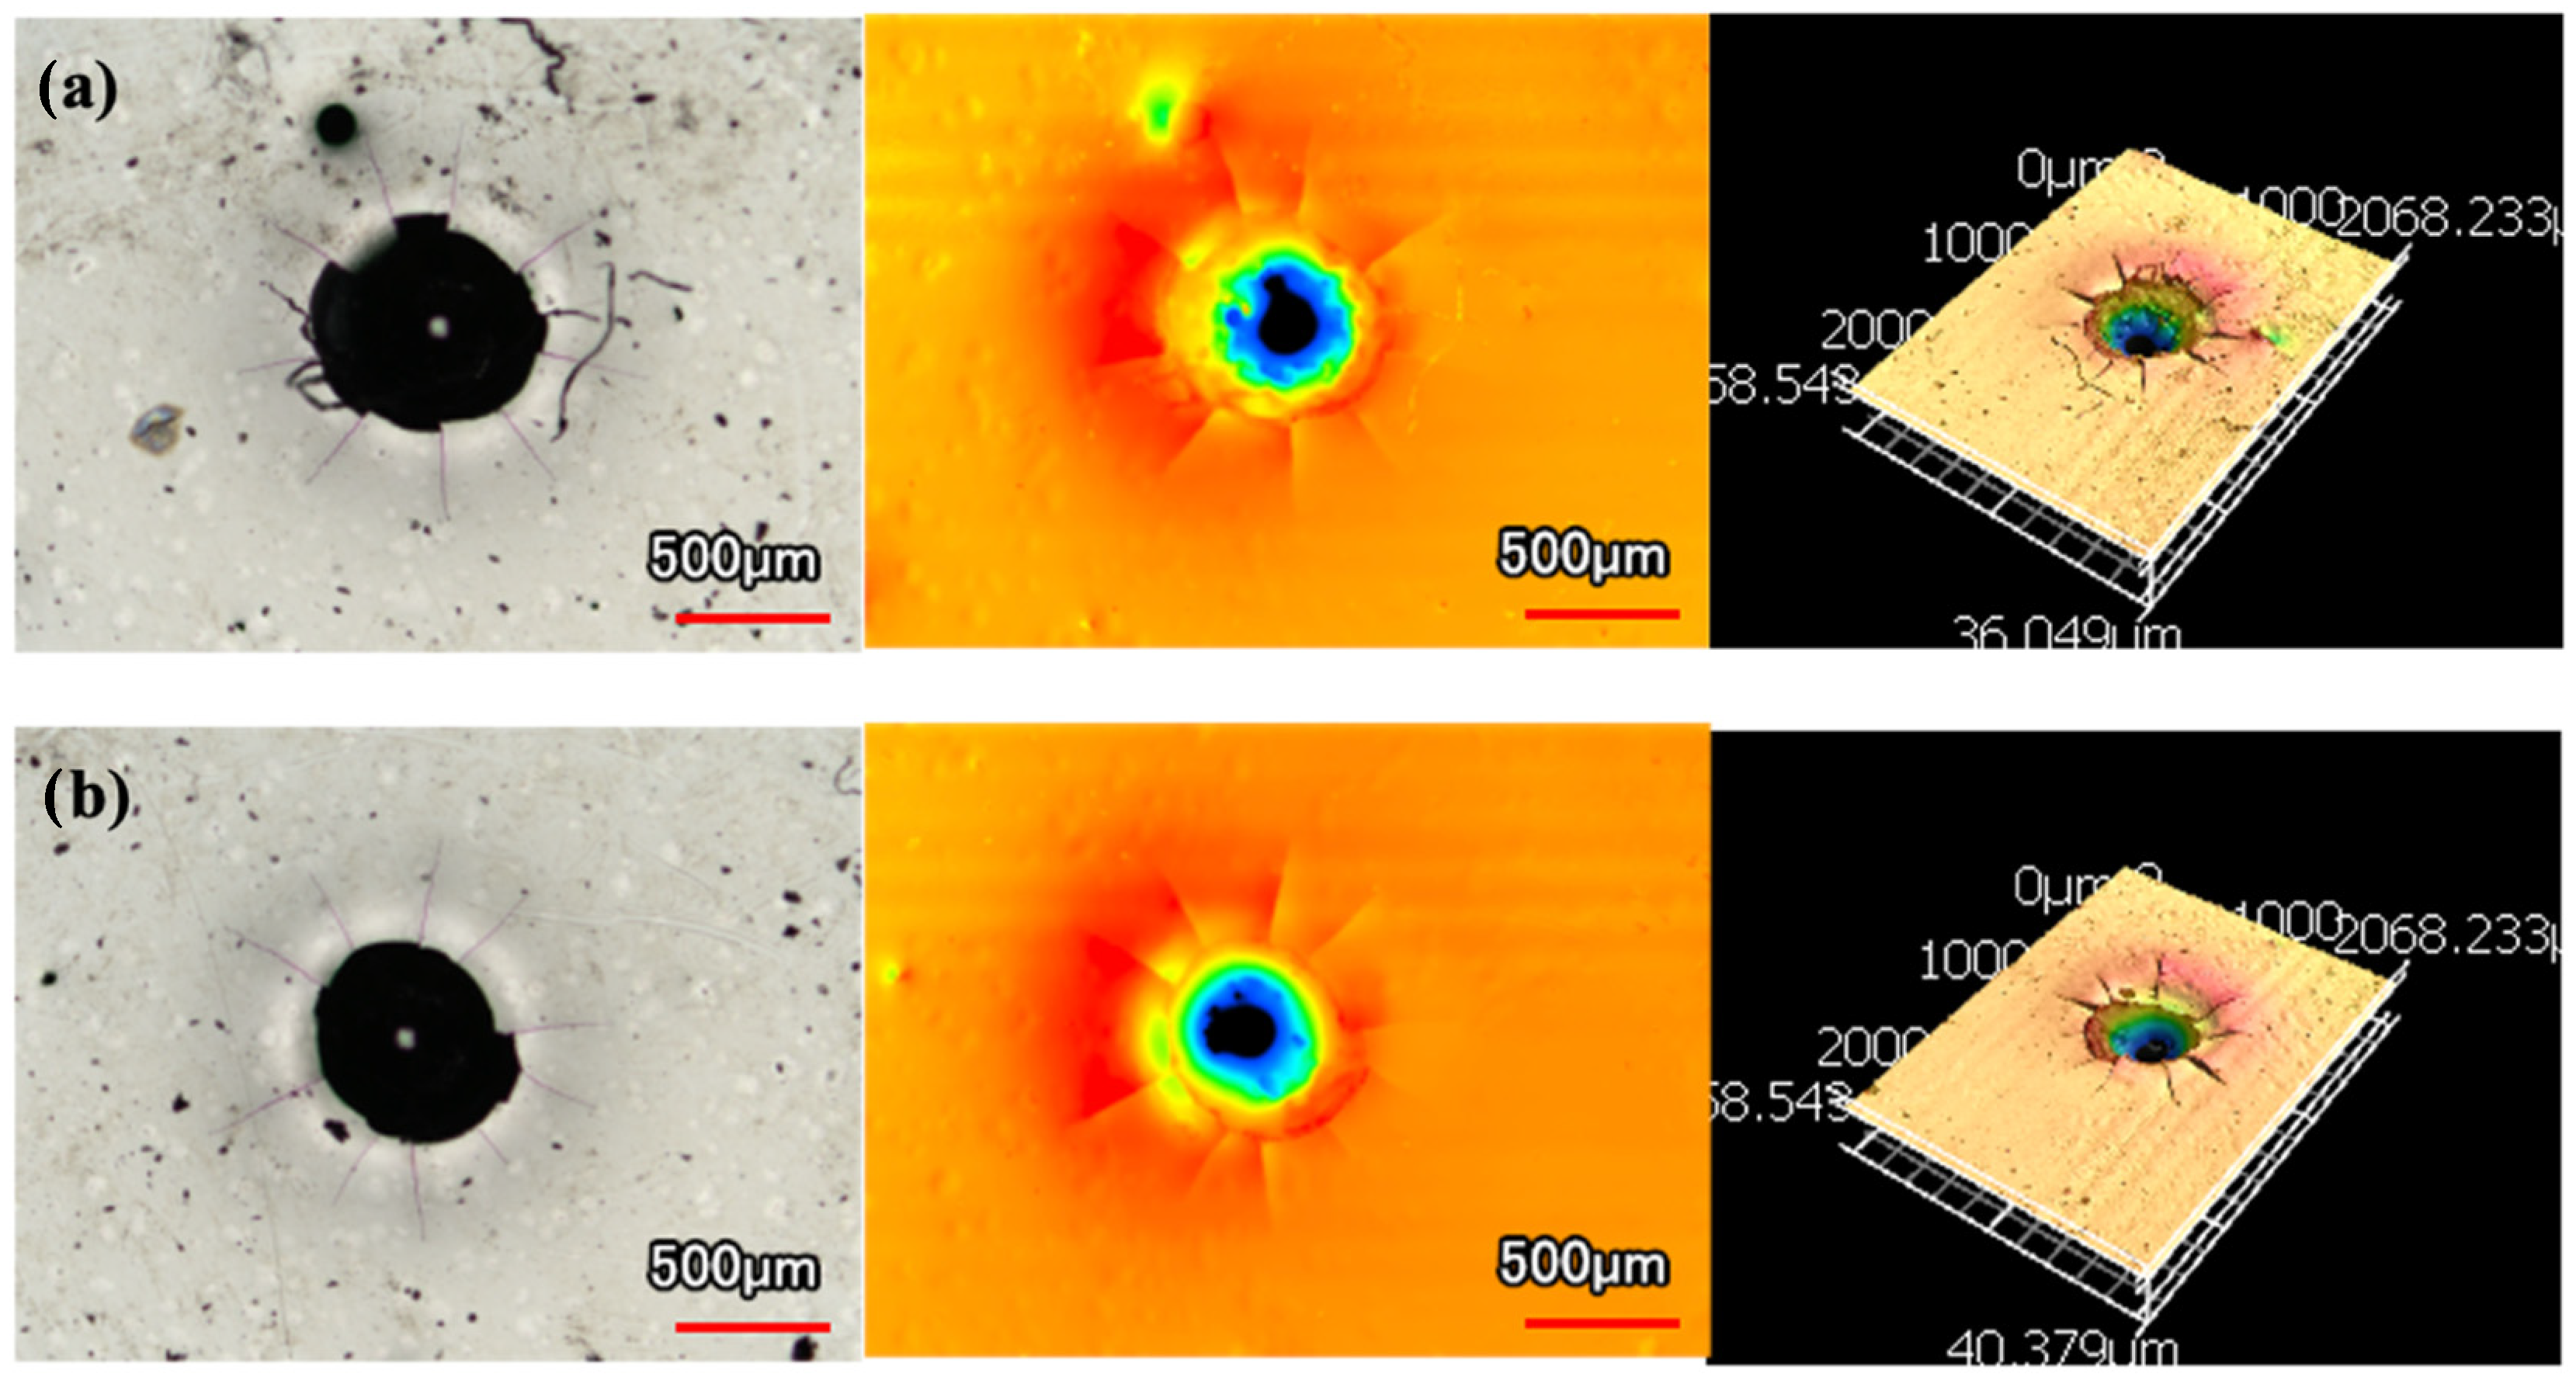
Images and 3D profiles of the Rockwell hardness tester indentations are shown below in Figure 5 and Figure 6. Figure 5 shows two examples of indents with large Hertzian indentation cracks on the monolithic Ni-P coating. Additionally, there are significant radial cracks. This cracking is a visual confirmation of its low toughness and ductility. The cracks and brittleness of Ni-P are even more jarring when compared to the indentation on Ni-P-NiTi coating shown in Figure 6. Due to the composite’s high toughness, it had minimal cracking and plastic material pile-up due to its higher ductility.
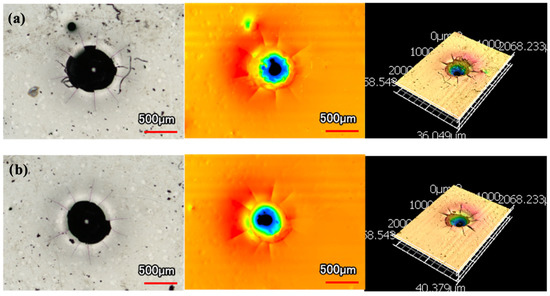
Figure 5.
Rockwell Indentations on Ni-P Coating: (a) Radial and Hertzian Cracks, (b) Hertzian Cracks.

Figure 6.
Rockwell Indentation on Ni-P-NiTi Coating.
3.3. Sliding Wear Behaviour
3.3.1. Wear Tracks
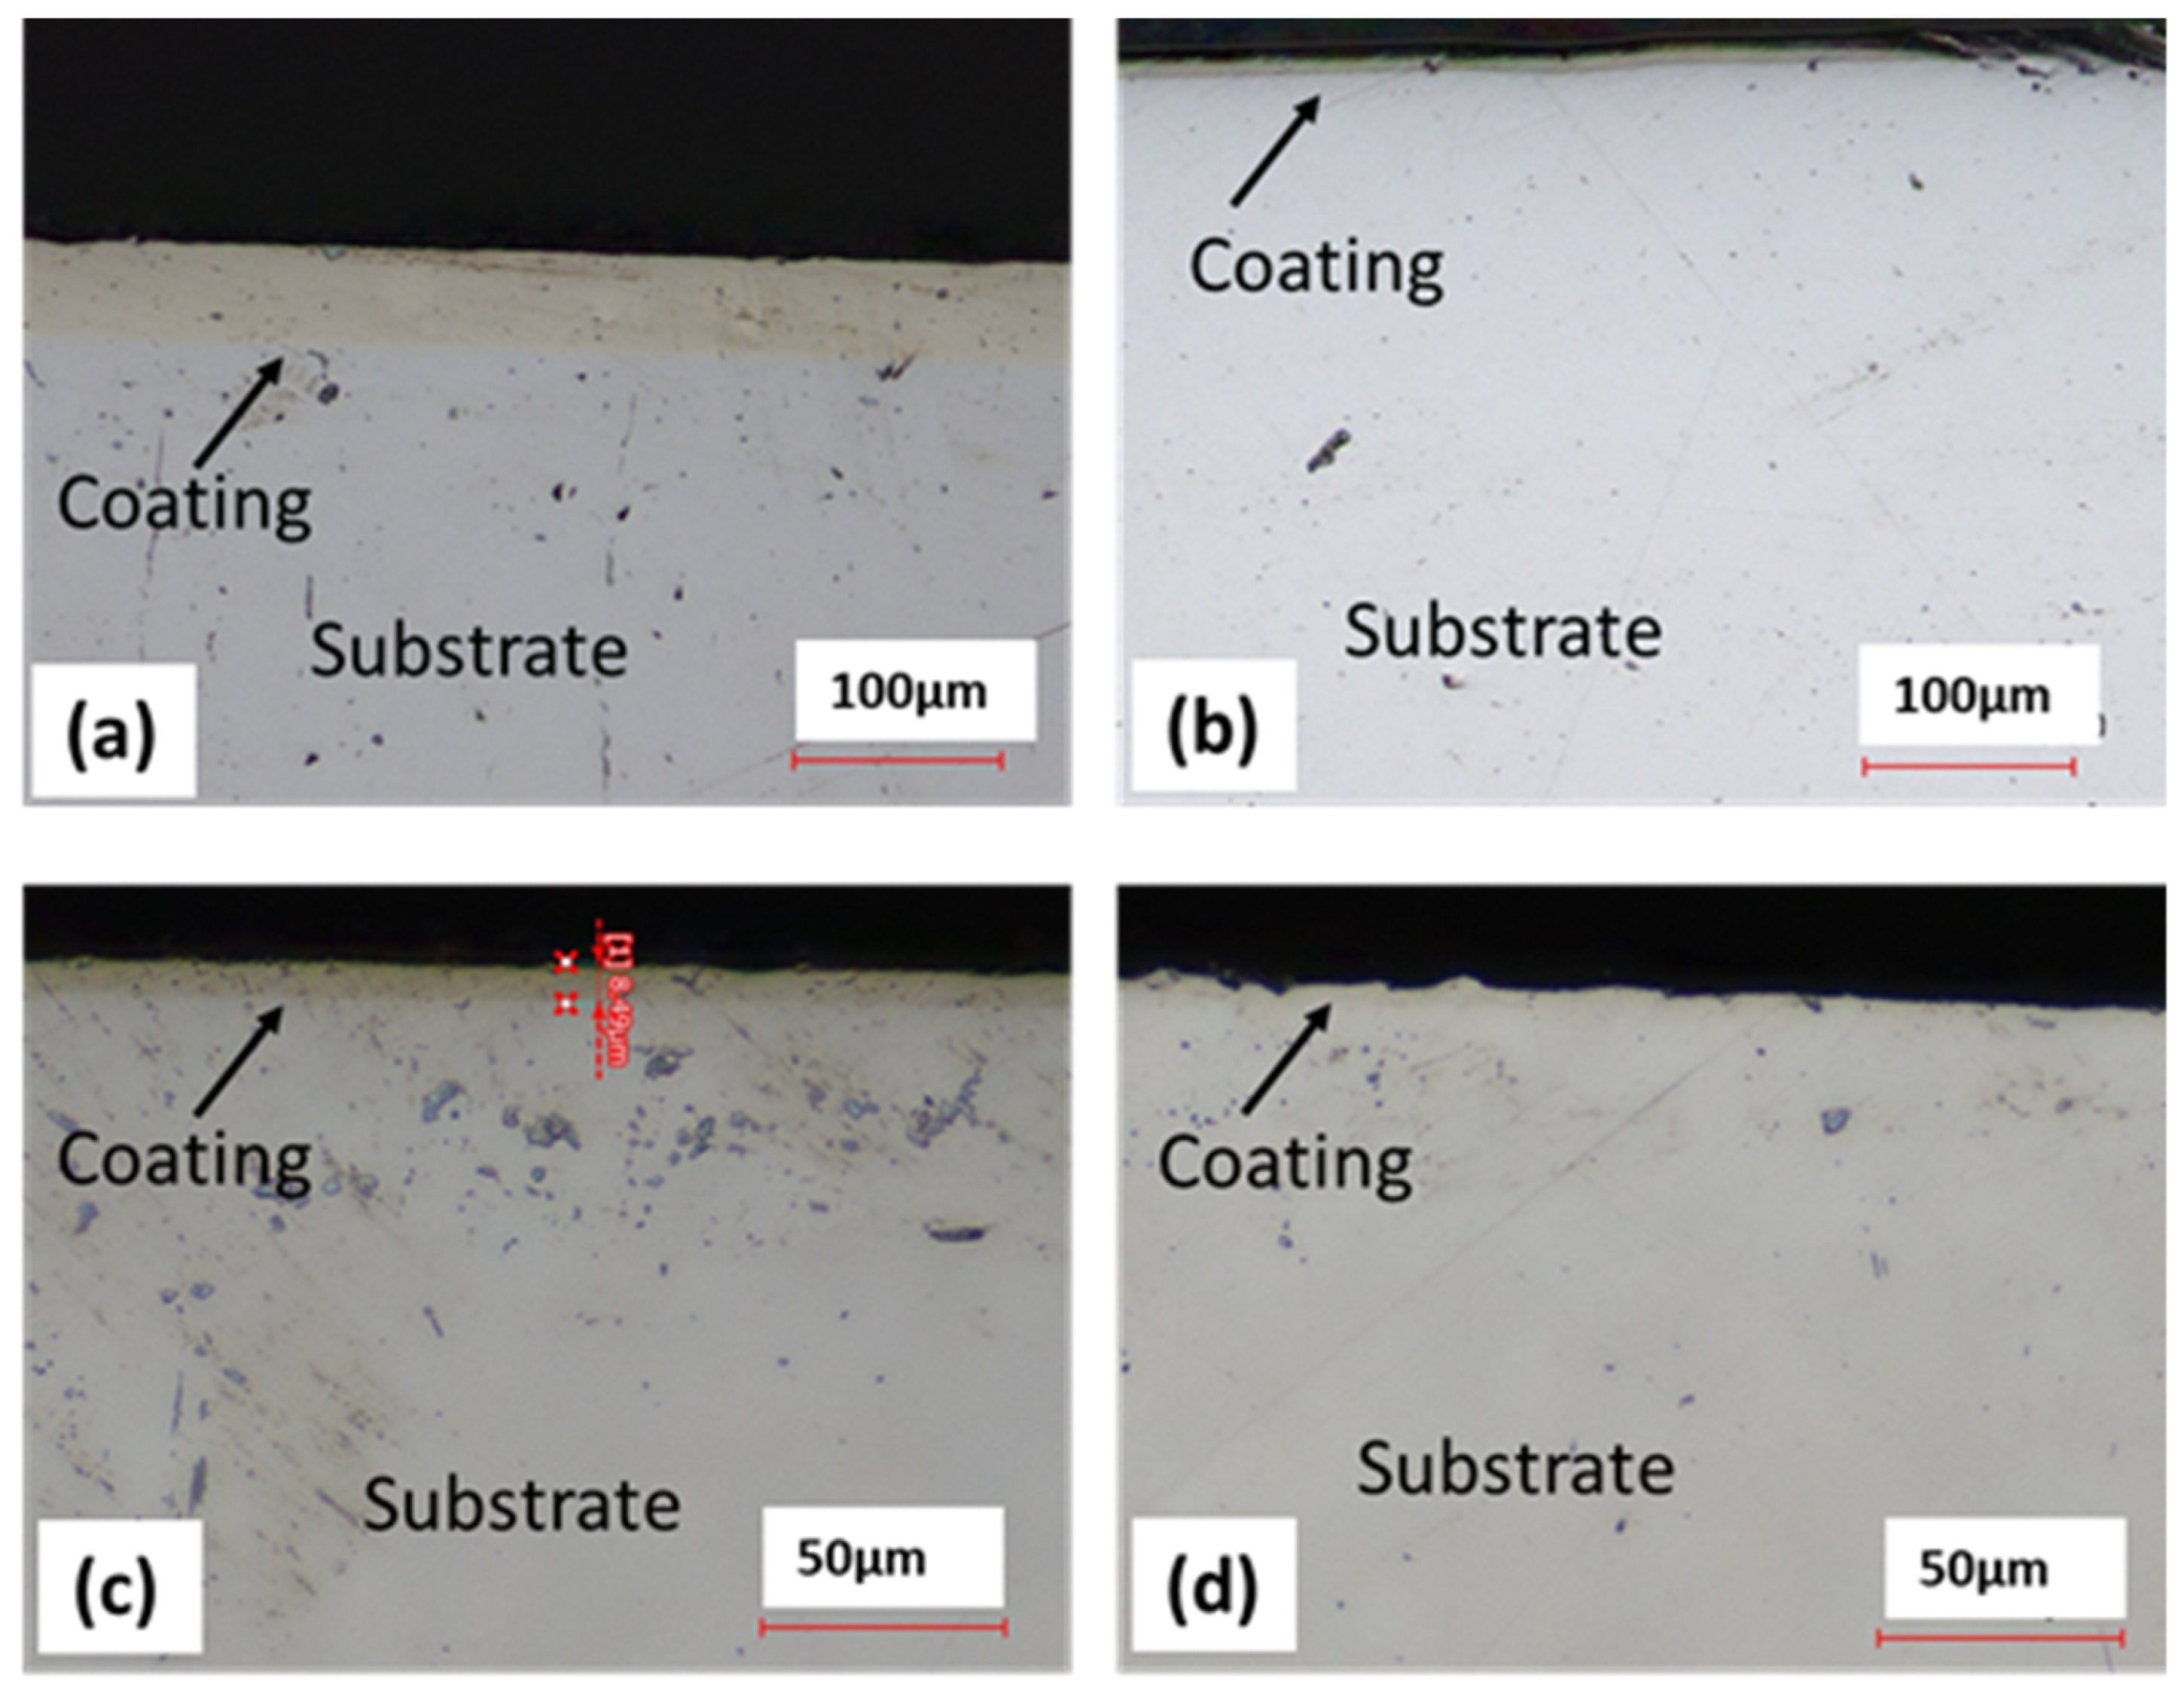
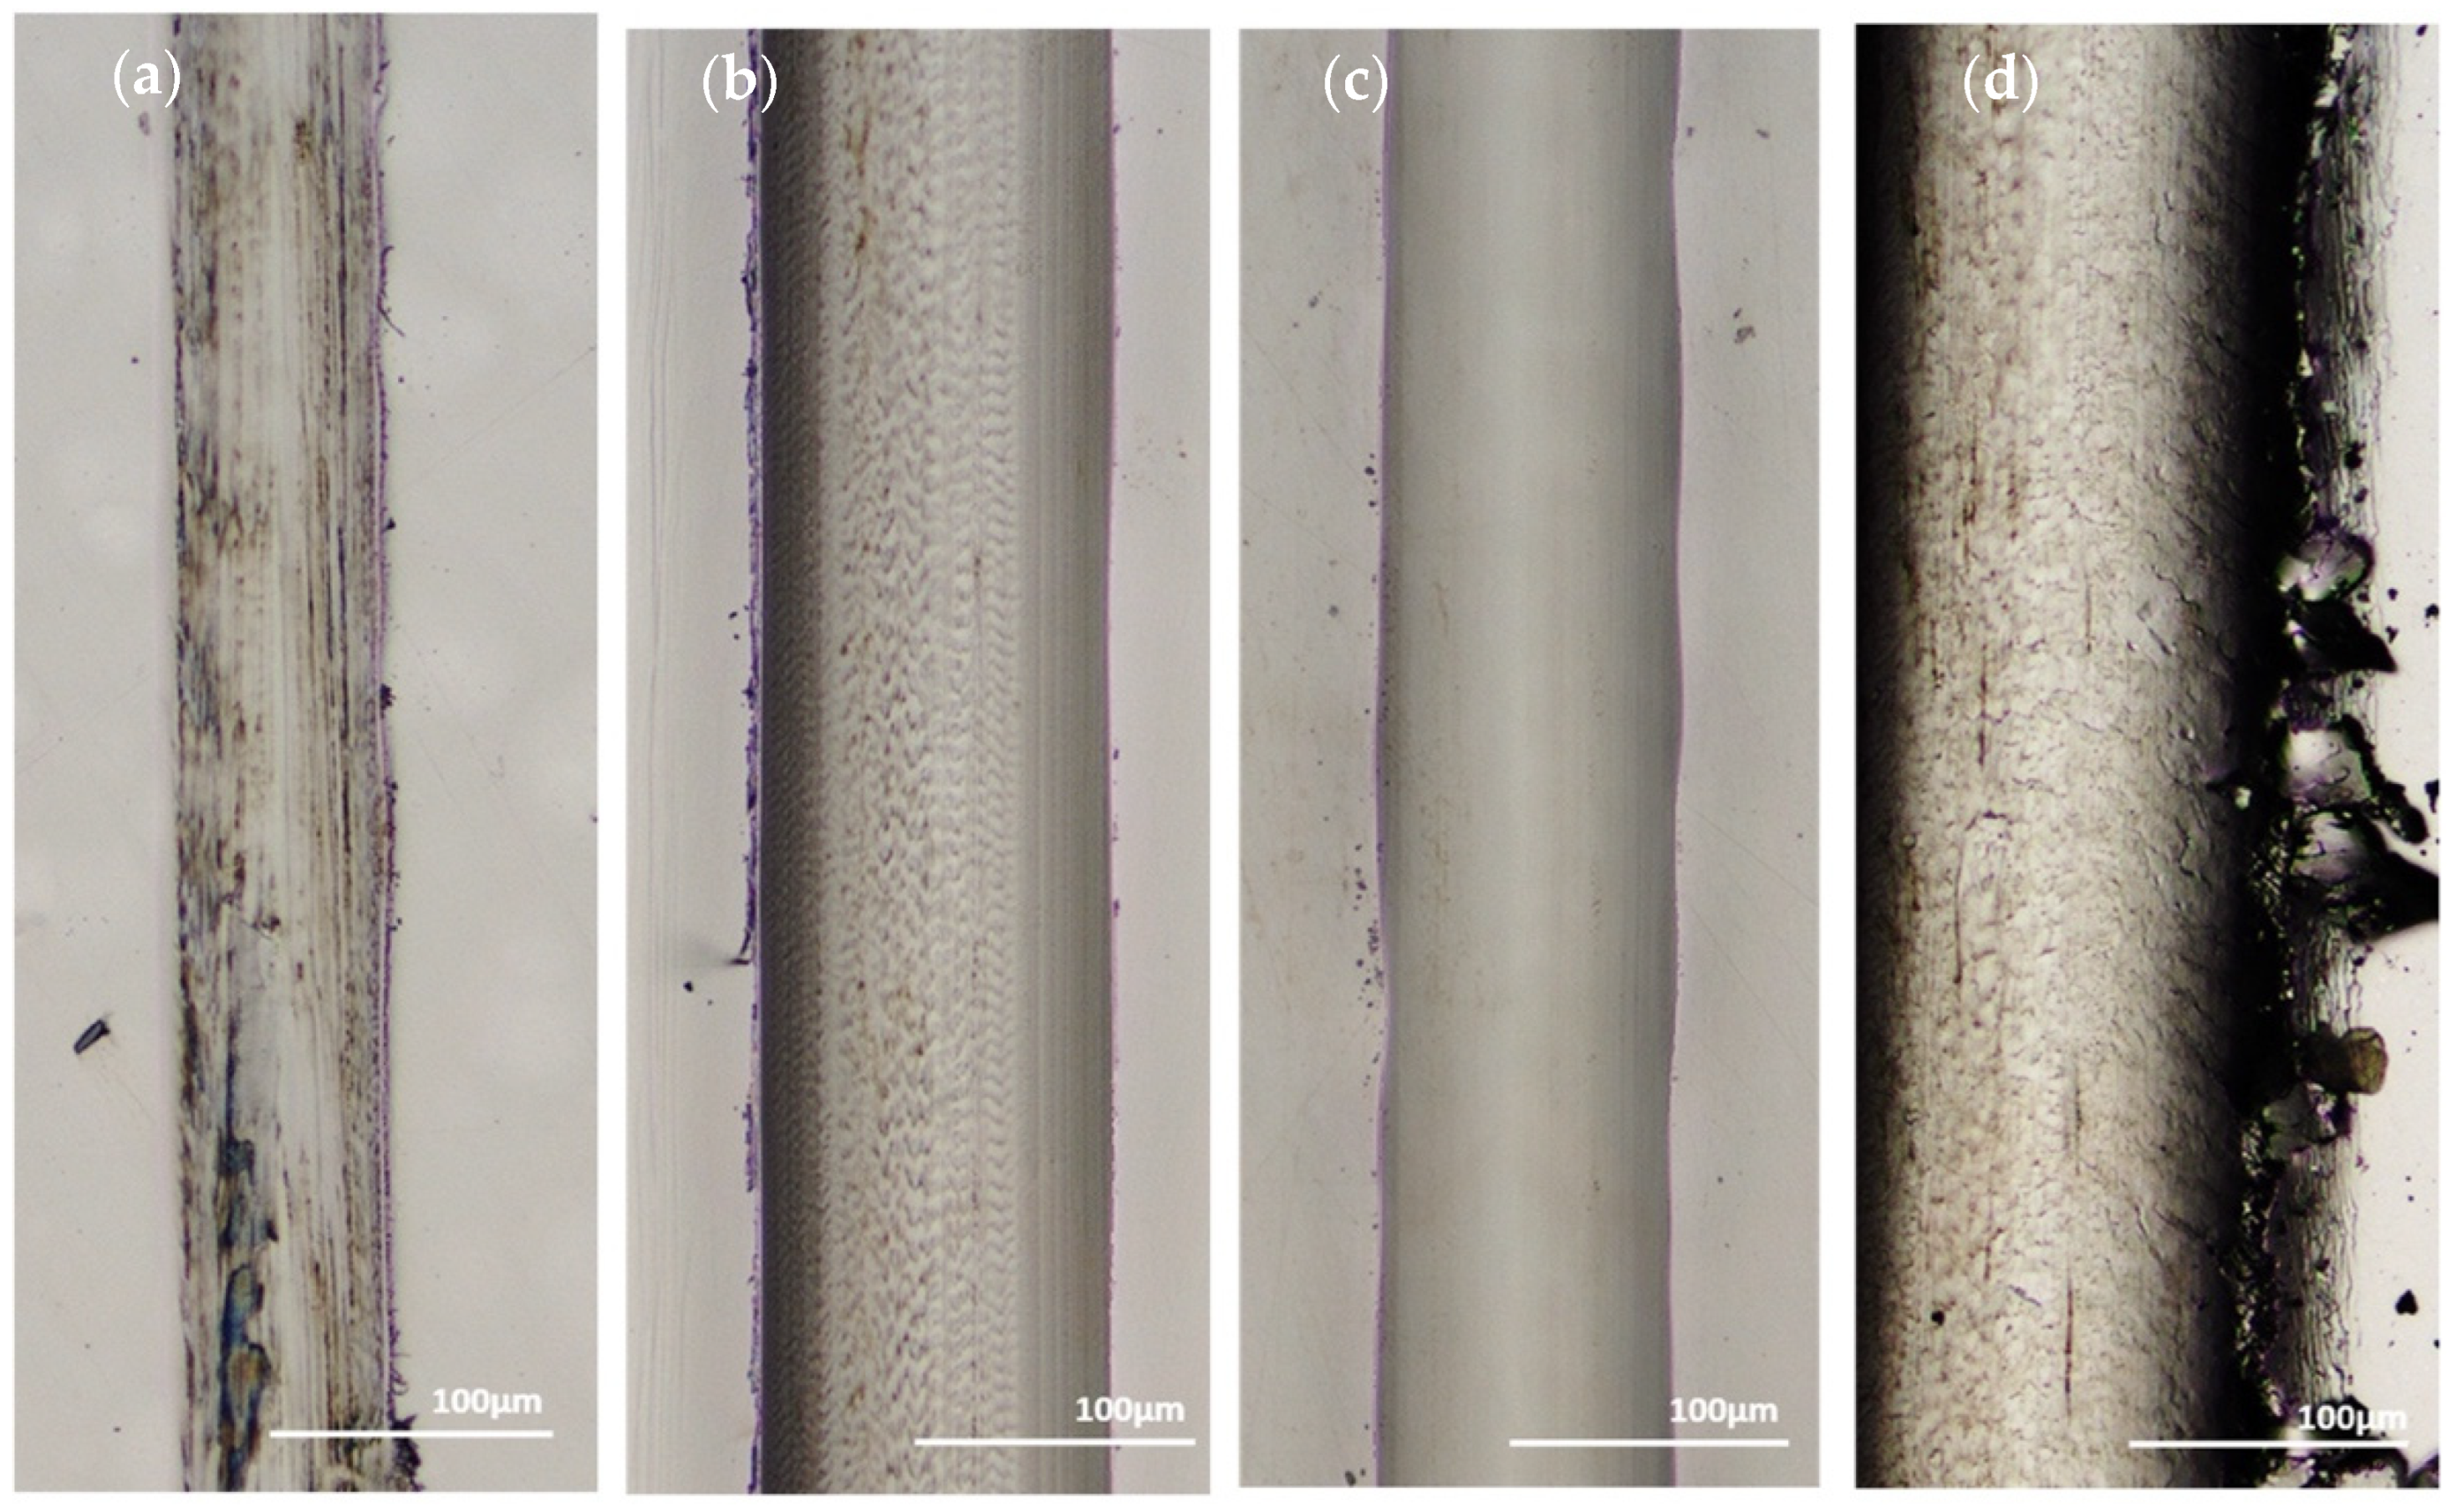
Micrographs of the sectioned samples that were used in wear testing are shown below in Figure 7. From these images, it was determined that the coatings used in wear testing were a 45 μm thick Ni-P shown in Figure 7a, 9 μm thick Ni-P shown in Figure 7b, 9 μm thick Ni-P-NiT shown in Figure 7c, and 4 μm thick Ni-P-NiTi shown in Figure 7d.
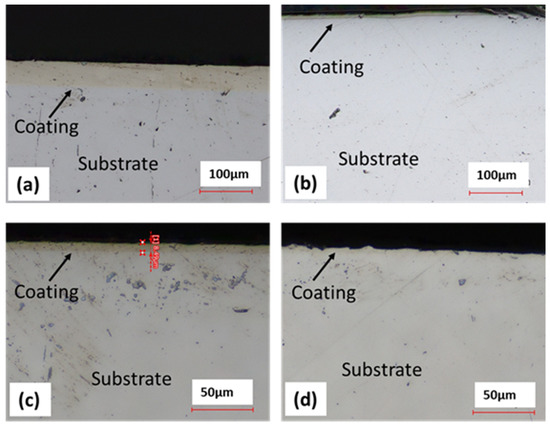
Figure 7.
Micrographs of the Different Coatings’ Cross Sections: (a) 45 μm Thick Ni-P Coating, (b) 9 μm Thick Ni-P Coating, (c) 9 μm Thick Ni-P-NiTi Coating, (d) 4 μm Thick Ni-P-NiTi Coating.
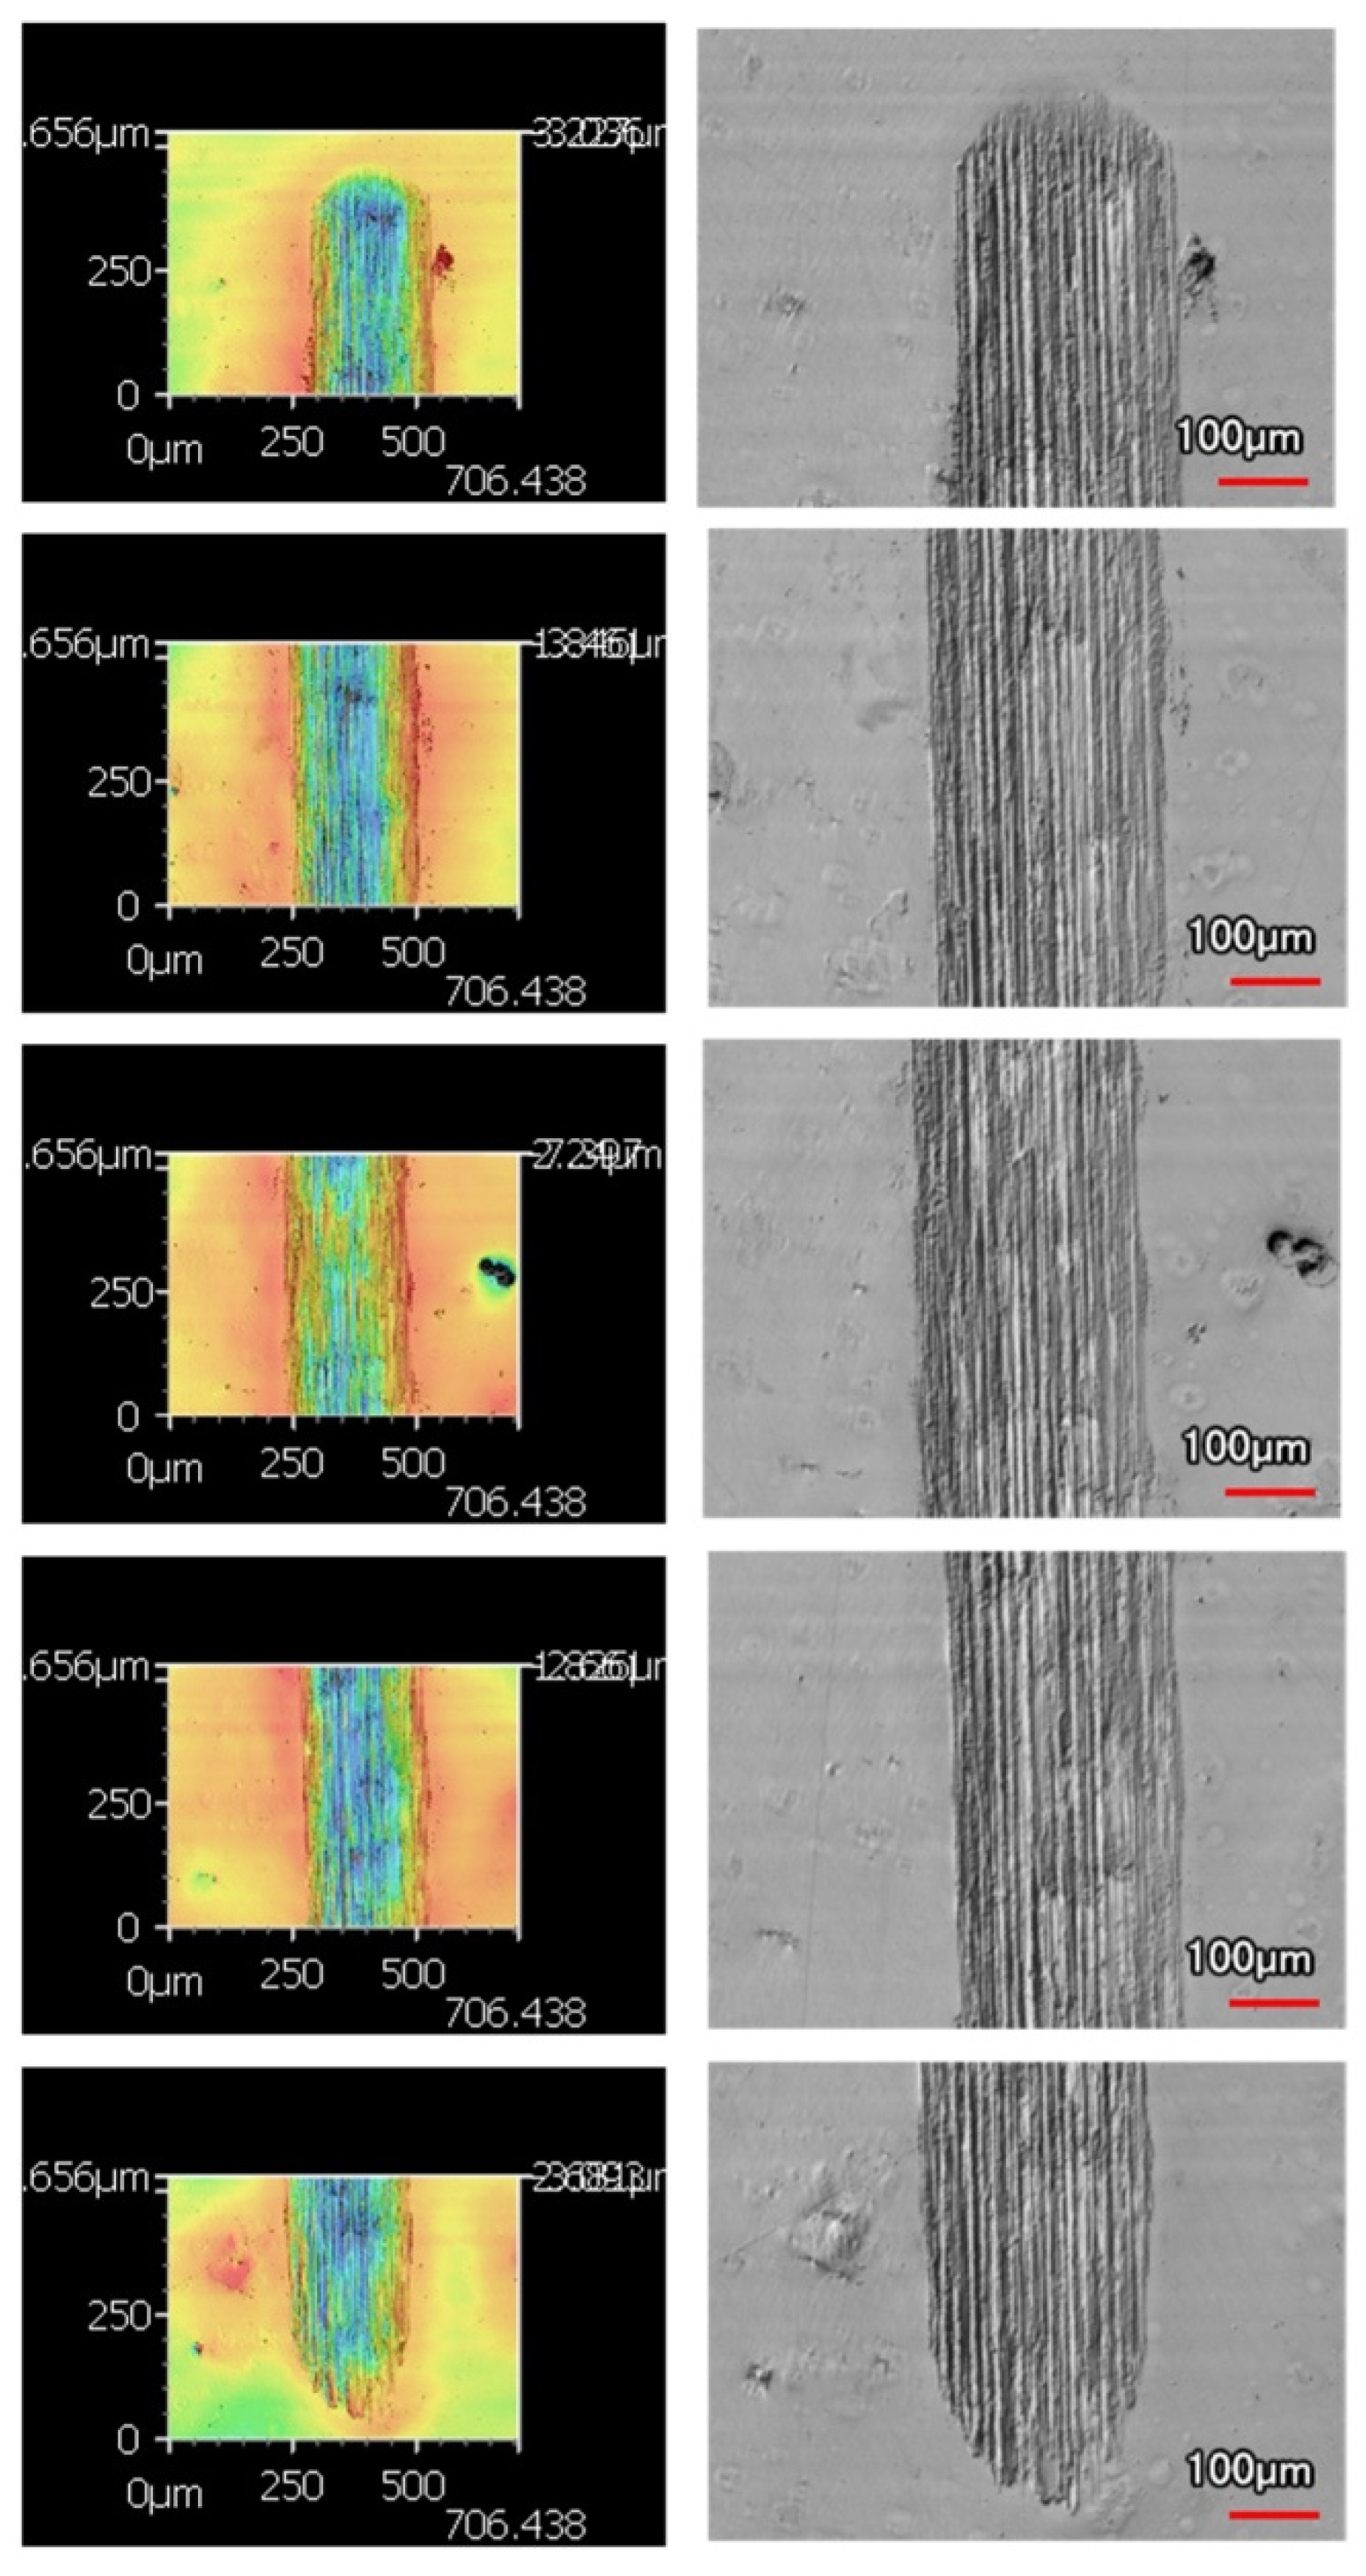
Wear tracks are categorized by coating type, indenter shape, and the number of passes. Micrographs were taken at five evenly spaced intervals along the wear track to allow the full track to be examined for its wear mechanisms. When the micrographs were taken, a laser scanned the surface to take the 3D profile for analysis. Most of the wear tracks had relatively consistent widths, apart from either end. Examples of the micrographs of wear tracks are shown in Figure 8 and Figure 9. Both wear scars are 50 pass wear tracks on 9 μm thick Ni-P, but the wear track in Figure 8 used the sharp indenter and Figure 9 used the spherical indenter.
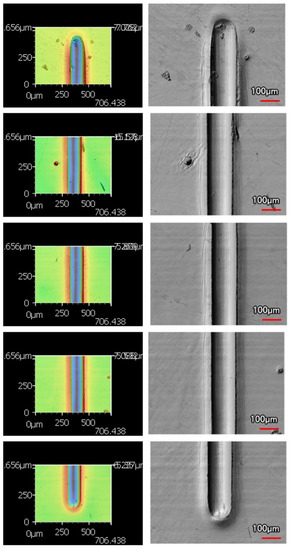
Figure 8.
Micrographs of Wear Track from 50 Passes of the Sharp Indenter on 9 μm Thick Ni-P Coating.

Figure 9.
Micrographs of Wear Track from 50 Passes of the Spherical Indenter on 9 μm Thick Ni-P Coating.
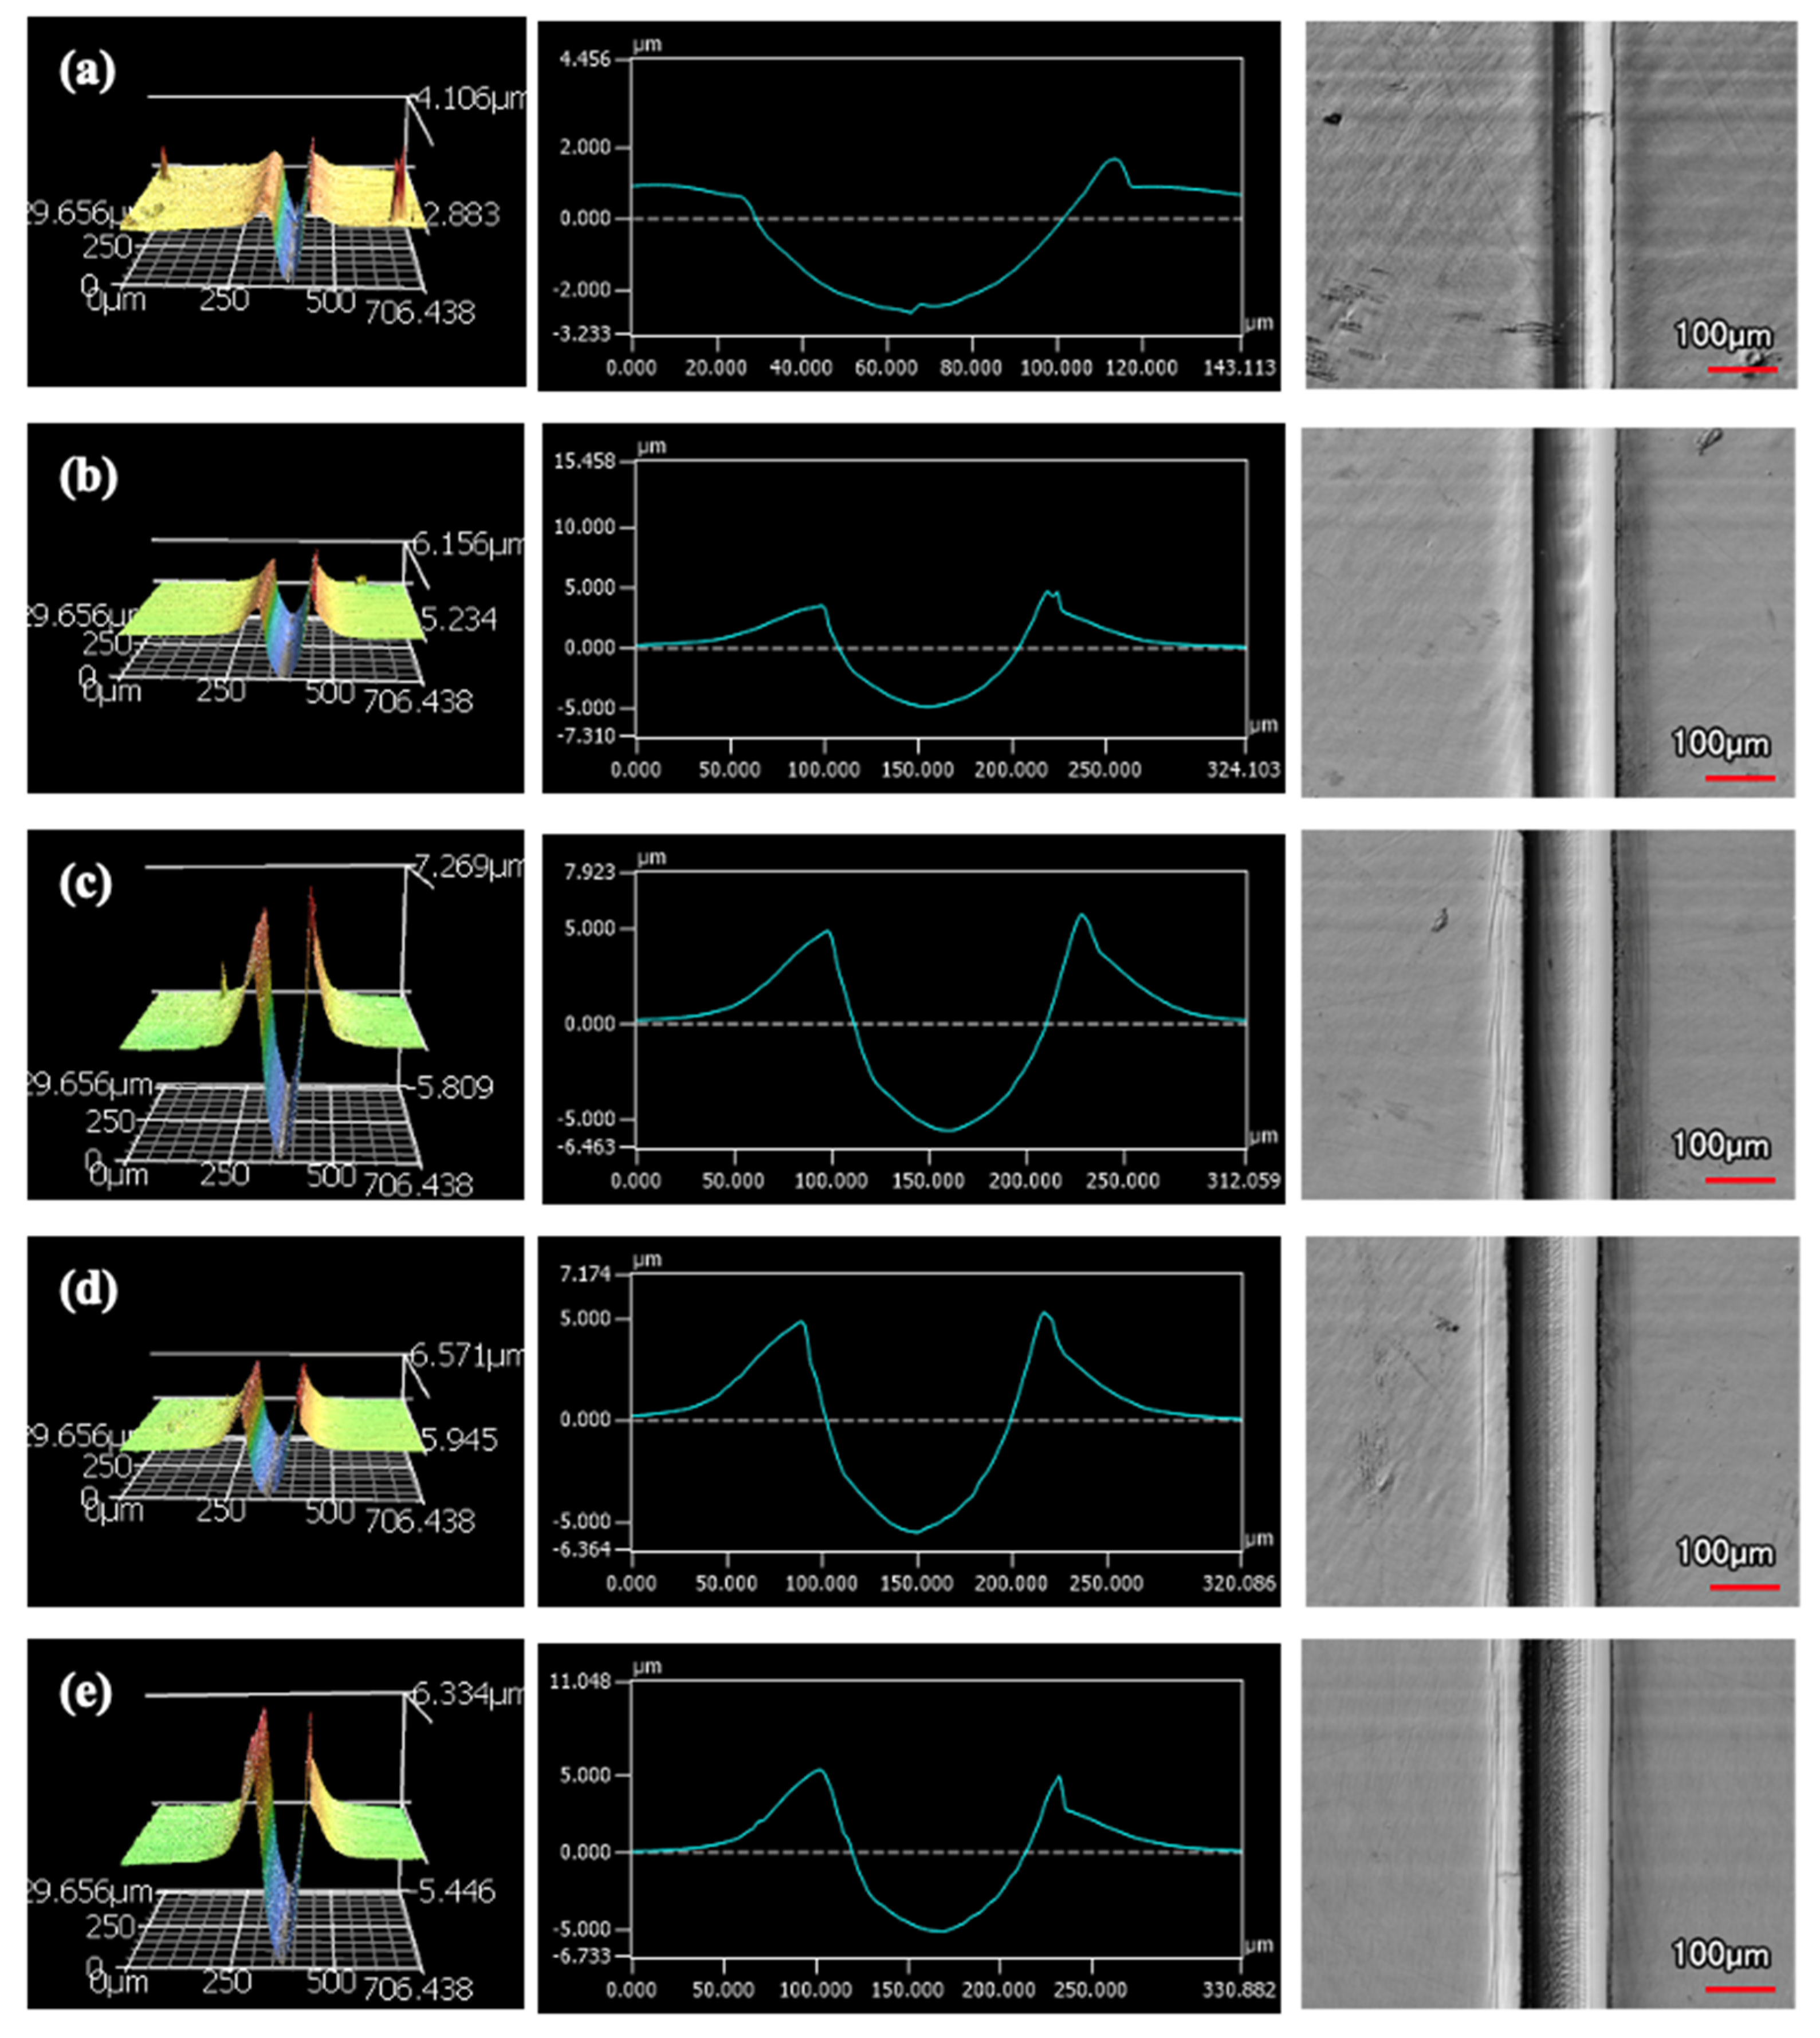
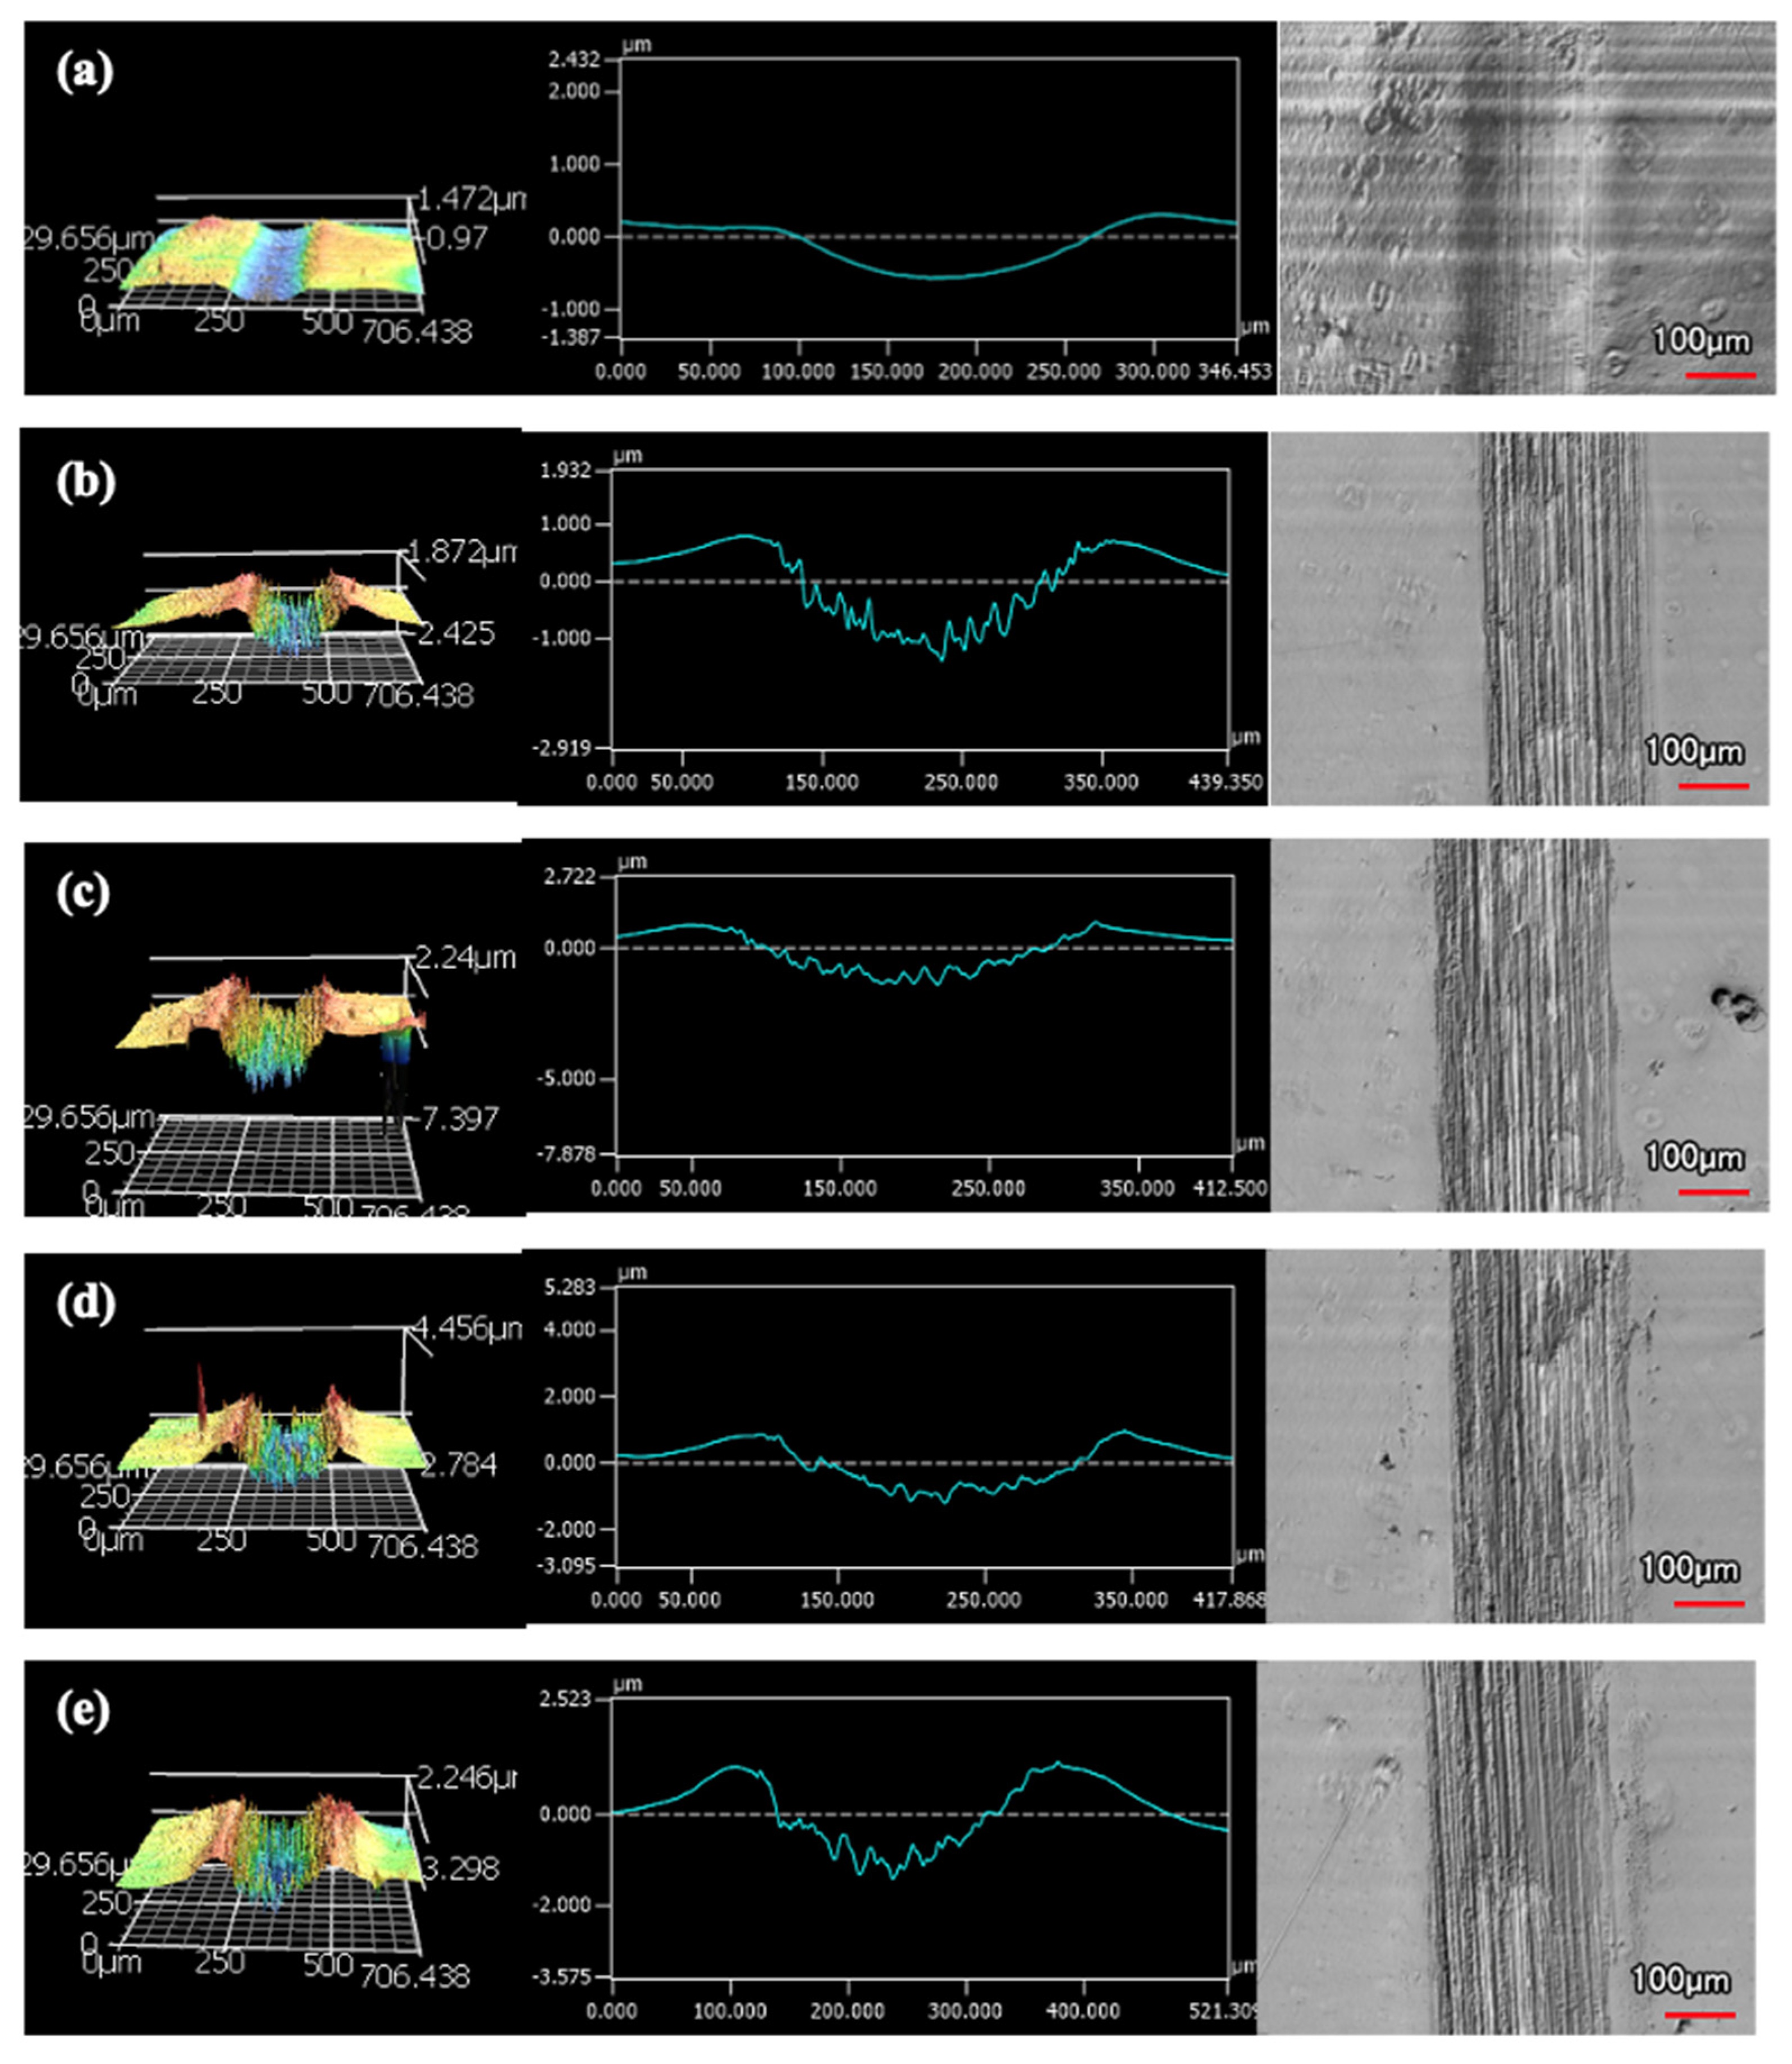
An increased number of wear passes equates to the surface undergoing a greater degree of wear. Consistently, when comparing the wear tracks made with the same indenter shape on the same coating, increasing the number of passes correlates to a larger wear track. Furthermore, with increased volume loss in the wear track, there is more material pile-up on the edges. Figure 10 and Figure 11 are examples of how the wear track changed with sliding distance using the middle of 9 μm thick Ni-P’s wear tracks. Figure 10 is the wear from the sharp indenter and Figure 11 is from the spherical indenter. Across all coating samples, the spherical tracks were wider than the sharp tracks of an equivalent number of passes and coating.
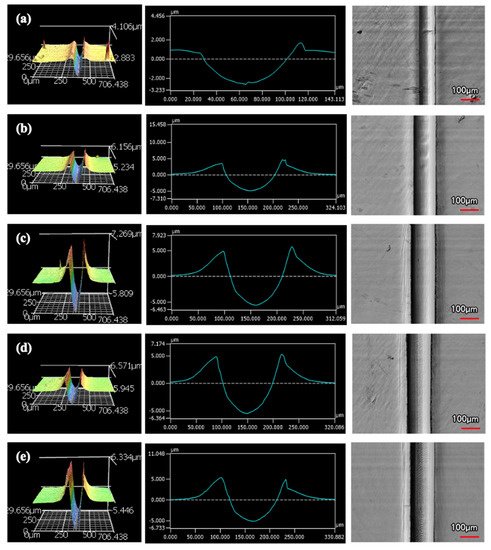
Figure 10.
Wear Profiles from the Sharp Indenter on 9 μm Thick Ni−P Coating: (a) 1 Pass, (b) 25 Passes, (c) 50 Passes, (d) 75 Passes, (e) 100 Passes.
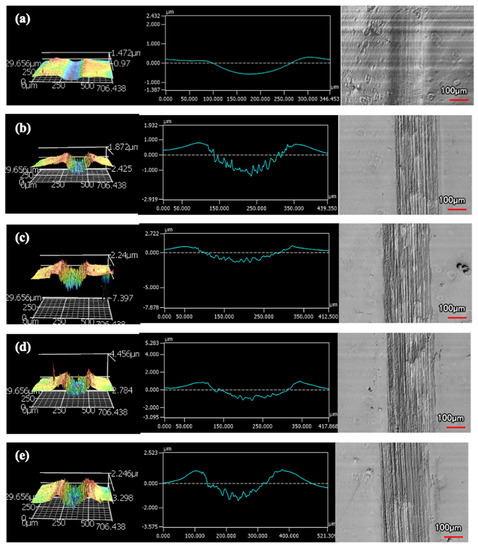
Figure 11.
Wear Profiles from the Spherical Indenter on 9 μm Thick Ni−P Coating: (a) 1 Pass, (b) 25 Passes, (c) 50 Passes, (d) 75 Passes, (e) 100 Passes.
The wear tracks from the same number of passes and indenter shape are unique to the type of coating. Figure 12, Figure 13, Figure 14, Figure 15, Figure 16, Figure 17, Figure 18 and Figure 19 compare the 3D profiles of the 100-pass wear tracks for each coating. Figure 12, Figure 13, Figure 14 and Figure 15 are from the sharp indenter and Figure 16, Figure 17, Figure 18 and Figure 19 are from the spherical indenter. In the case of both indenters, the 45 μm thick monolithic coating had the shallowest wear profile. The spherical wear profiles mostly had rough wear tracks with uneven depth throughout, but the 9 μm thick Ni-P-NiTi had a rather smooth curve that was evenly deformed throughout the wear profile. These differences in profile shapes correlate with the differences in properties between monolithic Ni-P and Ni-P-NiTi nanocomposite. Namely, the higher the hardness in monolithic Ni-P, the higher the toughness in the composite. Ni-P-NiTi is more prone to localized plastic deformation due to its lower hardness, and the higher toughness would allow for the deformation to be uniform with minimal cracking. By the same reasoning, monolithic Ni-P is susceptible to concentrated failures such as large cracks as opposed to plastic deformation due to its brittleness.

Figure 12.
45 μm Thick Ni-P Coating 100 Passes of the Sharp Indenter.

Figure 13.
9 μm Thick Ni-P Coating 100 Passes of the Sharp Indenter.

Figure 14.
9 μm Thick Ni-P-NiTi Coating 100 Passes of the Sharp Indenter.

Figure 15.
4 μm Thick Ni-P-NiTi Coating 100 Passes of the Sharp Indenter.

Figure 16.
45 μm Thick Ni-P Coating 100 Passes of the Spherical Indenter.

Figure 17.
9 μm Thick Ni-P Coating 100 Passes of the Spherical Indenter.

Figure 18.
9 μm Thick Ni-P-NiTi Coating 100 Passes of the Spherical Indenter.

Figure 19.
4 μm Thick Ni-P-NiTi Coating 100 Passes of the Spherical Indenter.
3.3.2. Volume Loss and Wear Rates
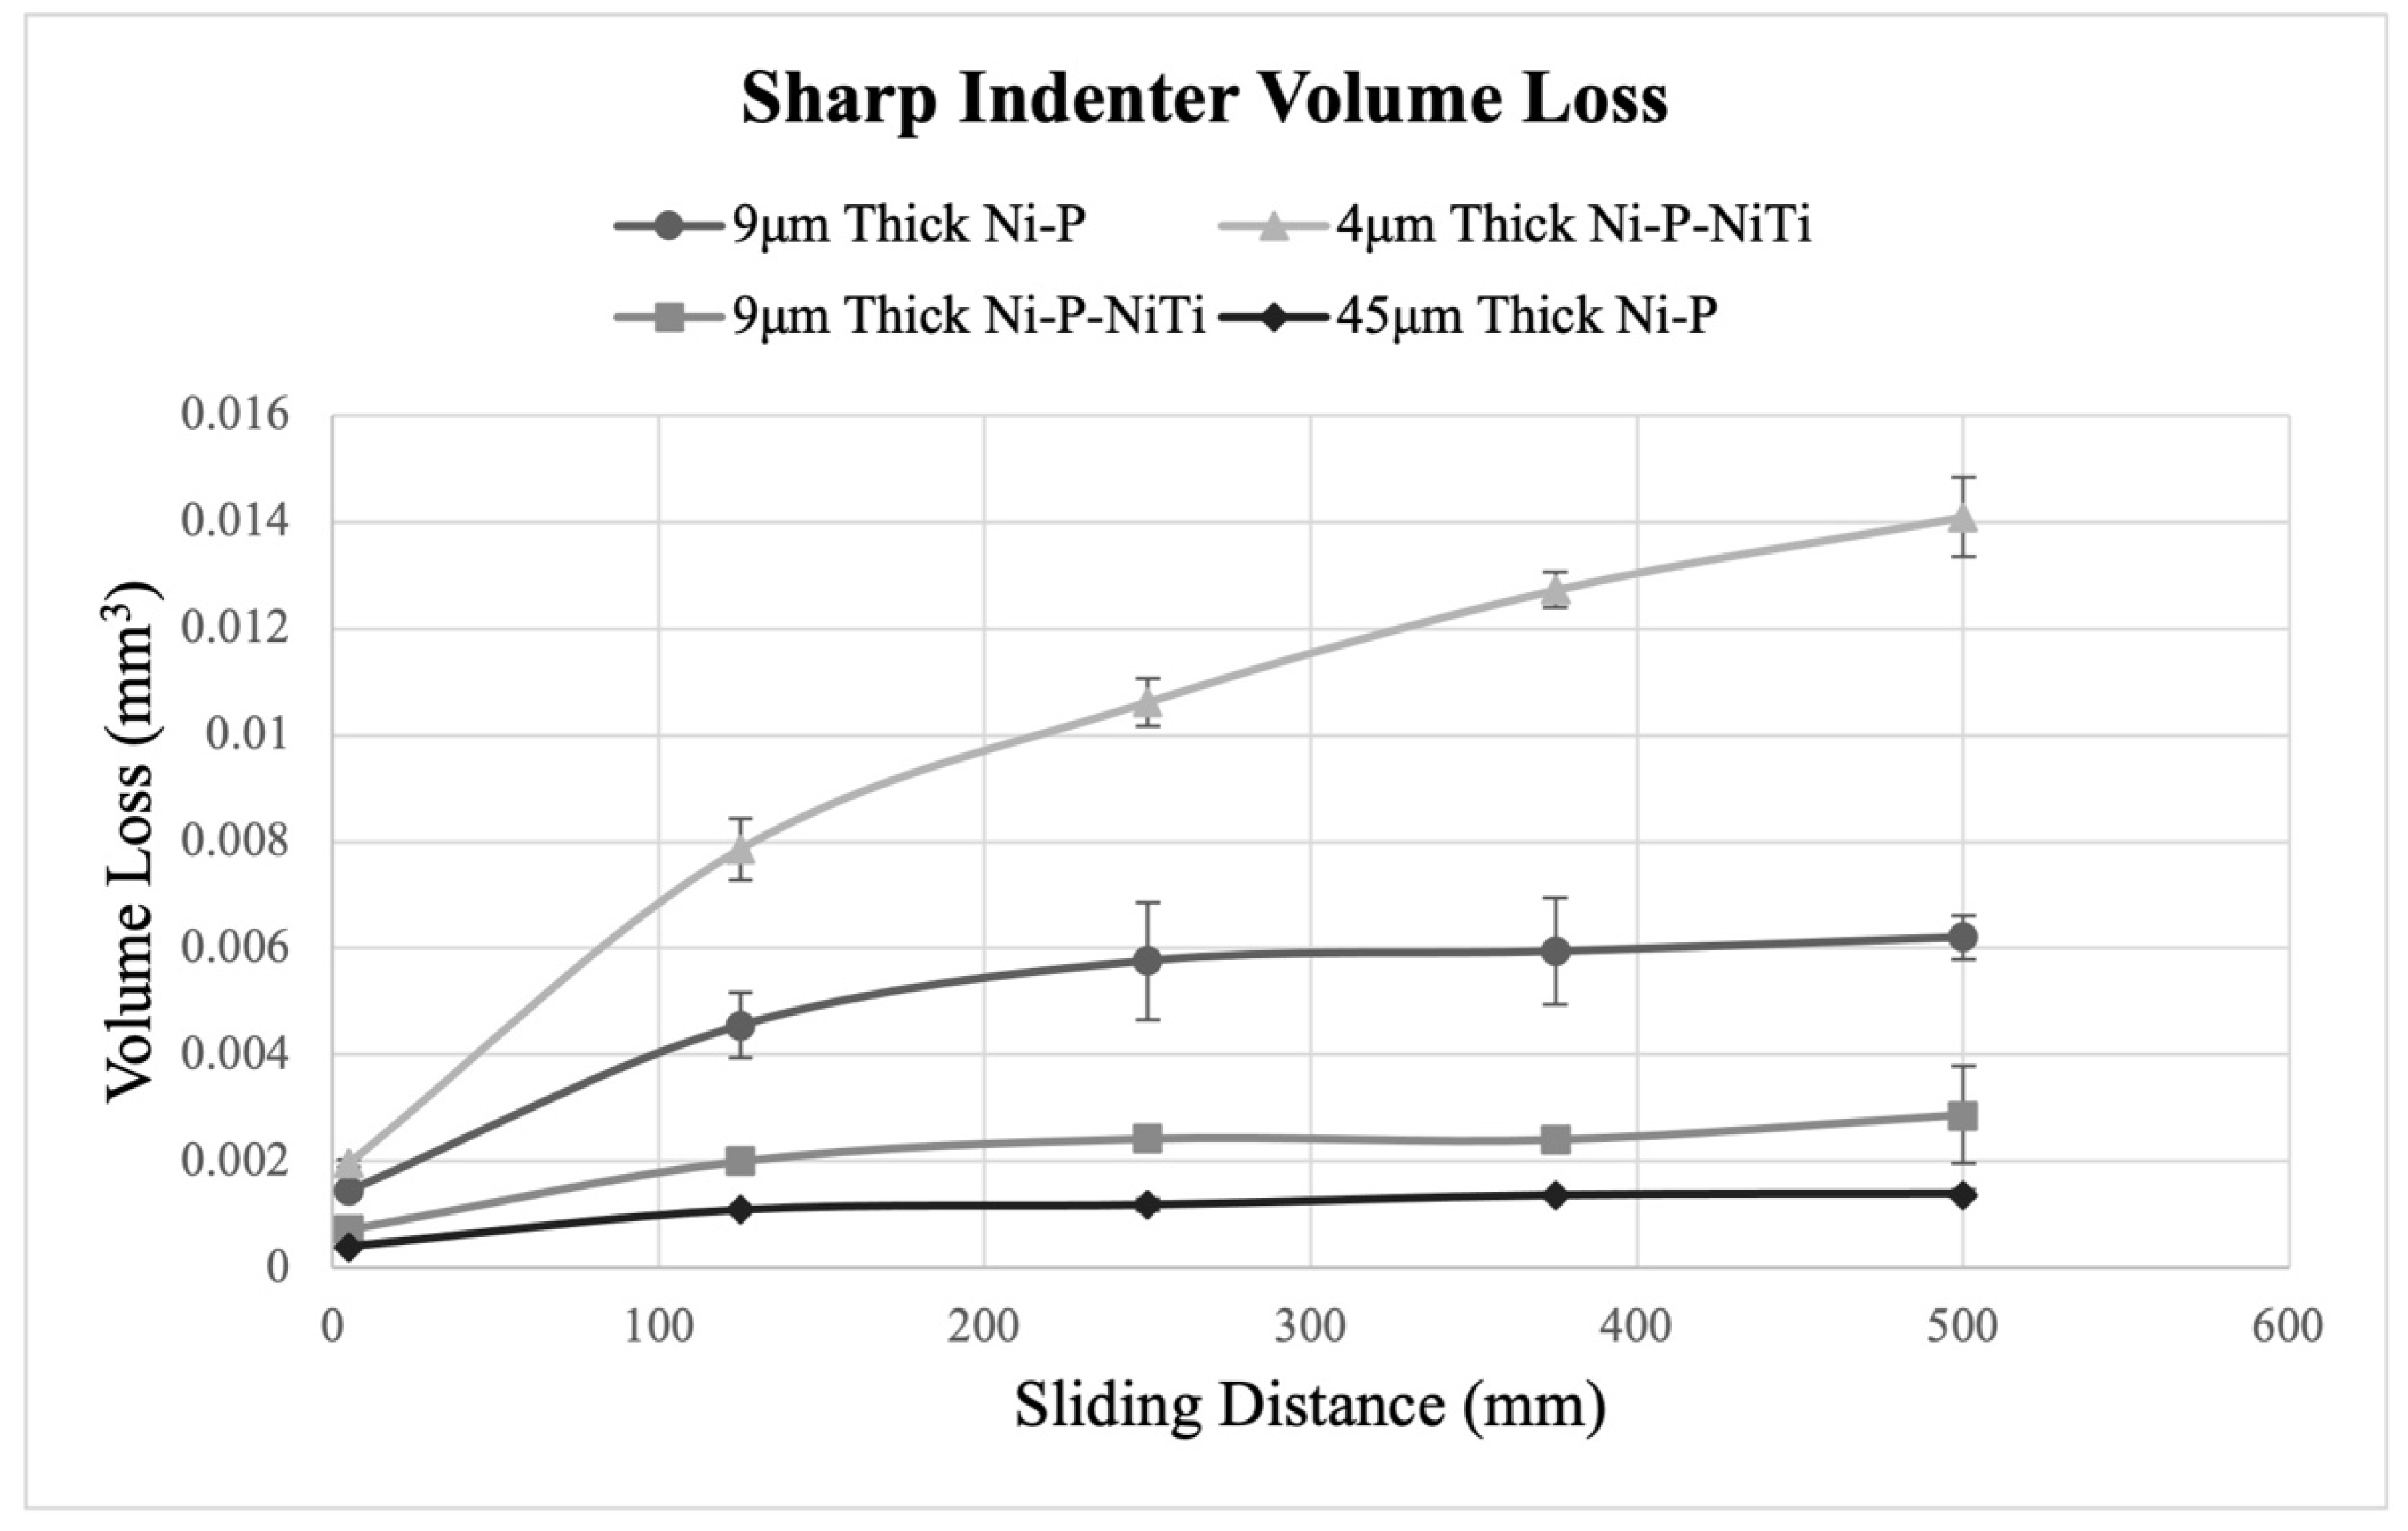
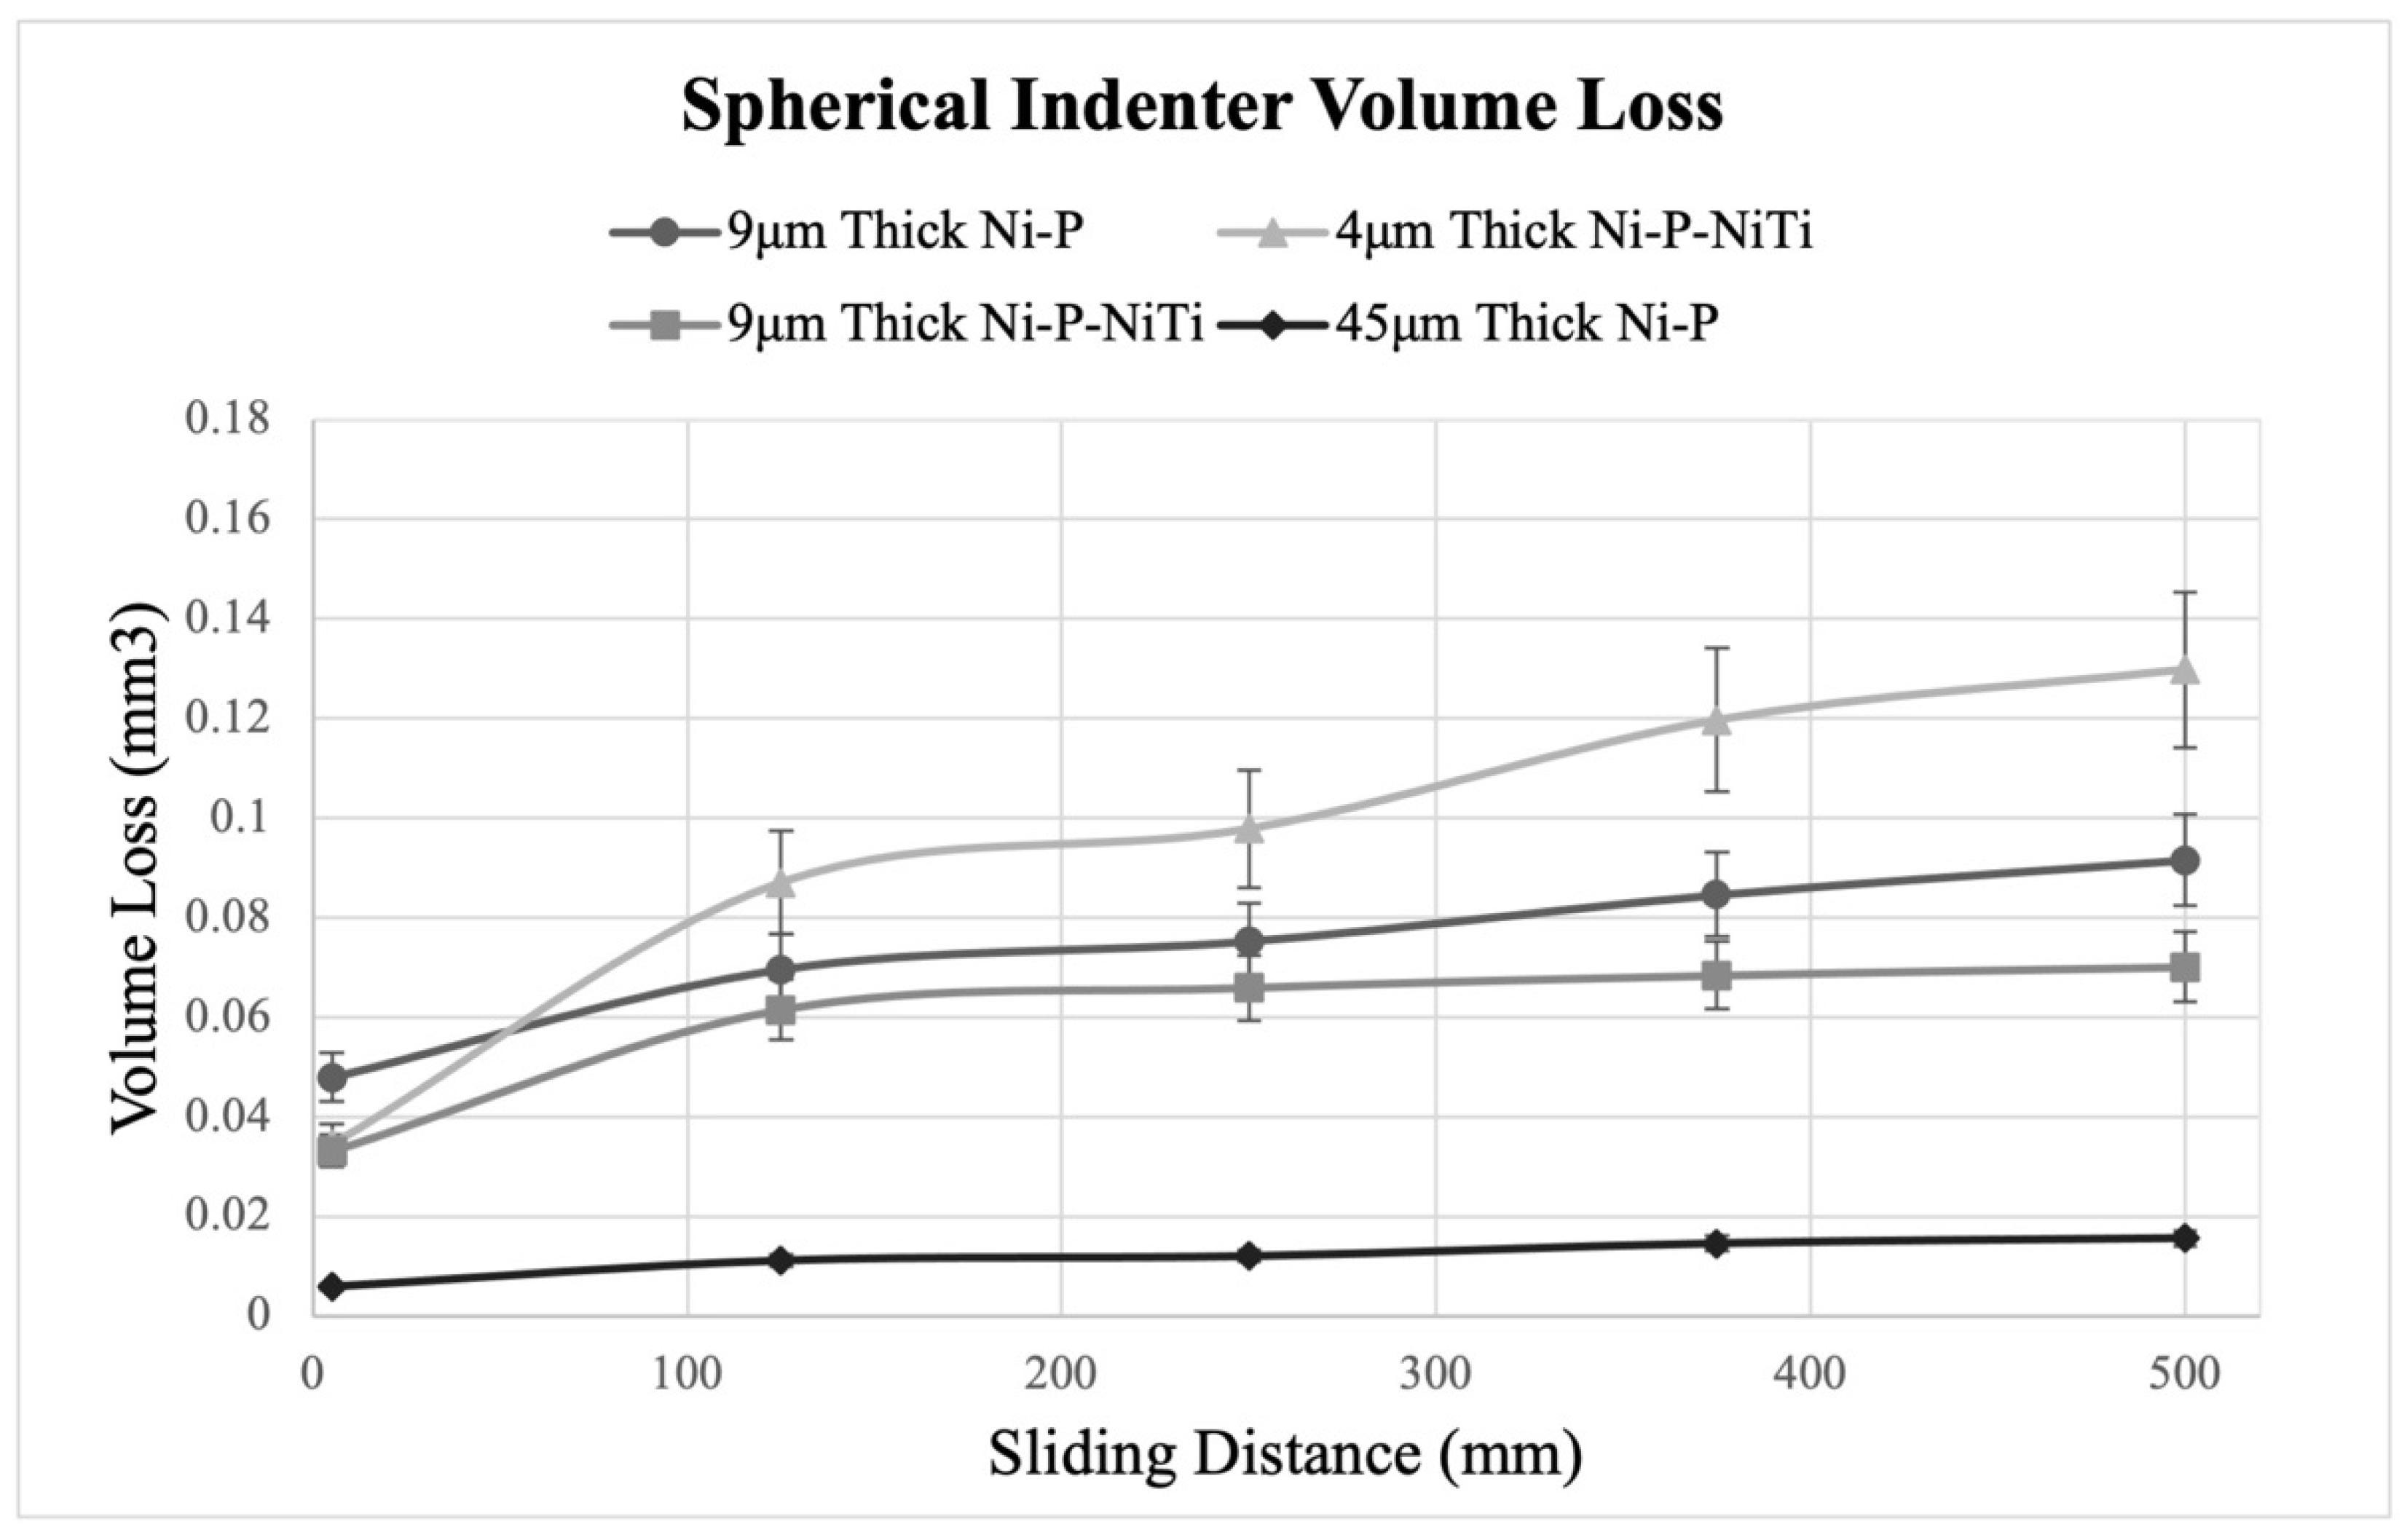
Figure 20 and Figure 21 show how volume loss changes with the wear sliding distance for each coating, where Figure 20 compares the sharp indenter scars and Figure 21 compares the spherical indenter scars. The pileup at the scar edges was excluded in the calculations of volume loss, and further confirms the wear depth profile observations. The standard deviations were found using the five intervals of wear depth measurements taken on the wear scar. In both indenters, the 4 μm thick Ni-P-NiTi coating experienced the greatest degree of volume loss while the 45 μm thick Ni-P coating experienced the least.
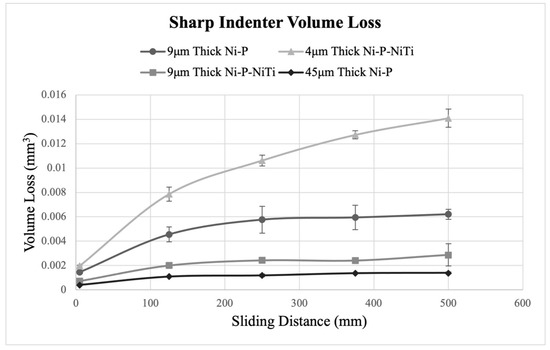
Figure 20.
Volume Loss from the Sharp Indenter.
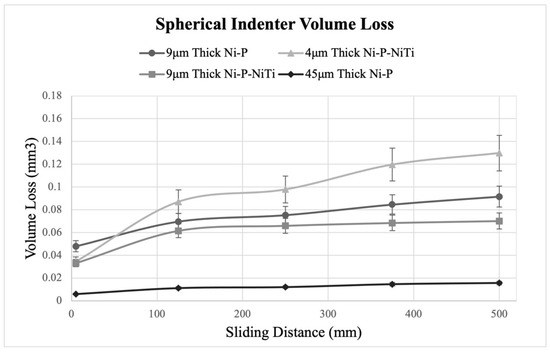
Figure 21.
Volume Loss from the Spherical Indenter.
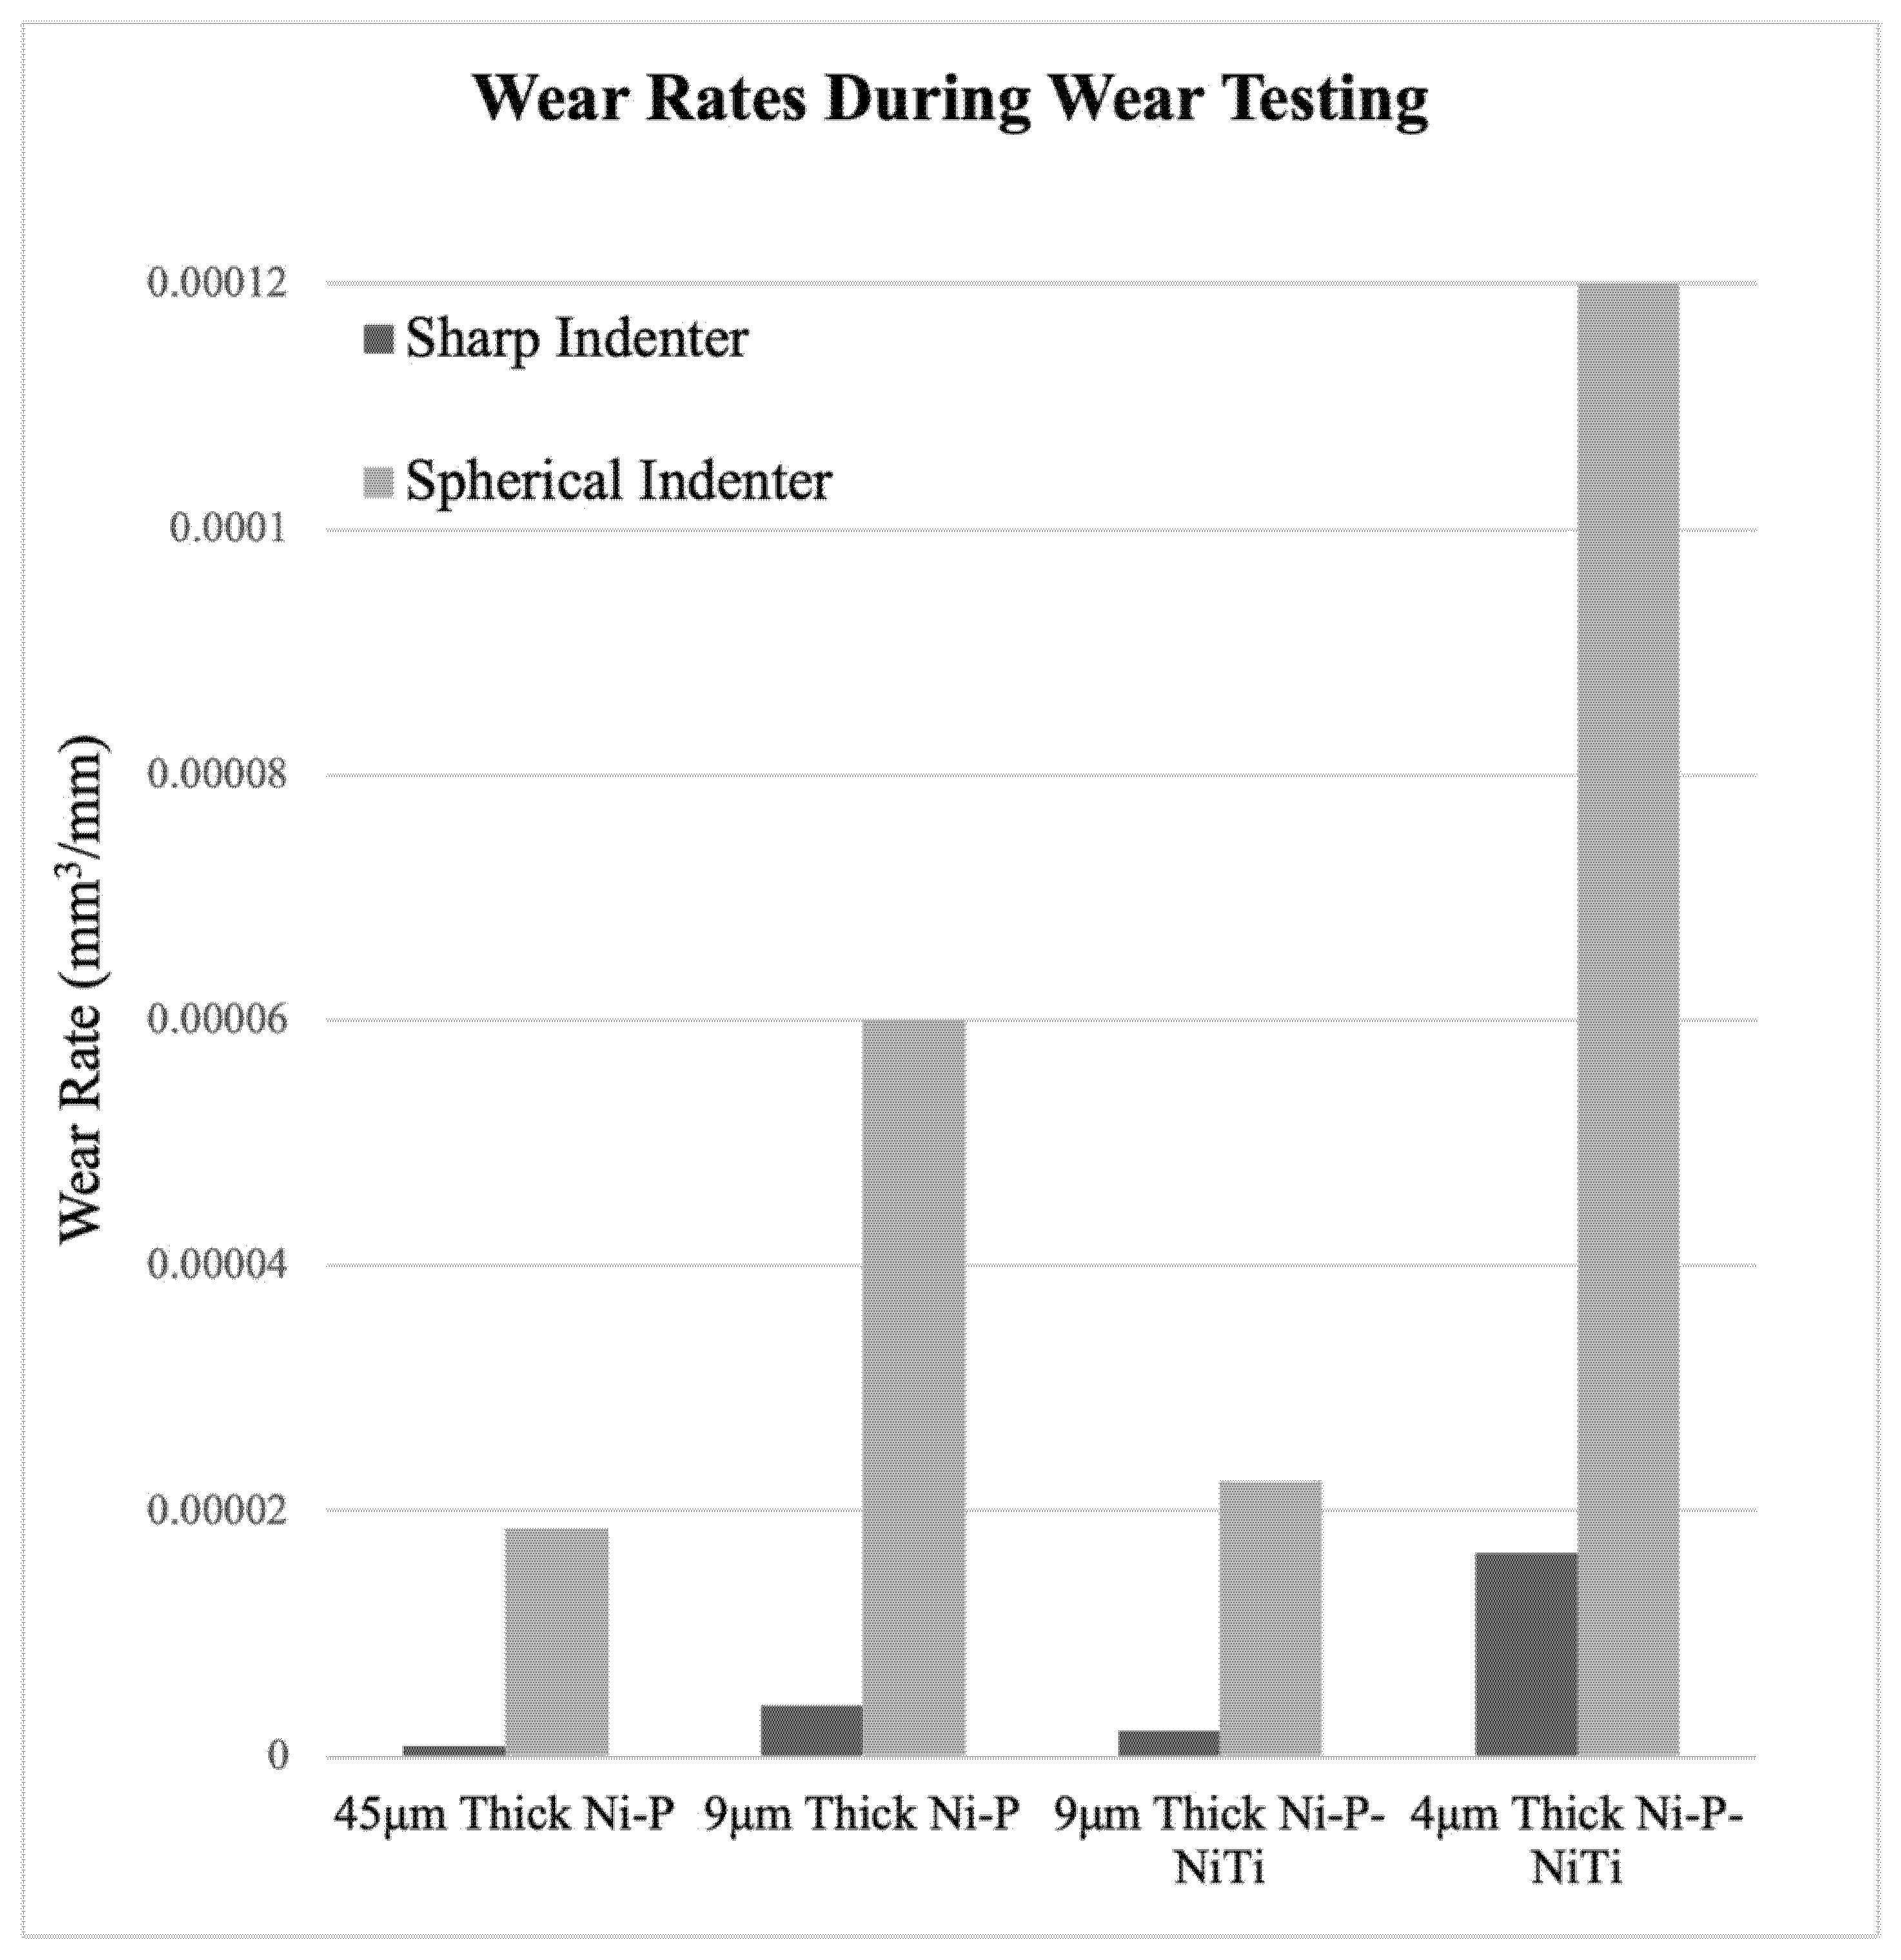
The wear rate was calculated from the slope of the volume loss curve at a steady state. Figure 22 compares the wear rates of each coating and indenter. The wear rates reflect what was shown on the volume loss graphs, where the highest wear rate was 4 μm thick Ni-P-NiTi coating and the lowest wear rate was 45 μm thick Ni-P coating. Consistently, the spherical indenter produced a higher wear rate than the sharp indenter. This was due to both the difference in geometries between the indenter styles and the higher load on the spherical indenter. Thinner coatings have higher amounts of volume loss and a lower wear rate than their thicker counterpart. Comparing the 9 μm thick Ni-P-NiTi to the 9 μm thick Ni-P, the composite had lower wear rates. This was particularly drastic in the spherical indenter scars.
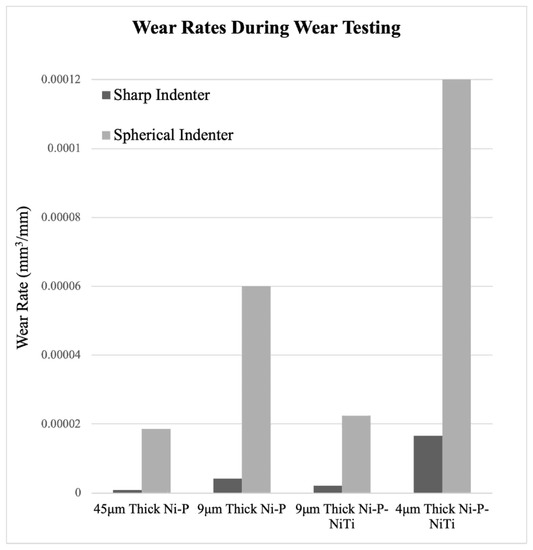
Figure 22.
Wear Rates from Wear Tests.
The percent difference in wear rate of the same coating type of different thicknesses was calculated to quantify the effect coating thickness has on wear rate. The formula is shown in Equation (3), where ‘WRThick’ represents the wear rate of the thicker coating, and ‘WRthin’ is the wear rate of its thinner counterpart. The resultant values are all relatively close and shown in Table 7.

Table 7.
Percent Difference in Wear Rate for Coating Thicknesses.
Regardless of the indenter shape, there is an over 100% difference in wear rate between an equivalent thick and thin coating. The wear profiles, volume loss, and wear rate all confirm that there is an apparent relationship between coating thickness and susceptibility to wear that is seen in both indenter styles. For the scars from the sharp indenter, both the thicker monolithic and composite coatings had wear profiles that were narrower and less deep than their thin counterparts. This is also observable in the scars made from the spherical indenter, where the thinner monolithic and composite coatings had more damage than the thicker counterpart. The thicker monolithic coating’s wear profile is considerably shallower than its thinner version. Furthermore, although the composite scar depth does not have the same visible depth in the thin coating, it was apparent in Figure 18 and Figure 19 that there was a catastrophic failure that the thicker version did not have. The wear track goes as deep as the approximate coating thickness, and therefore, the substrate was not fully protected. The 4 μm thick Ni-P-NiTi coating is delaminated at the substrate-coating interface, shown in Figure 19 in the optical image and 3D profile. The thinner coating’s higher wear rate compared to the thick coating can be explained through the relationship between internal stresses present in the coating, and their expected effects on tribological behavior. Work by A. M. Laera et al. [32] assessed the relationship between the residual stress in ZrO coating with its tribological behaviour and had found that compressive internal stresses correlate with higher wear resistance. We can assume the residual stresses in Ni-P coating thicknesses, as prior literature has found that thicker coatings have compressive residual stress while thinner coatings are tensile [23]. Therefore, the thicker coatings’ lower wear rates are because of their compressive stresses induced in plating. Thus, the thicker coatings are preferable over their thinner counterparts for sliding wear resistance.
Comparing all four coating types, the best resistance to sliding wear is the 9 μm thick Ni-P-NiTi. Although it is much thinner than the 45 μm Ni-P, it has a comparable wear rate and less cracking due to the presence of the super-elastic NiTi particles. The thick composite, therefore, is the superior choice for protecting against sliding wear. Furthermore, choosing a 9 μm thick Ni-P-NiTi over the 45 μm Ni-P would also have the benefit of the lower cost that is associated with a lower coating thickness.
3.3.3. Wear Mechanisms
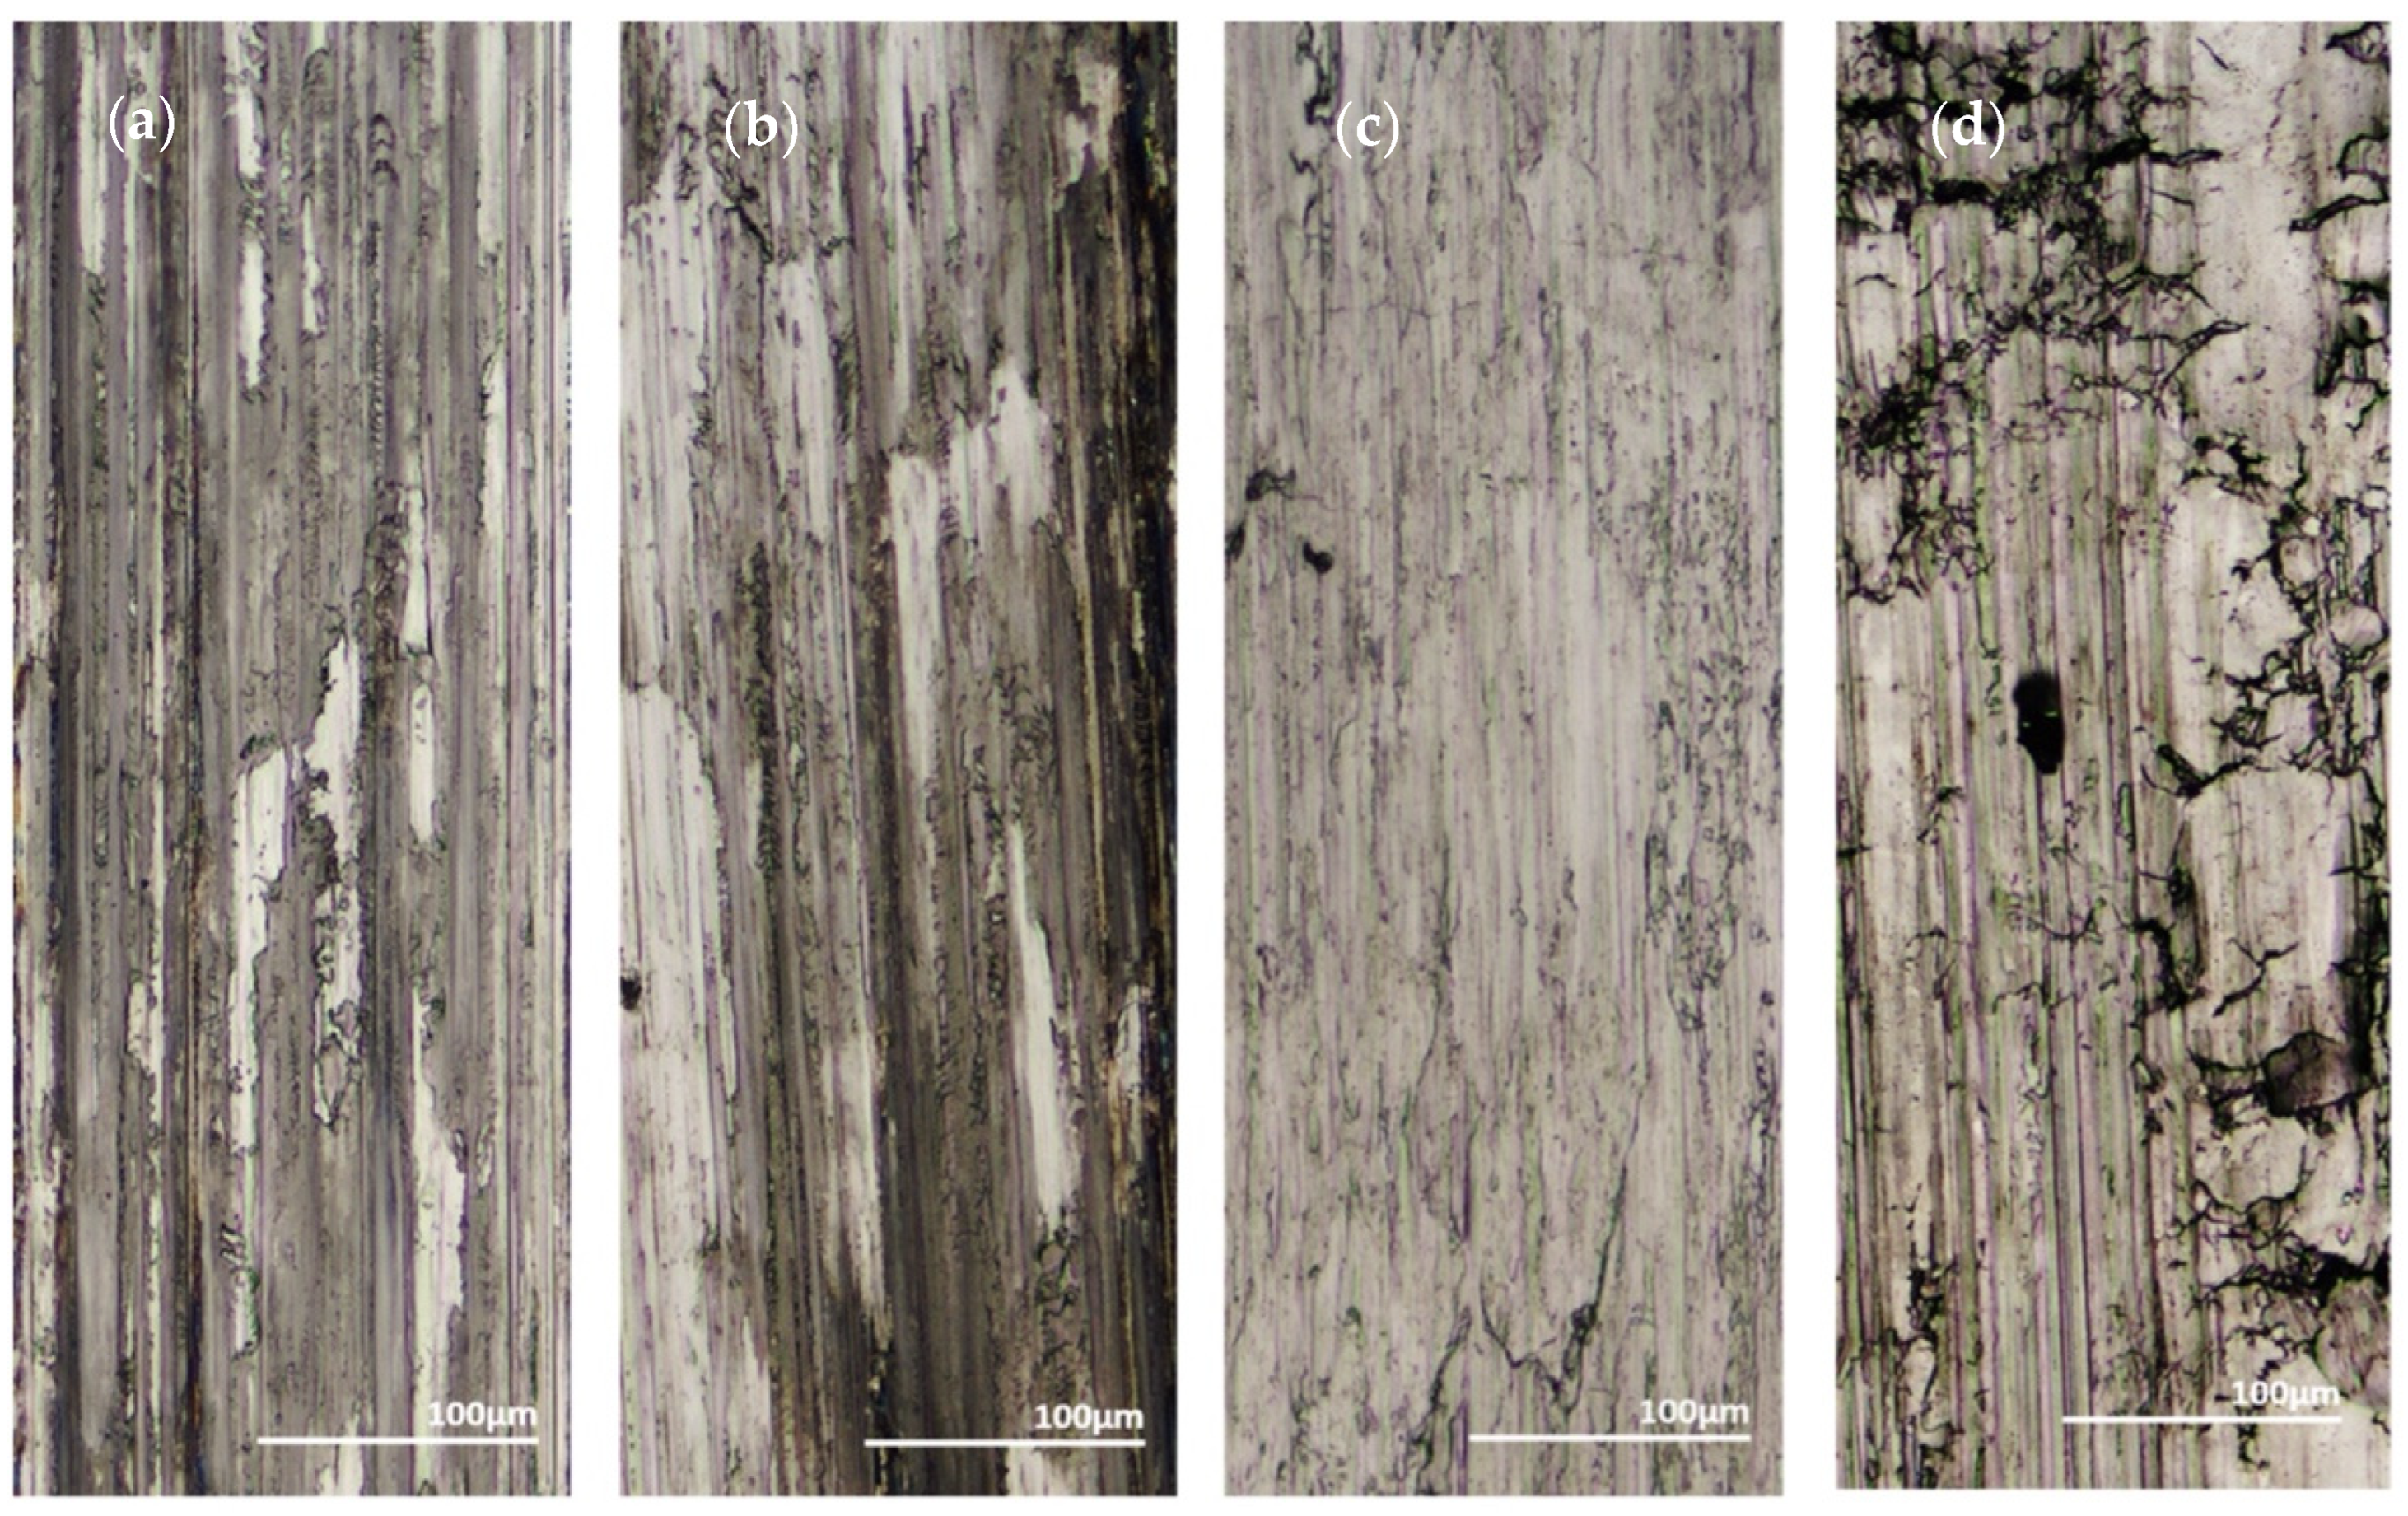
In brittle materials such as monolithic Ni-P, their yielding would more likely appear as severe cracking. Volume loss does not account for fractures, so it likely is not a fully equivalent assessment of wear resistance when comparing a brittle material to a material that is more ductile. Examining the wear tracks for the dominant wear mechanisms can give a deeper understanding of the materials compared. Figure 23a–d shows the 100 pass wear tracks from the sharp indenter and Figure 24a–d shows the 100 pass wear tracks from the spherical indenter.
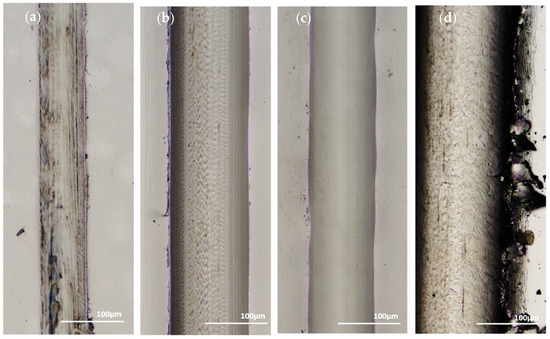
Figure 23.
One hundred Passes of the Sharp Indenter on the Surface of: (a) 45 μm Thick Ni-P, (b) 9 μm Thick Ni-P, (c) 9 μm Thick Ni-P-NiTi, (d) 4 μm Thick Ni-P-NiTi.
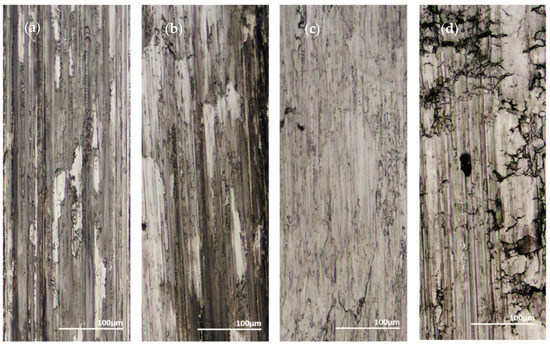
Figure 24.
One hundred Passes of the Spherical Indenter on the Surface of: (a) 45 μm Thick Ni-P, (b) 9 μm Thick Ni-P, (c) 9 μm Thick Ni-P-NiTi, (d) 4 μm Thick Ni-P-NiTi.
In both indenters, the 9 μm thick Ni-P-NiTi coating had the least amount of cracking. In the sharp indenter track, the monolithic 9 μm thick Ni-P coating had long cracks on the surface parallel to the wear track. The wear track itself is both parallel and perpendicular to the track direction. Contrastingly, the 9 μm thick Ni-P-NiTi coating wear track has uniform deformation and very little cracking. Similarly, under the spherical indenter, the 9 μm Ni-P coating had long large cracks and areas of delamination but the 9 μm thick Ni-P-NiTi coating has small cracks and less delamination. This suggests that the NiTi nanoparticles are toughening the coating and improving wear properties, despite the higher measurable wear rate in the 9 μm composite coating compared to the monolithic 9 μm thick Ni-P.
To understand the composite’s wear mechanisms, it needs to be confirmed if transformation toughening of the NiTi nanoparticles occurred. If so, the contact stress during testing would have exceeded the stress required for the martensitic phase transition. The transition stress has been approximated to be around 410 MPa at room temperature [33]. The mean contact pressure ‘pm’ can be calculated using Equation (3) using the indenter load (P) and the contact area (Ac) between the indenter and the coating surface. The elastic modulus of both Poisson’s ratio (ν) and the elastic modulus (E) of the indenters and the coatings were used to find the contact area. The coating is assumed to have νc = 0.29 and Ec = 198 GPa [34]. The sharp diamond indenter properties are assumed to be νi = 0.20 and Ei = 1050 GPa [35] while the spherical tungsten carbide indenter properties are assumed to be νi = 0.26 and Ei = 600 GPa [2,36].
The mean contact pressures of both indenters were found to exceed the 410 MPa transformation stress, with the diamond indenter having a mean contact pressure of 7.71 GPa and the tungsten carbide spherical indenter 4.53 GPa. Therefore, the wear testing experiments would have induced transformation toughening of the NiTi nanoparticles. This is further confirmed by the evidence of the toughening mechanisms provided by the nanoparticles that are visible in images of the wear tracks.
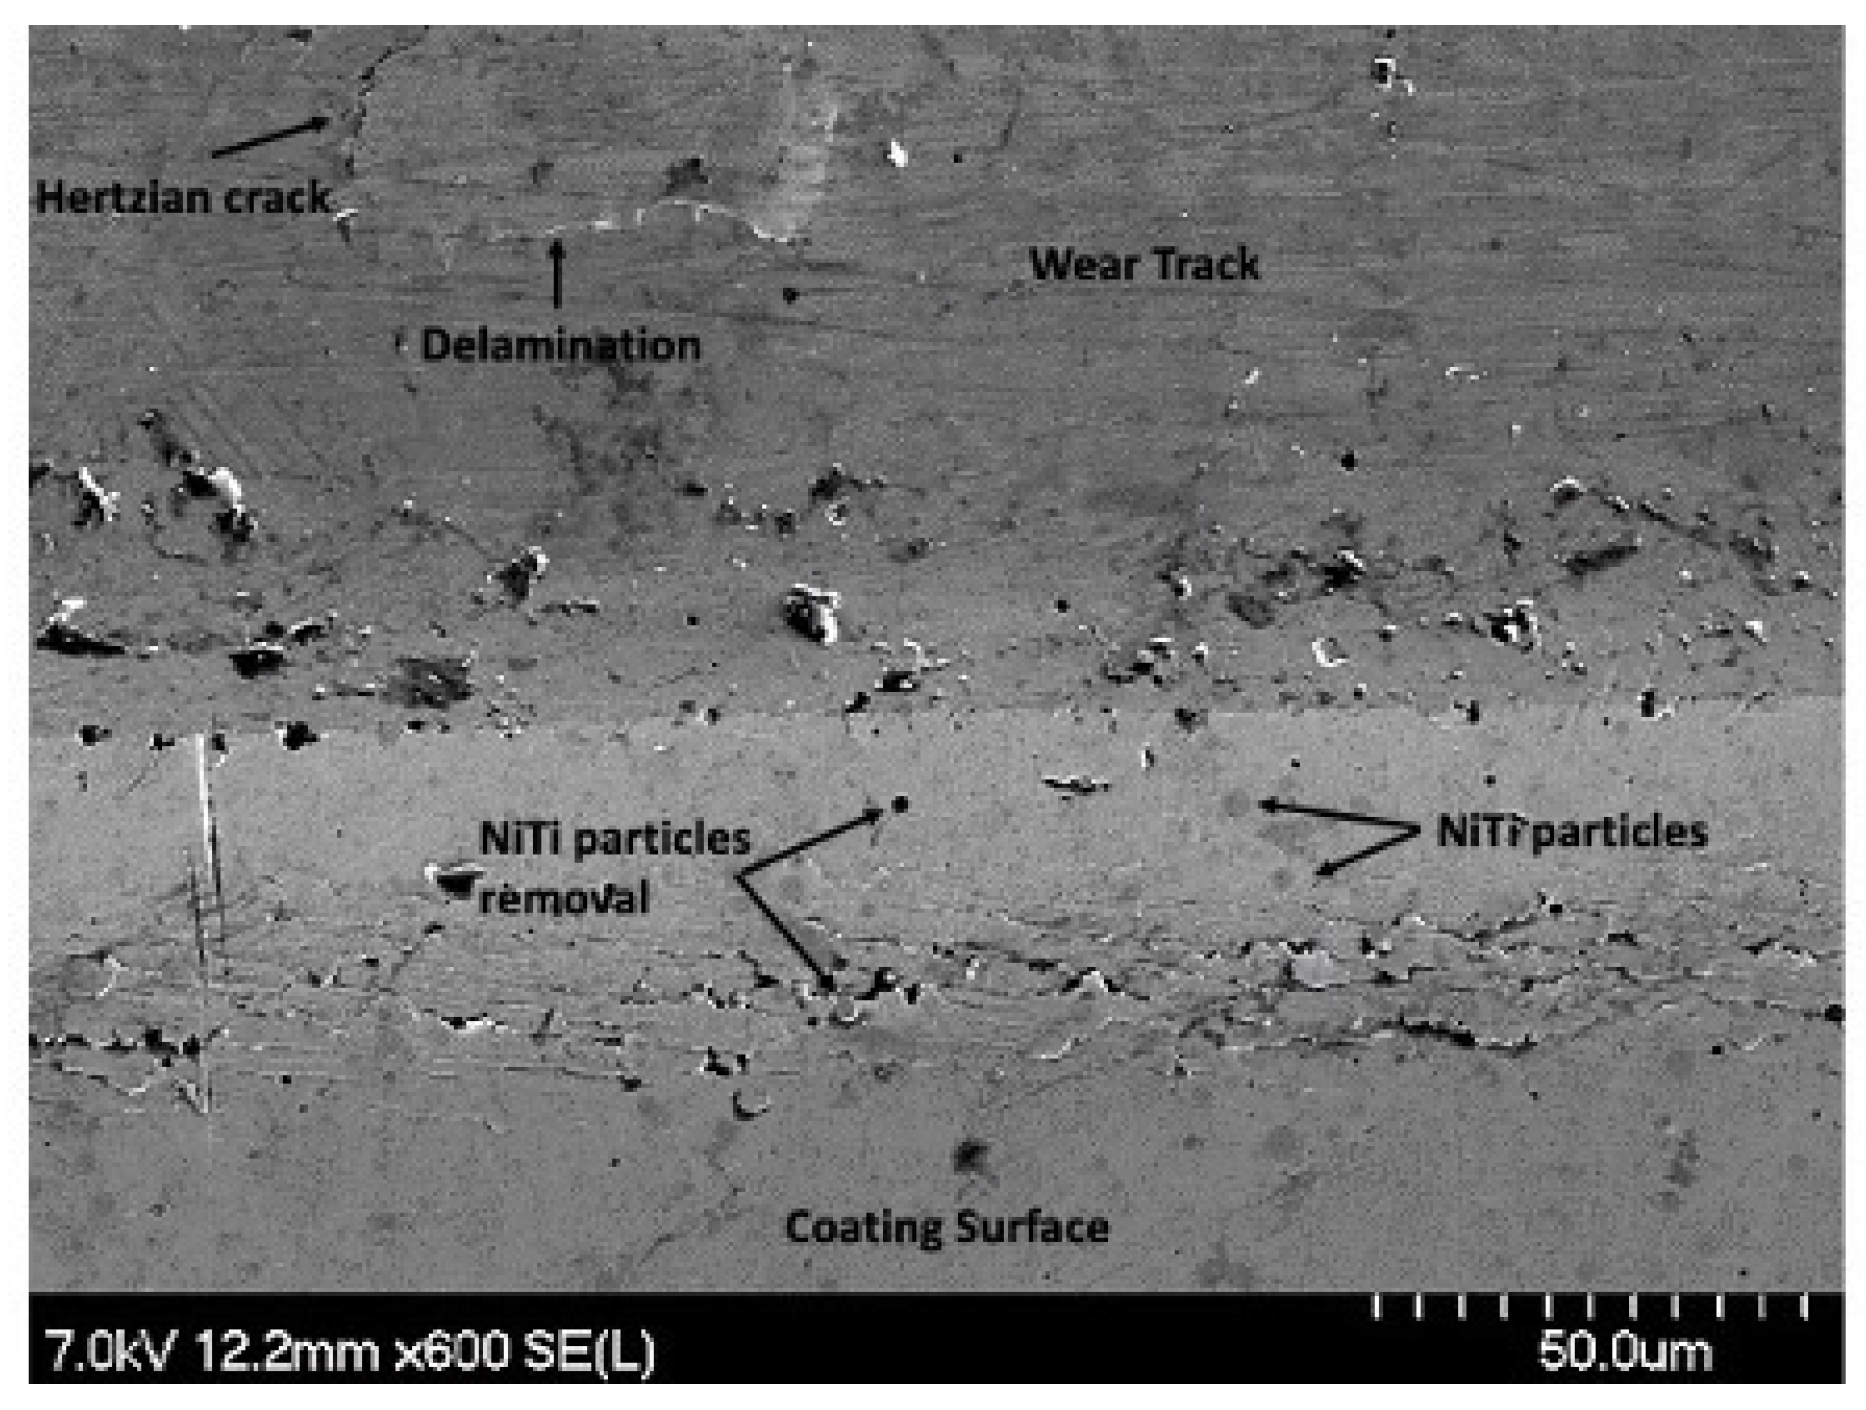
The heavy degree of plastic deformation that is visible on 4 μm thick Ni-P-NiTi coating’s 100 pass wear track from the sharp indenter allows for insight into the wear mechanisms from the particles. SEM images were taken to examine the particle interaction with the cracks. Figure 25 shows a region on the wear track where a Hertzian crack had propagated and caused delamination. The applied load created a Hertzian crack that was perpendicular to the surface and intersected with the crack parallel to the wear track. The intersection of the subsurface lateral cracks crossing the surface and the Hertzian crack creates plate-like wear debris and is depicted as an illustration in Figure 26. There were also particles removed from the coating, also shown in Figure 25. The high degree of stress in the material led to the particles being de-bonded from the coating. A removed particle and a particle that had begun to be displaced are pointed out in the image.
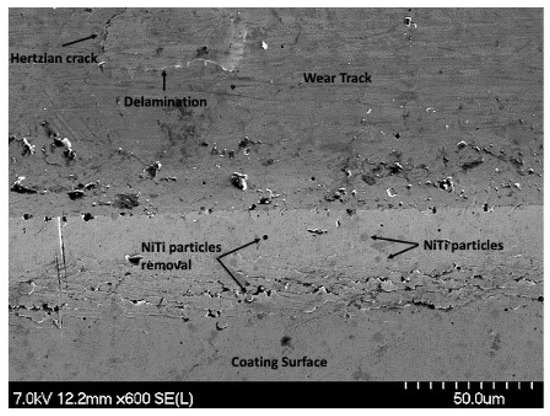
Figure 25.
SEM Image of Hertzian Crack, Delamination, and Particle Removal on the 100 Pass Wear Track on the 4 μm Thick Ni-P-NiTi Coating.
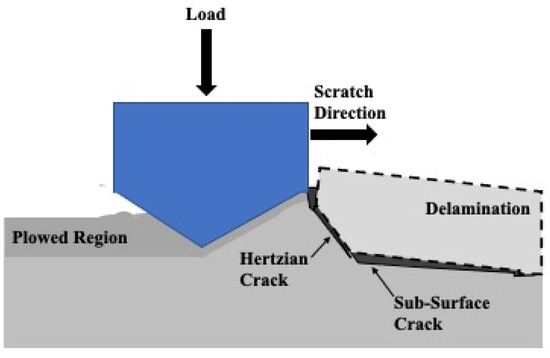
Figure 26.
Illustration of Wear Debris from Intersecting Hertzian Crack and Subsurface Crack.
As the wear progressed, material was displaced to accommodate the wear. With every slider pass, more material would be pushed outward. This is visible in Figure 27 by the layers of material that were squeezed out of the wear track. Material deformation is indicative of ductility, as opposed to brittle fractures such as the wear track that was seen in the monolithic Ni-P coatings in the confocal images of Figure 23. Those tracks had long cracks that were parallel to the wear track and did not show evidence of material pile-up.
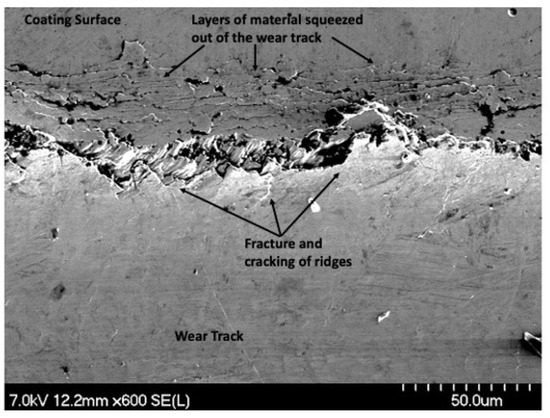
Figure 27.
SEM Image of Material Layers on the 100 Pass Wear Track on the 4 μm Thick Ni-P-NiTi Coating.
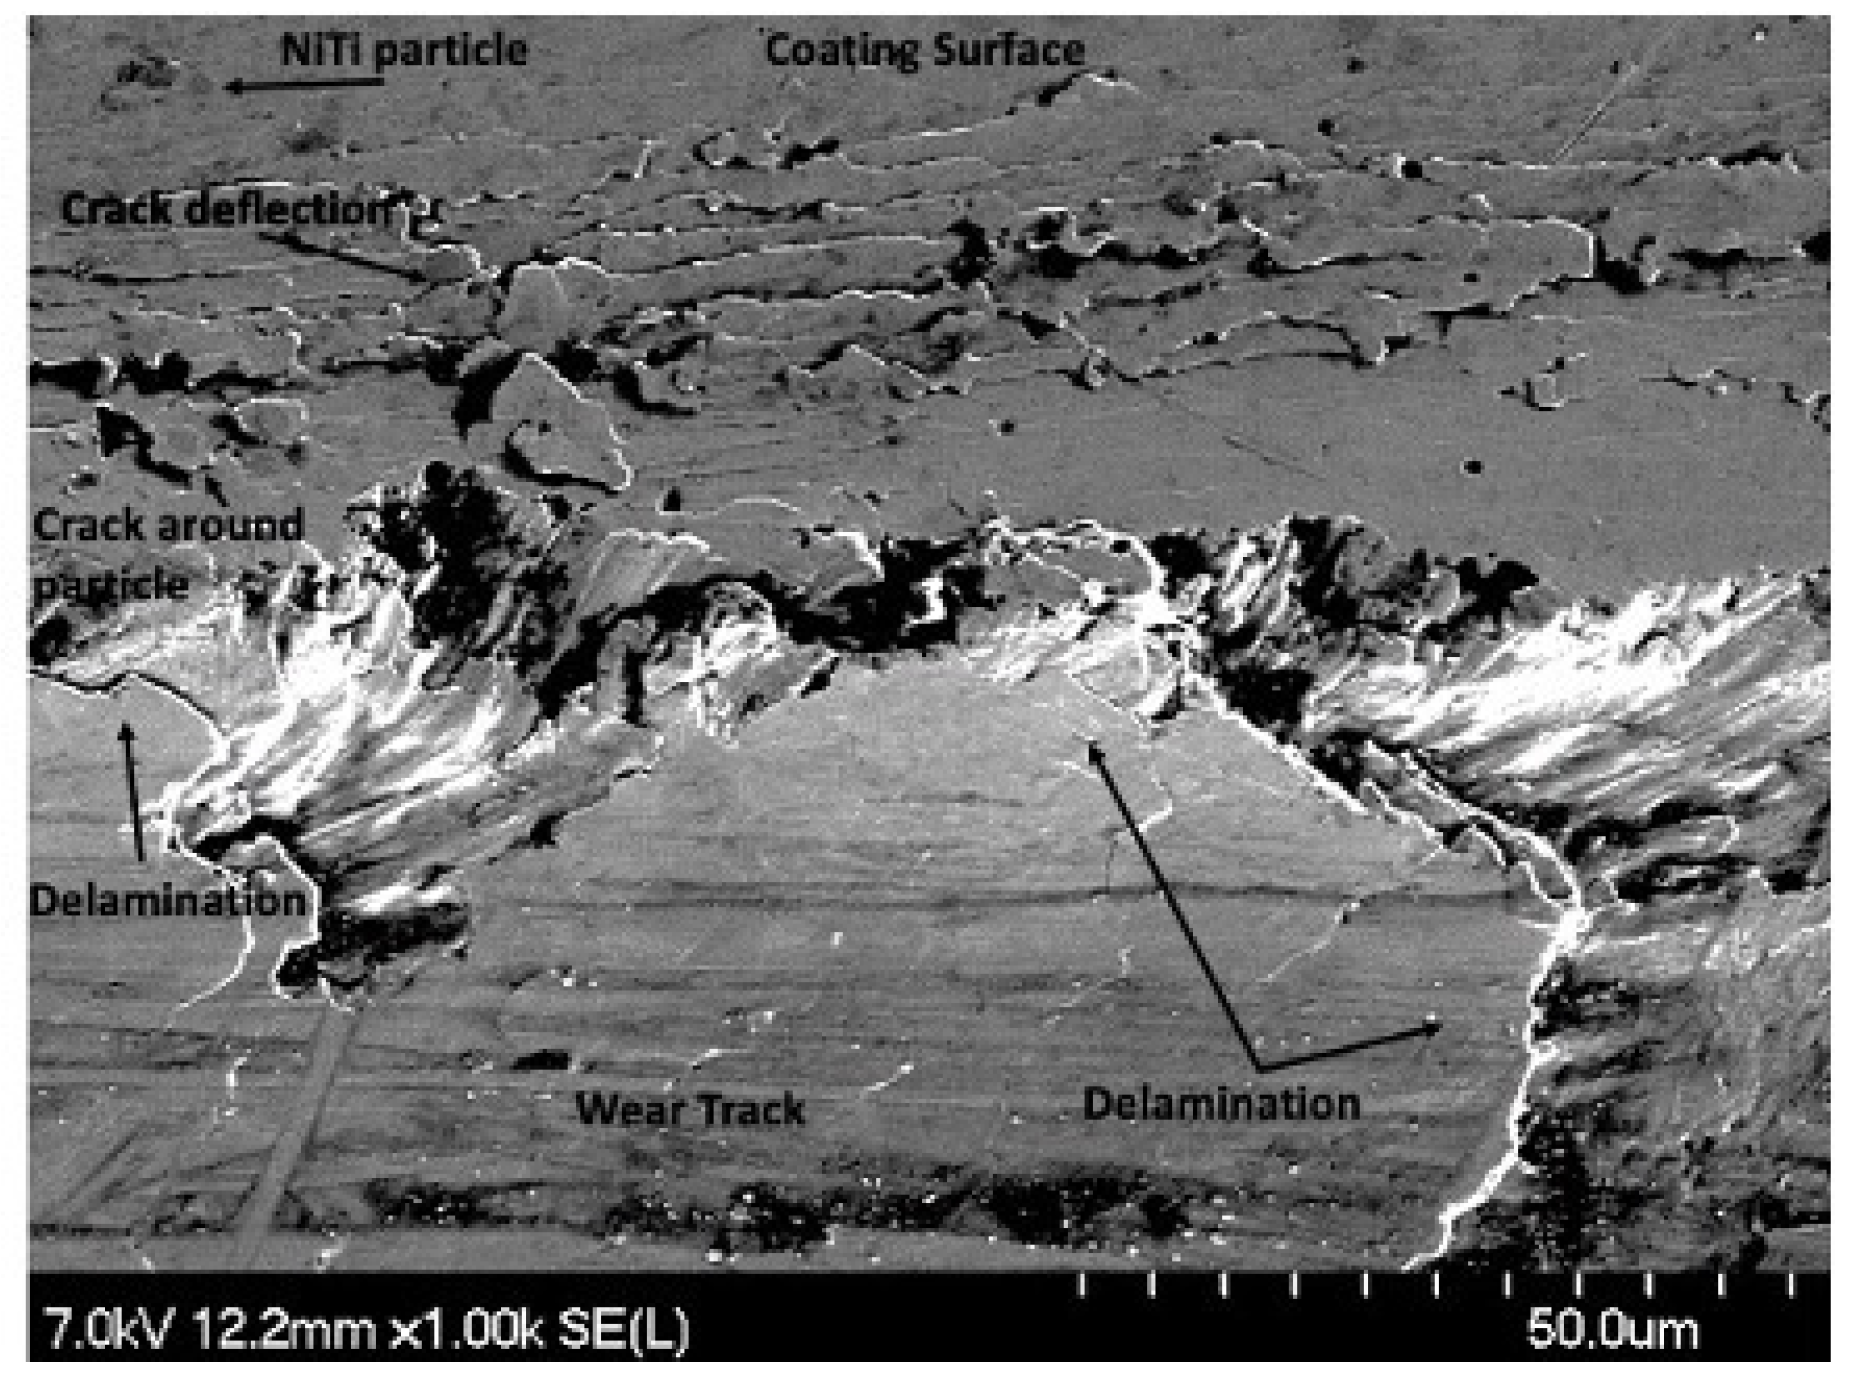
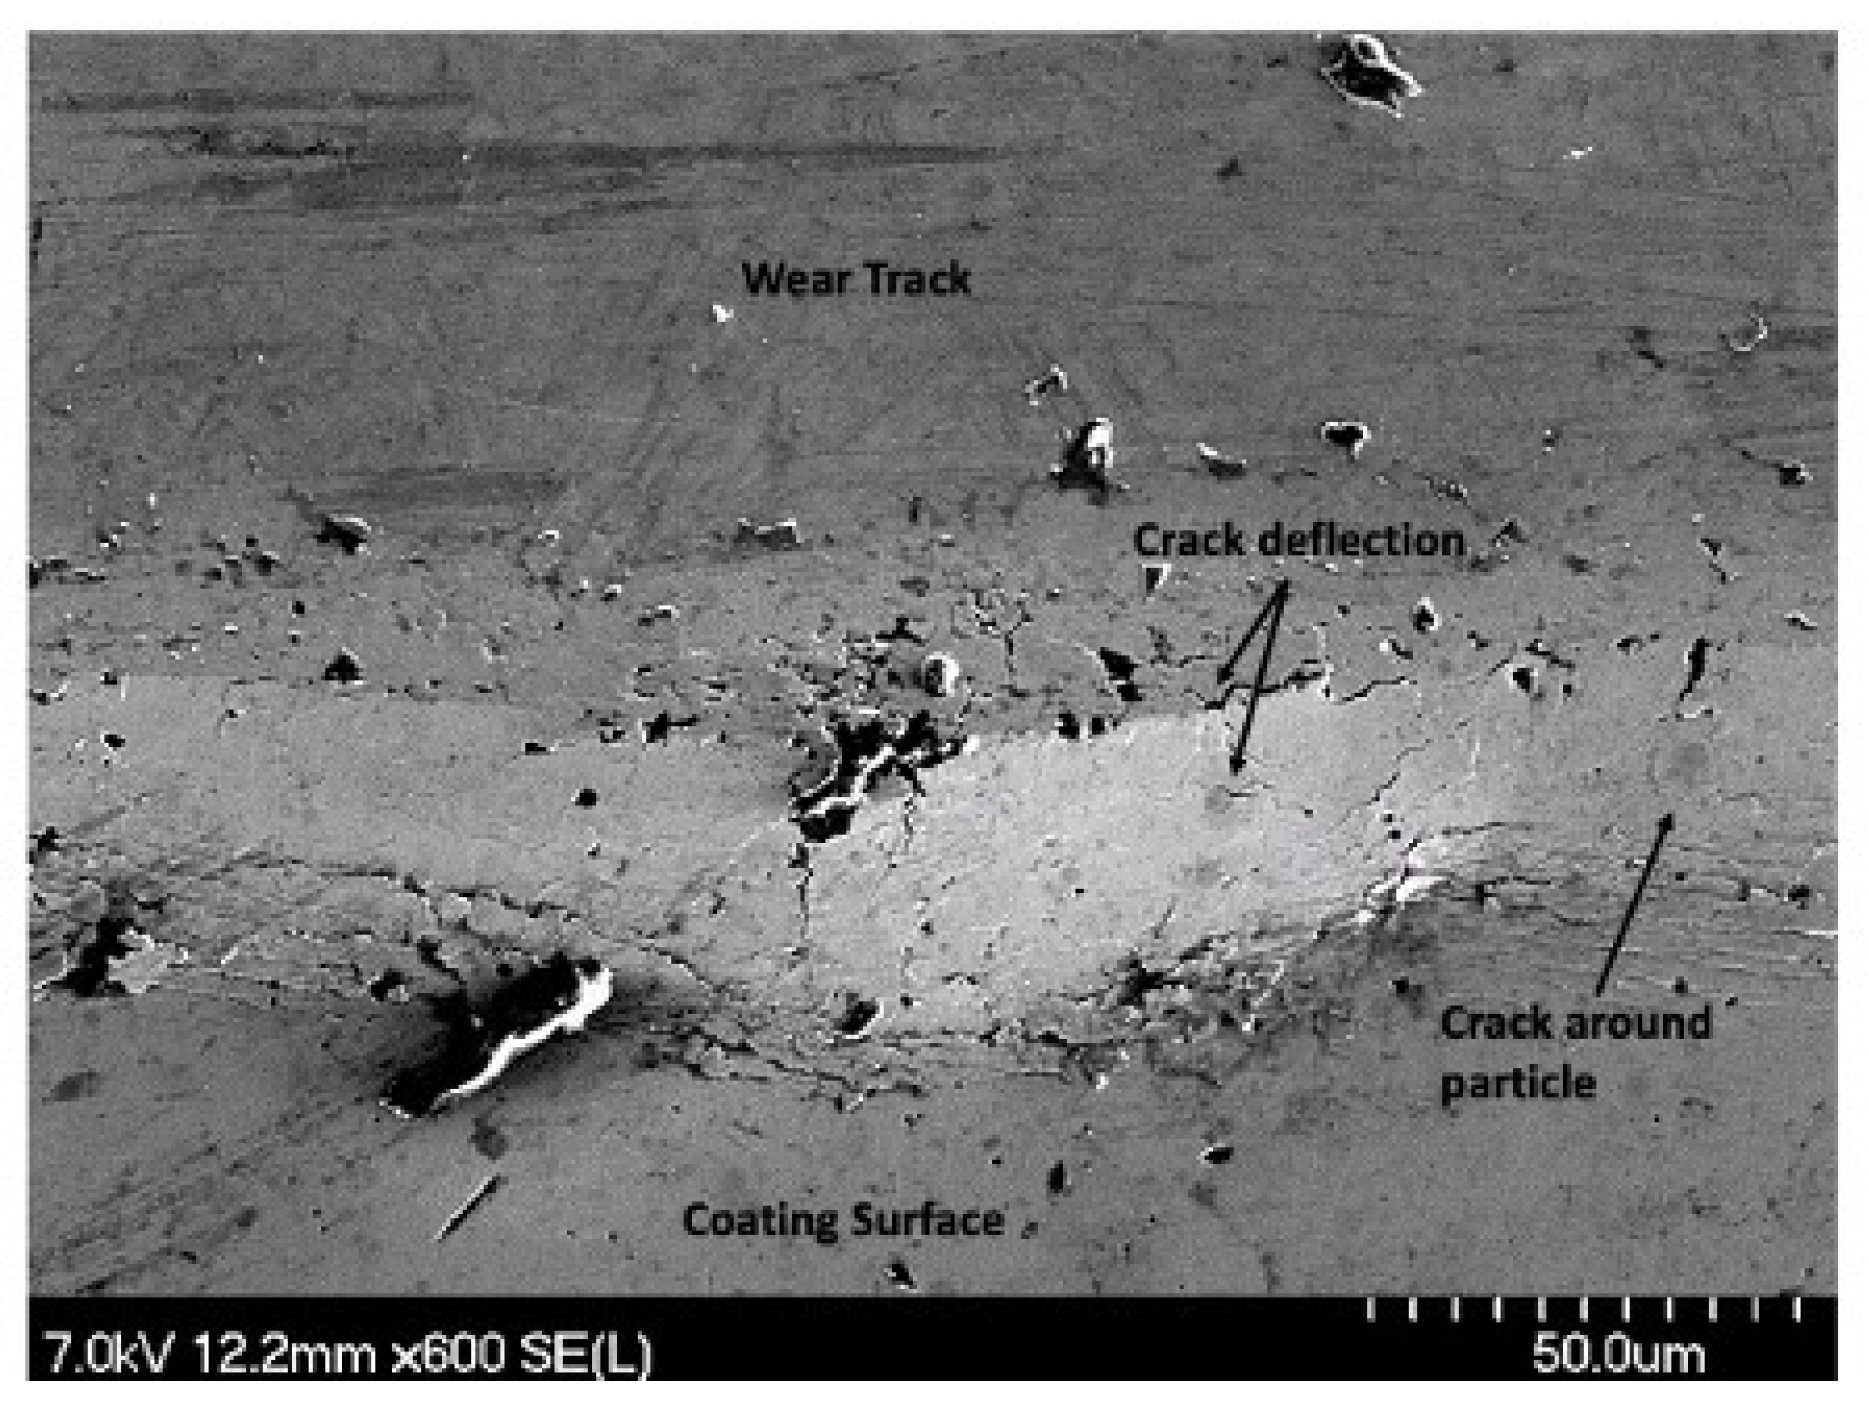
Further delamination and particle removal are visible in Figure 28. Additionally, both Figure 28 and Figure 29 show indications of toughening mechanisms from particle-crack interaction. The images have both forms of crack deflection, one with particle-crack interaction and one without. The spots labeled as crack deflection are where the crack contacted the particle which caused it to change paths and lose its fracture energy in the process. This is depicted in a schematic drawing in Figure 30. The areas in Figure 28 and Figure 29 that are labeled as a crack around a particle are crack deflection with indirect particle contact. The stress field around the particle is what changed the propagation’s path instead of a crack contacting the particle directly, and is shown as a representative illustration in Figure 31. The deflection of cracks when they come close to a NiTi particle is due to transformation toughening. The transformation occurs because as the crack approaches a NiTi particle, it produces a high-stress field. The stress induces the super-elastic NiTi to transform into martensite and expands which surrounds the particle with compression. This leads to crack deflection and loss of crack energy. Furthermore, the transformation also absorbs the crack energy leading to crack arrest. This mechanism is what causes toughening of the coating.
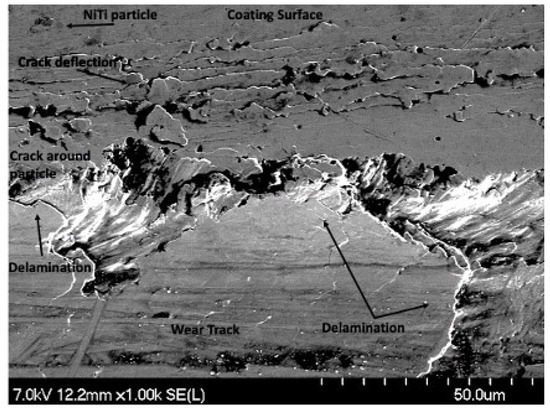
Figure 28.
SEM Image of Delamination, Particle Removal and Particle-Crack Interaction on the 100 Pass Wear Track on the 4 μm Thick Ni-P-NiTi Coating.

Figure 29.
Image of Particle-Crack Interaction on the 100 Pass Wear Track on the 4 μm Thick Ni-P-NiTi Coating.
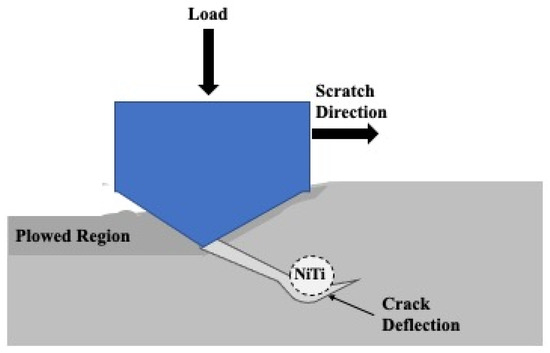
Figure 30.
Representative Illustration of the Crack Deflection Mechanism During Sliding Wear.

Figure 31.
Representative Illustration of the Crack Around Particle Mechanism During Sliding Wear.
4. Conclusions
In summary, monolithic Ni-P coatings and Ni-P-NiTi coatings of multiple thicknesses were prepared on API X100 steel substrates to observe and compare their wear behavior. Microhardness and indentations were conducted to define the mechanical properties of the coating produced. The sliding wear behavior of the monolithic and composite coatings was investigated as a function of coating thickness. The presence of super-elastic NiTi in the Ni-P coating improves its toughness by transformation toughening. In sliding wear, the monolithic Ni-P coating showed cracking, ridged surfaces, and material removal that was concentrated in certain areas. These features expose a steel substrate to the environment rapidly, despite the measured lower material loss. The composite had evenly distributed material loss, toughness, and minimal cracking which is more effective at protecting a steel substrate. The effect that changing the thicknesses and the powder addition on the wear behavior of Ni-P and Ni-P-NiTi coatings was found to be significant. Overall, the thicker Ni-P-NiTi composite coating was found to have the greatest sliding wear resistance.
Author Contributions
Conceptualization, Z.F.; methodology, R.J. and Z.F.; formal analysis, R.J.; investigation, R.J.; resources, Z.F. and G.J.; data curation, R.J.; writing—original draft preparation, R.J.; writing—review and editing, Z.F., M.A.I. and G.J.; supervision, Z.F.; All authors have read and agreed to the published version of the manuscript.
Funding
This research was funded by the Natural Sciences and Engineering Research Council of Canada (NSERC), grant number RGPIN 05125-17.
Data Availability Statement
Not applicable.
Conflicts of Interest
The authors declare no conflict of interest.
References
- Ebrahimian-Hosseinabadi, M.; Azari-Dorcheh, K.; Moonir Vaghefi, S.M. Wear behavior of electroless Ni–P–B4C composite coatings. Wear 2006, 260, 123–127. [Google Scholar] [CrossRef]
- Li, Z.; Farhat, Z.; Jarjoura, G.; Fayyad, E.; Abdullah, A.; Hassan, M. Synthesis and Characterization of Scratch-Resistant Ni-P-Ti-Based Composite Coating. Tribol. Trans. 2019, 62, 880–896. [Google Scholar] [CrossRef]
- Reddy, V.V.N.; Ramamoorthy, B.; Nair, P.K. A study on the wear resistance of electroless Ni–P/Diamond composite coatings. Wear 2000, 239, 111–116. [Google Scholar] [CrossRef]
- Palaniappa, M.; Seshadri, S.K. Friction and wear behavior of electroless Ni–P and Ni–W–P alloy coatings. Wear 2008, 265, 735–740. [Google Scholar] [CrossRef]
- Tamilarasan, T.R.; Sanjith, U.; Shankar, M.S.; Rajagopal, G. Effect of reduced graphene oxide (rGO) on corrosion and erosion-corrosion behaviour of electroless Ni-P coatings. Wear 2017, 390–391, 385–391. [Google Scholar] [CrossRef]
- Wang, C.; Farhat, Z.; Jarjoura, G.; Hassan, M.K.; Abdullah, A.M. Indentation and erosion behavior of electroless Ni-P coating on pipeline steel. Wear 2017, 376–377, 1630–1639. [Google Scholar] [CrossRef]
- Fayyad, E.M.; Abdullah, A.M.; Hassan, M.K.; Mohamed, A.M.; Jarjoura, G.; Farhat, Z. Recent advances in electroless-plated Ni-P and its composites for erosion and corrosion applications: A review. Emergent Mater. 2018, 1, 3–24. [Google Scholar] [CrossRef]
- Sade, W.; Proença, R.T.; Moura, T.D.D.O.; Branco, J.R.T. Electroless Ni-P Coatings: Preparation and Evaluation of Fracture Toughness and Scratch Hardness. ISRN Mater. Sci. 2011, 2011, 693046. [Google Scholar] [CrossRef]
- Sudagar, J.; Lian, J.; Sha, W. Electroless nickel, alloy, composite and nano coatings—A critical review. J. Alloys Compd. 2013, 571, 183–204. [Google Scholar] [CrossRef]
- Islam, M.; Azhar, M.R.; Fredj, N.; Burleigh, T.D.; Oloyede, O.R.; Almajid, A.A.; Shah, S.I. Influence of SiO2 nanoparticles on hardness and corrosion resistance of electroless Ni–P coatings. Surf. Coat. Technol. 2015, 261, 141–148. [Google Scholar] [CrossRef]
- Alirezaei, S.; Monirvaghefi, S.; Salehi, M.; Saatchi, A.; Kargosha, M. Effect of alumina content on wear behaviour of Ni−P−Al2 O3 (α) electroless composite coatings. Surf. Eng. 2005, 21, 60–66. [Google Scholar] [CrossRef]
- Saravanan, I.; Elayaperumal, A.; Devaraju, A.; Karthikeyan, M.; Raji, A. Wear behaviour of electroless Ni-P and Ni-P-TiO2 composite coatings on En8 steel. Mater. Today Proc. 2020, 22, 1135–1139. [Google Scholar] [CrossRef]
- de Hazan, Y.; Zimmermann, D.; Z’Graggen, M.; Roos, S.; Aneziris, C.; Bollier, H.; Fehr, P.; Graule, T. Homogeneous electroless Ni–P/SiO2 nanocomposite coatings with improved wear resistance and modified wear behavior. Surf. Coat. Technol. 2010, 204, 3464–3470. [Google Scholar] [CrossRef]
- Dhakal, D.R.; Gyawali, G.; Kshetri, Y.K.; Choi, J.-H.; Lee, S.W. Influence of SiC and TiC nanoparticles reinforcement on the microstructure, tribological, and scratch resistance behavior of electroless Ni–P coatings. Nanotechnology 2019, 31, 104001. [Google Scholar] [CrossRef] [PubMed]
- Franco, M.; Sha, W.; Malinov, S.; Liu, H. Micro-scale wear characteristics of electroless Ni–P/SiC composite coating under two different sliding conditions. Wear 2014, 317, 254–264. [Google Scholar] [CrossRef]
- MacLean, M.; Farhat, Z.; Jarjoura, G.; Fayyad, E.; Abdullah, A.; Hassan, M. Fabrication and investigation of the scratch and indentation behaviour of new generation Ni-P-nano-NiTi composite coating for oil and gas pipelines. Wear 2019, 426–427, 265–276. [Google Scholar] [CrossRef]
- Li, Z.; Farhat, Z. Microstructure development and nanoindentation behaviour of annealed Ni-P-Ti coatings. Surf. Eng. 2020, 37, 527–535. [Google Scholar] [CrossRef]
- Li, Z.; Farhat, Z. The Benefit of Superelastic NiTi Addition on Corrosion Performance of Electroless Ni–P Coating During an Accidental Scratch Event. J. Bio-Tribo-Corros. 2020, 7, 12. [Google Scholar] [CrossRef]
- Basista, M.; Węglewski, W. Modelling of damage and fracture in ceramic matrix composites—An overview. J. Theor. Appl. Mech. 2006, 44, 455–484. [Google Scholar]
- Kuntz, J.; Zhan, G.-D.; Mukherjee, A.K. Nanocrystalline-Matrix Ceramic Composites for Improved Fracture Toughness. MRS Bull. 2004, 29, 22–27. [Google Scholar] [CrossRef]
- Ma, L. Fundamental formulation for transformation toughening. Int. J. Solids Struct. 2010, 47, 3214–3220. [Google Scholar] [CrossRef]
- Czapczyk, K.; Siwak, P.; Legutko, S. Study of the effect of the electroless ni-p coating thickness applied on aw-7075 aluminum alloy on its mechanical properties. Adv. Sci. Technol. Res. J. 2018, 12, 291–297. [Google Scholar] [CrossRef]
- Güler, E.S.; Karakaya, I.; Konca, E. Effects of current density, coating thickness, temperature, pH and particle concentration on internal stress during Ni–MoS2electrocodeposition. Surf. Eng. 2013, 30, 109–114. [Google Scholar] [CrossRef]
- Vereschaka, A.; Volosova, M.; Chigarev, A.; Sitnikov, N.; Ashmarin, A.; Sotova, C.; Bublikov, J.; Lytkin, D. Influence of the Thickness of a Nanolayer Composite Coating on Values of Residual Stress and the Nature of Coating Wear. Coatings 2020, 10, 63. [Google Scholar] [CrossRef]
- Alam, T.; Farhat, Z.N. Slurry erosion surface damage under normal impact for pipeline steels. Eng. Fail. Anal. 2018, 90, 116–128. [Google Scholar] [CrossRef]
- ASTM G77-17; Standard Test Method for Ranking Resi stance of Materials to Sliding Wear Using Block-on-Ring Wear Test. ASTM International: West Conshohocken, PA, USA, 2017. [CrossRef]
- Powder Diffraction File (PDF); No. 04-020-1330, J.I.C.F.D. Data®; JCPDS: Netwon Square, PA, USA, 2021; Available online: https://www.icdd.com/pdfsearch/ (accessed on 12 September 2022).
- Czagány, M.; Baumli, P.; Kaptay, G. The influence of the phosphorous content and heat treatment on the nano-micro-structure, thickness and micro-hardness of electroless Ni-P coatings on steel. Appl. Surf. Sci. 2017, 423, 160–169. [Google Scholar] [CrossRef]
- Li, Z.; Farhat, Z. Hertzian Indentation Behavior of Electroless Ni-P-Ti Composite Coatings. Met. Mater. Trans. A 2020, 51, 3674–3691. [Google Scholar] [CrossRef]
- Neupane, R.; Farhat, Z. Wear and dent resistance of superelastic TiNi alloy. Wear 2013, 301, 682–687. [Google Scholar] [CrossRef]
- Lee, D.-H.; Park, B.; Saxena, A.; Serene, T.P. Enhanced surface hardness by boron implantation in nitinol alloy. J. Endod. 1996, 22, 543–546. [Google Scholar] [CrossRef]
- Laera, A.M.; Massaro, M.; Dimaio, D.; Vencl, A.; Rizzo, A. Residual Stress and Tribological Performance of ZrN Coatings Produced by Reactive Bipolar Pulsed Magnetron Sputtering. Materials 2021, 14, 6462. [Google Scholar] [CrossRef]
- Farhat, Z.; Jarjoura, G.; Shahirnia, M. Dent Resistance and Effect of Indentation Loading Rate on Superelastic TiNi Alloy. Met. Mater. Trans. A 2013, 44, 3544–3551. [Google Scholar] [CrossRef]
- Lin, C.; Dadvand, N.; Farhat, Z.; Kipouros, G.J. Electroless nickel phosphorous plating on carbon steel. Mater. Sci. Technol. Montr. 2013, 3, 2224–2237. [Google Scholar]
- Klein, C.A.; Cardinale, G.F. Young’s modulus and Poisson’s ratio of CVD diamond. Diam. Relat. Mater. 1993, 2, 918–923. [Google Scholar] [CrossRef]
- Neupane, R.; Farhat, Z. Prediction of Indentation Behavior of Superelastic TiNi. Met. Mater. Trans. A 2014, 45, 4350–4360. [Google Scholar] [CrossRef]
Publisher’s Note: MDPI stays neutral with regard to jurisdictional claims in published maps and institutional affiliations. |
© 2022 by the authors. Licensee MDPI, Basel, Switzerland. This article is an open access article distributed under the terms and conditions of the Creative Commons Attribution (CC BY) license (https://creativecommons.org/licenses/by/4.0/).

