Proceeding Paper

A Fatigue Life Calculation Procedure Implementing Surface and Depth-Graded Mechanical Properties †

by
Paschalis Adamidis
*,
Christos Gakias
,
Efstratios Giannakis
and
Georgios Savaidis
Laboratory of Machine Elements and Machine Design, Mechanical Engineering Department, Aristotle University of Thessaloniki, 541 24 Thessaloniki, Greece
*
Author to whom correspondence should be addressed.
Presented at the 8th International Conference of Engineering Against Failure (ICEAF VIII), Kalamata, Greece, 22–25 June 2025.
Eng. Proc. 2025, 119(1), 25; https://doi.org/10.3390/engproc2025119025
Published: 11 December 2025

Abstract

This study presents a fatigue life prediction procedure for high-strength steel suspension components that exhibit surface and depth-graded mechanical properties due to manufacturing processes such as shot peening and heat treatment. A layer-by-layer approach based on local stress and material properties at the examined depth from the surface is implemented, allowing the generation of S-N curves that reflect the local fatigue response at different depths. The methodology is applied to a parabolic monoleaf spring for the axle suspension of commercial vehicles, made of 51CrV4 steel, and validated against experimental fatigue data. Results show strong agreement, demonstrating the effectiveness of incorporating local mechanical characteristics in terms of stress and material properties into fatigue design workflows.

1. Introduction

Fatigue failure is a critical consideration in components subjected to cyclic loading. Particularly in the automotive industry, suspension elements such as leaf springs endure severe loading and are therefore treated through processes like quenching, tempering, and shot peening to enhance their fatigue performance [1,2,3].
Conventional fatigue design typically relies on extensive prototype testing or simplified models using average material properties with empirical factors to account for surface treatment procedures. However, these approaches often fail to capture the influence of surface treatments, since traditional S–N curves are derived from components or sub-components produced under specific manufacturing conditions. Any change in process parameters usually requires new and costly experimental testing.
To address this limitation, this work proposes a method that accounts for the local gradation of mechanical properties and stress along the depth. By incorporating local characteristics such as microhardness, residual stresses, and surface roughness introduced by manufacturing processes, the method predicts the fatigue behavior of the component, supporting early-stage design decisions, when prototypes are not available, while reducing cost and development time significantly. The developed procedure is applied to a monoleaf parabolic suspension spring and validated against experimental fatigue data.

2. Methodology Overview

To address the limitations of conventional fatigue life estimation methods for surface treated suspension components, this study proposes a layer-resolved fatigue life prediction procedure that accounts for depth-dependent mechanical properties, capturing the effects of surface treatments like shot peening and heat treatment. By integrating localized material behavior and loading, the approach improves accuracy and reliability in fatigue life estimation. The methodology relies on three main categories of input data:
  • Geometry: This includes identifying the failure critical location on the component and considering any relevant geometric features or discontinuities that influence stress levels under operational loading.
  • Local parameters: The component’s cross-section is discretized into layers from the surface to the core. For each layer, local mechanical characteristics such as local ultimate tensile strength, stress gradient and roughness (only for the outer layer) are assigned based on measured microhardness profile, residual stress profile and surface roughness profile, respectively. These parameters capture the influence of surface treatments and gradation of material properties on fatigue behavior.
  • Loading parameters: Once the aforementioned mechanical characteristics are defined, the local stress of each layer due to the operational loading is calculated. This is done by superimposing the stresses S developed by the externally applied loads and the residual stresses, allowing for an accurate assessment of the true stress σ acting at each layer.
Using these inputs, the method evaluates the local loading conditions of individual layers within the material depth. By applying the Local Stress Approach of the FKM Guideline [4] to each layer, the procedure determines its respective fatigue properties. Local fatigue strength approach was first introduced by Kloos and Velten [5], followed by similar formulations [6,7]; however, these studies do not consider the true stress experienced by each layer.
As a final output, the described method assigns an S-N curve for each individual layer at the failure critical point. The layer with the lowest fatigue resistance determines the overall fatigue behavior of the component. This approach provides a more physically meaningful fatigue life prediction, suitable for components influenced by surface treatments.

3. Case Study: Monoleaf Spring

A parabolic monoleaf spring made of high-strength steel 51CrV4 used for the axle suspension of trucks has been selected as the case study for applying the proposed methodology. The design and some structural details are shown in Figure 1.
The monoleaf features a symmetric, parabolic thickness distribution along its arm lengths. It is quite rigidly clamped in its middle area and supported on cylinders positioned near to the left and right arm ends. The operational load is introduced in the clamped area, perpendicularly to the monoleaf axis causing mainly bending stresses. The profile of the monoleaf in its clamping area amounts to 90 × 32 mm.
Parabolic leaf springs are typically produced from flat bars subjected to heat treatment (HTT) process involving quenching and tempering, followed by stress shot peening (SSP). Table 1 summarizes the hardness and tensile properties of the 51CrV4 flat bar batch before and after heat treatment and stress shot peening. The main stress shot peening parameters are an Almen intensity of 0.266 mm C, an impact angle of 15° and S390 spherical shots of a nominal diameter 1.18 mm. The coverage is technically over 100%.

3.1. Determination of Point of Interest

A Finite Element Analysis (FEA) is carried out for the examined leaf spring in order to determine its stress response to the applied loading, especially the failure critical point.
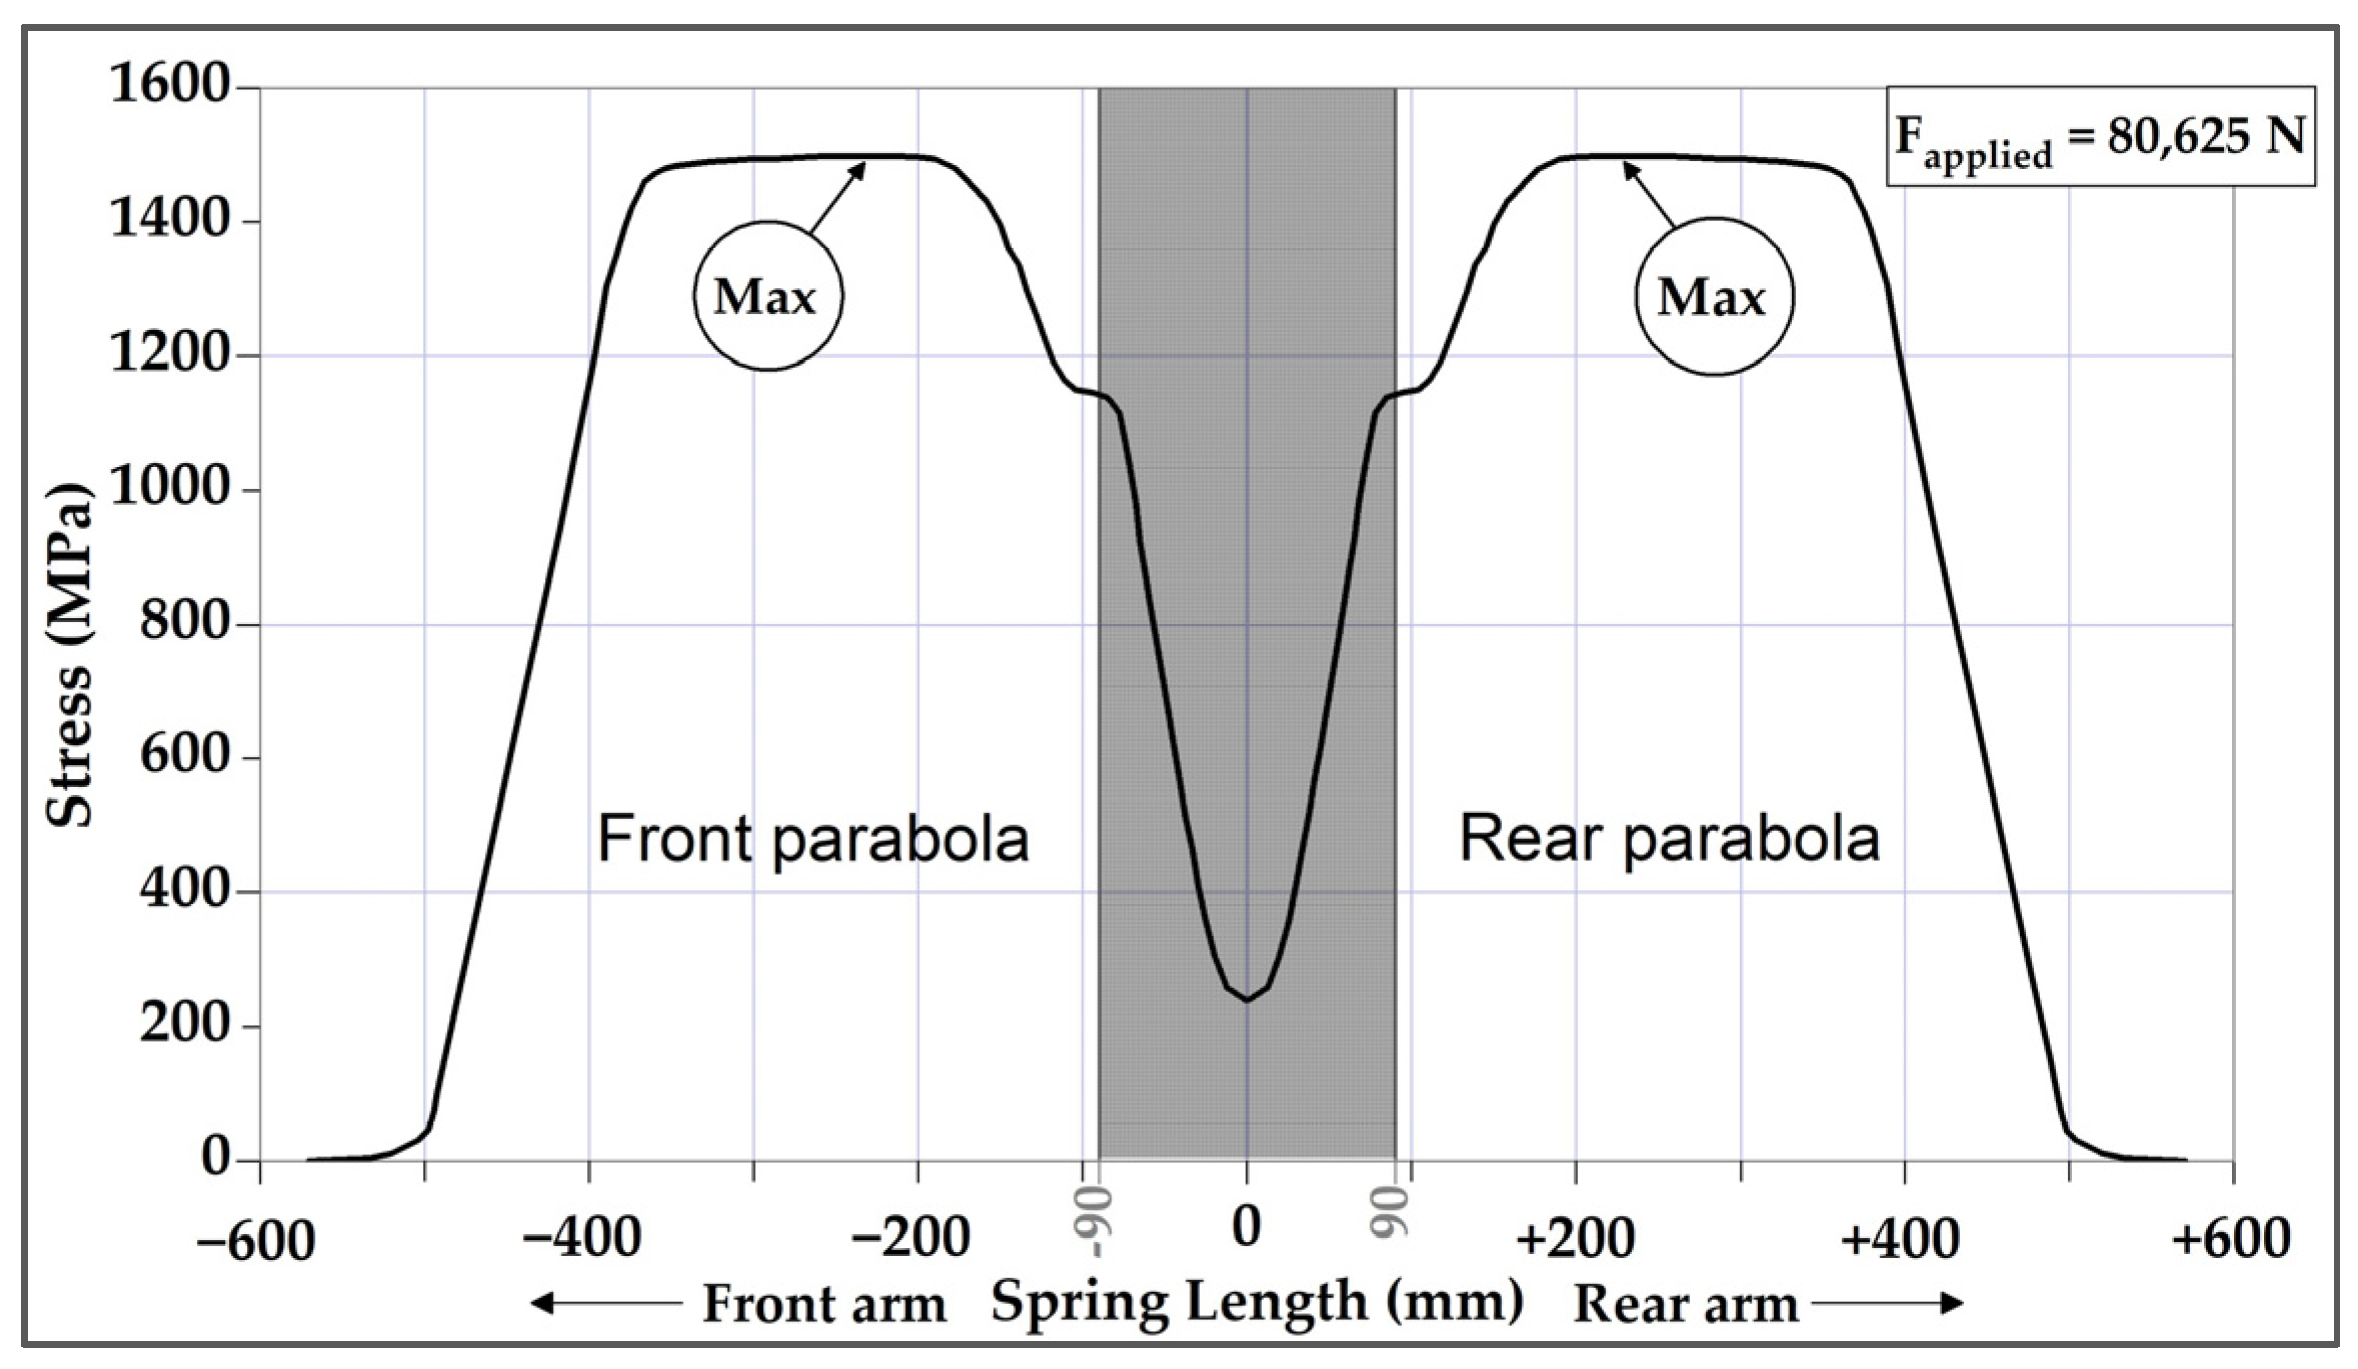
The stress distribution on the tensile side of the monoleaf spring along the length of the arms is shown in Figure 2. The maximum stress occurs at x = ±230 mm, measured from the center, identifying these locations as the critical points of interest. The subsequent analysis will therefore focus on these regions. Due to the symmetry, it is sufficient to investigate one location; the results are the same for the symmetrical location.

3.2. Examination of Local Properties

Surface and mechanical properties around the identified examination point were characterized. Surface roughness was measured according to ISO 4288 [8] using a stylus profilometer on eight specimens (ten measurements each), yielding a mean value of R z = 28.7 ± 1.63 μm.
A microhardness profile was measured from the surface to the core following [9], enabling correlation with ultimate tensile strength to estimate the local strength across the leaf thickness. For the correlation of microhardness with the local ultimate tensile strength Rm, the conversion table of ISO 18265:2013 [10] for quenching and tempering steels was used. The profile in the failure critical area is shown in Figure 3a.
Additionally, residual stress measurements were performed using X-ray diffraction (XRD) yielding the residual stress profile along the depth at the failure critical area, see Figure 3b. The profile satisfies the through-thickness self-equilibrium principle; however, only the compressive residual stresses region is shown here, as this is the focus area of the current analysis.

3.3. Loading Parameters

In this study, six cyclic loading scenarios were defined to reflect realistic operating conditions for a parabolic monoleaf spring, combining three stress levels with two load ratios. The load ratio is expressed as R = S m i n / S m a x , where S m i n and S m a x are the minimum and maximum operational stresses.
For R = 0 (pulsating loading), maximum stress levels of 1300 MPa, 1400 MPa, and 1600 MPa were considered. For R = 0.5, the maximum stresses were 1600 MPa, 1700 MPa, and 1800 MPa. These cases were selected to cover a broad range of fatigue loading and reflect typical service conditions experienced by leaf springs in actual applications.

3.4. Fatigue Behavior of Layers

Once the necessary parameters are defined, the fatigue behavior of each discrete material layer can be systematically evaluated. The process begins with the calculation of the operational stress profile at the surface and subsurface region of the point of examination, which is developed due to the applied (external) loading.
The next step involves determining the true stress state σ within the material. This is achieved by superimposing the residual stress profile onto the operational stress profile S . The resulting true stress distribution incorporates both the externally applied loading and the internal residual stresses induced by surface treatments. This adjusted stress profile forms the basis for the subsequent fatigue life calculation of each material layer, as it accurately reflects the actual stress conditions experienced throughout the depth. The process of stress superposition and the resulting true stress distribution are illustrated in Figure 4. Ιt should be noted that the present approach applies a linear superposition of residual and operational stresses and does not include stress relaxation effects [11] during cyclic loading, acknowledging that this could potentially overestimate the fatigue life.
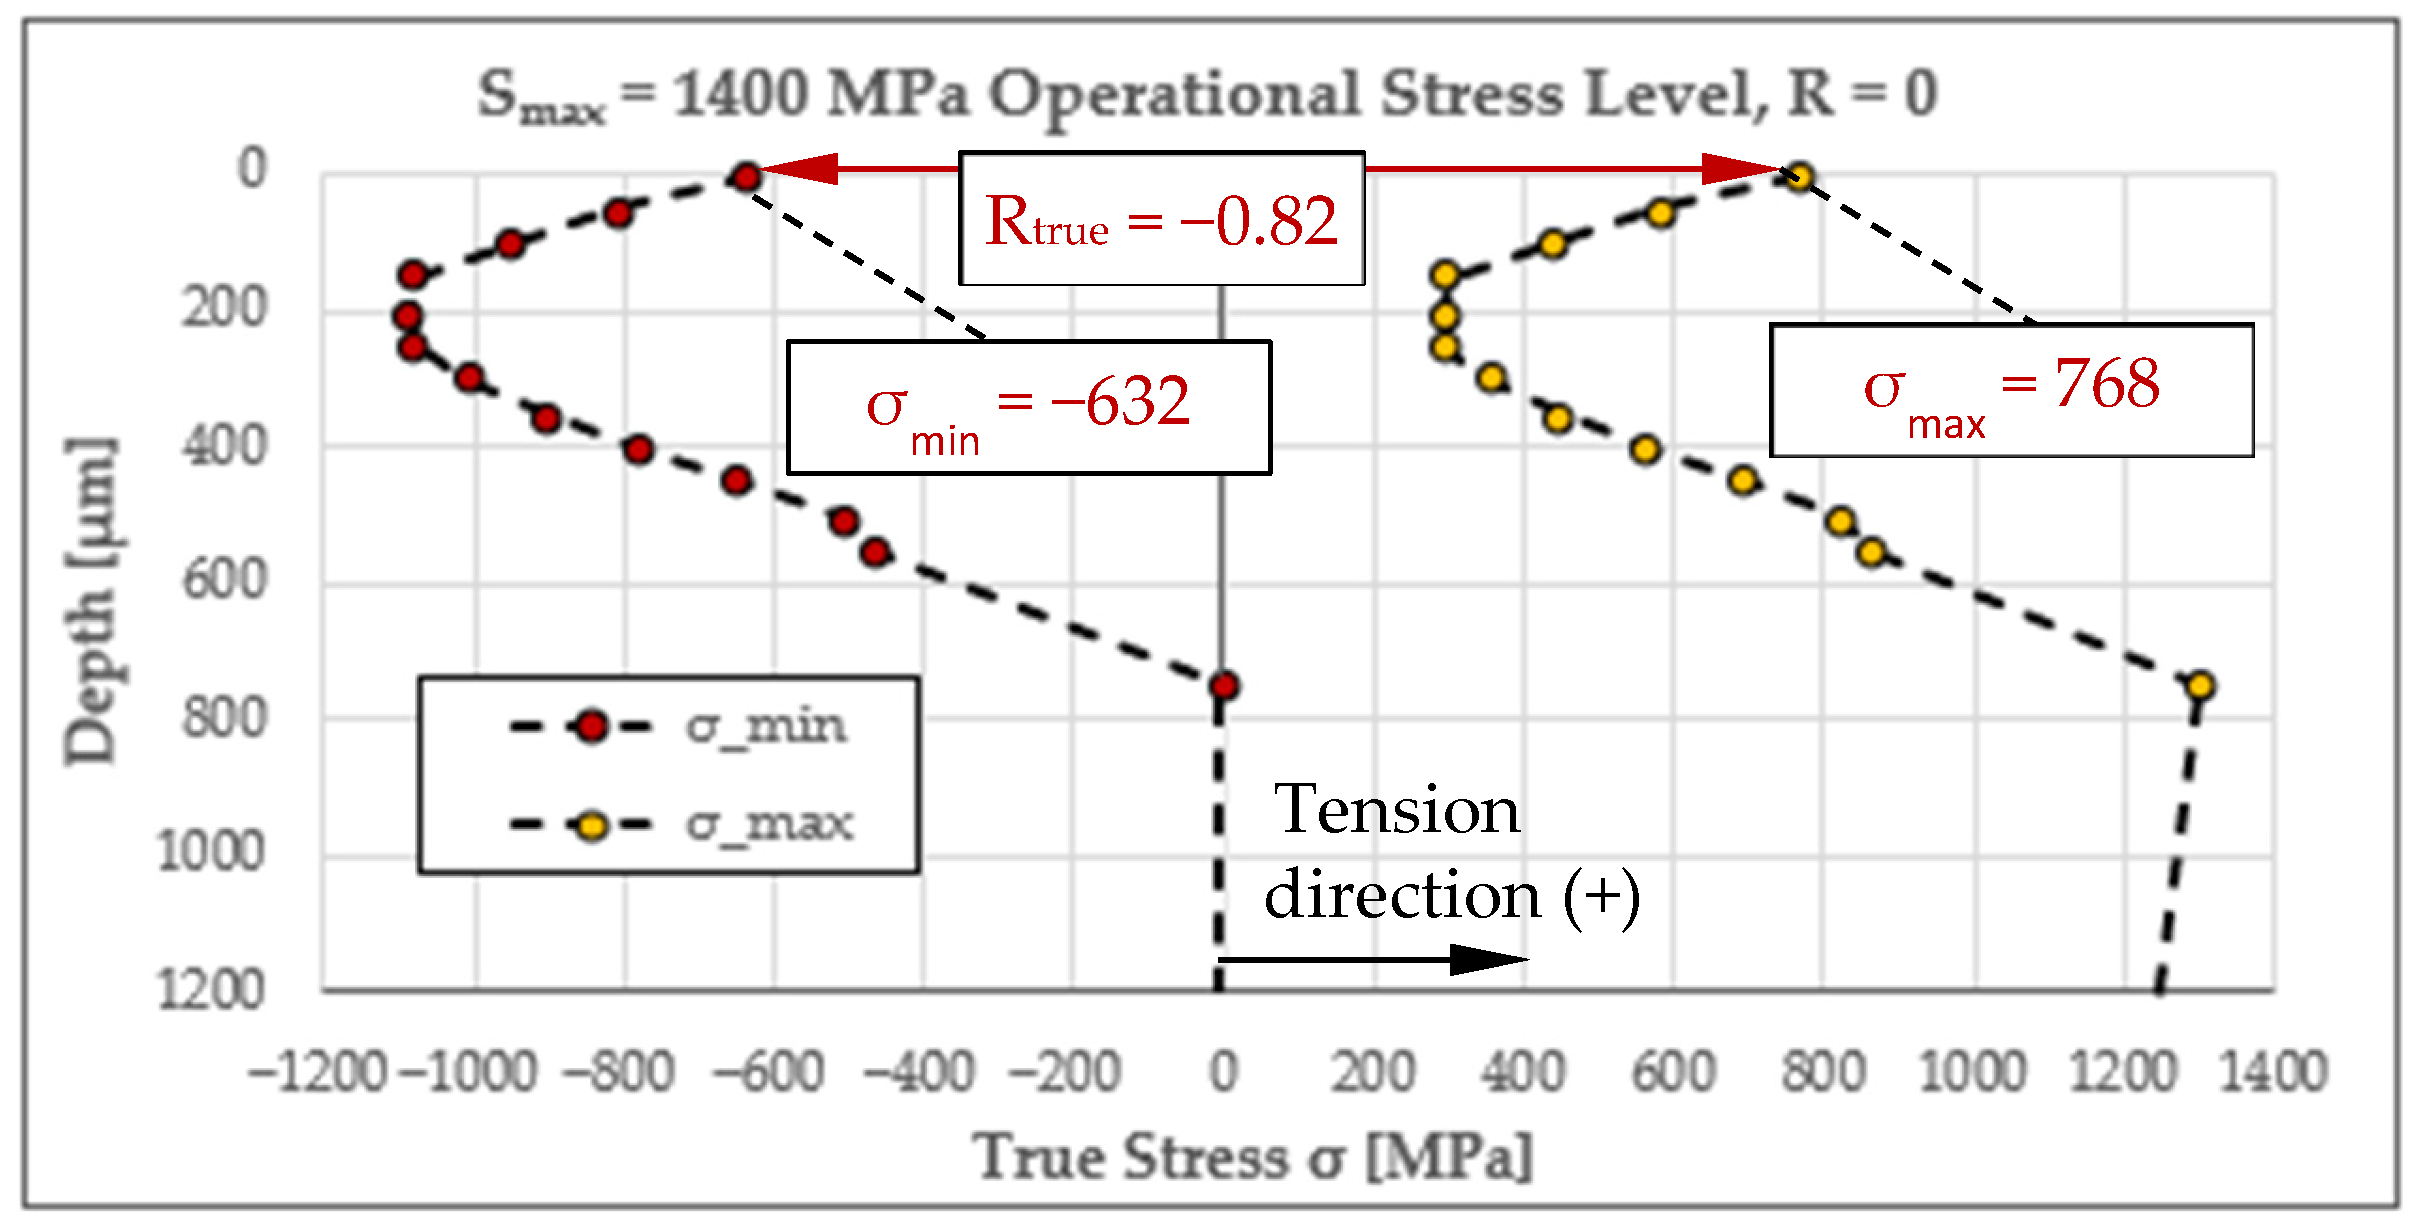
As a representative example, Figure 5 shows the resulting minimum and maximum true stress distribution for an operational load ratio of R = 0 and a maximum operational stress level of S m a x = 1400 MPa.
Under these operational loading conditions, the very surface layer experiences a true maximum stress of σ m a x = 768 MPa and a true minimum stress of σ m i n = −632 MPa, giving a true load ratio of Rtrue = −0.82, which differs significantly from the nominal R = 0.
By incorporating the measured surface roughness, the local ultimate tensile strength (derived from the microhardness correlations), and the true stress state of each individual layer, fatigue life can be evaluated using the Local Stress Approach, as outlined in the well-known Analytical Strength Assessment of the FKM Guideline [4]. This approach enables the construction of a σN curve for each discrete layer, capturing the depth-dependent fatigue performance under the defined loading conditions.
As an illustrative example, Figure 6 presents the calculated true σN curve and fatigue life of the very surface layer at the failure critical location under actual stress conditions (Rtrue = −0.82, σ m a x = 768 MPa), derived by superimposing the residual and the representative operational stresses (R = 0, S m a x = 1400 MPa) while accounting for surface roughness and local strength. Following the FKM Guideline 5th Edition [4], σ m a x values for N = 10 3 and N = 10 6 cycles were first determined for fully reversed stresses (Rtrue = −1) and then adjusted for Rtrue = −0.82 using the mean stress sensitivity factor Mσ. Specifically, for the R-correction, the mean stress factor, K A K , σ , was calculated using (1) and (2):
K A K , σ = 1 / 1 + M σ · σ m / σ α     ,     R 0
K A K , σ = 1 + M σ / 3 / 1 + M σ   /   1 + M σ / 3 · σ m / σ α     ,     0 R 0.5
The final amplitudes at the desired load ratio (Rtrue = −0.82) for N = 103 and N = 106 were determined by dividing the corresponding amplitudes at Rtrue = −1 by the mean stress factor, K A K , σ . Surface roughness was considered only for the surface layer with a roughness factor of K R , σ = 0.74 . For all other layers, a K R , σ = 1 was considered. The influence of contour and size was implemented using the KtKf ratio, n σ , acc. to Equation (3). The related stress gradient, Gσ, was calculated using the true stress profile, Figure 5, as Gσ = 0.093 for layers of 0–150 μm, Gσ = 0 for 200 μm and Gσ = 0.096 for layers of 250–750 μm.
n σ = 1 + G ¯ σ · m m · 10 0.5 0.5 + R m 2700 · M P a
As a result, using Equation (3), the K t K f ratio, n σ , for depths of 0, 50, 100, 150, 200, 250, 300, and 350 μm is 1.030, 1.036, 1.035, 1.030, 1, 1.027, 1.025, and 1.024, respectively. Furthermore, for depths between 400 and 750 μm the calculated value is n σ = 1.022 .

4. Results and Discussion

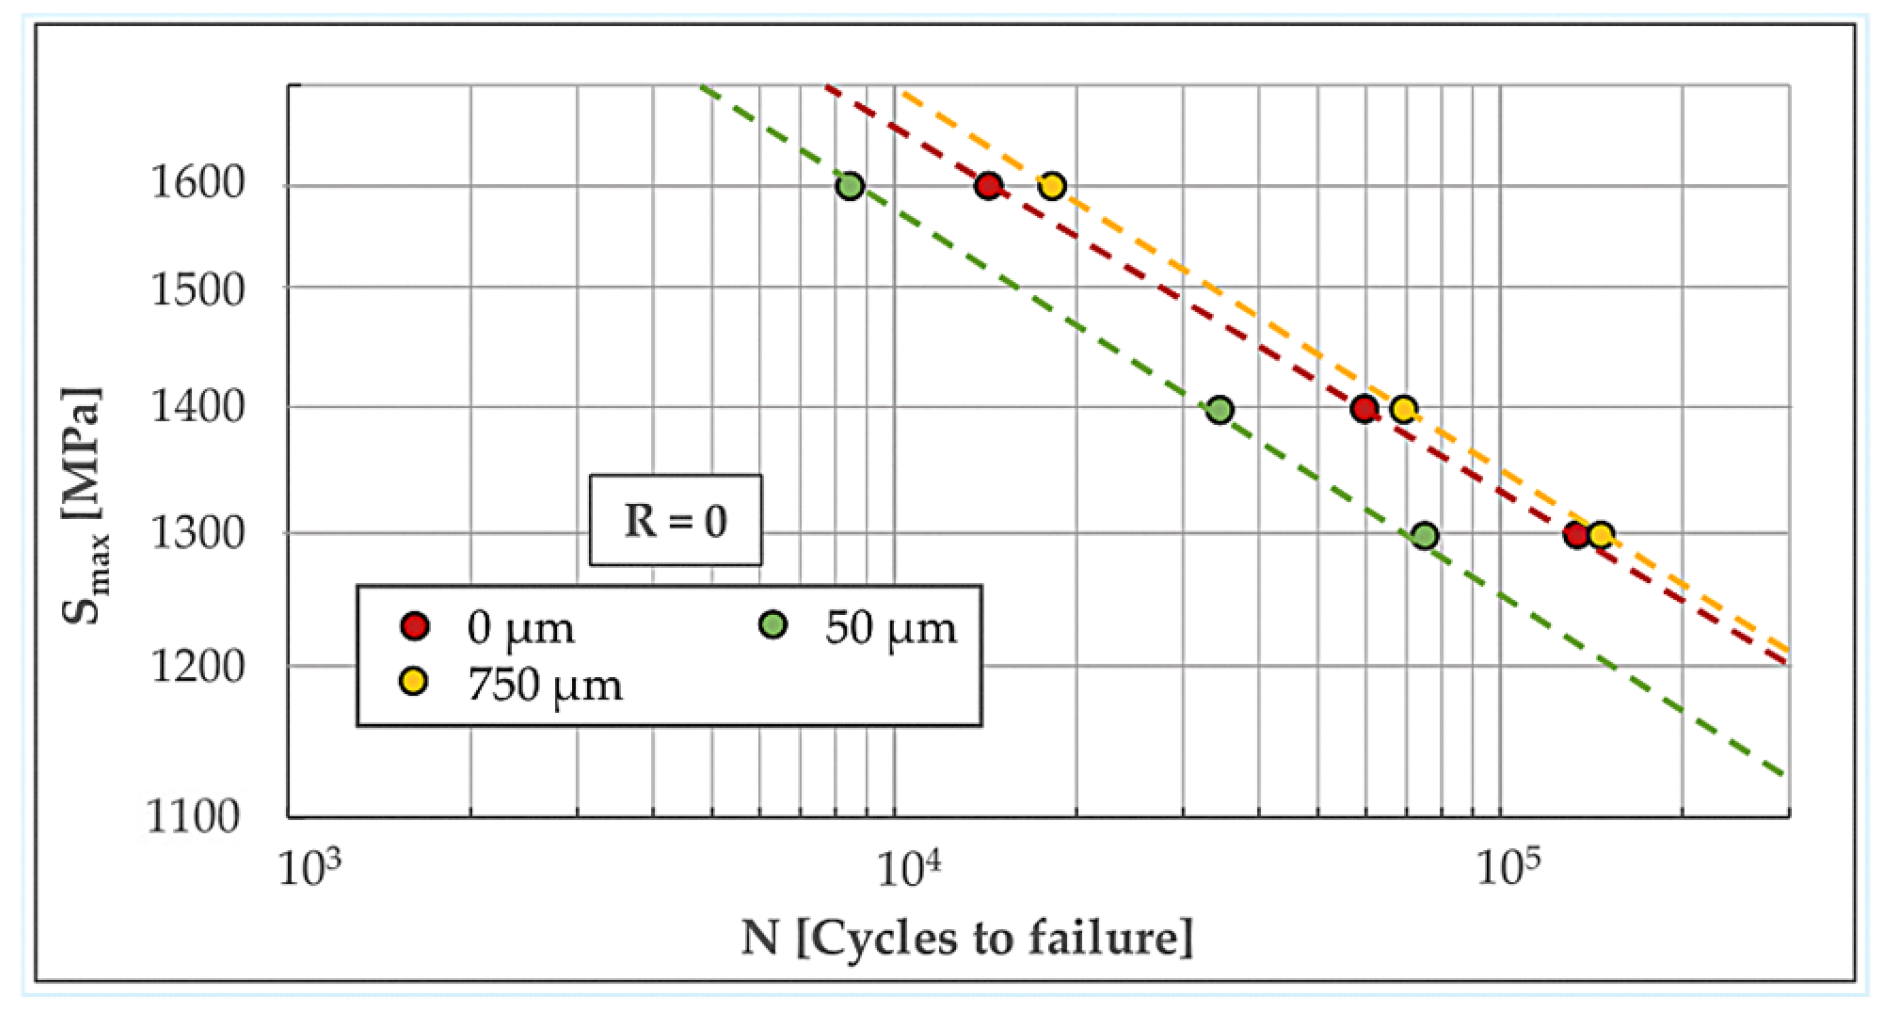
By repeating this procedure for each individual material layer and for all examined operational stress levels under both load ratios (R = 0 and R = 0.5), it is possible to establish a correlation between the externally applied stress S and the corresponding fatigue life for each layer. This enables the construction of a complete set of SN curves, one for every depth layer, reflecting its fatigue response under the given loading conditions. Figure 7 and Figure 8 illustrate the resulting SN curves for the discrete layers, corresponding to operational load ratios of R = 0 and R = 0.5, respectively. The different marker colors represent the different depth layers, measured from the very surface (0 μm).
It is assumed that layers exhibiting the shortest fatigue life under the applied loading govern the overall fatigue performance of the component. Here, the 50 μm layer (green dashed line in Figure 7) determines the critical behavior for R = 0, while the surface layer 0 μm (red dashed line in Figure 8) is critical for R = 0.5.
Notice that SN curves for layers between 50 μm and 750 μm depth exhibit very high fatigue lives, due to very high compressive residual stresses acting therein, and fall outside the visible range of Figure 7 and Figure 8.
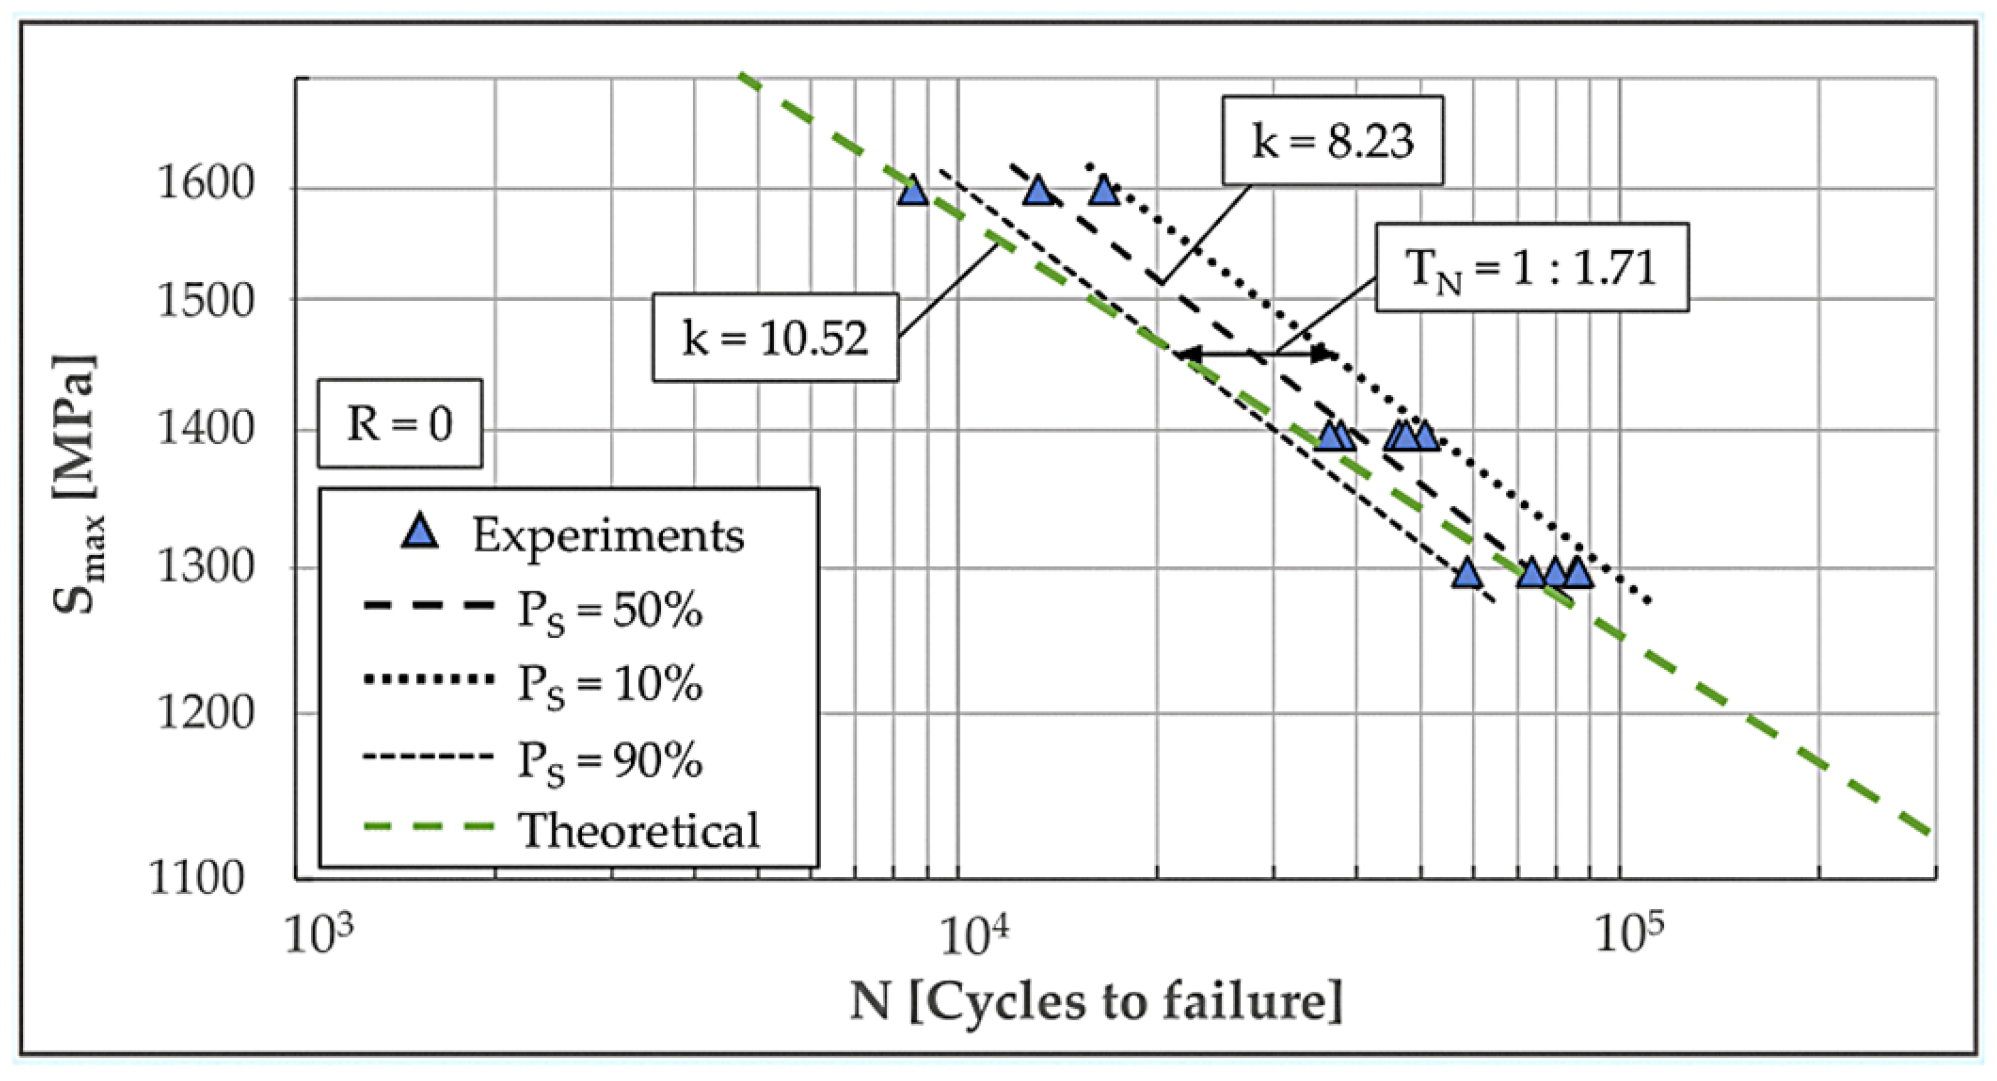
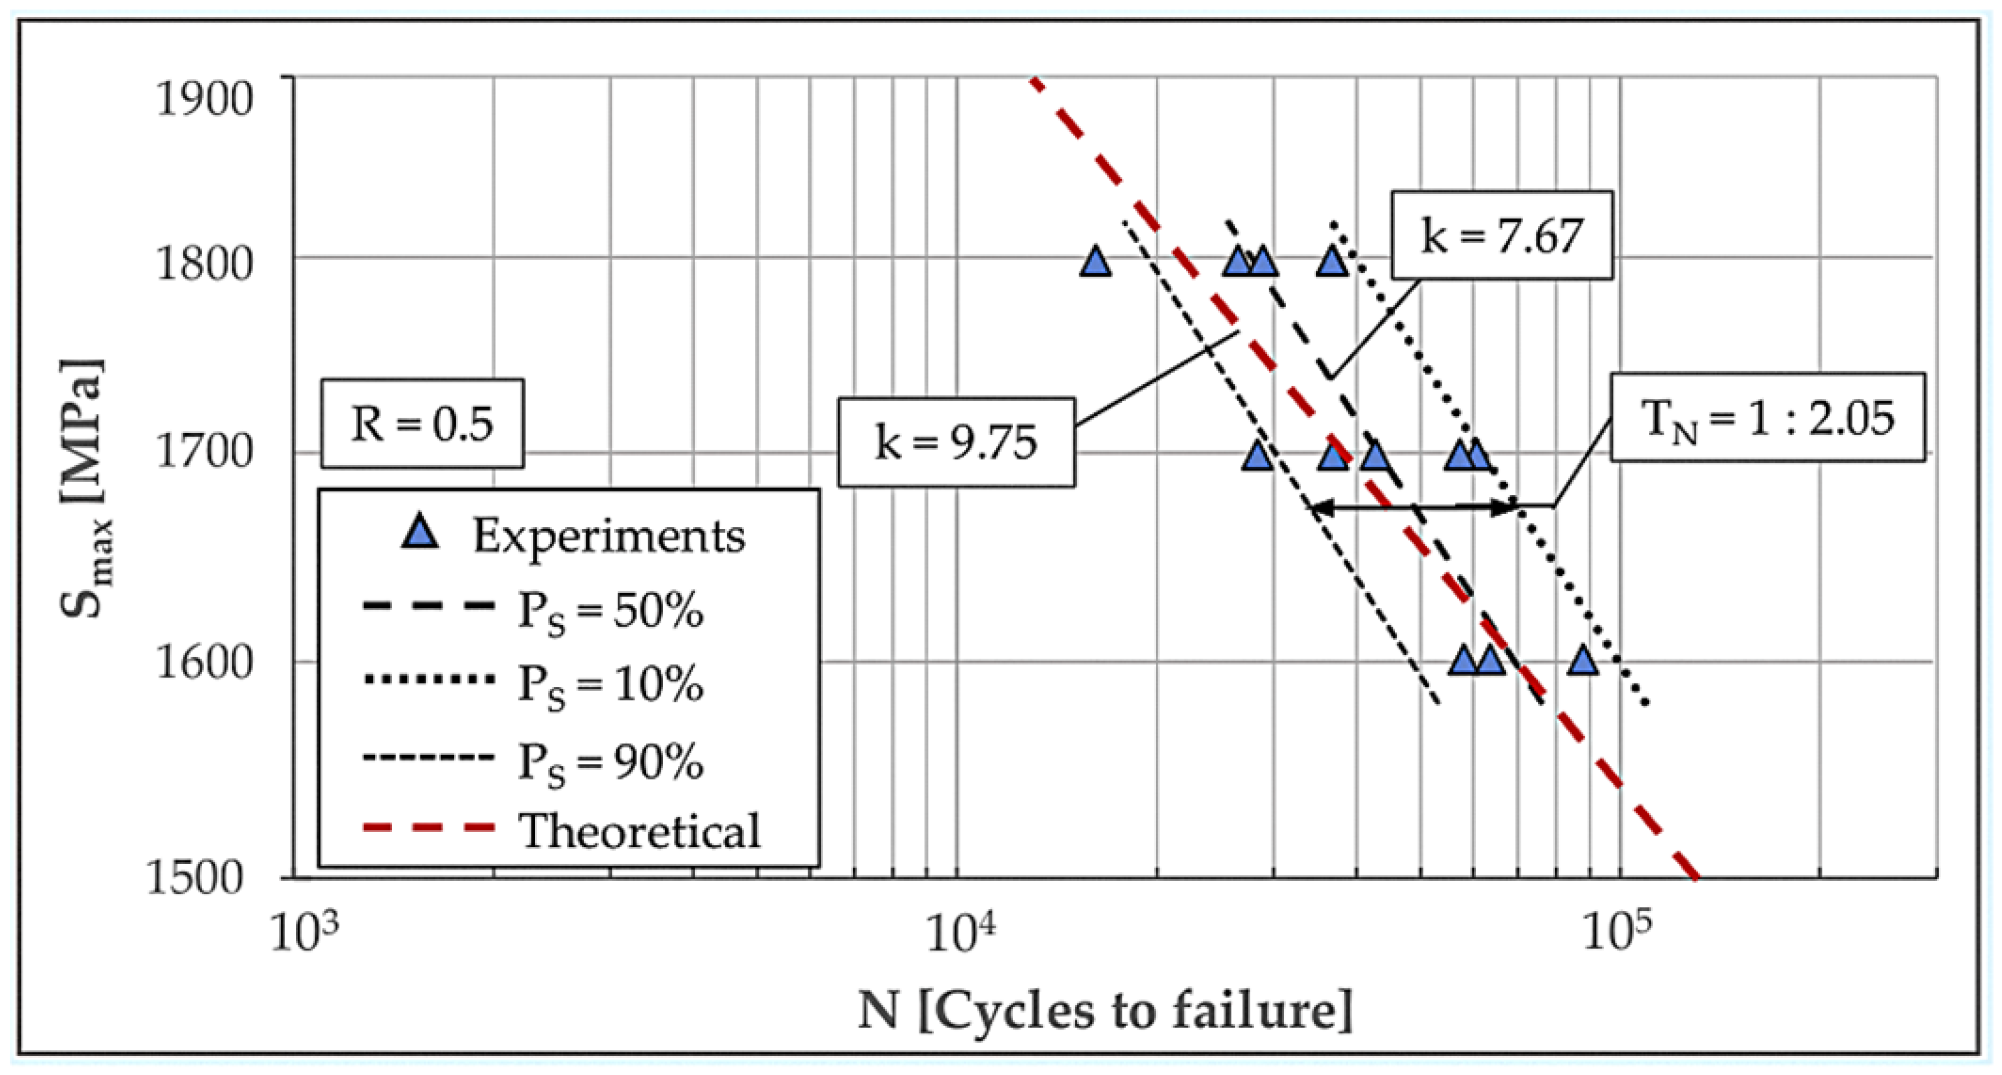
Figure 9 and Figure 10 compare predicted SN curves with corresponding experimental fatigue lives of examined monoleaves at two load ratios, R = 0 and R = 0.5, respectively. For each load ratio, a total of 13 specimens were tested across three distinct stress levels, with no run-outs achieved at the maximum cycle limit (N = 106 cycles). For R = 0, S m a x levels were 1300 MPa (5 specimens), 1400 MPa (5 specimens), and 1600 MPa (3 specimens). For R = 0.5, S m a x levels were 1600 MPa (3 specimens), 1700 MPa (5 specimens), and 1800 MPa (5 specimens). Both figures display the resulting SN curves, including the determined mean fatigue life (50% probability of survival, Ps = 50%) as well as the curves for Ps = 10% and Ps = 90% survival probabilities. The scatters T N = 1 : N P S = 10 % / N P S = 90 % for R = 0 and R = 0.5 were determined to be T N = 1:1.71 and T N = 1:2.05, respectively.
The model’s predictive accuracy was quantitatively assessed using the RMS Log-Error (ERMS). The resulting ERMS values of 0.11 for R = 0 and 0.07 for R = 0.5 demonstrate adequate accuracy of prediction.

5. Conclusions

This study presents a fatigue life calculation procedure to evaluate surface-treated components with depth-varying mechanical properties. By combining surface conditions (e.g., roughness) with subsurface profiles like residual stress and microhardness, the method provides sufficient calculation accuracy, minimizing the need for extensive prototype testing. The key points of this work are summarized below:
  • The fatigue assessment based on discrete material depth layers demonstrates good agreement with experimental fatigue data, providing first validation of the approach, despite the fact that stress relaxation during cyclic loading is ignored.
  • Incorporating depth-graded mechanical properties for heat treated and shot-peened components as in the present case study leads to accurate fatigue life predictions based on measurable parameters.
  • This procedure supports early-stage fatigue design, applicable in early stages of development, when components are not yet available.

Author Contributions

Conceptualization, P.A.; Methodology, P.A.; Validation, P.A., C.G. and E.G.; formal analysis, P.A. and C.G.; Investigation, C.G., E.G. and P.A.; Resources, G.S.; Data Curation, G.S.; Writing—Original Draft Preparation, P.A.; Writing—Review and Editing, G.S.; Visualization, P.A., C.G. and E.G.; Supervision, C.G. and G.S.; Project Administration, G.S. All authors have read and agreed to the published version of the manuscript.

Funding

This research has received funding from the Research Executive Agency (REA) under grant agreement No. 799785.

Institutional Review Board Statement

Not applicable.

Informed Consent Statement

Not applicable.

Data Availability Statement

The raw data supporting the conclusions of this article will be made available by the authors on request.

Acknowledgments

BETA CAE Systems is gratefully acknowledged for the provision of ANSA v23.1.2 and META v23.1.2 software. The Center for Interdisciplinary Research and Innovation (CIRI AUTH—ΚΕDΕΚ, DRAM Group) is gratefully acknowledged.

Conflicts of Interest

The authors declare no conflicts of interest.

References

  1. Malikoutsakis, M.; Gakias, C.; Makris, I.; Kinzel, P.; Müller, E.; Pappa, M.; Michailidis, N.; Savaidis, G. On the Effects of Heat and Surface Treatment on the Fatigue Performance of High-Strength Leaf Springs. MATEC Web Conf. 2021, 349, 04007. [Google Scholar] [CrossRef]
  2. Fragoudakis, R.; Karditsas, S.; Savaidis, G.; Michailidis, N. The Effect of Heat and Surface Treatment on the Fatigue Behaviour of 56SiCr7 Spring Steel. Procedia Eng. 2014, 74, 309–312. [Google Scholar] [CrossRef]
  3. Farrahi, G.H.; Lebrijn, J.L.; Couratin, D. Effect of Shot Peening on Residual Stress and Fatigue Life of a Spring Steel. Fatigue Fract. Eng. Mat. Struct. 1995, 18, 211–220. [Google Scholar] [CrossRef]
  4. Analytical Strength Assessment of Components in Mechanical Engineering: FKM-Guideline. In FKM-Guideline, 5th ed.; Forschungskuratorium, M., Ed.; VDMA Verl: Frankfurt am Main, Germany, 2003; ISBN 978-3-8163-0425-8. [Google Scholar]
  5. Kloos, K.H.; Velten, E. Berechnung der Dauerschwingfestigkeit von plasmanitrierten bauteilähnlichen Proben unter Berücksichtigung des Härte-und Eigenspannungsverlaufs. Konstruktion 1984, 36, 181–188. [Google Scholar]
  6. Hassani-Gangaraj, S.M.; Moridi, A.; Guagliano, M.; Ghidini, A.; Boniardi, M. The Effect of Nitriding, Severe Shot Peening and Their Combination on the Fatigue Behavior and Micro-Structure of a Low-Alloy Steel. Int. J. Fatigue 2014, 62, 67–76. [Google Scholar] [CrossRef]
  7. De La Cruz, P.; Odén, M.; Ericsson, T. Effect of Laser Hardening on the Fatigue Strength and Fracture of a B–Mn Steel. Int. J. Fatigue 1998, 20, 389–398. [Google Scholar] [CrossRef]
  8. DIN EN ISO 4288:1998; Geometrical Product Specifications (GPS)—Surface Texture: Profile Method—Rules and Procedures for the Assessment of Surface Texture. Beuth Verlag: Berlin, Germany, 1998.
  9. ISO 6507-1:2018; Metallic Materials—Vickers Hardness Test—Part 1: Test Method. International Organization for Standardization: Geneva, Switzerland, 2018.
  10. ISO 18265:2013(E); Metallic Materials—Conversion of Hardness Values. International Organization for Standardization: Geneva, Switzerland, 2013.
  11. Dalaei, K.; Karlsson, B.; Svensson, L.-E. Stability of Shot Peening Induced Residual Stresses and Their Influence on Fatigue Lifetime. Mater. Sci. Eng. A 2011, 528, 1008–1015. [Google Scholar] [CrossRef]
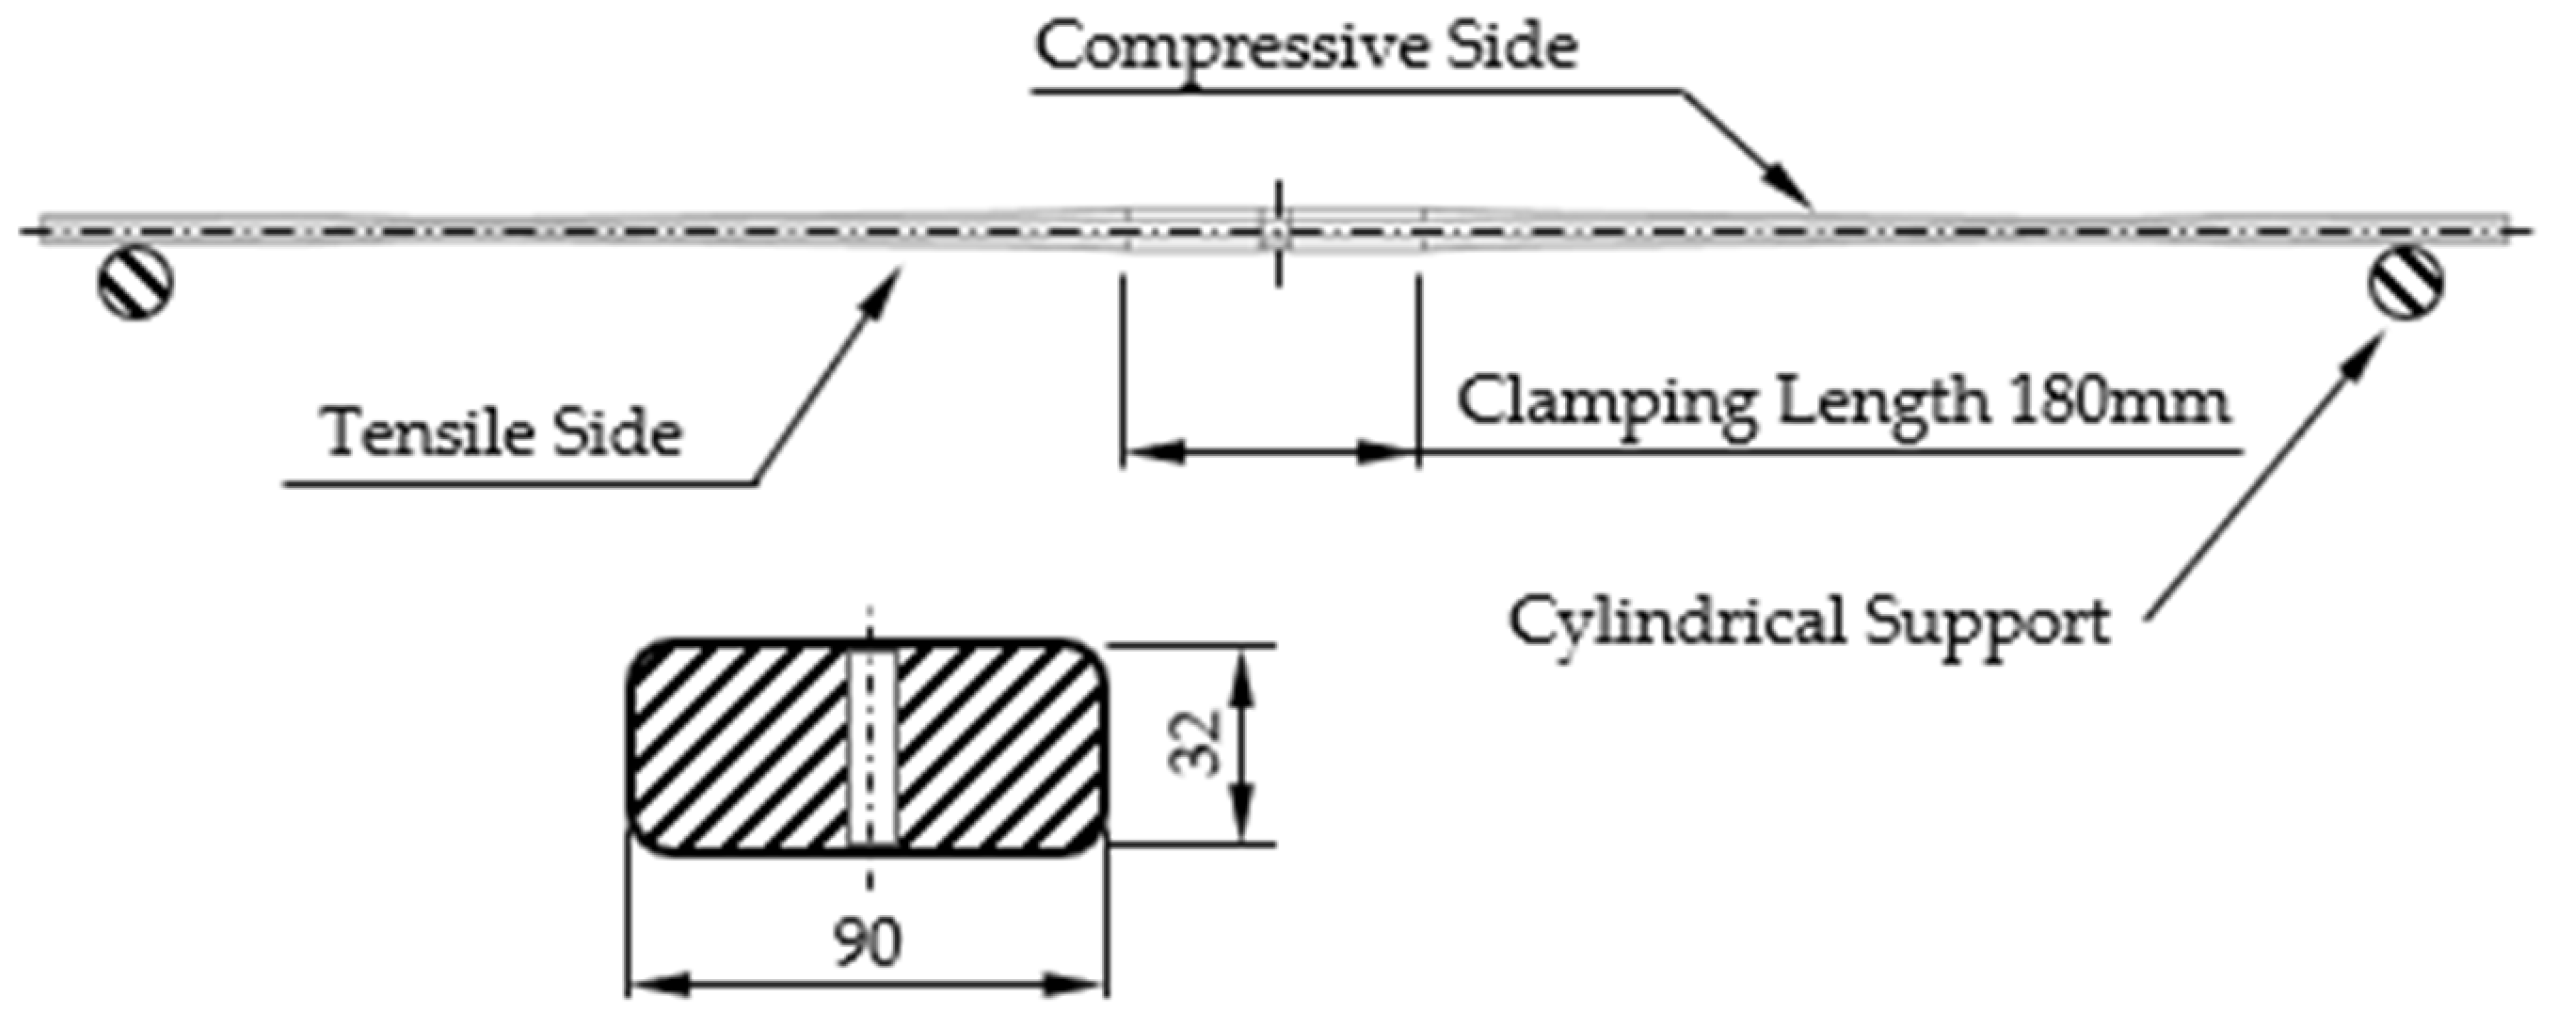
Figure 1. Drawing and basic dimensions of the examined monoleaf.
Engproc 119 00025 g001
Figure 2. Stress distribution and locations of maximum stress.
Engproc 119 00025 g002
Figure 3. Local properties: (a) Microhardness profile; (b) Residual stress profile.
Engproc 119 00025 g003
Figure 4. Scheme of residual, operational and true stress profile across the material depth.
Engproc 119 00025 g004
Figure 5. True stress profile at the surface and subsurface region of the point of interest, as a representative example for R = 0 and S m a x = 1400 MPa.
Engproc 119 00025 g005
Figure 6. Calculated σN curve and fatigue life of the surface layer.
Engproc 119 00025 g006
Figure 7. Fatigue lives of various depth layers, for operational S m a x and operational R = 0.
Engproc 119 00025 g007
Figure 8. Fatigue lives of various depth layers, for operational S m a x and operational R = 0.5.
Engproc 119 00025 g008
Figure 9. Comparison between theoretical S-N curve and experimental data for load ratio R = 0.
Engproc 119 00025 g009
Figure 10. Comparison between theoretical S-N curve and experimental data for load ratio R = 0.5.
Engproc 119 00025 g010
Table 1. Material specification of the 51CrV4 batch before and after treatment.
PropertyBefore HTT and SSPAfter HTT and SSP
HRC hardness31.848.2
Ultimate tensile strength Rm [MPa]9991644
Disclaimer/Publisher’s Note: The statements, opinions and data contained in all publications are solely those of the individual author(s) and contributor(s) and not of MDPI and/or the editor(s). MDPI and/or the editor(s) disclaim responsibility for any injury to people or property resulting from any ideas, methods, instructions or products referred to in the content.