1. Introduction
With the introduction of modern Industry 4.0 and smart manufacturing, integrating traditional machining with intelligent monitoring systems has become a critical task to maintain a competitive edge in the sphere of precision manufacturing. By transforming the workflow in manufacturing plants into a digital process, the digitalization revolution requires real-time monitoring capabilities that can find the compromise between the old equipment and new smart manufacturing technologies, especially the lathe machining processes in which cutting forces have a direct effect on product quality, life of tools, and process efficiency [
1,
2]. Recent research shows that cutting force measurement is the most direct and effective way of monitoring the machining condition, enabling adaptive control systems to automatically optimize the cutting parameters and achieve higher productivity and quality [
3,
4]. The technological convergence is necessitated by the fact that the introduction of components of intelligent systems needs to incorporate buried pockets and small holes that are supplied by traditional manufacturing processes, which cannot be overlooked, since they are reliable and flexible, such as lathe machining. Still, they demand well-developed sensing capabilities to grasp the entire dynamics of cutting interplays. Thus, the development of sophisticated force measurement systems is one of the essential conditions for making intelligent manufacturing a reality in traditional machining processes.
Cutting force measurement in lathe work has become a technological cornerstone in the area of process optimization for precision manufacturing, in monitoring the condition of the cutting tool and its related quality assurance. Cutting forces are always crucial as they are strongly connected with tool wear and can directly influence the turning quality. Force-based monitoring systems can identify the breakages of tools, excessive wear, and other problems associated with the tools, and recognize them before they lead to defects of the workpiece and its deterioration in quality [
5,
6]. In addition, specific frequency signatures in the cutting force signals relate to certain machining conditions; thus, they can be considered practically invaluable in terms of process diagnostics, and manufacturers can adapt cutting parameters to particular process needs [
7,
8]. The link between the forces involved in cutting and the machining process makes the force measurement more than a supervisory method. Still, it is a requirement in more sophisticated manufacturing, and its performance depends on instantaneous feedback about the process. Consequently, the debate on accurate cutting force measurement has since struck home to achieve the accuracy and confidence required by modern manufacturing needs and uses.
Although the force-sensing technology has been improving significantly, the current designs of 3-axis force sensors integrate inherent weaknesses that jeopardize their effectiveness in applications such as lathe machining. The existing strain gauge-based dynamometers have been found to have continuing cross-sensitivity problems with cross-interference errors of 0.14 and 4.42 percent per axis, due to the accuracy of these traditionally used dynamometers in multi-directional force measurements [
9,
10]. Also, prior designs have a critical trade-off between sensitivity and structural rigidity, where most practical dynamometer implementations alter conventional tool holders by compromising structural rigidity to achieve better sensitivity, which in turn compromises the precision of machining [
11]. These concerns are not just technical annoyances but a strictly practical limitation on the effective use of force sensors in highly accurate machining operations, where structural integrity and precision measurements are fundamental concerns. In this way, current sensor technologies are not sufficiently directed at both the high-sensitivity and structural integrity requirements needed to make rational lathe machining applications.
Also, the problem of mechanical decoupling of multi-axis force measurement remains unresolved in the current sensor architecture. Although octagonal ring structures are the most developed method to ensure 3-axis force sensing, with cross-sensitivity errors as low as 0.87 percent under optimized conditions [
12], the concept of multi-directional loading cannot reasonably avoid coupling errors because the elastic strain will always interact with other types of forces occurring whilst applying a load. Other structural designs, such as the use of crossbeam layouts, have even greater coupling errors, with specific designs having a dimensional interference of 3.56 percent [
13]. The resultant constraint in the uncertainty of measurements of the multi-axis forces will decrease the accuracy and reliability of force measurements at high frequencies, particularly where the force variables need to be separated with a high level of accuracy in terms of process control and monitoring routines, where complete accuracy in process control and monitoring algorithms is essential. As a result, the mechanical decoupling problem is one of the inherent constraints that is not yet satisfactorily addressed by existing sensor designs.
This paper aims to counter these inherent weaknesses by presenting the notion and simulation of a self-decoupled 3-axis force sensor with premium strain gauge technology and a Timoshenko beam theory, explicitly designed to measure cutting forces and cutting vibrations of the lathe process. The sensor design is proposed based on a symmetric elastic body design, which is made of four identical aluminum alloy 7075-T6 elastic beams with an inner square-shaped stable platform with a design factor of safety of five to maintain all the mechanical properties and for the linearity of strain over the whole working range of +300 N/−300 N on each axis. The mechanical framework applies Timoshenko beam theory to present better sensitivity and reduce the crosstalk between the measurement axes. This new concept explicitly overcomes the significant drawbacks of the current designs. This approach—combining superior beam theory with shape-optimized geometry—offers both effective mechanical decoupling and high performance, which are essential in precision machining. Accordingly, the study proposes a system-wide solution that addresses the bedeviling restrictions of the existing force sensor technologies with a high degree of structural design and model-based optimization.
2. Structural Design
2.1. Specification of the Sensor
The presented three-axis force sensor measures each translation axis in line with the X, Y, and Z directions with low noise and minimal cross-involvement. The physical design of the sensor is based on the requirements outlined in the specifications summarized in
Table 1, which determine the size of the sensor and the required force range of ±300 N per axis. As depicted in
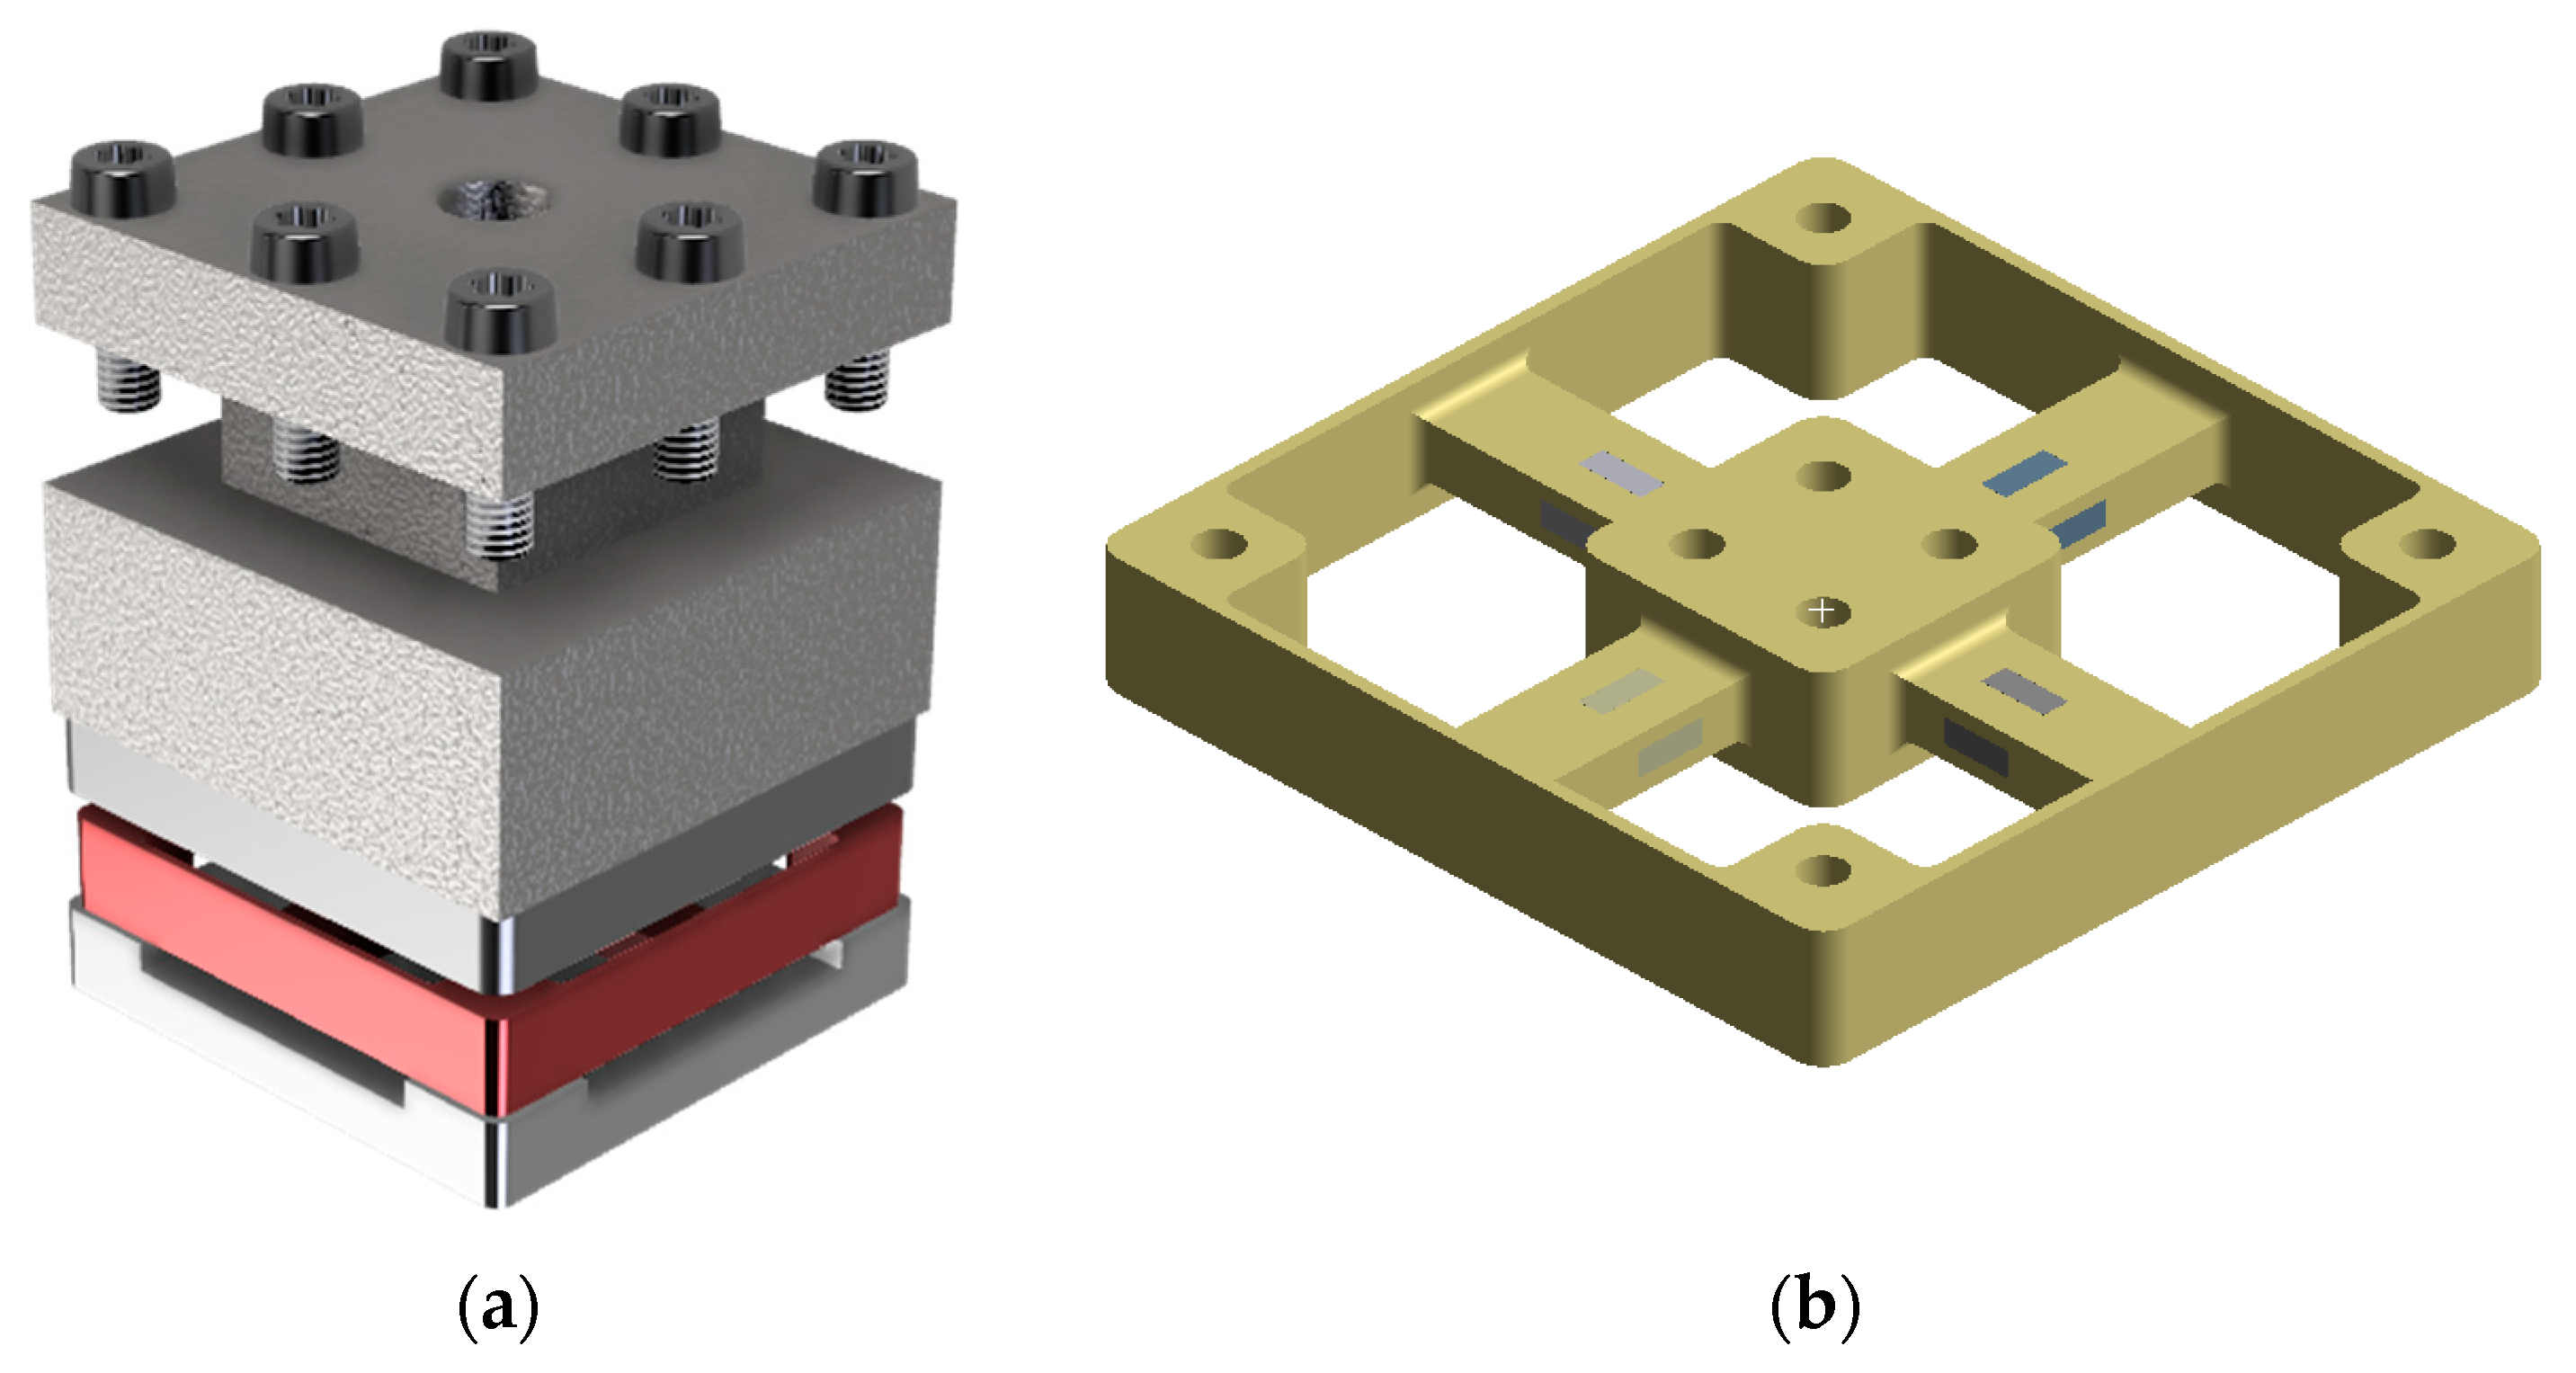
Figure 1a, the sensor assembly consists of three main parts: the upper flange, the lower flange, and the central elastic body (highlighted in red). The entire assembly is designed to fit on the lower surface of a standard lathe machine tool holder and to monitor forces during machining activity.
The elastic body is the main working component of the sensor, as shown in
Figure 1b. It uses four identical elastic beams arranged symmetrically and connected by a square-shaped central platform. The individual beams, which contact the surrounding structure, are bound together by elastic boundary segments. When external forces are applied to the beams under carefully controlled conditions, they deform. The square platform is welded to the upper flange and subjected to operational forces and moments, which are transmitted to the elastic beams with the help of a tool bolted to the upper flange. This design can be used to predict the transfer of mechanical loads in the sensing areas while avoiding unwanted structural resonances or compliance issues.
The sensor is made from aluminum alloy 7075-T6, chosen for its excellent strength-to-weight ratio and ease of machining to meet the requirements of reliability and structural integrity when these sensors are designed for repetitive loading. The Young’s modulus of this material is 71.7 GPa, and it has a tensile yield strength of 503 MPa, making it suitable for use in precision instrumentation. A design factor of safety (FoS) of 5 was used during design and optimization to ensure that each of the structure’s members remains within the elastic range throughout operation. This guarantees that the sensor provides consistent mechanical measurement—linear strain—across the entire working range.
The design layout emphasizes symmetry and compactness to achieve mechanical decoupling of the axes and minimize cross-sensitivity. This mechanical approach enables precise and isolated measurement of all translation forces. It serves as the foundation for the subsequent optimization and validation processes, detailed in later sections.
2.2. Structural Design Optimization
The elastic beam structure was optimized for maximizing strain sensitivity while maintaining structural safety, considering the mechanical and measuring constraints of the sensor. This optimization is performed using the beam theory of Timoshenko that takes into consideration the bending and shear deformation, and is very applicable to short and thick beam systems, as in this design [
14,
15]. The equations that govern, i.e., Equations (1)–(4), relate the applied loads and moments to the deformation at specific gage points and depend on geometrical and material properties. MATLAB 2024b was used to execute a numerical optimization of the equations using the Sequential Quadratic Programming (SQP).
In this work, the total design strain of interest rested on all 500 microstrain design strains on all sensing axes (X, Y, Z) at a design FoS of 5. This would ensure that the sensor structure would never enter the plastic region of the full-scale load of 300 N, and the response would not be non-linear. The six decision variables were the length, width, and height of the elastic beam, the dimensions of the square supporting platform, and the elastic edge. The strain equations were thus taken as constraints to have the sensitivity in the desired range, as well as the geometric fit of the form of the entire sensor scheme.
According to the information presented in
Table 2, the optimized design informs about specific dimensional differences in significant parameters such as length of the elastic beam (which was reduced by an amount of 2 mm, i.e., to 18.1 mm) and width of the elastic beam (which was reduced by an amount of 0.85 mm, i.e., to 7.8 mm) that can facilitate the strain output to be improved without the strength facing any reduction. The boundary and dimensions of the square platform were also adjusted slightly to be elastic but structurally stable. This optimized setup forms a foundation through which the validation stage will be carried out, along with analysis of measurement accuracy and resistance to six-axis loading crosstalk.
3. Simulation Results
The performance of the finalized three-axis force sensor design was analyzed using the numerical simulations of the system, following the structural optimization process mentioned in the previous section. This test was anticipated to determine that sensitivity is not just accomplished with the optimized geometry across each of the three paths of the X axis, the Y axis, and the Z axis, but in other directions through the desirable minimization of the cross-axis interferences to off-axis force and moment. It was also aimed at coming up with not only the mechanical response but also the strain output characteristic of the sensor structure subjected to different loading conditions by carrying out some FEAs of the sensor structure. These kinds of tests can bring to light distributions of stresses, the effectiveness of strain gauge locations, and the interaction between the scales being measured, which are the most significant parameters in establishing the functional reliability of a multi-axis force sensor.
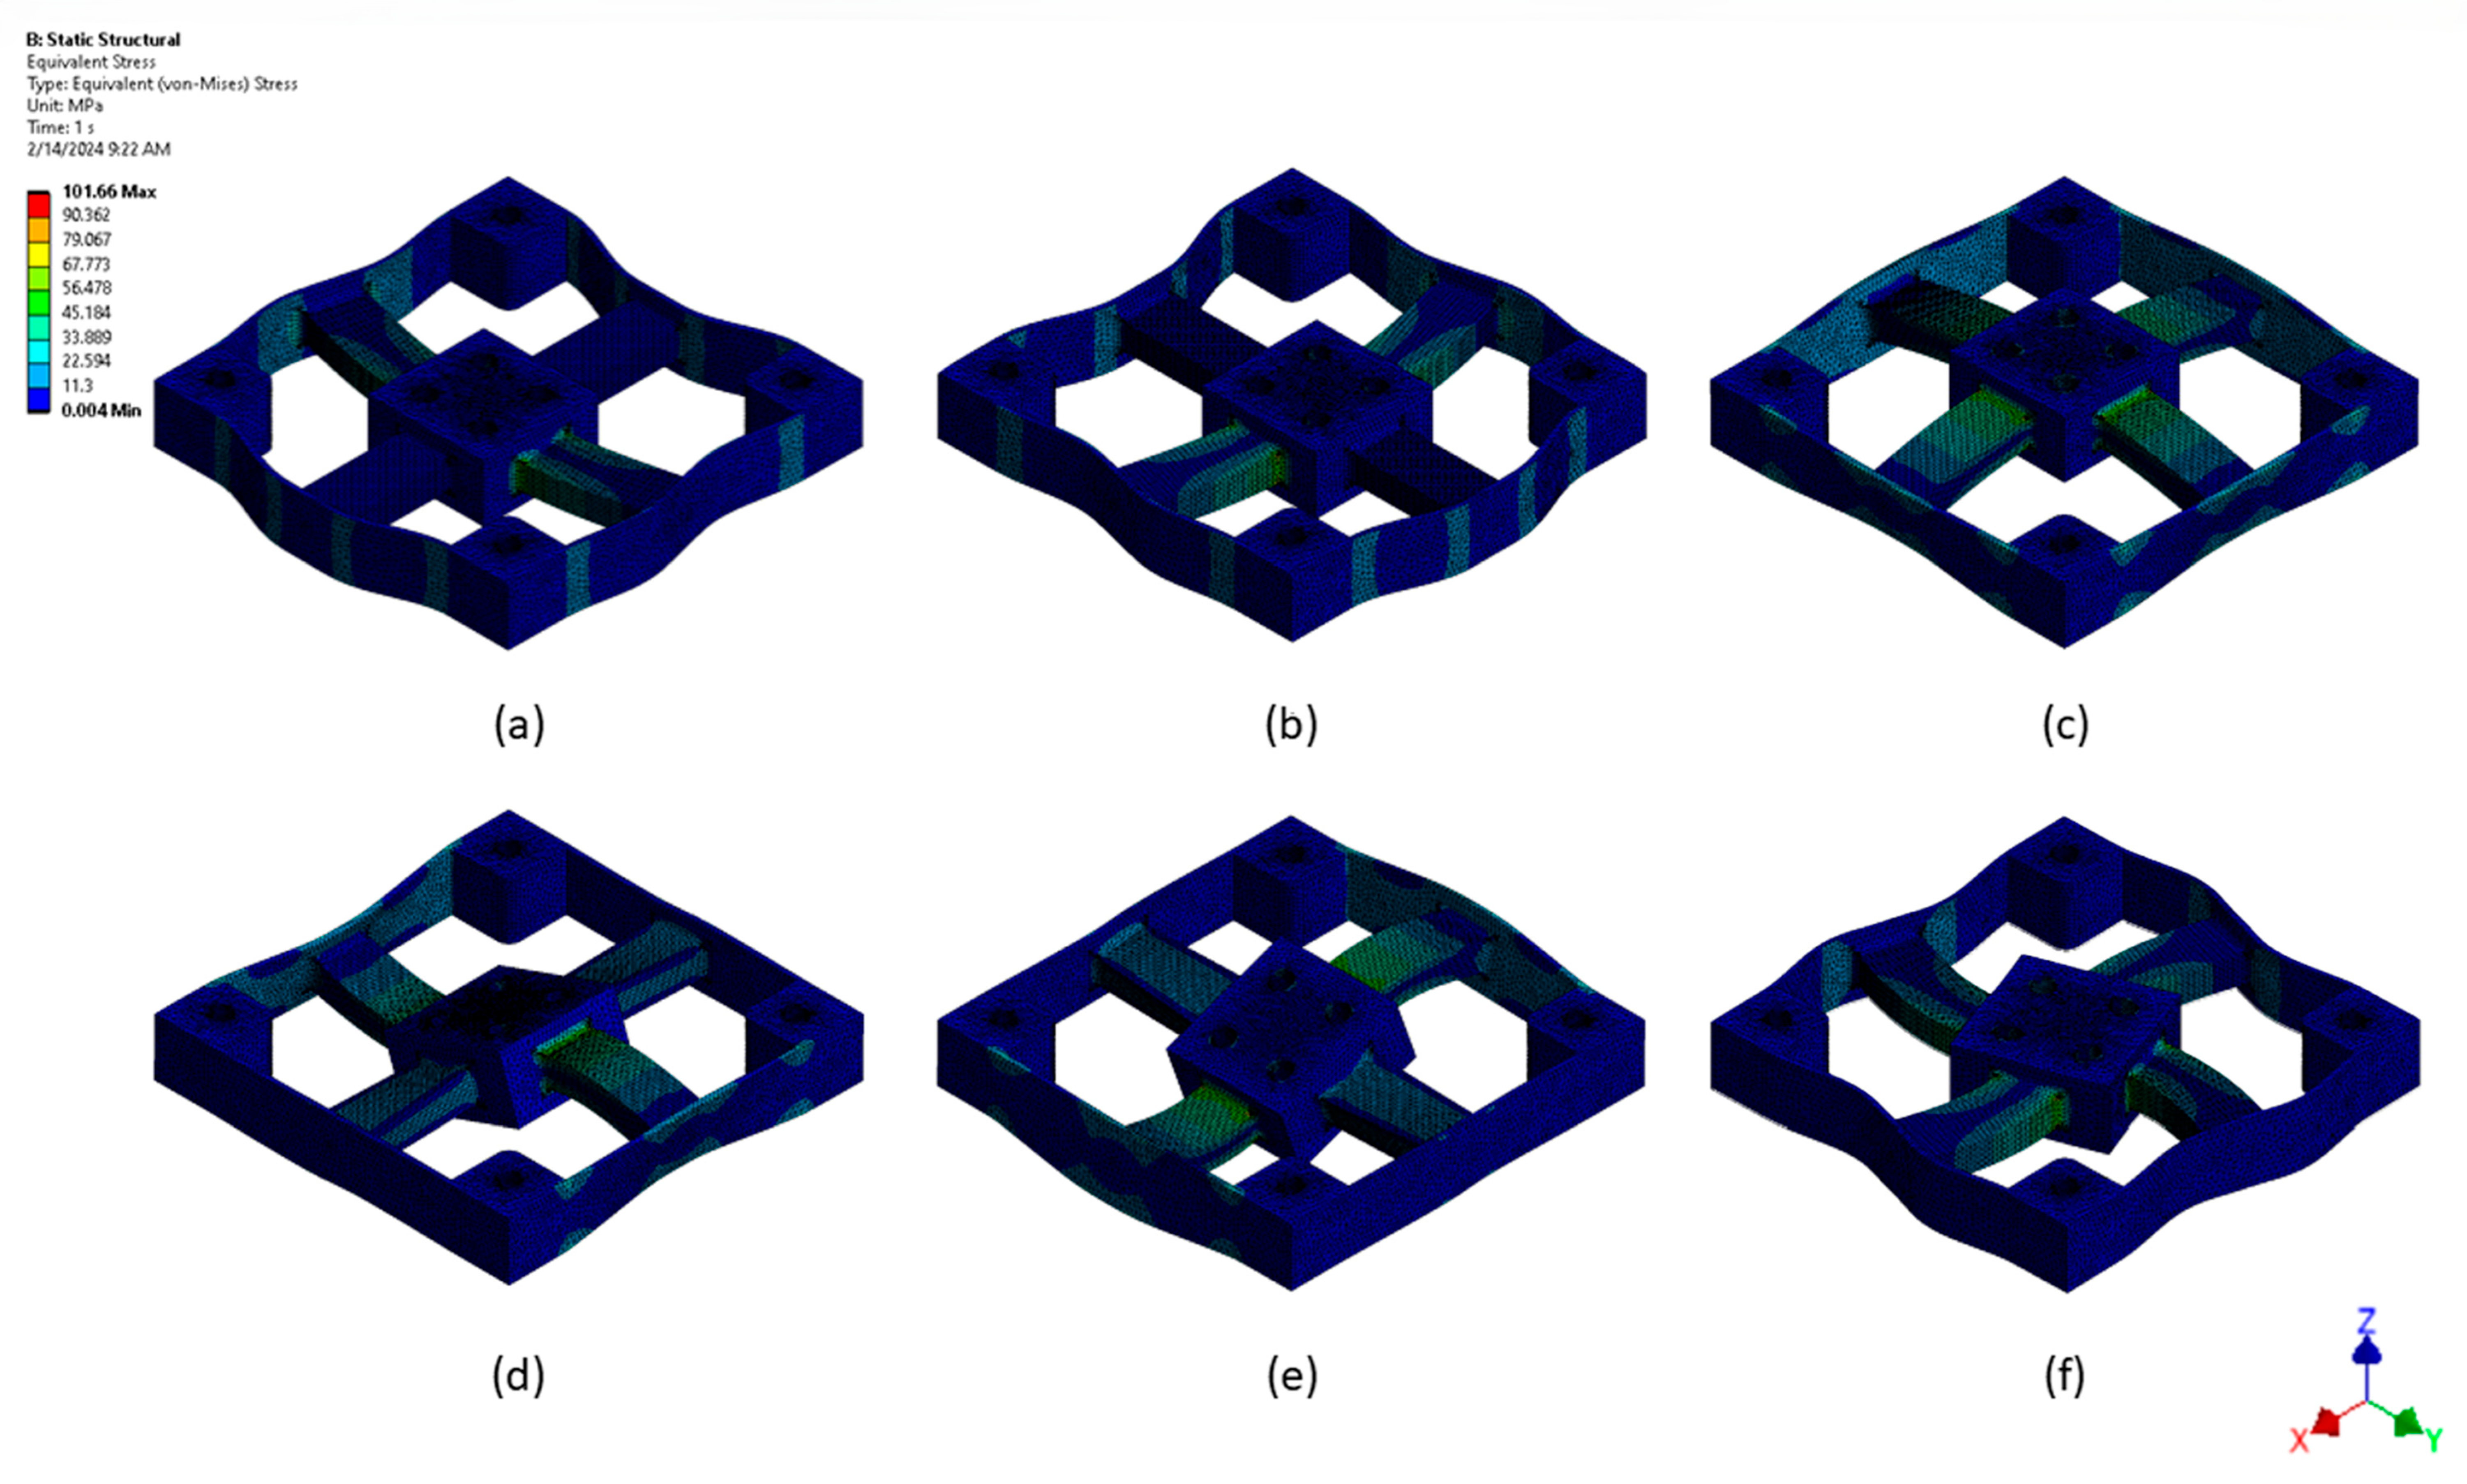
The given design of the three-axis force sensor was simulated and checked by loading in six pure directions, i.e., Translational force (
), Translational moment (
), and external force (
) analysis through the FEA.
Figure 2 represents a summary of each of the subfigures. It depicts the identical von Mises stress distribution being created with one of the seven pure loadings. These simulations were also performed to not only examine the sensitivity of the sensor along the planned directions of forces (X, Y, Z), but also its capability in resisting the undesired deformations on the sensor due to moments. Appropriate directional sensitivity of the structure has been confirmed, as the results indicate distinct stress localization patterns according to the intended axis of loading.
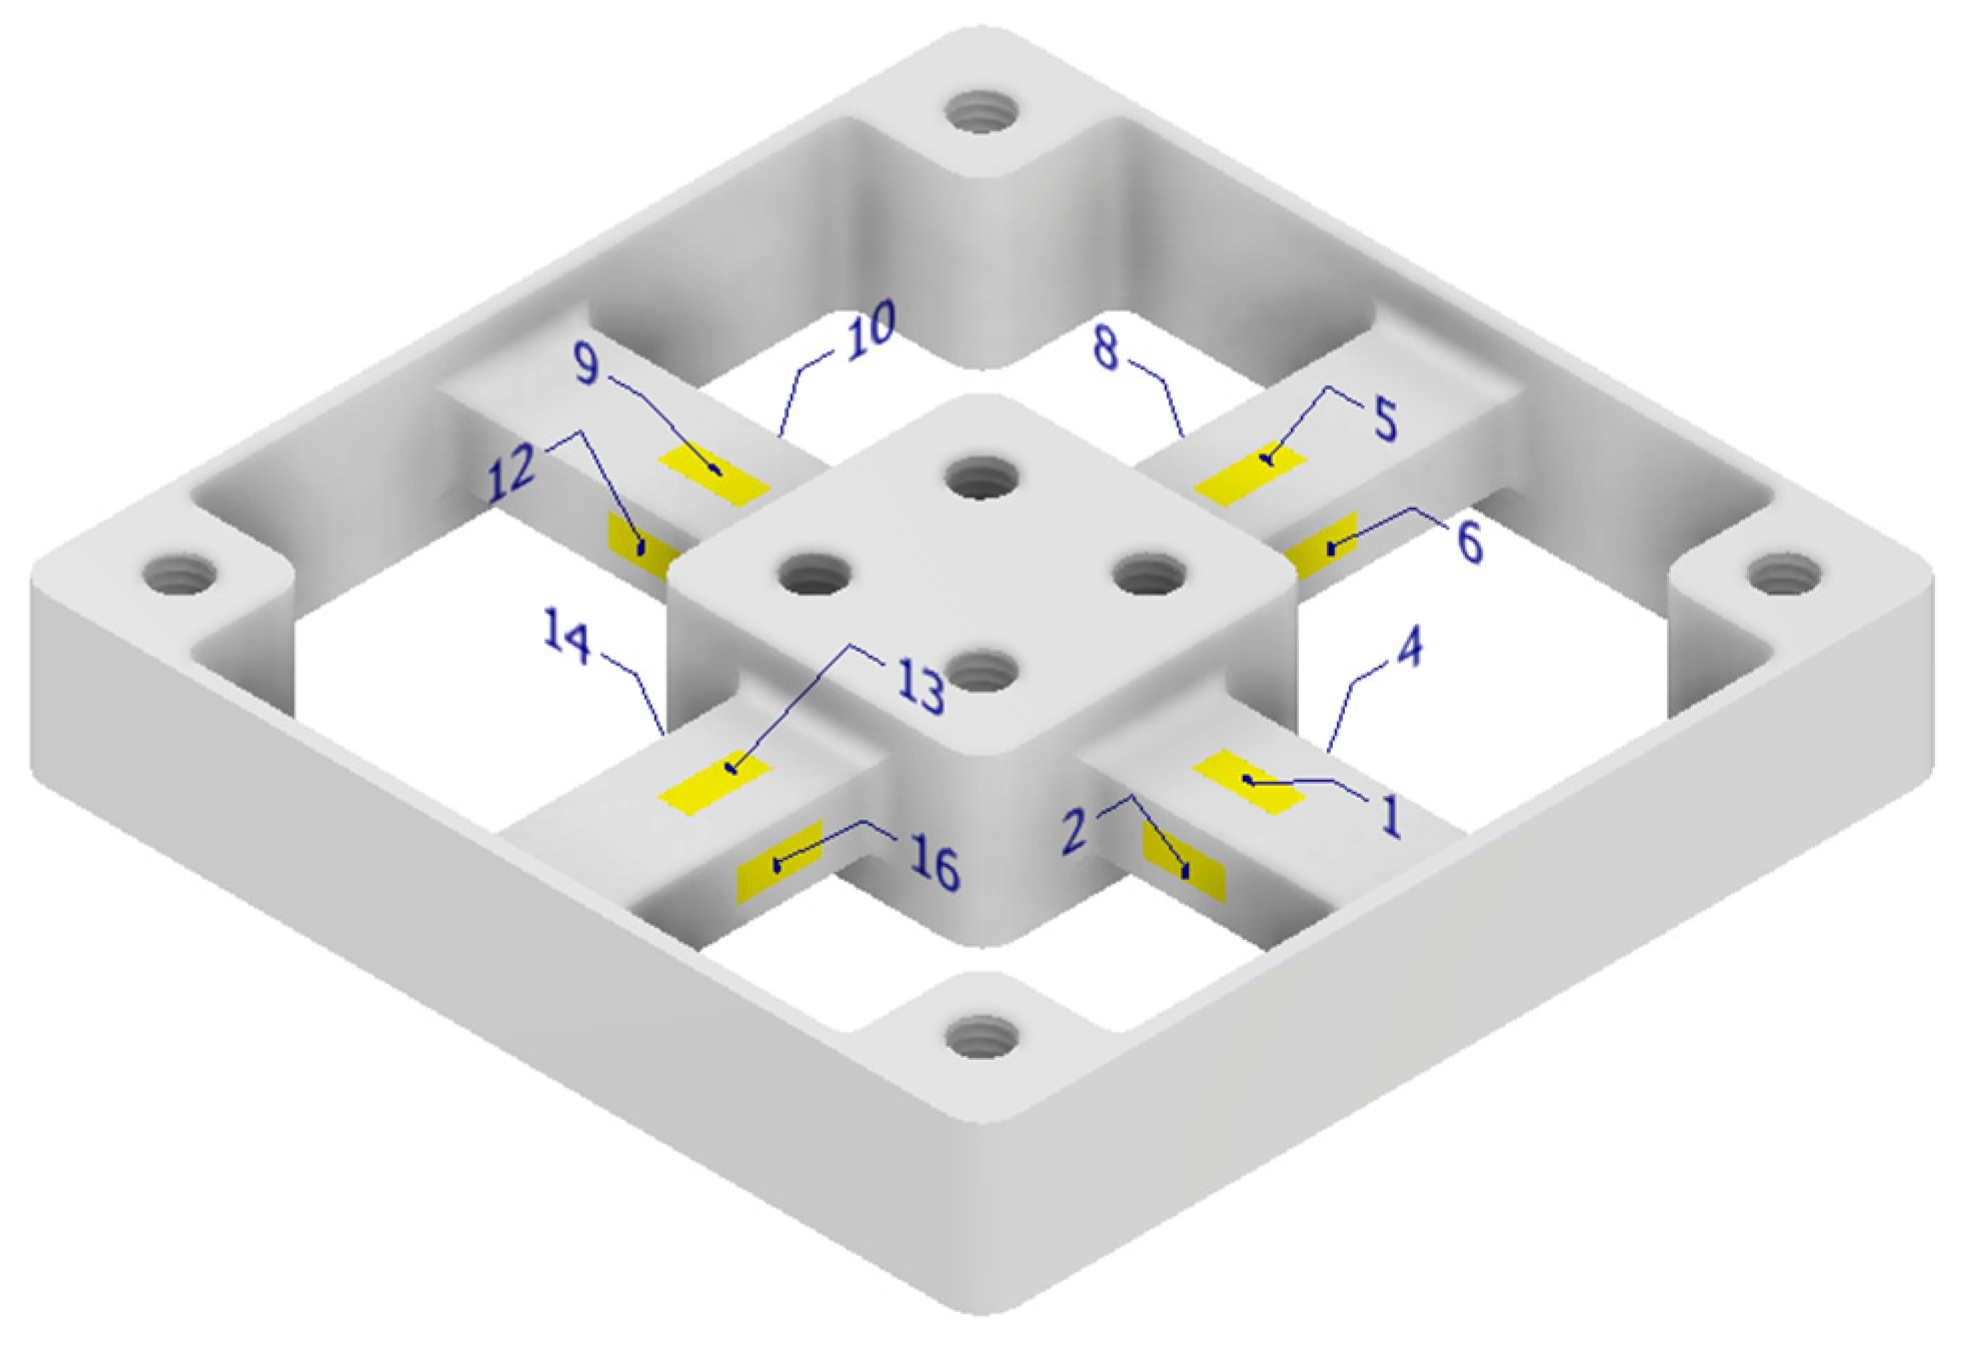
To obtain enough data to measure the deformation of the structure under sufficient multi-axis loading, a special strain gage layout was employed, and is shown in
Figure 3. Sixteen strain gages sensed the strain in X, Y, and Z directions as their inner surfaces were covered appropriately on the square frame. Such a system is motivated by prior art [
14], though it has a new layout of gages and a signal combination scheme that is enhanced compared to the above expression, in Equations (5)–(7). Components of the force in the x, y, and z directions can be calculated with the difference readings of strain gages (paired strain gage). In particular, the gages 6, 8, 16, and 14 are used to calculate the X-direction force, but to reduce directional sensitivity and to decrease crosstalk, the following different pairings are applied to the calculation of Y-direction and Z-direction forces: 6 and 8, 16 and 8, 6 and 14, 16 and 14.
The equations of strain gages were formulated by structural symmetry and anticipated loading patterns, and the weighting factors were taken care of so that contributions made by every group of sensors are balanced. The contributions of the addition of differences are normalized out by the incorporation of scale factors 1/4 and 1/8 in the proofs to make the adding of differences coefficients relative properties in the two directions. This pattern and processing algorithm lead to a sound multi-axis force estimator that would serve as an enabling tool to build a miniaturized, low-cost, and precise sensor system that could be utilized in structural or robotics.
Table 3 shows the respective strain outputs in simulated strains under the axes or the measured percentages of crosstalk, as well as the strain outputs in comparison to microstrain (µε). It also contains exceptional inter-axes decoupling and the lowest crosstalk that we measured at −0.31 percent at pure
moment. The exclusively determined effects of pure translational forces on the strain output are provided by the fact that it follows the wanted axis (e.g., 421 µε for
, 423 µε for
, and 496 µε for
). Still, the strands have almost no influence on the other axes. This shows that the design is not only headed in the right direction but also free from interference caused by moments. The proposed system provides a more coherent image of the properties of isolation and a much more durable directional across measurement versatility compared to the existing three-axis force sensors, for which crosstalk under combined loading conditions requires the order of 1 to 2 percent.
4. Conclusions
The design, optimization, and validation through simulation of a new three-axis force sensor designed for use on a lathe machine are reported in the work. The sensor was made based on strain gauge technology and Timoshenko beam theory, where a small, symmetrical elastic system was used to independently measure the force on the X, Y, and Z axes with minimal crosstalk. High direction accuracy and off-axis induced moment error robustness of the sensor are also verified by the finite element analysis, with a maximum interference error of only 0.31 percent. The strain response exhibits pure force loading conditions with effective decoupling in the strain outputs of the structure, which validates the sound work of optimization of the geometry.
Notably, such a sensor is made of commonly used aluminum 7075-T6 and compatible with common lathe toolholders, being very convenient and moderate in cost to small- and medium-sized enterprises. Such companies do not have the financial capacity to invest in sophisticated monitoring systems. Yet, they want to embrace intelligent manufacturing approaches like real-time cutting force control and process diagnostics. The proposed sensor would fill this gap because it is a low-cost and reliable sensor that will help integrate the old machine tools within the current digital manufacturing. Future prototyping will involve physical prototyping that is calibrated experimentally and even put into live machining to understand its performance in practice.


