Proceeding Paper

Statistical Analysis of Burr Width and Height in Conventional Speed Micro-Milling of Titanium Alloy (Ti-6Al-4V) by Varying Cutting Parameters Under Different Lubrication Methods: Dry, MQL and Wet †

by
Gulfam Ul Rehman
1,
Muhammad Rizwan ul Haq
1,*,
Manzar Masud
2,
Syed Husain Imran Jaffery
3,
Muhammad Salman Khan
1 and
Shahid Ikramullah Butt
1
1
Department of Design and Manufacturing Engineering (DME), School of Mechanical and Manufacturing Engineering (SMME), National University of Sciences and Technology (NUST), Sector H-12, Islamabad 44000, Pakistan
2
Department of Mechanical Engineering, Capital University of Science and Technology, Islamabad 46000, Pakistan
3
School of Engineering and the Built Environment, Faculty of Computing, Engineering and the Built Environment, Birmingham City University, Birmingham B4 7XG, UK
*
Author to whom correspondence should be addressed.
Presented at the 5th International Conference on Advances in Mechanical Engineering (ICAME-25), Islamabad, Pakistan, 26 August 2025.
Eng. Proc. 2025, 111(1), 11; https://doi.org/10.3390/engproc2025111011
Published: 16 October 2025

Abstract

In this research, micro-milling of Ti-6Al-4V has been carried out in the conventional machining range. The influence of key machining parameters, including feed rate, cutting speed, depth of cut, and cooling conditions, was statistically analyzed in relation to burr width and height on both the up-milling and down-milling sides. The feed rate, followed by cutting speed were found to be the most influencing factors affecting burr width with collective contribution of 89.06% in up-milling and 92.67% in down-milling. The depth of cut and cooling condition had negligible impact on burr width. Burr height was mostly affected by depth of cut and feed rate, whereas cutting speed and cooling condition had no impact on burr height. The combined contribution of depth of cut and feed rate to burr height was 77.36% in up-milling and 73.95% in down-milling.

1. Introduction

Micro-milling has gained recognition as an advanced machining method suitable for fabricating complex three-dimensional (3D) microscale components and intricate features [1]. Compared to other unconventional machining processes, micro-milling is typically favored due to advantages such as higher material removal rates, greater process adaptability, lower initial setup expenses [1], and the capability to fabricate highly detailed geometries [2]. Nevertheless, micro-milling is accompanied by certain limitations, notably burr formation, compromised surface finish, accelerated tool deterioration, and sudden, unpredictable tool failure [1,3]. Micro-milling poses substantial difficulties when machining materials that are challenging to cut, such as the titanium alloy Ti-6Al-4V [3]. The alloy Ti-6Al-4V is extensively acknowledged as the primary alloy within the titanium industry, primarily due to its balanced mechanical characteristics and broad applicability across diverse fields [4], accounting for more than half of total titanium consumption [5]. However, despite its beneficial attributes, the machining of this alloy is complicated by factors such as its low thermal conductivity, elevated chemical reactivity, reduced elastic modulus, and significant hardness at higher temperatures [6].
Mechanical machining, regardless of whether it occurs at the macro or micro scale, inevitably produces burrs. Nevertheless, deburring becomes notably more problematic in micro-machining than in macro-machining contexts. Specifically, in micro-scale components, the deburring operation carries a significant risk of damaging the component or negatively affecting delicate micro-scale features. Moreover, the deburring process can substantially raise costs due to the complexity and intricacy involved in handling and assembling micro-sized parts [7]. Thus, the implementation of deburring methods for burr removal is typically discouraged. A more effective alternative involves optimizing the machining parameters and refining tool geometry to proactively reduce burr formation [8].
Numerous studies have examined how parameters such as feed per tooth (fz), cutting speed (Vc), and tool edge radius (re) influence burr formation in micro-milling operations. Lee and Dornfeld [9] studied the impact of feed rate, cutting speed, and tool edge radius on micro-milling burr formation, concluding that burr height increases with higher feed rates but can be minimized through optimized combinations of feed rate and cutting speed. Similarly, Imran et al. [4] determined that the feed rate was the predominant factor influencing burr formation during micro-milling of Ti-6Al-4V. Specifically, they found that burr formation became more predictable when feed rate exceeded tool edge radius, whereas lower feed rates introduced greater variability due to factors such as tool vibrations and material elastic recovery. Thepsonthi and Özel [8] concentrated their research efforts on optimizing machining parameters to mitigate burr formation and improve surface finish. Their findings indicated that elevated feed rates and higher spindle speeds effectively improved surface quality, while axial depth of cut (ap) had the most substantial influence on burr formation. Kim et al. [7] further explored the mechanisms of burr reduction, revealing that increased spindle speeds help in decreasing burr sizes, whereas exceeding specific feed rate thresholds altered the underlying material removal mechanisms, thus reducing burr formation. Rehman et al. [10] identified the feed rate as the most influential parameter, having approximately 81% of contribution in burr formation, whereas the depth of cut was found to have negligible influence. Additionally, they reported that compared to high-speed setups, low-speed machining offered superior control over burr sizes when machining conditions were properly adjusted.
The influence of different milling methods and cooling strategies on burr formation and surface integrity during the micro-milling of Ti-6Al-4V has been thoroughly explored in existing research. Kiswanto et al. [11] reported that employing an up-milling strategy was more effective for minimizing burr formation, while down-milling generally resulted in larger, irregular, and more wavy burrs. Lekkala et al. [12] observed that increasing the number of tool flutes effectively lowered burr height for both up-milling and down-milling processes. Zheng et al. [13] investigated the effects of Minimum Quantity Lubrication (MQL) in micro-milling of Ti-6Al-4V. Their research demonstrated that MQL substantially enhances tool longevity by minimizing tool wear. Additionally, compared to dry milling conditions, MQL contributed to improved surface quality through the mitigation of cutting vibrations and reduction in surface roughness, establishing it as a superior method for the micro-milling of titanium alloys. Consistent with these findings, Vazquez et al. [14] also reported that applying MQL along the feed direction notably decreased both burr formation and tool wear.
Previous literature highlights multiple factors influencing burr formation during micro-milling of titanium alloys, specifically Ti-6Al-4V. These key factors include feed rate, tool edge radius, choice of milling method, tool coatings, and lubrication strategies. Considering the practicality and cost-effectiveness of conventional speed machining equipment, this study aims to perform a statistical analysis on how principal machining parameters—namely feed rate, cutting speed, and depth of cut—affect burr width and height in both down-milling and up-milling processes, under dry, MQL and wet cooling conditions. The primary goal is to identify the parameters significantly influencing burr formation.

2. Materials and Methods

2.1. Workpiece Material

The material selected for experimental analysis is grade 5 titanium alloy (Ti-6Al-4V). This alloy is characterized by a dual-phase microstructure consisting of alpha (α) and beta (β) phases. Typically, at room temperature, the alpha phase constitutes approximately 60–90%, while the beta phase accounts for around 10–40%.

2.2. Experimental Setup

Micro-milling experiments were carried out using a Yida MV-1060 CNC milling center under three different cooling conditions: dry, MQL and wet, as depicted in Figure 1. The experimental workpiece dimensions were 10 mm × 20 mm × 50 mm (length × width × height). An Olympus DSX1000 digital microscope was utilized to measure and evaluate the burr width and height in the machined slots. To assess experimental reliability, each test was performed twice, with the maximum burr width and height values recorded per run and subsequently averaged for analysis. The micro-milling experiments were performed with ultrafine tungsten carbide micro-end mills having a diameter of 500 µm. The micro tools exhibited an average measured edge radius of 3.5 µm with a standard deviation of 0.5 µm.

2.3. Design of Experiments

The micro-milling experiments were organized using the Taguchi Design of Experiments (DOE) approach, applying an L9 orthogonal array to structure the trials. This experimental design featured four independent variables, each evaluated across three different levels. The primary variables considered were feed per tooth, cutting speed, axial depth of cut, and cooling condition. The specifics of the machining parameters, along with their respective levels are given in Table 1.

3. Results and Discussion

This section presents the measured burr results along with their statistical analysis performed using the analysis of variance (ANOVA) method.

3.1. Burr Measurement

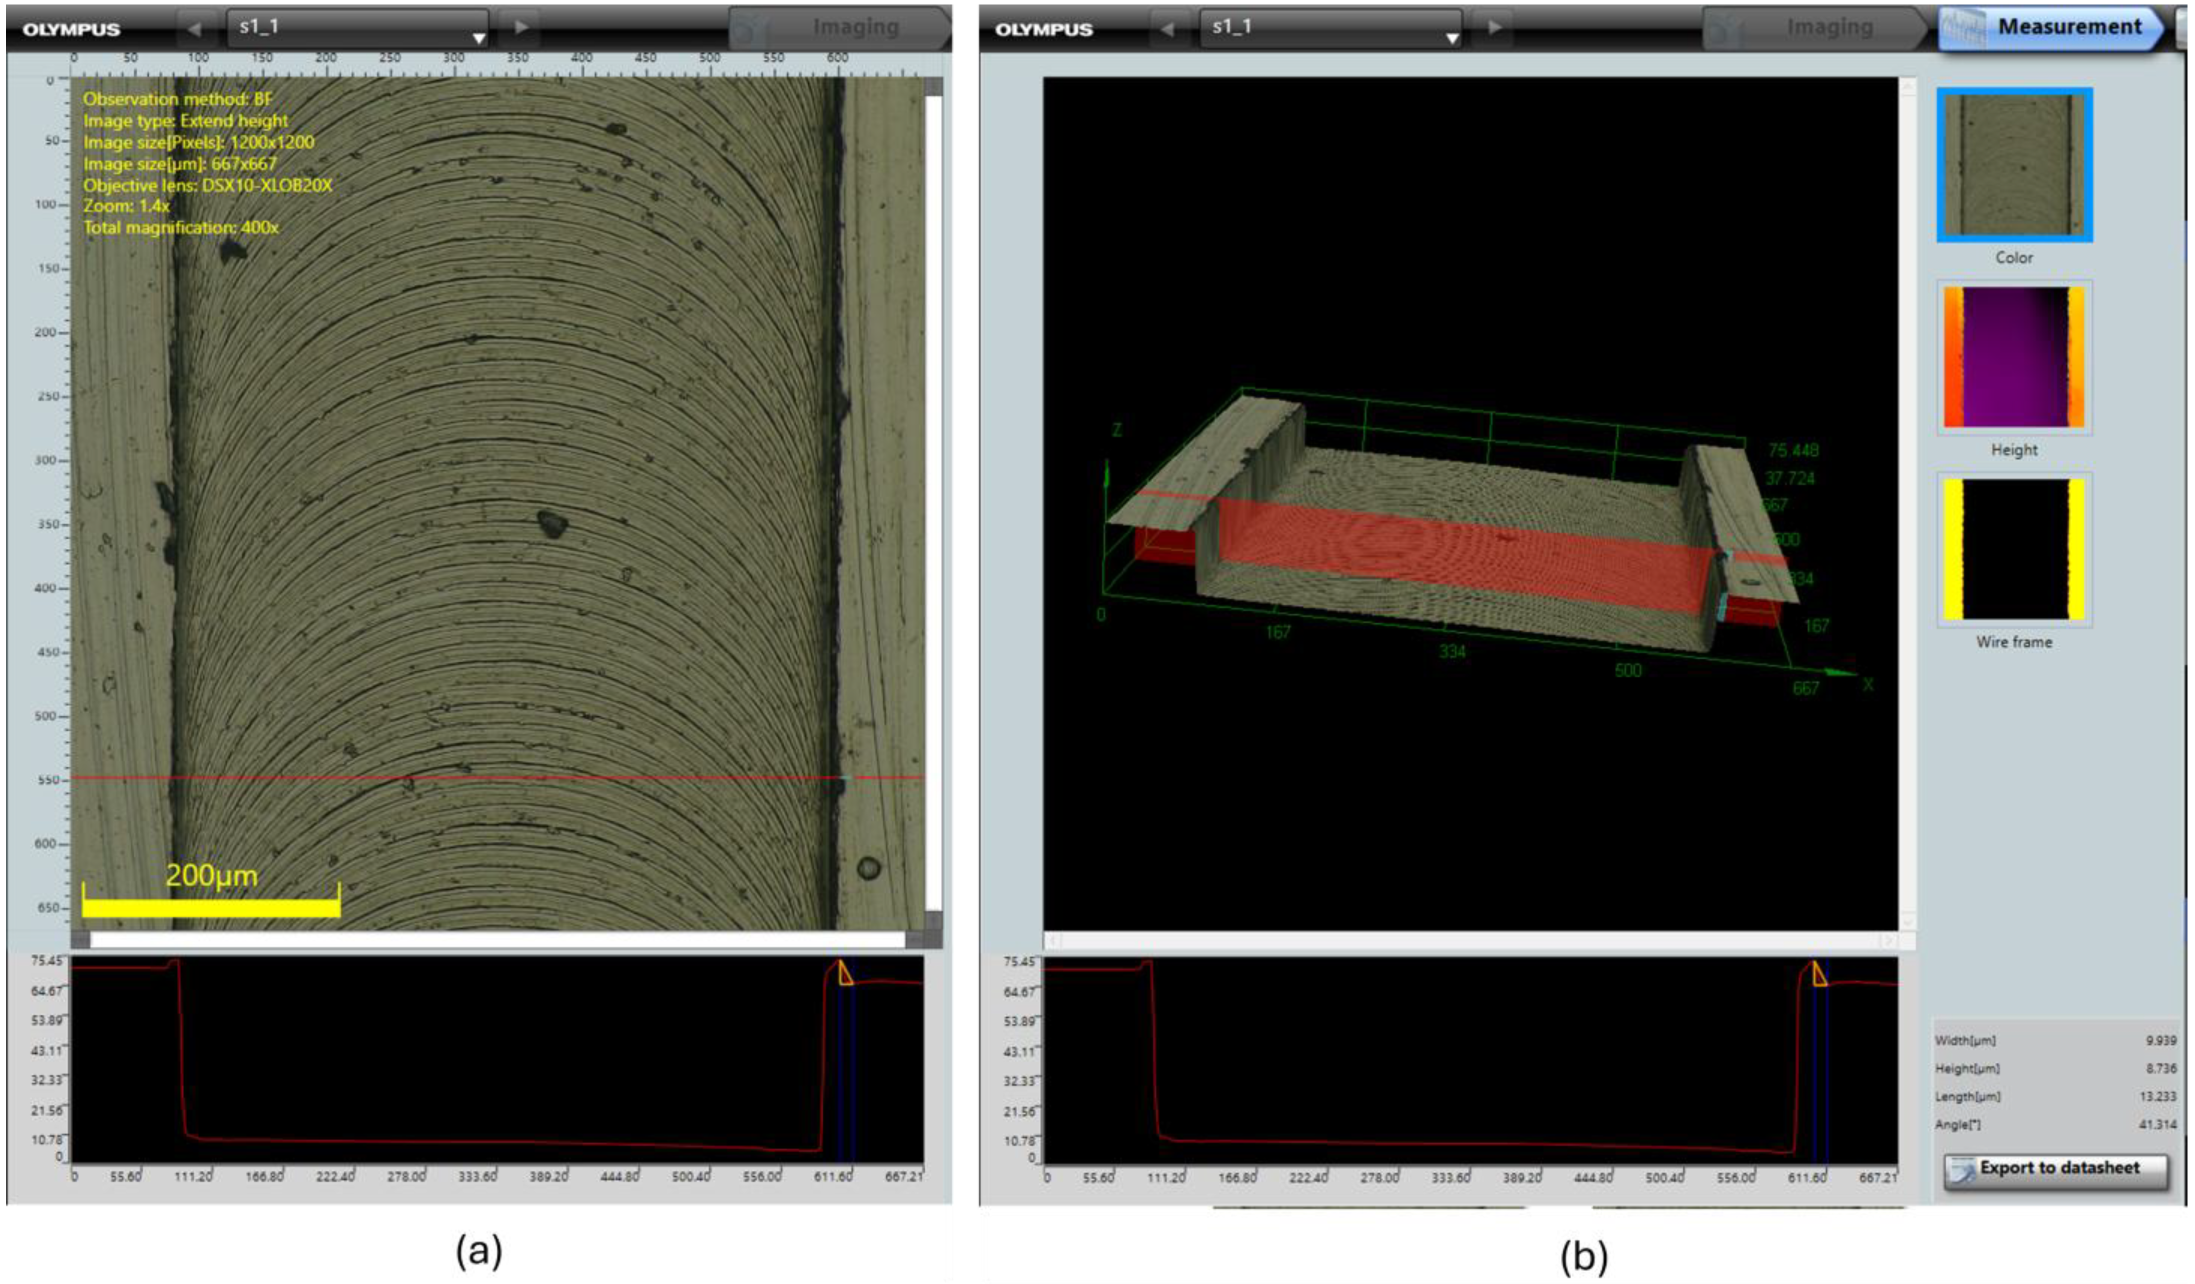
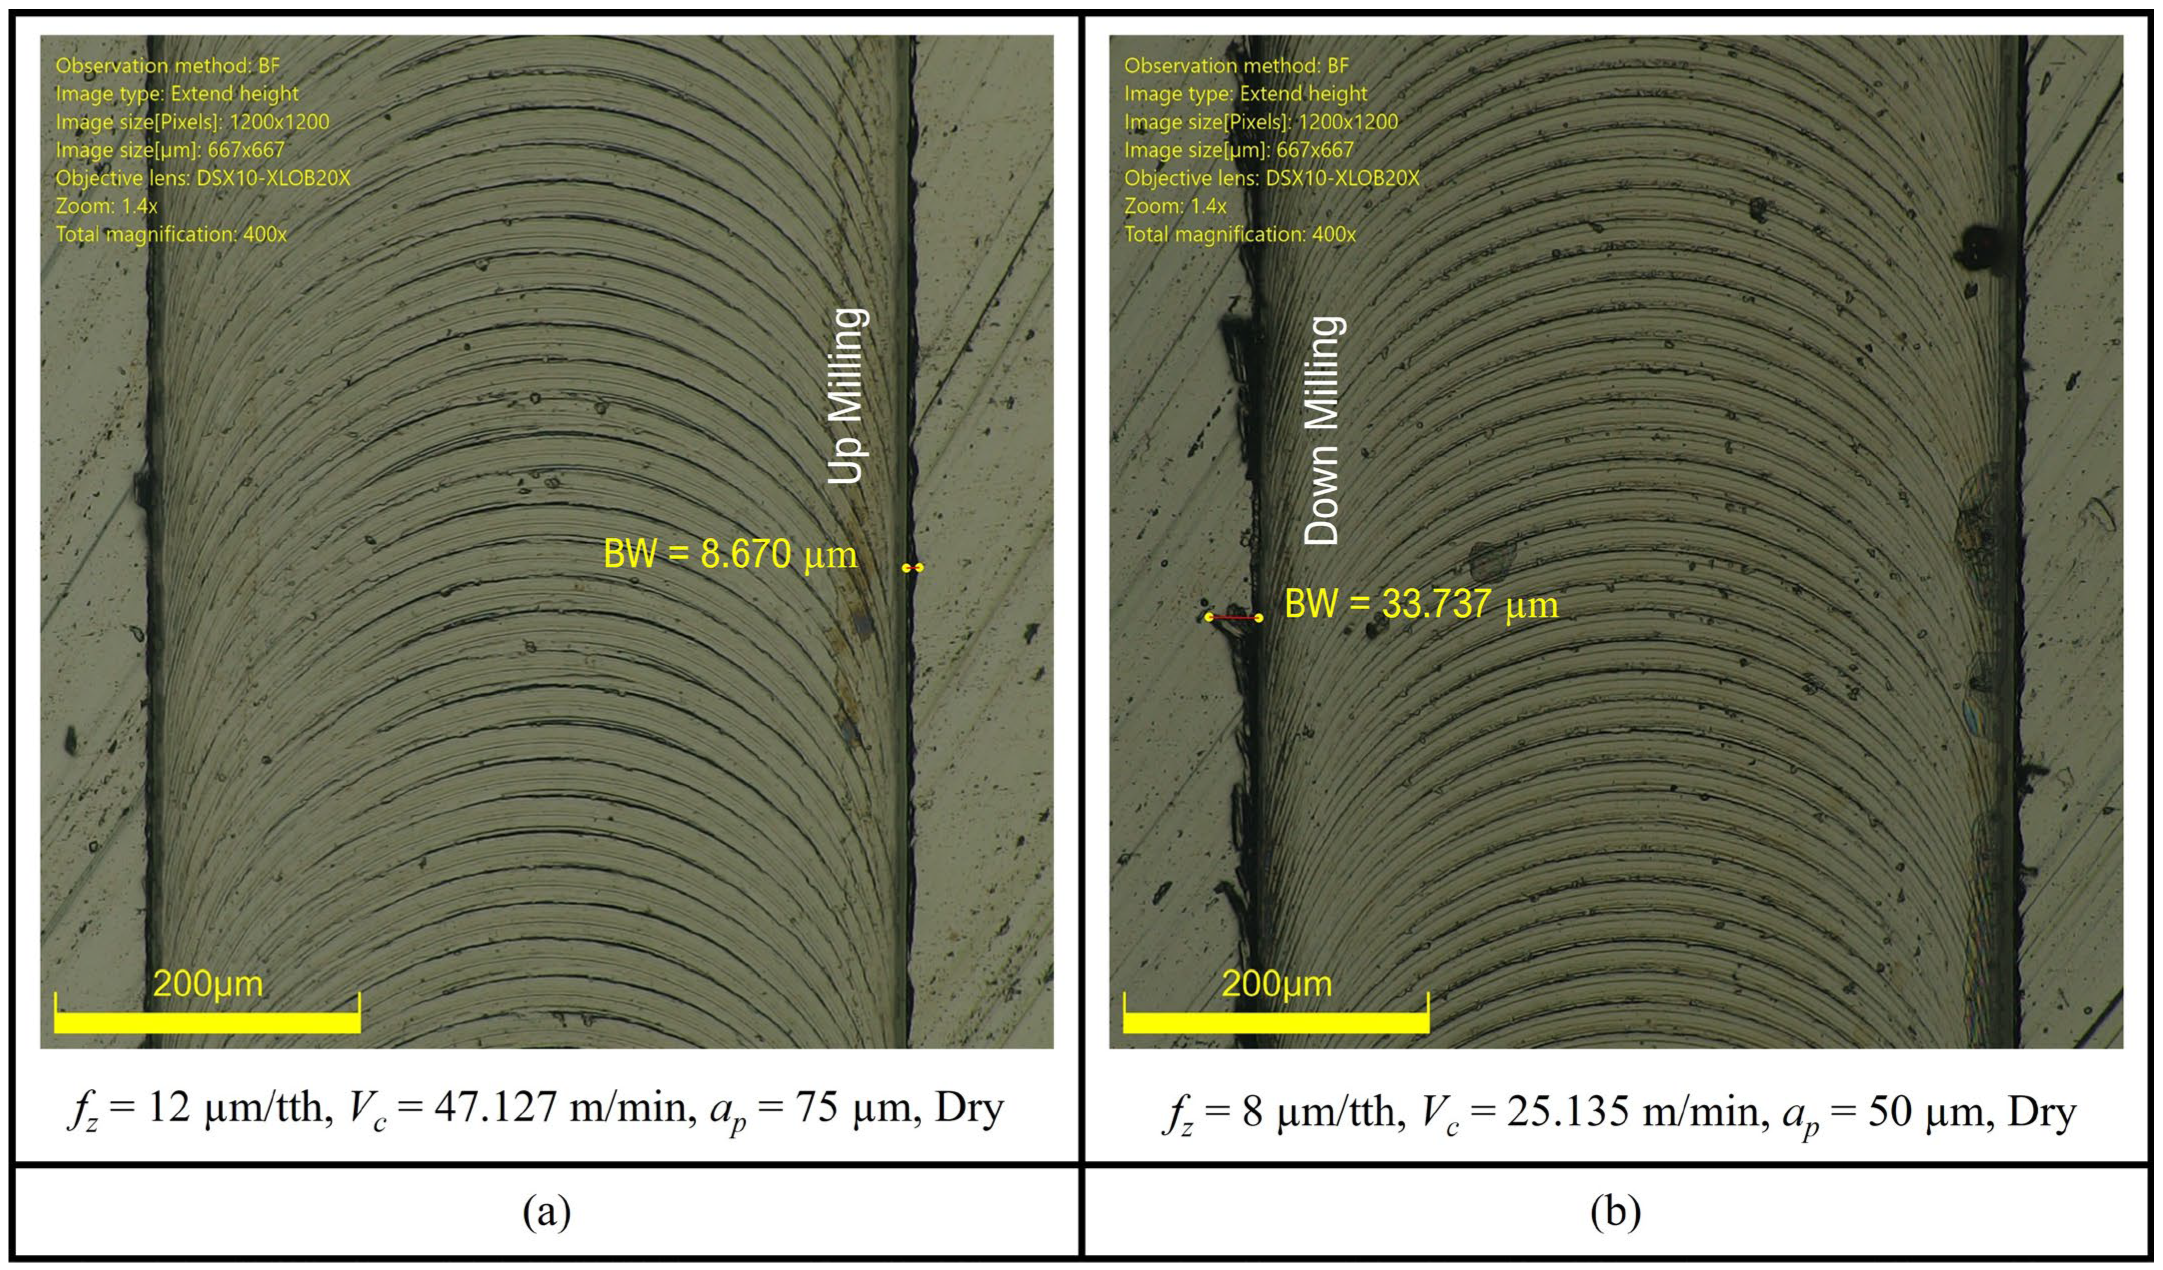
The average burr width and height were calculated, and the findings are arranged according to the Taguchi orthogonal L9 array, as shown in Table 2. Figure 2 defines the three linear descriptors extracted from every slot. Burr width is the plan-view distance between the two most protruding burr tips and was obtained directly from the calibrated 2-D micrograph. Because height cannot be resolved from a single view, a three-dimensional surface map of each slot was reconstructed within the microscope’s software (Figure 3b). The triangle was translated incrementally along the slot until the vertical leg reached an absolute maximum; this value was recorded as burr height for that machining condition. This approach ensures that the tallest burr, rather than the widest—is captured. Additionally, Figure 4 and Figure 5 show the measured burr width and height for both the up-milling and down-milling sides of some of the machined slots.

3.2. Application of ANOVA

After measuring the top burr width and height, a statistical analysis was performed in Minitab software (version 22.1) using ANOVA technique. The impact of each parameter was evaluated by examining the F-test ratios; a larger F-value suggests greater significance of the parameter, whereas a smaller F-value indicates lesser importance. Furthermore, p-values were assessed to determine the statistical significance of each factor, with a threshold of 0.05 (5%) typically used as a reference. A p-value lower than 0.05 implies a statistically significant parameter, with only a 5% probability of test error, thus corresponding to a 95% confidence level. Moreover, the contribution ratio (CR), representing the percentage contribution of each parameter to the overall variance, was calculated using the Equation (1) [16], and ANOVA results are reported in Section 4.
% C R = S S ( D o F × M S S R e s ) S S T × 100
where:
  • SS—Sum of squares;
  • DoF—Degrees of freedom;
  • MSSRes—Mean square of residuals;
  • SST—Total sum of squares.

4. Discussion

4.1. Burr Width (Up-Milling and Down-Milling)

The ANOVA results (Table 3 and Table 4) show feed per tooth as the primary factor influencing burr formation in both up-milling and down-milling, with CR of 76.74% and 74.71%, respectively. Cutting speed follows as the second most influential parameter, having a CR of 12.32% (up-milling) and 17.96% (down-milling). Depth of cut and cooling conditions demonstrate minimal impact. The main effects plots (Figure 6) indicate a consistent decrease in burr width as feed per tooth increases, aligning with prior studies. At lower feeds, chip thickness nears the cutting-edge radius, causing ploughing rather than effective shearing and increasing burr formation [10]. Higher feeds shift the cutting mechanism to efficient shearing, reducing lateral material displacement [7]. Cutting speed also influences burr width, exhibiting a reduction in burr size as the cutting speed is increased. Higher cutting speeds elevate the material’s strain rate, facilitating cleaner separation of chips and thus decreasing the likelihood of burr formation [17]. Although statistically insignificant (CR: 3.07% in up-milling; 0.86% in down-milling), the depth of cut demonstrates a downward trend in burr width in up-milling, attributed to better heat dissipation through the formation of larger chips, which in turn helps to minimize burr formation [10]. Cooling conditions, despite low CR (0.01% and 0.25% for up- and down-milling, respectively), show reduced burr formation under wet conditions, as coolant reduces friction and cutting temperatures, thus mitigating burr formation [17].

4.2. Burr Height (Up-Milling and Down-Milling)

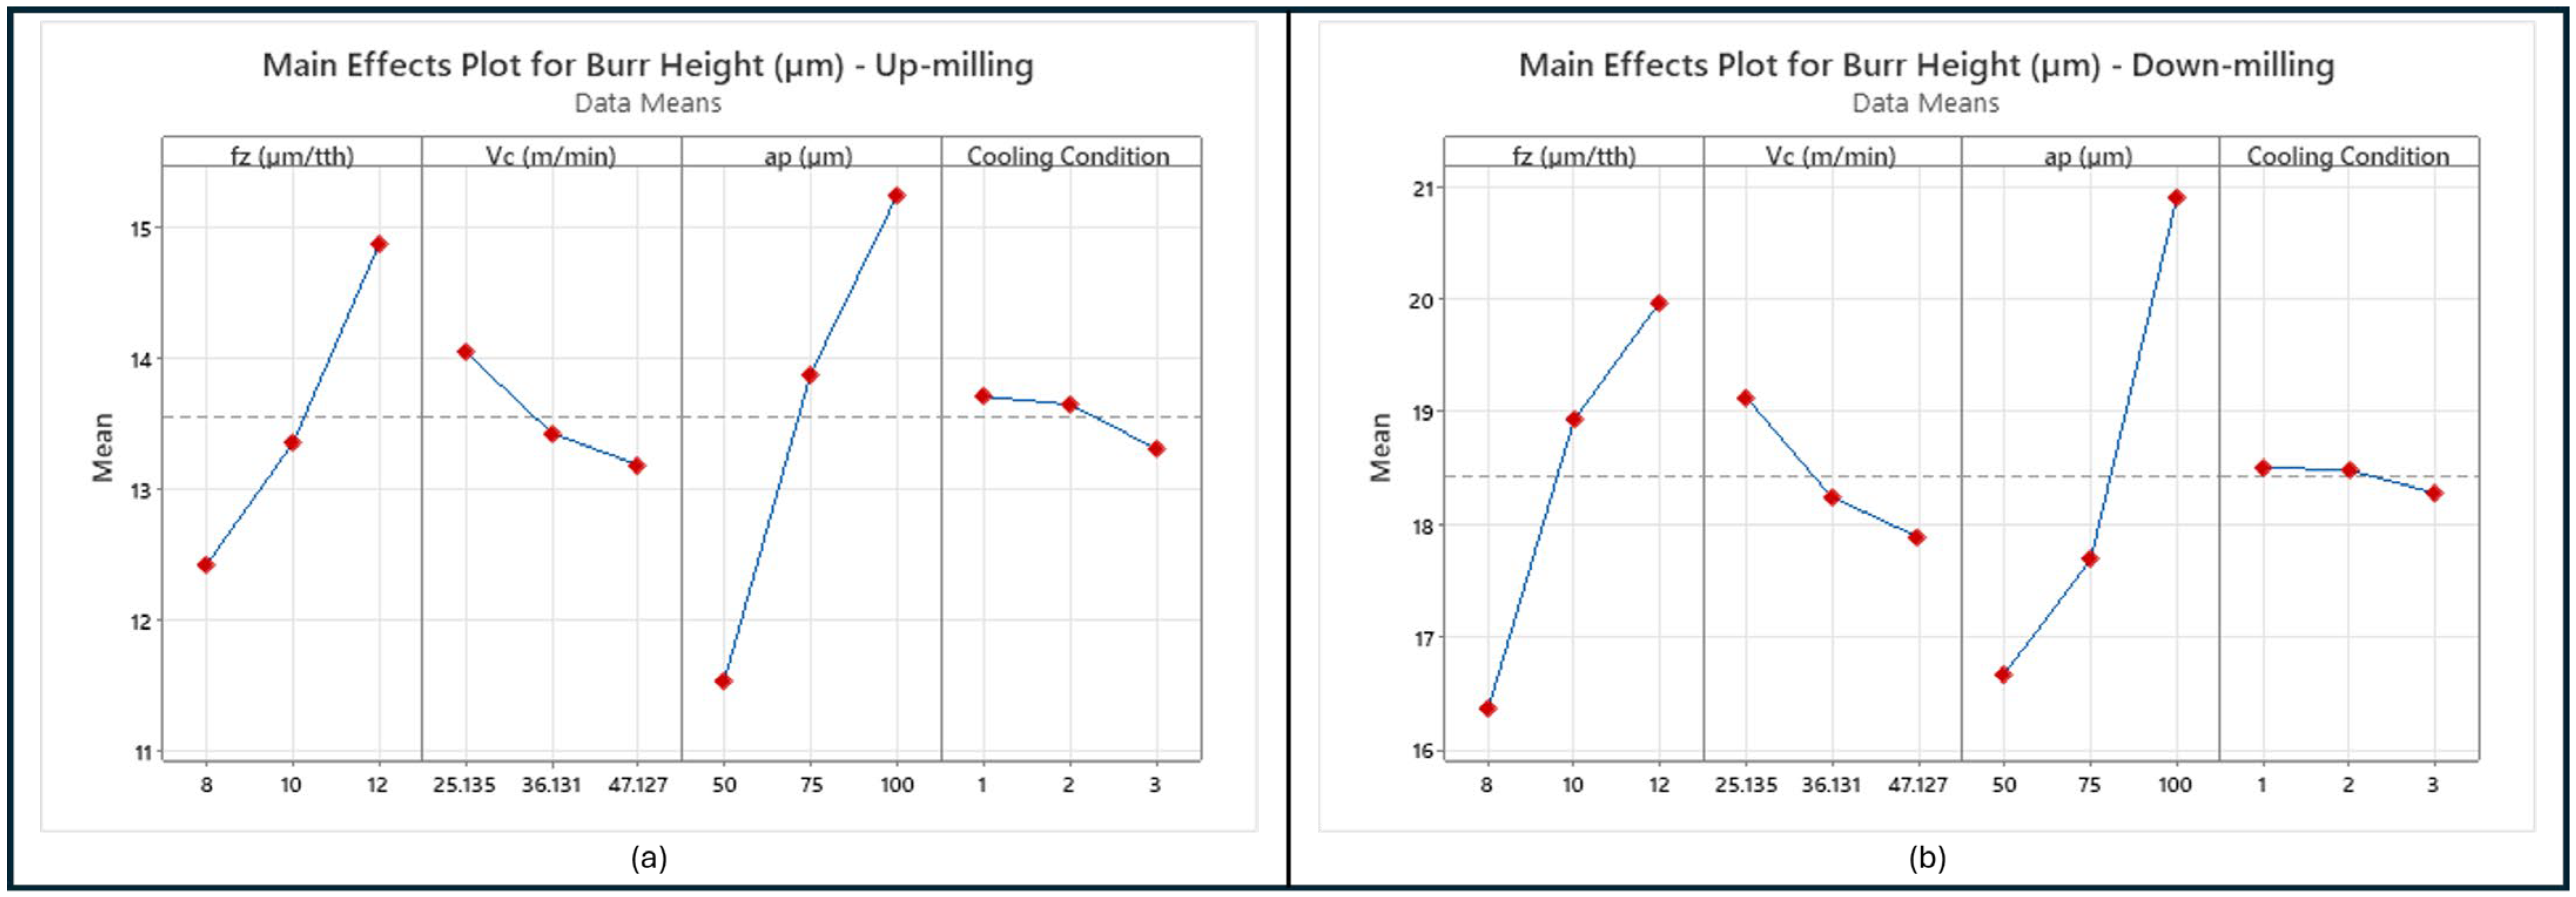
The ANOVA findings (Table 5 and Table 6) demonstrate that depth of cut and feed per tooth significantly affect burr height in both up- and down-milling, with ap being the most critical factor. Conversely, cutting speed and cooling conditions lack statistical significance in either configuration. Contribution ratios confirm the prominence of ap and fz (Figure 7), accounting for 53.82% and 23.54% in up-milling, and 43.38% and 30.57% in down-milling, respectively. The increased burr height at higher ap and fz results from greater material engagement, enhancing plastic deformation and lateral flow at the tool exit [17,18], consistent with prior research [19]. Although cutting speed shows minimal statistical significance (CR: 2.99% in up-milling, 3.61% in down-milling), an overall trend of decreased burr height with rising speeds is evident. This trend relates to thermal softening at elevated cutting speeds, reducing required cutting forces and subsequent plastic deformation, aligning with findings by Ezugwu and Wang [20].
Cooling conditions have a negligible effect on burr height, as reflected by flat main effects plots and non-significant ANOVA results (CR = 0.72% for up-milling; 0.14% for down-milling). This minimal influence is attributed to burr formation being primarily governed by mechanical factors, such as cutting forces and material deformation. The slight reduction observed under wet cooling likely results from enhanced lubrication and reduced thermal and frictional stresses at the tool–workpiece interface.

5. Conclusions

This study examined the influence of four critical machining parameters, feed per tooth, cutting speed, depth of cut, and cooling condition, to evaluate their effect on burr formation. Statistical analysis using the ANOVA method was employed to identify the significance and contribution to burr formation. The key findings from the analysis are summarized below:
  • Feed rate, followed by cutting speed, emerged as the most significant factors influencing burr width, contributing a combined 89.06% in up-milling and 92.67% in down-milling. In contrast, the depth of cut and cooling condition had a minimal influence on burr width. Burr height, however, was primarily affected by the depth of cut and feed rate, while cutting speed and cooling condition showed negligible impact. The combined effect of depth of cut and feed rate accounted for 77.36% of the variation in burr height during up-milling and 73.95% during down-milling.
  • Overall, feed rate was identified as the most influential parameter governing burr width, whereas depth of cut had the greatest impact on burr height. Therefore, precise control of these two parameters is crucial for minimizing burr formation in micro-milling operations.

Author Contributions

Conceptualization, G.U.R. and M.R.u.H.; methodology, M.M. and S.H.I.J.; software, M.S.K. and S.I.B.; vali-dation, S.I.B. and M.M.; formal analysis, G.U.R. and M.S.K.; investigation, M.M. and M.R.u.H.; data curation, G.U.R.; writing—original draft preparation, G.U.R.; writing—review and editing, M.R.u.H. and M.M.; supervision, S.I.B.; project administration, M.R.u.H. All authors have read and agreed to the published version of the manuscript.

Funding

This research received no external funding.

Institutional Review Board Statement

Not applicable.

Informed Consent Statement

Not applicable.

Data Availability Statement

The original contributions presented in this study are included in the article. Further inquiries can be directed to the corresponding author.

Conflicts of Interest

The authors declare no conflicts of interest.

References

  1. Özel, T.; Thepsonthi, T.; Ulutan, D.; Kaftanolu, B. Experiments and Finite Element Simulations on Micro-Milling of Ti-6Al-4V Alloy with Uncoated and CBN Coated Micro-Tools. CIRP Ann. Manuf. Technol. 2011, 60, 85–88. [Google Scholar] [CrossRef]
  2. Venkatesh, V.; Swain, N.; Srinivas, G.; Kumar, P.; Barshilia, H.C. Review on the Machining Characteristics and Research Prospects of Conventional Microscale Machining Operations. Mater. Manuf. Process. 2016, 32, 235–262. [Google Scholar] [CrossRef]
  3. Thepsonthi, T.; Özel, T. Experimental and Finite Element Simulation Based Investigations on Micro-Milling Ti-6Al-4V Titanium Alloy: Effects of CBN Coating on Tool Wear. J. Mater. Process Technol. 2013, 213, 532–542. [Google Scholar] [CrossRef]
  4. Jaffery, S.H.I.; Khan, M.; Ali, L.; Mativenga, P.T. Statistical Analysis of Process Parameters in Micromachining of Ti-6Al-4V Alloy. Proc. Inst. Mech. Eng. B J. Eng. Manuf. 2016, 230, 1017–1034. [Google Scholar] [CrossRef]
  5. Venkata rao, K. A Study on Performance Characteristics and Multi Response Optimization of Process Parameters to Maximize Performance of Micro Milling for Ti-6Al-4V. J. Alloys Compd. 2019, 781, 773–782. [Google Scholar] [CrossRef]
  6. Ezugwu, E.O.; Wang, Z.M. Titanium Alloys and Their Machinability—A Review. J. Mater. Process Technol. 1997, 68, 262–274. [Google Scholar] [CrossRef]
  7. Kim, D.H.; Lee, P.-H.; Lee, S.W. Experimental Study on Machinability of Ti-6Al-4V in Micro End-Milling. In Proceedings of the World Congress on Engineering; International Association of Engineers (IAENG), London, UK, 2 June 2014. [Google Scholar]
  8. Thepsonthi, T.; Özel, T. Multi-Objective Process Optimization for Micro-End Milling of Ti-6Al-4V Titanium Alloy. Int. J. Adv. Manuf. Technol. 2012, 63, 903–914. [Google Scholar] [CrossRef]
  9. Lee, K.; Dornfeld, D.A. Micro-Burr Formation and Minimization through Process Control. Precis. Eng. 2005, 29, 246–252. [Google Scholar] [CrossRef]
  10. Ul Rehman, G.; Husain Imran Jaffery, S.; Khan, M.; Ali, L.; Khan, A.; Ikramullah Butt, S. Analysis of Burr Formation in Low Speed Micro-Milling of Titanium Alloy (Ti-6Al-4V). Mech. Sci. 2018, 9, 231–243. [Google Scholar] [CrossRef]
  11. Kiswanto, G.; Zariatin, D.L.; Ko, T.J. The Effect of Spindle Speed, Feed-Rate and Machining Time to the Surface Roughness and Burr Formation of Aluminum Alloy 1100 in Micro-Milling Operation. J. Manuf. Process. 2014, 16, 435–450. [Google Scholar] [CrossRef]
  12. Lekkala, R.; Bajpai, V.; Singh, R.K.; Joshi, S.S. Characterization and Modeling of Burr Formation in Micro-End Milling. Precis. Eng. 2011, 35, 625–637. [Google Scholar] [CrossRef]
  13. Zheng, X.; Liu, Z.; Chen, M.; Wang, X. Experimental Study on Micro-Milling of Ti6Al4V with Minimum Quantity Lubrication. Int. J. Nanomanuf. 2013, 9, 570–582. [Google Scholar] [CrossRef]
  14. Vazquez, E.; Gomar, J.; Ciurana, J.; Rodríguez, C.A. Analyzing Effects of Cooling and Lubrication Conditions in Micromilling of Ti6Al4V. J. Clean. Prod. 2015, 87, 906–913. [Google Scholar] [CrossRef]
  15. Khan, M.A.; Aziz, S.; Faraz, M.I.; Tahir, A.M.; Jaffery, S.H.I.; Jung, D.-W.; Khan, M.A.; Khan, M.A.; Aziz, S.; Faraz, M.I.; et al. Experimental Evaluation of Surface Roughness, Burr Formation, and Tool Wear during Micro-Milling of Titanium Grade 9 (Ti-3Al-2.5V) Using Statistical Evaluation Methods. Appl. Sci. 2023, 13, 12875. [Google Scholar] [CrossRef]
  16. Ross, P.J. Taguchi Techniques for Quality Engineering; McGraw-Hill Publication: New York, NY, USA, 1998. [Google Scholar]
  17. Aurich, J.C.; Dornfeld, D.; Arrazola, P.J.; Franke, V.; Leitz, L.; Min, S. Burrs—Analysis, Control and Removal. CIRP Ann. 2009, 58, 519–542. [Google Scholar] [CrossRef]
  18. Vogler, M.P.; DeVor, R.E.; Kapoor, S.G. On the Modeling and Analysis of Machining Performance in Micro-Endmilling, Part I: Surface Generation. J. Manuf. Sci. Eng. 2004, 126, 685–694. [Google Scholar] [CrossRef]
  19. Baig, A.; Jaffery, S.H.I.; Khan, M.A.; Alruqi, M. Statistical Analysis of Surface Roughness, Burr Formation and Tool Wear in High Speed Micro Milling of Inconel 600 Alloy under Cryogenic, Wet and Dry Conditions. Micromachines 2022, 14, 13. [Google Scholar] [CrossRef] [PubMed]
  20. Ezugwu, E.O.; Wang, Z.M.; Machado, A.R. The Machinability of Nickel-Based Alloys: A Review. J. Mater. Process Technol. 1999, 86, 1–16. [Google Scholar] [CrossRef]
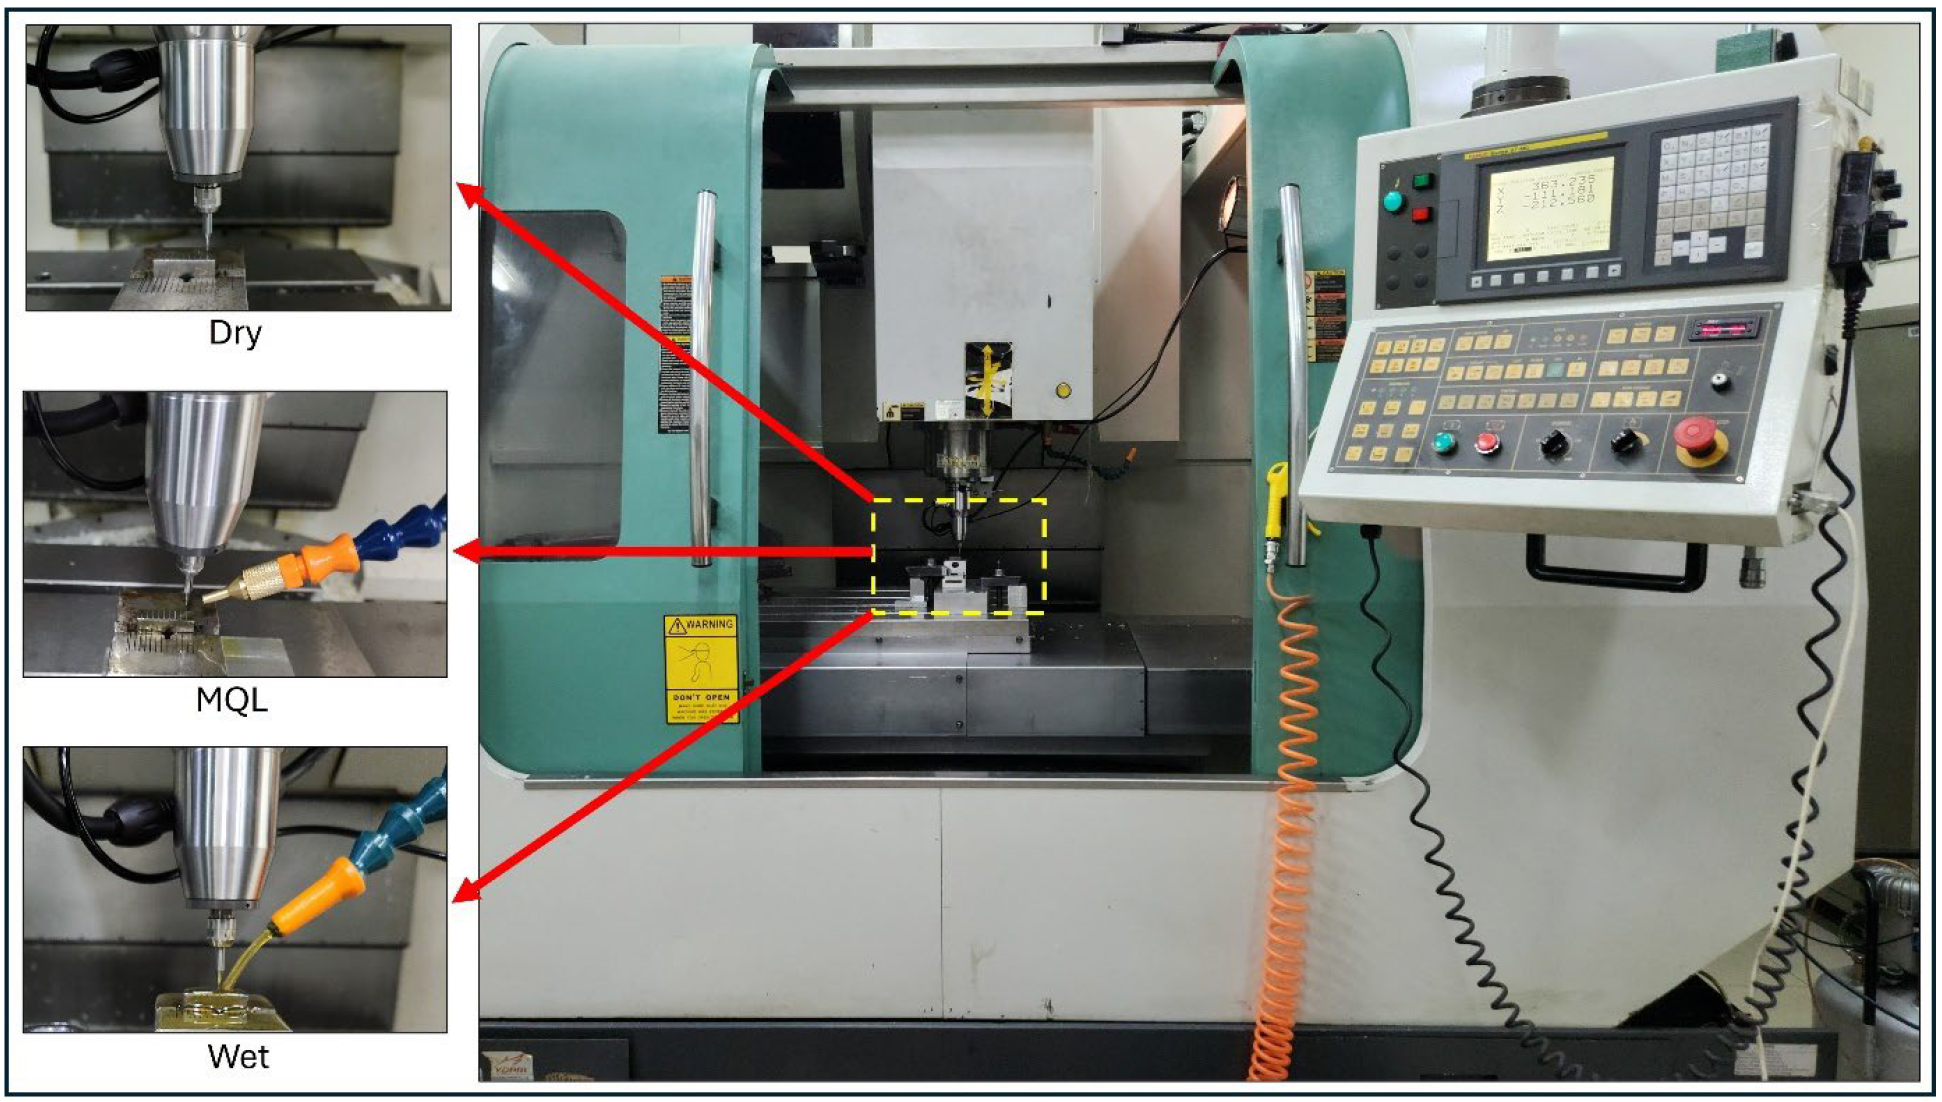
Figure 1. Experimental setup illustrating machining under dry, MQL, and wet cooling conditions.
Engproc 111 00011 g001
Figure 2. Burr measurement of machined slot (not to scale). Adapted from [15].
Engproc 111 00011 g002
Figure 3. Burr height measurement using digital microscope: (a) 2D view; (b) 3D view.
Engproc 111 00011 g003
Figure 4. Measurement of burr width using digital microscope: (a) up-milling; (b) down-milling.
Engproc 111 00011 g004
Figure 5. Measurement of burr height using digital microscope: (a) up-milling; (b) down-milling.
Engproc 111 00011 g005
Figure 6. Main effects plot illustrating the influence of process parameters on burr width (µm): (a) up-milling; (b) down-milling.
Engproc 111 00011 g006
Figure 7. Main effects plot illustrating the influence of process parameters on burr height (µm): (a) up-milling; (b) down-milling.
Engproc 111 00011 g007
Table 1. Machining parameters, their levels and values.
Machining Parameterfz (µm/tth)Vc (m/min)ap (µm)Cooling Condition
Level 1825.13550Dry
Level 21036.13175MQL
Level 31247.127100Wet
Table 2. L9 array with process parameters and responses.
Testfz
(µm/tth)
Vc
(m/min)
ap (µm)Cooling ConditionN
(rpm)
Vf
(mm/min)
Burr Width (µm)Burr Height (µm)
Up-MillingDown-MillingUp-MillingDown-Milling
1825.13550Dry16,00025632.74732.90111.04515.401
2836.13175MQL23,00036825.38727.12612.71215.511
3847.127100Wet30,00048023.34924.58013.49818.176
41025.13575Wet16,00032019.74927.25813.92218.755
51036.131100Dry23,00046013.22221.95115.07421.319
61047.12750MQL30,00060015.82721.23011.05016.704
71225.135100MQL16,00038413.39617.61617.15923.236
81236.13150Wet23,00055211.15414.07812.48517.902
91247.12775Dry30,0007208.93413.11814.99818.791
Table 3. Burr width analysis using ANOVA—up-milling.
FactorDoFSequential SSAdjusted SSAdjusted MSSF-Valuep-ValueSignificanceCR (%)
fz (µm/tth)2801.49801.49400.7543.970.000Significant76.74
Vc (m/min)2128.69128.6964.357.060.014Significant12.32
ap (µm)232.0232.0216.011.760.227Non-significant3.07
Cooling Condition20.140.140.070.010.992Non-significant0.01
Error782.0282.029.11 7.85
Total171044.37 100.00
Table 4. Burr width analysis using ANOVA—down-milling.
FactorDoFSequential SSAdjusted SSAdjusted MSSF-Valuep-ValueSignificanceCR (%)
fz (µm/tth)2542.47542.47271.2454.100.000Significant74.71
Vc (m/min)2130.40130.4065.2013.010.002Significant17.96
ap (µm)26.286.283.140.630.556Non-significant0.87
Cooling condition21.831.830.910.180.837Non-significant0.25
Error745.1245.125.01 6.21
Total17726.10 100.00
Table 5. Burr height analysis using ANOVA—up-milling.
FactorDoFSequential SSAdjusted SSAdjusted MSSF-Valuep-ValueSignificanceCR (%)
fz (µm/tth)218.5518.559.285.600.026Significant23.54
Vc (m/min)22.362.361.180.710.516Non-significant2.99
ap (µm)242.4242.4221.2112.800.002Significant53.82
Cooling Condition20.560.560.280.170.846Non-significant0.72
Error714.9214.921.66 18.93
Total1778.81 100.00
Table 6. Burr height analysis using ANOVA—down-milling.
FactorDoFSequential SSAdjusted SSAdjusted MSSF-Valuep-ValueSignificanceCR (%)
fz (µm/tth)241.4641.4620.736.170.021Significant30.57
Vc (m/min)24.904.902.450.730.509Non-significant3.61
ap (µm)258.8458.8429.428.750.008Significant43.38
Cooling Condition20.190.190.090.030.972Non-significant0.14
Error730.2530.253.36 22.30
Total17135.64 100.00
Disclaimer/Publisher’s Note: The statements, opinions and data contained in all publications are solely those of the individual author(s) and contributor(s) and not of MDPI and/or the editor(s). MDPI and/or the editor(s) disclaim responsibility for any injury to people or property resulting from any ideas, methods, instructions or products referred to in the content.