1. Introduction
The advent of adhesive restorative materials has introduced minimal intervention principles in restorative dentistry and prosthodontics [
1]. The necessity of making undercuts in the dental tissue has been abandoned due to new adhesive techniques that allow for the reconstruction of the cavities without excessive preparation for macromechanical retention [
2]. Also, the correct use of ceramic and composite materials with rigorous adhesive procedures allows a sound tissue preservation because of the minimally or even noninvasive (additive) approach, which is innovative, highly esthetic, and predictable in terms of both result and long-term prognosis [
3,
4]. The aesthetics have also improved because of the high level of biomimetics of these new adhesive materials, which also allow for a better function within the oral cavity. Because of the hydrophobic characteristics of these materials, the correct use of adhesive techniques requires an effective moisture control in order to promote the bonding of the restorative materials and then to reduce failure rates of dental restorative treatments [
5]. Therefore, a performing isolation system that creates a barrier from the rest of the person’s mouth is necessary before executing adhesive procedures in order to control the moisture and microbes. Using a rubber dam can isolate the teeth and this allows the teeth to be restored dry and with relatively less exposure to intraoral bacteria [
6]. Other advantages of the use of a rubber dam include superior isolation of the tooth to be treated from the saliva in the mouth [
7], improved visibility, reduced mirror fogging, enhanced visual contrast, soft tissue retraction [
8], protection of the person by preventing ingestion or aspiration of instruments, materials [
9] and preventing oral soft tissues from contact with harmful materials used during operative procedures, such as phosphoric acids [
10].
However, some problems related to the use of the rubber dam could be faced during prosthetic treatments, especially when rehabilitation of the anterior regions of the oral cavity has to be done with different indirect aesthetic restorations such as composite or ceramic laminate veneers (lithium disilicate, feldspathic ceramics). Incorrect rubber dam clamps placement may occupy a space that is needed for the restoration, besides possible damages to the marginal gingiva around the teeth. In addition, the use of the rubber dam leads to a loss of esthetics landmarks such as the midsagittal line, with subsequent difficulties [
11] for the correct placement of the veneers on the teeth. The small holes made in the sheet could disagree with the position of the teeth that have to be treated. In addition, inaccuracy in the reproduction of the position of the interdental contact points in the gypsum model during indirect restorations could lead to errors in the future positioning of the laminate veneers. The aim of this article is to present a clinical case report demonstrating an accurate operative protocol using different fine intraoperative maneuvers and tricks for the realization of prosthetic ceramic laminates in order to solve the problems mentioned above.
2. Materials and Methods
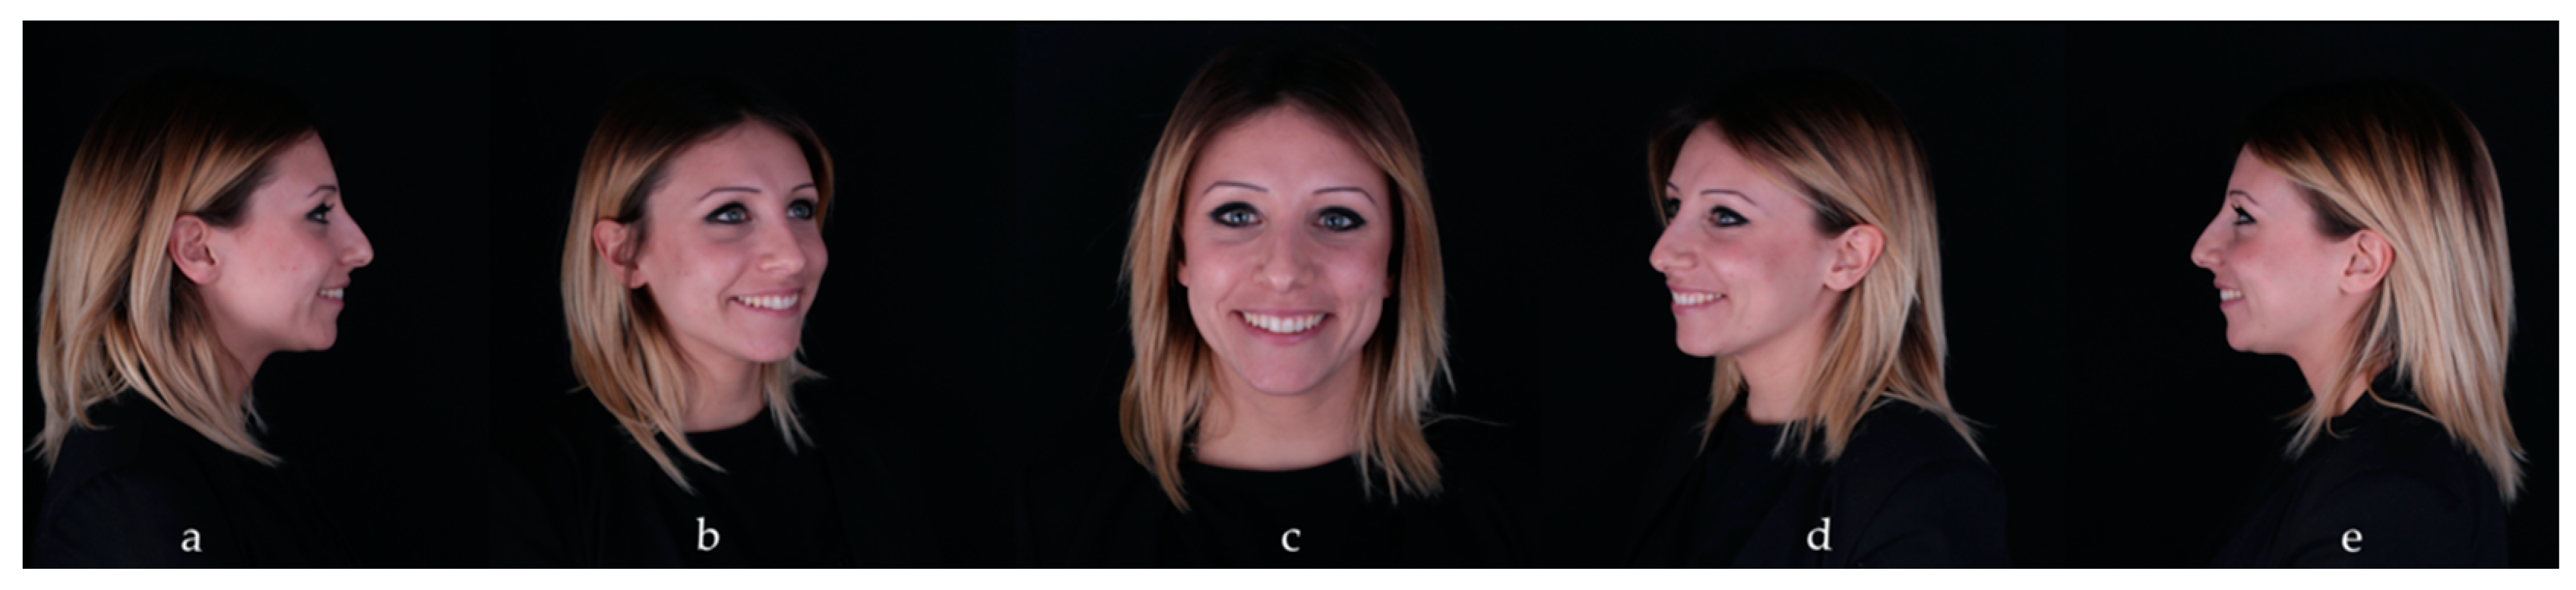
A 30 years old woman presented at our attention with aesthetic issues. She expressed the desire to change her smile because her anterior maxillary teeth seemed small and disharmonious because of the discrepancy in the dimension between each other. She refused to undergo orthodontic treatment for her situation of malocclusion (she presented) but she was very motivated for obtaining a more acceptable smile.
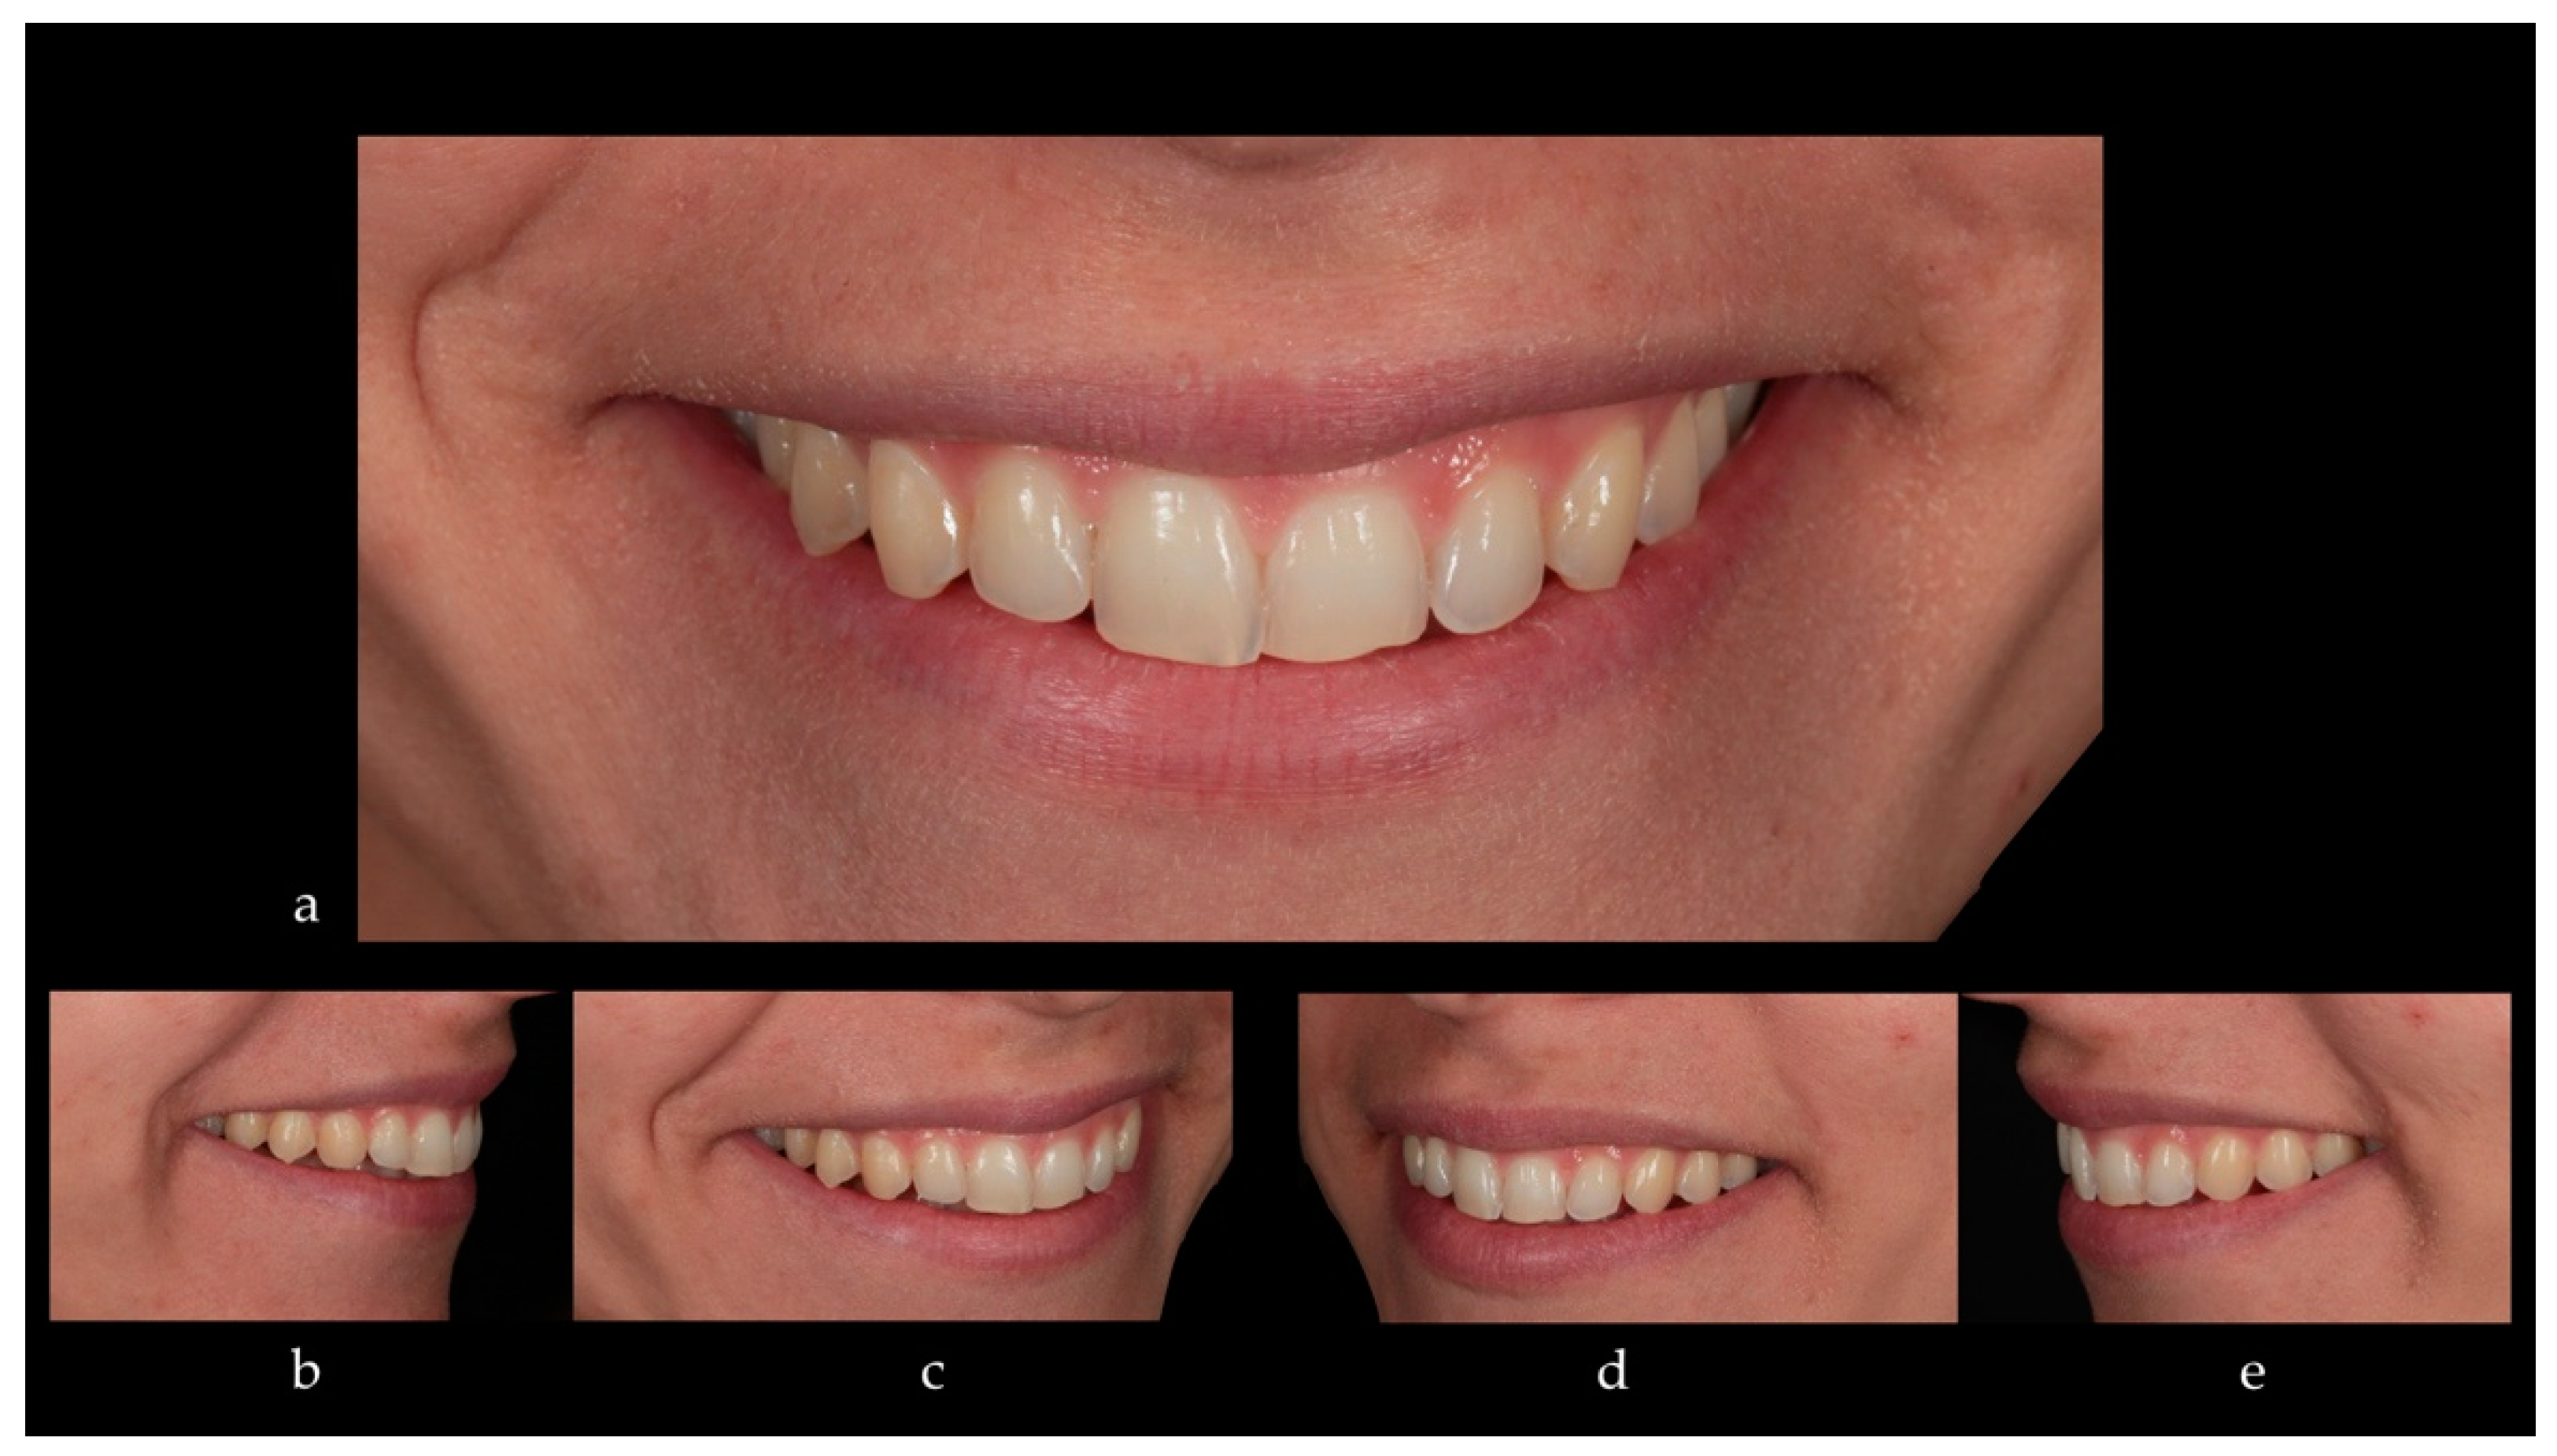
Clinical examination showed a right posterior crossbite with a normal overbite and overjet, superior and inferior dental midline misalignment and Altered Passive Eruption (APE) of 2.1 and 2.2. Radiographic evaluation showed an absence of endodontic and periodontal lesions. Esthetic analysis highlighted an important gummy smile, superior and inferior dental midline misalignment, gingival ogives asymmetry. The patient showed good oral hygiene habits. Then, in light of the anamnesis, objective and radiographic examinations, chief complaint, the treatment of the anterior sector of the upper maxilla with porcelain laminate veneers was proposed.
The operative sequence is structured as follows:
Intra- and extraoral esthetic analysis of the patient, with static photographic pre-prosthetic documentation.
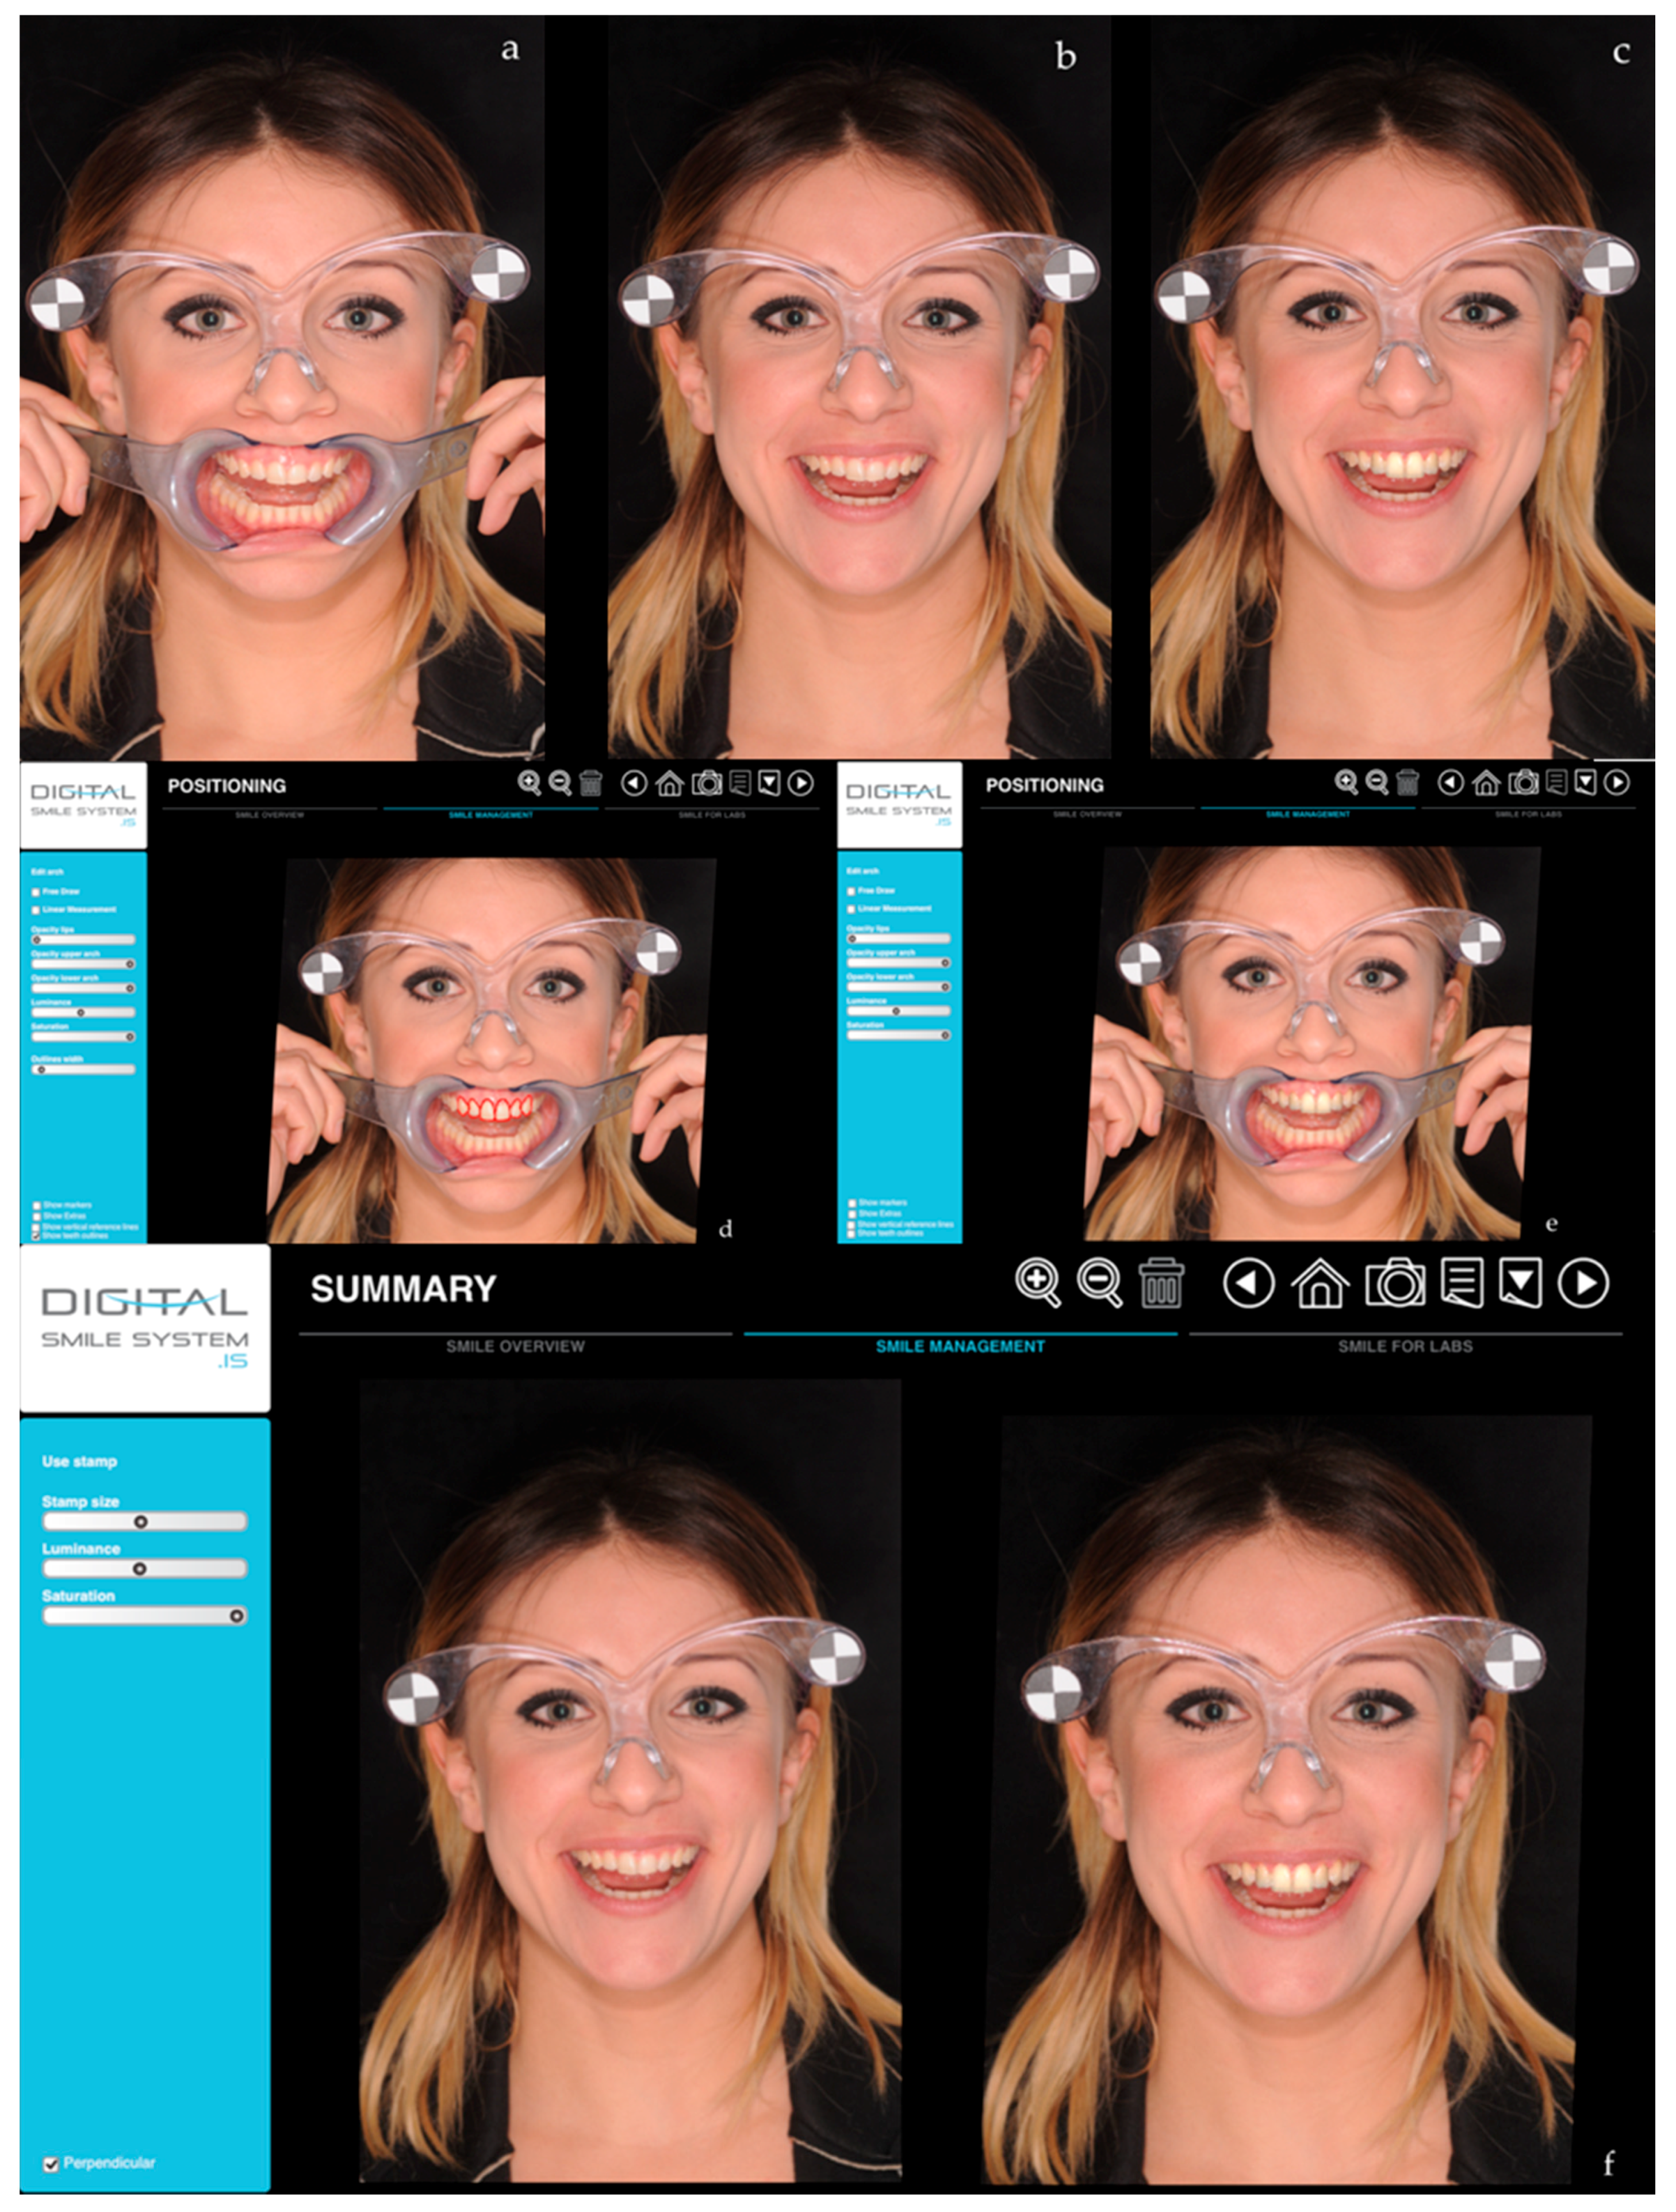
Digital previsualization by means of DSS (digital smile system) and patient’s approval of the digital prosthetic previsualization.
Clinical previsualization by means of a mock-up or aesthetic pre-evaluative temporaries (APTs), based on a virtual wax-up.
Evaluation and treatment of endodontic, mucogingival, and/or orthodontic problems, where necessary.
Preparation of the teeth added by the mock-up with proper modifications of the regular technique.
Master impression with adaptations.
Manufacturing of prosthetic ceramic laminate veneers (feldspathic or lithium disilicate).
Try-in and adhesive cementation under rubber dam isolation by using new different tricks.
2.1. Treatment Planning and Realization
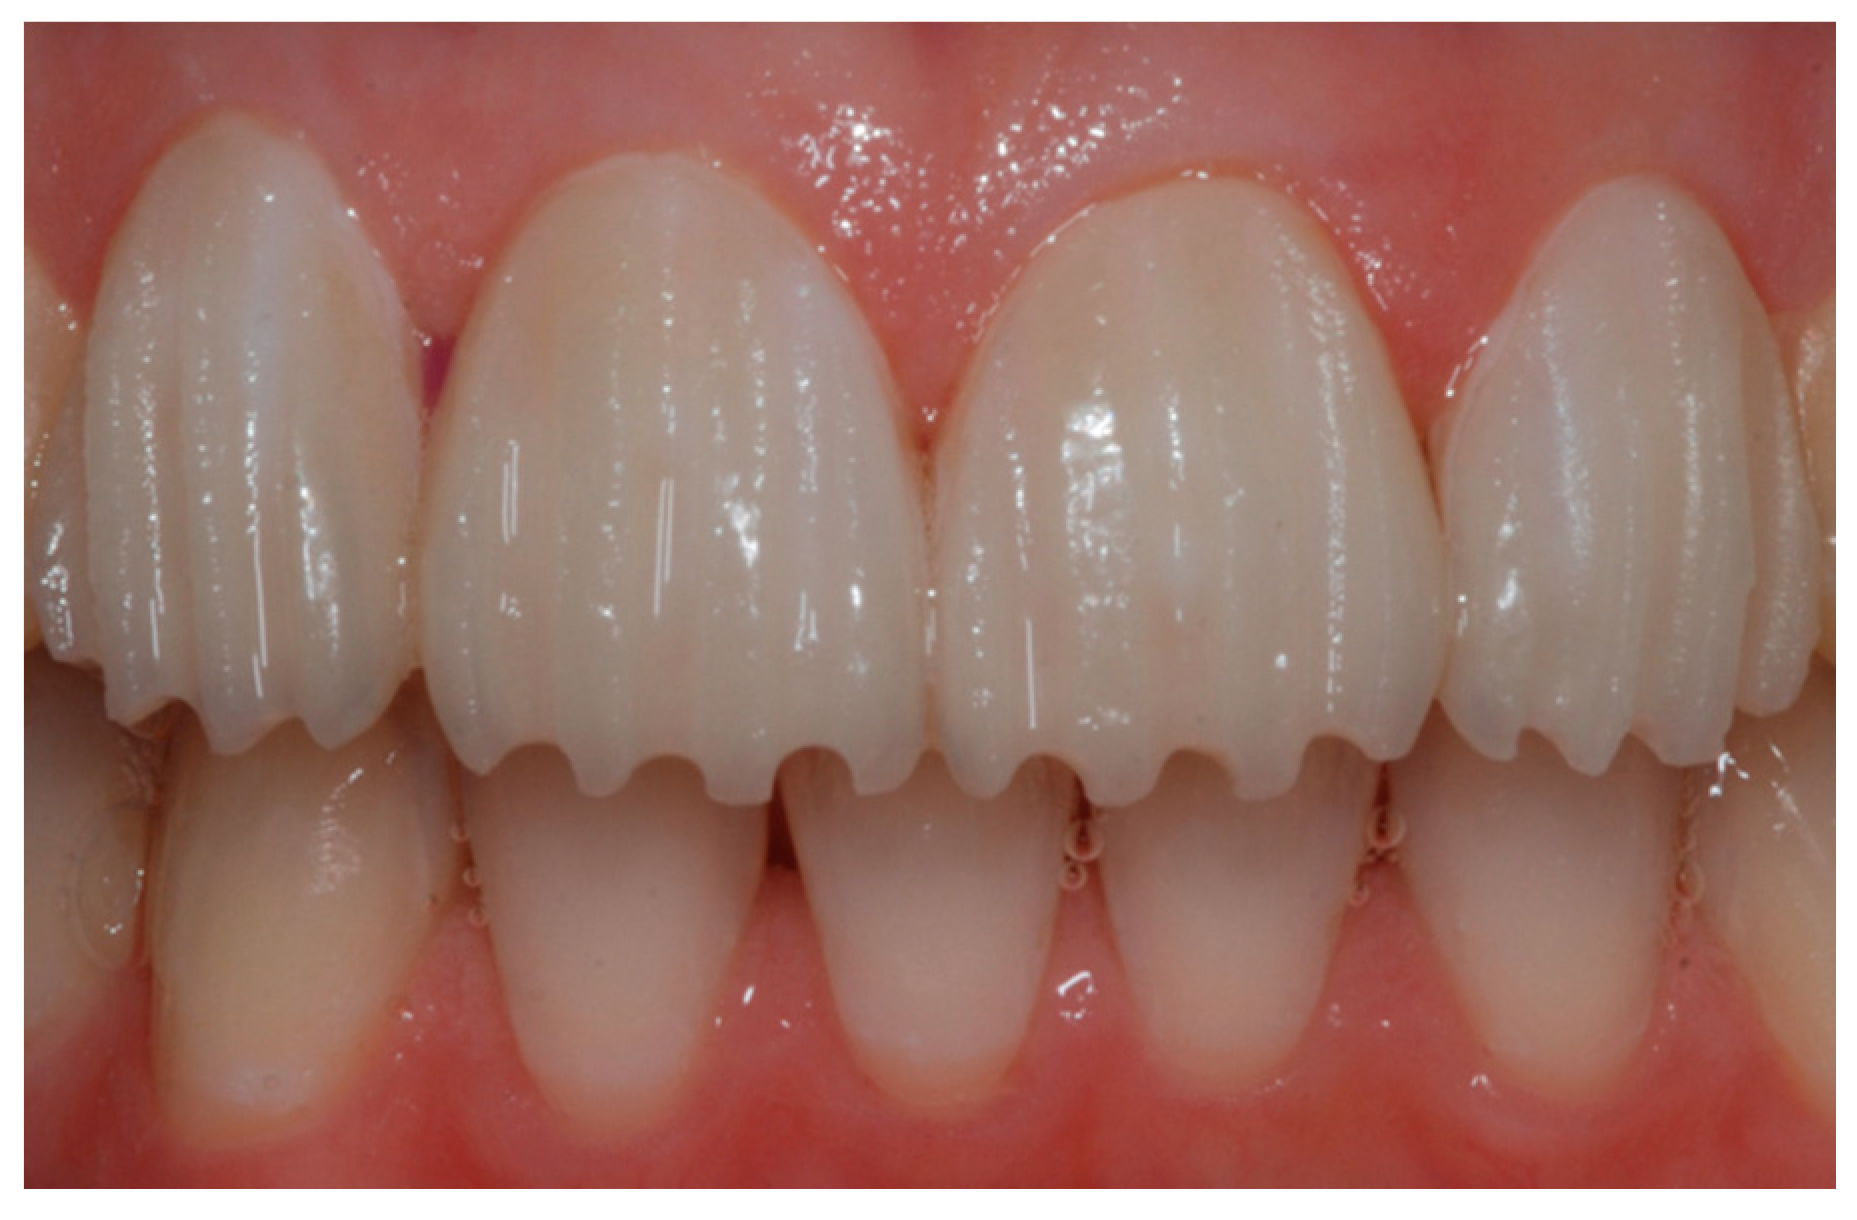
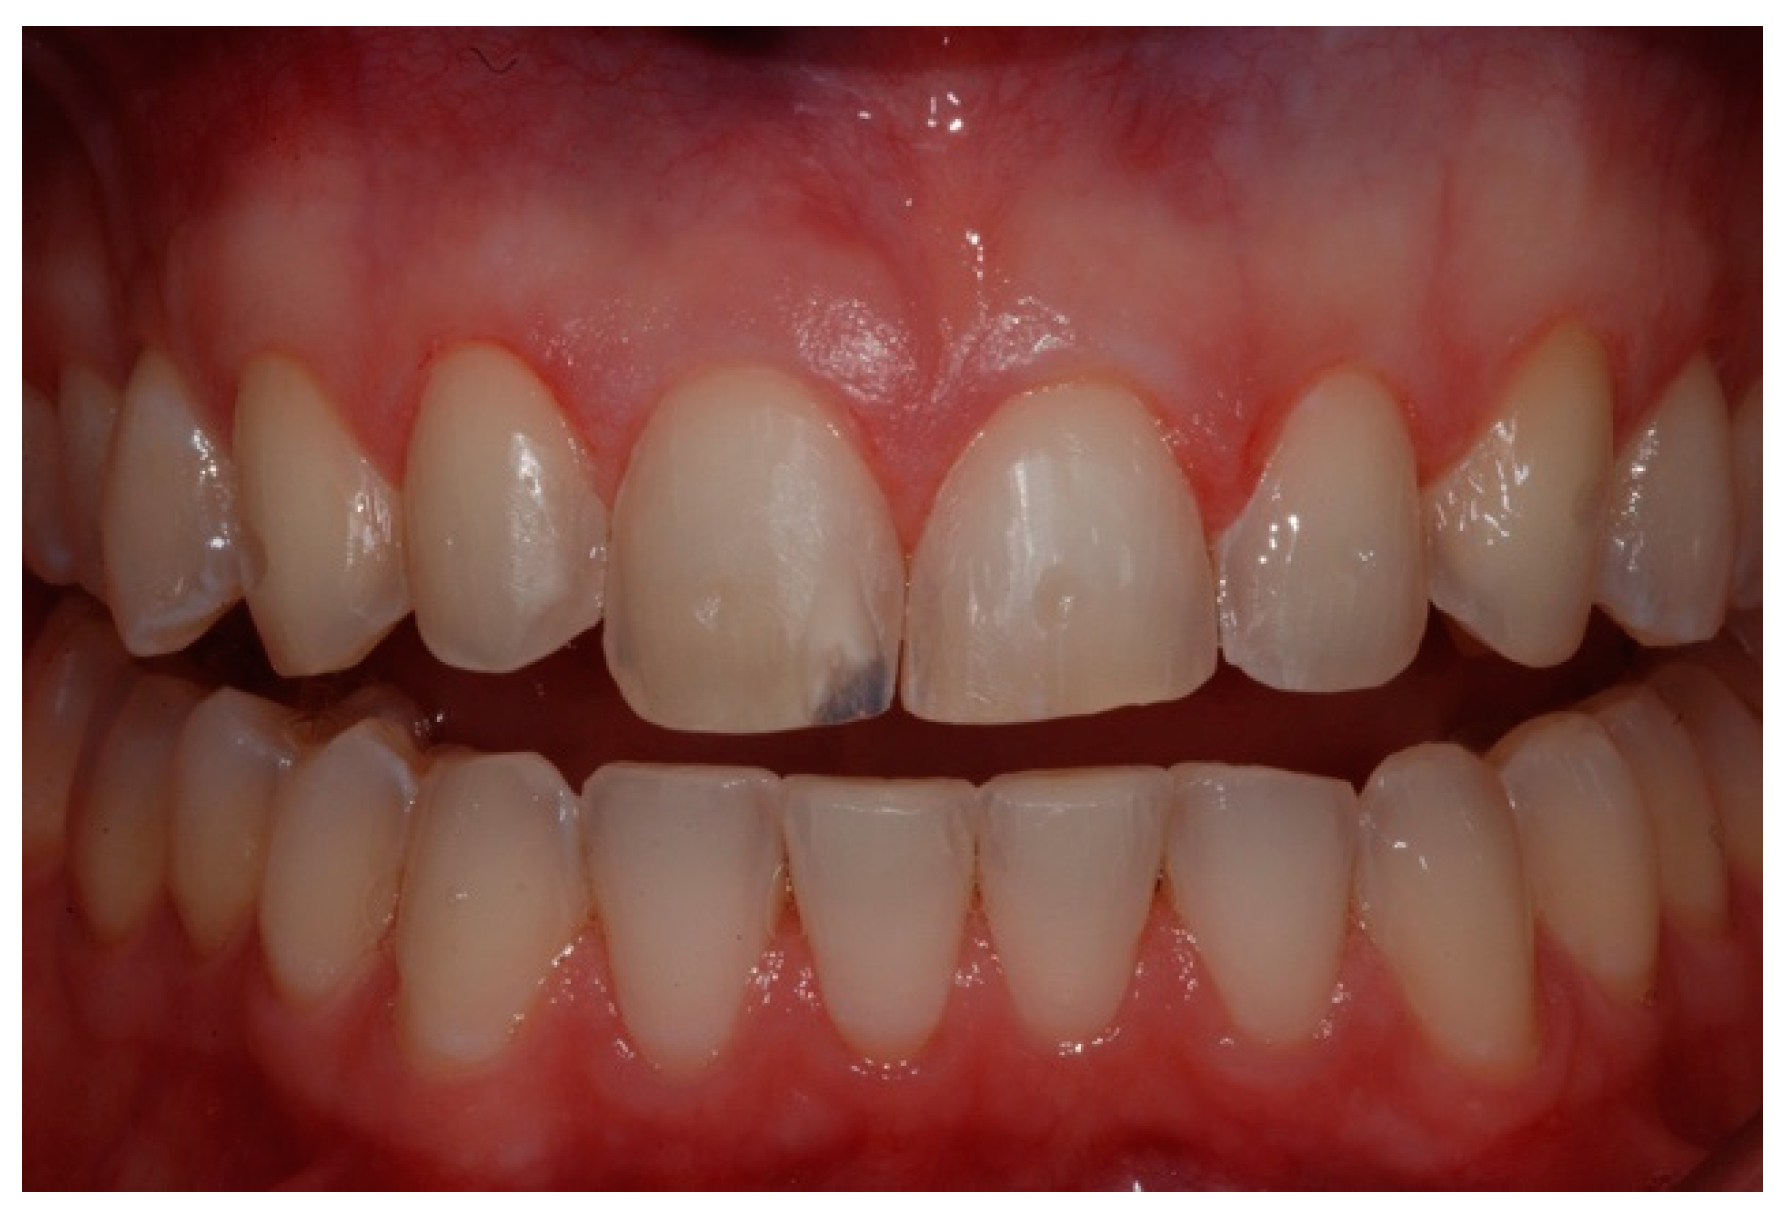
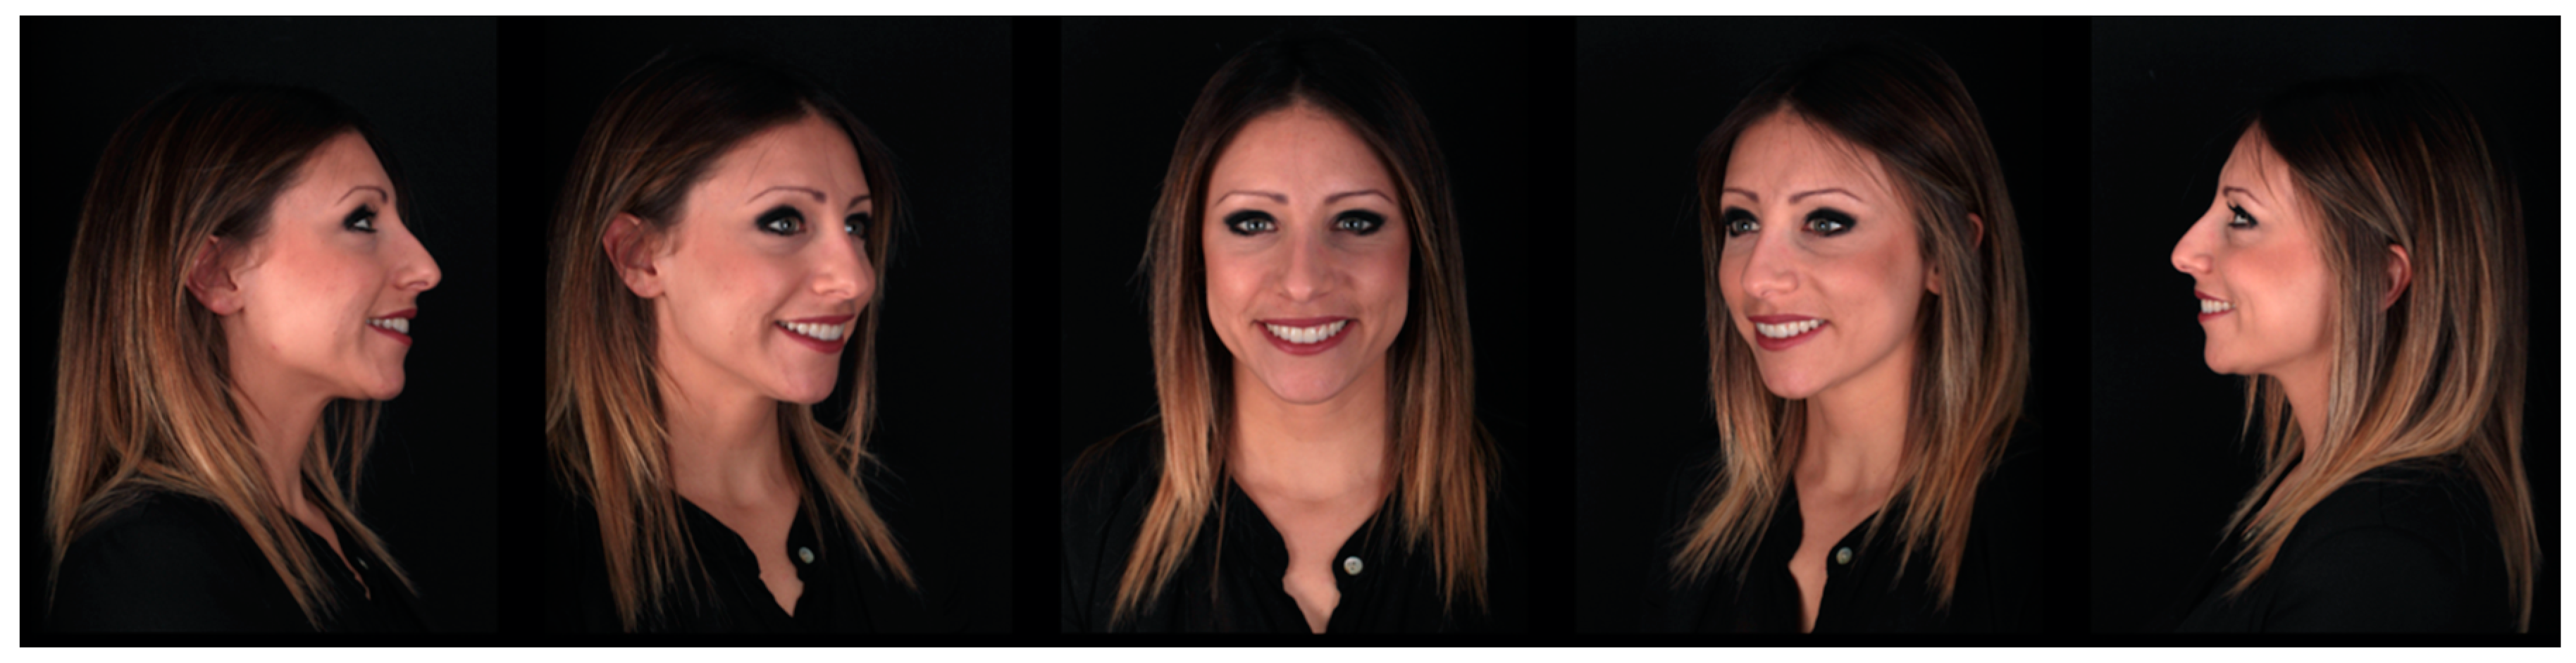
In the first objective clinical examination of the patient, a correct diagnosis, including medical and dental history, dental and periodontal screening with periodontal probing depths recording, full mouth intraoral X-rays set and initial clinical intraoral and extraoral photos was done (
Figure 1 and
Figure 2).
A preliminary phase with oral professional hygiene and full mouth disinfection was performed to achieve the health oral conditions necessary to do a correct treatment planning.
Oral impressions with alginate material (Hydrogum 5, Zhermack) have been taken and also digital oral impressions were detected for comparison.
Then a treatment proposal with digital prosthodontic previsualization was shown to the patient with the aid of the Digital Smile System. Longer teeth with more harmonic shapes in the cervical and incisal portions were digitally projected and the patients was informed about all the next steps of the treatment (
Figure 3).
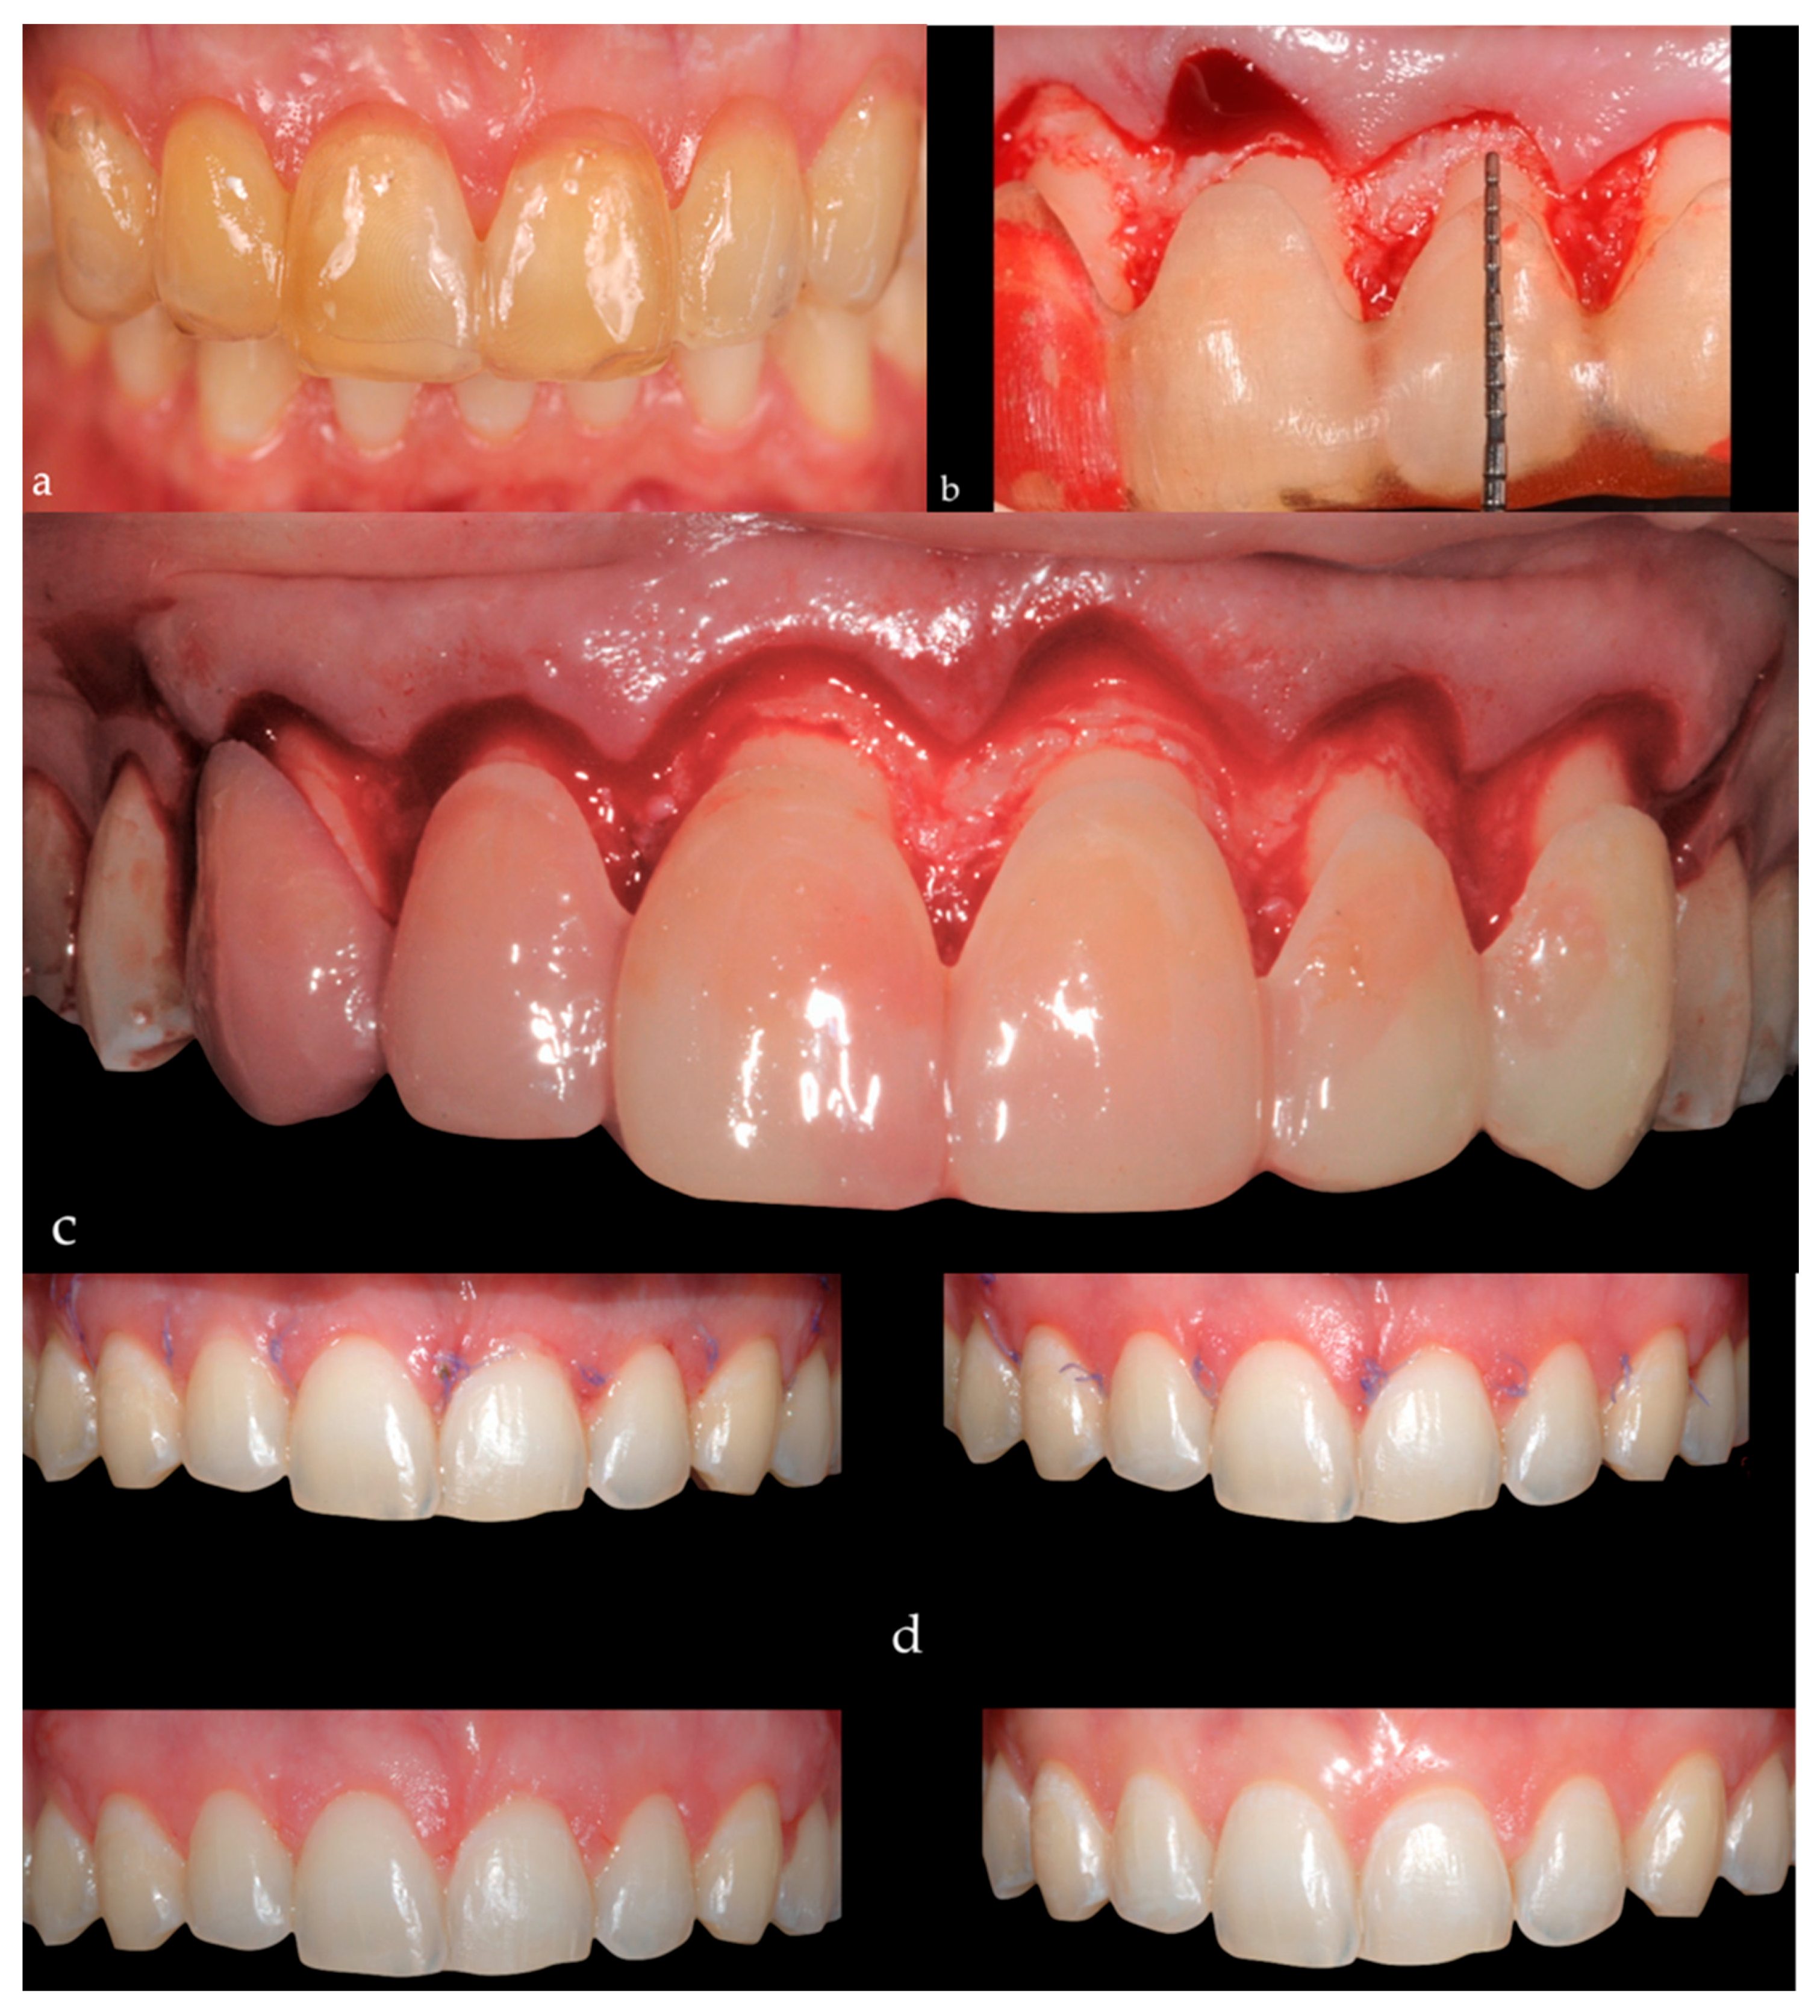
After patient approval of the previsualization, the treatment starts by performing a mucogingival surgery with the aid of a mockup used as an oral surgical guide for a highly accurate definition of the emergency profiles and gingival parabolas (
Figure 4). A multiple coronal flap technique was used and the gingiva excesses were cut. Little osteotomy and osteoplasty were done in order to reach the accurate vertical dimensions of the teeth established during the treatment planning. In this manner we were able to assess the correct biological width in real-time by placing the mock-up on the teeth. The epithelium of the anatomical papillae was removed and absorbable sutures were applied.
After a healing period of 12 months, as suggested by Pontoriero and Carnevale [
12], prosthetic phase with preparation of teeth 1.3, 1.2, 1.1, 2.1, 2.2 and 2.3 for porcelain laminate veneers was done. Then a resin mock-up (C&B, A3.5, NextDent B.V.) was applied on the teeth elected for veneer preparations (
Figure 5).
After trying the mock-up from the esthetically and mechanically point of view, a minimal iuxta-gingival butt joint preparation was done. A reduction of 0.5 mm of the buccal plate and of 1.5 mm of the incisal portion of the teeth added by the mock-up [
13] was performed (
Figure 6). Teeth 1.3, 1.2, 1.1, 2.1, 2.2 and 2.3 were prepared.
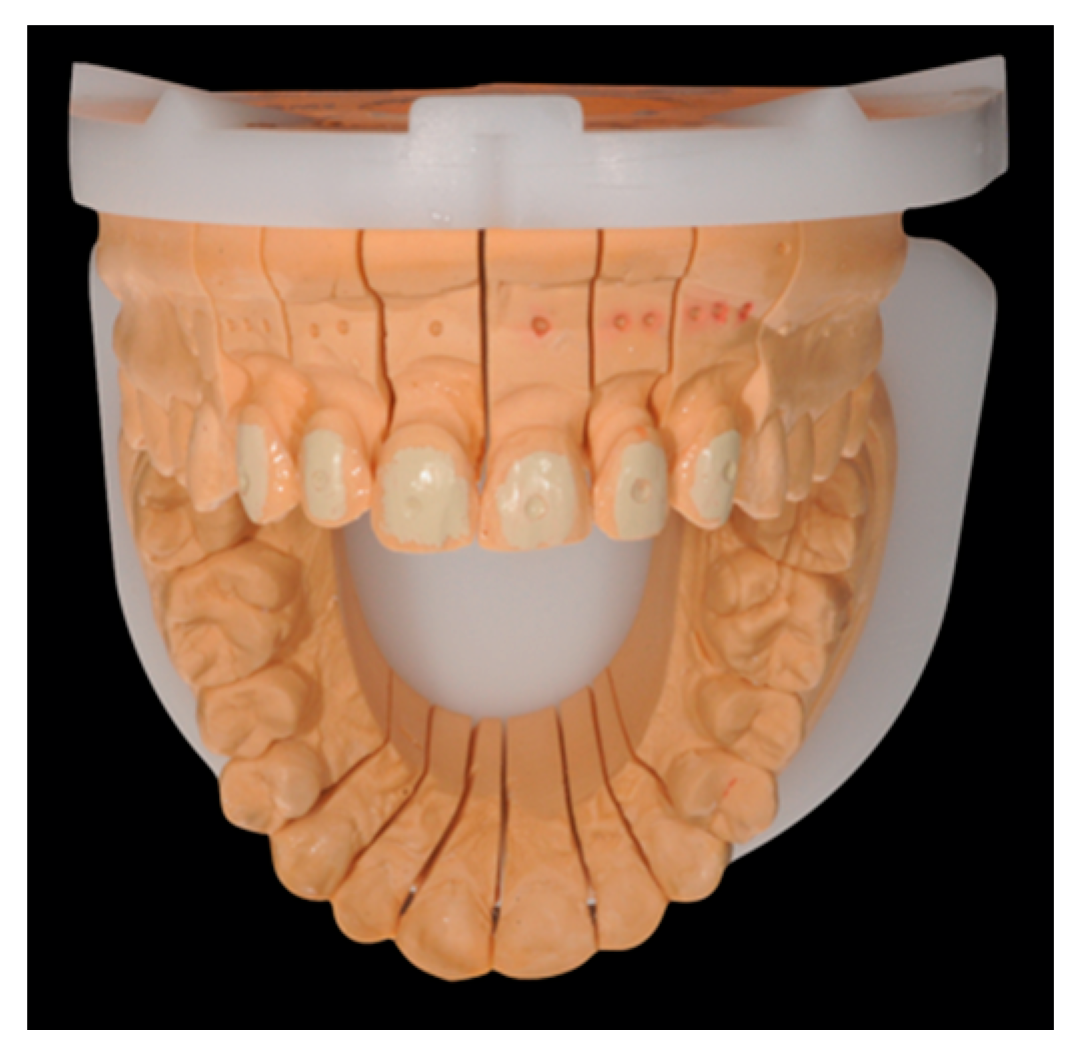
After the buccal plate preparation, a little hole made by a round bur at the center of each tooth was realized in order to ensure the correct positioning of the prosthetic veneers during the cementation phase under rubber dam (
Figure 7).
A stock tray was chosen to take the master impression, considering that around undercuts, the distance of the tooth to the try wall needs to be at least twice the depth of the undercut [
14]. Application of VPS adhesive on the tray and subsequent drying were done. For an accurate reproduction of the margin preparation, two retraction cords—the first smaller and the second bigger—were positioned around the prepared teeth according to the double cord retraction technique [
15].
In order to facilitate the technician in his work, seven small metal sectional matrixes were sprinkled with VPS adhesive and fixed between the anterior teeth and between canines and first premolars before taking the oral impression (
Figure 8).
Then, a master impression with a one-step technique using vinyl-polysiloxane impression materials (Acquasil Ultra mono e XLV regular set Dentsply) was taken.
The mockup realized in the first prosthetic phase was used again for making temporary veneers, which were attached on the teeth by using the spot-etching technique (
Figure 9).
2.2. Cementation Phase
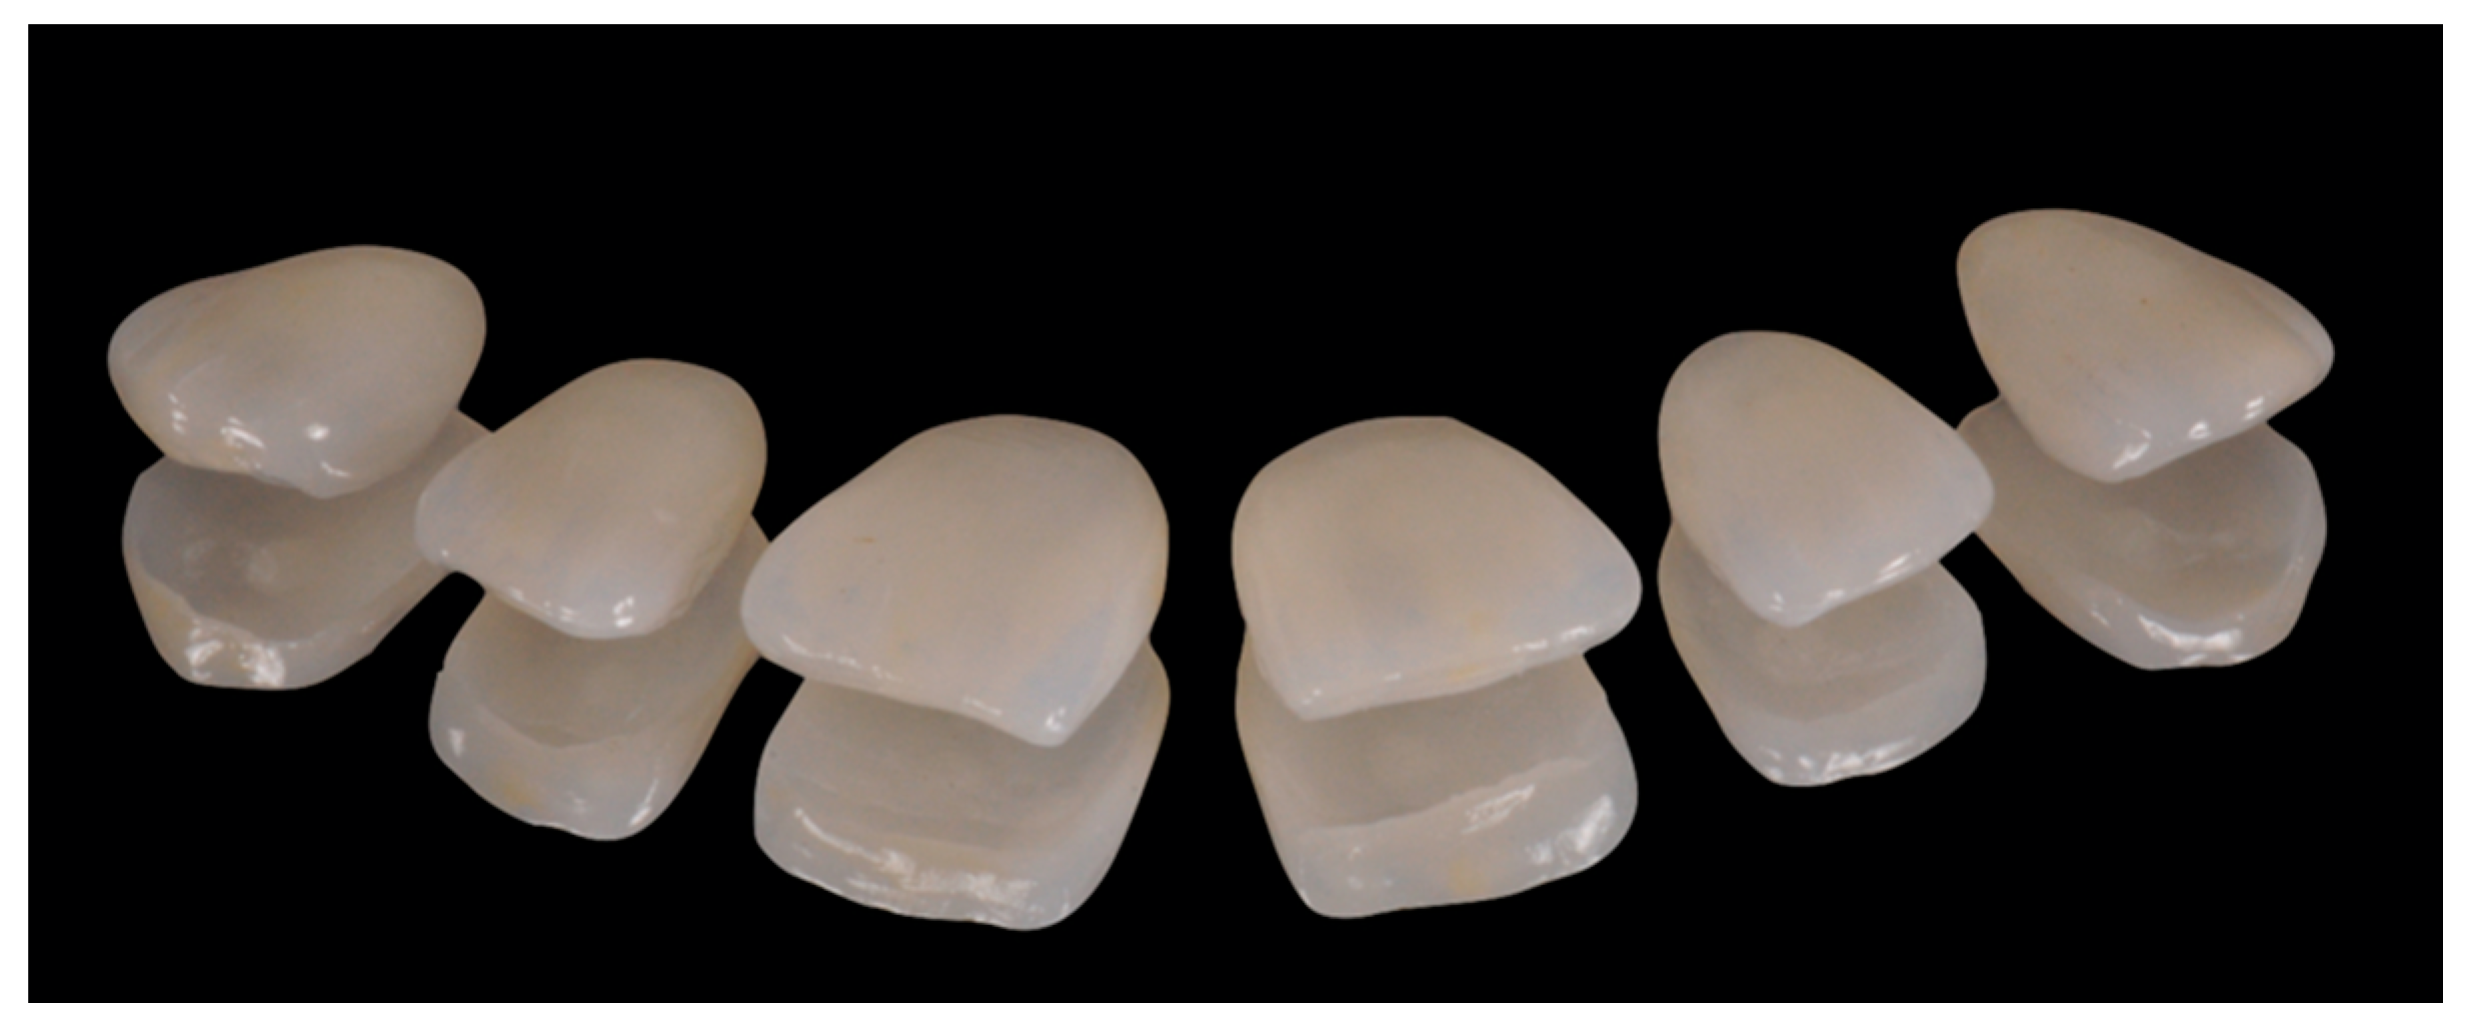
Six lithium disilicate veneer restorations were manufactured by the technician after seven days from the master impression (
Figure 10 and
Figure 11).
The following prosthetic clinical steps for the cementation phase were:
Removal of the temporary restorations and polishing of the tooth surfaces in order to remove the provisional cement.
Definitive restorations try-in on prepared teeth by using a water-soluble cement (Relyx Try-in paste 3M). Each single veneer was prosthetically evaluated for proximal contacts, shade match, contour, and marginal adaptation. After that evaluation, the definitive cementation phase could follow. Otherwise little reshaping of the veneer could be done if the ceramic permits those modifications or taking other oral impression. In this phase we could also try different colored translucent cements in order to visualize the resulting effect on the color and establishing color and viscosity of the cement of choice.
Triple zero retraction cord positioning around prepared teeth (1.3, 1.2, 1.1, 2.1, 2.2 and 2.3).
Rubber dam isolation from 1.5 to 2.5 with n°2 clamps and correct retraction in the apical part of the teeth by using an interdental floss ligature for each tooth for obtaining a correct moisture control.
Sandblasting with aluminum oxide particles of the prepared teeth surfaces in order to enhance the bond strength [
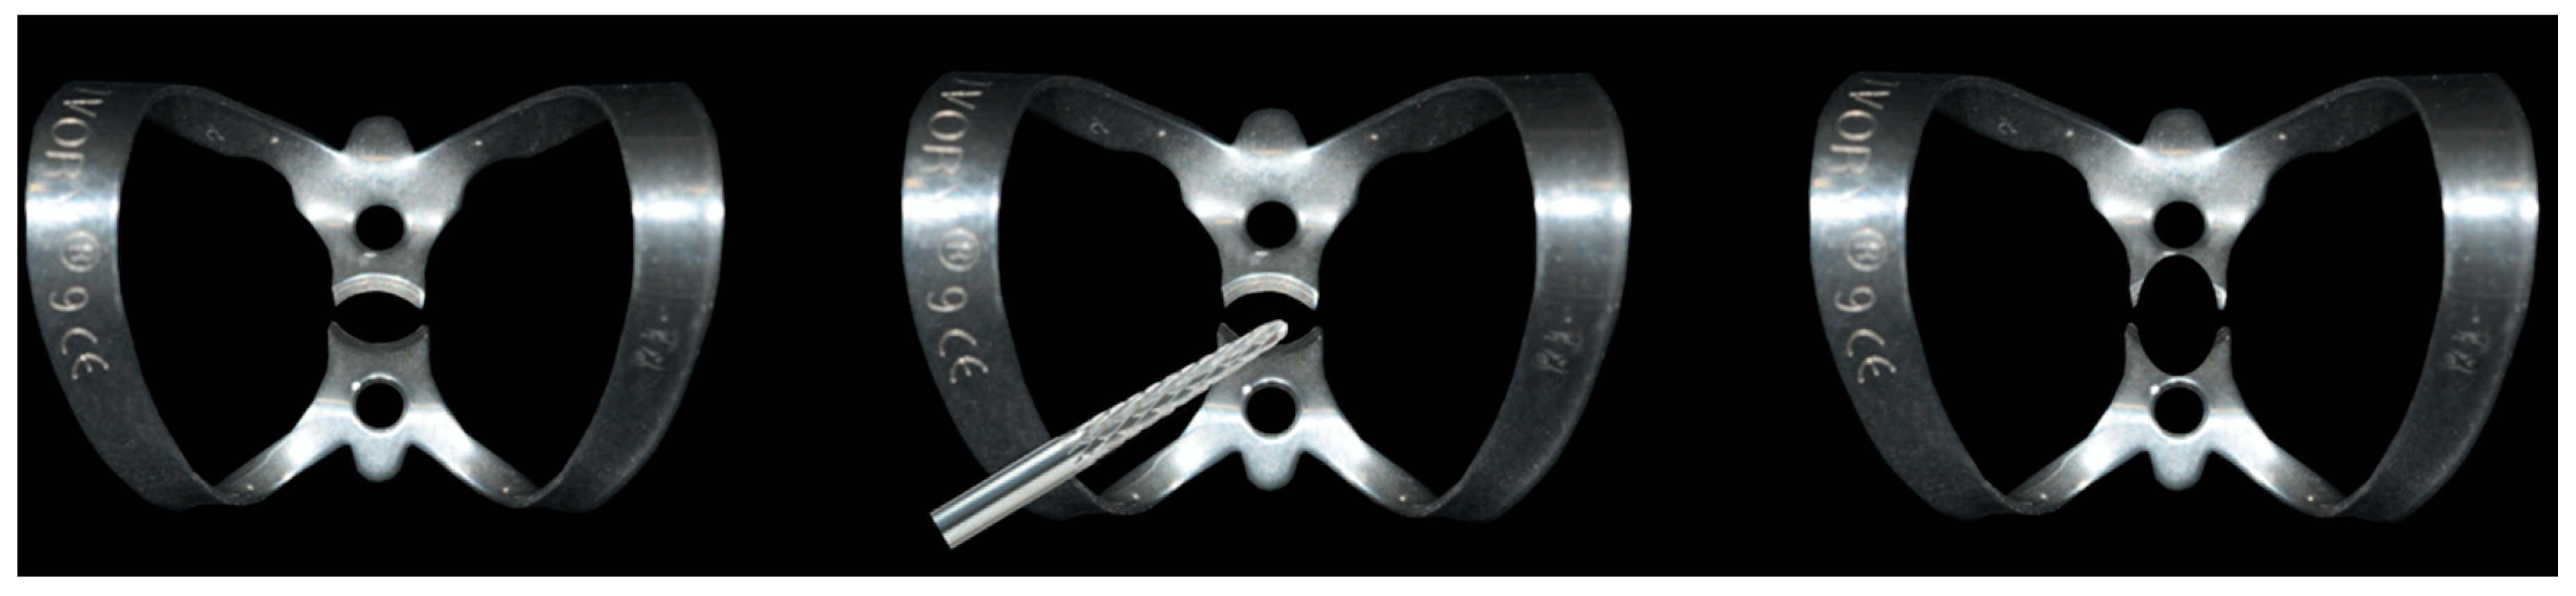
16].
Positioning of the modified n°9 clamp modified on the first tooth for cementation. This modification allows the correct positioning of the veneer without any interferences between the most apical point of the veneer (zenith of the veneer) and the clamp beaks (
Figure 12).
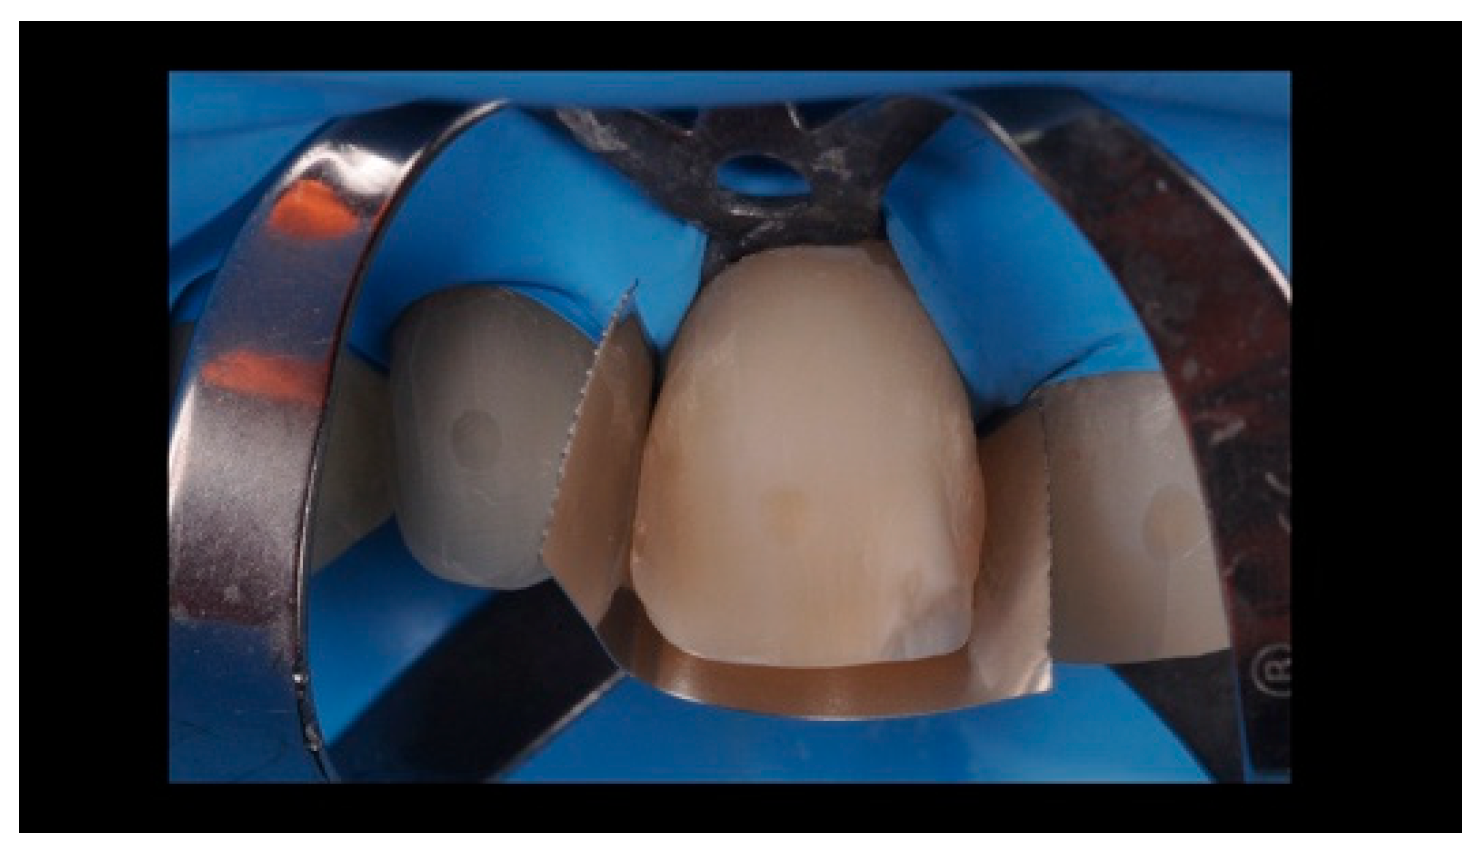
In order to reach a better control of the interdental contact point, the prosthetic cementation has begun from one central incisor and then continued alternating the tooth for cementation;
Teflon application on adjacent teeth or matrix positioning in order to avoid contamination of the other elements (
Figure 13);
Etching of the tooth surface prepared with 37% orthophosphoric acid. Subsequent rinsing, drying and application of bonding agent.
Etching with 9.5 hydrofluoric acid for 20 seconds and cleaning of the internal surface of lithium disilicate veneers [
17].
Application of the universal bond, which contains silane on the internal surface of the lithium disilicate veneers (or silane and bonding applied in two different subsequent steps) [
18];
Elimination of the bonding excesses and drying of the surface of the application in order to evaporate its volatile component.
Light curing of the adhesive on tooth and veneer surfaces.
Positioning of the veneer on tooth surface with Relyx veneer (3M) cement and removal of the cement excesses prior to photopolymerization.
Repetition of the procedure for each tooth prepared prior to controlling the interdental contact points.
Removal of the rubber dam.
Removal of the other excesses of bonding agent and cement in order to obtain more regular contours.
3. Discussion
The rehabilitation of the anterior sector is always a challenging procedure for the prosthodontist. This is especially true when young patients with high aesthetic requests are involved in the prosthetic treatment.
According to Magne and Belser [
19], ceramic laminate veneers represent a well-documented, effective, and predictable treatment option when teeth bleaching was ineffective and when major morphologic modifications and extensive restorations in adult patients are required.
The prosthetic preparation of the teeth for ceramic laminate veneers has to follow the minimally invasive concept brought by the modern Prosthodontic and Conservative Dentistry in order to provide esthetic and functional rehabilitation. Three different preparation designs have been suggested regarding the incisal edge preparation: the feathered incisal edge, the butt joint and the overlapped incisal edge with palatal chamfer. Some authors have found that the butt joint is the preparation that least affects the strength of the tooth and that the chamfer preparation type is more susceptible to ceramic fractures [
20].
For labial surface preparation, which is the most esthetic portion of ceramic laminate veneers, an accurate preparation depth can be achieved via several methods: freehand, use of depth cuts/grooves and use of a silicon putty index obtained after the wax up or the provisional have all shown good predictable results in reducing the buccal plate for the thickness previously planned [
21].
For interproximal extension, no conclusive evidence demonstrates what is the best technique to prepare. Then, the clinician has to choose for each case if it is better to not prepare or to prepare until the interproximal contact point or to slightly open the interproximal contact.
However, in some cases no teeth preparation is required to restore the teeth (“no prep technique”) [
22].
All these preparation techniques are based on the need to give optimal biomechanics and aesthetic characteristics—at the same time respecting the highly conservative concepts. However, in order to achieve those final goals, it is also mandatory that the prosthetic cementation phase is free of mistakes. These techniques do not consider the difficulty in maintaining the correct spatial orientation during the cementation phase, and the subsequent possibility to design a preparation for laminates in order to position in a correct way the veneers on the teeth. In this direction, we perform some different fine intraoperative maneuvers and tricks that help the clinician in the preparation of the teeth and in the subsequent placement of the laminates on the teeth prepared under the rubber dam.
The modification of the labial preparation by performing a little hole with a round bur at the center of buccal plate of the tooth is important to achieve the correct placement of the veneers under the rubber dam when extraoral and intraoral landmarks disappear. Moreover, during the prosthetic cementation phase, the attention of the clinician is mainly referred to factors such as the cement excesses and the pressure applied on the veneers during its positioning, as these factors could lead to cement the veneers in an incorrect position [
23].
Another little trick that could prevent possible errors during the luting phase is the modification of number 9 hook. The objective is to avoid small shifts during veneer positioning because of the interference between the hook and the most coronal part (zenith) of the veneer itself. This adaptation consists in the elimination of the flattened part of the labial clamp beak in order to put the hook in an apical position that cannot interfere with the zenith of the veneer.
The correct positioning of the prosthetic veneers on teeth is also dependent on how accurate the technician works and how precise the fitting of the veneers is. Then, in order to facilitate the technician, during the master impression phase seven small metal sectional matrixes were sprinkled with vinyl-polysiloxane adhesive and fixed between the anterior teeth and between canines and first premolars before taking the oral impression. The goal is to highlight the interdental contact points in the model, aiding the technician to separate the teeth from each other with the bur, without any risk to remove the contact points because of the additional space obtained during the manufacturing of the cast with the removable abutments.
4. Conclusions
Adhesive and minimally invasive dentistry is nowadays a consolidated reality in Prosthetic Dentistry. New materials and techniques must guarantee a good predictability of the final goal from the beginning to the end of treatment and not only an optimal aesthetics, which could also improve.
However, other studies with more patients and longer follow-ups are required to prove the reliability of this new tricks and techniques improving the technical procedures of the treatment.
Author Contributions
Conceptualization, L.O., T.V. and F.G.; methodology, L.O., T.V and T.V.; software, L.O., T.V. and T.V.; resources, T.V.; data curation, F.G.; writing—original draft preparation, F.G.; writing—review and editing, L.O., T.V. and F.G.; visualization, L.O., T.V. and F.G.; supervision, T.V. R.B. fabricated the laminate veneers.
Funding
This research received no external funding
Acknowledgments
The authors thank Gianni Ortensi, CDT and Marco Ortensi, CDT, who fabricated the mock-up and supported laboratory digital processes.
Conflicts of Interest
The authors declare no conflict of interest.
References
- Cicciù, M. Prosthes: New Technological Opportunities and Innovative Biomedical Devices. Prosthesis 2019, 1, 1–2. [Google Scholar] [CrossRef]
- Mackenzie, L.; Banerjee, A. Minimally invasive direct restorations: A practical guide. Br. Dent. J. 2017, 11, 163–171. [Google Scholar] [CrossRef] [PubMed]
- Staehle, H.J.; Wolff, D.; Frese, C. More conservative dentistry: Clinical long-term results of direct composite resin restorations. Quintessence Int. 2015, 46, 373–380. [Google Scholar]
- Edelhoff, D.; Prandtner, O.; Saeidi Pour, R.; Liebermann, A.; Stimmelmayr, M.; Guth, J.F. Anterior restorations: The performance of ceramic veneers. Quintessence Int. 2018, 49, 89–101. [Google Scholar] [PubMed]
- Pereira, J.R.; Pamato, S.; Vargas, M.; Junior, N.F. State of the Art of Dental Adhesive Systems. Curr. Drug Deliv. 2018, 15, 610–619. [Google Scholar] [CrossRef]
- Wang, Y.; Li, C.; Yuan, H.; Wong, M.C.; Zou, J.; Shi, z.; Zhou, X. Rubber dam isolation for restorative treatment in dental patients. Cochrane Database Syst. Rev. 2016, 9, CD009858. [Google Scholar] [CrossRef]
- Cochran, M.A.; Miller, C.H.; Sheldrake, M.A. The efficacy of the rubber dam as a barrier to the spread of microorganisms during dental treatment. J. Am. Dent. Assoc. 1989, 119, 141–144. [Google Scholar] [CrossRef]
- Reid, J.S.; Callis, P.D.; Patterson, C.J.W. Rubber Dam in Clinical Practice, 1st ed.; Quintessence Publishing: London, UK, 1991. [Google Scholar]
- Tiwana, K.K.; Morton, T.; Tiwana, P.S. Aspiration and ingestion in dental practice: A 10-year institutional review. J. Am. Dent. Assoc. 2004, 135, 1287–1291. [Google Scholar] [CrossRef]
- Lynch, C.D.; McConnell, R.J. The use of micro abrasion to remove discolored enamel: A clinical report. J. Prosthet. Dent. 2003, 90, 417–419. [Google Scholar] [CrossRef]
- Mizrahi, B. Porcelain veneers: Techniques and precautions. Int. Dent. 2007, 9, 1–4. [Google Scholar]
- Pontoriero, R.; Carnevale, G. Surgical crown lengthening: A 12-month clinical wound healing study. J. Periodontol. 2001, 72, 841–848. [Google Scholar] [CrossRef] [PubMed]
- Magne, P.; Magne, M. Use of additive wax up and direct intraoral mock-up for enamel preservation with porcelain laminate veneers. Eur. J. Esthet. Dent. 2006, 1, 10–19. [Google Scholar] [PubMed]
- Millstein, P.; Maya, A.; Segura, C. Determining the accuracy of stock and custom tray impression/casts. J. Oral Rehabil. 1998, 25, 645–648. [Google Scholar] [CrossRef] [PubMed]
- Cloyd, S.; Puri, S. Using the double-cord packing technique of tissue retraction for making crown impressions. Dent. Today 1999, 18, 54–59. [Google Scholar] [PubMed]
- Consani, R.L.; Richter, M.M.; Mesquita, M.F.; Sinhoreti, M.A.; Guiraldo, R.D. Effect of aluminum oxide particle sandblasting on the artificial tooth-resin bond. J. Investig. Clin. Dent. 2010, 1, 144–150. [Google Scholar] [CrossRef] [PubMed]
- Zogheib, L.V.; Bona, A.D.; Kimpara, E.T.; McCabe, J.F. Effect of hydrofluoric acid etching duration on the roughness and flexural strength of a lithium disilicate-based glass ceramic. Braz. Dent. J. 2011, 22, 45–50. [Google Scholar] [CrossRef] [PubMed]
- Johnson, G.H.; Lepe, X.; Patterson, A.; Sch√§fer, O. Simplified cementation of lithium disilicate crowns: Retention with various adhesive resin cement combinations. J. Prosthet. Dent. 2018, 119, 826–832. [Google Scholar] [CrossRef]
- Magne, P.; Belser, U. Bonded Porcelain Restorations in the Anterior Dentition: A Biomimetic Approach; Quintessence: Chicago, IL, USA, 2002. [Google Scholar]
- Da Costa, D.C.; Coutinho, M.; de Sousa, A.S.; Ennes, J.P. A meta-analysis of the most indicated preparation design for porcelain laminate veneers. J. Adhes. Dent. 2013, 15, 215–220. [Google Scholar]
- Abuzenada, B.; Alanazi, A.; Saydali, W.; Elmarakby, A.; Koshak, H.; Alharthi, A. Current classifications and preparation techniques of dental ceramic laminate veneers (Review article). Int. J. Adv. Res. 2017, 5, 1973–1979. [Google Scholar] [CrossRef]
- Wells, D.J. “No-prep” veneers. Inside Dent. 2010, 6, 56–60. [Google Scholar]
- Fradeani, M.; Redemagni, M.; Corrado, M. Porcelain laminate veneers: 6- to 12-year clinical evaluation-a retrospective study. Int. J. Periodontics Restor. Dent. 2005, 25, 9–17. [Google Scholar]
© 2019 by the authors. Licensee MDPI, Basel, Switzerland. This article is an open access article distributed under the terms and conditions of the Creative Commons Attribution (CC BY) license (http://creativecommons.org/licenses/by/4.0/).


