Article

Design, Topology Optimization, Manufacturing and Testing of a Brake Caliper MADE of Scalmalloy® for Formula SAE Race Cars

Department of Industrial Engineering, University of Padova, Via Venezia 1, 35131 Padova, Italy
*
Author to whom correspondence should be addressed.
Vehicles 2024, 6(3), 1591-1612; https://doi.org/10.3390/vehicles6030075
Submission received: 12 July 2024 / Revised: 10 August 2024 / Accepted: 2 September 2024 / Published: 4 September 2024
(This article belongs to the Special Issue Vehicle Design Processes, 2nd Edition)

Abstract

:
This paper details the conceptualization, design, topology optimization, manufacturing, and validation of a hydraulic brake caliper for Formula SAE race cars made of Scalmalloy®, an innovative Al-Mg-Sc alloy which was never adopted before to manufacture a brake caliper. A monoblock fixed caliper with opposing pistons was developed, focusing on reducing mass for a fixed braking force. The design process began with a theoretical analysis to establish braking force and pressure requirements, followed by preliminary design and topology optimization. The caliper was then manufactured using laser powder bed fusion (LPBF). Comprehensive experimental validation, including testing with static and rotating brake discs on an inertial dynamometer, confirmed the expected caliper’s performance, with the results showing strong alignment with finite element analysis estimations. In particular, strain and displacement measurements showed excellent correlation with numerical estimates, validating the design’s accuracy and effectiveness.

1. Introduction

In FSAE race cars [1], braking systems must deliver high deceleration while minimizing unsprung mass. Therefore, the design and optimization of these systems require careful consideration of factors to balance performance, weight, and durability [2,3,4,5,6,7,8,9,10,11,12]. Hydraulic braking systems are commonly employed in race cars, where a hydraulic actuator presses brake pads with lining material against the brake disc, generating the necessary friction to decelerate the vehicle [13]. Among the system’s components, the brake caliper plays a critical role in converting hydraulic pressure into mechanical force, enabling effective braking. The caliper must endure high braking forces and thermal loads without compromising structural integrity or performance. Ensuring its durability and reliability under severe racing conditions is crucial, and traditional brake calipers, often designed for mass-produced vehicles, are generally oversized, i.e., heavier and not optimized for the unique requirements of a FSAE race cars.
This study focuses on the design of a monoblock fixed caliper with opposing pistons, specifically tailored for FSAE race cars. In the literature, other authors have addressed similar topics. For example, Phad et al. [9] as well as Ravi Kumar et al. [14] focused on the design of a monoblock floating caliper in Al 7075 for FSAE cars, using traditional manufacturing methods. In their work, the authors provided a detailed description of the role of many parameters and conducted numerical analyses to verify the proposed caliper geometry. Similarly, the authors in [4,8] tackled the design of a monoblock fixed caliper with opposing pistons for FSAE cars in Al 7075, presenting a traditional design with numerical verifications of the realized model. Regarding traditional manufacturing methods, Ugemuge and Das [15] addressed the design, structural analysis using Finite Element method, manufacturing, and testing of a two-piece fixed caliper with two opposing pistons made of Al 7075-T6 alloy. Compared to a monoblock fixed caliper, a two-piece fixed caliper (constructed from two parts connected by bolted joints) offers easier manufacturing by eliminating undercuts and the need for specialized tooling. However, it can result in a heavier component due to the presence of flanges and bolts, and it typically has a lower braking performance due to increased caliper compliance [12,15].
Subsequently, Ugemuge and Das [16] addressed the redesign of the bridge in a four-piston fixed caliper made of Ti6Al4V alloy by using topology optimization and finite element analyses, focusing only on the numerical aspects of the design. Also, Meyer and Barnes [17] used topology optimization to perform a preliminary design of a four-piston monoblock fixed caliper. The objective of their work was to demonstrate that, in some cases, topology optimization can justify the use of high-performance, costly alloys in components produced via additive manufacturing. To do this, Meyer and Barnes [17] considered various alloys suitable for 3D printing, including AlSi10Mg, Ti6Al4V, and Scalmalloy®, an aerospace Al-Mg-Sc alloy with high specific strength. Interestingly, the authors showed that, under identical load cases and constraints in the topology optimization, Scalmalloy® enables the production of a lighter and less expensive caliper compared to AlSi10Mg or Ti6Al4V [17]. However, it is important to note that their investigation was limited to numerical analyses, and they did not proceed with the physical printing or experimental testing of the caliper. Instead, Farias et al. [6] combined topology optimization with additive manufacturing (AM) technologies to develop and fabricate a four-piston monoblock fixed caliper made of AlSi10Mg. Their work aimed to optimize an existing design, resulting in a lighter design with higher stiffness and better thermal dissipation capabilities. Similarly, Tyflopoulos et al. [7] used topology optimization and AM to redesign a commercial caliper, achieving a 3D-printed caliper made of Ti6Al4V that was 40% lighter than the original. Unfortunately, no experimental validation was reported in either [6] or [7]. Finally, Sergent et al. [10,12] presented the complete design of an optimized monoblock fixed caliper, not specifically tailored for FSAE vehicles, and made of an aluminum–lithium alloy. The authors also presented some experimental testing, mainly devoted to verifying the effectiveness of the proposed solution, by using both dial gauge measurement and pressure sensitive paper.
Instead, the present study offers one of the first examples of comprehensive perspective on the process of concept development, design, fabrication, and testing of a brake caliper made of an innovative Al-Mg-Sc (Scalmalloy®) alloy from scratch. This study starts by analyzing the vehicle dynamic to define the design loads of the brake caliper and it continues by discussing the preliminary design phase, which aims at defining the size of the caliper as well as its main geometrical feature. Then, it explores the use of topology optimization and laser powder bed fusion (LPBF) additive manufacturing to design and realize a high-performance, lightweight brake caliper made of an Al-Mg-Sc (Scalmalloy®) alloy, which was never been adopted to manufacture a brake caliper. Eventually, a comprehensive experimental validation is presented based mainly on strain gauge measurements and including testing at the dynamometer with static and rotating brake discs to verify the caliper’s performance and the reliability of the finite element simulations.

2. Design of the Braking Caliper

2.1. Maximum Braking Force

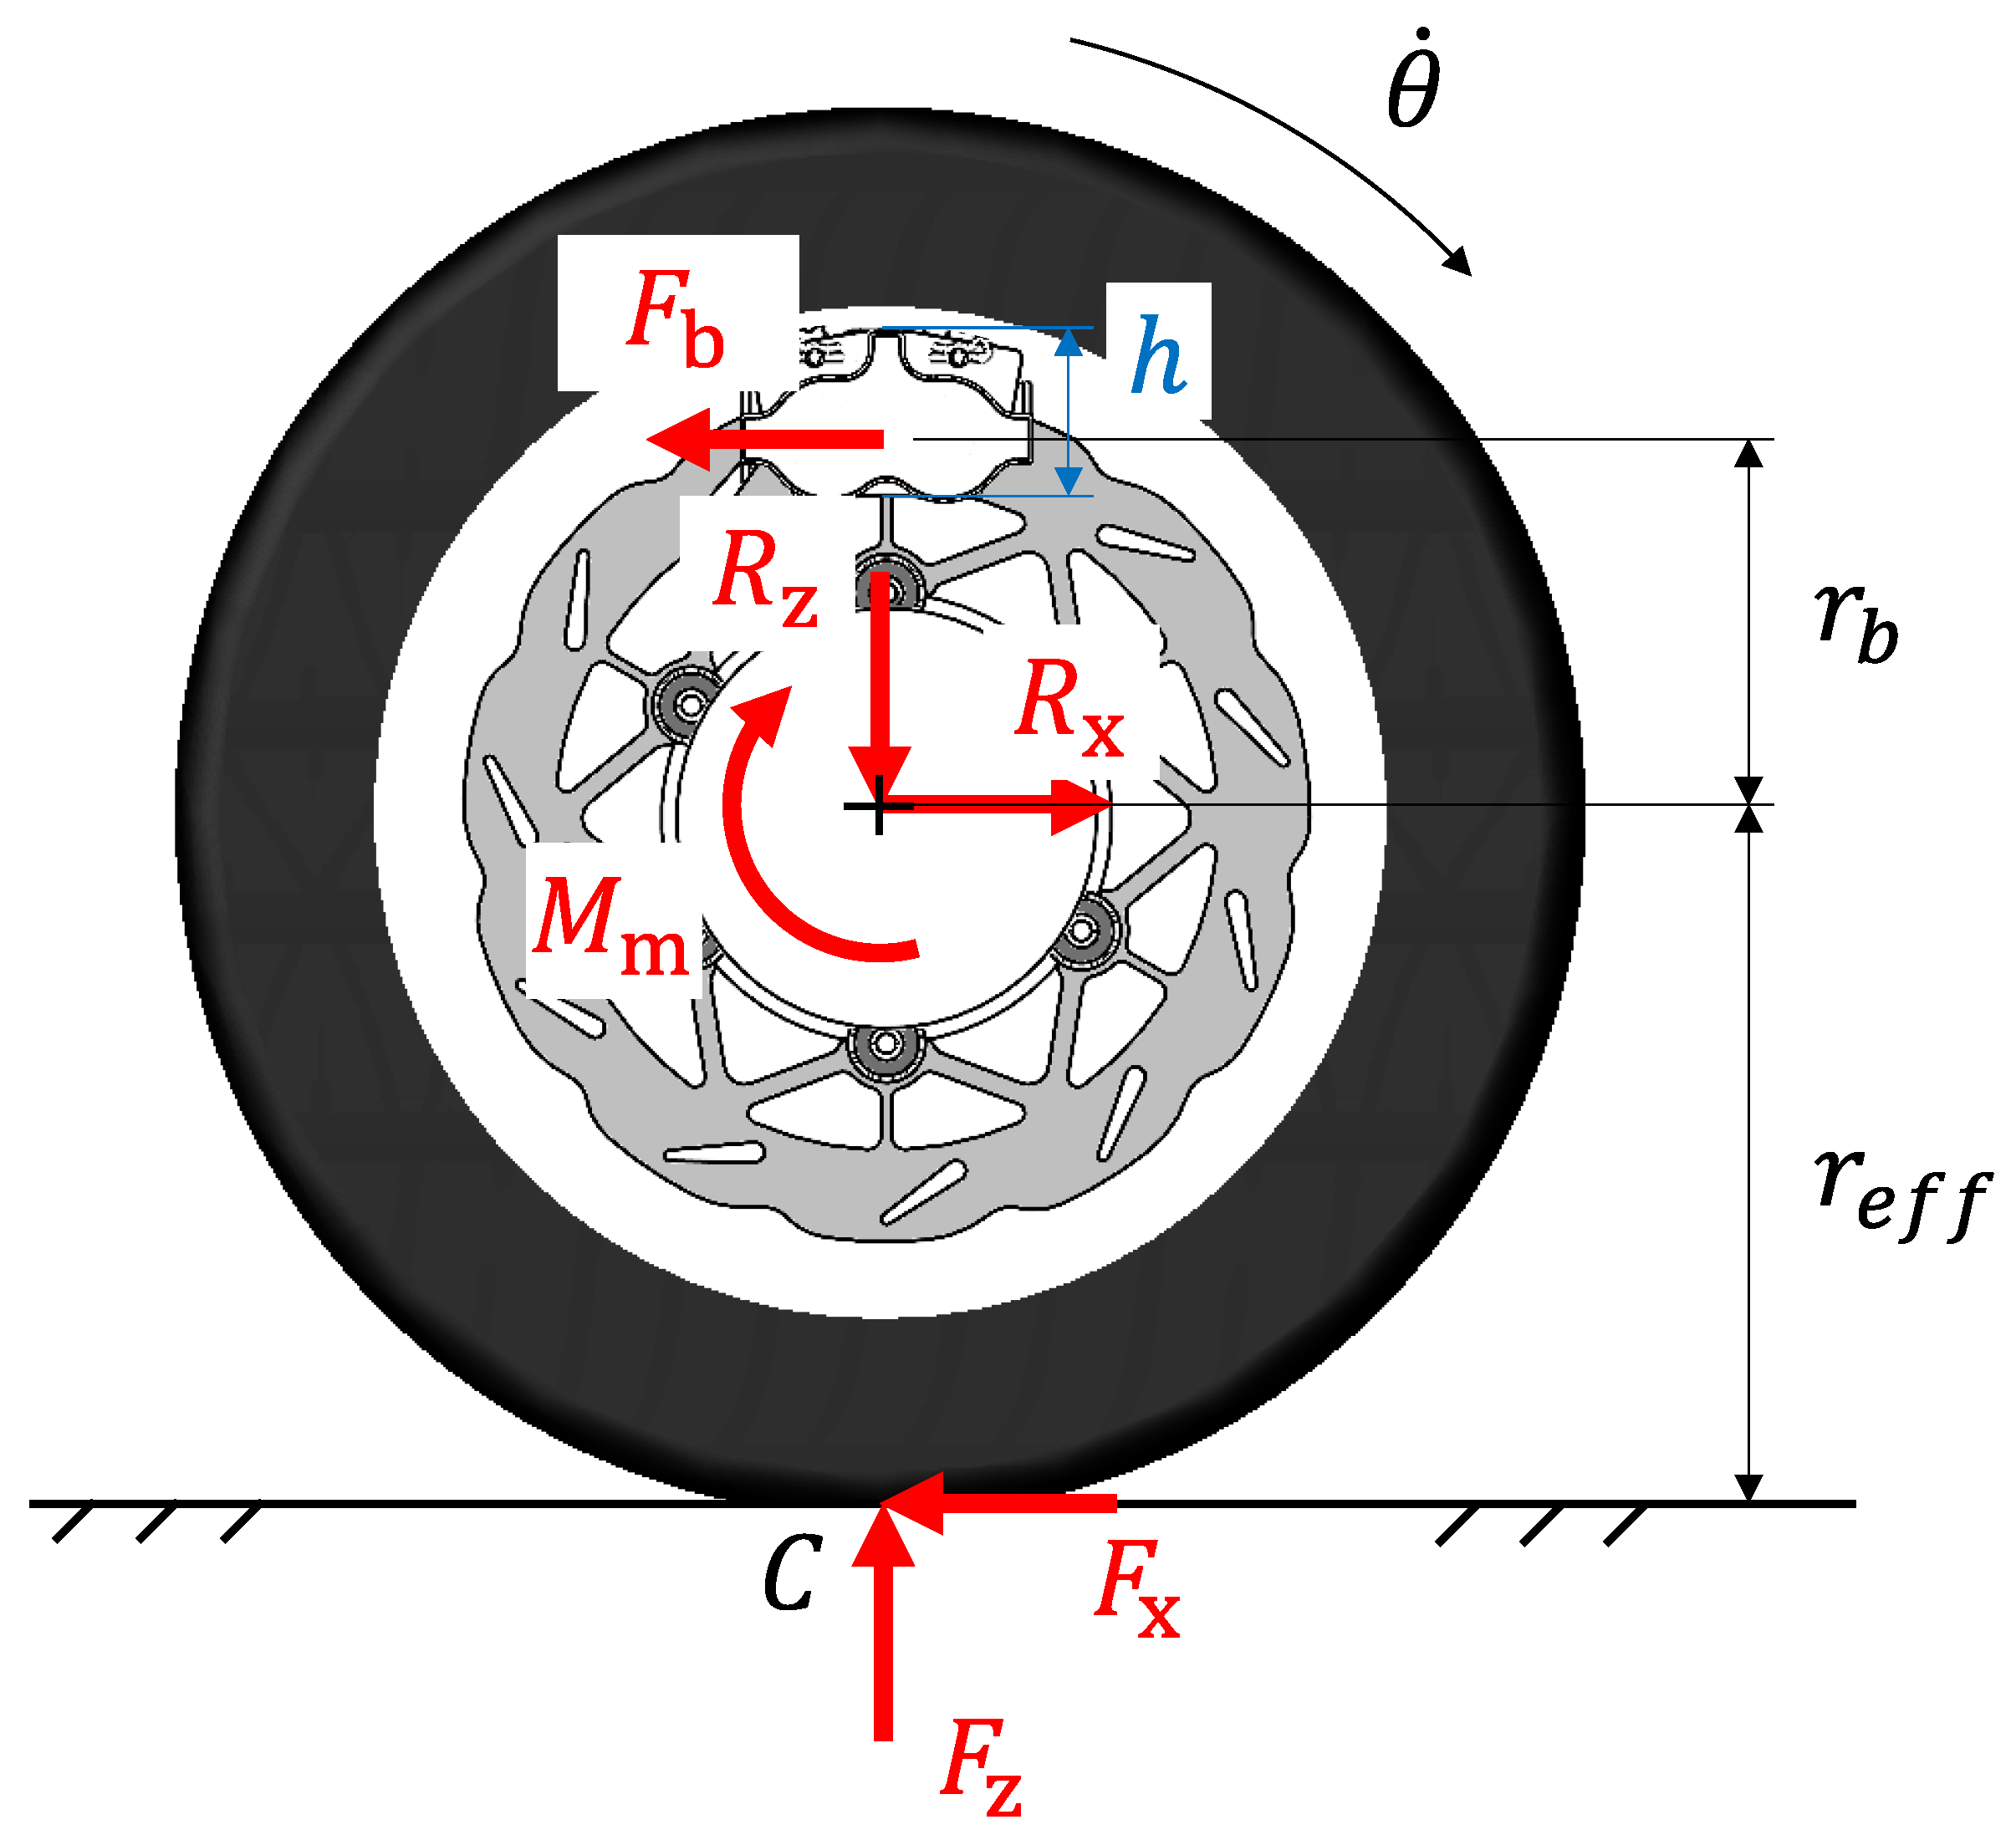
To accurately design a brake caliper and the entire braking system, it is crucial to understand the various factors affecting the required braking force. For this purpose, refer to Figure 1, which describes the sub-assembly consisting of a single wheel and the brake disc during the braking phase.
Regardless of whether the front or rear wheel group is considered, Rx and Rz are the longitudinal and vertical forces exchanged between the wheel and the hub, the axis of which is located at a distance equal to the effective rolling radius r e f f from the ground. M m is the torque transmitted by the drive shaft (positive if it comes from the engine and negative if relevant to engine braking or regenerative braking), while F b , positioned at a distance r b from the wheel’s axis, is the resultant of the friction forces generated by the contact of the brake pads with the rotating brake disc. Lastly, Fx and Fz are the external forces exchanged between the tires and the ground through contact point C in the longitudinal and vertical directions, respectively. Note that this simplified schematic deliberately neglects aerodynamic loads and the weight force of the wheel assembly, assuming negligible rolling resistance (i.e., the center of pressure C of the contact forces is assumed to have no offset from the rotation axis). According to Figure 1, the spin dynamic of a wheel assembly is described by the following expression:
r e f f F x r b F b + M m = I w θ ¨
where I w is the moment of inertia of the considered system. Rearranging Equation (1), the following expression is obtained:
F b = 1 r b r e f f F x + M m I w θ ¨
Equation (2) provides several interesting considerations and insights regarding the design of a brake caliper. When designing a brake system for a racing car, the objective is to maximize performance by creating a lightweight system capable of generating very high decelerations. This approach aims to delay the initiation of braking as much as possible, thereby reducing the duration of the braking phase. In general, achieving high deceleration θ ¨ (which is negative during braking) necessitates a substantial braking force F b . Typically, this results in relatively large and heavy brake calipers and associated components. However, this requirement conflicts with the well-established necessity to minimize unsprung mass, which includes the mass of the brake caliper. Therefore, it is essential to find a good compromise to reduce the braking force F b and, at the same time, to maximize the deceleration θ ¨ as much as possible.
In light of this, it is easier to interpret the role of each term in Equation (2) and to understand why the inertial component I w θ ¨ , although usually negligible, has a detrimental effect (remember that θ ¨ < 0 ). Secondly, Equation (2) suggests that it is preferable to maximize the average radius r b of the brake disc. However, increasing r b undesirably raises both the moment of inertia and the (unsprung) mass of the disc. Similarly, a positive driving torque ( M m > 0 ), although typically absent during braking, would require a higher braking force for the same angular deceleration θ ¨ . Conversely, a negative torque M m < 0 , either generated by the engine brake or through regenerative braking, is obviously advantageous for the lightweight design of the brake caliper. Finally, F x , which describes the resultant of friction forces between the tyre and the asphalt, reaches its maximum value at the point of incipient wheel slip, immediately prior to wheel lock-up. At this instant, its value equals the static friction force, expressed as follows:
max F x = μ x max F z
where μ x is the static longitudinal friction coefficient between the tires and (dry) asphalt (in this work, μ x 1.7 1.8 ). To estimate the value of F z , it is useful to refer to the diagram in Figure 2, where the longitudinal model of a race car is shown assuming it is symmetric and running on a perfectly flat track under constant acceleration/braking, inducing symmetric loads in the pitch plane (perfectly straight accelerations and braking).
In this model, four characteristics points are used to describe the system, i.e., the global center of mass G, the contact points of the rear and front wheels CR and CF, respectively, and the aerodynamic center of pressure CoPa. A concentrated mass mtot is applied to point G to schematize both the driver and the car inertia, while the resultant aerodynamic lift FL and drag forces FD are applied at point CoPa. With reference to this schematic, the following quasi-steady-state equations of motion can be written as follows [18]:
2 F x R + 2 F x F F D = m t o t x ¨ G 2 F z R + 2 F z F + F L m t o t g = 0 b 2 F z R w b 2 F z F h 2 F x R + 2 F x F + h h a F D b a b F L = I F θ ¨ F + I R θ ¨ R ± I e θ ¨ e
where x ¨ G is the longitudinal acceleration of the vehicle, and IF and IR are the moments of inertia of the front and the rear axles, respectively, while Ie represents that of all rotating parts belonging to the engine. Finally, θ ¨ F ,   θ ¨ R e θ ¨ e are their corresponding angular accelerations. Note that Fx and Fz for both front and rear axles are multiplied by a factor of 2 because of the symmetry of the problem.
Then, rearranging these equations, an explicit formulation of both FzF and FzR can be defined as follows:
F z F = 1 2   m t o t g b w m t o t x ¨ G h w F D h a w F L b a w I F w θ ¨ F I R w θ ¨ R I e w θ ¨ e F z R = 1 2   m t o t g w b w + m t o t x ¨ G h w + F D h a w F L w b a w + I F w θ ¨ F + I R w θ ¨ R ± I e w θ ¨ e
where the first term is related to the static distribution of mass, while the others are responsible for load transfer, them being non-zero only when the vehicle is in motion. More specifically, the second is the longitudinal inertial terms, the third and the fourth are aerodynamic contributions, and the last three terms are related to the inertia of the rotating parts. It should be noted that the two aerodynamic terms contribute differently to the load transfer. Indeed, the drag component F D is always positive ( F D > 0 ), while the lift component F L is generally negative ( F D < 0 ), as it actually is a downforce. Equation (5) suggests the highest vertical load during the brake, i.e., the highest braking force F b , is that occurring at the front wheel (Equation (5)). Then, considering the front wheel and by ignoring for simplicity the contribution due to aerodynamic and to the inertia of the rotating parts, the relationship is significantly simplified and can be written as follows:
max F z F = 1 2 m t o t g b w m t o t min x ¨ G h w
Assuming that, during the braking phase, the engine torque is zero and that the inertial component of the wheel assembly is negligible compared to the other forces, the following expression can be found by inserting Equation (6) into Equation (3) and then into Equation (2):
max F b , F = 1 2 r e f f r b   μ x   m t o t   g b w 1 h b min x ¨ G g
Equation (7) allows for an estimation of the maximum braking force required by the braking system and represents one of the key parameters in the sizing and design of the brake caliper. In the case under consideration, the parameters of the FSAE vehicle permit an estimation of a maximum braking force of approximately max F b , F 5200   N , corresponding to a braking torque of approximately max M b = r b max F b , F 570   N m with r b = 109   m m .

2.2. Preliminary Design

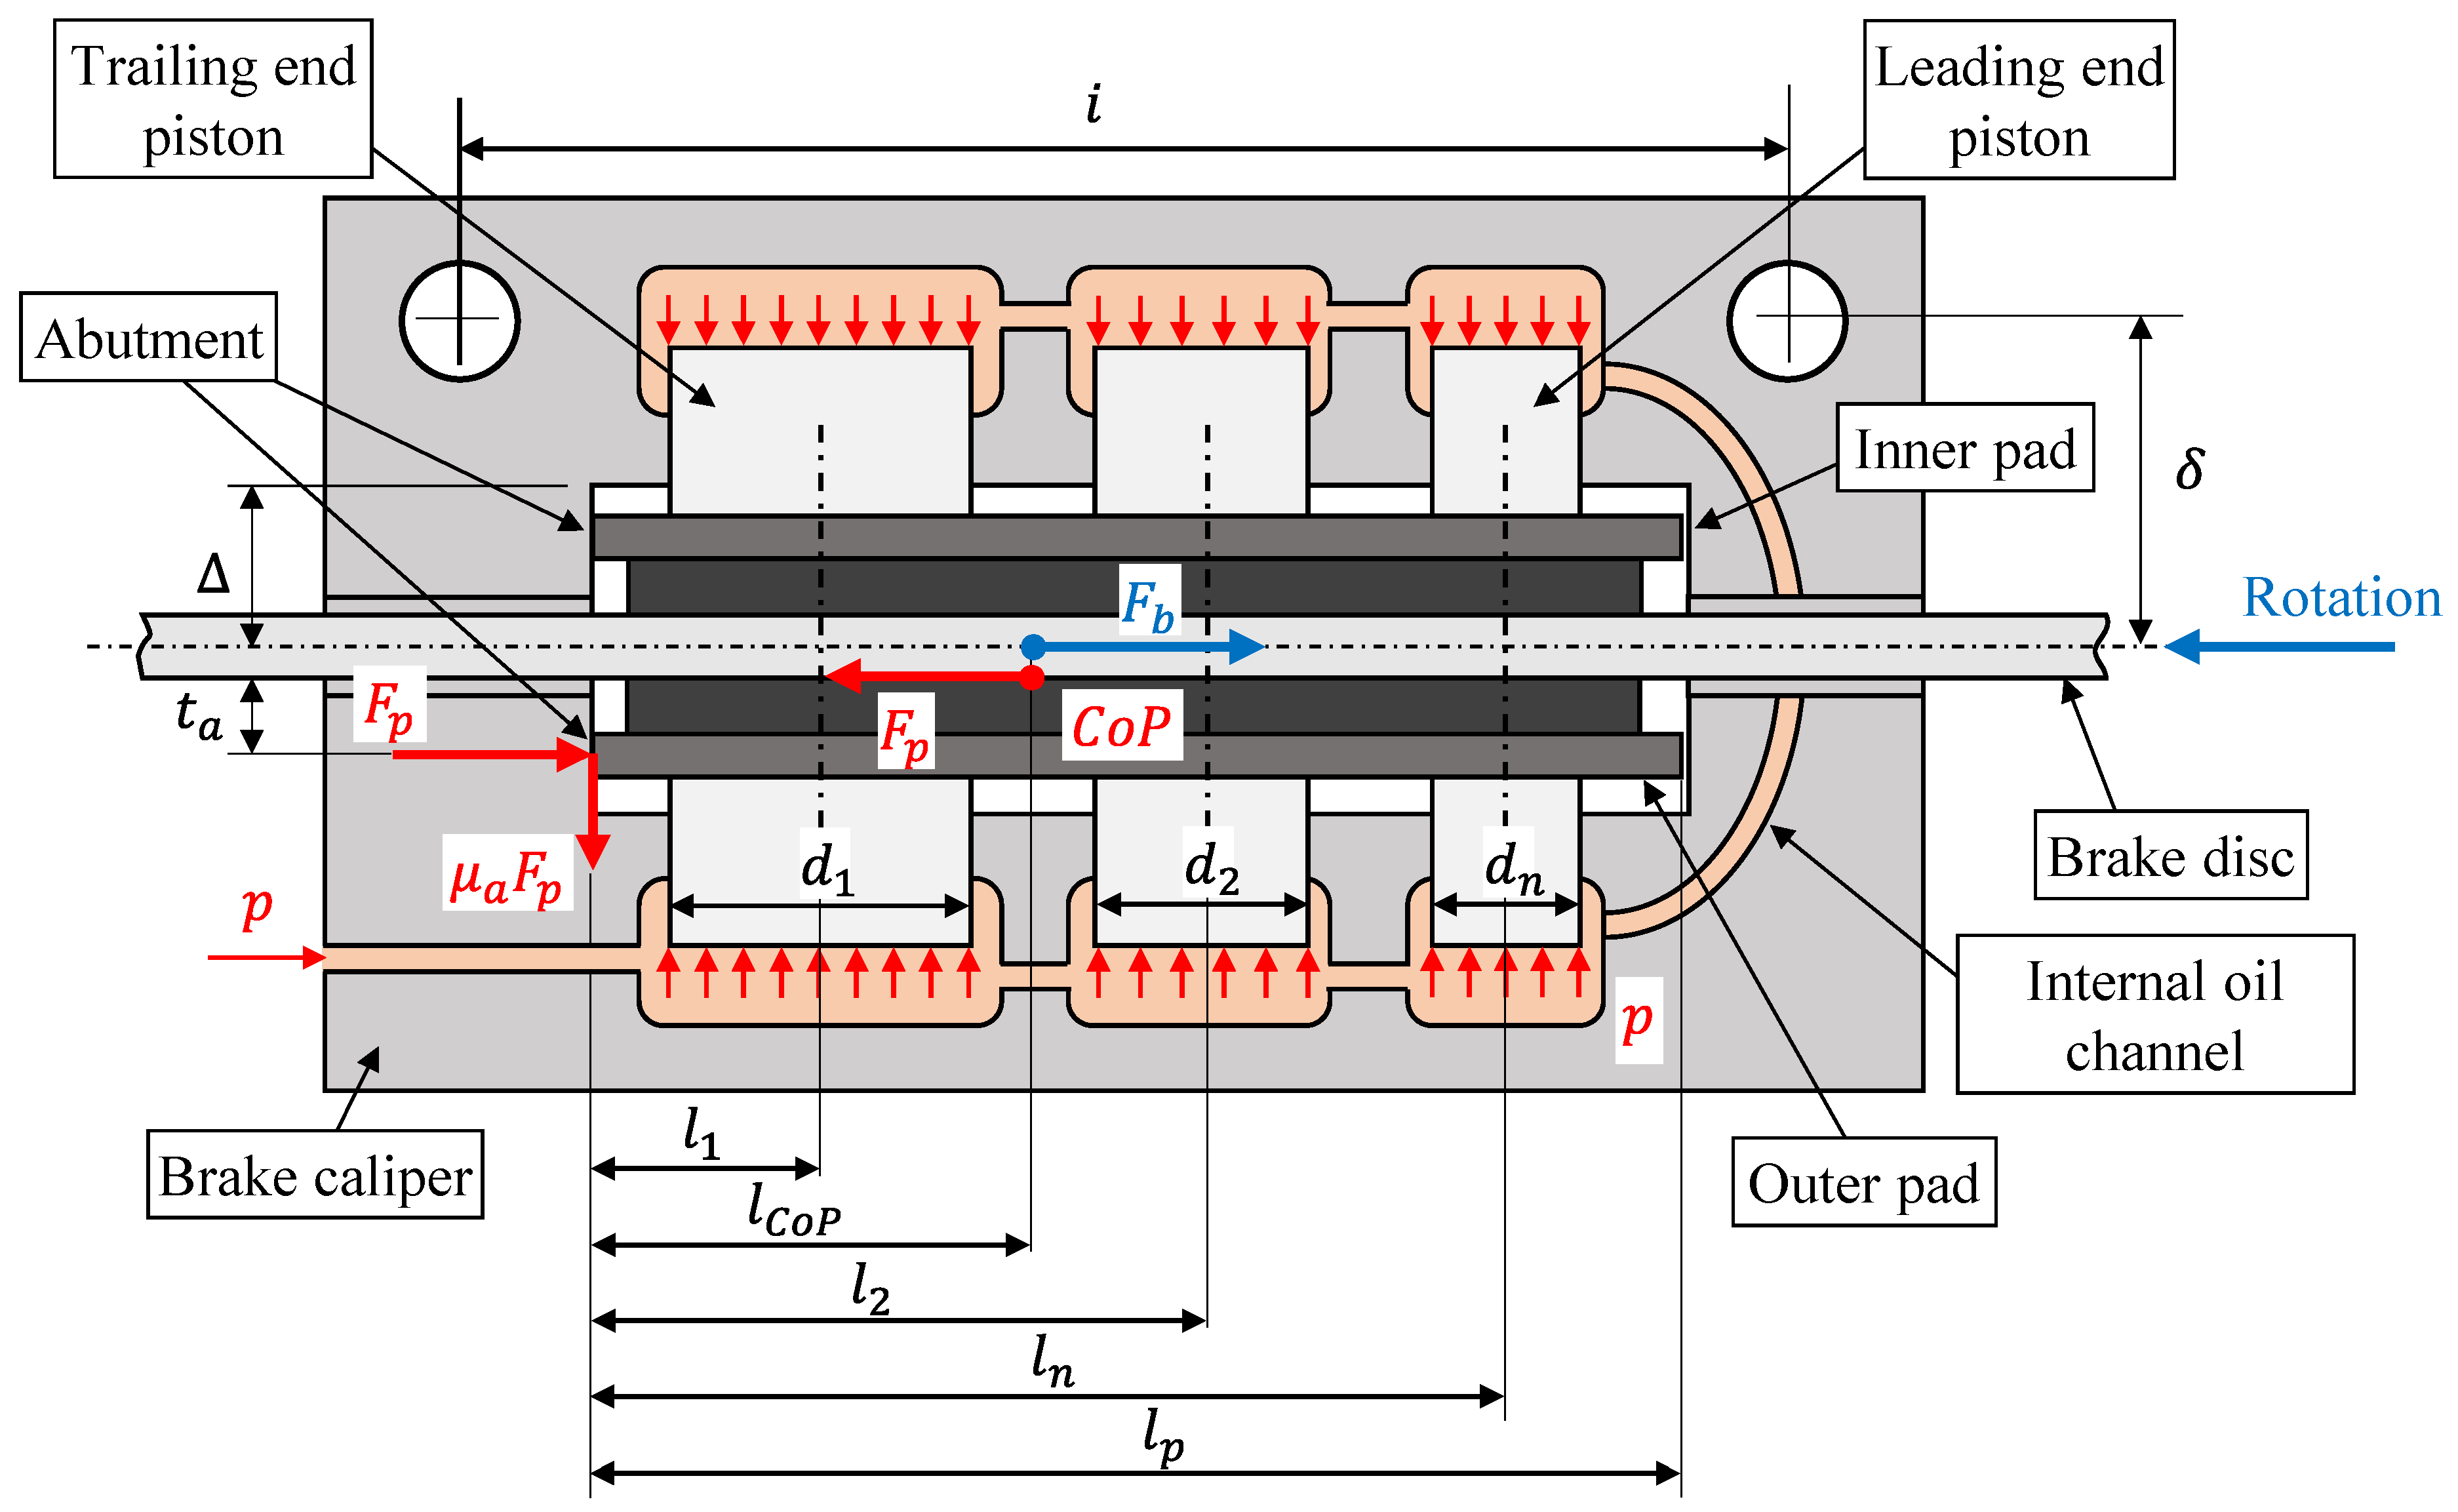
Given the maximum braking force, a detailed analysis of the brake caliper design can be undertaken, beginning with the delineation of its geometric details. This study is limited to considering the case of a hydraulic brake system, particularly a monoblock fixed caliper with one or more pairs of opposing pistons acting symmetrically with respect to the brake disc plane. Such a configuration is known for its advantages, including more uniform wear of the inner and outer pads, and typically requiring fewer parts compared to a floating-caliper design [13]. A typical example of a fixed caliper design is illustrated in Figure 3, which considers the case of a six-piston caliper.
Temporarily introducing the assumption that the forces generated by friction in the abutment μ a F p and the forces generated by the seals of each piston are negligible, the friction force generated at the interface between the disc and one pad is given by (Figure 3):
F p = μ   p   1 2 i = 1 n π 4 d i 2
where μ is the friction coefficient between the brake disc and the lining material of the brake pad, p is the oil pressure in the hydraulic brake line, n is the total number of pistons, and d i their corresponding diameters. It can be observed that the sizing of the caliper must be performed to ensure a braking capacity equal to or greater than the design value. This requirement translates into the following relation, obtained by comparing Equation (8) with Equation (9):
2 · max F p = μ   p m a x i = 1 n π 4 d i 2   1 2 r e f f r b   μ x   m t o t   g b w 1 h b min x ¨ G g
where the pressure p   has been replaced with its maximum value p m a x .
At this stage, the variables on the right-hand side of Equation (9) are completely defined, whereas those on the left-hand side need to be determined based on some design choices. The piston diameters d i are somewhat constrained by the dimensions of the brake pad (or the backing plate) used, and larger diameters result in greater braking force, but also in an increase in the overall size and weight of the brake caliper. Typical values for FSAE applications range between 25 mm and 35 mm. Similar conclusions can be drawn for the number of pistons n , specifically, a higher number of pistons typically ensures greater force but also increases the overall size of the caliper. Additionally, the number of pistons depends on the type of pad used and can significantly affect the wear of the lining material [19].
Regarding the choice of brake pads, it is generally more practical and economical to use a commercial pad or lining material with known performance characteristics rather than to develop a new pad material tailored to a specific caliper design [13]. Subsequently, the selection among various commercial alternatives can be based on considerations related to cost, availability, and, most importantly, performance, usually in terms of friction coefficients ( μ in Equation (9)), wear resistance, and dimensions/geometry. Finally, the choice of maximum pressure p m a x must be made to ensure compliance with the inequality in Equation (9). Noteworthily, the oil pressure p m a x typically represents the critical design load for the brake caliper since it affects the size and weight of the brake caliper more than F b . Consequently, it is preferable to design the system to minimize the pressure if it remains sufficiently high to guarantee the desired braking force F b .
With these characteristics defined, the overall dimensions of the caliper must be determined by selecting the size and position of the pistons. An efficient method for making this decision is proposed by Sergent [4]: he suggests using a simple model that assumes an in-plane 2D schematization of the brake caliper (as shown in Figure 3, where the curvature of the brake disc at its mean radius has been rectified) to evaluate the position of the center of pressure (CoP) of the contact forces between the disc and the pad and to optimize the position and size of the pistons to ensure uniform pad wear. Specifically, the caliper should be designed to ensure that the center of pressure is as close as possible to the centroid of the pad to avoid tapered wear and to ensure uniform wear across the entire surface of the pad [13].
According to this model, in the static case, where a braking force is applied with the vehicle stopped, the friction forces in the abutment μ a F p are negligible, and the position of the CoP on the pad coincides with the centroid of the pistons, calculated as the area-weighted average of the pistons as follows:
l C o P = i = 1 n d i 2 l i i = 1 n d i 2
where l i and l C o P represent the positions of the pistons and the CoP with respect to the abutment, respectively. Uniform wear is guaranteed if the following relation is satisfied [12,13]:
l C o P = l p 2
It must be emphasized that this simplified model assumes, among other hypotheses, an infinitely stiff pad and caliper. Therefore, when the design of the caliper is finished and its final geometry known, the real location of the CoP is required to be checked through more accurate analyses, such as finite element analysis. Moreover, note that Equations (8) and (10) are valid only when the brake disc is stopped. Instead, when the pads are squeezed against the rotating brake disc, it drags them until they strike against the abutment, where a normal force F p and a friction force μ a F p arise, the latter being no longer negligible due to the high value of the contact force F p . Then, the friction force, located at a distance t a from the pad–disc friction surface, opposes the motion of the pistons during the application of the load (Figure 3) and displaces the CoP compared to the static case (Equation (10)). Accordingly, referring to a single pad, the new friction force is less than that estimated by Equation (8) and can be calculated as follows:
F p = μ p   1 2 i = 1 n π 4 d i 2 μ a F p
which, properly rearranged, becomes:
F p = μ 1 + μ μ a p 1 2 i = 1 n π 4 d i 2
Instead, the l C o P updated for the case of the rotating disc can be estimated by imposing the equilibrium of moments about the CoP itself:
1 2 i = 1 n l i l C o P · π 4 d i 2 p + t a · F p + l C o P · μ a · F p = 0
Finally, l C o P is obtained by rearranging Equation (14), and by exploiting Equation (13):
l C o P = t a μ + 1 + μ μ a i = 1 n l i · d i 2 i = 1 n d i 2
Equation (15) allows for designing the pistons’ diameters and locations since it points out explicitly the role of the main parameters affecting the position of the CoP. In particular, it must be noted that most of them ( t a , μ , μ a , l p , and, indirectly, d i ) depend on the shape and the material of the brake pad; so, the choice of the position and size of the pistons is specific for the considered brake pads. Moreover, other constraints must be considered, for example, technological feasibility and the need for a certain clearance between each piston to allow for the location of the seals. Eventually, a slightly larger diameter is typically chosen on the trail side compared to that on the leading side to compensate for the effects of the friction at the abutment ( l C o P · μ a · F p in Equation (14)), the lever arm of the normal force ( t a · F p in Equation (14)), and the elastic deformation of the caliper [10,12]. A more detailed discussion on this topic can be found in [12,13].
In the present investigation, a fixed caliper with four opposite pistons ( n = 4 ) was chosen, this configuration being a good compromise for minimum size of the caliper and optimal pressure distribution at the brake pad. The adopted commercial brake pads allow for a friction coefficient μ 0.7 0.8 at the interface with the brake disc and an estimated value of μ a 0.3 at the abutment–backing plate interface. Furthermore, a new brake pad was considered and t a 8   m m was used in the calculations, this value being dependent on the geometries of the caliper and pad, as well as on pad’s wear. Noteworthily, assuming that the value of l C o P coincides with the midpoint of the pad, l C o P = l p 2 = 42   m m allows us to observe that the terms in Equation (14) relevant to the friction at the abutment ( l C o P · μ a · F p ) and the lever arm of the normal force ( t a · F p ) assume comparable values. Specifically, in this case, the product l C o P · μ a = 12.6   m m is greater than t a = 8   m m .
At this point, it was possible to solve Equation (15) for the unknowns l i and d i by imposing that the CoP coincides with the midpoint of the pad (Equation (11)) to ensure uniform wear. Moreover, the diameters of the pistons d i had to be chosen to guarantee the required maximum braking force F b according to Equation (9). In doing so, it was also fundamental to consider only physically compatible solutions (e.g., solutions that do not locate a piston outside the pad or result in piston overlap) and to account for the necessary clearance between pistons to accommodate their seals.
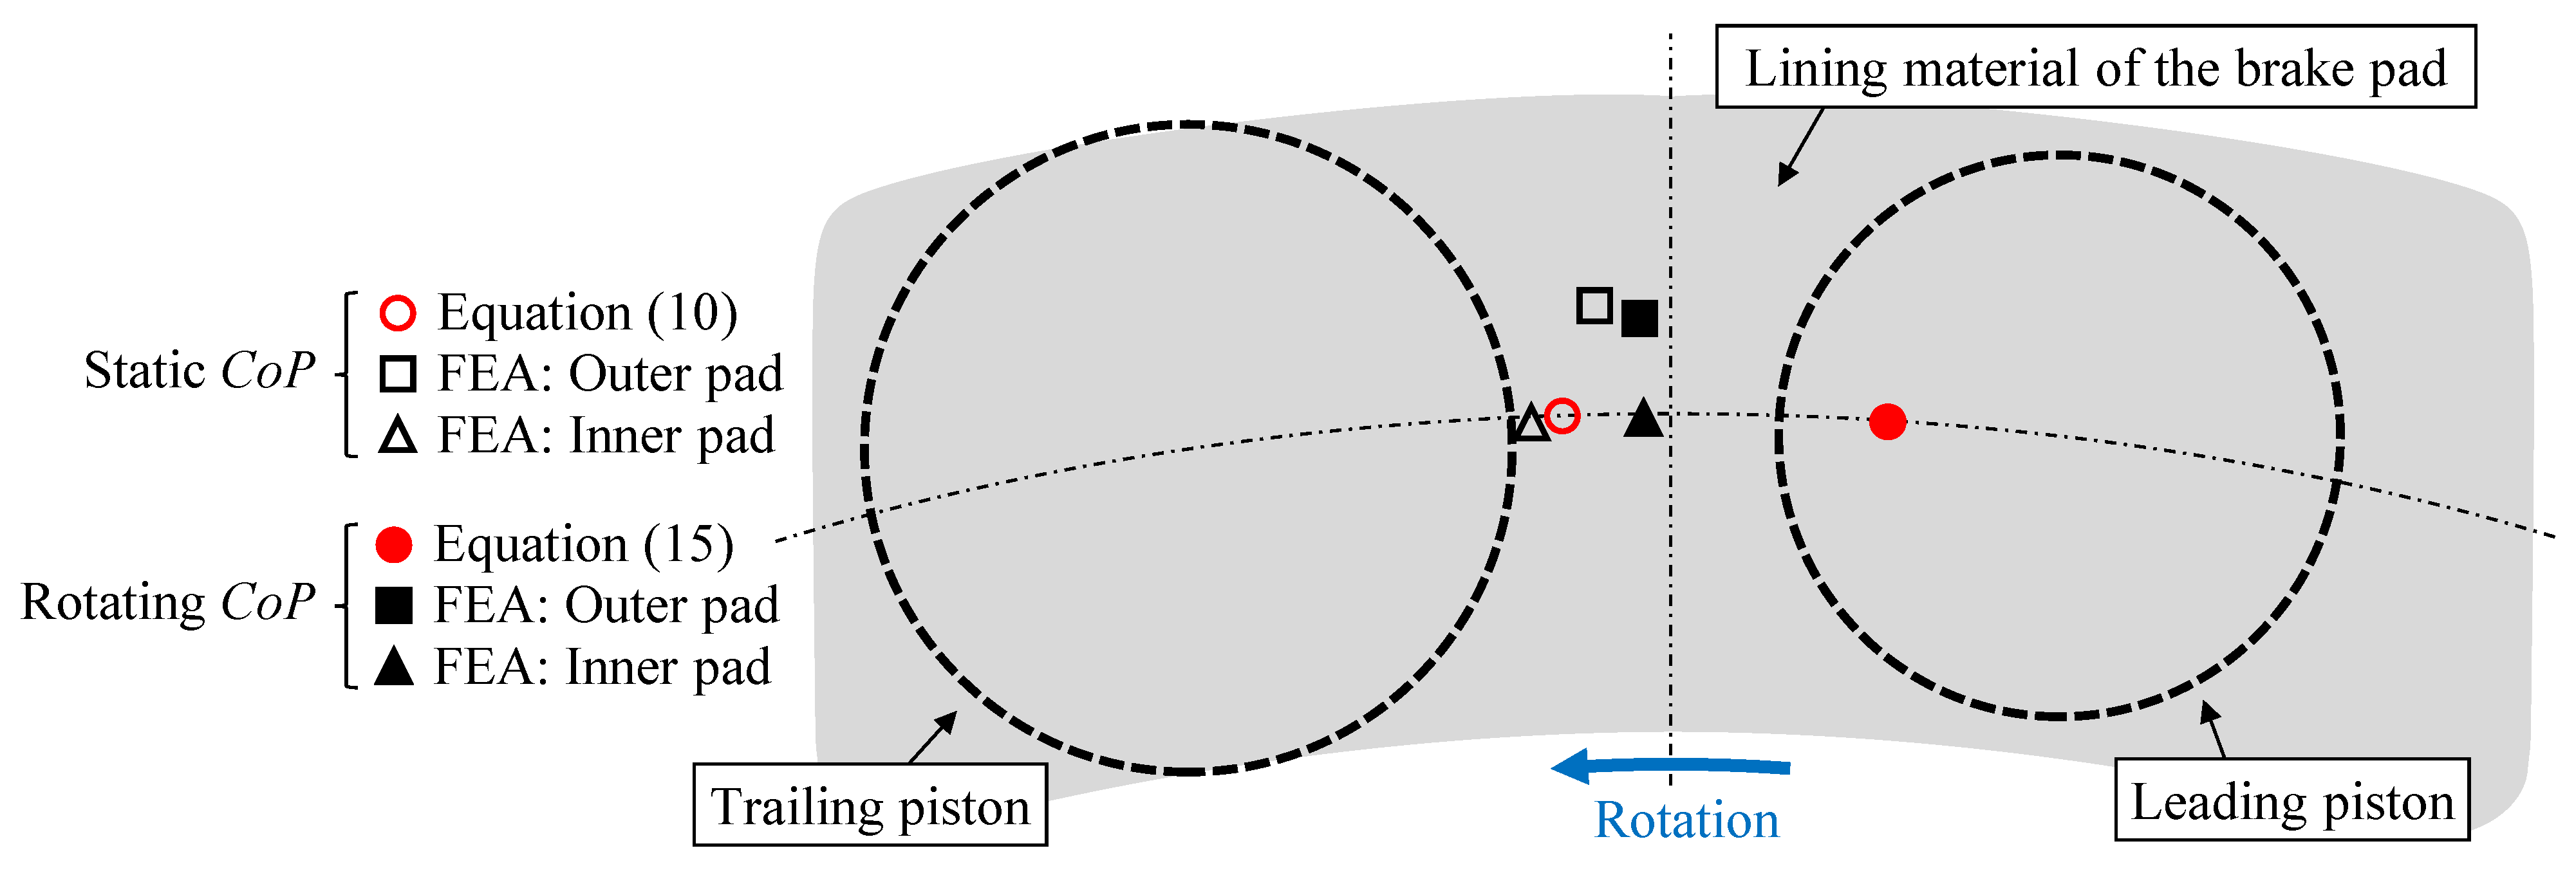
In this work, commercial values for pistons’ dimensions and their seals were used, resulting in diameters of d 2 = 26   m m and d 1 = 30   m m for the leading and trailing pistons, respectively. Concerning their position, the results are reported in Figure 4, which also shows the corresponding CoP for both the configurations with the static and rotating discs evaluated according to Equation (10) and Equation (15), respectively. The results show that the static CoP (empty red marker in Figure 4) is slightly to the left (toward the trail side) of the geometric center of the pad, while the CoP with a rotating brake disc (filled red marker in Figure 4) shifts to the right (toward the leading side), similarly to what was found in [12]. In this particular case, to align the CoP more closely to the center of the pad, it would have been necessary to reduce the friction coefficient at the abutment μ a , the height of the pad’s contact point on the abutment t a , the clearance between the pistons, or to choose a smaller diameter on the leading side and a larger one on the trailing side. In the present investigation, the friction coefficient μ a and the height t a were assumed to be fixed, their values being mainly dependent on the chosen brake pad. On the other hand, the clearance between the pistons had already been minimized, and further reduction would have fallen below the required limit to accommodate the hydraulic seals of the pistons (details of which will be presented later). Finally, a larger diameter d 2 (on the trailing side) would have improved the CoP position but reduced the maximum braking force (Equation (9)). Conversely, a larger diameter d 1 (on the leading side) would have moved the CoP closer to the piston’s axis, but it would have shifted the CoP on the leading side since the distance l 1 was constrained by the abutment geometry, the piston’s clearance, and the piston’s diameter d 1 .
Finally, it is also important to recall that Equation (15) is an approximate expression, highly useful in the preliminary design phase, but requiring subsequent verification through more detailed analyses, such as finite element analysis, which can account for the caliper’s compliance and the contact between various components. Accordingly, Figure 4 also shows the positions of the CoP with static and rotating discs evaluated by the finite element analyses (black markers), which will be presented and discussed in the following paragraphs.

2.3. Oil Channels and Hydraulic Seals

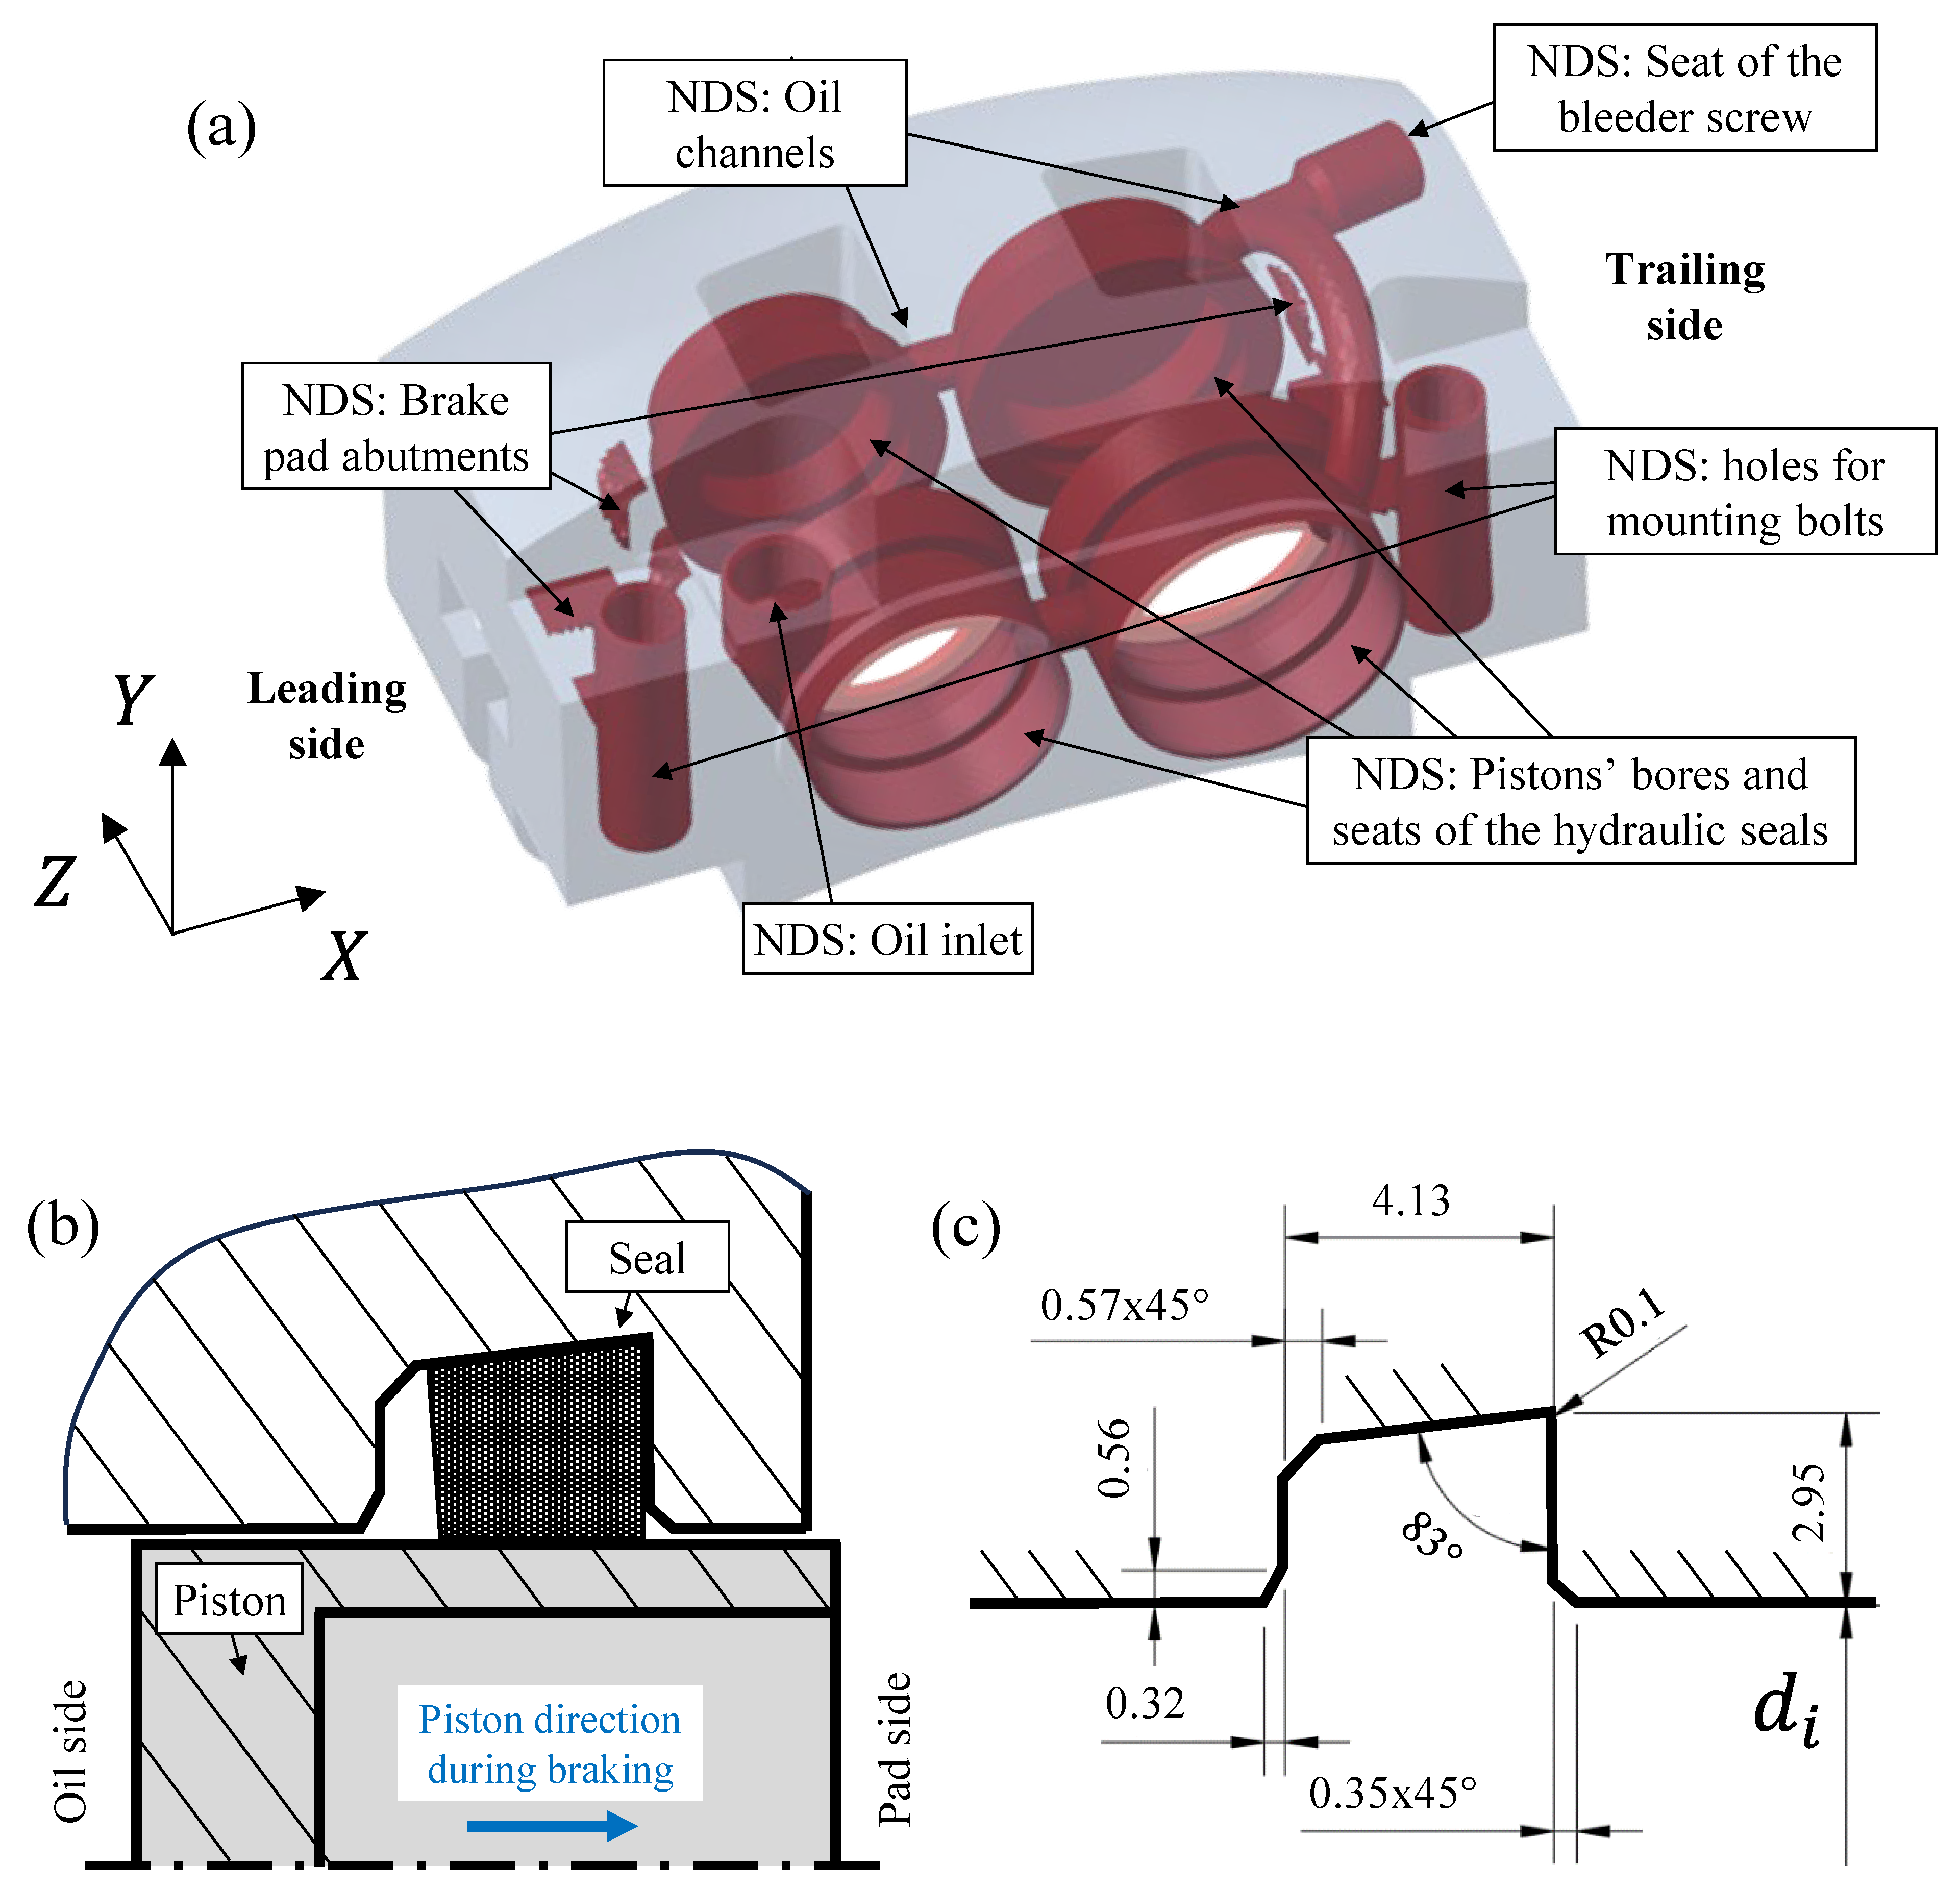
In this study, the internal channels for oil distribution were designed to resemble many commercial solutions (Figure 5a). A diameter of 3.5 mm was chosen for the channels, which may appear relatively large. This size is typically selected for technological reasons related to drilling difficulties with very thin bits but ensures that the channels can be created using additive manufacturing without the need for supports, thereby eliminating the need for post-processing with machining tools. The position of the oil inlet was fixed near the smallest piston (leading piston, see Figure 5a), due to space constraints, and on the side of the mounting bolt because that region of the caliper is less stressed. Finally, a single bleeder was placed at the highest possible point, which depends on how the caliper is installed on the vehicle. In this specific case, it was positioned in the channel on the bridge, which connects the inner pistons to the outer pistons (Figure 5a).
The design of the pistons’ seals (Figure 5b) is far more complex. Hydraulic sealing is usually achieved using a square-section O-ring protected by a dust seal, which helps to preserve and extend the life of the seal, especially in commercial solutions for standard road application. In FSAE applications, this dust seal is not essential, and its removal significantly reduces the space required for the seals as well as the size of the pistons and the caliper. The geometry of the seats for the hydraulic seals of the pistons is trapezoidal and is characterized, by design, by an outer diameter smaller than the outer diameter of the square-section O-ring it contains. This arrangement ensures that the O-ring is squeezed and compressed against the piston (Figure 5b), providing hydraulic sealing and, if properly designed, a small retraction force which ensures the pads do not remain in contact with the disc during brake release. In this study, the same seal seats’ geometry (Figure 5c) was assumed for both diameters (26 mm and 30 mm) to ensure easier design and manufacturing. Since the focus of this work is not on the detailed sizing of the seals, these details are omitted. Further details can be found in the literature [20,21].

2.4. Topology Optimization

The topology optimization required defining the Design Space and Non-Design Space, both depending on the maximum overall dimensions of the caliper summarized by the parameters i , Δ , and δ in Figure 3 and by the height h in Figure 1. In general, small values for i , Δ , and δ are preferred given that minimizing the volume of the caliper helps to reduce the overall mass and to reach a higher value of caliper’s stiffness. In more detail, Δ is primarily dependent on the thicknesses of the brake pad and disc. These factors also influence the choice of offset δ (Figure 3), whose value must consider enough space for the pistons’ stroke and for the oil chamber behind them. Similar considerations apply to the distance i (Figure 3). Lastly, the height of the caliper (h in Figure 1) must be minimized and chosen according to the space available between the wheel rim and the hub carrier.
The Non-Design Space includes regions of the caliper such as the pistons’ bores, the seats for the seals, the brake pad abutments, the holes for the mounting bolts that secure the caliper to the hub carrier, and the oil inlet, as well as the internal oil channels and the seat of the bleeder screw (see Figure 5a). Attention should be given to ensuring tolerances and facilitating post-printing machining operations for the pistons’ bores and their seals. To this end, it was decided to leave the bottoms of the pistons open on one side of the caliper and subsequently seal them with bore caps (see Figure 5a).
Concerning the material, the brake caliper was made of an aluminum alloy with elastic modulus E = 71,000   M P a , Poisson’s ratio ν = 0.33 . Aluminum was preferred over titanium for this application due to its low density and high thermal conductivity that helps easily dissipating the heat generated during braking.
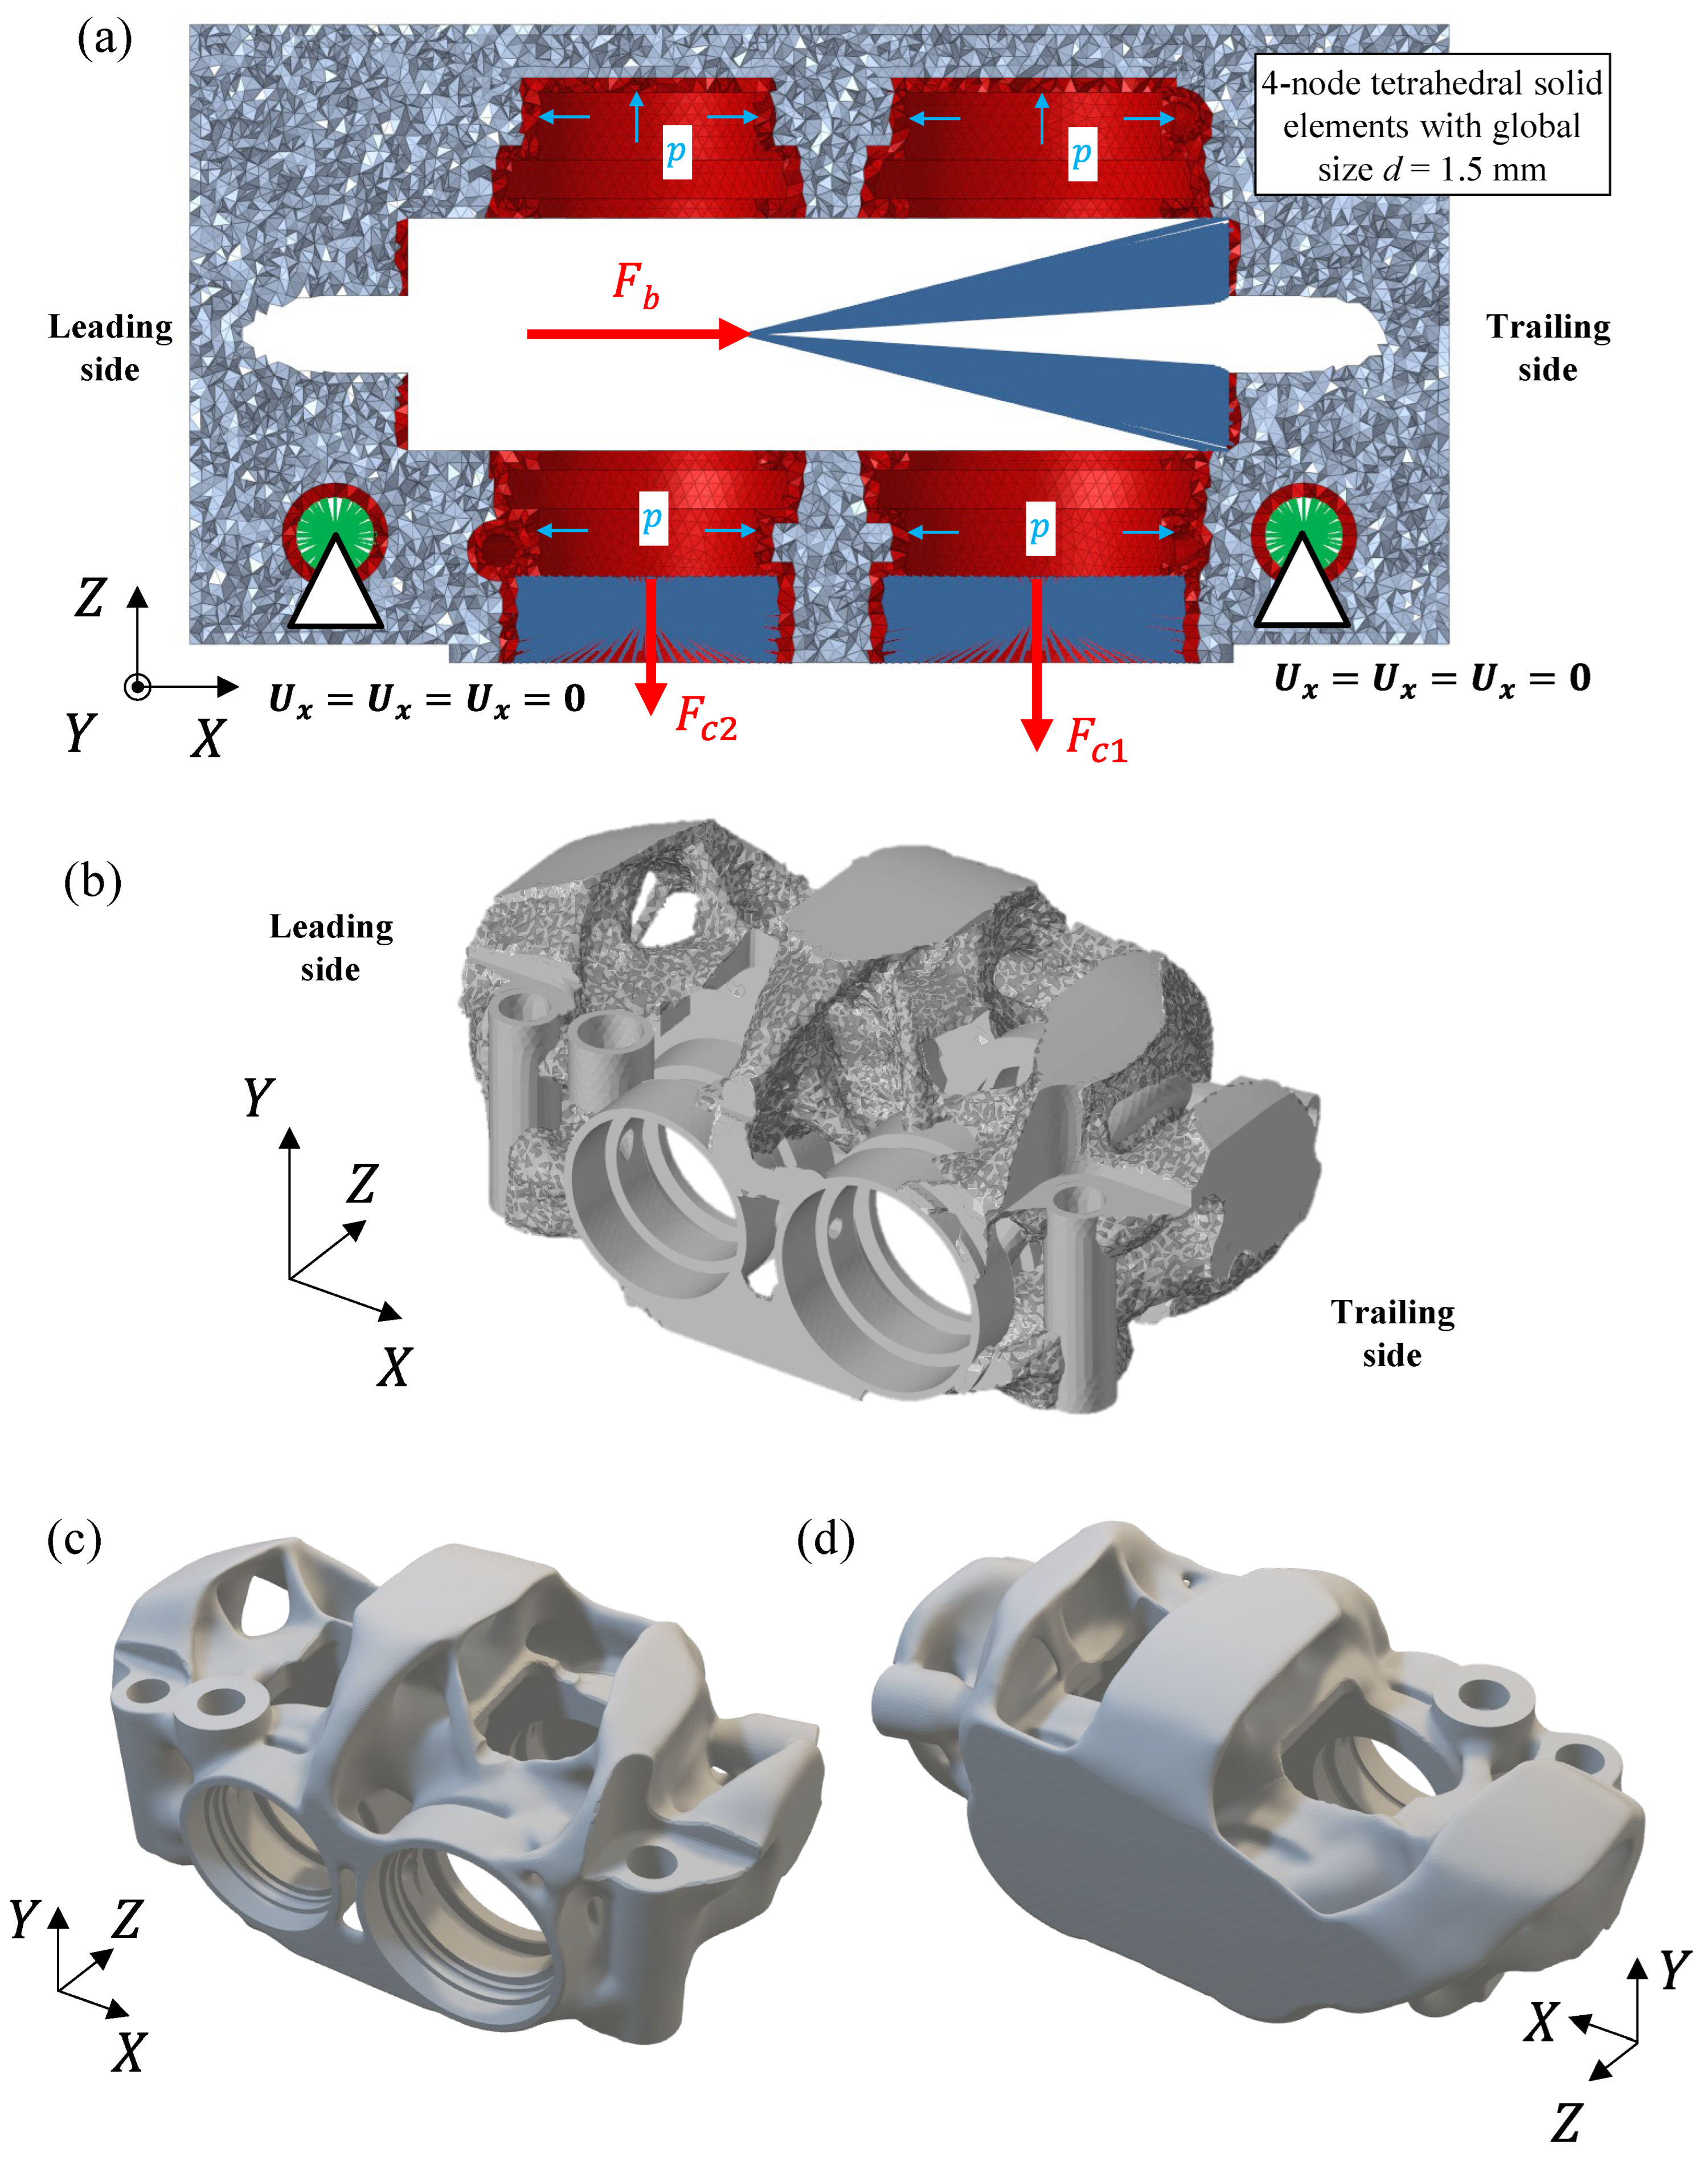
The model was generated within Altair®’s Hypermesh-OptiStruct and subsequently discretized with a mesh of four-node tetrahedral elements, with an average size of 1.5 mm. The applied loads are as shown in Figure 6a: a maximum braking force F b = 5200   N applied at the theoretical CoP and distributed to the abutment using RBE3 elements, a maximum pressure p m a x = 60   b a r on all internal walls and channels in contact with the oil, forces F c 1 and F c 2 to simulate the force exerted by the internal pressure on the bore caps, and RBE2 rigid elements to constrain the displacements of the internal nodes to the holes for the mounting bolts. The optimization parameters were included to minimize compliance (maximize stiffness) as the objective function. Eventually, a constraint on the final volume of 100,000 mm3, i.e., a final weight of roughly 300 g, and a second constraint on the maximum Von Mises stress to be less than or equal to 170 MPa were imposed. In particular, the Von Mises stress limit was set at approximately 35% of the yield strength of Scalmalloy®. This conservative value was chosen because the mesh used during the topology optimization phase was relatively coarse (to reduce computational time), and the peak stress values near the most critical notches were likely not fully converged. Selecting a higher target value at this stage could have resulted in geometries that were excessively stressed near the notches when analyzed with a refined mesh after the optimization process. Thereafter, the mesh generated by the optimization process (Figure 6b) was refined within Ansys® SpaceClaim and subsequently imported into Blender® and nTopology® for surface smoothing and final solid model generation (Figure 6c,d).

2.5. Finite Element Analyses and Manufacturing

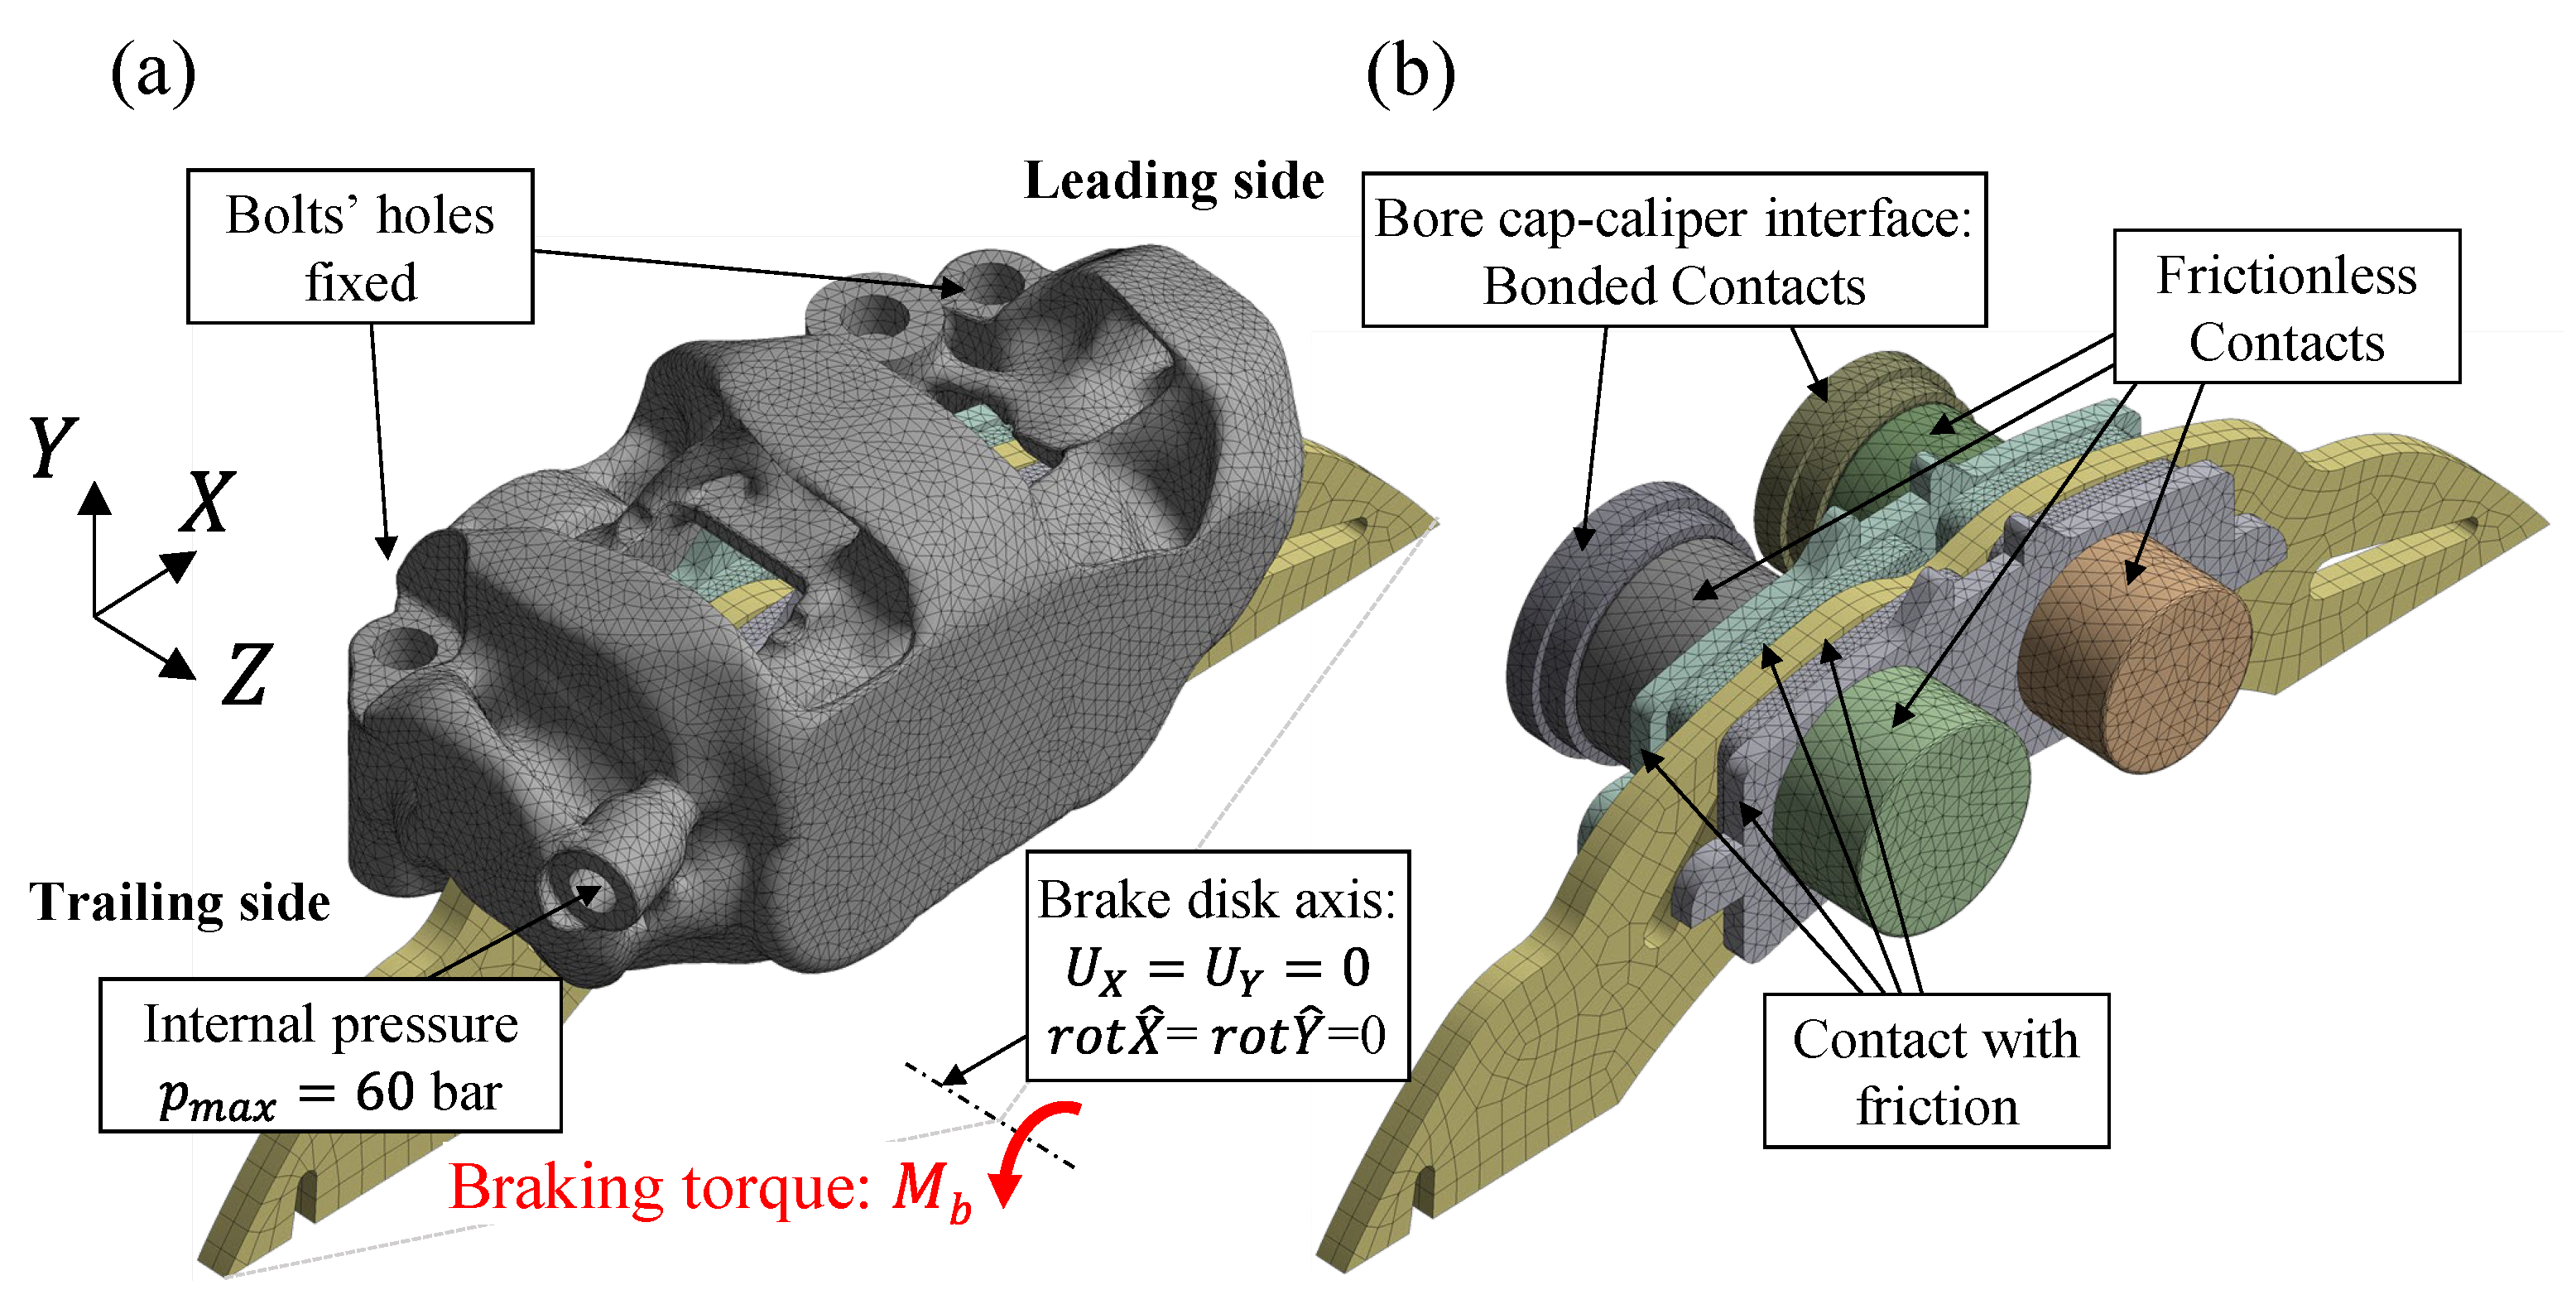
With the final CAD model (Figure 6c,d), a structural finite element model was carried out to verify the correctness of the real CoP’s location (Figure 7a,b). In particular, the aim of this FE analysis was to evaluate the actual position of the CoP with both static and rotating discs, considering contacts and stiffnesses of the various components comprising the caliper assembly (disc, pads, pistons, and the caliper body), and to check if it coincided with the geometric centroid of the pads. If discrepancies were found, the design choices would need to be reiterated, and the optimization process restarted.
To make the simulation as realistic as possible, the entire brake caliper assembly was modeled in Ansys® Workbench considering all the different components as separate bodies in contact with each other (Figure 7a,b). The hydraulic seals were omitted to avoid increasing the already significant complexity and computational time of the simulation, the latter being nonlinear due to the large number of contact regions. Consequently, the hydraulic seals were replaced with a unilateral holonomic frictionless constraint that precisely guides the axial movement of the pistons, which were placed in the cylinders without clearance. For simplicity, a unilateral holonomic frictionless constraint was also used at the piston–pad interface (Figure 7b). In contrast, a contact with friction was applied at both the pad–disc and the pad–caliper abutment interfaces (Figure 7b), with friction coefficients μ = 0.8 and μ a = 0.3 , respectively. Finally, structural continuity was assumed at all the bore cap–caliper interfaces (“Bonded contacts” in Figure 7b). The bore caps and caliper body were modeled in aluminum alloy, assuming an elastic modulus E = 71,000 MPa and a Poisson’s ratio ν = 0.33 . The pistons were made of titanium alloy (E = 115,000 MPa, ν = 0.34 ) due to its low thermal conductivity, which helps isolate the oil and the body of the caliper from the heat generated by the brake pad. The Young’s modulus E = 210,000 MPa and Poisson’s ratio ν = 0.3   of steel were used for both the brake disc and the brake pads, the latter with a 4.5 mm thick backing plate made of steel behind the lining material.
After defining the materials and contacts, the model was discretized with a mesh of 10-node tetrahedral elements for the caliper body and 4-node tetrahedral elements for all other parts, with an average element size of 1.5 mm in both cases (Figure 7a,b). All nodal displacements at the nodes on the holes for the mounting bolts were constrained. The brake disc was restrained with a remote point at its center to block translations in the X and Y directions and rotations about these axes. Conversely, translation along the Z-axis and rotation around the same axis were left free to correctly simulate the motion of the floating disc (Figure 7b). The loads, applied in two different load steps, allowed for the simulation of both the static and the rotating disc configurations in a single FE analysis. In the first load step, only the internal pressure p m a x = 60 b a r was applied to all internal channels of the caliper, to the bore caps, and to the faces of the pistons in contact with the oil. In the second load step, an additional torque was applied to the disc to simulate the condition of the rotating disc.
At the end of each substep of the simulation, the nodal values of the pressure on the face of each pad in contact with the disc were extracted and used to calculate the CoP. The corresponding results are presented in Figure 4 for both the static disc case (open black markers) and the rotating disc case (filled black markers), and for both the outer pad (square markers) and the inner pad (triangle markers). The results indicate that the deformation of the caliper, particularly the ‘opening up’ due to the bending of the bridge [10], causes a slight upward shift of the CoP for the outer pad compared to the inner pad (compare square markers with triangle markers in Figure 4). Noteworthily, the CoP determined from numerical analyses is very close to the geometric centroid of the inner and outer pads in all simulated cases (see black markers in Figure 4), confirming the final caliper’s geometry. As discussed above, if this had not been the case, meaning the CoP did not coincide with the geometric centroid of the pad, the position and size of the pistons would have needed to be iteratively adjusted, repeating the optimization and verification process until convergence was achieved.
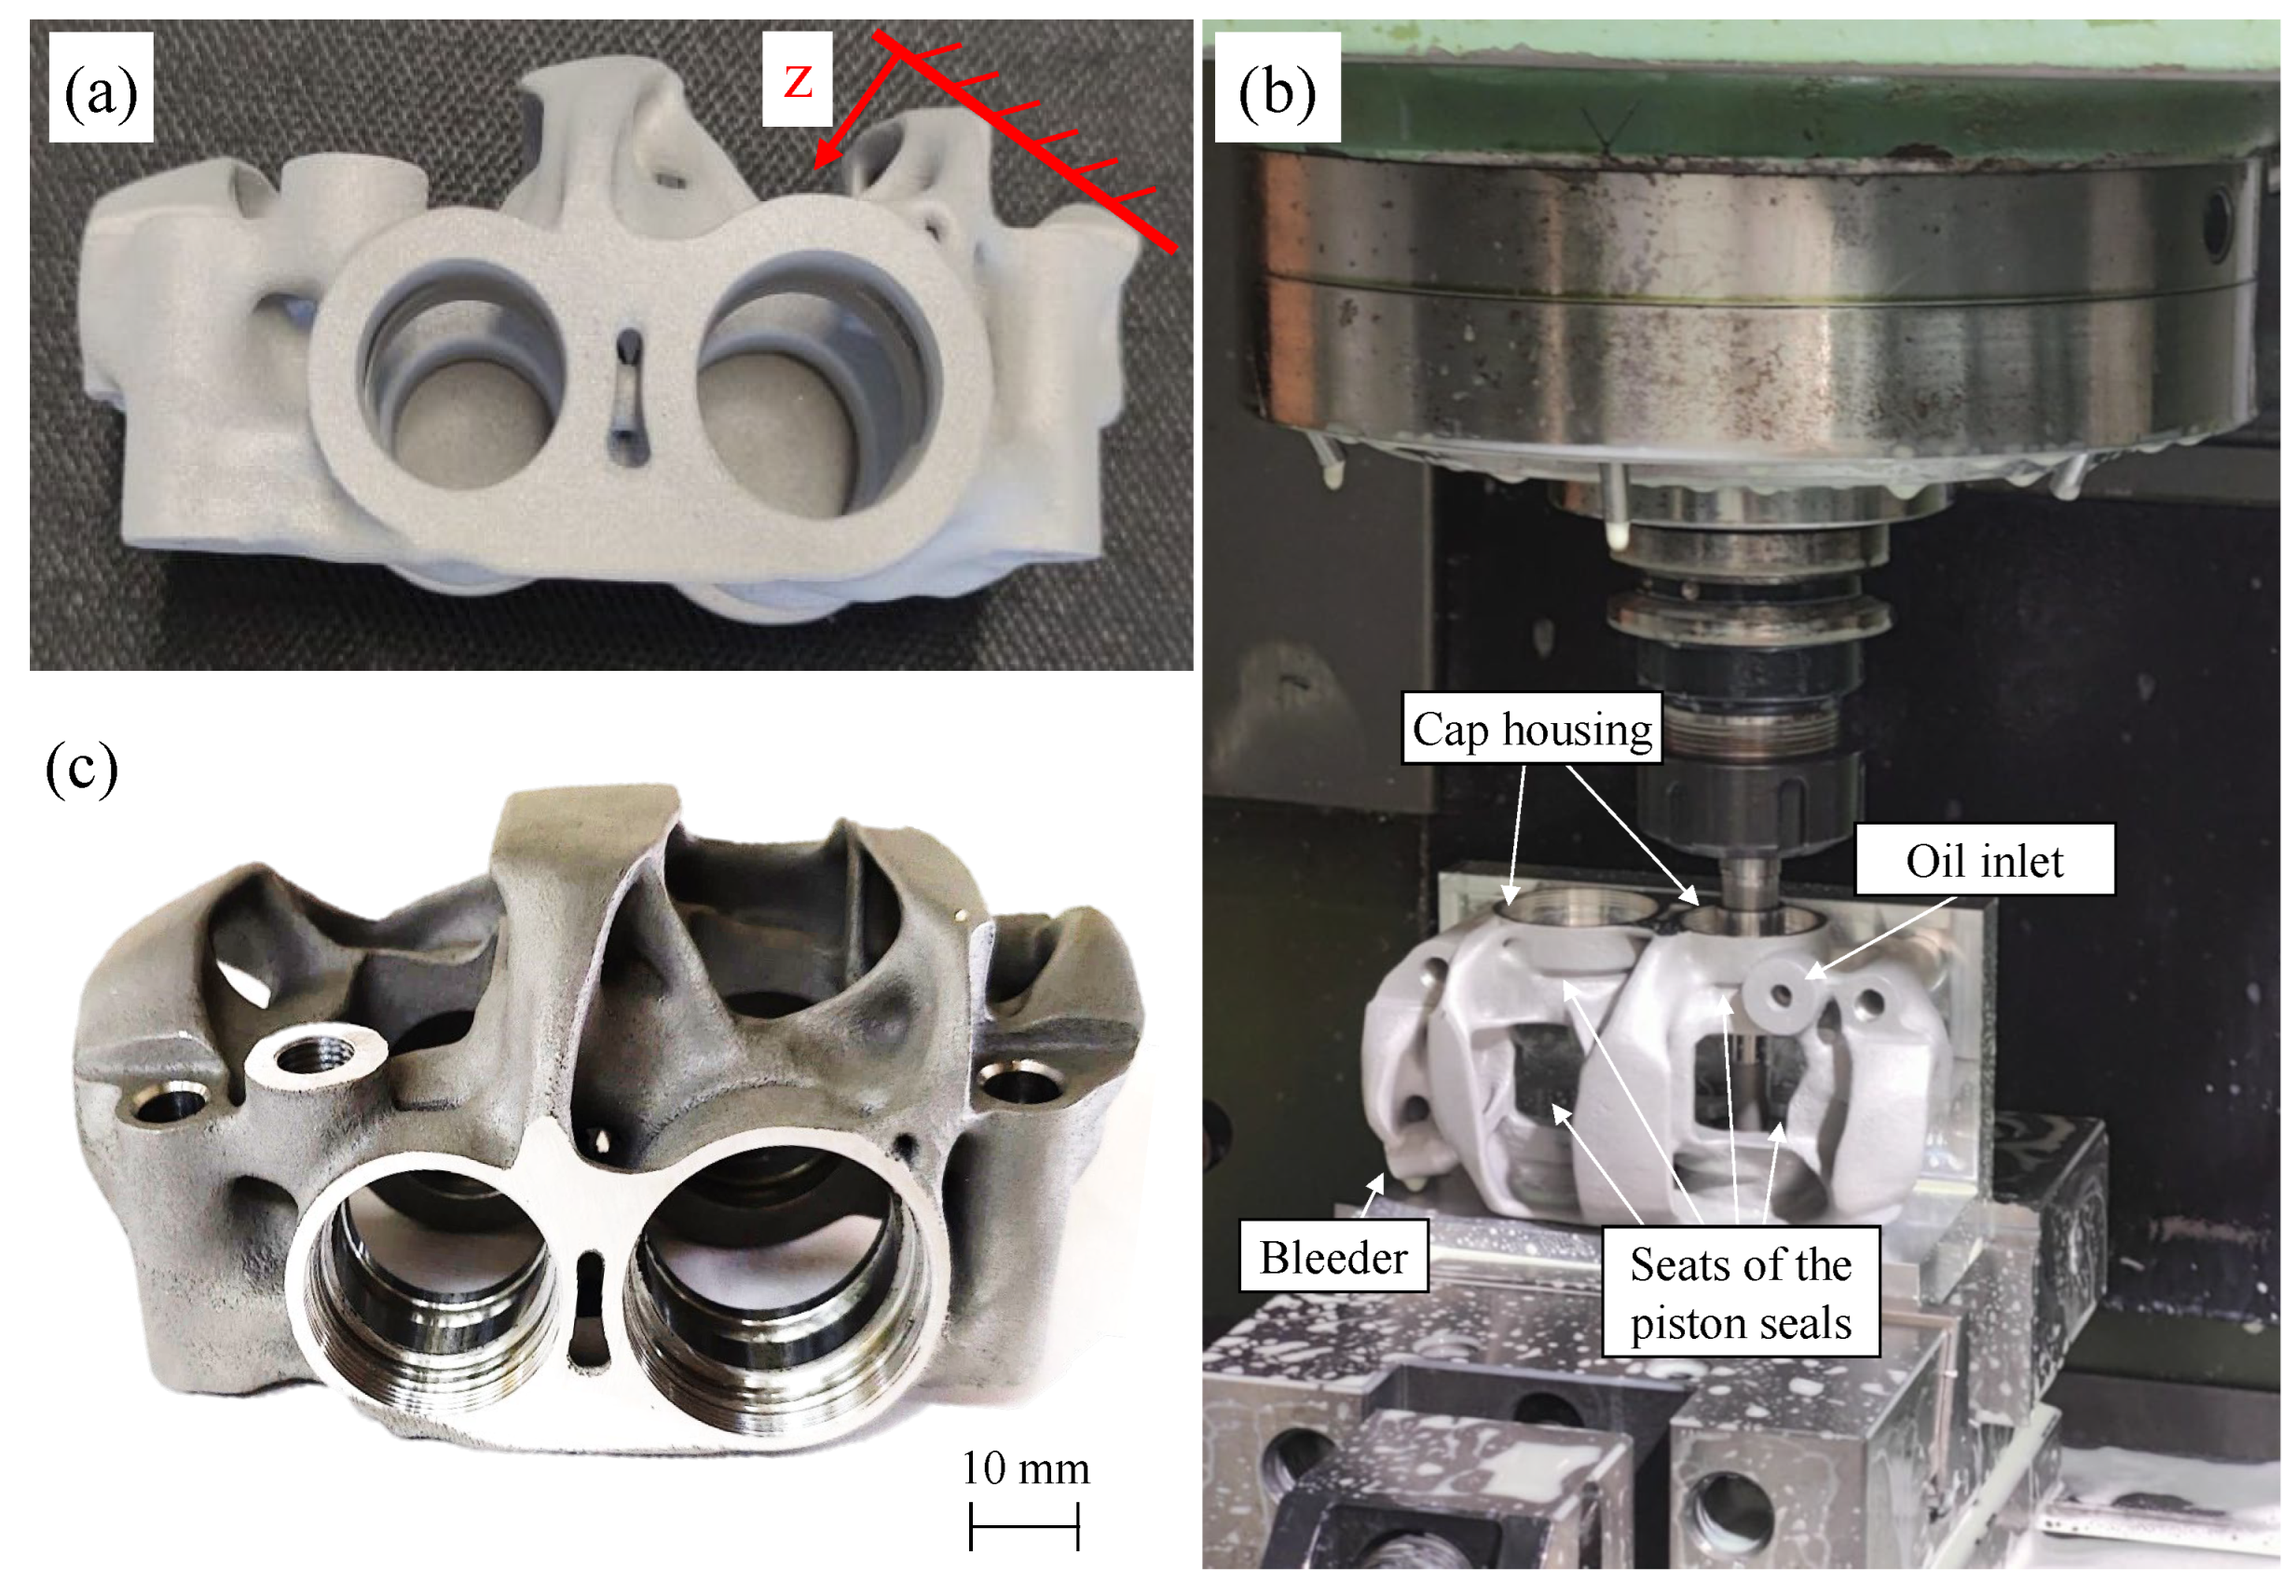
The final geometry of the optimized caliper was additively manufactured in an aluminum alloy, specifically an Al-Mg-Sc alloy (Scalmalloy®), using laser powder bed fusion (LPBF). In particular, an EOS M400-1 3D printer was adopted, with no pre-heating, and the platform temperature at approximately 35 °C. The powder diameter ranged from 80 to 100 μm and the building direction was that given in Figure 8a. After the printing process, the caliper was shot-peened and sandblasted for support removal and then heat-treated for 240 min at 325 °C. The obtained component is shown in Figure 8a. More details and parameters are omitted for confidentiality reasons.
Subsequently, the 3D-printed caliper was machined to refine regions requiring tight geometric tolerances. Specifically, the caliper was installed on a custom fixture designed for mounting on a three-axis CNC milling machine (Figure 8b). This setup enabled the machining of the seats for the seals of the pistons and the caps (which required the use of custom-designed tools), as well as the oil inlet and the bleeder. The latter, being inclined relative to the milling machine axes, was machined using a tilting vise. The final caliper is shown in Figure 8c.
Eventually, the entire brake caliper was assembled, and its overall dry weight was measured to be 429 g.
3. Experimental Tests

3.1. Strain Gauge Measurement with Static Disc

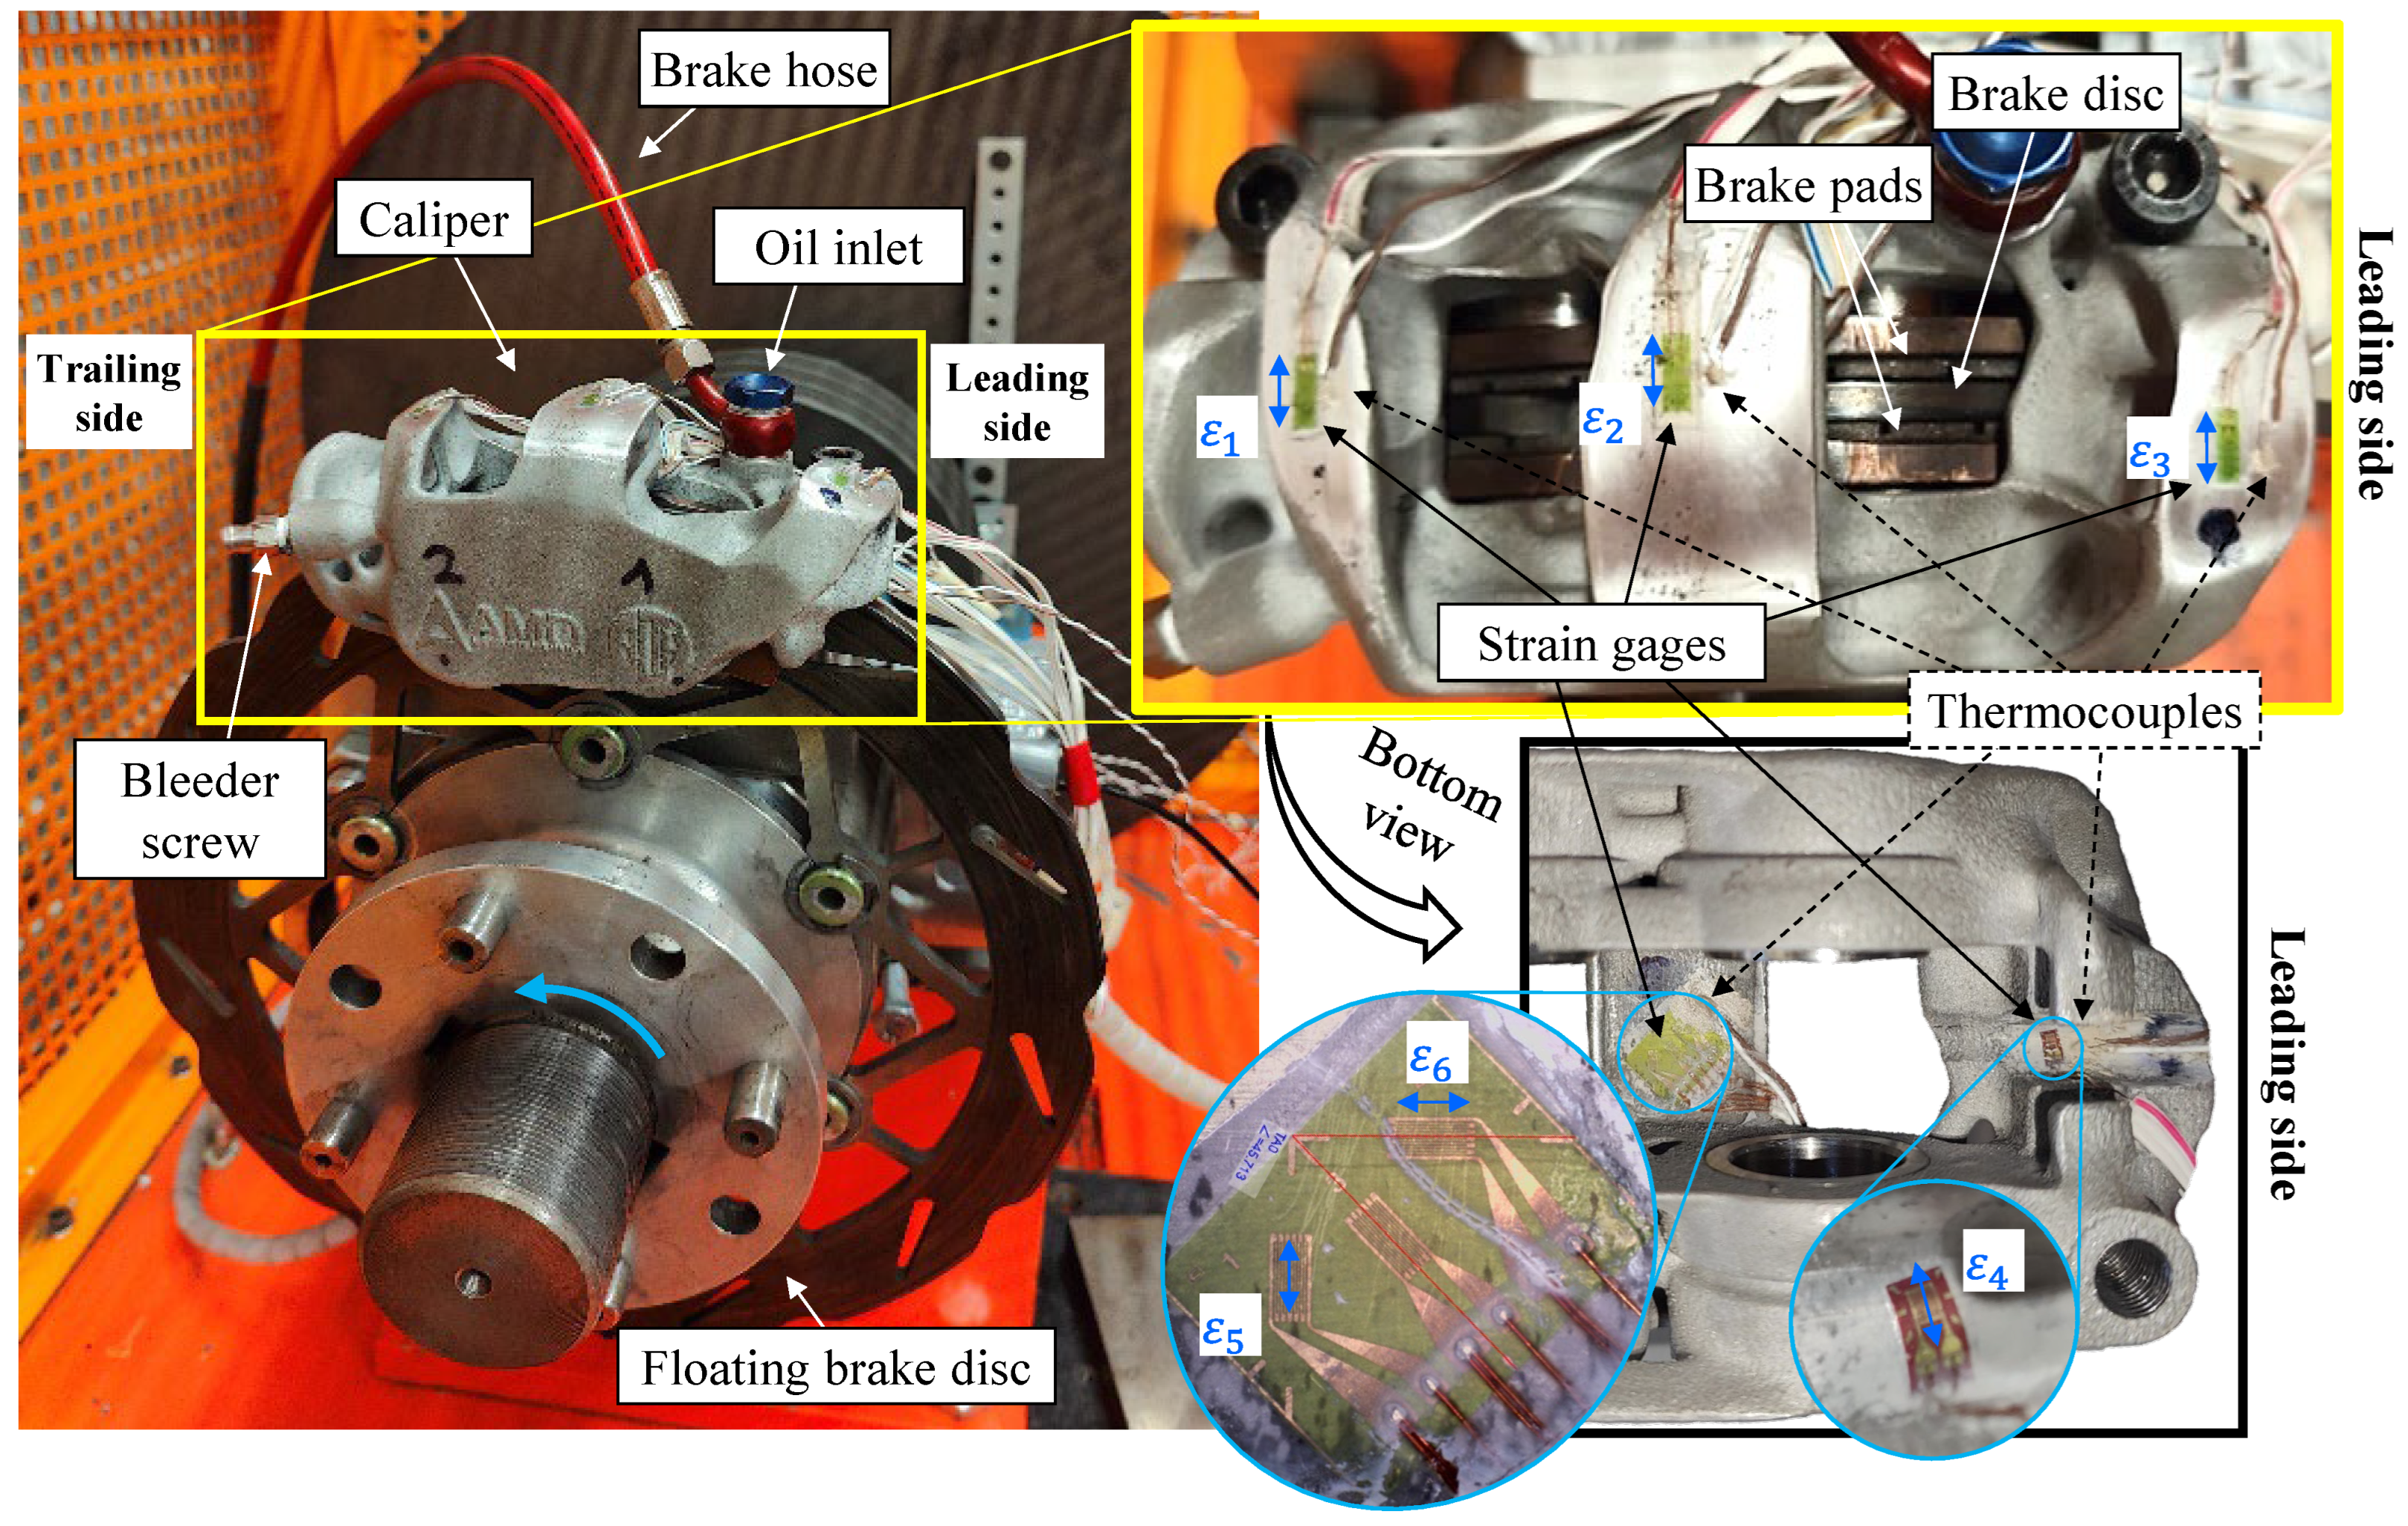
Tests were carried out on an inertial dynamometer, the details of which are described in [22], and aimed to validate the finite element analyses. Specifically, the test bench setup involved connecting the brake caliper to a hydraulic system that allows for continuously variable pressure application between 0 and 60 bar. Additionally, the bench is equipped with an electric motor and a flywheel mass, enabling the brake disc to rotate and replicate the kinetic energy of the vehicle, thereby simulating the actual braking conditions of the vehicle [22]. Strain and displacement measurements were planned by taking advantage of strain gauges and dial gauge, respectively. Concerning strain measurements, they were planned at different points on the caliper, the positions of which were chosen to easily place the strain gauges where the strain field was as elevated, uniform, and predominantly uniaxial (if possible). Based on the numerical analyses discussed previously, five points were identified, with a total of three axial strain gauges with a 3 mm base length ( ε 1 , ε 2 , and ε 3 in Figure 9), one with 1 mm base length ( ε 4 in Figure 9), and one 90° biaxial rosette strain gauge with a 2 mm base length ( ε 5 and ε 6 in Figure 9). Additionally, five thermocouples were included to compensate for thermal expansion effects and ensure that the maximum operating temperature of the adhesives was never exceeded. Each of the six strain gauges was connected in a quarter-bridge configuration to an IMC-CRONOS PL2 Data AcQuisition system. Similarly, two thermocouples were connected to the same DAQ, while the remaining three were connected to a National Instruments® NI USB-9162 + NI 9211 module.
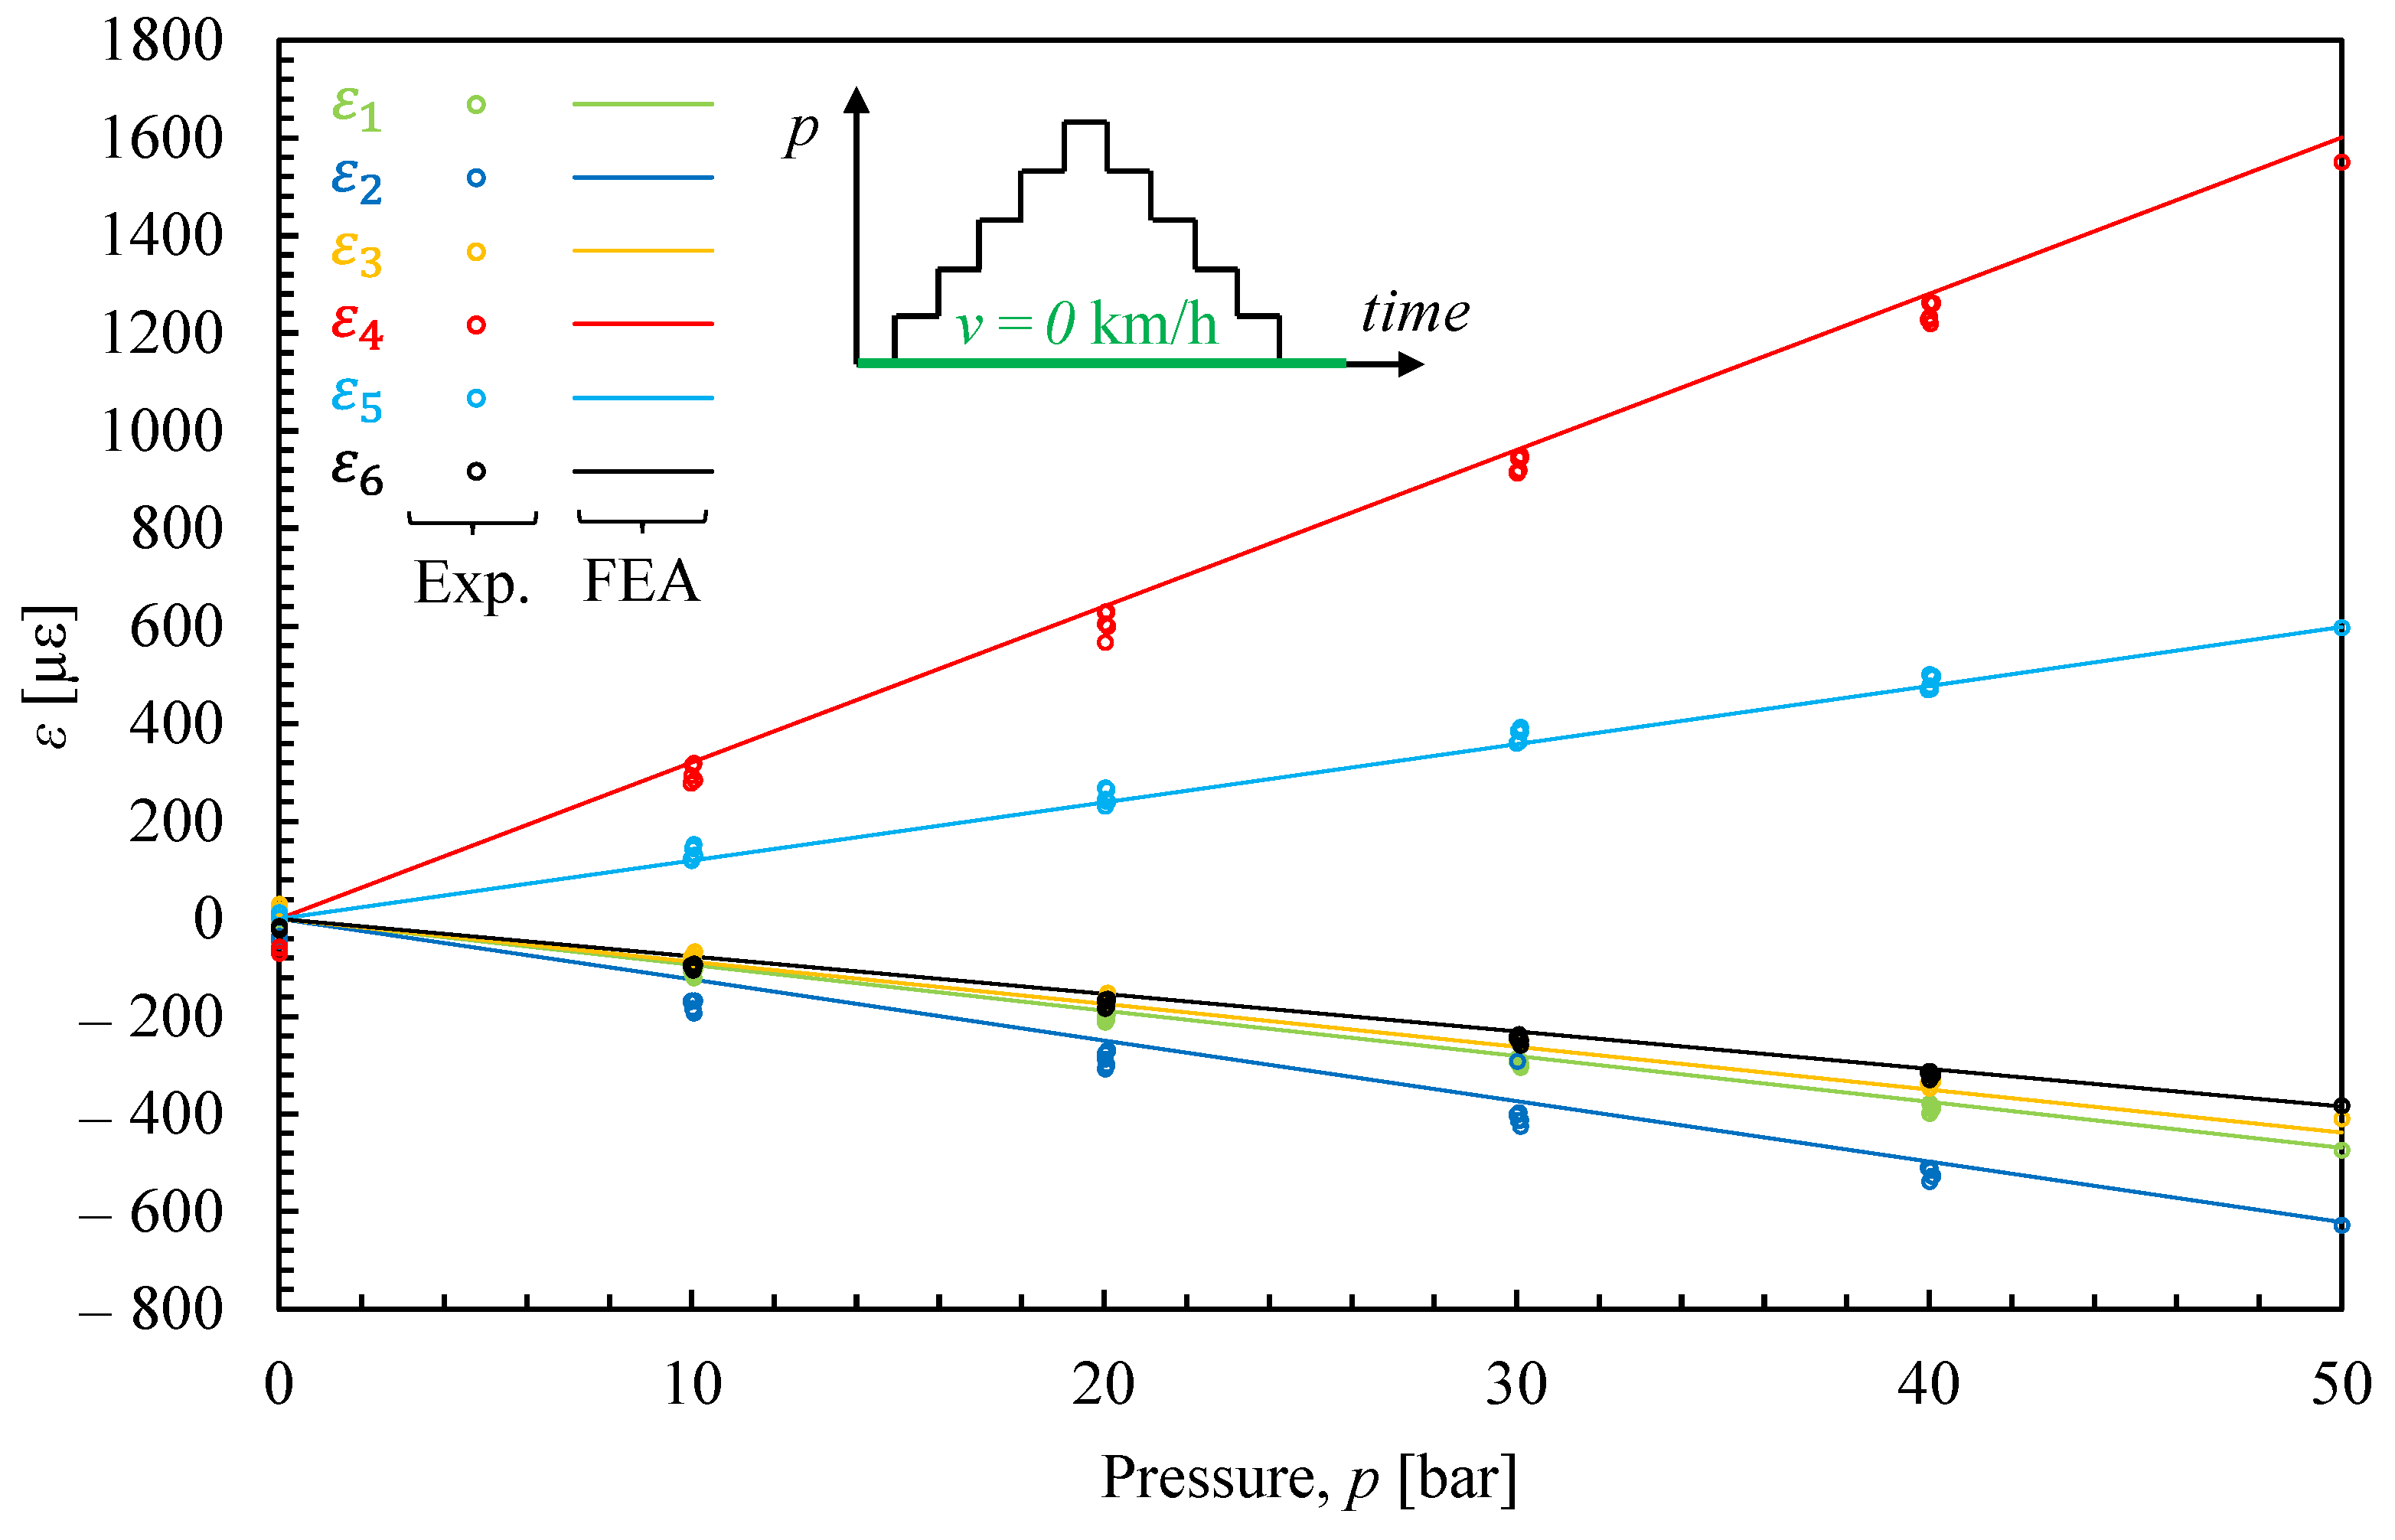
Before running the tests, the strain gauge readings were zeroed with the caliper fully unloaded and the mounting bolts loosened. Thereafter, the bolts were tightened and the static test, i.e., with the disc stopped, was conducted by applying by discretely increasing and decreasing the pressure in the brake line between 0 and 50 bar. The results, shown in Figure 10, present the experimental measurements of each strain gauge as markers and the corresponding numerical values as solid lines of the same colors. Notably, the measurements exhibited excellent agreement with the numerical estimates, with the error almost always being less than 5%. It should also be noted that the small (negligible) residual deformation at zero pressure is solely due to the bolt tightening (see Figure 10).

3.2. Dial Gauge Measurement with Static Disc

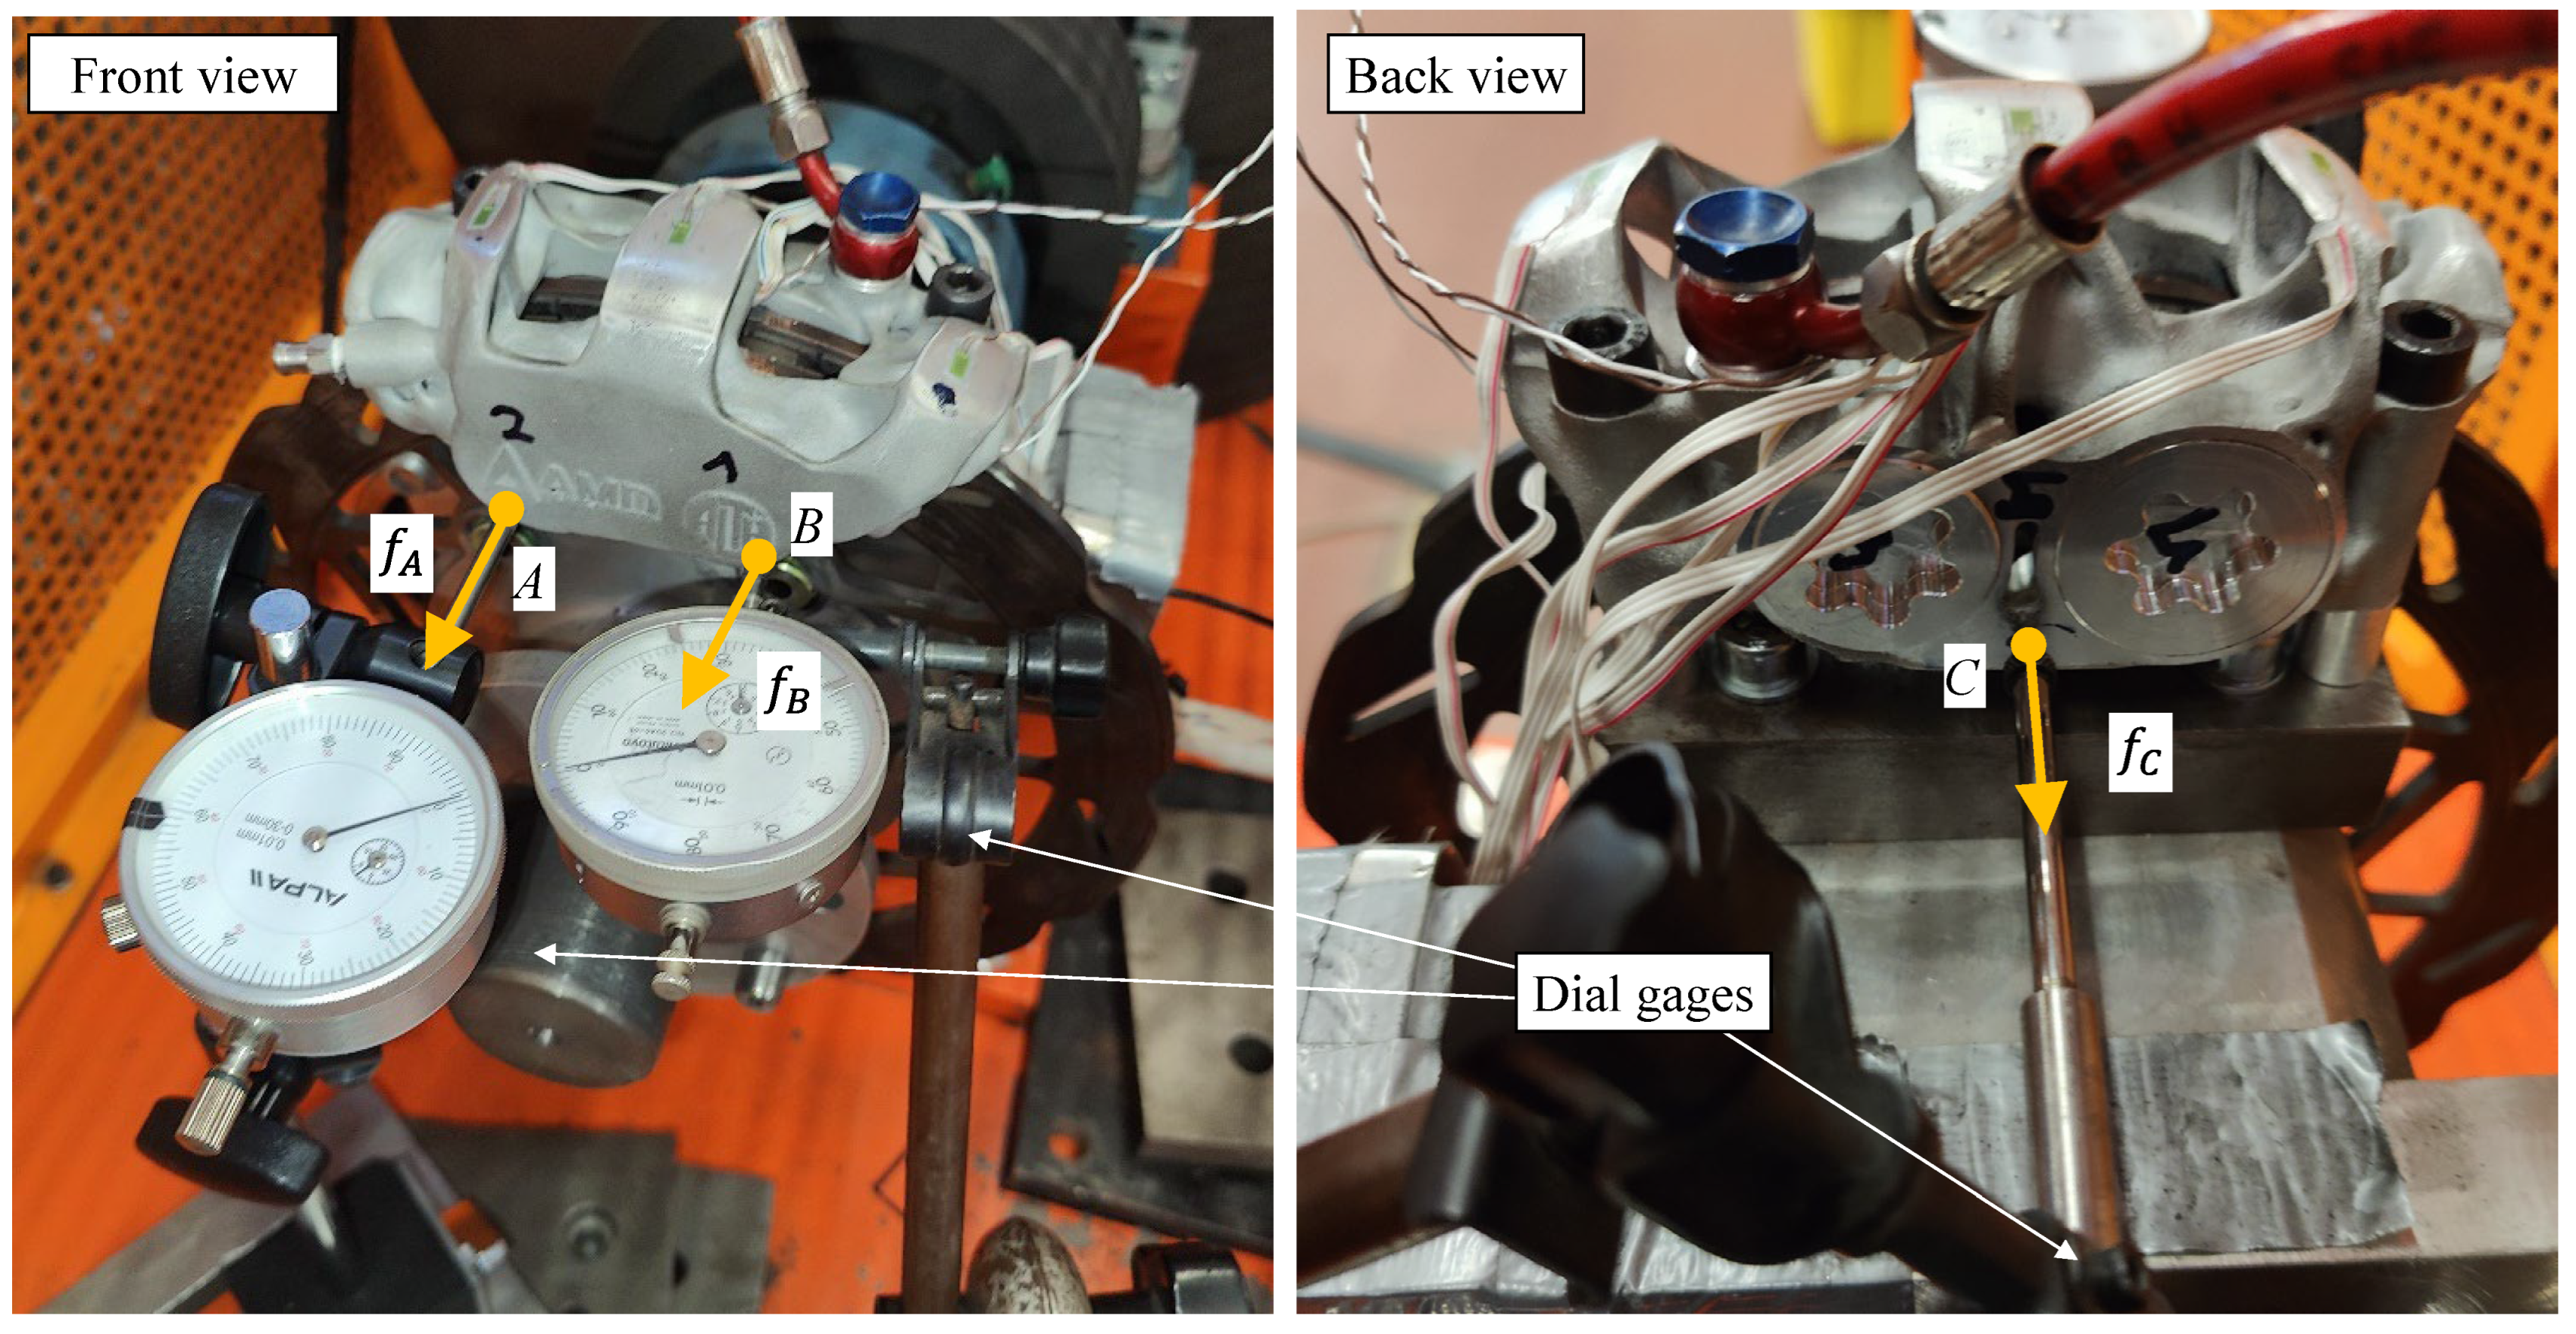
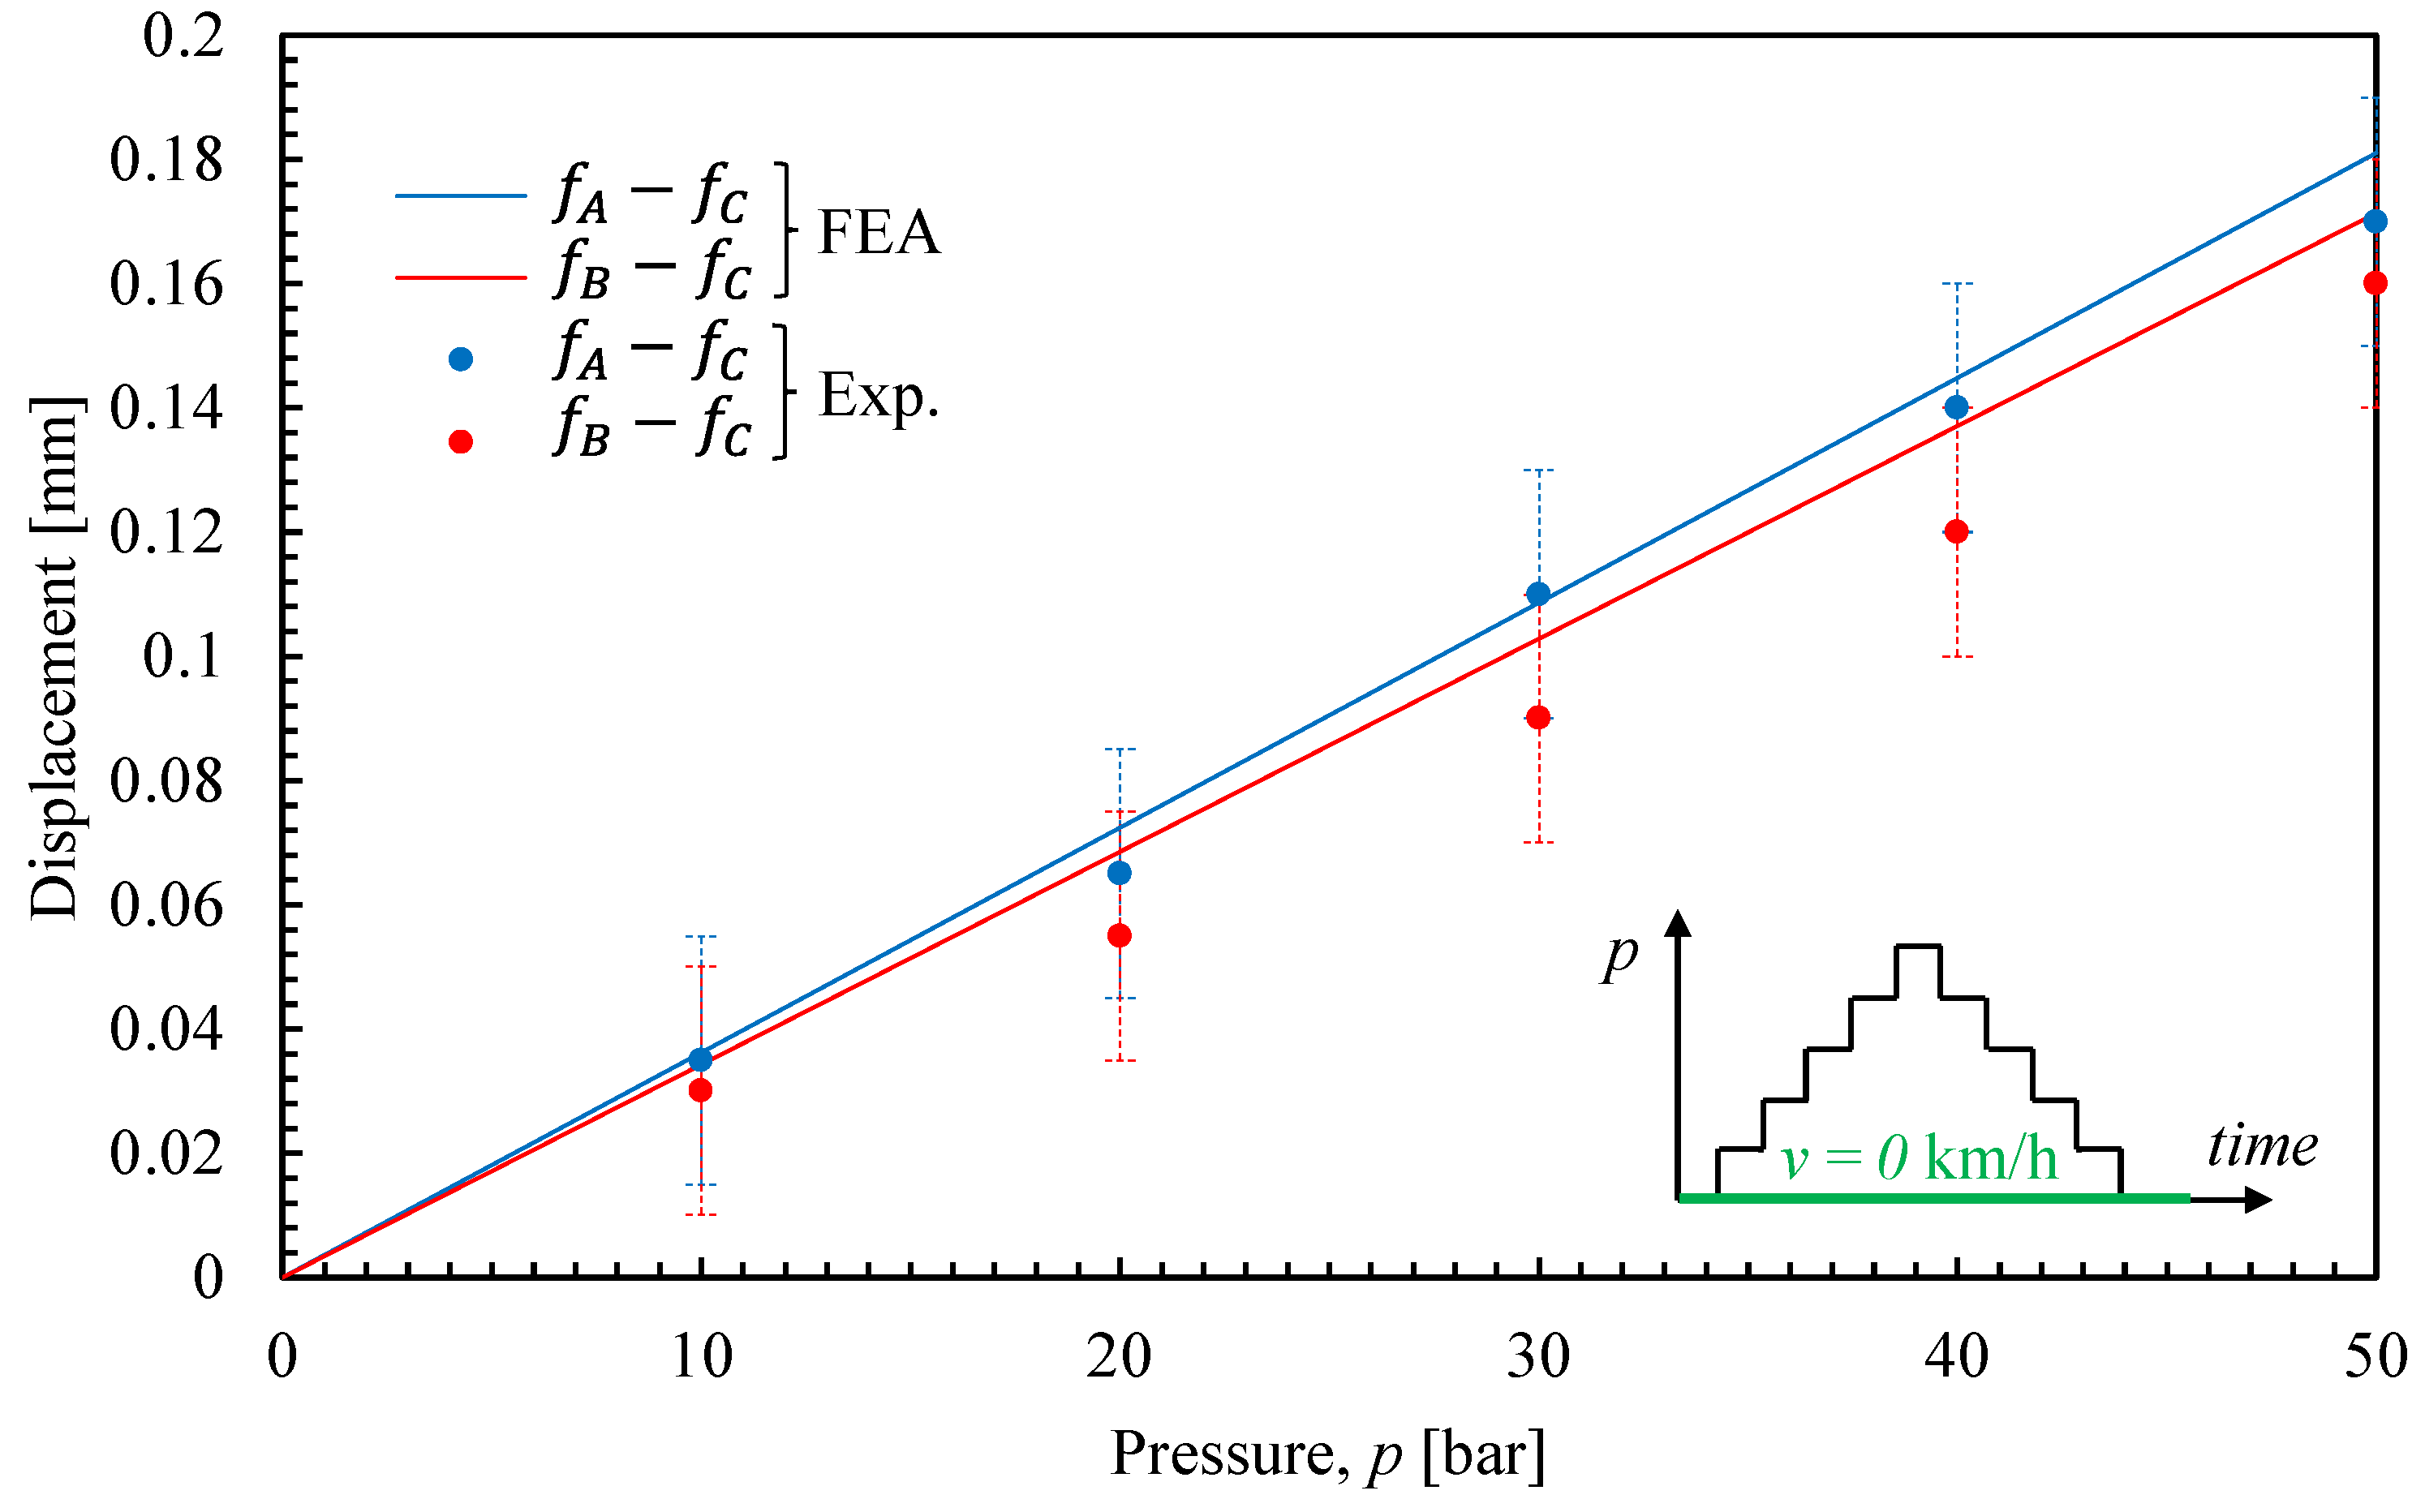
In addition to the strain gauge measurements, an experimental evaluation of the caliper’s displacement field was conducted by placing analog dial gauges at three different points on the caliper (points A, B, and C in Figure 11). These points were chosen for the high values of the caliper’s displacement when loaded and their easy access, which allows for the proper positioning of the dial gauges. It should be noted that the selected measurement points primarily capture the displacements resulting from the caliper’s ‘opening up’ deformation component [10]. Furthermore, the specific design of the test bench does not permit absolute displacement measurements by mounting the dial gauges rigidly to the frame since the brake caliper is fixed to a floating hub carrier that allows it to move slightly relative to the frame [22]. For this reason, two dial gauges were placed on one side of the caliper (points A and B in Figure 11), while the third gauge was positioned in the opposite direction on the opposite face (point C in Figure 11). This arrangement allowed for the evaluation of the caliper’s displacement field as the difference between the displacements measured at points A and B and that measured at point C, i.e., f A f C and f B f C , so as to remove any rigid body motion of the caliper.
Measurements were taken for some of the static pressure ramps between 0 and 50 bar previously discussed for the strain gauge measurements. The results, shown in Figure 12, exhibit excellent agreement between the experimental measurements (markers) and the corresponding finite element analysis estimations (solid lines of the same colors). Figure 12’s experimental results also include error bars of ±0.02 mm, this value being considered representative of the measurement resolution. This accounts for the intrinsic resolution of the dial gauges, the precise positioning of the dial gauge, potential parallax errors, and the compliance of the dial gauge supports.

3.3. Strain Gauge Measurement with Rotating Disc

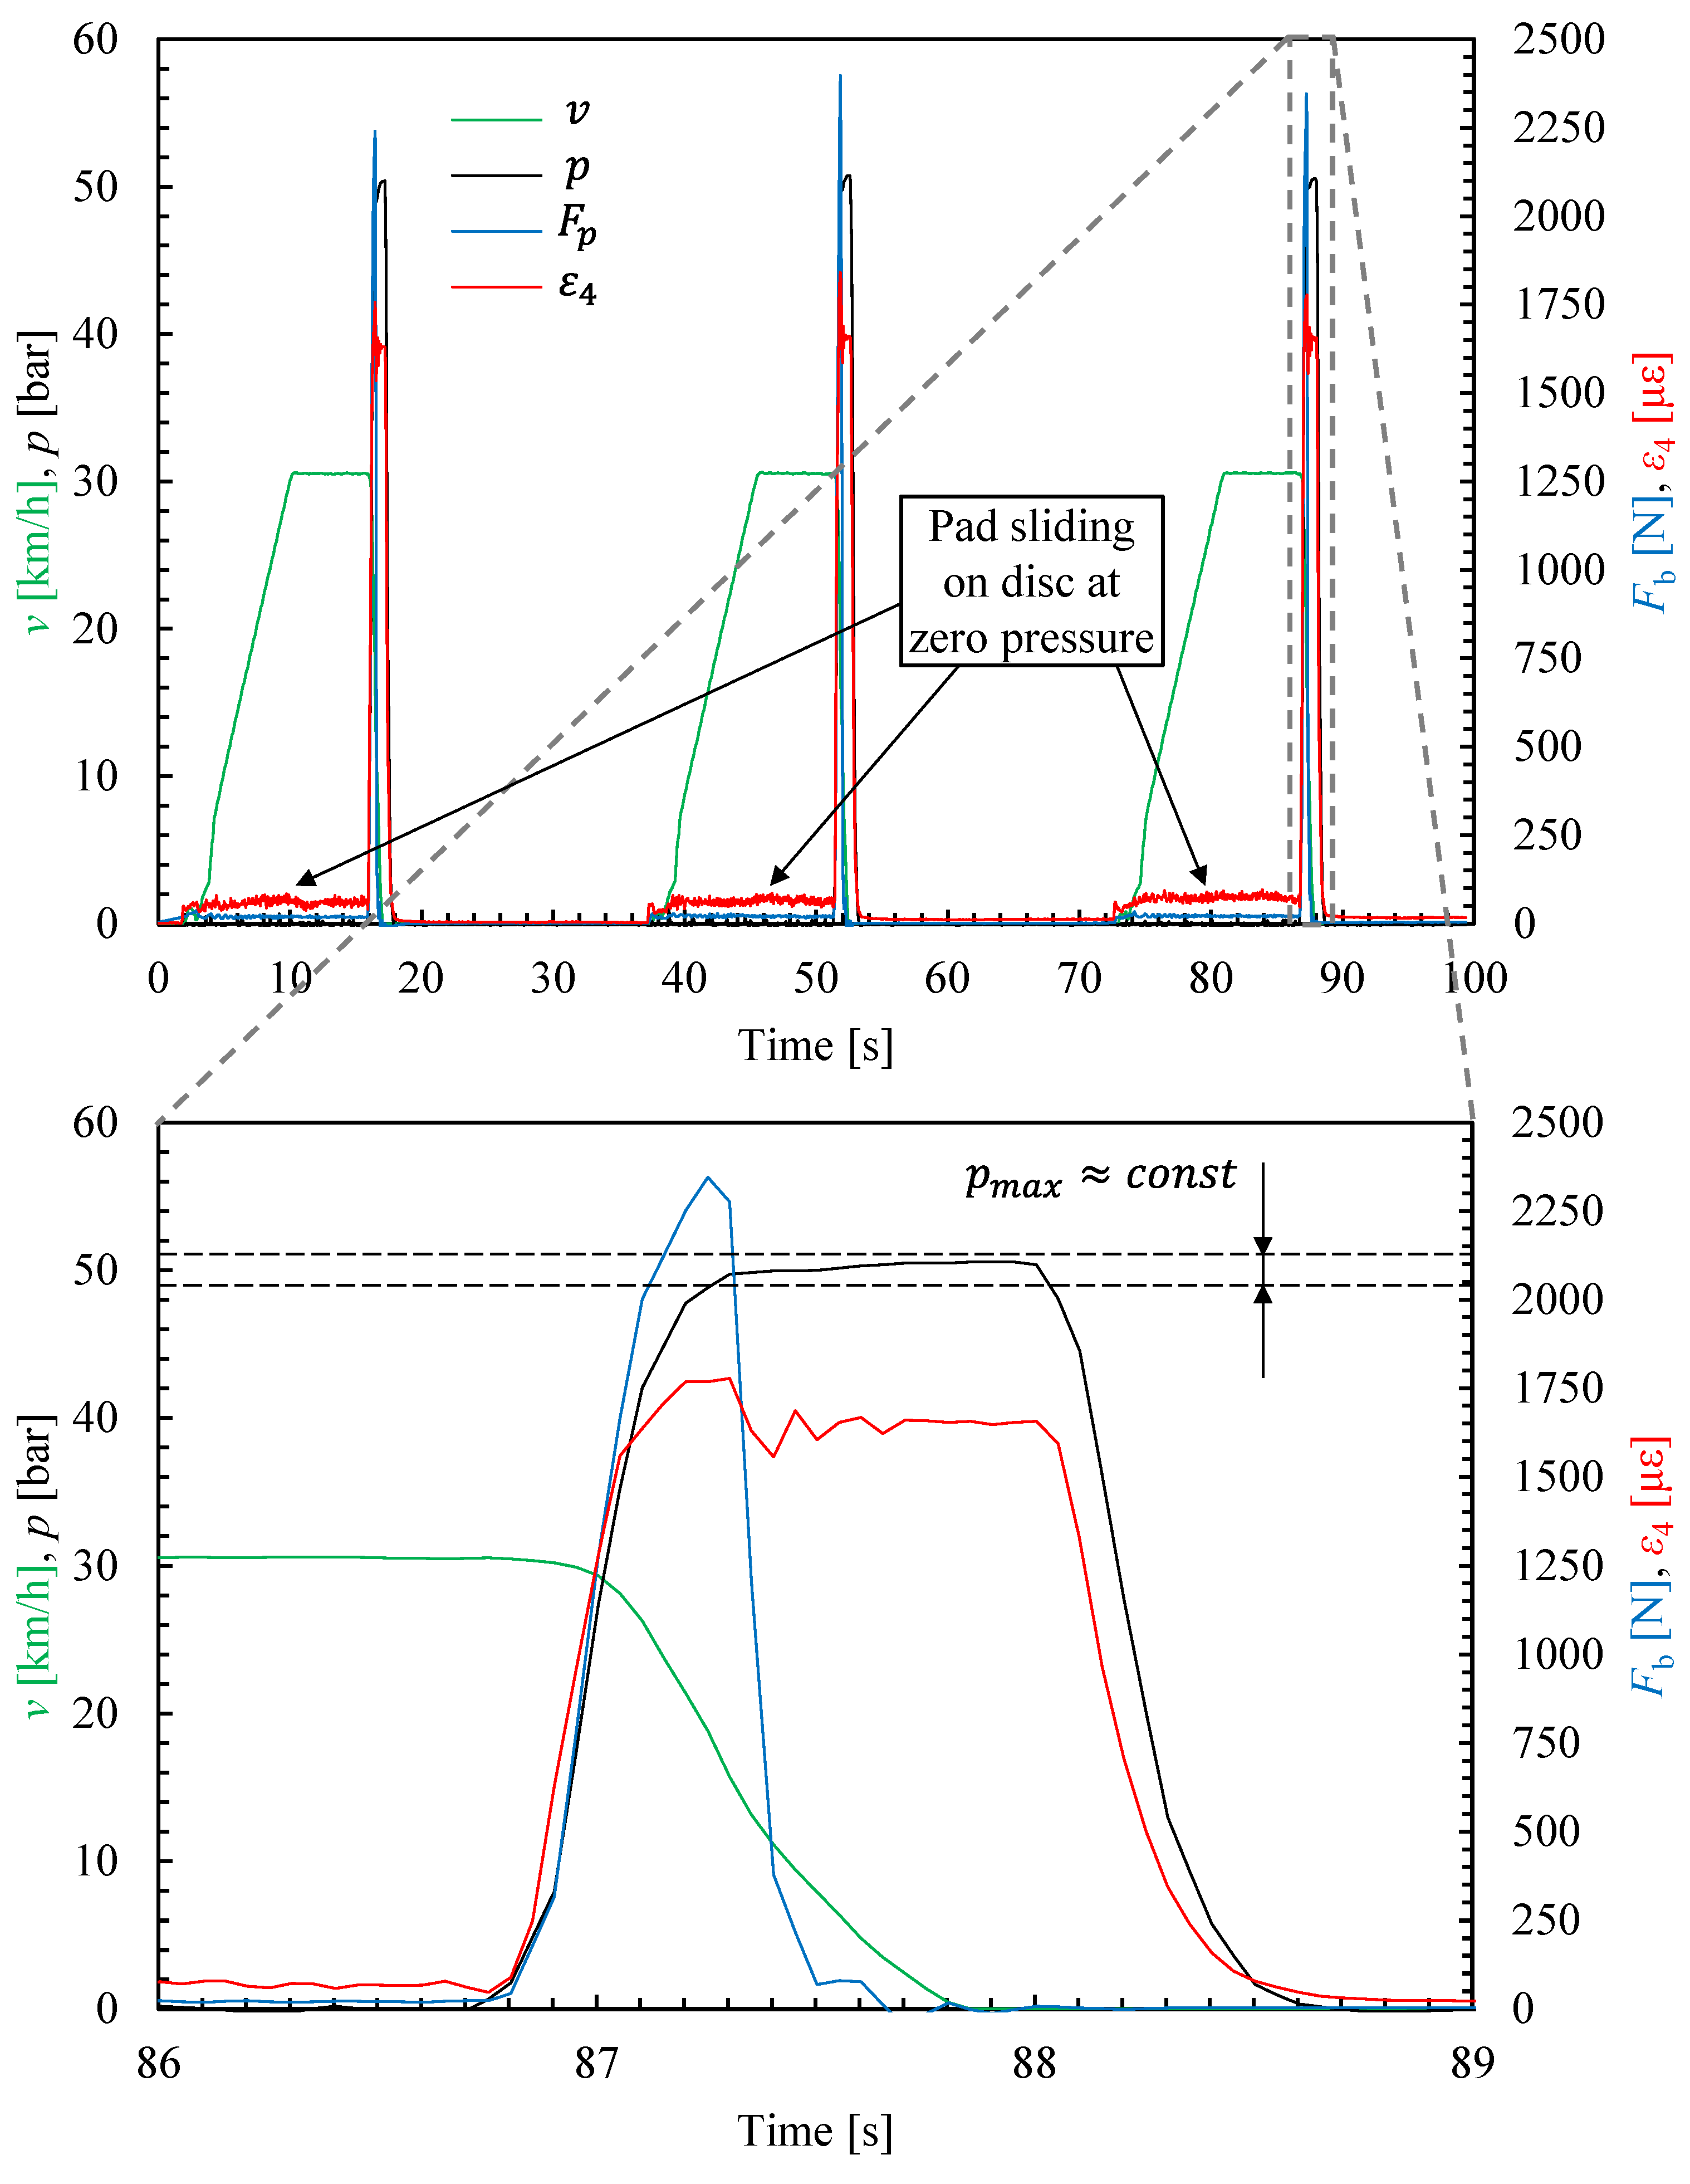
Strain measurements were also conducted under real braking conditions, i.e., with rotating brake disc. The brake test bench facilitated the application of repeated braking ramps at a constant initial speed v m a x and set pressure p m a x [22]. In essence, the inertial dynamometer accelerated the brake disc (along with the flywheels simulating the vehicle’s kinetic energy) from 0 km/h to a maximum speed v m a x (defined by the operator up to a maximum of 90 km/h) and maintained this speed for a few seconds (see green line Figure 13). Subsequently, the motor turned off, and a constant pressure p m a x (also set by the operator up to a maximum value of 60 bar) was applied and kept constant until the disc completely stopped (see black line Figure 13). Eventually, this sequence was repeated for a specified number of times. The advantage of these tests, as opposed to static tests with a static rotor, is that they allow for validating the numerical analyses under a non-zero braking force F b . Specifically, the rotating disc induces a braking torque M b , whose instantaneous value is measured by the dynamometer and used to calculate the friction force F b acting on the pad as F b = M b / r b (see blue line Figure 13). To validate the models, tests were conducted with two different maximum pressures p m a x (20 and 50 bar) and varying the initial speeds v m a x between 30 and 70 km/h. A sampling frequency of 20 Hz was used. At the end of each test, the strain measurements (see red line Figure 13, which represents the measurement of strain gauge 4) were correlated with the corresponding p m a x and friction force F b values. Specifically, Figure 13 (in particular, the zoomed view at the bottom) shows that during the entire braking cycle, both the pressure p (black curve) and the braking force F b (blue curve) vary continuously from zero to a maximum value and then return to zero at the end of the braking phase. Similarly, the strain measured by strain gauge 4 (analogous to the measurements from all other strain gauges) evolves continuously with p and F b . It starts from a value slightly above zero, reaches a maximum at the highest pressure and braking force, and then stabilizes at a constant value for p = p m a x and F b = 0 , before finally returning to zero upon complete release of the pressure ( p = 0 ). The initial value slightly above zero is attributed to the pad lightly touching the disc at zero pressure with the disc rotating, resulting in a slight braking force. This slight contact, while ideally avoidable (for instance, by providing a greater return force from the piston’s hydraulic seals), makes the system more responsive by eliminating the latency at the beginning of the braking phase.
Given that the caliper deformation is a function of two parameters, a two-dimensional comparison with numerical analyses required filtering the data. Only the portions of each braking cycle with approximately constant pressure ( p = p m a x ± 1   b a r ) were extracted and analyzed (see dashed black lines in the lower section of Figure 13). Specifically, all deformation values within this window were used for comparison with the numerical analyses, the results of which are shown in Figure 14.
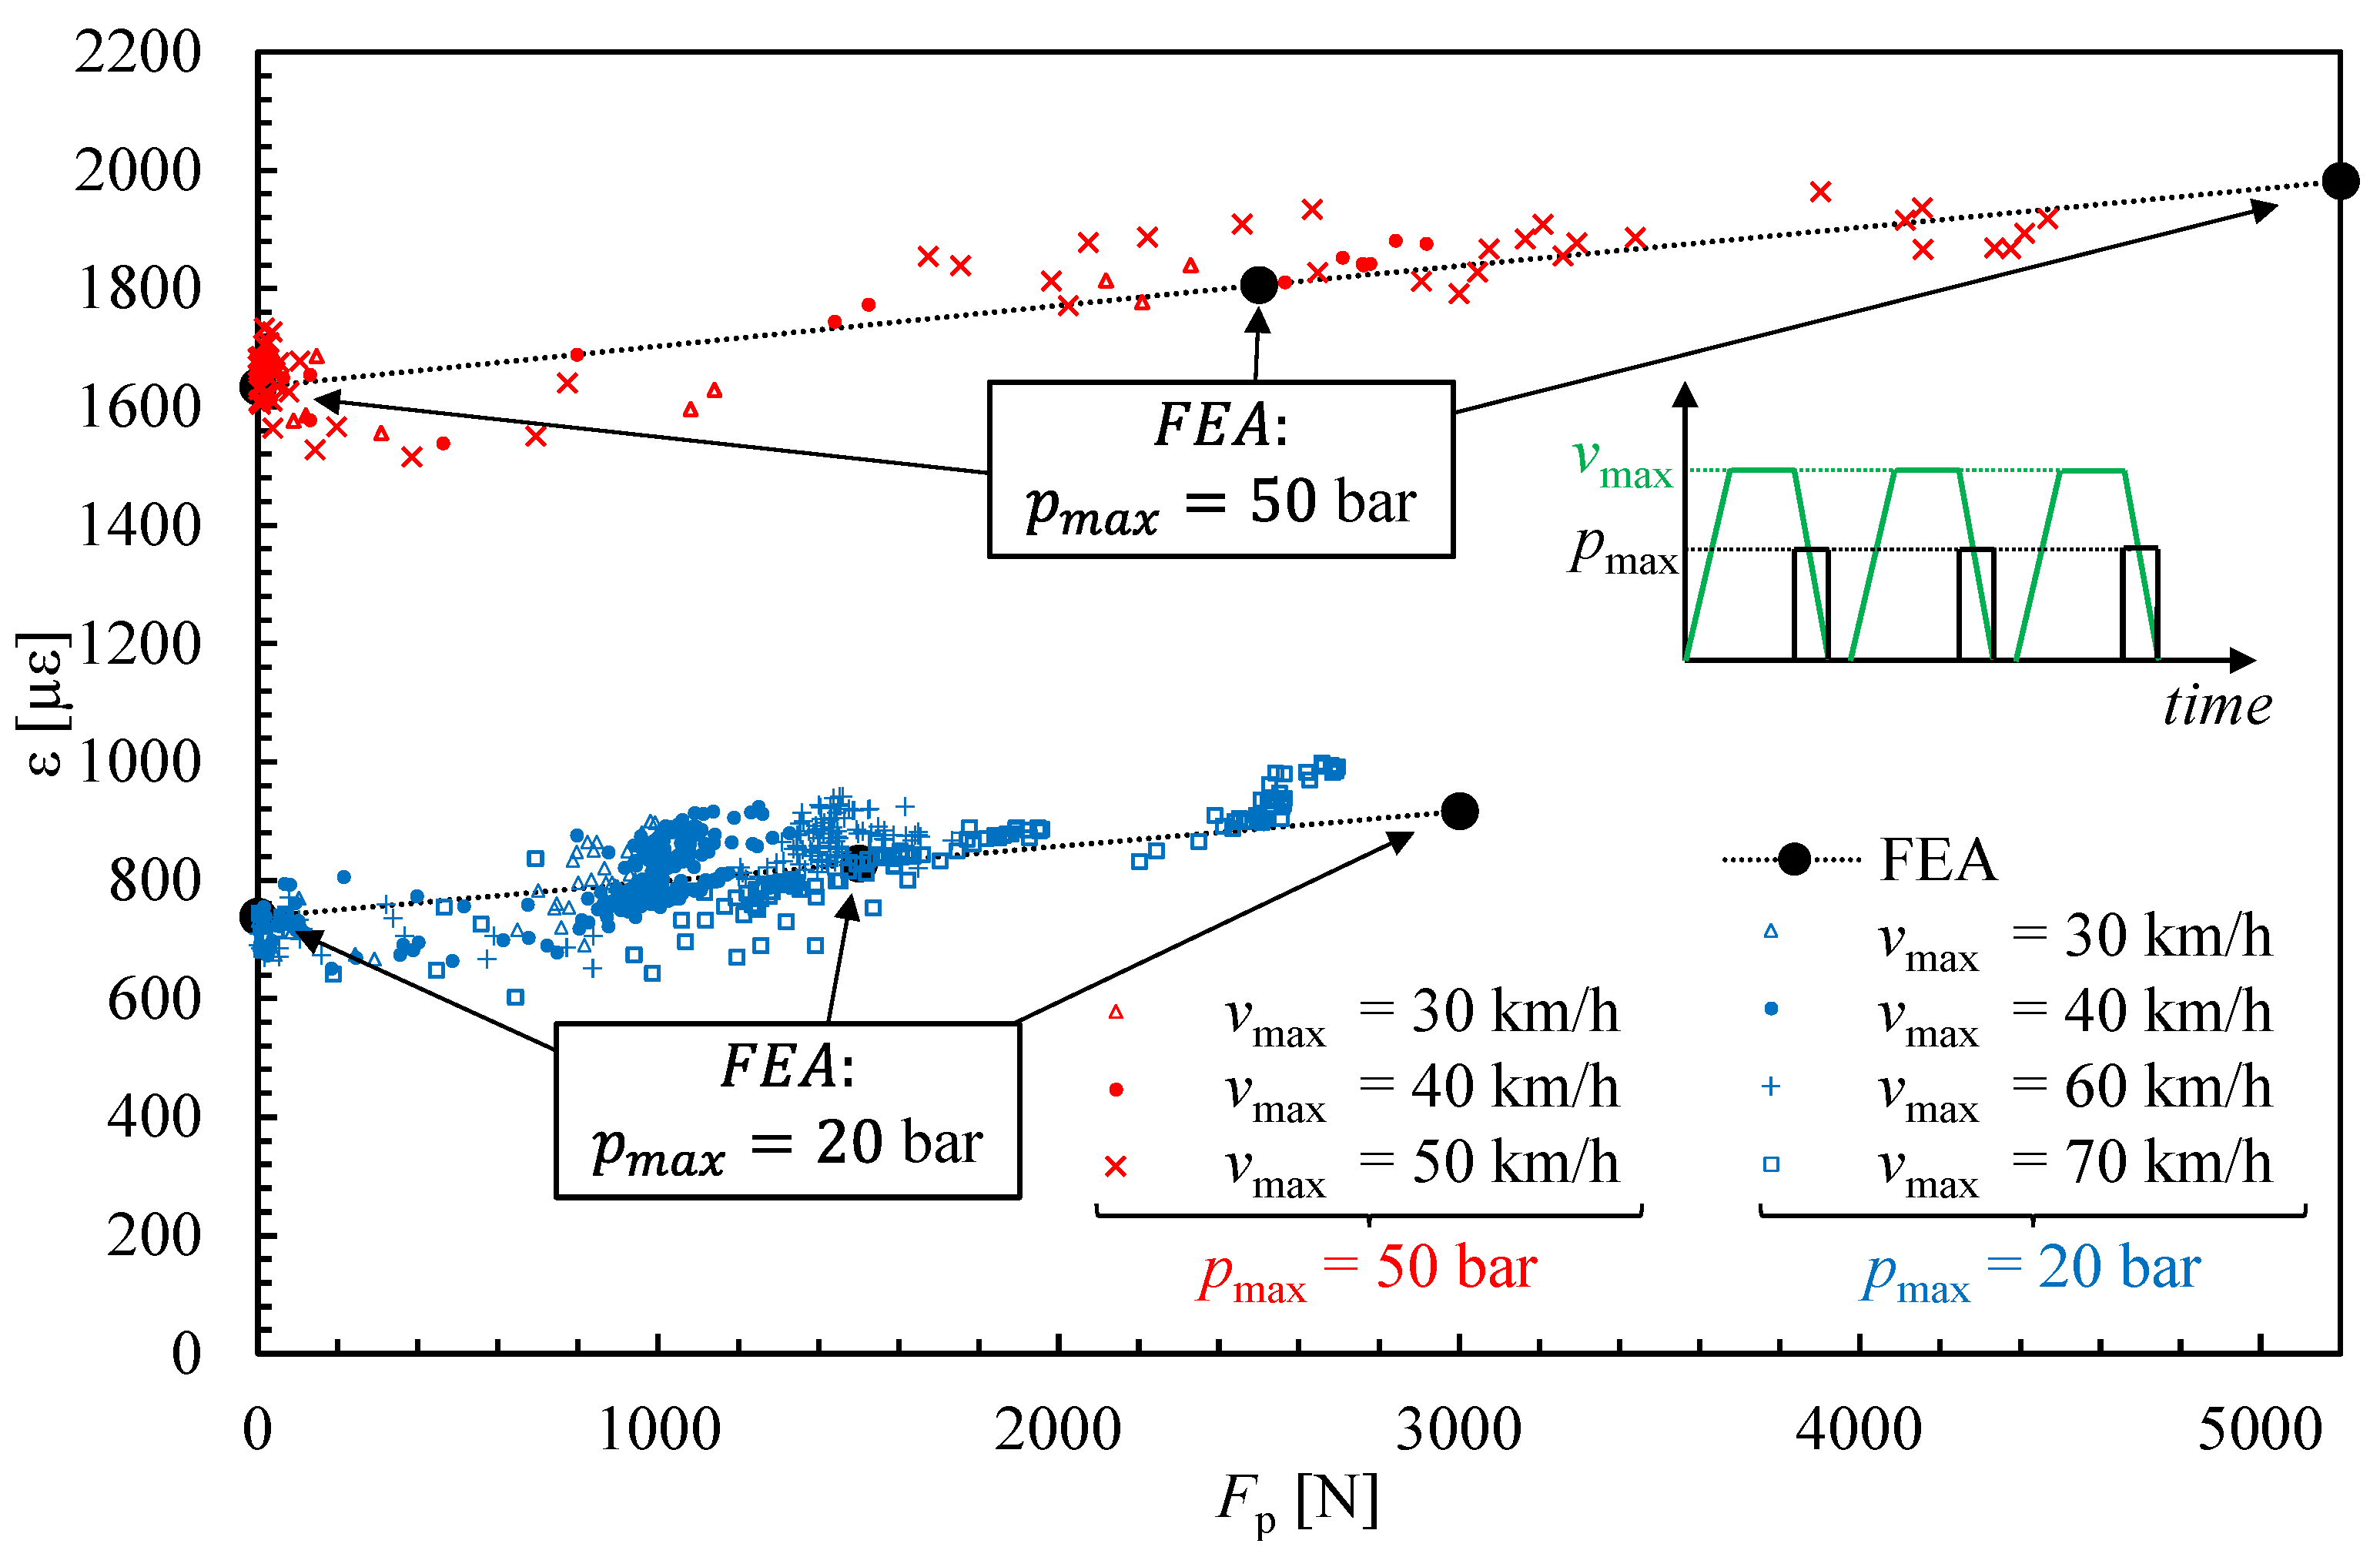
Figure 14 illustrates all the strain value as a function of the braking force F b (with F b = 0 being the case of static brake disc) at an almost constant pressure and equal to either 20 bar (blue markers in Figure 14) or 50 bar (red markers in Figure 14). Additionally, Figure 14 shows the strain values estimated from finite element analysis (as indicated in Figure 7) for six different pairs of ( p m a x , F b ) (see the six black markers in Figure 14). Intermediate values at constant p m a x are estimated by assuming a linear relationship between the FEA results (see black dashed lines in Figure 14). Note that, for brevity and clarity, Figure 14 shows only the data from strain gauge 4, i.e., the most stressed gauge (see Figure 10), with the results from the other strain gauges being similar.
An analysis of the figure indicates that the experimental results (markers in Figure 14) are in good agreement with the numerical estimates (black dashed lines in Figure 14) for both 20-bar and 50-bar pressures. Despite the huge scatter of the data, the average trend is well captured by the numerical analyses, with maximum errors generally within ±15% for p m a x = 20 bar and ±10% for p m a x = 50 bar.
At the conclusion of the tests with the rotating disc, it was also possible to measure the thickness of the brake pad’s lining material. As a result, this measurement confirmed that uniform wear occurred on both the inner and outer pads, further validating the efficacy of the analyses conducted and the correctness of the procedure used in the caliper’s design.

4. Conclusions

This study presents a comprehensive and systematic approach to conceiving, designing for additive manufacturing, manufacturing, and testing a hydraulic brake caliper specifically tailored for Formula SAE race cars and made from an Al-Mg-Sc alloy (Scalmalloy®), an innovative Al-Mg-Sc alloy which was never adopted before to manufacture a brake caliper. The focus is on a topology-optimized monoblock fixed caliper with four opposing pistons, aiming to balance minimal mass with high braking force, which is crucial for competitiveness in Formula SAE. The design process began with a detailed theoretical analysis of the vehicle dynamic to define the design loads, including the required braking force and applied pressure. This was followed by a preliminary design phase that defined the caliper’s main dimensions and key geometric features, e.g., the size and position of the pistons. Topology optimization was employed to minimize the caliper’s mass while maintaining appropriate stiffness and structural integrity.
The final design was realized using laser powder bed fusion (LPBF) additive manufacturing by taking advantage of the high-strength, low-weight properties of Scalmalloy®. The caliper was subsequently subjected to comprehensive experimental validation. Tests conducted on an inertial dynamometer with both static and rotating brake discs confirmed the caliper’s performance, demonstrating strong alignment with finite element analysis (FEA) estimations. The strain and displacement measurements showed excellent correlation with numerical estimates, with errors generally within 5% and 15% for static and rotating brake discs, respectively. Furthermore, the design ensured uniform wear of the brake pads, as validated by post-test inspections, confirming the effectiveness of the design process. In conclusion, this study successfully demonstrates the conceptualization, design, manufacturing, and validation of a topology-optimized brake caliper for Formula SAE race cars made of Scalmalloy® by using LPBF technology.

Author Contributions

Conceptualization, F.C. and G.M.; Data curation, F.C. and L.V.; Formal analysis, F.C. and L.V.; Investigation, F.C. and L.V.; Methodology, F.C., L.V. and G.M.; Project administration, G.M.; Resources, F.C. and G.M.; Software, F.C. and L.V.; Supervision, G.M.; Validation, F.C. and L.V.; Visualization, L.V. and F.C.; Writing—original draft preparation, L.V.; Writing—review and editing, F.C., L.V. and G.M. All authors have read and agreed to the published version of the manuscript.

Funding

This research received no external funding.

Data Availability Statement

The original contributions presented in the study are included in the article, further inquiries can be directed to the corresponding author.

Acknowledgments

The authors would like to thank AMD Engineering S.r.l for its contribution to the caliper’s development and the consultancy provided during the design phase, Alth S.n.c for the machining and realization of the auxiliary components, and Cinel S.r.l. for the metrology support. Finally, thanks are extended to APWORKS GmbH for the 3D printing.

Conflicts of Interest

The authors declare no conflicts of interest.

References

  1. SAE International. Formula SAE Rules 2024; SAE International: Warrendale, PA, USA, 2023. [Google Scholar]
  2. Carvalho, D.F.T.; Melo, C.A.P. Simulation Model and Testing of a Formula SAE Brake System; 2021-36-0430; SAE Technical Paper; SAE International: Warrendale, PA, USA, 2021. [Google Scholar] [CrossRef]
  3. Chen, W.; Jia, D.; Huang, S. Optimized Design of Braking System in FSAE Racers. J. Eng. Mech. Mach. 2022, 7, 62–74. [Google Scholar]
  4. Dalal, K.; Karnik, A. Monoblock Brake Caliper Design and Analysis. Int. Res. J. Eng. Technol. 2020, 7, 2419–2425. [Google Scholar]
  5. da Silva, P.H.M.; Idehara, S.J. Characterization of the Brake System of a Formula SAE Vehicle; 2018-36-0148; SAE Technical Paper; SAE International: Warrendale, PA, USA, 2018. [Google Scholar] [CrossRef]
  6. Farias, L.T.; Schommer, A.; Haselein, B.Z.; Soliman, P.; de Oliveira, L.C. Design of a Brake Caliper Using Topology Optimization Integrated with Direct Metal Laser Sintering; SAE Techincal Paper; SAE International: Warrendale, PA, USA, 2015. [Google Scholar] [CrossRef]
  7. Tyflopoulos, E.; Lien, M.; Steinert, M. Optimization of Brake Calipers Using Topology Optimization for Additive Manufacturing. Appl. Sci. 2021, 11, 1437. [Google Scholar] [CrossRef]
  8. Gupta, E.; Bora, D.K.S.; Rammohan, A. Design and analysis of brake system for FSAE race car. Eng. Res. Express 2022, 4, 025039. [Google Scholar] [CrossRef]
  9. Phad, D.; Auti, T.; Joshi, R.; Jadhav, S.; Devasthali, S. Design and Analysis of a Brake Caliper. Int. J. Mech. Eng. Res. Dev. 2015, 5, 1–10. [Google Scholar]
  10. Sergent, N.; Tirovic, M.; Voveris, J. Design optimization of an opposed piston brake caliper. Eng. Optim. 2014, 46, 1520–1537. [Google Scholar] [CrossRef]
  11. Tirovic, M.; Sergent, N.; Campbell, J.; Roberts, P.; Vignjevic, R. Structural analysis of a commercial vehicle disc brake caliper. Proc. Inst. Mech. Eng. Part D J. Automob. Eng. 2012, 226, 613–622. [Google Scholar] [CrossRef]
  12. Sergent, N. Analysis and Optimisation of Disc Brake Calipers. Ph.D. Thesis, Cranfield University, Bedford, UK, 2010. [Google Scholar]
  13. Limpert, R. Brake Design and Safety; SAE International: Warrendale, PA, USA, 2011. [Google Scholar]
  14. Ravi Kumar, L.; Prathiesh Lalan, R.A.; Shriram Naibal, B.; Chiranjeev Sanjay, P.; Gananathji Naveen Kishore, S.; Vasundharadevi, D. Design, Modeling and Analysis of Customized Brake Caliper for SAE BAJA Vehicle; SAE Technical Paper; SAE International: Warrendale, PA, USA, 2024. [Google Scholar] [CrossRef]
  15. Ugemuge, M.; Das, S. Design and Testing of Custom Brake Caliper of a Formula Student Race Car; SAE Technical Paper; SAE International: Warrendale, PA, USA, 2019. [Google Scholar] [CrossRef]
  16. Ugemuge, M.; Das, S. Topology Optimisation of Brake Caliper; SAE Technical Paper; SAE International: Warrendale, PA, USA, 2020. [Google Scholar] [CrossRef]
  17. Meyer, J.; Barnes, J.E. Scalmalloy is too expensive and design optimisation only makes sense in aerospace. True or false? Met. AM 2019, 5, 127–135. [Google Scholar]
  18. Limebeer, D.J.N.; Massaro, M. Dynamics and Optimal Control of Road Vehicles; Oxford University Press: Oxford, UK, 2018. [Google Scholar]
  19. Antanaitis, D.; Sanford, J. The Effect of Racetrack/High Energy Driving on Brake Caliper Performance; SAE Technical Paper; SAE International: Warrendale, PA, USA, 2006. [Google Scholar] [CrossRef]
  20. Chang, H.H. On a Numerical Study for Rubber Seals; SAE Technical Paper; SAE International: Warrendale, PA, USA, 1988. [Google Scholar] [CrossRef]
  21. Anwana, O.D.; Cai, H.; Chang, H.T. Analysis of Brake Caliper Seal-Groove Design; SAE Technical Paper; SAE International: Warrendale, PA, USA, 2002. [Google Scholar] [CrossRef]
  22. Vecchiato, L.; Negri, M.; Picci, G.; Viale, L.; Zaltron, G.; Giacometti, S.; Meneghetti, G. Design and Development of a Brake Test Bench for Formula SAE Race Cars. Machines 2024, 12, 135. [Google Scholar] [CrossRef]
Figure 1. Schematic of a wheel and brake disc assembly.
Vehicles 06 00075 g001
Figure 2. Schematic of a race car in the pitch plane.
Vehicles 06 00075 g002
Figure 3. Schematic of a monoblock six-piston fixed caliper.
Vehicles 06 00075 g003
Figure 4. Location of CoP on the brake pad with static and rotating brake discs: comparison between values calculated using Equation (10), Equation (15), and finite element analyses.
Vehicles 06 00075 g004
Figure 5. Geometry of the brake caliper: (a) main body with all internal features highlighted, (b) schematic of the working principle of the pistons’ seal and (c) geometry and dimensions of their seats used in the present investigation (dimensions are in mm). Grey and red regions in a) represent the Design Space and Non-Design Space (NDS), respectively, adopted in the topology optimization.
Vehicles 06 00075 g005
Figure 6. Topology optimization of the brake caliper: (a) section view of the FE model adopted for the topology optimization with details on the applied load and constraints, (b) output of the analysis, while (c,d) are two different views of the final CAD model.
Vehicles 06 00075 g006
Figure 7. Finite element simulations: (a) numerical simulations of the entire brake caliper with (b) detailed view of the internal components.
Vehicles 06 00075 g007
Figure 8. Manufacturing of the brake caliper: (a) as-built 3D-printed caliper with indication of the build direction z, (b) detail of the milling process for machining the pistons’ seals on the inner pad side, and (c) the machined caliper.
Vehicles 06 00075 g008
Figure 9. Brake caliper installed in the dynamometer described in [22]. Details of the strain gauges and thermocouples are given on the right side of the figure.
Vehicles 06 00075 g009
Figure 10. Comparison between experimental and numerical caliper’s strains under static loading.
Vehicles 06 00075 g010
Figure 11. Position of the dial gauges for caliper displacement measurement with static disc.
Vehicles 06 00075 g011
Figure 12. Comparison between experimental and numerical caliper’s displacements with static disc.
Vehicles 06 00075 g012
Figure 13. Example of data acquisition from a repetition of 3 ramps at a constant initial speed v m a x = 30   k m / h (green line, referred to the left axis) and set pressure p m a x = 50   b a r (black line, referred to the left axis). The same chart also gives the measured braking force F b (blue line, referring to the right axis) and, for brevity, the strain gauge measurement of the strain gauge 4 only (red line, referring to the right axis). The chart below is a zoom of the third ramp.
Vehicles 06 00075 g013
Figure 14. Comparison between experimental and numerical strains with rotating disc.
Vehicles 06 00075 g014
Disclaimer/Publisher’s Note: The statements, opinions and data contained in all publications are solely those of the individual author(s) and contributor(s) and not of MDPI and/or the editor(s). MDPI and/or the editor(s) disclaim responsibility for any injury to people or property resulting from any ideas, methods, instructions or products referred to in the content.