Article

Non-Destructive Testing of Dalle de Verre Windows by Fernand Léger and Alexandre Cingria in Switzerland

by
Johannes Hugenschmidt
1,*,
Sophie Wolf
2 and
Christophe Gosselin
3
1
NDT, Eastern Switzerland University of Applied Sciences, 8640 Rapperswil, Switzerland
2
Vitrocentre Romont, 1680 Romont, Switzerland
3
TFB Romandie SA, 1070 Puidoux, Switzerland
*
Author to whom correspondence should be addressed.
Heritage 2023, 6(9), 6311-6327; https://doi.org/10.3390/heritage6090330
Submission received: 12 June 2023 / Revised: 17 August 2023 / Accepted: 30 August 2023 / Published: 9 September 2023
(This article belongs to the Section Cultural Heritage)

Abstract

:
Dalle de verre windows consist of thick slabs of coloured glass set in a matrix of reinforced concrete. The invention of this special art form is closely linked to the developments in modern architecture in the first half of the 20th century that are characterized by using new technologies such as steel-frame construction, reinforced concrete and the increasing use of glass. Many of these windows are showing damage, some of it severe. Until now, the causes of damage have hardly been investigated and there is still no practical and suitable approach to the analysis of the state of conservation of dalle de verre glazings. One of the main objectives of an interdisciplinary project (2019–2021) was therefore to evaluate the potential of non-destructive techniques for the characterisation of and identification of damage of dalle the verre windows in their structural, physical and climatic context. Various non-destructive methods (Ground-Penetrating Radar, Electric resistivity, Half-cell potential, Ultrasonics, Induction, Magnet and Thermography) have been tested on two prominent dalle de verre examples: the windows created by Fernand Léger for the church of Saint-Germain d’Auxerre in Courfaivre (Swiss Jura mountains) and the large tripartite by Alexandre Cingria once decorating the choir window church of the Franciscan monastery at Fribourg, Switzerland. The results of the analyses presented in this paper provide valuable information on the advantages and limitations as well as the costs of the methods used.

1. Introduction

The French term ‘dalle de verre’ relates to thick slabs of coloured glass that are produced by casting in a mould. The glass slabs or ‘dalles’ are cut into shape with hammers or saws and then set in a matrix of reinforced concrete; the excess concrete is scraped off the glass surface once the cement has set.
The technique was developed by the French glass painter and mosaic artist Jean Gaudin (1912–1945), but it was the stained-glass artist Auguste Labouret (1871–1964), also based in Paris, who submitted the patent for the technique he called ‘vitrail en dalle de verre cloisonné en ciment’ in 1933 [1]. Gaudin, Labouret and also other French stained-glass artists such as Charles Lorin (1866–1940) and Gabriel Loire (1904–1996) created important dalle de verre artworks for numerous churches rebuilt in reinforced concrete after World War I. The coloured glass for the new windows came from the workshop of Jules Albertini (1901–1980), who was the only glassmaker to produce thick glass until the beginning of the production of cast glass at the Saint-Just-sur-Loire glassworks in 1946 [2].
In Switzerland, the dalle de verre technique also made its way in the mid-1930s. The Swiss painter and stained-glass artist Alexandre Cingria (1879–1945) was the first artist to create dalle de verre windows on Swiss territory. He was one of the founding members of the ‘Groupe Saint-Luc’, a catholic artistic society devoted to the renewal of sacred art and involved in the construction of several churches in the French-speaking part of Switzerland in the 1930s and 1940s. Cingria created dalle the verre for a number of these and other religious buildings in the region [3]. For the realisation of his works, he collaborated with the studio of Jean Gaudin in Paris, with whom he maintained close contact.
The heyday of this monumental art form, however, was between the 1950s and 1980s, when many stained-glass artists created windows using the dalle de verre technique. The online database vitrosearch.ch includes more than 200 entries relating to dalle de verre in Switzerland. Many of these creations were made by the Atelier Aubert and Pitteloud at Ecublens (near Lausanne). The workshops director Alfred Aubert was president of the ‘Union Suisse de béton translucide’ and made it his mission to promote the profession of ‘cimenteur-verrier’ and thus the art of dalle de verre in Switzerland. He even managed to get television to report on the profession [4].
After around 50–80 years, many of these dalle de verre windows are in poor condition and show defects or serious damage. The most important factors influencing the durability of dalle de verre and affecting their mechanical strength and stability are:
  • Corrosion of rebars due to carbonation of the cement paste and loss of passivation
  • Formation of expansive phases due to chemical reactions between the cement paste and the aggregate (most prominently the alkali-silica reaction)
  • Chemical reactions between the cement paste and the glass sometimes leading to a nearly complete decomposition of the glass pieces
  • Environmental impact such as freeze-thaw cycles also leading to cracks and spalling of the mortar
  • Structural problems and mechanical stress
  • Damage related to the manufacture of the dalles de verre, such as drying shrinkage cracks and uncovered rebars.
Several factors make the damage assessment of dalle de verre difficult. Firstly, many damage processes and reactions first take place beneath the surface and become visible only at a later stage. Secondly, on-site examination of dalle de verre windows can be challenging, since they are often difficult to access. Last but not least, there are so far no widely accepted approaches and techniques for the non-destructive analysis of dalle de verre glazings. The majority of non-destructive testing methods and instruments are designed for the analysis of large concrete structures rather than for delicate artworks such as dalle the verre windows and the analysis of concrete properties usually requires the collection of drill cores with diameters of several centimetres [5,6,7,8].
So far, dalle the verre glazings have rarely been the subject of research, although the importance and challenges of preserving these works are known [9]. So far, there have been only few attempts to use NDT for the analysis of dalle de verre glazings [10]. Most studies focus on restoration rather than on damage assessment [11,12,13,14]. A proper condition analysis, however, is an important prerequisite for the development and implementation of conservation strategies. The increasing number of consultation requests related to the conservation of dalle de verre in Switzerland and the lack of adequate methods for studying the delicate concrete-and-glass structures led us to initiate a research project.

2. Questions and Aims

The main objective of this interdisciplinary research was to develop and test a practical, non-destructive and low-cost approach for a systematic analysis and documentation of material properties and the state of preservation of dalle de verre windows in their structural, physical and climatic framework. The aim was to adapt existing techniques to the finer and more fragile structures of dalle de verre and to evaluate them in terms of ease of application, costs and benefits. Micro-invasive and non-destructive approaches for the chemical characterisation of the mortar and glass were also tested; they are the subject of another paper and further research [15]. The results of the visual inspection and a description of the state of as well as information on the iconography and the history of the dalle the verre windows, which are the first steps of a proper damage assessment, are published on www.vitrosearch.ch [16]. The present paper focusses on the evaluation of non-destructive techniques (NDT).
When evaluating the present condition and a possible need for repair of dalle de verre windows, information on the structural details, material properties and ongoing processes, such as corrosion are required. With respect to NDT the following information was considered relevant at the beginning of the project:
  • Existence and position of rebar
  • Concrete cover of rebar
  • Thickness of the dalle de verre structures
  • Corrosion of rebar
  • Existence and location of micro-cracks and other damages
  • Material properties, such as humidity and carbonation
Items 1–3 relate to the structure of the objects and items 4–6 to material properties.
Of course, there are additional issues that may be relevant, such as glass corrosion [17]. However, this paper will focus on the points listed above.

3. Investigated Dalle de Verre Glazings

The studies were carried out on a large dalle the verre window created by Alexandre Cingria for the church the Franciscan Monastery in Fribourg, Switzerland, and Fernand Léger’s dalle de verre glazings in the parish church of Courfaivre in the Swiss Jura mountains.

3.1. Fribourg

The monumental tripartite window by Alexandre Cingria, which is dedicated to the theme of Pentecost, was designed in 1938 for the central choir window of the existing church of the Franciscan Monastery in Fribourg [18]. About 40 years after later, the church underwent a major transformation during which Cingria’s dalle de verre window was dismantled and removed [19]. The 24 individual panels are now kept in the archives of the convent (Figure 1); the archives also keep the original colour drafts of the window [20]. An inscription on the lower right panel of the dalle de verre window tells us that it was made by the workshop of Jean Gaudin, Paris after the draft by Alexandre Cingria. The thickness of the panels varies between 2 and 4 cm. This variation is caused by the rough inner faces of the panels, which correspond to the upper face during manufacture, are sculpted to accentuate the shapes of the figures (Figure 1b). The outer faces of the panels are smooth and slightly textured. The texture is probably the result of pouring the mortar onto a textile-covered surface to facilitate demoulding [10]. In this study we have examined three of the 24 panels in depth. These panels are from formerly highly exposed areas in the lower third of the window (Figure 1c, panels 3a and 3c) as well as from the top area of the window (panel 9b), that shows only little damage. Strongly damaged panels (highlighted in red) were not examined by non-destructive analysis, since any necessary movement and handling of the panels would have posed an additional risk of damage.

3.2. Saint-Germain d’Auxerre at Courfaivre

In 1953, due to increasing population in the village of Courfaivre, the parish decided to enlarge the church. The renovation was entrusted to the architect Jeanne Bueche (1912–2000), who built two new side aisles. Their self-supporting reinforced concrete construction allowed the creation of large new window openings along the side walls. Jeanne Bueche considered the decoration of the church to be an integral part of the architecture and therefore devoted a large part of the budget to the creation of coloured windows using the dalle de verre technique. For their creation, she called on Fernand Léger, who had previously designed the windows of the church of Audincourt in France [21]. The workshop of Aubert and Pitteloud in Lausanne was commissioned to produce the dalle de verre windows.
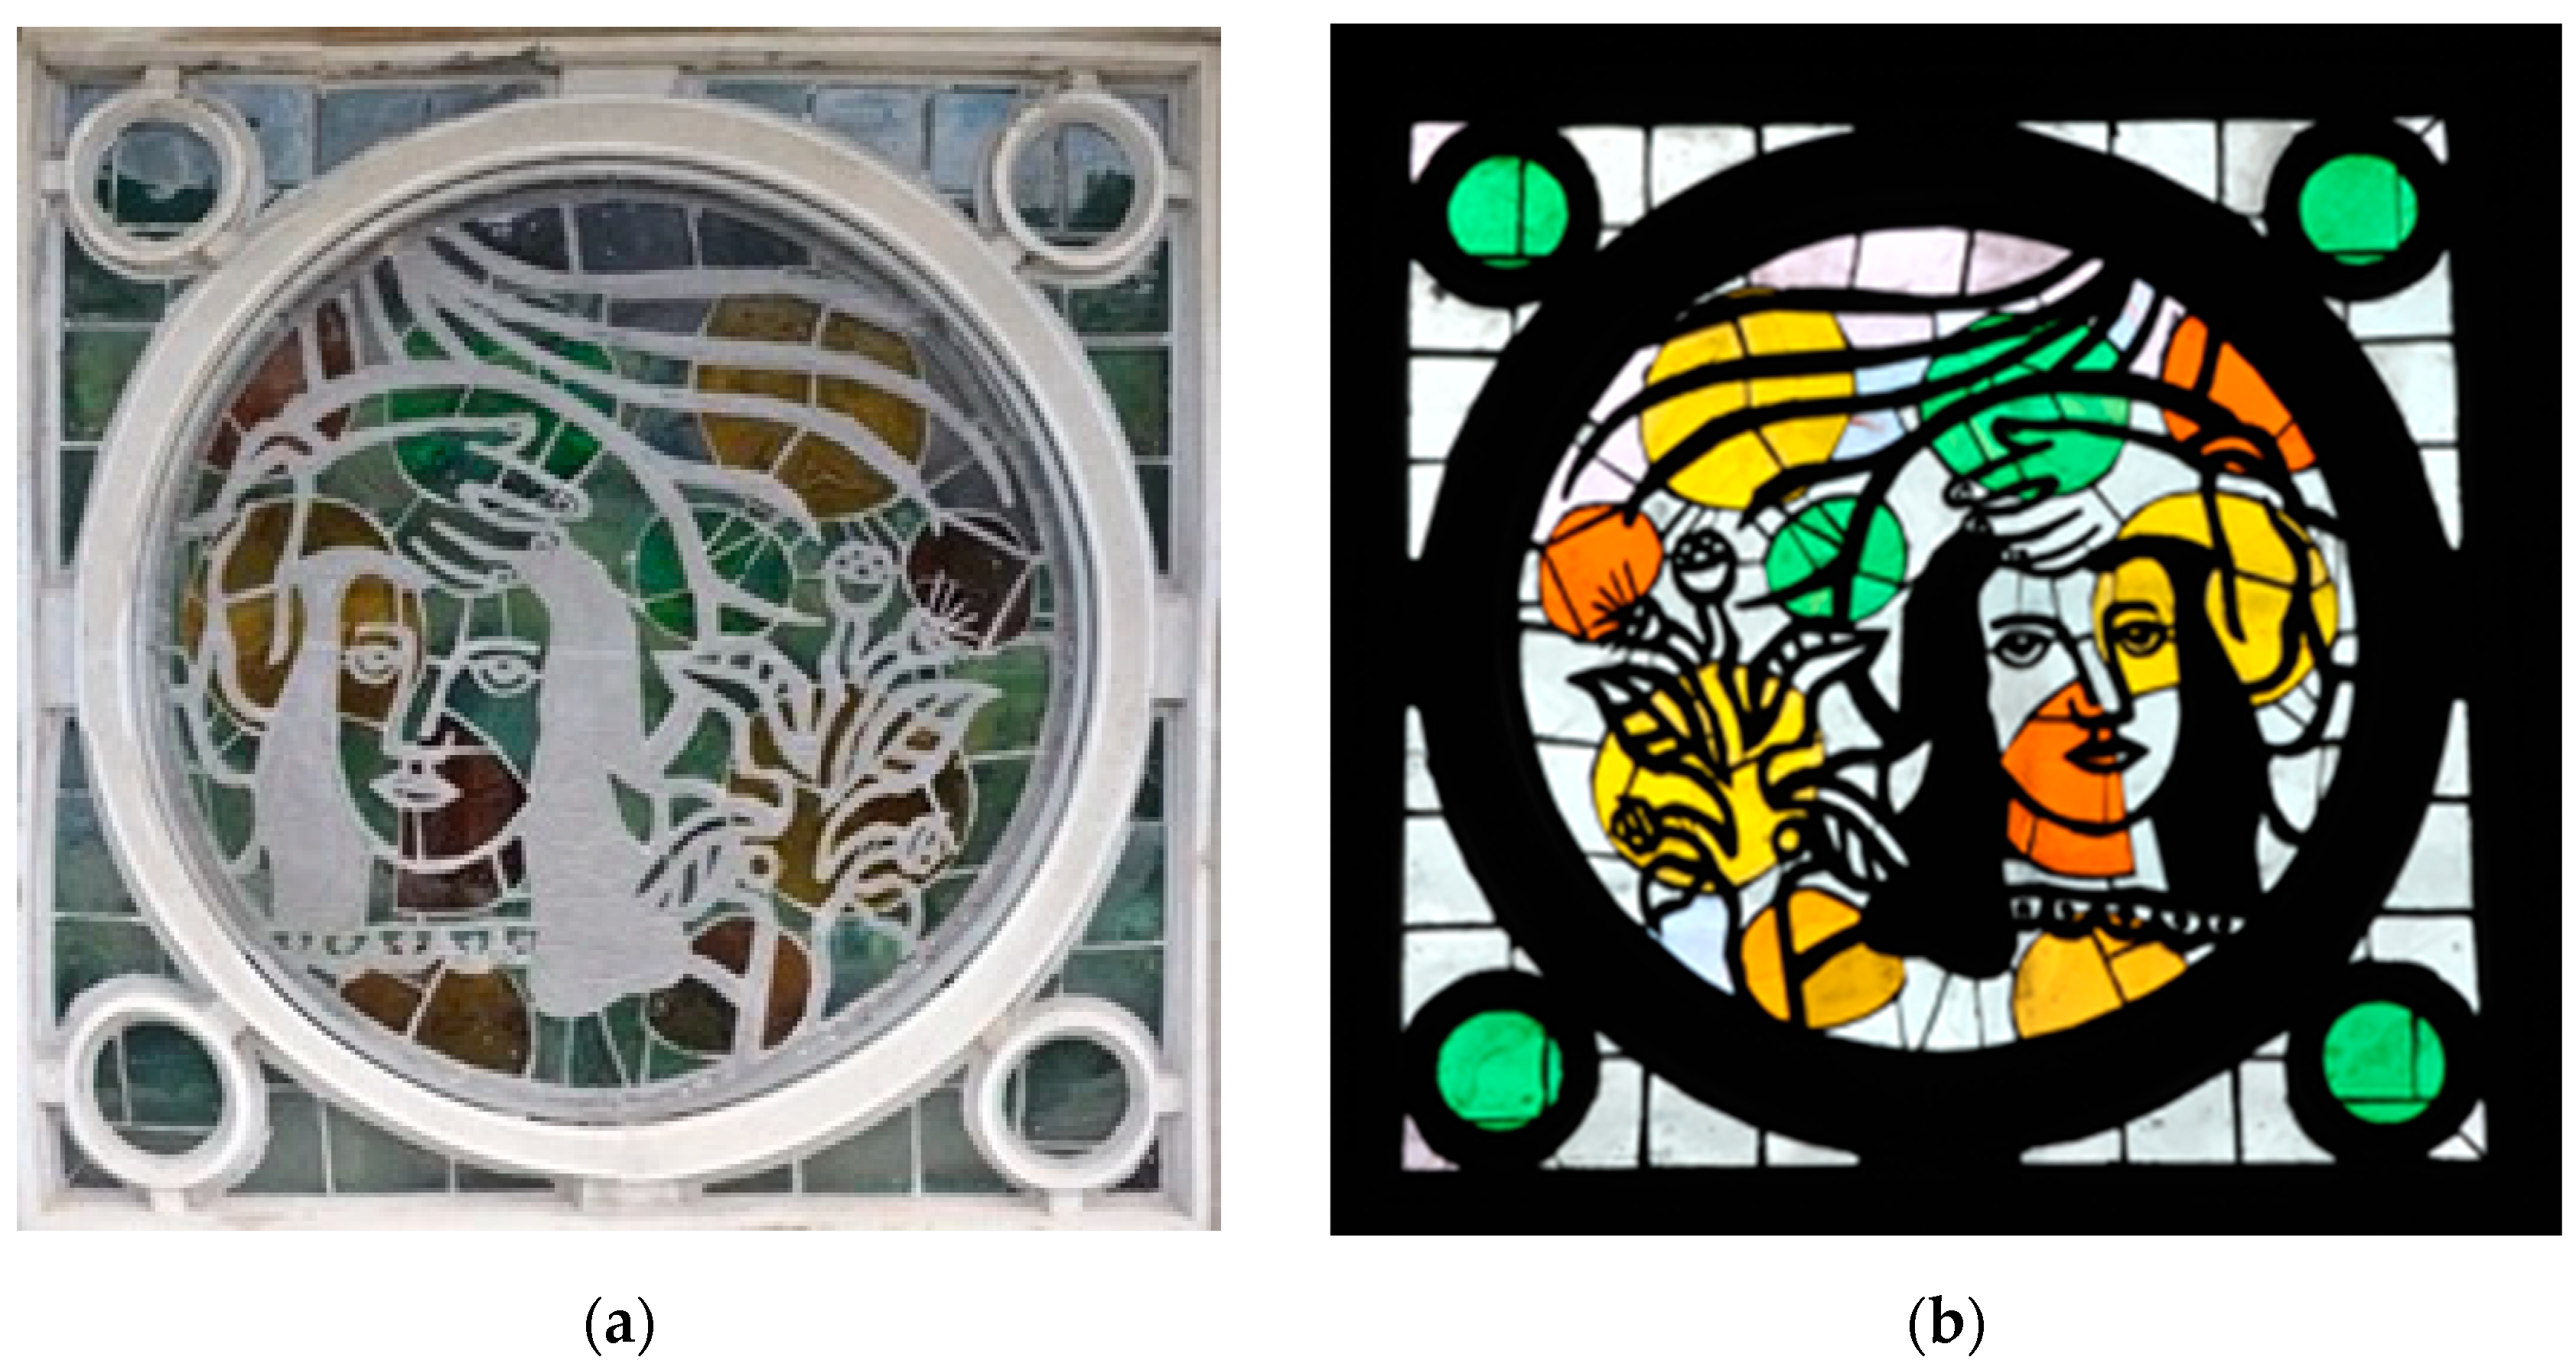
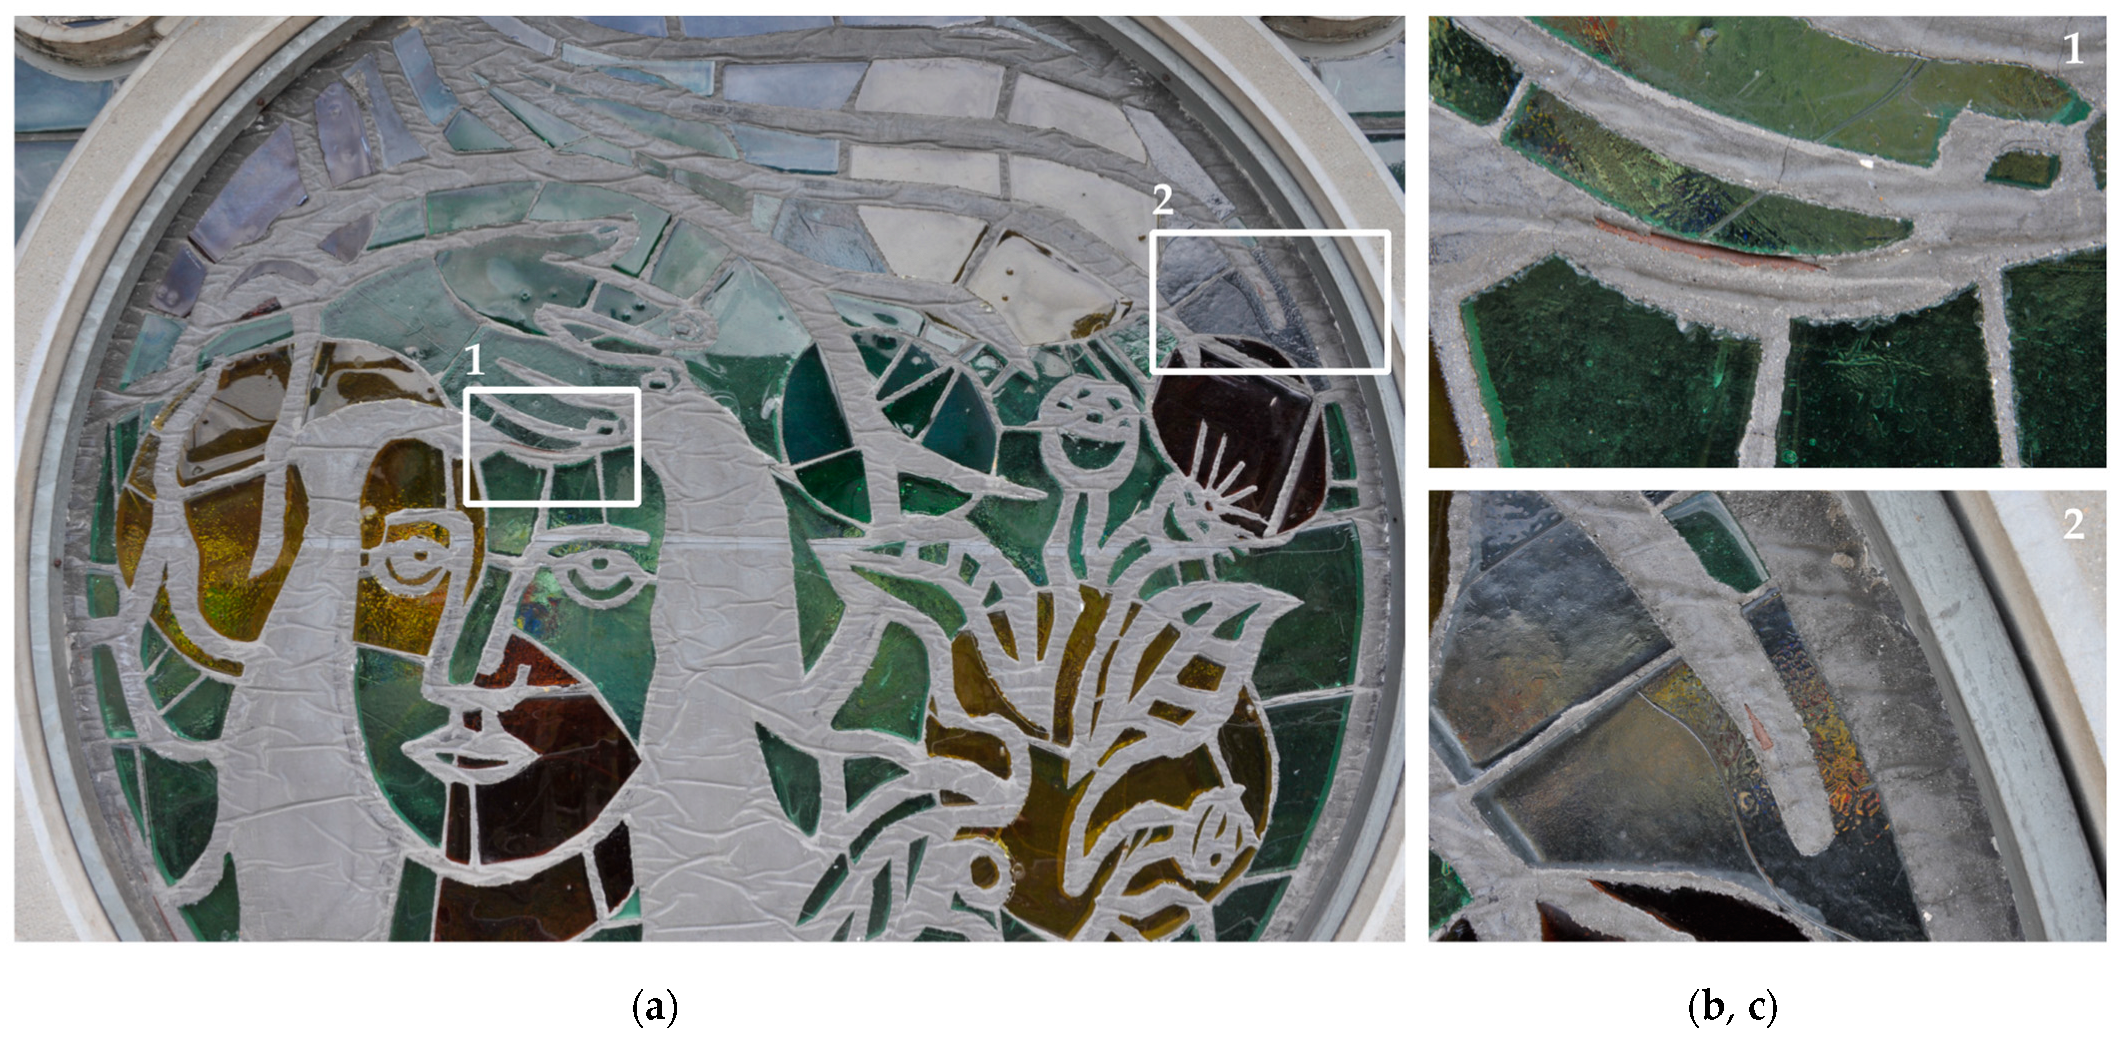
For the present study, two windows were examined in detail. The first is a medallion on the south façade depicting the theme of the Annunciation [22]. The medallion has a diameter of 161 cm and was cast in one piece. The outer face of the medallion corresponds to the underside of the cast panel, which shows the typical ‘crease marks’ of the plastic or textile material separating the setting concrete from the bottom of mould (Figure 2).
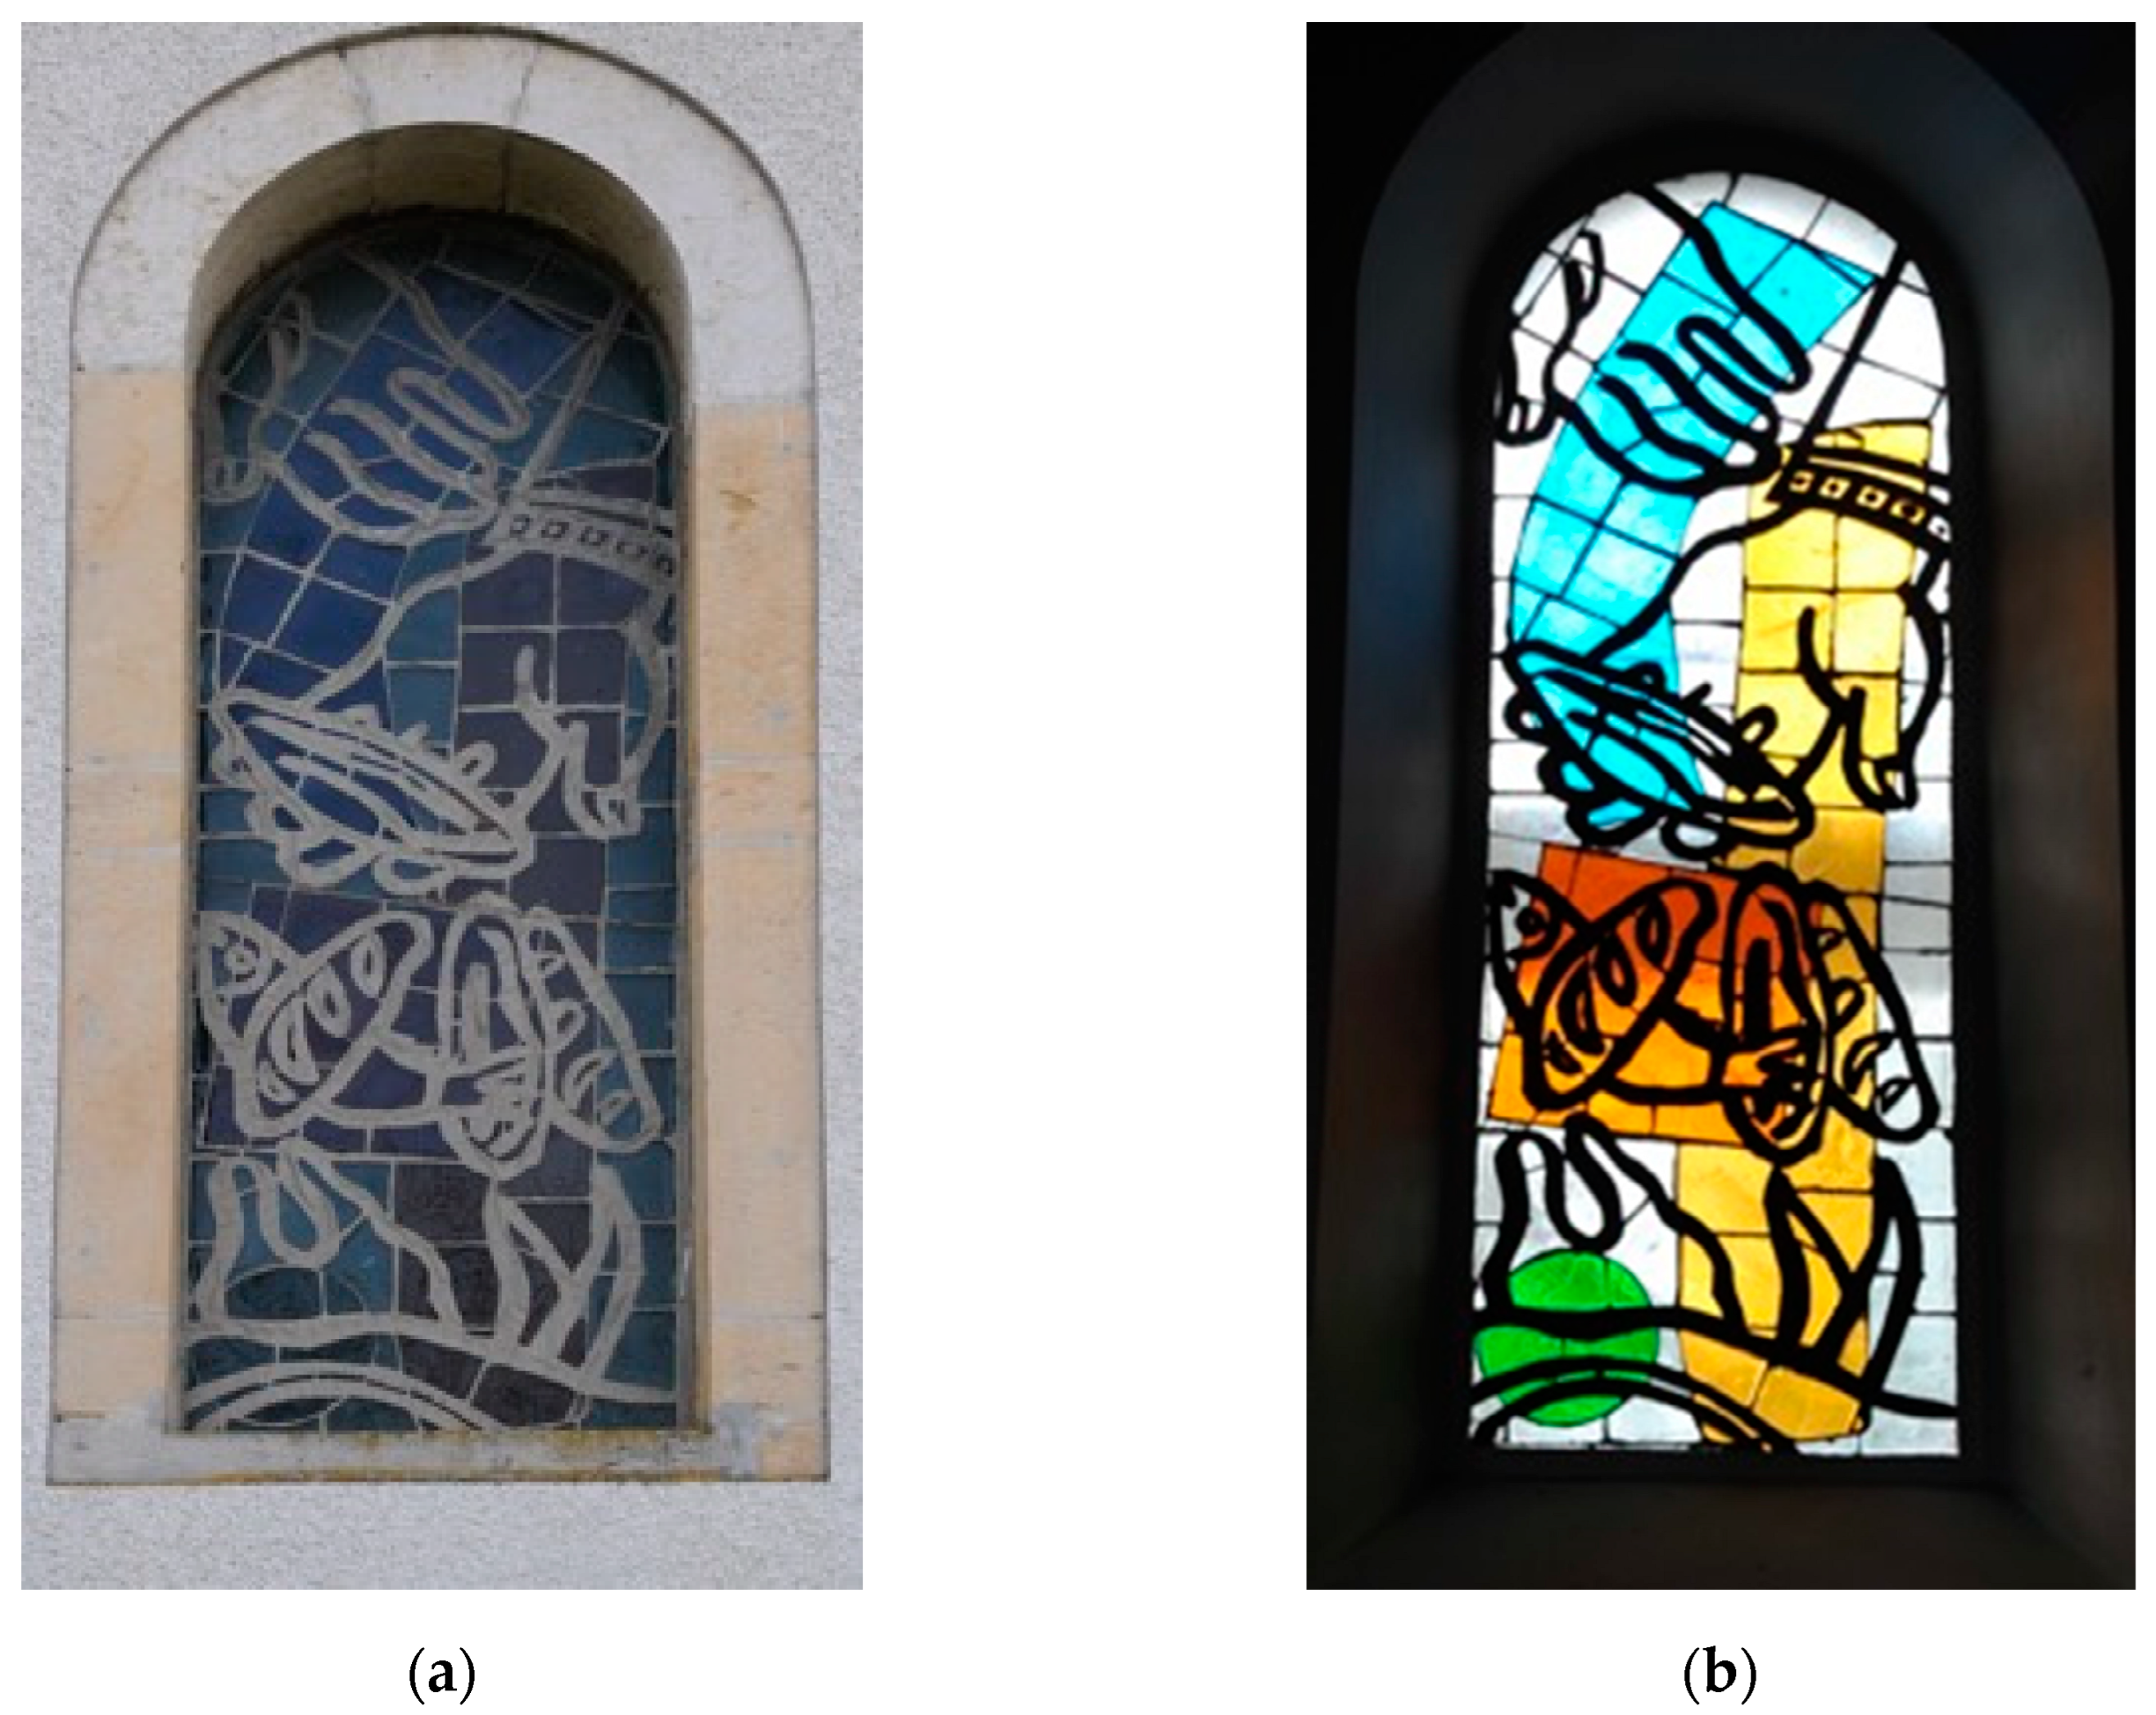
The second dalle de verre investigated is the large arched window in the north-east bay of the choir representing an allegory of the Eucharist: the Feeding the Multitude [23]. The panel is 3.06 m high and 1.04 m wide and was also moulded in one piece (Figure 3). It is mounted with a setting mortar in the rebate of the bay from the inside and sealed with a setting mortar. As with the medallion, the outside of the panel corresponds to the underside. The crease marks have not remained intact; they have possibly been lost when demoulding the panel.

4. Methods

Today, a large number of NDT methods is available for a wide range of objects and applications. As the dalle de verre windows of Courfaivre are irreplaceable objects of cultural heritage, their integrity was first priority. This limited the choice of applicable methods.
We focused on methods that seemed to be practical in terms of costs and time as well as being non-destructive or micro-invasive and suitable for in-situ analysis (i.e., to be used on scaffolding). The methods were chosen in order to answer our questions regarding the preservation state of the dalle de verre including parameters such as the position of rebar, the corrosion of rebar, the depths of the concrete cover, carbonation of the concrete, and the presence of internal defects.

4.1. Magnet

A magnet was used to investigate the existence and position of rebar. The position of rebar was marked on a paper grid attached to the outer surface of the dalle the verre glazing.

4.2. Induction

Induction is a standard method used for the detection and localization of reinforcing steel in concrete structures. In other contexts, methods using induction are also called ‘metal detectors’. A magnetic AC field is generated with a primary coil. If no rebar is present, the secondary coil registers the signal that is generated by the primary coil (Figure 4a). If a rebar is present, the field generated by the primary coil leads to electric currents in the rebar. This produces an additional magnetic field and the secondary coil registers the sum of the field generated by the primary coil and the field generated by the current in the rebar. The strength of the additional signal caused by the rebar depends on the diameter of the steel bar and its concrete cover. If one of the two parameters is known, the other can be determined. In this project, induction was used with three different approaches. An inexpensive line locater bought at a supermarket and a professional Proceq Profometer5+ were moved over the paper grid and rebar positions were directly marked on the paper. In addition, a Hilti Ferroscan PS200 was moved in a regular pattern over the surface of the window. Data were recorded and processed automatically by the instrument.

4.3. Electrical Resistivity

Electrical resistivity is a material property that is influenced by various factors, such as humidity [24,25] or by built-in parts, for example rebar in concrete. In principle, resistivity can be measured using two electrodes with a given voltage. However, in many cases the contact resistance between electrodes and the object inspected has a major influence. In order to avoid this, four electrodes can be used. Two are feeding a defined current into the structure and the other two electrodes are measuring a voltage. As a result, the electrical resistivity can be obtained.

4.4. Ground Penetrating Radar

Ground-penetrating radar (GPR) [26,27,28,29] is an electromagnetic inspection method based on the emission, reflection and reception of electromagnetic waves. It has many applications in the study of concrete structures and is frequently used for the non-destructive localisation of rebar. First attempts to use this method to study reinforcement in dalle de verre have been made by Marta Subirana Golobardes; the results and challenges are discussed in her master thesis [10].
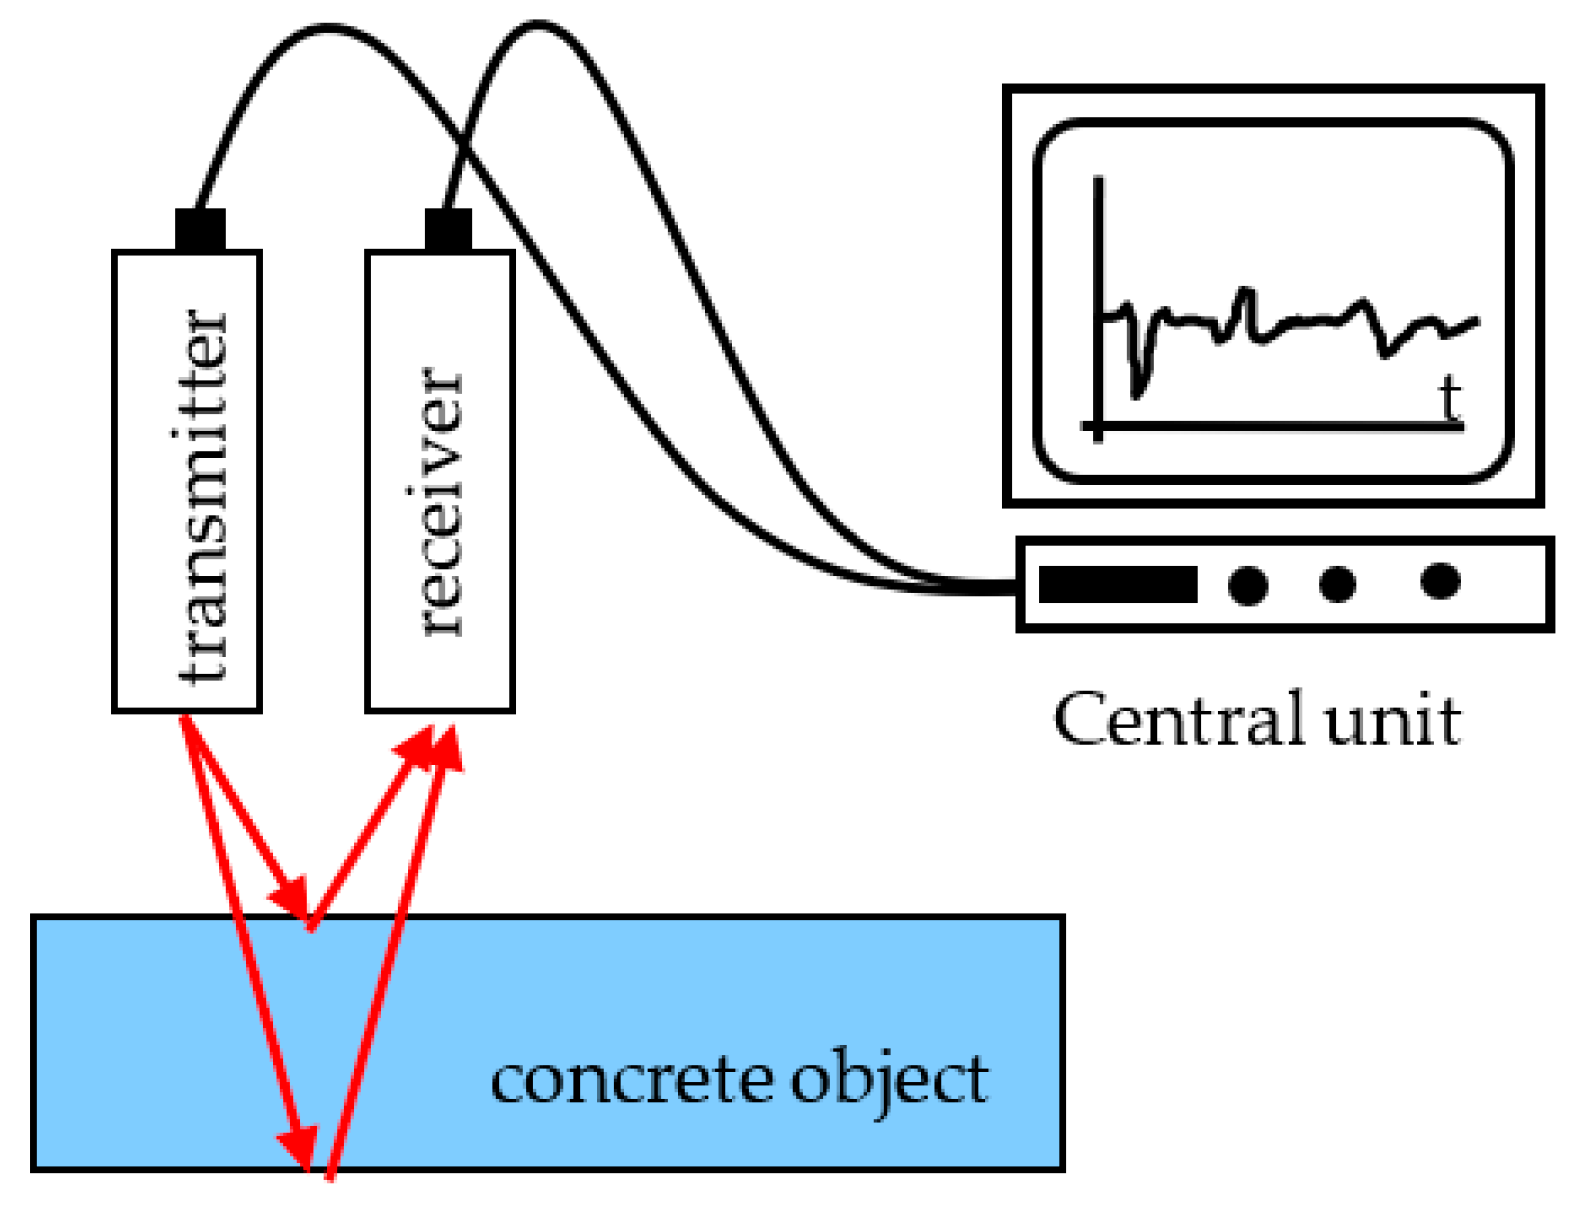
Figure 5 depicts the basic principle of the method. An electromagnetic impulse is emitted via a transmitter antenna. When material changes are encountered (e.g., at the surface or the bottom of the concrete object shown in Figure 5), part of the energy is reflected and recorded via the receiver antenna. As a result of a single measurement, a time series containing information on the object inspected is obtained. As the method is very fast (hundreds of measurements per second), huge amounts of data can be recorded and processed using sophisticated algorithms. GPR inspections are usually carried out in 2D along lines or in 3D scanning whole areas. GPR can be used to measure the thickness of objects and to locate built-in objects, such as rebar. The resolution and the possible depth of inspection depend on the properties of the material inspected and the frequency of the emitted signal. In addition, variations of the signal velocity or the damping of signal amplitudes can be used for an evaluation of material properties [29].

4.5. Ultrasonics

Ultrasonic methods [30] are based on mechanical waves in the frequency range above 20 kHz. Ultrasonics can be used in transmission [31] or reflection mode [32]. Transmission mode is used mainly for the evaluation of material properties and based on the analysis of variations in the signal velocity and the damping of the signal within the object. Transmission mode requires access to both sides of the object. In Courfaivre we only had access to one side and transmission could not be used. Reflection mode is mainly used for the determination of the thickness of objects. It requires access to one side of objects only and was used to measure the thickness of the dalle de verre panels in Courfaivre.

4.6. Half-Cell Potential

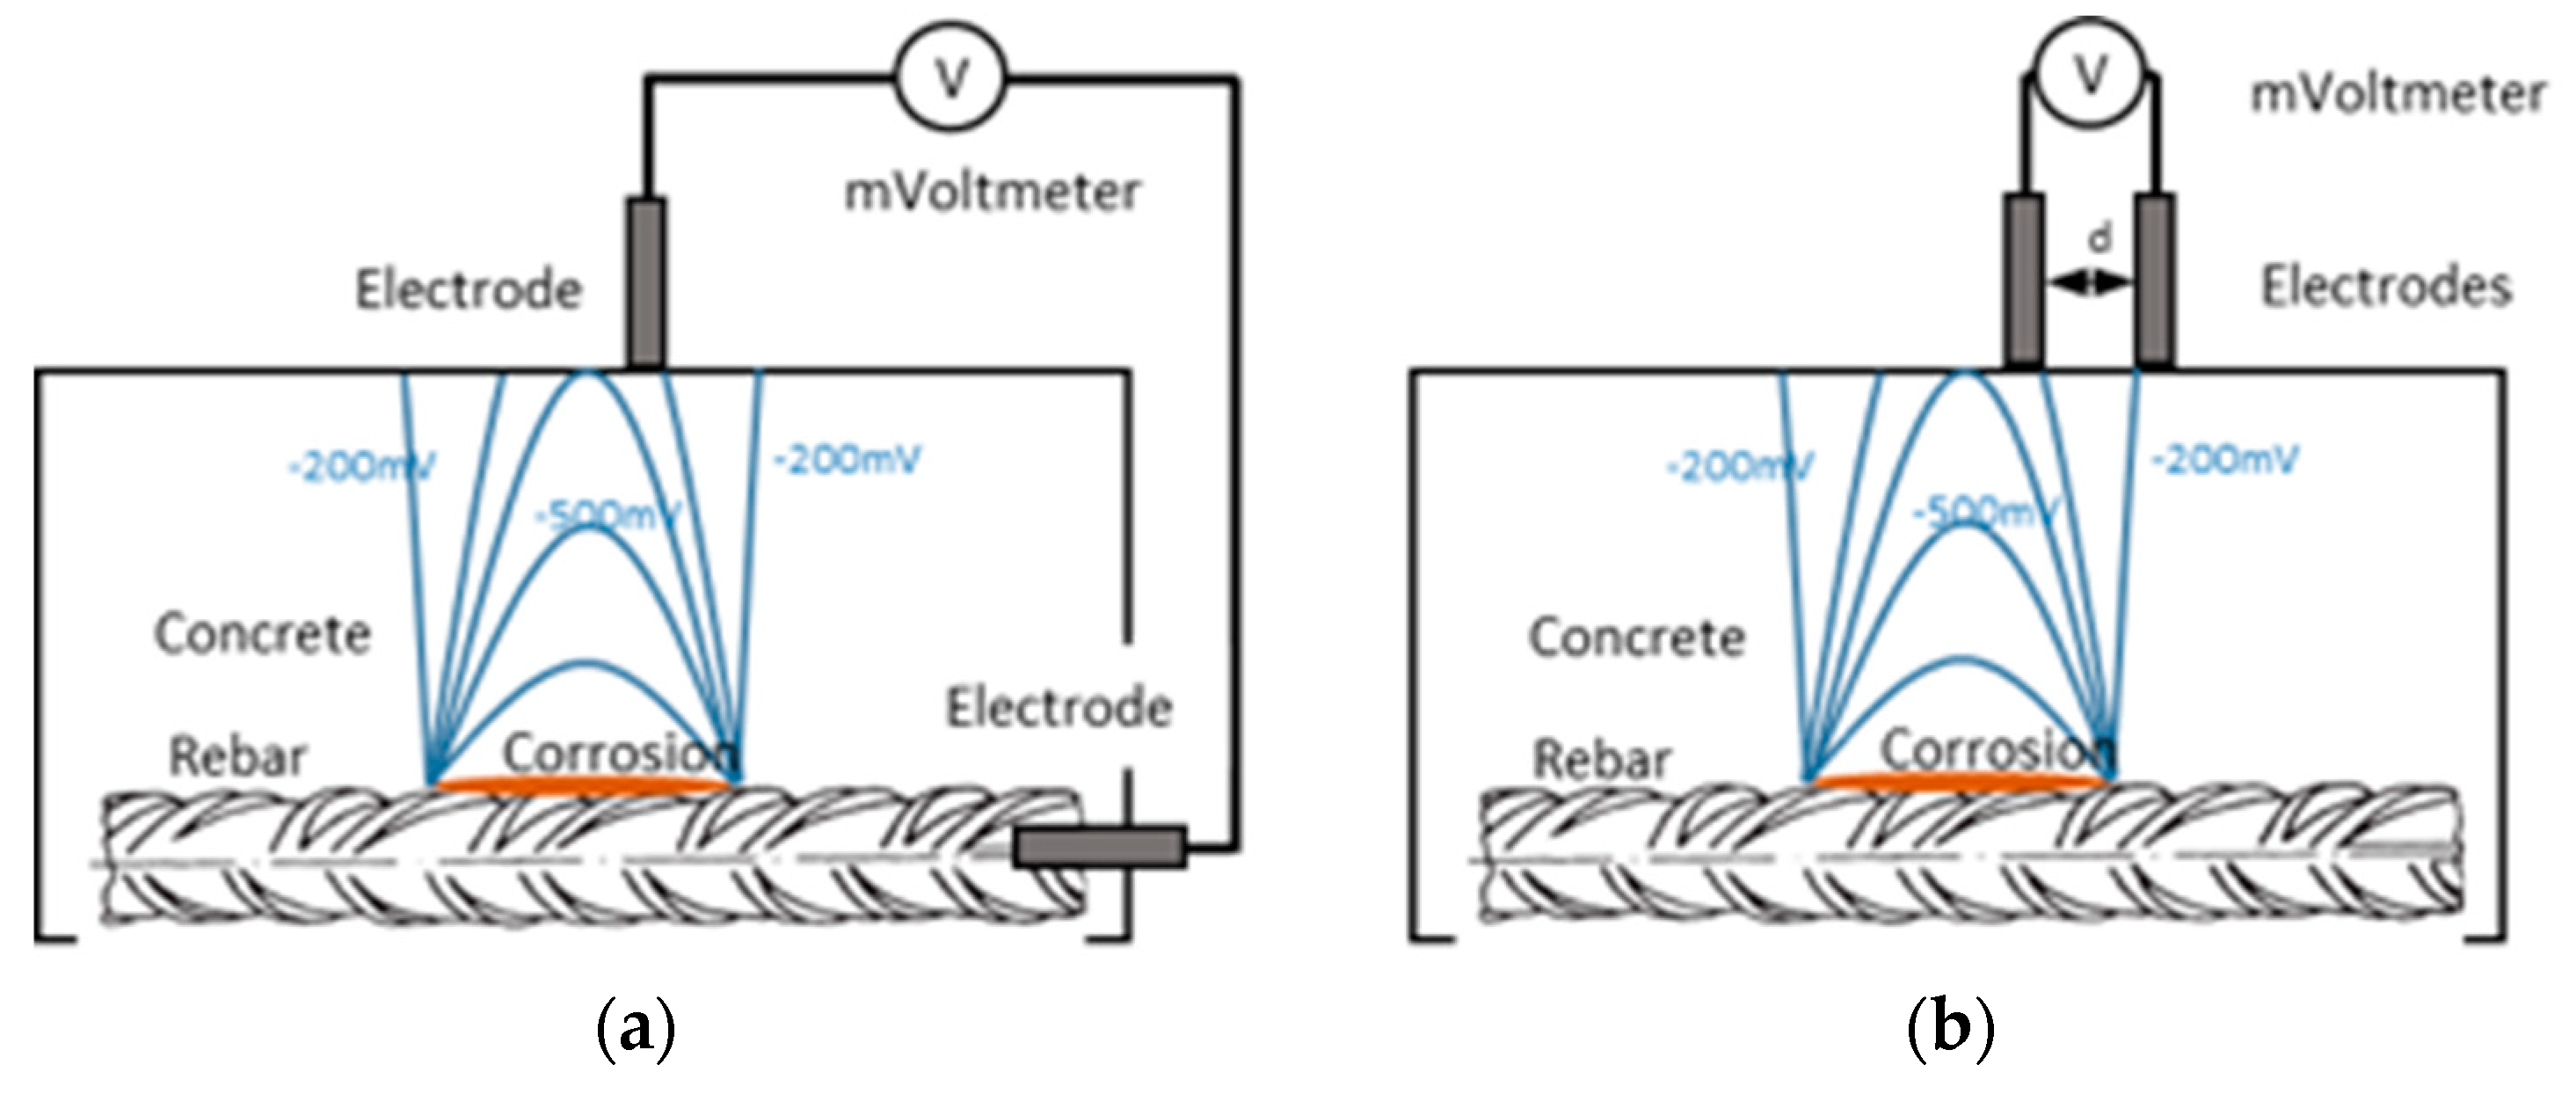
The measurement of the half-cell potential is the standard method for the detection of ongoing corrosion processes within reinforced concrete structures [33]. The method is based on the potential differences (voltages) caused by the electrochemical process of corrosion. Usually, the voltage in the Millivolt range between a point on the surface of the structure and an electrode connected to the rebar mesh is measured (Figure 6a). To enable this connection a hole has to be drilled into the concrete to connect the iron rebar to the electrode. To avoid drilling the dalle the verre, we used a different, non-destructive approach. In our set-up, the electrodes were placed on the surface of the dalle de verre at a fixed distance of 0.1 m (Figure 6b) and the voltage between the electrodes was recorded. To create contact between the electrodes, the surface had to be slightly moistened with water.

4.7. Thermography

Each object with a temperature above 0° Kelvin emits infrared radiation. The surface temperature of a material can be recorded with a thermography camera working in the infrared range [34,35]. Thermography can also be used to measure and record temperature variations on the surface, which can be the result of variable thermal conductivity of the material that are caused by material heterogeneities, humidity and defects such as fissures and microcracks. However, it has to be mentioned that the infrared emission of a surface is not only influenced by its temperature, but also by other factors, such as the emissivity of the material. If the inspected structure and its environment are at thermal equilibrium, the detection of internal defects is not possible as there is no heat flow. Therefore, temperature differences are required, which have either natural sources (passive thermography) or can be induced actively (active thermography). In Fribourg we could apply active thermography, since the panels could be moved and heated with heating blankets. In Courfaivre, we used passive thermography since the situation did not allow the active approach.

5. Results and Discussion

5.1. Existence and Position of Rebar

Figure 7 presents the results for the three different methods employed to identify the position of the reinforcing bars: magnet, induction with automated processing and GPR. The identification of the reinforcing steel with a magnet (Figure 7a) is straightforward. It can be used by non-specialists and is by far the cheapest piece of equipment. According to our experiments, the magnet provides consistent results for a depth of up to about 0.015 m, which should be sufficient for most dalle de verre windows. The positions of the rebars however, have to be marked by hand on a paper grid placed on the surface of the dalle de verre window.
Induction with automated processing (Hilti Ferroscan) has the advantage of a digital recording and display. The results shown in Figure 7b correspond to a depth of 0.02–0.03 m. The result is consistent with that of the magnet. The size of the sensor, however, meant that the area around the edges of the window could not be measured and is therefore missing. The line locater from the supermarket as well as the professional Proceq Profometer5+ did also provide results, but the precision was low due to the large size of the sensors. This is not a problem with most reinforced concrete structures, where rebars are usually placed in a regular pattern. For the localisation of reinforcing bars in dalle de verre, however, these devices are of limited use.
GPR data were acquired and processed in full 3D. Figure 7c shows the processed data at a depth of 0.015 m. Existing rebars appear as white lines due to the increased reflectivity of the electromagnetic waves at the surface of the bars.
Magnet, induction with automated processing and GPR provided comparable results. The advantage of the last two methods is that they can be used to determine not only the lateral position of the reinforcements but also their depth (see Section 5.2) and the results can be displayed digitally. The GPR data also provide information on the thickness of the structures (Section 5.3) and on the material properties (see Section 5.5). Although GPR is the most versatile of the three methods, it is also by far the most expensive and time-consuming in terms of equipment and data evaluation of the three (see Appendix A, Table A1).
Electrical resistivity measurements did not produce useful results related to the position of rebar due to the high resistivity of the concrete. We assume that the high resistivities are directly related to the complete carbonation of the concrete. As magnet and induction with automated processing provided reliable results for the existence and position of rebar, we recommend using these methods rather than electrical resistivity.

5.2. Concrete Cover of Rebar

The reinforcing bars are protected from corrosion by the concrete surrounding them. Insufficient concrete cover (insufficient depth of rebar within concrete) is one of the factors leading to corrosion. The determination of the thickness of the concrete cover is therefore a useful measure to assess the risk of corrosion. The depth of the cover can be determined by induction and by GPR. The induction and GPR inspections in Courfaivre not only provided information on the position of the rebar, but also on the cover (Figure 7b,c). It is important to mention that the values obtained by induction depend on the rebar diameter. This diameter can be either determined by measurement or estimated. If the rebar diameter is chosen too large, induction will underestimate the concrete cover. As it was not possible to lay open the rebar for measuring the diameter, we had to estimate this parameter. However, in the Annunciation medallion, the reinforcing bars are exposed in some places (Figure 8a,b). Here, the thickness of the bars could be roughly determined by measurement.
In the case of GPR, the value for the thickness rebar depends on chosen signal velocity within the concrete. If the signal velocity is chosen too high, GPR will overestimate the concrete cover. Again, it was not possible to calibrate the signal velocity by measuring the true cover destructively and the signal velocity had to be estimated.
GPR data can be displayed in several ways. In Figure 7c, data from a constant depth of 20 mm are displayed. Data recorded along a horizontal line (green line in Figure 7c) are shown in Figure 9a. The vertical scale is a depth scale using an estimated signal velocity of 0.1 m per nanosecond. On the right side of Figure 8, the dataset was interpreted and the position of single bars was marked with red dots. The dashed orange line depicts the reflection at the back wall and thus the thickness of the structure (see below for details).
Both methods are well suited for determining the concrete cover. However, as mentioned above, GPR is more expensive and time-consuming than induction with automated data processing.

5.3. Thickness of the Dalle de Verre Panels

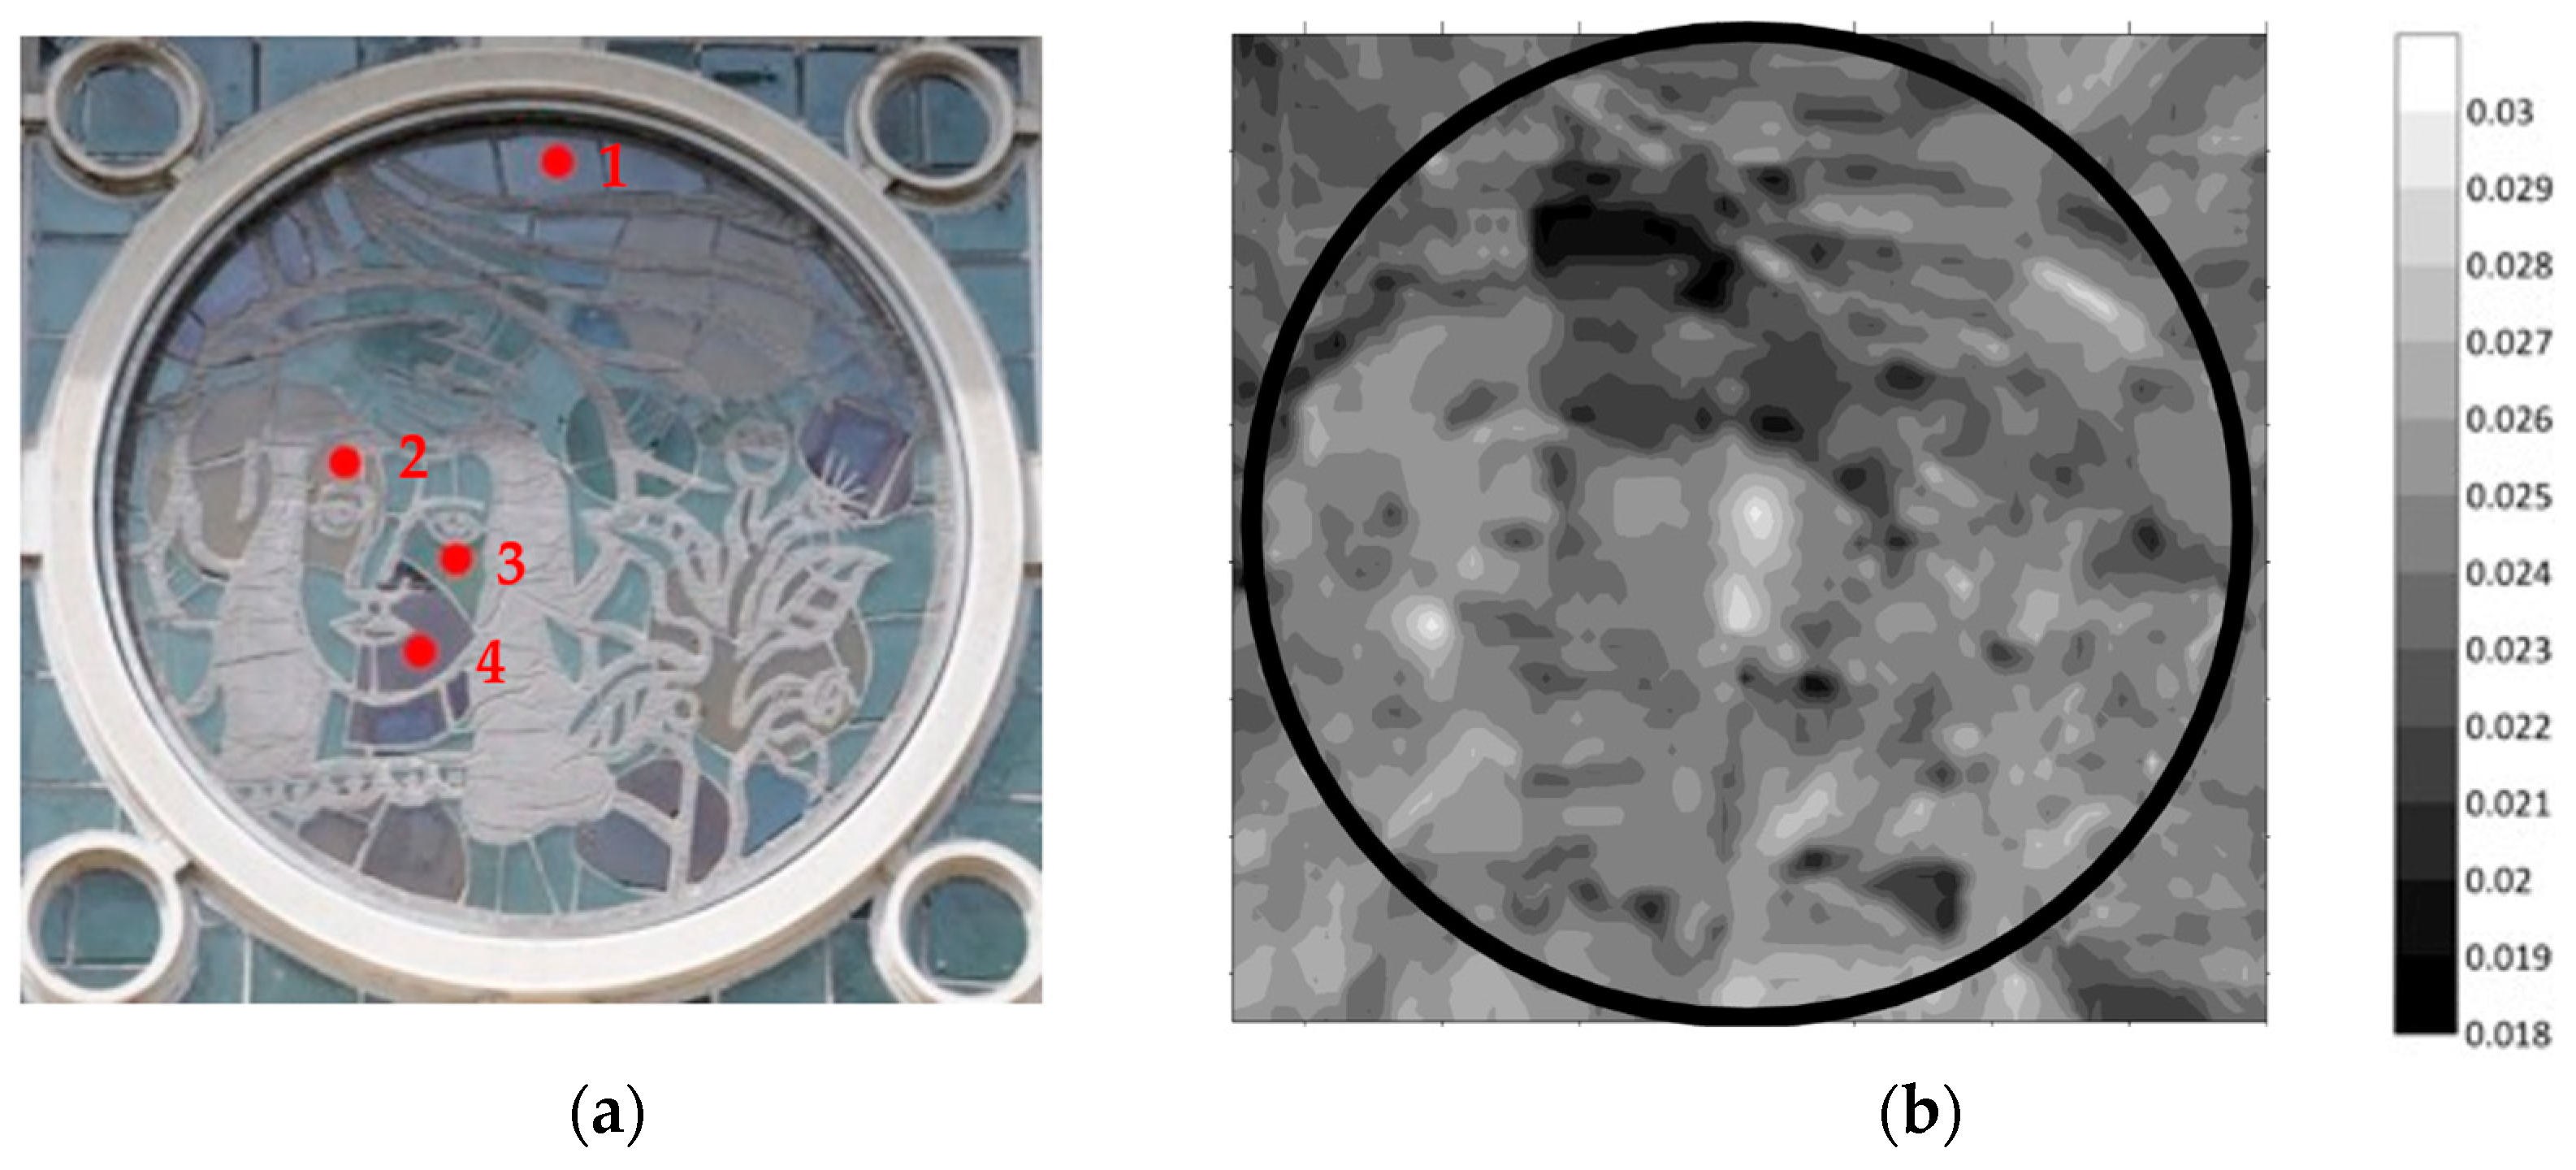
The thickness of structures such as dalle de verre can be determined using wave methods, such as ultrasonics or GPR. A calibration of the signal velocities, based on a direct measurement of thickness, is desirable. Alternatively, estimated values can be used. Figure 10 shows the uncalibrated thickness of the Annunciation medallion obtained with ultrasonics in reflection mode in four locations (Figure 10a) and with GPR covering the whole surface (Figure 10b). The ultrasonic measurements could only be performed on the glass, as a contact agent had to be applied to ensure sufficient contact between the sensor and the surface. The values determined with ultrasonics reasonably agree with those obtained with GPR (Table 1). However, the comparison of the values should not be overestimated, the number of ultrasonic measurements is very limited. As with the determination of the depth of concrete cover, no information can be given on the accuracy of the values due to the impossibility of a calibration of the signal velocities (see Section 5.2).

5.4. Rebar Corrosion

Corrosion of rebar, often a result of insufficient concrete cover and/or the of a loss of corrosion protection (passivation) due to the full carbonatation of the cement matrix, presents a major problem to the preservation of the dalle de verre structures. Moreover, the expansion of the corroded steel leads to cracks and spalling. To detect corroded rebar in dalle de verre structures, we used the half-cell potential method. To avoid damaging the art works, we used a set-up that differs from the normal approach (see Section 4.6, Figure 6b).
Figure 11a illustrates the set-up of the half-cell measurements on the Annunciation medallion. The voltmeter measures the electrical voltage between the two electrodes touching the moistened surface of the dalle de verre. In a normal setup, where one electrode is connected to the reinforcement of the concrete structure, the measured voltages would provide—via reference values and/or calibration—direct indication about whether and where the rebar is corroding. For the setup used in Courfaivre, such reference values do not exist. We therefore decided to range the measured values into three groups. Group one contains the values between 0 and 50 millivolts, group two between 50 and 100 mV and group three values above 100 mV, following the assumption that higher voltage values correspond to a higher probability of corrosion of the rebar and vice versa. The formation of the three groups was purely pragmatic and not based on any empirical values.
The result of this classification is shown in Figure 11b, where group three, possibly corresponding to rebar with the highest probability of corrosion is marked in red, and group two, representing rebar with a lower probability of corrosion, is highlighted in orange. Group one representing low probability is not shown. At this stage, we cannot confirm that the results reflect the situation correctly. The results (i.e., the consistency of the grouping with reality) need to be corroborated by further investigations, such as laboratory experiments combined with destructive testing and the inspection of additional dalle de verre windows.

5.5. Existence and Location of Cracks and Other Damages

Visual inspection is an efficient method to detect and map visible damages, such as fissures, spalling and delamination. However, damage that is barely visible or lies beneath the surface remains undetected with this method. In order to detect damage invisible with the naked eye, we explored the potential of thermography. The idea was to map temperature differences on the surface and trying to relate them to internal defects. The storage conditions of Cingria’s dalle de verre in Fribourg allowed us to use active thermography. Several panels of the windows were heated during one hour with an electric blanket. After removing the blanket, the thermography data were recorded every minute for one hour. This enabled a direct observation of temperature anomalies on the surface and the computation of differences of temperatures recorded at different times. Figure 12b shows the apparent surface temperatures recorded in the area highlighted by the red rectangle (Figure 12a) 40 min after the electric blanket had been removed. Obviously, the variations of the apparent temperatures are mainly governed by the different temperatures and/or emissivities of the three materials, steel, concrete and glass. However, there are also differences in apparent temperatures that cannot be explained by the different materials. One example is marked with a red arrow (Figure 11b). These anomalies may be related to micro-fissures and a thin delamination detected by visual inspection. The extent to which such anomalies can also be correlated with defects beneath the surface must still be verified by further investigations.
The thermography tests on the dalle de verre windows in Courfaivre were less conclusive, since an active heating of the fitted windows was not possible.

5.6. Material Properties, Such as Humidity or Carbonation

Carbonation is a chemical process within concrete that can lead to the corrosion of rebar. The process involves carbon dioxide and humidity. The degree of carbonation is usually tested by applying a phenolphthalein solution (colouring pH indicator) either onto a drill core or to drill dust. Due to the fact that such tests are destructive, they could not be applied to the inspected dalle the verre windows. Since moisture in concrete not only leads to carbonation but also to changes in electrical resistivity and surface temperature, we tested the potential of electrical resistivity measurements and thermography. In Fribourg, the electrical resistivity of the concrete was very high suggesting complete carbonation. As we expected this to be the case in Courfaivre as well, we decided not to repeat electrical resistivity measurements there.
Active thermography gave no hints concerning variations of humidity on the panels in Fribourg. Considering that the panels have been stored in the archive under constant climatic conditions (50–60% relative humidity and 20 °C room temperature) for many years, this result is not surprising. In Courfaivre, active thermography being impossible, we used passive thermography instead. The resulting data gave no clear indications for internal defects or humidity related damage or carbonation. It may be useful to test active thermography in future in-situ inspections.
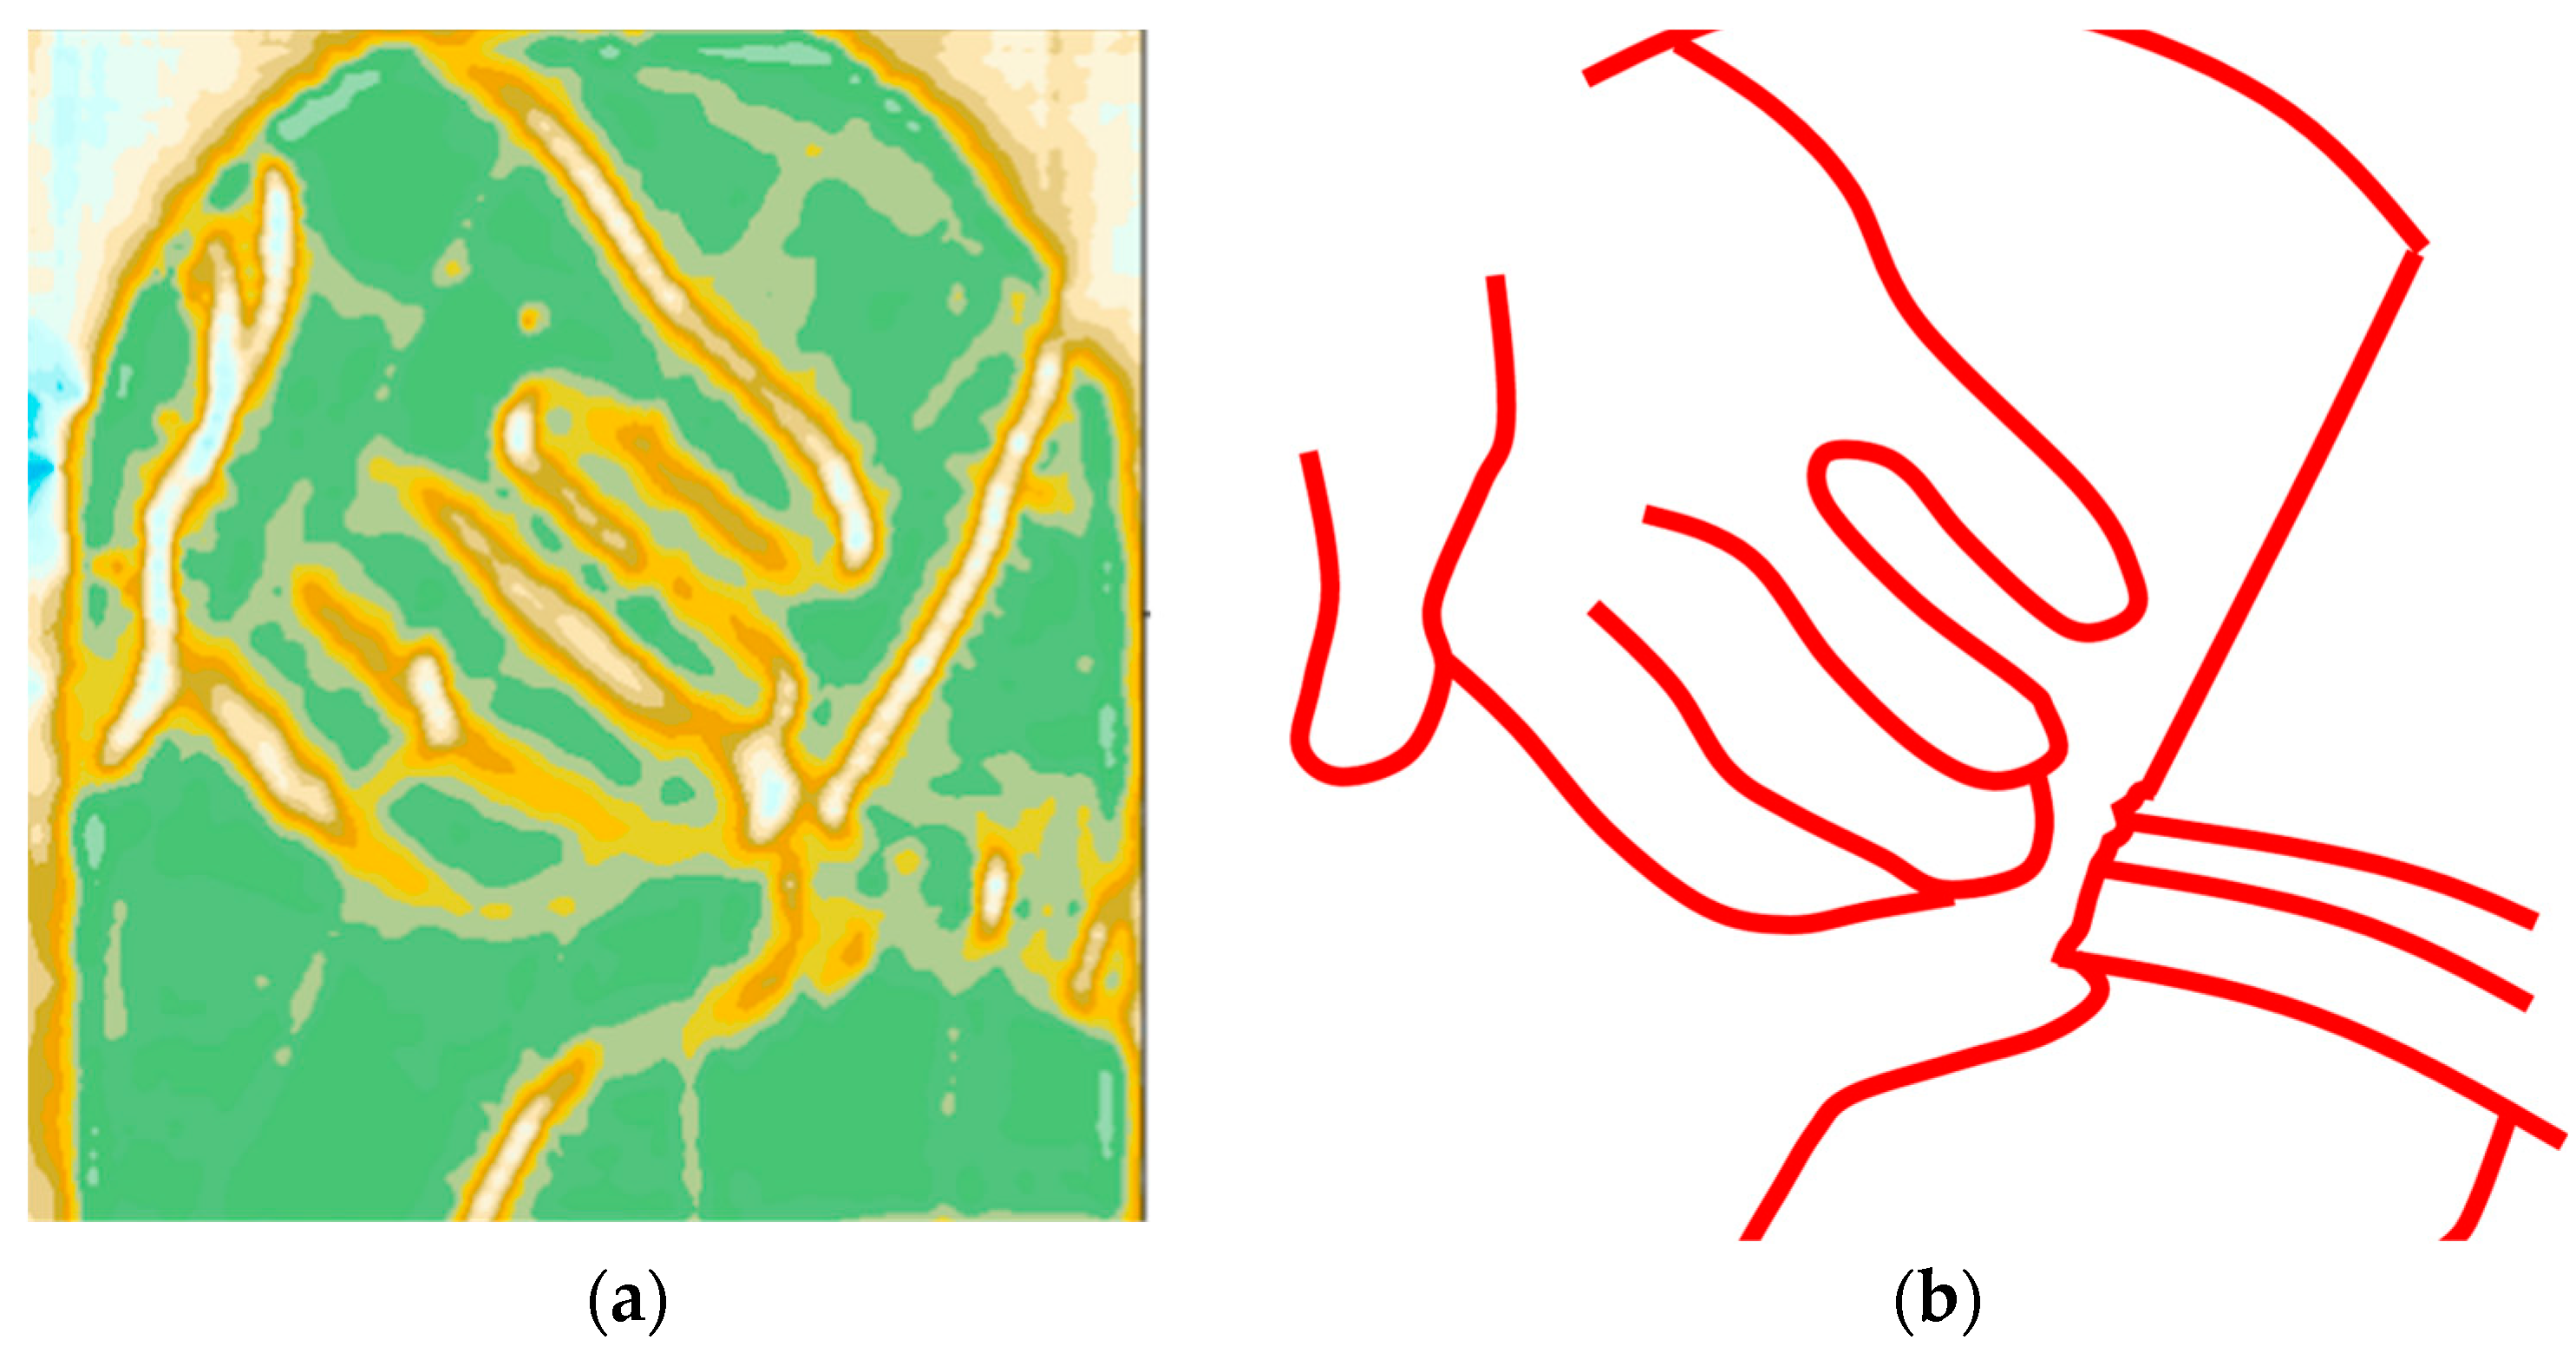
We also tested the potential of GPR to determine material heterogeneities. As GPR is a wave-based method, variations in signal velocities and reflection amplitudes can provide information on variations in material properties [1]. Both effects were analysed for the GPR data in Courfaivre. An example is presented in Figure 13a where strong reflection amplitudes (white) correspond very well with the position of rebar (Figure 13b). In addition, there are additional variations that do not correspond to rebar positions, but can be partly associated with material variations (glass, concrete).

6. Conclusions

Our study was a first attempt to test several non-destructive methods for their suitability to determine the state of conservation of dalles de verre. The methods were tested on two dalle de verre windows by Fernand Léger in the church of Courfaivre and on three panels of the large tripartite window of the church of the Franciscan Monastery by Alexandre Cingria, now stored in the archives of the Convent. All methods used were adapted to ensure the integrity of the artworks and all measurements were carried out without causing any damage.
The inspections have provided information on the practicalities and use as well as on the costs and benefits of non-destructive methods used to study dalle de verre windows (Appendix A, Table A1). They have shown that the different methods combined constitute an effective tool for the non-destructive and in situ characterization of materials and structures and the analysis of the degree of degradation of dalles de verre. The study, however, also showed the limits of the methods, particularly the lack of possibilities to calibrate results and confirmed that visual examination remains an indispensable tool in the analysis of degradation, prior to the selection and use of specialized NDT. Non-destructive analyses cannot replace visual inspection, but provide complementary information on the risks and the damage that lies beneath the surface.
The position of the rebar can be determined accurately and with a minimum of effort using a strong magnet. Induction with automated processing and full 3D GPR also provided useful results with the great advantage of digital recording and display of the position of reinforcements. Concrete cover of the rebar was best determined with induction and GPR, but both methods require either calibration or the use of estimated values for rebar diameter (induction) or signal velocity (GPR). The thickness of the dalle the verre panels can be estimated using ultrasonics and GPR, both providing consistent data. Half-cell measurement is the best method for assessing the probability of corrosion of the reinforcement. The equipment is inexpensive, but the interpretation of the results requires experience. The areas with higher voltages were interpreted as areas more likely to be corrosive. Future experience will foster the interpretation of recorded voltages.
Active thermography is a suitable technique to locate temperature anomalies that can be related to defects within the concrete. Sophisticated methods, such as a velocity or amplitude analysis of GPR data may provide further information on material properties, but the method is very time-consuming and costly, and the processing and interpretation of the data requires specific skills.
This study on selected but few selected examples of dalle de verre does not claim general validity. It is a first attempt to explore the possibilities and limits of in-situ and non-destructive testing on this fragile cultural asset. The interpretation of results, especially the lack of possibilities to calibrate measurements, has turned out to be a particular challenge. Beyond the specificity of each technique (thermal, magnetic, electromagnetic), the quality of interpretable data on the conservation state is strongly inherent to the exposure conditions of the windows (water saturation state of the concrete, wind-drying effects, sun exposition). A more systematic procedure still needs to be established, based on other investigated objects. We hope to pursue these avenues and answer the open questions in a follow-up project.

Author Contributions

Conceptualization, S.W.; methodology, J.H. and C.G.; Conceptualization, S.W.; Methodology, J.H. and C.G.; Investigation, J.H., S.W. and C.G.; Writing—original draft, J.H.; Writing—review & editing, S.W. and C.G.; Visualization, J.H.; Project administration, S.W.; Funding acquisition, S.W. All authors have read and agreed to the published version of the manuscript.

Funding

This research was funded by the Swiss Federal Office of Culture|Building Culture Section (ref. no. 2018-0052), the Sophie and Karl Binding Foundation Basel (ref.-no. 18-079) and the UBS Culture Foundation (project reference: Betonverglasungen: Schadensdiagnose, Monitoring, Konservierung—grant confirmed ). The project did not receive external funding for the APC.

Data Availability Statement

A detailed project report (in French) is archived at the Vitrocentre Romont; it is available on the website of the Vitrocentre Romont (https://vitrocentre.ch/dalles-de-verre-analyse-et-conservation/, accessed on 30 August 2023). The data on the history and condition of the Dalle de verre are publicly available on the online database (https://vitrosearch.ch, accessed on 30 August 2023). The NDT data are stored at Eastern Switzerland University of Applied Sciences.

Acknowledgments

For their cooperation and support of the project, we would like to thank the Franciscan Monastery in Fribourg and the Parish Council of Courfaivre. Our special thanks go to Petra Zimmer (Archives and Library of the Franciscan Monastery), Hubert Girardin (Parish Council of Courfaivre) and Andreas Vetterli (Villars-sur-Glâne) for their availability and support during the work on site. We are also extremely thankful to Marion Gartenmeister and Stefan Trümpler for fruitful discussions and assistance in the acquisition of the funding of the project. Finally, we are greatly indebted to Agathe Dumont, Karin von Wartburg, Sarah Amsler, and Valentine Costa for their support preparing and publishing the data on vitrosearch.ch and for helping to get copy rights for the photographs of the art works.

Conflicts of Interest

The authors declare no conflict of interest.

Appendix A

Table A1. Summary of the methods used.
MethodEquipment (Model, Producer)Type of MeasurementType of DataInformation ObtainedApprox. Cost of Equipment Remarks on Method, Handling, Knowledge Required, Data Representation, etc.
MagnetUnknownSpot analysis, on outside surfaceAnalog data (rebar positions on paper)Magnetic attraction, position of rebar10 €Inexpensive and fast, easy handling, no prior technical knowledge required, no digital representation of data
Induction, manualProceq Profometer5+Line scan, on outside surfaceDigital display and data recording Position and/or concrete cover of rebar5–10 k€Fast and comparatively inexpensive,
easy handling, little technical experience required, limited precision due to large size of sensor
Induction, automatedHilti PS200Area scan, on outside surfaceDigital data recording, 2D data processing and displayPosition and/or concrete cover of rebar10–15 k€Fast and straightforward, easy handling, comparatively expensive, some technical experience required, digital data representation
GPRHardware: GSSI SIR30 radar unit and model 623000XT antenna. Software: REFLEXW, Sandmeier ScientificWide range of options, in this paper area or line scan on surfaceDigital data recording, 3D data processing and representationPosition of rebar, depth of concrete cover, thickness of dalle de verre, material inhomogeneities (humid areas, fissures, etc.) 5–50 k€Versatile (multiple uses), but expensive and time-consuming, good technical experience required, digital data representation in full 3D
UltrasonicsTT-10, TIME Group Inc., Beijing, ChinaSpot analysis in reflection mode on outside surface (glass)Digital display, no data recordingThickness of dalle de verre1 k€Fast and comparatively inexpensive, easy handling, some technical experience required, no digital data representation, contact fluid required
Electrical resistivityProceq ResipodSpot analysis, on outside surface; setup with four electrodes at fixed distancesDigital displayChanges in electrical resistivity, position of rebar, information on degree of carbonation and humidity3–5 k€Fast and comparatively inexpensive, handling tricky, technical experience required, no digital data representation, method unsuitable, if cement fully carbonated
Half-cell potential electrodesCopper sulphate electrodes and voltmeterSpot analysis, on outside surface (non-destructive setup)Digital displayVoltage between two points, information on corrosion of rebar1 k€Inexpensive, but time-consuming, handling tricky, technical experience required, surface has to be moistened to create contact, values provide information on probability of corrosion of rebar
Thermography cameraHardware: FLIR T640BX
Software: FLIR ResearchIR
2D scans surface temperatures, repeated measurements (e.g. 1 scan/minute)Digital data recording and processing (2D false colour images)Differences in relative surface temperatures, information on material inhomogeneities (humid areas, fissures, etc.)30–70 k€Active (active heating of object) thermography provides better results than passive thermography (no active heating); active approach difficult to apply for in-situ measurements

References

  1. Labouret, A. (A)—Windows, Particularly Stained Glass Windows for Churches and Other Buildings of Reinforced Concrete, and a Process for Their Production, Submitted by in 1933. Patent No. FR756065. Available online: https://www.epo.org/searching-for-patents/technical/espacenet.html (accessed on 26 October 2022).
  2. Loire, N. Les vitraux en dalle de verre en France, des origines à 1940; Décors Muraux. Hist. De L’art 1989, 8, 40–56. [Google Scholar] [CrossRef]
  3. Noverraz, C.; Sauterel, V.; Wolf, S. De béton et de verre. La dalle de verre et ses premières utilisations en Suisse. Monum. Vaud. 2021, 11, 50–59. [Google Scholar]
  4. Barrat, R. A Vous de Choisir Votre Avenir: Cimenteur Verrier, RTS, Broadcast on 11 April 1964. Available online: https://www.rts.ch/archives/tv/jeunesse/a-vous-de-choisir-votre-avenir/7519078-cimenteur-verrier.html (accessed on 26 October 2022).
  5. Marie-Victoire, É.; Bouichou, M.; Congar, T.; Blanchard, R. Concrete cultural heritage in France—Inventory and State of Conservation. In Concrete Repair, Rehabilitation and Retroftting III; Dehn, F., Beushausen Hans, D., Alexander, M., Moyo, P., Eds.; CRC Press: London, UK, 2016; pp. 343–350. [Google Scholar]
  6. Breysse, D. Non-Destructive Assessment of Concrete Structures: Reliability and Limits of Single and Combined Techniques; Springer: Berlin, Germany, 2012. [Google Scholar]
  7. Bertolini, L.; Carsana, M.; Gastaldi, M.; Lollini, F.; Redaelli, E. Corrosion assessment and restoration strategies of reinforced concrete buildings of the cultural heritage. Mater. Corros. 2010, 62, 146–154. [Google Scholar] [CrossRef]
  8. Hugenschmidt, J. Ground penetrating radar for the evaluation of reinforced concrete structures. In Non-destructive evaluation of reinforced concrete structures. Non-Destructive Testing Methods; Maierhofer, C., Reinhardt, H.-W., Dobmann, G., Eds.; CRC Press: Boston, MA, USA, 2010; pp. 317–333. [Google Scholar]
  9. Cuzange, L.; Loisel, C.; Marie-Victoire, É.; Faure, W. Conserver les dalles de verre: Un nouveau défi interdisciplinaire pour le vingt et unième siècle. In The Art of Collaboration Stained-Glass Conservation in the Twenty-First Century; Shepard, M.B., Pilosi, L., Strobl, S., Eds.; Harvey Miller Publications: London, UK, 2010; pp. 176–182. [Google Scholar]
  10. Golobardes, S.M. Vitralls de Ciment—Vitralls de Ciment—Avaluació d’un Sistema de Conservació Preventiva al Baptisteri de la Parròquia Verge de la Pau (Barcelona). Master’s Thesis, University of Barcelona, Barcelona, Spain, 2021. Available online: https://diposit.ub.edu/dspace/handle/2445/181444 (accessed on 9 August 2023).
  11. De Vis, K.; Caen, J.; Janssens, K.; Jacobs, P. The consolidation of cracks and fissures in dalle de verre. Assessment of selected adhesives. In Recent Advances in Glass, Stained Glass and Ceramics Conservation 2012; Roemich, H., Van Lookeren, C.K., Eds.; Spa Uitgevers: Zwolle, The Netherlands, 2013; pp. 43–52. [Google Scholar]
  12. Pepi, R.M.; Buchner, L.N.; Gembinski, C. Conservation of Dalle de Verre at the New York Hall of Science, APT Bulletin. J. Preserv. Technol. 2012, 45, 3–12. [Google Scholar]
  13. Ünal, M.; Kühne, H.-C. Repair and restoration of Dalle de Verre concrete windows. In Concrete Repair, Rehabilitation and Retroftting III; Dehn, F., Beushausen, H.-D., Alexander, M., Moyo, P., Eds.; CRC Press: London, UK, 2012; pp. 343–350. [Google Scholar]
  14. Sander, C.; Kühne, H.-C.; Ünal, M.; Kleine, M.; Köhler, A.; Kriesten, V. Betondickglasfenster. Schadensmechanismen und Instandsetzungsprinzipien zur Erhaltung. Restauro 2011, 117, 48–53. [Google Scholar]
  15. Wolf, S.; Hugenschmidt, J.; Gosselin, C. La dalle de verre: Évaluation de méthodes non invasives pour le diagnostic des oeuvres menaces. In Stained Glass Conservation: Preserving Identity, Proceedings of the 11th Forum for the Conservation and Technology of Historic Stained Glass, Girona, Barcelona, 7–9th July 2022; Cañellas, S., Brown, S., Eds.; Corpus Vitrearum Catalunya: Barcelona, Spain, 2022; pp. 144–150. [Google Scholar]
  16. Wolf, S.; Dumont, A. Dalle de Verre en Suisse. 2021. Available online: www.vitrosearch.ch (accessed on 2 November 2022).
  17. Zacharias, N.; Palamara, E.; Kordali, R.; Muros, V. Archeological glass corrosion studies: Composition, environment and content. Sci. Cult. 2020, 6, 53–67. [Google Scholar]
  18. Vitrocentre Romont. Available online: https://vitrosearch.ch/de/objects/2674436 (accessed on 9 January 2023).
  19. Rudaz, P. Église des Cordeliers: Pas de résurrection en vue pour la Pentecôte. Pro Fribg. 1997, 116, 10–15. [Google Scholar]
  20. Vitrocentre Romont. Available online: https://vitrosearch.ch/de/objects/2674496 (accessed on 9 January 2023).
  21. Bueche, J. Die Kirche von Courfaivre und ihre Bildfenster. Cementbulletin 1957, 25, 1–10. [Google Scholar]
  22. Vitrocentre Romont. Available online: https://vitrosearch.ch/de/objects/2674613 (accessed on 9 January 2023).
  23. Vitrocentre Romont. Available online: https://vitrosearch.ch/de/objects/2675388 (accessed on 9 January 2023).
  24. Lataste, J.F. Electrical resistivity measurement. In Non-Destructive Assessment of Concrete Structures: Reliability and Limits of Single and Combined Techniques, State-of-the-Art Report of the RILEM Technical Committee 207-INR; Breysse, D., Ed.; Springer: Berlin/Heidelberg, Germany, 2012; pp. 77–85. [Google Scholar]
  25. Lataste, J.-F. Electrical resistivity for the evaluation of reinforced concrete structures. In Non-Destructive Evaluation of Concrete Structures, Vol.2: Non-Destructive Testing Methods; Maierhofer, C., Reinhardt, H.-W., Dobmann, G., Eds.; Woodhead Publishing Limited: Cambridge, UK, 2010; pp. 243–270. [Google Scholar]
  26. Daniels, D.G. Ground Penetrating Radar, 2nd ed.; IEE The Institution of Electrical Engineers: London, UK, 2004. [Google Scholar]
  27. Carrick, U.E. Ground Penetrating Radar—Theory and Practice, 1st ed.; Butterworth-Heinemann: Oxford, UK, 2017. [Google Scholar]
  28. Hugenschmidt, J. Ground-Penetrating Radar. In Non-Destructive Assessment of Concrete Structures: Reliability and Limits of Single and Combined Techniques, State-of-the-Art Report of the RILEM Technical Committee 207-INR; Breysse, D., Ed.; Springer: Berlin/Heidelberg, Germany, 2012; pp. 63–70. [Google Scholar]
  29. Hugenschmidt, J.; Loser, R. Detection of chlorides and moisture in concrete structures with Ground penetrating radar. Mater. Struct. 2008, 41, 785–792. [Google Scholar] [CrossRef]
  30. Schickert, M.; Krause, M. Ultrasonic techniques for the evaluation of reinforced concrete structures. In Non-Destructive Evaluation of Concrete Structures, Vol.2: Non-Destructive Testing Methods; Maierhofer, C., Reinhardt, H.-W., Dobmann, G., Eds.; Woodhead Publishing Limited: Cambridge, UK, 2010; pp. 490–526. [Google Scholar]
  31. Garnier, V. Ultrasounds through transmission. In Non-Destructive Assessment of Concrete Structures: Reliability and Limits of Single and Combined Techniques, State-of-the-Art Report of the RILEM Technical Committee 207-INR; Breysse, D., Ed.; Springer: Berlin/Heidelberg, Germany, 2012; pp. 17–26. [Google Scholar]
  32. Krause, M.; Mielentz, F. Ultrasonic Echo. In Non-Destructive Assessment of Concrete Structures: Reliability and Limits of Single and Combined Techniques, State-of-the-Art Report of the RILEM Technical Committee 207-INR; Breysse, D., Ed.; Springer: Berlin/Heidelberg, Germany, 2012; pp. 27–38. [Google Scholar]
  33. Andrade, C.; Martinez, I. Techniques for measuring the corrosion rate (polarization resistance) and the corrosion potential of reinforced concrete structures. In Non-Destructive Evaluation of Concrete Structures, Vol.2: Non-Destructive Testing Methods; Maierhofe, C., Reinhardt, H.-W., Dobmann, G., Eds.; Woodhead Publishing Limited: Cambridge, UK, 2010; pp. 284–313. [Google Scholar]
  34. Defer, D.; Maierhofer, C. Infrared thermography. In Non-Destructive Assessment of Concrete Structures: Reliability and Limits of Single and Combined Techniques, State-of-the-Art Report of the RILEM Technical Committee 207-INR; Breysse, D., Ed.; Springer: Berlin/Heidelberg, Germany, 2012; pp. 85–97. [Google Scholar]
  35. Maierhofer, C.; Roellig, M.; Schlichting, J. Active thermography for the evaluation of reinforced concrete structures. In Non-Destructive Evaluation of Concrete Structures, Vol.2: Non-Destructive Testing Methods; Maierhofer, C., Reinhardt, H.-W., Dobmann, G., Eds.; Woodhead Publishing Limited: Cambridge, UK, 2010; pp. 370–399. [Google Scholar]
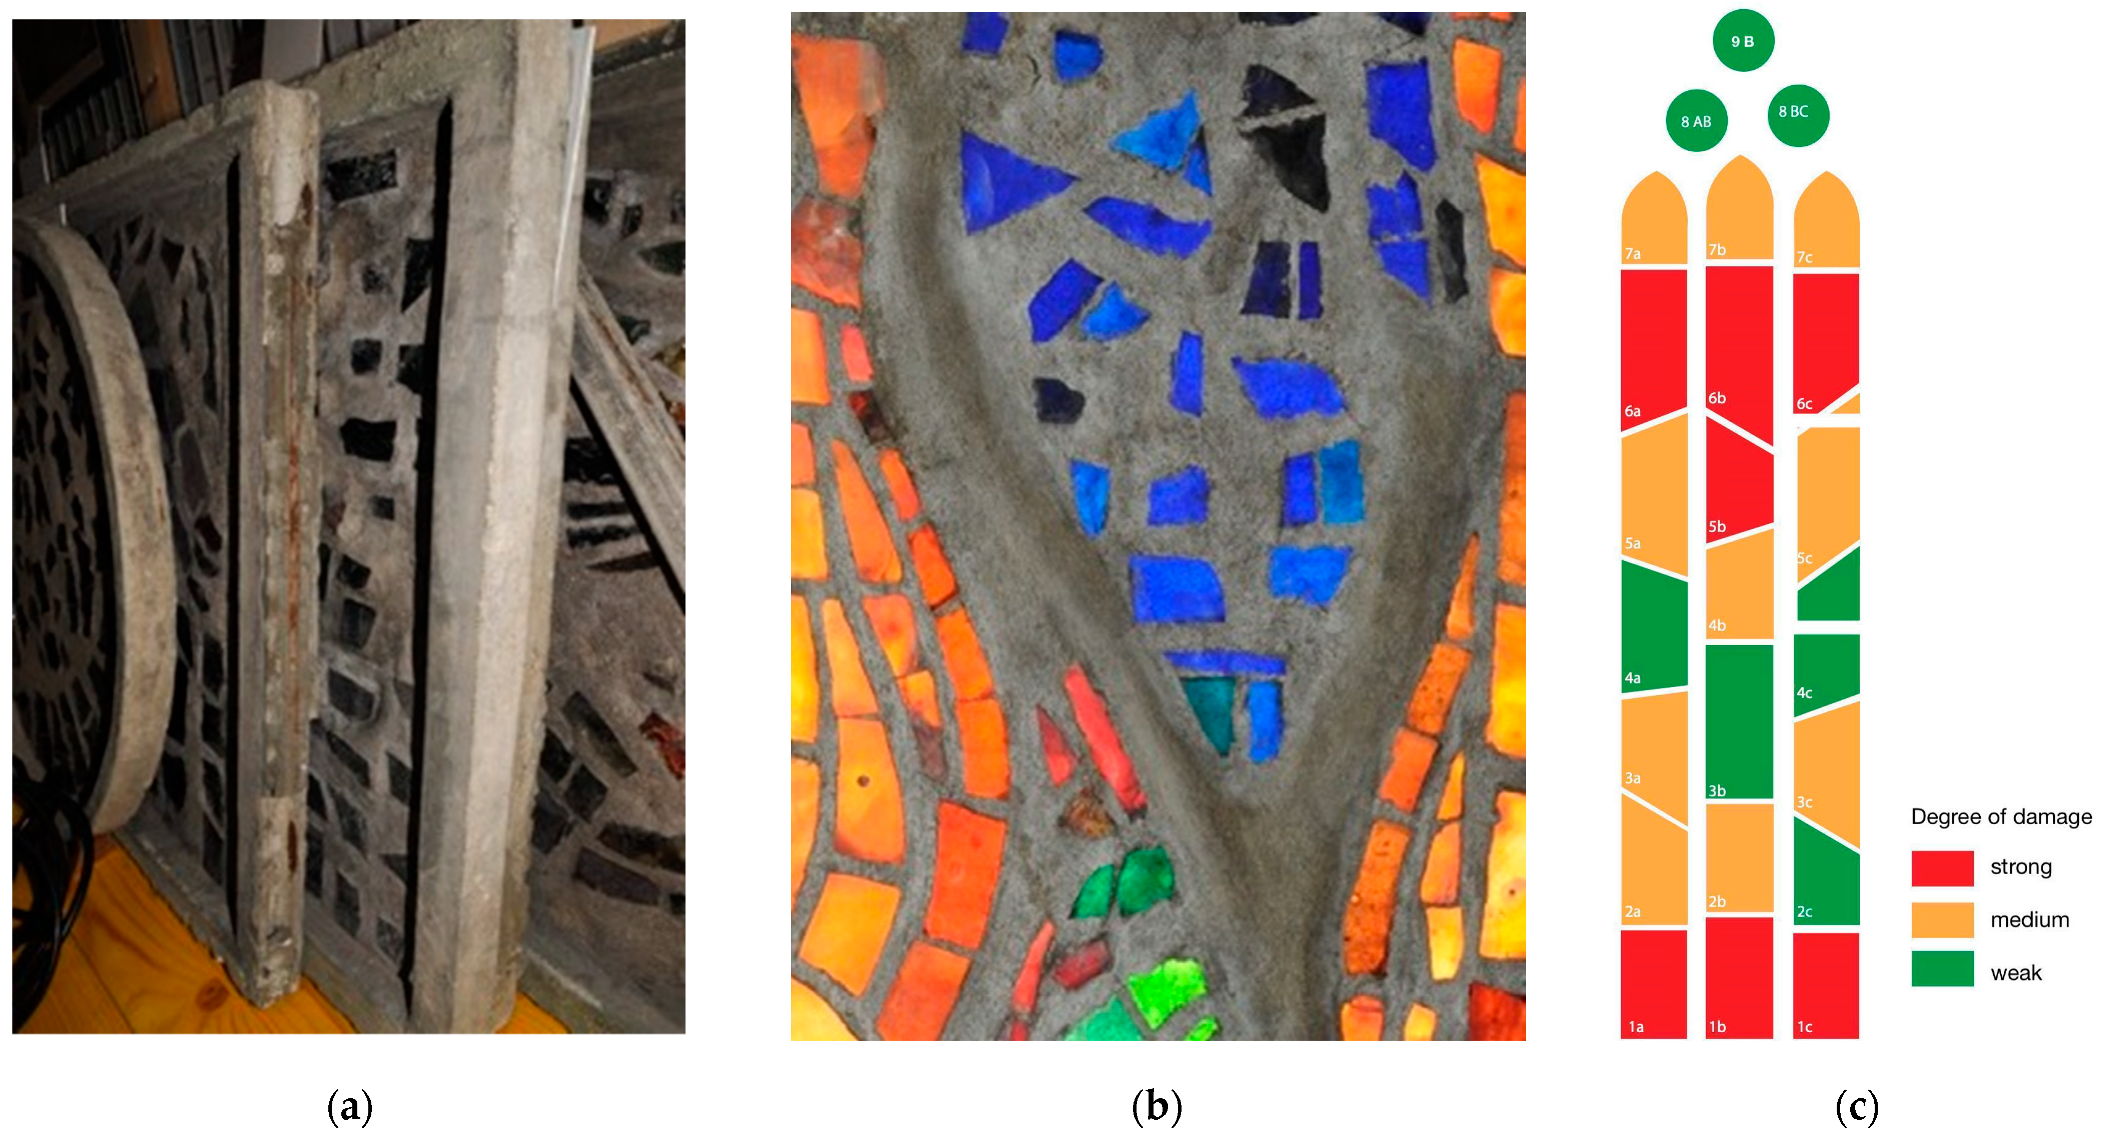
Figure 1. Pentecost, Alexandre Cingria, 1938. Some of the 24 panels of the original window, now preserved in the archives of the Franciscan Monastery in Fribourg (a) and detail of the inner surface of one panel (b); (c), diagram showing the degree of damage of all 24 four panels according to their previous position in the window.
Heritage 06 00330 g001
Figure 2. Annunciation, Fernand Léger, 1954. Dalle de verre window on the southern façade of Saint-Germain d’Auxerre at Courfaivre, Switzerland. View from the outside (a) and from the inside (b) © 2023, ProLitteris, Zurich.
Heritage 06 00330 g002
Figure 3. Feeding the multitude, Fernand Léger, 1954. Dalle de verre window in the north-east bay of the choir of Saint-Germain d’Auxerre at Courfaivre, Switzerland. View from outside (a) and from the inside (b) © 2023, ProLitteris, Zurich.
Heritage 06 00330 g003
Figure 4. Induction, Signal at primary and secondary coils without (a) and with (b) rebar.
Heritage 06 00330 g004
Figure 5. GPR principles.
Heritage 06 00330 g005
Figure 6. Measurement of half-cell potential, normal setup (a) and setup used in Courfaivre (b).
Heritage 06 00330 g006
Figure 7. Existence and position of rebars on the medallion of the Annunciation, magnet (a), induction (b) and GPR (c) © 2023, ProLitteris, Zurich.
Heritage 06 00330 g007
Figure 8. Two places in the medallion of the Annunciation with exposed rebar: overview (a) and details (b,c) © 2023, ProLitteris, Zurich.
Heritage 06 00330 g008
Figure 9. GPR data recorded on horizontal line (a) with interpretation (b).
Heritage 06 00330 g009
Figure 10. Thickness of the panel of the Annunciation medallion, ultrasonics result from four locations (a) and GPR result covering the whole surface (b) © 2023, ProLitteris, Zurich.
Heritage 06 00330 g010
Figure 11. Half-cell measurements on the medallion of the Annunciation (a) and results (b), voltages > 50 mV = orange, voltages > 100 mV = red, © 2023, ProLitteris, Zurich.
Heritage 06 00330 g011
Figure 12. Photograph of a panel of the window from Fribourg (a) with area marked on thermography image (b); the horizontal extension of the area is about 1.2 m.
Heritage 06 00330 g012
Figure 13. GPR reflection amplitudes (strong = white, medium = orange, weak = green) from the upper part of Feeding the multitude, Courfaivre (a) and rebar positions found with magnet (b), © 2023, ProLitteris, Zurich.
Heritage 06 00330 g013
Table 1. Thickness of the Annunciation medallion measured by ultrasonics and GPR, uncalibrated.
PositionUltrasonics
(Thickness in m)
GPR
(Thickness in m)
10.02470.024–0.025
20.02680.025–0.026
30.02540.024–0.025
40.02410.023–0.024
Disclaimer/Publisher’s Note: The statements, opinions and data contained in all publications are solely those of the individual author(s) and contributor(s) and not of MDPI and/or the editor(s). MDPI and/or the editor(s) disclaim responsibility for any injury to people or property resulting from any ideas, methods, instructions or products referred to in the content.