Article

Using KOCOA Military Terrain Analysis for the Assessment of Twentieth Century Battlefield Landscapes

by
Dirk HR Spennemann
Institute for Land, Water and Society, Charles Sturt University, PO Box 789, Albury, NSW 2640, Australia
Heritage 2020, 3(3), 753-781; https://doi.org/10.3390/heritage3030042
Submission received: 19 June 2020 / Revised: 8 July 2020 / Accepted: 9 July 2020 / Published: 13 July 2020
(This article belongs to the Section Archaeological Heritage)

Abstract

:
Military terrain analysis serves as a tool to examine a battle commander’s view of a battlefield and permits to hindcast some of the rationale for actions taken. This can be augmented by physical evidence of the remains of the battle that still exist in the cultural landscape. In the case of World War II-era battlefields, such terrain analysis has to take into account the influence of aerial warfare—the interrelationship between attacking aircraft and the siting of anti-aircraft guns. This paper examines these issues using the case example of the Japanese WWII-era base on Kiska in the Aleutian Islands (Alaska).

1. Introduction

There is an increasing body of research that considers the remains of World War II either from an archaeological or a cultural heritage management perspective. Most of the early work was carried out in Micronesia, surveying the remains of Japanese [1,2,3,4,5,6,7,8,9] and US installations and residual equipment [10,11,12], while addressing questions of conservation management [13,14,15] and heritage policy [16,17,18]. Since then, work has been carried out on Japanese installations and equipment in the Aleutians [19,20,21,22,23,24,25,26] and German installations in France [27,28]. A limited number of studies have considered the World War II battlefields or military action in Micronesia [11,12,29,30], the Aleutians [31,32], Normandy [33,34,35], southern France [36], and Germany [37].
A real-life battlefield is circumscribed by the geographical terrain and the differential strength and disposition of forces that can be brought to bear. A meticulous analysis of the opportunities and challenges posited by the terrain can provide a commander with a distinct advantage in an impending conflict. This applies to movement warfare, where both sides are mobile, fighting over contested ground, and to stationary warfare, where one side has established a defensive stronghold to prevent an opposing force from advancing.
The U.S. military, in keeping with most armed forces, has developed a formalized approach for this. Like with many planning concepts impressed on the common soldier, the U.S. military uses a mnemonic acronym for military terrain analysis: KOCOA (also OCOKA; U.S. Army Corps of Engineers 2006). It encapsulates the analysis of: Key Terrain/Decisive Terrain; Observation and Fields of Fire; Concealment and Cover; Obstacles; and Avenues of Approach/Withdrawal (Table 1).
This paper will consider the use of KOCOA in analysing and interpreting a World War II where the entire battle was carried out as a struggle between a defending garrison force and an attacker who had to almost solely rely on aircraft to deliver their strikes.

2. The Application of KOCOA and Its Theoretical Underpinning

The National Park Service (NPS) American Battlefield Protection Program has adopted KOCOA as a suitable tool for analysing a historic battlefield (Table 1) and requires all grantees to use it. In principle, it needs to be understood that in a military setting, KOCOA is an analysis tool aimed at assessing the suitability of the terrain for the movement of friendly and enemy forces. As has been noted by military commentators, the standard approach of KOCOA has to be modified for warfare in urban conflict settings [38], as well as in situations where counter-insurgency measures are being undertaken [39].
In the historic preservation setting, KOCOA is an analysis tool aimed at hindcasting a battle commander’s view of the battlefield, in the hope of being able to reconcile any remaining physical actual battlefield with the historic accounts of the battle. Geographical features, which figure prominently in the KOCOA analysis as determinants, must be examined in the light of the military doctrine of the day, as well as in the light of the then available technology. In the ideal world, this approach allows to (a) better interpret the battlefield to an audience, and (b) to identify those aspects of the battlefield that may have not seen the level of management attention they deserve.
The NPS site managers and consultants, as well as other heritage researchers, have used KOCOA successfully to analyse historic battlefields in particular and the manifestation in the cultural landscape they created and in which they are embedded [40]. Examples are the Battle of Little Big Horn [41], the Battles of Buckland Mills [42], Gettysburg [43] or Vicksburg [44], as well as various other Civil War sites [45,46]. However, common to all battles analysed so far, is that they are terrestrial battles only. All the battles of the War of Independence, the Civil War, and the so-called Indian Wars were land warfare pure and simple, on occasion augmented by naval action bombarding shore installations and small-scale landings [47]. KOCOA has also been applied to understand the nature and boundaries of battlefields of landing beaches in the Northern Mariana Islands [11,12]. There is a limited application of KOCOA in a purely maritime dimension, albeit primarily in a closely confined coastal setting during the War of Independence [48,49].
The aerial dimension to active warfare was a later development starting in World War I [50]—but one that plays an integral role in the understanding of almost all World War II Battlefields, including the one that is the focus of this paper, the Kiska National Historic Landmark. The cultural heritage implications of the aerial dimension of warfare, in particular the resulting landscape of bomb craters, have been a recent and emerging focus of scholarship, starting with studies by Spennemann [31,51,52], and followed by research by McKinnon [53], Sprague [54], and most recently by Passmore [33,34] and Gregory [55].

2.1. Limitations of KOCOA

While KOCOA is a suitable tool to examine a battlefield location, it is not a tool that can be applied uncritically to any situation. Pivotal in the understanding of KOCOA is that the methodology is primarily suited for land-based combat between two opposing forces. KOCOA is inherently unsuited for open sea naval warfare as well as for purely aerial warfare. KOCOA is also of limited use in a situation where an opposing force holds an environmentally circumscribed terrain, such as an island, where the military operations consisted of long-range bombing efforts to dislodge the opponent, but where no actual person-to-person ground combat occurred. This is the case of Kiska.
In the following we will look at how KOCOA can be used as a query tool for the understanding of the Kiska battlefield, and in the process, we will advance a modified KOCOA approach suitable to aid the interpretation of island conquests in a twentieth century warfare setting.

2.2. KOCOA and the Pacific Island War

The Pacific Theatre of World War II was defined by Japanese-occupied islands that were heavily defended and which were either conquered, or bypassed, by the advancing U.S., Australian, and Canadian forces (the Allies). Common to all situations was that after their initial occupation, the Japanese forces commenced to fortify the islands against Allied attacks from the air, the sea and from amphibious assaults; and that the Allied forces attacked an island first from the air, and on occasion, from the sea, prior to a possible landing. If a landing was planned, then the island was subjected to an intense naval bombardment in the days prior to the assault. While some islands were attacked by amphibious assaults, such as Guadalcanal (1942), Attu (1943), Kiska (1943), Tarawa (1943), Kwajalein/Roi Namur (1944), Enewetak (1944), Tinian (1944), Saipan (1944), Peleliu (1944), and Iwo Jima (1945), other bases and defended population centres were merely stripped of their air capabilities, bypassed, isolated, and thus neutralized, such as Chuuk (Truk), Pohnpei (Ponape), Wake, Wotje, Taroa (Maloelap), Jaluit, or Mile (all in Micronesia).
Today, many of these sites are National Historic Landmarks (NHL), such as Attu, Kiska, Guam (landing beaches), Tinian, Saipan, and Wake, even though several are in jurisdictions outside the United States, such as Kwajalein/Roi Namur (in the Republic of the Marshall Islands) or Peleliu (in the Republic of Palau). Other sites are on the National Register of Historic Places, such as various sites on Guam and the Commonwealth of the Northern Mariana Islands.
It can be argued that any combat zone, where no actual ground combat occurred, does not qualify as a battlefield sensu strictu. For the purposes of this paper, these semantics are set aside, and the concept of a battlefield shall encompass that space of contested ground where direct military action occurred either through ground combat or through the projection of lethal force onto a stationary or mobile opponent.
Given the fact that some island battlefields never saw a direct assault leading to a successful or aborted re-conquest, any military terrain analysis of such island battlefields, therefore, has to proceed along two discrete lines: (i) an analysis of the terrain opportunities for the pre-landing period, and (ii) an analysis for the post landing period. Only the latter, where it entails ground combat, conforms closely to what can be termed the standard KOCOA approach taken by the NPS—a situation where we have to be concerned with the topography of the landing beaches, the disposition of the enemy forces opposing that landing, if any, and how the landing forces were opposed as the gradual conquest of the island continued.
Yet the analysis of the terrain opportunities for the pre-landing period has more universal relevance as all Japanese bases in the Pacific were subjected to aerial, and on occasion naval, bombardment. In all cases, a largely stationary military force was exposed to, and thus had to react to, highly mobile aerial warfare where the enemy could come from any direction.
Since Kiska was an aerial battle, we cannot locate the critical and key/decisive elements of that battle in the landscape: all of Kiska that was occupied and defended by the Japanese was key terrain. Indeed, the landscape is clearly littered with evidence of the struggle: bomb craters abound, interspersed with anti-aircraft gun (AA) sites and aircraft wrecks.
Some of what is discussed in the following is based on analytical research carried on in 2010 as part of a cultural landscape study of the Kiska battlefield [31]. As the research into World War II battlefields, their preservation and management is increasing, there is a need to bring this conceptualization and application of the aerial dimension of KOCOA to a wider professional audience beyond the reach and readership of grey literature.

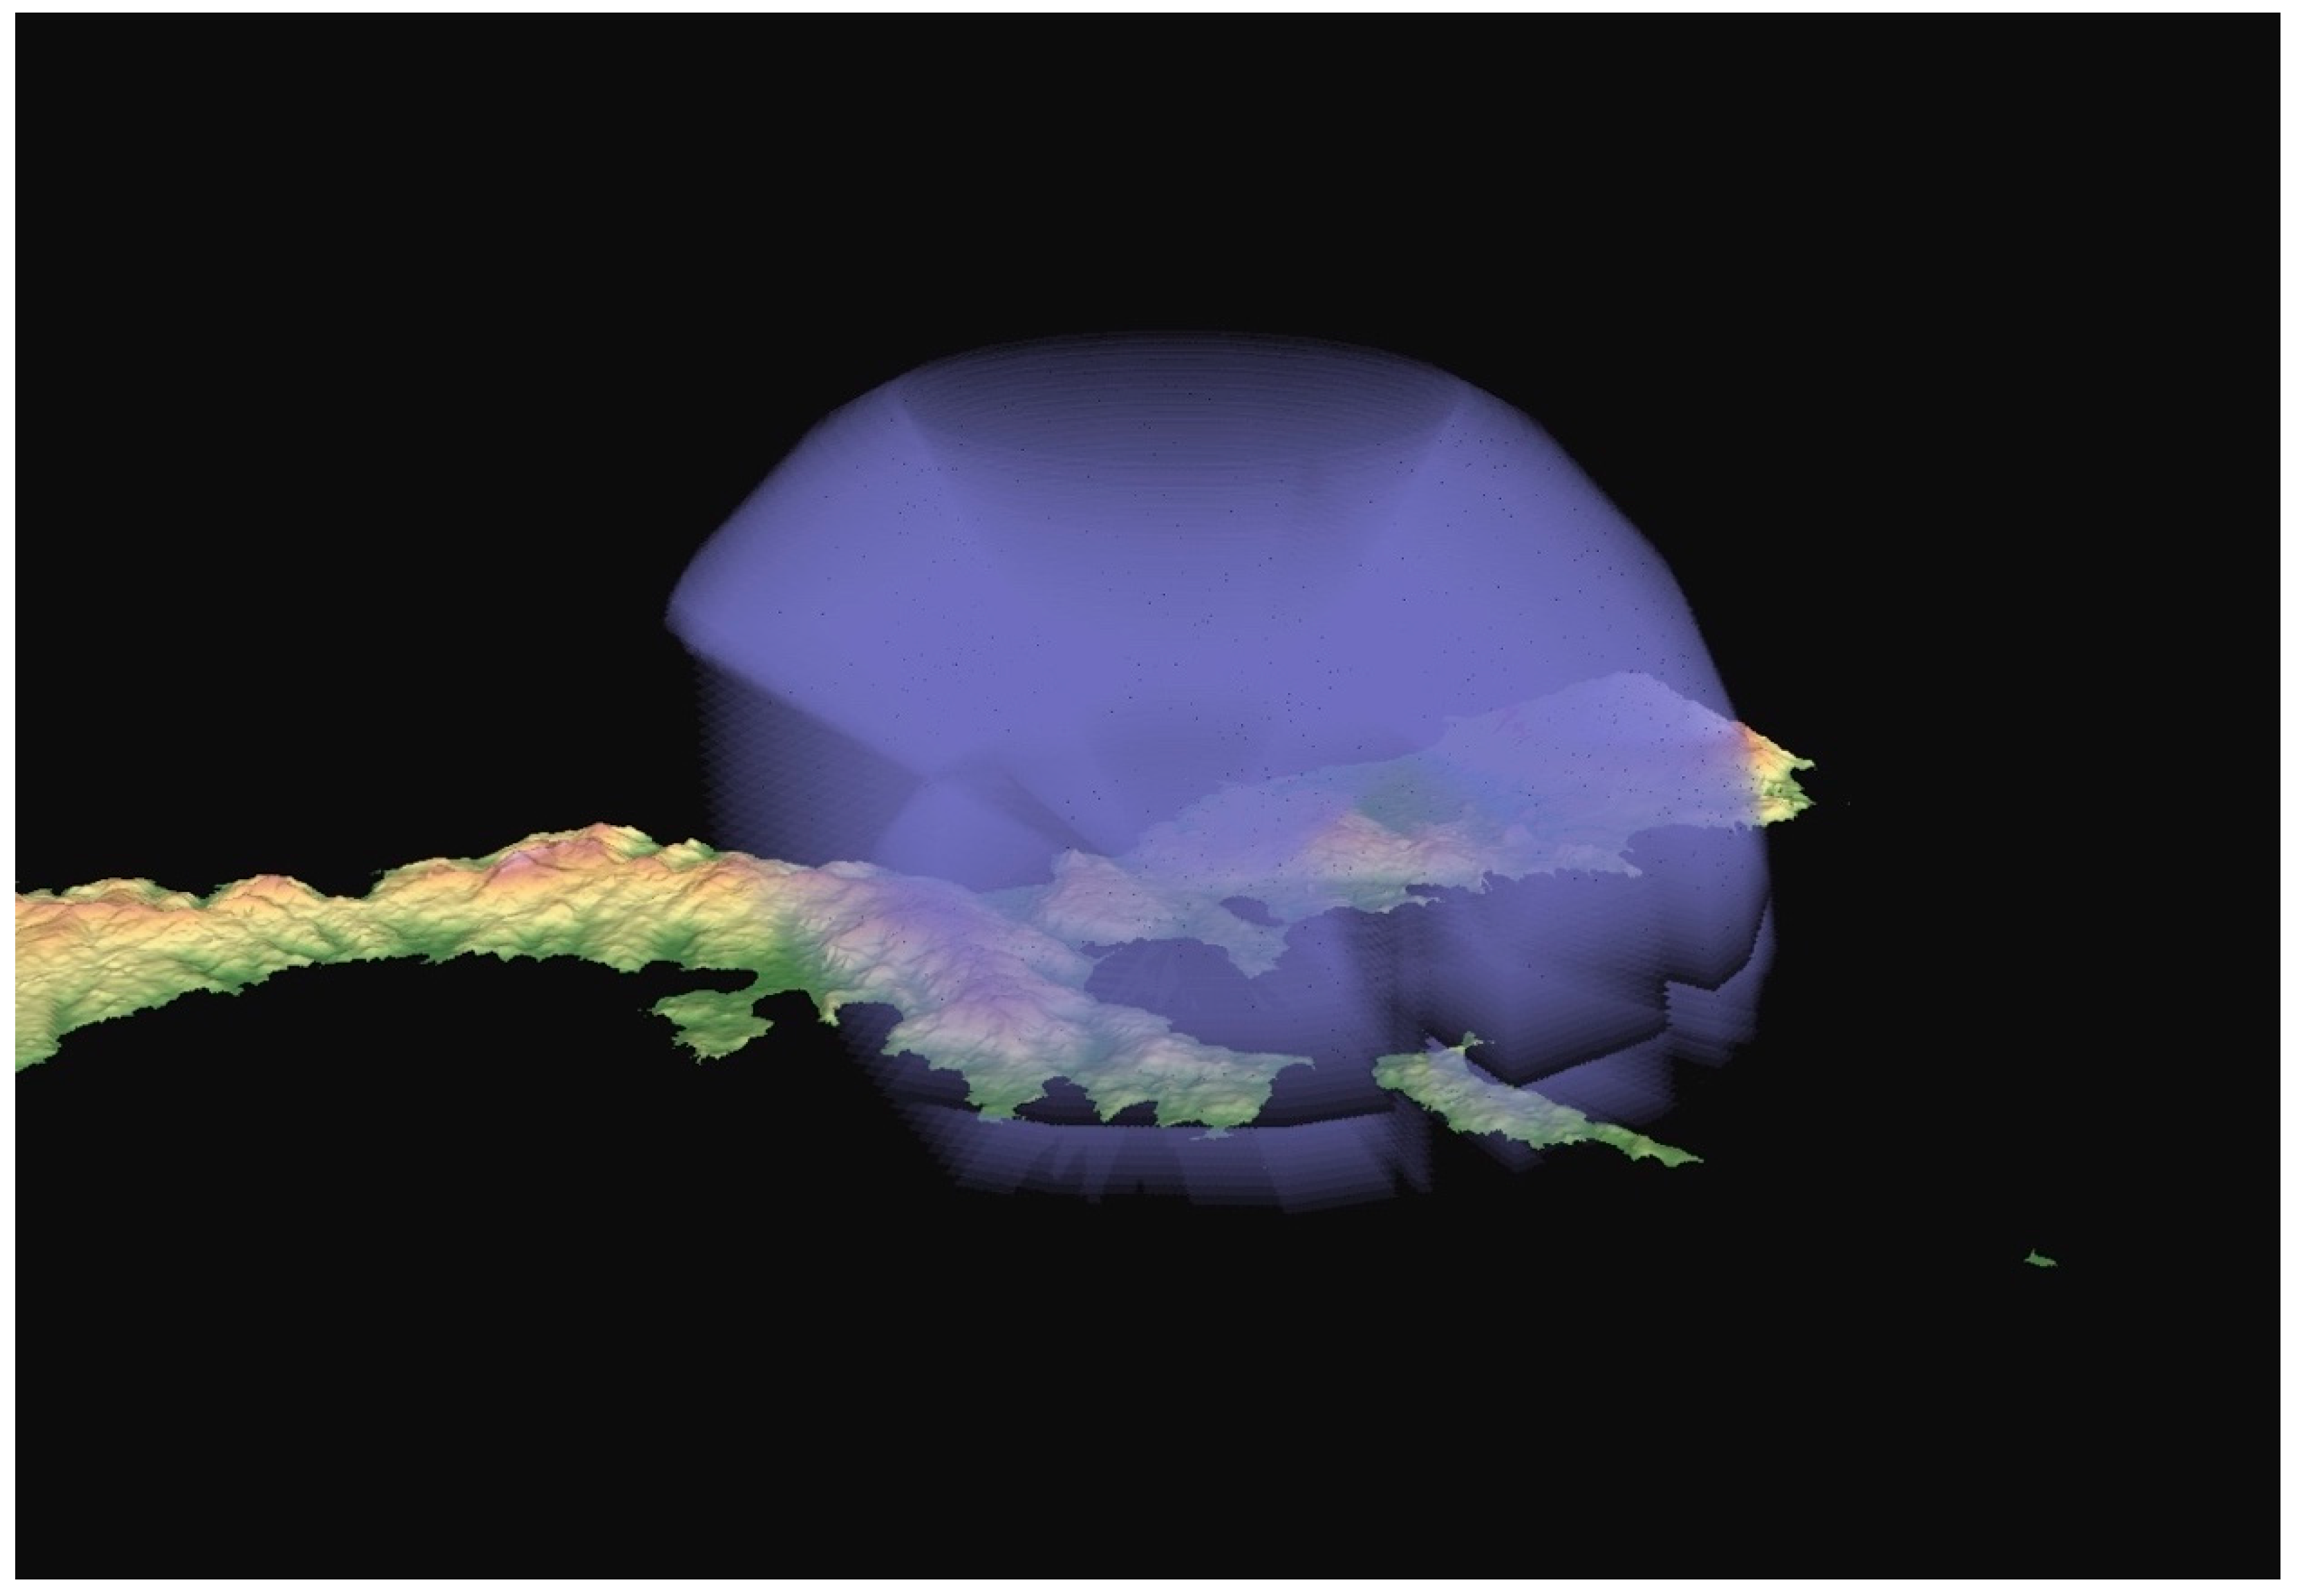
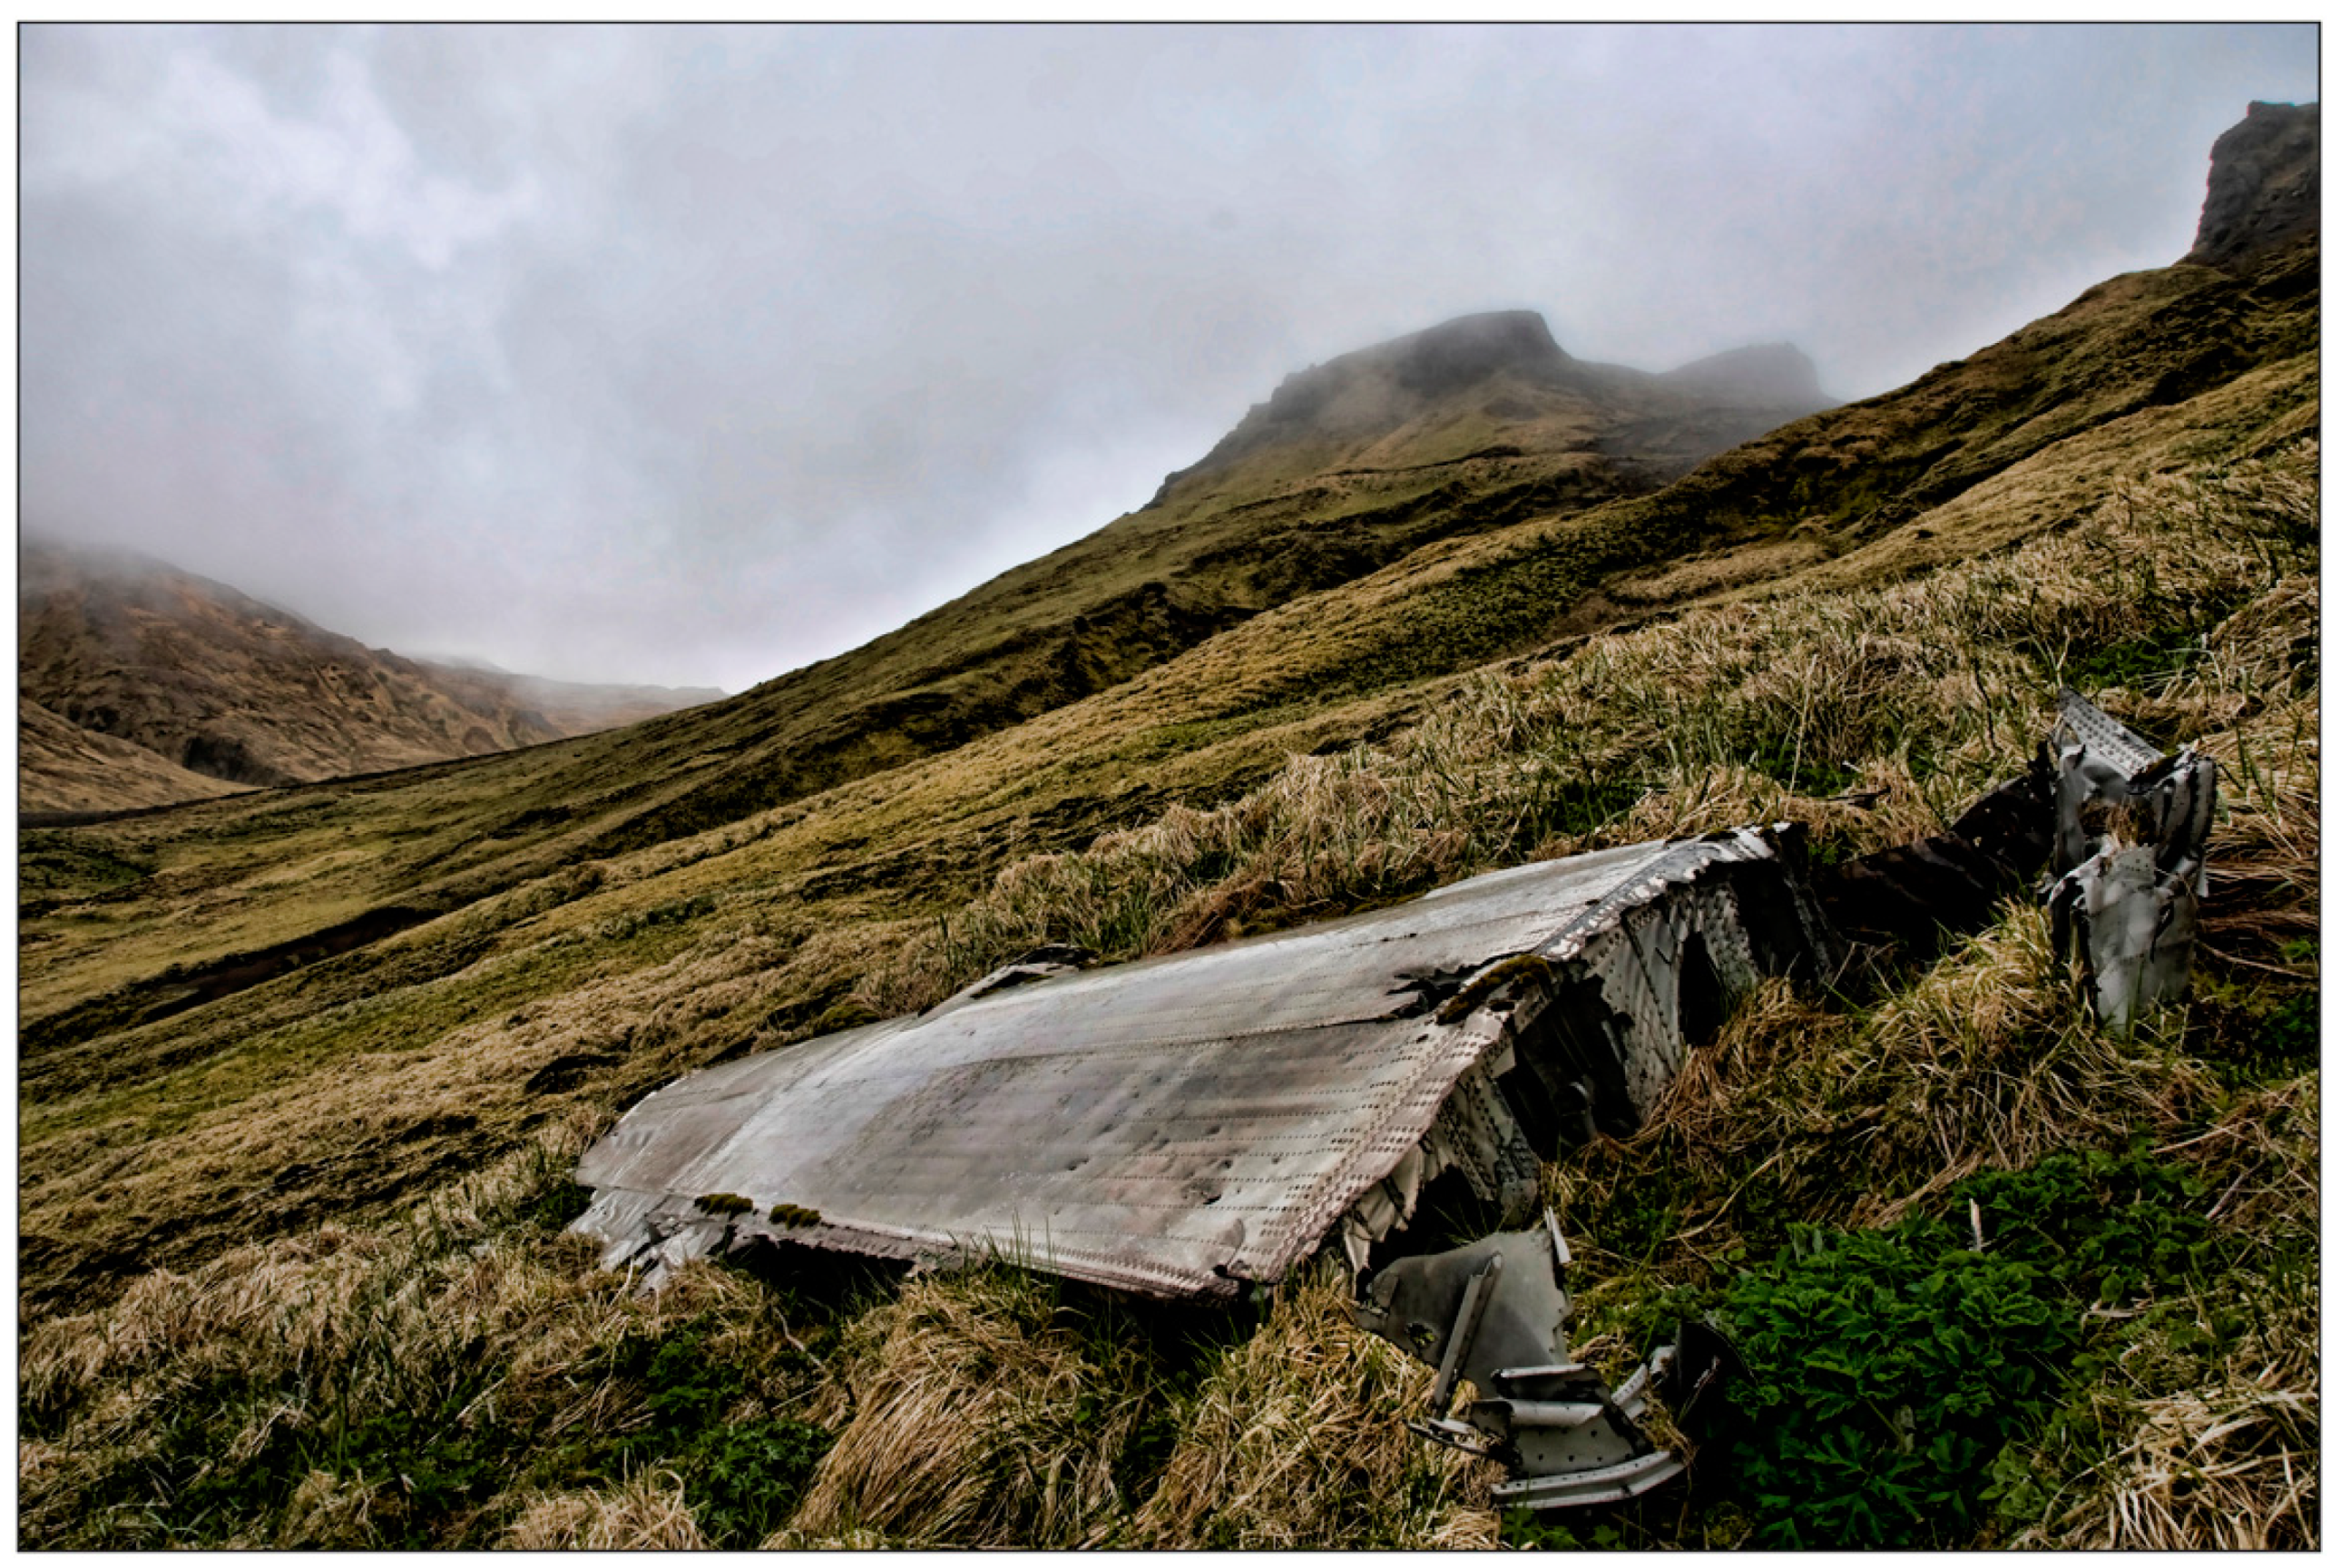
3. Background on Kiska

Kiska is an approximately 30-mile long and 7-mile wide volcanic island in the Western Aleutian Islands, located approximately 1450 miles west of Anchorage. From the 1830s until World War II, the island was uninhabited, but occasionally visited on a seasonal basis for fur hunting (foxes and sea otters). By 1941, the U.S. Navy operated a small weather station at Kiska Harbor.
As part of the overall Battle of Midway operation, Japanese forces occupied Kiska on 6 June 1942 and nearby Attu the following day. While the main objective, to establish a base on Midway, failed, the Aleutian component was a success [31,56,57]. In the following months the Japanese turned Kiska into a formidable base from which to launch seaplane and submarine operations in the Northern Pacific. The base, which at the height of development saw over 5000 Japanese Navy and Army troops stationed there, was well defended by an array of coastal defence and anti-aircraft guns. The U.S. attempted, in vain, to dislodge the Japanese by long-range aerial bombardment [58], which was hampered by bad visibility of the target and adverse flying conditions. Once U.S. forces had successfully recaptured Attu on 30 May 1943, the Japanese garrison on Kiska became unsustainable as the island was now cut off from Japan and could only be supplied by submarines. As an American and Canadian force of more than 34,000 men prepared to invade Kiska, a Japanese fleet managed to slip through the fog undetected and evacuate over 5100 troops [31].
When the U.S./Canadian assault occurred three weeks later, they found the island deserted. To deny the Japanese the future use of Kiska, the U.S. established their own garrison which operated, in increasingly scaled-down size, until the end of the Pacific War [31].
Kiska forms a unique cultural landscape because, with the exception of a few prehistoric indigenous Aleut sites, the island represents a battlefield pure and simple. When the Japanese evacuated the island, they had to leave all their major equipment behind. All of this, as well as personnel shelters and revetments for barracks, is still in situ except where the U.S. and Canadian garrison forces had competing land use (and cleared the debris) or where U.S. intelligence removed some equipment for analysis and testing. In addition to the Japanese component, the battle field encompasses evidence of the U.S. bombing, wrecks of U.S. aircraft shot down, as well as evidence of the U.S. base development, including an airfield (which had been started by the Japanese), piers, collapsed Quonset huts and the like [19,26,31,32].

What Is the Kiska Battlefield?

Kiska was not a single decisive battle, but a prolonged, 14-month engagement trying, by means of air attacks, to dislodge the Japanese after they had gained their foothold. The standard KOCOA is predicated on a spatially and temporally highly circumscribed battlefield with both combatants essentially moving on the same terrain. Kiska is neither.
In order to understand the Kiska battlefield and the structures and other physical remains that are still extant, it is necessary to disentangle the various threads of the background history and to first set them out into discrete phases. By creating an analytical matrix, we can identify significant components, which are representative of these phases. While the events of course unfolded as a continuum, in historical hindsight we can break up the World War II history of Kiska into six phases: (i) Preparing for War; (ii) Attack Phase; (iii) Occupation Period; (iv) Retaking Phase; (v) Garrisoning; and (vi) Abandonment. Some of these phases have both a U.S. and a Japanese component to them (Table 2).

4. Applying KOCOA to the Kiska Situation

We only need to be concerned with phases II (Attack) and III (Occupation) as the others are not relevant to the methodological issues to be addressed here. When examining the U.S. response to the Japanese presence on Kiska, the latter phase can be broken up in further discrete sub-phases based on the technological capabilities the U.S. could bring to bear (Table 3).
U.S. bombing commenced on June 10th, 1942, as soon as the presence of the Japanese on Kiska had been discovered. The first bombing runs were carried out from Cold Bay via Umnak necessitating long distance flights which were hard on crews and aircraft. Over time, U.S. forces built a range of airfields ever closer to Kiska (Table 3). U.S. bombing runs to Kiska had to be carried out by B-17 and B-24 heavy bombers, dropping their loads from medium to high altitude. While fighter escorts to suppress AA fire were possible once the base on Adak was operational, this was not very effective as fighters operated near the end of their range. This changed in February 1942 with the opening of an airfield on nearby Amchitka. Not only could fighters routinely accompany the bombers, but the U.S. could also use medium bombers, such as the B-25, for medium and low-altitude attacks. In the final phase of the battle, ironically after the Japanese had already abandoned Kiska, the U.S. used dive bombers for high precision bombing of specific targets (mainly gun installations) in preparation for the Allied landings.

4.1. Phase II (Attack Phase)

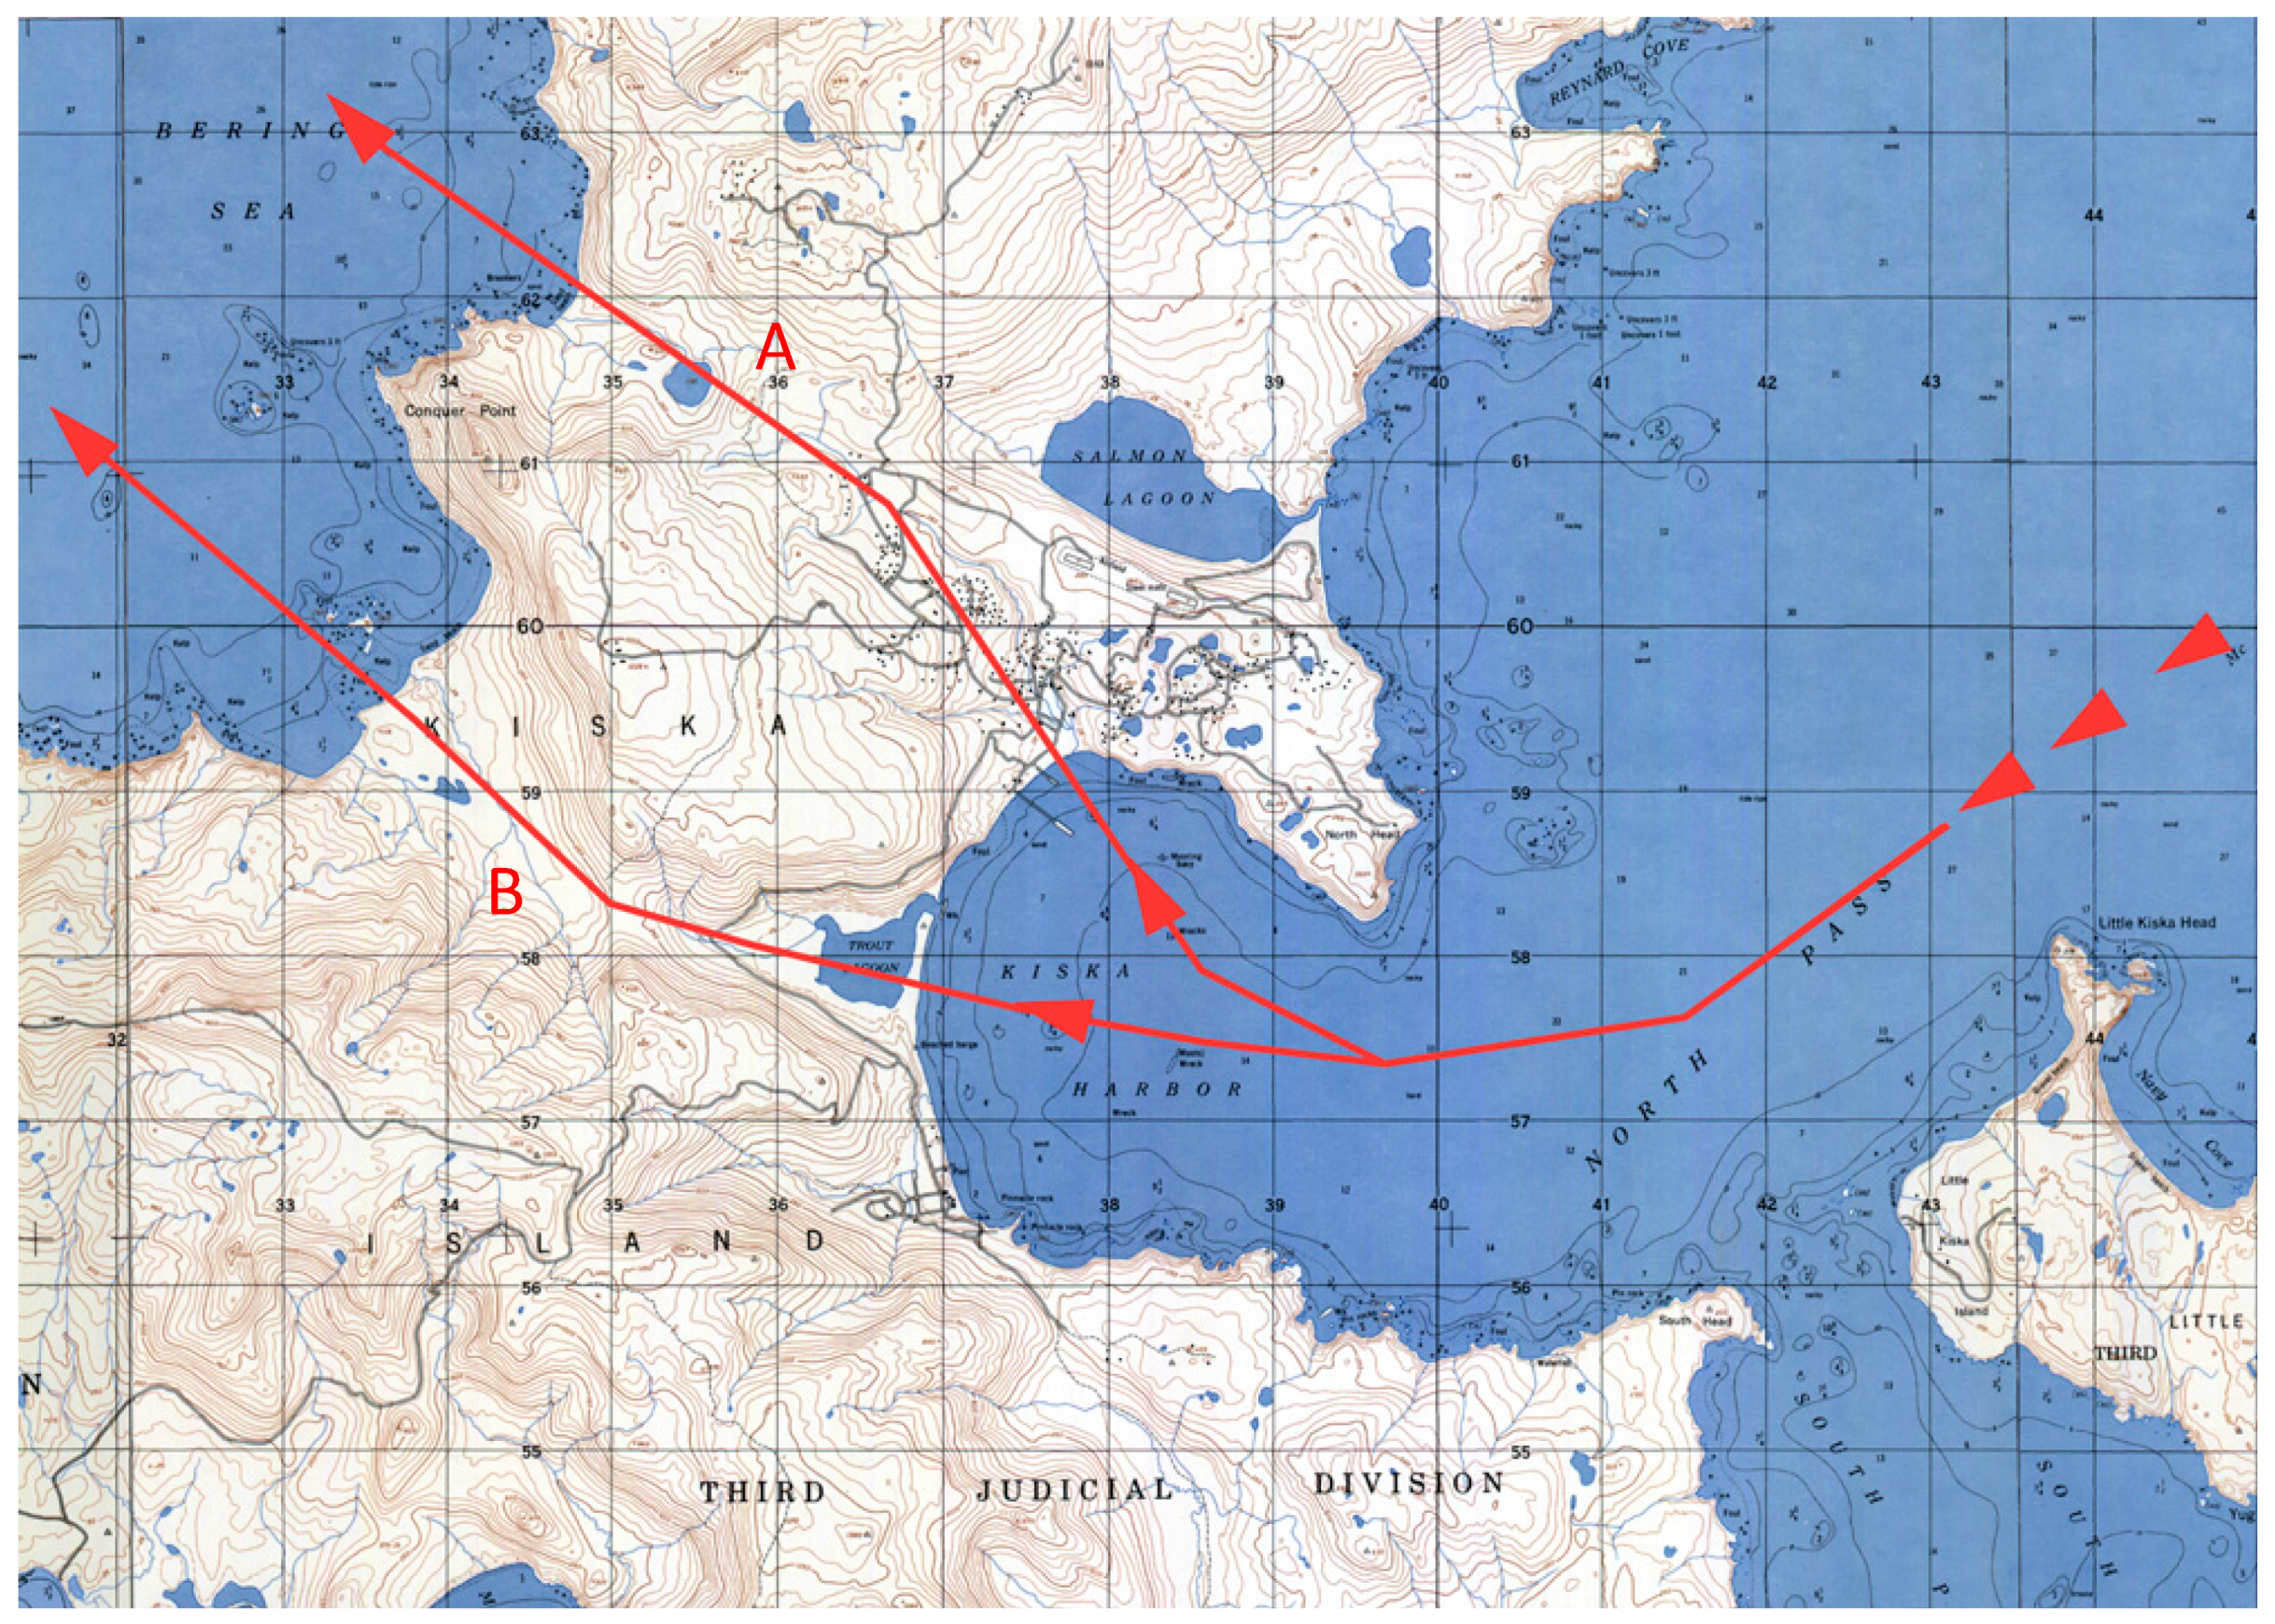
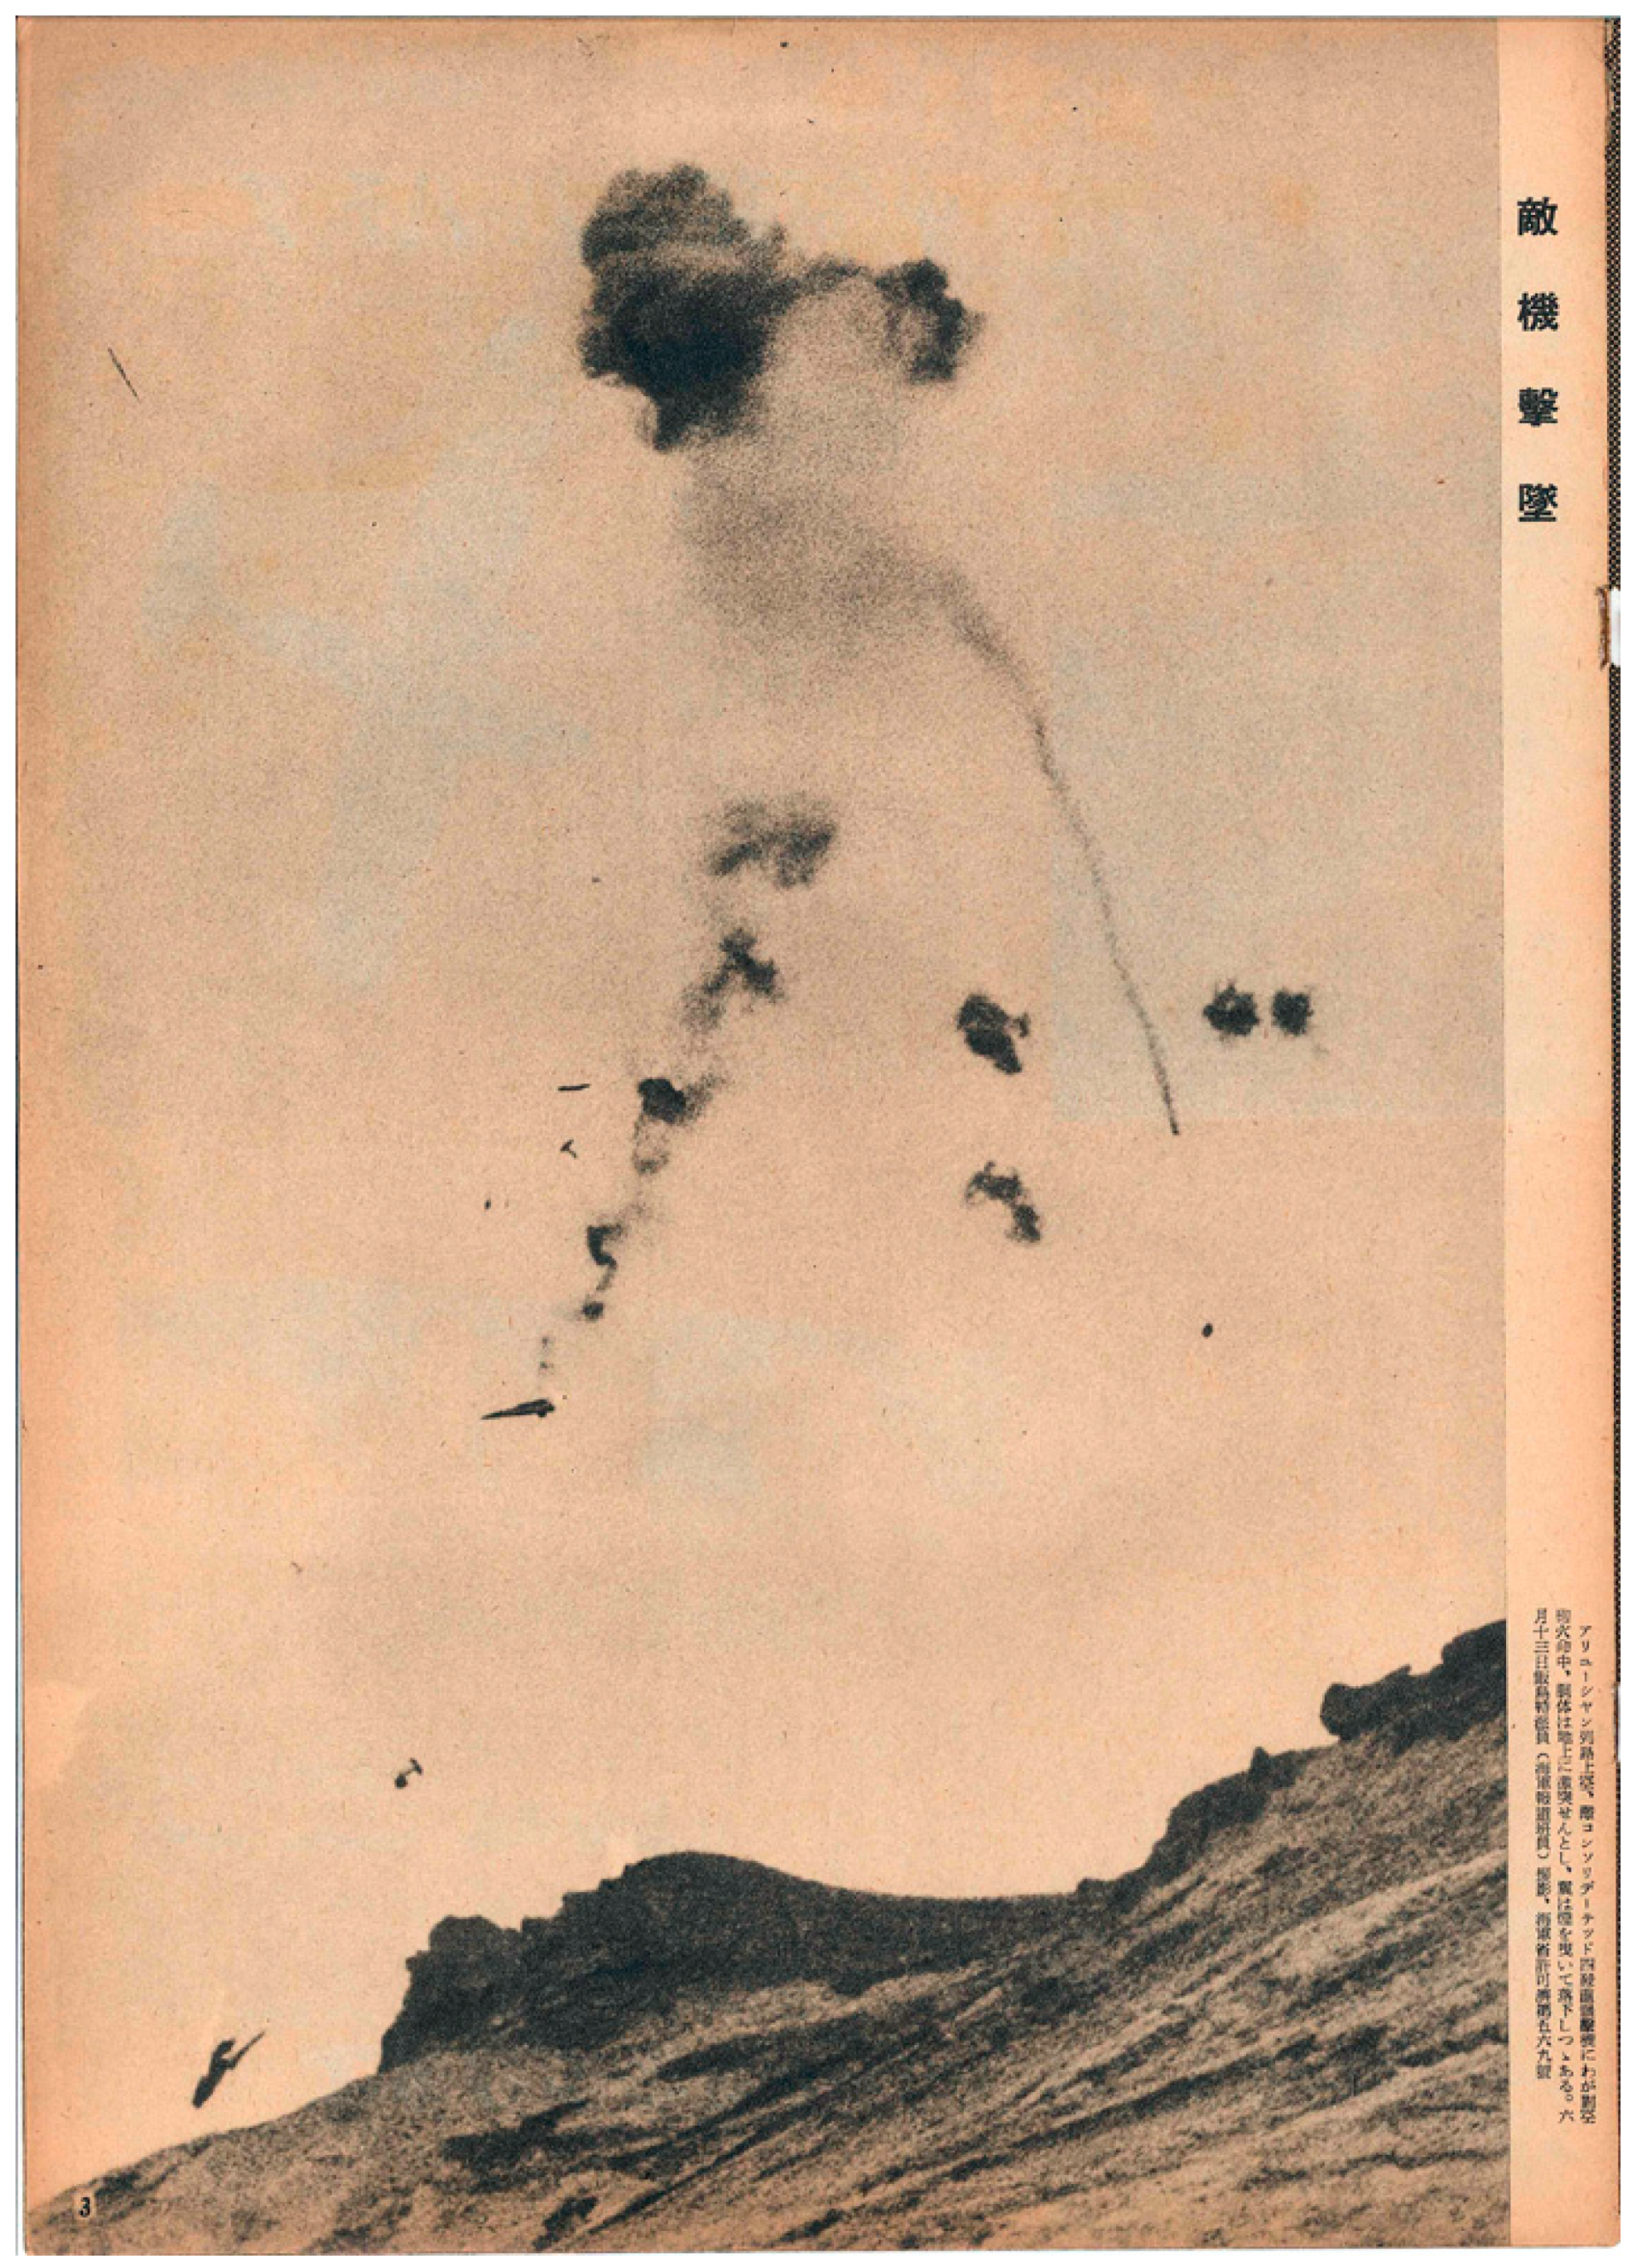
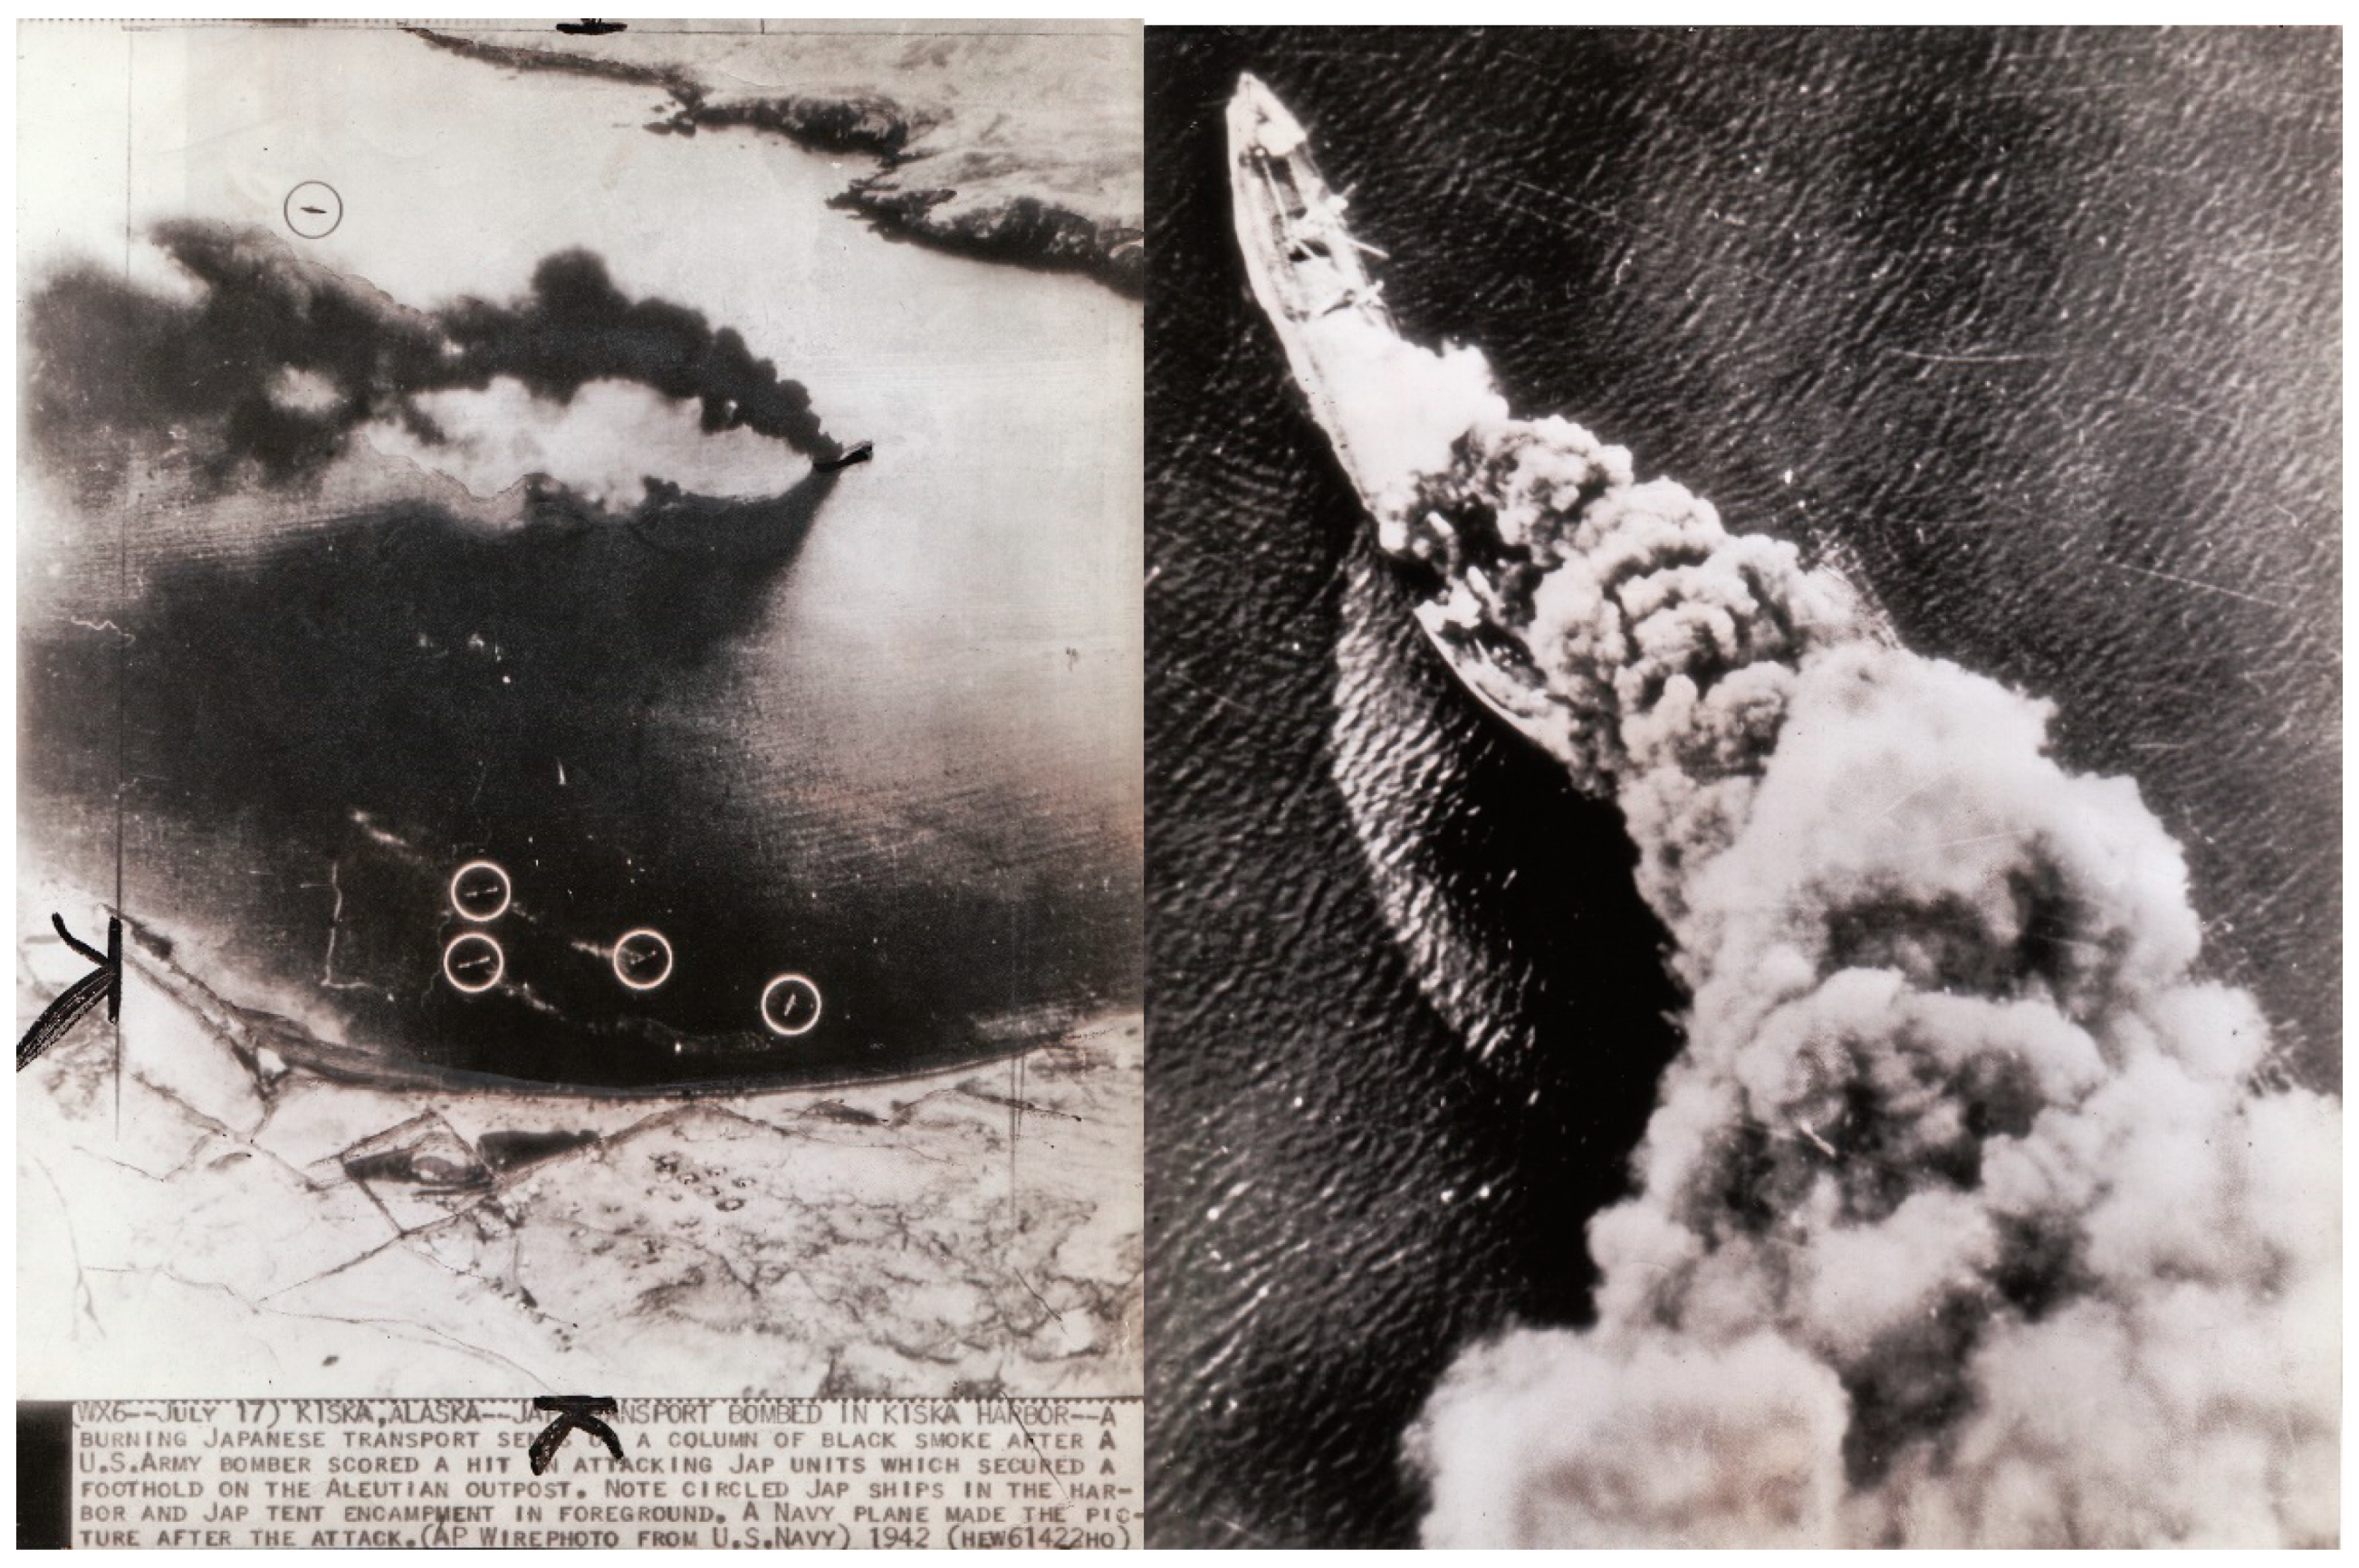
Initial U.S. Response: The Kiska Blitz

The day after the U.S. forces noted that the U.S. Meteorological Station on Kiska had stopped transmitting (6 June 1942), the U.S. Air Army Force (USAAF) sent a reconnaissance plane to investigate. Following the report that the Japanese had indeed landed, the USAAF immediately began bombing missions, trying to prevent the Japanese from gaining a firm hold on the island. To achieve this, the USAAF planners instructed their air crews to follow a priority set of targets if other variables (such as opportunity and weather) were equal:
  • Warships in the harbor or en route, as they (a) were the most valuable naval asset to the Japanese and (b) could cause the most damage to Allied operations in the Pacific;
  • Transport ships in the harbor, as they (a) carried supplies that had not been landed and (b) could be used to (re-)supply Kiska and other bases if they were allowed to sail;
  • Installations and materiel already landed on Kiska.
The aim of the early round of attacks initiated as soon as the presence of the Japanese had been confirmed was to catch the Japanese ships in the harbor, during unloading operations and in the hope that the ships of the Japanese invasion fleet were still present and would have less room to manoeuvre.
The U.S. bombing mission on 11 June 1942 is the only one in the war for which we have imagery from both the U.S. and the Japanese side. Film footage shot by a Japanese news crew aboard the Kimikawa Maru shows U.S. aircraft (visible are a PBY and a B-24) attacking at low to medium altitude. Japanese anti-aircraft fire downed one of the B-24s (see below).
Kiska Harbor is a 2 by 2¼ mile wide bay that opens to the east, its entrance protected by North Head and Little Kiska Island. It is a large and relatively protected anchorage that once had been short-listed for a U.S. naval base [31]. From a traditional terrestrial battlefield scenario, any base located in that bay could be readily protected by the erection of coastal defence batteries on North Head and Little Kiska, guarding the harbor entrance. Like any naval base, Kiska would have been vulnerable to an attack from the landward side once an enemy had landed at one of the many smaller bays that characterize Kiska and marched over land. As the battle took place in the age of aerial warfare, such considerations were relegated to the later phases of the war. Instead, the first line of attack were the bombing missions.
High-level bombing decreased the risk of being hit by Japanese AA, both the AA that had already been landed and the AA that was mounted aboard naval vessels present in the harbor. On the downside, the higher the planes flew, the greater was the inaccuracy of the bombing—which was exacerbated in the case of naval targets as they could get under way and take evasive actions. Conversely, low- and medium-level bombing increased the bombing accuracy, but also the risk of being hit by Japanese AA.
In principle, the U.S. aircraft had a limited number of options for attacking shipping in the harbor. Unless they flew very low, using the landforms for concealment (see below), their approaches would have been noted, giving the Japanese sufficient time to man the AA positions. Two main routes were possible, coming from the east or the west. The eastern approach, through the mouth of the harbor, gave the U.S. pilots the time to choose and line up their targets as they approached. But this also gave the Japanese AA gunners time to spot and aim at the incoming aircraft. Depending on which side of the harbor they attacked, the U.S. aircraft would then cross over Kiska, either in a north-westerly direction, passing over what was later known as Main Camp (Route A, Figure 1), or in a south-westerly direction, taking the pass just to the west of Trout Lagoon (Route B, Figure 1). Depending on armament load, the aircraft could then return the same way for a second run.
Alternatively, the aircraft could circle the island to the north or south and approach the harbor from the west, flying through the pass just to the west of Trout Lagoon (reverse of Route B, Figure 1). Depending on the height of approach, some or much of the approach would have been concealed, thus possibly catching the Japanese off-guard—unless the presence of bombers had been spotted by picket vessels. While both the escape and the attack route near Trout Lagoon seemed logical, it was effectively a linear arrangement, where the surrounding hillsides offered the pilot no escape route. As a result, Japanese AA gunners could follow a plane out, or in, without having to readjust their aim to any sizeable degree.
As the 1944 U.S. Intelligence Assessment noted in its review: “[t]he fourteen-month battle for Kiska was largely an engagement between the Eleventh Air Force and Japanese AA fire” [59].
We have to appreciate that this battle was dynamic. Japanese military doctrine specified the layout and placement of AA in relation to the target to be protected [60,61]. At the same time, field commanders made local modifications based on local topography and the way the enemy attacked. Therefore, the initial U.S. attacks, which could be largely warded off by the heavy concentration ship-based AA, allowed the Japanese to re-examine their own attempts at the field placement of the AA. At the same time, the U.S. bomber crews learnt to adapt to the presence of the AA and adjust their own techniques. This in turn led to the adjustment of the AA, which was facilitated by the arrival of additional AA and other materiel originally destined for Midway [57].
The Japanese AA capacity was further enhanced in late August 1942 when the Imperial Japanese Army (IJA) troops on Attu were moved to Kiska. They developed a garrison presence (protected by AA) at Gertrude Cove and erected a further AA battery in the centre of Kiska—the latter in direct response to U.S. attacks from that direction. The medium AA used by the IJA was the 75 mm Type 88 a highly mobile gun, which allowed for rapid repositioning.
There are fundamental differences between the Imperial Japanese Navy (IJN) and the IJA. Setting aside the Special Naval Landing Forces, the doctrine of the IJN, as far as their shore-based presence was concerned, was stationary: the protection of shore-based naval assets such as harbors, piers, and supply-and repair facilities. Thus, the AA [19,21], and the coastal defence guns for that matter [20,22,23], were placed at permanent strategic positions. The IJA, on the other hand, was geared at mobile warfare and thus not only emplaced their AA in temporary positions, but also developed alternate placements to which the AA could be moved if the tactical need arose.
Let us now consider the Kiska battlefield from the viewpoints of the two opposing forces. What choices did the Japanese commanders have and how could the U.S. bomber crews respond?
A review of the footage provided in the Japanese newsreel shot on 11 June shows that, indeed, the warships in the harbor provided all AA (Table 4) [31,62]. It seems logical to assume that the warships remained in the harbor for that purpose. Keeping in mind that the newsreel footage is edited and cut for dramatic effect, it nonetheless shows one string of bombs being dropped into the inner part of the harbor, more or less parallel with North Head, with the sequence of the bombs suggesting the plane flew from east to west. Two other explosions are shown. A single bomb dropped amidst the shipping in the harbor seems to have been dropped by a PBY which approached the ships from the northeast judging by the splash/plume of water. The other bomb, again a single bomb, was dropped near Mercy Point, also hitting the water. Again, judging by the splash/plume of water, it was dropped by an aircraft also coming from the north-east. In addition, the footage shows a PBY flying in across the island, coming in from the Trout Lagoon area. While under fire, and effectively flying straight into the AA fire, it escapes unharmed. This cannot be said for three incoming B-24s, one of which was shot down, while flying on a 1800-foot approach [59]. The still photos taken by Japanese Navy photographers [63] and movie footage [62] show the struck aircraft disintegrating and tumbling to the ground, with a subsequent explosion (Figure 2). The remains of that aircraft can still be seen in situ (Figure 3). At the same time, some of the later bombing runs met with success, sinking Japanese supply ships (Figure 4).
The first Japanese medium AA position was set up on the rise just inland from what was to become known as the main camp area, with an additional light AA (13.2 mm) set up on a small rise just to the north of the beach and at the root of North Head (Figure 5). The medium battery consisted of four 75 mm Type 88 AA guns with a range of 15,000 yards and a ceiling of 29,500 feet. From the available evidence, it appears that the battery was not operational until well after a fortnight after the landings [64]. Once established, however, that AA position would provide an effective coverage of Kiska Harbor above 500 feet which would cover all but low-flying strafing aircraft for most of the approaches. Low-level attacks at 700 feet, flown by PBY patrol bombers, for example, could be covered for much of the area bar a small reach of approach west of Trout Lagoon. Any aircraft that flew above 1000 feet and below the ceiling of the 75 mm guns was at risk from AA fire.

4.2. KOCOA for Phase III (Occupation Period)

Once Kiska had been occupied, the Japanese lost no time in developing the area around the key terrain, Kiska Harbor, into a formidable base from which to launch seaplane and submarine operations. The KOCOA analysis does not add substantially to the understanding of either the Japanese, or the U.S. situation (Table 5). Nothing changes with regard to the key terrain, but all other factors are largely immaterial because of the distances involved and the method of weapons delivery on the targets. A more general evaluation of the strategic situation proves more fruitful. Unlike the U.S. attackers, which were essentially a mobile force that could, conceivably, attack Kiska from any direction and at any time, the Japanese were an essentially stationary force, not only with little mobility, but also with little advance warning. The only warning was provided by a RADAR set which was operational by early July [59] or by picket vessels.
From the perspective of the Japanese defenders, the U.S. counter attacks on Kiska could, theoretically, come in the number of aerial and naval attacks (and a combination thereof). For the purposes of this paper, the possible Japanese responses to seaborne threats are set aside [31].

4.2.1. Responding to Airborne Threats

The standard KOCOA analysis (Table 5) is largely meaningless in an age of aerial warfare as several of its elements are irrelevant. Thus, in order to be meaningful, a different methodology needs to be substituted that takes into account the aerial dimension. Two of the KOCOA principles can be used as prompters:
Key terrain: what are the key assets that are contested and how are they situated in the landscape?
Observation and Fields of Fire: from a defender’s point of view, what are the micro-topographical parameters that govern the placement of the AA and what types of defences (AA and aircraft) are available? From an attacker’s point of view, which are the key assets that can be brought to bear and how do they perform against the defences?
When considering their defences against airborne threats, the Japanese military planners would have had to consider four attack scenarios:
  • purely aerial bombardment at low, medium, and high altitude, by long-range land-based bombers, with increasing frequency (under the assumption that additional airfields closer to Kiska may be built in due course);
  • attacks by carrier-based dive bombers on land-based targets;
  • attacks by carrier-based dive bombers and torpedo planes on shipping in the harbor; and
  • attacks by carrier-based fighter aircraft against exposed personnel, equipment and minor installations.
In addition, the planners would have predicted that the U.S. might establish bases closer to Kiska that would eventually allow the deployment of medium-range bombers as well as of land-based fighters capable of low-level strafing of positions.
Given the isolated nature of Kiska, any protection against aerial attacks had to come from Kiska itself. The other major ally for the Japanese was inclement weather, especially fog and medium-level cloud cover, occasionally accompanied by winds in excess of 50 knots [65]. Yet, this was a double-edged sword as such weather would also exact a toll on Japanese men and gear, which would delay any construction activities they were undertaking. While the attacking planes might have had difficulties in seeing the target, the clouds and fog also obscured the planes from the AA.
A factor that played in favour of the Japanese, certainly in the early period, was distance. Until U.S. airfields had been developed that were very close to Kiska (Table 3), aerial attacks were restricted to mid-mornings to lunchtime. As the weather was very erratic and unpredictable, U.S bombing missions were preceded by a weather plane that radioed in if an attack was feasible. Given the flight distances involved and given that most fields did not have reliable night-landing capabilities, the U.S. air raids occurred predominantly mid-morning, giving the Japanese the afternoon to repair any damage the raid may have caused and to continue their base development activities.

4.2.2. Examining the Threats

Of all the threats, the most substantive were those posed by long-range, land-based bombers capable of low, medium, and high-altitude bombing. They operated from land-based airfields and could be brought to bear as regular as machines and weather permitted. U.S. carrier strikes, on the other hand, would be few and far in-between given the limited number of U.S. fleet carriers.
In the first days after the landings, the Japanese had already experienced the capabilities of the U.S. bomber pilots (both B-17 and B-24 long-range bombers and PBY patrol bombers) and could observe both bombing accuracy (which was bound to improve over time) and destructive effect. One of the interesting observations the Japanese must have made soon after the bombing started, was that bombs dropped on the tundra were far less destructive than bombs dropped on terrestrial targets elsewhere: the tundra, coupled with the underlying sandy volcanic ash deposits, proved a soft surface absorbing much of the bomb impact [66]. Thus, while bombs might explode on impact (and it is not clear at present how many malfunctioned), the soft conditions meant that ancillary damage from shrapnel and dislodged ground matter was quite confined if not totally negligible. Essentially, to be destructive, the bomb had to score a direct hit. Moreover, for the bombers to have a high bombing accuracy, their course and speed was predetermined, making them more vulnerable once they had committed to a bombing run. Bombers, too, had to ideally fly at a medium altitude to ensure some semblance of accuracy. With any increase in bombing altitude, the accuracy of bombing decreased caused by minor errors in navigation, inaccurate readings of aircraft speed over land (due to instrumentation or human errors), and environmental conditions, such as defection by strong winds.
When the Japanese considered their options at defending their base, they well understood the potential destructive impact of fast-moving carrier forces. In the early days of the Pacific War, they themselves had demonstrated the power that carriers could project in their attacks on Pearl Harbor (7 December 1941), Darwin (Australia, 19 February 1942), and Trincomalee (Sri Lanka, 9 April 1942). Likewise, the U.S. had carried out a strike against the Southern Marshalls, attacking the Japanese bases on Kwajalein, Taroa, and Wotje (1 February 1942), and later Marcus Island (4 March 1942). Such attacks consisted of a combination of fighter aircraft sent to subdue any air opposition, and then to strafe personnel, ground installations, and small inshore craft; of torpedo bombers to neutralize any shipping; and of dive-bombers to selectively destroy ground targets, with fuel dumps, power stations and heavy anti-aircraft guns the primary targets. When conducting a post-attack damage assessment of the U.S. attacks on their installations in the Marshalls, the Japanese Navy would have come to realize that while such strikes were highly effective against any shipping that could be caught unprepared, as well as against any aircraft still on the ground during the attack, the lasting effect of these attacks was actually limited. These were essentially airstrikes with a high miss ratio, where the psychological impact on the defenders was greater than the physical damage. Only when sustained by several waves of attack would they have any lasting effects.
Attacks by carrier-based torpedo bombers flown against shipping, however, were highly successful. Their own attack on Pearl Harbor, as well as the British attack on the Italian Fleet at Taranto (Italy, 11–12 November 1940), had unequivocally demonstrated to the Japanese planners that no fleet bottled up in a harbor could ever be safe from low-flying torpedo planes. This threat could be largely negated by limiting the time that valuable naval assets were present in Kiska Harbor, and by making use of days where heavy fog persisted. Given the significance of the limited number of fleet carriers to the overall U.S. war effort, it was clear that any U.S. carrier strikes would be selective, few and far in-between—if they ever occurred. And that evidently would depend on the overall situation of the war in the other theatres of the Central and Southern Pacific where the carriers might be better used to greater effect.
The third airborne threat, low-level strafing of positions by fighter aircraft, presuming that the U.S. would build an airfield that put Kiska within range of their fighters, is equivalent to the threat posed by carrier-borne fighter aircraft. The only exception was that such land-based fighter strikes would be much more frequent and recurrent than carrier-based strikes.

4.2.3. Responding to Airborne Attacks

The only realistic means for the Japanese against the threat posed by aircraft was to maintain aerial supremacy over Kiska, or to develop an umbrella of effective anti-aircraft fire. Let us consider the second option first, as this was one that could be readily established and maintained.
Anti-aircraft fire was primarily designed to deny the attacking forces their preferred route of attack or their desired altitude, thus reducing bombing accuracy and impact. Any shoot-down of one or more attacking aircraft was highly desirable, but essentially a by-product. Thus, an umbrella of effective anti-aircraft fire required a strategic placement of the available AA batteries. And here the two modes of aerial attack require different responses. Defence against slower moving bombers required a more scattered, but overlapping, positioning of the AA batteries. This allowed the AA gunners to track and cover an attacking bomber both coming into the target and leaving it, thereby maximizing disruption of the flight path on the way in while maintaining a chance of a shoot-down on the bomber’s way out. A defence against carrier-based dive-bombers required the AA to be placed close to the key installations, again to deflect the attacker’s aim and to allow for the chance of a shoot down. Defence against strafing fighter aircraft was much more limited as all AA positions, by their nature, are in exposed positions with the gun crew totally in the open—which makes both the gun and its crew vulnerable to strafing by the attacking fighter. Only one of the types of AA guns, the 120 mm dual-purpose gun (Figure 8), had turret shields, but these were very thin and essentially protected the gun only from sea spray when ship-mounted. A defence against carrier-borne torpedo aircraft attacking cargo/transport shipping could only be provided by AA guns that overlooked the harbor and that could take attacking aircraft into crossfire.
The success of the AA heavily relied on any early warning that the Japanese could muster. This comprised the Radar system as well as ground-based observers. Although the Japanese had access to Radar, it was limited. Erected on a 500 foot rise northwest of the Main Camp area, the Radar had become operational in early July 1942 [59]. A second set was installed in August or early September 1942 on Little Kiska. While both were screens with a 360° traverse, operated by motor or hand, they seem to have been more or less directional, pointing into the main direction of the U.S. attacks: from the east. Even when circling, the Radar on Kiska was blind-sighted in the southwest, where the ridge separating the Main Camp valley from Trout Lagoon interfered, and in the north where the Kiska Volcano stood in the way [67]. A third, small set with a fixed array was installed at South Head.
The capabilities of the Japanese Radar are not fully clear, as post-war assessments had to contend with a heavily damaged unit, but it would appear that the Radar had a range of 40 miles for aircraft contacts [67]. Assuming the Radar operators were on the money, then that range, coupled with a B-24 cruising speed of 150 mph, gave the Japanese less than 15 min as warning of an impending air raid.

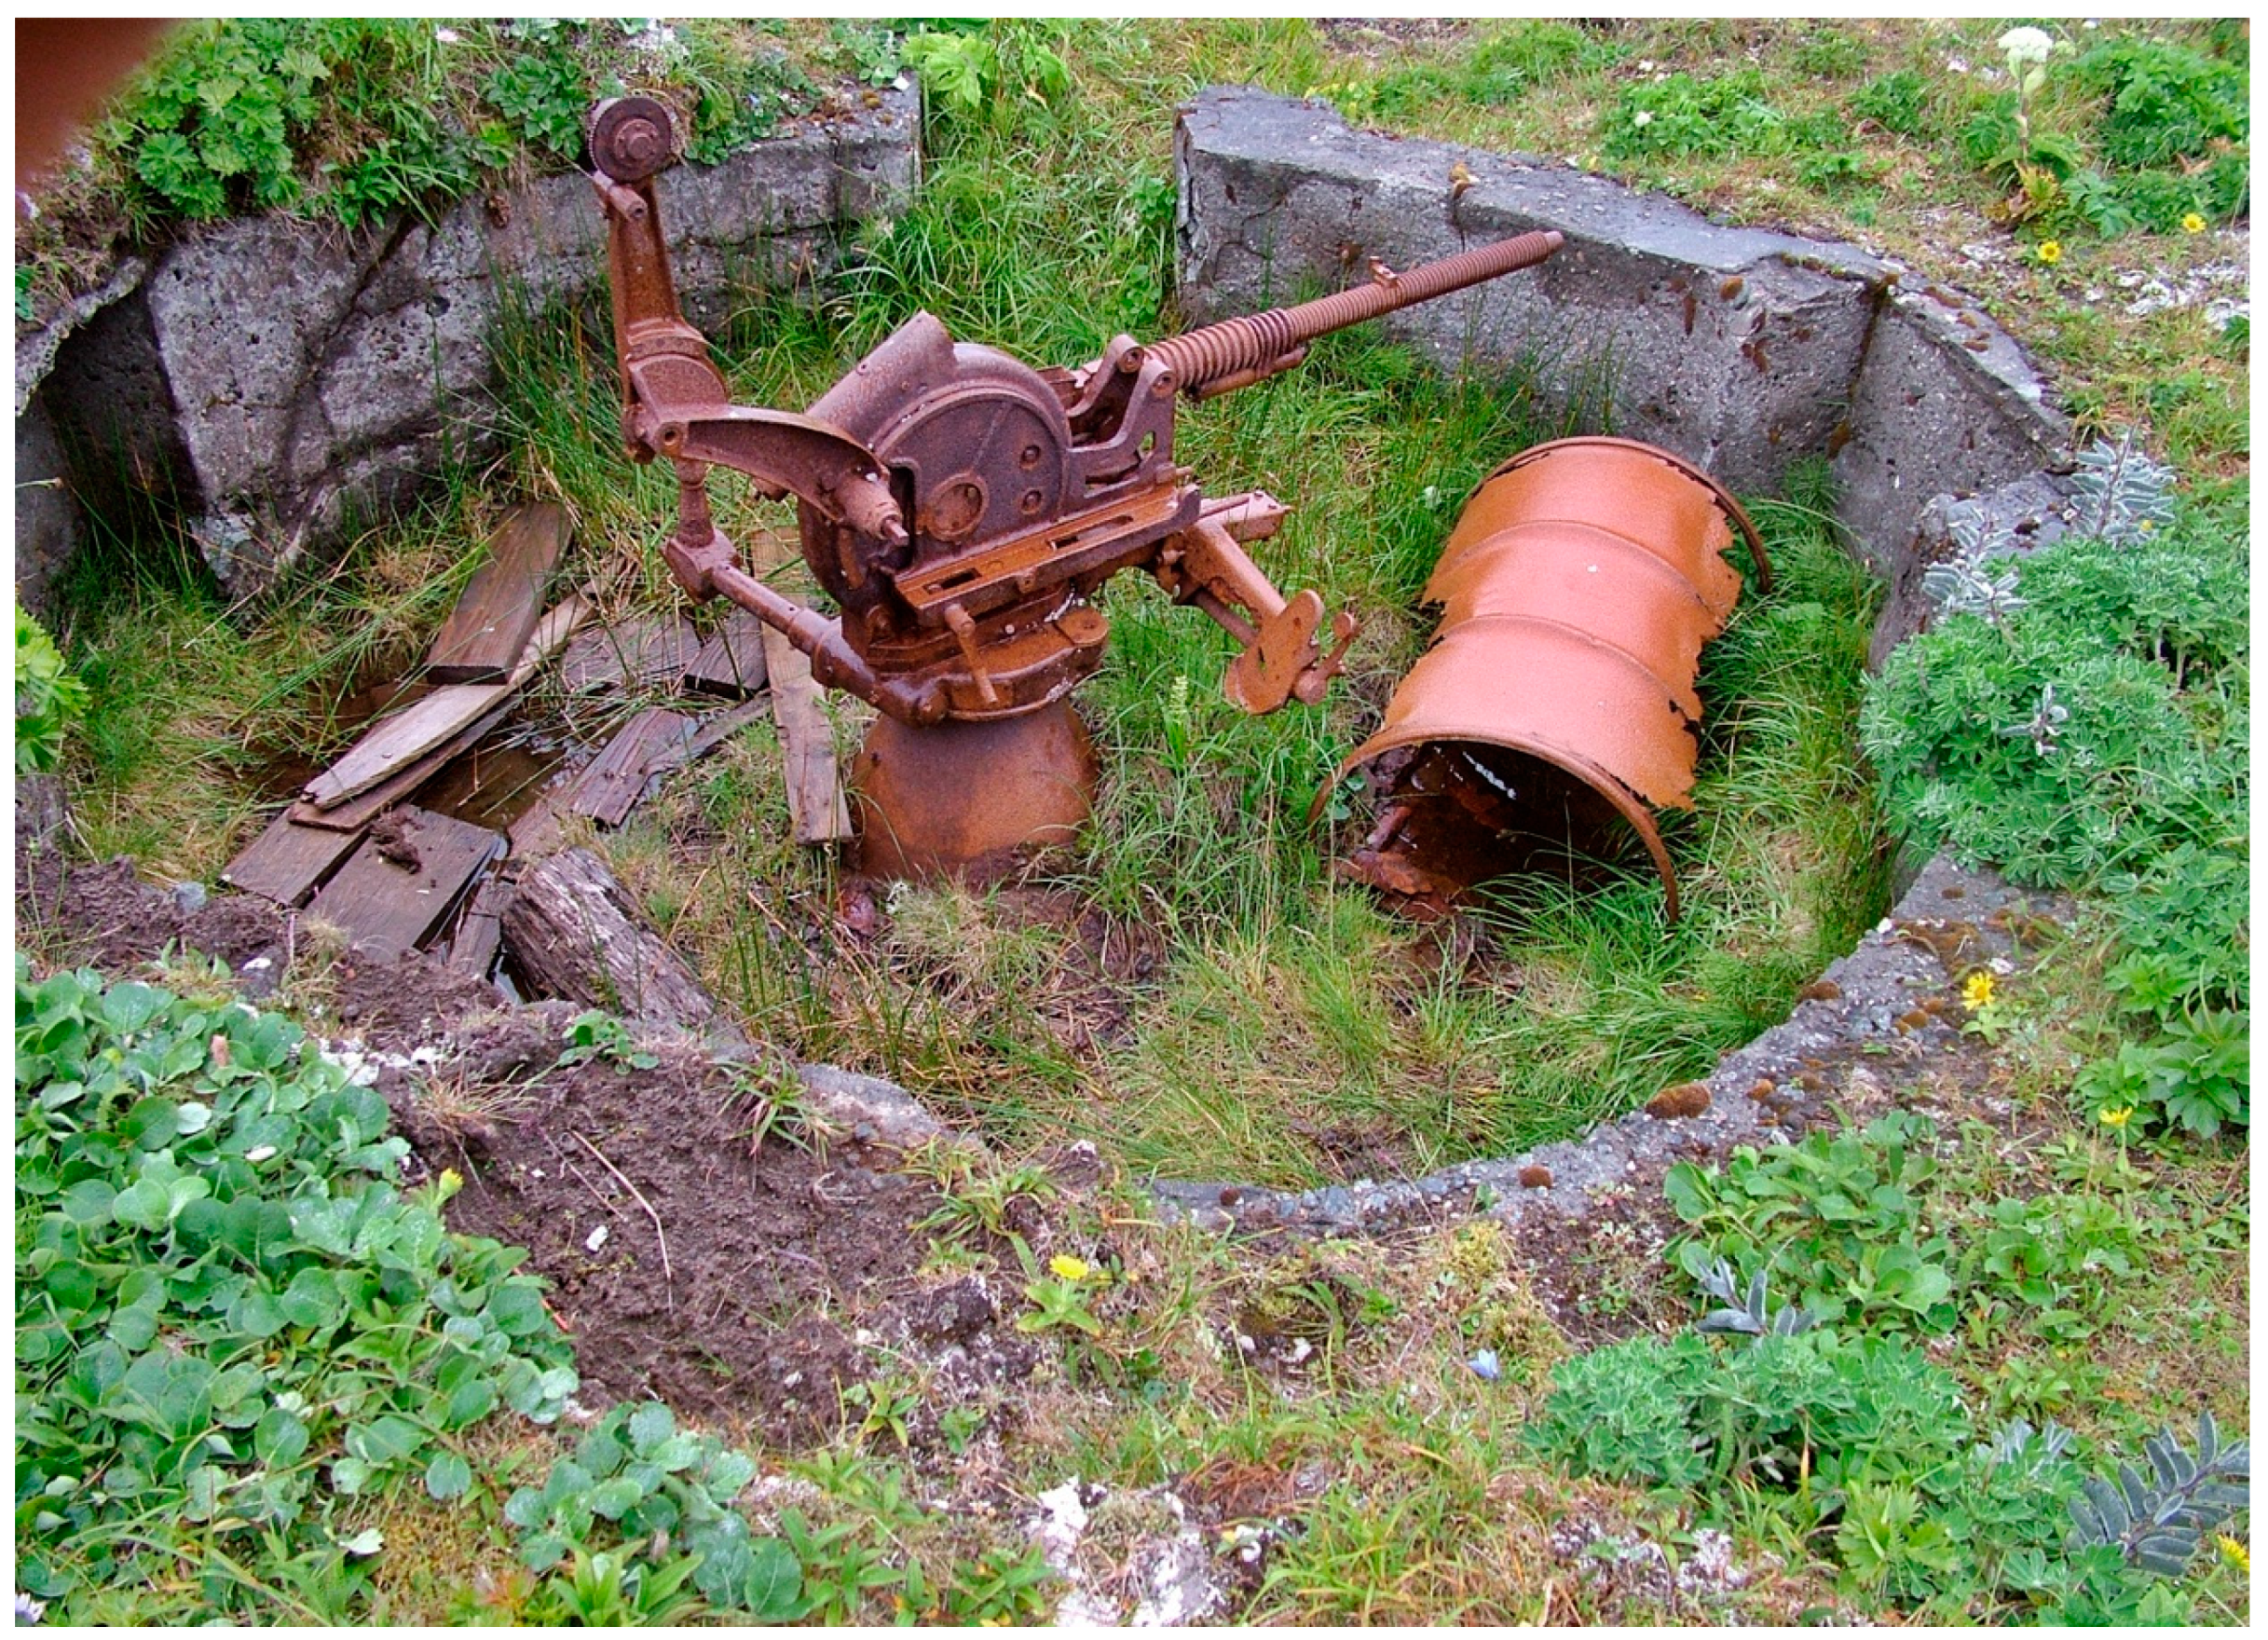
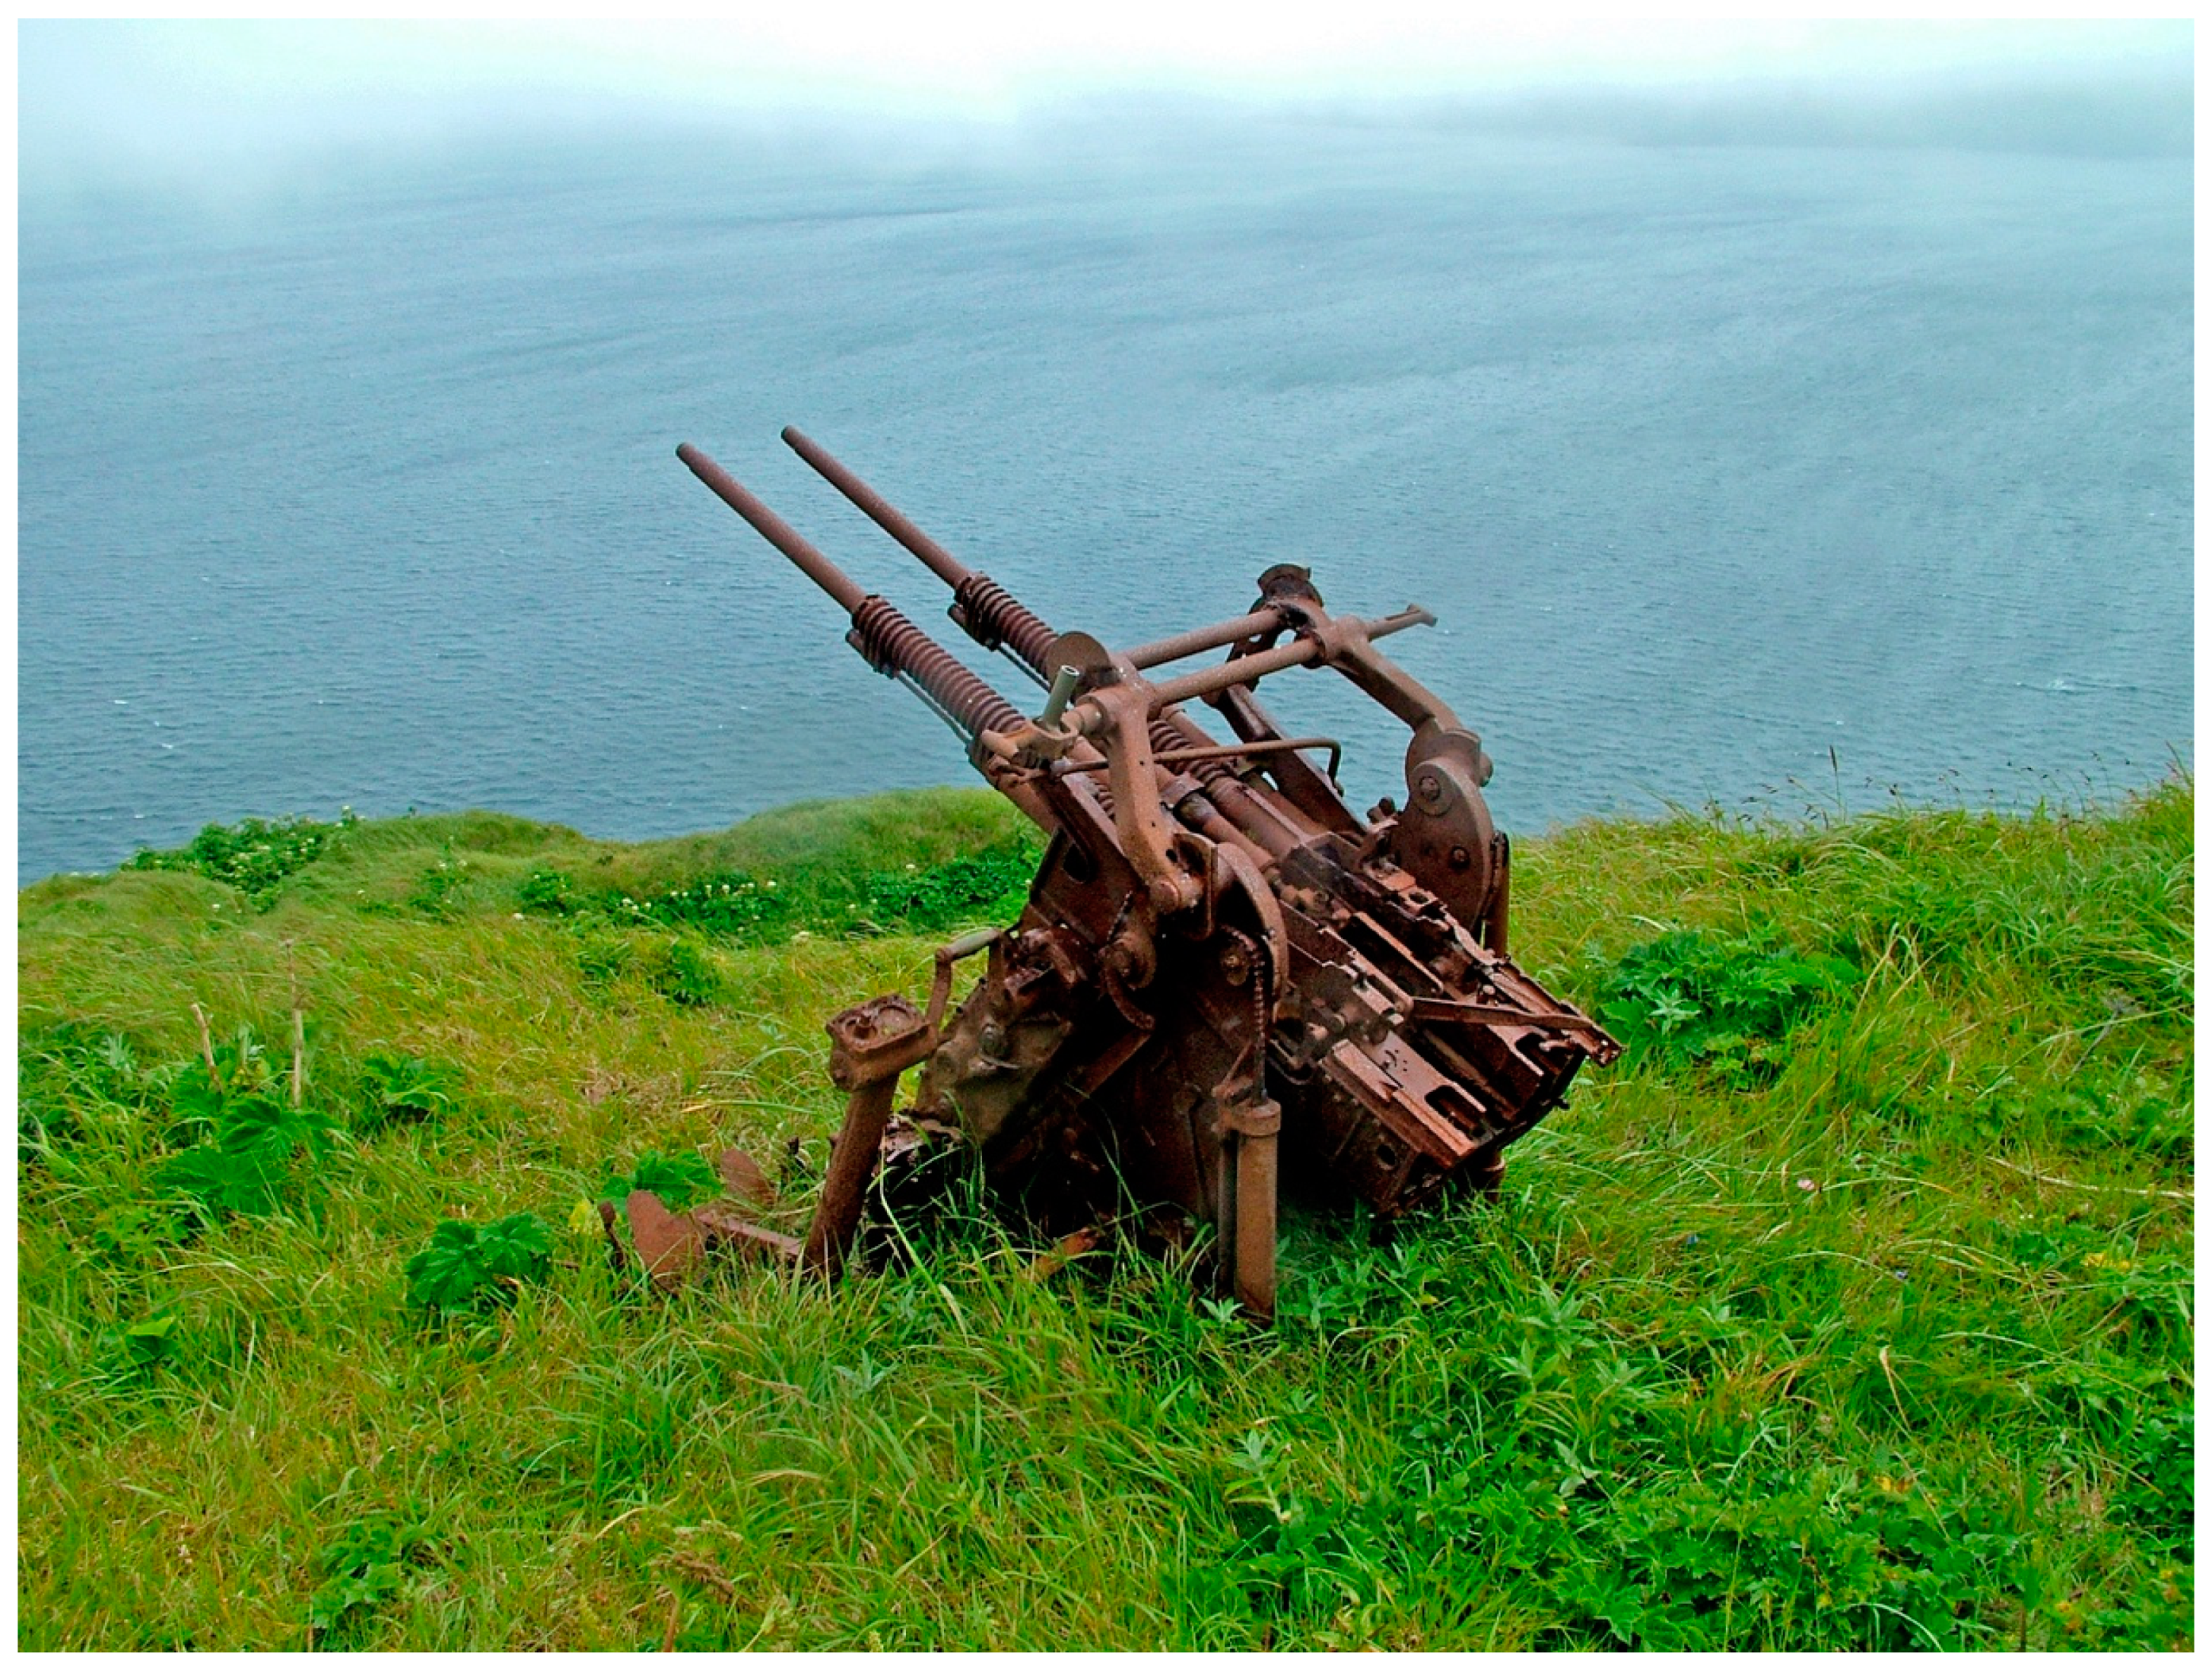
4.2.4. Types of AA Guns

The principal AA have been summarised in Table 6. The key weapons in the early part of the battle were the 25 mm Type 96 twin-barrelled medium AA, the 75 mm Type 88 heavy AA, and the 120mm dual-purpose guns. The latter also served as surface weapons against naval targets. Once fighters can into play, the smaller calibres, notably the 13.2 mm Type 93, were used but were also subject to direct strafing fire by attacking aircraft and their effectiveness seems to have been low.

13.2 mm Type 93 Light AA

The main weapon of Japanese light anti-aircraft defence was the 13.2 mm Type 93 heavy machine gun (Figure 5). The weapon was emplaced as single guns in batteries between one and ten guns, and as twin-barrelled guns in batteries of two, three and seven guns depending on the situation. Both pedestal and tripod mounts (with four outriggers) are known, the latter being more common [61]. With a practical rate of 250 rounds per minute per barrel, the weapon was able to throw up a hail of bullets into the path of an oncoming aircraft. As the single and twin mounts were moved by an operator who straddled the gun in a reclining position, the gun could rapidly move and follow the approaching/departing targets. Even though the maximum height was 13,000 feet (~4100 m), the effective height of the weapon were hits could be expected was limited to 3500 feet (1050 m), making it useful only against low-flying aircraft [61].
Because the guns are comparatively small, most of these have been removed from their positions immediately after the war as part of disarmament. Those left on abandoned bases commonly fell victim of scrap metal dealers and collectors. Having 13.2 mm guns in situ, as on Kiska, is a very uncommon occurrence.

25 mm Type 96 Twin-Barrelled Medium AA

The mainstay of the Japanese Navy’s medium anti-aircraft defence was the electrically driven Type 96 25 mm (1-inch) automatic cannon, usually used in fixed twin-barrel mounts (Figure 6). Predominantly developed as ship-based fast firing gun, the Type 96 cannon entered service in 1936. Given its high sustained rate of fire of 220 rounds per minute (up to 260 rounds/min were possible), the gun proved very versatile.
It was commonly used by the IJN in the close-range defence of land base installations, where the low elevation of the gun, with a depression of −10° allowed to employ the weapon also against ground targets and light armour even from batteries sited on elevated terrain [19,61].

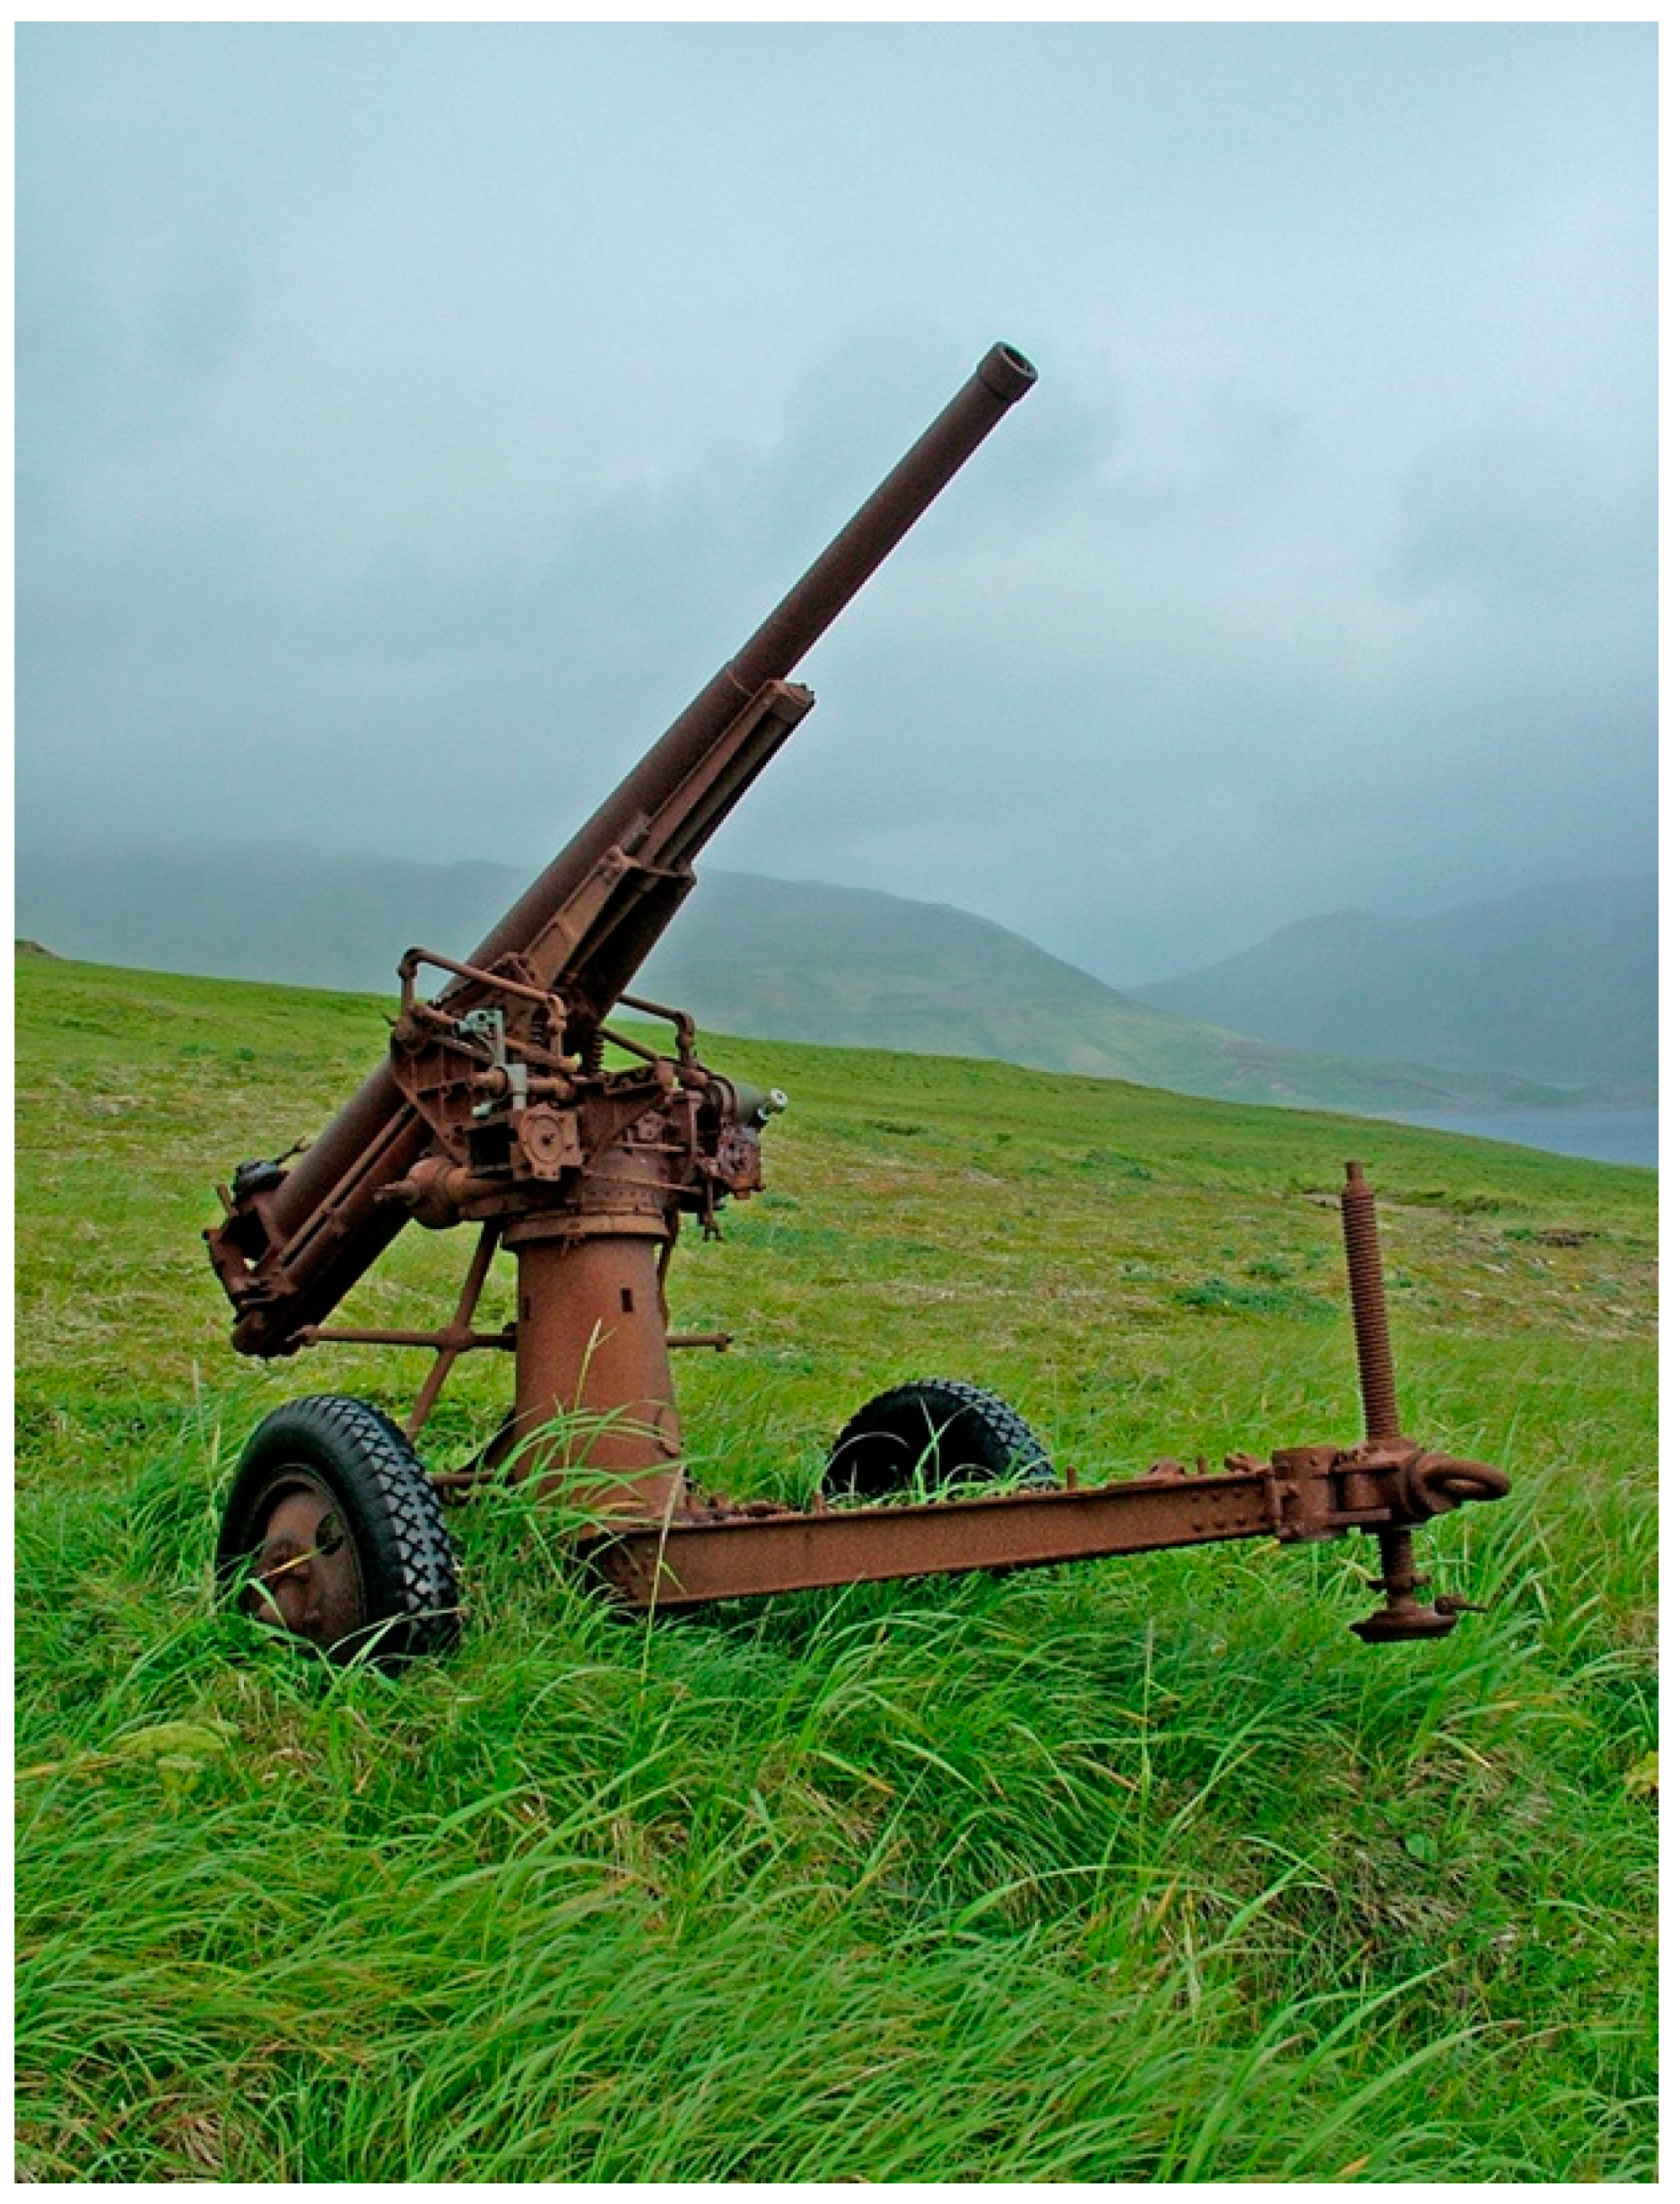
75 mm Type 88 Heavy AA

The 75 mm Type 88 AA gun entered service in 1928 and during the Second Sino-Japanese War and World War II found widespread use by the Imperial Japanese Army as protection against medium level aircraft attacks. The Imperial Japanese Navy used it to protect its land bases. The 75 mm Type 88 AA gun had a single piece gun barrel with sliding breech, mounted on a central pedestal. When emplaced, the unit was based on five outriggers that could be folded to form a carriage; single and double axel units are known. One of the guns encountered on South Head was still on its tyres (Figure 7), prima facie evidence that these guns could be moved around if the tactical situation so required.
The 75 mm guns were to most ubiquitous Japanese AA in World War II, being used by both the IJA and the IJN. Consequently, a large number survives, mainly on the Pacific Island bases in in SE Asia. Of these guns, the units on Kiska are by far the best preserved.

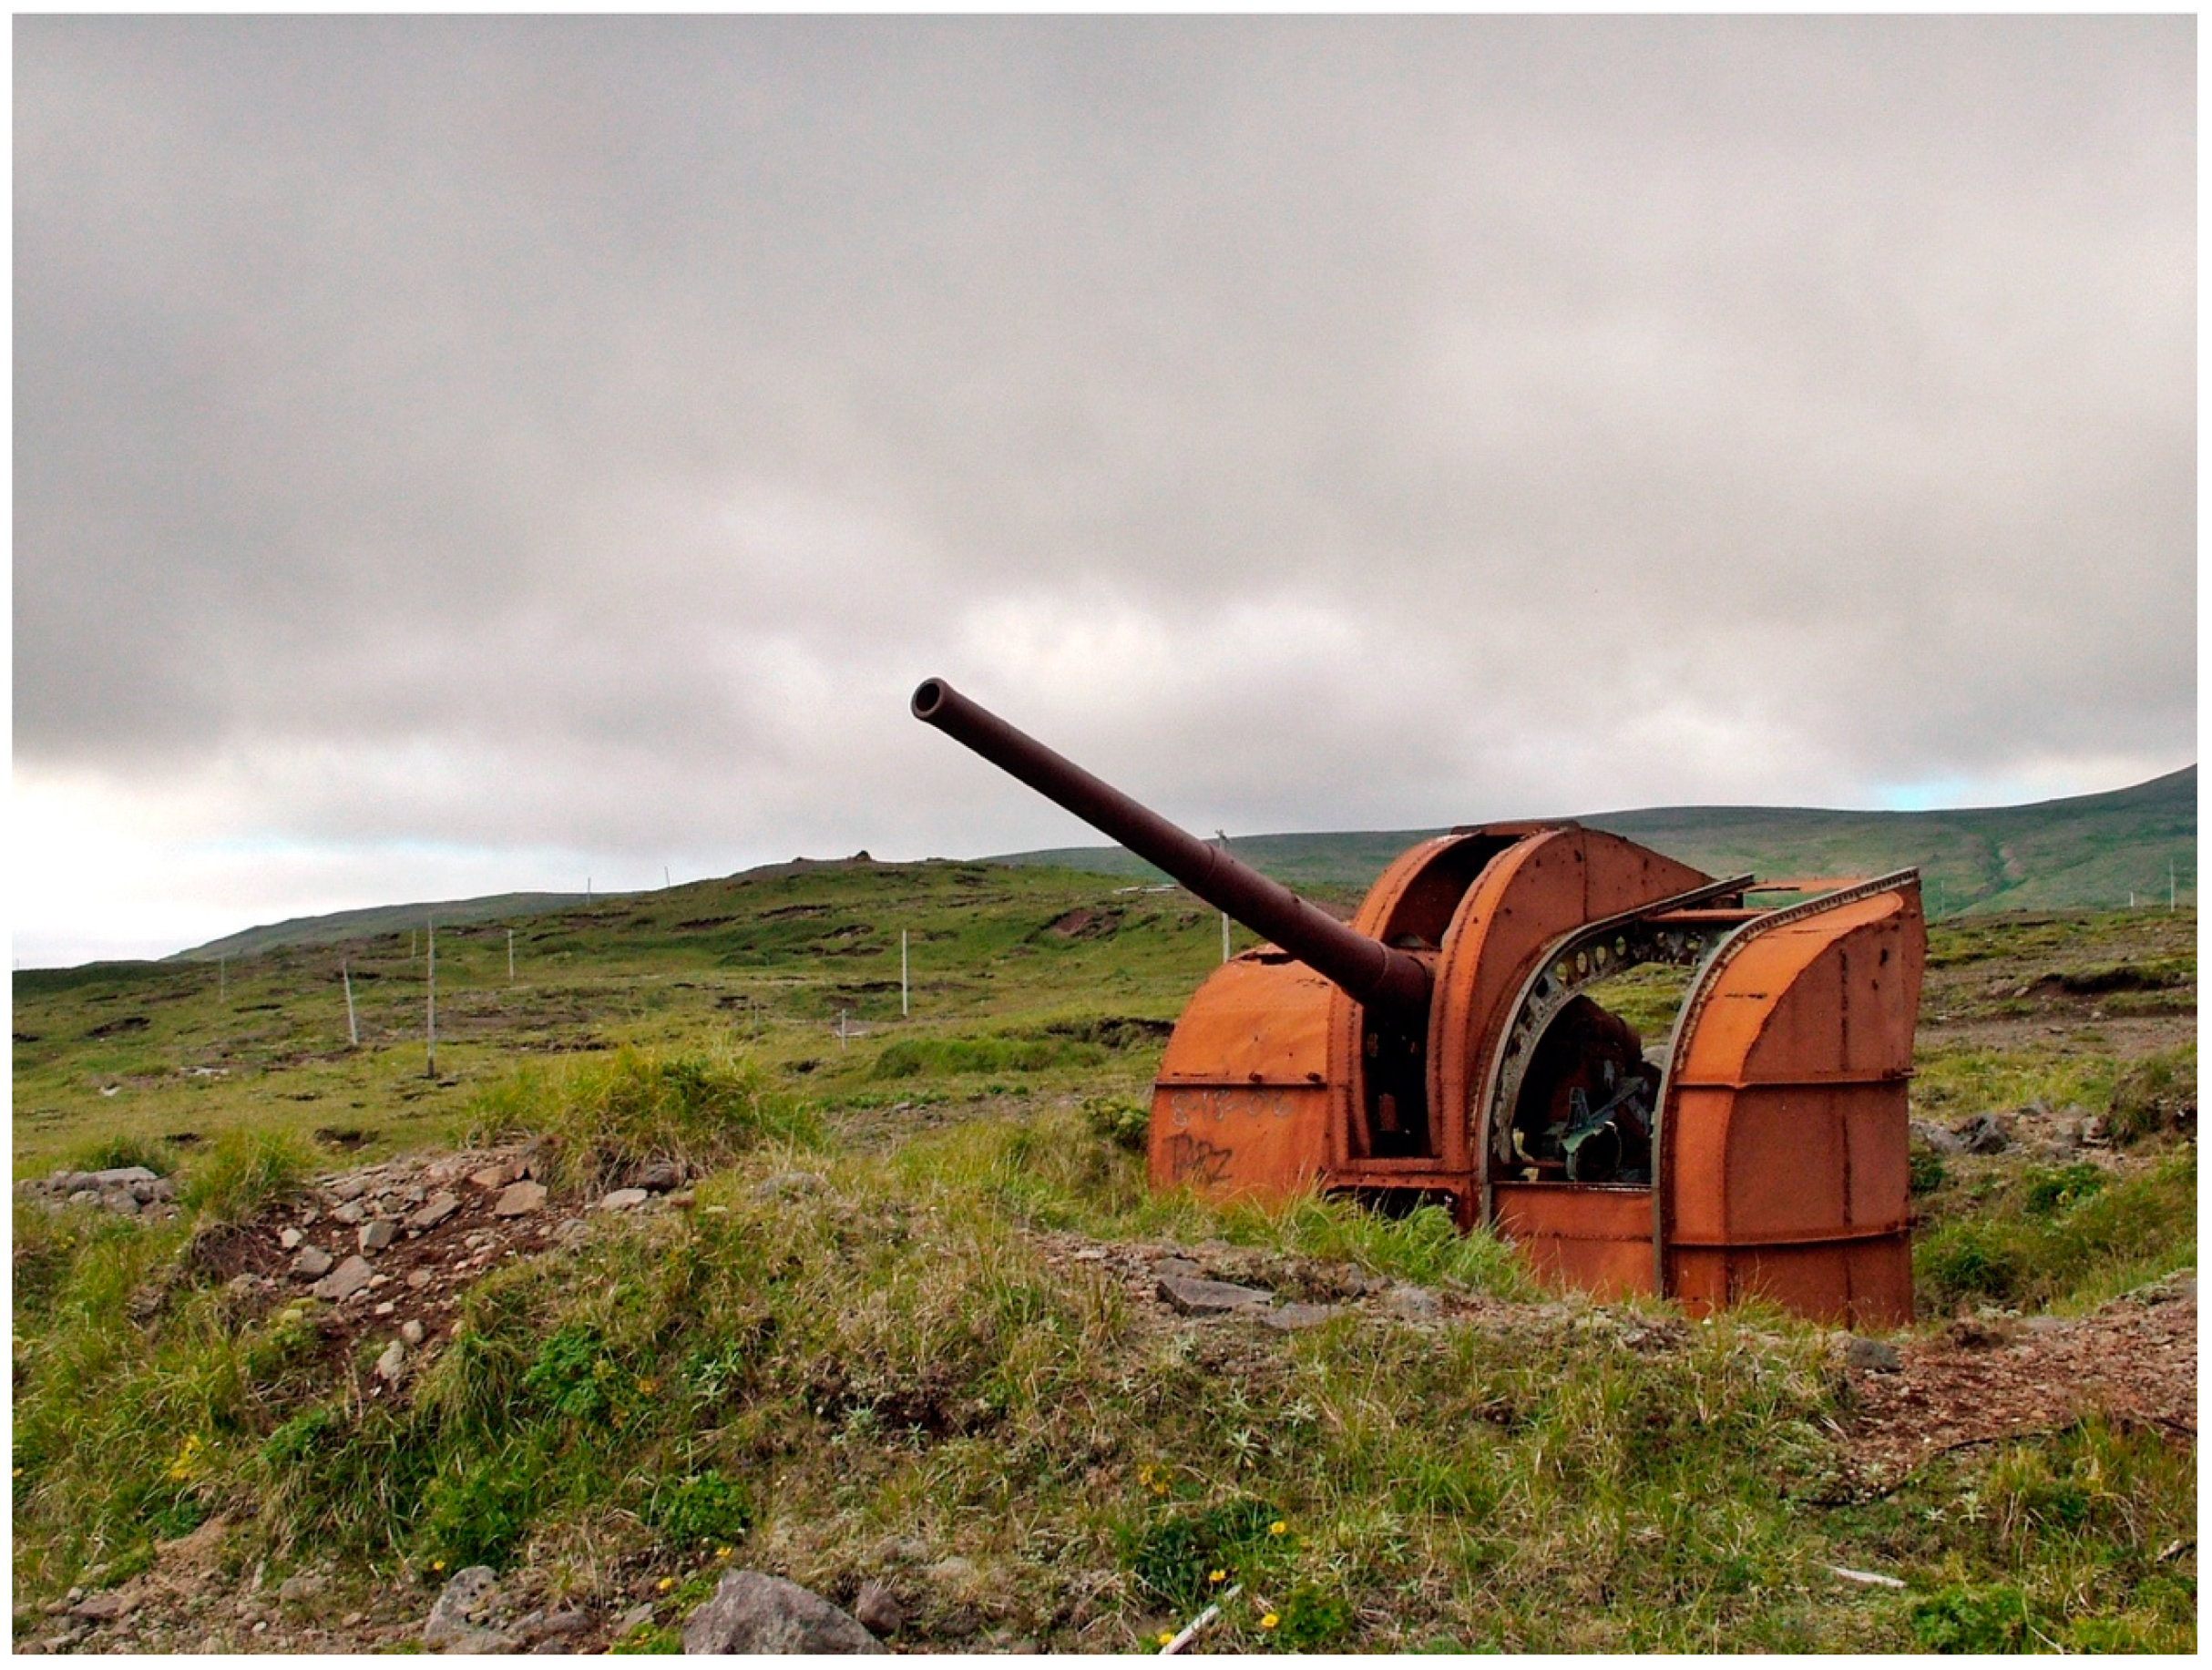
120 mm Dual-Purpose Guns

The Type 10 120 mm dual-purpose (DP) gun was adopted for naval service in 1927 and found wide-spread use on the cruisers of the day. In its ship-borne form, which was also emplaced on Kiska, the gun was fitted with a turret (Figure 8). The metal covering is comparatively thin [21], which demonstrates that its primary function of the turret was to protect the gun mechanism from the salt spray. With a range of 15.2 km (16,600 yards), the 120 mm DP could play a role in protecting the approaches to a number of possible landing beaches. In its primary role as an anti-aircraft gun, the weapon was more limited. The effective range of the 120 mm dual purpose gun decreases with altitude, from 16,600 yards at a horizontal target to 7300 yards at 30,000 feet. Even though it could fire 36,000 feet, US intelligence found that while the gun was a very effective weapon, it did not produce hits above 22,900 feet [60].
Given their nature and weight, many 120 mm DP guns had been abandoned in situ at the end of the war. Most of them have been removed, either for scrap metal of for display purposes. Some of them remain in situ, mainly on those Pacific Island bases that were established from 1942 onwards. The guns on Kiska are exceptional due to their state of preservation and the fact that they retain their ship-based turrets—a feature not present among guns that were emplaced later on at other locations.

4.2.5. Tactics

In terms of battle tactics, Japanese documents captured in the South Pacific tell us that dual-purpose guns were primarily used in an AA role, and only switched to a coast defence role when no aerial targets were to be engaged. Moreover, because of the potential dual role, they seem to have been subject to fire control at the battery level, rather than the overall area level. To improve response time and performance, the Japanese AA gunners were trained to calculate out firing data with a range of set distances and have them at the ready on boards. Japanese documents captured in other theatres of the Pacific war suggest that Japanese AA fire control assumed a window of ten to twenty seconds of effective fire against a high-level bomber, emphasizing that fire had to be very rapid. Against medium-level attacks, where the window was ten seconds or less, a burst of four rounds laid by eye was set as the standard. Against low-level attack, the 75 mm AA was to be limited to two rounds, placed well ahead of the aircraft. Barrage fire was only recommended against dive-bombing attacks, with the barrage set at 1000 m [71,72].
The performance data for the mainstay of the Japanese AA defence, the 75 mm Type 88 gun, vary widely, with effective ceiling heights, where hits can be expected, ranging from 16,400 feet to 26,200 feet. Based on Japanese PoW information, a round fired from a 75 mm gun took 27 s to reach the 26,000 foot ceiling. It required six soldiers to operate a 75 mm Type 88 gun. Normally, such a gun was staffed by a gun crew of twelve, so that each position had an alternate so that the principal operator could be relieved if fatigued, injured, or killed.

4.2.6. Structuring the AA Defenses

Thus, in structuring the AA defences, the Japanese had to consider long-range bombers, strafing fighters, and, possibly, carrier-based dive-bombers. This required a matrix of AA positions, combining heavy AA with a greater range, but slower rate of fire with light AA with a much lesser range, but a higher rate of fire.
Of the five available calibres, the 13.2 mm, with its 3500 feet effective ceiling, was useless against bombers attacking from medium to high altitudes. The 13.2 mm were, however, significant in the defence of key installations from low level attacks.
When assessing the effectiveness of these AA barrage curtains, we need to consider the impact of the projectiles. Any of the smaller projectiles would effectively be a stream originating from a single source point, which could be avoided with quick evasive manoeuvres unless the aircraft was already committed to a dive-bombing run. The heavier weapons used projectiles with fuses that were set to explode either by altitude reached or by time passed since firing. These would then send out an array of shrapnel, which could hit and damage planes even if not directly in the line of the projectile.
Only one of the five major types of AA guns available to the Japanese, the 120 mm dual-purpose gun, had to be permanently emplaced. The electrically driven 25 mm gun, which could be operated manually, was designed to remain stationary once emplaced, but could be moved if the need arose. The other three types were considered mobile and could be shifted to other positions. The 13.2 mm gun could be readily dismounted and transported on a truck, while the 20 mm Type 98 came with a small carriage that could be attached. The largest of these, the 75 mm Type 88 gun was supported by five outriggers which could be folded up and, with the addition of two tires, formed a gun carriage that allowed the gun to be towed or pushed to a new location.
Therefore, the Japanese AA strategy had to be two-fold: (i) to establish a matrix of emplaced anti-aircraft guns that provided an effective AA umbrella of varied depth and range, and (ii) to create a further matrix of empty AA positions where the three more mobile types could be relocated if and when the strategic situation changed. While the available evidence suggests that the Japanese Navy initially made use of the latter concept, it did not do so at the later stages of the occupation of Kiska. Indeed, a U.S. post-invasion assessment of the Japanese AA Defenses of Kiska argues that the low success rate enjoyed by the Japanese AA gunners was in part due to the fact that all Japanese AA positions were well known to the U.S. planners through visual reconnaissance and photo interpretation, and who then plotted various attack and break-away routes taking into account the “knowledge of AA fire capabilities including effective range and areas of coverage” [59].
On the other hand, there is evidence from both U.S. intelligence reports and from an analysis of satellite imagery of extant features in the landscape that the Japanese Army in its occupation of Gertrude Cove made ample use of emplacements that were still devoid of guns but had been readied for their acceptance. This may well reflect inter-service differences in tactics between the IJN, which was used to develop and plan for the defence of stationary bases, while the IJA would have been accustomed to moving battlefronts which required contingencies at various depths.

5. Hindcasting Command Decisions

When examining the interactions between attacking aircraft and opposing anti-aircraft fire, we can work from the known entity, the location of the AA gun batteries (Figure 9). On Kiska, these have been mapped during World War II on the bomb target maps and the larger of these have since been verified in the field during surveys carried out in 2007 and 2009 [19,31].
Any hindcasting analysis poses problems, particularly in the absence of Japanese primary source material regarding the Japanese military’s tactics on Kiska. The Japanese operational commander on the ground had years of technical military training and experience and could readily visualize the situation as it presented itself to him in 1942; the modern-day researcher, however, is not intuitively cognizant of the capabilities, and limitations, of the Japanese AA systems in a given setting.

5.1. Methodology

The past decade has seen 3-D visualisation to become a common approach in heritage research, in particular with regard to the reconstruction of historic buildings and environments [73,74]. Geographic-Information System (GIS) modelling was drawn on to adequately analyse the AA defence system of Kiska, both in terms of its overall functionality and to assess its development over time. The required technical data for the altitude, radius, and rate of fire of the AA guns were drawn from intelligence sources. For the 25 mm, 75 mm, and 120 mm, detailed fire domes had been compiled by U.S. sources These were based on data contained in Japanese documents as well as tests carried out U.S. forces with captured equipment [60]. No such data existed for the 13.2 mm AA, but an approximate dome could be constructed drawing on dispersed intelligence commentary.
Using these data, a set of 3-D AA fire domes were generated. Given that the Japanese AA guns had a maximum elevation of 85° and thus could not fire straight overhead, fire domes with depressed centres had to be created. Using the documented positions of the major guns (Figure 9. Distribution of major Japanese AA protecting Kiska Harbor Symbols: circles: 25 mm; triangles 75 mm, square 120 mm), these domes were superimposed on a terrain model of Kiska. Initially, simple wire frame models (that could be rotated) were placed on the centroids of the gun batteries (Figure 10). While these allowed to examine and visualize the AA in general terms, they did not take into account the actual number of gun barrels emplaced, nor the rate of fire. To examine this, revised AA fire domes were generated. These domes include a representation of AA fire intensity, based on gun type, the number of gun barrels, the sustained (as opposed to maximum) rate of fire, and the individual projectile weight. The resulting 3-D model could then be rotated and queried from all angles to emulate the viewpoints attacker and the defender alike. The ability to shift vertical viewpoints allowed for interrogating the effects of altitude. Moreover, routes for a fly-though can be programmed and then executed, in effect simulating bombing runs the U.S. pilots might have flown and query to what degree they would have been exposed to AA fire [51].

5.2. Implications

The key terrain that the Japanese commander had to protect at the start of the occupation was the beach in the northwest of Kiska Harbor, where the seaplane base had been established, as well as the immediate surrounding area where personnel, ammunition, and fuel had been dispersed. At the beginning, the Japanese commander had to rely on ship-based AA (Table 4) to protect the landing operations and the initial build-up of the fledgling base (Figure 11). To some extent, that would have proven beneficial as he could evaluate the effectiveness of the AA when placed into the hypothetical centre of the defence array (near the apex of the bay). While ships carrying 25 mm and 120 mm AA outperformed his own equipment (comprising 13.2 mm and 75 mm), the first days would have provided enough information to guide the siting of the guns (Figure 12).
The arrival of the convoy with equipment initially destined for Midway posed new challenges, e.g., the protection of the new midget submarine base at the south-western end of the harbour. But with it also came a large array of AA that allowed the commander to both extend the range of the AA (with the 120 mm DP) and especially increase the depth of the AA umbrella (Figure 13).
The main problem that remained was a central inverted cone of low AA coverage directly above the batteries (Figure 13). The arrival of the IJA troops from Attu, and the 75 mm AA they brought with them, gave the opportunity to further extend and deepen that protective umbrella (Figure 14), effectively cancelling out the blind spots.
While the area was covered, at least in theory, the effective success at repelling U.S. air attacks was less, largely due to delays in target acquisition, multiple targets attacking different angles and at different altitudes (i.e., gun elevations), as well as overall targeting and firing accuracy. The generally low visibility over the target generally benefitted the Japanese defenders. As the U.S. pilots could not see the target areas bar these areas devoid of fog, the Japanese AA gunners could pre-train their guns on these areas in the clouds—to devastating effect [75].
This could be overcome, however: the increased accuracy of the aerial photography and mapping by U.S. intelligence analysts [76] allowed the U.S. aircrew to improve on a technique that enabled bombing of the critical area, even when the target was obscured by low-level cloud or dense fog. During the Kiska Blitz, the U.S. Navy PBY squadron pioneered a technique of bombing runs carried out on set course and set time, using the peak of Kiska volcano as the starting point [67]. Given that bombs would fall through the cloud cover, Japanese AA was effectively blind sighted and could only react to motor sounds [52]. Although the Japanese had access to Radar, it was limited, and unable to direct, let alone control AA fire.
The Japanese reaction to the ongoing bombing runs was to ensure that the material was dispersed, thus giving the bombers less opportunity at hitting targets, and to develop underground facilities for critical infrastructure, such as hospitals, stores and command facilities as well as personnel shelters.

6. Implications for the Management of the Kiska NHL

The National Park Service (NPS) American Battlefield Protection Program has adopted KOCOA as a suitable tool for analysing a historic battlefield as this approach allows to better interpret the battlefield to an audience, and to identify those aspects of the battlefield that may have not seen the level of management attention they deserve. Critically, an examination of a battlefield using KOCOA allows the identification of those elements that contribute to the understanding of the battle and its battlefield. Thus, under normal circumstances, the findings of the KOCOA approach can be used to evaluate individual elements of a battlefield in terms of their importance to the run of the battle and identify those with a high significance to the overall outcome. This in turn then allows management to prioritise its decisions, especially in the arena of (expensive) conservation management of structures, large pieces of equipment still in situ (such as the guns on Kiska).
In the case of Kiska, however, the modified approach discussed in this paper has demonstrated the strong interconnectedness of the various AA positions. While some are more significant than others (for example the IJN positions covering the key terrain compared to those of the IJA), they all form a network that circumscribes the protection of Kiska Harbour.
From a management perspective, this signals that all AA positions contribute substantially to the significance and that all IJN AA positions are highly significant. In consequence, a selective management approach, emphasising some positions over others, should be considered inappropriate.
The KOCOA analysis has also shown, however, that the extensive installations of coastal defence batteries [20,22,23] played no substantive role in the battle of Kiska. While they have high interpretive value as evidence for the Japanese determination to retain the island as a military installation, and while some guns in themselves have a high historic value [6,25,31], they are not priorities for management if the battlefield and not the whole garrison installation are considered the management focus.
This has obvious implications on the resourcing of future conservation action.

Funding

The fieldwork on Kiska was funded through a battlefield grant by the US National Park Service and logistically supported by the Alaska Maritime National Wildlife Refuge.

Acknowledgments

I am indebted to Craig Poynter (Spatial Analysis Network, Charles Sturt University) for generating the fire domes that permitted the analysis presented in this paper. The ongoing support by Janet Clemens (US NPS) is gratefully acknowledged.

Conflicts of Interest

The author declares no conflict of interest. The funders had no role in the interpretation of data, in the writing of the manuscript, or in the decision to publish the results.

References

  1. Denfeld, D.C. Field Survey of Truk: World War II Features. In Micronesian Archaeological Survey Report; Historic Preservation Office, Trust Territory of the Pacific Islands: Saipan, MP, USA, 1979. [Google Scholar]
  2. Denfeld, D.C. Japanese fortifications and other military structures in the Central Pacific. In Micronesian Archaeological Survey Report; Historic Preservation Office, Trust Territory of the Pacific Islands: Saipan, MP, USA, 1981. [Google Scholar]
  3. Denfeld, D.C. Peleliu revisited. An historical and archaeological survey of World War II sites on Peleliu Island. In Micronesian Archaeological Survey Report; Historic Preservation Office, Trust Territory of the Pacific Islands: Saipan, MP, USA, 1988. [Google Scholar]
  4. Denfeld, D.C. Japanese fortifications and other military structures in the Central Pacific. In Micronesian Archaeological Survey Report; Historic Preservation Office, Trust Territory of the Pacific Islands: Saipan, MP, USA, 1992. [Google Scholar]
  5. Adams, W.H.; Ross, R.E.; Krause, E.L. Archaeological Survey of Taroa Island, Maloelap Atoll, Republic of the Marshall Islands; Micronesian Endowment for Historical Preservation: Washington, DC, USA, 1990. [Google Scholar]
  6. Spennemann, D.H.R. Physical reminders of the British-Japanese Armament Trade in Micronesia. J. Pac. Soc. (Tokyo) 1995, 18, 117–130. [Google Scholar]
  7. Mushynsky, J.; McKinnon, J.; Camacho, F. The archaeology of World War II karst defences in the Pacific. J. Confl. Archaeol. 2018, 13, 198–222. [Google Scholar] [CrossRef]
  8. Mushynsky, J. Defining Karst Defenses: Construction and Features. Hist. Archaeol. 2019, 53, 193–204. [Google Scholar] [CrossRef]
  9. Boyd, D.; Laura, G.; Lon, B. The Archaeology of World War II Japanese Stragglers on the Island of Guam and the Bushido Code. Asian Perspect. 2012, 51, 110–127. [Google Scholar]
  10. Spennemann, D.H.R. The Last Flight of the “St. Quentin Quail”. Investigations of the Wreckage And History of Consolidated B-24 “Liberator” Aircraft #42-41205 off Jab’u Island, Arno Atoll, Republic of the Marshall Islands; The Johnstone Centre for Parks, Recreation and Heritage, Charles Sturt University: Albury, NSW, Australia, 1994. [Google Scholar]
  11. McKinnon, J.F.; Carrell, T.L. Saipan WWII Invasion Beaches Underwater Heritage Trail; Report by Ships of Exploration and Discovery Research, Inc.; Corpus Christi. American Battlefield Protection Program: Washington, WA, USA, 2011. [Google Scholar]
  12. McKinnon, J.F.; Carrell, T.L. Underwater Archaeology of a Pacific Battlefield: The WWII Battle of Saipan; Springer: Berlin, Germany, 2015. [Google Scholar]
  13. Look, D.W.; Spennemann, D.H.R. For Future Use: A Management Conservation Plan for the World War II Sites in the Republic of the Marshall Islands; The Johnstone Centre of Park, Recreation and Heritage: Albury, NSW, Australia; The U.S. National Park Service Western Regional Office: San Francisco, CA, USA, 1993.
  14. Look, D.W.; Spennemann, D.H.R. Saving WWII Historic Sites. Metals Conservation Course in the Marshall Islands. Crm Bull. 1993, 16, 22–24. [Google Scholar]
  15. Look, D.W.; Spennemann, D.H.R. In a tropical marine climate: Conservation Management of Historic Metals. Apt Bull. 1996, 27, 60–68. [Google Scholar] [CrossRef]
  16. Spennemann, D.H.R. Apocalypse now?—The fate of World War II sites on the Central Pacific Islands. Cult. Resour. Manag. 1992, 15, 15–16, 22. [Google Scholar]
  17. Spennemann, D.H.R. World War II Remains on Central Pacific Islands: Perceptions of Heritage versus Priorities of Preservation. Pac. Rev. 1992, 5, 278–290. [Google Scholar] [CrossRef]
  18. McKinnon, J. Community consensus-building and preservation effort on WWII-related caves in Saipan, Northern Mariana Islands. J. Community Archaeol. Herit. 2020, 1–15. [Google Scholar] [CrossRef]
  19. Spennemann, D.H.R. The Present and Future Management of the Japanese Guns on Kiska I., Aleutians, Alaska. Conservation Management Plan; Study for The US Fish and Wildlife Service, Alaska; Heritage Futures Australia: Shepparton, VIC, Australia, 2008. [Google Scholar]
  20. Spennemann, D.H.R. The Present and Future Management of the Japanese Guns on Kiska Island, Aleutians, Alaska. The 4.7-inch Battery on North Head, Kiska Island; Documentation and Condition Report. Study prepared for the US Fish and Wildlife Service, Alaska; Heritage Futures Australia: Shepparton, VIC, Australia, 2008. [Google Scholar]
  21. Spennemann, D.H.R. The Present and Future Management of the Japanese Guns on Kiska Island, Aleutians, Alaska. 120 mm Dual Purpose Gun Battery on North Head, Kiska Island; Documentation and Condition Report. Study for the US Fish and Wildlife Service, Alaska; Heritage Futures Australia: Shepparton, VIC, Australia, 2008. [Google Scholar]
  22. Spennemann, D.H.R. The Present and Future Management of the Japanese Guns on Kiska Island, Aleutians, Alaska. The 6-Inch Gun Battery on North Head, Kiska Island; Documentation and Condition Report. Study Prepared for the US Fish and Wildlife Service, Alaska; Heritage Futures Australia: Shepparton, VIC, Australia, 2008. [Google Scholar]
  23. Spennemann, D.H.R. The Present and Future Management of the Japanese Guns on Kiska Island, Aleutians, Alaska. The 6-Inch Gun Battery on Little Kiska Island; Documentation and Condition Report Study for the US Fish and Wildlife Service, Alaska; Heritage Futures Australia: Shepparton, VIC, Australia, 2008. [Google Scholar]
  24. Spennemann, D.H.R. The Remains of a Japanese Plane at Salmon Lagoon, Kiska Island, Aleutian Chain, Alaska. Identification and Condition Assessment; Report for the US National Park Service and the US Fish and Wildlife Service, Alaska; Institute for Land, Water and Society, Charles Sturt University: Albury, NSW, Australia, 2009. [Google Scholar]
  25. Spennemann, D.H.R.; Clemens, J. Silent Sentinels. The Japanese Guns of the Kiska WWII Battlefield; US National Park Service Alaska Regional Office: Anchorage, AK, USA, 2014.
  26. Mobley, C. Cultural Resource Investigations at Kiska, Little Kiska, and Semisopochnoi, Aleutian Islands; Report by Charles M. Mobley & Associates, Anchorage, Alaska, under to Dames & Moore, Anchorage Alaska for the U.S. Army Corps of Engineers, Alaska District; Dames & Moore: Anchorage, AK, USA, 1996. [Google Scholar]
  27. Tunwell, D.C.; Passmore, D.G.; Harrison, S. Landscape archaeology of World War Two German logistics depots in the forêt domaniale des Andaines, Normandy, France. Int. J. Hist. Archaeol. 2015, 19, 233–261. [Google Scholar] [CrossRef]
  28. Gaffney, C.; Gater, J.; Saunders, T.; Adcock, J. Day: Geophysical investigation of a World War II German site in Normandy, France. Archaeol. Prospect. 2004, 11, 121–128. [Google Scholar] [CrossRef]
  29. Carrell, T.; Burns, J.; McKinnon, J.; Krivor, M.; Enright, J.; Roth, M.; Pascoe, K.; Raupp, J.; Arnold, S.; Keusenkothen, M. Peleliu’s Forgotten WWII Battlefield; Ships of Exploration and Discovery Research: Santa Fe, NM, USA, 2020. [Google Scholar]
  30. Bulgrin, L.E. The tudela site: Fire and steel over saipan, 15 June 1944. J. Confl. Archaeol. 2005, 1, 1–18. [Google Scholar] [CrossRef]
  31. Spennemann, D.H.R. The Cultural Landscape of the World War II Battlefield of Kiska, Aleutian Islands. Findings of a Cultural Heritage Survey Carried Out in June 2009; Institute for Land, Water and Society, Charles Sturt University: Albury, NSW, Australia, 2011; p. 552. [Google Scholar]
  32. Spennemann, D.H.R.; Clemens, J.; Kozlowski, J. Scars on the Tundra: The cultural landscape of the Kiska Battlefield, Aleutians. Alsk. Park Sci. 2011, 10, 16–21. [Google Scholar]
  33. Passmore, D.G. Conflict Archaeology of Tactical Air Power: The Forêt Domaniale de la Londe-Rouvray and the Normandy Campaign of 1944. Int. J. Hist. Archaeol. 2020, 1–33. [Google Scholar] [CrossRef]
  34. Passmore, D.G.; Capps-Tunwell, D.; Harrison, S. Revisiting the US military ‘Levels of War’Model as a Conceptual Tool in Conflict Archaeology: A Case Study of WW2 Landscapes in Normandy, France. In Fields of Conflict Conference. Proceedings of the 10th Biennial Conference, Ledyard, CT, USA, 26–30 September 2018; Moreira, N., Derderian, M., Bissonnette, A., Eds.; Mashantucket Pequot Museum & Research Center: Ledyard, CT, USA, 2018. [Google Scholar]
  35. Passmore, D.G.; Harrison, S.; Tunwell, D.C. Second World War conflict archaeology in the forests of north-west Europe. Antiquity 2014, 88, 1275–1290. [Google Scholar] [CrossRef] [Green Version]
  36. Gassend, J.-L. What Can Be Learned from Shell Fragments? Examples from World War II Battlefields in the Maritime Alps. J. Confl. Archaeol. 2014, 9, 16–32. [Google Scholar] [CrossRef]
  37. Rass, C.; Lohmeier, J. Transformations: Post-battle processes on the Hürtgenwald battlefield. J. Confl. Archaeol. 2011, 6, 179–199. [Google Scholar] [CrossRef]
  38. U.S. Marine Corps. Commander’s Tactical Handbook, 30 July 1988. MCRP 3-11.1A; Department of the Washington: Washington, DC, USA, 1988.
  39. U.S. Marine Corps. Military Operations on Urbanized Terrain (MOUT). 26 April 1998; Department of the Washington: Washington, DC, USA, 1988.
  40. Bleed, P.; Scott, D.D. Contexts for conflict: Conceptual tools for interpreting archaeological reflections of warfare. J. Confl. Archaeol. 2011, 6, 42–64. [Google Scholar] [CrossRef]
  41. Scott, D.D.; Fox, R.A.; Connor, M.A.; Harmon, D. Archaeological Perspectives on the Battle of the Little Bighorn; University of Oklahoma Press: Norman, OK, USA, 1989. [Google Scholar]
  42. Fonzo, S. Key Terrain; Observation and Fields of Fire; Cover and Concealment; Obstacles; and Avenues of Approach and Retreat at the Battle of Buckland Mills 19th October 1863; Fauquier County Administration: Warrenton, VA, USA, 2008.
  43. Black, B. Gallery Brian Black on the Copse at Gettysburg. Environ. Hist. 2004, 9, 306–310. [Google Scholar] [CrossRef]
  44. Vicksburg NMP. Vicksburg National Military Park, Vicksburg, Mississippi. Cultural Landscape Report; National Park Service; Southeast Regional Office: Atlanta, GA, USA, 2009.
  45. Mabelitini, C.B. The Hammock Landing Battery and the Confederate Defenses of the Apalachicola River; University of West Florida: Pensacola, FL, USA, 2012. [Google Scholar]
  46. Sivilich, E.D.; Sivilich, D.M. Surveying, Statistics, and Spatial Mapping: KOCOA Landscape Analysis of Eighteenth-Century Artillery Placements at Monmouth Battlefield State Park, New Jersey. Hist. Archaeol. 2015, 49, 50–71. [Google Scholar] [CrossRef]
  47. Brown, C.J. The Battle of Chelsea Creek, May 27–28, 1775: KOCOA Military Terrain Analysis Applied to Heavily Urbanized and Coastal Marine Environments; Boston, Chelsea, and Revere, Massachusetts; University of Massachusetts: Boston, MA, USA, 2012. [Google Scholar]
  48. Babits, L.E. The Principles of War and the “Battle of the Barges”. In The Archaeology of Engagement: Conflict and Revolution in the United States; Pertermann, D.L., Norton, H.K., Eds.; Texas A&M University Press: College Station, TX, USA, 2015; pp. 74–93. [Google Scholar]
  49. Babits, L.; Espenshade, C.T.; Lowry, S. Battlefield Analysis: Six Maritime Battles in Maryland, Revolutionary War and War of 1812; Report Submitted to the Maryland Historical Trust and the American Battlefield Preservation Program of the National Park Service; National Park Service: Washington, DC, USA, 2011.
  50. Stichelbaut, B.; Gheyle, W.; Saey, T.; Van Eetvelde, V.; Van Meirvenne, M.; Note, N.; Van den Berghe, H.; Bourgeois, J. The First World War from above and below. Historical aerial photographs and mine craters in the Ypres Salient. Appl. Geogr. 2016, 66, 64–72. [Google Scholar] [CrossRef]
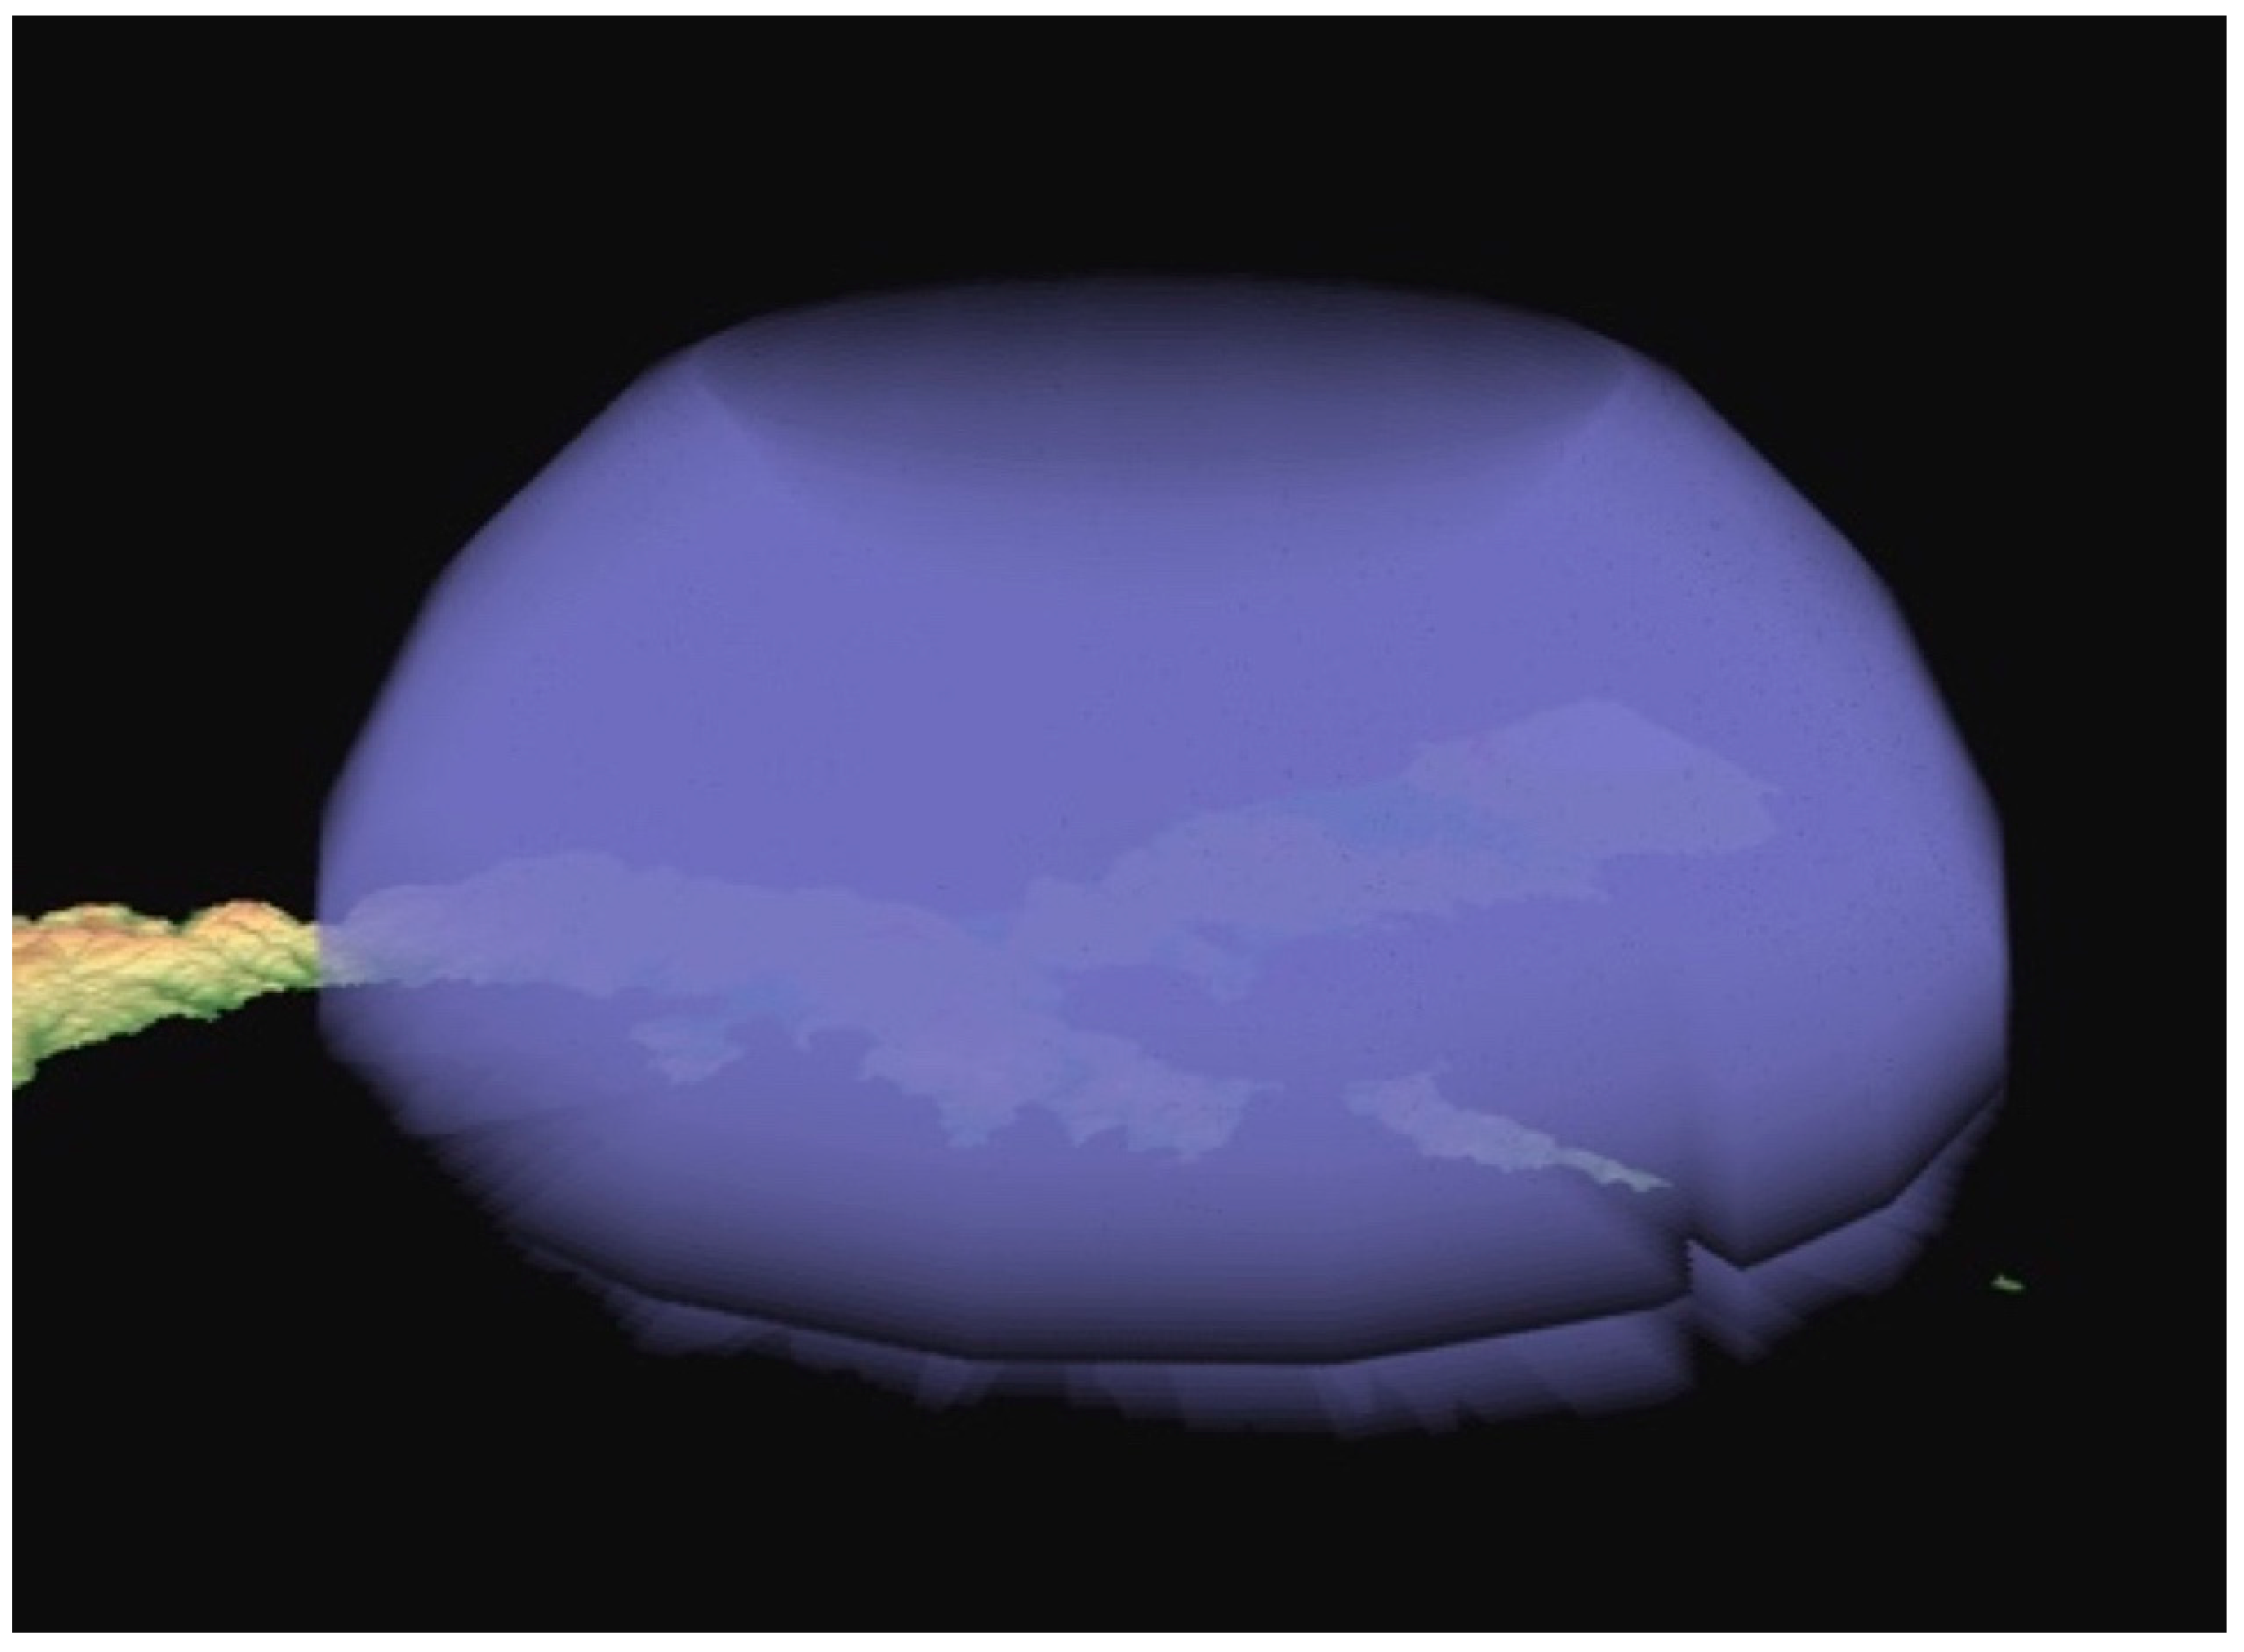
  51. Spennemann, D.H.R.; Poynter, C. Using 3-D spatial visualisation to interpret the coverage of Anti -Aircraft Batteries on a World War II Battlefield. Heritage 2019, 2, 151. [Google Scholar] [CrossRef] [Green Version]
  52. Spennemann, D.H.R. Dead Reckoning: Bombing Kiska through the Clouds. Sabretache 2017, 58, 26–36. [Google Scholar]
  53. Roth, M.; McKinnon, J.F. “Unidentified Planes Sighted”: The Application of KOCOA Military Terrain Analysis to Aerial Combat. In ACUA Underwater Archaeology Proceedings 2018; Keith, M., Evans, A., Eds.; Advisory Council on Underwater Archaeology: New Orleans, LA, USA, 2018; pp. 181–186. [Google Scholar]
  54. Sprague, D.L. Defining B-29 Airscapes in the Archaeological Record as a Predictive Model for Site Location; East Carolina University: Greenville, NC, USA, 2018. [Google Scholar]
  55. Gregory, D. A ‘Baby GDA’: Norwich’s Airspace during the Second World War. Landscapes 2020, 1–19. [Google Scholar] [CrossRef]
  56. Parshall, J.; Tully, A. Shattered Sword: The Untold Story of the Battle of Midway; Potomac Books: Dulles, VA, USA, 2005. [Google Scholar]
  57. Spennemann, D.H.R. Hindcasting the Japanese Military Base on Midway Atoll (Central Pacific). J. Confl. Archaeol. 2013, 8, 136–159. [Google Scholar] [CrossRef]
  58. Cloe, J.H. The Aleutian Warriors: A History of the 11th Air Force and Fleet Air Wing 4; Pictorial Histories Publishing Co.: Missoula, MO, USA, 1990. [Google Scholar]
  59. HQ AA AC. Japanese AA Defenses of Kiska; AA-2 Section, Headquarters Anti-Aircraft Artillery Command, E.D.C: Fort Trotten, NY, USA, 1944. [Google Scholar]
  60. CinCPac-CinCPOA. Japanese Anti-Aircraft Materiel. Flak Intelligence Memorandum n° 4; United States Pacific Fleet and Pacific Ocean Areas: Washington, DC, USA, 1945. [Google Scholar]
  61. OPNAV. Japanese Antiaircraft & Coastal Defense Guns; Air Intelligence Group, Division of Naval Intelligence; Office of the Chief of Naval Operations, Navy Department: Washington, DC, USA, 1945. [Google Scholar]
  62. News in Japan. 日本ニュース 第107号 [The News In Japan n° 107[昭和17年6月22/22 June 1942]. Newsreel Provided Online by NHK. 1942. Available online: cgi2.nhk.or.jp/shogenarchives/jpnews/ (accessed on 15 May 2020).
  63. AsahiGraph. 魂軍海リた燦に洋北。中命彈巨ヾーバーハチッダ [Hokuyō ni san tari kaigundamashii. Datchi hābā kyodan meichū] Naval spirit shines in the northern seas. In Proceedings of the Big rounds find their target at Dutch Harbor. アサヒグラフ. 日二十二 月 七 昭和 年 七十. AsahiGraph (Tokyo), Tokyo, Japan, 22 July 1942; pp. 3–5. [Google Scholar]
  64. Operational Intelligence Division. Aerial Photo Interpretation Report n° 40, Kiska Harbor, Rat Islands, 18 June 1942; Photo Interpretation Section, Operational Intelligence Division, Directorate of Intelligence Section A-2, Headquarters Army Air Forces: San Francisco, CA, USA, 1942. [Google Scholar]
  65. Fett, R.W.; Englebretson, R.E.; Perryman, D. Forecasters Handbook for the Bering Sea, Aleutian Islands, and Gulf of Alaska; U.S. Naval Research Laboratory: Washington, DC, USA, 1993. [Google Scholar]
  66. Hailey, F. Pacific Battle Line. The First Two Desperate Years; Macmillan: New York, NY, USA, 1944. [Google Scholar]
  67. Payne, I.P. The Enemy on Kiska. US Naval Intelligence, Section G-2. AC/G-2]; Advance Command Post, Hdqtrs; Alaska Defense Command; Advance Intelligence Center, North Pacific Area: Adak, AK, USA, 1943. [Google Scholar]
  68. CinCPac-CinCPOA. Table of Characteristics of Principal Weapons.’ Translation of Captured Japanese document JICPOA item 7164, Captured at Kwajalein Atoll. JICPOA Serial AND-191355, 19 June 1944. Cincpac-Cincpoa Spec. Transl. 1944, 61, 1–12. [Google Scholar]
  69. CinCPac–CinCPOA. Anti-aircraft defense fortifications. Special Translations No. 62. Cincpac–Cincpoa Bull. 1945, 110–145. [Google Scholar]
  70. Photographic Interpretation Unit. Map ‘KISKA ISLAND’ Sheet n° 20. Second Edition 28 July 1943. Based on Kiska Map by Corps of Engineers, U.S. Army. Scale 1/25,000, 1943; Photographic Interpretation Unit, Advanced Intelligence Center, North Pacific Force and Photographic Intelligence Section A-2, 11th Air Force: Kodiak, Alaska, 1943. [Google Scholar]
  71. JICPOA. Gilbert Area Defense Force Order. Gilbert Area Defense Force Secret Order #8. Dated Tarawa (Kiribati) 15 September 1943. Translation of Captured Japanese Document. Captured Tarawa 24 November 1943, Received JICPOA 11 Dec 1943. JICPOA Item 5067; Australian War Memorial: Canberra, Australia, 1943. [Google Scholar]
  72. JICPOA. Results of the Conference held by the Defense Planning Section. 3rd Special Base Force Secret #131-43. Headquarters 3rd Special Base Force [Tarawa, Kiribati] 16 Aug 1943; Translation of Captured Japanese Document; Captured Tarawa 24 November 1943, Received JICPOA 11 Dec 1943. JICPOA Item 4002; Australian War Memorial: Canberra, Australia, 1943. [Google Scholar]
  73. Unver, E.; Taylor, A. Virtual stonehenge reconstruction. In Euro-Mediterranean Conference; Springer: Berlin/Heidelberg, Germany, 2012; pp. 449–460. [Google Scholar]
  74. Gruen, A. Reality-Based Virtual Models in Cultural Heritage. In Archaeologizing Heritage? Springer: Berlin, Germany, 2013; pp. 109–126. [Google Scholar]
  75. Engel, L. PBY Saga. From the log of a PBY squadron. Air Trails Pict. 1944, 22–23, 62, 64, 68. [Google Scholar]
  76. Spennemann, D.H.R. Interpreting WWII intelligence data for cultural heritage studies. J. Confl. Archaeol. 2012, 7, 105–132. [Google Scholar] [CrossRef]
Figure 1. Air Attack on Kiska Harbor. main approaches from the east.
Heritage 03 00042 g001
Figure 2. The Consolidated B-24D, serial # 41–1088, piloted by Captain Jack F. Todd, is being shot down 11 June 1942 during the Kiska Blitz (Source AsahiGraph 22 July 1942 p 3).
Heritage 03 00042 g002
Figure 3. The Wing of a Consolidated B-24D, serial # 41–1088, piloted by Captain Jack F. Todd, shot down 11 June 1942 during the Kiska Blitz.
Heritage 03 00042 g003
Figure 4. The Nissan Maru is burning and sinking by the stern. Images released to the media on 17 July 1942 [31].
Heritage 03 00042 g004
Figure 5. A 13.2 mm AA position just to the north of Kiska beach.
Heritage 03 00042 g005
Figure 6. A 25 mm Type 96 twin-barrelled anti-aircraft gun at Mercy Point, overlooking Kiska Harbour.
Heritage 03 00042 g006
Figure 7. Example of a 75 mm Type 88 AA at South Head, Kiska Harbor. Note that the gun is mounted on wheels, suggesting the Japanese were moving it to a new location in July 1943, the last days of their presence on Kiska.
Heritage 03 00042 g007
Figure 8. A Type 10 120 mm dual purpose gun on North Head, Kiska.
Heritage 03 00042 g008
Figure 9. Distribution of major Japanese AA protecting Kiska Harbor Symbols: circles: 25 mm; triangles 75 mm, square 120 mm.
Heritage 03 00042 g009
Figure 10. The 25 mm Type 96 medium anti-aircraft guns at Mercy Point and the 75 mm AA on Kiska their range to the west of the Main Camp area and their range, showing the stratified structure the AA. This reflects the AA soon after the Japanese landing on Kiska.
Heritage 03 00042 g010
Figure 11. Extent of Japanese AA cover over Kiska provided by ships of the occupation fleet showing the extent to which at least 1 ton of shell/minute could be brought to bear.
Heritage 03 00042 g011
Figure 12. Extent of Japanese AA cover over Kiska soon after occupation, showing the extent to which at least 1 ton of shell/minute could be brought to bear. Note the central inverted cone caused by the fact that the AA had a maximum elevation of 85° (view from Southeast).
Heritage 03 00042 g012
Figure 13. Extent of Japanese AA cover over Kiska after the arrival of the Midway materiel, showing, the extent to which at least 1 ton of shell/minute could be brought to bear. Note the central inverted cone caused by the fact that the AA had a maximum elevation of 85° (view from Southeast).
Heritage 03 00042 g013
Figure 14. Extent of Japanese AA cover over Kiska at height of development. Total medium and heavy AA (25 mm, 75 mm and 120 mm), showing the extent to which at least 1 ton of shell/minute could be brought to bear. Note that deeply structuring the AA removed the central inverted cone.
Heritage 03 00042 g014
Table 1. Definitions of KOCOA Battlefield Evaluation System used by the National Park Service.
Battlefield ElementDefinition Examples
Key Terrain A portion of the battlefield, possession of which gives an advantage to the possessor. Road junctions, bridges, high ground.
Observation and Fields of Fire Any point on the landscape that allows observation of the movements, deployments, and activity of the enemy that is not necessarily key terrain, offers opportunity to see over an area and acquire targets, and allows flat-trajectory weapons to be brought to bear on the enemy. High ground, sloping approaches to entrenched positions.
Cover and Concealment Landforms or landscape elements that provide protection from fire and hide troop positions from observation. Walls, structures, forests, ravines, riverbanks, entrenchments, ditches.
Obstacles Landscape elements that hinder movement and affect the ultimate course of the battle. Rivers, walls, dense vegetation, fortifications, ravines, ditches.
Avenues of Approach Corridors used to transfer troops between the core battle area and outer logistical areas. Roads, paths, creek beds, railroads
Table 2. Phases of the Battle for Kiska.
PhaseJapanese DevelopmentsU.S. ResponseJapanese Reaction
Phase I:
Preparation phase
War threat developing in SE AsiaEstablishment of a weather station on KiskaAttack Preparations
Phase II:
Attack Phase
Invasion, development of Naval Installations in Kiska HarborInitial long-range bombing from Cold Bay & Umnak
medium, later solely high altitude
Installation of initial AA batteries
Phase III:
Japanese Occupation Period
Japanese extend and strengthen Naval Installations in Kiska HarborSystematic long-range high altitude bombing from UmnakDeployment of Nakajima A6M2-N floatplane fighters (‘Rufe’)
Strengthening of heavy AA batteries
Japanese establish Army garrison at Gertrude CoveSystematic long-range high altitude bombing from Adak, some fighter escortsStrengthening and repositioning of heavy AA batteries
Systematic short-range medium to low altitude bombing from Amchitka, regular fighter escortsRepositioning of light and medium AA batteries
Short-range dive bombing from Amchitkan/a (Japanese had already left)
Phase IV:
Retaking
Japanese evacuate Kiska after Attu was retaken by U.S. forcesU.S. & Canadian forces landing unopposed
Phase V:
Garrisoning
U.S. & Canadian forces
dig in
Phase VI:
Abandonment
Canadian withdrawal
U.S. withdrawal
Table 3. U.S. Airfields in the Aleutians and their period of primary use in the Kiska Campaign [31].
LocationPeriodDistance to Kiska
Cold Bay11 Jun 42–???840 m
Umnak11 Jun–14 Sep 42580 m
Adak13 Sep 42–after U.S. landings on Kiska270 m
Amchitka18 Feb 43–after U.S. landings on Kiska75 m
Attu22 Jul 43–after U.S. landings on Kiska190 m
Shemya28 Jul 43–after U.S. landings on Kiska215 m
Table 4. Medium and Light AA carried by the Kiska Invasion Fleet [31].
127 mm76 mm25 mm13.2 mm7.7 mm
ShipType 893rd YearType 96Type 93Type 92
CL-4 Tama 2 × 12 × 26 × 12 × 1
CL-6 Kiso 2 × 12 × 26 × 12 × 1
DD-55 Akatsuki3 × 2 2 × 2
DD-58 Hibiki3 × 2 2 × 2
DD-8 Shiokaze 2 × 1
DD-12 Hokaze 2 × 1
AV Kimikawa Maru2 × 12 × 12 × 22 × 1
AC Asaka Maru 2 × 21 × 4, 4 × 1
AC Awata Maru 2 × 21 × 4, 4 × 1
AP Kumagawa Maru 2 × 1
AP Hakusan Maru 2 × 1 ?
AM Hakuhō Maru 2 × 1 ?
AM Kaihō Maru 2 × 1 ?
AMShinkotsu Maru 2 × 1 ?
Table 5. KOCOA for the U.S. bombings in the early part of the occupation period.
KOCOAJapaneseU.S. Aircrew
Key Terrain/Decisive Terrainharbour area (incl. ships)
western shore of Kiska Harbor
harbour area (incl. ships)
western shore of Kiska Harbor
Observation and Fields of FireKiska Harbor and nearby shore areas
sall of Kiska (when Japanese aircraft were present)
all of Kiska (as attack is airborne)
Concealment and Covercloud cover only (obscuring the island)
underground shelters and caves for personnel (*)
cloud cover only (obscuring the target)
Obstaclesnilterrain limitations (e.g., Kiska Volcano)
Avenues of Approach/Withdrawaln/aopen sea, overland over centre of Kiska
(*) underground shelters and caves provide protection, but only limited concealment as the location (albeit not the function) of the underground facilities was visible from the air.
Table 6. Technical overview of the capabilities of the AA on Kiska.
Caliber
(mm)
ModelMountMobile?Depression/ElevationRate of Fire
(Rounds per Min)
Effective Ceiling
(Ft)
Maximum Ceiling
(Ft)
Weight of
Round (Kg)
Types of
Ammunition
13.2Type 93single yes4−5°/85°~25013,00014,7000.05ball, AP, I&T, HE
13.2Type 93twinyes14−5°/85°~50013,00014,7000.05ball, AP, I&T, HE
20Type 98single yes15−5°/85°~120500011,5000.14AP, APT, HE, HET, HETSD, ITSD
25Type 96twinno10−10°/85°~220980018,0000.27AP, HE, HET, HETSD, ITSD
75Type 88single yes220°/85°17–2016,40035,8006.53Type 90 AA HE
12010th Year single no4−5°/85°6–822,90033,00020.73HE
Technical data [60,61,68,69,70]. Quantity of guns encountered on Kiska after enumeration in Payne [67]—Codes used for types of ammunition: AP—Armor Piercing Shell; APT—Armor Piercing Shell with Tracers; HE—High Explosive Shell; HET—High Explosive Shell with Tracers; HETSD—High Explosive Shell with Tracers and Self Destructing; I&T—Incendiary and tracer shell; ITSD—Incendiary and tracer shell, self-destructing.

