Abstract
Whenever food in a microwave oven is heated, the user estimates the time to heat. This estimation can be incorrect, leading the food to be too hot or still cold. In this research, an intelligent microwave oven is designed. After the food is put into the microwave oven and the door is closed, it captures the image of the food, classifies the image and then suggests the food’s target temperature by learning from previous experiences, so the user does not have to recall the target food temperature each time the same food is warmed. The temperature of the food is measured using a thermal camera. The proposed microwave incorporates a display to show a real-time colored thermal image of the food. The microwave automatically stops the heating when the temperature of the food hits the target temperature using closed-loop control. The deep learning-based image classifier gradually learns the type of foods that are consumed in that household and becomes smarter in temperature recommendation. The system can classify and recommend target temperature with 93% accuracy. A prototype is developed using a microcontroller-based system and successfully tested.
1. Introduction
In this age of technical innovation from a fitness tracker to the international space station, we are enjoying the wave of change in every aspect of our lives. Electromagnetic radiation in the microwave frequency range is used in a microwave oven (known as a microwave) to heats food. Since 1967, it has been used in houses and also for commercial purposes [1]. To control how long the microwave heats the food, some sort of timing mechanism using dials or push-button programming is used. To do this, the user needs to guess the required time mentally by considering several factors such as the present temperature of the food (for instance, the food could be taken out from refrigerator, freezer, or could be at room temperature), amount and thermal properties of the food, power level of the microwave oven, and finally the desired target temperature of the food. This thinking process of calculating the exact required time is complex and may be guessed inaccurately. If a longer time is guessed than the required time, then the food becomes too hot to eat. If the food is eaten with a spoon without checking the temperature by touching it first, it may burn the mouth. The user needs to wait until the food cools down when the food is too hot. If a shorter time is guessed than the required time, the user needs to repeat the process of checking the present temperature of the food by touch, guessing time, and then heating again until the desired target temperature is reached. This process is tedious and tiresome.
This paper proposes a solution to the above problems. The proposed system’s overall operation in Figure 1. The key contributions of this research are stated below.

Figure 1.
The proposed system’s overall operation. (a) After the food is put in and the door is closed, the proposed microwave takes an image and recommends the target food temperature using deep learning-based image classifier; (b) When the “Start” button is pressed, the microwave starts heating the food and automatically stops heating when food temperature reaches the target temperature. On a graphical liquid crystal display (LCD), the thermal image of the food is shown in real-time. The two cameras are placed at the outside of the oven cavity, on the cavity’s roof, where the cameras can sense the light and the heat through two small 4-mm holes.
- A closed-loop microwave oven is designed which continuously measures the food temperature using a thermal camera while the food is being heated, and stops the heating automatically when the food temperature reaches the target temperature. Thus, the user does not need to calculate the exact needed time in the head. This is easier for the user and ensures the precise target temperature of the food. On a graphical liquid crystal display (LCD), the thermal image of the food is shown in real-time while the food is being heated.
- The paper also proposes an automatic target temperature recommendation method. After food is put in and the door is shut, it captures an image of the food using a camera and trains a deep learning-based image classifier. When a target temperature is set for that food by the user for the first time, that temperature is assigned to that image class. Later, when the user heats the same class of food again (even if the food is on a different stir or transformation condition), the proposed method automatically classifies the food and recommends the target temperature which was assigned to that food class previously. Thus, the user does not need to recall and re-enter the target temperature. The method uses a Convolutional Neural Network (CNN) to classify the images. Whenever a new food item is inserted or an image is misclassified, the method retrains the deep learning model in real-time. In this way, the proposed microwave oven progressively learns the food items that are consumed in that family and becomes smarter in recommending the target temperature.
- The expected shipment of microwaves is 13.5 million units in 2019 [2] and 96% of Americans use this product [3]. According to the survey in [4], microwaves are used by the Americans to warm and heat more, rather than cook dishes. The microwave oven is behind compared with other major appliances in terms of smart and Artificial Intelligence (AI) features [5]. The proposed machine learning-based intelligent microwave can fill-up this gap in research.
2. Related Works
Several works are found in the literature on real-time measuring of food temperature while heating is going on by microwaves. Inside a microwave oven, traditional temperature sensors cannot be used, as the intense electromagnetic field can destroy the sensor. Fiber optic sensors [6] are unaffected by electromagnetic fields. They require, however, direct contact with the food and each time the food is warmed they require cleaning. This is troubling. For non-contact temperature measurements inside a microwave oven, the use of an infrared (IR) fiberoptic radiometer is suggested in [7]. In this process, the tip of the IR fiber is located directly above the sample and transmits to a radiometer the thermal radiation emitted from the heated sample. In [8] the thermal imaging technique is used with the Forward-Looking InfraRed (FLIR) camera, where temperature and other data are transferred to a PC to monitor and control the microwave power level. The FLIR camera is used in [9] to capture the thermal surface image of the food. In [10] a traditional color Charge-Coupled Device (CCD) camera is proposed to monitor the temperature inside a microwave oven. This may be a low-cost approach but may not be effective. A cheap temperature controller [11] and optimum microwave oven power control techniques are discussed at [12,13]. Nevertheless, when the food temperature reaches the target temperature, they do not mention the automatic shutdown of microwave power. A heating element-based oven (not microwave-based heating) in [14], uses a High Definition (HD) camera to identify from a common predefined set of foods and recommend cooking times and temperature. A resistance temperature detector (RTD) sensor probe is inserted manually into the food and when the food is cooked, the user can get a notification on smart devices. This temperature sensing form, however, requires physical contact with the food by the temperature sensor. In addition, the method of identifying food is limited to a collection of predefined foods, so it does not know any new food products and cannot prescribe their temperatures. We previously proposed an image classification and temperature recommendation algorithm in [15]. However, the work in [15] uses similarity scores from histograms to classify images, which does not work very well when the images of different classes have similar color, as it does not recognize texture. Our work in [16] proposes thermal imaging using an IR temperature sensing grid containing pixels organized in an 8 × 8 matrix. Due to the low resolution, contouring the food image was not possible and it does not have an image classification algorithm for temperature recommendation.
Table 1 provides a contrast with other related works. The work in [8] uses thermaCAM FLIR P65 (FLIR systems, MA, USA) and [9] uses a FLIR camera (Unilever Research Colworth Laboratory, Sharnbrook, UK) for contactless temperature sensing and thermal imaging in real-time. Temperature sensing based on CCD camera is used in [10]. The research in [14] uses the measurement of temperature using the RTD sensor (June Life Inc, CA, USA) that requires physical contact with the food. The sensor also needs to be cleaned and this is unpleasant. In [8], temperature and other information is transferred to a personal computer, and the microwave oven’s power level is controlled. Our proposed work does not involve an external PC, but controls are done using an embedded low-cost system. The research in [15] uses histograms to classify pictures and is less accurate in classification. Our proposed work classifies a food item by a deep learning model based on CNN and determines the food’s target temperature based on its previous experience. The approach suggested also has the ability to learn new food items and to store their target temperature in the database. As a result, the microwave slowly becomes more knowledgeable in suggesting the target temperature of food items that are used in that house. The proposed microwave oven shows a real-time high-resolution thermal image of the food and shuts down the heating automatically when the food hits the target temperature.

Table 1.
Comparison with other works.
The research in [14] uses a “Food ID” feature, which automatically recognizes a collection of predefined foods using image processing. Nevertheless, new food products and their target temperatures cannot be learned. Whenever the food is ready it also uses a mobile notification system. It should be noticed that the research in [14] is an oven for food cooking, and it is not a microwave oven for food heating. It can take hours to cook food in the oven and mobile notification is well justified. Nonetheless, usually, it does not take more than a few minutes to heat up food using a microwave, so the user can stay close to the microwave until the food is ready. So a notification feature for a smartphone could be an overdesign.
The food temperature is calculated in this proposed research using a FLIR thermal camera mounted on the top of the microwave roof outside the cavity of the oven using a 4 mm hole. It is microwave insensitive and does not require physical contact with the food. In this research microcontroller-based embedded system also implements the automatic shutdown of microwave power when the food temperature reaches the target temperature. The microwave includes an LCD with a touchscreen and displays the colored thermal image of the food while the food is being heated in real-time. The temperature of the food is computed by contouring the thermal image. In addition, the proposed microwave captures a food image using a Complementary Metal-Oxide-Semiconductor (CMOS) camera (Raspberry Pi, UK) and automatically classifies the food. The proposed CNN-based image classification method gradually learns the food items through real-time retraining of a deep learning model and recommends their target temperatures.
The remainder of the paper is structured in the following way. The next section—Related Works—discusses and compares the proposed work with other works. Section 3 discusses a deep learning-based temperature recommendation method, food temperature calculation from a thermal image, and prototype development. Section 4 discusses the result of the prototype development and comparison with other works. Section 5 presents the discussion and future work. Finally, Section 6 concludes the paper.
3. Materials and Methods
In this paper, a deep learning-based image classifier to classify food images is developed for recommending the target temperature. The current food temperature is calculated using a contouring method on the thermal image. Then the proposed system as shown in Figure 1 is designed and developed with a microcontroller-based system. They are briefly described below.
3.1. Deep Learning-based Temperature Recommendation Method
3.1.1. Dataset Generation
The proposed microwave captures the food image as soon as the door is closed. The image is then classified, and a target temperature is recommended. Now, if the user indicates that the food item is a new food, then a new image class is created. To train and validate the deep learning model for the new class, more images are required. This is done by image augmentation [17]. Image data augmentation is used to artificially increase the size of a dataset by creating variations of an image using different transformations such as horizontal and vertical flip, rotation, height and width shift, shear, brightness, rescaling, etc. Food will have different shapes each time when it is placed on a plate or when it is stirred. Training deep learning neural network models with augmented images can improve to generalize the model, as the food does not have any fixed shape.
Keras is a high-level Application Programming Interface (API) for neural networks, written in Python running on top of TensorFlow [18]. It provides a library to generate augmented images. Figure 2 shows the original image and some generated augmented images. For every new image class, 64 augmented images are generated for training and 32 augmented images are generated for validation from the original image. The images have a fixed size of 32 × 24.


Figure 2.
(a) original image; (b)–(f) augmented images using different transformations.
3.1.2. The Architecture of the Convolutional Neural Network
The classification of the input image class is based on a deep learning neural network as shown in Figure 3. The various layers and the network optimizer are described in brief below.

Figure 3.
The proposed architecture of the convolutional neural network. The last layer output size, C, dynamically increases with the addition of new image classes.
- Input Image: The input image is a tensor of size (24, 32, 3) having distinct channels for red, green and blue. The data type of the image pixel is transformed into a floating-point. For normalization, pixels are also divided by 255, so the numbers range from 0 to 1.
- Convolutional Layer: Sliding convolutional filters are applied in a 2-D convolutional layer on the input. The filters are moved along the input vertically and horizontally. It computes the dot product of the weights and the input, and then the bias term is added [19]. One convolutional layer having filter sizes of 3 × 3 is used in the proposed model. The filters are learnable network parameters and they are initialized with random values. Conv2d_1 layer in Figure 3 has 16 filters of size 3 × 3 with padding and they generate 16 output layers having the same input layer’s height and width.
- Activation Layer: The Rectified Linear Unit (ReLU) is a nonlinear activation function [20]. This layer is used after the convolutional layer and the dense layers (except the last dense layer). Any element value less than zero is set to zero by the ReLU layer.
- Max Pooling Layer: Down-sampling by dividing the input into rectangular pooling areas and calculating the maximum of each area [21] is performed by a max-pooling layer. The sizes of the pooling area are set to 2 × 2 in the proposed model.
- Dropout Layer: Input elements are randomly set to zero with a given probability by a dropout layer. This action changes the original network architecture between iterations and helps avoid the network from overfitting [22]. This layer has no learnable parameter. To prevent overfitting of training data within a few epochs, one dropout layer is used in the proposed model. The probability of the dropout layer is set to 0.10.
- Flatten Layer: The input becomes a single column vector by a flatten layer. It breakdowns the spatial dimensions of the input. The flatten layer in this model changes the (12, 16, 16) tensor to a one-dimensional vector of size 3072.
- Dense Layer: The dot product of the input and a weight matrix is calculated by the dense layer or a Fully Connected (FC). It then adds a bias vector [23,24]. The weight matrix and bias are learnable network parameters and they are initialized with random numbers.
- Loss Function and Optimizer: A loss function measures the agreement between the predicted scores and the ground truth labels, and an optimizer tries to reach the global minima where the loss function reaches the least possible value for the network parameters. The features to classify the images are combined in the last fully connected layer–dense layer 3. Therefore, the last dense layer’s output size is the total number of classes, C, and it will increase with the addition of new image classes. When a food image is captured by the microwave and the user identifies it as a new class of food, then the total number of class, C, is incremented by one. When C is 1, no CNN model is generated, as two classes are required as a minimum for classification. When C becomes greater than one, the cross-entropy loss or softmax loss [25,26] is calculated and RMSprop [27] optimizer is used. The CNN is then trained and the model file is generated in the embedded system for the new classes. The proposed CNN architecture has a total of 3,409,857 trainable parameters.
Each new food item’s class number and its target temperature is stored in a database. Once a food image is classified, its corresponding target temperature is read from the database and recommended by the method.
3.2. Food Temperature Calculation from Thermal Image
The target food temperature is automatically recommended from previous experience in the proposed microwave oven by classifying the image, and the food item continues to be heated until it hits the target temperature. The heating is switched off automatically once the target temperature is reached. IR waves are radiated proportional to their temperature from every physical object. The temperature of the food is measured using a non-contact thermal FLIR camera [28]. The thermal camera is installed through a 4-mm opening at the outer side of the microwave oven cavity wall. The microwave has a wavelength of about 120 mm [29] and the wavelength of the infrared is 1–750 nm [30]. Since the microwaves are long waves, they don’t pass through the 4 mm hole and don’t damage the camera. The IR waves can pass through the hole and therefore the FLIR camera can measure the food temperature.
The FLIR camera in [28] contains pixels organized in 80 × 60 matrices. The sensor sends each pixel temperature in Kelvin multiplied by 100. Averaging all the pixel values and dividing by 100 will not give precise food temperature because some of these pixels contain plate and surrounding temperature. Therefore a technique must be developed to isolate the pixels representing only the temperature of the food.
The microwave heats the food’s water molecules more than the other molecules on the plate and in the vicinity [31]. Thus, the pixels containing food temperature will have a higher value than the other surrounding pixels. To separate the food temperature pixels from the nearby area pixels, the grayscale thermal image is converted to a binary image using a threshold. The threshold value is calculated by taking the average of the pixels around the boundary of the image. Then using Open CV library [32], contours in the binary image are calculated. If there exists at least one contour, then a mask, having the same dimensions of the binary image, is generated where the inside of the contours are filled with ‘1′ and the outside of the contours are filled with ‘0′. Once the mask is created, then the average value is calculated from the grayscale thermal image selecting only the pixels where the mask value is ‘1′. Then the average value is divided by 100 and converted from Kelvin to Fahrenheit. If no contour exists, then a mask is created by making a small square shape at the center of the image.
The microwave incorporates a graphical LCD that displays the food’s artificially colored thermal image in real-time while it is warmed. The JET colormap [33] is applied to the grayscale thermal image to create artificial color on the thermal image, where red indicates hot and blue indicates cold. The contours are also drawn using black color on the image. Figure 4 shows a food image taken by the CMOS camera, its grayscale thermal image taken by the FLIR camera, the mask, and the colored thermal image with contour.

Figure 4.
(a) Food image taken by the CMOS camera; (b) grayscale thermal image taken by the FLIR camera; (c) the mask; (d) colored thermal image with contour.
3.3. Prototype Development
After disconnecting it from its control unit, an embedded system based on the microcontroller is implemented in a turntable rotation-free commercial microwave oven [34]. The prototype’s hardware and firmware components are described in brief below.
3.3.1. Hardware
The hardware block diagram is shown in Figure 5. The central processing unit is a single-board computer (Raspberry Pi (RPi) v3) [35]. It has a 1.2 GHz 64-bit ARMv8 quad-core microprocessor, 1 GB RAM, micro SD card slot supporting up to 32 GB, LCD interface (DSI), onboard BLE and Wi-Fi module, and other built-in peripheral hardware. Since image processing requires high memory and processing speed [36], the RPi is selected from other microcontrollers such as Advanced Virtual RISC (AVR) or Peripheral Interface Controller (PIC) that has lower memory and speed. Using the DSI and I2C port, a 7” capacitive touch LCD [37] is interfaced with the RPi. The LCD has a 24-bit color depth and 800 × 480 pixel screen resolution.

Figure 5.
Block diagram of the hardware.
An RPi HD camera module [38] is attached through a 4 mm hole near the center of the prototype microwave oven roof. The focal length is set to the height of the cavity of the oven which is 20 cm to get a sharper image. A FLIR thermal camera [28] is mounted near the center of the roof of the oven through a 4-mm hole. The thermal camera is interfaced with the RPi using Serial Peripheral Interface (SPI) protocol. To produce sounds, a speaker [39] is connected to the RPi board using a 3.5 mm stereo jack. One of the oven’s door’s switch is connected to an RPi interrupt pin, and the other door switch is connected to the AC circuit path so that the current can only flow when the door is closed. A daylight white LED bulb [40] is connected via relay contacts [41]. It was covered by stainless steel wire mesh which was connected with ground to shield the LED bulb from the microwave. For microwave generation, a Solid-State Relay (SSR) [42] is used to toggle power in the magnetron circuit. The RPi board and display are powered by means of a 110V AC to 5.1V DC adapter [43]. The RPi board produces 3.3 V and 5 V DC, with which the RPi HD camera, FLIR thermal camera, relay and speaker are powered.
In this research, the two cameras are placed on the microwave oven’s roof, where the cameras can sense the light and the heat through two small 4-mm holes. Thus, their bodies are not directly exposed to the microwaves, except for the lenses. The operating temperature of the thermal camera is −10 °C to +80 °C and it can measure temperature from −10 °C to +140 °C [28]. The RPi camera, used to capture the color image of the food for classification, can operate from −20 °C to 60 °C [38].
3.3.2. Firmware
Raspbian [35], a Debian-based Linux operating system, is installed on a 16 GB SD card and inserted in the RPi board. The firmware is built-in Python language and the required packages are installed such as Tensorflow, Keras 2.3.1, PyQT5, PiCamera, PyLepton, Open CV (CV2), RPi. GPIO, threading, subprocess, etc. Window-based graphical user interface (GUI) is created using Qt Designer [44] and the program was designed on an event-based signal–slot concept of PyQT5 [45]. The firmware consists of two layers: the driver layer, and the application layer. The driver layer consists of low-level firmware to handle different peripheral hardware such as camera, relay, SSR, FLIR camera, speaker and door status. Through calling the driver layer functions, the application layer accesses the hardware.
Whenever the door of the microwave is closed, an interrupt is triggered and its callback function is executed. This causes the actions shown in the pseudocode of Figure 6 to be executed. The program captures a color image of 320 × 240 using the RPi camera and then finds out whether the microwave is empty or non-empty (i.e., food inside). To do that, a preexisting image of the microwave oven without any food, Ie, is compared with the captured image, Ic. The environment inside the microwave cavity does not change when there is no food. The captured image sometimes may have different brightness levels due to the auto adjustments of the camera. To remove the effect of brightness, the images are first converted to grayscale and then normalized by subtracting the mean from each pixel; thus, the average pixel value becomes zero. Then the two normalized images are subtracted and the mean is calculated by taking the absolute pixel values of the subtracted image. The result is then compared with a threshold to decide the captured image to be empty or non-empty.
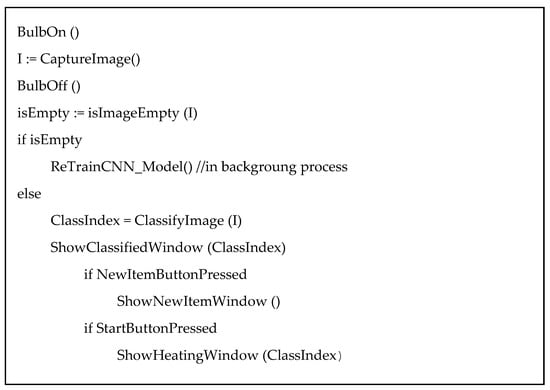
Figure 6.
Pseudocode of the callback function for the door closed event.
If the microwave was empty when the door was closed, then it starts retraining the CNN model, if required, in the background process. Retraining is required whenever a new item was added or the user corrected a misclassified item.
If the microwave has food when the door is closed, the image is classified using the deep learning model as described in Section 3.1.2. The classify function returns the classified image class number and then the classify window is displayed. Some screenshots of the GUI are shown in Figure 9. On the classify window, the captured image is displayed. The item name is selected and shown in a combo box that contains the list of all existing items. The target temperature is recommended from the food_temperature file which contains a dictionary of each item name and its target temperature.
If the item is a new item, then the user presses the ‘New’ button and it opens the new item window. The user can insert the new item name and its preferred target temperature in that window using an onscreen keyboard. When the ‘OK’ button is pressed, this information is appended in the new_food_temperature file. Then training and validation images are generated for the new class using data augmentation as discussed in Section 3.1.1. The flag, isTrainingRequired, is set indicating the retraining of the model is required. The user then returns to the classify window after pressing the OK button.
If the item is misclassified, then the user can select the correct item name from the combo box in the classify window. The program will then delete some random images from the correct class’s training and validation dataset, and add some new augmented images from the captured image to the dataset. In this way, the model will be trained with new images so that the item will not be misclassified again. The isTrainingRequired flag is also set in this case.
When the ‘Start’ button is pressed in the classify window, the heating window is shown. The bulb and the cooling fan relay, and the SSR to heat the food is turned on. A repetitive timer with an interval of 1 s is started. Every after 1 s, the callback function of the timer is executed. The actions done in the callback function are shown in the pseudocode in Figure 7. The average food temperature is calculated and the thermal image is captured according to the discussion on Section 3.2. The heating goes on until the current food temperature becomes greater than or equals to the target temperature. The heating is also stopped if the user presses the ‘Stop’ button or the door is opened during heating. A beep sound is played when the food was heated to the target temperature. The user can then open the door and take out the food from the microwave oven. When the door is closed, the callback function for the door close event, as shown in Figure 6, is executed.
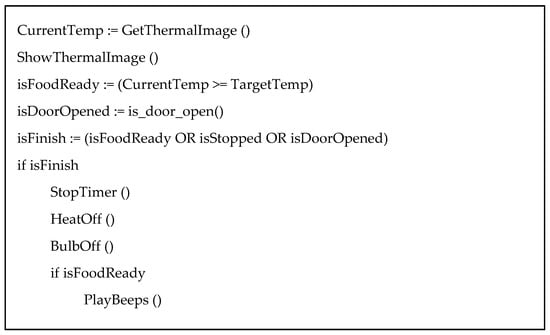
Figure 7.
Pseudocode for the timer event callback function during heating.
If the isTrainingRequired flag was set due to the addition of new item or correcting a misclassified item, and no training is currently going on, then a separate thread runs the code to retrain the CNN model. As the training runs on a separate thread, the normal operation of the microwave can be done while the training is going on in the background. The total number of classes for that model is calculated by adding the items in food_temperature and new_food_temperature files. The CNN model is trained until the validation loss is smaller than 0.25 or for 5000 epochs, whichever reaches first. The training and validation batch size is set to 64 and the number of steps for each epoch is dynamically calculated as the sample size changes with the addition of new items. The learning rate is set to 1e-6. Once the training is done, the model file is saved, the items from the new_food_temperature file are appended to the food_temperature file, and the new_ food_temperature file items are deleted.
4. Results
Prototype Development Result
The proposed microwave oven hardware, as discussed in Section 3.3.1, is developed and its photographs are shown in Figure 8. The firmware, as discussed in Section 3.3.2, is written in Python and programmed to the Raspberry Pi board. Some screenshots of the GUI are shown in Figure 9. The experiment with the prototype is done with ten different food items. Some of the images of the food items are shown in Figure 10. One item at a time was put inside the microwave and added in its database. After the addition of a new item, the program will retrain the CNN model in the background. The total epochs to reach a validation loss of less than 0.25, training dataset accuracy, validation dataset accuracy, and training time required by the RPi microcontroller for a different number of classes are shown in Table 2. Here, we see that the training time increases with the increase of classes as the total number of training and validation samples increases and the network needs more epochs to train. The average validation accuracy for all the classes is 0.93. Figure 11 shows the loss vs. epochs and the accuracy vs. epochs when the total class is 10. The size of the model is around 26 MB and the prediction time of the model is 250 ms when running on the RPi.
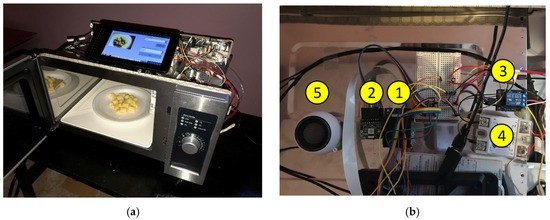
Figure 8.
Photograph of the prototype hardware: (a) embedded system interfaced with a commercial microwave oven. The Raspberry Pi microcontroller is attached at the backside of the display unit; (b) top view of the oven showing the hardware components: (1) RPi HD camera; (2) FLIR thermal camera; (3) Relay (4) SSR; (5) Speaker.
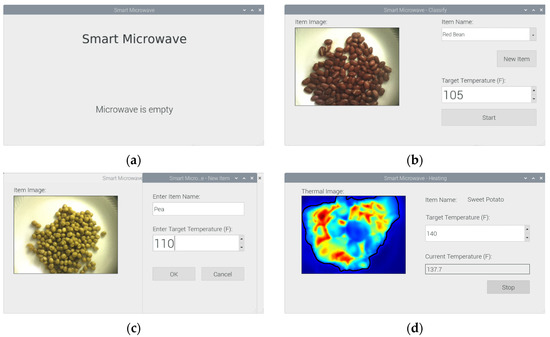
Figure 9.
Screenshots of the GUI: (a) default screen shown when idle; (b) Classify window showing the captured image, item name, and target temperature; (c) New item window showing textboxes to enter item name and target temperature by the user; (d) Heating window showing real-time thermal image, item name, target temperature, and current food temperature.
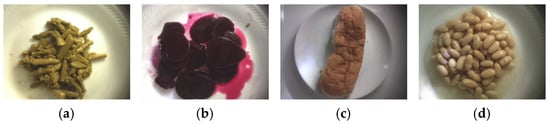
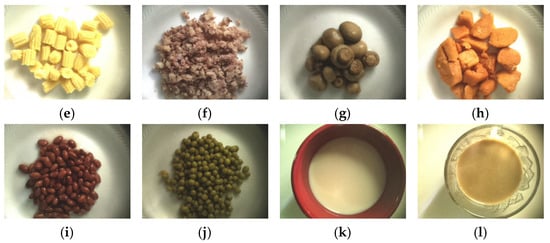
Figure 10.
Food items used in experiment: (a) asparagus; (b) sliced beet; (c) bun; (d) cannellini beans; (e) baby corn; (f) beef with corn; (g) mushrooms; (h) sweet potatoes; (i) red beans; (j) sweet peas; (k) milk; (l) tea.
Table 2.
Training and validation accuracy and timing for different number of classes.

Figure 11.
Training and validation history plots when the total class is 10: (a) Loss vs. epochs; (b) Accuracy vs. epochs
After the training, the classifier was able to recognize the item and recommend its target temperature if it was put into the microwave again, even though the item was in a different stirring or transformation condition. After the target temperature is recommended, the proposed microwave oven then heats the food until it reaches the target temperature. The real-time thermal image and the current temperature of the food are calculated as discussed in Section 3.2, and shown in the heating window as shown in Figure 9d.
5. Discussion
The CNN based deep learning model is developed considering the fact that it will be trained in an embedded system in real-time, rather than in a high-performance graphics processing unit (GPU) based computer. So, the model capacity is kept relatively low, so that the memory and speed of RPi are sufficient to train the model. From Table 1, we see that the training time increases with the increase of classes as the total number of training and validation samples increases. This training happens in a separate background process, thus the normal operation can continue while training is going on.
It is also possible to send image data to a cloud using the Internet and train the model in a cloud [46], where training can be done quickly by using GPU based computers. We plan to explore this possibility in the future.
Microwave food cover is sometimes used to eliminate the splattering of food inside a microwave oven to keep it clean. As the proposed microwave captures images to classy the food, opaque food cover cannot be used in this proposed system. Rather, transparent food covering [47] needs to be used.
The microwave oven has an inherent property of non-uniform heating [7]. The thermal image shows the areas where the food is hot and where it is relatively cold, thus the user can have a good idea about the distribution of the heat on the food, and start eating from the desired portion of the food. Moreover, the realtime display of thermal images adds artistic value which will attract customers.
Note that the two cameras are not placed inside the oven cavity. As shown in Figure 1 and Figure 8b, they are placed at the outside of the oven cavity on the microwave oven’s roof where the cameras can sense the light and the heat through two small 4-mm holes. Thus, their bodies are not directly exposed to the microwaves, except for the lenses. The microwave has a wavelength of around 120 mm [29], visible light has a wavelength of about 380 nm to 740 nm, and infrared has a wavelength in the range of 1–750 nm [30]. As the microwaves are long waves, they do not pass the 4-mm hole and do not damage the camera. The visible light and IR waves can pass through the hole and thus images can be captured, and the food temperature can be sensed. If the food explodes, then the food particles that only penetrate the two 4mm holes may put dirt on the lenses. Transparent microwave food cover [47] can be used to eliminate the splattering of food inside a microwave oven to keep it clean.
The RPi 3 uses a Broadcom BCM2837 SoC that has a 1.2 GHz 64-bit ARM Cortex-A53 core, while the Raspberry Pi Zero W (RPZW) uses a Broadcom BCM2835 SoC that has a 1 GHz 32-bit ARM1176JZF-S core. The speed of the RP3 is 20% faster than the RPZW. The RPZW only has a single-core, meaning that it contains only one core to process different operations. With RP3′s quad-core, it has four cores to process different operations; thus, it can multitask. Their memory (SDRAM) differs, as the RP3 has a 1 GB memory and the RPZW has a 512 MB memory [48]. In this application, we need a faster processor to train the model in a short time, need multitasking ability to train the model at the background process while the normal operation of the microwave can go on, and need more memory to increase the batch size while training the model. This makes the RP3 a better option compared to RPZW, which is faster, multitasking enabled quad-core processor and has more memory to perform the proposed deep learning task more efficiently.
The microwave oven contains a cooling fan as shown in Figure 5, and it is activated by the RPi whenever the microwave heating is turned on. Thus, the cooling fan runs as long as the heating is going.
6. Conclusions
An autonomous temperature feedback microwave oven with real-time thermal imaging capability has been proposed in this paper. It also presents a deep learning-based image classifier and a recommendation method for the target temperature. The proposed method has the ability to learn, and the recommendation progressively becomes better. Experiments are conducted on various solid and liquid foods. The system classifies and suggests the target temperature with 93% accuracy. A prototype is built and its accuracy is successfully tested.
There may be more than one user of the microwave and they may have different food temperature choices for the same kind of food. In order to recommend the correct temperature for each user, a personal profile option can be implemented in the proposed system in the future. Another future work is to send the food image data to a GPU based cloud server [46] using the Internet and train the model quickly in a cloud. We would like to explore these possibilities in the future.
Funding
This research was funded by the Faculty Research Fellowship (FRF) award of Eastern Michigan University.
Conflicts of Interest
The authors declare no conflict of interest.
References
- Osepchuk, J.M. A History of Microwave Heating Applications. IEEE Trans. Microw. Theory Tech. 1984, 32, 1200–1224. [Google Scholar] [CrossRef]
- Total Unit Shipments of Microwave Ovens in the U.S. from 2005 to 2019. Available online: https://www.statista.com/statistics/220122/unit-shipments-of-microwave-ovens/ (accessed on 10 December 2019).
- Williams, A. Surveys of Microwave Ovens in U.S. Homes; Lawrence Berkeley National Laboratory: Berkeley, CA, USA, 2014; Available online: https://escholarship.org/uc/item/3s29h7wd (accessed on 10 December 2019).
- Americans are Eating at Home More; Microwave Usage Increases but not Cooking; NPD: Toronto, ON, Canada, 2009; Available online: https://www.npd.com/wps/portal/npd/us/news/press-releases/pr_091112/ (accessed on 10 December 2019).
- Microwaves in the US; Euromonitor: London, UK, 2019; Available online: http://www.euromonitor.com/microwaves-in-the-us/report (accessed on 10 December 2019).
- Sun, M.H.; Wickersheim, K.A.; Kim, J.H. Fiber optic temperature sensors in the medical setting. Proc. SPIE 1989, 1067, 15–21. [Google Scholar]
- Belotserkovsky, E.; Shenfeld, O.; Katzir, A. Infrared fiberoptic temperature control of the heating process in a microwave oven. IEEE Trans. Microw. Theory Tech. 1994, 42, 901–903. [Google Scholar] [CrossRef]
- Cuccurullo, G.; Giordano, L.; Albanes, D.; Cinquanta, L.; Matteo, M.D. Infrared thermography assisted control for apples microwave drying. J. Food Eng. 2012, 112, 319–325. [Google Scholar] [CrossRef]
- Bows, J.; Joshi, K. Infrared imaging feels the heat in microwave oven. Phys. World 1992, 5, 21–22. [Google Scholar] [CrossRef]
- Liyan, C.; Min, G.; Qingyu, X.; Junhao, W.; Ning, X. Temperature monitoring based on image processing for intelligent microwave heating. In Proceedings of the 27th Chinese Control and Decision Conference (2015 CCDC), Qingdao, China, 23–25 May 2015; pp. 1397–1401. [Google Scholar]
- Sanchez, I.; Banga, J.R.; Alonso, A.A. Temperature control in microwave combination ovens. J. Food Eng. 2000, 46, 21–29. [Google Scholar] [CrossRef]
- Cabrera, J.M.; Molina, J.L.P.; Toledo, A. Feedback control procedure for energy efficiency optimization of microwave-heating ovens. Measurement 2009, 42, 1257–1262. [Google Scholar] [CrossRef]
- Li, Z.; Raghavan, G.S.V.; Orsat, V. Optimal power control strategies in microwave drying. J. Food Eng. 2010, 99, 263–268. [Google Scholar] [CrossRef]
- June Intelligent Oven. 2019. Available online: https://juneoven.com (accessed on 10 December 2019).
- Khan, T.H. Smart microwave oven with image classification and temperature recommendation algorithm. Int. J. Electr. Comput. Eng. (IJECE) 2018, 8, 4239–4252. [Google Scholar] [CrossRef]
- Khan, T.H. Towards an autonomous temperature feedback microwave oven with thermal imaging. In Proceedings of the IEEE International Conference on Electro Information Technology (EIT 2018), Rochester, MI, USA, May 2018; pp. 444–448. [Google Scholar]
- Shorten, C.; Khoshgoftaar, T.M. A survey on Image Data Augmentation for Deep Learning. J. Big Data 2019, 6. [Google Scholar] [CrossRef]
- Keras: The Python Deep Learning library. 2019. Available online: https://keras.io/ (accessed on 11 December 2019).
- LeCun, Y.; Bengio, Y.; Hinton, G. Deep learning. Nature 2015, 521, 436–444. [Google Scholar] [CrossRef] [PubMed]
- Nair, V.; Geoffrey, E.H. Rectified linear units improve restricted Boltzmann machines. In Proceedings of the 27th International Conference on Machine Learning (ICML-10), Haifa, Israel, 21–24 June 2010; pp. 807–814. [Google Scholar]
- Nagi, J.; Ducatelle, F.; di Caro, G.A.; Ciresan, D.; Meier, U.; Giusti, A.; Nagi, F.; Schmidhuber, J.; Gambardella, L.M. Max-Pooling Convolutional Neural Networks for Vision-based Hand Gesture Recognition. In Proceedings of the IEEE International Conference on Signal and Image Processing Applications (ICSIPA2011), Kuala Lumpur, Malaysia, 16–18 November 2011. [Google Scholar]
- Srivastava, N.; Hinton, G.; Krizhevsky, A.; Sutskever, I.; Salakhutdinov, R. Dropout: A Simple Way to Prevent Neural Networks from Overfitting. J. Mach. Learn. Res. 2014, 15, 1929–1958. [Google Scholar]
- Glorot, X.; Yoshua, B. Understanding the difficulty of training deep feedforward neural networks. In Proceedings of the 13th International Conference on Artificial Intelligence and Statistics, Sardinia, Italy, 13–15 May 2010; pp. 249–256. [Google Scholar]
- He, K.; Zhang, X.; Ren, S.; Sun, J. Delving deep into rectifiers: Surpassing human-level performance on ImageNet classification. In Proceedings of the IEEE International Conference on Computer Vision, Santiago, Chile, 7–13 December 2015; pp. 1026–1034. [Google Scholar]
- Bishop, C.M. Pattern Recognition and Machine Learning; Springer: New York, NY, USA, 2006. [Google Scholar]
- Softmax Activation Function. Available online: https://keras.io/activations/#softmax (accessed on 19 December 2019).
- Gandhi, R. A Look at Gradient Descent and RMSprop Optimizers. Available online: https://towardsdatascience.com/a-look-at-gradient-descent-and-rmsprop-optimizers-f77d483ef08b (accessed on 11 December 2019).
- FLIR. Radiometric Lepton Dev Kit. Available online: https://www.sparkfun.com/products/14654 (accessed on 12 December 2019).
- Microwave Oven. Available online: http://hyperphysics.phy-astr.gsu.edu/hbase/Waves/mwoven.html (accessed on 12 December 2019).
- Infrared. Available online: http://hyperphysics.phy-astr.gsu.edu/hbase/ems3.html (accessed on 12 December 2019).
- The Physics of Microwave Ovens. Available online: http://tobyzerner.com/microwaves (accessed on 12 December 2019).
- OpenCV Contours. Available online: https://docs.opencv.org/trunk/d4/d73/tutorial_py_contours_begin.html (accessed on 12 December 2019).
- ColorMaps in OpenCV. Available online: https://docs.opencv.org/2.4/modules/contrib/doc/facerec/colormaps.html (accessed on 12 December 2019).
- Amana RMS10DS Light-Duty Commercial Microwave. Available online: https://www.amazon.com/Amana-Medium-Duty-Microwave-Oven/dp/B07MXLXZFV (accessed on 18 December 2019).
- Raspberry, Pi. Available online: https://www.raspberrypi.org (accessed on 12 December 2019).
- Khan, T.H.; Wahid, K. Universal bridge interface for DVP-compatible image sensors. Microprocess. Microsyst. Elsevier 2011, 35, 547–556. [Google Scholar] [CrossRef]
- Raspberry Pi LCD-7” Touchscreen. Available online: https://www.sparkfun.com/products/13733 (accessed on 12 December 2019).
- Raspberry Pi camera Module. Available online: https://www.raspberrypi.org/products/camera-module-v2 (accessed on 12 December 2019).
- Hamburger Mini Speaker. Available online: https://www.sparkfun.com/products/14023 (accessed on 12 December 2019).
- Daylight White E17 LED Bulb. Available online: https://www.amazon.com/dp/B01KX765TE (accessed on 12 December 2019).
- 5v Relay Module. Available online: https://www.amazon.com/Tolako-Arduino-Indicator-Channel-Official/dp/B00VRUAHLE/ (accessed on 12 December 2019).
- Solid State Relay. Available online: https://www.sparkfun.com/products/13015 (accessed on 12 December 2019).
- DC Power Supply. Available online: https://www.sparkfun.com/products/13831 (accessed on 12 December 2019).
- Qt Designer. Available online: https://www.riverbankcomputing.com/static/Docs/PyQt5/designer.html (accessed on 13 December 2019).
- PyQt5 Tutorial. Available online: https://pythonspot.com/pyqt5/ (accessed on 13 December 2019).
- AWS Deep Learning. Available online: https://aws.amazon.com/machine-learning/amis/ (accessed on 23 December 2019).
- Transparent Microwave Plate Cover. Available online: https://www.amazon.com/Re-usable-flexible-Microwave-Transparent-Splatter/dp/B07PJP6MCS (accessed on 31 January 2020).
- Raspberry Pi 3 vs. Raspberry Pi Zero W. Available online: https://www.arrow.com/en/research-and-events/articles/raspberry-pi-3-vs-raspberry-pi-zero-w (accessed on 3 February 2020).
© 2020 by the author. Licensee MDPI, Basel, Switzerland. This article is an open access article distributed under the terms and conditions of the Creative Commons Attribution (CC BY) license (http://creativecommons.org/licenses/by/4.0/).