1. Introduction
As the core components of mechanical equipment, the accuracy of bearing directly determines the machining accuracy of precision equipment [
1,
2]. Accuracy is one of the properties of bearings and an important parameter in the bearing manufacturing process, which directly determines the performance, life, and reliability of bearings [
3]. The accuracy grade of bearings is divided into five grades: P0, P6, P5, P4, and P2. According to the different dimensional accuracy and rotational accuracy, choosing the appropriate accuracy grade is crucial to ensure the precision operation and efficient performance of the equipment. In particular, rotation accuracy is the degree of accuracy that a bearing can achieve during operation, which reflects the stability and accuracy of the bearing under load and rotation [
4].
Taking rolling bearings as objects, scholars have analyzed the influence of geometric error of bearing elements on bearing rotation accuracy. Noguchi et al. [
5,
6] discussed the concept of non-repetitive accuracy, explored the correlation between the accuracy of key bearing components and non-repetitive accuracy, analyzed the relationship between the accuracy of rolling elements and non-repetitive accuracy, and carried out relevant experimental verification. Yuan et al. [
7] applied rolling bearing geometry, elastic mechanics, and raceway control theory, and gave the numerical calculation formula of NRRO caused by the number of steel balls in the geometric error of the parts of high-speed ACBBs. Liu et al. [
8] established a multi-degree-of-freedom pseudo-static model of ACBBs and explained the correlation mechanism between the surface topography accuracy of key components and the non-repetitive accuracy of ball bearings. Hu et al. [
9,
10,
11] made a detailed analysis of the internal failure and surface properties of the bearing raceway. The precise control technology of roundness and performance of bearing raceway during machining is studied. According to the geometry and kinematic relationship of cylindrical roller bearings, Yu et al. [
12,
13,
14] discussed the influencing factors of the overall accuracy of cylindrical roller bearings, obtained an analytical method for rotational accuracy, and verified the correctness of the influence law through experiments. Zhou et al. [
15] deduced the geometric coordination equation of cylindrical roller bearing according to the geometric relationship among the parts of cylindrical roller bearing, iteratively solved the geometric coordination equation and the load balance equation simultaneously, explained the correlation between the shape-position and topography accuracy of bearings and their overall accuracy. Chen et al. [
16] proposed a numerical calculation method of bearing rotation accuracy considering the roundness error of bearing inner ring channel and outer ring channel based on the rotation accuracy of four-point contact ball bearing. Ji et al. [
17] studied the correlation characteristics between the dimensional accuracy, shape-position accuracy of components and rotational accuracy, and obtained the influence rules of the dimensional accuracy and shape-position accuracy of components on the rotational accuracy of bearings.
From the current research results, it can be seen that there is little in-depth research on the maximum rotation accuracy error and its control method in the measurement state and the variation law of accuracy error and its control method in the working state of ACBBs. Furthermore, the method of improving the machining accuracy of the bearing component and thus improving the accuracy of the bearing by investing a large amount of money is not applicable to mass production. Therefore, it is very useful to study the relationship between various factors of bearings and bearing slewing accuracy, and to then guide production and assembly to improve the slewing accuracy of bearings. In this paper, the maximum rotation accuracy error in the measurement state and the variation law of accuracy error in working state are studied, the error transmission mechanism and mapping law are analyzed, the method of accurately controlling the overall rotation accuracy of bearing by controlling the topography accuracy of parts is given, and the accuracy of this method is verified by testing.
2. Rotation Accuracy and Measurement Method
The ACBBs play axial and radial support roles on high-speed rotating spindle [
18,
19]. As shown in
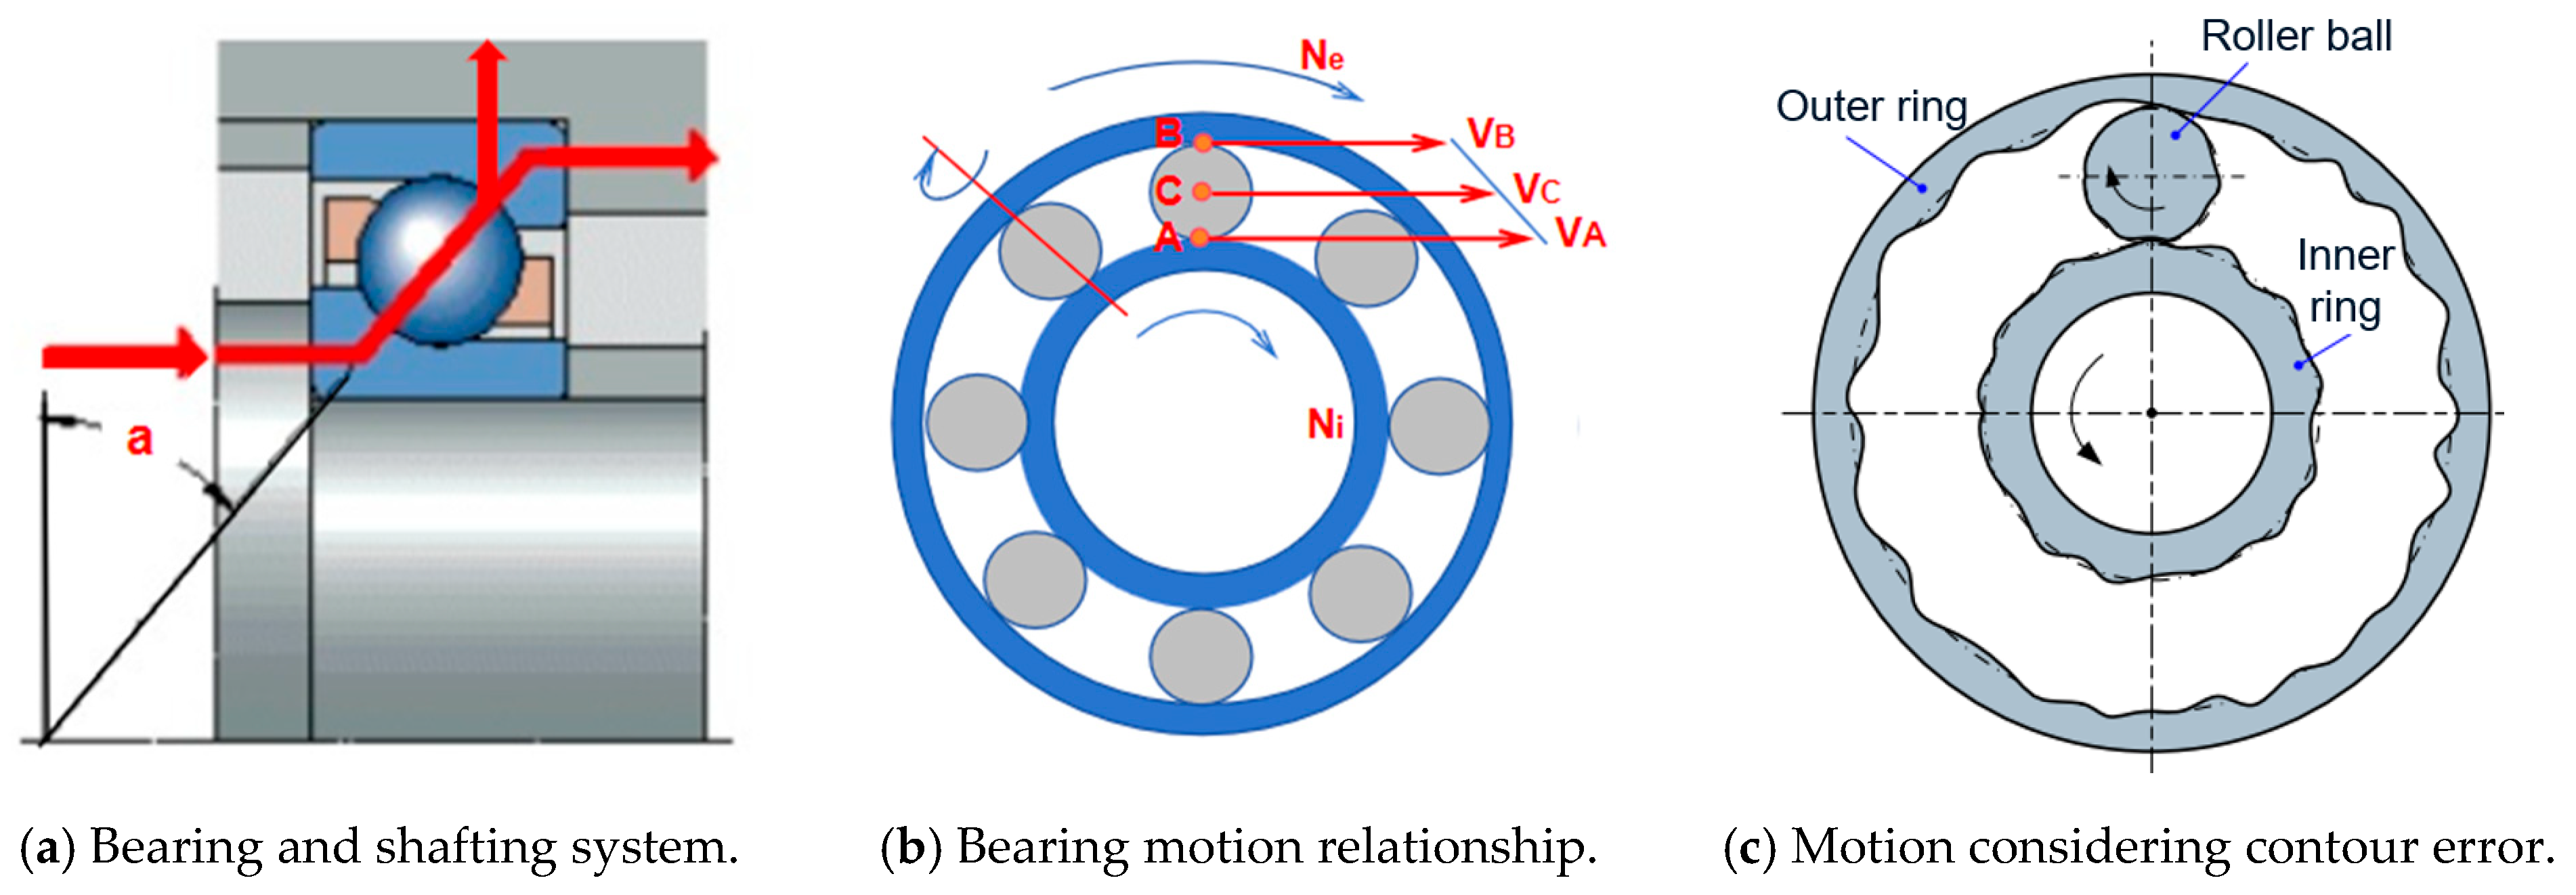
Figure 1a, their radial runout and axial runout have a great influence on the accuracy of the spindle. Usually, the outer ring is fixed in the seat, and the inner ring rotates with the rotation axis as a moving coil, so the rotation accuracy of the inner ring has a more significant influence on the whole axial direction. The relative motion between the inner and outer rings, rolling elements, and cage of ACBBs plays an important role in the performance and life analysis of bearings. The relationship between the parts of the highspeed ACBBs is shown in
Figure 1b. The motion of rolling elements is the most complex, with both revolution, rotation, and spin. In the process of movement, the size and contour error of bearing parts leads to the large runout of bearing in radial and axial directions, which is the main reason for the unstable accuracy of bearing and shafting system in the working process, as shown in
Figure 1c.
Rotation accuracy is the amount of swing when the bearing is rotating, that is, the stability and smoothness when the bearing is rotating [
20]. The rotational accuracy of rolling bearings includes the radial runout (Kia, Kea) of the inner and outer rings of the bearing and the axial runout (Sia, Sea) of the inner and outer rings of the bearing. The radial runout Kia of the inner ring refers to the difference between the maximum and minimum radial distances between different angular positions of the inner hole surface of the inner ring and a fixed point of the outer ring; the axial runout Sia of the inner ring refers to the difference between the maximum and minimum axial distances between the reference end face of the inner ring, at different angular positions of the inner ring, and a fixed point on the outer ring at a radial distance from the axis of the inner ring equal to half of the contact diameter of the inner ring raceway. Similarly, the radial runout Kea and the axial runout Sea of the bearing outer ring can be understood.
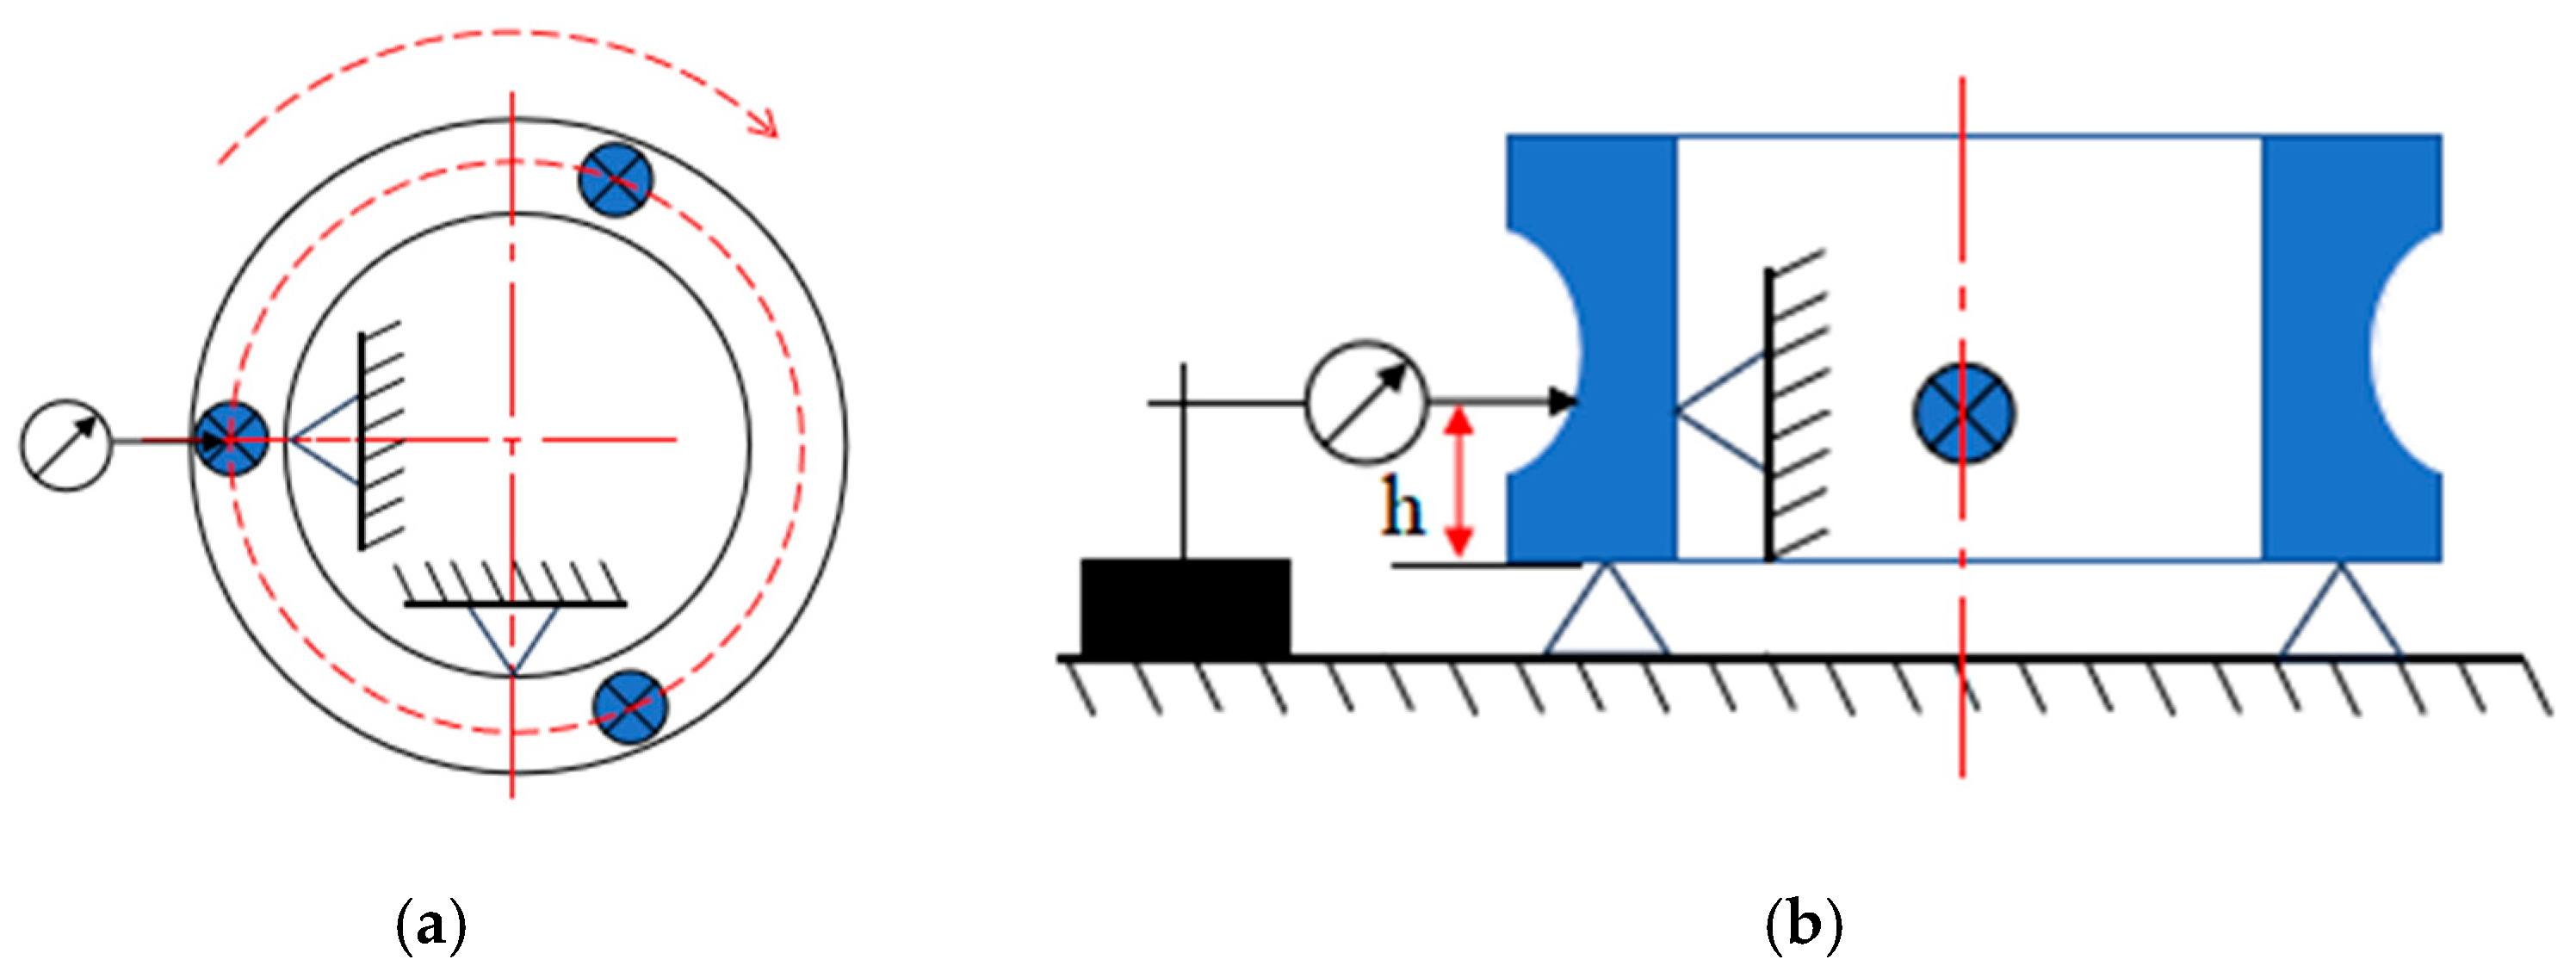
The principle of measuring the rotation accuracy of ACBBs is shown in
Figure 2.
Figure 2a is the measurement of the radial runout of the bearing inner ring, and
Figure 1b is the measurement of the axial runout of the bearing inner ring. The probe of the measuring instrument is in contact with the inner circular surface of the inner ring and should be placed in the middle of the inner circular surface of the inner ring as much as possible. Then let the inner ring rotate steadily once, and the reading of the measuring instrument can be obtained. The difference between the maximum reading and the minimum reading read by the instrument is the measured radial runout of the inner ring. The measurement method of axial runout is similar, except that the measuring instrument is placed on the end face of the inner ring of the bearing.
The inner ring of the bearing is supported horizontally; a stable axial load is applied to the outer ring of the bearing on the reference end face of the outer ring along the axial direction, and the outer ring rotates steadily for one turn, so that the radial runout Kea and axial runout Sea of the outer ring of the bearing can be obtained through the reading of the measuring instrument.
3. Prediction and Optimization Model of Rotation Accuracy
3.1. Analysis of Influencing Factors
Taking the rotation accuracy of the inner ring and outer ring of the bearing as an example, the error components and influencing factors are analyzed, as shown in
Figure 3.
For
Figure 3a,b, the radial runout Kia and Kea of the bearing and the axial runout Sia and Sea are the superposition of the radial and axial errors of the broken line O
1-O
2-O
3-O
4 and O
5-O
2-O
3-O
6, respectively, which are composed of the shape and position error of the bearing ring itself, the roundness error of the channel, and the shape error of the ball. According to the measurement principle, when measuring the rotation accuracy of the bearing inner ring, the outer ring is fixed (
Figure 3), and the inner ring rotates; the measurement error is the superposition of the roundness error of the outer ring channel, the roundness error of the inner ring channel, and the shape and position error of the inner ring. On the contrary, when measuring the rotation accuracy of the outer ring of the bearing, the inner ring is fixed and the outer ring is rotated; the measurement error is the superposition of the roundness error of the inner ring channel, the roundness error of the outer ring channel, and the shape and position error of the outer ring. Let Ke, Ki, Se, and Si be the radial and axial form and position errors of the outer ring and the inner ring, respectively. Δ
Cre and Δ
Cri are the roundness errors of the outer ring and the inner ring at points O
2 and O
3, respectively. Δ
Dw is the surface topography error of the ball. Then, the components and influencing factors of the bearing rotation accuracy can be expressed as Equations (1)–(4).
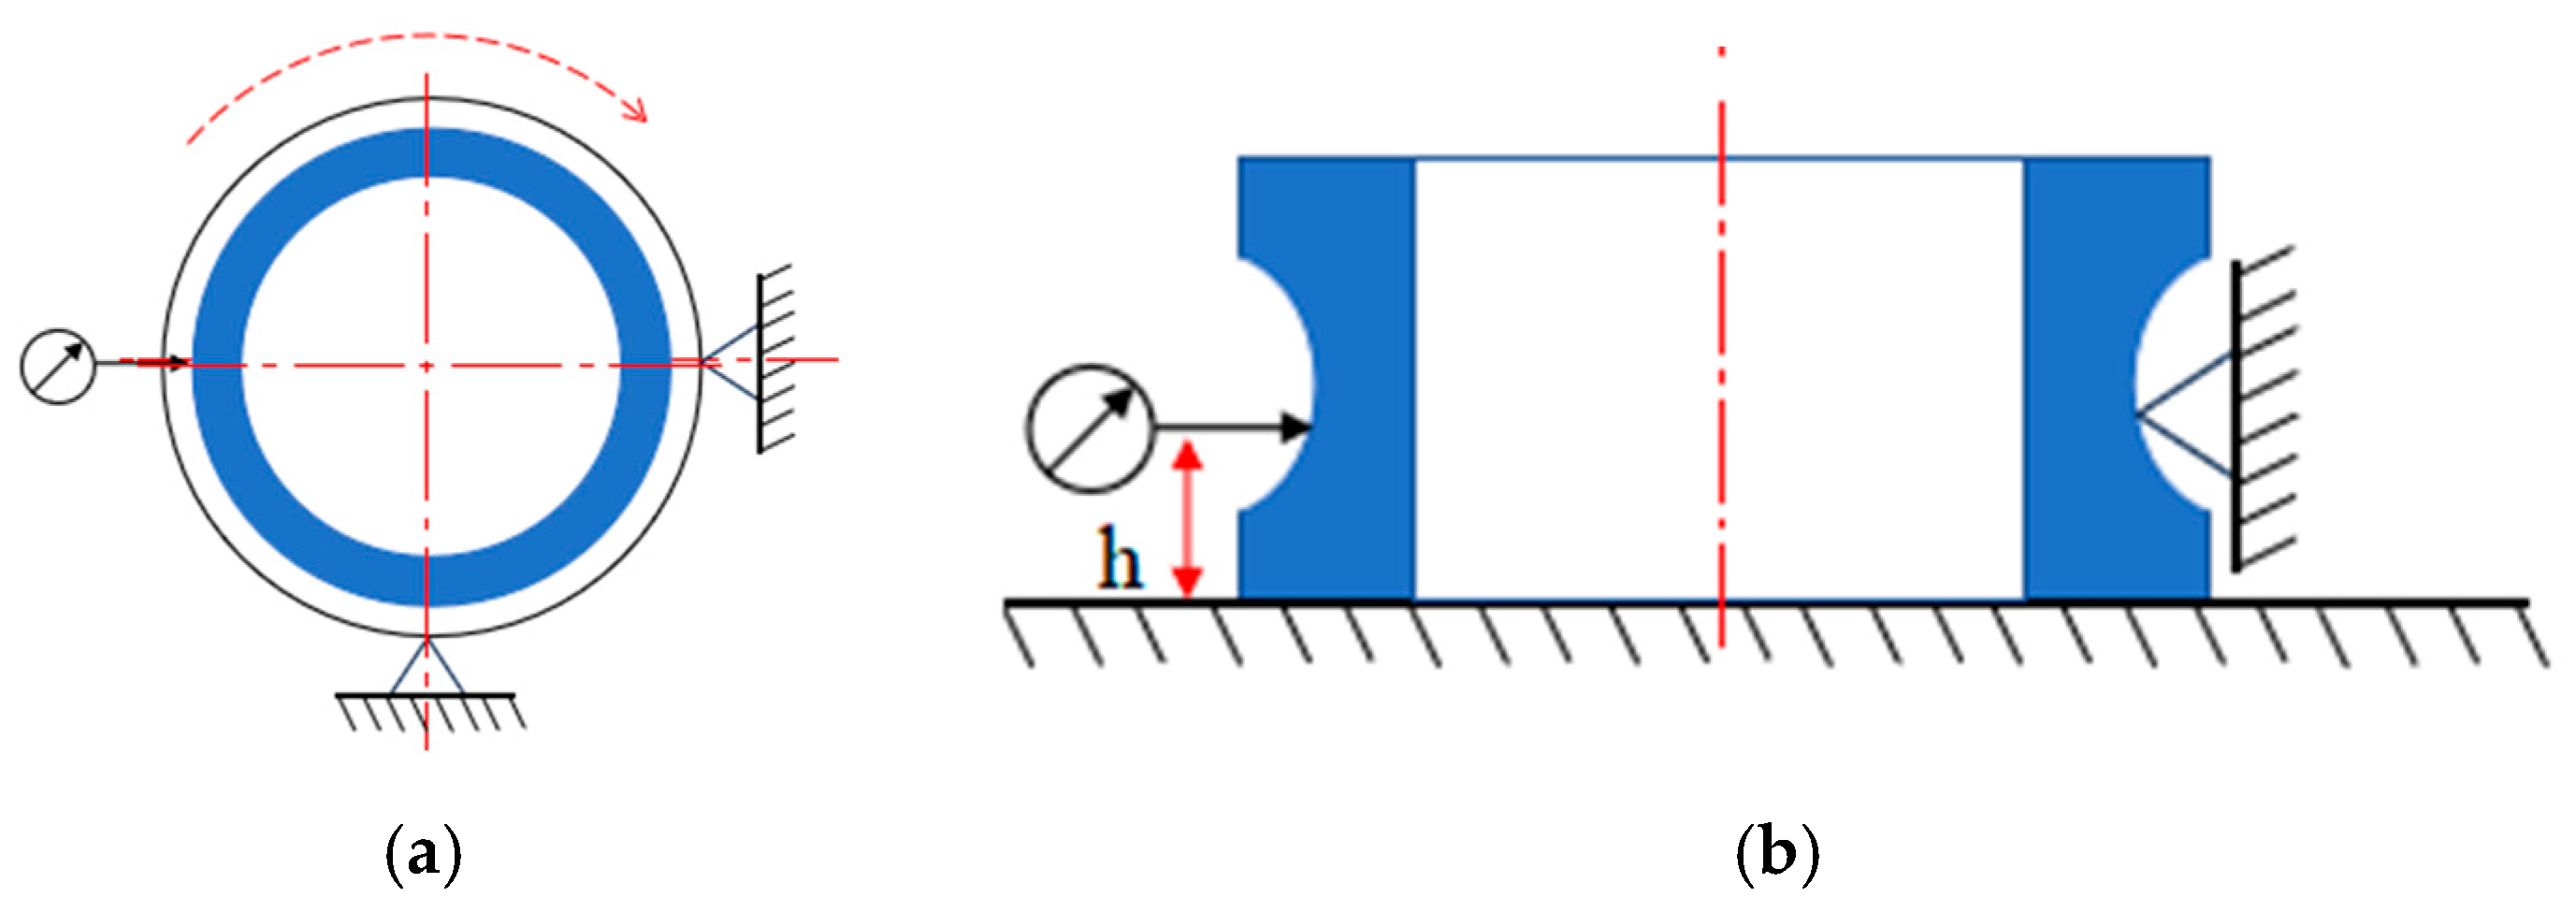
The roundness error here refers to the deviation between the circumferential roundness of the bearing raceway and the ball contact area and the ideal roundness, which is generally measured by a precision roundness instrument. The roundness error and measurement method of the bearing inner ring are shown in
Figure 4.
The shape and position errors inside and outside the bearing include the wall thickness error of the inner ring channel and the parallelism error of the inner ring channel to the end face. In this paper, the wall thickness error of the inner ring refers to the error of the distance from the contact point of the bearing groove and the ball to the cylindrical surface of the inner hole of the inner ring in the circumferential direction, which is measured by a precision groove wall thickness error measuring instrument. The measurement method is shown in
Figure 5.
The parallelism error of the inner ring channel to the end face, the measurement principle, and method are shown in
Figure 6.
3.2. Calculation of Influence Coefficient
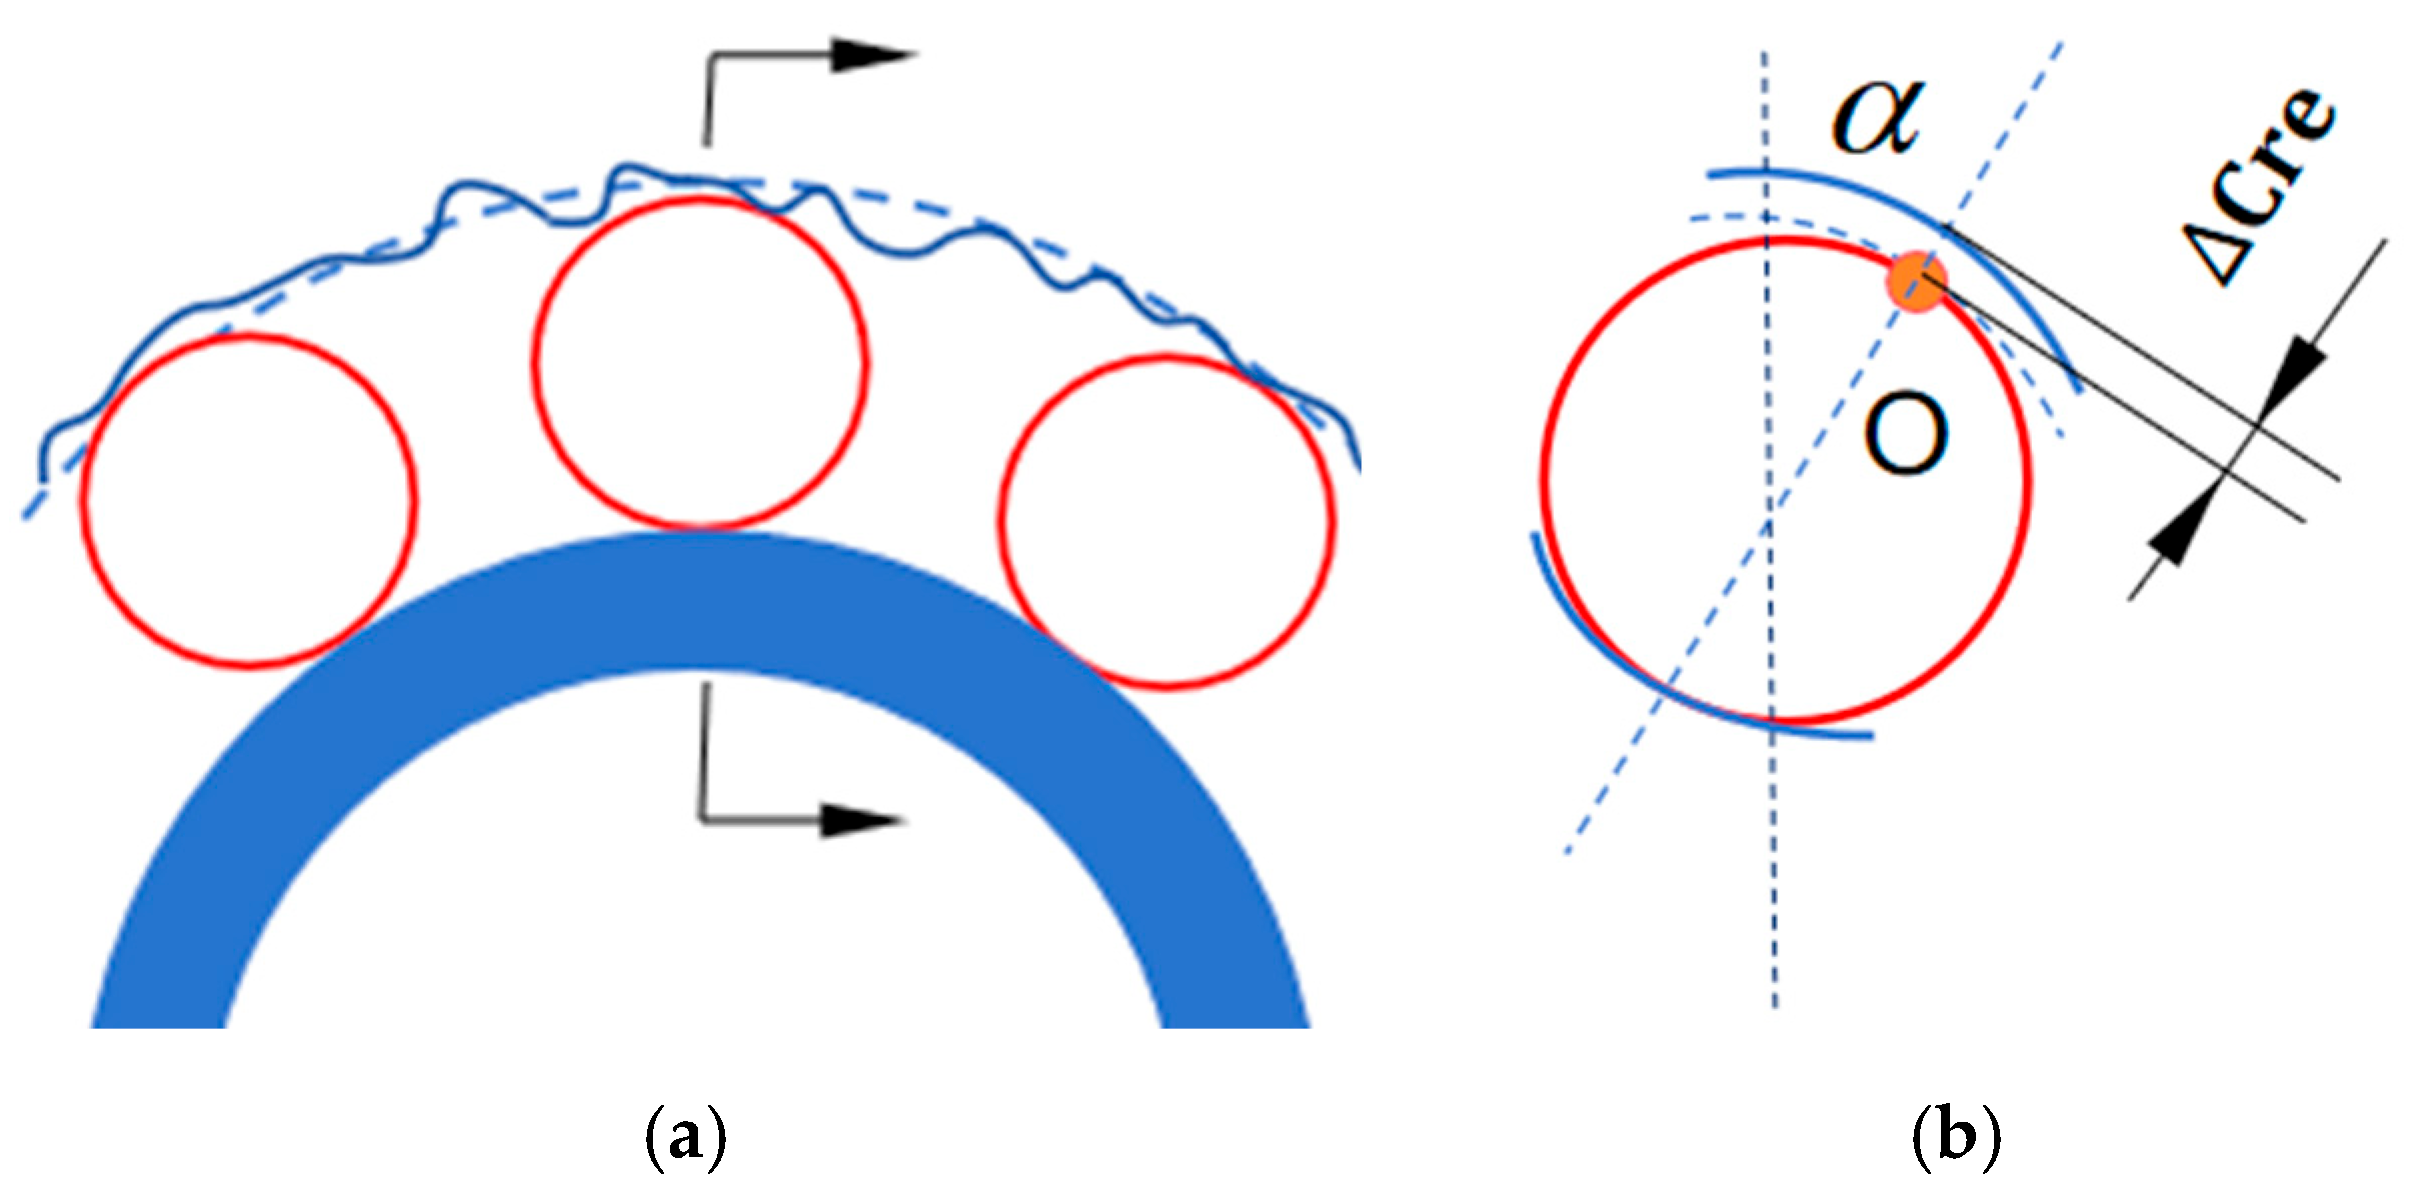
Because the roundness error of the inner and outer rings is very small, it can be approximately considered that the influence of the small change in the size of the inner and outer rings’ channel at the contact point on the rotation accuracy of the bearing can be approximated. For the contact point
O in
Figure 7, there is a roundness deviation Δ
Cre, which can be regarded as a transient runout of radial play
Sr and axial play
Sa caused by small changes in channel size.
According to the geometric relationship of the bearing, it can be obtained.
Since the channel roundness error only affects the radial and axial directions of the bearing, assuming that
Ri,
Re, and
Dw remain unchanged, Equations (5) and (6) are deflected to obtain the bearing outer ring channel diameter
De, the transient value of the inner ring channel diameter di (channel roundness error) on the radial clearance, and the axial clearance influence coefficient, as shown in Equations (7)–(10).
Therefore, it can be obtained from Equations (7) and (8) that the influence coefficient of the channel roundness error on radial runout is 1, that is, Equation (11).
It should be emphasized that due to the existence of the measurement pressure, the influence of the roundness error Δ
Cre and Δ
Cri on the radial direction is two-way, but the influence on the axial direction is one-way. Therefore, the calculation formula of the influence coefficient of the roundness error on the axial runout is Equation (12).
The bearing contact angle Equation (13) can be obtained from the bearing geometric relationship.
It can be obtained from Equation (13) that when Ri, Re, and Dw remain unchanged, the contact angle of the bearing increases when the difference (De − di) between the outer ring channel diameter De and the inner ring channel diameter di increases. It can be seen from Equation (12) that the influence coefficient ΔSa decreases, so the influence coefficient ΔSa decreases with the increase in contact angle.
3.3. Prediction and Optimization Models
According to the previous study, the numerical calculation formulas of rotation accuracy of bearing inner ring are Equations (14) and (15).
In the same way, the numerical calculation Equations (16) and (17) for the rotation accuracy of the bearing outer ring can be obtained.
If the bearing design parameters
De,
di,
Ri,
Re,
Dw, and the roundness errors Δ
Cre, Δ
Cri, and shape and position errors of the inner and outer rings are known, the rotation accuracy of the finished bearing can be accurately predicted by Equations (14)–(17). If the required indexes of rotation accuracy Kia0, Sia0, Kea0, and Sea0 of finished bearings are known, the optimal matching of each error can be carried out according to the model to meet the index requirements. The capability of bearing processing equipment is expressed by the process capacity index
Cp and the index evaluation and grading table (
Table 1).
The machine tool processing capability index is defined as , where T is the tolerance range, and σ is the process standard deviation. The parameters and represent the machine’s ability to control the roundness of the outer and inner raceways, respectively. Their values are obtained by repeatedly measuring the raceway error distribution and normalizing it according to the design tolerance. These parameters directly affect the effective value during the optimization process.
Therefore, the core of the bearing rotation accuracy optimization method is to obtain the highest accuracy range under the highest
Cp, so that the control of the rotation accuracy of ACBBs can be realized economically and efficiently. The formula of the optimization model is Equation (18).
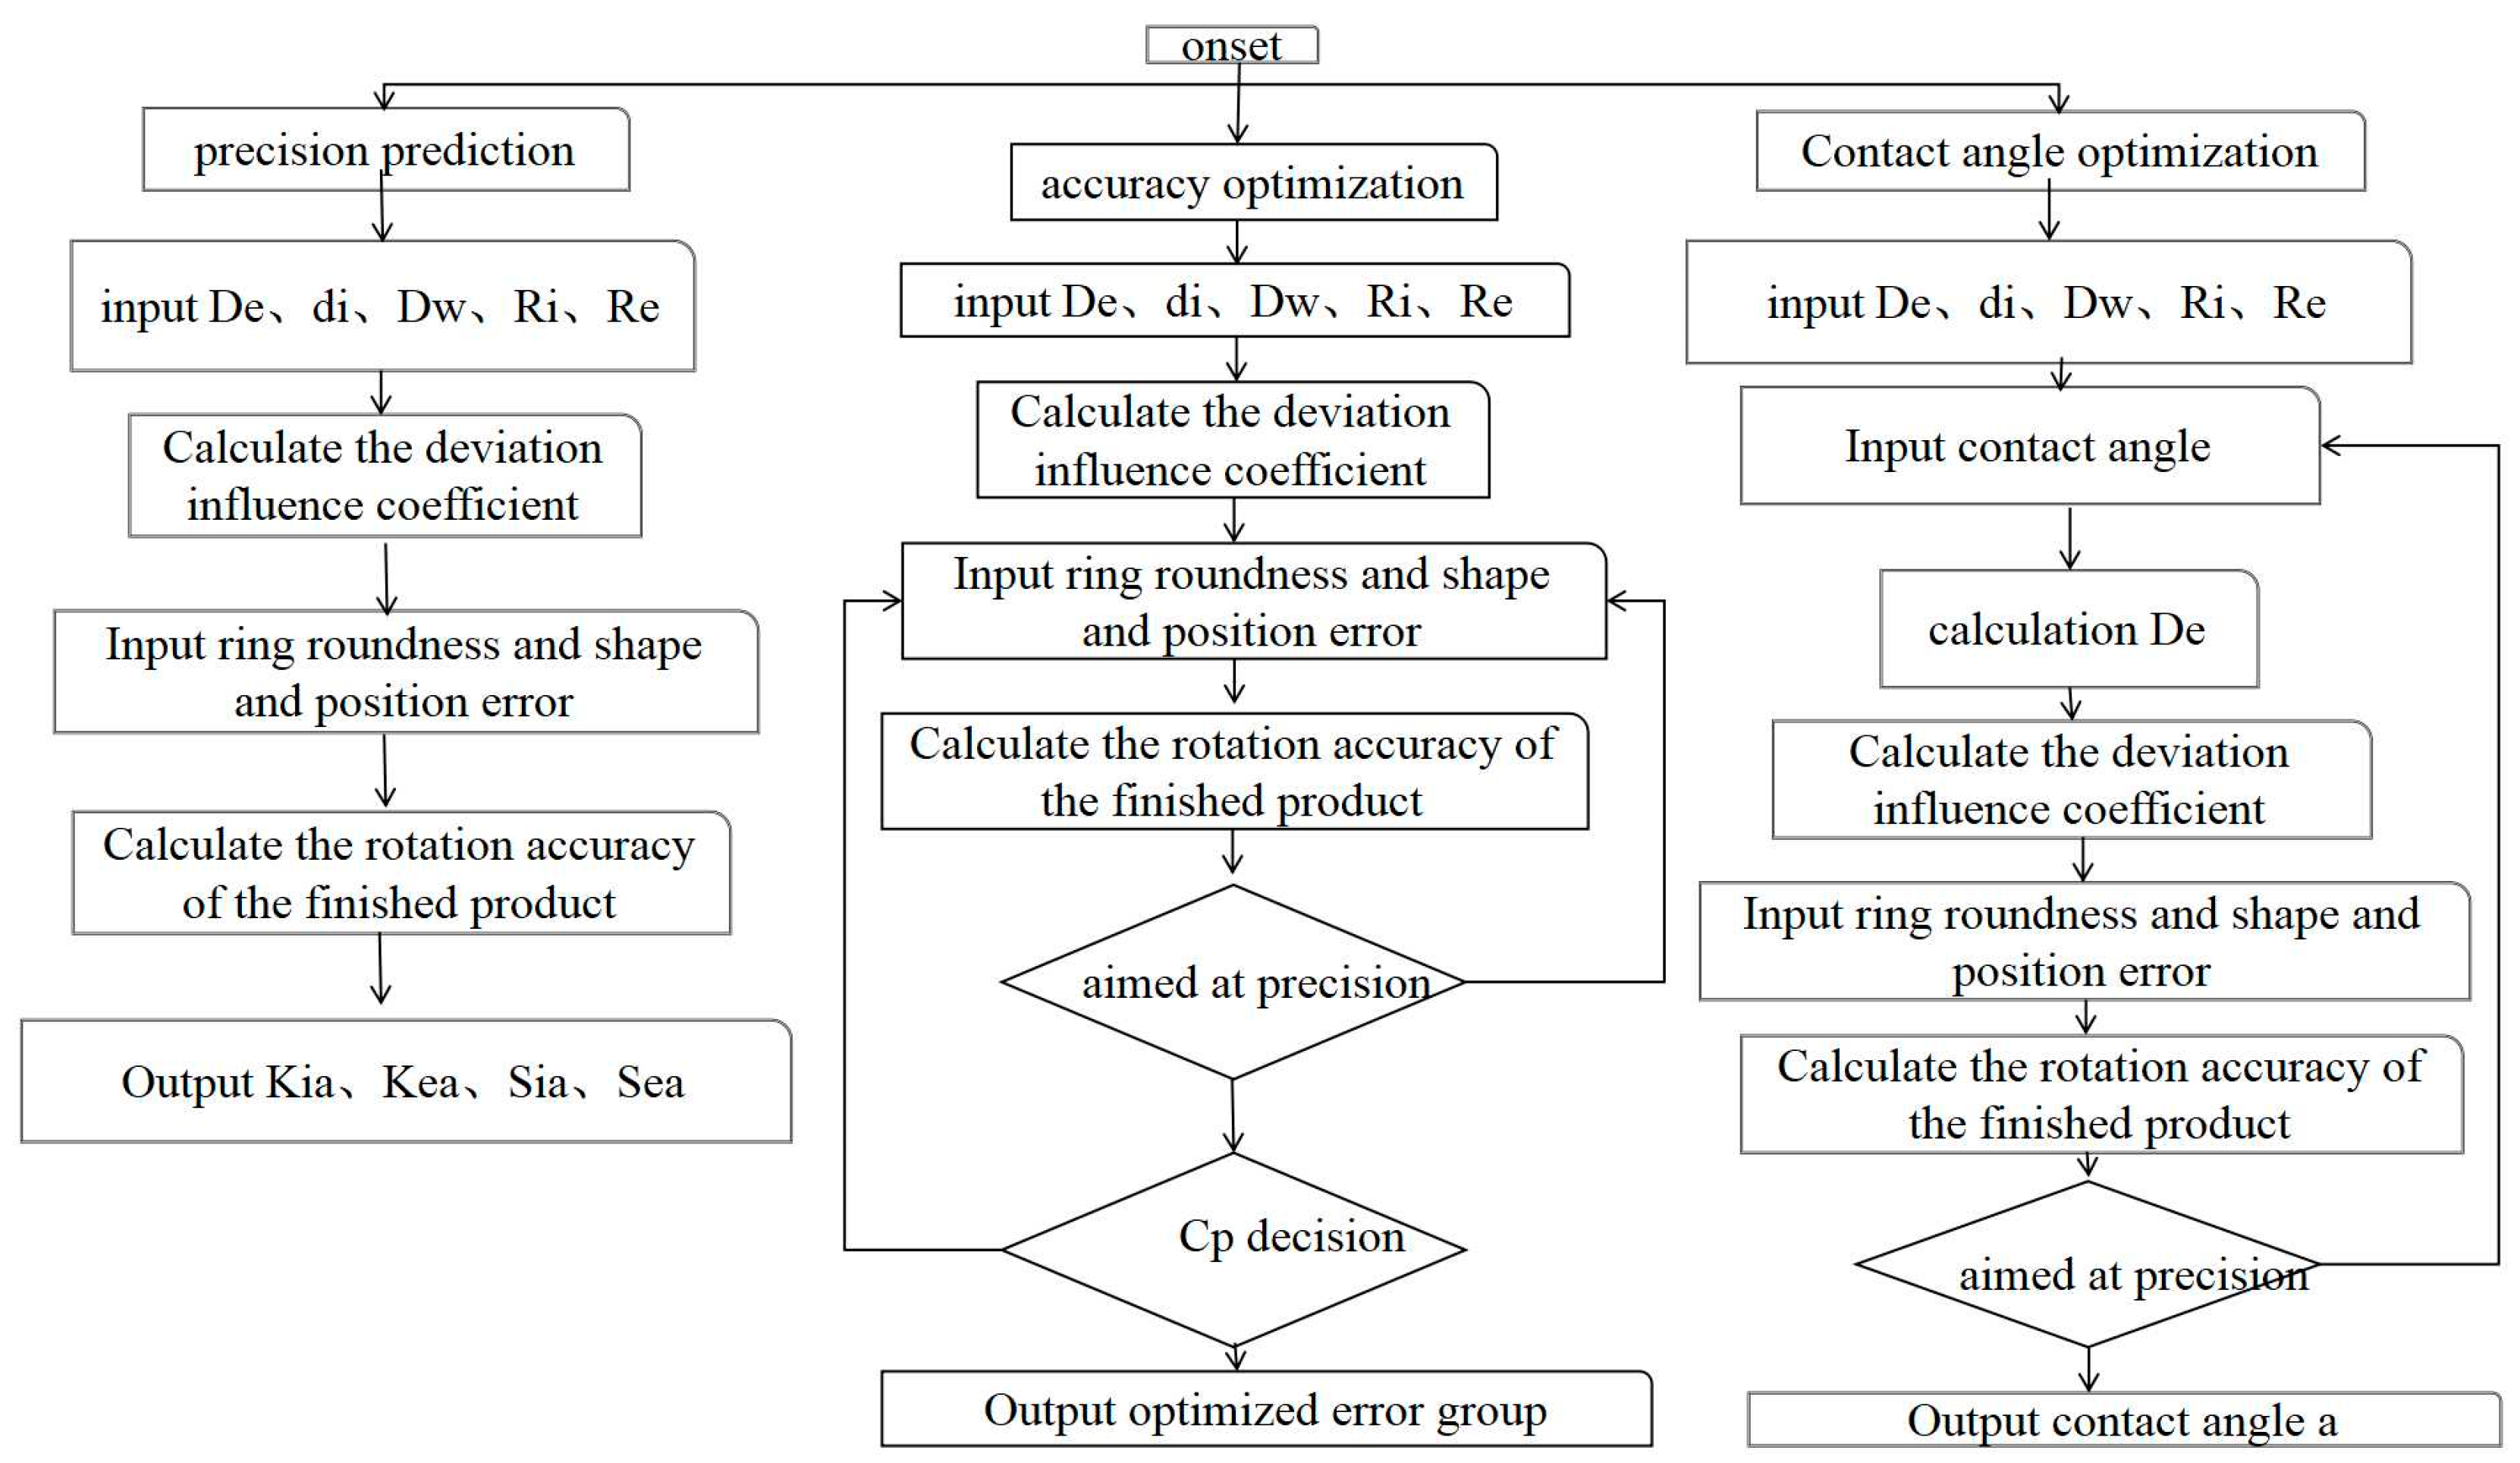
The appropriate contact angle can also be determined according to the rotation accuracy index requirements of the host equipment for the matching bearings. This rotation accuracy prediction and optimization model can economically and efficiently meet the actual production demand, and its process is shown in
Figure 8.
4. Model Analysis and Validation
Taking ACBBs 7020C/P4, 7020AC/P4, 7020A/P4, and 7020B/P4 (four conventional contact angles of 15°, 25°, 30°, and 40°), as examples, the model calculation results are analyzed and tested. The relevant structural parameters of the bearings are shown in
Table 2.
To evaluate whether the bearing contact angle has a statistically significant effect on the main output metrics (Kia, Sia, Kea, Sea), a one-way analysis of variance (ANOVA) was conducted. The independent variable was contact angle (15°, 25°, 30°, 40°), and the dependent variables were the measured radial and axial runouts. A significance level of α = 0.05 was adopted.
4.1. Influence of Channel Roundness Error
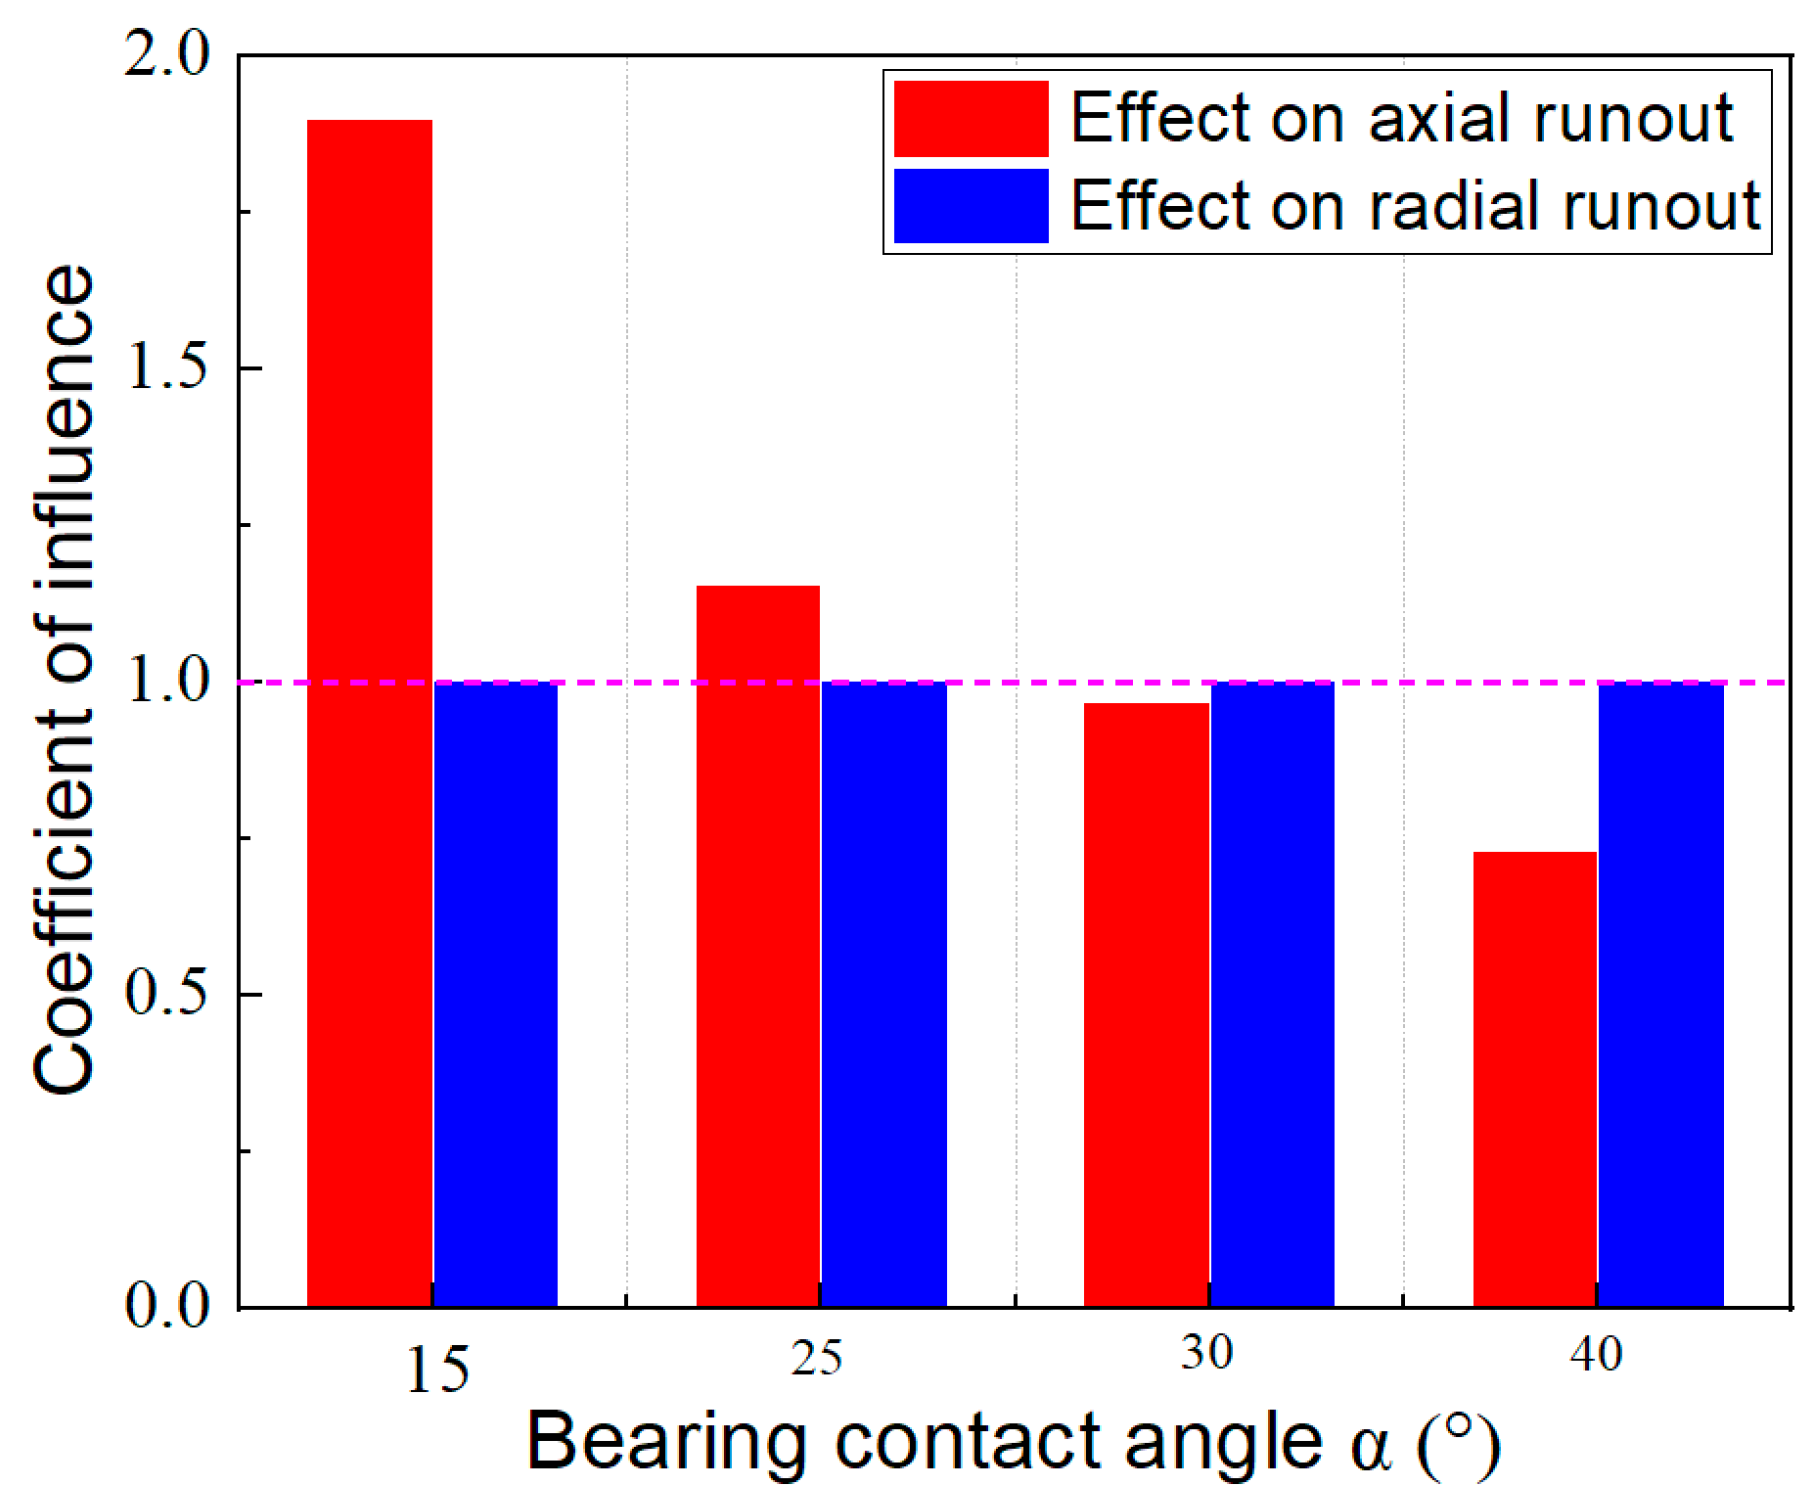
From the above, the influence of the roundness bearing ring channel on overall accuracy of bearing can be calculated. The ACBBs 7020C/P4, 7020AC/P4, 7020A/P4, and 7020B/P4 are calculated, respectively. The influence degree of channel roundness error on axial runout is 1.9, 1.155, 0.966, and 0.731 in turn, and the influence degree decreases in turn, while the influence coefficient on radial runout remains unchanged at 1, as shown in
Figure 9.
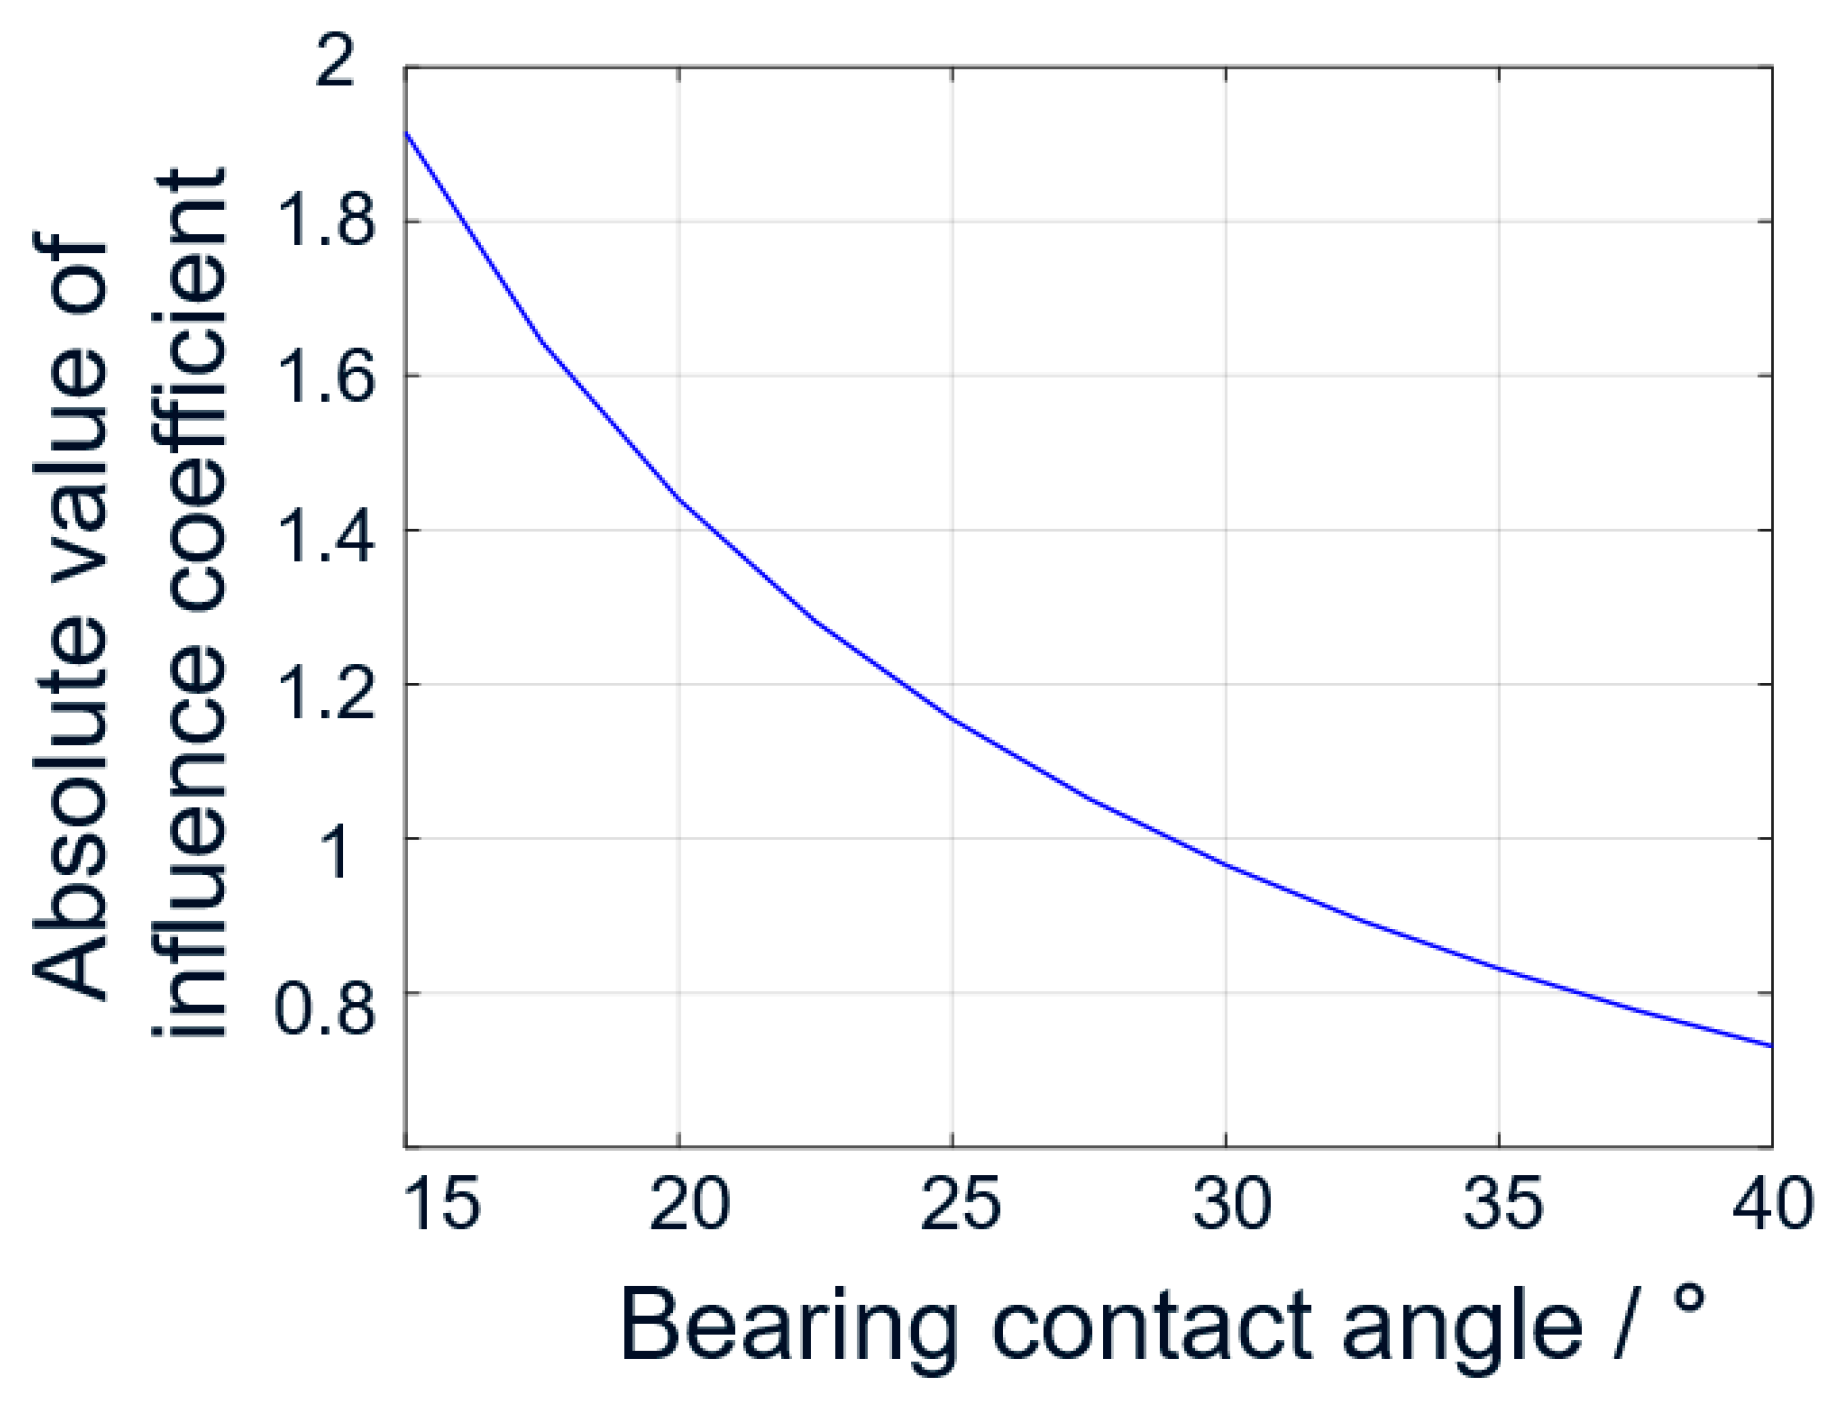
Therefore, we can obtain the model calculation results that with the increase in contact angle, the influence of channel roundness error on the axial runout of bearings is significantly reduced, and the axial runout of ball bearings with small contact angle is difficult to control. Therefore, it is more appropriate to use ball bearings with a large contact angle in application scenarios that generally require higher axial accuracy. The curve of the influence of channel roundness error on axial runout with contact angle is shown in
Figure 10.
4.2. Prediction Analysis and Verification of Rotation Accuracy
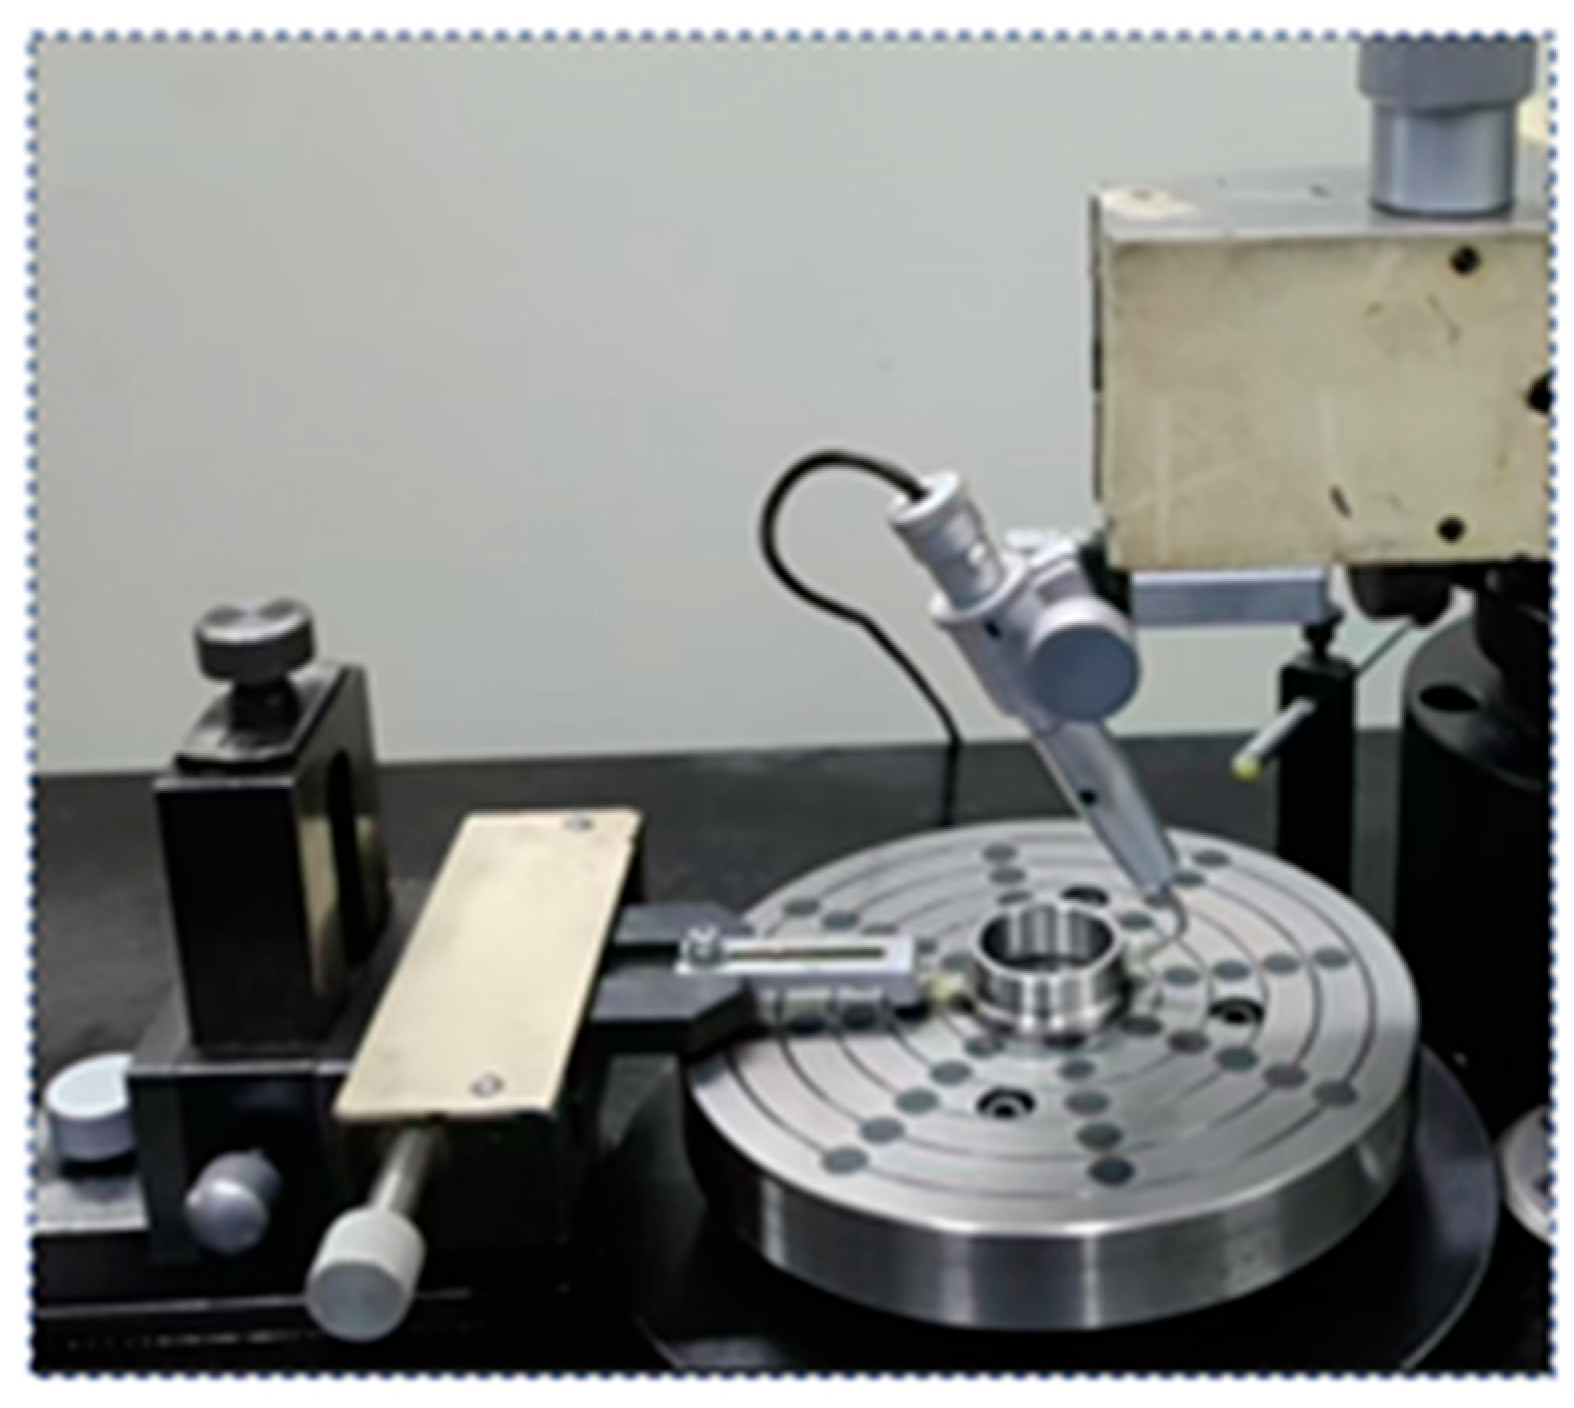
Taking 7020C/P4 as the object, 20 sets of finished outer ring and inner ring of this type of bearing are selected, respectively. The corresponding serial numbers are compiled, and the channel roundness error, channel wall thickness difference, and parallelism error of channel to end face at the contact between the inner and outer rings are measured by high-precision measuring instruments, as shown in
Figure 11, and the recording results are shown in
Table 3.
All measured values are compared based on the tolerance limits of rolling bearings specified in ISO 492 and ISO 1132 [
21]. As long as the deviation between the model prediction and the actual measurement results does not exceed ±10%, it is considered to meet the engineering requirements.
Measurements were carried out using a Taylor Hobson 565 roundness tester, a Mitutoyo LSM-902 wall thickness gauge, and a custom-made parallelism test fixture. For each bearing type, 20 samples were tested, and each sample was measured three times repeatedly.
According to
Table 3, the radial and axial runout model results of the rings of bearing 7020C can be obtained from Equations (9)–(12), and
Table 4 shows the calculation results and test results.
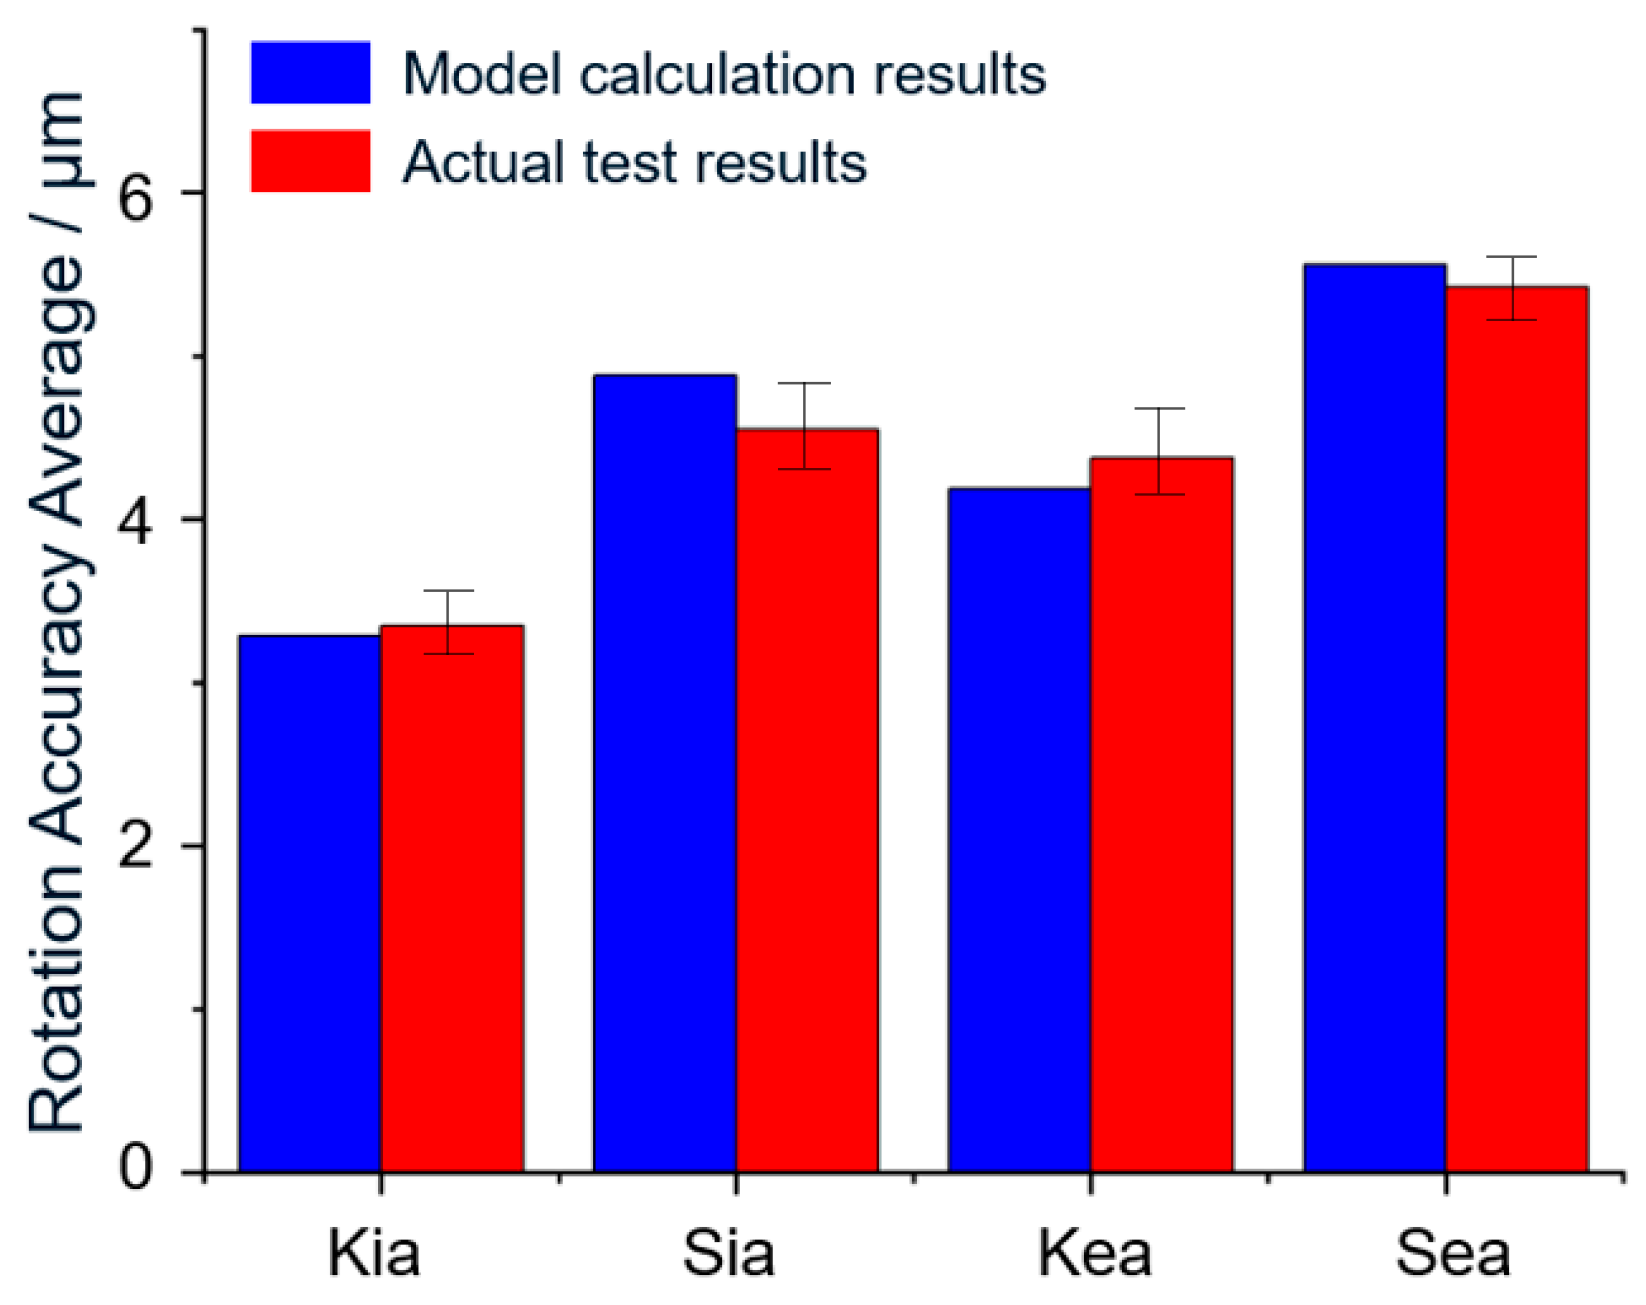
The comparison figure between the calculation results of the radial and axial jump models of the inner and outer rings of bearing 7020C/P4 and the actual test results is shown in
Figure 12.
In
Figure 12, the errors between the model calculation results and the measured results are 1.8%, 7.2%, 4.0%, and 2.4%, respectively, and the errors are all less than 10%. It can be considered that the model calculation results are in good agreement with the measured results, and the model calculation is accurate and effective.
Figure 9 shows that the axial runout is slightly greater than the radial runout, and the rotation accuracy error of the outer ring is greater than the rotation accuracy error of the inner ring, which also explains from the side why high-precision rotating equipment generally prefers shaft rotation over shell rotation.
The rotation accuracy of bearings with different contact angles is verified by the same method, and the model calculation and actual measurement verification of bearings 7020AC/P4, 7020A/P4, and 7020B/P4 are carried out. The average value of model calculation results, the average value of measured results, and error analysis are shown in
Table 5.
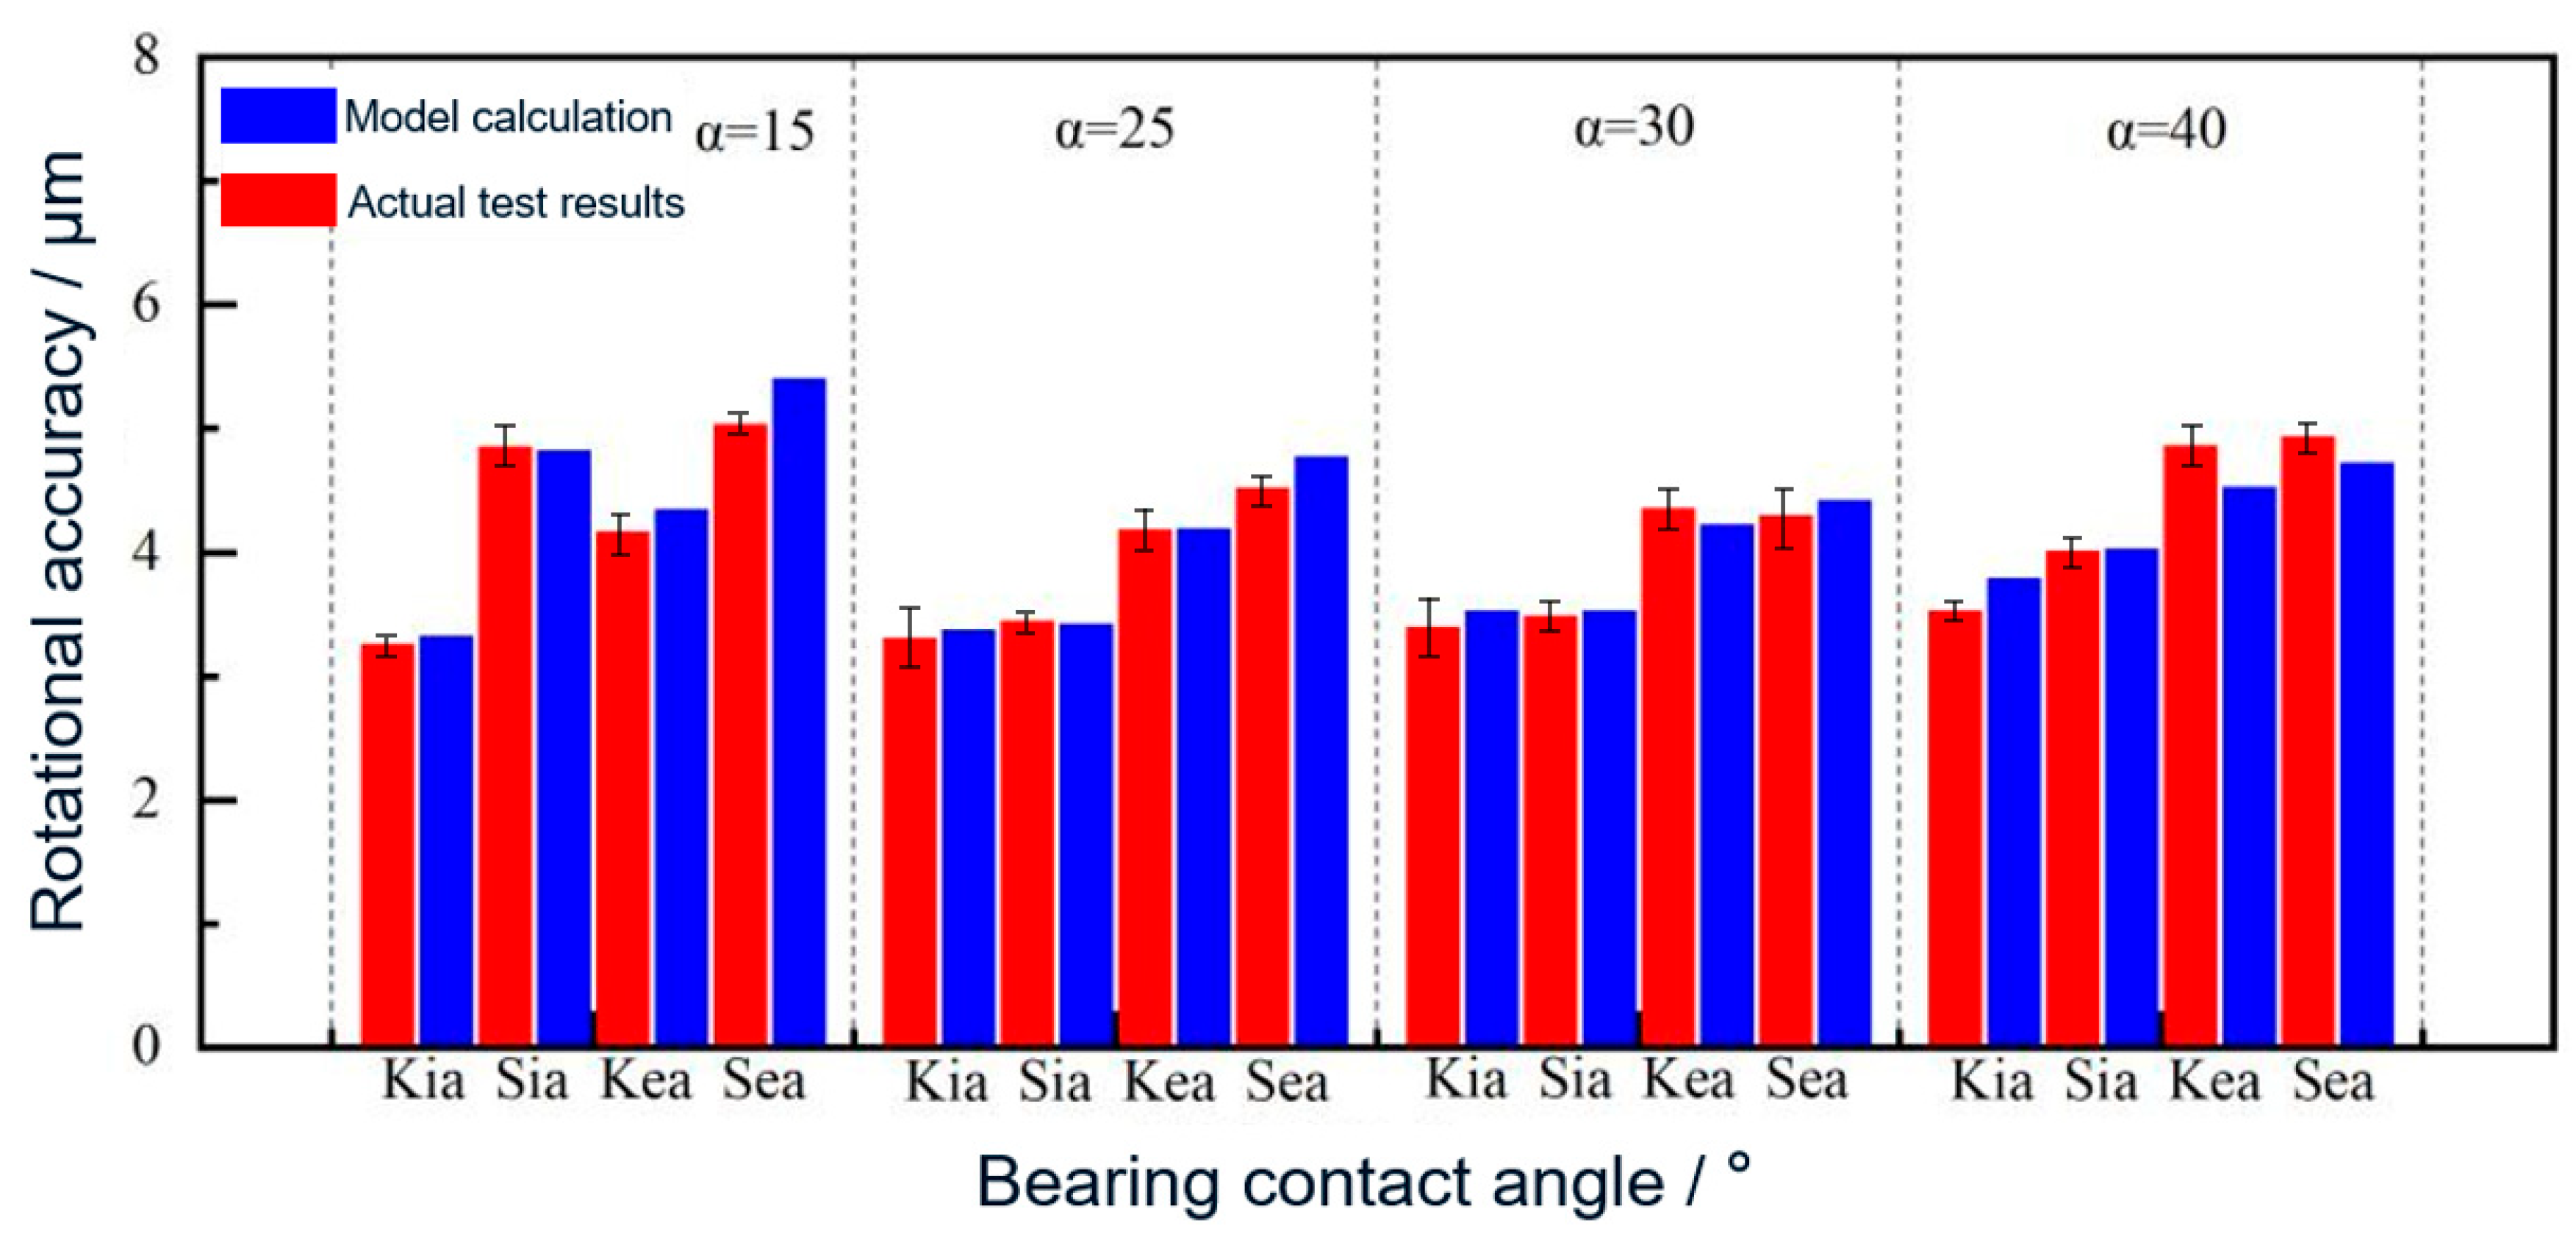
The comparison figure between the calculation results and the actual test results of the radial and axial jump models of the inner and outer rings of the bearings with different contact angles is shown in
Figure 13.
From
Figure 13, the error between the model calculation results and the measured results is less than 7.5%. The model calculation results are in good agreement with the measured results, and the model calculation is accurate and effective. The figure shows that the axial runout of bearings 7020C/P4 and 7020AC/P is slightly larger than the radial runout, while the axial runout of bearings 7020A/P4 is basically equal to the radial runout, and the axial runout of bearings 7020B/P4 is smaller than the radial runout. This result proves the correctness of the law that the influence of channel roundness error on axial runout decreases with the increase in contact angle analyzed by the model. In addition, it can also be seen from the figure that with the increase in contact angle, the radial runout of the bearing also increases, and the rotation accuracy error of the outer ring is always greater than that of the inner ring, which is not affected by the contact angle.
ANOVA results showed that contact angle had a statistically significant effect on axial runout Sia and Sea (p < 0.05), while its effect on radial runout Kia and Kea was not significant (p > 0.05). This indicates that increasing the contact angle significantly reduces axial runout but does not notably influence radial runout.
4.3. Optimization Analysis and Verification of Rotation Accuracy
Assuming that the rotation accuracy requirement indexes Kia0, Sia0, Kea0, and Sea0 of the bearing are 3.5 μm, 4 μm, 4.5 μm, and 5 μm, respectively, Ke, Ki, Se, Si, Δ
Cre, and Δ
Cri are primarily selected according to Equation (18), and the matching is iteratively optimized repeatedly under the premise of considering the processing capacity of the equipment (satisfying
Cp ≥ 1), and the optimal group is actually selected for production. In this study, bearing 7020C/P4 (contact angle 15°) is taken as the object to compare the improvement of rotation accuracy before and after optimization, and bearing 7020B/P4 (contact angle 40°) is taken as the reference to analyze the influence of contact angle change on rotation accuracy optimization. The deviation range (maximum value of the model) and optimal deviation group (actual selected value) selected after model optimization are shown in
Table 6.
According to
Table 6, the qualified rate statistics of bearing rotation accuracy after optimization control are shown in
Table 7. From
Table 7, it can be seen that before optimization control, the selection of bearing deviation group is very unreasonable, and the qualified rate is very low, especially the qualified rate of axial rotation accuracy is only 25%. After optimization, the bearing accuracy is obviously improved, but based on the limited processing capacity of equipment (
Cp < 1), it still cannot fully meet the target accuracy requirements (Sea qualified rate is 96%). When the large contact angle structure is adopted, the accuracy fully meets the requirements (all qualified rates are 100%), and its
Cp values are above 1.
Table 8 shows in detail the obvious differences in the requirements of equipment process capability index between the two structural bearings in the actual processing process, especially the parameter Cer, which increases the equipment capacity by 30%. Therefore, the larger contact angle can better meet the processing requirements, significantly improve the equipment processing capacity index, and improve the production efficiency.
5. Conclusions
In this study, the influencing factors and control measurement of rotation accuracy of ACBBs are deeply studied, and the error influence mechanism and transmission law are obtained. The rotation accuracy control strategy of batch manufacturing precision ACBBs is put forward. One-way ANOVA confirmed that contact angle exerts a significant influence on axial runout (p < 0.05), validating the model’s prediction that larger contact angles reduce axial runout. The main research conclusions are as follows:
(1) Based on the principle of error superposition, this paper establishes a prediction and optimization model of ACBBs rotation accuracy error considering the machining capacity of equipment. The research shows that the roundness error of the bearing channel, the thickness difference in the bearing ring wall, and the parallelism error of the channel to the end face are the main influencing factors of the bearing rotation accuracy Kia, Sia, Kea, and Sea. The influence coefficient of channel roundness error on axial runout (Sia, Sea) decreases rapidly with the increase in contact angle, while the influence coefficient on radial runout (Kia, Kea) remains constant; the rotation accuracy error of the outer ring is always greater than that of the inner ring, which is not affected by the contact angle, and the radial runout of the bearing increases with the increase in the contact angle.
(2) This study takes ACBBs 7020C/P4, 7020AC/P4, 7020A/P4, and 7020B/P4 (four conventional contact angles 15°, 25°, 30°, and 40°) as examples to verify the experiment. The error between the model calculation results and the actual detection results is less than 7.5%. The actual machining proves that the structure with larger contact angle requires lower equipment process capability index Cp, especially the corresponding parameter Cer, and the equipment capability index Cp is equivalent to an increase of 30%.
(3) ACBBs is one of the most classic structures of high-speed rolling bearing, and its rotation accuracy directly determines the machining accuracy of the main machine. In actual production, the precise control of bearing rotation accuracy is one of the technical problems in the batch manufacturing of ACBBs. The research results in this paper will surely further promote the improvement of production manufacturing technology. This model has broad application prospects.
This approach offers practical advantages for industrial mass production of ACBBs in aerospace, high-speed machining, and medical devices. However, the model has been validated only for 7020 series ACBBs. Future research will extend the method to other bearing types and investigate the effects of lubrication and thermal deformation.
Author Contributions
Conceptualization and Writing—Original Draft, C.W. and L.H.; Methodology, D.W.; Software, X.L. and H.W.; Formal Analysis, D.L. and G.C. All authors have read and agreed to the published version of the manuscript.
Funding
This research was funded by the Henan Province Science and Technology Development Plan Project of China (24210211033), National Natural Science Foundation of China (52505496), the Open Project of Anhui Province Key Laboratory of Critical Friction Pair for Advanced Equipment (LCFP-2512), and the Postdoctoral Fellowship Program of China Postdoctoral Science Foundation (GZC20250909).
Data Availability Statement
Data will be made available on request.
Acknowledgments
The authors have reviewed and edited the output and take full responsibility for the content of this publication.
Conflicts of Interest
Authors Dongfeng Wang and Huqiang Wang were employed by the Luoyang Bearing Science and Technology Co., Ltd. The authors declare no conflicts of interest.
Nomenclature
Function variable meaning:
| ae | Position of outer ring groove, mm |
| ai | Position of inner ring groove, mm |
| B | Inner ring width, mm |
| b | The amount of protrusion of the inner ring relative to the outer ring, mm; |
| D | Outer ring diameter, mm |
| d | Inner ring diameter, mm |
| De | Outer ring groove bottom diameter, mm |
| di | The diameter of the groove bottom of the inner ring, mm |
| Der | The diameter of the center of curvature of the outer ring channel, mm |
| dir | The diameter of the center of curvature of the inner ring channel, mm |
| Dw | Rolling element diameter, mm |
| f | Protrusion of the outer ring with respect to the inner ring, mm |
| Fa | Axial load, N |
| Fr | Radial load, N |
| K | Deviation coefficient |
| δ | Bulge amount, mm |
| ∆α | Contact angle deviation, ° |
| ∆ae deviation | Position deviation of outer ring groove, mm |
| ∆ai deviation | Position deviation of inner ring groove, mm |
References
- Bryan, J.; Clouser, R.; Holland, E. Spindle accuracy. Am. Mach. 1967, 111, 149–164. [Google Scholar]
- Wang, L.; Kong, X.; Yu, G.; Li, W.; Li, M.; Jiang, A. Error Estimation and Cross-Coupled Control Based on a Novel Tool Pose Representation Method of a Five-axis Hybrid Machine Tool. Int. J. Mach. Tools Manuf. 2022, 182, 103955. [Google Scholar] [CrossRef]
- Ebert, F. Fundamentals of design and technology of rolling element bearings. Chin. J. Aeronaut. 2010, 23, 123–136. [Google Scholar] [CrossRef]
- Yu, G.; Wang, L.; Wu, J.; Gao, Y. Milling stability prediction of a hybrid machine tool considering low-frequency dynamic characteristics. Mech. Syst. Signal Process. 2020, 135, 106364. [Google Scholar] [CrossRef]
- Noguchi, S.; Tanaka, K. Theoretical analysis of a ball bearing used in HDD spindle motors for reduction of NRRO. IEEE Trans. Magn. 1999, 35, 845–850. [Google Scholar] [CrossRef]
- Noguchi, S.; Ono, K. Reduction of NRRO in ball bearings for HDD spindle motors. Precis. Eng. 2004, 28, 409–418. [Google Scholar] [CrossRef]
- Yuan, X.; Zhu, Y.S.; Hong, J.; Zhang, Y.Y. Prediction of the influence of non-repeatable runout of precision ball bearings on spindle dynamic characteristics. J. Jilin Univ. Eng. Ed. 2012, 42, 382–387. [Google Scholar]
- Liu, J.; Hong, J.; Yang, Z.; Zhu, Y.; Li, X. Study on the rotation accuracy generation mechanism of high-speed precision angular contact ball bearings. J. Xi’an Jiaotong Univ. 2011, 45, 72–78. [Google Scholar]
- Hu, L.; Wang, Z.; Wang, J.; Wang, Y. Derivative analysis and evaluation of roll-slip fretting wear mechanism of ultra-thin-walled bearings under high service. Wear 2025, 562, 205630. [Google Scholar] [CrossRef]
- Hu, L.; Li, B.; Wang, Z.; Wang, Y. Analysis and evaluation of multi-state wear mechanism of elastic-flexible thin-walled bearings. Tribol. Int. 2025, 202, 110293. [Google Scholar] [CrossRef]
- Hu, L.; Pueh, L.H.; Wang, Z.; Wang, Y. Surface performance control and evaluation of precision bearing raceway with wireless sensing CBN grinding wheel. Wear 2025, 568, 205966. [Google Scholar] [CrossRef]
- Yu, Y.; Chen, G.; Li, J.; Xue, Y. A method to predict the radial runout of outer ring in cylindrical roller bearings. Adv. Mech. Eng. 2017, 9, 1–14. [Google Scholar] [CrossRef]
- Yu, Y.J.; Li, J.S.; Chen, G.D.; Liu, Y.G.; Xue, Y.J.; Song, F. Rotation accuracy of cylindrical roller bearings based on inner ring raceway profile. Acta Aerodyn. 2017, 32, 155–161. [Google Scholar]
- Yu, Y.; Chen, G.; Li, J.; Xue, Y. Effect of roller geometry error on rotational accuracy of cylindrical roller bearings. J. Northwestern Polytech. Univ. 2019, 37, 774–784. [Google Scholar] [CrossRef]
- Zhou, Y.; Xue, Y.; Yu, Y.; Pang, B. Analysis of the influence of raceway error on bearing rotation accuracy under load. Mech. Des. Manuf. 2019, 38–41, 46. [Google Scholar]
- Chen, Y.; Qiu, M.; Du, H.; Yang, X. Factors affecting rotation accuracy of four-point contact ball bearings for robots. China Mech. Eng. 2020, 31, 1678–1685, 1692. [Google Scholar]
- Ji, Y.; Zheng, H.; Wang, D.; Ma, X. Research on measurement method of rotation accuracy of angular contact ball bearings without assembly. Manuf. Technol. Mach. Tools 2023, 2, 175–180. [Google Scholar]
- Yu, G.; Wang, L.; Wu, J.; Wang, D.; Hu, C. Stiffness modeling approach for a 3-DOF parallel manipulator with consideration of nonlinear joint stiffness. Mech. Mach. Theory 2018, 123, 137–152. [Google Scholar] [CrossRef]
- Zhao, C.; Wang, D.; Yu, H.; Yu, P.; Yao, Y. Installation Methods for Precision Angular Contact Ball Bearings and Effect on Bearing Performance. Bearing 2021, 8, 54–58. [Google Scholar]
- MacMillan, W.R.; Irani, R.A.; Ahmadi, M. Planar image-space trajectory planning algorithm for contour following in robotic machining. CIRP J. Manuf. Sci. Technol. 2023, 42, 1–11. [Google Scholar] [CrossRef]
- Adamczak, S.; Gajur, M.; Kuźmicki, K. Use of geometrical product specifications in the structural design of second generation bearing hub unit. Transp. Res. Procedia 2023, 74, 486–492. [Google Scholar] [CrossRef]
Figure 1.
Kinematic relationship of ACBBs and their shafting system.
Figure 1.
Kinematic relationship of ACBBs and their shafting system.
Figure 2.
Measurement of rotation accuracy of ACBBs.
Figure 2.
Measurement of rotation accuracy of ACBBs.
Figure 3.
Mathematical model of bearing inner ring rotation accuracy.
Figure 3.
Mathematical model of bearing inner ring rotation accuracy.
Figure 4.
Roundness error and measurement method of bearing inner ring. (a) Diagram of roundness error of bearing inner ring. (b) Roundness meter and measurement method of bearing inner ring.
Figure 4.
Roundness error and measurement method of bearing inner ring. (a) Diagram of roundness error of bearing inner ring. (b) Roundness meter and measurement method of bearing inner ring.
Figure 5.
Measurement diagram of wall thickness error of bearing inner ring. (a) Overview of wall thickness error measurement of bearing inner ring. (b) Front view of wall thickness error measurement of bearing inner ring.
Figure 5.
Measurement diagram of wall thickness error of bearing inner ring. (a) Overview of wall thickness error measurement of bearing inner ring. (b) Front view of wall thickness error measurement of bearing inner ring.
Figure 6.
Schematic diagram of parallelism error of bearing inner ring groove to end face. (a) Top view of the measurement of the parallelism error of the channel to the end face. (b) Front view of the measurement of the parallelism error of the channel to the end face.
Figure 6.
Schematic diagram of parallelism error of bearing inner ring groove to end face. (a) Top view of the measurement of the parallelism error of the channel to the end face. (b) Front view of the measurement of the parallelism error of the channel to the end face.
Figure 7.
Schematic diagram of the instantaneous fluctuation of each clearance caused by the slight change in the raceway size. (a) Schematic diagram of minor changes in the outer ring. (b) Schematic diagram of instantaneous fluctuation of each clearance.
Figure 7.
Schematic diagram of the instantaneous fluctuation of each clearance caused by the slight change in the raceway size. (a) Schematic diagram of minor changes in the outer ring. (b) Schematic diagram of instantaneous fluctuation of each clearance.
Figure 8.
The rotation accuracy prediction and optimization process.
Figure 8.
The rotation accuracy prediction and optimization process.
Figure 9.
Effect of channel roundness error on axial runout and radial runout.
Figure 9.
Effect of channel roundness error on axial runout and radial runout.
Figure 10.
Effect of channel roundness error on axial runout with contact angle.
Figure 10.
Effect of channel roundness error on axial runout with contact angle.
Figure 11.
Measurement of bearing roundness.
Figure 11.
Measurement of bearing roundness.
Figure 12.
Comparison of calculation results and detection results.
Figure 12.
Comparison of calculation results and detection results.
Figure 13.
Comparison of calculation results and test results of rotation accuracy models of bearings with different contact angles.
Figure 13.
Comparison of calculation results and test results of rotation accuracy models of bearings with different contact angles.
Table 1.
Process capability index evaluation grading table.
Table 1.
Process capability index evaluation grading table.
| No. | | Grade | Determine | Tolerance Range on Both Sides T | Remark |
|---|
| 1 | ≥1.67 | Special grade | Excessive capacity | 10σ~ | Simplifies inspection, compression tolerances |
| 2 | 1.33~1.67 | Grade 1 | Sufficient capacity | 8σ~10σ | Simplifies detection |
| 3 | 1.0~1.33 | Grade 2 | Ability is acceptable | 6σ~8σ | Strictly control |
| 4 | 0.67~1.0 | Grade 3 | Inadequate capacity | 4σ~6σ | Strict control or sorting |
| 5 | ≤0.67 | Grade 4 | Serious lack of capacity | ~4σ | Replace equipment |
Table 2.
Typical model parameters.
Table 2.
Typical model parameters.
| Parameter | 7020C/P4 | 7020AC/P4 | 7020A/P4 | 7020B/P4 | Units |
|---|
| Outer diameter D | 150 | 150 | 150 | 150 | mm |
| Inner diameter d | 100 | 100 | 100 | 100 | mm |
| Outer ring channel diameter De | 137.736 | 137.888 | 137.990 | 138.244 | mm |
| Inner ring channel diameter di | 112.25 | 112.25 | 112.25 | 112.25 | mm |
| Radius of curvature of outer ring groove Re | 6.86 | 6.86 | 6.86 | 6.86 | mm |
| Radius of curvature of inner ring groove Ri | 7.11 | 7.11 | 7.11 | 7.11 | mm |
| Ball diameter Dw | 12.7 | 12.7 | 12.7 | 12.7 | mm |
| Contact angle a | 15 | 25 | 30 | 40 | ° |
Table 3.
Related test record sheet of bearing 7020C/P4.
Table 3.
Related test record sheet of bearing 7020C/P4.
| No. | Test Items (μm) |
|---|
| Ki | Si | Ke | Se | Cir | Cer |
|---|
| 1 | 1.5 | 2 | 2.5 | 3 | 0.653 | 0.978 |
| 2 | 2 | 2.5 | 2.5 | 2.5 | 0.659 | 0.865 |
| 3 | 1.5 | 2.5 | 3.5 | 3.5 | 0.562 | 0.834 |
| 4 | 3 | 2.5 | 2.5 | 2.5 | 0.432 | 0.863 |
| 5 | 1.5 | 1.5 | 3.0 | 3 | 0.612 | 0.976 |
| 6 | 2 | 2.5 | 2.5 | 2.5 | 0.659 | 0.865 |
| 7 | 2.5 | 2 | 2.5 | 2.5 | 0.653 | 0.978 |
| 8 | 2 | 1.5 | 2.5 | 2.5 | 0.337 | 0.830 |
| 9 | 1.5 | 1.5 | 2.5 | 2.5 | 0.452 | 0.778 |
| 10 | 2 | 2.5 | 2.5 | 2.5 | 0.459 | 0.765 |
| 11 | 1.5 | 2.5 | 3.5 | 3.5 | 0.712 | 0.975 |
| 12 | 3 | 2.5 | 2.5 | 2.5 | 0.411 | 0.975 |
| 13 | 1.5 | 2.5 | 3.5 | 3.5 | 0.653 | 0.902 |
| 14 | 1.5 | 2.5 | 2.5 | 2.5 | 0.559 | 0.865 |
| 15 | 1.5 | 2 | 2 | 3 | 0.653 | 0.878 |
| 16 | 2.5 | 1.5 | 2.5 | 2.5 | 0.501 | 0.865 |
| 17 | 1.5 | 2 | 3.5 | 3.5 | 0.603 | 0.698 |
| 18 | 1.0 | 2.5 | 2.5 | 2.5 | 0.502 | 0.865 |
| 19 | 1.5 | 1.5 | 2.5 | 3.5 | 0.653 | 0.728 |
| 20 | 2 | 2.5 | 3.5 | 2.5 | 0.659 | 0.895 |
| Average | 1.85 | 2.15 | 2.75 | 2.825 | 0.5692 | 0.8689 |
Table 4.
Calculation results and test results of bearing 7020C/P4 rotation accuracy model.
Table 4.
Calculation results and test results of bearing 7020C/P4 rotation accuracy model.
| No. | Calculation Results (μm) | Test Results (μm) |
|---|
| Kia | Sia | Kea | Sea | Kia | Sia | Kea | Sea |
|---|
| 1 | 3.131 | 5.0989 | 4.131 | 6.0989 | 3.5 | 5 | 4.5 | 5 |
| 2 | 3.524 | 5.3956 | 4.024 | 5.3956 | 3 | 4.5 | 4 | 5.5 |
| 3 | 2.896 | 5.1524 | 4.896 | 6.1524 | 3.5 | 5 | 4.5 | 6 |
| 4 | 4.295 | 4.9605 | 3.795 | 4.9605 | 3.5 | 4.5 | 4 | 5.5 |
| 5 | 3.088 | 4.5172 | 4.588 | 6.0172 | 3.5 | 5 | 4.5 | 5 |
| 6 | 3.524 | 5.3956 | 4.024 | 5.3956 | 3 | 4 | 5 | 5.5 |
| 7 | 4.131 | 5.0989 | 4.131 | 5.5989 | 3.5 | 4.5 | 4 | 5 |
| 8 | 3.167 | 3.7173 | 3.667 | 4.7173 | 2.5 | 4 | 4 | 5.5 |
| 9 | 2.73 | 3.837 | 3.73 | 4.837 | 3.5 | 5 | 4.5 | 5 |
| 10 | 3.224 | 4.8256 | 3.724 | 4.8256 | 2.5 | 4 | 5 | 5.5 |
| 11 | 3.187 | 5.7053 | 5.187 | 6.7053 | 3.5 | 4.5 | 4.5 | 6 |
| 12 | 4.386 | 5.1334 | 3.886 | 5.1334 | 4 | 4 | 4 | 5.5 |
| 13 | 3.055 | 5.4545 | 5.055 | 6.4545 | 3.5 | 4.5 | 4.5 | 4.5 |
| 14 | 2.924 | 5.2056 | 3.924 | 5.2056 | 3.5 | 5 | 5 | 5.5 |
| 15 | 3.031 | 4.9089 | 3.531 | 5.9089 | 3.5 | 4.5 | 4.5 | 5 |
| 16 | 3.866 | 4.0954 | 3.866 | 5.0954 | 3.5 | 4 | 5 | 5.5 |
| 17 | 2.801 | 4.4719 | 4.801 | 5.9719 | 3.5 | 5 | 4.5 | 6.5 |
| 18 | 2.367 | 5.0973 | 3.867 | 5.0973 | 3.5 | 4.5 | 3.5 | 5.5 |
| 19 | 2.881 | 4.1239 | 3.881 | 6.1239 | 3.0 | 4.5 | 4.5 | 5.5 |
| 20 | 3.554 | 5.4526 | 5.054 | 5.4526 | 3.5 | 5 | 3.5 | 5.5 |
| Average | 3.2881 | 4.88239 | 4.1881 | 5.55739 | 3.35 | 4.55 | 4.375 | 5.425 |
Table 5.
Calculation results and actual test results of rotation accuracy model of bearings with different contact angles.
Table 5.
Calculation results and actual test results of rotation accuracy model of bearings with different contact angles.
| Bearing Model | Average of Model Calculation Results (μm) | Average of Actual Test Results (μm) | Error (%) |
|---|
| Kia | Sia | Kea | Sea | Kia | Sia | Kea | Sea | Kia | Sia | Kea | Sea |
|---|
| 7020C/P4 | 3.28 | 4.88 | 4.19 | 5.06 | 3.35 | 4.85 | 4.375 | 5.425 | 2.1 | 0.6 | 4.2 | 6.7 |
| 7020AC/P4 | 3.33 | 3.47 | 4.21 | 4.54 | 3.4 | 3.45 | 4.215 | 4.8 | 2.1 | 0.6 | 0.1 | 5.4 |
| 7020A/P4 | 3.42 | 3.51 | 4.38 | 4.32 | 3.55 | 3.55 | 4.25 | 4.45 | 3.7 | 1.1 | 3.1 | 2.9 |
| 7020B/P4 | 3.55 | 4.04 | 4.89 | 4.96 | 3.82 | 4.05 | 4.55 | 4.75 | 7.1 | 0.2 | 7.5 | 4.4 |
Table 6.
Optimization results of rotation accuracy model Before and after comparison of rotational accuracy models.
Table 6.
Optimization results of rotation accuracy model Before and after comparison of rotational accuracy models.
| Bearing Model | Items | Deviation Optimization Combination (μm) |
|---|
| Ki | Si | Ke | Se | Cir | Cer |
|---|
| 7020C/P4 | Model Max | 2.47 | 2.04 | 3.47 | 3.04 | 0.48 | 0.55 |
| Actual selection value | 2.00 | 2.00 | 3.00 | 2.50 | 0.50 | 0.60 |
| Actual Cp value | 1.06 | 1.00 | 1.33 | 1.10 | 0.92 | 0.92 |
| 7020B/P4 | Model Max | 2.00 | 2.90 | 3.00 | 3.90 | 0.60 | 0.90 |
| Actual selection value | 2.00 | 2.50 | 3.00 | 3.50 | 0.60 | 0.90 |
| Actual Cp value | 1.06 | 1.20 | 1.33 | 1.33 | 1.10 | 1.20 |
Table 7.
Optimization results of rotation accuracy model.
Table 7.
Optimization results of rotation accuracy model.
| Pass Rate Before Optimization | Kia | Sia | Kea | Sea |
|---|
| 7020C/P4 of before optimization | 80.00 | 25.00 | 80.00 | 25.00 |
| 7020C/P4 of after optimization | 100.00 | 98.00 | 100.00 | 96.00 |
| 7020B/P4 of after optimization | 100.00 | 100.00 | 100.00 | 100.00 |
Table 8.
Effect of different contact angles on process capability index.
Table 8.
Effect of different contact angles on process capability index.
| Processing Capacity Improvement | Different Contact Angle Cp Value |
|---|
| Kia | Sia | Kea | Sea | Cir | Cer |
|---|
| 7020C | 1.00 | 1.00 | 1.30 | 1.10 | 0.92 | 0.92 |
| 7020B | 1.00 | 1.20 | 1.30 | 1.30 | 1.1 | 1.2 |
| Cp uplift (%) | 0 | 20 | 0 | 20 | 19.5 | 30 |
| Disclaimer/Publisher’s Note: The statements, opinions and data contained in all publications are solely those of the individual author(s) and contributor(s) and not of MDPI and/or the editor(s). MDPI and/or the editor(s) disclaim responsibility for any injury to people or property resulting from any ideas, methods, instructions or products referred to in the content. |
© 2025 by the authors. Licensee MDPI, Basel, Switzerland. This article is an open access article distributed under the terms and conditions of the Creative Commons Attribution (CC BY) license (https://creativecommons.org/licenses/by/4.0/).
