1. Introduction
The forging industry in Germany holds significant importance. It annually manufactures approximately 1.4 million tons of parts components characterized by high strengths. These components are primarily used in safety-relevant products, particularly in the automotive sector [
1]. The forming process for these parts requires heating to temperatures starting at 900 °C. This process consumes about 3150 GWh of energy annually, a substantial portion of which is released unused into the surrounding air [
2].
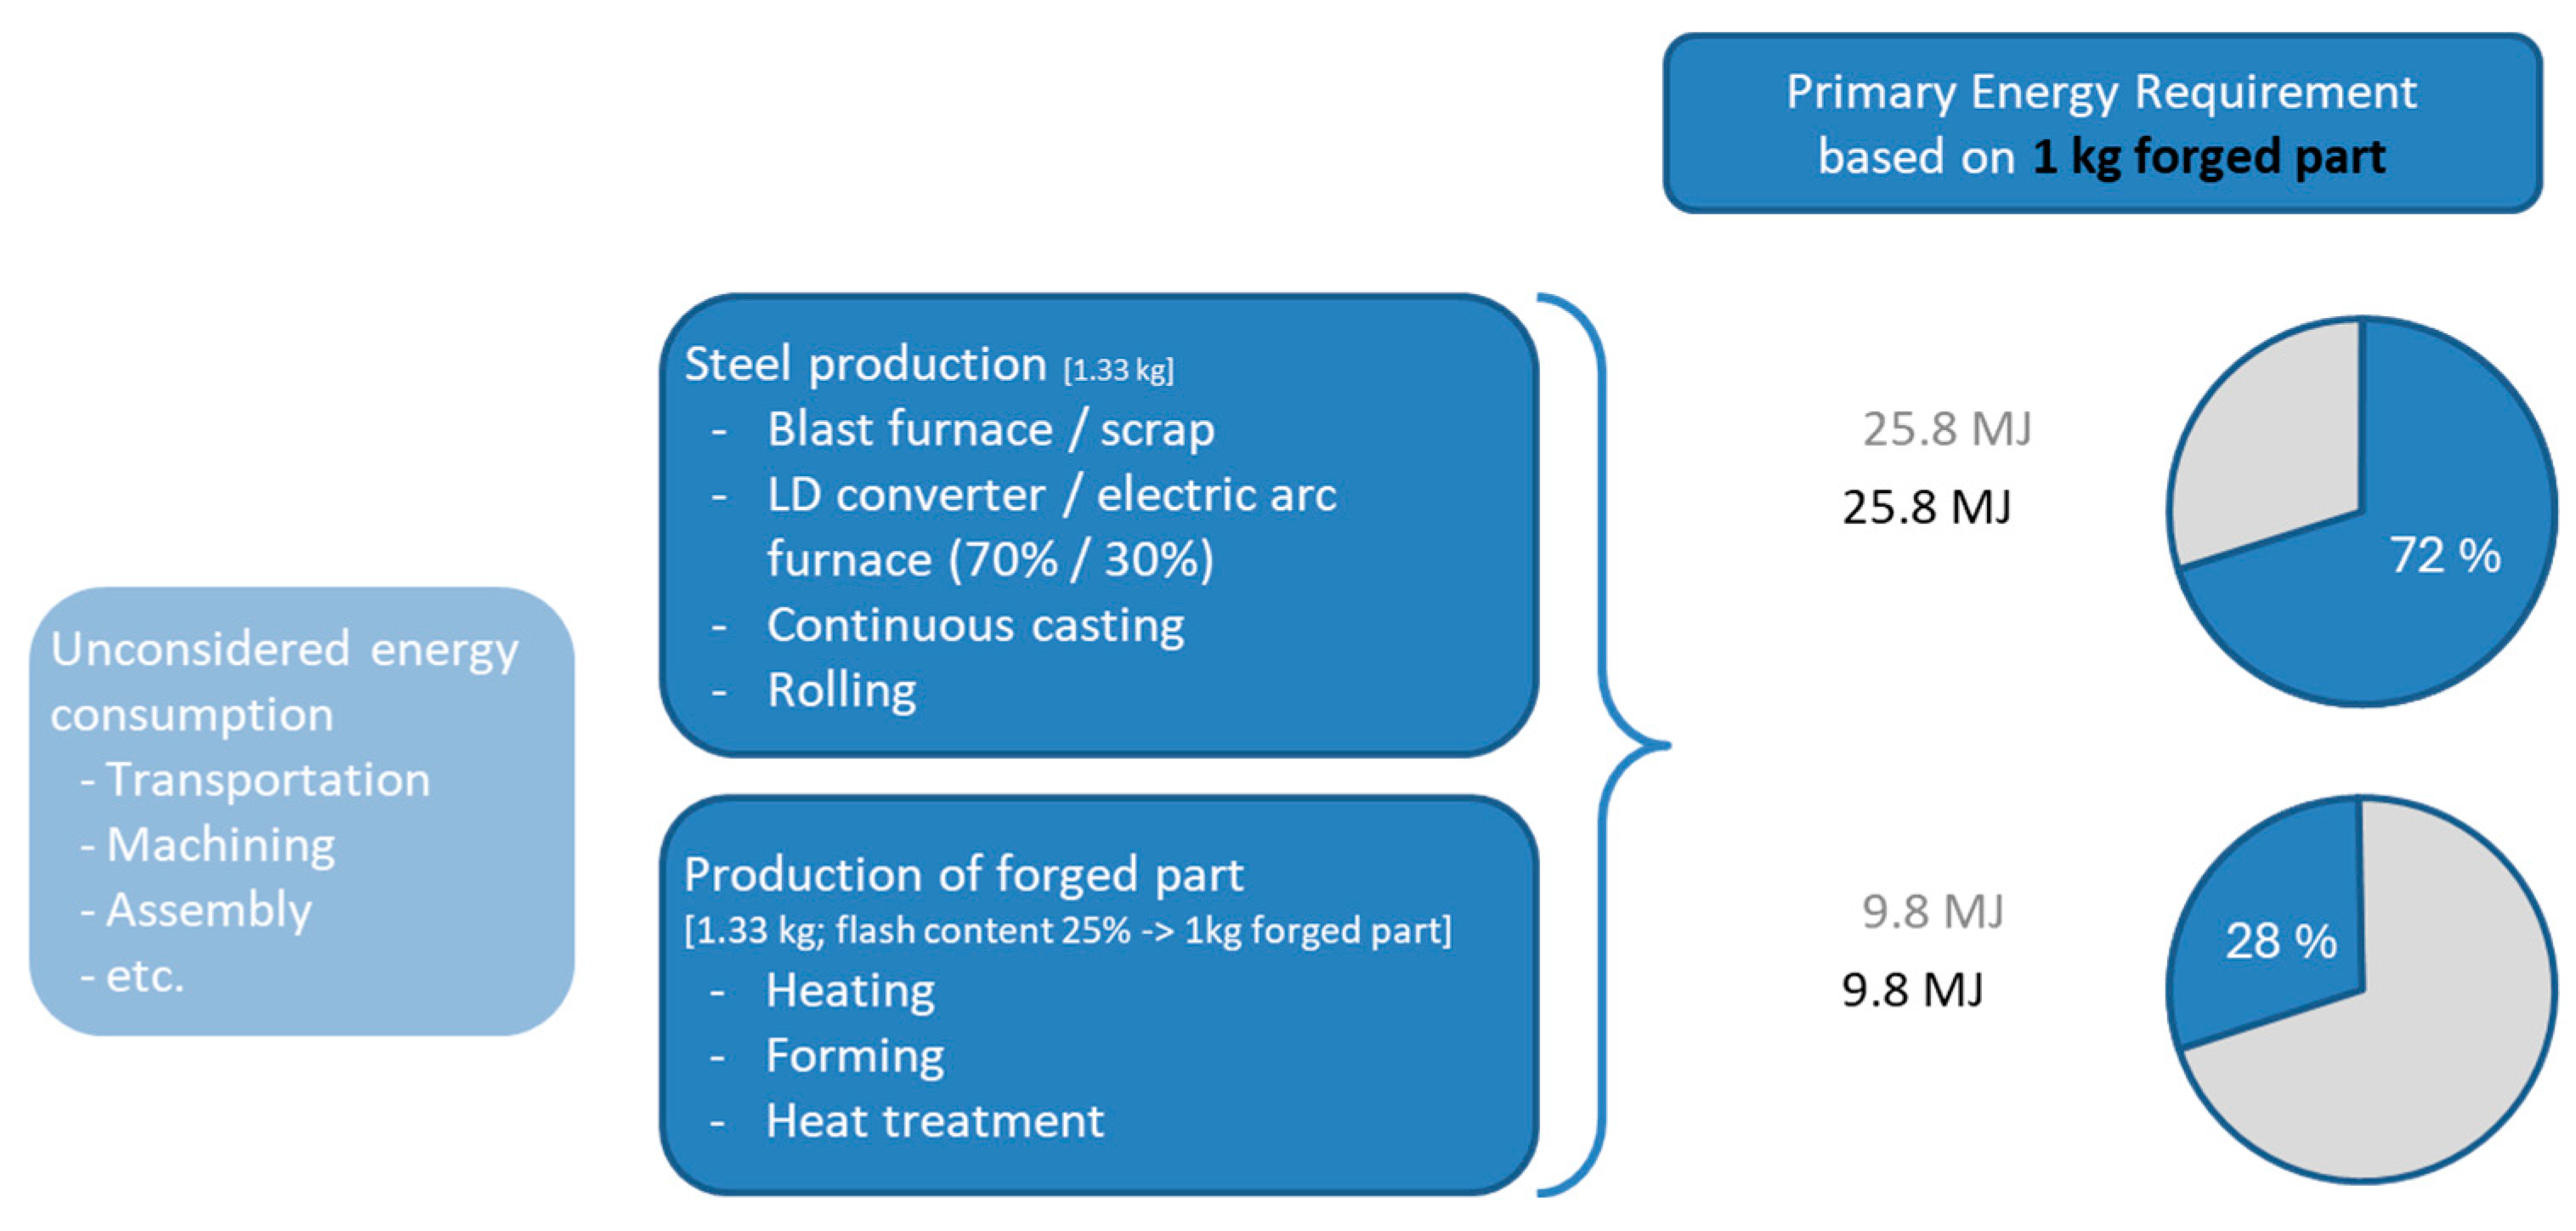
Approximately 30% of the total primary energy requirement for manufacturing these components is utilized in the production of a forged part. A significantly larger portion of energy is consumed in the extraction and processing of the raw material [
3]. The specific energy requirement per kilogram of a forged part is illustrated in
Figure 1 [
4].
The resulting CO
2 emissions were calculated using the FRED carbon footprint calculator and amount to 400,000 tons per year for material heating and 4,000,000 tons per year for steel production. With an average material loss of about 25%, the need for efficient resource utilization is highlighted from both economic and ecological perspectives. An increase in material efficiency can be achieved by optimizing product geometry, forming processes, and tooling technology. One specific measure is the improvement of mass distribution in early forming stages to reduce burr formation, potentially leading to significant savings [
5].
Cross-wedge rolling is an efficient method for producing rotationally symmetric preforms for die-forging. This technique, by efficiently utilizing materials, reduces the CO2 demand per component while simultaneously enhancing material properties. This process is suitable for both ferrous and non-ferrous metals and can be applied at various temperature ranges: cold, semi-warm, and warm.
2. Related Work
However, the Mannesmann effect, which is specifically used to produce seamless pipes by cross-wedge rolling, is an unwanted defect in cross-wedge rolling. It is caused by material-related influences such as inclusions during raw material production, selected process parameters, and cyclically changing plastic deformations. Hydrostatic tensile stresses in the center of the workpiece and torsional shear stresses at the cross-sectional transitions of the different outside diameters also have an effect. Predicting this damage is a major challenge because, despite the widespread use of the finite element method (FEM) in process design, no reliable and generally applicable failure criteria are yet available [
6].
The limits of cross-wedge rolling include visible surface defects and internal damage, such as cracks or cavities, which are known as the Mannesmann effect. This process-related damage occurs as a result of the material’s ability to change shape being exceeded. This situation has led companies to abandon preforming operations using cross-wedge rolling for smaller batch sizes due to safety concerns about the Mannesmann effect or to prefer the geometrically less accurate stretch rolling, which means that the full resource potential is not utilized. In the area of large batch sizes, on the other hand, the possible process limits and, thus, the full potential are not utilized, which leads to a waste of resources in the form of material and energy. The design of the process is complex and involves a high expenditure of resources [
3].
Simulation-based investigations by [
6] have calibrated the parameters of a damage model in order to achieve agreement with experimental data. Since such an adapted damage model cannot be transferred to other forming conditions with the necessary certainty, the process and tool parameters are often selected based on empirical values. However, this often leads to cost-intensive adjustments and additional set-up processes during the product start-up phase as a result of design errors. In addition, possible influences of different material batches on the material properties are not taken into account, as these are usually unknown [
6].
Important factors that influence the formation of cracks are the angles of the forming tools and the cross-section reduction ratio [
7]. The stress triaxiality in the workpiece center also plays a significant role in the development of damage [
8]. At high positive stress triaxialities, the damage is dominated by the formation, growth, and coalescence of cavities, while micro-shear fractures predominate at low positive or negative stress triaxialities [
9].
Optimizing the tool geometry and process parameters is crucial to minimize the risk of central cracks. For example, the use of multiple wedge tools can improve rolling conditions and reduce the tendency for material cracking if the tool parameters are selected correctly [
5].
In addition, simulation-based investigations have calibrated the parameters of a damage model in order to achieve agreement with experimental data. However, these models often have to be adapted as they cannot be transferred to other forming conditions with the necessary certainty. This often leads to cost-intensive adjustments and additional set-up processes during the product start-up phase as a result of design errors [
6].
The prediction and control of damage in cross-wedge rolling is complex and requires the consideration of various process parameters and damage criteria. However, optimizations and the development of new models and algorithms have enabled significant progress that can contribute to improving material efficiency and product quality.
3. Objective
Previous investigations and literature research have shown that cross-wedge rolling is a promising process for the efficient production of rotationally symmetrical parts. However, the prediction and control of central cracks and internal damage remains a major challenge that can significantly affect the integrity and quality of the produced parts. The central damage in cross-wedge rolling is mainly caused by the formation, growth, and coalescence of micro-cavities as well as stresses in the workpiece center [
7,
8,
9].
There are various models and criteria for predicting crack formation, such as the Cockcroft-Latham criterion, the Oyane-Sato criterion, and the Johnson-Cook model [
10]. However, these models need to be adjusted through precise calibration tests to enable reliable predictions. Advances in optimization, such as the development of a genetic algorithm, have shown that significant improvements can be achieved through targeted adjustment of the process parameters [
5].
Based on these findings, this work aims to develop and validate a safe and effective design criterion for cross-wedge rolling tools.
3.1. Development of a New Calibration Test
An experimental test will be developed based on the rotating compression of the component to accurately determine the critical damage values. This test will be applied to different steel grades to extend the range of prediction models. It is expected that this approach will reduce the previous uncertainties in damage prediction and thus enable more reliable process control.
3.2. Creation of Process Maps
Process maps for different materials are created that depict the relevant tool and process parameters and their influence on the damage to the material. These maps are validated by experimental data. This enables a comprehensive evaluation of the process parameters and their effects, which in turn contributes to the optimization of tools and processes.
3.3. Implementation and Validation
The practical applicability of the developed models and criteria is tested through extensive testing and validation in industrial practice. This includes cooperation with industrial partners to test and validate the developed approaches in real production environments. These tests ensure that the solutions developed are not only theoretically sound but also fulfill the practical requirements and can, therefore, significantly increase resource efficiency in forging. The aim is to minimize the environmental impact through reduced material losses and lower CO2 emissions while at the same time improving production quality.
This work should, therefore, make a significant contribution to reducing the environmental impact by utilizing the resource potential of cross-wedge rolling to the experimentally determined limits.
4. Materials and Methods
This chapter describes in detail the methods and experimental procedures used to develop and validate a safe design criterion for cross-wedge rolling tools.
4.1. Deriving the Problem-Describing Similarity Variables
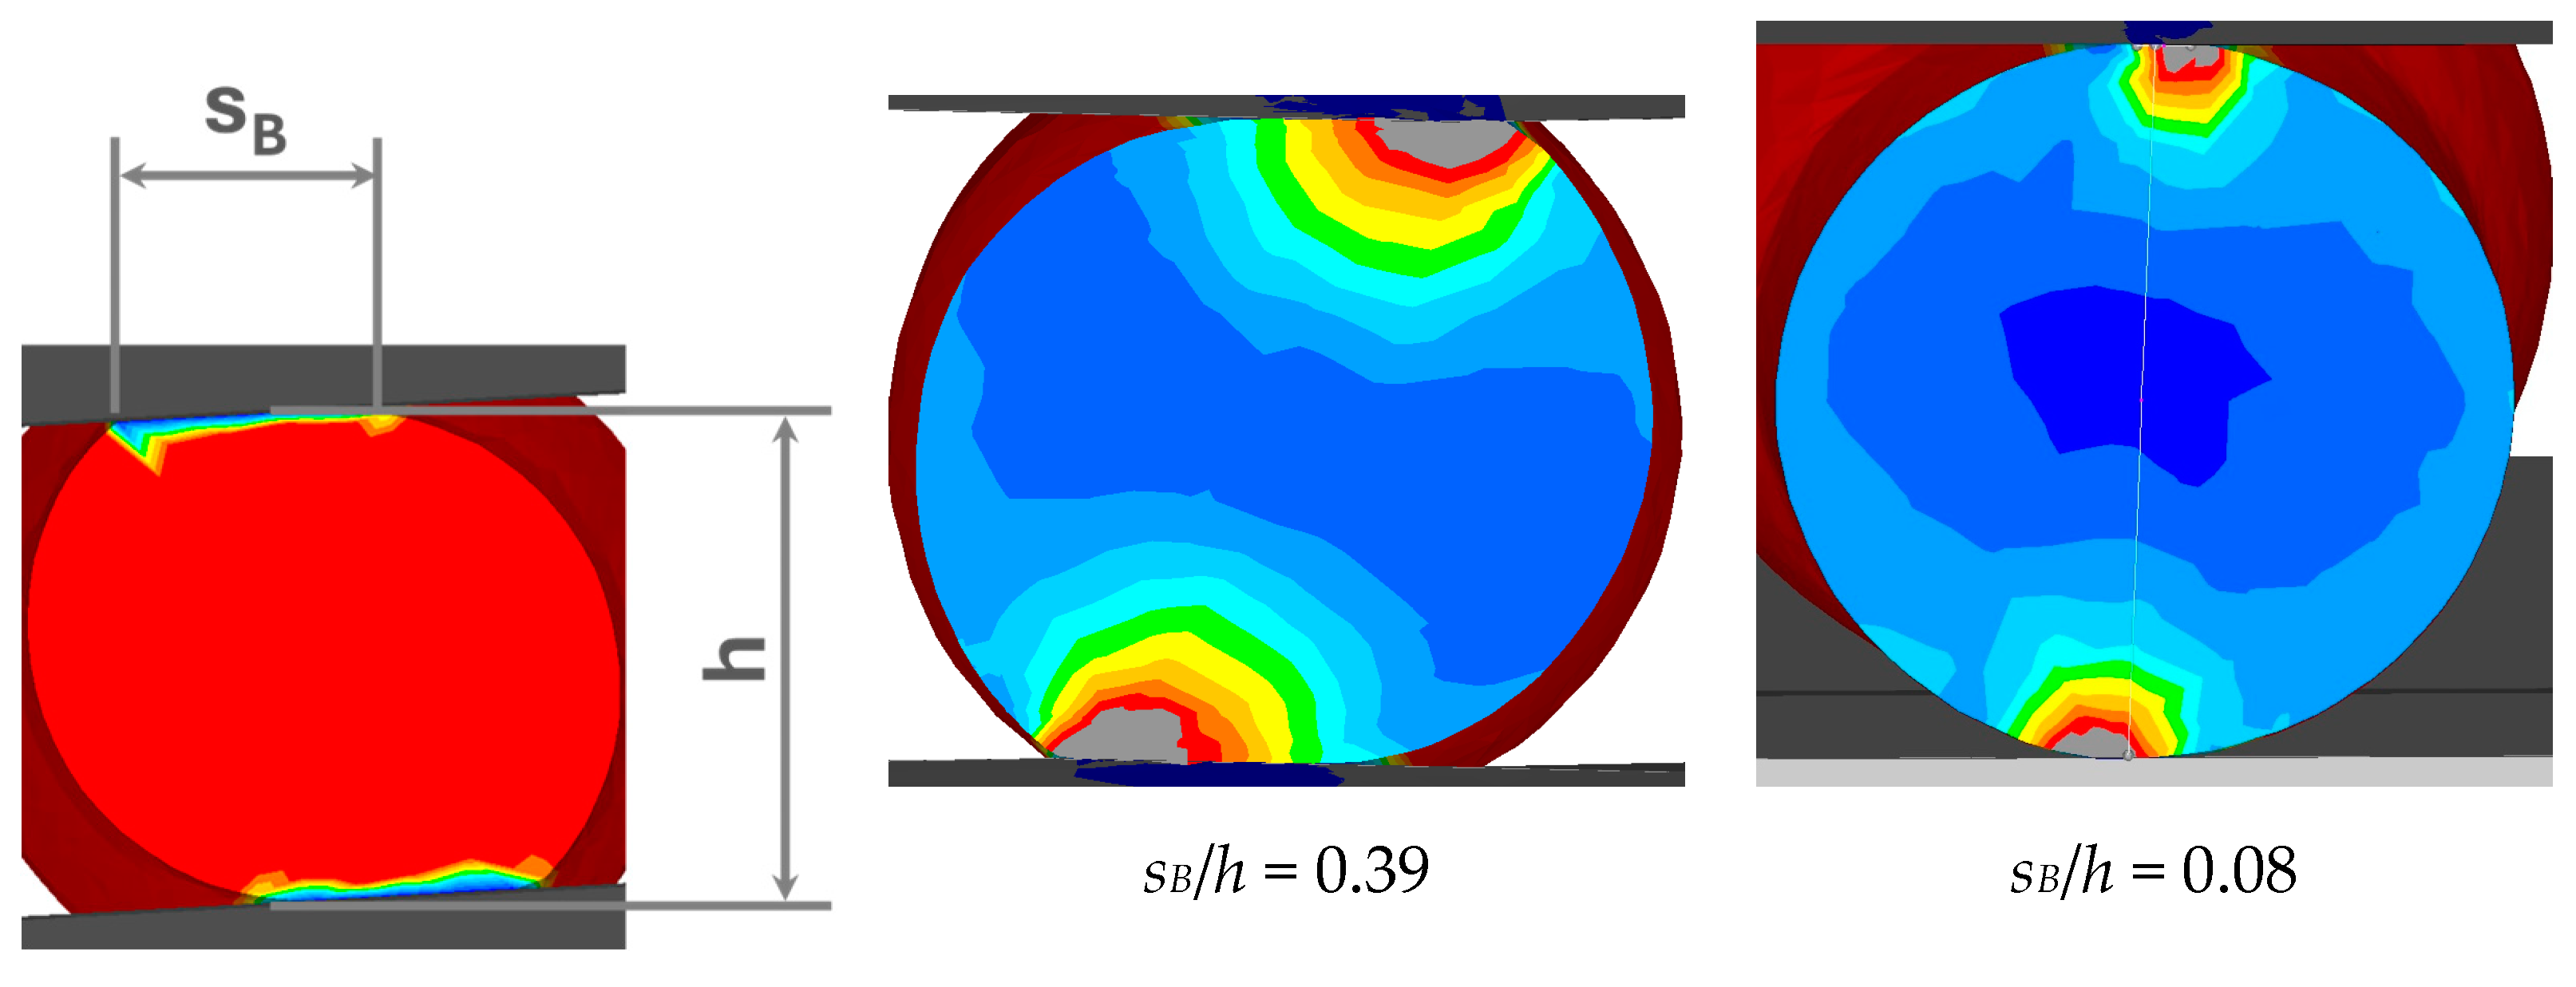
As previously mentioned, the Mannesmann effect occurs as a result of the deformation capacity being exceeded, based on alternating plastic deformations and cyclical tensile stresses in the core. The stress state during forming along the axis of rotation of the workpiece is significantly influenced by the diameter reduction of the bite ratio
sB/
h (
Figure 2) [
3].
The smaller the bite ratio, the greater the tensile stresses in the core of the rolled product. A high number of rollovers intensifies this effect. The following approach for a damage model can be derived from these findings:
Here, ΔS denotes the progress of the damage, which is a function of the number of rollovers i, the stress state σm, the forming temperature T, the Fourier coefficient Fo, and the material W.
The number of rollovers depends on the required reduction in diameter and the tool length
L required for this. This can be described as follows:
The overrolled tool length
L is divided into the stretching zone and calibration zone, whereby the main forming takes place in the stretching zone and thus forms the critical production section. The dimensionless variable
n can be derived with the aid of the damage variables, the number of rollovers, and the stress state:
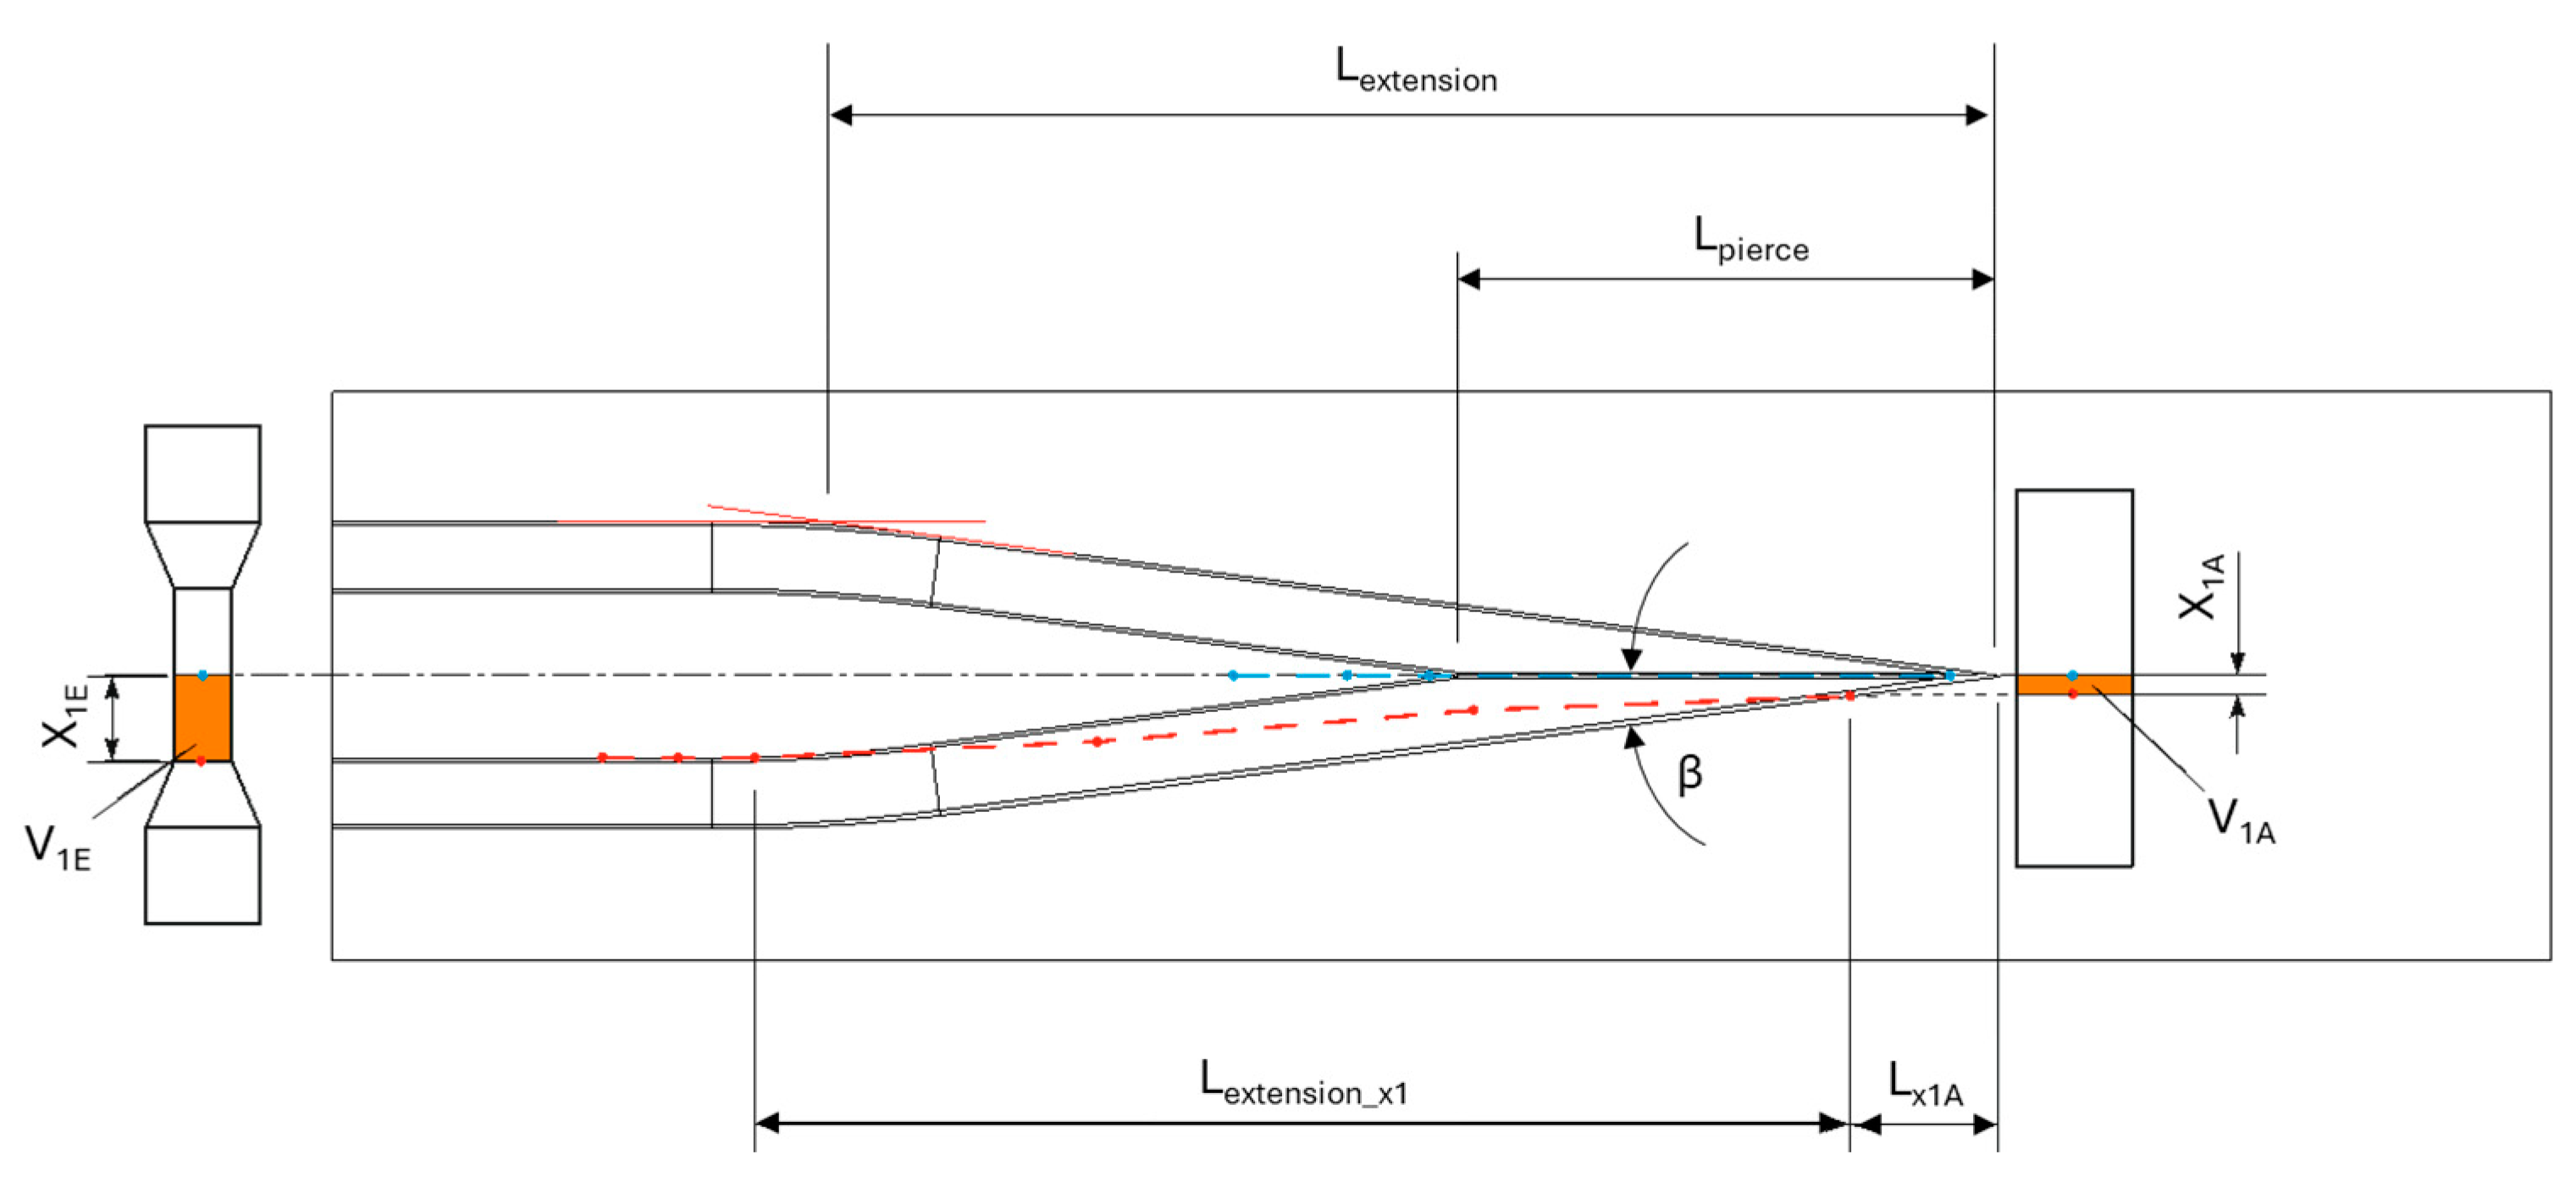
The parameter
x1E describes the observation point on the rolled workpiece according to
Figure 3. This shows that the dimensionless variable
n reflects a function of the following specific influencing parameters:
Product parameters:
- ▪
Initial diameter d0
- ▪
Diameter reduction εd
- ▪
Length factor λ
Tool parameters:
- ▪
Wedge angle β
- ▪
Shoulder angle α
- ▪
Type of wedge geometry (wedge effect on one or both sides)
The reduction of the diameter describes the ratio of the initial diameter to the target diameter (). The ratio of the length of the reduced length to the reduced diameter is described by the length factor .
4.2. Determining the Practically Relevant Value Range of the Similarity Variables
The technically meaningful range of values for these variables for the following experimental investigations was defined by analyzing industrial rolling cases and their limit values. A cause-and-effect diagram (
Figure 4) was drawn up at the beginning.
The significance of the development of internal cracks was assessed on the basis of literature statements and empirical values from industrial practice.
As the diameter reduction increases, the number of internal defects [
11].
With increasing diameter, reduction increases the incidence of internal defects [
12].
There is currently no known correlation between the carbon alloy element content of the material and internal cracking. Sulfur content is critical for internal cracking [
13].
Small shoulder angles are worse than large shoulder angles [
14].
Large wedge angles are worse than small wedge angles [
11].
In semi-warm forming, small wedge angles are worse than large wedge angles [
12].
Internal cracking occurs predominantly at low temperatures (<1150 °C) [
15], respectively, at 850° and 950 °C, according to [
12].
Internal cracking tends to occur at low temperatures (C70S6, 16MnCrMo5, <1000 °C) for steels with high C content and also at temperatures at temperatures > 1200 °C [
13].
Lower die temperatures (20° instead of 120 °C) reduce the risk of internal cracking [
16].
Internal cracking occurs at low rolling speeds (<230 mm/s) [
15].
Internal cracks increase with increasing rolling speed (200–800 mm/s) [
17].
Based on this, a technically sound range of values was derived for the influencing variables. These are shown in
Table 1. They were used to design a test system for cross-wedge rolling.
4.3. Development, Production, Construction, and Validation of a Standard Test and Tool
A standard test rig for cross-wedge rolling was developed and implemented in order to experimentally determine the forming limit as a function of the key influencing variables. The required forces, power, and speeds were determined using simulations based on the finite element method, taking into account the mutually dependent influencing variables. One critical aspect, for example, was the required vertical speed, which places high demands on the test rig.
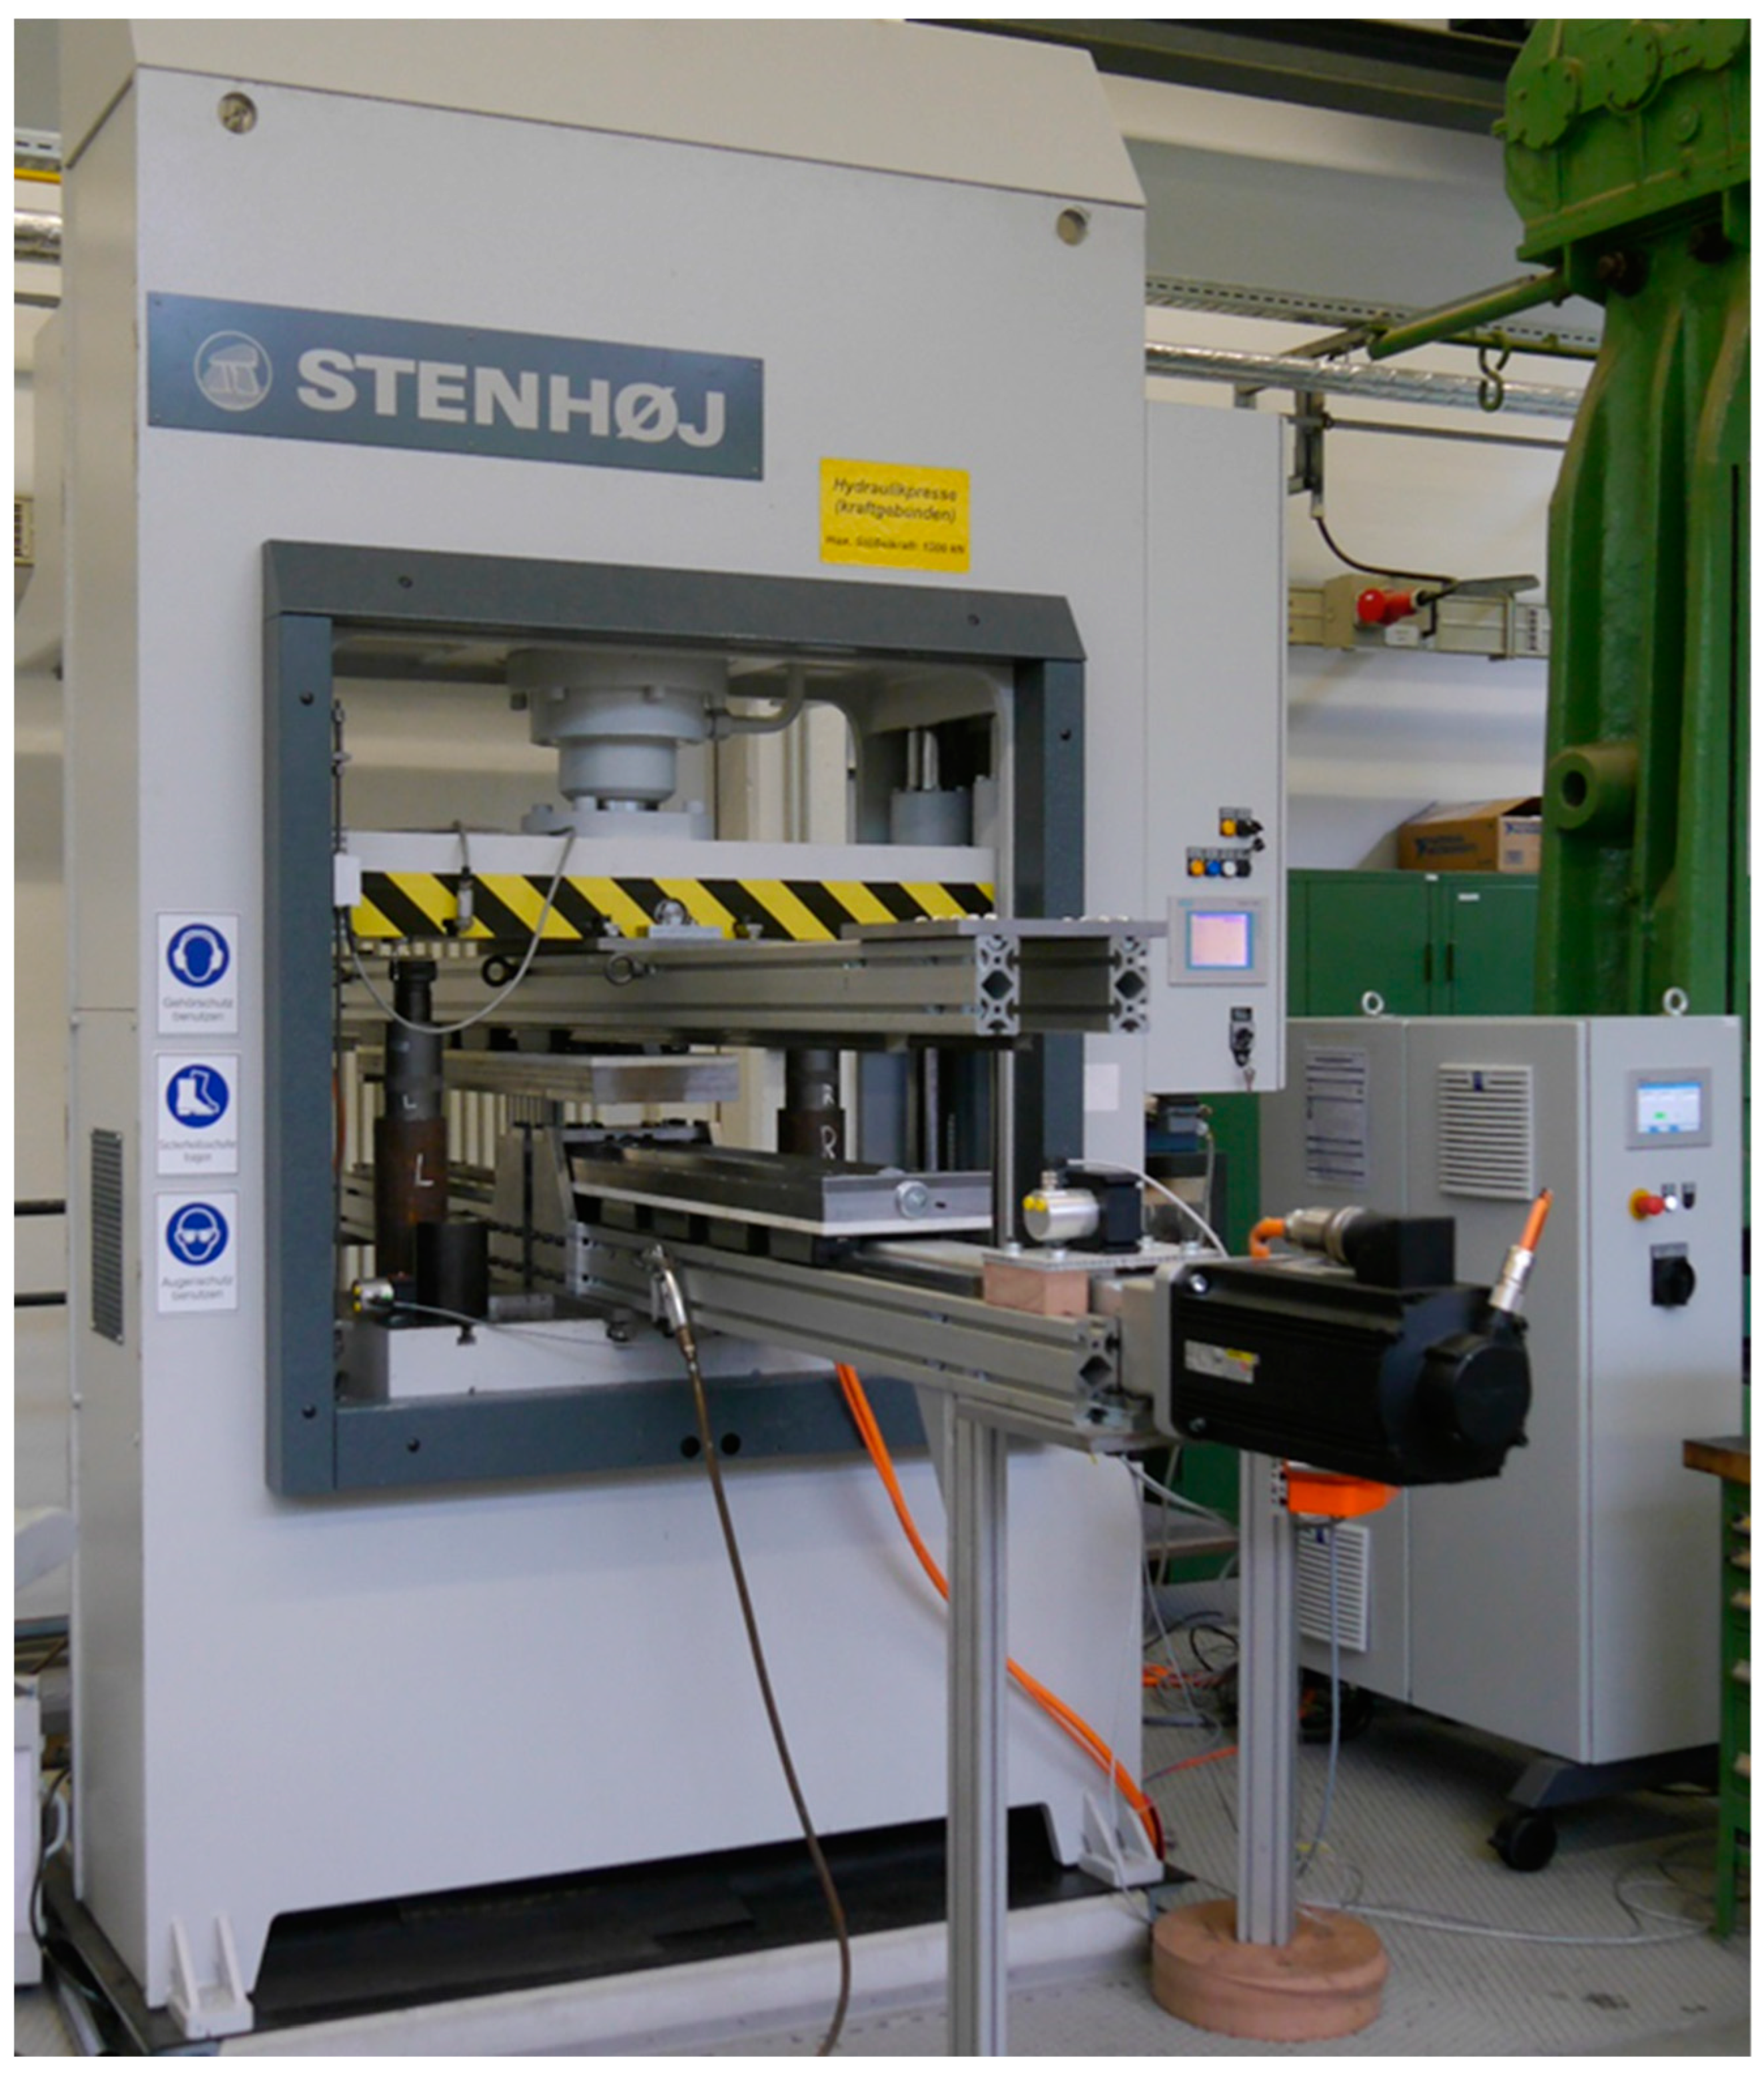
The test rig, which is shown in
Figure 5, was designed as a flat-jaw variant with two tool slides moving in opposite directions, which was integrated into an existing hydraulic press. The guide frame consists of a modular system made of aluminum profiles reinforced with steel plates at the points subject to high loads, as well as high-precision, heavy-duty linear guides for the horizontal movements of the upper and lower tools. These two drives are synchronized via the additional control system, which is decoupled from the hydraulic press. Furthermore, the control system enables a variable dependency between the vertical position and/or speed and the speed of the horizontal axes, which makes it possible to capture several characteristic map points with just one tool. The master function is responsible for the vertical infeed, which is performed by the hydraulic press. The position of the press ram is recorded via position sensors and transmitted to the control system of the CWR device to provide the start signal for the horizontal tool movement.
4.4. Selection and Testing of a Test Procedure for Fault Detection
To identify and quantify the internal cracks in the test specimens, a defect classification was first carried out based on known practical examples in order to determine the required test severity of the process and to create a specification sheet.
A market analysis was then carried out to identify suitable defect detection methods. The methods that stood out were digital X-ray inspection, three-dimensional cone beam computed tomography (3D CT), and optical measurement of the defect size by separating the test specimens.
The evaluation of the different test methods, which is shown in
Table 2, was based on the criteria of defect resolution, testing effort, and testing costs. The results are presented in
Table 3.
This led to the selection of optical measurement by cutting as the primary test method. This is characterized by a high defect resolution and low effort, as the test method is immediately available, and the test specimens can be inspected directly after cooling. However, the disadvantage is that the defects can only be viewed in two dimensions.
5. Test Execution
5.1. Preparation and Performance of the Experiments
To reduce the scope of the tests, test parameters were first compiled and their relevance assessed on the basis of experience. The parameters for which no or only uncertain findings were available were analyzed in preliminary tests.
The framework conditions and the support points for the respective parameters (
Table 4) were defined for the test plan, which was then created using the design of experiments (DoE) methodology. Compared to conventional single-factor experiments, the advantage of this method is that it minimizes the experimental effort while still achieving a high level of efficiency in terms of knowledge gain [
18].
A full-factorial test plan was chosen for the tests in order to capture all possible interactions between the different input variables. The result was a test plan with 32 tests per material. The size of the resulting internal cracks served as the target variable.
The number of repetitions per test point was set at five tests based on empirical scatter values in order to ensure meaningful and reliable results. With three steel materials, this results in a total of 480 test specimens. The samples were produced from different steel grades, including the low-alloyed carbon steel C45 and the two AFP steels 46MnVS5 and C70S6. Each batch of samples was prepared in a standardized manner and sawn to the required dimensions.
The rotating compression was carried out on a specially developed test rig. This test rig, which was described in detail in
Section 4.3, enabled precise control of the process parameters, including temperature, rotational speed, and compression force.
Temperature control: The samples were heated to the target temperature using an electric muffle furnace before compression began.
Rotation speed: The speed of the rotating compression was varied to investigate the effects of different loading rates on the development of damage.
Compression force: The applied force was continuously monitored and adjusted to achieve the desired degree of deformation.
The data obtained from the calibration tests was analyzed in order to create calibration curves for the various damage criteria. These curves are used to adjust the damage models and increase their prediction accuracy.
The full-factorial test plan was then carried out for the various steel materials with different diameters. These include the low-alloyed carbon steel C45 and the two AFP steels 46MnVS5 and C70S6. After the tests, the test specimens were thoroughly analyzed with regard to internal defects, surface quality, and geometry. For this purpose, all samples were inspected using optical measurement. In addition, digital X-ray testing was carried out on all samples of the materials C45 and 46MnVS5. Further investigations on selected cross-wedge rolled test specimens made of 46MnVS5 were analyzed using cone beam computed tomography.
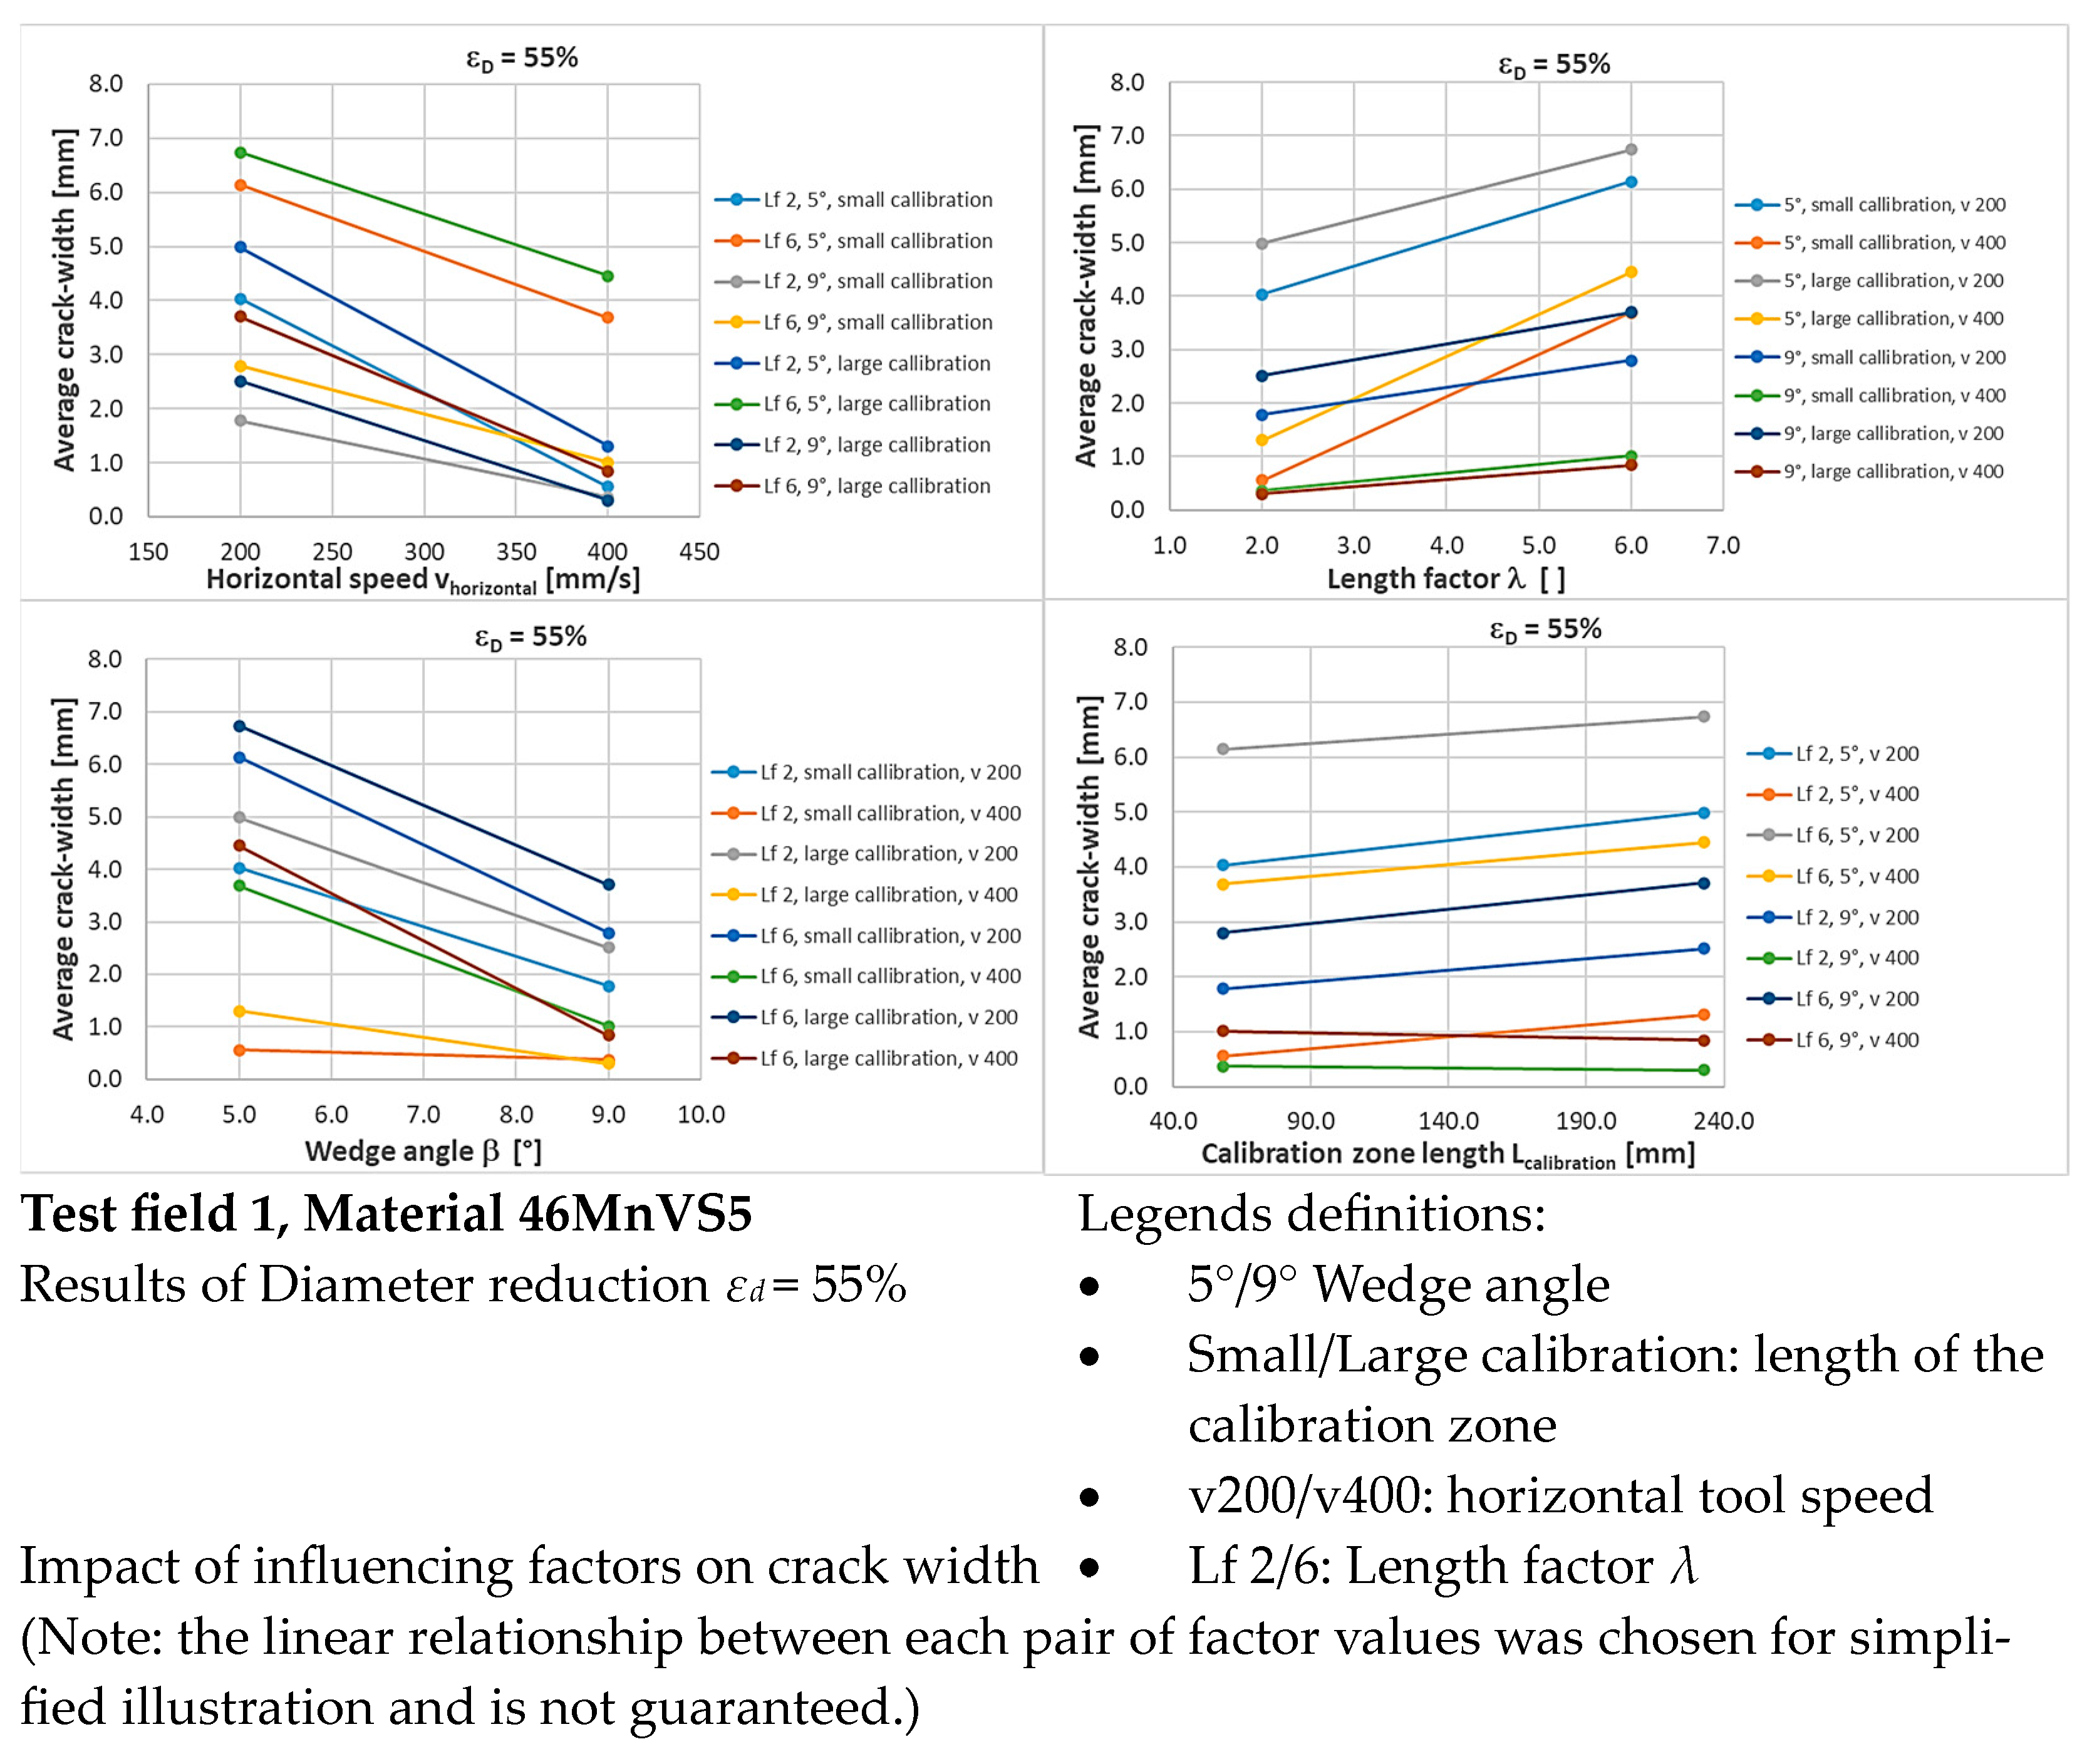
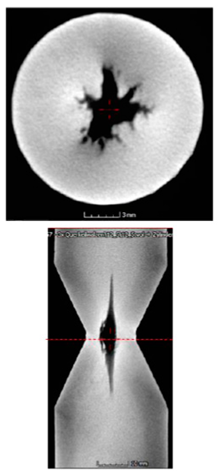
The material 46MnVS5 was examined in more detail, as significant internal cracks occurred in this material depending on the respective parameter combination. However, this only occurred at a diameter reduction of 55%, while no defects occurred at a reduction of 10%. The results are shown in
Figure 6. The statistical analysis in
Figure 7 confirms the clear influence of the diameter reduction.
Further tests on the other steel materials show that they have a significantly lower susceptibility to internal cracking, according to the Mannesmann effect.
In the tests on C45, cracks of a few tenths of a millimeter were only identified in 11 of 160 samples. Statistical analyses showed no significance. A higher number of defects (16 out of 160 samples) and larger cracks were found in C70S6 samples, but the statistical results were also not significant. However, there was a similar trend in the ranking of the influencing variables, as observed for 46MnVS5 in
Figure 7.
5.2. The Creation of Process Maps for Cross-Wedge Rolling
The creation of process maps for cross-wedge rolling follows a structured and methodical approach in order to precisely record and predict the damage to the material. The basis of the created maps is the dimensionless variable n, which is a measure of the number of rollovers and the diameter reduction per rollover of a reduced component area. The variable n thus represents the cyclic, critical load on the material caused by the bite ratio sB/h.
The dimensionless variable n is a function of the following influencing variables:
This variable
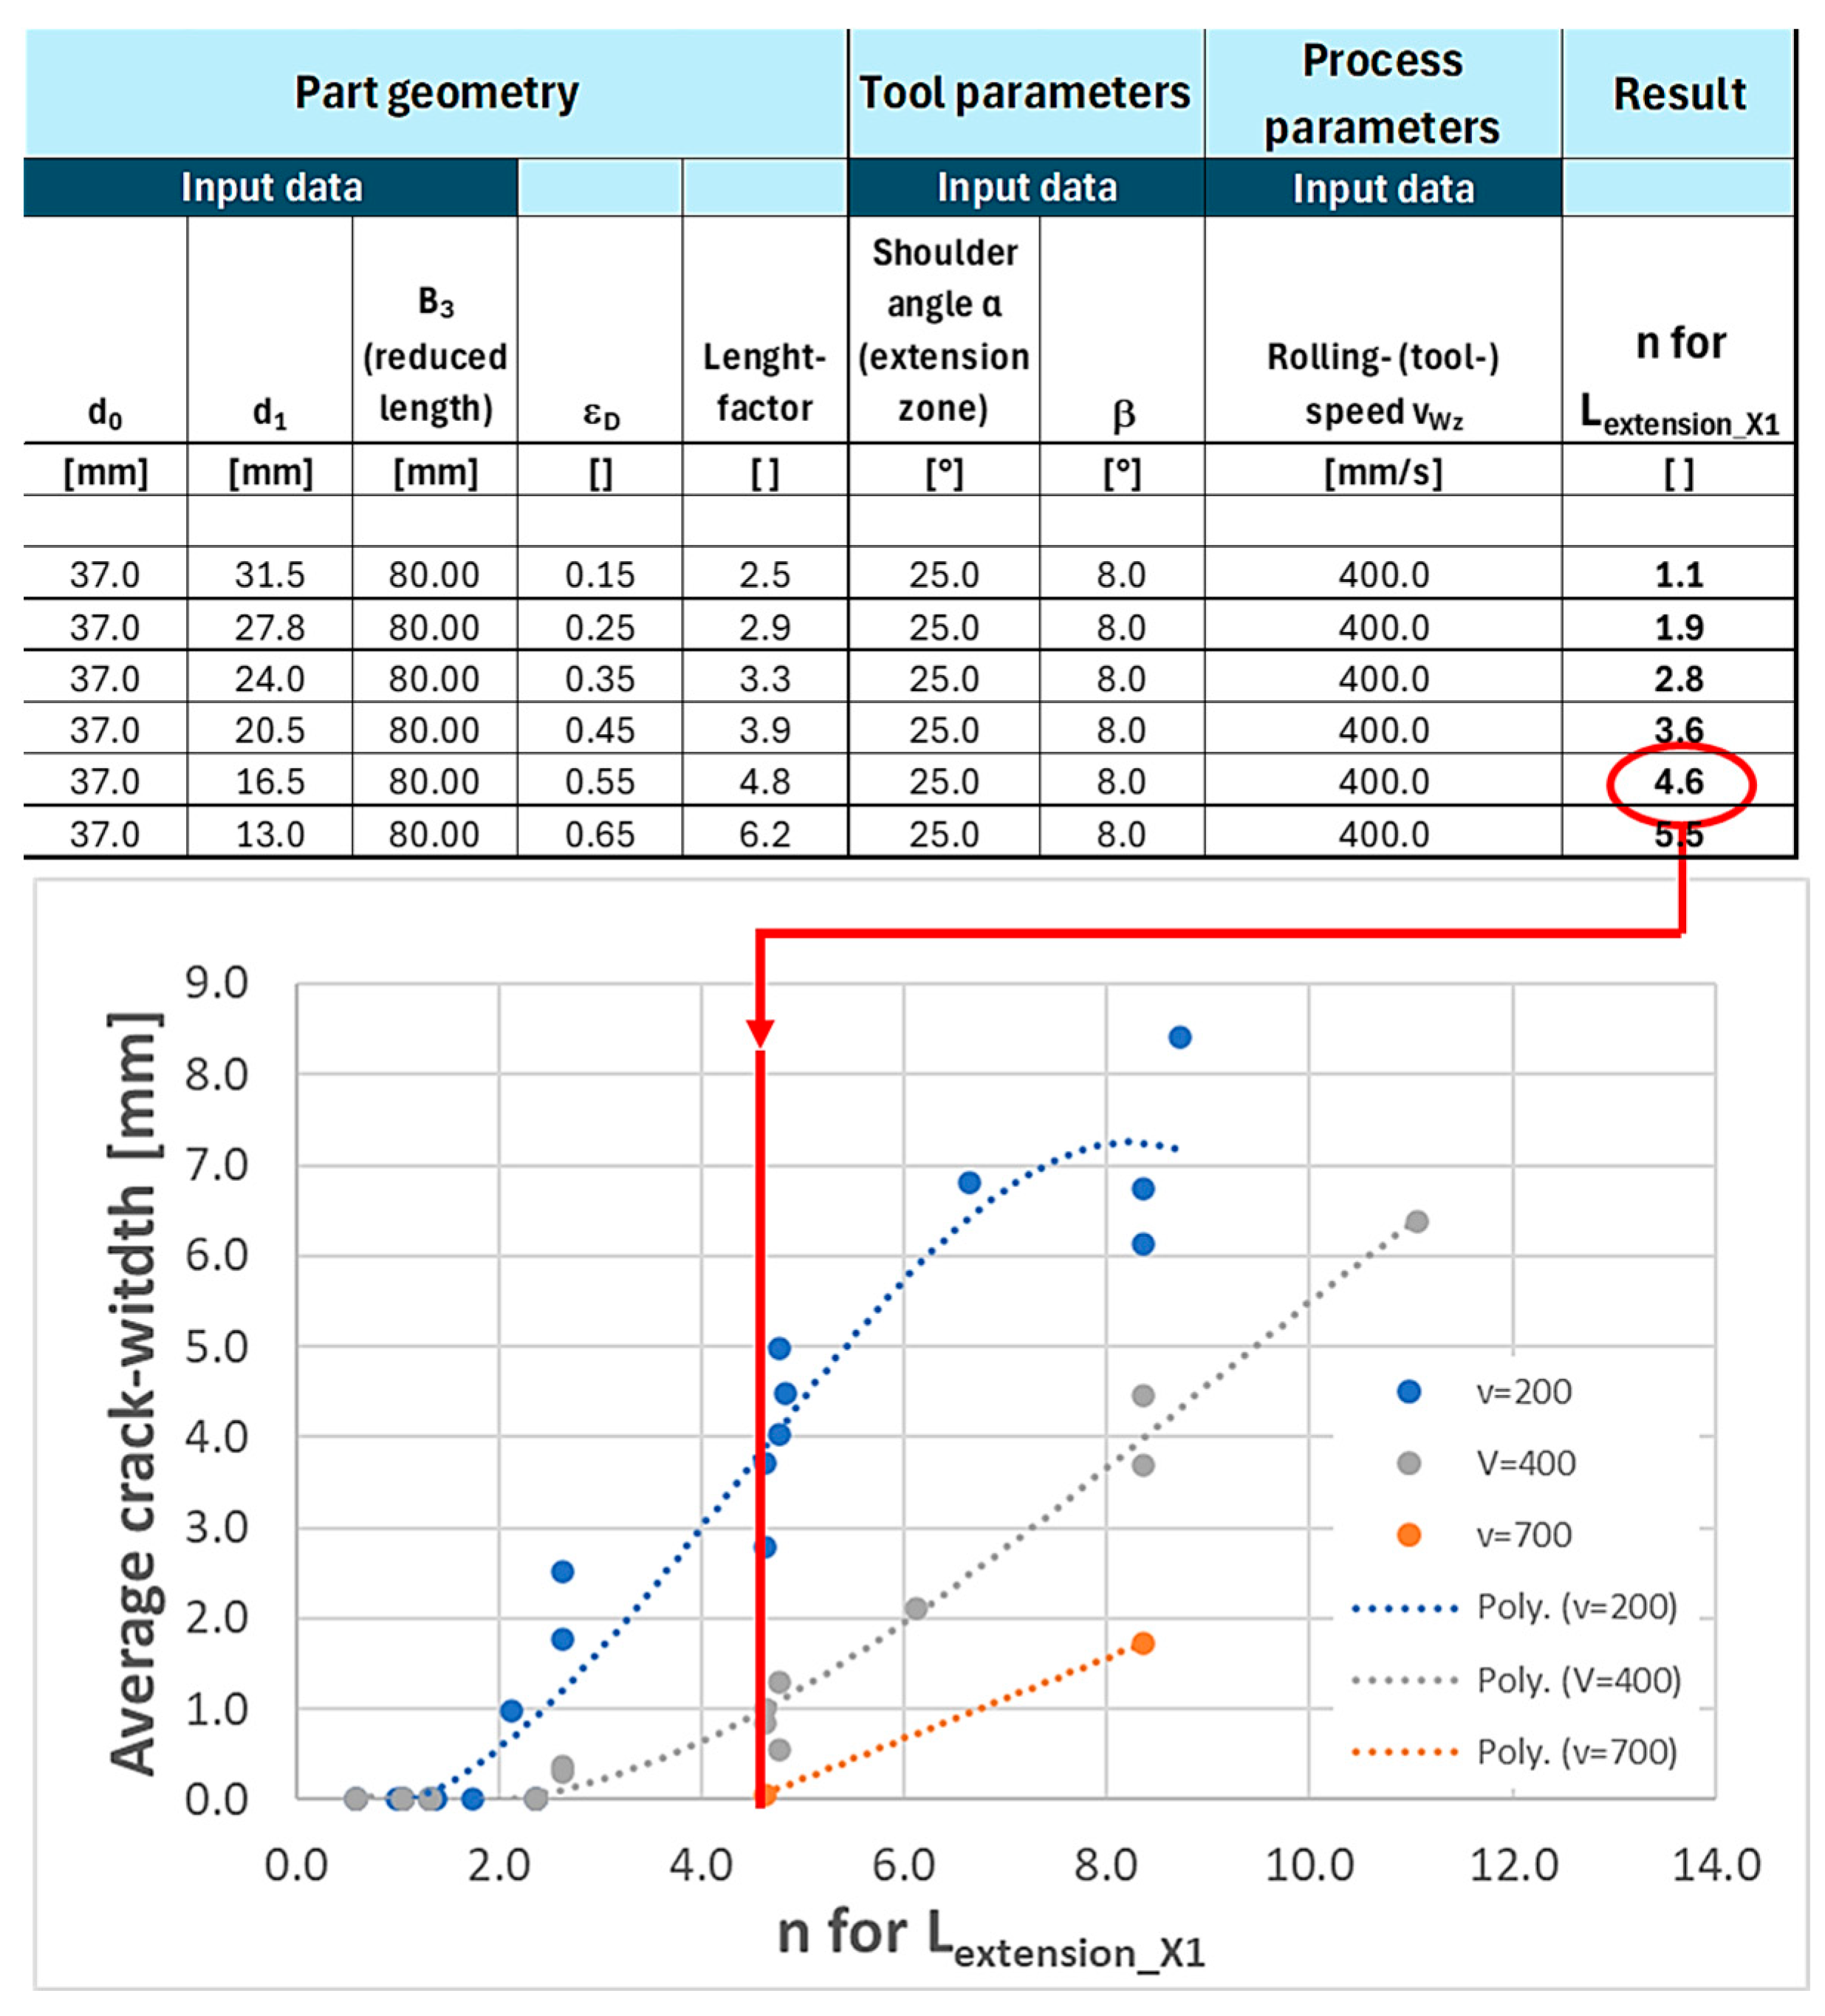
n makes it possible to summarize the main influencing variables and precisely map the cyclic, critical load on the material. A characteristic map consists of two main components: the characteristic field table and the characteristic field diagram (see
Figure 8). These components provide a practice-oriented representation that enables the user to optimally adapt the design of the CWR-tool parameters. The map table is structured as an active system based on an Excel file. By varying the component and/or tool parameters, it enables the user to directly estimate the effect on the variable
n and thus, depending on the tool speed, the risk and magnitude of internal cracks. The input values for the component geometry, the tool parameters, and the process parameters are listed in the characteristic diagram table and linked to the corresponding variable
n. The characteristic diagram is generated by experimental tests and shows the dependence of the size of the Mannesmann error (e.g., the mean value of the crack width) on the variable
n. This diagram makes it possible to graphically display the results of the calibration tests and the resulting damage. The characteristic diagram shows the size of the crack width as a function of the variable
n for different materials. The diagrams for the different materials show the sensitivity of the materials to the formation of internal cracks.
5.3. Penetration Test on an Aluminum Alloy
To investigate the applicability of the methodology and results of the standard test to other materials, a penetration test was performed on an aluminum alloy.
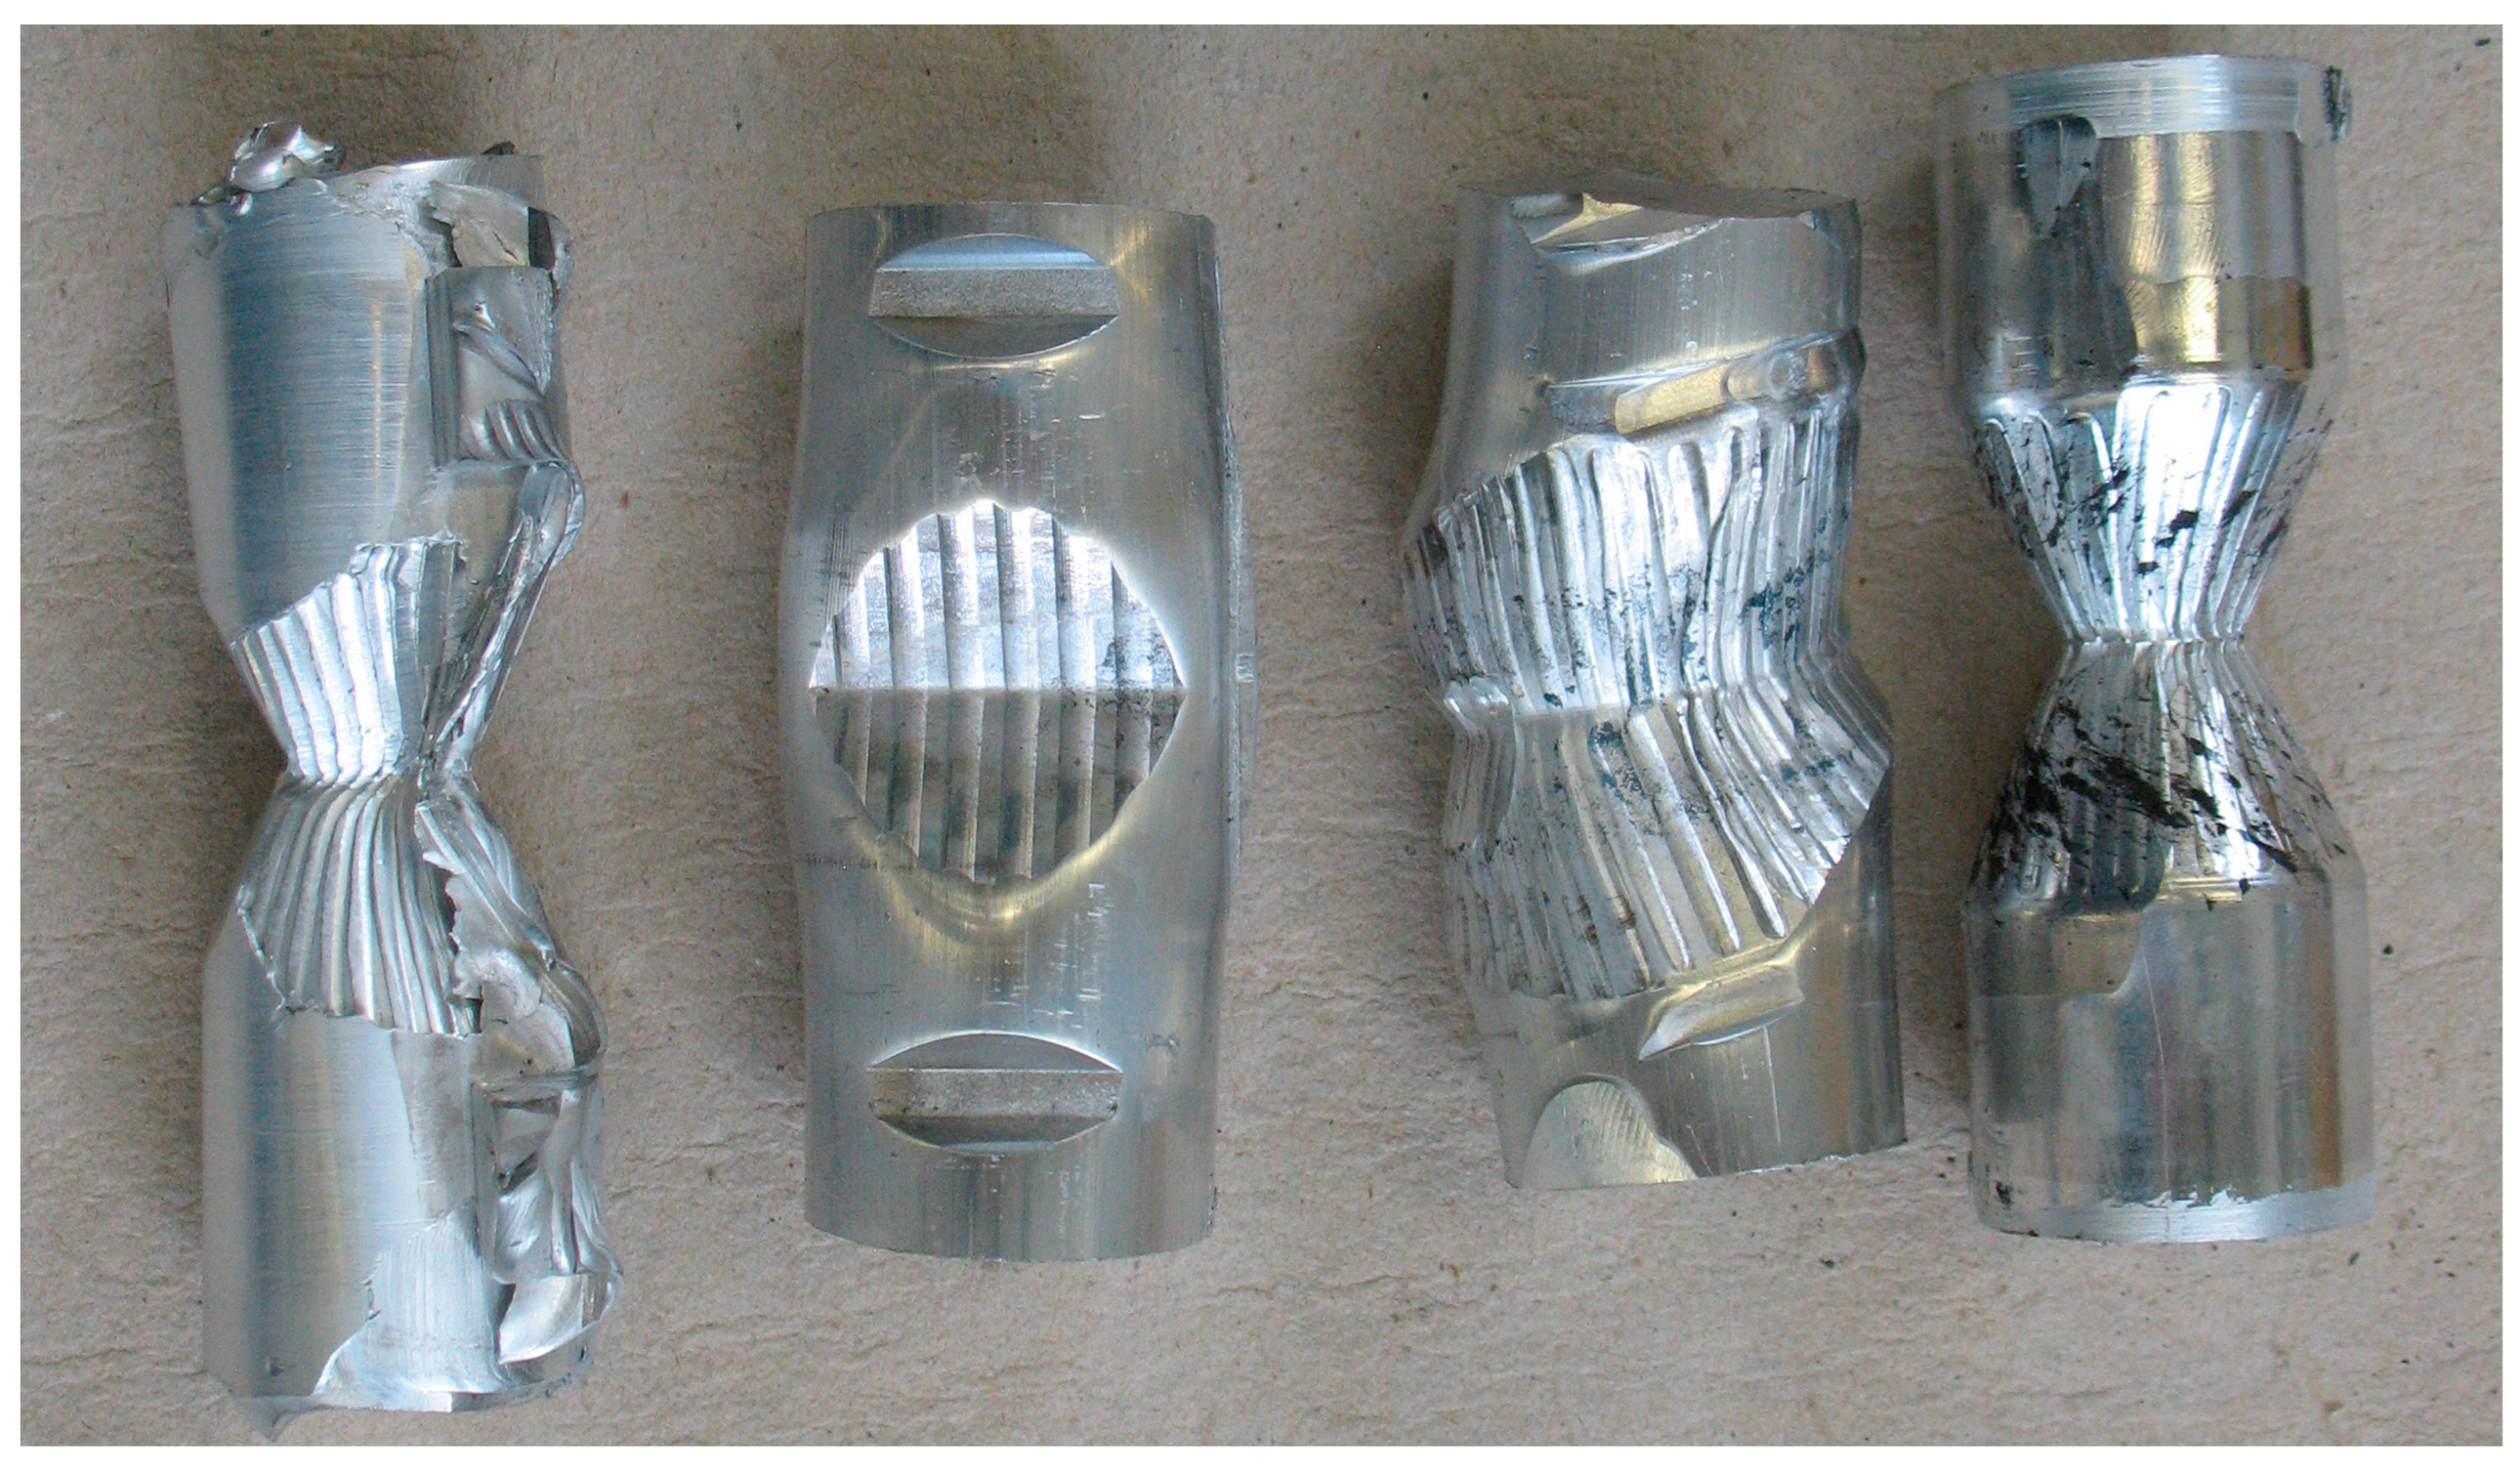
The initial preliminary tests revealed deficiencies in the rolling process, resulting in unverified test components. Optimization of the rounding and the gradual adjustment of the height setting of the guide rails allowed the production of rolled products with high geometric quality. An overview of the test specimens is shown in
Figure 9.
Six experimental configurations were conducted using the optimized rolling device, with variations in the parameters of length factor λ, wedge angle β, and tool speed vWz. Each experiment was repeated five times.
The results of the targeted material investigations indicate that the fundamental methodology and the execution of the standard test can be transferred to aluminum materials with minor adjustments to the rolling device. No internal crack formations were observed under any test parameter configuration during the analysis of the specific aluminum alloy.
6. Results
This chapter presents the results of the investigations and experiments carried out. The process maps created, and the knowledge gained from them are presented, which contribute to optimizing resource efficiency and improving production quality in cross-wedge rolling.
6.1. Presentation of the Created Process Maps
Process maps for 46MnVS5, C70S6 and C45:
46MnVS5: The map shows a high sensitivity to the formation of internal cracks. The data shows that the variable n has a significant influence on the crack width. A high value of n leads to a larger crack width.
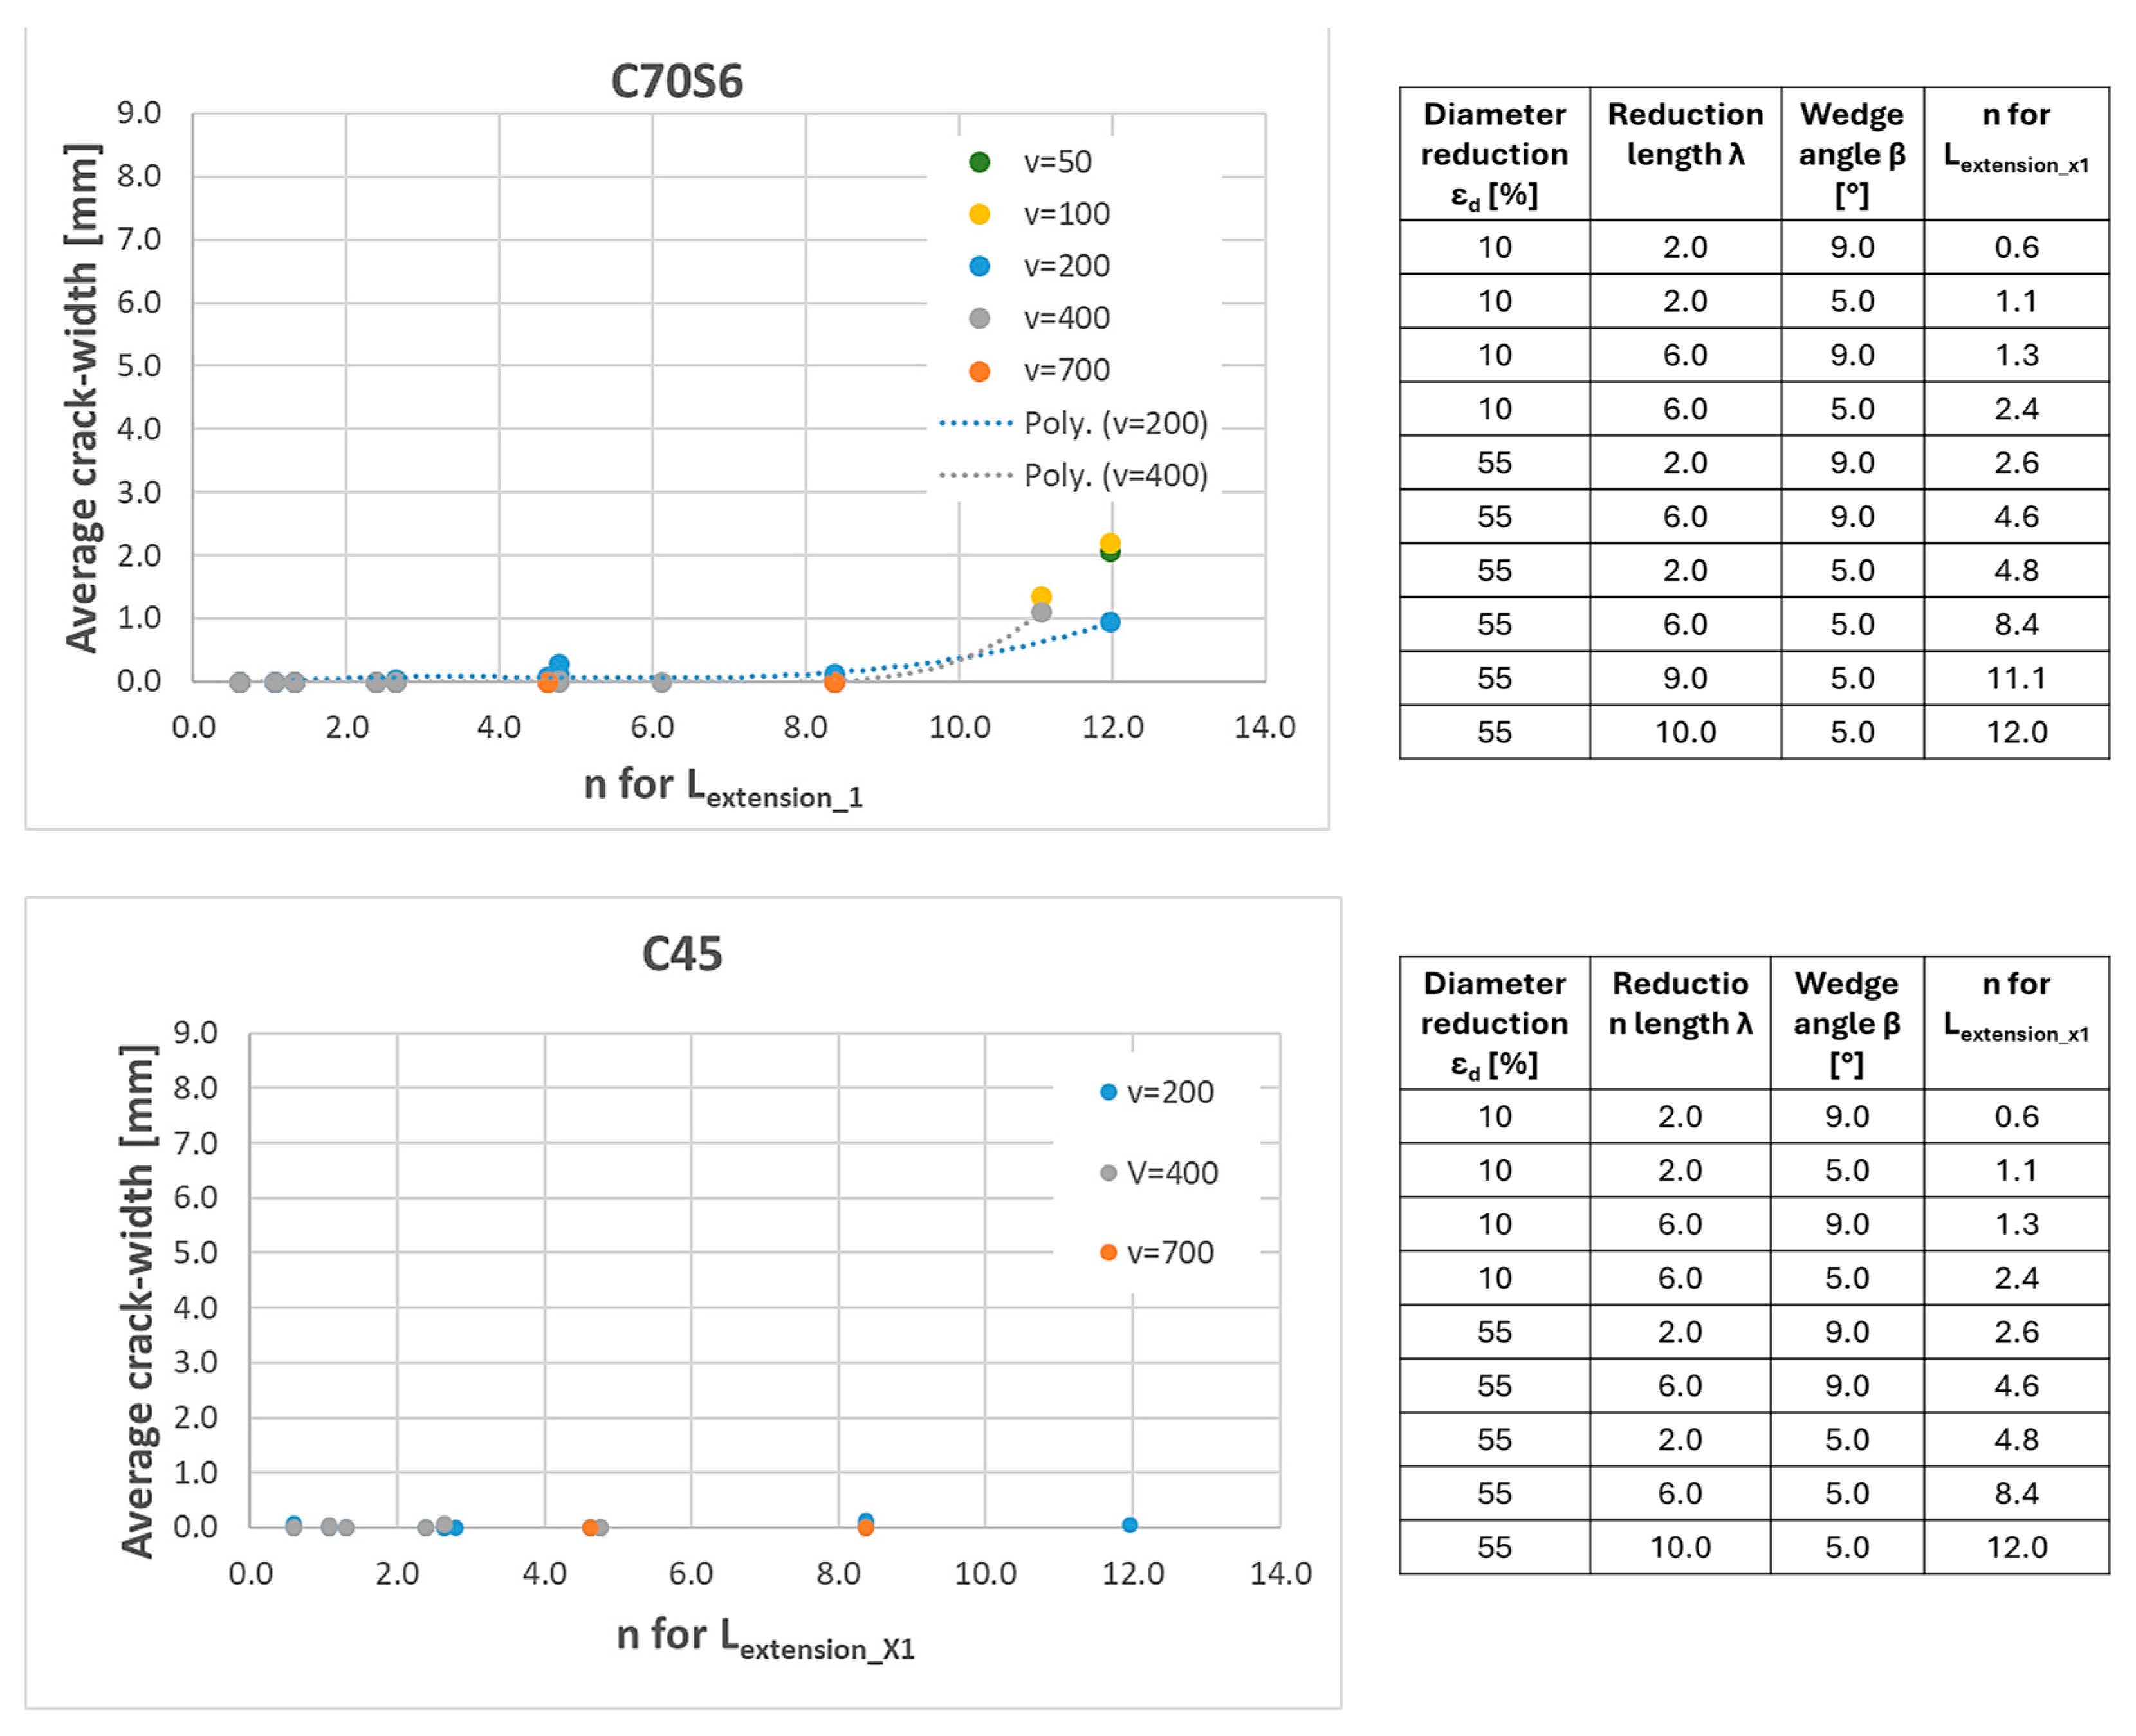
C70S6: This material shows a slight sensitivity to internal cracks. The characteristic maps enable the identification of the optimum process parameters to minimize cracking.
C45: The characteristic diagram for C45 shows no sensitivity to internal cracks. This confirms that this material is largely insensitive to the Mannesmann load.
Figure 10 and
Figure 11 show the dependence of the mean crack width on the variable
n for the materials 46MnVS5, C70S6 and C45. The different curves represent different tool speeds. It can be seen that a reduction in speed leads to an increase in crack width.
The map table provides a tabular overview of the process parameters and their influence on the variable n. The table shows how different input values influence the variable n and which combinations of parameters lead to the minimization of internal cracks.
6.2. Findings from the Process Maps
The maps have provided important findings for optimizing the process parameters in cross-wedge rolling:
Optimization of the tool parameters: The analysis of the maps has shown that by adjusting the wedge angle and shoulder angle, cracking can be significantly reduced. A symmetrical wedge angle (type A) offers better results in reducing the crack width compared to a one-sided wedge angle (type B).
Process parameters: The investigation of the process parameters has shown that the reduction length B3 and the diameter reduction εd are decisive factors. An optimal combination of these parameters leads to a minimization of the critical loads and, thus, to less cracking.
Material dependency: The different sensitivities of the materials to internal cracks were clearly demonstrated. These findings enable a targeted selection of process parameters for different materials in order to minimize material damage. This is due to the different structures and alloying elements of the materials investigated. C45 and C70S6 are easier to form than 46MnVS5.
The results of these investigations contribute significantly to improving resource efficiency and production quality in cross-wedge rolling. By applying the process maps created, tool designers and process engineers can identify the optimum parameters for their specific applications and thus reduce the risk of internal cracks.
7. Discussion
The characteristic maps, which were developed taking into account the forming companies involved in the project, were tested in two practical applications in the flat and round jaw technology of cross-wedge rolling. Two specific real tools for the flat-jaw variant with different wedge angles, which nevertheless produce identical component geometries, were designed, manufactured, and then used on the test system. The industrial validation was then carried out with a cross-wedge rolling machine on a series of round jaw tools.
The aim of these investigations is
to evaluate the savings potential of materials in series parts,
to ensure quality assurance by applying the working maps, and
to demonstrate by means of spot tests that exceeding these maps leads to defective products.
Tool-independent parameters such as rolling gap, forming temperature, and forming speed were varied.
The tests carried out with real tools on the test system were performed on identical materials with a diameter reduction of 44–65%. One result was that the characteristic maps deviated in some areas from those previously created. However, good agreement was found in the middle of the reduced range in particular, while a significantly lower tendency to form internal cracks was observed in the outer shaft area than previously expected. No internal defects were found in the materials C45 and C70S6.
Figure 12 shows the results of the characteristic diagrams based on the formula-based prediction for
n and the test results for the material 46MnVS5.
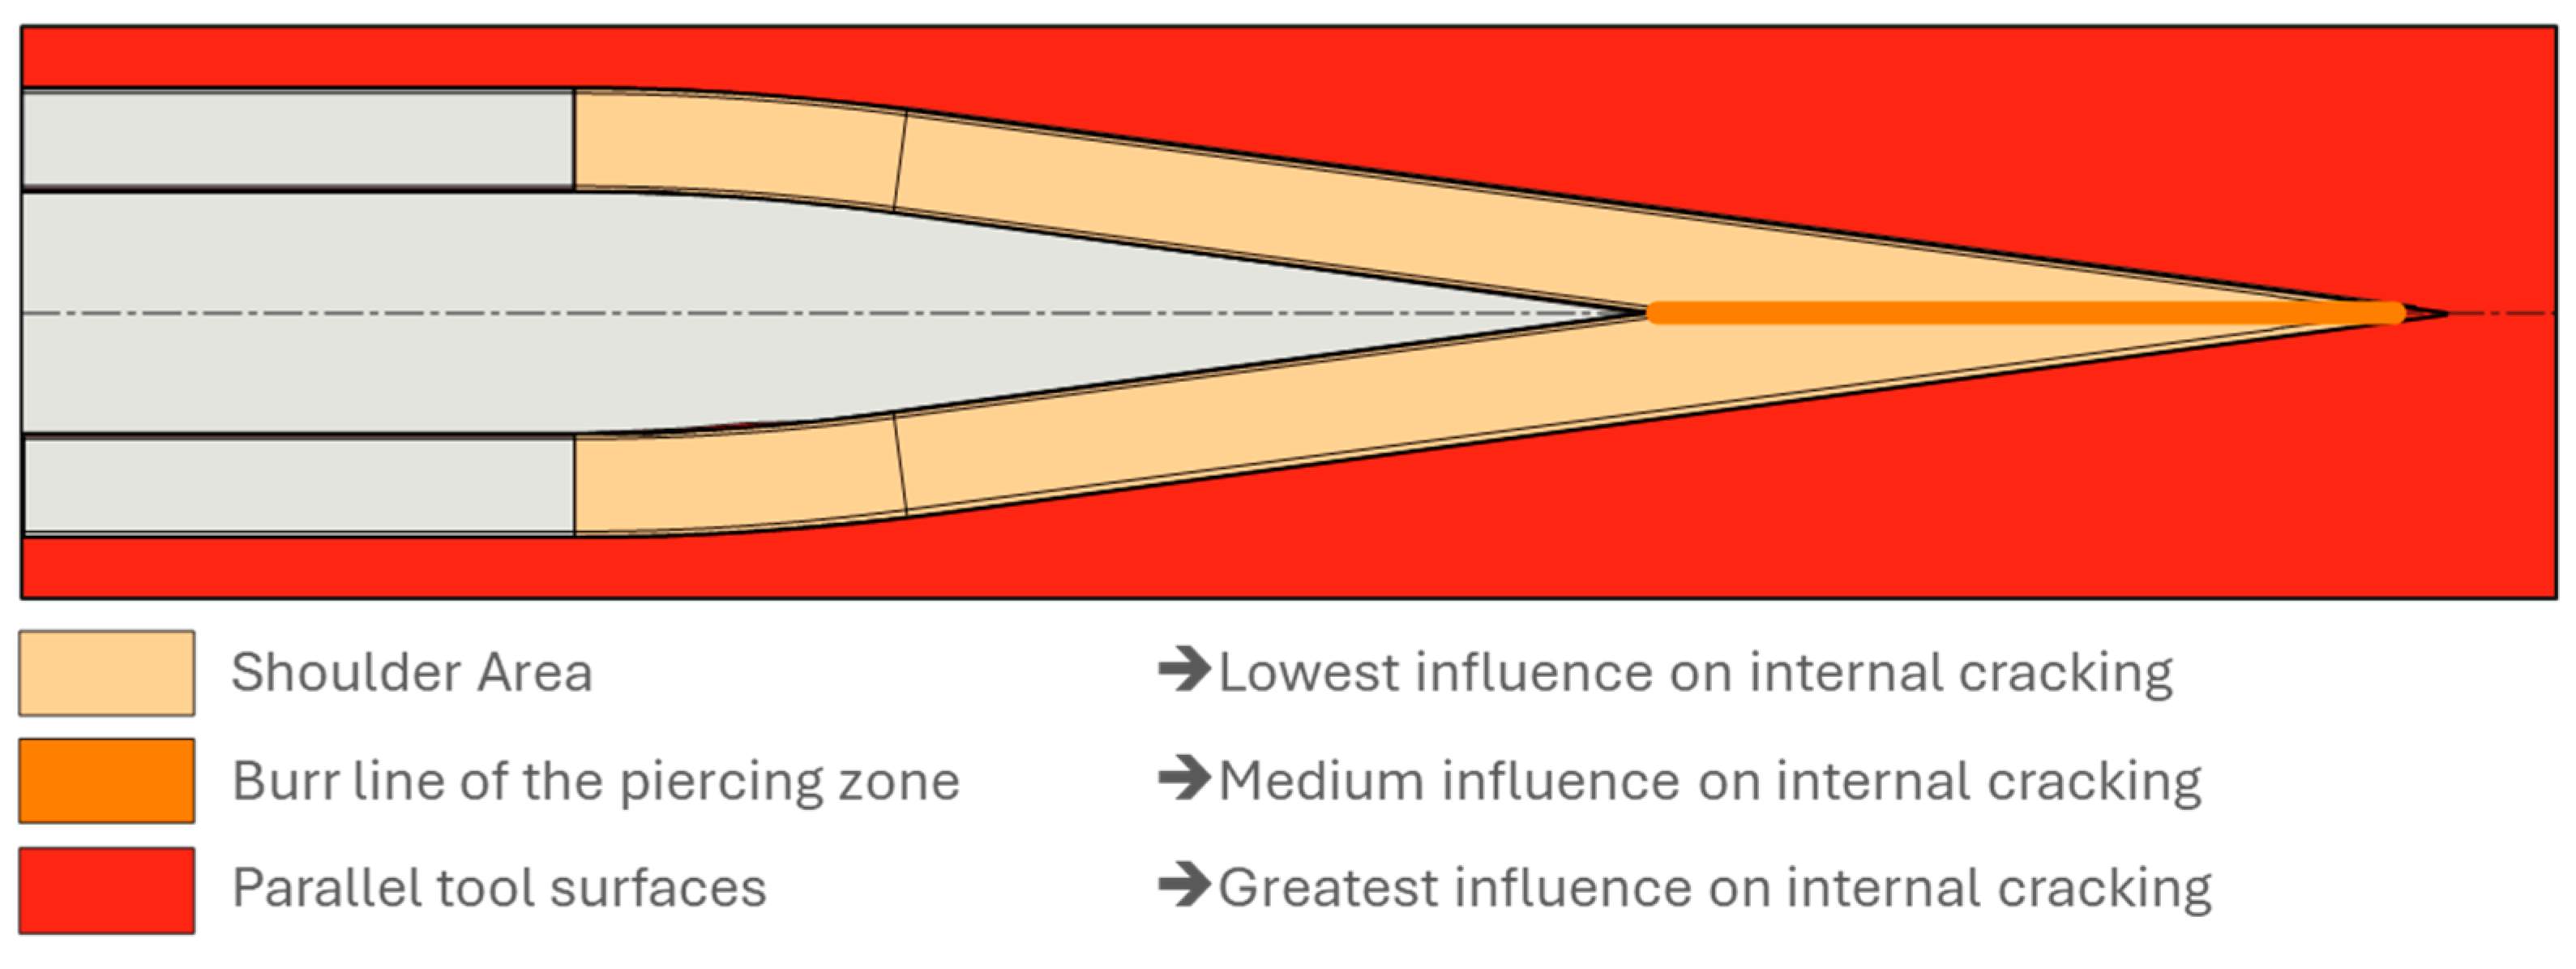
The deviations in the results of industrial series tools from the created characteristic diagrams are caused by the influence of specific tool areas. In particular, the tool geometry in which the diameter reduction takes place influences the formation of internal cracks. The shoulder surface has the least influence, while the burr line of the grooving zone has a medium influence, and the parallel tool surfaces without wedge geometry have the greatest influence on internal cracks. The maps created, therefore, primarily take into account the influence of the burr line of the grooving zone.
The different influences of the various tool areas (
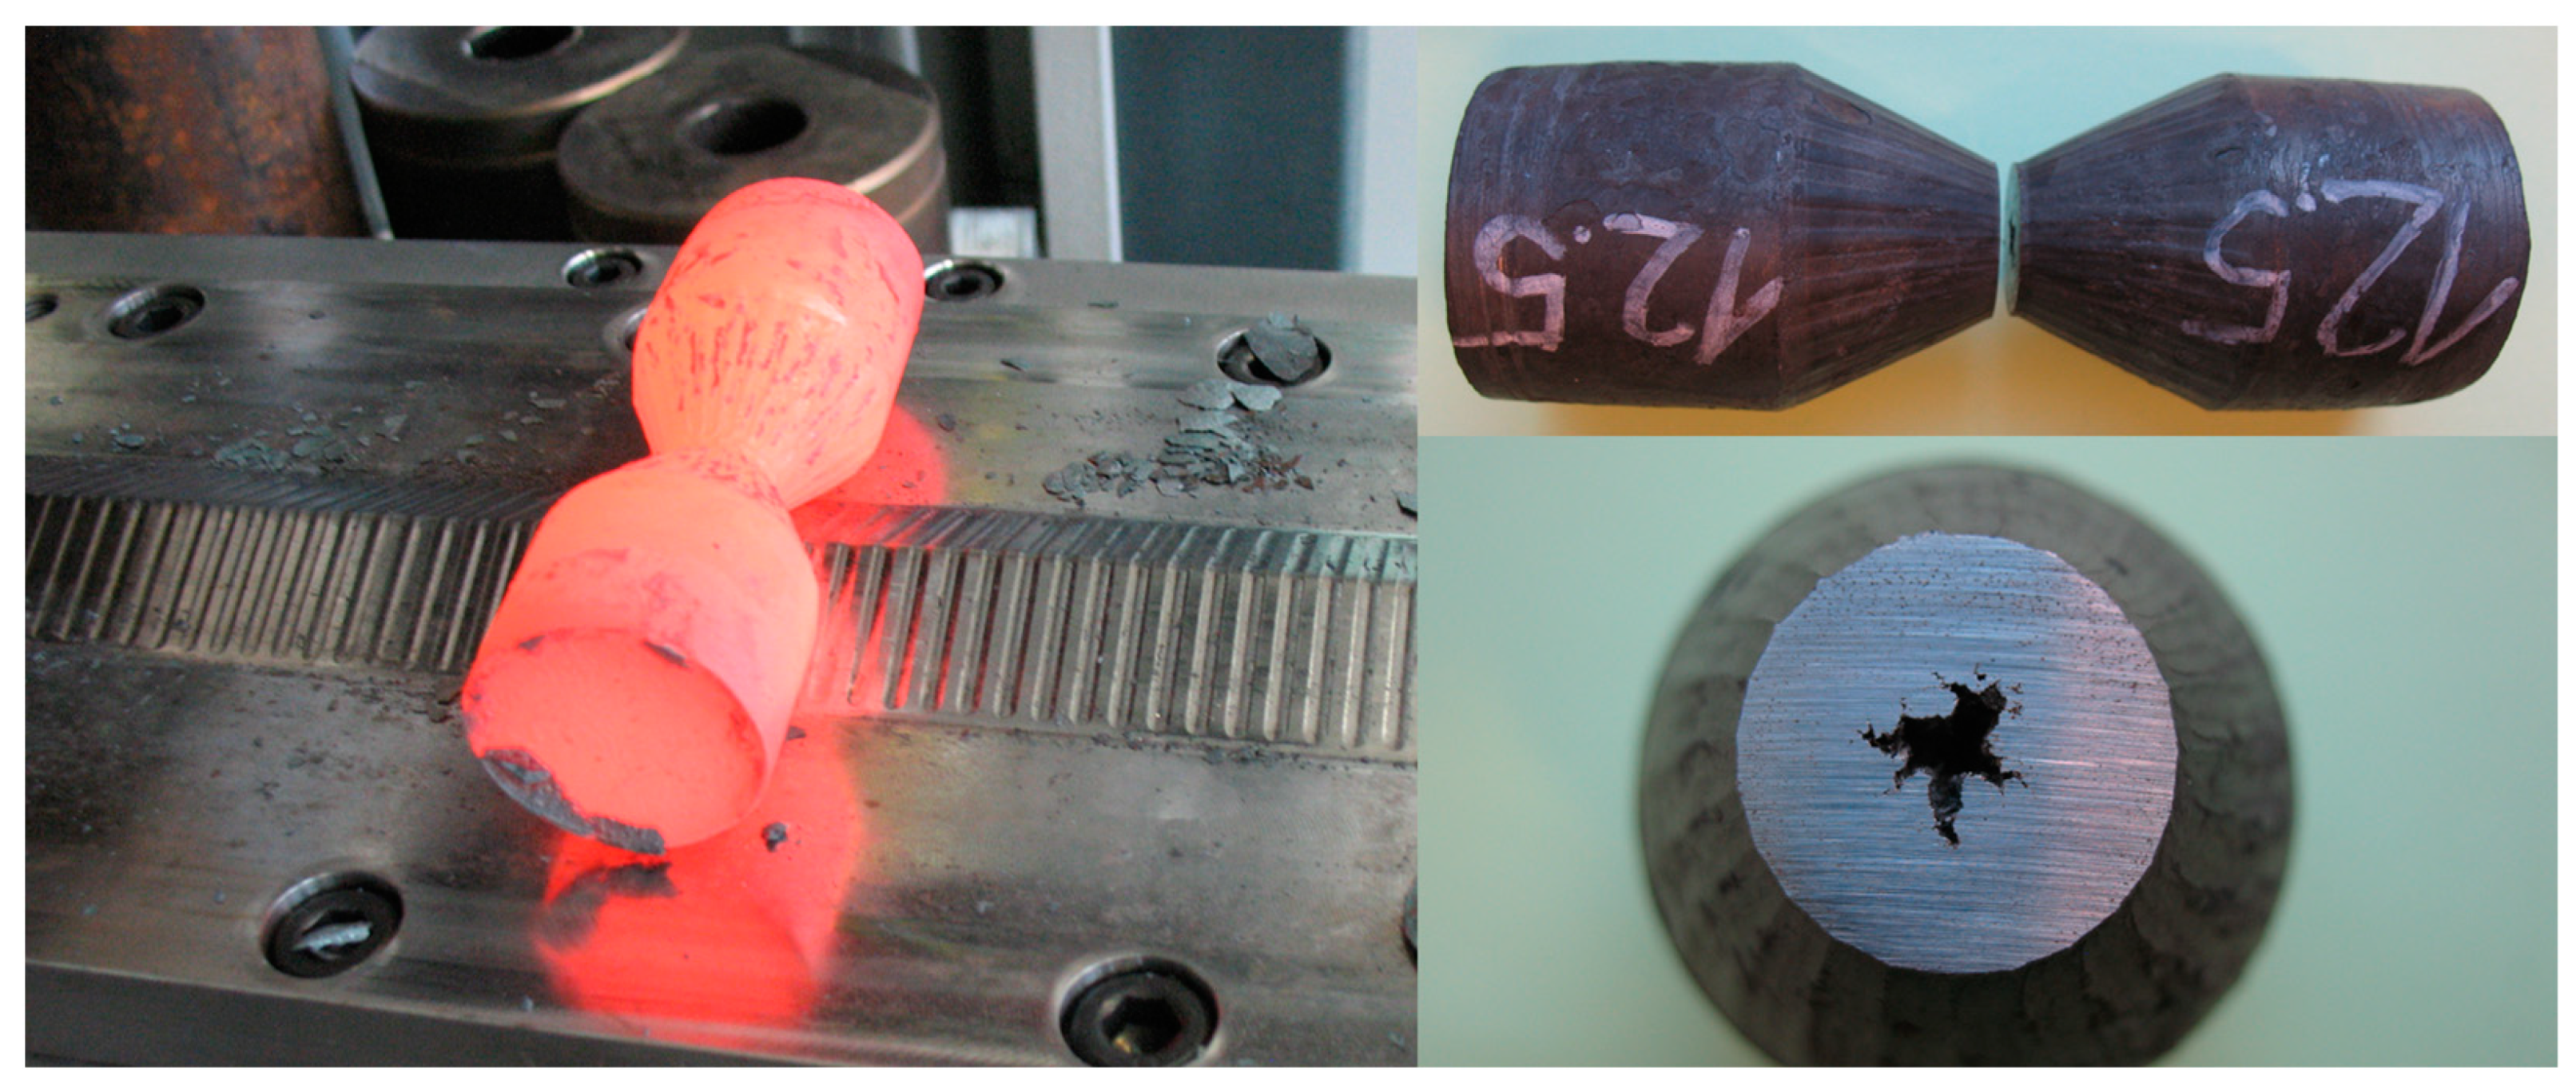
Figure 13) on the formation of internal cracks are well known. This is used, for example, in the production of seamless rolled pipes using the Mannesmann pipe rolling process. Here, the parallel surfaces are used to deliberately cause the formation of internal cracks. For this reason, experienced tool designers strictly avoid this when designing cross-wedge rolling tools. What is new, however, is the realization of the significant difference in the influence of the tool areas of the shoulder surface and the burr line of the grooving zone, which is neither known to the industrial companies involved nor described in the relevant literature. An exemplary test specimen for investigating the influence of the burr line is shown in
Figure 14. Based on this finding, the variable
n must be expanded to include this newly identified influencing factor.
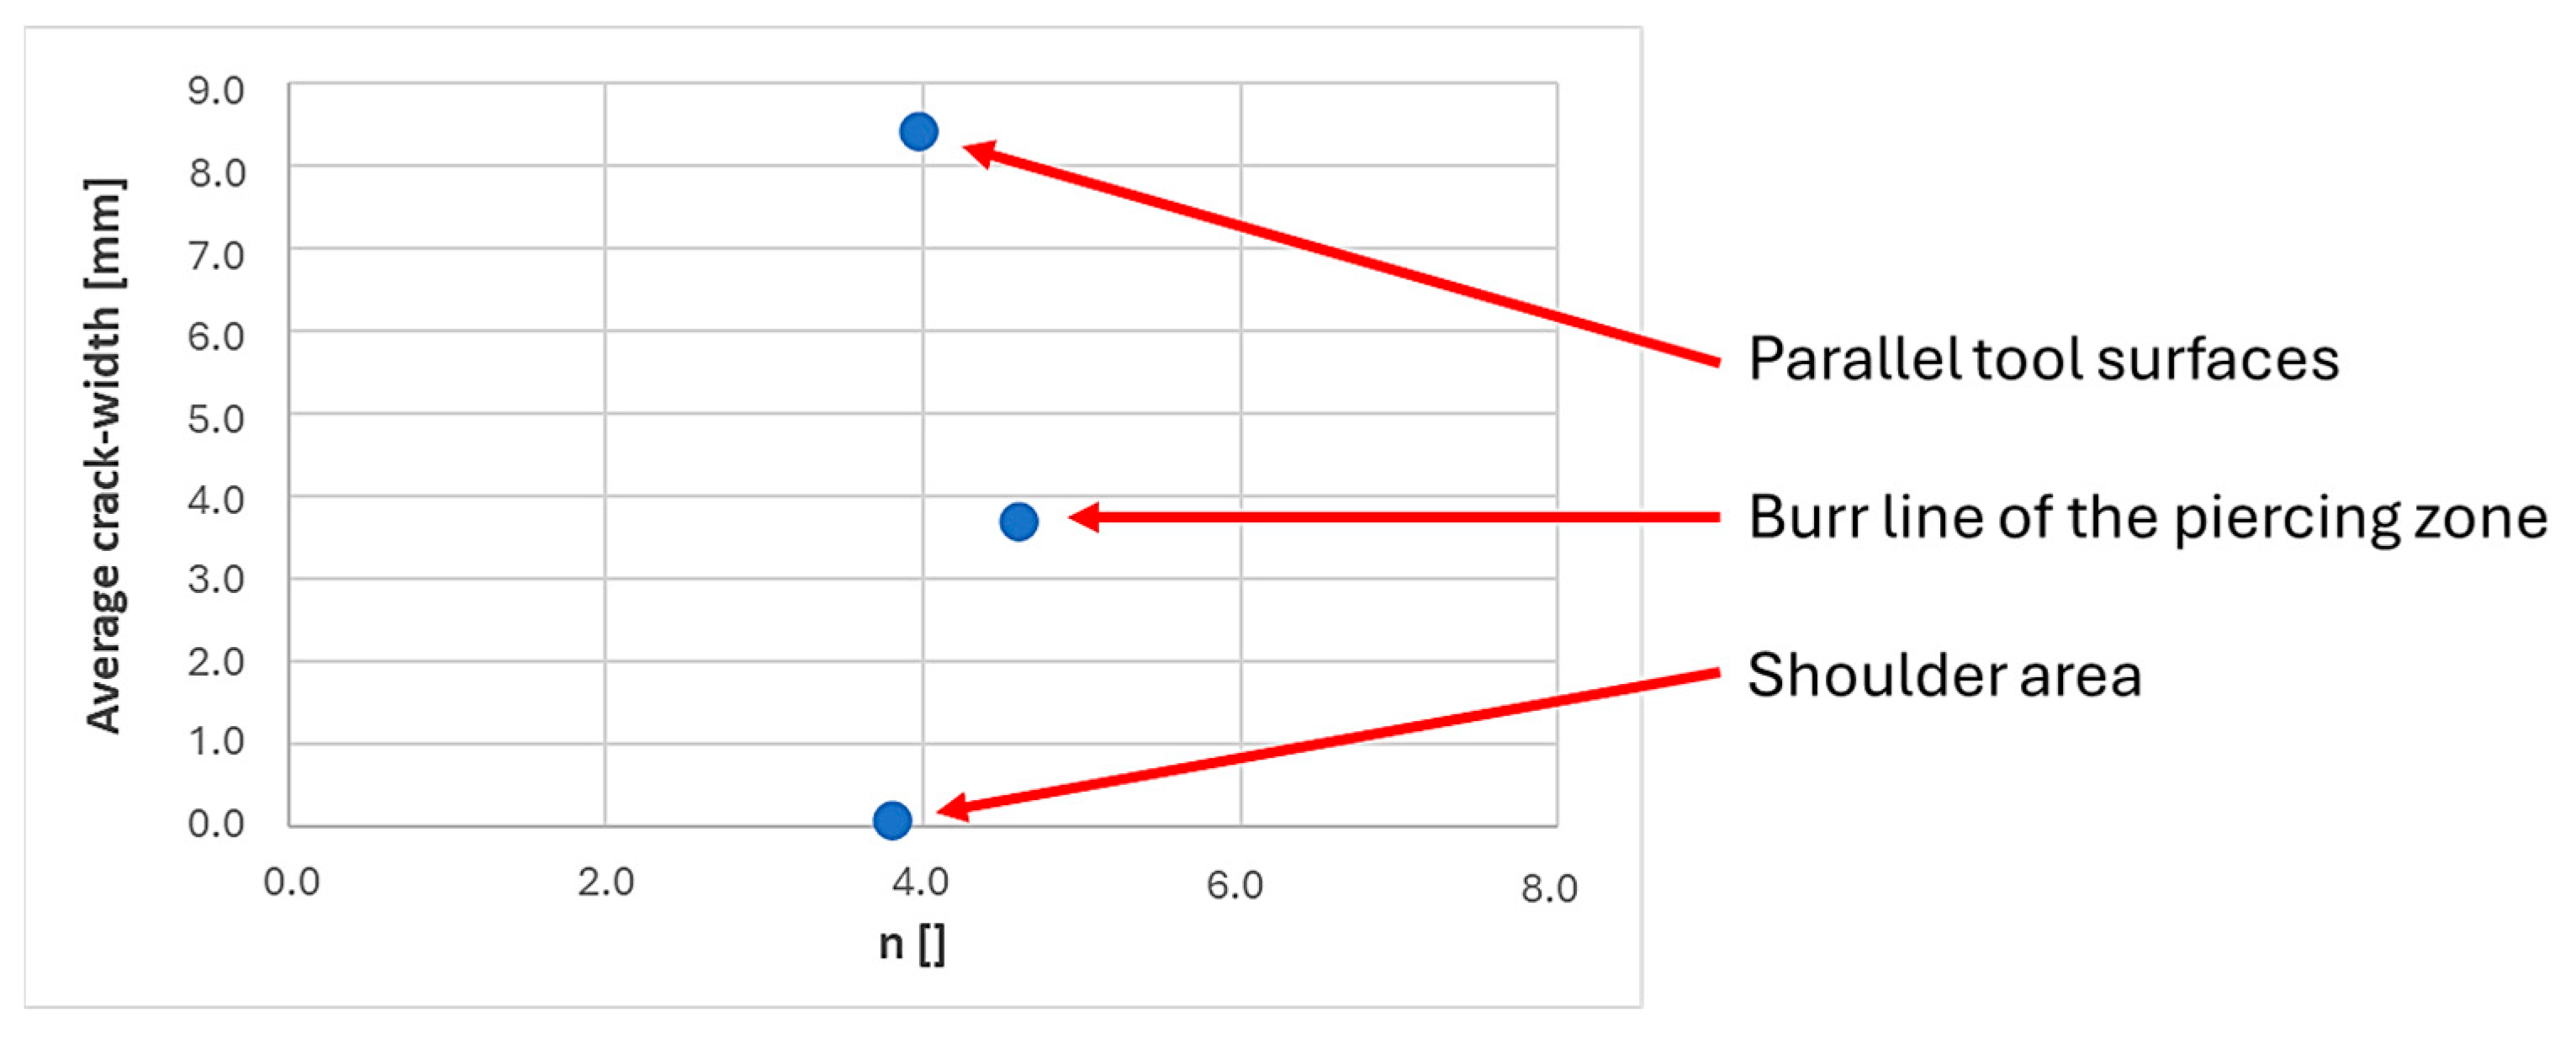
The influence of the tool geometry was confirmed by further tests in which the forming was concentrated on the respective tool areas with almost the same value for the variable
n. The differences in the results obtained from these tests are shown in
Figure 15.
The investigations with real tools show that the maps created are effective for comparing different materials and batches. However, they are not suitable for the quantitative prediction of material damage.
8. Conclusions
The project developed a reliable criterion for the design of cross-wedge rolling tools to prevent material damage as a result of the Mannesmann effect. The aim of the project was to reduce the environmental impact and minimize excess material in the subsequent die-forging process by optimizing the use of the resource potential of cross-wedge rolling. For this purpose, a damage function was established from the prevailing influencing parameters, and the dimensionless similarity variable n was derived. This variable can be used to directly identify the significant physical influencing parameters of the component and tool geometry.
From this work, it was noted that
the crack formation is significantly influenced by the geometry of the tool and the rolled workpiece
the largest influence comes from the reduction of the diameter
with the generated process maps, it is possible to draw conclusions about the dimensionless variable n, which represents the number of times the workpiece is rolled over and is, therefore, an important parameter for tool and process design
it was also found that the different areas of the tool, consisting of the burr line of the grooving zone, the shoulder surfaces, and the parallel tool surfaces, have different influences on the development of damage according to the Mannesmann effect
With the help of the required “standard test stand”, which meets the specified requirements, over 700 test specimens were successfully manufactured as part of the project. Based on the tests carried out on three steel materials and an aluminum alloy, working maps were created for the respective materials depending on the dimensionless variable n. These maps are used for the targeted design of tools for cross-wedge rolling to avoid the Mannesmann effect.
The validation was carried out using the test stand with real tools and testing in an industrial environment. This revealed that another significant factor must be taken into account when creating the characteristic maps. It became clear that the formation of internal cracks, according to the Mannesmann effect, is also strongly influenced by the geometric conditions of the different tool areas used to reduce the diameter, in addition to the process parameters taken into account. Furthermore, the good comparability of the characteristic maps of different materials and material batches created using this method was confirmed. However, a quantitative prediction of the material damage cannot be achieved with the help of the generated maps.
Author Contributions
Conceptualization, P.K. and M.M.; methodology, P.K. and M.M.; validation, P.K. and M.M.; formal analysis, P.K.; writing—original draft preparation, P.K., M.M. and A.K.; writing—review and editing, P.K., M.M., and A.K.; visualization, P.K. and A.K.; supervision, M.M.; project administration, M.M.; funding acquisition, M.M. All authors have read and agreed to the published version of the manuscript.
Funding
This research was funded by the German Federal Environmental Foundation (DBU), grant number 33234/01. This Article is funded by the Open Access Publication Fund of South Westphalia University of Applied Sciences.
Data Availability Statement
No new data were created or analyzed in this study. Data sharing is not applicable to this article.
Acknowledgments
The authors would like to express their gratitude to the German Federal Environmental Foundation (DBU) for their financial support, which had been acquired by Herbertz as the predecessor of M.M. The authors would also like to thank Franz Fuss for determining the formulaic correlation of the variable n and Harald Hermanns for their execution of the project as well as for carrying out and documenting the experiments during their affiliation as research associates at our Lab.
Conflicts of Interest
The authors declare no conflict of interest.
Correction Statement
This article has been republished with a minor correction to resolve spelling and grammatical errors. This change does not affect the scientific content of the article.
References
- Industrieverband Massivumformung e.V. Evaluation of the Official Production Statistics for the Forging Industry in Germany: IV and I–IV Quarters 2023 Preliminary; Industrieverband Massivumformung e.V.: Hagen, Germany, 2023. [Google Scholar]
- Olschewski, I.; Rothgang, M. Final Report on the IGF Project No. LN 25. Massiver Leichtbau: TP5: Potentials, Technology Transfer, Innovation Barriers, Aachen, Germany, 2018.
- Marré, M.; Hermanns, H.; Frank, S. Increasing Resource Efficiency in Forging by Securing and Expanding Process Limits in Cross Wedge Rolling: DBU Final Report 33234/01-24, Iserlohn, Germany, 2019.
- Industrieverband Massivumformung e.V. (Ed.) Massive Forming in Germany: An Energy-Intensive Energy-Efficient Industry; Industrieverband Massivumformung e.V.: Hagen, Germany, 2017. [Google Scholar]
- Kampen, D.; Richter, J.; Blohm, T.; Knust, J.; Langner, J.; Stonis, M.; Behrens, B.A. Design of a Genetic Algorithm for Preform Optimization in Hot Forging Processes. Int. J. Mater. Form. 2020, 13, 77–89. [Google Scholar] [CrossRef]
- Komischke, T.; Hora, P.; Hermanns, H.; Marré, M.; van Putten, K.; Wick, D. Prediction of Core Crack Initiation in Cross Wedge Processes Using Experimental and Virtual Methods. Massivumformung Sept. 2019, 2019, 66–70. [Google Scholar]
- Zhou, X.; Shao, Z.; Pruncu, C.I.; Hua, L.; Balint, D.; Lin, J.; Jiang, J. A Study on Central Crack Formation in Cross Wedge Rolling. J. Mater. Process. Technol. 2020, 279, 116549. [Google Scholar] [CrossRef]
- Yang, C.; Dong, H.; Hua, Z. Micro-Mechanism of Central Damage Formation During Cross Wedge Rolling. J. Mater. Process. Technol. 2018, 252, 322–332. [Google Scholar] [CrossRef]
- Brünig, M.; Brenner, D.; Gerke, S. Stress State Dependence of Ductile Damage and Fracture Behavior: Experiments and Numerical Simulations. Eng. Fract. Mech. 2015, 141, 152–169. [Google Scholar] [CrossRef]
- Pater, Z.; Tomczak, J.; Bulzak, T.; Wójcik, Ł. Assessment of ductile fracture criteria with respect to their application in the modeling of cross wedge rolling. J. Mater. Process. Technol. 2020, 278, 116501. [Google Scholar] [CrossRef]
- Li, Q.; Lovell, M.R. The establishment of a failure criterion in cross wedge rolling. Int. J. Adv. Manuf. Technol. 2004, 24, 180–189. [Google Scholar] [CrossRef]
- Kache, H. Method for the Design of Cross Wedge Rolling Processes by Means of Small Scaling Using the Example of Warm Forming. Ph.D. Thesis, Leibniz Universität Hannover, Hannover, Germany, 2014. [Google Scholar]
- Idoyaga, Z.; Elvira, R.; Wendenbaum, J.; Meunier, J.; Robelet, M.; Toscanelli, O.; Reis, M.; Zachäus, R.; Lorenz, B.; Kolbe, M. Influence of Tramp Elements (P, Cu, S, Sn) on the Mannesmann Effect in the Transversal Hot Rolling of Engineering Steels (MANNESTRAMP); EUR Research Fund for Coal and Steel; Off. for Official Publ. of the European Communities: Luxembourg, 2008; Volume 23597. [Google Scholar]
- Li, Q.; Lovell, M. Cross wedge rolling failure mechanisms and industrial application. Int. J. Adv. Manuf. Technol. 2008, 37, 265–278. [Google Scholar] [CrossRef]
- Meyer, M. Cross Wedge Rolling and Multidirectional Forming as a Preforming Process for the Production of Crankshafts. Ph.D. Dissertation, Leibniz Universität Hannover, Hannover, Germany, 2016. [Google Scholar]
- Wang, M.; Xiang, D.; Xiao, C.; Zhou, J.; Jia, Z. Influence of cooling condition of tools on central deformation of workpiece and tool wear in cross wedge rolling. Int. J. Adv. Manuf. Technol. 2012, 59, 473–482. [Google Scholar] [CrossRef]
- Steger, J. Cross Rolling of Light Metals; 4; VDI-Fachtagung Warmmassivumformung: Düsseldorf, Germany, 2016. [Google Scholar]
- Siebertz, K.; van Bebber, D.; Hochkirchen, T. Statistical Design of Experiments (DoE); VDI-Buch; Springer Science & Business Media: Berlin, Germany, 2010. [Google Scholar]
Figure 1.
Ratio of energy required for production and heating for 1 kg of forged part.
Figure 1.
Ratio of energy required for production and heating for 1 kg of forged part.
Figure 2.
Definition and examples of the bite ratio sB/h (the colors represent a quantitative visualization of stress levels, with each color corresponding to a specific range of stress values).
Figure 2.
Definition and examples of the bite ratio sB/h (the colors represent a quantitative visualization of stress levels, with each color corresponding to a specific range of stress values).
Figure 3.
Description of the length of the reduced diameter using the example of a symmetrical tool.
Figure 3.
Description of the length of the reduced diameter using the example of a symmetrical tool.
Figure 4.
Cause-effect diagram to identify the relevant process parameters.
Figure 4.
Cause-effect diagram to identify the relevant process parameters.
Figure 5.
Construction of the CWR test facility by integration into a hydraulic press.
Figure 5.
Construction of the CWR test facility by integration into a hydraulic press.
Figure 6.
Results of the tests on 46MnVS5 with a diameter reduction of 55%.
Figure 6.
Results of the tests on 46MnVS5 with a diameter reduction of 55%.
Figure 7.
Statistical analysis of the influence of the investigated parameters.
Figure 7.
Statistical analysis of the influence of the investigated parameters.
Figure 8.
Structure of characteristic field map.
Figure 8.
Structure of characteristic field map.
Figure 9.
Overview of the test specimen of the penetration tests with AlMgSi1.
Figure 9.
Overview of the test specimen of the penetration tests with AlMgSi1.
Figure 10.
Dependence of mean crack width on variable n for 46MnVS5 material at different tool speeds.
Figure 10.
Dependence of mean crack width on variable n for 46MnVS5 material at different tool speeds.
Figure 11.
Characteristic diagrams of the steel materials for wedge geometry type A.
Figure 11.
Characteristic diagrams of the steel materials for wedge geometry type A.
Figure 12.
Characteristic map (lines) of the material 46MnVS5 with the results of the real tools (points) for the cross-sectional areas A and M of the cross-wedge rolled part.
Figure 12.
Characteristic map (lines) of the material 46MnVS5 with the results of the real tools (points) for the cross-sectional areas A and M of the cross-wedge rolled part.
Figure 13.
Definitions of tool geometries and their influence on internal crack formation.
Figure 13.
Definitions of tool geometries and their influence on internal crack formation.
Figure 14.
Tool and test specimen for investigating the influence of the burr line.
Figure 14.
Tool and test specimen for investigating the influence of the burr line.
Figure 15.
Influences of the different tool areas on the crack width.
Figure 15.
Influences of the different tool areas on the crack width.
Table 1.
Evaluation of the influence of the relevant process parameters (-: no influence, o: minor influence, x: significant influence).
Table 1.
Evaluation of the influence of the relevant process parameters (-: no influence, o: minor influence, x: significant influence).
| Parameter | Characteristic | Influence on CWR Device | Preselection |
|---|
| | | Tool
length | Tool speed | Power | |
| | | | horizontal | vertical | | |
Component
geometry | Diameter reduction εd | o | o | o | × | max.: 55% |
| Length factor λ | × | o | o | o | max.: 4 |
| Initial diameter | × | o | o | × | max.: 35 |
| Tool | Shoulder angle α
(Stretch zone) | × | - | × | o | 25° |
| Wedge angle β | × | o | × | o | min.: 5°, max.: 9° |
| Calibration zone length | × | o | - | - | max.: d0 × 2π |
| Process | Tool speed vWz
(horizontal) | - | × | × | × | max.: 400 (Penetration test: 700) mm/s |
Table 2.
Evaluation of the different error detection methods (✓: good, ⦿: fair, ✘: bad).
Table 2.
Evaluation of the different error detection methods (✓: good, ⦿: fair, ✘: bad).
| | Defect Resolution | Inspection Effort | Inspection Costs |
|---|
| Digital X-ray inspection | ✘ | ✘ | ⦿ |
| 3D CT | ✓ | ✘ | ✘ |
| Optical measurement | ✓ | ✓ | ✓ |
Table 3.
Comparison of the results of the test with the same test specimen.
Table 4.
Framework conditions for drawing up the design of experiments (DoE).
Table 4.
Framework conditions for drawing up the design of experiments (DoE).
| Parameter | Characteristic | Selection | Variants |
|---|
Component
geometry | Diameter reduction εd | 10%, 55% | 2 |
| Length factor λ | 2, 6 | 2 |
| Initial diameter d0 | 35 (±2) | 1 |
| Material | Alloy | | 3 |
| Supplier | | 1 |
| Charge | | 1 |
| Tool | Shoulder angle α | 25° | 1 |
| Wedge angle β | 5°, 9° | 2 |
| Calibration zone length | d0 × π/2, d0 × 2π | 2 |
| Knurling | Relatively rough | 1 |
| Process | Forming temperature | 1200 °C (46MnVS5, C45, C70S6)
525 °C (AlMgSi1) | 1 |
| Tool temperature | 40 °C | 1 |
| Process | Tool speed vWz | 200, 400 (Penetration test: 700) mm/s | 2 |
| Disclaimer/Publisher’s Note: The statements, opinions and data contained in all publications are solely those of the individual author(s) and contributor(s) and not of MDPI and/or the editor(s). MDPI and/or the editor(s) disclaim responsibility for any injury to people or property resulting from any ideas, methods, instructions or products referred to in the content. |
© 2024 by the authors. Licensee MDPI, Basel, Switzerland. This article is an open access article distributed under the terms and conditions of the Creative Commons Attribution (CC BY) license (https://creativecommons.org/licenses/by/4.0/).
