Article

The Mechanical Properties of a Transient Liquid Phase Diffusion Bonded SSM-ADC12 Aluminum Alloy with a ZnAl4Cu3 Zinc Alloy Interlayer

1
Faculty of Industrial Technology, Songkhla Rajabhat University, Songkhla 90000, Thailand
2
Faculty of Engineering, Rajamangala University of Technology Srivijaya, Songkhla 90000, Thailand
*
Author to whom correspondence should be addressed.
J. Manuf. Mater. Process. 2024, 8(5), 184; https://doi.org/10.3390/jmmp8050184
Submission received: 3 July 2024 / Revised: 25 July 2024 / Accepted: 20 August 2024 / Published: 23 August 2024
(This article belongs to the Special Issue Advances in Dissimilar Metal Joining and Welding)

Abstract

:
In this study, the mechanical properties of SSM-ADC12 aluminum alloy specimens with a ZnAl4Cu3 zinc alloy interlayer were observed after Transient Liquid Phase Diffusion Bonding (TLPDB), a welding process conducted in a semi-solid state. The purpose of the experiment was to study how the following parameters—bonding temperature (400, 430, 460, 490, and 520 °C), bonding time (60, 90, and 120 min), and thickness of the ZnAl4Cu3 zinc alloy (0.5, 1.0, and 2.0 mm)—affect the mechanical properties and the types of defects that formed. The results show that the bonding strength varied significantly with different parameters following the TLPDB process. A maximum bonding strength of 32.21 MPa was achieved at a bonding temperature of 490 °C, with 20 min of bonding and a ZnAl4Cu3 zinc alloy layer that was 2.0 mm thick. Conversely, changing the welding parameters influenced the bonding strength. A minimum bonding strength of 2.73 MPa was achieved at a bonding temperature of 400 °C, with a bonding time of 90 min and a ZnAl4Cu3 zinc alloy interlayer that was 2.0 mm thick. The Vickers microhardness results showed that the bonded zone had a lower hardness value compared to the base materials (BMs) of the SSM-ADC12 aluminum alloy (86.60 HV) and the ZnAl4Cu3 zinc alloy (129.37 HV). The maximum hardness was 83.27 HV, which resulted from a bonding temperature of 520 °C, a bonding time of 90 min, and a ZnAl4Cu3 zinc alloy that was 2.0 mm thick. However, in the near interface, the hardness value increased because of the formation of MgZn2 intermetallic compounds (IMCs). The fatigue results showed that the stress amplitude was 31.21 MPa in the BMs of the SSM-ADC12 aluminum alloy and 20.92 MPa in the material that results from this TLPDB process (TLPDB Material) when the limit of cyclic loading exceeded 106 cycles. Microstructural examination revealed that transformation from a β-eutectic Si IMC recrystallization structure to η(Zn–Al–Cu) and β(Al2Mg3Zn3) IMCs occurred. A size reduction to a width of 6–11 µm and a length of 16–44 µm was observed via SEM. Finally, voids or porosity and bucking defects were found in this experiment.

1. Introduction

ADC12 aluminum alloys are commonly used in automotive components such as engine parts, transmission cases, wheels, and structural components due to their lightweight nature and strength [1]. Meanwhile, the aerospace industry applies these alloys in certain aerospace components where lightweight materials with good strength and heat resistance are required [2]. In addition, the electronics industry applies these alloys in electronics and electrical components, including housings for electronic devices, heat sinks, and connectors, owing to their thermal conductivity and machinability [3]. Therefore, the usage rate of ADC12 aluminum alloys is continuously increasing because of their excellent castability, relatively high strength, good resistance to corrosion, good thermal conductivity, and good heat resistance. In addition, like most aluminum alloys, their light weight makes them ideal for applications where weight reduction is desired without compromising strength [4].
Gas-induced semi-solid (GISS) processing is a method used in the fabrication of metal matrix composites and advanced materials, particularly aluminum-based alloys. This technique involves introducing gas bubbles into a molten metal matrix, which causes it to transition into a semi-solid state with a globular microstructure [5].
ADC12 aluminum alloys are commonly formed using the GISS process. Janudom et al. [6] investigated the feasibility of semi-solid die casting of ADC12 aluminum alloys and found great possibilities for molding this type of material using the GISS process, which can produce materials with improved properties and increased microstructural uniformity. In addition, Gautam [7] studied the semi-solid rheocasting process of ADC12 Al alloys. The results showed that the microstructure exhibited a nearly globular shape, was distributed relatively uniformly in the matrix structure, and the best mechanical properties were a tensile strength of 223 MPa, an elongation of 6.5%, and a hardness of 87 VH. Consequently, ADC12 aluminum alloys are suitable for semi-solid casting due to their excellent mechanical properties.
Transient liquid phase diffusion bonding (TLPDB) is a specialized welding technique used to join metal materials that cannot be bonding using conventional welding techniques; it is especially used in the aerospace industry with the aim of achieving high-quality bonds. This process involves the application of heat and pressure to bring materials into intimate contact, allowing diffusion to occur at the interface. The distinguishing feature of TLPDB is the introduction of a temporary liquid phase, typically via the addition of an interlayer material [8]. TLPDB is commonly used to join materials with similar or dissimilar compositions that may be difficult to weld using conventional methods due to differences in their melting points or metallurgical properties. An interlayer material is a thin layer of a material with a lower melting point than the base materials (BMs). It is placed between the parts to be joined. This interlayer serves as a temporary liquid phase during the bonding process. The TLPDB mechanism uses a temperature above the melting point of the interlayer but below the melting points of the BMs. This causes the interlayer to melt while keeping the BMs solid. Atoms from the BMs diffuse into the liquid phase, promoting atomic mixing and bonding across the interface. This diffusion process helps to eliminate voids and defects in the bond interface, resulting in a strong metallurgical bond. At the same time, pressure is applied to the materials during the bonding process to ensure intimate contact between the mating surfaces and to facilitate the diffusion of atoms across the interface [9,10]. TLPDB offers several advantages over traditional welding techniques, including the ability to join dissimilar materials. TLPDB can be used to join materials with significant differences in their compositions and properties, expanding the range of applications where welding is feasible. This process uses a lower temperature than the melting points of the BMs to minimize the risk of distortion, heat-affected zone (HAZ) formation, and metallurgical changes in BMs with high bond strengths. This is because the diffusion of atoms across the interface during the bonding process results in a strong metallurgical bond with excellent mechanical properties. Finally, precise control over the microstructure and composition of the bond interface leads to improved performance and reliability of the welded joint [11]. It is evident that the TLPDB parameters significantly affect the mechanical properties. The selection of parameters for TLPDB is therefore important, especially the choice of cementitious materials that play an important role in the adhesion and formation of intermetallic compounds (IMCs) in the microstructure. The significant TLPDB parameters that have been studied are summarized in Table 1.
The novelty of this experiment was to investigate the effects of the following TLPDB parameters: the bonding temperature (°C), bonding time (min), bonding pressure (MPa), and different thicknesses (mm) of ZnAl4Cu3 zinc alloy interlayer materials on the mechanical properties of SSM-ADC12 aluminum alloys. The experiments simulated welding in a semi-solid state in which some of the material melted, leading to good adhesion. After TLPDB of an SSM-ADC12 aluminum alloy with a ZnAl4Cu3 zinc alloy as an interlayer material, the microstructures of the samples were evaluated in the bonding zones, the near-bonding zones (NBZs), and the BM zones to evaluate the mechanism of IMC phase transformation using optical microscopy, scanning electron microscopy (SEM), and energy-dispersive X-ray spectroscopy (EDX). Moreover, following mechanical properties—bonding strength, fatigue, and hardness—were analyzed.

2. Materials and Methods

2.1. Materials

The SSM-ADC12 aluminum alloy chosen for this study contained aluminum, silicon, and magnesium as its main components and had a melting point of 548 °C. The SSM-ADC12 aluminum alloy was formed using the GISS technique (supported by GISSCO Company Limited, Songkhla, Thailand) [17]. This SSM-ADC12 aluminum alloy was cast at 640 °C with a continuous flow of nitrogen gas through porous graphite for 14 s. The base microstructure of the SSM-ADC12 aluminum alloy had a globular shape that consisted of an α-aluminum matrix and a eutectic Si phase with a particle grain size of around 78–97 µm as shown in Figure 1. For this experiment, the interlayer material was a ZnAl4Cu3 zinc alloy (commercial-grade ZA27 zinc alloy), which contained both aluminum and copper as the main components and had a melting point of 399 °C. The chemical compositions and mechanical properties of these materials are shown in Table 2.

2.2. TLPDB Process

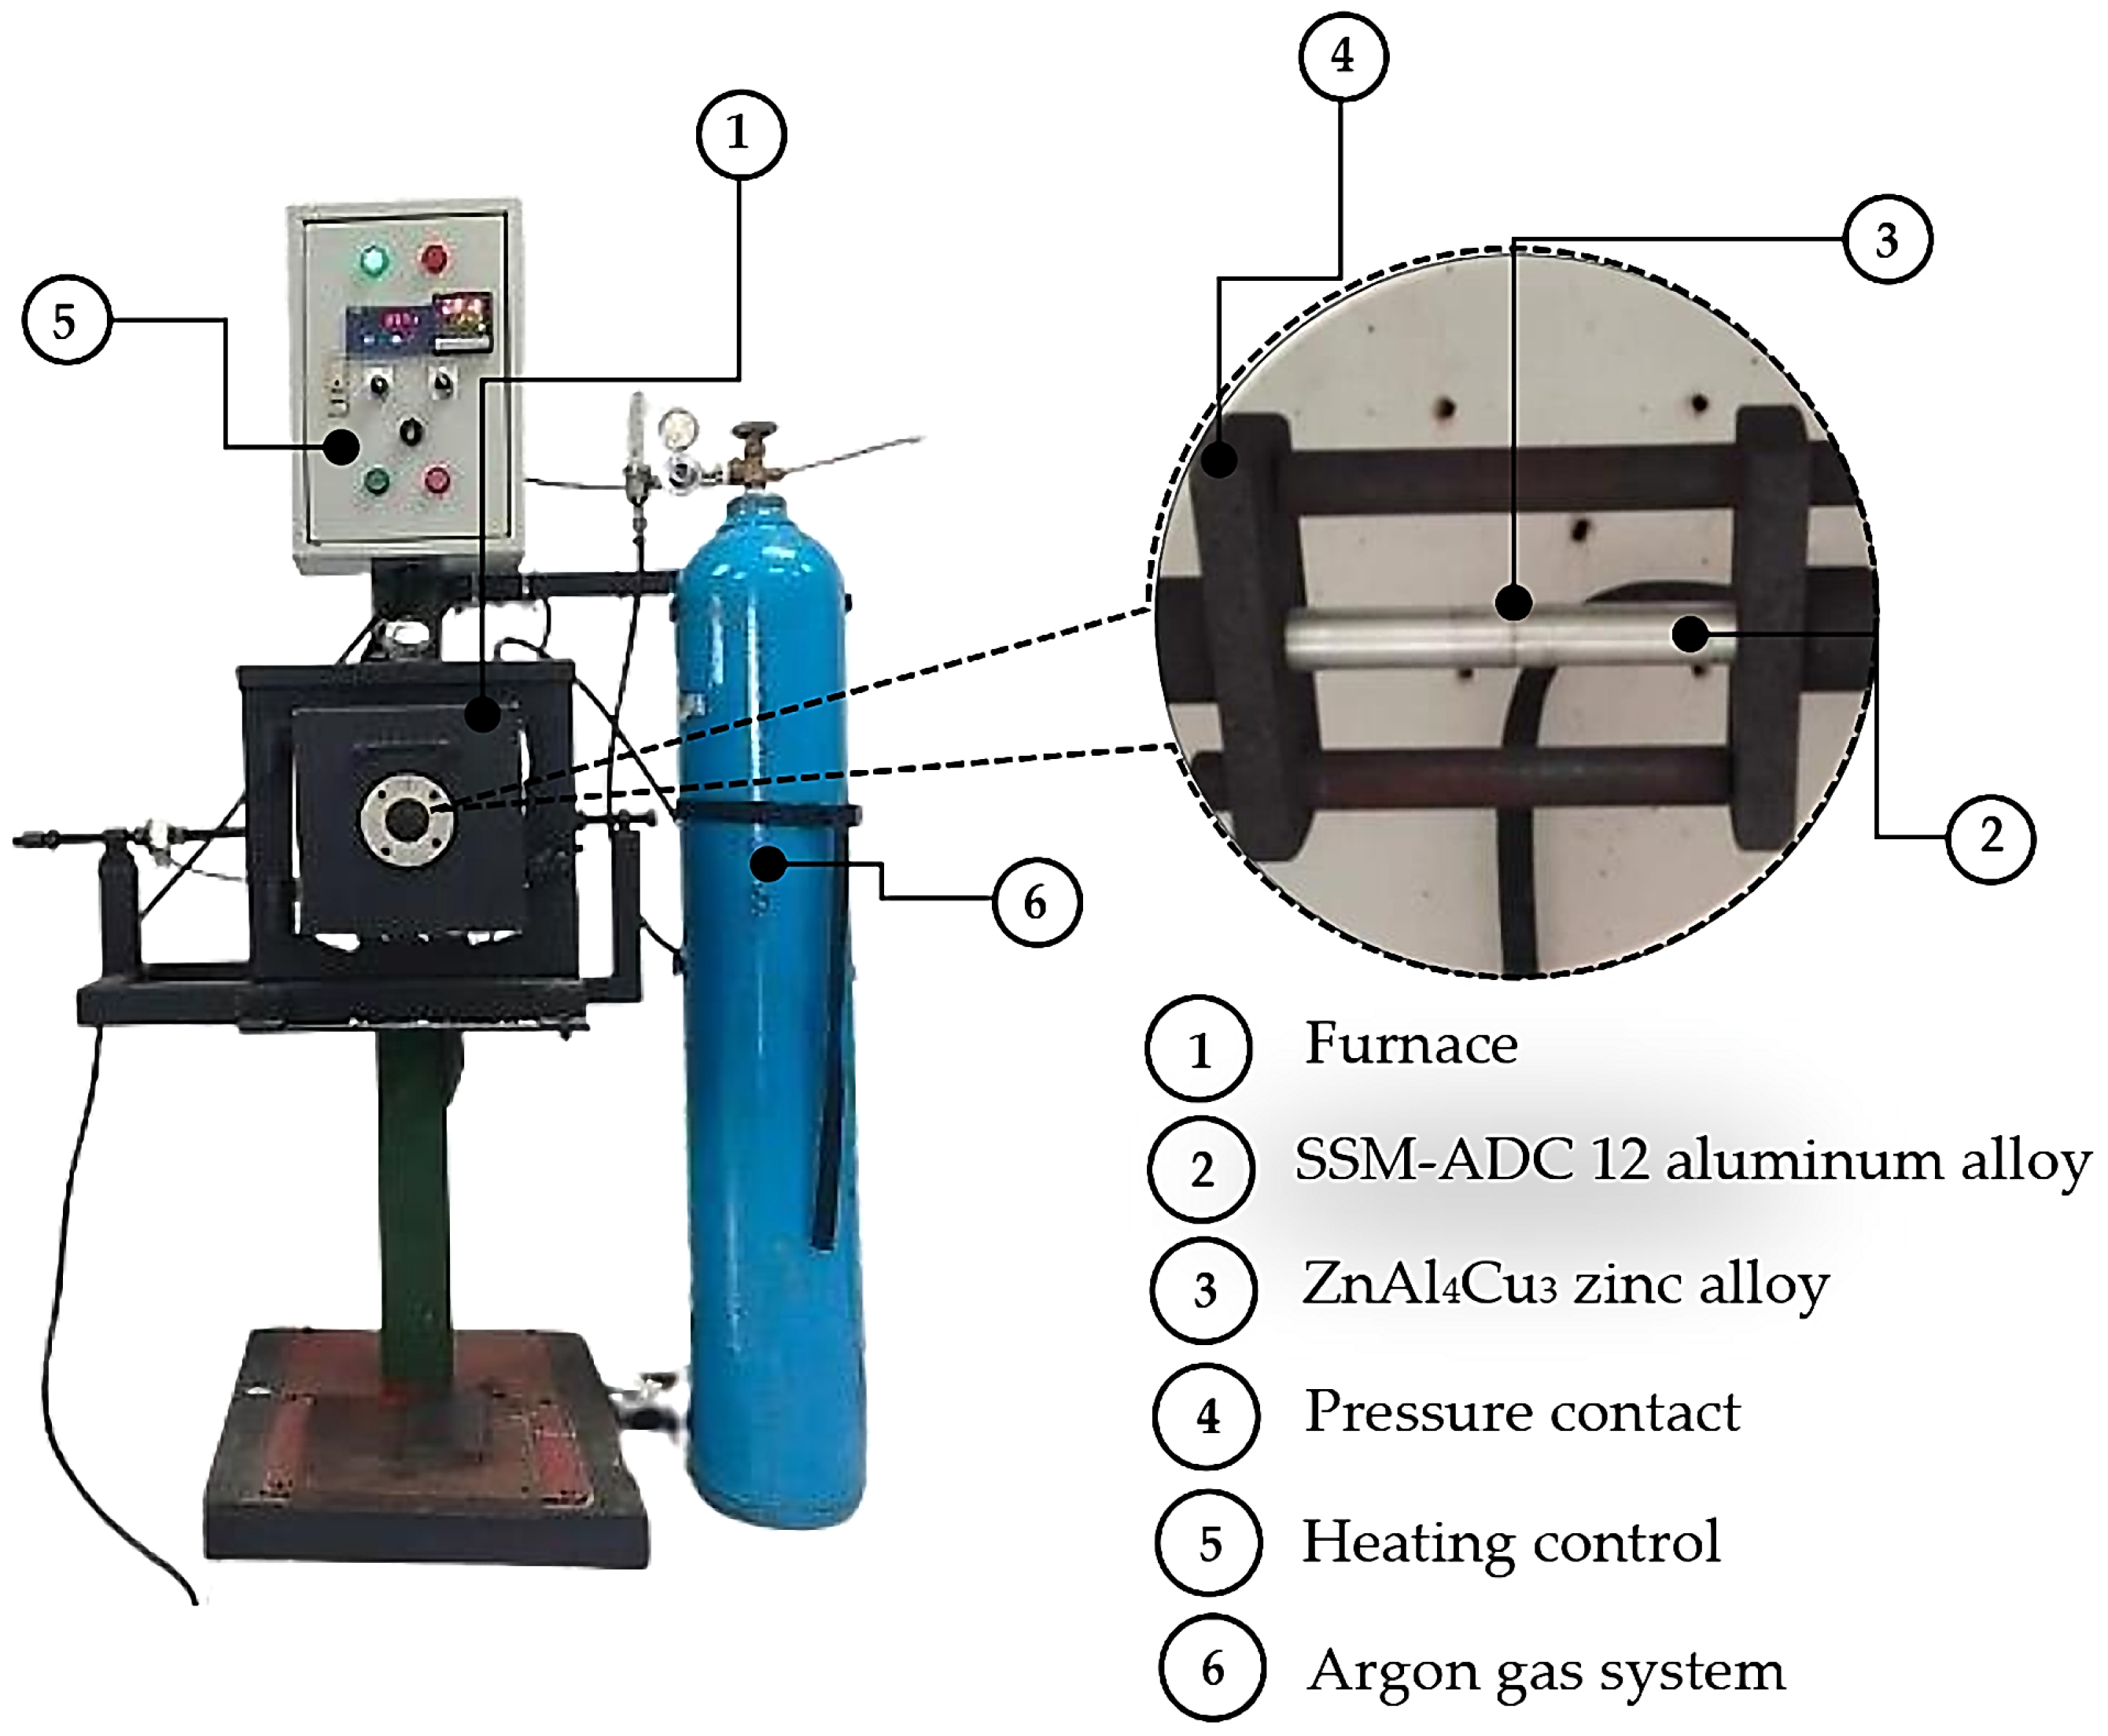
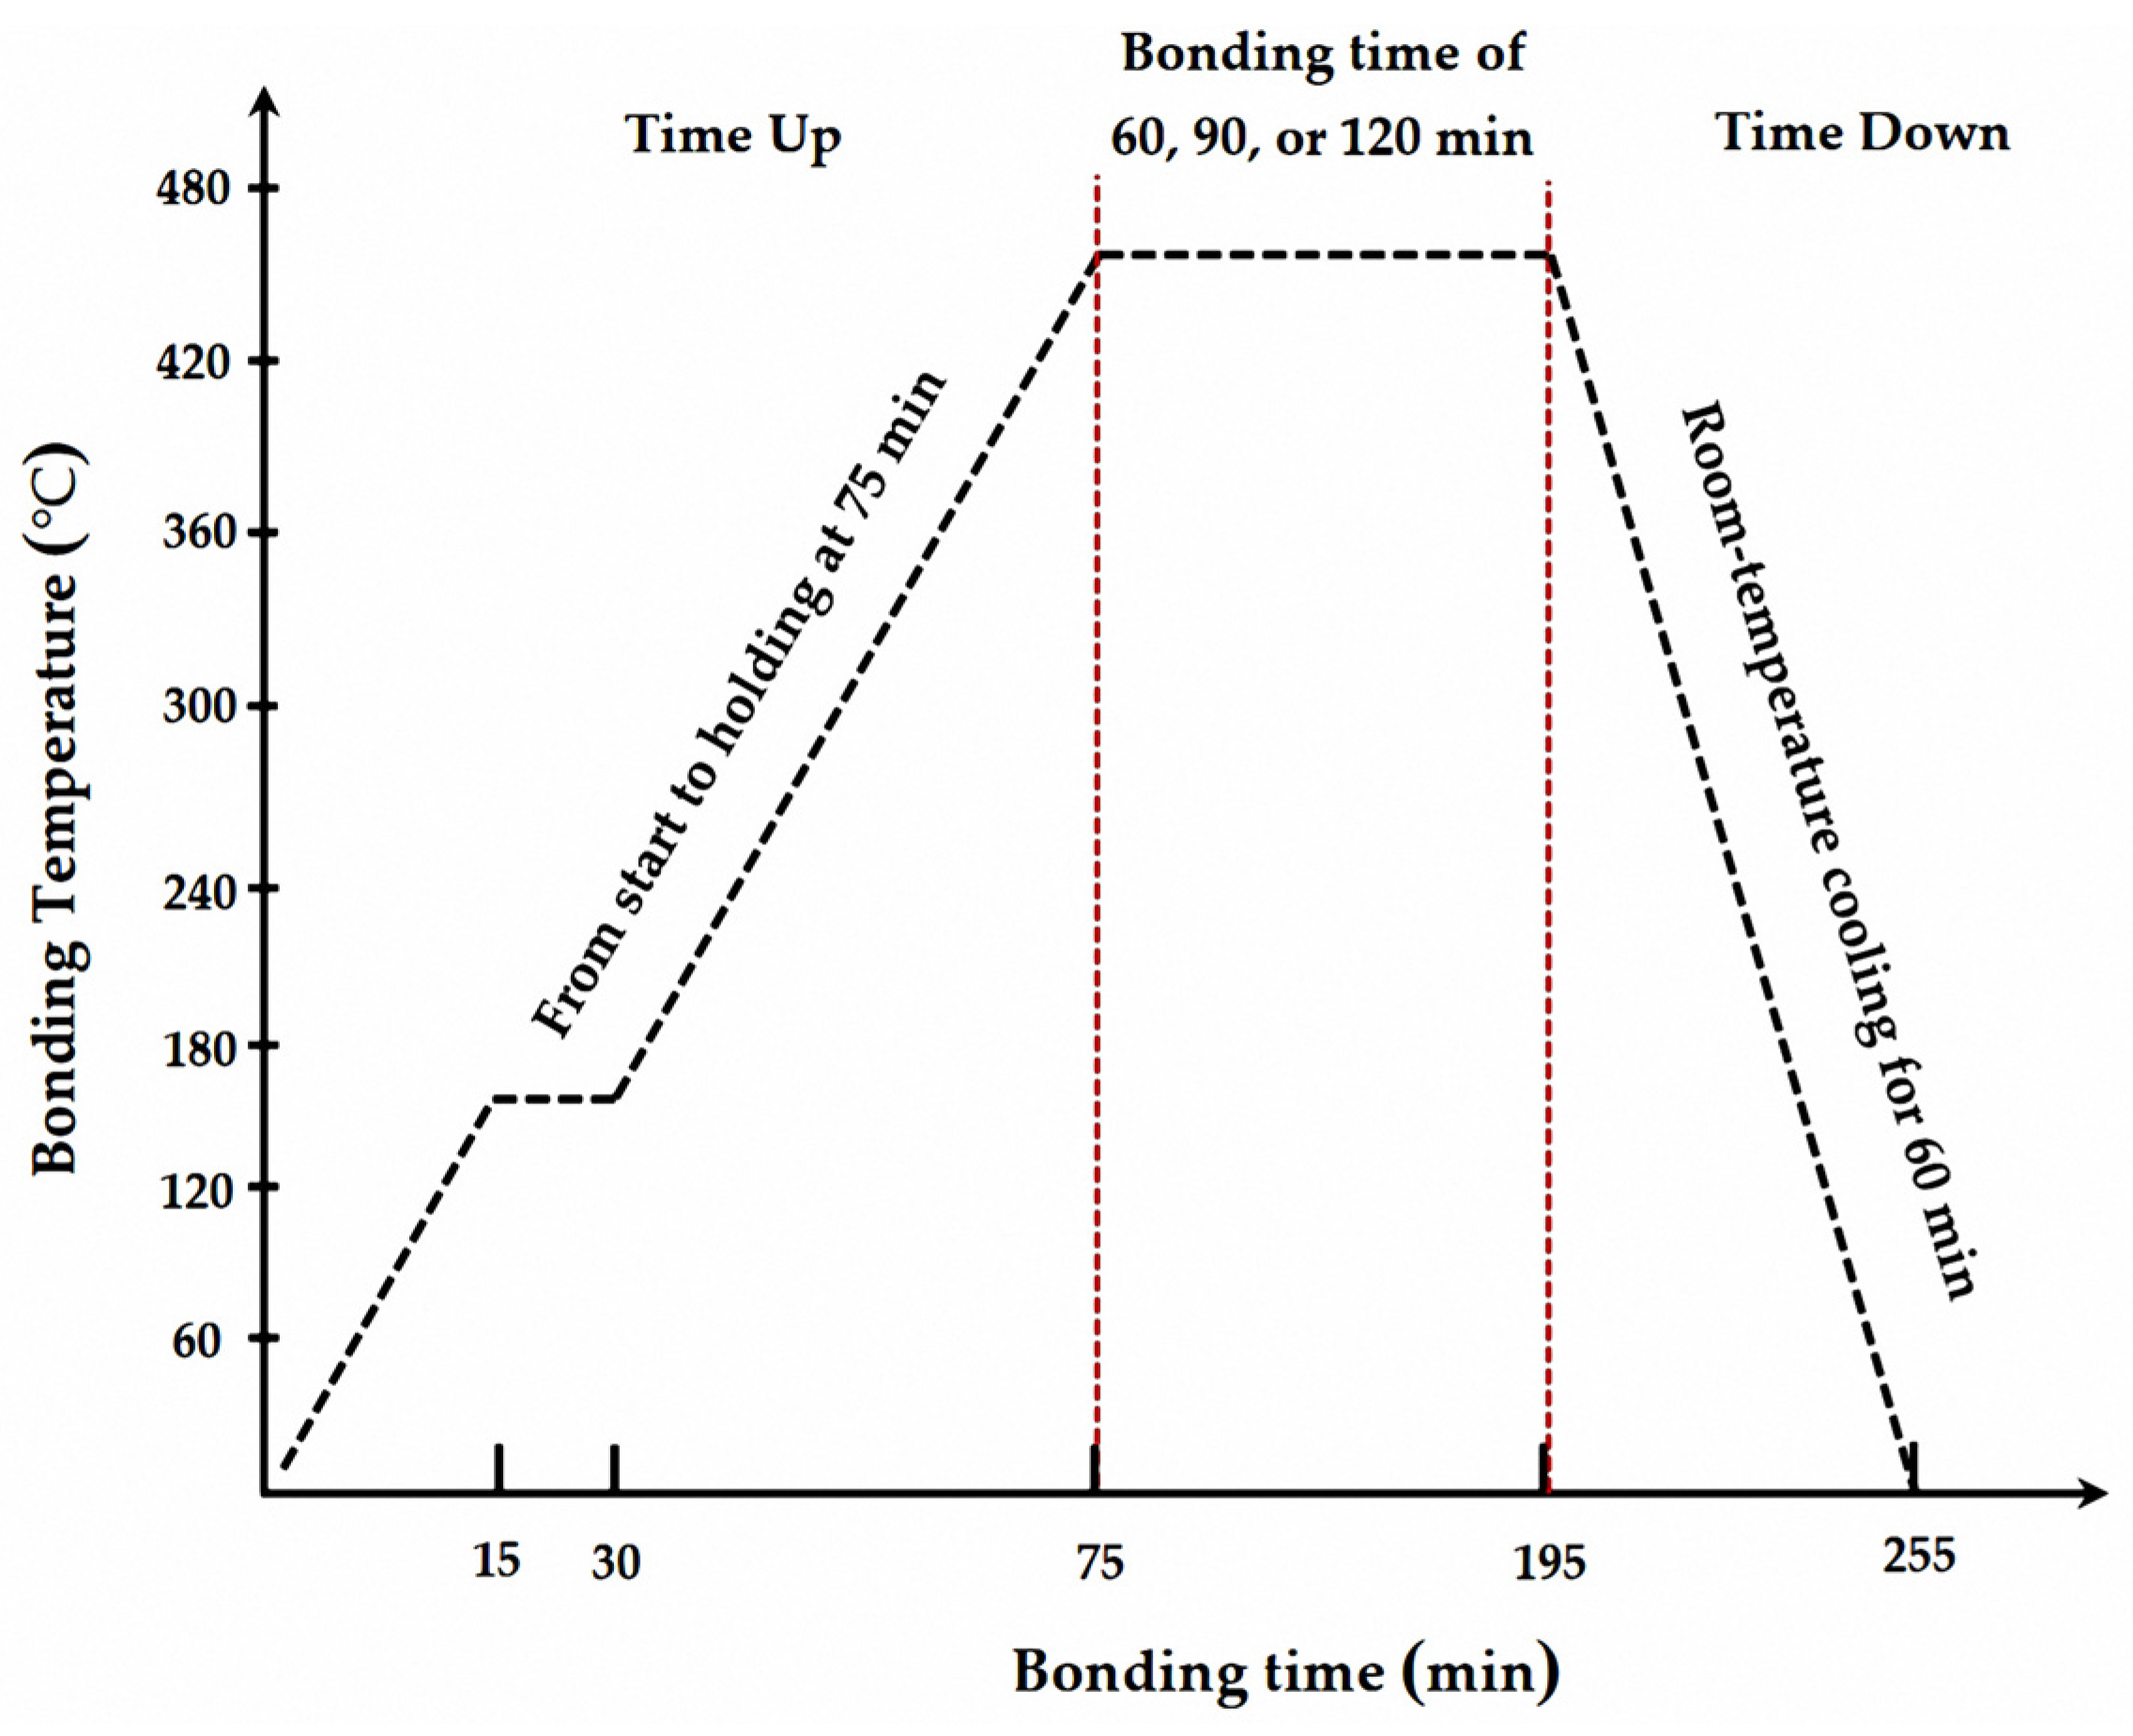
The SSM-ADC12 aluminum alloy was formed with a cylindrical shape that was 45 mm in length and 10 mm in diameter, and the ZnAl4Cu3 zinc alloy was used as interlayer material disks that were 10 mm in diameter and 0.5, 1.0, and 2.0 mm thick. Before TLPDB, the surfaces of both samples were polished using P320-grit SiC paper (Hitachi, Ltd., Tokyo, Japan). Then, they were cleaned using acetone in order to remove debris. To prevent surface oxidation effects before starting the TLPDB process, the ZnAl4Cu3 zinc alloy interlayer disks were stored in ethanol. After this, the samples were placed on the constant-pressure side in the axial direction. Next, a ZnAl4Cu3 zinc alloy interlayer disk was clamped between the SSM-ADC12 aluminum alloy pieces. Bonding temperatures of 400, 430, 460, 490, and 520 °C; bonding times of 60, 90, and 120 min; and a constant bonding pressure of 3.4 MPa were used in a gas chamber filled with 7 L of argon per min, preventing oxygenation during the TLPDB process. The equipment used for the TLPDB is shown in Figure 2, and the temperature control during TLPDB is shown in Figure 3.

2.3. Fatigue Testing

Fatigue was tested using a NARIN NRI-CPT500-2 Static and Dynamic Testing Machine (Narin Instrument Co., Ltd., Samut Prakan, Thailand). The frequency was set to 20 Hz, with a stress ratio of R = −1, and the stroke value was adjusted to 0.80, 0.70, 0.60, 0.50, 0.45, 0.40, and 0.35 mm. The fatigue limit for the material produced using this TLPDB process (TLPDB Material) and BMs was over 106 cycles [20]. An S–N curve was generated based on the relationship between the stress amplitude values and the number of cycles of TLPDB material and BMs. The life equation and endurance limit were also calculated. The specimens for fatigue testing were machined and removed using a Hardinge TALENT 8/52 CNC lathe machine (Hardinge Inc., Atlanta, GA, USA). The specimens for the fatigue test required special attention with regard to surface preparation, and the final surface was prepared with P1200-grit SiC paper according to the American Society for Testing of Materials’ standard ASTM E466-15 [21].

2.4. Metallurgy and Mechanical Testing

This study adhered to the American Society for Testing and Materials standard ASTM E8M-04 when evaluating the bonding strengths and microstructures of the samples after undergoing the TLPDB process [22]. Following this standard, the researchers utilized a lathe machine manufactured by Jet Tools (JPW Industries, La Vergne, TN, USA) to conduct a bond strength test at room temperature. This test involved a universal testing machine, specifically a Lloyd EZ50 (MSI-Viking Gage, Greer, SC, USA), set at a crosshead speed of 1.67 × 10⁻² mm/s.
Next, to assess the microhardness of the bond, the researchers employed an FM-700e Vickers microhardness tester from Future-Tech Corp (Kanagawa, Japan). This test involved applying a 100 g force to the indenter for a duration of 10 s, with the indentation placed 0.2 mm from the center of the bond.
Finally, for a detailed examination of the microstructure, the samples underwent a meticulous preparation process. This involved cutting and polishing them sequentially using SiC paper with grits of P320, P400, P600, P800, P1000, and P1200. Following this, the samples were further polished using alumina powder with grades of 5.0, 3.0, and 1.0 μm. To reveal the microstructure for observation, the samples were then etched with Keller’s reagent, which was obtained from the Materials Engineering Laboratory (PSU, Thailand). This reagent was formulated with specific proportions: 190 mL of water, 5 mL of HNO3, 3 mL of HCl, and 2 mL of HF. The microscopic analysis itself utilized two instruments: a BH2-UMA light microscope from Olympus Co., Ltd. (Bangkok, Thailand) for general observation of the microstructure and an FEI-Quanta 400 electron microscope (ThermoFisher, Hillsboro, OR, USA) for a more in-depth analysis of the quantitative chemical composition of the bond.

3. Results and Discussion

3.1. Characteristics of the TLPDB Samples

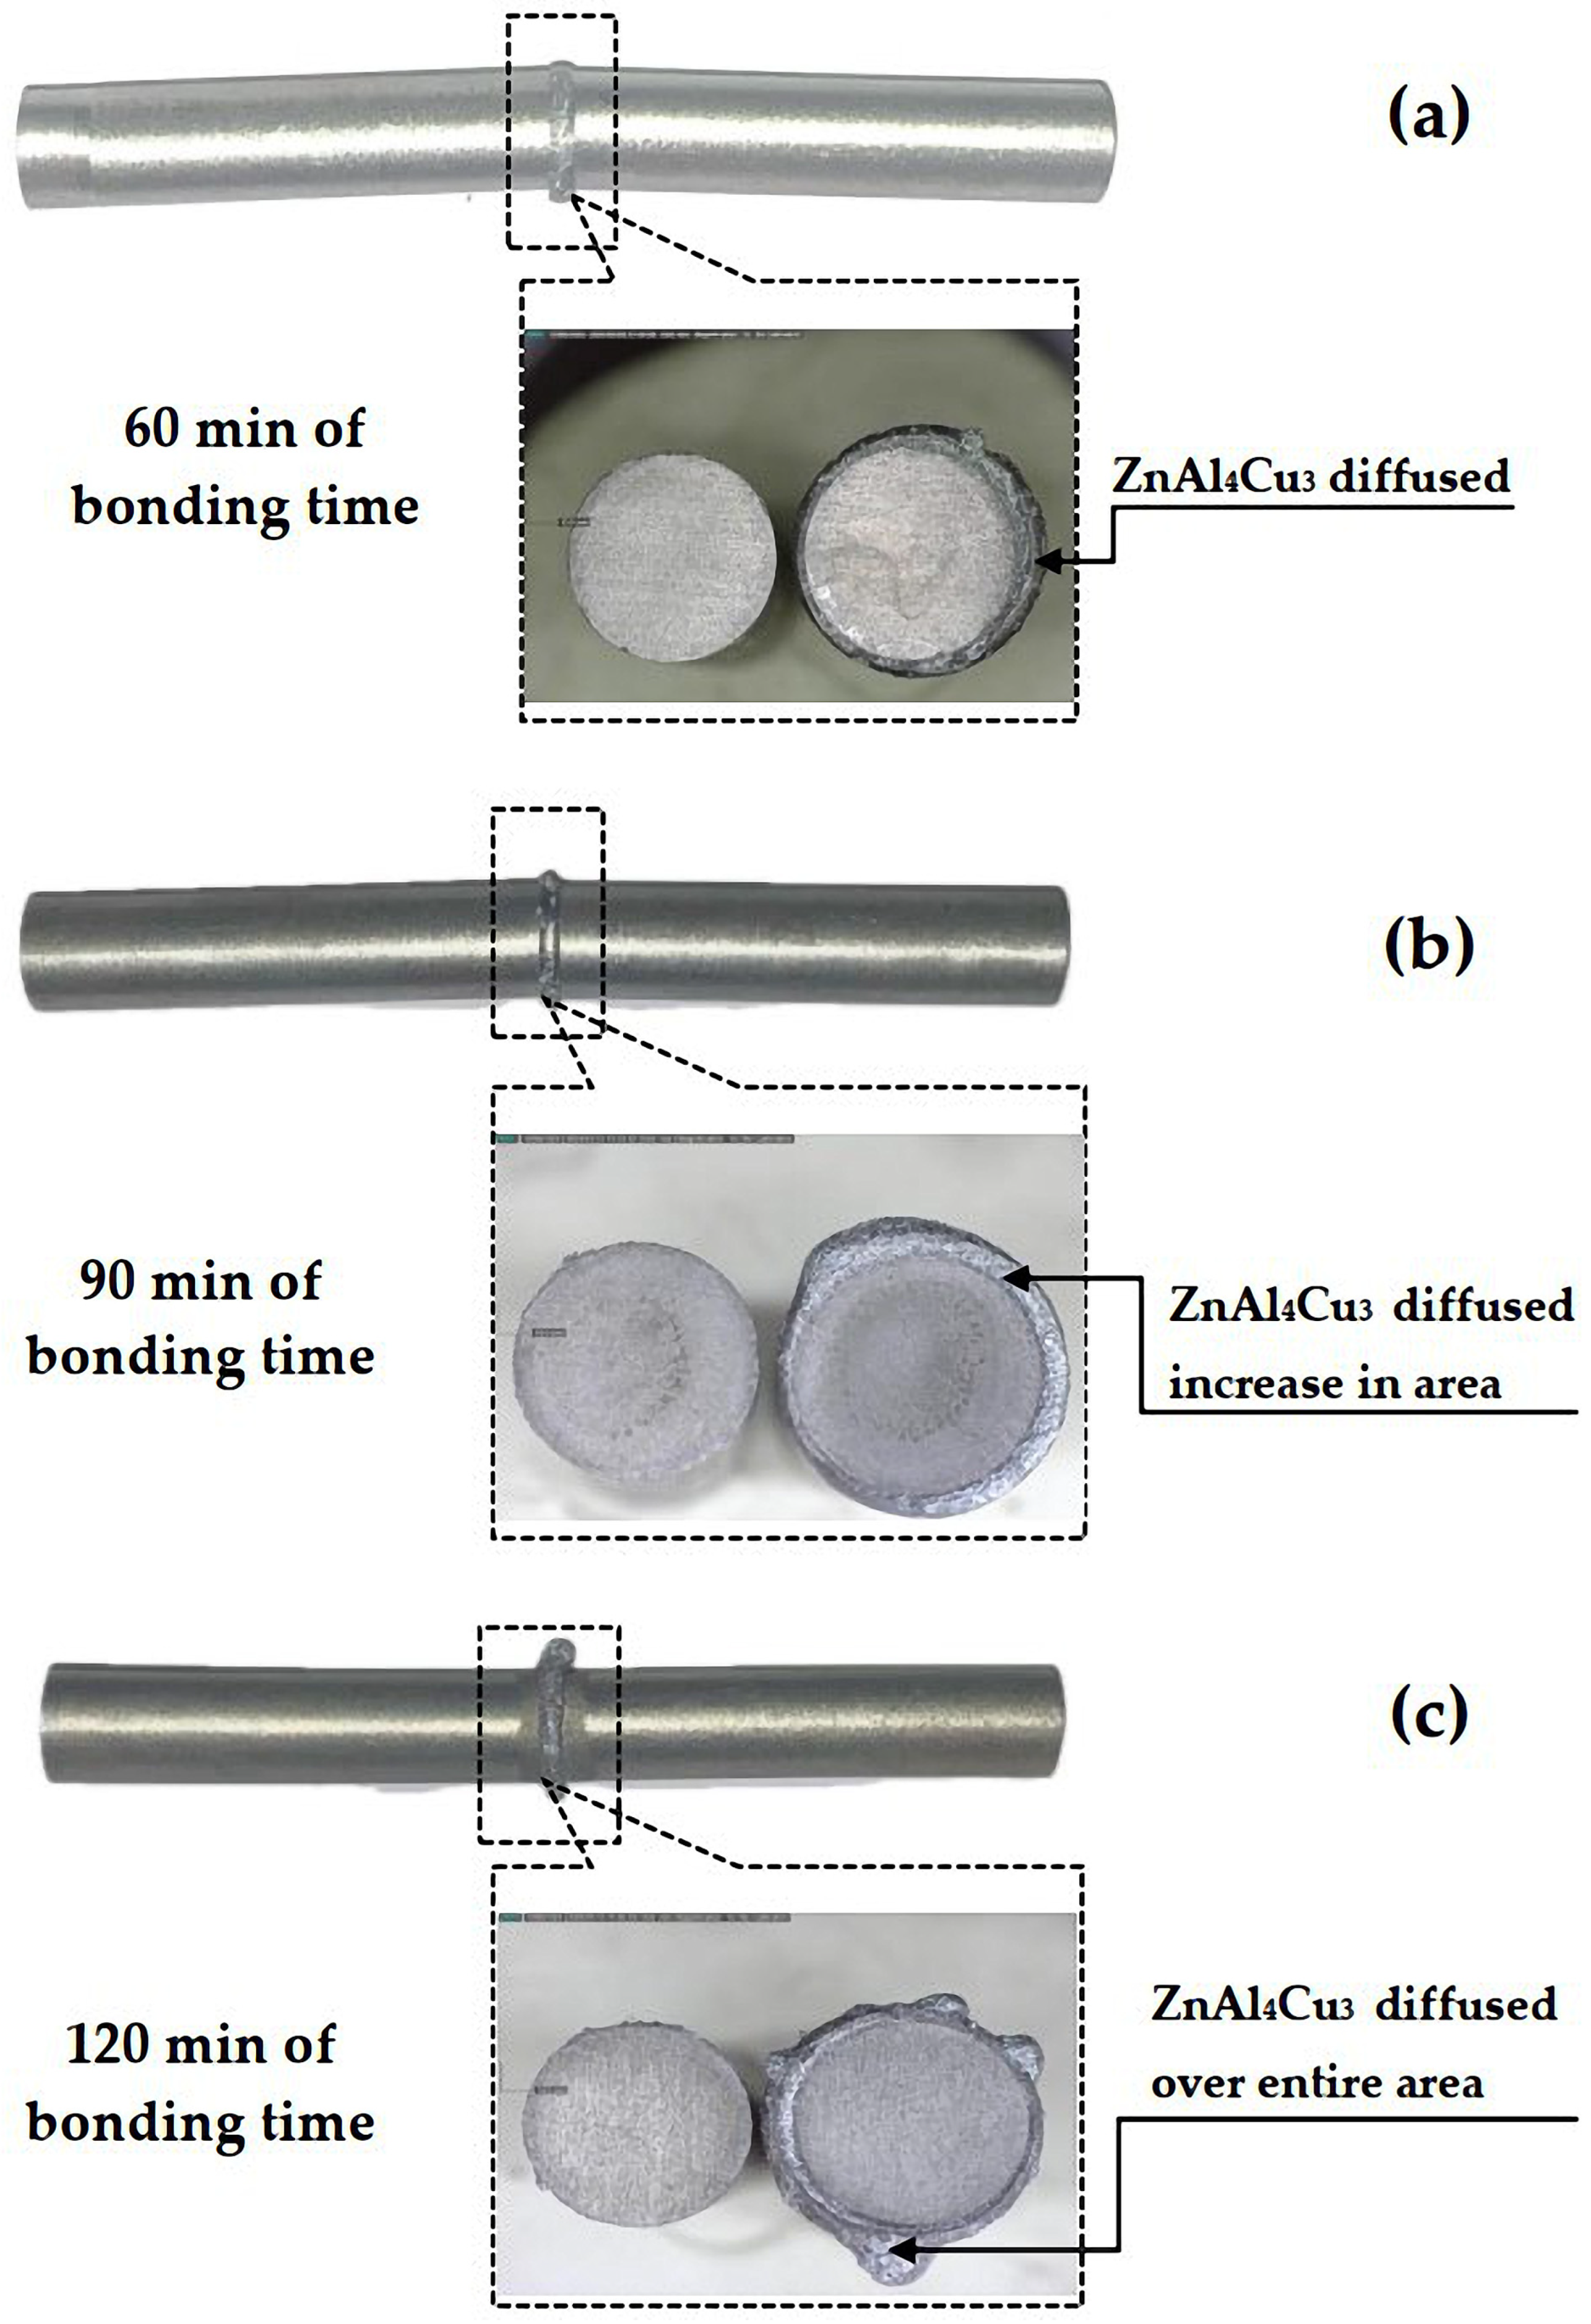
The physical characteristics of the samples after TLPDB were found to be clearly different and depended on each parameter of the experiment. The bonding temperature, bonding time, and thickness of the interlayer material used for welding affected the physical characteristics when increasing the bonding time from 60 to 120 min. However, when the bonding temperature and thickness of the interlayer material remained the same, it was found that the ZnAl4Cu3 zinc alloy that was the binder between the two pieces still continued to melt due to the accumulation of heat. As a result, the ZnAl4Cu3 zinc alloy was ejected and both pieces could have deflection defects due to the high liquidity of the melt [23], as shown in Figure 4c. Conversely, for a bonding time of 60 min, the samples had little deformation and fewer melting characteristics of the ZnAl4Cu3 zinc alloy, as shown in Figure 4a. Therefore, the bonding time influenced the bonding strength of the samples [24]. For a bonding time of 90 min, the samples showed a good ability to adhere, but the samples began to buckle on the bonded line because the ZnAl4Cu3 zinc alloy had a melting point of only 399 °C and the bonding temperature reached 490 °C. As a result, a high proportion of liquid accumulated in the joint area, causing deformation [25]. In regard to the physical characteristics of the samples after welding via TLPDB, the ZnAl4Cu3 zinc alloy adhered together well. However, it was found that the bonding temperature and bonding time influenced the deformation after welding. A short bonding time or a low bonding temperature resulted in poor adhesion in the samples because there were fewer atoms in the liquid state that had more activation energy than in the solid state. Conversely, a longer time or an excessively high bonding temperature resulted in deformation, leading to defects and samples with concave edges.

3.2. Bonding Strength Analysis

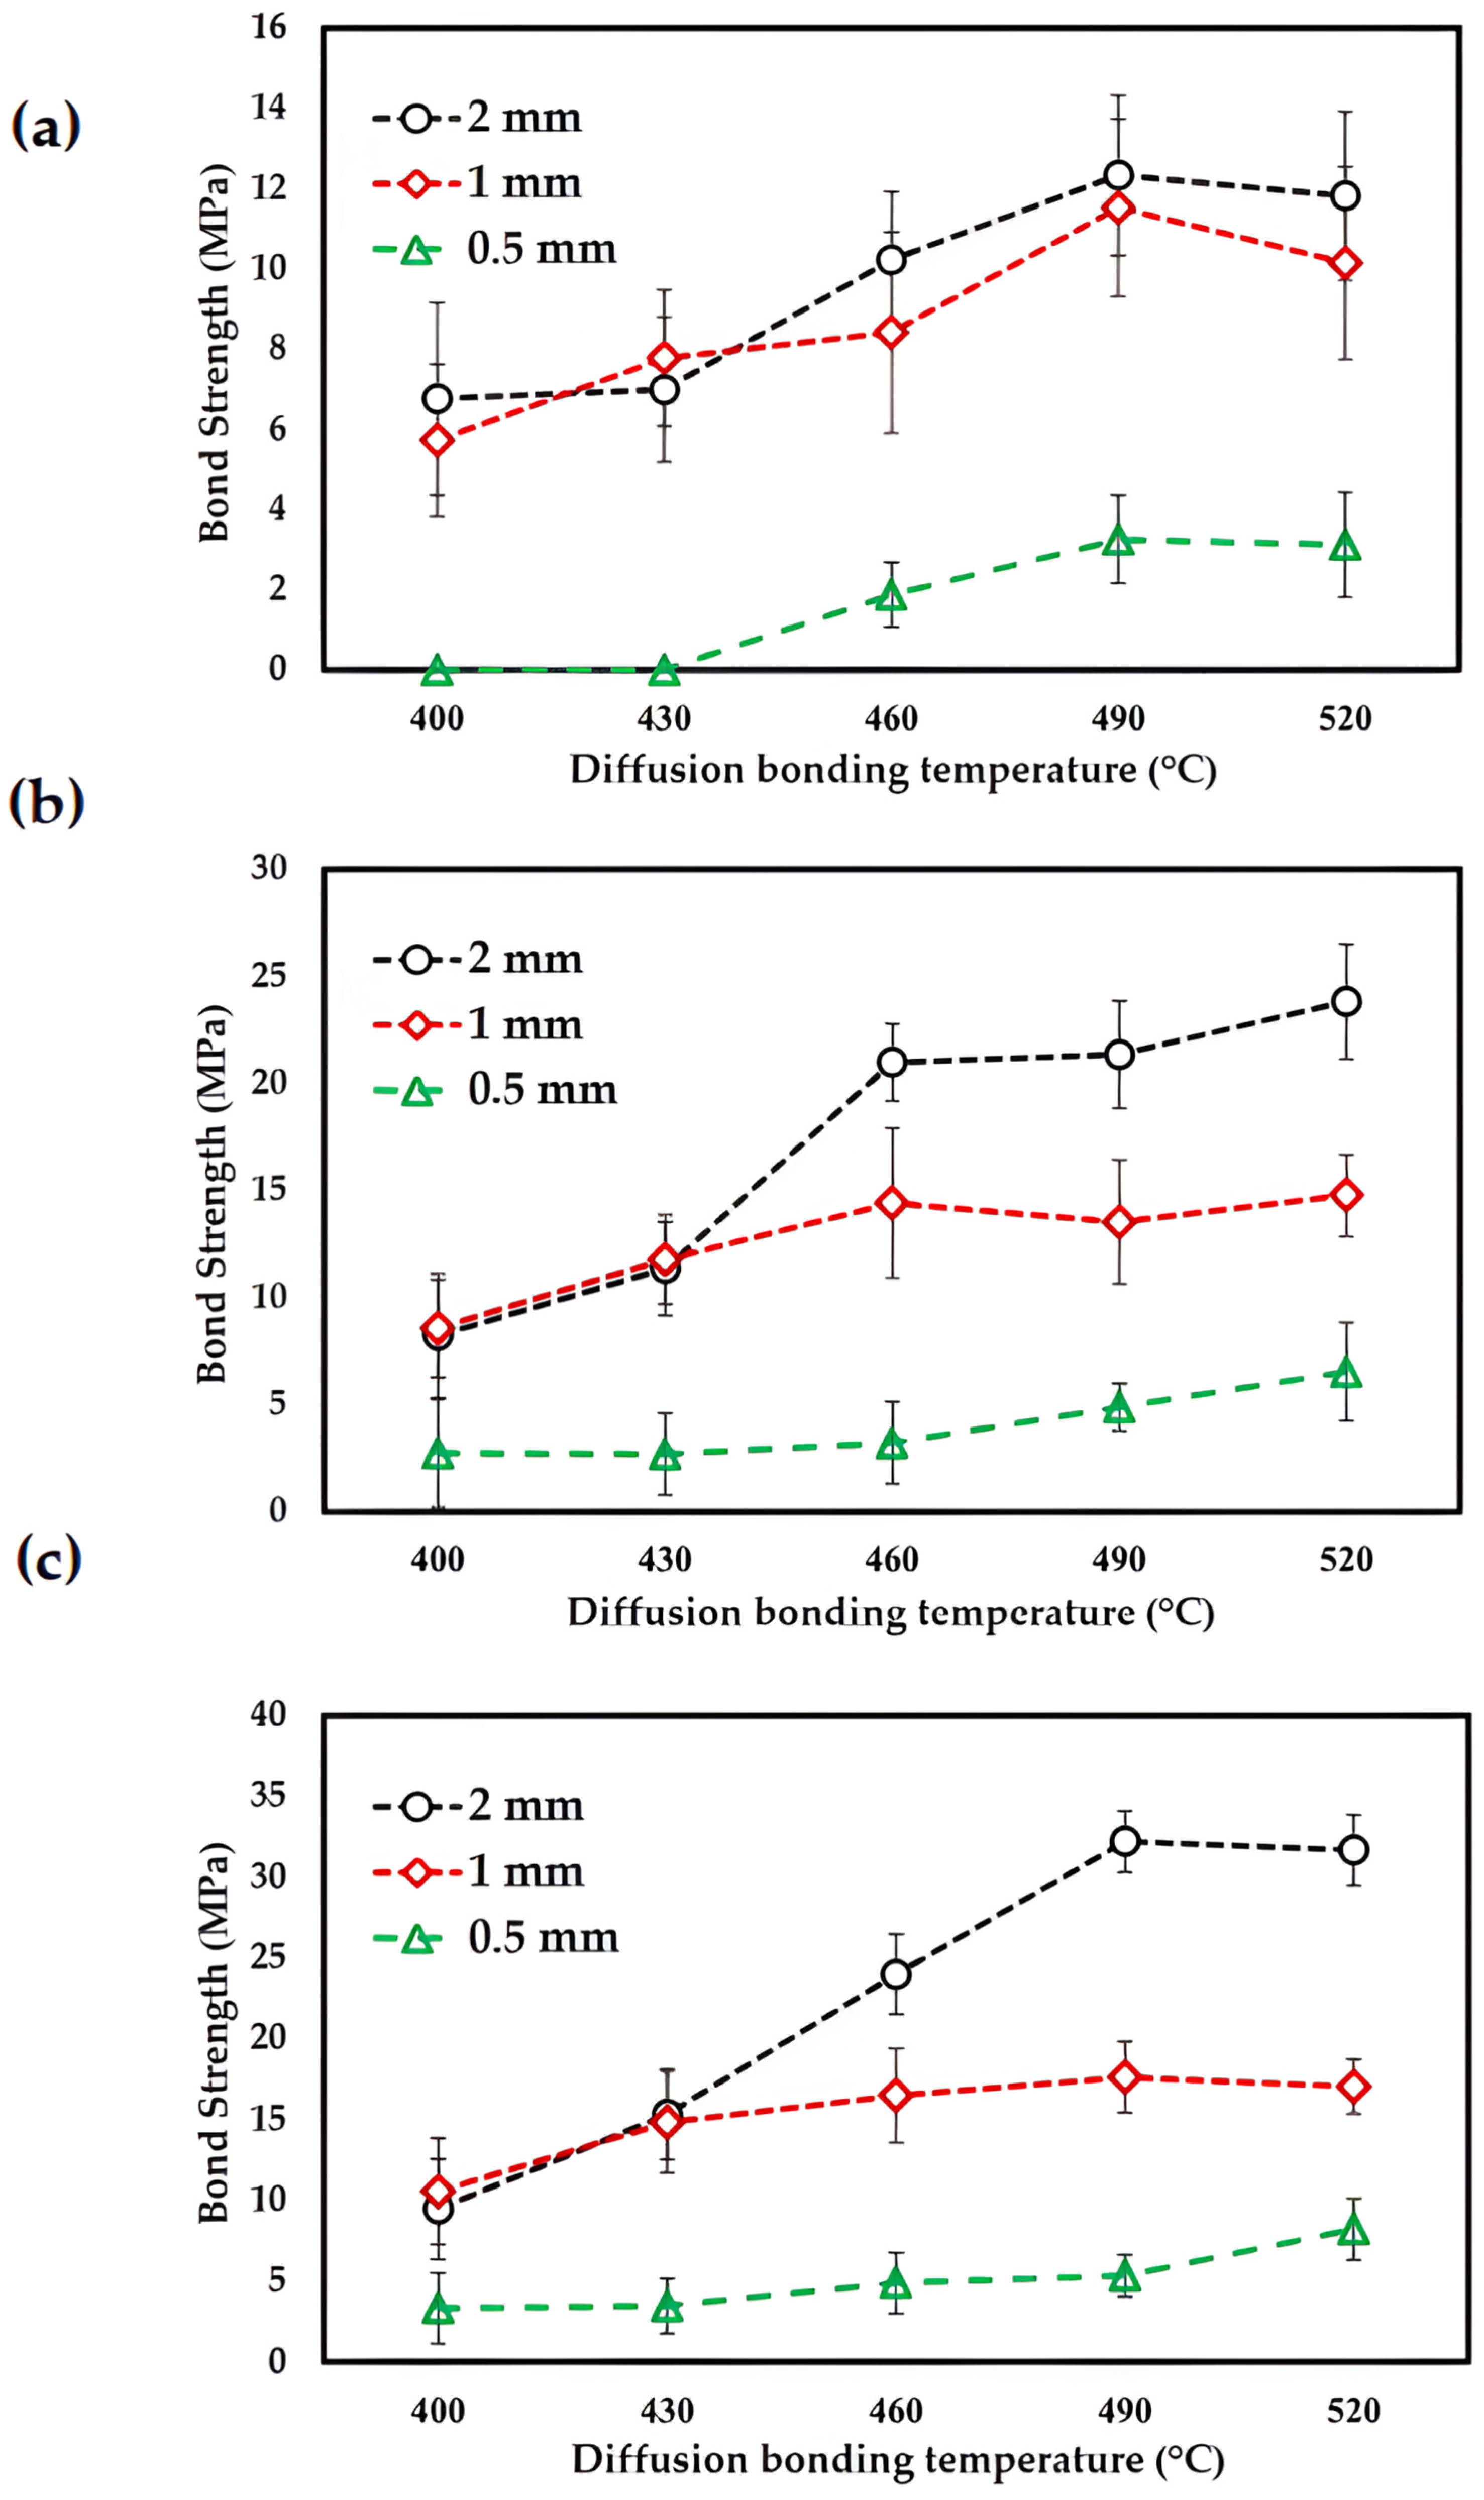
Figure 5 shows the bonding strengths for the TLPDB material of the SSM-ADC12 aluminum alloy using a ZnAl4Cu3 zinc alloy as an interlayer. It was found that the bonding strengths were related to the bonding temperature, bonding time, and thickness of the interlayer material. The results show that increases in the bonding temperature and ZnAl4Cu3 zinc alloy thickness tended to improve the bonding strength. For instance, with a bonding time of 120 min, a bonding temperature of 400 °C, and a ZnAl4Cu3 zinc alloy that was 2.0 mm thick, the average bonding strength was 10.55 MPa. However, when the bonding temperature was increased from 400 to 520 °C, high bonding strengths were observed. This study found that weaker bonds formed when the bonding temperature and time were lower. This weakness likely stemmed from the presence of voids, or tiny air pockets, within the bonds. Additionally, our team observed cracks or shrinkage in the liquid states of Zn, Al, and other elements involved in the bonding process. These cracks and shrinkage could also contribute to a weaker bond overall. Noticeably, a bonding temperature of 490 °C, a bonding time of 60 min, and a 2.0 mm thick ZnAl4Cu3 zinc alloy led to a lower bonding strength of only 1.87 MPa, where the joint efficiency was still lower than that of the BMs of the SSM-ADC12 aluminum alloy (319 MPa) and the ZnAl4Cu3 zinc alloy BMs (125 MPa). However, an increase in bonding time explicitly led to additional bonding strength [26]. For bonding times from 60 to 120 min at a bonding temperature of 490 °C, these factors significantly increased the bonding strength from 11.52 to 17.61 MPa. In addition, when the bonding time and bonding temperature were increased, the complete formation of IMCs was observed, including the η(Zn–Al–Cu), β(Al2Mg3Zn3), and MgZn2 phases, especially in the areas with a high bonding strength [27]. For a bonding temperature of 520 °C, bonding times from 60 to 120 min, and a ZnAl4Cu3 zinc alloy that was 1.0 mm thick, the average bonding strengths were 10.14, 14.77, and 17.02 MPa, respectively. Additionally, 120 min or more of bonding time could significantly increase the bonding strength. This is because the diffusion mechanism and activating thermal energy caused an increase in bonding and better bonding area formation. Compared to traditional diffusion bonding processes, the TLPDB process is a good bonding technique for the elimination of surface oxide film [28], which is a problem for many researchers. The diffusion process significantly affects the mechanism of atomic motion, which eliminates surface oxide film. In summary, Table 3 shows the comparisons from different previous studies using TLPDB in different materials. Therefore, in future work, the author suggests that new studies should conduct comparable studies to fulfill more comprehensive profiles among TLPDB parameters in other materials.
The amount of heat energy that was created during the welding process was directly correlated with the bonding strength. It can be seen that the TLPDB parameters had significant effects on the bonding abilities of the samples, leading to perfection [33,34]. This completely eliminated the formation of defects in the IMCs.

3.3. Fatigue Analysis

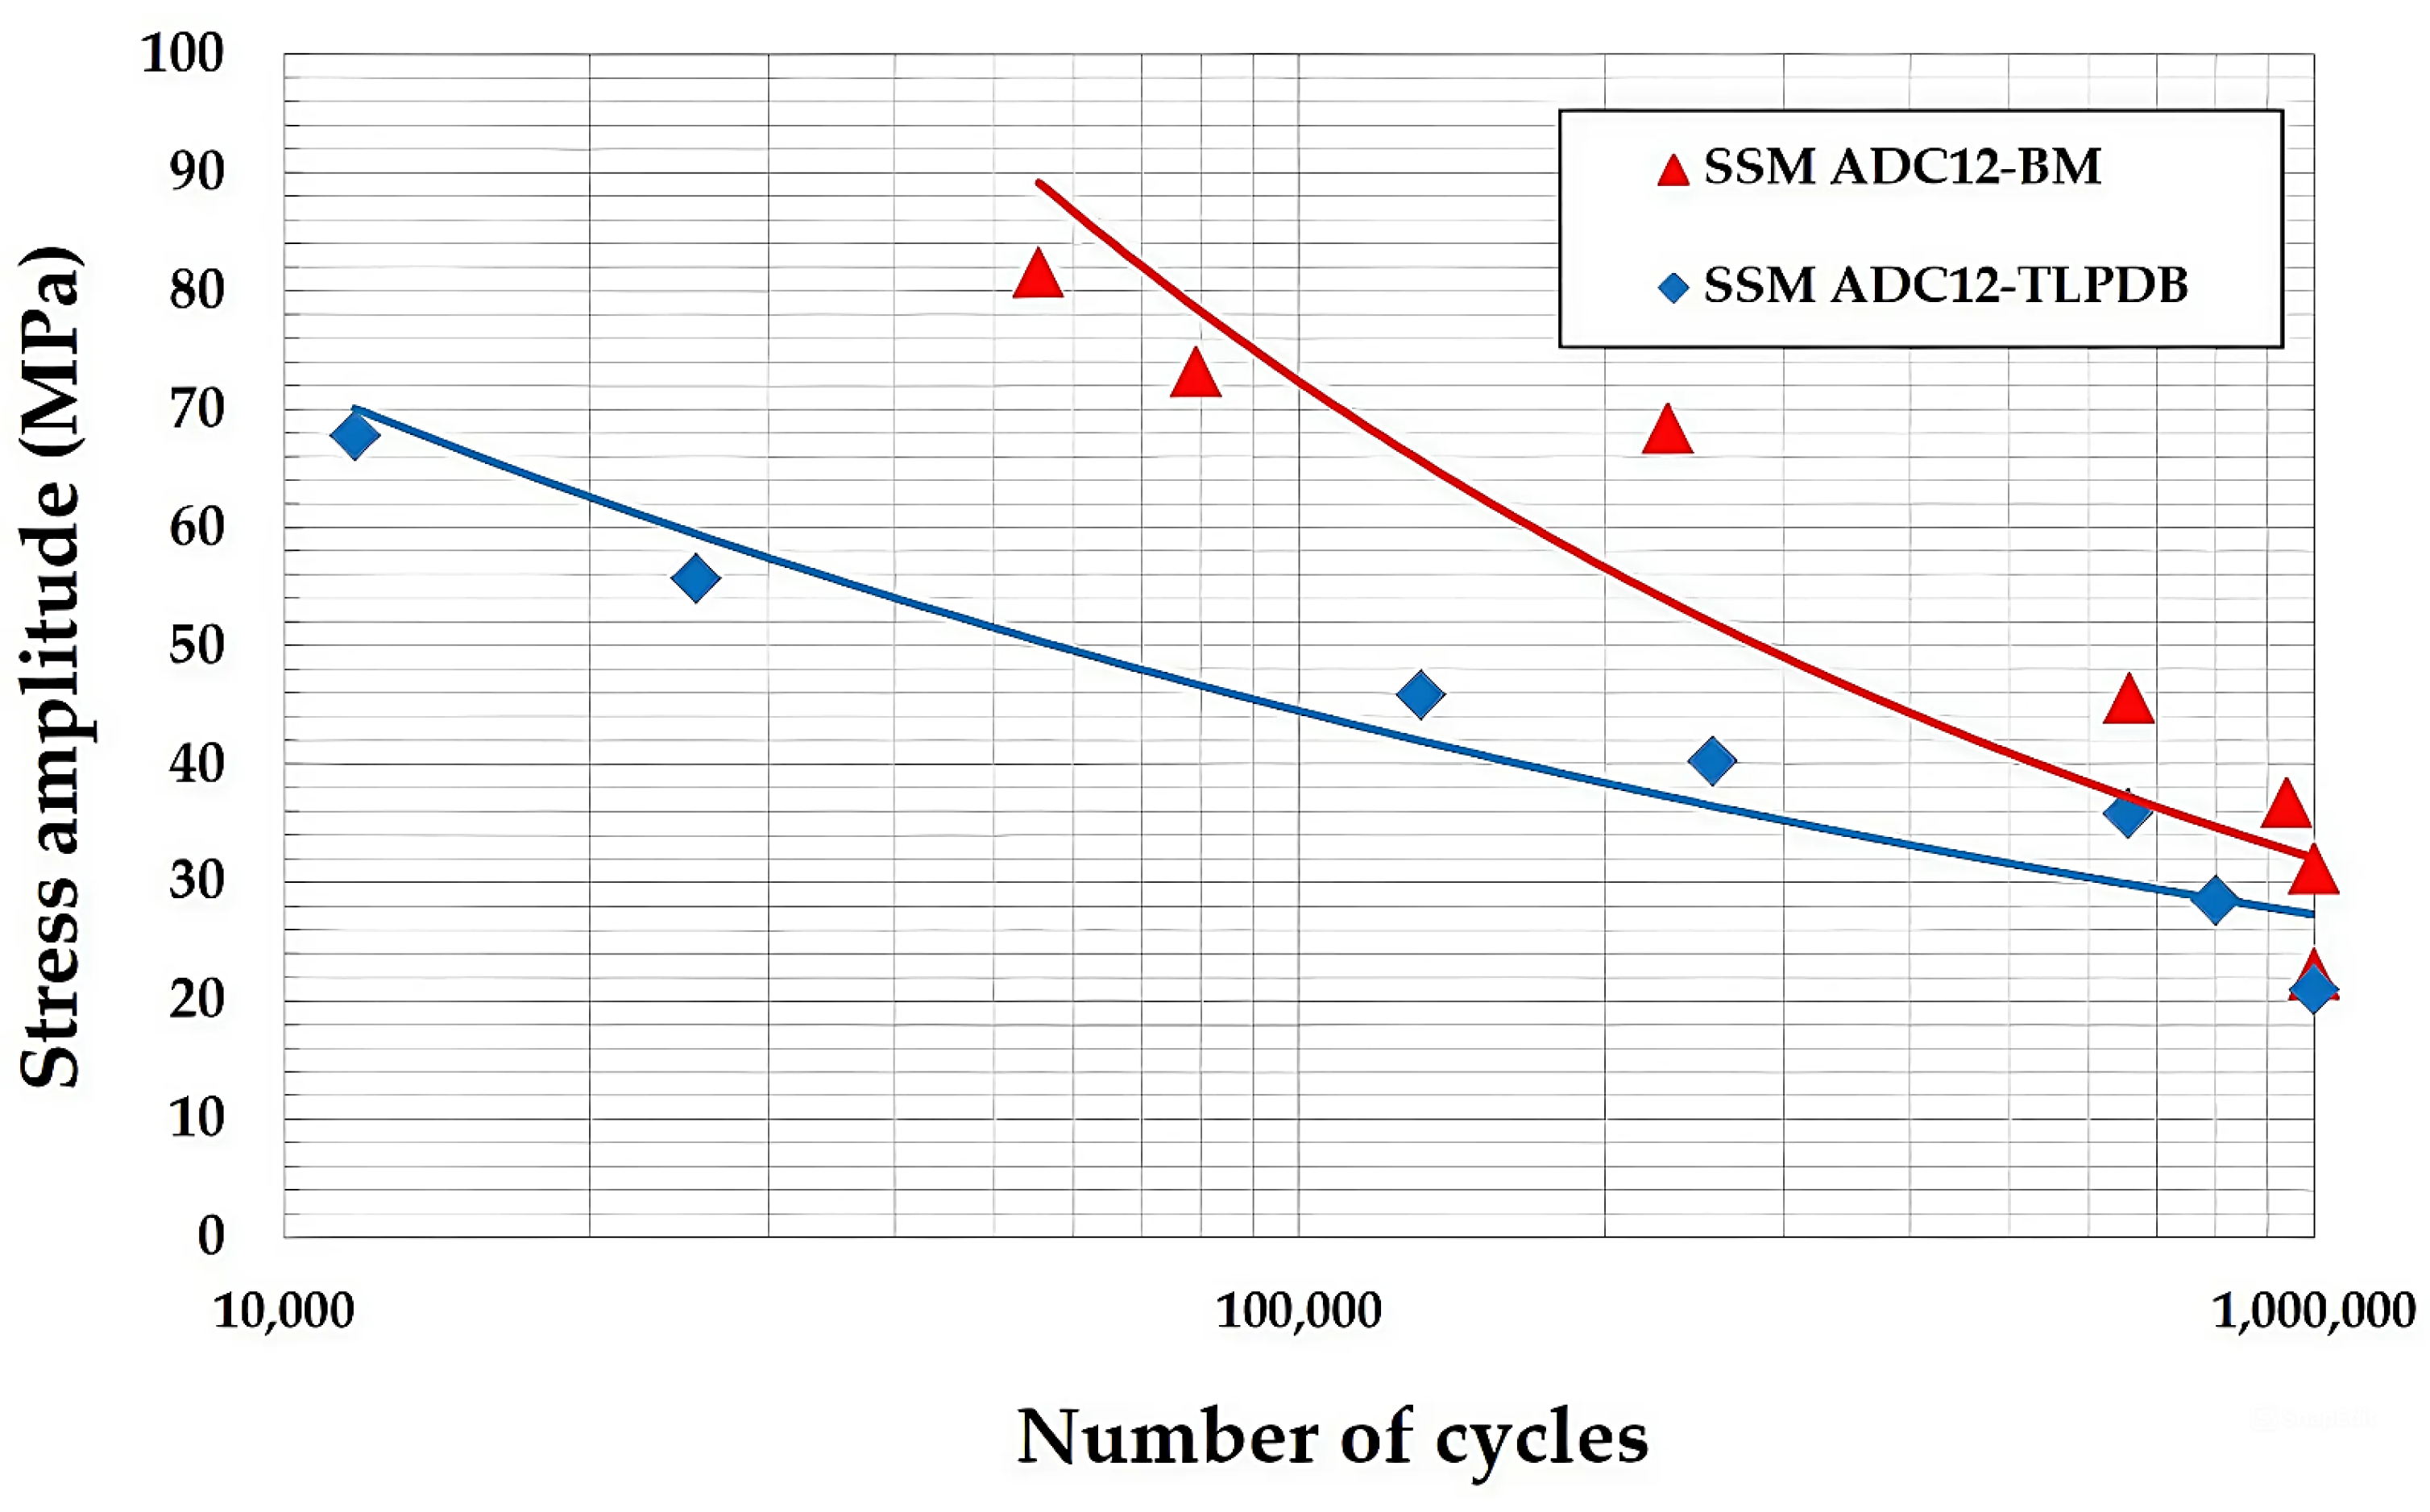
For the results of the fatigue tests for the TLPDB material and the BMs of the SSM-ADC12 aluminum alloy, the stroke levels are proportionally correlated to the levels of stress, and the number of cycles was similar at each level for the TLPDB material and the SSM-ADC12 BMs, as shown in Table 4. In addition, a reduced stress amplitude resulted in a higher number of cycles. The fracture positions of the fatigue tests occurred at all seven levels of the BMs, which changed the fatigue lives of the welds according to the degree of tensile strength [35,36]. In addition, the defects caused by the aluminum casting process and other welding defects affect the hardness, which is unmatched by the surrounding material and greatly accelerates crack nucleation [37]. These defects are often harmful with respect to fatigue strength and fatigue life [38]. The fatigue S–N curves for the TLPDB material and BMs of the SSM-ADC12 aluminum alloys are shown in Figure 6.
Table 5 shows the life equations (σ) and endurance limits at 106 cycles. The calculated endurance limit of the BMs of the SSM-ADC12 aluminum alloy was 31.12 MPa. Conversely, the calculated endurance limit of the TLPDB material of the SSM-ADC12 aluminum alloy was 20.29 MPa, which was less than the endurance of the BMs. This resulted from the new precipitate of the β-eutectic phase and the α-primary aluminum matrix phase in the bonded zone [39] and was also caused by the formation of crack and void defects during the TLPDB process [40].

3.4. Microstructure of the TLPDB Material of the SSM-ADC12 Aluminum Alloy

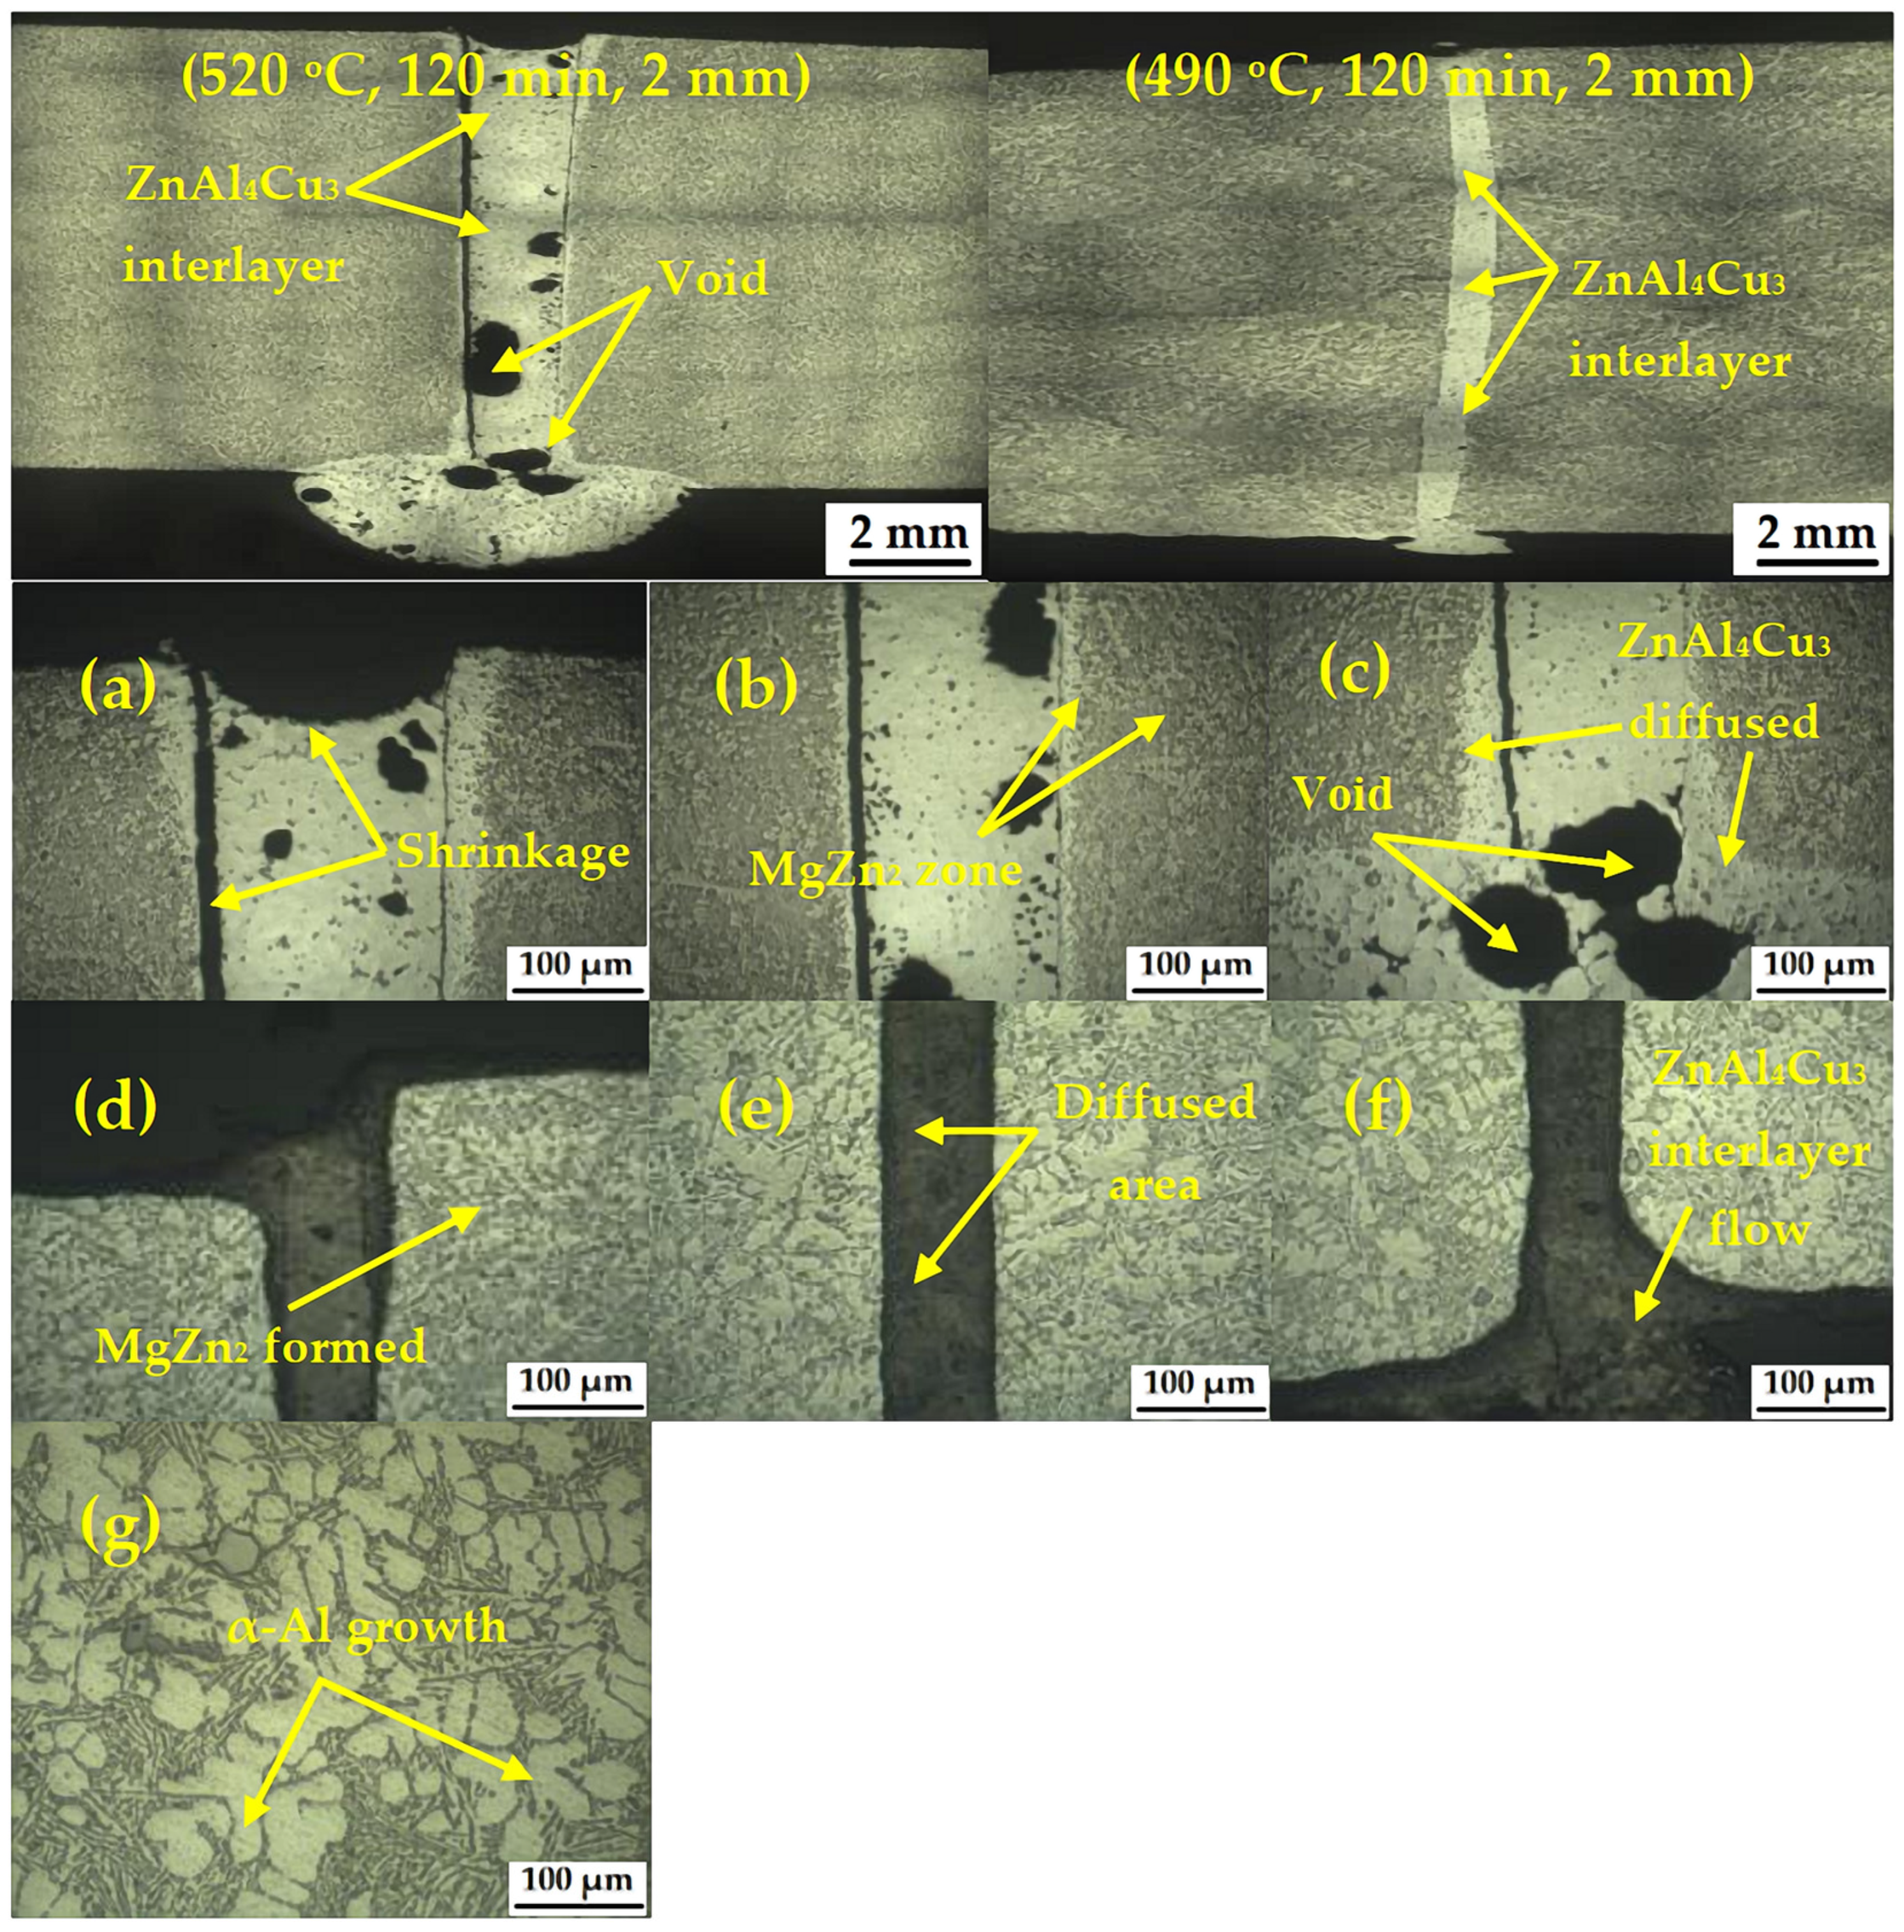
The macrostructures obtained at a bonding time of 120 min, bonding temperatures of 490 and 520 °C, and with an interlayer material with a thickness of 2.0 mm can be observed in Figure 7. These results suggest that the bonding temperature and time significantly influenced the diffusion of alloying elements between the ZnAl4Cu3 zinc alloy and the SSM-ADC12 aluminum alloy. Lower temperatures and shorter bonding times resulted in the formation of larger voids within the bonding zone. These were essentially tiny air pockets that weakened the bond [41]. These voids likely prevented complete welding between the two alloys. Additionally, the voids tended to be aligned longitudinally within the bonding zone. In contrast, when an appropriate bonding temperature and time were used, these voids disappeared. This is likely due to the diffusion of atoms in the bonding zone, leading to a more homogeneous microstructure. This study emphasizes that the bonding temperature plays a critical role in shaping the microstructure of the bonded area. It is also worth noting that our team observed the precipitation of an α-Al phase within the SSM-ADC12 aluminum alloy that has been significantly influenced by temperature and time, respectively.
Similar to other cases, tiny MgZn2 particles formed and were scattered throughout the main aluminum phase (α-Al). This behavior was linked to the fast movement of Zn atoms in the ZnAl4Cu3 alloy, particularly near the area where the material was joined (the bonding zone). This rapid diffusion led to the creation of a specific phase consisting of β + η phases. This microstructural result shows that the β + η phase formation due to the bonding time and bonding temperature resulted in a β(Al2Mg3Zn3) phase being supersaturated to form a β′ phase [42]. Meanwhile, the η(Zn–Al–Cu) phase also merged into a β phase by forming an η′ phase and gradually diffusing into the borders of the voids, leading to a slow void elimination mechanism. However, after TLPDB, the crystal form of the atoms changed and ZnAl4Cu3 zinc alloy shrinkage led to cracks in the bonding zone.
Figure 7a–c shows the shrinkage of the near interlayers and the tops of the samples (Figure 7a) with a bonding time of 120 min, a bonding temperature of 520 °C, and an interlayer with a thickness of 2.0 mm. The results show that this shrinkage was caused by sudden and rapid cooling, which resulted in the material shrinking. While the ZnAl4Cu3 zinc alloy was in the liquid state, oxygen could penetrate into the melting zone, forming a void or porosity in the diffused area (Figure 7c). However, diffusion of the ZnAl4Cu3 zinc alloy into the SSM-ADC12 aluminum alloy could be seen, especially near the bond line. The Zn in the ZnAl4Cu3 zinc alloy had the ability to combine with Mg and led to the formation of MgZn2 IMCs, which caused hardness near the bond line (Figure 7b). With a bonding time of 90 min, a bonding temperature of 490 °C, and a ZnAl4Cu3 zinc alloy interlayer with a thickness of 2.0 mm, as shown in Figure 7d–f, the ZnAl4Cu3 zinc alloy interlayer had formed a complete diffusion. This could be observed based on the formation of few defects and the Zn equilibrium distribution (Figure 7e). Similarly, the top and bottom areas of the samples did not shrink from the ZnAl4Cu3 zinc alloy, resulting in complete bond lines, as shown in Figure 7d,f. Finally, the microstructures in the BMs were transformed into an α-aluminum matrix (shown in Figure 7g) and a eutectic Si phase. Before TLPDB, the eutectic Si IMCs had an average particle grain size of 78–97 µm. However, after TLPDB, the average particle grain size increased to 118–139 µm and the shape was transformed from globular to distorted grains shown in Figure 7g.
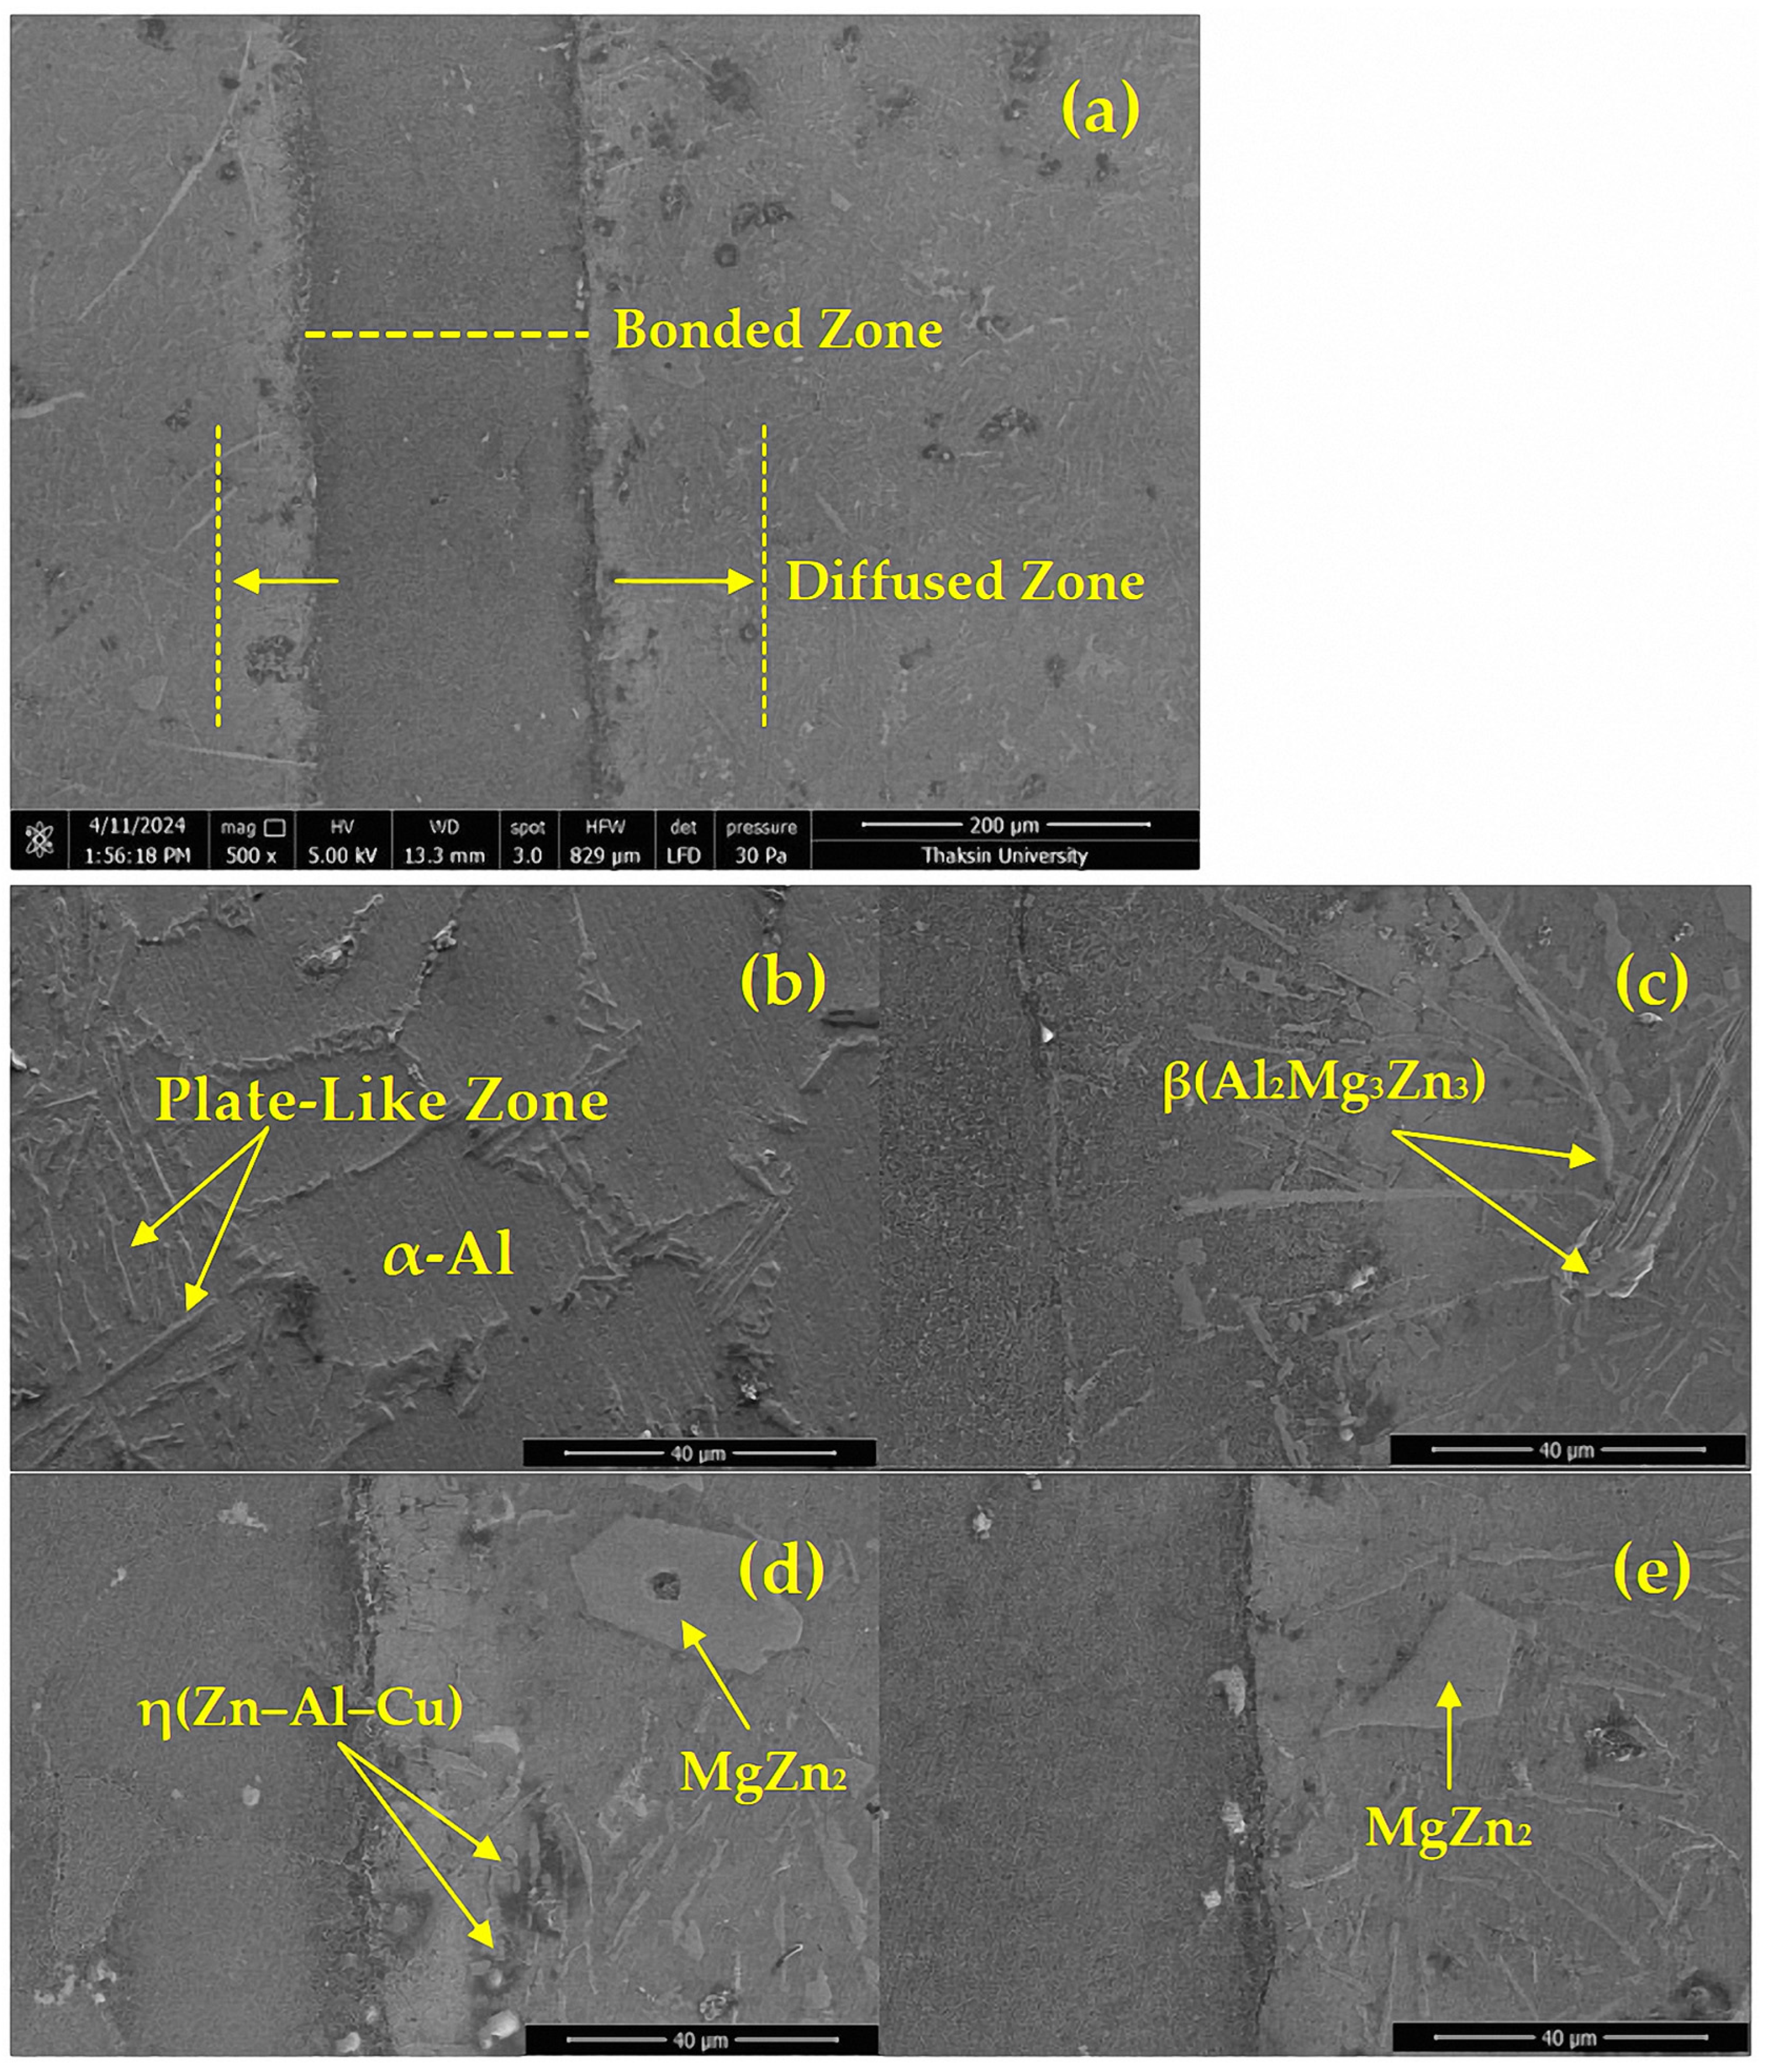
Figure 8a shows SEM micrographs of a sample with a bonding time of 120 min, a bonding temperature of 490 °C, and a ZnAl4Cu3 zinc alloy interlayer that was 2.0 mm thick. The different characteristics of the eutectic Si IMCs from the BMs, bonding zone, center interlayer, and NBZ were observed. The post-experiment examination revealed a substantial transformation in the morphology of the eutectic Si IMCs. Initially, these IMCs exhibited interconnected, gauze-like basal structures with uniform distributions in length (21–70 µm) and width (2–9 µm). Notably, the eutectic Si IMCs within the BMs remained unaltered, which was attributed to the negligible influence of thermal and frictional stresses (as observed in Figure 8b). Conversely, the eutectic Si IMCs located in the bonding zone experienced a distinct morphological shift, losing their characteristic gauze-like configuration. The gauze-like shape of the eutectic Si IMCs was broken by cyclic loading, resulting in them becoming smaller in size [43]. Microscopic analysis revealed distinct variations in the size and distribution of the eutectic Si IMCs across the different weld zones (Figure 8). In the HAZ near the weld (Figure 8c), the eutectic Si IMCs exhibited an elongated morphology, with average dimensions of 6–11 µm (length) and 2–4 µm (width), oriented along the welding direction. This suggests a preferential alignment due to the welding process. Similarly, the NBZ displayed altered eutectic Si IMCs with larger average dimensions (lengths of 16–44 µm and widths of 2–3 µm) and a clustered distribution, as depicted in Figure 8d. The most significant microstructural transformation occurred in the center interlayer (Figure 8e). Here, the eutectic Si IMCs displayed a refined grain size with a more uniform distribution and average dimensions of 19–29 µm (width) and 12–27 µm (length). These microstructural changes were attributed to atomic displacements and movement (sliding) of the eutectic Si IMCs during the welding process. The observed variation in the morphology of the eutectic Si IMCs across different locations strongly suggests that the thermal cycle is a key factor influencing their behavior.
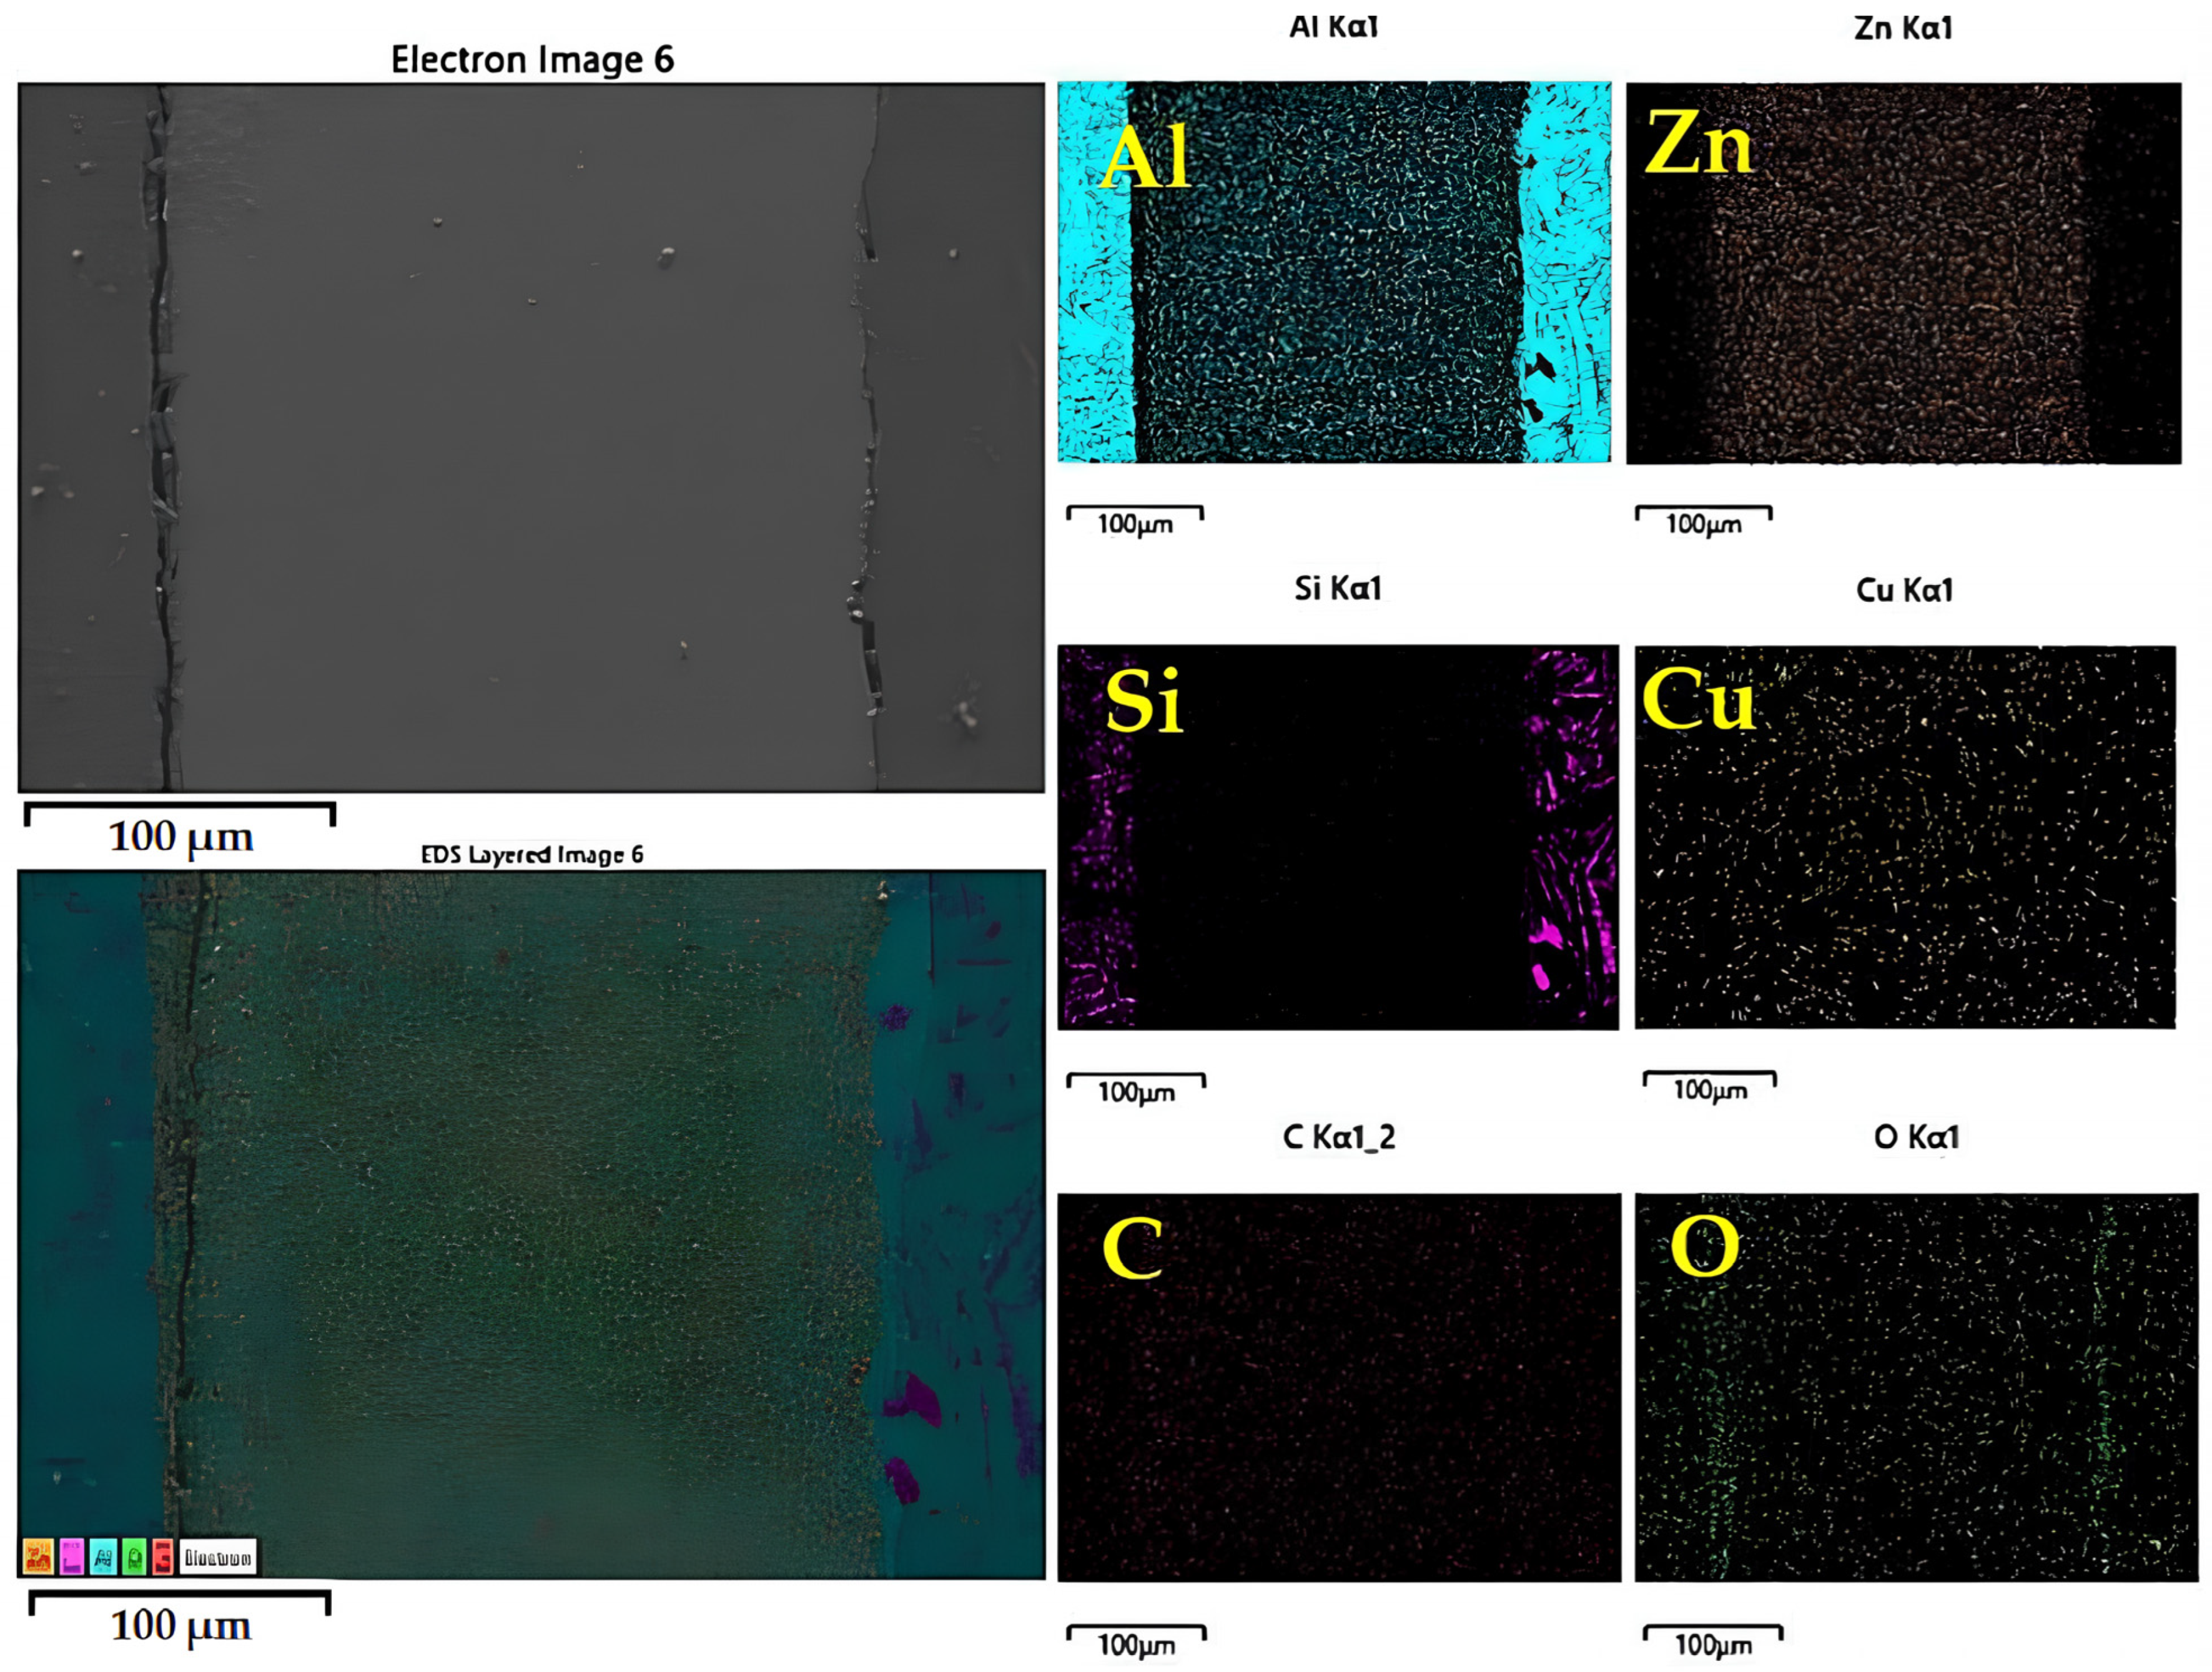
This study employed EDX to quantify the elemental composition within the bonding zone of the joint, as presented in Figure 9. The analysis indicated temperature-dependent precipitation of Cu and Zn. At higher bonding temperatures, these elements exhibited a propensity to concentrate at the interface. However, moisture contamination during the bonding process presented a significant obstacle. The introduction of moisture resulted in the formation of oxide layers that impeded the diffusion of Cu and Zn. Notably, these oxides were observed to be generally distributed along the interface and throughout the bonding zone, creating a continuous barrier to elemental movement. The diffusion principle states that elements naturally migrate from regions of high concentration to regions of low concentration. The extent of this diffusion is influenced by various factors, while substituted carbon elements may have a role in this process [44].
Carbon atoms could be embedded in the aluminum matrix. Likewise, Si was able to precipitate at a high temperature, leading to good diffusion behavior. After quantitative analysis of the bonding zone, the concentration of Al was observed to be 65.25 wt%. Similarly, the concentrations of the elements in the bonding zone, moving from the alloy elements of the welding materials, were 19.01 wt% for Zn, 9.94 wt% for C, 5.68 wt% for Si, and 2.34 wt% for Cu, as shown in Table 6. However, there were significant improvements in the mechanical properties due to the high bonding temperature and the mixed-element formation of the IMCs.

3.5. Vickers Microhardness

Figure 10 presents the microhardness profiles obtained at a distance of 0.2 mm from the bonding zone. These data demonstrate a pronounced increase in hardness within the bonding zone relative to the BMs in their as-cast conditions. This observation can be ascribed to the elevated temperatures achieved during the TLPDB process. These higher temperatures promoted the precipitation of dissolved elements at the interface, facilitating the formation of IMCs. The MgZn2 phase is specifically highlighted, which was likely a key contributor to the observed hardening mechanism. Increased thermal exposure provided the necessary activation energy for atomic rearrangement and dissolution within the MgZn2 phase. This phenomenon consequently led to the formation of a superior microstructure characterized by enhanced hardness. Furthermore, this study suggests that extended bonding times and higher bonding temperatures may be correlated with further increases in hardness and concomitant reductions in the density of defects within the bonding zone. These correlations were likely due to the extended duration, allowing for more complete diffusion and precipitation reactions and leading to a more robust and uniform microstructure [45]. For example, a bonding time of 120 min and a bonding temperature of 520 °C resulted in an average hardness of 83.20 HV, as shown in Figure 10c, which was the highest hardness property among all conditions. Moreover, longer bonding times and higher bonding temperatures during the TLPDB process could eliminate oxidation because of the semi-solid state of the ZnAl4Cu3 zinc alloy. Conversely, a bonding time of 60 min resulted in low hardness at the bond line because of the incomplete precipitation and diffusion of the ZnAl4Cu3 zinc. The extended bonding time facilitated more complete precipitation of elements and their subsequent transformation into IMCs within the bonding zone. This process involved the interchange or exchange of elements like Al, Zn, Cu, Si, and C, leading to the formation of various intermetallic phases such as η(Zn–Al–Cu), β(Al2Mg3Zn3), and MgZn2 [46]. Conversely, insufficient bonding times and temperatures hindered the development of desirable hardness properties [47]. As an example, Figure 10a,b illustrate that bonding times of 60 and 90 min at a temperature of 490 °C resulted in average hardness values of only 73.12 and 77.25 HV, respectively. Furthermore, at an even lower temperature of 460 °C, the hardness remained relatively uniform across all measured areas. In contrast, a significant increase in hardness was observed within the bonding zone compared to other regions when the bonding temperature was elevated to 520 °C. This phenomenon can be attributed to the semi-solid state of the ZnAl4Cu3 zinc alloy during the TLPDB process. This semi-solid state allows for enhanced solubility of elements in the liquid phase, promoting their efficient diffusion and interaction with other atoms. Consequently, the combined effects of the bonding time and temperature may induce recrystallization of the microstructure within the bonding zone and the surrounding areas. Recrystallization refers to the formation of new grains within a material, which can significantly influence its mechanical properties.
In essence, the selection of the appropriate bonding time and temperature parameters during the TLPDB process is crucial for achieving optimal IMC formation and the resulting enhancement of material hardness. This, in turn, can translate into improved performance in demanding aerospace and electronic applications. The TLPDB technique is very useful to weld highly porous materials, which is beneficial to industries that require strong materials. We can use this technique to test other types of alloy materials in future work.

4. Conclusions

In this work, experiments were conducted to study how the parameters of the transient liquid phase diffusion bonding (TLPDB) process for a SSM-ADC12 aluminum alloy with a ZnAl4Cu3 zinc alloy interlayer affect microstructural transformations, bonding strength, fatigue properties, and Vickers hardness. The following conclusions were obtained by evaluating the results.
  • Different parameters directly affect the mechanical properties. An average maximum bonding strength of 32.21 MPa was obtained at a bonding temperature of 490 °C, a bonding time of 120 min, and a ZnAl4Cu3 zinc alloy interlayer material thickness of 2.0 mm.
  • After the TLPDB material was evaluated, crack, void, and deformation defects could be detected in this experiment.
  • The fatigue tests for the TLPDB material of the SSM-ADC12 aluminum alloy with ZnAl4Cu3 zinc alloy interlayer materials revealed amplitude fatigue similar to the base material (BMs), and the endurance limits of the TLPDB material and BMs were 20.29 and 31.12 MPa, respectively.
  • The maximum Vickers microhardness value obtained with 120 min of bonding, a bonding temperature of 520 °C, and a ZnAl4Cu3 zinc alloy interlayer that was 2.0 mm thick was 83.20 HV. Meanwhile, η(Zn–Al–Cu), β(Al2Mg3Zn3), and MgZn2 intermetallic compounds (IMCs) led to increases in hardness.
  • A MgZn2 phase formed in the microstructure and precipitation at and near the bonded line led to improved mechanical properties. A transformation of the α-primary matrix with β-eutectic Si IMCs to form an η(Zn–Al–Cu) phase was also observed at the bonded line. Evaluation using optical microscopy showed that the precipitation changed from globular to coarse structures with larger grains, whilst SEM evaluation showed that β-eutectic Si IMCs diffused into β(Al2Mg3Zn3) and MgZn2 IMCs with an average width of 19–29 µm and an average length of 12–27 µm. Finally, EDX mapping at the joint showed that Mg, Si, and Al were able to move freely.

Author Contributions

Conceptualization, C.M.; methodology, C.M.; software, C.M.; formal analysis, C.M. and D.M.; investigation, Y.D.; data curation, C.M.; writing—original draft preparation, C.M.; writing—review and editing, C.M. and D.M.; supervision, Y.D.; project administration, C.M.; funding acquisition, C.M. All authors have read and agreed to the published version of the manuscript.

Funding

This research was funded by the National Research Council of Thailand (NRCT) (grant number: N42A660846).

Data Availability Statement

Data is contained within the article.

Acknowledgments

The authors gratefully acknowledge the Faculty of Industrial Technology, Songkhla Rajabhat University for providing resources. Thanks to all who contributed to this research.

Conflicts of Interest

The authors declare no conflicts of interest.

References

  1. Lee, H.; Yoon, J.; Yoo, J. Manufacturing of Aerospace Parts with Diffusion Bonding Technology. Appl. Mech. Mater. 2011, 87, 182–185. [Google Scholar] [CrossRef]
  2. Pola, A.; Tocci, M.; Kapranos, P. Microstructure and Properties of Semi-Solid Aluminum Alloys: A Literature Review. Metals 2018, 8, 181. [Google Scholar] [CrossRef]
  3. Vinith, S.; Uthayakumar, A.; Rajan, S. Fluidity of ADC12 alloy based on theoretical and computational fluid dynamics. Mech. Eng. 2015, 4, 996–999. [Google Scholar]
  4. JIS H 5302:Japan; Japanese Industrial Standard, Aluminum Alloys Die Castings (ADC 12). Japanese Industrial Standard: Tokyo, Japan, 2000; p. 10.
  5. Wannasin, J.; Janudom, S.; Rattanochaikul, T.; Canyook, R.; Burapa, R.; Chucheep, T.; Thanabumrungkul, S. Research and development of gas induced semi-solid process for industrial applications. Trans. Nonferr. Met. Soc. China 2010, 20, 1010–1015. [Google Scholar] [CrossRef]
  6. Janudom, S.; Rattanochaikul, T.; Burapa, R.; Wisutmethangoon, S.; Wannasin, J. Feasibility of semi-solid die casting of ADC12 aluminum alloy. Trans. Nonferr. Met. Soc. China 2010, 20, 1756–1762. [Google Scholar] [CrossRef]
  7. Gautam, S.K.; Singh, B.K. Investigation on the effects of isothermal holding temperature and time on the coarsening mechanism and rheological properties of ADC12 Al semi-solid slurry. Mater Chem Phys. 2024, 314, 128813. [Google Scholar] [CrossRef]
  8. Simões, S. Diffusion Bonding and Brazing of Advanced Materials. Metals 2018, 8, 959. [Google Scholar] [CrossRef]
  9. Zhang, L.X.; Chang, Q.; Sun, Z.; Xue, Q.; Feng, J.C. Effects of boron and silicon on microstructural evolution and mechanical properties of transient liquid phase bonded GH3039/IC10 joints. J. Manuf. Process. 2019, 38, 167–173. [Google Scholar] [CrossRef]
  10. Jiao, Y.J.; Sheng, G.M.; Zhang, Y.T.; Xu, C.; Yuan, X.J. Transient liquid phase bonding of Inconel 625 with Mar-M247 superalloy using Ni-Cr-B interlayer: Microstructure and mechanical properties. Mater. Sci. Eng. A 2022, 831, 142204. [Google Scholar] [CrossRef]
  11. Yuan, L.; Ren, J.; Xiong, J.T.; Zhao, W.; Shi, J.M.; Li, J.L. Transient liquid phase bonding of Ni3Al based superalloy using Mn-Ni-Cr filler. J. Mater. Res. Technol. 2021, 11, 1583–1593. [Google Scholar] [CrossRef]
  12. Vatnalmath, M.; Auradi, V.; Murthy, B.V.; Nagaral, M.; Pandian, A.A.; Islam, S.; Khan, M.S.; Anjinappa, C.; Razak, A. Impact of Bonding Temperature on Microstructure, Mechanical, and Fracture Behaviors of TLP Bonded Joints of Al2219 with a Cu Interlayer. ACS Omega 2023, 8, 26332–26339. [Google Scholar] [CrossRef] [PubMed]
  13. Saleh, M.I.; Roven, H.J.; Khan, T.I.; Iveland, T. Transient Liquid Phase Bonding of Al-6063 to Steel Alloy UNSS32304. J. Manuf. Mater. Process. 2018, 2, 58. [Google Scholar]
  14. Dong, J.H.; Liu, H.; Ji, S.D.; Yan, D.J.; Zhao, H.X. Diffusion Bonding of Al-Mg-Si Alloy and 301L Stainless Steel by Friction Stir Lap Welding Using a Zn Interlaye. Materials 2022, 15, 696. [Google Scholar] [CrossRef]
  15. Muhamed, M.N.; Omar, M.Z.; Abdullah, S.; Sajuri, Z.; Zamri, W.F.H.W. Al-Si-Zn Behaviouron Interface of AR500 Steel and AA7075 Aluminium Alloy BrazedJoint. J. Phys. Conf. Ser. 2020, 1532, 012006. [Google Scholar] [CrossRef]
  16. Zhang, H.; Niu, T.; Yuan, M. Influence of High Magnetic Field-Thermal Coupling Processing on Diffusion Bonding Properties and Element Diffusion of 1420 Al-Li Alloy. Crystals 2022, 12, 1508. [Google Scholar] [CrossRef]
  17. Canyook, R.; Wannasin, J.; Wisutmethangoon, S.; Flemings, M.C. Characterization of the microstructure evolution of a semi-solid metal slurry during the early stages. Acta Mater. 2012, 60, 3501–3510. [Google Scholar] [CrossRef]
  18. Chainarong, S.; Pitakaso, R.; Sirirak, W.; Srichok, T.; Khonjun, S.; Sethanan, K.; Sangthean, T. Multi-Objective Variable Neighborhood Strategy Adaptive Search for Tuning Optimal Parameters of SSM-ADC12 Aluminum Friction Stir Welding. J. Manuf. Mater. Process. 2021, 5, 123. [Google Scholar] [CrossRef]
  19. Seah, K.H.W.; Sharma, S.C.; Girish, B.M. Mechanical properties of cast ZA-27 graphite particulate composites. Mater. Des. 1996, 16, 271–275. [Google Scholar] [CrossRef]
  20. Kittima, S.; Yoshiharu, M.; Yukio, M.; Nobushiro, S. Fatigue Strength Estimation Based on Local Mechanical Properties for Aluminum Alloy FSW Joints. Metals 2017, 10, 186. [Google Scholar]
  21. ASTM E466-15; Standard Practice for Conducting Force Controlled Constant Amplitude Axial Fatigue Tests of Metallic Materials. Designation. ASTM International Standards: West Conshohocken, PA, USA, 2015.
  22. ASTM E8; Standard Test Methods for Tension Testing of Metallic Materials. Designation. ASTM International Standards: West Conshohocken, PA, USA, 2015.
  23. Malekan, A.; Farvizi, M.; Mirsalehi, S.E.; Saito, N.; Nakashima, K. Holding Time Influence on Creep Behavior of Transient Liquid Phase Bonded Joints of Hastelloy X. Mater. Sci. Eng. A 2020, 772, 138694. [Google Scholar] [CrossRef]
  24. Al Hazaa, A.; Haneklaus, N.; Almutairi, Z. Impulse pressure-assisted diffusion bonding (IPADB): Review and outlook. Metals 2021, 11, 323. [Google Scholar] [CrossRef]
  25. Venugopal, S.; Seeman, M.; Seetharaman, R.; Jayaseelan, V. The effect of bonding process parameters on the microstructure and mechanical properties of AA5083 diffusion-bonded joints. Int. J. Ligh. Mater. Manuf. 2022, 5, 555–563. [Google Scholar] [CrossRef]
  26. Yu, W.; Zhao, H.; Huang, Z.; Chen, X.; Aman, Y.; Li, S.; Zhai, H.; Guo, Z.; Xiong, S. Microstructure evolution and bonding mechanism of Ti2SnC-Ti6Al4V joint by using Cu pure foil interlayer. Mater. Charact. 2017, 127, 53–55. [Google Scholar] [CrossRef]
  27. Silva, M.; Ramos, A.; Vieira, M.; Simões, S. Diffusion Bonding of Ti6Al4V to Al2O3 Using Ni/Ti Reactive Multilayers. Metals 2021, 11, 655. [Google Scholar] [CrossRef]
  28. Ben-Haroush, M.; Mittelman, B.; Priel, R.S.E. The Influence of Time, Atmosphere and Surface Roughness on the Interface Strength and Microstructure of AA6061–AA1050 Diffusion Bonded Components. Materials 2023, 16, 769. [Google Scholar] [CrossRef] [PubMed]
  29. Meengam, C.; Dunyakul, Y.; Maunkhaw, D.; Chainarong, S. Transient Liquid Phase Bonding of Semi-Solid Metal 7075 Aluminum Alloy Using ZA27 Zinc Alloy Interlayer. Metals 2018, 8, 637. [Google Scholar] [CrossRef]
  30. Alhazaa, A.; Khan, T.; ul Haq, I. Transient liquid phase (TLP) bonding of Al7075 to Ti–6Al–4V alloy. Mater. Charact. 2010, 61, 312–317. [Google Scholar] [CrossRef]
  31. Wen, Z.; Li, Q.; Liu, F.; Dong, Y.; Zhang, Y.; Hu, W.; Li, L.; Gao, H. Transient Liquid Phase Diffusion Bonding of Ni3Al Superalloy with Low-Boron Nickel-Base Powder Interlayer. Materials 2023, 16, 2554. [Google Scholar] [CrossRef]
  32. Kejanli, H.; Taşkin, M.; Kolukisa, S.; Topuz, P. Transient liquid phase (TPL) diffusion bonding of Ti45Ni49Cu6 P/M components using Cu interlayer. Int. J. Adv. Manuf. Technol. 2009, 44, 695–699. [Google Scholar] [CrossRef]
  33. Meengam, C.; Dunyakul, Y.; Chainarong, S.; Maunkhaw, D. The Influence of Diffuse Element in Solid-State on Dissimilar Joint between Semi-Solid Cast 7075 with 6061 Al Alloy by Diffusion Welding. Solid State Phenom. 2022, 330, 71–76. [Google Scholar] [CrossRef]
  34. Maity, J.; Pal, T.K.; Maiti, R. Transient liquid phase diffusion bonding of 6061-15 wt % SiCp in argon environment. J. Mater. Process. Technol. 2009, 209, 3568–3580. [Google Scholar] [CrossRef]
  35. Seyyed Afghahi, S.S.; Ekrami, A.; Farahany, S.; Jahangiri, A. Fatigue properties of temperature gradient transient liquid phase diffusion bonded Al7075-T6 alloy. Trans. Nonferrous Met. Soc. China 2015, 25, 1073–1079. [Google Scholar] [CrossRef]
  36. Liu, Y.; Zhang, Y.; Liu, S.; Xiao, S.; Sun, Y.; Wang, X. Effect of unbonded areas around hole on the fatigue crack growth life of diffusion bonded titanium alloy laminates. Eng. Fract. Mech. 2016, 1, 176–188. [Google Scholar] [CrossRef]
  37. He, X.; Liu, W.; Sun, Y.; Wang, X. Fatigue crack growth characteristic for diffusion bonded laminates of titanium alloy with centered hole. Eng. Mech. 2015, 4, 244–249. [Google Scholar]
  38. Syed, A.K.; Zhang, X.; Moffatt, J.E.; Maziarz, R.; Castelletti, L.; Fitzpatrick, M.E. Fatigue performance of bonded crack retarders in the presence of cold worked holes and interference-fit fasteners. Int. J. Fatigue 2017, 105, 111–118. [Google Scholar] [CrossRef]
  39. Liu, Y.; Liu, S. Experimental Research on Fatigue Crack Growth Behavior of Diffusion-Bonded Titanium Alloy Laminates with Preset Unbonded Areas. Materials 2022, 15, 5224. [Google Scholar] [CrossRef] [PubMed]
  40. Li, S.; Xuan, F.; Tu, S. Fatigue damage of stainless steel diffusion-bonded joints. Mater. Sci. Eng. A 2008, 480, 125–129. [Google Scholar] [CrossRef]
  41. Abdolvand, R.; Atapour, M.; Shamanian, M.; Allafchian, A. The effect of bonding time on the microstructure and mechanical properties of transient liquid phase bonding between SAF 2507. J. Manuf. Process. 2017, 25, 172–180. [Google Scholar] [CrossRef]
  42. Norouzi, E.; Atapour, M.; Shamanian, M.; Allafchian, A. Effect of bonding temperature on the microstructure and mechanical properties of Ti-6Al-4V to AISI 304 transient liquid phase bonded joint. Mater. Des. 2016, 99, 543–551. [Google Scholar] [CrossRef]
  43. Habisch, S.; Peter, S.; Grund, T.; Mayr, P. The Effect of Interlayer Materials on the Joint Properties of Diffusion-Bonded Aluminium and Magnesium. Metals 2018, 8, 138. [Google Scholar] [CrossRef]
  44. Yang, L.; Yang, Y.; Zhang, Y.; Xu, F.; Jian, Q.; Lu, W. Microstructure evolution and mechanical properties of the In-Sn-20Cu composite particles TLP bonding solder joints. Appl. Phys. A 2020, 126, 343. [Google Scholar] [CrossRef]
  45. Kim, S.H.; Cha, J.-H.; Jang, C.; Sah, I. Microstructure and Tensile Properties of Diffusion Bonded Austenitic Fe-Base Alloys—Before and After Exposure to High Temperature Supercritical-CO2. Metals 2020, 10, 480. [Google Scholar] [CrossRef]
  46. Ghaderi, S.; Karimzadeh, F.; Ashra, A. Evaluation of microstructure and mechanical properties of transient liquid phase bonding of Inconel 718 and nano/ultrafine-grained 304L stainless steel. J. Manuf. Process. 2020, 49, 162–174. [Google Scholar] [CrossRef]
  47. Peng, Y.Y.; Li, C.; Li, H.J.; Liu, Y.C. Effect of interlayer on microstructure and mechanical properties of diffusional-bonded Ni3Al-based superalloy/S31042 steel joint. J. Manuf. Process. 2021, 72, 252–261. [Google Scholar] [CrossRef]
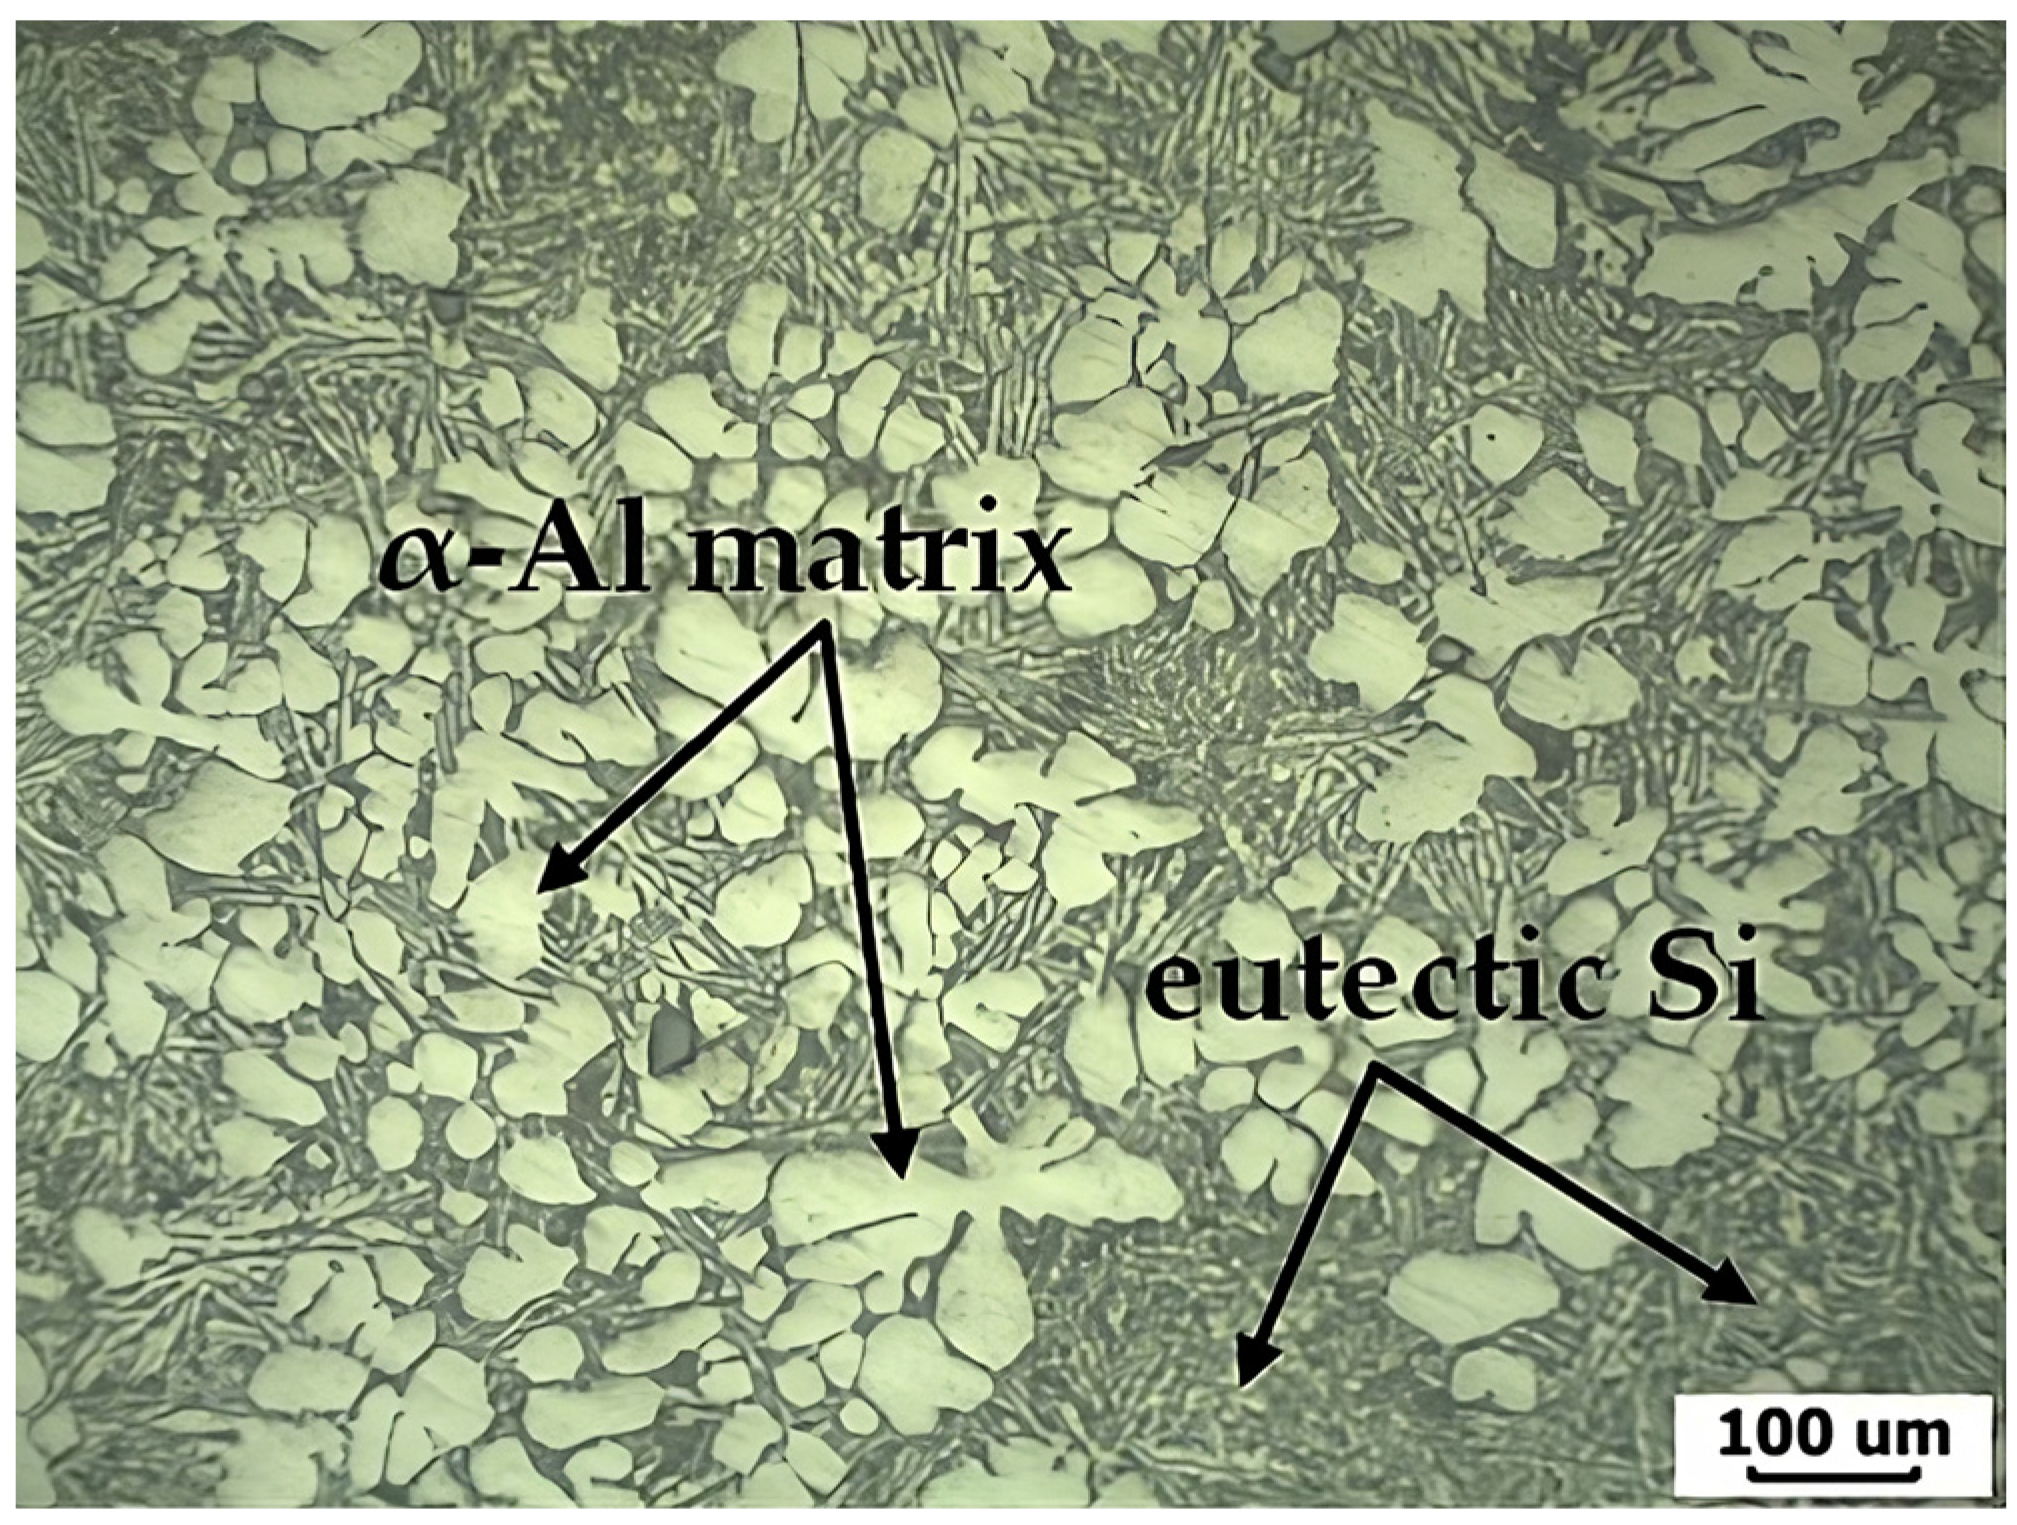
Figure 1. Photograph of the base microstructure of the SSM-ADC12 aluminum alloy formed using GISS casting.
Jmmp 08 00184 g001
Figure 2. Equipment used for the TLPDB of SSM-ADC12 aluminum alloy using the ZnAl4Cu3 zinc alloy interlayer material.
Jmmp 08 00184 g002
Figure 3. A schematic view of the temperature of TLPDB of the SSM-ADC12 aluminum alloy.
Jmmp 08 00184 g003
Figure 4. Micrographs showing the characteristics of the samples and cross sections after TLPDB of the SSM-ADC12 aluminum alloy using a ZnAl4Cu3 zinc alloy with a 2.0 mm interlayer at 490 °C for (a) 60 min, (b) 90 min, and (c) 120 min.
Jmmp 08 00184 g004
Figure 5. Bond strengths for the TLPDB of the SSM-ADC12 aluminum alloy using a ZnAl4Cu3 zinc alloy as the interlayer with different bonding times of (a) 60 min, (b) 90 min, and (c) 120 min.
Jmmp 08 00184 g005
Figure 6. The fatigue S–N curves for the BMs and TLPDB material of the SSM-ADC12 aluminum alloy using a ZnAl4Cu3 zinc alloy as an interlayer.
Jmmp 08 00184 g006
Figure 7. Micrographs of the microstructure in the bonded zone (ag) and BM around diffused area after TLPDB.
Jmmp 08 00184 g007
Figure 8. SEM micrographs (taken in EDX mode) of different characteristics of the eutectic Si IMCs show the following: (a) entire bond, (b) BMs, (c) bonding zone, (d) near-bonding zone, and (e) center interlayer.
Jmmp 08 00184 g008
Figure 9. EDX mapping analysis of the composition (wt%) in the bonded zone.
Jmmp 08 00184 g009
Figure 10. The Vickers microhardness values of the SSM-ADC12 aluminum alloy after TLPDB with a ZnAl4Cu3 zinc alloy interlayer that was 2.0 mm thick: (a) 60 min bonding time, (b) 90 min bonding time, and (c) 120 min bonding time.
Jmmp 08 00184 g010
Table 1. The influence of TLPDB parameters on the mechanical properties of aluminum alloys.
MaterialsBonding
Temperature
Bonding
Time
Bonding
Pressure
Interlayer
Materials
Recommended
Parameters
Reference
Al2219480, 500, and 520 °C30 min2 MPaCuA maximum shear strength of 18.75 MPa was produced at 520 °C, with a maximum hardness value of 723 HV.[12]
Al6063 and UNS S32304550, 555, 560, and 570 °C90 min0.2 KNCopper foilA defect-free joint was produced at 570 °C, and IMCs (Al2Cu) were found at the interface.[13]
Al-Mg-Si Alloy and 301L Stainless Steel485 °C10 and 30 minNot specifiedSn-based materialTLPDB is particularly important for the joining of semiconductor chips with expensive die-attached materials during low-temperature sintering.[14]
AR500
Steel and AA7075
425 and 477 °C1, 2, and 5 minNot specifiedAl–Si–ZnThe highest shear load was 6460 N, which was produced at a brazing temperature of 477 °C, and the hardness of the aluminum base metal was decreased by 1 and 2 min flame times.[15]
1420 Al-Li Alloy440–560 °C60 min7 MPaNot specifiedThe diffusion bonding temperature promotes the atomic diffusion of Mg in pure aluminum. The bonding temperature is an important factor affecting the quality of the bonding interface and the bonding strength.[16]
SSM-ADC12400, 430, 460, 490, and 520 °C60, 90, and 120 min3.4 MPaZnAl4Cu3 zinc alloyThis research represents a new concept for GISS materials. The maximum bonding strength value was high at 32.21 MPa. This was generated at a bonding temperature of 490 °C, with a bonding time of 120 min and a ZnAl4Cu3 zinc alloy that was 2.0 mm thick, which had never been studied before.Present work
Table 2. The chemical compositions and mechanical properties of the SSM-ADC12 aluminum alloy and the ZnAl4Cu3 zinc alloy chosen for this study [18,19].
Element (wt.%)
MaterialsSiFeCuMnMgZnSnOtherAl
SSM-ADC1211.990.931.750.120.070.780.030.03Rest
ZnAl4Cu30.810.013.220.910.8289.30--4.20
MaterialsVickers hardness
(HV)
Yield strength
(MPa)
Ultimate tensile
strength (MPa)
Elongation
(%)
SSM-ADC1296.7016331910–12
ZnAl4Cu379.12971255–7
Table 3. Maximum bonding strength found after the TLPDB process in previous studies and in the present work.
Material Optimal TLPDB ParametersMaximum Bonding Strength (MPa)Reference
SSM7075Bonding time of 120 min
Temperature of 540 °C
17.44[29]
Al7075 to Ti–6Al–4VBonding time of 30 min
Temperature of 540 °C
19.50[30]
Ni3Al superalloyBonding time of 6 h
Temperature of 1250 °C
860.84[31]
Ti45Ni49Cu6Bonding time of 60 min
Temperature of 970 °C
193.00[32]
SSM-ADC12Bonding time of 120 min
Temperature of 490 °C
32.21Present work
Table 4. The stress values and numbers of cycles for the BMs and TLPDB material of the SSM-ADC12 aluminum alloy at different stroke lengths.
Stroke (mm)SSM-ADC12 (BMs)SSM-ADC12 (TLPDB)
Stress (MPa)Number of CyclesStress (MPa)Number of Cycles
0.3522.211,000,000 *20.921,000,000 *
0.4031.121,000,000 *28.45800,000
0.4536.72940,47035.79655,334
0.5045.52657,13440.24255,560
0.6068.31230,78045.81131,835
0.7073.1079,10455.6625,465
0.8081.5255,36067.7211,747
* The amplitude fatigue over 1,000,000 cycles, not failure from fatigue testing.
Table 5. The life equations (σ) and endurance limits of the BMs and TLPDB material of the SSM-ADC12 aluminum alloy.
MaterialLife Equation at 106 CyclesEndurance Limit (MPa)
SSM-ADC12 (BMs)σ = 257.32x−0.13131.12
SSM-ADC12 (TLPDB)σ = 188.08x−0.12720.29
Table 6. The composition of the bonded zone obtained from the TLPDB process, as measured via EDX mapping.
ElementLine TypeApparent Concentrationk Ratiowt%wt% SigmaAtomic %Standard Label
CK series0.440.009399.730.699.94C Vit
SiK series0.220.004674.550.415.68SiO2
CuK series0.120.001681.460.192.34CuO
AlK series17.130.0845365.250.9249.92Al2O3
ZnK series5.110.0345319.010.3232.12ZnO3
Total: 100 100
Disclaimer/Publisher’s Note: The statements, opinions and data contained in all publications are solely those of the individual author(s) and contributor(s) and not of MDPI and/or the editor(s). MDPI and/or the editor(s) disclaim responsibility for any injury to people or property resulting from any ideas, methods, instructions or products referred to in the content.