1. Introduction
The efficient machining of thin-wall features is crucial. Although CAM systems have been significantly developed over previous decades, they lack efficient tool path strategies for the milling of such features which involves several stages, where the compliance of the workpiece changes throughout. This paper discusses the potential benefits of cycle time reduction when tool path strategies are developed considering such specific characteristics.
Thin-wall features are indispensable for several industries, where finish milling constitutes approximately half of the total cycle time [
1]. Especially in the finishing stage, thin-wall features become very flexible. Hence, static deflections and chatter vibration start to be governed by the workpiece structure. The most common method for chatter avoidance is the use of stability diagrams by selecting chatter-free machining conditions, which stand as one of the major barriers in achieving high efficiency [
2,
3]. Prediction of milling dynamics and stability requires the total dynamic response at the cutting point to be known, which consists of the cutting tool and the workpiece. Receptance coupling [
4] is one of the most widely used analytical methods to predict the structural dynamics of several machine tools components. Schmitz et al. [
4] were the first to propose the use of receptance coupling to predict tool point FRF by combining tool and spindle dynamics. This approach was later extended by Budak et al. [
5] for prediction of spindle–holder–tool assembly.
In the literature, powerful simulation tools [
6] have been developed to address deflection and chatter vibrations in the milling of thin-wall features. Still, it is noteworthy to state that prediction of the continuously varying in-process workpiece (IPW) geometry is challenging due to volumetric removal along the tool path. Several researchers studied the effect of workpiece dynamics on chatter stability for parts having prismatic shapes. Bravo et al. [
7] and Thevenot et al. [
8] demonstrated the significance of flexible workpiece dynamics on milling stability. They benefited from structural modal analysis and finite element (FE) simulations to establish position-dependent 3D stability lobes. In one of the early efforts, Biermann et al. [
9] developed a simulation approach which couples both geometrical and FE simulations to predict the dynamics of the IPW in 5-axis milling. Later, simulation of varying IPW dynamics was performed Budak et al. [
10] through structural modification based on the FE model of the final part geometry. In their method, the FRFs at the regions of interest on the final part were updated by knowing the removed elements in the FE mesh.
Atlar et al. [
11] studied variation of IPW dynamics and its effects on milling stability during material removal for a beam-like part. They analyzed different milling strategies for increased stability. Alan et al. [
12] extended this study to the machining of plates. Weinert et al. [
13] used time domain simulations to predict the stability of 5-axis milling of plate-like parts, where the structural dynamics of IPW were predicted by using FE simulations. In one of the original approaches, chatter mitigation was performed by introducing sacrificial features to increase the dynamic stiffness of the part during machining [
14]. These studies were the initial attempts to utilize modeling and simulation efforts to achieve increased efficiency in the milling of thin-wall features. In one of the advanced attempts, Tunc and Zatarain [
15] proposed stock shape optimization in the 5-axis milling of thin-wall features and demonstrated the effectiveness of the approach on aeroengine blade milling. The optimization of stock thickness and the machining sequence was recently studied by Karimi and Altintas [
16], where they proposed an automatic segment selection algorithm which considers the structural flexibility of the milling tool and varying workpiece dynamics. They used the idea of variable stock thickness to improve chatter stability limits while controlling surface finish errors.
In 5-axis milling, the tool axis significantly affects both deflections and chatter stability. Layegh et al. [
17] studied the effect of tool posture on the deflection of flexible workpieces in 5-axis milling. On rectangular plates, they demonstrated that appropriate selection of the tool axis is beneficial to reduce part deflections. Later, Tunc et al. [
18] proposed a constrained optimization approach in the selection of smoothly varying tool axis vectors for 5-axis milling operations. In their study, they considered the minimization of the rotary axis movements as the objective function subject to cutting forces and chatter stability. In a recent study, Karimi and Altintas [
19] proposed the variation of the tool axis together with spindle speed, considering the continuous variation of workpiece dynamics. In their approach, they implemented rotational transformation to update the cutter workpiece engagement, which enabled analytical calculations.
In this study, tool path strategies for the efficient milling of thin-wall parts are discussed, which covers the implementation of cutting step-based variable axial depth of cut and spindle speed and the effect of stock shape. Henceforth, the paper is organized as follows;
Section 2 presents the terminology and milling strategy for thin-wall parts. This is followed by the discussion of efficient milling strategies in
Section 3. Then, the results and discussion are presented in
Section 4.
2. 5-Axis Ball-End Finish Milling of Thin-Wall Parts
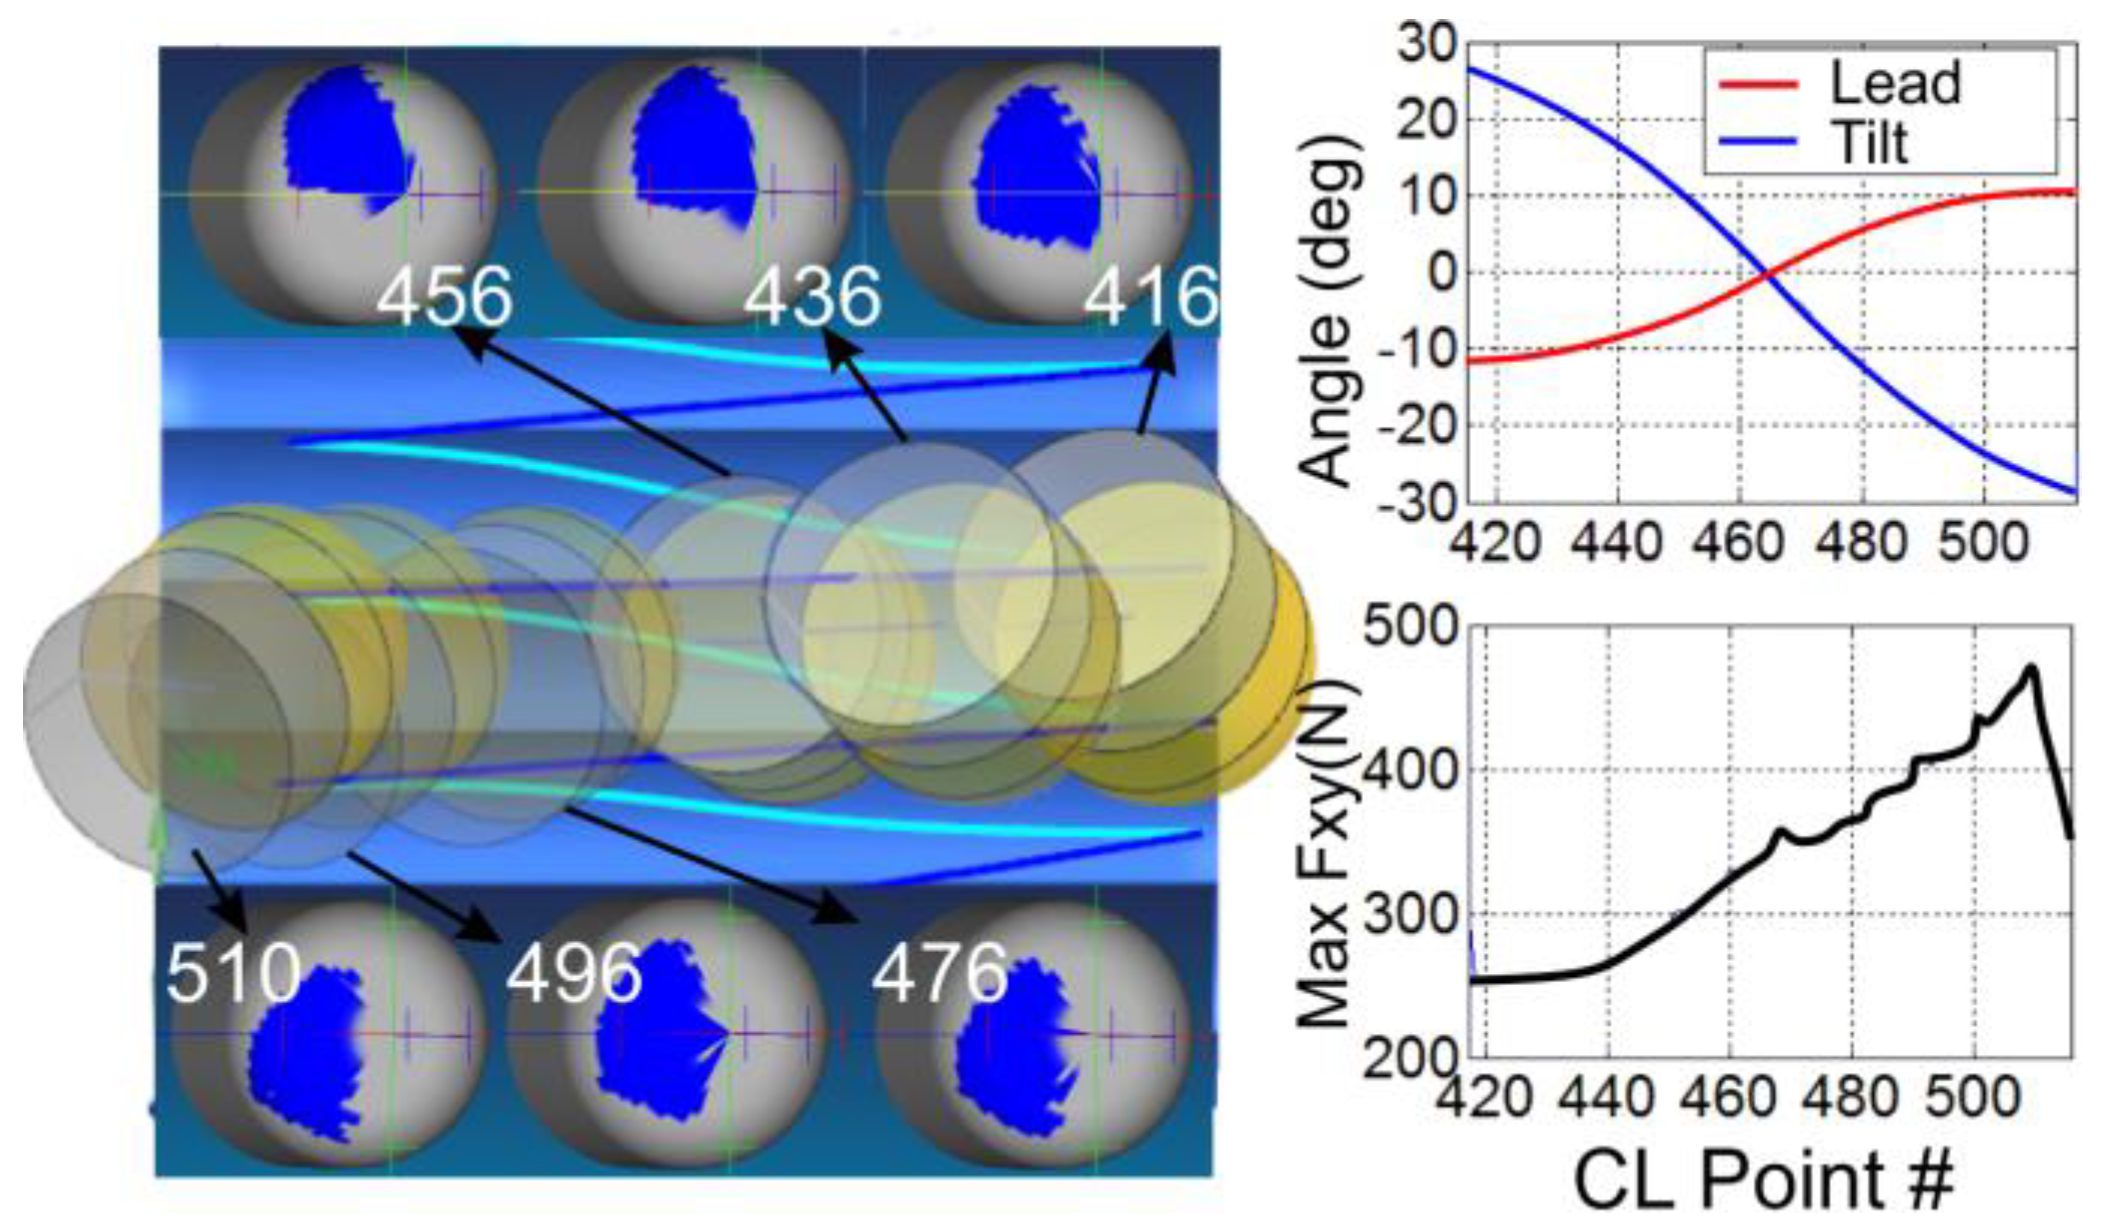
In 5-axis ball-end milling of free-form surfaces, depending on the surface characteristics and geometrical constraints, process parameters vary at each cutter location (CL) as the tool traverses along the tool path. This leads to continuously varying cutter workpiece engagement boundaries (CWEB) as illustrated in
Figure 1. As far as finish milling of thin-wall parts is concerned, conserving the stiffness of the IPW is of great importance. In this section, general considerations are discussed to establish a fundamental understanding.
2.1. Strategies in Finish Milling of Thin-Wall Features
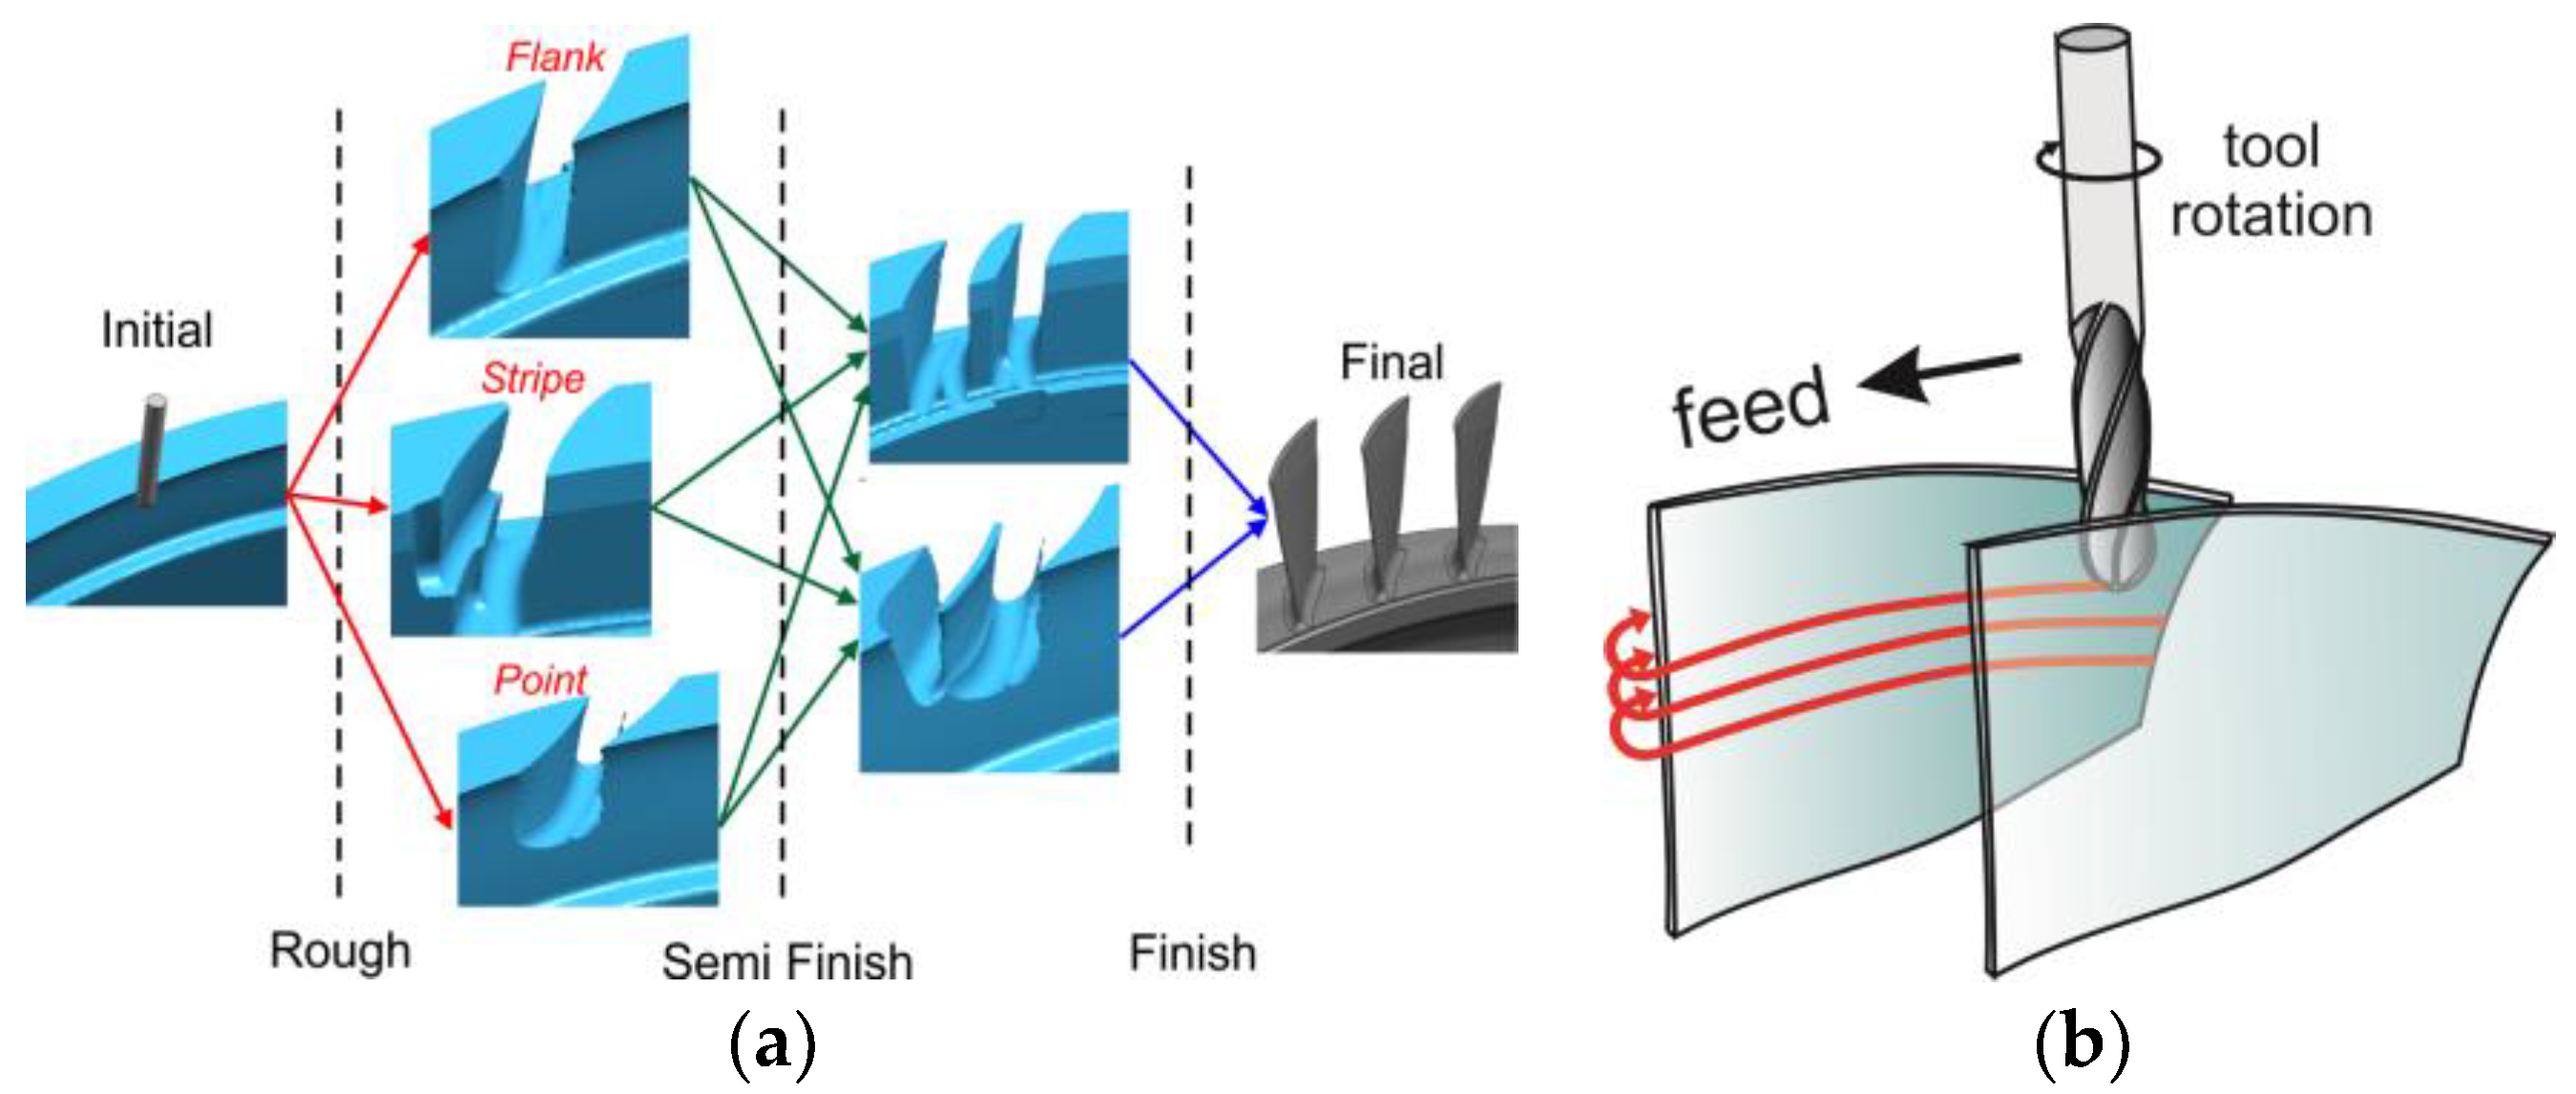
In most cases, thin-walled features are milled out of a rigid initial stock, where roughing, semi-finishing and finishing can be considered as the major milling stages (see
Figure 2a). In the roughing stage, the IPW is mostly very rigid compared to the milling tool. However, starting from the semi-finishing to finishing stages, the structural compliance of the IPW increases. Therefore, implementation of a milling strategy to keep the IPW as rigid as possible is the fundamental approach. In this regard, level-first strategy is one of the vastly used tool path approaches for such a purpose. In other words, the tool path is generated to have the milling tool moving consecutively from top-to-bottom of the thin-wall feature, as shown in
Figure 2b.
In such a milling strategy, the stock thickness, depth of cut, and tool axis govern the CWEB. Thus, change in any of those will lead to a different process output, i.e., cutting force and chatter stability. On the other hand, the compliance of the IPW, which becomes significantly higher than that of the milling tool, depends on the shape of the stock left around the final geometry. Therefore, selection of the stock thickness to be removed is a critical step. In a more advanced manner, the near-net shape of the IPW just before the finishing stage will be distinctive depending on how cutting forces, deflection, and chatter vibrations develop. In the rest of this section, the effect of IPW dynamics and tool axis on finish milling are presented with relevant examples.
2.2. Effect of IPW Dynamics on Milling Stability
As depicted in
Figure 2a, the IPW is a live geometry through the milling stages. In this respect, the volume removed and left by a milling operation directly affects the subsequent operation. Therefore, the milling stages are interconnected to each other through the IPW geometry. From the structural analysis point of view, the compliance of a part is a function of its geometry. However, in conventional tool path generation approaches, this issue is ignored. Considering that the cycle time is a function of the number of passes along the part height, the cutting depth is an important parameter for increased efficiency. At this point, the stock thickness affects the milling of thin-wall features through (i) the workpiece dynamics and (ii) duration of engagement of the milling tool. The effect of stock thickness on these two are contradictory, which creates a trade-off. As the stock thickness increases, the workpiece FRF becomes more rigid; however, it also increases the regeneration due to the longer duration of engagement.
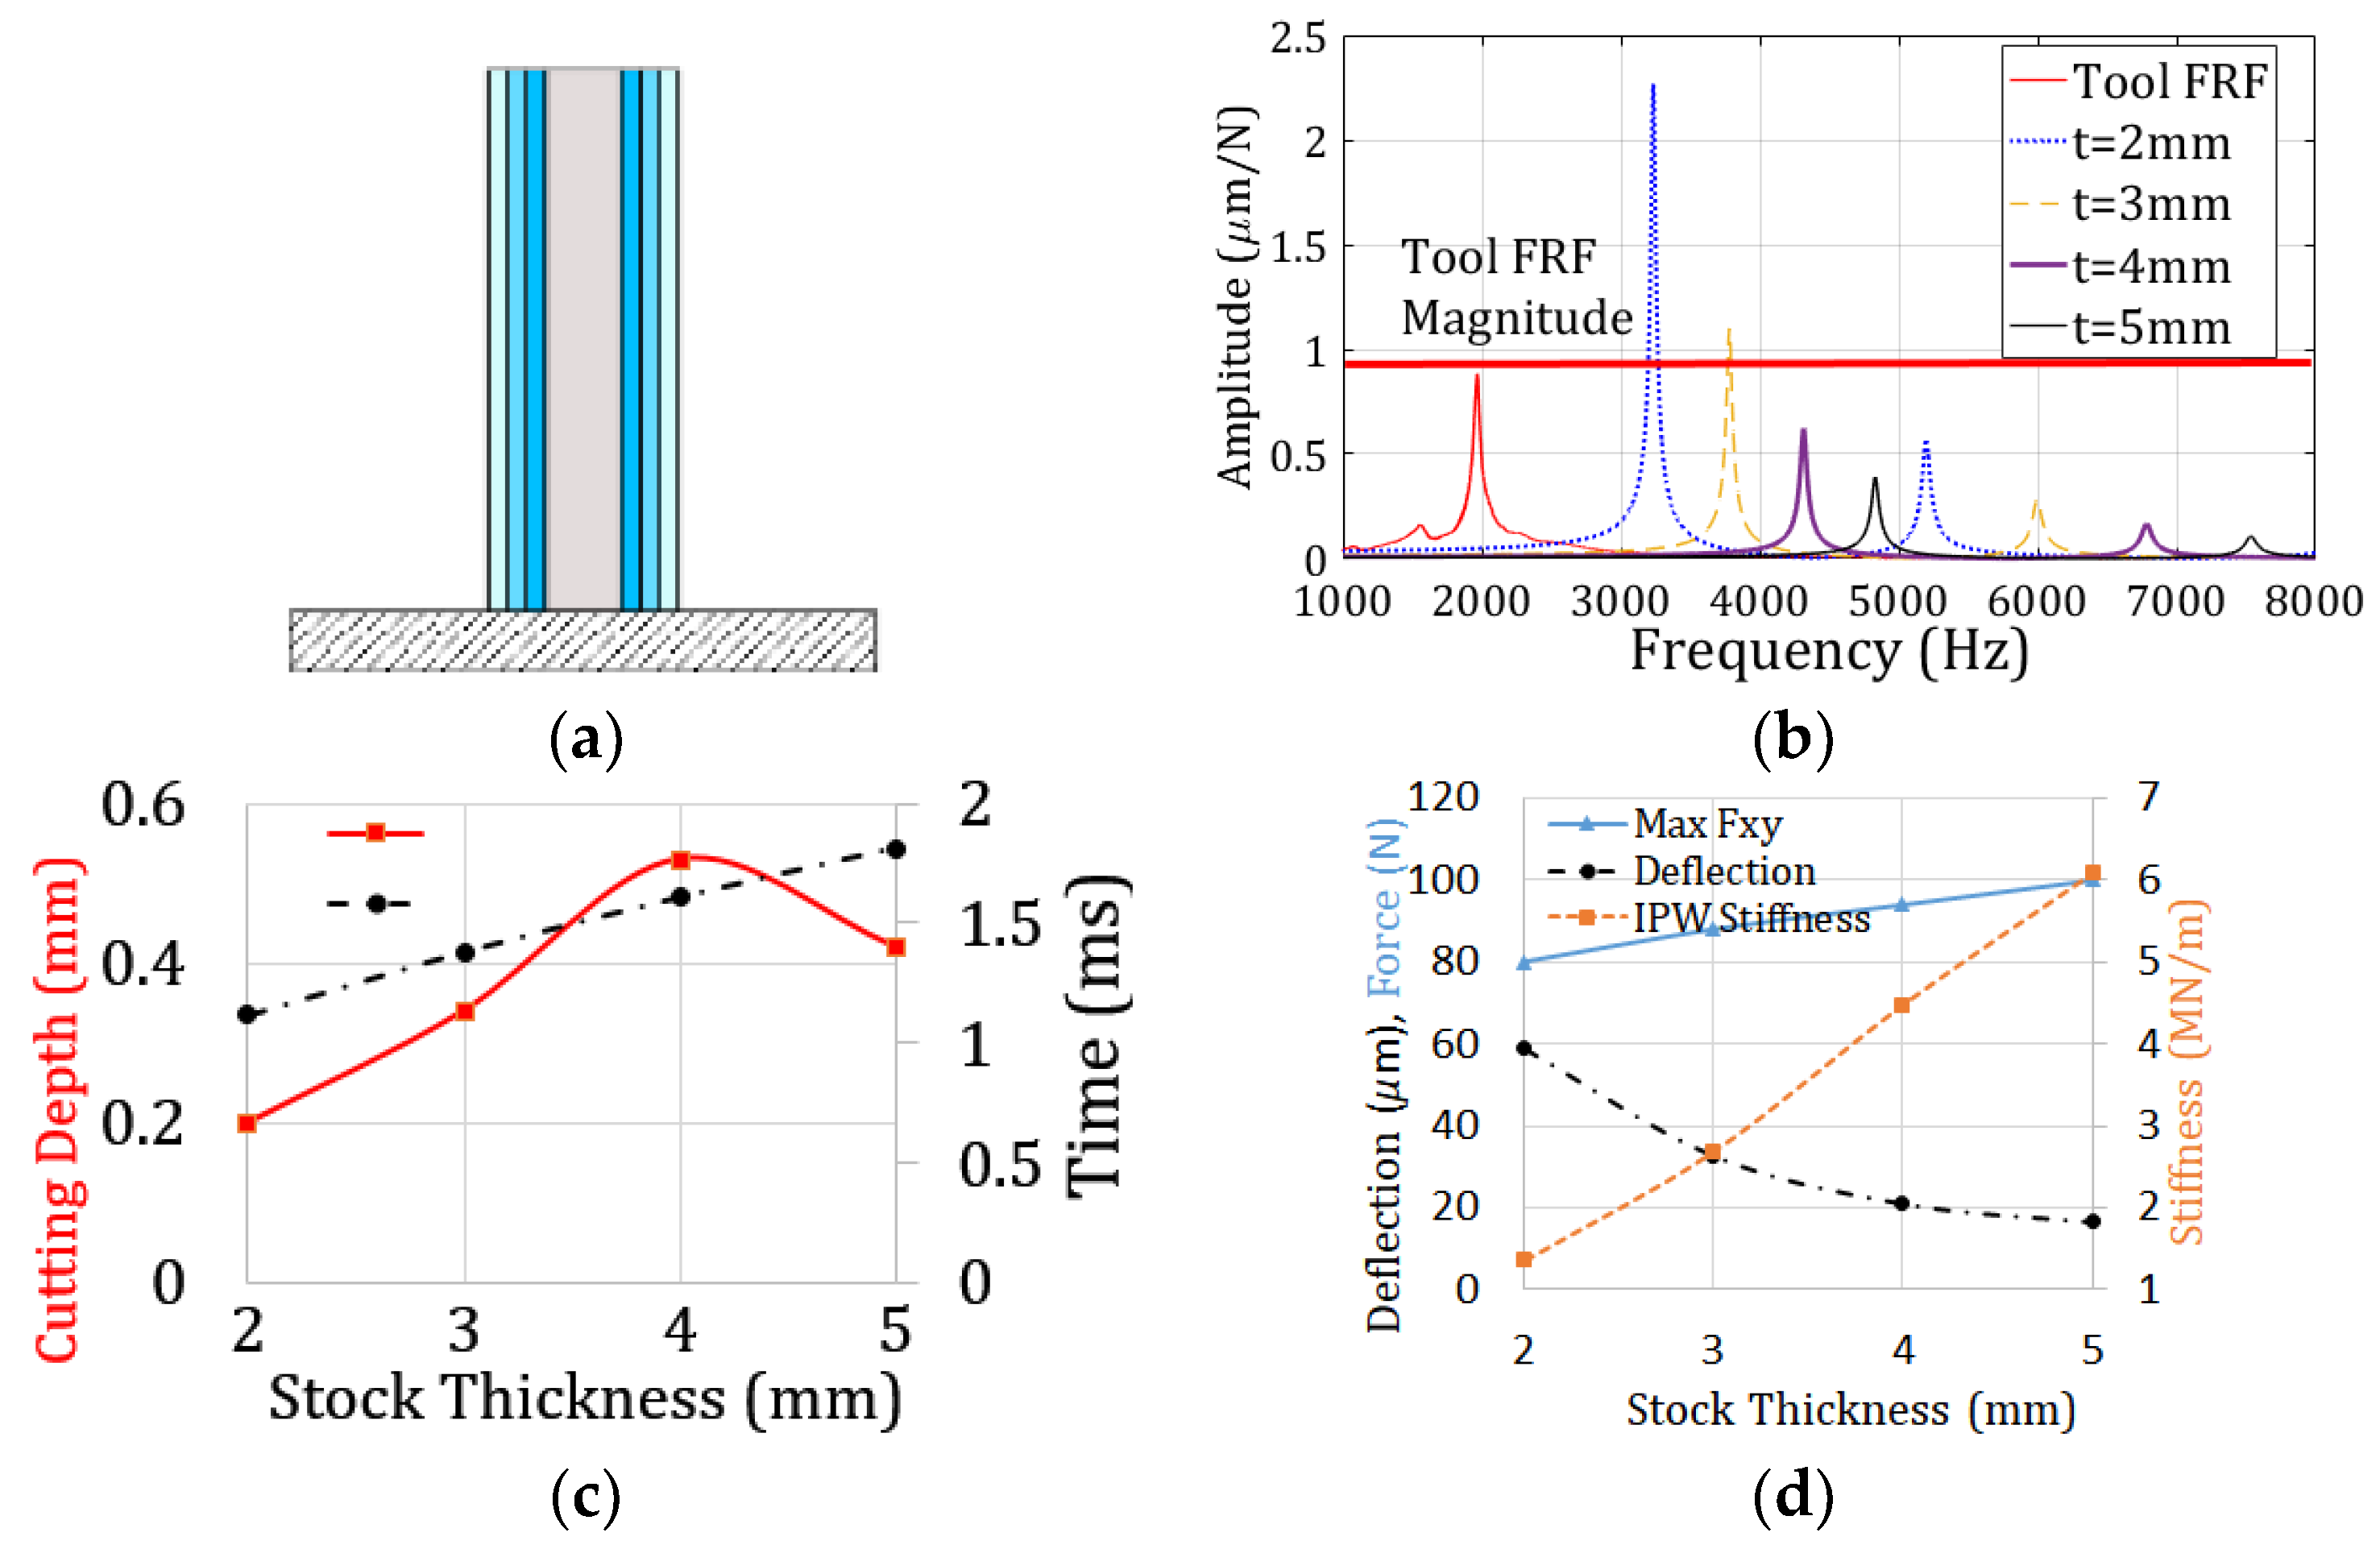
For a representative case, the effects of stock thickness on the dynamics of the IPW and the absolute stability are shown in
Figure 3 [
15]. Different stock thickness values on the same part geometry are illustrated in
Figure 3a. The natural frequencies and mode shape of the most flexible point, i.e., the upper most corner, on the part is simulated in ANSYS APDL 19.1 ©. Then, the FRF is calculated using mode superposition. The one-sided thickness of the part is changed from 5 mm to 2 mm. Thereafter, it is compared with the milling tool FRF.
It is observed in
Figure 3b that at 5 mm stock thickness, the workpiece is 10 times more rigid than the milling tool. However, as the thickness is decreased to 3 mm, the first mode of the workpiece has almost equal rigidity with that of the milling tool. Once the thickness is decreased to 2 mm, the workpiece FRF reaches double the tool FRF amplitude. However, the FRF is not a decision criterion by itself because the stability limits do not always increase with the increasing stock thickness. This is because higher stock thickness leads to higher regeneration in milling, and hence it may decrease stability. The effect of stock thickness on the absolute stability limits is shown in
Figure 3c, where it is seen that increased stock thickness leads to a constant increase in the engagement duration. Hence, the absolute stability limit increase is not possible after 4 mm of stock thickness.
The maximum bending force, Fxy, IPW stiffness, and resulting part deflection are also compared. It can be observed that increased stock thickness leads to a slight increase in the maximum bending force. However, as part stiffness nonlinearly increases, the resulting part deflection decreases with the stock thickness. Thus, it can be concluded that selection of the stock thickness and shape is a constrained optimization problem, which is a trade-off between milling stability and part deflection.
Another issue in the milling of thin-wall features is the position-dependent IPW dynamic caused by (i) mode shape and (ii) material removal during the tool path. In return, stability diagrams are affected in terms of stable depth of cut and spindle speed. This is due to the (i) mode shape and (ii) material removal during the tool path.
2.3. Effect of Tool Axis on Cutting Forces and Stability
Finish milling conditions are usually known to be of low radial immersion, where the stock thickness is lower than 20% of the tool diameter. Thus, as the tool axis is tilted, the cutter workpiece engagement boundaries, and therefore the variation of cutting forces, change. Moreover, the dynamic compliance at the tool tip is a coupled response of the compliant workpiece and the milling tool, as illustrated in
Figure 4a. Calculation of the oriented FRF, including the tool and workpiece compliance, is depicted in
Figure 4b.
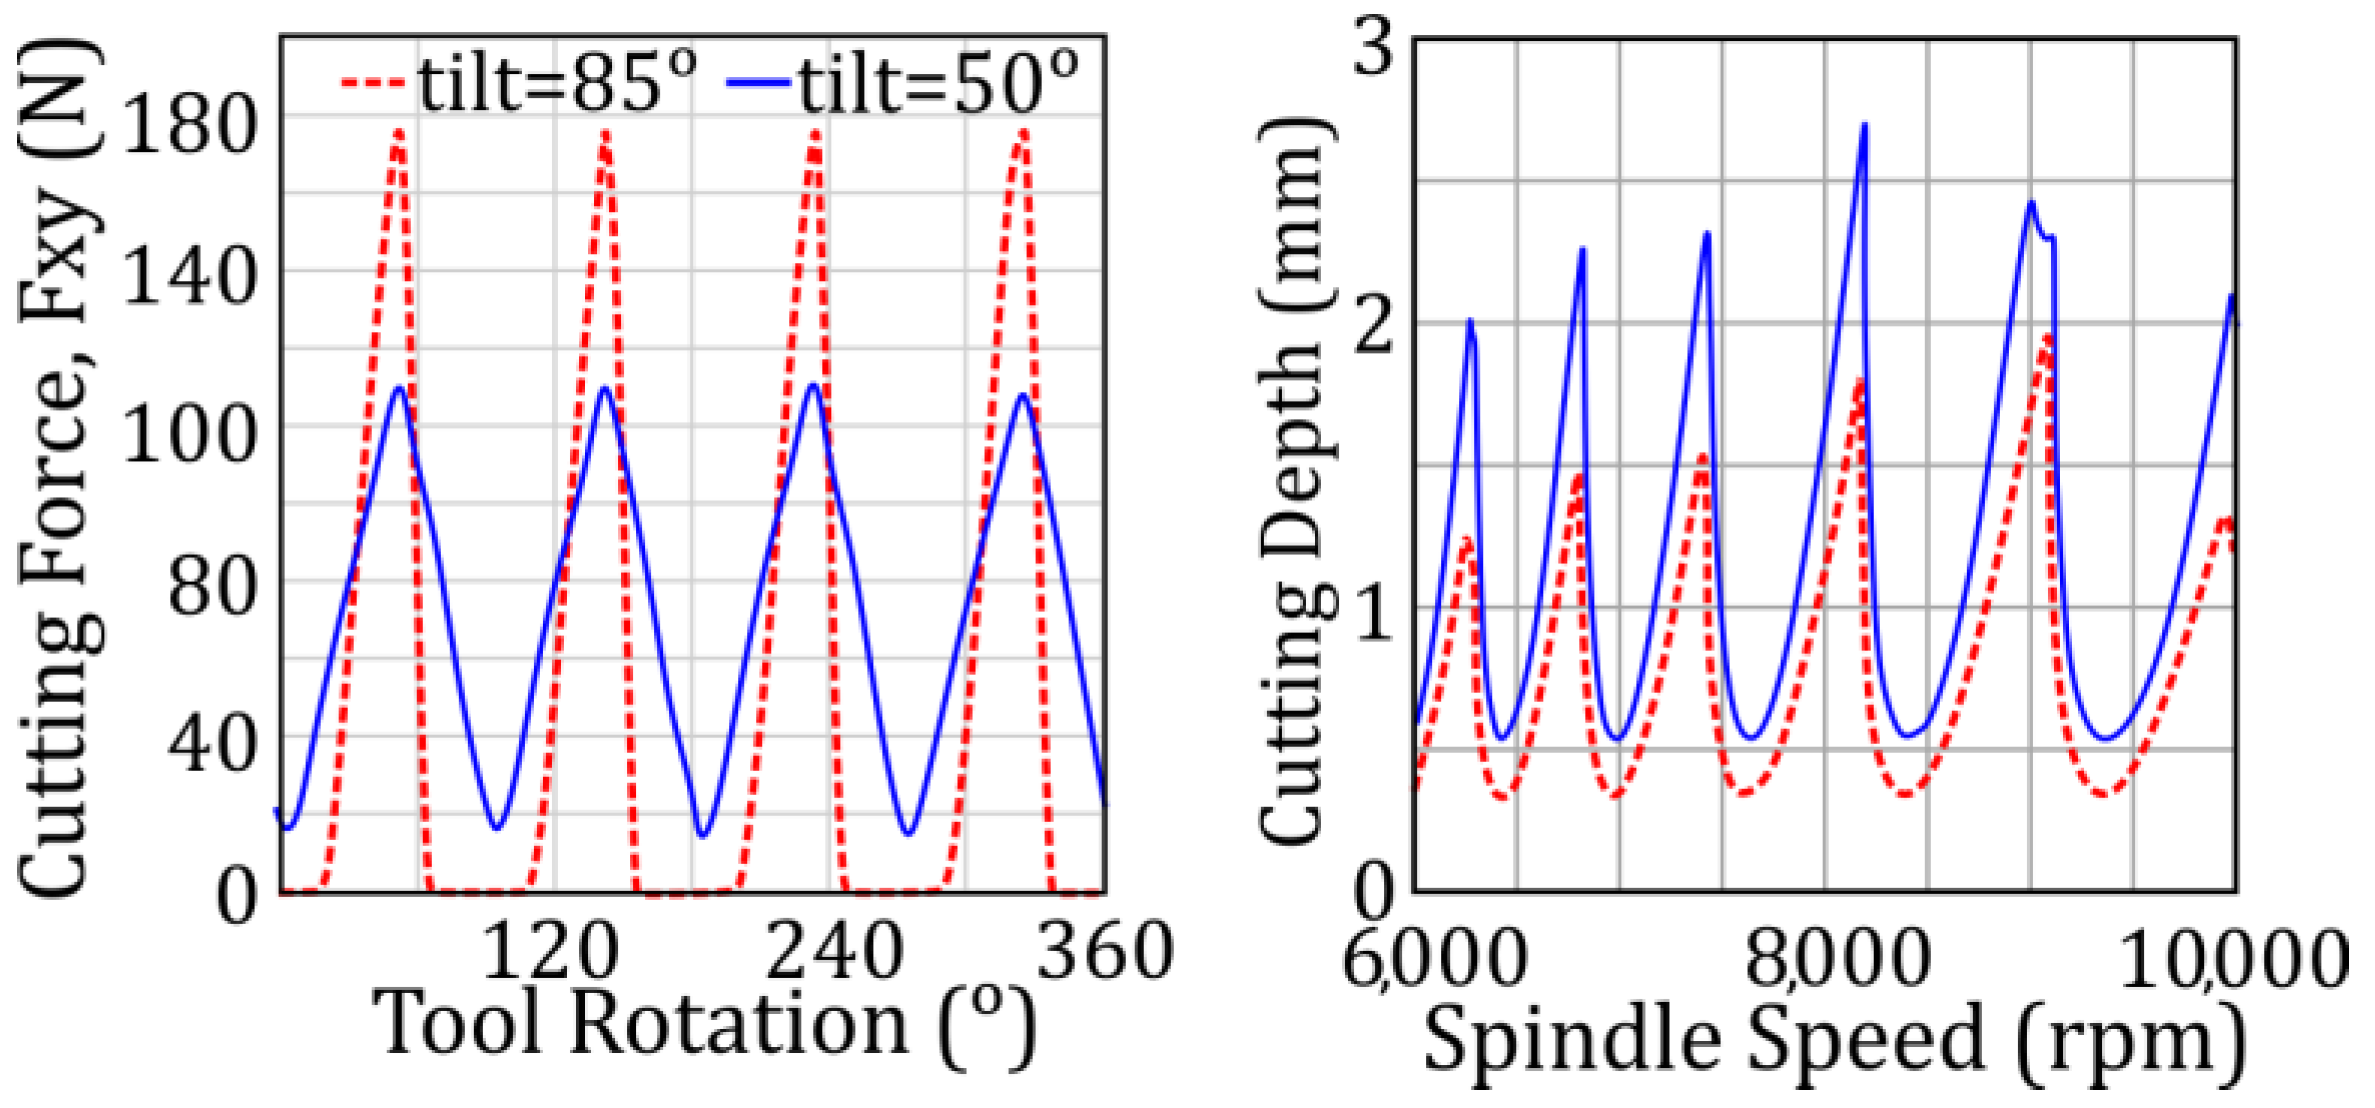
The effect of the tilt angle on the cutting forces and stability diagrams is shown in
Figure 5. As the tilt angle is increased, the tool axis moves away from the surface normal vector
n, and the side of the milling tool starts to engage with the workpiece. In return, the cutting force fluctuation becomes even higher. Moreover, the contribution of the milling tool structure to the dynamic response at the tool tip along the surface normal vector increases when the projection of lateral tool direction on the surface normal vector becomes larger. In return, both the magnitude of the excitation force and dynamic compliance increase, which leads to a decrease in stability limits. The representative case shows a 25% increase in the stability limits with a change in tilt angle from 50 degrees to 80 degrees.
3. Efficient Milling Strategies
Spindle speed, depth of cut, stock thickness and shape are crucial parameters in tool path generation and establishing a milling strategy. Having discussed the significant effects of those, this section presents two case studies to demonstrate how simulation tools can be used to develop 5-axis milling tool path strategies for increased efficiency in the milling of thin-wall features. The position-dependent natural frequency and magnitude of the dynamic response opens the opportunity to implement a tool path strategy, where the depth of cut and spindle speed are varied among the grouped cutting steps, as presented in
Section 3.1. The workpiece geometry selected in Case 1 represents a blade geometry used in aerospace applications such as jet engines. This part was selected to demonstrate the applicability of the proposed tool path strategies on free-form surfaces. As far as the effect of stock thickness and shape, i.e., the near-net shape of IPW, is concerned, there is significant potential for implementing variable stock geometry to increase the stability limits, as exemplified in
Section 3.2. The workpiece geometry selected in Case 2, represents a plate-like part, which is structurally more flexible than the cutting tool and demonstrates significantly variable workpiece dynamics.
In the case studies, the blades are milled out of AL7075 material for demonstration purposes considering the availability and low cost. The milling tool was a 12 mm ball-end mill with four cutting flutes, where 0.1 mm/rev/tooth of feed rate was implemented. The milling experiments were conducted on a DMG 50Evo 5-axis milling center (DMG MORI, Shiomi Koto-ku, Tokyo, Japan).
3.1. Case 1: Variable Depth of Cut and Spindle Speed
In a representative finish milling of a blade geometry, shown in
Figure 6a, the effect of material removal and machining location is simulated. Variations in the magnitude and natural frequency of the dominant mode are plotted in
Figure 6b and
Figure 6c, respectively. It is observed that the magnitude of the dominant mode significantly varies on the part surface. For instance, at point p
1,1 (u = 0 and v = 1), the magnitude of the dominant mode is around 60 units, whereas it reaches up to 120 units at point p
1,10 (u = 1 and v = 1). And in between these two points, the magnitude shows a convexly decreasing variation. Moreover, the dominant mode also shifts with material removal and machining location (see
Figure 6c). For instance, at p
1,10 (u = 1 and v = 1) in
Figure 6a, the dominant mode is at a natural frequency of around 2 kHz, which increases up to a level of 5 kHz at p
1,1 (u = 0 and v = 1).
The simulated IPW FRFs are used in prediction of stability limits using the 5-axis stability model [
20] based on the zeroth order approximation [
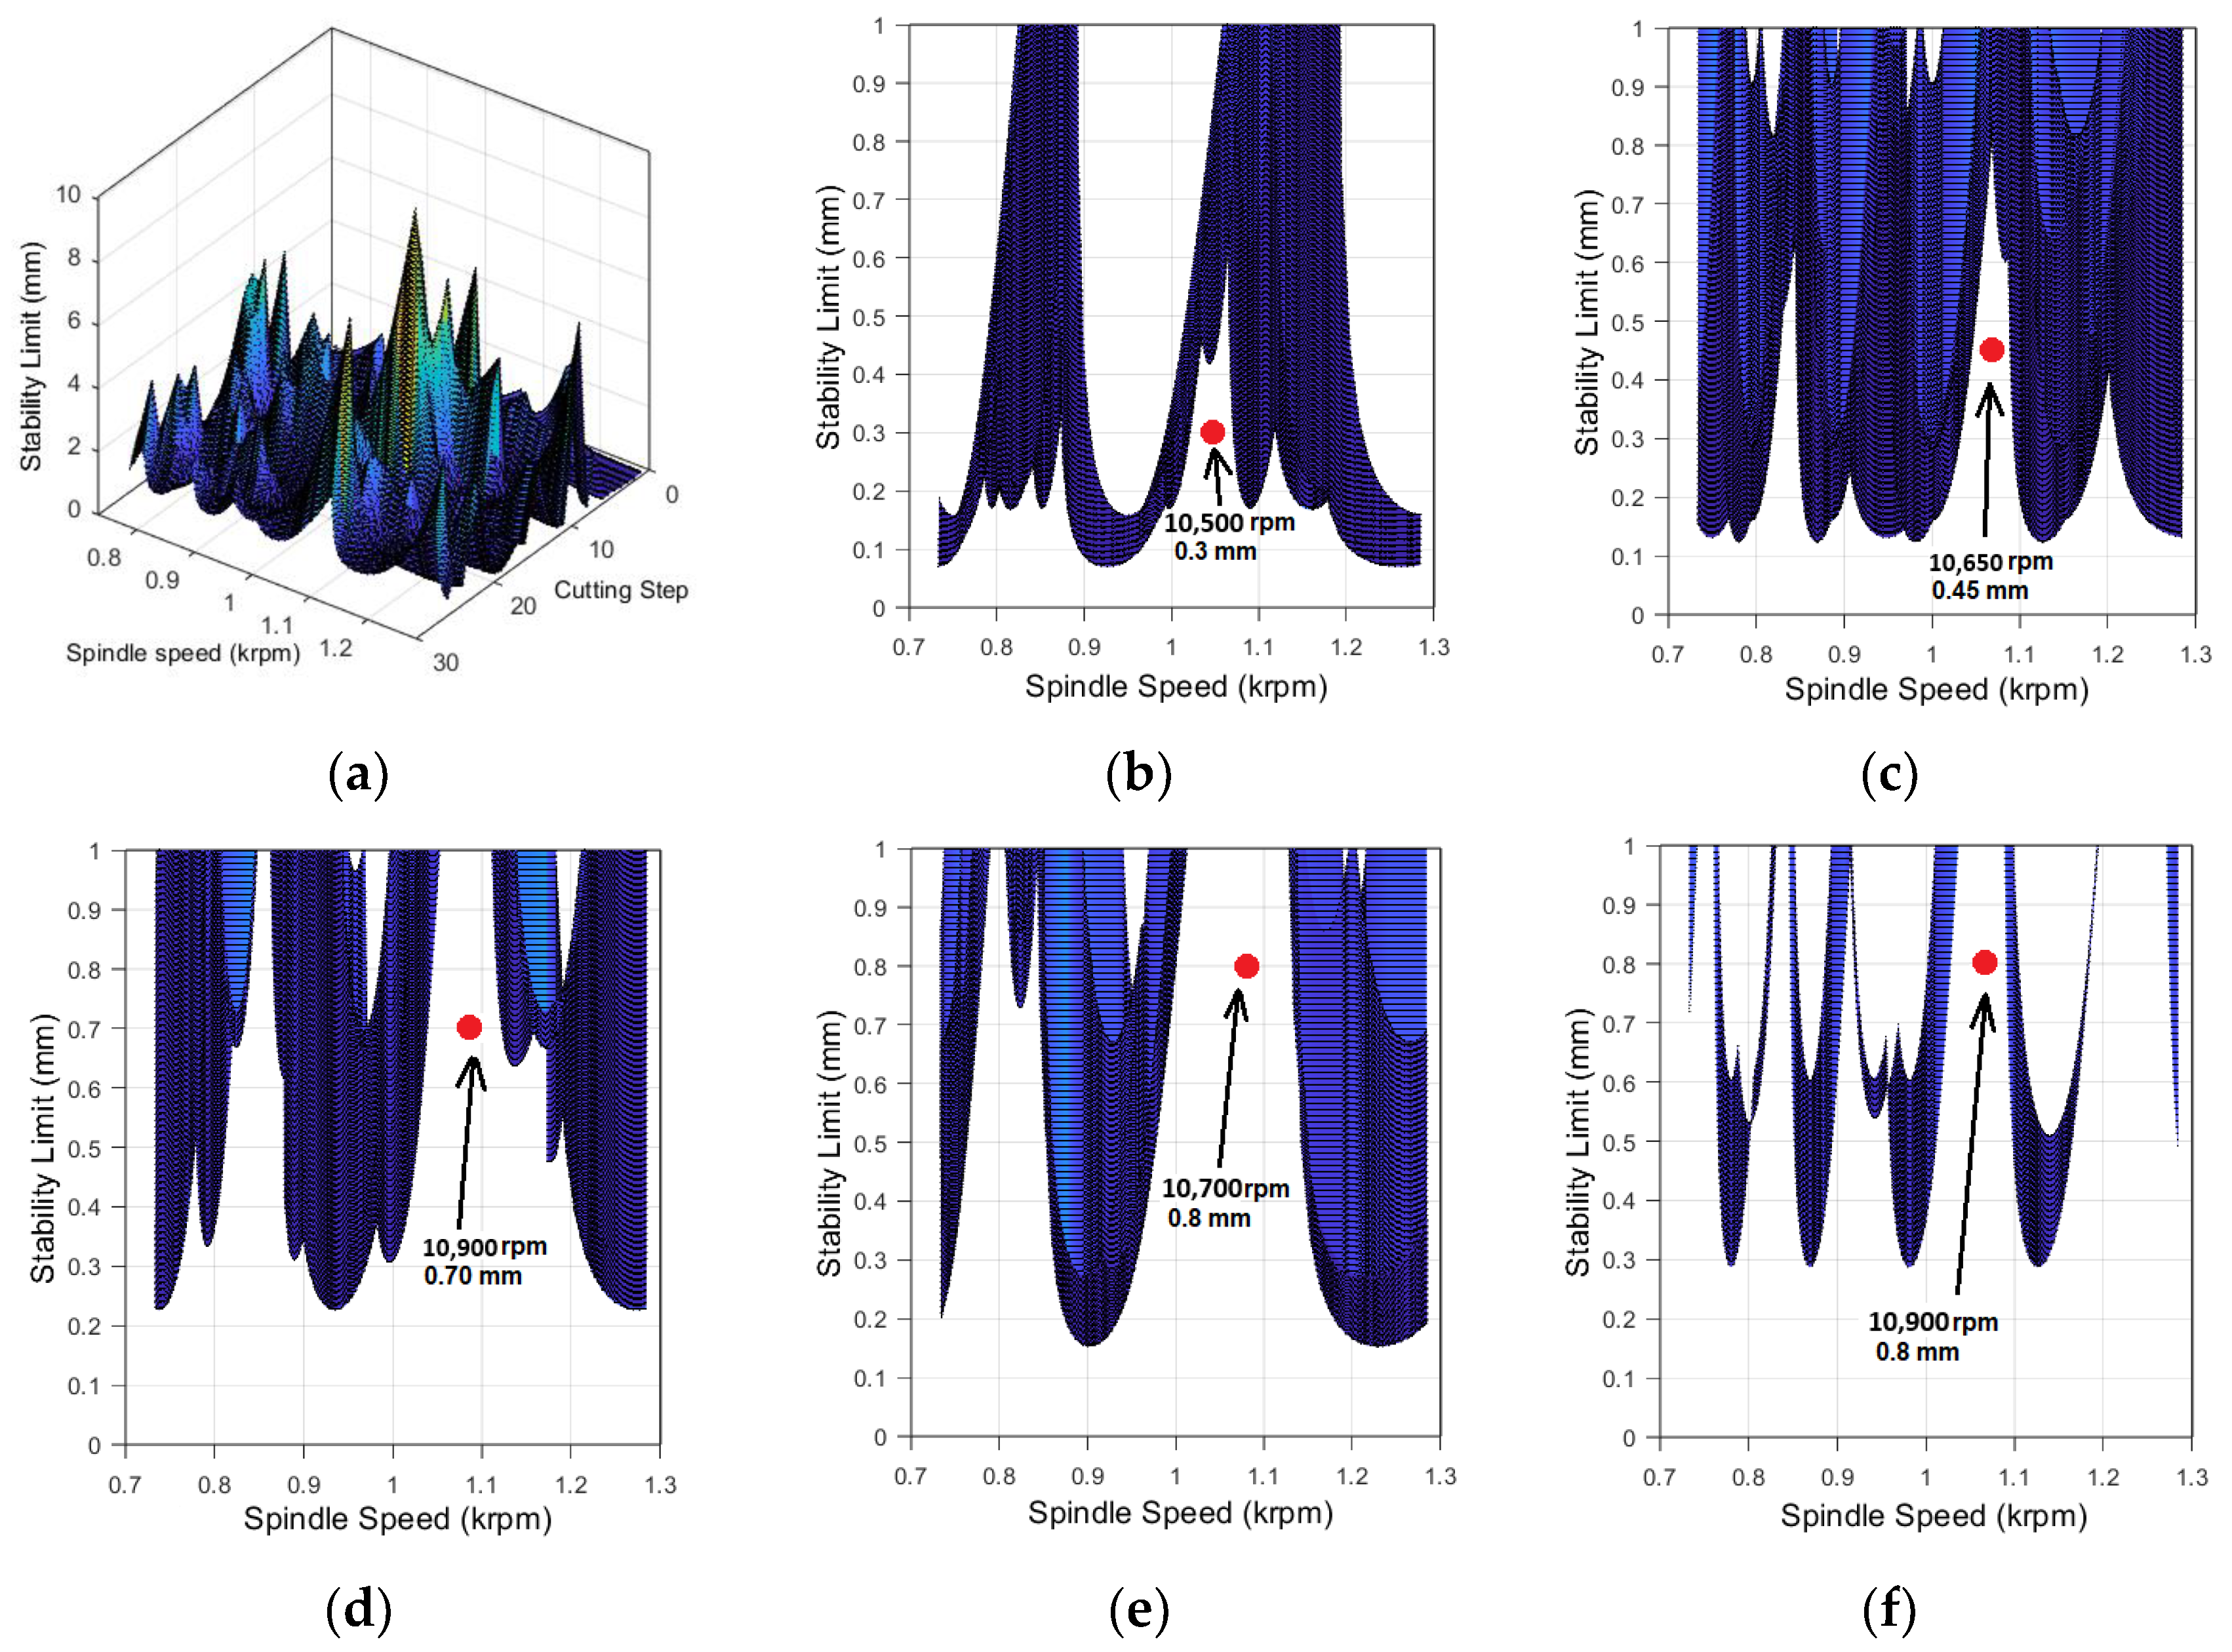
21]. The position-dependent stability diagrams in 3D and 2D are shown in
Figure 7.
Although the 3D view looks very complicated, as it is windowed for a group of cutting steps, common stability lobes and absolute stability limits can be obtained. From
Figure 7b through to
Figure 7f, representative 2D stability diagrams for cutting step 1 through to cutting step 25 are plotted in five groups, where slight shifts in the sweet spots for the selected spindle speed and the depth of cut pairs are observed. These pairs are used for demonstration of the variable depth of cut and spindle speed approach in a grouped manner. Although, in recent years, continuously variable spindle speed control approaches have been utilized on thin-wall milling, it would not be practical to do so in industrial applications. Therefore, the cutting speeds are grouped based on the variation of stability pockets. The spindle speed is selected at the mid-point of the stability diagram, whereas the depth of cut is selected as the average of the absolute stability limit and 1 mm, which is the maximum limit due to the scallop height limitation.
For instance, in
Figure 7b, the sweet spot is seen at 10,500 rpm and 0.3 mm depth of cut from cutting step 1 to cutting step 5. However, this changes to 10,900 rpm at 0.70 mm from cutting step 11 to cutting step 15. This is implemented throughout the grouped cutting steps by tracking the variation of the stability diagrams along the −v direction.
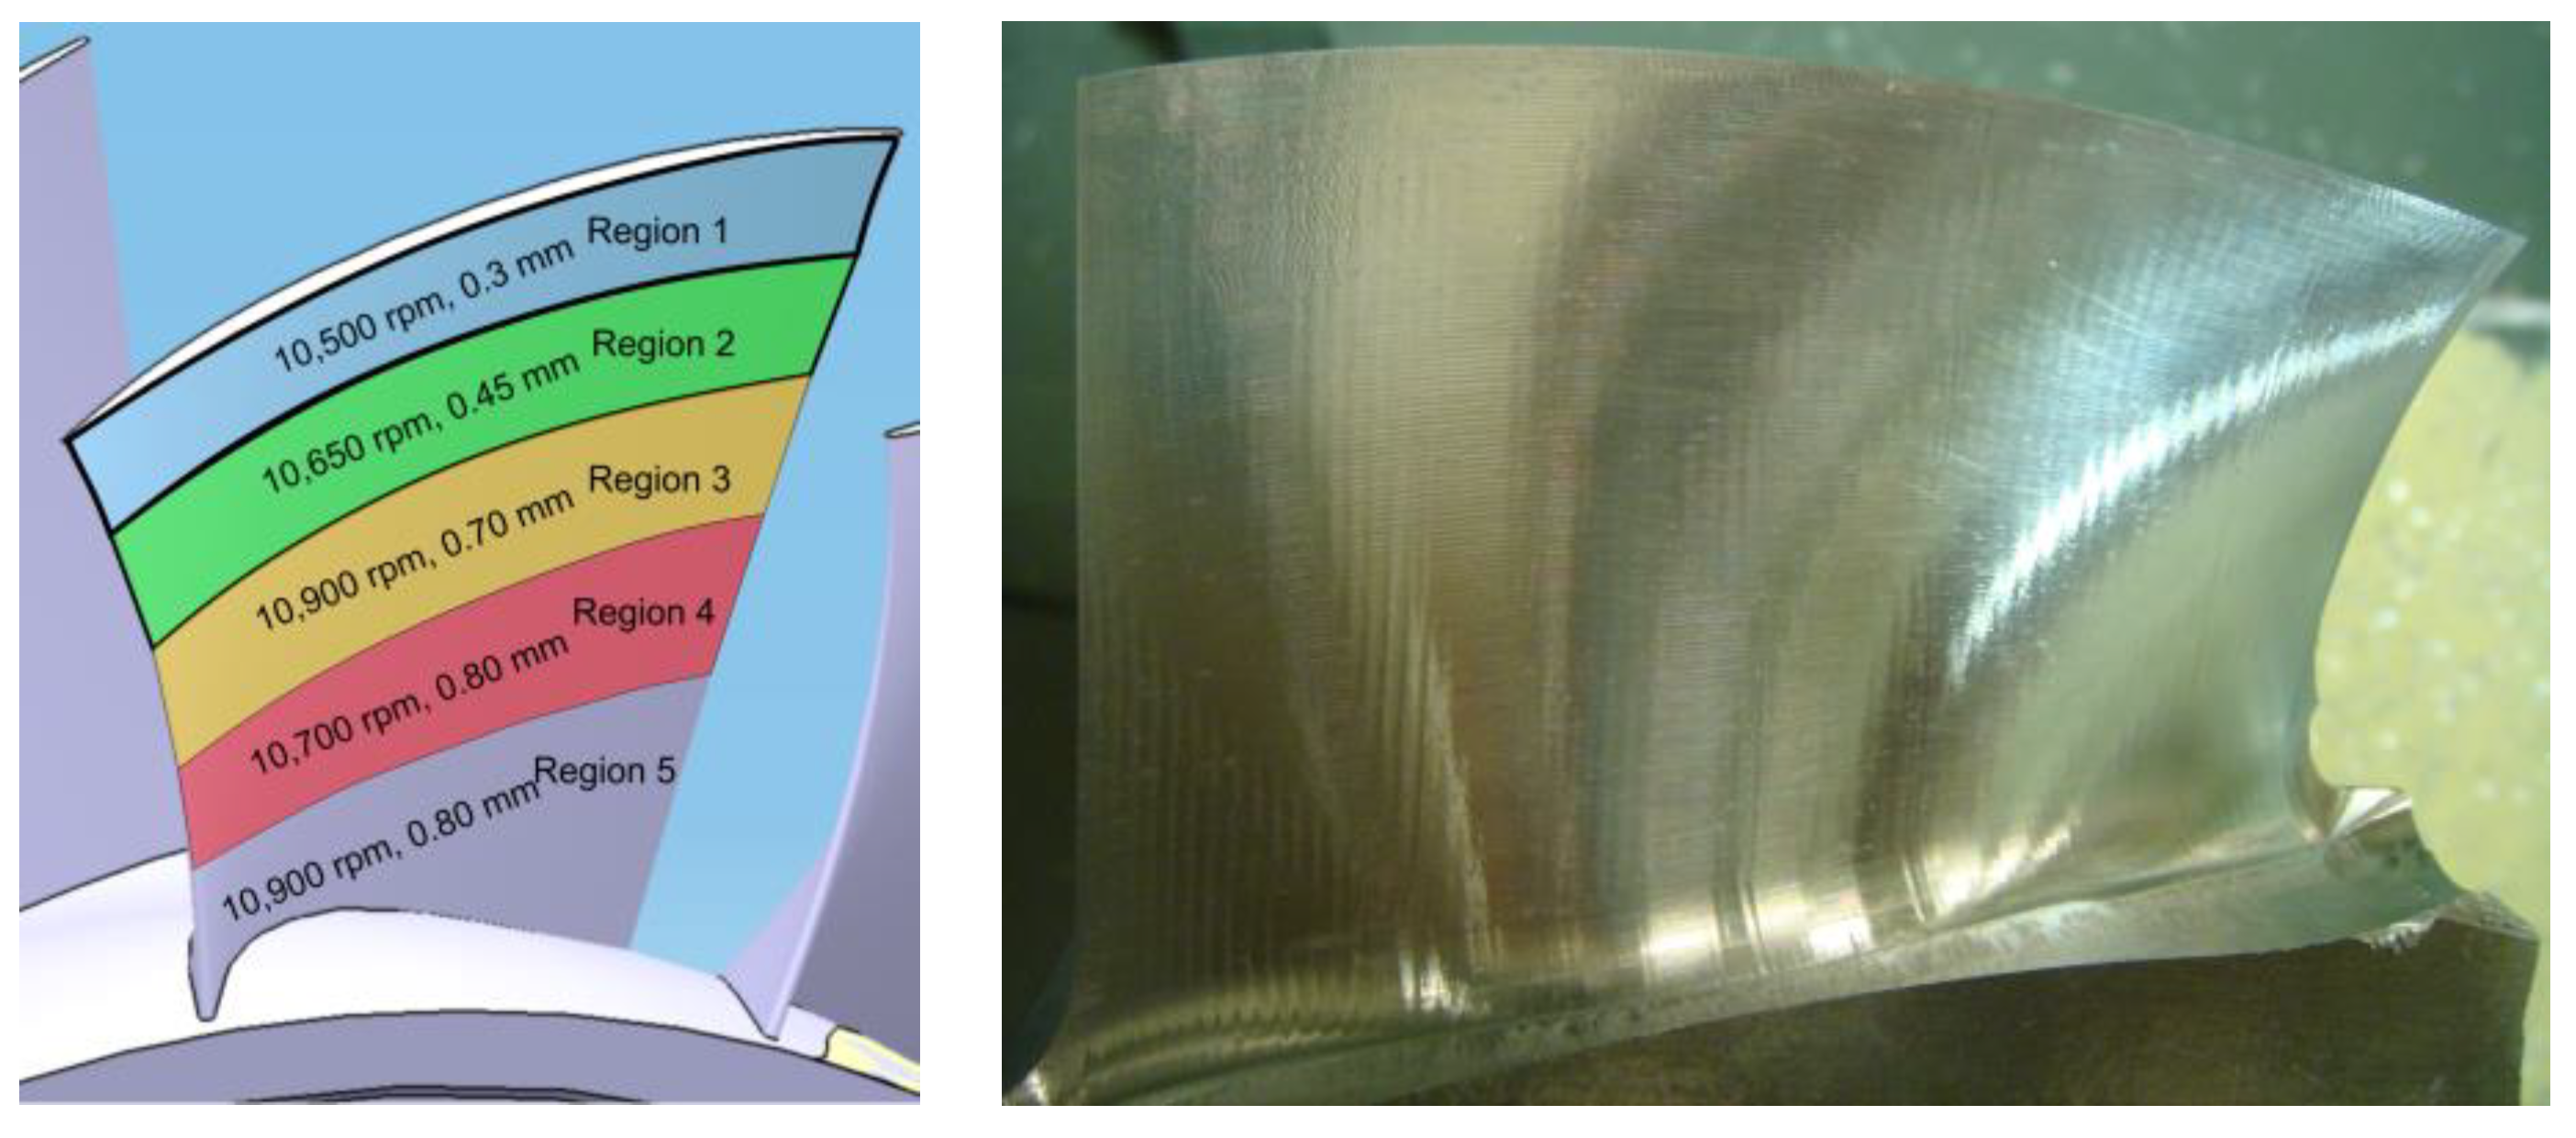
Observing the variation of the stability diagrams and considering the practical application, the blade surface is divided into five segments along the axial (v) direction. At each segment, rather than selecting the same cutting depth, it is adjusted based on the change in absolute stability limits corresponding to the specific common stability diagram. However, considering the horizontal (spindle speed axis) shift in the stability diagrams, the spindle speed is also changed at each section. The sections and corresponding cutting parameters are shown on the blade surface in
Figure 8. The machined surface is observed to be free of chatter marks; however, the vertical marks are optically generated due to the machine tool motion dynamics.
3.2. Case 2: Improvement of Near-Net Shape of IPW
In the literature and most of the CAM systems, the stock thickness value is selected as a constant value in finish milling operations, where structural compliance of the IPW has been ignored. However, as described in
Section 2, the stock thickness is a key parameter, especially for finish milling of thin-walled features. In the literature, Tunc et al. [
15] proposed the variable stock finish milling context. In this section, the tool path strategies to enable variable stock context are discussed through a representative case.
The variable stock shape is implemented by modifying the tool path just before the finish milling stage, i.e., semi-finishing. To define the variable stock shape, the variation of stock thickness is written as a parametric function along the feed (
u) and cross feed (
v) directions. In this modification, curvature (G
2) continuity is critical to have smooth milling tool path tracks. Thus, the shape of the parametric function is selected accordingly. In this study, sinusoidal variation is used along the
u direction, and piecewise exponential variation is used along the
v direction, as shown in
Figure 9a. Consequently, the stock thickness,
t(
u,
v) is written by Equation (1):
The variable stock strategy is implemented on the semi-finish tool path by generating seven cases with various stock thickness parameters, as listed in
Table 1. Case 1 represents constant stock thickness all along the part surface. Then, stock thickness is changed along v up to Case 6. Then, in Case 7, u-v variation was implemented.
Absolute stability limits are calculated using the simulated FRF of the generated near-net shape IPW volumes. Then, cycle times are calculated using the corresponding axial depth of cut and spindle speed values as compared in
Figure 10. It is seen that cycle time can be decreased from 20 min to 10 min.
4. Discussion and Conclusions
In this paper, tool path strategies for increased efficiency in the milling of thin-walled features are discussed based on process simulations. The process of 5-axis milling requires the depth of cut, stock thickness, tool axis and spindle speed to be decided by the process planner. However, as far as thin-wall features are concerned, the selection of stock thickness and shape recursively affects chatter stability and hence the depth of cut and spindle speed pairs to be selected. In addition, as the cutting tool removes material while progressing on the tool path along the surface of the feature, the dynamic stiffness at the point of contact increases, which allows a higher depth of cut value to be implemented. These are the major concerns, considerations, and issues in the milling of thin-wall parts. However, the conventional tool path generation approaches do not provide tool path strategies to address them.
This paper demonstrated the effect of workpiece dynamics, tool axis, stock thickness and shape on the selection of process parameters, where the conventional tool path obtained from the CAD/CAM systems usually limits the most efficient process parameter sets due to the geometry of the tool path. This paper presented two case studies generated using process simulations: (i) region-based axial depth of cut and spindle speed selection; and (ii) the effect of stock shape. Case study 1 involved increasing the depth of cut based on the milling region on the surface, where it was demonstrated that the average axial depth of cut can be increased by 100% instead of applying a constant axial depth-of-cut value. This enabled decreased cycle time when process parameters were bound to chatter stability. It was also demonstrated that the spindle speed may need to be adjusted, considering the varying natural frequency as material is removed. Case study 2 involved the effect of stock shape on milling dynamics and stability, where modification of the semi-finishing passes enabled the generation of a variable stock shape to be removed during the finish milling stage. In this case study, it was demonstrated that the cycle time can be decreased by 50% through stock shape analysis.
The results of this manuscript can be generalized as follows: (i) region-based axial depth of cut and spindle speed selection in 5-axis milling of free-form surfaces will be beneficial if enabled in a CAD/CAM system. (ii) Provided that the tool path generation enables the process planners to implement stock shape variation at the semi-finish milling stage, it would increase the process planning freedom and will a enable further increase in productivity, as well as local treatment in flexible parts.
