Abstract
Wire and arc additive manufacturing (WAAM) is a metal deposition technique with a fast rate and the possibility of a high volume of deposition. Because of its fast deposition and high heat input, the manufactured products have poor surface quality. This paper presents a study on the machining of Inconel 718 wall-shaped additive manufacturing (AM) products, a necessary step for the improvement of surface quality. Considering the possibility that the characteristics of the milling processes of AM products might differ from those of traditionally manufactured parts, in this research, two types of Inconel 718 were studied and compared: one was manufactured using WAAM, and the other was an Inconel 718 rolled bar (Aerospace Material Specifications 5662). Using the testing procedure, a conventional two-flute cutting tool was used to assess their machinability. For this process, multiple passes were performed at three different heights of the samples. Considering the peculiarities of the AM products, such as their uneven surfaces, dendritic microstructures, and anisotropy, the results were analyzed. After the machining operation, the effects on the products were also studied by analyzing their surface quality. This study found a higher stability in the cutting process for the AMS 5662 samples relative to the WAAM parts with less variability in the cutting forces overall, resulting in better surface quality.
1. Introduction
Recently, additive manufacturing (AM) has been getting more attention and adoption; this kind of growth is explained as being caused by the highlight of the different advantages that this kind of manufacturing process possesses, and one of the main differentials is quoted as being the complexity of its products which comes without the addition of deposition costs [1]. With this attention, more focus is being given to not only this kind of technology but also to the progression of its techniques.
With the advancement of different AM methods, a shift is occurring from AM methods being only used as prototyping processes to being used as techniques for creating final products [2]. However, compared with traditional methods, the costs of manufactured products for the more extensive adoption of AM techniques by the industry remain a differential point [3].
Among AM techniques, wire and arc AM (WAAM) is one of the methods used to manufacture final products. It is based on using arc welding as a deposition process for different metal components. Compared with other AM processes, WAAM has, as its main benefits, a high deposition rate [4], lower costs (for both fixed and variable costs), and a higher material use efficiency [5]. However, its fast deposition process comes with the disadvantage of producing uneven surfaces due to its high heat input and the stair-stepping effect intrinsic to the nature of most AM samples due to the deposition based on layers, which diminishes the surface quality of the WAAM products [6].
Regarding the problems of surface quality and defects, different methods are currently being applied to reduce AM-induced irregularities. Ranging from techniques that calculate and control the feed rate for deposition control [7], the optimization of tool vectors during manufacturing [8], and the use of AI to achieve better products [9]. These possibilities are being explored in a way that makes the post-processing step faster, and less material is wasted during the material removal process.
Even with the employment of techniques to improve the surface quality during deposition and reduce its defects, for different uses of the deposited products as final parts, especially for uses such as in the aerospace industry, which usually require wrought or cast materials to have an average surface roughness (Ra) of 3.2 μm or lower [10], a step that could improve this surface roughness, a post-processing step, is required.
The conventional machining process has been well studied and documented for the different types of metallic alloys, diverse manufacturing processes, and various machining techniques (milling, turning, and drilling). However, when considering the novelty of AM systems and their products’ peculiar characteristics (such as their microstructures, mechanical properties, and the possibility of anisotropy), there is a need for further study of the machining processes for AM goods.
However, research for the post-processing of Inconel 718 products built with different AM techniques is being performed [11,12], especially for products manufactured with the powder bed fusion (PBF) technique, and showing that the wrought and AM alloys do not share the same machinability, data on the machining of WAAM are still considered lacking. Considering the peculiarities of each additive manufacturing process, like the deposition process, energy, and solidification rate, and the differences in the mechanical properties, for instance, lower yield and tensile strength for WAAM, and in the microstructure, finer grains for PBF [13], the machining process could present different outcomes, and with that, the different steps in this research were performed.
Therefore, in this study, the distinct machining characteristics of Inconel 718 (a material known to be hard to machine but with wide usability) WAAM samples are presented to assess this product’s machinability and evaluate its possible differences in manufacturing costs in the future.
Regarding machinability, different parameters are used not only to analyze this kind of property but to also define it. Characteristics of machining such as tool life, surface finish, and production rate are commonly used to define machinability [14], but as a more general definition, machinability could be explained as the capability of a material to be machined [15], and in this paper, the use of this term falls into this idea.
2. Materials and Methods
2.1. Workpiece Parameters (Wire and Arc Additive Manufacturing (WAAM) and Annealed)
In this study, different WAAM workpieces were manufactured with a Fanuc six-axis robot manipulator, Arc Mate 100iC. This manipulator was responsible for controlling the welding torch movement. Simultaneously, the Inconel 718 wire material was fed with a Fronius Cold Metal Transfer System. The samples were 25 mm high, 30 mm long, and 4 mm deep.
In the same way as other AM systems, the samples in WAAM were built in layers. For the pieces in question, 20 layers (each approximately 1 mm in height) were deposited in the same direction with a cooling time between layer depositions of 15 s. These layers had different deposition parameters for the first and posterior steps. The manufacturing parameters and pictures representing the AM system (welding system (a), manipulator robot (b)), printed sample example (c), and deposition direction representation diagram (d) are presented in Table 1 and Figure 1.

Table 1.
Wire and arc additive manufacturing (WAAM) manufacturing parameters.
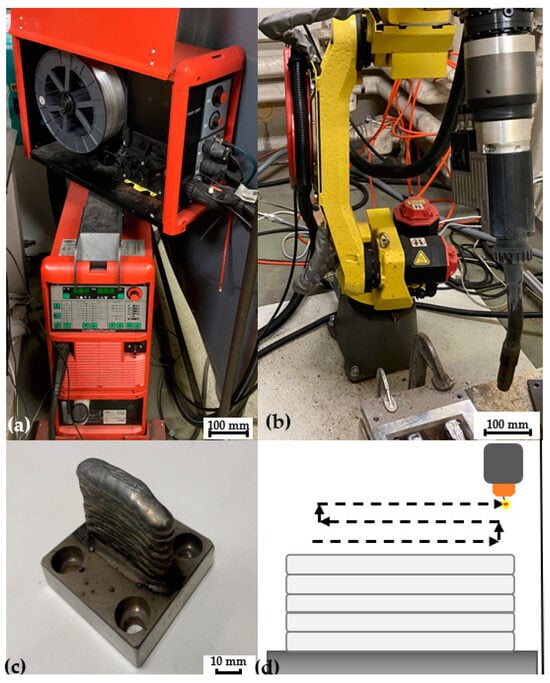
Figure 1.
Wire and arc additive manufacturing process representation ((a)—welding system, (b)—manipulator robot, (c)—printed sample, (d)—deposition direction).
An attempt to minimize the distortions of the manufactured samples explains the choices of the different parameters for the first and posterior printed layers. As the interactions of the first layer base metal (stainless steel) at room temperature to Inconel 718 are different from those of the posterior layers at high temperatures, the changes in parameters seek to keep the amount of material deposited and its dimensions the same throughout the deposition process.
Similarly, the deposition delay (cooling time) aims to minimize these distortions. The deformation of the samples can be reduced by reducing the buildup temperature due to the cooling time so that the overall maximum temperature is diminished. For simplicity, in other parts of this paper, the workpieces manufactured using this method are referred to as “WAAM samples”.
The other type of sample (AMS 5662 [16]) was acquired as a round bar comprising the Inconel 718 alloy, as manufactured by cold rolling and subjected to an annealing heat treatment. Similar to the WAAM samples, the AMS 5662 samples are referred to as “Annealed samples”. The heat treatment standard for the AMS5662 sample, containing temperature range, timing, and type of cooling, as stated by the Society of Automotive Engineering (SAE) [16], is described in Table 2.

Table 2.
Aerospace Material Specifications (AMS) 5662 Heat Treatment Process AMS5662 Heat Treatment Standard.
Before machining, the samples were cut using an electric discharge machining technique to create dimensions similar to those of the AM samples. These samples were subsequently set up in a clamp for machining. The samples were 35 mm in height and 10 mm in width.
For the fixation of the samples in the machining center, a clamping system was manufactured with dimensions of 50 mm in width and length and 15 mm in height. The system included a slot in the middle of approximately 10.5 mm for the sample to be clamped in. The pieces were secured in the clamp with four m6 screws. The system was secured on the dynamometer with four m8 screws, in the same manner as the WAAM Inconel 718 workpieces.
The round bar and the sample on the clamp system are presented in Figure 2.
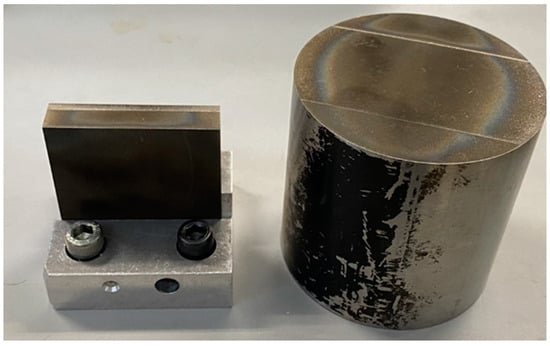
Figure 2.
Aerospace Material Specifications (AMS) 5662 round bar and prepared sample.
2.2. Material Properties (WAAM and Annealed)
As mentioned beforehand, two types of Inconel 718 alloys are considered in this study. Although they are the same kind of alloy, their difference in manufacturing and even in chemical composition might influence different material properties, ranging from mechanical properties to microstructure, and in this topic, these differences are explored.
Regarding the chemical composition, both materials fall under the determination of the AMS for the Inconel 718, and while the chemical composition of the welding wire was specified exactly by the providing company, the other material is only presented as specified “ranges”. Figure 3 presents the chemical composition of the Inconel 718 wire.

Figure 3.
Inconel 718 welding wire chemical composition.
The other studied material (AMS 5662) is referred to with this terminology so as to follow the required AMS terminology for this type of standard as assembled by the Society of Automotive Engineers International [16]. This standard describes the chemical composition, manufacturing process, and properties.
In the same manner as for the Inconel 718 wire, Figure 4 was assembled containing the chemical composition for the AMS5662; this time, however, being a standard, there are absences of exact numbers and a majority of range percentages.

Figure 4.
AMS5662 chemical composition [10].
The AMS 5662, as informed by the standard, has the lowest hardness relative to other AMS Inconel 718 materials (around 335HV [16]) because it does not suffer an age-hardening treatment like other alloys. The WAAM Inconel 718, on the other hand, has been reported as having a hardness of 259HV [17]; this difference in hardness could also indicate a difference in machinability, having, for instance, a tendency of the increase in cutting forces with the increase in hardness [18].
However, the WAAM Inconel 718 and AMS 5662 present several differences in regard to other properties. Owing to their manufacturing characteristics and primarily because the material deposition is based around a sudden increase in temperature and rapid posterior cooling, the WAAM workpieces present a different type of microstructure [19]. Mainly owing to this different microstructure, the mechanical properties will differ.
This microstructure differs from the AMS5662, which comprises grains sharing roughly the same diameter through different directions. The WAAM Inconel 718, in contrast, is composed of columnar dendrites with large grain boundaries (as large as 200 µm), with various diameters across multiple directions as opposed to the average 26.7 µm diameter of the AMS5662 grains [20]. The presence of the dendrites in the microstructure causes it to be anisotropic, with different directionality and a peculiar texture.
Another example of the properties influenced by the differences in the microstructure is the tensile properties. As expected, these two materials do not share many similarities, it has been reported that the AMS5662 has higher values for both the ultimate tensile and yield strengths, with differences of 300 MPa and approximately 500 MPa, respectively. In contrast to the other properties, the elongation is higher for the WAAM as-deposited samples, with an average difference of 8% [21]. In this study, considering the 3D printing process and other parameters (such as the material properties explained above) and that the differences in microstructure owing to the manufacturing procedure can lead to differences in machinability [22], the machining process and its steps were idealized. The next section presents the machining steps, describes the process, and shows the parameters of the operation and its data acquisition process.
2.3. Machining Parameters
As previously mentioned, this study required a set of data concerning the cutting forces. To obtain this type of data, a multi-component piezoelectric dynamometer (Kistler Type 9272) with a measuring range of ±5 kN for the X and Y axes and −5 to 20 kN for the Z axis, having a hysteresis less or equal to 1% and linearity less or equal to ±1%, was coupled with a five-axis machining center (OKK VM4) while using a charge amplifier (Kistler Type 5015A) with integrated high- and low-pass filters and the Keyence Wave Logger as data acquisition system.
A side-milling process was performed using a “conventional” cutting tool, not a specific cutting tool for the machining of AM samples or even difficult-to-cut material (higher number of flutes). A tool that is not only a less costly cutting tool (OSG WXL 3D DE) when compared with specific cutting tools for the machining of AM or difficult-to-cut material but also a cutting tool with easy accessibility, making the replicability of the current research easier and having an endmill with two flutes and a helix angle of 35°, was also used and is referred to herein as the WXL.
Another aspect of the choice of cutting tools is related to the novelty of this study. As little is known regarding the machinability of Inconel 718 products manufactured with WAAM methods, it was unknown whether the most effective way of machining and its parameters, including the types of tools, would be similar to those for wrought workpieces, having a later type of material.
Although endmills containing additional flutes are generally recommended for materials like Inconel 718, it is still unknown if it is the same procedure for WAAM samples; also, with the relatively low amount of material removed, problems like excessive wear or tool breakage could be minimized.
The machining tests were performed with the basic procedure of 21 passes of down milling completed at three different heights. It was divided into eight passes at the first height, also referred to as the first layer herein (6 mm from the top—first layer), seven passes at the second height (12 mm from the top—second layer), and six passes at the last height (18 mm from the top—third layer). In other words, with an axial depth of cut of 6 mm at three heights and a radial depth of cut of 0.3 mm with multiple cutting passes, the sample resembled a “staircase” made possible with this type of differences in the depth of cut, to better evaluate the dimensional accuracy of the process.
In other words, multiple cutting passes were performed with a fixed axial depth of cut of 6 mm and radial depth of cut of 0.3 mm. A diagram of the milling procedure is presented in Figure 5, representing the progress of the cutting process after the process of material removal for each height is completed, from left to right, ending with the final aspect of the workpiece.
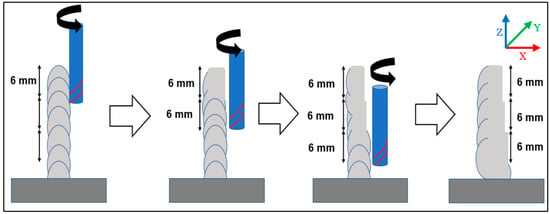
Figure 5.
Side-milling diagram.
The choice for the number of machining passes to be performed took into consideration primarily the WAAM sample characteristics. Regarding the number of passes, it was considered necessary to machine flat surfaces to acquire data that had fixed radial and axial depths of cuts, for a comparison with the same parameters as the annealed sample, so to cut the sample until the removal of the surface deformations was deemed necessary. In the same manner, a limit to the number of passes was required to be established since thinning of the material wall could increase the possibility of inducing chatter vibration, and it was chosen to be 50% of the original width.
The setup for the cutting force acquisition system is shown in Figure 6. Those figures present different representations of coordinate systems, with Figure 5 representing the “real” coordinates regarding the machining center and workpiece setup and Figure 6 describing the coordinates of the cutting forces obtained by the acquisition system. This meant that the directions of the recorded forces might differ according to the dynamometer setup, requiring a posterior adjustment to the cutting force results.
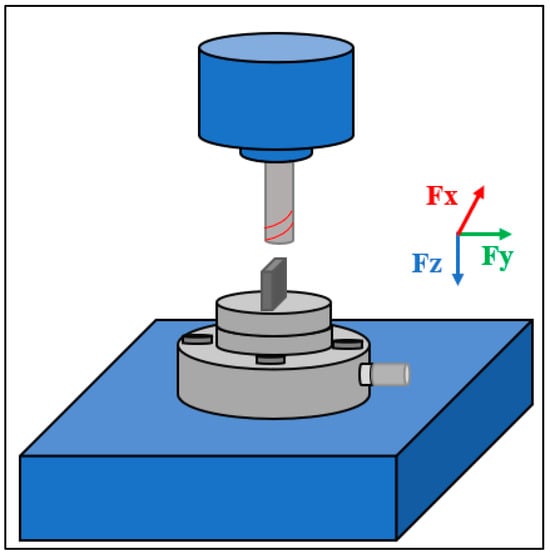
Figure 6.
Cutting force acquisition setup.
The multiple cutting passes were executed with the same machining parameters for both samples, being a wet-side milling (Blaser Swisslube 2000 Universal coolant, Hasle-Rüegsau, Switzerland) procedure. As for the parameters, the cutting speed was chosen as 15 m/min, the spindle rate was set at 800 rpm, and the feed speed was set at 240 mm/min.
Different aspects of the machining process were considered when selecting the machining parameters. For instance, because the Inconel 718 is a material known as being hard to cut, the cutting parameters were chosen, taking that into consideration. Therefore, not only the range suggested by the company catalog was considered, but literature examples were also considered, having not only a recommended cutting speed for carbide tools but also mentioning that the increase in feed speed should be considered for the prevention of rubbing, which affects work hardening and consequently tool life [23].
Another critical point is that the samples manufactured using the WAAM method and annealed samples had relatively small widths. Milling these samples under more aggressive cutting conditions could cause the pieces to vibrate and negatively influence the experimental procedure. Choosing a relatively low cutting speed also decreased the effects of tool wear throughout the process.
With the previously mentioned parameters in mind, in this research, two cases were presented: subjects a and b for machining using the WXL tool for the WAAM and annealed products, respectively. The previously explained machining parameters are presented in Table 3.

Table 3.
Machining parameters.
The surface roughness and cutting forces were measured for both samples to analyze the machining processes. As explained above, the cutting forces for the X- and Y-axes were gathered for all of the machining passes. In the next section, discussions regarding the results are presented.
3. Results and Discussion
3.1. Cutting Forces
As mentioned previously, one of the parameters used for the analysis of the machining process was that of the cutting forces. This kind of data is quoted as being one important parameter to be monitored because it is one of the ways that material machinability could be evaluated, owing to the relation that the magnitude of cutting forces has with the tool wear, heat generation, accuracy, and quality of the final products [24].
As there are different aspects of the cutting forces to be analyzed, for a better organization of the present section, this discussion was divided into different subsections, containing observations for the shapes of cutting graphs, maximum cutting forces, and machining stability of both samples.
3.1.1. Surface Deformation Effects on Cutting Forces
To evaluate the maximum cutting forces, only the last machining pass for each height was analyzed, with the idea of only assessing the machining of a flat surface. Owing to the surface deformation of the WAAM samples, as shown in Figure 1c, the amount of material being cut (cutting depth) may vary, resulting in differences in the cutting forces. To exemplify this variation in the cutting forces owing to the deformation of the samples, Figure 7 presents one graph representing the cutting forces for the first machining pass on the second height (12 mm) for case (a).
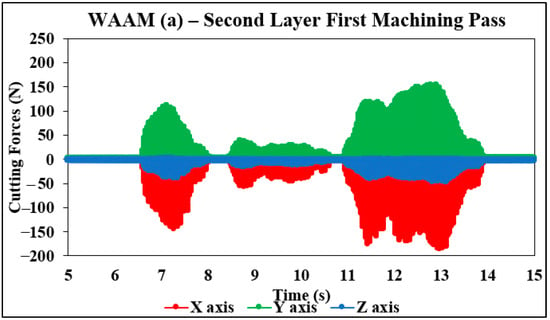
Figure 7.
Second layer first-machining-pass cutting forces (case a).
Figure 7 represents the cutting forces for the X-, Y-, and Z-axes for the second layer (12 mm of height from the top) and first machining pass, with a cutting depth of 0.3 mm. This graph shows the variations owing to the deformation of the samples manufactured using the WAAM technique.
These variances are explained by the differences in the amount of material removed by the machining step, with the sample distortions being more significant than the radial depth of the cut (0.3 mm) in that dimension, meaning that the actual radial depth of the cut would keep changing throughout the cutting procedure, explaining the variances of the cutting forces. This directly influences the first cutting passes’ results, making the comparison process more difficult. Accordingly, it was decided to leave this step out of the present study.
Although not present in this paper and not the objective of this study, it is important to mention that the machining of these irregularities present throughout the workpieces could represent some problems for the post-processing step. The abrupt increase and decrease in the depth of the cut cause these variations in cutting forces, and these changes could be responsible for causing unwanted wear and even tool breakage during the cutting procedure, making the machining of additive manufacturing samples even harder.
In the case of this research, however, the endmills were checked for possible excessive wear and breakage before the analysis of the cutting forces, and although some wear was present in all cases, including for the annealed samples, it was considered to be minimum, especially when taking into account the difficulty in machining Inconel 718; it was discarded that the deformation and its impact in the machining process played an important role in the results that will be further discussed in the posterior topics.
One example of pictures of cutting tools after machining for each type of material (WAAM (a), AMS5662 (b)) is present in Figure 8, highlighting the area of wear by a red circle, that was considered of low impact to the cutting procedure.
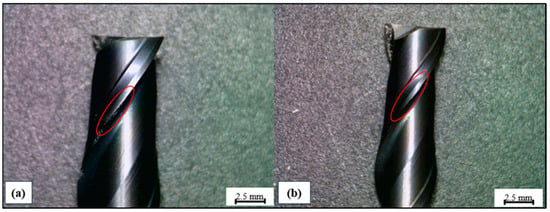
Figure 8.
Tool wear example—(a) WAAM, (b) AMS5662.
Another important observation to be made is regarding the stability of the cutting procedure. Being a new kind of setup and a different kind of sample to be machined, it was deemed important to consider the possibility that problems, such as chatter vibration, would occur during the cutting process; with that, a set of experiments were performed to check that possibility with the aid of an accelerometer. The setup of the experiments is shown in Figure 9.
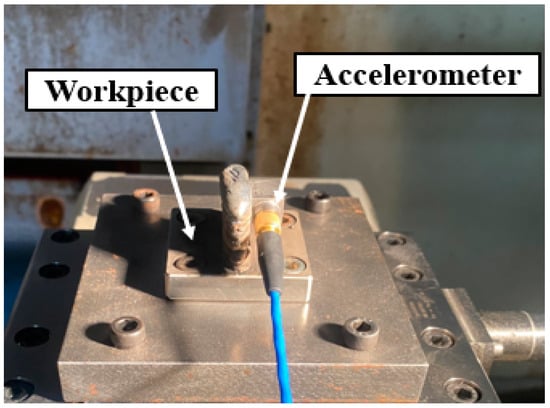
Figure 9.
Cutting stability setup.
The data to be gathered from this kind of experiment would be both cutting forces from the dynamometer and frequency from the accelerometer. While the dynamometer showcases data in the form of cutting forces (N), the accelerometer and software only yield data in frequency after a fast Fourier transform (FFT) analysis. The idea behind this experiment is to check the vibration signals (frequency) and compare them with the natural frequency of vibration of the system; the deviations from the range of the natural frequency could be deemed as anomalies, such as chatter vibrations.
The natural frequencies that would be acting as standard for the vibration signals gathered were calculated using the equations previously proposed for a cantilever beam presented below [25].
where E is the Young modulus of the material, M is the mass, I is the moment of inertia, Y is the displacement, L is the beam length, β is the constant for cantilever beam vibration, and ω is the natural frequency.
From Equations (1) and (2), it was obtained that the first harmonic for the system in question is 153 Hz, meaning that when vibrations from this range are obtained from the accelerometer, it is assumed that the vibration is the natural frequency for the system and not from some kind of abnormality. One example of the results of cutting forces and frequency of vibration, called Case 1, is shown in Figure 10.
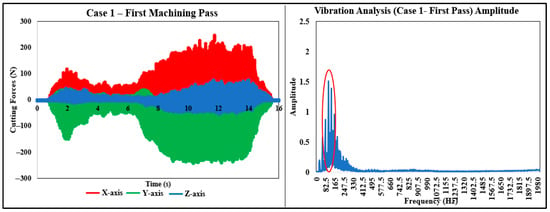
Figure 10.
Preliminary analysis (cutting forces and vibration).
It is possible to observe from Figure 10, that, although the cutting forces present a variable nature, due to the geometry of the cutting samples, which could increase the possibility of unwanted vibrations, the vibration signals are primarily located in the range of 150 Hz, highlighted by the circle in red, the natural frequency of the system that was calculated previously, meaning no possible anomalies had been observed during the cutting process.
Although there are some different factors that could affect the cutting process and induce unwanted vibrations, it is assumed that the data acquisition and clamping system used throughout this research are not causes for unwanted vibrations, and with that, the testing procedure could proceed.
3.1.2. Maximum Cutting Forces
With the considerations stated in the previous topic in mind and for a better understanding of the influences of the different characteristics of the products owing to their manufacturing processes and the cutting conditions in the milling of Inconel 718 products, the maximum values for the X- and Y-axes for the last machining pass at each height are plotted in a graph in Figure 11.
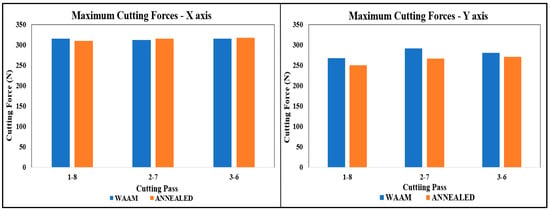
Figure 11.
Maximum cutting forces (X- and Y-axes).
From Figure 11, it can be seen that the cutting force values for the X-axis do not present significant differences, making it possible to consider the same overall maximum value for all cases. Moreover, these values do not increase significantly after multiple cutting passes, indicating that, even though this material is hard to cut, the degree of tool wear was minimal.
However, when considering the Y-axis, a different trend can be perceived; the WAAM sample (case (a)) presents higher values overall. Even though the values themselves do not differ greatly, they were higher for all cases and could even be thought of as significant when considering the fact that the two cases are composed of the same kind of alloy.
When analyzing the cutting forces, is difficult to draw any conclusion comparing the maximum values for cutting forces alone. Due to the nature of the machining process, it is possible that different fluctuations occur, and with that, the maximum cutting force value would not be a good representation of the process as a whole. For that, the analysis of the graphs of the cutting forces could complement this step, and for that, in the next topic, this kind of analysis is performed.
3.1.3. Machining Pass Analysis
For the next research stage, the last machining pass of the second height (12 mm from the top) at a depth of 2.1 mm was studied. The cutting data collected using the dynamometer were plotted as two graphs, one for each parameter (a, and b), and these results are presented in Figure 12.
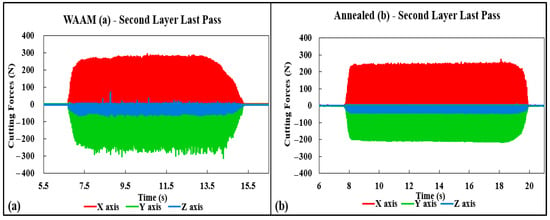
Figure 12.
Second-layer last-pass cutting forces—machining conditions (a,b).
By comparing Figure 7 and Figure 12, the influences of the deformations of the sample caused by the additive manufacturing process on the cutting forces become more evident, with Figure 12 showing a more even shape across the cutting process for all cases. This demonstrates that the material removal is constant throughout the procedure for the last cutting pass, indicating the removal of a flat surface. The authors also visually confirmed this by observing the samples before each machining pass.
Even though the surface of the AM products is flat, because no machining is performed on the sides and tops of the samples, the material is still irregular on the sides of the sample. These differences can be observed by the sudden diminishing trend in the cutting forces detected when the cutting procedure is nearing its end; this is noted on all axes but is more accentuated on the X- and Y-axes.
When further comparing both materials, the WAAM samples seem to present a higher variation, with higher peaks of the cutting forces overall, as opposed to the annealed sample, which had almost a “linear” shape for each of the graphs after its peaks. It is also interesting to note that the Y axis presented more variations in the cutting forces when compared to the X axis for case (a), having an elevated presence of peaks, making the graph for this axis appear more irregular than that of the other axes.
What was mentioned previously, regarding the analysis of the maximum cutting forces (Figure 11), is better observed in Figure 12; that is, while the annealed sample presented almost no variability in the cutting force values, the WAAM workpieces, especially for the Y-axis presented peaks that were not consistent with the shape of the graph, presenting instability that likely affected the maximum cutting force values.
Another point worth mentioning is that, although being a side-milling operation, the Z-axis was not expected to have major differences in their profile, for case (a); the variation in Z-axis cutting forces is more significant when compared to case (b), indicating some sort of instability in the cutting procedure.
3.1.4. Single-Cycle Cutting Forces
To further understand the cutting forces’ stabilities, as shown in Figure 12, the corresponding discussion is presented. In this study, the graphs of a single cycle (0.075 s), that is, a 360° rotation of the cutting tool of a specific cutting route, were observed to obtain more profound insights. To acquire a more accurate representation of the side-milling step, the last pass of a particular height was analyzed in a manner similar to the previous evaluations to observe the cutting of a more even surface and avoid surface deformations influencing the analysis.
Figure 13 presents one graph of each studied case (a, b) for the second height.
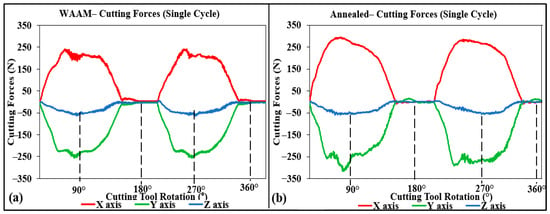
Figure 13.
Single-cycle cutting forces—machining conditions (a,b).
From Figure 13, different characteristics of the machining processes can be observed. First, the graphs present a visible distance between the cutting and non-cutting intervals, that is, between the periods in which there is actual contact with the edge of the blade for the process of material removal (higher values of cutting forces) and those in which the material removal (cutting) process is not present (cutting forces close to zero Newtons).
The above-mentioned characteristic is observed because there are only two flutes on the endmill, causing the cutting force profile to be composed of two different cutting peaks. It is also important to mention that not only the material and the number of flutes of the endmill are influences in the cutting force values, but also different kinds of parameters like the cutting tool geometry are also important factors that one should look for when observing the cutting force procedure.
Regarding this aspect, it has been reported that for side milling, an increase in the helix angle of a cutting tool will decrease the peak cutting forces [26]. The rake angle also plays an integral part in the cutting force differences. Thus, changing the rake angles of cutters can directly influence the surface finishes of samples [27].
Regarding the values themselves, although the WAAM results in Figure 13 present lower cutting forces, they present slightly higher maximum cutting forces, as observed in Figure 11. Although a single cycle picked at random might have lower values, there are peaks of cutting forces causing disturbances in the process throughout the whole procedure, as was already discussed in this paper.
3.1.5. Simulation Procedure (Material Analysis)
It was chosen to perform an additional procedure to identify the best differences in the cutting forces. Focusing on the cutting force values for both the AM and annealed samples for one tooth of the endmill, it was determined that performing a simulation was the best option.
Considering the differences in the cutting forces presented in this study, it can be seen that the Z-axis does not show much variability. This is expected because the research in question is being performed as side-milling operations. With this in mind, the cutting force values for the Z-axis were not simulated.
For the simulation process, the endmilling process was modeled using a mechanistic model [28]. The cutting forces (F) were derived using the previously proposed equations and processes described below.
With “q = (x,y,z)” and “fi”, the feed rate of the experiment can be simulated. By integrating Equation (1) in terms of the entry and exit angles (θst and θex), Equations (4) and (5) corresponding to the X- and Y-axes, respectively, can be obtained as follows:
When following the modeling process and focusing on Equations (4) and (5) for the cutting forces on the X- and Y-axes, the feed rate, entry and exit angles, number of teeth for the cutting tool (N), and width of the cut (a) are already known. However, there is still a need to acquire data for the calculation of the shearing force cutting coefficients and plowing force cutting coefficients for the tangential (Ktc) and radial (Krc) directions. Thus, different machining steps were performed with varying feed rates for both the annealed and WAAM samples.
The average values of the cutting forces were plotted in different graphs from the data acquired from the machining experiments. The values for Ktc, Kte, Krc, and Kre were derived from a linear regression. The simulation was performed, and a graph representing the cutting forces from a single cutting tooth for both the WAAM and annealed samples is shown in Figure 14.
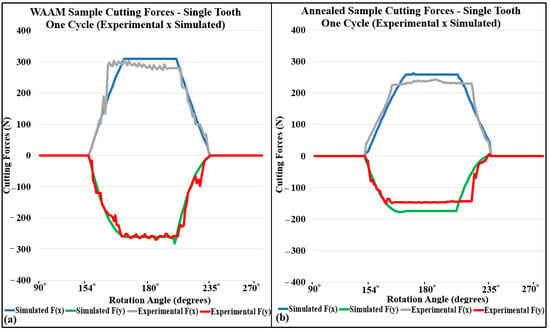
Figure 14.
Cutting force data (Experimental × Simulated): (a) WAAM, (b) annealed.
As shown in Figure 14, the simulated values, particularly for the WAAM sample (a), share high similarity with the experimental results. Even though the values for the annealed sample are not as similar, they are still considered satisfactory by the authors.
When comparing the cases among themselves as opposed to the maximum cutting force graph seen in Figure 11, and similar to the results in Figure 12, the annealed sample presents lower values, especially for the Y-axis. This indicates that the machinability might be better for the annealed sample and reinforces the idea that certain problems might have occurred during the machining process of this type of sample.
When considering the shape of the simulated graphs, for both simulated and experimental data for the different samples, it is possible to observe that although the WAAM samples presented a higher variability overall, presenting especially in the peak of the graphs a “wavy” appearance of the cutting forces, in contrast with the other graphs that present a more “straight” form. And although those variations are higher when compared with the annealed case, it is considered not as significant when compared with the difference in values for cutting forces themselves.
The possible causes for those instabilities or oscillations on the cutting forces on the WAAM samples are better explained in Section 3.3 where the differences in the materials and their influence on the machining process are further explored.
3.1.6. Average Resultant Cutting Forces (Material Analysis)
To further evaluate the machinability of both samples, another graph was produced. For that, the average resultant cutting forces for both kinds of samples, WAAM and annealed, were calculated for five different feed rates (80, 120, 160, 200, and 240 mm/min), and were plotted into a graph. The graph of the resultant cutting forces for each feed per tooth is presented in Figure 15.
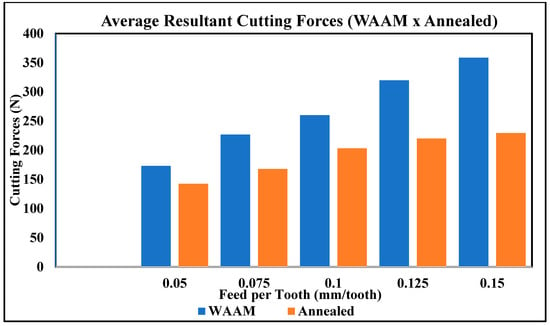
Figure 15.
Average resultant cutting forces (WAAM × Annealed).
When analyzing Figure 15, the trend that was observed previously from the cutting force analysis contained in this topic is more easily perceived. That is, the cutting forces for the WAAM samples presented higher values than those of the annealed samples, for all analyzed parameters.
The presence of higher cutting forces could be a hindrance to the machining process for different kinds of reasons. First, although not observed for the machining of the samples in question, this increase in forces is linked with chatter vibration and faster tool wear, possibly causing early breakage of tools and decreasing the surface quality of the samples.
From the productivity standpoint, when lower cutting forces are involved, more “aggressive” parameters such as higher feed per tooth could be selected, increasing the material removal rate, and consequently being able to increase productivity without having negative effects on the machining procedure.
It is interesting to also observe that when considering the values of cutting forces for each axis, the differences between the two kinds of samples are not considered great, but when those “small” differences add up for the three axes, the resultant cutting forces present a significant difference for each feed per tooth.
A related point to consider when analyzing the cutting forces is that for both kinds of samples, there is a growth in the overall values of resultant forces as the feed rate increases. This trend is explained by the fact that the chip load per tooth increases as the feed rate rises; that is, the amount of material being removed by the cutting tool blade is increased, requiring more force for the material removal; similar results are found in the literature for the milling of Inconel 718 [29].
Even though a growth trend was observed for the cutting forces with the increase in the feed rate, extrapolating this tendency of growth for different parameters such as cutting speed might lead to erroneous conclusions. And even though the optimization of those parameters was not the focus of this research, it is deemed necessary to better explore these kinds of differences between the materials.
Another critical aspect of the machining analysis is the finished products themselves. However, the instabilities of the cutting forces suggested that differences in surface quality could occur and could only be assessed after a thorough examination. For this reason, the next section presents an evaluation of the surfaces of the machined samples.
3.2. Surface Quality
To assess the surface quality of the samples after machining, two steps were performed. The first step was to analyze the visual aspects of the pieces, and the second was a surface roughness measurement process.
3.2.1. Surface Appearance
To evaluate the appearance of the samples, pictures were first taken at a macro level with a regular digital camera as shown in Figure 15 and then with the aid of a microscope as shown in Figure 16. The photographs were taken with the aim of noticing different aspects of the samples, such as feed marks and possible imperfections owing to chatter vibrations.
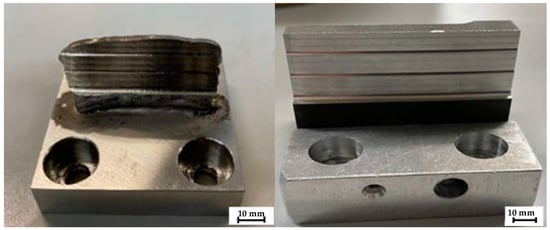
Figure 16.
Samples after machining.
In performing only the side-milling process, certain irregularities, such as the deformations at the top and sides of the WAAM sample (cases (a)), were not removed, as mentioned in the previous section. However, when evaluating the machined area itself, it can be seen that flat surfaces with no significant apparent distortions are achieved in all cases.
Moreover, the staircase aspect of the samples is well discerned with the differences between the heights visible to the naked eye, indicating that no significant deformation has occurred. However, when considering the deformations and possible imperfections on the surfaces of the machined samples, a more precise conclusion can be drawn only with higher magnification. Figure 17 presents pictures of the sample surfaces after machining at a higher magnification as taken using a USB microscope.
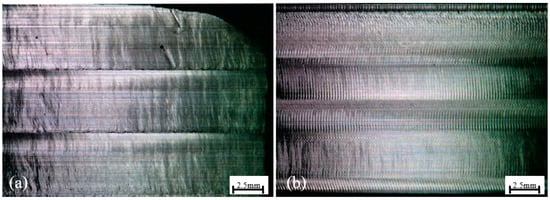
Figure 17.
Surfaces after machining: (a) additive manufacturing (AM) WAAM, (b) annealed.
Figure 17 shows clear differences between the machined surfaces. It can be seen that the cutter marks are not as visible as in the first picture. In addition, this case presents different irregularities on the surface, indicating a possible instability in the cutting process. Case (b), however, has a more stable surface and exhibits no significant irregularities. The cutter marks presented in the last case also appear less spaced, possibly indicating better results in terms of surface roughness.
The authors hypothesize that these differences in stability and apparent variabilities in the surface can be explained (as in the cutting forces topic) by the anisotropy and differences in microstructures between the samples. The less stable cutting with possible variations on the removed chips causes the surface to have a worse overall visual aspect.
Regarding the microstructure, different research explores the possibility of this kind of property influencing the surface profile. For instance, when comparing samples with different grain sizes, it was described that the material removal process was affected by this characteristic, having the grain size determining the uniformity of deformation, and possibly affecting the surface profiles [30].
When considering additive manufactured samples and, more specifically, workpieces with microstructure composed of dendritic structures, investigations regarding differences in this kind of microstructure, achieved by changing the chemical composition, concluded that the machining of more homogenous microstructures achieved better surface profiles, owing to better stability in the material removal process, due to this more homogeneous microstructure [31].
In other words, the idea behind this instability is that the deformation process that occurs during the metal cutting is constantly being disturbed due to the microstructure and its differences. The resistance that is offered by the material during cutting might change due to those differences, and with that, the “easiness” for the material to be removed changes as well, and the machining process becomes unstable. Reflecting, then, on the results that are shown in this paper, this process and differences are further explored in Section 3.3.
Another aspect that can directly influence the surface quality of the parts is the wear of the cutting tools. Unfortunately, this characteristic is not further discussed herein due to the differences in the material removed (cutting length and volume).
In the next topic, a more thorough examination of the surface quality and surface roughness is presented.
3.2.2. Surface Roughness Analysis
As mentioned previously, to evaluate the surface quality of the machined samples beyond the visual aspects, the surface roughness values of the machined products were measured according to the International Organization for Standardization 4288 [32]. A contact-based measurement system comprising a profilometer (Kosaka Laboratory Surfcorder ET 200), equipment with reproducibility of 1 σ 0.3 nm or less and resolution of 0.1 nm for Z and 0.1 μm for X, was used to acquire the values for Ra (average of the profile measurements), Rz (the sum of the values for the highest peak and depth), and RSm (the average of the profile widths) [33]. The tests were performed 10 times in different locations for each case, with the movement of the stylus being performed in the direction of the milling, having the stylus traveling 4.8 mm, with an evaluation length of 4 mm and 0.8 mm of sampling length.
The parameters to be analyzed were chosen based on the idea that the Ra and Rz measurements are the most used values for roughness analyses in industrial environments [34]; the RSm values were also used for observations. The average results of these tests are presented in Table 4. In addition, the values for the average surface roughness (Ra) are shown in Figure 18 in the form of a graph for easier visualization.

Table 4.
Surface roughness measurement after machining.
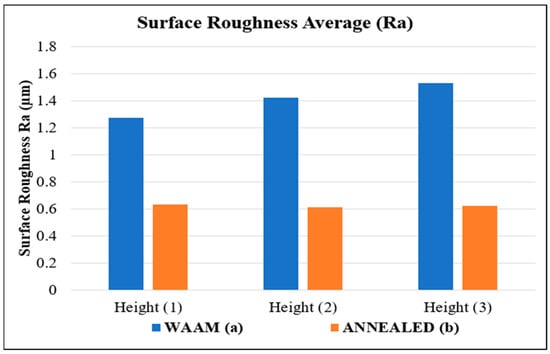
Figure 18.
Surface roughness average (Ra).
Different sample characteristics are observed in the surface roughness tests after the machining. First, when comparing the WAAM and annealed materials, the latter achieves better results, with lower average surface roughness values and lower variations in the valley peaks and depths. This indicates that the annealed samples are “easier to cut” than the WAAM samples. In addition, the best surface quality overall, as evaluated by the surface roughness tests, was achieved in case (b), i.e., the annealed sample.
Although the differences between the measured surface roughness averages from (a) to (b) might not be considered significant variations (especially when considering actual product applications), together with the other aspects of machinability discussed herein, this type of disparity is another indicator of the machinability differences between the two different types of samples.
Also important to mention is that even though the AMS5662 sample presents higher values for Vickers microhardness, the results from both the surface roughness average and visual aspect are worse for the WAAM sample, in opposition to what is to be expected considering this parameter alone. As discussed previously, the instability of the cutting process for WAAM is thought to be the main reason behind those differences.
A further point worth discussing is that even though it was discoursed previously that the tools after cutting presented no excessive damage, and the volume of material removed was considered small, considering the difficulty of machining the Inconel 718 alloy for both wrought and AM, the tool wear could be a hindrance to the cutting procedure, affecting the results for roughness and cutting forces as well.
The causes of the machinability distinctions for the WAAM and AMS5662 samples were initially only considered to arise from the influences of the microstructure and anisotropic characteristics, but further explanations were considered necessary. Thus, the next subsection introduces a more thorough explanation of the machinability differences between the two types of materials, focusing on the microstructures and anisotropy but also exploring different possibilities, such as the mechanical properties’ influences on the machining procedure.
3.3. Material-Affected Machinability
In Section 2.2, certain differences between both types of materials were discussed. Among those variations, grain size was quoted as one of the main distinctions. As this characteristic was hypothesized by the authors as having a possible impact on machinability comparisons, the influence of this characteristic on the same type of alloy was already one focus of this study.
When researching the different effects of the grain size in the post-processing of Inconel 718, it was reported that workpieces with larger grain sizes are linked to higher cutting forces and a higher degree of wear, as affected by the relationship between the grain size, undeformed chip thickness, and anisotropic properties [35].
Although the boundary density may be weaker for large grain sizes, the deformation occurring during the machining process is highly irregular. As there are fewer neighboring grains able to act as a bond, irregular deformation is not inhibited and causes disturbances in the process.
In the present study, the samples differed in regard to grain size, and the microstructures of the WAAM Inconel 718 were uneven. The differences in the size and directionality of the grains could cause variations in the cutting forces not observed in the wrought samples.
Another point mentioned previously is the anisotropy characteristic of the WAAM samples. The highly textured microstructures of AM workpieces, mainly owing to the dendritic formations, as opposed to the uniformity of the grains of AMS5662, could lead to constant changes in the required cutting forces for the material removal process.
These dendritic formations are not exclusive to AM samples; this type of microstructure has also been reported in Inconel 718 samples manufactured by casting. Even though the casting procedure does not repeat the cyclic nature of the thermal history of AM, the increase in temperature for melting and sudden decrease in temperature as the sample material is hardened are responsible for the formation of this type of microstructure.
Although there are differences between the AM and cast material properties, because they share the same type of microstructure and there are examples of research regarding the machining of this type of product, it was considered that an analogy could be drawn.
Similar to the comparison between the machining of different grain sizes and results from the present research, the machining of large dendritic structures (as-cast) and fine-equiaxed-grain structures had different cutting forces from the machining of the dendritic structures and presented higher values. These differences were explained to be caused by irregular deformations owing to the sizes of the dendritic structures [36].
Another peculiar aspect of the dendrites that differentiates them from the usual equiaxial grain structure is the fact that in the grains that present this kind of structure, not only the dendrites are present, but structures that are usually called interdendritic regions occur. These structures that show an absence of dendritic formations are also present in the WAAM Inconel 718.
It is explained that the dendritic and interdendritic regions share differences in micromechanical properties, owing primarily to the chemical composition differences between the two regions [37].
Those variations in micromechanical properties, like microhardness, could affect the machining process, as those variations are quoted as having a strong relation to the abrasion resistance, influencing aspects like tool wear and surface quality [38].
Those changes that happen throughout the whole sample being cut could represent minor fluctuations in the cutting forces, causing unwanted instability during the cutting procedure. Also, although not explored in the present research, this instability could increase the wear of the cutting tools.
With these minor fluctuations of material removal mechanisms, the variations found on the cutting forces graphs are explained and, together with the previously mentioned points, represent one of the possible causes for the machinability differences encountered in this research.
Other authors also explore the possibility of the additive-manufacturing-deposition-induced microstructure directly affecting the machining process. For the particular case of the Inconel 718 and its microstructure, which is composed of columnar dendrites, not only the relation between cutting and dendritic directionality was studied, concluding that the machining process and its results are different with the different dendrites’ direction [39] but also trying to improve the machining stability by performing different deposition strategies to change this directionality and consequently the relation between dendrites and cutting tool [40].
Although in this topic, the focus of the explanations regarding the differences in machinability between the two different kinds of materials was given to the differences in microstructure and anisotropy, it is important to mention that other properties might influence the milling procedure as well.
Material hardness is one of those already discussed in the present paper. And even though it might influence the machining procedure and tool life, the AMS5662 presents higher values of hardness than those of the WAAM Inconel 718 manufactured for this research, an aspect that did not end up reflecting in the results obtained. However, when considering the peculiarities of the AM products, it is also important to mention that for both wrought and WAAM Inconel 718, there is a presence of MC carbide deposits, which are abrasive material deposits that could negatively influence the machining process [41], for both types of samples.
Another property that, along with the hardness, is quoted as having a direct effect on the cutting forces is the tensile strength. It is known that the high values for both hardness and tensile strengths are associated with low machinability, which affects the cutting forces [42]. As explained previously, the AMS5662 presents higher tensile and yield strength for this kind of property. This difference in the strength of the materials could also be quoted as being one more aspect that could have been influential in causing the difference in cutting forces and machinability overall.
Another aspect of the manufacturing process that could hinder the machining process and the products themselves is the appearance of different defects that could happen throughout the deposition process. Porosity is quoted as one of the main concerns in the production by AM [43]; this kind of structure could lead to the initiation of cracks, which could be formed for different reasons, such as the lack of fused material, trapped gases, and even contaminants [44].
Apart from the structural defects that the pores could be directly linked, it is explained that these kinds of structures directly influence the machining process, making the cutting procedure more difficult, linking the increase in porosity with the higher instability of the cutting forces, higher surfacer roughness, and faster tool wear [45]. Even though this kind of formation could also appear in WAAM samples, due to it usually not being considered a problem for this specific kind of production process for most alloys [13], its influence was considered negligible and is not present in the discussions of the present paper.
Also not present in the discussions, in an isolated manner, is the anisotropic behavior of the WAAM Inconel 718. Although quoted as being a possible influence on the machining process, the effect of the anisotropy of this kind of product was not explored. To set apart the effects of this kind of property without the influence of the other characteristics of the sample was not achieved by the authors.
As explained in this topic, there are different characteristics that could make the machining process differ among the samples, and isolating the effect of each property would be a difficult task, mainly considering the effect of the microstructure on the different mechanical properties.
With that, although it is hypothesized that the microstructure and anisotropy played an important role in the effects of the material removal process, further research is deemed necessary to try and understand the possible different effects of those characteristics on the material removal process.
4. Conclusions
In this research, the WAAM Inconel 718 samples were machined, analyzed, and compared with a traditionally manufactured alloy, i.e., Aerospace Material Specifications (AMS) 5662. AMS 5662 is a rolled Inconel 718 that suffers annealing. The data of characteristics such as the cutting forces and surface roughness were used to analyze and assess the differences between both types of manufacturing procedures and to understand if the peculiarities of the WAAM samples also affect the machining process; some of the main points of this paper are highlighted below:
- (1)
- The side milling of WAAM and Annealed Inconel 718 presented different results. First, when comparing the cutting forces between the two samples, the WAAM samples presented higher values of the maximum resultant cutting forces, with a difference of 7.85, 7.63, and 5.55% for layers 1, 2, and 3, respectively, indicating a more difficult cutting process for WAAM.
- (2)
- When considering the results of the machining itself (the surface quality of the workpieces), the annealed samples presented better outcomes, not only showing fewer variations on the surfaces, as observed in the pictures, but also presenting lower values for surface roughness measurements, Ra, with differences of 50.39, 57.04, and 59.47% and differences for Rz of 68.78, 70.25, and 70.34% for the layers 1, 2, and 3, respectively.
- (3)
- The simulated results and the values of the average resultant forces also matched the idea that the annealed samples had overall better machinability, presenting lower cutting forces for all tested and simulated results, not only for the values themselves, which was expected, but also regarding their stability when considering the oscillations on cutting forces obtained in the WAAM samples, a fact that was also observed in the graph of the cutting forces for the experimental results.
- (4)
- Although it is a relatively novel kind of research and a novel focus to be given to the machining aspect, the influence of the microstructure on the material removal process was discussed and presented as a major hypothesis to explain the manufacturing differences between the two materials under study.
- (5)
- It is encouraged to further explore the microstructure and its influences on the machining procedure, considering not only additive manufacturing, a technique that has gained attention, but also the possibility that products with better surface quality and a higher degree of dimension tolerance are necessary, demanding more control of the process and its results.
- (6)
- Other aspects of the machining process, such as tool wear, chip formation, and the optimization of the process itself for both tool geometry and machining parameters, are also suggested for further research.
Author Contributions
Conceptualization, G.Q.V.d.S., J.K. and T.A.; methodology J.K.; validation, G.Q.V.d.S., J.K. and T.A.; formal analysis, G.Q.V.d.S.; investigation, G.Q.V.d.S.; resources, J.K. and T.A.; data curation, G.Q.V.d.S.; writing—original draft preparation, G.Q.V.d.S.; writing—review and editing, G.Q.V.d.S., J.K. and T.A.; visualization, G.Q.V.d.S.; supervision, J.K. and T.A.; project administration, J.K.; funding acquisition, J.K. and T.A. All authors have read and agreed to the published version of the manuscript.
Funding
This research received no external funding.
Data Availability Statement
The data presented in this study are available on request from the corresponding author.
Conflicts of Interest
The authors declare no conflict of interest.
References
- Kirchheim, A.; Dennig, H.J.; Zumofen, L. Why Education and Training in the Field of Additive Manufacturing is a Necessity. In Industrializing Additive Manufacturing, Proceedings of Additive Manufacturing in Products and Applications—AMPA2017; AMPA, 2017; Meboldt, M., Klahn, C., Eds.; Springer: Cham, Switzerland, 2018. [Google Scholar] [CrossRef]
- Ian, G.; David, R.; Brent, S. Additive Manufacturing Technologies 3D Printing, Rapid Prototyping, and Direct Digital Manufacturing, 2nd ed.; Springer: New York, NY, USA, 2015. [Google Scholar]
- Yehorov, Y.; da Silva, L.J.; Scotti, A. Balancing WAAM Production Costs and Wall Surface Quality through Parameter Selection: A Case Study of an Al-Mg5 Alloy Multilayer-Non-Oscillated Single Pass Wall. J. Manuf. Mater. Process. 2019, 3, 32. [Google Scholar] [CrossRef]
- Veiga, F.; Gil Del Val, A.; Suárez, A.; Alonso, U. Analysis of the Machining Process of Titanium Ti6Al-4V Parts Manufactured by Wire Arc Additive Manufacturing (WAAM). Materials 2020, 13, 766. [Google Scholar] [CrossRef] [PubMed]
- Wang, F.; Williams, S.; Colegrove, P.; Antonysamy, A.A. Microstructure and Mechanical Properties of Wire and Arc Additive Manufactured Ti-6Al-4V. Met. Mater. Trans. A 2013, 44, 968–977. [Google Scholar] [CrossRef]
- Xiong, J.; Li, Y.J.; Yin, Z.Q.; Chen, H. Determination of Surface Roughness in Wire and Arc Additive Manufacturing Based on Laser Vision Sensing. Chin. J. Mech. Eng. 2018, 31, 74. [Google Scholar] [CrossRef]
- Calleja, A.; Tabernero, I.; Ealo, J.A.; Campa, F.J.; Lamikiz, A.; de Lacalle, L.N.L. Feed rate calculation algorithm for the homogeneous material deposition of blisk blades by 5-axis laser cladding. Int. J. Adv. Manuf. Technol. 2014, 74, 1219–1228. [Google Scholar] [CrossRef]
- Tang, Q.; Yin, S.; Zhang, Y.; Wu, J. A tool vector control for laser additive manufacturing in five-axis configuration. Int. J. Adv. Manuf. Technol. 2018, 98, 1671–1684. [Google Scholar] [CrossRef]
- He, F.; Yuan, L.; Mu, H.; Ros, M.; Ding, D.; Pan, Z.; Li, H. Research and application of artificial intelligence techniques for wire arc additive manufacturing: A state-of-the-art review. Robot. Comput.-Integr. Manuf. 2023, 82, 102525. [Google Scholar] [CrossRef]
- Bagehorn, S.; Wehr, J.; Maier, H.J. Application of mechanical surface finishing processes for roughness reduction and fatigue improvement of additively manufactured Ti-6Al-4V parts. Int. J. Fatigue 2017, 102, 135–142. [Google Scholar] [CrossRef]
- Park, E.; Kim, D.M.; Park, H.W.; Park, Y.-B.; Kim, N. Evaluation of Tool Life in the Dry Machining of Inconel 718 Parts from Additive Manufacturing (AM). Int. J. Precis. Eng. Manuf. 2020, 21, 57–65. [Google Scholar] [CrossRef]
- Ostra, T.; Alonso, U.; Veiga, F.; Ortiz, M.; Ramiro, P.; Alberdi, A. Analysis of the Machining Process of Inconel 718 Parts Manufactured by Laser Metal Deposition. Materials 2019, 12, 2159. [Google Scholar] [CrossRef]
- Gradl, P.; Tinker, D.C.; Park, A.; Mireles, O.R.; Garcia, M.; Wilkerson, R.; Mckinney, C. Robust Metal Additive Manufacturing Process Selection and Development for Aerospace Components. J. Mater. Eng. Perform. 2022, 31, 6013–6044. [Google Scholar] [CrossRef]
- Martin, J.W. (Ed.) 3—Metals and alloys. In Materials for Engineering, 3rd ed.; Woodhead Publishing: Sawston, UK, 2006; pp. 71–132. [Google Scholar] [CrossRef]
- Lalbondre, R.; Krishna, P.; Mohankumar, G.C. An Experimental Investigation on Machinability Studies of Steels by Face Turning. Procedia Mater. Sci. 2014, 6, 1386–1395. [Google Scholar] [CrossRef]
- AMS5662:2016; Nickel Alloy, Corrosion and Heat-Resistant, Bars, Forgings, and Rings 52.5Ni-19Cr3.0Mo-5.1Cb (Nb)-0.90Ti-0.50AI-18Fe Consumable Electrode or Vacuum Induction Melted 1775 °F (968 °C) Solution Heat Treated, Precipitation-Hardenable. SAE International: Warrendale, PA, USA, 2016. [CrossRef]
- Xu, X.; Ganguly, S.; Ding, J.; Seow, C.E.; Williams, S. Enhancing mechanical properties of wire+arc additively manufactured INCONEL 718 superalloy through in-process thermomechanical processing. Mater. Des. 2018, 160, 1042–1051. [Google Scholar] [CrossRef]
- Marinescu, I.; Rowe, B.; Dimitrov, B.; Inasaki, I. Tribology of Abrasive Machining Processes. Manuf. Sci. Eng. 2004, 126, 859. [Google Scholar] [CrossRef]
- Bhujangrao, T.; Veiga, F.; Suárez, A.; Iriondo, E.; Mata, F.G. High-Temperature Mechanical Properties of IN718 Alloy: Comparison of Additive Manufactured and Wrought Samples. Crystals 2020, 10, 689. [Google Scholar] [CrossRef]
- Xu, X.; Ding, J.; Ganguly, S.; Williams, S. Investigation of process factors affecting mechanical properties of INCONEL 718 superalloy in wire + arc additive manufacture process. J. Mater. Process. Technol. 2019, 265, 201–209. [Google Scholar] [CrossRef]
- Seow, C.E.; Coules, H.E.; Wu, G.; Khan, R.H.U.; Xu, X.; Williams, S. Wire + Arc Additively Manufactured Inconel 718: Effect of post-deposition heat treatments on microstructure and tensile properties. Mater. Des. 2019, 183, 108157. [Google Scholar] [CrossRef]
- Alauddin, M. End Milling Machinability Studies for Steel, a Nickel-Base Alloy (Inconel 718) and a Metal Matrix Composite; Dublin City University: Dublin, Ireland, 1993. [Google Scholar]
- Maria, K.; Viktor, R.; Birger, K. Material Properties Affecting the Machinability of Inconel 718; Superalloys 718, 625, 706 and Derivatives 2005; TMS (The Minerals, Metals & Materials Society): Pittsburgh, PA, USA, 2005. [Google Scholar] [CrossRef]
- De Agustina, B.; Bernal, C.; Camacho, A.M.; Rubio, E.M. Experimental Analysis of the Cutting Forces Obtained in Dry Turning Processes of UNS A97075 Aluminium Alloys. Procedia Eng. 2013, 63, 694–699. [Google Scholar] [CrossRef]
- Leonard, M. Analythical Methods in Vibrations, International ed.; McGraw-Hill: New York, NY, USA, 2001. [Google Scholar]
- Wan, M.; Feng, J.; Zhang, W.-H.; Yang, Y.; Ma, Y.-C. Working mechanism of helix angle on peak cutting forces together with its design theory for peripheral milling tools. J. Mater. Process. Technol. 2017, 249, 570–580. [Google Scholar] [CrossRef]
- Zhang, H.-J.; Sun, C.; Liua, M.; Gao, F. Analysis of the optimization of tool geometric parameters for milling of Inconel718. IOP Conf. Ser. Mater. Sci. Eng. 2018, 423, 012030. [Google Scholar] [CrossRef]
- Altintas, Y. Manufacturing Automation: Metal Cutting Mechanics, Machine Tool Vibrations, and CNC Design, 2nd ed.; Cambridge University Press: Cambridge, UK, 2012. [Google Scholar]
- Alauddin, M.; Mazid, M.A.; El Baradi, M.A.; Hashmi, M.S.J. Cutting forces in the end milling of Inconel 718. J. Mater. Process. Technol. 1998, 77, 153–159. [Google Scholar] [CrossRef]
- Tian, P.; He, L.; Zhou, T.; Du, F.; Zou, Z.; Zhou, X.; Jiang, H. Effect of workpiece microstructure on tool wear behavior and surface quality during machining Inconel 718 alloy. Tribol. Int. 2022, 175, 107814. [Google Scholar] [CrossRef]
- Eissel, A.; Engelking, L.; Treutler, K.; Schroepfer, D.; Wesling, V. Investigations on influencing the microstructure of additively manufactured Co-Cr alloys to improve subsequent machining conditions. Weld. World 2022, 67, 1081–1089. [Google Scholar] [CrossRef]
- ISO 4288:1997; Geometrical Product Specifications (GPS)—Surface Texture: Profile Method—Rules and Procedures for the Assessment of Surface Texture. ISO: Geneva, Switzerland, 1996.
- ISO 4287:1997; Geometrical Product Specifications (GPS)—Surface Texture: Profile Method—Terms, Definitions and Surface Texture Parameters. ISO: Geneva, Switzerland, 1997.
- Todhunter, L.D.; Leach, R.K.; Lawes, S.D.A.; Blateyron, F. Industrial survey of ISO surface texture parameters. CIRP J. Manuf. Sci. Technol. 2017, 19, 84–92. [Google Scholar] [CrossRef]
- Olovsjö, S.; Nyborg, L. Influence of microstructure on wear behaviour of uncoated WC tools in turning of Alloy 718 and Waspaloy. Wear 2012, 282–283, 12–21. [Google Scholar] [CrossRef]
- Zhao, Z.L.; Ai, C.H.; Liu, L. The Effect of Grain Size on Cutting Force in End Milling of Inconel 718C. Mater. Sci. Forum 2010, 654–656, 484–487. [Google Scholar] [CrossRef]
- Lu, G.X.; Liu, J.D.; Zhou, Y.Z.; Jin, T.; Sun, X.F.; Hu, Z.Q. Differences in the micromechanical properties of dendrites and interdendritic regions in superalloys. Philos. Mag. Lett. 2016, 96, 461–468. [Google Scholar] [CrossRef]
- Chen, L.; Zhou, J.; Bushlya, V.; Stahl, J.-E. Influences of Micro Mechanical Property and Microstructure on Performance of Machining High Chromium White Cast Iron with cBN Tools. Procedia CIRP 2015, 31, 172–178. [Google Scholar] [CrossRef][Green Version]
- Pérez-Ruiz, J.D.; de Lacalle, L.N.L.; Urbikain, G.; Pereira, O.; Martínez, S.; Bris, J. On the relationship between cutting forces and anisotropy features in the milling of LPBF Inconel 718 for near net shape parts. Int. J. Mach. Tools Manuf. 2021, 170, 103801. [Google Scholar] [CrossRef]
- Pérez-Ruiz, J.; González-Barrio, H.; Sanz-Calle, M.; Gómez-Escudero, G.; Munoa, J.; de Lacalle, L.L. Machining stability improvement in LPBF printed components through stiffening by crystallographic texture control. CIRP Ann. 2023, 72, 141–144. [Google Scholar] [CrossRef]
- Thakur, D.G.; Ramamoorthy, B.; Vijayaraghavan, L. Effect of cutting parameters on the degree of work hardening and tool life during high-speed machining of Inconel 718. Int. J. Adv. Manuf. Technol. 2012, 59, 483–489. [Google Scholar] [CrossRef]
- Arlyapov, A.; Volkov, S.; Promakhov, V.; Matveev, A.; Babaev, A.; Vorozhtsov, A.; Zhukov, A. Study of the Machinability of an Inconel 625 Composite with Added NiTi-TiB2 Fabricated by Direct Laser Deposition. Metals 2022, 12, 1956. [Google Scholar] [CrossRef]
- Gao, Y.; Wang, X.; Son, J.; Yue, X. Hierarchical modeling of microstructural images for porosity prediction in metal additive manufacturing via two-point correlation function. IISE Trans. 2023, 55, 957–969. [Google Scholar] [CrossRef]
- García-Moreno, A.-I.; Alvarado-Orozco, J.-M.; Ibarra-Medina, J.; Martínez-Franco, E. Ex-situ porosity classification in metallic components by laser metal deposition: A machine learning-based approach. J. Manuf. Process. 2021, 62, 523–534. [Google Scholar] [CrossRef]
- Ahmad, S.; Mujumdar, S.; Varghese, V. Role of porosity in machinability of additively manufactured Ti-6Al-4V. Precis. Eng. 2022, 76, 397–406. [Google Scholar] [CrossRef]
Disclaimer/Publisher’s Note: The statements, opinions and data contained in all publications are solely those of the individual author(s) and contributor(s) and not of MDPI and/or the editor(s). MDPI and/or the editor(s) disclaim responsibility for any injury to people or property resulting from any ideas, methods, instructions or products referred to in the content. |
© 2023 by the authors. Licensee MDPI, Basel, Switzerland. This article is an open access article distributed under the terms and conditions of the Creative Commons Attribution (CC BY) license (https://creativecommons.org/licenses/by/4.0/).