1. Introduction
Statutory mandates aimed at diminishing greenhouse gas emissions are compelling the automotive industry to innovative concepts, such as electric or hydrogen-based propulsion systems [
1]. Considering the higher overall weight of these propulsion systems in comparison to internal combustion engines, lightweight construction, and lightweight materials emerge as key technologies for ensuring compliance with these regulations. Simultaneously, the challenge lies in meeting the increased crash safety requirements in modern vehicles [
2]. In addition to materials like high-strength cold-formable steels and aluminum, there is a growing utilization of body components made from hot-stamped steels [
3]. Through a combination of forming in the austenitized state and subsequent quenching, conventional hot-stamped steels like 22MnB5 can achieve tensile strengths of about 1500 MPa [
4]. The high tensile strength enables the use of thin-walled, weight-optimized components in highly stressed structural areas of the body. However, research findings consistently indicate that the crash performance of structural components, as well as the mechanical joinability and cutability in rework processes, can be optimized through the deliberate incorporation of regions with reduced strength and enhanced ductility [
5]. The increasing demands in terms of component complexity and properties cannot be met with conventionally manufactured 22MnB5 hot-stamped components. The utilization of new semi-finished products and functionally adapted component concepts, including tailor rolled blanks, tailor welded blanks, patchwork blanks, and tailor tempered parts, offers the opportunity to integrate ductile component areas and expand the boundaries for the application of structural components [
6]. The concept of tailor tempered parts has assumed an important role, primarily attributed to continuous advancements in tool and furnace technology. To produce tailor tempered parts, four distinct process control strategies can be identified concerning partial austenitization and partial intermediate cooling prior to quenching, partial cooling during the quenching phase, and partial tempering post-quenching [
6].
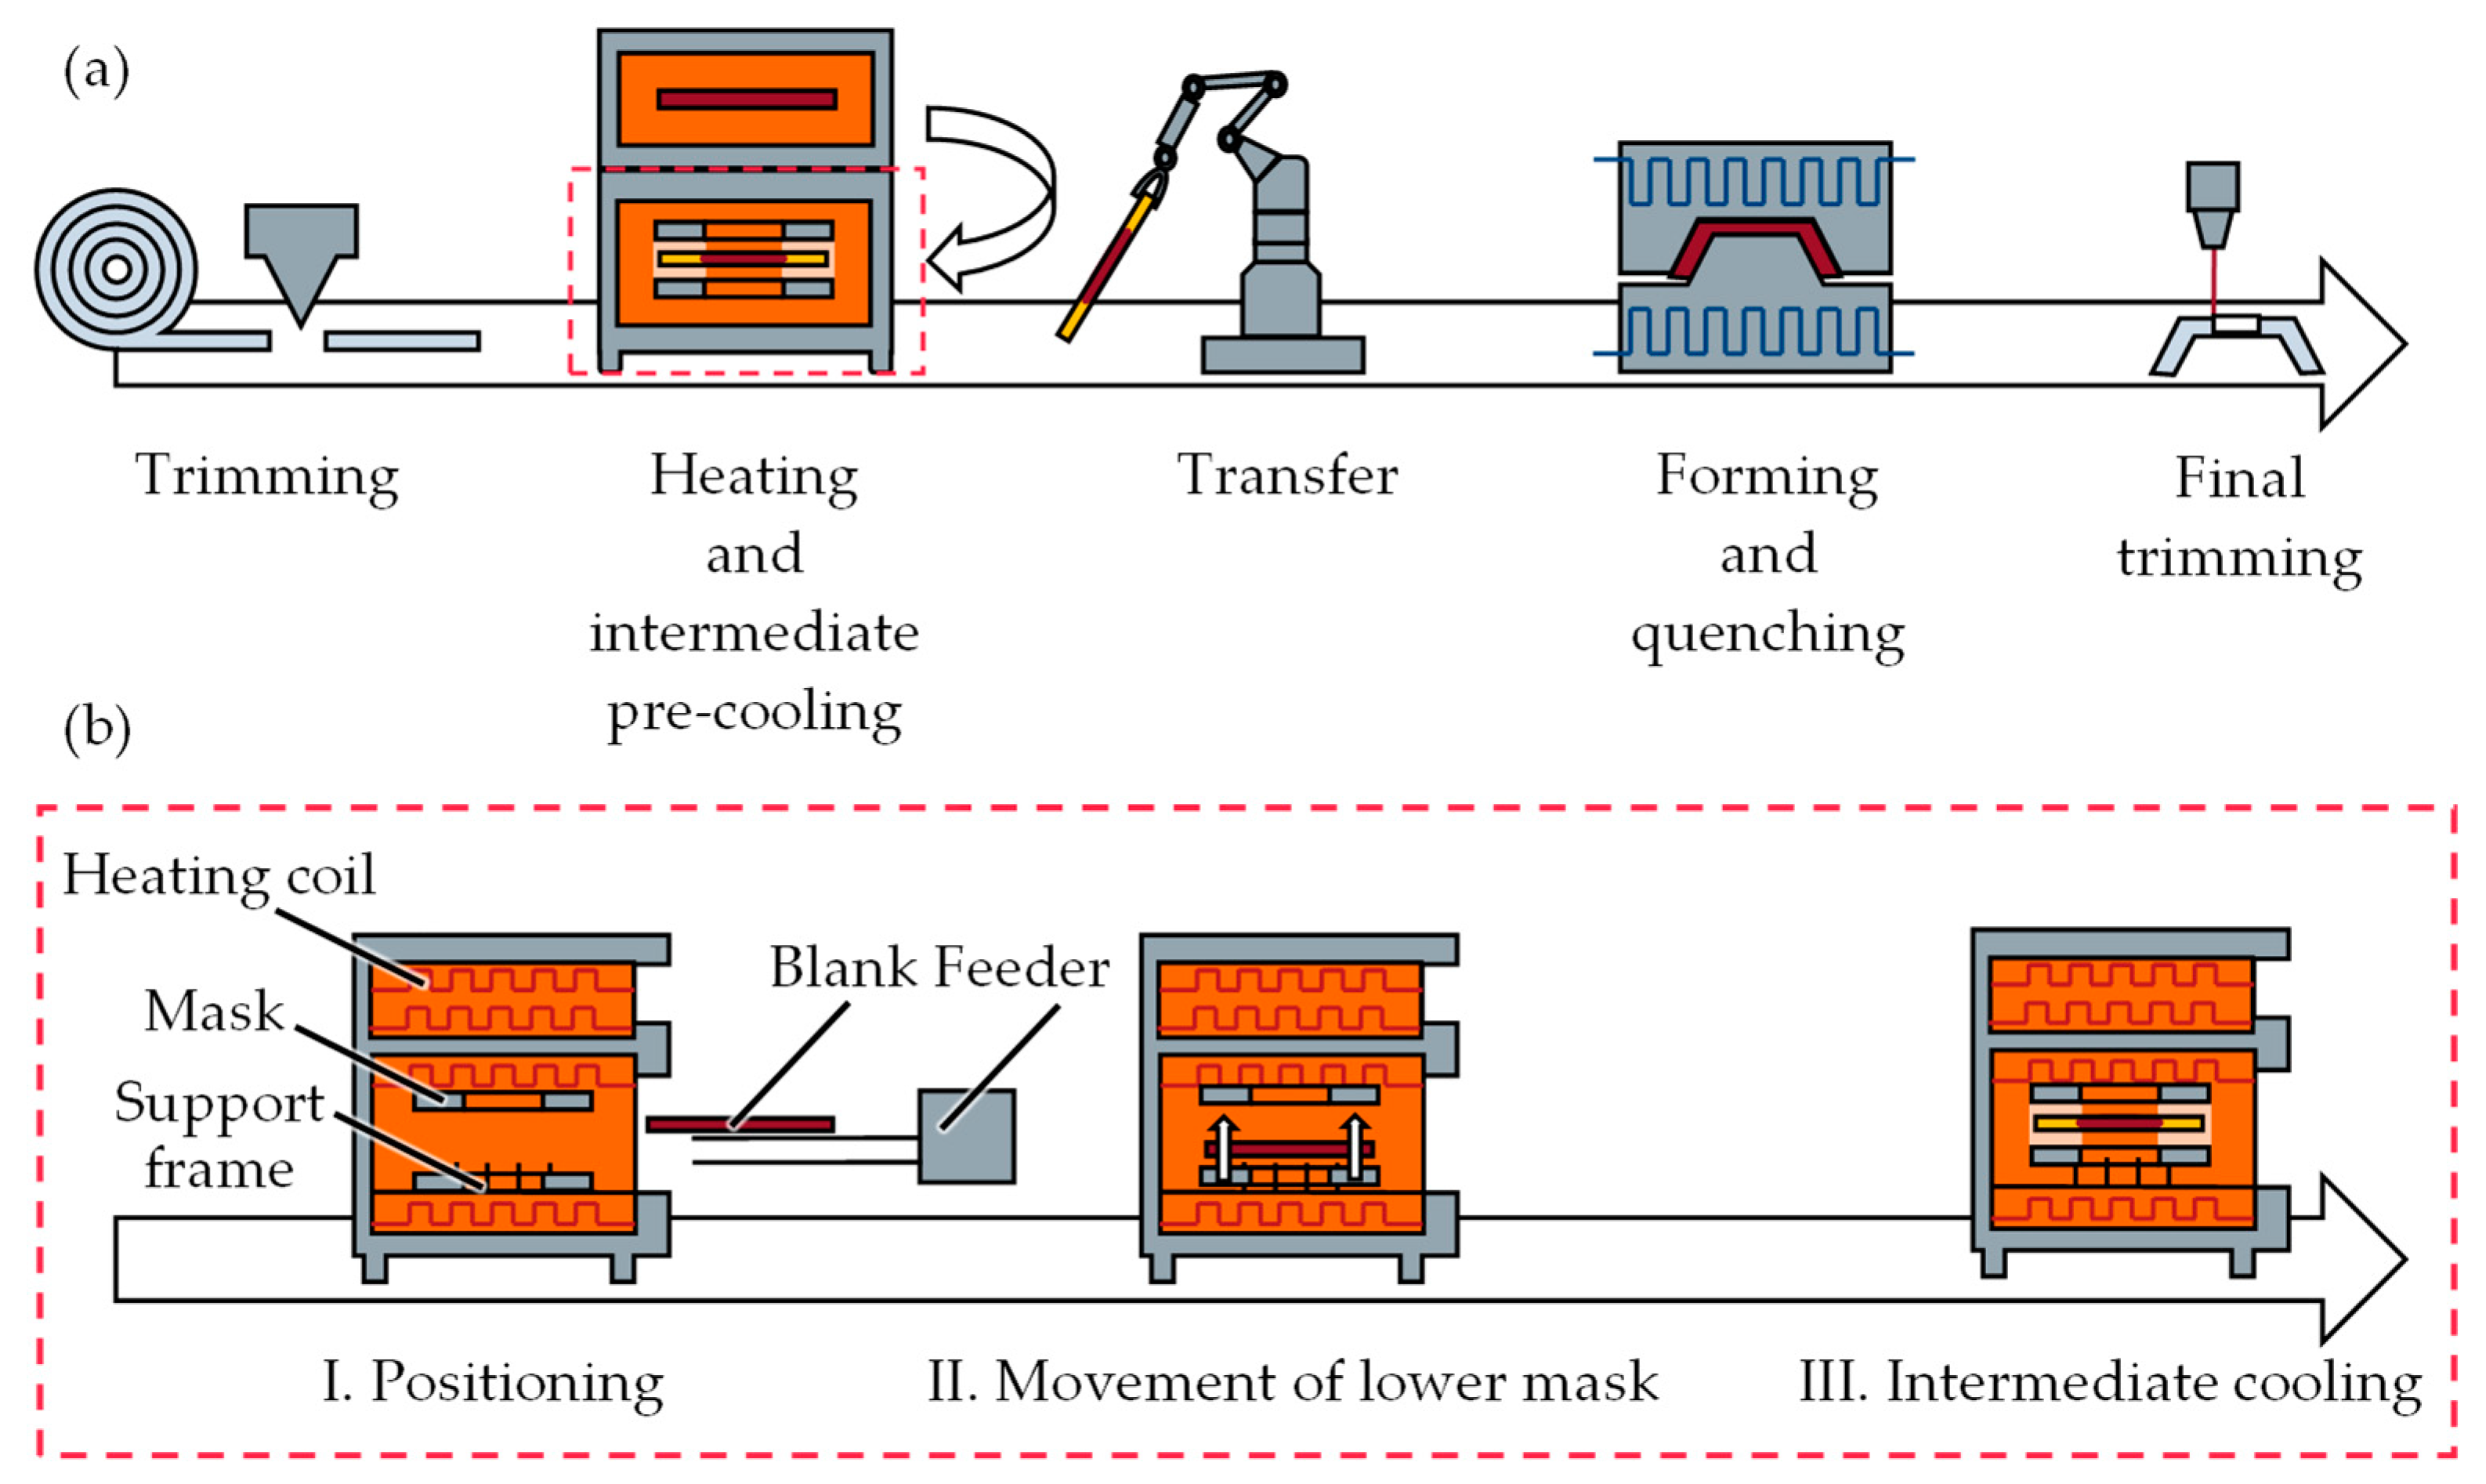
One approach of tailored tempering with intermediate cooling is facilitated by a furnace chamber known as the TemperBox
®, which was developed by Gedia GmbH Attendorn, Germany. This specialized furnace chamber is integrated into a multi-chamber furnace manufactured by AP&T AB and enables the production of hot-stamped components with graded mechanical properties through partial intermediate cooling. A crucial component of the TemperBox
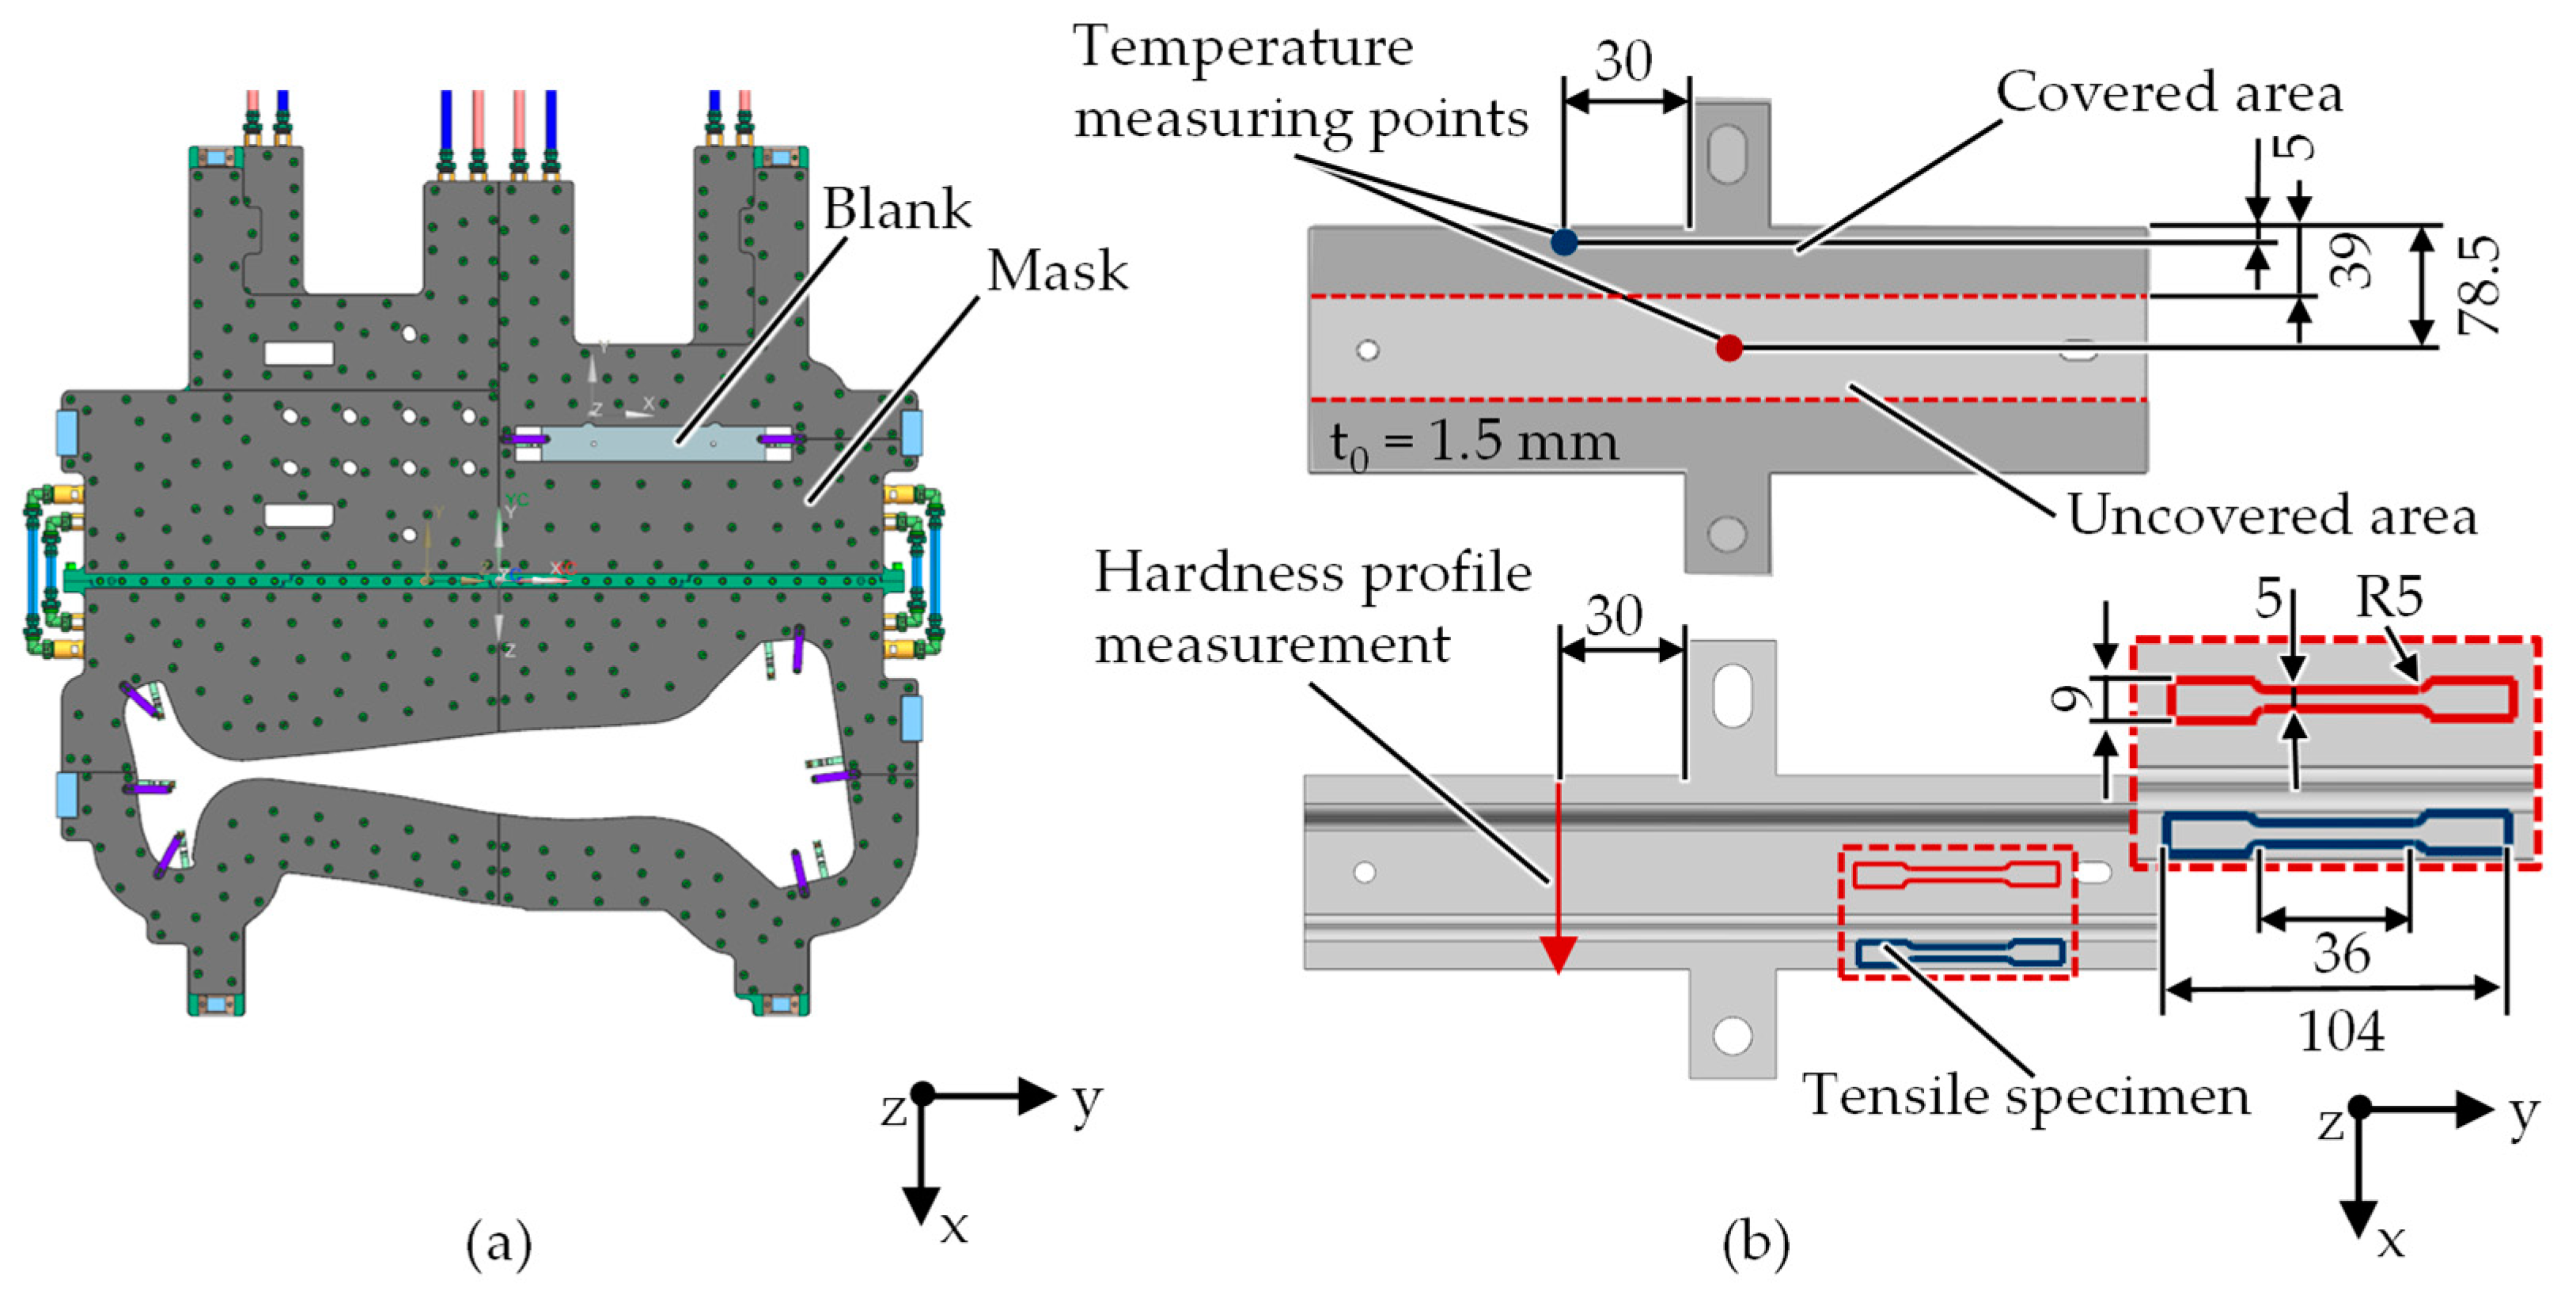
® comprises two water-cooled aluminum masks, between which the heated blank is positioned and locally cooled in covered areas. The process steps of tailored hot stamping with the TemperBox
® are shown in
Figure 1a.
Initially, the raw material is trimmed and heated. The heating duration required to achieve uniform austenitization varies according to the blank geometry, material type, and sheet thickness. Subsequently, the austenitized blank is automatically positioned within the TemperBox
® and subjected to an intermediate cooling phase. The processes within the TemperBox
® (
Figure 1b) can be segmented into three distinct stages: I. positioning; II. movement of the lower mask; and III. intermediate cooling. In the first stage, the uniformly austenitized blank is positioned on the support frame within 4 to 6 s. The lower movable mask then moves towards the upper fixed mask, securely centering the blank with the aid of centering cones. Depending on the blank’s geometry, material properties, and sheet thickness, the intermediate cooling process takes approximately 45 to 140 s, employing a cooled aluminum mask. The surface of the mask facing the heating elements is chrome-plated and polished to a mirror-like finish to minimize heat absorption. In contrast, the mask side facing the blank is intentionally given a higher surface roughness to enhance the absorption of thermal radiation emitted by the heated blank. After the intermediate cooling stage, the blank is positioned in the tool, accomplished using a robotic system or furnace feeder. Within the tool, the blank undergoes both forming and partial quenching. During the quenching phase, the blank’s cooling process begins due to the thermal energy transfer upon contact with the tool. The heat conduction effect results in the non-diffusion transformation of the austenitized region of the blank into a martensitic microstructure due to rapid cooling. The effect of heat conduction on the phase transformation within the covered area of the blank depends on the duration of intermediate cooling and the preceding phase transformation from austenite to ferrite, pearlite, and bainite. Once quenched, the components are air-cooled and subsequently trimmed to their final dimensions. A significant advantage of the process route involving intermediate cooling, in comparison to alternative tailored tempering methods using heated tools or localized laser annealing, is the improved dimensional accuracy of the components [
7]. This improvement is a result of the reduced temperature gradient experienced by the components after quenching in the cooled tools. Moreover, this process allows for the adjustment of soft, transition, and hard areas by modifying process parameters, such as the distance between the blank and the aluminum mask or the duration of intermediate cooling within the TemperBox
®. Additionally, the approach leads to consistent surface properties, in contrast to methods that involve partial austenitization. With partial austenitization approaches, the coating varies due to different heating rates [
8]. Precisely controlling the heat treatment within these process pathways enhances the ductility in areas of the components with lower strength. This increased ductility results in enhanced energy absorption and deformation capacity during crash-like events, as well as simplifying subsequent mechanical joining operations.
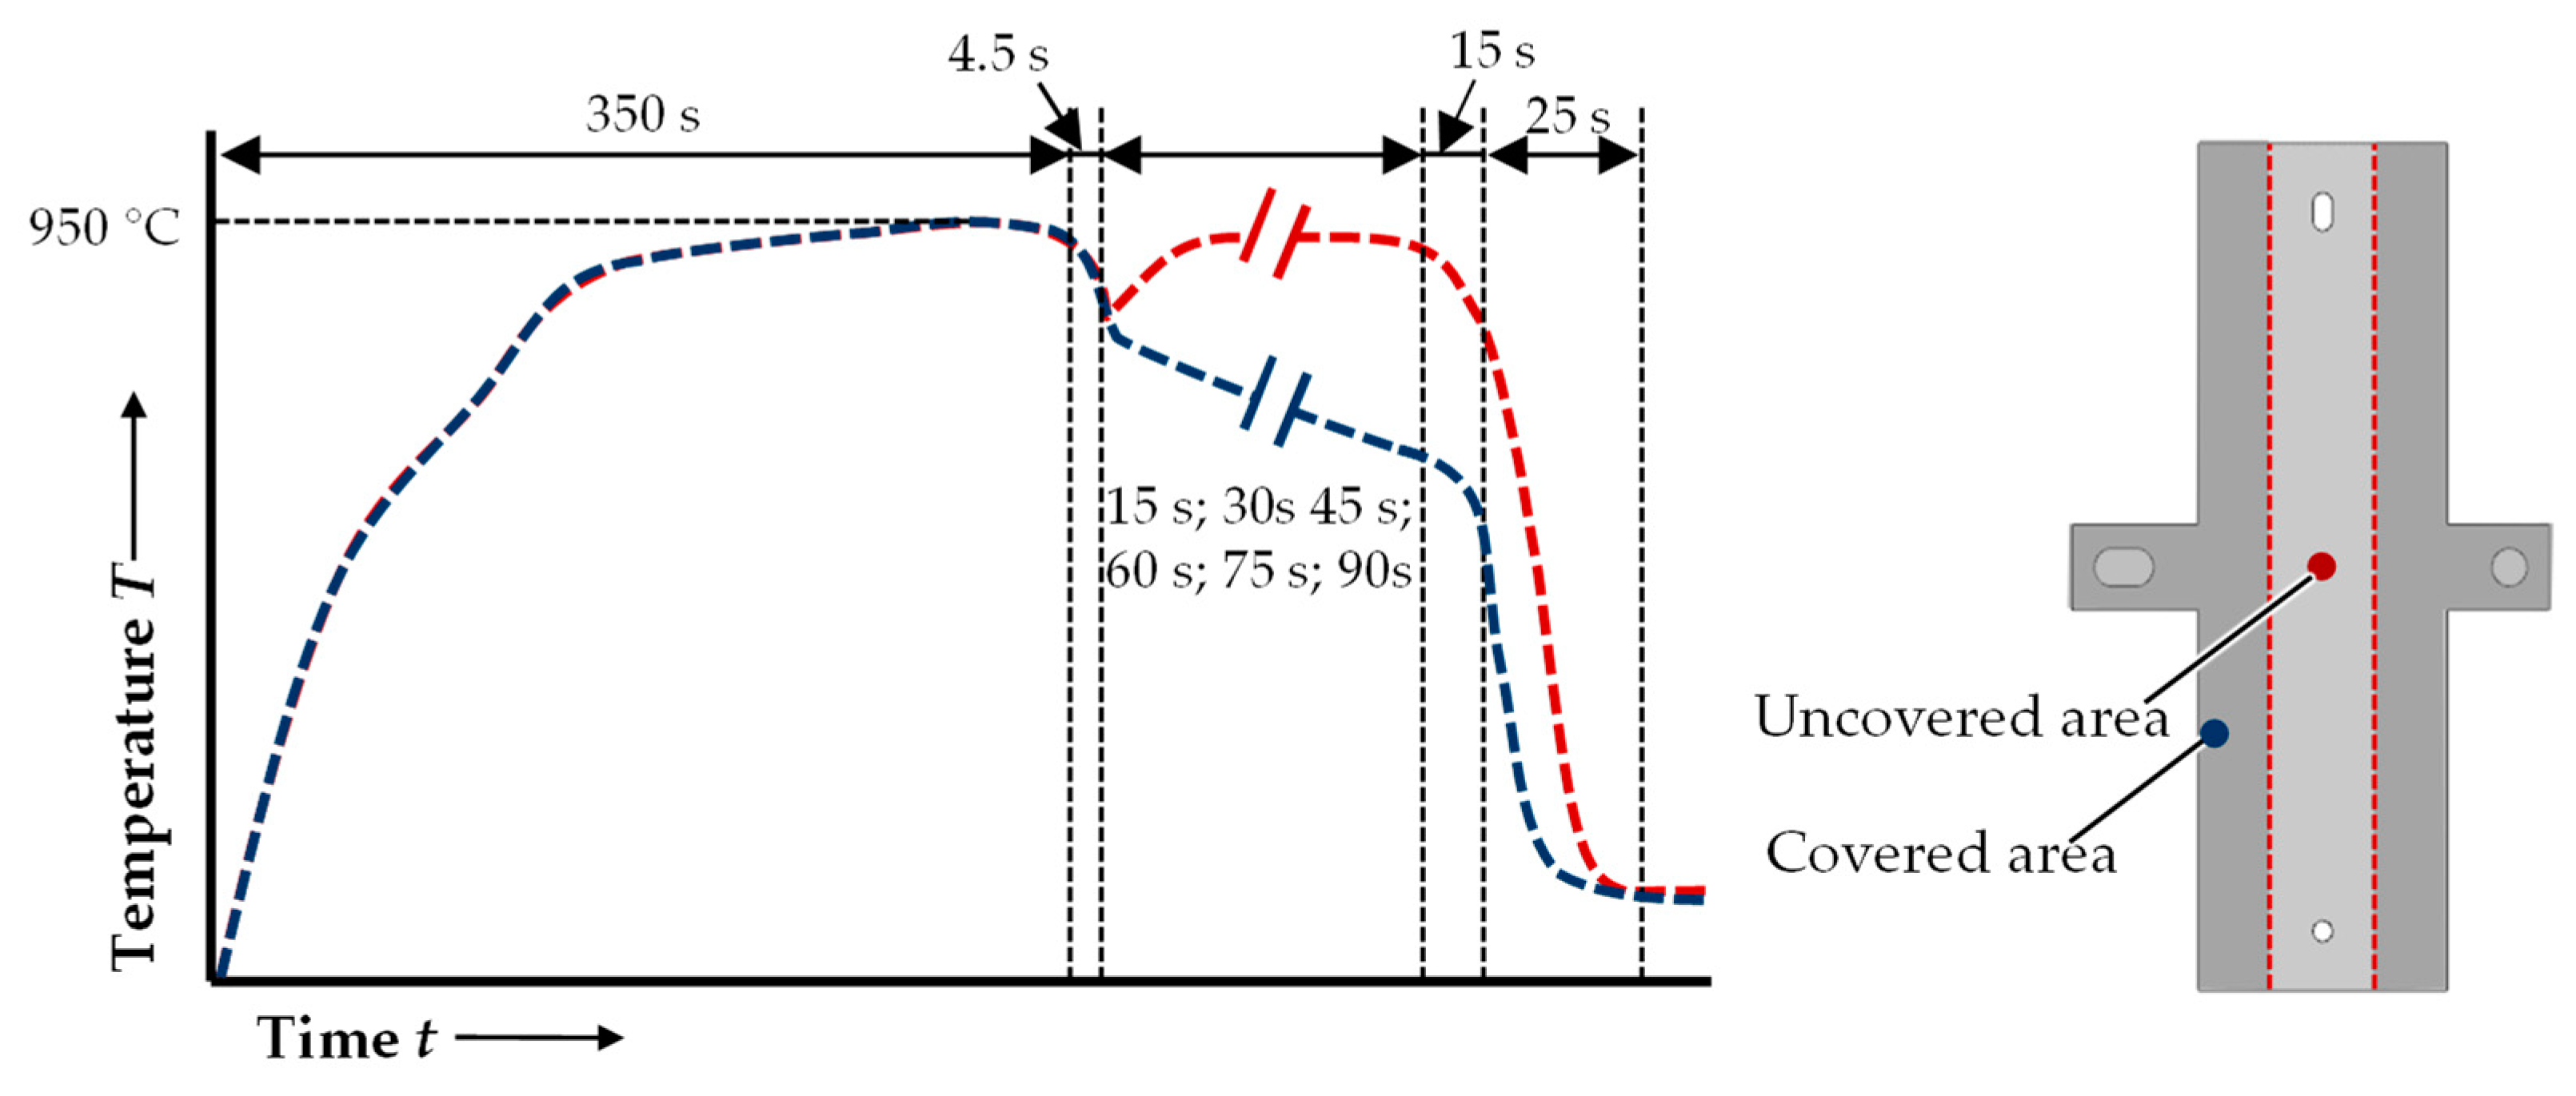
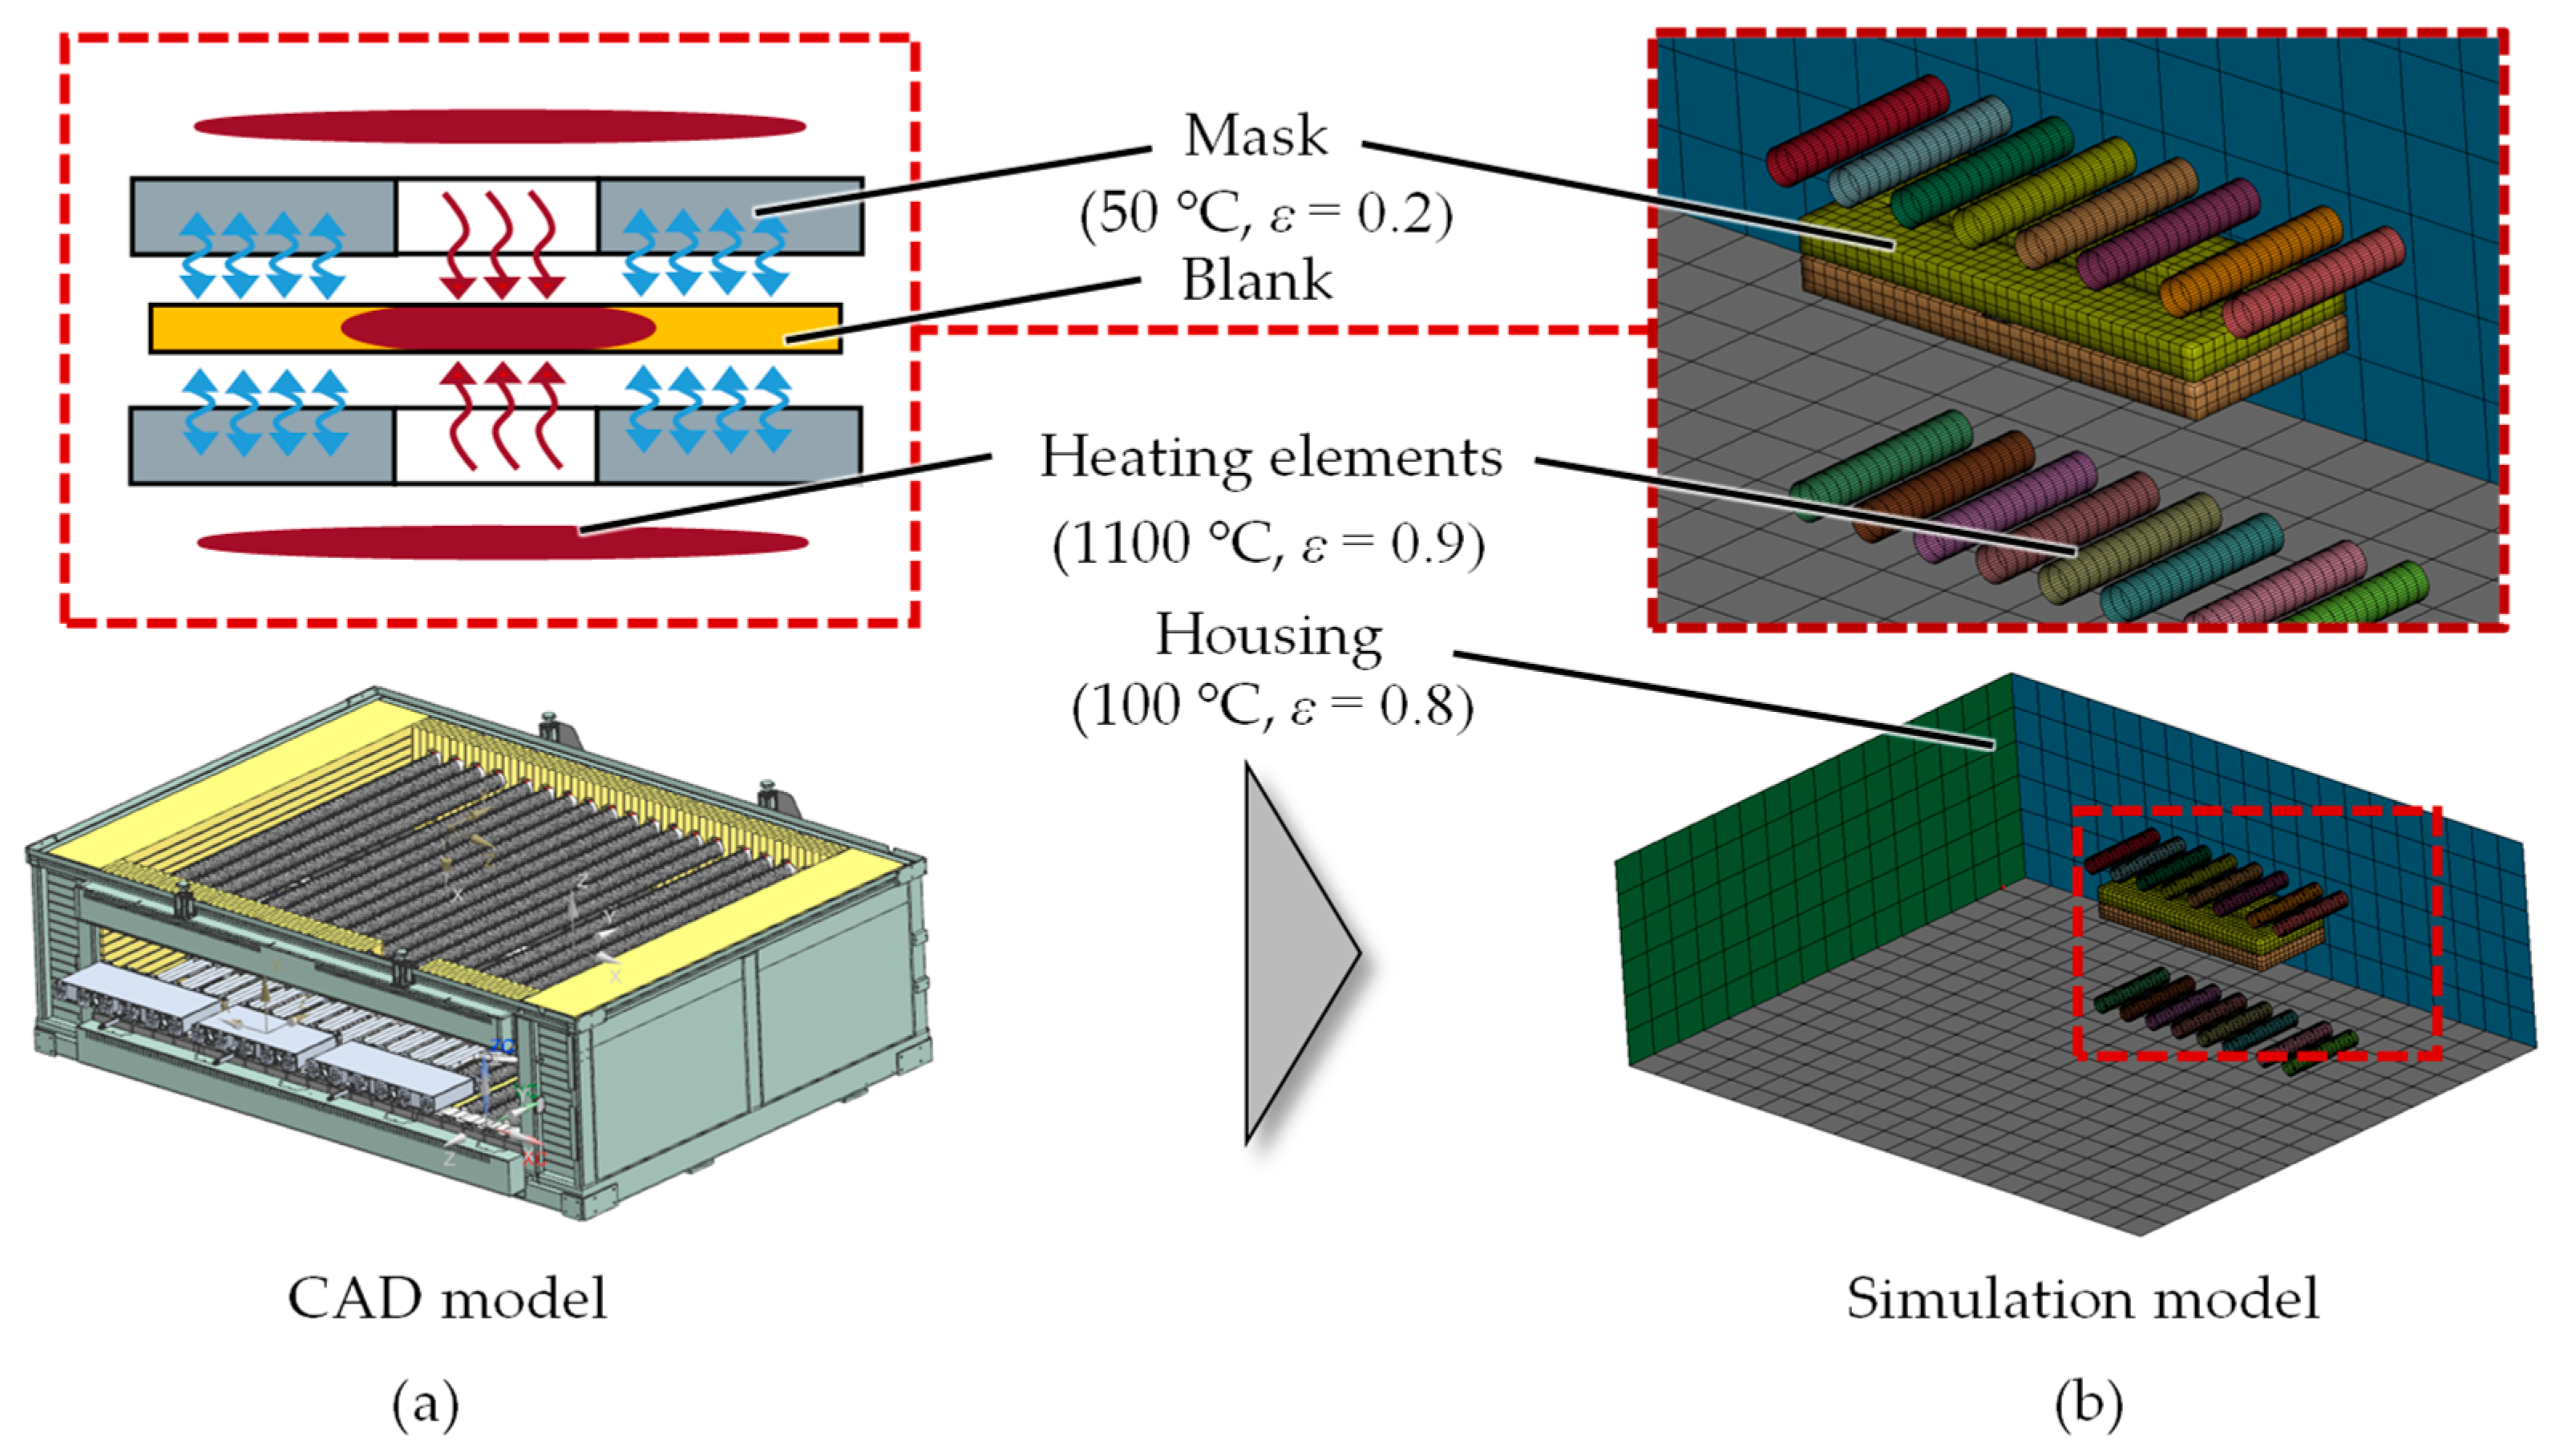
The impact of intermediate cooling through radiation exchange within a tailored hot stamping process on phase transformation and component properties has not been experimentally investigated in scientific studies. For this reason, this study examines the impact of the duration of partial intermediate cooling by radiation exchange in a partial press hardening process on the diffusion-dependent phase transformation process and the component properties using the conventional manganese-boron steel 22MnB5. The experiments are conducted using a chamber furnace provided by AP&T AB, equipped with two chambers for heating and austenitization of the blank, along with the TemperBox® for partial intermediate cooling of the blank. In this context, partial intermediate cooling of the blank is defined as cooling the covered areas while continuing to heat the uncovered areas, which remain in the austenitic state. In addition to the controlled exchange of heat radiation, the time- and temperature-dependent phase transformations are important and play a key role in achieving tailored properties in hot-stamped components. To explore these effects, this study presents an approach to simulate radiative heat exchange in the LS-Dyna®(R12) program. The simulation results are validated through experimental investigations.
2. Fundamentals of Phase Transformation and Radiant Heat Exchange in Hot Stamping
In recent decades, finite element analysis has emerged as the established simulation method in the field of engineering [
9]. The main objectives are to expedite the design and development phases and to facilitate manufacturability assessment. In the field of hot stamping, accurate prediction of phase transformation processes and their subsequent impact on component properties assumes critical importance for optimizing the manufacturing process. To model the intricate thermomechanical interactions that take place during hot stamping and to account for the influence of phase transformation behavior, a profound understanding of various mechanical, thermal, and microstructural influencing factors is imperative [
10]. In particular, the determination of the austenite decomposition into ferrite, pearlite, bainite, and martensite is important when simulating hot stamping processes.
The transformation kinetics for these phases are mainly diffusion-controlled, except for martensite transformation, and can be described by various models. [
11]. A well-established model that adopts a phenomenological approach was formulated by Johnsen, Mehl, Avrami, and Kolmogorov (JMAK) and is commonly referred to as the incremental variant of the JMAK model [
12]. This incremental form of the JMAK model addresses the phase transformation that occurs during isothermal processes. To calculate non-isothermal processes, like hot stamping and welding, the JMAK model has been extended through various approaches [
13]. In addition to the JMAK model, Kirkaldy-type semi-empirical transformation models are also utilized for the computation of the phase transformation process [
14]. As an example, Li et al. [
15] formulated a model based on the framework of Kirkaldy and Venugopalan [
16] in which the phase transformation is contingent upon various factors, including grain number, chemical composition, temperature, and activation energy of distinct phases. It differs from the Kirkaldy model in terms of the influence of the chemical composition and the grain number. The transformation of austenite into martensite takes place abruptly and is not governed by a diffusion process. To represent this phase transformation, the non-diffusion phase transformation Koistinen–Marburger model [
17] is employed.
The following section offers an overview of the fundamental principles involved in calculating heat radiation exchange and delves into application-specific aspects of partial intermediate cooling using the TemperBox
®. Depending on the stage of the process, various heat transfer mechanisms become relevant in hot stamping. In the transfer phase, the temperature of the blank decreases due to heat radiation and convection with the surrounding environment. Additionally, during the forming and quenching phases, there is an added heat conduction element resulting from the contact with the tool. Advancements in technology, both in the equipment and tooling domains, have introduced greater intricacies to the thermal challenge. For instance, in the case of the TemperBox
®, the interaction of heat radiation between surfaces within an enclosure assumes a distinct significance. Unlike heat transfer mechanisms like convection and heat conduction, where heat energy is transported from warmer to cooler areas, heat radiation involves the exchange of heat energy from cooler to warmer areas [
18]. The effectiveness of this heat radiation exchange is particularly influenced by factors such as the orientation and position of the emitting surfaces, their respective temperatures, and their radiation properties [
18].
A geometric parameter employed to streamline the computation of heat radiation exchange is known as the view factor. The view factor quantifies the proportion of heat radiation transferred from one surface to another, contingent on their respective positions and orientations, without regard to the wavelength of the thermal radiation [
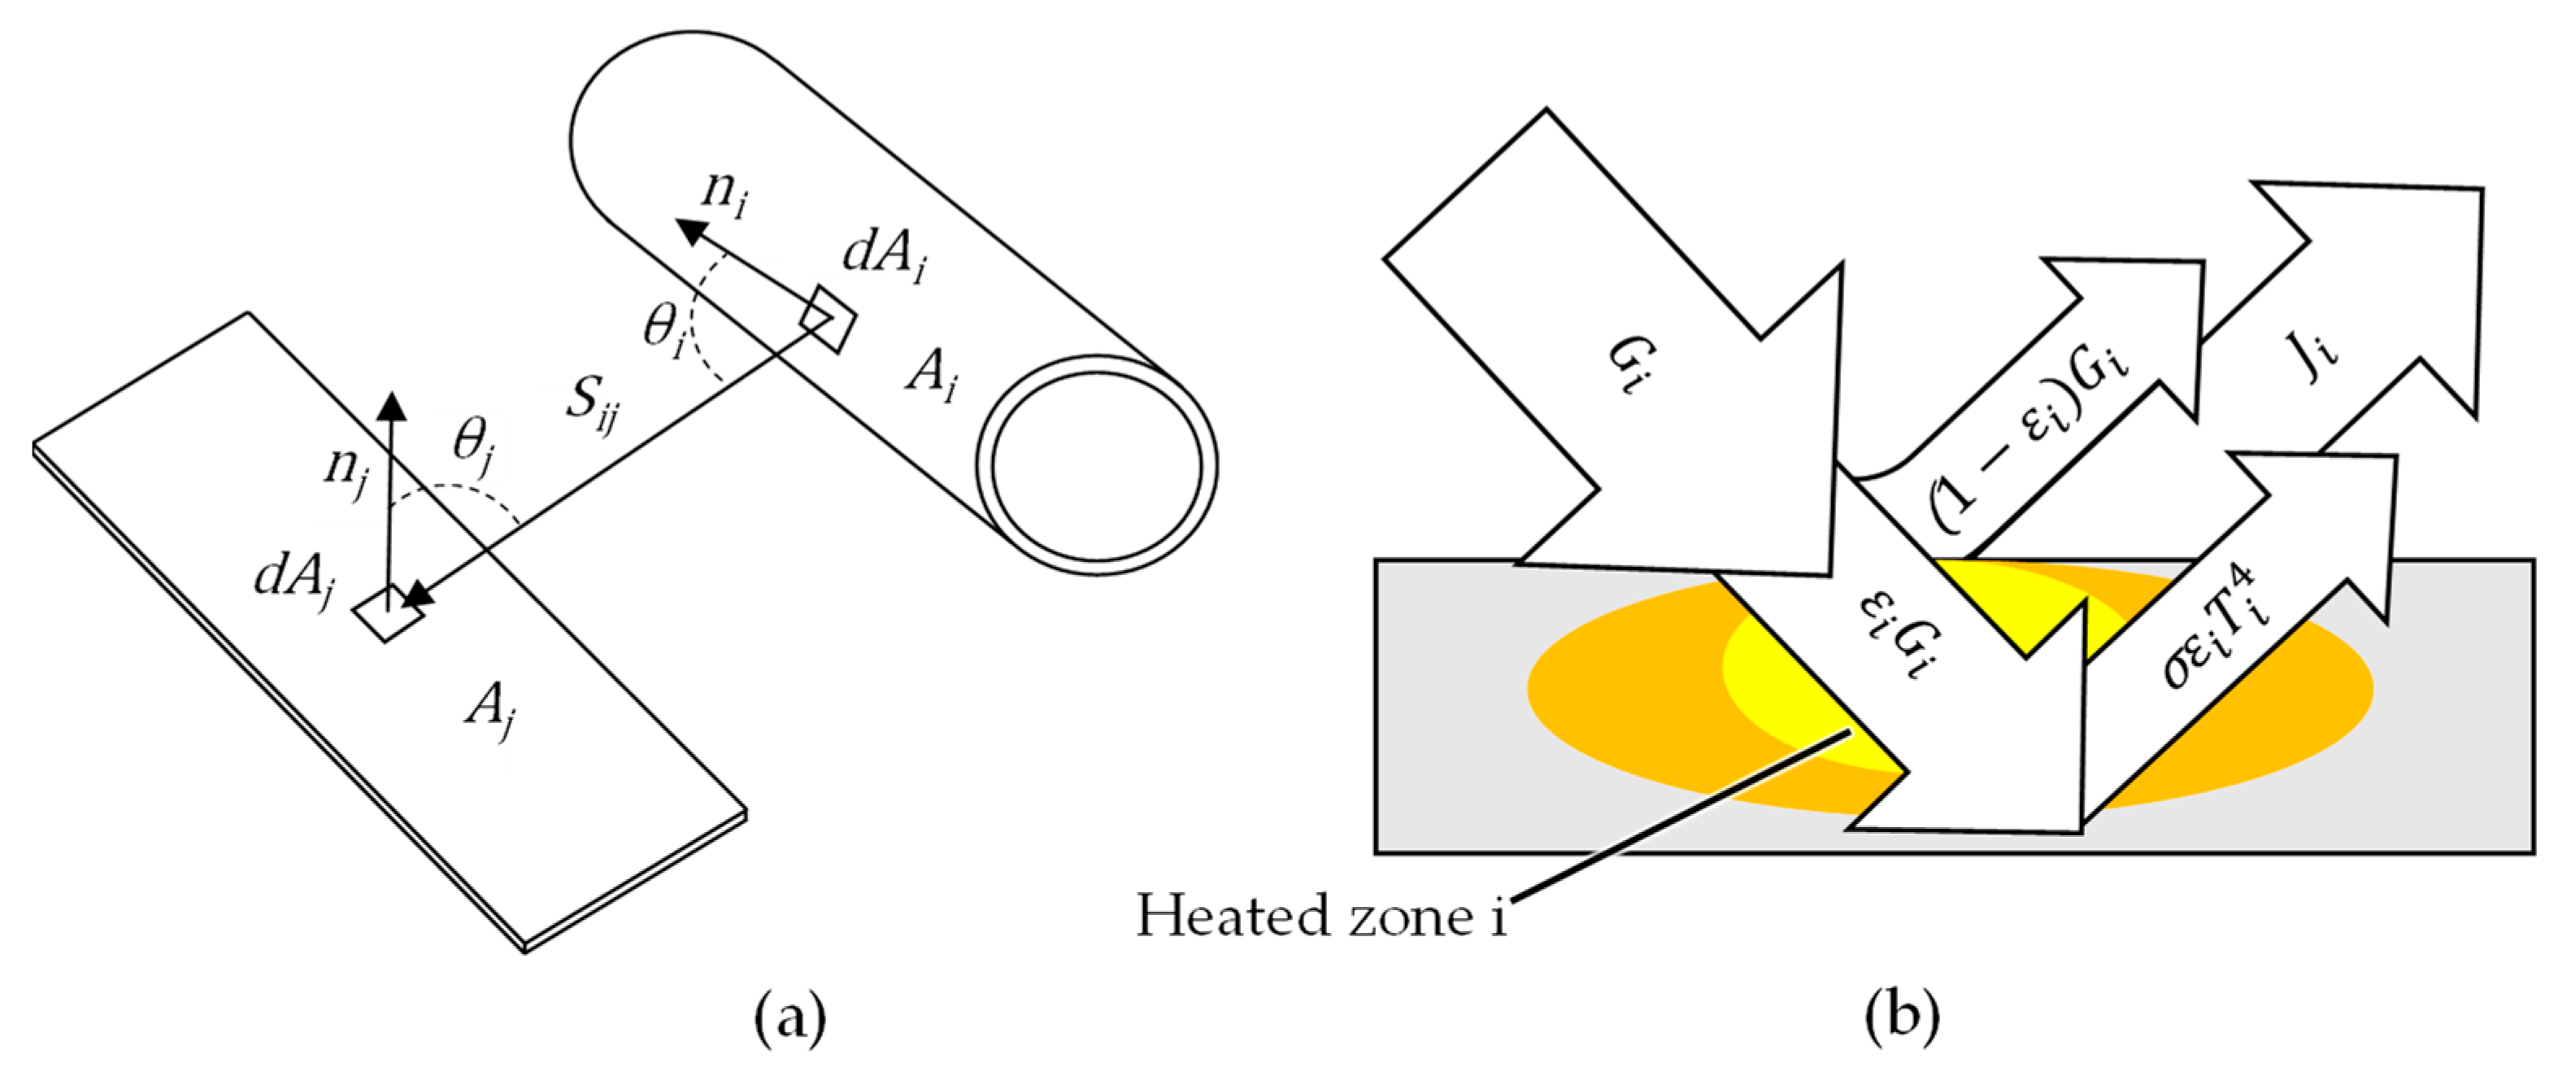
18]. The derivation of the view factor begins with the photometric fundamental law. For two surfaces located in an empty space, as depicted in
Figure 2a, the photometric fundamental law provides the radiant flow, denoted as
, from a small surface increment (
) to another small surface increment (
). This radiant flow is expressed as a function of the surface’s intensity (
) and the distance
between the surfaces and the angles (
), as well as (
) between the common connecting line and the normal vector of the surfaces [
18]:
Through the integration of the photometric fundamental law, as defined in Equation (1), across two finite surfaces and under the assumption of a constant radiation intensity (
) over the surface, the radiation flow can be described by the following equation:
With the relation
as the radiant flux emitted from the surface
), the view factor is obtained as:
Equation (3) reveals that the view factor is a geometric parameter that quantifies the proportion of radiation emitted from surface () to surface (). In this context, the Kronecker delta () characterizes the visibility between finite surfaces. Surfaces that have line-of-sight visibility to each other are assigned a value of 1, while surfaces lacking such visibility are assigned a value of 0.
Radiation exchange problems in the LS-Dyna
® simulation program are solved using the energy balance at zone i, as depicted in
Figure 2b. The heat flow (
) can be expressed as the difference between emitted radiation (
) and irradiation (
) [
18]. As emitted radiation already accounts for the reflected radiation of irradiation (
), the equation for heat flow (
) can be simplified as follows:
where
represents the emissivity,
denotes the Stefan–Boltzmann constant, and
signifies the temperature of zone i. By connecting the incident radiant flux
with all the other zones, a secondary relationship between the heat flow (
) and emitted radiation (
) is derived. In conjunction with the reciprocity law
, the total radiation incident on zone i can be described as follows [
19]:
By substituting Equation (5) into Equation (4), the heat flow (
) can be described by the following equation:
Equating Equations (4) and (6), the unknown heat flow (
) can be eliminated and the radiation problem can be solved by the following equation:
Equation (7) is used for zones 1, 2 … m, where the temperature (
) of the zone i is given and all coefficients are known. In matrix form, Equation (7) is called the radiosity model or radiosity matrix equation and can be formulated as follows [
19]:
4. Results
Mechanical properties, encompassing Vickers hardness, tensile strength, and elongation at break, are examined and analyzed in this section. The aim is to quantitatively assess the disparities in these mechanical properties exhibited by 22MnB5 blanks subjected to varying intermediate cooling durations (ti). In addition to the examination of the mechanical properties, this section provides an assessment of temperature profiles and investigates the microscopic structural images. Simultaneously, the results of the temperature profile and the hardness will serve the purpose of validating the numerical model.
4.1. Examination of the Temperature Profile and the Microstructure
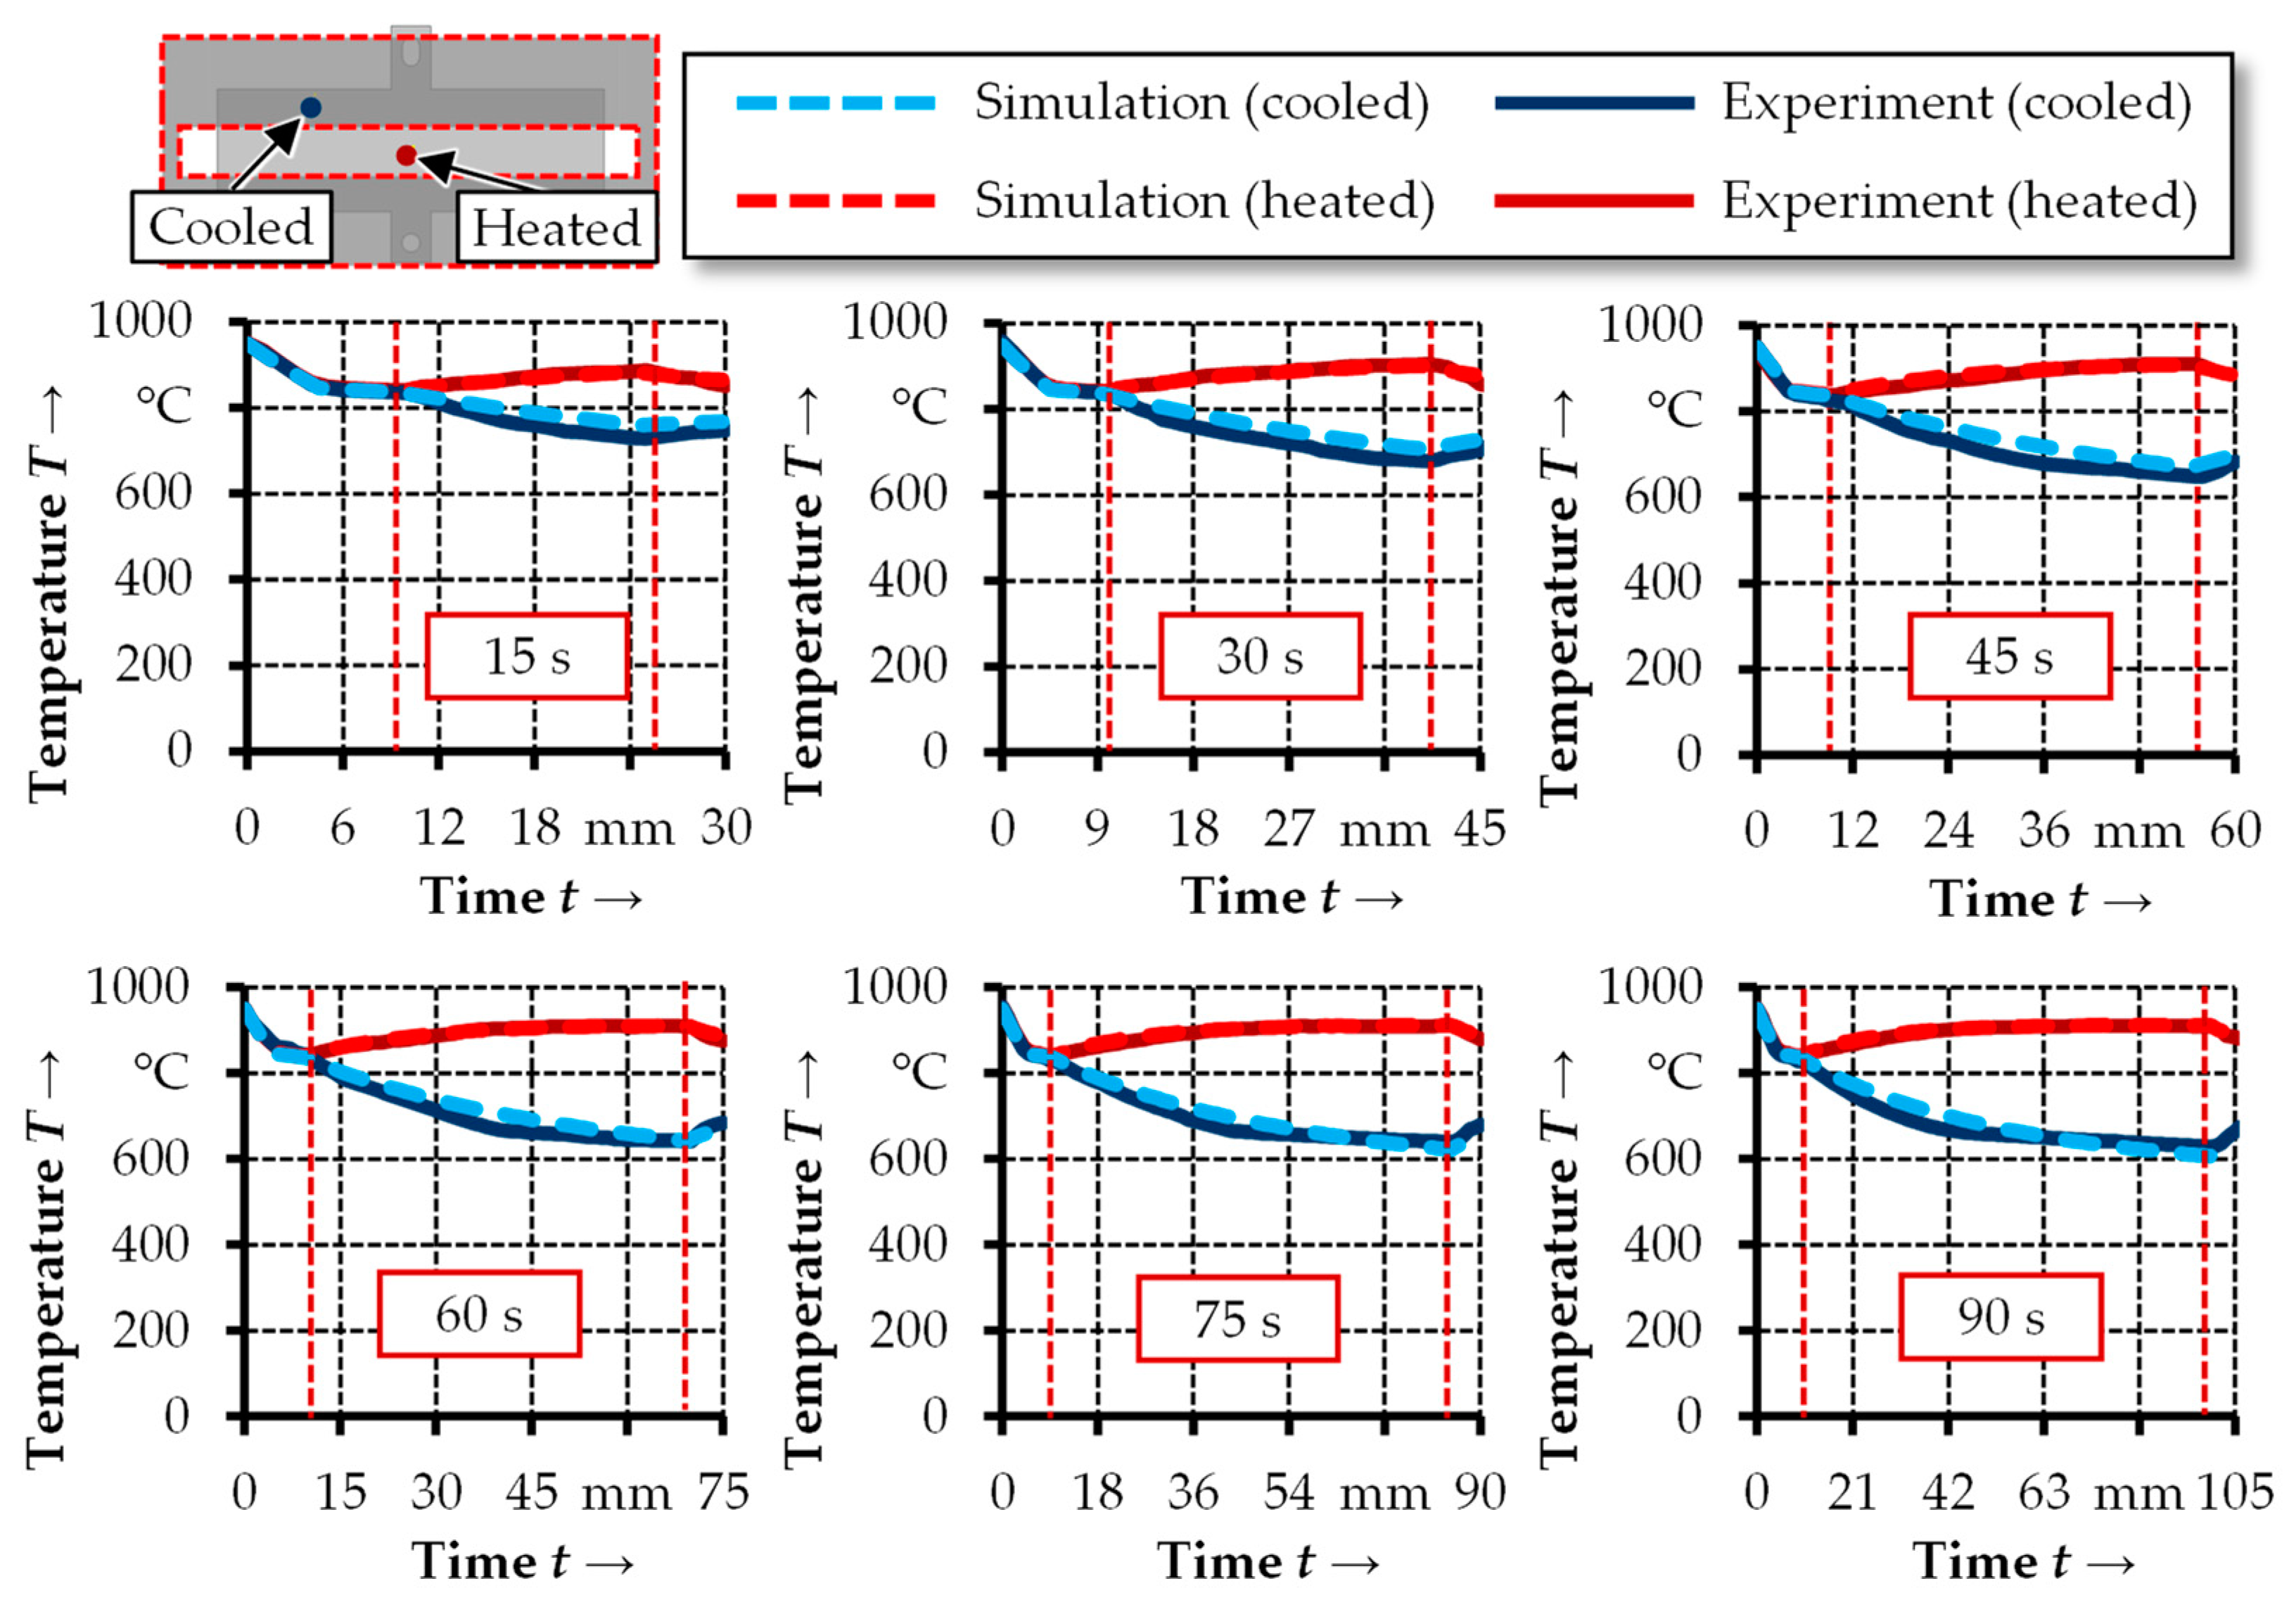
The temperature profile of the blank serves as a crucial measured parameter for evaluating the phase transformation that takes place during cooling and for verifying the simulation. To measure the temperature of the blank, type K thermocouples from Herth GmbH Werne, Germany are affixed to the surface of the blank in both the heated and cooled areas. As depicted by the measurements in
Figure 7, an increase in the partial intermediate duration (
ti) influences the temperature profile of the workpiece in both the heated and cooled regions.
A comparison of the temperature profiles of the blanks at partial intermediate durations of 15 s, 30 s, and 45 s reveals a continuous temperature variation in both the heated and cooled regions. Increasing the partial intermediate cooling duration (ti) from 15 s to 45 s, results in an increase in the blank temperature from 850 °C to 906 °C in the heated area and a decrease from 742 °C to 633 °C in the cooled area. Following a partial intermediate cooling duration (ti) of 45 s, only minor temperature changes are observable at the measurement points due to the reduced cooling rate. The decreasing cooling rate over time in the covered area of the blank can be attributed to the declining emissivity coefficient over time, the increased temperature of the aluminum masks due to the absorption of thermal radiation, and the heat energy released during the phase transformation.
The numerical temperature profiles closely replicate the experimentally determined profiles in the heated and cooled areas with reasonable accuracy. The minor discrepancies between the simulation and experimental results can be attributed to the absence of the temperature-dependent variation in the emission coefficient of the sheet surface in the simulation. Particularly with larger sheet thicknesses and longer partial intermediate cooling durations, assuming a constant emissivity coefficient can lead to an inaccurate calculation of the cooling rate in the covered area. Furthermore, the released latent heat due to the transformation of austenite into ferrite, pearlite, and bainite is not considered in the material model employed.
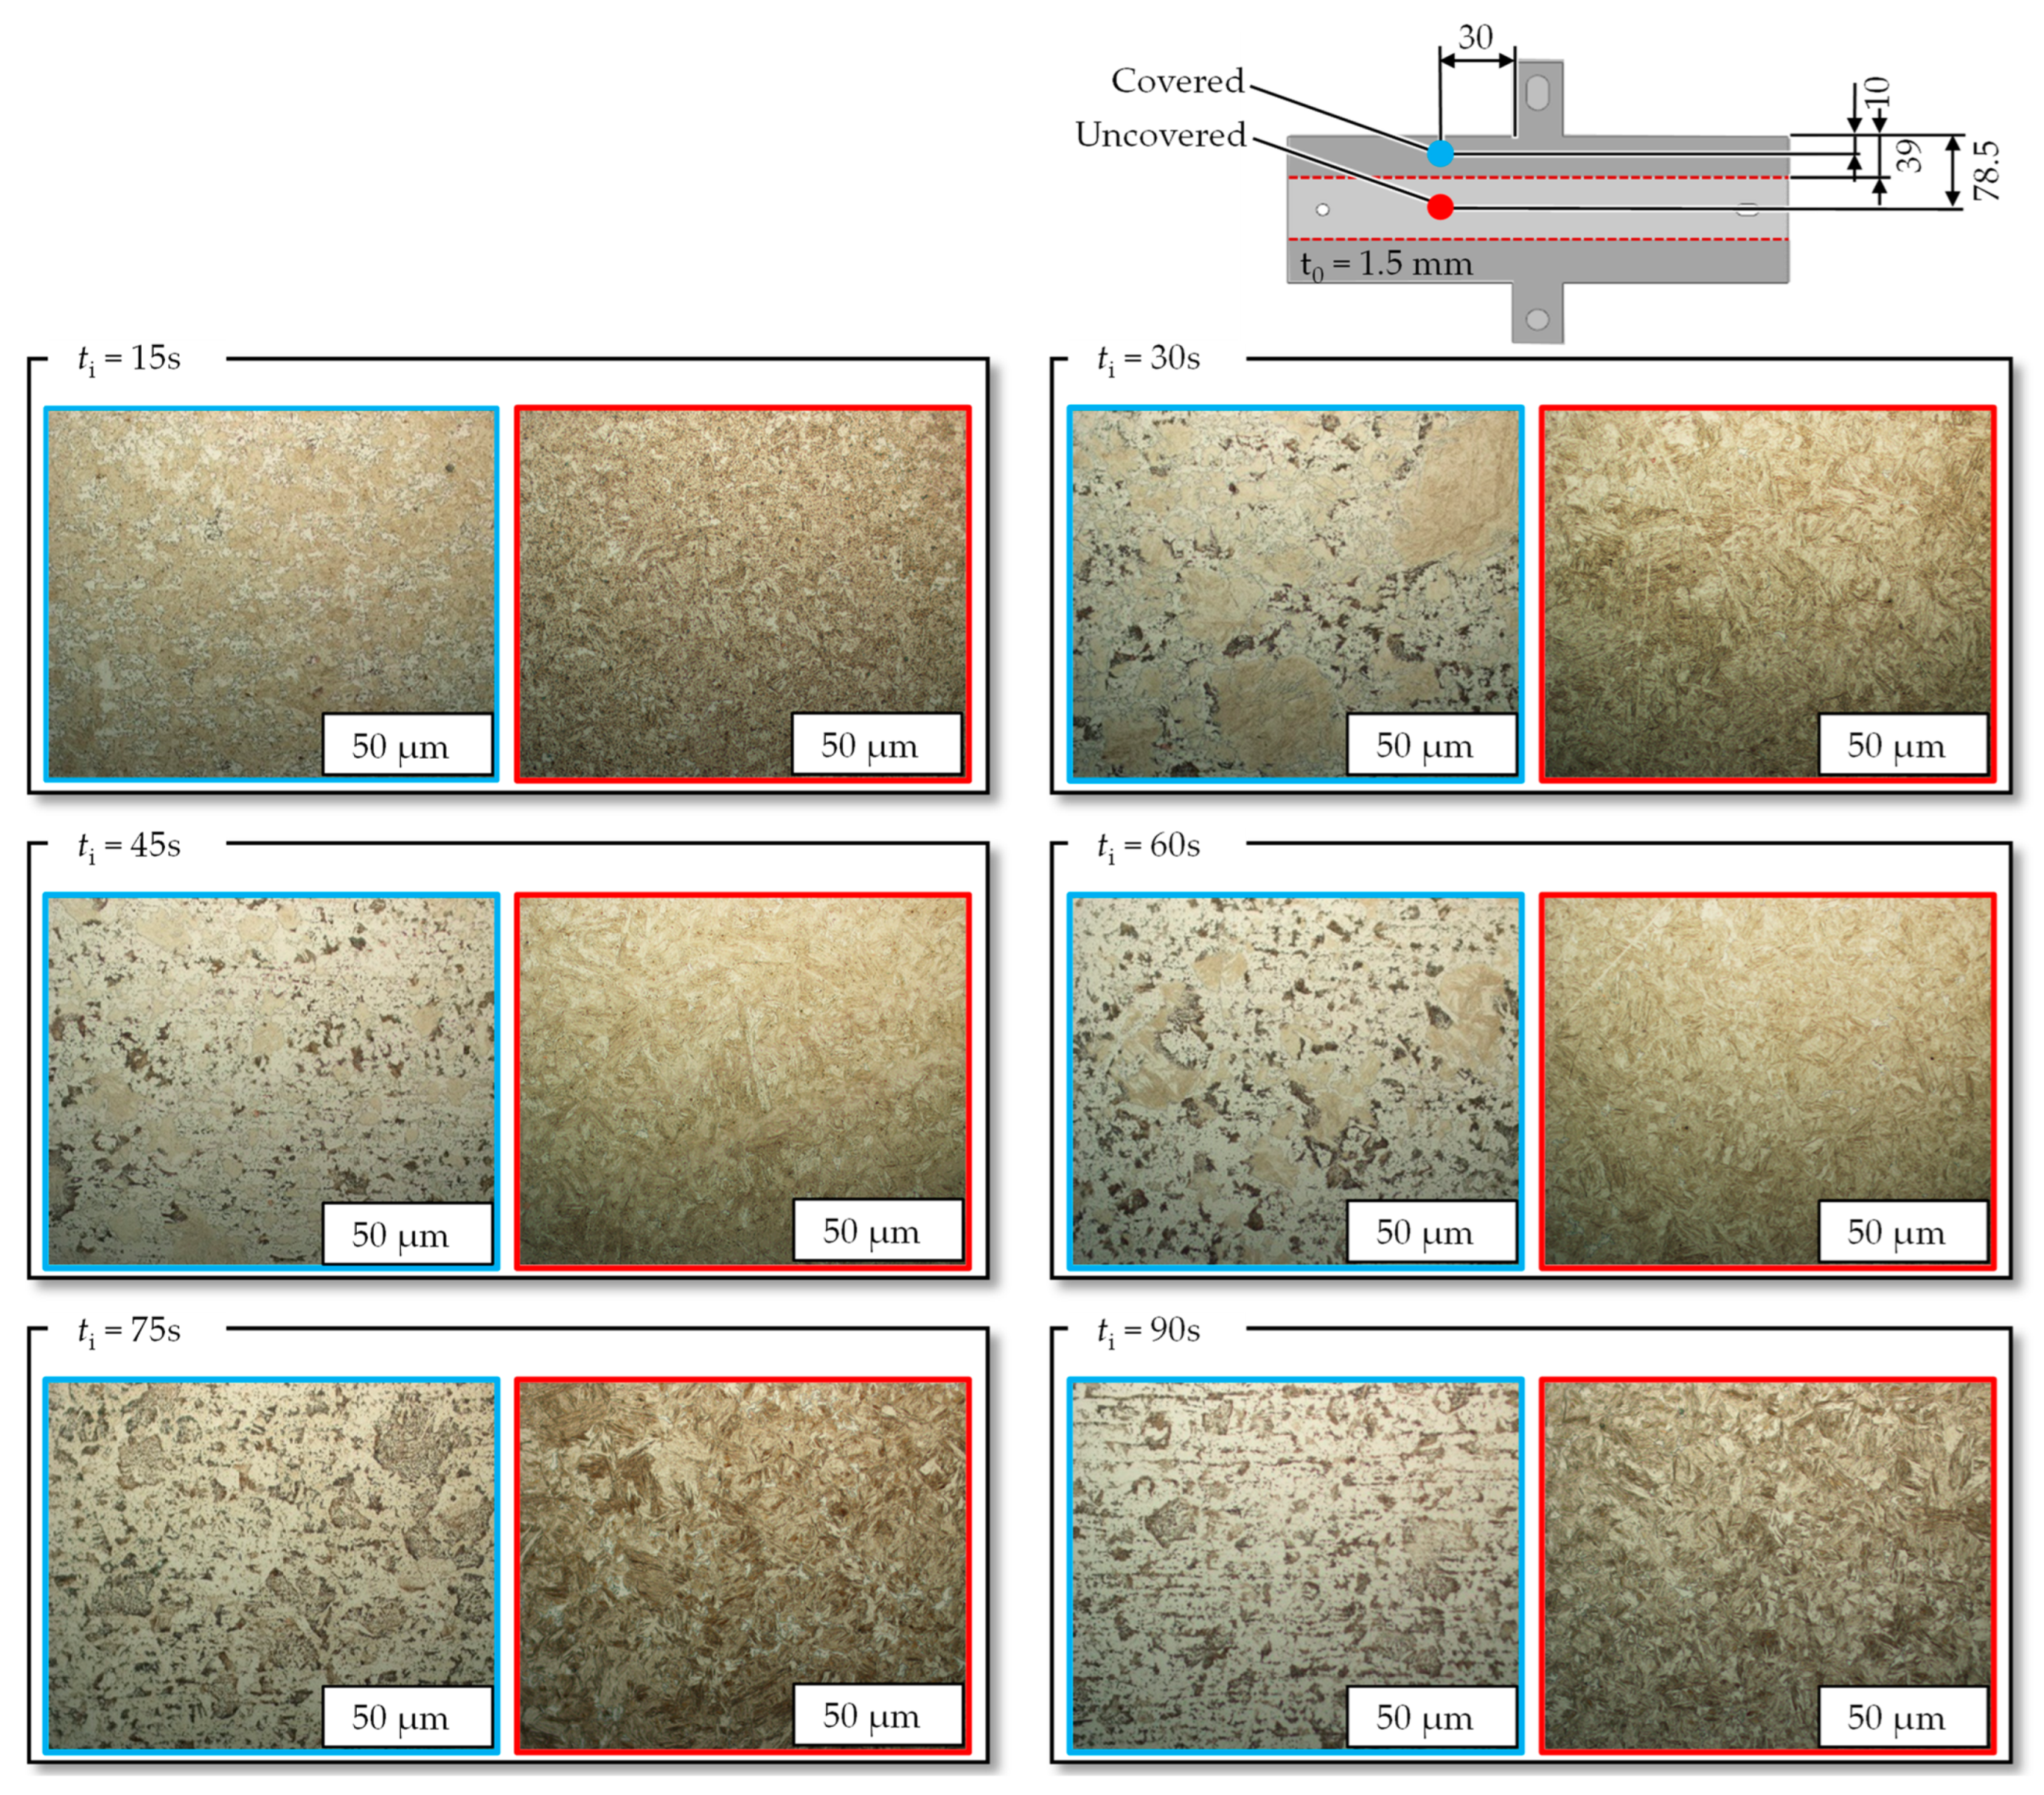
In addition to the temperature profiles of the blanks,
Figure 8 provides corresponding microstructure images of the covered area at 10 mm from the edge of the hat profile. Nital etching is employed for this purpose in the study. The light microscopic images demonstrate that the partial intermediate cooling duration (
ti) significantly influences the phase transformation processes within the TemperBox
®. Specifically, the sample with a partial intermediate duration (
ti) of 15 s exhibits a predominantly martensitic and bainitic structure, whereas an increasing proportion of ferrite and pearlite becomes evident in the overall structure starting from a partial intermediate duration (
ti) of 30 s. After a partial intermediate cooling duration (
ti) of 75 s, the presence of martensite and bainite phases can no longer be detected, resulting in the formation of a homogeneous structure comprising ferrite and pearlite phases.
4.2. Analysis of the Mechanical Properties
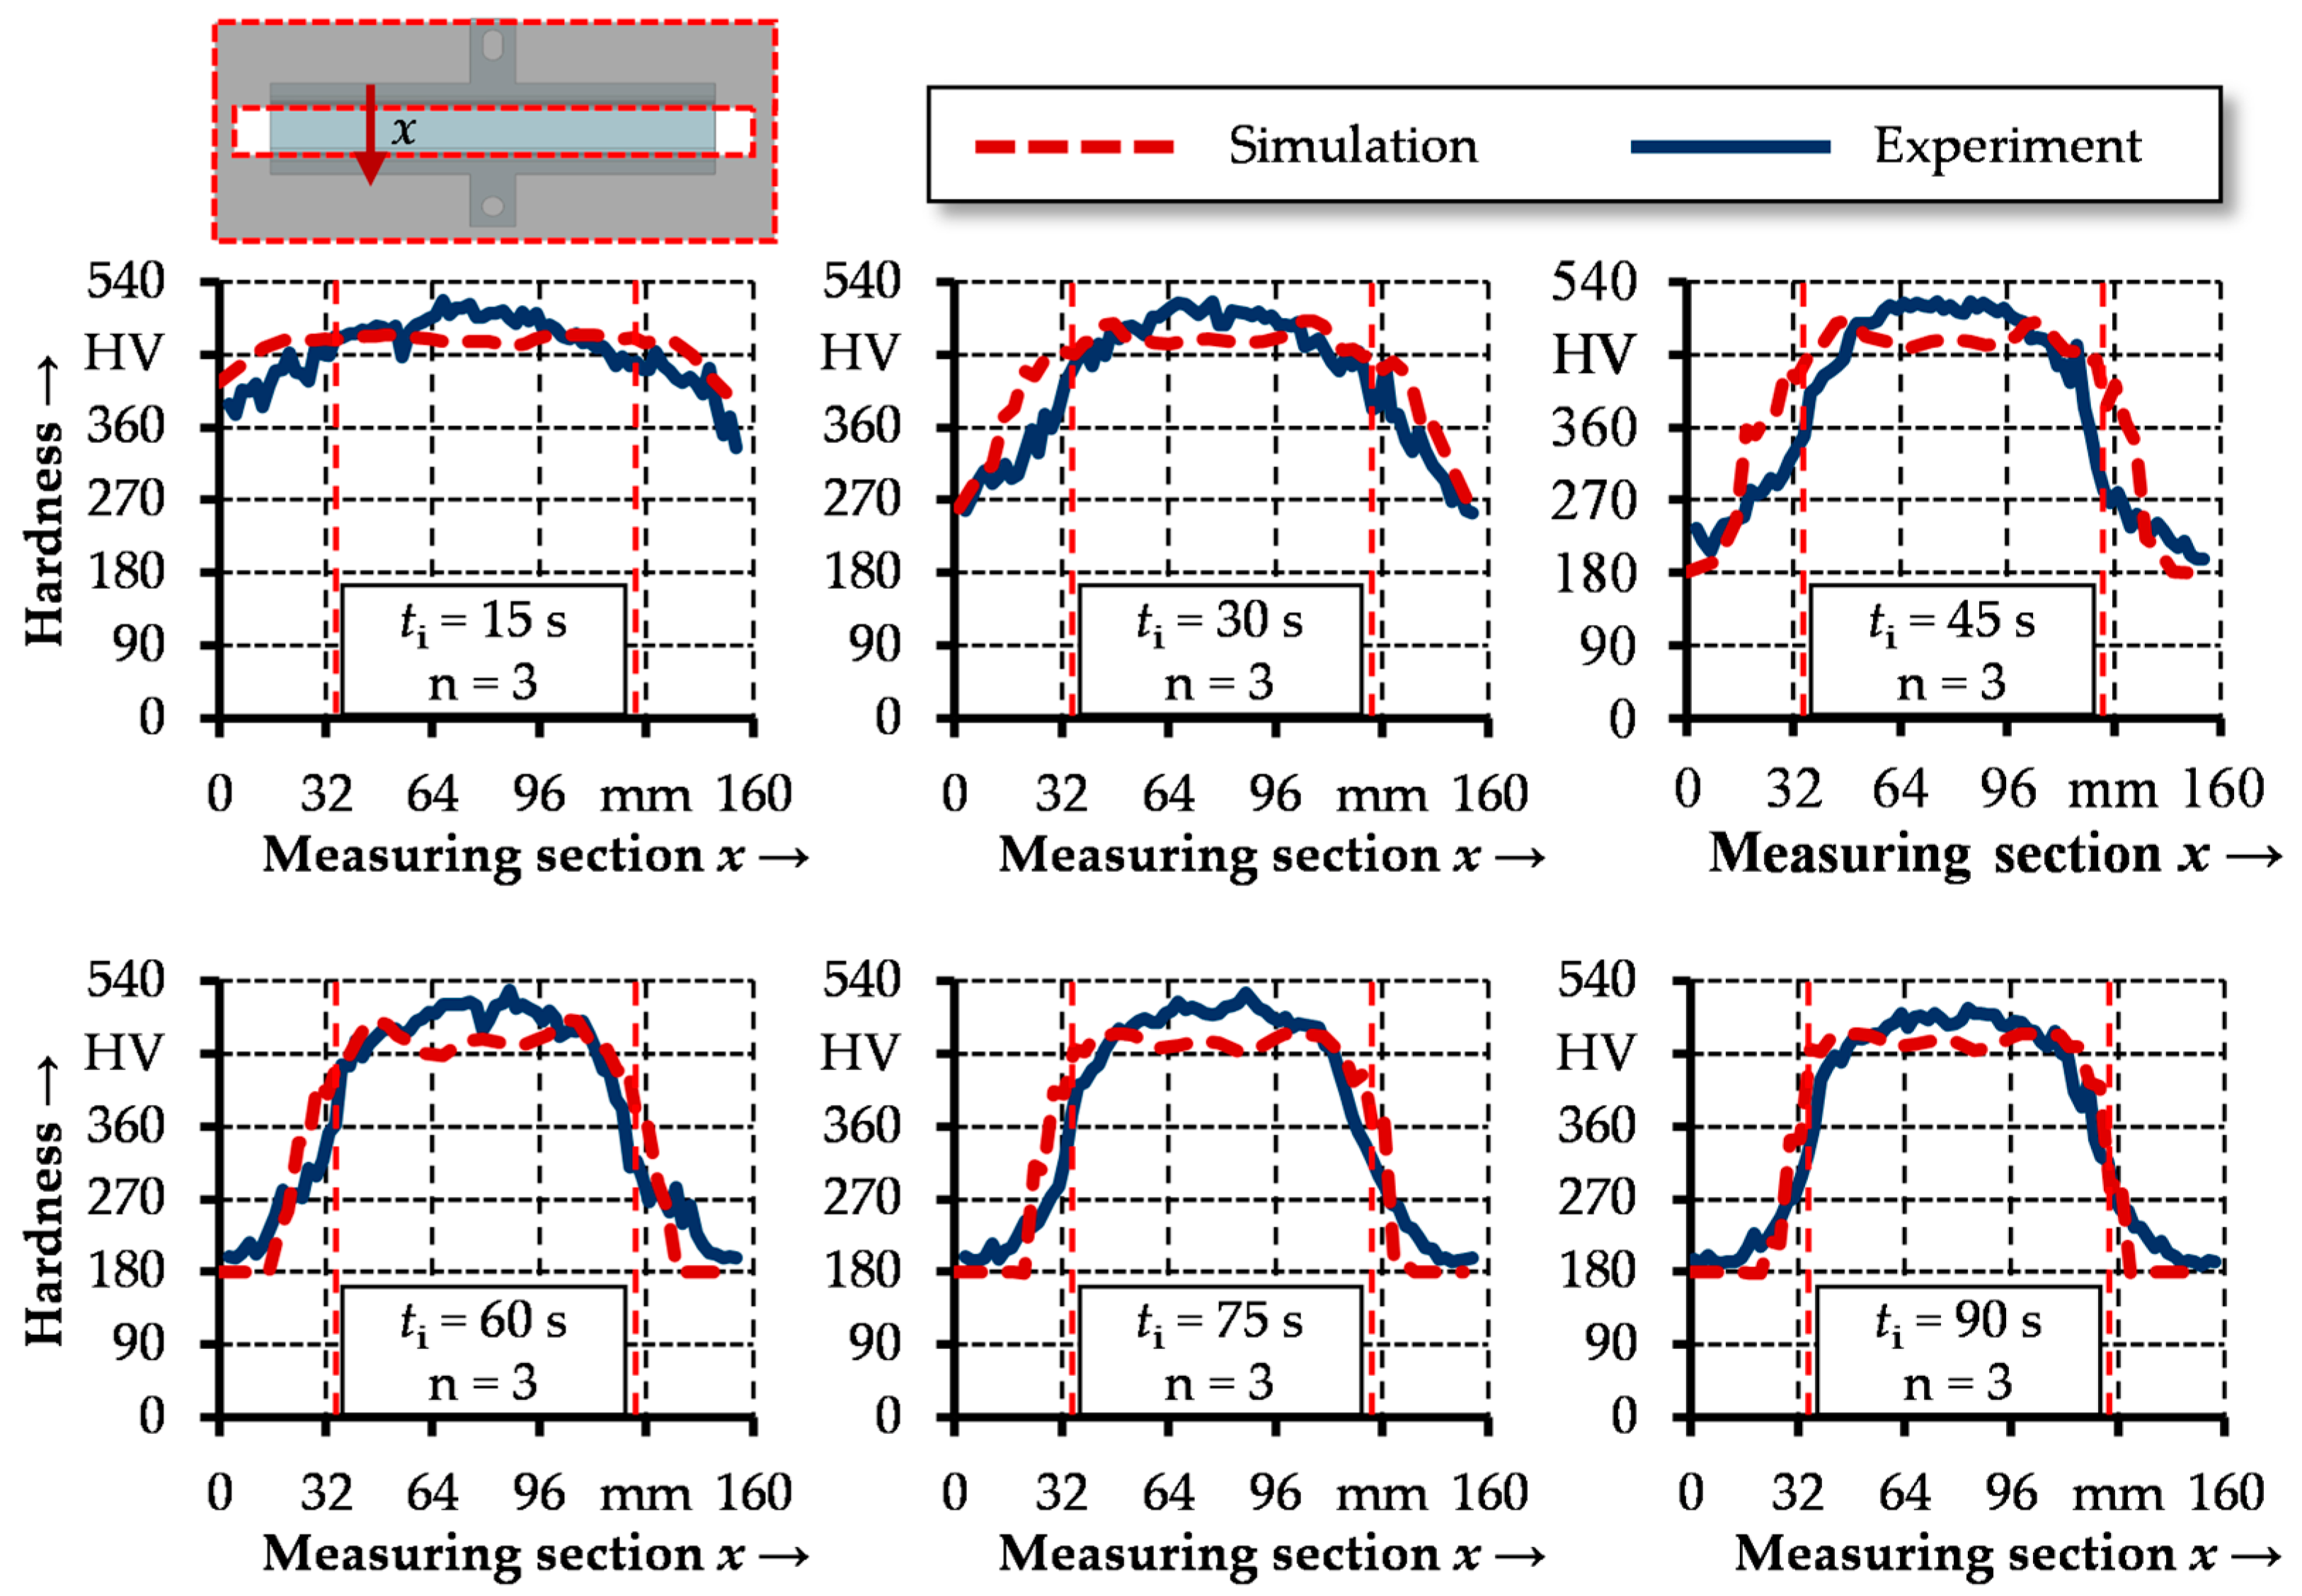
An essential mechanical parameter for evaluating hot-stamped components is hardness, which enables the assessment of both the component’s properties and the ensuing phase transformation. In this study, Vickers hardness tests were performed on cross-sections using the semi-automatic hardness tester DuraScan 70 G5 from Struers GmbH, in conjunction with the associated Ecos Workflow pro software from EMCO-TEST Prüfmaschinen GmbH Kuchl, Austria. The findings of the hardness measurements for different partial intermediate cooling durations are illustrated in
Figure 9. Upon examining the results, it becomes evident that the hardness values in the uncovered area exhibit a consistent level of homogeneity, ranging from 415 HV to 522 HV for intermediate cooling durations of 15 s and 30 s. With an increasing partial intermediate cooling duration (
ti), the hardness values in the region between the covered and uncovered areas decrease by up to 35%, reaching values between 272 and 339 HV. In the covered area of the component, there is a noticeable decline in hardness, which is contingent upon the chosen partial intermediate cooling duration (
ti). The hardness values decrease gradually from the uncovered area to the covered area due to the directional internal heat conduction of the blank and radiative heat exchange between the cooled mask and the blank. From a partial intermediate cooling duration (
ti) of 45 s, no further reduction in hardness is observed in the covered area. Hardness values are reduced to as low as 185 HV. A partial intermediate cooling duration (
ti) of more than 45 s leads to more uniform hardness values in the covered area, resulting in a more distinct soft area in the component. This observation is consistent with the temperature profiles and microstructural images, which reveal no significant deviations from a partial intermediate cooling duration (
ti) of 45 s. To assess the differences between experiment and simulation, the numerically calculated hardness curves are compared with the experimentally determined hardness curves in
Figure 9. The graphs show that the hardness curves can be calculated with a high degree of agreement. Similar to the experimental results, no decrease in hardness can be detected in the covered area from a partial intermediate cooling duration (
ti) of 45 s and beyond. Simultaneously, the numerical hardness curve also exhibits a distinct soft area from a duration of 45 s.
A significant characteristic of tailored hot-stamped components is the transition zone between hard and soft areas, which can have a profound impact on component performance. Increasing the duration of partial intermediate cooling results in the formation of distinct hard and soft regions, characterized by narrower transition zones. This effect can be quantitatively determined through numerical calculations of the view factors and thermal interactions between the heating elements, masks, and the blank within the furnace chamber.
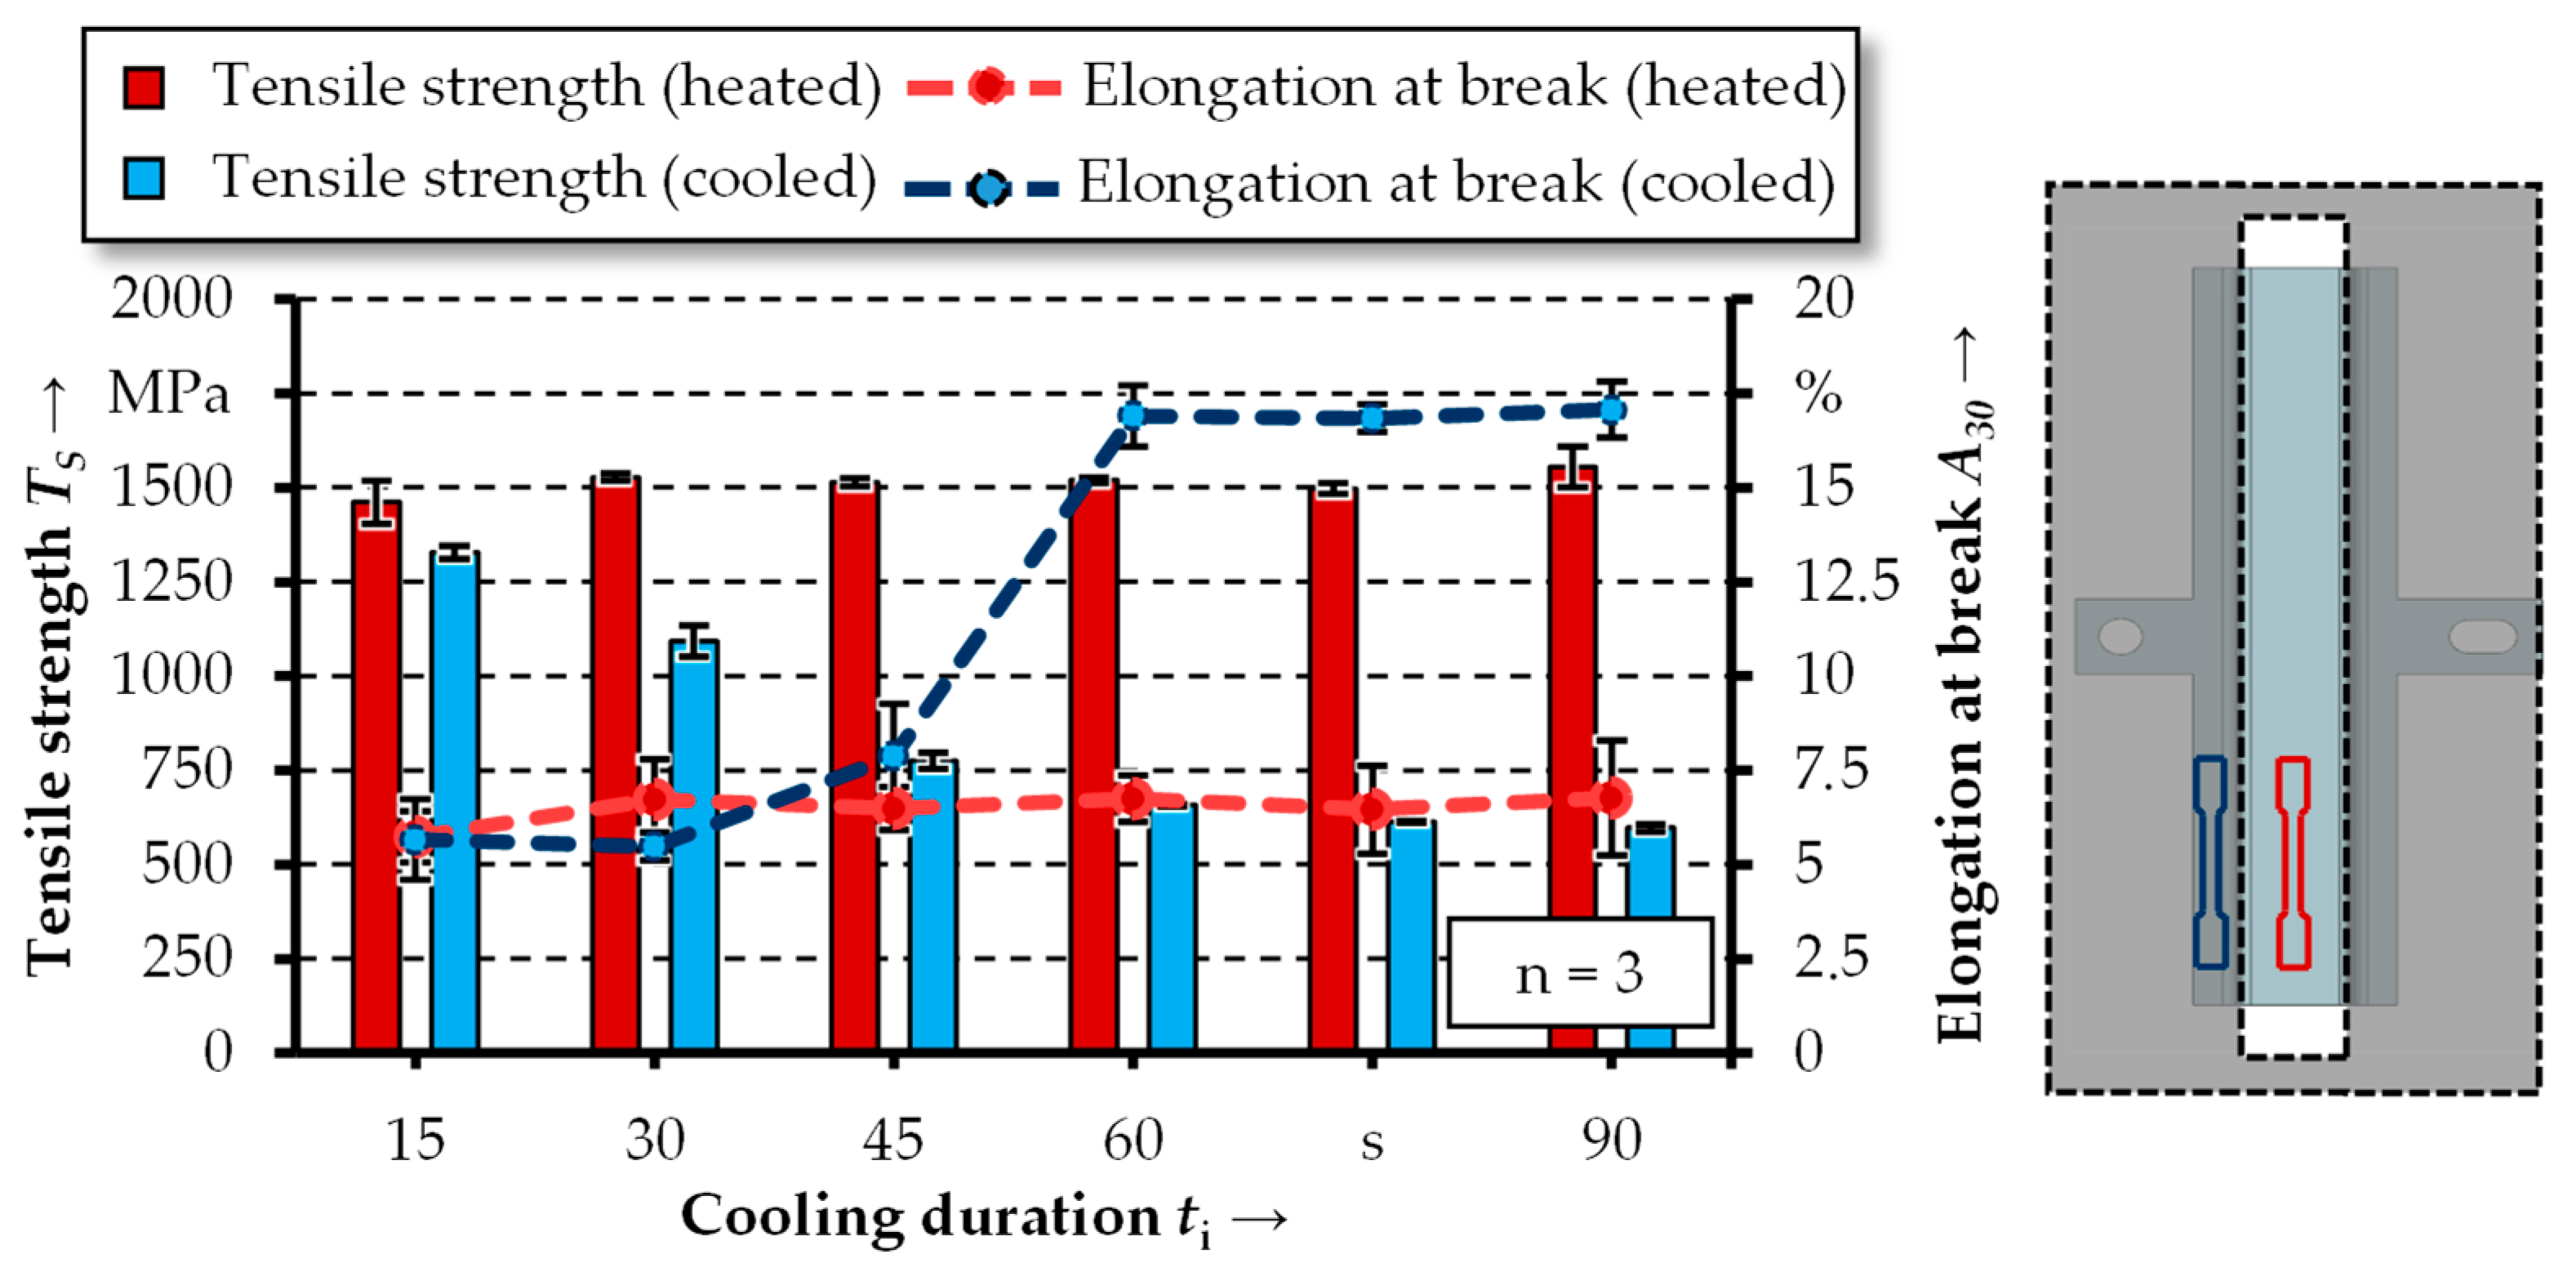
In addition to the hardness tests, tensile tests were conducted using a Z250 universal testing machine from Zwick/Roell AG. The resultant mechanical properties, namely tensile strength and elongation at break, are presented in
Figure 10 for varying partial intermediate durations (
ti) in both the cooled and heated areas. Analysis of the graph reveals that in the covered area, the tensile strength decreases as the intermediate cooling duration (
ti) increases, up to 60 s. Concurrently, the elongation at break shows a significant increase starting from a duration of 60 s. Results obtained with cooling durations of 30 s and 45 s exhibit premature strain localization due to the strength’s non-uniformity. The intermediate cooling durations of 30 s and 45 s do not allow the formation of a uniformly softened area across the width of the tensile specimen. This effect is confirmed by the higher standard deviation of the respective mean tensile strengths and elongations at break for the 30 s and 45 s intermediate cooling durations (
ti). The high standard deviation is due to the heterogeneous microstructure of martensite, bainite, ferrite, and pearlite. In the heated area, no discernible effect of the partial intermediate cooling on tensile strength and elongation at break is observed. This observation suggests the formation of a uniform martensitic microstructure in the uncovered area of the component, regardless of variations in the parameters.
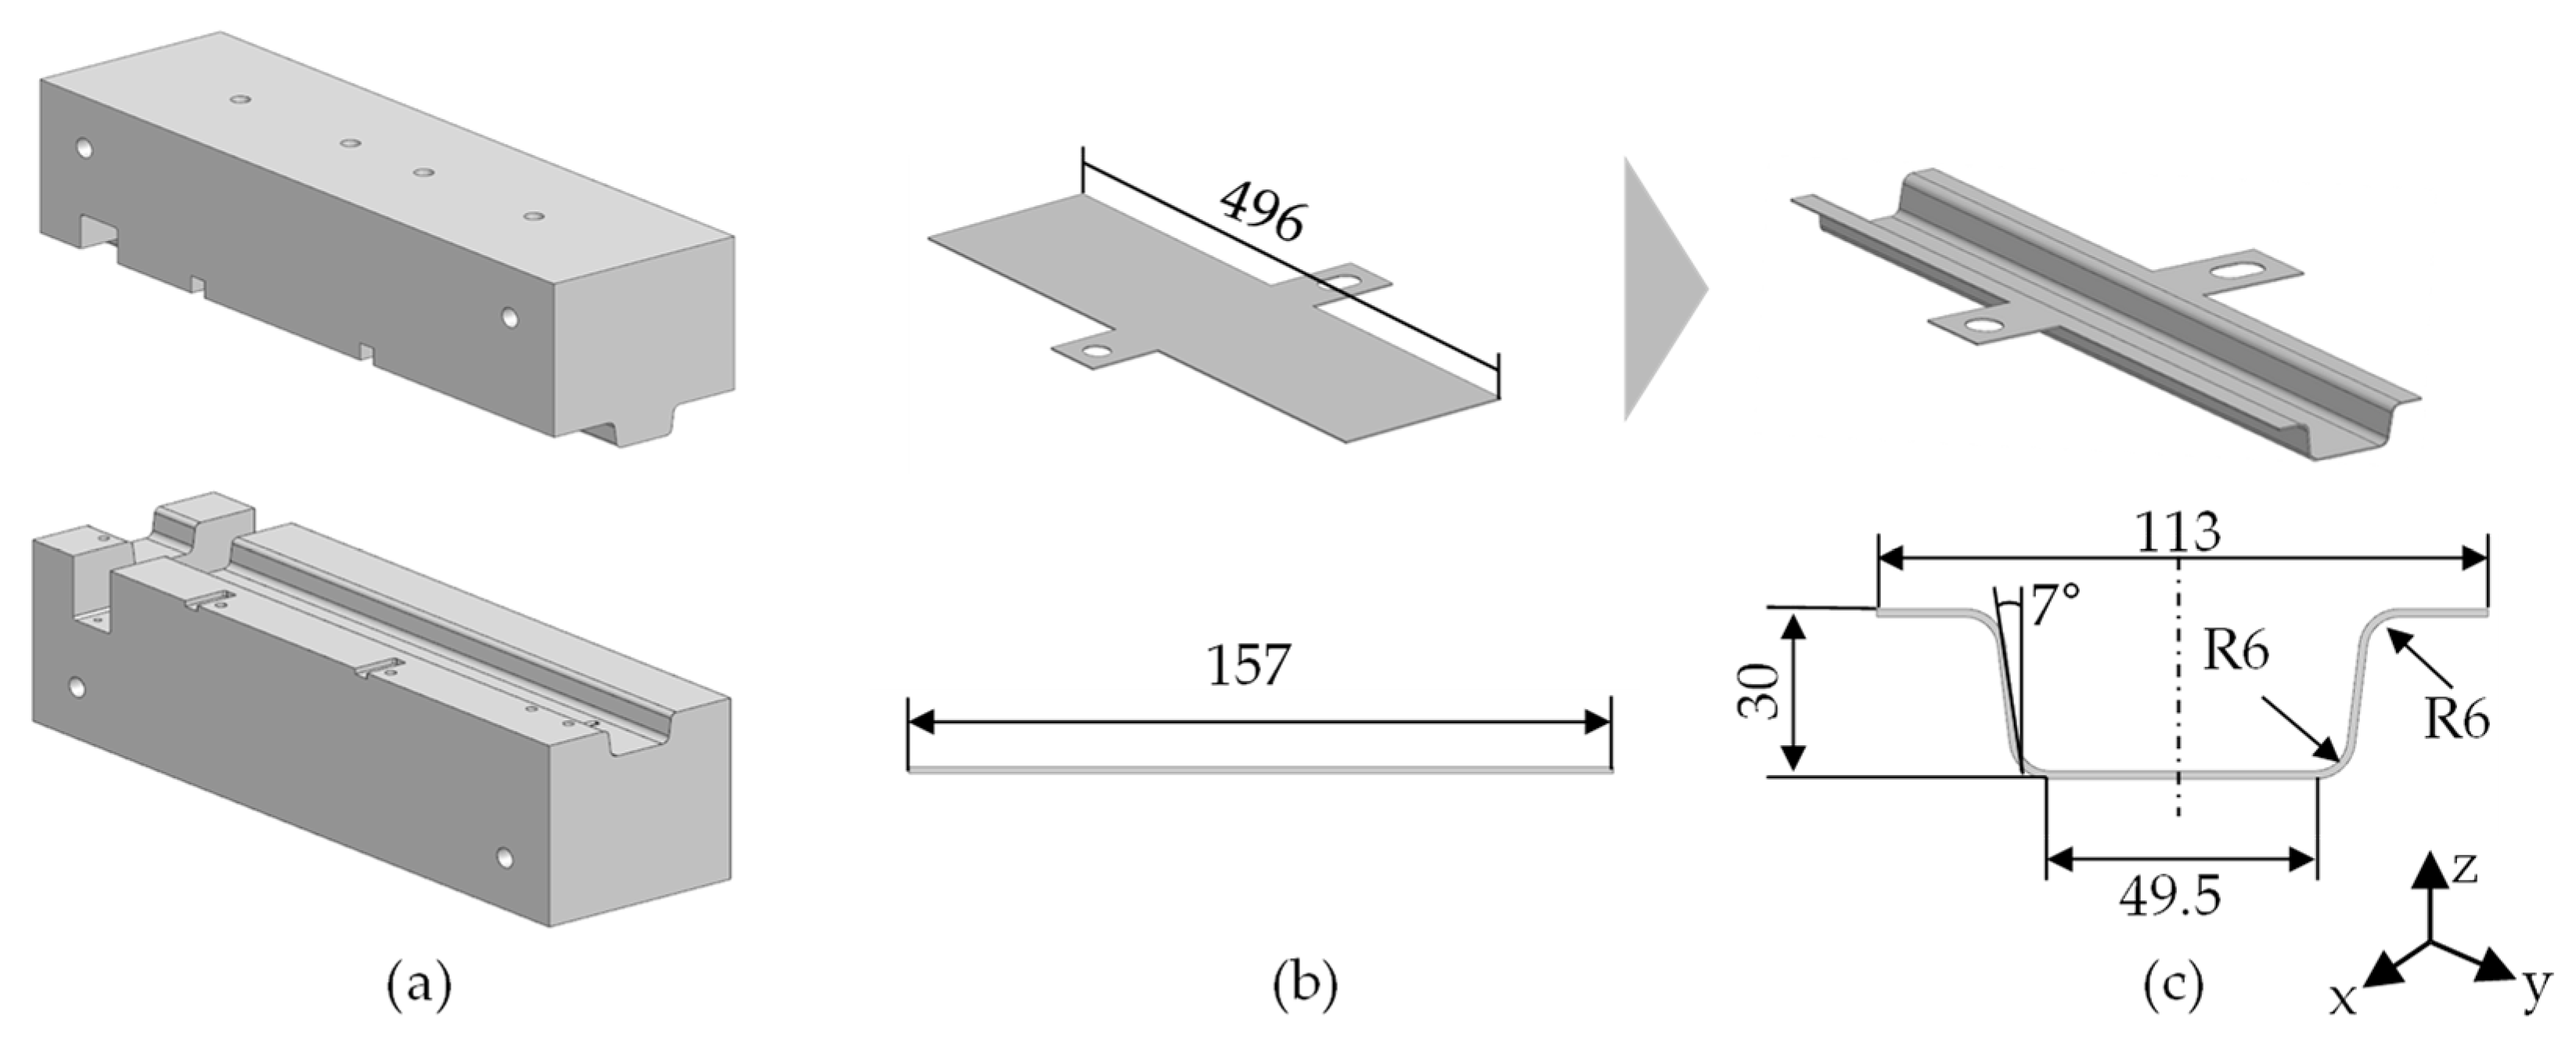
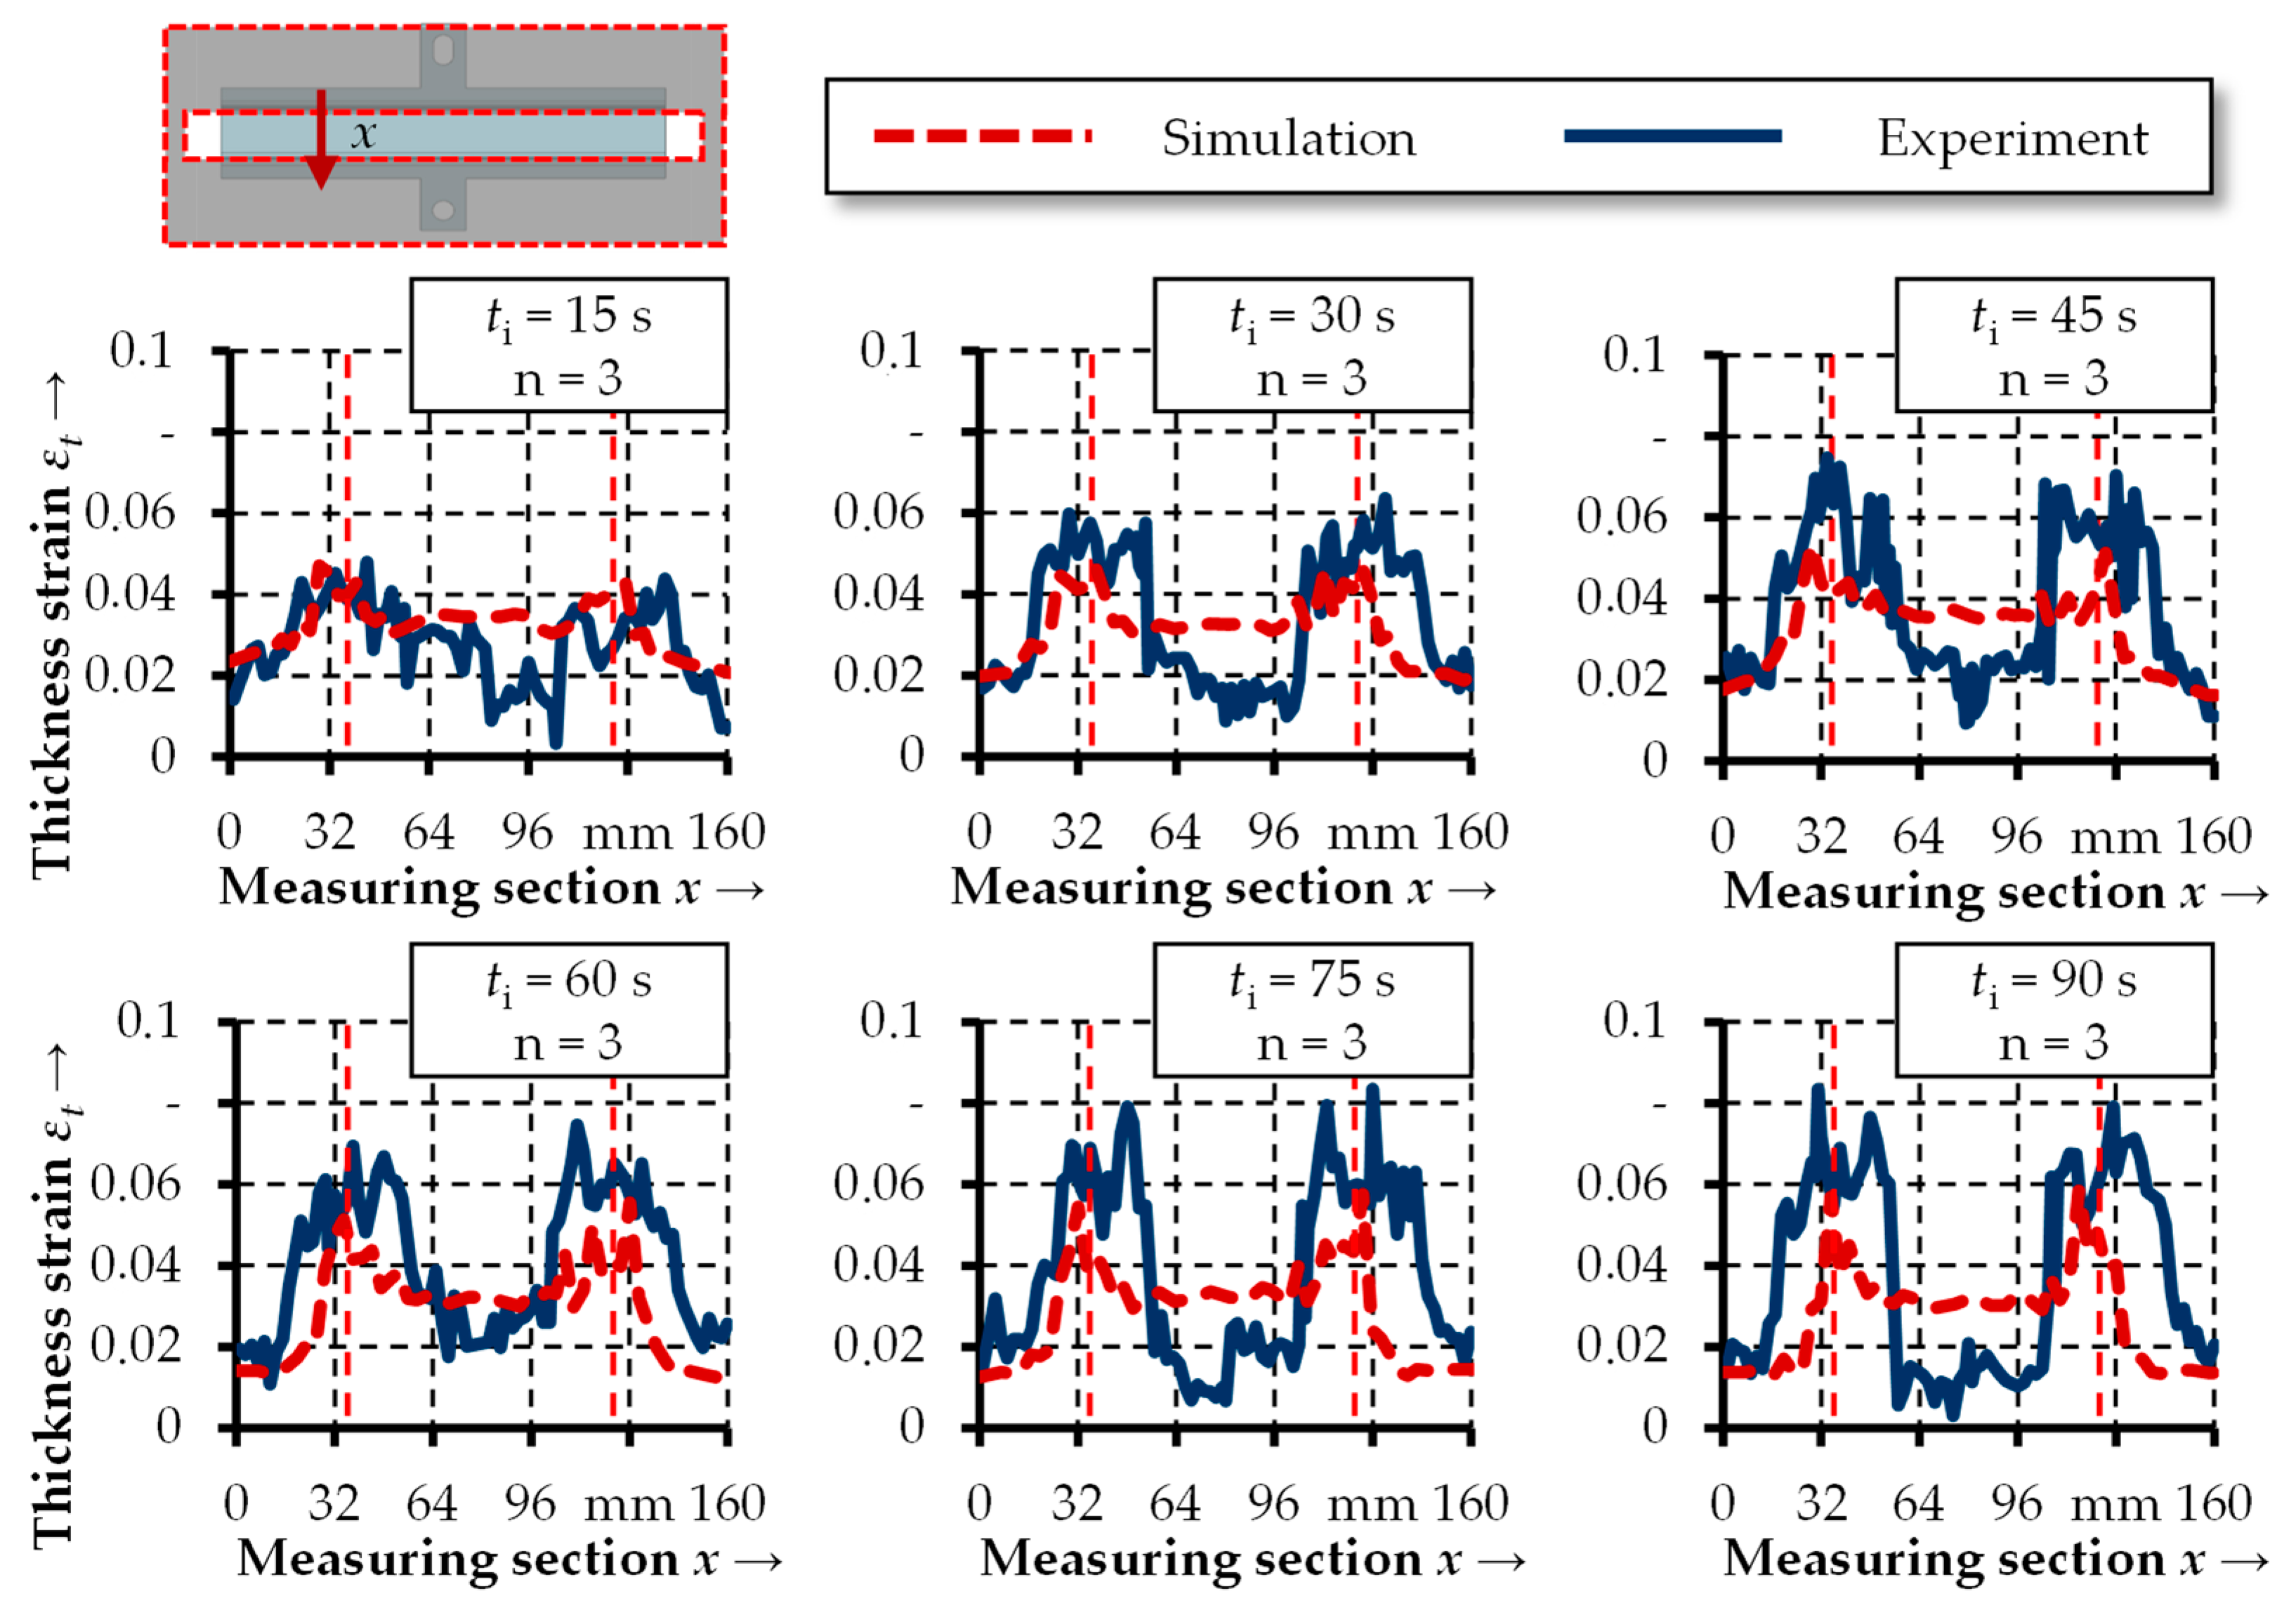
During the forming phase, sheet thinning may occur due to the 7° wall angle. To measure the sheet thickness, cross-sections are taken under an optical microscope and then measured. To assess sheet thinning, the true thickness strain
is measured relative to the sheet thickness of 1.5 mm and plotted across the width of the component (
Figure 11).
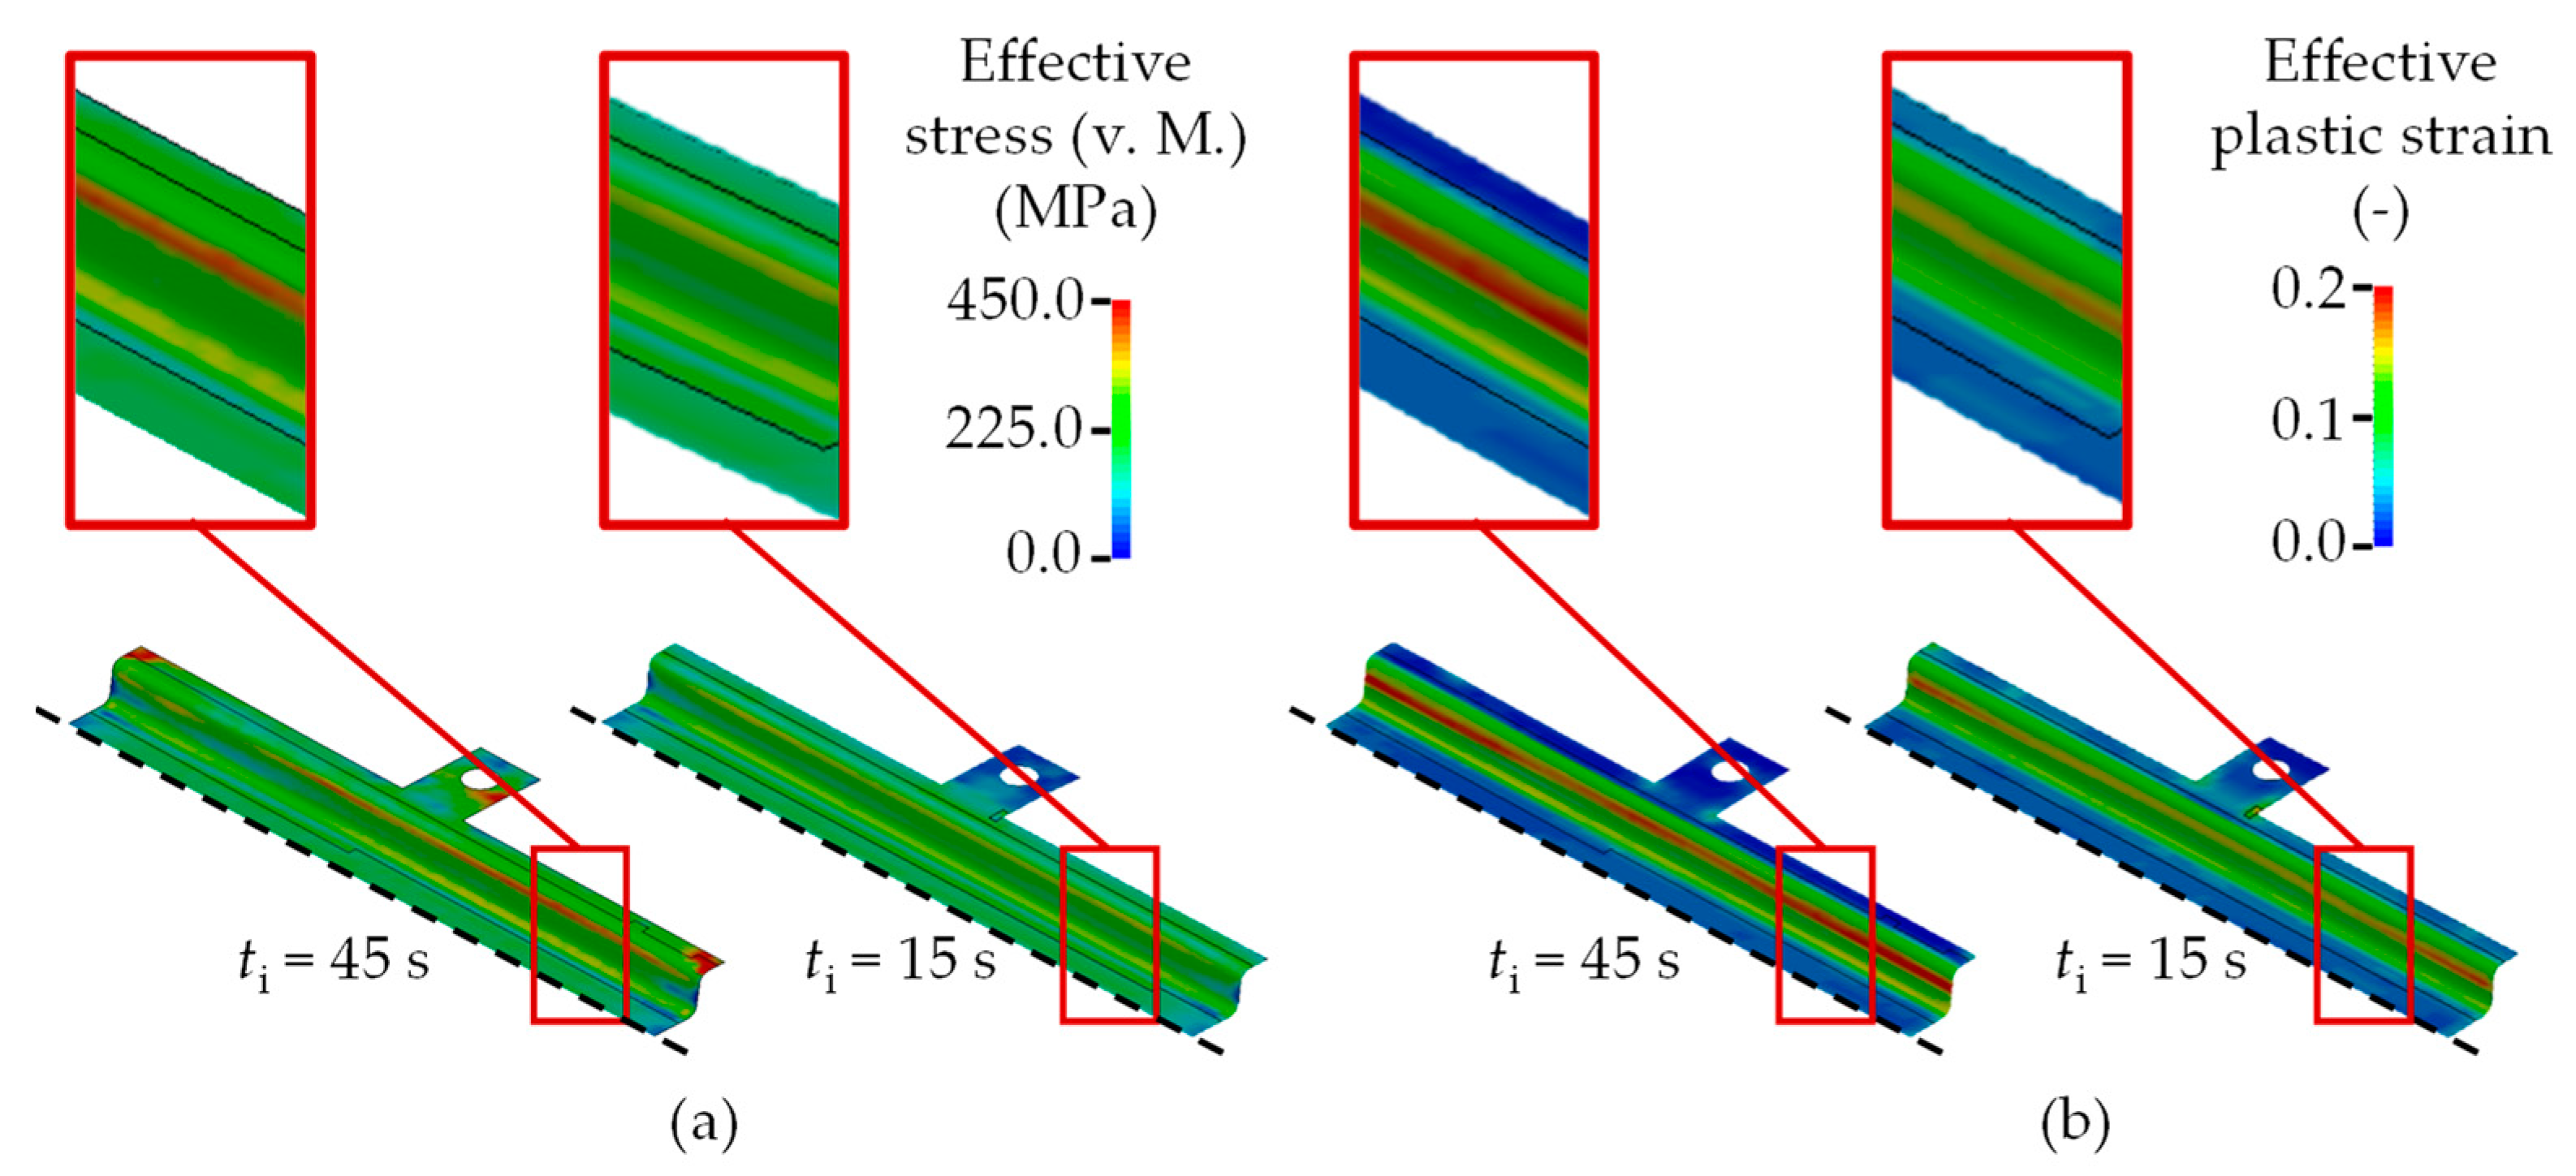
When examining the thickness strain profiles, a notable surge in strain becomes apparent within the wall regions at 20–40 mm and 120–140 mm. The increased sheet-thinning effect observed in the wall region is primarily due to constrained material flow resulting from intermediate cooling in the covered area of the component. This phenomenon induces the development of tensile stresses within the wall, resulting in increased sheet thinning and increased true strain values. To illustrate this further,
Figure 12 shows the distribution of von Mises effective stresses (
Figure 12a) and effective plastic strains (
Figure 12b) for intermediate cooling durations (
ti) of 15 s and 45 s. For longer intermediate cooling durations (
ti), stresses locally increase in the wall region, causing uneven material flow in this region and ultimately leading to increased sheet thinning. Simultaneously, the distribution of effective plastic strain for 15 s and 45 s (
Figure 12b) confirms an increase within the wall region with longer intermediate cooling durations (
ti).
Consequently, the increased implementation of partial intermediate cooling leads to an augmentation of the heterogeneity in strain and stress distribution within the wall region of the formed test component. To visualize the heterogeneity of the effective plastic strain,
Figure 13 depicts the maximum effective plastic strain of the test component after quenching as a function of partial intermediate cooling. The analysis of the diagram (
Figure 13) reveals that the maximum plastic strain increases to a value of 0.26 up to an intermediate cooling time of 45 s. Further increments in the intermediate cooling duration (
ti) do not yield a significant impact on the maximum plastic strain.
These findings suggest that local strain and consequent sheet thinning within the wall region can be addressed by numerical modeling. However, the numerical simulation consistently underestimates the thickness strain in comparison to the experimental outcomes across all parameter variations. In addition to the strain hardening behavior of the different phases, as derived from the research by Eller et al. [
26] and integrated into the material model “*MAT_244”, the assumption of a constant Coulomb friction coefficient (
µ) of 0.45 can have a pronounced effect on the numerical calculation of true strain profiles.
5. Conclusions
In summary, the present work has shown that the partial intermediate cooling duration in the TemperBox® has an influence on the phase transformation and the resulting mechanical properties. The results showed that the hardness values remained consistent in the uncovered area, but in the covered area of the hat profile, they decreased depending on the duration of partial intermediate cooling (ti). Beyond 45 s of intermediate cooling, no further reduction in hardness was observed, leading to a more uniform hardness distribution in the covered area. These findings are in good agreement with both experimental and numerical data, demonstrating a distinct soft area in the component after 45 s of partial intermediate cooling. Additionally, this study demonstrated that partial intermediate cooling exerts an influence on the transition zone between hard and soft areas of the components, resulting in more distinct hard and soft areas and narrower transition areas with extended intermediate cooling durations. Furthermore, an approach to simulate the partial intermediate cooling with the TemperBox® was presented and validated. Overall, the combination of the view factor calculation and the use of the material model “*MAT_244” is suitable for the prediction of the semi-finished product temperature and the Vickers hardness after tailored tempering with intermediate cooling. The tensile tests confirmed the results from the measured hardening profiles and showed that the tensile strength in the covered area decreased with increasing intermediate cooling duration up to 60 s, while the elongation at break increased significantly from 60 s onwards. It is also evident that the duration of intercooling impacts the true strain in the thickness direction within the wall region of the component. A longer intermediate cooling duration of up to 45 s results in a higher thickness stress, mainly due to the increased heterogeneity of stress and strain in the wall region of the test component. In the simulation, the thickness strain is underestimated. For components with more complex boundary conditions in terms of geometry and tool contact, it is necessary to apply a strain rate, temperature- and phase-dependent hardening behavior, and a pressure- and temperature-dependent coefficient of friction.
