Review

The Post-Processing of Additive Manufactured Polymeric and Metallic Parts

Department of Mechanical & Aerospace Engineering, School of Engineering & Digital Sciences, Nazarbayev University, 53 Kabanbay Batyr Avenue, Astana 010000, Kazakhstan
*
Author to whom correspondence should be addressed.
J. Manuf. Mater. Process. 2022, 6(5), 116; https://doi.org/10.3390/jmmp6050116
Submission received: 27 August 2022 / Revised: 24 September 2022 / Accepted: 28 September 2022 / Published: 4 October 2022

Abstract

:
The traditional manufacturing industry has been revolutionized with the introduction of additive manufacturing which is based on layer-by-layer manufacturing. Due to these tool-free techniques, complex shape manufacturing becomes much more convenient in comparison to traditional machining. However, additive manufacturing comes with its inherent process characteristics of high surface roughness, which in turn effect fatigue strength as well as residual stresses. Therefore, in this paper, common post-processing techniques for additive manufactured (AM) parts were examined. The main objective was to analyze the finishing processes in terms of their ability to finish complicated surfaces and their performance were expressed as average surface roughness (Sa and Ra). The techniques were divided according to the materials they applied to and the material removal mechanism. It was found that chemical finishing significantly reduces surface roughness and can be used to finish parts with complicated geometry. Laser finishing, on the other hand, cannot be used to finish intricate internal surfaces. Among the mechanical abrasion methods, abrasive flow finishing shows optimum results in terms of its ability to finish complicated freeform cavities with improved accuracy for both polymer and metal parts. However, it was found that, in general, most mechanical abrasion processes lack the ability to finish complex parts. Moreover, although most of post-processing methods are conducted using single finishing processes, AM parts can be finished with hybrid successive processes to reap the benefits of different post-processing techniques and overcome the limitation of individual process.

1. Introduction

Additive manufacturing (AM) is a manufacturing technology in which a part is built in a layer-by-layer fashion directly from its CAD model. The part is sliced into layers of specified thickness, and the AM machine is coordinated using a computer numerical control (CNC) to draw the resulting cross-section on top of the previous layer. Thus, this technology can build a very complex and customized part with less effort than traditional manufacturing technologies. An additional benefit comes from the reduced amount of waste, and for this reason, the cost for the part is reduced compared to machining operations. Because of that, additive manufacturing is extensively used in advanced fields such as aerospace, automotive, and biomedical engineering. In addition, it is also used to produce patterns for rapid casting.
On the other hand, parts produced by AM have process-inherent defects, and one of the most important is the surface roughness. Because of layered manufacturing and the stair-step effect, the surface finish of the parts produced by AM is poorer compared to the traditional manufacturing methods [1,2]. This is especially true for the inclined and curved surfaces. Moreover, for metal powder-based systems, apart from stair-step effect, there is also an agglomeration of partially melted particles which leads to surface deterioration. Shrinkage, expansion, thermal stresses, and warping can also adversely affect the dimensional accuracy [3]. Apart from the relatively poor appearance, these parts also have lower fatigue resistance due to their surface roughness, as reported by Chan et al. [4] and Gisario et al. [5]. In addition, the high surface roughness of the additive manufactured ducts in aerospace components might reduce the flow performance. Thus, high roughness not only deteriorates the appearance of the part, but also results in the lower performance of such products.
Since the desired mechanical properties and surface roughness are not directly achievable by AM technology alone [6], significant research is conducted to optimize and reduce the surface roughness of the additive manufactured parts. This research can be subdivided into two, namely pre-processing and post-processing. At the pre-processing stage, optimum process parameters of additive manufacturing are selected to reduce the part’s surface roughness. Anitha et al. [7] pointed out the importance of the layer thickness and the fact that a decrease in layer thickness leads to the surface roughness’ reduction. However, thinner layer thickness leads to an increased production time. Thus, adaptive slicing can be applied to reduce the layer’s thickness when ramps or curves are printed [8]. Alternatively, for improved surface finish, contours can be introduced [9]. Additionally, the surface roughness depends on the part orientation, and its value is low for vertical surfaces. Thus, as pointed out by Martinez-Pellitero et al. [10], the part’s orientation can be also adjusted to obtain smaller roughness on the important surfaces.
However, pre-processing techniques are not very effective methods for reducing the surface roughness of parts which are considered to be fully functional. The pattern produced cannot be used for rapid casting, or the metal part cannot be used as a component of the engine without the application of the finishing process. For this reason, the main purpose of this study is to critically review the most essential finishing techniques for polymer and metal additive manufacturing.
In the following sections, different methods for the finishing of the additive manufactured polymer and metal parts are discussed. The finishing techniques are classified according to the applied energy nature. Further, these techniques are discussed and compared with each other. Finally, the conclusions are drawn.

2. Finishing of the Polymer Parts

The additive manufacturing of polymer parts can be accomplished via many processes. Among them, fused deposition modelling (FDM), fused filament fabrication (FFF), and stereolithography (SLA) are some of the most common ones. However, due to the nature of additive manufacturing, such processes lead to high surface roughness, especially on inclined and curved surfaces, due to the stair-step effect [11]. An example of such a defect is shown in Figure 1 for the cell structure with cylindrical struts manufactured by FDM from tough PLA with a layer height of 20 μm. Observable surface roughness can be seen at low angles (10–45 degrees) with respect to horizontality. For this reason, several methods are proposed to improve the surface roughness (SR) of such parts. By implementation, they can be classified as mechanical abrasion, post-machining, chemical treatment, and coating application.

2.1. Mechanical Abrasion

Mechanical abrasion is one of the most common processes used to finish the additive manufactured parts. It includes various methods, from the simplest using sandpaper to magnetorheological finishing (MRF) and abrasive flow finishing (AFF).
Sandpaper polishing is the simplest method used to finish the parts produced by FDM. It was described by Tiwary et al. [12]. In their work, sandpaper polishing was applied, and the Ra of the part was reduced from 14.4 μm to 0.407 μm. However, sandpaper polishing led to a high wear rate and, as a result, parts dimensions were reduced considerably.
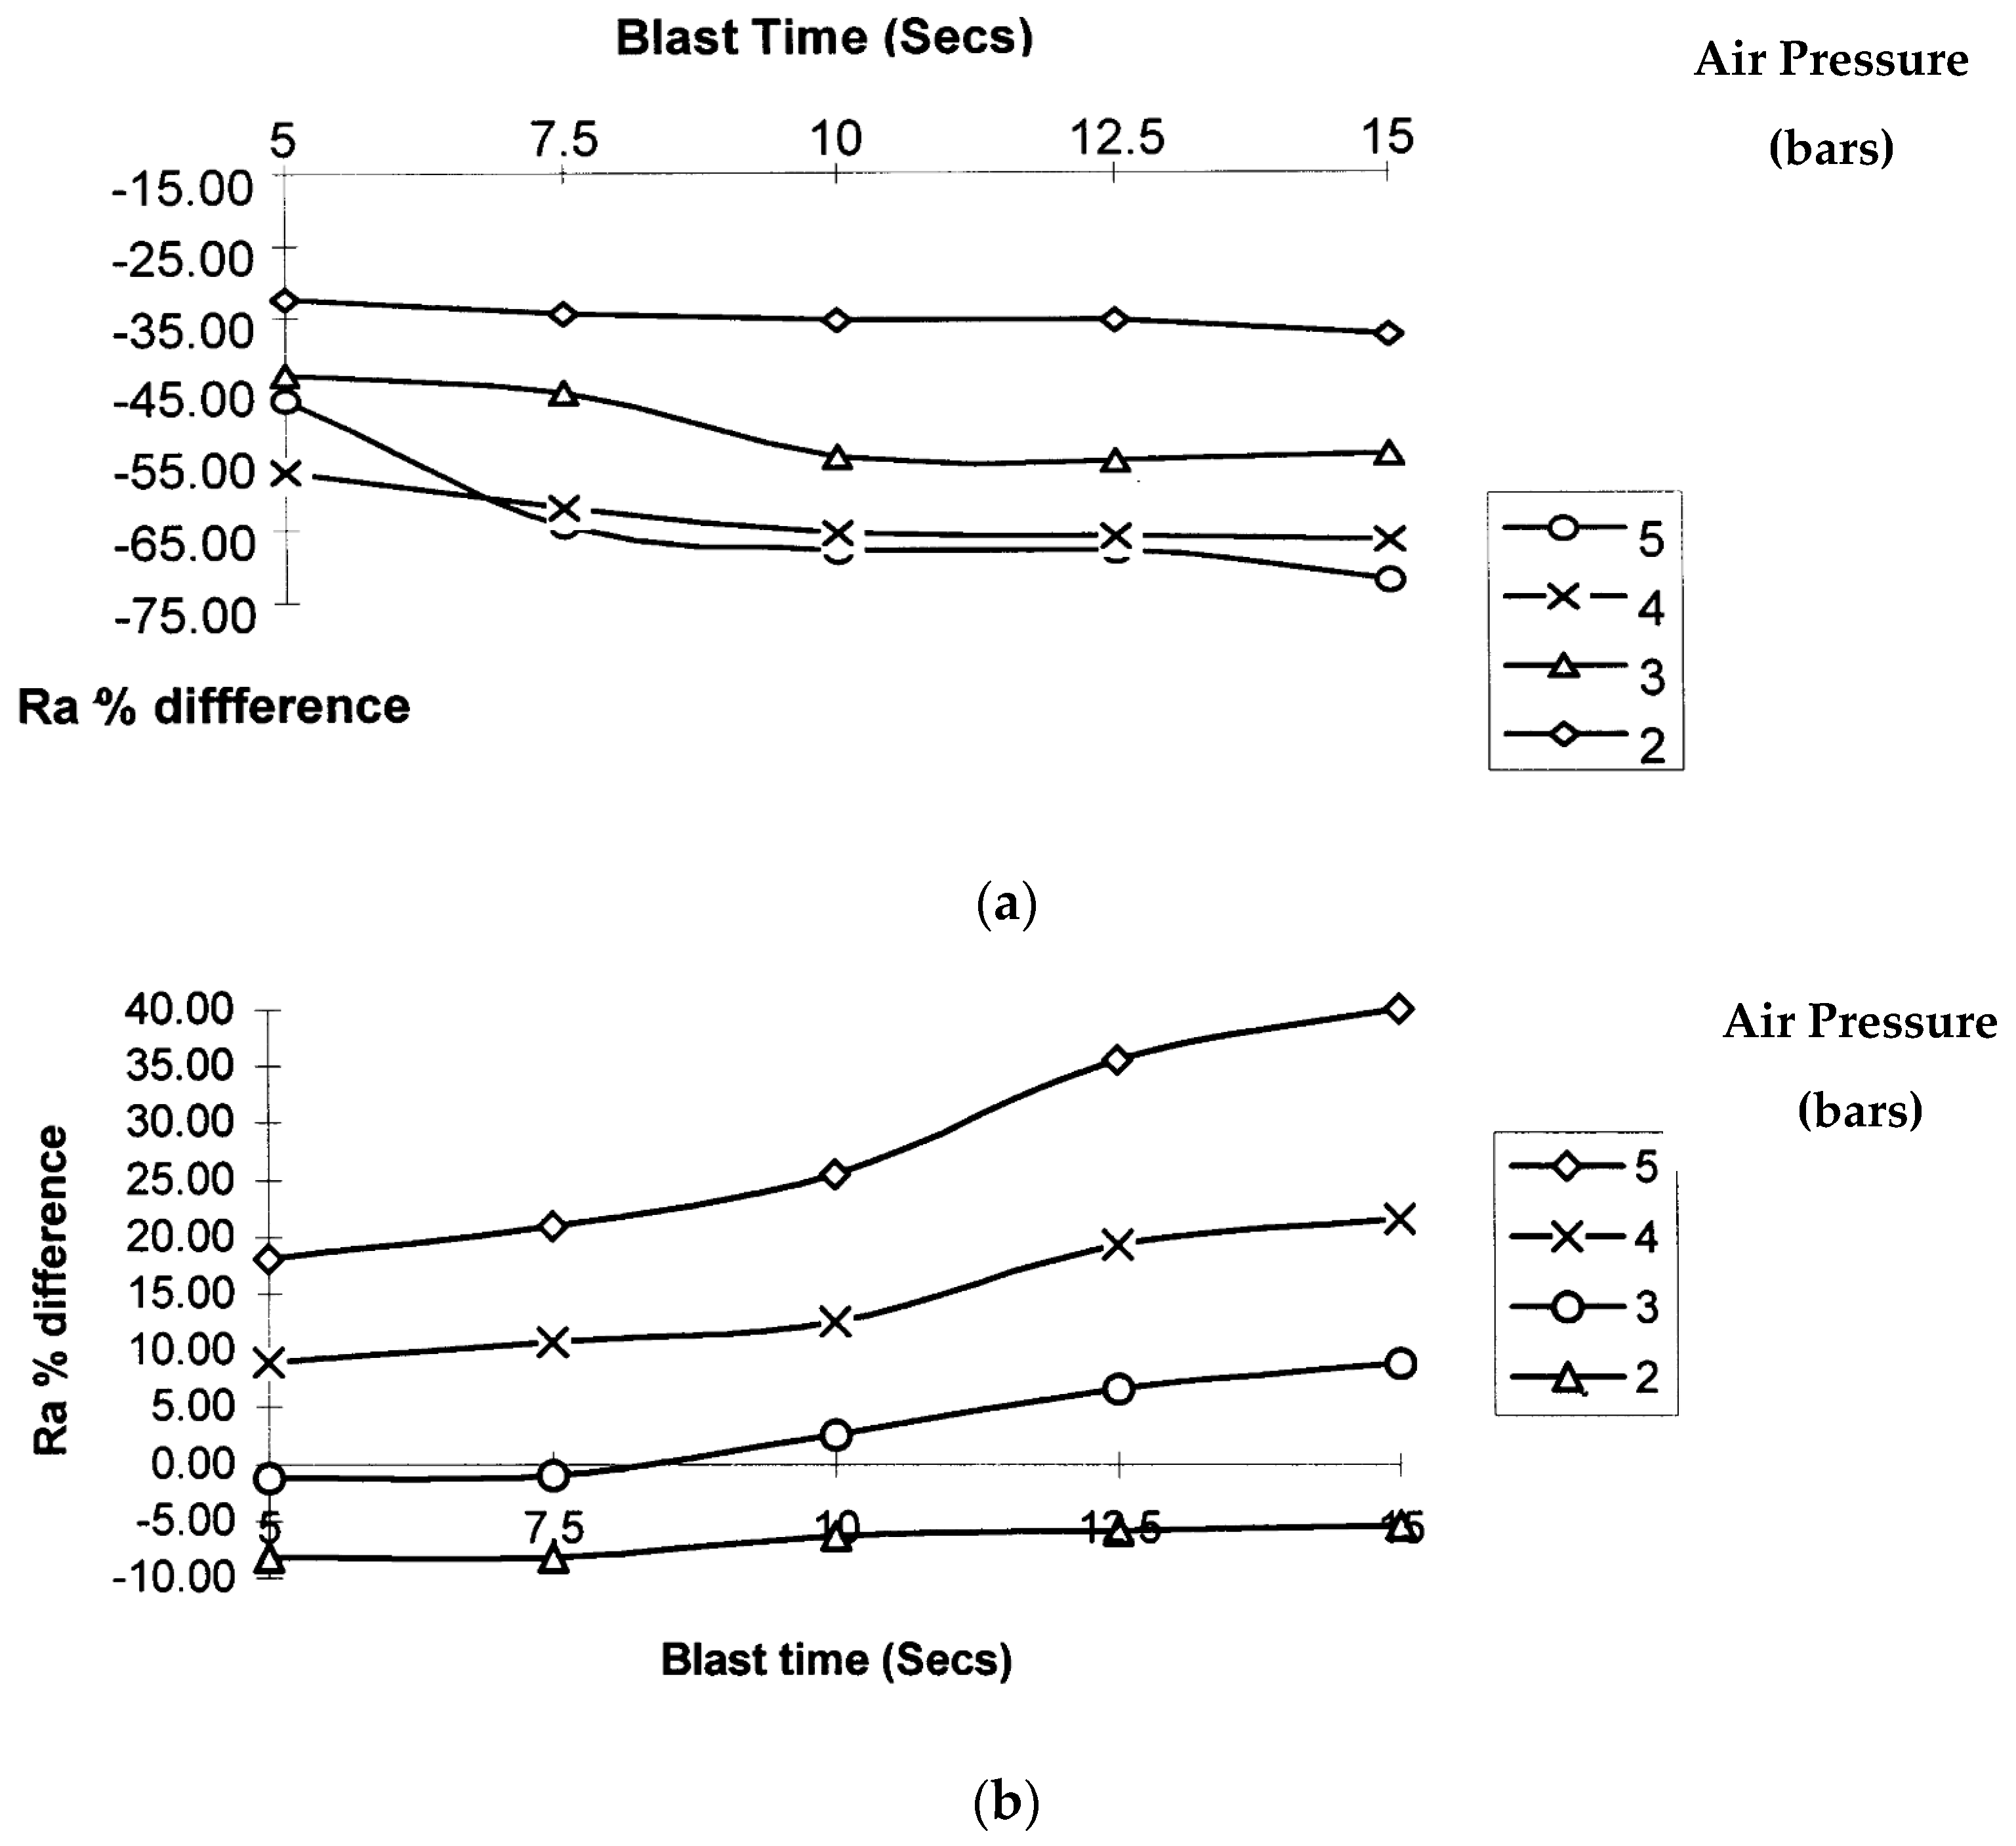
Another abrasive finishing method of polymeric parts produced by AM is abrasive jetting (AJ), or abrasive jet machining (AJM), which Leong et al. [13] studied to finish jewelry patterns for casting made by SLA. In this process, a stream of abrasive particles was directed to the surface to be finished at a specific non-vertical angle. The jet moved according to the programmed path to perform the finishing operation. Two types of abrasives were used, such as aluminum oxide and glass bead, and the effects of the abrasive jet pressure, distance, and blasting time were investigated. It was observed that aluminum oxide produced a finer surface than glass beads, and the pressure and blasting time were the only important parameters. Increased pressure produced finer surfaces; however, the effect of the blasting time was not so pronounced, and the surface roughness stabilized as the blast time increased, as shown in Figure 2. In a similar work conducted by Gajdos et al. [14], abrasive jetting was applied to coated parts (with nano-fillers to fill valleys of the parts and with putty) and to the parts with no coating. It was found that the glass beads perform abrasion poorly compared to the silicon carbide. In addition, coating reduced the Ra value considerably from 11.41 μm to 6.17 and 4.42 μm when the part was coated with nano-fillers and putty, respectively. However, additional post-processing of the coated parts using AJ significantly deteriorated the surface finish. Finally, it was also found that the AJ method with the given process parameters was not as effective as a coating application and led to small roughness reduction.
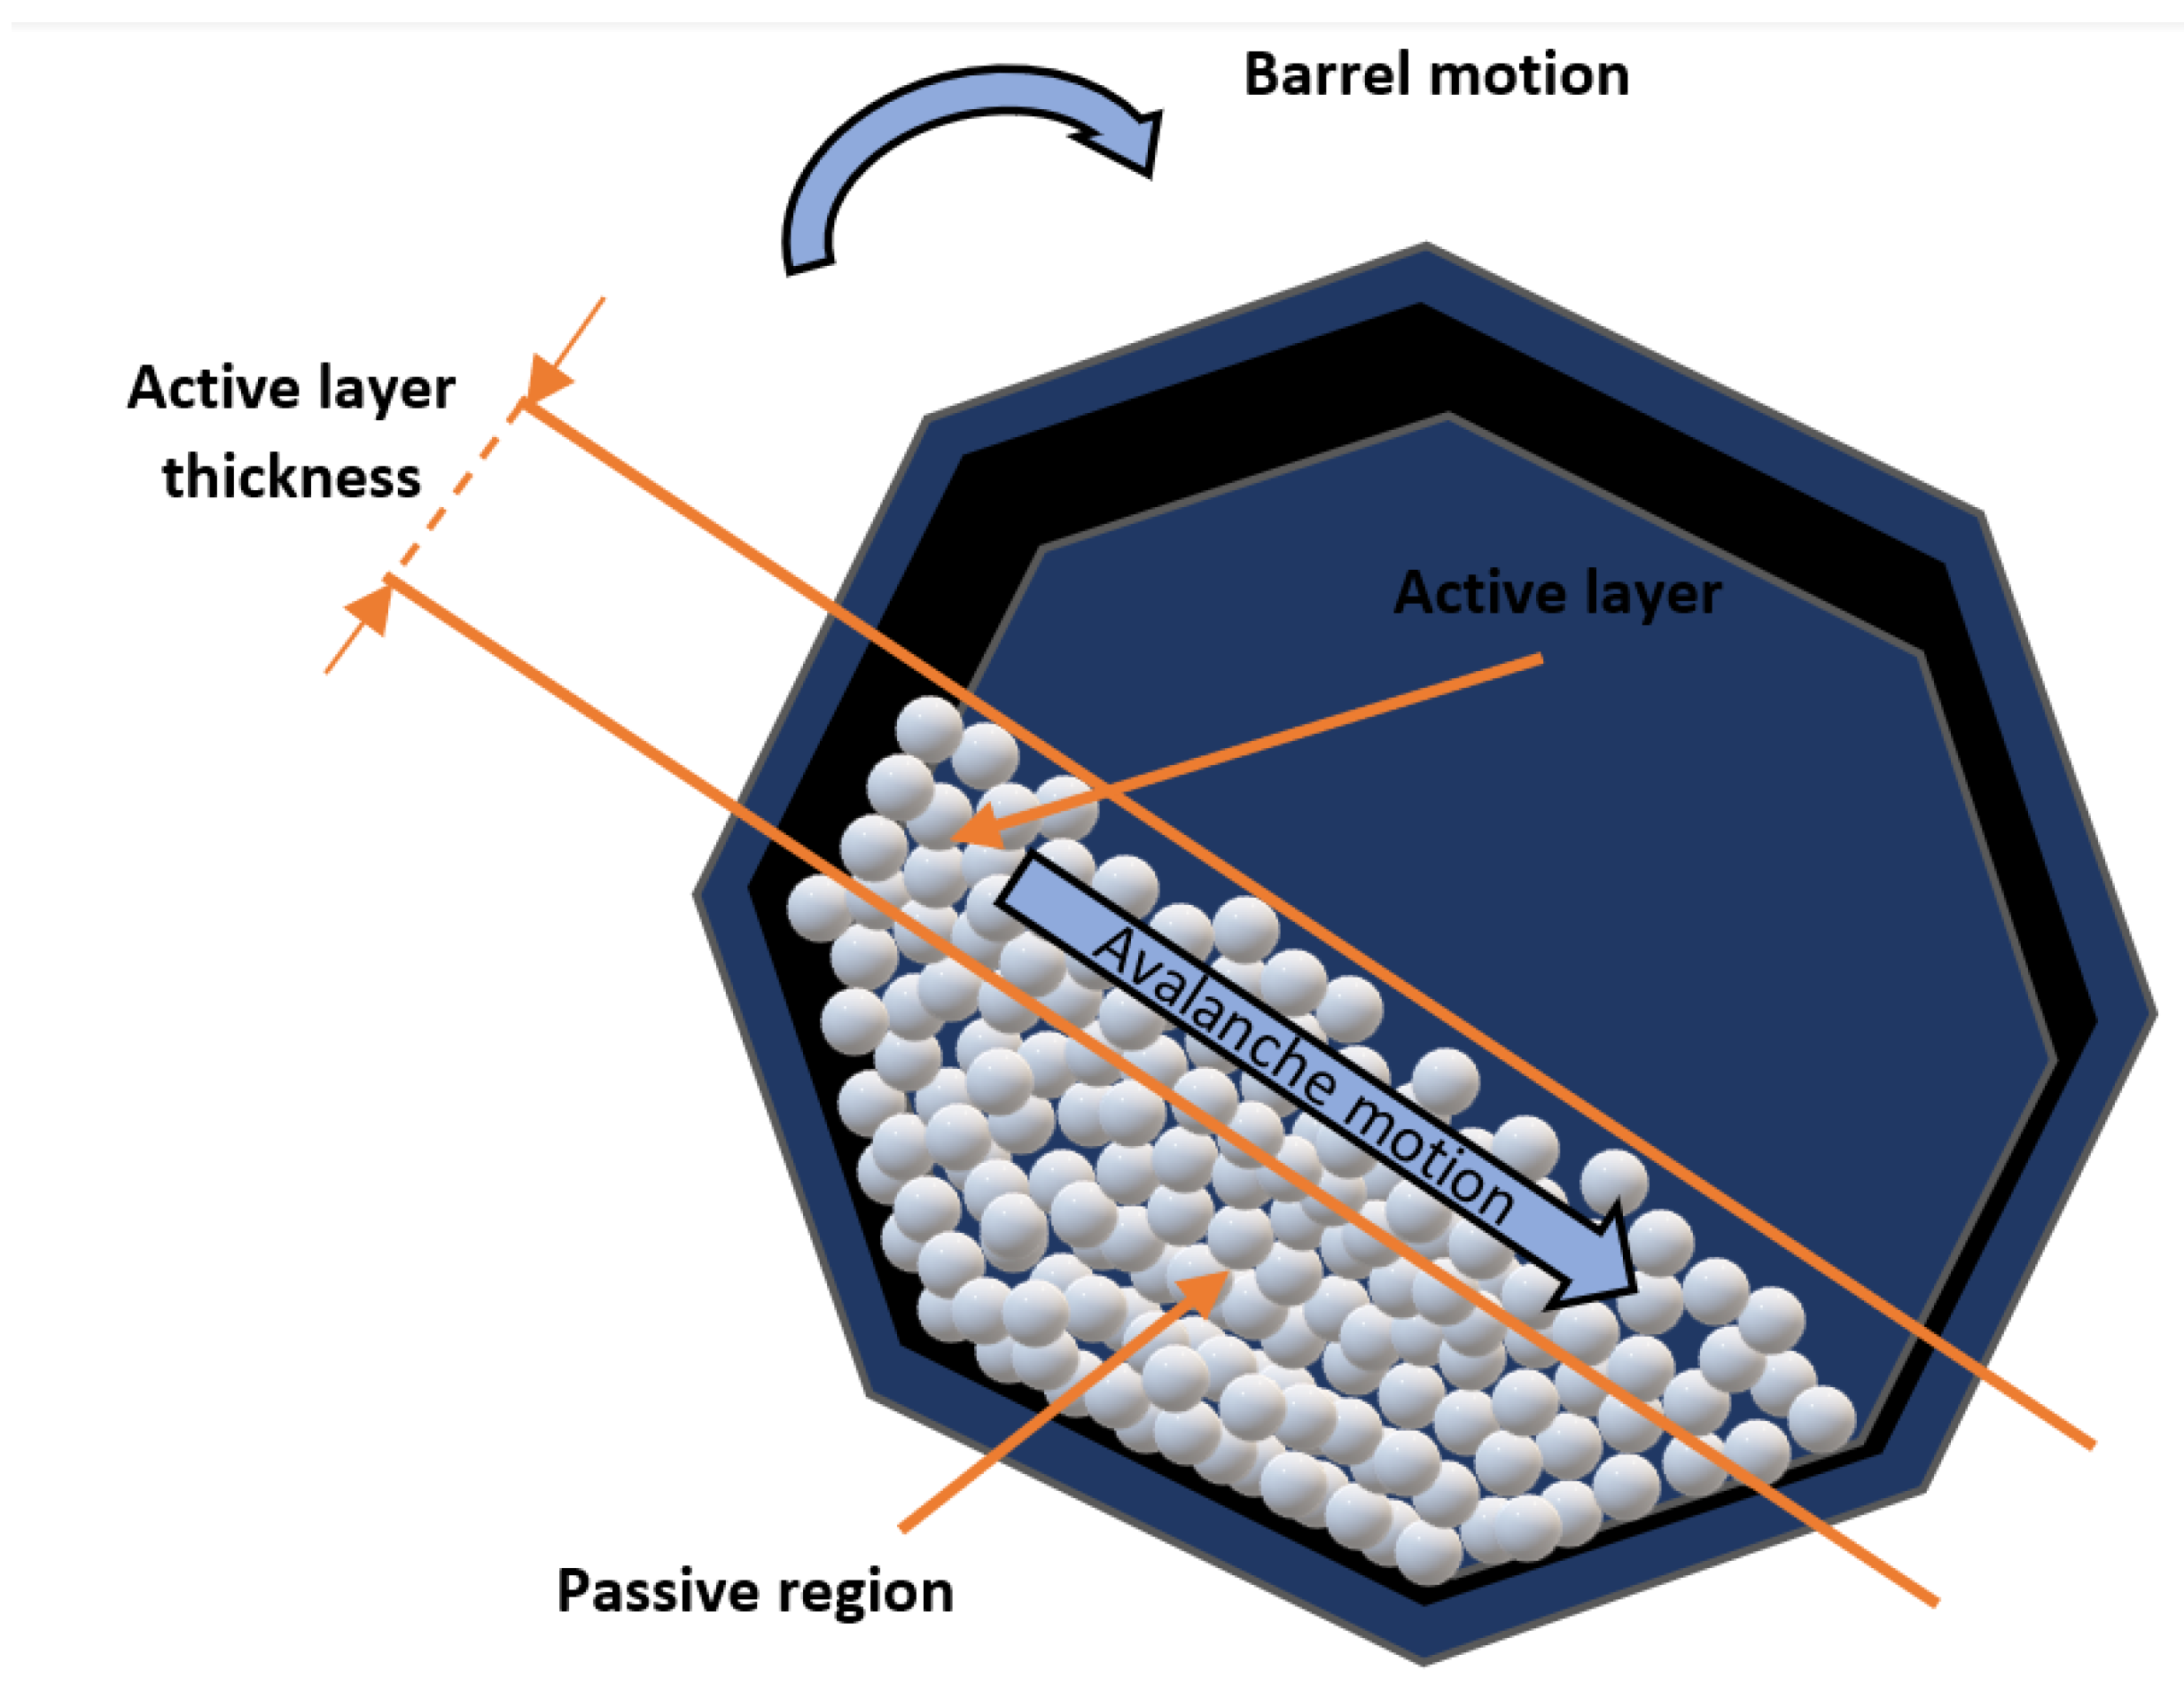
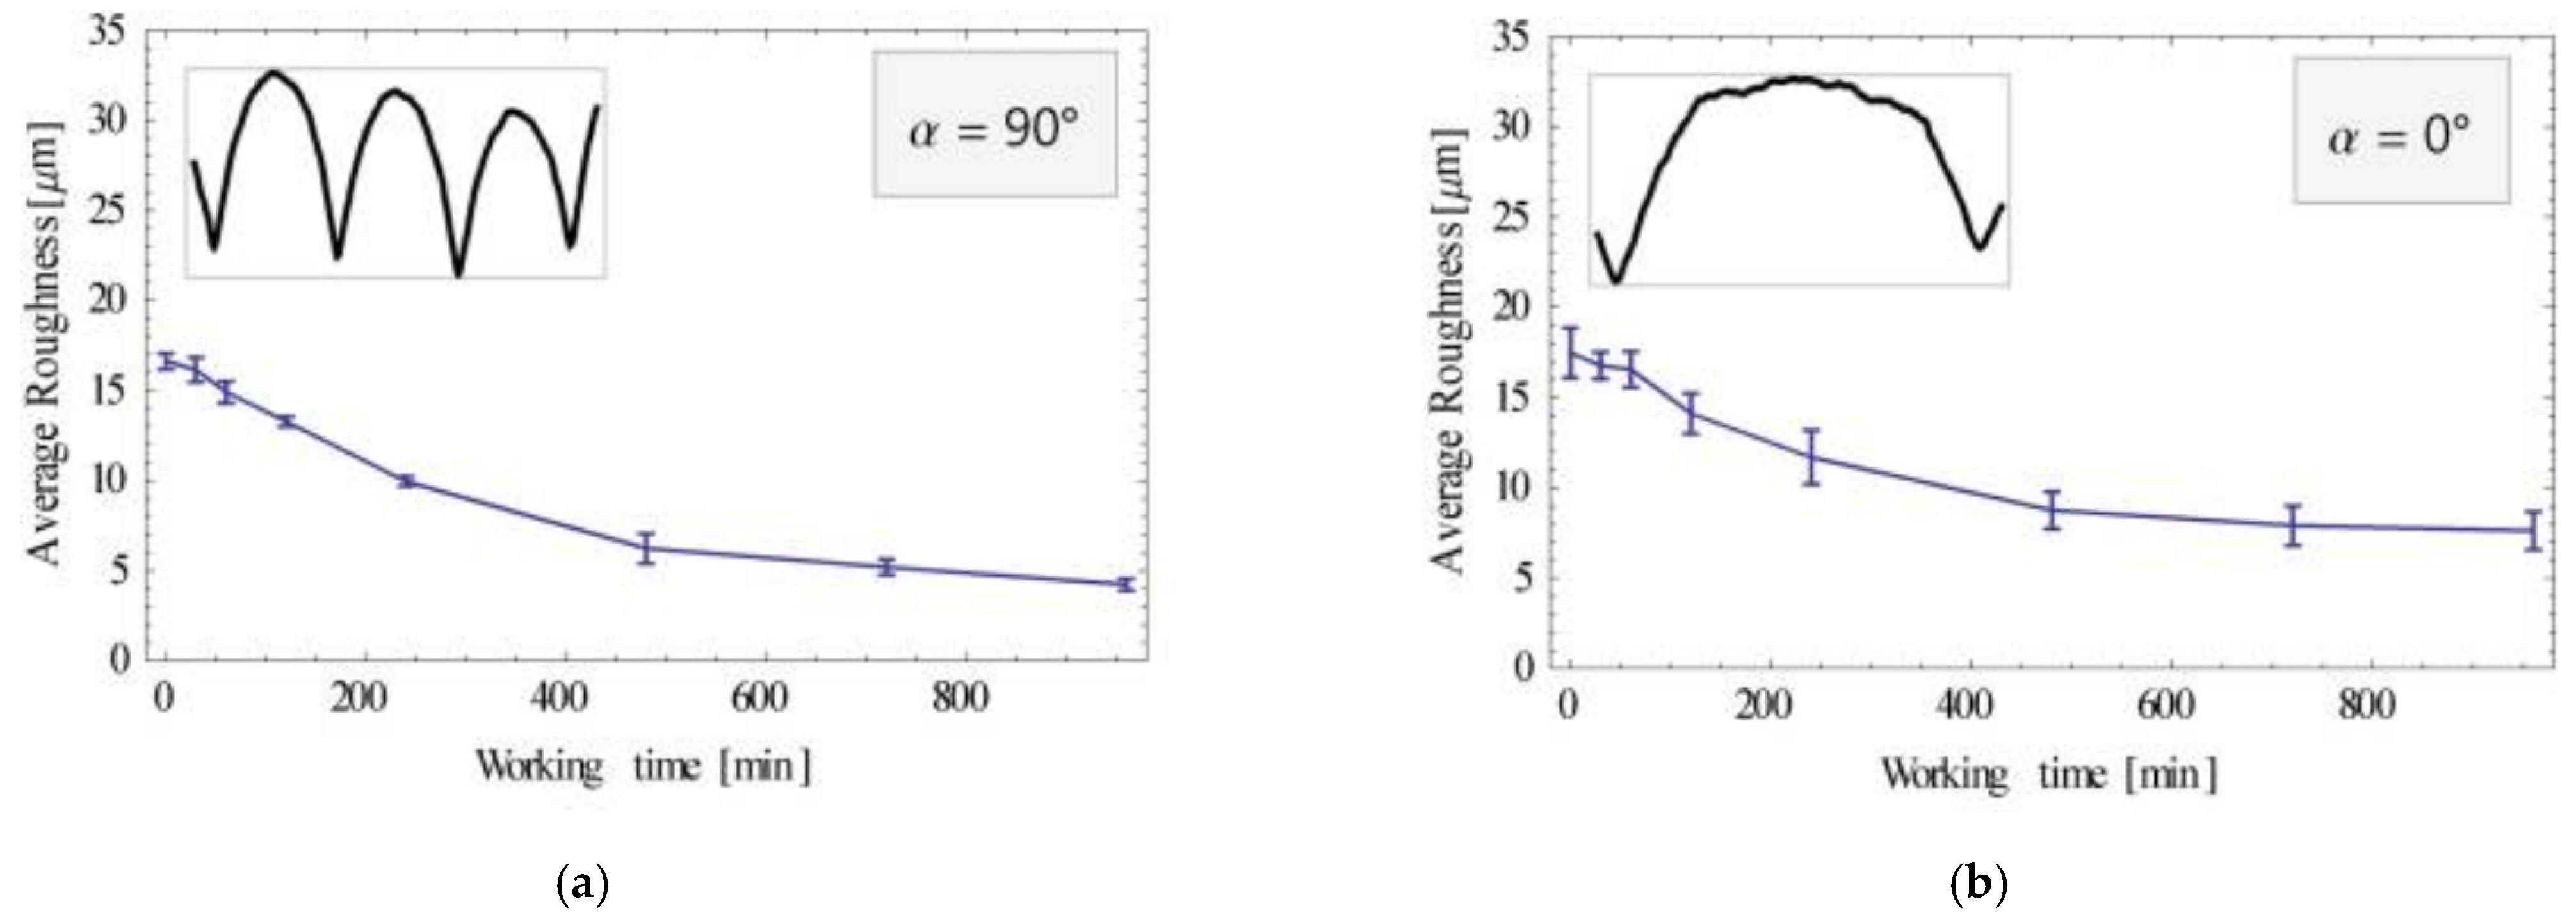
One of the disadvantages of AJ finishing is the lack of flexibility to machine intricate shapes. Thus, abrasive processes which involve placing the part into a finishing medium were developed. One of them is barrel finishing, in which an additive manufactured part is placed in an abrasive media inside a rotating barrel, as shown in Figure 3 [15]. The rotation speed was 20.3 rpm, and the medium was a mixture of 10 L of water and 35 kg of abrasives. The geometry of the abrasives was cylindrical (3 mm in diameter and 10 mm in height). The authors studied how this process performs under different deposition angles of the FDM part. The deposition angle indicated the build orientation of the part was defined as the angle between the stratification direction and the normal that identified the slope of the printed surface. The results are shown in Figure 4. As it can be noticed, despite the long process, the improvement of surface finish was not very good. The process achieved good results at the vertical and planar profiles; however, when inclined profiles were introduced, the surface was rough even after 16 h of finishing. Moreover, with time, the surface roughness decrease rate was considerably reduced. The process was not efficient, but its main advantage was that it could finish complex shapes. Thus, this process can be used as the first finishing operation, followed by more advanced operations such as AFF and MRF. However, the usage of more efficient abrasives (SiC) should be analyzed to increase the rate of finishing.
One of the first studies where abrasive flow finishing was used to improve the surface finish of the parts made by stereolithography (SLA) was carried out by Williams and Melton [17]. In their work, they studied how the grit size, surface orientation, and pressure affect the surface roughness and material removal rate of the AM part. According to ANOVA, these process parameters were not statistically significant for surface roughness; however, a considerable improvement was observed, as indicated in Figure 5. The first cycle of finishing led to a higher decrease in roughness compared to the second cycle. A similar trend was observed in other finishing processes and discussed earlier.
Similar work was conducted by Prajwal et al. [18]. They optimized abrasive the concentration, pressure, finishing time, and layer thickness of the parts produced by FDM to achieve a maximum reduction in the surface roughness (Ra). It was found that increasing the finishing time, extrusion pressure, and abrasive concentration led to the highest reduction in surface roughness. However, it seems that the measure of the decrease in surface roughness was not entirely correct, as the surfaces which were initially very rough exhibit the highest reduction in SR but cannot guarantee the lowest absolute surface roughness.
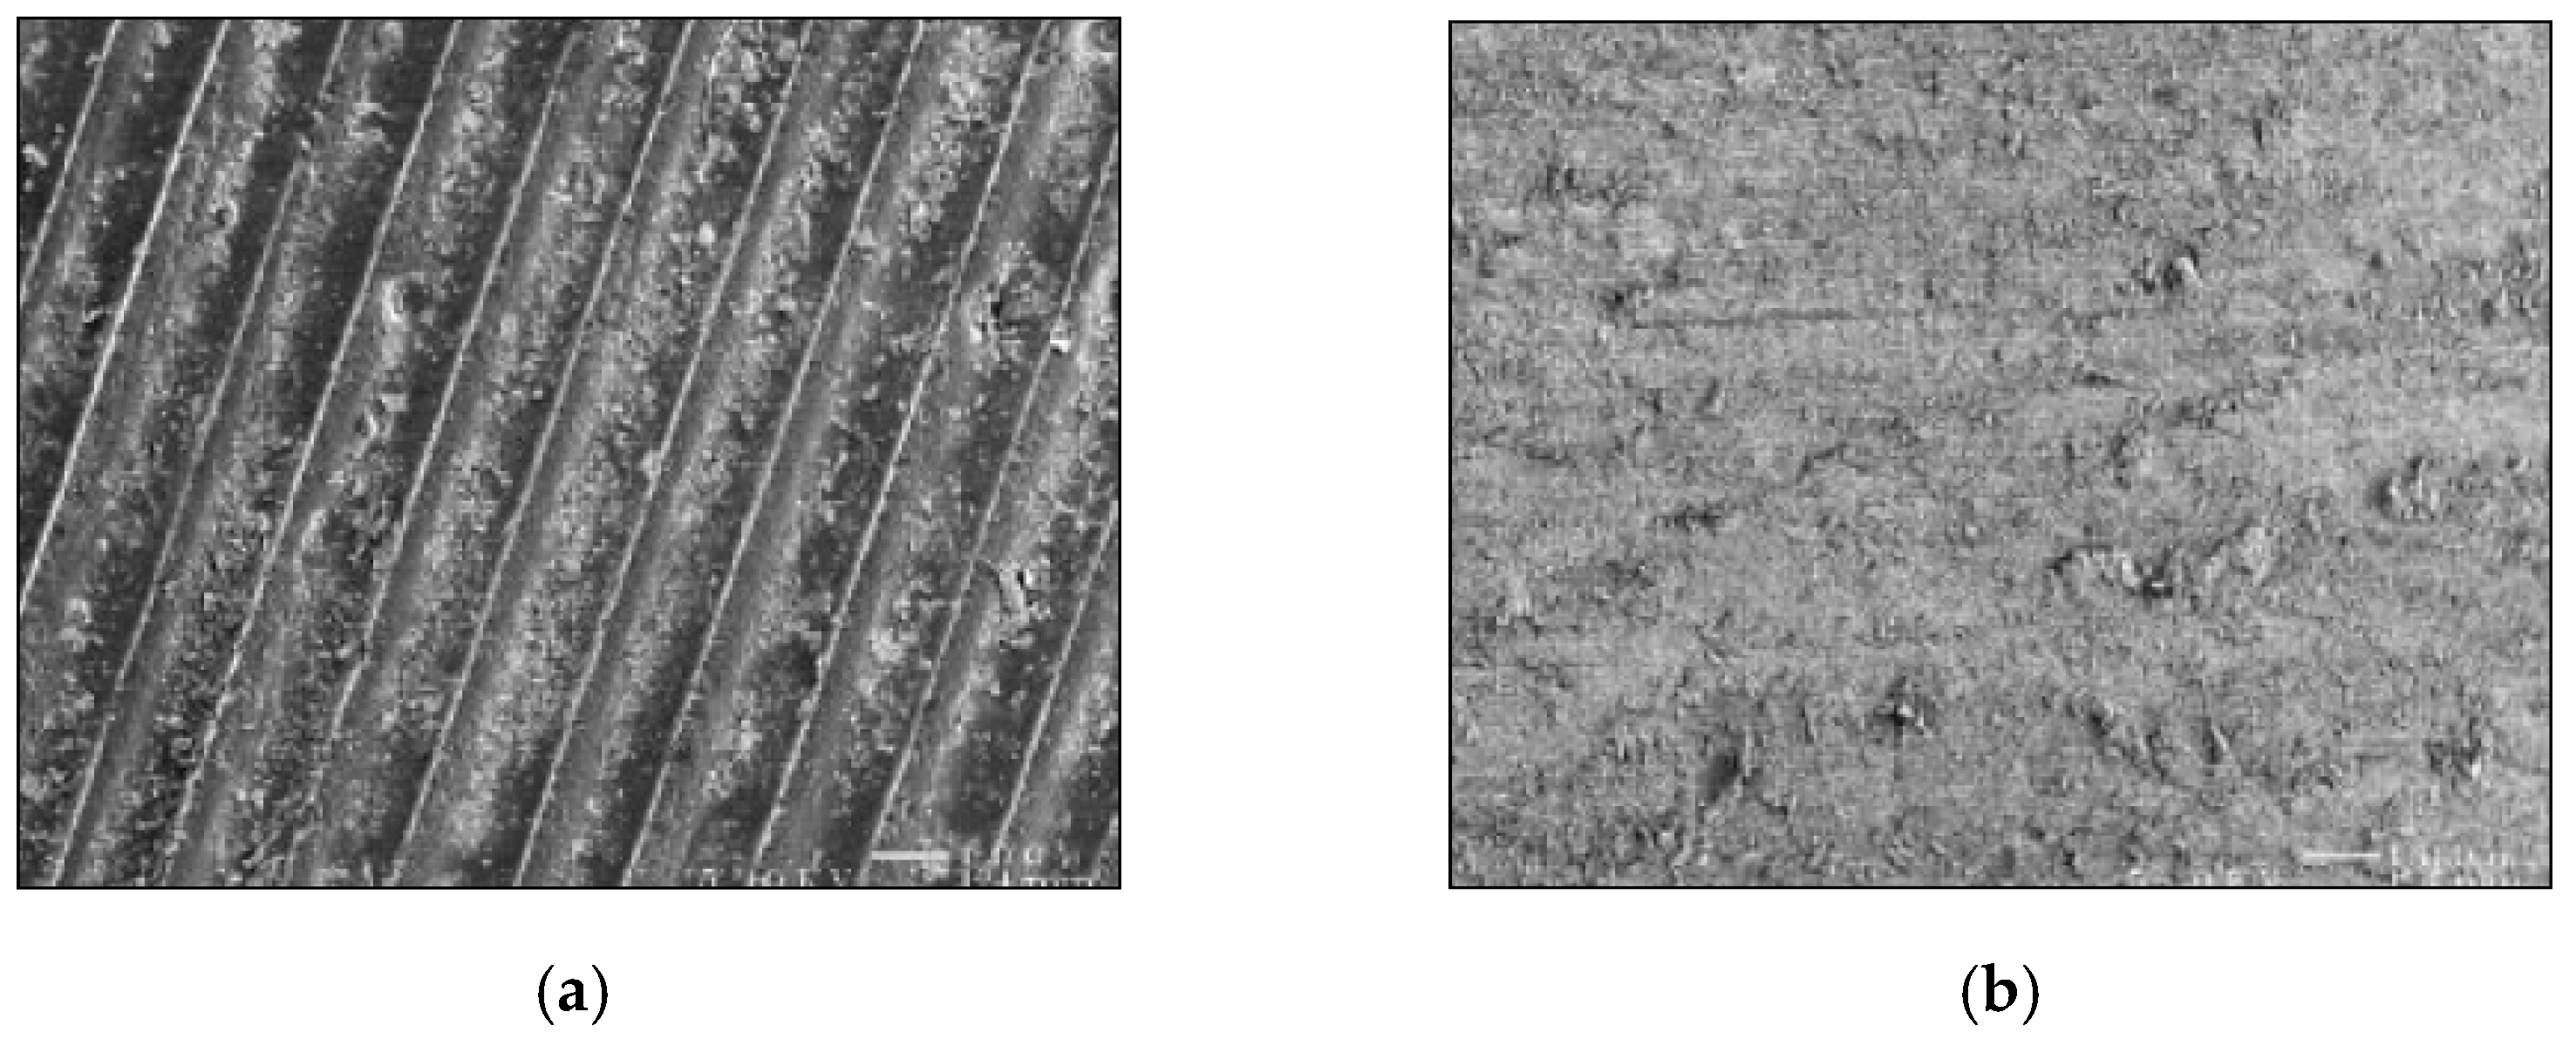
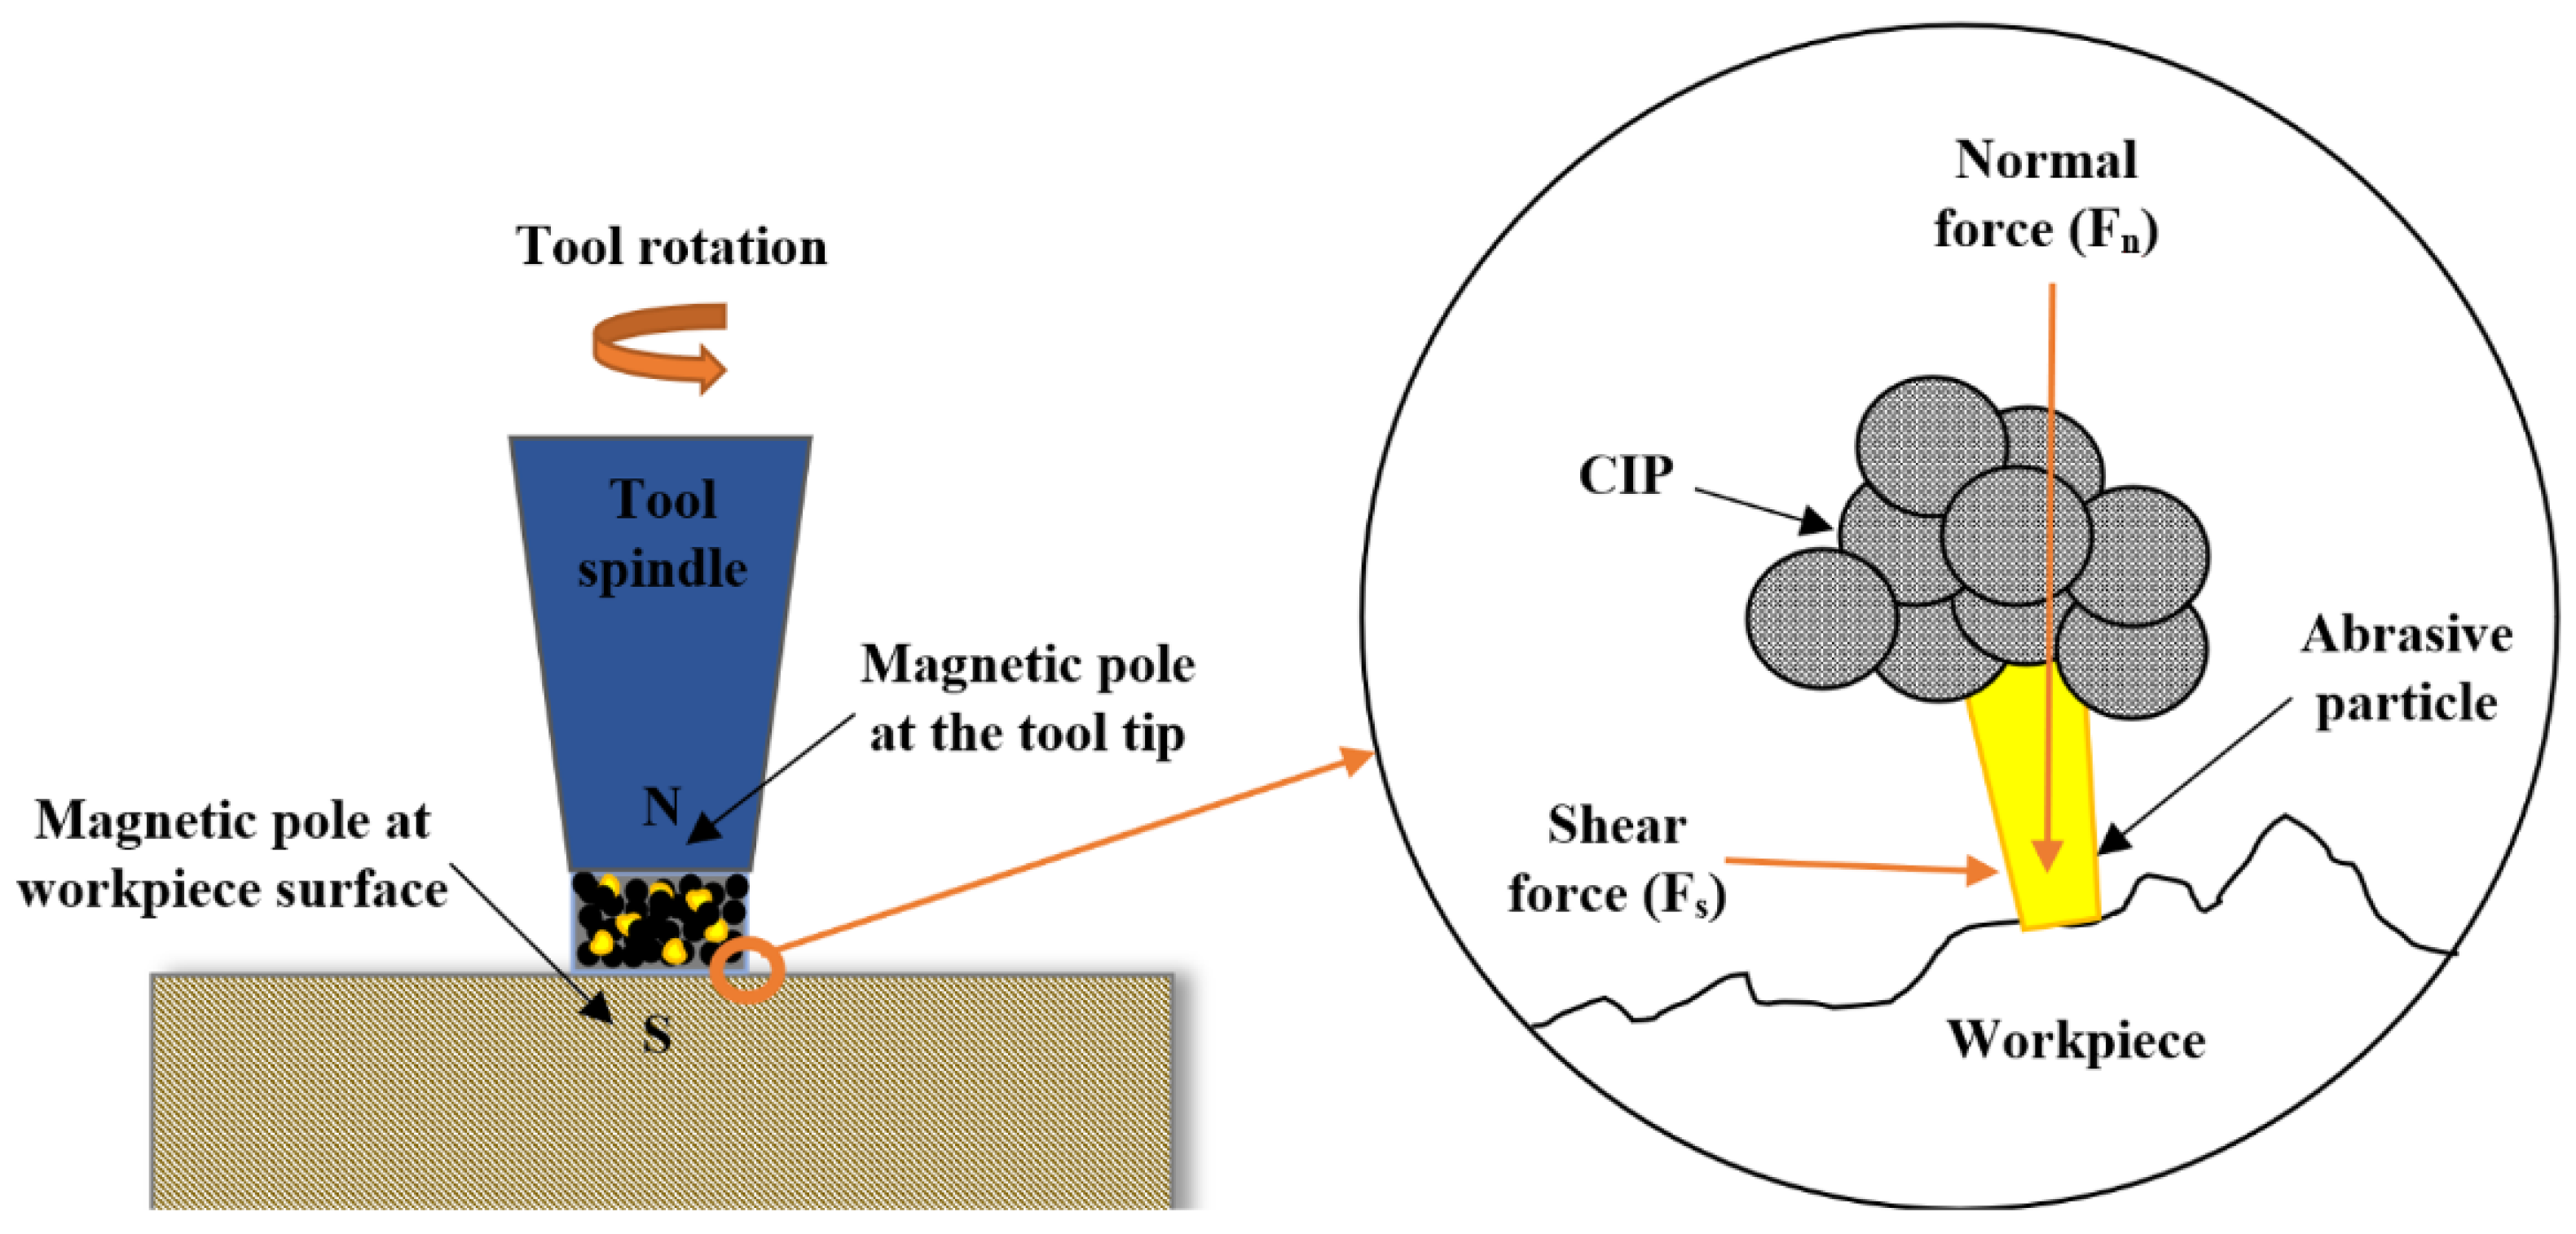
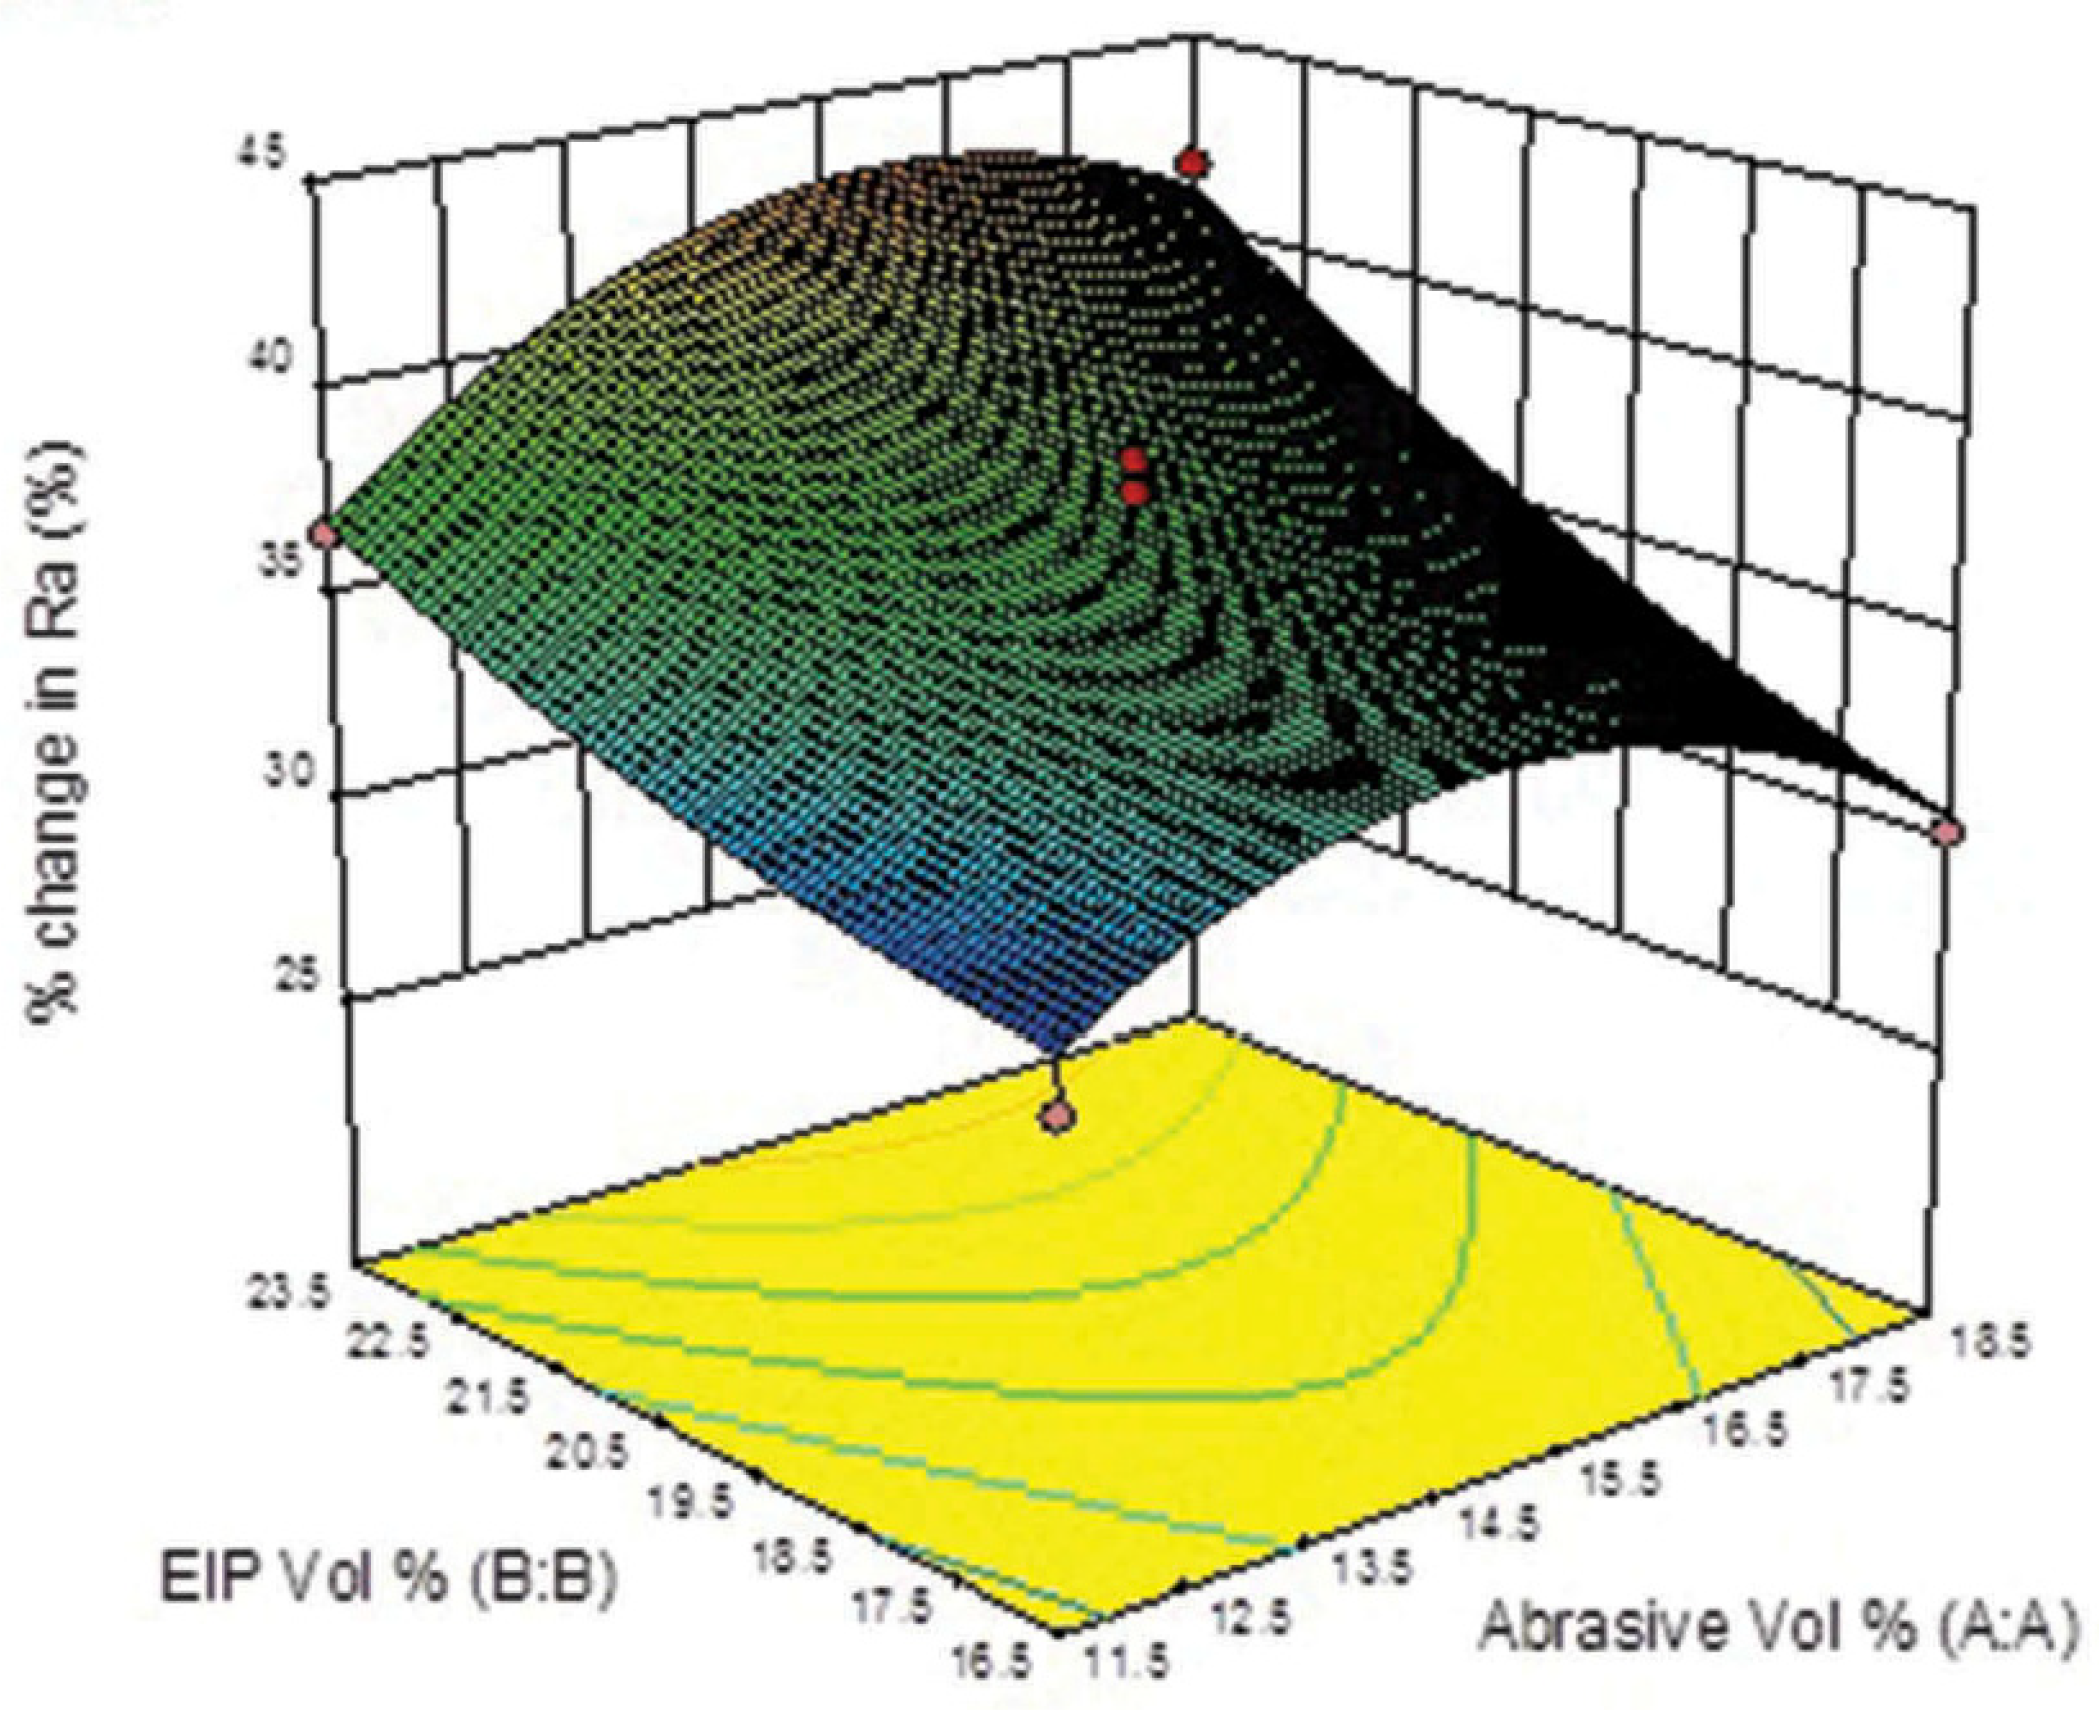
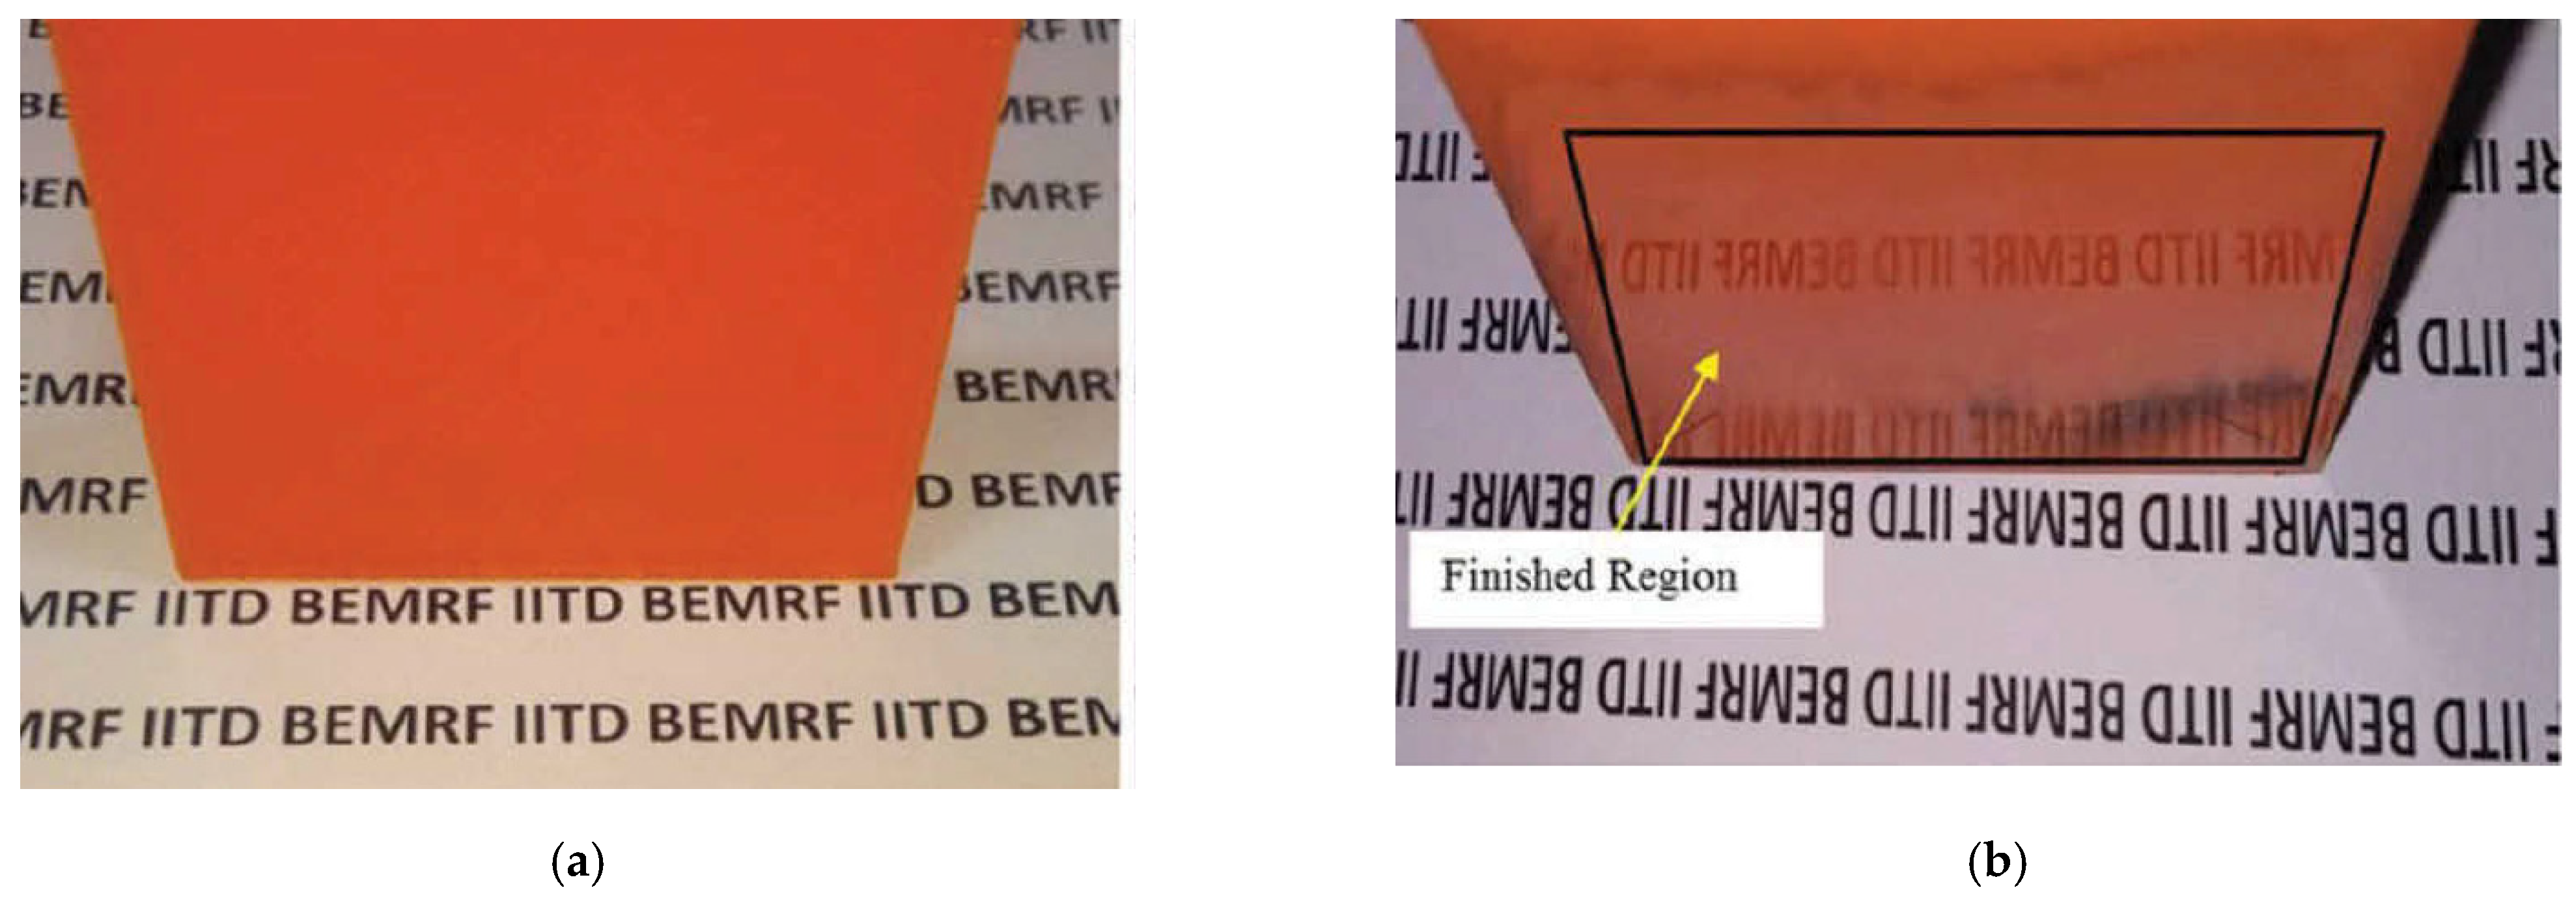
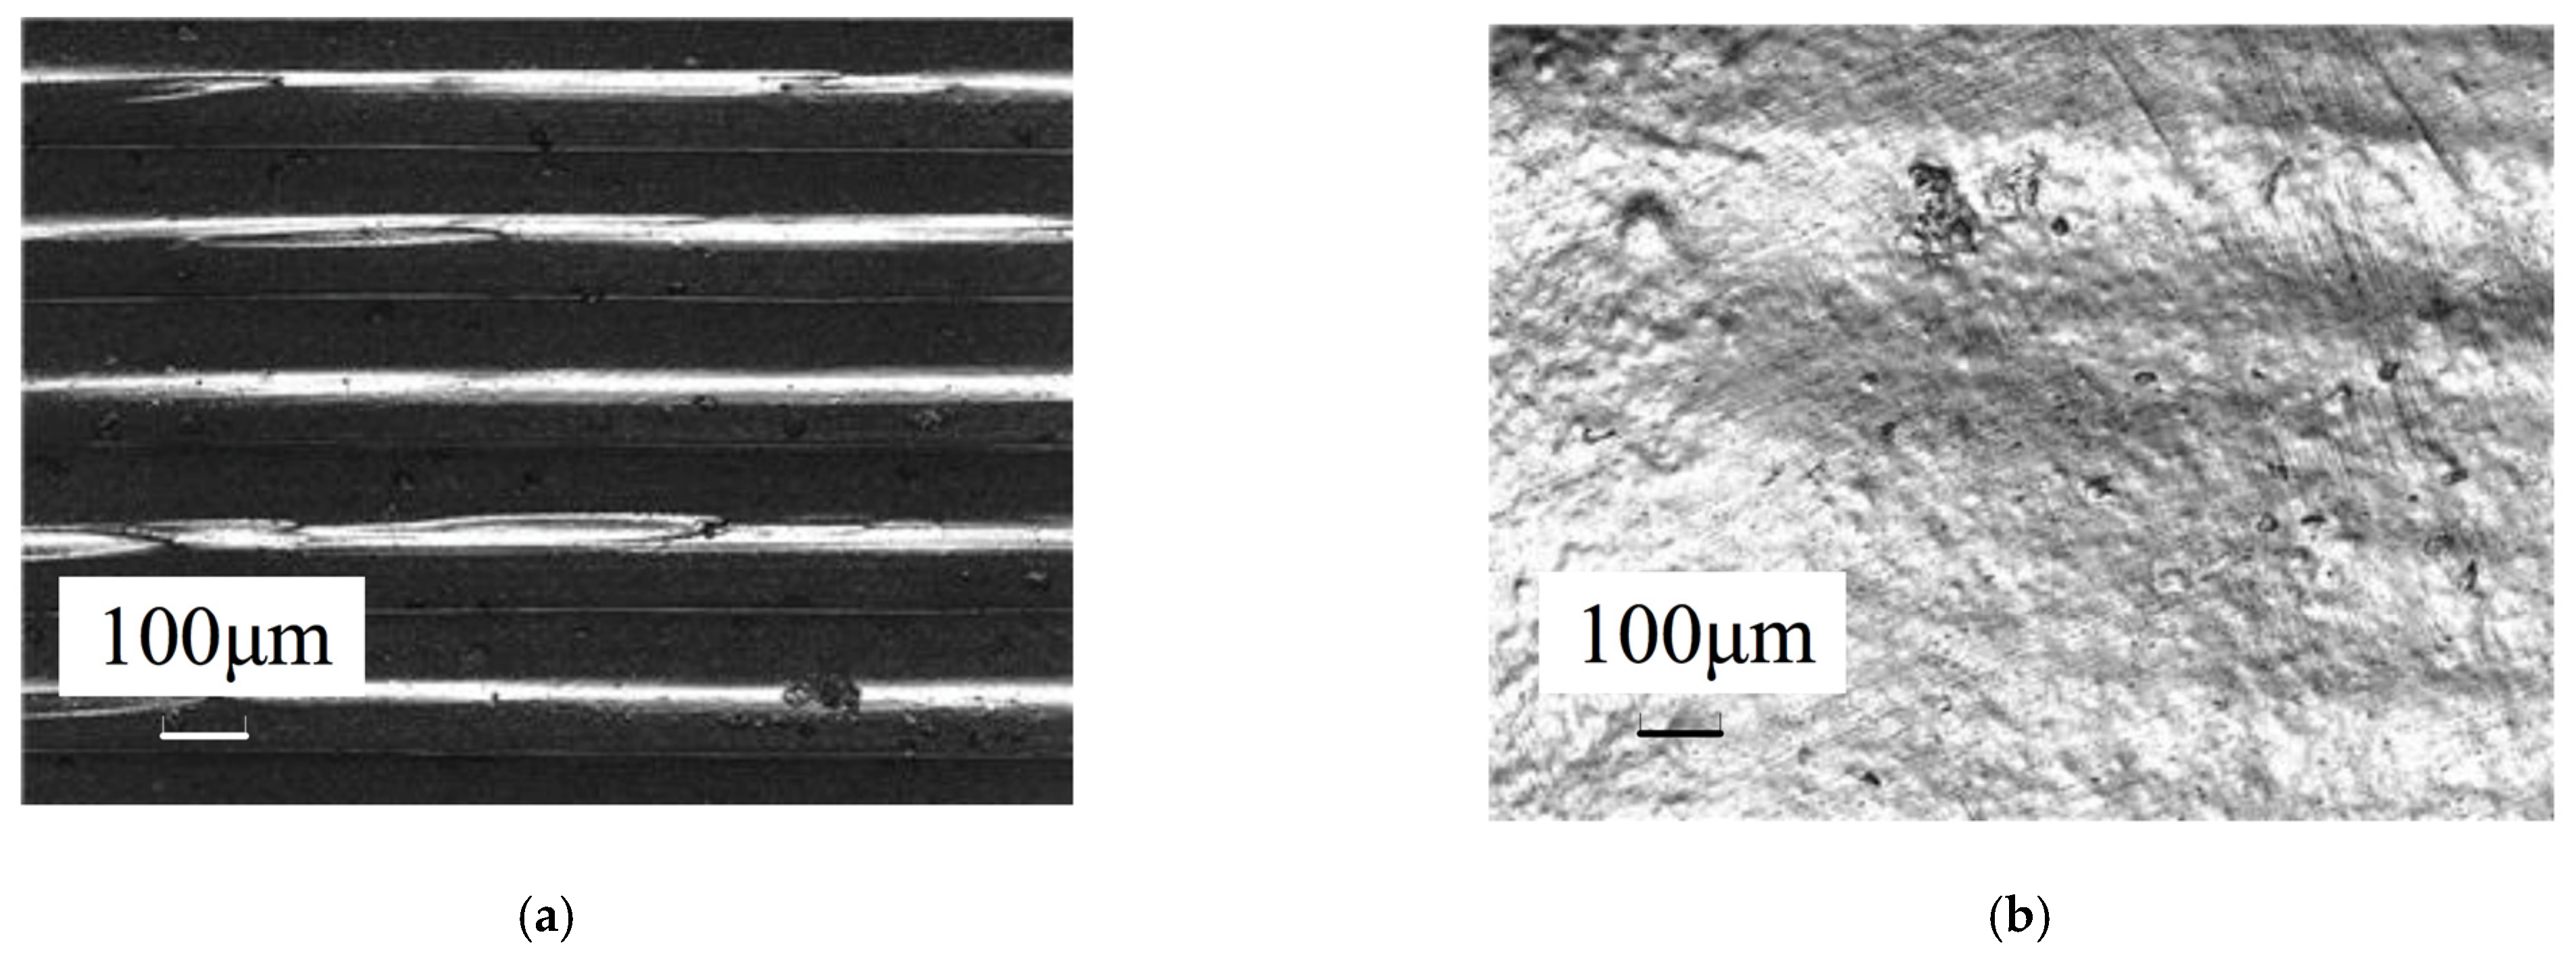
The best surface finish among the mechanical abrasion process group was achieved by using ball end magnetorheological finishing (BEMRF). In this process, the MR fluid is applied to the hemispherical end tool and, upon its energizing, orients itself in the form of a hemisphere. In this manner, the finishing is performed on the surface, as shown in Figure 6. Kumar et al. [19] studied this process and investigated the effect of the concentration of abrasive particles (APs) and electrolytic iron particles (EIPs) in the MR fluid. It was found that a higher concentration of EIP particles led to better boding of the MR fluid and more effective finishing. This is shown in Figure 7. On the other hand, too low or too high concentration of abrasives led to decreased finishing performance. Too high concentration of abrasives led to a lower bonding strength of the MR fluid as a result of an interruption of EIP chains. By properly selecting the process parameters and performing pre-finishing using sandpaper, they obtained a surface roughness (Ra) of 81 nm, as shown in Figure 8b. According to the authors’ results, the optimized volume percentages for EIP and AP were 25% and 16.17%, respectively.

2.2. Chemical Treatment

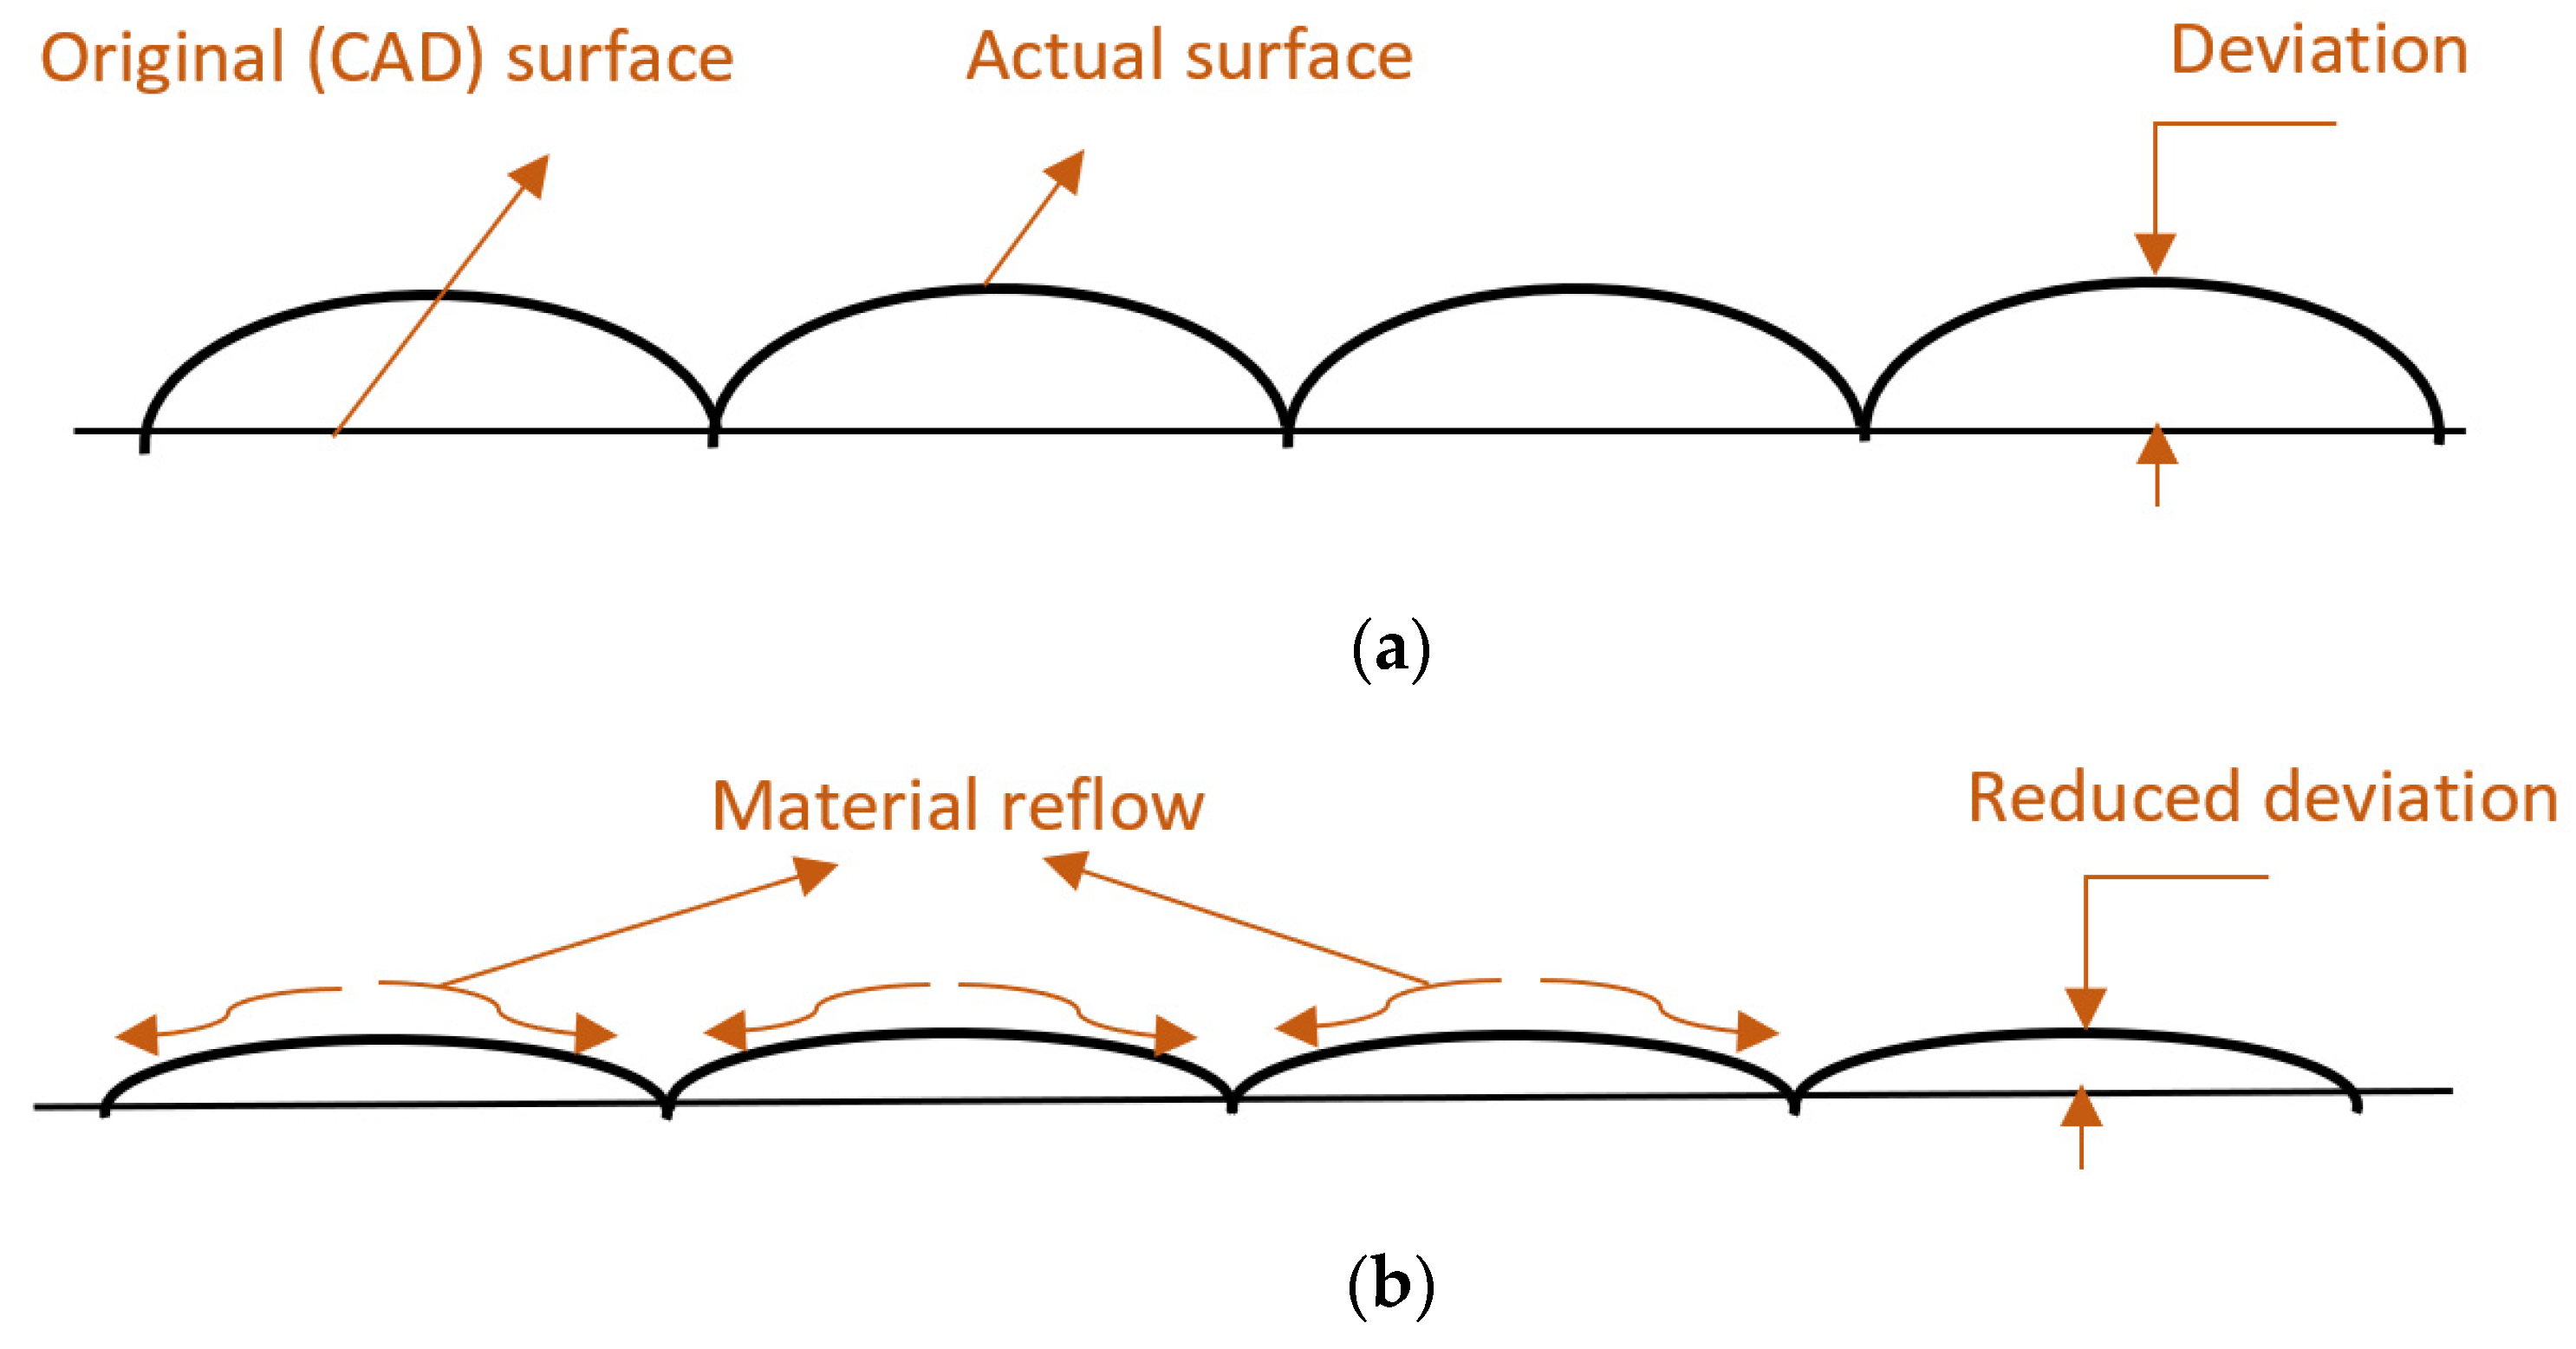
Apart from mechanical abrasion processes, chemical treatment is commonly used to improve the surface finish of AM products. Chemical treatment is performed by submerging the part in the liquid or vaporized chemical solution. The application of specific chemicals initiates the reactions on the surface of the plastic part. The detailed schematic is shown in Figure 9 [20]. The initial surface before the treatment is different from the designed CAD surface (Figure 9a). The deviations are denoted as valleys and peaks. When the chemical reactions induce melting of the material the material reflows decreasing the peaks and filling the valleys (Figure 9b). However, such a method tends to reduce the dimensions of the parts, as reported. This is a benefit for the part which has a size larger than nominal, and hence chemical treatment will reduce this deviation; however, in the opposite case, the deviation will increase.
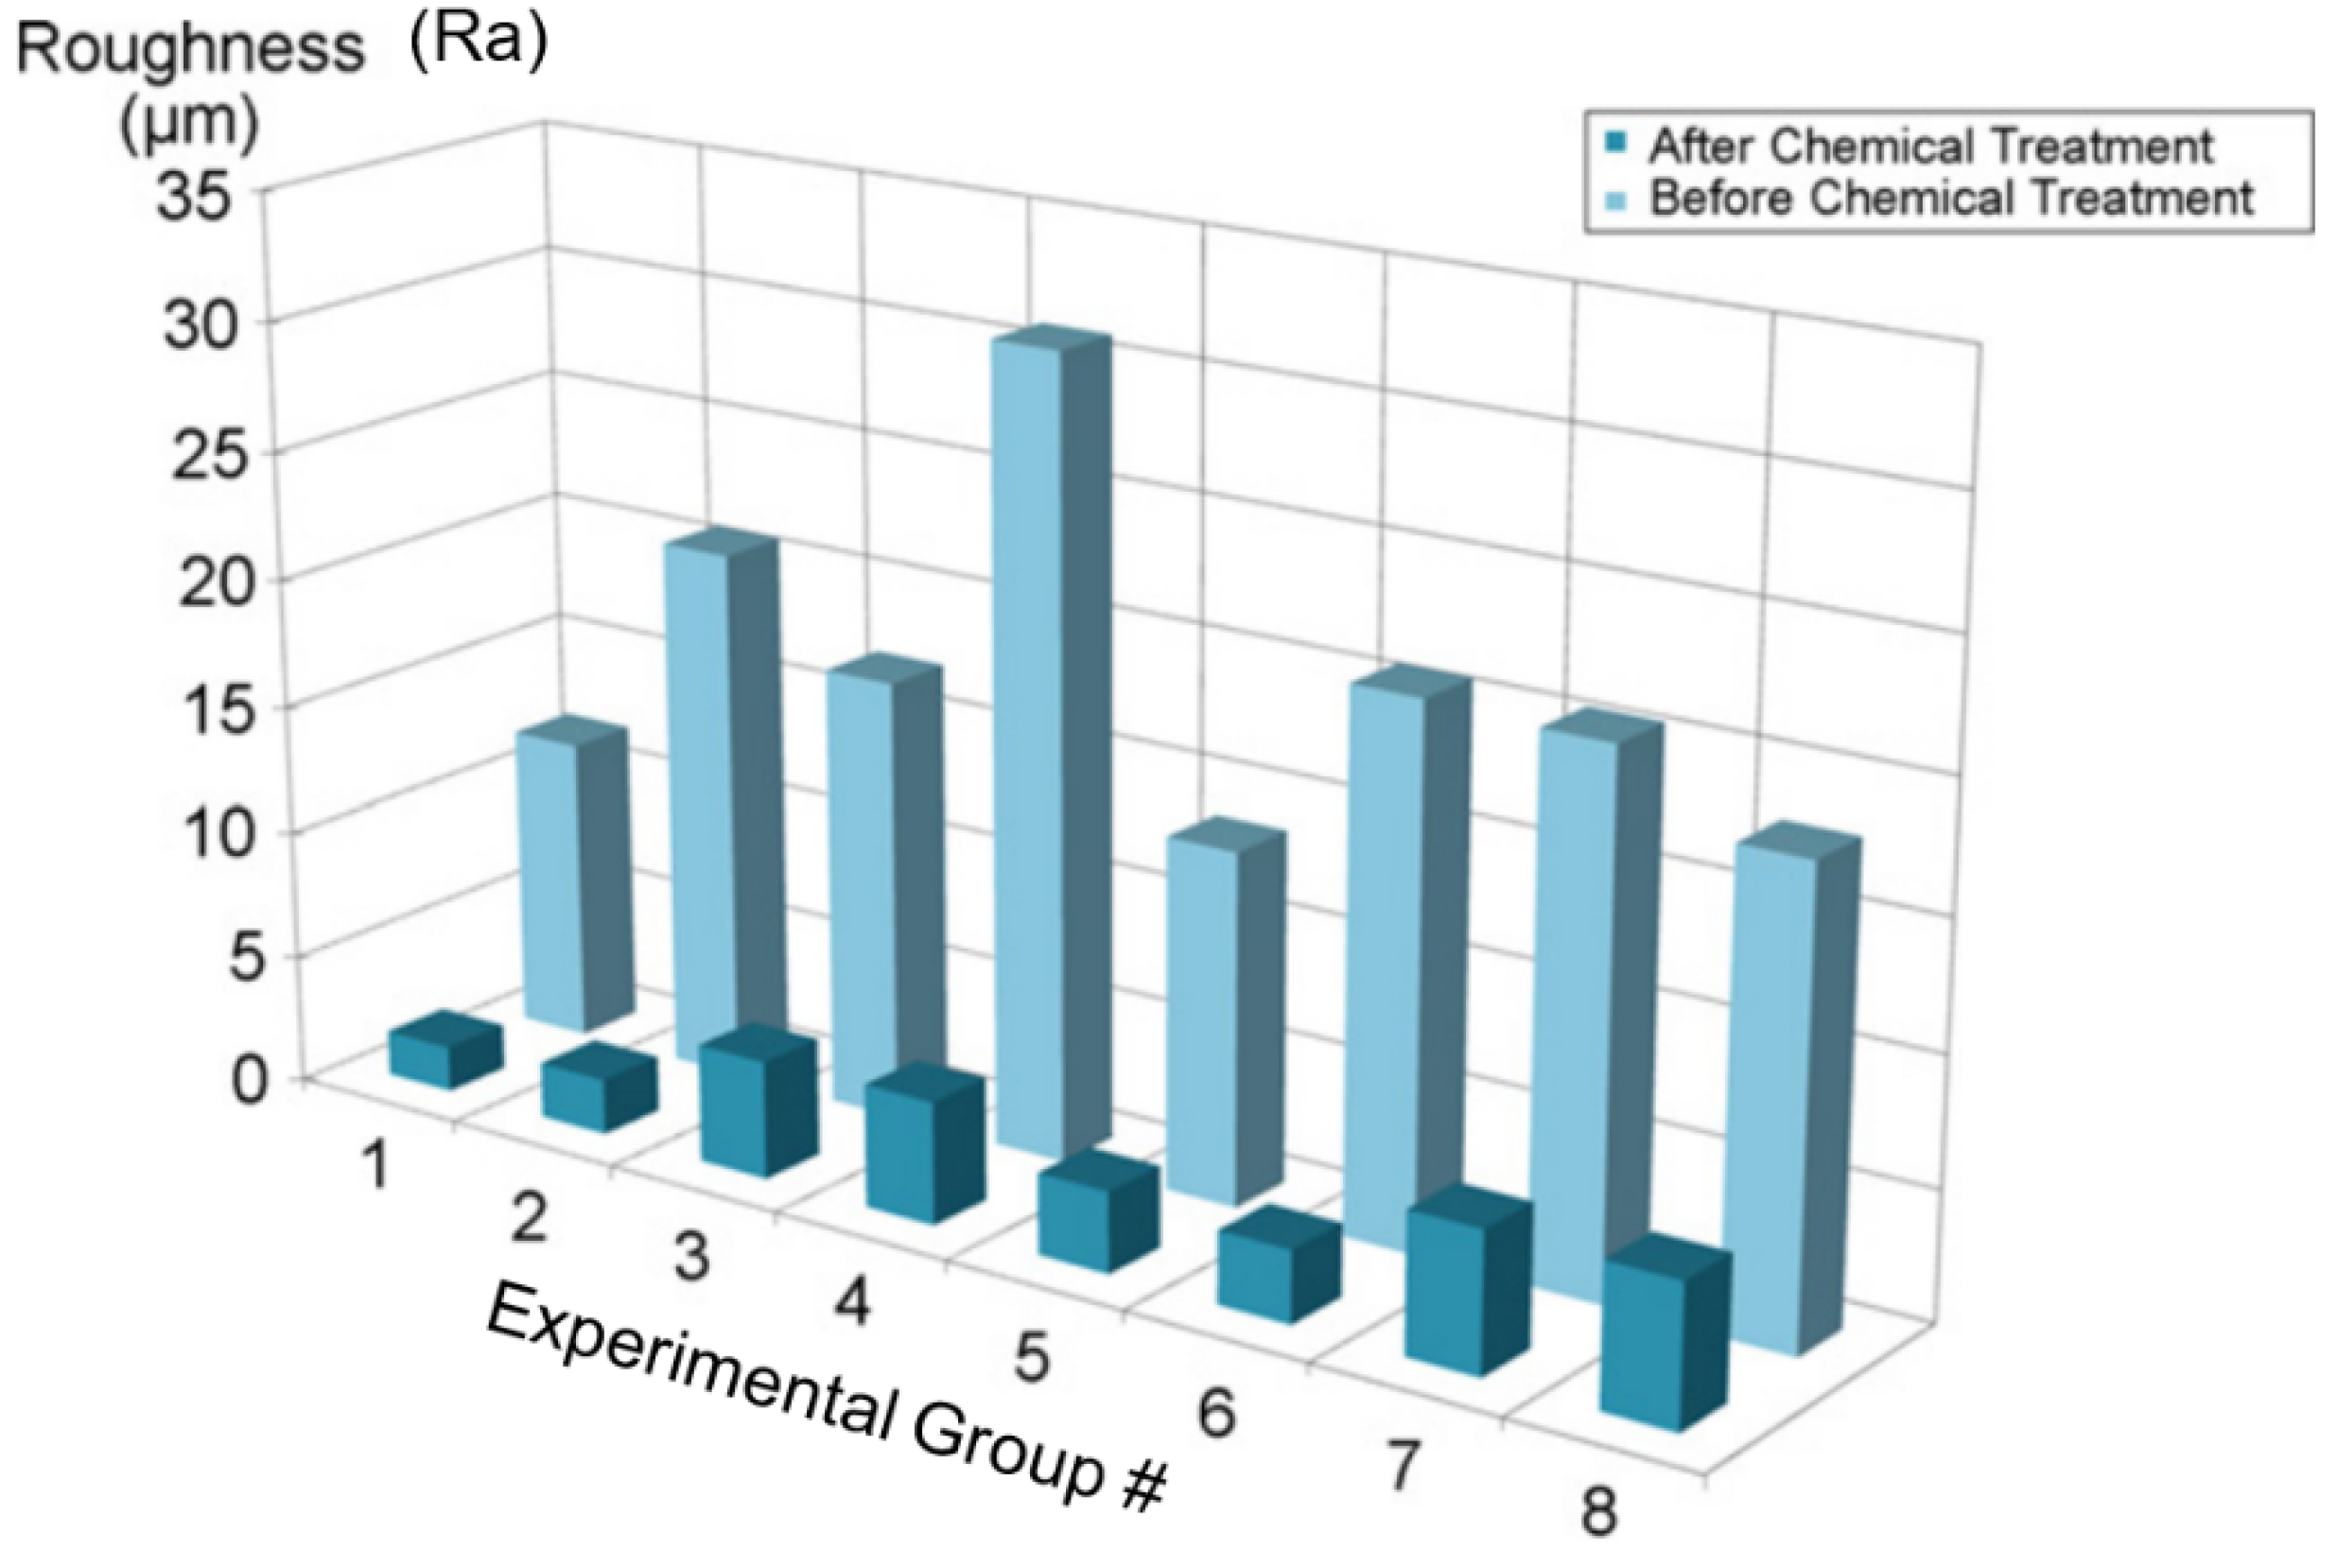
Galantucci et al. [21] submerged the parts made from ABS in 90% dimethylketone-water solution for 300 s. According to his reports, there was a 1% reduction in dimensions and a negligible increase in the part’s weight due to absorption of the chemical. As a result, the surface roughness (Ra) on the top surface of the part reduced considerably, as shown in Figure 10. Similar work was conducted by Lalehpour et al. [22] who submerged ABS particles in an acetone bath to reduce the surface roughness. It was found that this process depends on the number of cycles and the cycle duration when the ABS part is finished in the bath. With an increase in these parameters, the surface roughness was reduced. Additionally, this process was the most effective for slopes with angles larger than 40 degrees, where they led to significant reductions in the SR. Finally, an increase in the layer thickness was considered preferable as surface roughness was no longer dependent on the layer thickness after the finishing.
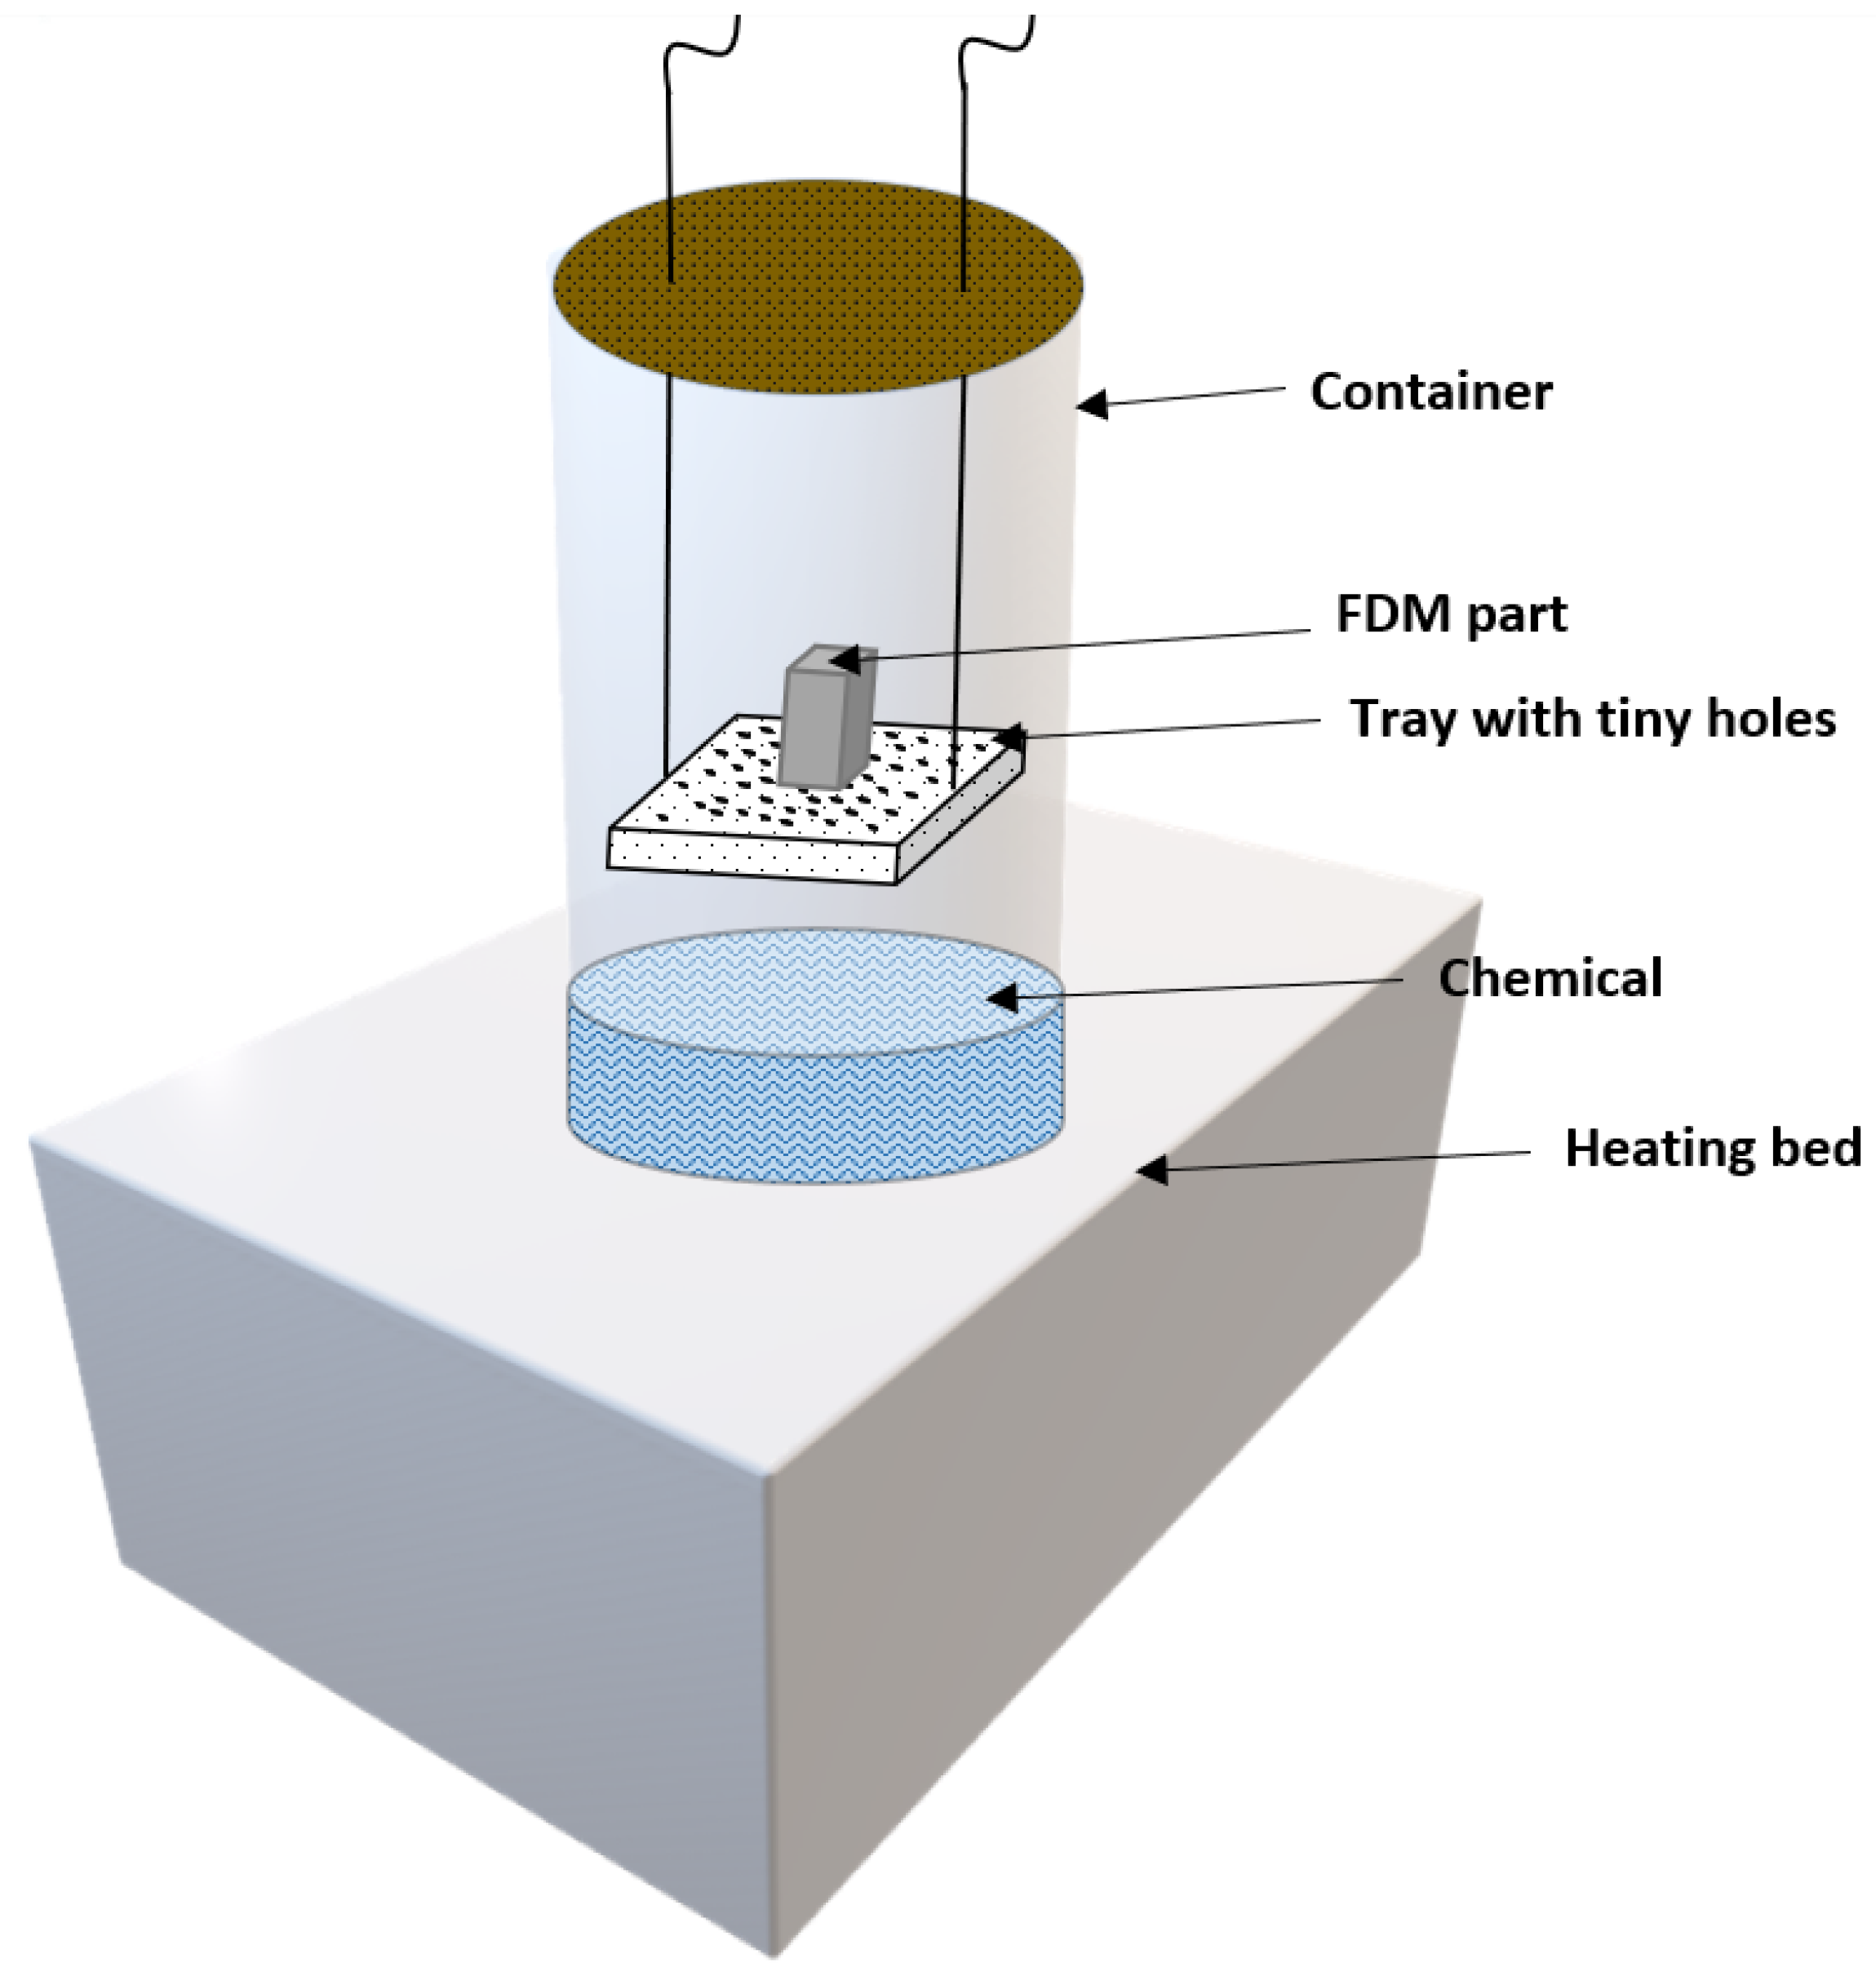
Apart from simply submerging the part in the chemical solution, it can be applied as vapor. This leads to better process control and reduces the shrinkage of the part. The process is shown in Figure 11. As demonstrated, the part is placed inside the chamber and the chemical vaporizes at the bottom, leading to a reduction in the surface roughness. The chemical vapor condenses at the ceiling and recirculates. Using acetone vapor and finishing part for 2 min, Tiwary et al. [12] reduced the Ra value from 14.4 to 0.37 μm. In the related work, Singh et al. [23] used chemical vapor smoothening to prepare patterns for rapid investment casting of the ball used in the hip joint implant. By properly selecting parameters and using chemical vapor smoothening, they obtained final casting with an average surface roughness (Ra) of 1.5 μm.
Acetone and dimethylketone are perfective options for the vapor smoothing of ABS parts. However, these chemicals cannot be used for PLA materials. PLA is widely used in FDM and FFF technologies along with ABS plastics. Printing with PLA is much easier as it does not warp (unlike ABS) and has good adhesion to the build plate. Thus, several studies were performed to assess the finishing capabilities of different solutions when they applied for the vapor smoothening of PLA surfaces.
Jin et al. [24] compared the soaking of additively manufactured PLA parts in NaOH solution against vapor treatment in dichloromethane solution. Soaking was carried out for 30 min, while vapor smoothening was conducted for 5 min. Despite this, the dichloromethane vapor treatment led to an 86% reduction in roughness (Ra) compared to sodium hydroxide soaking, and an 88% reduction in roughness compared to the untreated parts. The application of this process on the complex part showed a remarkable reduction in Ra from 18 μm to 3.77 μm, as shown in Figure 12.
The positive effect of the dichloromethane vapor was also described in studies by Valerga et al. [25] who compared its performance against chloroform, tetrahydrofuran, and ethyl acetate. It was found that dichloromethane, along with chloroform, led to the smoothest surface with roughness (Ra) less than one micron after one minute of smoothing, while ethyl acetate led to the roughest surface with only a 35% improvement.

2.3. Post-Machining

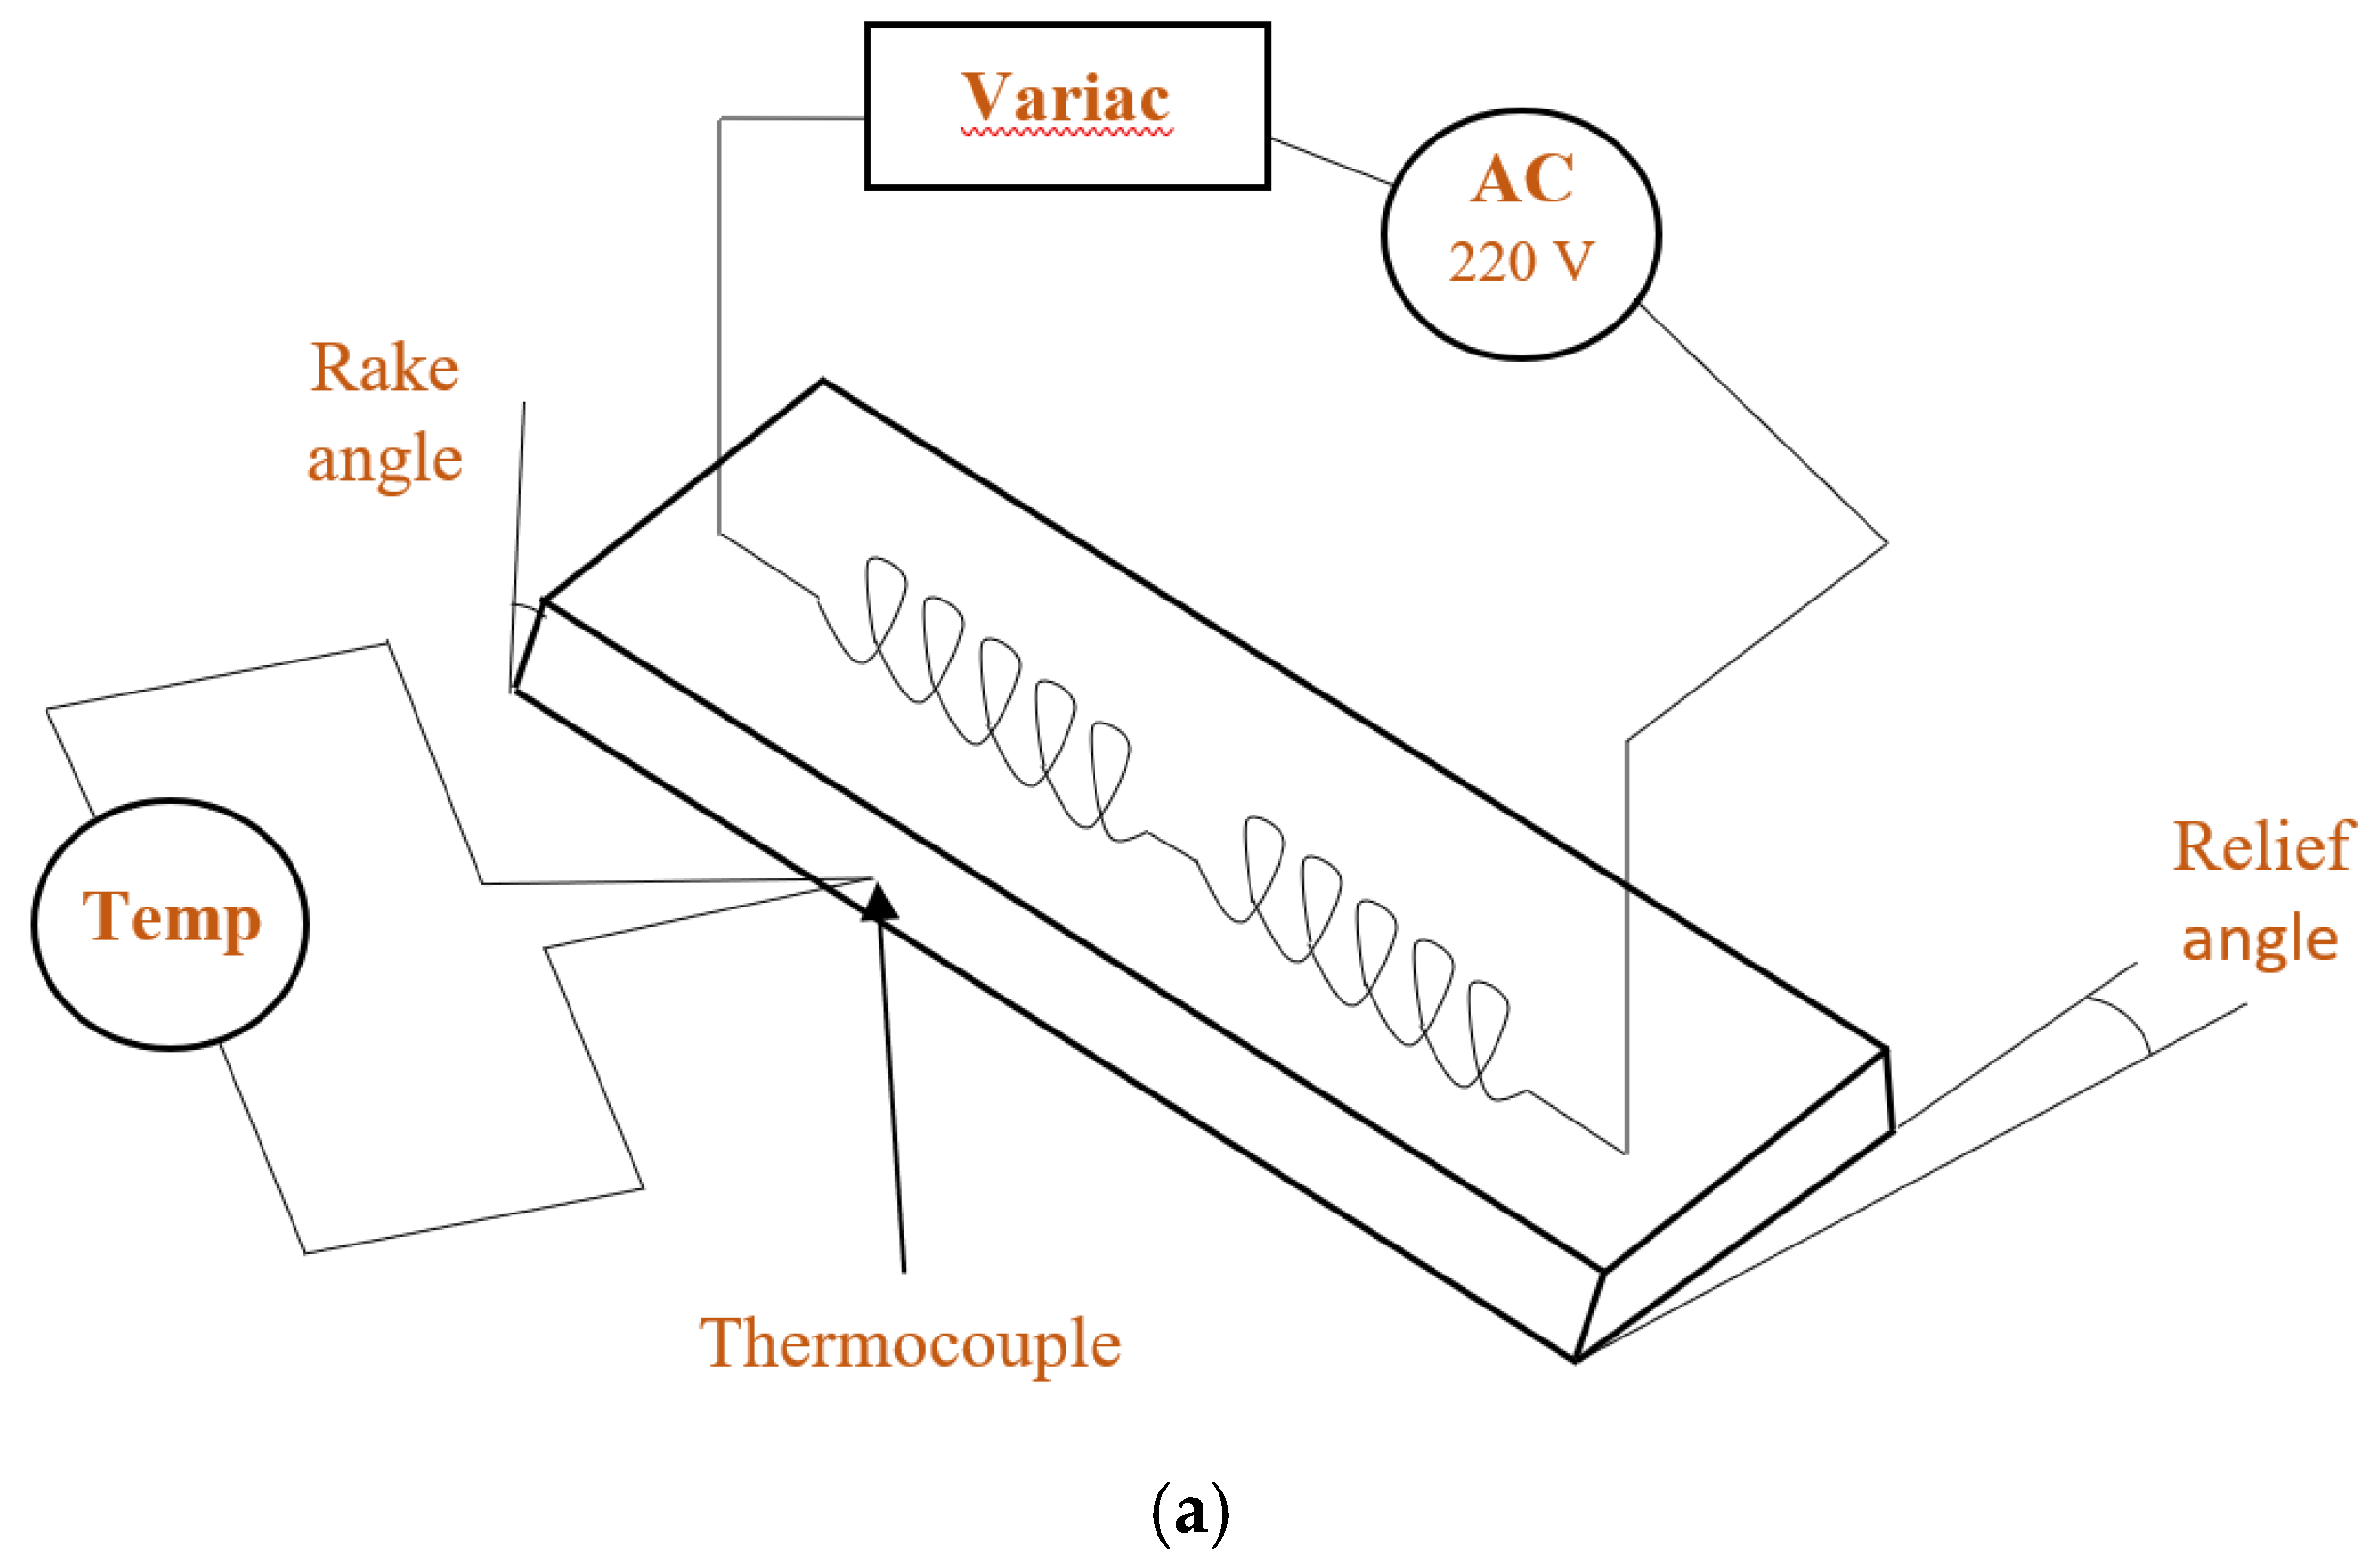
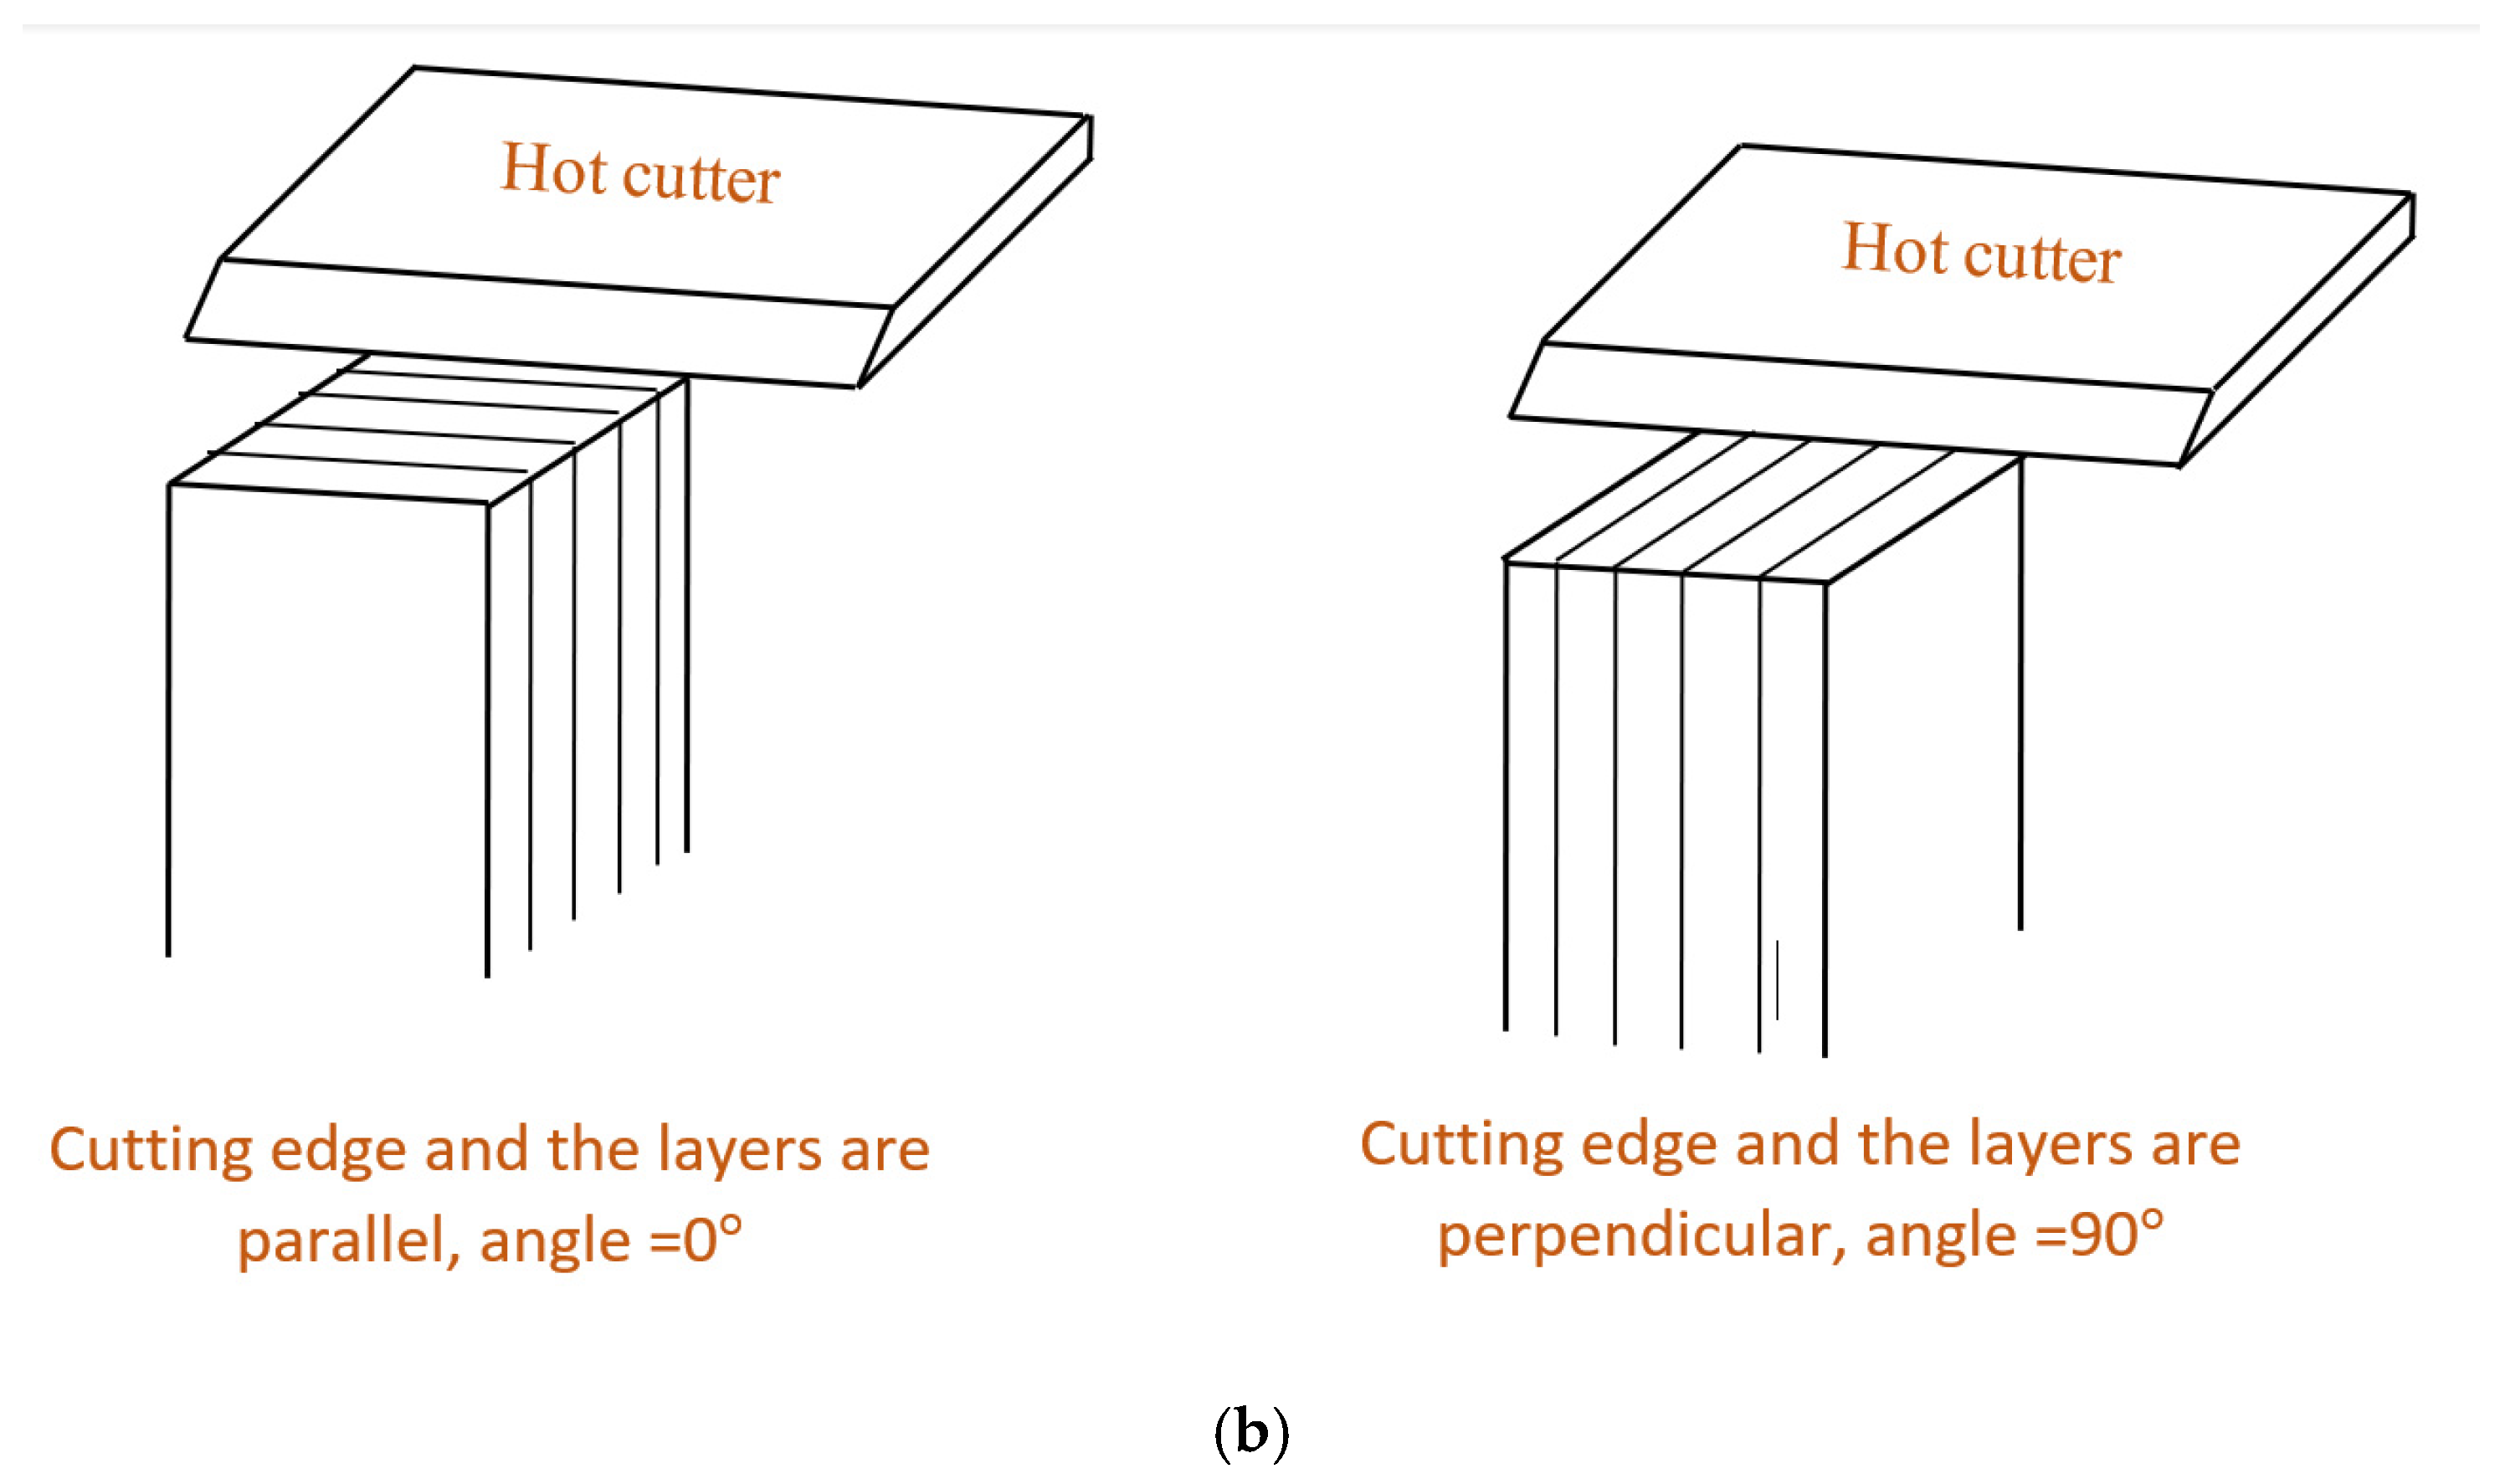
Little research was carried out on the application of machining to additively manufactured parts. Stair-case machining, one of the earliest examples of showing whether a heated cutter can be used to cut off the peaks from the additively manufactured surface, was applied by Pandey et al. [26]. The shape of the cutter and its motion are shown in Figure 13, and heating was used so that the cutting could be easily conducted. In their work, they investigated the effect of the cutting speed, surface inclination, and rake angle. It was found that increased cutting speed and rake angle increase the surface roughness of the parts. Additionally, machining was conducted more easily at an inclination of 10 degrees rather than at 45 degrees.
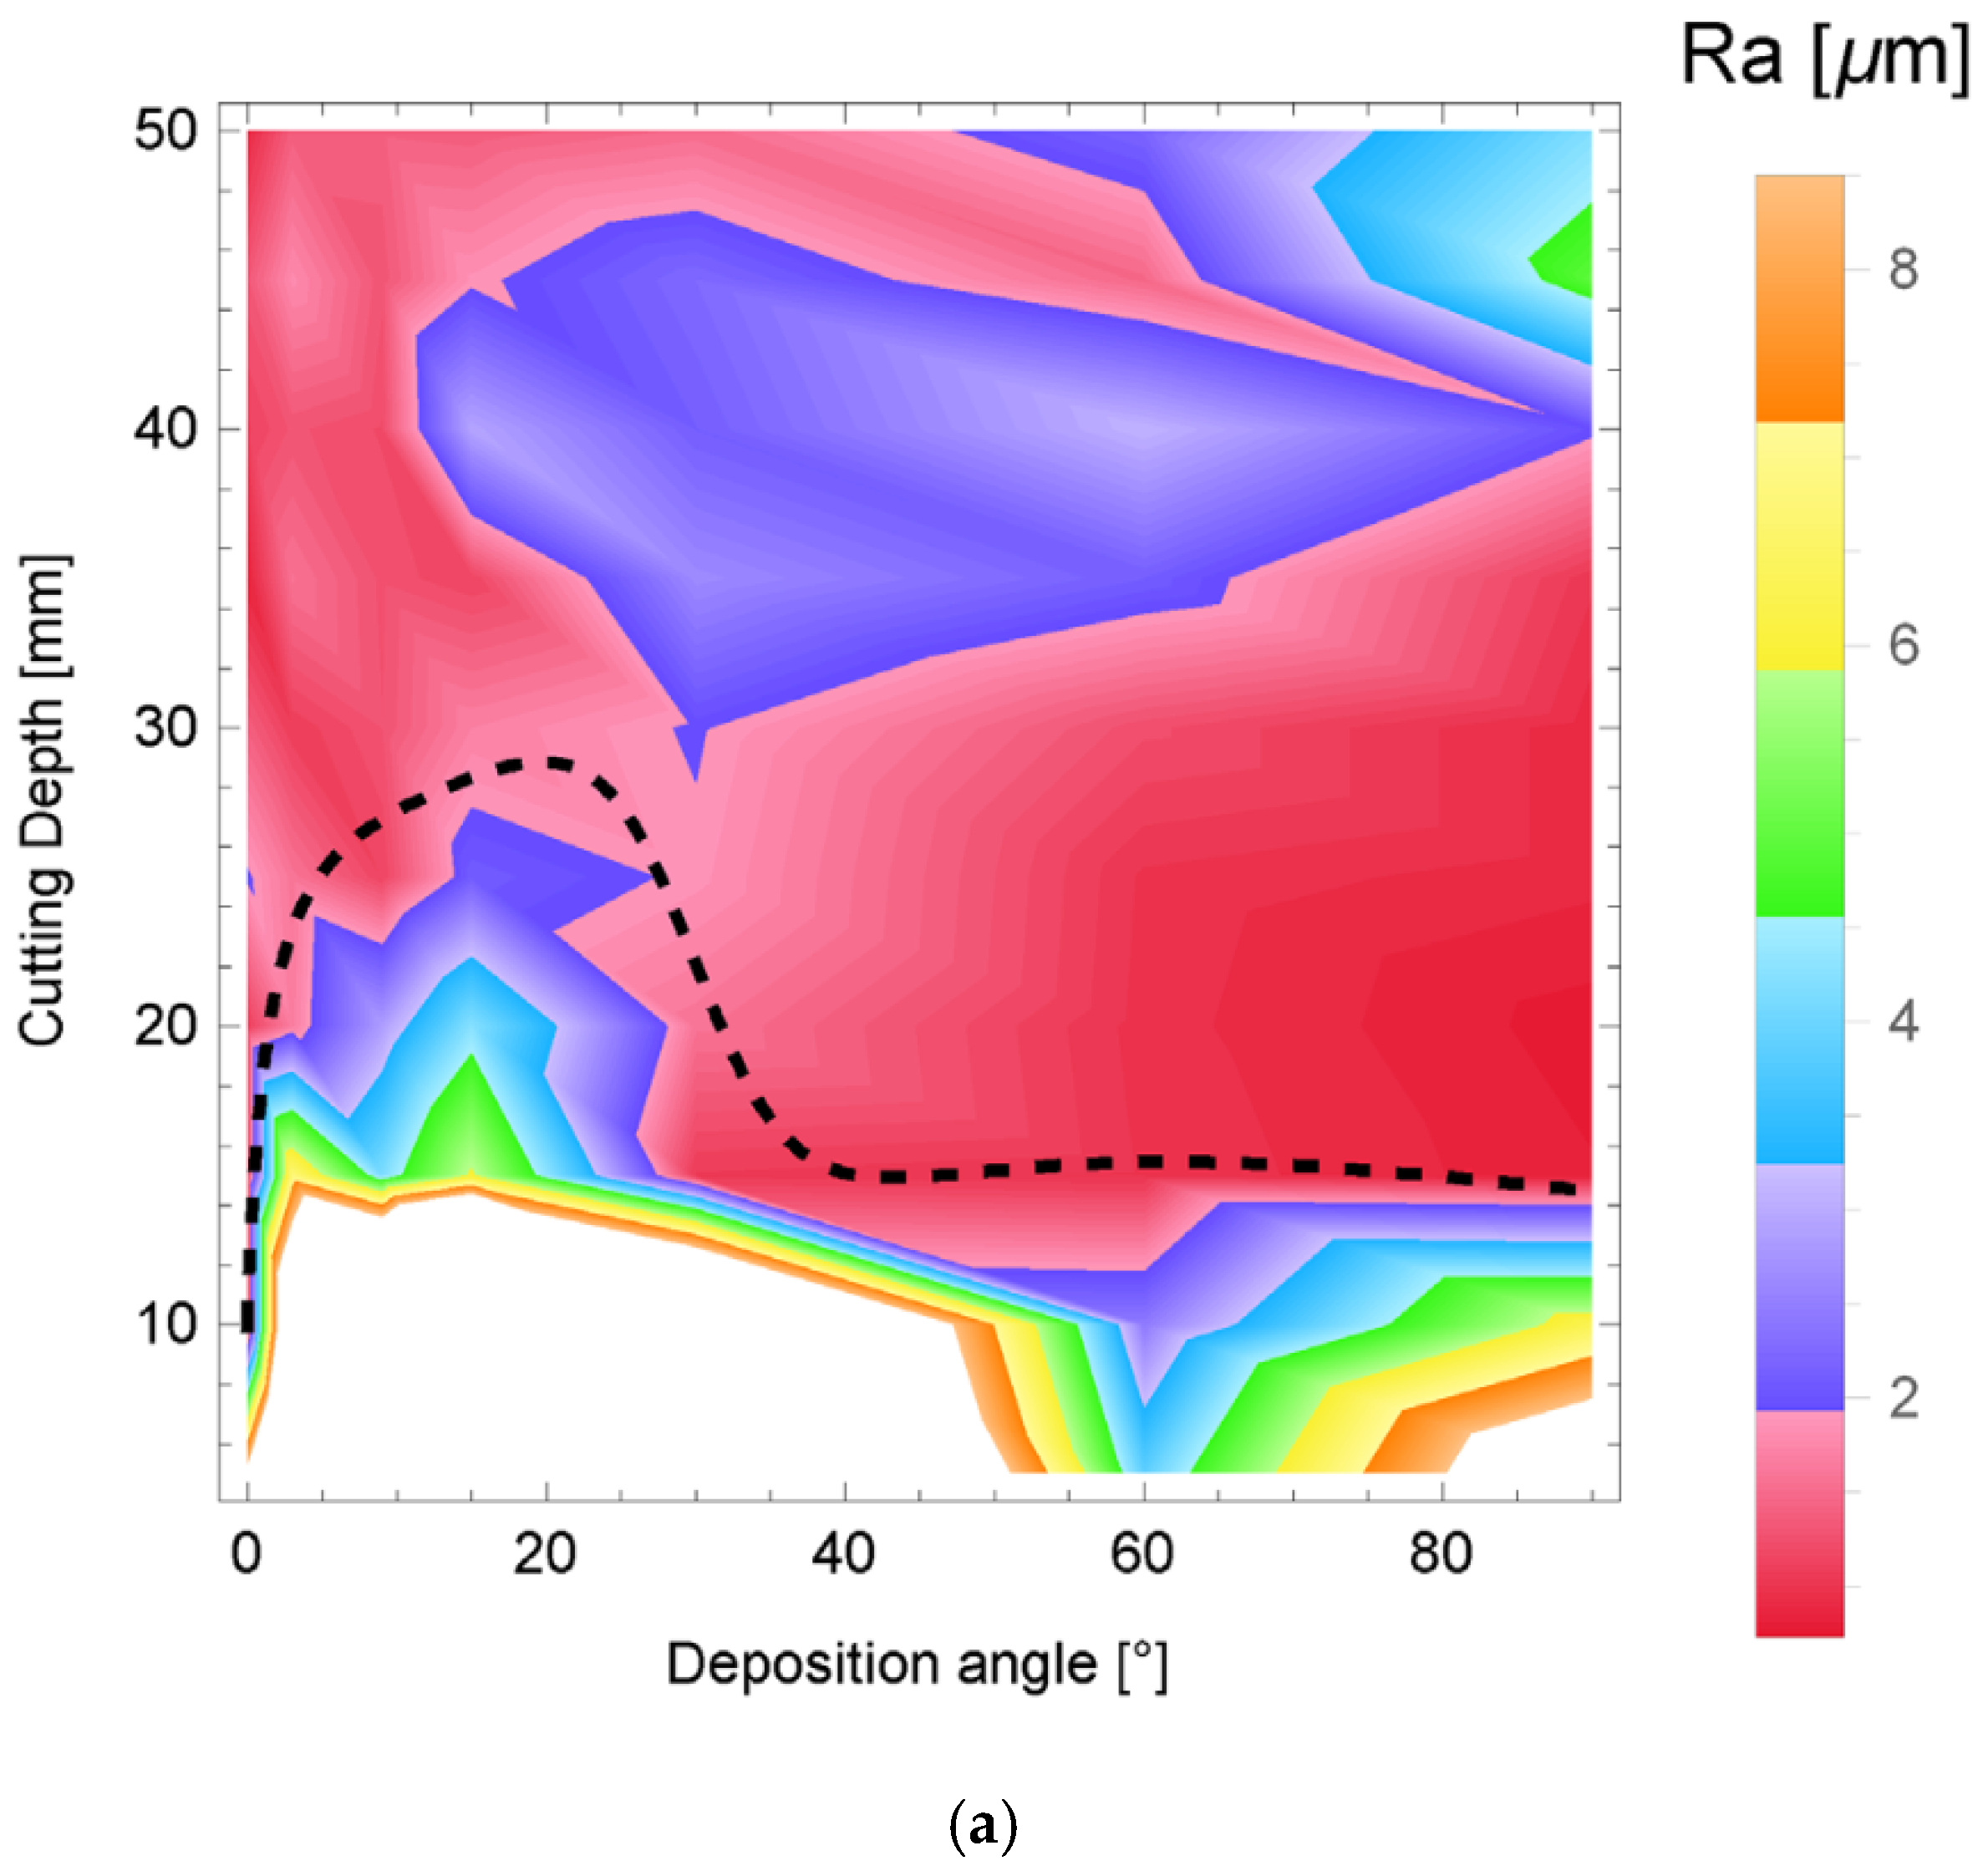
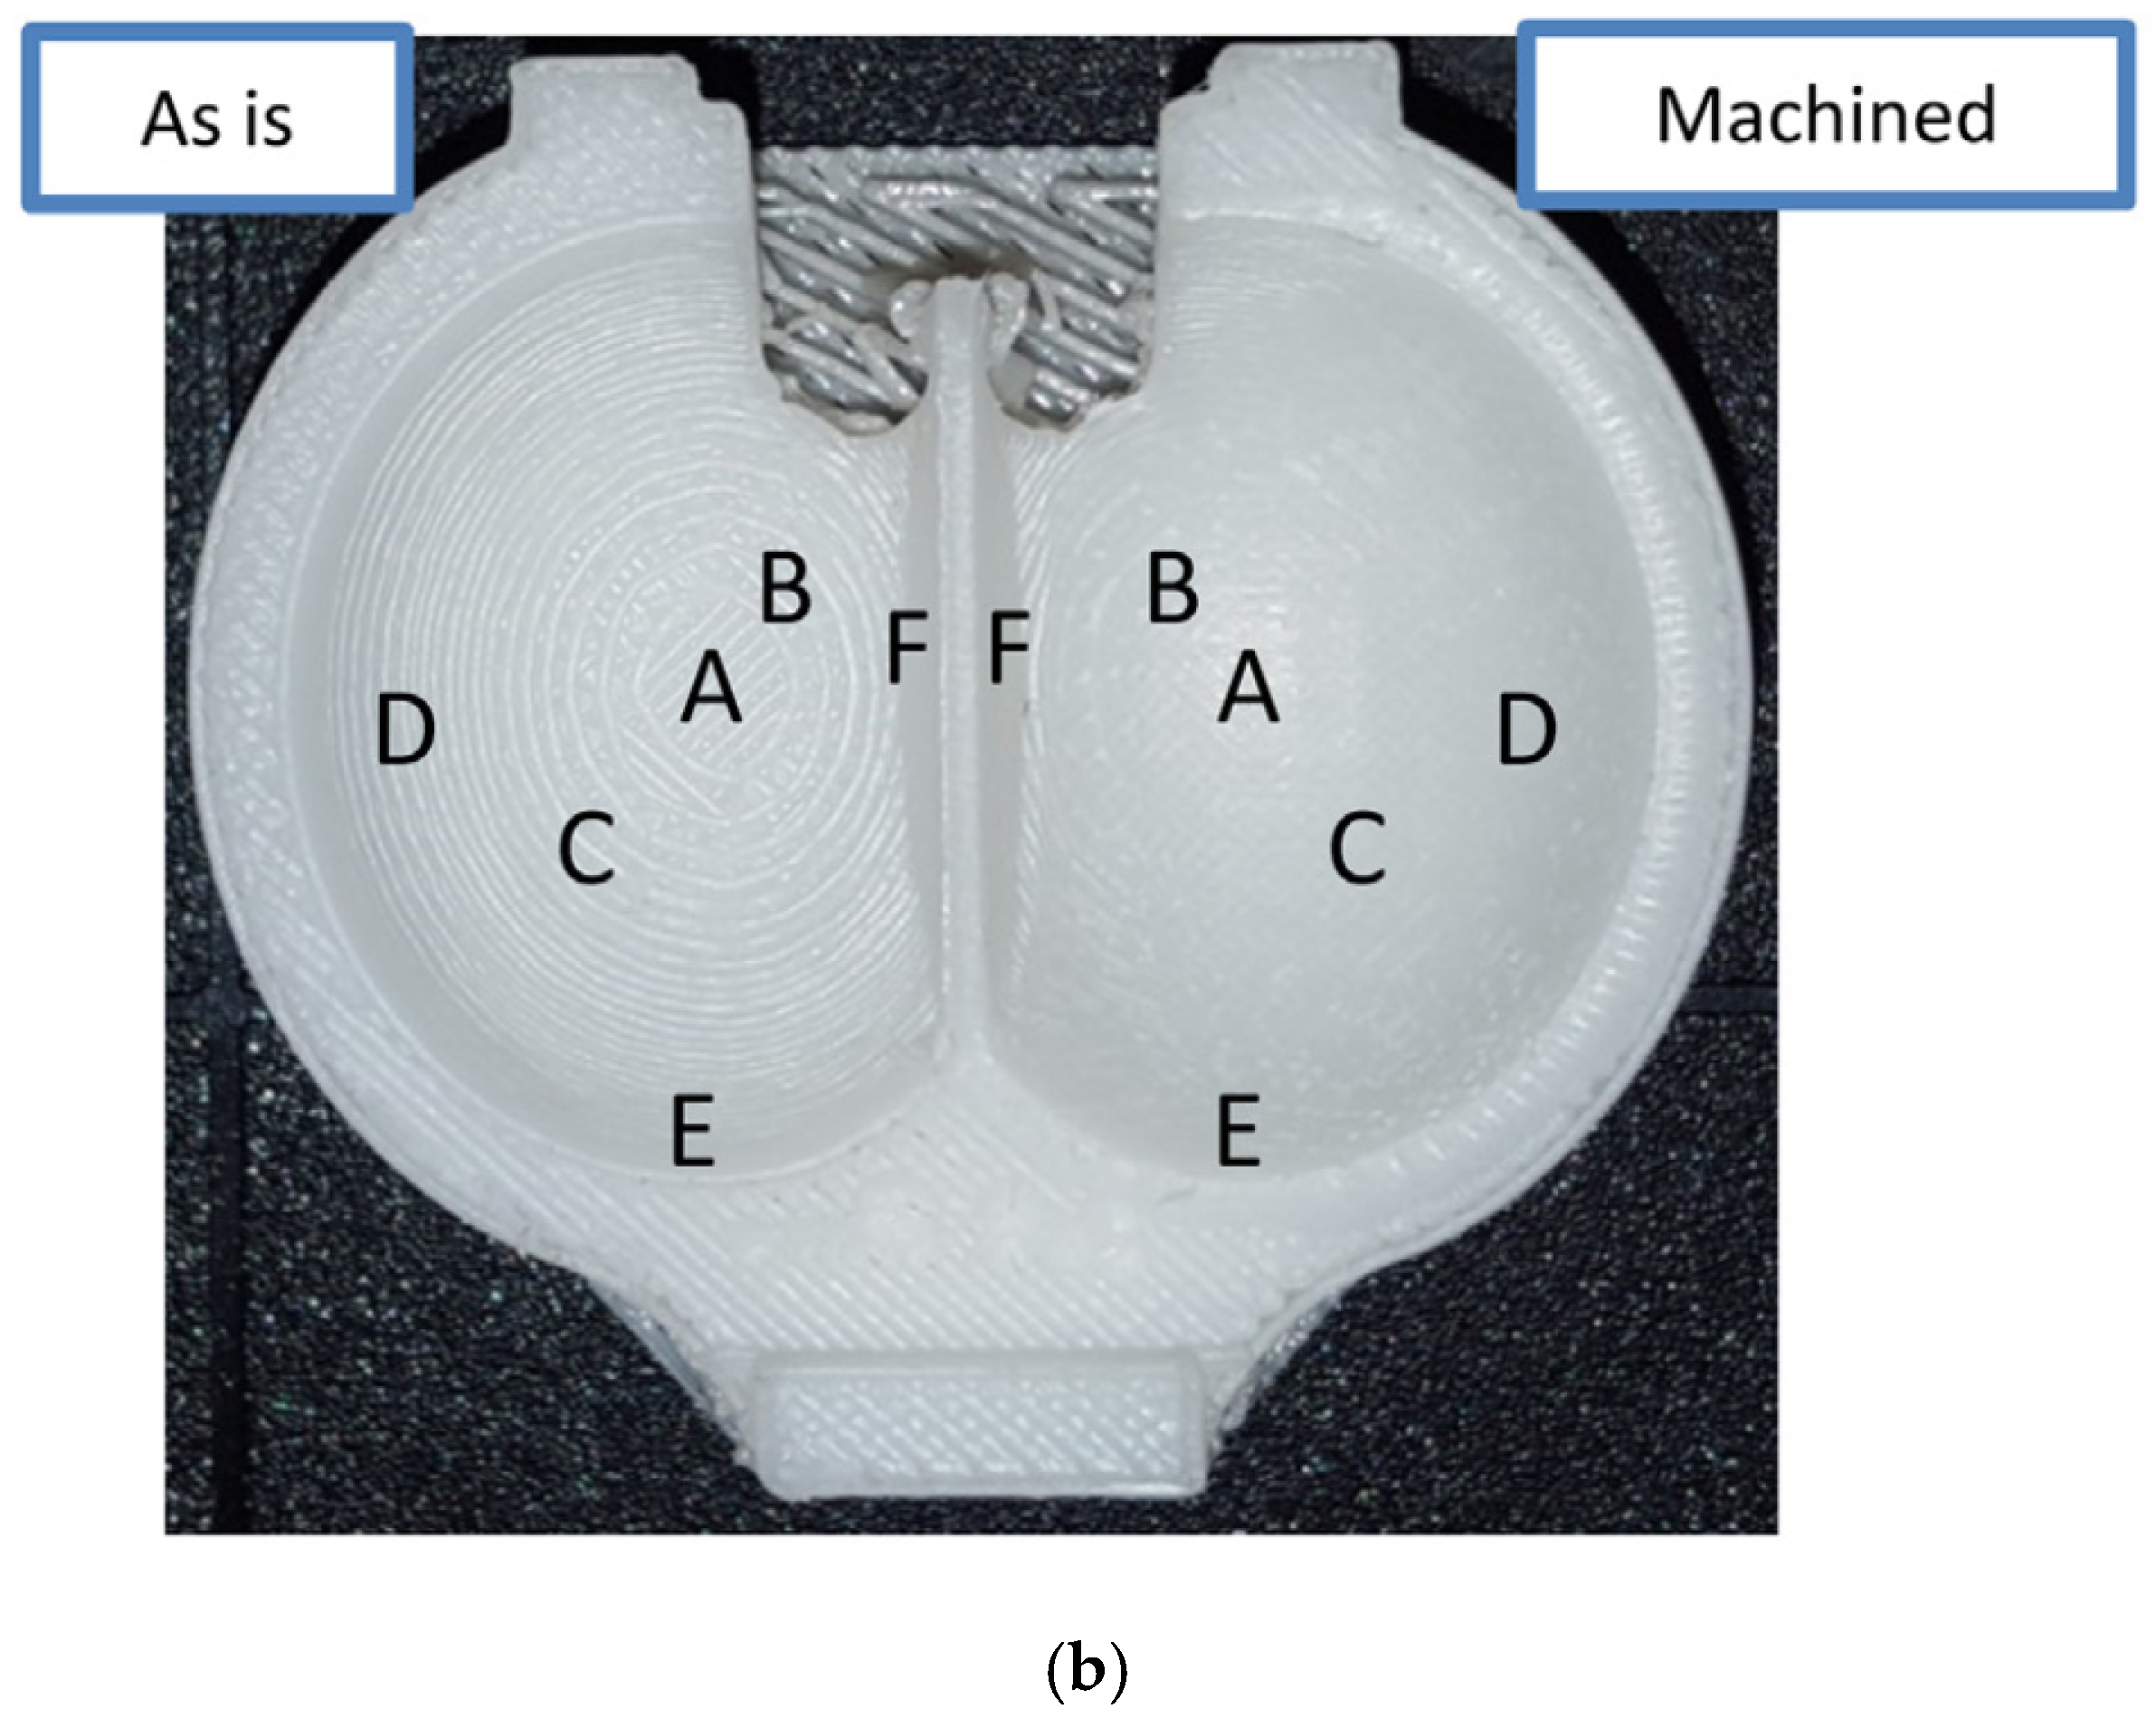
Machining is the other way of smoothening the surface. However, as described by Boschetto et al. [27], selecting the proper machining depth is not a straightforward task. A depth that is too high might lead to the complete removal of the upper surface and can help to obtain a rougher profile by opening the internal infill of the part produced by FDM/FFF. In their work, they developed an algorithm to calculate the proper depth of the cut, depending on the profile angle of the part. Firstly, they performed a parametric study on how different depths of cut affect the SR of the parts printed at different angles. The result is shown in Figure 14a. The authors made a line fitting of the black line which is continuously passed through a depth of cut, leading to a good SR. Using this equation, they machined the bracket of the hydraulic turbine, as shown in Figure 14b, as the case study. As a result, Ra at three random zones decreased from 50.61, 25.42, and 16.53 μm to 1.91, 1.66, and 1.52 μm, respectively.

2.4. Application of Coatings on Additively Manufactured Parts

The other group of finishing methods for polymers is the application of coatings. The coating layer causes the dimensional size to increase, and hence should only be carried out in case the dimensional deviation is not important. Usually, such parts are not used as end products, but as a pattern for rapid investment casting to not transfer the stair-step effect to the mold. In the research performed by Garg et al. [28], wax coating was applied on the part produced by FDM/FFF. These parts were used as patterns for rapid investment casting. It was found that the final parts produced a smooth casting with the lowest surface roughness (Ra) of 1.77 μm. Additionally, coating created a medium between the shell and the pattern, which melted first and reduced the possibility of shell crack during firing. Similar work, but with a coating of the part produced by SLA, was carried out by Zhou et al. [29]. In their work, they applied additional photopolymer coating to the part produced using SLA. This allowed them to reduce the surface roughness (Ra) of the pattern from 20 to 7.5 μm.
In similar work by Roach et al. [30], surface coating was applied to the part produced by FDM to improve the surface finish. This part was used to produce RC circuits, and a conductive silver road was applied to the part. For this reason, a smooth substrate was required so that the silver road thickness and resistance would be uniform. Thus, they initially applied polyetherimide (PEI) coating in the form of the inkjet on the polyimide (PAA) plastic. This was followed by the deposition of the poly(ethylene glycol) diacrylate (PEGDA) layer. The intermediate coating was applied to prevent the reaction of the PEGDA layer and the PAA plastic.

2.5. Laser Finishing of Additively Manufactured Polymer Parts

Available studies on the laser polishing of polymer parts are limited, mainly because of the low melting temperature of the polymers. Nevertheless, one of the works where laser polishing was applied to parts produced by FDM was conducted by Perez Deway and Ulutan [31]. It was found that the part’s surface roughness depends on the laser’s energy density. When the minimum energy density was employed (0.75 W power and 180 mm/s feed), the surface roughness (Ra) decreased insignificantly, from 34.5 μm to 32.4 μm. However, an increased energy density of 5.54 J/cm2 led to a 67% reduction in the surface roughness and am energy density of 7 J/cm2 led to a 95% reduction. The final surface roughness under such conditions was 1.89 μm. As it can be noticed from this study, only 1–5% of the power of the laser was used in this study. The further increase in power might lead to over-melting of the part because of the low melting temperature and poor conductivity of the surface.
Chen et al. [32] studied the surface laser polishing of the specimens printed from PLA using FDM technology. It was found that the high power of the laser (larger than 3 W) and the small diameter of the beam (smaller than 175 μm) led to surface waviness. Although the authors did not explain its cause, the reason might be that the surface was over-heated and over-melted; thus, humps were formed in the melting pool. Therefore, it was suggested that the best process parameters were 3 W of the laser power and 175 μm of the beam diameter. These parameters helped to reduce the surface roughness (Sa) from 18.46 μm to 1.02 μm. Thus, when a small energy density is used, laser polishing can be successfully applied to polymer materials. A similar study was performed by Lambiase et al. [33] who optimized the overlap distance, scanning speed, and focus distance. It was observed that if a low scanning speed is used, it should be balanced by a lower hatch overlap distance. Similarly, a high scanning speed should be balanced by a larger hatch overlap. This will avoid the over-melting of the surface and lead to a good surface finish. By employing optimal parameters, they reduced the average final surface roughness (Ra) to 0.37 μm, which was even smoother than it was following the MRF process. This study demonstrates that laser polishing is effective for the finishing polymers and can even lead to nanoscale roughness.
Braun et al. [34] emphasized that the surface temperature of the polymer, due to laser heating and scanning time, plays an important role in the determination of the surface roughness of the final part. The temperature can be controlled by adjusting the laser power and observing the result for the pyrometer. They found that the optimum surface finish is obtained when the surface temperature during the laser polishing is slightly larger than the melting point of a polymer. By manipulating this parameter, they reduced the surface roughness (Sa) of the 3D-printed part from 10.1 to 0.61 μm using the PA12 polymer. The further increase in power (and in surface temperature) produced polymer degradation due to burning.
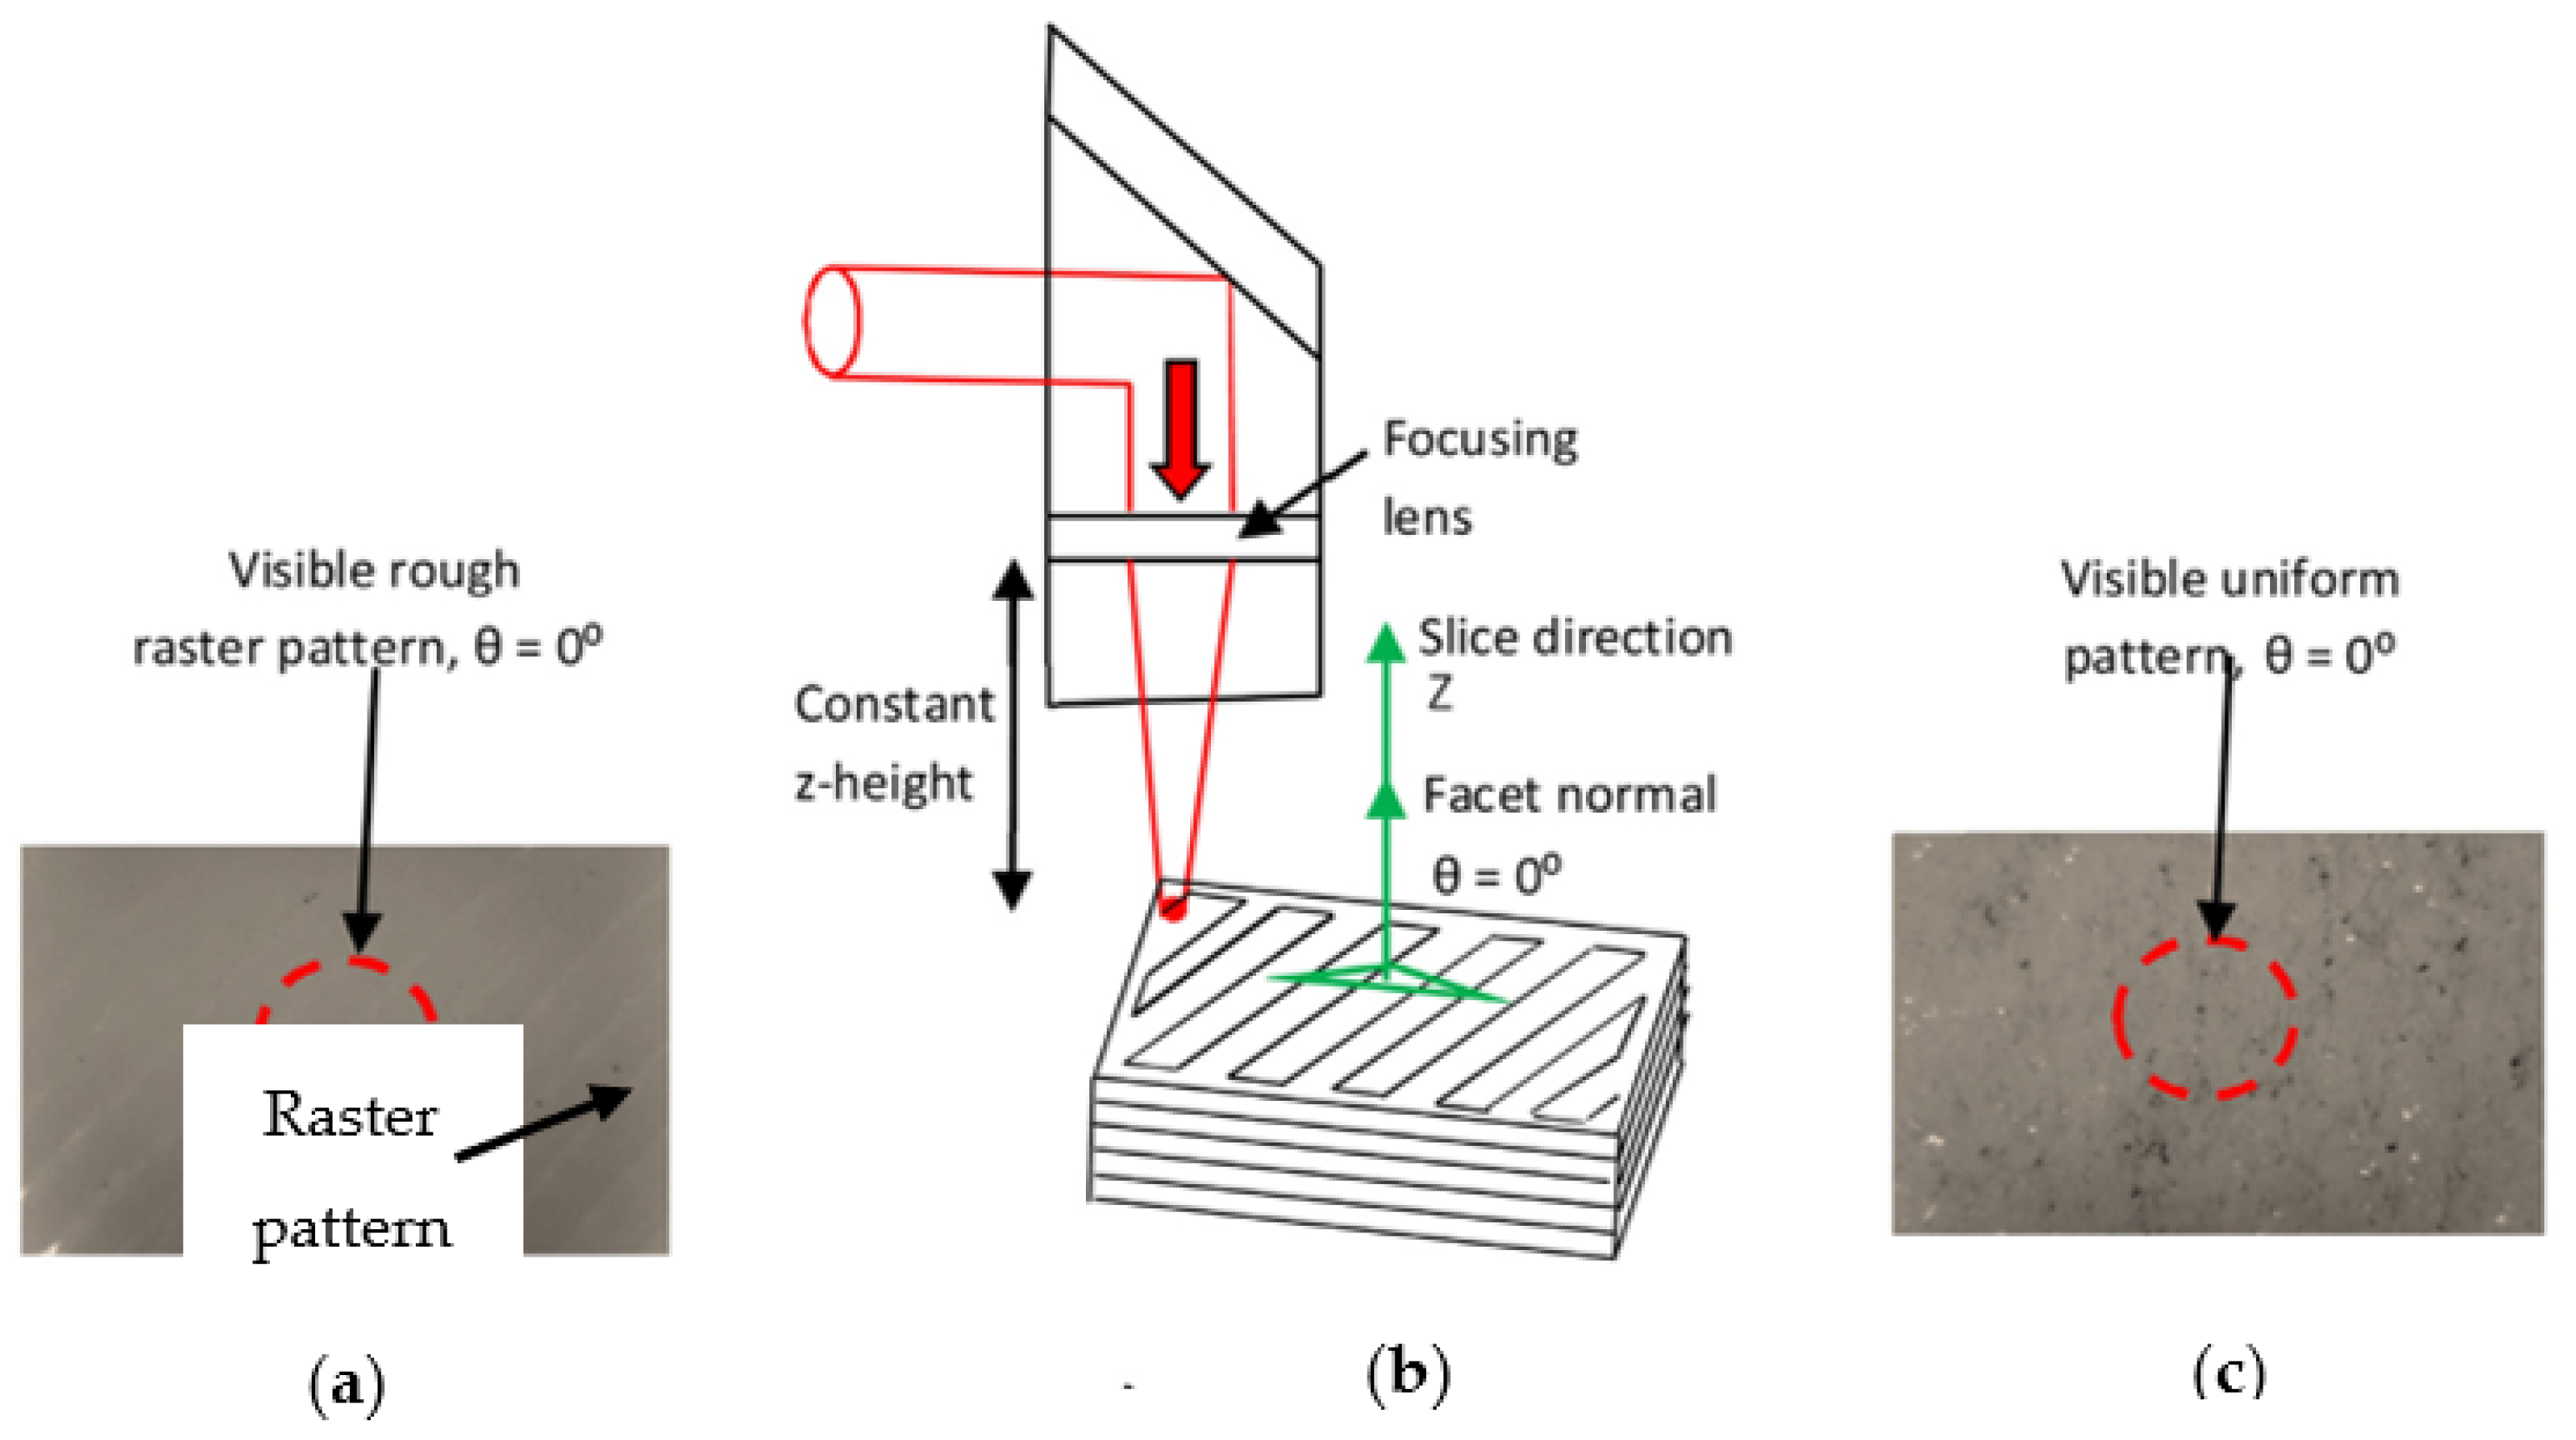
The studies described above demonstrate that laser polishing can be effective for the surface improvement of parts produced from PLA material. However, experiments performed by Chai et al. [35] demonstrated that the laser polishing of ABS parts is not successful. In their study, a maximum reduction in SR that was obtained was less than 5%. It was found that the ABS melt pool formed during laser polishing tends to create a spherical shape during solidification due to the high surface tension of molten ABS. This does not allow the surface roughness of the part to be improved. Increased laser power (setting it larger 6 W) led to the oxidation of ABS and its eventual burning. On the other hand, the studies conducted by Taufik and Jain [36] demonstrated that ABS could be successfully polished using laser technology as well. By using laser technology for engraving, they obtained a significant reduction in roughness, as shown in Figure 15. It was also observed that at zero angle of the surface (planar surface), which was the case in the previous study, the surface roughness reduction was the lowest. Thus, the discrepancy between the results of Chai et al. [35] and Taufik and Jain [36] might be attributed to this fact, and the dependence of the laser polish ability on the surface inclination should be studied in more depth.

3. Finishing of the Metal Parts

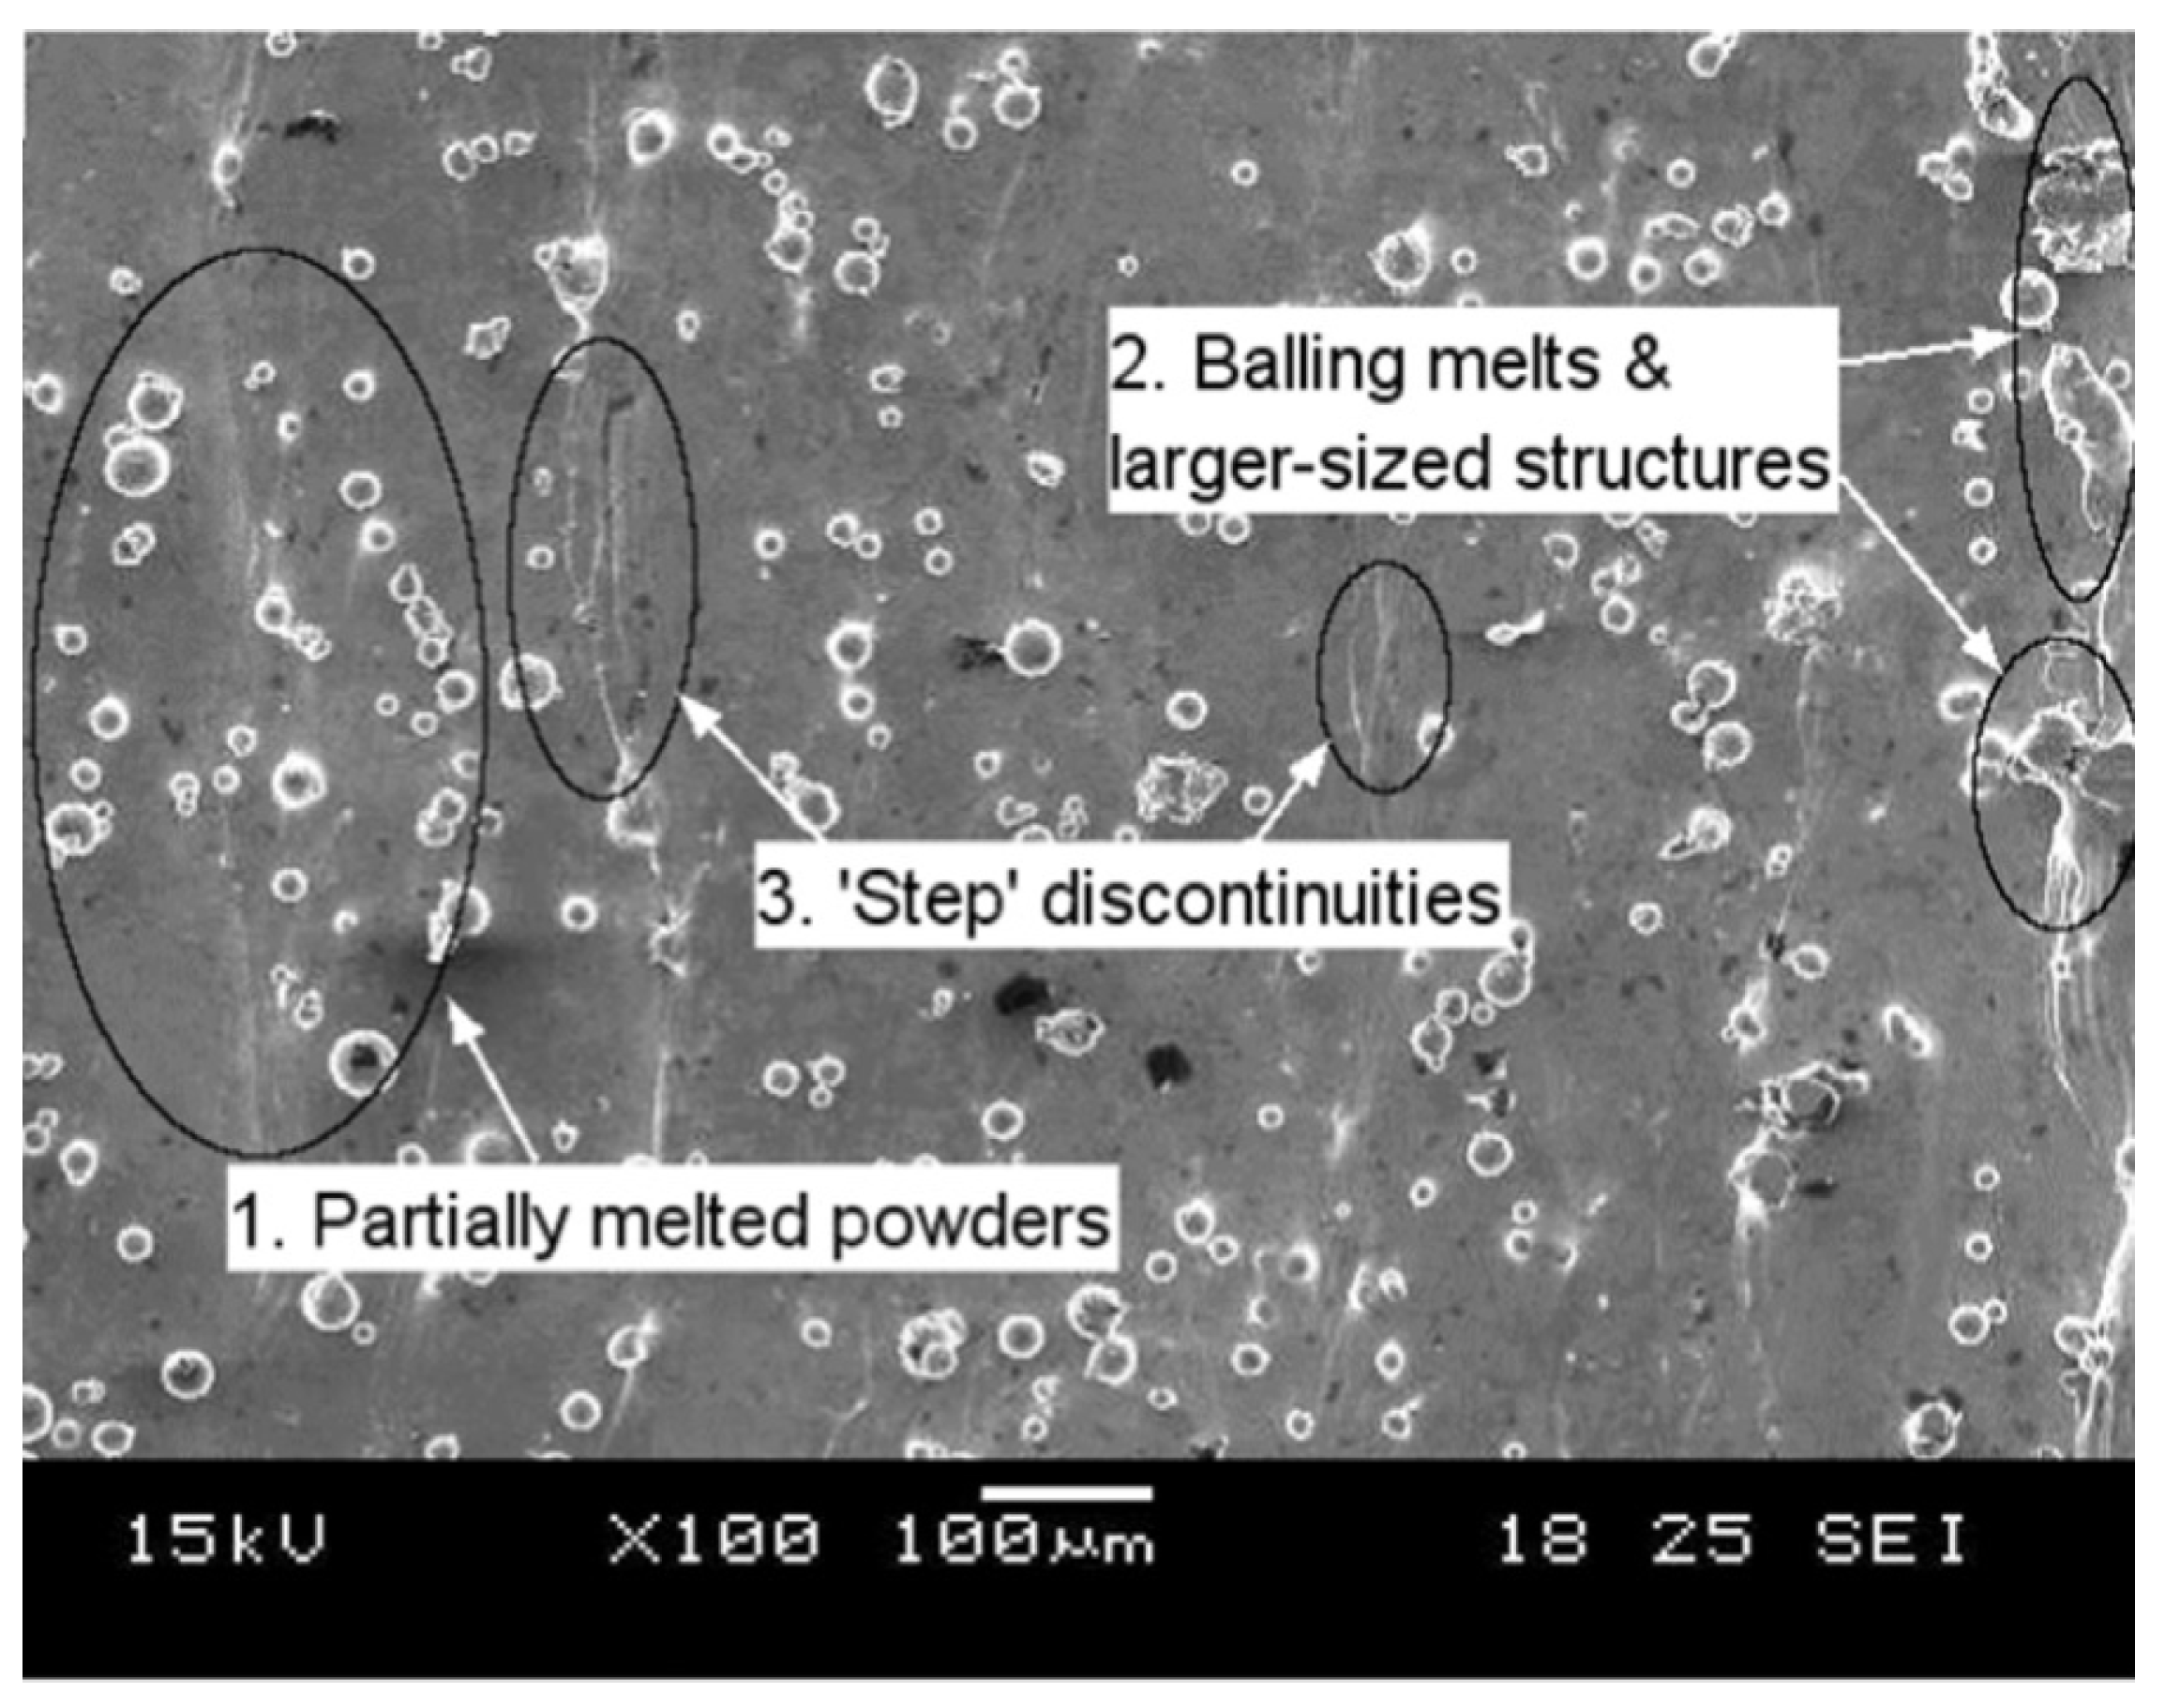
The additive manufacturing of metal parts is commonly performed by selective laser melting (SLM) or sintering (SLS) the powders on the printing bed in a controlled environment to avoid any undesirable chemical reactions (typically oxidation). The surfaces of such parts are rough, as with the AM of polymers. In addition to the stair-step effect, partially melt powders are left on the surface. Some can agglomerate and form larger balling melts [37]. Figure 16 shows these types of defects formed on the part produced by direct laser metal sintering (DMLS), which is also one of the AM metal technologies.

3.1. Laser Polishing of Metal Parts Produced by AM

One of the methods used to finish metal parts produced by AM is to use laser polishing. According to Lee et al. [38], this process can significantly change the texture of the surface without wasting material. The main working principle is that the laser is used to heat the part surface, which then allows the hills to melt and fill the valleys while reducing the surface roughness. This method depends on the energy density of the laser beam, ED (J cm−2), which itself is a function of the laser power, P (W); the feed, V (mm/min); and the beam diameter, D (mm). According to Lamikiz et al. [39], the relation is given by Equation (1):
ED = 6000 P DV
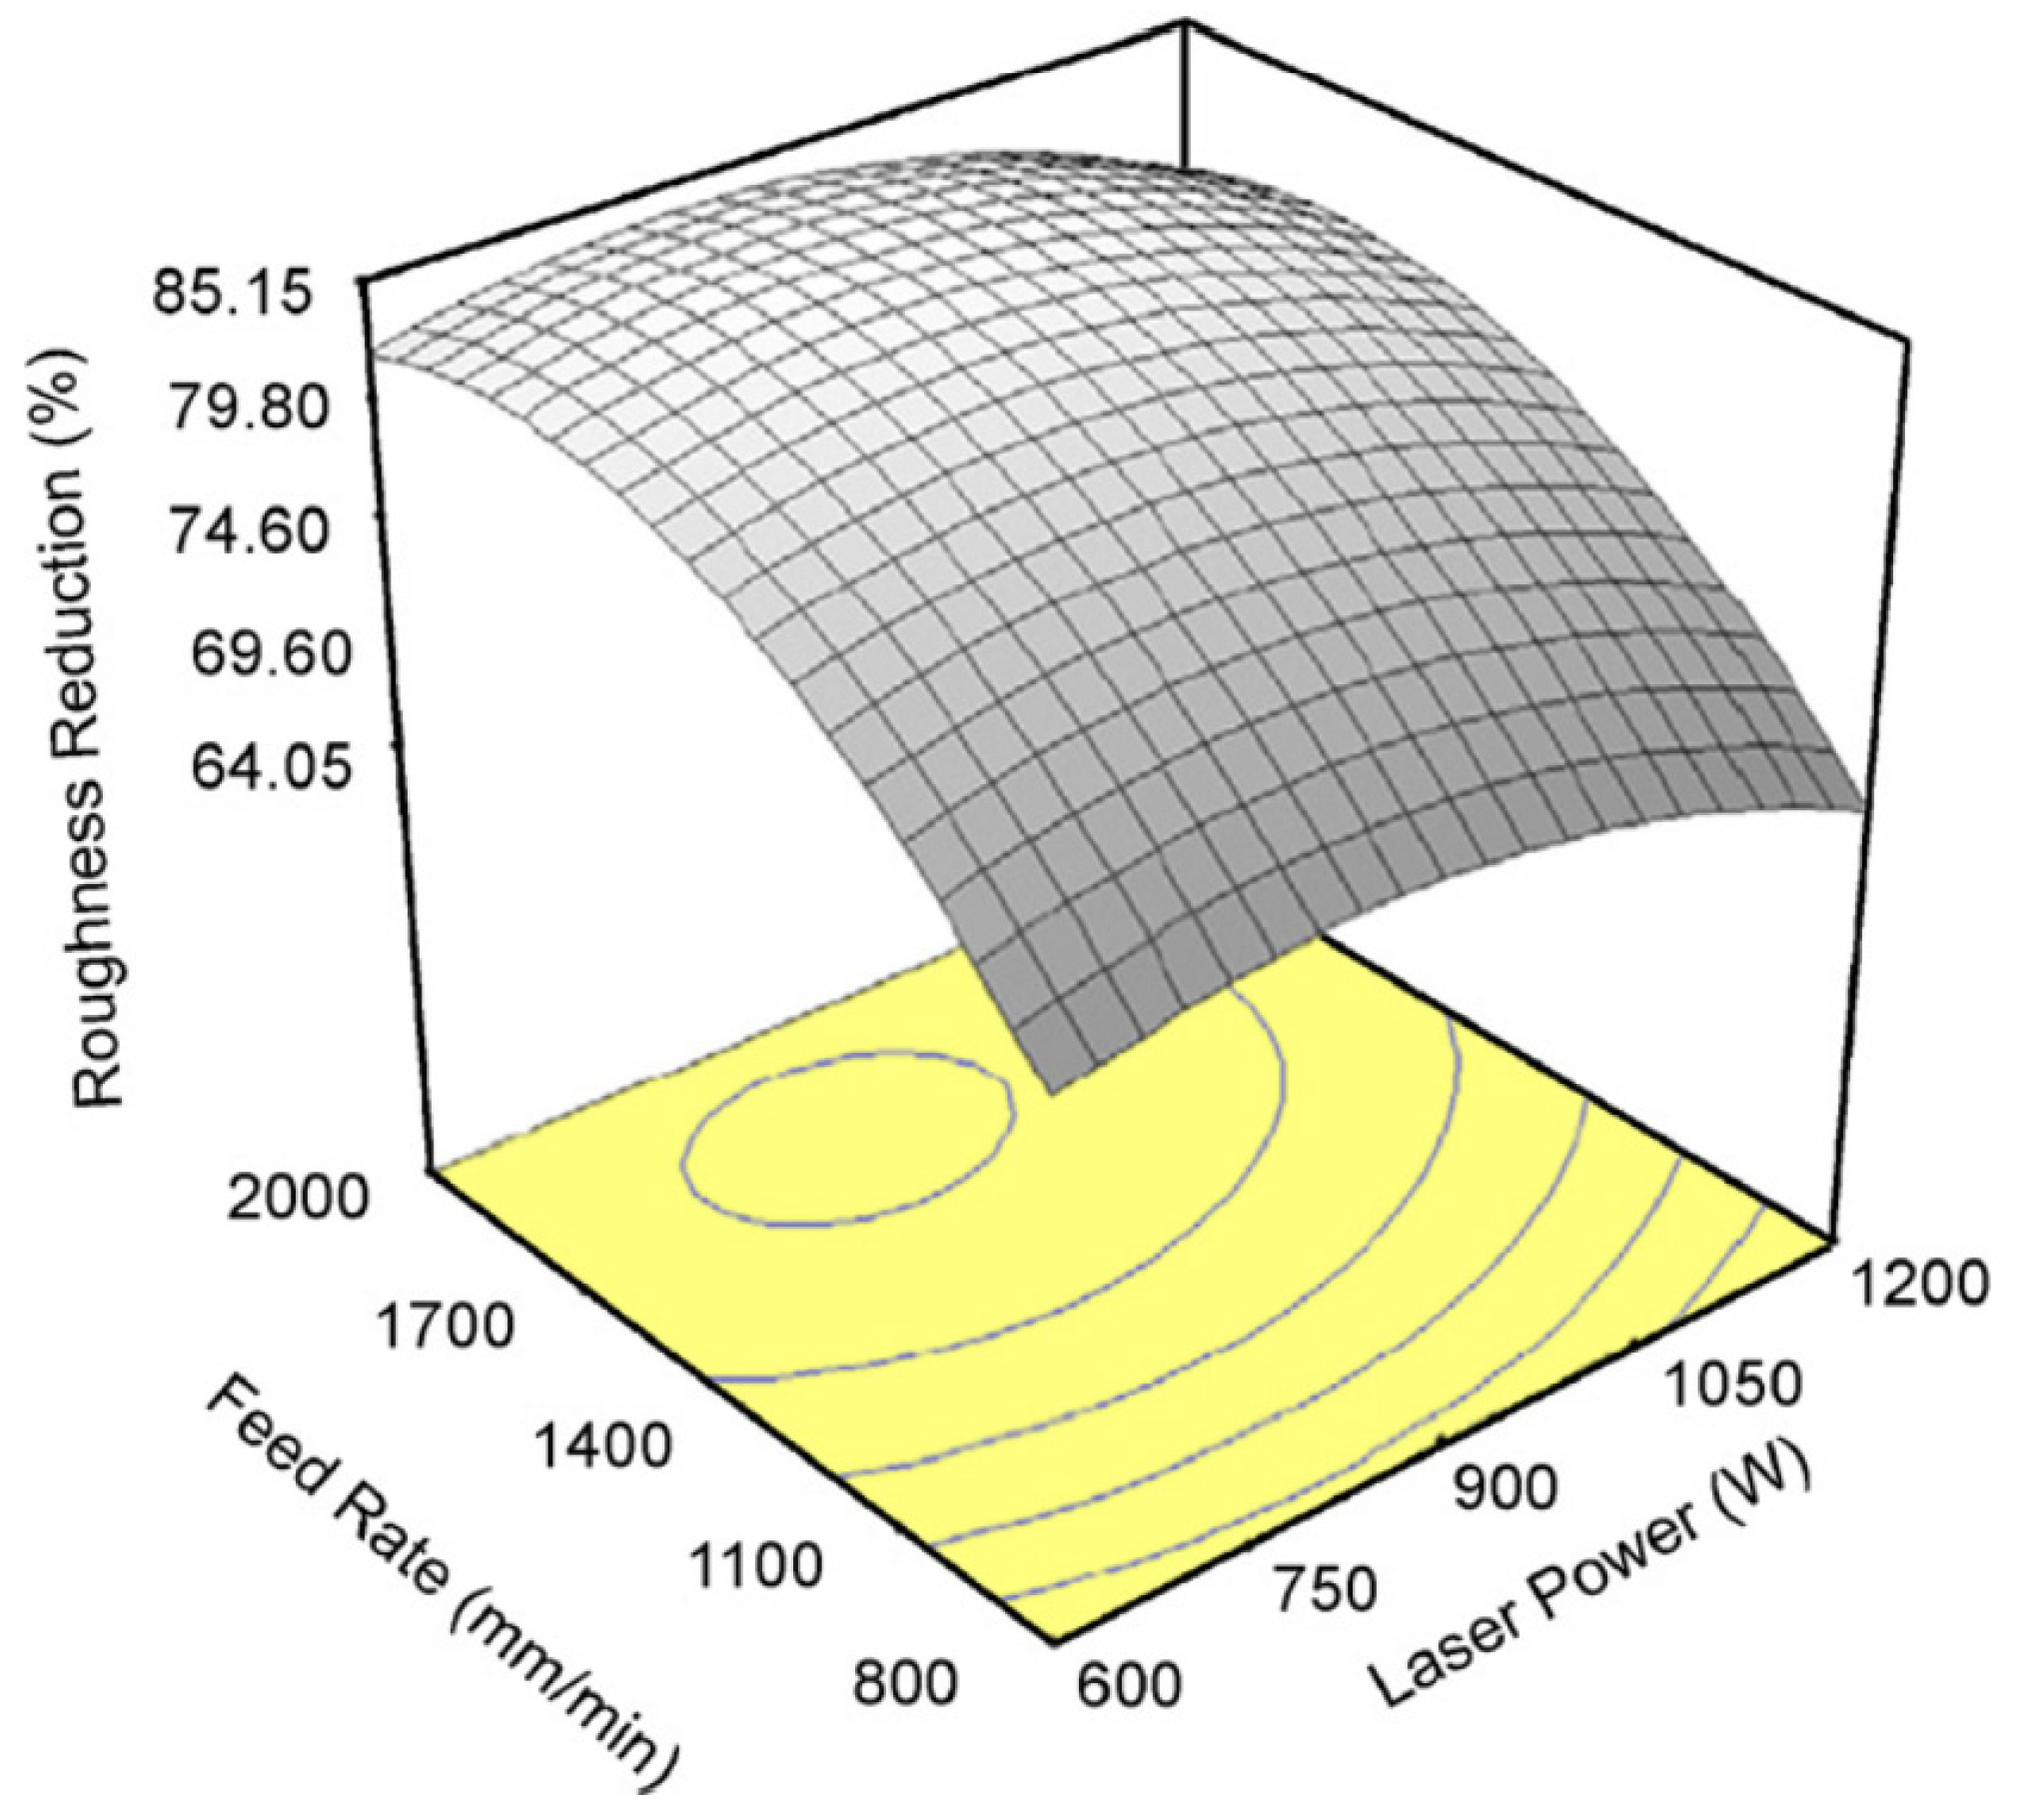
The beam diameter itself depends on the focal length of the laser. It was shown that the optimum surface roughness is obtained at average values of the laser power and feed, as shown in Figure 17. At high feeds and low energy powers, the energy density is not enough to melt the part. In contrast, at high-energy powers and low feeds, the part melts excessively, deteriorating the surface. By properly selecting LF parameters, they reduced the surface roughness of the planar and the inclined surfaces of parts sintered from the steel and copper powder mixture by 68.2% and 74.2%, respectively. However, for the inclined surface, the laser slightly deteriorated the slope and was not able to finish surfaces at angles larger than 45 degrees, relative to horizontality. Ineffective finishing was attributed to the large melting temperature difference in the copper and steel. The significance of optimizing the laser polishing parameters was also highlighted in the work of Guo et al. [40]. They studied the influence of the feed rate, duration, frequency, and energy of the pulse on the surface roughness. Laser pulse energy was found to be the most influential factor.
Gora et al. [41] studied the surface improvement of the Ti6Al4V and chromium cobalt part manufactured by the SLM process using laser polishing. It was found that it is possible to reduce the surface roughness (Ra) of Ti6Al4V and cobalt parts by 85 and 96%. However, it was also mentioned that the initial surface roughness directly influences the processed surface roughness. For this reason, before applying advanced nano-finishing techniques, rough finishing should be performed. The surface roughness of the additively manufactured Ti6Al4V block was successfully reduced from 90 µm to 4 µm in the work of Ma et al. [42]. They also reported on the microstructure change in the polished zone. Before the laser polishing, α and β phases were present. However, after the polishing was performed, the microstructure was composed of α martensite, and the β phase was not observed. In a similar study by Zhou et al. [43], the authors end-milled the Ti6Al4V blocks, and reduced the surface roughness (Ra) from 7.3 µm to 0.6 µm by laser polishing. They also observed the occurrence of the martensitic phase in the polished zone. This occurrence led to the increased micro-hardness by 25% compared to the hardness of the substrate. The corrosion resistance of the surface was also increased. Tian et al. [44] also reduced the Sa by 75% and observed microstructural transformation after laser polishing the AM-ed Ti6Al4V. Heat treatment can be applied to alter the microstructure and decompose martensite. Li et al. [45] numerically studied the laser polishing of Ti6Al4V. In the smoothing process, surface tension and Marangoni flow play crucial roles as driving forces in the molten pool.
In a similar study by Yasa et al. [46], the similar dependence of the finishing quality on the laser power and feed rate was observed. The surface roughness (Ra) of the pure steel part was reduced by almost 90% from 12 μm to 1.5 μm by selecting the average level of process parameters mentioned. The kinematics of the melt pool during the laser finishing of the printed parts were studied by Marimuthu et al. [47]. It was found that when the part is finished with a laser, a melt pool is formed and it tends to flow outward. With an increase in the laser power and a reduction in the feed, this flow velocity tends to increase, forming a hump in the melt pool. Thus, after solidification, this leads to the deterioration of the surface. For this reason, the feed rate, laser power, and laser beam distance should be carefully controlled in the laser finishing of metal parts produced by AM. The dependence of the surface roughness of Co-Cr-Mo parts on the energy density was also demonstrated using numerical simulations conducted by Richter et al. [48].
Cernasejus et al. [49] conducted related research in which the steel parts produced by metal AM were laser polished. It was found that an increase in the laser power from 1 to 3 W and a decrease in the scanning speed from 5 to 1 mm/s significantly improved the surface roughness. An increase in the number of scans from 1 to 4 led to a smaller increase in the surface roughness and homogenization, while further scanning led to the formation of surface cracks. A side benefit of laser polishing which was observed is an increase in the surface hardness from 281 HV to 509–558 HV. A similar study which used the laser polishing of 316L part was conducted by Rosa et al. [50]. They found that the laser polishing can reduce the surface roughness (Sa) of the complex thin-walled part up to 5.39 μm. A much better reduction to 790 nm was achieved on the simple surface. An additional benefit was that the laser polishing reduced the formation and amount of silicon oxide particles on the surface with an increased number of passes. Mai and Lim [51] also studied the effect of laser polishing on the reflectivity of steel surfaces. They polished the surface of 304 steel and studied the reflectivity of the surface before and after the polishing. After reducing the surface roughness (Ra) from 195 nm to 75 nm, the diffusion reflectance reduced by 70%, while the specular reflectance increased by 14%. Chen et al. [52] observed that after laser polishing, the proportion of grain boundaries at low angles in the microstructure of the 316L stainless steel increased. Moreover, the refinement of grains and a slight increase in the grains’ aspect ratio was noticed in the polished zone. This refinement led to the strengthening of the material. However, Obeidi et al. [53] observed no difference in the microstructure after laser polishing the AM-ed samples made of 316L stainless steel.
With the use of polymer laser polishing, parameters such as laser power, laser beam, and scanning speed determine the final surface roughness of parts. By carefully controlling these parameters, it is possible to achieve significant reductions in surface roughness and eliminate the un-melted powders from the surface. If the parameters are optimized, it is possible to improve surface roughness along with other characteristics, such as the high-cycle fatigue behavior [54]. The surface roughness for the simple shapes can be reduced to a nano-level, as demonstrated by the previous study; however, such a result is likely difficult to achieve for complex shapes. An additional benefit of this finishing technique applied on the laser-based AM systems is that the same machine can be used for polishing and additive manufacturing, e.g., in the study by Zhou et al. [55]. By inputting the relevant CNC commands, the laser can be used to polish the surface after the manufacturing. Thus, no capital investment for the finishing system is needed if this process is employed. However, this process has its own drawbacks. According to Temmler et al. [56], the heat from the laser can lead to a generation of residual stresses. The authors observed tensile stresses of 926 MPa. Therefore, electrochemical machining can be viewed as an alternative, as discussed in the next section.
Another process that involves laser technology is laser shock peening (LSP). LSP, similar to laser polishing, can be integrated with SLM since both the printer and LSP utilize the laser [57]. This process is usually used on metal parts to induce beneficial compressive residual stresses to prolong the fatigue life of the high-performance components, such as blades of the jet engine or compressor [2]. LSP can also be adapted to post-process the AM-ed parts. For example, Jinoop et al. [58] performed LSP on the AM-ed Inconel 718 cylinder to increase the hardness of the surface. They managed to change tensile residual stresses (197–227 MPa) of the as-built component to compressive residual stresses (214.9–307.9 MPa) by conducting LSP. Additionally, they observed an increase in the wear resistance of the LSP-ed surface. Another process that has the same working principle as LSP and does not involve laser is shot peening (SP). LSP and SP can be used to reduce porosity in the SLM-ed samples. For example, Damon et al. [59] performed SP on the AlSi10Mg parts. The porosity in the near-surface regions was reduced by 15–30% in the distance of up to 250 μm from the surface. Similarly, LSP was applied on TiC/IN625 cubes in the study by Chen et al. [60]. They observed a reduced number of pores in the subsurface layer, as compared to the as-built samples. LSP was also used on the SLM-ed Ti6Al4V specimens in a study by Jiang et al. [61]. According to the authors, though LSP can delay crack propagation, it cannot eliminate the defects inherent to SLM, such as α -phase clusters, a lack of fusion, and un-melted powders. In another study by Sagbas [62], three different post-processing techniques were compared. Three groups of SLM-ed AlSi10Mg discs were blasted, shot-peened, and polished by the SiC paper, respectively. It was found that the hardness values of the post-processed discs were 187 HV for the abrasive-blasted samples, 178 HV for the shot-peened samples, and 124 HV for the polished samples. With regards to surface roughness (Ra) results, the values were 18.71 μm for the abrasive-blasted samples, 5.39 μm for the shot-peened samples, and 1.39 μm for the polished samples. The authors did not provide the initial hardness and surface roughness of the as-built discs. However, they demonstrated that shot-peened samples had the optimum properties and a minimum wear rate. The SP of SLM-ed AlSi10Mg parts was also studied by Maamoun et al. [63]. The authors observed microstructural changes in the subsurface regions after applying SP. Due to the pressure imposed by SP, the microstructure was refined near the surface. This led to the increased hardness of 154 HV as compared to the as-built and in-depth hardness of 119 HV. The surface roughness improved; however, micro-cracks were detected. The fatigue performance of the SLM-ed AlSi10Mg parts was analyzed in the study by Uzan et al. [64]. The fatigue performance was improved after SP, but other processes performed after SP could reduce this effect. The fatigue strength was also improved in the study by Luo et al. (2018) after applying LSP [65]. Chi et al. used both LSP and heat treatment on the AM-ed Ti17 samples to enhance the mechanical strength without losing ductility. As a result, after the heat treatment followed by LSP, the tensile strength was 1181 MPa, while elongation was 6% [66].
It can be concluded that compared to polymeric parts, metallic AM-ed parts can have additional effects after laser polishing, such as microstructural changes. However, this effect is only present close to the polished zone. For example, the microhardness of the surface was increased by 25%; however, approximately 50 μm away from the surface, the hardness dropped back to the initial value [43].

3.2. Electrochemical and Chemical Machining

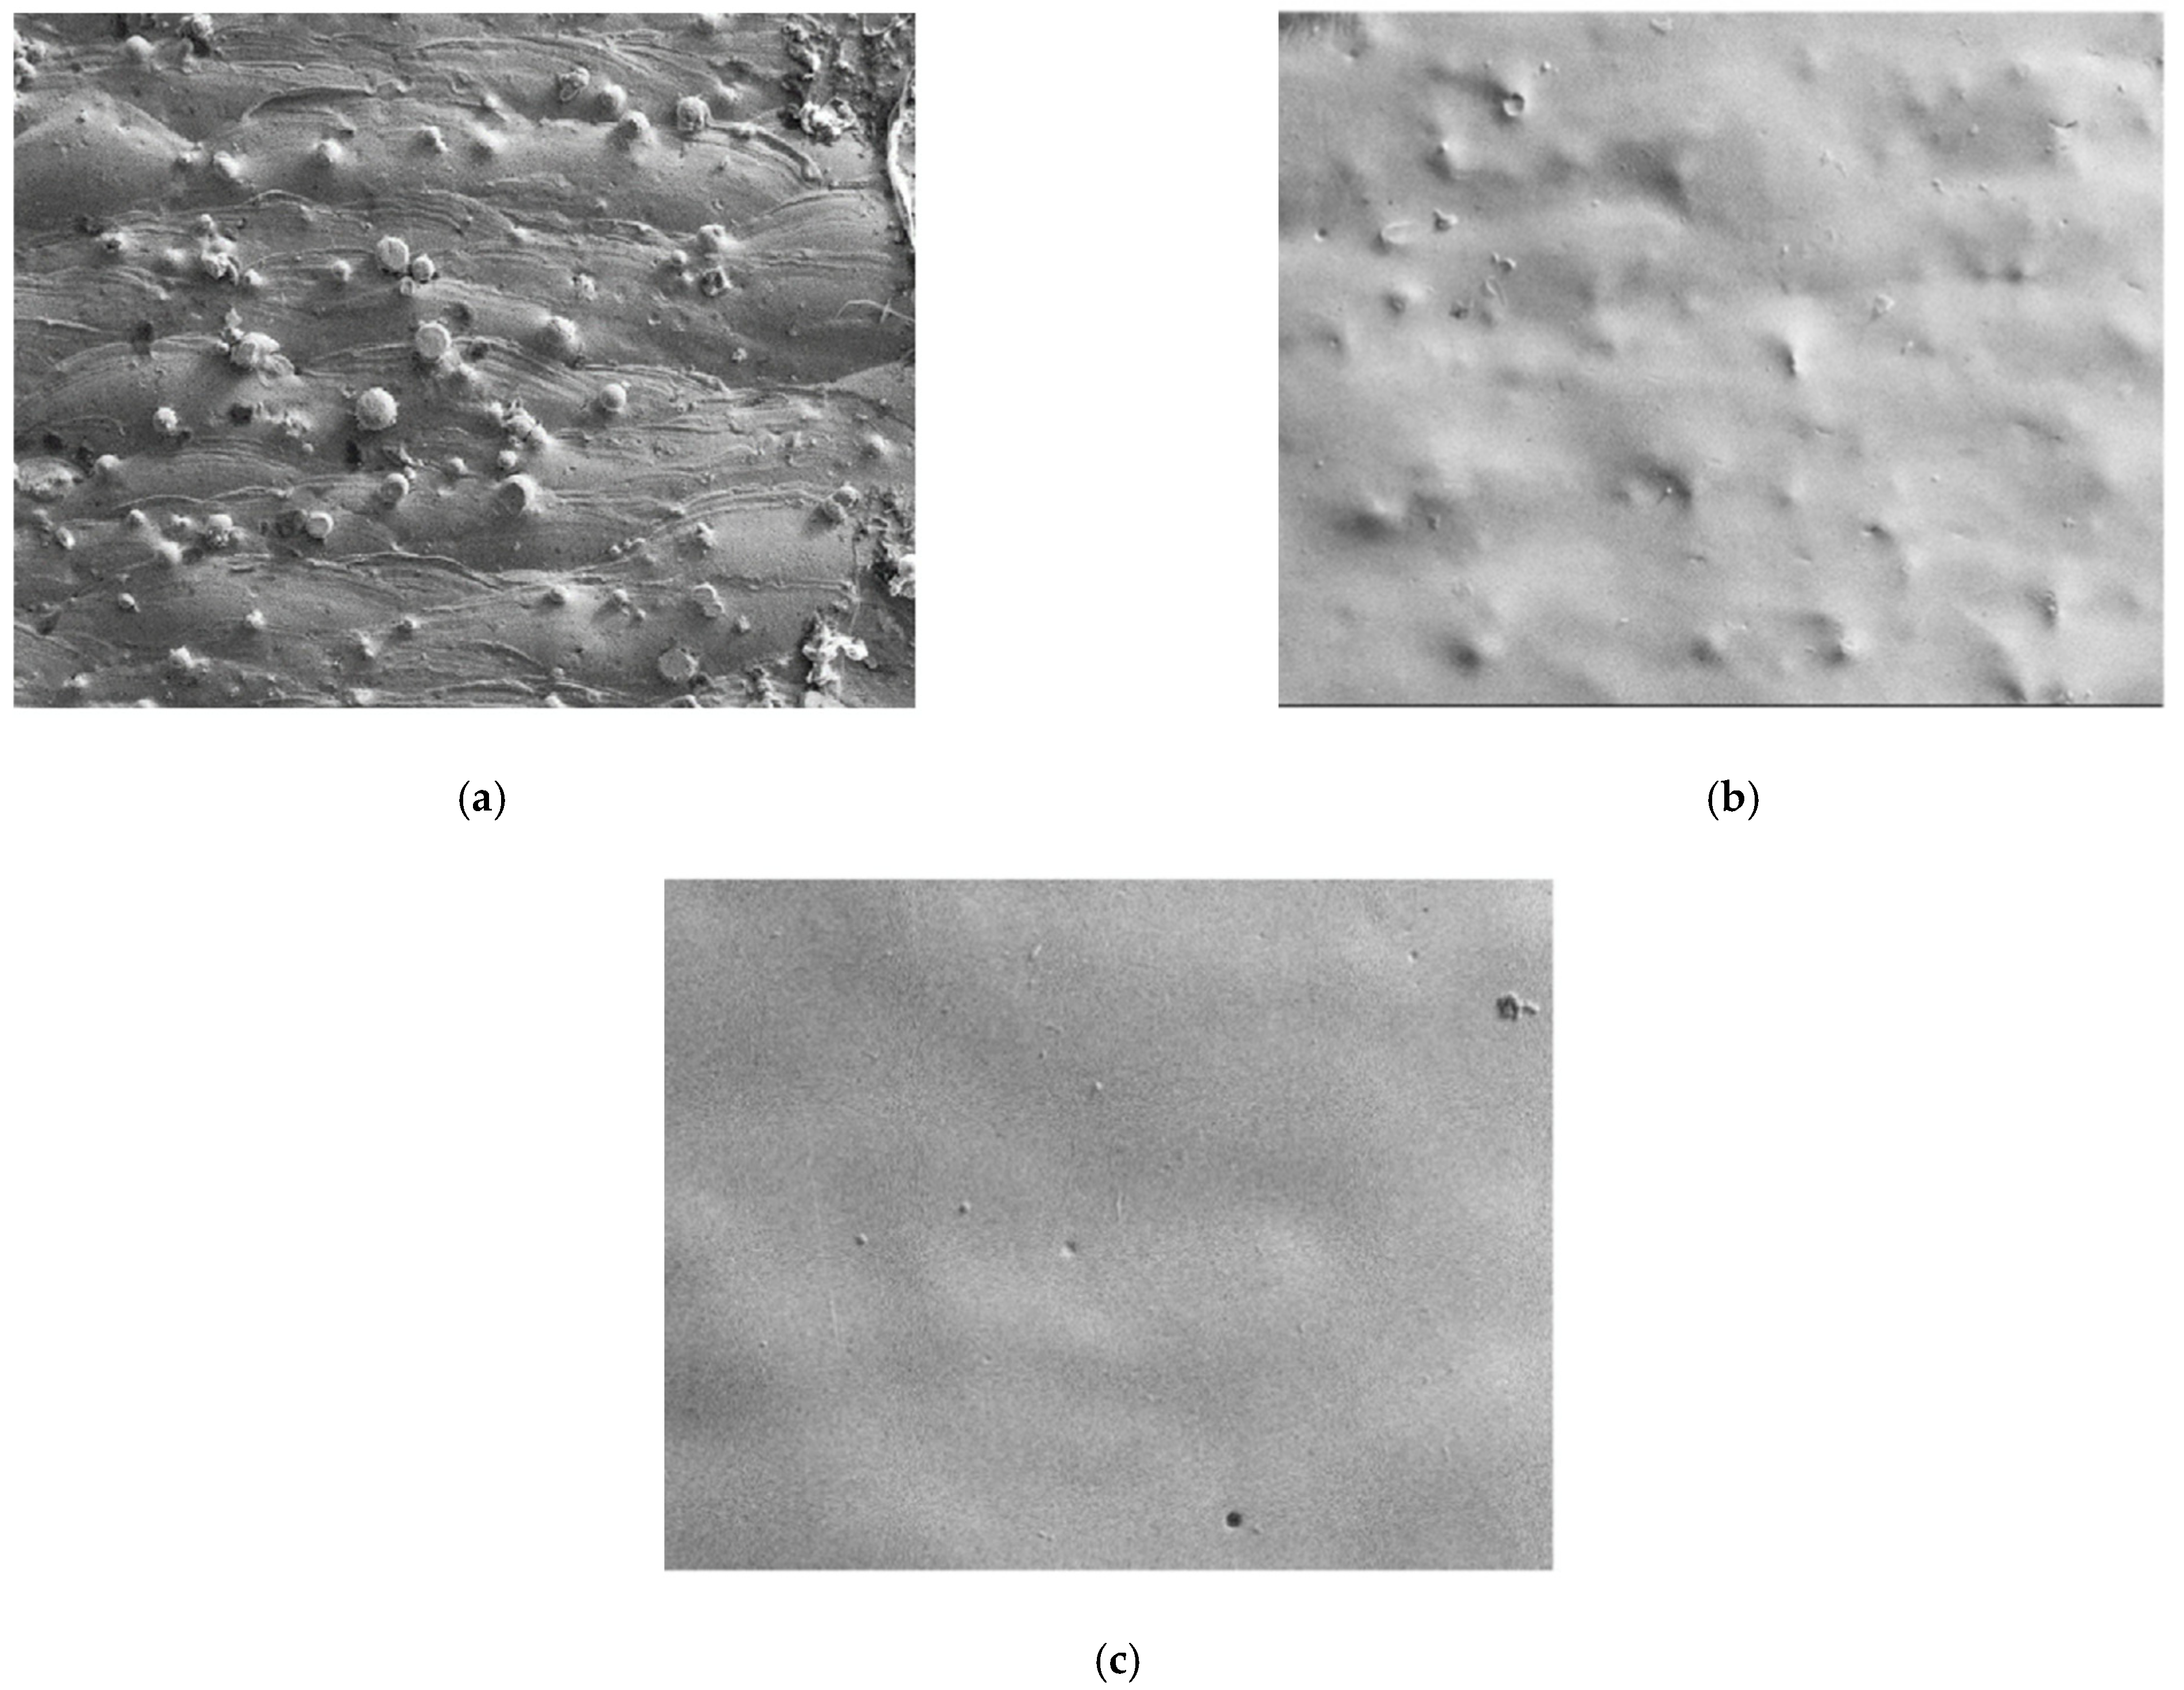
Unlike polymers, metal parts produced by additive manufacturing conduct electricity, making it possible to perform electrochemical (EC) finishing on the produced parts. There are several reports in which electrochemical finishing helped to partially remove the melted particles from the surface of the produced parts. For example, Baicheng et al. [67] performed the electrochemical finishing of Inconel parts produced by SLM. In their study, sulfur acid was mixed with pure ethanol to form electrochemical media. They observed that after 1 min of finishing, the attached particles were removed. Two minutes of finishing led to the removal of the partially melt particles from the surface. After 5 min of finishing, the surface attained uniform roughness, as indicated in Figure 18. This reduced the surface roughness (Ra) from 6.05 to 3.69 μm. However, this method leads to a significant reduction in thickness of the part. In their study, they found the thickness reduction rate was uniform at the level of 20 μm/min.
Zhao et al. [68] studied how the internal surface can be finished using the electrochemical process. In their work, they studied how different current densities affect the machining performance in the mixture of salt and water. The finishing time was adjusted so that the total charge received was the same in all cases. It was found that the current density of 2 A/cm2 was not enough to remove all the powders and no further effect was observed, even when the finishing time was increased. On the other hand, a current density of 7 A/cm2, along with a finishing time of 2.86 min, was enough to remove the un-melted powders. The surface of the AM part had an arc-shaped texture due to the SLM process. The roughness (Sa) of the part was reduced from 15.552 to 8.102 μm.
Urlea and Brailovski [69] studied how the electrochemical polishing inside perchloric and glacial acid solution is accomplished. By using trial tests, they observed that polishing occurs at higher voltages and current density values. After optimizing the current density and the voltage, electrochemical finishing was performed on the surface with a varied built angle. The maximum reduction in surface roughness (Ra) was obtained for 112.5 and 67.5 degrees and equal to 94%. The final roughness on these surfaces was less than 1 μm and the maximum surface roughness did not exceed 4 μm for all the experiments. One of the major issues related to electrochemical polishing is pit formation. Due to the mass movement in the solution, gas bubbles can be formed. Such bubbles can form non-conductive layers by sticking to the workpiece and can explode when the current density increases, leading to pit formation [70]. According to Basha et al., this issue can be mitigated by applying magnetic field stirring [71].
Electrochemical machining can be combined with magnetic abrasive finishing. The resultant hybrid process is called electrochemical magnetic abrasive finishing (EMAF). According to Sun et al. [72], the material removal rate of this hybrid process is seven times higher than that of magnetic abrasive finishing. Another hybrid machining process is dry mechanical–electrochemical polishing (DMECP). According to Bai et al., this process is more environmentally friendly compared to electrochemical polishing that requires hazardous acids. The authors reduced the roughness (Ra) of the SLM-ed 316L steel cubic samples by 91% and 93% for the top and side surfaces, respectively [73]. An et al. [74] used electrochemical mechanical polishing (ECMP) to reduce the surface roughness of interior channels of the AM-ed 316L steel. As a result, the roughness (Sa) values reduced from 15.92–18.18 to 5.06–6.02 μm. Similarly, ECMP was applied to the machine interior surface of the SLM-ed 304L steel in [75]. The surface roughness (Sa) decreased from 14.151 to 3.88 μm.
Tyagi et al. [76] compared surface improvements using the chemical and electrical polishing process of the steel components produced by AM. During the chemical polishing, the part was placed in acidic solution and, due to the chemical reaction, the surface imperfections were removed. Prior to polishing, the surface was prepared by abrasive blasting. It was found that the chemical polishing offers more flexibility and finishes the internal cavities better compared to electrical polishing because only fluid is used without electrons. However, chemical polishing produces multiple crater patterns because of the preferential reactions which occur between cementite and acid. Thus, the surface finish obtained by chemical polishing was poorer compared to electrical polishing. Nonetheless, both methods led to a significant reduction in the average surface roughness (Sa) at the nano-level. Chemical surface finishing was also conducted by Scherillo [77] who immersed SLM-ed AlSi10Mg parts in the solution of HNO3 and HF. The surface roughness was significantly improved, but the peaks were mainly removed. According to Pyka et al. [78], depending on the initial surface roughness, the solution concentration and etching duration can be customized. The solution can be made more aggressive if the structure increased the number of attached metal powder particles. The temperature of the chemical mixture can also affect the results. According to Tehrani and Imanian [79], a higher temperature of the etchant increases the machining rate. Moreover, according to Ivanits’ka et al. [80], an increase in the rotation speed of the etching setup disc leads to an increased removal rate. The concentration and composition of the solution also play significant role in the polishing performance. For example, according to Balyakin et al. [81], hydrofluoric acid, when in reaction with the titanium surface, releases hydrogen gas which is highly explosive and can cause hydrogen embrittlement. Hence, the addition of HNO3 can eliminate the production of hydrogen by changing the chemical reaction. However, the resultant byproduct is nitrogen dioxide which is known to be toxic. According to authors, the best concentration for the AM-ed Ti-6Al-4V workpiece is 10% HF and 10% HNO3 [82]. AM-ed Ti-6Al-4V samples were also chemically polished in the study by Bezuidenhout et al. [83]. They observed that at a constant HNO3 concentration, the increase in HF concentration can lead to a better surface roughness after 60 min of processing. Another study on the chemical polishing of AM-ed Ti-6Al-4V was conducted by Soro et al. [84]. The titanium lattice structures were chemically polished for different time ranges. The 15 min time range was found to be the optimum, since a longer polishing time can compromise the integrity of the thin lattice struts. Titanium lattice scaffolds were chemically polished in the study of Wysocki et al. [85]. They experimentally showed that a slight increase in the HF concentration from 2% to 2.2% can accelerate chemical polishing. On the other hand, increasing the concentration of HNO3 higher than 20% can make the solution passive and vice versa. Hence, the solution of 9% in HNO3 concentration led to the dissolving of the core struts in the scaffold. According to Dolimont et al. [86] and Dolimont et al. [87], chemical etching can produce repeatable, reproducible, and homogeneous results of material dissolution. However, the process has limitations. When chemical polishing is performed in the ultrasonic cleaner, the homogeneity of the process is eliminated, and over-polishing became an issue [88]. Furthermore, according to the experimental results of Spitaels et al., after robotic milling is performed on AM-ed Ti-6Al-4V, the surface was shiny; however, subsequent chemical etching made the surface duller [89].
According to Basha et al., chemical mechanical polishing (CMP) is gaining popularity in high-precision machining technology [71]. Similarly to the electrochemical process, chemical treatment can be combined with mechanical machining by mixing chemicals and abrasives into a slurry. This slurry is then applied onto the workpiece [90]. Zhang et al. used environmentally friendly slurry comprised of SiO2 and H2O2 solution. The resultant roughness (Ra) was 0.68 nm compared to the initial value of 0.71 nm [91]. CMP was also applied to reduce the surface roughness of AM-ed parts [92]. The resultant roughness (Sa) was reduced from 1.4 nm to 0.4 nm.
The surface roughness of the part can be reduced to as low as 50 nm, according to the reviewed studies. The main difference of this study is that the electrochemical polishing was applied as a secondary finishing operation after abrasive jet blasting. Hence, this study shows that this powerful technique can obtain smooth surfaces. Moreover, according to Basha et al. [71] and Crane et al. [93], complex geometries such as cellular structures can be post-processed using chemical and electrochemical finishing with predictable and reproducible results. However, chemical finishing is associated with a slow removal rate and high toxicity of the etching reagents [81].

3.3. Application of Mechanical Energy to Perform Smoothening of the Part

Applying mechanical energy to remove the material involves a wide range of processing techniques, ranging from post-milling to ultrasonic and abrasive flow finishing. Thus, a huge number of studies were carried out on this group of finishing processes.
Abrasive jet machining includes a wide variety of finishing processes and, according to Melentiev and Fang [94], there is an exponential growth in the research interest towards AJM. The process is also known as blasting, or micro-blasting. Bagehorn et al. [95] compared abrasive blasting, milling, vibration grinding, and micro-machining. It was found that abrasive blasting resulted in only 44% of surface roughness reduction; however, the other three methods led to a 95% reduction in the Ra value. Milling was the best method, because it consistently involved removing a high amount of material from the surface. The poor performance of abrasive blasting is attributed to the fact that some particles were projected to the surface, and revealed by EDX analysis. However, the part printed in this study was the simple prismatic surface at 45 degrees of orientation relative to the build plate. Thus, its milling was easily accomplished. This is not a case for more complex shapes [96] that are not easily accessible for the milling tools and which are usually manufactured using 3D printing and thus other methods need to be studied. A similar study was performed by Iquebal et al. [97] who used milling and fine abrasive grinding to finish parts produced by powder bed laser melting process. Using two-stage finishing helped to reduce the Sa value of the final part from 15.76 to 0.025 μm, as shown in Figure 19. Bai et al. [98] also studied milling as a post-processing technique for A131 steel cubic samples manufactured using direct energy deposition AM. The roughness (Ra) was decreased from 22.78 μm to 0.6 μm. It was noted that although high cutting speeds accelerate the tool wear, higher velocities are preferable for a better surface finish. A similar observation was drawn by Lopes et al. [99] who milled AM-ed steel parts. They concluded that a higher cutting speed and lower feeding rate led to a decreased surface roughness. Ni et al. [100] and Ni et al. [101] used ultra-precision machining and milling, respectively, to surface finish the SLM-ed Ti6Al4V parts. They noticed that due to the inherent anisotropic nature of the SLM process, the surface finish was also anisotropic when the top and front surfaces of the part were compared. The surface roughness of the front surface was higher than the surface roughness of the top surface.
Ultrasonic vibrations can be used to improve the surface finish of the printed parts. There are several methods that employ this form of energy to reduce the surface roughness, including ultrasonic cavitation abrasive finishing (UCAF), ultrasonic elliptical vibration-assisted machining (UEVAM), and ultrasonic nanocrystal surface modification (UNSM).
Ma et al. [102] demonstrated the effect of the UNSM on the surface finish of part. The principle of the UNSM process is shown in Figure 20. The tool performs high-frequency (20 kHz) oscillations with a small amplitude (8–20 μm) and scans the surface. Due to plastic deformation, the hist is deformed and the surface roughness is reduced. In their study, they reduce the roughness of the surface Ra from 18 to 3.5 μm using 8 μm amplitude vibrations. Thus, this method can be effective in reducing the SR. A side benefit of this process is the creation of residual compressive stresses on the surface which increases the fatigue resistance of the part. Additionally, this method can significantly reduce the surface porosity. In studies conducted by Ma et al. [103], it was found that the porosity volume reduced by a factor of 11.
UEVAM was used to produce an optical surface on the AM-ed parts in the study by Bai et al. [104]. By optimizing printing parameters and using UEVAM, they reduced the surface roughness (Ra) of AlSiMg0.75 from 11.03 nm to 5.1 nm.
Another way of improving of the surface finish of the additive manufactured part is to use ultrasonic cavitation abrasive finishing (UCAF), as reported by Tan and Yeo [37]. Unlike the ultrasonic machining process, material removal occurs in UCAF due to bubbles forming as the result of cavitation. It was noticed that these bubbles form on the surface peaks. Then, when they collapse, they remove the peaks and hence produce a smoother surface. The addition of the abrasive particles has a double effect: they serve as points where cavitation bubbles can form and, due to collapse of the bubbles, they accelerate and remove material by impact. Thus, it was found that using smaller-size abrasive particles increases the performance of UCAF because they produce more cavitation bubbles to perform the machining.
Wang et al. [105], on the other hand, compared ultrasonic finishing at different regimes. One of them was the performance with (SiC) and without abrasive particles (material removal by cavitation only). It was found that both methods considerably reduce the surface roughness of the part and partially remove the melt powders from the surface. However, introducing abrasives results in a lower surface roughness of 2.93 μm, whereas cavitation only results in a 5.02 μm surface roughness. It was concluded that cavitation results in the removal of un-melted powders from the surface but cannot remove powder agglomerations and larger discontinuities. Abrasive particles, on the other hand, are accelerated by the collapse of cavitation bubbles and perform micro-cutting which helps to smoothen the surface father. Additionally, an increase in the abrasive particle concentration leads to reduced roughness up until the critical value is reached. Rising the concentration beyond this point results in an increase in SR, again due to overcuts.
Abrasive flow finishing which was discussed in the context of polymer finishing can also be applied to parts produced from metal additive manufacturing. AFF is characterized by a high initial MRR due to higher variations in the surface followed by decreased MRR with each successive cycle [106,107]. According to Hashmi et al. [108], this process can offer high-quality surface finishing and freedom of use on various geometries. However, the control parameters should be carefully chosen to preclude adverse effects on delicate geometrical features, such as channels with thin walls [106]. Such a method was studied by Bouland et al. [109] who studied the surface finish of the Ti-6Al-4V alloy produced by powder bed fusion and developed a material removal model. It was found that increasing the number of the cycles in abrasive flow finishing asymptotically decreased the surface roughness. However, for profiles inclined at 45 and 90 degrees, a smaller number of passes is required to obtain the critical surface roughness compared to the profile with a 135 degree inclination. Additionally, the material removal distribution was not uniform and more material was removed from the center compared to the edges. By combining surface roughness information and the evolution of material removal with the number of passes, allowances for the desired final surface roughness were determined. Nano-level surface finishing results were also obtained by Wang et al. [110] who studied the AFF process of parts produced by SLM and obtained a resultant roughness (Ra) of 940 nm compared to an initial 14 μm average surface roughness. Guo et al. [111] applied abrasive flow machining to improve the surface of Inconel 718. The improved surface finish was achieved using a combination of low pressure, low temperature, high viscosity, and large particle size. Abrasive flow finishing was also used in the study by Han et al. [112]. Surface roughness (Sa) was reduced from 7.7 to 1.8 µm. The fatigue resistance was also improved due to the application of abrasive flow machining. Peng et al. [113] surface-finished the AM-ed AlSi10Mg workpiece using AFF. They concluded that during the first cycles of AFF, adhered molten balls and metal powders were removed, while the surface improvement of the bulk material started in the later cycles. The resultant surface roughness was 1.8 µm compared to the initial Sa of 13–14 µm. Moreover, after AFF, the residual compressive stresses were present in the surface layer of the workpiece.
Magnetic field assisted finishing (MFAF) and AFM are considered as unconventional technologies. MFAF includes magnetic abrasive finishing (MAF), magnetorheological finishing (MRF), magnetic abrasive flow finishing (MAFF), and magnetorheological jet polishing (MJP) [114]. MAF was used in the study of Zhang et al. [115]. The surface roughness of the 316L stainless steel was improved by 75.7%. In a similar study, the SLM-ed 316L stainless steel disc was polished by the MAF process and the surface roughness (Sa) was reduced from 80 to 0.3 µm [116]. Teng et al. [117] combined MAF with the grinding process and reduced the surface roughness (Ra) of the SLM-ed AlSi10Mg from 7 to 0.155 µm. Yamaguchi et al. [118] used magnetic-field-assisted polishing and burnishing on the SLM-ed 316L steel part. The surface roughness (Ra) reduced from 100 to 0.1 µm. Various machining processes can be improved via integration with the magnetic field assistance. For example, to decrease the instability of the AJM, MRF was introduced. According to Melentiev and Fang [94], with MRF roughness of 1 nm was achievable. In the study of Guo et al. [119], the internal surface of the SLM-ed Inconel 718 double-layered tube was polished using magnetic abrasives. The roughness (Ra) was reduced from 7 µm to 0.5 µm.

4. Research Trend and Limitations

In this section, the limitations of post-processing technologies will be discussed for polymers and metals. New trends will also be described.

4.1. Finishing of the Parts Produced by Polymer Additive Manufacturing

Although polymer AM cannot be directly used to produce functional parts, it can be used in hybrid processes, for example, to prepare patterns or molds for investment casting, instead of machining the wax. In such parts, surface finish becomes critical as it is will be transferred to the final metal part.
Several groups of finishing processes were studied. Among them, the application of mechanical energy is the largest one. Sandpaper polishing, although having led to a good surface finish, is too labor-intensive and cannot be used for the finishing of complex shapes. A similar drawback applies to abrasive jet finishing, which is not flexible and leads to small reduction in the surface roughness. Barrel finishing can be considered as a free-form finishing technique, but there were reports about its poor performance and long finishing time. Abrasive flow finishing of the polymer parts produced by AM showed a good reduction in surface roughness and the process itself was very flexible and can be applied to finish freeform surfaces. Finally, the best performance among the processes of this group was shown by the ball-end magnetorheological process. It led to a reduced roughness to 500 nm and produced shiny surface. However, it seems that this process cannot be applied to finish complex freeform surfaces.
Chemical finishing is another group of finishing techniques. It was found to be successful for the finishing of free-form surfaces of polymer AM parts and lead to a significantly reduced roughness in a short time. However, a reduction in dimensions due to chemical dissolution should be considered and allowances for the part should be set.
Post-machining is another technique used to improve the surface roughness of the part. It was shown that it leads to considerable roughness reduction, to 1 micron. However, the depth of the cut should be carefully controlled in order to not produce overcut to the infill of the part. Furthermore, the flexibility of the process is weaker than in abrasive flow finishing and chemical finishing.
The application of coating is also one of the techniques used to finish the parts produced using AM from polymers. It was found to be flexible as parts only need to be soaked in coating. Additionally, it improves the firing of the green mold if the pattern is produced using AM. However, there is no study which analyzes the dimensional change due to application of coatings.
Laser finishing also showed a significant improvement in the surface roughness up to 1–2 μm Ra. However, it cannot be used to machine complex internal cavities, similar to AFF and chemical finishing. Additionally, energy density should be carefully controlled because the polymer degrades and burns at high-energy densities.
Table 1 summarizes the post-processing operations which can be used with polymer AM.

4.2. Finishing of the Metal AM Parts

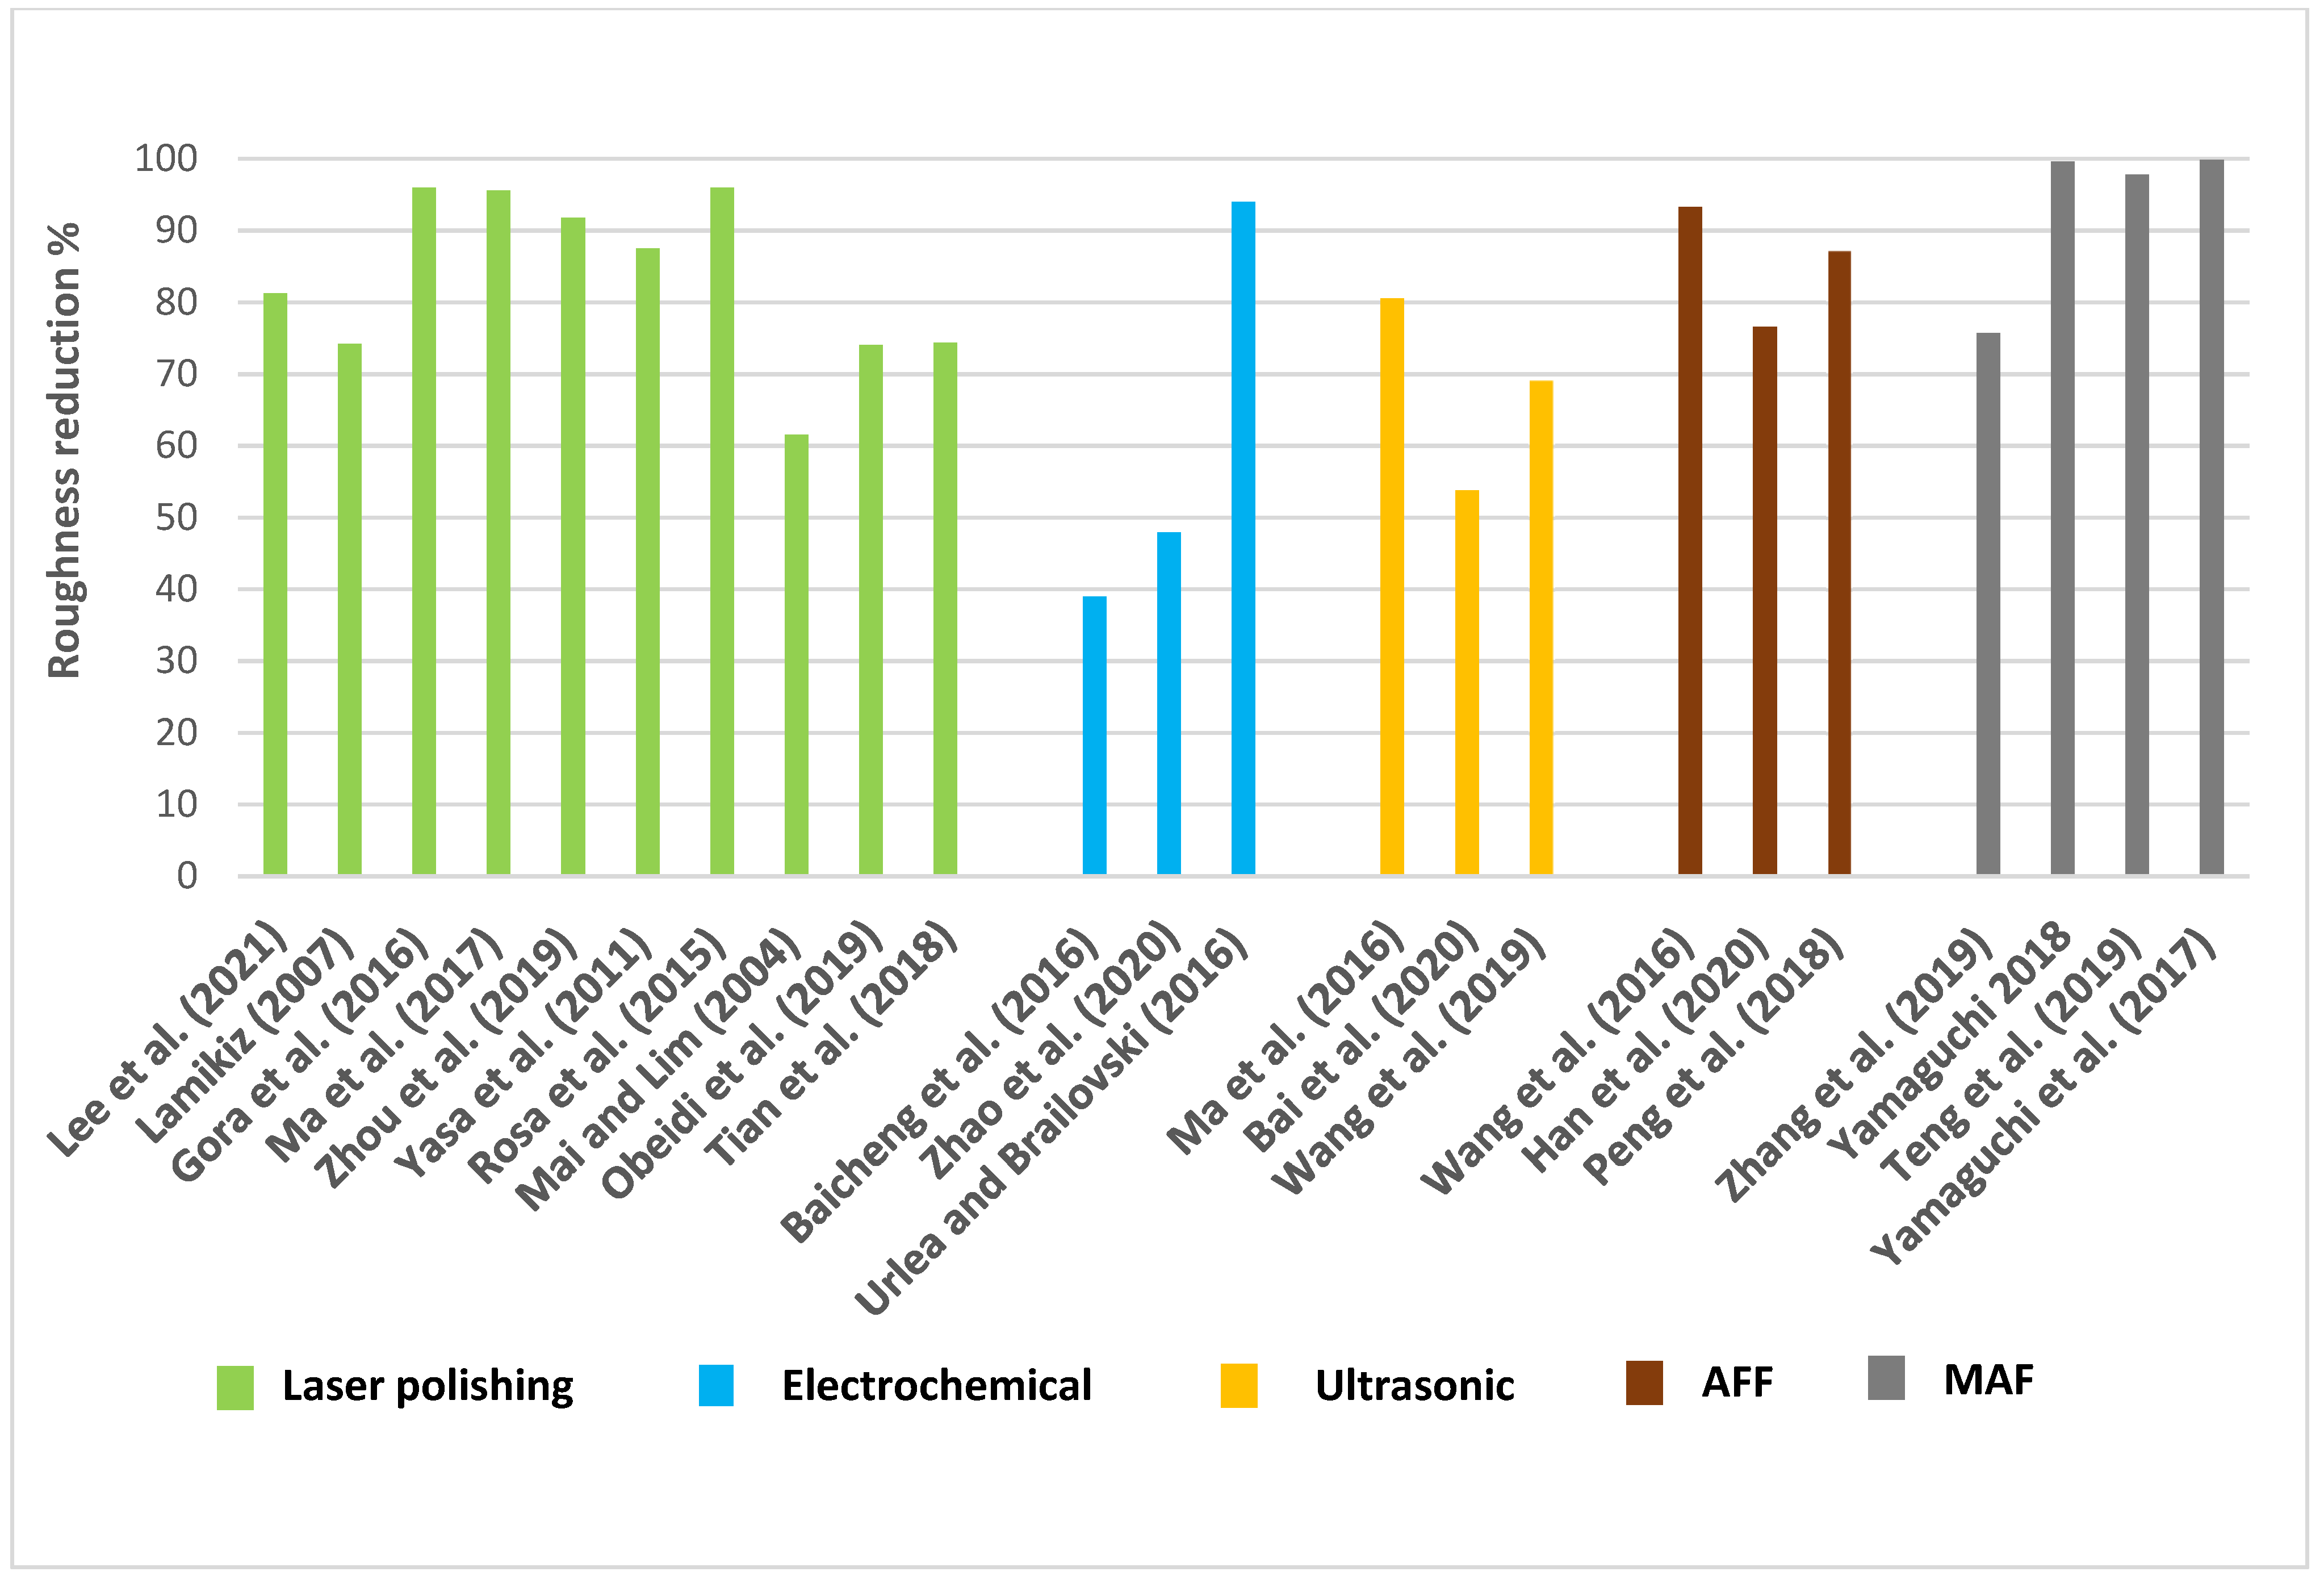
Parts produced by metal additive manufacturing have better mechanical properties compared to their polymer counterparts. For this reason, they can be used to produce fully functional parts. However, prior to use, their surface should be finished to remove partially melted powder and balling phenomenon. There are several methods used for the finishing of metal AM parts. The resultant roughness reduction analysis for laser polishing, electrochemical, ultrasonic machining, AFF, and MAF is shown in Figure 21. It can be noticed that the values fluctuate and either post-processing technique can be applied to achieve desired surface roughness reduction. Other parameters and conditions need to be analyzed to choose the optimum process.
The application of mechanical energy is one of the easiest options. As for polymer parts, abrasive jetting is not a very efficient option to perform finishing. It leads to a small decrease in surface roughness and, at the same time, cannot finish complex profiles. On the other hand, abrasive grinding, milling, and micromachining can produce a fine surface finish of nano-level roughness. An important class of finishing methods are used alongside ultrasonic vibrations. UNSM is one of the related processes in which plastic deformation is applied on the surface using a high-frequency low-amplitude vibration tool to smoothen the surface. This significantly reduces the surface roughness to 3.5 μm Ra. A side benefit is that it can produce compressive stresses and close the surface pores. However, it is not flexible to finish internal cavities well. The UCAF process, on the other hand, has higher flexibility because cavitation bubbles can collapse in any location and remove material. Research studies have reported the resultant surface finish after this process to be about 5 μm Ra. AFF can also be applied to finish metal parts manufactured by AM. Among the mechanical energy-assisted processes which were considered, this is the most flexible one and can be applied to finish internal cavities of any shape. In addition, this results in a roughness (Ra) of 940 µm.
The second method used to finish the metal parts involves a chemical and electrochemical process. Since metals conduct electricity, electroplating erosion can be applied to finish the resulting part. It can yield 3.6 μm Ra, and yet is a moderately flexible process. There were reports in which angled cavities were finished using flexible electrodes. Chemical processes, on the other hand, does not use the electrode and relies only on chemical reaction to finish the part. For this reason, it can be applied for any surface unlike the electrochemical process.
Finally, laser polishing is one of the most widespread processes for the finishing of metal AM parts. It can produce surfaces with the roughness as low as 790 nm. According to Mahmood et al. (2022) [120], laser polishing can reduce surface roughness up to 95%. Additionally, it can be accomplished on the same machine which the part was built with. However, removing the material from internal freeform cavities is problematic.
A summary the finishing operations which can be used with metal AM is shown in Table 2.

5. Conclusions

In this paper, the surface finishing techniques for metal and polymer additive manufactured parts were reviewed and discussed. Their implementation techniques were discussed and the process capabilities were reviewed.
The following points can be concluded for polymeric AM-ed parts:
  • Chemical finishing for polymers produces a very fine surface finish and can be used to smoothen very complex surfaces. However, the allowances for the finishing should be considered.
  • Abrasive finishing methods is the largest group of finishing techniques, and hence very different results can be obtained. Several processes yield an ultra-smooth surface and almost nano-level finishing, but they lack the flexibility of the chemical finishing. Abrasive flow machining seems to be the most successful of the processes considered, in terms of the final roughness and ability to finish complex cavities.
  • The application of coatings appears to be a good alternative to finish the patterns for investment casting, but the pattern will enlarge due to applied coating and hence allowances should be considered.
  • Finally, laser finishing, although leading to smooth surfaces, needs a careful process control, as excessive energy density might burn the polymer.
The following points can be concluded for metallic AM-ed parts:
  • For metals, laser finishing can produce nano-level surface roughness in metal additive manufacturing, but it cannot finish small intricate internal cavities. This process, when applied to metal additive manufactured parts, does not need any capital cost as finishing and can be conducted on the same machine.
  • Laser polishing can alter the microstructure of the parts’ subsurface, leading to increased hardness.
  • The electrochemical finishing process can also be used to finish metal parts. However, compared to chemical finishing, it cannot finish complex-shaped cavities due to the geometry of the electrode.
  • Mechanical abrasion is also the largest group of processes for metal AM parts. Among them, AFF, UCAF, and UNSM are the most flexible and can finish almost any shape.
Depending on the geometry, material, and required properties, the final product can be finished by one or several successive processes. Furthermore, some of limitations of finishing processes can be overcome by hybrid technologies. However, the choice of the post-processing operation or a combination of operations can also lead to a deterioration in the quality of the workpiece if the control parameters are not chosen carefully. Moreover, the pre-processing and optimization of the finishing process can be crucial for the resultant product. Since the finishing process is chosen according to the initial roughness, the parameters of the AM technology that directly affect the initial roughness should also be researched further. Therefore, pre-processing and post-processing operations need to be studied as an integral system for future work. Additionally, for future work, finishing technologies need to be further researched to adapt to the growing demands of the AM industry.

Author Contributions

Conceptualization, A.P. and D.T.; investigation, D.S. and A.S.; writing—D.S. and A.S.; review and editing: A.P. and D.T.; supervision, A.P. and D.T.; project administration, A.P. and D.T.; funding acquisition, D.T. All authors have read and agreed to the published version of the manuscript.

Funding

This research was funded under the target program (no. OR07665556) for project entitled “Additive production systems and metal powders for Kazakhstan industry”, by the Ministry of Industry and Infrastructure Development of the Republic of Kazakhstan.

Institutional Review Board Statement

Not applicable.

Informed Consent Statement

Not applicable.

Data Availability Statement

The data presented in this study are available on request from the corresponding authors.

Conflicts of Interest

The authors declare no conflict of interest.

List of Acronyms

AbbreviationDefinition
ABSAcrylonitrile butadiene styrene
AFFAbrasive flow finishing
AJAbrasive jetting
AJMAbrasive jet machining
AMAdditive manufacturing
APAbrasive particle
BEMRFBall end magnetorheological finishing
CADComputer-aided design
CIPCarbonyl iron particle
CMPChemical mechanical polishing
CNCComputer numerical control
DMECPDry mechanical–electrochemical polishing
DMLSDirect laser metal sintering
ECElectrochemical
ECMPElectrochemical mechanical polishing
EIPElectrolytic iron particles
EMAFElectrochemical magnetic abrasive finishing
FDMFused deposition modelling
FFFFused filament fabrication
LFLaser finishing
LSPLaser shock peening
MAFFMagnetic abrasive flow finishing
MFAFMagnetic field assisted finishing
MJPMagnetorheological jet polishing
MRMagnetorheological
MRFMagnetorheological finishing
MRRMaterial removal rate
PAAPolyacrylic acid
PEGDAPolyethylene glycol diacrylate
PEIPolyetherimide
PLAPolylactic acid
RaLinear average roughness
SaAreal average roughness
SLAStereolithography
SLMSelective laser melting
SLSSelective laser sintering
SPShot peening
SRSurface roughness
UCAFUltrasonic cavitation abrasive finishing
UEVAMUltrasonic elliptical vibration-assisted machining
UNSMUltrasonic nanocrystal surface modification

References

  1. Kumbhar, N.N.; Mulay, A. Post processing methods used to improve surface finish of products which are manufactured by additive manufacturing technologies: A review. J. Inst. Eng. India Ser. C 2018, 99, 481–487. [Google Scholar] [CrossRef]
  2. Peng, X.; Kong, L.; Fuh, J.Y.H.; Wang, H. A review of post-processing technologies in additive manufacturing. J. Manuf. Mater. Process. 2021, 5, 38. [Google Scholar] [CrossRef]
  3. Turner, B.N.; Gold, S.A. A review of melt extrusion additive manufacturing processes: II. Materials, dimensional accuracy, and surface roughness. Rapid Prototyp. J. 2015, 21, 250–261. [Google Scholar] [CrossRef]
  4. Chan, K.S.; Koike, M.; Mason, R.L.; Okabe, T. Fatigue Life of Titanium Alloys Fabricated by Additive Layer Manufacturing Techniques for Dental Implants. Met. Mater. Trans. A 2012, 44, 1010–1022. [Google Scholar] [CrossRef]
  5. Gisario, A.; Kazarian, M.; Martina, F.; Mehrpouya, M. Metal additive manufacturing in the commercial aviation industry: A review. J. Manuf. Syst. 2019, 53, 124–149. [Google Scholar] [CrossRef]
  6. Tan, H.; Fang, Y.; Zhong, C.; Yuan, Z.; Fan, W.; Li, Z.; Chen, J.; Lin, X. Investigation of heating behavior of laser beam on powder stream in directed energy deposition. Surf. Coat. Technol. 2020, 397, 126061. [Google Scholar] [CrossRef]
  7. Anitha, R.; Arunachalam, S.; Radhakrishnan, P. Critical parameters influencing the quality of prototypes in fused deposition modelling. J. Mater. Process. Technol. 2001, 118, 385–388. [Google Scholar] [CrossRef]
  8. Li, H.; Wang, T.; Sun, J.; Yu, Z. The adaptive slicing algorithm and its impact on the mechanical property and surface roughness of freeform extrusion parts. Virtual Phys. Prototyp. 2016, 11, 27–39. [Google Scholar] [CrossRef]
  9. Wang, Z.; Ummethala, R.; Singh, N.; Tang, S.; Suryanarayana, C.; Eckert, J.; Prashanth, K.G. Selective Laser Melting of Aluminum and Its Alloys. Materials 2020, 13, 4564. [Google Scholar] [CrossRef]
  10. Martínez-Pellitero, S.; Castro, M.; Fernández-Abia, A.I.; González, S.; Cuesta, E. Analysis of influence factors on part quality in micro-SLA technology. Procedia Manuf. 2017, 13, 856–863. [Google Scholar] [CrossRef]
  11. Fischer, M.; Schöppner, V. Some investigations regarding the surface treatment of Ultem*9085 parts manufactured with fused deposition modeling. In Proceedings of the 2013 International Solid Freeform Fabrication Symposium, Austin, TX, USA, 12–14 August 2013. [Google Scholar]
  12. Tiwary, V.K.; Arunkumar, P.; Deshpande, A.S.; Rangaswamy, N. Surface enhancement of FDM patterns to be used in rapid investment casting for making medical implants. Rapid Prototyp. J. 2019, 25, 904–914. [Google Scholar] [CrossRef]
  13. Leong, K.F.; Chua, C.K.; Chua, G.S.; Tan, C.H. Abrasive jet deburring of jewellery models built by stereolithography apparatus (SLA). J. Mater. Process. Technol. 1998, 83, 36–47. [Google Scholar] [CrossRef]
  14. Gajdoš, I.; Spišák, E.; Kaščák, L.; Krasinskyi, V. Surface finish techniques for FDM parts. In Materials Science Forum; Trans Tech Publications: Zurich, Switzerland, 2015; Volume 818, pp. 45–48. [Google Scholar]
  15. Boschetto, A.; Bottini, L. Roughness prediction in coupled operations of fused deposition modeling and barrel finishing. J. Mater. Process. Technol. 2015, 219, 181–192. [Google Scholar] [CrossRef]
  16. Boschetto, A.; Bottini, L. Surface improvement of fused deposition modeling parts by barrel finishing. Rapid Prototyp. J. 2015, 21, 686–696. [Google Scholar] [CrossRef]
  17. Williams, R.E.; Melton, V.L. Abrasive flow finishing of stereolithography prototypes. Rapid Prototyp. J. 1998, 4, 56–67. [Google Scholar] [CrossRef]
  18. Mali, H.S.; Prajwal, B.; Gupta, D.; Kishan, J. Abrasive flow finishing of FDM printed parts using a sustainable media. Rapid Prototyp. J. 2018, 24, 593–606. [Google Scholar] [CrossRef]
  19. Kumar, A.; Alam, Z.; Khan, D.A.; Jha, S. Nanofinishing of FDM-fabricated components using ball end magnetorheological finishing process. Mater. Manuf. Process. 2019, 34, 232–242. [Google Scholar] [CrossRef]
  20. Chohan, J.S.; Singh, R.; Boparai, K.S.; Penna, R.; Fraternali, F. Dimensional accuracy analysis of coupled fused deposition modeling and vapour smoothing operations for biomedical applications. Compos. Part B Eng. 2017, 117, 138–149. [Google Scholar] [CrossRef]
  21. Galantucci, L.M.; Lavecchia, F.; Percoco, G. Experimental study aiming to enhance the surface finish of fused deposition modeled parts. CIRP Ann. 2009, 58, 189–192. [Google Scholar] [CrossRef]
  22. Lalehpour, A.; Barari, A. Post processing for fused deposition modeling parts with acetone vapour bath. IFAC-PapersOnLine 2016, 49, 42–48. [Google Scholar] [CrossRef]
  23. Singh, D.; Singh, R.; Boparai, K.S. Investigations for surface roughness and dimensional accuracy of biomedical implants prepared by combining fused deposition modelling, vapour smoothing and investment casting. Adv. Mater. Process. Technol. 2020, 1–20. [Google Scholar] [CrossRef]
  24. Jin, Y.; Wan, Y.; Liu, Z. Surface polish of PLA parts in FDM using dichloromethane vapour. MATEC Web Conf. 2017, 95, 05001. [Google Scholar] [CrossRef] [Green Version]
  25. Valerga, A.P.; Batista, M.; Fernandez-Vidal, S.R.; Gamez, A.J. Impact of chemical post-processing in fused deposition modelling (FDM) on polylactic acid (PLA) surface quality and structure. Polymers 2019, 11, 566. [Google Scholar] [CrossRef] [Green Version]
  26. Pandey, P.M.; Reddy, N.V.; Dhande, S.G. Improvement of surface finish by staircase machining in fused deposition modeling. J. Mater. Process. Technol. 2003, 132, 323–331. [Google Scholar] [CrossRef]
  27. Boschetto, A.; Bottini, L.; Veniali, F. Finishing of Fused Deposition Modeling parts by CNC machining. Robot. Comput. Manuf. 2016, 41, 92–101. [Google Scholar] [CrossRef]
  28. Garg, P.K.; Singh, R.; Ahuja, I. Multi-objective optimization of dimensional accuracy, surface roughness and hardness of hybrid investment cast components. Rapid Prototyp. J. 2017, 23, 845–857. [Google Scholar] [CrossRef]
  29. Zhou, J.; Lu, Z.; Miao, K.; Ji, Z.; Dong, Y.; Li, D. Quick fabrication of aeronautical complicated structural parts based on stereolithography. Propuls. Power Res. 2015, 4, 63–71. [Google Scholar] [CrossRef] [Green Version]
  30. Roach, D.J.; Roberts, C.; Wong, J.; Kuang, X.; Kovitz, J.; Zhang, Q.; Spence, T.G.; Qi, H.J. Surface modification of fused filament fabrication (FFF) 3D printed substrates by inkjet printing polyimide for printed electronics. Addit. Manuf. 2020, 36, 101544. [Google Scholar] [CrossRef]
  31. Dewey, M.P.; Ulutan, D. Development of laser polishing as an auxiliary post-process to improve surface quality in fused deposition modeling parts. In Proceedings of the ASME 2017 12th International Manufacturing Science and Engineering Conference Collocated with the JSME/ASME 2017 6th International Conference on Materials and Processing, Los Angeles, CA, USA, 4–8 June 2017; American Society of Mechanical Engineers, 2017; Volume 50732, p. V002T01A006. [Google Scholar]
  32. Chen, L.; Zhang, X.; Gan, S. Effects of laser polishing on surface quality and mechanical properties of PLA parts built by fused deposition modeling. J. Appl. Polym. Sci. 2019, 137, 48288. [Google Scholar] [CrossRef]
  33. Lambiase, F.; Genna, S.; Leone, C. Laser finishing of 3D printed parts produced by material extrusion. Opt. Lasers Eng. 2020, 124, 105801. [Google Scholar] [CrossRef]
  34. Braun, K.; Willenborg, E.; Schleifenbaum, J.H. Laser polishing as a new post process for 3D-printed polymer parts. Procedia CIRP 2020, 94, 134–138. [Google Scholar] [CrossRef]
  35. Chai, Y.; Li, R.W.; Perriman, D.M.; Chen, S.; Qin, Q.-H.; Smith, P.N. Laser polishing of thermoplastics fabricated using fused deposition modelling. Int. J. Adv. Manuf. Technol. 2018, 96, 4295–4302. [Google Scholar] [CrossRef]
  36. Taufik, M.; Jain, P.K. Laser assisted finishing process for improved surface finish of fused deposition modelled parts. J. Manuf. Process. 2017, 30, 161–177. [Google Scholar] [CrossRef]
  37. Tan, K.L.; Yeo, S.H. Surface modification of additive manufactured components by ultrasonic cavitation abrasive finishing. Wear 2017, 378, 90–95. [Google Scholar] [CrossRef]
  38. Lee, S.; Ahmadi, Z.; Pegues, J.W.; Mahjouri-Samani, M.; Shamsaei, N. Laser polishing for improving fatigue performance of additive manufactured Ti-6Al-4V parts. Opt. Laser Technol. 2021, 134, 106639. [Google Scholar] [CrossRef]
  39. Lamikiz, A.; Sánchez, J.; de Lacalle, L.L.; Arana, J. Laser polishing of parts built up by selective laser sintering. Int. Int. J. Mach. Tools Manuf. 2007, 47, 2040–2050. [Google Scholar] [CrossRef]
  40. Guo, W.; Hua, M.; Tse, P.W.-T.; Mok, A.C.K. Process parameters selection for laser polishing DF2 (AISI O1) by Nd:YAG pulsed laser using orthogonal design. Int. J. Adv. Manuf. Technol. 2012, 59, 1009–1023. [Google Scholar] [CrossRef]
  41. Gora, W.S.; Tian, Y.; Cabo, A.P.; Ardron, M.; Maier, R.R.J.; Prangnell, P.; Weston, N.J.; Hand, D. Enhancing surface finish of additively manufactured titanium and cobalt chrome elements using laser based finishing. Phys. Procedia 2016, 83, 258–263. [Google Scholar] [CrossRef]
  42. Ma, C.P.; Guan, Y.C.; Zhou, W. Laser polishing of additive manufactured Ti alloys. Opt. Lasers Eng. 2017, 93, 171–177. [Google Scholar] [CrossRef]
  43. Zhou, J.; Liao, C.; Shen, H.; Ding, X. Surface and property characterization of laser polished Ti6Al4V. Surf. Coat. Technol. 2019, 380, 125016. [Google Scholar] [CrossRef]
  44. Tian, Y.; Gora, W.S.; Cabo, A.P.; Parimi, L.L.; Hand, D.P.; Tammas-Williams, S.; Prangnell, P.B. Material interactions in laser polishing powder bed additive manufactured Ti6Al4V components. Addit. Manuf. 2018, 20, 11–22. [Google Scholar] [CrossRef] [Green Version]
  45. Li, K.; Zhao, Z.; Zhou, H.; Zhou, H.; Jin, J. Numerical analyses of molten pool evolution in laser polishing Ti6Al4V. J. Manuf. Process. 2020, 58, 574–584. [Google Scholar] [CrossRef]
  46. Yasa, E.; Kruth, J.-P.; Deckers, J. Manufacturing by combining selective laser melting and selective laser erosion/laser re-melting. CIRP Ann. 2011, 60, 263–266. [Google Scholar] [CrossRef]
  47. Marimuthu, S.; Triantaphyllou, A.; Antar, M.; Wimpenny, D.; Morton, H.; Beard, M. Laser polishing of selective laser melted components. Int. J. Mach. Tools Manuf. 2015, 95, 97–104. [Google Scholar] [CrossRef] [Green Version]
  48. Richter, B.; Blanke, N.; Werner, C.; Vollertsen, F.; Pfefferkorn, F. Effect of initial surface features on laser polishing of Co-Cr-Mo alloy made by powder-bed fusion. JOM 2019, 71, 912–919. [Google Scholar] [CrossRef]
  49. Černašėjus, O.; Škamat, J.; Markovič, V.; Višniakov, N.; Indrišiūnas, S. Surface Laser Processing of Additive Manufactured 1.2709 Steel Parts: Preliminary Study. Adv. Mater. Sci. Eng. 2019, 2019, 7029471. [Google Scholar] [CrossRef] [Green Version]
  50. Rosa, B.; Mognol, P.; Hascoët, J.-Y. Laser polishing of additive laser manufacturing surfaces. J. Laser Appl. 2015, 27, S29102. [Google Scholar] [CrossRef] [Green Version]
  51. Mai, T.A.; Lim, G.C. Micromelting and its effects on surface topography and properties in laser polishing of stainless steel. J. Laser Appl. 2004, 16, 221–228. [Google Scholar] [CrossRef]
  52. Chen, L.; Richter, B.; Zhang, X.; Bertsch, K.B.; Thoma, D.J.; Pfefferkorn, F.E. Effect of laser polishing on the microstructure and mechanical properties of stainless steel 316L fabricated by laser powder bed fusion. Mater. Sci. Eng. A 2021, 802, 140579. [Google Scholar] [CrossRef]
  53. Obeidi, M.A.; McCarthy, E.; O’Connell, B.; Ahad, I.U.; Brabazon, D. Laser polishing of additive manufactured 316L stainless steel synthesized by selective laser melting. Materials 2019, 12, 991. [Google Scholar] [CrossRef]
  54. Avilés, R.; Albizuri, J.; Lamikiz, A.; Ukar, E.; Avilés, A. Influence of laser polishing on the high cycle fatigue strength of medium carbon AISI 1045 steel. Int. J. Fatigue 2011, 33, 1477–1489. [Google Scholar] [CrossRef]
  55. Zhou, J.; Han, X.; Li, H.; Liu, S.; Shen, S.; Zhou, X.; Zhang, D. In-Situ Laser Polishing Additive Manufactured AlSi10Mg: Effect of Laser Polishing Strategy on Surface Morphology, Roughness and Microhardness. Materials 2021, 14, 393. [Google Scholar] [CrossRef] [PubMed]
  56. Temmler, A.; Liu, D.; Preußner, J.; Oeser, S.; Luo, J.; Poprawe, R.; Schleifenbaum, J. Influence of laser polishing on surface roughness and microstructural properties of the remelted surface boundary layer of tool steel H11. Mater. Des. 2020, 192, 108689. [Google Scholar] [CrossRef]
  57. Lu, J.; Lu, H.; Xu, X.; Yao, J.; Cai, J.; Luo, K. High-performance integrated additive manufacturing with laser shock peening–induced microstructural evolution and improvement in mechanical properties of Ti6Al4V alloy components. Int. J. Mach. Tools Manuf. 2020, 148, 103475. [Google Scholar] [CrossRef]
  58. Jinoop, A.N.; Subbu, S.K.; Paul, C.P.; Palani, I.A. Post-processing of Laser Additive Manufactured Inconel 718 Using Laser Shock Peening. Int. J. Precis. Eng. Manuf. 2019, 20, 1621–1628. [Google Scholar] [CrossRef]
  59. Damon, J.; Dietrich, S.; Vollert, F.; Gibmeier, J.; Schulze, V. Process dependent porosity and the influence of shot peening on porosity morphology regarding selective laser melted AlSi10Mg parts. Addit. Manuf. 2018, 20, 77–89. [Google Scholar] [CrossRef]
  60. Chen, L.; Sun, Y.; Li, L.; Ren, X. Improvement of high temperature oxidation resistance of additively manufactured TiC/Inconel 625 nanocomposites by laser shock peening treatment. Addit. Manuf. 2020, 34, 101276. [Google Scholar] [CrossRef]
  61. Jiang, Q.; Li, S.; Zhou, C.; Zhang, B.; Zhang, Y. Effects of laser shock peening on the ultra-high cycle fatigue performance of additively manufactured Ti6Al4V alloy. Opt. Laser Technol. 2021, 144, 107391. [Google Scholar] [CrossRef]
  62. Sagbas, B. Post-Processing Effects on Surface Properties of Direct Metal Laser Sintered AlSi10Mg Parts. Met. Mater. Int. 2020, 26, 143–153. [Google Scholar] [CrossRef]
  63. Maamoun, A.H.; Elbestawi, M.A.; Veldhuis, S.C. Influence of Shot Peening on AlSi10Mg Parts Fabricated by Additive Manufacturing. J. Manuf. Mater. Process. 2018, 2, 40. [Google Scholar] [CrossRef]
  64. Uzan, N.E.; Ramati, S.; Shneck, R.; Frage, N.; Yeheskel, O. On the effect of shot-peening on fatigue resistance of AlSi10Mg specimens fabricated by additive manufacturing using selective laser melting (AM-SLM). Addit. Manuf. 2018, 21, 458–464. [Google Scholar] [CrossRef]
  65. Luo, S.; He, W.; Chen, K.; Nie, X.; Zhou, L.; Li, Y. Regain the fatigue strength of laser additive manufactured Ti alloy via laser shock peening. J. Alloy. Compd. 2018, 750, 626–635. [Google Scholar] [CrossRef]
  66. Chi, J.; Cai, Z.; Wan, Z.; Zhang, H.; Chen, Z.; Li, L.; Li, Y.; Peng, P.; Guo, W. Effects of heat treatment combined with laser shock peening on wire and arc additive manufactured Ti17 titanium alloy: Microstructures, residual stress and mechanical properties. Surf. Coat. Technol. 2020, 396, 125908. [Google Scholar] [CrossRef]
  67. Baicheng, Z.; Xiaohua, L.; Jiaming, B.; Junfeng, G.; Pan, W.; Chen-Nan, S.; Muiling, N.; Guojun, Q.; Jun, W. Study of selective laser melting (SLM) Inconel 718 part surface improvement by electrochemical polishing. Mater. Des. 2017, 116, 531–537. [Google Scholar] [CrossRef]
  68. Zhao, C.; Qu, N.; Tang, X. Removal of adhesive powders from additive-manufactured internal surface via electrochemical machining with flexible cathode. Precis. Eng. 2021, 67, 438–452. [Google Scholar] [CrossRef]
  69. Urlea, V.; Brailovski, V. Electropolishing and electropolishing-related allowances for powder bed selectively laser-melted Ti-6Al-4V alloy components. J. Mater. Process. Technol. 2017, 242, 1–11. [Google Scholar] [CrossRef]
  70. Landolt, D. Fundamental aspects of electropolishing. Electrochim. Acta 1987, 32, 1–11. [Google Scholar] [CrossRef]
  71. Basha, M.M.; Basha, S.M.; Jain, V.K.; Sankar, M.R. State of the art on chemical and electrochemical based finishing processes for additive manufactured features. Addit. Manuf. 2022, 58, 103028. [Google Scholar] [CrossRef]
  72. Sun, X.; Fu, Y.; Lu, W.; Hang, W. Investigation on the electrochemical assisted magnetic abrasive finishing for a stainless steel of SUS304. Int. J. Adv. Manuf. Technol. 2021, 116, 1509–1522. [Google Scholar] [CrossRef]
  73. Bai, Y.; Zhao, C.; Yang, J.; Fuh, J.Y.H.; Lu, W.F.; Weng, C.; Wang, H. Dry mechanical-electrochemical polishing of selective laser melted 316L stainless steel. Mater. Des. 2020, 193, 108840. [Google Scholar] [CrossRef]
  74. An, L.; Wang, D.; Zhu, D. Combined electrochemical and mechanical polishing of interior channels in parts made by additive manufacturing. Addit. Manuf. 2022, 51, 102638. [Google Scholar] [CrossRef]
  75. Zhao, C.; Qu, N.; Tang, X. Electrochemical mechanical polishing of internal holes created by selective laser melting. J. Manuf. Process. 2021, 64, 1544–1562. [Google Scholar] [CrossRef]
  76. Tyagi, P.; Goulet, T.; Riso, C.; Stephenson, R.; Chuenprateep, N.; Schlitzer, J.; Benton, C.; Garcia-Moreno, F. Reducing the roughness of internal surface of an additive manufacturing produced 316 steel component by chempolishing and electropolishing. Addit. Manuf. 2019, 25, 32–38. [Google Scholar] [CrossRef] [Green Version]
  77. Scherillo, F. Chemical surface finishing of AlSi10Mg components made by additive manufacturing. Manuf. Lett. 2019, 19, 5–9. [Google Scholar] [CrossRef]
  78. Pyka, G.; Kerckhofs, G.; Papantoniou, I.; Speirs, M.; Schrooten, J.; Wevers, M. Surface roughness and morphology customization of additive manufactured open porous Ti6Al4V structures. Materials 2013, 6, 4737–4757. [Google Scholar] [CrossRef] [Green Version]
  79. Tehrani, A.F.; Imanian, E. A new etchant for the chemical machining of St304. J. Mater. Process. Technol. 2004, 149, 404–408. [Google Scholar] [CrossRef]
  80. Ivanits’ka, V.G.; Moravec, P.; Franc, J.; Tomashik, V.M.; Tomashik, Z.F.; Masek, K.; Chukhnenko, P.S.; Höschl, P.; Ulrych, J. Chemical Polishing of CdTe and CdZnTe in Iodine–Methanol Etching Solutions. J. Electron. Mater. 2011, 40, 1802–1808. [Google Scholar] [CrossRef]
  81. Balyakin, A.; Goncharov, E.; Zhuchenko, E. The effect of preprocessing on surface quality in the chemical polishing of parts from titanium alloy produced by SLM. Mater. Today Proc. 2019, 19, 2291–2294. [Google Scholar] [CrossRef]
  82. Balyakin, A.V.; Shvetcov, A.N.; Zhuchenko, E.I. Chemical polishing of samples obtained by selective laser melting from titanium alloy Ti6Al4V. MATEC Web Conf. 2018, 224, 01031. [Google Scholar] [CrossRef]
  83. Bezuidenhout, M.; Haar, G.T.; Becker, T.; Rudolph, S.; Damm, O.; Sacks, N. The effect of HF-HNO3 chemical polishing on the surface roughness and fatigue life of laser powder bed fusion produced Ti6Al4V. Mater. Today Commun. 2020, 25, 101396. [Google Scholar] [CrossRef]
  84. Soro, N.; Saintier, N.; Attar, H.; Dargusch, M.S. Surface and morphological modification of selectively laser melted titanium lattices using a chemical post treatment. Surf. Coat. Technol. 2020, 393, 125794. [Google Scholar] [CrossRef]
  85. Wysocki, B.; Idaszek, J.; Buhagiar, J.; Szlazak, K.; Brynk, T.; Kurzydlowski, K.; Swieszkowski, W. The influence of chemical polishing of titanium scaffolds on their mechanical strength and in-vitro cell response. Mater. Sci. Eng. C 2019, 95, 428–439. [Google Scholar] [CrossRef] [PubMed]
  86. Dolimont, A.; Rivière-Lorphèvre, E.; Ducobu, F.; Backaert, S. Impact of chemical polishing on surface roughness and dimensional quality of electron beam melting process (EBM) parts. AIP Conf. Proc. 2018, 1960, 140007. [Google Scholar]
  87. Dolimont, A.; Demarbaix, A.; Ducobu, F.; Rivière-Lorphèvre, E. Chemical etching as a finishing process for electron beam melting (EBM) parts. AIP Conf. Proc. 2019, 2113, 150020. [Google Scholar]
  88. Łyczkowska, E.; Szymczyk, P.; Dybała, B.; Chlebus, E. Chemical polishing of scaffolds made of Ti-6Al-7Nb alloy by additive manufacturing. Arch. Civ. Mech. Eng. 2014, 14, 586–594. [Google Scholar] [CrossRef]
  89. Spitaels, L.; Ducobu, F.; Demarbaix, A.; Rivière-Lorphèvre, E.; Dehombreux, P. Influence of Conventional Machining on Chemical Finishing of Ti6Al4V Electron Beam Melting Parts. Procedia Manuf. 2020, 47, 1036–1042. [Google Scholar] [CrossRef]
  90. Hou, N.; Wang, M.; Wang, B.; Zheng, Y.; Zhou, S.; Song, C. Fundamental functions of physical and chemical principles in the polishing of titanium alloys: Mechanisms and problems. Int. J. Adv. Manuf. Technol. 2021, 118, 2079–2097. [Google Scholar] [CrossRef]
  91. Zhang, Z.; Shi, Z.; Du, Y.; Yu, Z.; Guo, L.; Guo, D. A novel approach of chemical mechanical polishing for a titanium alloy using an environment-friendly slurry. Appl. Surf. Sci. 2018, 427, 409–415. [Google Scholar] [CrossRef]
  92. Hilpert, E.; Hartung, J.; Risse, S.; Eberhardt, R.; Tünnermann, A. Precision manufacturing of a lightweight mirror body made by selective laser melting. Precis. Eng. 2018, 53, 310–317. [Google Scholar] [CrossRef] [Green Version]
  93. Crane, N.B.; Ni, Q.; Ellis, A.; Hopkinson, N. Impact of chemical finishing on laser-sintered nylon 12 materials. Addit. Manuf. 2017, 13, 149–155. [Google Scholar] [CrossRef]
  94. Melentiev, R.; Fang, F. Recent advances and challenges of abrasive jet machining. CIRP J. Manuf. Sci. Technol. 2018, 22, 1–20. [Google Scholar] [CrossRef]
  95. Bagehorn, S.; Wehr, J.; Maier, H.J. Application of mechanical surface finishing processes for roughness reduction and fatigue improvement of additively manufactured Ti-6Al-4V parts. Int. J. Fatigue 2017, 102, 135–142. [Google Scholar] [CrossRef]
  96. Zhang, J.; Toh, A.Y.X.; Wang, H.; Lu, W.F.; Fuh, J.Y.H. Vibration-assisted conformal polishing of additively manufactured structured surface. Proc. Inst. Mech. Eng. Part C J. Mech. Eng. Sci. 2019, 233, 4154–4164. [Google Scholar] [CrossRef]
  97. Iquebal, A.S.; El Amri, S.; Shrestha, S.; Wang, Z.; Manogharan, G.P.; Bukkapatnam, S. Longitudinal milling and fine abrasive finishing operations to improve surface integrity of metal am components. Procedia Manuf. 2017, 10, 990–996. [Google Scholar] [CrossRef]
  98. Bai, Y.; Chaudhari, A.; Wang, H. Investigation on the microstructure and machinability of ASTM A131 steel manufactured by directed energy deposition. J. Mater. Process. Technol. 2020, 276, 116410. [Google Scholar] [CrossRef]
  99. Lopes, J.G.; Machado, C.M.; Duarte, V.R.; Rodrigues, T.A.; Santos, T.G.; Oliveira, J.P. Effect of milling parameters on HSLA steel parts produced by Wire and Arc Additive Manufacturing (WAAM). J. Manuf. Process. 2020, 59, 739–749. [Google Scholar] [CrossRef]
  100. Ni, C.; Zhu, L.; Zheng, Z.; Zhang, J.; Yang, Y.; Hong, R.; Bai, Y.; Lu, W.F.; Wang, H. Effects of machining surface and laser beam scanning strategy on machinability of selective laser melted Ti6Al4V alloy in milling. Mater. Des. 2020, 194, 108880. [Google Scholar] [CrossRef]
  101. Ni, C.; Zhu, L.; Zheng, Z.; Zhang, J.; Yang, Y.; Yang, J.; Bai, Y.; Weng, C.; Lu, W.F.; Wang, H. Effect of material anisotropy on ultra-precision machining of Ti-6Al-4V alloy fabricated by selective laser melting. J. Alloy. Compd. 2020, 848, 156457. [Google Scholar] [CrossRef]
  102. Ma, C.; Dong, Y.; Ye, C. Improving surface finish of 3D-printed metals by ultrasonic nanocrystal surface modification. Procedia CIRP 2016, 45, 319–322. [Google Scholar] [CrossRef] [Green Version]
  103. Ma, C.; Andani, M.T.; Qin, H.; Moghaddam, N.S.; Ibrahim, H.; Jahadakbar, A.; Amerinatanzi, A.; Ren, Z.; Zhang, H.; Doll, G.L.; et al. Improving surface finish and wear resistance of additive manufactured nickel-titanium by ultrasonic nano-crystal surface modification. J. Mater. Process. Technol. 2017, 249, 433–440. [Google Scholar] [CrossRef]
  104. Bai, Y.; Shi, Z.; Lee, Y.J.; Wang, H. Optical surface generation on additively manufactured AlSiMg0.75 alloys with ultrasonic vibration-assisted machining. J. Mater. Process. Technol. 2020, 280, 116597. [Google Scholar] [CrossRef]
  105. Wang, J.; Zhu, J.; Liew, P.J. Material removal in ultrasonic abrasive polishing of additive manufactured components. Appl. Sci. 2019, 9, 5359. [Google Scholar] [CrossRef]
  106. Petare, A.C.; Jain, N.K. A critical review of past research and advances in abrasive flow finishing process. Int. J. Adv. Manuf. Technol. 2018, 97, 741–782. [Google Scholar] [CrossRef]
  107. Sankar, M.R.; Mondal, S.; Ramkumar, J.; Jain, V.K. Experimental investigations and modeling of drill bit-guided abrasive flow finishing (DBG-AFF) process. Int. J. Adv. Manuf. Technol. 2009, 42, 678–688. [Google Scholar] [CrossRef]
  108. Hashmi, A.W.; Mali, H.S.; Meena, A.; Puerta, A.P.V.; Kunkel, M.E. Surface characteristics improvement methods for metal additively manufactured parts: A review. Adv. Mater. Process. Technol. 2022, 1–40. [Google Scholar] [CrossRef]
  109. Bouland, C.; Urlea, V.; Beaubier, K.; Samoilenko, M.; Brailovski, V. Abrasive flow machining of laser powder bed-fused parts: Numerical modeling and experimental validation. J. Mater. Process. Technol. 2019, 273, 116262. [Google Scholar] [CrossRef]
  110. Wang, X.; Li, S.; Fu, Y.; Gao, H. Finishing of additively manufactured metal parts by abrasive flow machining. In Proceedings of the 2016 International Solid Freeform Fabrication Symposium, Austin, TX, USA, 8–10 August 2016. [Google Scholar]
  111. Guo, J.; Song, C.; Fu, Y.; Au, K.H.; Kum, C.W.; Goh, M.H.; Ren, T.; Huang, R.; Sun, C.-N. Internal Surface Quality Enhancement of Selective Laser Melted Inconel 718 by Abrasive Flow Machining. J. Manuf. Sci. Eng. 2020, 142, 101003. [Google Scholar] [CrossRef]
  112. Han, S.; Salvatore, F.; Rech, J.; Bajolet, J.; Courbon, J. Effect of abrasive flow machining (AFM) finish of selective laser melting (SLM) internal channels on fatigue performance. J. Manuf. Process. 2020, 59, 248–257. [Google Scholar] [CrossRef]
  113. Peng, C.; Fu, Y.; Wei, H.; Li, S.; Wang, X.; Gao, H. Study on Improvement of Surface Roughness and Induced Residual Stress for Additively Manufactured Metal Parts by Abrasive Flow Machining. Procedia CIRP 2018, 71, 386–389. [Google Scholar] [CrossRef]
  114. Qian, C.; Fan, Z.; Tian, Y.; Liu, Y.; Han, J.; Wang, J. A review on magnetic abrasive finishing. Int. J. Adv. Manuf. Technol. 2021, 112, 619–634. [Google Scholar] [CrossRef]
  115. Zhang, J.; Chaudhari, A.; Wang, H. Surface quality and material removal in magnetic abrasive finishing of selective laser melted 316L stainless steel. J. Manuf. Process. 2019, 45, 710–719. [Google Scholar] [CrossRef]
  116. Wu, P.-Y.; Yamaguchi, H. Material Removal Mechanism of Additively Manufactured Components Finished using Magnetic Abrasive Finishing. Procedia Manuf. 2018, 26, 394–402. [Google Scholar] [CrossRef]
  117. Teng, X.; Zhang, G.; Zhao, Y.; Cui, Y.; Li, L.; Jiang, L. Study on magnetic abrasive finishing of AlSi10Mg alloy prepared by selective laser melting. Int. J. Adv. Manuf. Technol. 2019, 105, 2513–2521. [Google Scholar] [CrossRef]
  118. Yamaguchi, H.; Fergani, O.; Wu, P.-Y. Modification using magnetic field-assisted finishing of the surface roughness and residual stress of additively manufactured components. CIRP Ann. 2017, 66, 305–308. [Google Scholar] [CrossRef]
  119. Guo, J.; Au, K.H.; Sun, C.-N.; Goh, M.H.; Kum, C.W.; Liu, K.; Wei, J.; Suzuki, H.; Kang, R. Novel rotating-vibrating magnetic abrasive polishing method for double-layered internal surface finishing. J. Mater. Process. Technol. 2019, 264, 422–437. [Google Scholar] [CrossRef]
  120. Mahmood, M.A.; Chioibasu, D.; Ur Rehman, A.; Mihai, S.; Popescu, A.C. Post-Processing Techniques to Enhance the Quality of Metallic Parts Produced by Additive Manufacturing. Metals 2022, 12, 77. [Google Scholar] [CrossRef]
  121. Zhu, P.; Zhang, G.; Du, J.; Jiang, L.; Zhang, P.; Cui, Y. Removal mechanism of magnetic abrasive finishing on aluminum and magnesium alloys. Int. J. Adv. Manuf. Technol. 2021, 114, 1717–1729. [Google Scholar] [CrossRef]
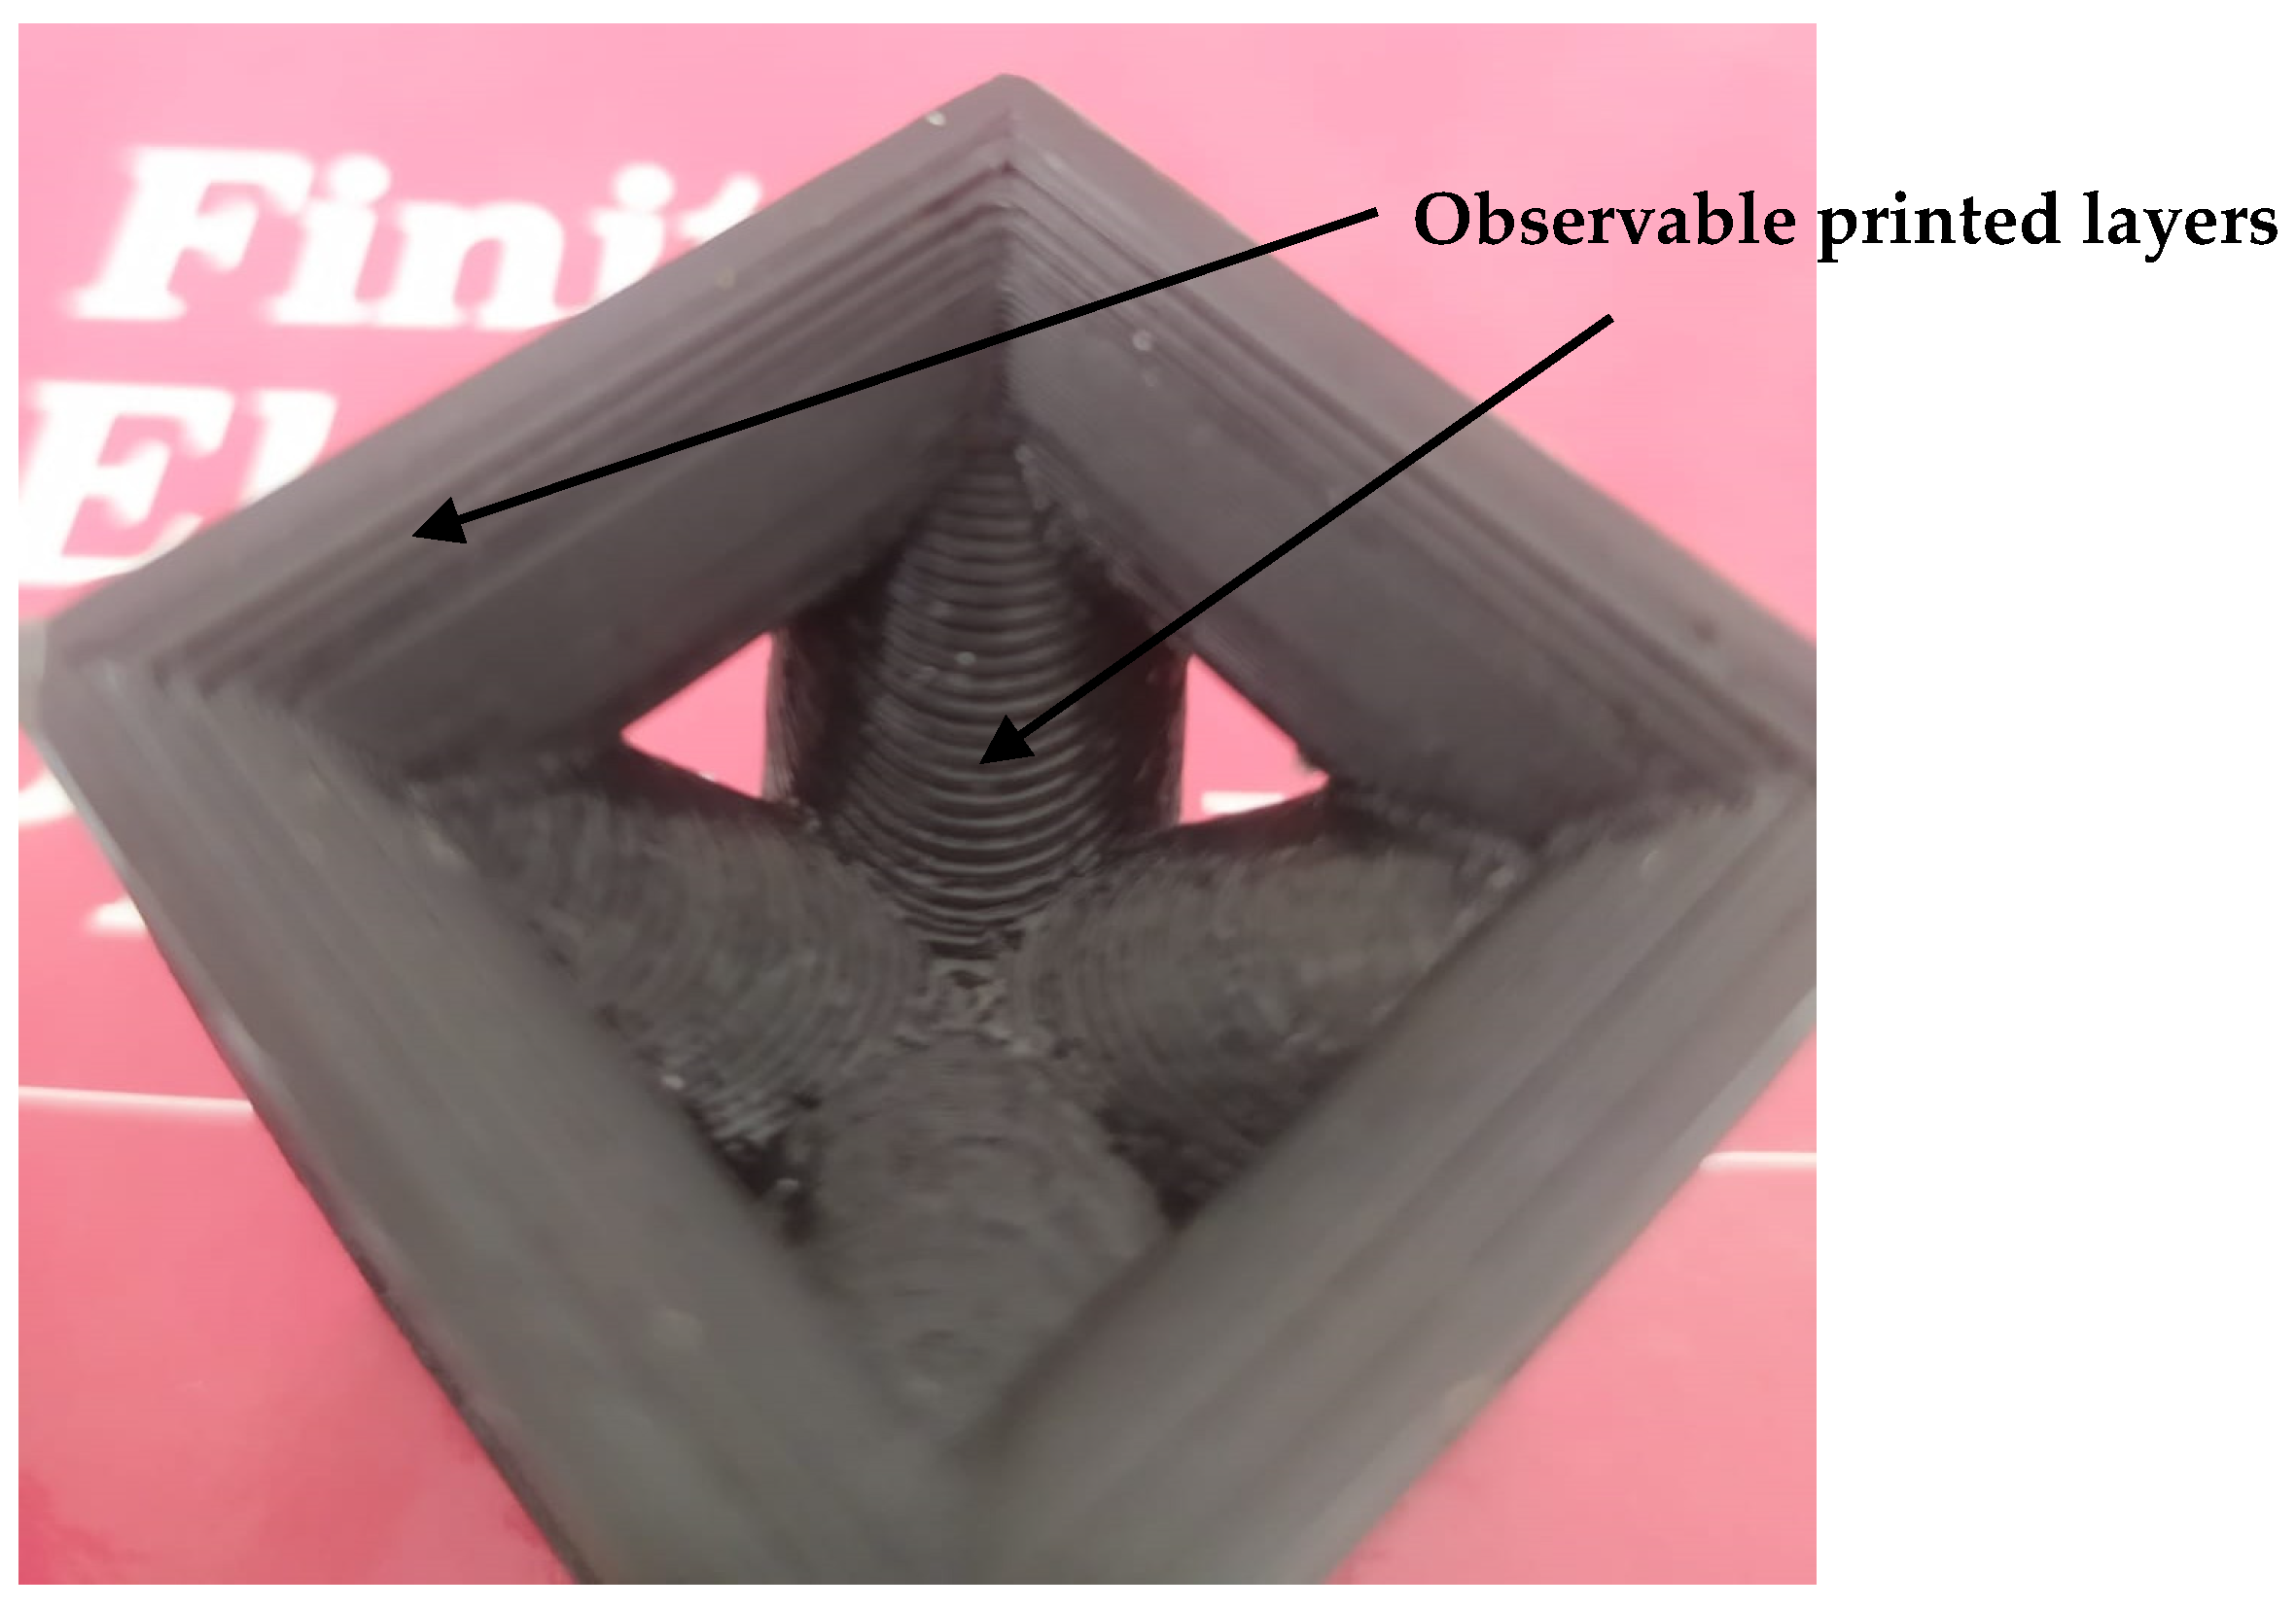
Figure 1. Stair-step effect.
Jmmp 06 00116 g001
Figure 2. Surface roughness variation with respect to process parameters for: (a) aluminum oxide (b) and glass bead abrasives [13].
Jmmp 06 00116 g002
Figure 3. Barrel finishing operation.
Jmmp 06 00116 g003
Figure 4. Surface roughness with the indication of the initial peaks as the function of time for: (a) the deposition angle α = 90 and (b) the deposition angle α = 0 [16].
Jmmp 06 00116 g004
Figure 5. Surface finish: (a) before and (b) after the AFF process [17].
Jmmp 06 00116 g005
Figure 6. The BEMRF process.
Jmmp 06 00116 g006
Figure 7. The effect of process parameters in the BEMRF process [19].
Jmmp 06 00116 g007
Figure 8. FDM-ed sample: (a) unfinished surface and (b) finished surface after applying the BEMRF process [19].
Jmmp 06 00116 g008
Figure 9. Chemical treatment mechanism: (a) before the chemical reaction and (b) after the chemical reaction.
Jmmp 06 00116 g009
Figure 10. Surface finish improvement after chemical treatment [21].
Jmmp 06 00116 g010
Figure 11. Vapor smoothening.
Jmmp 06 00116 g011
Figure 12. PLA parts and roughness: (a) before chemical vapor finishing and (b) after chemical vapor finishing of the surface [24].
Jmmp 06 00116 g012
Figure 13. Machining with the heated cutter: (a) shape of the cutter and (b) direction of the machining.
Jmmp 06 00116 g013aJmmp 06 00116 g013b
Figure 14. (a) Surface roughness as a function of the deposition angle and cutting depth; (b) resultant surface finish versus unmachined surface [27].
Jmmp 06 00116 g014aJmmp 06 00116 g014b
Figure 15. The result of laser polishing the ABS part at a build orientation angle θ = 0°: (a) raster pattern before laser polishing; (b) schematic of laser polishing; (c) laser polished surface [36].
Jmmp 06 00116 g015
Figure 16. Defects that can occur in metal powder bed following AM [37].
Jmmp 06 00116 g016
Figure 17. The effect of process parameters in the LF of AM parts [39].
Jmmp 06 00116 g017
Figure 18. Surface of the part: (a) prior to finishing; (b) 2 min; (c) 5 min after EC finishing [67].
Jmmp 06 00116 g018
Figure 19. Surface finish of the part produced by powder bed laser melting: (a) without finishing; (b) after post-milling; (c) after fine abrasive finishing [97].
Jmmp 06 00116 g019
Figure 20. Schematic of the UNSM process.
Jmmp 06 00116 g020
Figure 21. Resultant roughness reduction summary [38,39,41,42,43,44,46,50,51,53,67,69,75,102,104,105,110,112,113,115,116,117,118].
Jmmp 06 00116 g021
Table 1. Summary of the finishing processes for polymer using additive manufacturing.
Finishing Operation GroupFinishing
Operation
CommentsReferences
Application of mechanical energySand paper finishingSimple to apply
High wear rate
Unsuitable for industrial scales
[12]
Abrasive jet finishingCannot finish intricate parts
The translucent surface of the material can become opaque
[13]
Barrel finishingLong processing times
May not be efficient
Can finish intricate parts
Surface roughness decrease rate can decay over time
[16]
Abrasive flow finishingCan be time-consuming[17,18]
Stair-step machining [26,27]
Milling
Magnetic-field-assisted finishingMagnetorheological finishingMay require primary finishing beforehand to reduce the roughness to 1–2 µm[19]
Chemical finishingChemical polishingRequires the knowledge of the material’s chemical properties
May not remove the material evenly
Can damage thin and intricate features
[21,22,24,25]
Laser polishingLaser polishingDoes not waste material because it remelts it
Can decrease the dimensions by creating negative deviations
Highly controllable and can be selectively used for different parts of the workpiece
[31,32,33,34,35,36]
Application of coatingWax coating for FDMCan be used for investment casting
Can lead to dimensional inaccuracy
Can compensate for shrinkage
[28,29]
Photopolymers for SLA
Table 2. Summary of the finishing processes for metal additive manufacturing.
Finishing Operation GroupFinishing OperationCommentsReferences
Application of mechanical energyPost-millingThe tools’ path is restricted so they cannot access intricate details of the parts
Waste material
May induce undesired deformation
The material removal rate can be high
[95,96,97,98,99,100,101]
Abrasive jet finishingCan be applied in a micro and macro scale
Can be applied to various shapes, complex surfaces, and geometries
Not sensitive to the gap fluctuation between the nozzle and the workpiece
The resultant surface roughness and material removal rate are easily controlled
Improvement of the surface
Slow tool wear without abrupt changes in the process accuracy Abrasives can be recycled
More cost-effective compared to polishing, etching, and milling
[94]
Ultrasonic nanocrystal surface modification [102,103]
Ultrasonic cavitation abrasive finishing [37,105]
Abrasive flow finishingHigh initial MRR and decreased MRR with each successive cycle
Rounding of the corners might be an issue
[106,107,108,109,110,111,112,113]
Magnetic-field-assisted finishingMagnetic abrasive finishingSelf-sharpening
Good flexibility, stability, and controllability
Suitable for regular and complex geometries
Suitable for a range of wide materials: resin, ceramics, metals, glass, etc. (mostly for hard materials)
The abrasives’ life is short
[72,115,116,121]
Electrochemical and chemical finishingElectrochemical finishingThe post-processing of complex and intricate parts is possible
Can be used on any conductive material
Does not alter the bulk material properties
Pit formation can be an issue
[67,68,69,70,71,72]
Chemical finishingThe post-processing of complex and intricate parts is possible
The material removal rate might be slow
No impact on residual stress
Dangerous chemicals
Less expensive
Repeatable, reproducible results, homogeneous dissolution
Can alter mechanical properties due to the change in surface morphology
Internal features can be accessed
[76,77,78,79,80,81,82,83,84,85,86,87,88,93]
Laser polishingLaser polishingHeat from the laser can cause undesirable tensile residual stresses to appear
Does not waste material because it remelts it
Similar to laser-based AM technologies, and thus can be integrated with them
The initial surface roughness may influence the final surface roughness
Can alter the surface microstructure
May increase the hardness of the surface material
[38,39,40,41,42,43,44,45,46,47,48,49,50,51,52,53,54,55,56]
Laser shock peening and shot peening Can induce compressive stresses in the surface of the workpiece or transform existing tensile stresses to compressive stresses
Grain refinement and work hardening in the surface
Can improve or degrade the surface
Can improve fatigue performance
[2,57,58,59,62,63,64,65,66]
Publisher’s Note: MDPI stays neutral with regard to jurisdictional claims in published maps and institutional affiliations.