Article

A Novel Approach for Real-Time Quality Monitoring in Machining of Aerospace Alloy through Acoustic Emission Signal Transformation for DNN

1
Department of Mechanical Engineering, University of Kentucky, Lexington, KY 40506, USA
2
Institute for Sustainable Manufacturing, University of Kentucky, Lexington, KY 40506, USA
*
Author to whom correspondence should be addressed.
J. Manuf. Mater. Process. 2022, 6(1), 18; https://doi.org/10.3390/jmmp6010018
Submission received: 21 December 2021 / Revised: 14 January 2022 / Accepted: 18 January 2022 / Published: 25 January 2022

Abstract

:
Gamma titanium aluminide (γ-TiAl) is considered a high-performance, low-density replacement for nickel-based superalloys in the aerospace industry due to its high specific strength, which is retained at temperatures above 800 °C. However, low damage tolerance, i.e., brittle material behavior with a propensity to rapid crack propagation, has limited the application of γ-TiAl. Any cracks introduced during manufacturing would dramatically lower the useful (fatigue) life of γ-TiAl components, making the workpiece surface’s quality from finish machining a critical component to product quality and performance. To address this issue and enable more widespread use of γ-TiAl, this research aims to develop a real-time non-destructive evaluation (NDE) quality monitoring technique based on acoustic emission (AE) signals, wavelet transform, and deep neural networks (DNN). Previous efforts have opted for traditional approaches to AE signal analysis, using statistical feature extraction and classification, which face challenges such as the extraction of good/relevant features and low classification accuracy. Hence, this work proposes a novel AI-enabled method that uses a convolutional neural network (CNN) to extract rich and relevant features from a two-dimensional image representation of 1D time-domain AE signals (known as scalograms), subsequently classifying the AE signature based on pedigreed experimental data and finally predicting the process-induced surface quality. The results of the present work show good classification accuracy of 80.83% using scalogram images, in-situ experimental data, and a VGG-19 pre-trained neural network, establishing the significant potential for real-time quality monitoring in manufacturing processes.

1. Introduction

Intermetallic titanium aluminide alloys such as TiAl, Ti3Al, Al3Ti, and Ti2AlNb are currently gaining ground in the aerospace, biomedical, and automotive industry, due to their low density, high strength, and suitability for high-temperature applications. Over the years, TiAl has been grouped under three categories, namely alpha-2 (α2-Ti3Al), gamma (γ-TiAl), and alpha-2/gamma (α2/γ) phases. Among these, gamma titanium aluminide (γ-TiAl) features unique physical and mechanical properties: high melting point, low density, high strength, resistance to oxidation, and corrosion. Compared to conventional titanium, steel, and nickel-based (super)alloys, the low density offered by γ-TiAl provides improved specific strength in high-temperature performance. To date, there have been three commercially developed generations of TiAl alloys [1]. In the first and second generations of Ti (42–48%)Al, elements such as Cr, V, and Mn were added to produce ternary alloys, which were further heat-treated to improve the ductility. The addition of elements such as Ta, Mo, and W enhances the oxidation and creep properties at high temperatures. The third and fourth generations of TiAl alloys have high Mo and Nb content. The fourth generation of TiAl are often referred to as TNM alloys and possess high oxidation resistance due to the addition of Nb and Ta. The addition of elements such as Mo and Nb enhances precipitation hardening and makes the final alloy highly suitable for high-temperature applications. Additionally, Zr elements act as β-stabilizers and promote the compression strength of binary TiAl alloys. For this reason, gamma titanium aluminide alloys have been proposed as a higher-performance replacement for Ni-based superalloys [2,3]. These unique properties of titanium aluminide have made it of interest during the manufacturing of next-generation rotating parts in gas turbine engines for the automotive and aeronautical industry. This study deals with a proprietary second-generation (near-gamma) TiAl alloy used by a major turbine manufacturer.
Commercially, γ-TiAl is adopted in the manufacturing of low-pressure turbines of the GEnX engine [1,4], turbocharger rotors [5,6], and rocket fins [7,8]. However, a full-scale adoption of these alloys in the aeronautical sector hinges on passing the industry’s high dimensional accuracy and surface integrity standard. On the downside, the high strength of γ-TiAl adversely affects its ductility, making it a brittle material with low fracture toughness near room temperature. This major drawback makes titanium aluminide highly susceptible to damage through the brittle fracture. Consequently, mechanical machining of titanium aluminide is highly challenging, especially at room temperature (i.e., without laser/heat assistance to promote thermal softening and increased ductility). While titanium aluminide studies span over 30 years, its application in the aerospace industry has been somewhat limited due to its low damage tolerance and poor machinability, even when compared to other difficult-to-cut aerospace alloys such as Ni-based superalloy Inconel 718 and titanium alloy Ti-6Al4V.
Existing research studies dealing with cutting to γ-TiAl have focused on surface integrity characterization [9,10,11,12,13], cutting parameter selection [13,14,15,16], tool wear [11,13,17,18], and machining environment, specifically coolants and lubricants [17,18]. According to Zhang, et al. [19], titanium aluminide has a lower thermal expansion coefficient and specific heat comparable to engineering materials, such as Ni- and Ti-based alloys. The poor ductility of γ-TiAl has been attributed to its low dislocation density and cleavage/intergranular fracture propensity [14]. As reported in various literature studies, the orientation and lamellae boundary micro-cracks along grain boundaries contribute to the machining fracture mode [20,21]. The formation of cracks during the machining of titanium aluminide adversely affects the workpiece fatigue life during application [22,23]. According to the literature, poor surface integrity is attributable to lamella plate failure (sub-surface cracks) [22] and deformed grains [10,17,24] due to excessive cutting depth/feed [25] and cutting tool wear or improper edge geometry/hone [13,18].
Achieving high-quality (i.e., damage-free) surface integrity is crucial in aerospace and automotive applications [24,26]. Extensive work by Beranoagirre explored the brittle mechanical response in third-generation titanium aluminide milling and electrical discharge machining [16,27,28,29]. Notably, such non-traditional (non-mechanical) machining approaches are being used in the industry to process a variety of difficult-to-cut alloys. However, conventional (mechanical) machining continues to be applied for final finishing operations due to the cost/efficiency and quality (e.g., residual stress and surface finish). Beranoagirre and Lopez de Lacalle [29] recommended an optimal cutting time and conditions for industrial milling of titanium aluminide. Several other studies [16,30,31] have focused on improving the surface integrity of machined titanium aluminide components, with metrics such as surface cracks, thermal damage, residual stresses, and surface finish being the primary focus. This study emphasizes sensor- and data-based methodologies that allow for detecting the (near-)surface crack formation during second-generation gamma-titanium aluminide machining. A novel approach is proposed for crack quantification and cutting mode classification.
Existing methods focused on monitoring and analyzing the crack formation during titanium aluminide machining are performed post-mortem. However, since a release of energy typically accompanies crack formation, the authors propose that the crack formation in titanium aluminide machining can be monitored with an acoustic emission sensor. The extracted acoustic emission signal data can then be analyzed for pattern recognition, damage quantification, process monitoring, and control, an approach applied in various fields of study [30,31,32]. As described above, an informed sensor selection for process characterization is known as ‘smart’ or ‘physics-informed’ sensors and sensor data. This approach contrasts with the ‘big data’ methodology, which is often without physical correlation to material behavior and causal mechanisms. For accurate process characterization, it is imperative to select sensors whose data correlate to the real-world material’s behavior.
Acoustic emission (AE) involves the rapid release of energy in a structure or body undergoing loading or deformation conditions. The ability to pick the deformation stress wave frequency with a piezoelectric sensor can be traced to redistributing local strain energy associated with respective deformation conditions. This technique provides an in situ or non-destructive approach for process monitoring and characterization [33]. Not only does it have substantial practical relevance to the field of non-destructive testing, but it is also often used in seismology.
The main limitation of AE as a method of non-destructive testing and tool condition monitoring is the lack of a rigid formula or set of models that apply to every use case, specifically varied materials and failure modes. AE is essentially a qualitative measurement tool, and in order to produce quantitative feedback, other non-destructive tests or calibration/correlation trials are necessary. However, for machining purposes, some of the benefits of AE include high sensitivity, continuous online measurement, bulk volume monitoring, and determining the location of damaged regions. AE signals can be application functions, sensor type, propagation medium, coupling efficiency, sensor sensitivity, amplifier gain, and threshold voltage. Additionally, testing and developing a baseline for comparison costs money and time. Most AE studies in machining have focused heavily on machine condition and tool wear monitoring. In both approaches, relevant features such as AE energy, counts, RMS values, and count distributions were extracted for correlation with selected quality metrics. However, only a few efforts have attempted to correlate the AE signals with the workpiece surface finish.
Extracted AE signals contain process- or material-specific information useful for the signal source detection, location, and severity. AE signals can be categorized under burst, continuous, and mixed signals. Burst signals are due to defect emergence during deformation. In contrast, continuous signals consist of overlapping transients (noise included) from varying emission sources, and mixed AE signals consist of both burst and continuous signals overlaid with environmental noise. According to Terchi and Au [27], the post-utilization of AE signals for process monitoring involves three critical steps: signal enhancement, signal separation, and signal analysis. The signal enhancement step involves the optimal removal of embedded noise, preceding the segmentation of crucial burst signals or critical events. The signal analysis subsequently attempts to identify or correlate the wave source and appropriately characterize its magnitude, severity, and propagation.
The acoustic emission technique has been studied and found several applications in material science research, with its scope spanning damage initiation detection, dynamic loading, composite materials’ crack propagation, and definition of damage and fracture mechanisms. The application of AE signals has focused extensively on machine and tool condition monitoring, friction analysis, and fault detection in machining. It is also a well-established sensor for detecting fracture and fracture/deformation mode. In recent years, modern advancements in signal processing and pattern recognition analysis have driven several AE signal characterization and adoption fields.
One of the many tools that researchers use when investigating the AE signals is Artificial Neural Networks. Rather than applying statistical tools such as using the center frequency, peak frequency, average frequency, or weighted frequency, one can apply a machine-learning algorithm to the data. Integration of sensors via neural networks for wear detection has been adopted for some time, even in the early 1990s [9]. However, the authors reiterated that the output of neural networks has many of the same limitations as standard acoustic emission data, namely, variations in machining conditions, material properties, and geometry. Artificial Intelligence (AI) tools and algorithms have been applied extensively to correlate AE waveforms with induced damage or cracks. AI tools such as Principal Component Analysis and K-means clustering are efficient in AE signal classification using unique feature characteristics. Wavelet transformation lends itself to this process quite easily. A time-frequency image representation of the signal, such as scalograms, can be passed to a convolutional neural network for layer-by-layer deep feature extraction and, ultimately, event classification. However, the AE signals must be denoised by applying a multilevel wavelet decomposition to generate accurate scalograms. Using repeated low- and high-pass filters, “approximation level” and “detail level” coefficients A and D can be found [8]. The multilevel wavelet decomposition separates the signal into new layers, where thresholding techniques filter external noise sources. This study presents a novel approach to detect crack formation during gamma-titanium aluminide machining by integrating scalograms generated from wavelet transformation of AE signals into CNN models used for training and classifying different cutting modes.

2. Materials and Methods

2.1. Acoustic Emission Signal Denoising

A major problem faced during AE signal analysis is noise, primarily due to environmental conditions. These conditions are difficult to eliminate due to the internal vibration generated by the servo motors while moving or holding position. To address this challenge, the AE signals extracted from the cuts must first undergo a denoising step before being analyzed. While there are several denoising approaches, we adopted the wavelet interval-dependent denoising technique in the MATLAB wavelet toolbox. An alternative Fourier transform approach could be applied so long as the extraneous signals do not vary over time.
Within the 1D Wavelet Toolbox app, the reference wavelet of db1, or Daubechies 1, was used. It is a type of wavelet helpful in analyzing signals with sharp peaks that typically occur during fracture events. Eight decomposition levels were used during signal processing, and the signal was then denoised. Threshold values for each of the eight decomposed levels were selected based on the signal acquired outside the testing region. The method used for determining the threshold values can be summarized as selecting the ‘lowest trough’ for each level or the smallest signal amplitude. The eight levels range from lower to higher frequency content so that the various external signals can be filtered over the frequency ranges. After excluding the minimum acquired signal for each of the eight levels, the signal was cropped to the testing region. A later comparison between this method and reversing the order of denoising, then cropping, showed little difference in the final output signal. However, the minimum threshold values were easier to spot when the tool was not engaged with the workpiece. Figure 1 shows a sample of the raw and denoise acoustic emission signal. The denoised signal can be further analyzed via scalograms through a convolutional neural network and traditional signal analysis techniques. One observation made during this process is that the deeper and more aggressive the cut, the more the servo must operate to maintain the cutting depth, and therefore the more ringing and vibrations. This phenomenon causes the relative need for denoising to increase for a larger depth of cut.

2.2. Continuous Wavelet Transform (CWT)

Fourier transform captures the frequency information over an entire signal using only sine and cosine basis functions. However, this approach is unsuitable for signals with short intervals of characteristic oscillations, such as in Electrocardiography (ECG). Wavelet transform can address this limitation by decomposing functions into sets of infinite wavelet basis functions, ideal for non-stationary and non-linear signal analysis. Wavelet transform also has variable windows, providing more accurate signal data information [30].
Wavelets are wave-like oscillations localized in time. There are two types of wavelet transform: continuous and discrete wavelet transform. Continuous wavelet transform (CWT) uses all the possible wavelets over a range of locations and scales, while discontinuous wavelet transform (DWT) is confined to specific location and scale sets. The differences between these two methods include scale parameter discretization, transient localization of non-stationary signals, and the time resolution in the frequency band. CWT has better scale discretization and is more suitable for transient localization in non-stationary signals than DWT. CWT is displacement-insensitive while DWT is displacement-dependent; overall, CWT is the most suitable for non-stationary signals. CWT methods transform one-dimensional time signals to a two-dimensional time-frequency domain and are highly useful in time-frequency location, multi-resolution of signals.
CWT is mathematically represented as follows:
C W T ( a , τ ) = 1 a + s ( t ) ψ ( t τ a ) d t
where a is the wavelet scale, ψ represents the mother wavelet ( ψ ) conjugate, τ is the wavelet time localization, and 1 a maintains the wavelet energy constant at varying scales. Signal representation with CWT allows better visualization and analysis of signal data extracted from machining processes. There are different types of CWT, of which Mexican, Morlet, and Gaussian wavelets are the most common (respective shapes are shown in Figure 2). The Morlet wavelet is more suitable for wideband signals with time-based frequency and scale attributes [34].
A spectrogram is the frequency spectrum representation of an audio signal as a function of time. It is generated when the signals are windowed with a constant length window adjusted with time and frequency. Similarly, the application of CWT on signals affords a 2D time-frequency spectrum known as scalograms. Scalograms represent a continuous wavelet transform (CWT), whose color code represents the wavelet coefficient magnitude, a dimensionless estimate that localizes the AE energy in both time and frequency. Scalograms are obtained from wavelets shifted in time and are particularly useful for short sound signals with high frequency. In this study, we used the analytical Morlet wavelet as the wavelet basis function for the scalogram generation of the AE signals.

2.3. Convolutional Neural Network

Deep learning is a machine learning tool where several linear and non-linear processing units are structured in a deep architecture to extract high-level abstraction in data. Deep learning techniques include auto-encoders, convolutional neural networks (CNNs), deep belief networks (DBNs), and multi-layer perceptron. CNN is a unique deep learning technique tailored for image classification. It consists of variants of multi-layer perceptron, which detects visual trends on images.
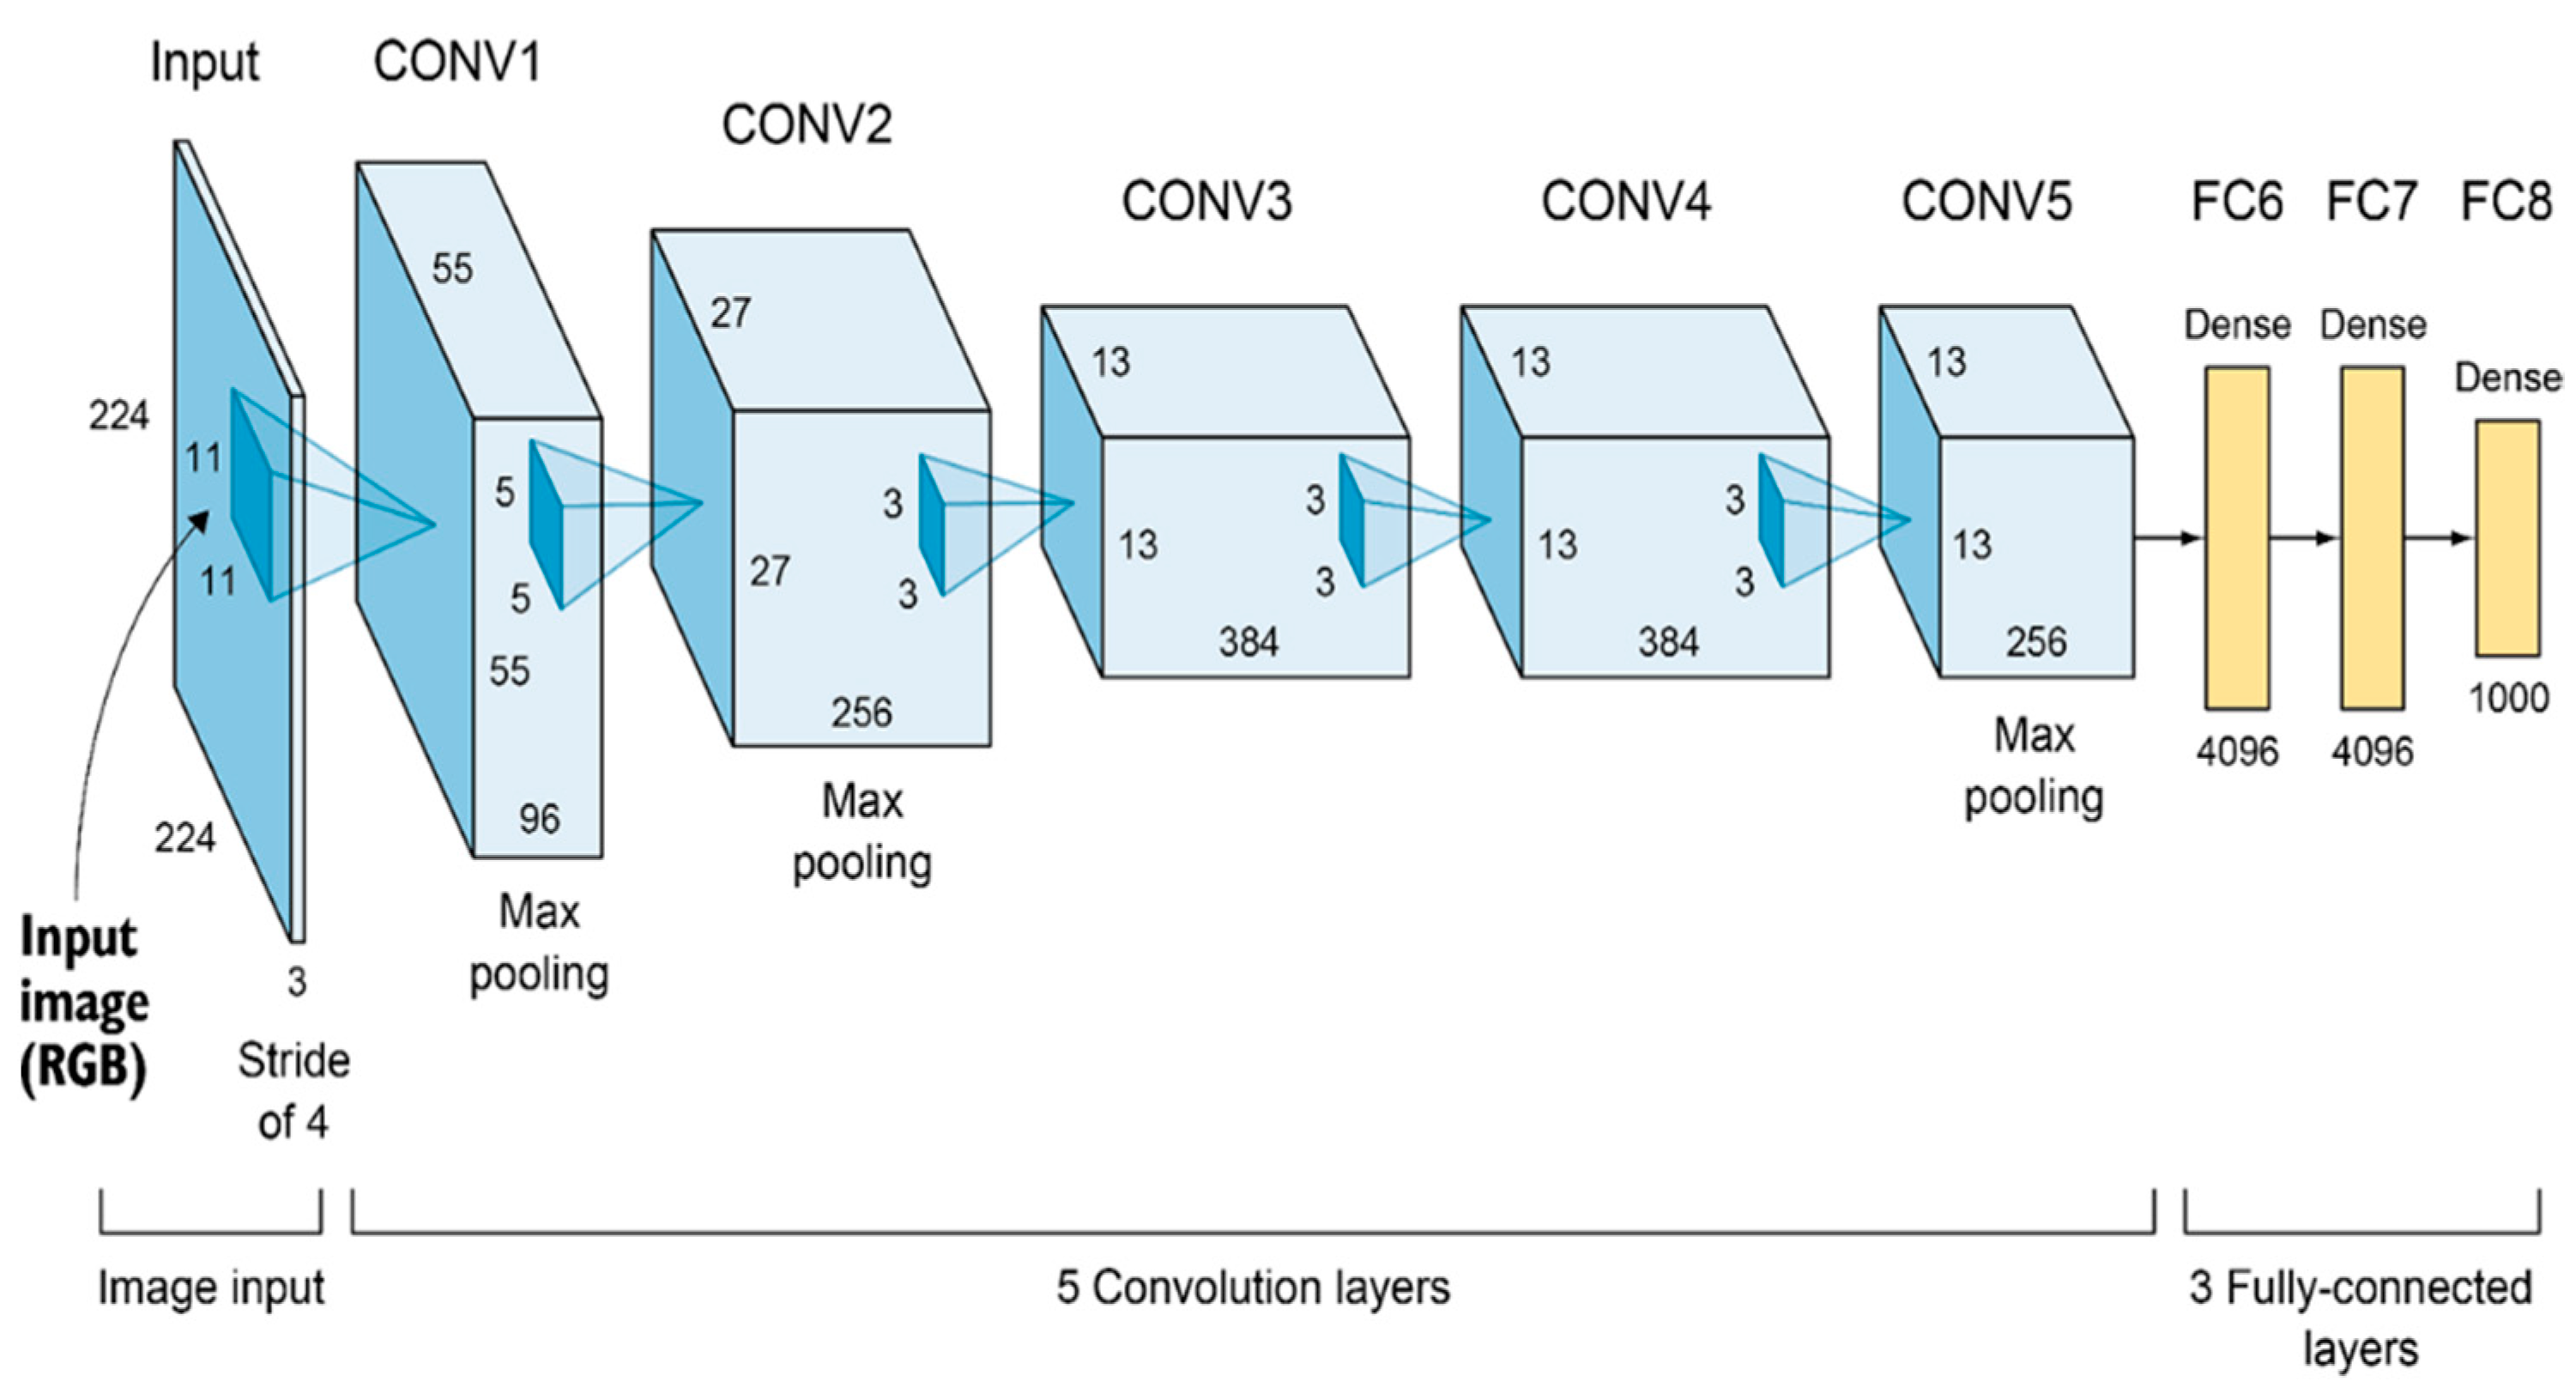
A typical CNN architecture consists of an input image, a feature extraction block (comprising convolution, activation, and pooling layers), fully connected layers, and a classification layer. There are various variants of the CNN architecture, such as LeNet, AlexNet, GoogleNet, and ResNet. For instance, AlexNet is a deep learning structure whose architecture consists of five convolutional layers, three max-pooling layers, two normalization layers, two fully connected layers, and one softmax layer, as shown in Figure 3. The AlexNet architecture was introduced in 2012, similar to the 1998 LeNEt architecture. However, it is a deeper structure and uses a Rectified Linear Unit (ReLU) activation instead of a sigmoid function. The first convolutional layer comprises an 11 × 11 window shape to fully capture the input image. This window is followed by a 5 × 5 window size in the second layer and a 3 × 3 window size in the remaining convolutional layers. The choice of ReLU as the activation function in AlexNet makes the computation and model training easier when adopting different parameter initialization methods. AlexNet adopts a drop-out approach to control model complexity, while LeNet only uses weight decay.
Efficient integration of machine learning techniques with signal analysis often comprises a three-phase process: signal collection, feature selection/extraction, and model training [35]. The signal collection phase involves a holistic experiment design, collection, and accurate data labeling. The feature extraction phase involves detecting key signal characteristics and matching them with their corresponding data labels. The model training phase matches the extracted features with their respective process states. Manual feature extraction involves a human selection of crucial data characteristics suitable for the problem at hand.
However, the selected features are only suitable for that specific problem and might not be relevant in a different scenario. Additionally, it might be challenging to decide between features of similar performance. As highlighted above, AE signals are one-dimensional; however, recent research efforts have represented the 1D AE signals as 2D CWT images [30,32]. This method is often preferred as the images represent information better than one-dimensional signal charts. The application of CNN extends across object tracking and recognition, text tracking and recognition, action recognition, and scene labeling.

2.4. Experimental Setup

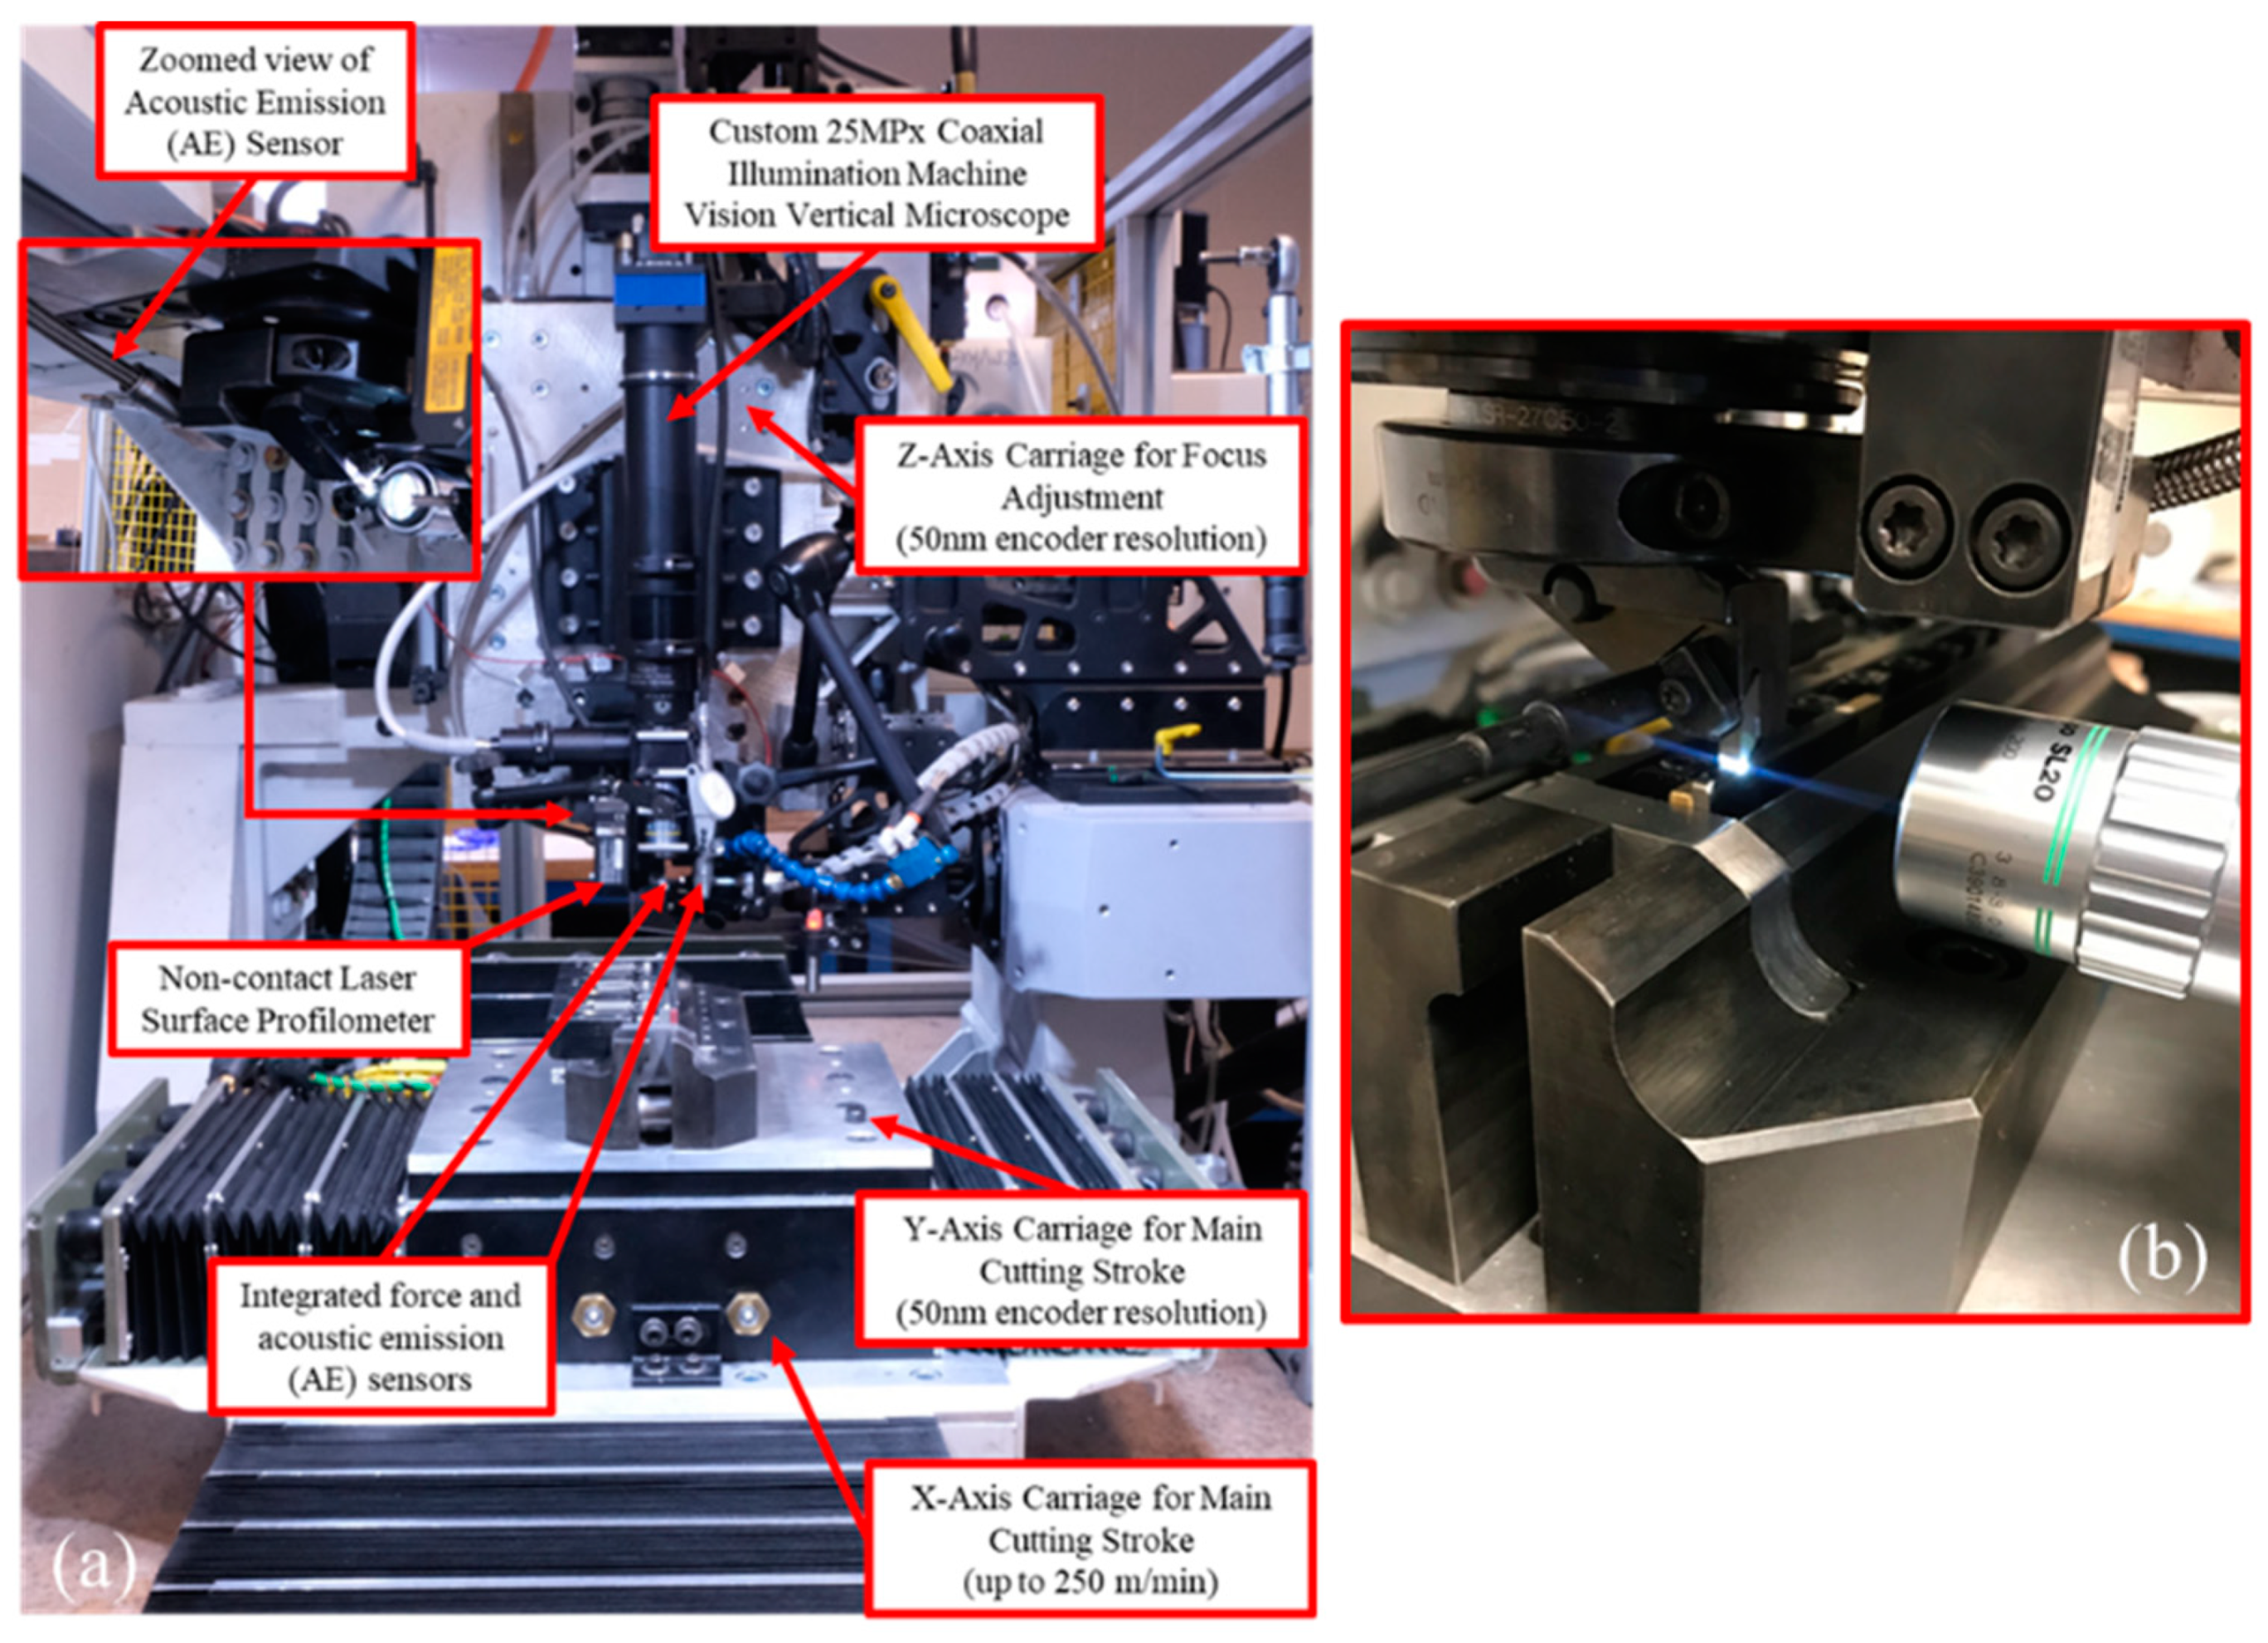
Schoop, Adeniji, and Brown [36] developed a state-of-the-art high-speed in situ testbed to study cutting of advanced engineering materials, such as γ-TiAl (patents: [37,38]). The setup comprises a high-speed linear servo motor stage and various integrated sensors, such as strain gages, thermocouples, acoustic emission sensors, and accelerometers. Figure 4 provides an overview of the custom-built in situ testbed.
The primary cutting stroke (1 m travel length), powered by a proprietary linear servo motor by Yaskawa (experimental series SLGFW2), can achieve up to 4.2 m/s (~250 m/min) travel speed with 5Gs of acceleration and a peak force above 5 kN. The vertical axis, which controls the uncut chip thickness in 2D cutting (could also be considered the depth of cut or feed), features positional repeatability of better than 0.4 microns. Integrated foil strain gauges capture cutting forces (Futek LLB300 series), which typically achieve better than 0.2 N force measurement accuracy at a sampling bandwidth of 50 kHz (Futek’s IAA300 differential amplifier).
For the present study, an AE sensor by KISTLER, model 8152C with a 5125C AE coupler, featuring a bandwidth of 100–900 kHz, was used along with a National Instruments USB-6361 data acquisition system (DAQ), featuring a peak sampling rate of 2 Ms/ch. The AE sensor was integrated into the cutting tool holder using a rigid M6 screw connection per the manufacturer’s specification to maintain constant signal attenuation during cutting. The distance of the AE sensor to the cutting tool tip was approximately 20 mm, with the solid steel tool holder shank (grade AISI 4350) separating the tungsten carbide cutting insert (NB2R geometry, K68 grade) and the AE sensor.
A custom coaxially illuminated microscope based on a Thorlabs ITL200 infinity-corrected tube lens was constructed for vertical surface analysis, using a Mitutoyo M-plan 10× long working distance objective lens. Images were acquired using a ViewWorks VC-25MC 25-megapixel machine vision camera and Karbon-CL KBN-CL4-2.7-SP frame grabber, along with MATLAB image acquisition software. Three-dimensional scans of the machined surface morphology were captured using a ZYGO New View 7300 white light profilometer at 20× magnification.

3. Results and Discussion

3.1. Surface Crack Evaluation

Surface crack formation is one of the prevalent drawbacks and challenges in γ-TiAl machining. In conventional machining practices, this problem is often solved or avoided by raising the process cutting temperature via an increase in cutting speeds, improving the alloy ductility, and reducing the chances of crack initiation. However, the downside of this approach is the concurrent increase in thermal load and accumulation at the cutting edge, which results in rapid tool wear or low tool life. Additionally, this approach is challenging to adopt in titanium aluminide machining since the cutting temperature must exceed the brittle to ductile transition temperature of 600–700 °C. The estimated cutting temperature at the cutting tool–workpiece interface using high-speed machining is around 420 °C, which is below the brittle to ductile transition temperature expected in gamma titanium aluminum machining. Uhlmann, et al. [39] proposed a workpiece preheating approach to overcome this limitation in γ-TiAl machining. They established that preheating the workpiece to about 300 °C significantly reduced the size and density of surface cracks as compared to room temperature machining, while increasing the preheating temperature to 700 °C reduced the macro-cracks to micro-cracks and the >800 °C preheating temperature eliminated the surface cracks after machining.
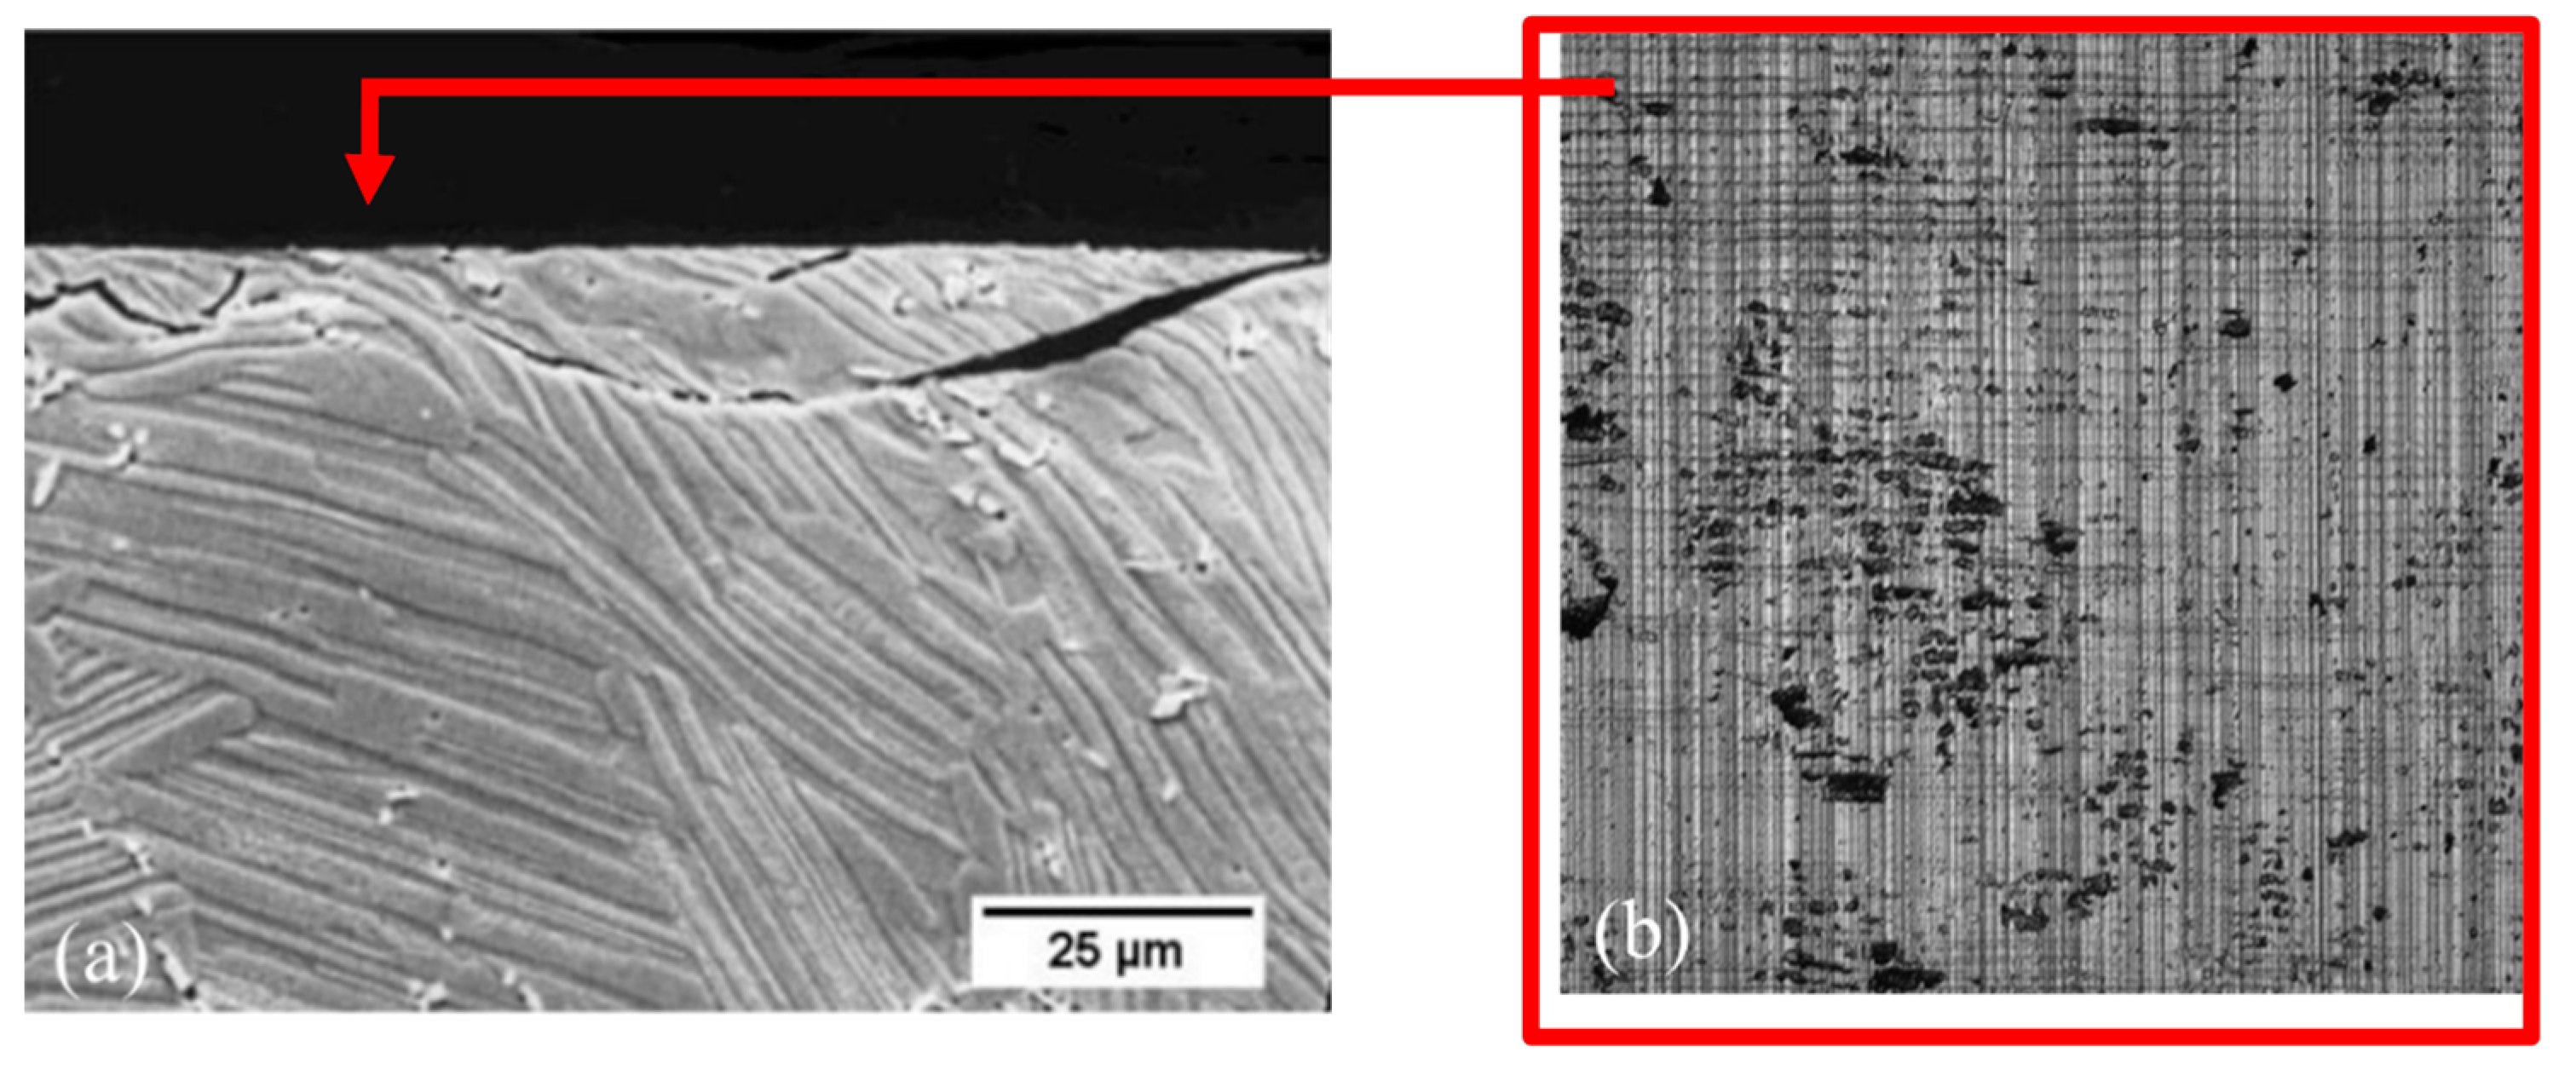
In addition, the correlation between surface cracks and tool wear was confirmed by Priarone, Rizzuti, Rotella and Settineri [18], showing that the ability of PCBN and diamond cutting tools to maintain a sharp cutting edge during cutting helps in reducing the crack density. A low crack density was also reported when low cutting forces were adopted in operations such as grinding [28]. It has been established that the cutting tool wears out concurrently as the surface defect occurs. Turning tests on the Titanium 45-2-2-0.8 alloy by Sharman, Aspinwall, Dewes and Bowen [25] showed that the depth of cuts influenced the surface crack density by 67% when a low cutting speed and depth of cut between 0.05 and 0.1 mm were adopted. The lowest crack geometry (50 µm width and 5 µm depth) was observed in the smallest depth of cut (0.05 mm), while the 0.1 mm depth of cut had a crack geometry of 150 µm width and 15 µm depth. Studies by Mantle and Aspinwall [22] on gamma XDTM titanium aluminide (Ti-45Al-2Nb-2Mn-0.8% TiB2) turning at a low cutting speed of 25 m/min, 0.1 m/rev feed rate, and 0.7 mm depth of cut correlated the surface cracks to the flank wear and cutting time. It was concluded that the interlamellar plate failure shown in Figure 5a results from the low ductility of titanium aluminide.
We studied the formation of surface cracks during machining using the experimental setup described above. Figure 5b shows the top view image of the surface segments obtained at a cutting speed of 60 m/min and a 21 µm depth of cut. The dark spots on the image are traceable to the surface cracks formed due to the mechanical effects of the machining process.
We developed a MATLAB script to evaluate the percentage of cracked machined surface area by accounting for the black spots/cracks on the surface images. The algorithm converts the grayscale surface images captured by the upright Nikon microscope to black and white images using a specified threshold. The threshold value ranges between 0.27 and 0.32 depending on the image brightness and feed mark intensity, and is thereby manually adjusted as needed. The algorithm computes the number of black pixels and divides them by the total number of image pixels, representing the gross crack percentage.
However, the gross crack percentage is not corrected for the feed marks, which sometimes have the same color intensity as the surface cracks. The crack algorithm processes a baseline surface image with zero cracks and uses the resulting crack percentage (due to feed marks) as a correction factor to account for feed marks. The baseline surface crack percentage is subtracted from subsequent images, thereby accounting for the feed marks. The surface crack output and crack estimate algorithm’s flowchart are displayed in Figure 6a–c.
We captured data for a total of six trials at each depth of cut. Due to camera limitations, the overall surface image from each of these cuts was divided into 50 segments. The surface images’ segments were processed with the developed MATLAB script, and the crack percentage of each segmented image was computed and averaged per depth.
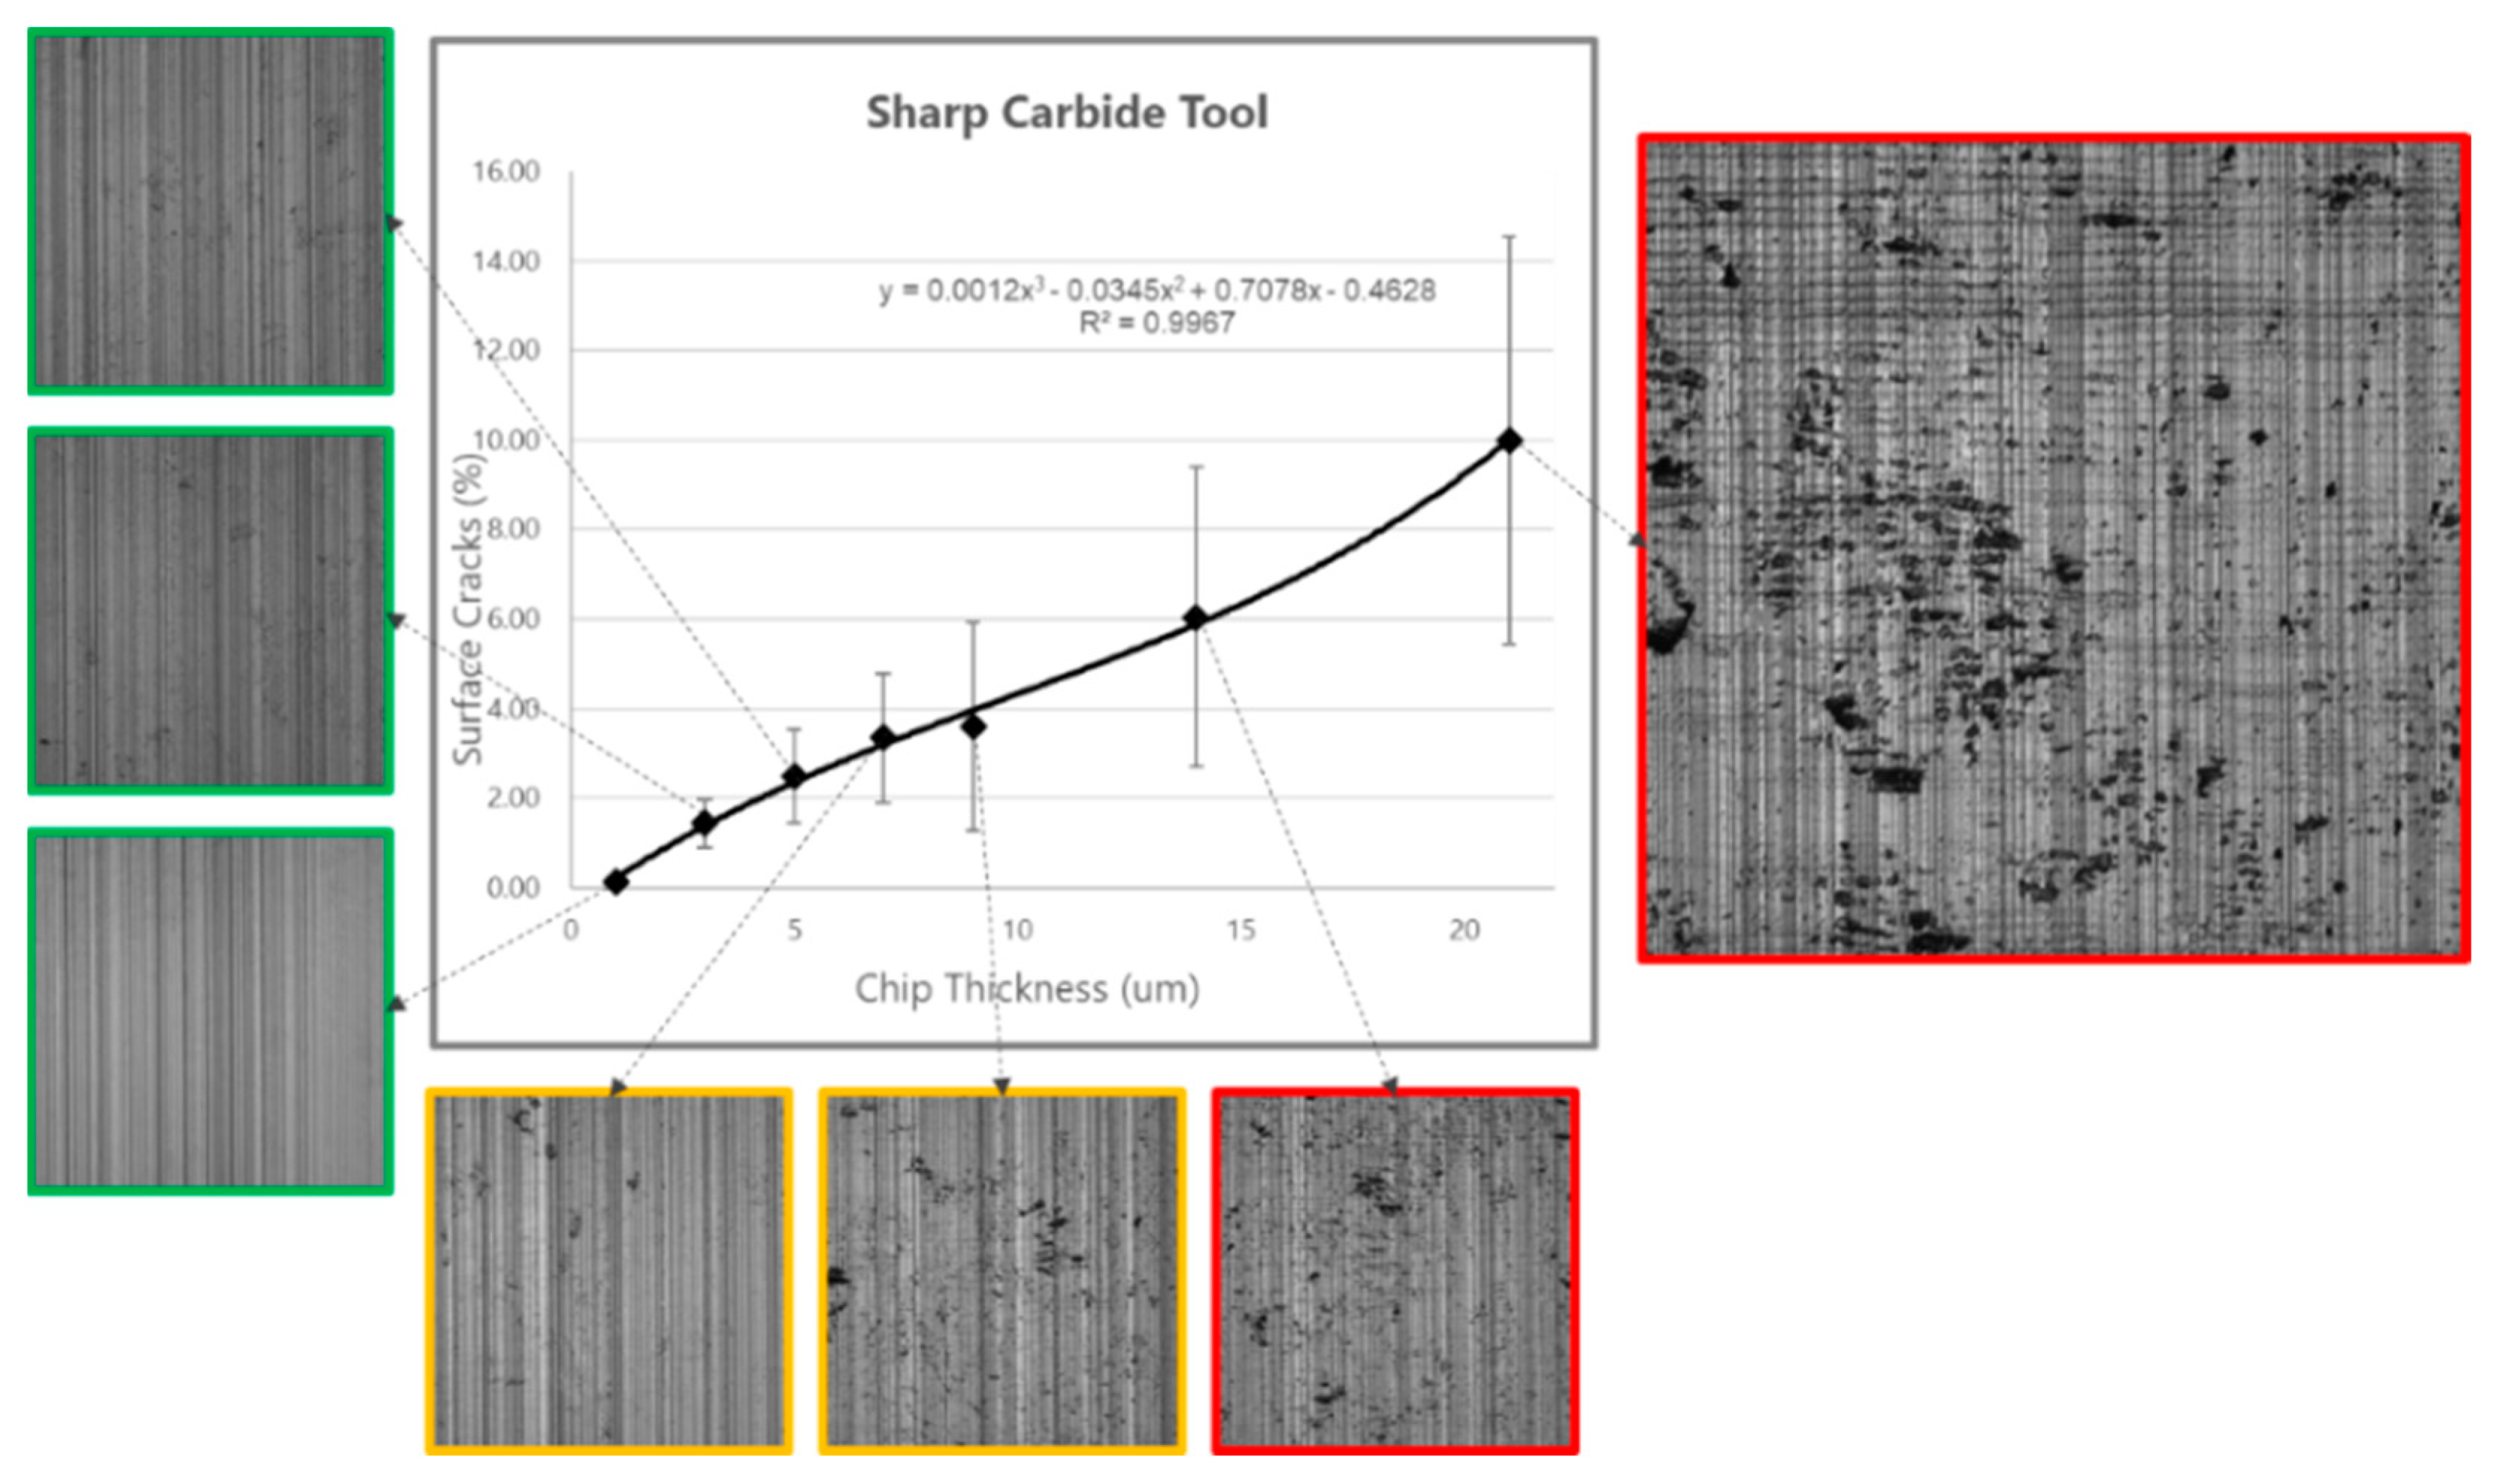
Figure 7 shows the plot of the average surface cracks against chip thickness (1, 3, 5, 7, 9, 14, 21 µm) for a sharp carbide tool cut at a 60 m/min cutting speed.
The crack trend and representative surface images are shown in Figure 7, which shows that the surface crack percentage and measurement deviation tend to increase with the depth of cut. From this observation, ductile cuts with few or no micro-cracks were recorded for a cut depth of less than 5 µm, and the surface cracks from 5 µm upward exhibited a brittle cutting mode with pronounced micro- and macro-cracks. These cracks resulted from the mechanical effect on the surface during machining.
The final surface quality from each trial was categorized into three groups: good, marginal, and poor quality, considering the average surface crack percentage shown in Figure 7. Data from trials with a surface crack percentage of less than 2.5% were grouped as good quality. In comparison, trials with crack percentages above 2.5% but lower than 3.6% were grouped as marginal quality. The remaining trials with a higher crack percentage (above 3.6%) were grouped as poor quality.

3.2. Surface Crack Percentage and Depth Evaluation

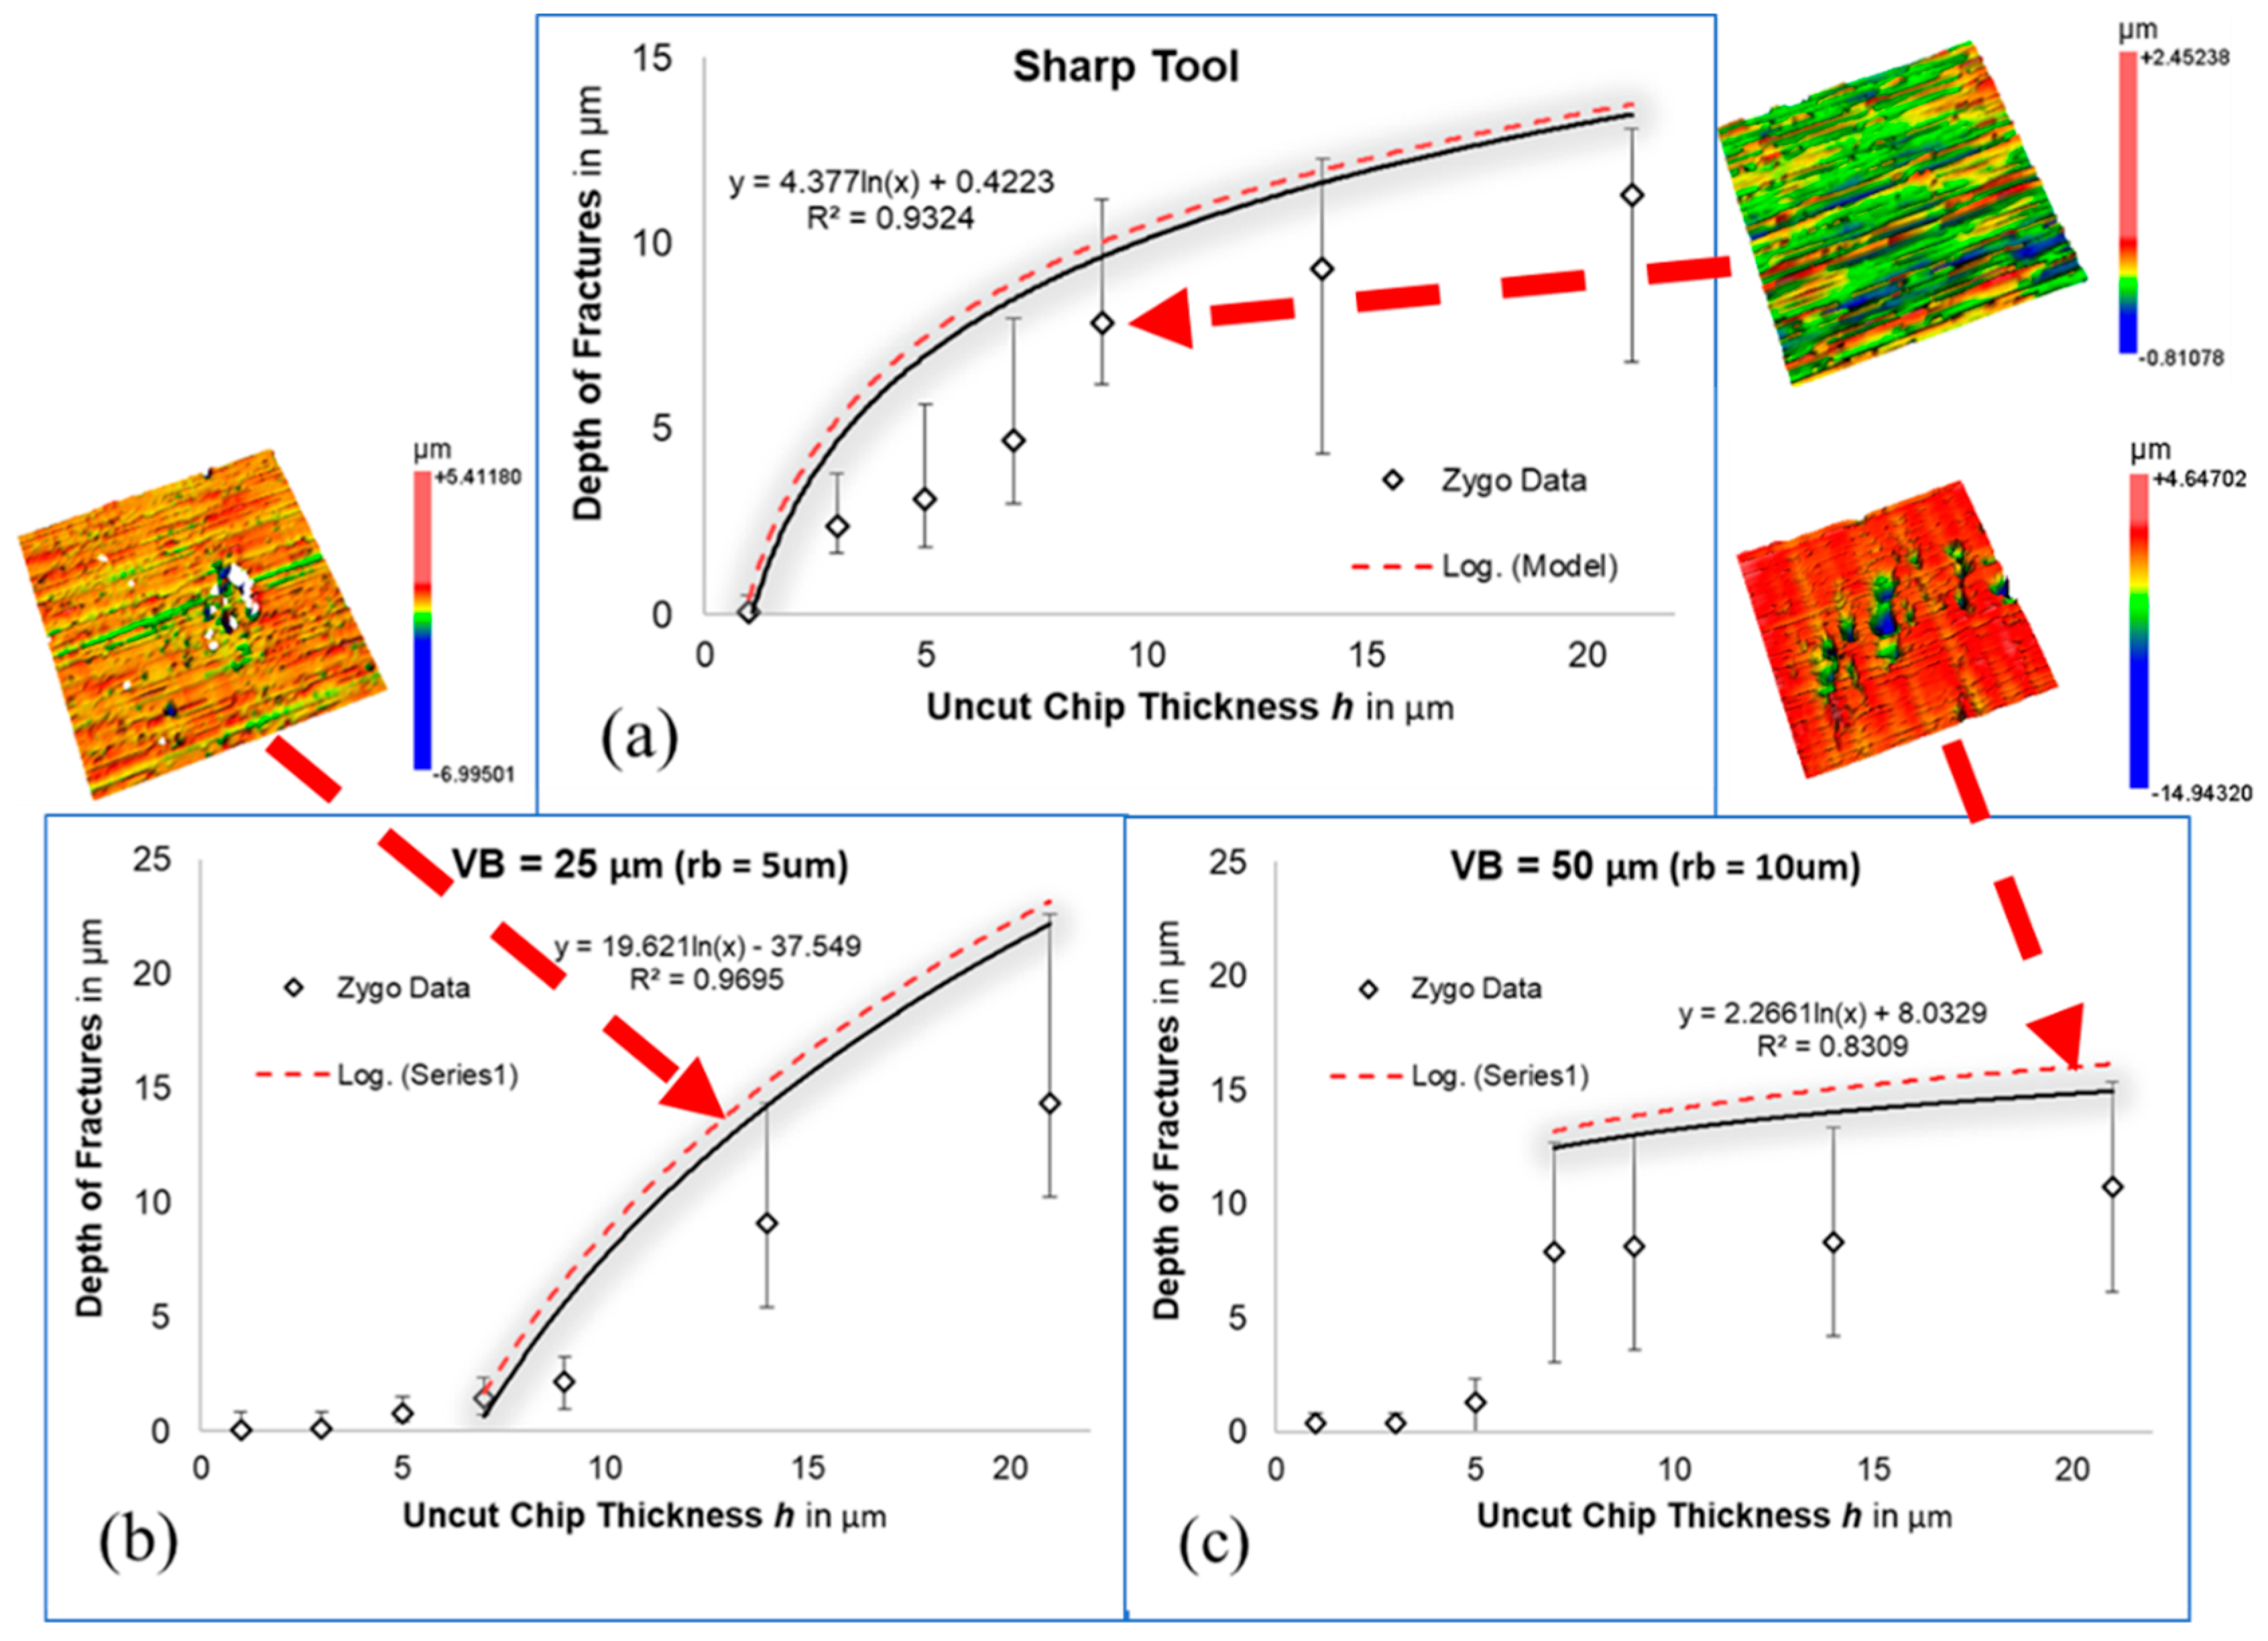
The images of the final surface were captured using a white light profilometer, ZYGO New View 7300. The average crack depth observed at each depth of cut was recorded. Figure 8a–c show the experimental fracture average depth (in microns) data for sharp and worn tools, with their respective log-fitted models. It was observed that for chip thickness <5 µm, only cuts made with a sharp tool resulted in a significant mechanical fracture depth. The lack of an evident fracture depth in worn tools at a low chip thickness is hypothesized to be due to reduced stress intensity in the machined sub-surface. Increased wear spreads the process forces and results in workpiece stresses over a larger area. This phenomenon reduces local stress intensity and thus the likelihood of fracture. The observed fracture depth increases due to chip thicknesses greater than 7 µm under the worn tool conditions and follows a similar pattern as the sharp tool scenario at increasing uncut chip thickness values.
Based on the data displayed in Figure 8, an empirical model of critical chip thickness and associated fracture depths was constructed (see red dashed best-fit log functions). These relationships can be used for process planning, e.g., setting a maximum feed rate or depth of cut for a given tool wear level. In the present study, Figure 8 and the traditional (2D) surface images were used to inform the depth and severity of fractures and classify the machined surfaces’ quality (i.e., good, marginal, or poor quality).

3.3. Scalogram Generation and Analysis

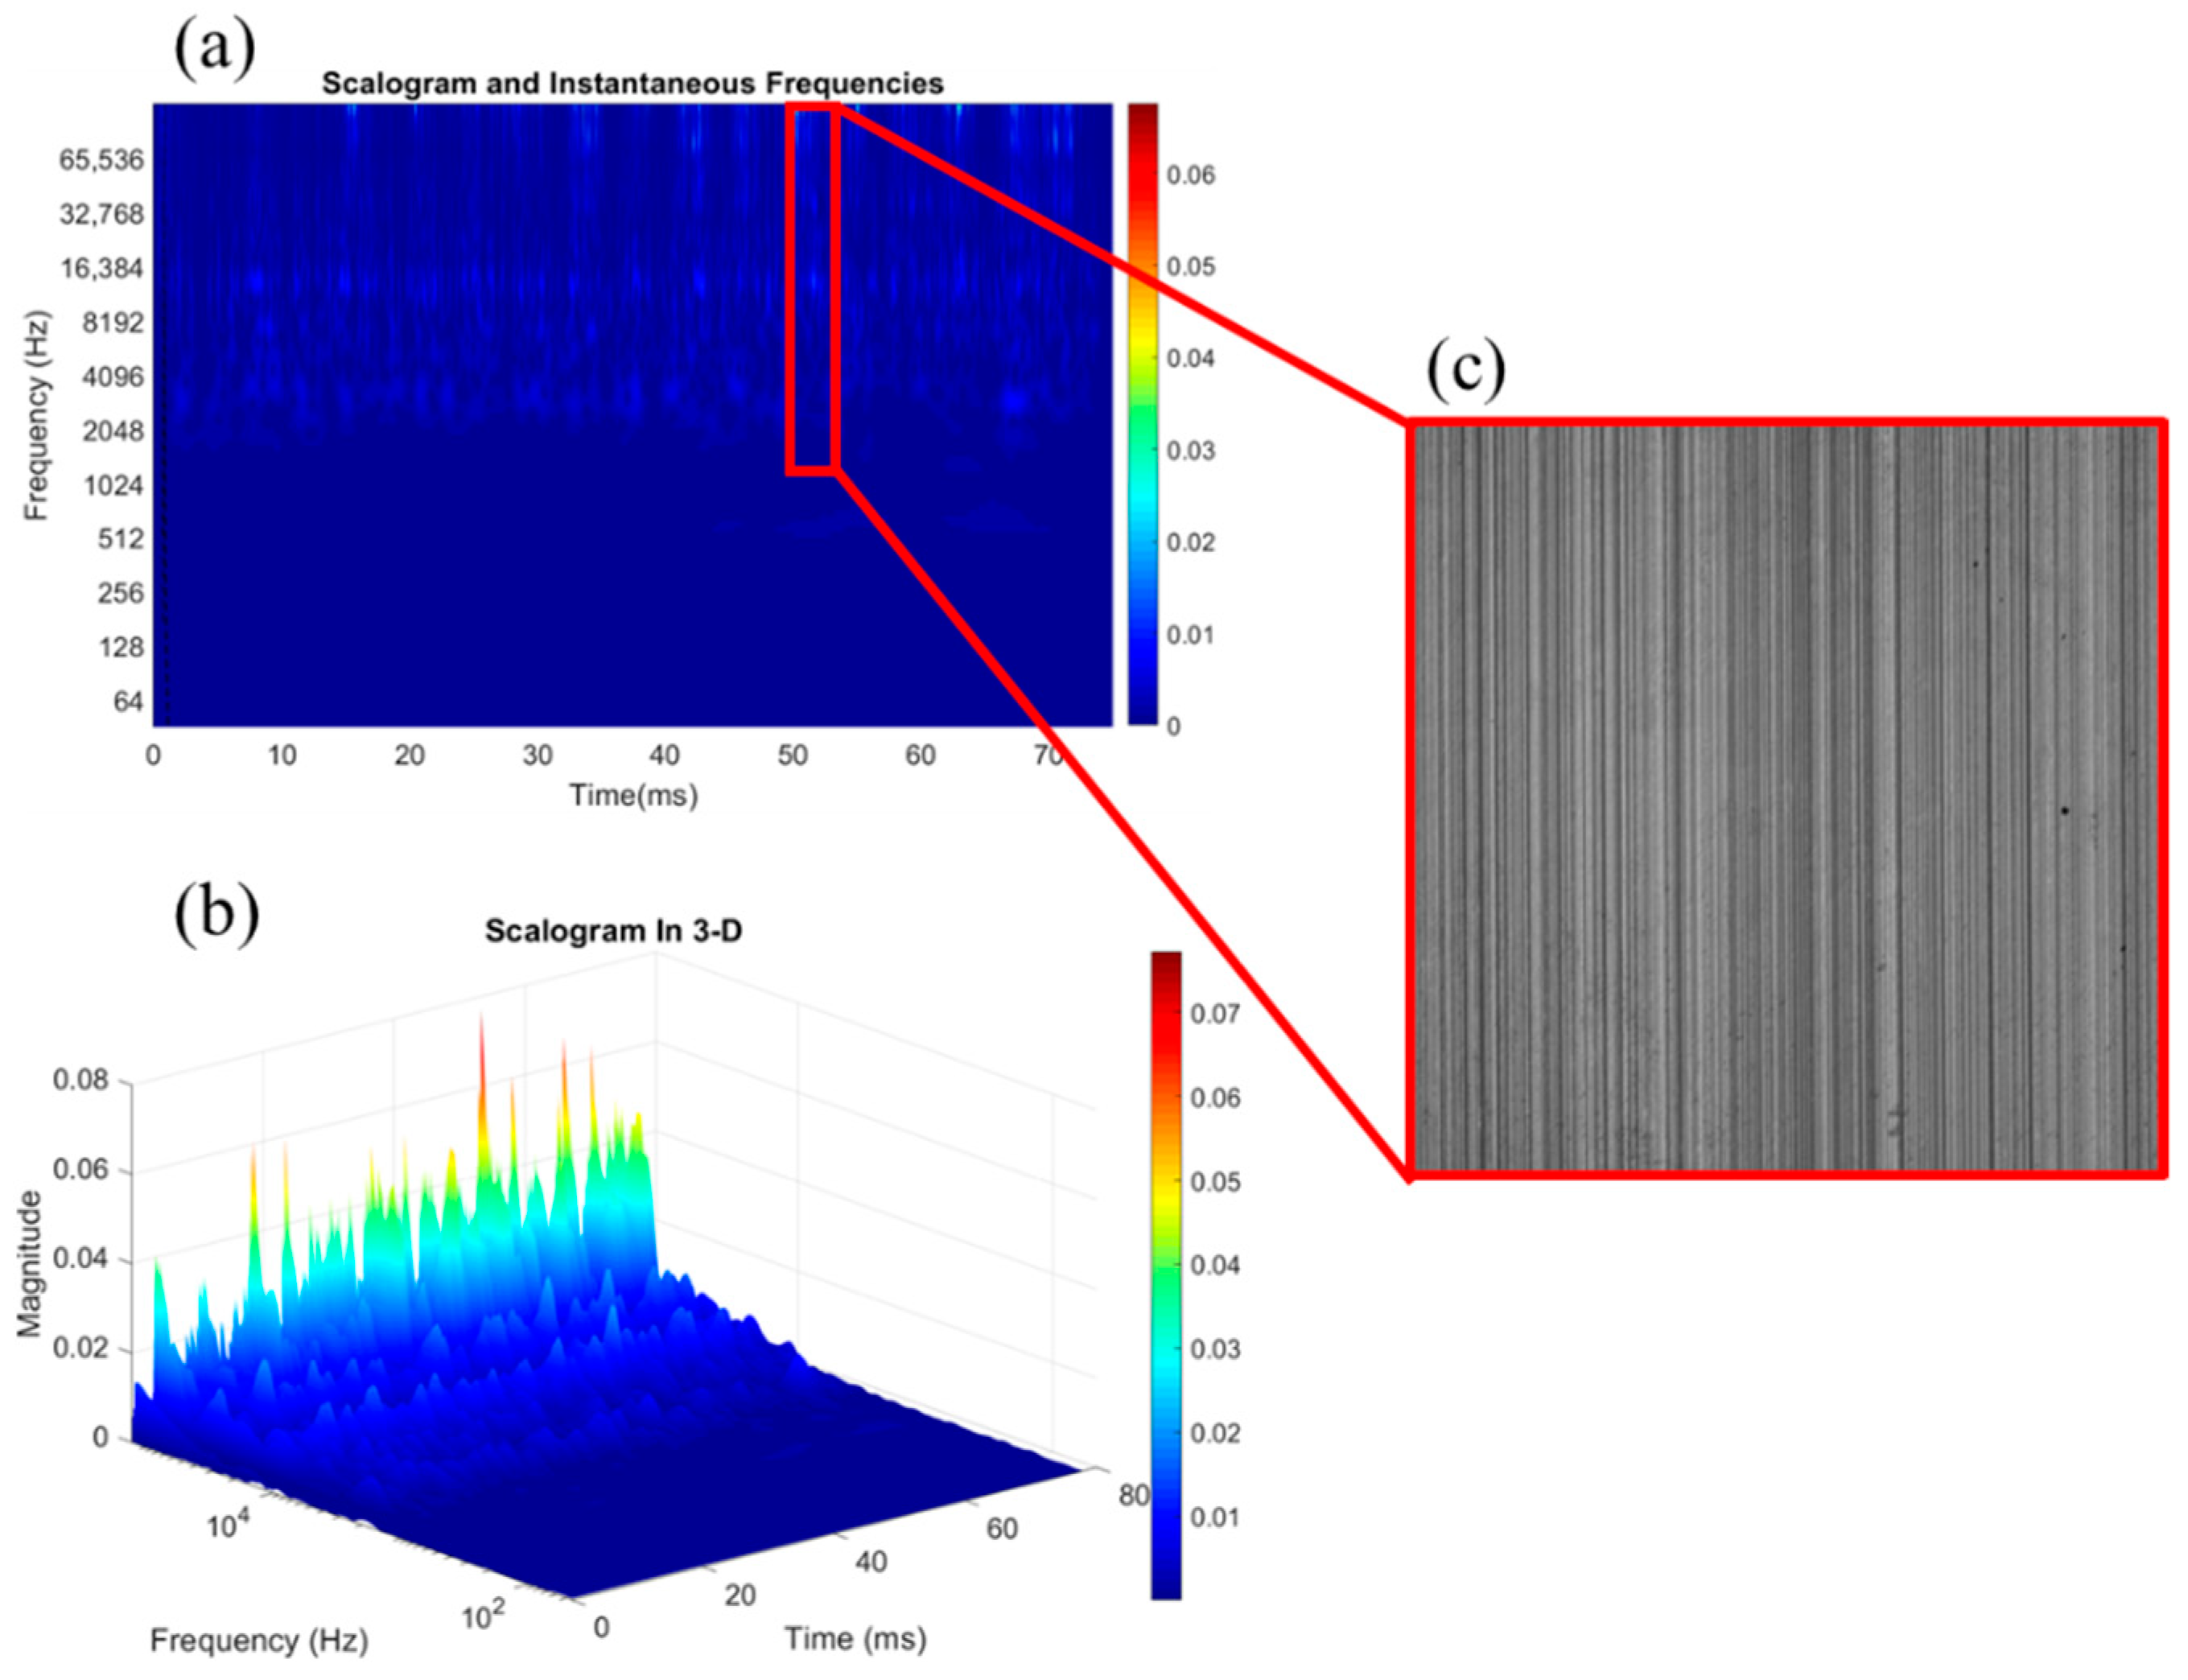
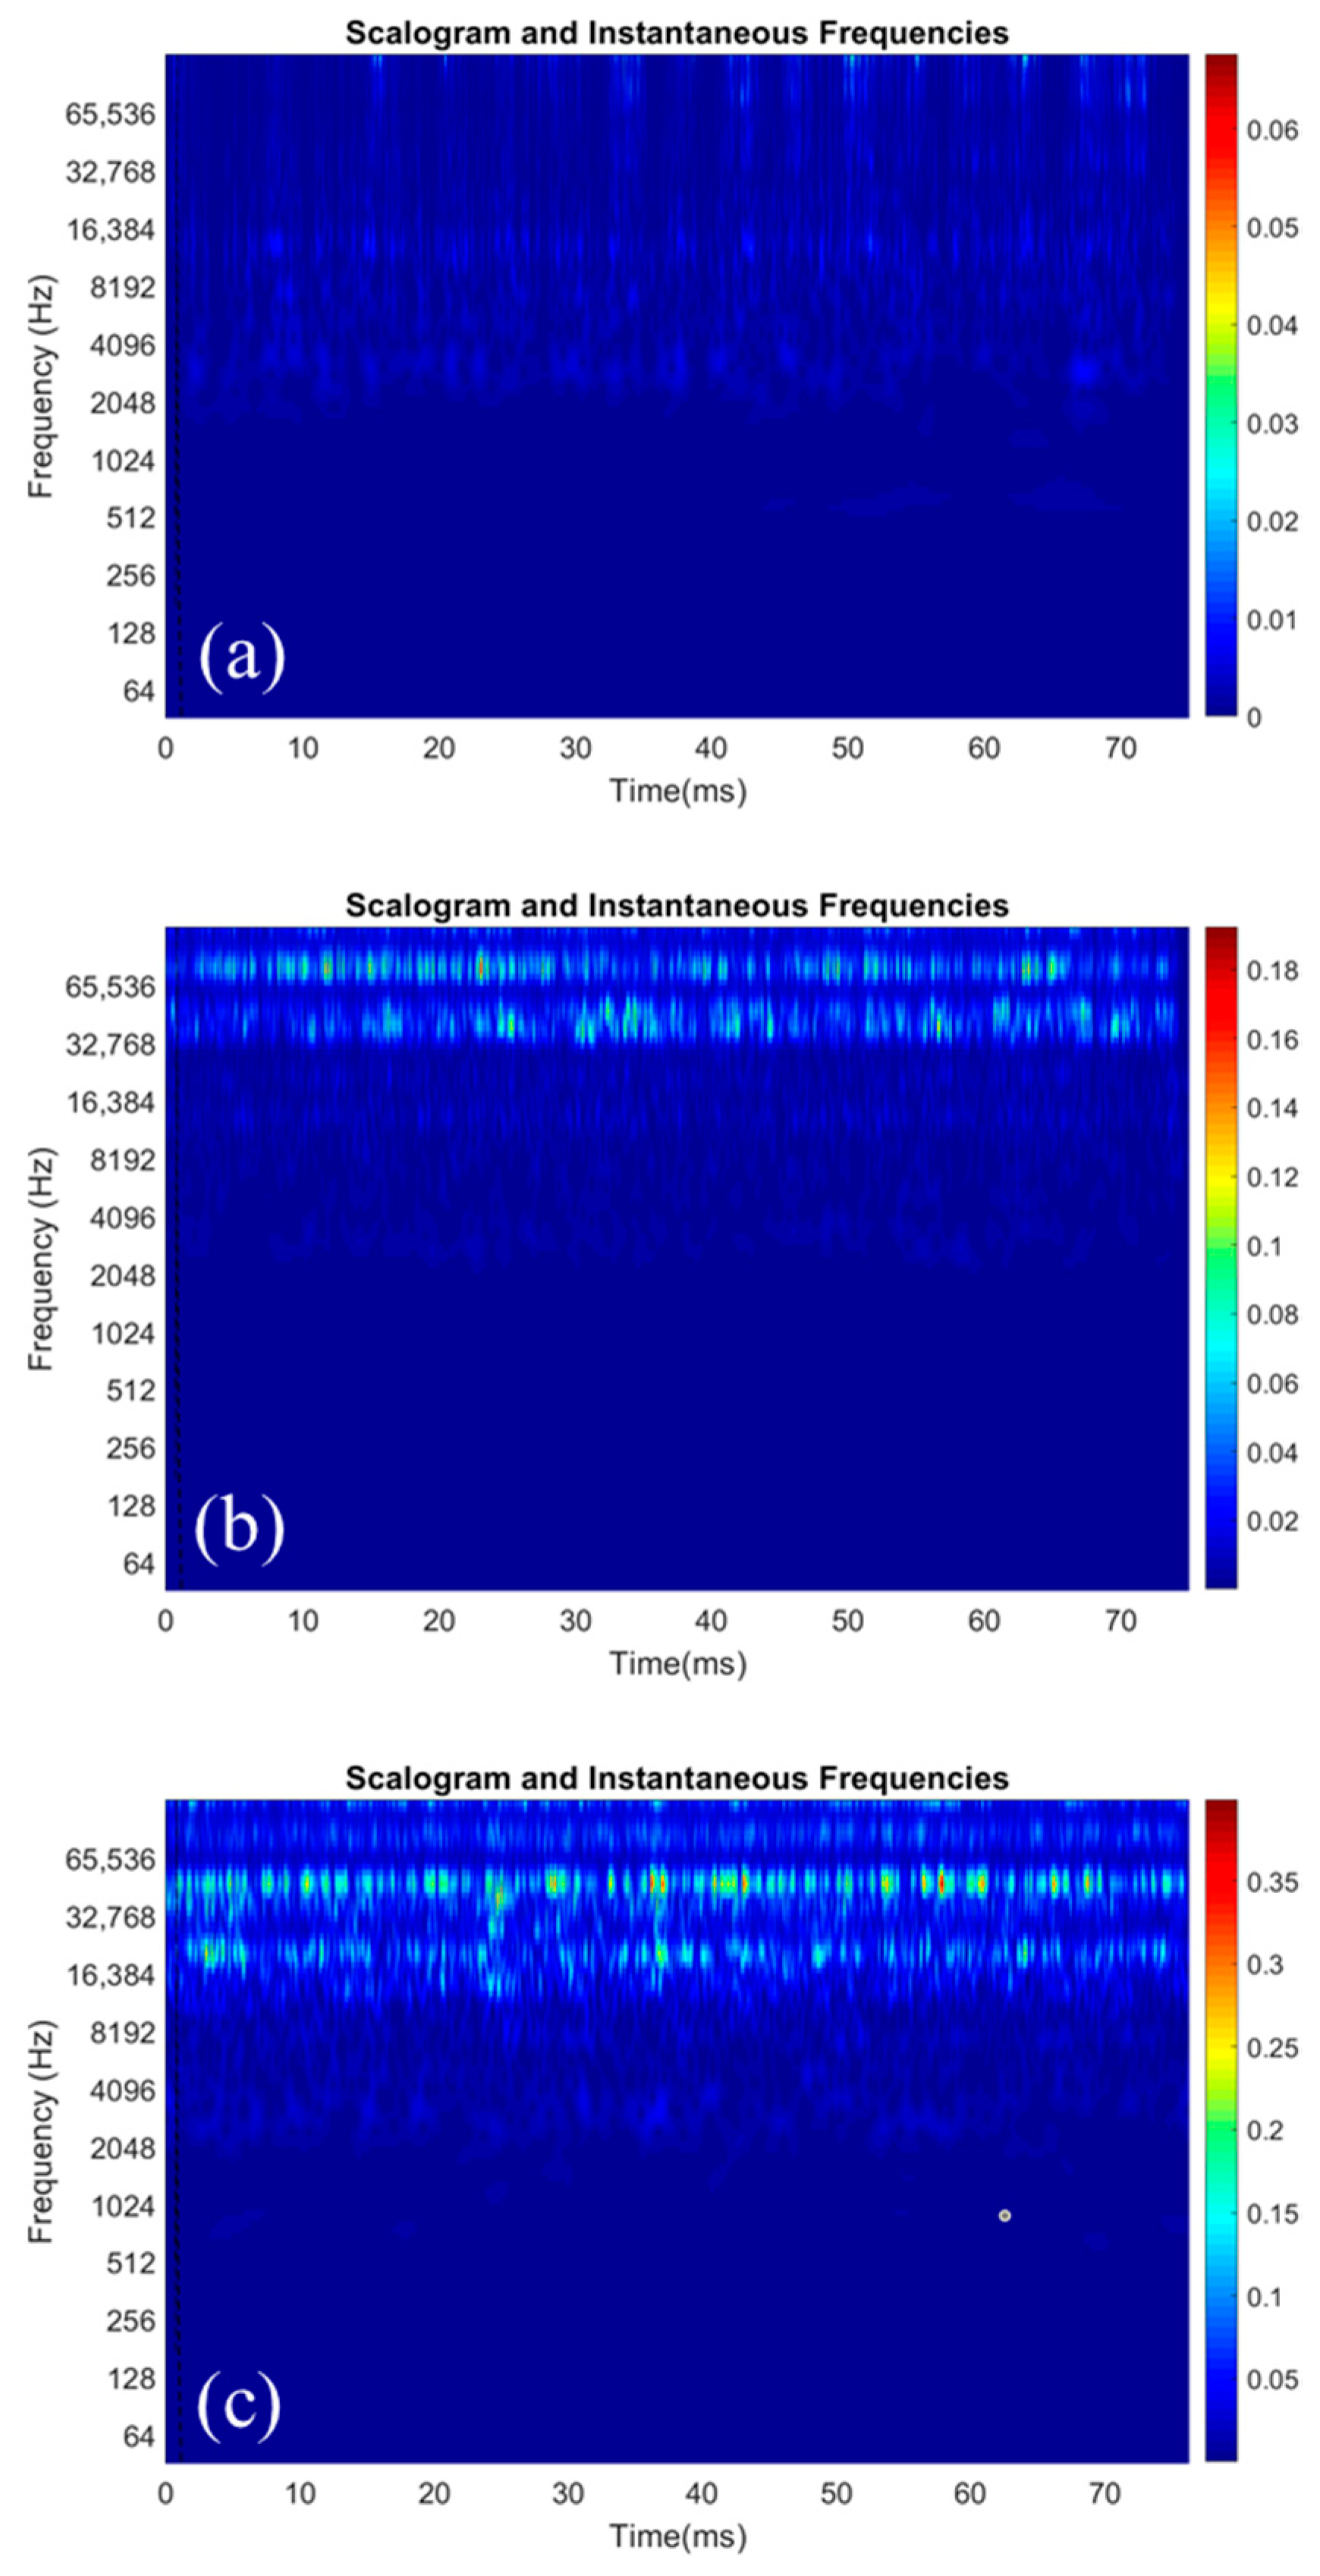
Following the acoustic emission signal denoising and pre-processing, the local time-frequency attributes or scalograms of the AE signals were generated using the wavelet time-frequency analysis, a unique class of analytic wavelets known as Morse wavelets in MATLAB. The cwtfilterbank in MATLAB was used to segment the time bandwidth to 1.7 ms mini-signals and tune the Morse wavelet as needed. The segmented signals were converted to scalogram images and grouped into their respective quality groups as described above. Figure 9 and Figure 10 show the 2D and 3D scalogram outputs for 1 and 21 µm depths of cut using a sharp carbide tool. The 2D scalograms show the signal frequency as high as 65 to 100 kHz. Figure 9 shows a low wavelet coefficient magnitude and high frequency for the 1 µm/ductile cut, while a higher magnitude at lower frequency was recorded for the 21 µm/brittle depth of cut, as shown in Figure 10. This difference in magnitude and shift in frequency resulted from the cracks/fracture on the specimen surface at a higher depth of cut, as displayed in Figure 10c. The wavelet coefficient magnitude for the 1 µm cut with a fine surface finish concentrated around 100 kHz, while the 21 µm cut with a poor surface finish is concentrated around the 20–55 kHz range, as shown in Figure 10a. The surface images in Figure 9c and Figure 10c have been time-matched to the scalograms to clearly show the workpiece surface state at the specific instance on the scalogram representation.
Figure 11 shows a pictorial representation of the acoustic emission wavelet analysis data observations, showing the ductile cutting mode with fewer surface cracks, high signal frequency, and low magnitude. The mixed/transition cutting mode is concurrent with the ductile and brittle cutting mode (BCM). The BCM occurs at a lower signal frequency with a higher magnitude.

3.4. CNN for Fracture Detection (Feature Extraction and Classification)

In this section, the scalograms generated from the acoustic emission signals were passed through a convolutional neural network for image or signal classification. We created three data categories (good, marginal, and poor surface quality) considering the computed surface crack percentage for each cut. For instance, for the sharp tool cuts, the 1, 3, and 5 µm depths of cut comprising of 18 AE signals were categorized as good quality, the 7 and 9 µm depths of cut comprising of 12 AE signals as marginal quality, and the 14 and 21 µm depth of cut scalograms consisting of 12 AE signals as poor quality (selected samples shown in Figure 12). Since the same workpiece sample and cutting speed were used for these trials, each of the captured AE signals had a length of 80 ms. After converting the AE signal data, each trial dataset had only about 270 scalogram images of 227 x 227 pixels, displayed in Figure 13. Passing this small amount of data into CNN models would result in overfitting due to the small size. The features can be extracted by passing the scalogram images to a pre-trained deep neural network (DNN) to overcome this challenge. A pre-trained network is a CNN model trained on a large dataset whose learning can then be transferred to smaller datasets. The typical pre-trained architecture includes VGG, AlexNet, ResNet50, and InceptionV3. In this work, VGG19 and ResNet50 architectures previously trained on more than a million images were used as the pre-trained network to extract the scalogram features. The purpose of using these three models for classification is to compare their respective performances and select the best classifier for further analysis. Table 1 shows the total number of segmented scalogram images for each of the categories and datasets.
The experimental trials with a sharp tool were performed at a 1 m/s cutting speed for varying depths of cut: 1, 3, 5, 7, 9, 14, and 21 µm. The worn tool trials were captured at 0.2 and 1 m/s cutting speeds for only the 3 and 21 µm depths of cut. The worn tool chip thickness was limited to 21 µm due to the fatal surface damage (thermal and mechanical cracks) observed above the 21 µm depth of cut. The extracted scalograms for both sharp and worn tool cuts were grouped into Dataset A, Dataset B, and Dataset C. Dataset A consists of only sharp tool scalograms, grouped into training and testing datasets. Dataset B consists of both sharp and worn tool scalograms; however, only the sharp tool scalograms are used for training, while the worn tool scalograms are used for testing. The rationale behind this approach is to evaluate whether the sharp tool cutting data can adequately predict the worn tool cutting condition. Similarly, Dataset C consists of all the scalograms, but the training and testing data include an adequate proportion of sharp and worn tool scalograms.
In this work, we adopted both the accuracy and F1-score to evaluate the performance of the proposed models. The accuracy indicates the correct classification rate. The F1-score is computed from precision and recall, with precision representing the value of true positives divided by the cumulation of true and false positives. In contrast, recall is the value of true positives divided by aggregating true positives and false negatives. Table 2 shows the accuracy and F1-score of different classifiers. The result shows that a scalogram is an effective way of representing the acoustic emission signal. The lowest accuracy recorded for Dataset B is traceable because the models were trained with sharp tool scalograms and tested on worn tool scalograms. The poor performance in this dataset establishes the theory that machine/process dynamics differ and cannot be transferred between different tool geometries. The confusion matrix for the best models is shown in Table 3 and Table 4 for Datasets A and C, respectively. The confusion matrix for Dataset B was excluded due to its poor performance. Table 2 shows that the accuracy of VGG19 makes it the best performing model across all datasets, with emphasis on Datasets A and C. The accuracy of the “good” surface quality signals had the highest performance in the confusion matrix in both datasets. It is also shown that there is repeated misclassification between the “marginal” surface quality scalograms and that of both good and poor category scalograms. The convergence of the training and validation process of VGG19 is shown in Figure 14.

4. Conclusions

The main contribution of this work is the presentation of a novel approach for converting AE signals extracted during machining to time-frequency scalograms and executing further analysis with classification into different cutting modes using CNN models. This approach offers new possibilities for real-time, low-cost, and non-destructive (NDE) quality monitoring of critical surface features when manufacturing high-value components.
  • The CNN model developed in this work successfully classified the cutting mode of titanium aluminide into three different quality categories: good, marginal, and poor quality, created using the crack depth information.
  • A total of 42 AE signals of 80 ms each were generated from 7 different depths of cut (1, 3, 5, 7, 9, 14, 21 µm). These AE signals were then segmented into a sequence of 40 signals with 2 ms each and converted to scalograms of 227 × 227 pixels. These images were passed to the CNN algorithm and split using a ratio of 60:20:20 for the training, evaluation, and testing datasets, respectively.
  • The results show that the scalogram-CNN model achieved a state-of-the-art accuracy. Additionally, the segmented scalogram and transfer learning approach provide flexibility to the amount of data needed for adequate model training and validation.
  • Ultimately, the wear condition during titanium aluminide machining can be estimated with acoustic emission and machine learning integration, with a predictive accuracy of 80.83%.
In summary, the proposed approach provides a straightforward but accurate process monitoring and potential process control capability. While the present work dealt with second-generation TiAl alloys, our technique can be extended to future material variants of TiAl alloys, such as the third-generation alloys studied by Beranoagirre [40]. It is worth noting that the future industrial implementation of the proposed paradigm will require custom sensor-integrated tool holders or fixtures to ensure consistent signal quality and attenuation. Nevertheless, the technique is not limited to monitoring the surface finish during titanium aluminide machining, but could, in principle, be adopted for a wide variety of manufacturing processes and material systems that exhibit physical mechanisms (e.g., energy release during crack formation or tribological phenomena) that correlate with the quality and performance of the manufactured components. This furthermore includes potential future applications for use-stage asset condition monitoring, such as real-time detection of cracks during the operation of turbines.

Author Contributions

Conceptualization, D.A. and J.S.; methodology, D.A. and K.O.; software, D.A. and K.O.; validation, J.S. and D.A.; formal analysis, J.S.; investigation, D.A.; resources, J.S.; data curation, D.A.; writing—original draft preparation, J.S., D.A., and K.O.; writing—review and editing, K.O. and D.A.; visualization, J.S.; supervision, J.S.; project administration, J.S.; funding acquisition, J.S. All authors have read and agreed to the published version of the manuscript.

Funding

This material is based upon work supported by the U.S. Department of Energy’s Office of Energy Efficiency and Renewable Energy (EERE) under the Advanced Manufacturing Office’s (AMO) DE-FOA-0001980, Award Number DE-EE0009121/0000, project title “AI-Enabled Discovery and Physics-Based Optimization of Energy-Efficient Processing Strategies for Advanced Turbine Alloys”.

Conflicts of Interest

The authors declare no conflict of interest. The funders had no role in the design of the study; in the collection, analyses, or interpretation of data; in the writing of the manuscript, or in the decision to publish the results.

References

  1. Bewlay, B.P.; Nag, S.; Suzuki, A.; Weimer, M.J. TiAl alloys in commercial aircraft engines. Mater. High Temp. 2016, 33, 549–559. [Google Scholar] [CrossRef]
  2. Appel, F.; Brossmann, U.; Christoph, U.; Eggert, S.; Janschek, P.; Lorenz, U.; Müllauer, J.; Oehring, M.; Paul, J.D.H. Recent progress in the development of gamma titanium aluminide alloys. Adv. Eng. Mater. 2000, 2, 699–720. [Google Scholar] [CrossRef]
  3. Kim, Y.-W. Intermetallic alloys based on gamma titanium aluminide. JOM 1989, 41, 24–30. [Google Scholar] [CrossRef]
  4. Clemens, H.; Mayer, S. Intermetallic titanium aluminides in aerospace applications–processing, microstructure and properties. Mater. High Temp. 2016, 33, 560–570. [Google Scholar] [CrossRef]
  5. Noda, T. Application of cast gamma TiAl for automobiles. Intermetallics 1998, 6, 709–713. [Google Scholar] [CrossRef]
  6. Biamino, S.; Klöden, B.; Weißgärber, T.; Kieback, B.; Ackelid, U. Properties of a TiAl turbocharger wheel produced by electron beam melting. In Proceedings of the Fraunhofer Direct Digital Manufacturing Conference DDMC, Berlin, Germany, 12–13 March 2014; pp. 1–4. [Google Scholar]
  7. Clemens, H.; Mayer, S. Development status, applications and perspectives of advanced intermetallic titanium aluminides. In Materials Science Forum; Trans Tech Publ: Freienbach, Switzerland, 2014; pp. 15–20. [Google Scholar]
  8. Chen, Y.Y.; Chen, Y.F.; Kong, F.T.; Xiao, S.L. Fabrication and processing of gamma titanium aluminides-a review. In Materials Science Forum; Trans Tech Publ: Freienbach, Switzerland, 2010; pp. 1281–1287. [Google Scholar]
  9. Kolahdouz, S.; Hadi, M.; Arezoo, B.; Zamani, S. Investigation of surface integrity in high speed milling of gamma titanium aluminide under dry and minimum quantity lubricant conditions. Procedia CIRP 2015, 26, 367–372. [Google Scholar] [CrossRef] [Green Version]
  10. Bentley, S.; Mantle, A.; Aspinwall, D. The effect of machining on the fatigue strength of a gamma titanium aluminide intertmetallic alloy. Intermetallics 1999, 7, 967–969. [Google Scholar] [CrossRef]
  11. Priarone, P.C.; Klocke, F.; Faga, M.G.; Lung, D.; Settineri, L. Tool life and surface integrity when turning titanium aluminides with PCD tools under conventional wet cutting and cryogenic cooling. Int. J. Adv. Manuf. Technol. 2016, 85, 807–816. [Google Scholar] [CrossRef]
  12. Radkowski, G.; Sep, J. Surface quality of a milled gamma titanium aluminide for aeronautical applications. Manag. Prod. Eng. Rev. 2014, 5, 60–65. [Google Scholar]
  13. Priarone, P.C.; Rizzuti, S.; Settineri, L.; Vergnano, G. Effects of cutting angle, edge preparation, and nano-structured coating on milling performance of a gamma titanium aluminide. J. Mater. Process. Technol. 2012, 212, 2619–2628. [Google Scholar] [CrossRef] [Green Version]
  14. Aspinwall, D.K.; Dewes, R.C.; Mantle, A.L. The machining of γ-TiAI intermetallic alloys. CIRP Ann. 2005, 54, 99–104. [Google Scholar] [CrossRef]
  15. Weinert, K.; Bergmann, S.; Kempmann, C. Machining Sequence to Manufacture a γ-TiAl-Conrod for Application in Combustion Engines. Adv. Eng. Mater. 2006, 8, 41–47. [Google Scholar] [CrossRef]
  16. Beranoagirre, A.; Olvera, D.; De Lacalle, L.L. Milling of gamma titanium–aluminum alloys. Int. J. Adv. Manuf. Technol. 2012, 62, 83–88. [Google Scholar] [CrossRef]
  17. Aspinwall, D.K.; Mantle, A.L.; Chan, W.K.; Hood, R.; Soo, S.L. Cutting temperatures when ball nose end milling γ-TiAl intermetallic alloys. CIRP Ann. 2013, 62, 75–78. [Google Scholar] [CrossRef] [Green Version]
  18. Priarone, P.C.; Rizzuti, S.; Rotella, G.; Settineri, L. Tool wear and surface quality in milling of a gamma-TiAl intermetallic. Int. J. Adv. Manuf. Technol. 2012, 61, 25–33. [Google Scholar] [CrossRef] [Green Version]
  19. Zhang, W.J.; Reddy, B.V.; Deevi, S.C. Physical properties of TiAl-base alloys. Scr. Mater. 2001, 45, 645–651. [Google Scholar] [CrossRef]
  20. Gnanamoorthy, R.; Mutoh, Y.; Mizuhara, Y. Fatigue crack growth behavior of equiaxed, duplex and lamellar microstructure γ-base titanium aluminides. Intermetallics 1996, 4, 525–532. [Google Scholar] [CrossRef]
  21. Gnanamoorthy, R.; Mutoh, Y.; Masahashi, N.; Mizuhara, Y. Fracture properties of γ-base TiAl alloys with lamellar microstructure at room temperature. Mater. Sci. Eng. A 1994, 184, 37–44. [Google Scholar] [CrossRef]
  22. Mantle, A.; Aspinwall, D. Surface integrity and fatigue life of turned gamma titanium aluminide. J. Mater. Process. Technol. 1997, 72, 413–420. [Google Scholar] [CrossRef]
  23. Sharman, A.; Aspinwall, D.; Dewes, R.; Clifton, D.; Bowen, P. The effects of machined workpiece surface integrity on the fatigue life of γ-titanium aluminide. Int. J. Mach. Tools Manuf. 2001, 41, 1681–1685. [Google Scholar] [CrossRef]
  24. Adeniji, D.; Schoop, J. In-situ Calibrated Digital Process Twin Models For Resource Efficient Manufacturing. J. Manuf. Sci. Eng. 2021, 144, 041008. [Google Scholar] [CrossRef]
  25. Sharman, A.; Aspinwall, D.; Dewes, R.; Bowen, P. Workpiece surface integrity considerations when finish turning gamma titanium aluminide. Wear 2001, 249, 473–481. [Google Scholar] [CrossRef]
  26. Schoop, J.; Poonawala, H.A.; Adeniji, D.; Clark, B. AI-enabled Dynamic Finish Machining Optimization for Sustained Surface Integrity. Manuf. Lett. 2021, 29, 42–46. [Google Scholar] [CrossRef]
  27. Beranoagirre, A.; Urbikain, G.; Calleja, A.; López de Lacalle, L.N. Drilling process in γ-TiAl intermetallic alloys. Materials 2018, 11, 2379. [Google Scholar] [CrossRef] [Green Version]
  28. Beranoagirre, A.; de Lacalle, L.L. Grinding of gamma TiAl intermetallic alloys. Procedia Eng. 2013, 63, 489–498. [Google Scholar] [CrossRef] [Green Version]
  29. Beranoagirre, A.; Lopez de Lacalle, L.N. Optimising the milling of titanium aluminide alloys. Int. J. Mechatron. Manuf. Syst. 2010, 3, 425–436. [Google Scholar] [CrossRef]
  30. Neupane, D.; Kim, Y.; Seok, J. Bearing Fault Detection Using Scalogram and Switchable Normalization-Based CNN (SN-CNN). IEEE Access 2021, 9, 88151–88166. [Google Scholar] [CrossRef]
  31. Oh, D.C.; Jo, Y.U. EMG-based hand gesture classification by scale average wavelet transform and CNN. In Proceedings of the 2019 19th International Conference on Control, Automation and Systems (ICCAS), Jeju, Korea, 15–18 October 2019; pp. 533–538. [Google Scholar]
  32. Tran, T.; Lundgren, J. Drill Fault Diagnosis Based on the Scalogram and Mel Spectrogram of Sound Signals Using Artificial Intelligence. IEEE Access 2020, 8, 203655–203666. [Google Scholar] [CrossRef]
  33. Worlton, D.C. Experimental confirmation of Lamb waves at megacycle frequencies. J. Appl. Phys. 1961, 32, 967–971. [Google Scholar] [CrossRef]
  34. Najmi, A.-H.; Sadowsky, J. The continuous wavelet transform and variable resolution time-frequency analysis. Johns Hopkins APL Tech. Dig. 1997, 18, 134–140. [Google Scholar]
  35. Fu, Y.; Zhang, Y.; Gao, Y.; Gao, H.; Mao, T.; Zhou, H.; Li, D. Machining vibration states monitoring based on image representation using convolutional neural networks. Eng. Appl. Artif. Intell. 2017, 65, 240–251. [Google Scholar] [CrossRef]
  36. Schoop, J.; Adeniji, D.; Brown, I. Computationally efficient, multi-domain hybrid modeling of surface integrity in machining and related thermomechanical finishing processes. Procedia CIRP 2019, 82, 356–361. [Google Scholar] [CrossRef]
  37. Schoop, J. Testbed Device for Use in Predictive Modelling of Manufacturing Processes. U.S. Patent Application No. 16/856,533, 29 October 2020. [Google Scholar]
  38. Schoop, J.M. High Speed Multi-Axis Machine Tool. U.S. Patent Application No. 16/798,007, 27 August 2020. [Google Scholar]
  39. Uhlmann, E.; Herter, S.; Gerstenberger, R.; Roeder, M. Quasi-static chip formation of intermetallic titanium aluminides. Prod. Eng. 2009, 3, 261–270. [Google Scholar] [CrossRef]
  40. Beranoagirre, A.; Urbikain, G.; Marticorena, R.; Bustillo, A.; López de Lacalle, L.N. Sensitivity analysis of tool wear in drilling of titanium aluminides. Metals 2019, 9, 297. [Google Scholar] [CrossRef] [Green Version]
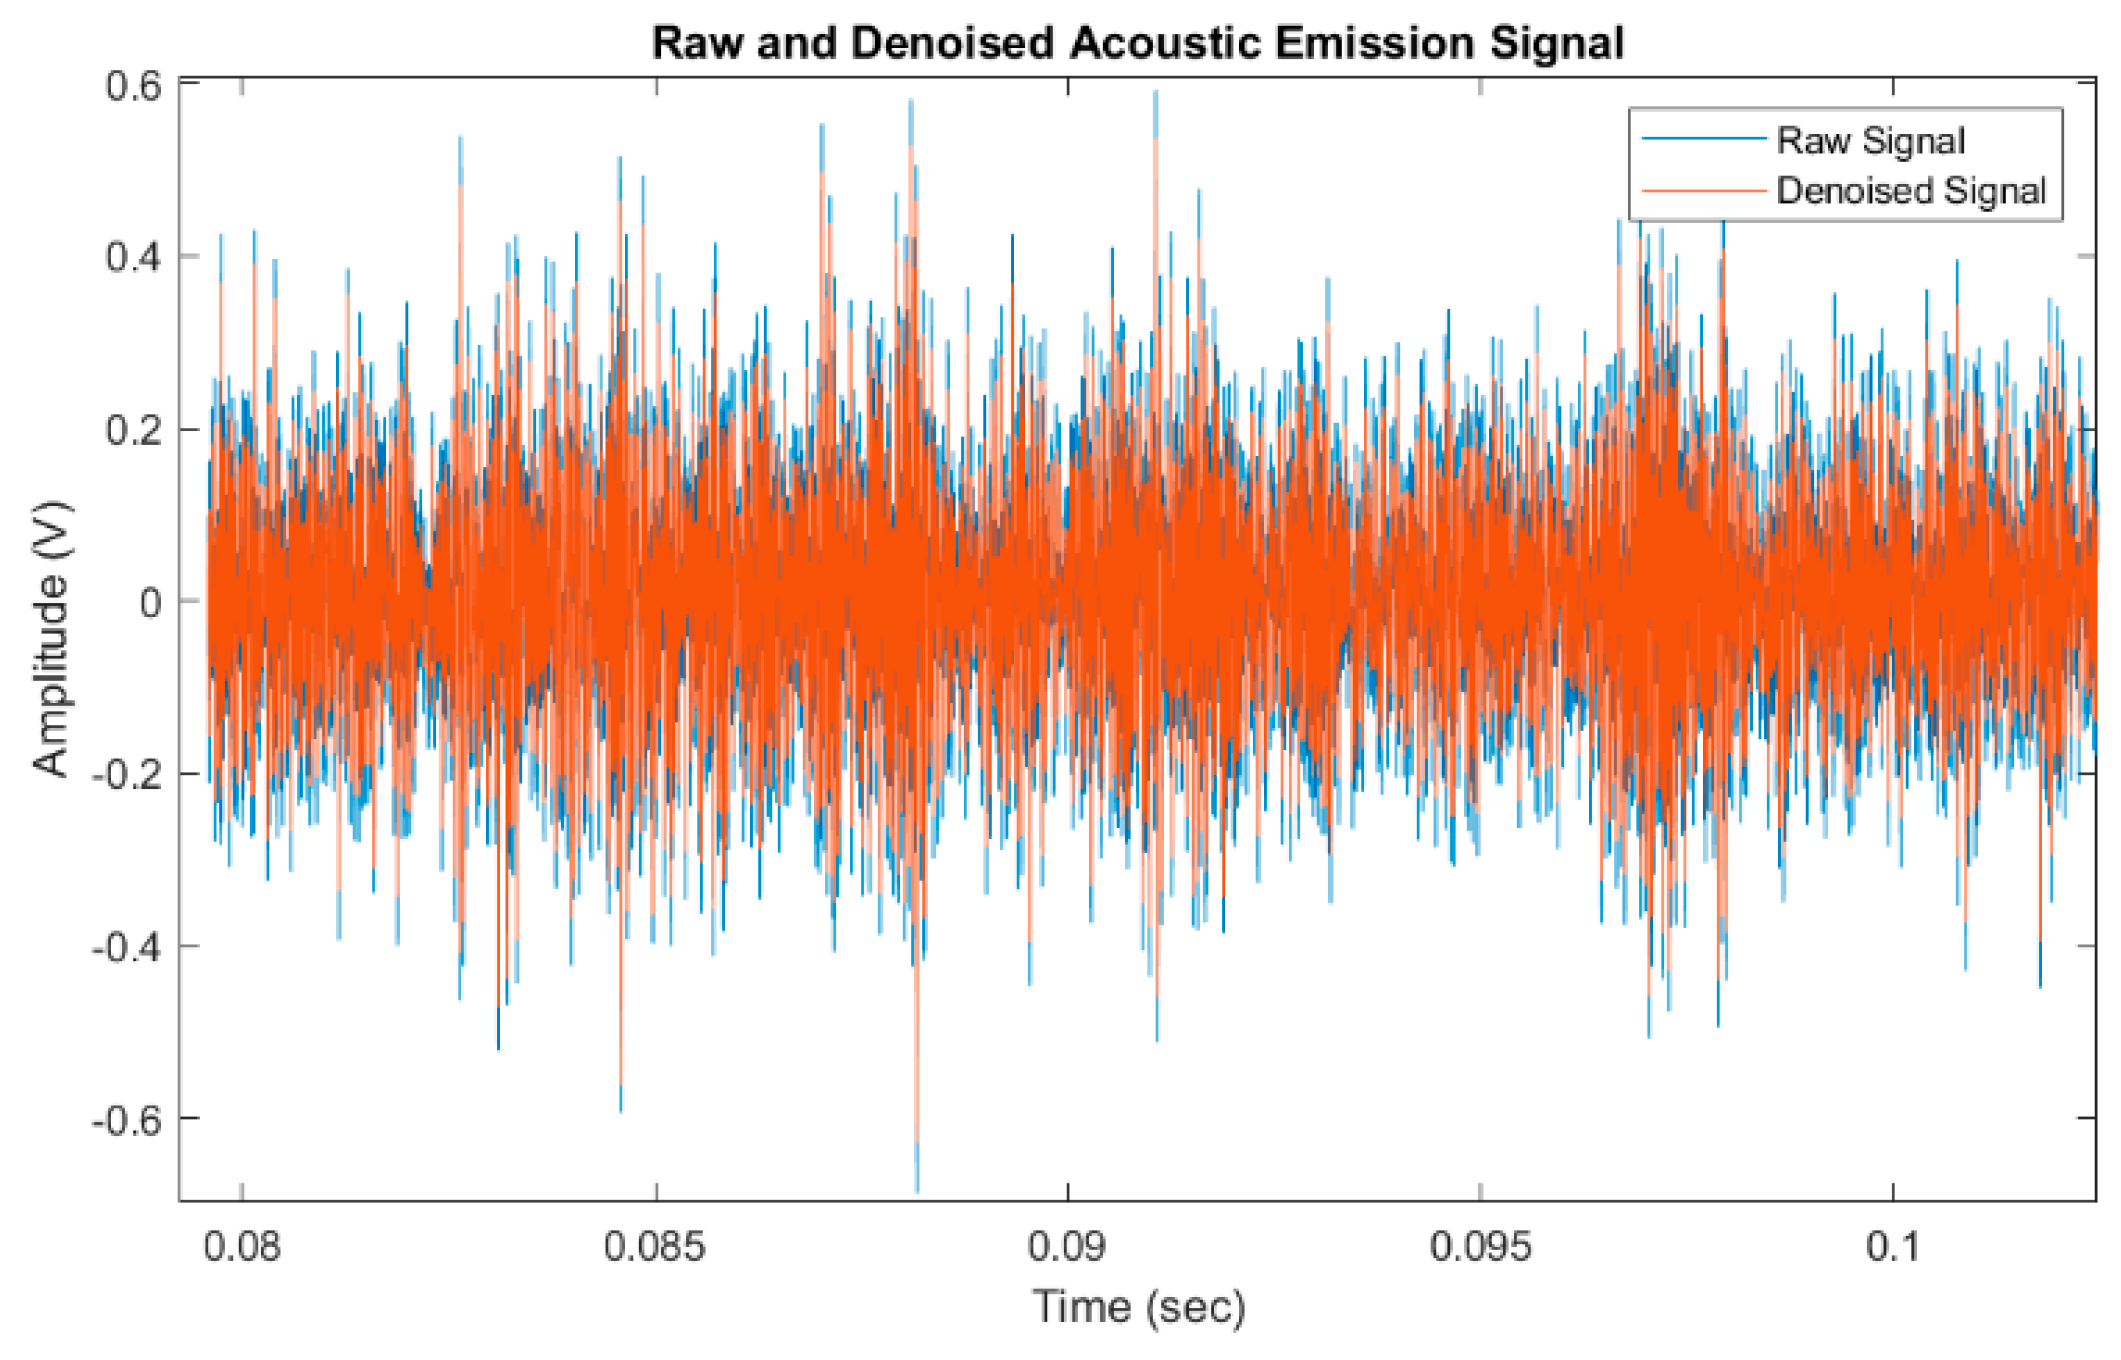
Figure 1. Raw and denoised acoustic emission signal.
Jmmp 06 00018 g001
Figure 2. Types of continuous wavelets.
Jmmp 06 00018 g002
Figure 3. AlexNet architecture.
Jmmp 06 00018 g003
Figure 4. (a) Custom in situ testbed developed at the authors’ laboratory, and (b) a zoomed-in view of the cutting zone.
Jmmp 06 00018 g004
Figure 5. Surface cracks observed (a) during turning of Ti-45Al-2Nb-2Mn-0.8 vol% TiB2 [22] and (b) at a 21 µm chip thickness and 60 m/min, with the authors’ experimental setup (top view).
Jmmp 06 00018 g005
Figure 6. (a) Surface image with cracks at 21 µm DOC using a sharp carbide tool, (b) processed image output with MATLAB crack script, and (c) MATLAB script flowchart.
Jmmp 06 00018 g006
Figure 7. Average surface cracks against chip thickness plot with respective optical images using a sharp carbide tool.
Jmmp 06 00018 g007
Figure 8. Plot of fracture depth vs. chip thickness for: (a) sharp tool, (b) worn tool, VB = 25 µm, and (c) worn tool, VB = 50 µm.
Jmmp 06 00018 g008
Figure 9. (a) 2D scalogram, (b) 3D scalogram, and (c) surface image for 1 µm depth of cut at 60 m/min.
Jmmp 06 00018 g009
Figure 10. (a) 2D scalogram, (b) 3D scalogram, and (c) surface image for 21 um depth of cut at 60 m/min.
Jmmp 06 00018 g010
Figure 11. Qualitative illustration of the observed trend in gamma-titanium aluminide cutting mode.
Jmmp 06 00018 g011
Figure 12. Typical scalogram image for (a) good surface quality, (b) marginal surface quality with minor cracks, and (c) poor surface quality.
Jmmp 06 00018 g012
Figure 13. Typical CWT segmented scalograms for (a) good surface quality, (b) marginal surface quality with minor cracks, and (c) poor surface quality.
Jmmp 06 00018 g013
Figure 14. Convergence of the training and validation process of VGG19: (a) accuracy and (b) cross-entropy loss.
Jmmp 06 00018 g014
Table 1. Number of segmented images for respective categories and datasets.
Dataset ADataset BDataset C
CategoriesTrainingTestingTrainingTestingTrainingTesting
Good6791297201581035332
Marginal440100500115774200
Poor4401005401301041558
Table 2. The accuracy and F1-score of the selected models.
Dataset ADataset BDataset C
ClassifierAccuracy (%)F1-ScoreAccuracy (%)F1-ScoreAccuracy (%)F1-Score
VGG1976.780.7539.270.3380.830.78
ResNet5078.640.7851.640.4050.920.60
AlexNet75.000.7046.250.3560.520.65
Table 3. The confusion matrix of the best performing model (VGG19) for Dataset A.
LabelsGood (%)Marginal (%)Poor (%)
Good93.026.980.00
Marginal21.6572.166.20
Poor1.0339.1859.79
Table 4. The confusion matrix of the best performing model (VGG19) for Dataset C.
LabelsGood (%)Marginal (%)Poor (%)
Good89.763.616.63
Marginal26.0062.0012.00
Poor10.756.9882.26
Publisher’s Note: MDPI stays neutral with regard to jurisdictional claims in published maps and institutional affiliations.