1. Introduction
The continuous pressure to reduce costs is one of the main challenges in subtractive manufacturing, especially for small- and medium-sized enterprises as well as contract manufacturers. To this end, the OberA research project is investigating how digital manufacturing solutions can be utilized in these environments to optimize machining processes during daily work. One of the main goals is optimal tool utilization, resulting in reduced tooling costs and greener manufacturing through increased resource efficiency.
Tool condition monitoring (TCM) systems have been widely researched. Such TCM systems allow the condition of the cutting tool to be monitored, so that it can be used for as long as possible but is nevertheless replaced before it breaks. Within TCM, a broad distinction can be made between direct and indirect observation methods. In the case of direct observation, laser scanners [
1] or cameras [
2] are used to directly assess the wear condition of the respective cutting tool. For indirect observation, signals such as acoustic emission [
3], power [
4], current [
5], torque [
6], or vibrations [
7] are used to deduce the tool’s condition. While these approaches have the advantage of easy application to online monitoring, they are prone to noise from the environment [
8,
9].
One such influence are variations between material batches, which were shown to have significant influence on the material and its machinability [
10]. The root cause for these deviations can be found in the underlying material manufacturing processes, between different suppliers and material lots, such as variations in the material and its chemical composition, fabrication procedure, or heat treatment. These lead to variations in properties such as grain size or microstructure, which directly influence the machinability of the respective material [
11].
In order to facilitate meaningful tool condition monitoring, it is therefore important to know the exact material batch currently being machined, so that its influences on the machine signals can be modelled. A review of material identification systems can be found in [
12]. It is shown that there are several material identification approaches researched in subtractive manufacturing, which aim at identifying various major materials, material sub-classes, specific materials, material grades, and material batches. While there are several approaches for identifying different materials during machining, such as aluminum and steel [
13,
14,
15], aluminum and carbon-fiber-reinforced plastics (CFRP) [
16,
17], titanium and CFRP [
18,
19], and steel and ceramic [
20], there are only a few approaches investigating batch-specific material identification [
10,
21].
According to the review in [
12], most approaches in the area of automated material identification use sophisticated feature engineering, which so far has not been investigated for material batch identification in subtractive manufacturing. Thus, this study extends the previous work from [
10] by investigating a variety of features for a new validation scenario.
The remaining paper is structured as follows. In
Section 2, the proposed method for batch-aware tool condition monitoring is proposed. In
Section 3, the experimental procedure for validating the results is shown while presenting the findings of this study. These findings are discussed in
Section 4, while
Section 5 concludes this paper with a summary and an outlook of future research activities.
2. Methods
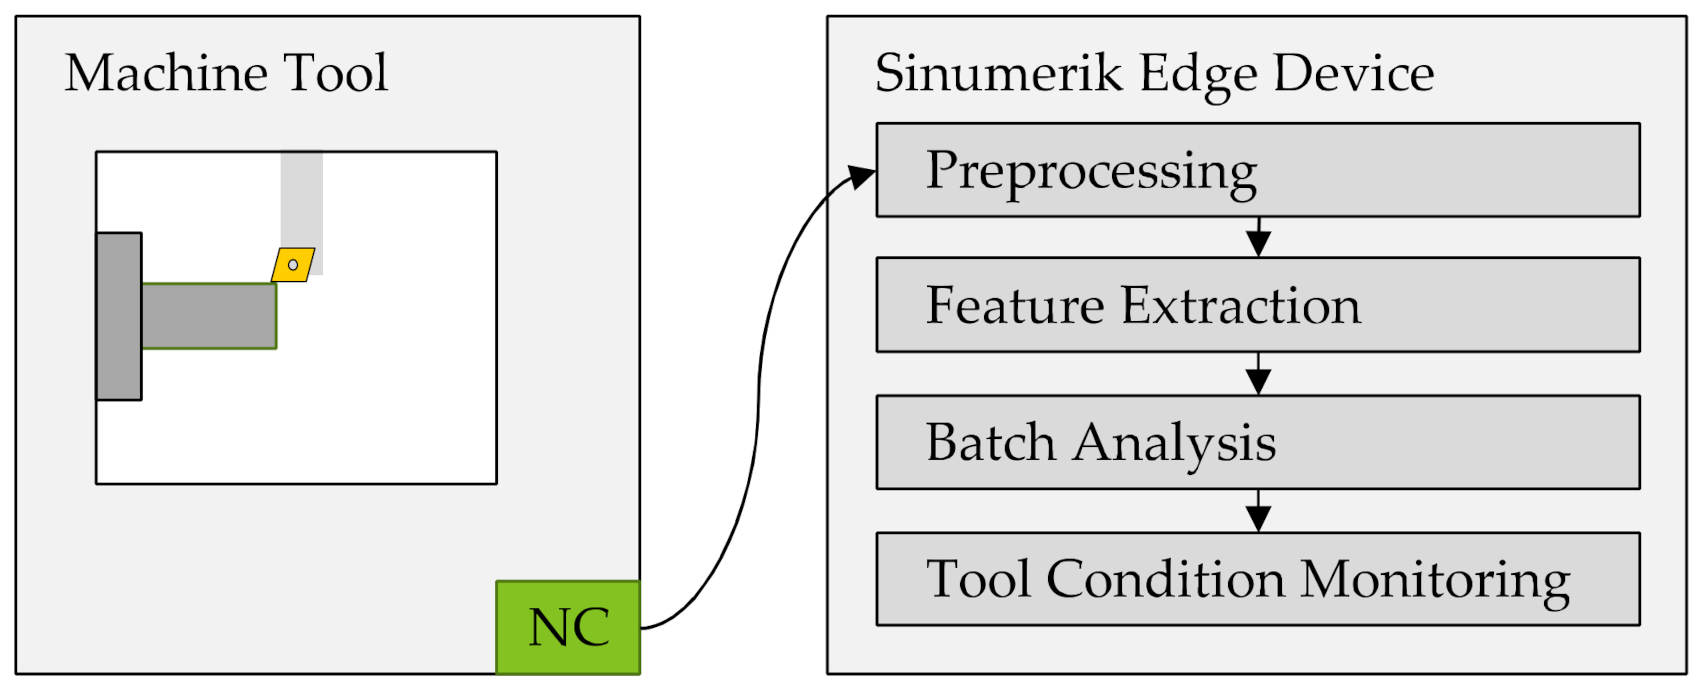
In this section, the proposed method for batch-aware tool condition monitoring is described (see
Figure 1). High-frequency control data are acquired from the machine tool’s numerical control (NC) by a connected edge device. On the edge device, data preprocessing is carried out to reduce the signal impact of cutting conditions. Subsequently, feature extraction is used to aggregate the high-dimensional and high-frequency data into low-dimensional feature vectors. These feature vectors are used for batch analysis, consisting of the identification of clusters of material batches with similar machinability. The influence of the material batch on the signals can hence be considered for the subsequent tool condition monitoring.
2.1. Data Acquisition
In this study, turning processes are investigated. Internal signals such as the position and torque values of all axes are used, as these are typically provided by modern machine tools [
22], thus avoiding the need for additional sensor integration. Specifically, the position and torque values of the main spindle and the feed drives are acquired, with a frequency of 500 Hz. These signals are forwarded to a connected edge device. Furthermore, low-frequency data such as override, the cutting conditions and the machine code are tracked.
2.2. Preprocessing
As an initial data preprocessing step, the continuously acquired machining data need to be referenced to the respective cutting operations under investigation. This is achieved by placing specific lines in the machine code, which indicate the relevant cutting operation. These lines can be read by the edge device, enabling the connection between the machining data and the cutting operations of interest. The individual cuts are identified by analyzing the set values of x- and z-feed drives, so that data that do not correspond to a cutting operation (e.g., tool repositioning) can be eliminated.
Secondly, the absolute position values of all drives are differentiated twice to yield the respective acceleration signals. Thereby, low-frequent vibrations can be observed.
Finally, the spindle torque
Mc is normalized by the part diameter
d, deriving a metric
M’ (see Equation (1)) which correlates with the cutting force.
2.3. Feature Extraction
As the spindle torque and the position signals are only needed for preprocessing, they are not used further for feature extraction. Thus, only the torque of the x- and z-feed drives, the computed normalized spindle torque, and the acceleration signals for the x- and z-feed drives are analyzed.
These are now used to derive features, as shown in
Figure 2. Here, the common statistical features mean and standard deviation are used, as well as sophisticated features such as acceleration impact hardness, acceleration impact spectral centroid, acceleration movement spectral roughness, waviness, spikiness, regularity, friction feature, sound impact hardness, spectral low high ratio, spectral impact centroid and spectral spread. Details regarding these features can be found in [
23]. These features are computed in a sliding window manner. Thus, the segmented signal is not analyzed on its own, but a sliding window of length 1 s is iterated over the signal. For each window, one feature vector is computed. To do this, all available signals are analyzed individually by the various feature computation formulas to derive a single feature
Xi. The set of all computed features is now considered as feature vector
X.
2.4. Clustering
To visualize the features in 2D, the t-distributed stochastic neighbor embedding (t-SNE) method [
24] is used. Thereby, a low-dimensional embedding of high-dimensional data is computed based on similarities, allowing for a 2D visualization of the multidimensional feature vector. Using visual analytics, the resulting scatter plot is investigated for the formation of clusters, which are then related to observed batch effects throughout production.
2.5. Tool Condition Monitoring
With the material batch identified by the clustering procedure, tool condition monitoring can be carried out separately for each cluster. Thereby, it is ensured that signal deviations must originate from a degrading tool condition, as potential material deviations are ruled out in the previous step and all samples belong to the same material batch. In this work, the normalized spindle torque is used as a metric to investigate the degrading tool condition throughout time for each material batch found.
3. Results
3.1. Experimental Procedure
Cutting experiments are conducted in an operational setting of small-sized lot production of shafts using a CNC-lathe with a Sinumerik 840D SL control unit. For data acquisition and logic execution, the Sinumerik Edge edge device is used. The cutting process consists of four roughing operations followed by a single finishing cut. For the roughing operations, a cutting depth ap of 4.5 mm is used, while the finishing cut has an ap of 1.4 mm. In total, 150 cutting sequences are monitored, with each sequence lasting 90 s for all five cuts combined. The data were acquired over two days in total. Due to small tolerance deviations of the raw shape of the workpiece, the exact cutting depth varies for the first roughing operation. Therefore, the first roughing operation as well as the finishing operation with ap of 1.4 mm are discarded, as the cutting conditions differ for these operations. Thereby, the analysis focuses on the three roughing operations with a known and constant cutting depth of 4.5 mm, eliminating potential sources of signal error. Furthermore, the first and last second of each cut is discarded to avoid transient effects.
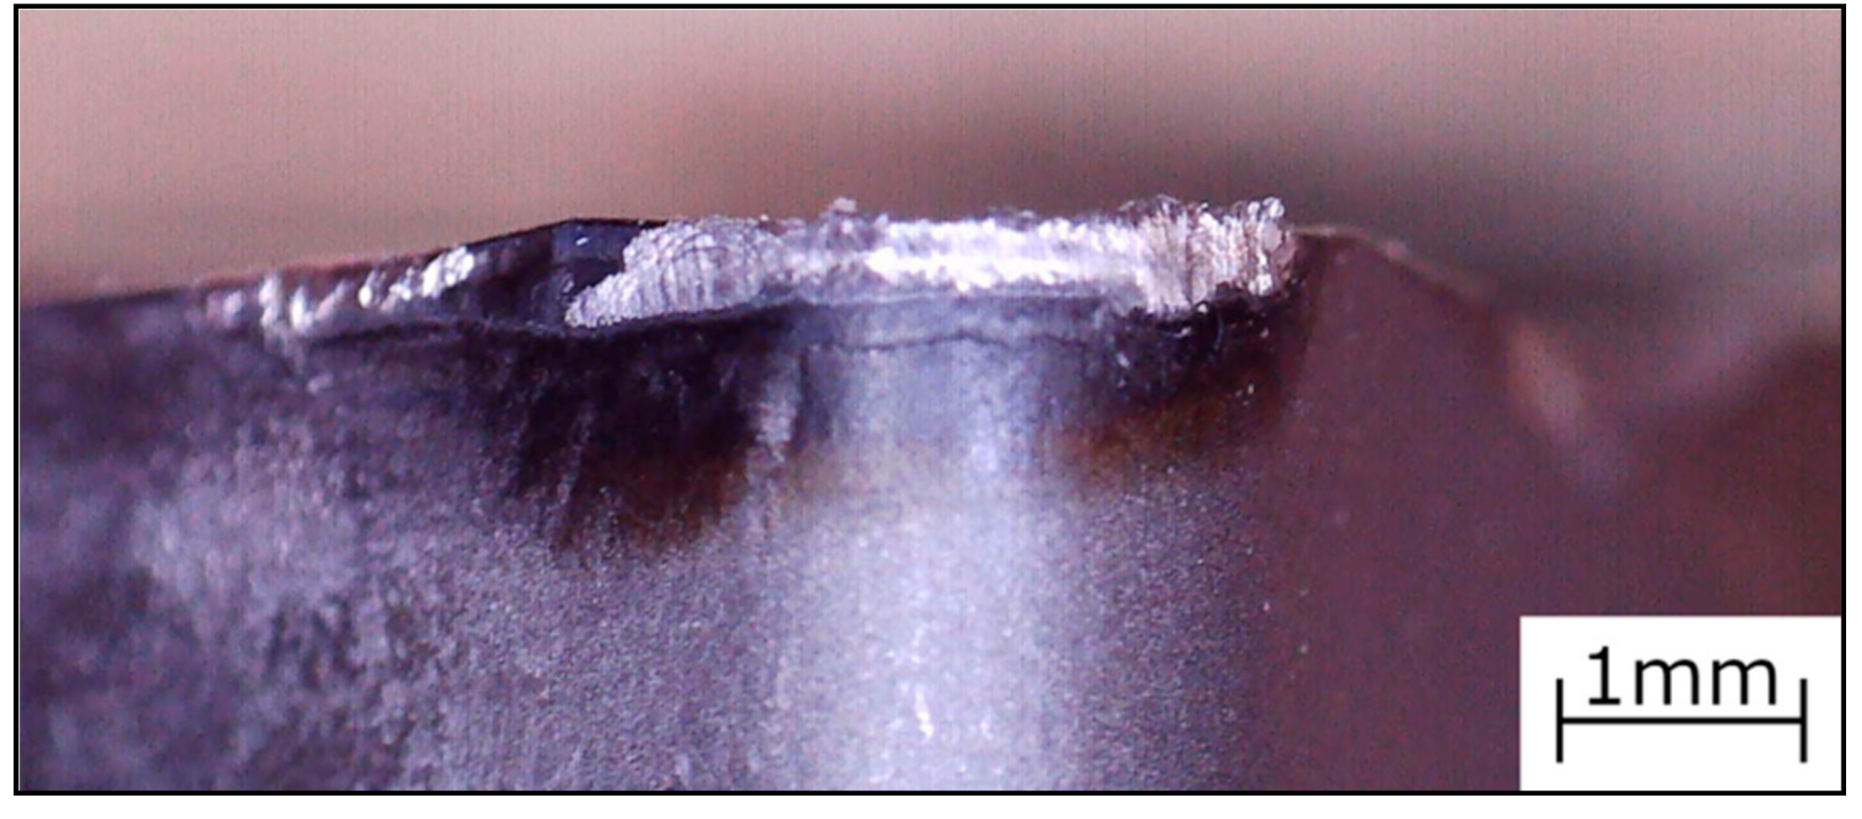
All sequences are carried out under identical conditions. Throughout operation, the used cutting tools experience wear and are exchanged once the operator judges that they reach their end-of-life, with the exchange times being recorded by the operator. The worn-out cutting tool inserts are evaluated using a tool maker’s microscope (see
Figure 3) and the image evaluation procedure proposed in [
25]. Thereby, ground-truth data about the actual tool condition are generated. In total, nine such tool exchanges occurred during the 150 investigated sequences.
3.2. Data Preprocessing
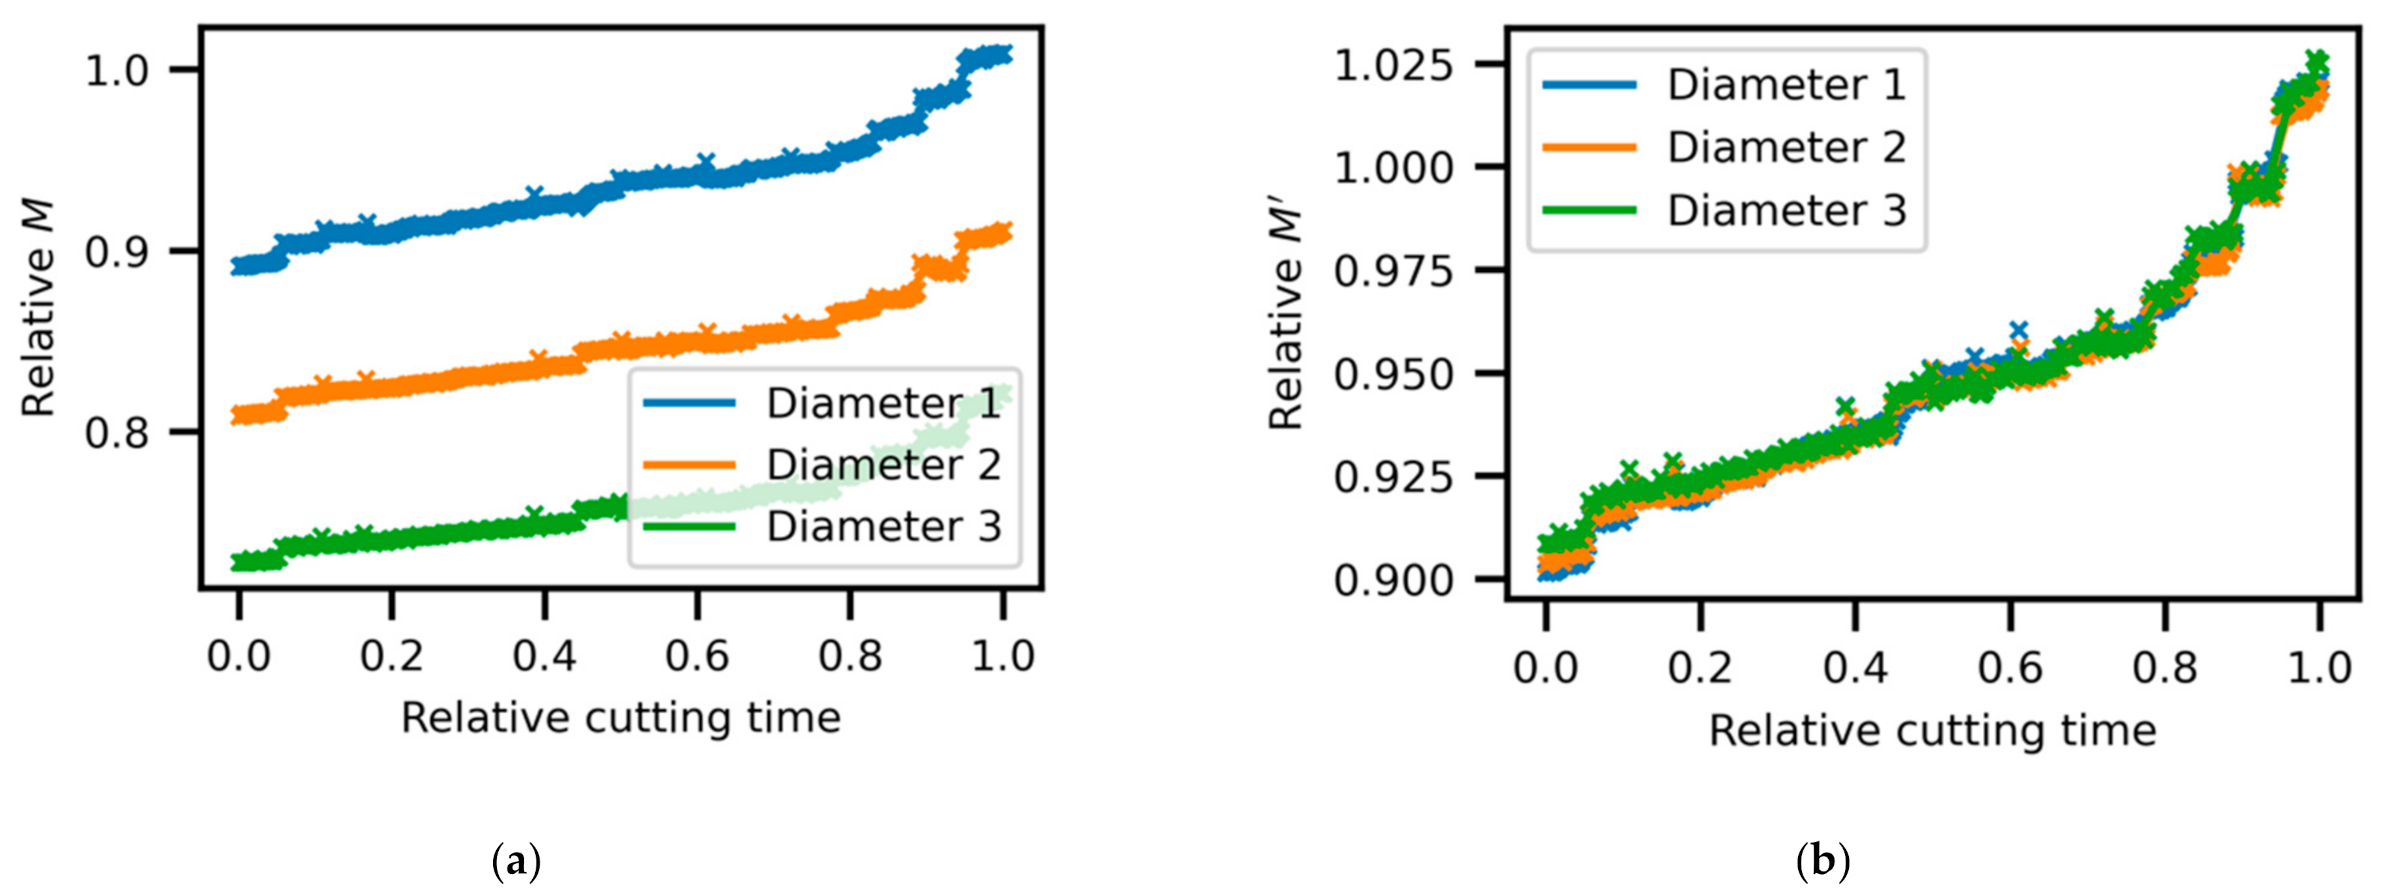
Figure 4a shows typical data for the spindle torque over the lifecycle of one tool, which was used to cut 15 workpieces. Each datapoint corresponds to 1 s of data from the cuts with a cutting depth of 4.5 mm. The torque
Mc is clearly distinguishable for each of the three cuts at different workpiece diameters, but
Figure 4b shows that the normalized spindle torque
M’ falls onto the same curve for all three diameters. This universal behavior confirms the correctness of the data analysis.
The high-frequency data are then aggregated using feature extraction, described in
Section 2.3. For each of the six signals, all features are calculated. Thereby, the data of 162,000 datapoints per sequence can be reduced to 48 feature vectors of 60 features each.
3.3. Clustering
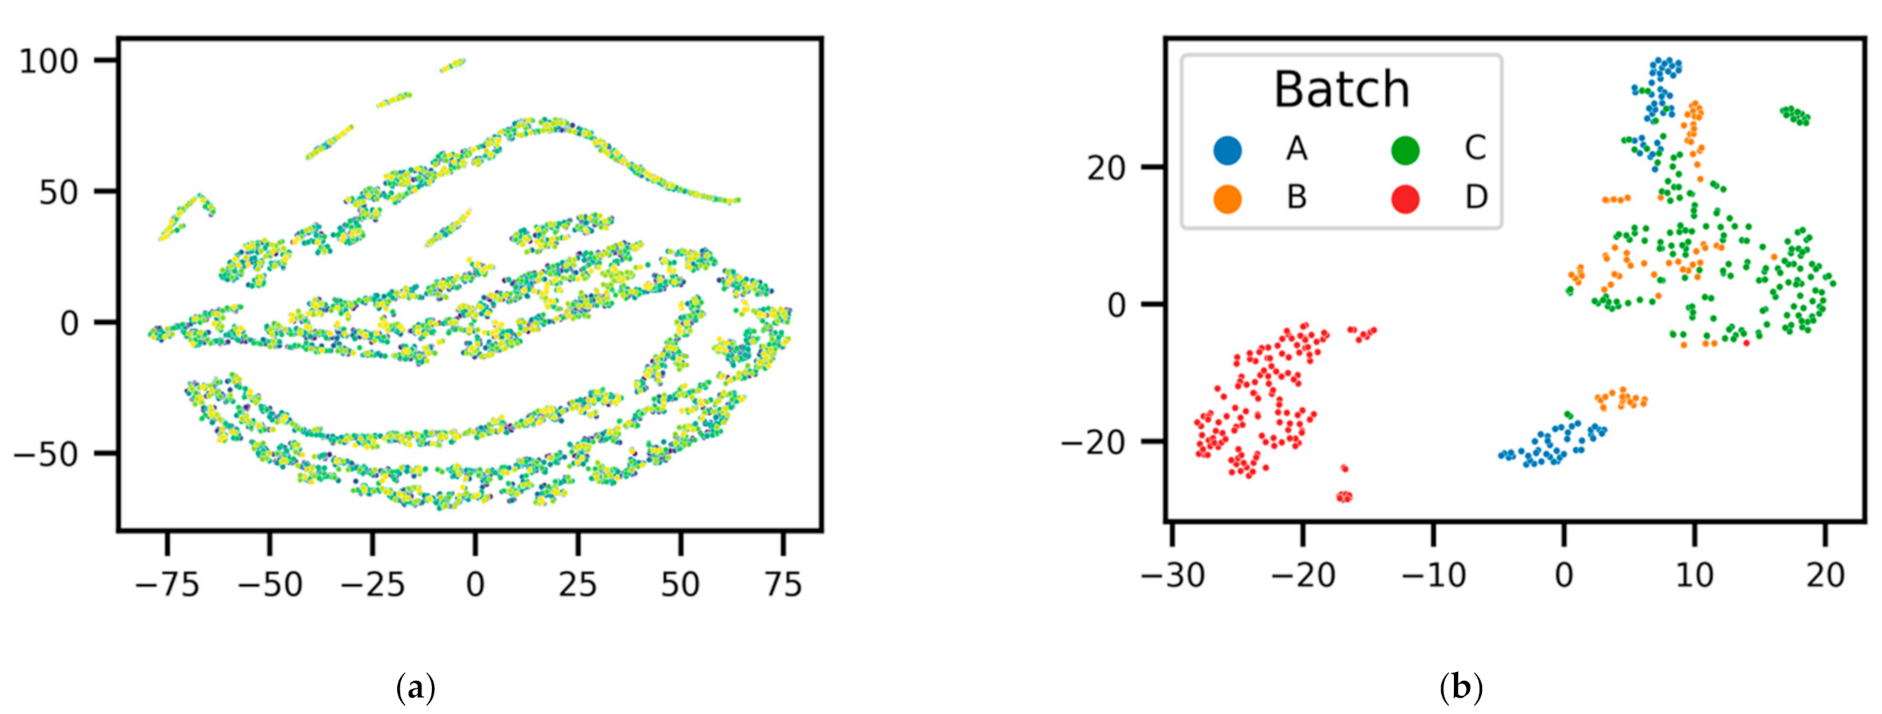
Using these features, a cluster map is computed to investigate potential material batch influences, which can be seen in
Figure 5a. Here, the color gradient represents the time the respective cut was conducted; thus, data from the first experiment are shown in yellow, data from the last experiment in purple, and all remaining cuts in-between. The cluster map shows that no clear clusters with similar colors are forming; thus, it can be assumed that all investigated samples belong to the same material batch. This agrees with ground-truth data acquired from the process planning, as only one lot of material was used during the investigated time. In contrast,
Figure 5b shows the cluster map of the dataset investigated in [
10]. Here, two clusters can be clearly distinguished, which align well with the different machineabilities found in the related study.
3.4. Tool Condition Assessment
Based on the findings so far, it can be assumed that all workpieces are from the same material batch, thus the remaining systematic deviations in signal information must be caused by decreasing tool condition.
Figure 6 shows the normalized spindle torque signal for all experiments with tool change events marked in gray. For all cutting tools, a clear correlation can be seen between the computed spindle torque signal and the decreasing tool condition, indicated by an increasing normalized spindle torque.
Furthermore, the absolute value of tool condition is investigated as well. Tool wear was measured at the insert radius with the image evaluation procedure [
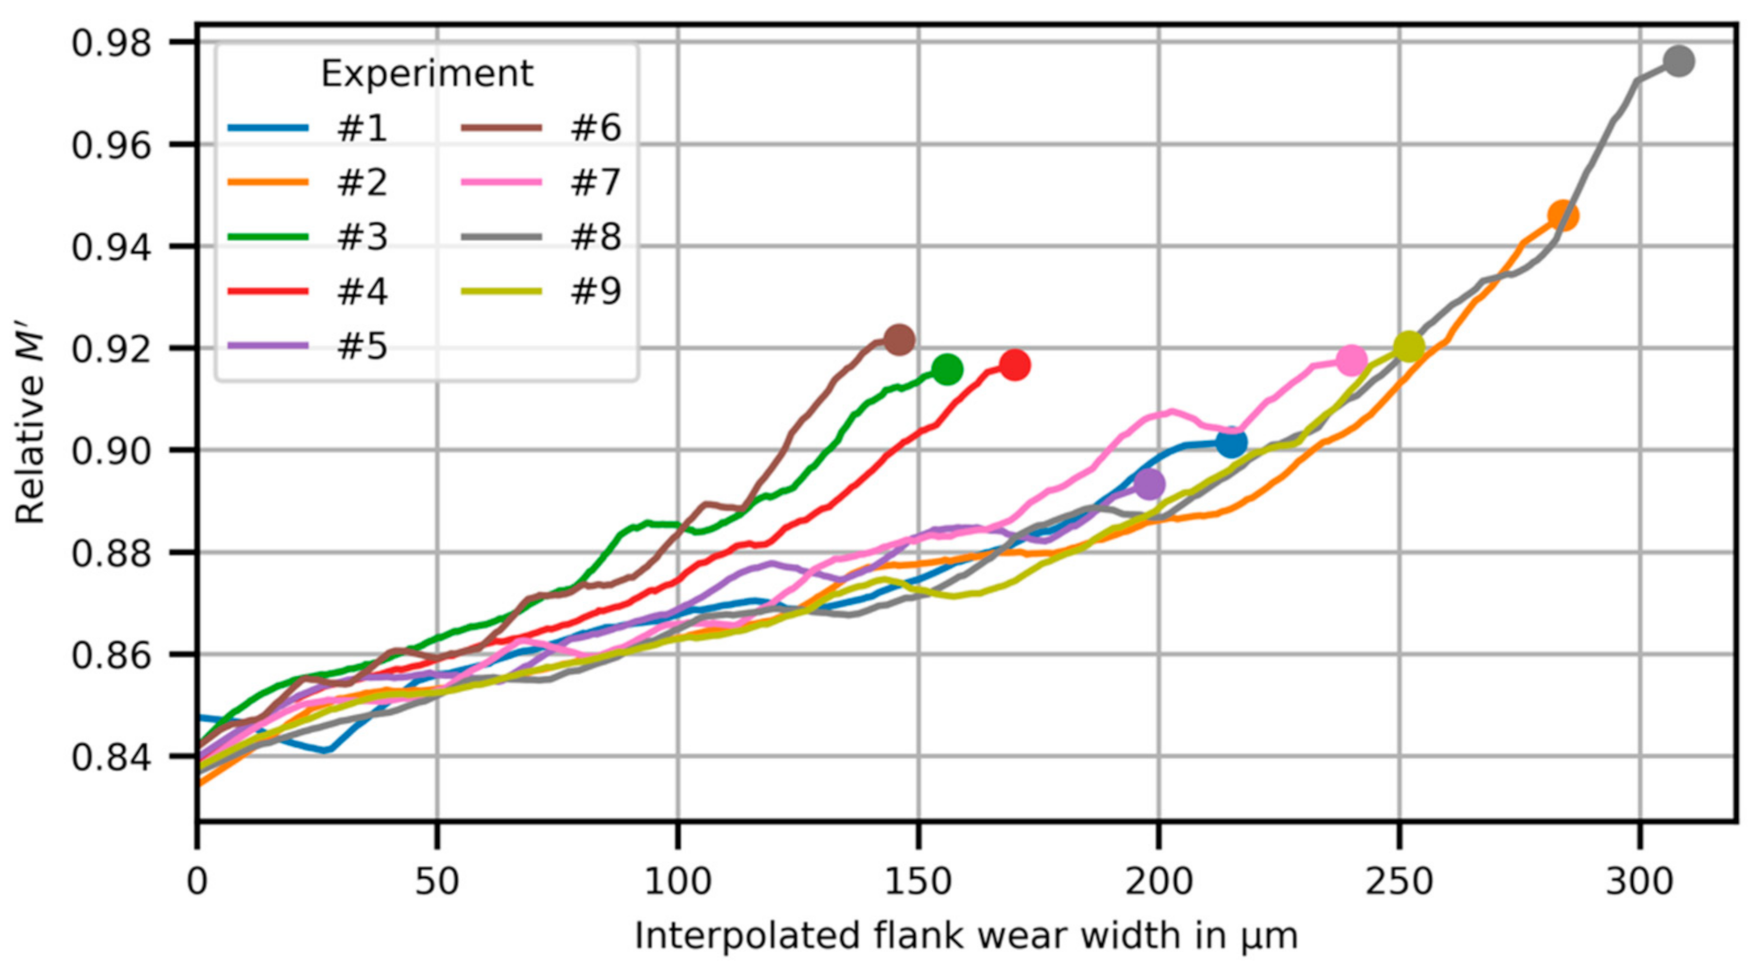
25], yielding the average flank wear width. These values thus represent the ground truth of the wear at the end of each tool’s lifetime and are represented as circles in
Figure 7. Assuming that the wear develops linearly with usage time, the smoothed normalized spindle torque can then be plotted as a function of the interpolated wear (lines in
Figure 7). Experiments #3, #4, and #6 reach their end-of-life rather early with measured flank wear widths in the range 120 µm to 170 µm. However, they show rather high normalized spindle torques, such as experiments #7 and #9, which reach a flank wear width of about 240 µm. The remaining experiments #1, #2, #5, #7, #8, and #9 show varying degrees of tool condition, ranging from 200 µm to 310 µm. However, there seems to be a good correlation between measured normalized spindle torques and interpolated flank wear width, as the trend curves of these experiments align well with each other.
4. Discussion
As shown in
Figure 6, the times at which the cutting tool was changed match perfectly with the times when the derived normalized spindle torque jumps from a high to a low value. Thus, the observed continuous increase in the normalized spindle torque can be explained by increasing tool wear.
Figure 7 shows that in most cases, the maximum normalized spindle torque correlates with the value of the tool wear at the insert radius determined from the image evaluation procedure. Furthermore, under the reasonable assumption that the tool wear develops linearly as a function of usage time,
Figure 7 shows that in most cases, the normalized spindle torque correlates directly with the current state of tool wear. However, in experiments #3, #4, and #6, the tool shows less wear than expected from the computed normalized spindle torque. The reason for this is still under investigation.
Data-driven approaches for TCM rely on the quality of feature extraction, since much of the information which the experienced operator uses today as an indication of the tool wear can hardly be recorded. However, the applied method based on the normalized spindle torque is consistent with the actual operator decision and, hence, represents a promising solution.
It is clear that deeper investigation of the relationship between the final normalized spindle torque and the measured tool wear requires more data, spanning a wider range of final normalized spindle torques and material batches.
5. Summary and Outlook
In this study, the fundamentals for a novel batch-aware tool condition monitoring system are researched. Deviations in machinability among material batches make indirect condition assessment of cutting tools a challenging task. This paper therefore uses a material identification system to identify potential variations in machinability, so that only data from material batches from the same machinability are further analyzed.
Cutting experiments are carried out for a small-sized lot production, yielding high-frequency control data and tool condition data as ground-truth. It is shown that all investigated workpieces in this study belong to the same machinability class, which allows the correlation between NC signal and tool condition to be meaningfully investigated. For each cutting tool used, a clear trend of increased normalized spindle torque with decreasing tool condition is observed. Furthermore, the relations between computed normalized spindle torque and expected tool condition align well for most experiments.
In future research, the image acquisition unit for generating ground-truth data will be integrated into the machine tool, to enable automated data acquisition, and eliminate human error. Furthermore, the relations found between normalized spindle torque signal and tool condition will be verified on a larger dataset and transformed into an automated monitoring solution.
Author Contributions
Conceptualization and methodology, B.L.; validation, B.L. and P.H.; writing—original draft preparation, B.L.; writing—review and editing, P.H., D.R., B.E. and J.F.; supervision, J.F.; funding acquisition, B.E. All authors have read and agreed to the published version of the manuscript.
Funding
The authors gratefully acknowledge the funding support of the OBerA project by the state of Bavaria (Bayerisches Staatsministerium für Wirtschaft, Landesentwicklung und Energie, Grant no. IUK 530/10).
Conflicts of Interest
The authors declare no conflict of interest.
References
- Du, D.; Sun, J.; Yang, S.; Chen, W. An investigation on measurement and evaluation of tool wear based on 3D topography. Int. J. Manuf. Res. 2018, 13, 168–182. [Google Scholar] [CrossRef]
- Lutz, B.; Reisch, R.; Kisskalt, D.; Avci, B.; Regulin, D.; Knoll, A.; Franke, J. Benchmark of Automated Machine Learning with State-of-the-Art Image Segmentation Algorithms for Tool Condition Monitoring. Procedia Manuf. 2020, 51, 215–221. [Google Scholar] [CrossRef]
- Kothuru, A.; Nooka, S.P.; Liu, R. Audio-Based Tool Condition Monitoring in Milling of the Workpiece Material with the Hardness Variation Using Support Vector Machines and Convolutional Neural Networks. J. Manuf. Sci. Eng. 2018, 140. [Google Scholar] [CrossRef]
- Shen, Z.-G.; He, N.; Li, L. An intelligent monitoring system for high-speed milling process. Harbin Gongye Daxue Xuebao J. Harbin Inst. Technol. 2010, 42, 1158–11621167. [Google Scholar] [CrossRef]
- Aghazadeh, F.; Tahan, A.; Thomas, M. Tool condition monitoring using spectral subtraction and convolutional neural networks in milling process. Int. J. Adv. Manuf. Technol. 2018, 98, 3217–3227. [Google Scholar] [CrossRef]
- Tansel, I.N.; Li, M.; Demetgul, M.; Bickraj, K.; Kaya, B.; Ozcelik, B. Detecting chatter and estimating wear from the torque of end milling signals by using Index Based Reasoner (IBR). Int. J. Adv. Manuf. Technol. 2012, 58, 109–118. [Google Scholar] [CrossRef]
- Binsaeid, S.; Asfour, S.; Cho, S.; Onar, A. Machine ensemble approach for simultaneous detection of transient and gradual abnormalities in end milling using multisensor fusion. J. Mater. Process. Technol. 2009, 209, 4728–4738. [Google Scholar] [CrossRef]
- García-Ordás, M.T.; Alegre, E.; González-Castro, V.; Alaiz-Rodríguez, R. A computer vision approach to analyze and classify tool wear level in milling processes using shape descriptors and machine learning techniques. Int. J. Adv. Manuf. Technol. 2017, 90, 1947–1961. [Google Scholar] [CrossRef] [Green Version]
- Dai, Y.; Zhu, K. A machine vision system for micro-milling tool condition monitoring. Precis. Eng. 2018, 52, 183–191. [Google Scholar] [CrossRef]
- Lutz, B.; Kisskalt, D.; Mayr, A.; Regulin, D.; Pantano, M.; Franke, J. In-situ identification of material batches using machine learning for machining operations. J. Intell. Manuf. 2020, 32, 1485–1495. [Google Scholar] [CrossRef]
- Schneider, G. Cutting Tool Applications. Machinability of Metals. In Tooling and Production; Nelson Publishing: Nashville, TN, USA, 2002; Chapter 3; Volume 67, pp. 2–10. [Google Scholar]
- Lutz, B.; Kisskalt, D.; Regulin, D.; Hauser, T.; Franke, J. Material Identification for Smart Manufacturing Systems: A Review. In Proceedings of the 2021 4th IEEE International Conference on Industrial Cyber-Physical Systems (ICPS), Victoria, BC, Canada, 10–12 May 2021; pp. 353–360. [Google Scholar]
- Denkena, B.; Bergmann, B.; Witt, M. Automatic process parameter adaption for a hybrid workpiece during cylindrical operations. Int. J. Adv. Manuf. Technol. 2018, 95, 311–316. [Google Scholar] [CrossRef]
- Denkena, B.; Bergmann, B.; Witt, M. Material identification based on machine-learning algorithms for hybrid workpieces during cylindrical operations. J. Intell. Manuf. 2019, 30, 2449–2456. [Google Scholar] [CrossRef]
- Denkena, B.; Bergmann, B.; Handrup, M.; Witt, M. Material identification during turning by neural network. J. Mach. Eng. 2020, 20, 65–76. [Google Scholar] [CrossRef]
- Neugebauer, R.; Ben-Hanan, U.; Ihlenfeldt, S.; Wabner, M.; Stoll, A. Acoustic emission as a tool for identifying drill position in fiber-reinforced plastic and aluminum stacks. Int. J. Mach. Tools Manuf. 2012, 57, 20–26. [Google Scholar] [CrossRef]
- Pardo, A.; Majeed, M.; Heinemann, R. Process signals characterization to enable adaptive drilling of aerospace stacks. Procedia CIRP 2020, 88, 479–484. [Google Scholar] [CrossRef]
- Prasanth, R.; Prabukarthi, A.; Kumar, M.S.; Krishnaraj, V.; Rajamani, R. Identification of drill position in CFRP/Titanium alloy stacks using acoustic emission signals. In Proceedings of the International Conference on Advances in Materials, Manufacturing and Applications (AMMA 2015), Trichy, India, 9–11 April 2015. [Google Scholar]
- Prabukarthi, A.; Senthilkumar, M.; Krishnaraj, V. Prominence in Understanding the Position of Drill Tool Using Acoustic Emission Signals During Drilling of CFRP/Ti6Al4V Stacks. In Applications and Techniques for Experimental Stress Analysis; IGI Global: Hershey, PA, USA, 2020; pp. 214–230. [Google Scholar]
- Kramer, N. In-Process Identification of Material-Properties by Acoustic Emission Signals. CIRP Ann. 2007, 56, 331–334. [Google Scholar] [CrossRef]
- Lin, Y.; Chen, D.; Liang, S.; Xu, Z.; Qiu, Y.; Zhang, J.; Liu, X. Color Classification of Wooden Boards Based on Machine Vision and the Clustering Algorithm. Appl. Sci. 2020, 10, 6816. [Google Scholar] [CrossRef]
- Tong, X.; Liu, Q.; Pi, S.; Xiao, Y. Real-time machining data application and service based on IMT digital twin. J. Intell. Manuf. 2019, 31, 1113–1132. [Google Scholar] [CrossRef]
- Strese, M.; Schuwerk, C.; Iepure, A.; Steinbach, E. Multimodal Feature-Based Surface Material Classification. IEEE Trans. Haptics 2017, 10, 226–239. [Google Scholar] [CrossRef] [PubMed]
- van der Maaten, L.J.P.; Hinton, G.E. Visualizing Data Using t-SNE. J. Mach. Learn. Res. 2008, 9, 2579–2605. [Google Scholar]
- Lutz, B.; Kisskalt, D.; Regulin, D.; Reisch, R.; Schiffler, A.; Franke, J. Evaluation of Deep Learning for Semantic Image Segmentation in Tool Condition Monitoring. In Proceedings of the 2019 18th IEEE International Conference on Machine Learning and Applications (ICMLA), Boca Raton, FL, USA, 16–19 December 2019; pp. 2008–2013. [Google Scholar]
| Publisher’s Note: MDPI stays neutral with regard to jurisdictional claims in published maps and institutional affiliations. |
© 2021 by the authors. Licensee MDPI, Basel, Switzerland. This article is an open access article distributed under the terms and conditions of the Creative Commons Attribution (CC BY) license (https://creativecommons.org/licenses/by/4.0/).
