Review

A Review of Post-Processing Technologies in Additive Manufacturing

1
Shanghai Engineering Research Center of Ultra-Precision Optical Manufacturing, School of Information Science and Technology, Fudan University, Shanghai 200435, China
2
Department of Mechanical Engineering, National University of Singapore, 9 Engineering Drive 1, Singapore 117575, Singapore
*
Authors to whom correspondence should be addressed.
J. Manuf. Mater. Process. 2021, 5(2), 38; https://doi.org/10.3390/jmmp5020038
Submission received: 15 March 2021 / Revised: 11 April 2021 / Accepted: 12 April 2021 / Published: 18 April 2021
(This article belongs to the Special Issue Metal Additive Manufacturing and Its Post Processing Techniques)

Abstract

:
Additive manufacturing (AM) technology has rapidly evolved with research advances related to AM processes, materials, and designs. The advantages of AM over conventional techniques include an augmented capability to produce parts with complex geometries, operational flexibility, and reduced production time. However, AM processes also face critical issues, such as poor surface quality and inadequate mechanical properties. Therefore, several post-processing technologies are applied to improve the surface quality of the additively manufactured parts. This work aims to document post-processing technologies and their applications concerning different AM processes. Various types of post-process treatments are reviewed and their integrations with AM process are discussed.

1. Introduction

Additive manufacturing (AM) technology, also known as 3D printing technology, freeform fabrication, or rapid prototyping, constructs 3D parts by joining materials layer-by-layer based on digital models [1,2,3,4,5,6,7,8,9]. AM technology has undergone a fundamental change in the manufacturing principle, raw material form, and component performance in comparison with the traditional manufacturing processes [10,11,12,13]. Based on the process characteristics of point-by-point melting and layer-by-layer manufacturing, the AM technology can quickly produce three-dimensional complex structural parts [14,15,16]. The non-equilibrium solidification process can potentially be adjusted to tailor materials with desired properties to suit specific applications.
The AM technology has many advantages such as fast free molding, short manufacturing cycle, and low production costs of small-batch parts [17,18,19,20]. The AM technology only needs raw materials and equipment to produce parts without the need for complex tooling or molds, effectively saving the processing and assembly time. Moreover, the AM technology possesses the benefits of near-net-shape forming, small machining allowance, and high material utilization [21,22,23,24,25,26]. The laser beam energy density is high enough to process many kinds of materials [27,28]. Lasers have characteristics of good dryness, monochrome, direction, and high brightness. Its high energy density can effectively raise the local temperature to thousands of degrees, at which the vast majority of metals can be melted. The structural strength of the manufactured parts is higher, and the process-induced stress concentration is smaller [29,30,31,32]. The layer-by-layer forming technology used in the manufacture of the material releases the forming stress when each layer condenses into its final form. Certainly, there are many other advantages of AM technology, such as the ability to achieve a variety of multi-material composite manufacturing [33,34,35], high processing efficiency, and fabrication of various complex structures [36,37,38,39,40,41,42,43,44].
However, when compared with other traditional manufacturing technologies, the surface quality of AM parts is commonly lower because of the layer-by-layer processing and the staircase effect. The surface finish of the part is not satisfactory, a critical issue to be resolved in AM processes [45,46]. Different AM processes will result in different surface roughness. Therefore, AM technology alone cannot manufacture parts meeting the requirements of mechanical properties and surface roughness at the same time [47,48]. Usually, an insufficient understanding of process dynamics is the most influential factor in various challenges. For example, in the selective laser melting (SLM) processes, the interaction mechanisms between the powder bed and the molten pool and between the powder and the laser beam, as well as the melting processes are difficult to understand due to the complicated metallurgical and thermophysical phenomena. In the SLM process, it is necessary to evaluate the strong bonding force in processing areas and the rapid solidification phenomenon under an ultra-high temperature gradient. The evolution of the internal structure of the parts and the change of thermal stress under cyclic conditions also require further exploration. During the manufacturing processes, internal defects such as balling, porosity, cracks, powder agglomeration, and thermal stress would appear between different printing layers. These defects have serious influences on the internal microstructure and mechanics of the final parts [49,50,51,52,53,54,55]. Therefore, after the parts being manufactured, post-processing operations are usually required to improve the mechanical properties and the surface quality, achieving their intended utilization [56,57,58,59,60,61,62]. There have many post-processing technologies, such as the thermal post-processing method to release thermally-induced residual stress and laser peening to reduce micro-defects and improve surface quality. This article reviews widely used post-processing technologies, including thermal post-processing, laser peening, laser polishing, machining, and abrasive finishing.
This paper describes post-processing technologies by introducing the procedures of different post-processing methods and their effects on additively manufactured parts. Section 2 summarizes the thermal post-processing method and its applications. Section 3 discusses the laser peening method and its applications. Section 4 illustrates the laser polishing method and its applications. Section 5 summarizes the machining and abrasive finishing method and its applications. Finally, Section 6 presents the future prospects and conclusions of post-processing technologies.

2. Thermal Post-Processing

The thermal post-processing method for the AM parts can significantly alleviate residual stresses, reduce cracking and homogenize the microstructure [63,64,65,66]. For example, thermal post-processing such as solution heat treatment (SHT), hot isostatic pressing (HIP), and T6 heat treatment (T6 HT) for AlSi10Mg parts can significantly improve part quality. Recently, researchers have conducted extensive research on the thermal post-processing method, including its influences on the microstructure and mechanical properties of the AM parts [67,68,69,70,71,72]. HIP is a frequently used thermomechanical treatment method, which combines high-temperature and high-pressure production technology. Its heating temperature usually reaches 1000–2000 °C. High-pressure inert gas is employed as the pressure medium in a closed container, where the working pressure can reach 200 MPa. The manufactured parts are pressed evenly in all directions with high temperature and pressure. Therefore, the manufactured parts have high density, good uniformity, and excellent performance. HIP has the characteristics of short production cycle, low energy consumption, maximizing material utilization by improving material properties and allowing for smaller, lighter-weight, high strength parts. The HIP can heal or eliminate the inherent defects and pores in the parts produced by powder bed fusion (PBF) [73,74].
Several investigations have shown that HIP can significantly strengthen the fatigue strength of Ti-6Al-4V prepared by electron beam melting (EBM) [70,73,74]. This improvement is due to the reduction of crack initiation points in the material. The mechanical properties of the EBM products have been optimized by HIP processes. The excellent mechanical properties can be achieved with the HIP treatment because of the reduction in porosity and un-melted material, as well as the coarsening of microstructure during the high operating temperature of the HIP process. The reduction of un-melted material after the HIP process can be achieved with a low proportion of subsequent material transfer and plastic flow under a low-pressure environment.
Goel et al. [75] investigated the effects of two different post-processing treatments: one involving the HIP and the other involving the combined HIP + HT treatments on 718 Alloy prepared by EBM. HIP was mainly used for post-processing the AM parts to eliminate defects. The defects in EBM 718 Alloy include shrinkage porosity and incomplete fusion, which can be observed in Figure 1a. Gas porosity is caused by the gas infiltrated inside powders during the production process, which is represented by a two-dimensional circular shape [76]. Shrinkage porosity is observed between dendrite structures after solidification and appears aligned along the build direction. Additionally, it is worth noting that shrinkage porosity and liquefaction cracking are different. Liquefaction cracking is usually observed during welding because it is related to the existence of the secondary phases [77]. Shrinkage is the most critical factor affecting the total defect content of finished materials [77]. The lack of fusion defect is caused by incomplete fusion between the melted layers, typically in a 2D elliptical form, with the principal axis perpendicular to the manufacturing direction [76]. Only a few lack-of-fusion defects can be observed in the materials processed by EBM. The two post-processing methods, HIP and HIP + HT, both lead to a significant reduction in defects by an order of magnitude, which in turn makes the part almost completely densified, as shown in Figure 1b. Obviously, different mechanisms are responsible for closing defects during HIP, such as creep and diffusion [77]. According to previous research, these defects may be mainly filling pores [73], except for any surface defects that cannot be compacted by the HIP treatment.
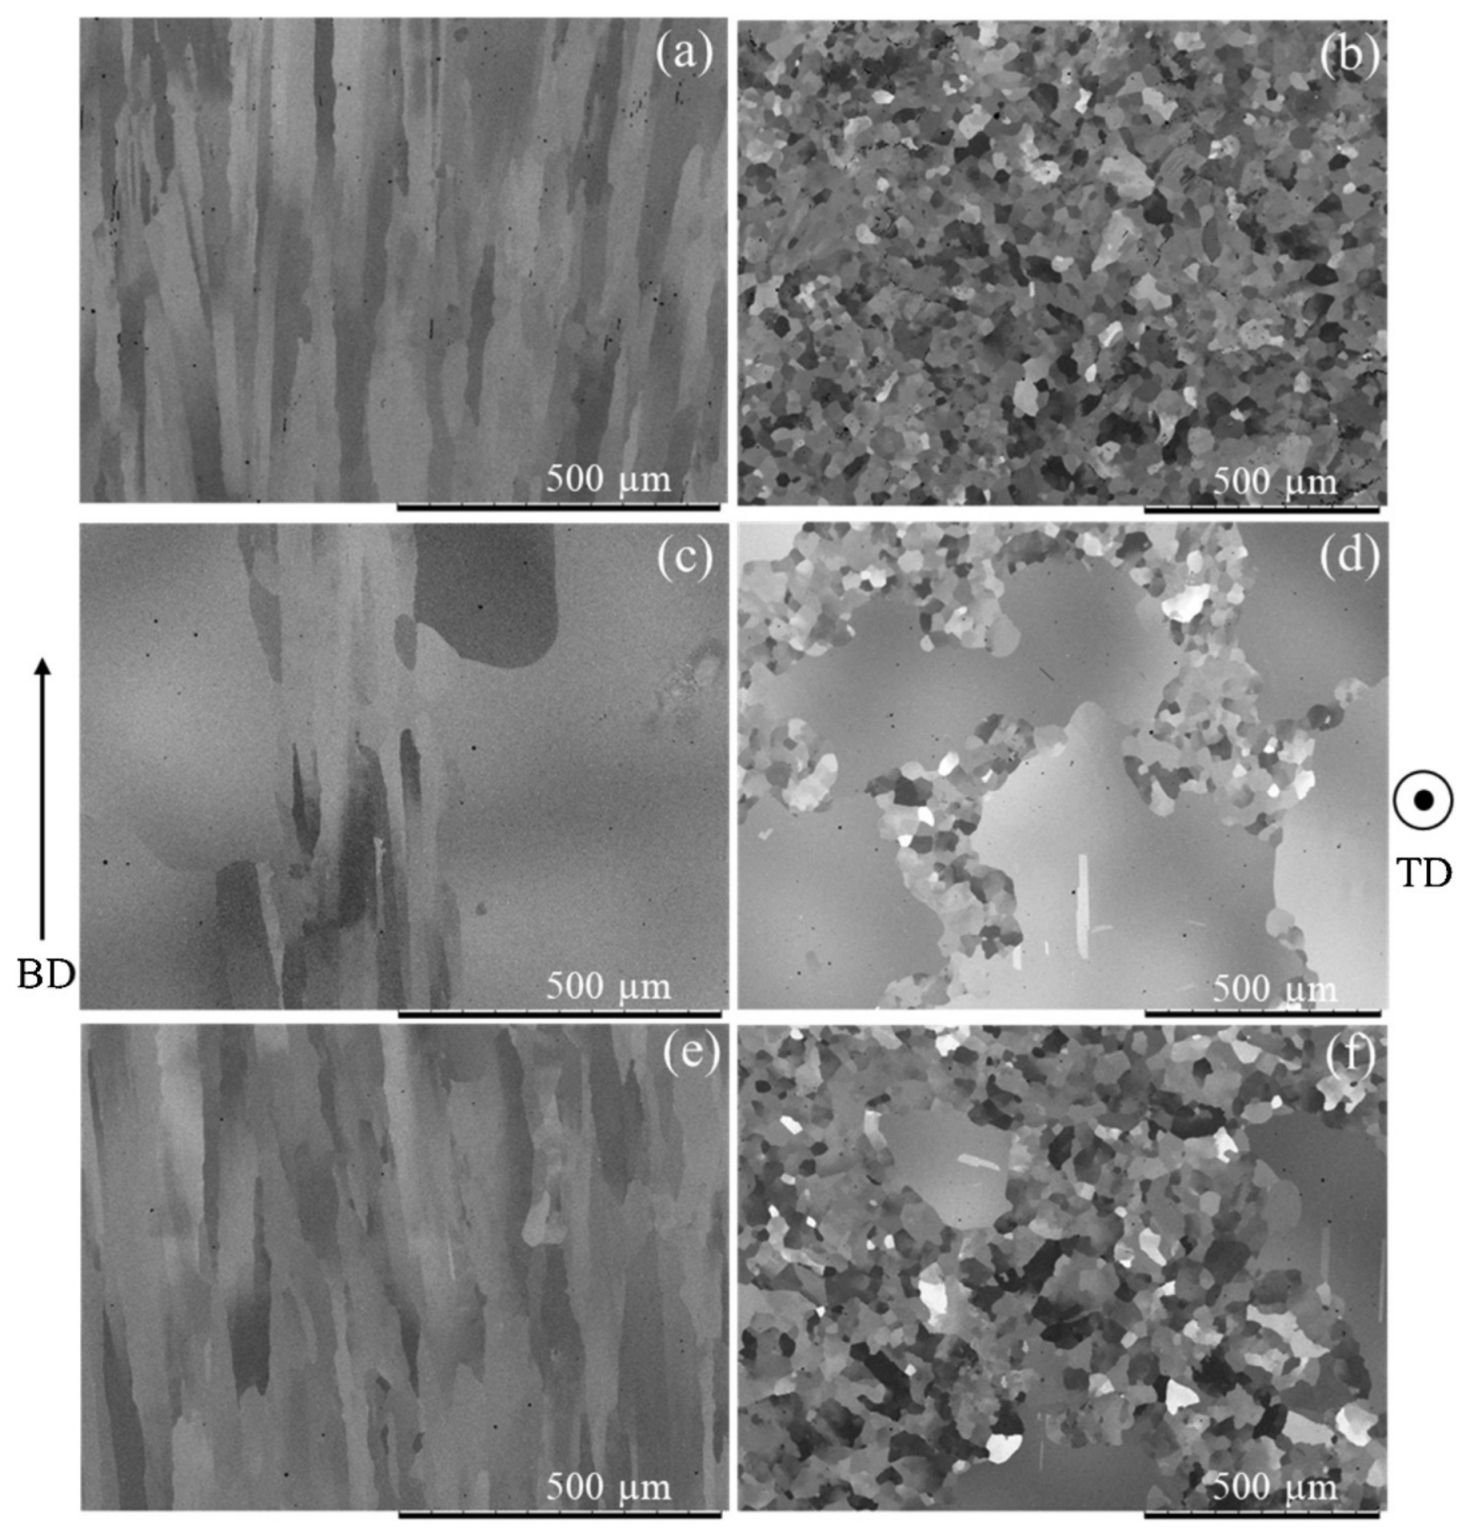
Figure 2 presents the scanning electron microscopy (SEM) micrographs with different post-processing treatments. As shown in Figure 2c,e, the columnar grain structure remains unchanged after the two post-treatments. As the grain length in the finished material may be in millimeters and cannot be fully captured in SEM micrographs as shown in Figure 2a, the grain width is regarded as a grain growth indicator after post-processing as presented in Figure 2b [78]. The transverse micrograph illustrates that the grains grow significantly after HIP treatment at 1200 °C (Figure 2d). The micrograph is like the common “necklace” microstructure of the 718 Alloy during dynamic or even static recrystallization [79]. The EBM-built Alloy 718 material was not strained and a driving force for either static or dynamic recrystallization was absent. Therefore, the abnormal grain growth observed is because of the uneven distribution of pinned particles at low and medium density grain boundaries. The enlarged grains are columnar. The evaluation of the mechanical properties of this microstructure deserves a separate detailed study.
Leon et al. [80] utilized a slow strain-rate testing (SSRT) analysis and electrochemical measurements to study the influence of HIP on the corrosion performance of EBM Ti-6Al-4V. Figure 3 presents the macrostructure and microstructure of the as-built and HIP treated EBM samples in longitudinal and cross-sections. The two samples showed a typical columnar microstructure of AM Ti-6Al-4V by the epitaxial growth characteristics of parent β grains [81]. As represented in Figure 3a,b, the macrostructure of the as-built part is relatively finer and more heterogeneous than the macrostructure of the HIP sample. Additionally, after electron beam thermal post-processing, the columnar structure remained unchanged. The microstructure of the finished sample in Figure 3c shows the existence of three phases as follows: discontinuous α-grain boundary, fine Widmanstätten α and primary α, which are likely nucleated at the previous β-grain boundary because of the rapid cooling conditions [82]. The relative expansion of Widmanstätten structure and the wider α-lath obtained in HIP samples are associated with the increase in diffusion-controlled transition shown by the thermally induced coarsening of α-lath [83]. Bagherifard et al. [84] investigated the influences on microstructural, physical, and mechanical properties of AlSi10Mg specimens by utilizing mechanical and thermal post-processing. The results showed that an appropriate post-processing method can significantly enhance the fatigue strength of manufactured parts. Butler et al. [85] studied the thermal conductivity of AM AlSi10Mg alloy by comparing the as-manufactured and thermal post-processed parts. The results demonstrated that the thermal conductivity can be significantly increased after thermal post-processing.
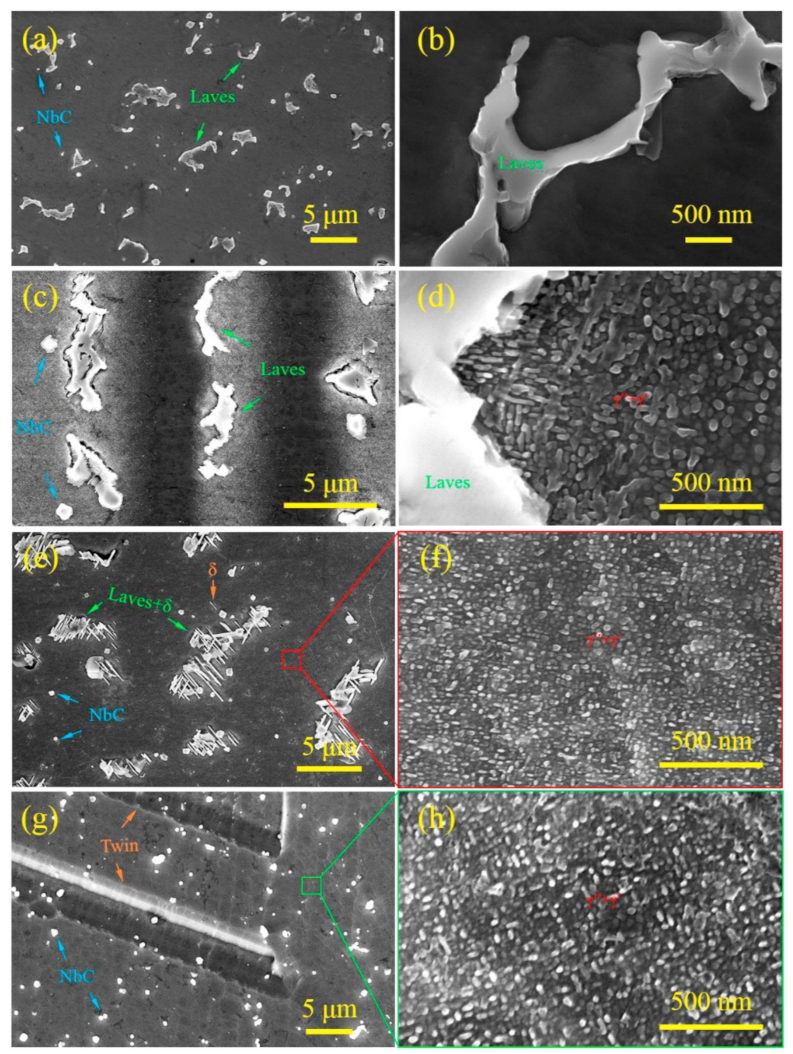
Generally, the laser-based directed energy deposition (DED) can process parts with tiny amounts of porosity when compared with the laser-based PBF method [86]. Moreover, there is also a remarkable difference between their parts after thermal post-processing, including elastic modulus, elongation, and yield strength [87]. Yu et al. [88] investigated the effects of thermal post-processing on the room-temperature fracture toughness and microstructure of parts manufactured by laser-based DED technology. The detailed microstructure characterization was executed on as-manufactured and thermally post-processed parts utilizing direct aging, solution treatment plus aging, and homogenization plus solution treatment plus aging. As presented in Figure 4, the as-processed parts mainly consist of γ columnar dendrites with a small amount of (γ + Laves) eutectic in the inter-dendritic region. There are heterogeneous γ″/γ′ precipitates around Laves phase with the direct aging thermal post-processing. The short needle-like δ-phase precipitates around/inside Laves phase, the micro-segregation decreases, and the distribution of γ″/γ′ phase in the dendrite arm is basically uniform with the solution treatment plus aging thermal post-processing. After homogenization plus solution treatment plus aging thermal post-processing, the Laves phase almost disappeared, micro-segregation completely eliminated, and γ″/γ′ precipitates distributed in bimodal recrystallized grains. All these phenomena illustrate that thermal post-processing has positive effects on the laser-based DED parts. Careri et al. [89] studied the influences on the residual stresses, microstructure, microhardness, and surface finish of the DED manufactured parts by using two post-processing methods, including thermal post-processing and machining. The results showed that the strategy of DED manufacturing process followed by machining process presents the best machinability conditions because of the higher ductility of the material in relation to the absence of the strengthening phase. The high surface hardness and low surface roughness can also been observed. The strategy of manufacturing process followed by the machining process followed by double-aging heat treatment was demonstrated to be better as the parts was machined before the double-aged treatment providing improved machinability and taking advantages of the higher ductility of the material.

3. Laser Peening

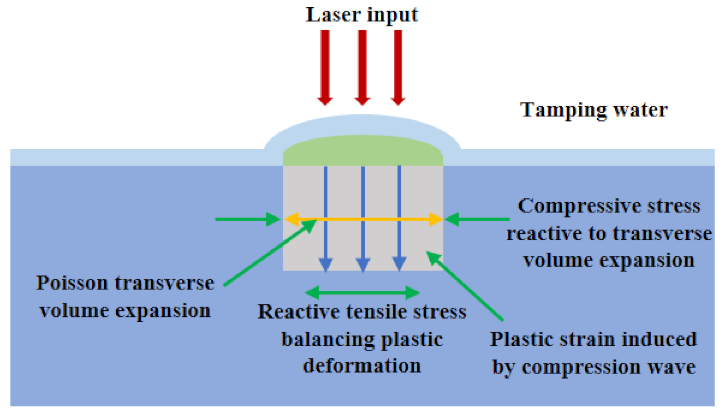
Laser peening is a process of plastic compression of material perpendicular to the surface, resulting in lateral expansions. When laser peening is performed on thick or constrained parts, the ability to resist transverse strain leads to the accumulation of local compressive stresses [90,91]. For thinner parts, laser peening causes changes in strain and shape. Similar effects are also caused by other compressive surface treatments, which include deep cold rolling and ultrasonic peening. Figure 5 shows the principle of laser shot peening. It is worth noting that the concepts of lateral expansion and plastic compression are common in all deformation-based post-processing treatments.
Laser peening is widely utilized to improve the fatigue life of compressor blades and jet engine fans, most recently in nuclear-spent fuel storage tanks and aircraft structures [90]. Laser peening technology has also been applied to improve the surface properties of processed maraging steels [92,93,94], as well as bend and stretch the thick sections of aircraft fenders to provide accurate aerodynamic models. In the laser peening processes, the short intense laser pulse generates plasma in the confined geometry and thereby produces pressure pulses, causing local plastic deformations. The generated pressure can be increased by using a water compactor, thus making the process more effective [90]. The existing residual compressive stress, the expected strain, and microstructure, as well as the modification of stress state and/or shape in the component can be modeled point by point accurately according to the material and geometry.
The first research on laser peening was conducted by Fairand et al. [95] in 1972. They investigated the influence of laser shock waves on the microstructure of 7075 aluminum alloy and reported the material depth dislocations caused by low-pressure shock waves. Since then, low pressure-induced residual stresses and their influences on fatigue life and the stress corrosion behavior of all kinds of metals such as titanium alloy [96], aluminum alloy [97], steel [98], and nickel base superalloy [99] have been investigated. Many researchers also have studied the process parameters and the laser peening technology that affect the mechanical properties, fatigue life, and residual stresses of Al 6061-T6 [100,101,102].
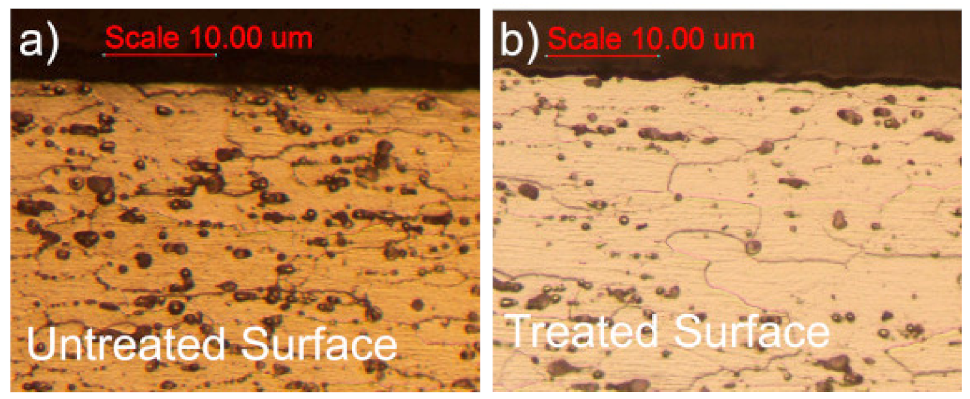
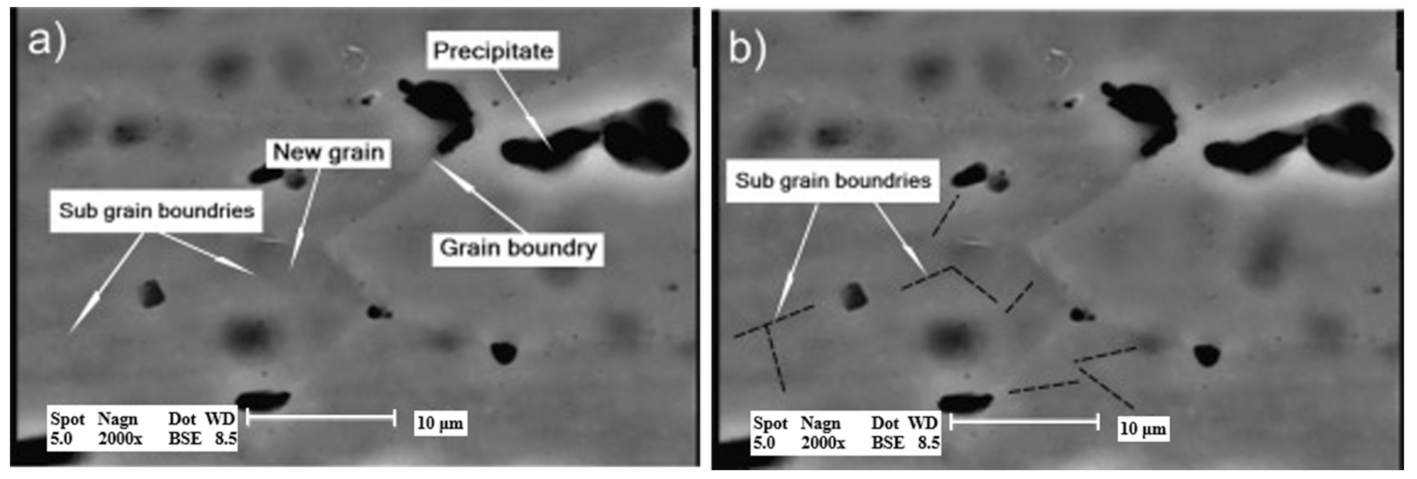
Salimianrizi et al. [103] analyzed the effect of laser peening on Al 6061-T6. The microstructure depicted shows the oriented grains and precipitates produced by the rolling operation in the aluminum plate production process. As shown in Figure 6a, the upper surface of the sample is a smooth straight line, indicating the significant effect of polishing before laser peening operations. Figure 6b represents a sample image of a single laser peening with 50% overlap. Obviously, the micrograph presents an uneven surface, which may be associated with plastic deformations during laser peening, despite the application of sacrificial confinement layers. The formation of new grain boundaries after laser peening and the decrease in grain sizes were reported in Refs [104,105]. However, the results obtained from optical microscopy could not prove this phenomenon. Therefore, the SEM images are presented in Figure 7. In Figure 7a, precipitates and grain boundaries can be identified effectively. The images imply the formation of newly developed regions and their boundaries, though they are not easy to identify. Figure 7b adds dashed lines to clearly display new boundaries. The sub-grains can be observed more accurately by electron backscatter diffraction (EBSD) or transmission electron microscopy (TEM) analysis. Similar grain refinement observations are also documented in [51]. As the laser peening process is completed, it is expected that the grain refinement degree of the lower surface of the sample can reach tens of microns on the upper surface [106]. This grain refinement can be interpreted as a consequence of continuous dynamic recrystallization at a high strain rate in the laser peening process [104]. The results showed that the laser peening method can effectively induce the compressive residual stress of Al 6061-T6.
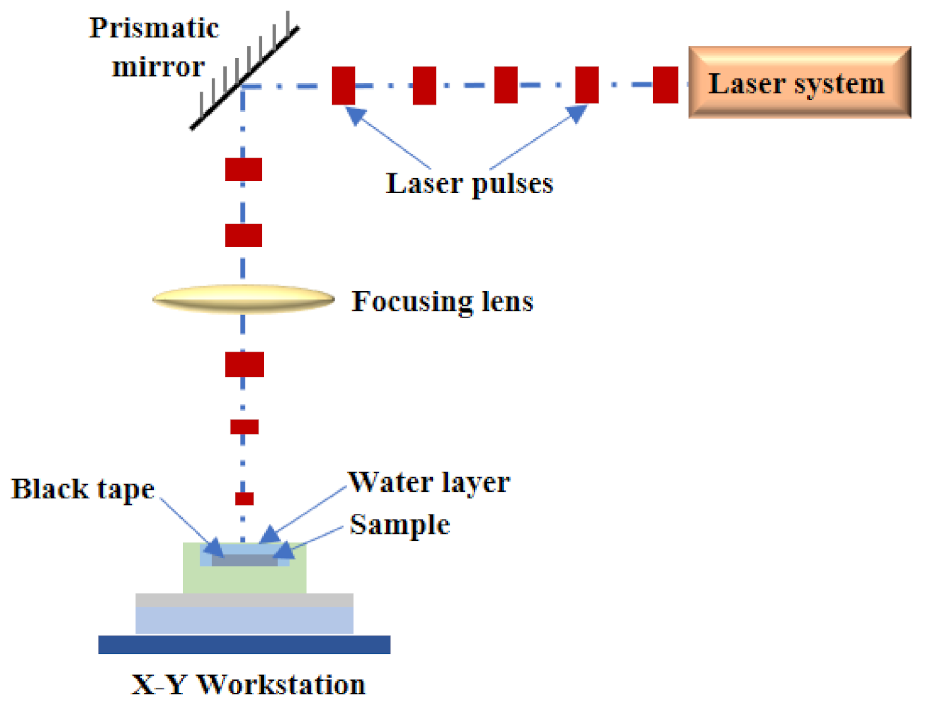
Jinoop et al. [107] reported the laser peening of an Inconel 718 Alloy processed by a PBF process, and the parameters were studied with different laser peening number and peak laser power at three different instances. A schematic diagram of the laser peening device used in this study is presented in Figure 8. A pulsed Nd: YAG laser beam is emitted and deflected downwards at 90° through a prism lens. An XY table is used to control the movement of the sample in two directions, while a 500 mm focusing lens is equipped behind the prism lens to converge the beam to the surface of the sample.
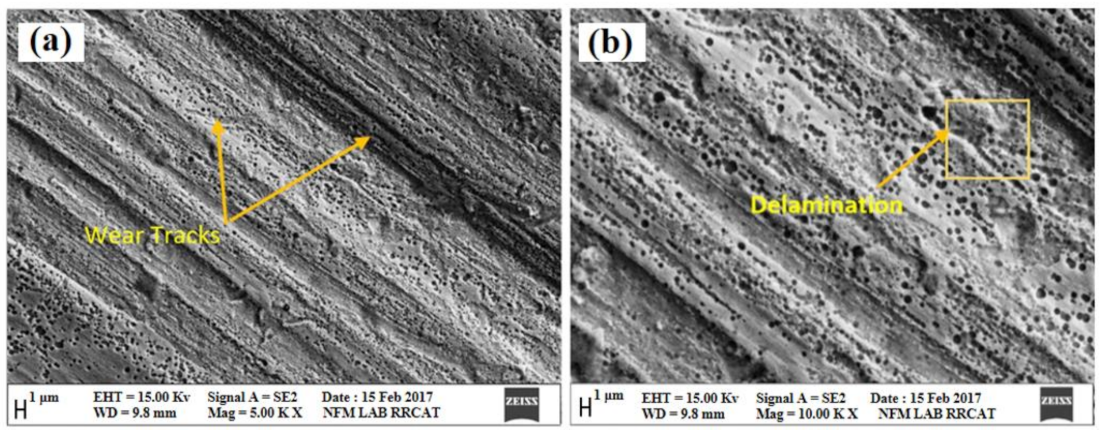
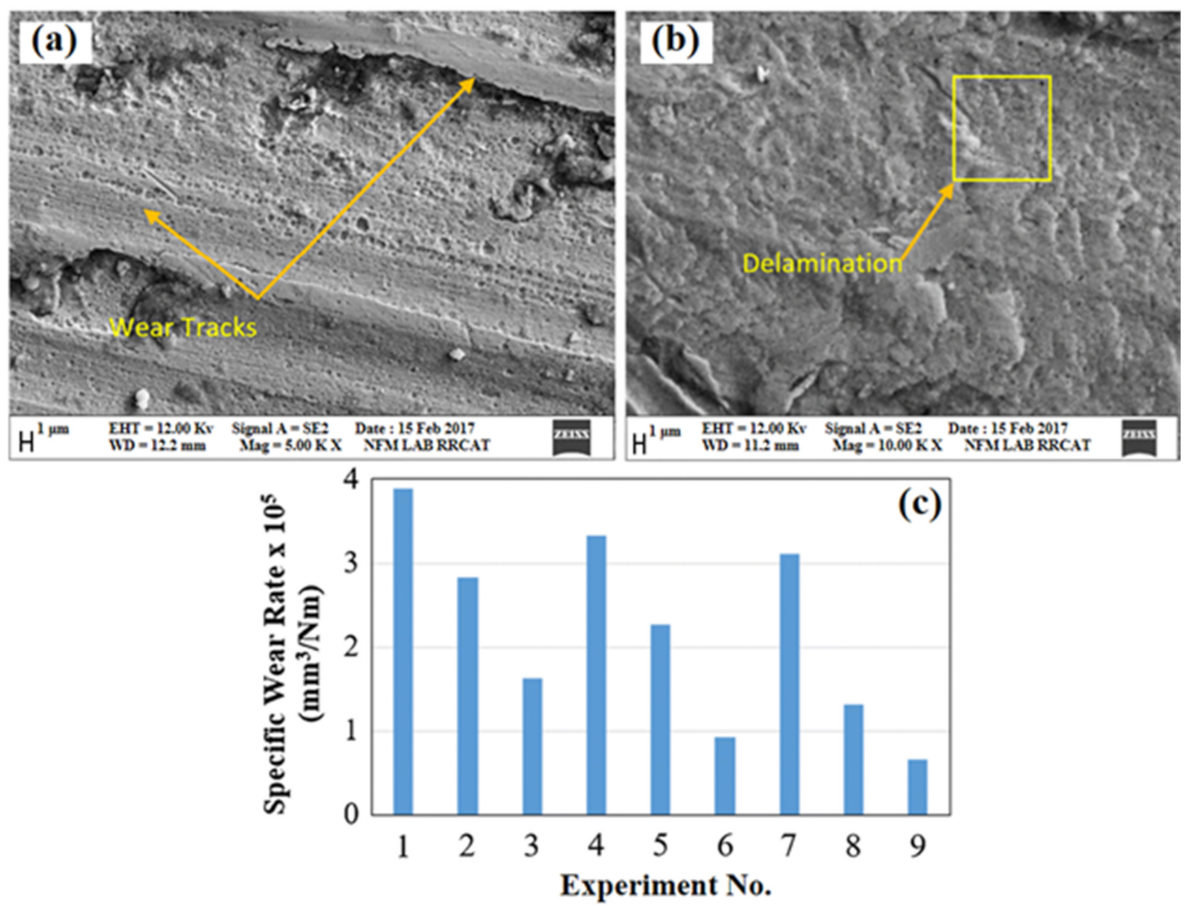
Figure 9 and Figure 10 show the comparison chart of laser peening. SEM images present that the particles are separated from the sample surface because of delamination. The working principle of some equipment made of titanium alloys is to prevent corrosion, but sometimes, these alloys must be used on certain parts of the equipment, which involves the sliding of titanium on other opposite surfaces—the titanium tribosystems. Although titanium is an extremely reactive metal, it is often necessary to use titanium fasteners for assembling titanium parts. Regular disassembly and reassembly of the fasteners can cause the threaded holes in extremely expensive equipment to wear. Titanium may suffer from different forms of wear modes in chemical process systems, such as metal to metal wear, abrasion, and fretting wear [108]. The plate-like debris particles shown in Figure 9 testify delamination, and they are generated because of adhesion and metal to metal contact [55]. Debris particles rising from the surface decrease with the increase in hardness and residual compressive stress, owing to the reduction of pores in the post-processed sample. Figure 10c shows a change in the wear rate under different low-pressure process parameters. The settings of laser shock peening experiments are presented in Table 1. Results showed that the laser peening post-processing method can improve the mechanical properties and surface morphology of the AM parts. The optimum number of shots and laser power are found to be 7 and 170 mW respectively by gray relational analysis. The effect of the number of shots is more significant compared with that of laser power, and the variation in specific wear rate is in line with the micro-hardness results.
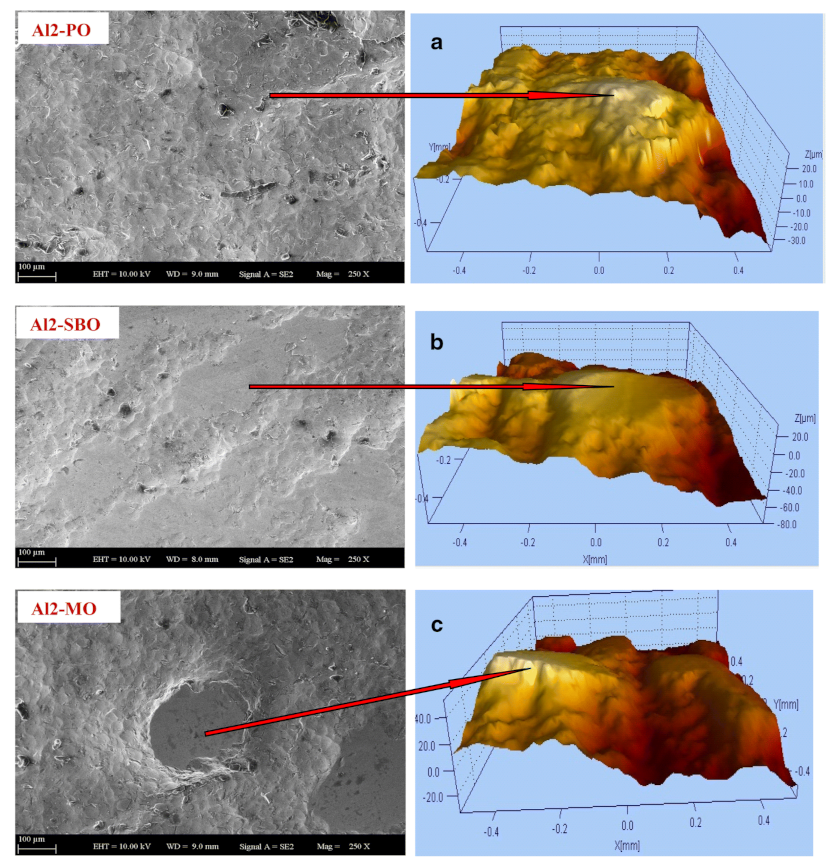
AlSi10Mg is an age-hardenable cast alloy that has superior mechanical properties and good cast-and-weldability when compared with other Al alloys [109]. The significant effects of laser shock peening on stress corrosion and fatigue properties have been well investigated and understood. Damon et al. [109] studied the morphology and porosity distribution of SLM AlSi10Mg parts by using micro-tomography analysis, comparing properties before and after laser peening. The results showed an impressive reduction of porosity between 15–30% by means of the laser peening method. Sagbas [110] investigated the influences of laser peening, abrasive blasting, and laser polishing on texture properties of direct metal laser sintered AlSi10Mg parts, utilizing density measurement, roughness characterization, and hardness measurement. The laser peening can increase the hardness and strength of the surface and decrease the surface roughness in comparison with shot blasting. The kurtosis Rku of shot peening surface is less than three, which indicates that the height distribution of shot peening surface is flattened. Additionally, the skewness Rsk of the same surface is negative, so the surface deviation height (peak and pit) is above the average, where Rku and Rsk profile parameters have an effective role in the characterization of the surface texture properties according to the ISO 4287 [111]. The shot-peened surface shows the best wear resistance. The SEM and optical microscope images of the laser peening surface can be seen in Figure 11. Maamoun et al. [112] reported using different laser peening intensities to improve the surface characteristics of the as-processed AlSi10Mg parts. The results showed that the good surface topography can be processed with Gp165 glass beads and 22.9 A intensity. Uzan et al. [113] investigated the effect on the fatigue resistance of AM AlSi10Mg parts fabricated with laser peening post-processing. Whether the surface is polished before shot peening or removed about 25–30 μm (electrolytic polishing or mechanical polishing) after shot peening, the fatigue resistance and fatigue limit are improved.

4. Laser Polishing

Laser polishing is considered a potential method for improving the surface roughness of AM parts. During laser polishing, morphology apexes can reach the melting temperature rapidly when the energy source irradiates the material surface. The liquid material redistributes to the same level after molten-pool formation because of the effect of gravity and surface tension. Once the laser beam stops scanning the surface, the temperature of the heat-affected zone (HAZ) drops rapidly, resulting in the solidification of the molten pool, and the surface roughness reduces accordingly [114,115,116]. Laser polishing is an automated process that changes surface morphology by re-melting without changing or affecting the bulk properties [117]. During the past 20 years, laser polishing technology has been extensively utilized to process different materials. For example, Mai and Lim [118] applied laser polishing to reduce the roughness of 304 stainless steel from 195 nm to 75 nm, consequently increasing surface reflectivity to 14% and reducing diffusion reflectivity to 70%. Guo et al. [119] investigated polishing results in AM processes, showing that the roughness value decreased from 0.4 μm to 0.12 μm. Lamikiz et al. [120] claimed that the hardness of a laser polishing processed surface was slightly higher and more uniform than other surfaces, with almost no cracks or HAZ. Laser polishing can also improve the surface performance of SLM parts.
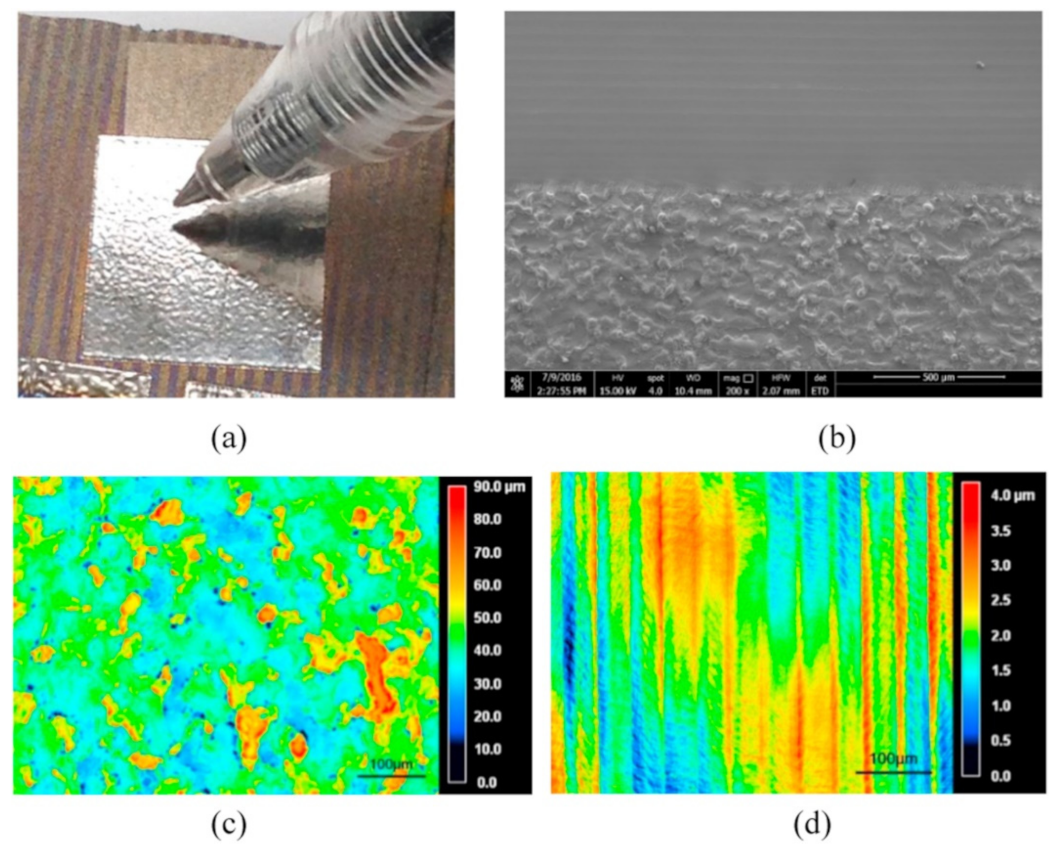
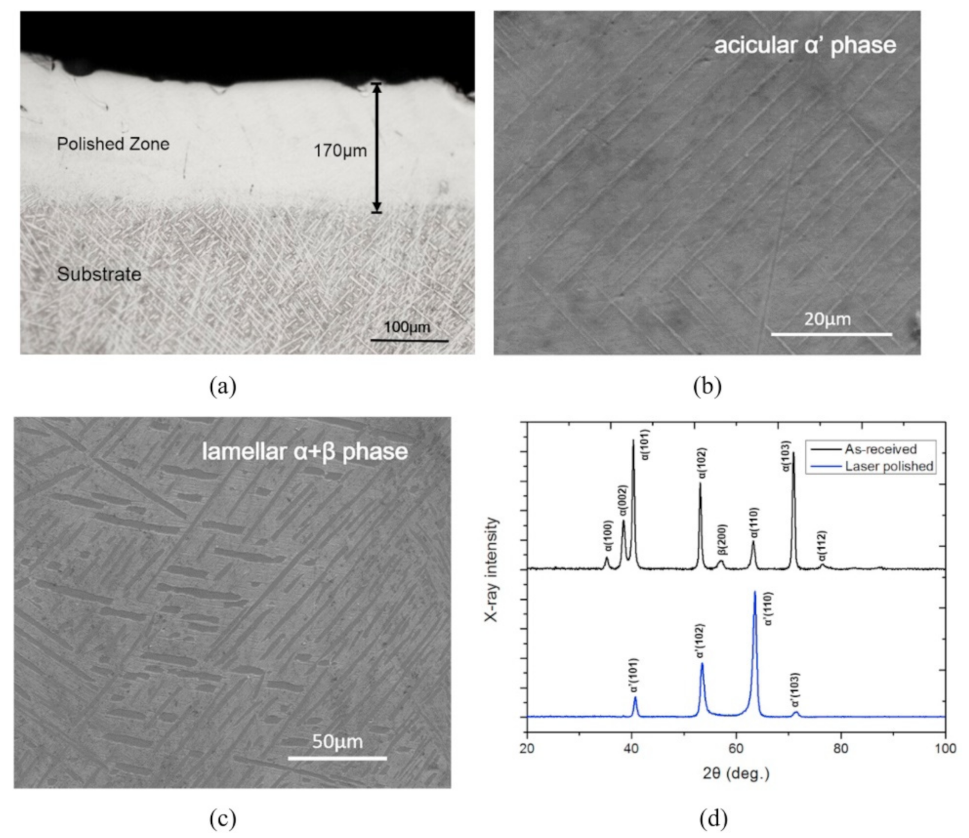
Ma et al. [117] studied the laser polishing of a titanium alloy manufactured by laser-based AM technology. Macrographs of the surface after laser polishing are taken and presented in Figure 12a. The typical microstructure of TC4 alloy substrate is shown in Figure 13a. As presented in Figure 12b, the rough surface was polished, the laser melting traces are apparent on the titanium alloy surface. The results showed that the morphological apexes of titanium alloy absorb energy and reach the melting temperature in a short time in the process of laser polishing. After the surface material is melted, a small part of the peak melting mass flows into the valley driven by surface tension and gravity. Once the laser beam leaves, the solidification of liquid material is accelerated, leading to the decrease in peak valley height. The surface morphology and surface roughness of the titanium alloy after laser polishing were measured by laser scanning confocal microscopy. Figure 12c,d show that the peak-valley height of the TC4 surface decreased from 90 μm to 4 μm after laser polishing. Figure 13a–c presents the microstructure graphs of the TC4 alloy matrix after AM processing, including acicular α phase (lower V content) and β phase (higher V content) [121,122]. The martensitic α′ phase formed after laser rapid melting and cooling is the reason for the uniform distribution of elements at the top of the polishing zone [123,124]. Being consistent with the microstructure analysis, the X-ray diffraction (XRD) curve in Figure 13d shows that the received TC4 includes α phase and β phase, but the laser polishing surface is mainly composed of α′ martensite without β phase.
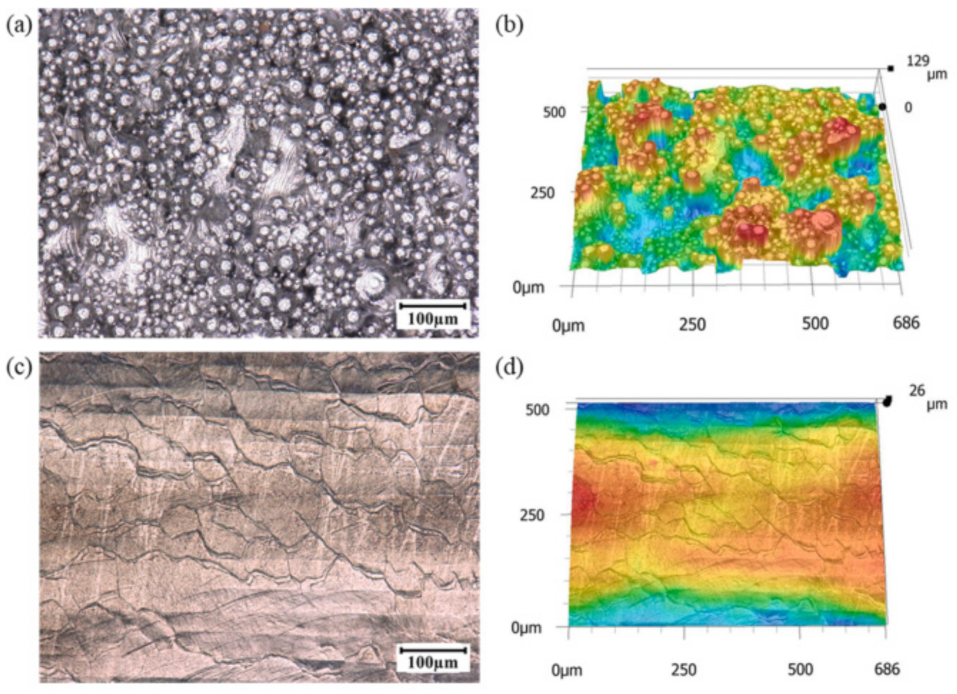
In the study of [125] by Lee et al., the α-β titanium alloy (Ti-6Al-4V) sample was prepared by the laser beam-powder layer fusion (LB-PBF) method, and the surface was processed with a continuous wave fiber laser. Laser polishing properly re-melted the powder particles and reconstructed the surface morphology. As shown in Figure 14a,b, the fabricated surface conditions presented an extremely rough surface with random peaks and valleys. On the contrary, the smooth surface presented in Figure 14c,d is obtained after laser polishing. Even if no material was wasted in the process of laser polishing, the measured cross-sectional area would change significantly after laser polishing. The average cross-sectional area of the test piece with the as-built surface is 10.28 mm2, and the area after the laser polishing is reduced to 9.75 mm2. The result indicated that the cross-sectional area difference between the manufactured surface and the laser polishing surface is reduced from 5.4% to 1.7%. Zhou et al. [126] studied laser polishing of the AlSi10Mg parts at different laser directions, passes, and hatching spaces, as well as analyzing the roughness, microhardness, and surface morphologies. Figure 15 and Figure 16 present the SEM images and optical morphologies of unpolished surface and polished surface, respectively. The experimental results showed that the surface roughness Sa and Ra of manufactured surface can be optimized from 29.3 μm to 8.4 μm and from 12.5 μm to 3.7 μm. Zhou et al. [127] experimentally investigated the laser polishing titanium alloys. The results showed that the surface roughness can be decreased from 7.3 µm to approximately 0.6 µm. Avilés et al. [128] studied the effect of laser polishing in the absence of inert gas on the high cycle fatigue (HCF) performance of AISI 1045 steel. The results showed that laser polishing can improve the HCF behavior of AISI 1045 steel parts. Chen et al. [129] characterized the surface microstructure and morphology of the LP-PBF stainless-steel 316L before and after laser polishing. The results indicated that the surface roughness can be effectively reduced from 4.84 μm to 0.65 μm (Sa) by laser polishing, as well as the proportion of low angle grain boundaries (2°–5°) is increased and the average grain diameter is reduced. Rosa et al. [130] studied the influences on stainless-steel 316 L by using multiple laser polishing parameter sets. The surface roughness (Sa) was reduced to 0.79 μm with a reduction of 96% after five passes.

5. Machining and Abrasive Finishing

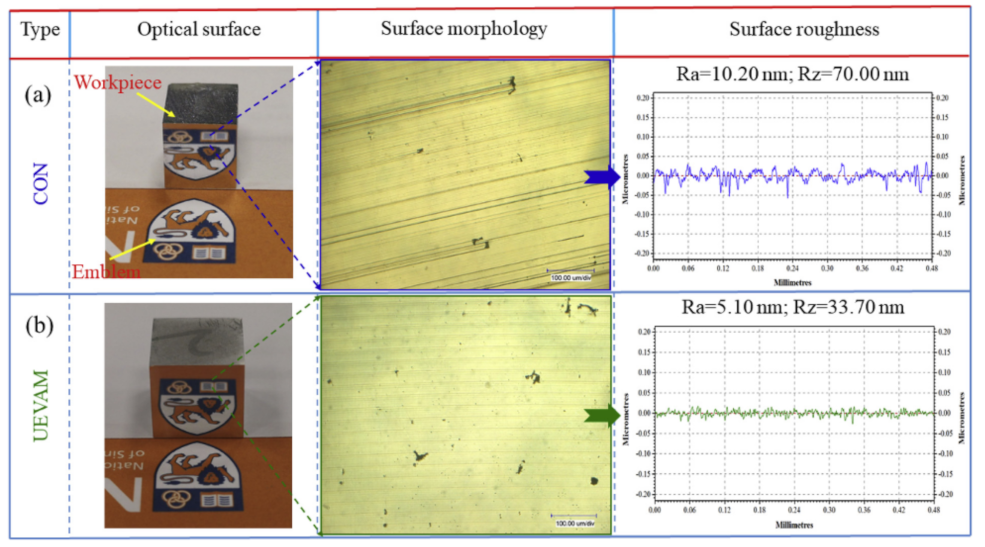
Machining and abrasive finishing are conventional manufacturing techniques to improve the form accuracy and surface finish of functional parts in various industries. They are used as common post-processing methods for AM parts for their high maturity and good accessibility. Bai et al. [131] employed computer numerical controlled (CNC) milling to post-process ASTM A131 steel parts generated by DED. Though the tool wear is obvious, the milling can reduce the surface roughness of the workpiece from 22.78 μm to 0.6 μm and the high cutting speed contributes to a more favorable surface finish. Besides, it is found that the milling procedure hardly changes the microhardness of the DED samples. To generate a superior surface finish and study the machinability of AM parts, Ni et al. [132,133] utilized ultra-precision machining (UPM) to cut SLM-ed Ti-6Al-4V alloy. They found that the material anisotropy is notable in UPM regarding the achieved surface roughness and cutting forces. For example, the surface roughness of the top surface after machining is lower than that of the front surface and the cutting force shows the same trend. The anisotropic machinability of the workpiece is due to the anisotropic microstructure during the printing process, as suggested by the authors. Researchers also explored the potential of non-conventional machining to produce an optical surface on additively manufactured parts. For example, a reflective surface with roughness as low as 5.1 nm is achieved by the combination of the optimized printing parameters and ultrasonic elliptical vibration-assisted machining in Ref [61]. By contrast, it is interesting to find that the conventional diamond turning can only obtain a surface roughness of 10.2 nm, as seen in Figure 17.
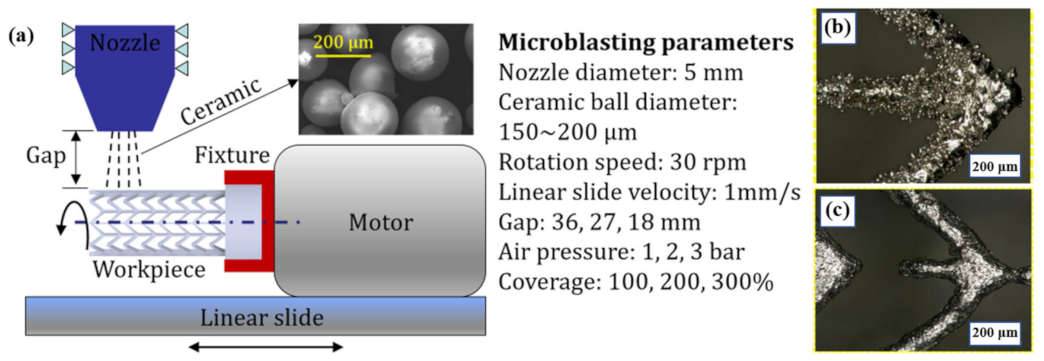
Regarding the abrasive finishing method, Zhang et al. [45] used magnetic abrasive finishing (MAF) to polish the SLM-ed 316L stainless steel surface generated by various building angles. The surface finish improvement can reach as high as 75.7% and all the surface defects, i.e., the un-melted particles and balling effects, are removed. They also found the final surface roughness has a high dependence on the as-built surface roughness for the pressure-copying finishing process. In [134], Zhang developed an automatic micro-blasting setup to finish the SLM-ed 316 L stainless workpiece with a tubular lattice structure. As presented in Figure 18, the micro-blasting of SLM-ed tubular lattice structure. The effect of the air pressure and the standing distance on the achieved surface finish of the workpiece is investigated. The author found micro-blasting is a suitable post-processing method to remove the partially bonded particles on the fragile lattice structure. However, the process parameters should be well-selected to prevent strut damage. Wang et al. [135] investigated the effects of ultrasonic abrasive polishing on the surface quality of AM parts. The impact action of abrasive particles was simulated with the Smoothed Particle Hydrodynamics (SPH) methodology. The results presented that the ultrasonic laser polishing can effectively remove the partially melted structures, the surface roughness decreased from 5.02 μm to 2.93 μm. Teng et al. [136] studied the grinding process (GP) and MAF for finish machining of SLM parts. The results showed that the combination of MAF and GP can reduce the surface roughness and improve the surface quality of AlSi10Mg parts. The surface roughness was decreased from 7 μm to 0.155 μm with the MAF method. Guo et al. [137] presented an experimental and analytical study on the internal surface quality improvement of Inconel 718 by abrasive flow machining (AFM). The results showed that good surface quality can be achieved with low extrusion pressure, high viscosity, low temperature, and large particle size. Han et al. [138] investigated the influence of the AFM technique on residual stress and surface roughness. The results showed that the AFM can improve the fatigue resistance of channels by 26%.

6. Future Prospects and Conclusions

This paper has reviewed various methods to improve the surface finish of the AM parts by summarizing different post-processing technologies and their applications in AM processes, including thermal post-processing, laser peening, laser polishing, machining and abrasive finishing method. For metal AM technology, the post-processing covers a variety of stages that 3D printed parts have to undergo before being used for the final purpose, such as powder removal, stress relief annealing, wire cutting, other finishing, hot isostatic pressing and so on. Some of these procedures still require manual operation, where skilled operators are necessary for key tasks. It may be cost-effective to complete the prototype or even dozens of parts manually, but if hundreds or even thousands of parts are produced, the demand for post-processing automation in AM becomes extremely urgent.
Automated solutions can improve production efficiency, but there are only a few centralized specific solutions to help achieve automated post-processing, and these systems are mainly designed for polymer AM parts. In terms of metal AM, the post-processing technology of traditional manufacturing is still used. In order to further automate these technologies, some companies have also begun to implement robotic solutions that can install printing substrates, clean powder, unload parts and post-processing. The goal is to replace all manual work to promote continuous and large-scale production. Although this development is encouraging, the pace of innovation in this field is still relatively slow. The number of advanced automatic post-processing solutions would certainly increase in the future, so as to adapt to the growing development of the AM industry.

Author Contributions

Conceptualization, L.K. and X.P.; methodology, L.K., X.P., J.Y.H.F. and H.W.; writing—original draft preparation, L.K. and X.P.; writing—review and editing, L.K., J.Y.H.F. and H.W.; supervision, L.K. and H.W. Funding acquisition, L.K. and H.W. All authors have read and agreed to the published version of the manuscript.

Funding

This work was supported by National Key R&D Program of China (No.2017YFA0701200), National Natural Science Foundation of China (Grant No. 52075100), Shanghai Science and Technology Committee Innovation Grant (Grant No. 19ZR1404600), and Agency for Science, Technology and Research (A*STAR) of Singapore through the Industry Alignment Fund—Pre-positioning Program (IAF-PP) (Grant Nos. A1893a0031 and A19E1a0097).

Conflicts of Interest

The authors declare no conflict of interest.

References

  1. Moon, S.K.; Tan, Y.E.; Hwang, J.; Yoon, Y.-J. Application of 3D printing technology for designing light-weight unmanned aerial vehicle wing structures. Int. J. Precis. Eng. Manuf. Green Technol. 2014, 1, 223–228. [Google Scholar] [CrossRef]
  2. Campbell, R.I.; Martorelli, M.; Lee, H.S. Surface roughness visualization for rapid prototyping models. Comput. Aided Des. 2002, 34, 717–725. [Google Scholar] [CrossRef]
  3. Oliveira, J.; la Londe, A.; Ma, J. Processing parameters in laser powder bed fusion metal additive manufacturing. Mater. Des. 2020, 193, 108762. [Google Scholar] [CrossRef]
  4. Kang, D.; Benipal, S.S.; Gopal, D.L.; Cha, Y.-J. Hybrid pixel-level concrete crack segmentation and quantification across complex backgrounds using deep learning. Autom. Constr. 2020, 118, 103291. [Google Scholar] [CrossRef]
  5. Kruth, J.P.; Mercelis, P.; van Vaerenbergh, J.; Craeghs, T. Feedback control of selective laser melting. In Proceedings of the 3rd International Conference on Advanced Research in Virtual and Rapid Prototyping, Leiria, Portugal, 1 June 2008; pp. 521–528. [Google Scholar]
  6. Frazier, W.E. Metal additive manufacturing: A review. J. Mater. Eng. Perform. 2014, 23, 1917–1928. [Google Scholar] [CrossRef]
  7. Zhu, J.Q.; Ling, Z.M.; Du, F.R.; Ding, X.P.; Li, H.M. Monitoring of laser metal-wire additive manufacturing temperature field using infrared thermography. Infrared Laser Eng. 2018, 47, 0604002. [Google Scholar]
  8. Kuo, C.C.; Su, S.J. A simple method for improving surface quality of rapid prototyping. Indian J. Eng. Mater. Sci. 2013, 20, 465–470. [Google Scholar]
  9. Chen, Y.; Peng, X.; Kong, L.B.; Dong, G.X.; Remani, A.; Leach, R. Defect inspection technologies for additive manufacturing. Int. J. Extrem. Manuf. 2021, 3, 022002. [Google Scholar] [CrossRef]
  10. Zhou, X.; Zhang, H.; Wang, G.; Bai, X. Three-dimensional numerical simulation of arc and metal transport in arc welding based additive manufac-turing. Int. J. Heat Mass Transf. 2016, 103, 521–537. [Google Scholar] [CrossRef]
  11. Han, C.; Li, Y.; Wang, Q.; Cai, D.; Wei, Q.; Yang, L.; Wen, S.; Liu, J.; Shi, Y. Titanium/hydroxyapatite (Ti/HA) gradient materials with quasi-continuous ratios fabricated by SLM: Material interface and fracture toughness. Mater. Des. 2018, 141, 256–266. [Google Scholar] [CrossRef]
  12. Berumen, S.; Bechmann, F.; Lindner, S.; Kruth, J.-P.; Craeghs, T. Quality control of laser- and powder bed-based Additive Manufacturing (AM) technologies. Phys. Proc. 2010, 5, 617–622. [Google Scholar] [CrossRef] [Green Version]
  13. Pandey, P.M.; Reddy, N.V.; Dhande, S.G. Improvement of surface finish by staircase machining in fused deposition modeling. J. Mater. Process. Technol. 2003, 132, 323–331. [Google Scholar] [CrossRef]
  14. Liu, Y.; Zhang, Y. Microstructure and mechanical properties of TA15-Ti2AlNb bimetallic structures by laser additive manufacturing. Mater. Sci. Eng. A 2020, 795, 140019. [Google Scholar] [CrossRef]
  15. Stavroulakis, P.I.; Leach, R.K. Invited Review Article: Review of post-process optical form metrology for industrial-grade metal additive manufactured parts. Rev. Sci. Instrum. 2016, 87, 041101. [Google Scholar] [CrossRef]
  16. Gao, F.; Zhou, H.; Huang, C. Defect detection using the phased-array laser ultrasonic crack diffraction enhancement method. Opt. Commun. 2020, 474, 126070. [Google Scholar] [CrossRef]
  17. Grasso, M.; Colosimo, B.M. Process defects and in situ monitoring methods in metal powder bed fusion: A review. Meas. Sci. Technol. 2017, 28, 044005. [Google Scholar] [CrossRef] [Green Version]
  18. Caiazzo, F.; Caggiano, A. Laser Direct Metal Deposition of 2024 Al Alloy: Trace Geometry Prediction via Machine Learning. Materials 2018, 11, 444. [Google Scholar] [CrossRef] [PubMed] [Green Version]
  19. Yao, X.; Moon, S.K.; Bi, G. A Cost-Driven Design Methodology for Additive Manufactured Variable Platforms in Product Families. J. Mech. Des. 2016, 138, 041701. [Google Scholar] [CrossRef]
  20. Charalampous, P.; Kostavelis, I.; Tzovaras, D. Non-destructive quality control methods in additive manufacturing: A survey. Rapid Prototyp. J. 2020, 26, 777–790. [Google Scholar] [CrossRef]
  21. Thompson, S.M.; Bian, L.; Shamsaei, N.; Yadollahi, A. An overview of Direct Laser Deposition for additive manufacturing; Part I: Transport phenomena, modeling and diagnostics. Addit. Manuf. 2015, 8, 36–62. [Google Scholar] [CrossRef]
  22. DebRoy, T.; Zhang, W.; Turner, J.; Babu, S. Building digital twins of 3D printing machines. Scr. Mater. 2017, 135, 119–124. [Google Scholar] [CrossRef]
  23. Dilip, J.J.S.; Zhang, S.; Teng, C.; Zeng, K.; Robinson, C.; Pal, D.; Stucker, B. Influence of processing parameters on the evolution of melt pool, porosity, and microstructures in Ti-6Al-4V alloy parts fabricated by selective laser melting. Prog. Addit. Manuf. 2017, 2, 157–167. [Google Scholar] [CrossRef] [Green Version]
  24. Acharya, R.; Sharon, J.A.; Staroselsky, A. Prediction of microstructure in laser powder bed fusion process. Acta Mater. 2017, 124, 360–371. [Google Scholar] [CrossRef]
  25. Bahnini, I.; Rivette, M.; Rechia, A.; Siadat, A.; Elmesbahi, A. Additive manufacturing technology: The status, applications, and prospects. Int. J. Adv. Manuf. Technol. 2018, 97, 147–161. [Google Scholar] [CrossRef] [Green Version]
  26. Ko, H.; Moon, S.K.; Hwang, J. Design for additive manufacturing in customized products. Int. J. Precis. Eng. Manuf. 2015, 16, 2369–2375. [Google Scholar] [CrossRef]
  27. Koester, L.W.; Taheri, H.; Bigelow, T.A.; Collins, P.C.; Bond, L.J. Nondestructive testing for parts fabricated using additive manufacturing. Mater. Eval. 2018, 76, 514–524. [Google Scholar]
  28. Taheri, H.; Shoaib, M.R.M.; Koester, L.W.; Bigelow, T.A.; Collins, P.C.; Bond, L.J. Powder based additive manufacturing—A review of types of defects, generation mechanisms, detection, property evaluation and metrology. Int. J. Addit. Subtractive Mater. Manuf. 2017, 1, 172–209. [Google Scholar] [CrossRef] [Green Version]
  29. Everton, S.K.; Hirsch, M.; Stravroulakis, P.; Leach, R.K.; Clare, A.T. Review of in-situ process monitoring and in-situ metrology for metal additive manufacturing. Mater. Des. 2016, 95, 431–445. [Google Scholar] [CrossRef]
  30. Tapia, G.; Elwany, A. A Review on Process Monitoring and Control in Metal-Based Additive Manufacturing. J. Manuf. Sci. Eng. 2014, 136, 060801. [Google Scholar] [CrossRef]
  31. King, W.E.; Barth, H.D.; Castillo, V.M.; Gallegos, G.F.; Gibbs, J.W.; Hahn, D.E.; Kamath, C.; Rubenchik, A.M. Observation of keyhole-mode laser melting in laser powder-bed fusion additive manufacturing. J. Mater. Process. Technol. 2014, 214, 2915–2925. [Google Scholar] [CrossRef]
  32. Bin-Maidin, S.; Campbell, I.; Pei, E. Development of a design feature database to support design for additive manufacturing. Assem. Autom. 2012, 32, 235–244. [Google Scholar] [CrossRef] [Green Version]
  33. Bai, Y.; Zhang, J.; Zhao, C.; Li, C.; Wang, H. Dual interfacial characterization and property in multi-material selective laser melting of 316L stainless steel and C52400 copper alloy. Mater. Charact. 2020, 167, 110489. [Google Scholar] [CrossRef]
  34. Kong, L.B.; Peng, X.; Chen, Y.; Wang, P.; Xu, M. Multi-sensor measurement and data fu sion technology for manufacturing process monitoring: A literature review. Int. J. Extrem. Manuf. 2020, 2, 022001. [Google Scholar] [CrossRef]
  35. Zolfaghari, A.; Chen, T.T.; Yi, A.Y. Additive manufacturing of precision optics at micro and nanoscale. Int. J. Extrem. Manuf. 2019, 1, 012005. [Google Scholar] [CrossRef]
  36. Aboulkhair, N.T.; Everitt, N.M.; Ashcroft, I.; Tuck, C. Reducing porosity in AlSi10Mg parts processed by selective laser melting. Addit. Manuf. 2014, 1–4, 77–86. [Google Scholar] [CrossRef]
  37. Pablo, D.E.; Ali, K.; Reza, E.; Stephen, P.; Hamid, J.; Ehsan, T.; Norman, Y.Z. Enhancing fatigue life of additive manufactured parts with electrospark deposition post-processing. Addit. Manuf. 2020, 36, 101526. [Google Scholar] [CrossRef]
  38. Chua, Z.Y.; Ahn, I.H.; Moon, S.K. Process monitoring and inspection systems in metal additive manufacturing: Status and applications. Int. J. Precis. Eng. Manuf. Technol. 2017, 4, 235–245. [Google Scholar] [CrossRef]
  39. Yan, Z.; Liu, W.; Tang, Z.; Liu, X.; Zhang, N.; Li, M.; Zhang, H. Review on thermal analysis in laser-based additive manufac-turing. Opt. Laser Technol. 2018, 106, 427–441. [Google Scholar] [CrossRef]
  40. Abdelrahman, M.; Reutzel, E.W.; Nassar, A.R.; Starr, T.L. Flaw detection in powder bed fusion using optical imaging. Addit. Manuf. 2017, 15, 1–11. [Google Scholar] [CrossRef]
  41. Khairallah, S.A.; Anderson, A.T.; Rubenchik, A.; King, W.E. Laser powder-bed fusion additive manufacturing: Physics of complex melt flow and formation mechanisms of pores, spatter, and denudation zones. Acta Mater. 2016, 108, 36–45. [Google Scholar] [CrossRef] [Green Version]
  42. Lane, B.; Mekhontsev, S.; Grantham, S.; Vlasea, L.; Whiting, J.; Yeung, H.; Fox, J.; Zarobila, C.; Neira, J.; McGlauflin, M.; et al. Design, developments, and results from the NIST additive manufacturing metrology testbed (AMMT). In Proceedings of the Solid Freeform Fabrication Symposium, Austin, TX, USA, 8 August 2016; pp. 1145–1160. [Google Scholar]
  43. Lu, L.-X.; Sridhar, N.; Zhang, Y.-W. Phase field simulation of powder bed-based additive manufacturing. Acta Mater. 2018, 144, 801–809. [Google Scholar] [CrossRef]
  44. Rodgers, T.M.; Madison, J.D.; Tikare, V. Simulation of metal additive manufacturing microstructures using kinetic Monte Carlo. Comput. Mater. Sci. 2017, 135, 78–89. [Google Scholar] [CrossRef]
  45. Zhang, J.; Chaudhari, A.; Wang, H. Surface quality and material removal in magnetic abrasive finishing of selective laser melted 316L stainless steel. J. Manuf. Process. 2019, 45, 710–719. [Google Scholar] [CrossRef]
  46. Zhang, J.; Toh, A.Y.X.; Wang, H.; Lu, W.F.; Fuh, J.Y.H. Vibration-assisted conformal polishing of additively manufactured structured surface. Proc. Inst. Mech. Eng. Part C J. Mech. Eng. Sci. 2018, 233, 4154–4164. [Google Scholar] [CrossRef]
  47. Tan, H.; Fang, Y.; Zhong, C.; Yuan, Z.; Fan, W.; Li, Z.; Chen, J.; Lin, X. Investigation of heating behavior of laser beam on powder stream in directed energy deposition. Surf. Coat. Technol. 2020, 397, 126061. [Google Scholar] [CrossRef]
  48. Pyka, G.; Kerckhofs, G.; Papantoniou, I.; Speirs, M.; Schrooten, J.; Wevers, M. Surface roughness and morphology customi-zation of additive manufactured open porous Ti6Al4V structures. Materials 2013, 6, 4737–4757. [Google Scholar] [CrossRef] [Green Version]
  49. Gisario, A.; Kazarian, M.; Martina, F.; Mehrpouya, M. Metal additive manufacturing in the commercial aviation industry: A review. J. Manuf. Syst. 2019, 53, 124–149. [Google Scholar] [CrossRef]
  50. Leung, C.L.A.; Marussi, S.; Towrie, M.; Atwood, R.C.; Withers, P.J.; Lee, P.D. The effect of powder oxidation on defect formation in laser additive manufacturing. Acta Mater. 2019, 166, 294–305. [Google Scholar] [CrossRef] [Green Version]
  51. Varela, J.; Merino, J.; Pickett, C.; Abu-Issa, A.; Arrieta, E.; Murr, L.E.; Wicker, R.B.; Ahlfors, M.; Godfrey, D.; Medina, F. Per-formance characterization of laser powder bed fusion fabricated Inconel 718 treated with experimental hot isostatic processing cycles. J. Manuf. Mater. Process. 2020, 4, 73. [Google Scholar]
  52. Di, A.L.; Di, S.P.; Guardiani, E. Search for the optimal build direction in additive manufacturing technologies: A review. J. Manuf. Mater. Process. 2020, 4, 71. [Google Scholar]
  53. Cerniglia, D.; Montinaro, N. Defect detection in additively manufactured components: Laser ultrasound and laser thermog-raphy comparison. Proced. Struct. Integr. 2018, 8, 154–162. [Google Scholar] [CrossRef]
  54. Tino, R.B.; Leary, M.; Yeo, A.U.; Kyriakou, E.; Kron, T.; Brandt, M. Additive manufacturing in radiation oncology: A review of clinical practice, emerging trends and research opportunities. Int. J. Extrem. Manuf. 2020, 2, 012003. [Google Scholar] [CrossRef]
  55. Turner, B.N.; Gold, S.A. A review of melt extrusion additive manufacturing processes: II. Materials, dimensional accuracy, and surface roughness. Rapid Prototyp. J. 2015, 21, 250–261. [Google Scholar] [CrossRef]
  56. Chavez, L.A.; Ibave, P.; Wilburn, B.; Alexander, D., IV; Stewart, C.; Wicker, R.; Lin, Y. The Influence of Printing Parameters, Post-Processing, and Testing Conditions on the Properties of Binder Jetting Additive Manufactured Functional Ceramics. Ceramics 2020, 3, 65–77. [Google Scholar] [CrossRef] [Green Version]
  57. Zhang, J.; Tai, W.; Wang, H.; Kumar, A.S.; Lu, W.; Fuh, J.Y.H. Magnetic abrasive polishing of additively manufactured 316L stainless steel parts. In Proceedings of the 18th International Conference of the European Society For Precision Engineering and Nanotechnology EUSPEN 2018, Venice, Italy, 4–8 June 2018; pp. 401–402. [Google Scholar]
  58. Cao, Q.; Bai, Y.; Zhang, J.; Shi, Z.; Fuh, J.Y.H.; Wang, H. Removability of 316L stainless steel cone and block support structures fabricated by Selective Laser Melting (SLM). Mater. Des. 2020, 191, 108691. [Google Scholar] [CrossRef]
  59. Cao, Q.; Shi, Z.; Bai, Y.; Zhang, J.; Zhao, C.; Fuh, J.Y.H.; Wang, H. A novel method to improve the removability of cone support structures in selective laser melting of 316L stainless steel. J. Alloys Compd. 2021, 854, 157133. [Google Scholar] [CrossRef]
  60. Cao, Q.; Zhang, J.; Chang, S.; Fuh, J.Y.H.; Wang, H. The effect of support structures on maraging steel MS1 parts fabricated by selective laser melting at different building angles. Rapid Prototyp. J. 2020, 26, 1465–1476. [Google Scholar] [CrossRef]
  61. Bai, Y.; Shi, Z.; Lee, Y.J.; Wang, H. Optical surface generation on additively manufactured AlSiMg0.75 alloys with ultrasonic vibration-assisted machining. J. Mater. Process. Technol. 2020, 280, 116597. [Google Scholar] [CrossRef]
  62. Bai, Y.; Zhao, C.; Yang, J.; Fuh, J.Y.H.; Lu, W.F.; Weng, C.; Wang, H. Dry mechanical-electrochemical polishing of selective laser melted 316L stainless steel. Mater. Des. 2020, 193, 108840. [Google Scholar] [CrossRef]
  63. Maamoun, A.H.; Elbestawi, M.; Dosbaeva, G.K.; Veldhuis, S.C. Thermal post-processing of AlSi10Mg parts produced by Selective Laser Melting using recycled powder. Addit. Manuf. 2018, 21, 234–247. [Google Scholar] [CrossRef]
  64. Ma, P.; Prashanth, K.G.; Scudino, S.; Jia, Y.; Wang, H.; Zou, C.; Wei, Z.; Eckert, J. Influence of Annealing on Mechanical Properties of Al-20Si Processed by Selective Laser Melting. Metals 2014, 4, 28–36. [Google Scholar] [CrossRef]
  65. Bermingham, M.; Nicastro, L.; Kent, D.; Chen, Y.; Dargusch, M. Optimising the mechanical properties of Ti-6Al-4V components produced by wire + arc additive manufacturing with post-process heat treatments. J. Alloys Compd. 2018, 753, 247–255. [Google Scholar] [CrossRef]
  66. Bai, Y.; Wang, D.; Yang, Y.; Wang, H. Effect of heat treatment on the microstructure and mechanical properties of maraging steel by selective laser melting. Mater. Sci. Eng. A 2019, 760, 105–117. [Google Scholar] [CrossRef]
  67. Aversa, A.; Lorusso, M.; Trevisan, F.; Ambrosio, E.P.; Calignano, F.; Manfredi, D.G.; Biamino, S.; Fino, P.; Lombardi, M.; Pavese, M. Effect of Process and Post-Process Conditions on the Mechanical Properties of an A357 Alloy Produced via Laser Powder Bed Fusion. Metals 2017, 7, 68. [Google Scholar] [CrossRef]
  68. Li, W.; Li, S.; Liu, J.; Zhang, A.; Zhou, Y.; Wei, Q.; Yan, C.; Shi, Y. Effect of heat treatment on AlSi10Mg alloy fabricated by selective laser melting: Microstructure evolution, mechanical properties and fracture mechanism. Mater. Sci. Eng. A 2016, 663, 116–125. [Google Scholar] [CrossRef]
  69. Fiocchi, J.; Tuissi, A.; Bassani, P.; Biffi, C. Low temperature annealing dedicated to AlSi10Mg selective laser melting products. J. Alloys Compd. 2017, 695, 3402–3409. [Google Scholar] [CrossRef]
  70. Aboulkhair, N.T.; Maskery, I.; Tuck, C.; Ashcroft, I.; Everitt, N.M. The microstructure and mechanical properties of selectively laser melted AlSi10Mg: The effect of a conventional T6-like heat treatment. Mater. Sci. Eng. A 2016, 667, 139–146. [Google Scholar] [CrossRef]
  71. Tradowsky, U.; White, J.; Ward, R.; Read, N.; Reimers, W.; Attallah, M. Selective laser melting of AlSi10Mg: Influence of post-processing on the microstructural and tensile properties development. Mater. Des. 2016, 105, 212–222. [Google Scholar] [CrossRef] [Green Version]
  72. Aboulkhair, N.T.; Tuck, C.; Ashcroft, I.; Maskery, I.; Everitt, N.M. On the Precipitation Hardening of Selective Laser Melted AlSi10Mg. Met. Mater. Trans. A 2015, 46, 3337–3341. [Google Scholar] [CrossRef]
  73. Tillmann, W.; Schaak, C.; Nellesen, J.; Schaper, M.; Aydinöz, M.; Hoyer, K.-P. Hot isostatic pressing of IN718 components manufactured by selective laser melting. Addit. Manuf. 2017, 13, 93–102. [Google Scholar] [CrossRef]
  74. Rosenthal, I.; Tiferet, E.; Ganor, M.; Stern, A. Post-processing of AM-SLM AlSi10Mg specimens: Mechanical properties and fracture behavior. Weld. Equip. Technol. 2015, 26, 33–38. [Google Scholar]
  75. Goel, S.; Sittiho, A.; Charit, I.; Klement, U.; Joshi, S. Effect of post-treatments under hot isostatic pressure on microstructural characteristics of EBM-built Alloy 718. Addit. Manuf. 2019, 28, 727–737. [Google Scholar] [CrossRef]
  76. Sames, W.J.; List, F.A.; Pannala, S.; Dehoff, R.R.; Babu, S.S. The metallurgy and processing science of metal additive manu-facturing. Int. Mater. Rev. 2016, 61, 315–360. [Google Scholar] [CrossRef]
  77. Bailey, P.G.; Schweikert, W.H. HIP densification of castings. Superalloys Metall. Manuf. 1976, 9, 451–462. [Google Scholar] [CrossRef]
  78. Raghavan, B.; Zhang, P.; Wang, C.N.; Sun, M.L.; Nai, S.; Li, T.; Wei, J. Effect of different heat treatments on the microstructure and mechanical properties in selective laser melted INCONEL 718 alloy. Mater. Manuf. Process. 2017, 32, 1588–1595. [Google Scholar] [CrossRef]
  79. Cao, J.; Liu, F.; Lin, X.; Huang, C.; Chen, J.; Huang, W. Effect of overlap rate on recrystallization behaviors of Laser Solid Formed Inconel 718 superalloy. Opt. Laser Technol. 2013, 45, 228–235. [Google Scholar] [CrossRef]
  80. Leon, A.; Levy, K.G.; Ron, T.; Shirizly, A.; Aghion, E. The effect of hot isostatic pressure on the corrosion performance of Ti-6Al-4 V produced by an electron-beam melting additive manufacturing process. Addit. Manuf. 2020, 33, 101039. [Google Scholar] [CrossRef]
  81. Xu, W.; Lui, E.; Pateras, A.; Qian, M.; Brandt, M. In situ tailoring microstructure in additively manufactured Ti-6Al-4V for superior mechanical performance. Acta Mater. 2017, 125, 390–400. [Google Scholar] [CrossRef]
  82. Al-Bermani, S.S.; Blackmore, M.L.; Zhang, W.; Todd, I. The Origin of Microstructural Diversity, Texture, and Mechanical Properties in Electron Beam Melted Ti-6Al-4V. Met. Mater. Trans. A 2010, 41, 3422–3434. [Google Scholar] [CrossRef]
  83. Galarraga, H.; Lados, D.A.; Dehoff, R.R.; Kirka, M.M.; Nandwana, P. Effects of the microstructure and porosity on properties of Ti-6Al-4V ELI alloy fabricated by electron beam melting (EBM). Addit. Manuf. 2016, 10, 47–57. [Google Scholar] [CrossRef] [Green Version]
  84. Bagherifard, S.; Beretta, N.; Monti, S.; Riccio, M.; Bandini, M.; Guagliano, M. On the fatigue strength enhancement of additive manufactured AlSi10Mg parts by mechanical and thermal post-processing. Mater. Des. 2018, 145, 28–41. [Google Scholar] [CrossRef]
  85. Butler, C.; Babu, S.; Lundy, R.; O’Reilly Meehan, R.; Punch, J.; Jeffers, N. Effects of pro cessing parameters and heat treatment on thermal conductivity of additively manufactured AlSi10Mg by selective laser melting. Mater. Charact. 2021, 173, 110945. [Google Scholar] [CrossRef]
  86. Debroy, T.; Wei, H.L.; Zuback, J.S.; Mukherjee, T.; Elmer, J.W.; Milewski, J.O.; Beese, A.M.; Wilson-Heid, A.; De, A.; Zhang, W. Additive manufacturing of metallic components—Process, structure and properties. Prog. Mater. Sci. 2018, 92, 112–224. [Google Scholar] [CrossRef]
  87. Wang, X.Q.; Gong, X.B.; Chou, K. Review on powder-bed laser additive manufacturing of Inconel 718 parts. Proc. Inst. Mech. Eng. Part B J. Eng. Manuf. 2016, 231, 1890–1903. [Google Scholar] [CrossRef]
  88. Yu, X.; Lin, X.; Liu, F.; Wang, L.; Tang, Y.; Li, J.; Zhang, S.; Huang, W. Influence of post-heat-treatment on the microstructure and fracture toughness properties of Inconel 718 fabricated with laser directed energy deposition additive manufacturing. Mater. Sci. Eng. A 2020, 798, 140092. [Google Scholar] [CrossRef]
  89. Careri, F.; Imbrogno, S.; Umbrello, D.; Attallah, M.M.; Outeiro, J.; Batista, A.C. Machining and heat treatment as post-processing strategies for Ni-superalloys structures fabricated using direct energy deposition. J. Manuf. Process. 2021, 61, 236–244. [Google Scholar] [CrossRef]
  90. Hackel, L.; Rankin, J.R.; Rubenchik, A.; King, W.E.; Matthews, M. Laser peening: A tool for additive manufacturing post-processing. Addit. Manuf. 2018, 24, 67–75. [Google Scholar] [CrossRef]
  91. Raja, K.; Nathan, M.; Patil Balram, T.; Naiju, C.D. Study of Surface Integrity and Effect of Laser Peening on Maraging Steel Produced by Lasercusing Technique. SAE Tech. Pap. Ser. 2018. 2018-28-0094. [Google Scholar] [CrossRef]
  92. Lu, Y.; Sun, G.F.; Wang, Z.D.; Su, B.Y.; Zhang, Y.K.; Ni, Z.H. The effects of laser peening on laser additive manufactured 316L steel. Int. J. Adv. Manuf. Technol. 2020, 107, 2239–2249. [Google Scholar] [CrossRef]
  93. Lan, L.; Jin, X.; Gao, S.; He, B.; Rong, Y. Microstructural evolution and stress state related to mechanical properties of electron beam melted Ti-6Al-4V alloy modified by laser shock peening. J. Mater. Sci. Technol. 2020, 50, 153–161. [Google Scholar] [CrossRef]
  94. Lan, L.; Xin, R.; Jin, X.; Gao, S.; He, B.; Rong, Y.; Min, N. Effects of Laser Shock Peening on Micro-structure and Properties of Ti–6Al–4V Titanium Alloy Fabricated via Selective Laser Melting. Materials 2020, 13, 3261. [Google Scholar] [CrossRef] [PubMed]
  95. Fairand, B.P.; Wilcox, B.A.; Gallagher, W.J.; Williams, D.N. Laser shock-induced microstructural and mechanical property changes in 7075 aluminum. J. Appl. Phys. 1972, 43, 3893–3895. [Google Scholar] [CrossRef]
  96. Nalla, R.; Altenberger, I.; Noster, U.; Liu, G.; Scholtes, B.; Ritchie, R. On the influence of mechanical surface treatments—Deep rolling and laser shock peening—On the fatigue behavior of Ti–6Al–4V at ambient and elevated temperatures. Mater. Sci. Eng. A 2003, 355, 216–230. [Google Scholar] [CrossRef]
  97. Peyre, P.; Fabbro, R. Laser shock processing: A review of the physics and applications. Opt. Quantum Electron. 1995, 27, 1213–1229. [Google Scholar]
  98. Ganesh, P.; Sundar, R.; Kumar, H.; Kaul, R.; Ranganathan, K.; Hedaoo, P.; Raghavendra, G.; Kumar, S.A.; Tiwari, P.; Nagpure, D.; et al. Studies on fatigue life enhancement of pre-fatigued spring steel specimens using laser shock peening. Mater. Des. 2014, 54, 734–741. [Google Scholar] [CrossRef]
  99. Zhou, Z.; Gill, A.S.; Qian, D.; Mannava, S.; Langer, K.; Wen, Y.; Vasudevan, V.K. A finite element study of thermal relaxation of residual stress in laser shock peened IN718 superalloy. Int. J. Impact Eng. 2011, 38, 590–596. [Google Scholar] [CrossRef]
  100. Gomez-Rosas, G.; Rubio-Gonzalez, C.; Ocaña, J.L.; Molpeceres, C.; Porro, J.A.; Morales, M.; Casillas, F.J. Laser shock processing of 6061-T6 Al alloy with 1064 nm and 532 nm wavelengths. Appl. Surf. Sci. 2010, 256, 5828–5831. [Google Scholar] [CrossRef]
  101. Irizalp, S.G.; Saklakoglu, N.; Yilbas, B.S. Characterization of microplastic deformation produced in 6061-T6 by using laser shock processing. Int. J. Adv. Manuf. Technol. 2014, 71, 109–115. [Google Scholar] [CrossRef]
  102. Sathyajith, S.; Kalainathan, S. Effect of laser shot peening on precipitation hardened aluminum alloy 6061-T6 using low energy laser. Opt. Lasers Eng. 2012, 50, 345–348. [Google Scholar] [CrossRef]
  103. Salimianrizi, A.; Foroozmehr, E.; Badrossamay, M.; Farrokhpour, H. Effect of Laser Shock Peening on surface properties and residual stress of Al6061-T6. Opt. Lasers Eng. 2016, 77, 112–117. [Google Scholar] [CrossRef]
  104. Zhou, J.; Huang, S.; Sheng, J.; Lu, J.; Wang, C.; Chen, K.; Ruan, H.; Chen, H. Effect of repeated impacts on mechanical properties and fatigue fracture morphologies of 6061-T6 aluminum subject to laser peening. Mater. Sci. Eng. A 2012, 539, 360–368. [Google Scholar] [CrossRef]
  105. Ren, X.; Ruan, L.; Yuan, S.; Yang, H.; Zhan, Q.; Zheng, L.; Wang, Y.; Dai, F. Metallographic structure evolution of 6061-T651 aluminum alloy processed by laser shock peening: Effect of tempering at the elevated temperatures. Surf. Coat. Technol. 2013, 221, 111–117. [Google Scholar] [CrossRef]
  106. Jin, X.Y.; Lan, L.; Gao, S.; Bo, H.; Rong, Y.H. Effects of laser shock peening on microstructure and fatigue behavior of Ti–6Al–4V alloy fabricated via electron beam melting. Mater. Sci. Eng. A 2020, 780, 139199. [Google Scholar] [CrossRef]
  107. Jinoop, A.N.; Subbu, S.K.; Paul, C.P.; Palani, I.A. Post-processing of Laser Additive Manufactured Inconel 718 Using Laser Shock Peening. Int. J. Precis. Eng. Manuf. 2019, 20, 1621–1628. [Google Scholar] [CrossRef]
  108. Budinski, K.G. Tribological properties of titanium alloys. Wear 1991, 151, 203–217. [Google Scholar] [CrossRef]
  109. Damon, J.; Dietrich, S.; Vollert, F.; Gibmeier, J.; Schulze, V. Process dependent porosity and the influence of shot peening on porosity morphology regarding selective laser melted AlSi10Mg parts. Addit. Manuf. 2018, 20, 77–89. [Google Scholar] [CrossRef]
  110. Sagbas, B. Post-Processing Effects on Surface Properties of Direct Metal Laser Sintered AlSi10Mg Parts. Met. Mater. Int. 2019, 26, 143–153. [Google Scholar] [CrossRef]
  111. ISO 4287. Geometrical Product Specification (GPS)—Surface Texture: Profile Method—Terms, Definition and Surface Texture Parameters; International Organization for Standardization (ISO): Geneva, Switzerland, 1997. [Google Scholar]
  112. Maamoun, A.H.; Elbestawi, M.A.; Veldhuis, S.C. Influence of Shot Peening on AlSi10Mg Parts Fabricated by Additive Man-ufacturing. J. Manuf. Mater. Process. 2018, 2, 40. [Google Scholar]
  113. Uzan, N.E.; Ramati, S.; Shneck, R.; Frage, N.; Yeheskel, O. On the effect of shot-peening on fatigue resistance of AlSi10Mg specimens fabricated by additive manufacturing using selective laser melting (AM-SLM). Addit. Manuf. 2018, 21, 458–464. [Google Scholar] [CrossRef]
  114. Wang, Q.; Morrow, J.D.; Ma, C.; Duffie, N.A.; Pfefferkorn, F.E. Surface prediction model for thermocapillary regime pulsed laser micro polishing of metals. J. Manuf. Process. 2015, 20, 340–348. [Google Scholar] [CrossRef]
  115. Ukar, E.; Lamikiz, A.; Liebana, F.; Martinez, S.; Tabernero, I.; Mentxaka, A.L. An industrial approach of laser polishing with different laser sources. Mater. Werkst. 2015, 46, 661–667. [Google Scholar] [CrossRef]
  116. Pfefferkorn, F.E.; Duffie, N.A.; Morrow, J.D.; Wang, Q. Effect of beam diameter on pulsed laser polishing of S7 tool steel. CIRP Ann. 2014, 63, 237–240. [Google Scholar] [CrossRef]
  117. Ma, C.; Guan, Y.; Zhou, W. Laser polishing of additive manufactured Ti alloys. Opt. Lasers Eng. 2017, 93, 171–177. [Google Scholar] [CrossRef]
  118. Mai, T.A.; Lim, G.C. Micromelting and its effects on surface topography and properties in laser polishing of stainless steel. J. Laser Appl. 2004, 16, 221–228. [Google Scholar] [CrossRef]
  119. Guo, W.; Hua, M.; Tse, P.W.-T.; Mok, A.C.K. Process parameters selection for laser polishing DF2 (AISI O1) by Nd:YAG pulsed laser using orthogonal design. Int. J. Adv. Manuf. Technol. 2012, 59, 1009–1023. [Google Scholar] [CrossRef]
  120. Lamikiz, A.; Sánchez, J.; de Lacalle, L.L.; Arana, J. Laser polishing of parts built up by selective laser sintering. Int. J. Mach. Tools Manuf. 2007, 47, 2040–2050. [Google Scholar] [CrossRef]
  121. Brandl, E.; Greitemeier, D. Microstructure of additive layer manufactured Ti-6Al-4V after exceptional post heat treatments. Mater. Lett. 2012, 81, 84–87. [Google Scholar] [CrossRef]
  122. Nassar, A.R.; Reutzel, E.W. Additive manufacturing of Ti-6Al-4V using a pulsed laser beam. Metall. Mater. Trans. A 2015, 46, 2781–2789. [Google Scholar] [CrossRef]
  123. Wu, S.; Lu, Y.; Gan, Y.; Huang, T.; Zhao, C.; Lin, J.; Guo, S. Microstructural evolution and microhardness of a selective-laser-melted Ti–6Al–4V alloy after post heat treatments. J. Alloys Compd. 2016, 672, 643–652. [Google Scholar] [CrossRef]
  124. Hahn, J.D.; Shin, Y.C.; Krane, M.J.M. Laser transformation hardening of Ti-6Al-V-4 in solid state with accompanying kinetic model. Surf. Eng. 2007, 23, 78–82. [Google Scholar] [CrossRef]
  125. Seungjong, L.; Zabihollah, A.; Jonathan, W.P.; Masoud, M.S.; Nima, S. Laser polishing for improving fatigue performance of additive manufactured Ti-6Al-4V parts. Opt. Laser Technol. 2021, 134, 106639. [Google Scholar]
  126. Zhou, J.; Han, X.; Li, H.; Liu, S.; Shen, S.; Zhou, X.; Zhang, D. In-Situ Laser Polishing Additive Manufactured AlSi10Mg: Effect of Laser Polishing Strategy on Surface Morphology, Roughness and Microhardness. Materials 2021, 14, 393. [Google Scholar] [CrossRef] [PubMed]
  127. Zhou, J.; Liao, C.; Shen, H.; Ding, X. Surface and property characterization of laser polished Ti6Al4V. Surf. Coat. Technol. 2019, 380, 125016. [Google Scholar] [CrossRef]
  128. Avilés, R.; Albizuri, J.; Lamikiz, A.; Ukar, E.; Avilés, A. Influence of laser polishing on the high cycle fatigue strength of medium carbon AISI 1045 steel. Int. J. Fatigue 2011, 33, 1477–1489. [Google Scholar] [CrossRef]
  129. Chen, L.; Richter, B.; Zhang, X.; Bertsch, K.B.; Thoma, D.J.; Pfefferkorn, F.E. Effect of laser polishing on the microstructure and mechanical properties of stainless steel 316L fabricated by laser powder bed fusion. Mater. Sci. Eng. A 2021, 802, 140579. [Google Scholar] [CrossRef]
  130. Rosa, B.; Mognol, P.; Hascoët, J.-Y. Laser polishing of additive laser manufacturing surfaces. J. Laser Appl. 2015, 27, S29102. [Google Scholar] [CrossRef] [Green Version]
  131. Bai, Y.; Chaudhari, A.; Wang, H. Investigation on the microstructure and machinability of ASTM A131 steel manufactured by directed energy deposition. J. Mater. Process. Technol. 2020, 276, 116410. [Google Scholar] [CrossRef]
  132. Ni, C.; Zhu, L.; Zheng, Z.; Zhang, J.; Yang, Y.; Yang, J.; Bai, Y.; Weng, C.; Lu, W.F.; Wang, H. Effect of material anisotropy on ul-tra-precision machining of Ti-6Al-4V alloy fabricated by selective laser melting. J. Alloys Compd. 2020, 848, 156457. [Google Scholar] [CrossRef]
  133. Ni, C.; Zhu, L.; Zheng, Z.; Zhang, J.; Yang, Y.; Hong, R.; Bai, Y.; Lu, W.F.; Wang, H. Effects of machining surface and laser beam scanning strategy on machinability of selective laser melted Ti6Al4V alloy in milling. Mater. Des. 2020, 194, 108880. [Google Scholar] [CrossRef]
  134. Zhang, J. Micro-blasting of 316L tubular lattice manufactured by laser powder bed fusion. In Proceedings of the 19th International Conference of the European Society For Precision Engineering and Nanotechnology EUSPEN 2019, Bilbao, Spain, 3–7 June 2019. [Google Scholar]
  135. Wang, J.; Zhu, J.; Liew, P.J. Material Removal in Ultrasonic Abrasive Polishing of Additive Manufactured Com-ponents. Appl. Sci. 2019, 9, 535. [Google Scholar] [CrossRef] [Green Version]
  136. Teng, X.; Zhang, G.; Zhao, Y.; Cui, Y.; Li, L.; Jiang, L. Study on magnetic abrasive finishing of AlSi10Mg alloy prepared by selective laser melting. Int. J. Adv. Manuf. Technol. 2019, 105, 2513–2521. [Google Scholar] [CrossRef]
  137. Guo, J.; Song, C.; Fu, Y.; Au, K.H.; Kum, C.W.; Goh, M.H.; Ren, T.; Huang, R.; Sun, C.-N. Internal Surface Quality Enhancement of Selective Laser Melted Inconel 718 by Abrasive Flow Machining. J. Manuf. Sci. Eng. 2020, 142, 1–42. [Google Scholar] [CrossRef]
  138. Han, S.; Salvatore, F.; Rech, J.; Bajolet, J.; Courbon, J. Effect of abrasive flow machining (AFM) finish of selective laser melting (SLM) internal channels on fatigue performance. J. Manuf. Process. 2020, 59, 248–257. [Google Scholar] [CrossRef]
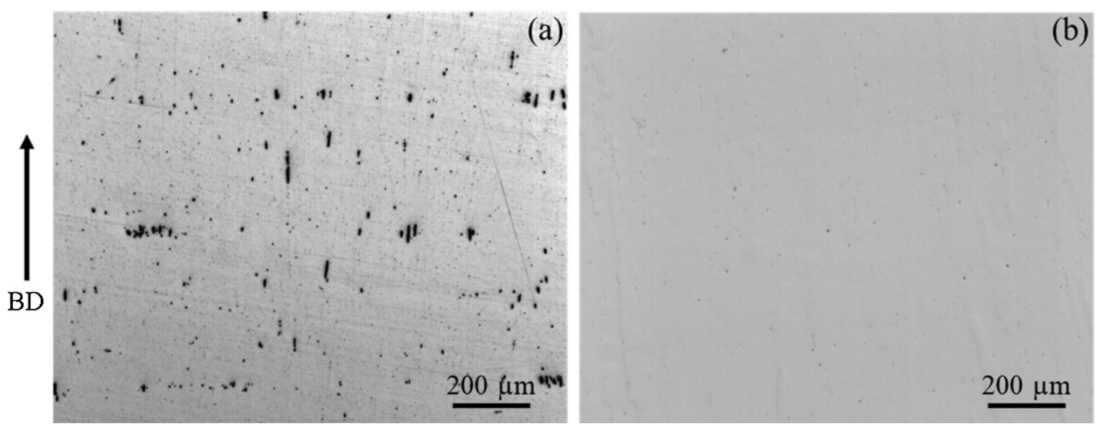
Figure 1. Optical micrographs presenting defects. (a) Electron beam melting (EBM) part with obvious defects. (b) Optical microstructure after the hot isostatic pressing (HIP) treatment. (Reprinted with permission from ref. [75]. Copyright 2019 Elsevier).
Jmmp 05 00038 g001
Figure 2. Schematic diagram of SEM micrographs. (a,b) as-built. (c,d) HIP. (e,f) HIP + HT treatments [75]. (Reprinted with permission from ref. [75]. Copyright 2019 Elsevier).
Jmmp 05 00038 g002
Figure 3. The macrostructure and microstructure of Ti-6Al-4 V samples manufactured by EBM at a longitudinal cross-section. (a) Macrostructure in as-built conditions. (b) Macrostructure in as-built and HIP treatments. (c,d) Microstructure in as-built conditions. (e,f) Microstructure in as-built and HIP treatments. (Reprinted with permission from ref. [80]. Copyright 2020 Elsevier).
Jmmp 05 00038 g003
Figure 4. SEM images. (a,b) As-manufactured. (c,d) direct aging. (e,f) solution treatment plus aging. (g,h) homogenization plus solution treatment plus aging. (Reprinted with permission from ref. [88]. Copyright 2020 Elsevier).
Jmmp 05 00038 g004
Figure 5. Schematic diagram of the laser peening processes.
Jmmp 05 00038 g005
Figure 6. Schematic diagram of micrographs (“Scale 10.00 μm” represents scale length of the micrograph of sections). (a) treated sample. (b) untreated sample. (Reprinted with permission from ref. [103]. Copyright 2016 Elsevier).
Jmmp 05 00038 g006
Figure 7. Schematic diagram of SEM graphs for the post-processed surface. (a) original image and (b) marked subgrain. (Reprinted with permission from ref. [103]. Copyright 2016 Elsevier).
Jmmp 05 00038 g007
Figure 8. Schematic diagram of the laser shock peening setup.
Jmmp 05 00038 g008
Figure 9. Schematic of a wear surface of an untreated sample. (a) lower magnification; (b) higher magnification. (Reprinted with permission from ref. [107]. Copyright 2019 Springer).
Jmmp 05 00038 g009
Figure 10. Schematic of a wear surface of a treated sample under different magnification. (a) lower magnification; (b) higher magnification. (c) comparison with untreated sample. (Reprinted with permission from ref. [107]. Copyright 2019 Springer).
Jmmp 05 00038 g010
Figure 11. SEM images (left) and 3D optical profilometer images (right) of wear tracks of laser peening surfaces. (a) with palm oil. (b) with soybean oil. (c) with machine oil. (Reprinted with permission from ref. [110]. Copyright 2019 Springer).
Jmmp 05 00038 g011
Figure 12. Effects of laser polishing on TC4 Ti alloy manufactured by laser AM. (a) Laser-polished region of the laser AM surface. (b) SEM micrograph of the boundary comparison between the original region and laser-polished region. (c) Topographic image from laser scanning confocal microscope of the original region. (d) Topographic image from laser scanning confocal microscope of the laser-polished region. (Reprinted with permission from ref. [117]. Copyright 2017 Elsevier).
Jmmp 05 00038 g012
Figure 13. Schematic diagram of microstructure analysis for TC4 surface manufactured by laser AM. (a) Overview of the substrate and laser-polished region. (b) Microstructure of the laser-polished region. (c) Microstructure of the substrate. (d) XRD profiles. (Reprinted with permission from ref. [117]. Copyright 2017 Elsevier).
Jmmp 05 00038 g013
Figure 14. Surface condition before and after laser polishing. (a) Optical image of the manufactured surface. (b) 3D analysis of the surface. Color map and scale show larger surface roughness. (c) Optical image of the laser polishing surface. (d) three-dimensional analysis of the laser polishing surface. (Reprinted with permission from ref. [125]. Copyright 2021 Elsevier).
Jmmp 05 00038 g014
Figure 15. SEM images of the surface pore defects. (a) surface without treatment. (b) polished surface. (Reprinted with permission from ref. [126]. Copyright 2021, open access).
Jmmp 05 00038 g015
Figure 16. Optical morphologies of the surface. (a) surface without treatment. (b) polished surface. (Reprinted with permission from ref. [126]. Copyright 2021, open access).
Jmmp 05 00038 g016
Figure 17. (a) Surface quality of SLM-ed AlSiMg0.75 alloy after conventional diamond turning. (b) ultrasonic elliptical vibration-assisted machining. (Reprinted with permission from ref. [61]. Copyright 2020, Elsevier).
Jmmp 05 00038 g017
Figure 18. Micro-blasting of SLM-ed tubular lattice structure. (a) setup. (b) lattice structure before micro-blasting. (c) after blasting.
Jmmp 05 00038 g018
Table 1. Laser shock peening experiments settings of laser additive manufactured Inconel 718.
Experiment No.Number of ShotsLaser Power (mW)
13140
25140
37140
43170
55170
67170
73200
85200
97200
Publisher’s Note: MDPI stays neutral with regard to jurisdictional claims in published maps and institutional affiliations.