1. Introduction
Virgin aluminum is a widely used metal in the manufacturing field, and its use means that natural bauxite resources could tend towards exhaustion, since the remelting of aluminum always leads to a loss of quality [
1]. The question is then whether this loss of quality can have an influence on the machinability of recycled aluminum. By remaining in the manufacturing field, the chips produced during machining can be recovered and processed according to different processes for new forms. This is currently carried out with the shavings of aluminum alloys, which are formed hot or cold by compaction or extrusion, by molding or sintering. These processes are widely used to study mechanical and chemical properties [
2,
3]. The AA6060 aluminum alloy chips were recycled and processed by the hot extrusion for a number of studies. Studies have shown that the recycled alloy has mechanical and microstructure properties similar to those of the virgin alloy from foundries [
4]. When A7075 machining chips and dust are hot extruded, this alloy has good cohesion between the chips and dust that play a very good binder role, and [
5,
6] good surface quality and good mechanical properties.
In the literature, there is much more work on the machinability of virgin aluminum alloys, and the characteristics considered are the general surface roughness, formation of chips, burrs, and cutting power, including the emission of metal particles [
7]. The study of these characteristics depends on several criteria: the cutting parameters, the cutting conditions, the geometry of the cutting tool and many others. The study on 6061-T6 aluminum alloy machined with lubrication, on the one hand, dry, on the other hand, and in mode MQL [
8] showed that the increase in cutting speed leads to a decrease in surface roughness, whatever the value of the feed. Surface roughness increases with increasing feed. Lubrication minimizes the deterioration of the machined surface. Additionally, using the optimum cutting conditions, dry machining and MQL produced parts of comparable quality to those obtained by wet machining. In the same way, according to the cutting speed [
9], A319 (at T0 and T6) analyzed the shavings of aluminum alloys and A356 (at T0 and T6) [
10] analyzed the bronze aluminum alloy chips.
Two other characteristics, the height of the burrs and the surface roughness of the 2024, 7075 and 7050 aluminum alloys in drilling using cutting speed and feed as parameters [
11], were considered to show that the feed was the parameter most influencing the height of the burrs. The cutting speed and then the feed influenced the roughness. The geometry of the tool also has effects on the surface condition. The authors of [
12] studied the effects of cutting angles and showed that the wear on the tool is high when the cutting angle increases and the roughness value tends to increase. Using this same aluminum alloy, the authors of [
13] studied the effect of the cutting speed of the feed and the cutting depth on the surface roughness when dry machining. They showed that the optimum roughness has been achieved when the pass feed and the cutting depth are as low as possible, and when the cutting speed is high. This study observed that increasing the cutting speed tends to improve the surface finish. However, the increase in the cutting depth slightly influences the surface roughness.
In general, machining generates very high temperatures, sometimes requiring the use of R. Khettabi lubricants [
14], but the use of these lubricants increases the machining costs and presents difficulties for the recycling of chips. Dry machining is therefore used to avoid these difficulties. However, dry machining produces metallic particles, which have a considerable impact on the operator’s health [
15,
16]. Considering the emission of particles, as a characteristic of machinability, which can be defined in terms of mass concentration, its mastery is more than necessary today. Several studies on the production of metal particles have been carried out. They show that the amount of metal particles produced during the drilling of 6061 and A356 aluminum alloys is influenced by the material and type of heat treatment, temperature and chips formation. These four parameters can be added to the cutting depth [
17,
18]. The production of these particles is very important at the beginning of the machining and decreases when the depths are slightly larger [
19], and the emission of the particles during the cutting process is a function of the material. Ductile materials generate more fine and ultrafine particles than fragile materials, as the formation of the chip correlates with the mass concentration of the metal particles. Most of the work on the mass concentration of metal particles during machining is generally done on virgin materials, and in particular on the drilling of aluminum alloys. Very few studies on the mass concentration of metal particles in the machining of aluminum alloys for recycling are done. Using lubrication during machining significantly reduces the mass concentration of metal particles by at least 70% [
18].
Studies on the machinability of recycled aluminum alloys, mainly those resulting from the recycling of machining chips, are not yet very repainted. However, one of the most recent examples is [
19], which shows a clear difference in the machinability between the two recycled aluminum alloys and indicates a significant lubrication effect on surface roughness and chip morphology. The question of whether recycled aluminum can have good machinability as virgin aluminum is still worth raising. This study was conducted to try to provide some answers to this problem. It aims to highlight models with good machinability resistance of some recycled aluminum alloys. The machining is carried out in dry turning and with lubrication on two recycled aluminum alloys, obtained by melting the machining chips of the aluminum alloy 6061. In this study, we first show the existence of a hardness difference between the two recycled alloys. In a second step, by making a comparison, we show the influence of feed, heat treatment and lubrication on machinability (surface roughness, mass concentration of metal particles and chips morphology) of these recycled aluminum alloys and present models for evaluating the machinability of recycled alloys. Three main parts make up this study, namely the methodology used, the machinability of recycled alloys, and the conclusion of this study.
We present the notations:
MQL: minimum quantity lubrication.
Y: size studied;
X1, X2 …: factors influencing Y;
ɛ: fault.
: measured variable x or y of the sample;
: mean of the sample variable x or y;
β, βo, β1: estimated coefficients;
: estimated value of y;
t: coefficient as a function of confidence level;
α: probability threshold;
n: sample size;
: estimated standard deviation.
2. Materials and Methods
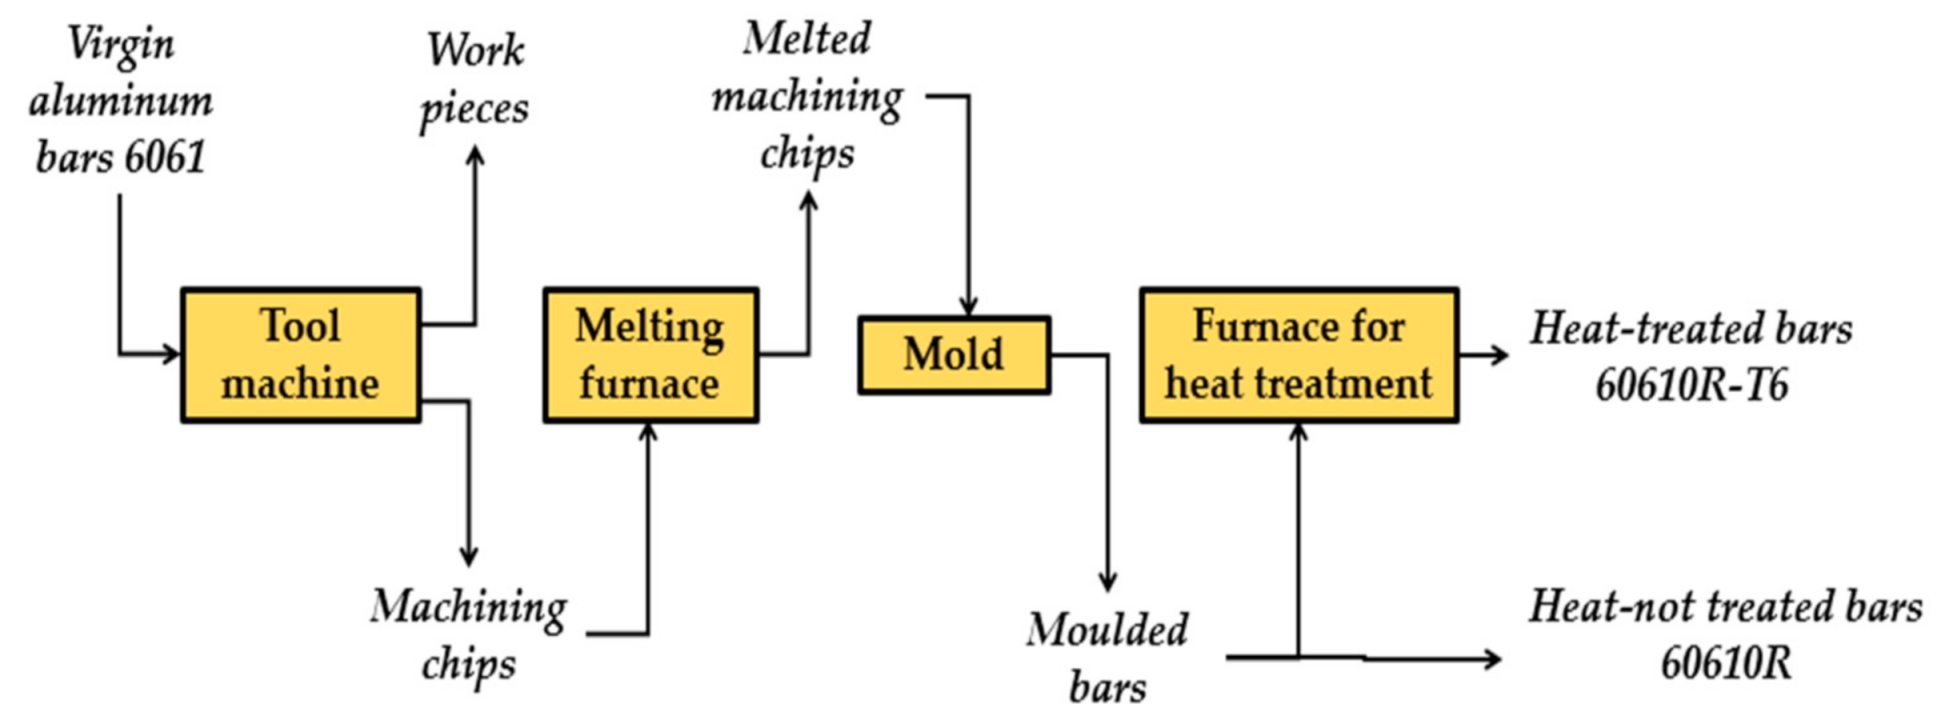
This study was carried out in two parts. The first part consisted of producing recycled aluminum alloy bars following the established process (
Figure 1). The 6061 aluminum machining chips were recovered, processed and formed by molding. This resulted in recycled aluminum bars that were named 6061 R. Then, some of them were heat-treated in a furnace, to obtain recycled aluminum bars named 6061 R-T6. 6061 R alloy was dissolved at 550 °C for 3 h, followed by rapid cooling in water at 23 °C. Aging was immediately performed for 3 h at 160 °C followed by slow cooling.
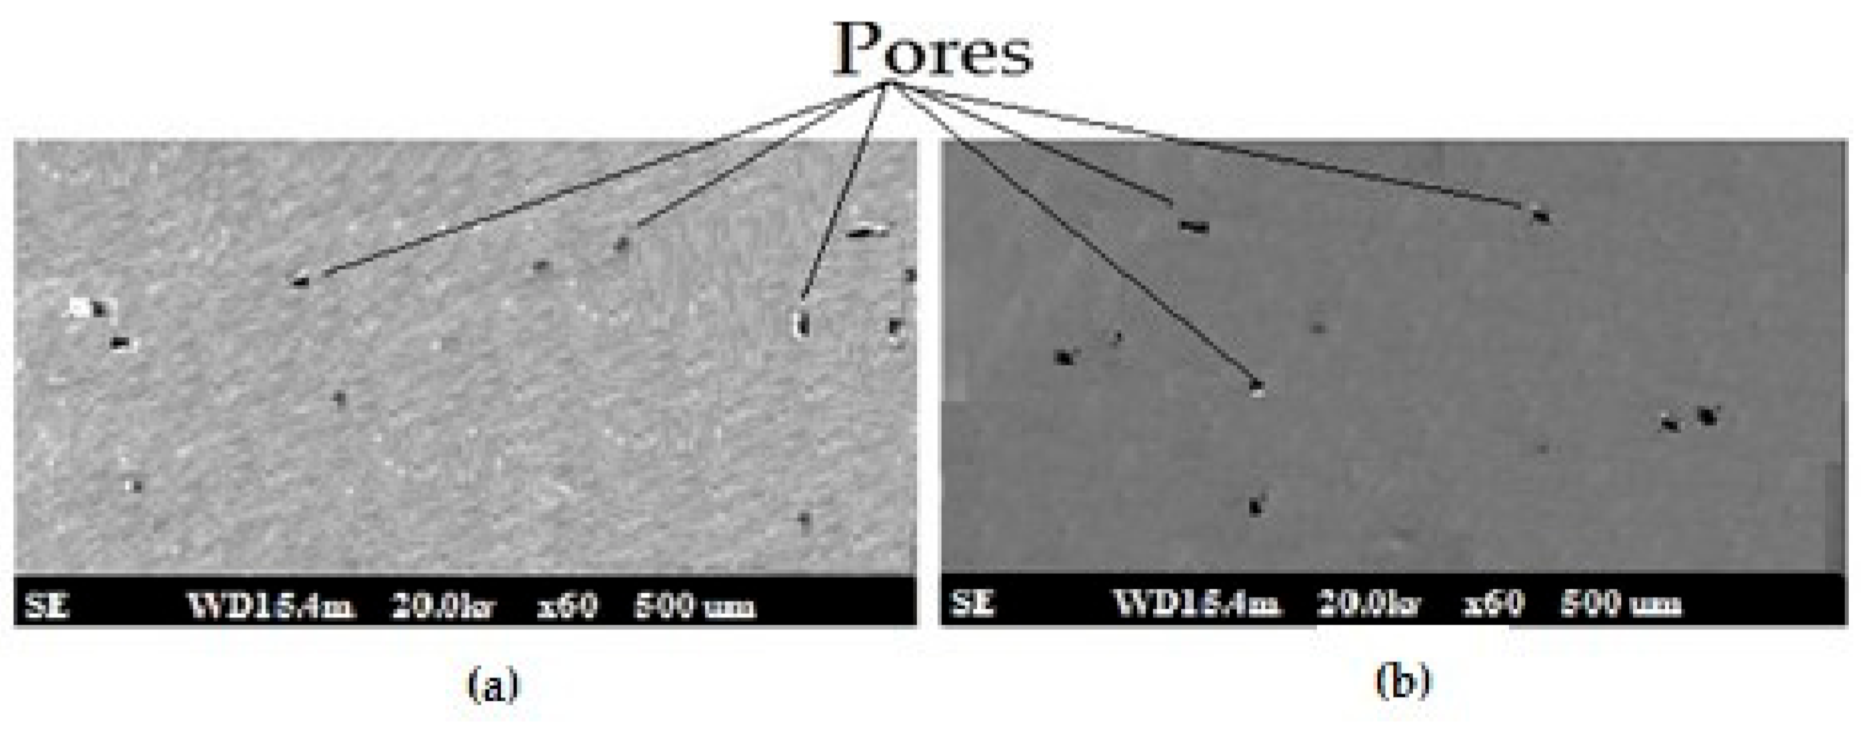
6061 R and 6061 R-T6 aluminum alloys were analyzed under a scanning electron microscope (SEM), and the results showed a clear difference between the two recycled alloys.
Figure 2 shows the condition of the recycled alloy before and after heat treatment. The presence of pores, the location of which is heterogeneous, is observed. These pores have different sizes and shapes. The dimensions range from 0.01 to 0.06 mm and shapes.
The hardness of alloys recycled by foundry is also different from that of virgin aluminum alloys. These aluminum alloys recycled by smelters are more fragile, whether heat-treated or not, unlike virgin aluminum alloys, which are ductile.
The recycled aluminum alloys obtained were compared with virgin aluminum alloys. This comparison showed some differences in chemical composition.
Table 1 show the content of each addition element.
The hardness tests were carried out on a durometer, characterized by many scales. This durometer features a 3.175 mm diameter tungsten carbide ball, for a load of 980.665 N. The material tested is an aluminum alloy.
Table 2 shows the hardness values measured on each recycled aluminum alloy.
The second part consisted of machinability tests for the study of surface roughness (Ra), chip morphology and the mass concentration of metal particles (C
m). For surface roughness, the parameters and cutting conditions (
Table 3) were used to perform all machinability tests. The machining operation (over a length of 200 mm, diameter of the workpiece is 50 mm and a cutting depth of 0.6 mm), with rotation frequencies 640, 1000 and 1260 rpm, was performed with cutting inserts that were uncoated grade positive KC5410 (rɛ = 0.8 mm, α = 11°). The lubricant used (BLASOCUT
® BC 20 SW) is a mixture of mineral oils, emulsifiers, EP additives (chlorinated paraffin, C
14–17) and inhibitors.
The data in
Table 3 are taken with reference to the study by the authors of [
20], who had previously investigated the machinability of recycled aluminum alloys. To stay in the same logic, it was considered necessary to fix the use of the cutting speeds considered by [
20]. Since the study was made for finishing operations, the feed is considered in an interval ranging from 0.05 mm/rev to 0.2 mm/rev.
The experimental design method (factor design 3
2: response surface) was used. It studied the effects of feed and cutting speed (15 tests include six in the center), on surface roughness. Initially, the multifactorial method made it possible to organize and execute the experiments in an optimal manner in order to define the input parameters most influencing the surface roughness (Ra). The multifactorial model was adopted on the basis of the standard notation (1) to define the models for the assessment of surface roughness as a function of the feed and cutting speed and their interactions.
Since the feed is the parameter that most affects surface roughness, the uni-factorial method was used for further machinability tests, at a cutting speed of 100 m/min and at a cutting depth of 0.6 mm. These tests made it possible to study the evolution of the surface roughness (measured with a Surftest 301 (Mitutoyo), the mass concentration of metal particles (measured with a Dust Tract) and chip morphology.
The simple regression procedure was used to design statistical models describing the impact of the feed on surface roughness and concentration of metal particles. The choice of the best simple regression model was made by determining the correlation coefficient (Equation (2)), the highest R
2 statistic (Equation (3)) and taking into account the confidence and prediction limits (Equations (4) and (5)). The chips were collected, and their morphologies observed under an optical microscope.
3. Results and discussion
3.1. Surface Roughness
The experimental designs were used to perform the machinability tests, in order to measure the surface roughness.
Table 4 contains the parameters taken into account to perform the tests. There are nine tests for both parameters: feed (0.05 mm/rev for the low level and 0.2 mm/rev for the high level) and cutting speed (100 m/min for the low level and 210 m/min for the high level). This experiment also includes six tests in the center for the two parameters (0.13 m/rev for the feed and 155 m/min for the cutting speed) which are represented by the repeated values in the table.
Figure 3 shows the roughness profile of the measurement performed on the 6061 R-T6 alloy wet machined. This profile gave the surface roughness on several parameters including the arithmetic mean deviation (Ra) which was chosen for the study.
The surface roughness was measured after each loading operation under experimental conditions. With a 95% confidence interval, all designs were randomized and the degree of freedom for error is 9. After the tests, the surface roughness was measured six times in order to rank an average value. These average values are given in
Table 4. The results obtained were analyzed to study the influence of each experimental parameter on the surface roughness of the two recycled alloys.
Table 5 and
Table 6 present the ANOVA for the two alloys 6061R and 6061R-T6 taking into account each machining mode. These tables break down the variability of the surface roughness of the 6061 R and 6061 R-T6 alloys, for each of the effects of the parameters and their interactions (giving the sum of squares, the root mean square, the F ratio and the probability). The data in these tables show that the factors with the probability less than 0.05 have a significant influence on the surface roughness.
Analysis of the results shows:
- ■
For the recycled 6061 R dry machined alloy, there are three significant and positive influences (feed, cutting speed and interaction cutting speed-cutting speed). When machining, this alloy is carried out with lubrication; there are five significant and positive influences (feed, feed–feed, cutting speed, feed-cutting speed then cutting speed-cutting speed).
- ■
For the recycled 6061 R-T6 dry machined alloy, there are three significant influences, including the influence of the feed that is positive, the influence of the interaction feed–feed that is negative and the influence of the cutting speed that is positive. When machining, this alloy is cut with lubrication; there are two significant and positive influences (feed, interaction feed–feed).
All of these effects have probabilities less than 0.05, indicating that they are significantly different from zero at the 95% confidence level.
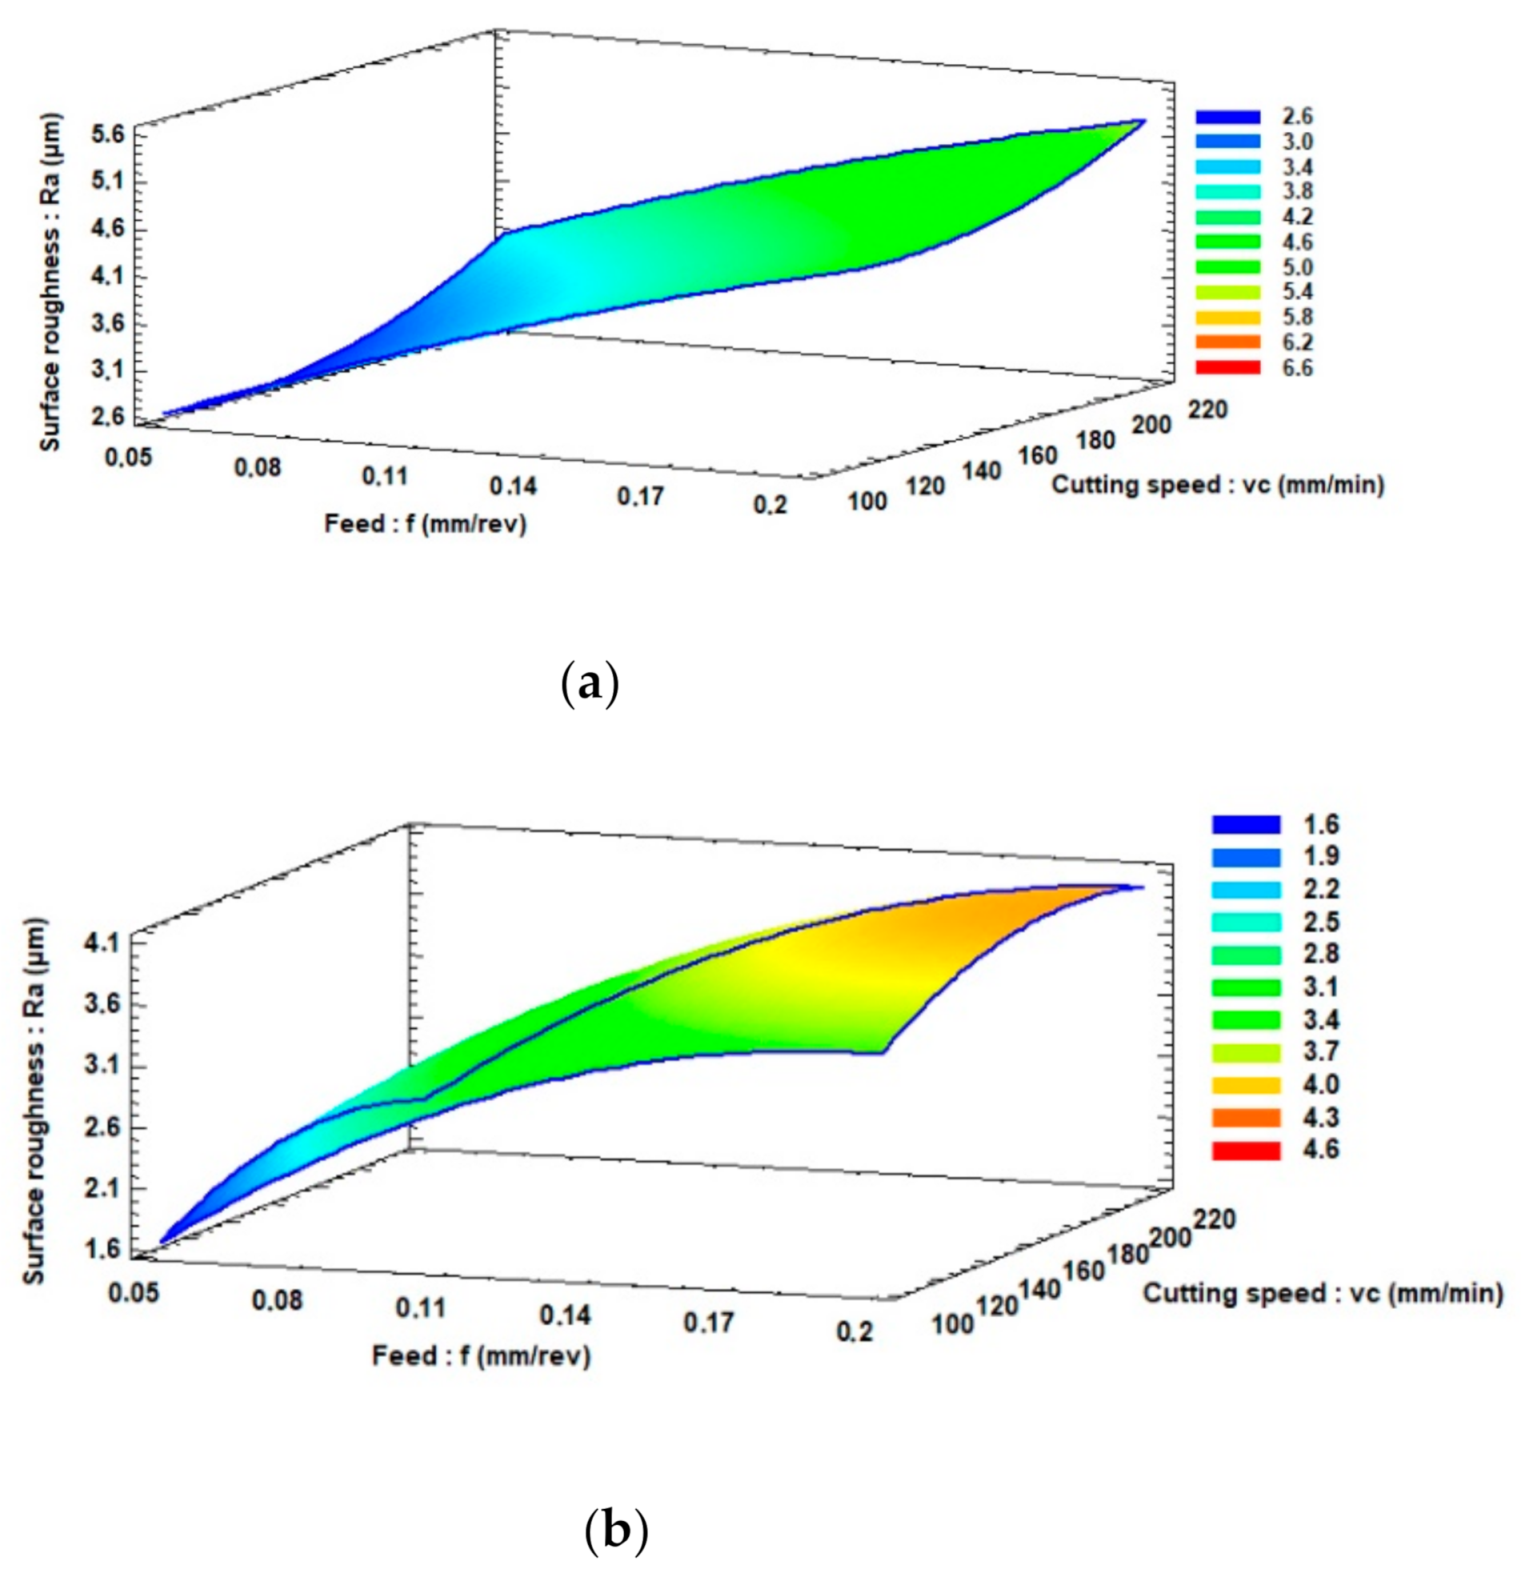
Figure 4 and
Figure 5 show the response surfaces of the surface roughness of each recycled alloy, obtained by varying the feed (from 0.05 to 0.2 mm/rev) and the cutting speed (from 100 to 210 m/min), at a cutting depth of 0.6 mm. In all cases, there is a very large significant and positive influence of feed on surface roughness, and a small significant and positive influence of the cutting speed on the surface roughness.
The analysis of these response surfaces shows that, for all alloys, when the feed increases from 0.05 to 0.2 mm/rev, the roughness increases considerably. The best surface finish is achieved when the machining operation is performed at a low feed (f = 0.05 mm/rev). When the cutting speed increases from 100 to 210 m/min, the surface roughness increases slightly. With the exception of the recycled 6061 R-T6 alloy machined with the lubrication, as the cutting speed increases from 100 to 210 m/min, the surface roughness appears constant. The best surface finish is achieved when the machining operation is carried out at a cutting speed of 100 m/min.
In all cases, the forms of surface roughness change are very different depending on the recycled alloy and whether lubrication is used or not. There is also a marked improvement in surface roughness when lubrication is used and also when the material is harder. Models 6 to 9 are used to assess surface roughness, taking into account feed rate and cutting speed under machining conditions.
Models 6 to 9 are established on the basis of these average values of the data in
Table 4. These models allow the evaluation of the surface roughness as a function of the feed and the cutting speed.
- ■
Dry machining
- ■
Machining with lubrication
The best surface finish is obtained at a cutting speed of 100 m/min and a feed of 0.05 mm/rev for all recycled alloys with or without lubrication, so another series of tests was carried out on the two recycled alloys 6061 R and 60601 R T6, considering the feed which is the parameter having the greatest influence.
Table 7 shows the average values of surface roughness obtained by varying the feed and with a cutting speed of 100 m/min.
For each of these measurements, given the average values contained in
Table 7, the average absolute errors are, respectively:
- ■
0.0679 and 0.0162 for 6061 R and 6061 R-T6 alloys dry machined.
- ■
0.0249 and 0.0160 for 6061 R and 6061 R-T6 alloys machined with lubrication.
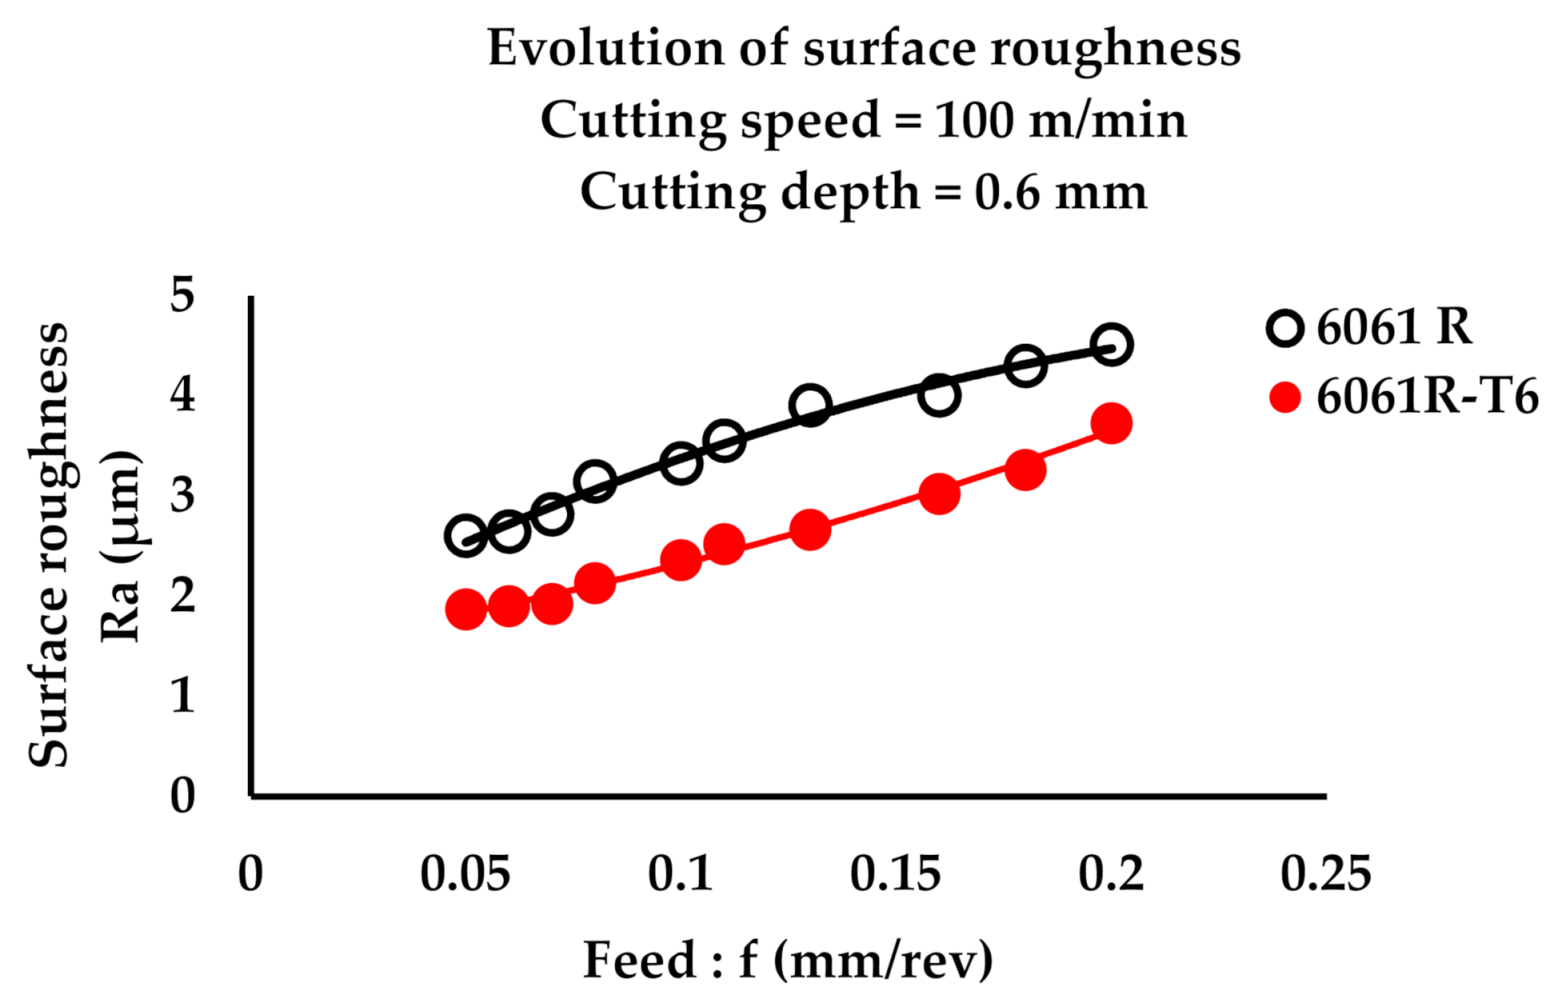
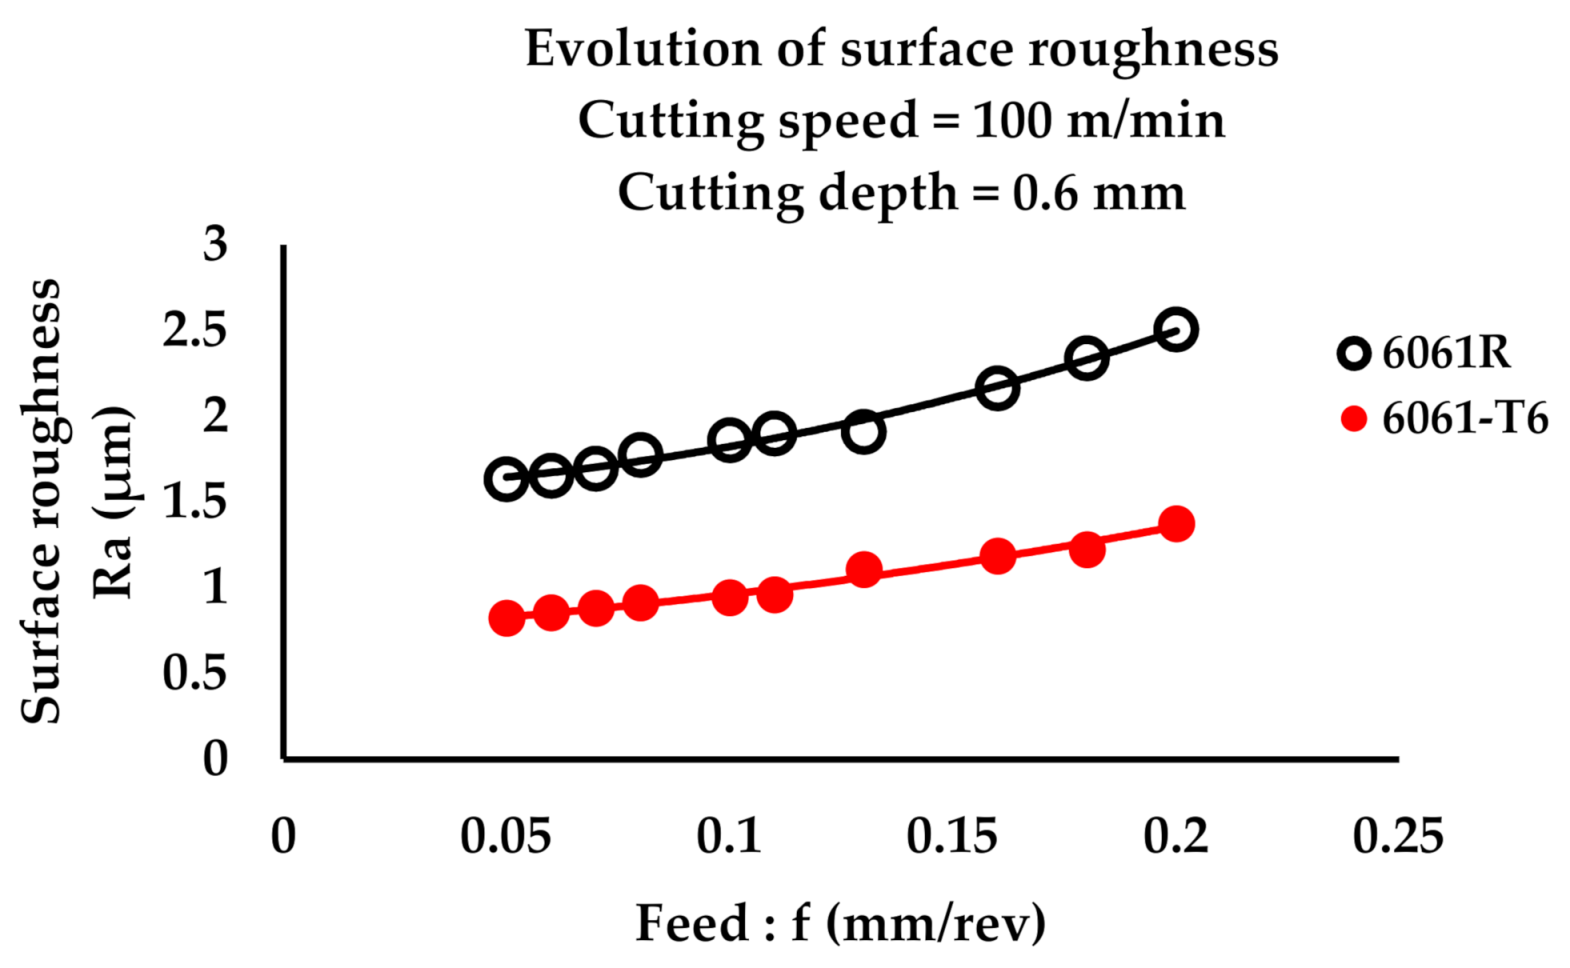
The tests were carried out by varying the feed from 0.02 to 0.2 mm and considering the constant cutting speed of 100 m/min and a cutting depth of 0.6 mm to study the evolution of the surface roughness as a function of the feed.
Figure 6 and
Figure 7 show the evolution of the surface roughness of each recycled alloy. When the machining of the two recycled alloys 6061 R and 6061 R-T6 is carried out dry and with lubrication, it appears that the heat treatment also has an influence on the surface roughness. Whatever the hardness of the alloy and the machining conditions, the roughness increases with the increase of the feed at the cutting speed of 100 m/min.
By analyzing the curves in
Figure 6 and
Figure 7, we observe that the surface roughness of each recycled alloy evolves differently. To define the models for assessing the surface roughness of each recycled alloy, Equations (2)–(5) were considered. The correlation coefficients for the surface roughness of recycled alloys 6061 R and 6061 R-T6 machined dry and with lubrication are, respectively, 0.992, 0.994, 0.994 and 0.991 and statistics R
2 are 98.51%, 98.95%, 98.81% and 98.25%. This led to the definition of all models for the assessment of surface roughness by the forms of Equations (10)–(13).
- ■
Dry machining
- ■
Machining with lubrication
The surface roughness of these recycled alloys has been compared to that of the virgin alloy. Note that for the virgin alloy and the recycled alloy, the lead is the common factor with the greatest significant influence. However, machined under the same conditions, the surface finish of the virgin alloy is much better. The surface finish of the machined 6061 R-T6 alloy with lubrication approximates that of the virgin alloy.
3.2. Mass Concentration of Metal Particles
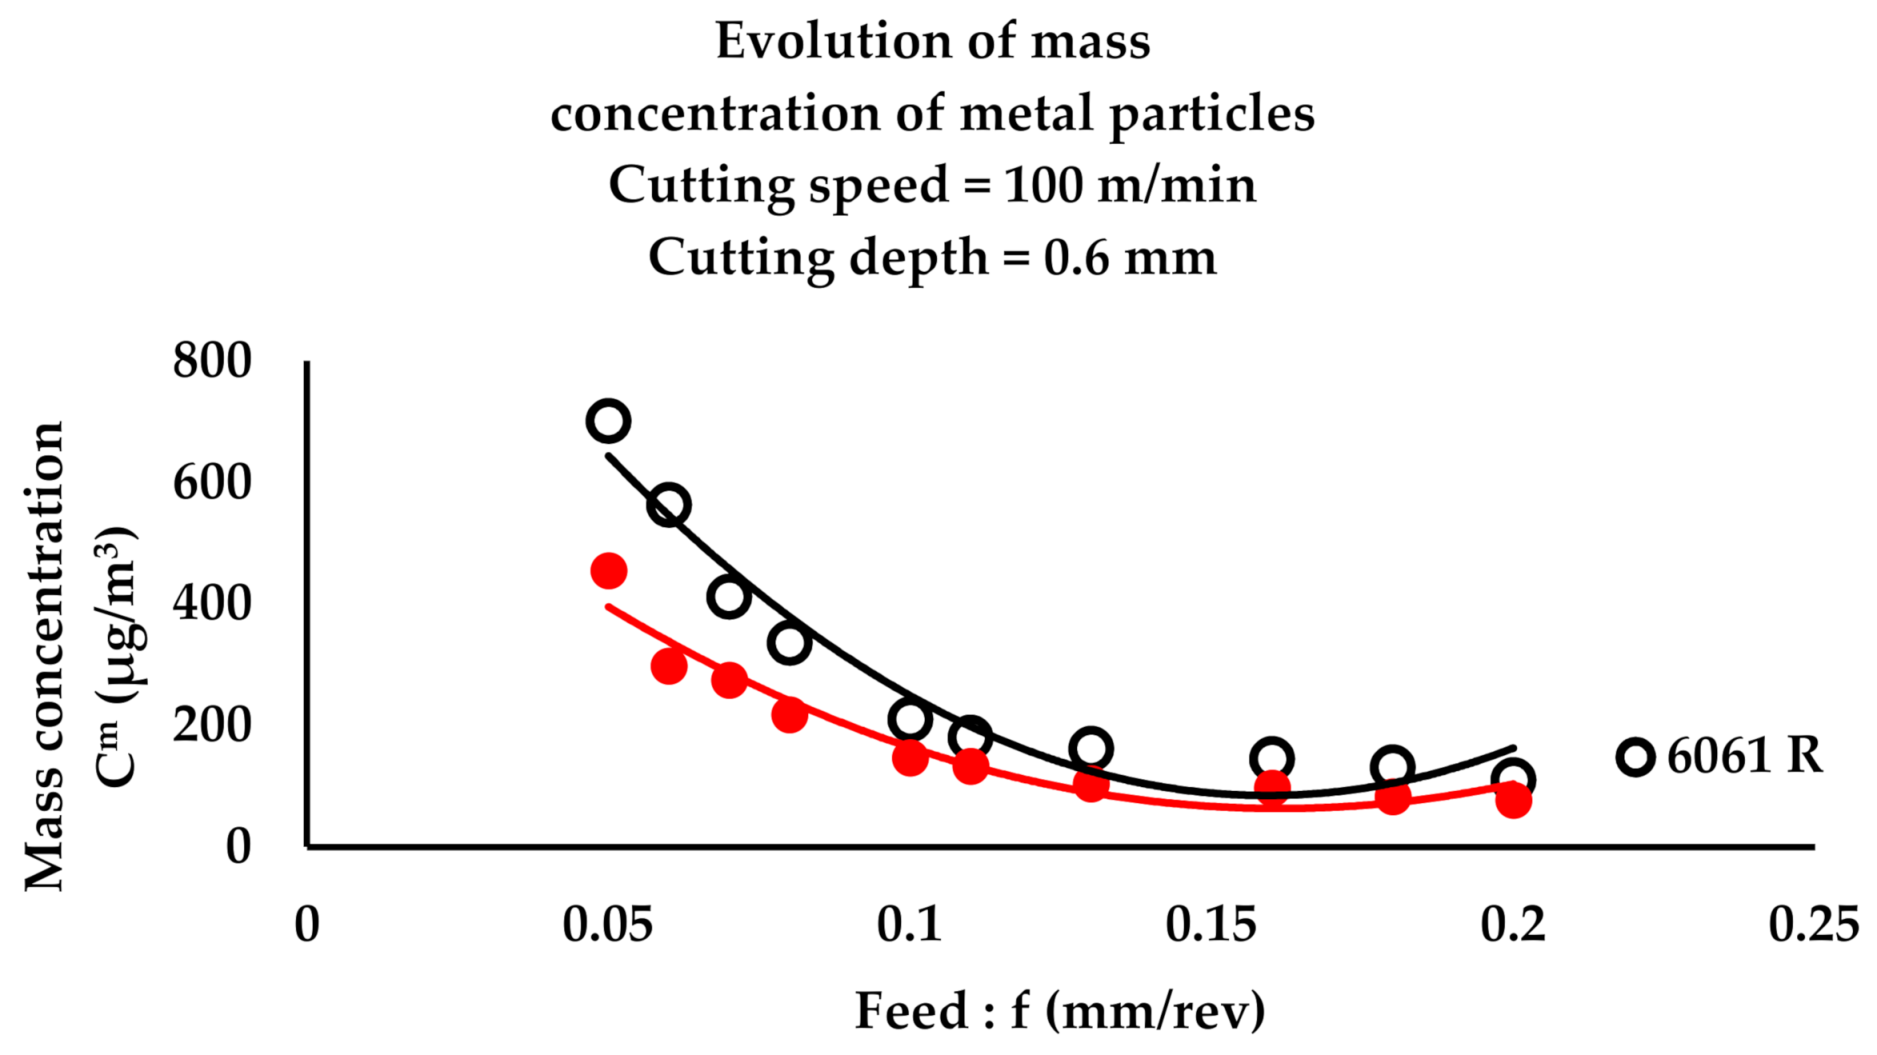
The machinability tests were performed by varying the feed from 0.05 to 0.2 mm and considering the cutting speed of 100 m/min and the cutting depth of 0.6 mm to study the mass concentration of metal particles as a function of the feed.
Table 8 shows the mass concentration values of the metal particles produced during the various tests. These values allowed
Figure 8 and
Figure 9 to show the evolution of the mass concentration of metal particles as a function of the feed.
The dry machining of the two recycled alloys produces more metal particles. This is due to the temperature as indicated [
14,
15,
16]. For dry machining, the mass concentration of metal particles in the recycled 6061 R alloy is higher than in the 6061 R-T6 alloy. The production of metal particles in machining with lubrication is well-reduced to about 82%, a value close to that of [
18]. Whatever the hardness and machining conditions, the mass concentration of metal particles decreases with the increase of the feed at the cutting speed of 100 m/min.
By analyzing the curves in
Figure 8 and
Figure 9, it is observed that the mass concentration of metal particles of each recycled alloy evolves differently. To define models for evaluating the mass concentration of metal particles in each recycled alloy, Equations (2)–(5) were considered. The correlation coefficients for the mass concentration of metallic particles in recycled alloys 6061 R and 6061 R-T6 dry machined and wet machined are 0.995, 0.995, 0.993 and 0.987, respectively. The R
2 statistics are 99.12%, 99.03%, 98.65% and 97.54%, respectively. This led to the definition of all models for the evaluation of the mass concentration of metallic particles by the forms of Equations (14)–(17).
- ■
Dry machining
- ■
Machining with lubrication
The machining of the two recycled alloys—6061 R and 6061 R-T6—shows that the heat treatment has an influence on the mass concentration of the metal particles. However, the influence of lubrication is more significant. By correlating the mass concentration of metal particles with surface roughness, it is observed that:
- ■
The mass concentration of metal particles decreases when the surface roughness value is high, regardless of the machining condition (dry machining or with lubrication).
The mass concentration of metal particles of these recycled alloys has been compared to that of the virgin alloy. Machined under the same conditions, the mass concentration of the metal particles has practically the same evolution, but the production of these particles is higher for the virgin alloys.
3.3. Chips Morphology
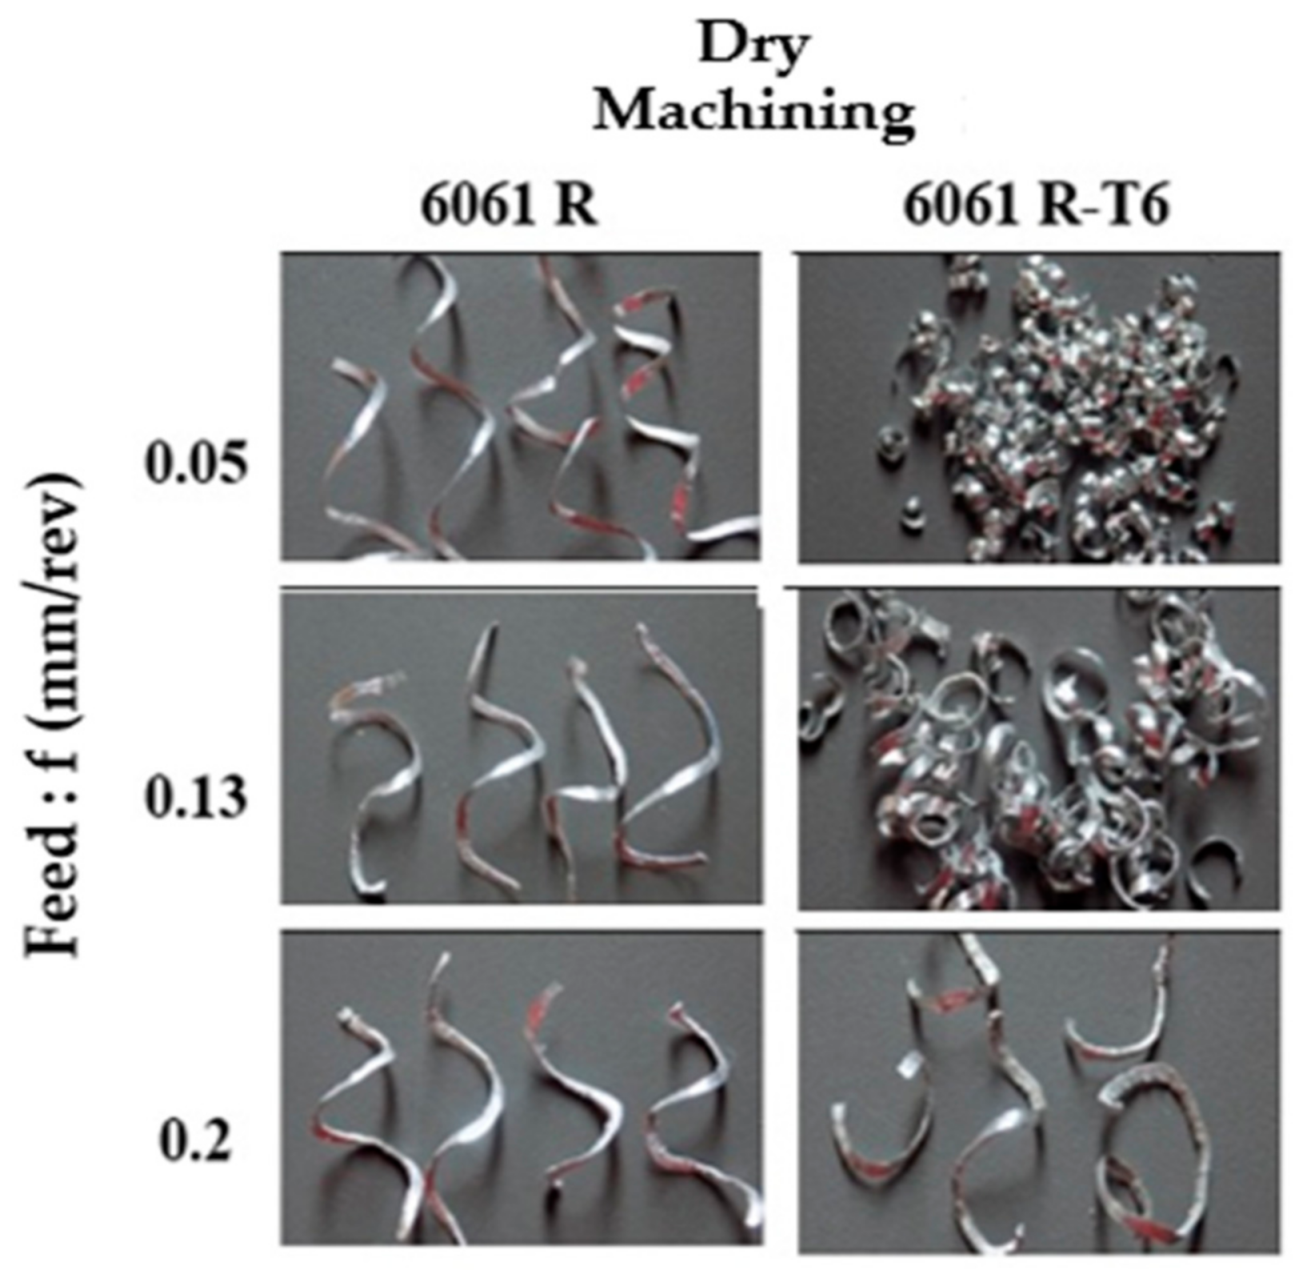
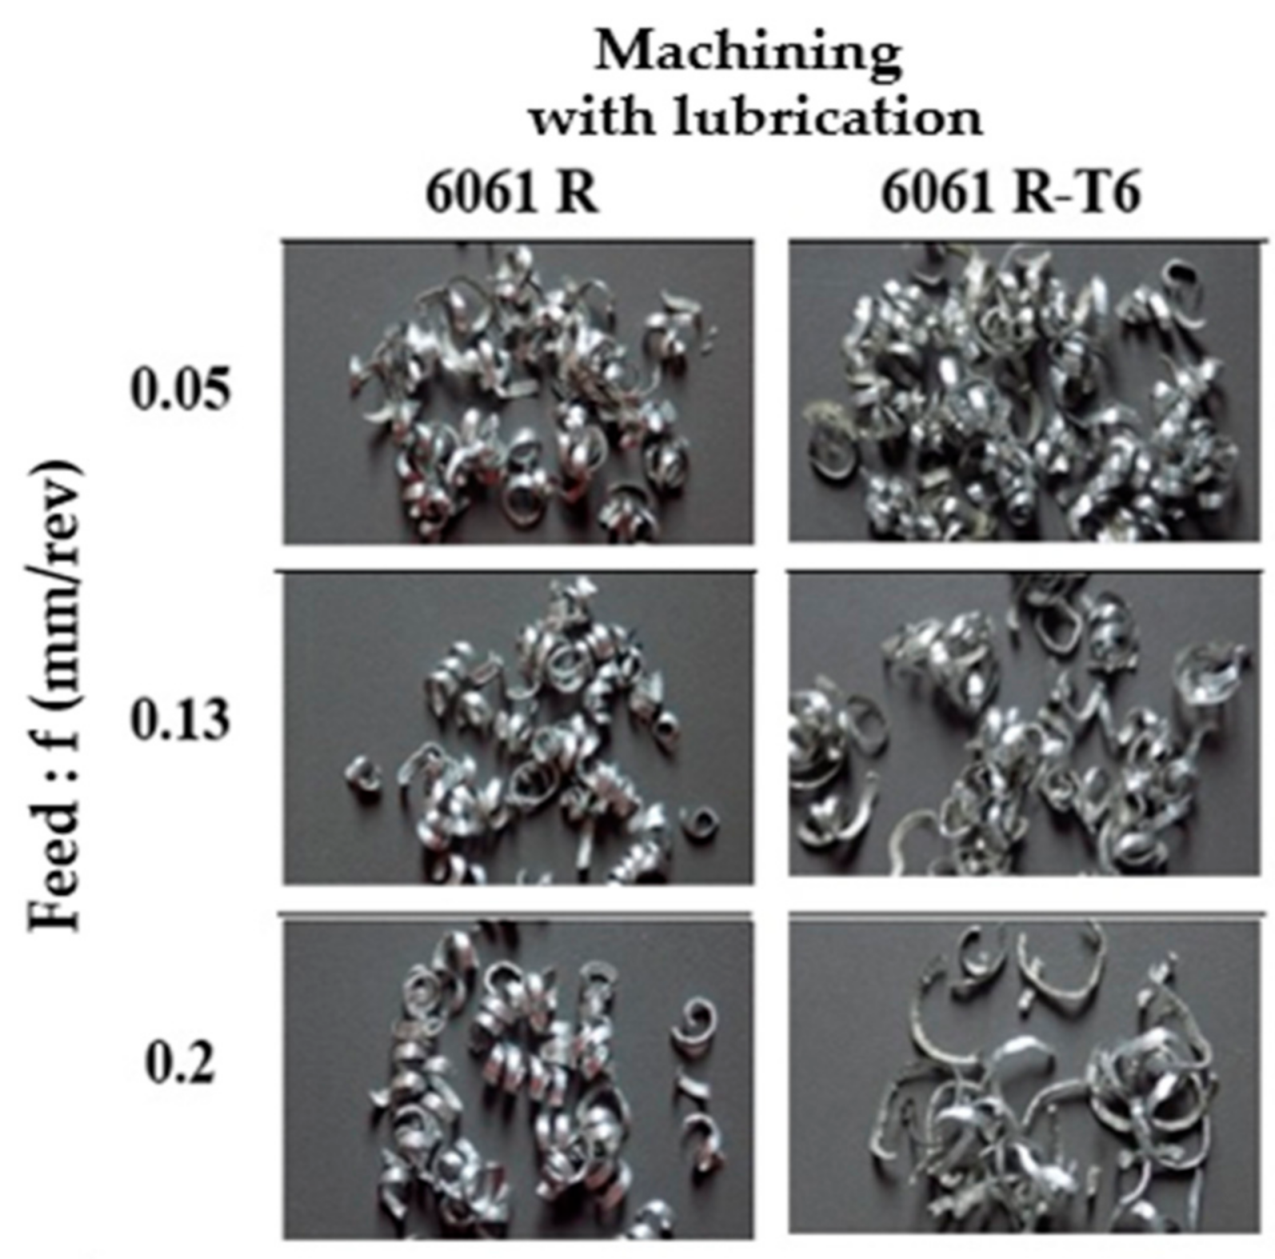
Figure 10 and
Figure 11 show the shavings of recycled alloys 6061 R and 6061 R-T6, taken during dry machining and with lubrication, at a cutting speed of 100 m/min and a cutting depth of 0.6 mm. There is a clear difference between the shavings of these two recycled alloys. For 6061 R alloy, regardless of the feed (0.05 to 0.2 mm/rev), the shavings are long, fragmented and appear to be thicker. The cutting tool does not cut the material easily. We observed more a phenomenon of tearing of the material, and the chips that rubbed on the surface of the part before breaking. This could explain the large surface roughness values. For the 6061 R-T6 alloy, the shavings are very short and fragmented when the feed varies from 0.05 to 0.1 mm/rev. Beyond that, the shavings are similar to those of the 6061 R alloy, but less long. From the feed of 0.13 mm/rev, the tool does not easily cut the material. We also observed the same phenomenon of tearing of the material, but the chips acted less on the surface of the part before breaking. The comparison of the morphology of these shavings clearly shows the influence of heat treatment on the morphology of the shavings when the recycled alloy is dry machined.
There is a clear difference between the shavings of these two recycled alloys. For the 6061 R alloy, the shavings are very short and fragmented when the feed varies from 0.05 to 0.1 mm/rev. From the feed of 0.13 mm/rev, the shavings are shorter. The phenomenon of material pulling is less accentuated, and the chips rub less on the surface of the part, thanks to the lubricant, which plays its role as evacuator. For the 6061 R-T6 alloy, regardless of the feed (0.05 to 0.2 mm/rev), the shavings are very short, fragmented and less thick. The cutting tool easily cuts the material, and the chips almost do not rub on the surface of the part, thanks to the lubricant, which plays its role as evacuator. This could explain the small surface roughness values. The comparison of the morphology of these shavings shows well the influence of lubrication on the morphology of the shavings when the alloy is not heat-treated.
Another comparison was made between the chips of these two recycled alloys. It has been observed that, during dry machining, the chips of the non-heat-treated alloy are longer than those of the heat-treated alloy. When machining with lubrication, there is a similarity in shape and size between the alloy chips in both conditions. These results make it possible to understand that the combination of the feed and the hardness of the material have a strong influence on the morphology of the chips of the two recycled alloys 6061 R and 6061 R-T6.
The morphology of the chips was also compared, and a big difference was observed when the machining was carried out under the same conditions. The virgin alloy chips are long, they do not break quickly, and they deteriorate the surface finish. In contrast, the shavings of the recycled alloy are shorter for the recycled alloy.
The authors of [
20,
21] have studied the machinability in the turning of recycled aluminum alloys by foundry, and in [
19], the same procedure has been carried out by drilling. The purpose of their studies was to assess the surface roughness and mass concentration of metal particles. The evaluation models established in their studies are of the form Ra or C
m = A*f
α (A is a constant dependent on the material, and α the coefficient of influence dependent on the material). However, it turns out that this form does not necessarily give a model that brings the experimental curve closer to the fitted curve. This study thus complements those of [
18,
20,
21] by specifying the need to search for the best correlation coefficients (r) and R
2 statistics to define the best models for assessing surface roughness and mass concentration of metal particles.
4. Conclusions
This study showed that dry machining results in longer shavings that alter the surface of the workpiece and thus impact the surface finish. Furthermore, this machining condition increases the temperature that promotes the mass concentration of metal particles, especially for 6061 R recycled alloy, which is more ductile than 6061 R-T6 recycled alloy.
The use of lubrication during the machining of the two recycled alloys causes chip fragmentation, gives a good surface finish and reduces the mass concentration of metal particles to almost 82%. The lubrication, the high hardness and the reduction of the feed give a good surface finish for the two recycled alloys.
Both 6061 R and 6061 R-T6 recycled alloys have good machinability. Thus, we note that the feed, the hardness of the material and the lubrication considerably influence the machinability of the two recycled alloys. The machinability of the two recycled alloys can be assessed by considering the predictive models established in this study.
