1. Introduction
Biaxial stress states are a common load scenario in everyday life, considering for example pressure vessels subjected to an internal pressure; however, considerably less attention is devoted to these stress states experimentally in comparison to standard uniaxial tensile tests. In addition to this well-known example of pressurized vessels, biaxial stress states demand scientific attention in many other areas.
For example, for the future fusion reactor ITER, investigation of tungsten (W) and its mechanical properties under thermal loading, which leads to a biaxial/multi-axial stress state, is of great technical as well as scientific importance. W features many superior properties, such as high melting point, low erosion rate under fast ion bombardment, and low hydrogen retention, making it a very interesting choice as a plasma facing material for future nuclear fusion reactors. The mechanical properties of W, especially at lower temperatures below the ductile-to-brittle transition temperatures, are said to be the ‘Achilles heel’ of W. Thus, these properties need to be precisely examined.
During the operation of future nuclear fusion reactors, the heat load can be as high as 20 MW/m
2 [
1] with a fast neutron spectrum, further aggravating the complexity of a material’s interaction with its environment. There are ongoing international collaborations, such as the International Fusion Materials Irradiation Facility DEMO Oriented Neutron Source (IFMIF-DONES), that will put materials to test using a fusion-relevant neutron source [
2], but it is not yet available. A feasible workaround is to use high-energy ion irradiation to mimic the displacement damage originating from neutron irradiation. One advantage is that the irradiation experiment is rather fast without activating the material. The drawback, however, is the low penetration depth of ions, which is in the range of a couple of µm. Feichtmayer et al. [
3] present a solution to this problem by probing thin W wires using a newly developed experimental setup (General Purpose Irradiated Fibre and Foil Experiment, GIRAFFE), where a high-precision tensile testing machine is combined with an accelerator, and first results on irradiation creep of thin W wires at low temperatures are presented in [
4]. While the GIRAFFE is designed for uniaxial strains, the apparatus and method introduced in this study provide access to in situ irradiation testing of biaxially or semi-biaxially strained components. The results can further be used to model the strain state of thermally loaded fusion reactor components.
In addition to the potential application of the apparatus and method in fusion reactor materials research, it can also contribute to advances in several other application areas. Metal or ceramic films on more compliant substrates, such as various polymer foils, are used in everyday and advanced applications. From food packaging and radio frequency identification for transportation or entertainment to wearable and flexible electronics and optical solar reflectors for satellites, these material systems will be subjected to a variety of loading geometries that can cause failure. Mechanically, the film–substrate systems can be subjected to uniaxial and biaxial loading as well as thermo-mechanically induced biaxial loading and bending/folding [
5,
6]. Common testing of films or coatings on polymer substrates is performed predominantly with uniaxial tensile straining, or fragmentation testing [
7,
8,
9,
10,
11]. Fragmentation testing has evolved to have versatile in situ options, including X-ray diffraction (XRD), optical/confocal laser scanning microscopy (CLSM), atomic force microscopy (AFM), scanning electron microscopy (SEM), and four-point-probe (4PP) electrical resistance measurements. The technique is also able to evaluate interface adhesion using tensile-induced delamination [
12,
13,
14] if buckle delaminations form. Another application of foil straining is the examination of surface treatments, such as irradiation or nitriding, on foils. With such a method, one could study how coating or radiation damage of a surface affects the fracture or reliability of the material, since radiation damage is often in the nm or µm range.
A drawback of uniaxial fragmentation testing is that most applications, including fusion applications, actually cause biaxial loading. Uniaxial results are difficult to compare to biaxial [
15,
16] since the damage produced has a different morphology, a different size, and occurs at different strains. However, solutions for in situ biaxial straining at small scales with XRD and neutrons are available [
17,
18,
19,
20,
21,
22] and can include (4PP) [
15,
23] at synchrotron beamlines. One solution for biaxial straining uses motor pairs that are moved in sequence to achieve quasi-biaxial loading and should not be considered as synchronous biaxial loading. For a different type of testing device, widely used for thin sheet testing, synchronous biaxial loading can be achieved [
24,
25,
26], but there is no access to the top or bottom surfaces to implement desired in situ observation methods. Additionally, the devices are quite large themselves, further decreasing the possibilities of adding even an optical microscope to the apparatus, not to speak of putting such a device into a scanning electron microscope.
As mentioned, asynchronous biaxial loading is possible at small scales for in situ synchrotron measurements at dedicated beamlines. These devices rely on moving a pair of motors sequentially (in perpendicular directions) rather than moving all four motors simultaneously to achieve synchronous biaxial loading. The ability to move motors individually has advantages to study damage under different loading paths [
27,
28], but it is challenging to achieve synchronous biaxial loading, which is still necessary. Also, other observation methods (optical, SEM, and AFM) are not possible since the device cannot be operated without beamline controls.
A compact and versatile biaxial straining device with precisely synchronous biaxial loading of four, or even more, arms, simultaneously, is introduced [
29]. The size and design allow for unhindered observation of the top surface with optical, CLSM, AFM, or inside an SEM. Reflection or transmission XRD is accommodated with a window or central opening in the base for use on different beamlines. The bottom surface can also be accessed and used as a secondary strain measurement using digital image correlation (DIC), or a heating/cooling element can be placed under the sample for temperature-dependent straining. Such heating/cooling experiments are necessary for materials for outer space or energy applications. The new biaxial straining device will be introduced and its functions demonstrated on a thin W film on polyimide under CLSM. The W film was chosen as a proof of concept for future irradiation experiments that require small volumes to be tested due to the challenging sample preparation.
2. Description of Device
A schematic of the device, further denoted as AXL, is presented in
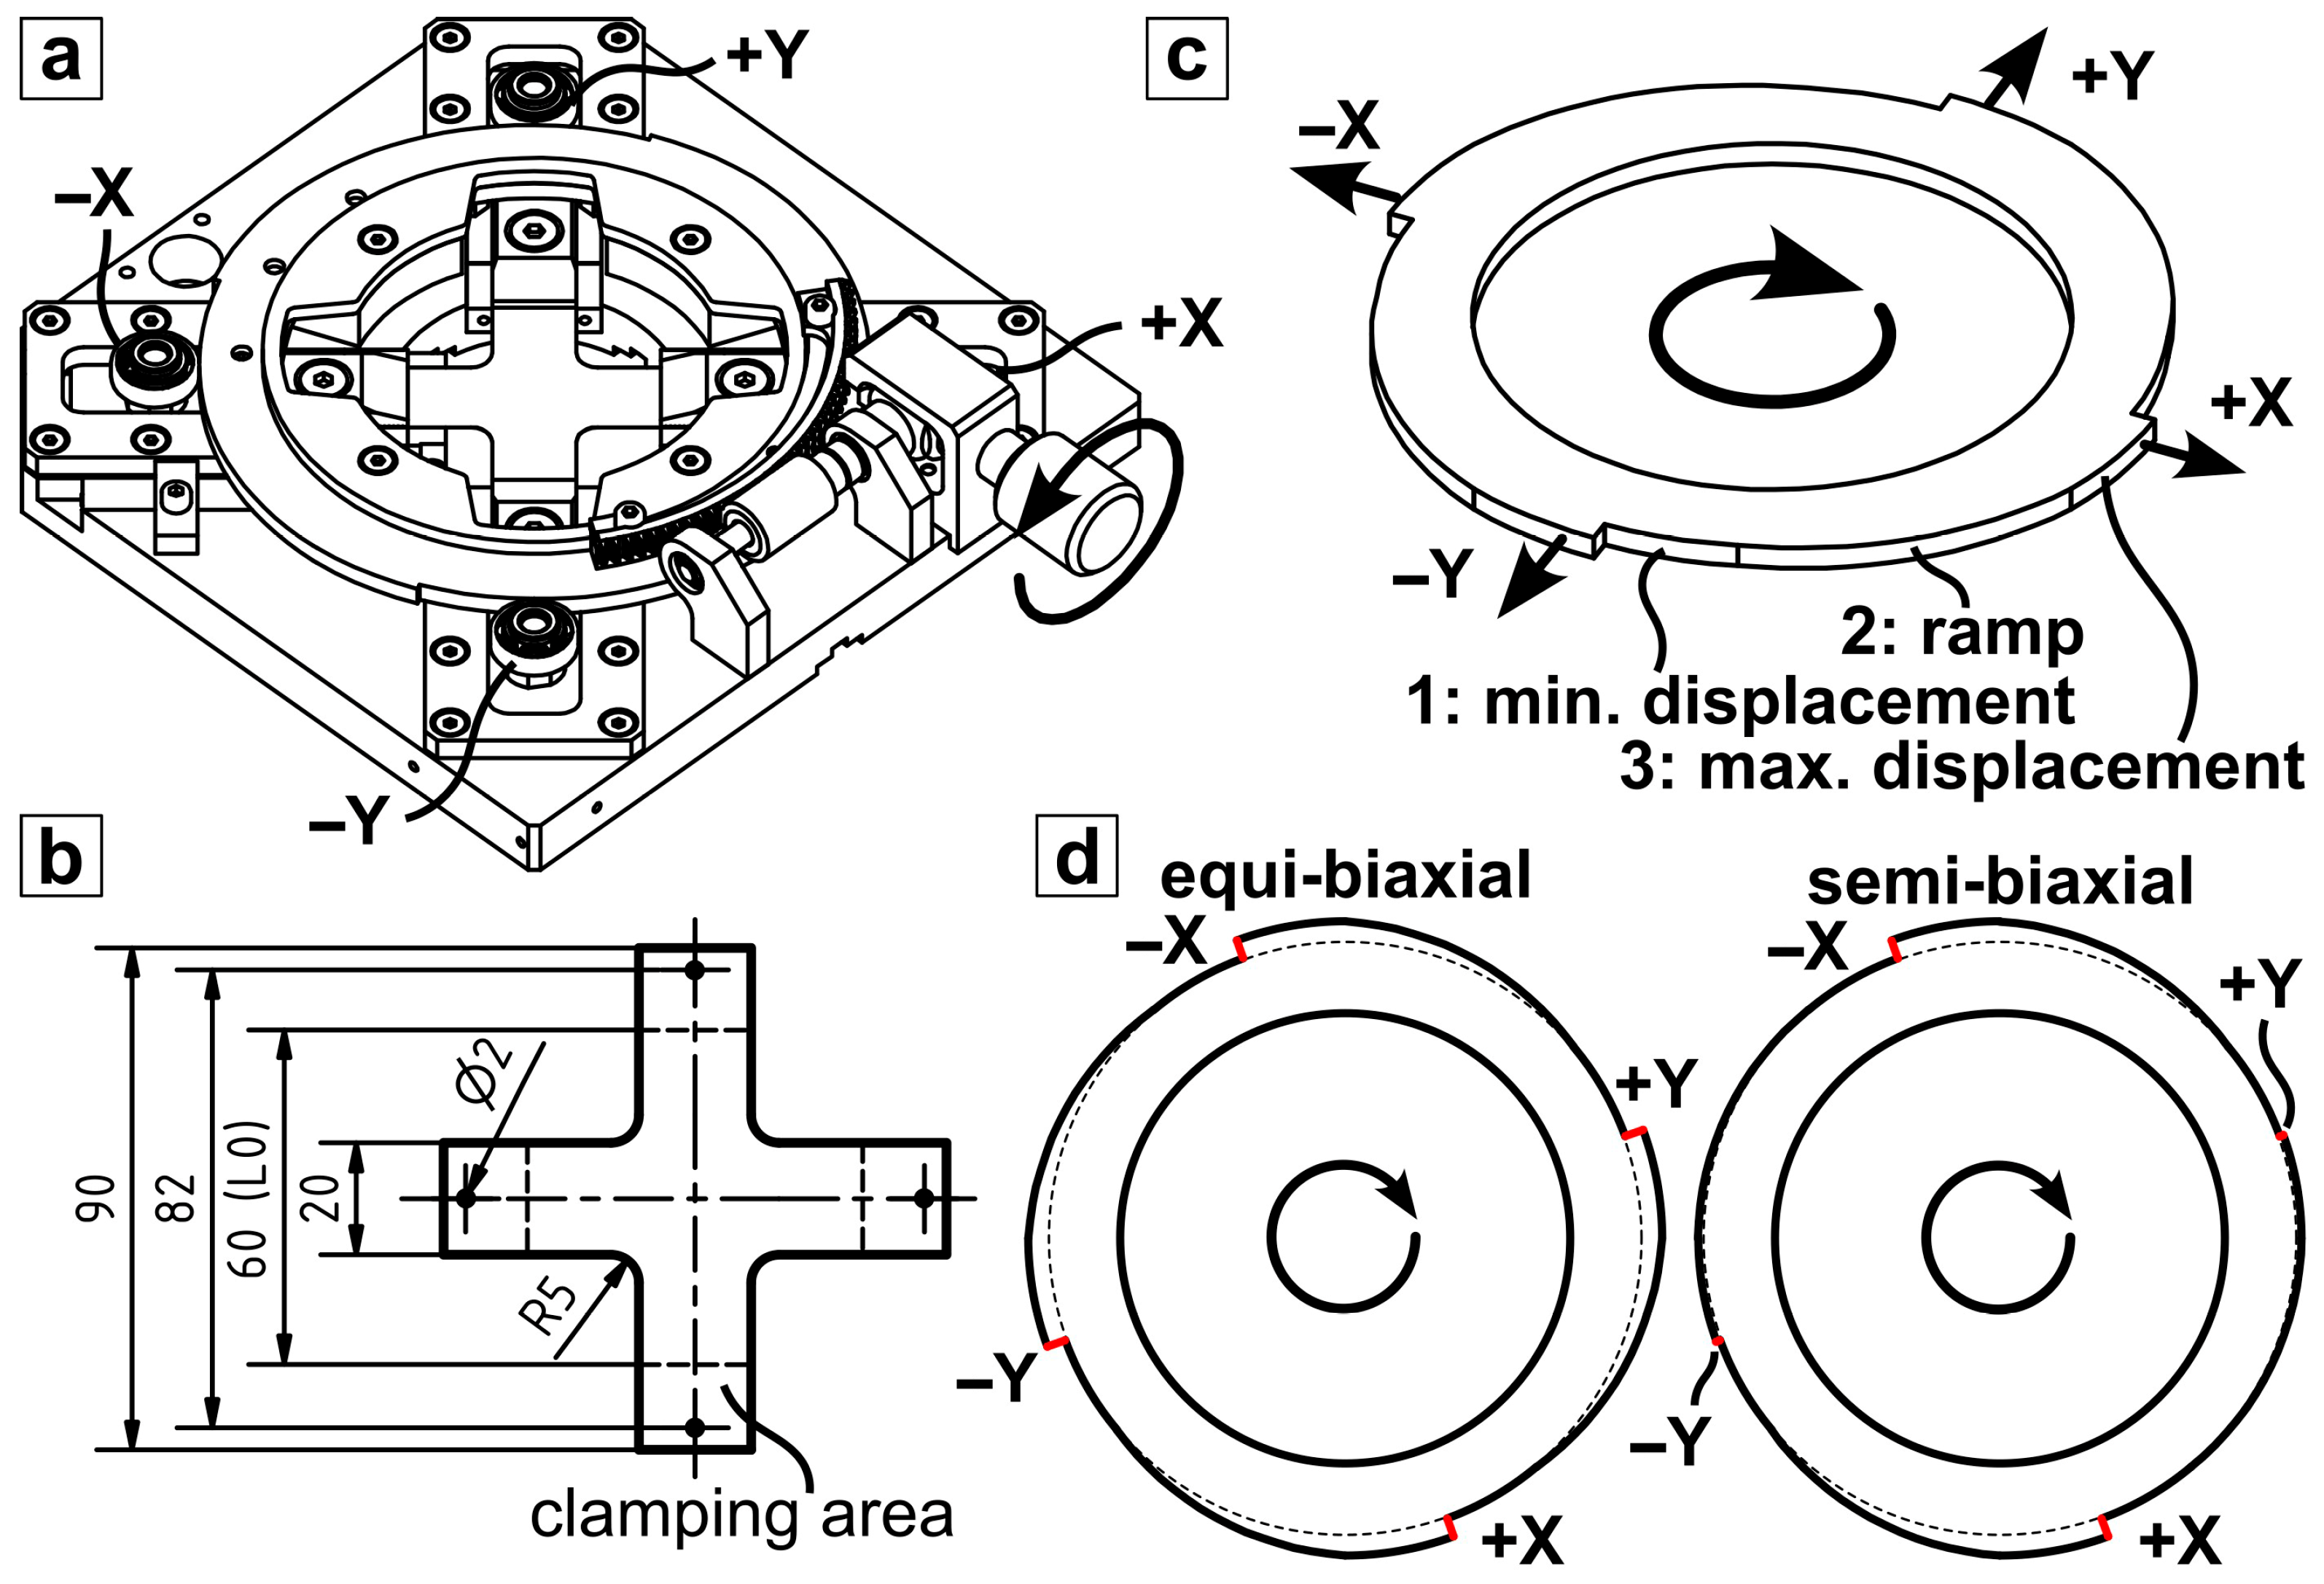
Figure 1a. Further schematics can be found in the patent [
29]. AXL consists of a base frame with a central opening that fulfills two basic functions: First, it serves as a bearing for the load ring that acts as an exchangeable tool (
Figure 1c) and is aligned concentrically with the central opening. Second, it guides the four sample grips, which are positioned concentrically around the central opening, along two orthogonal axes and allows translation only along perpendicular X- and Y-axes. The tool consists of three regions (
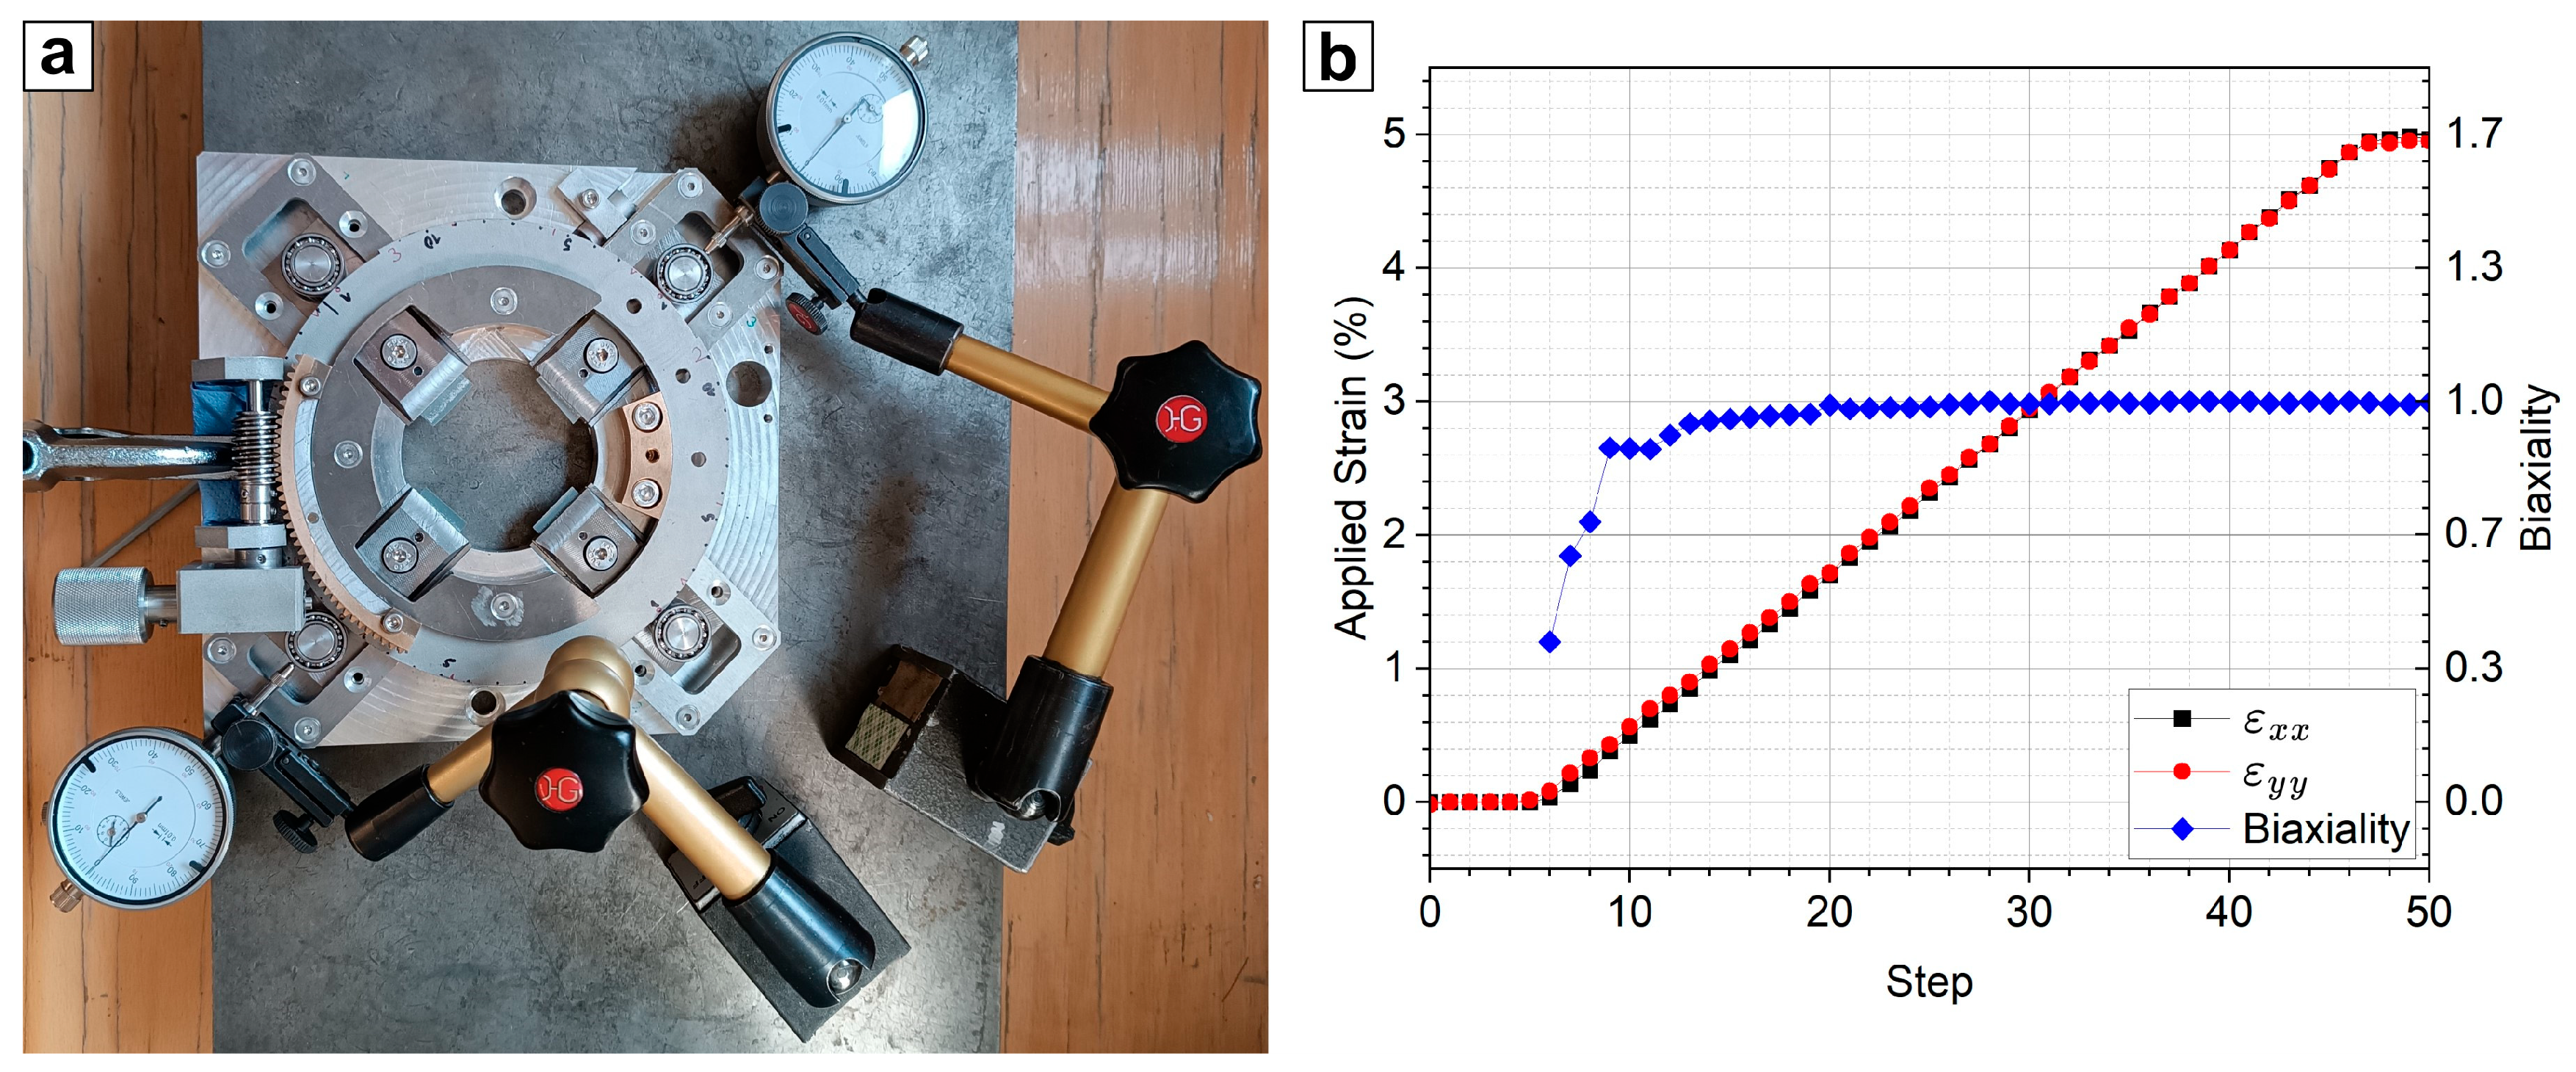
Figure 1c). Region 1 serves as the sample mounting position with minimum displacement, which is generated by a zone with a constant radius relative to the tool center. Region 2 applies displacement along the X- and Y-axes, with the unique capability of synchronous biaxial loading compared to other devices, since the simultaneous loading is mechanically driven as the loading along both axes is transmitted by a solid part. Region 3 has, again, a constant radius relative to the tool center and reflects the upper displacement limit, which was chosen to be 3 mm for the prototype, resulting in a maximum applicable strain of 5% (
Figure 2b). For synchronous equi-biaxial loading, the displacements in X- and Y-directions must be identical (
Figure 1d). The rotation of the tool, achieved with a self-locking screw gear mechanism, causes a displacement of the sample grips. Using a properly manufactured loading ring with low manufacturing tolerances, as discussed later, the sample can be equi-biaxially loaded in a synchronous way, whereas the maximum displacement is defined by the slope of the ramp (
Figure 1c,d). However, the loading ring can be exchanged to achieve semi-biaxial strains (e.g., with displacement in Y being 1/5 of the displacement in X). For this purpose, the ramp of the loading ring in
Figure 1d can be machined with different slopes in X- and Y-directions, with the ratio of the slopes defining the degree of biaxiality. The sample grips are specifically designed to avoid stress accumulation at the grip edges that tend to cause pre-mature failure. This is achieved by a quarter-elliptical shape (7.5 mm and 0.07 mm ellipse half axis lengths) of the front of the sample grip, which was machined by electrical discharge machining. This shape slightly reduces the clamp force, as proposed in [
29]. With the used grip design, the need for roller grips and extra-long arm lengths is removed. For testing, a cruciform shape is used (
Figure 1b) that has a total arm length of 90 mm and an arm width of 20 mm. The sample grips of the presented device could be redesigned to hold samples with dimensions diverging from the dimensions in
Figure 1b. Nevertheless, it is possible to adapt the sample geometry, e.g., decreasing the sample arm width of 20 mm, or changing the shape and radii of the cruciform center.
Initially, the applied strain range of AXL was calibrated using dial gauges to measure the displacement of the grips in both X- and Y-directions (
Figure 2a). The applied strain was calculated by dividing the grip displacement by the initial sample length of 60 mm. The applied strains,
εxx and
εyy, as well as the biaxiality [
30], are shown in
Figure 2b. The biaxiality is calculated with
Figure 2b illustrates that the X and Y strains overlap and that the biaxiality is stable at a value of 1 for almost all of the displacement range. The biaxiality diverging from 1 up to step 20 is caused by the manufacturing tolerances of the prototype loading ring. The coaxiality of the inner circle and the ramp sections (
Figure 1c) and the rotation symmetry of the four ramp sections (two in
Figure 1c) of the loading ring need to be as accurate as possible. Any asymmetry of the ramp sections is directly transmitted to the tested samples and causes a biaxiality error (
Figure 2b). The loading ring was manufactured by electron discharge machining, a high-precision process. Nevertheless, it is recommended to rough cut the inside and outside shape of the loading ring with some finishing allowance (e.g., 0.2 mm) before finishing the geometry if a biaxiality better than that shown in
Figure 2b is needed. The effect of the manufacturing tolerance-based asymmetry of the used loading ring on the local strains of the samples in this study will be discussed later.
3. Materials and Methods
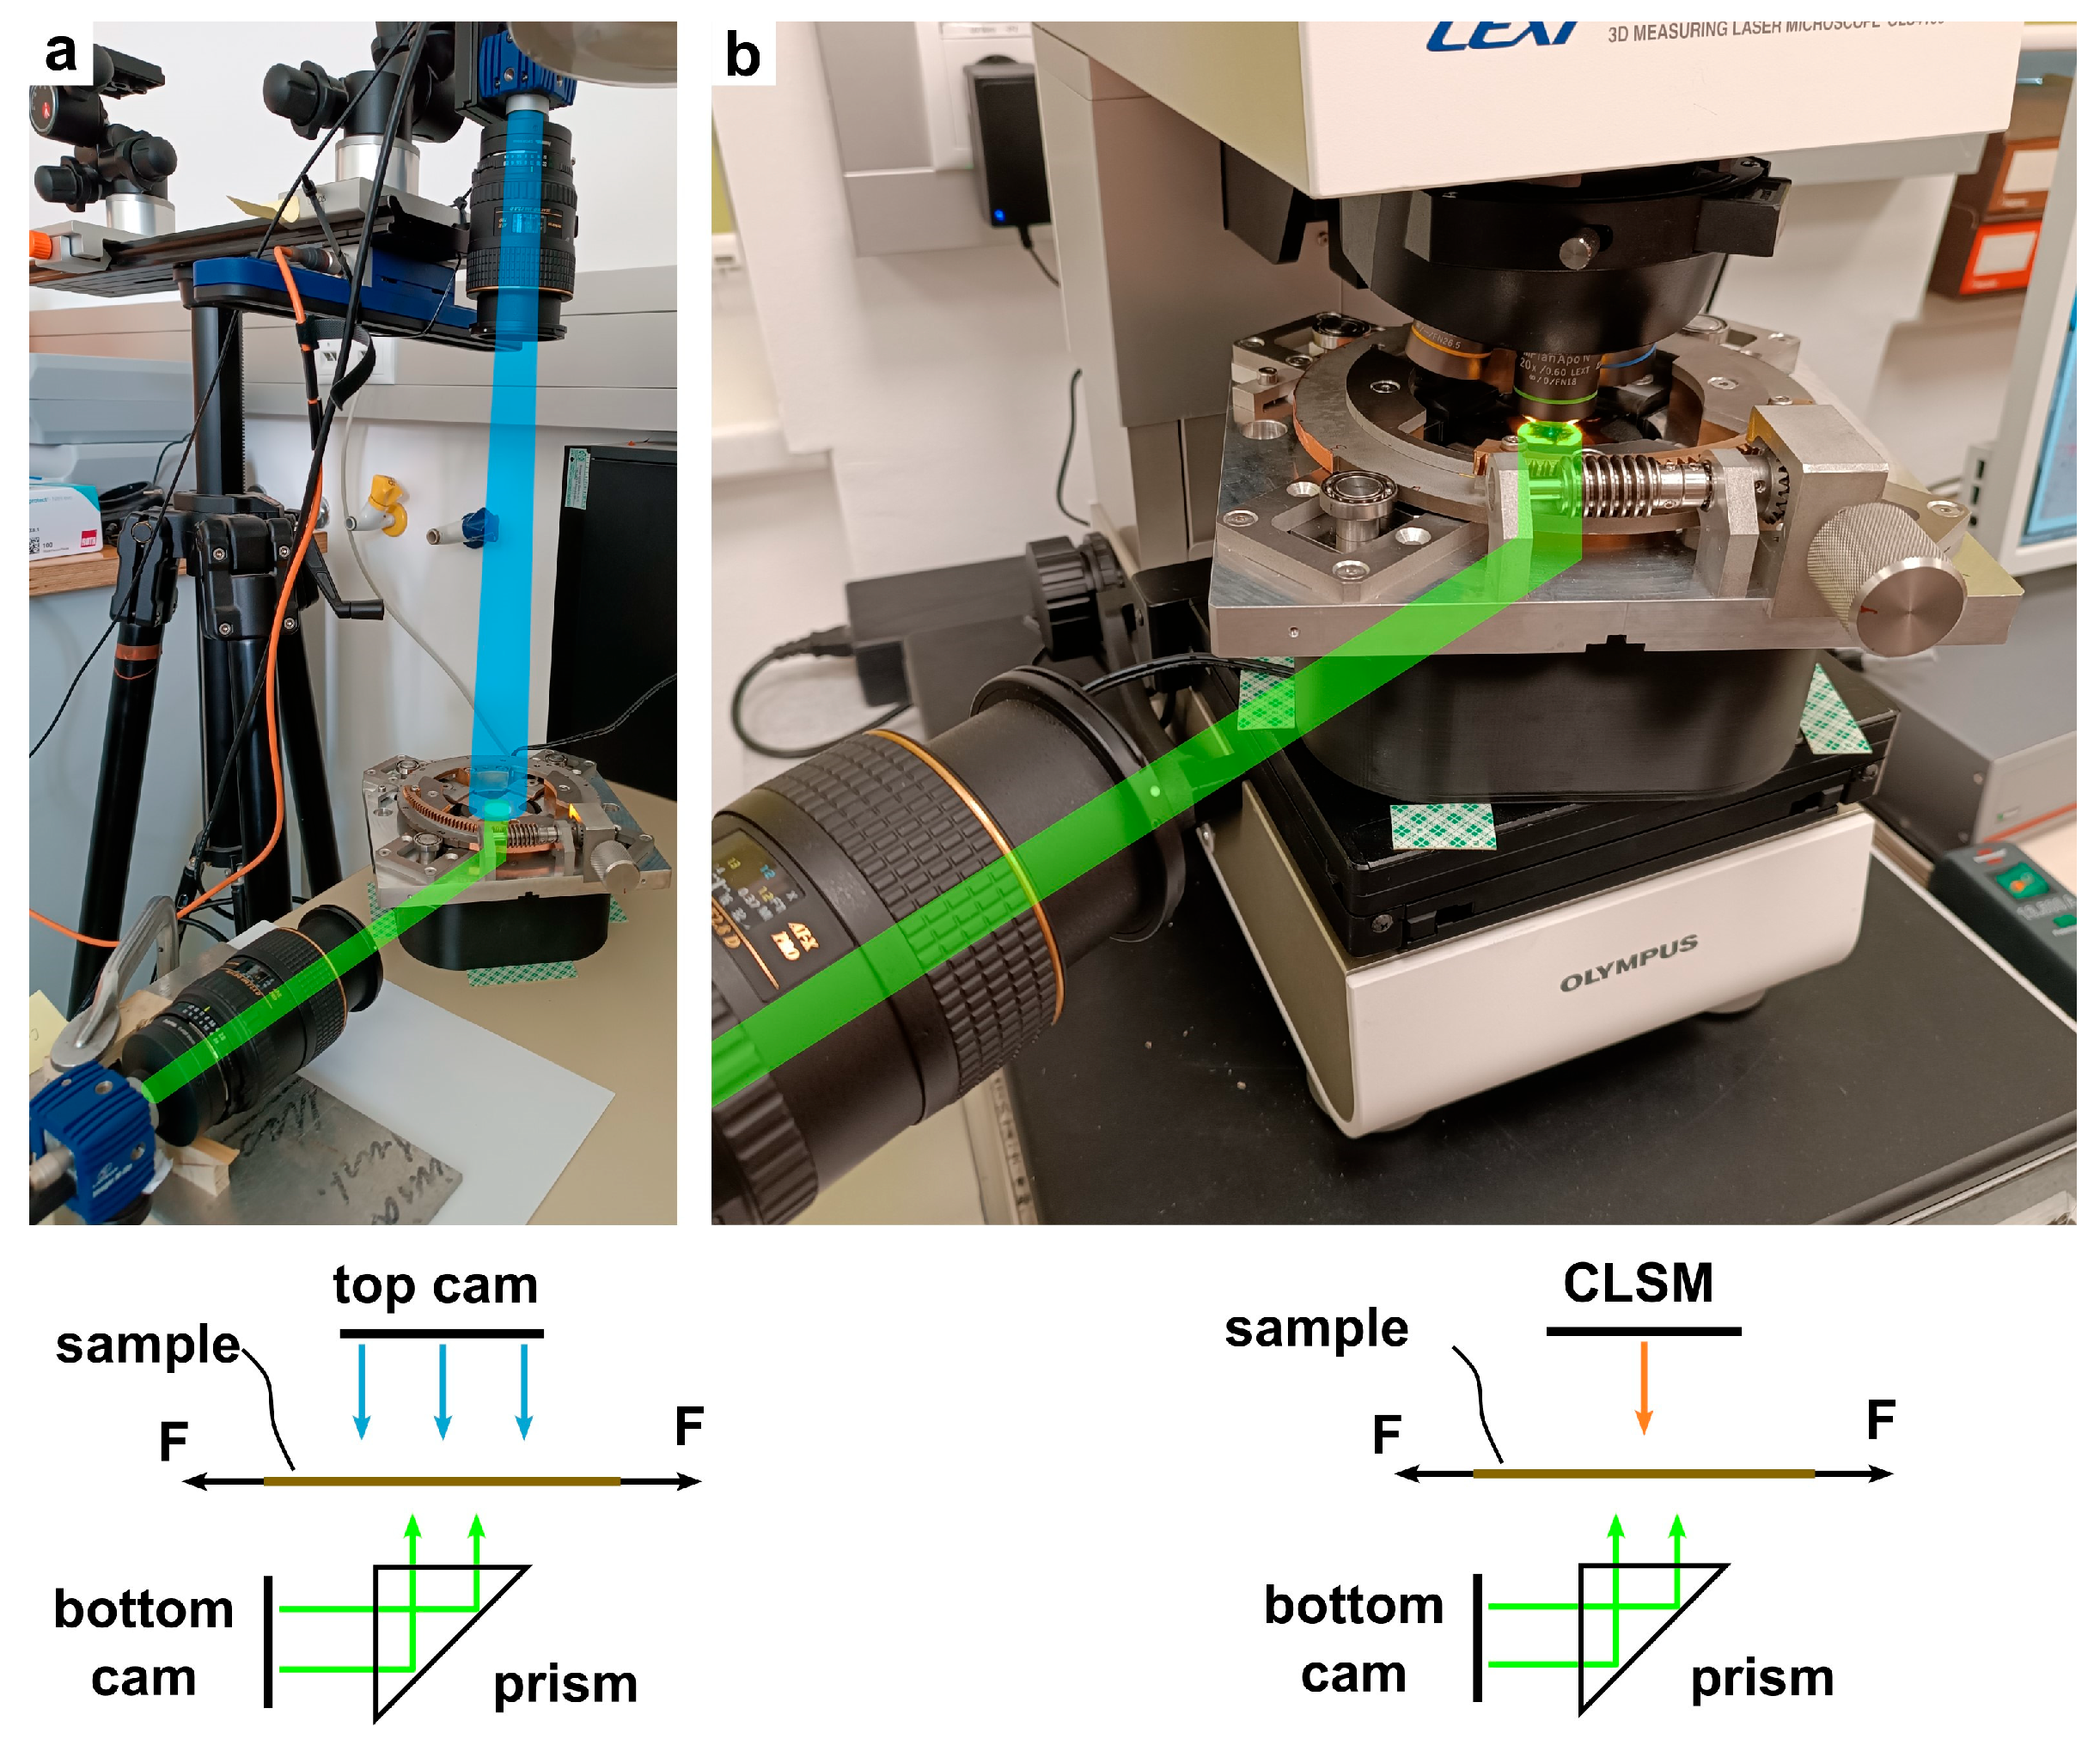
To demonstrate the synchronous equi-biaxial loading capabilities of AXL on foil samples, two setups were used. In both cases, AXL was placed on a 3D-printed hollow pedestal containing a prism and a ring light, which allowed the central area of the sample to be viewed from below with a macro camera. Local strains were captured by DIC using a Lavision setup (LaVision M-Lite 5 MP USB camera, Göttingen, Germany; Tokina AT-X 2.8/100 mm AF PRO D macro-objective, Tokyo, Japan, and the LaVision DAVIS 8.4 Software, Göttingen, Germany). The DIC system was calibrated using the Pinhole Model [
31].
For the demonstration of AXL’s capabilities and limits, two experimental setups were in use: In Setup 1 (
Figure 3a), a second camera captures the top view of the sample, including the sample arms, to measure the strain by DIC in a large field of view (see
Figure 4). In Setup 2 (
Figure 3b), the device is placed in the CLSM (Olympus LEXT 4100 OLS) to observe the formation of crack patterns in the metal film on a polyimide substrate while simultaneously measuring the local strain of the polyimide foil by DIC (using the Lavision setup) from the bottom side of the sample. The thin coating’s impact on the mechanical properties of the sample is considered negligible, due to the small film thickness compared to the substrate, which is a common procedure when testing thin films, as shown in [
32]. The sample must be mounted centered and fully flat (see
Supplementary Information). Setup 1 is used for systematic determination of the best practice to achieve fully equi-biaxial loading, considering the sample geometry, sample mounting, and the device itself as possible sources of deviation from perfect biaxial strain state (
Biaxiality = 1) in the sample center, while Setup 2 provides first insights on biaxial fracture of W films, demonstrating the feasibility of the method for in situ tests.
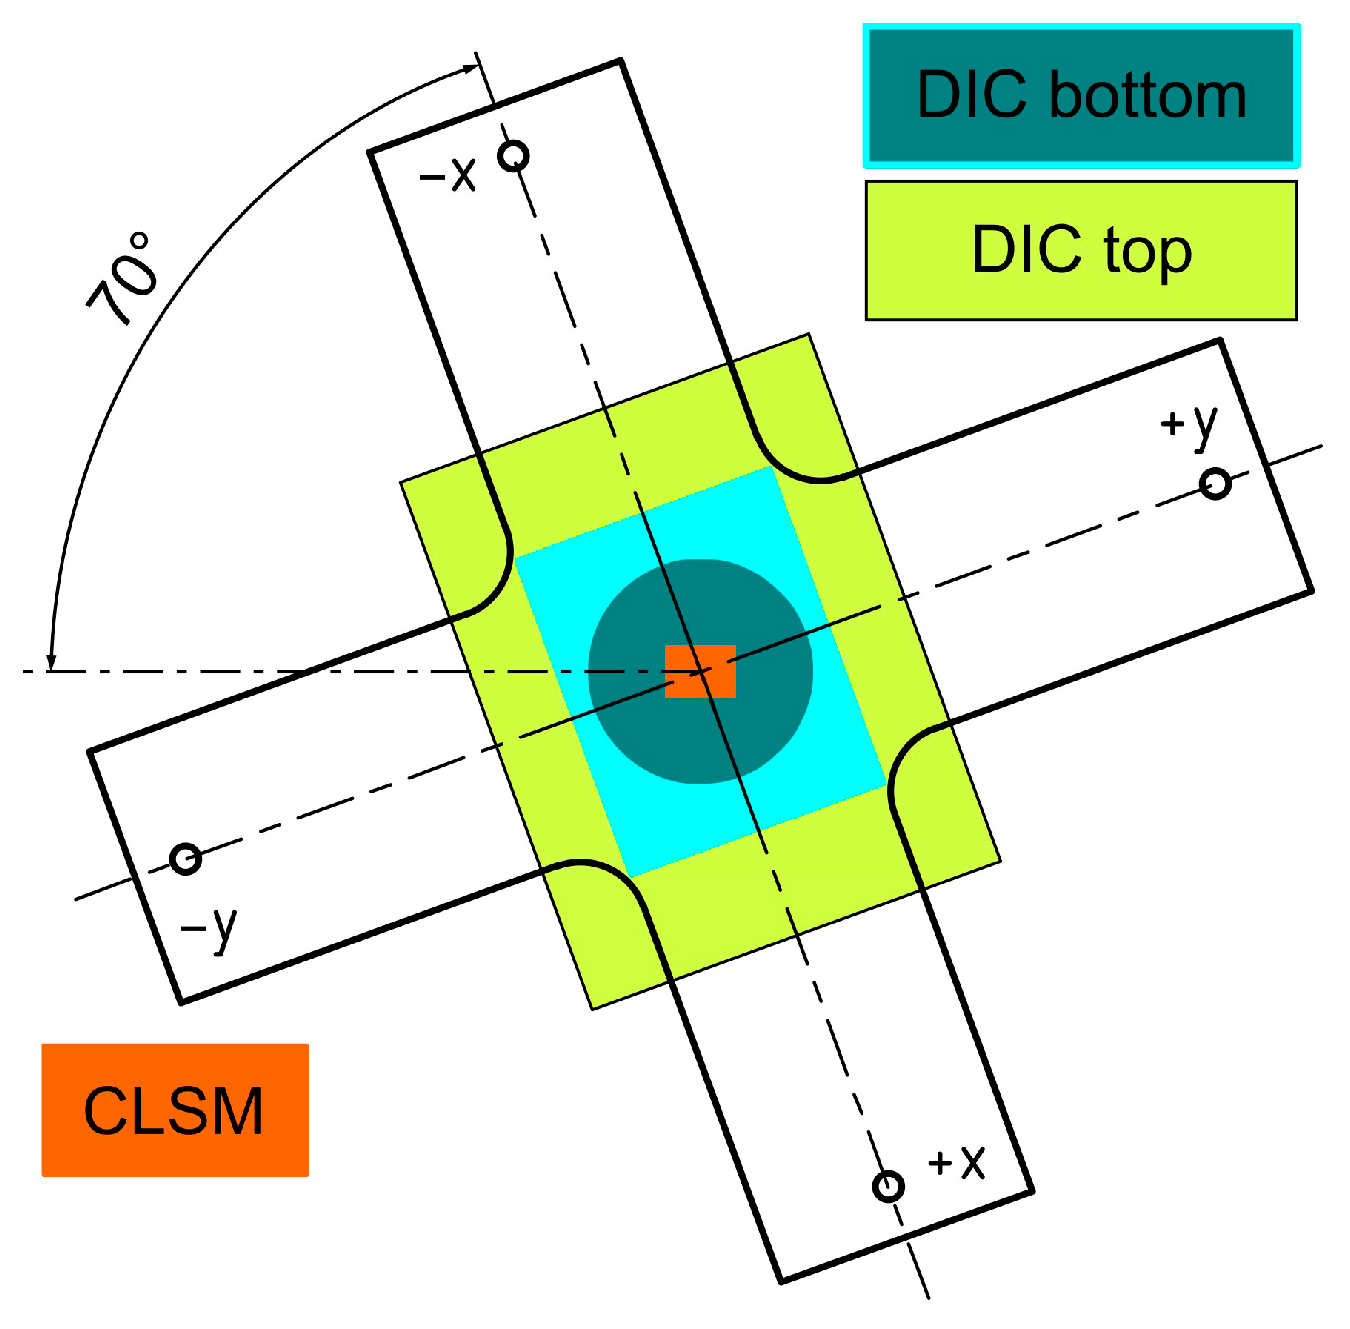
Figure 4 schematically illustrates the areas captured by the two DIC cameras (DIC bottom, and DIC top) and the CLSM. For all experiments, AXL was rotated 70° to accommodate the additional lenses of the CLSM, resulting in the alignment of the imaging methods relative to each other as depicted in
Figure 4.
Cruciform substrates were cut from 50 µm and 75 µm thick polyimide foils using Cricut Explore Air 2 (cut tolerance usually <0.1 mm). The 75 µm thick foils were Upilex-S polyimide, and the 50 µm thick foils were Kapton polyimide. The differences between the two types are color and elastic modulus, with the Upilex brand having a darker, more brown color as well as a slightly higher elastic modulus (9 GPa). W thin films were deposited onto pre-cleaned, cruciform-shaped 50 µm thick polyimide (Dupont Kapton, Circleville, OH, USA) substrates via direct current magnetron sputtering using a lab-scale, modular thin-film deposition chamber (Korvus Technology, Buckinghamshire, UK). The film deposition was made using a flat W target of 99.95% purity (HMW Hauner, Röttenbach, Germany). For each run, the substrates were attached to a rotating sample stage such that the center of the substrates aligned with the center of the stage. The depositions were performed with a target power of 70 W, an Ar pressure of 3.8 × 10
−3 mbar during 30 min deposition time, with a substrate to target distance of 12 cm, yielding a film thickness of approximately 100 nm (confirmed by focused ion beam cross-sectioning). During each deposition, the substrate holder was rotated at a frequency of 20 rpm. Post-deposition, the samples exhibited pronounced curling with convex W surfaces, indicating high compressive stresses in the as-deposited W films. After deposition, W deposited on the arms was etched with 30% H
2O
2 using a mask, preventing the material from the center from being etched. This step is necessary to remove material from the arms of the cruciform shape in order to ensure uniform cracking in the sample center and is a common practice [
17,
19,
32,
33]. The W-coated polyimide samples were used for experiments performed with Setup 2.
Speckle patterns were applied to both sides of the 75 µm polyimide cruciform and to the backside of the W-coated sample using white spray paint for the DIC measurements during straining. The experiments covered the full strain range of 5%, which is the maximum strain the actual biaxial straining device loading ring was designed for. Therefore, the strain was applied by half turns of the screw gear driven load train, with steps of 0.12% (
Figure 2b). For Setup 1 (
Figure 3a), images of the bottom and top speckle patterns were captured after each straining step to compare the smaller bottom view to the larger top view, that also includes portions of the cruciform arms and allows comparison of the strain evolution from bottom versus top DIC images. To test the W-coated polyimide foil, the sample was mounted in the device with the film side facing up (towards the CLSM objective lens), then placed under the CLSM (
Figure 3b). Again, strain was applied by half turns of the screw gear with DIC bottom image for strain analysis, and CLSM optical, laser intensity, and height images taken of the film for crack evolution analysis. The crack density, in the X- and Y-directions using four lines in each direction, was determined with the line intercept method and the open-source software Gwyddion 2.68 [
34]. Finally, SEM images in the central area of the W-coated sample after straining were made using a Tescan Magna operated at 20 kV using a secondary electron detector. With these images, a larger region (several square millimeters), compared to the small field of view captured during the CLSM test, could be observed. For improved visualization purposes, the crack patterns were extracted from the SEM image using the WEKA-segmentation plug-in [
35] for Image J [
36].
4. Results
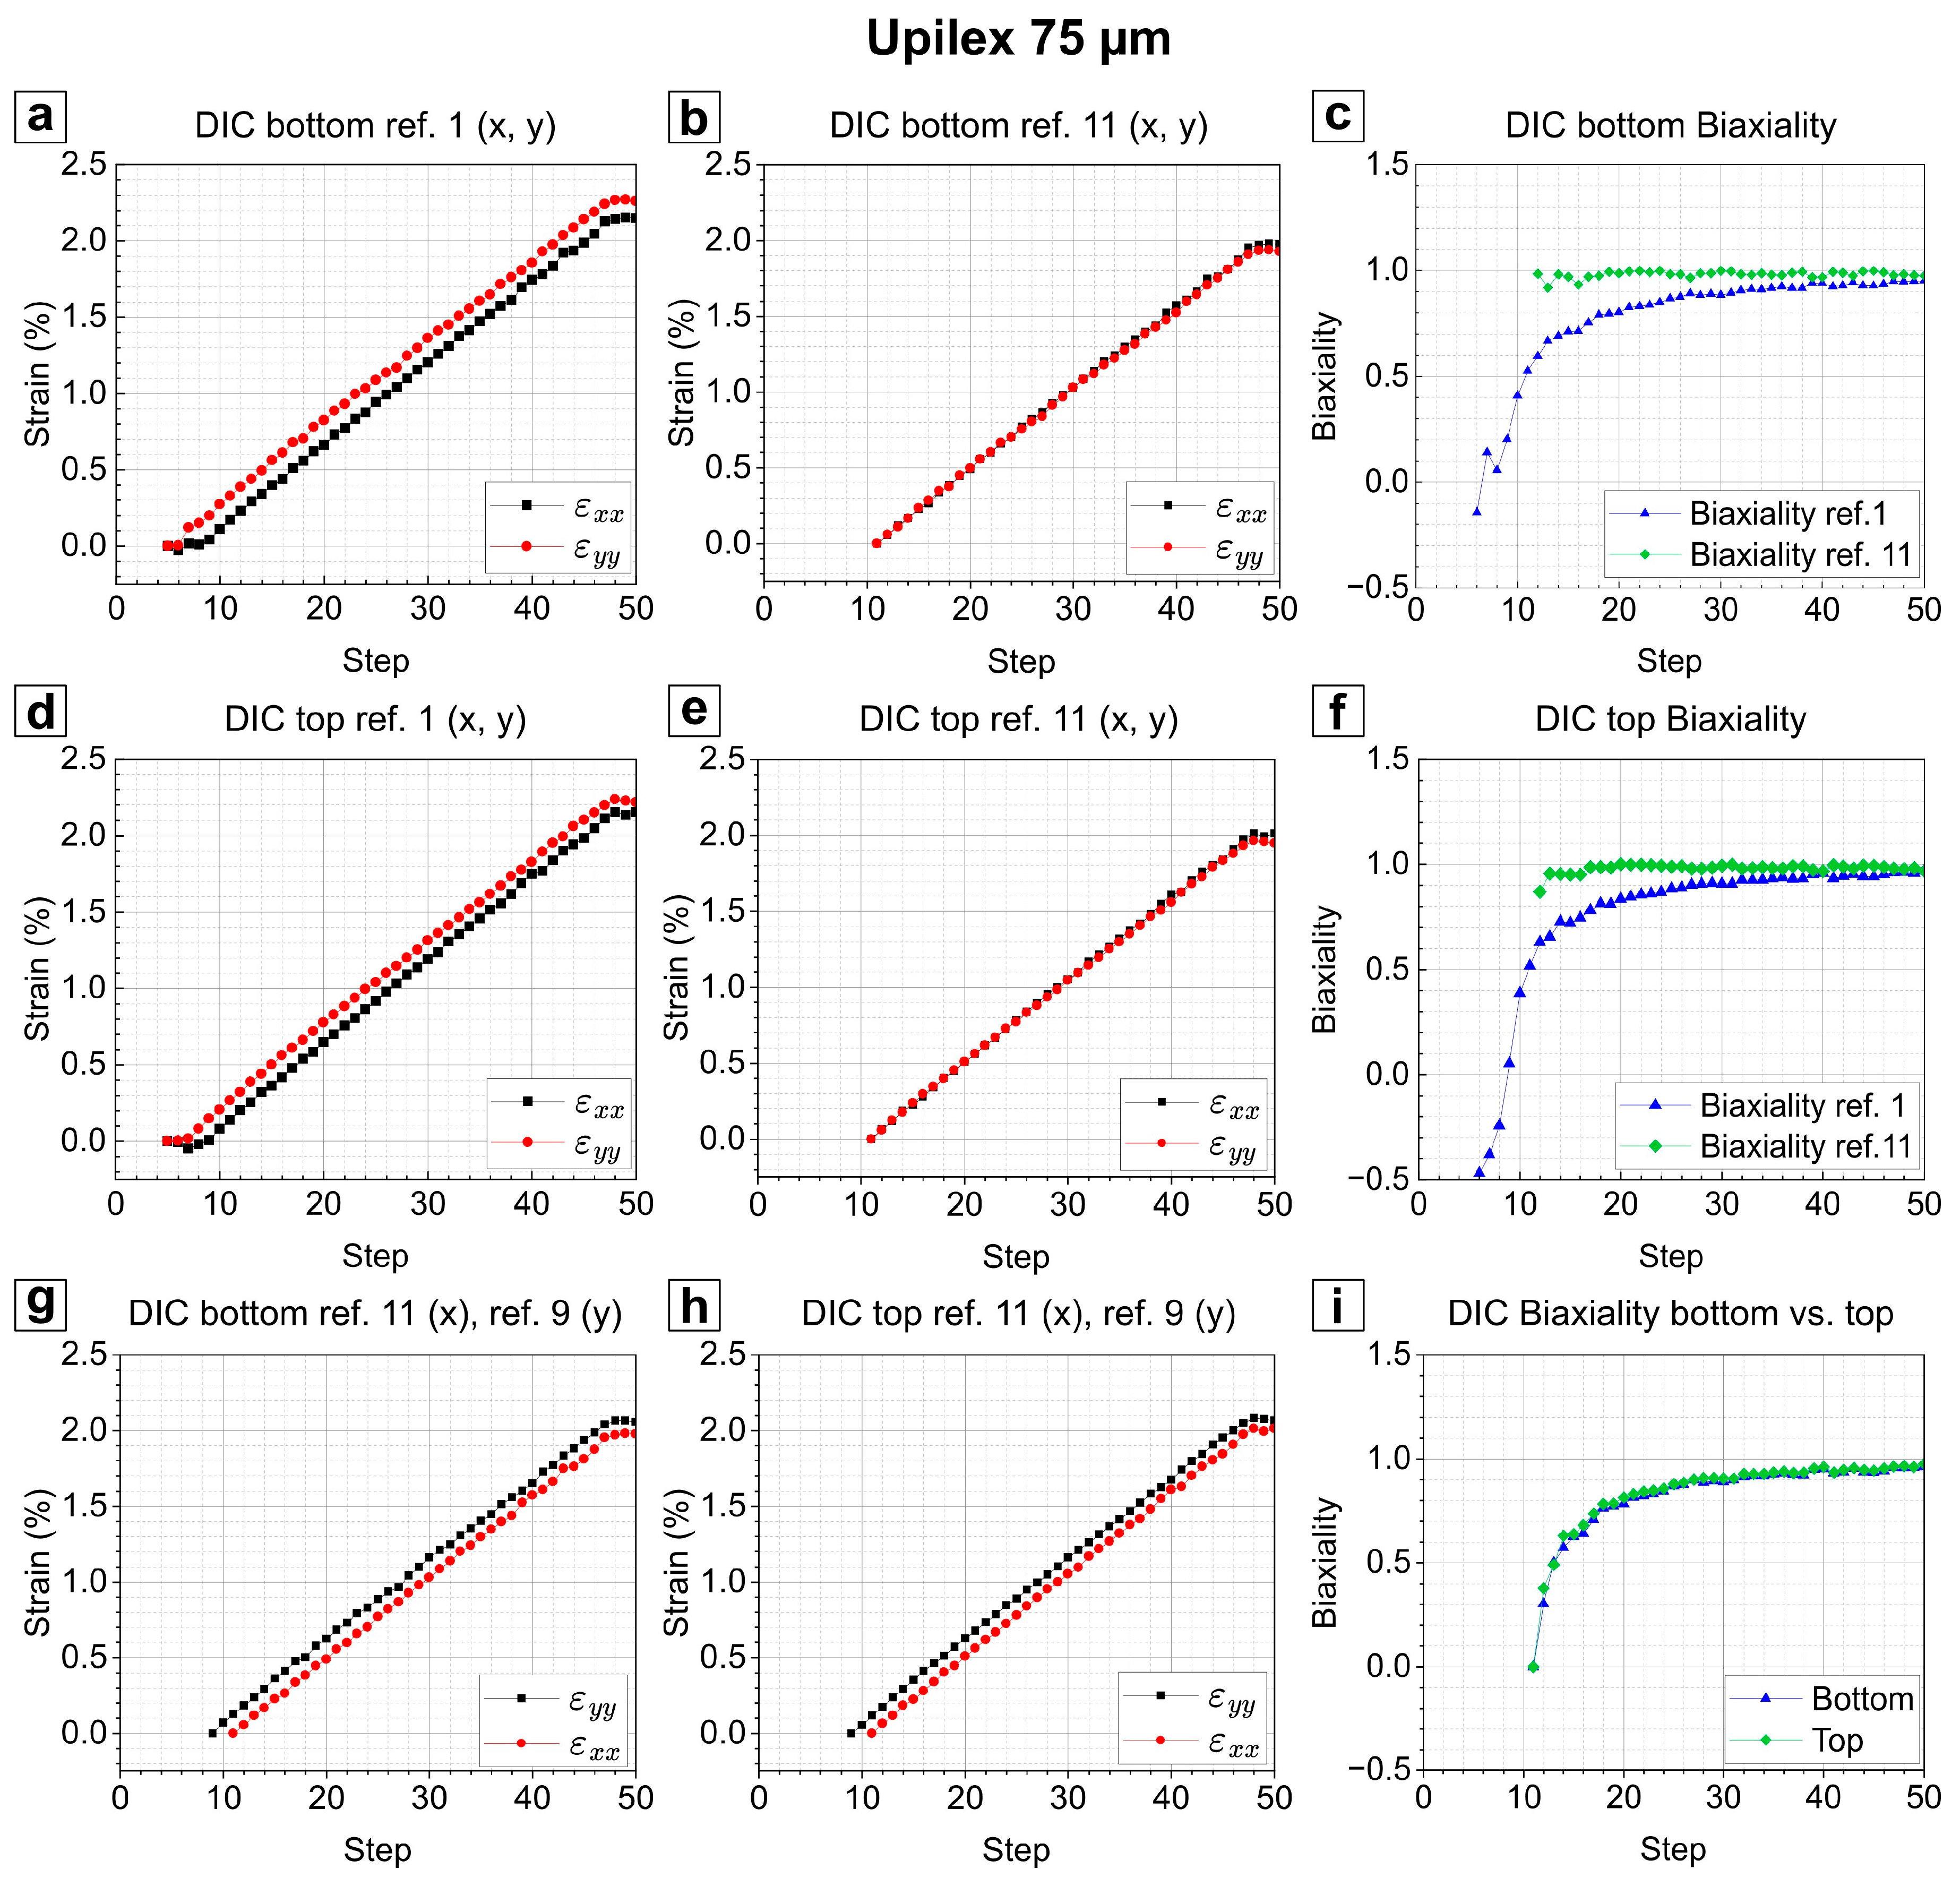
Using Setup 1, the proper device operation was verified, based on an intentionally imperfectly inserted 75 µm thick UPILEX sample with initially non-flat appearance, highlighting possible sources of error. To characterize the errors, the DIC measurement was started prior pre-straining, and three methods of defining the reference step (ref.) in the DIC evaluation are compared. For the first method, defining the reference step (ref. 1), the first recorded DIC image was taken, for the second method, the 11th image was used where both axes are pre-strained (ref. 11). For the third method, images were individually chosen for x and y (ref. 11 (X), ref. 9 (Y)), which will be explained in more detail later. Details on the analysis based on these three methods are shown in
Figure 5. The calculation of the strains in both directions using the first image as the reference frame indicated a small offset in
εxx and
εyy using the DIC bottom images (
Figure 5a). Initially, the sample is in an unloaded state after installation. The first several straining steps result in zero strain. After the 9th straining step was reached, the sample was slightly pre-loaded in the Y-axis, while a similar pre-loading was achieved after the 11th straining step for the X-axis. The difference is caused by sample insertion errors, which become visible as a rippled surface in the sample mounting state and are commonly overcome by slight pre-straining of the sample.
Such sample mounting issues that require a pre-load (or pre-straining) have been observed for other machines [
37,
38]. The loading steps at which the axis became pre-strained (11th and 9th step, X and Y, respectively) were set as the reference steps in the DIC evaluation to receive real physical strain measurements (
Figure 5g,h). However, by defining the reference step as the first loading step, the sample insertion error is visualized (
Figure 5a,d). In order to show the applied strain of the tool, the reference is set to the 11th step for both axes (
Figure 5b,e). The resolved biaxiality of all methods is presented in
Figure 5c,f,i. The shape of the biaxiality evolution based on the 11th reference step in
Figure 5c,f directly reflects the biaxiality of the tool (
Figure 2b). However, the diverging biaxiality based on the evaluation from reference step 1 would be misleading, since both errors of sample insertion and errors of the initially non-flat sample are captured. The appropriate method, therefore, is to use reference steps 9 in Y and 11 in X, revealing the physically correct biaxiality within the sample center (
Figure 5i). Moreover, the biaxiality from the large field of view also follows a similar trend as the small field of view (
Figure 5i). Comparing both fields of view (top and bottom DIC) reveals perfectly comparable results. Using Setup 1, it could be proven that the small field of view recorded through the prism is sufficient for strain measurements on thin films tested in AXL. Therefore, the consecutive case study was performed with Setup 2. Videos of the strain evolution are provided in the
supplementary to this article (Supplementary Videos S1 and S2).
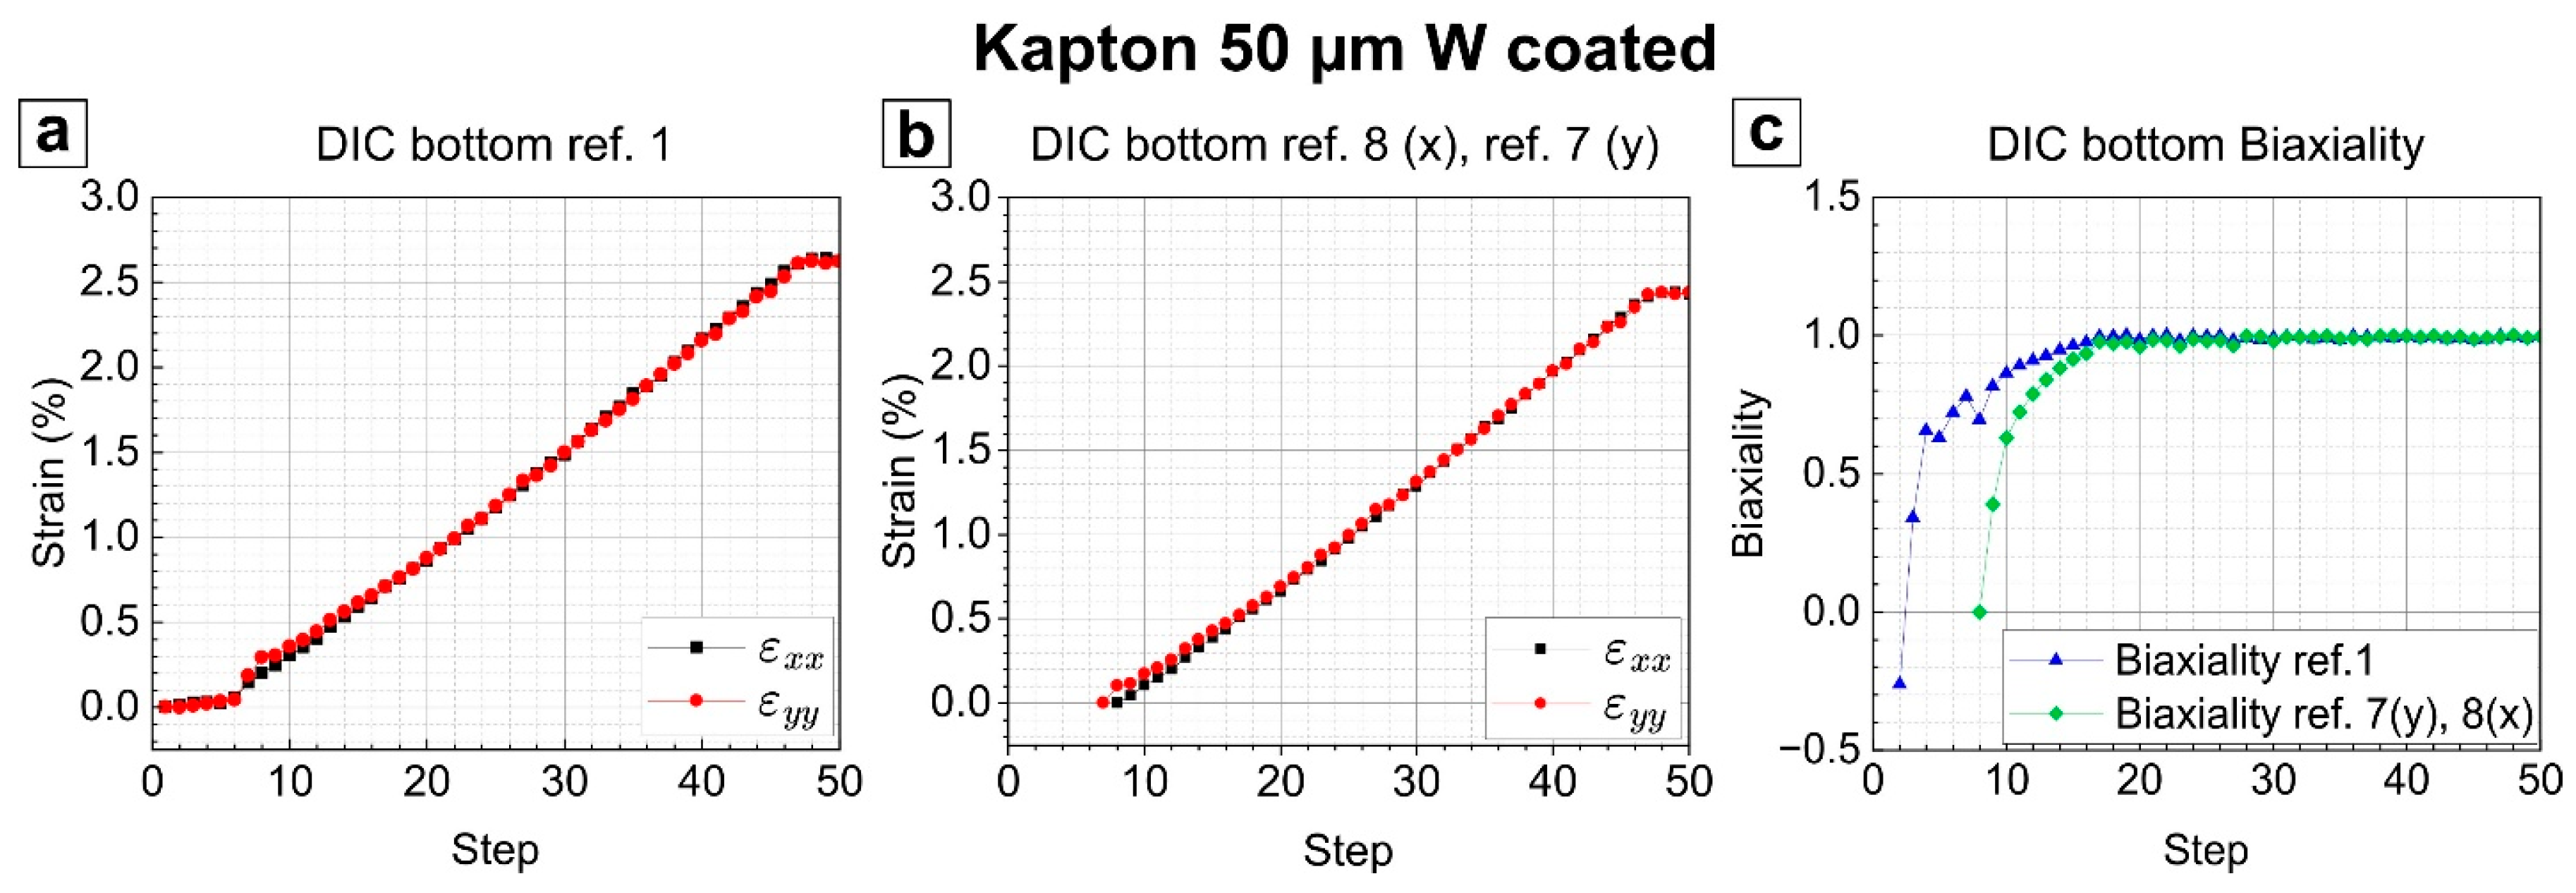
For the W-coated sample, the sample insertion error was kept at the minimum possible with the prototype device, and minor differences in strain progression along the X- and Y-axis were observed compared to the 75 µm Upilex foil.
Figure 6a shows the DIC strains calculated using the first frame as the reference. For this sample, the
εxx and
εyy strains match without any further offsets. However, the sample was in an unloaded state until straining step 7 in Y-direction and 8 in X-direction. Therefore, the reference steps are determined to be 8 and 7 for the X- and Y-axis, respectively, and the corresponding true physical strains
εxx and
εyy are presented in
Figure 6b.
Figure 6c compares the biaxiality when using frame 1 and frames 7 and 8 as the DIC reference, respectively. When the strains reach a plateau (steps 46–50), no further loading of the sample occurs (region 3,
Figure 2b and
Figure 6). Biaxiality evolution reflects the principal shape of the prototype tool biaxiality (
Figure 2b), with slight deviations from perfect biaxiality up to straining step 20. Video of the strain evolution is provided in the
supplementary to this article (Supplementary Video S3).
In the following, the v. Mises strain,
εvM, was also calculated assuming that
εxx and
εyy are principal strains since the X- and Y-axis are the principal axes in tension in this setup [
24]. Thus, the strain can be calculated with
with
εzz, the principal stress in Z-direction and
ν, the Poisson’s ratio of 0.34 provided by the foil manufacturer.
Biaxial straining of the W-coated sample observed with CLSM further revealed the true biaxiality of the device through the fracture of the W film. Similar to uniaxial straining of brittle metallic thin films on polymer substrates, including W [
11], cracks initiate at low applied strains. For this sample, cracks initiated at
εvM of 0.6% at the position of the highest biaxial strain. The initial cracks are shown in
Figure 7a at a slightly higher applied strain to better observe the cracks’ initiation site (circled upper part of image). Continued straining reveals the expected mud crack pattern produced under biaxial straining (
Figure 7b,c). Some cracks form quickly along substrate scratches in a more uniaxial manner (long straight cracks in
Figure 7a–c). The scratches and their effect on crack propagation are unavoidable, acting as stress concentration points where cracks form more easily. However, between the scratch-induced cracks, the mud crack pattern still emerged. Of note is how well the same area is imaged with each straining step, as the same features are observed in
Figure 7a–c, which accounts for almost the full straining range of the biaxial device. The crack density evolution (
Figure 7d) has a strong increase after the cracks initiate and starts to plateau near the end of the experiment, indicating that no further cracks can form. The strains were calculated using the DIC images recorded from the bottom of the sample (
Figure 6b).
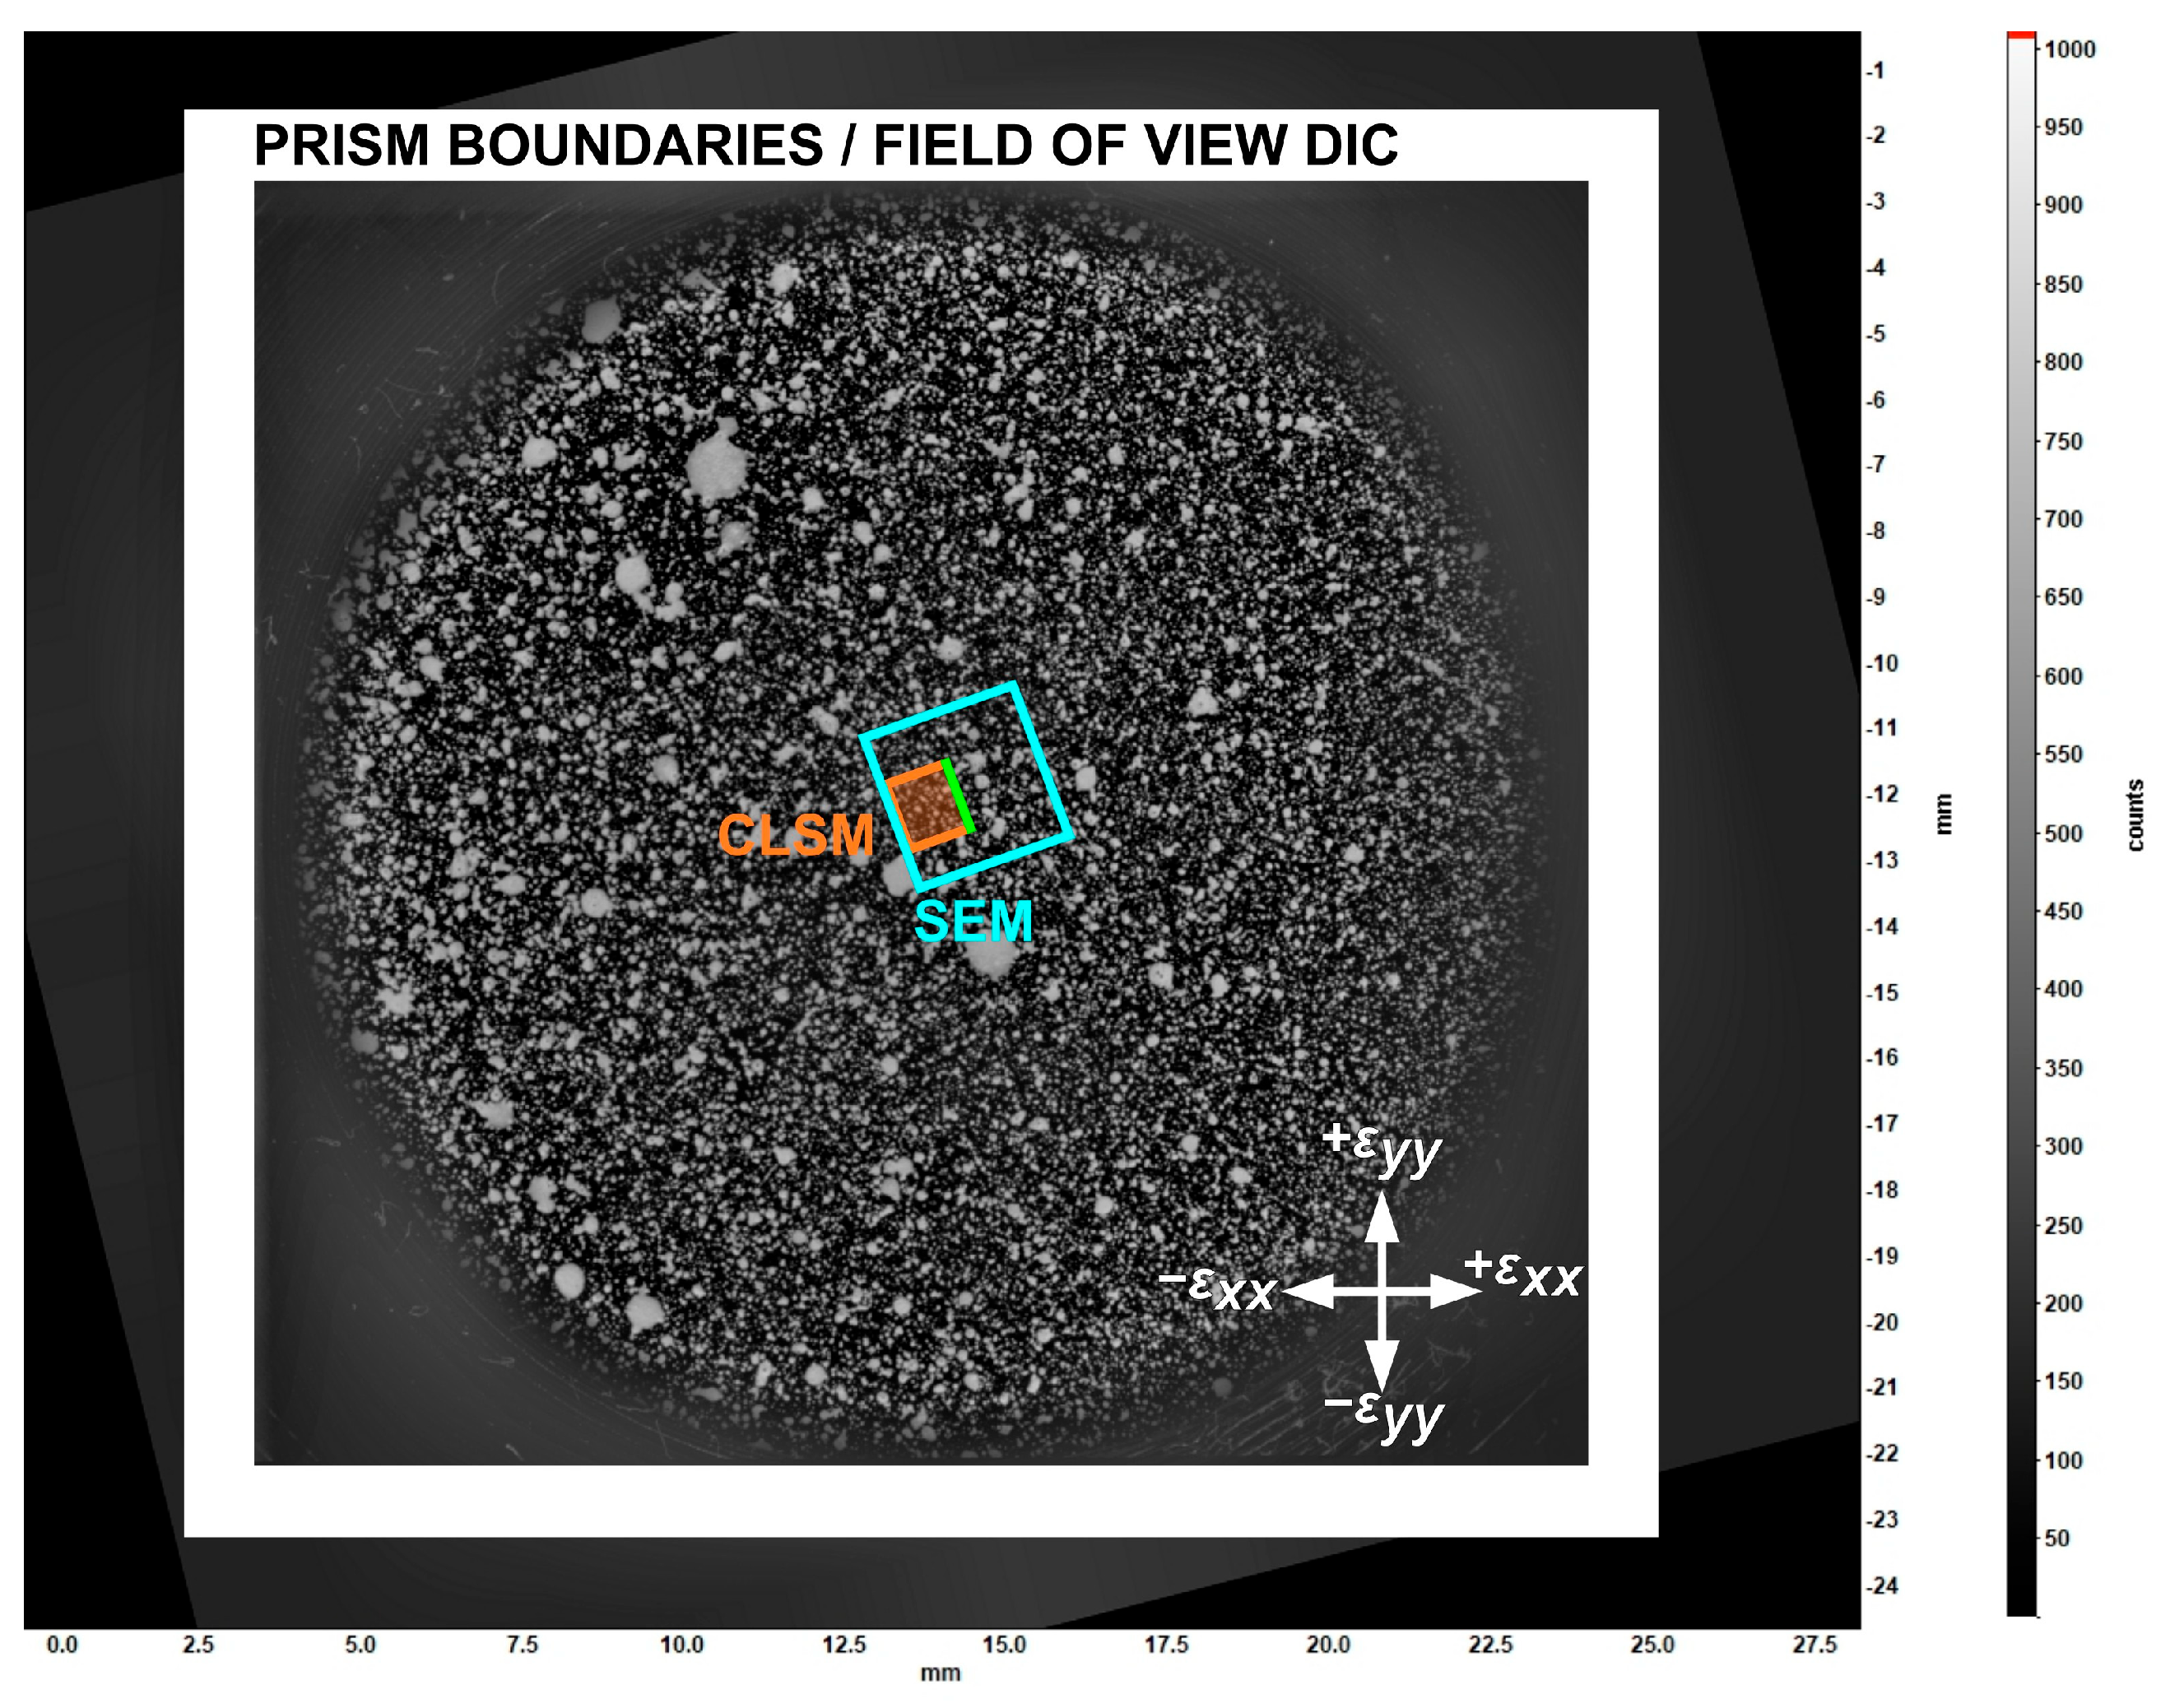
The drop in crack density at approximately 3% strain is attributed to a shift of the field of view during the experiment, which could be avoided by capturing a larger area with a different magnification or by stitching images together. In the present experiment, the region of interest of the CSLM scanning area does not capture the exact center of the cruciform, see also
Figure 8. Video of the crack pattern evolution is provided in the
supplementary to this article (Supplementary Video S4).
The DIC images capture a larger area than the CLSM. A comparison of the field of views from the DIC, CLSM, and post-straining SEM image after the last straining step is shown in
Figure 8. For the SEM image, the sample was relaxed, which makes the cracks more challenging to observe. The SEM also helps to confirm the initiation site of the cracks due to the high biaxial loading.
5. Discussion
From the initial introduction of the biaxial straining device, the biaxial loading evolution was illustrated (
Figure 2). Although the biaxiality diverges from true synchronous biaxiality (value of 1) from step 1 to step 20 (
Figure 2b), the divergence is caused by the manufacturing tolerances of the prototype device, especially of the loading ring. This biaxiality error is then transmitted to the tested samples as a source of error. Another source of error is how precise the sample is cut with the method used. If one or more arm widths are not the same, the biaxial center is shifted throughout the experiment, and damage might evolve differently. A final source of error directly related to the experimental setup is how well the sample is aligned and mounted between the four grips. In case of a sample insertion error, such as an unstrained and slightly rippled sample, the first loading steps do not represent a physical strain in the sample, but a relative movement of the speckle pattern is detected, resulting in apparent strains (consult again
Figure 5a,d, and later
Figure 6a). This is caused by the fundamental principle of DIC being a relative measurement, where an initial image (speckle pattern) is defined as a reference representing zero strain. The apparent strains are measured by DIC already, while flattening of the sample occurs throughout the first loading steps (initial plateau of data points in
Figure 5). In order to overcome this deviation, the reference frame in DIC should be set to correspond to the load step of the onset of real sample straining. In the case of biaxial loading, these reference steps might not be equal for both loading directions, due to unequal sample insertion errors for an individual axis, which has been demonstrated in
Figure 5. In the first experiment, the reference frames were determined visually by observing the displacement center shifts in the DIC evaluation software. However, it is recommended to improve the sample grips by integrating strain gauges for precise force measurements for both axes, thus simplifying the determination procedure.
Through experiments (
Figure 5 and
Figure 6), it could be further demonstrated that with and without suitable offsets, true biaxial loading was achieved. The differences observed between the experiments using Setup 1 and Setup 2 stem from how well the sample was installed prior to testing. Therefore, care must be taken when installing a sample, but with correct offsets and reference steps of the DIC evaluation, the experiment is valid.
The only deviation that is not considered when the reference steps are individually defined for X- and Y-directions is the strain applied in the orthogonal direction (Y- and X-direction) due to the lateral contraction. Assuming initially linear elastic behavior, the absolute value of the error may be calculated using the term
in Equations (4) and (5):
with
E the elastic modulus, and for plane stress with
σzz = 0. Imagine a point in time during the experiment, where
εxx is non-zero while
εyy still is, where straining in the X-direction leads, through Equation (5), already to a strain in the Y-direction. However, due to the low stress at the onset of straining and only slight differences between the insertion errors, the effect of lateral contraction is considered negligible between the different reference steps. An apparent sample insertion error on the DIC, plus a real sample insertion error with a biaxiality error of AXL’s loading ring (
Figure 2b), all contribute to the errors shown in
Figure 5a,d (reference step 0 for both axis). When the reference was set to the identical step and both axes are under load (or flat), as demonstrated in
Figure 5b,e, there is no sample insertion error with the DIC, but
εyy is underestimated, see Equation (4). Thus, the real sample insertion error was ignored and only the biaxiality error of AXL’s loading ring contributed to the final error. This means that the effects of the device and sample geometry are shown in
Figure 5b,e. Finally,
Figure 5g,h describes the appropriate procedure to capture sample insertion errors with the DIC, and
εyy is not underestimated. This is performed by individually choosing the reference for each axis. Only the biaxiality error of AXL’s loading ring remains superimposed with the real insertion error and highlights the need for high-precision loading rings. At this point in the analysis, the reference steps are individually defined for X- and Y-directions when the sample is loaded, or flat, along both axes.
Also of importance for later in situ experiments with other observation methods is the outcome that the local DIC measurements using a smaller field of view (FOV) (DIC bottom) matched the global FOV (DIC top) measurements (
Figure 5). The local images, taken with a prism, of the bottom of the sample, are more than adequate to continue in situ experiments to observe cracking and deformation of films under biaxial loading.
The straining of the W-coated sample also demonstrated the synchronous equi-biaxial loading through the production of a mud crack pattern (
Figure 7a–c). Biaxial loading of polymer-supported thin films can generate two types of crack patterns, which are dependent on the loading of the cruciform arms [
27]. Quasi-biaxial straining, when X- and Y-arms are sequentially loaded in small strain steps, as demonstrated in several works, [
15,
16,
17,
18,
19,
27,
28,
32,
33,
39] resulted in mud crack patterns.
The evolution of the crack density follows a similar trend to that found for uniaxial straining [
9,
10,
14,
40,
41]. Very few publications have been able to provide crack density evolution as a function of true biaxial loading. A new key observation from the experiments was presented, namely, the position of the initiation site of the cracks in the W film. Unlike uniaxial straining, where cracks perpendicular to the loading direction initiate almost anywhere along the gauge length, in the present experiment, the cracks initiated in the area of highest biaxiality. Even though several mud crack sites evolve in this area, the biaxiality is very uniform (compare the size of micrographs in
Figure 7 and
Figure 9 with the large field of view in the
Supplementary Videos), which implies that, along with the stress state, local defects control the crack initiation. The biaxial center point would be located at the center of the cruciform if the film area is well defined; however, errors previously discussed can slightly move that location, as illustrated in
Figure 8. A similar biaxial center point was observed using laser ablation of a W film that locally induced biaxial loading, which led to fracture and delamination of the film [
42].
Figure 9.
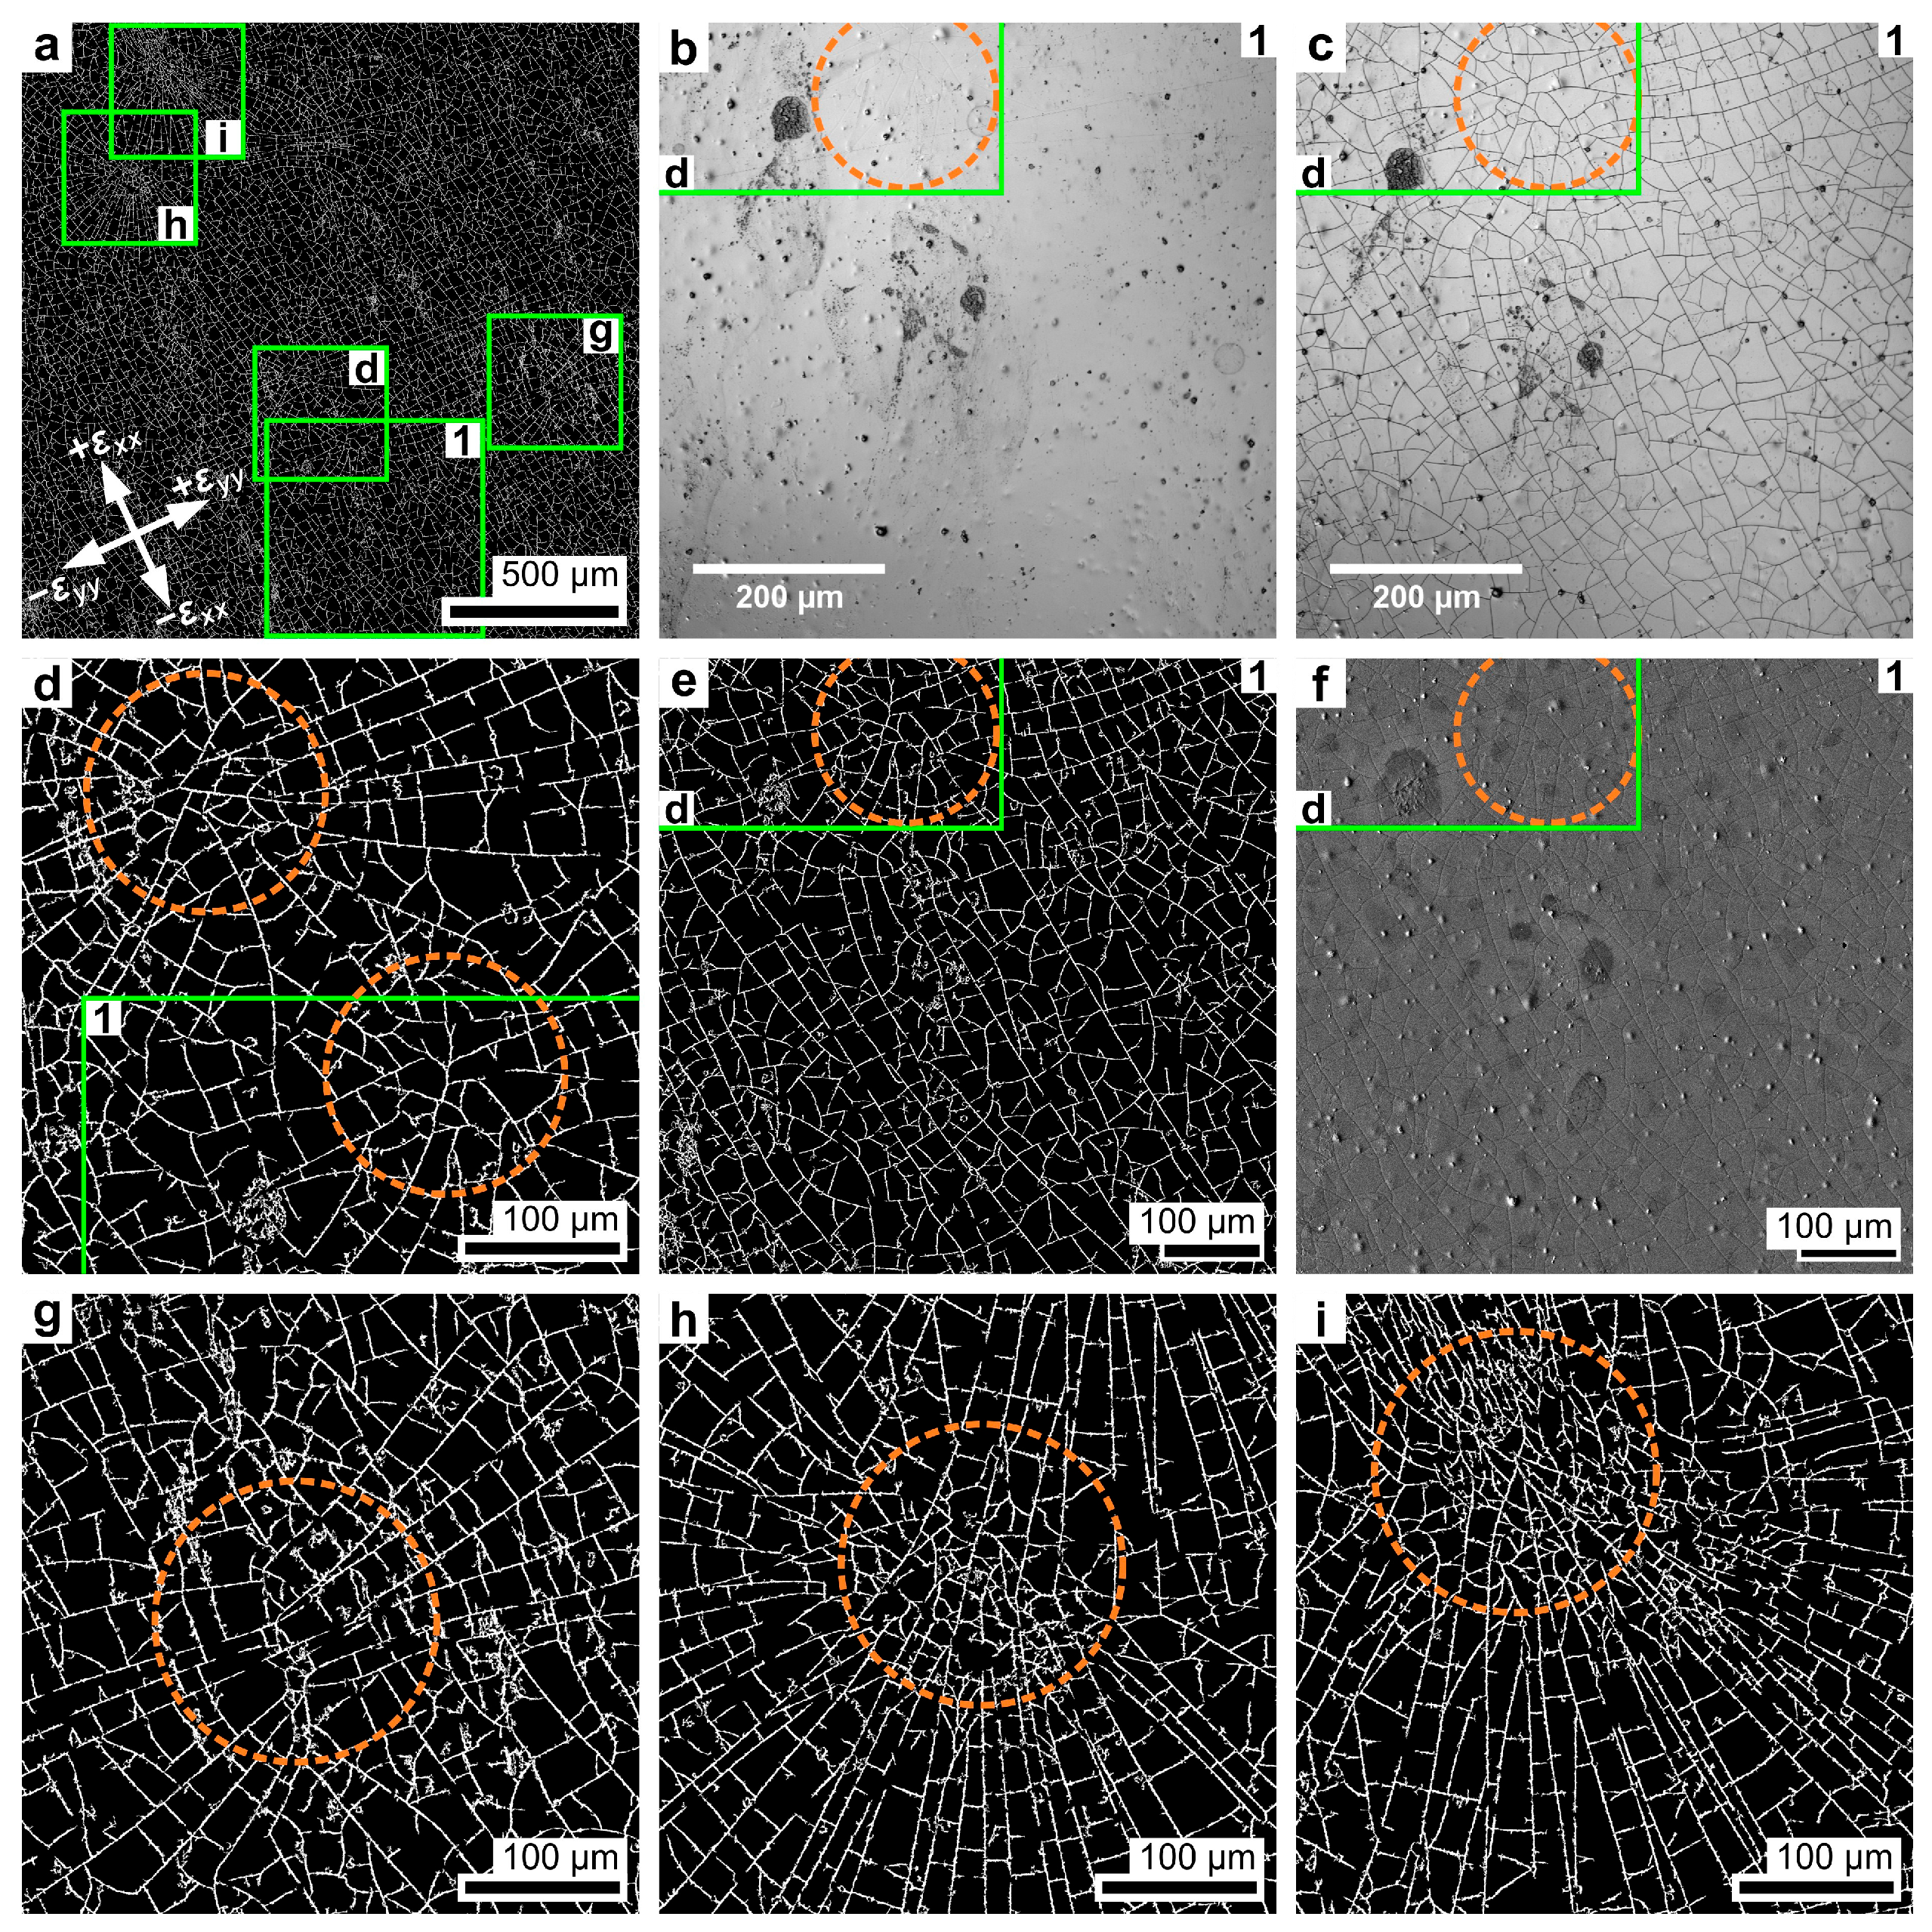
(a) Overview SEM image after WEKA segmentation showing the position of all subfigures (b–i). Green boundaries in figures (b–f) refer to positions indicated in (a). (b) CLSM laser intensity image at crack initiation and (c) at the last step of straining (Box 1). (d) Area above Box 1 that also had biaxial mud crack patterns. (e) SEM image with WEKA segmentation of Box 1 (CLSM area) and the (f) original SEM image with local contrast correction. Areas (g–i) are other regions of the film that also exhibited biaxial mud crack patterns, indicating that cracks initiate in more than one region at or near film defects (color online).
While the in situ CLSM images provide information about a single location, cracking occurs over the entire film area.
Figure 9a indicates several areas of interest in a SEM image featuring a large field of view that was WEKA segmented to improve the contrast of the cracks. Increasing the crack contrast was necessary for crack detection because the sample was removed from AXL and relaxed before SEM imaging. Relaxation of the polyimide substrate closes cracks, making them challenging to observe. Box 1 in
Figure 9a refers to the area imaged by CSLM (see
Figure 7), with
Figure 9b being taken at crack initiation and
Figure 9c at the last straining step. Both images mark the first cracks observed with a dashed circle. Above this area, shown in
Figure 9d, another biaxial mud crack pattern was observed. Focusing again on Box 1,
Figure 9e (WEKA segmented) and
Figure 9f, the original SEM images reveal that the CLSM and SEM images have the same cracks. The additional areas considered in
Figure 9g–i show other areas with biaxial mud crack patterns, thus other initiation sites for cracking outside of the CLSM area. Consequently, the far field stress state was homogeneous in the film during straining, and crack initiation is influenced by film defects, as expected. The upper left corner of
Figure 9i reveals higher crack density with a more uniaxial character caused by higher strains in
εyy. This is caused by the larger distance from the biaxially loaded sample center. For future in situ tests, reducing the coated region by etching and capturing a larger zone using CLSM or SEM is recommended in order to capture all crack initiation sites and the corresponding damage evolution. However, due to the local nature of using microscopy techniques it might be challenging to capture all crack initiation sites simultaneously.
6. Conclusions
A new device, AXL, that applies true biaxial loading by simultaneously moving four loading arms connected via a loading ring has been introduced. Validation experiments of the setup without any sample and with samples demonstrated that thin foil samples (<125 µm thick) can be reproducibly strained with a biaxiality of 1. These experiments also illustrated the possible sources of error that are present for the device, the sample geometry, and the correct installation of a sample into the device. It should be noted that the local bottom side DIC measurements were compared to top side DIC measurements using a much larger FOV to determine that both strain measurements result in the same values, making the more localized bottom side DIC measurement valid for further in situ experiments where the top surface is accessed via another microscope.
To showcase that AXL can be used in situ with other characterization methods, including but not limited to CLSM, AFM, SEM, and XRD, a W film supported on Kapton polyimide was tested with CLSM. The W film was imaged with the CLSM, while the bottom of the sample with a speckle pattern was accessed via a prism and DIC camera to measure the applied strains. The experiment resulted in the common mud crack pattern indicative of true biaxial straining, and the evolution of the crack density could be determined from each CLSM image once the film fractured. The initial film fracture was very localized to the highest point of biaxial strain and was captured with the CLSM. The presented device was shown to be robust for ex situ and in situ experiments. Moreover, with minor changes, for example, the loading ring could be changed to apply other loadings to each grip, the device is a versatile addition to a testing lab.
