Abstract
Stainless steels are the most exploited materials due to their high mechanical strength and versatility in producing different alloys. Although there is great interest in these materials, mechanical characterisation, in particular fatigue characterisation, requires the application of several standardised procedures involving expensive and time-consuming experimental campaigns. As a matter of fact, the use of Standard Test Methods does not rely on a physical approach, since they are based on a statistical evaluation of the fatigue limit with a fixed probabilistic confidence. In this regard, Infra-Red thermography, the well-known, non-destructive technique, allows for the development of an approach based on evaluation of dissipative sources. In this work, an approach based on a simple analysis of a single thermographic sequence has been presented, which is capable of providing two indices of the damage processes occurring in material: the phase shift of thermoelastic signal φ and the amplitude of thermal signal at twice the loading frequency, S2. These thermal indices can provide synergetic information about the mechanical (fatigue and fracture) behaviour of austenitic AISI 316L and martensitic X4 Cr Ni Mo 16-5-1; since they are related to different thermal effects that produce damage phenomena. In particular, the use of φ and S2 allows for estimation of the fatigue limit of stainless steels at loading ratio R = 0.5 in agreement with the applied Standard methods. Within Fracture Mechanics tests, both indices demonstrate the capacity to localize the plastic zone and determine the position of the crack tip. Finally, it will be shown that the value of the thermoelastic phase signal can be correlated with the mechanical behaviour of the specific material (austenitic or martensitic).
1. Introduction and State of Art: Infrared Detection Based Approaches
In recent years, the scientific scenario concerning fatigue tests saw the development of novel techniques called ‘thermal methods’ based on the detection of radiative emission. The potentiality of these techniques to assess mechanical behaviour of materials relies on the obtaining of more information on damage. Following these considerations, infrared-based techniques have been exploited for in situ/operating condition detections.
This work deals with the development of thermal methods to assess the fatigue behaviour and crack tip localisation of materials. In this regard, Infrared radiation has been widely adopted for damage assessment of materials undergoing dynamic loading [1,2,3,4].
TSA (Thermoelastic Stress Analysis) [5,6,7,8,9,10] represents an example of application of the IR (Infrared) technique for stress analysis evaluation on a cyclically loaded specimen. This technique has been widely exploited but its application is related to the achievement of adiabatic conditions. In many applications, particularly referring to a self-heating test [2], non-adiabatic conditions are intrinsically produced due to damage phenomena involved in fatigue and fracture tests for studying damage behaviour of material. In this case, a number of authors have shown how thermoelastic heat sources allow for assessment of the damage behaviour of material [10], by using TSA. Another approach is based on the evaluation of dissipative heat sources [11,12,13,14]. By applying the Fourier Sine Series when analysing the thermal signal of a specimen undergoing fatigue load, Enke [11] found a component at twice the imposed loading frequency. This contribution to the thermal signal is zero in absence of damage and rises when fatigue processes occur; it then represents the temperature contribution to plastic phenomena. In this paper, the attention is focused on the evaluation of parameters related to dissipative phenomena in the material. The adopted approach involves the analysis of thermographic signal in the time domain [10,11,12,13,14,15,16,17,18,19,20,21] in order to study the various components of thermal signal related to the fatigue/damage behaviour of material. In particular, the considered indices referred to dissipative heat sources, are:
- the phase shift of thermoelastic signal that occurs when damage phenomena are present in the material [3,14,22].
- the energy dissipations in the material [13,16] related to the second order harmonic amplitude [11,12], of temperature signal.
The advantage of the proposed approach refers to the possibility of adopting the same parameters to discuss both fracture mechanics and fatigue behaviour. In fact, the adopted algorithm is relatively simple and provides, by analysing a single thermographic sequence, a simultaneous assessment of φ and S2. Such parameters are related to intrinsic dissipations occurring in presence of damage and furthermore, can provide complementary information on damage processes. In particular, in this work, they have been adopted for estimating the fatigue limit of stainless steels at a loading ratio of 0.5 (a lack of experimental data is present in literature referring to this loading ratio).
In Fracture Mechanics, the analysis of φ and S2 leads to crack propagation analysis: in fact, for the first time, the complementary use of φ and S2 to localize the plastic zone and then to define crack propagation has been shown. The fact that two complementary indices could describe the mechanical behaviour of materials opens a wide discussion on fatigue damage assessment and on the localization of the crack tip of specimens undergoing a fracture mechanics test. It is worth noting that, in literature, only the phase shift of thermoelastic signal has been used to achieve the position of the crack tip (calculation of “a” crack size) while the analysis of crack tip position may be improved by evaluation of both φ and S2 indices. Further efforts involve correlation between the information provided by these two indices.
Finally, it was observed that φ presents typical values for specific material, and it may be adopted in order to characterise the specific material or classes of materials.
In this work, the response of two materials: X4 Cr Ni Mo 16-5-1 martensitic stainless steel and AISI 316L austenitic lattice is discussed. Fatigue and fracture tests were carried out on specimens designed according to Standards and thermal sequences were acquired continuously during the tests. In the following paragraphs, the state of art concerning thermal methods will be discussed separately, referring to fracture mechanics and fatigue.
1.1. Thermal Methods for Assessing Crack Propagation in Material
Fracture mechanics is actually supported by Infrared Technique [23,24,25,26,27,28,29,30,31,32] referring to the measurement of the crack propagation or the determination of the Stress Intensity Factor. However, it has been demonstrated [3,14,31], that a direct measurement of surface temperature can provide an overview of the crack tip region. However, this method is not suitable for accurately calculating the crack position, since two different dissipative phenomena are present at the crack tip due to crack closure and plastic behaviour.
Moreover, the use of temperature as an index of dissipative heat sources may find limitation in those cases in which temperature changes on material related to the plastic zone are very low (short cracks) and furthermore, high performance equipment and a difficult set-up are required. This is the case, for instance, with brittle materials (such as martensitic steels), titanium alloys [10] or complex shaped welded joints [14].
By taking this limitation of temperature measurements into account, the TSA technique has been proposed for detecting the position of the crack and SIF evaluation [24,25,26,27,28]. In particular, several authors [24,25,28] have studied the phase shift of TSA signal in order to localize the position of the crack. The phase changes of the signal are due to high stress gradients, which may be ascribed to non-adiabatic conditions and to plastic behaviour at the crack tip. Furthermore, the characteristic performance of the phase signal at the crack tip contains a double reversal of sign, notably caused by the two cited effects, which has an opposite sign influence [26,27].
In literature, phase signal is also considered as an effective parameter for the identification of local damage and for the evaluation of fatigue damage in materials [3,30,31], as will be explained in the following paragraph.
1.2. Thermal Methods for Fatigue Limit Assessment
With the aim of reducing testing time and costs of experimental campaigns, IRT can be adopted to perform tests. The advantage of the technique is related to the possibility to observe the heat sources involved in damage and failure of materials by using the potentiality of a well-established, non-destructive, real-time and non-contact technique.
Based on the detection of temperature changes, different approaches have been developed [1,2,3,4].
Luong [1], first of all, illustrated a graphical method to assess the fatigue limit of a specimen and connecting rod and his work promotes the online monitoring of crack initiation and propagation. Risitano [2], proposes the Risitano Method to graphically estimate fatigue limit in a short time, by implementing self-heating tests. These graphical methods involve systematic errors of under/overestimating fatigue limit owing to non-objectivity in the selection of data series in the range between elastic and plastic stresses. In De Finis’s [4] work, a statistical approach was proposed to avoid errors by applying a threshold method in order to discriminate elastoplastic behaviour and thus fatigue limit, without bringing the specimen to failure.
The energy dissipation study can be performed [33,34,35] to assess fatigue behaviour as proposed by Morabito [33] in a calorimetric approach, which deals with the assessment of thermoelastic coupling and dissipative heat sources. Experimental analysis is combined with local numerical models of heat diffusion equation in order to separate these heat sources [35].
In particular, by adopting a suitable mathematical method, the various components of thermal signal can be assessed. Referring to this approach, Enke [11] by adopting the Fourier sine series, separated the component of thermal signal related to thermoelastic phenomena from that related to dissipative phenomena. From a more empirical standpoint, Krapez [13] adopted a numerical model based on the least squares method to extract the individual components of thermographic signal and to calculate the fatigue limit of steel. Several authors [10,14,21,22,31] deal with the phase lag between a reference signal and thermoelastic signal to evaluate dissipative phenomena and the fatigue limit of metals. As a matter of fact, thermal methods require shorter testing times in experimental campaigns, and provide a more accurate damage behaviour assessment, thus these techniques are developing.
2. Material and Methods
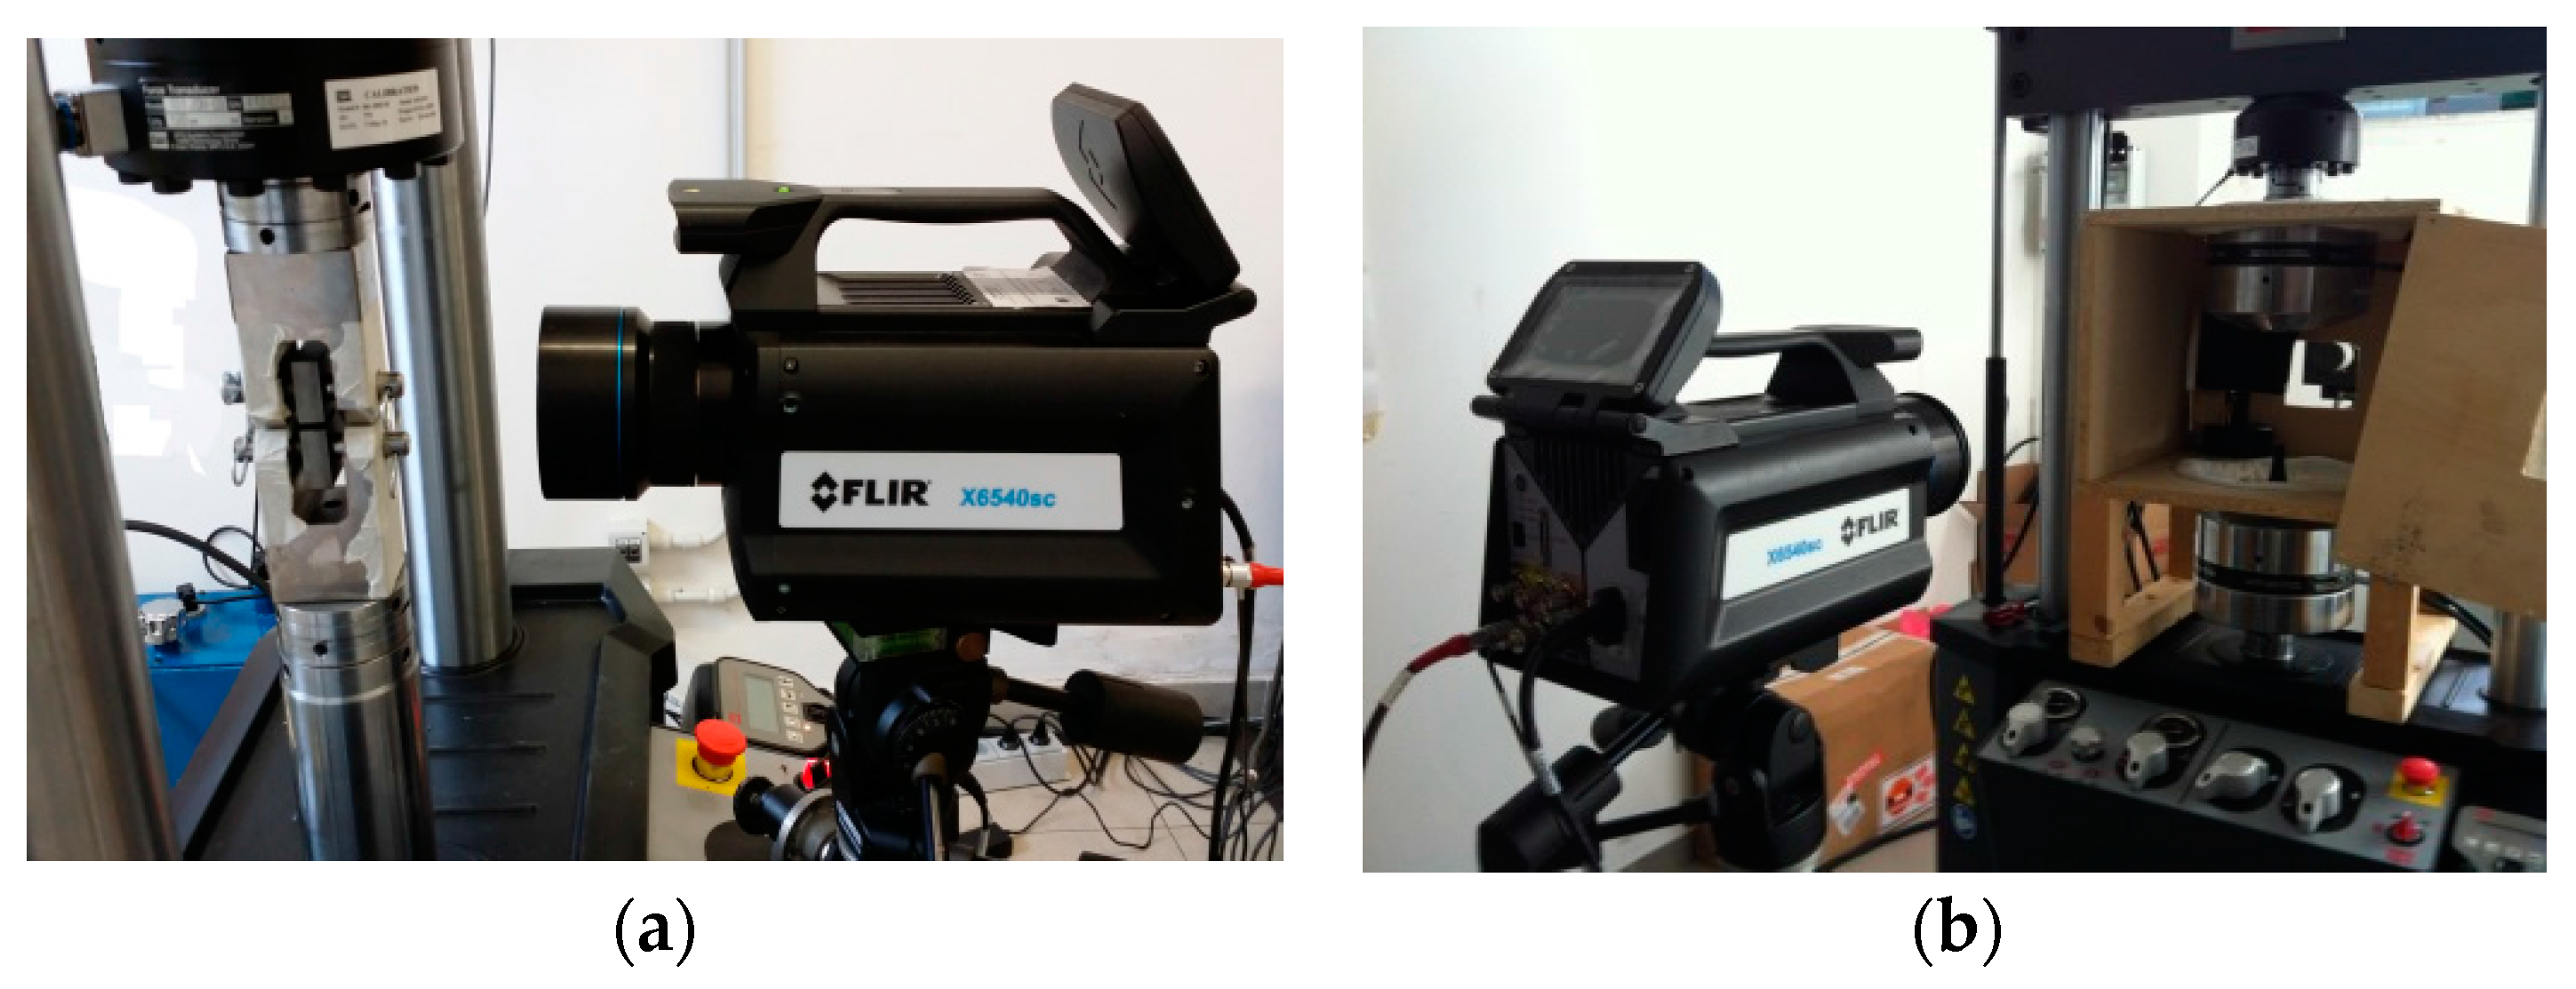
The experimental setup is depicted in Figure 1. As is clearly illustrated in Figure 1, the convenience of the method relies on using a similar setup to characterize both fatigue behaviour and crack propagation:
- The Infrared camera used was FLIR IR X6540 SC (Wilsonville, OR, USA) with an InSb detector (640 × 512 pixels) and a full-frame acquisition rate of 123 Hz.
- MTS model 370 servo-hydraulic fatigue machine with a 100 kN capacity.
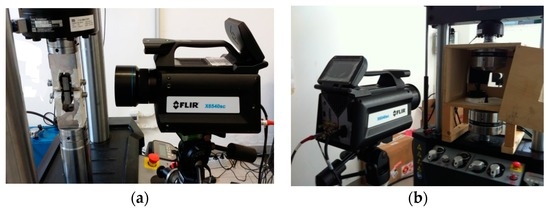
Figure 1.
Experimental setup: (a) Fracture Mechanics test; (b) Fatigue test.
Two different high-Cromium steels were selected for the experimental tests made of an as-cast austenitic stainless steel AISI 316L (UTS 515 MPa) and a forged precipitation hardening stainless steel X4 CR NI MO 16-5-1. In total, three specimens have been fatigue and fracture tested, even if, referring to the Fracture Mechanics, the results for one specimen will be shown. Chemical composition and mechanical properties are provided by [36], for austenitic lattice, while for the analysed martensitic X4 Cr Ni Mo 16-5-1 (UTS 850 MPa), mechanical properties as well as chemical composition are discussed in [37]. Both materials presented in this paper are employed in the industrial fields operating within a corrosive environment, therefore the interest in mechanical characterisation of these alloys is explained.
2.1. Fracture Mechanics Test Procedure
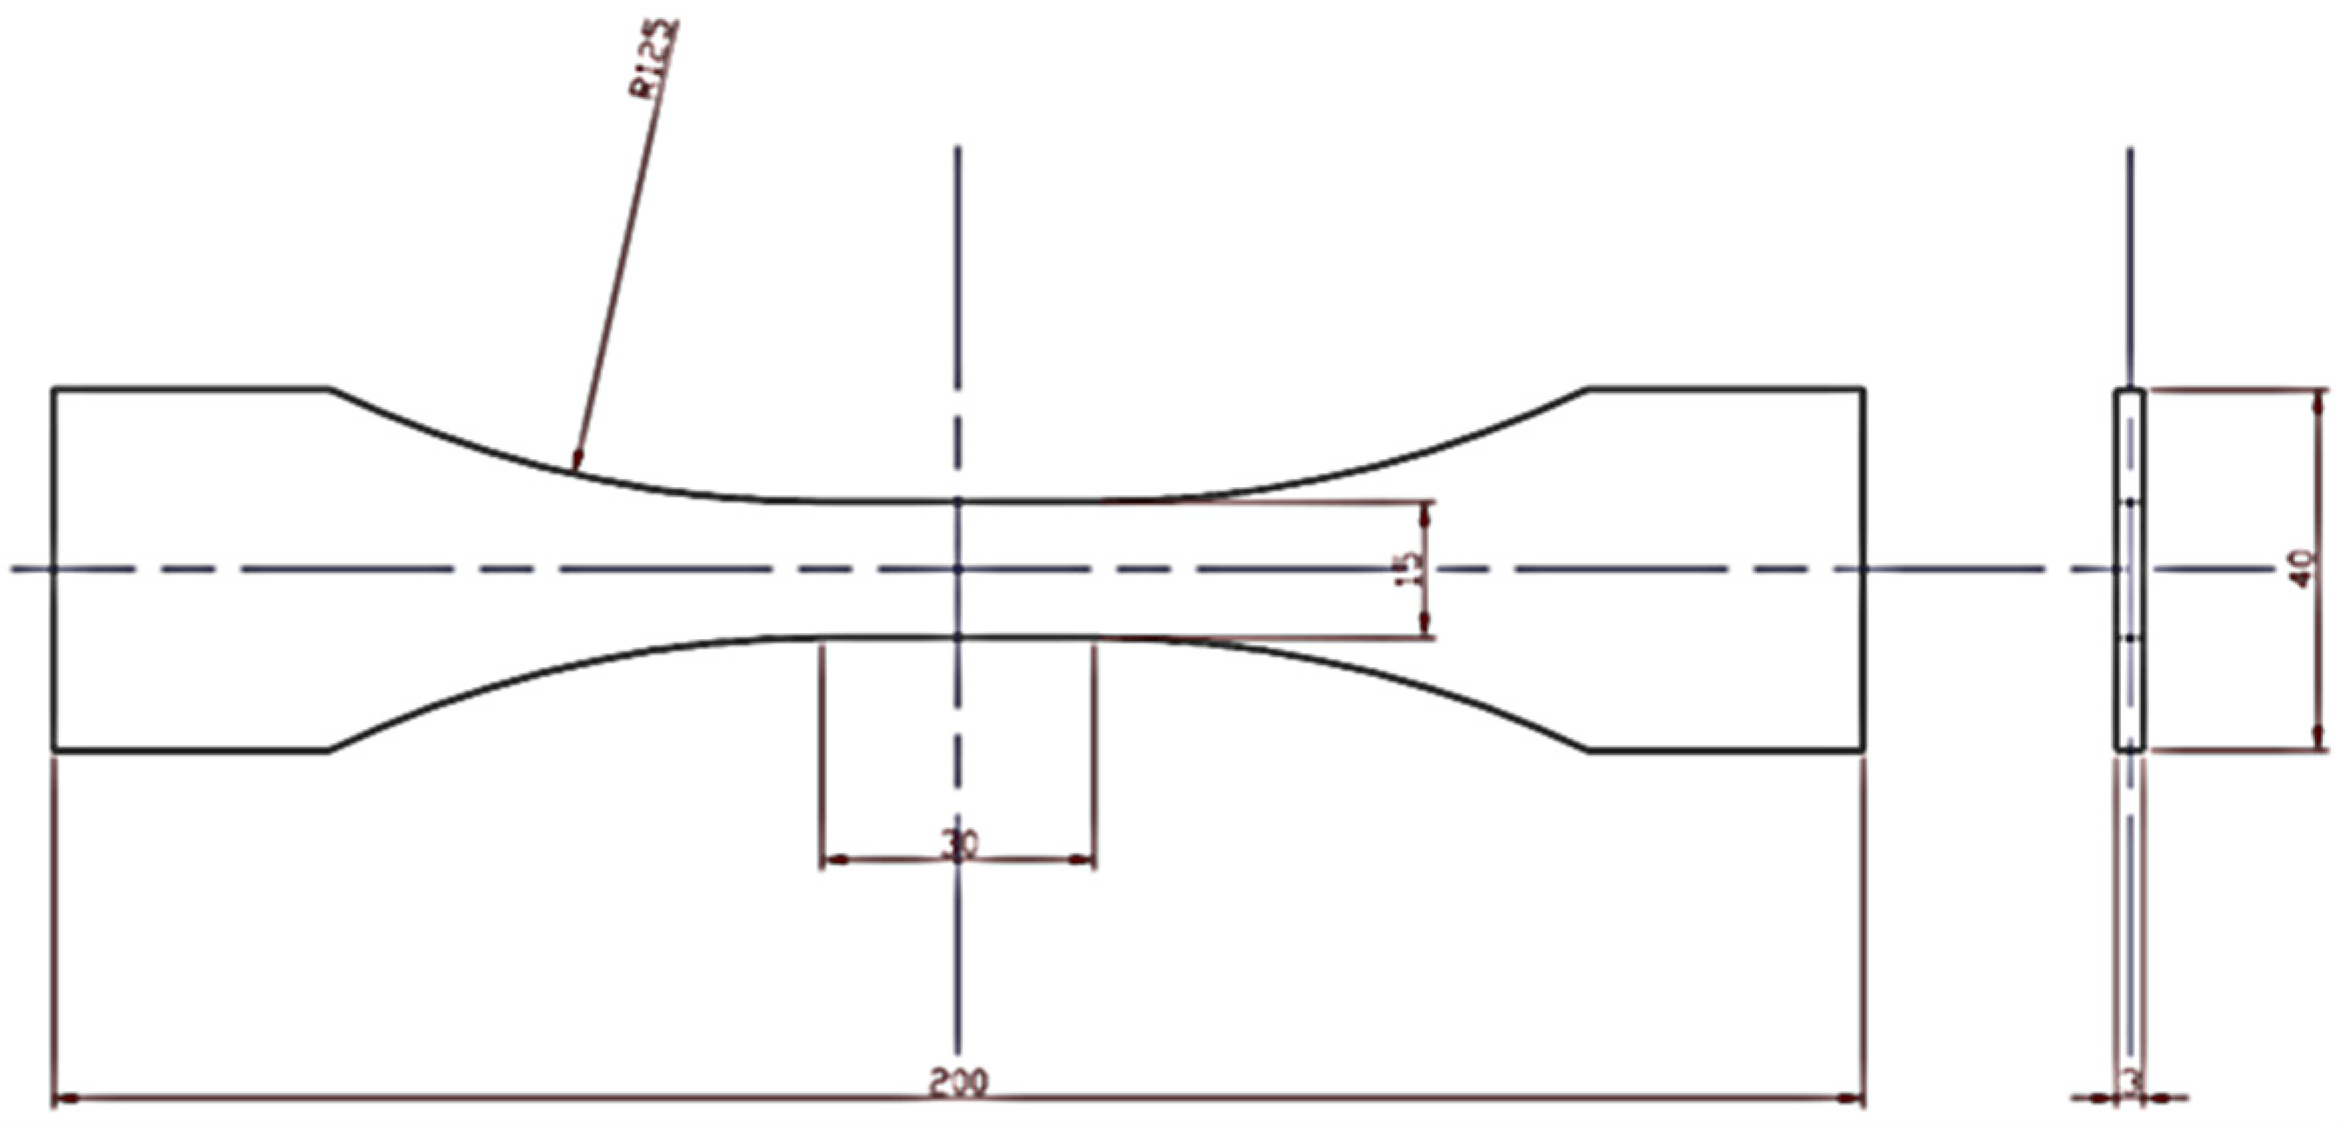
Figure 2 shows the specimen’s geometry, a compact tension (CT) specimen according to ASTM E 647 [38]. The constant-force-amplitude procedure was used with a constant force range ΔP, fixed stress ratio (R = 0.1) and loading frequency f = 13 Hz. In Table 1, the loading ranges used during the tests for each material are reported.
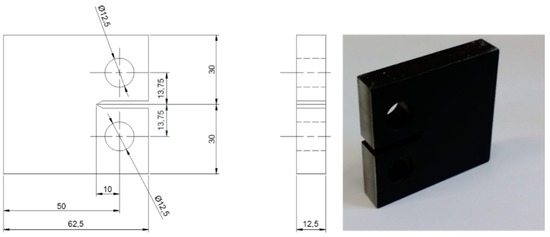
Figure 2.
Fracture Mechanics specimen dimension (mm) according to ASTM E 647-00 and aspect.

Table 1.
Loading amplitudes adopted for Fracture Mechanics tests.
Thermographic sequences were acquired with constant intervals of 2000 cycles by using FLIR IR X6540 SC infrared camera, Figure 1a, with an acquisition rate of 123 Hz. A geometrical resolution of 0.067 mm/pixel was obtained by placing the IR-camera at 170 mm from the specimen and by using a 50 mm lens with a 12 mm extension ring. All specimens were pre-cracked up to a crack length of 2.5 mm according to ASTM E-647 [37].
2.2. Fatigue Test Procedure
Referring to the setup in Figure 1b, the adopted specimens were ‘dog bone’ shaped, as shown in Figure 3. A ‘stepwise’ loading procedure was set up by performing different stress-controlled fatigue tests at a constant amplitude step level (see Table 2), on a servo-hydraulic MTS machine. The investigated load ratio for fatigue tests was R = 0.5 with a frequency of 17 Hz; the value is as high as possible in order to preserve the adiabatic condition. The fatigue tests were run until the specimen failed. Each stress level of the stepwise procedure represents a fatigue test in which the sample undergoes constant stress amplitude and frequency for roughly 20,000 cycles. During this period, the acquisition frequency was above 100 Hz, in order to make 1000 frames. The moment chosen to acquire the infrared sequences was approximately mid-test, in order to achieve thermographic signal stabilisation.
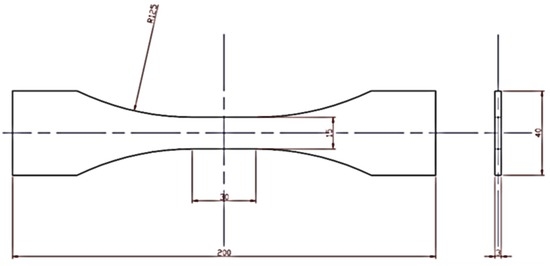
Figure 3.
Geometry and dimensions of dog-bone fatigue specimen (ASTM E 466-96 [39]).

Table 2.
Loading amplitudes adopted for Fatigue tests: (a) AISI 316L; (b) X4 Cr-Ni-Mo 16-5-1.
3. Data Processing
For both Fracture Mechanics and Fatigue, processing involves applying a suitable mathematical algorithm in order to extract the superficial temperature pixel by pixel. This represents an advantage of the technique, which provides considerable information on Fracture and Fatigue.
In particular, the model allows for time domain analysis of thermal signal to assess several indices related to intrinsic dissipation: the amplitude and phase of the thermoelastic signal and the amplitude of the second Fourier harmonic component. The model provides the thermal signal Sm evolution in the time domain, as indicated in Equation (1):
the term S0 + at represents the increase in mean temperature during the cyclic mechanical loading, ω is angular frequency of the mechanical imposed load, S1 and φ are respectively amplitude and phase of the first harmonic component of Fourier series, while S2 represents the amplitude of the second Fourier harmonic component. The term S1 describes the stress field on the specimen’s surface and corresponds to the signal variation related to thermoelastic effect, the term S2 is proportional to the energy of intrinsic dissipation.
Equation (1) is integrated in the algorithm of IRTA® software (Bari, Italy), providing an image in data matrix form for each constant parameter. In this paper, φ will be taken into account, along with S2 parameters to study crack propagation and fatigue in stainless steels.
The processing procedure for thermographic data was applied on both crack propagation and fatigue sequences of a fixed loading level and frequency. In particular, it provides:
- The acquisition of the thermographic sequence of approximately 1000 frames acquired in 10 s.
- The signal analysis for assessing φ, S2 pixel by pixel matrix.
The signal analysis provides parameter maps, which can be analysed as soon as they are obtained.
For fatigue limit estimation, the analysis of data series for both parameters involves a further processing procedure by adopting Matlab® software (Torino, Italy). The procedure for extracting data, capable of evaluating fatigue limit referring to phase and S2 data, consists of:
- Applying a Median 2D-smoothing on the data matrix obtained by IRTA® software,
- Reducing data matrix to refer the analysis only to the gauge length area (for fatigue tests). The same data matrix has been chosen for φ, S2 parameters.
- Evaluating the standard deviation of signal of the φ, S2 for application of the threshold method [4] to assess the fatigue limit of material.
The threshold method, as will be illustrated in Section 4.3, is not within the scope of this paper; the authors recommend to referring to [4] for details.
4. Results and Discussions
In this section, the results of Fracture and Fatigue tests will be discussed. In particular, the study of S2 has been previously discussed by [13]. The phase shift is related to several factors (loss of adiabatic condition intrinsically, plasticisation, damage and surface non-homogeneity) affecting its value; the second order parameter seems to depend on energy which is irreversibly dissipated in the material due to the occurrence of hysteresis loop.
It will be shown that the typical values of the phase shift can be related to dissipative phenomena and cracks. Even if Fatigue and Fracture Mechanics are different fields of mechanical characterisation, the simultaneous analysis of values extracted from φ and S2 maps can be considered useful for studying damage phenomena.
4.1. Fracture Mechanics: Crack Propagation by Studying Dissipative Heat Source
By monitoring the dissipative phenomena in the crack tip region of a specimen undergoing cyclic loading, it is possible to achieve considerable information capable of providing insight into complex processes related to the onset and development of dissipations. The phase φ and S2 maps have been used for the purpose of studying damage in its initial stages.
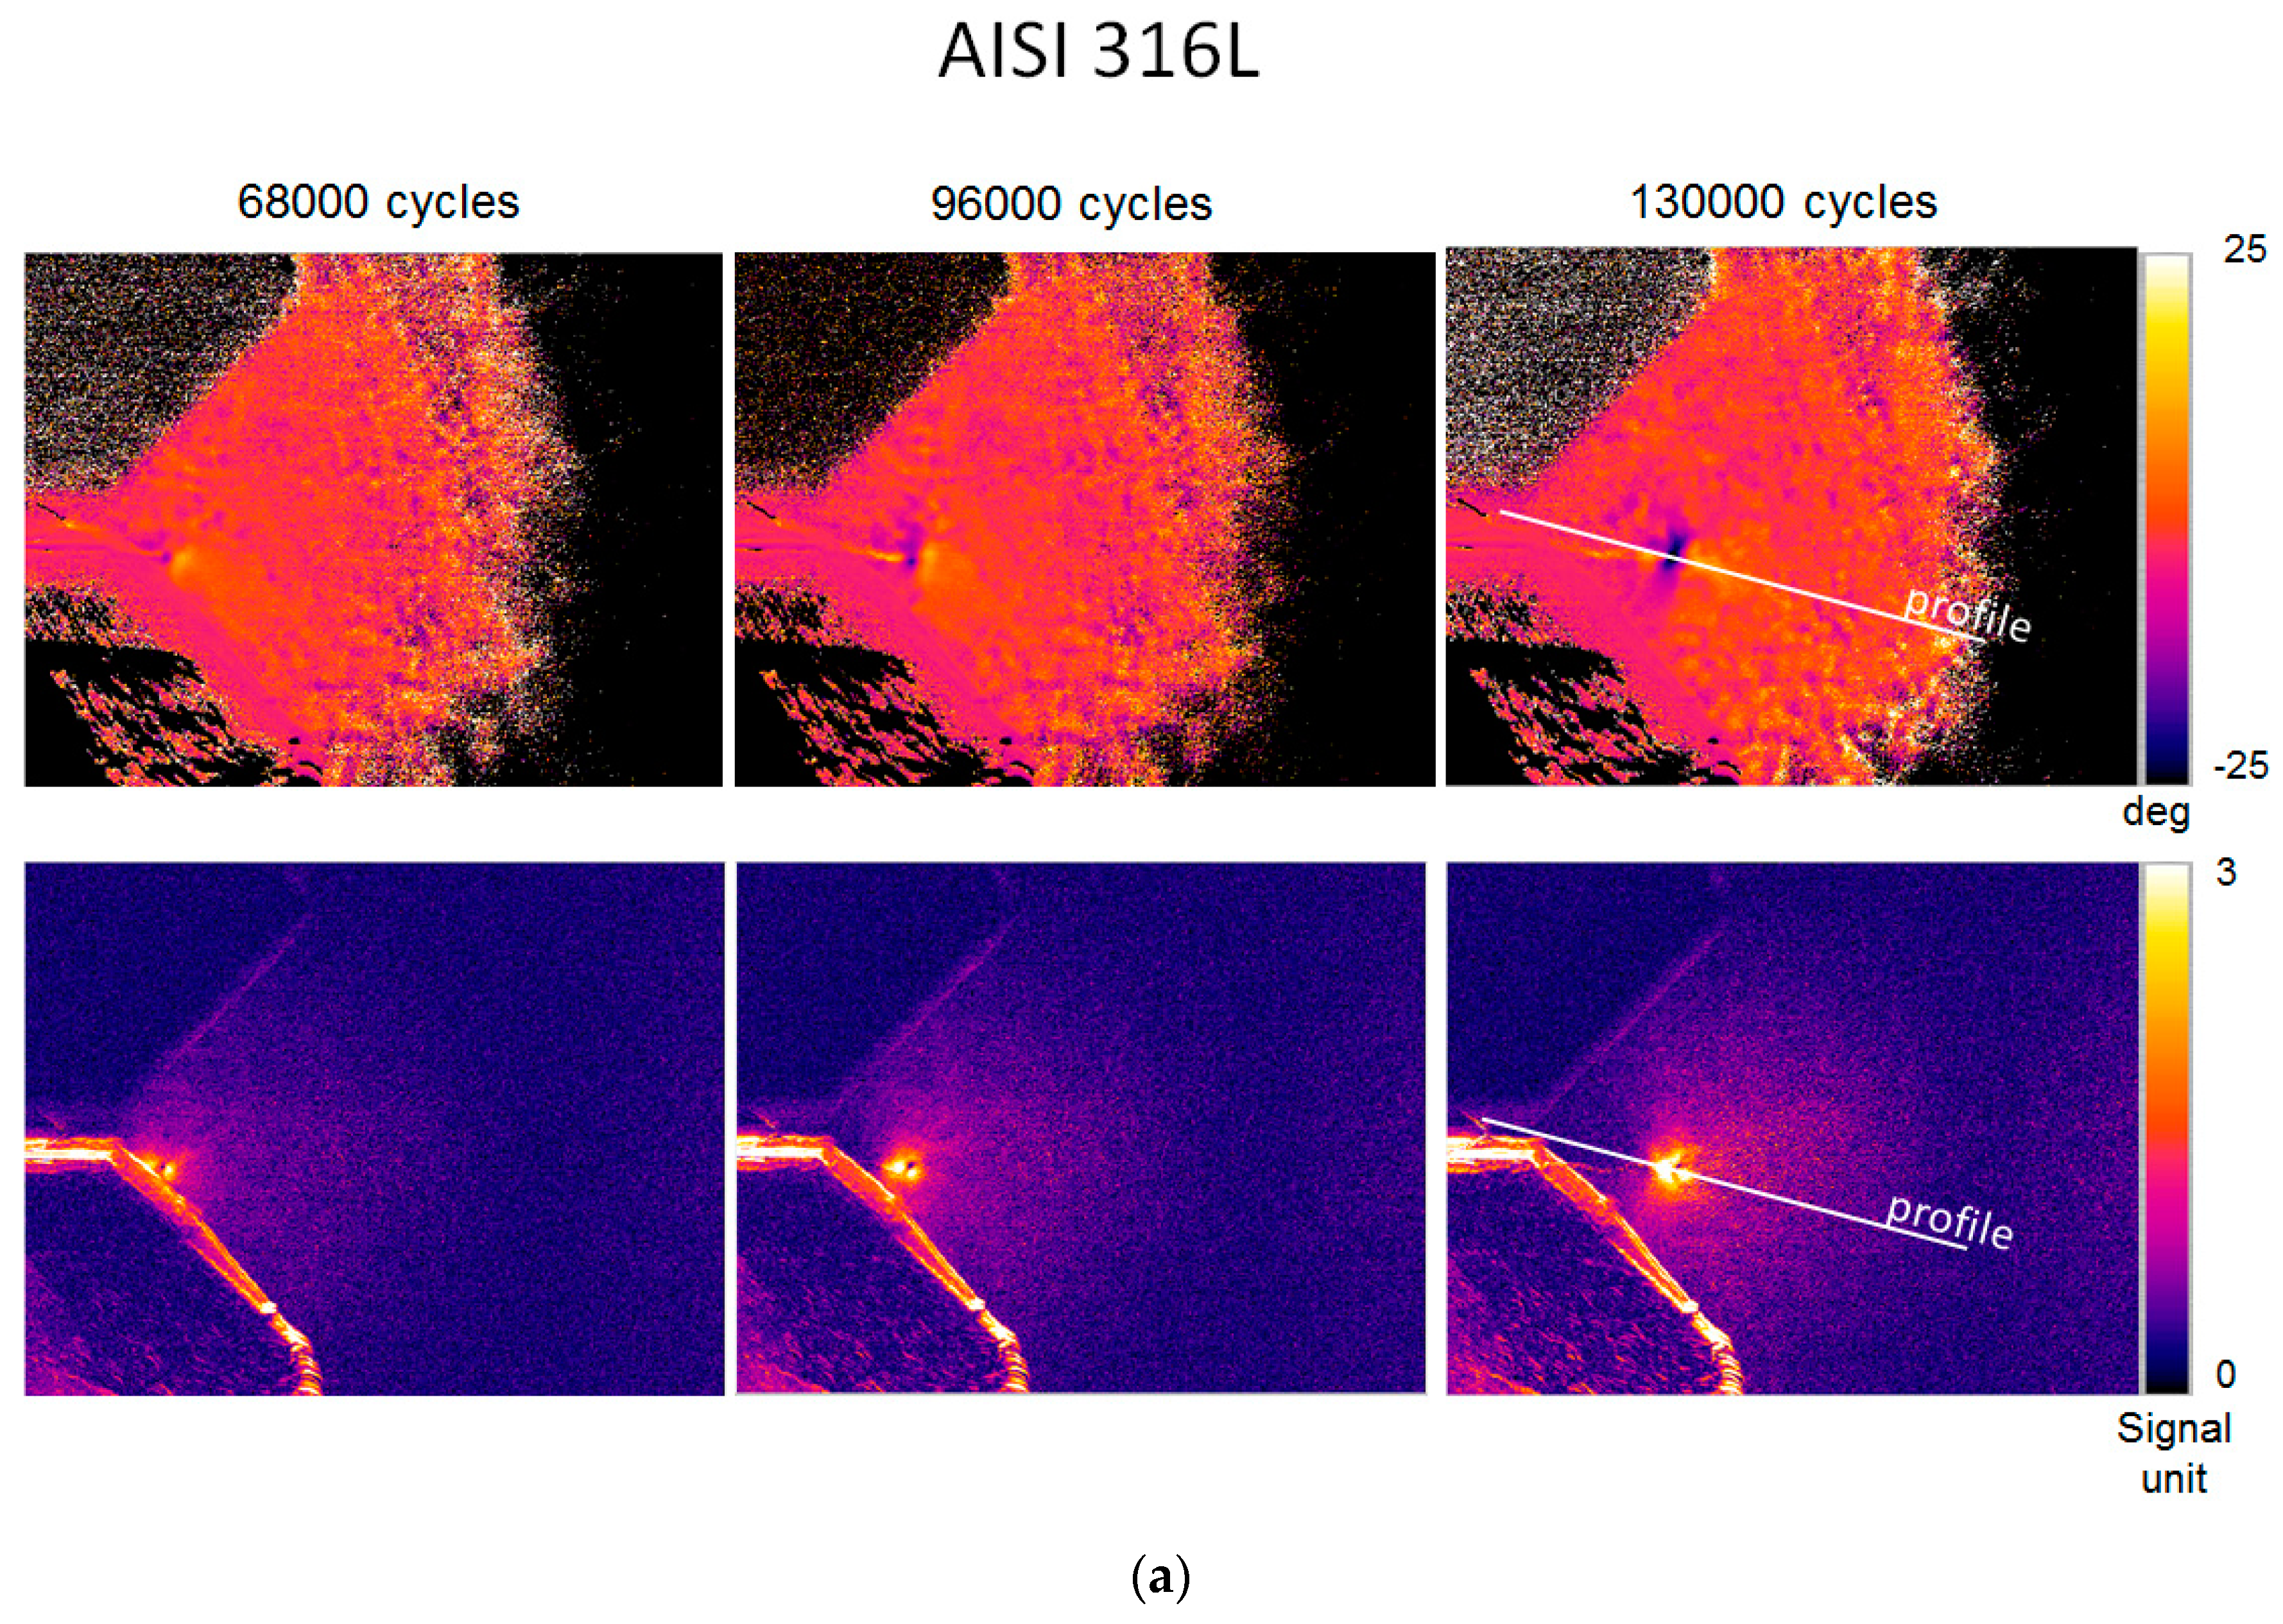
In Figure 4, φ and S2 maps are reported for AISI 316L (Figure 4a) and X4 Cr Ni Mo 16-5-1 (Figure 4b) at different cycles of loading machine for a fixed loading level. By observing both Figure 4 referring to the phase data, it is worth noting that in the crack tip region, positive/negative values of phase co-exist. The phenomenon may be explained by referring to crack closure effects for positive phase zone and plasticized effect for negative values as found by Diaz et al. [24].
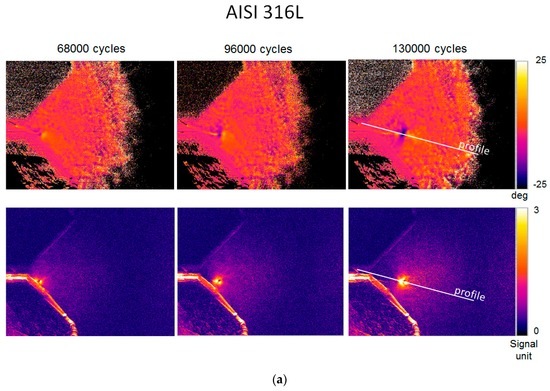
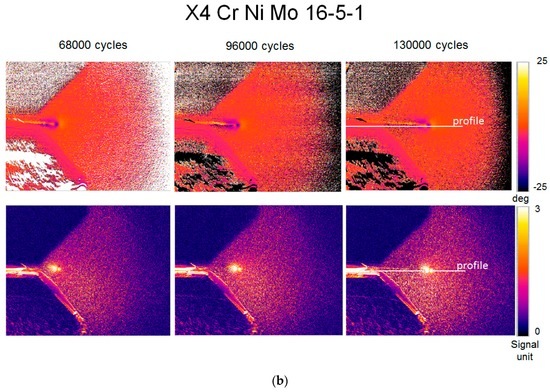
Figure 4.
Crack growth monitoring using φ (upper part of image) and S2 (lower part of image) data (a) AISI 316L; (b) X4 Cr Ni Mo 16-5-1.
S2 maps depicted in Figure 4, as expected, show the dissipation in the lattice with only a positive range of variations, since this parameter is related to the energy of intrinsic dissipations.
The comparison between φ and S2 leads to a correlation between areas affected by dissipations before and after the crack tip. As previously stated, the first area can be associated with dissipation in the material owing to crack closure effect, while the second area is related to plastic phenomena beyond the crack tip. The size of the areas seems to increase during the test, for austenitic stainless steel Figure 4a, whilst it appears constant for martensitic lattice, as in Figure 4b. It may be observed that the crack propagation depends on the mechanical behaviour of the specific lattice, in fact, the direction is linear for martensitic brittle material while for AISI 316L it deviates from a linear pattern due to the out-of-plane deformation, typical of ductile materials.
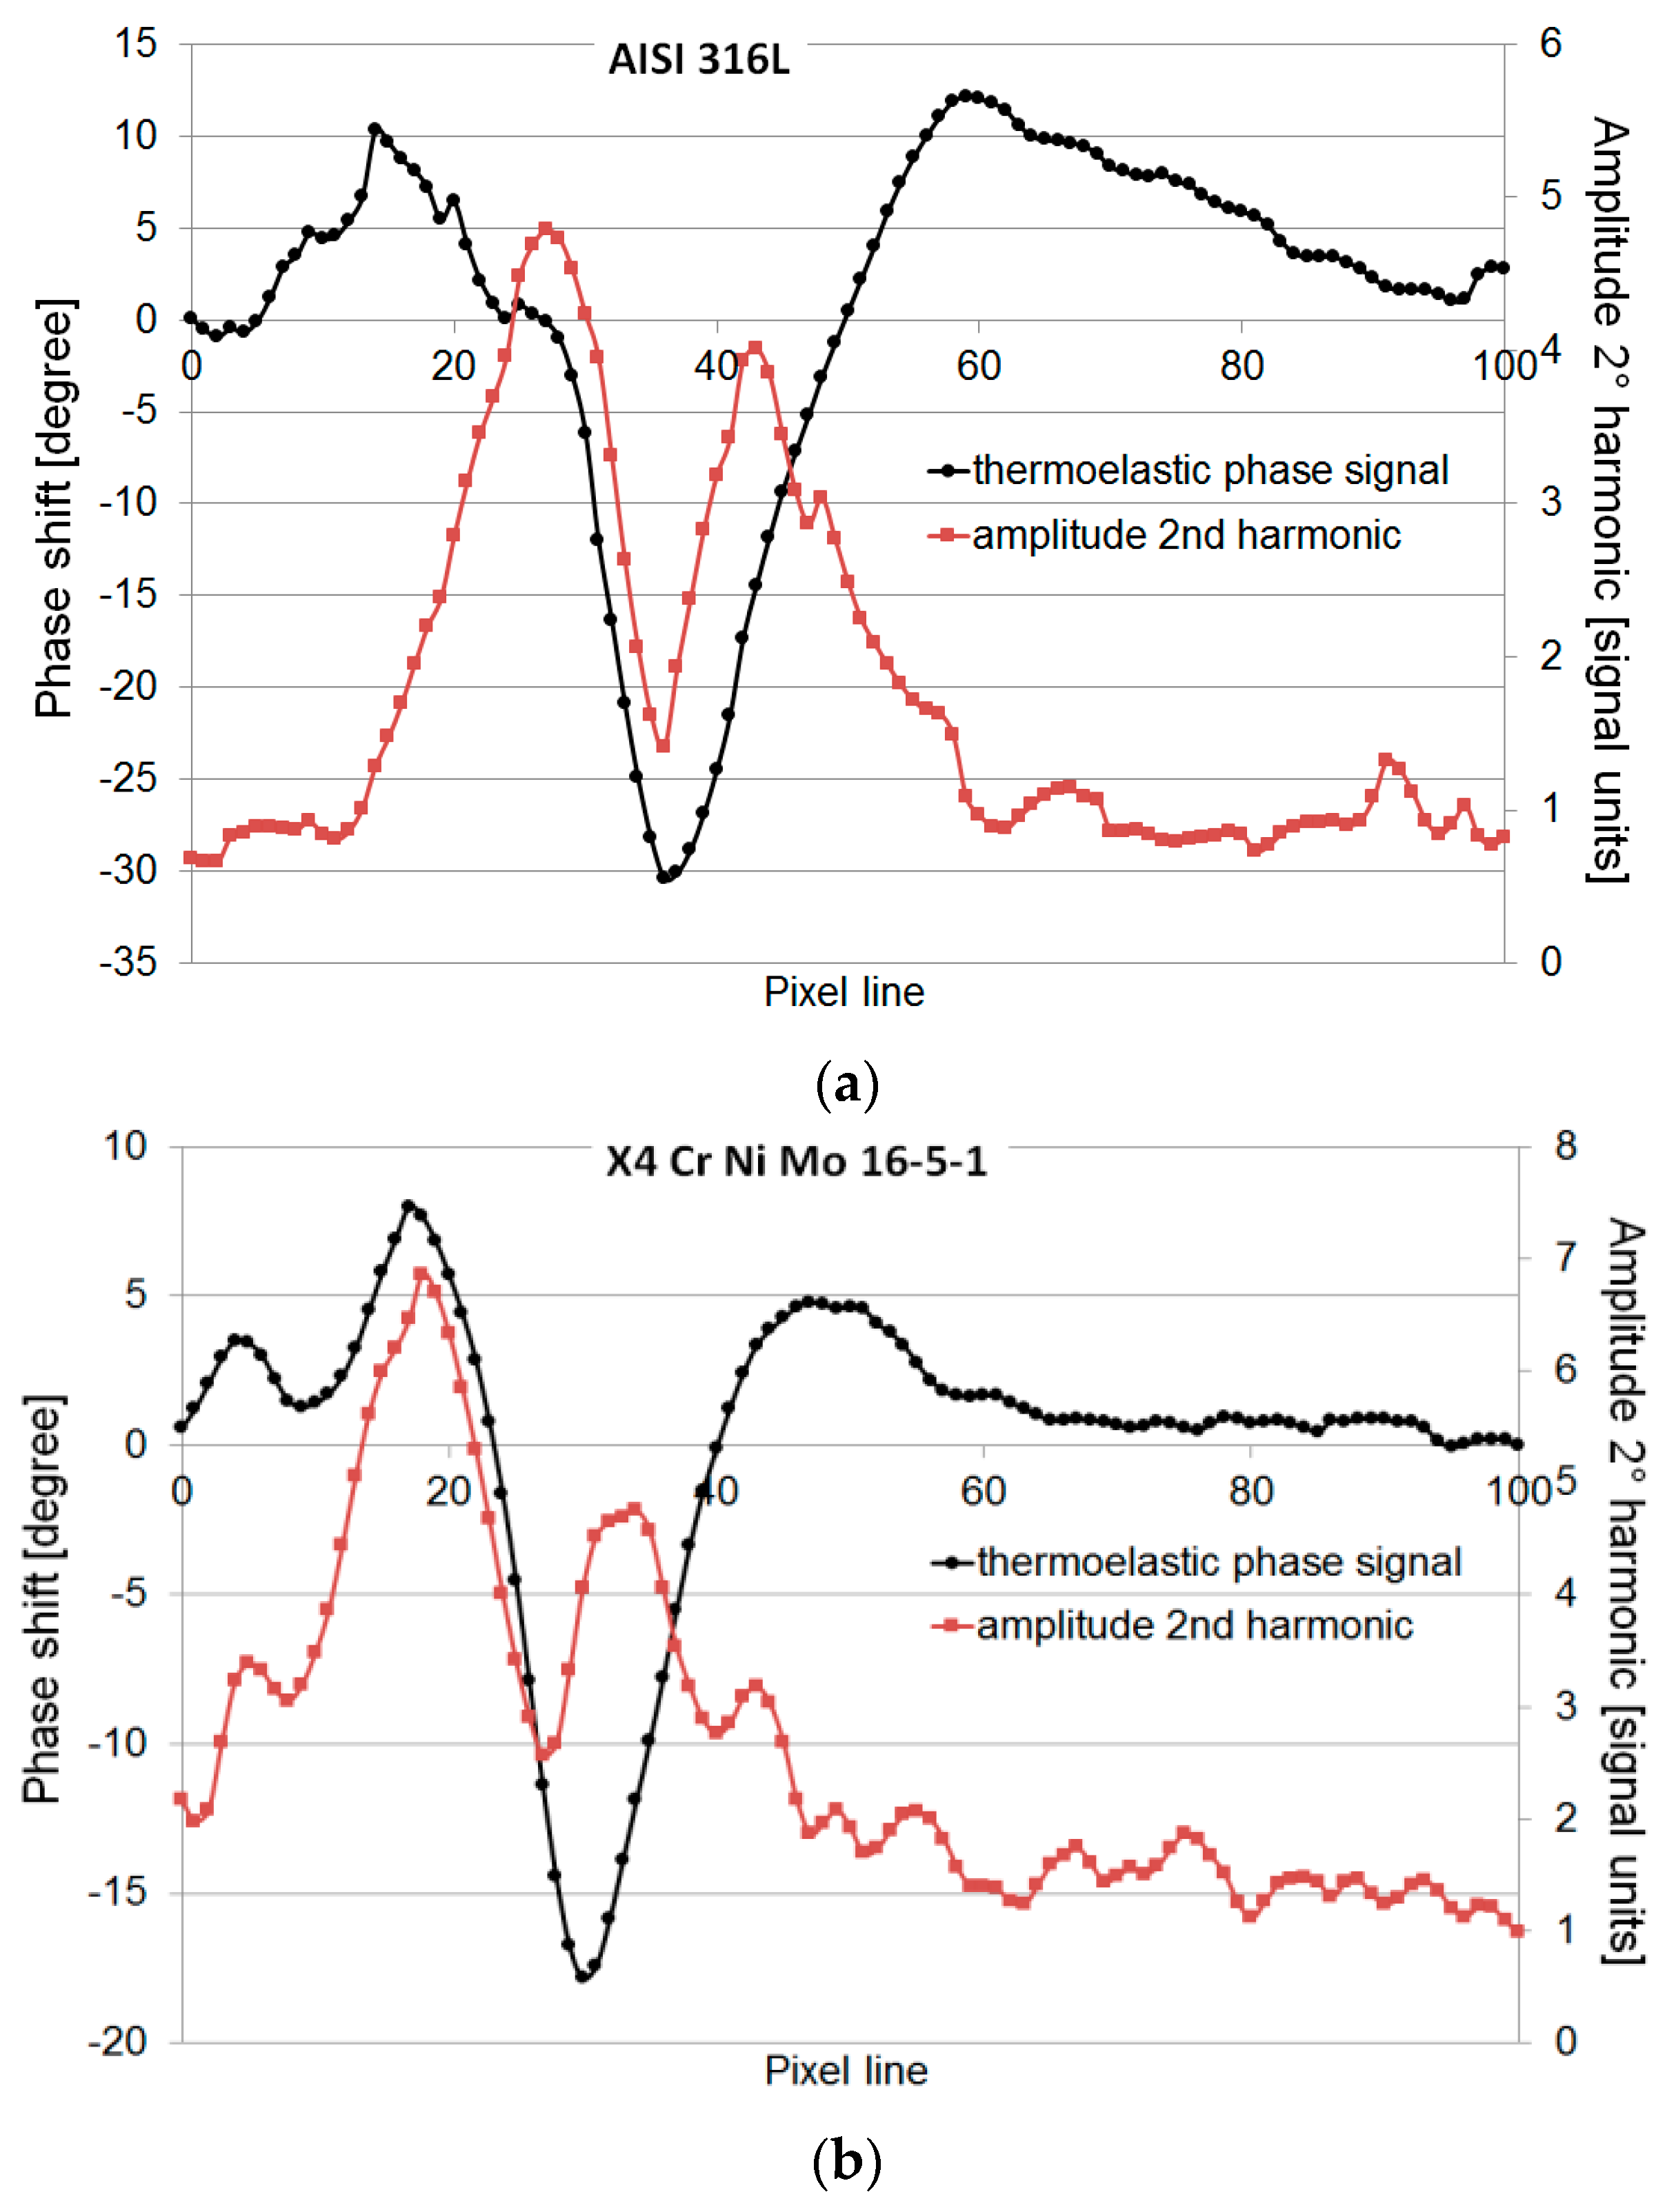
Moreover, by plotting the values of profiles represented in Figure 4 at 13,000 cycles of test, the profiles of φ and S2 are depicted (Figure 5). It is noteworthy that the analysis of Figure 5 enables us to:
- to determine the crack tip of both materials;
- to highlight different phase shift intervals for AISI316L and X4 Cr Ni Mo 16-5-1 steels.
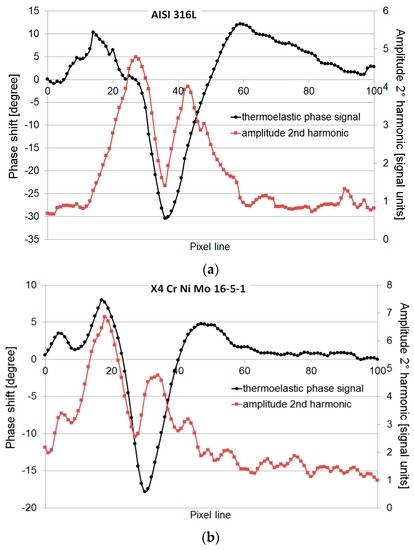
Figure 5.
Comparison between φ and S2 data (a) AISI 316L; (b) X4 Cr Ni Mo 16-5-1, along pixel line (white profile in Figure 4).
The potential of thermal analysis lies with the possibility of detecting and monitoring the position of the crack. In literature [24,25,26,27,28], it has been found that the crack tip occurs when phase value approaches zero. Referring to the second order parameter S2, by observing Figure 5, there are two maximum values: the first maximum is related to crack closure effect while the second is related to plasticization beyond the crack tip. The analysis of S2 may be adopted for the localisation of the crack tip; referring to the data, the crack tip seems to occur at the minimum of S2, some pixels after the minimum value of phase shift. In literature, only the use of the thermoelastic phase is considered to continuously evaluate the crack tip position [29]. However, as a first step, in the work of [30], the attention is focused on these parameters providing complementary information with respect to the classic Thermoelastic signal usually adopted for characterizing the fatigue crack of AISI 410 and AISI 316L steels.
In Fracture Mechanics, the obtained spatial resolution was approximately 0.067 mm/pixel; this analysis is more accurate than those provided by [24,25,26,27,28].
The presented analysis demonstrates for the first time that φ and S2 can be adopted to localize the plastic zone and then, to define crack propagation. An accurate analysis to achieve information about the position of the notional crack tip, heat sources correlated to plastic deformations and crack closure may also be provided by studying S2 parameter.
However, a careful study of the phenomena affecting both the phase shift and second order harmonic amplitude changes must be set up. In fact, under the influence of non-adiabatic conditions, plasticity together with the crack closure effect is still the subject of study.
Another skill related to thermoelastic phase shift, φ, is related to the possibility of mechanical characterisation of specific material. In fact, as depicted in Figure 5 phase values range between typical values for each of the studied materials. Moreover, crack propagation does not seem to be linear for ductile materials. This can be confirmed by the trend of variation in minimum phase shift, which is related to several factors such as loss of adiabatic conditions in the material and material behaviour.
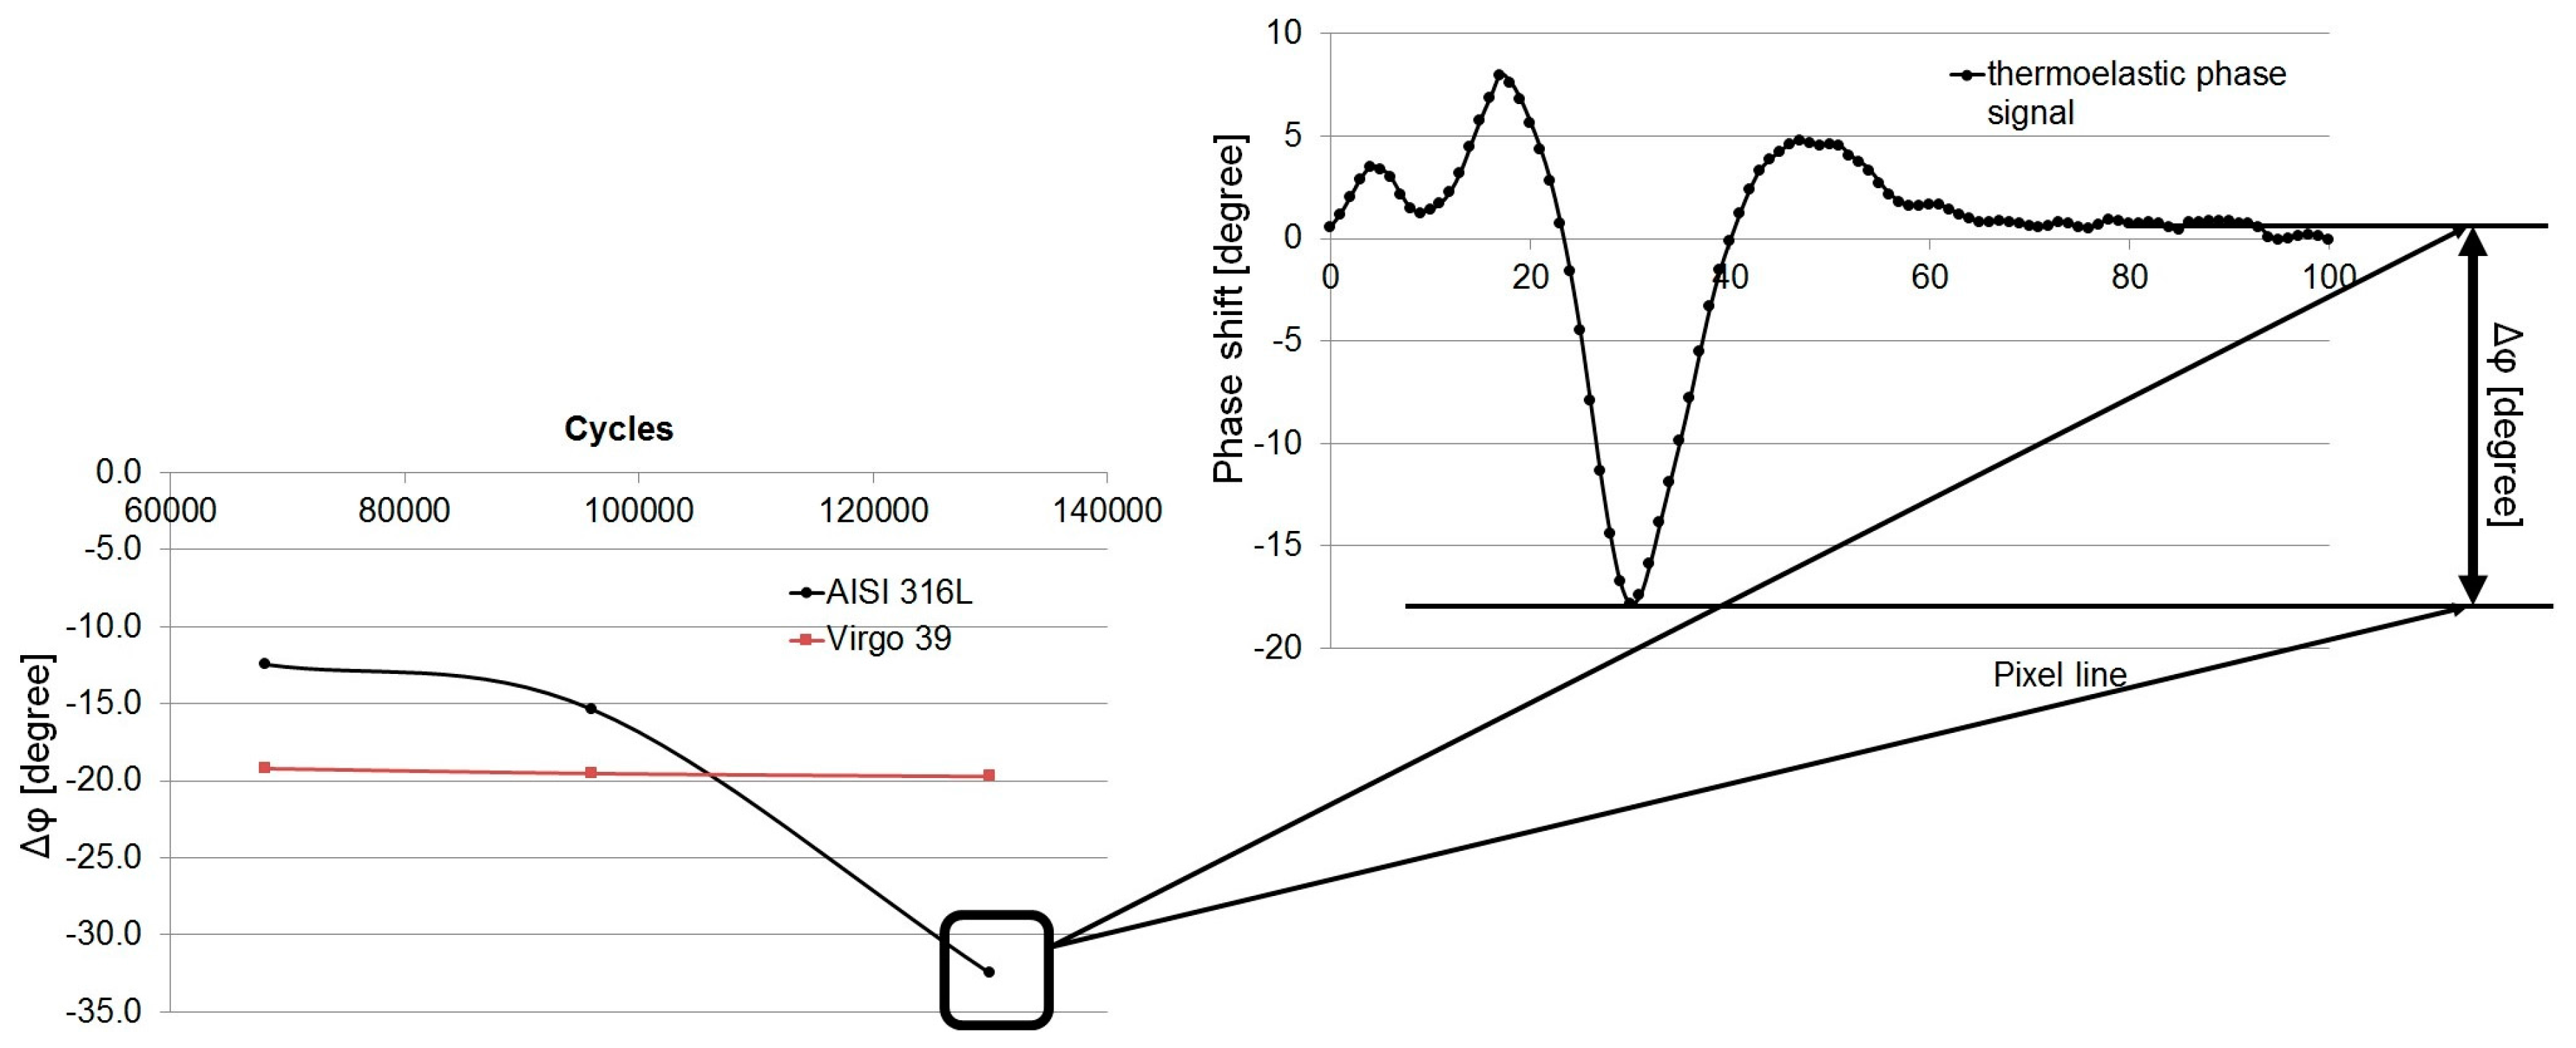
In Figure 6, the minimum values are calculated by observing the difference between minimum value and an average value of far-from-plastic-region data. By analysing Figure 6, a difference between two materials is recorded: the trend of minimum phase shift is approximately linear for brittle stainless steel and sloped for AISI 316L. This behaviour may be associated with that of crack propagation depicted in Figure 5.
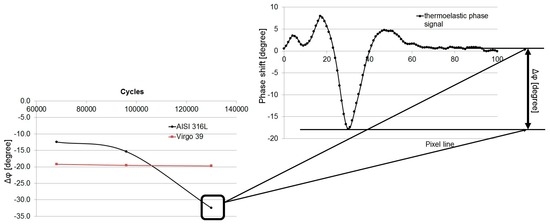
Figure 6.
Variation of minimum value of phase shift (Δφ) for AISI 316L and X4 Cr Ni Mo 16-5-1.
Figure 6 shows the range of minimum value variation in phase signal during the test (loading cycles) which is of approximately −20 degrees and constant for X4Cr Ni Mo 16-5-1, while it is variable and decreasing between −10/−30 degrees for austenitic stainless steel. In effect, the phase changes provide a useful parameter for separating the behaviour of materials.
4.2. FATIGUE: Damage Process Assessment
In this section, the differing fatigue behaviour of materials (austenitic lattice and martensitic lattice), will be discussed in terms of phase shift φ and second order parameter S2.
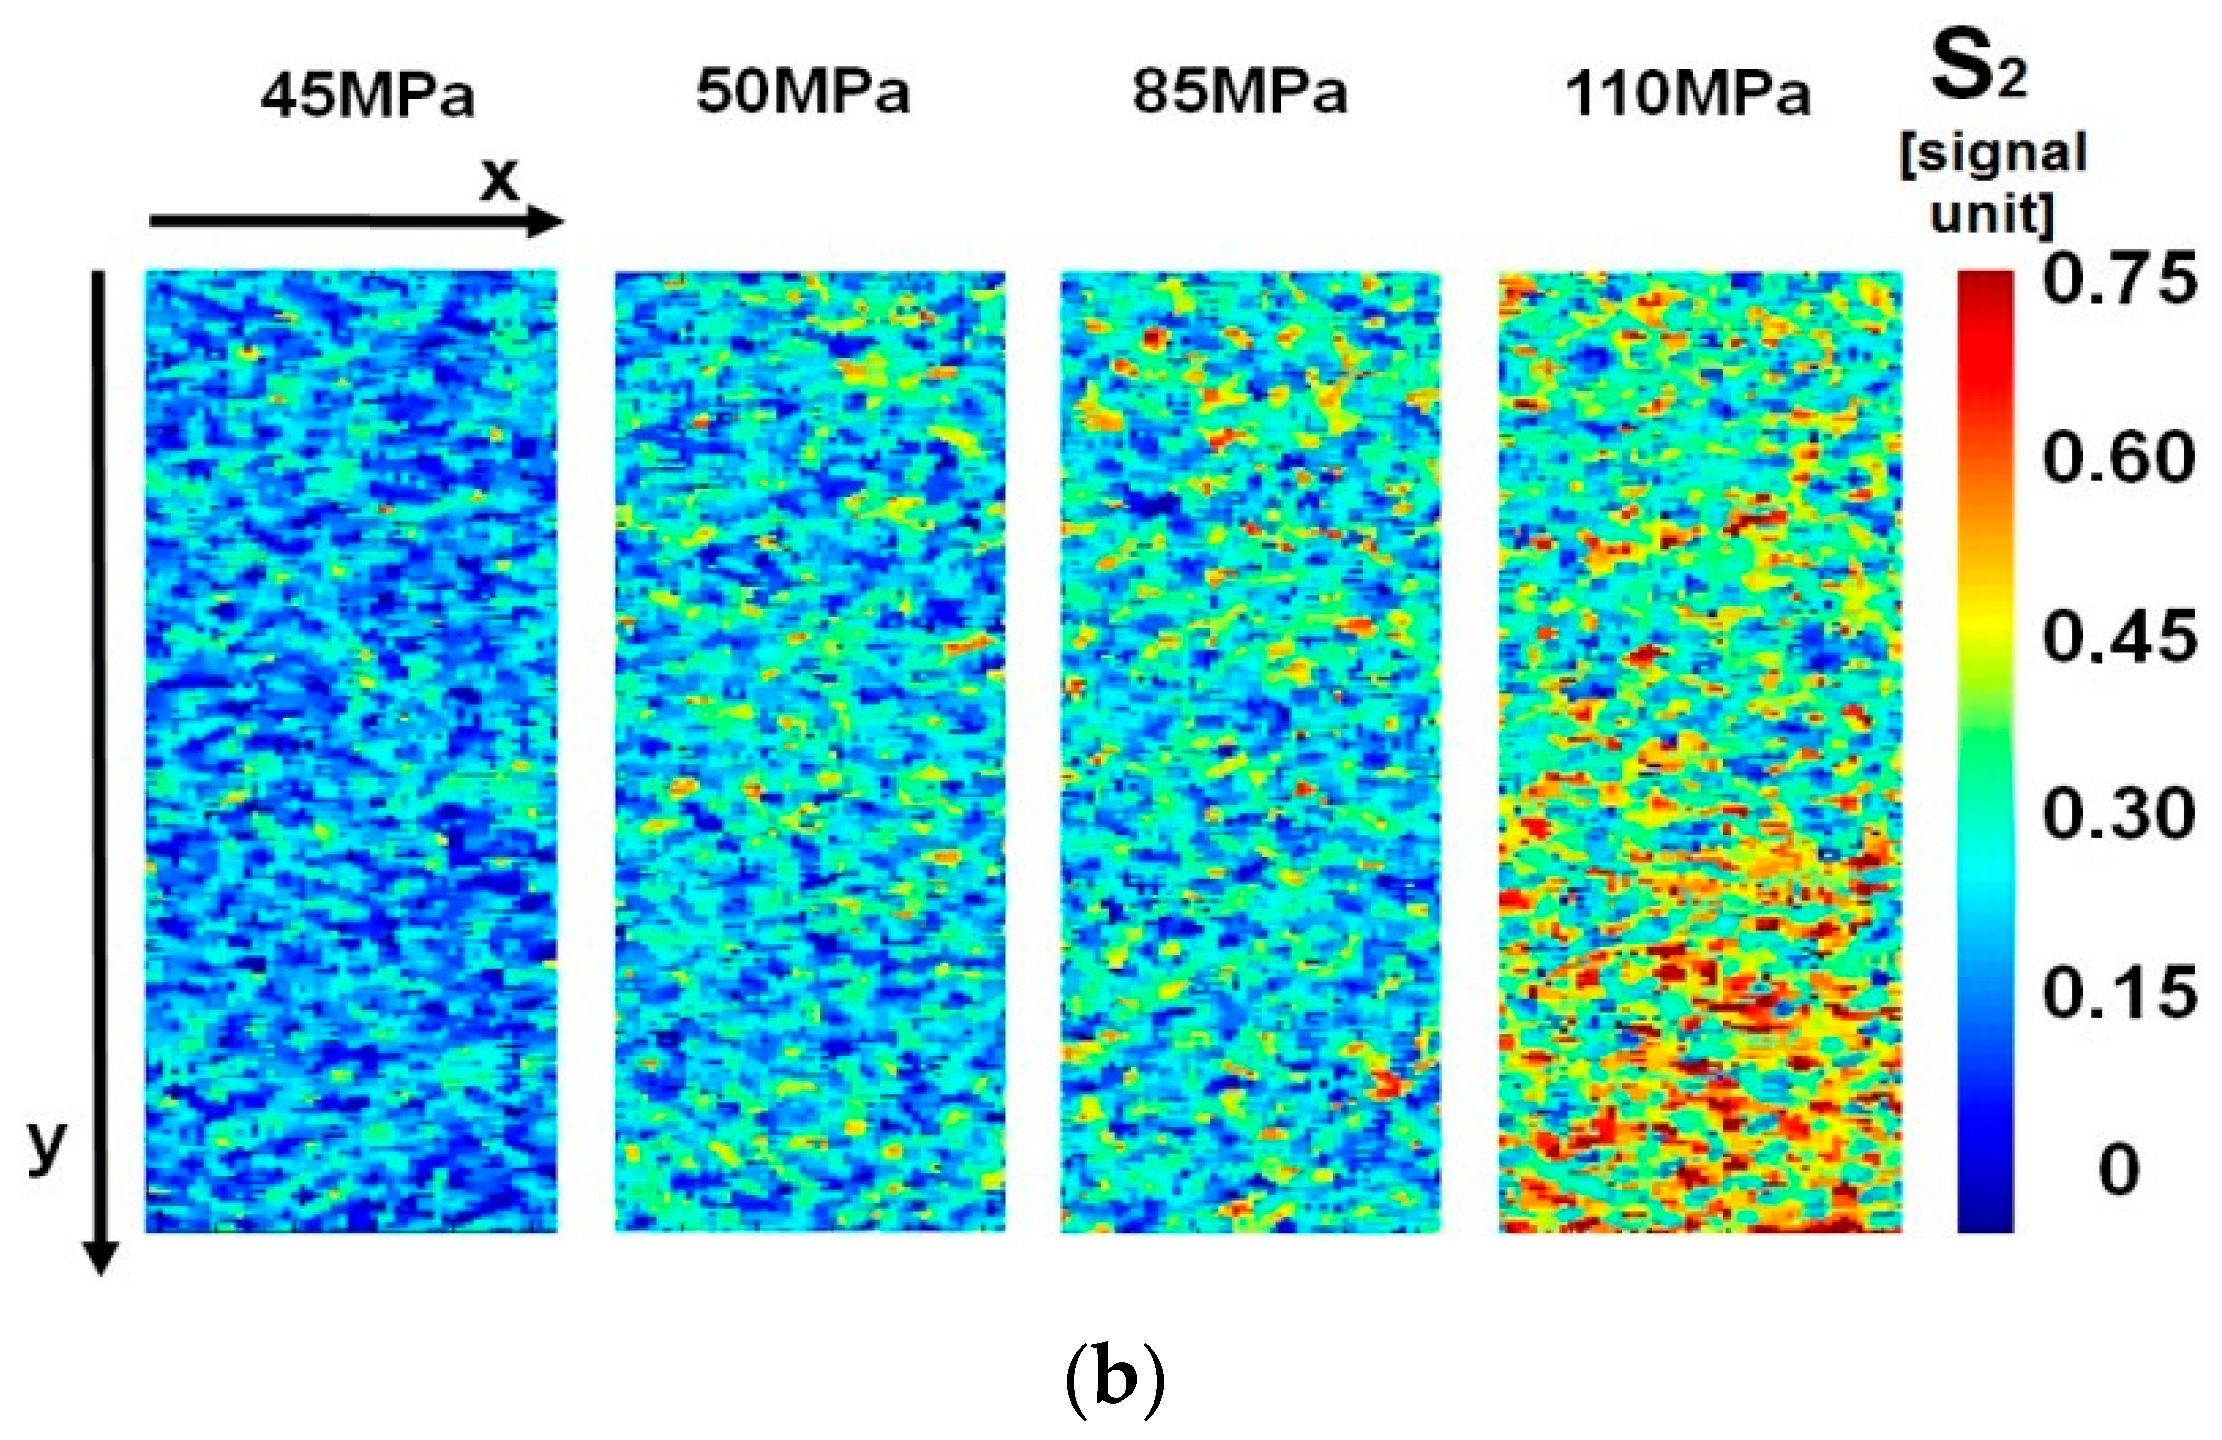
Figure 7 represents respectively φ and S2 maps for AISI 316L austenitic steel. The maps have been provided by MatLab® software after several processing steps as described previously in Section 3.
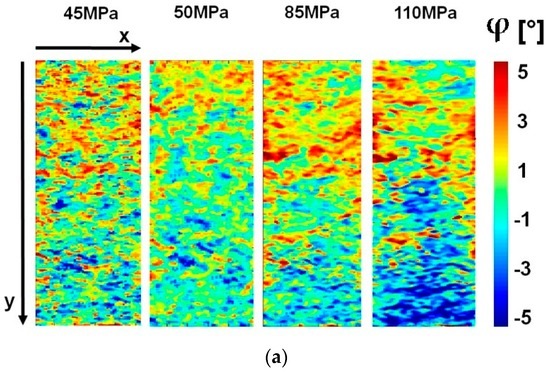
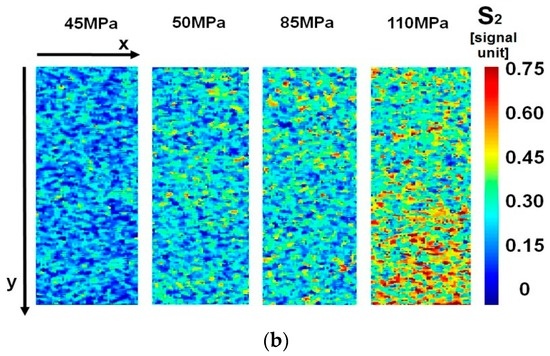
Figure 7.
AISI 316L, Specimen 1, maps of (a) phase data; (b) second order parameter.
Figure 7a, shows phase shift data, referred to the gauge length of the specimen. High stress gradients affect the downward part of the gauge length (85–110 MPa), and plasticization seems to occur at stress levels above 50 MPa in localized zones. Figure 7b shows S2 values. A slight increase in S2 thermal signal appears, starting from 50 MPa in localized areas, but the most significant variation occurs at 110 MPa in the underlying part of the matrix. This area is coincident with the one found in Figure 7a referring to phase data. In this case, the large variation of S2 at 110 MPa can be explained as the large dissipated energy involved in damage, thus the S2 parameter confirms phase data results, referring to the damaged zone.
In Figure 8, φ and S2 maps for martensitic material of X4 CR NI MO 16-5-1 are represented. The most important effects appear starting from 207.5 MPa as depicted in Figure 8 in both parameters. In Figure 8a, phase data shows the most stressed area in the underlying part of the gauge length. In this area in particular some clusters of nearby positive/negative values appear localized, with evidence, starting from 165 MPa. Even for this material, the localization of dissipative phenomena seems to be confirmed by the S2 parameter map (Figure 8b) which allows for detection of the same area in the phase data.
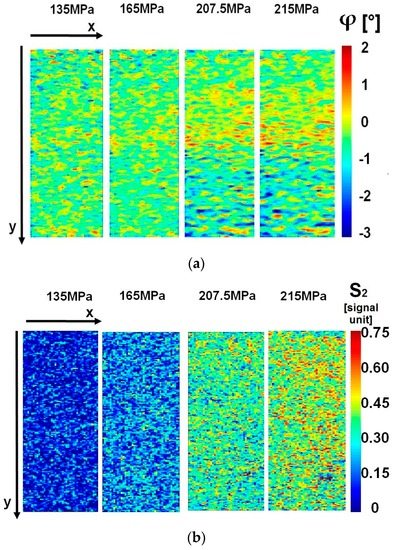
Figure 8.
X4 Cr Ni Mo 16-5-1, Specimen 1, maps of (a) phase data; (b) second order parameter.
By comparing Figure 7 and Figure 8, it is possible to point out the difference between different materials affecting phase data: in fact, the phase shift ranges between −5/5 degrees for austenitic lattice while for the martensitic structure it ranges between −2/3 degrees. The interval of variation in S2 is roughly similar for both materials. Therefore, phase data may be used as an indicator of material behaviour as seen previously in Section 4.1, in which in the crack tip region and the phase shift, assumed different values for both materials. Results demonstrate that the two parameters related to dissipative phenomena may be adopted in a synergetic manner in order to characterise the damage processing in the lattice during fatigue tests.
In general, changes in phase of thermoelastic signal were also observed in correspondence with physical phase variation of material microstructure [40,41,42,43,44]. However, for the materials studied, the thermoelastic phase changes are only due to the phenomena just described.
4.3. FATIGUE: Fatigue Limit Evaluation
In this work, the adopted approach for evaluating fatigue limit involves using a well-known method (Threshold Method [4]).
The novelty with respect to previous works, is represented by the application of such approaches to AISI 316L and X4 CR NI MO 16-5-1.
The purpose of this paragraph is not simply to illustrate the strong points of the threshold method (which have been amply highlighted and compared with Luong’s method [1], previously in [4]), but to apply the proposed statistical approach to other materials.
The authors recommend referring to De Finis’ article [4], in which the method is discussed in depth. This may provide a ‘non-destructive’ evaluation of fatigue limit, given that once the threshold has been assessed, it is not necessary to continue the test.
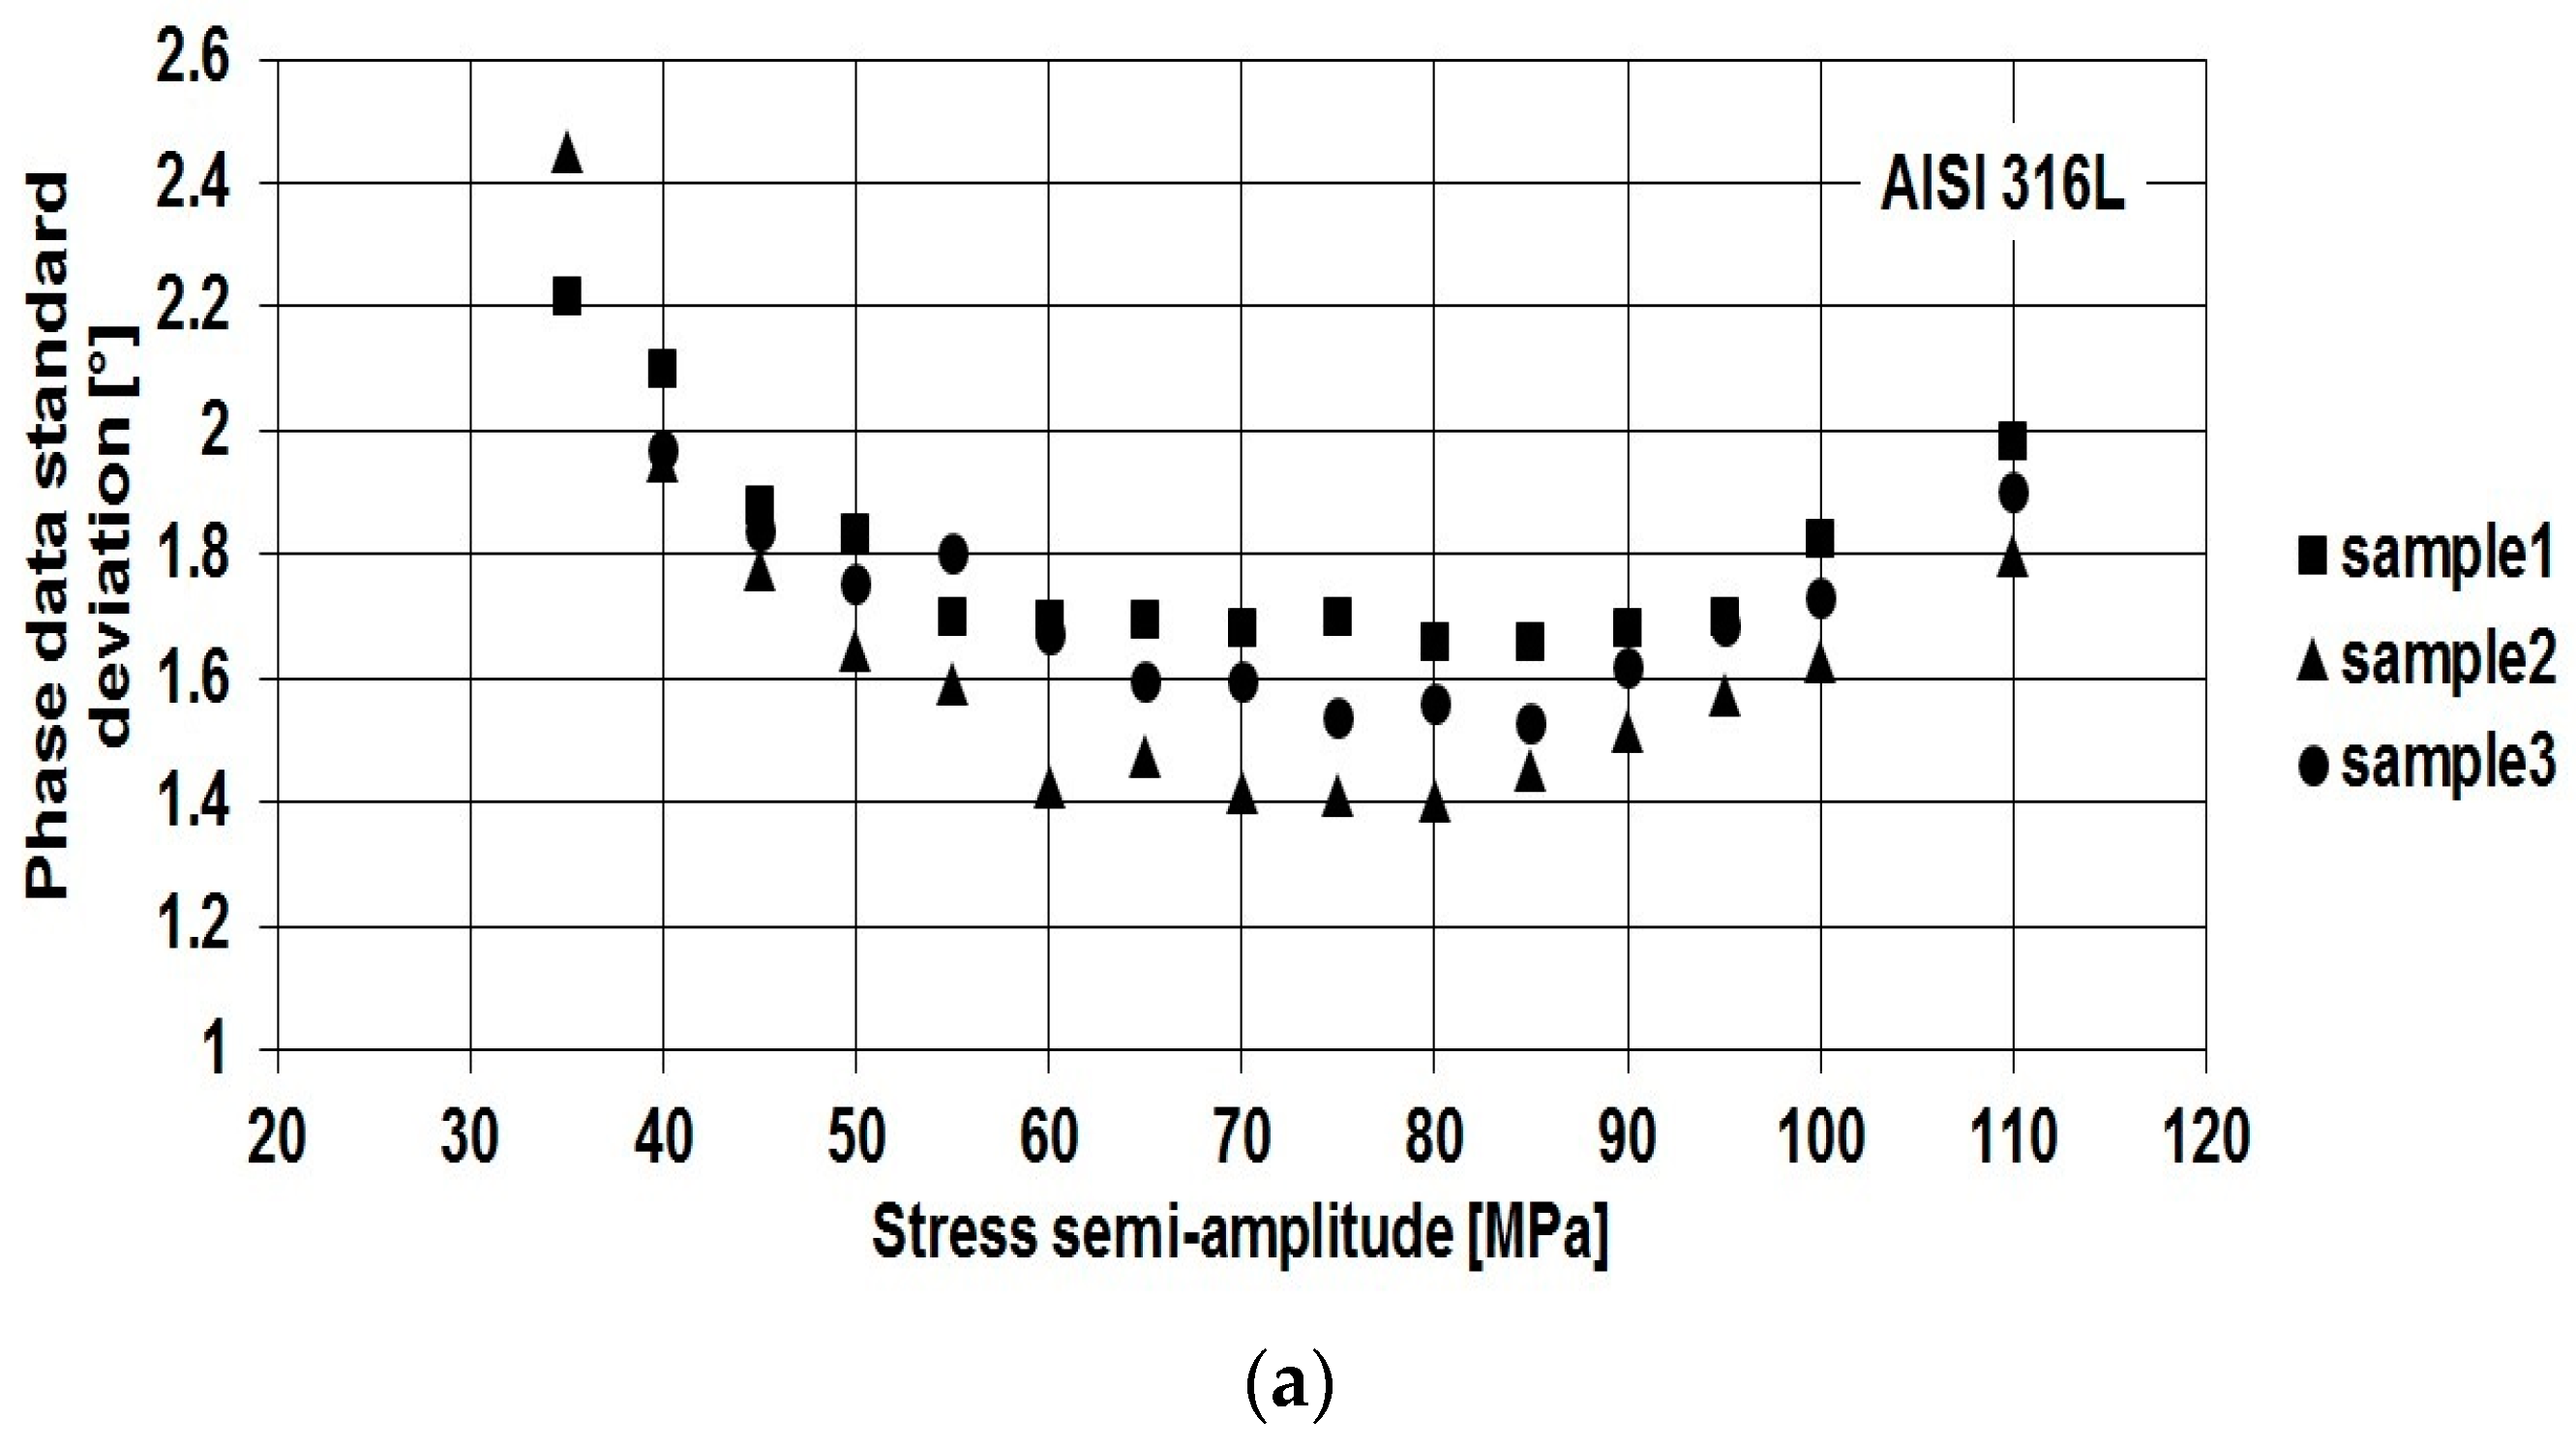
The data considered for analysis, as described in Section 3, are the standard deviation values extracted for each loading level of the test. In particular, the raw data for austenitic stainless steel are represented in Figure 9. Phase standard deviation (Figure 9a) shows a typical trend represented by initial reduction followed by a signal increase. This behaviour may be explained by the fact that in the prime loading level (elastic regime), the signal-to-noise ratio is so low due to the absence of dissipative phenomena in the matrix, and thus data scattering is high. Conversely, by increasing the stress semi-amplitude, signal becomes higher with respect to noise which remains constant, and the Standard Deviation increases in the last part of the test, occurring in the plastic regime.
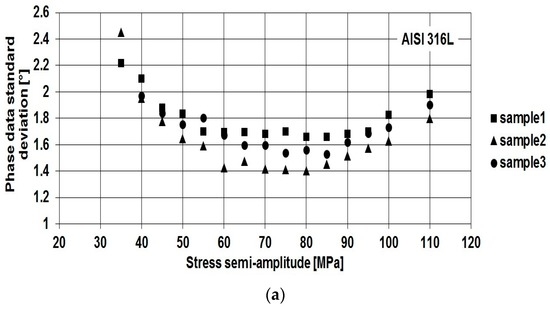
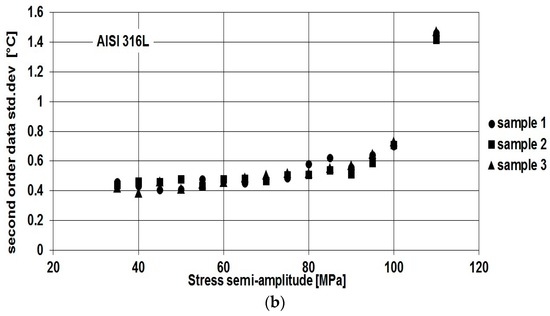
Figure 9.
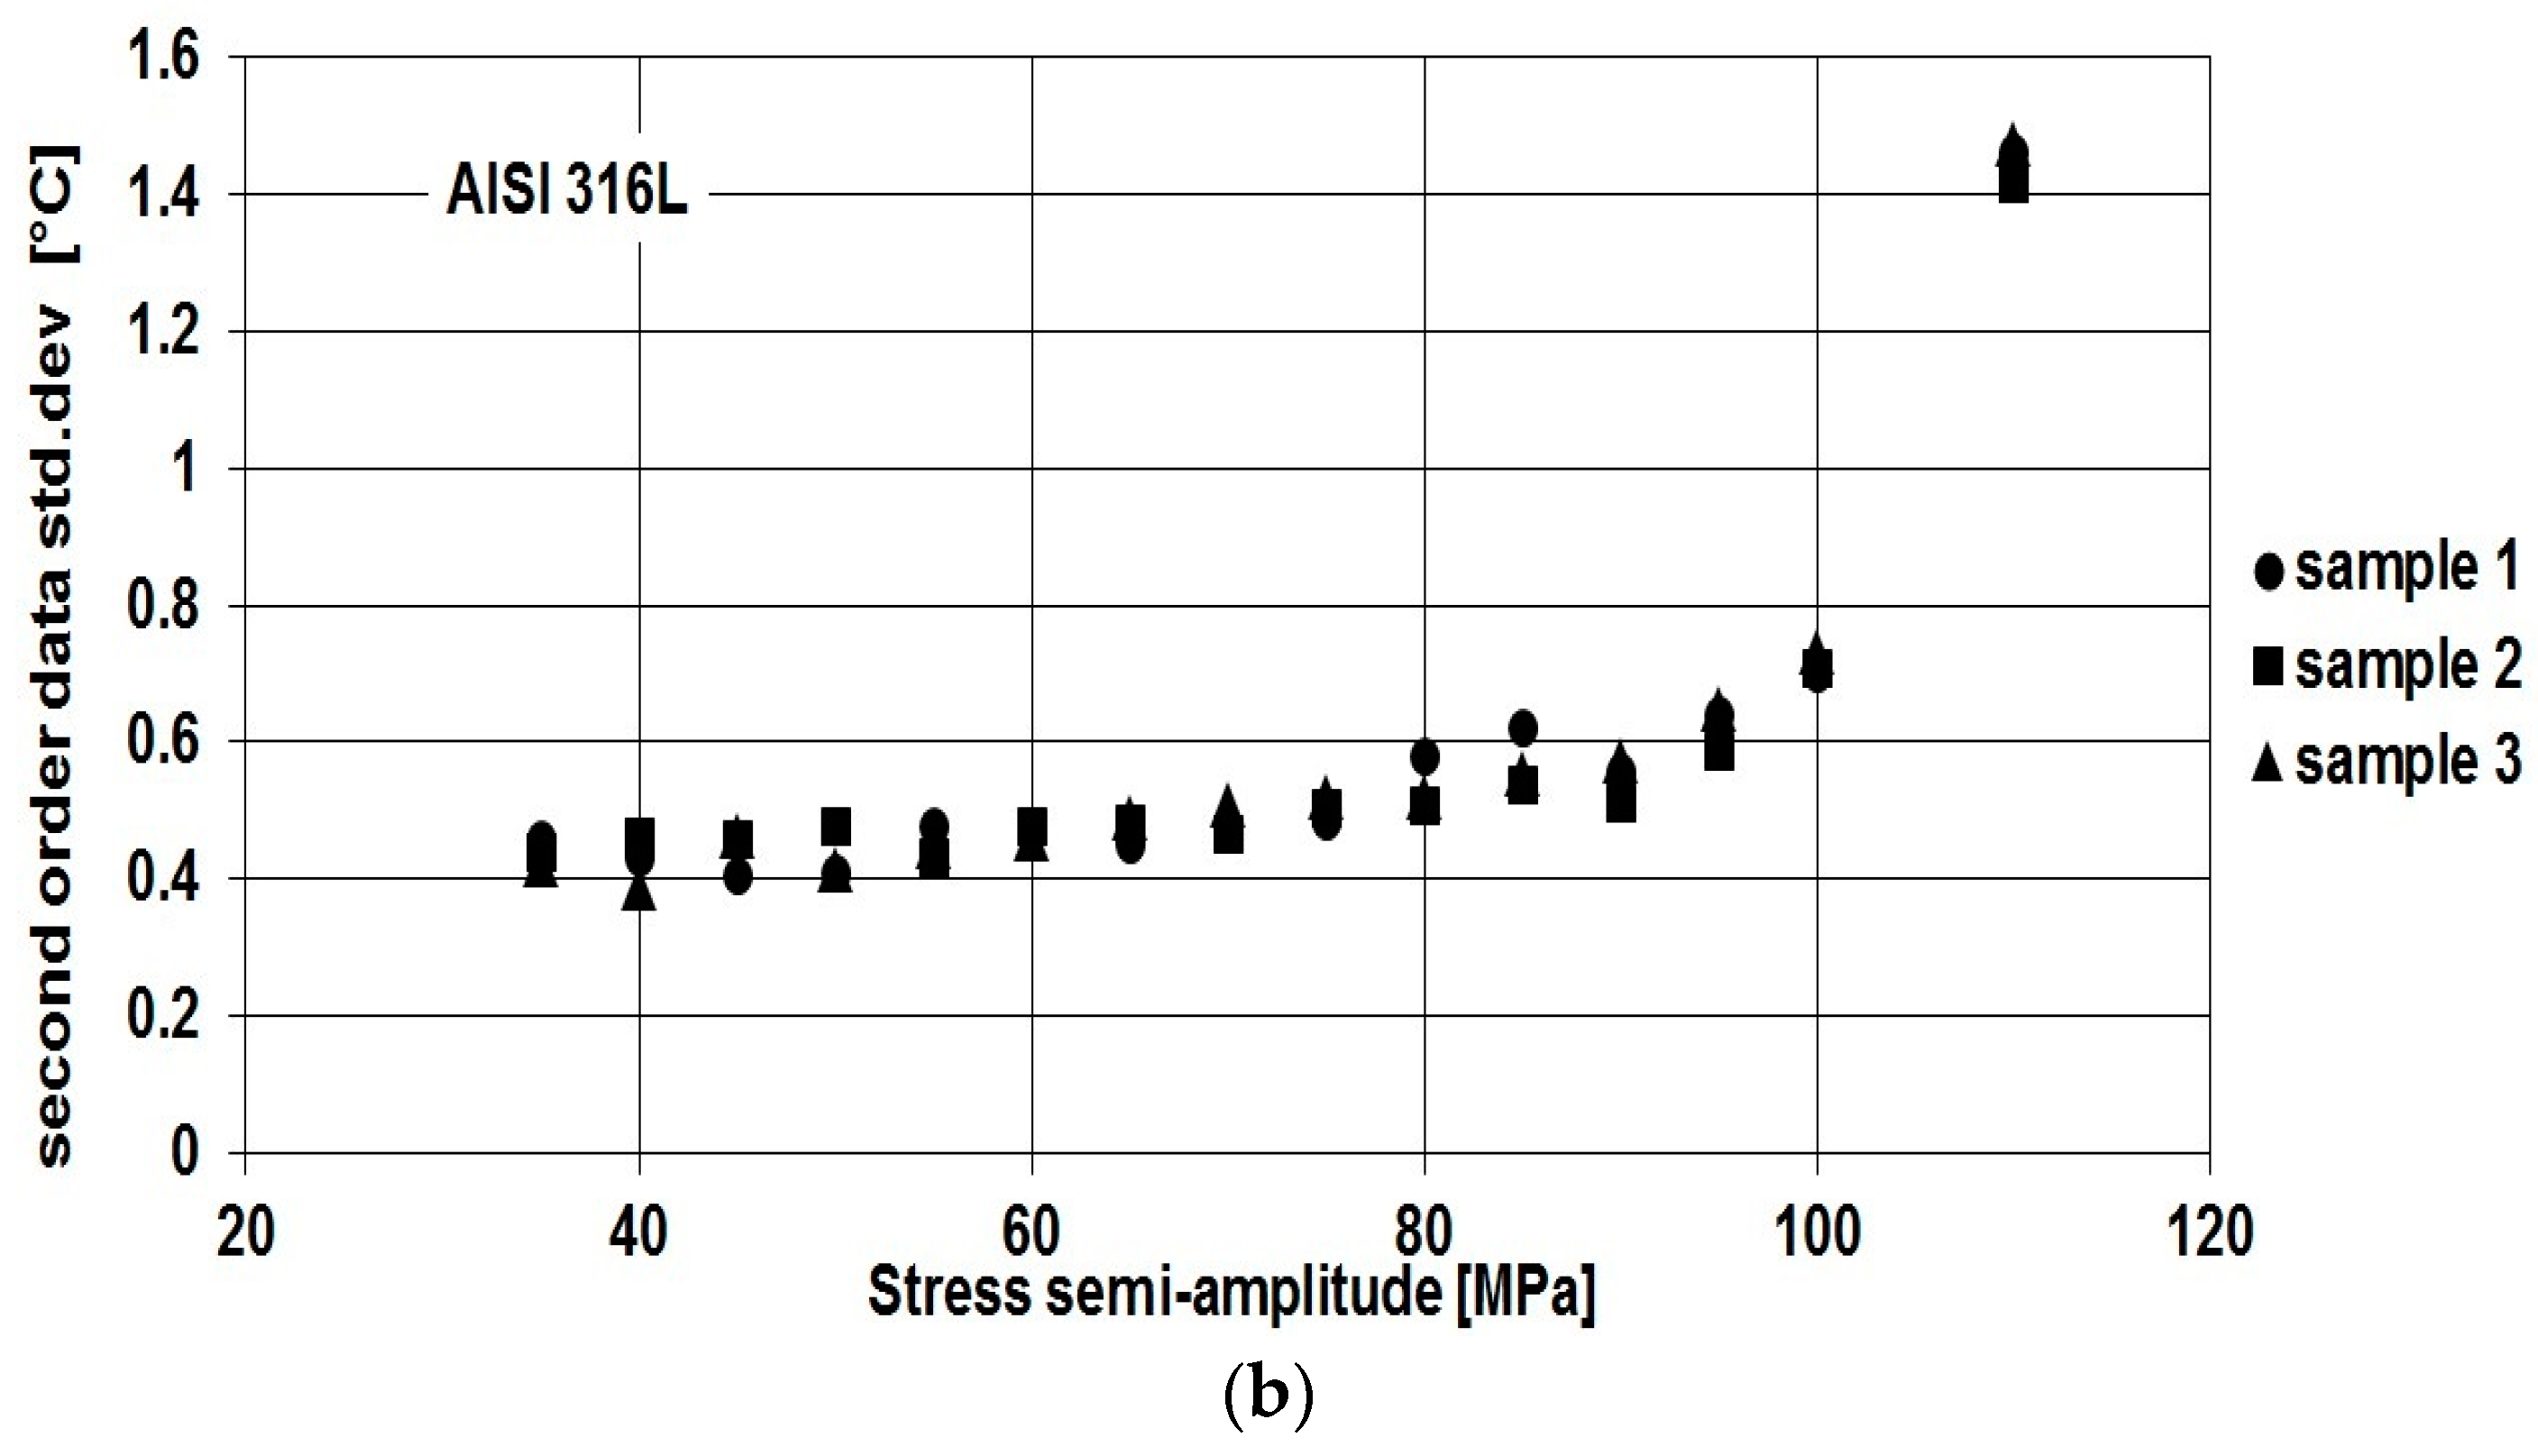
AISI 316L, (a) standard deviation of phase data; and (b) standard deviation of S2 data versus loading level (stress semi amplitude of applied load) for overall tests.
Figure 9b shows standard deviation data for the S2 parameter. In this case, two trends can be pointed out: the data remains roughly constant for loading level occurring in the elastic regime, firstly; as the load increases the series becomes increasingly sloped.
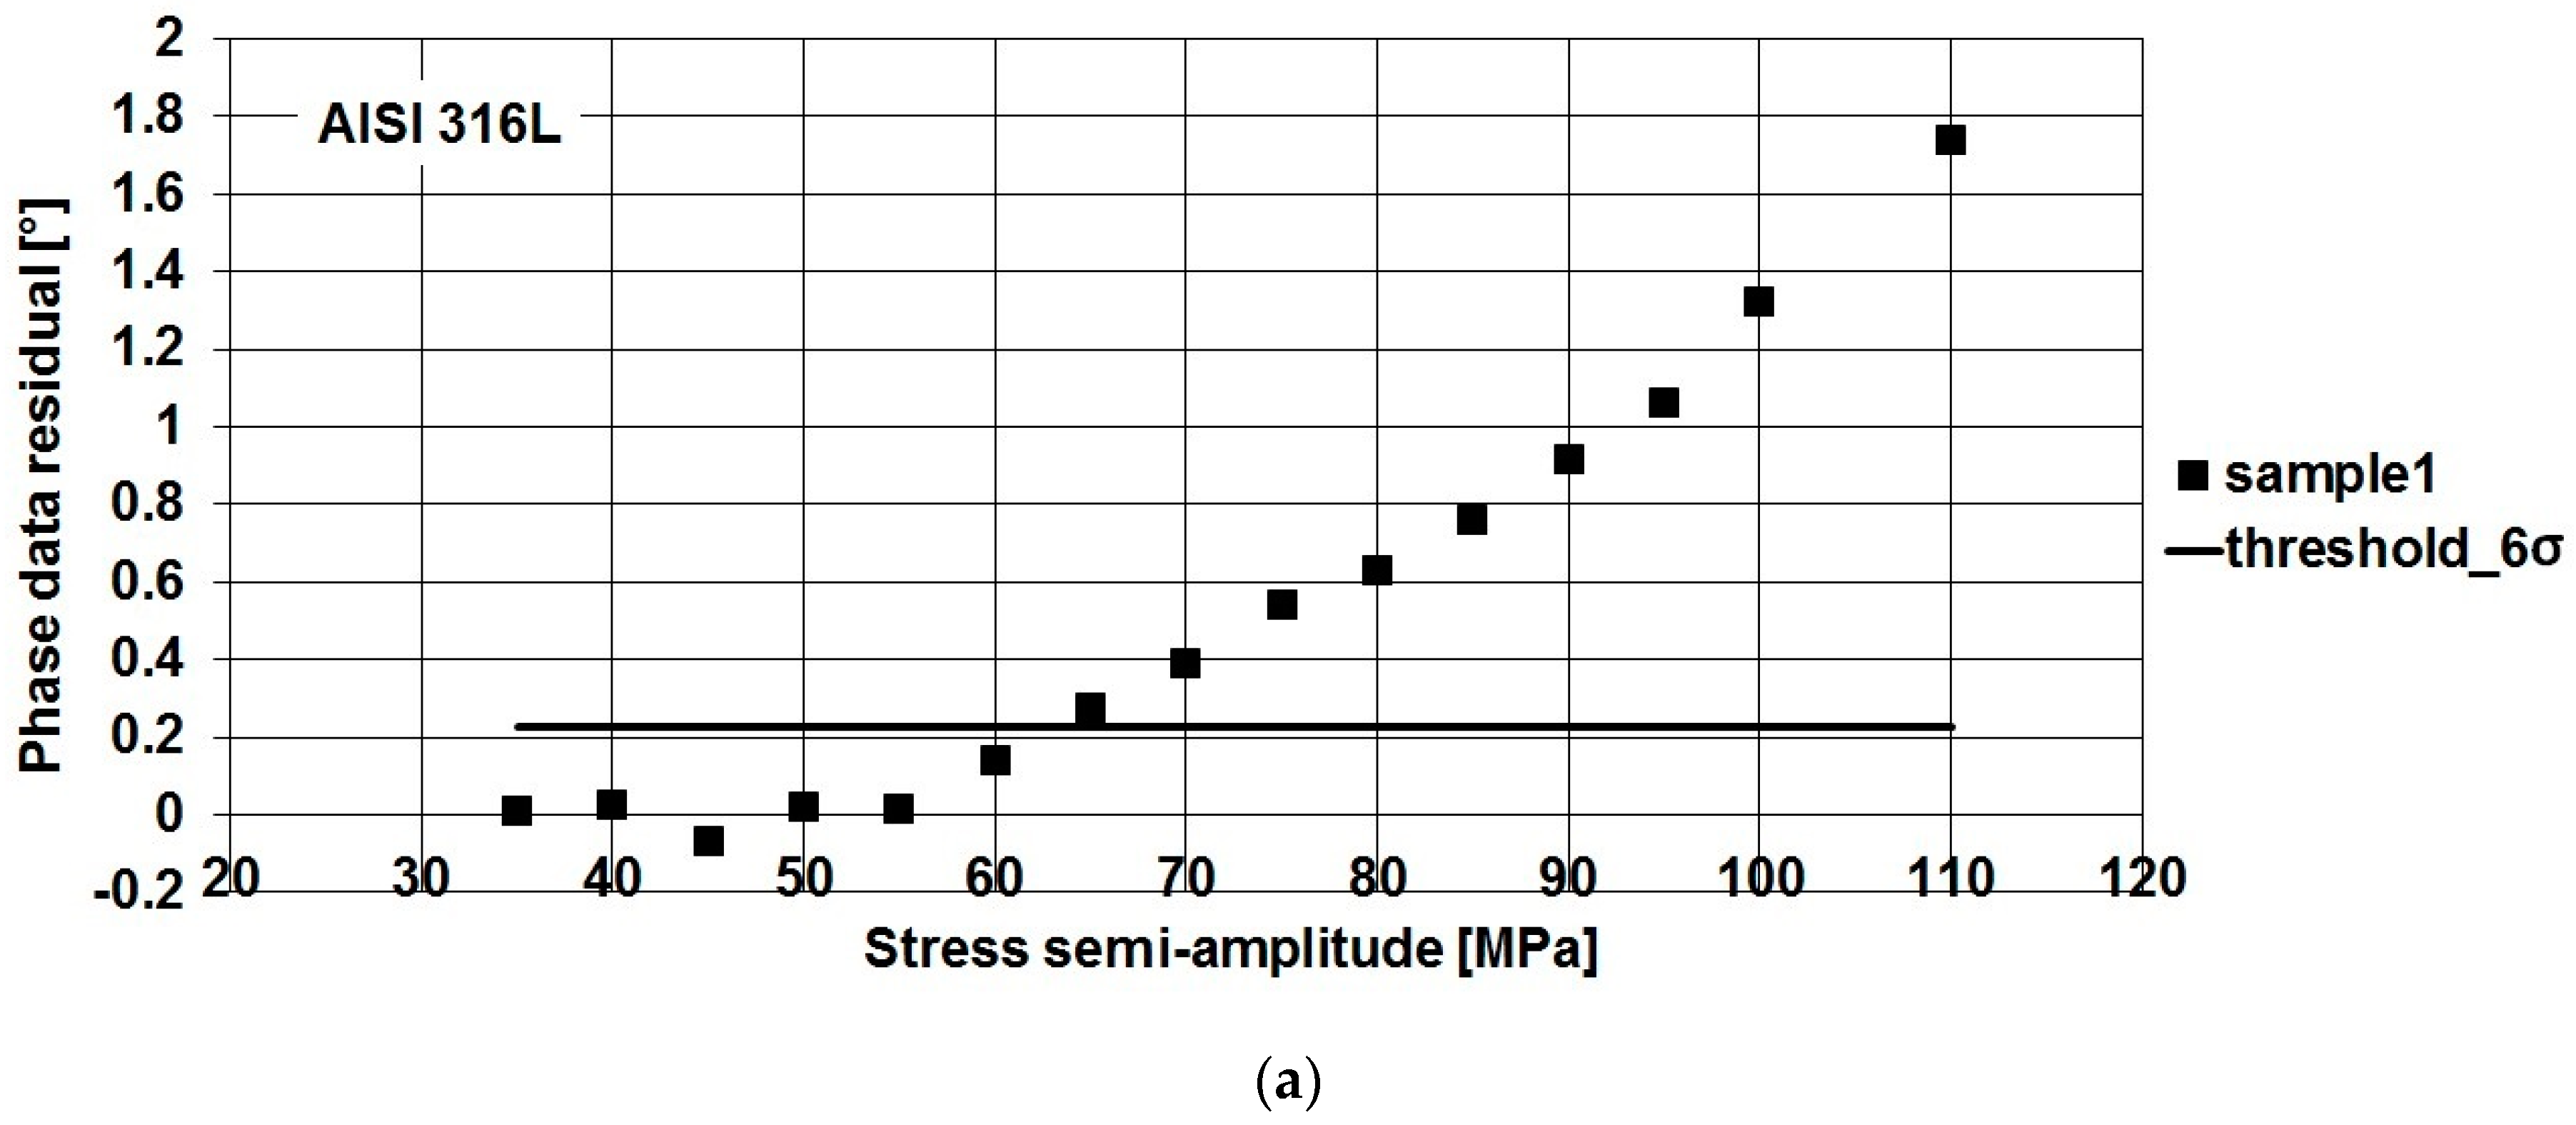
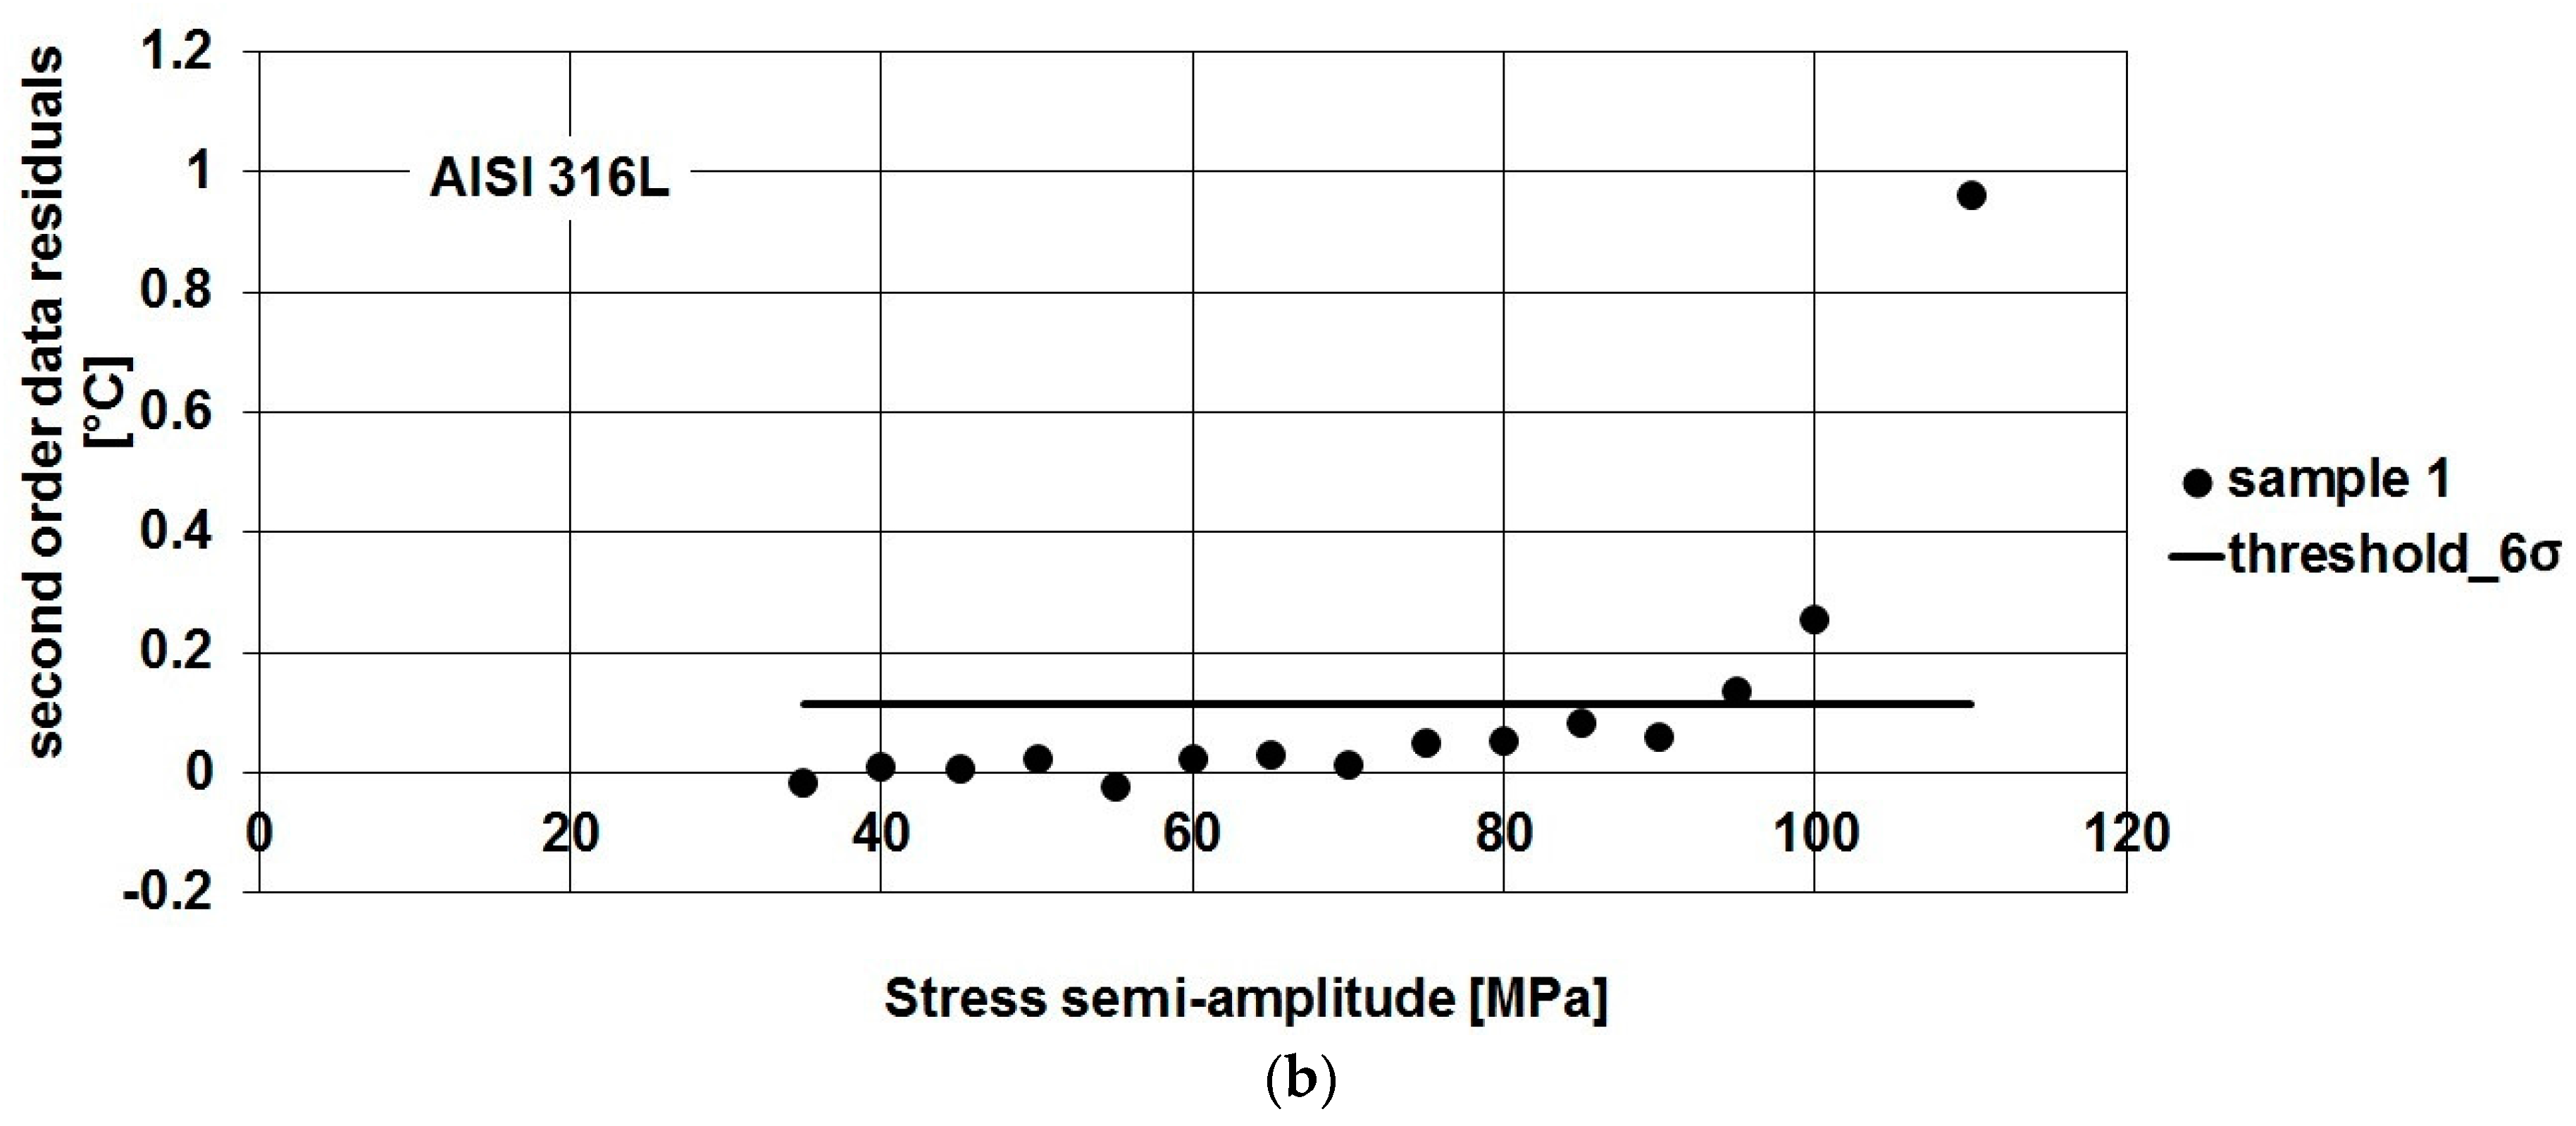
In Figure 10, residual analysis applied according to [4] allows us to obtain a threshold value (μ + 6σ) referring to the first five data couples (Δσ/2; φ) or (Δσ/2; S2) of the series shown in Figure 9. By adopting the threshold method, all the criticalities related to the application of the graphic method [1,2], such as the choice of the breakdown point of data series, are avoided.
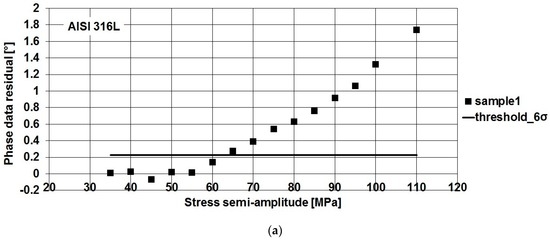
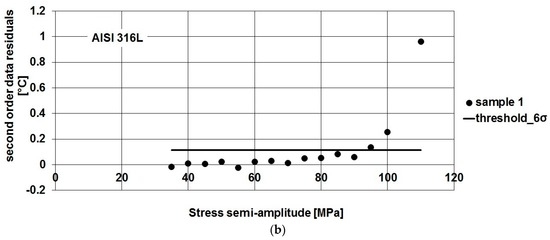
Figure 10.
AISI 316L, (a) phase data residual; and (b) S2 data residual, and thresholds versus loading level (stress semi amplitude of applied load) for Sample 1.
The method has been applied to both austenitic and martensitic materials. The results are shown in Table 3. AISI 316L shows large scattering between the mean values of fatigue limit found by using phase data and S2 data. As shown in Figure 10, the variations of signal in S2 are very low in value, and it is difficult to fix an appropriate threshold. For X4 Cr Ni Mo 16-5-1, both the phase and S2 parameters show very close fatigue limits.

Table 3.
Fatigue limit evaluation results by using both parameters for AISI 316L and X4 Cr Ni Mo 16-5-1.
In literature, little data is available referring to the fatigue limit of these stainless steels at R = 0.5 (the loading ratio suggested by the partner of the project). In fact, in order to make a comparison with Thermal data results, the fatigue limit of AISI 316L has been extrapolated by using the Goodman model [45]. In order to provide a reference for X4 CR NI MO 16-5-1 of the fatigue limit at R = 0.5, the same procedure as adopted for austenitic steel, has been applied to achieve an estimation of the fatigue limit.
The reference value of the fatigue limit for X4 Cr Ni Mo 16-5-1 is 187 MPa. Both φ and S2 show good agreement with reference values and, moreover, they may be used for describing the fatigue behaviour of X4 Cr Ni Mo 16-5-1 stainless steel.
A standard value of fatigue limit at the adopted loading ratio was estimated by applying the Goodman model [45]:
in which represents the stress amplitude of an unknown fatigue limit at R = 0.5, is the mean stress value, is the amplitude of fatigue limit at R = −1, while is the ultimate tensile stress of material. By rewriting the amplitude (Equation (3)) and the mean stress (Equation (4)) in function of maximum stress:
By substituting the values of amplitude and means stress, as shown in Equations (3) and (4), Equation (2) provides the value of fatigue limit. For austenitic stainless steel, the values of and have been provided by [36], respectively the amplitude of fatigue limit at R = −1 and ultimate tensile strength. The value of fatigue limit found was 70.63 MPa. The result of the application of threshold method on austenitic stainless steel shows an overestimation of the fatigue limit with respect to the reference found. Referring to the phase shift, results fit very well with those provided by the reference of 70.63 MPa, while for the S2 results, it seems that the method overestimates the fatigue limit.
The amplitude of the thermal signal at double the mechanical frequency is very low, and moreover, the signal-to-noise ratio is low. The influence of noise on the S2 parameter affects the evaluation of the fatigue limit by determining an overestimation of the fatigue limit. This difference between the parameters φ and S2, will enhance the development of new processing procedures.
By applying the same procedure as used for austenitic AISI 316L, the reference value of the fatigue limit for X4 Cr Ni Mo 16-5-1 is 187 MPa. All the assessed parameters (φ, S2) show good agreement with the value of reference and moreover, may be used for describing the fatigue behaviour of X4 Cr Ni Mo 16-5-1 stainless steel, except for a slightly higher value of the standard deviation for phase data. As expected, different behaviour of phase and S2 parameters were obtained for different materials and in this regard, further works will be focused on the optimization of the proposed procedure for each material.
5. Conclusions
In this paper, thermal methods have been shown to be useful in the study of fracture mechanics and fatigue in stainless steels by assessing two indices (φ, S2) representing the dissipative phenomena occurring in presence of damage.
The adopted procedure to achieve both the parameters involves a simple data algorithm for analysing a single thermographic sequence. The application of such an approach involves several novelties in studying fatigue and fracture behaviour of the innovative martensitic stainless steels X4 Cr Ni Mo 16-5-1 and austenitic AISI 316L stainless steel.
The fatigue limit estimation at loading ratio R = 0.5 has been provided. Literature lacks information about the same materials tested at this loading ratio and referring to X4 Cr Ni Mo 16-5-1, no data available are present even at typical loading ratio.
Different information about the plastic zone may be assessed by observing phase and S2 maps, as demonstrated both under fatigue and fracture mechanics regimes. In fatigue analysis the use of both parameters enhance the fatigue limit estimation while the potential of the technique based on the synergic use of φ and S2 in fracture mechanics is represented by the possibility to monitor the fatigue crack propagation, “a”. In this case, the analysis of the second order parameter S2, here encouraged, may improve and simplify the analysis of the position of the crack tip in the plastic zone with respect to merely using the thermoelastic phase shift parameter φ.
Further developments of the method will focus on the study of correlations between φ and S2, and on the comparison of the crack tip observations with those provided by a quantitative experimental method such as Microscopy.
Moreover, referring to the phase lag, since its values are specific for the material, the capability of the parameter φ has been demonstrated for characterising the behaviour of material during fatigue.
Finally, due to:
- their capability of assessing and monitoring damage behaviour, they provide more information than other methods;
- the simple algorithm performed, the adopted method provides a less time consuming test and data analysis;
- the simple sample preparation, requiring only the application of a thin removable layer of matt black on the surface, the proposed method may be applied successfully on real components during their operating life, without damaging or wasting them.
Acknowledgments
This work is part of a large-scale research project (PON-SMATI) aimed at identifying innovative steels for turbo machinery used in extreme environmental conditions. The authors would like to thank GE oil & gas (Nuovo Pignone S.r.l.) for the support and collaboration provided in the experimental tests.
Author Contributions
Rosa De Finis and Davide Palumbo conceived and designed the experiments, Rosa De Finis wrote the paper; Umberto Galietti oversaw the paper.
Conflicts of Interest
The authors declare no conflict of interest.
References
- Luong, M.P. Infrared Thermographic scanning of fatigue in metals. Nucl. Eng. Des. 1995, 158, 363–373. [Google Scholar] [CrossRef]
- La Rosa, G.; Risitano, A. Thermographic methodology for the rapid determination of the fatigue limit of materials and mechanical components. Int. J. Fatigue 2000, 22, 65–73. [Google Scholar] [CrossRef]
- Galietti, U.; Palumbo, D. Application of Thermal Methods for Characterization of Steel Welded Joints; EPJ Web of Conferences 2010; EDP Sciences: Les Ulis, France, 2010; Volume 6. [Google Scholar]
- De Finis, R.; Palumbo, D.; Ancona, F.; Galietti, U. Fatigue limit evaluation of various martensitic stainless steels with new robust thermographic data analysis. Int. J. Fatigue 2015, 74, 88–96. [Google Scholar] [CrossRef]
- Harwood, N.; Cummings, W. Thermoelastic Stress Analysis; CRC Press: Bristol, PA, USA, 1991. [Google Scholar]
- Stanley, P. Applications and potential of thermoelastic stress analysis. J. Mater. Process. Technol. 1997, 64, 359–370. [Google Scholar] [CrossRef]
- Dulieu-Barton, J.M. Introduction to thermoelastic stress analysis. Strain 1999, 35, 35–39. [Google Scholar] [CrossRef]
- Pitarresi, G.; Patterson, E.A. A review of the general theory of thermoelastic stress analysis. J. Strain Anal. Eng. Des. 2003, 38, 405–413. [Google Scholar] [CrossRef]
- Wang, W.J.; Dulieu-Barton, J.M.; Li, Q. Assessment of non-adiabatic behaviour in thermoelastic stress analysis of small scale components. Exp. Mech. 2010, 50, 449–461. [Google Scholar] [CrossRef]
- Palumbo, D.; Galietti, U. Data Correction for Thermoelastic Stress Analysis on Titanium Components. Exp. Mech. 2016. [Google Scholar] [CrossRef]
- Enke, N.F.; Sandor, B.I. Cyclic plasticity analysis by differential infrared thermography. In Proceedings of the VII International Congress on Experimental Mechanics, Cincinnati, OH, USA, 7 June 1988; pp. 830–835.
- Sakagami, T.; Kubo, S.; Tamura, E.; Nishimura, T. Identification of plastic-zone based on double frequency lock-in thermographic temperature measurement. In Proceedings of the International Conference of Fracture ICF11, Torino, Italy, 20–25 March 2005.
- Krapez, J.K.; Pacou, D.; Gardette, G. Lock-In Thermography and Fatigue Limit of Metals. In Proceedings of the Quantitative Infrared Thermography (QIRT), Reims, France, 18–21 July 2000.
- Palumbo, D.; Galietti, U. Characterization of Steel Welded Joints by Infrared Thermographic Methods. Quant. Infrared Thermogr. J. 2014, 11, 29–42. [Google Scholar] [CrossRef]
- Kim, K.S.; Jung, H.C.; Akhter, N.; Chang, H.S.; Kim, M.K.; Kim, D.S.; Jung, D.W. Thermoelastic Stress Analysis of a Fatigue Specimen using the Lock-in Infrared Thermography. In Proceedings of the 7th International Conference on NDE in Relation to Structural Integrity for Nuclear and Pressurized Components, Yokohama, Japan, 12–15 May 2009.
- Shiozawa, D.; Inagawa, T.; Washio, T.; Sakagami, T. Fatigue limit estimation of stainless steels with new dissipated energy data analysis. Procedia Struct. Integr. 2016, 2, 2091–2096. [Google Scholar] [CrossRef]
- Talemi, R.; Chhith, S.; De Waele, W. On effect of pre-bending process on low cycle fatigue behaviour of high strength steel using lock-in thermography. Procedia Struct. Integr. 2016, 2, 3135–3142. [Google Scholar] [CrossRef]
- Li, X.D.; Zhang, H.; Wu, D.L.; Liu, X.; Liu, J.Y. Adopting lock-in infrared thermography technique for rapid determination of fatigue limit of aluminum alloy riveted component and affection to determined result caused by initial stress. Int. J. Fatigue 2012, 36, 18–23. [Google Scholar] [CrossRef]
- Fan, J.; Guo, X.; Wu, C. A new application of the infrared thermography for fatigue evaluation and damage assessment. Int. J. Fatigue 2012, 44, 1–7. [Google Scholar] [CrossRef]
- Kim, W.T.; Choi, M.J.; Huh, Y.H.; Eom, S.J. Measurement of Thermal Stress And Prediction of Fatigue for Sts Using Lock-In Thermography. In Proceedings of the 12th A-PCNDT 2006—Asia-Pacific Conference on NDT, Auckland, New Zealand, 5–10 November 2006.
- Galietti, U.; Palumbo, D.; de Finis, R.; Ancona, F. Fatigue Damage Evaluation with New Thermal Methods. In Proceedings of the 3th International Workshop On Advanced Infrared Technology And Applications, Tourin, Italy, 11–14 September 2013.
- Palumbo, D.; Galietti, U. Thermoelastic Phase Analysis (TPA): A new method for fatigue behaviour analysis of steels. Fatigue Fract. Eng. Mater. Struct. 2016. [Google Scholar] [CrossRef]
- Fedorova, A.Y.U.; Bannikov, M.V.; Plekhov, O.A.; Plekhova, E.V. Infrared thermography study of the fatigue crack propagation. Frattura ed Integrità Strutturale 2012, 21, 46–53. [Google Scholar]
- Diaz, F.A.; Patterson, E.A.; Yates, R.A. Some improvements in the analysis of fatigue cracks using thermoelasticity. Int. J. Fatigue 2004, 26, 365–387. [Google Scholar] [CrossRef]
- Diaz, F.A.; Patterson, E.A.; Yates, R.A. Application of thermoelastic stress analysis for the experimental evaluation of the effective stress intensity factor. Frattura ed Integrità Strutturale 2013, 25, 109–117. [Google Scholar]
- Tomlinson, R.A.; Olden, E.J. Thermoelasticity for the analysis of crack tip stress fields—A review. Strain 1999, 7, 35–49. [Google Scholar] [CrossRef]
- Tomlinson, R.A.; Patterson, E.A. Examination of Crack Tip Plasticity Using Thermoelastic Stress Analysis. In Thermomechanics and Infra-Red Imaging; Society for Experimental Mechanics Series; Springer: New York, NY, USA, 2011; Volume 7, pp. 123–130. [Google Scholar]
- Diaz, F.A.; Patterson, E.A.; Yates, R.A. Differential Thermography Reveals Crack Tip Behaviour? In Proceedings of the SEM Annual Conference on Experimental and Applied Mechanics Society for Experimental Mechanics, Portland, OR, USA, 6–9 June 2005; pp. 1413–1419.
- Ancona, F.; de Finis, R.; Demelio, G.P.; Galietti, U.; Palumbo, D. Study of the plastic behavior around the crack tip by means of thermal methods. In Proceedings of the Structural Integrity Procedia of the 21st European Conference on Fracture, ECF21, Catania, Italy, 20–24 June 2016.
- Ancona, F.; Palumbo, D.; de Finis, R.; Demelio, G.P.; Galietti, U. Automatic procedure for evaluating the Paris Law of martensitic and austenitic steels by means of thermal methods. Eng. Fract. Mech. 2016. [Google Scholar] [CrossRef]
- Galietti, U.; Palumbo, D.; De Finis, R.; Ancona, F. Fatigue Damage Evaluation of Martensitic Stainless Steel by Means of Thermal Methods. In Proceedings of the National Conference IGF XXII, Rome, Italy, 1–3 July 2013; pp. 80–91.
- Bar, J. Determination of dissipated Energy in Fatigue Crack Propagation Experiments with Lock-in Thermography and Heat Flow Measurements. Procedia Struct. Integr. 2016, 2, 2105–2112. [Google Scholar] [CrossRef]
- Morabito, A.E.; Chrysochoos, A.; Dattoma, V.; Galietti, U. Analysis of heat sources accompanying the fatigue of 2024 T3 aluminium alloys. Int. J. Fatigue 2007, 29, 977–984. [Google Scholar] [CrossRef]
- Meneghetti, G. Analysis of the Fatigue Strength of a Stainless Steel Based on the Energy Dissipation. Int. J. Fatigue 2007, 29, 81–94. [Google Scholar] [CrossRef]
- Boulanger, T.; Chrysochoos, A.; Mabru, C.; Galtier, C. Calorimetric analysis of dissipative and thermoelastic effects associated with the fatigue behavior of steels. Int. J. Fatigue 2006, 26, 221–229. [Google Scholar] [CrossRef]
- Matweb. Available online: http://www.matweb.com/ (accessed on 4 November 2016).
- Industeel Belgium, ArcelorMittal. Technical Data Sheet VIRGO 39—Ed 28.07. 2003. Available online: http://www.industeel.info/products/stainless-steels/ferritic-martensitic/virgo-39/ (accessed on 4 November 2016).
- ASTM E 647–00. Standard Test Method for Measurement of Fatigue Crack Growth Rates, 2000. Available online: http://www.astm.org/Standards/E647 (accessed on 4 November 2016).
- ASTM E E466-96. Standard Practice for Conducting Force Controlled Constant Amplitude Axial Fatigue Tests of Metallic Materials. 1996. Available online: http://www.astm.org/DATABASE.CART/HISTORICAL/E466-96.htm (accessed on 4 November 2016).
- Delpueyo, D.; Balandraud, X.; Grédiac, M. Applying infrared thermography to analyse martensitic microstructures in a Cu–Al–Be shape-memory alloy subjected to a cyclic loading. Mater. Sci. Eng. A Struct. 2011, 528, 8249–8258. [Google Scholar] [CrossRef]
- Arghavani, J.; Auricchio, F.; Naghdabadi, R.; Reali, A.; Sohrabpour, S. A 3-D phenomenological constitutive model for shape memory alloys under multiaxial loadings. Int. J. Plast. 2010, 26, 976–991. [Google Scholar] [CrossRef]
- Kan, Q.; Kang, G. Constitutive model for uniaxial transformation ratchetting of super-elastic NiTi shape memory alloy at room temperature. Int. J. Plast. 2009, 26, 441–465. [Google Scholar] [CrossRef]
- Ortin, J.; Planes, A. Thermodynamics of thermoelastic martensitic transformations. Acta Metall. 1989, 37, 1433–1441. [Google Scholar] [CrossRef]
- Pan, H.; Thamburaja, P.; Chau, F.S. Multi-axial behavior of shape memory alloys undergoing martensitic reorientation and detwinning. Int. J. Plast. 2007, 23, 711–732. [Google Scholar] [CrossRef]
- Juvinall, R.; Marshek, K. Fundamental of Machine Component Design; Edizioni ETS: Pisa, Italy, 1994. [Google Scholar]
© 2016 by the authors; licensee MDPI, Basel, Switzerland. This article is an open access article distributed under the terms and conditions of the Creative Commons Attribution (CC-BY) license (http://creativecommons.org/licenses/by/4.0/).

