1. Introduction
Astronomical and earth observations performed using space telescopes have become increasingly common in recent years. In order to increase the collecting power and improve the angular resolution, larger aperture mirrors are needed [
1,
2]. Due to the mass restrictions of rockets, the mirrors need to be lightweight designed. The goal of mirror design is to satisfy the requirements of mirror surface accuracy and location which are obtained by optical error analysis and technical specifications [
3,
4,
5,
6]. When designing the mirror assembly, these requirements should be taken as objectives and constraints. The requirement of mirror surface accuracy refers to the ability to be unaffected by environmental influences. These environmental influences include gravity, axial assembly error, flatness error of mounting interface and thermal change, under which the mirror surface accuracy is degraded. The requirement of location can be further divided static location and dynamic location. The static and dynamic location is related to the mass, compliance of support and fundamental frequency, respectively. However, satisfying the traditional design requirements is not enough to obtain a good performance in practice. The blank error and assembly error should be considered.
In recent years, silicon carbide (SiC) has been used to construct lighter and larger size mirrors [
7,
8]. Comparing with other mirror material, SiC has high specific stiffness (the ratio of Young’s modulus to density) and adequate thermal stability (the ratio of thermal conductivity to coefficient of thermal expansion). In general, the SiC mirror is developed by using sintering process or reaction bonding process which are similar to casting process. The blank error of SiC mirror is 0~1 mm in which significant changes in weight distribution can be introduced. And the error is random, which is reflected in each product is not exactly the same, so it cannot be estimated accurately. Slight deviations of the mirror’s dimensions result in a change of the center of gravity and inertial moments in the case of large optics [
9]. Combined with assembly errors of the mirror, the mirror’s surface error would not be minimized as expected. The performance of optical mirrors, such as those employed in orbiting telescopes, can be severely degraded. If the deviation is too large or unacceptable, a new set of flexures should be made to compensate for the mirror’s fabrication errors. This procedure is, however, time-consuming and costly [
10,
11,
12,
13].
Different methods have been proposed to minimize the mirror accuracy under gravity. Kihm et al. [
14] proposed an adjustable bipod flexure with mechanical shims to compensate for the gravitational distortion of the mirror. The 10 nm error caused by deviation can be compensated within the adjustment range of the mechanical shim. As additional moving parts have been introduced, the structural stability can be decreased.
For the present study, a large aperture SiC square mirror adopting three-point supports is studied. The surface shape of the assembly under the influence of gravity, temperature and assembly error is obtained by finite element analysis. Then the position relationship between the flexible joint and the mirror is presented when the gravity surface shape is optimal. The sensitivity of RMS value of gravity surface distortion to assembly error is calculated. Furthermore, the influence of the blank error of the lightweight mirror on gravity surface distortions is studied by Monte Carlo analysis. Lastly, a compensation method is proposed which avoids the disturbance of the blank error to the greatest extent.
2. Performance Metrics
Typically, space mirrors are fabricated and tested on ground, and then launched into space. The mirror surface accuracy in orbiting may be degraded by gravity relief and thermal change. In order to fully verify the optical performance of space telescopes on ground, it is necessary that the mirror shape is maintained to a high precision. In addition, to prevent the mirror from vibration damage during the launch, it is very important to ensure its good dynamic stiffness.
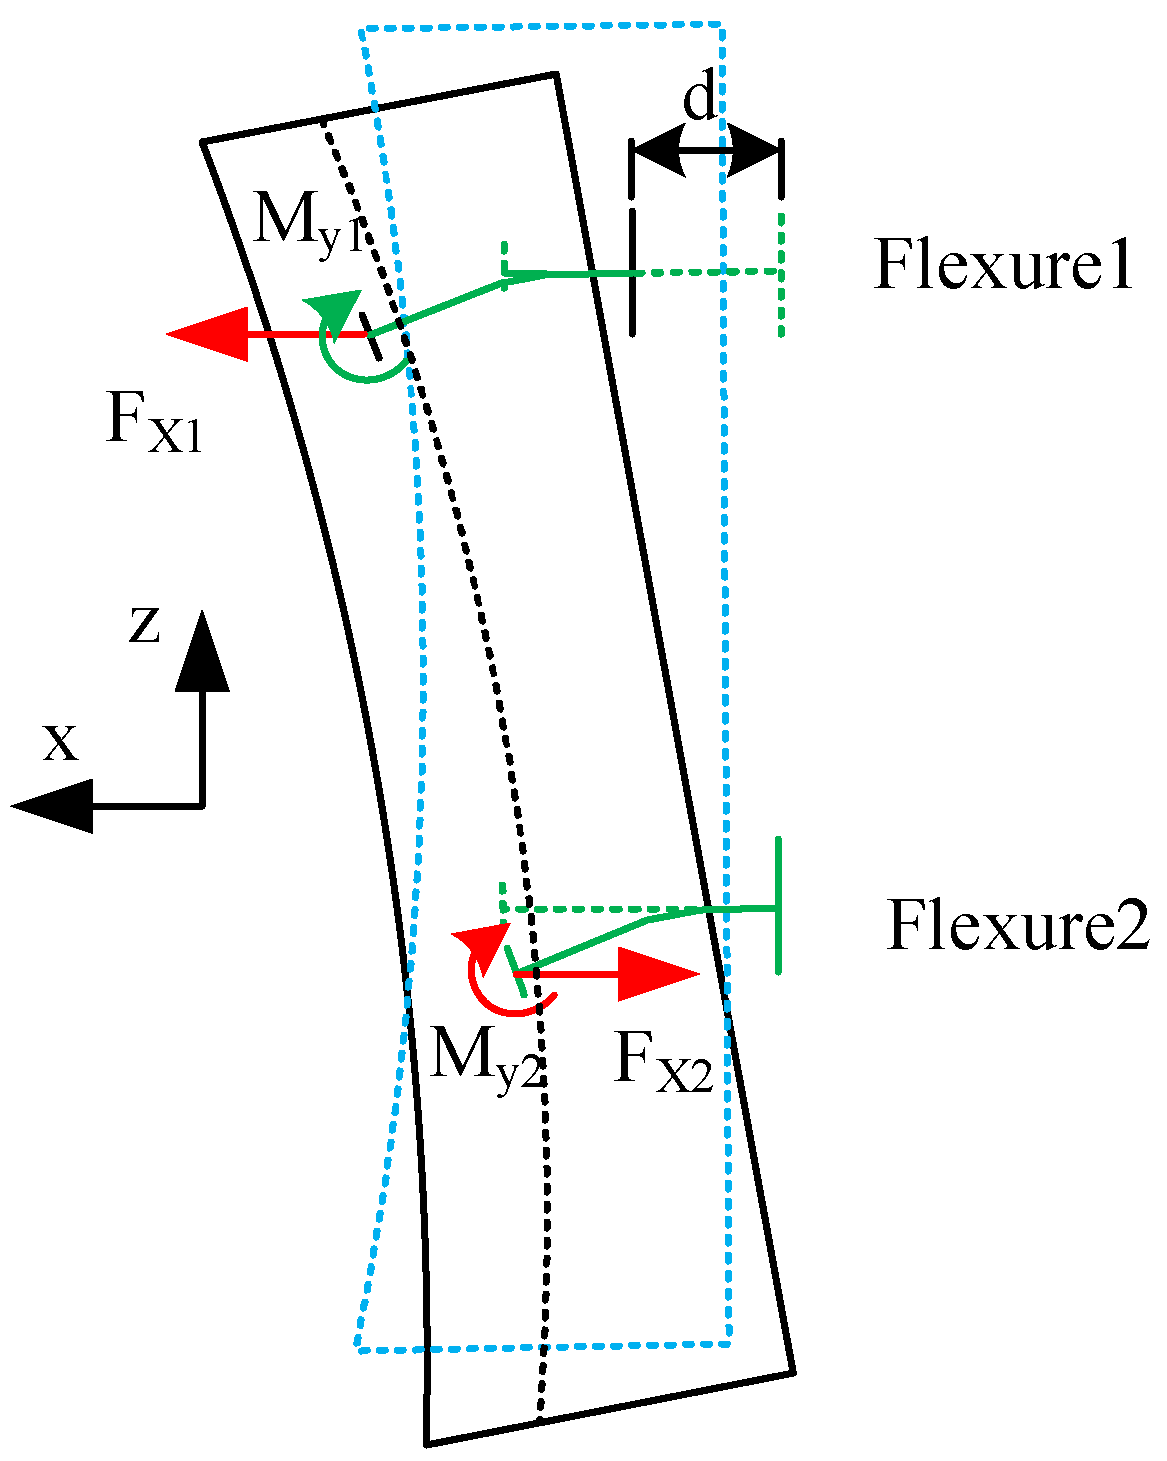
In order to ensure the high surface accuracy of the mirror, the surface accuracy deg radiation caused by the disturbance of gravity, thermal change, the flatness error of the mounting surface, and axial mount accuracy are considered in the design process of the space mirror assembly. The flatness error refers to the non-coplanarity error of three flexible support mounting surfaces caused by machining error and substrate deformation. Generally, the error can be simulated by applying a stiffening displacement on the flange surface of one flexible support and keeping the other two flexible supports stationary. Under the action of flatness error, the front-end face of flexible support is mainly affected by bending moment, and its motion form is rotation. According to the structural symmetry, the stress analysis of the mirror assembly under the action of flatness error is shown in
Figure 1. The mirror rotates around the Y axis when the three flexible supports are under the action of flatness error.
In actual engineering, the causes of these four disturbances are different and approximately unrelated. The following error synthesis formula of random error and systematic error can be used to calculate the total error.
where
is the random error and
is the single undetermined system error.
The comprehensive surface accuracy index is decomposed into independent indexes according to the disturbance type. In this way, the comprehensive surface accuracy index can be satisfied when each sub-index meets the requirements separately.
For the present study, a lightweight SiC mirror assembly adopting three-point supports is designed. According to the optical error analysis, the required comprehensive surface accuracy should not exceed 5.6 nm. Then, 5.6 nm is decomposed into 2.5 nm for gravity; The surface distortion caused by the assembly error is less than 3.5 nm, which mainly refers to the surface distortions induced by 0.08 mm flatness error of the mounting face, and The deviation between the axial installation position and the ideal position of the flexible joint is caused by manufacturing and assembly errors, which leads to the degradation of the mirror shape accuracy less than 2.5 nm.; When the temperature change is 4 °C, the allowed degradation of surface accuracy is 2.5 nm, as shown in
Figure 2 [
15].
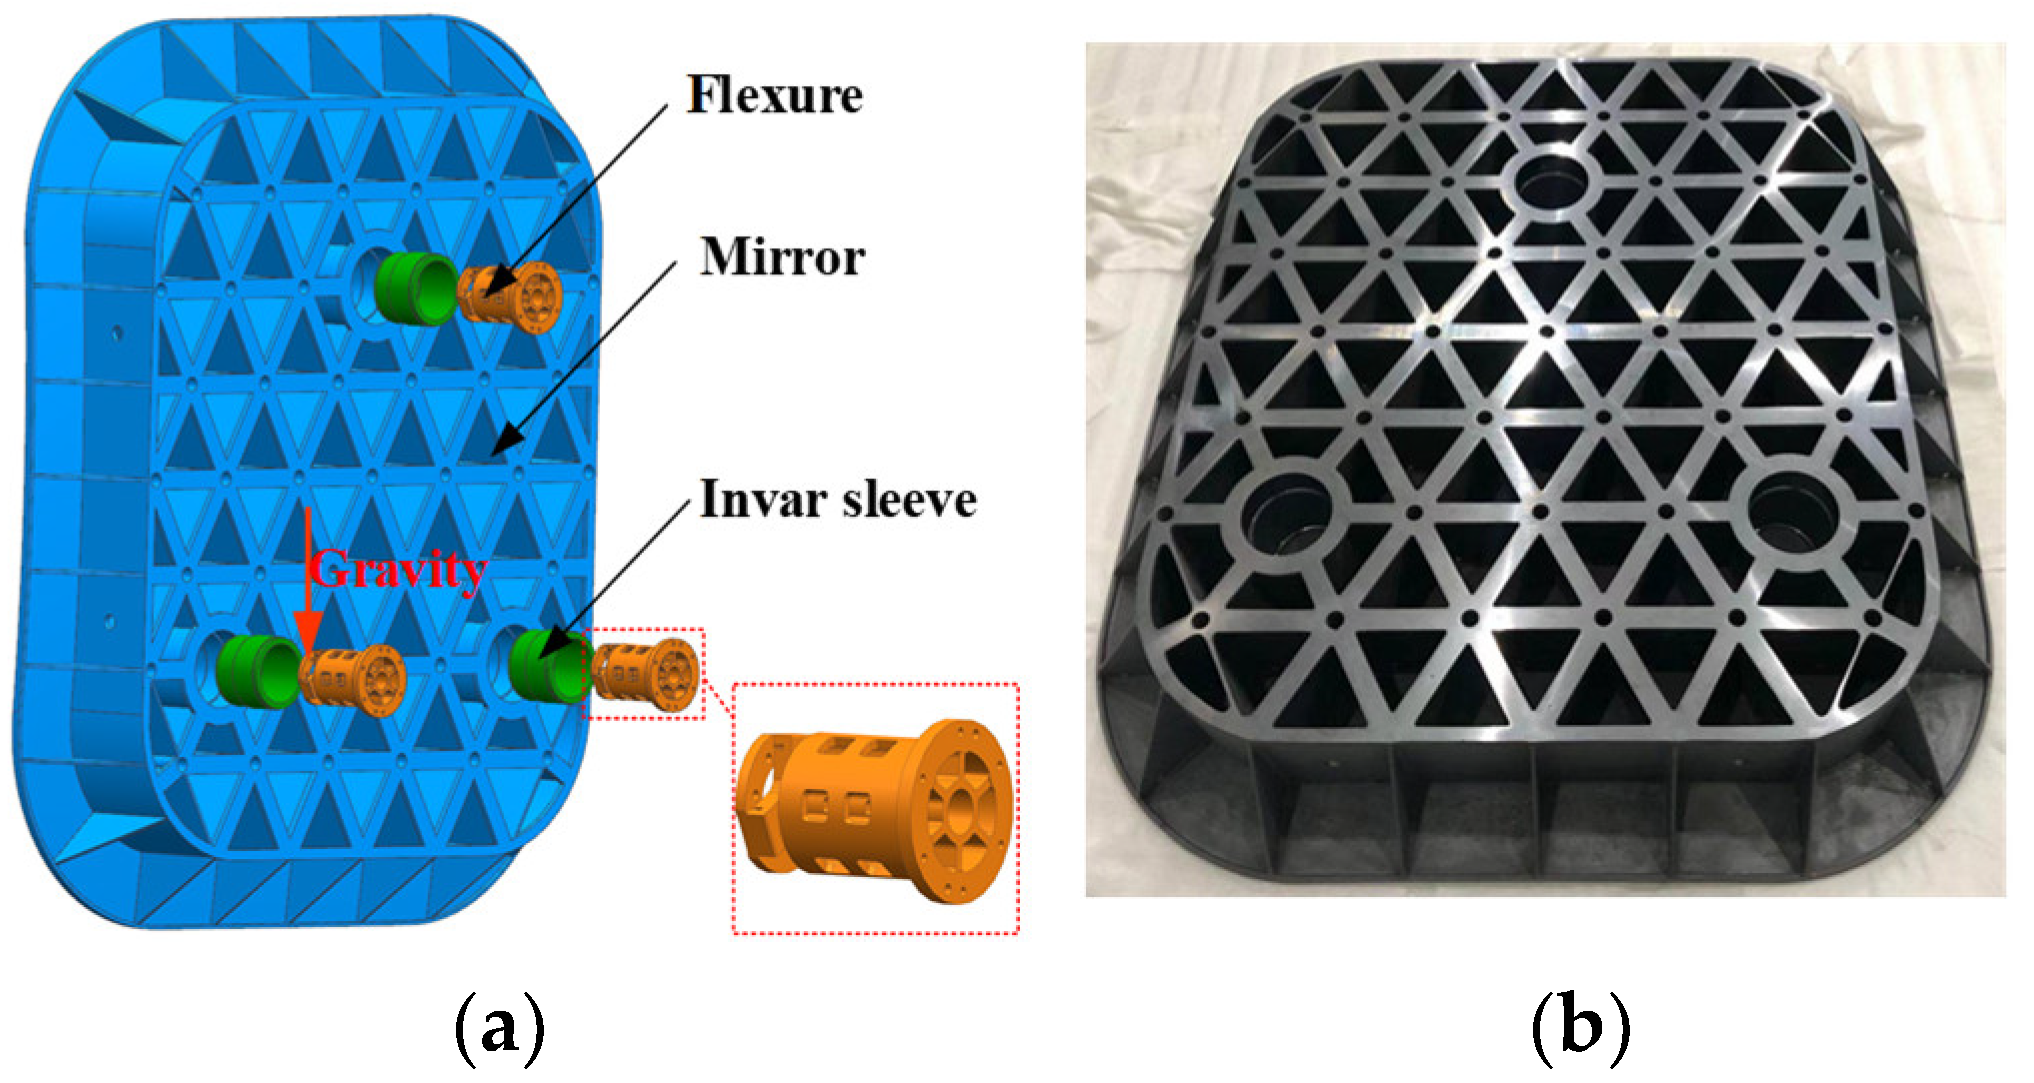
A partially closed back monolithic, SiC mirror configuration is examined. The aperture is 1.3 × 1.2 m, the radius of curvature is 4.6998684 m, and the mass is 73 kg (the lightweight ratio relative to the solid mirror reaches 86.8%). The mirror is supported by three flexures through the supporting holes located on its back as shown in
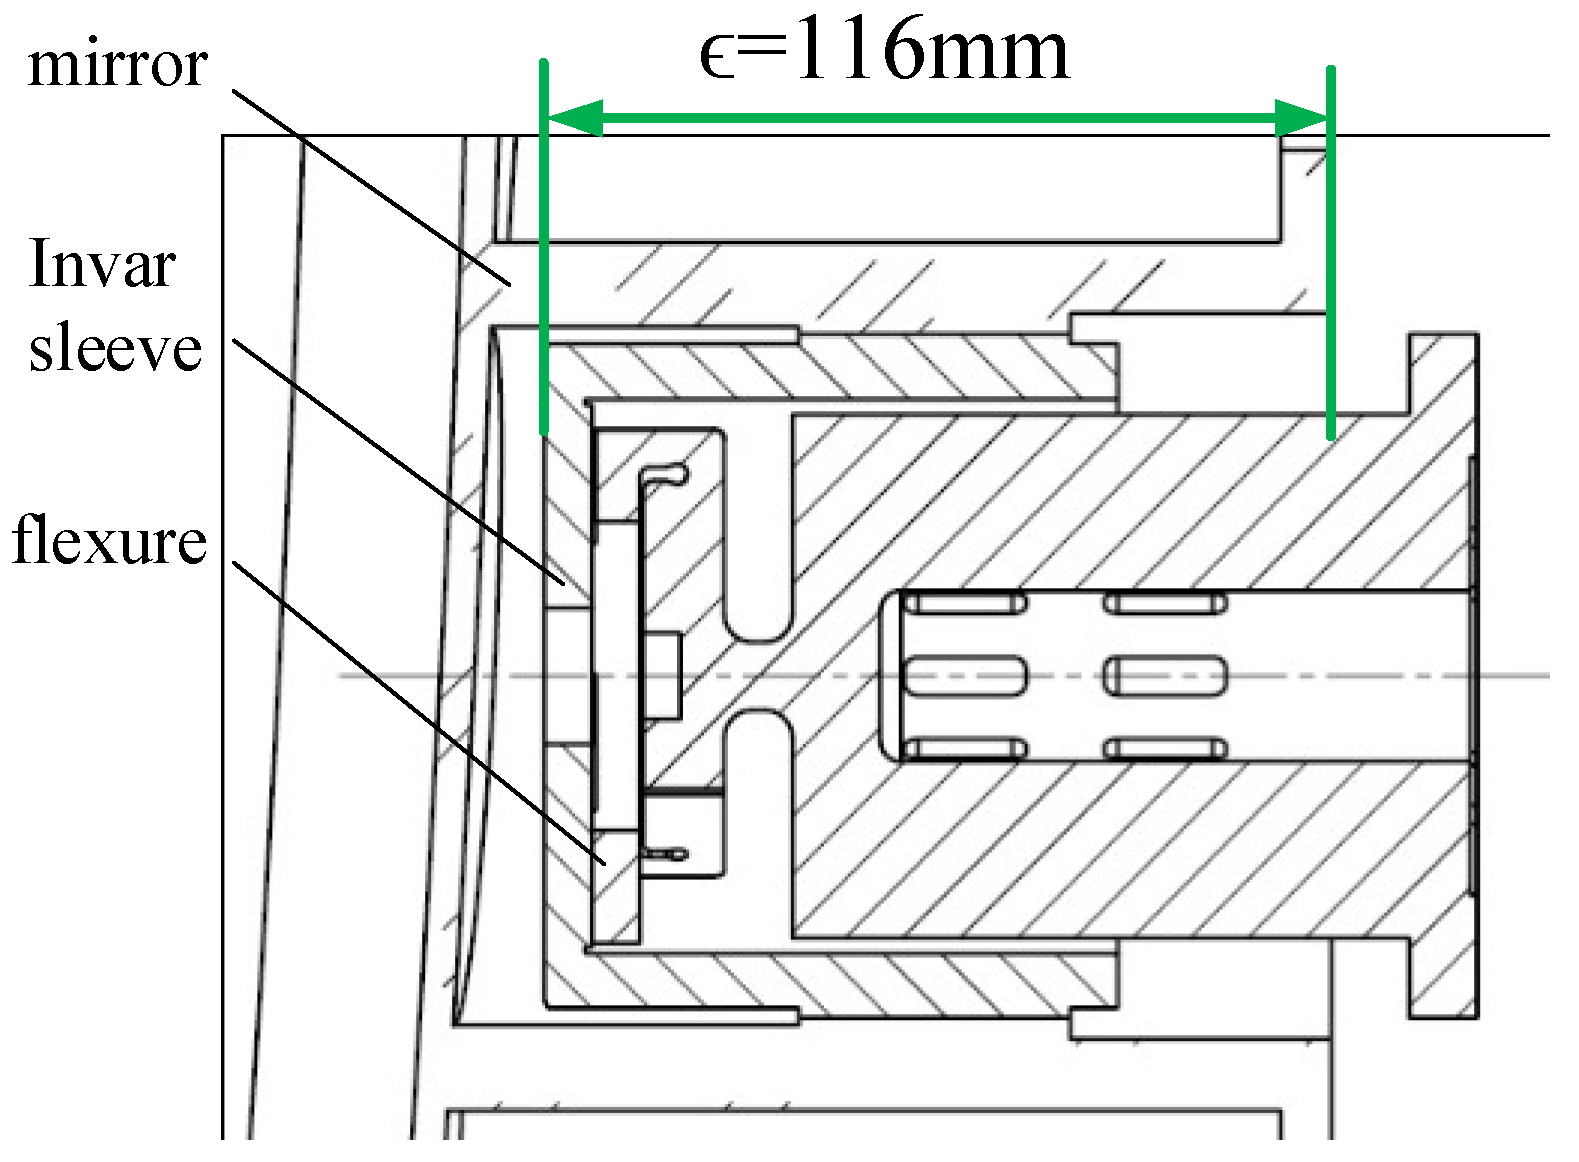
Figure 3a. The three Invar sleeves are bonded to the internal surface of supporting holes by using an epoxy adhesive (GHJ-01(Z)) in a 120-deg interval for improving thermal stability. The flexure is attached to sleeves and the back plate by screws, respectively. The mirror is fabricated with its optical axis vertical. As ground testing with the optical axes horizontal can result in less distortion than in the vertical orientation, the mirror is tested horizontally. When supported at optimum axial mount location, the surface accuracy under self-weight is 1.73 nm. The optimal axial installation position of the flexible support is shown in
Figure 4 (ϵ = 116 mm), and the distance between the front face of the invar sleeve and the back of the mirror is ϵ = 116 mm. The specific design index is listed in
Table 1. It can be concluded that every single design index has been meet. The fabricated mirror under milling is shown in
Figure 3b.
3. Effect of Blank Error on Mirror Accuracy
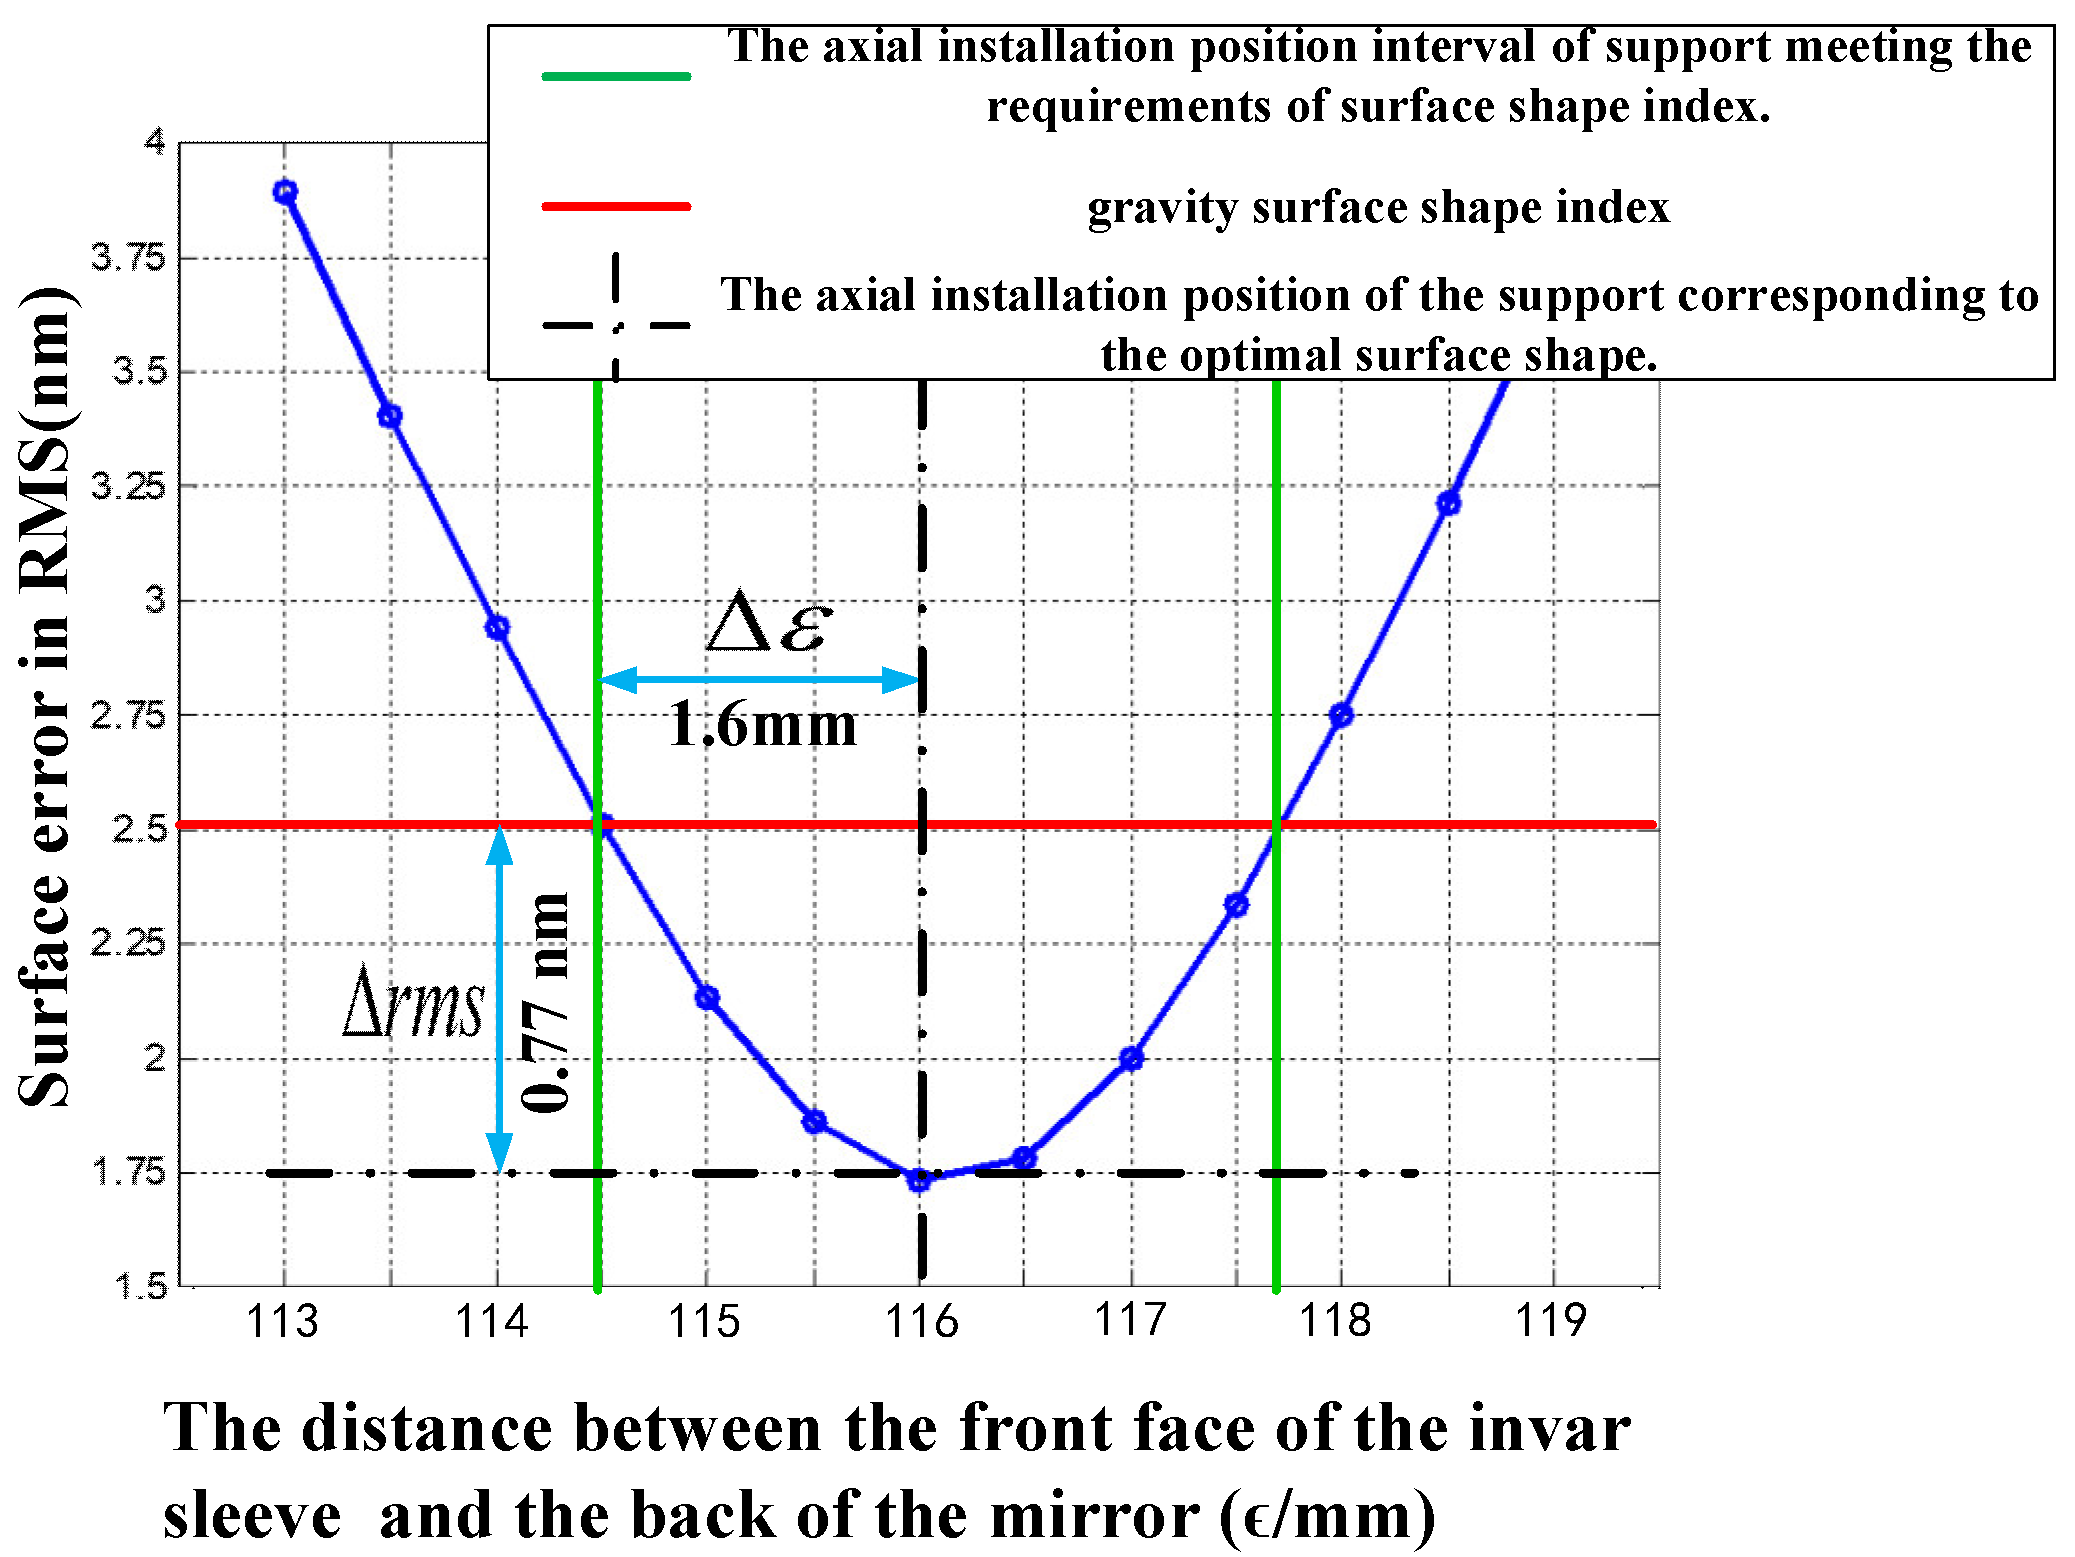
It is well known that when the flexure’s rotation center is located in the neutral plane of the mirror, the gravity surface shape of the mirror assembly is optimal. When the flexure deviates from the optimal axial installation position, the surface shape will degenerate. During the simulation analysis, the RMS value at each position is obtained by changing the axial assembly position of the flexible support, and the sensitivity relationship curve of the mirror surface shape to the axial position of the flexible joint shown in
Figure 5 is obtained.
The sensitivity of the mirror to flexure mount location is shown in
Figure 5. The sensitivity is 0.48 nm/±1 mm which means that the degradation is 0.48 nm when the deviation from the optimum axial mount location equals 1 mm. This value of the sensitivity is calculated as follows:
where
δrms is the difference between gravity surface accuracy index and the value when supported in optimal position.
δε is the distance between the support position of gravity surface accuracy index and optimal support position.
Therefore, when the flexure is installed according to the traditional assembly method, the axial installation accuracy needs to be controlled at ±1.6 mm. However, due to the lightweight and SiC material, the influence of the blank error on the neutral plane location of the mirror cannot be ignored. If the neutral plane deviation between the actual mirror and the initial design mirror is too large or unacceptable, a new set of flexures should be made to compensate for the mirror’s fabrication errors. This procedure is time-consuming and costly.
In general, blank error belongs to random error which is normally distributed. Therefore, the examination of the blank error on mirror accuracy is carried out by Monte Carlo analysis. According to the reverse mapping results, the size of ribs, triangle back panel, front panel, surrounding vertical reinforcement and support hole have their own error distribution. The ribs with the same error distribution have been grouped together marked with same color as shown in
Figure 6. Each group denotes a separate variable in Monte Carlo analysis. The specific tolerance range of each group is shown is
Table 2. As shown in
Table 2, the tolerance has a positive value, which means that the actual mirror will have larger mass and higher rigidity.
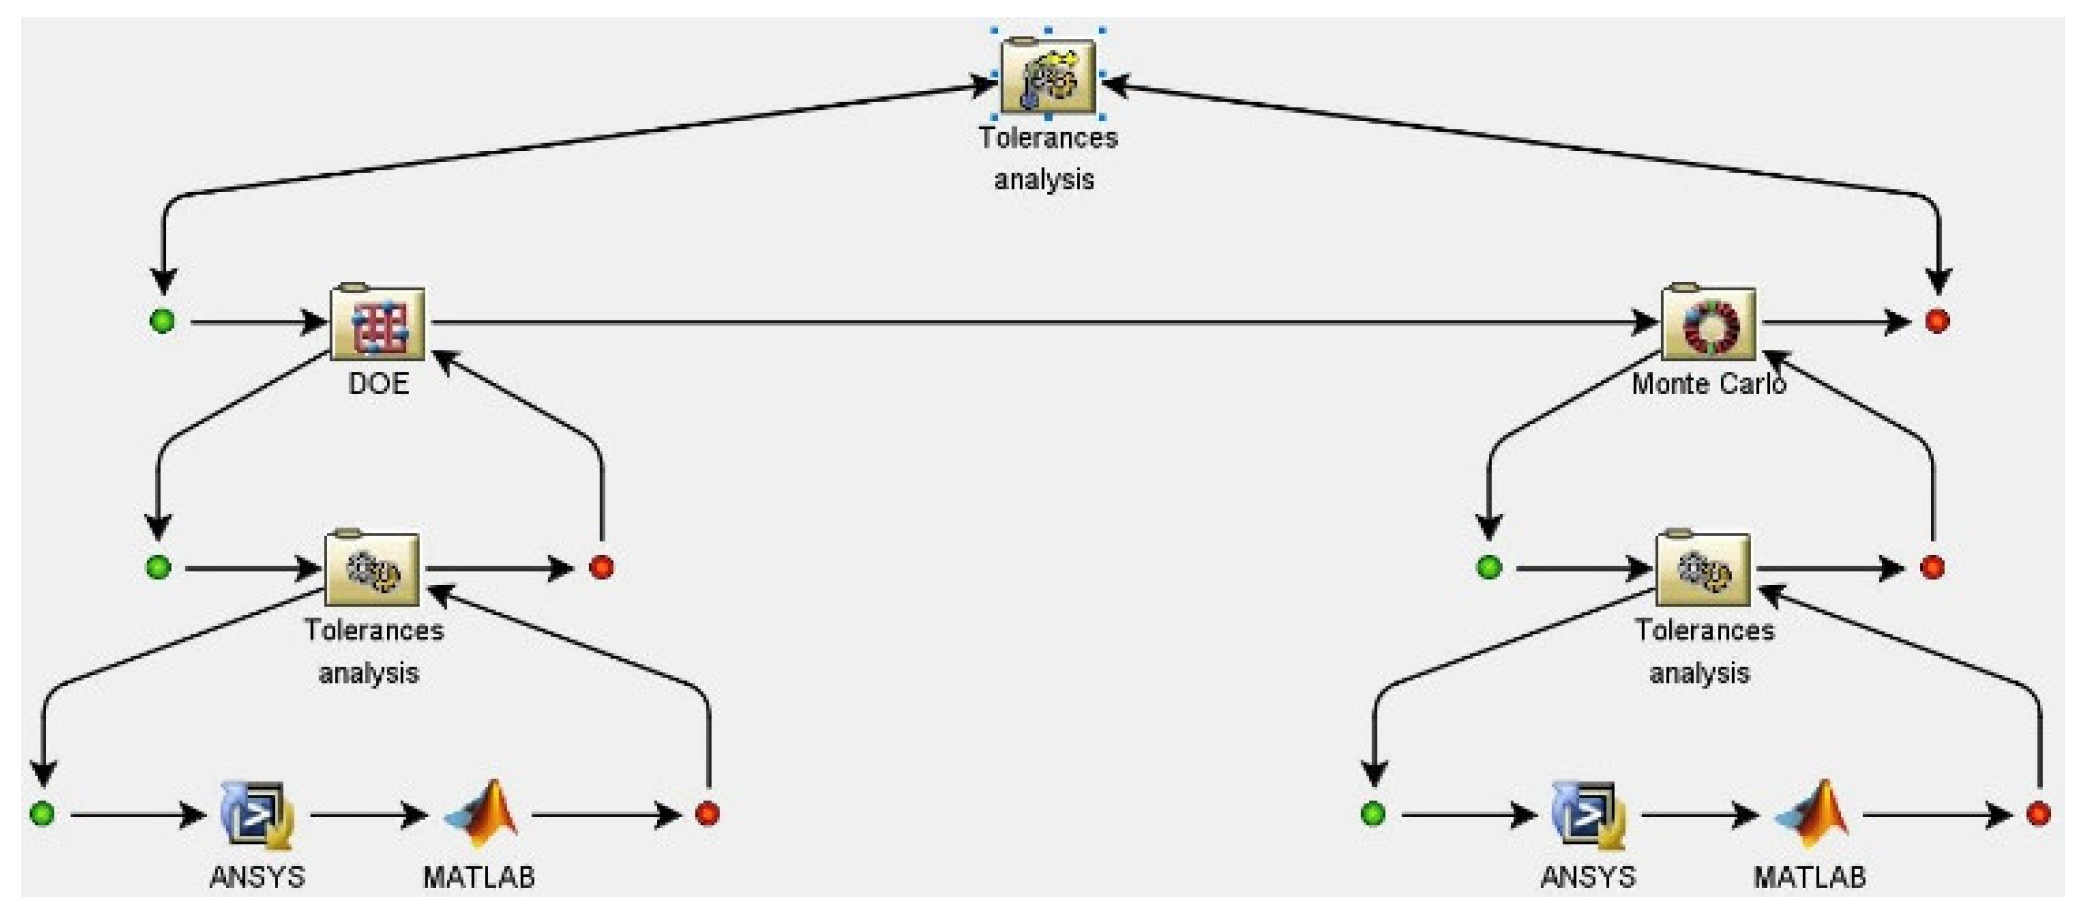
Ansys, and Matlab, were integrated into the Isight software to perform the Monte Carlo simulation [
16,
17,
18,
19], as outlined in
Figure 7. Before the analysis, the finite element model of the mirror is built by HyperMesh. The simulation proceeds as follows: The Ansys module performs the static calculation of the model, and the Matlab module completes the wave front fitting process to obtain the RMS value. The Monte Carlo simulation module generates the random fabrication error by sampling 1000 times and yields the probability distribution of the RMS. The probability distributions of the RMS, resulting from the blank error, are plotted in
Figure 8. The results show that, within the 40.3% rejection rate, the RMS of the figure caused by the blank error is more than 2.5 nm as shown in
Table 3, and the mean of RMS is 2.44 nm. Obviously, the positive tolerance will improve the stiffness of the mirror (that is, the positive tolerance will not cause the degradation of the bare mirror shape). Then the reason for the surface degradation caused by assembly Monte Carlo is that the mass distribution caused by tolerance changes the position of the mirror neutral plane, and the neutral plane position does not match with the rotation center of the flexible support. Finally, this mismatch introduces the surface degradation. In the next section, inverse modeling and testing of gravity center for the SiC mirror is used to compensate the above mismatch.
4. The Compensation Method
The detailed process of the compensation method is shown in
Figure 9. As shown in
Figure 9, the main procedure is the mirror reverse modeling. Mirror reverse modeling refers to reverse surveying and mapping of all structural dimensions of the mirror assembly. Then the collected data are used to modify the finite element model to improve simulation accuracy. As shown in
Figure 3a, the square SiC mirror assembly includes SiC mirror, Invar sleeve and titanium alloy (TC17) flexure. The metal parts among them are fabricated by high-precision CNC machine tools. The size error can be controlled within 0.01 mm. A few mounting dimensions can achieve higher accuracy by griding. So, these dimensional errors have a limited impact on the performance of the mirror assembly. According to the analysis in
Section 3, the blank error of the mirror has a great impact on the performance of the mirror assembly. Therefore, this paper uses the reverse modeling method to eliminate the surface error caused by the blank error.
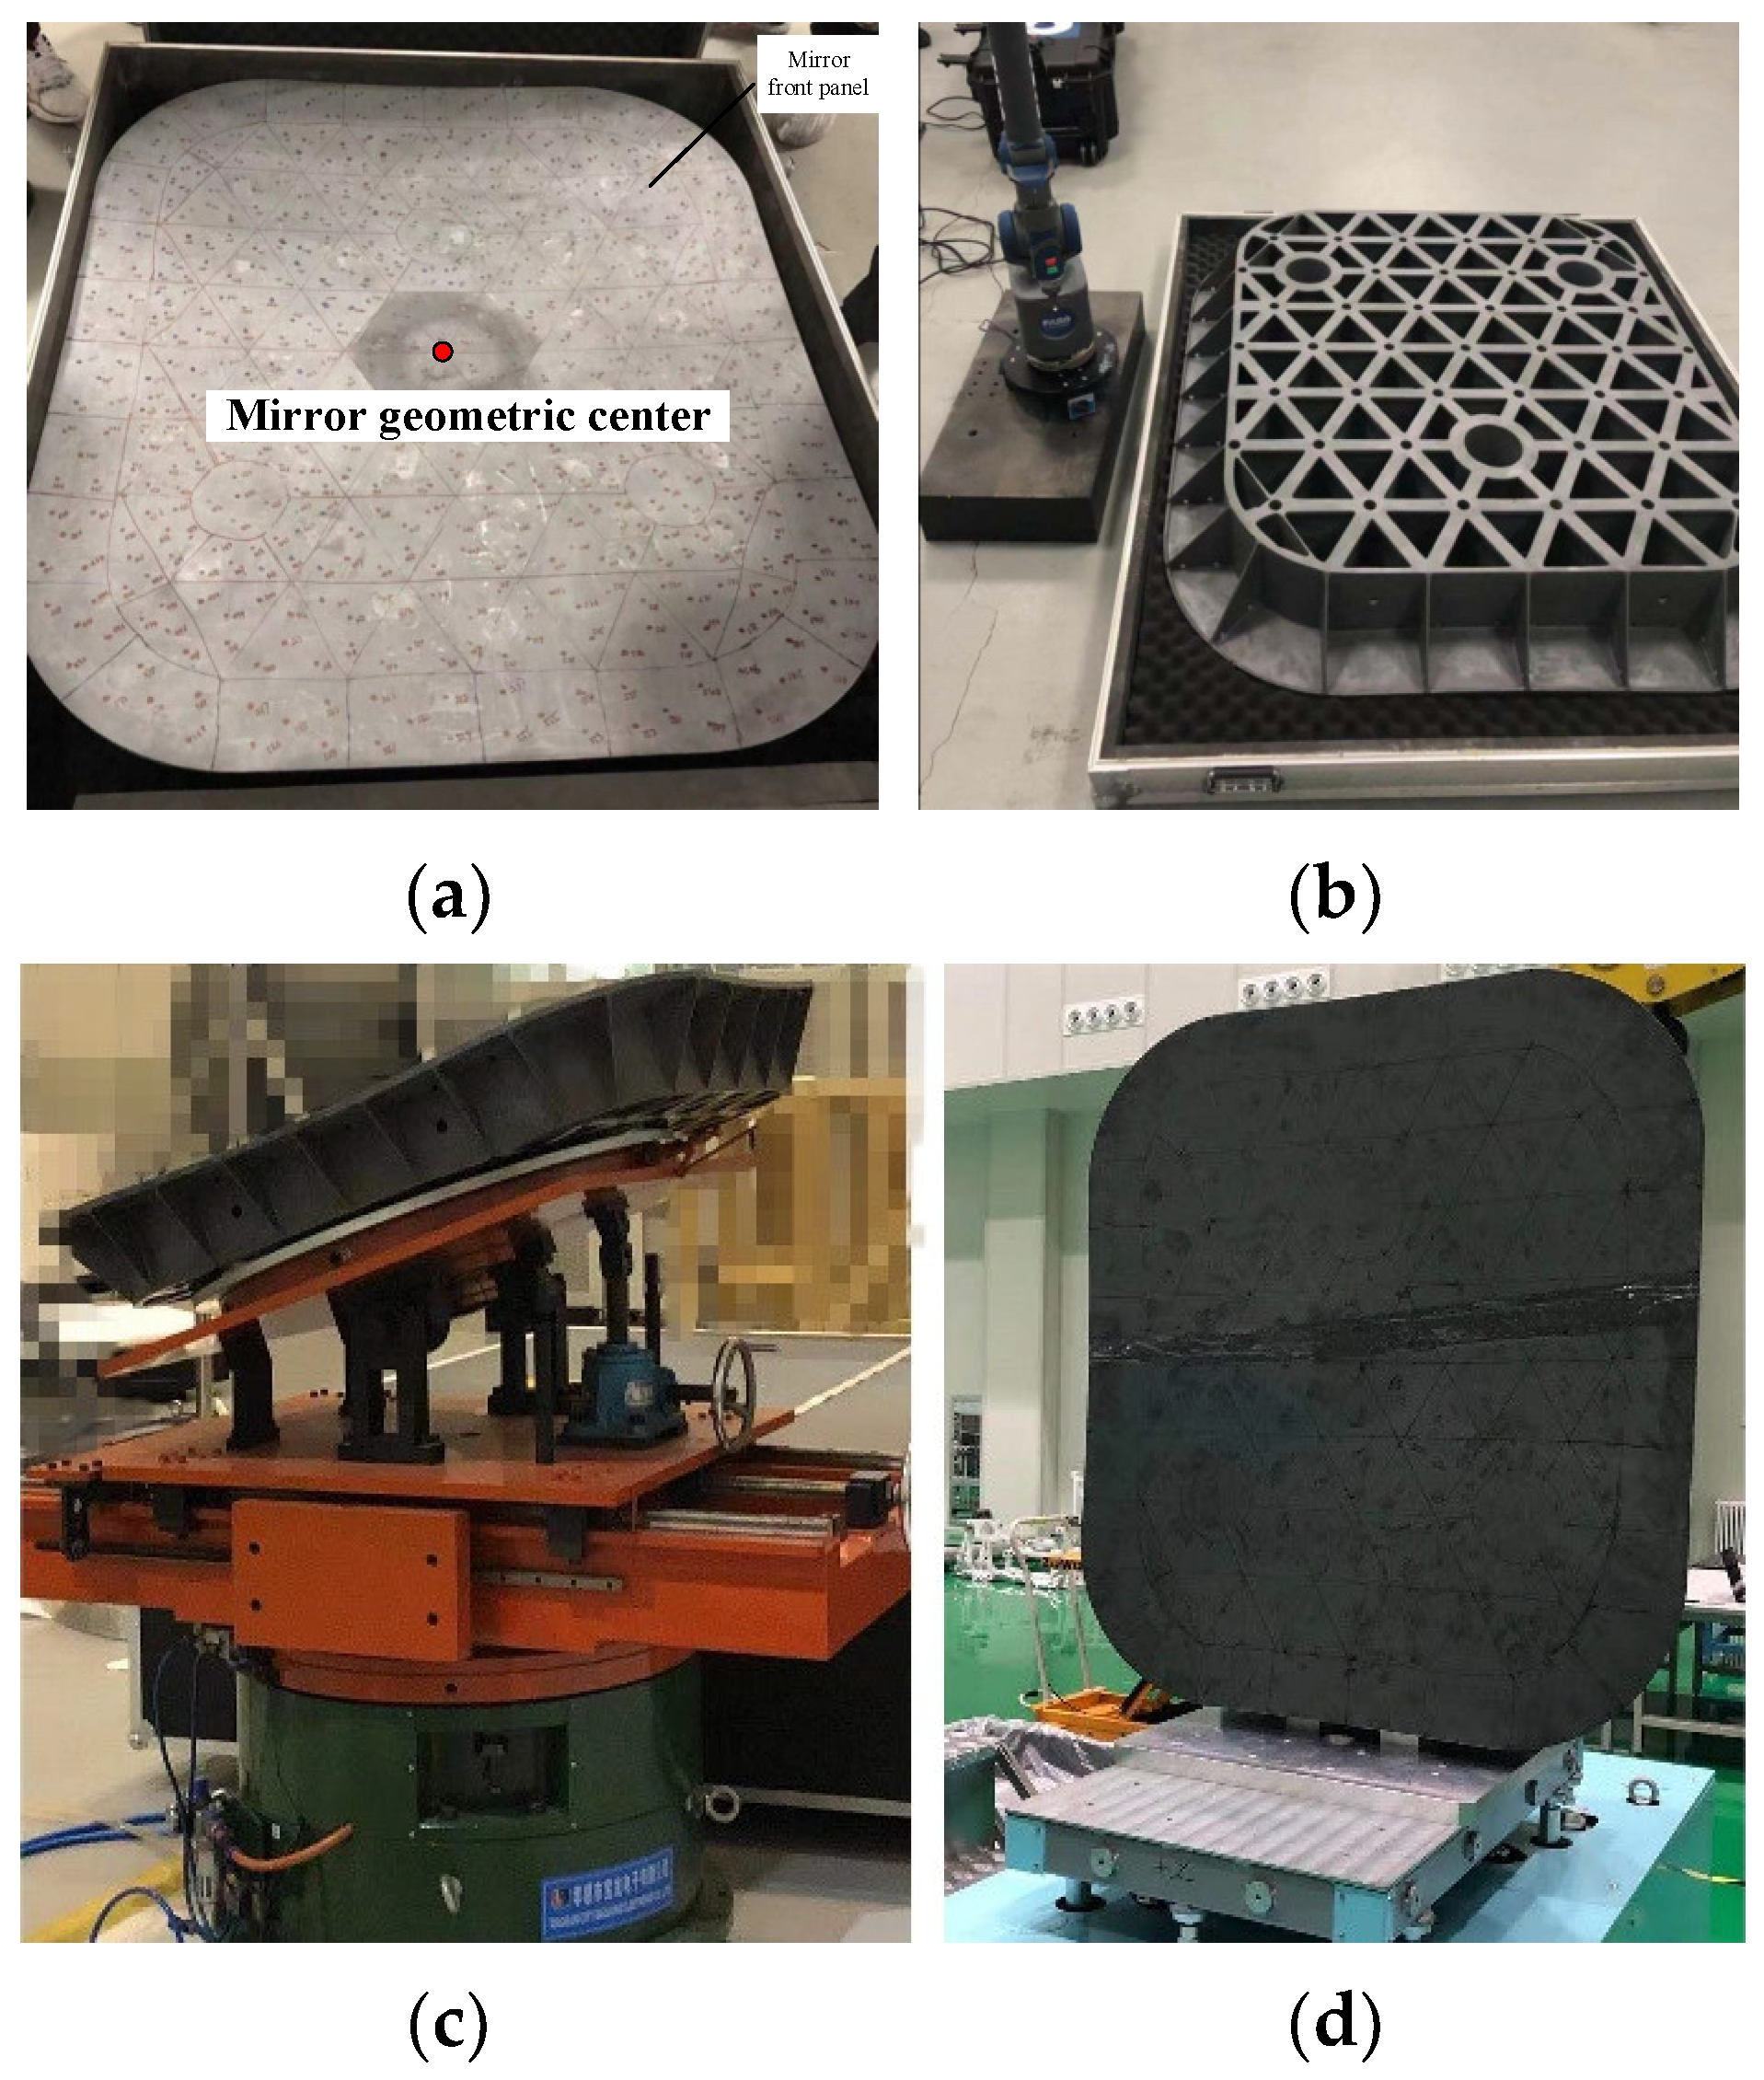
The dimensions that need to be measured during the reverse modeling include: the thickness of the mirror, the outline dimension, the size of the ribs and the size of the back flange. According to the characteristics of structural size, the adopted equipment includes laser tracker (accuracy: 15 µm + 6 µm/m), ultrasonic thickness gauge (accuracy: 0.01 mm), measuring tape, depth gauge, vernier caliper and other equipment. The detailed parameter measurement status is shown in
Figure 10: Firstly, the mirror is placed on the marble platform with the front panel upward, as shown in
Figure 10a. The central thickness of the mirror is measured by laser tracker. The central thickness of the mirror refers to the thickness of the geometric center of the concave mirror from the back of the mirror. The specific measurement method is to measure the overall dimension of the mirror through the laser tracker, and then calculate the geometric position coordinates of the mirror. The laser tracker establishes the relationship between the marble platform surface and the geometric center of the mirror to calculate the thickness of the mirror center. Secondly, the position of the lightweight rib is marked on the front panel of the mirror. Four points are selected in each triangle lightweight hole on the front panel of the mirror, and the thickness of each marked point is measured by ultrasonic thickness meter. The average of the four points is taken as the panel thickness in each lightweight hole. The thickness of each lightweight rib and the width of back plate are measured by caliper; Use vernier caliper to measure the thickness of back plate. The measurement results of each parameter show that the machining deviation of each parameter is within the tolerance range shown in
Table 2.
As mentioned in
Section 3, when the flexible support deviates from the optimal support position, the mirror surface will degrade quickly. In contrast, when the rotation center of flexure support is aligned with the neutral plane of the mirror body, the mirror assembly has minimal surface figure error. The neutral plane and the center of the mirror body are both inherent attributes and have a certain positional relationship. The neutral plane cannot be measured directly as with the center of mass; it can only be obtained by a high-precision finite element analysis. Through the test of gravity center and mass, the accuracy of reverse molding can be verified. After verification, the neutral plane (optimal support position) can be determined. In the grinding stage of the invar sleeve and the support hole of the mirror, measure the distance between the back surface of the invar sleeve and the back of the mirror with a height ruler to detect whether the support reaches the optimal assembly position and finally determine the axial installation position of the support.
In order to guarantee the measurement precision, two different mass moment of inertia test benches are used, as shown in
Figure 10c,d. When measuring, the mirror is tilted by 30° and 90°, respectively. These test benches use three built-in force sensors with a distribution of 120° to calculate the mass and center of mass. The measurement accuracy of the center of mass can achieve ±0.3 mm. The measurement results of mass and center of mass are 77.1 ± 0.2 kg and 79.8 ± 0.3 mm, respectively. Compared with the designed value, the mass adds 4 kg and the position of the center of mass remains unchanged. Accordingly, the mass and center of mass of the reversed model is 76.9 kg and 80.2 mm away from the back plate of mirror. As can be seen, the test results are in consonance with that of the reversed model.
To obtain the optimal support position, the finite element analysis of the reversed model is carried. The results of the new optimal support position (ϵ = 117.5 mm) and the initial design position (ϵ = 116 mm) is listed in
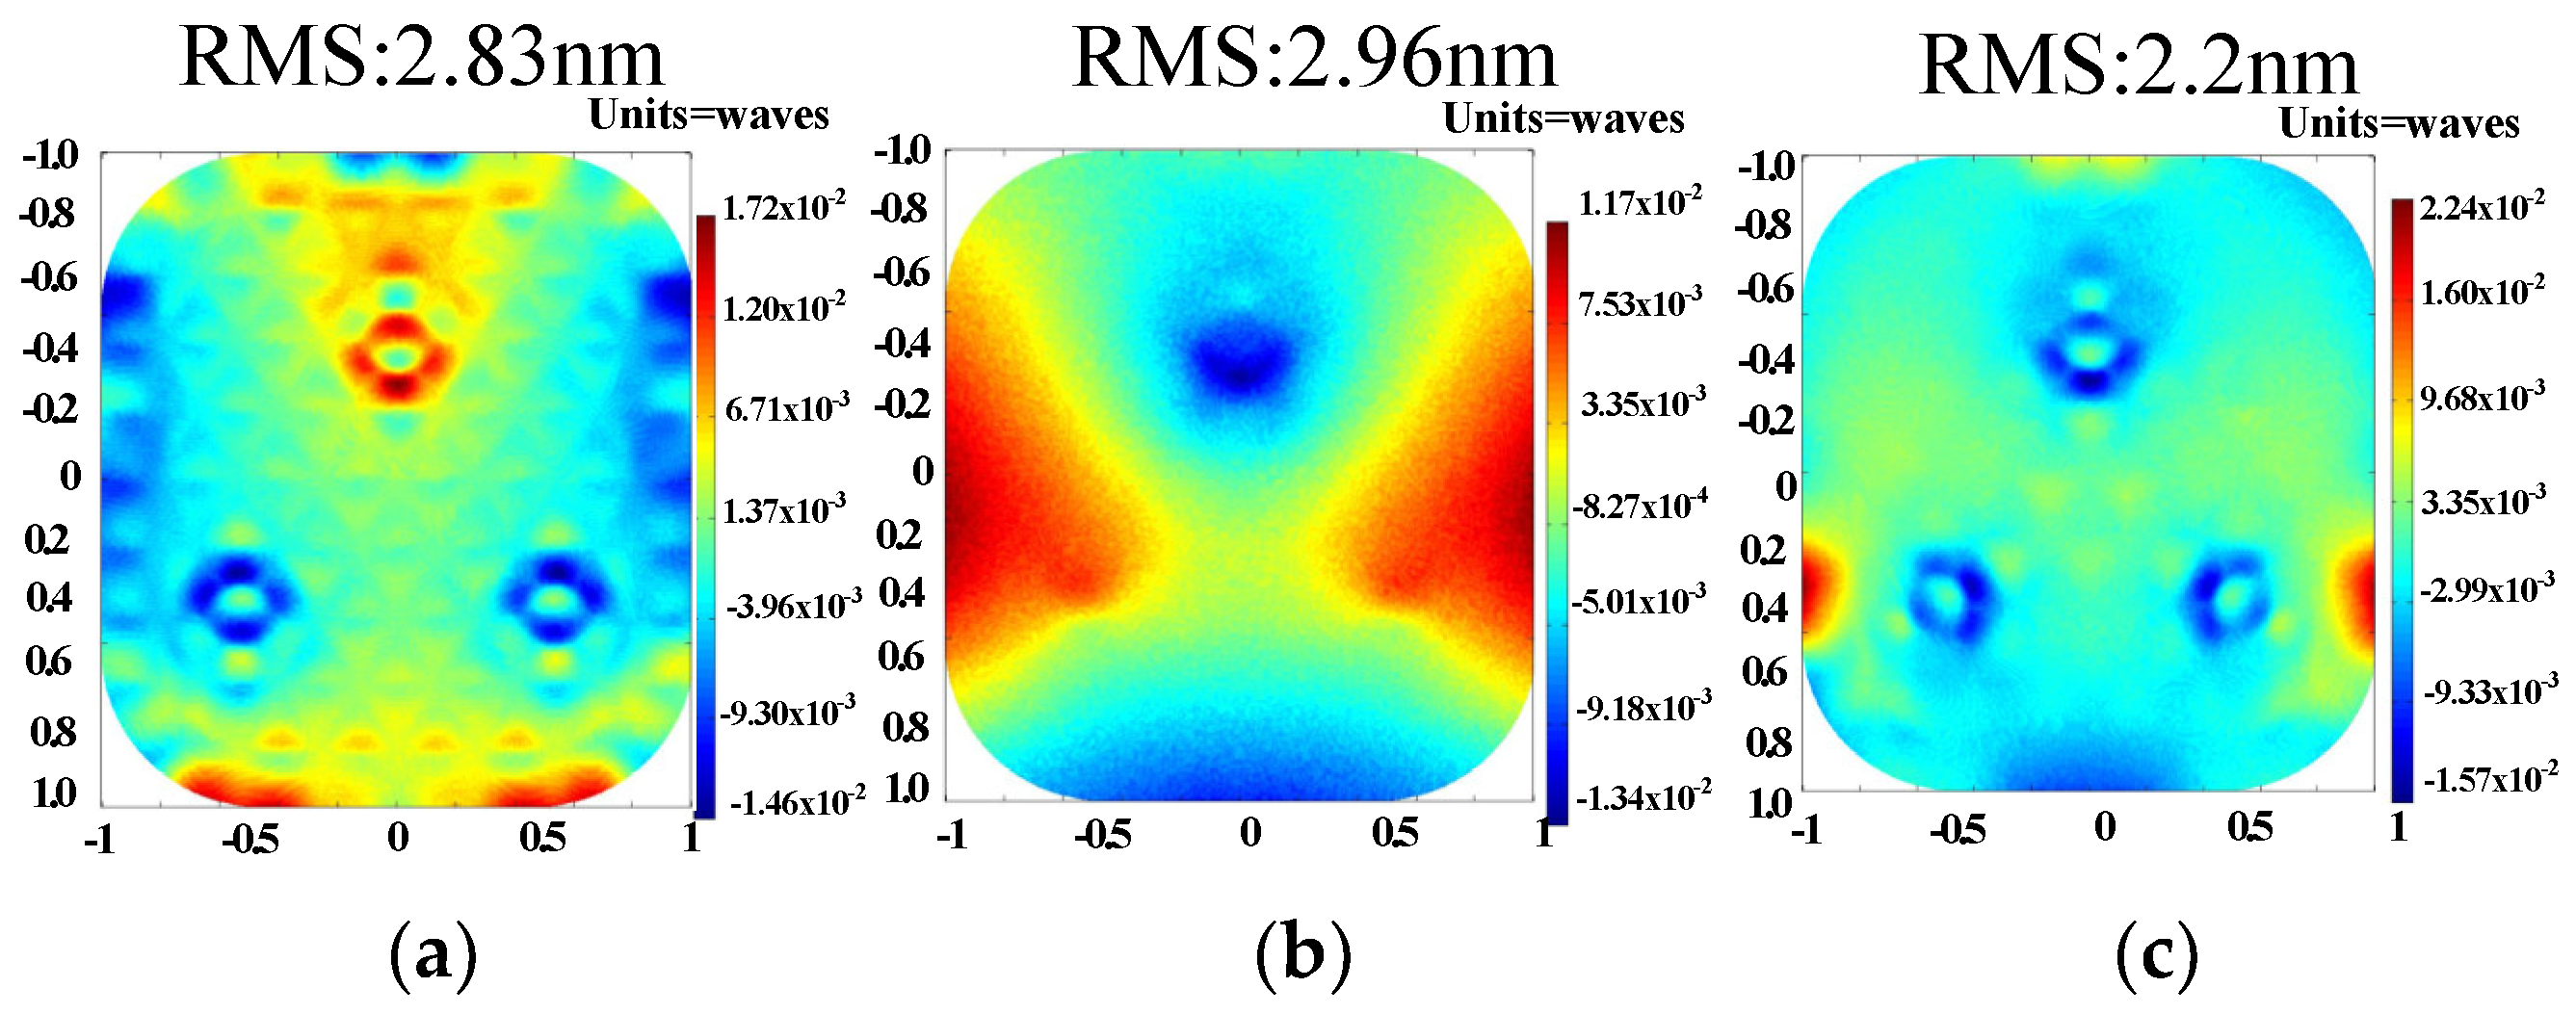
Table 4. When the flexible support is located at different axial positions, the surface cloud diagrams of the mirror assembly under three working conditions of gravity, temperature and flatness error are shown in
Figure 11 and
Figure 12, respectively. When the flexible support is installed according to the initial design position, the gravity surface shape is 2.8 nm. This value has exceeded the index requirement of 2.5 nm. However, the gravity surface figure error is 1.7 nm when supported in new optimal support position which is better than that of design. As can be seen from
Figure 11 and
Figure 12, when the axial installation position of the flexible support moves with the position of the neutral surface of the mirror, the gravity surface shape is significantly improved. However, the improvement of surface shape under the temperature and flatness errors is not obvious. It is further proved that the essence of the influence of the blank error on the mirror surface shape is to affect the matching relationship between the neutral surface of the mirror and the rotation center of the flexible support.
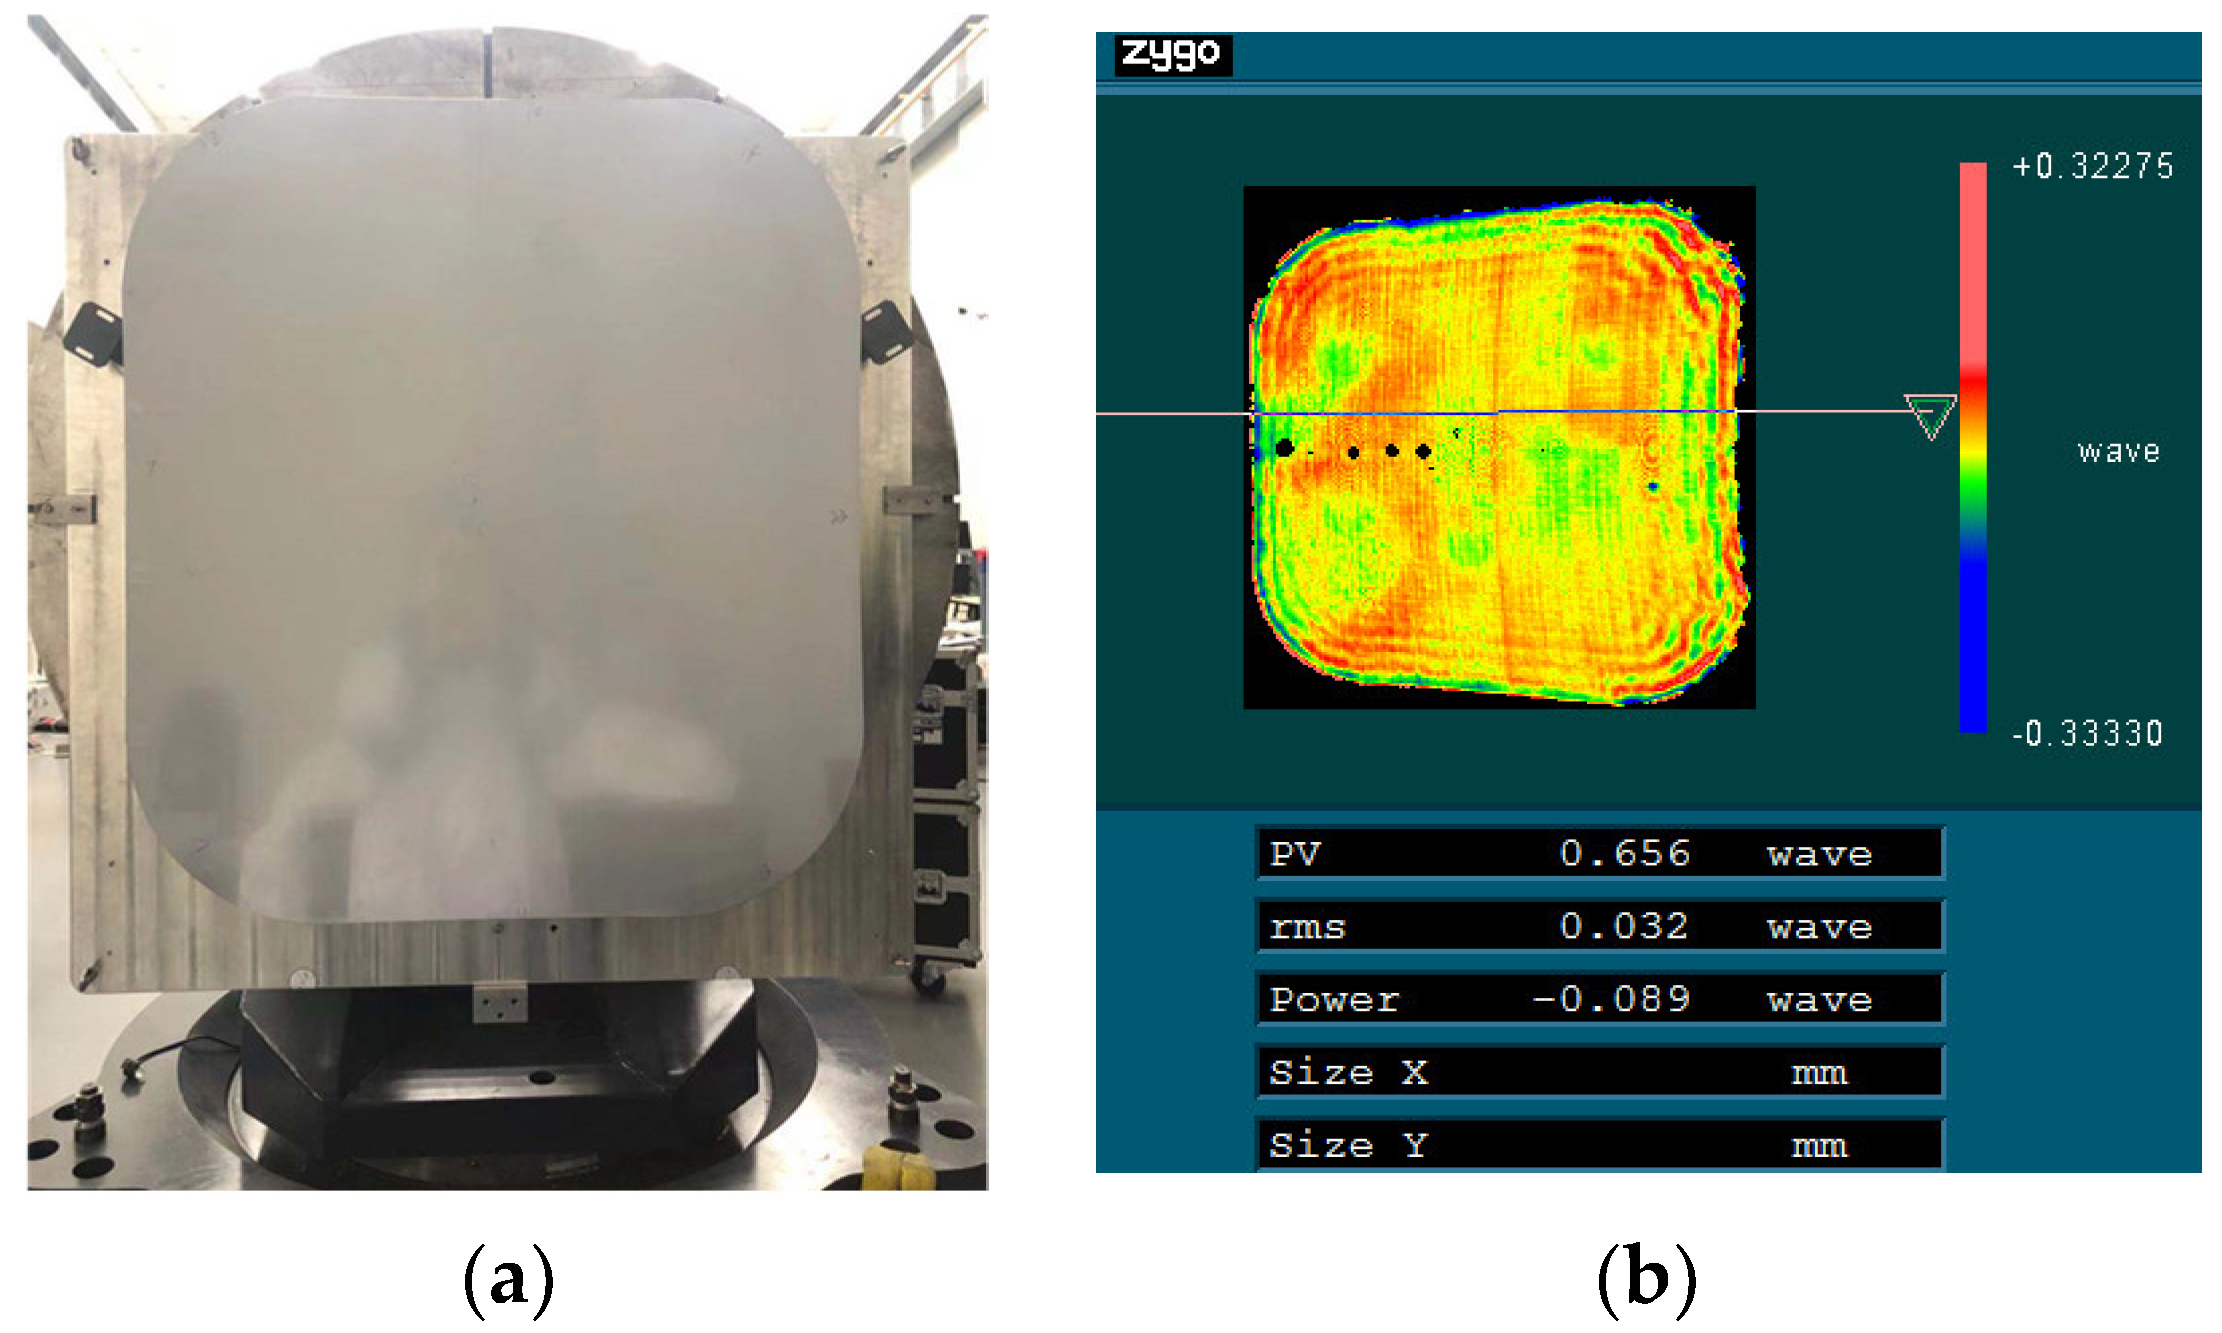
According to the compensation method, the parts of the square mirror have already completed.
Figure 13a is the surface shape of the mirror assembly actually measured by the Zygo interferometer. The mirror assembly is in the state of surface polishing as shown in
Figure 13b. Mirror processing is expected to be completed by the middle of 2022.
5. Conclusions
With the aim to decrease optical distortion caused by the blank error of the mirror body, a flexure mounting technique for a 1.3 × 1.2 m square SiC mirror of a space camera is presented in this paper. The examination of the blank error on mirror accuracy is carried out by Monte Carlo analysis. The results show that, within the 40.3% confidence interval, the RMS figure error and the mean of that are 2.5 nm and 2.44 nm, respectively. The reason is that the blank error has changed the mass distribution. Then, a compensation method is proposed which avoids the disturbance of the blank error to the greatest extent. By comparing with the tested results and that of reversed model, the reverse model is verified. The new flexure mounting technology not only fully considers the optical performances of the mirror assembly, but also avoids multiple physical testing, reduces time and cost consumption, and offers a good reference for structural design in moving opto-mechanical systems.
