Review

Additive Manufacturing for Repair and Restoration in Remanufacturing: An Overview from Object Design and Systems Perspectives

Center for Integrated Design of Advanced Mechanical Systems, Faculty of Engineering and Built Environment, Universiti Kebangsaan Malaysia, 43600 UKM Bangi, Selangor, Malaysia
*
Author to whom correspondence should be addressed.
Processes 2019, 7(11), 802; https://doi.org/10.3390/pr7110802
Submission received: 30 September 2019 / Revised: 19 October 2019 / Accepted: 24 October 2019 / Published: 3 November 2019
(This article belongs to the Special Issue Advances in Sustainable Supply Chains)

Abstract

:
Repair and restoration is an important step in remanufacturing as it ensures end-of-life products are returned to as-new condition before entering the subsequent life cycle. Currently, such processes are carried out manually by skilled workers. The advent of additive manufacturing (AM) has encouraged researchers to investigate its potential in automated repair and restoration, thus rendering it as a more effective method for remanufacturing. However, the application of this widespread technology for repair and restoration in remanufacturing is still new. This paper provides an overview of the principles and capabilities offered by the existing metal AM technology for object repair and restoration namely, direct energy deposition, powder bed fusion, and cold spray technology. Their applications in the repair and restoration of remanufacturable components are presented and discussed along with issues requiring attention from the perspectives of object design and process systems capabilities. The study provides a compilation of the challenges in AM repair and restoration, which primarily lie in the aspects of geometrical complexity, geometric dimensioning and tolerancing, material compatibility, and pre-processing requirements since it is critical for remanufacturing to restore end-of-life components to as new-condition. The paper concludes with suggestions for further works in AM restoration to enable product life cycle extension in the circular economy.

Graphical Abstract

1. Introduction

Since 1965, an increment of 65% has been recorded in the number of raw materials used worldwide. Such prevalence is attributable to manufacturing process activities, which have led to material depletion, high energy consumption, and environmental pollution [1,2]. Therefore, the current circumstances must be addressed through various efforts to pursue the goal of decreased raw material usage, otherwise, they will lead to a supply deficiency of non-renewable resources, environmental overloading, and an increase in raw material costs [3,4], which will negatively impact the business environment. To achieve the final goal, sustainable development aimed at minimizing the use of resources in product design and processes is crucial. Through sustainable development, emissions will be reduced. Moreover, products will be environmentally-friendly and affordable [5,6]. This will result in a diminished negative impact of a product throughout its useful life and its extended life cycle, which are the goals of sustainable product design and development [7,8].
A recent initiative has been positioned for industrial flow management to ensure a reduction in raw material consumption, specifically by reusing the materials of production from an existing product; which is referred to as the circular economy (CE) [9]. This aims to contrive a loop system of raw material flow to minimize the use of new raw materials sourced from nature, and to replace it with processed or used materials from an existing product [10]. CE implementation requires the manufacturers to comply with the requirements of sustainable design during product development. In doing so, the product will be deemed suitable to go through the loop system within CE implementation [10].
Effective recovery strategies for end-of-life products are made possible due to the development of sustainable products based on life-cycle thinking [11]. Today, remanufacturing is highlighted as the most value-added strategy for end-of-life products and has been widely implemented in many countries [12]. It is capable of reverting a used product to its initial performance at a surety of equal or better than a newly-manufactured product [13]. Furthermore, the useful life of the product is expected to be extended through sustainable design strategies of the product life cycle [14]. Remanufacturing, as compared to recycling, is a more resource efficient recovery strategy as it retains durable cores in their subsequent life cycles, hence reducing the need to manufacture new components every time [15]. Nevertheless, the main activities of remanufacturing are: disassembly, inspection, cleaning, reassembly, restoration, and testing by skilled workers [16]. The processes involved in the remanufacturing of reparable products are shown in Figure 1.
Restoration is one of the critical activities in remanufacturing since the core components have to be reverted to their original performance [17]. In a manual restoration process, the general activities include crack repairing, overlaying of material, and welding to restore the original dimensions of parts and components [18]. Today, remanufacturing production is growing annually in many countries [19]. Several countries, namely the United States (USA), the European Union (EU), China, Brazil, India, Japan, and Singapore have focused their resources on improving their capability to produce as many remanufactured products as possible [19,20,21,22]. Table 1 depicts the output value of remanufacturing in Japan, the United Kingdom, and USA in 2016.
Remanufacturing activities in Malaysia have increased progressively following the establishment of the National Automotive Policy 2014. In 2017, the total value of exports in automotive remanufactured products in Malaysia reached about RM 750 million [25]. In the case of an automotive product such as an engine block, defects to the surface of the engine-head are normally due to cracking, which requires resurfacing via welding or pinning to cover the affected surface [26]. Similarly, defects in end-of-life marine components such as the crankpin journal surface consist of ridges, cuts, and grooves that are restored through grinding on a stationary machine [27]. Likewise, in the aerospace or aircraft industry, remanufacturing involves the repair of landing gear parts and flight surface actuators as well as rebuilding chipped parts of gas turbines [20,28].
With the advancement of technologies, it is foreseen that the manual reparation processes of remanufacturable products can be possibly replaced by digital restoration such as additive manufacturing (AM) as the primary option [29,30,31]. The state-of-the-art in AM technology is the opposite of subtractive manufacturing technology, where AM is capable of binding materials layer-by-layer [32]. This technology can also rebuild any broken parts to return the products to as-new condition [33].
AM is popularly referred to as 3D printing [34]. Rapid prototyping was the first implementation of such technology in the 1980s, namely as a method for making prototypes of a product [35]. The subsequent implementation of AM was aimed to create an end product, which is commonly known as rapid manufacturing [36]. This technology is highly capable of shortening the manufacturing process [37] and producing complex products without difficulties [38,39,40]. Today, technology advancement alongside AM is deemed as the solution for conducting the repair and restoration in products. For remanufacturing, AM is expected to be the technology that enables the substitution of manual reparation for remanufacturable cores [41]. The progress in AM application today is depicted in Figure 2.
AM technology is built upon seven principles [34,42], as outlined in Table 2 The information includes a brief description and an example of each AM principle.
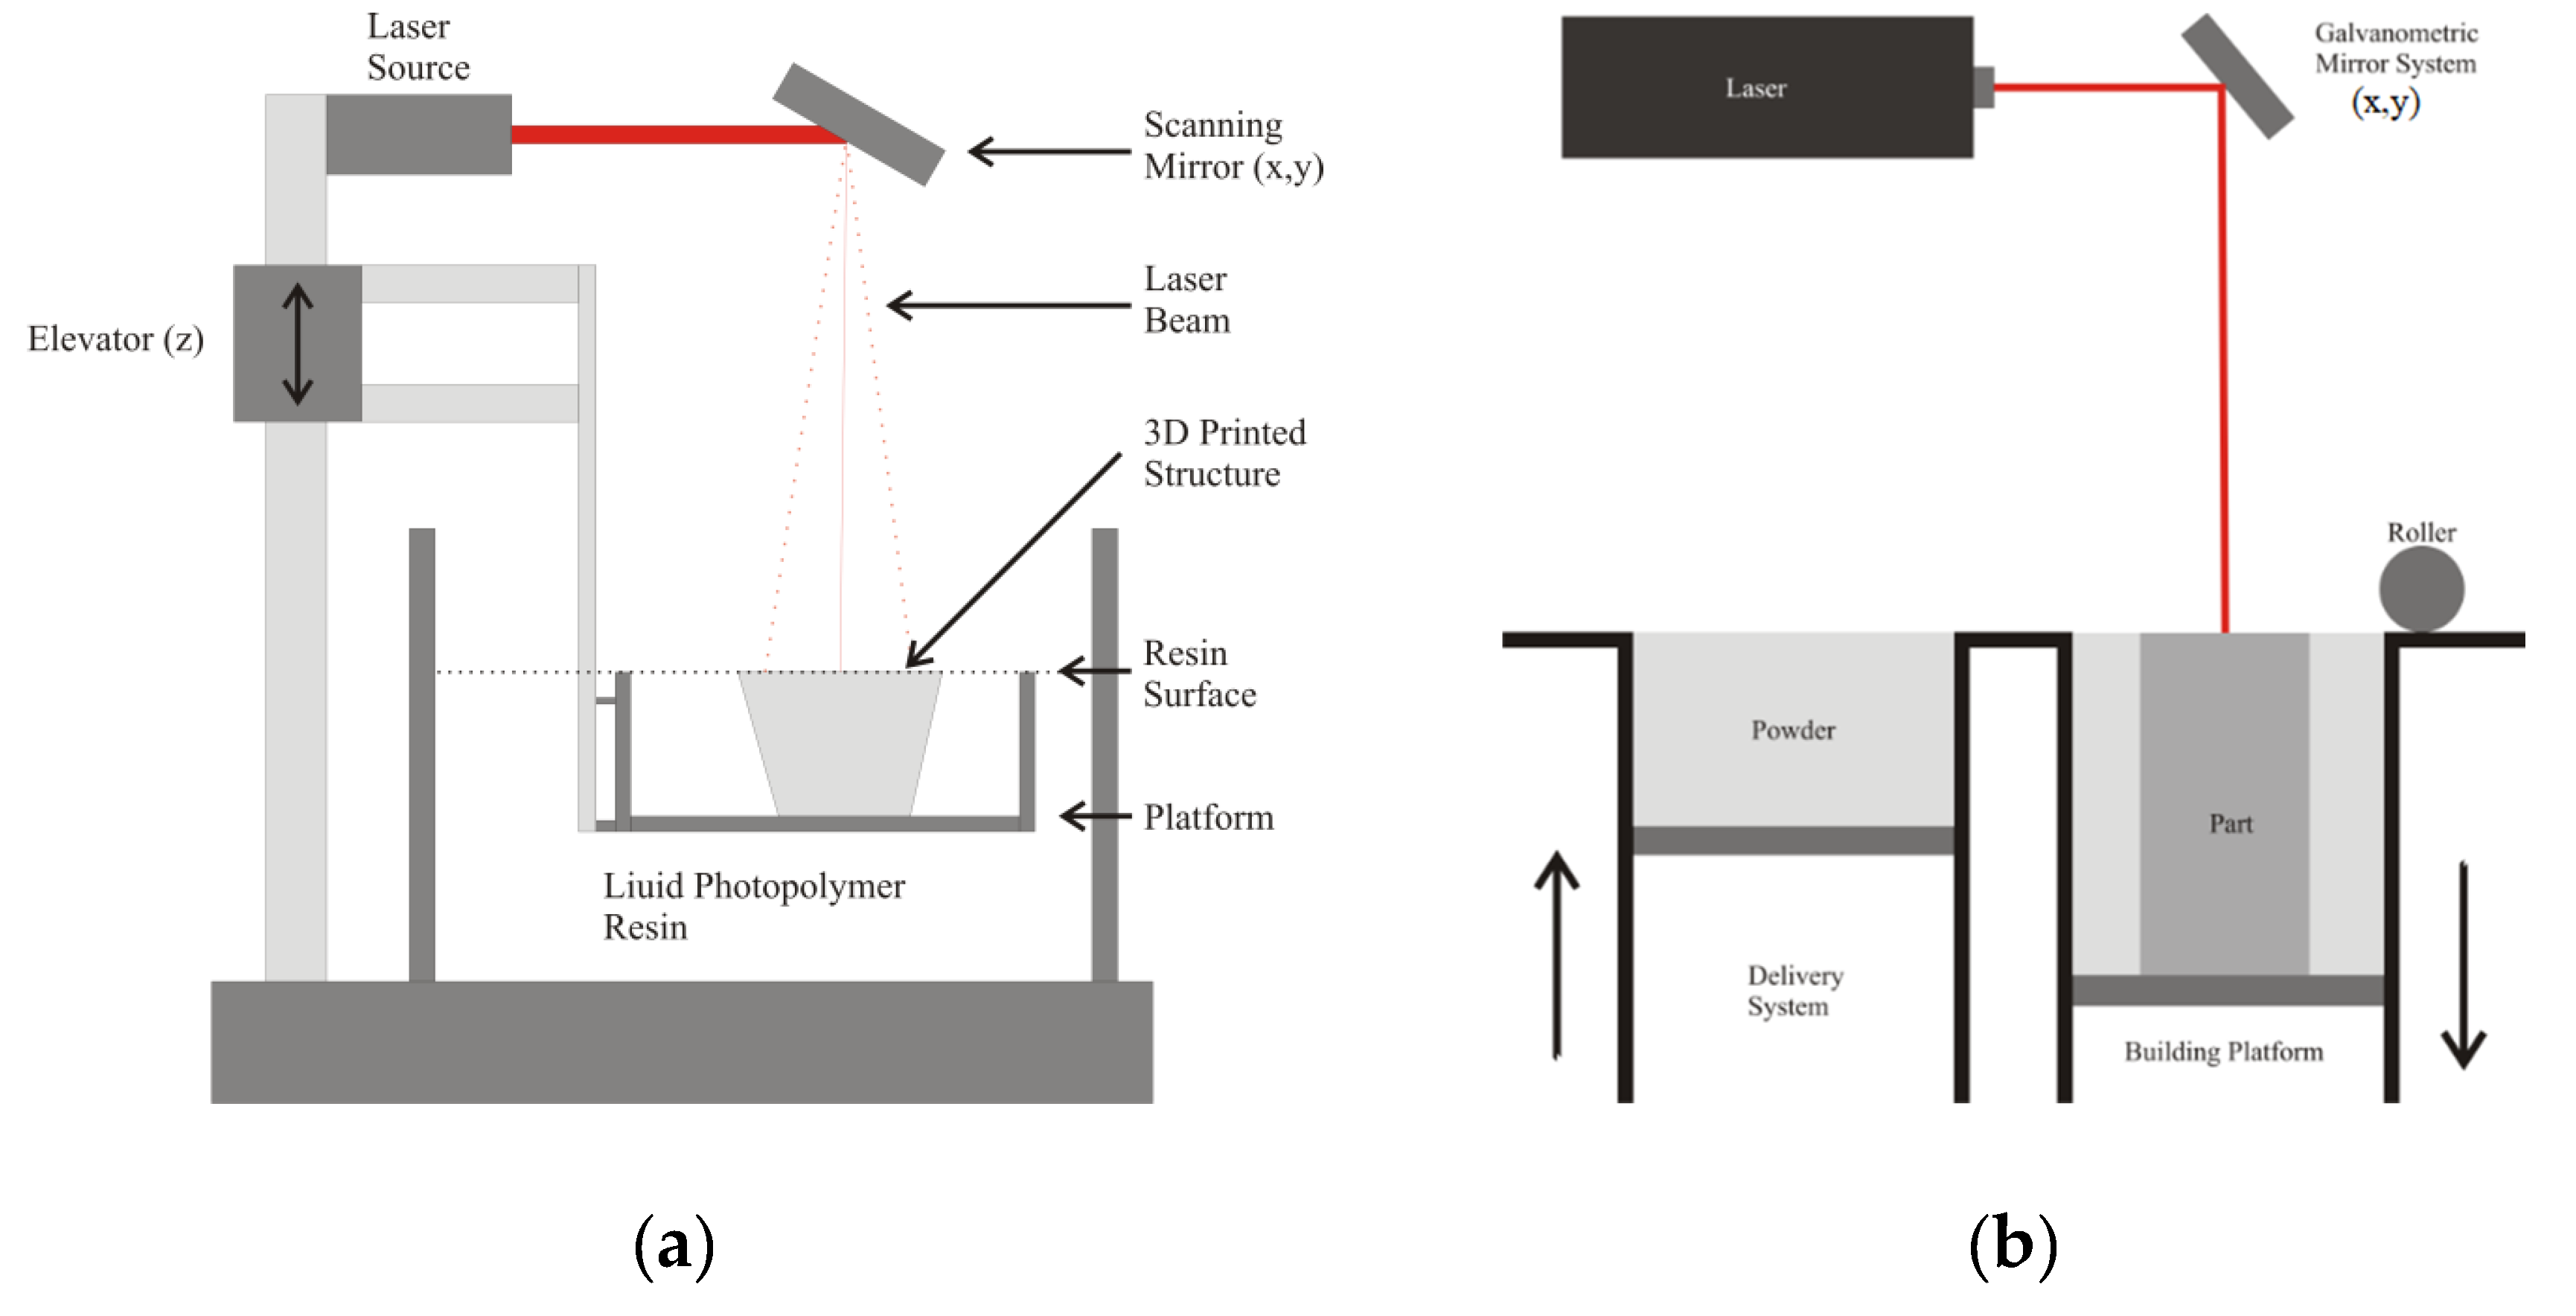
The initial idea of stereolithography (SLA) was developed in 1980 by a Japanese researcher, Hideo Kodama, at the Nagoya Municipal Industrial Research [43]. It was improved by Charles Hull in 1984 by using the concept of a hardened process that implemented some liquid polymers using UV light [44]. Further improvements were then made by Carl Decard with the use of a laser beam and through the solidification of powder material, thereby known as selective laser sintering (SLS) [45]. Figure 3 illustrates the SLA and SLS systems accordingly.
In 1981, the initial implementation of laser cladding (LC), which is a direct energy deposition system, was undertaken along with the use of LC in the hard facing of an RB-211 Rolls Royce jet engine [46]. Following this in 1989, S. Scott and Lisa Crump created a system for the extrusion of plastic or metal filament through a nozzle in order to build a 3D object layer-by-layer from a computerized design, which was subsequently named fused deposition modeling (FDM) [44].
Today, the role of AM has expanded from the fabrication of parts to parts repair and restoration in remanufacturing [47]. Out of the seven principles of AM outlined in Table 2, Leino et al. [48], Rahito et al. [47], and Matsumoto et al. [49] reported that only three were applicable for repair and restoration purposes, namely direct energy deposition (DED), cold spray, and powder bed fusion (PBF). These principles are applicable for making metal-based parts or components, therefore, they are capable of building broken or chipped parts of a product. Moreover, for the replacement of components in remanufacturing, the technology is able to produce rare parts that are no longer available in the market. Therefore, the aim of this paper is to provide a comprehensive overview of the restoration process for remanufactured products in various applications. The paper will then focus on the constraints and challenges in part repair and restoration using AM from the perspectives of geometrical complexity, pre-processing, tolerance, fastening, and material compatibility. The following section explains the systematic procedure carried out in conducting a thorough literature review of the aspects above-mentioned, followed by a discussion on the current gaps observed in the field of study as well as the way forward in the application of AM for a more effective and efficient remanufacturing process.

2. Systematic Literature Review

Fink [50] proposed the steps for conducting a systematic review, beginning with the selection of the research question, followed by gathering the article database and website bibliographic content, according to the appropriate search term. The next step is implementing the practical screening criteria aimed at excluding or including the related literature. Then, one should advance and implement a methodological review criterion by using a review protocol for the content analysis. The concluding step is the examination and synthesis of the findings, which were explored based on the construction of the review protocol, preference of research questions, database, and search terms. Therefore, the research questions in this paper were wide-ranging and proposed to accommodate all issues regarding the restoration process from the perspectives of object design and process systems. Table 3 presents the research question investigated in this paper.
Terms used during the literature search were “restoration”, “repair”, and “remanufactured product”. Since restoration is a part of remanufacturing, the term “remanufacturing” was also used. The literature search on AM technology that is feasible for restoration covered the term “direct energy deposition”, which included “laser cladding remanufacturing”. Similar terms for the technology application namely, “laser deposition” and “laser engineered net shaping” were also used. Meanwhile, the term “powder bed fusion” included “electron beam melting”, “direct metal laser sintering”, and “selective laser melting”. All AM principles were also included in the search terms to widen the result. To explore the full texts of publications available using the terms as declared above, the databases of the main publishers, namely Elsevier [51] Springer [52], Emerald [53], and Wiley [54] were sought. As recommended by Tranfield et al. [55], Google Scholar was also used to classify conference proceedings, unpublished reports, and related publications to avoid limited searches.

Application of Screening Criteria

The second step of this systematic review was to specify the eligibility criteria [56], which is the process of deciding whether the articles need to be included or eliminated from the review. According to Fink [50], the selection of publications can be separated into two sections: (1) primary practical application, and (2) methodology. The first section consists of contents describing the publications, language, setting, research, time, methods, and category of publications, while the second section serves to limit the exploration to related studies only. The second section focuses on the methodology used to specify the search into the most relevant studies. For the purpose of this study, book reviews were eliminated, whereas presentations, comments, research report, conference proceedings, and journals not composed in English were also excluded to avoid language bias [57]. Therefore, the search was restricted to four categories of publications: journals, books, proceedings, and reports.
This review focused on the application of AM in the repair and restoration processes. All of its principles were evaluated to update the information from some case studies that have successfully applied AM as the main technology for restoration. Moreover, this review will improve the current knowledge by attempting to gain more insight from other potential AM principles through the application of methodological quality screening.
The review method aimed at identifying restoration processes carried out in the past, encompassing challenges in implementing the process from the perspectives of object design and process systems. Based on the method, the review protocol from earlier research can be expanded to gain further information [55,58]. The first section of the review protocol consists of information related to the publication, namely author name, year of publication, name of publication, and type of publication. Table 4 presents the list of review protocols used in the review, which were separated between two specific groups: (1) bibliographic data, and (2) the focus and content of the publication.
The second section of the review protocol described the details of the restoration process as a case study, which included the AM technology determination to show the determination of AM technology, according to the object of restoration. This was followed by addressing the AM technologies previously utilized in the restoration process including the product or object material, AM material, and AM machine setting.
The last section of the review protocol focused on the content of the publication according to the design and system perspective, which consisted of the geometrical complexity of the product, pre-processing, tolerance, and material compatibility. Such information will determine whether the path is in line with the aims of the systematic review.

3. Results and Discussion

The results and discussion were basically the output of the previous step, namely the implementation of the methodological screening criteria. The previous phase dictated that the first information that would be displayed was the bibliographic data and the specifics of the restoration process. Finally, the concentration and content of the publication were displayed.

3.1. Bibliographic Analysis and Type of Industry

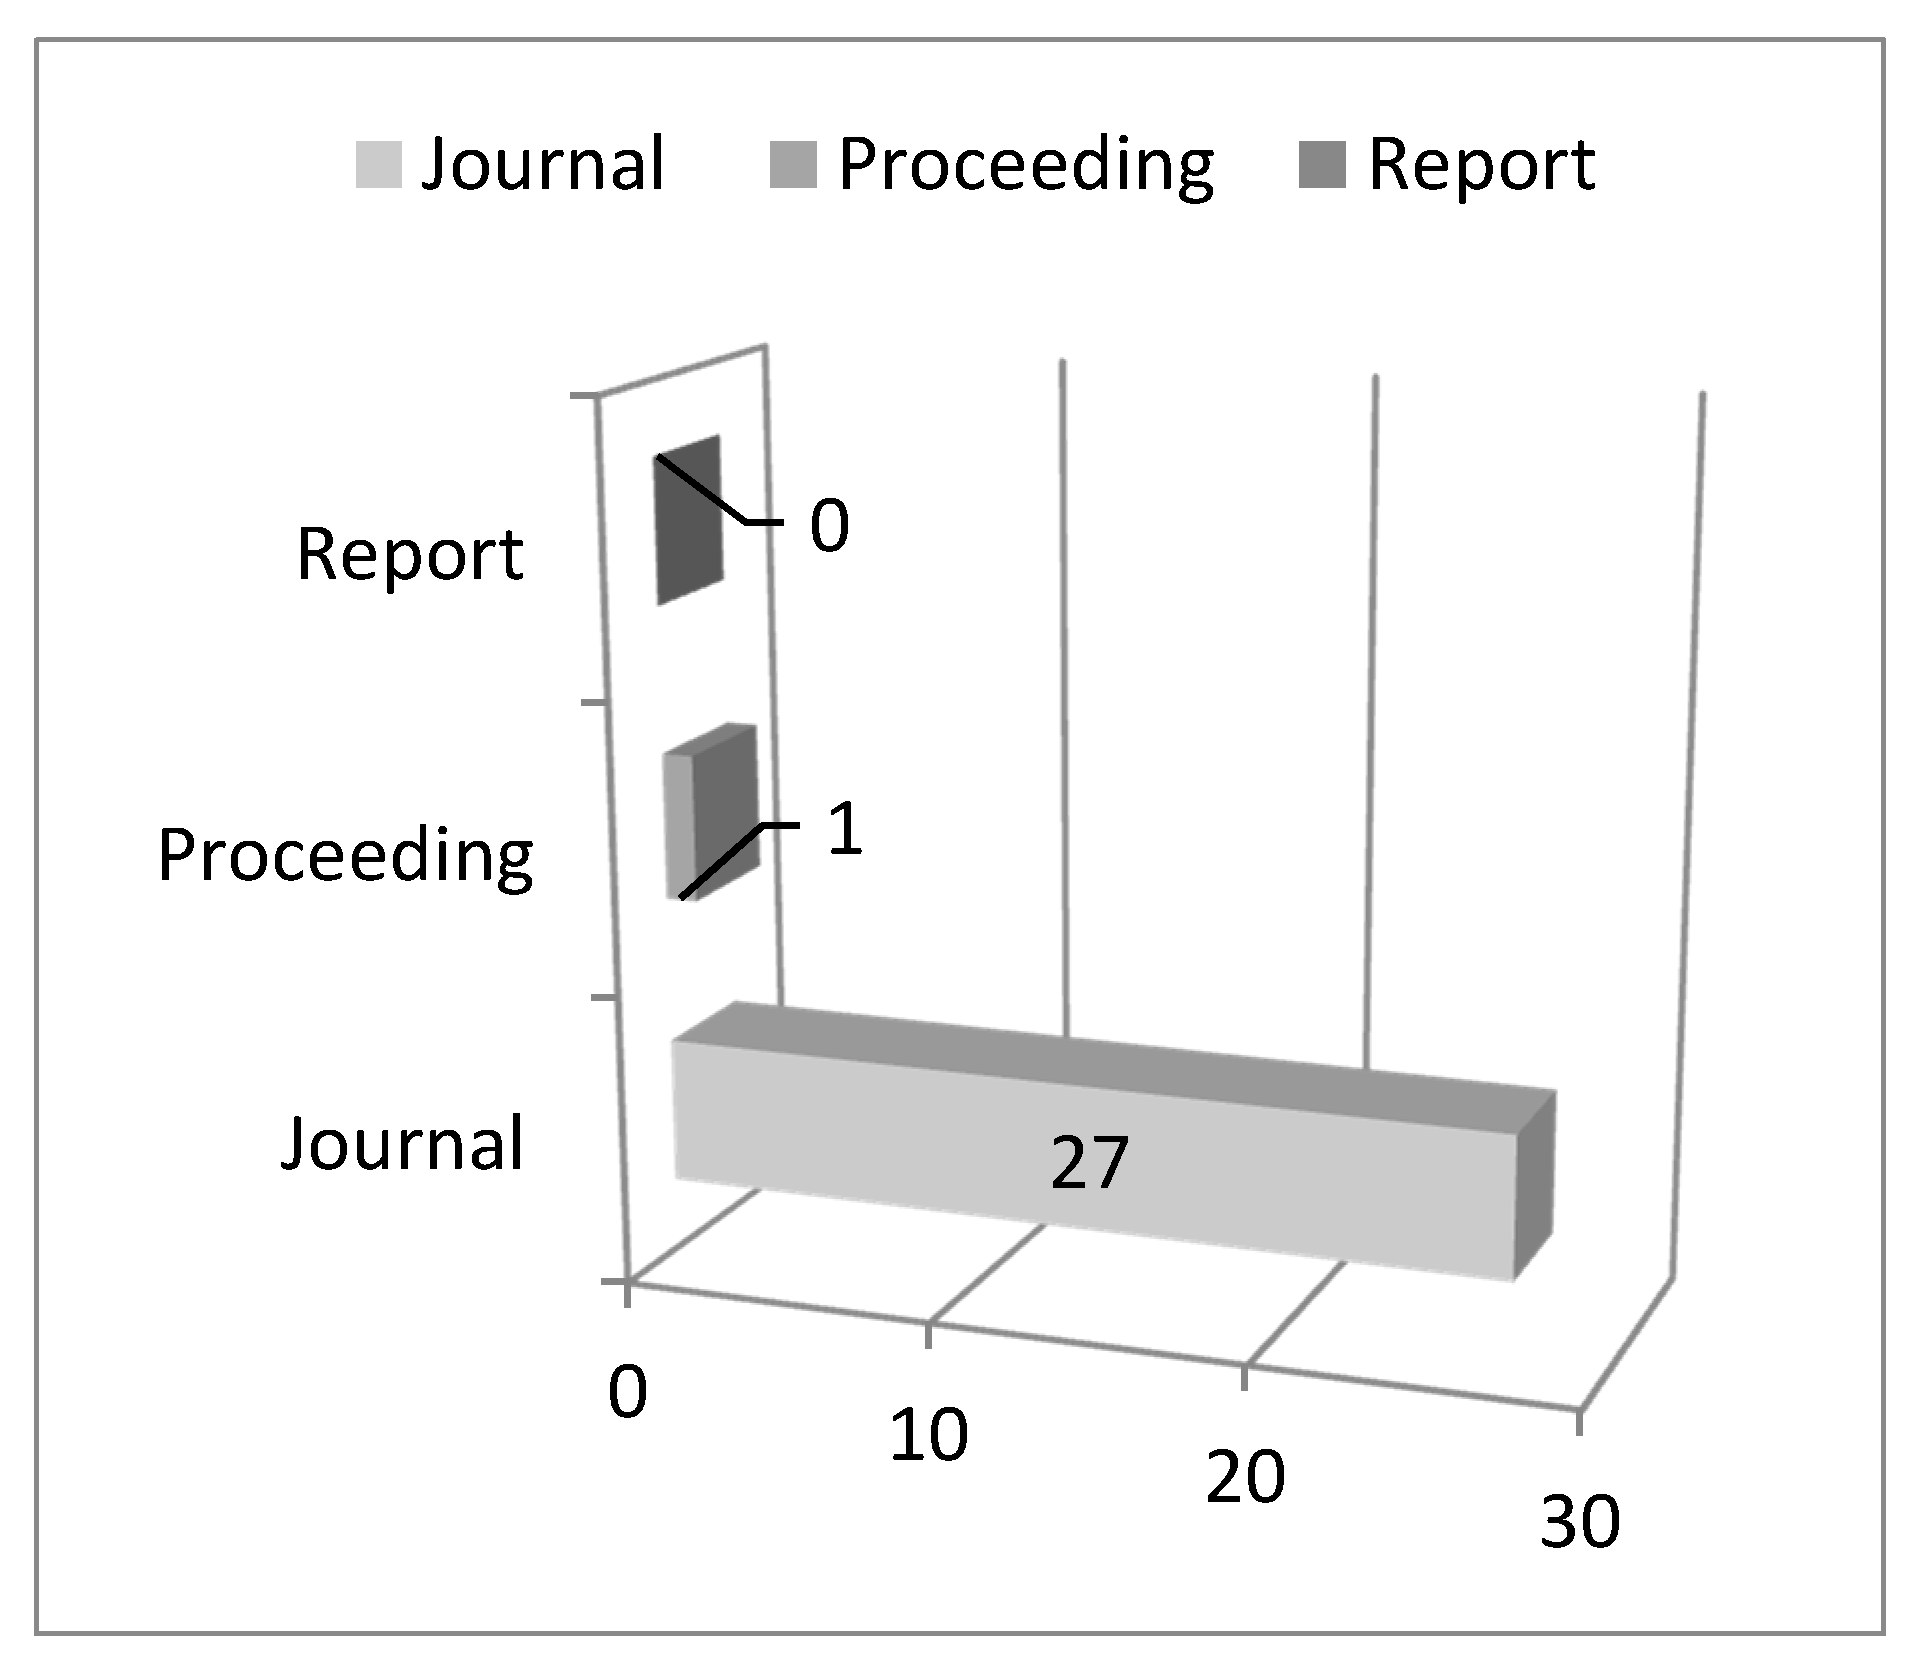
A literature exploration across all databases yielded 77 related publications. After further screening, 29 publications were classified as “to be studied”, which included papers for review and were based on content focused on the repair and restoration process using AM. The first journal article was published in 2011, while the same year also generated three other publications. In contrast, the most recent publication was published in 2018. This literature review concentrated on four kinds of publications, whereby most were categorized as journal papers (96%), conference papers (4%), and there are none from published reports. Figure 4 shows an illustration of the diagram.
The International Journal of Advanced Manufacturing Technology and Physics Procedia contributed the highest number of journal publications related to the review paper, whereby five articles were published in this journal. Following this, the Journal of Cleaner Production published three articles. The research topic was also discussed in several other publications such as the Journal of Alloys and Compounds, Optics and Lasers in Engineering, Rare Metal Materials and Engineering, Coatings, International Journal of Fatigue, Journal of Manufacturing Systems, Surface Engineering, Wear, Materials Science and Engineering A, Metallurgical and Materials Transactions A: Physical Metallurgy and Materials Science, Procedia CIRP, Procedia Engineering, the Journal of Industrial Ecology, and the Journal of Manufacturing Processes. These journals published one article each on the subject. Meanwhile, a conference proceeding by the 22ème Congrès Français de Mécanique CFM2015 provided one publication.
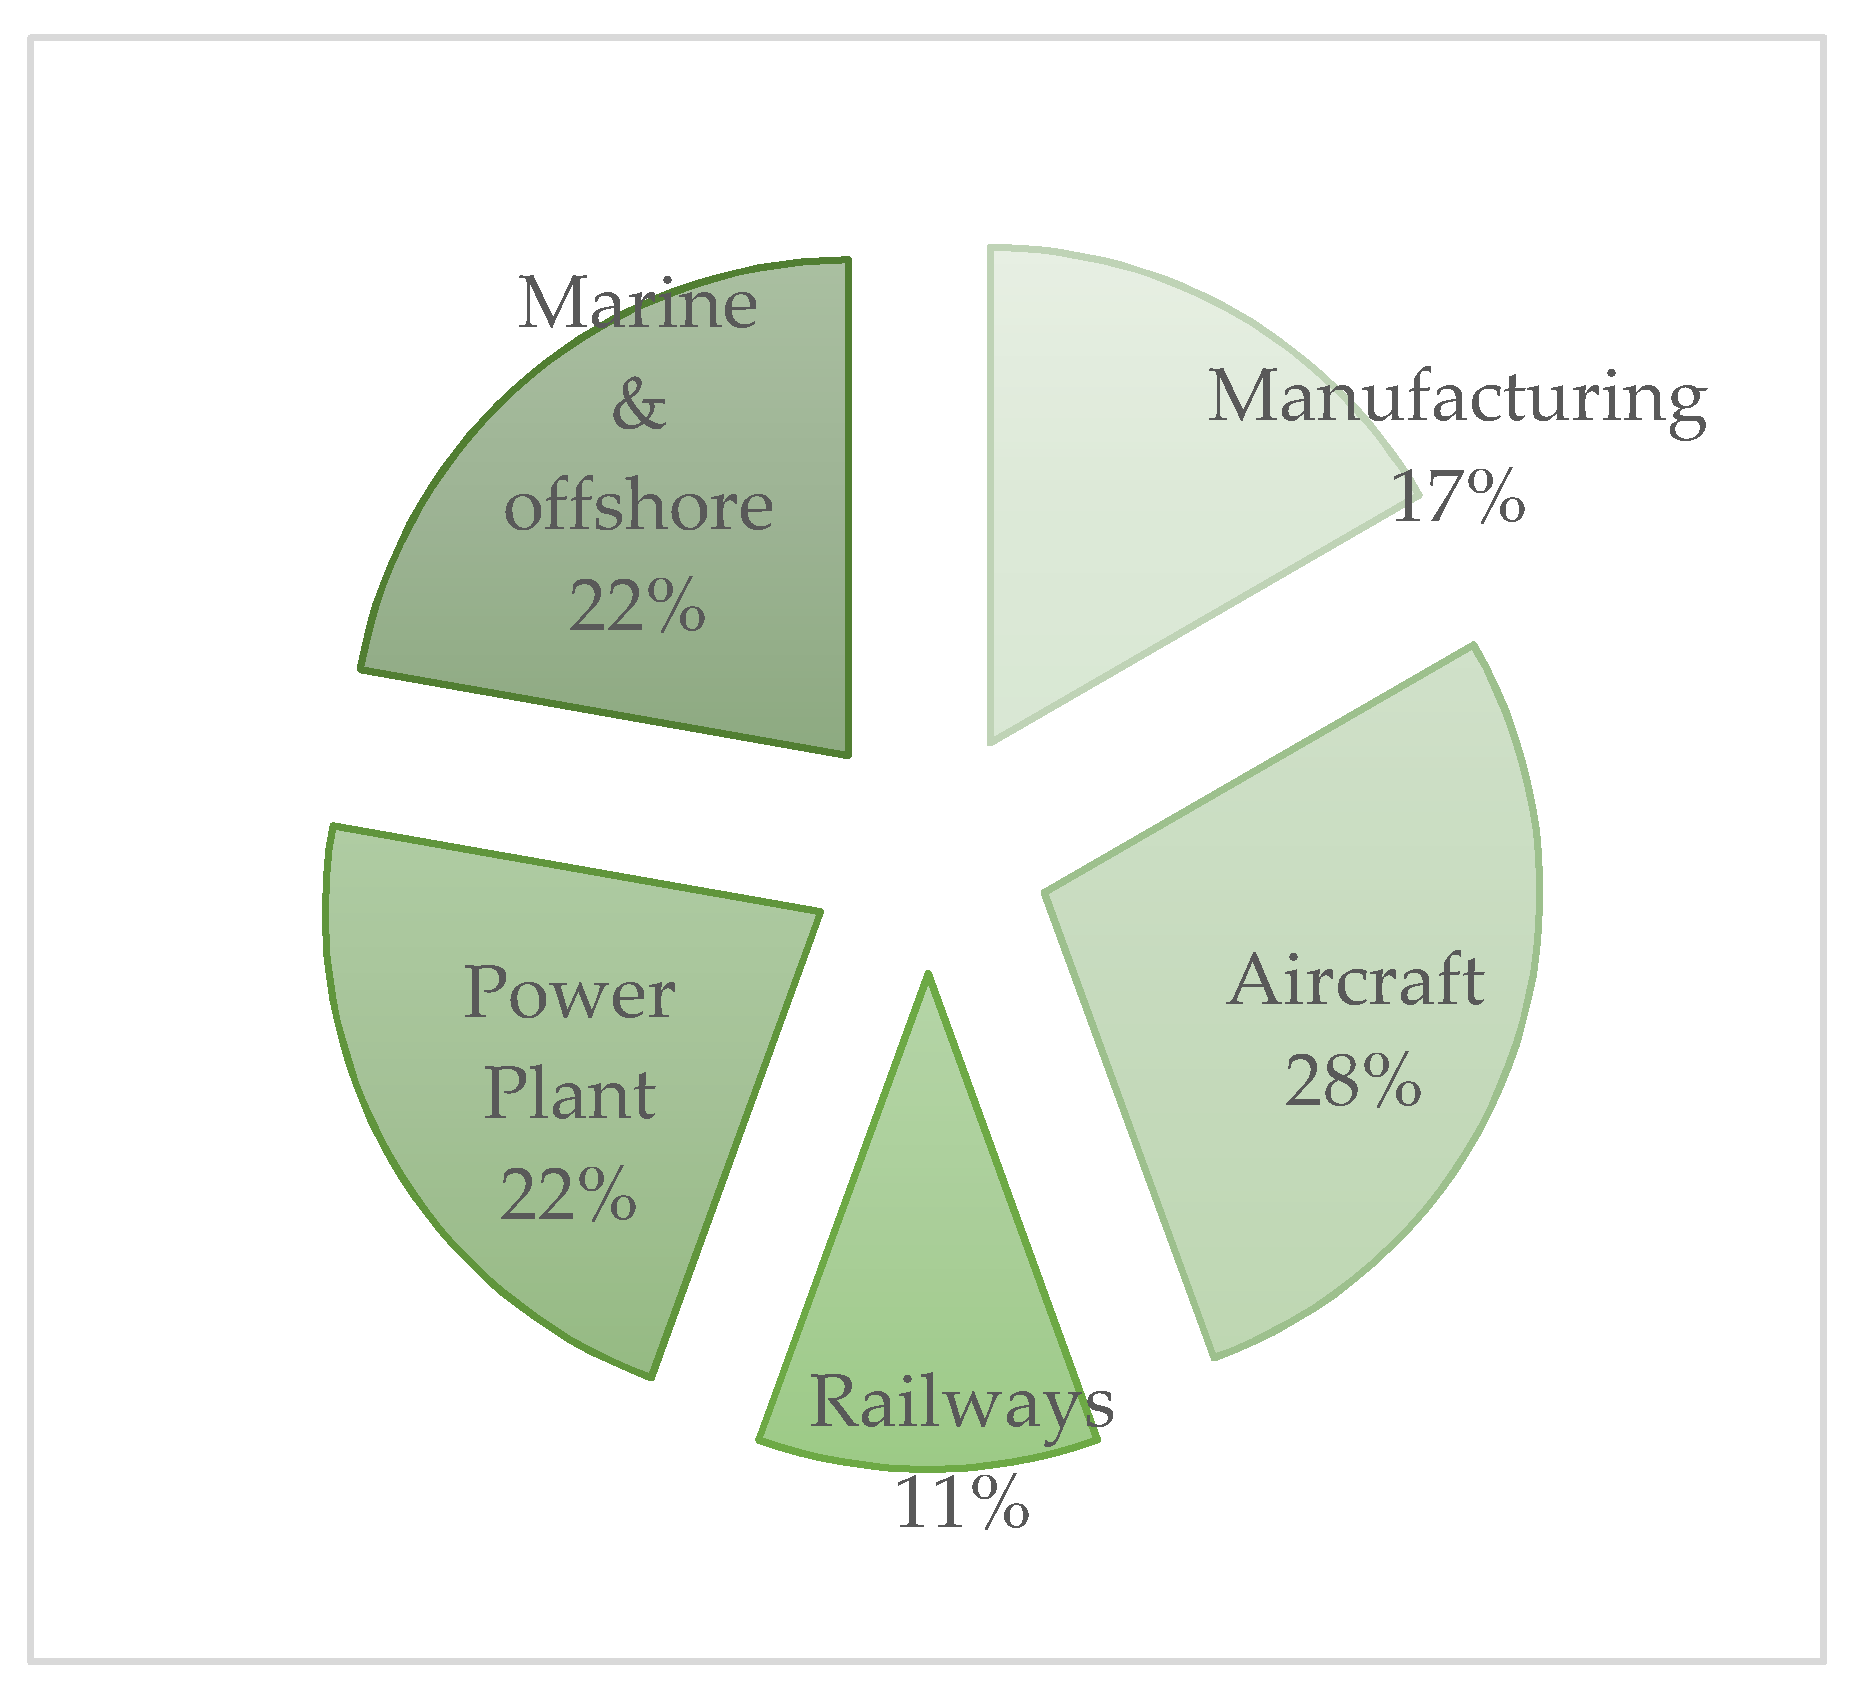
Figure 5 shows the types of industry in which AM has been deployed for component repair and restoration. The highest utilization of AM for repair and restoration is in the aircraft industry due to the need for cost reduction and ultimately, business continuity [59]. Publications related to the aircraft industry were found to make up 28% of the total (five publications), followed by 22% (four publications) for the power plant industry and marine and offshore industries each, 17% (three publications) in the manufacturing industry, and 11% (two publications) in the railway industry.
Aircraft is one of the industrial sectors that benefit from reparation using AM, since spare parts are expensive to produce [33]. This is followed by the marine and offshore industry, which are known to have huge spare parts that are costly, especially if new parts have to be produced each time [60]. Therefore, a better solution is to conduct the appropriate reparation process using AM, which is capable of overcoming the difficulties and limitations of manual reparation as well as ensuring uniformity of the results [61,62,63].

3.2. Focus of Previous Study

This section discusses the focus of study by previous researchers and the field of industry in which AM has been applied for repair and restoration..
Table 5 provides a compilation of the studies by previous researchers and indicates the type of repaired object, AM technology used in reparation, and the focus of study such as geometric reconstruction algorithm and optimization of process systems parameters.

3.2.1. AM Technology for Repair and Restoration

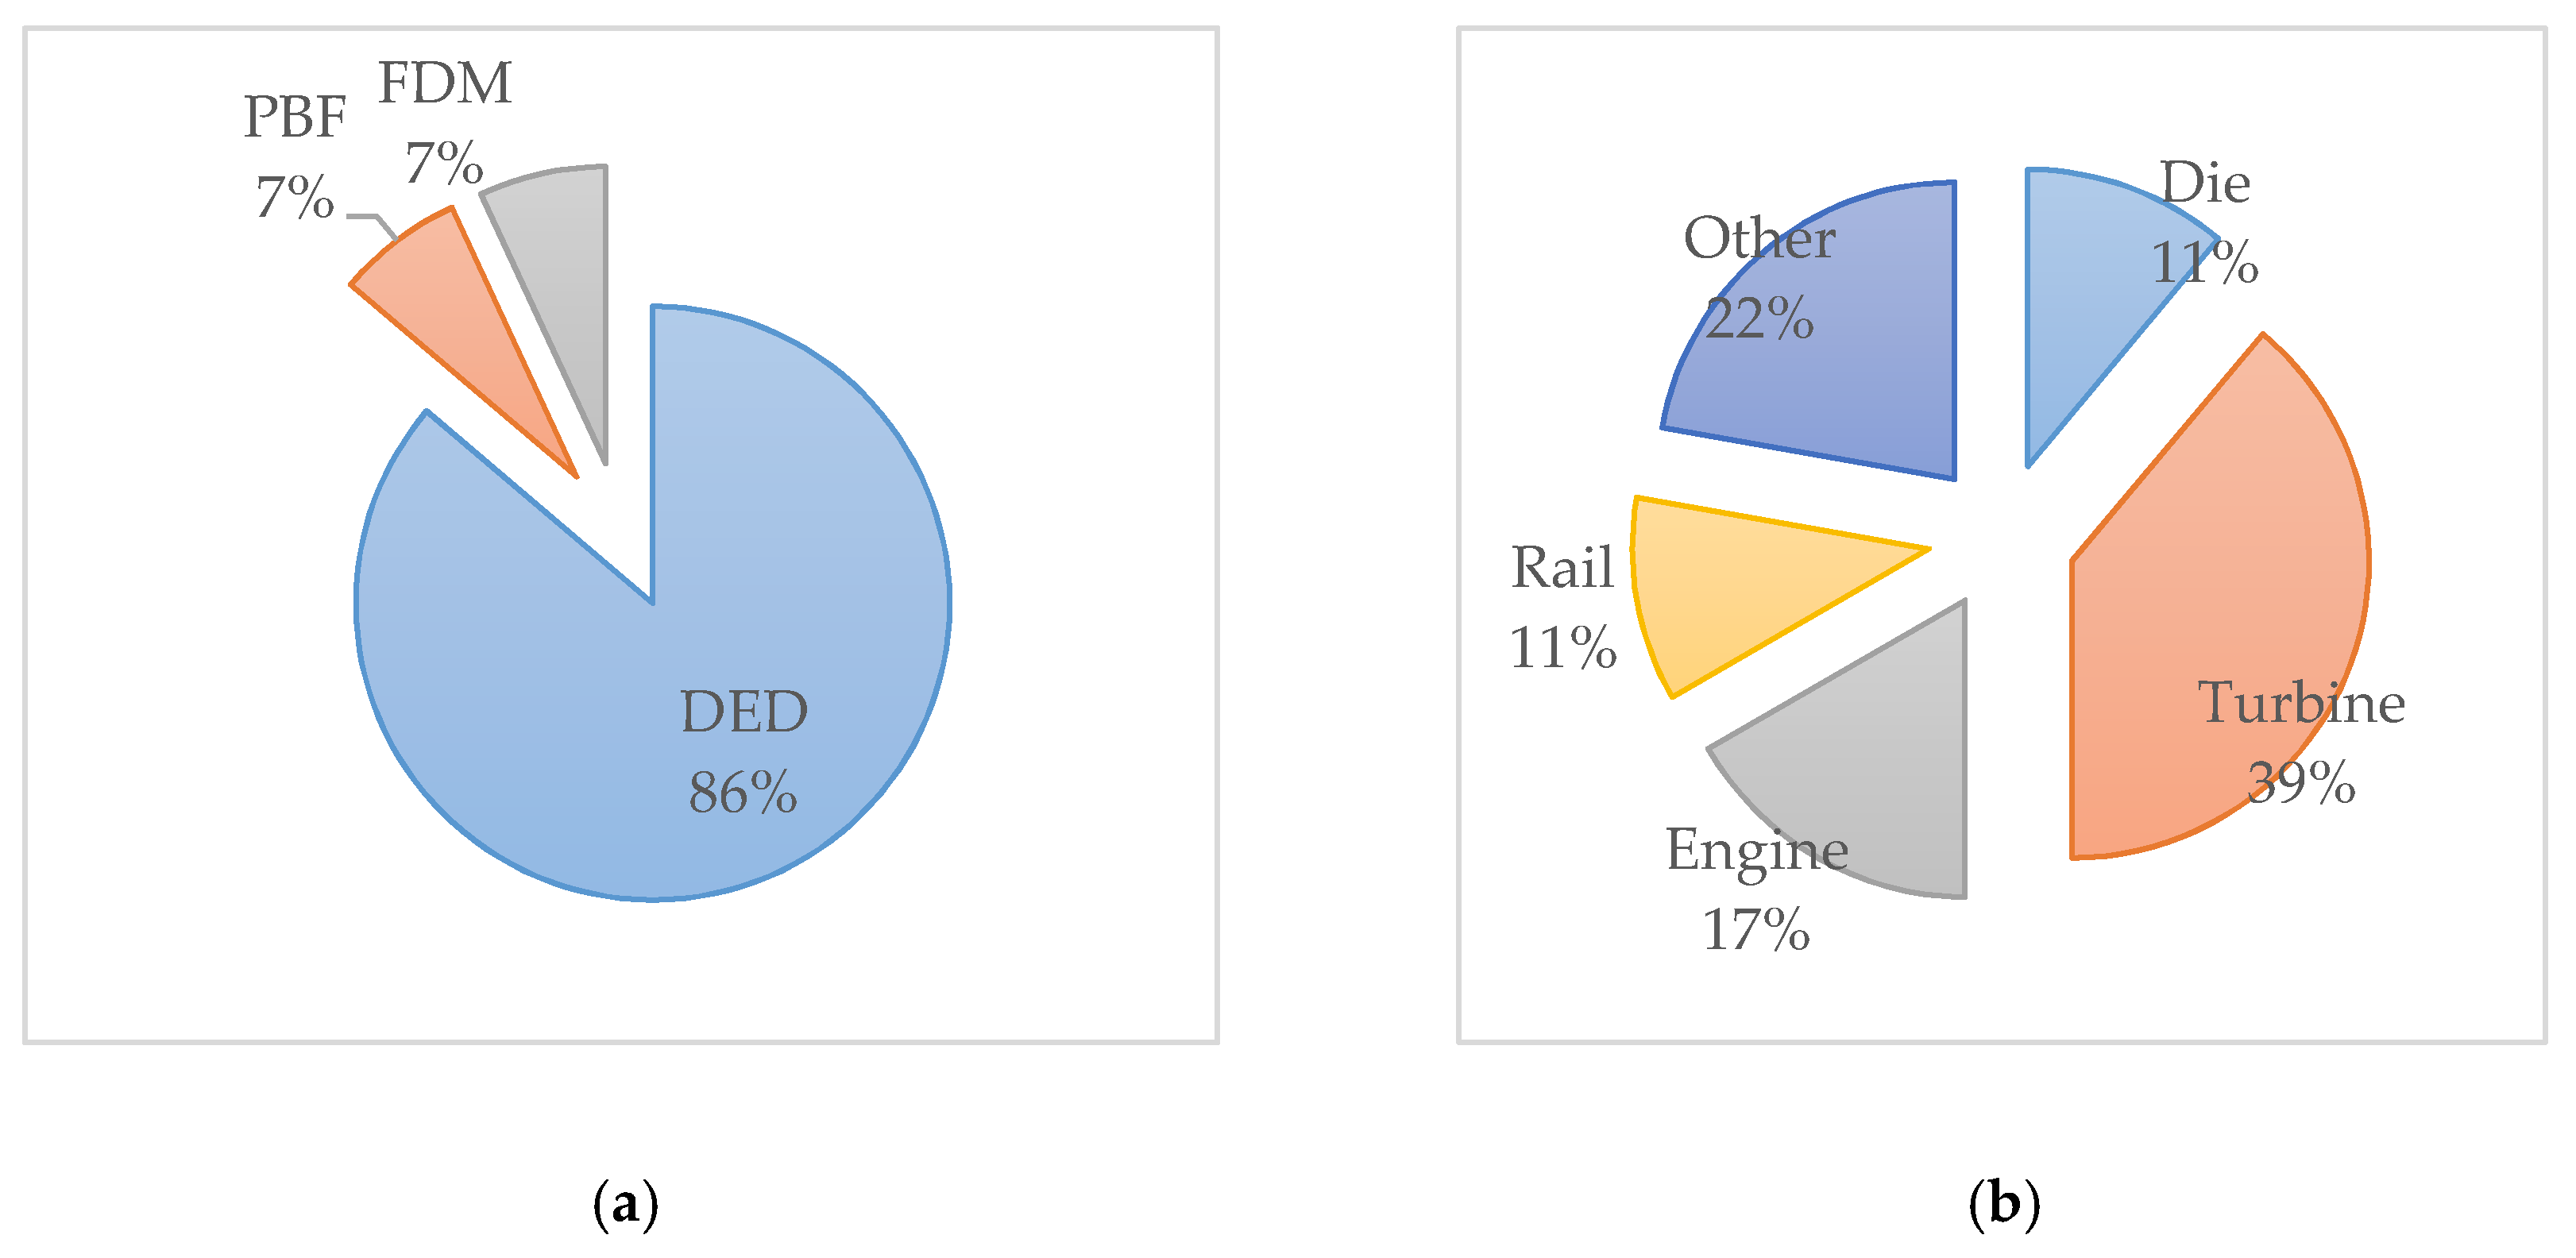
The chart diagram reveals the types of technology for repair and restoration from among the seven principles of AM technology (a), whereas the second diagram depicts the objects that have undergone reparation using AM, as reported by earlier researchers (b).
As shown in Figure 6, turbine components in power plants have been the most common case example used by earlier studies. To date, five articles related to turbine components have been published, followed by engine components, namely the cylinder head, engine head, and crankshaft, amounting to three publications. For example, Guo et al. [68] conducted the restoration of a steam turbine rotor belonging to the whole forging type of rotor, whereby a SS316L turbine blade was used by Wilson et al. [64] as a reconstruction object, whereby the repair activity was focused on rebuilding the turbine. Meanwhile, the study by Bi and Gasser [65] focused on the reconstruction of the blade tip of a turbine.
Furthermore, die repair was reported in two publications, whereby Kattire et al. [74] first conducted an experiment to overlay the surface of a die. In contrast, Pathak and Saha [75] reported on an overlay process on the damaged part of a flap transmission tee box by using the cold spray technique. Similarly, another publication by Portolés et al. [76] focused on the reconstruction of a bracket from one original equipment manufacturer part by eliminating the material of the broken area and then reconstructing it by using the undamaged remaining material as the base. Restoration of marine engine parts namely crankshafts are carried out by overlaying the curved part using laser cladding [27,60] and repairing the cylinder head [77]. Moreover, publications related to the restoration processes for railways have reported on the use of laser cladding to overlay the surface of railway switches and crossing components [70,72].
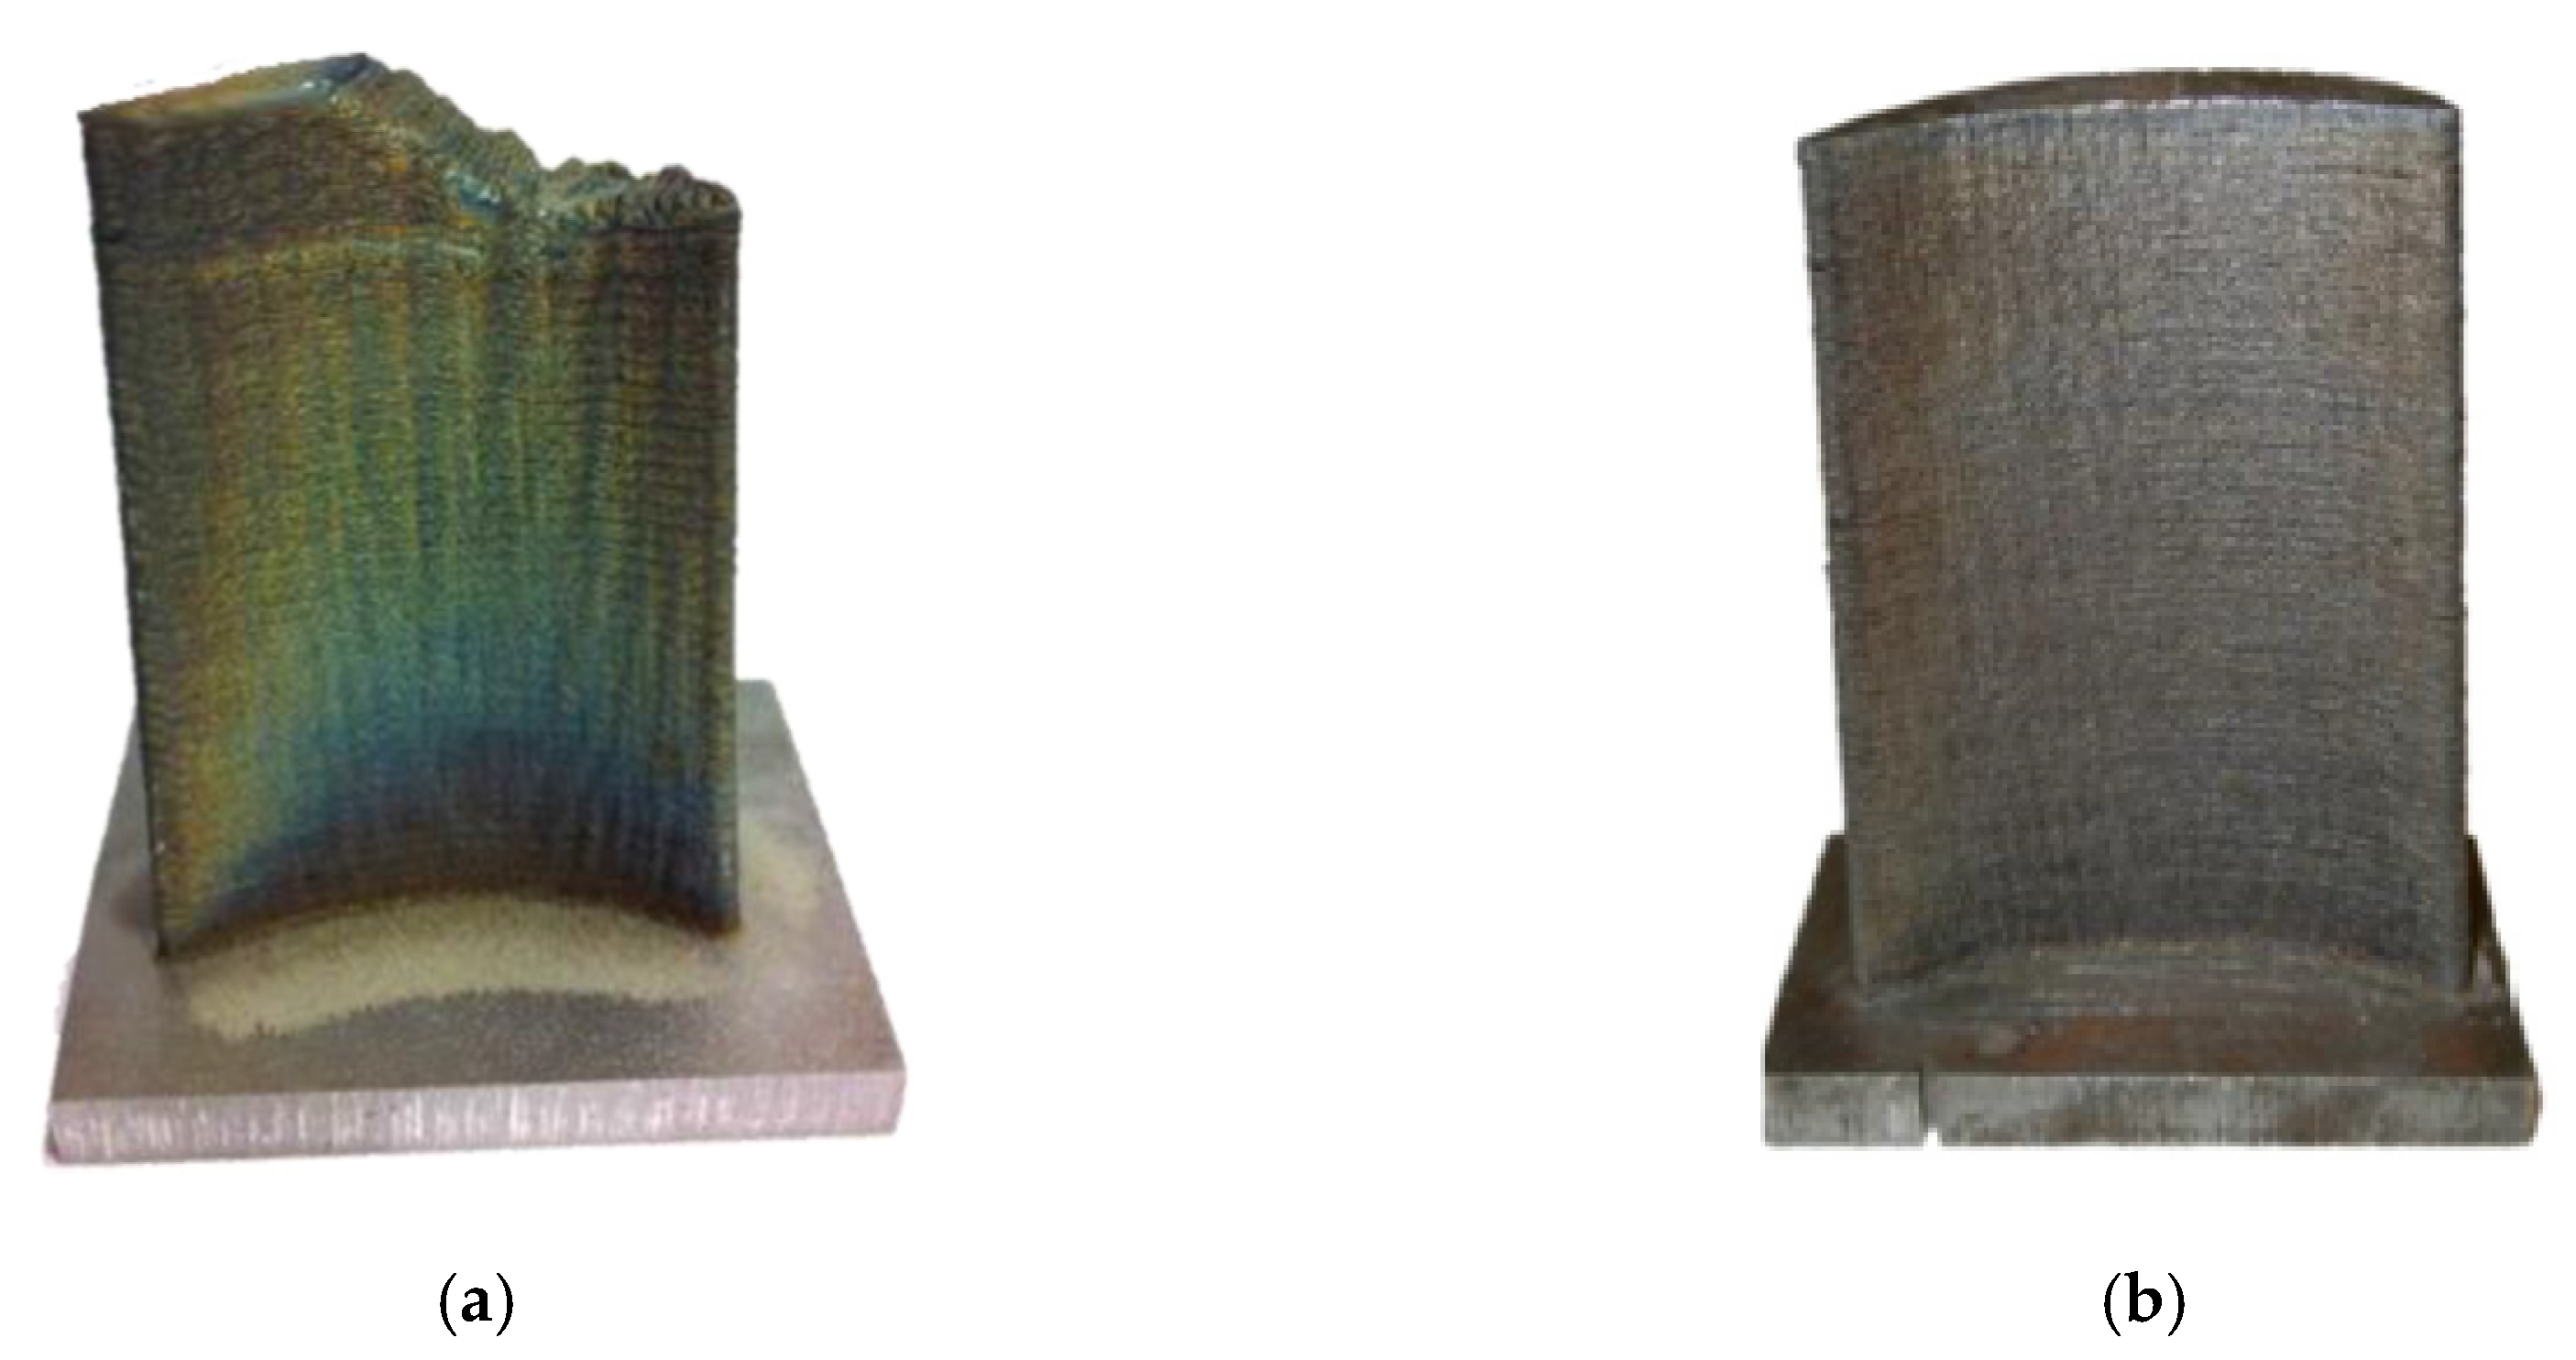
Based on the review, it can be inferred that the repair process may be of two different types. The first category is the process of reconstructing the product surface, in which reverse engineering (RE) is the initial process, followed by the RE data computation to reconstruct the damaged product area. To reconstruct a product with a curved side, Gao et al. [78] developed an implementation technique based on several main steps that included deciding the length of the damaged part, calculating the knot vectors, computing the extremum, reconstructing the B-spline curve, achieving the control points, redeveloping the B-spline curves, and developing the essential output model. Figure 7a shows an image of a damaged tip while Figure 7b shows the reconstructed tip after undergoing restoration using laser cladding.
First, the object thickness that is to be restored must be taken into consideration to avoid any difficulties during the restoration process. The diameter of the laser spot used should be based on the dimension of the object so as to construct a precise thickness of the part [79].
From the review, it was observed that the AM technology commonly used for restoration is direct energy deposition (DED), which is capable of restoring the broken parts layer-by-layer [80]. Leino et al. [48] pointed out that generally, the reparation processes are dominated by metal-based AM. Such AM technology was addressed in 25 publications for DED, which specified the use of laser cladding [61,69,70,73] and laser metal deposition [28] as well as three other publications for powder bed fusion technology, which uses electron beam melting [29,76]. Meanwhile, one publication described the material extrusion technology using fused deposition modeling [30] and the metal-based AM of cold spray [75].
Laser cladding is commonly used in the application of DED technology for the reparation process. The capability of laser cladding in reconstructing damaged areas is one of its significant contribution in repair and restoration. Powder Bed Fusion technology has been deployed in the reconstruction of gas turbine burners, however, certain adjustments to the technical process are required.

3.2.2. Product or Object Material

Most of the publications (28 in total) reported on the use of metal-based AM technologies namely, DED, PBF, and cold spray for the repair and restoration of metal-based objects. However, one publication reported on the use of the polymer polylactic acid (PLA) in FDM technology [30].
The reason behind the high number of papers underlining metal as the focus is due to their vast industrial application, the high cost of new metal parts as well as the inefficiency and cost involved in manual reparation [28,81].

3.2.3. AM Material

Since most of the objects and the deployed AM technology are both metal-based, the additive material should be in line with the machine principle. Table 6 provides a compilation of earlier works pertaining to the reparation of various objects using different types of additive material such as Ti6Al4V, Inconel 625, stainless steel, Cr–Ni alloy, FeCrNiCu alloy, and AISI 4140. DED was deployed in all studies except for the cylinder’s guide yoke plate, which was repaired using FDM technology with PLA as the additive material.

3.2.4. AM Machine Setting

According to Khajavi et al. [59], AM machines differ in their characteristics. Table 7 presents the work by previous researchers on different types of AM technology, additive material, and their machine setting. In accordance with the review, it was observed that three principles of AM machine settings were used in earlier studies. For the DED machine setting, the critical items within the DED machine setting were laser power, scan speed, and powder feed rate [86]; such settings would influence the resulting process [87]. The review also showed that the laser power was applied within the range of 360 W to 3000 W. As reported, each study addressed different laser power settings. For example, an 800 W laser power was used in the repair of composite material for the aerospace industry and the gas turbine burner [28,32]. Meanwhile, the highest laser power of 3000 W was utilized in repairing an AISI 1045 steel rod bar. In contrast, the lowest laser power of 360 W was used to repair cast iron and low carbon steel.
Moreover, the setting for the powder feed rate was adjusted according to the laser power set by the user. The parameters for the mass feed rate were the powder feed rate and cladding speed rate, whereas the parameters for energy input were power and cladding speed. These different parameters serve as the basis of the setting process for the FDM machine used, whereby the extrusion time is affected by volume, nozzle diameter, nozzle feed rate, and layer thickness.

3.2.5. Geometrical Complexity of Product

Today, PBF technology is capable of fabricating products of any shape and geometrical complexity [48,73]. However, for the repair and restoration of these components using DED technology such as laser cladding, geometrical complexity becomes one of the constraints in remanufacturing [90]. Table 8 provides a compilation of earlier studies on objects with geometrical complexities that were repaired using AM. The aim of the compilation was to ascertain the manner and how objects with geometrical complexities affected the restoration capabilities of AM.
Several papers have previously discussed the reconstruction of chipped parts in objects [64,65,66,88] where AM technology provided an effective option for reconstructing aircraft blades and power plants, rather than producing a new part [33]. Similarly, the papers as aforementioned implemented LC technology as the tool for the repair and restoration process, which had the capability to reconstruct a part above the damaged area [91]. For the reconstruction process, the part to be restored will be processed in the design phase, and then divided into several layers with the intention of following the LC nozzle process during the restoration procedure. The computation of repair preparations will be discussed in the following section.
According to the review, LC technology is capable of reconstructing a chipped or damaged part of the product, even if it is a solid construction with a wide shape [65,66,82]. Further details related to the compatibility of the additional material and reconstructed part will be outlined in the following section.
LC technology is capable of repairing cracks by overlaying material on the affected surface [27,60,67,68,74]. The technology will ultimately replace some of the manual restoration processes [18]. However, it should be noted that products subjected to heat and stress during manufacturing will easily suffer a surface crack [93].
A different application has been found for the FDM technology in terms of repair activity during product remanufacture, whereby the technology can reproduce a new part in order to replace a worn-out part [48] and reconstruct a chipped part [73]. Moreover, it may be more efficient for the part to be self-produced by the user, instead of having to order from the manufacturer [30]. It will be extremely helpful in reproducing a part that no longer exists in the market [30,48]. Wits et al. [30] introduced a new methodology to repair a product via collaboration so that users could conduct their own repair process. This was made possible by the manufacturer by providing a 3D model of the spare part on their personal website, which can be downloaded easily.
Overlaying material on an object’s surface using DED is the most common reparation technique for damaged components. Meanwhile, for reconstruction using PBF, the object surface has to be flat and parallel to the platform prior to the reconstruction process.

3.2.6. Pre-Processing

This subsection discusses the pre-processing requirements and systems for restoration, which are object preparation and the computational process of AM technology. The preparation involved the use of RE to obtain a 3D model of the objects prior to reconstruction. A small number of papers briefly explained the preparation process. For example, Zhang et al. [88] used a 3D scanner supported with a 6-axis robotic arm to automate the scanning system. The result of the scanning process was obtained from the intersection between the nominal model and the damaged model, which was then used as the input for 3D model processing using OpenSCAD.
Similarly, Wilson et al. [64] used a different approach as an option for the 3D model and the reconstruction process, whereby two different processes were utilized based on the object condition. Repair geometry and prominent cross section (PCS) may be used depending on the situation. If a nominal model is available, the repair geometry will be the input for the reconstruction process. Meanwhile, if the model is not available, PCS can be used. The result of the repair geometry or PCS will be delivered by CATIA V5 to construct the cross-section splines of an incremental blade cross-section of the non-defective region. The surface is then cleared across the spline cross-section, whereby the surface is next extrapolated over the left-over height residue of the blade to span across the malfunctioning region. A compact body is thus constructed from the resulting collaboration of the surface.
According to the review, the main factor in the preparation of the repair process using AM is the RE process, which constructs the damaged part of the object. So far, researchers have conducted the reconstruction of damaged products as discussed in their respective case studies [27,28,30,60,64,65,66,67,68,73,74,88]. To date, no researchers have attempted to analyze the common faults in the components in relation to their modularity and interfaces so as to facilitate the restoration process. Redesigning products from this perspective to ease restoration using AM should be considered in light of extending the product life cycle.

3.2.7. Engineering Tolerance

This subsection presents the results of the review related to the dimension of engineering tolerance for repair and restoration using AM, as it is a critical aspect in industrial application [94]. Based on the review, only two papers provided a brief explanation related to the geometric tolerance. Zhang et al. [88] suggested an engineering tolerance of ±73 µm for the repair process. Meanwhile, the experiment by Wilson et al. [64] yielded an engineering tolerance of about ±150 µm. Therefore, it can be concluded that DED technology such as laser cladding and laser direct deposition are capable of restoration to a near-initial object shape [64].

3.2.8. Material Compatibility

This subsection discusses the results of the review related to the material compatibility of the final process. The AM material has a big effect on the output in term of characteristics and also strength toward crack [95]. The results obtained by Zhang et al. [88] proved that cobalt-based alloy Wallex 40 as a filler material was compatible with the AISI H13 tool steel die as a material of the product. Similarly, Leunda et al. [67] conducted an experiment to prove the compatibility of the same material used between the object materials and that of AM material or filler material. Furthermore, the study by Wilson et al. [64] showed that the same object material and filler material was compatible with the reconstructed object, whereby the stainless steel 316 L powder used could restore the product to its original form. In relation to the material, the size of the material should also be considered as it can influence the powder feed rate and laser speed within the machine setting [74].
Today, AM technology is considered feasible for building metal-based and non-metal-based products [96], offering various designs and geometrical complexities. It is also an enabler and in support of remanufacturing as one of the important elements of CE. The technology has displayed significant progress in terms of its application in the fabrication of parts that are no longer available in the market as well as the development of rare parts [29,76]. To this end, AM has been deployed in the repair and restoration process for remanufacturing through material overlaid on damaged surfaces [75,89] and the reconstruction of chipped parts in an object [79]. With these capabilities, the remanufacturing process can be easily and competently undertaken using this technology, resulting in an improved end-of-life product value. In fact, AM as a technology applied during remanufacturing has progressed within the past five years and plays a major role in reducing the cost of product replacement [62]. In addition, its implementation will contribute to the propagation of environmentally-friendly technology.
AM technology provides an effective method for repair and restoration such as in the case of a build-up on chipped components, namely the blade tip, impeller blade, sprocket, or gas turbine. It resolves the issue of direct build-up in the position of the broken part layer-by-layer, rather than requiring a manual build of the part and then attaching it to the position of the broken part [28,64,66,79]. The review indicated that several design aspects of components must be considered before AM technology can be adequately and successfully deployed in the process of remanufacturing or restoration. Important product aspects for the ease of restoration using AM technology include design and geometrical complexity, which has to be addressed from the early stage of the product design process. First, the goals of the restoration process, whether to build a broken part or reproduce a rare part of a product that is no longer available in the market will inevitably impact the choice for AM technology. Building up a broken part requires the use of DED or cold spray technology in accordance with the compatibility and capability of both technologies, with respect to their construction through the residual area of the damaged platform [80]. Therefore, selecting DED, PBF, and cold spray should be the options afforded for metal-based products. In accordance with the design and development goals, the object material to be restored and the additive material are important considerations to assure the quality of the restored output.
Up until now, AM technologies such as DED, PBF, and also cold spray are the best options for the reparation of metal based objects. Both DED and PBF have been used for reconstructing chipped parts, however, there is a small difference between both technologies in terms of the process. PBF requires the surface of the object to be trimmed before entering the machine. This process is important because the repair object will be placed in a bucket containing material powder that will be heated up to build a part layer by layer. The PBF technique can be used in products that have a relatively flat geometry [73]. For objects with many geometries on its surface such as aerospace or aircraft components, laser cladding is the most feasible technology to be deployed [28,69,71]. For the purpose of overlaying the surface of objects, laser cladding and cold spray are suitable options.
From the review, challenges in the application of LC for repair and restoration were identified. Table 9 outlines the challenges faced by earlier researchers from the perspectives of object design and process systems.
In relation to the process or tools for reparation, most of the challenges regard the process parameters of laser cladding. The parameters of the LC machine will inevitably have a large impact on the output of the process [66,97]. Furthermore, different scan speeds of LC will affect the resulting microstructure [84], thereby requiring it to be considered in the repair process of a product with a thick wall and many edges [28]. Additionally, the parameters of the machine are also influenced by the material of the product [66].
The use of the LBM machine in the repair process is associated with other challenges related to the set-up process, due to its completely different characteristics and operations. For the purpose of the repair process, the LBM machine requires the user to set-up the repaired product under the material powder; as it melts the material layer upon layer, the repaired object should be placed slightly beneath the surface of the material pile. The laser will then focus on the material powder surface and the object surface in order to melt them [73].
Another challenge is the use of material powder as the base for the LC machine, whereby the type of material powder is adjusted to the material of repair object, otherwise, the result of reparation would not be optimal [67,69]. In relation to the design of products to be reconstructed, several papers focused on the development of algorithms for reconstructing worn out parts [88,98]. Therefore, a 3D model of reconstructed worn out parts would serve as the input for the LC machine and the algorithm would be based on the RE concept for the purpose of object comparison between the initial object and the damaged object.
Furthermore, the initial repair process and the use of RE to build the digital design of broken parts, followed by the subsequent production of additive design is another major concern for consideration. The aim is to construct a future build-up part in the case of a broken object part in remanufacturing, whereby a consideration for the chosen additive material would be the main constraint to ensure that the AM material is compatible with the surface of the repaired object. The fastening technique employed for the repair process should be adjusted at the beginning, along with the laser power, cladding speed, laser spot diameter, powder size, and powder feed rate. These parameters are the inputs required during the digital design and before the execution process.
Several publications related to the use of AM technology for repair and restoration in remanufacturing were not substantiated by the data and procedures for its successful implementation. Therefore, future research should address the manner in which these products can be designed and developed in support of AM restoration and repair at the end of their useful life. It is thus rendered essential for the design guidelines and rules to be technologically advanced in the future, specifically in the form of precise design for X requirements for end-of-life restoration using AM technology. Efforts toward the deployment of enabling technologies such as AM will inevitably assist in the application of automated and digital remanufacturing, while concomitantly contributing to the CE. Digital remanufacturing efforts are aimed at replacing manual reparation with digital reparation, which will certainly optimize the flow of the remanufacturing system, while simultaneously reducing the overall costs. Digital reparation will also reduce the level of failure on the final product due to human limitations [99,100,101].
The technological leap in automated repair and restoration for remanufacturing requires a reliable and efficient technology to guarantee the restoration of these components to their original condition before entering their next life cycle. Therefore, advancements in the field of AM have resulted in the invention of DED technology, which has the capability to build or fabricate parts as well as perform repair and restoration to damaged objects for maintenance and remanufacturing. This paper provided an overview on the state-of-the-art in AM technologies for conducting repair and restoration as well as the influencing factors and challenges from the perspectives of object design and process systems. The paper concludes with suggestions related to the manner in which products should be designed to yield successful repair and restoration using AM technology. The development of design guidelines namely design for restoration using AM technology should be the way forward. The approach will ensure that AM process systems requirements are integrated with knowledge on object design constraints, failure modes, and their severity, in order to support the effective recovery of end-of-life products for the circular economy.
Technological leaps in automated repair and restoration for remanufacturing will require a reliable and efficient technology such as DED to guarantee the restoration of remanufacturable components to their original condition before entering their next life cycle. However, several publications related to the use of AM technology for repair and restoration in remanufacturing were not substantiated with the data and procedures for its successful implementation. Therefore, future research should address the manner in which these products can be designed and developed in support of AM restoration and repair at the end of their useful life. It is thus rendered essential for the design guidelines and rules to be technologically advanced in the future, specifically in the form of precise design for X requirements for end-of-life restoration using AM technology.

4. Conclusions

This review aimed to uncover recent applications of AM for repair and restoration in various industries. Despite the growing interest in automating repair and restoration using AM, there exist several issues and challenges for effective repair and restoration, from the perspectives of object design and process systems. This review focused on several elements, namely, the material of objects and AM, material compatibility, machine setting, geometrical complexity of objects, pre-processing requirement, and geometric tolerance. The paper concludes with suggestions related to the manner in which products should be designed for effective repair and restoration for product life cycle extension in the circular economy.

Author Contributions

R. wrote the manuscript as well as carried out the literature review; R., D.A.W. and A.H.A. analyzed the data, finalized the paper and proofread, and D.A.W. was the main corresponding author during the review process.

Funding

Funding for this research is provided by the Ministry of Education, Malaysia and Universiti Kebangsaan Malaysia

Acknowledgments

The authors would like to acknowledge the support of the Ministry of Education, Malaysia for sponsoring this study under FRGS/1/2017/TK03/UKM/01/2, the Universiti Kebangsaan Malaysia for the Research University Grant DIP-2017-016, and the Malaysia International Scholarship (MIS) for the student scholarship.

Conflicts of Interest

The authors declare no conflicts of interest.

References

  1. World Energy Council. World Energy Council World Energy Resources: 2013 Survey; World Energy Council: London, UK, 2013; p. 11. [Google Scholar]
  2. Patel, D.; Kellici, S.; Saha, B. Green Process Engineering as the Key to Future Processes. Processes 2014, 2, 311–332. [Google Scholar] [CrossRef] [Green Version]
  3. OECD. Material Resources, Productivity and the Environment; OECD: Paris, France, 2015; p. 172. [Google Scholar]
  4. Lv, L.; Deng, Z.; Liu, T.; Wan, L.; Huang, W.; Yin, H.; Zhao, T. A Composite Evaluation Model of Sustainable Manufacturing in Machining Process for Typical Machine Tools. Processes 2019, 7, 110. [Google Scholar] [CrossRef]
  5. Ong, S.; Fang, H.; Nee, A. A Design Feature-based Approach for Product Remanufacturability Assessment and Analysis. Procedia CIRP 2016, 53, 15–20. [Google Scholar] [CrossRef] [Green Version]
  6. Sun, H.; Liu, C.; Chen, J.; Gao, M.; Shen, X.; Sun, L.; Chen, G.; Shen, A. Novel Method of Sustainability Evaluation in Machining Processes. Processes 2019, 7, 275. [Google Scholar] [CrossRef]
  7. Schöggl, J.-P.; Baumgartner, R.J.; Hofer, D. Improving sustainability performance in early phases of product design: A checklist for sustainable product development tested in the automotive industry. J. Clean. Prod. 2017, 140, 1602–1617. [Google Scholar] [CrossRef]
  8. Subramanian, A.S.R.; Gundersen, T.; Adams, T.A. Modeling and Simulation of Energy Systems: A Review. Processes 2018, 6, 238. [Google Scholar] [CrossRef]
  9. Reike, D.; Vermeulen, W.J.; Witjes, S. The circular economy: New or Refurbished as CE 3.0—Exploring Controversies in the Conceptualization of the Circular Economy through a Focus on History and Resource Value Retention Options. Resour. Conserv. Recycl. 2018, 135, 246–264. [Google Scholar] [CrossRef]
  10. Velte, C.J.; Scheller, K.; Steinhilper, R. Circular Economy through Objectives—Development of a Proceeding to Understand and Shape a Circular Economy Using Value-focused Thinking. Procedia CIRP 2018, 69, 775–780. [Google Scholar] [CrossRef]
  11. Rios, I.C.D.L.; Charnley, F.J. Skills and capabilities for a sustainable and circular economy: The changing role of design. J. Clean. Prod. 2017, 160, 109–122. [Google Scholar] [CrossRef]
  12. Gan, S.S.; Pujawan, I.N. Suparno Remanufacturing of Short Life-cycle Products. Oper. Supply Chain Manag. 2014, 7, 13–22. [Google Scholar]
  13. Anne-Marie, B.; Owen, L.; Michael, F. Triple Win: The Social, Economic and Environmental Case for ReManufacturing; All-Party Parliamentary Sustainable Resource Group & All-Party Parliamentary Manufacturing Group: London, UK, 2014. [Google Scholar]
  14. King, A.M.; Burgess, S.C.; Ijomah, W.; McMahon, C.A. Reducing waste: Repair, recondition, remanufacture or recycle? Sustain. Dev. 2006, 14, 257–267. [Google Scholar] [CrossRef]
  15. Wahab, D.; Blanco-Davis, E.; Ariffin, A.; Wang, J. A review on the applicability of remanufacturing in extending the life cycle of marine or offshore components and structures. Ocean Eng. 2018, 169, 125–133. [Google Scholar] [CrossRef]
  16. Dias, A.S.; Kim, H.; Sivakumar, P.K.; Liu, Z.; Zhang, H. Re-engineering Manufacturing for Sustainability; Springer: Singapore, 2013. [Google Scholar]
  17. Paterson, D.A.; Ijomah, W.L.; Windmill, J.F. End-of-life decision tool with emphasis on remanufacturing. J. Clean. Prod. 2017, 148, 653–664. [Google Scholar] [CrossRef] [Green Version]
  18. Kim, H.-I.; Park, H.-S.; Koo, J.-M.; Seok, C.-S.; Yang, S.-H.; Kim, M.-Y. Evaluation of welding characteristics for manual overlay and laser cladding materials in gas turbine blades. J. Mech. Sci. Technol. 2012, 26, 2015–2018. [Google Scholar] [CrossRef]
  19. Lee, C.M.; Woo, W.S.; Roh, Y.H. Remanufacturing: Trends and issues. Int. J. Precis. Eng. Manuf. Green Technol. 2017, 4, 113–125. [Google Scholar] [CrossRef]
  20. USITC. The USITC Remanufacturing Report: Key Findings, Observations, and Insights 7; USITC: New York, NY, USA, 2013. [Google Scholar]
  21. Oakdene Hollins Ltd. Inspiring Change for Scotland’ s Resource Economy; Oakdene Hollins Ltd.: Aylesbury, UK, 2015. [Google Scholar]
  22. Vlaanderen, T. Accelerating Growth of the US Remanufacturing Industry A Stakeholder Guide Accelerating Growth of the US Remanufacturing Industry; Circular Futures: New York, NY, USA, 2018. [Google Scholar]
  23. Kafuku, J.M.; Saman, M.Z.M.; Yusof, S.M. Current and future issues in electronics and automobiles remanufacturing operations. In Proceedings of the 2016 Future Technologies Conference (FTC), San Francisco, CA, USA, 6–7 December 2016; pp. 415–421. [Google Scholar]
  24. Kumar, A.; Chinnam, R.B.; Murat, A. Hazard rate models for core return modeling in auto parts remanufacturing. Int. J. Prod. Econ. 2017, 183, 354–361. [Google Scholar] [CrossRef]
  25. Malaysia Automotive Institute. Updates on the Automotive Industry 2017 and Outlook in 2018; Malaysia Automotive Institute: Selangor, Malaysia, 2018. [Google Scholar]
  26. Mirhedayatian, S.M.; Vahdat, S.E.; Jelodar, M.J.; Saen, R.F. Welding process selection for repairing nodular cast iron engine block by integrated fuzzy data envelopment analysis and TOPSIS approaches. Mater. Des. 2013, 43, 272–282. [Google Scholar] [CrossRef]
  27. Torims, T.; Pikurs, G.; Ratkus, A.; Logins, A.; Vilcāns, J.; Sklariks, S. Development of Technological Equipment to Laboratory Test In-situ Laser Cladding for Marine Engine Crankshaft Renovation. Procedia Eng. 2015, 100, 559–568. [Google Scholar] [CrossRef] [Green Version]
  28. Petrat, T.; Graf, B.; Gumenyuk, A.; Rethmeier, M. Laser Metal Deposition as Repair Technology for a Gas Turbine Burner Made of Inconel 718. Phys. Procedia 2016, 83, 761–768. [Google Scholar] [CrossRef]
  29. Mandil, G.; Le, V.T.; Paris, H.; Suard, M. Building new entities from existing titanium part by electron beam melting: Microstructures and mechanical properties. Int. J. Adv. Manuf. Technol. 2016, 85, 1835–1846. [Google Scholar] [CrossRef]
  30. Wits, W.W.; García, J.R.R.; Becker, J.M.J. How Additive Manufacturing Enables more Sustainable End-user Maintenance, Repair and Overhaul (MRO) Strategies. Procedia CIRP 2016, 40, 693–698. [Google Scholar] [CrossRef] [Green Version]
  31. Yeo, N.; Pepin, H.; Yang, S. Revolutionizing Technology Adoption for the Remanufacturing Industry. Procedia CIRP 2017, 61, 17–21. [Google Scholar] [CrossRef]
  32. Mahamood, R.M.; Mahamood, D.R.M. Laser Metal Deposition Process of Metals, Alloys, and Composite Materials; Springer: Berlin/Heidelberg, Germany, 2018. [Google Scholar]
  33. Huang, R.; Riddle, M.; Graziano, D.; Warren, J.; Das, S.; Nimbalkar, S.; Cresko, J.; Masanet, E. Energy and emissions saving potential of additive manufacturing: The case of lightweight aircraft components. J. Clean. Prod. 2016, 135, 1559–1570. [Google Scholar] [CrossRef]
  34. ASTM International. F2792-12a—Standard Terminology for Additive Manufacturing Technologies; ASTM International: West Conshohocken, PA, USA, 2013. [Google Scholar]
  35. Gardan, J. Additive manufacturing technologies: State of the art and trends. Int. J. Prod. Res. 2016, 54, 3118–3132. [Google Scholar] [CrossRef]
  36. Kruth, J.-P.; Leu, M.; Nakagawa, T. Progress in Additive Manufacturing and Rapid Prototyping. CIRP Ann. 1998, 47, 525–540. [Google Scholar] [CrossRef]
  37. Gebhardt, A. Understanding Additive Manufacturing; Carl Hanser Verlag GmbH & Co. KG: Munich, Germany, 2011; ISBN 978-3-446-42552-1. [Google Scholar]
  38. Gao, J.; Chen, X.; Yilmaz, O.; Gindy, N. An integrated adaptive repair solution for complex aerospace components through geometry reconstruction. Int. J. Adv. Manuf. Technol. 2008, 36, 1170–1179. [Google Scholar] [CrossRef]
  39. Baumers, M.; Tuck, C.; Hague, R. Realised levels of geometric complexity in additive manufacturing Martin Baumers. Chris Tuck. Int. J. Prod. Dev. 2011, 13, 222–244. [Google Scholar] [CrossRef]
  40. Kovalev, O.B.; Bedenko, D.V. Development and application of laser cladding modeling technique: From coaxial powder feeding up to the surface deposition and bead formation. Appl. Math. Model. 2017, 57, 339–359. [Google Scholar] [CrossRef]
  41. Huang, S.H.; Liu, P.; Mokasdar, A.; Hou, L. Additive manufacturing and its societal impact: A literature review. Int. J. Adv. Manuf. Technol. 2013, 67, 1191–1203. [Google Scholar] [CrossRef]
  42. Flynn, J. Hybrid Additive and Subtractive Machine Tools-Research and Industrial Developments Hybrid Additive and Subtractive Machine Tools- Research and Industrial Developments. Int. J. Mach. Tools Manuf. 2015, 101, 1–45. [Google Scholar]
  43. Crawford, R.H.; Beaman, J.J. Solid freeform fabrication: A new fabrication paradigm. IEEE Spectrum, February 1999; 34–43. [Google Scholar]
  44. Gornet, T. History of Additive Manufacturing. Wohlers Rep. 2014, 24, 118. [Google Scholar]
  45. Kumar, S. Selective Laser Sintering/Melting. In Comprehensive Materials Processing; Elsevier: Amsterdam, The Netherlands, 2014; Volume 10, pp. 93–134. ISBN 9780080965338. [Google Scholar]
  46. Brückner, F.; Lepski, D. Laser Cladding; CRC Press: Boca Raton, FL, USA, 2017; Volume 119, ISBN 0849321727. [Google Scholar]
  47. Rahito Wahab, D.A.; Azman, A.H. Restoration of Remanufacturable Components Using Additive Manufacturing. In Sustainable Design and Manufacturing 2018; Dao, D., Howlett, R.J., Setchi, R., Vlacic, L., Eds.; Springer International Publishing: Cham, Switzland, 2019; pp. 193–198. [Google Scholar]
  48. Leino, M.; Pekkarinen, J.; Soukka, R. The Role of Laser Additive Manufacturing Methods of Metals in Repair, Refurbishment and Remanufacturing—Enabling Circular Economy. Phys. Procedia 2016, 83, 752–760. [Google Scholar] [CrossRef]
  49. Matsumoto, M.; Yang, S.; Martinsen, K.; Kainuma, Y. Trends and research challenges in remanufacturing. Int. J. Precis. Eng. Manuf. Technol. 2016, 3, 129–142. [Google Scholar] [CrossRef]
  50. Fink, A. Conducting Research Literature Reviews; Sage: Thousand Oaks, CA, USA, 2014; ISBN 9781452259499. [Google Scholar]
  51. www.Sciencedirect.Com. Available online: http://www.sciencedirect.com/ (accessed on 2 November 2019).
  52. www.Link.Springer.com. Available online: http://link.springer.com/ (accessed on 2 November 2019).
  53. www.emerald.com. Available online: https://www.emerald.com/insight/ (accessed on 2 November 2019).
  54. www.wiley.com. Available online: https://www.wiley.com/en-id (accessed on 2 November 2019).
  55. Denyer, D.; Smart, P.; Tranfield, D. Towards a Methodology for Developing Evidence-Informed Management Knowledge by Means of Systematic Review. Br. J. Manag. 2003, 14, 207–222. [Google Scholar]
  56. Littell, J.H.; Corcoran, J.; Pillai, V. Systematic Review and Meta-Analysis; Oxford University Press: Oxford, UK, 2008; ISBN 978-0-19-532654-3. [Google Scholar]
  57. Stechemesser, K.; Guenther, E. Carbon accounting: A systematic literature review. J. Clean. Prod. 2012, 36, 17–38. [Google Scholar] [CrossRef]
  58. Suhariyanto, T.; Wahab, D.; Rahman, M.A. Multi-Life Cycle Assessment for sustainable products: A systematic review. J. Clean. Prod. 2017, 165, 677–696. [Google Scholar] [CrossRef]
  59. Khajavi, S.H.; Partanen, J.; Holmström, J. Additive manufacturing in the spare parts supply chain. Comput. Ind. 2014, 65, 50–63. [Google Scholar] [CrossRef]
  60. Koehler, H.; Partes, K.; Seefeld, T.; Vollertsen, F. Influence of Laser Reconditioning on Fatigue Properties of Crankshafts. Phys. Procedia 2011, 12, 512–518. [Google Scholar] [CrossRef] [Green Version]
  61. Shellabear, M.; Nyrhilä, O. DMLS—Development History and State of the Art. Lane 2004, 2004, 1–12. [Google Scholar]
  62. Penaranda, X.; Moralejo, S.; Lamikiz, A.; Figueras, J. An adaptive laser cladding methodology for blade tip repair. Int. J. Adv. Manuf. Technol. 2017, 92, 4337–4343. [Google Scholar] [CrossRef]
  63. Ion, J.C.; Ion, J.C. Chapter 12—Cladding. In Laser Processing of Engineering Materials; Butterworth-Heinemann: Oxford, UK, 2005; pp. 296–326. ISBN 9780750660792. [Google Scholar]
  64. Wilson, J.M.; Piya, C.; Shin, Y.C.; Zhao, F.; Ramani, K. Remanufacturing of turbine blades by laser direct deposition with its energy and environmental impact analysis. J. Clean. Prod. 2014, 80, 170–178. [Google Scholar] [CrossRef]
  65. Bi, G.; Gasser, A. Restoration of Nickel-Base Turbine Blade Knife-Edges with Controlled Laser Aided Additive Manufacturing. Phys. Procedia 2011, 12, 402–409. [Google Scholar] [CrossRef]
  66. Liu, H.; Hu, Z.; Qin, X.; Wang, Y.; Zhang, J.; Huang, S. Parameter optimization and experimental study of the sprocket repairing using laser cladding. Int. J. Adv. Manuf. Technol. 2017, 91, 3967–3975. [Google Scholar] [CrossRef]
  67. Leunda, J.; Soriano, C.; Sanz, C.; Navas, V.G. Laser Cladding of Vanadium-Carbide Tool Steels for Die Repair. Phys. Procedia 2011, 12, 345–352. [Google Scholar] [CrossRef] [Green Version]
  68. Guo, S.; Shang, H.; Cui, L.; Guo, X.; Yao, J. Effects of Laser Cladding Layers Width on Total Indicated Runout Characteristics of Steam Turbine Rotor Surface. Xiyou Jinshu Cailiao Yu Gongcheng/Rare Met. Mater. Eng. 2017, 46, 612–616. [Google Scholar]
  69. Lourenço, J.M.; Da Sun, S.; Sharp, K.; Luzin, V.; Klein, A.N.; Wang, C.H.; Brandt, M. Fatigue and fracture behavior of laser clad repair of AerMet® 100 ultra-high strength steel. Int. J. Fatigue 2016, 85, 18–30. [Google Scholar] [CrossRef]
  70. Lewis, S.; Lewis, R.; Fletcher, D. Assessment of laser cladding as an option for repairing/enhancing rails. Wear 2015, 330, 581–591. [Google Scholar] [CrossRef]
  71. Acharya, R.; Das, S. Additive Manufacturing of IN100 Superalloy Through Scanning Laser Epitaxy for Turbine Engine Hot-Section Component Repair: Process Development, Modeling, Microstructural Characterization, and Process Control. Met. Mater. Trans. A 2015, 46, 3864–3875. [Google Scholar] [CrossRef]
  72. Clare, A.T.; Oyelola, O.; Abioye, T.E.; Farayibi, P.K. Laser cladding of rail steel with Co–Cr. Surf. Eng. 2013, 29, 731–736. [Google Scholar] [CrossRef]
  73. Walachowicz, F.; Bernsdorf, I.; Papenfuss, U.; Zeller, C.; Graichen, A.; Navrotsky, V.; Rajvanshi, N.; Kiener, C. Comparative Energy, Resource and Recycling Lifecycle Analysis of the Industrial Repair Process of Gas Turbine Burners Using Conventional Machining and Additive Manufacturing. J. Ind. Ecol. 2017, 21, S203–S215. [Google Scholar] [CrossRef] [Green Version]
  74. Kattire, P.; Paul, S.; Singh, R.; Yan, W.; Singh, R. Experimental characterization of laser cladding of CPM 9V on H13 tool steel for die repair applications. J. Manuf. Process. 2015, 20, 492–499. [Google Scholar] [CrossRef]
  75. Pathak, S.; Saha, G.C. Development of Sustainable Cold Spray Coatings and 3D Additive Manufacturing Components for Repair/Manufacturing Applications: A Critical Review. Coatings 2017, 7, 122. [Google Scholar] [CrossRef]
  76. Portolés, L.; Jordá, O.; Jordá, L.; Uriondo, A.; Esperon-Miguez, M.; Perinpanayagam, S. A qualification procedure to manufacture and repair aerospace parts with electron beam melting. J. Manuf. Syst. 2016, 41, 65–75. [Google Scholar] [CrossRef]
  77. Liu, Z.; Jiang, Q.; Li, T.; Dong, S.; Yan, S.; Zhang, H.-C.; Xu, B. Environmental benefits of remanufacturing: A case study of cylinder heads remanufactured through laser cladding. J. Clean. Prod. 2016, 133, 1027–1033. [Google Scholar] [CrossRef]
  78. Gao, J.; Wen, H.; Lin, Z.; Wu, H.; Li, S.; Chen, X.; Chen, Y.; He, Y. Geometric model reconstruction through a surface extension algorithm for remanufacturing of twist blades. Rapid Prototyp. J. 2017, 23, 382–390. [Google Scholar] [CrossRef]
  79. Lei, X.; Huajun, C.; Hailong, L.; Yubo, Z. Study on laser cladding remanufacturing process with FeCrNiCu alloy powder for thin-wall impeller blade. Int. J. Adv. Manuf. Technol. 2017, 90, 1383–1392. [Google Scholar] [CrossRef]
  80. Gupta, K. Advanced Manufacturing Technologies; Springer: Berlin/Heidelberg, Germany, 2017; Volume 16. [Google Scholar]
  81. Hällgren, S.; Pejryd, L.; Ekengren, J. (Re)Design for Additive Manufacturing. Procedia CIRP 2016, 50, 246–251. [Google Scholar] [CrossRef] [Green Version]
  82. Zhang, X.; Li, W.; Cui, W.; Liou, F. Modeling of worn surface geometry for engine blade repair using Laser-aided Direct Metal Deposition process. Manuf. Lett. 2018, 15, 1–4. [Google Scholar] [CrossRef]
  83. Zhang, P.; Liu, Z. Plastic deformation and critical condition for orthogonal machining two-layered materials with laser cladded Cr-Ni-based stainless steel onto AISI 1045. J. Clean. Prod. 2017, 149, 1033–1044. [Google Scholar] [CrossRef]
  84. Raju, R.; Duraiselvam, M.; Petley, V.; Verma, S.; Rajendran, R. Microstructural and mechanical characterization of Ti6Al4V refurbished parts obtained by laser metal deposition. Mater. Sci. Eng. A 2015, 643, 64–71. [Google Scholar] [CrossRef]
  85. Lestan, Z.; Milfelner, M.; Balic, J.; Brezocnik, M.; Karabegovic, I. Laser deposition of Metco 15E, Colmony 88 and VIM CRU 20 powders on cast iron and low carbon steel. Int. J. Adv. Manuf. Technol. 2013, 66, 2023–2028. [Google Scholar] [CrossRef]
  86. Zhang, W. Research on Microstructure and Property of Fe-VC Composite Material Made by Laser Cladding. Phys. Procedia 2012, 25, 200–204. [Google Scholar] [CrossRef] [Green Version]
  87. Rickli, J.L.; Dasgupta, A.K.; Dinda, G.P. A descriptive framework for additive remanufacturing systems. Int. J. Rapid Manuf. 2014, 4, 199. [Google Scholar] [CrossRef]
  88. Zhang, X.; Li, W.; Adkison, K.M.; Liou, F. Damage reconstruction from tri-dexel data for laser-aided repairing of metallic components. Int. J. Adv. Manuf. Technol. 2018, 96, 3377–3390. [Google Scholar] [CrossRef]
  89. Zhang, P.; Liu, Z. On sustainable manufacturing of Cr-Ni alloy coatings by laser cladding and high-efficiency turning process chain and consequent corrosion resistance. J. Clean. Prod. 2017, 161, 676–687. [Google Scholar] [CrossRef]
  90. Lashlem, A.; Wahab, D.; Abdullah, S.; Haron, C.C. The Effect of Geometry in End-of-Life Vehicle Recovery of Safety Beams. Appl. Mech. Mater. 2014, 663, 614–621. [Google Scholar] [CrossRef]
  91. Acharya, R. Multiphysics Modeling and Statistical Process Optimization of the Scanning Laser Epitaxy Process Applied to Additive Manufacturing of Turbine Engine Hot-Section Superalloy Components; Georgia Institute of Technology: Atlanta, Georgia, 2014. [Google Scholar]
  92. Cuda, P.E.; James, B. Engine Block Cylinder Head Bolt Hole Repair. United States Patent US 5,025,556, 25 June 1991. [Google Scholar]
  93. Kassim, J.; Ramli, R.; Abdullah, S. Review on Geometrical Tolerance Applications and Contribution in Automotive Industry. J. Eng. 2018, 1, 41–48. [Google Scholar]
  94. Arifin, A.M.T.; Abdullah, S.; Rafiquzzaman, M.; Zulkifli, R.; Wahab, D.A. Failure characterisation in polymer matrix composite for un-notched and notched (open-hole) specimens under tension condition. Fibers Polym. 2014, 15, 1729–1738. [Google Scholar] [CrossRef]
  95. Gebhardt, A.; Hötter, J.-S. Additive Manufacturing/3D Printing; Carl Hanser Verlag GmbH & Co. KG: Munich, Germany, 2016; Volume 35, ISBN 9781569905821. [Google Scholar]
  96. Calleja, A.; Tabernero, I.; Fernández, A.; Celaya, A.; Lamikiz, A.; De Lacalle, L.L.; Mentxaka, A.L.; De Lacalle, L.N.L. Improvement of strategies and parameters for multi-axis laser cladding operations. Opt. Lasers Eng. 2014, 56, 113–120. [Google Scholar] [CrossRef]
  97. Praniewicz, M.; Kurfess, T.; Saldana, C. Adaptive geometry transformation and repair for hybrid manufacturing. Procedia Manuf. 2018, 26, 228–236. [Google Scholar] [CrossRef]
  98. Fera, M.; Fruggiero, F.; Lambiase, A.; Macchiaroli, R.; Todisco, V. A modified genetic algorithm for time and cost optimization of an additive manufacturing single-machine scheduling. Int. J. Ind. Eng. Comput. 2018, 9, 423–438. [Google Scholar] [CrossRef]
  99. Fera, M.; Fruggiero, F.; Lambiase, A.; Macchiaroli, R.; Maccharoli, R. State of the art of additive manufacturing: Review for tolerances, mechanical resistance and production costs. Cogent Eng. 2016, 3, 1261503. [Google Scholar] [CrossRef]
  100. Costabile, G.; Fera, M.; Fruggiero, F.; Lambiase, A.; Pham, D. Cost models of additive manufacturing: A literature review. Int. J. Ind. Eng. Comput. 2016, 8, 263–282. [Google Scholar] [CrossRef]
  101. Di Pasquale, V.; Miranda, S.; Neumann, W.P.; Setayesh, A. Human reliability in manual assembly systems: A Systematic Literature Review. IFAC-PapersOnLine 2018, 51, 675–680. [Google Scholar] [CrossRef]
Figure 1. Process flow of remanufacturing.
Processes 07 00802 g001
Figure 2. Additive manufacturing (AM) implementation course
Processes 07 00802 g002
Figure 3. (a) Illustration of the Stereolithography system (b) Illustration of the Selective Laser Sintering system.
Processes 07 00802 g003
Figure 4. Type of publication that published articles related to AM restoration.
Processes 07 00802 g004
Figure 5. AM deployment for repair and restoration according to the types of industry.
Processes 07 00802 g005
Figure 6. (a) AM technology for repair and restoration and (b) object of restoration using AM.
Processes 07 00802 g006
Figure 7. (a) Damaged tip and (b) reconstructed tip reproduced with permission from Wilson et.al [64], Journal of Cleaner Production; published by Elsevier, 2014.
Processes 07 00802 g007
Table 1. Total output value of remanufacturing in 2016.
ProducersOutput Value (in USD)
Japan [23]4,800,000,000
United Kingdom [13]7,280,000,000
USA [24]75,000,000,000
Table 2. Additive Manufacturing (AM) principles.
American Standard Testing and Materials (ASTM) CategoryBasic PrinciplesExample of AM Technology
Binder Jetting (BJ)Liquid printing binder deployed onto specific coordinate layer-by-layer of material powder that sticks at the particle until it becomes a 3D object.3D inkjet technology
Direct Energy Deposition (DED)Deposition of powder material coincides with focused thermal energy to melt it through the targeted spot.Electron Beam
Laser Engineered Net Shaping (LENS)
Plasma Arc Melting
Laser cladding (LC)
Material Extrusion (ME)Precipitation of build materials droplets through a heated nozzle.3D inkjet technology
Fused Deposition Modeling (FDM)
Powder Bed Fusion (PBF)The fusion of a specific coordinate in a small region of the powder bed of the build material using focused thermal energyDirect Metal Laser Sintering (DMLS)
Electron beam melting (EBM)
Selective Laser Sintering/Melting (SLS/SLM)
Sheet Lamination (SE)Attachment of sheets/foils of materials.Ultrasound consolidation/Ultrasound Additive Manufacturing (UC/UAM)
Laminated Object Manufacturing (LOM)
Vat Photo Polymerization (VP)Focused light-curing towards liquid polymer in a vatDigital Light Processing (DLP)
Stereo Lithography (SLA)
Cold SprayInjected powder at high velocity to build-up material, caused by adhesionMulti-Metal Deposition
Table 3. Research question.
Issues in AM RestorationResearch Questions
How does AM technology conduct repair and restoration? What are the recommendations for effective repair and restoration using AM technology from an object design and systems perspective?
Table 4. Review protocol.
Bibliographic Data and Field of Industry
AuthorWho is the author of the publication?Xu Lei, Cao Huajun, Liu Hailong, Zhang Yubo
YearIn what year is the work issued?2016
TitleWhat is the title of the publication?Study on laser cladding remanufacturing process with FeCrNiCu alloy powder for thin-wall impeller blade.
Type of PublicationWhat kind of publication?Journal
Name of PublicationWhat is the name of journal/proceeding/book/report?International Journal of Advanced Manufacturing Technology
Field of IndustryWhat is the industrial field categorizing the product?Marine and offshore
Focus and Content of the Publication
AM technology DeterminationWhich AM technology is used in this study, according to the object of restoration?Laser Cladding (DED)
MotivationWhat is the reason for conducting the study?To conduct restoration on the thin wall of a centrifugal compressor impeller.
GoalWhat is the goal of the study?To ascertain the use of FeCrNiCu alloy powder in the restoration process
Product or object materialWhat is the material of the restored product and AM?Metal-based product and
FeCrNiCu alloy powder
AM machine settingWhat is the AM machine setting used in this study?4 axis robotic arm to aid the extrusion process
4 kW laser
−140~+320 mesh size of powder material
5 mm/s laser speed
8.0 g/min powder feed rate
3 mm laser spot diameter
150 L/h carrier flow
Geometrical complexityWhat is the geometrical complexity of the restored object?Impeller blade has a thin wall, which limits the optimization of the LC scanning path.
Pre-processingWhat is the pre-processing of the restoration process preparation?This experiment uses ANSYS software as a simulated heat source, Pro/E software as 3D-remanufactured impeller model builder.
Engineering ToleranceWhat is the geometric tolerance of the restoration process?1.5 mm.
Material compatibilityHow was the material compatibility of the restoration process?The AM material was compatible to be used to repair the object material
Table 5. Focus of previous research in AM reparation.
Repaired ObjectAM TechnologyFocus of Study and Repair
Turbine Blade of Aircraft component [64]Laser Energy Deposition (DED)A geometric reconstruction algorithm for repairing turbine airfoils.
Gas Turbine Blade of Power Plant [65]Laser Aided Additive Manufacturing (DED)Analysis of a restoration process using Laser Aided AM onto turbine blade knife edges.
Sprocket Mining [66]Laser Cladding (DED)Ascertaining the optimum process parameters of LC for sprocket reparation.
Automotive Die [67]Laser Cladding (DED)Studying the effect of material on the heat treatment of Vanadis Extra 4.
Steam Turbine Rotor of Power Plant [68]Laser Cladding (DED)Analyzing the effect of different widths of LC on the Total Indicated Runout.
Crankshaft of Marine Engine [60]Laser Cladding (DED)Comparison between uncladded and cladded flat specimens towards crankpin journal surface.
Yoke plate Cylinder Guide [30]FDMAnalysis of specific strategies for Maintenance Repair Overhaul optimization.
Sprocket Mining [66]Laser Cladding (DED)Application of the LC process in sprocket restoration.
Aerospace [28]Laser Metal Deposition (DED)Analysis of appropriate geometries towards the remanufacturing process.
Marine [27]Laser Cladding (DED)Constructing the system for onboard reparation using LC on the engine housing of marine.
Aerospace [69]Laser Cladding (DED)Analysis of fatigue and fracture of AerMet 100 powder application for LC repair process.
Railways [70]Laser Cladding (DED)Analysis of the wear and Rolling Contact Fatigue (RCF) performance of the LC process for rail applications.
Aircraft [71]Scanning Laser Epitaxy (DED)Development of a model for melting and solidification of EQ Alloy IN100 in Scanning Laser Epitaxy.
Railways [72]Laser Cladding (DED)Analysis of surface coating for R260 rail steel.
Industrial Gas Turbine Burner [73]PBFAnalysis of the environmental impact of the reparation process using PBF for gas turbine burner.
Table 6. AM reparation of objects using different types of additive material.
Repaired ObjectAM TechnologyAdditive Material
Composite materials [32]DEDTi6Al4V
Die [82]DEDInconel 625
Steam turbine rotor [68]DEDStainless Steel
AISI 1045 steel rod bar [83]DEDCr–Ni alloy
Centrifugal compressor impeller [79]DEDFeCrNiCu Alloy
Sprocket [66]DEDAISI 4140 & Fe based powder
Aerospace component [69]DEDAerMet Powder
Gas turbine burner [28]DEDNickel-based alloy Inconel 718
Cylinder’s guide yoke plate [30]FDMPolylactic Acid (PLA)
Ti6Al4V based aero engine blade material [84]DEDTi6AlV
Turbine blade [64]DEDStainless Steel 316 L powder
Rails [72]DEDStellite 6 powder
Cast iron and low carbon steel [85]DEDMetco 15 E
Colmony 88
VIM CRU 20
Table 7. Machine setting for different additive materials.
AuthorAM TechnologyAdditive MaterialAM Machine Setting
Zhang et al. [88]DEDInconel 625 Laser power: 600 W
Scan speed: 220 mm/min
Powder feed rate: 4 g/min
Guo et al. [68]DEDStainless Steel Laser power: 1800 W
Laser spot diameter: 4 mm
Powder feed rate: 10 g/min
Zhang and Liu [89]DEDCr–Ni alloyLaser power: 3000 W
Scan speed: 5.1 mm/s
Powder feed rate: 450 g/min
Lei et al. [79]DEDFeCrNiCu Alloy Laser power: 1100 W
Powder size: −140∼+320 mesh
Scan speed: 5 mm/s
Powder feed rate: 8 g/min
Laser spot diameter: 3 mm
Carrier flow: 150 L
Liu et al. [66]DEDAISI 4140 & Fe based powder Laser power: 1000–2000 W
Powder feed rate: 2.21–2.81 g/min
Scanning speed: 800–1200 mm/min
Lourenço et al. [69]DEDAerMet Powder Laser power: 800 W
Laser spot size: 1.3 mm
Powder flow rate: 5.15 g/min
Petrat et al. [28]DEDNickel-base alloy Inconel 718 Laser power: 800–1600 W
Spot diameter: 1–2.2 mm
Powder flow rate: 5–15 g/min
Wits et al. [30]FDMPolylactic Acid (PLA) Ultimaker machine
Heated bed & nozzle: 2.85 mm
Heat: 210 °C
Print speed: 50 mm/s
Raju et al. [84]DEDTi6AlVLaser power: 1500 W
Scan speed: 600 mm/min
Powder size: 45–100 μm
Spot diameter: 2 mm
Wilson et al. [64]DEDStainless Steel 316L powder Laser carrier: Optomec LENS® 750
Laser power: 500 W
Powder size: 44 μm
Clare et al. [72]DEDStellite 6 powder Laser power: 1600 W
Powder flow rate: 0.25–0.5 g/s
Lestan et al. [85]DEDMetco 15 E
Colmony 88
VIM CRU 20
Laser carrier: Optomec LENS 850-R
Laser power: 360–400 W
Laser spot diameter: 0.8 mm
Powder feed rate: 3.5–3.8 g/min
Table 8. Reparation of objects with geometrical complexity.
Repaired ObjectGeometrical Complexity
Manufacturing Die [88]Reconstructing the convex chipped part at the edge of the die.
Turbine Blade of Aircraft component [64]Reconstructing the chipped part of the blade tip.
Gas Turbine Blade of Power Plant [65]Building up a thin wall of the turbine blade.
Sprocket Mining [66]Reconstructing a sprocket tooth of the conveyor.
Manufacturing Die [74]Overlaying the surface of a die.
Automotive Die [67]Surface coating of die (surface was machined before laser treatment).
Steam Turbine Rotor of Power Plant [68]The curved surface of the shaft.
Crankshaft of Marine engine [60]Overlaying the surface of the marine crankshaft.
Yoke plate Cylinder Guide [92]Rebuilding yoke plate using FDM machine.
Aerospace [28]A hollow cylinder of gas turbine burner with varies thickness between 7.20 and 7.34 mm.
Marine [27]Overlay wearing in the surface of the crankshaft.
Industrial Gas Turbine Burner [73]A hollow cylinder of gas turbine burner.
Table 9. Challenges in AM reparation from object design and process systems perspectives.
Repaired ObjectChallenge of Repair Process
Sprocket Mining [66]The optimum parameter of LC machine should be determined to obtain the optimum result of repair
Aerospace [69]The use of ultra-high-strength steels in aircraft, which is susceptible to fatigue resulting in brittle fracture, must be repaired using the appropriate material powder for LC repair
Aerospace [28]Finding the optimum parameter of LC to build three different single hollow cylinders with varying wall thicknesses
Marine [27]Building an onboard LC repair tool
Industrial Gas Turbine Burner [73]Determining the precise location of the object for repair using the LBM machine
Manufacturing Die [88]Building a reconstruction algorithm to model worn out parts for LC repair process.
Gas Turbine Blade of Power Plant [65]Finding the appropriate heat input for the deposition of Laser Aided Additive Manufacturing to avoid crack after process completion
Sprocket Mining [66]Ascertaining the different parameters of the LC machine (i.e., laser power, scanning speed, and powder feed rate) as they affect surface profile characteristics, microstructure, and micro-hardness
Manufacturing Die [74]Analyzing the optimum laser power towards CPM powder burst on H13 tool steel.
Automotive Die [67]Determining the appropriate choice of CPM 10V and Vanadis 4 Extra steel powder deposited into heat-treated Vanadis 4 plate
Steam Turbine Rotor of Power Plant [68]Determining the optimum diameter and laser cladding width to solve wear reparation.
Yoke plate Cylinder Guide [92]Constructing the appropriate process flow for MRO strategies.