Next Article in Journal
Unsupervised Domain Adaptation in Semantic Segmentation: A Review
Next Article in Special Issue
Wire Tool Electrode Behavior and Wear under Discharge Pulses
Previous Article in Journal
Investigation of Methods to Extract Fetal Electrocardiogram from the Mother’s Abdominal Signal in Practical Scenarios
Previous Article in Special Issue
Electrical Discharge Machining Non-Conductive Ceramics: Combination of Materials
 
 
Correction published on 13 December 2023, see Technologies 2023, 11(6), 180.
Article

Influence of WC-Based Pin Tool Profile on Microstructure and Mechanical Properties of AA1100 FSW Welds

by
Abbas Tamadon
1,*,
Arvand Baghestani
2 and
Mohammad Ebrahim Bajgholi
3,†
1
Department of Mechanical Engineering, University of Canterbury, Christchurch 8041, New Zealand
2
Department of Mechanical Engineering, Kish International Campus, University of Tehran, Kish Island 79416-55665, Iran
3
Department of Mechanical Engineering, École de Technologie Supérieure (ETS), Montreal, QC H3C 1K3, Canada
*
Author to whom correspondence should be addressed.
Current Address: Department of Materials Engineering, Science and Research Branch, Islamic Azad University, Tehran 1477893855, Iran.
Technologies 2020, 8(2), 34; https://doi.org/10.3390/technologies8020034
Submission received: 4 April 2020 / Revised: 2 June 2020 / Accepted: 5 June 2020 / Published: 15 June 2020 / Corrected: 13 December 2023
(This article belongs to the Special Issue Reviews and Advances in Materials Processing)

Abstract

:
The effect of various tungsten carbide (WC) pin tools and operating parameters on the material structure and properties of an AA1100 friction stir welding (FSW) weld were evaluated. Three different pin shapes were employed (conical, square and threaded). For each tool shape, welds were generated for a set of tool (revolutions per minute, RPM) (710, 1120 and 1400) and advancing speeds (150, 250 and 400 mm/min). Weld samples were tested for mechanical strength by tensile testing. Morphology was examined using optical microscopy, and weld composition with scanning electron microscopy (SEM), energy-dispersive X-ray spectroscopy (EDS) and X-ray diffraction (XRD). No weld contamination from the tools was observed. However, a number of structural defects, inherent to the FSW process, were observed (including tunnel voids, kissing bonds and swirling lines). These defects, associated with the stirring action, could not be eliminated. The results show how the operating parameters may be optimized to produce stronger welds.

1. Introduction

Friction stir welding (FSW) is a solid-phase process [1] carried out at lower temperatures than conventional fusion welding [2]. This joining technique was introduced by The Welding Institute (TWI) [3], originally for aluminium alloys. The welding action is conducted by a non-consumable rotating tool, consisting of a penetrating pin at the centre supported by the tool shoulder [4]. The advancement of the tool through the weld-line results in severe plastic deformation [3,5,6], inducing frictional heating in the base material [7,8]. The stirring action mixes the softened material from both sides of the weld-line (advancing side (AS) and retreating side (RS)). The mixing is the result of both forging and extrusion forces underneath and around the tool [9,10,11,12,13]. As the rotating tool leaves the stirring position, material is deposited behind the tool, forming a continuous weld-line [13,14].
FSW can be used for a variety of ferrous and non-ferrous metallic materials [15,16,17], where solidification-related problems common to fusion welding can be eliminated from the weld structure. Mechanical properties may also be improved. In general, the severe deformation inherent to FSW causes grain fragmentation in the stir zone (SZ) and produces a fine-grained microstructure as the major region of the FSW weld [9,18]. In immediate proximity to the stir zone is the transition zone where the microstructure differs from the base material, due to dynamic recrystallization (DRX) caused by thermal flux and mechanical strain. These transitional regions are called the thermo-mechanically affected zone (TMAZ) and heat affected zone (HAZ) [19,20,21]. During cooling, microstructural evolution eventually leads to grain refinement and precipitation, which increases the mechanical strength of the weld [9].
The thermomechanical nature of the process induces DRX, which causes some grain-scale alterations within the weld texture. This microstructural evolution has considerable effects on the final properties of the FSW weld [20].
Depending on the welding parameters (welding speeds and the tool geometry), the frictional heat input and the subsequent flow-based stirring action can establish a relatively complex strain distribution which is stored in the fragmented grain structure [22,23]. By the beginning of the cooling stage, DRX leads to a variety of microscopic transformations throughout the polycrystalline weld structure [24,25].
These thermomechanical alterations need to be accurately studied at a grain-structure level to characterize the origin of microscopic transformations (e.g., grain refinement, morphological alterations and precipitation). However, the FSW process can introduce structural weld defects, such as micro-voids or micro-cracks due to improper welding parameters [26,27]. It is expected that the strength of the weld should reach the same as the parent metal [28] given the homogenous DRX microstructure in the SZ. However the mechanical strength of the weld can be easily affected by the welding speeds—advancing speed (V) and rotating speed (ω). Additionally, the geometry of the pin tool has an impact on the weld quality [13,29], it influencing the heating of the substrate and transportation of the plasticised mass flow during the stirring action. The pin tool is subject to large forces and at elevated temperatures may undergo abrasion, possibly contaminating the weld [30,31].
In metal forming processes, the surface quality can be changed during the plastic deformation. In this regards, by using some proper surface finishing procedures (such as burnishing), the high spots of the surface can be flattened by a smooth hard tool. The ball-burnishing [32] is a secondary process that is applied after the FSW to smooth the surface of the welding nugget by a radial feed and exerting a sufficient compressive force. Consequently, the blanked edge of the weld surface is smoothed out by a certain magnitude of compressible residual stress distribution. As a result, it improves the tensile strength or bending strength of the weld in the springback phenomenon.
The inherent formability of aluminium guarantees the applicability of FSW to Al alloys. Deformable non-ferrous materials, such as aluminium, are generally processed using tool steels for the pin-tools. Tool steels provide enough friction and thermal strength for the FSW process, however weld contamination is common. Contaminants displaced from the FSW tool can be trapped into the weld region causing impurity or void formation [33], both of which deteriorate the expected strength properties of the weld. These issues can be worse for FSW of reactive materials such as aluminium. Therefore, enhanced wear resistance and stability at elevated temperatures is required to promote the tool lifetime. Tungsten carbide (WC), which has high hardness (1650 HV), is a promising candidate. However, the performance of WC in FSW conditions [34,35,36], and its feasibility for FSW, is unknown.
The research objective of this study is to investigate the effect of a WC pin tool on the microstructure and mechanical properties of FSW AA1100 aluminium alloy under different welding conditions. Additionally, the impact of various FSW operating parameters, including tool advancing speed, rotational speed and tool geometry, were assessed. AA1100 aluminium is a commercial aluminium alloy metallurgically stabilized with a standard element composition to attain specific mechanical properties. Weld contamination may be easily detected due to the chemical purity. The alloy was chosen as the first material to test as it is easily deformable, and hence is a good candidate for FSW. If unsatisfactory results are obtained for this alloy, the method will not be suitable for other grades. Three tool geometries were used to generate weld samples: conical, threaded and square, manufactured by powder metallurgy [24,37]. Although WC-based tools are usually used in processing of high strength and high-temperature alloys (e.g., steels or super-alloys), this research was designed to investigate the possibility of the tool material loss and contamination of the weld region arising from the tool material.
Different tool shapes can provide different mechanical stirring and engagement between the tool and substrate, allowing evaluation of the mechanical instability of the WC tool under the high-friction conditions of the stirring action. By applying different speeds (spindle rotational speed and advancing feed rate), the mechanical performance of the tool can be assessed better.
The thickness of the workpiece and the spindle load were kept constant. The samples were tested for mechanical strength, microscopic structure and weld contamination. Metallographic measurements and mechanical strength can be used as a reliable method to evaluate the optimum microscopic features.

2. Materials and Methods

FSW welding trials were conducted on AA1100 alloy plates with a thickness of 5 mm. The composition of the AA1100 aluminium plate (utilised as the parent metal in this work) is listed in Table 1, measured using an atomic absorption analysis quantometer (AA-6300, Shimadzu Corporation, Kyoto, Japan).
Three single-piece tools with different pin geometry designs but similar configuration and dimensions were utilised for the weld trials. With a constant shoulder diameter of 20 mm, pins were manufactured to three different geometries; conical, square and threaded (Figure 1). The pin tools were made of WC, by powder metallurgy sintering [38]. The composition of the powder mixture utilized was WC—0.3 wt % C—6 wt % Co. The free-carbon powder was used to prevent porosity, and to avoid formation of oxide phases (e.g., WO and WO3) during the sintering process. Cobalt (Co) was employed as the binder phase to improve the wettability on micro-size WC particles, therefore promoting interfacial bonding strength and wear resistance of the segment. Sintering was done at 1800 °C for 90 min under a pressure of 70 MPa. The shoulders of the FSW tools were fabricated from H13 hot work tool steel (hardness 560 HV), a standardised grade suitable for hot working. For each tool, the pin and shoulder were joined by the transient liquid phase diffusion bonding (TLPDB) technique.
The weldment plates were cut into two plates with dimensions of 235 mm in length and 45 mm in width and set side-by-side for a butt weld. For this soft aluminium grade, initial trials showed that lower speeds could not provide a stable welding condition, while higher speeds led to poor weld quality with structural defects (e.g., flash, voids or discontinuities) occurring throughout the weld. Many welds were conducted, but the speed parameters (ω and V) were limited to the ones with better results in preliminary tests. Five feed rate speeds in the range of 100–400 mm/min and eight rotational speeds in the range of 600–1500 RPM (revolutions per minute) were applied to produce the FSW weldments. While some complete welds were produced, there was also a high proportion of only partially successful welds, hence indicating a quality problem. The issue was invariably a partially successful joint with a localised defect (discontinuity line or tunnel void defect). We aimed to better understand the causes of the quality issues for different pin tool profiles. Therefore, after some trial and error, the feed rates and rotational speeds were optimized to those given in Table 2.
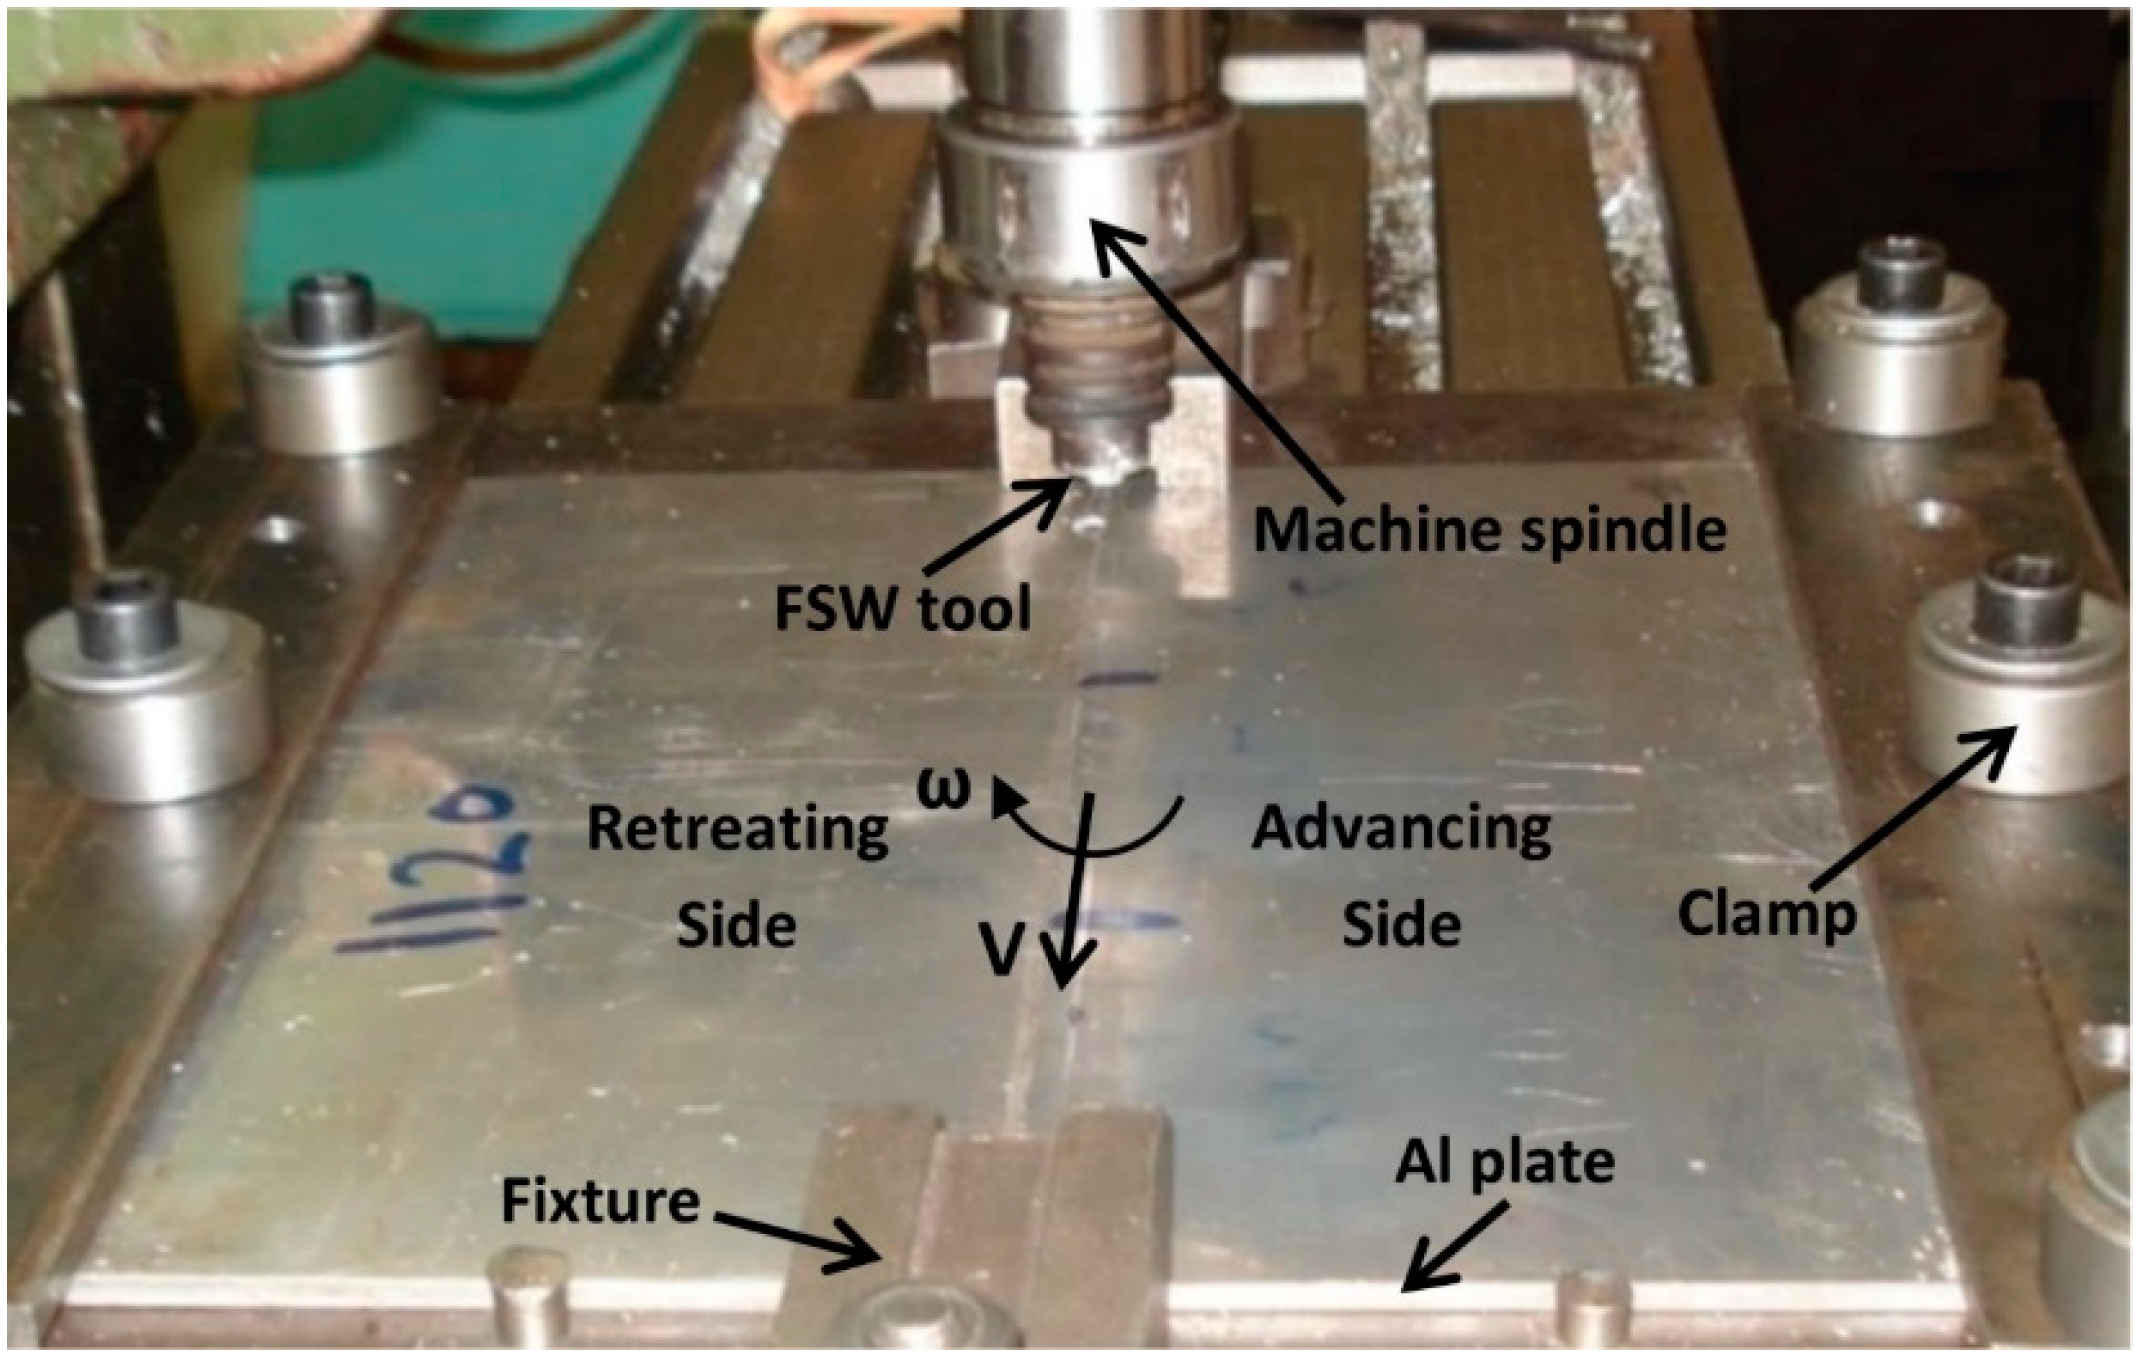
The aluminium welds were conducted using a 3-axis Computer Numerical Control (CNC) machine with a control unit and motor capacity of 10 kW. The direction of tool rotation was clockwise, and the plates were fixed rigidly by strap clamps at the corners. Clockwise rotation of the tool enables feeding of material into the centre of the weld during rotation (Figure 2). The welding was done without any initial pre-heating, and in an open air atmosphere at a temperature of 18 °C. Table 2 presents more details of the process parameters employed for the AA1100 aluminium weld trials. A schematic of the FSW set-up and process is shown in Figure 2. After the test, tensile test samples and metallographic specimens were cut from the middle of the plate, perpendicular to the weld-seam.
To evaluate weld quality, samples were primarily examined by the visual inspection. Weld surfaces were photographed using a high-resolution bridge digital camera (FinePix S9500 Model, Fujifilm brand, Tokyo, Japan), under the light of a fluorescent lamp. For metallographic analysis, mounted samples of the weld cross-sections were polished by standard preparation methods down to 0.5 μm to provide a smooth mirror finish. For microstructural observations, the cross-section samples were etched to identify grain boundaries and morphology. The specimens were etched in an ultrasonic bath using the Keller’s reagents (95 mL H2O, 2.5 mL HNO3, 1.5 mL HCl and 1.0 mL HF), at 70 °C for 20 s. After etching, the specimens were washed with deionised water, rinsed with ethanol and dried with hot air. The macro- and microscopic observations of the etched cross-sections were done with a typical optical microscope, at magnifications of 50-1000×.
For further microstructural characterisation, after etching samples were examined in a scanning electron microscope (SEM, MIRA model, TESCAN instrument, Brno, Czech Republic) with an energy-dispersive spectroscopy (EDS) detector. The accelerating voltage of the SEM was 20 kV. For phase characterization via X-ray diffraction (XRD), a Philips diffractometer instrument was used with Cu-Kα radiation at angles of 20–110°, and an accelerating voltage of 40 kV.
The tensile test samples, with a dimension of 120 mm gauge length and 30 mm gauge width (Figure 3), were fabricated according to the ASTM E8/E8M standard method. For FSW joints, the sampling position was selected perpendicular to the welding direction. In this configuration, the weld-seam is located in the centre of the dog-bone tensile specimen. Therefore, during the tensile testing, the strength of both the base metal and cross-weld are measured simultaneously [39,40]. Tensile tests were performed with an Instron-5967 tensile tester at a strain rate of 10−5 s−1, at room temperature. For each sample, we repeated the tensile test five times and then reported the average value between the three most consistent samples as the selected tensile curve.

3. Results

3.1. General Appearances of the FSW Weld

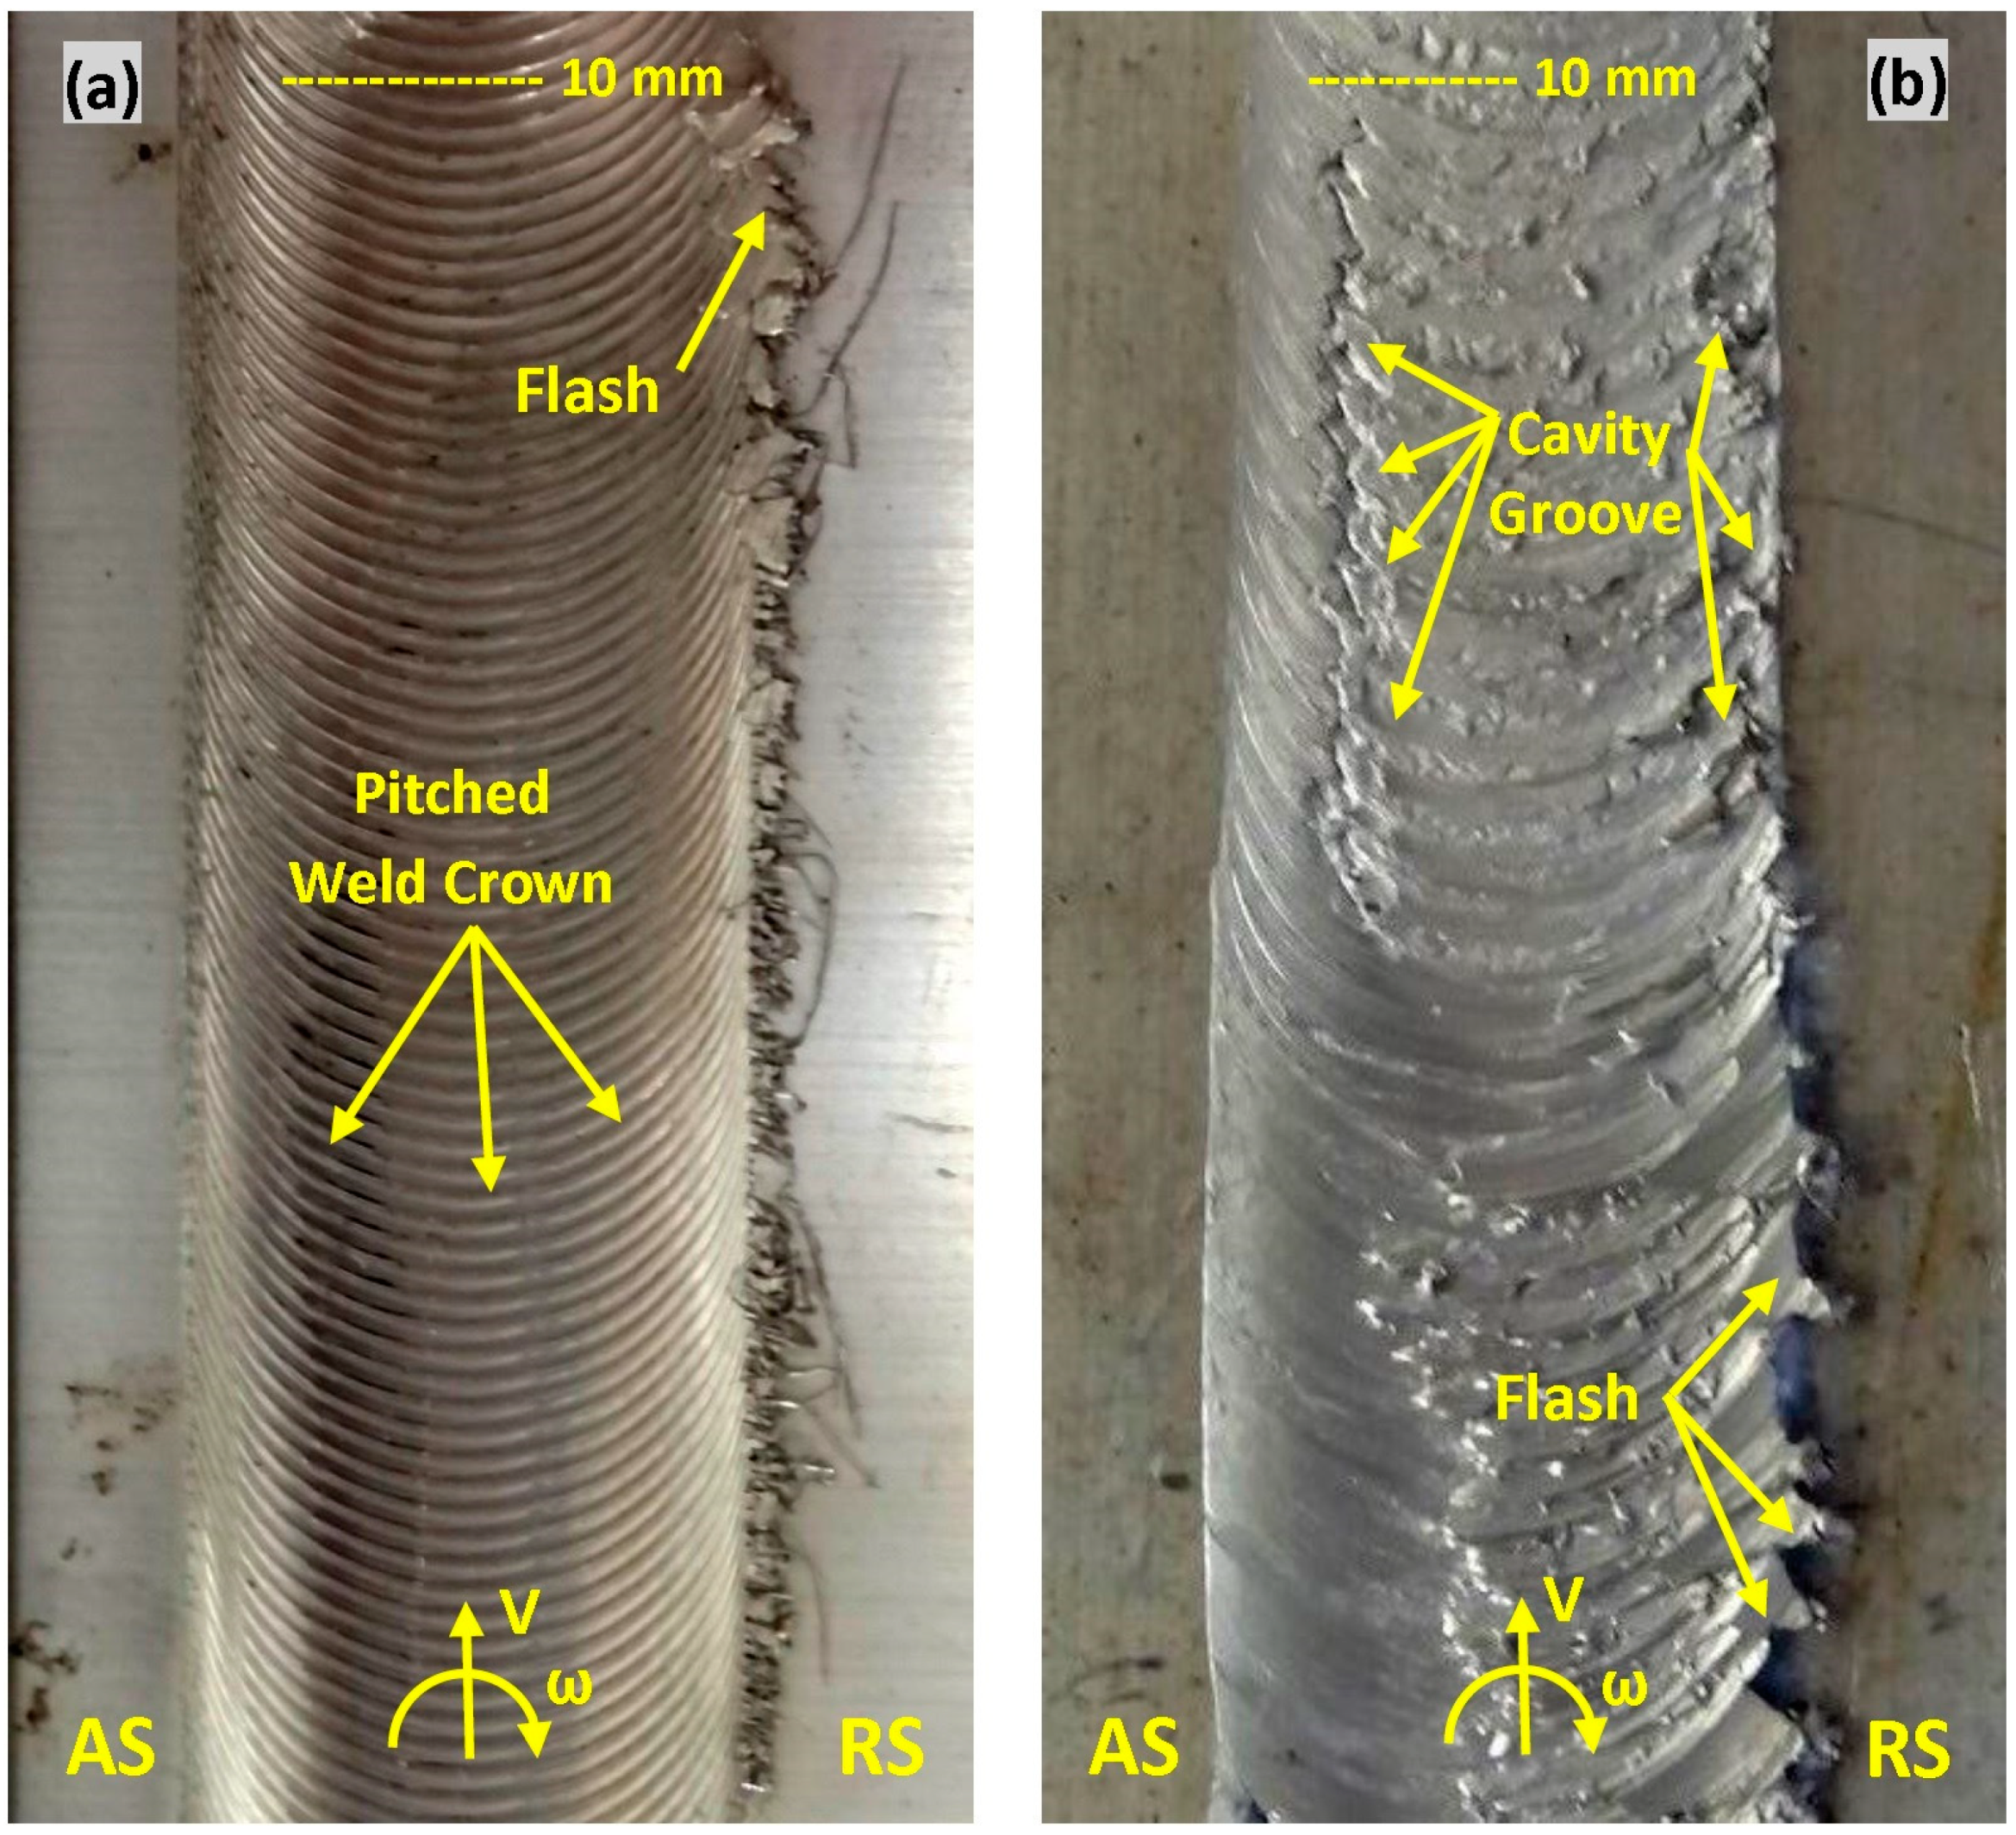
The general appearance of the FSW weld, along with typical structural defects formed during the process, is shown in Figure 4, Figure 5 and Figure 6. In these figures, the weld appearance varied depending on welding speeds (ω and V) and tool features. It is believed that the heat input plays a key role in determining weld appearance, and insufficient heat input can produce defects in the stir zone. Figure 4 shows the crown view at the top surface of the FSW joints welded by the conical-shape tool, at a constant rotating speed (1120 rpm) and two different feed rates (150 and 315 mm/min). The first set of speeds (1120 rpm and 150 mm/min) in Figure 4a shows a uniform pitched surface without any visible defects at the surface. By increasing the feed rate at the same rotating speed (1120 rpm and 315 mm/min), the weld surface became more smooth, while the ripple features disappear and a cavity/groove defect emerges on the advancing side (AS) of the weld surface. Additionally, for both set of speeds, flash defects are visible on the retreating side (RS) edge of the weld-line.
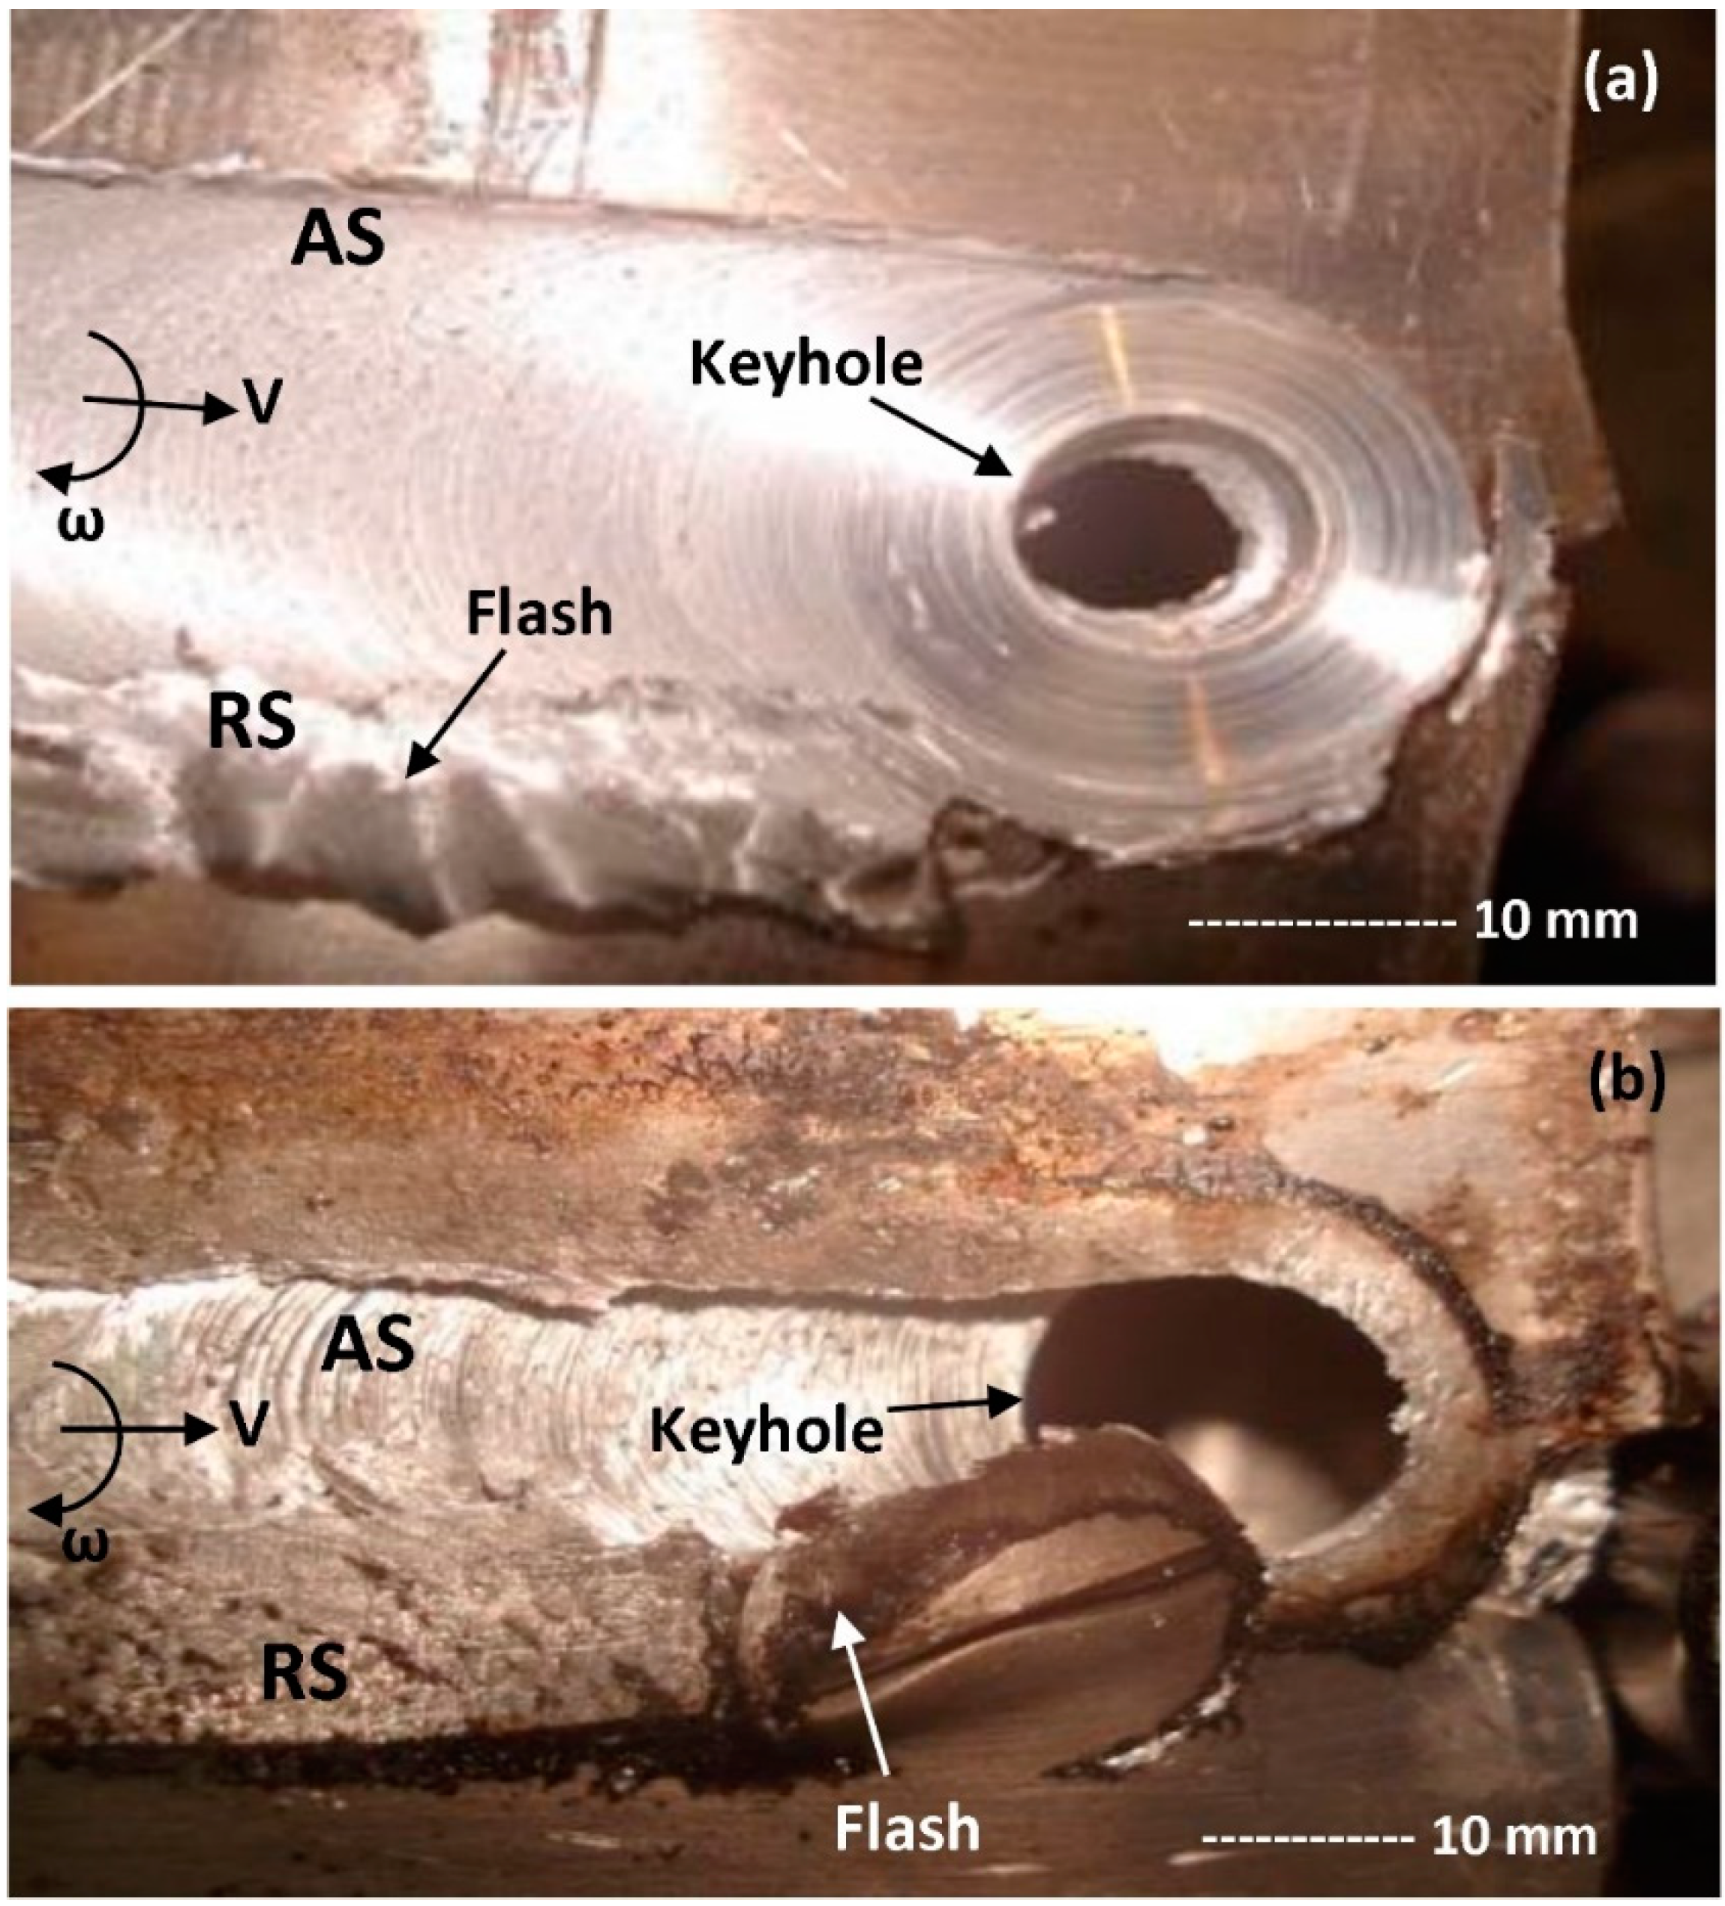
For a better understanding of the surface appearance of the weld, different sets of speeds were studied with the same conical-shape tool, where the feed rate was kept constant and the RPM varied. Figure 5 shows the surface view of the FSW joint for two different speed sets with the same RPM. For the welding speeds set of (250 rpm and 710 mm/min), Figure 5a shows a relatively smooth surface, compared to Figure 5b at a higher feeding rate (250 rpm and 1400 mm/min). Similar to Figure 4, again flash defects were obvious in Figure 5a,b, but the size of the flash defects and the apparent surface roughness increased. In Figure 5, the keyhole position where the tool exits the workpiece was also visible. Clearly, by increasing the feed rate (Figure 5b) the size of the keyhole and the flash defect increased. Our interpretation is that inconsistency in welding speeds (ω and V) can intensify the slipping during the stirring action. Therefore, excessive circumferential inertia affects the flow distribution during the stirring, leading to interruption of the flow deposition.
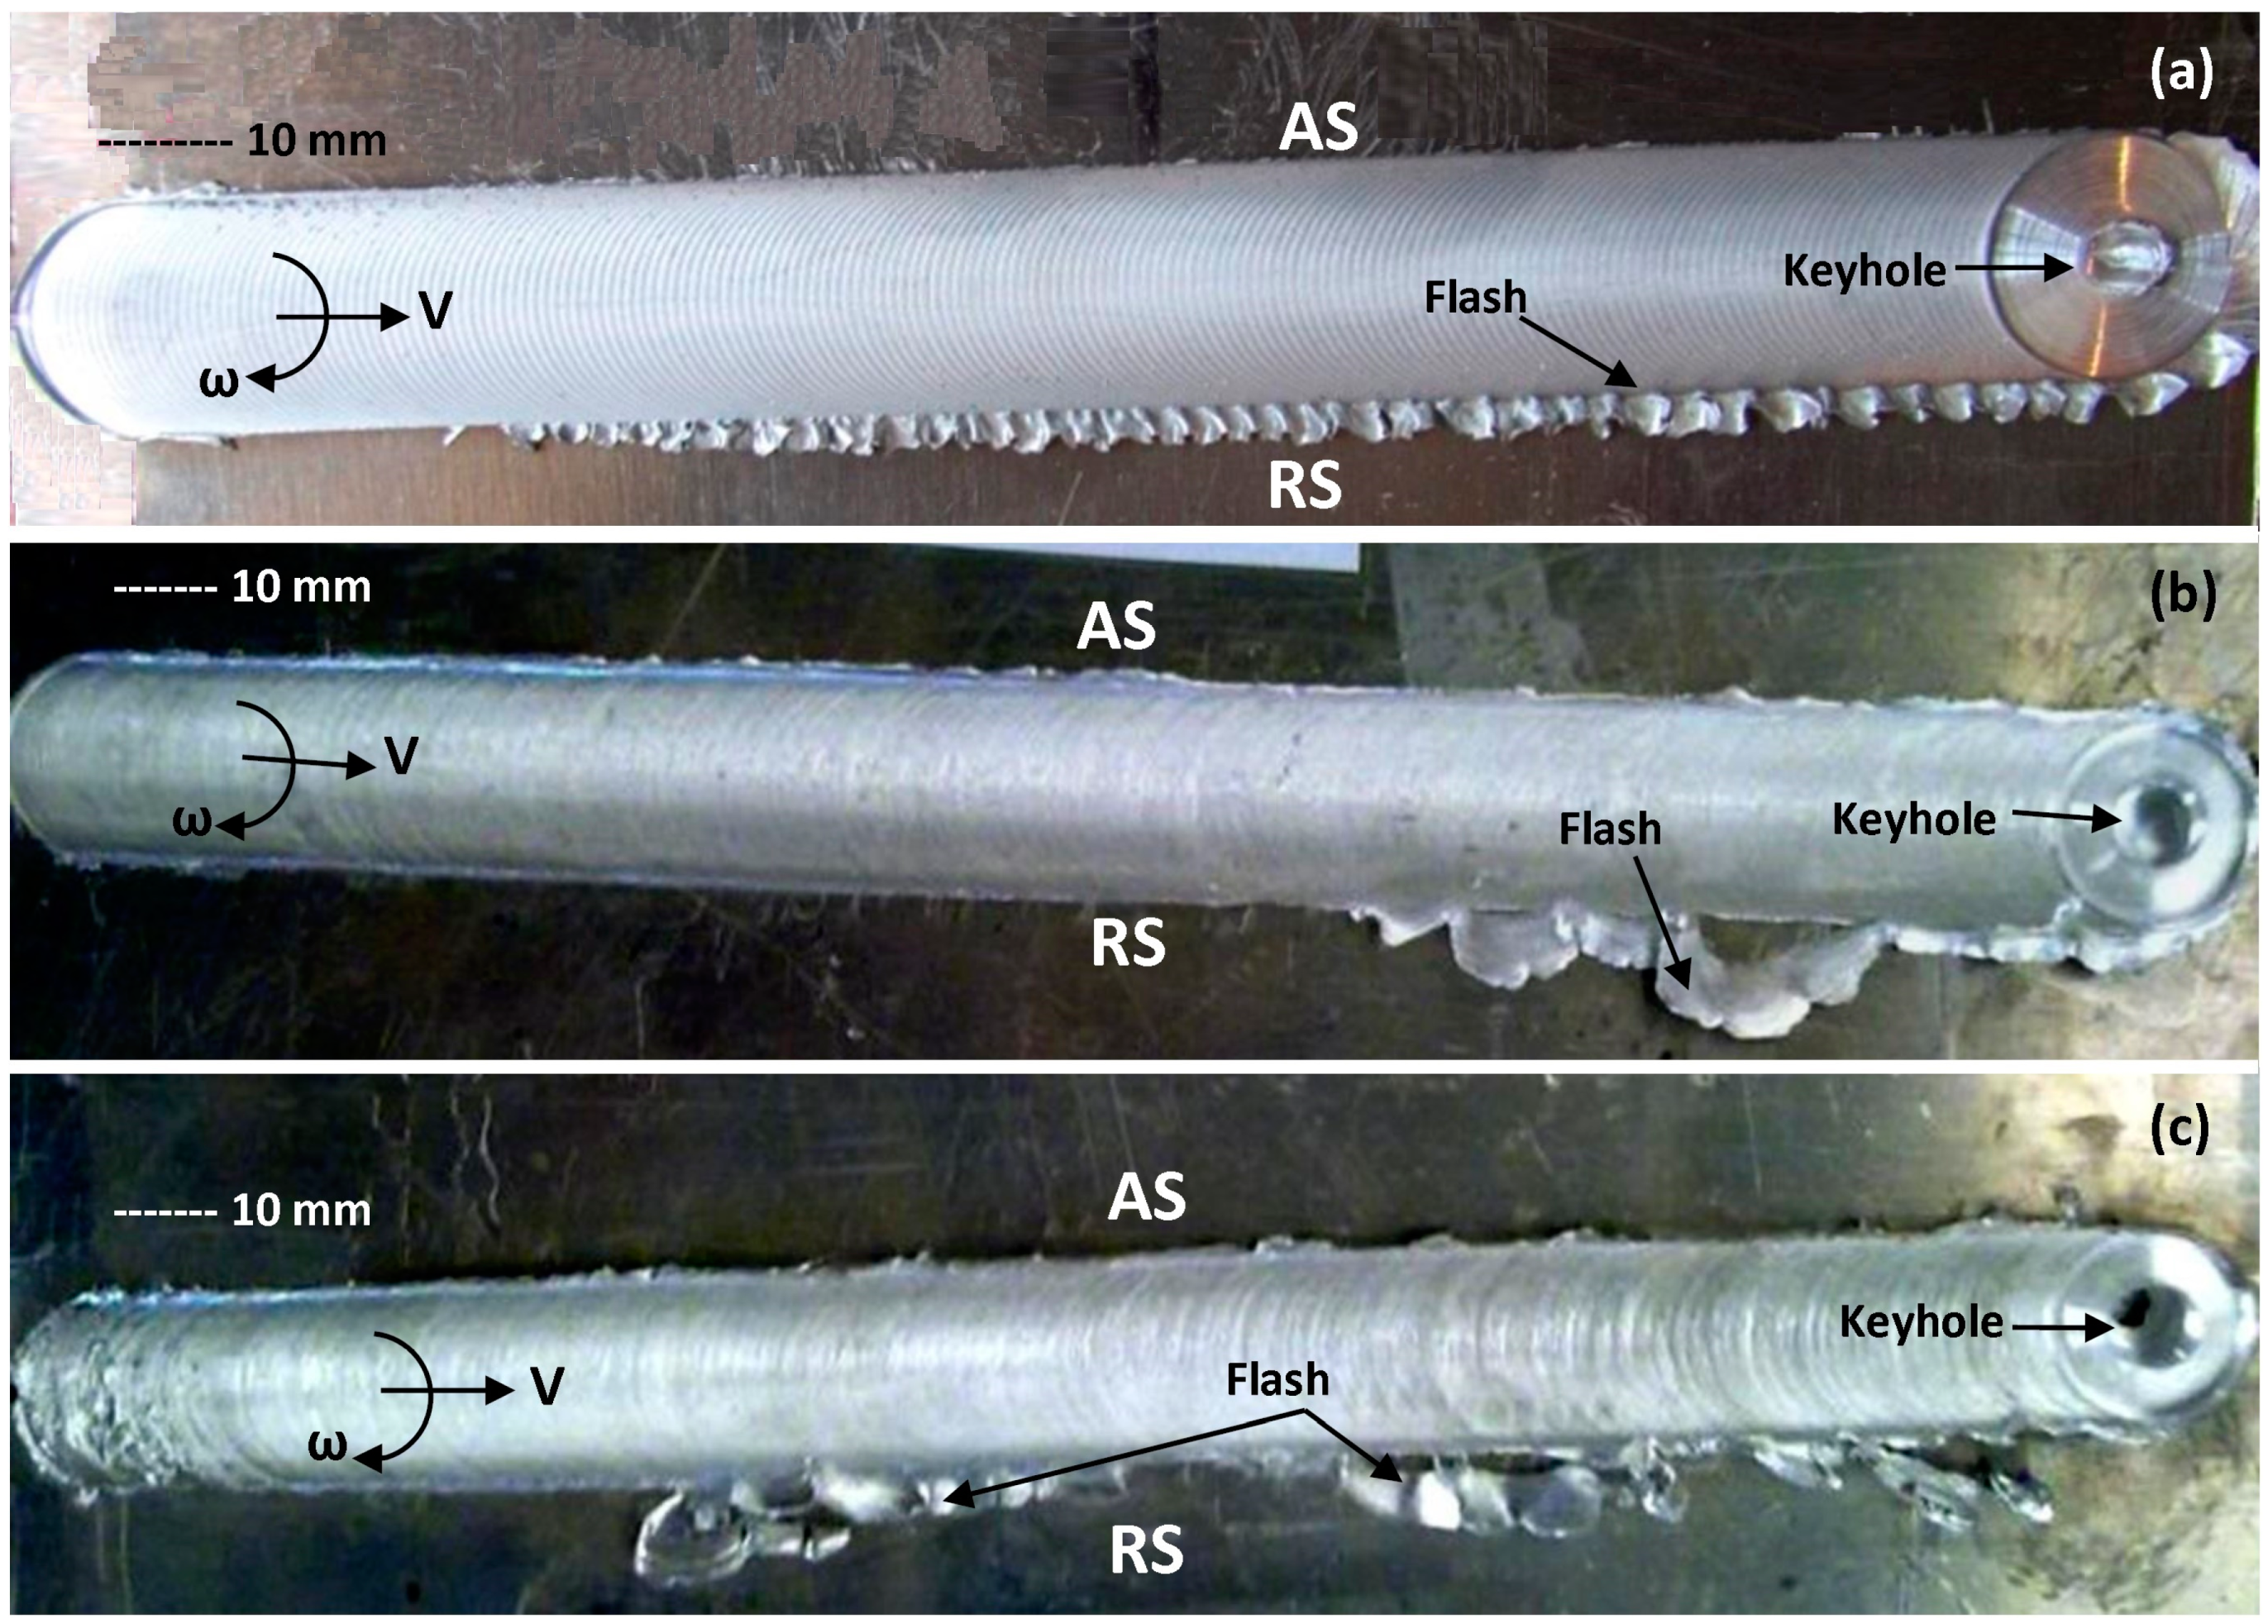
The role of the tool geometry on the quality of the weld was studied in Figure 6, where the general appearance of the weld-seam is shown for the conical, square and threaded designed tool. Welding speeds (ω and V) remained constant. As is clear in Figure 6, for the same processing speeds (1120 rpm and 315 mm/min), the weld-line provided by the conical tool shows the best surface quality: a uniform pitched ripple pattern for the weld crest, a filled keyhole and minimal flash defects.
The performance of the conical tool can be attributed to the inherent lateral motion of the mass around the pin, which pumps material inwards and simultaneously in a spiralling manner to the top surface. This can avoid mass deficit or ejection as the tool moves forward along the welding locus. Therefore, material loss and discontinuity defects are minimized.
It should be noted that in the FSW process, the material flow plays a key role in the control of defects. In general, insufficient heat input can lead to failure of flow regimes in which the stirred mass is not strong enough to fill the discontinuity, and therefore, a defect occurs.
On the other hand, redundant heat input also can result in the emergence of defects. By increasing welding speeds (ω and V), excessive frictional heat is generated between the tool and the workpiece. The increased heat input can yield more plasticized mass under the shoulder. At higher speeds, this plasticized material flow can split out in the form of the excessive flash defects at the edge of the weld-line. Furthermore, the ejection of the mass results in mass deficit at the weld-seam, where groove defects appear underneath the shoulder, or other subsurface discontinuity defects form in weld.
The relationships between processing parameters and the apparent quality of aluminium welds are illustrated in Figure 5. The photographs, both taken from the top surface of the weld samples at the spindle side position, show a distinctive ejected tail as the flash defect, protruding from the retreating side (RS) of the weld-line. The exit point of the tool shows a keyhole feature where the tool leaves the workpiece. In both samples, the tool leaves the weld-seam by a disruption in the body of the workpiece.
The curved features at the weld surface reveal layered flow patterns that trace the plastic flow between the AS and RS. However, due to disruption at the sides of the weld, the circulation of material and therefore the primary stirring flow-lines are discontinuous.
As the front of the stirred mass around the pin loses stiffness because of the shortage of forwarding material, flow circulation becomes irregular. Thus due to the upward motion of the tool, the plasticized material bulges out and a hole is left at the position of ejection.
In a similar way, where the leading edge of the shoulder approaches the free surface of the workpiece, the stirred material at the retreating side of the tool creates a curve in the surface pattern of the weld-line. During rotation of the tool, the inconsistency in speed ratio (ω/V) can cause excessive stretching at the weld edge, more so than at the middle of the weld-line, whereby the compressed mass can be shredded outwards instead of being deposited at the trailing edge of the tool. This can form a flash sprayed tail as a defect at the RS position of the weld-line.
In Figure 6, constant welding speeds (250 mm/min and 1400 rpm) for different FSW tool geometry (conical, square and threaded shaped pins) show a similarity in the size of the flash defect and the keyhole. The weld samples indicate a similar amount of material loss as the flash defect, and similar shape of the keyhole at the surface. This suggests that the tool geometry plays the main role in the stirring conditions in proximity to the rotating tool.
The surface quality of the weld-seam shows a more uniform pitch-pattern for the conical pin tool (see Figure 6a) compared to the square pin and threaded pin (Figure 6b,c, respectively). This indicates that in similar welding speeds, the presence of the flats (in square pin tool) and the threads (in threaded pin tool) aggregates the plastic flow deposition within the stirring zone, in which needs a more accurate flow control during the FSW position. It should be noted that because of applying a rotating pin, the keyhole profiles could not show the exact flow geometry around the pin. Therefore, the rotating pin leaves a circular pattern at the keyhole by ejection from the weld-line. More specifically regarding the square pin, because of the sharp orthogonal edges of the flats, during the tool ejection, it might cause some material loss from the stirred Al-mass, stuck around the pin (see Figure 1b). Nevertheless, the WC-based square pin tool shows an acceptable mechanical instability during the stirring action without occurring any contamination or tool failure.
The surface features of the weld-line for different welding parameters were illustrated in Figure 4, Figure 5 and Figure 6. However, the flow aspects of the FSW joints concerning various welding conditions need to be elucidated in more detail through microstructural study of the weld cross-sections. Microstructural observations can also reveal more flow features within the weld structure, where internal defects arise from flow failure within the stir zone.

3.2. Macrostructure of the Weld Region

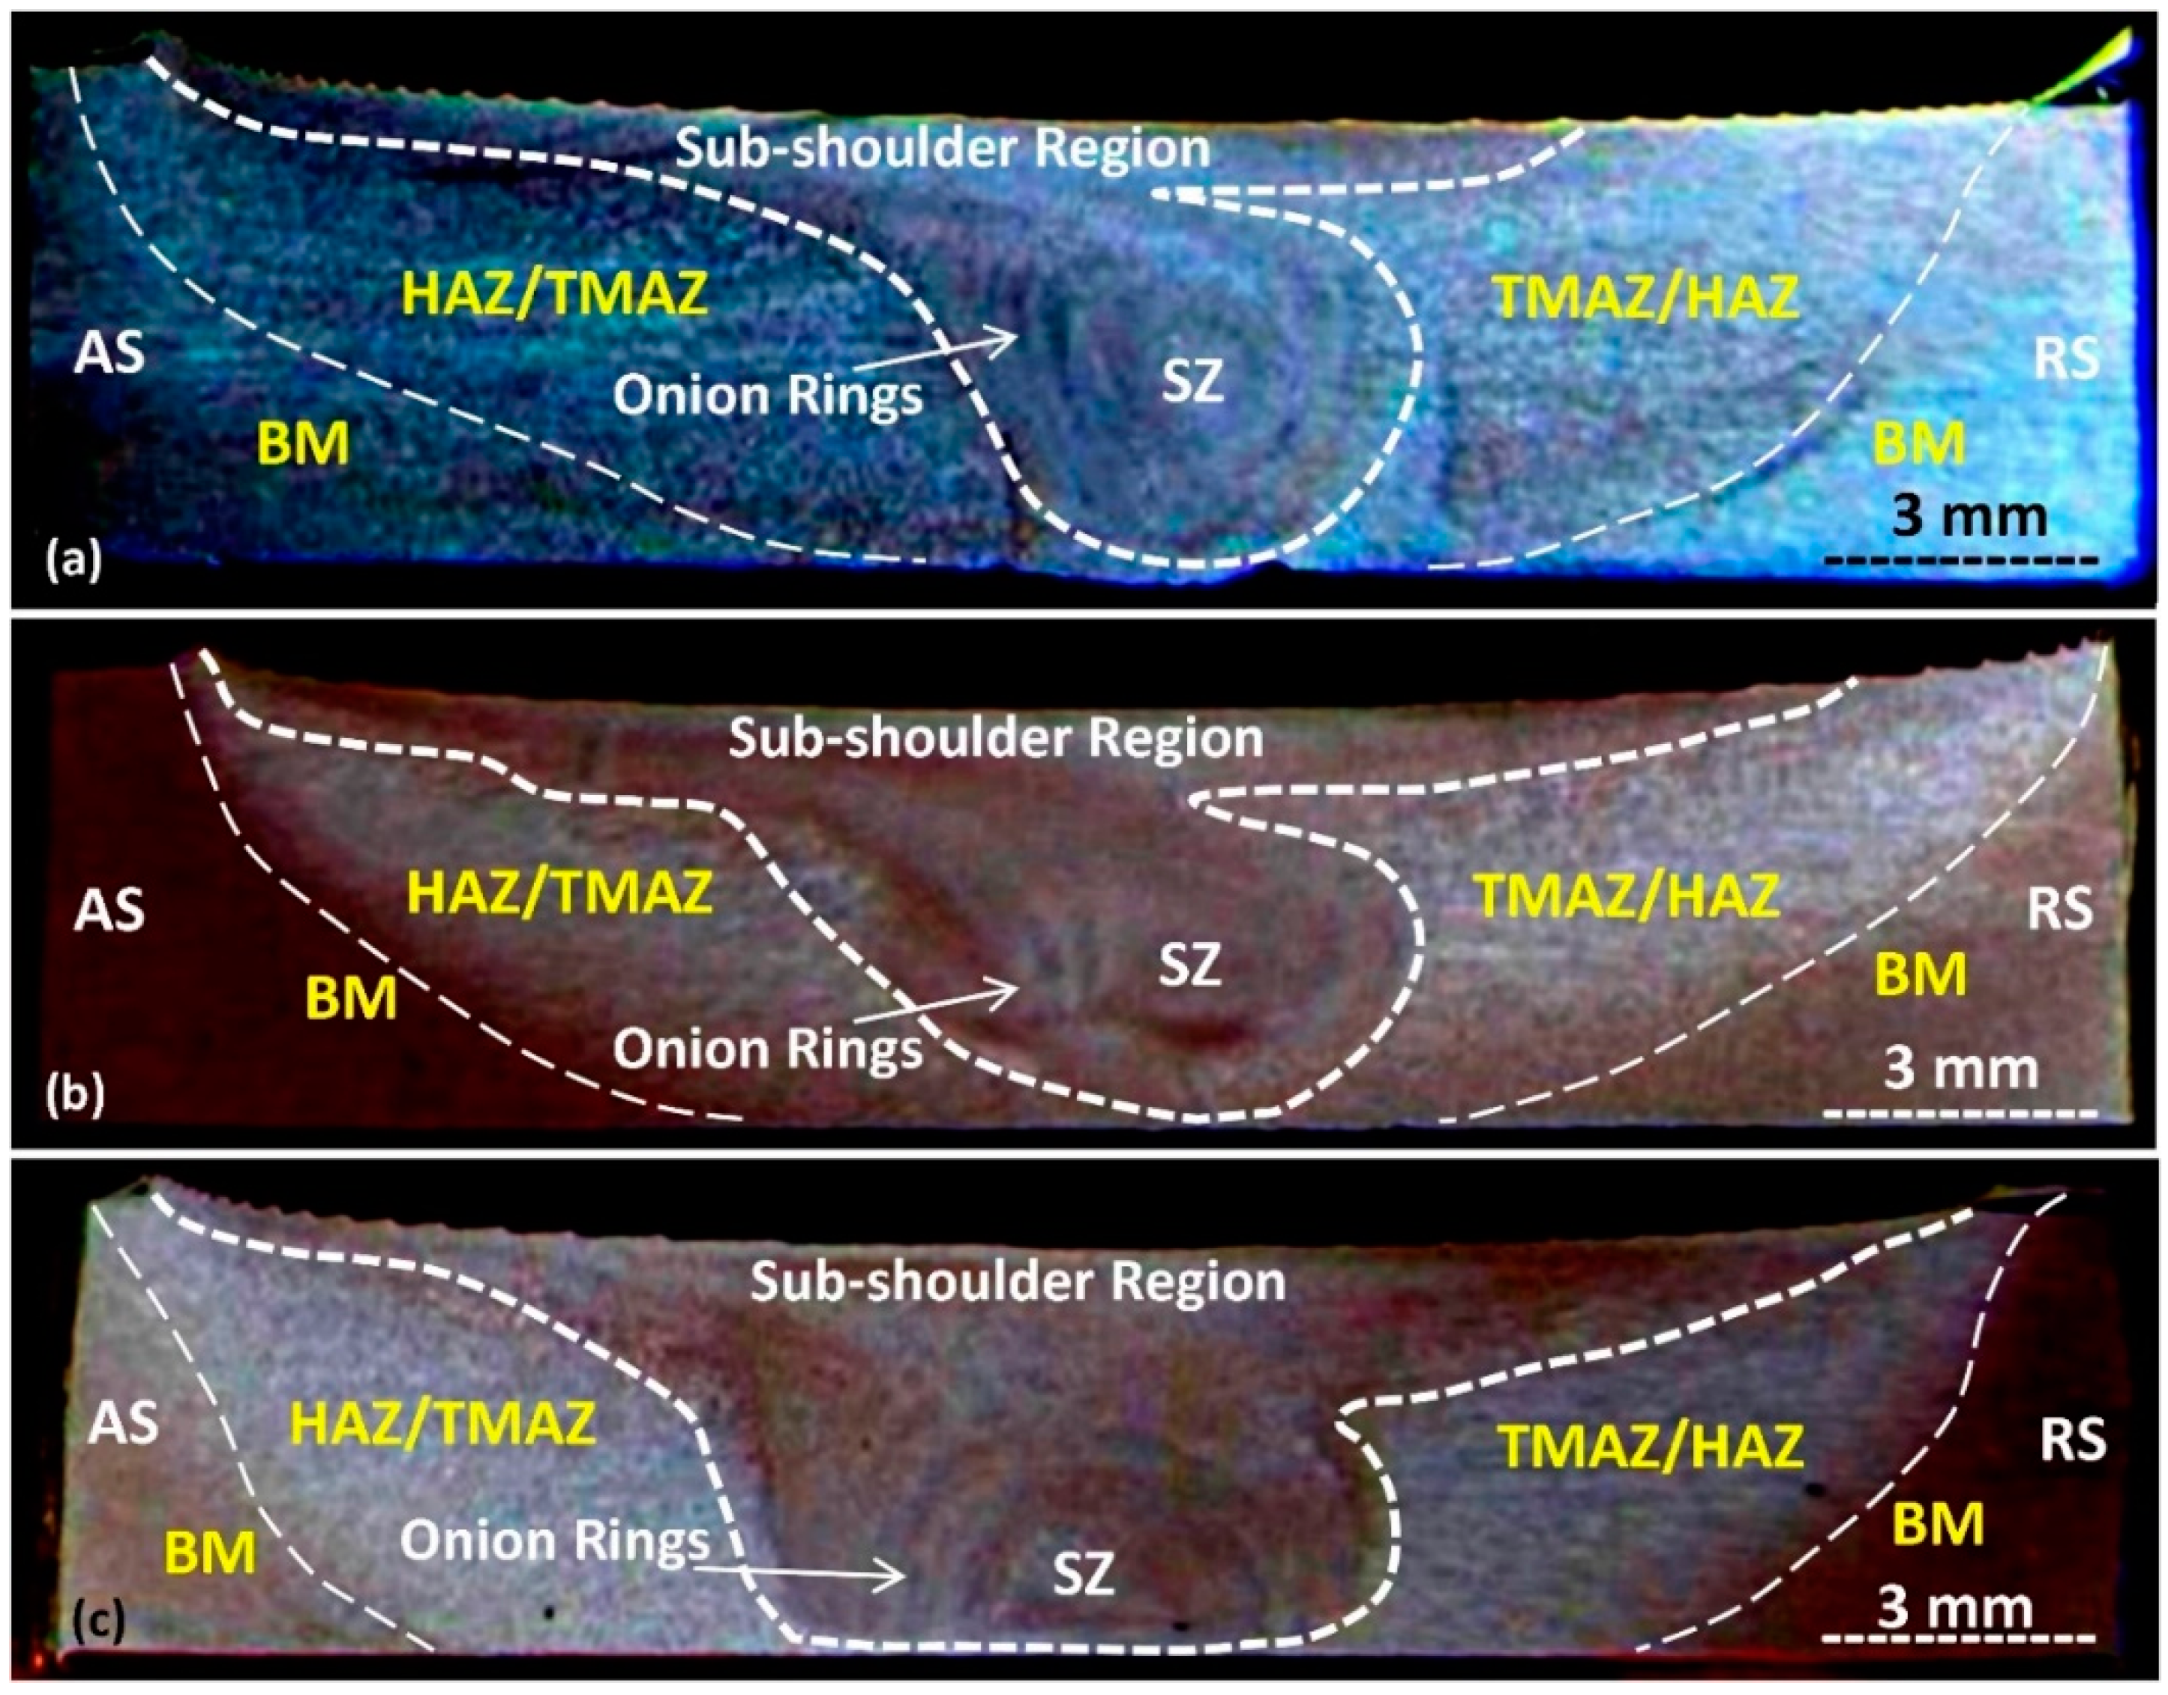
The macrostructure of the cross-section of an FSW joint, processed using three different tools, is shown in Figure 7. The macrostructure readily revealed the SZ basin-shaped pattern in the cross-section of the weld, and onion-ring flow patterns were also visible. In Figure 7c, compared to Figure 7a,b, the weld border was more visible in the middle of SZ rather than at the sides of the weld. Even so, in Figure 7b there is a blurring of the weld border. This is attributed to the tendency for the tool to aggressively remove the substrate material from the base metal (BM) and subsequently backfill the region with heavily worked material, hence making the SZ borders more defined in comparison to the sides.
The flow eddy features known as onion rings at the bottom of the SZ were attributed to the mass transport mechanism inside the weld. The tool scouring action during stirring caused the plastically deformed material from the substrate to be aggressively conducted in flow path lines between the advancing side and retreating side. Consequently, because the combined linear and rotation motions of the tool were greater at the bottom surface, this is also the hottest part of the weld region. However, the material was also scoured from the leading edge towards the retreating side, and was deposited at the trailing edge of the tool. The rotation of the tool (clockwise from above) stirred the flowing mass in the same rotational direction, corresponding to a horizontal flow from right to left in the wake of the tool. Consequently, during mass deposition, the stirred flow-lines were packed into the downstream region, and the boundaries between these layered masses were believed to correspond to the onion rings in the cross-section samples shown in Figure 7a–c. The spacing between the boundary lines was also observed to be smaller closer to the centre of the pin, attributed to the flow mechanism during stirring. Additional complexity was introduced by the threads on the tool (Figure 7c). This transports the material downward, hence explaining why the onion rings were preferentially located at the bottom of the SZ.
Inconsistency in flow-lines transport can cause the emergence of internal void defects. As the macroscopic views of the FSW samples were not able to show the grain structure in detail, micro-etching and microscopic observation at higher magnifications is required. The delineation of fine grain size in proximity to probable defects can also explain the origin of defects based on the microstructural evolution of the weld region.

3.3. Microscopic Measurements of the Weld

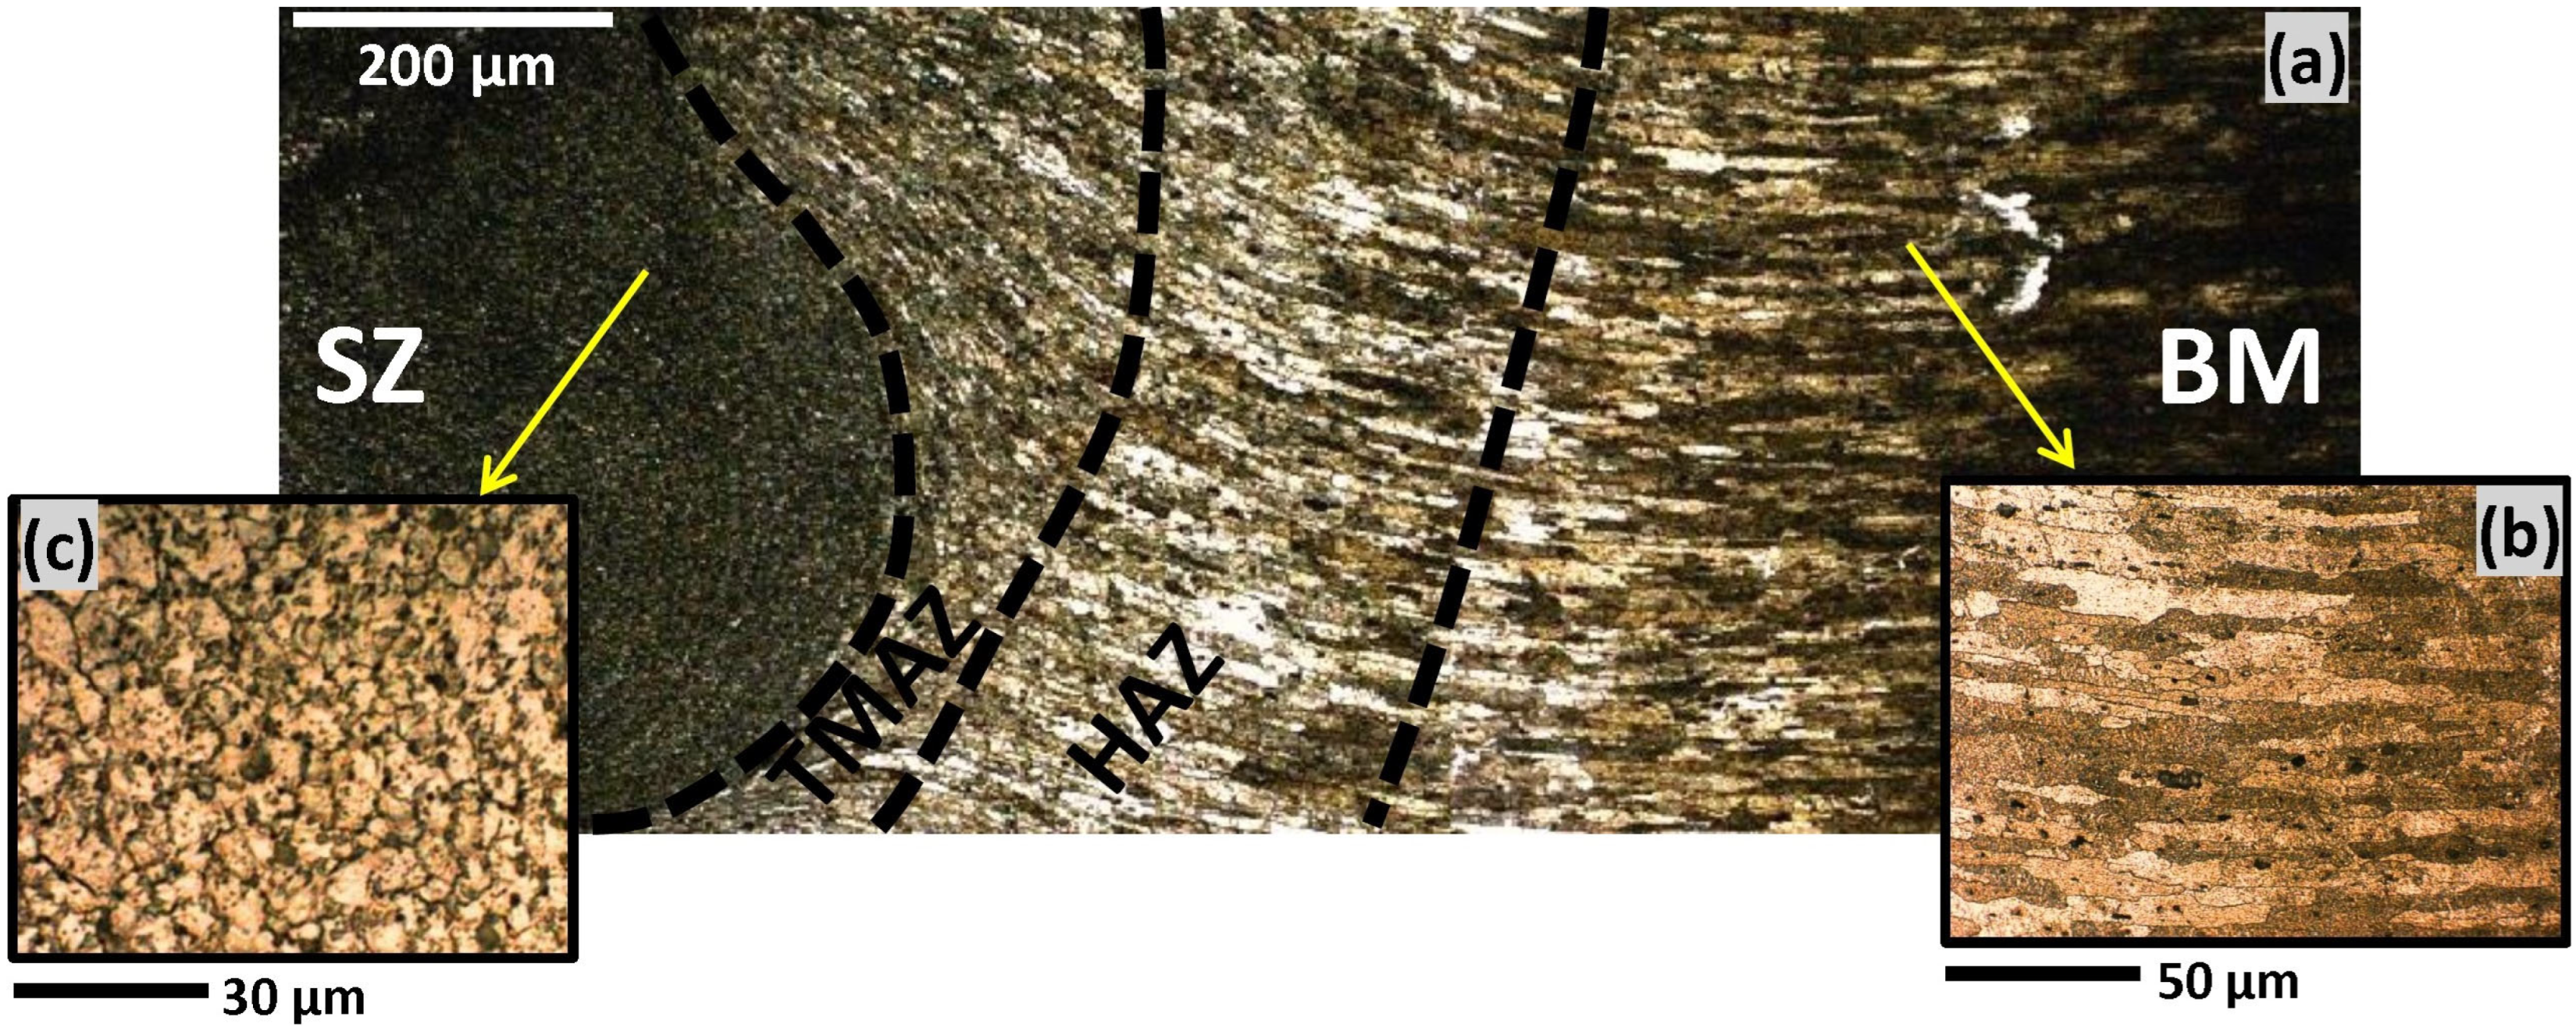
The micro-etching of the weld cross-section in Figure 8a shows that the weld region comprised of the SZ and the transition region, which were distinct from the base metal (BM) region. The transition region, including the HAZ and TMAZ, was situated between BM and the SZ. The dynamically recrystallized nature of the FSW weld structure caused each layer to have a different grain size and morphology in comparison with the adjacent layers.
While the BM shows a directional grain morphology with the average grain size of 50 μm (Figure 8b), this changed to an equiaxed, ultrafine structure with an average grain size of 10–15 μm in the SZ (Figure 8c). This can be interpreted as the direct outcome of grain fragmentation by mechanical stirring, and subsequent post-welding dynamic recrystallization arising from frictional heat generation.
Entering into the SZ, the morphological flow features through the grain structure revealed some inhomogeneous transitional micro-patterns in the form of weld defects. Figure 9, Figure 10 and Figure 11 demonstrated some of the typical weld defects in the weld region that emerge at the bottom of the SZ adjacent to the base metal (BM).
Figure 9 shows the flow patterns around tunnel voids at the cross-section of the FSW weld for the conical and the square tool geometries.
The drawn flow-lines around the tunnel voids show a layered structure representing different gradients in the deposited flow at the BM regions.
Comparison between the samples shows that while the number of voids in the weld sample from the conical-shaped tool (Figure 9a) was greater than for the square-shaped tool (Figure 9b), the size of the voids were greater when processed using the square tool. This can be related to the coarse performance of the square-shaped tool and the sharpness of the square corners compared to the conical geometry.
Further study of the micro-features around tunnel voids is shown in Figure 10. While all three different tool geometries produce some tunnel voids within the stirring zone, the conical (Figure 10a) and threaded (Figure 10c) pin profiles exhibited more complex flow patterns around the tunnel voids compared to the square-shaped pin profile (Figure 10b). The swirling zone in Figure 10a for the conical-shaped pin profile and the kissing bond defect in Figure 10c for the threaded-pin were the direct outcome of flow failure around the formed tunnel void. These flow-based defects could be attributed to the complexities of the stirring flow mechanisms driven by the pin geometry.
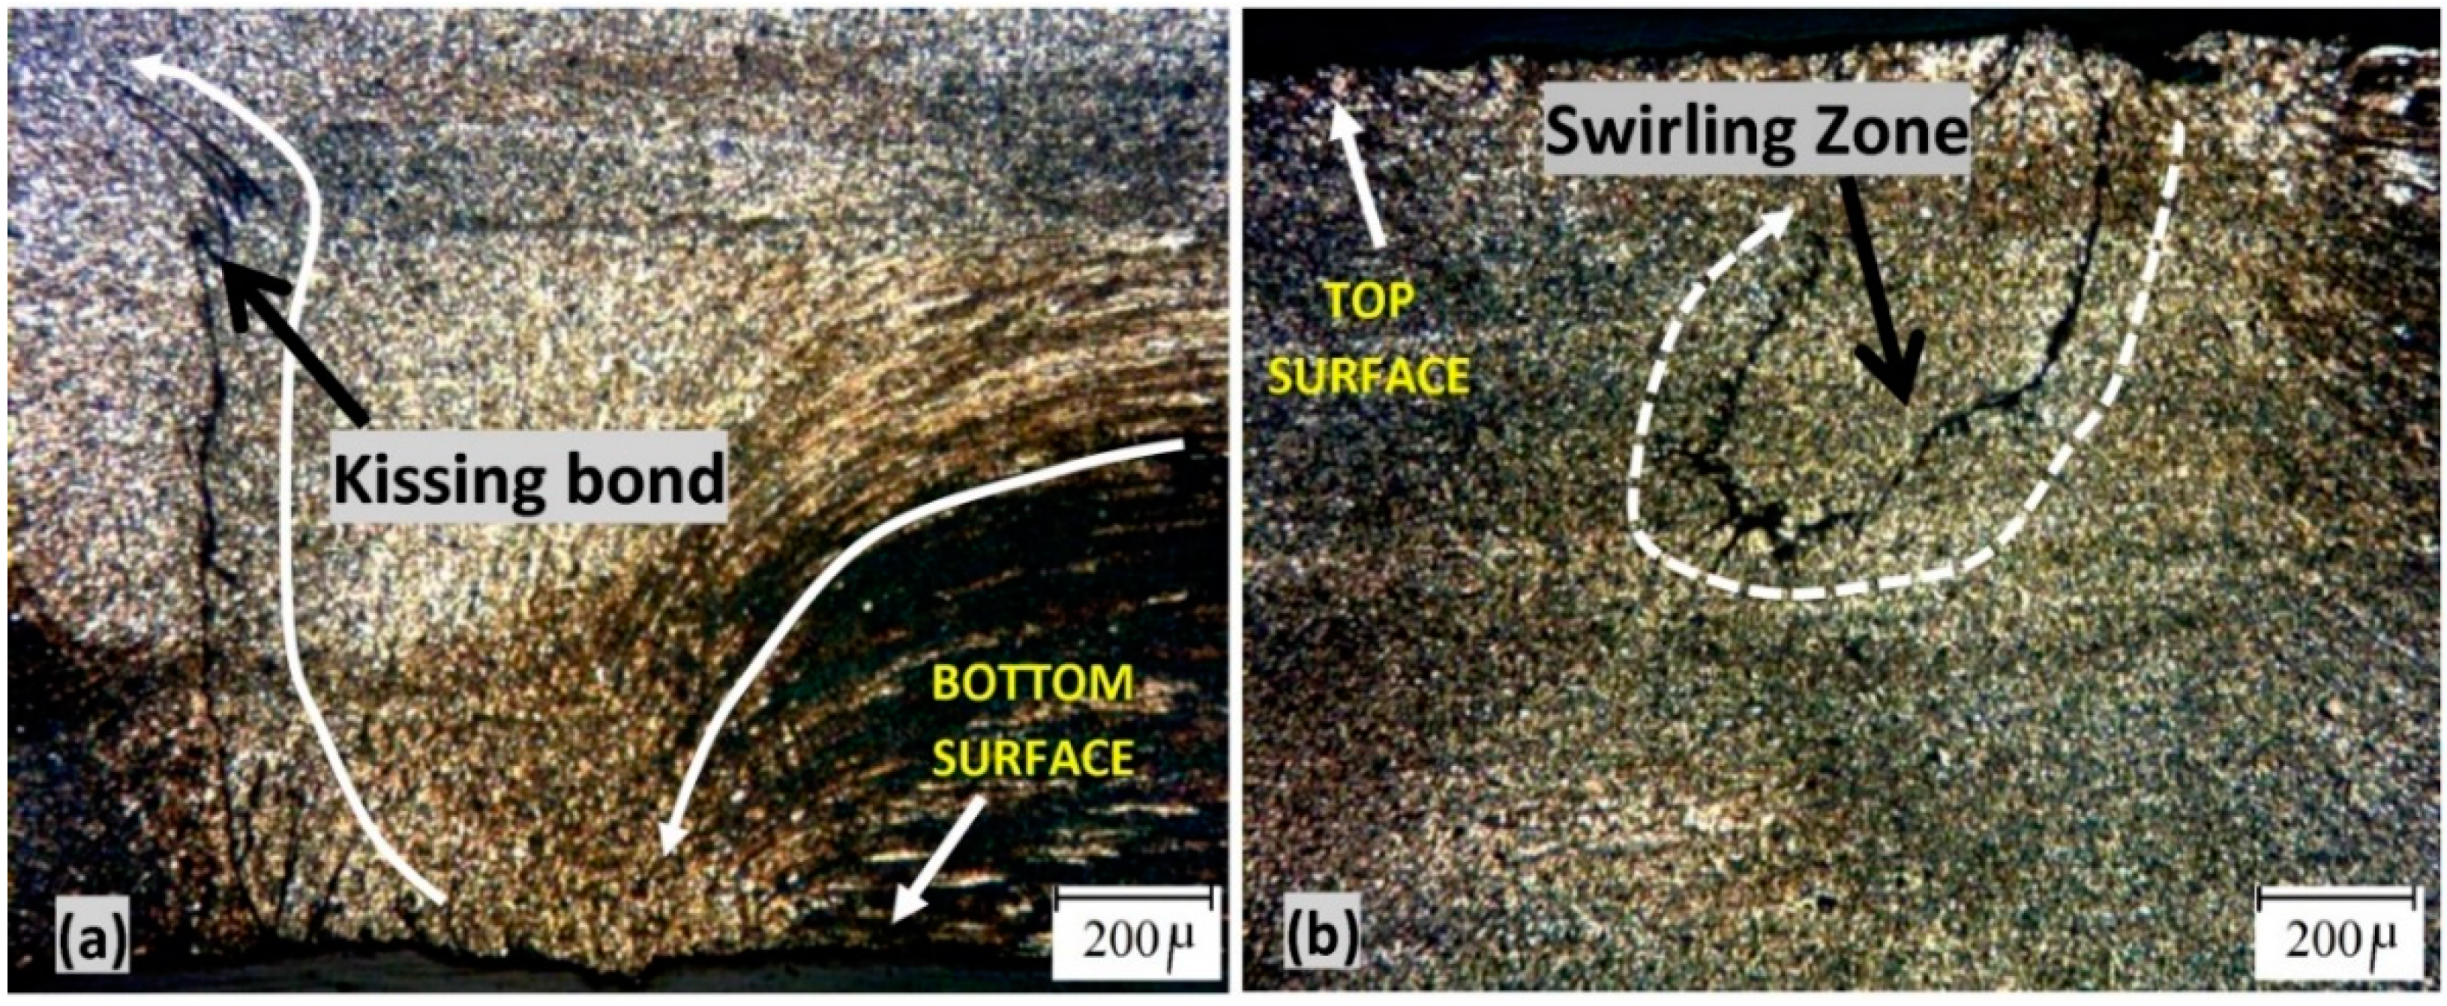
Figure 10 also revealed that the swirling zone was situated at the top surface, and the kissing bond had propagated from the bottom surface. Microscopic observation of the weld cross-section at a higher magnification revealed these flow-based features as the kissing bond by conical pin profile (Figure 11a), and the swirling zone by threaded pin profile (Figure 11b). In both cases, the microstructural patterns show a change in the grain direction from the weld surface towards the body of the weld in the ultrafine structure in the SZ.
The fine grains of the SZ reveal the changes in the flow direction, with narrow flow-lines delineating the kissing bond (Figure 11a) and the swirling zone (Figure 11b) as a direct outcome of the tool action within the stirring zone of the weld. These features were indicative of the mechanical stirring action and the subsequent flow inconsistencies and dynamic recrystallization experienced during the FSW welding process.
These dark flow-lines and the existing tunnel voids are representative of flow failure as the microstructure stabilised during cooling to room temperature. The flow inhomogeneity can result in the deterioration in mechanical properties of the weld. Therefore, it is necessary to measure the mechanical properties of the weld to see how the internal defects could affect the strength of the weld.
To investigate the possibility of contamination of the welding region by the tool, the composition of the stir zone texture should be measured. Micromorphology of the grain structure was observed via SEM, and composition was analysed using EDS, as shown in Figure 12. Tungsten atoms have a high atomic number (74) and atomic weight (183.84 g/mol), which can be easily characterized by EDS.
The microstructure of the stirring zone (processed by the square-shape tool) in Figure 12a confirms that the DRX equiaxed grains are uniformly distributed through the weld. Moreover, it can be seen that there were no irregular morphologies indicating agglomerate phases, or any specific inclusions formed due to possible dispersed contamination within the microstructure. In Figure 12b, the EDS spectrum of the selected region from Figure 12a (Spectrum 1) could be seen. This confirms that the composition did not contain any W or C impurities. The presence of Fe (0.2 wt %) was consistent with the initial composition of the parent metal AA1100 (containing 0.182 wt % of Fe in quantometer analysis), so was unlikely to represent contamination from the H13 steel shoulder of the tool.
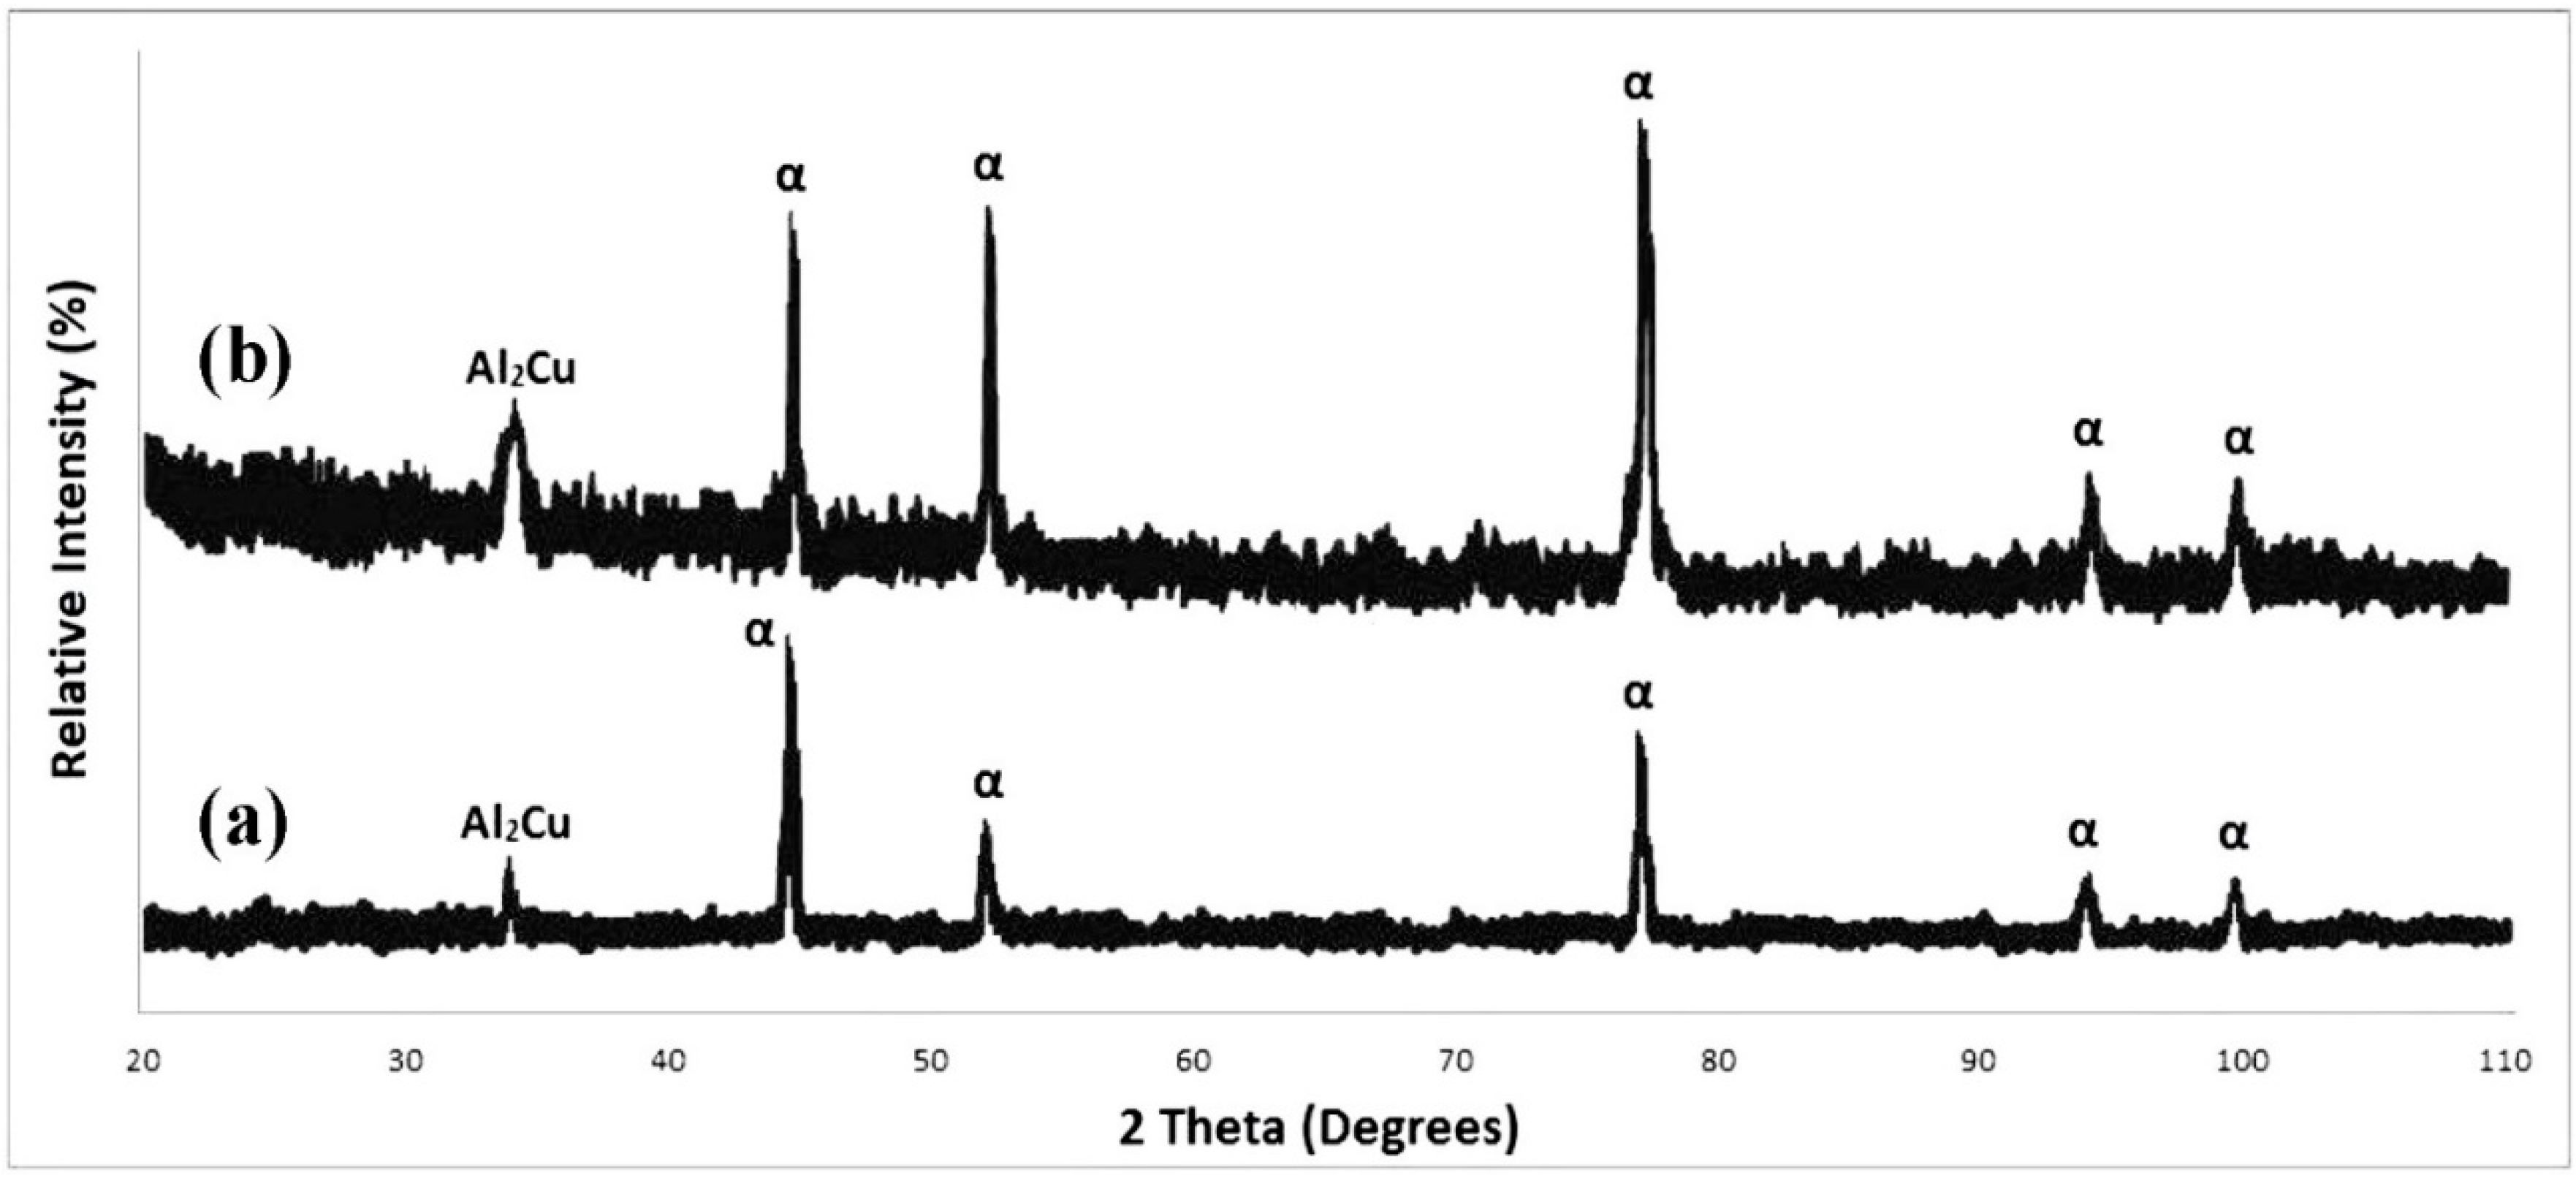
To provide a better correlation between the FSW processing conditions and the phases formed within the weld region, further phase characterization was conducted by X-ray diffraction (XRD) analysis (Figure 13), where the parent metal AA1100 was compared with the SZ material.
Figure 13 illustrates the XRD patterns for the AA1100 alloy parent metal (Figure 13a) and the SZ (Figure 13b) processed by the FSW tool (square-shaped tool). As shown in Figure 13a, the α-Al phase (matrix) and Al2Cu precipitate were identified from the peaks of the diffraction pattern for the parent metal.
According to Figure 13b, the XRD analysis of the SZ region after the FSW processing shows the same phases (α-Al matrix and Al2Cu precipitate), compared to the parent. However, a significant increase in the intensity of the diffraction peaks was evident for both phases of the matrix (α-Al) and precipitate (Al2Cu), upon stirring. This can be attributed to phase stabilization after the stirring process and also an increase in precipitate distribution density due to DRX.
Consistent with the EDS analysis, the XRD analysis also confirmed that the SZ of the weld region was free of any W and C impurities. This shows that the FSW processing provides proper phase homogeneity in the SZ, without any contamination from the tool. This is based on examination of the weld sample processed using the square-shaped pin geometry, which has the highest degree of stress concentration at the sharp corners of the tool.

3.4. Mechnical Strength of the Weld

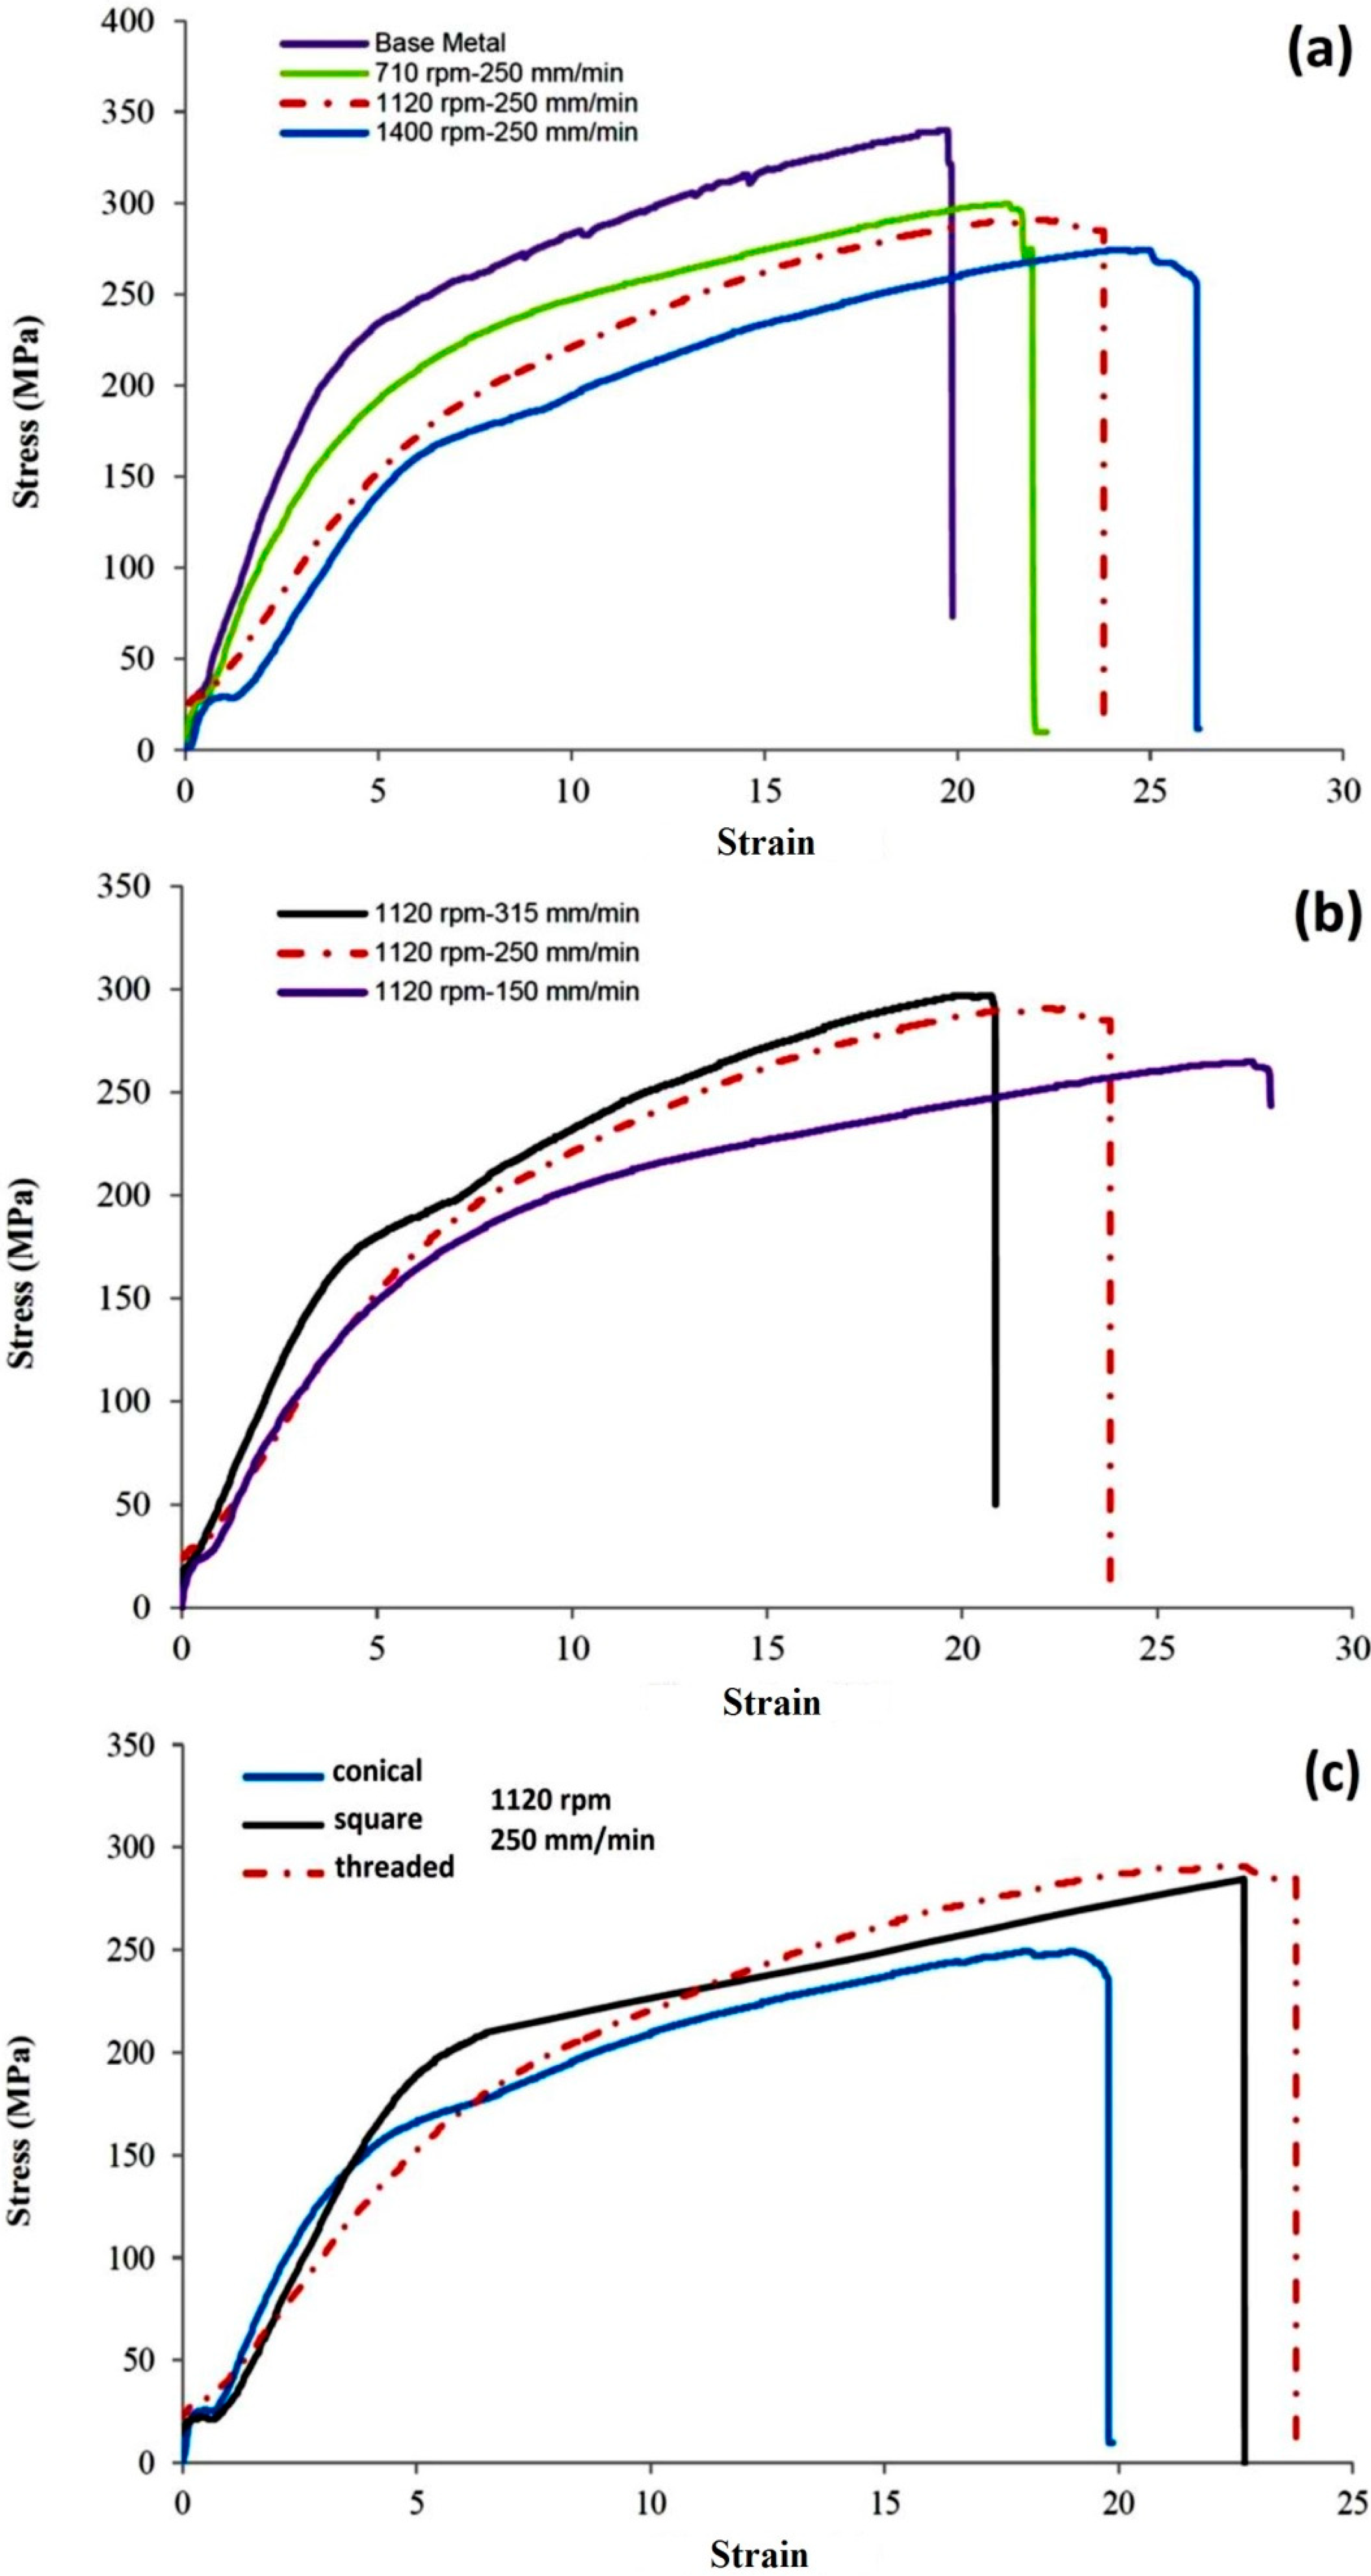
Figure 14 shows the tensile strength graphs (stress–strain) for the three sets of weld samples processed by varying different conditions; alteration of RPM (Figure 14a), alteration of feed rate (Figure 14b), and changing of the tool geometry (Figure 14c). As observed in Figure 14a,b, by increasing RPM or decreasing feed rate, the ultimate strength of the weld slightly decreased compared to the base metal. However, at the same time the elongation rate of the sample increased. Regarding the dependence of tensile strength on the geometry of the pin profile, Figure 14c confirms that threaded > square > conical.
Lower rotation speed during FSW results in less frictional heat generation, and consequently poor plastic flow of material. Therefore the tensile strength can be considered a function of the process speeds.
It was observed in Figure 14a that the ultimate tensile stress (UTS) for the base metal (340 MPa) was higher than the weld samples. It can be attributed to the formation of the HAZ region with a negative impact on the strength of the weldment, because of the coarsened grains associated with this region [41].
However, the percentage elongation of the weld sample was more than the base metal, representative of the ductile behaviour of the weld. Our interpretation is that the processing parameters (rotational speed and feed rate) increase the homogeneity of the weld region during the stirring process, in which lead to the ductility of the stirred material, compared to the parent metal [42]. More specifically, the comparison between the tensile test–strain curve for the samples processed by different tools in constant speeds (1120 RPM and 250 mm/min), shows a higher strength and the percentage elongation achieved by the threaded pin tool, see Figure 14c. This also implied the flow uniformity induced by the tool, leading to an increase of the ductility of the weld [39,43].
It should be noted that all the tensile curves show a kink [44] at the stress level of 25 MPa, approximately. This behaviour is explained as the toe region at the beginning of the tensile test [45,46], where the mechanical loading is less than 2% nonlinear strain for the stress–strain curve [47]. There is not a clear explanation for this behaviour, however, it mainly occurs for the soft materials [48,49]. When the stiffness is reduced, or in the presence of micro-defects, a micro-failure accumulates within the material, which was shortly released as the loading continues. Regarding the AA1100 FSW samples, existing of some flow-based discontinuity or micro-porosities like tunnel voids cause a self-interaction inside the material texture during the first steps of the tensile test loading, therefore the toe region occurs. However, the main aim was to compare the strength of the weld in different processing parameters. Additionally, because the tensile testing method was conducting in the same way, and the toe region was observed at stress level approximately 25 MPa for all samples, it did not affect the results of the tensile test.

4. Discussion

This work makes the following original contributions to improve the understanding of the FSW welding processed by the WC-based tool for the aluminium alloy, regarding the microstructural evolution and mechanical properties of the weld.
According to the microscopic observations made, at higher speeds the frictional heat generated is higher, which leads to an increase in the plastic flow of material. This can intensify the emergence of flow-based defects (e.g., tunnel voids, kissing bonds and swirling zone) and subsequently results in poor stirring conditions [33,50,51]. This is consistent with observations in the literature for the Al alloys processed by the FSW, which show the control of the plastic flow deformation as the main factor for improvement of the weld quality [42,52,53]. Alternatively, the interruption of the flow integrity can easily deteriorate the quality of the weld structure.
Similar to the speed condition, the pin geometry also can affect the tensile strength. The pin profile in different geometrical configurations (conical, square and threaded pin) can affect the frictional heat. The tensile strength of the threaded tool weld was higher than that of both other types (conical and square). This is because of greater material softening obtained at higher temperatures, as the threaded pin enhances the plastic flow of material due to higher engagement between the pin and material, and extra material contact. According to the literature, the pin profile for the Al FSW welds show a distinct shearing effect, mainly an ultrafine grain refinement at the mid-SZ, altered to the transition region borders (TMAZ and HAZ) towards the base metal. It is also supported by the previous works that the shearing field induced by the rotating tool into the proximity mass flows is the main factor in the microstructure alteration of the weld texture [39,54,55,56].
As a key finding of the phase characterization, from the XRD and SEM/EDS analysis, it was confirmed that there was no evidence of weld contamination from the WC pin tool. However, optical microscopy revealed some defects, (e.g., kissing bonds, swirling patterns and tunnel voids), which were identified as being inherent to the FSW process, rather than being due to tool contamination. Furthermore, the absence of carbon-containing compounds in XRD and EDS analysis eliminates the possibility of formation of carbon monoxide (CO) gas due to oxidation of the WC at the elevated temperatures occurring during the FSW [24]. Therefore, the stability of the WC pin tool was confirmed, as no oxidative wear degradation occurred during the severe frictional deformation.
This has been affirmed in the literature that the formation of oxide inclusions or other external contaminations can strongly disrupt the flow homogeneity within the plasticized stirred mass [57,58,59]. Subsequently, the recrystallization and grain refinement also can be affected. The microscopic observations in this study indicate the absence of the formation of the oxide layers of contamination or any other W-based compounds within the weld structure, which confirms the main idea of this research in the successful performance of the WC-based pin tools for FSW processing of the Al alloy as an active material, without occurrence of any metallurgical issue.

5. Conclusions

The effect of a WC pin in the microstructural quality of the AA1100 FSW weld was evaluated using different sets of welding speeds (RPM and feeding rate) and different pin geometries (conical, square and threaded shapes). Metallurgical analysis confirmed that the weld structure was free of possible W and/or C contamination from the pin. Nevertheless, microstructural observations revealed the formation of flow-based defects (tunnel voids, kissing bonds and swirling patterns) within the weld structure. Since the quality of the weld was directly affected by these structural defects, the tensile strength of the welded sheets was reduced, as the plasticized material of the weld could not sufficiently achieve the strength of the base metal. Moreover, the welded samples experienced a clear decrease in elongation rate by the increase in the feeding rate. The metallographic observations confirmed that the emerging internal defects could not be completely avoided. Therefore, the specific application should adjust the welding parameters according to the required strength.

Author Contributions

Conceptualization, A.T. and A.B.; Formal analysis, A.T. and A.B.; Investigation, A.T. and A.B.; Methodology, A.T. and A.B.; Project administration, A.T. and A.B.; Resources, A.T. and A.B.; Supervision, A.T.; Validation, A.T. and A.B.; Visualization, A.T. and A.B.; Writing—original draft, A.T. and A.B.; Writing—review and editing, A.T. and M.E.B. All authors have read and agreed to the published version of the manuscript.

Funding

This research received no external funding.

Acknowledgments

The authors would like to thank Alice Young (University of Canterbury, NZ) for her assistance in proofreading the manuscript.

Conflicts of Interest

The authors declare no conflict of interest.

References

  1. Thomas, W.; Nicholas, E.; Needham, J.; Murch, M.; Temple-Smith, P.; Dawes, C. Friction Stir Butt Welding. International Patent Application No. PCT/GB92 Patent Application 9125978.8, 6 December 1991. [Google Scholar]
  2. Murr, L.; Flores, R.; Flores, O.; McClure, J.; Liu, G.; Brown, D. Friction-stir welding: Microstructural characterization. Mater. Res. Innov. 1998, 1, 211–223. [Google Scholar] [CrossRef]
  3. Thomas, W.; Nicholas, E. Friction stir welding for the transportation industries. Mater. Des. 1997, 18, 269–273. [Google Scholar] [CrossRef]
  4. Threadgill, P.; Leonard, A.; Shercliff, H.; Withers, P. Friction stir welding of aluminium alloys. Int. Mater. Rev. 2009, 54, 49–93. [Google Scholar] [CrossRef]
  5. Tamadon, A. Characterization of Flow-Based Bobbin Friction Stir Welding Process. Ph.D. Thesis, University of Canterbury, Christchurch, New Zealand, 2019. [Google Scholar]
  6. Tamadon, A.; Pons, D.; Sued, M.; Clucas, D.; Wong, E. Analogue Modelling of Bobbin Tool Friction Stir Welding. In Proceedings of the International Conference on Innovative Design and Manufacturing (ICIDM2016), Auckland, New Zealand, 24–26 January 2016. [Google Scholar]
  7. Barcellona, A.; Buffa, G.; Fratini, L.; Palmeri, D. On microstructural phenomena occurring in friction stir welding of aluminium alloys. J. Mater. Process. Technol. 2006, 177, 340–343. [Google Scholar] [CrossRef]
  8. Tamadon, A.; Pons, D.J.; Clucas, D. Afm characterization of stir-induced micro-flow features within the aa6082-t6 bfsw welds. Technologies 2019, 7, 80. [Google Scholar] [CrossRef]
  9. Tamadon, A.; Pons, D.; Sued, K.; Clucas, D. Thermomechanical grain refinement in aa6082-t6 thin plates under bobbin friction stir welding. Metals 2018, 8, 375. [Google Scholar] [CrossRef]
  10. Tamadon, A.; Pons, D.; Sued, K.; Clucas, D. Formation mechanisms for entry and exit defects in bobbin friction stir welding. Metals 2018, 8, 33. [Google Scholar] [CrossRef]
  11. Tamadon, A.; Pons, D.; Sued, K.; Clucas, D. Development of metallographic etchants for the microstructure evolution of a6082-t6 bfsw welds. Metals 2017, 7, 423. [Google Scholar] [CrossRef]
  12. Sued, M.; Tamadon, A.; Pons, D. Material flow visualization in bobbin friction stir welding by analogue model. Proc. Mech. Eng. Res. Day 2017, 2017, 368–369. [Google Scholar]
  13. Colligan, K. Material flow behavior during friction welding of aluminum. Weld. J. 1999, 75, 229s–237s. [Google Scholar]
  14. Tamadon, A.; Pons, D.; Sued, M.; Clucas, D.; Wong, E. Preparation of plasticine material for analogue modelling. In Proceedings of the International Conference on Innovative Design and Manufacturing (ICIDM2016), Auckland, New Zealand, 24–26 January 2016. [Google Scholar]
  15. Elrefaey, A.; Gouda, M.; Takahashi, M.; Ikeuchi, K. Characterization of aluminum/steel lap joint by friction stir welding. J. Mater. Eng. Perform. 2005, 14, 10–17. [Google Scholar] [CrossRef]
  16. Watanabe, T.; Takayama, H.; Yanagisawa, A. Joining of aluminum alloy to steel by friction stir welding. J. Mater. Process. Technol. 2006, 178, 342–349. [Google Scholar] [CrossRef]
  17. Kimapong, K.; Watanabe, T. Friction stir welding of aluminum alloy to steel. Weld. J. 2004, 83, 277. [Google Scholar]
  18. Tamadon, A.; Pons, D.J.; Clucas, D. Microstructural study on thermomechanical behaviour of 6082-t6 aluminium bfsw weld plates. In Materials@UC 2018; University of Canterbury: Christchurch, New Zealand, 2018. [Google Scholar]
  19. Murr, L.; Liu, G.; McClure, J. Dynamic recrystallization in friction-stir welding of aluminium alloy 1100. J. Mater. Sci. Lett. 1997, 16, 1801–1803. [Google Scholar] [CrossRef]
  20. Tamadon, A.; Pons, D.J.; Clucas, D. Thermomechanical performance of bobbin tool design as an innovative variant for friction stir welding. In Manufacturing and Design Conference (MaD 2019); NZ’s Manufacturing, Design and Entrepreneurship (MaDE) Network: Auckland, New Zealand, 2019. [Google Scholar]
  21. Tamadon, A.; Pons, D.J.; Clucas, D.; Sued, K. Internal material flow layers in aa6082-t6 butt-joints during bobbin friction stir welding. Metals 2019, 9, 1059. [Google Scholar] [CrossRef]
  22. Hattingh, D.; Blignault, C.; Van Niekerk, T.; James, M. Characterization of the influences of fsw tool geometry on welding forces and weld tensile strength using an instrumented tool. J. Mater. Process. Technol. 2008, 203, 46–57. [Google Scholar] [CrossRef]
  23. Tamadon, A.; Pons, D.; Clucas, D. Analogue modelling of flow patterns in bobbin friction stir welding by the dark-field/bright-field illumination method. Adv. Mater. Sci. 2020, 20, 56–70. [Google Scholar] [CrossRef]
  24. Siddiquee, A.N.; Pandey, S. Experimental investigation on deformation and wear of wc tool during friction stir welding (fsw) of stainless steel. Int. J. Adv. Manuf. Technol. 2014, 73, 479–486. [Google Scholar] [CrossRef]
  25. Dialami, N.; Cervera, M.; Chiumenti, M.; de Saracibar, C.A. A fast and accurate two-stage strategy to evaluate the effect of the pin tool profile on metal flow, torque and forces in friction stir welding. Int. J. Mech. Sci. 2017, 122, 215–227. [Google Scholar] [CrossRef]
  26. Ramulu, P.J.; Narayanan, R.G.; Kailas, S.V.; Reddy, J. Internal defect and process parameter analysis during friction stir welding of al 6061 sheets. Int. J. Adv. Manuf. Technol. 2013, 65, 1515–1528. [Google Scholar] [CrossRef]
  27. Kumar, S.S.; Ravisankar, B.; Raviram, R.D. Evaluation of mechanical properties of friction stir welded commercially pure aluminium. In MATEC Web of Conferences; EDP Sciences: Les Ulis, France, 2018; p. 04003. [Google Scholar]
  28. Uthayakumar, M.; Balasubramanian, V.; Rani, A.M.A.; Hadzima, B. Effects of Welding on the Fatigue Behaviour of Commercial Aluminum aa-1100 Joints. In IOP Conference Series: Materials Science and Engineering; IOP Publishing: Bristol, UK, 2018; p. 012065. [Google Scholar]
  29. Tamadon, A.; Pons, D.J.; Clucas, D.; Sued, K. Texture evolution in aa6082-t6 bfsw welds: Optical microscopy and ebsd characterisation. Materials 2019, 12, 3215. [Google Scholar] [CrossRef]
  30. Tamadon, A.; Pons, D.J.; Clucas, D. Flow-based anatomy of bobbin friction-stirred weld; aa6082-t6 aluminium plate and analogue plasticine model. Appl. Mech. 2020, 1, 3–19. [Google Scholar] [CrossRef]
  31. Tamadon, A.; Pons, D.J.; Clucas, D. Structural anatomy of tunnel void defect in bobbin friction stir welding, elucidated by the analogue modelling. Appl. Syst. Innov. 2020, 3, 2. [Google Scholar] [CrossRef]
  32. Egea, A.S.; Rodriguez, A.; Celentano, D.; Calleja, A.; De Lacalle, L.L. Joining metrics enhancement when combining fsw and ball-burnishing in a 2050 aluminium alloy. Surf. Coat. Technol. 2019, 367, 327–335. [Google Scholar] [CrossRef]
  33. Kolbeck, C.; Pitonak, R.; Weissenbacher, R. Friction Stir Welding Tool. U.S. Patent Application No. 12/742,760, 14 October 2010. [Google Scholar]
  34. Ye, F.; Fujii, H.; Tsumura, T.; Nakata, K. Friction stir welding of inconel alloy 600. J. Mater. Sci. 2006, 41, 5376–5379. [Google Scholar] [CrossRef]
  35. Seighalani, K.R.; Givi, M.B.; Nasiri, A.; Bahemmat, P. Investigations on the effects of the tool material, geometry, and tilt angle on friction stir welding of pure titanium. J. Mater. Eng. Perform. 2010, 19, 955–962. [Google Scholar] [CrossRef]
  36. Tolle, C.R.; Clark, D.E.; Barnes, T.A. Friction Stir Welding Tool. U.S. Patent No. 7,357,292, 15 April 2008. [Google Scholar]
  37. Park, H.K.; Oh, I.H.; Yoon, H.J.; Son, H.T.; Lee, K.J.; Bang, H.S.; Bang, H.S. Preparation Method of Tungsten Carbide Sintered Body for Friction Stir Welding Tool. U.S. Patent No. 9,580,361, 28 February 2017. [Google Scholar]
  38. Bahaaddini, M.; Baharvandi, H.R.; Ehsani, N.; Khajehzadeh, M.; Tamadon, A. Pressureless sintering of lps-sic (sic-al2o3-y2o3) composite in presence of the b4c additive. Ceram. Int. 2019, 45, 13536–13545. [Google Scholar] [CrossRef]
  39. Machniewicz, T.; Nosal, P.; Korbel, A.; Hebda, M. Effect of fsw traverse speed on mechanical properties of copper plate joints. Materials 2020, 13, 1937. [Google Scholar] [CrossRef]
  40. Torzewski, J.; Grzelak, K.; Wachowski, M.; Kosturek, R. Microstructure and low cycle fatigue properties of aa5083 h111 friction stir welded joint. Materials 2020, 13, 2381. [Google Scholar] [CrossRef]
  41. Msomi, V.; Mbana, N. Mechanical properties of friction stir welded aa1050-h14 and aa5083-h111 joint: Sampling aspect. Metals 2020, 10, 214. [Google Scholar] [CrossRef]
  42. Li, Y.; Sun, D.; Gong, W. Effect of tool rotational speed on the microstructure and mechanical properties of bobbin tool friction stir welded 6082-t6 aluminum alloy. Metals 2019, 9, 894. [Google Scholar] [CrossRef]
  43. Wang, F.; Li, W.; Shen, J.; Hu, S.; Dos Santos, J. Effect of tool rotational speed on the microstructure and mechanical properties of bobbin tool friction stir welding of al–li alloy. Mater. Des. 2015, 86, 933–940. [Google Scholar] [CrossRef]
  44. Wang, L.; Sabisch, J.; Lilleodden, E. Kink formation and concomitant twin nucleation in mg–y. Scr. Mater. 2016, 111, 68–71. [Google Scholar] [CrossRef]
  45. Korhonen, R.K.; Saarakkala, S. Biomechanics and modeling of skeletal soft tissues. In Theoretical Biomechanics; InTech: Rijeka, Croatia, 2011; pp. 113–132. [Google Scholar]
  46. Roeder, B.A.; Kokini, K.; Sturgis, J.E.; Robinson, J.P.; Voytik-Harbin, S.L. Tensile mechanical properties of three-dimensional type i collagen extracellular matrices with varied microstructure. J. Biomech. Eng. 2002, 124, 214–222. [Google Scholar] [CrossRef]
  47. Zitnay, J.L.; Weiss, J.A. Load transfer, damage, and failure in ligaments and tendons. J. Orthop. Res. 2018, 36, 3093–3104. [Google Scholar] [CrossRef]
  48. Mitsuhashi, K.; Ghosh, S.; Koibuchi, H. Mathematical modeling and simulations for large-strain j-shaped diagrams of soft biological materials. Polymers 2018, 10, 715. [Google Scholar] [CrossRef]
  49. Lee, B.; Zhou, X.; Riching, K.; Eliceiri, K.W.; Keely, P.J.; Guelcher, S.A.; Weaver, A.M.; Jiang, Y. A three-dimensional computational model of collagen network mechanics. PLoS ONE 2014, 9, e111896. [Google Scholar] [CrossRef]
  50. Khan, N.Z.; Siddiquee, A.N.; Khan, Z.A.; Shihab, S.K. Investigations on tunneling and kissing bond defects in fsw joints for dissimilar aluminum alloys. J. Alloy. Compd. 2015, 648, 360–367. [Google Scholar] [CrossRef]
  51. Kang, M.; Yoon, J.; Kim, C. Hook formation and joint strength in friction stir spot welding of al alloy and al–si-coated hot-press forming steel. Int. J. Adv. Manuf. Technol. 2020, 106, 1671–1681. [Google Scholar] [CrossRef]
  52. Krishnan, M.M.; Maniraj, J.; Deepak, R.; Anganan, K. Prediction of optimum welding parameters for fsw of aluminium alloys aa6063 and a319 using rsm and ann. Mater. Today 2018, 5, 716–723. [Google Scholar] [CrossRef]
  53. Liu, X.; Wu, C.; Padhy, G.K. Characterization of plastic deformation and material flow in ultrasonic vibration enhanced friction stir welding. Scr. Mater. 2015, 102, 95–98. [Google Scholar] [CrossRef]
  54. Mahto, R.P.; Anishetty, S.; Sarkar, A.; Mypati, O.; Pal, S.K.; Majumdar, J.D. Interfacial microstructural and corrosion characterizations of friction stir welded aa6061-t6 and aisi304 materials. Met. Mater. Int. 2019, 25, 752–767. [Google Scholar] [CrossRef]
  55. Nasir, S.N.N.M.; Sued, M.K.; Abidin, M.Z.Z. The effects of rotational tool speed on mechanical properties of bobbin friction stir welded aa1100. In Advances in Material Sciences and Engineering; Springer: Berlin, Germany, 2020; pp. 337–342. [Google Scholar]
  56. Shen, Z.; Li, W.; Ding, Y.; Hou, W.; Liu, X.; Guo, W.; Chen, H.; Liu, X.; Yang, J.; Gerlich, A. Material flow during refill friction stir spot welded dissimilar al alloys using a grooved tool. J. Manuf. Process. 2020, 49, 260–270. [Google Scholar] [CrossRef]
  57. Teimournezhad, J.; Masoumi, A. Experimental investigation of onion ring structure formation in friction stir butt welds of copper plates produced by non-threaded tool pin. Sci. Technol. Weld. Join. 2010, 15, 166–170. [Google Scholar] [CrossRef]
  58. Wen, Q.; Li, W.; Gao, Y.; Yang, J.; Wang, F. Numerical simulation and experimental investigation of band patterns in bobbin tool friction stir welding of aluminum alloy. Int. J. Adv. Manuf. Technol. 2019, 100, 2679–2687. [Google Scholar] [CrossRef]
  59. Wiedenhoft, A.G.; Amorim, H.J.D.; Rosendo, T.D.S.; Tier, M.A.D.; Reguly, A. Effect of heat input on the mechanical behaviour of al-cu fsw lap joints. Mater. Res. 2018, 21. [Google Scholar] [CrossRef]
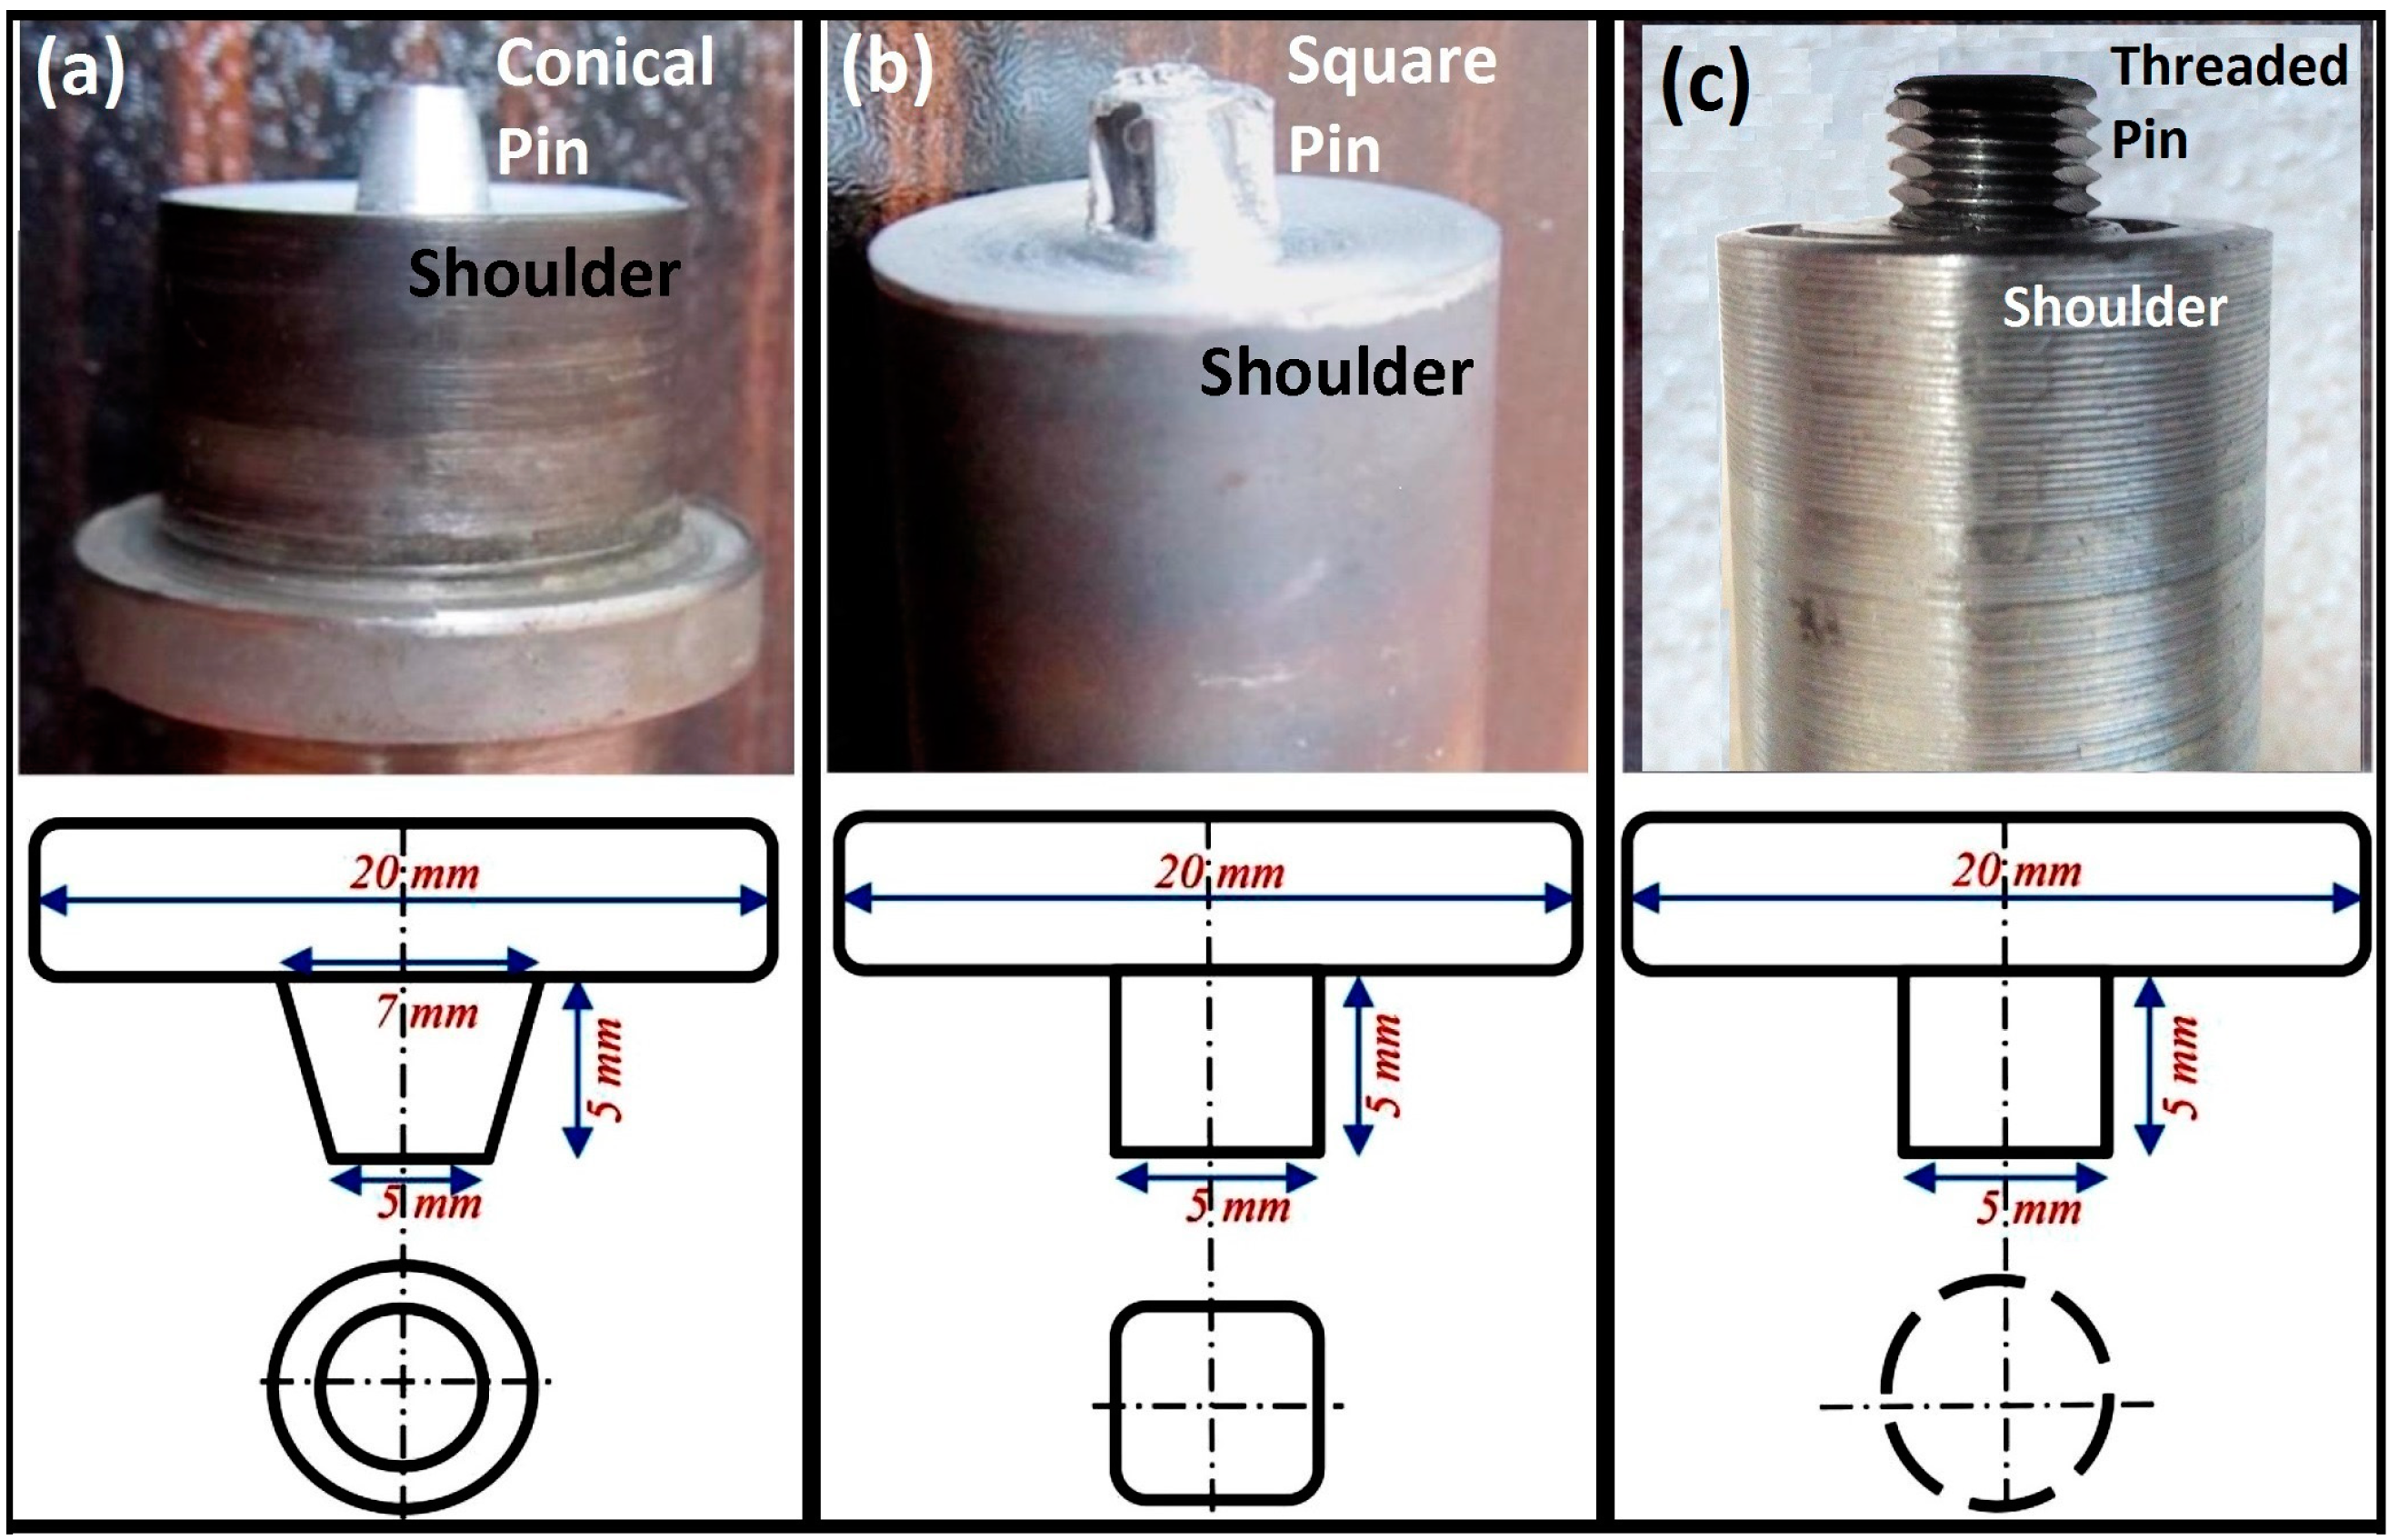
Figure 1. Configuration of the FSW tools utilized for the AA1100 weld trials ((a) conical, (b) square and (c) threaded pin tools) with geometry and dimension.
Technologies 08 00034 g001
Figure 2. Schematic of the FSW process, the FSW tool in interaction with the AA1100 plates as the substrate.
Technologies 08 00034 g002
Figure 3. Schematic dimensions of the tensile test sample, made of FSW plates of AA1100.
Technologies 08 00034 g003
Figure 4. Surface appearance of the weld for conical FSW tool in constant feeding rate; (a) at the welding speeds of (1120 rpm and 150 mm/min) and (b) at the welding speeds of (1120 rpm and 315 mm/min).
Technologies 08 00034 g004
Figure 5. Surface appearance of the weld for conical FSW tool at constant RPM; (a) at welding speeds of (250 rpm and 710 mm/min) and (b) at welding speeds of (250 rpm and 1400 mm/min).
Technologies 08 00034 g005
Figure 6. Surface appearance of the weld for different FSW tool in constant speed sets of (250 mm/min and 1400 rpm); (a) conical pin profile, (b) square pin profile and (c) threaded pin profile.
Technologies 08 00034 g006
Figure 7. The macrostructure of the cross-section of the FSW weld for three different tools: (a) conical, (b) square and (c) threaded; all in speeds of 250 mm/min and 1400 rpm.
Technologies 08 00034 g007
Figure 8. Microstructure of the grain distribution in the cross section of the AA1100 FSW weld (processed at 1120 rpm and 250 mm/min); (a) general view of the cross section, (b) the base metal, and (c) the stirring zone (SZ), at higher magnification.
Technologies 08 00034 g008
Figure 9. Micro-void features visible in stirring zone of the FSW weld, known as a tunnel void, observed in: (a) conical tool and (b) square tool welds.
Technologies 08 00034 g009
Figure 10. Formation of flow-based defects around tunnel voids formed by different FSW tools at constant speed sets of (250 mm/min and 1400 rpm); (a) conical pin profile, (b) square pin profile and (c) threaded pin profile.
Technologies 08 00034 g010
Figure 11. Formation of the flow-based defects at the structure of the FSW weld; (a) kissing bond by conical pin profile and (b) swirling zone by threaded pin profile, in speed sets of (250 mm/min and 1400 rpm).
Technologies 08 00034 g011
Figure 12. Schematic plot of the SEM results; (a) micromorphology of the stirring zone and (b) EDS composition for the selected region of the stirring zone processed by the square-shape pin tool.
Technologies 08 00034 g012
Figure 13. XRD analysis of AA1100 aluminium plate, before and after FSW processing by the square-shape pin tool; (a) parent metal and (b) stirring zone.
Technologies 08 00034 g013
Figure 14. Tensile test results for the AA1100 aluminium welds; (a) RPM = 710, 1120 and 1400 at feed rate of 250 mm/min, (b) feed rate = 150, 250 and 315 mm/min at 1120 RPM and (c) comparison between conical, square and threaded pin tools, processed in constant welding speeds (1120 RPM and 250 mm/min).
Technologies 08 00034 g014
Table 1. Composition of the AA1100 Al alloy.
ElementComposition (wt %)
Al99.3
Zn0.006
Mn0.016
Si0.138
Cu0.009
Cr0.03
Fe0.182
Mg0.007
Table 2. The operational welding parameters of the friction stir welding (FSW) process for the AA1100 plates.
Welding Parameters
ω (rpm)71011201400
V (mm/min)150250315
Tilt Angle3 degrees
Plunge Depth (shoulder)0.5 mm