Review

Applications of Optical Interferometer Techniques for Precision Measurements of Changes in Temperature, Growth and Refractive Index of Materials

by
Rami Reddy Bommareddi
Department of Physics, Alabama A&M University, P.O. Box 1268, Normal, AL 35762, USA
Technologies 2014, 2(2), 54-75; https://doi.org/10.3390/technologies2020054
Submission received: 13 December 2013 / Revised: 16 March 2014 / Accepted: 27 March 2014 / Published: 5 May 2014
(This article belongs to the Special Issue Precision Measurements and Metrology Using Lasers)

Abstract

:
Optical metrology techniques used to measure changes in thickness; temperature and refractive index are surveyed. Optical heterodyne detection principle and its applications for precision measurements of changes in thickness and temperature are discussed. Theoretical formulations are developed to estimate crystal growth rate, surface roughness and laser cooling/heating of solids. Applications of Michelson and Mach-Zehnder interferometers to measure temperature changes in laser heating of solids are described. A Mach-Zehnder interferometer is used to measure refractive index and concentration variations of solutions in crystal growth experiments. Additionally, fluorescence lifetime sensing and fluorescence ratio method are described for temperature measurement. For all the above techniques, uncertainty calculations are included.

1. Introduction

Optical testing/assessment of optical surfaces are usually done using interferometers. So, a series of interferometers were designed based on the division of amplitude or wavefront [1]. Interference occurs whenever two coherent beams are superimposed; one of them is reflected by a reference surface and the other by a test surface. Newton demonstrated concentric fringes in an air gap between a convex surface and a flat surface. Newton’s rings are easily disturbed by vibrations and so this technique is not used for routine testing of optical surfaces. In a Fizeau interferometer, the reference and test flats are separated by an air gap. Light reflected from these two flats generate interference fringes. Young demonstrated interference fringes by the division of wave fronts using a double slit experiment. Now-a-days, similar setups are used to measure coherent properties of light sources. Albert Michelson configured an interferometer which bears his name, to measure the speed of light. Later on, similar interferometer configurations were used for a variety of experiments. Twyman-Green (T-G) interferometer uses a collimated beam which is considered a modified version of the Michelson interferometer. Mach-Zehnder (M-Z) interferometer could be modified to a variety of experimental situations. In general, T-G, M-Z, Fizeau and shearing interferometers facilitate the testing of large optical surfaces. Most of the instruments are two-beam interferometers whereas Fabry-Pérot (F-P) interferometer is based on multiple beam interference. In the pre laser era, interferometers utilized either a sodium lamp or a mercury lamp as light source. After the advent of lasers, majority of the interferometers are equipped with HeNe lasers, because they produce stable laser sources whose beam parameters are superb. F-P etalons and interferometers are utilized extensively in laser design and to monitor single mode laser beams. Michelson type interferometers are also used in the design of wave meters [1]. Homodyne interferometer uses a single wavelength laser whereas a heterodyne interferometer uses a two frequency laser. Both of them are used in metrology instruments. Sagnac developed a common path interferometer in which the two beams travel in counter propagating directions [1]. Sagnac interferometer is very stable and hence it is used in sensing rotations. Now-a-days, interferometers can be setup using free space optics, optical waveguides or fiber optics. Fringe analysis and phase retrieval became easy and faster with the use of digital computers. In particular, phase shifting and dynamic interferometer techniques are becoming popular.
In situ monitoring of growth rate and temperature is crucial in vapor deposition, molecular beam epitaxy (MBE) and crystal growth [2]. Surface micro-irregularities limit storage capacity of magnetic media. Surface roughness also limits the resolution of images and the resolving power of optical elements. There are several ex situ techniques based on scanning electron microscope (SEM), transverse electron microscope (TEM), X-Ray diffraction (XRD) and atomic force microscope (AFM), for assessment or characterization. However, for in situ measurements, non-contact and non-destructive techniques are preferred.
Temperature is an important parameter in many industrial environments [3]. The development of temperature sensors has been continually evolving for more than two centuries. Any material whose property quickly changes proportionate to temperature can be used as a thermometer. This property can be pressure, volume, length, resistance, refractive index, color, etc. Resistive thermometers are susceptible to electromagnetic interference; thermocouples are not suitable in corrosive atmospheres, and liquid thermometers are not suitable for high temperature measurements. Harsh environments such as combustion or jet plume studies require reliable temperature sensors [3]. In optically pumped lasers, thermal effects limit the performance of laser materials and the beam quality [4]. The temperature of an optical material may change along the path of the laser beam. For such cases, surface mounted thermocouples do not reveal the accurate material temperature along the beam path, because a temperature gradient exists. So, alternate techniques are required for many such cases for the measurement of either large or small temperature changes. Whenever conventional techniques are not suitable, optical metrology techniques are being developed. Optical sensors have gained importance after laser sources are incorporated into metrology instruments. In this article, optical techniques are reviewed to measure growth rate and temperature changes. High precession measurements involve changes in phase measurement [5]. Applications of Michelson, Mach-Zehnder and optical heterodyne interferometers are described in detail, for in situ measurement of material temperature changes, crystal growth rate measurement, and refractive index and concentration changes of solutions. Fluorescence intensity and lifetime based techniques are also reviewed for temperature measurements. These techniques are useful in harsh environments and also in other situations, where conventional methods are not applicable.

1.1. Survey Optical Techniques for Growth Rate Measurements

Interferometry has applications in science and industry including precision surface topography, film growth monitoring, temperature sensing, and concentration mapping [5]. In general, interferometry can be used to measure films, which are thicker than one fourth of laser wavelength, whereas ellipsometry can be used for thin film characterization. In ellipsometry, the polarization of the incident light is rotated after reflection from the sample, which is detected by an analyzer [6]. Phase shifting interferometry (PSI) [7], vertical scanning interferometry (VSI), Moiré interferometry [8] and holographic interferometry [9] techniques are computer based techniques and their data processing times are faster [7]. In PSI, the relative phase of reference beam is varied in a continuous manner by applying discrete voltages to a PZT mounted mirror, and phase shifted interferograms are recorded sequentially. The interferograms are recorded with a CCD camera, and a computer measures the intensity variation for various phase shifts to characterize the object [7]. Measurement sensitivity of PSI is higher and small changes in concentration, temperature and density can be determined. VSI uses white light and is useful to map rough surfaces but its sensitivity is less than that of PSI [10]. Laser reflectance interferometry (LRI) involves measuring the intensity of a laser beam reflected from the front and back surface of a material/film under growth [11]. Film thickness and growth rate can be measured using LRI. However, surface roughness and bulk absorption/reflectance, adversely affect the use of this technique after some material growth, as it decreases the reflectivity, and hence the oscillation amplitude. Michelson and Mach-Zehnder interferometers are used in real time for growth rate measurements and concentration field measurements onboard the international space station [12]. Differential laser interferometer technique was used to measure thermal expansion of solids, by using a stepped sample. Light is reflected from both the surfaces. Two fringe signals that are 90° out of phase are monitored simultaneously [13]. Film thickness was measured by a modified Michelson interferometer in which one mirror was replaced by a step. A double interference pattern was obtained which depicted a shift between the patterns. The patterns were obtained from the substrates with and without the film. Film thickness was calculated from the shift.

1.2. Survey of Optical Sensor Technologies for Temperature Measurement

Optical measurements involve the detection of light. Any parameter that changes with temperature, for example, changes in emission intensity, lifetime, optical path length or phase of an electromagnetic wave can be used to estimate the sample temperature. Raman scattering is the principle behind the operation of distributed temperature sensing (DTS) device [14]. If a fiber’s temperature changes at one or more points along the length of a fiber, thermal effects induce lattice vibrations locally, and a propagating pulsed laser beam undergoes Raman scattering at those points. The ratio of anti-Stokes to Stokes line intensities is used to derive the fiber temperature. Commercial devices measure temperatures up to 700 °C with a linear resolution of 1 m. Fiber Bragg grating temperature sensors are used within nuclear power facilities to monitor reactor core temperature and avoid the possibility of nuclear meltdowns [15]. After the advent of ultraviolet LEDs, frequency domain lifetime sensing [16] was employed for temperature measurement. A modulated light (MHz-GHz) source excites luminescence from the sample. The resulting luminescence is also modulated, and shifted in phase, from that of the exciting light source. The detector output is demodulated and the lifetime is derived from the measured phase shift. In differential luminescence measurement (DLM), changes in luminescence spectrum of a sample are monitored as a function of temperature. Spectral subtraction reveals whether the material is heating or cooling [17]. This technique is fast and achieves sub millikelvin (mK) resolution. Another high temperature probe design involves an optical fiber made of Y2O3, or another [18]. One end of the fiber is coated with rare-earth ion doped film that is in contact with the surface under measurement. The light output of the fiber passes through a band pass filter (or a spectrometer) before being detected, whose intensity is related to the sample temperature. This device is useful for temperature measurement from 400–2000 °C, and operates even in reactive and corrosive environments. It has a fast response time of 1 ms and a temperature resolution of 1 °C. In spite of all the developments, there is no universal device that is suitable for all environments. So, optical metrology is continually evolving with different applications. Any technique that involves phase measurement is more accurate than fringe counting techniques. Here, we will review the theory and the applications of interferometers and fluorescence techniques for scientific research and industrial measurements.

2. Experimental Details

2.1. Optical Heterodyne Technique

In general, a typical interferometer involves two beams of which one is a reference beam and the other is a measurement beam. Measurement beam either gets reflected or passes through the material under investigation. Depending on the application, these experiments can be setup in several different configurations. We will review some unique applications of optical heterodyne interferometer in this section. Interferometry deals with either fringe counting or phase measurement [4,5]. In a fringe counting experiment, an ordinary HeNe or another low power laser of long coherence length is required. For phase measurements, a stabilized two frequency Zeeman laser is required [19]. If a Zeeman laser is not available, the required two frequencies can be produced with modulators. Figure 1 and Figure 2 depict Michelson and Mach-Zehnder interferometer configurations, required for the implementation of optical heterodyne interferometer technique. A milliwatt Zeeman laser produces two collinear and orthogonally polarized beams, whose frequencies differ by 1.5 MHz for a HP laser and 250 kHz for an OPTRALITE laser. These frequencies are spatially separated by a polarizing beam splitter (PBS) and one beam gets retro-reflected by a fixed mirror, hereafter called the reference beam, and the other beam is retro-reflected by a film/crystal under growth, hereafter called the measurement beam (Figure 1). The reflected beams are recombined by the PBS and then directed to a detector (Figure 1). This technique was implemented for the measurement of LAP crystal growth from solution [20] and the surface roughness of coated mirrors [21] in real time. For some applications, a setup similar to that of a Mach-Zehnder interferometer is preferred. The experimental configuration of optical heterodyne detection technique needed for the investigation of laser cooling and heating of solids is described in Figure 2. The p (|) and s (●) polarized beams are spatially separated by a PBS. For the measurement of crystal growth or film deposition rate, a Michelson interferometer configuration is convenient (Figure 1). For the measurement of laser cooling or heating of solids, a Mach-Zehnder interferometer configuration is ideal (Figure 2). Based on the optical configuration, the mathematical model has to be developed accordingly.
Figure 1. Optical configuration of the experimental setup for growth rate measurement p (|) and s (●) -polarization components are separated by a PBS [20].
Technologies 02 00054 g001
Figure 2. Mach-Zehnder interferometer configuration; p (|) and s (●) -polarization components are spatially separated by a PBS.
Technologies 02 00054 g002

2.2. Rare-Earth Luminescence Measurements
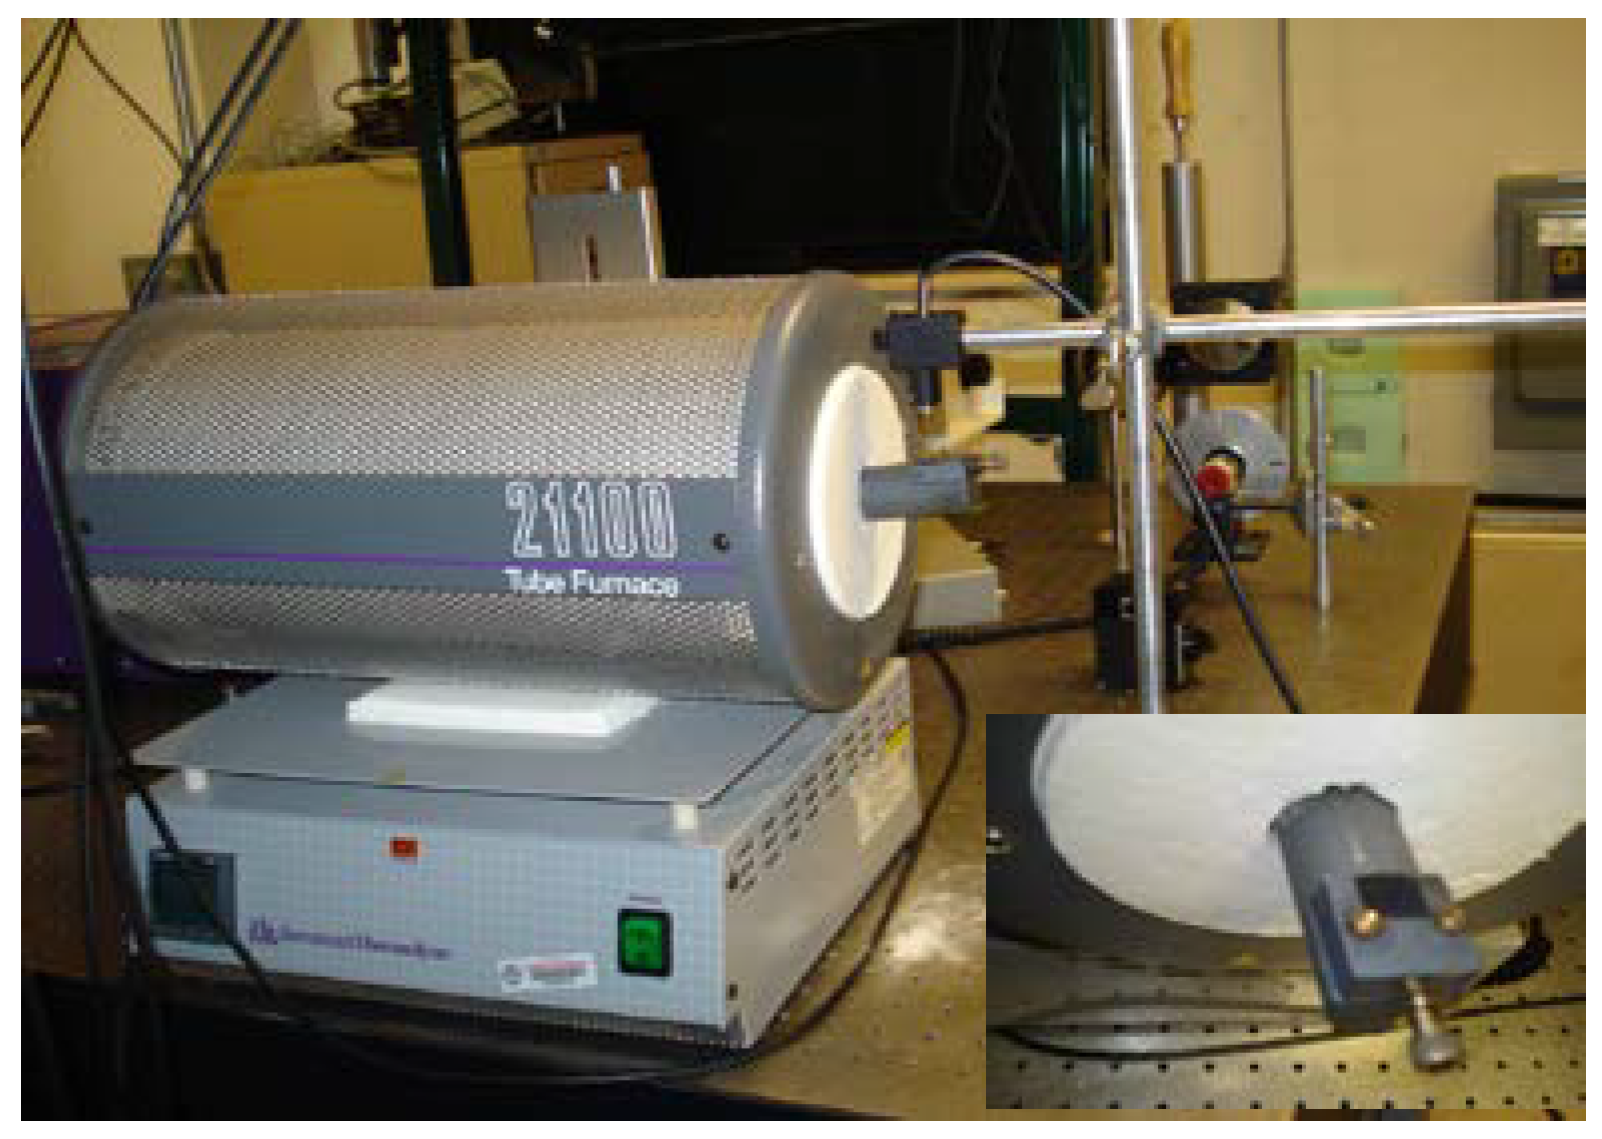
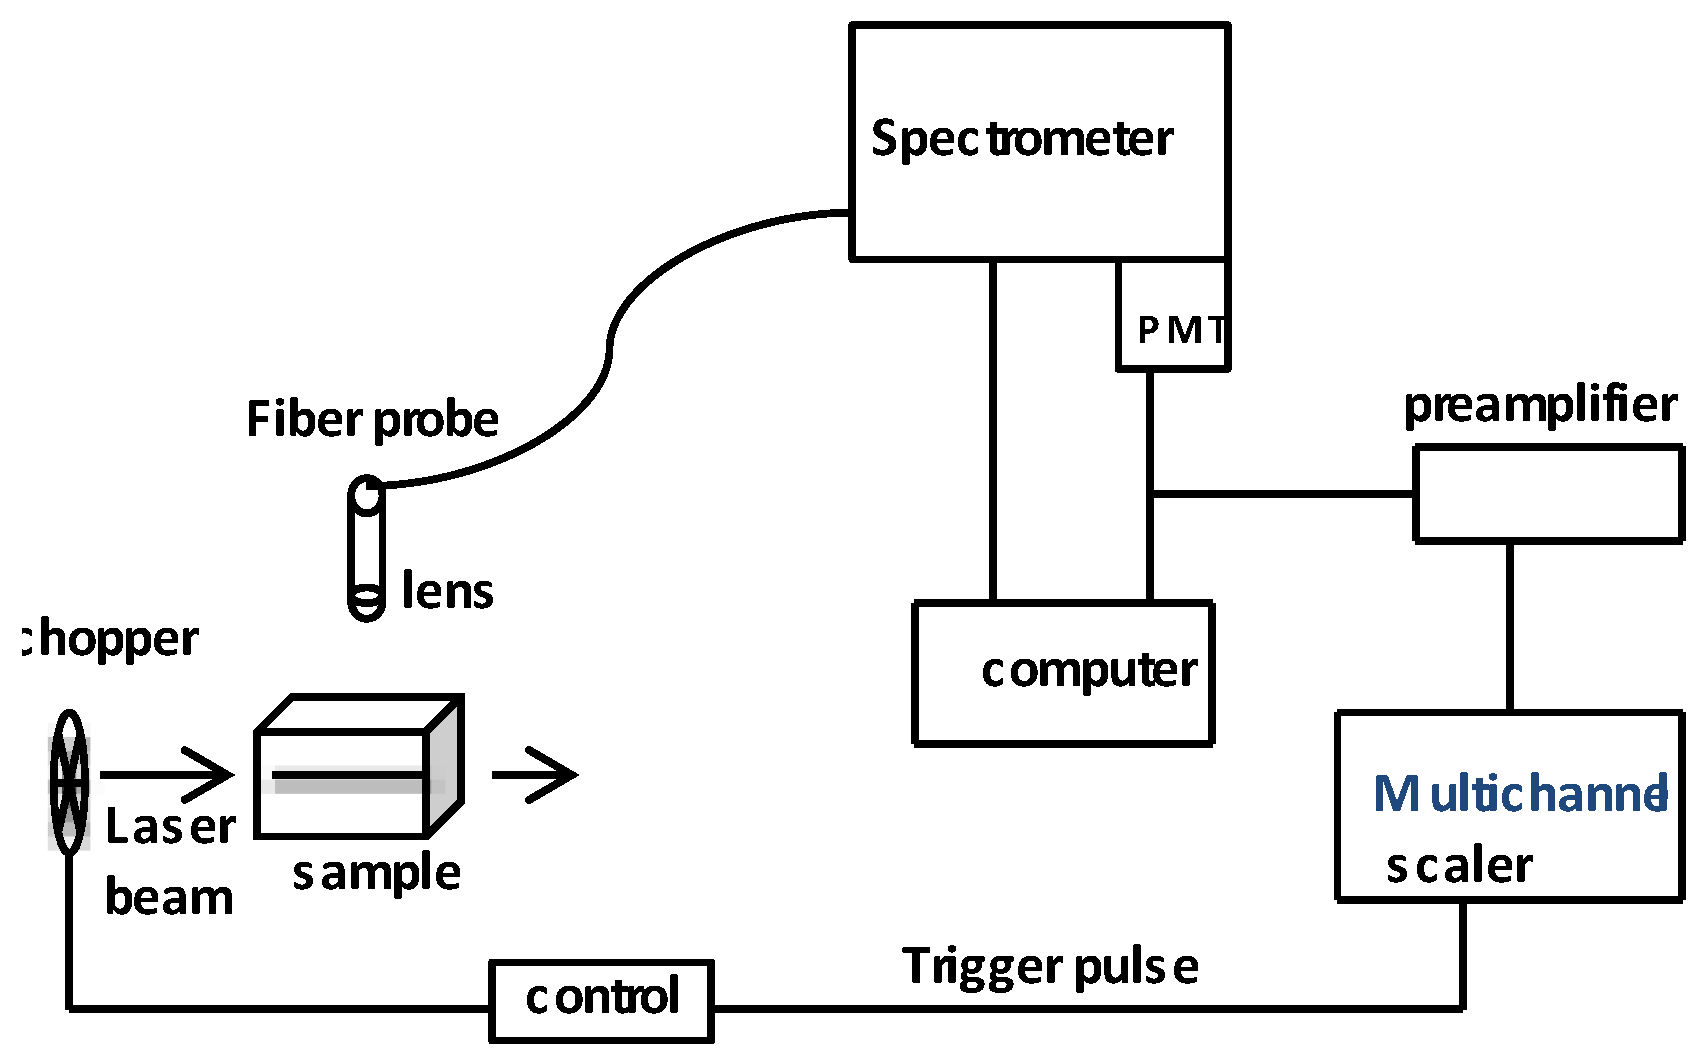
Rare-earth luminescence is used to estimate sample temperature. For this purpose the system has to be calibrated. So, luminescence spectra and lifetimes were measured as a function of sample temperature. A sample compartment was machined at one end of an iron rod of 0.0254 m diameter, and 0.3 m in length. The rod was inserted into a tube furnace except for the sample chamber that remains outside (Figure 3). The sample is in contact with the metal rod on five sides. The top surface of the sample is exposed to air [22]. The laser beam enters the sample chamber from the side, through a millimeter size hole, and exits from the opposite side (see the inset, in Figure 3). A fiber bundle collects fluorescence from the top of the sample, whose other end is attached to a medium resolution spectrometer. A block diagram of the setup is shown in Figure 4. The use of a spectrometer minimizes the blackbody radiation entering the detector. A photomultiplier tube (PMT) is mounted on the exit slit for the detection of light. PMT output is acquired by a computer for spectral recording. A mechanical chopper was used to pulse the continuous wave laser beams. The amplified output of the PMT was acquired by a multichannel scaler for lifetime measurement. Single crystals were obtained from Optovac, Inc., and Scientific Materials Corp, and glasses were made in our laboratory. The melting points of YAG and LaF3 crystals are respectively 1940 and 1493 °C and the latter have small phonon frequency. These materials are used in lifetime sensing as well as interferometer methods for temperature measurement.
Figure 3. Photograph of the sample heating chamber in fluorescence lifetime sensing setup. Inset shows the sample compartment [22].
Technologies 02 00054 g003
Figure 4. Block diagram of the fluorescence lifetime sensing setup [22].
Technologies 02 00054 g004

3. Principle of the Optical Heterodyne Detection Technique

Optical frequencies are of the order of 6 × 10¹⁴ Hz or larger. When such a wave falls on a detector, it does not respond to such fast variations. So, the detector output is a DC current whose amplitude is proportional to the intensity of light (Figure 5). The two Zeeman laser frequencies ν1 and ν2 are slightly different, and their difference Δν = ν2 − ν1, is in the radiofrequency (rf) range. When two such optical waves, ν1 and ν2, fall on a detector, its output is a DC current that is modulated by the rf current at Δν. The frequency of the rf component equals the difference between the two optical frequencies (1.5 MHz for HP 5501A laser, and 250 kHz for OPTRALITE laser). If the two beams travel slightly different path lengths and then fall on a detector, the resultant amplitude is given by
E = E1 + E2 = A exp i (k1z1 − ω1t) + A exp i (k2z2 − ω2t)
where A is the amplitude, and ωi, ki and zi (i = 1, 2) are the angular frequency, wavenumber and path length of each wave. Detector output current, I is proportional to the intensity of the beams,
I = EE* = I0 + Irf
where
Irf = I0 cos (2πΔνt + ΔΘ(z))
where ΔΘ(z) = Θ1(z1) − Θ2(z2). Θ1(z1) is the phase of the reference beam and Θ2(z2) is the phase of the measurement beam. As the material grows, optical path length travelled by the measurement beam decreases, and hence its phase, Θ2(z2) changes. Consequently, the phase difference between the two waves, ΔΘ(z) changes continuously as the material grows. ΔΘ(z) is related to the path length change as
ΔΘ (z) = (2π/λ) Δz
where λ is the wavelength corresponding to the center frequency of the Zeeman laser, the roundtrip change in path length, Δz = 2ΔH and ΔH is the change in thickness.
ΔH = (λ/4π) ΔΘ
Figure 5. Conceptual diagram of optical heterodyne detection. Rectangle represents the detector.
Technologies 02 00054 g005
ΔΘ is measured by the experiment. The wavelength has to be divided by the refractive index of the medium if the sample is in a solution whose refractive index is more than 1. OPTRALITE laser head provides the 250 kHz rf frequency for reference purposes. For a HP laser the reference beam has to be derived from a detector output. The reference and measurement rf frequencies (detector outputs) are given to the two inputs of a HP 3575A phase meter, whose output (in DC volts) is proportional to the phase difference between the two rf inputs.

3.1. Application of Optical Heterodyne Detection Technique for in situ Measurement of Crystal Growth
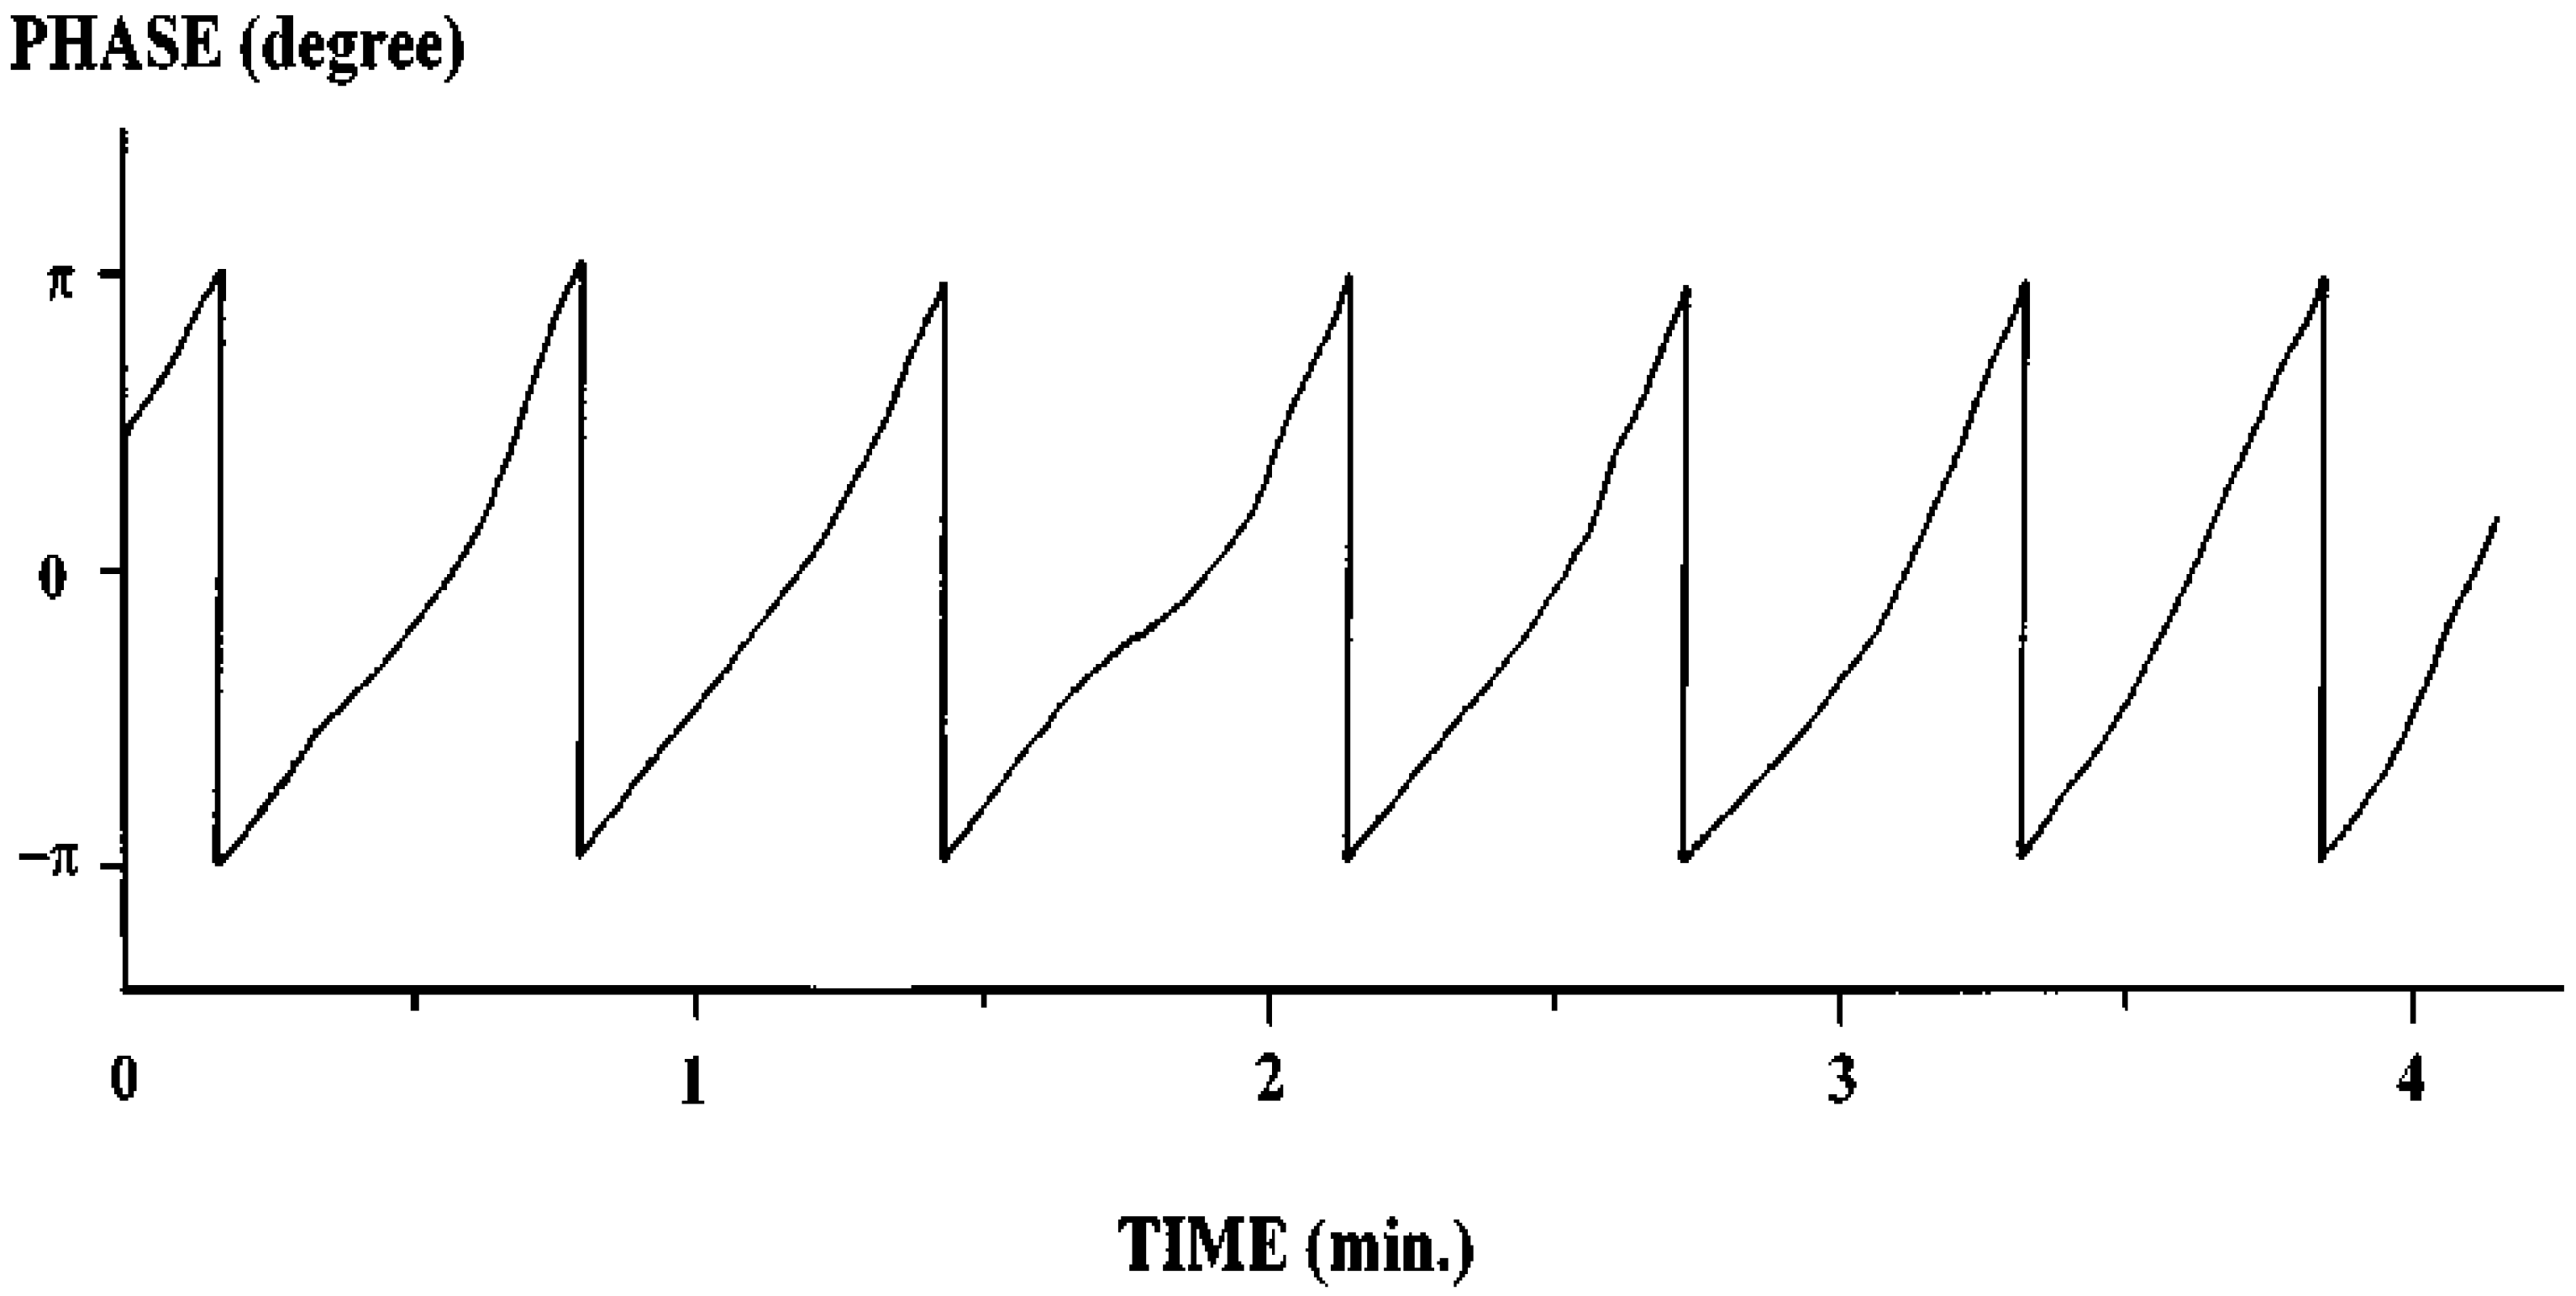
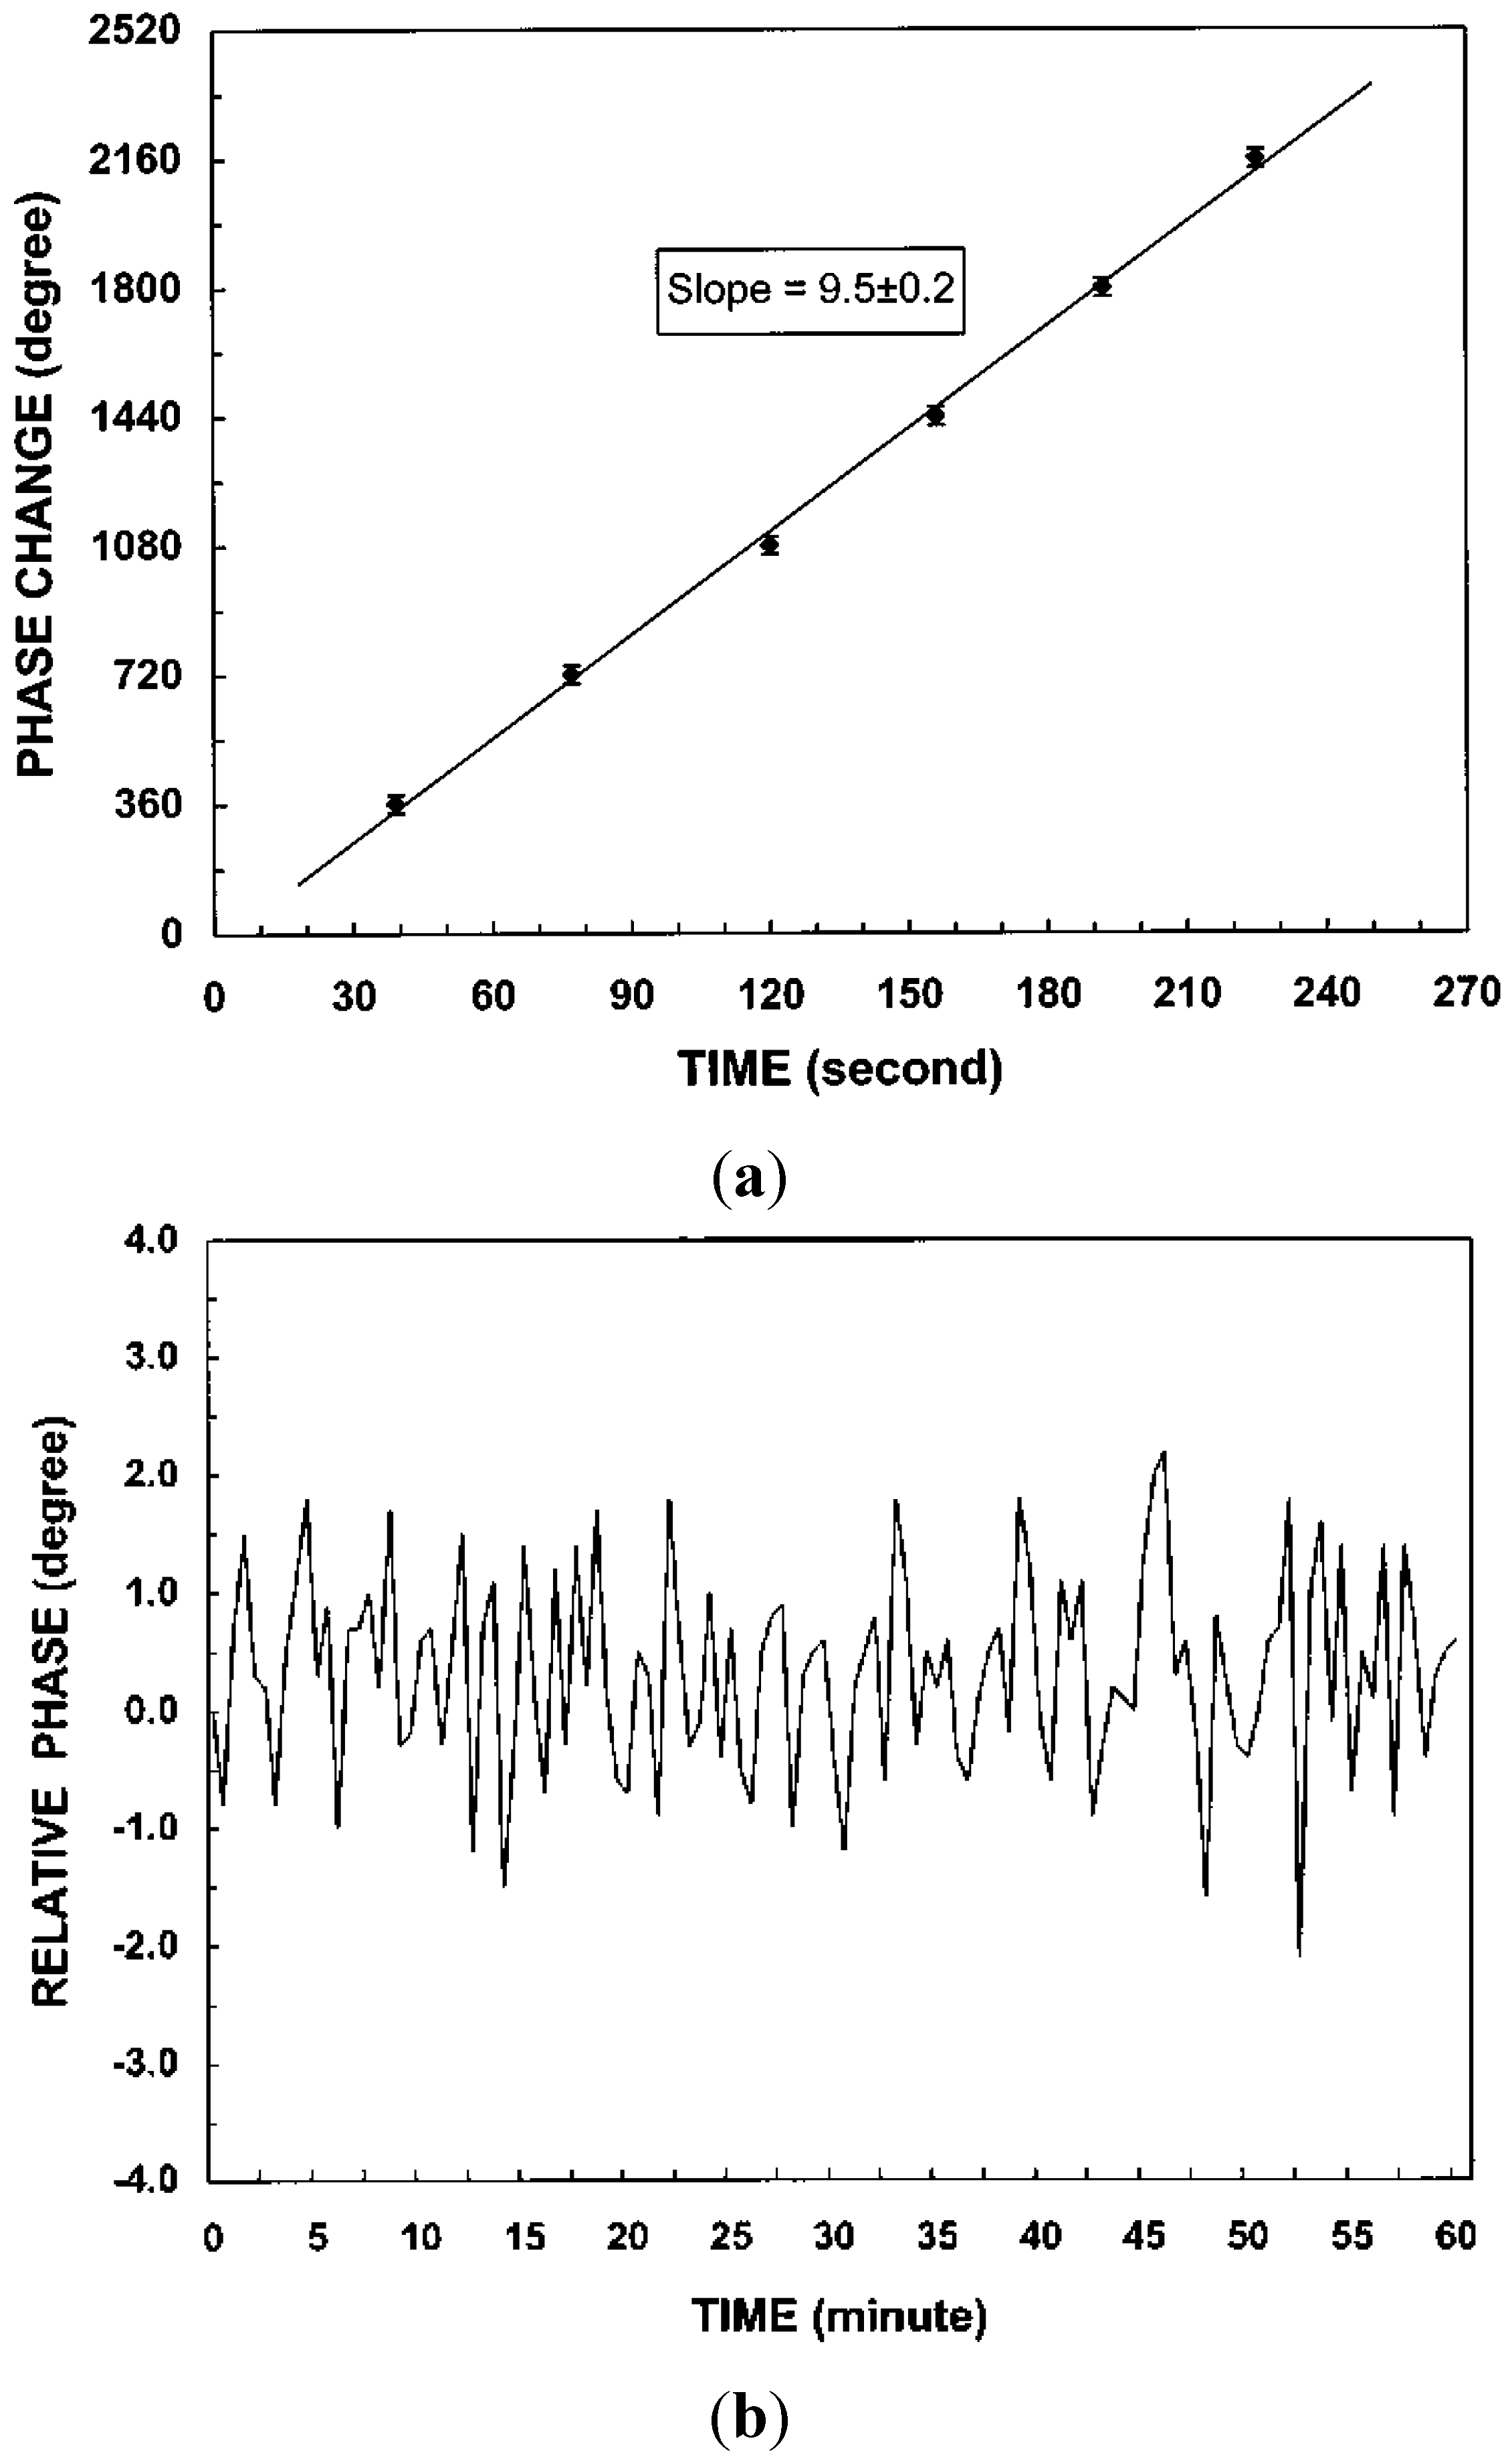
We applied this technique for crystal growth rate measurement [20]. The experimental configuration is similar to that shown in Figure 1. The phase meter output is shown in Figure 6. The phase meter output steadily increases between –π and +π, and immediately resets, as per the instrument design. The smallest value of ΔH that can be measured is limited by the resolution of the phase measurement device employed, which equals ΔΘ. The resolution of HP 3575A phase meter is 0.1°. For λ = 632.8 nm, and ΔΘ = 0.1° (equal to phase resolution), thickness (or height) changes can be measured to an accuracy of 0.1 nm. For a better understanding, the data of Figure 6 are plotted in Figure 7a as phase change versus time. The slope reveals a phase change of 9.5°/s which corresponds to a growth rate of 6.1 nm/s. If the experimental setup is located in a noisy environment, it will impact the measurement sensitivity [20]. Background noises such as thermal drift, mechanical vibration may adversely affect the measurement. To address this problem, crystal growth chamber was replaced by a mirror and the detector output was monitored for an hour. The resulting noisy signals are shown in Figure 7b. The root-mean-square drift in phase change was 1.3° which corresponds to a path length change of 0.8 nm in LAP solution, since the solution refractive index is 1.3565. This technique works equally well for thin film growth rate measurement. The only requirement is that the crystal/film surface has to reflect the laser light.
Figure 6. In situ measurement of crystal growth rate by the heterodyne detection technique [20].
Technologies 02 00054 g006
Figure 7. (a) A plot of heterodyne signal-phase versus time in a crystal growth experiment [20]; (b) Stability measurement of heterodyne detection in the Michelson interferometer setup [20].
Technologies 02 00054 g007

3.2. Application of Optical Heterodyne Detection Technique for Surface Roughness Measurement

The experimental configuration for the measurement of surface roughness of coated mirrors is different from that of crystal growth rate measurement. For this experiment, a HP Zeeman laser was used. Reference rf wave was generated by mixing the optical waves (10% of the laser power) in a detector. Measurement rf wave was generated by launching the beams to an air-lifted mirror that can be rotated (Figure 8). The p- and s- polarization components are spatially separated by a Wollaston prism and focused at two different points on the air-lifted mirror (inset of Figure 8). One of the spots is incident at a point that is coincident with the axis of rotation. The other polarization component is slightly displaced from the axis of rotation. The positions of the beams are fixed in space. However, when the mirror is rotated, the off axis beam encounters different points in a circle. If the surface is rough, the path length travelled by the off axis beam (measurement beam) changes. As a result, the phase of the rf signals (detector output) changes continuously. Consequently, the phase meter output changes at each step, proportionate to the phase difference between the reference and measurement waves (rf). The phase meter output is acquired by a computer for further processing. This technique was highly sensitive, so it revealed 0.1 nm level surface roughness of coated mirrors [19]. However, in our laboratory we were able to measure roughness of 1 nm [21].
Figure 8. A block diagram of the optical heterodyne detection setup for surface roughness measurement. Inset shows the beam configuration on the mirror surface [21].
Technologies 02 00054 g008

4. Measurement of Temperature Changes

4.1. Application of Optical Heterodyne Detection Technique to Laser Cooling/Heating of Solids

For the measurement of temperature changes in laser heating or cooling experiments, the heterodyne technique works equally well. However, the mathematical formulation is entirely different which is described below. Whenever a material is heated or cooled its length as well as refractive index change. A measurement of optical path length variation of a beam, which passes through the material, reveals the sample temperature change. So, prior knowledge of the temperature dependence of the material’s refractive index and thermal expansion coefficient is needed. For the implementation of optical heterodyne technique a Mach-Zehnder interferometer configuration (Figure 2) is a straight forward approach whose theory is discussed below. The two orthogonally polarized beams of the laser are spatially separated by a PBS of which one is a reference beam (ν1) and the other is the measurement beam (ν2) that passes through the material under investigation. In this case, the material is heated or cooled by another laser beam that gets reflected by the dichroic mirror (DM), which is collinear with the probing beam but passes in the opposite direction (Figure 2). The laser beam either heats or cools the laser material depending on the sample and beam wavelength. Say ν1 and ν2 travel roughly equal distances, and their path length difference is within the coherence length of the laser. The refractive index of air and the material are represented by η1 and η2, respectively. L1 and L2 are the lengths of the interferometer arms and L3 is the sample length. D1 and D2 represent the optical path lengths of the reference and measurement beams which are given by
D1 = η1 (L1 + L2)
D2 = η1L2 + η1 (L1 − L3) + η2L3
Optical path length difference (OPD) is given by
OPD = D2 − D1 = η2L3 − η1L3
If we assume that the refractive index of air, η1 = 1 then
OPD = η2L3 − L3
Here after, we drop the subscripts and use η for the refractive index of the material and L for sample length
OPD = ηL − L
As the sample temperature changes, η and L change accordingly. Therefore, change in optical path length difference is given by
Δ (opd) = Δ (ηL) − ΔL = Δη L + η ΔL − ΔL
Refractive index and sample length are temperature dependent. Therefore
Technologies 02 00054 i001
Technologies 02 00054 i002
where
Technologies 02 00054 i003
and
Technologies 02 00054 i004
The change in OPD is simplified as
Technologies 02 00054 i005
Optical path length difference is related to the phase difference between the two beams as
Technologies 02 00054 i006
By rearranging the above equation, temperature difference is estimated as
Technologies 02 00054 i007
Probe laser wavelength is 632.8 nm. The values of α and 𝛾 are estimated from the sample data [23] using Equations (14) and (15). ΔΘ can be measured to an accuracy of 0.1° (resolution) with a phase meter (Model HP 3575A). For YAG material α = 7.8 × 10⁻⁶, γ = 11 × 10−6, L = 0.0105 m and η = 1.821. If ΔΘ is 0.1°, then Equation (18) predicts a temperature change of 1.4 mK (theoretical limit). This accuracy is comparable to that obtained with differential luminescence measurement [17]. However, the measurement of such a small change in temperature may not be possible because the accuracy is limited by the uncertainty, which is calculated by the propagation of errors [24], as
Technologies 02 00054 i008
where the subscript u refers to uncertainty in the parameter and the partial derivatives are evaluated from Equation (18). The uncertainty in wavelength, Δλu is zero because the probe laser wavelength does not change. So, the accuracy in ΔT estimation depends on the uncertainties in the estimates of η, α, γ, and ΔΘ measurement.

4.2. Rare-Earth Luminescence Sensors for Temperature Measurement

4.2.1. Fluorescence Lifetime Sensors

In solids, excited rare-earth ions relax radiatively and non-radiatively [25] and the latter exhibits temperature dependence. Under pulsed laser excitation, the emission intensity varies as I(t) = I0 exp (−t/τ) where τ is the excited state lifetime. So, the measured lifetime, τ of the excited level, i is related to both the relaxation rates [25] as
τ−1 (i) = ∑ ij ωr + ∑ ij ωnr (T)
where Σωr and Σωnr are the total radiative and non-radiative relaxation rates, to all the lower levels, j. τ decreases linearly with temperature, T if ωnr >> ωr. In general, this situation applies to many of the rare-earth ion doped glasses, for which the phonon frequency is larger [26]. At high temperatures, non-radiative relaxation dominates, and the lifetime varies empirically as [27]
Technologies 02 00054 i009
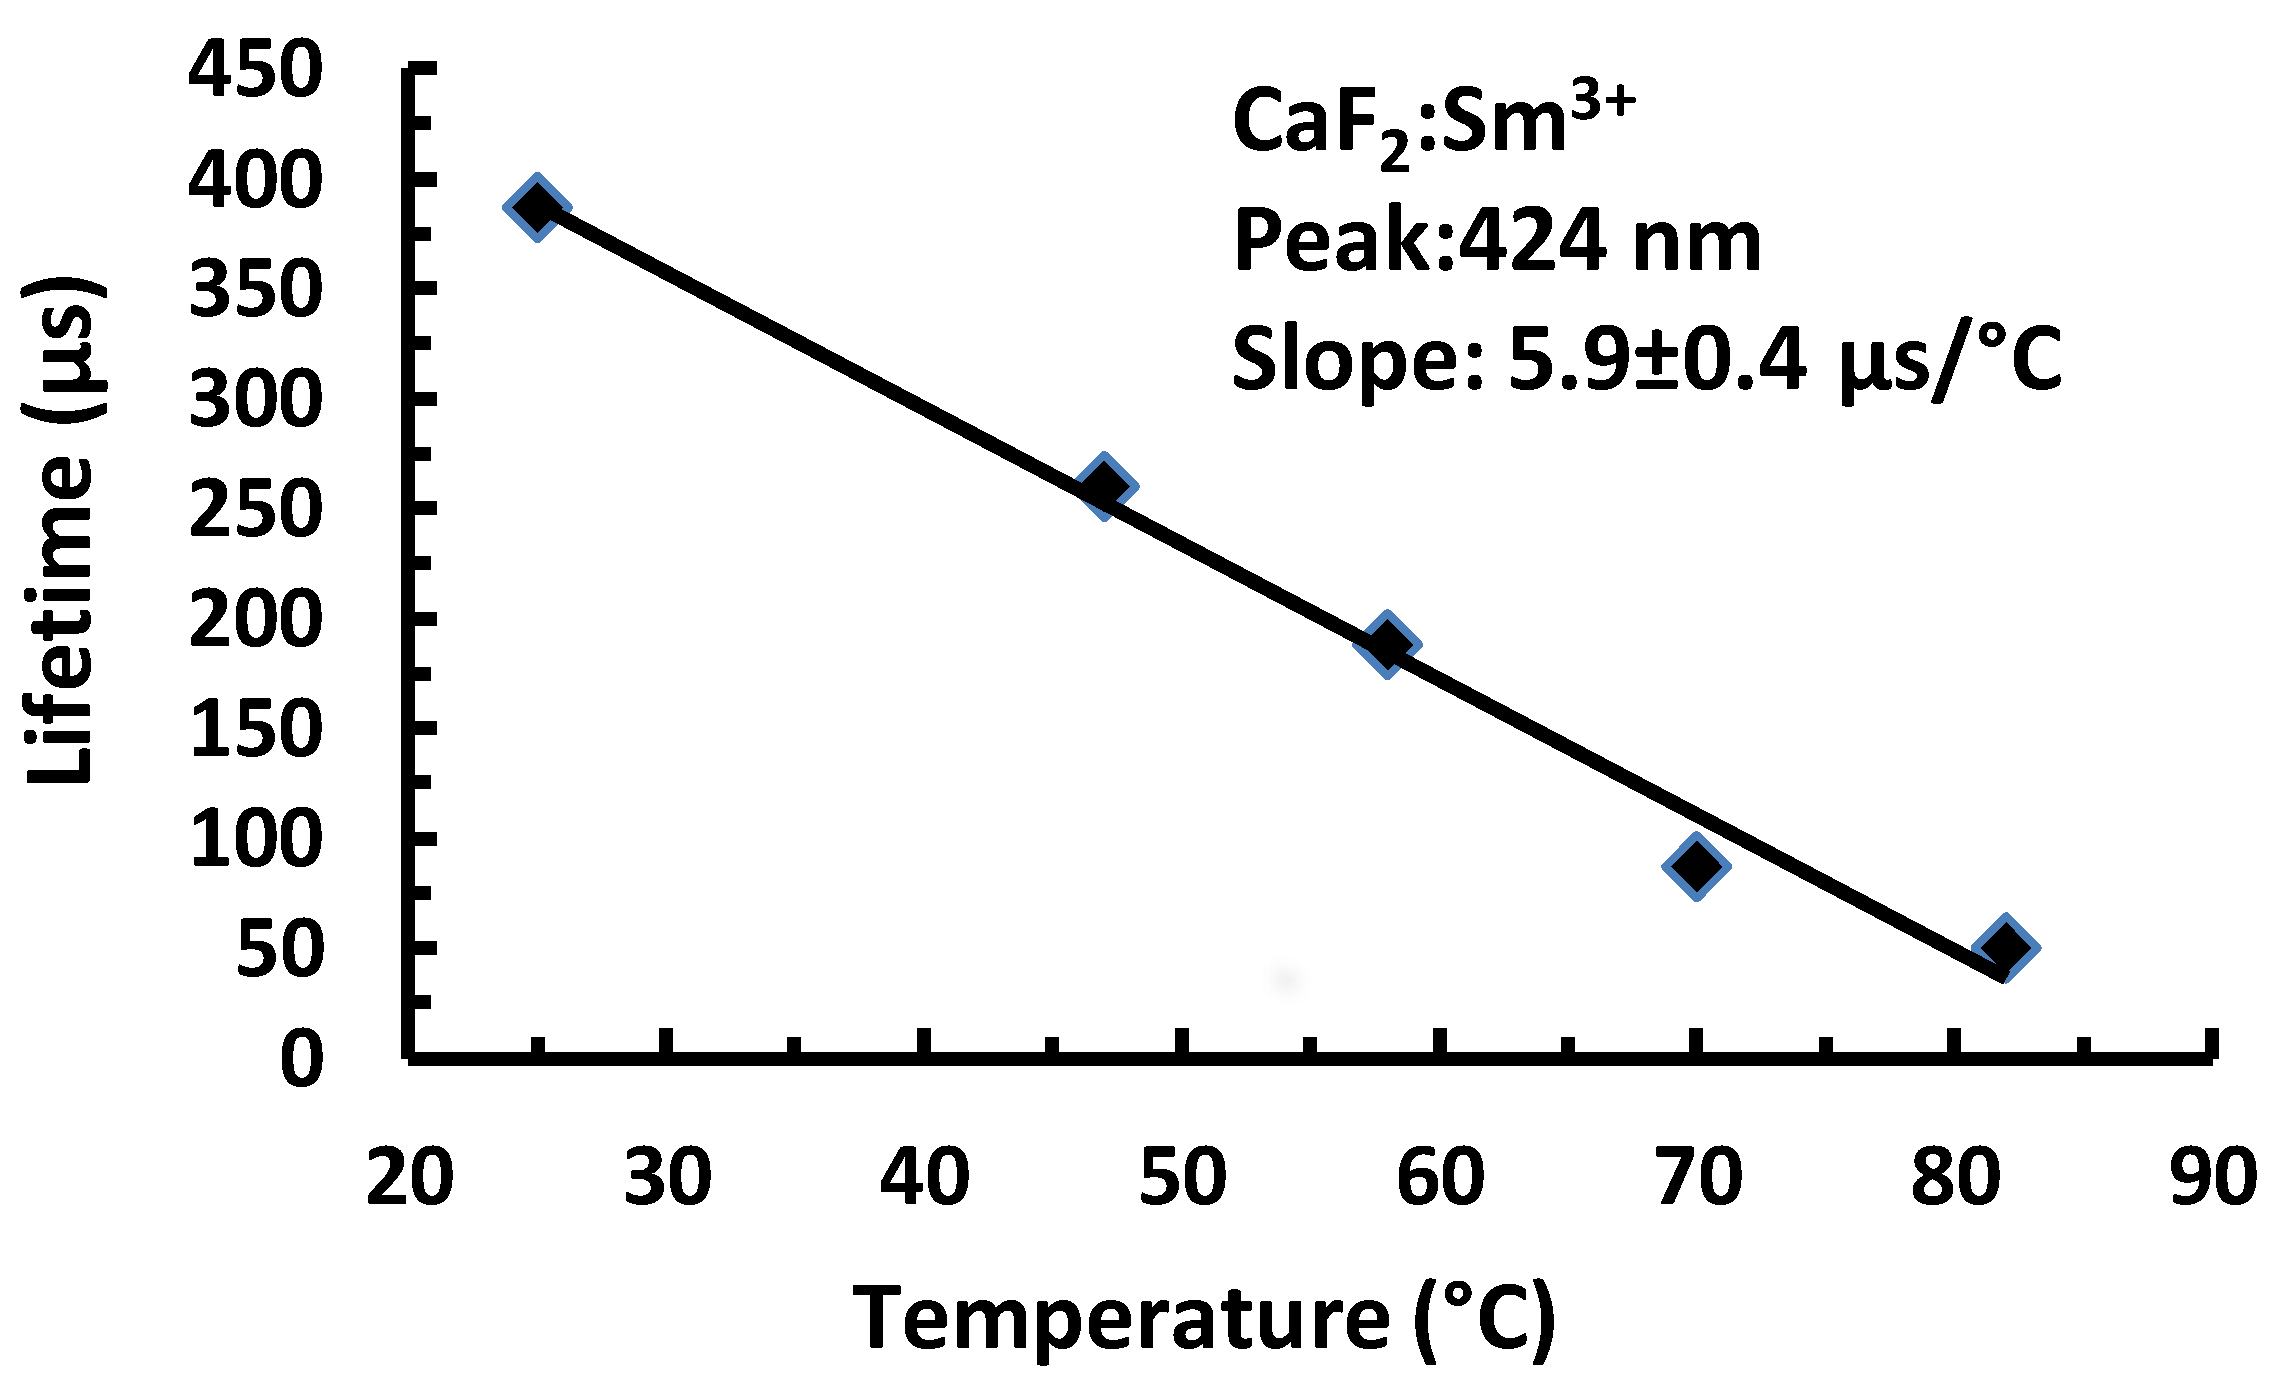
Equation (21) predicts that lnτ increases linearly with 1/T (or τ decreases with T). Accordingly, the fluorescence lifetime decreases with an increase in temperature. The temperature range over which it exhibits linear variation is dependent on the material characteristics. We have investigated several materials and only four materials exhibited such linear variation in a limited temperature range. The lifetime of 5F5 level of Ho3+ -doped CaF2 decreased linearly from 380 μs at room temperature to 188 μs at 1000 °C [28]. The 1D2 level of Pr3+-doped YAG predominantly emits at 617 nm (1D23H4) and its lifetime decreased linearly with temperature, from 187 μs at 20 °C to 110 μs at 1000 °C [28]. On exposure to a 308 nm laser beam, Samarium doped CaF2 revealed emission at 424, 560, 600, 620, and 690 nm and the sample color changed to bluish green due to the reduction of Sm3+ to Sm2+. The intensity of 424 nm peak decreased drastically with an increase in temperature [29], and the upper level lifetime decreased from 380 μs at 20 °C to 34 μs at 85 °C (Figure 9). The slope of the plot is 5.9 ± 0.4 µs/°C. In other words, for each degree rise in temperature the lifetime decreased by 5.9 μs. This implies that the temperature can be measured to high accuracy. However, the accuracy is limited by the uncertainty whenever the data points scatter (Figure 9). We will use this illustration to estimate the uncertainty. In general, a plot of lifetime versus temperature varies linearly in a limited range, which is represented by
τ = mT + b
where b and m represent intercept and slope respectively (b = 518.8 ± 22.7 μs and m = 5.9 ± 0.4 μs/°C). If the lifetime measured at some unknown temperature is τ = 200 µs, the corresponding sample temperature is estimated from the calibration plot as 54.5 °C. Equation (22) can be rearranged as
T = (τ − b)/m
Here, the accuracy in temperature estimation depends on the accuracies in τ, b and m values. By the method of propagation of errors, the uncertainty in the temperature estimation is given by
Technologies 02 00054 i010
where δτ, δb, δm, and δT are uncertainties in lifetime, intercept, slope and temperature, respectively, and are expressed by
Technologies 02 00054 i011
For the data shown in Figure 9, the uncertainties δτ = 4 (by assuming a 2% error in lifetime measurement), δb = 22.7, δm = 0.4, and the uncertainty in temperature measurement, δT = 5.3 (or 9.7%). Fluorescence lifetime sensing of temperature was investigated by several other groups using rare-earth ion doped fibers, waveguides [30,31,32], crystals, glasses and powders [3].
Figure 9. Variation of 424 nm emission lifetime in Sm3+-doped CaF2 as a function of temperature [29].
Technologies 02 00054 g009

4.2.2. Fluorescence Ratio Method
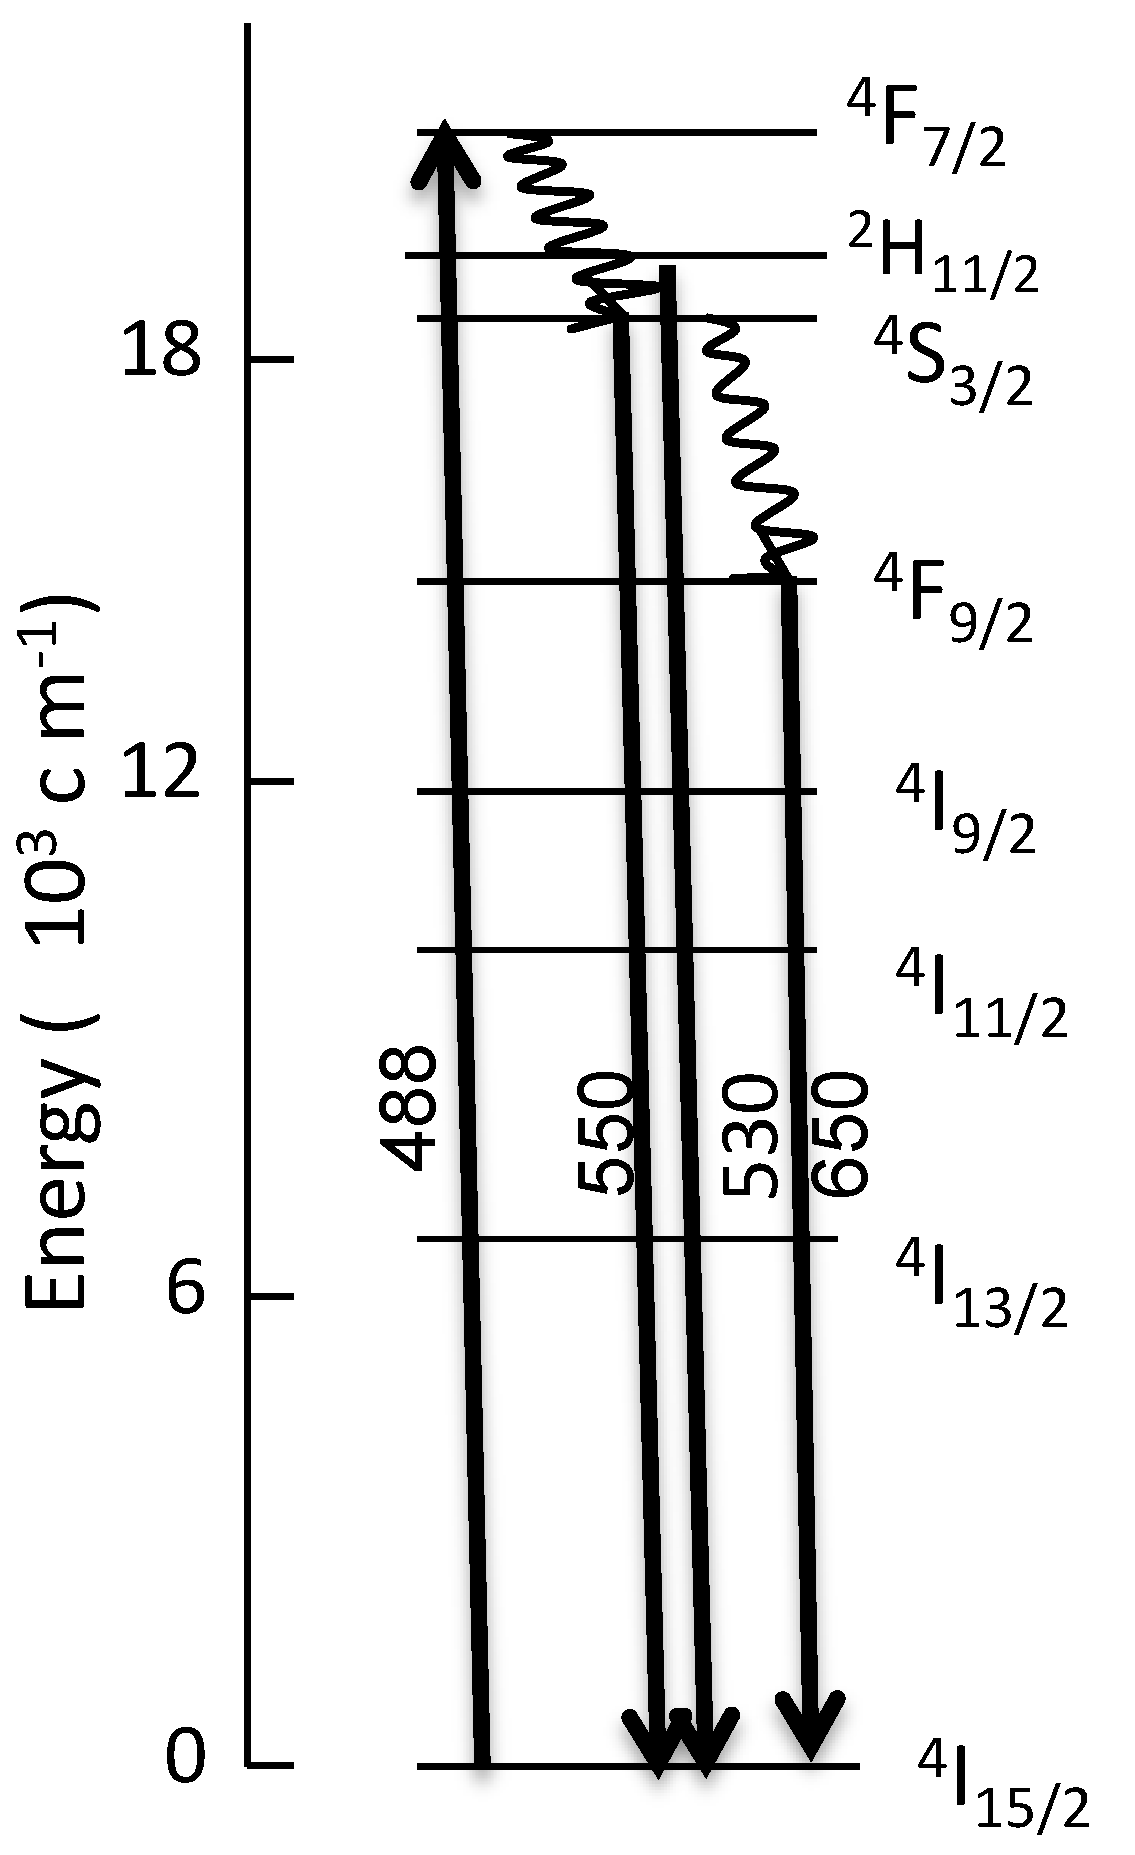
Whenever 4F7/2 level of Er3+ is excited, it relaxes non-radiatively in cascade to the 4S3/2 level (Figure 10) and fluorescence occurs from the latter at 550 nm (4S3/24I15/2). At higher sample temperatures, population is sustained in the higher multiplet, 2H11/2, due to thermalization; and emission also occurs from 2H11/2 at 530 nm (2H11/24I15/2). Accordingly, the measured lifetimes are same for both the emissions. The fluorescence intensity ratio of 530 nm/550 nm bands increases with an increase in temperature. This phenomenon was also used in temperature sensing. The ratio of the emission intensities at temperature, T is given by [33]
Technologies 02 00054 i012
where gi is the degeneracy of level i (i = 0, 1, 2), and Ni is the population of levels 2H11/2 (level 2) and 4S3/2 (level 1), ΔE is the energy gap between levels 2 and 1, and kT is the thermal energy. The emission intensity of a transition depends on the population, Ni of the excited level, frequency νi0 and the transition probability, Ai0 to the ground level, 0. The above equation reduces to
Technologies 02 00054 i013
A plot of lnR versus 1/T decreases linearly with temperature, whereas lnR versus T increases linearly with T. Such a linear variation was observed in a limited temperature range, up to 140 °C in Er3+-doped silica waveguide [31] and up to 96 °C in Er3+-doped silica fiber [34].
Figure 10. Partial energy level diagram of Er3+-doped LaF3 depicting the excitation and emission wavelengths [22].
Technologies 02 00054 g010

4.3. Application of Michelson and Mach-Zehnder Interferometers to Measure Temperature Changes

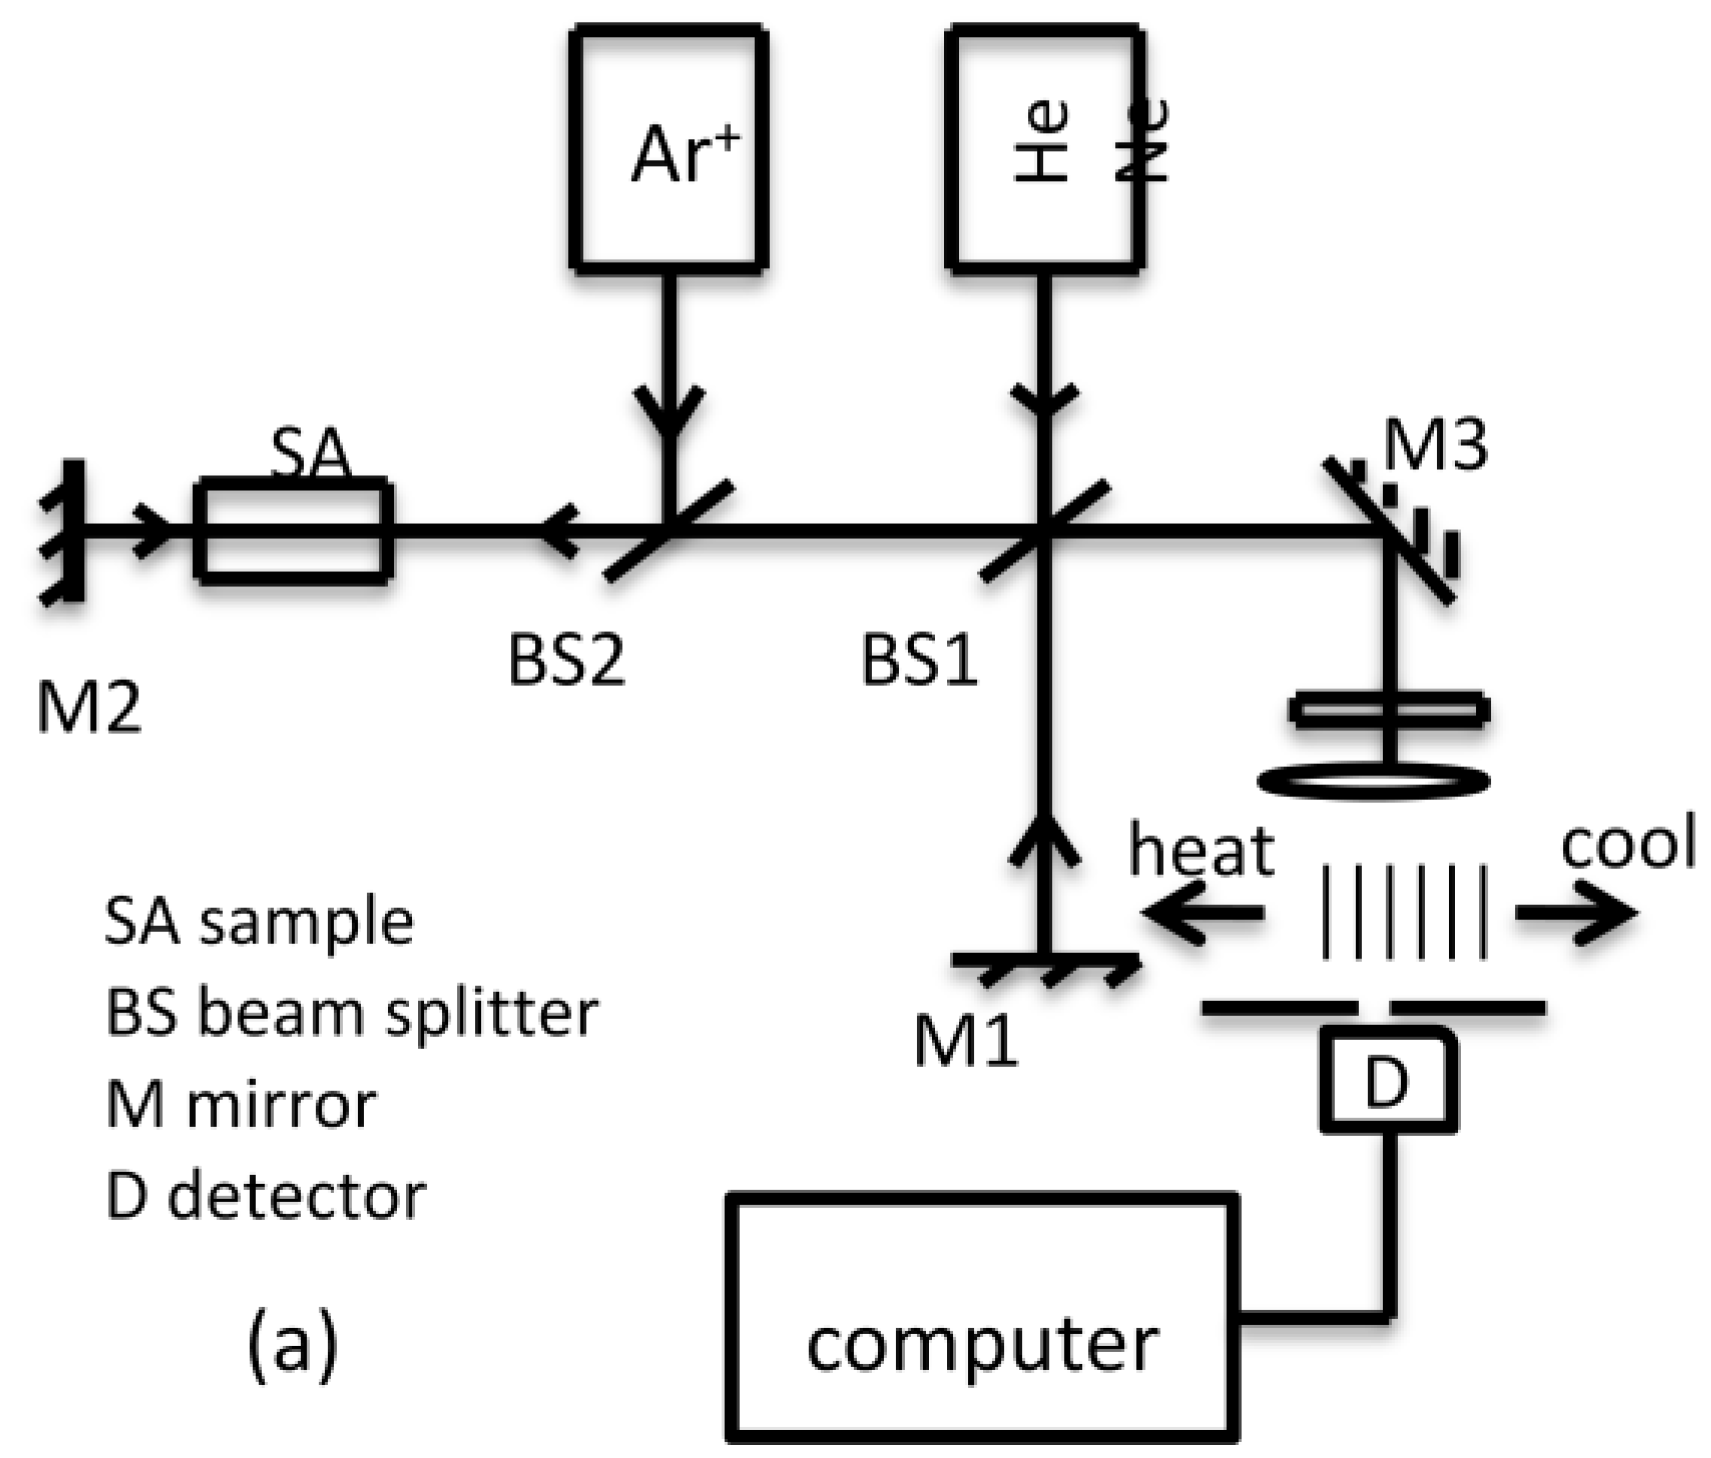
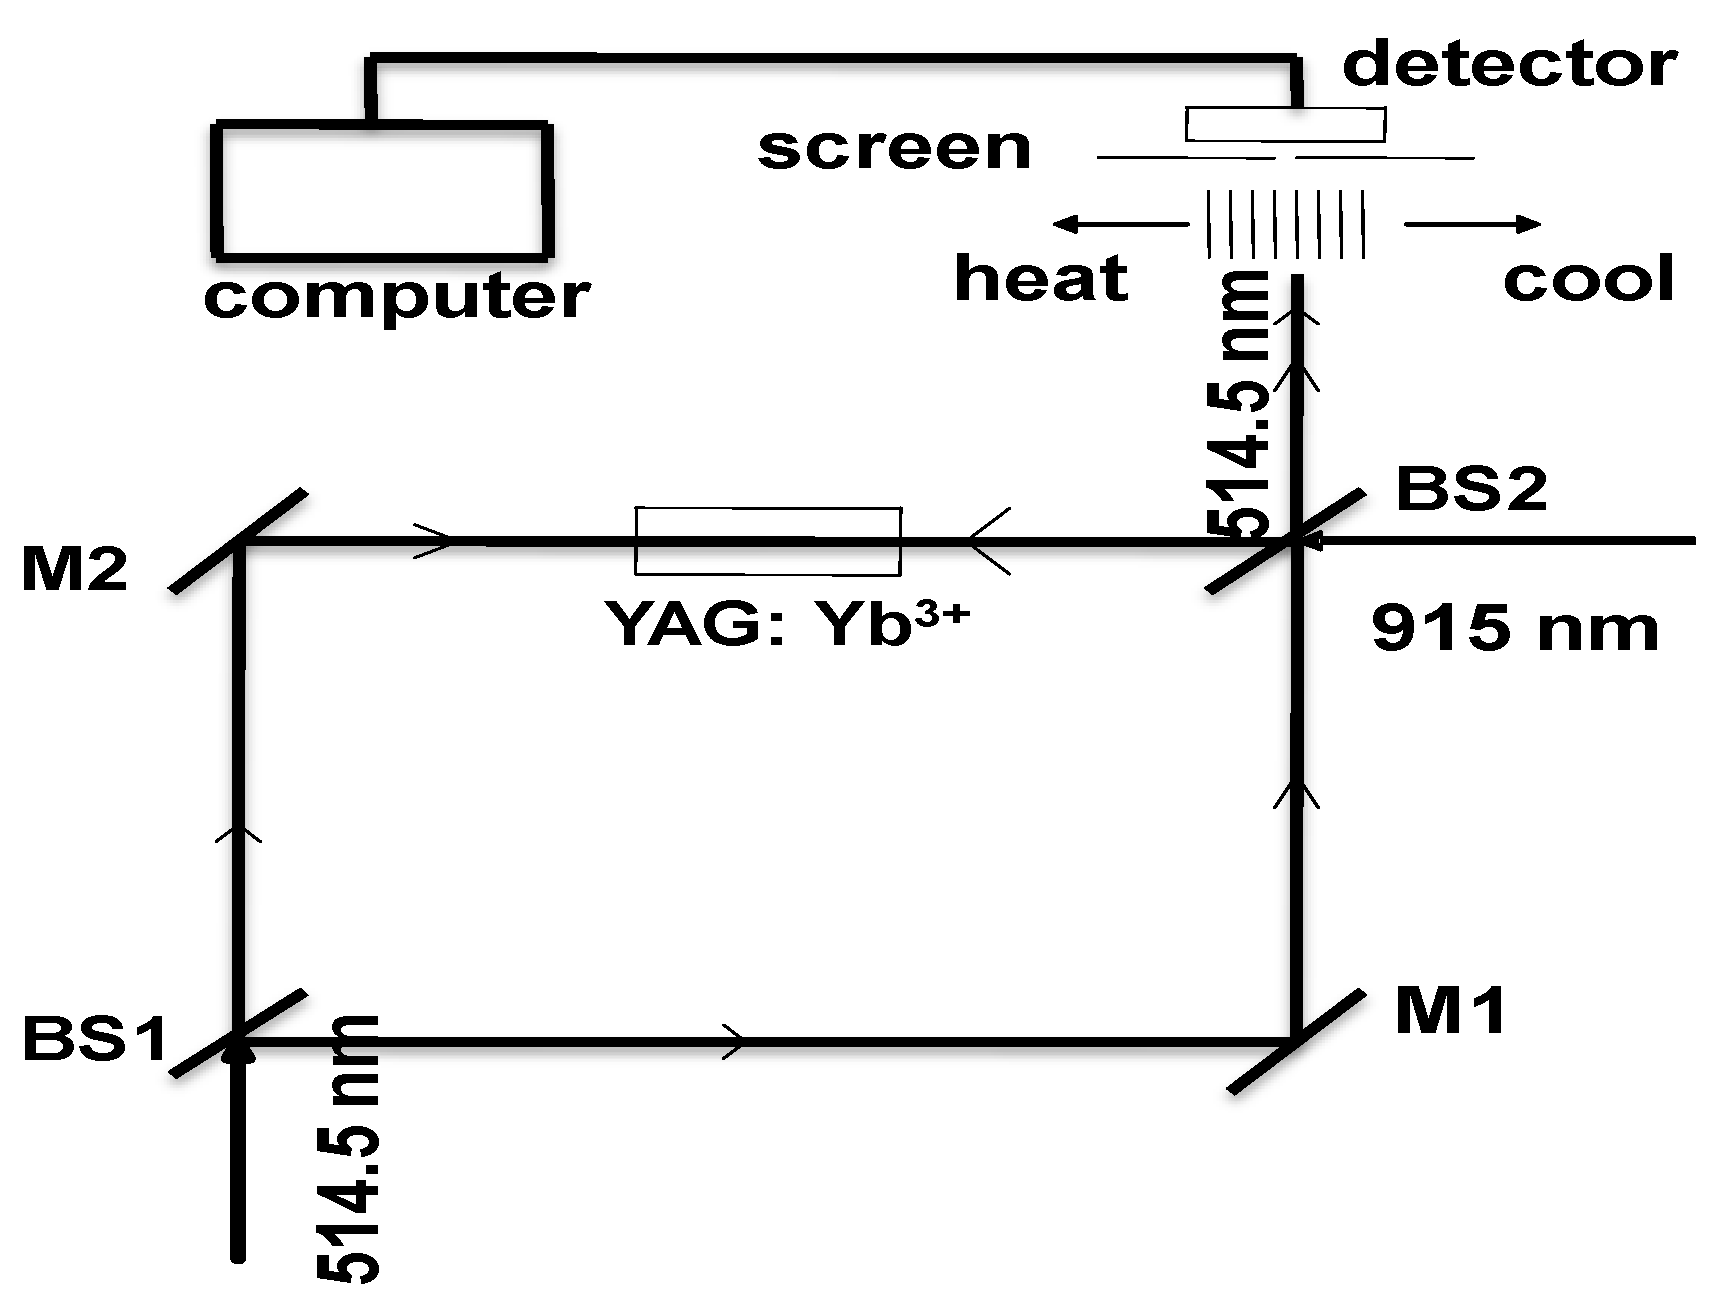
Interferometry deals with either fringe counting or phase measurement [5,7]. Fringes are produced by the superposition of two coherent beams of which one is a reference beam and the other is the measurement beam. The latter either passes through or gets reflected from the sample and its optical path length changes, whenever the sample is heated or cooled. So, the fringe intensity, measured by a detector, changes continuously with time, because of a change in the optical path length, ηL, where the sample length, L and refractive index, η are temperature dependent. Depending on the experimental configuration, a Michelson (Figure 11) [24] or Mach-Zehnder (Figure 12) [35] interferometer configuration is used. For a Michelson interferometer configuration, the optical path length difference (OPD) between the two beams is given by [24]
OPD = 2L (η − 1)
where L is the sample length and η is its refractive index. For a temperature change ΔT, if the detector counts N fringes then the change in optical path length difference equals λN, where λ is the laser wavelength. Temperature change is given by [24]
Technologies 02 00054 i014
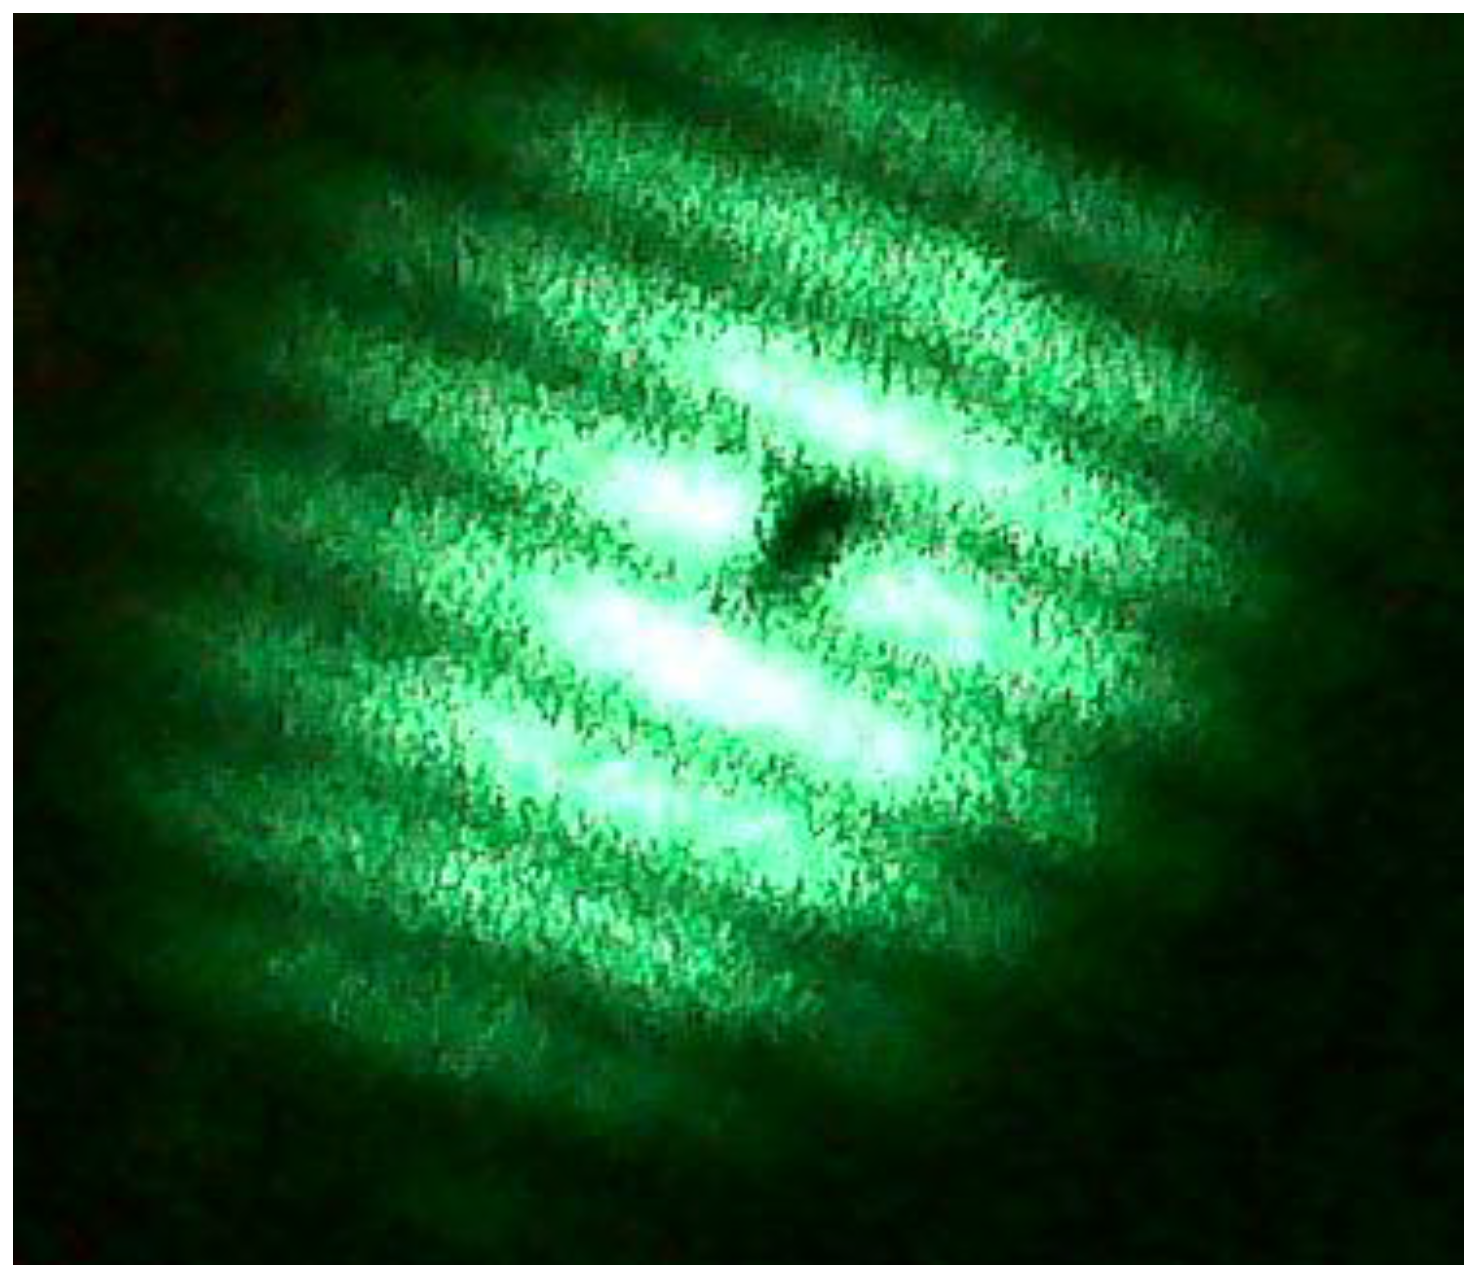
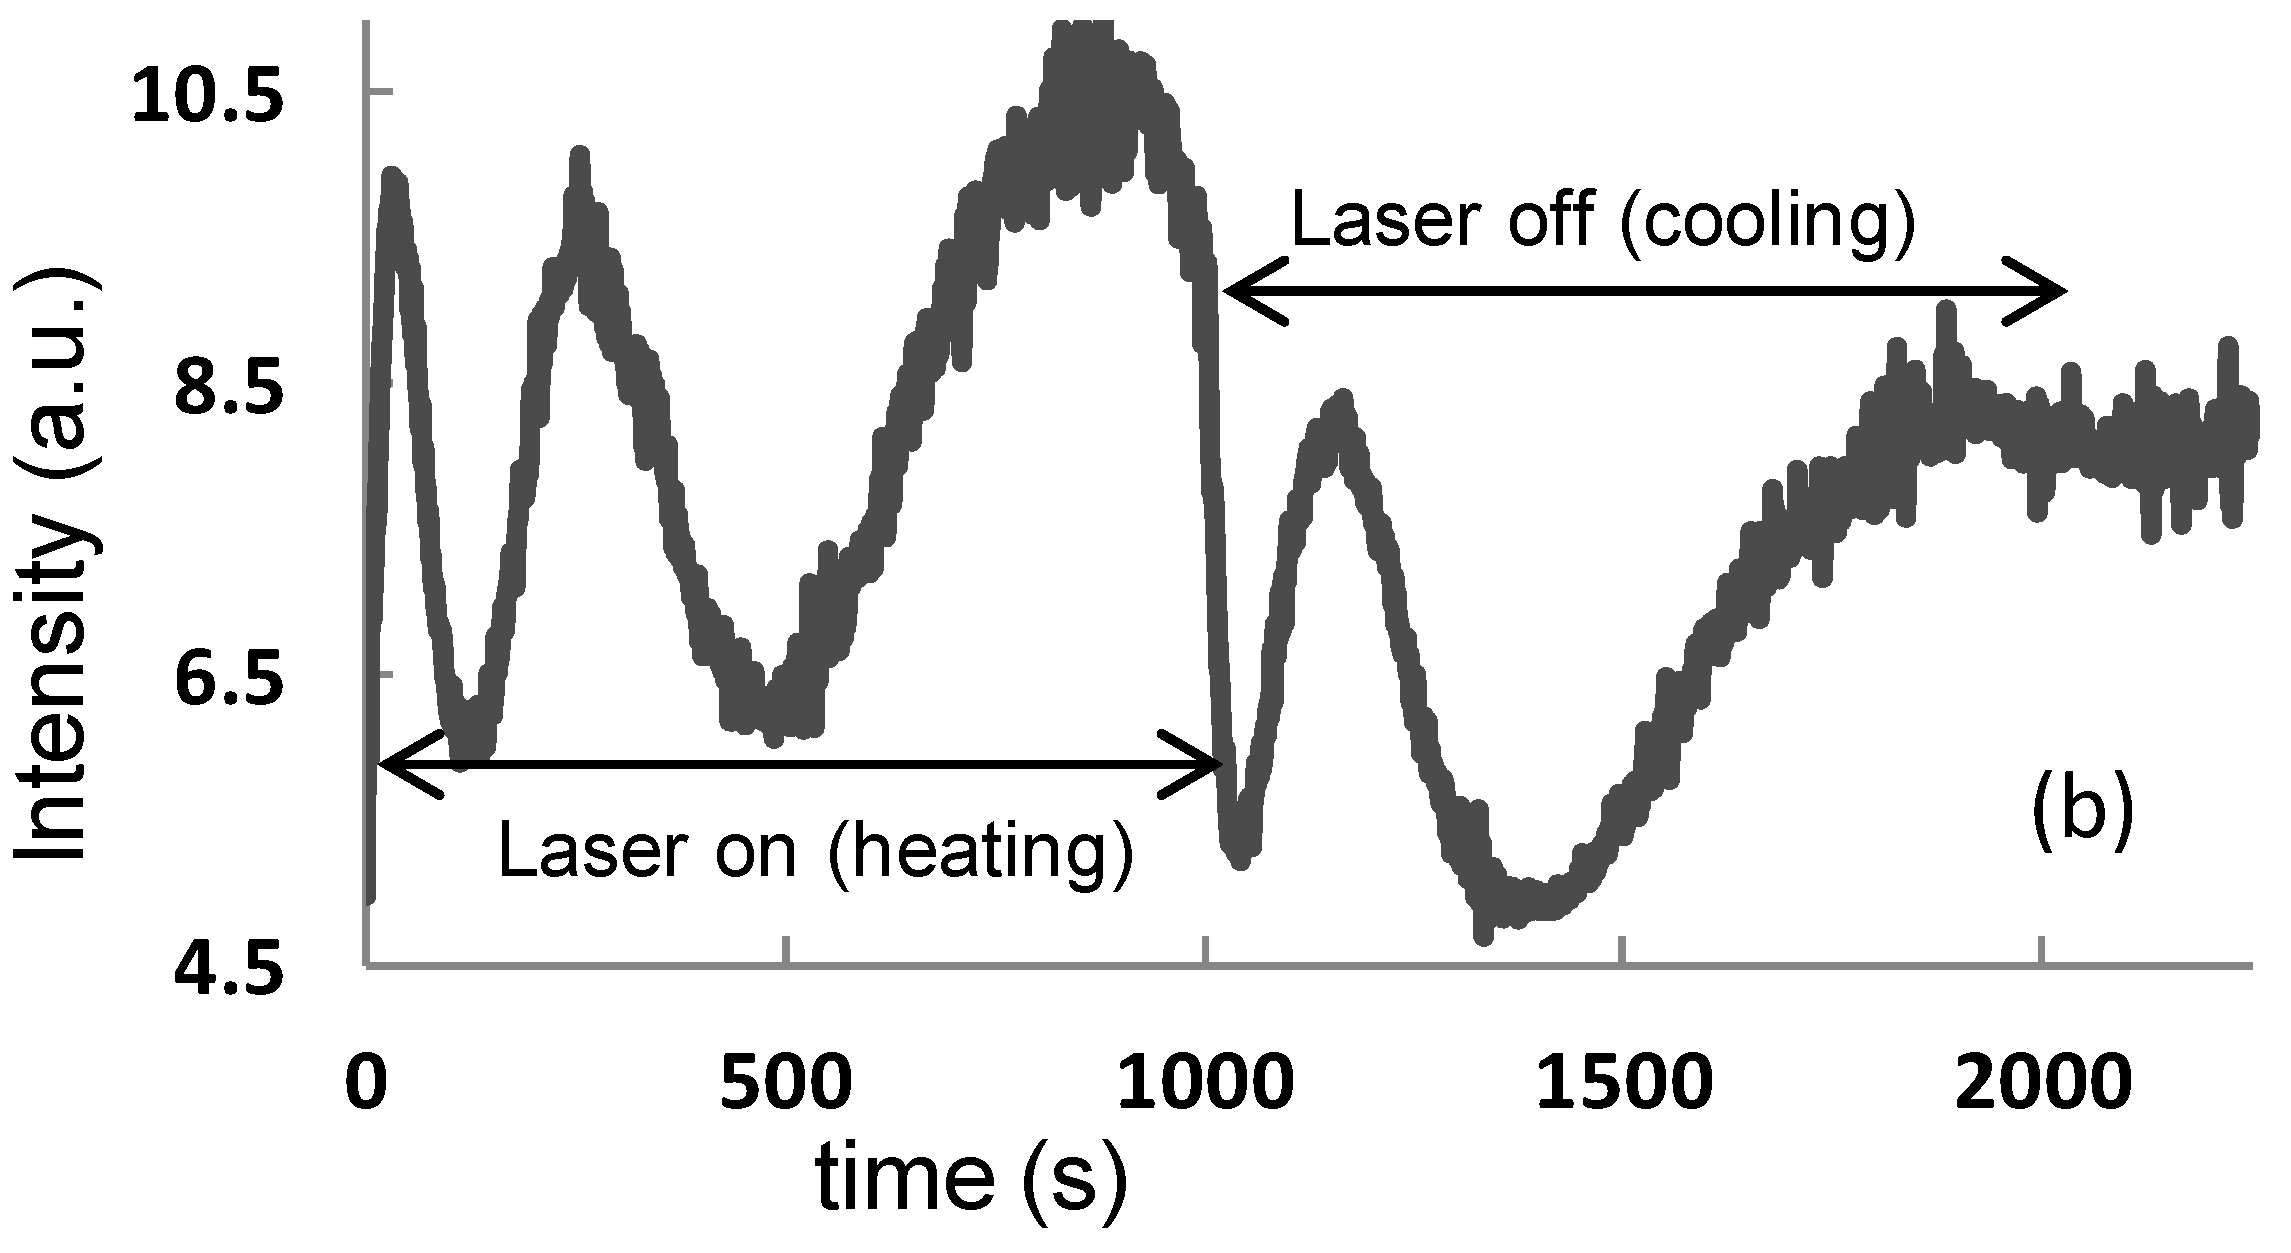
where the symbols have their usual meaning. The interferometric fringes produced by a Mach-Zehnder interferometer are shown in Figure 13. The detector output variation is shown in Figure 14. For a Mach-Zehnder interferometer, the temperature change is given by [35]
Technologies 02 00054 i015
Here, the measurement accuracy is limited by the accuracies with which we can measure the fringe shift, index of the material η, coefficient of thermal expansion α and γ of the material. Uncertainty in ΔT is estimated by the propagation of errors. For a Mach-Zehnder interferometer, the temperature change is twice to that given by Equation (29) because of single pass configuration of the beam through the material. Michelson interferometer configuration was used to measure temperature changes produced by laser absorption in a Pr3+-doped YAG. A 488 nm laser was used to excite Pr3+ ions to 3P0 level.
Figure 11. Ar+ laser heats the sample. A HeNe laser was used to setup a Michelson interferometer configuration to measure laser heating of Pr3+-doped YAG crystal [24].
Technologies 02 00054 g011
Figure 12. A 915 nm laser beam heats the YAG: Yb3+ sample. A 514.5 nm beam was used to setup a Mach-Zehnder interferometer to measure temperature changes [35].
Technologies 02 00054 g012
Figure 13. Interferometer fringes produced by a 514.5 nm laser. The dark spot is the pin hole in front of the detector [36].
Technologies 02 00054 g013
Figure 14. Detector output variation during heating, 0–1000 s (Ti: Sapphire laser on) and cooling, 1000–2000 s (Ti: Sapphire laser off) [35].
Technologies 02 00054 g014
Non-radiative relaxation to 1D2 causes laser heating. The change in temperature was probed by a 632.8 nm HeNe laser [24]. A Mach-Zehnder interferometer configuration was used to measure temperature changes in Yb3+-doped YAG caused by laser absorption at 915 nm. A 915 nm laser excites Yb3+ ions from the ground state to the excited state, 2F5/2. Excited ions undergo non-radiative relaxation processes which heats up the material, along the beam path. The change in temperature was measured with 514.5 nm laser beam by setting up a Mach-Zehnder interferometer [35] and the fringes are shown in Figure 13. The intensity of the fringe pattern varied continuously with time, and the detector output followed such a variation (Figure 14). The crystal was heated by the Ti: Sapphire laser beam from 0–1000 s and the material cooled down from 1000–2000 s, when the Ti: Sapphire laser beam was blocked. As soon as the Ti: Sapphire laser was on, the non-radiative relaxation starts, and the material is heated. So the fringe period is small in the beginning. Eventually, the material temperature approaches the equilibrium state, causing the fringe period to increase. Similar situation occurs when the heating laser beam was blocked, from 1000–2000 s. For a 300 mW of 915 nm laser beam, the sample temperature increased by 6.9 °C [35]. This is a unique technique, which measures heating or cooling along the beam path, in real time. The accuracy with which ΔT can be estimated depends on the accuracy of the other parameters α, β, and γ.

5. Application of Mach-Zehnder Interferometer Technique for the Measurement of Changes in Solution Concentration or Refractive Index in a Crystal Growth Experiment

A typical solution growth experiment is shown in Figure 15. Crystals are grown by mounting a seed crystal on a cold finger whose temperature is slightly less than that of the solution [37]. During growth, solute particles migrate from solution to the seed crystal. As a result, the refractive index of the solution changes in the vicinity of the seed crystal. This change can be measured by setting up a Mach-Zehnder interferometer, whose measurement beam passes in front of the seed crystal in the solution, as shown in Figure 15. The optical path lengths of the reference and the measurement beams are given by
L1 = η1 (l1 + l2)
and
L2 = η1 (l2 + a1 + a2) +η2 (b1 + b2) + sη3
where ηi (i = 1, 2 and 3) are refractive indices of air, glass and solution, l1 and l2 are the interferometer arm lengths in air. The measurement beam passes through air, glass windows and solution whose path lengths are (l2 + a1 + a2), (b1 + b2) and S, respectively.
The phase difference Θd between the two beams of the interferometer is given by
Technologies 02 00054 i016
As the material grows solute particles migrate from solution along the beam path towards the crystal surface, thus changing the refractive index of the solution. Hence, the third term in the bracket changes during crystal growth while the first two terms remain constant. The magnitude of variation in the phase difference is given by
Technologies 02 00054 i017
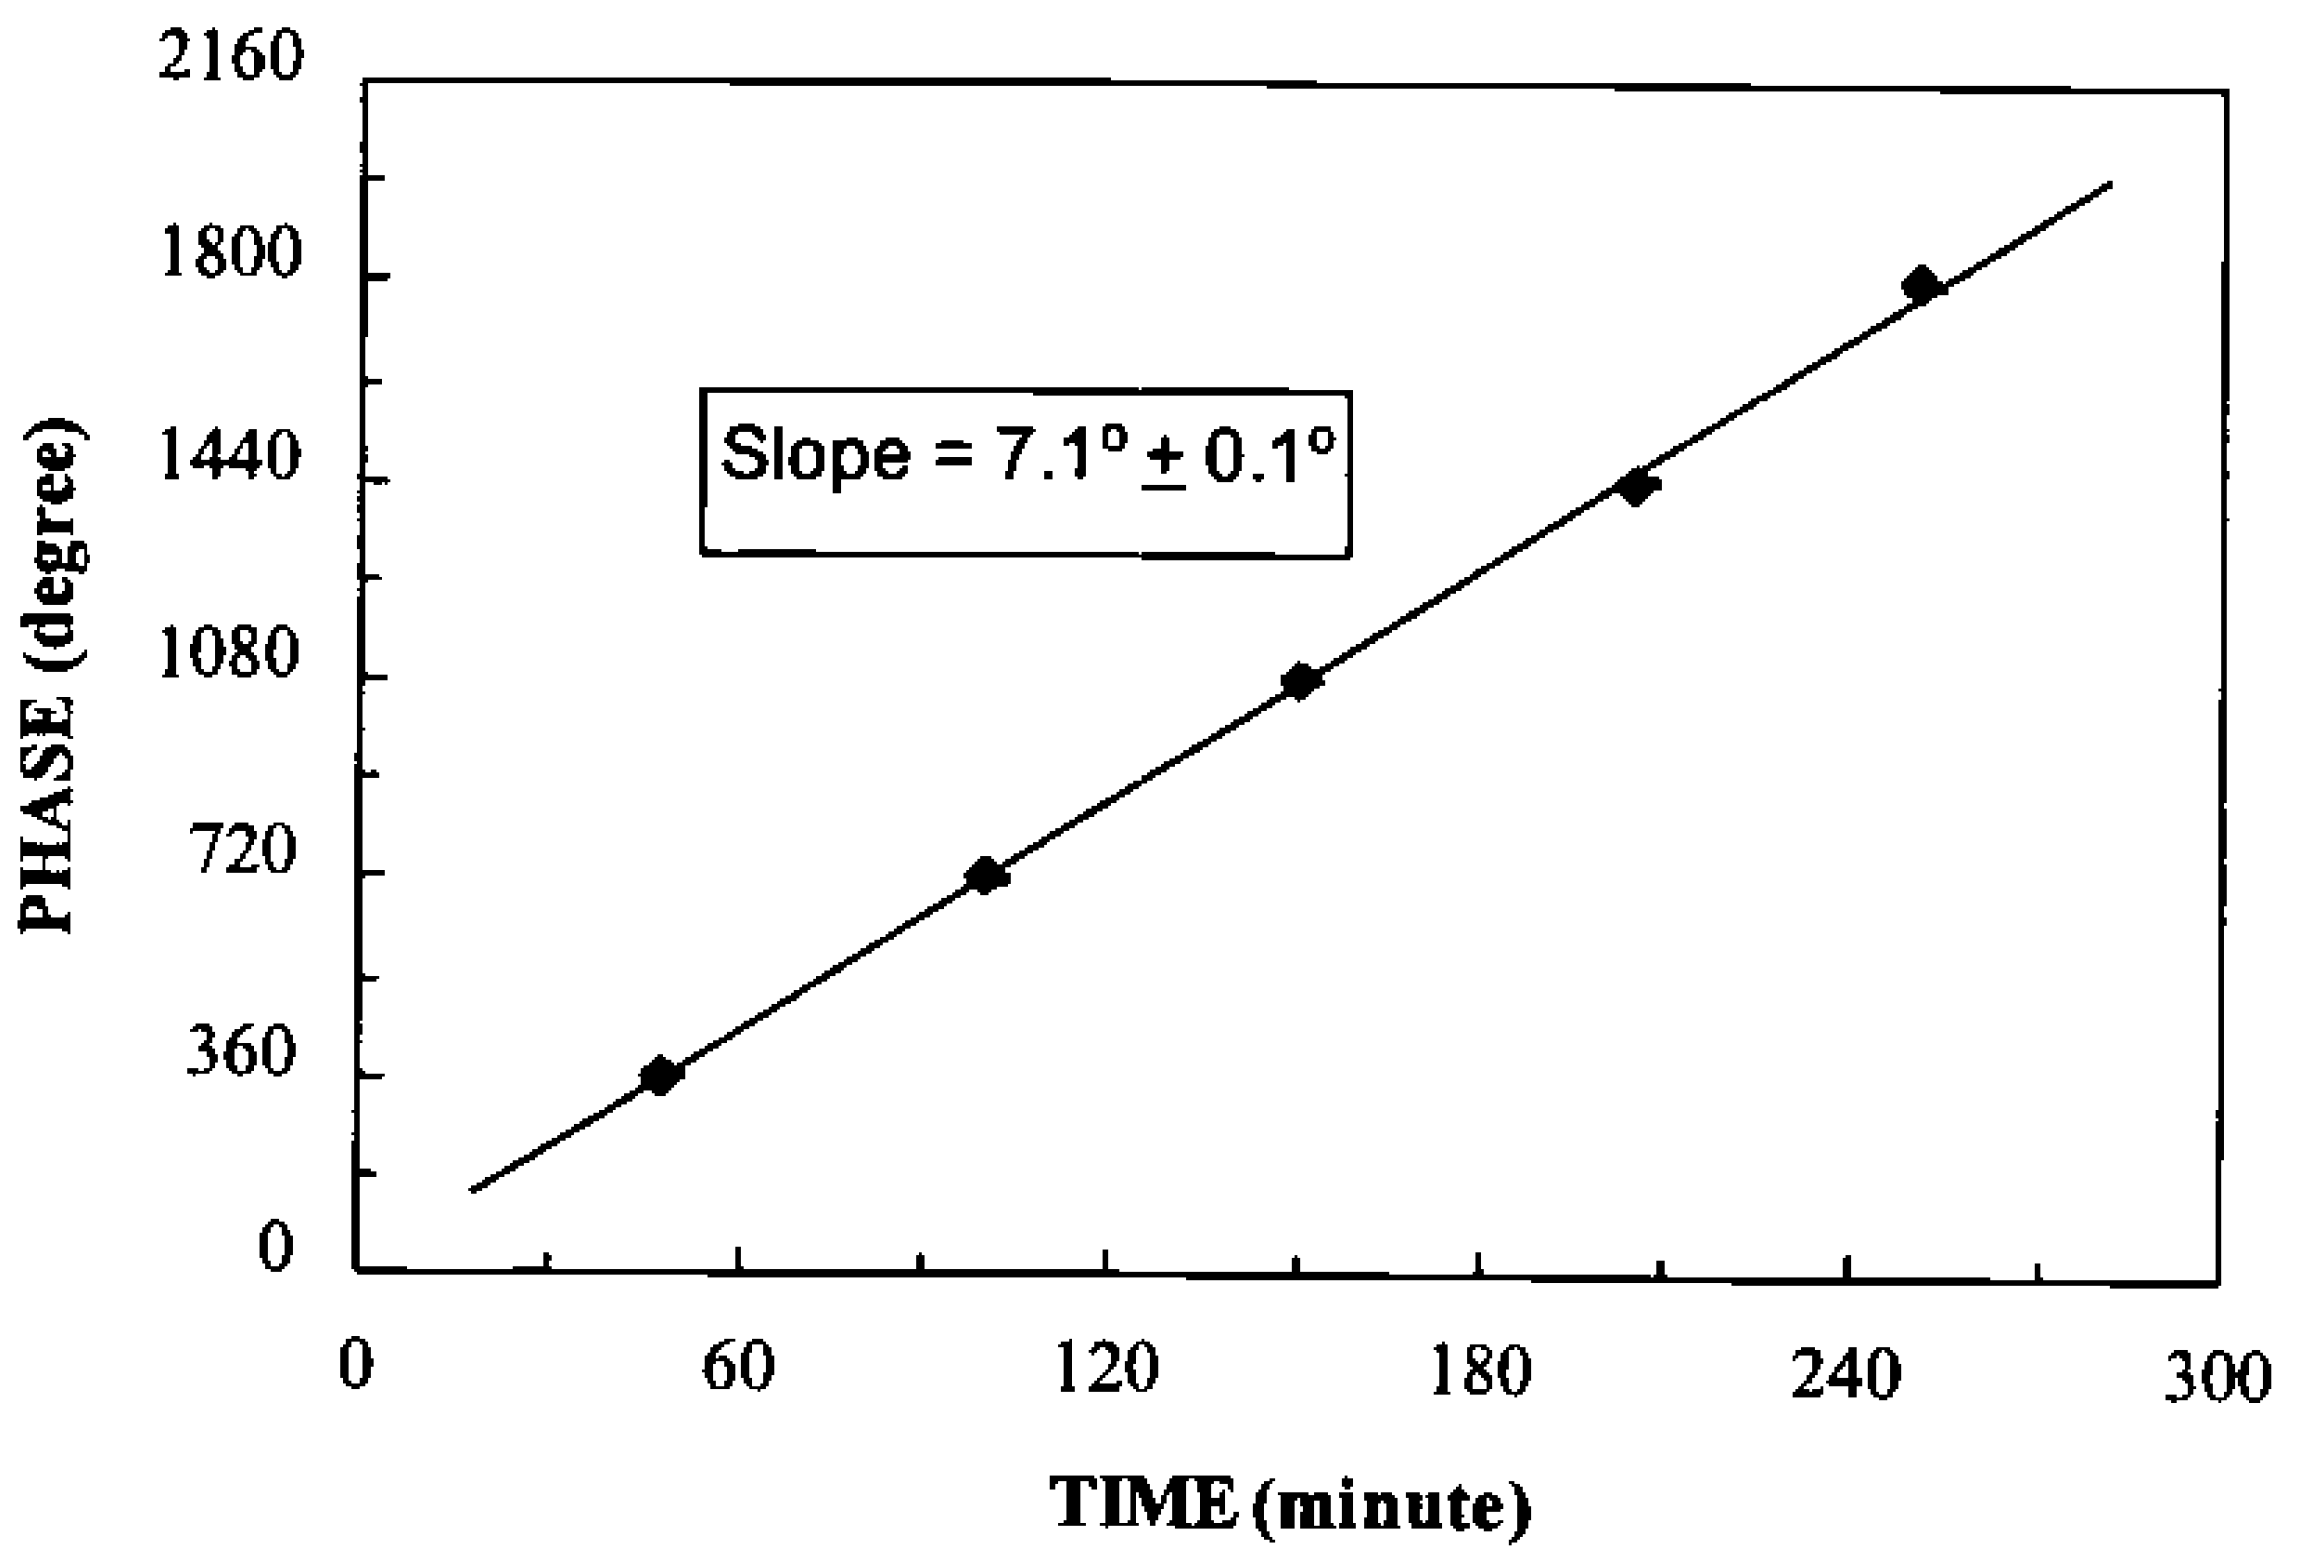
ΔΘd can be measured experimentally. During crystal growth the fringes appear to be moving to the naked eye. If the fringe intensity is measured by a detector its output exhibits periodic variation (Figure 16). So the change in index for a given change in phase difference is given by
Technologies 02 00054 i018
where ΔΘd = 2π is the phase difference between two successive peaks (Figure 17). Refractive index changes with a change in the concentration of solute particles, c as
Technologies 02 00054 i019
Refractive index variation Technologies 02 00054 i021 can be measured experimentally. For a 2π phase change (ΔΘd = 2π), the concentration change can be estimated as
Technologies 02 00054 i020
The change ∆η3 can be correlated to growth rate if we measure the growth simultaneously by an alternate technique, such as heterodyne detection technique [20] or from laser reflectance measurements [37]. In Equation (37), the laser wavelength (λ) and the solution path length (s) do not change. So, the uncertainty in the estimation of concentration change depends on the accuracy with which Technologies 02 00054 i021 was measured. According to Equation (35) Δη3 equals λ/s if ΔΘd = 2π. The optical mounts/beams are subjected to random vibrations. So the fringe intensity and hence the electrical output of the detector fluctuates (Figure 16). That is why the fringes shown in Figure 16 are not uniform in shape. This will result in a maximum error of 10% in the estimation of Δη3. So the maximum error in the estimation of change in concentration is likewise 10%.
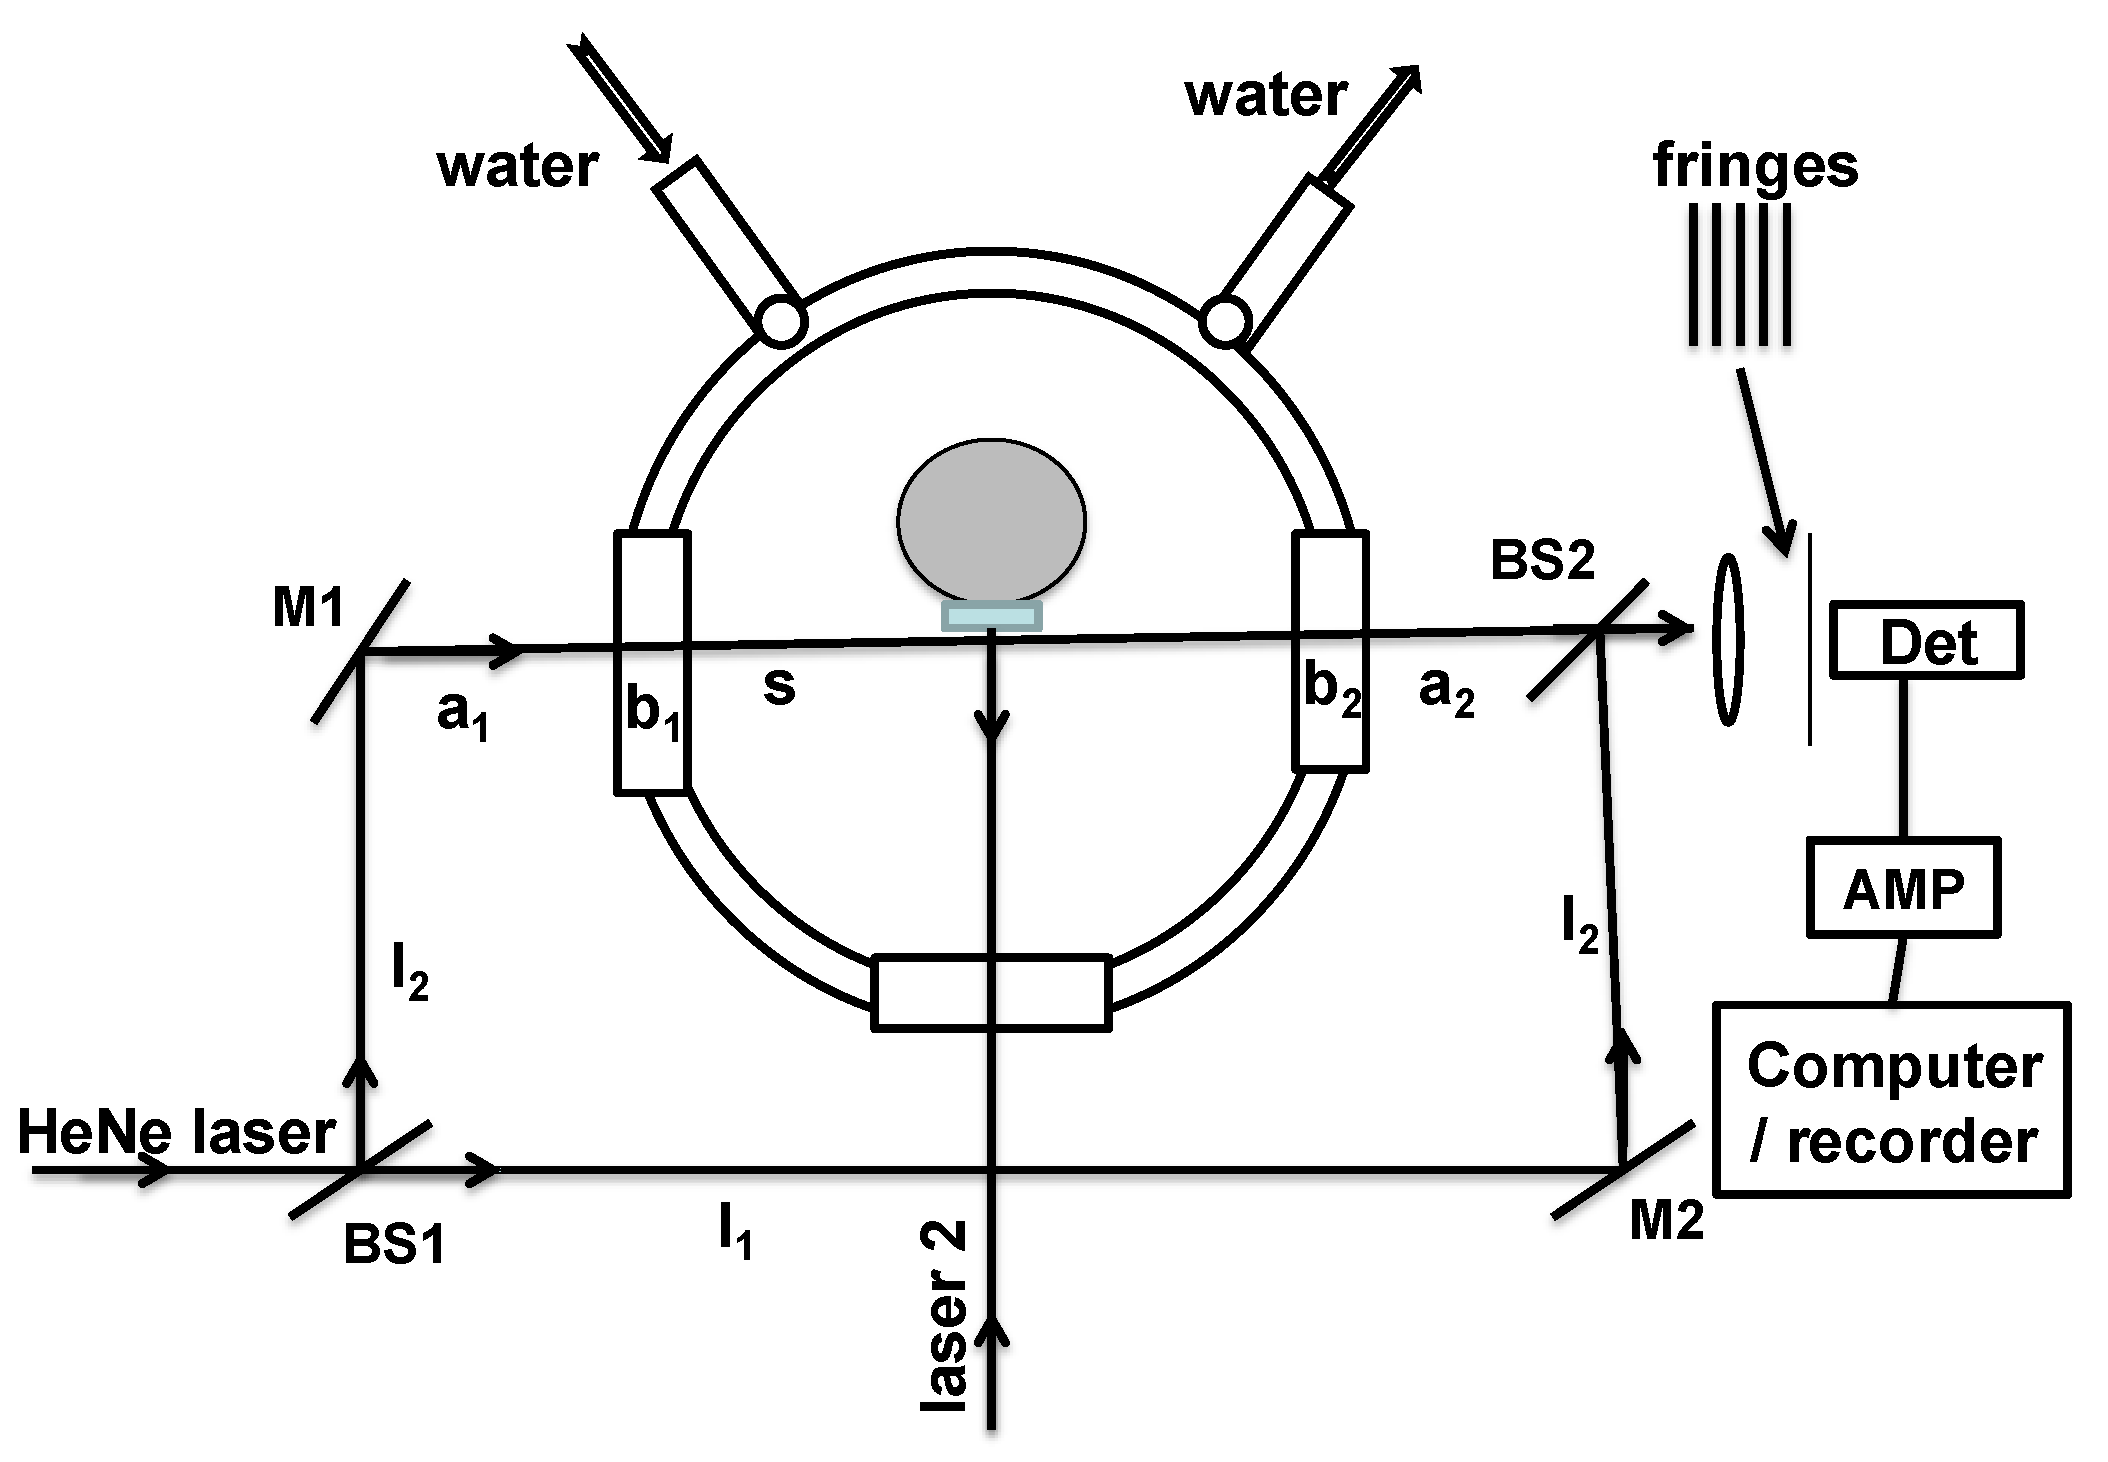
Figure 15. Optical configuration of the Mach-Zehnder interferometer configuration for the measurement of changes in solution concentration/index of refraction. Measurement beam passes in front of the seed crystal inside the solution. Laser 2 is used for growth rate measurement [37].
Technologies 02 00054 g015
Figure 16. Temporal dependence of the detector output (of Figure 15) reveals fringe behavior [37].
Technologies 02 00054 g016
Figure 17. The data shown in Figure 16 are plotted to reveal phase variation as a function of time [37].
Technologies 02 00054 g017

6. Conclusions

Optical heterodyne detection theory has been developed for the measurements of crystal growth, surface roughness of mirrors and laser heating/cooling of solids. The technique was demonstrated for in situ measurement of crystal growth and surface roughness of coated optics. Michelson and Mach-Zehnder interferometers were applied for the measurement of temperature changes in laser heating of Pr3+-doped YAG and Yb3+-doped YAG. We have demonstrated the suitability of rare-earth ion doped crystals and glasses for temperature measurement using fluorescence ratio method, and lifetime sensing. Mach-Zehnder interferometer was also demonstrated for the measurement of solution concentration changes. Rare-earth luminescence sensors and interferometers are suitable for temperature measurements in a variety of situations including jet plumes, combustion studies, corrosive atmospheres and many others. Interferometer arrangement is relatively difficult to set up, and require accurate values for the coefficients of thermal expansion and refractive index. Techniques that involve interferometers are suitable for certain unique situations and provide absolute values of temperature changes.
In Michelson and Mach-Zehnder interferometer techniques, the reference and measurement beams travel along different paths and so these techniques are sensitive to vibrations. For in-situ measurements, Michelson, M-Z, optical and heterodyne techniques are desirable. Of these, the last one is the most sensitive technique. For assessment or surface topography, phase shifting interferometry and dynamic interferometry techniques are suitable, which have sub nanometer sensitivity and are suitable for very fast assessment of large surfaces. These techniques have sub nanometer sensitivity in depth profile measurement and micron or better in spatial resolution. For laser heating or cooling studies of solids optical heterodyne, Michelson and Mach-Zehnder interferometer are suitable. Of these, only optical heterodyne technique can reveal temperature changes of mK, in real time. Dynamic interferometry technique is not suitable for real time measurements of temperature changes induced by a laser beam along the beam path. When the temperature or length changes are large and if one is interested in average changes over a long period of time then Michelson, Mach-Zehnder and heterodyne techniques are equally good. When the changes in temperature are small, optical heterodyne technique is superior to other techniques. If one is interested in absolute temperature measurement then rare-earth luminescence or spectral measurements are better [18,22]. For the measurement of flatness of optics, inexpensive techniques like Fizeau, Twyman-Green or shear interferometers will do just fine. For surface roughness measurements, dynamic interferometry and other phase shifting interferometry techniques are superior and faster. Optical heterodyne technique is suitable for small surface areas whereas dynamic interferometry is suitable for large surface areas. For accurate measurement of laser wavelength, Michelson type interferometers are suitable. If one is interested in average growth rate over a period of several minutes, even a simple reflection measurement (front and back surface reflections) reveals reasonable estimate, provided the sample thickness is smaller. Optical heterodyne technique requires a stable two frequency laser and hence it is relatively expensive when compared to reflection or conventional Michelson type interferometers.

Conflicts of Interest

The author declares no conflict of interest.

References

  1. Hariharan, P. Optical Inteferometry; Elsevier/Academic Press: New York, NY, USA, 2003. [Google Scholar]
  2. Zhou, J.J.; Li, Y.; Thompson, P.; Chu, R.; Lee, H.P. Continuous in situ growth rate extraction using pyrometric interferometry and laser reflectance measurement during molecular beam epitaxy. J. Electron. Mater. 1997, 26, 1083–1089. [Google Scholar] [CrossRef]
  3. Allison, S.W.; Gillies, G.T. Remote thermometry with thermographic phosphors: Instrumentation and applications. Rev. Sci. Instrum. 1997, 68, 2615–2650. [Google Scholar] [CrossRef]
  4. Koechner, W.; Bass, M. Solid State Lasers; Springer-Verlag: New York, NY, USA, 2003. [Google Scholar]
  5. Gasvik, K.J. Optical Metrology; John Wiley & Sons: New York, NY, USA, 1995. [Google Scholar]
  6. Hilfiker, J. Emerging applications of spectroscopic ellipsometry. Glass Coatings 2007, 1, 24–27. [Google Scholar]
  7. Hariharan, P.; Oreb, B.F.; Eiju, T. Digital phase-shifting interferometry: A simple error-compensating phase calculation algorithm. Appl. Opt. 1987, 26, 2504–2506. [Google Scholar] [CrossRef]
  8. Kanzaki, N.; Onuma, K.; Ito, A.; Teraoka, K.; Tateishi, T; Tsutsumi, S. Direct growth rate measurement of Hydroxyapatite single crystal by Moiré phase shift interferometry. J. Phys. Chem. 1998, 102, 6471–6476. [Google Scholar] [CrossRef]
  9. Hariharan, P. Optical Holography: Principles, Techniques, and Applications; Cambridge University Press: Cambridge, UK, 2004. [Google Scholar]
  10. Gao, F.; Muhamedsalih, H.; Jiang, X. Surface and thickness measurement of a transparent film using wavelength scanning interferometry. Opt. Express 2012, 20, 21450–21456. [Google Scholar] [CrossRef]
  11. Zuiker, C.D.; Gruen, D.M.; Krauss, A.R. In situ laser reflectance interferometry measurement of diamond film growth. J. Appl. Phys. 1996, 79, 3541–3546. [Google Scholar] [CrossRef]
  12. Yoshizaki, I.; Tsukamoto, K.; Yamazaki, T.; Murayama, K.; Oshi, K.; Fukuyama, S.; Shimaoka, T.; Suzuki, Y.; Tachibana, M. Growth rate measurements of lysozyme crystals under microgravity conditions by laser interferometry. Rev. Sci. Instr. 2013, 84. [Google Scholar] [CrossRef]
  13. Masuda, K.; Erskine, D.; Anderson, O. Differential laser interferometer for thermal expansion measurements. Am. Mineral. 2000, 85, 279–282. [Google Scholar]
  14. Farahani, M.A.; Torsten Gogolla, T. Spontaneous raman scattering in optical fibers with modulated probe light for distributed temperature raman remote sensing. J. Lightw. Technol. 1999, 17, 1379–1383. [Google Scholar] [CrossRef]
  15. Zhan, Y.; Wu, H.; Yang, Q.; Xiang, S.; He, H. Fiber Bragg grating sensors for high temperature measurement. Opt. Lasers Eng. 2008, 46, 349–354. [Google Scholar] [CrossRef]
  16. Liao, S.C.; Xu, Z.; Izatt, J.A.; Alcala, J.R. Real-time frequency domain temperature and O2 sensor with a single optical fiber. IEEE Trans. Biomed. Eng. 1997, 44, 1114–1121. [Google Scholar]
  17. Patterson, W.M.; Seletskiy, D.V.; Sheik-Bahae, M.; Epstein, R.I.; Hehlen, M.P. Measurement of solid-state optical refrigeration by two-band differential luminescence thermometry. J. Opt. Soc. Am. B 2010, 27, 611–618. [Google Scholar] [CrossRef]
  18. Chubb, D.L.; Wolford, D.S. Rare-earth optical temperature sensor. Rev. Sci. Instrum. 2000, 71, 2233–2240. [Google Scholar] [CrossRef]
  19. Sommergren, G.E. Optical heterodyne profilometry. Appl. Opt. 1981, 20, 610–618. [Google Scholar] [CrossRef]
  20. Kim, Y.; Reddy, B.R.; George, T.G.; Lal, R.B. Optical heterodyne interferometry technique for solution crystal growth rate measurement. Opt. Eng. 1998, 37, 616–621. [Google Scholar] [CrossRef]
  21. George, M.C.; Reddy, B.R.; Jagannath, H.; Perera, G.M.; Venkateswarlu, P. Measurement of Surface Roughness Using a Noncontact Profilometer. In Laser Spectroscopy and Nonlinear Optics of Solids; Radhakrishna, S., Tan, B.C., Eds.; Narosa Publishing House: Delhi, India, 1991; pp. 147–152. [Google Scholar]
  22. Kamma, I.; Kommidi, P.; Reddy, B.R. Design of a high temperature sensing system using luminescent lifetime measurement. Rev. Sci. Instrum. 2008, 79. [Google Scholar] [CrossRef]
  23. Fan, T.Y.; Daneu, J.L. Thermal coefficients of the optical path length and refractive index in YAG. Appl. Opt. 1998, 37, 1635–1637. [Google Scholar] [CrossRef]
  24. Farley, C.W.; Reddy, B.R. Interferometric measurement of laser heating in Praseodymium doped YAG crystal. Appl. Opt. 2011, 50, 526–531. [Google Scholar] [CrossRef]
  25. Weber, M.J. Probabilities for radiative and non-radiative decay of Er3+ in LaF3. Phys. Rev. 1967, 157, 262–272. [Google Scholar] [CrossRef]
  26. Layne, C.B.; Lowdermilk, W.H.; Weber, M.J. Multiphonon relaxation of rare-earth ions in glasses. Phys. Rev. 1977, B16, 10–20. [Google Scholar]
  27. Shepard, C.L.; Cannon, B.D.; Khaleel, M.A. Determination of temperature in glass with a fluorescence method. Int. J. Heat Mass Transfer 2001, 44, 4027–4034. [Google Scholar] [CrossRef]
  28. Kamma, I.; Kommidi, P.; Reddy, B.R. High temperature measurement using luminescence of Pr3+ doped YAG and Ho3+ doped CaF2. Phys. Stat. Sol. C 2009, 6, S187–S190. [Google Scholar] [CrossRef]
  29. Kommidi, P.; Reddy, B.R. Fluorescence lifetime sensing of temperature. Proc. SPIE 2006, 6377. [Google Scholar] [CrossRef]
  30. Wade, S.A.; Collins, S.F.; Baxter, D.W. Fluorescence intensity ratio technique for optical fiber point temperature sensing. J. Appl. Phys. 2003, 94, 4743–4756. [Google Scholar] [CrossRef]
  31. Messias, D.N.; Vermelho, M.V.D.; Gouveia-Neto, A.S.; Aitchison, J.S. All optical integrated upconversion fluorescence based point temperature sensing system using Er3+ doped silica-on-silicon waveguides. Rev. Sci. Instrum. 2002, 73, 476–479. [Google Scholar] [CrossRef]
  32. Forsyth, D.I.; Sun, T.; Grattan, K.T.V.; Wade, S.A.; Collins, S.F. Characteristics of doped optical fiber for fluorescence-based fiber optic temperature systems. Rev. Sci. Instrum. 2003, 74, 5212–5218. [Google Scholar] [CrossRef]
  33. Shen, Y.; Wang, X.; He, H.; Lin, Y.; Nan, C. Temperature sensing with fluorescence intensity ratio technique in epoxy-based nanocomposite filled with Er3+-doped 7YSZ. Compos. Sci. Technol. 2012, 72, 1008–1011. [Google Scholar] [CrossRef]
  34. Paez, G.; Strojnik, M. Erbium-doped optical fiber fluorescence temperature sensor with enhanced sensitivity, a high signal-to-noise ratio and a power ratio in the 520–530- and 550–560-nm bands. Appl. Opt. 2003, 42, 3251–3258. [Google Scholar] [CrossRef]
  35. Reddy, B.R.; Kamma, I.; Kommidi, P. Optical sensing techniques for temperature measurement. Appl. Opt. 2013, 52, B33–B39. [Google Scholar] [CrossRef]
  36. Farley, C.W.; Reddy, B.R. Mach-Zehnder interferometric measurement of laser heating/cooling in Yb3+: YAG. Proc. SPIE 2011, 7951. [Google Scholar] [CrossRef]
  37. Kim, Y.K.; Reddy, B.R.; Lal, R.B. Laser and Mach-Zehnder interferometry for solution crystal growth rate and concentration variation measurement, in “Laser interferometry IX: Applications”. Proc. SPIE 1998, 3479, 172–180. [Google Scholar] [CrossRef]