1. Introduction
Additive manufacturing, also known as 3D printing, has recently been popularized. The technology, previously the subject of laboratory research and the domain of large enterprises, has gained in popularity due to the advent of low-cost, personal, desktop-size units. A 3D printer can print virtually anything that can be created as a CAD file, though the printed parts’ utility for some purposes is limited by the filament material and durability.
While many individuals print items they have designed or have obtained from an online collection, this approach is not conducive to printing one-off parts as the design time might exceed the value, significantly. The use of a 3D scanner can help by facilitating rapid bespoke model creation. There are also numerous other prospective uses where scanning is desirable to measuring and designing. Humans, for example, would likely be unwilling to hold a position for the amount of time required to capture full body measurements and might find the required measuring invasive. The scanning process can also capture greater detail than would be practical with a manual measuring process (i.e., a 3D scanner’s point cloud can contain thousands of points corresponding to hundreds of manual measurements). It is also, obviously, much faster (based on comparing the 3D scanner’s 1–2 second speed with 20 to 30 seconds—or more—per manual measurement).
A limited number of 3D scanners are commercially available. These include scanners which move cameras and/or lasers around an object and those which move the object in front of cameras and/or lasers. The work presented in this paper is loosely based upon the concept created by Richard Garsthagen [
1] for a Raspberry Pi-based scanning system that captures all of the images required for creating a 3D model simultaneously. Prior work has been expanded upon by replacing the freestanding stands with a booth structure, adding 12 additional cameras to support a greater height of imaging, adding overhead and optional floor cameras, designing a control console with associated user control software and adding support for the capture of 3D video. The process of developing this 3D scanner is presented herein.
This paper continues by providing background on 3D scanning and printing. It then discusses the prospective uses of the 3D scanner, the project goals and the system design, which flowed from these uses. Next, the process of system development is discussed and an overview of system operations is provided, before concluding.
2. Background
Background in two areas is now discussed. First, an overview of prior work on 3D scanning is provided. The initial goal of this work was to digitize objects for 3D printing; however, the goals have grown somewhat since then. Given this, a brief discussion of 3D printing is also provided to add context in this area.
2.1. 3D Scanning
The 3D scanning technology has numerous applications, spanning several magnitudes of object scale. Fundamentally, 3D scanning seeks to digitize the real world to allow it to be interacted with by software. The exact definition of 3D scanning is elusive. Some have sought to capture 3D objects to generate 2D movies from them, possibly creating 3D models in the process. Others have created limited 3D scans from a small collection of image points, based on dots placed on the human being sensed. DeMatto [
2] describes how Brooks Running Shoes, for example, uses this technology to assess the impact of shoe changes on the user’s running. Many digitally animated movies have been created using this point-based approach.
Three-dimensional scanning of humans has focused on more than product interaction. Stuyck
et al. [
3], for example, have demonstrated how it can be used to identify human facial expressions. They demonstrated that it could identify the expression correctly 93.06% of the time. Medical applications [
4], such as detecting the shape of a scoliosis patient’s back or making dental measurements have also been undertaken. A related application, evaluating cosmetic products effect on the volume of “large size skin zones” has also been aided by the 3D scanning technology [
4]. Scanning of human feet to detect anomalies and differences between and across populations has also been performed [
5]. Human 3D scanning has also been used to design custom clothing [
6,
7]: Miller’s Oath, Astor and Black, and Alton Lane use 3D scanning to create general-purpose custom clothing [
8] while Brooks Brothers utilizes it for suit tailoring and Victoria’s Secret utilizes the technology for generating product recommendations [
9]. Three-dimensional scanning has also been used to develop custom swim suits [
10] and even edible clothing [
11]. Scanning has also been utilized to generate clothing for special applications: it has been used to create tightly fitting “high performance sportswear” [
12], to assess the clothing used by firefighters, hazmat workers and warfighters [
2]. Scanning has also been used for sizing for uniform selection by the U.S. Coast Guard [
13], speeding up the process considerably. Brown
et al. [
14] used the technology to assess what physical characteristics were most associated with perceptions of attractiveness. Scanning has also been used to assess the impact of exercise on the body [
15] and to assess changes in the skeletal structure during individuals’ lives using radiography [
16]. It has also been utilized for medical engineering, to scan body structures for characterization and replication [
17].
A large variety of object imaging applications have also been demonstrated. These include reverse engineering [
18,
19], validating product quality (e.g., for automotive products) [
20] and digitally preserving historical artifacts [
21]. Scanning has also been used to assess the bearing capacity of slab concrete, without destroying or damaging it, like is required by some methods [
22], and assessing turbine blades [
23]. Work has also focused on digitizing both the structure and texture of small objects [
24]. Libraries of small object models have been created by educational (e.g., Dalhousie University [
25]) and commercial institutions (e.g., thingiverse.com).
Three-dimensional scanning is also used for outdoor/landscape scenes. Gu and Xie [
26] demonstrated its utility in relation to assessment for mining. It has also been used for road design [
27], urban planning [
28], robotic navigation [
28] and the assessment of rock joints [
29]. Outdoor scanning has also been utilized to record and plan for the preservation of historic sites [
30] and for archeology [
31,
32]. It has also been utilized to record an intricate recessed construction drawing [
33].
Indoors, 3D scanning is used for real estate work—to create virtual walkthroughs of buildings and characterize the spaces contained within [
34]. It is also used to perform tunnel inspection [
35] and to generate surfaces for “microphone array acoustic imaging” [
36].
Numerous 3D scanning techniques exist. Some are based on lasers (e.g., [
37]). Lasers have gained a reputation for accuracy; however, care must be taken to use eye-safe lasers when operating in proximity to humans. The use of “white light” scanning is gaining popularity due to its comparative ease. This technique doesn’t require purpose-built laser emitters and collectors. It also lacks the eye safety concerns of laser scanning. Several “white light” approaches exist. For example, a small number of aligned cameras, such as on an Xbox Kinect [
38], can generate a relief image of one face of an object [
39]. Other approaches require handheld scanners to be moved around an object to image it (e.g., [
40,
41]). Techniques which can take images from a moving camera or those collected via other means (e.g., [
42]) have also been developed. An approach which combines a camera and projector has also been demonstrated [
43].
2.2. 3D Printing
Berman proffers that 3D printing is “the new industrial revolution”—that it will disrupt traditional manufacturing approaches in the way that e-books and online music impacted their respective industries [
44]. Applications for 3D printing include the creation of prototypes for goods that will be produced using higher-volume techniques. Printing can also be used to create bespoke items, such as custom equipment replacement parts, limbs, dental fixtures and even bridge components [
44]. All printers start with design files, such as those produced by a 3D scanner. Several different production processes are used. Plastic filament, such as PLA or ABS, can be extruded into a pattern (
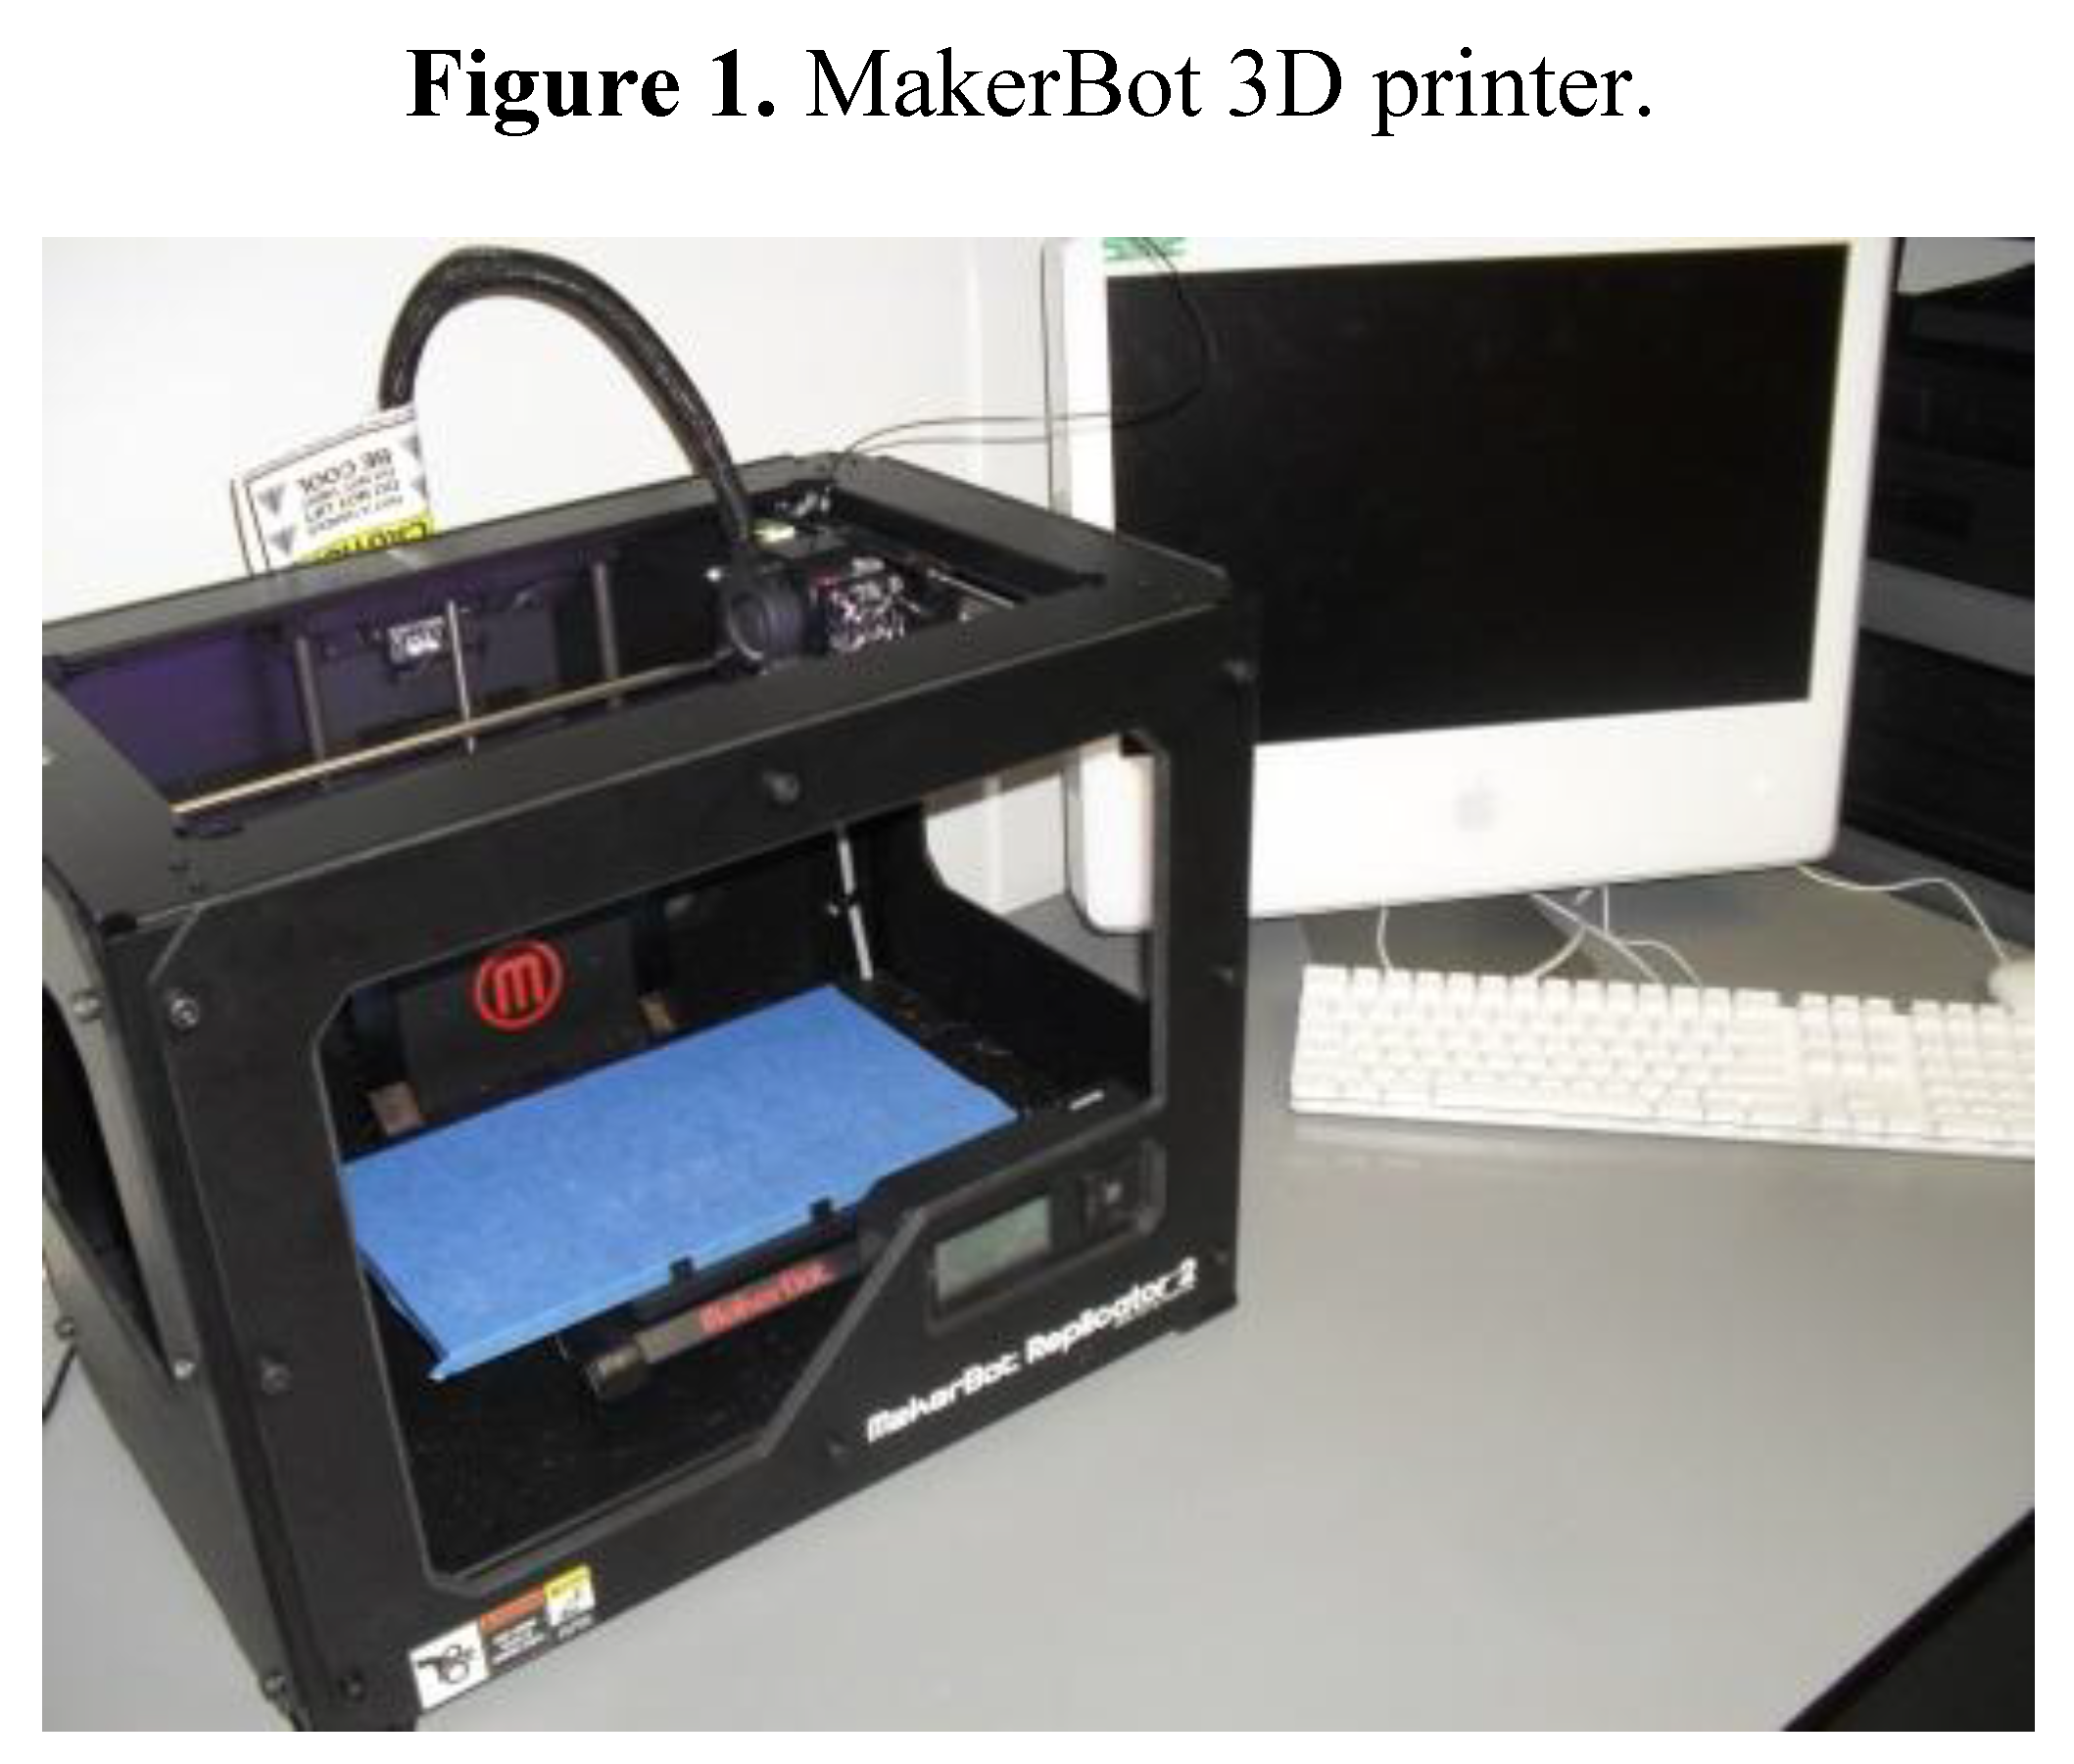
i.e., the approach used by MakerBot models, such as the one shown in
Figure 1) or a plastic powder can deployed and laser-hardened (see [
44]). Metal printers can also use an extrusion-based approach [
45]. A powder-based approach can be used to print ceramic objects such as “membranes and reactors” [
46]. Nanocomposites [
47], microfluids [
48], biodegradable scaffold units which “guide and stimulate tissue regeneration”, pharmaceuticals [
49,
50] and even “high-density imaging apertures” [
51] can be produced using 3D printing technology. Three-dimensional printers have been used for preserving historical heirlooms [
52], inspiring children [
53] and 3D printing has even been proposed for use in creating a base on the Moon (using significant amounts of pre-existing materials) [
54]. Wittbrodt
et al. [
55] even propose the purchase of an open-source 3D printer for the home, arguing that it quickly economically justifies itself. They suggest the RepRap (see [
56]), which can produce a large number of the parts required for maintenance and replacement or to build another RepRap unit.
Figure 1.
MakerBot 3D printer.
Figure 1.
MakerBot 3D printer.
Three-dimensional printing is not without controversy. Stephens
et al. [
57] have argued that the technology emits ultrafine and harmful particles; however, it is unclear, from their study, how problematic this would be in the typical ventilated single-printer use environment. Aron [
58] notes that 3D printers, problematically, cannot detect defects in their products making them unsuitable for safety-critical uses. Birtchnell and Urry [
59], using science fiction prototyping, envision numerous possible future scenarios surrounding 3D printer use. While many showcase a bright future, some are cautionary tales of what can go wrong if the technology is over-relied upon and under-performs.
3. Prospective Uses
In the academic and research environment at the University of North Dakota (UND), several prospective uses drove the development of this technology. The overarching goal was to situate the university to provide training to companies in the region and to students, who would graduate and go on to work for regional employers, related to additive manufacturing and 3D scanning technology. The 3D scanning technology was seen as a potential “killer app” that might drive the use of additive manufacturing for many. Generating a locus of users and innovators at UND is seen to serve as the first step towards being able to act as this type of a resource for the region.
3.1. Research and Education Uses in Computer Science
The project of developing the 3D scanner, itself, facilitates both computer science research and education. The creation of the easily reconfigurable hardware (i.e., the cameras can be moved by detaching and re-attaching zip-ties; moving facilitates testing at multiple mounting locations) facilitates experiments related to scan output optimization and the identification of factors that impact this. The development and limited aspects of the design served as a class project for some students in CSCI 297-Software Project Management through Experiential Learning. These students learned about image processing, networking, computer hardware, distributed system development and project management through the process of constructing the scanner and designing and developing the software that runs it. In the realm of computer science, the 3D scanner could also be immediately used to support several other areas of research and education.
First, it could be utilized to digitize avatars for use in student-developed games and movies. Students can capture images of themselves, friends or objects to import into their game world or video. This use would prospectively support computer graphics and game development courses offered in the UND Computer Science Department. The use of these scanned avatars will allow student to have the experience of dealing with the complexity of utilizing real-world models which may have significantly more complexity than the artificially-generated ones that might be otherwise used. It may also have the benefit of increasing student excitement, due to being able to incorporate themselves and friends as characters into assignments.
Second, the scanner could be utilized to generate fixed alignment images for other image processing work such as on mosaicking techniques or super-resolution, facilitating further student and faculty inquiry in this area. This may aid research and education in this arena via reducing the collection time and complexity.
Third, the scanner could be utilized to characterize the interactions of ground- and air-based robots, their movement patterns and interactions with objects and their environment. This would allow more detailed simulation and analysis. It may also facilitate research into control system evaluation and facilitate autonomous controller training to correct discrepancies between the intended and sensed action.
Finally, the scanning technology could inspire students—both at UND and in local K-12 schools—to pursue careers related to computing by seeing how this skillset can be used to create physical items, instead of just images on a screen.
3.2. Research and Education Uses in Other Disciplines
In addition to the benefits to those researching or studying in software-related fields, other prospective areas of use were identified based on overlaps between prior uses of 3D scanners and potential areas of interest at UND. These include using the device for medical studies, to create customized clothing, to capture a starting point for the creation of on-screen or 3D printed artwork and to capture details to allow for engineering work and learning related to physical objects.
As a longer-term goal, the scanner could aid work on 3D video scanning. This burgeoning area of research could support both 3D display, such as via hologram or prospective-sensitive viewing goggles, of video. It could also use changes in the orientation or structure of an object from moment-to-moment to assess numerous phenomena.
4. Project Goals
The 3D scanner development project aimed to blend the development of a teaching tool, research activities and student learning. As such, the project incorporated goals relevant to all three desired outcome areas.
The project was funded due to the teaching potential that the 3D scanner presented. The 3D scanner was budgeted to cost approximately $3500. An additional $1500 was budgeted for expenses related to the operation of a summer program that would use the scanner and pre-existing 3D printer. It was designed to replicate the capabilities of a significantly more expensive piece of hardware. The bulk of the budget was spent on the 50 Raspberry Pi units and cameras initially specified. This accounted for approximately $3000 of the budget. The remainder was devoted to the structural hardware and wiring. A design for a 53-unit system was later arrived at which provided optional imaging points on the ground which can be deployed and removed, as needed. As a point of comparison,
Table 1 provides an overview of pricing and capabilities of several other 3D scanners with publically available pricing information. These range from lower-cost scanners that must be moved around the object (or the object moved/rotated in front of the scanner) to larger scanners that can capture from all sides simultaneously. The scanner described herein aims to provide functionality similar to the $200,000 to $240,000 scanners, albeit at a potentially lower level of resolution.
Table 1.
Scanner costs and capabilities.
Table 1.
Scanner costs and capabilities.
| Scanner | Cost | Type | Scanning Time |
|---|
| 3D Systems Sense 1 | $300 | Optical—subject must move/be moved | Varies by object/operator |
| Artec EVA 2 | $17,999 | Optical—subject must move/be moved | Varies by object/operator |
| Geomagic Capture 3 | $14,900 | Optical with LED point emitter—subject must move/be moved | Varies by object/operator |
| Gotcha 3D Scanner 4 | EUR 995 | Optical—subject must move/be moved | Varies by object/operator |
| Head & Face Color 3D Scanner (Model 3030/RGB/PS)—(CyEdit+) 5 | $63,200 | Laser—fixed scanner/fixed subject (supports the size of the front of a human head) | Not provided |
| Head & Face Color 3D Scanner (Model 3030/sRGB/PS)- Hires Color—(CyEdit+) 6 | $73,200 | Laser—fixed scanner/fixed subject (supports the size of the front of a human head) | Not provided |
| Head & Face Color 3D Scanner (Model PX)—Single View—(PlyEdit) 7 | $67,000 | Laser—fixed scanner/fixed subject (supports the size of the front of a human head) | Not provided |
| Head & Face Color 3D Scanner (Model PX/2)—Dual View—(PlyEdit) 8 | $77,000 | Laser—fixed scanner/fixed subject (supports the size of the front of a human head) | Not provided |
| KX-16 3D Body Scanner 9 | <$10,000 | Optical—fixed large object or human | 7 s |
| MakerBot Digitizer 10 | $799 | Laser—small subject automatically moved | |
| Mephisto VR 11 | EUR 4995 | Optical—small subject automatically moved | Varies by object/operator |
| PicoScan 12 | EUR 1995 | Optical with projector—subject must move/be moved | Varies by object/operator |
| Whole Body 3D Scanner (Model WBX)—(DigiSize Pro) 13 | $200,000 | Optical—booth/fixed large object or human | 17 s |
| Whole Body Color 3D Scanner (Model WBX/RGB)—(DigiSize Pro) 14 | $240,000 | Optical—booth/fixed large object or human | 17 s |
The goals in the first area were, thus: (1) to develop a 3D scanner with sufficient resolution and accuracy such as to allow students to gain an understanding of 3D scanning and 3D printing and its applications and (2) for this scanner to be able to produce high-resolution scans (e.g., 150 mega pixels of data are collected in the 50-camera design) that can be turned into printed objects which meet or exceed the maximum resolution of the 3D printer.
Second, additive manufacturing and 3D scanning is an ongoing area of research. In building the scanner, it was sought to develop a tool that would facilitate research in the computer science domain areas described in
Section 3.1 as well as to facilitate collaboration with other UND departments and in other universities and businesses in the region. This was also seen as a way to identify more prospective application areas to present to students and to have examples to present to them with.
The goals in this area were: (1) to develop a 3D scanner using hardware that was reconfigurable to support investigation into techniques for maximizing 3D scanning performance; (2) for this scanner to provide sufficient resolution imagery to support other prospective application areas, that were not firmly known at the time of design; and (3) for the scanner to be easily operable by those in other disciplines who may decide to collaborate.
Finally, the ability to hit the desired budgetary level was enabled by the participation of volunteer undergraduate students to assemble to scanner. The project was presented as one option in CSCI 297—Experiential Learning and three students selected to participate in this project. As such, it was crucial that participation in the development of the scanner provide educational benefits aligned with course goals to the students. These goals included giving students the experience to work on a larger-scale project, as compared to the typical course project, and imparting knowledge about the management of a large technology project to the students.
The goals in this third area included: (1) allowing student participants to have a substantive role in the decision making regarding the implementation of the design; while (2) not impairing the ability to deliver the 3D scanner at the needed date and time and (3) utilizing the project—especially the software development part—to allow the students to learn about and use project management techniques.
5. System Design
The 3D scanner was designed to be constructable from commonly-available parts within the budgetary limitations discussed in
Section 4. The design was informed by the prior work of Garsthagen [
1], who also utilized Raspberry Pi units and cameras for a 3D scanner. Three areas of this design are now discussed. First, the physical structure is presented. Next, the electronic components are discussed. Finally, the software that will operate the system is considered.
5.1. Physical Structure
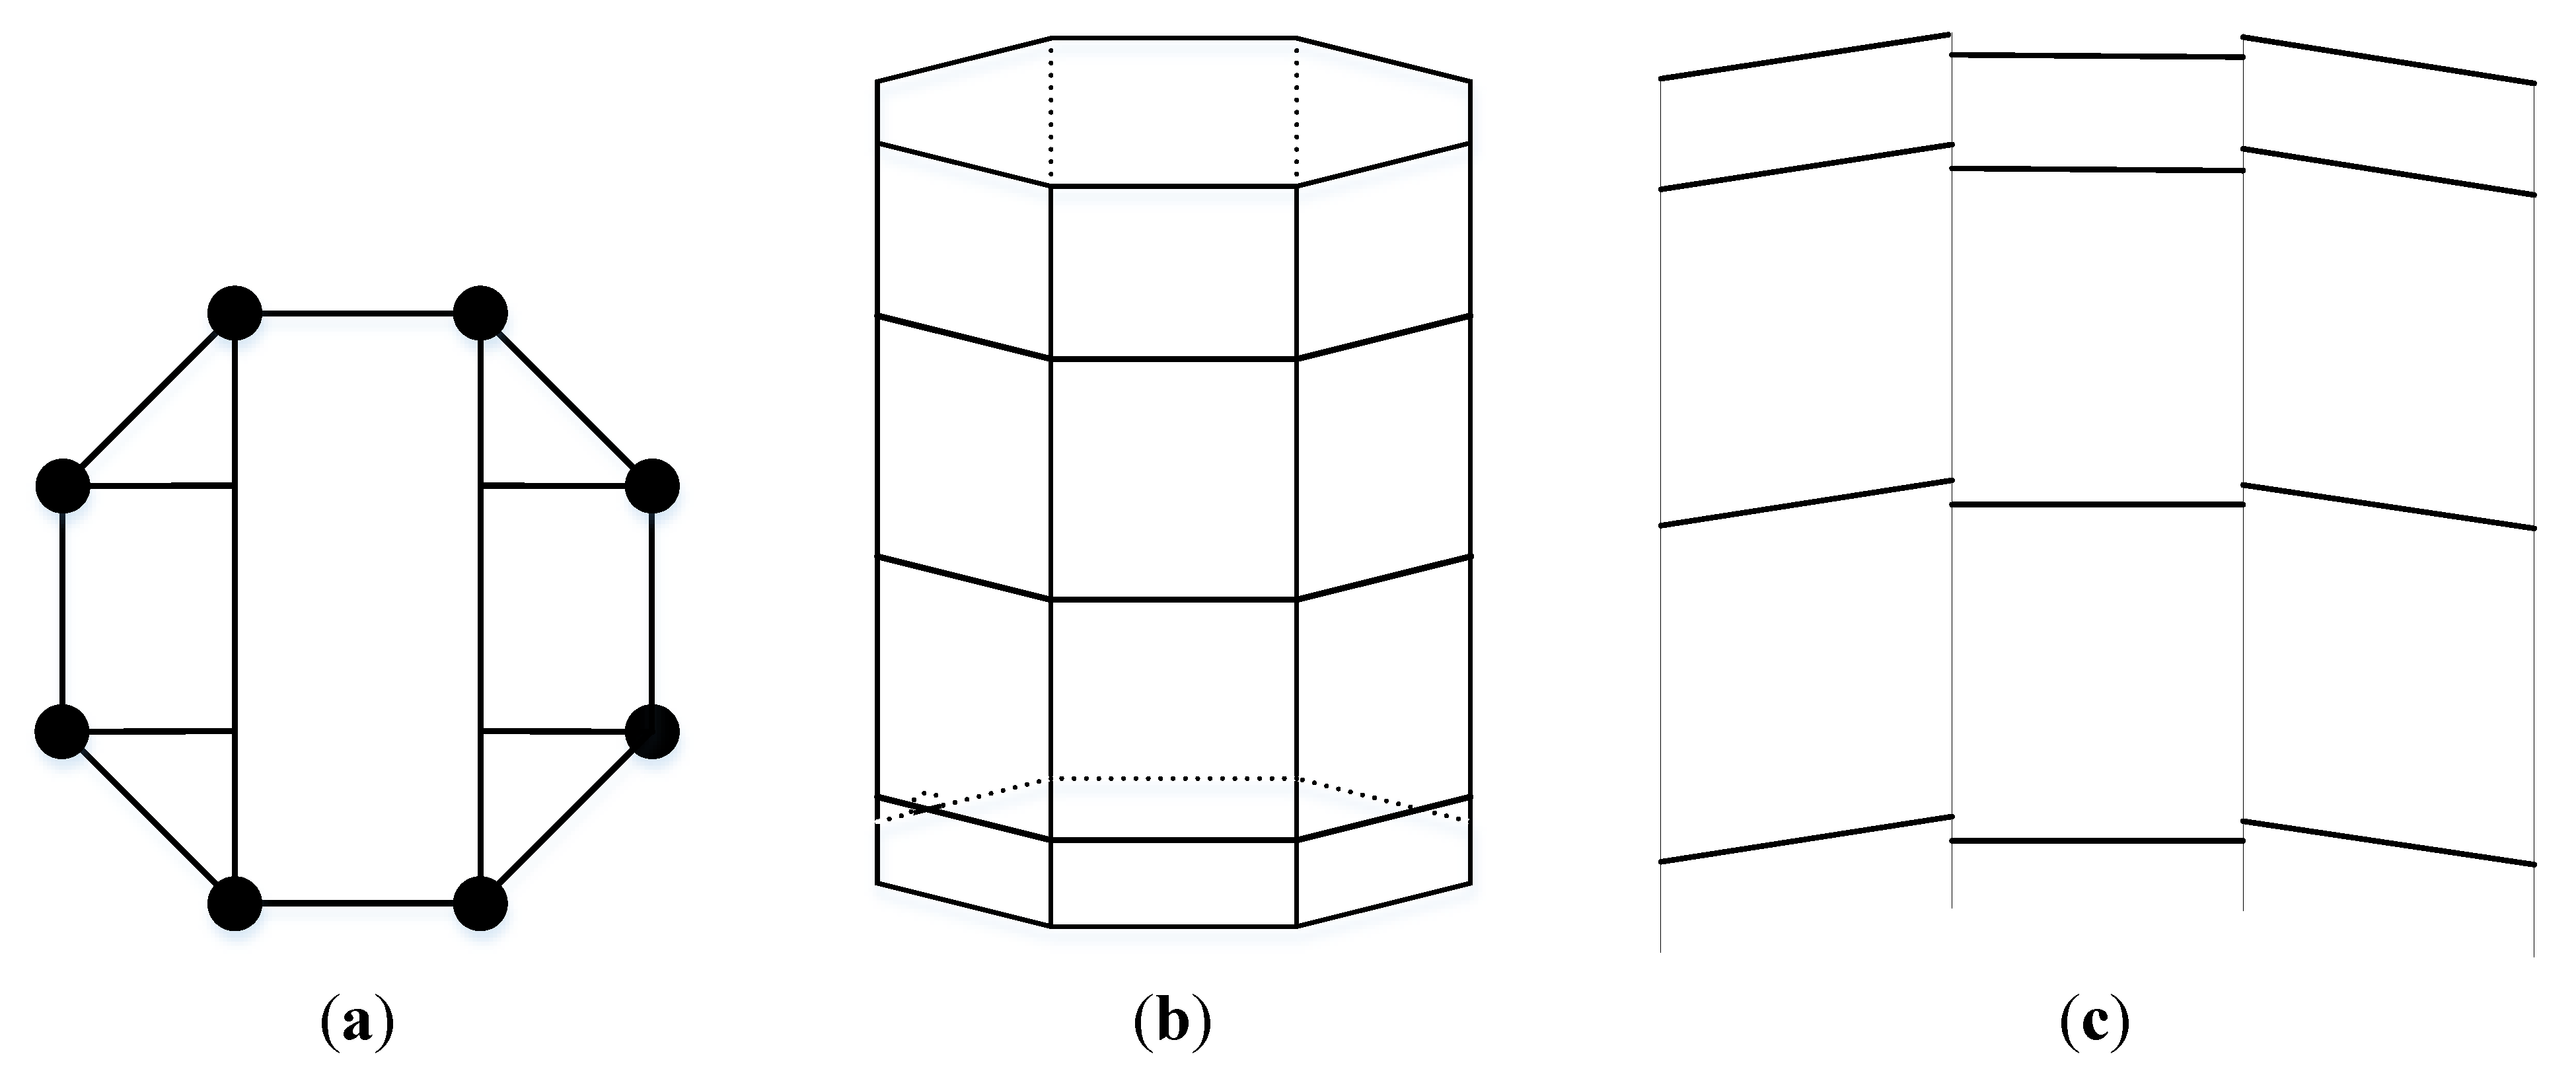
The physical structure of the 3D scanner is composed of 1.5 inch polyvinyl chloride (PVC) pipe and associated connectors. For the side walls, shown in
Figure 2b,c, the following components were utilized:
The top structure, shown in
Figure 2a, utilized:
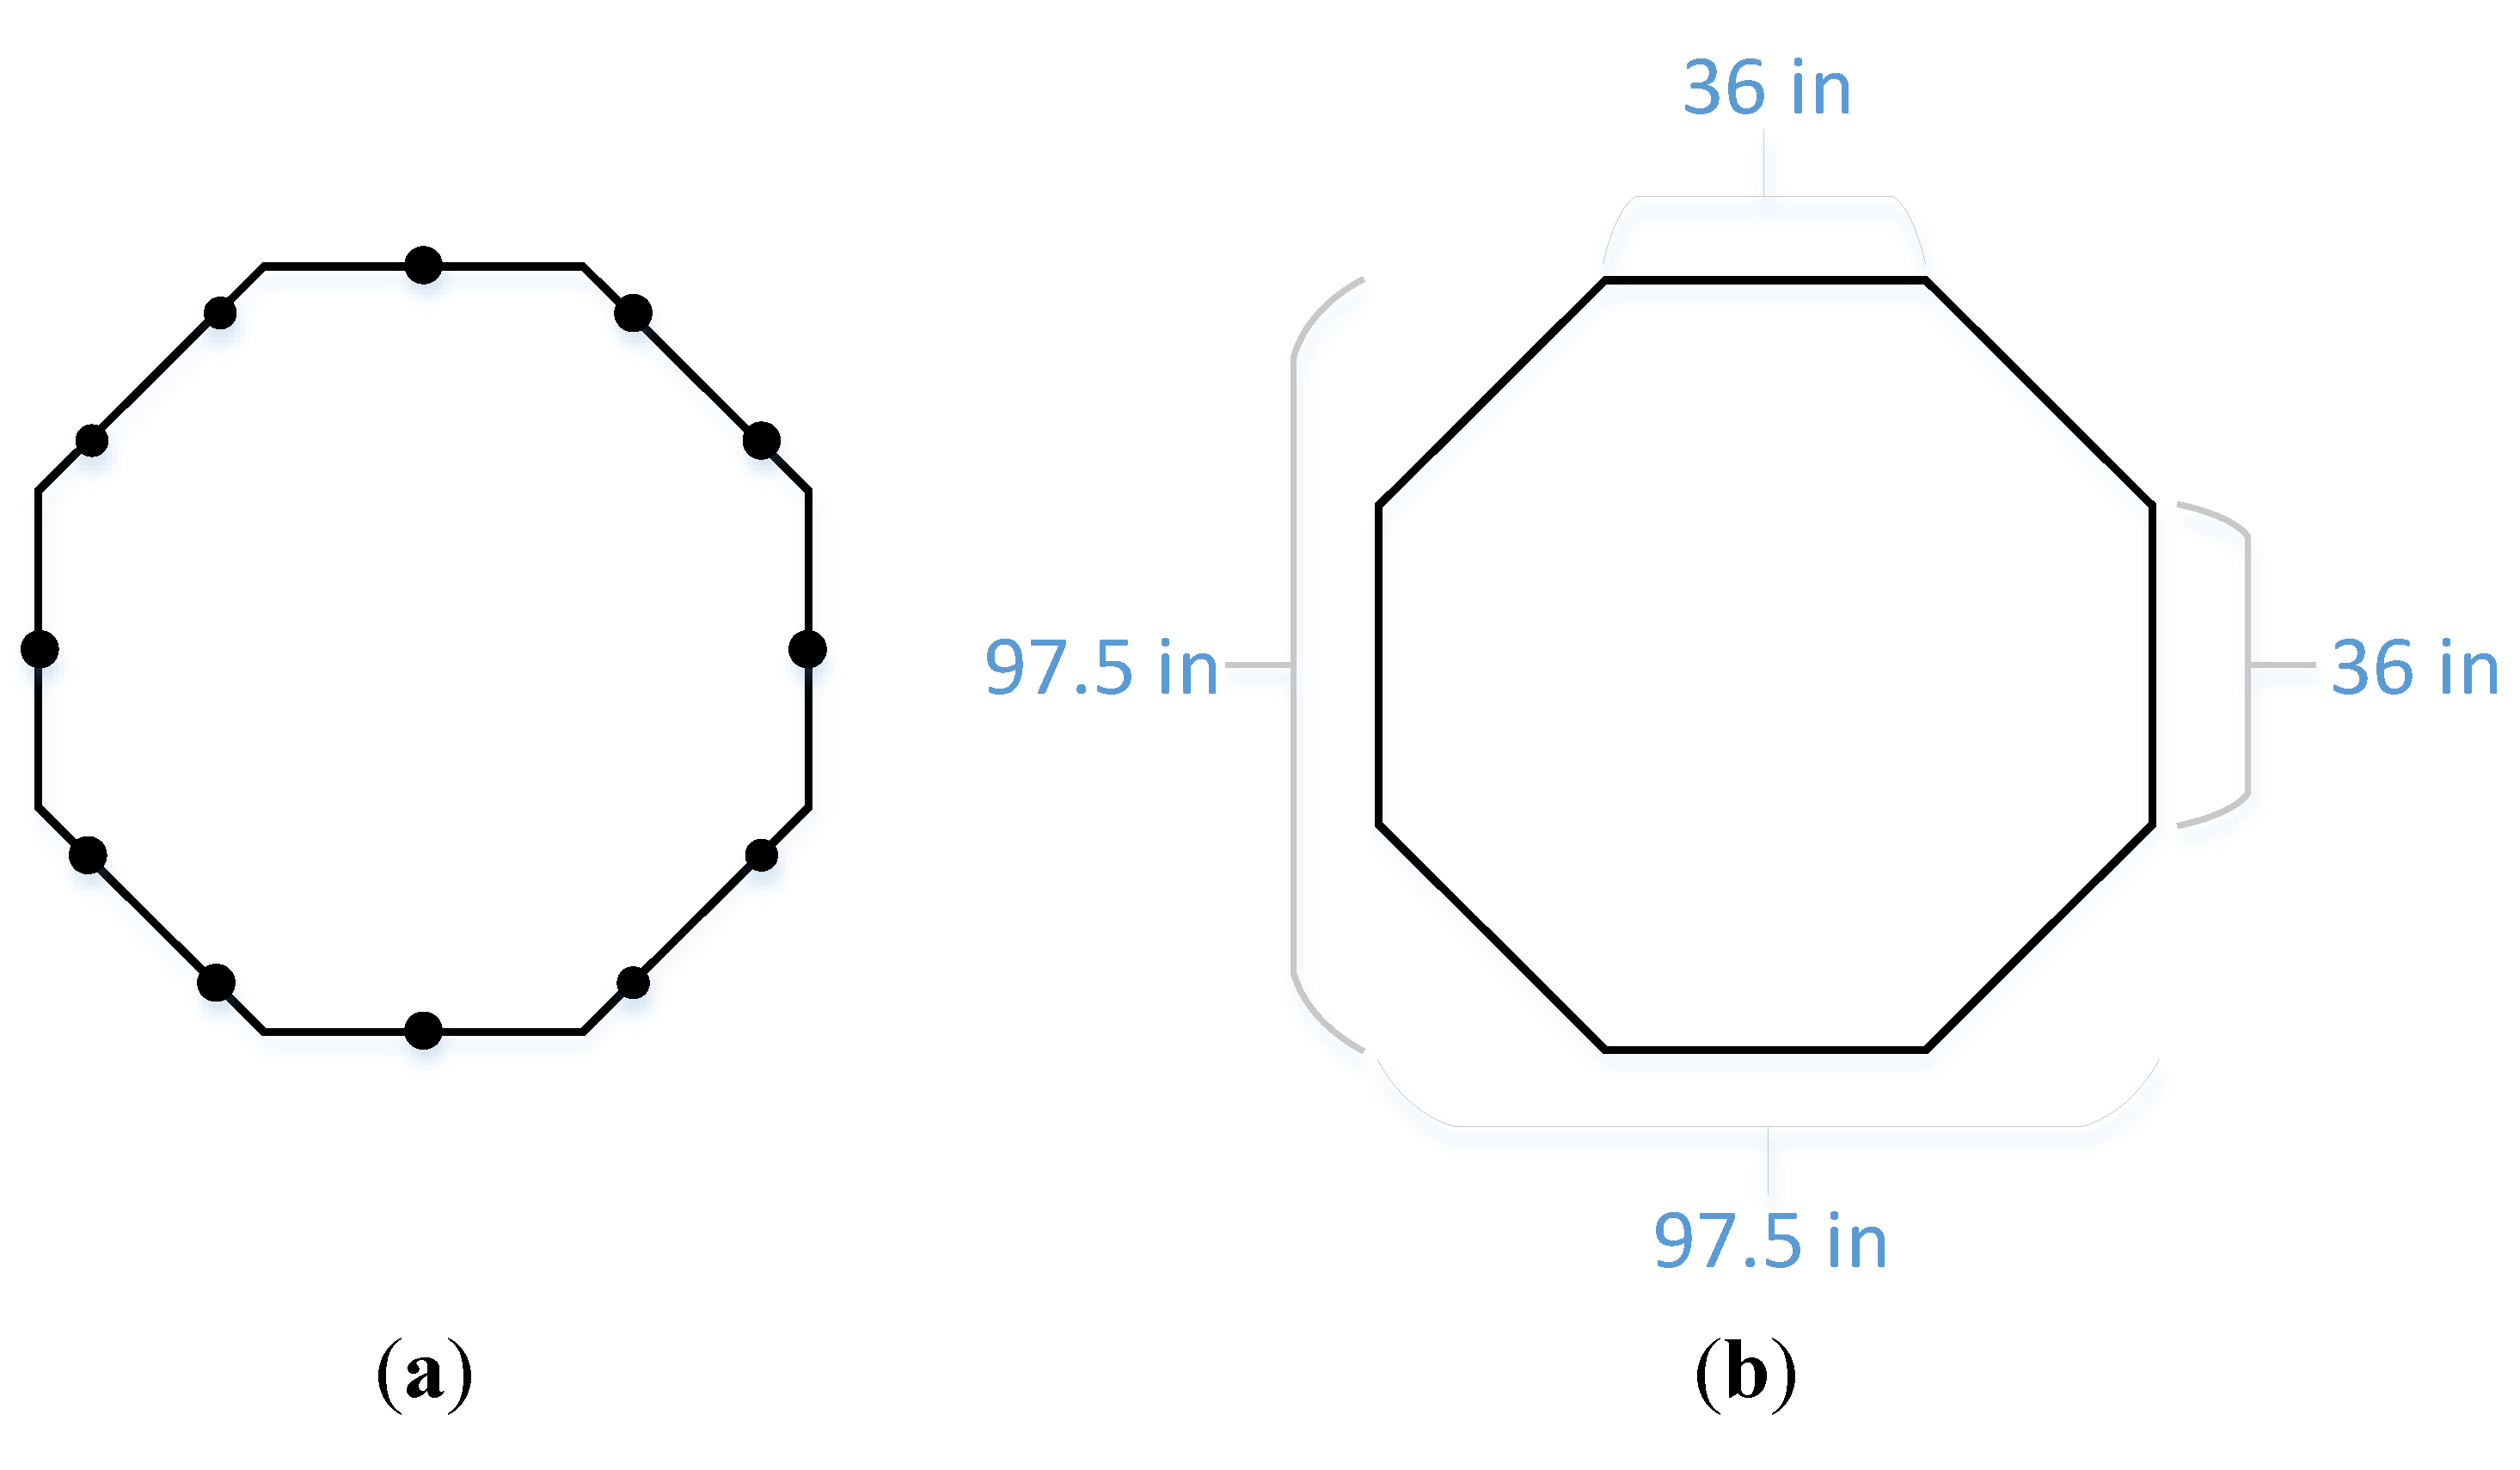
The structure is an octagon comprised of eight 36-inch-long sides. The dimensions of the structure are shown in
Figure 3b. The required angle between the adjacent walls (157.5°) was created through the positioning of the T-joint pieces for the two sides on the joining post. This octagonal shape was selected to ensure that the doorway, which is one side of the octagon, was wide enough for disability access while providing a sufficient number of posts to ensure structural stability, provide a location for cable runs and make the frame as close to circular as practical. As cameras can be mounted on both vertical and horizontal bars, significant flexibility in the positioning of cameras is possible. The cameras were placed equidistantly around the octagon. Because the software utilizes an image point-matching technique (discussed in more detail in
Section 7), the system effectively self-calibrates for each job, reducing the level of criticality of maintaining precise camera positions over time. Minor structural movements or flexing are also, similarly, taken care of via the image processing technique.
Figure 2.
(a) Frame design—top view; (b) Frame concept; (c) Staggering of adjacent panels.
Figure 2.
(a) Frame design—top view; (b) Frame concept; (c) Staggering of adjacent panels.
Figure 3.
(a) Camera locations; (b) Frame dimensions.
Figure 3.
(a) Camera locations; (b) Frame dimensions.
Cameras were spaced at regular intervals around the structure. As there were 12 camera locations each comprised of four cameras at different heights, mounted on the applicable horizontal beam at the location, some sides had more than one camera, while others had a single one located on it. The camera locations are shown in
Figure 3a. Two additional cameras are included on the top piece (see
Figure 2a) in the middle of the two spanning pipe pieces.
Two opposite sides were connected using pluming unions which could be detached to allow the structure to be transported in two equally-sized pieces. One union was over the main entrance; the other four were located on the side opposite this.
The structure was built from polyvinyl chloride pipe connected to suitable joint pieces using standard PVC primer and cement. Once the structure was built, it was covered with metallic silver spray paint to give it the desired look. Panels were hung using zip-ties in the open spaces between beams to exclude background areas from being imaged. The electronic components and wiring were also attached with zip-ties.
5.2. Electronic Components
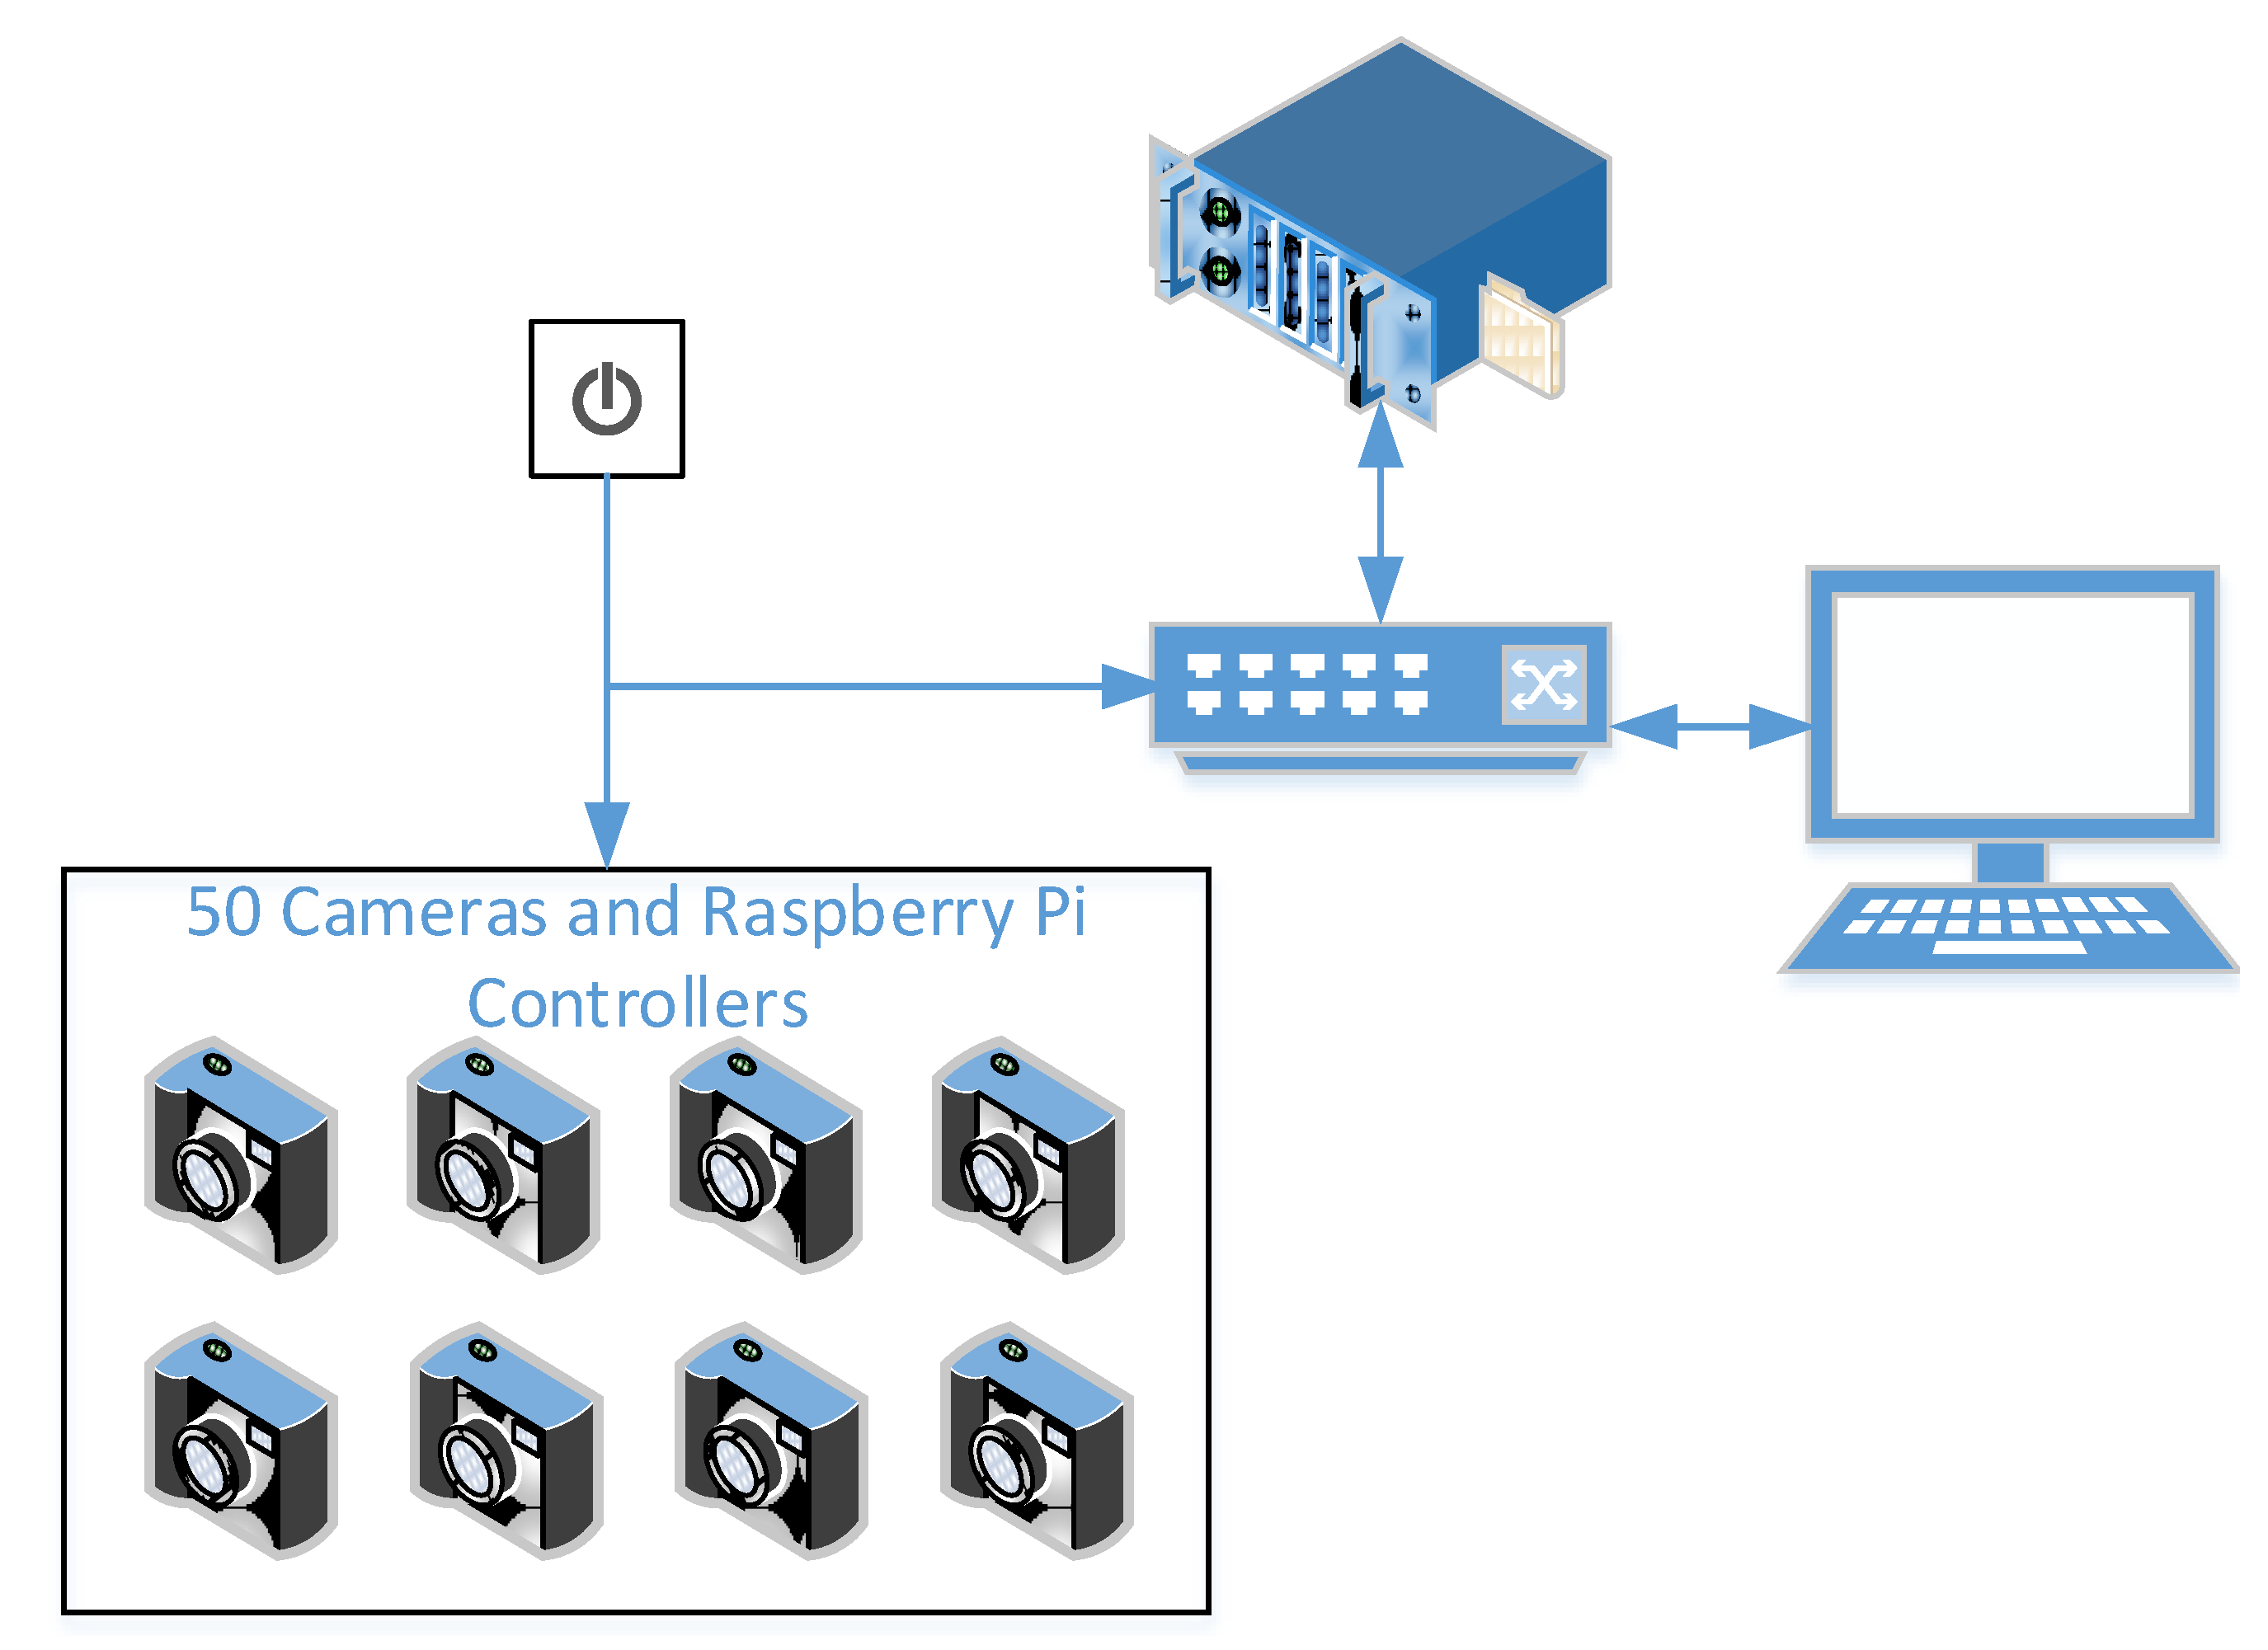
The principal electronic components of the 3D scanner system are shown in
Figure 4. These components include:
1 × File Server, created from existing hardware on hand, running the FTP protocol;
2 × 48-port Ethernet switches;
1 × User console workstation; additional workstations are planned to allow multiple users to render concurrently;
50 × Raspberry Pi computers;
50 × Raspberry Pi cameras;
50 × 8 GB SD cards;
3 × Adjustable power supplies.
Figure 4.
System electronics diagram.
Figure 4.
System electronics diagram.
As shown in
Figure 4, most of the components are connected via the Ethernet switch. The workstation, which will eventually become multiple workstations, and the file server are connected directly to the switch using category 5e Ethernet cable. Two wire pairs (four wires) in the Ethernet cable connect to the RJ 45 port on the Raspberry Pi units and are used for data transmission. An additional pair (two wires) are used to transmit power to the Raspberry Pi. Because neither the switches nor the Raspberry Pi supports the power-over-Ethernet standard, the power wires are not connected to the RJ 45 (standard Ethernet) connector; instead, they draw power from the adjustable power supply and connect to the power-in and ground ports on the Raspberry Pi unit.
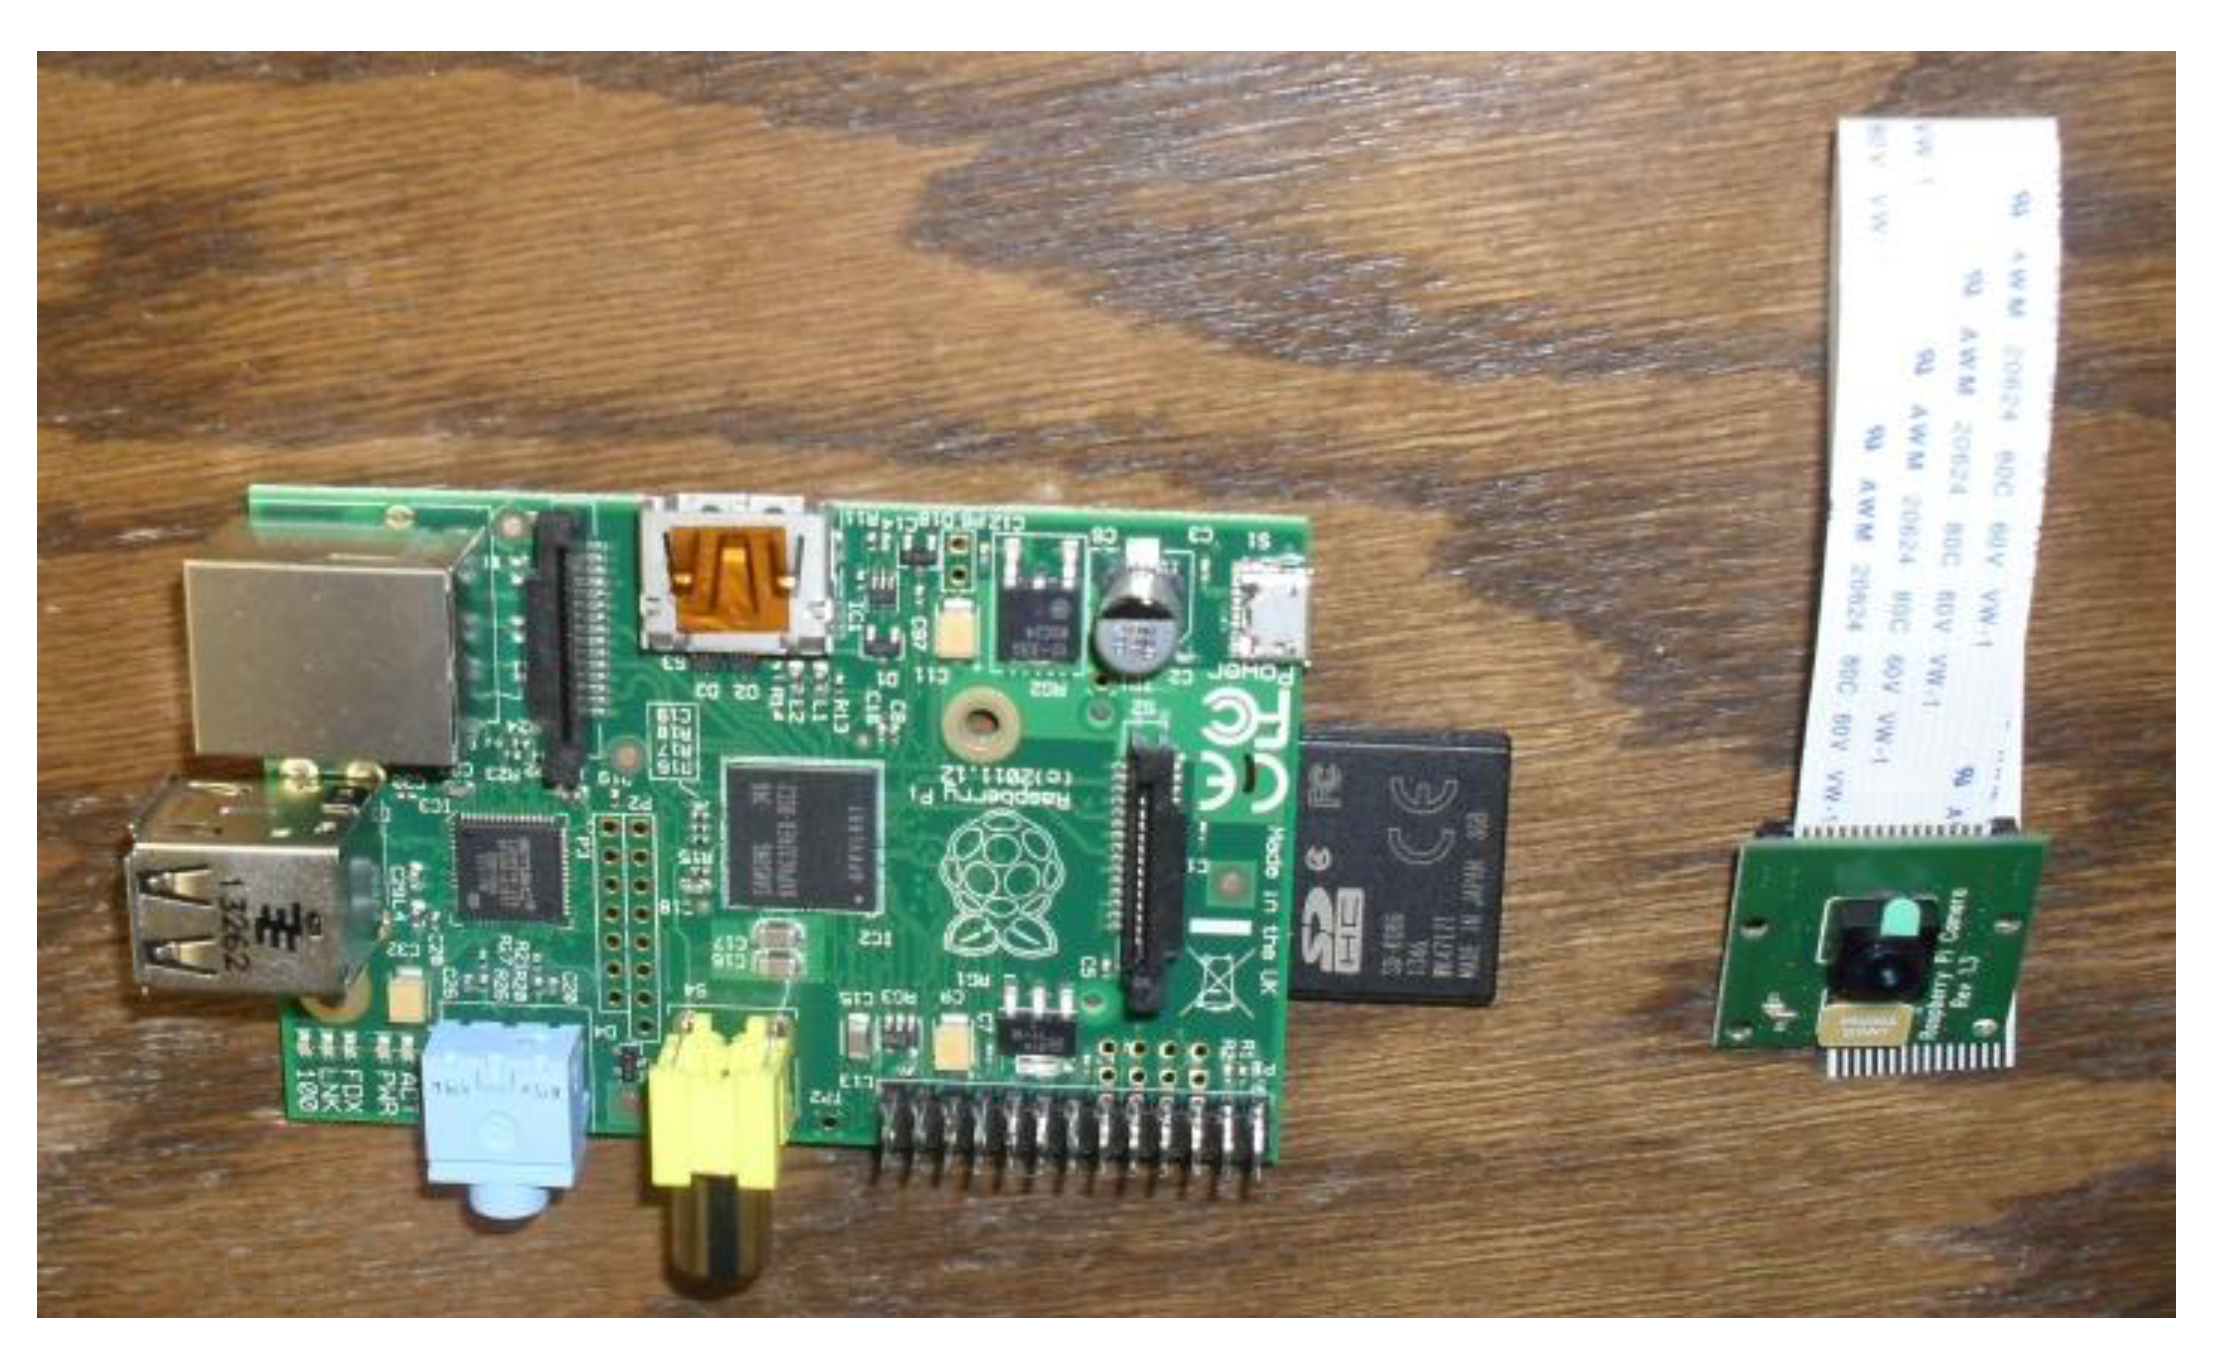
A camera is connected directly to each Raspberry Pi, via a ribbon cable included with the camera unit, and an 8 GB SD card is inserted into the Raspberry Pi’s SD slot. The SD card houses the Raspbian operating system for the Raspberry and is also used as temporary storage for the captured images, prior to their transmission to the file server for longer-term storage. A Raspberry Pi computer, with its 8 GB SD card inserted and Raspberry Pi camera are shown in
Figure 5.
Figure 5.
Raspberry Pi and camera.
Figure 5.
Raspberry Pi and camera.
5.3. Software
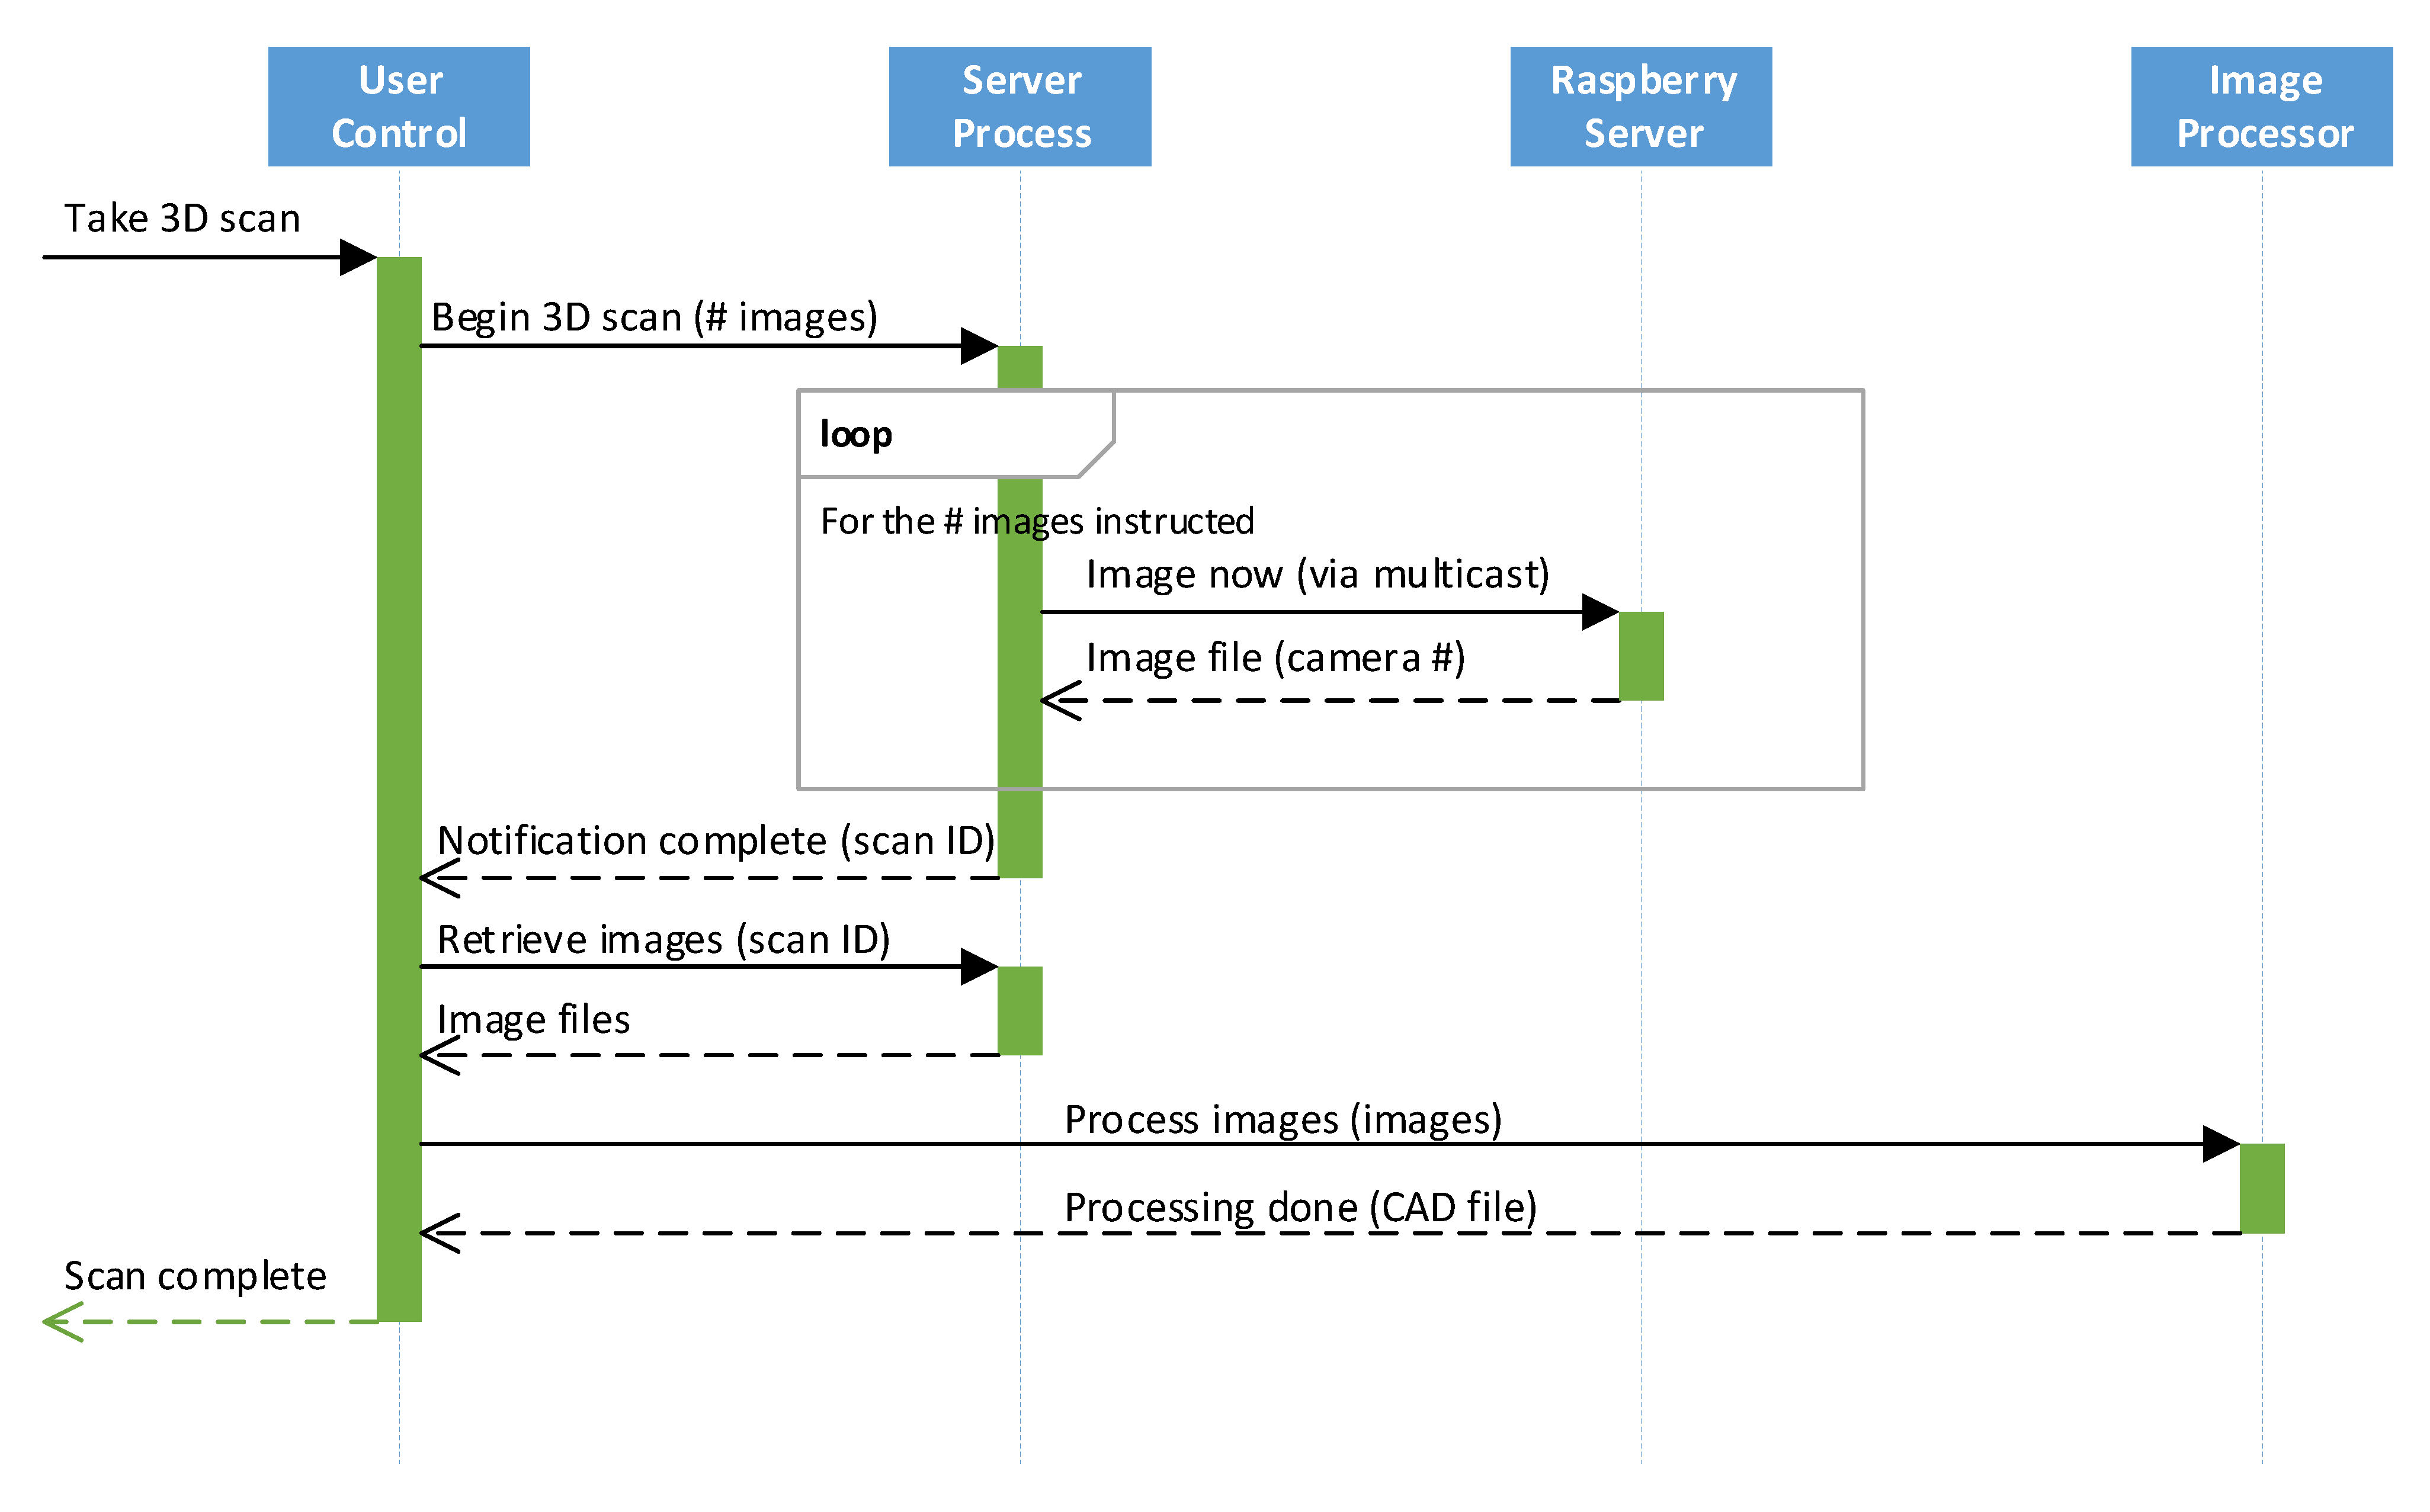
The software that operates the 3D scanner system is designed to support the capture of a single 3D scan, a small number of scans or a 3D scanned video. Currently, video is collected as a sequence of image captures; however, capturing and re-processing video is also being considered.
Figure 6.
UML sequence diagram of software operation.
Figure 6.
UML sequence diagram of software operation.
The software sequence of operations (shown in
Figure 6) begins with a user command to perform a single scan, series of scans or video capture. This instruction is transmitted to the server process, running on the file server, which generates one multi-cast “capture-now” message for each frame needed to service the user’s request. This capture message is received nearly concurrently by each Raspberry Pi (an infinitesimal propagation delay is introduced by the difference in cable lengths, latency may also be introduced by the switch and process state onboard the Raspberry Pi) which then collects the image and sends it back to the file server. When the file server has all the collected images, it notifies the user process which collects the images and prepares them for use by the 3D rendering program. The transition to this last step is currently performed manually; however, automation has been identified as a near-term goal.
6. System Development
The steps required for construction have been alluded to in previous sections which describe the design and components utilized. The construction process began with the fabrication of the structural frame. This frame was built one layer at a time. Four total layers comprised the structure. The three-layer-completed frame is shown in
Figure 7a; the complete four-layer frame is shown in
Figure 7b. Plumbing union joints were utilized to allow the structure to be disassembled. Initial plans called for only four of these joints; however, an additional joint was added to complete the back of the structure, preventing the need for a more elaborate solution to replace this part.
The frame was then painted using metallic silver spray paint. This is shown in process in
Figure 7c and completed in
Figure 8a. Removable side panels were created by attaching two pieces of foam-core board together and cutting them to the desired size. These were then painted with the same spray paint utilized to paint the structural frame. The structure with the panels attached is shown in
Figure 8b. Finally, the Raspberry Pi units were installed (shown in
Figure 7d). These units were attached to 3D printed mounts (a mount being printed is shown in
Figure 8c); 3D printed mounts were also used for the cameras. Zip-ties were utilized to attach the Raspberry Pi and camera mounts to the frame.
Figure 7.
(a) Frame under construction; (b) Frame completed; (c) Frame being painted; (d) Two Raspberry Pi units and cameras mounted on frame.
Figure 7.
(a) Frame under construction; (b) Frame completed; (c) Frame being painted; (d) Two Raspberry Pi units and cameras mounted on frame.
Figure 8.
(a) Frame painting completed; (b) Frame with panels added; (c) MakerBot 3D Printer creating Raspberry Pi mount.
Figure 8.
(a) Frame painting completed; (b) Frame with panels added; (c) MakerBot 3D Printer creating Raspberry Pi mount.
7. System Operations
This section provides a brief overview of how the system works, from a holistic perspective. The scanning process begins with positioning the object or individual to be scanned in the scanning chamber. To the individual or object, the process is virtually unnoticeable. The system can capture the collection of imagery required to make a point model within a fraction of a second. The operator triggers image collection and then is able to begin to review the images.
Figure 9.
(
a) 3D Scanner in final location with console stations and 3D printer; (
b) Wireframe of scanned individual [
60]; (
c,
d) Pictures of individual being scanned [
60].
Figure 9.
(
a) 3D Scanner in final location with console stations and 3D printer; (
b) Wireframe of scanned individual [
60]; (
c,
d) Pictures of individual being scanned [
60].
To create the 3D model from the image data, a commercial software package is utilized. Autodesk’s Recap 360 has been primarily utilized. The wireframe seen in
Figure 9b was produced, for example, utilizing this software. Autodesk Recal 360 has a low learning curve: it requires the user to, just at the most basic level, load images and trigger model production. Other software packages such as Autodesk’s 123D Catch or Agisoft’s PhotoScan can also be utilized. Agisoft’s PhotoScan, in particular, while more complicated to use, generally produces the output more quickly due to the use of local computing resources that do not require waiting in a server-processing queue. Argisoft’s PhotoScan is more complicated to use and requires user training as it requires multiple steps to be performed in order for the model creation process. All of these software packages identify features that are shared between multiple images to align the images and produce the 3D model. Given this, there is no need for explicit system calibration.
The camera locations and separation were chosen to ensure significant overlap between the images. The two top-most rows of cameras are spaced closer together to facilitate capturing higher levels of detail on the face area, for an adult of average height. The frame was designed to facilitate the movement and testing of numerous camera positions and orientations. Evaluation of the effect of camera positioning shall serve as a subject for future work.
The software packages produce a model in a format that can be opened with many CAD software packages or utilized in 3D printer software (such as MakerWare) to generate printer control commands to produce a physical object. Currently, images must be manually loaded from the file server into the software package. The Recap 360 software, as a cloud-based application, introduces a variable duration of processing depending both on the complexity of the model created and its load from other users at the time.
8. Approach Advantages and Disadvantages
Several different prospective approaches to deriving the benefits discussed in previous sections were considered. This section provides an overview of the decisions that were made leading to and during the design process and compares the outcome that has occurred with other possible ones.
The first decision that was made was one of building or buying the hardware. Several factors were critical to this decision. First, the system was to be utilized for human scanning, so a system that could capture an image without requiring a significant period of holding a fixed pose, requiring subject movement or requiring another individual to move around the subject was desired. The financial resources available were also quite limited comparative to the cost of ready-built scanners that didn’t require subject movement or an extended capture regimen. Additionally, while not an initial requirement, the ability to involve undergraduate students in the development of the scanner and achieve educational benefits through this process was also highly desirable. The additional risk posed by development as opposed to procurement was considered. This was, to some extent, offset by the ability to repair the scanner down the road if parts malfunctioned and the low cost of individual parts, which limited the prospective damage from any single mistake. The SQUIRM model [
61] was utilized to evaluate the risks inherent to and increased by student development involvement. However, as no procurement solution meeting critical requirements and financial constraints was available, building was necessitated.
Upon making the decision to build, two different sets of decisions were required: those related to the camera-mount structure and those related to the electronics. Two approaches to the camera-mount structure were possible. The first, the approach taken by Garsthagen [
1], was to create several different freestanding stands. This approach benefited from ease of movement from location-to-location; however, the stands also carried an increased a risk of tipping (and possibly damaging the cameras). The approach also resulted in a large collection of wires on the floor, which represented a trip hazard in the classroom/laboratory environment. This also could have possibly prevented the stands from being able to be left set up for any period of time in an office or lab, as the wires would pose a trip hazard there as well. The stands also didn’t offer any privacy to the scan subject or block out any background individuals and objects. The approach taken reduces the trip hazard, as the wiring is located adjacent to the PVC base. It also provides protection against accidental knock-over related damage. Conversely, this structure is much heavier than the freestanding stands would have been and is significantly more difficult to move. It can be disassembled into two pieces; however, these just barely fit through doors and in the stairwell.
The electronics selection process also presented several options. The most basic approach would have been to simply mount cameras that could be manually triggered or configured to take a picture when powered on and simply engage the system by providing the cameras with power. This, problematically, would have still required manual collection of the images from SD cards in each camera. It would also preclude capturing 3D video. Connecting multiple cards to USB ports on a single computer (via a collection of USB hubs) was also considered; however, this suffered from wiring expense and complexity, due to the necessity of making or buying USB cables of numerous lengths. The approach utilized by Garsthagen [
1], using Raspberry Pi units connected to an Ethernet-based TCP/IP network, was selected for several reasons. First, the fact that Garsthagen had already used this approach, and demonstrated that it worked and that it generated suitable imagery, reduced project risk significantly. Second, the ability to provide power via the Ethernet cable was also attractive. Third, this approach resulted in automatic central collection of all of the imagery that could be taken, for all practical purposes, concurrently. Finally, supplies for making custom Ethernet cables were readily available and the cables were easy to make and test.
The selection of the software to utilize for image processing wasn’t a decision that had to be made as part of the system design process. The images produced would work with several common packages. Autodesk’s Recap 360 was found to be the easiest to utilize, while Agisoft’s PhotoScan produced results faster, due to not having to wait for remote service processing availability. Characterization of which software works better for particular applications and possible improvement via image pre-processing and other enhancements will serve as a subject for future work.
9. Conclusions and Future Work
This paper has presented the design and development process of a 3D scanner at the University of North Dakota. It has summarized prior work related to 3D scanning and one use that it supports: 3D printing. The prospective uses for the scanner developed have been discussed and the project’s goals reviewed. The paper has described the physical structure, electronic components and software that it is comprised of and provided an overview of the process of its construction. Future work will include the utilization of the scanner for student education and research purposes across a wide variety of prospective projects. The characterization of the performance of the scanner under various configurations will also be undertaken.
