Article

Modification of Space Debris Trajectories through Lasers: Dependence of Thermal and Impulse Coupling on Material and Surface Properties

1
Institute of Technical Physics, German Aerospace Center (DLR), Pfaffenwaldring 38–40, 70569 Stuttgart, Germany
2
Institute of Space Systems, Technische Universität Braunschweig, Hermann-Blenk-Str. 23, 38108 Braunschweig, Germany
3
GSI Helmholtzzentrum für Schwerionenforschung GmbH, Plasmaphysik/PHELIX, Planckstraße 1, 64291 Darmstadt, Germany
4
ISU International Space University, 1 Rue Jean-Dominique Cassini, 67400 Illkirch-Graffenstaden, France
5
Institute for Nuclear Physics, Technical University of Darmstadt, Schlossgartenstraße 9, 64289 Darmstadt, Germany
*
Author to whom correspondence should be addressed.
Current address: Chair of Space Technology, Department of Aeronautics and Astronautics, Technische Universität Berlin, Marchstraße 12-14, 10587 Berlin, Germany.
Aerospace 2023, 10(11), 947; https://doi.org/10.3390/aerospace10110947
Submission received: 29 September 2023 / Revised: 30 October 2023 / Accepted: 30 October 2023 / Published: 7 November 2023
(This article belongs to the Special Issue Laser Propulsion Science and Technology)

Abstract

:
Environmental pollution exists not only within our atmosphere but also in space. Space debris is a critical problem of modern and future space infrastructure. Congested orbits raise the question of spacecraft disposal. Therefore, state-of-the-art satellites come with a deorbit system in cases of low Earth orbit (LEO) and with thrusters for transferring into the graveyard orbit for geostationary and geosynchronous orbits. No practical solution is available for debris objects that stem from fragmentation events. The present study focuses on objects in LEO orbits with dimensions in the dangerous class of 1 to 10 cm. Our assumed method for the change of trajectories of space debris is laser ablation for collision avoidance or complete removal by ground-based laser systems. Thus, we executed an experimental feasibility study with focus on thermal and impulse coupling between laser and sample. Free-fall experiments with a 10 ns laser pulse at nominally 60 J and 1064 nm were conducted with GSI Darmstadt’s nhelix laser on various sample materials with different surfaces. Ablated mass, heating, and trajectory were recorded. Furthermore, we investigated the influence of the sample surface roughness on the laser-object interaction. We measured impulse coupling coefficients between 7 and 40 µNs/J and thermal coupling coefficients between 2% and 12.5% both depending on target fluence, surface roughness, and material. Ablated mass and changes in surface roughness were considered via simulation to discriminate their relevance for a multiple shot concept.

1. Introduction

In 1978, Donald J. Kessler predicted a condition where space will be so congested that a cascade of collisions between the space objects might cause a pollution of the orbits and, therefore, make it unusable for future space applications [1]. Nowadays, we are closer to that point than ever. Some scientists found indications that the collapse has already begun [2], while others still believe little time is left until the Kessler Syndrome de facto appears [3]. Both research opinions are alerting and require mankind to act and protect space. Losing space as a resource would deeply affect our daily lives. As [4] illustrates, the loss of GPS could lead to an economic breakdown, just to mention one effect. NASA most recently published a study where the damage due to space debris is expressed as monetary numbers, showing how expensive it will be to not act [5]. Adilov et al. names monetary losses of about USD 86–103 million in 2020 due to satellite collisions with space debris [6].
In another study, Liou [7] shows that on today’s measures, the current post-mission disposal is not enough to stop the growth of the fragment population in orbit. Only active debris removal can reduce the population of unwanted objects and cause a sustainable space environment in the future.
This leads to the question of how to remove debris from space. For bigger objects, like defunct satellites, rocket bodies, or other mission-related objects, the European Space Agency (ESA) works on ClearSpace1, which is a chaser system that hunts down and deorbits them [8]. For the very first removal demonstration, ClearSpace1 is meant to deorbit a Vega launch adapter named VESPA. Recently, the ESA reported about a new object in VESPA’s vicinity, which most likely is the result of a fragmentation event of VESPA. This underlines the urgency of trajectory modification and removal of larger debris objects as well as the great danger that potentially undetected small debris objects pose to other orbital objects [9,10]. This smaller class of fragments, namely with a size of a few decimeters, cannot be chased efficiently. For this purpose, laser-ablative debris removal is proposed, which can be operated either space-based [11,12] or ground-based [13]. In the concept of ground-based lasers, a high-power laser system is based in a ground station. This laser system transmits laser pulses, typically in the nanosecond regime, towards the designated object in orbit. Each pulse causes ablation at the object’s surface and, thus, momentum perpendicular to the surface. The relevant trajectory modification results from a multi-shot interaction. For the final deorbit of an object, several 100 to 1000 passes of the object are required, depending of the laser settings (mainly repetition rate and applied fluence) and the target dimensions [14].
The present study is part of our feasibility studies regarding ground-based, laser-based methods for modification of space debris trajectories, with the option for complete removal of objects. In previous publications, we performed various simulative and experimental studies [15,16,17]. In particular, the influence of the sample geometry on impulse coupling was investigated [17]. In this work, we investigate a variation in materials and surface properties aiming for measuring impulse and thermal coupling by simultaneously applying approximately 10 J/cm 2 within 10 ns on sample surfaces.
This document is structured as follows: we will present the experimental framework in Section 2, followed by an introduction to the experimental methods in Section 3. Finite element simulations for thermal and impulse coupling will be presented in Section 4. The results are summarized in Section 5, which is followed by the discussion section, Section 6. The paper will close with a conclusion in Section 7 and an outlook in Section 8.

2. Experiment

The experiment was conducted to gain knowledge about thermal and impulse coupling depending on material and sample surface condition. The following sections will describe the laser facility and the experimental set-up, including the samples and irradiation parameters.

2.1. nhelix Laser Facility

The applied laser is the nhelix (nanosecond high energy laser for heavy ion experiments) laser of the GSI (Gesellschaft für Schwerionenforschung) in Darmstadt, Germany. nhelix provides 60 J pulse energy at a wavelength of 1064 nm and a pulse duration of 10 ns.
For the conducted experiment, laser fluences above the ablation threshold are required, which is material-dependent and, beyond that, affected by the surface roughness. Based on simulations, we have determined that for this given wavelength and at a pulse duration of 10 ns, a fluence of 10 J/cm² is sufficient for the ablation of metal surfaces. Moreover, momentum coupling is expected to be rather effective in this fluence regime. These constraints have been kept identical to the previous experiment [17].
Due to damage in the last amplifier stage, nhelix comes with variations in its output energy. We set 60 J, which leads to the nominal fluence of 10 J/cm² with the given laser diameter of 28 mm at the target point. Our study covers a bandwidth of fluences between 3 and 20 J/cm². Aside from energy fluctuations, inhomogeneous energy distribution amongst the spot diameter as well as the true target hit angle also have to be considered. Details are discussed in Section 3.1.

2.2. Experimental Setup

For the experiment, we adopted the set-up from the previous experiment by Lorbeer et al. [17], cf. Figure A1 in Appendix A.1. We employ a dropping arm set-up where the arm is accelerated by a spring, cf. Figure 1a. The arm is initially actuated by a spring, while the sample experiences acceleration due to gravity alone. The arm is intercepted by a spring plate which avoids it to move back and interact with the falling sample. The sample itself is placed on a chair-like sample holder, cf. Figure 1b. For thermal measurements, a thermal sensor is affixed to the sample backside. Charging contacts for the sensor are installed on a fixed rail. The arm is held into position by an electromagnet, which is switched off when the trigger sequence is started. The trigger signals for sample release, camera and laser, as well as the oscilloscope are linked to a trigger box via BNC. This trigger box consists of a micro-controller, type Arduino Leonardo. Timing nuances were adjusted manually at the trigger box to achieve an optimum hit of the laser pulse at the target during its fall through the beam propagation path. A mechanical button is installed to kick-start the trigger sequence manually.
With our choice of samples, we tried to cover a wide spectrum of debris materials. We selected the materials listed in Table 1 as they are expected to be highly abundant throughout debris fragments in the size range of 1–10 cm [18]. We subsequently prepared two sets of samples: one with a polished surface and another with a sandblasted surface. All samples were prepared in a squared shape with an edge length of 2 cm and a thickness of 0.8 mm.

2.3. Hemispherical Reflection of the Samples

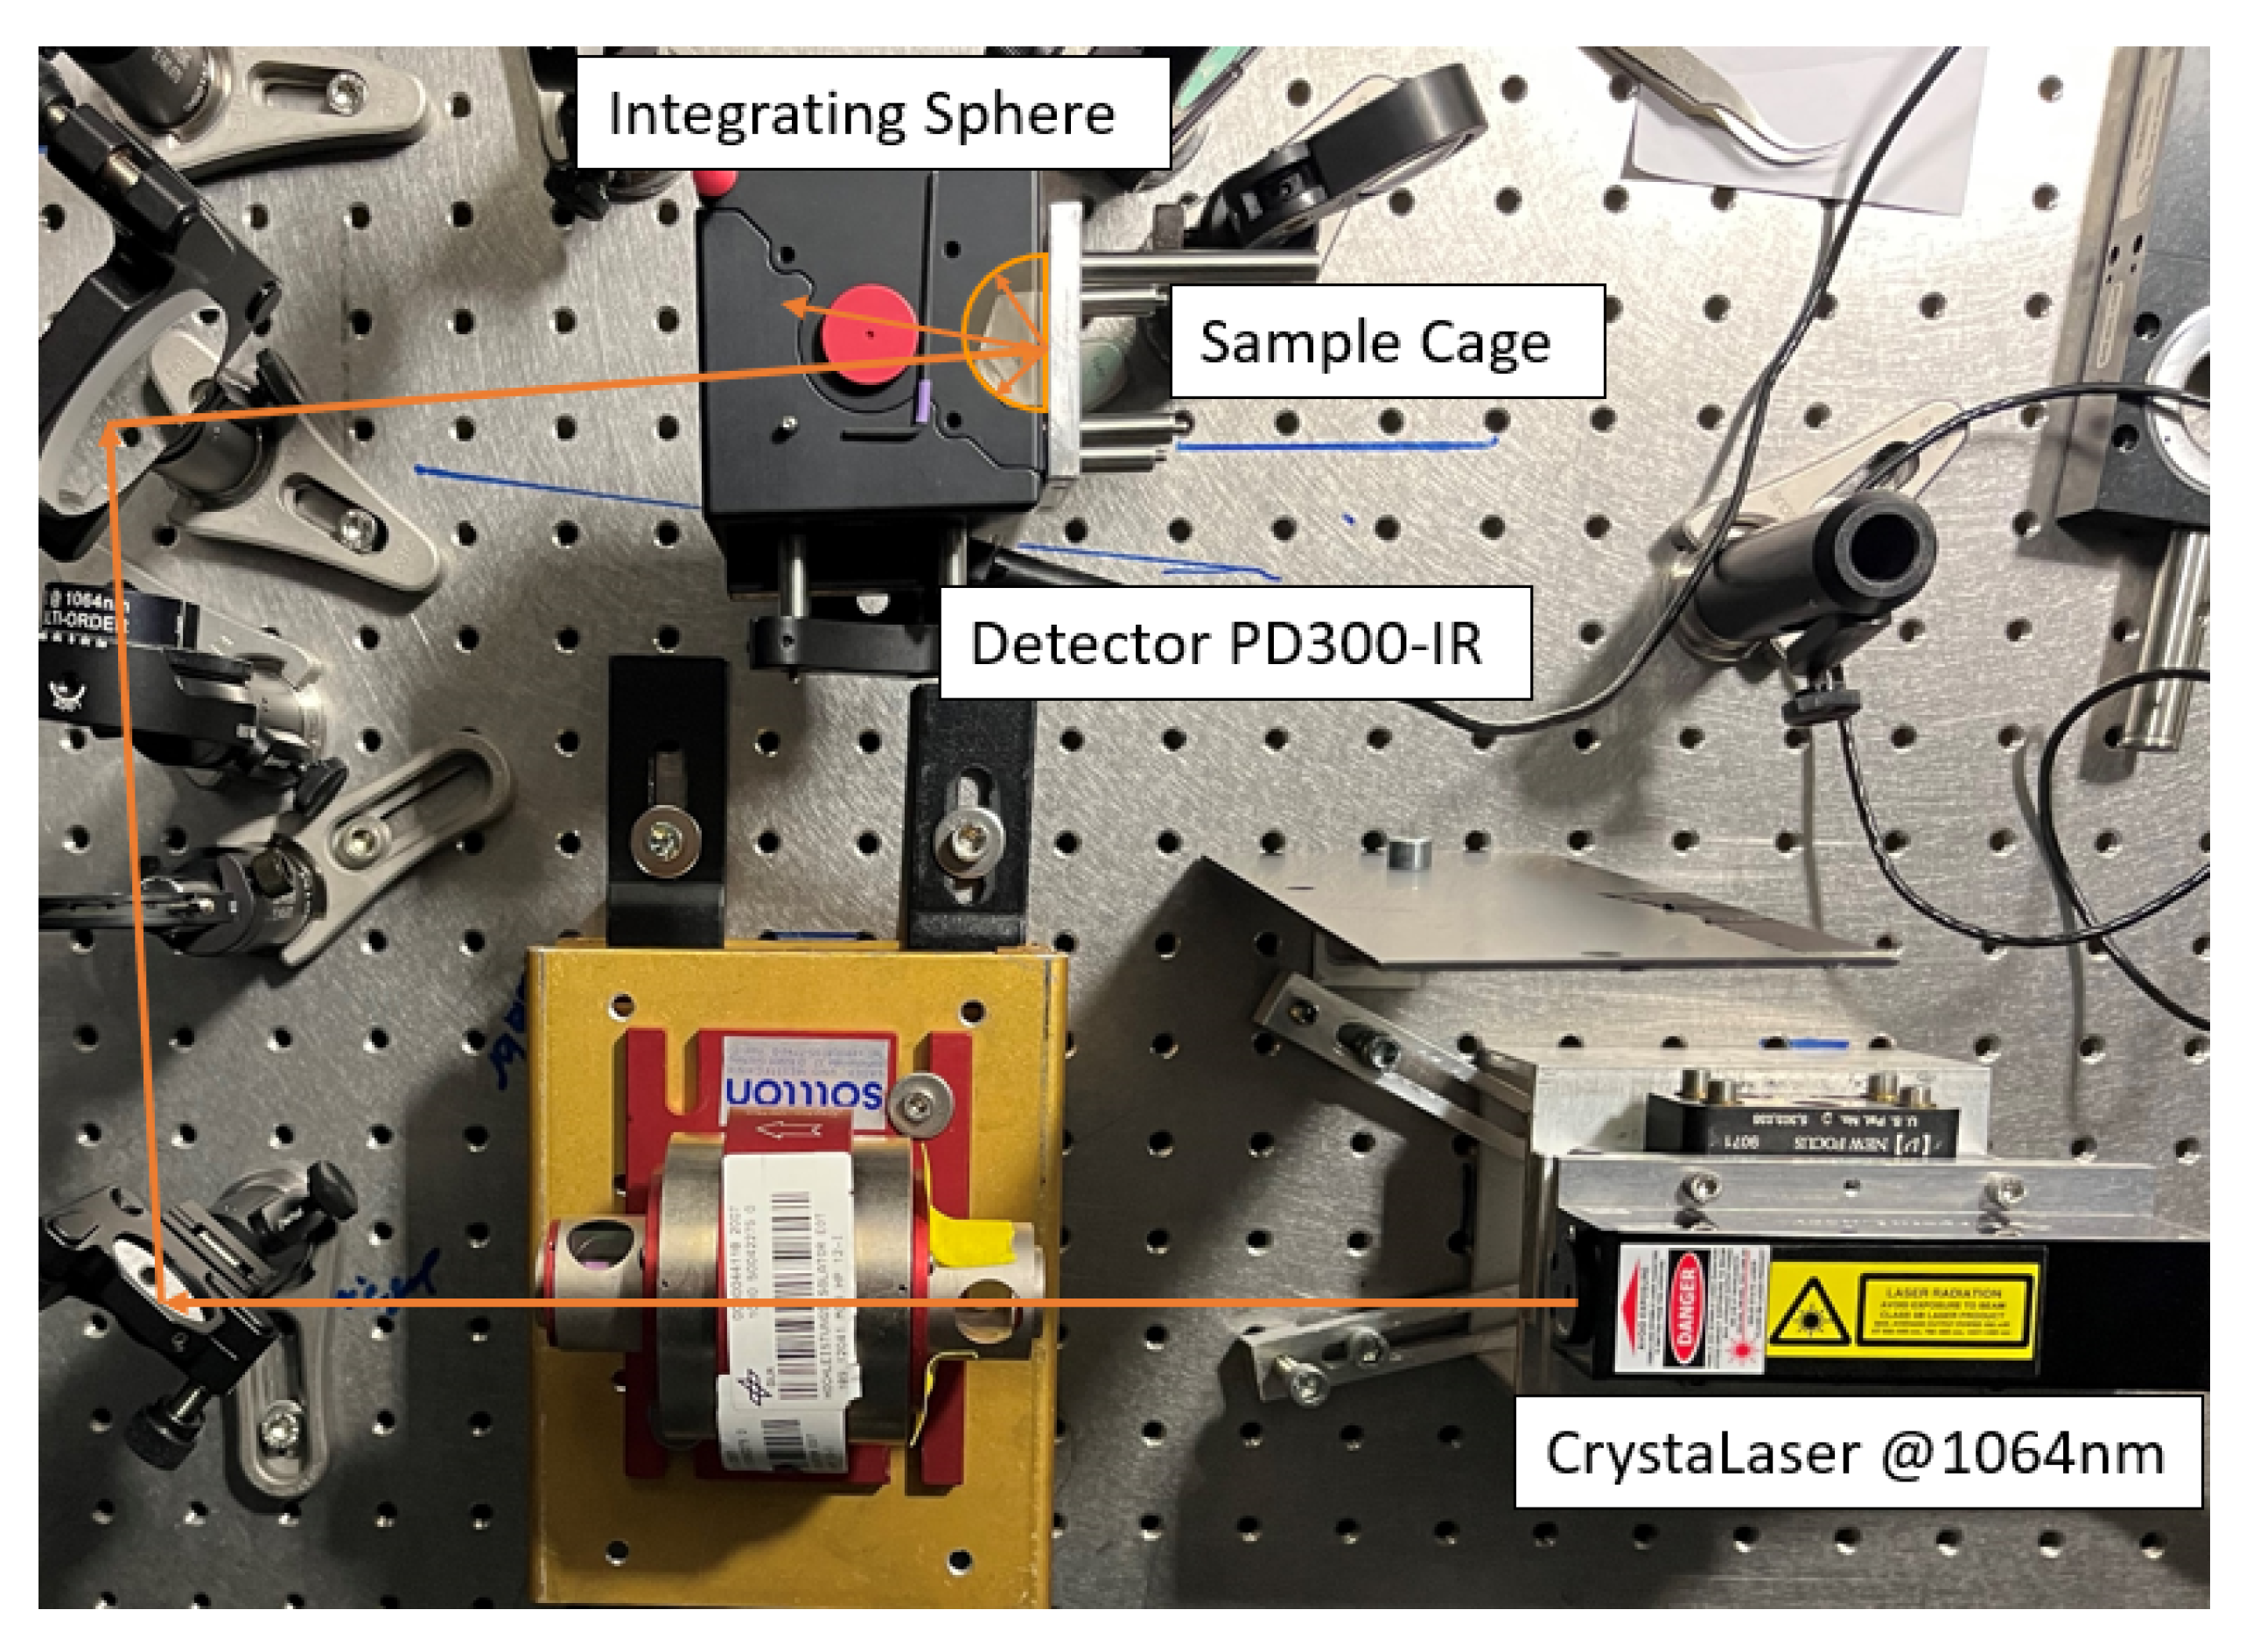
To characterize the samples reflection behaviors, we carried out hemispherical reflection measurements applying an integrating sphere (Thorlabs 2P4, Thorlabs GmbH, Bergkirchen, Germany), a laser light source at 1064 nm, and a photo diode (PD300IR, Ophir Spiricon Europe GmbH, Darmstadt, Germany). The integrating sphere was installed so that the samples are illuminated by the laser under an angle of incidence of 8° ± 1° as proposed by [19] in order to avoid a specular back-reflection leaving the sphere through the input port, cf. Figure 2 for details. Each measurement was individually calibrated by placing the sample in an additional port and directly illuminating the closed integrating sphere. With this procedure, we avoided distortion due to individual and imperfect reflection lobes for real materials.
The third-Taylor method was applied for the measurements [19]. This method allows for a direct comparison of the detected signals for reference ( Φ ref tot ) and sample ( Φ meas tot ) under consideration of the wall fraction f w = A w / A 0 , where A w is the wall area and A 0 the whole surface of the sphere. For our specific case, the wall factor is 0.972. The reflectivity R is given by
R = ϕ meas tot f w ϕ ref tot .

3. Experimental Methods

3.1. Fluence Estimation

To accurately document the laser fluence per shot, a calorimeter probe directly connected to an oscilloscope has been employed. The calorimeter is placed in the laser path so that it is irradiated with approximately 1% of the laser power. Several calibration shots on a second calorimeter probe at the sample position in the vacuum chamber were taken to identify a factor to convert oscilloscope voltage data into energy emitted by the laser. For detailed knowledge about the laser spot, we installed a second beamline, identical to the one in the vacuum chamber. Approximately 1% of the laser light is transmitted through the mirror, forwarding the other 99% of the laser beam towards the sample chamber. This small fraction of the laser light is projected on a screen which is recorded by an Andor iXon Ultra 897 camera, cf. Appendix A.2. The camera chip is protected by a neutral density filter (ND 1.8). Via the distribution of the intensity per pixel, we can derive the laser profile per shot. The integrated intensity over the area illuminated by the laser was also calibrated via probe measurements, which provides an additional method to estimate the laser energy per shot.
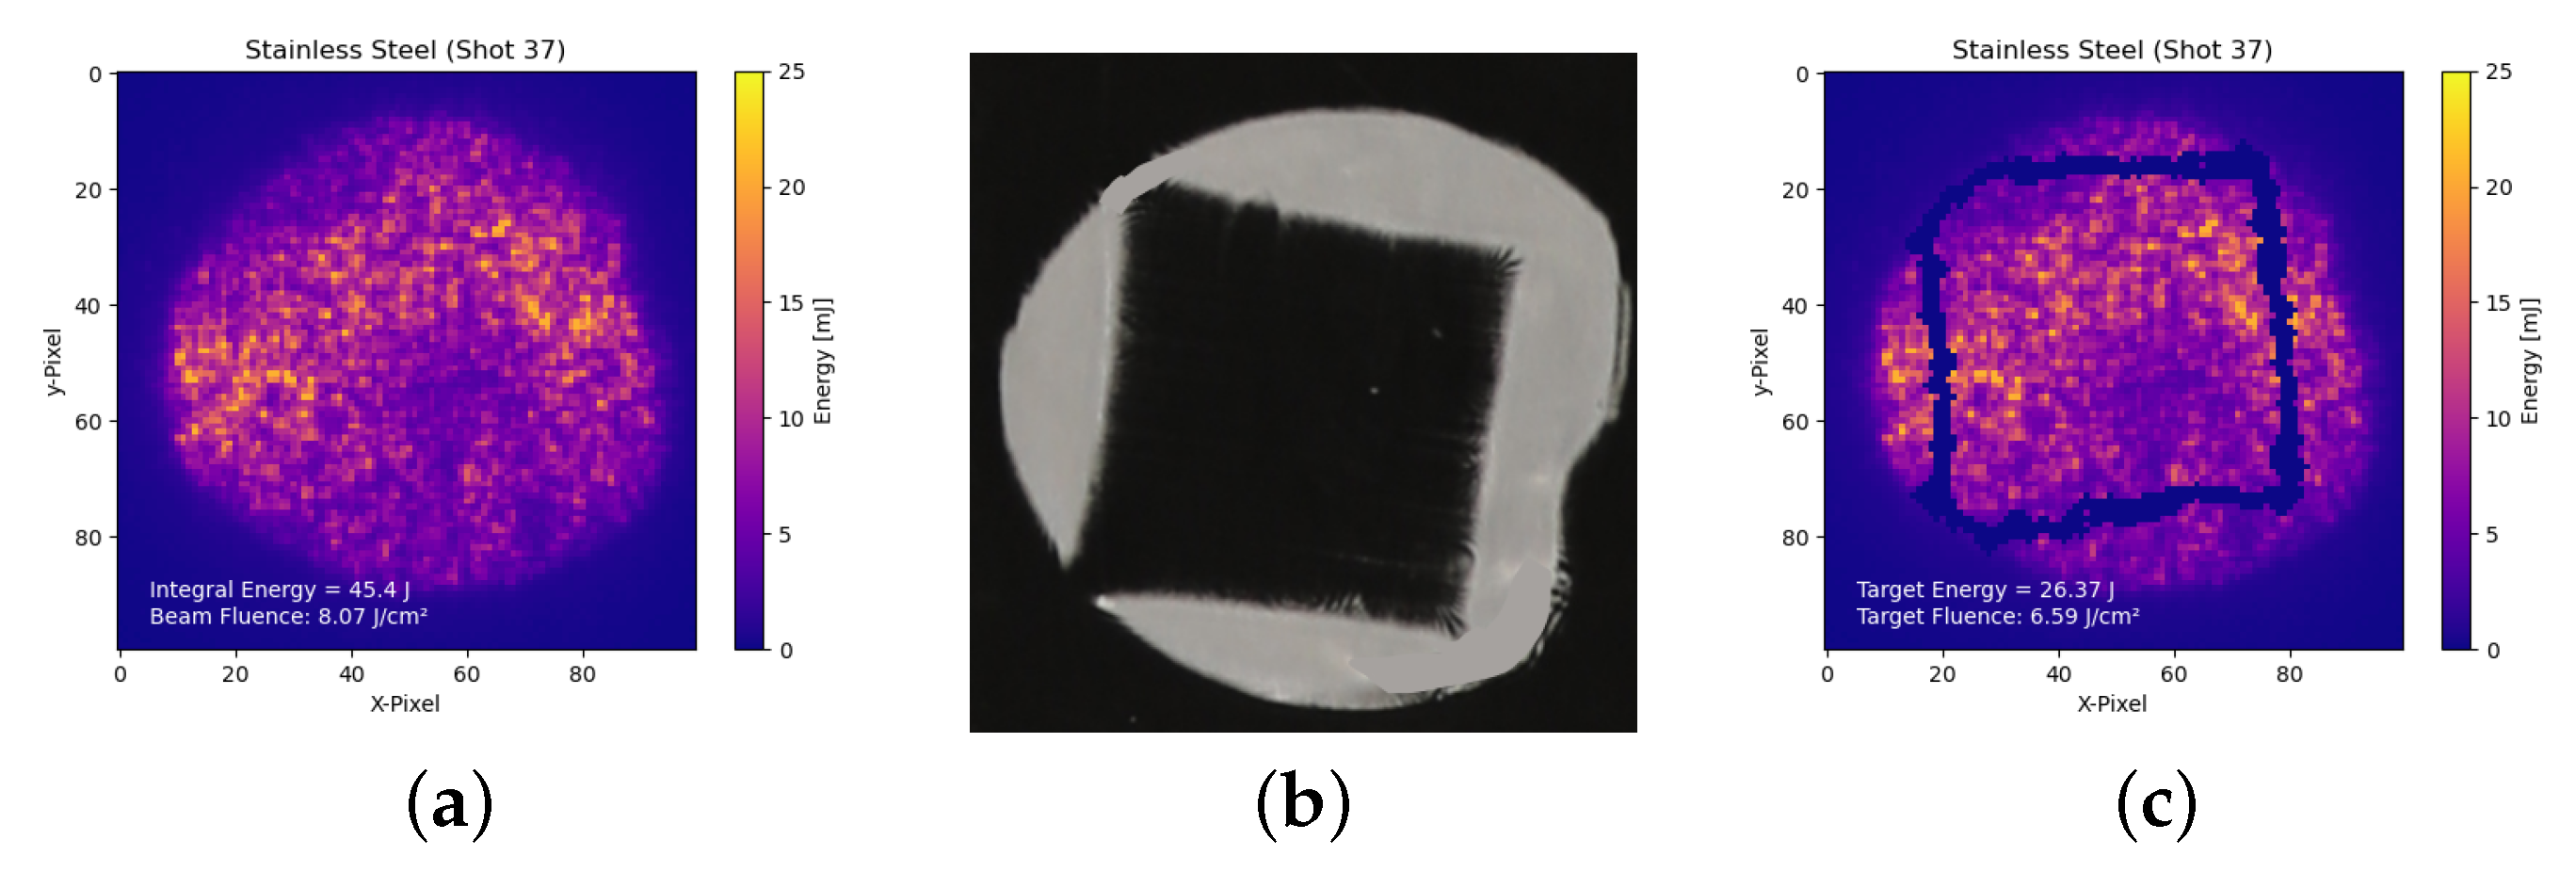
For fluence estimation per shot, we extracted the laser energy per pixel from the Andor images, cf. Figure 3. In an ideal case, the laser would hit with a homogeneous profile perpendicular to the sample surface and apply a vector of force in its center of gravity (COG). Since reality is different, we extracted the relevant pixels contributing to the impulse. For this, we converted the shadowgraph images (Figure 3b). into a mask and used a best-fit function to match and apply it to the image array (Figure 3a). This provides us with the relevant pixel area of the profile (Figure 3c). Thus, the sum of the energy per pixel area is the true applied fluence Φ target on the target surface, further referred to as target fluence.

3.2. Motion Tracking

For exact analysis of the sample trajectory before and after the laser shot, we installed two high-speed cameras (M3 MotionScope and OS7, Integrated Design Tools Inc., Pasadena, CA, USA) in a stereoscopic setup. These are triggered with the sample release, recording the sample falling for a sequence of 0.5 s with a frame rate of 1000 fps on the M3 camera and 2000 fps on the OS7 camera. Details are listed in Appendix A.3.
Camera calibration for triangulation, motion tracking, trajectory calculation, derivation of COG, as well as linear and angular speed was performed via a self-made python tool. To determine the imaging characteristics and relative positions in 3D space of the two high-speed cameras, a calibration procedure adapted from Zhang was used [20,21]. To analyze the movement of the falling sample, a semi-automatic motion tracking procedure was applied. The sample corners were chosen as characteristic, well-observable object features. Their locations were manually initialized as pixel coordinates in the first frame of each high-speed camera footage. Then, the 2D-trajectories of the sample corners were obtained by automated tracking of the initially chosen pixels in the subsequent frames based on the optical flow method [22]. For each tracked object feature, the two 2D trajectories are then combined via triangulation yielding its 3D trajectory [21,23]. The trajectories undergo a correction where the y-axis of the trajectory is aligned with the direction of gravity. The final trajectory data are then analyzed regarding translational velocity changes due to the laser. For this, we used the first derivative of the displacement-time data of the COG data points before and after laser interaction. For the y-component of the laser-induced motion, gravitational acceleration d v g = g · d t is taken into account with g = 9.81 m/s² at sea level. For targets perpendicular to the beam, d v y d v g would equal 0. The final velocity increment results as follows:
d v = d v x 2 + d v z 2 + ( d v y d v g ) 2 .

3.3. Thermal Coupling

For measuring thermal coupling, we developed a thermal sensor, which is described in detail in [24]. It is a lightweight micro-controller equipped with data storage, capacitors as energy source, and four PT1000 elements that allow for wireless data collection. The sensor is applied on the sample backside using thermal conductive tape. Only the PT1000 elements are in contact with the material. The rest is in no thermal dependence. The sensor comes with two contacts that allow for charging the sensor inside the vacuum chamber. When the dropping arm is detached, the circuit is interrupted and the capacitors will start to discharge. The sensor starts looping the measurements until the capacitors cannot provide further energy. The data file is read out via a GUI and processed further.

3.4. Ablation Behavior

In order to determine the sample ablation behavior in dependence of material, laser fluence, and surface properties, we weighed the samples before and after the experiment. It is assumed that material losses due to hitting the chamber ground are neglectable for the majority of cases. Thus, the measured difference equals the mass of ablated material. Furthermore, we investigated the sample surface roughness, as we expect different laser coupling in dependency of roughness due to a more diffusive reflection/absorption behavior on rougher samples. Therefore, we created defined surfaces for each sample material. Reference and ablated sample surfaces were investigated using a White Light Interferometer (WLIM) Wyko NT9100 (Appendix A.5). The measured roughness R a at 3 positions of the sample surface were averaged.

4. Simulations

Laser ablation strongly depends on laser parameters and the irradiated material. The main figures of interest here are the momentum coupling coefficient c m and the coefficient of residual heat η r e s . Following [25], c m is given by
c m = M Δ v E L = Δ P E L ,
where E L denotes the laser pulse energy, and Δ P , Δ v are the change of momentum and velocity, respectively, of the target with the mass M after ablation.
During the ablation process, laser pulse energy is converted not only into the heat and kinetic energy of the ablation plume, but also a considerable amount of heat Δ Q remains in the target after ablation. For its consideration, η r e s is defined as the coefficient of residual heat given by
η r e s = Δ Q E L .
Since the dependencies of c m and η r e s from the incident laser fluence Φ are highly non-linear, their prediction from simulations is of great interest for feasibility studies and preliminary system design. In our case, we employ the simulation results for c m ( Φ ) and η r e s ( Φ ) to compute theoretical values of velocity change Δ v and temperature increment Δ T for comparison with experimental data by employing the measured fluence distribution Φ (x,y) on the target surface using
Δ v = 1 M c m ( Φ ( x , y ) ) Φ ( x , y ) d A
and
Δ T = 1 M c p η r e s ( Φ ( x , y ) ) Φ ( x , y ) d A ,
where c p denotes the specific heat of the target material.
From the combination of thermal and momentum coupling, the so-called thermo-mechanical coupling coefficient c t m can be derived using [16]
c t m = c m η r e s ,
which gives the ratio of imparted momentum to the laser-induced heat that has to be considered, in particular under highly repetitive laser irradiation where thermal limitations of target integrity might be encountered.

4.1. Finite-Element Method (FEM) Simulation

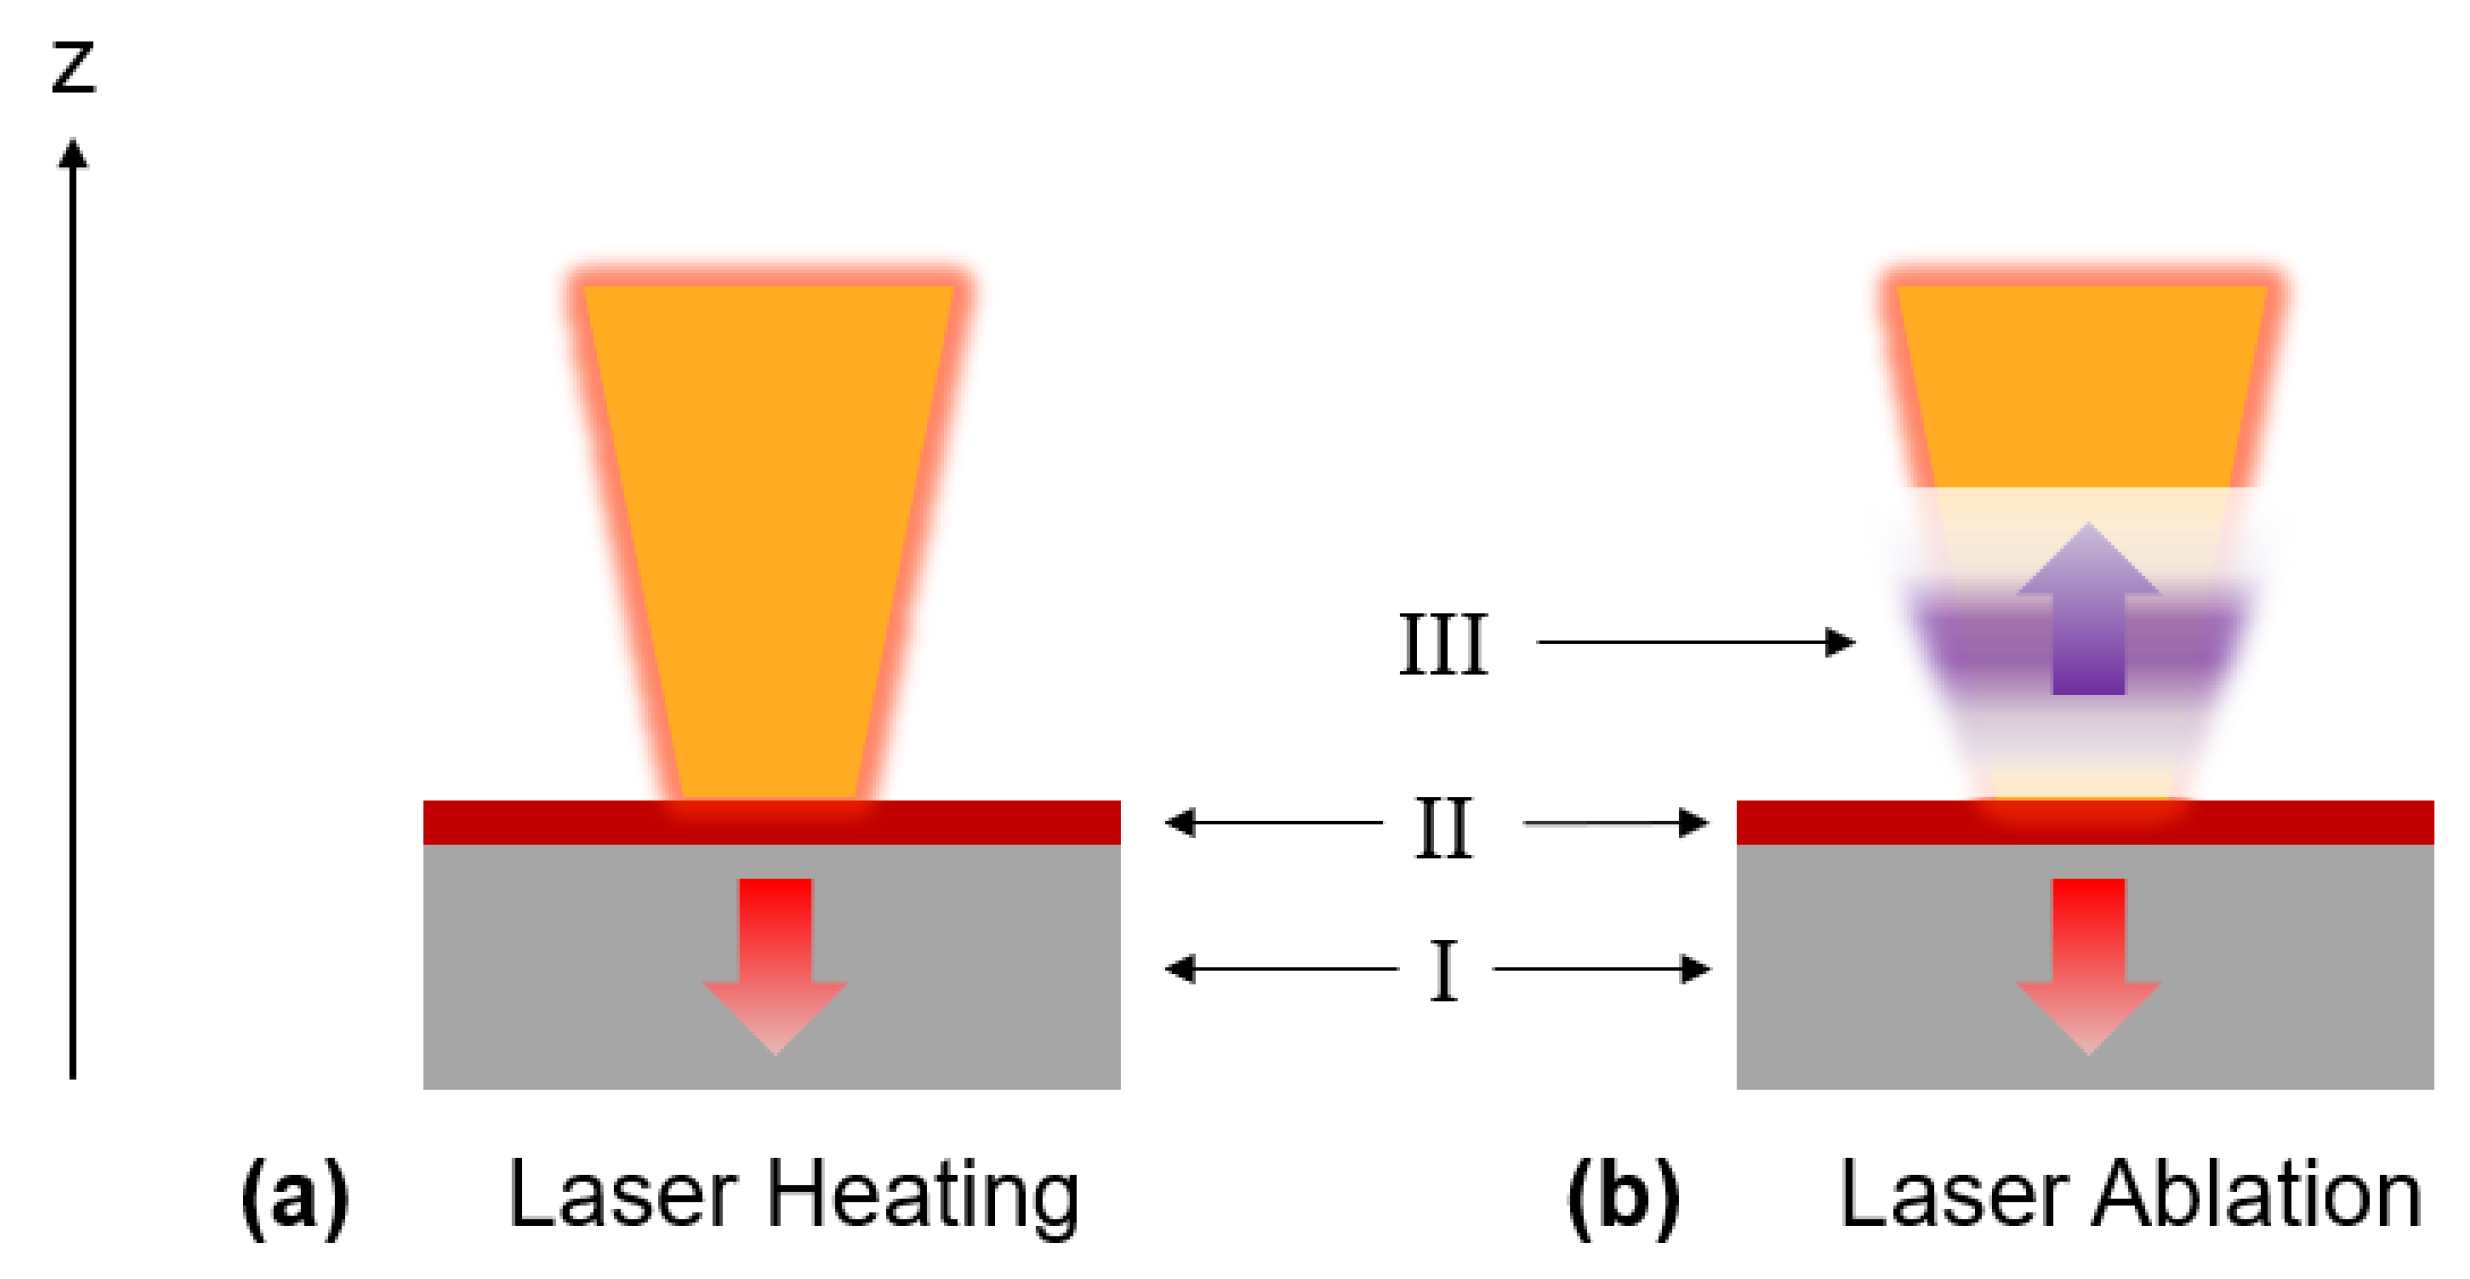
As a starting point for our FEM simulations, implemented in COMSOL Multiphysics® 6.1, we have set up a one-dimensional model which consists of three domains, cf. Figure 4.
In our model, which is described in greater detail in [26], the incident laser pulse irradiates the target at its surface where laser radiation is absorbed within a thin surface layer (region II). Below this layer, the bulk material of the target (region I) is subsequently heated. For laser fluences beyond the ablation threshold, the vaporized surface material forms a plume (region III) propagating in the direction of the laser source. Laser light absorption is computed within the surface layer (II) following the Lambert–Beer law given by
z I = α · I ,
where the intensity I 0 of the incident laser light at the target surface is split into a fraction I a b s = ( 1 R ) · I 0 , which is absorbed as described by Equation (5), as well as a fraction of light reflected I r e f l = R · I 0 from the target surface. In these relations, I denotes the (local) laser light intensity, R represents the target’s reflectivity, and α is the material’s absorption coefficient. Once ablation of surface material is initiated, light absorption within the ablation jet has to be considered as well; see below.
Optical properties of target and ablation jet depend significantly from the temperature which is incorporated into our simulations based on the relations outlined in Appendix C. Using Equation (3) as a source term, the heat transfer equation
ρ c p t T z ( κ · z T ) = z I
can be solved in domains I and II for the target temperature field T ( x , t ) . Note that the material’s density ρ , its specific heat capacity c p , and its heat conductivity κ strongly depend on the temperature. Moreover, the target’s reflectivity R ( T ) and its absorption coefficient α ( T ) depend from the temperature as well, which gives a feedback from heat transfer inside the material to the laser heating boundary condition in terms of a real laser–matter interaction.
Thermophysical data as a function of the temperature has been taken from the COMSOL material database which comprises material data for heat conductivity from [27,28,29], for heat capacity from [30,31,32,33], and for density from [28,29,32,34,35,36,37,38,39,40,41,42,43,44,45,46,47]. The temperature dependency of the optical properties is calculated separately, cf. Appendix B. Numerical solution of heat transfer takes into account for melting comprising the latent heat of fusion as well as a smooth transition of the thermophysical and optical properties between the two phases within a transition interval of Δ T = 200 K around the melting temperature T m to ensure numerical stability.
Ablation of surface material is computed following [48] using the Hertz–Knudsen equation from which the surface recession rate v R ( T s ) can be expressed as
v R ( T s ) = s s t i ρ m a 2 π k B T s · p s ( T s ) ,
where T s is the surface temperature, s s t i is the sticking coefficient, m a the atomic mass, k B is Boltzmann’s constant, and p s is the saturation pressure at the surface given by the Clausius–Clapeyron equation as
p s ( T s ) = p b e x p L b k B 1 T b 1 T
with the latent heat L b of vaporization, the boiling temperature T b , and the pressure p b for which T b is given. From this, the process of material removal at the surface can be quantified by the area density μ a of ablated mass using t μ a = v R · ρ .
Above the ablation surface, a thin film of saturated gas is immediately formed, the so-called Knudsen layer [49]. Mathematically, this layer, which is not resolved spatially in our simulations, is used to describe the discontinuity between target and ablation plume as a region in which pressure, velocity, and temperature drastically change. According to [49], at the interface between Knudsen layer and ablation jet we have a temperature T k = T s 1.49 where T s is the temperature at the target surface. Furthermore, the pressure is given by p K = 0.21 · p s , where p s is the saturation pressure at the target surface and is obtained for the particle escape velocity v K = γ k B T K / m a , where γ is the material’s adiabatic index. These relations are used to characterize the inflow at the boundary of the ablation jet which forms above the Knudsen layer. Furthermore, we employ that mass conservation demands
v R · ρ m a = v K ρ K m a = v K n K ,
where ρ K and n K are the jet’s mass density and particle density at the end of the Knudsen layer. The gas dynamics inside the jet can be described according to [50] by the Euler equations of hydrodynamics with respect to continuity,
t n + z ( n u ) = 0 ,
momentum balance,
t ( ρ u ) + z ( ρ u 2 + p ) = 0 ,
and energy balance
t ( E + ρ u 2 / 2 ) + z [ u ( E + ρ u 2 + p ) ] = α p · I ,
where n = n 0 + n i is the particle number density of neutrals and ions, and u, ρ , and p are the local particle velocity, density and pressure, respectively. E is the local internal energy density given by
E = n 3 2 ( 1 + η i ) k B T + η i W 1 , 0
with the first ionization potential given by W 1 , 0 and η i as the mean ionization fraction. Moreover, the ideal gas rule is assumed valid here and reads as p = ( 1 + η i ) · n k B T .
p = ( 1 + η i ) · n k B T = ( n 0 + 2 n e ) k B T .
The source term α p · I in the energy balance equation Equation (15) indicates laser heating of the ablation plume. For laser light absorption in the plume, we restrain our considerations to absorption by inverse Bremsstrahlung according to [49]. Finally, due to the plasma absorption of the laser light in the ablation jet, the incident laser intensity at the target surface is reduced, which is commonly referred to as plasma shielding.

4.2. FEM Configuration

For our simulations, we have employed the commercial FEM software COMSOL Multiphysics®, Version 6.1, together with the related Heat Transfer Module and the COMSOL Material Library. The timespan of our simulation usually covered 100 ns, while in a few cases as well as for fluences below the ablation threshold only the time interval of the laser pulse was simulated. The simulations cover a laser fluence range over three orders of magnitude from 0.1 J/cm 2 up to 100 J/cm 2 . For the temporal course of the laser pulse intensity, we assume a Gaussian shape and start our simulations at the point in time where the laser intensity negligibly low (between 30 ns and 34 ns before the pulse peak). We use an initial timestep of 1 fs, which is dynamically enlarged up to max. 70 ps during the ablation process and furthermore increased towards the end of the simulation. The maximum element sizes for the target bulk have been chosen to amount to 1 μ m with a maximum element grow rate of 1.005. While heat transfer, cf. Equation (9), is computed throughout the entire target with a thickness of 1 mm, laser absorption is only modeled within a thin surface layer with a thickness of 5 × α m i n 1 , which is between 135 nm (titanium) and 230 nm (aluminum). Correspondingly, the spatial resolution of the mesh is far higher in the absorption layer than in the bulk and amounts to between 0.31 nm and 0.46 nm. Finally, the computation domain for the ablation plume extends 5 mm from the target surface comprising 2000 mesh elements whose size increases linearly with the distance from the surface.

4.3. Post-Processing and Validation

The figures of merit in laser-ablative thermo-mechanical coupling can then be obtained in post-processing of the simulation results, where the momentum coupling coefficient c m is given by integration at the target/plume boundary as
c m = p a d t Φ ,
where p a = v R · ρ · v K + p K denotes the pressure acting on the target surface generated from the pressure p k in the Knudsen layer together with the recoil from the ablated particles escaping with the jet velocity v k from the Knudsen layer. Furthermore, the coefficient of residual heat η r e s can be derived from
η r e s = E r e s ( t 1 ) E r e s ( t 0 ) Φ ,
where the areal density of the residual heat E r e s in the target can be derived from the integration
E r e s ( t ) = ρ ( x , t ) H ( x , t ) d x
with the specific enthalpy H.
While data on residual heat in laser ablation could not be retrieved for our laser parameters, experimental data on momentum coupling in this parameter range have been found in the literature, which serves for validation of our simulations. It can be seen from the comparison in Figure 5 that the results from our simulations are in general supported by the experimental findings from the literature. While the results for titanium match quite well, we observe, however, that c m is underestimated for iron at high fluences, for aluminum in general, and in particular for copper, which might be attributed to the generalized assumptions on plume pressure and temperature, cf. Equations (A5) and (A6) in Appendix B, which are neither spatially nor temporally dissolved. Beyond that, deviations between simulation and experimental results occur at the ablation threshold in particular for aluminum, copper, and iron. While for the latter this deviation might stem from the thermo-physical behavior of the irradiated steel being different from that of iron, the reason for the deviation with aluminum and copper has not been clarified yet. Overall, however, c m data for aluminum in this laser parameter region from different researchers exhibit a significant scatter among each other.

5. Results

In the following, we present our experimental and simulated results. Here, we firstly separate the different observation channels for data analysis, namely the simulation and measurement results of the velocity increment and the temperature increase as well as data regarding surface ablation. Afterwards, we analyze the data as a whole set. All considered laser shots are listed in Table 2 and Table 3. The list contains the four measurement parameters, which are building the base of further discussion and of the coupling coefficient calculation. Data not obtained are marked with “n.a.”. Fluences listed in brackets relate to shots where no beam profile was available either due to poor signal in the Andor camera (shot 10 and 14) or cases without shadowgraph available (shot 42). In case of poor signal, the oscilloscope value was used for further processing. In case of unsuccessful shadowgraph, a comparable shadowgraph of another shot was applied for the target fluence estimation.

5.1. Ablation Behavior

In order to evaluate the ablation behavior of the samples, we analyzed ablated masses and the change in surface roughness between a surface before ablation and the sample. The results are listed in Table 2 and Table 3. Samples which were exposed to similar fluences range around similar mass losses and, thus, were well reproduced across the shots. We find that the relation between ablated mass and fluence is not linear. This effect has been described in the literature before [49]. Furthermore, we see that for polished samples, discrepancies in ablated mass under similar conditions for copper and stainless steel are immense.
These discrepancies are not reproduced in the roughness change, instead, changes in surface roughness are rather low for both materials, while aluminum and titanium exhibit relatively large changes. For roughness change, we find three cases. In case 1, the polished samples became rougher, which is consistent throughout all polished samples. In the second case, sandblasted surfaces become smoother. In case 3, sandblasted samples become rougher. Case 3 only appears for stainless steel and within a narrow range of ±100 nm; thus, we consider these results as “no changes”. Regardless of the fluence, roughness changes per material and sample above the ablation threshold are comparable.
Lastly, we investigated the hemispherical–directional reflectance as described in Section 2.3. As a result, we found approximately a factor of 3 in reflectance between polished and sandblasted surfaces for initial sample surfaces, referred to as reference samples, as listed in Table 4. Comparing the sandblasted references and samples, the reflectances are almost identical. In comparison, we found reduced reflectivity for polished samples between the ablated sample surface and the reference. Here, we consider our sample materials fully intransparent (transmission τ = 0) and, thus, the absorptivity A = 1 R .

5.2. Laser-Induced Momentum and Heat

Thermal data were collected with the described sensor system (see Section 3.3). Measurement data of all four PT1000 elements was averaged. To avoid external influences due to surface contact of the sample with the vacuum chamber, we considered only the first 350 ms, which is within the time frame of the samples’ free fall. Here, there are 100 ms before the laser interaction. To assure correct data in good approximation, we recorded calibration curves for each sensor model in pre-experiments in our cleanroom at DLR Stuttgart. For this, we applied the sensor together with the thermal tape on a heated element in a vacuum chamber. The true temperature was logged by a calibrated thermo-logger in close spatial proximity to the sensor also including the thermal tape. Not all shots have been completed with the sensor applied. This is due to the fact that also trajectories with pure targets, without the influence of the extra weight of the sensor were demanded. Nevertheless, the sensor was designed to minimize weight while the relevant components were placed to ensure a good overlap of the sample’s center of gravity with the sensor’s one when the sensor is applied centric to the sample’s backface. More details can be taken from [24]. Conclusively, one to three data points per material and surface are provided, which still gives an indication of the thermal behavior. Furthermore, presumably the laser-induced shock wave sometimes caused the sensor to detach from the sample’s backside; thus, this data were not considered here. Discussion on mechanical shock is out of scope for the present framework but will be considered in future work.
The measured residual heat Δ T ranges between 0.2 K and 0.85 K, depending on material, surface, and applied fluence, cf. Table 2 and Table 3. Thermal losses in the tape were considered by calculating the heat Q = c p · m · Δ T in sample and tape each, the corrected value Δ T c o r r is then used for further calculations. With these temperatures, an η r e s between 2% and 12% have been calculated.
The velocity increment Δ v is extracted from the high-speed video files by using the motion tracking algorithm, cf. Section 3.2. The accuracy of the implemented motion tracking algorithm was investigated by applying the second derivative on the fit function of the gravity directed displacement vector. The chosen sequence is before the laser interaction and ignores the first frames after release and the last ones before laser hit to ensure a stable and continuous movement. The expected acceleration is a = g, which is gained to a good approximation with an average acceleration of a = 9.45 ± 0.46 m/s² across all investigated samples. A systematic error, explaining the offset of a to g = 9.81 m/s², is expected due to the short sequence under consideration. This leads to an average uncertainty of 5%, which is expected for the measured velocities. Additionally, the triangulated tracks of the falling sample are limited in their reproducibility due to the manual choice of the initial tracking pixel and, in case of losing the tracked pixel, reselecting the very same pixel again. One needs to note that due to overexposure from plasma, the tracked pixel always needs to be re-initiated after ablation.
Equation (3) was used to calculate the momentum coupling coefficient. This coefficient provides the information regarding how efficiently the laser energy is disposed into the sample and converted to impulse. The sample mass M is measured with a precision scale (cf. Appendix A.4) before and after the experiment. Laser energy E L is taken from the measured spot profiles, described in Section 3.1. We used the calculated target energy and fluence, respectively, for all further calculations. As the coupling coefficient scales linear with the velocity increment, we also expect an error range of 5% for these results. Overall, the calculated values for c m are between approximately 7 and 100 μ Ns/J. Values higher than 40 μ Ns/J for the given fluence range has been considered as outliers.
Fluence estimation of each shot shows a broad fluence range of 2 < Φ target < 12.5 J/cm 2 , which can be deduced to the imperfection of alignment during dropping and, therefore, not exposing the sample surface completely and perpendicularly to the incoming laser beam.
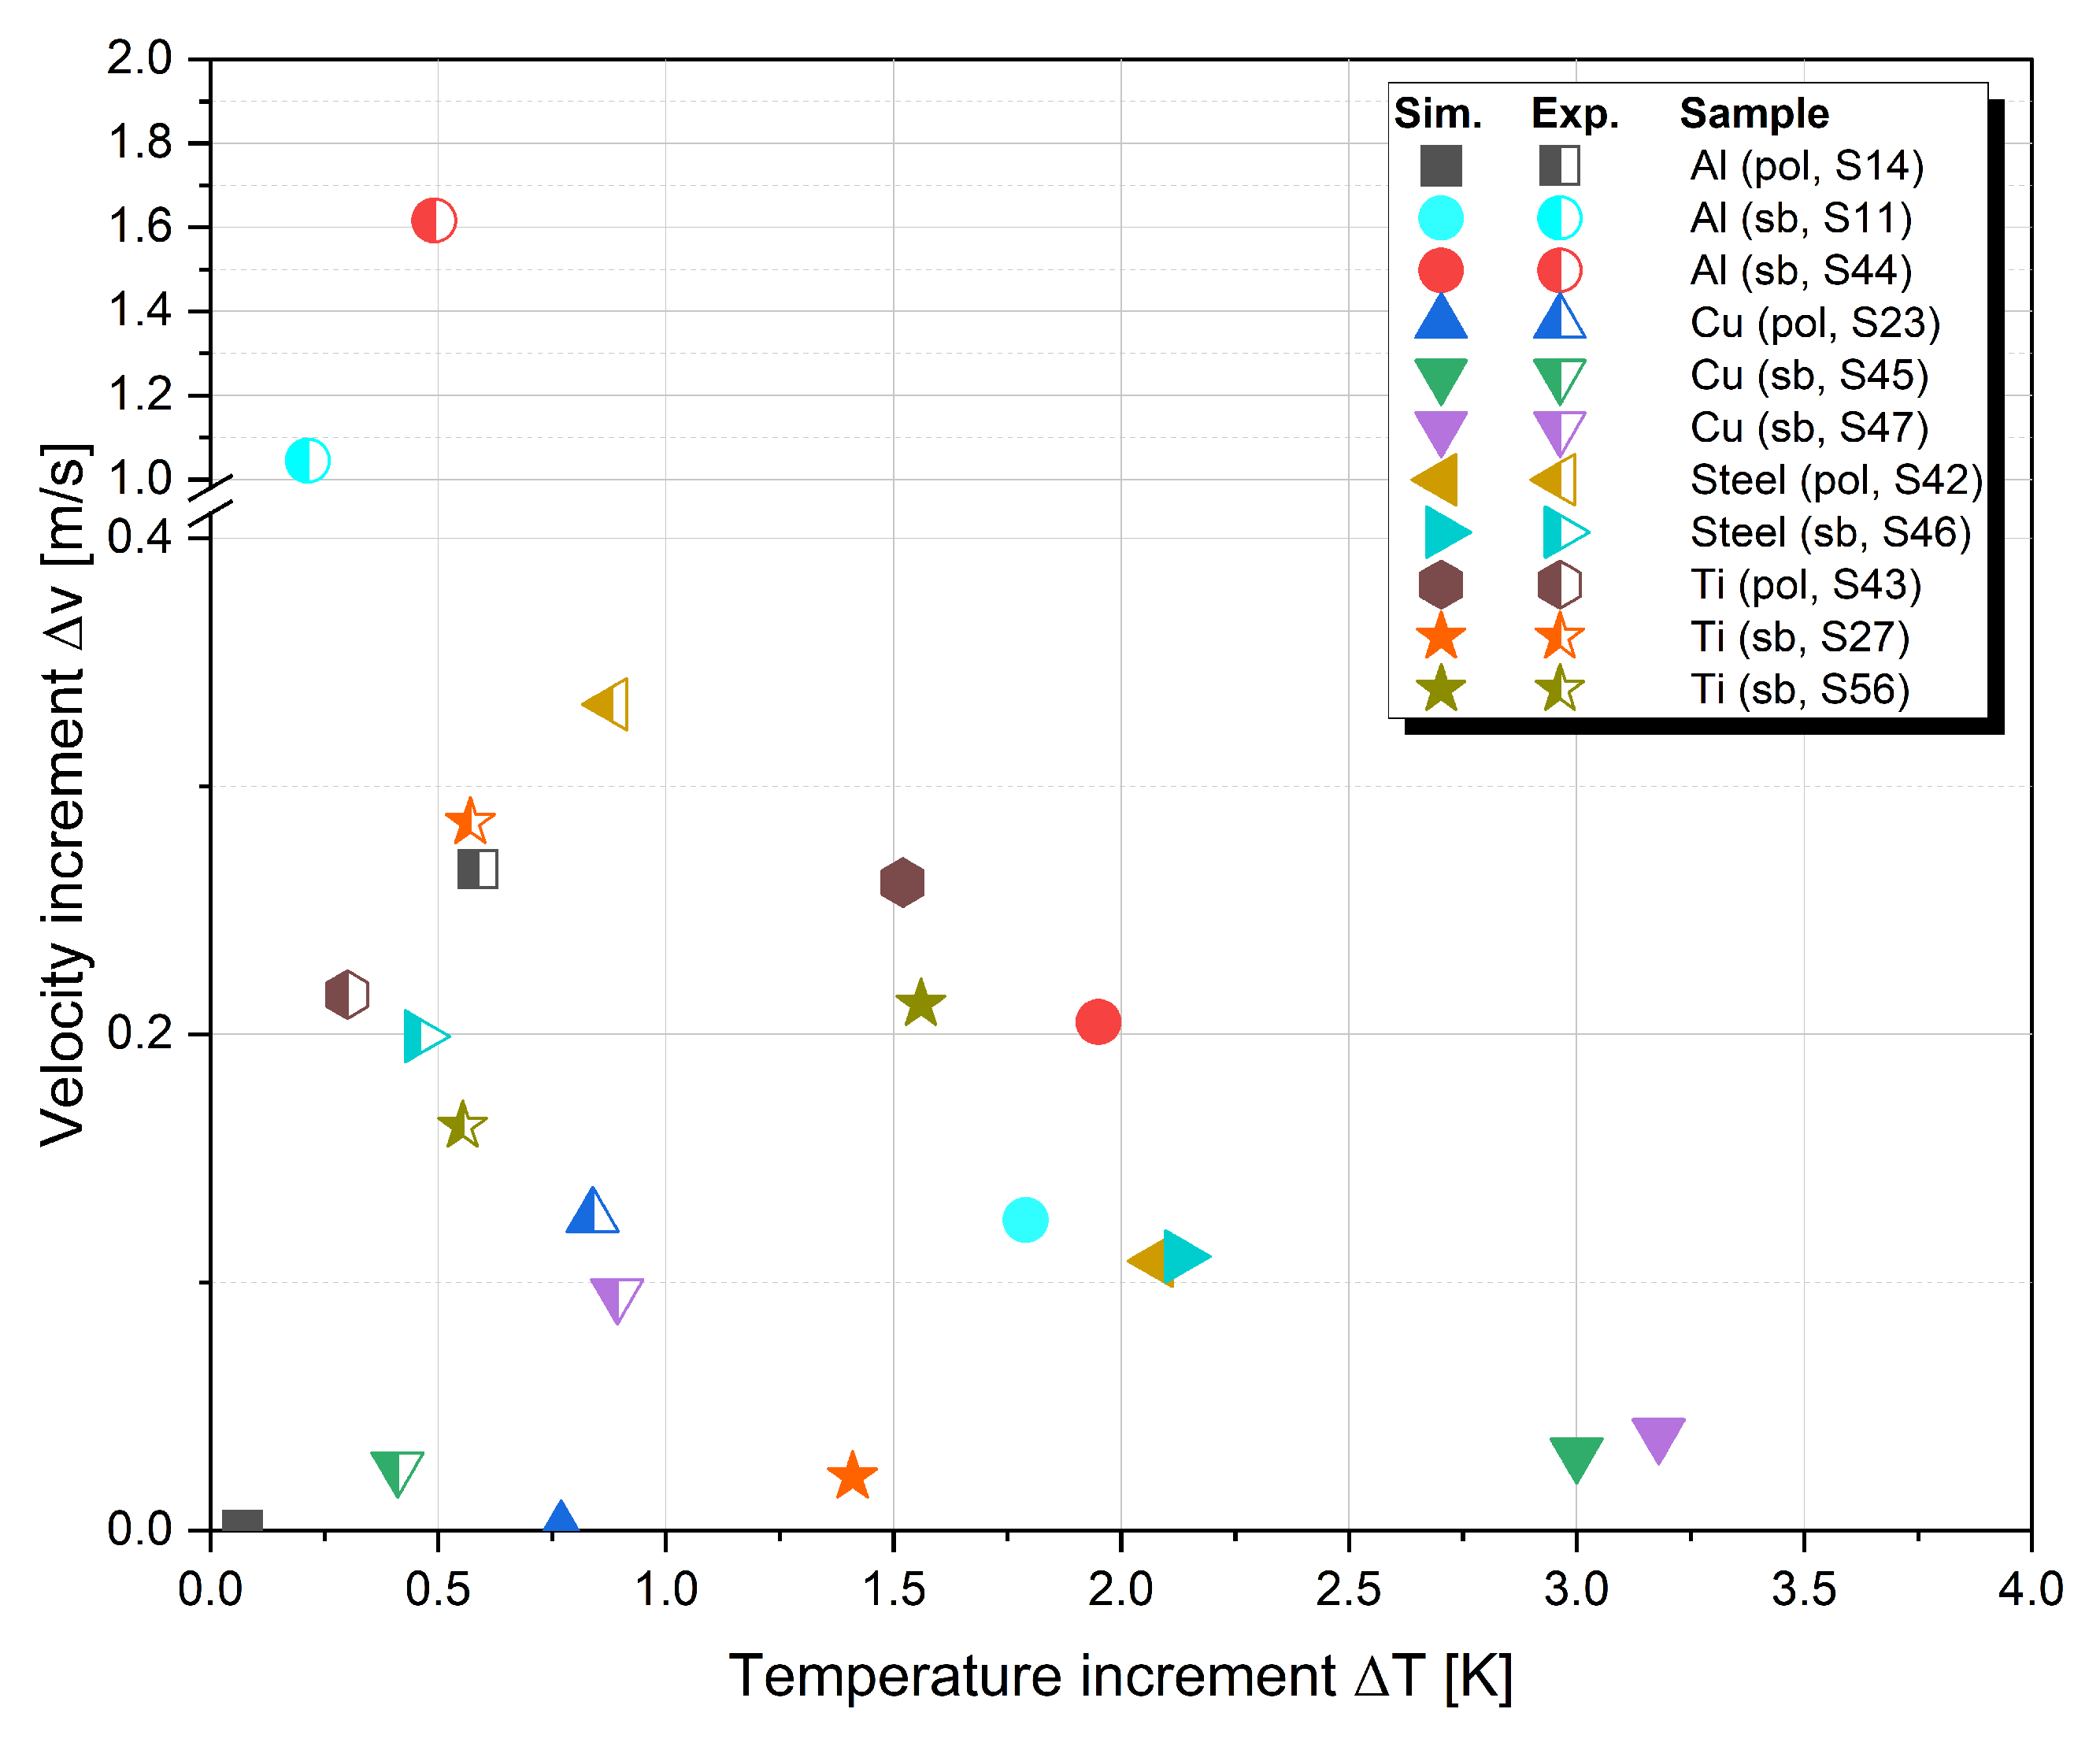
Plotting Δ v over Δ T and comparing it with the respective calculated values shows that the prediction of Δ v is close to the measured values, cf. Figure 6. An underestimation for all aluminum samples and sandblasted titanium samples as well as polished stainless steel is found. Polished copper is well predicted. For the temperature increment, we found higher discrepancies up to a factor of 3 to 5 between measurements and expected values (cf. Equations (5) and (6) depending on most of the sample. A further error analysis is performed in Section 6. Samples which provide two data points (Al, Cu, Ti; all sandblasted) show consistency within each other.

5.3. Comparison with Simulations

The FEM simulation results for the laser parameters, mentioned in Section 2, are depicted in Figure 7. The datafits of the simulation results have been computed using the empirical fit functions from [16], cf. Appendix C, enabling us to derive the theoretical values of imparted momentum and heat for the experimental targets, see below.
In the simulations, the initial reflectivity R s b of the rough surfaces was assumed to amount to R s b = R s N , where R s ( T ) is reflectivity modeled for the solid phase, cf. Appendix B. The exponent N has been derived from the experimental data shown in Table 3, where similarly we assumed R s b = R p o l N ; hence, N virtually represents the average number of reflections of a single ray on a rough surface.
Comparing the measured c m data with the simulations, one can see that simulation and experiment are in good agreement, even though the experimental results underlie a noticeable scatter. The aforementioned underestimation of c m (cf. Figure 5) is confirmed by our measurements. While copper and stainless steel are mostly in good agreement, titanium steel and aluminum are noticeably underestimated. The measured thermal coupling is in general overestimated by the simulations for all samples.

5.4. Thermo-Mechanical Coupling Coefficient

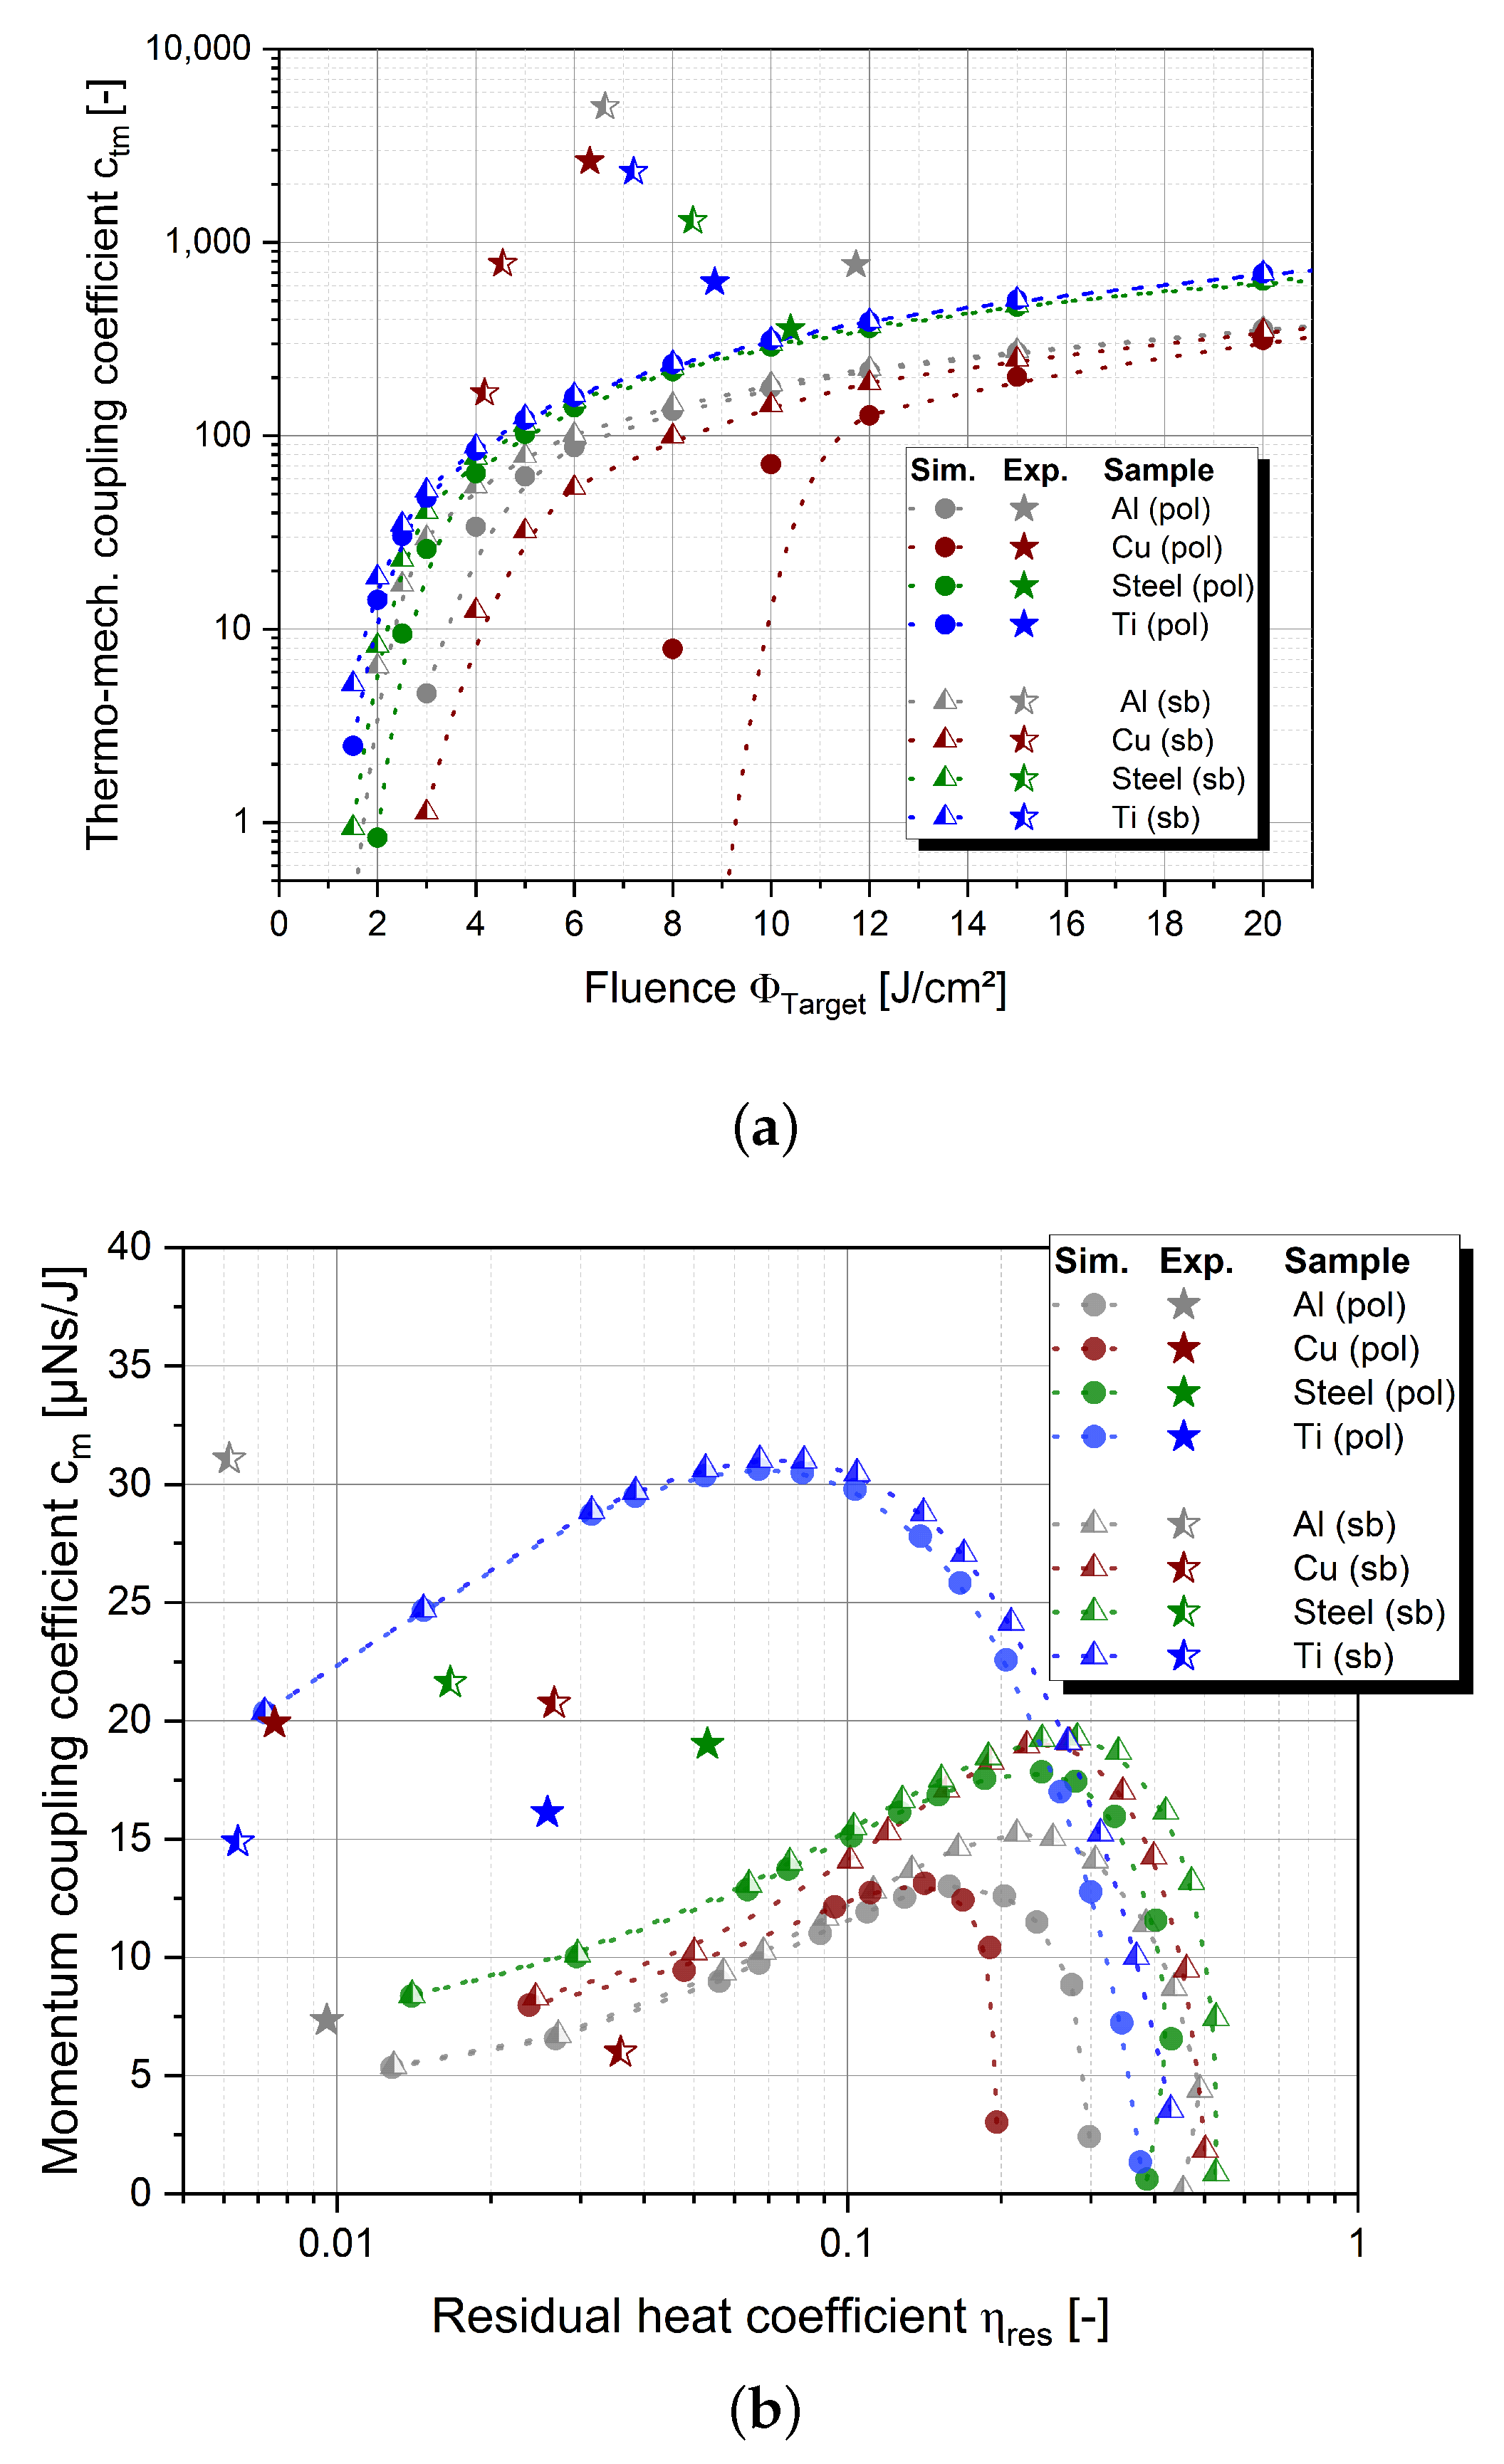
The most interesting question of our research study was to identify how mechanical coupling and thermo-coulpling are related. Therefore, we calculated c t m as described in Equation (7). The results are displayed in Figure 8a. The calculated c t m for polished titanium is in good approximation to the simulated values, while others are underestimated.
The simulation, cf. Figure 8b, firstly shows the obvious: the less energy is put into heat, the more energy can be used to apply the desired velocity increment. This is valid for all η r e s > 0.1 for copper and titanium and η r e s > 0.2 for aluminum and stainless steel. Furthermore, it indicates that materials with higher heat capacity transform less energy into momentum than samples with lower heat capacities. The measured data points are too few to confirm this finding experimentally. However, considering the η r e s being off by a factor of 3 to 5 due to underestimation of the temperature increment, the measurement points would align well. Here, too, aluminum and copper are predicted comparably well, while stainless steel is underestimated and titanium overestimated.

6. Discussion

Laser–matter-interaction experiments have been conducted at an experimental wavelength of 1064 nm and an estimated fluence of 10 J/cm². Pulse duration was set to 10 ns. These settings were explicitly chosen since former studies indicate them as most reasonable for a real-life scenario [13,14,15,55,56,57]. The existence of laser facilities like the National Ignition Facility (NIF) [58] and the Laser Mégajoule (LMJ) [59] indicate that kJ-pulses at a wavelength around 1 μ m are technologically possible. These facilities operate on a nanosecond base which gives a foundation for the assumption of a 10 ns pulse duration. Along with this, fluences between 1 and 10 J/cm² are possible, which are in good agreement with the required fluence for overcoming the ablation thresholds for metal materials [49].
During the laser–matter interaction, it was found that samples which have been exposed to similar laser conditions show similar ablated masses and, thus, fulfil the expected behavior. Surface roughness changes show a strong dependency on the initial state of the sample surface and the sample material. This, we suspect, is due to the different melting behavior of the materials. First of all, due to the inhomogeneous beam profile, locally higher fluences can be expected, which would cause an imprint of the beam profile’s “roughness” into a surface. This effect would be predominant on polished surfaces. Secondly, a polishing effect on surfaces that have been sandblasted could be explained by not melting the sample surfaces across a thickness higher than the roughness itself. In other terms, only the roughness peaks are melting and thus flatten. Polishing effects are most prominent for samples with a lower discrepancy between melting and boiling point, e.g., for aluminum. For in-orbit applications, due to atmospheric aberrations, a “rough” laser spot can be expected as well. Therefore, we expect target materials for laser-ablative trajectory modification to alter their surface conditions towards higher roughness as well while interacting with the laser source.
Integrating sphere measurements showed increasing absorbance of the laser energy for increasing surface roughness. This can be explained by multiple reflections of the light on microscopic scale. An increasing absorbance of the sample surfaces after the interaction is observed for polished samples, except for stainless steel, while sandblasted samples remain similar. Stainless steel’s behavior can be explained by the fact that it is the sample which ablated the least material and conclusively is least responsive to laser momentum transfer among the tested materials. Additionally, no measurable roughness changes were found for it, which also indicates that its reflectivity and, thus, its absorbance, remain on the same level.
Simulations regarding thermo-mechanical coupling have been conducted and compared with experimental results. All in all, the experimental results for Δ v and c m align well with simulations. Experimental values for c m are scattering in good proximity around the calculated curves. Offsets from the simulated data can be explained by inaccuracies from the motion tracking due to noisy video files, losing and re-selecting the tracked pixel, and tracking difficulties for tumbling objects, e.g., when the tracked point disappears for several frames while the sample is flipping. The general underestimation of Δ v is most likely influenced by a systematic error that can be deduced from the slightly underestimated values for gravitational acceleration. Furthermore, inaccuracies due to imperfect masking of the spot profile could contribute here.
Temperature data Δ T was overestimated by the simulation. To exclude artifacts due to the sensor application by thermal tape, we computed the evolution of the temperature distribution of target and tape using a simple one-dimensional FEM model. We found equilibrium after approximately 100 ms, which is within the time frame of 250 ms after laser hit and before the sample hits the chamber. The calculation shows that a small fraction of the heat energy is stored inside the tape so that the temperature of the target itself (without tape) is slightly underestimated by presumably less than 10%. The correction of the thermal data approves this range. Effects of the bonding have been excluded, assuming perfect bonding and no detachment during mechanical shock, which has been observed for some measurements. Thus, only measurements that showed no detachment of the sensor in the high-speed video files were considered. Nevertheless, reduced bonding, outside of the detection of the camera, could lead to lower measured temperatures than the true temperature. We observe higher discrepancies for sandblasted samples which could be reasonable expecting higher mechanical shock due to better mechanical coupling.
Furthermore, the experimental result is strongly dependent on the angle under which the target interacts with the laser. This situation is considered by extracting the target fluence and assuming that the experimental data point under random laser–sample–angle equals the data point of a simulated sample hit perpendicularly by a laser with reduced fluence.

7. Conclusions

We conducted a laser–matter-interaction experiment at the site of GSI Darmstadt, Germany, and compared the experimental data with results from FEM simulations. Metal materials, namely aluminum, copper, titanium, and stainless steel, with two different, defined surfaces were under investigation. We found higher thermal and mechanical coupling of the laser for sandblasted surfaces, which, we conclude, is due to inter-surface reflections in the microscopic pits of the surface. We found higher ablated masses for rough surfaces, while the ablated mass depends on the material itself. The finding that the surface roughness of polished samples increases significantly during the interaction suggests that for a multi-shot interaction of the surface, the behavior would shift towards a rough surface needs to be considered for ablative change of trajectory during multiple passes of a debris particle. As the initial state of a material surface of a debris particle is unknown, the authors recommend considering it as a rough surface for a conservative heating rates calculation during trajectory modification. Furthermore, the experiments indicated higher applied Δ v for rough surfaces. This would allow for a stronger trajectory modification of debris particles with increasing surface roughness, either due to the laser–matter interaction itself or interaction with its environment, but at the cost of a limited number of laser pulses per pass due to the higher heating rates.
Thermo-mechanical coupling shows a material-dependent optimum value for an η r e s 0.1 to 0.2 and a c m between 12 μ Ns/J and 30 μ Ns/J in simulations, considering the experimental measurements being underestimated due to imperfect bonding of the thermal sensor and its detachment due to mechanical shock. This led to an c t m ranging between 166 μ Ns/J and 5000 μ Ns/J.
We conclude that based on these findings, ground-based laser-ablative orbit modification appears to be feasible for metal debris fragments, especially since no sample disintegrated for the tested fluences in our experiments. This, of course, should be verified by further multi-shot experiments. Furthermore, we conclude a given relevance for object identification for laser-ablative orbit modification.

8. Outlook

In this article, we only discussed single, plane, metal targets, while the analyses of further samples from this experiment comprising composite materials, layered targets, and plastics are in preparation to be published in the near future [60].
For future experiments, alternative ways of sample–sensor bonding would most likely lead to more realistic measurements of Δ T . Also, simulations of mechanical shock of a two layer material could confirm the factor of delamination between sensor and sample.
To further validate the feasibility of laser-based trajectory modification, multi-material and organic material simulations as well as mechanical shock simulations will be required and, possibly, experimentally validated.

Author Contributions

Conceptualization, D.K., S.S., R.-A.L., D.S. and M.R.; Data curation, D.K., E.K. and S.S.; Formal analysis, S.S. and E.K.; Funding acquisition, W.R. and T.D.; Investigation, D.K., S.S., E.K. and D.S.; Methodology, D.K., S.S., E.K. (FEM simulation [26]), R.-A.L., D.S., F.S. (thermal sensor [24]), K.K.S.(image processing [23]), M.Z. (image processing [21]) and L.S.; Project administration and Resources, D.S., M.R., W.R. and T.D.; Software, S.S., E.K., F.S., K.K.S., M.Z. and L.S.; Supervision, D.K., S.S., R.-A.L., M.R., M.K.B.-L., C.W., W.R. and T.D.; Validation, S.S., F.S., K.K.S., M.Z. and L.S.; Visualization, D.K., S.S., E.K., F.S., K.K.S., M.Z. and L.S.; Writing—original draft, D.K. and S.S.; Writing—review & editing, D.K., S.S., E.K., R.-A.L., D.S., F.S., K.K.S., M.Z., L.S., M.R., M.K.B.-L., C.W., W.R. and T.D. All authors have read and agreed to the published version of the manuscript.

Funding

This research was enabled by institutional funding.

Institutional Review Board Statement

Not applicable.

Data Availability Statement

Upon reasonable request.

Acknowledgments

The authors gratefully want to thank Fabian Isensee and Ole Johannsen from Helmholtz Imaging for assisting in optimization of the motion tracking algorithm. Further gratitude goes to Anja Jenner for supporting our experiment preparation. We thank Martin Metternich and Haress Nazary from GSI for supporting the experimental procedure. Also, we thank Samantha Siegert for proofreading the manuscript.

Conflicts of Interest

The authors declare no conflict of interest. The funders had no role in the design of the study; in the collection, analyses, or interpretation of data; in the writing of the manuscript; or in the decision to publish the results.

Abbreviations

The following abbreviations are used in this manuscript:
MDPIMultidisciplinary Digital Publishing Institute
DLRGerman Aerospace Center
LEOLow Earth Orbit
GSIGesellschaft für Schwerionenforschung
nhelixNanosecond High Energy Laser for Heavy Ion Experiments
GPSGlobal Positioning System
NASANational Aviation and Space Agency
ESAEuropean Space Agency
BNCBayonet Neill Concelman, coaxial cable connector
NDNeutral Density
COGCenter of Gravity
GUIGraphical User Interface
WLIMWhite Light Interferometer
FEMFinite-Element Method
AlAluminum
Fe/Steel/AISI304Iron/Stainless Steel
n.a.Not Available
EMCCDElectron Multiplying Charged-Coupled Device
ROIRegion of Interest
polPolished
sbSandblasted
NIFNational Ignition Facility
LMJLaser Mégajoule

Appendix A. Equipment

Appendix A.1. Schematic Set-Up
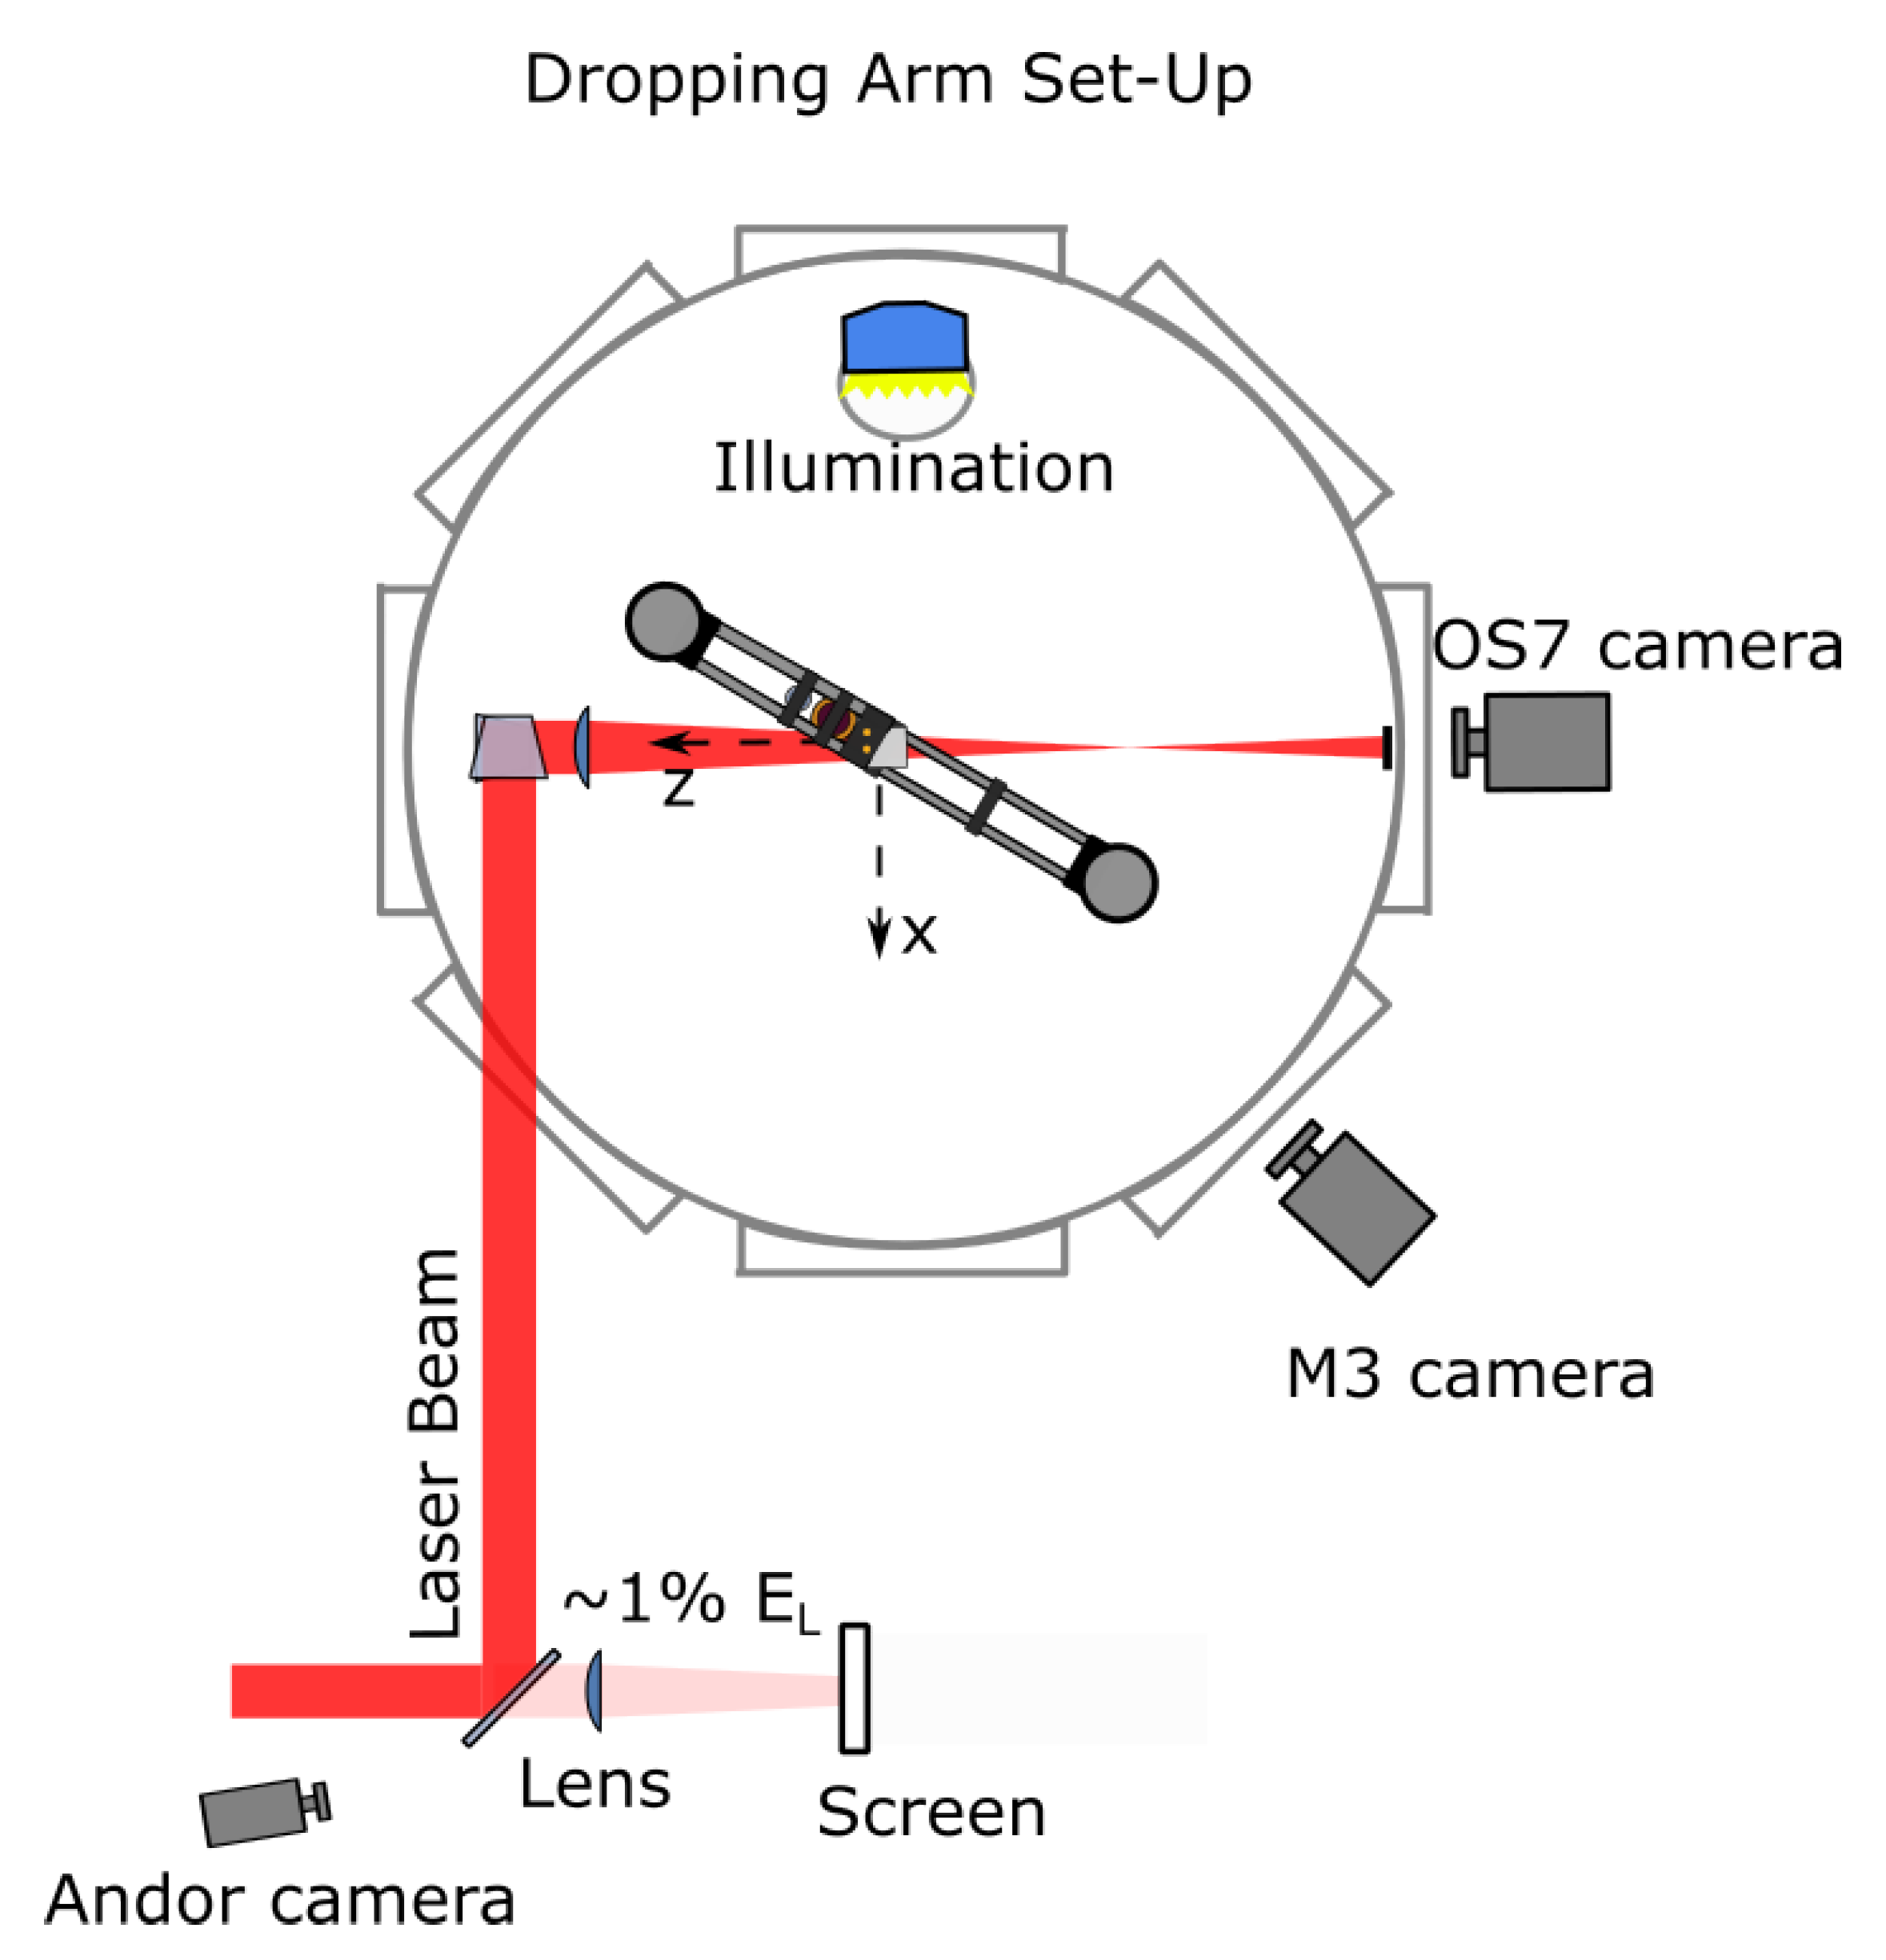
The following schematic drawing, cf. Figure A1, shows the details of the experimental set-up. It depicts where the elements of the set-up are positioned. One can see that the dropping arm is mounted in the center of the vacuum chamber under an angle so that the laser will not interact with the mechanical structure. This angle is compensated by the rotation of the actual sample holder. The laser beam enters the chamber from above and redirected towards the sample plane by a further mirror. A lens focuses the beam such that the required laser diameter is provided in the sample plane. An identical light path is installed outside the chamber for documenting the laser profile. The vacuum chamber is illuminated by a light source from above as well. The high-speed cameras are positioned as depicted.
Figure A1. Schematic of the experimental dropping arm set-up.
Aerospace 10 00947 g0a1

Appendix A.2. Andor iXon Ultra

The applied camera for documenting the laser profile is an Andor iXon Ultra 897 EMCCD camera. The integrated sensor is 512 × 512 pixels, which limits the resolution of the laser spot increment that can be extracted. Each pixel has a size of 13 µm.
For calibration, the noise, consisting of sensor and environment prior to the experiment is recorded, by taking a frame without releasing the laser. This is referred to as our experimental background and is substracted from each data frame. To calibrate the true distance in diameter on the dimensions of the chip, a scale paper with squares of 1 mm size has been photographed. An algorithm then calculates the mm-to-pixel scale factor to estimate the true dimensions of the laserspot.

Appendix A.3. High-Speed Cameras

For stereoscopic measurements of the sample trajectory, we used two high-speed cameras (MotionScope M3 and OS7 IDT Vision). While the OS7 camera captured the falling samples with a framerate of 2000 fps, the framerate of the M3 camera was limited to 1000 fps for the required region of interest (ROI). Both cameras had an illumination time of 400 μ s. The motion-tracking process was performed based on a framerate of 2000 fps, and the pixel positions of each tracked object feature in the M3 frame were interpolated for the instants between captured images. To assure parallel recording of both systems, both cameras received the same trigger signal from the Arduino controller. Their temporal offset was considered in the post-processing of the oscilloscope information, which recorded the incoming trigger signal for each camera. The temporal offset between trigger instants of both cameras was considerably low and evened out by interpolation. Both cameras captured monochrome images, which came with the advantage of moderate requirements to the lighting conditions.

Appendix A.4. Sartorius CPA225D

The applied analytical balance is a Sartorius CPA225D with a capacity of 40 g and a readability of 10 μ g with a reproducibility of +/−20 μ g. For measuring the ablated mass, the samples were weighted before and after experiment. For defining uncertainty, we measured a “light sample” (polyimide foil), a “medium sample”, (PFTE) and a “heavy sample” (titanium) frequently during the 3-week period of the experiment to validate the stability of the data. All samples provided the same dimensions. Furthermore, we took a series of 10 measurement to confirming data reproducibility, which led to the following results, cf. Table A1.
Table A1. Balance accuracy.
TitaniumPTFEPolyimide
Average mass [g]1.4479190.7272150.029277
Stand. dev. [g]5.4 × 10 6 1.2 × 10 5 6.4 × 10 6
Error [g]1.7 × 10 6 3.8 × 10 6 2.0 × 10 6

Appendix A.5. White Light Interferometer (WLIM) Wyko NT9100

Our WLIM provided us with the possibility of a contactless measurement of the sample surface roughness. The device allows for measurements between sub-nanometer region up to the mm region. To achieve a good averaging across the surface, we applied a low magnification of 2.5 and a sampling of 3.96 µm for rough samples and 971 nm for polished samples. Data were taken at 3 points each.

Appendix B. Temperature Dependence of Simulation Parameters

Optical properties of target and ablation jet depend significantly on the temperature which, in turn, has a strong impact on heat transfer during the laser pulse, thus constituting the laser–matter interaction. These dependencies are incorporated in our simulations based on the relations outlined in the following:
The reflectivity for perpendicular light incidence is calculated by R = ( ( n 1 ) 2 + k 2 ) ( ( n + 1 ) 2 + k 2 ) [61] and the absorption coefficient using α = 4 π k λ , where n * = n + i k = ε * is the complex refractive index of the material. For the computation of the temperature dependency of R and α in solid metals following [62], n * has to be known for a reference temperature T r e f . Then, R and α can be computed as a function of the temperature T using n e ( T ) = ρ ( T ) m a · N v where n e is the electron density and N v denotes the number of valence electrons per atom. From this, the plasma frequency ω p of the electron gas can be derived by ω p ( T ) = e 2 ( n e ( T ) ) / ( m e ϵ 0 ) yielding the collision frequency ω c (T) in the electron gas given by
ω c ( T ) = ω c ( T r e f ) T 5 0 Θ D / T z 4 e z 1 d z T r e f 5 0 Θ D / T r e f z 4 e z 1 d z ,
where Θ D is the Debye temperature. Thus, the complex dielectric constant [49]
ε * ( T ) = 1 ω p 2 ω 2 + ω c 2 + i ω p 2 · ω c ω 2 + ω c 2 · ω
can be computed where ω = ( 2 π c 0 ) λ is the angular frequency of the laser light with the wavelength λ and c 0 denotes the speed of light in vacuum. Eventually, R ( T ) and α ( T ) can be obtained from ε * ( T ) using the above-mentioned relations.
It should be noted, however, that this procedure demands proper initialization data for n * ( T r e f ) , otherwise backwards computation of n * at the reference temperature T r e f from Equations (A1) and (A2) yields inconsistency obtaining n ˜ m o d * ( T r e f ) = n ˜ * [ ε * ( T r e f ) ] n e x p * ( T r e f ) . Therefore, consistency with the model assumptions is achieved using n e x p * and n ˜ m o d * as a starting point for an iteration to derive an adapted value of n m o d * ( T r e f ) , which is in line with the considerations given by Equations (A1) and (A2). The resources employed for the experimental data are [63] for Al, [64] for Cu, [65] for Fe, and [66] for Ti. For the computation of R and α in the liquid phase, we follow Siegel’s approach [67], replacing Θ D in Equation (A1) with the Percus-Yevick temperature Θ P Y . The temperature dependency of Θ P Y can then be computed using
Θ P Y ( T ) = Θ P Y ( T m ) T T m ρ ( T ) ρ ( T m ) 2 3 ,
where the data for Θ P Y ( T m ) are taken from the tabulated values given in [67].
To compute the laser absorption inside the ablation jet, we determine the mean ionization fraction η i as a function of incident laser fluence Φ and pulse duration τ . Following [25], we restrict our considerations on single-state ionization and solve the set of the general gas equation, cf. Equation (17), together with the Saha equation:
n e = n 0 · 2 u 1 u 0 2 π m e k B T h 2 3 2 e x p W 1 , 0 k B T
for the particle density n 0 of neutrals and n e of electrons, respectively, where m e is the electron mass in order to obtain η i = n e ( n i + n 0 ) = n e ( n e + n 0 ) . In this computation, the first ionization potential W 1 , 0 as well as the quantum mechanical weighting functions u 0 and u 1 are taken from [68]. As estimates for temperature T and pressure p in the plume we employ Phipps’ approximations for the electron temperature, assuming local thermal equilibrium (which is a rather rough, but nevertheless, bearing assumption), and the ablation pressure given in [69] by
p = 5.83 A 1 8 Ψ 9 16 I 3 4 ( λ τ ) 1 4 ,
and
T = 2.98 · 10 4 A 1 8 · ( Z + 1 ) 5 8 Z 3 4 ( I λ τ ) 1 2
using
Ψ = A 2 · Z 2 ( Z + 1 ) 3 ,
where A is the atomic mass number, I = Φ τ denotes the laser pulse intensity assuming a square laser pulse. Note that Equations (A5)–(A7) are not invariant as regards the employed unit system but refer to m e , k B , h, W 1 , 0 , p, I, and λ given in cgs-units.
From these considerations, η i ( Φ ) can be computed to eventually derive the absorption coefficient α p due to inverse Bremsstrahlung via [49]
α I B = C · λ 3 Z 2 n i n e T 1 e x p ω k B T ,
where C 1.37 · 10 35 , λ is the laser wavelength (in microns), n e and n i are electron and ion number density, respectively, and Z = n e n i denotes the mean ionization state in the plume. Note that α I B , n e , and n i are given in cgs-units in Equation (A8). = h / 2 π is the reduced Planck constant, while ω = ( 2 π c 0 ) λ is the angular frequency of the laser light where c 0 denotes the speed of light in vacuum. In sum, this allows us to compute the laser light absorption inside the ablation jet for the specific laser irradiation parameters λ , τ , and Φ as a function of particle density and temperature, which are variables solved for in the FEM simulation.

Appendix C. Fit Functions

FEM simulation data on thermo-mechanical coupling have been fitted using the empirical functions given in [16]. The respective fit parameters for momentum coupling with
c m ( Φ ) Φ Φ 0 Δ Φ + ( Φ Φ 0 ) · b · 12.46 · A 7 16 · τ λ · Φ c ,
where b can be understood as the optimum magnitude of momentum, Δ Φ is related to the difference between the fluence for momentum coupling and the ablation threshold, c indicates the impact of plasma shielding, and A is the atomic mass in amu. Fit results are shown in Table A2. Note that Φ is given here in J / c m 2 , whereas SI units are used for all other quantities. Moreover, Equation (A9) is valid for Φ Φ 0 only.
Table A2. Parameters from non-linear fits of Equation (A9) to the FEM simulation results shown in Figure 7a for aluminum (Al), copper (Cu), iron (Fe), and titanium (Ti). Reflectivities obtained from the method shown in Appendix C have been employed for polished surfaces, denoted as “pol”, whereas in the simulations for sandblasted surfaces, denoted as “sb”, we used the scaling method described above.
MaterialSurface Δ Φ bc Φ 0
[J/cm 2 ][µNs/J][-][J/cm 2 ]
Alpol2.180.0970.522.81
Alsb4.330.0930.651.54
Cupol1.880.1050.397.68
Cusb4.450.1040.592.89
Fepol2.170.1100.441.99
Fesb2.240.1080.471.49
Tipol5.270.3210.361.47
Tisb4.570.3200.351.34
For the coefficient of residual heat, we used
η r e s ( Φ ) a 0 + a 1 Φ + a 2 Φ 2 1 + a 3 Φ + a 4 Φ 2 + a 5 Φ 3
with arbitrary parameters a ( 0 5 ) which holds for Φ 0 . The respective results are shown in Table A3.
Table A3. Parameter from non-linear fits of Equation (A10) to the FEM simulation results shown in Figure 7b for aluminum (Al), copper (Cu), iron (Fe), and titanium (Ti). Reflectivities as obtained from the method shown in Appendix C have been employed for polished surfaces, denoted as “pol”, whereas in the simulations for sandblasted surfaces, denoted as “sb”, we used the scaling method described above.
MaterialSurface a 0 a 1 a 2 a 3 a 4 a 5
[-][ J 1 cm 2 ][ J 2 cm 4 ][ J 1 cm 2 ][ J 2 cm 4 ][ J 3 cm 6 ]
Alpol0.040−0.0450.015−0.5670.0750.0061
Alsb0.180−0.0370.054−0.5770.1490.0291
Cupol0.024−0.0100.0013−0.2190.0120.0003
Cusb0.2570.0490.0017−0.1300.0390.0004
Fepol0.048−0.0740.067−0.6370.1120.0344
Fesb−0.0492.4171.3646.140−0.2821.0584
Tipol0.0360.1610.102−0.4070.2610.1224
Tisb0.402−0.0120.1780.0430.0350.2141

References

  1. Kessler, D.J.; Cour-Palais, B.G. Collision frequency of artificial satellites: The creation of a debris belt. J. Geophys. Res. Space Phys. 1978, 83, 2637–2646. [Google Scholar] [CrossRef]
  2. Phipps, C.; Bonnal, C. Laser Ranging and Nudging in Space Debris Traffic Management. Sens. Transducers 2022, 255, 17–23. [Google Scholar]
  3. Mrusek, B.; Weiland, L. Space Commercialization and the Rise of Constellations: The Resulting Impact on the Kessler Effect. In Proceedings of the 2023 IEEE Aerospace Conference, Big Sky, MT, USA, 4–11 March 2023; pp. 1–7. [Google Scholar] [CrossRef]
  4. Hollingham, R. What Would Happen if All Satellites Stopped Working? BBC Future. 10 June 2013. Available online: https://www.bbc.com/future/article/20130609-the-day-without-satellites (accessed on 4 September 2023).
  5. Colvin, T.J.; Karcz, J.; Wusk, G. Cost and Benefit Analysis of Orbital Debris Remediation; Technical report 10 March 2023; NASA Headquarters, Office of Technology, Policy, and Strategy: Washington, DC, USA, 2023. [Google Scholar]
  6. Adilov, N.; Braun, V.; Alexander, P.; Cunningham, B. An estimate of expected economic losses from satellite collisions with orbital debris. J. Space Saf. Eng. 2023, 10, 66–69. [Google Scholar] [CrossRef]
  7. Liou, J.C. An active debris removal parametric study for LEO environment remediation. Adv. Space Res. 2011, 47, 1865–1876. [Google Scholar] [CrossRef]
  8. ClearSpace1. Available online: https://www.esa.int/Space_Safety/ClearSpace-1 (accessed on 17 March 2023).
  9. Objects Detected in the Vicinity of ClearSpace-1 Debris Removal Mission Target. 2023. Available online: https://www.esa.int/Space_Safety/Objects_detected_in_the_vicinity_of_ClearSpace-1_debris_removal_mission_target (accessed on 4 September 2023).
  10. Ben-Larbi, M.K.; Hensel, R.; Atzeni, G.; Arzt, E.; Stoll, E. Orbital debris removal using micropatterned dry adhesives: Review and recent advances. Prog. Aerosp. Sci. 2022, 134, 100850. [Google Scholar] [CrossRef]
  11. Schall, W.O. Orbital debris removal by laser radiation. Acta Astronaut. 1991, 24, 343–351. [Google Scholar] [CrossRef]
  12. Shen, S.; Jin, X.; Hao, C. Cleaning space debris with a space-based laser system. Chin. J. Aeronaut. 2014, 27, 805–811. [Google Scholar] [CrossRef]
  13. Phipps, C.R.; Albrecht, G.; Friedman, H.; Gavel, D.; George, E.V.; Murray, J.; Ho, C.; Priedhorsky, W.; Michaelis, M.M.; Reilly, J.P. ORION: Clearing near-Earth space debris using a 20-kW, 530-nm, Earth-based, repetitively pulsed laser. Laser Part. Beams 1996, 14, 1–44. [Google Scholar] [CrossRef]
  14. Scharring, S.; Kästel, J. Can the Orbital Debris Disease Be Cured Using Lasers? Aerospace 2023, 10, 633. [Google Scholar] [CrossRef]
  15. Esmiller, B.; Jacquelard, C.; Eckel, H.A.; Wnuk, E. Space debris removal by ground-based lasers: Main conclusions of the European project CLEANSPACE. Appl. Opt. 2014, 53, I45–I54. [Google Scholar] [CrossRef]
  16. Scharring, S.; Eisert, L.; Lorbeer, R.A.; Eckel, H.A. Momentum predictability and heat accumulation in laser-based space debris removal. Opt. Eng. 2019, 58, 011004. [Google Scholar] [CrossRef]
  17. Lorbeer, R.A.; Zwilich, M.; Zabic, M.; Scharring, S.; Eisert, L.; Wilken, J.; Schumacher, D.; Roth, M.; Eckel, H.A. Experimental verification of high energy laser-generated impulse for remote laser control of space debris. Sci. Rep. 2018, 8, 8453. [Google Scholar] [CrossRef] [PubMed]
  18. Opiela, J.N. A study of the material density distribution of space debris. Adv. Space Res. 2009, 43, 1058–1064. [Google Scholar] [CrossRef]
  19. Germer, T.A.; Zwinkels, J.C.; Tsai, B.K. (Eds.) Spectrophotometry: Accurate Measurement of Optical Properties of Materials; Elsevier: Amsterdam, The Netherlands, 2014; Volume 46. [Google Scholar]
  20. Zhang, Z. A flexible new technique for camera calibration. IEEE Trans. Pattern Anal. Mach. Intell. 2000, 22, 1330–1334. [Google Scholar] [CrossRef]
  21. Zwilich, M. 3D-Motion-Tracking for the Aquisition of Free Fall Events in the Ms Range. Bachelor’s Thesis, University of Applied Sciences Münster, Münster, Germany, 2017. (In German). [Google Scholar]
  22. Beauchemin, S.S.; Barron, J.L. The Computation of Optical Flow. ACM Comput. Surv. 1995, 27, 433–466. [Google Scholar] [CrossRef]
  23. Sharma, K.K. Development of Motion Trackers for Space Debris Research; Student reseach project; International Space University: Strasbourg, France, 2020. [Google Scholar]
  24. Seiz, F. Development and Integration of a Wireless Microcontroller for Data Acquisition in Laser Interaction Experiments for Space Debris Removal. Master’s Thesis, University of Stuttgart, Stuttgart, Germany, 2020. [Google Scholar]
  25. Phipps, C.; Birkan, M.; Bohn, W.; Eckel, H.A.; Horisawa, H.; Lippert, T.; Michaelis, M.; Rezunkov, Y.; Sasoh, A.; Schall, W.; et al. Review: Laser-Ablation Propulsion. J. Propuls. Power 2010, 26, 609–637. [Google Scholar] [CrossRef]
  26. Klein, E.M. Simulation of Space Debris Heating in Laser-Ablative Orbit Modification Manoeuvers. Master’s Thesis, Technical University Braunschweig, Braunschweig, Germany, 2021. [Google Scholar]
  27. Ho, C.Y.; Powell, R.W.; Liley, P.E. Thermal Conductivity of the Elements. J. Phys. Chem. Ref. Data 2009, 1, 279–421. [Google Scholar] [CrossRef]
  28. Simon, N.J.; Drexler, E.S.; Reed, R.P. Properties of Copper and Copper Alloys at Cryogenic Temperatures. Final Report; National Institute of Standards and Technology: Boulder, CO, USA, 1992. [Google Scholar] [CrossRef]
  29. Military Handbook. MIL-HDBK-5H: Metallic Materials and Elements for Aerospace Vehicle Structures; U.S. Department of Defense: Washington, VA, USA, 1998; Volume 1998, pp. 5–9. [Google Scholar]
  30. McBride, B.; Gordon, S.; Reno, M. Thermodynamic Data for Fifty Reference Elements; NASA Technical Paper 3287; NASA: Washington, DC, USA, 1993. [Google Scholar]
  31. Jensen, J.E.; Tuttle, W.A.; Stewart, R.B.; Brechna, H.; Prodell, A.G. Brookhaven National Laboratory Selected Cryogenic Data Notebook: Volume 1, Sections 1–9; Brookhaven National Laboratory: Upton, NY, USA, 1980; Volume V1. [Google Scholar]
  32. White, G.; Roberts, R. Problems in presenting key values: Linear expansivity of copper. High Temp. High Press. 1980, 12, 3116. [Google Scholar]
  33. Desai, P.D. Thermodynamic Properties of Iron and Silicon. J. Phys. Chem. Ref. Data 1986, 15, 967–983. [Google Scholar] [CrossRef]
  34. Nix, F.C.; MacNair, D. The Thermal Expansion of Pure Metals: Copper, Gold, Aluminum, Nickel, and Iron. Phys. Rev. 1941, 60, 597–605. [Google Scholar] [CrossRef]
  35. Feder, R.; Nowick, A.S. Use of Thermal Expansion Measurements to Detect Lattice Vacancies near the Melting Point of Pure Lead and Aluminum. Phys. Rev. 1958, 109, 1959–1963. [Google Scholar] [CrossRef]
  36. Gibbons, D.F. Thermal Expansion of Some Crystals with the Diamond Structure. Phys. Rev. 1958, 112, 136–140. [Google Scholar] [CrossRef]
  37. Kroeger, F., Jr. The Absolute Thermal Expansion of Copper and Aluminum between 5 K and 330 K. Ph.D. Thesis, Iowa State University, Ames, IA, USA, 1974. [Google Scholar] [CrossRef]
  38. Drotning, W. Thermal expansion of molten tin, lead, and aluminum to 1300/sup 0/K. High Temp. Sci. 1979, 11, 265–276. [Google Scholar]
  39. Wilson, R., Jr. Density of aluminum at 2450 to 2900 K. High Temp. Sci. 1969, 1, 367–372. [Google Scholar]
  40. Thornburg, D.; Thall, E.; Brous, J. A Manual of Materials for Microwave Tubes; Wright Air Development Division, Air Research and Development Command, United States Airforce: Dayton, OH, USA, 1961. [Google Scholar]
  41. Brillo, J.; Egry, I.; Ho, I. Density and Thermal Expansion of Liquid Ag–Cu and Ag–Au Alloys. Int. J. Thermophys. 2006, 27, 494–506. [Google Scholar] [CrossRef]
  42. Hepworth, M.; Ruud, C. Viscosity and Density of Liquid Copper and Copper Alloys: Final Report; INCRA project: International Copper Research Association: Washington, DC, USA, 1974. [Google Scholar]
  43. Pstruś, J.; Fima, P. Molar Volume and Surface Tension of Liquid Bi–Cu Alloys. Metall. Mater. Trans. A 2022, 53, 1659–1673. [Google Scholar] [CrossRef]
  44. Corruccini, R.; Gniewek, J. Thermal Expansion of Technical Solids at Low Temperatures: A Compilation from the Literature; Monograph 29 Series; U.S. Department of Commerce, National Bureau of Standards: Washington, DC, USA, 1961. [Google Scholar]
  45. Drotning, W. Thermal expansion of iron, cobalt, nickel, and copper at temperatures up to 600 K above melting. High Temp. High Press. 1981, 13, 441–458. [Google Scholar]
  46. Laquer, H. Low Temperature Thermal Expansion of Various Materials; ADA307613; Defense Technical Information Center: Fort Belvoir, VA, USA, 1952. [Google Scholar]
  47. Wessing, J.J.; Brillo, J. Density, Molar Volume, and Surface Tension of Liquid Al-Ti. Metall. Mater. Trans. A 2016, 48, 868–882. [Google Scholar] [CrossRef]
  48. Zhang, Y.; Zhang, D.; Wu, J.; He, Z.; Deng, X. A thermal model for nanosecond pulsed laser ablation of aluminum. AIP Adv. 2017, 7, 075010. [Google Scholar] [CrossRef]
  49. Bäuerle, D. Laser Processing and Chemistry, 5th ed.; Springer Science & Business Media: Berlin/Heidelberg, Germany, 2013. [Google Scholar]
  50. Balazs, L.; Gijbels, R.; Vertes, A. Expansion of laser-generated plumes near the plasma ignition threshold. Anal. Chem. 1991, 63, 314–320. [Google Scholar] [CrossRef]
  51. Tsuno, K.; Wada, S.; Ogawa, T.; Ebisuzaki, T.; Fukushima, T.; Hirata, D.; Yamada, J.; Itaya, Y. Impulse measurement of laser induced ablation in a vacuum. Opt. Express 2020, 28, 25723–25729. [Google Scholar] [CrossRef] [PubMed]
  52. Yu, C.; Ye, J.; Chang, H.; Zhou, W.; Han, X.; Li, M.; Gao, H. Experimental Research on Characteristics of Impulse Coupling and Plasma Plume Generated by Laser Irradiating Copper Target with Nanosecond Pulsed Laser Propulsion. Aerospace 2023, 10, 544. [Google Scholar] [CrossRef]
  53. Yu, C.; Zhou, W.; Chang, H.; Chen, Y.; Guo, W. Impulse coupling characteristics of typical metal materials irradiated by nanosecond laser with a millimeter-scale spot size. Infrared Laser Eng. 2021, 50, 20200390. [Google Scholar] [CrossRef]
  54. WebPlotDigitizer 4.6. Available online: https://apps.automeris.io/wpd/ (accessed on 14 June 2023).
  55. Phipps, C.R.; Baker, K.L.; Libby, S.B.; Liedahl, D.A.; Olivier, S.S.; Pleasance, L.D.; Rubenchik, A.; Trebes, J.E.; George, E.V.; Marcovici, B.; et al. Removing orbital debris with lasers. Adv. Space Res. 2012, 49, 1283–1300. [Google Scholar] [CrossRef]
  56. Wnuk, E.; Golebiewska, J.; Jacquelard, C.; Haag, H. Future Orbits of Space Debris after LDR Operation. In Proceedings of the 6th European Conference on Space Debris, Darmstadt, Germany, 22–25 April 2013; Volume 723, p. 70. [Google Scholar]
  57. Eckel, H.A.; Göge, D.; Zimper, D. Laser-Based Space Debris Removal An Approach for Protecting the Critical Infrastructure Space. Transform. Jt. Air Power J. JAPCC 2016, 22, 75–84. [Google Scholar]
  58. Haynam, C.; Wegner, P.; Auerbach, J.; Bowers, M.; Dixit, S.; Erbert, G.; Heestand, G.; Henesian, M.; Hermann, M.; Jancaitis, K.; et al. National Ignition Facility laser performance status. Appl. Opt. 2007, 46, 3276–3303. [Google Scholar] [CrossRef]
  59. CEA—Direction des Applications Militaires. Laser Megajoule: Description de l’Installation LMJ. 2023. Available online: https://www-lmj.cea.fr/lmj-description.html (accessed on 27 October 2023).
  60. Scharring, S.; Keil, D.; Klein, E.; Lorbeer, R.A.; Schumacher, D.; Roth, M. De-Risking Space Debris Removal: Thermo-Mechanical Integrity of Space Debris Objects under Pulsed Laser Irradiation. In Proceedings of the High-Power Laser Ablation VIII, Santa Fe, NM, USA, 26 February–1 March 2024. submitted. [Google Scholar]
  61. Patterson, J.D.; Bailey, B.C. Solid State Physics; Springer: Berlin/Heidelberg, Germany, 2007. [Google Scholar] [CrossRef]
  62. Ujihara, K. Reflectivity of metals at high temperatures. J. Appl. Phys. 1972, 43, 2376–2383. [Google Scholar] [CrossRef]
  63. Mathewson, A.; Myers, H. Absolute values of the optical constants of some pure metals. Phys. Scr. 1971, 4, 291. [Google Scholar] [CrossRef]
  64. Johnson, P.B.; Christy, R.W. Optical constants of the noble metals. Phys. Rev. B 1972, 6, 4370. [Google Scholar] [CrossRef]
  65. Johnson, P.; Christy, R. Optical constants of transition metals: Ti, v, cr, mn, fe, co, ni, and pd. Phys. Rev. B 1974, 9, 5056. [Google Scholar] [CrossRef]
  66. Palm, K.J.; Murray, J.B.; Narayan, T.C.; Munday, J.N. Dynamic optical properties of metal hydrides. ACS Photonics 2018, 5, 4677–4686. [Google Scholar] [CrossRef]
  67. Siegel, E. Optical reflectivity of liquid metals at their melting temperatures. Phys. Chem. Liq. 1976, 5, 9–27. [Google Scholar] [CrossRef]
  68. Allen, C.W. Astrophysical Quantities; Athlone Press: London, UK, 1973. [Google Scholar]
  69. Phipps, C., Jr.; Turner, T.; Harrison, R.; York, G.; Osborne, W.; Anderson, G.; Corlis, X.; Haynes, L.; Steele, H.; Spicochi, K.; et al. Impulse coupling to targets in vacuum by KrF, HF, and CO2 single-pulse lasers. J. Appl. Phys. 1988, 64, 1083–1096. [Google Scholar] [CrossRef]
Figure 1. Experimental set-up, installed in the Z6 vacuum chamber at the GSI Darmstadt. (a) Set-up displayed with expected sample trajectory. (b) Detailed image of the sample holder with sensor charging and release mechanism.
Aerospace 10 00947 g001
Figure 2. Integrating sphere set-up for hemispherical–directional reflectance measurements.
Aerospace 10 00947 g002
Figure 3. Relevant array extraction by applying the shadowgraph mask onto the laser profile. (a) Image of the initial beam profile. (b) Shadowgraph image. (c) Masked beam profile only considering the pixels within the mask for fluence estimation.
Aerospace 10 00947 g003
Figure 4. Simulation domain for 1D FEM analysis of laser ablation. (a) Laser heating. (b) Laser ablation. Note: graph is not to scale.
Aerospace 10 00947 g004
Figure 5. Comparison of experimental data on laser-ablative momentum coupling from the literature with 1D-FEM simulation results at the same laser parameters. While pure metals serve as a reference for Al [51] and Cu [52], results for alloys have been taken from [53] for comparison with Fe simulation results (30CrMnSiA steel) and Ti (TC4 alloy), respectively. Whereas the numerical values of the experimental data were provided alongside the paper in the case of [51], underlying numerical data have been extracted from the graphs of [52,53] using WebPlotDigitizer 4.6 [54].
Aerospace 10 00947 g005
Figure 6. Comparison of measured and calculated velocity and temperature increments.
Aerospace 10 00947 g006
Figure 7. FEM simulation results for (a) momentum coupling and (b) thermal coupling as a function of incident fluence of a laser pulse with τ = 10 ns pulse duration at λ = 1064 nm wavelength. For data fitting, empirical fit functions from [16] have been used. Simulation results for polished material are denoted by full symbols, whereas the hollow symbols indicate results for computations where the surface reflectivity was scaled according to the measurements; see text. Thermal and momentum coupling derived from experimental results are depicted by full and hollow stars.
Aerospace 10 00947 g007
Figure 8. Comparison of (a) experimental thermo-mechanical coupling coefficients with simulated data and (b) experimentally estimated and simulated coupling coefficients.
Aerospace 10 00947 g008
Table 1. Predominant materials for small space debris >1 cm and their usage in space applications.
MaterialSpace Application
Aluminum 6082General structure material with multiple applications due to light weight and good cost–benefit balance.
CopperMainly electronic components
Stainless Steel AISI304Rocket stages
Titanium 99%Structure elements like bolts and screws
Table 2. Results for ablated mass Δ m and respective roughness change Δ R as well as for velocity and temperature increments ( Δ v , Δ T ) for each polished sample at the given target fluence Φ target . Note: values marked with * are considered as outliers.
Shot-No.Material Φ target Δ m Δ Ra Δ v Δ T Δ T corr
[J/cm²][ μ g][nm][m/s][K][K]
14Aluminum(11.73)1290218.710.2670.550.58
36Aluminum5.22160163.860.613n.a.n.a.
19Copper3.390 *62.640.158n.a.n.a.
23Copper6.3221,070 *53.360.1260.800.84
39Copper10.482083.940.141n.a.n.a.
37Steel6.5920115.330.264n.a.n.a.
42Steel(8.84)1920125.970.3330.840.88
18Titanium2.8350193.090.316n.a.n.a.
21Titanium3.8540588.240.287n.a.n.a.
38Titanium9.13300344.111.704n.a.n.a.
43Titanium8.86430317.530.2160.280.30
Table 3. Results for ablated mass Δ m and respective roughness change Δ R as well as for velocity and temperature increments ( Δ v , Δ T ) for each sandblasted sample at the given target fluence Φ target . Note: values marked with * are considered as outliers.
Shot-No.Material Φ target Δ m Δ Ra Δ v Δ T Δ T corr
[J/cm²][ μ g][nm][m/s][K][K]
10Aluminum(10.72)500n.a.0.788n.a.n.a.
11Aluminum6.63480−6201.0440.200.21
44Aluminum12.412790−476.671.6160.460.49
22Copper7.67310−65.330.619n.a.n.a.
24Copper6.981090−365.330.419n.a.n.a.
45Copper4.17850−20.0250.390.41
47Copper4.54620−320.0950.850.89
30Steel2.33360+26.631.734n.a.n.a.
31Steel9.89480+66.630.475n.a.n.a.
46Steel8.4130,330 *−46.70.1990.440.46
25Titanium2.175200−159.970.047n.a.n.a.
27Titanium2.023540−209.970.2850.530.57
56Titanium7.205870−213.30.16370.520.55
Table 4. Reflectances of the initial surfaces (reference) and the surfaces after ablation (sample).
MaterialReference ReflectanceAblated Sample Reflectance
PolishedSandblastedPolishedSandblasted
Aluminum0.850.370.790.33
Copper0.940.410.840.46
Stainless Steel0.630.20.620.22
Titanium0.670.190.540.21
Disclaimer/Publisher’s Note: The statements, opinions and data contained in all publications are solely those of the individual author(s) and contributor(s) and not of MDPI and/or the editor(s). MDPI and/or the editor(s) disclaim responsibility for any injury to people or property resulting from any ideas, methods, instructions or products referred to in the content.