Abstract
Medical and agricultural robots that interact with living tissue or pick fruit require tactile and flexible sensors to minimise or eliminate damage. Until recently, research has focused on the development of robots made of rigid materials, such as metal or plastic. Due to their complex configuration, poor spatial adaptability and low flexibility, rigid robots are not fully applicable in some special environments such as limb rehabilitation, fragile objects gripping, human–machine interaction, and locomotion. All these should be done in an accurate and safe manner for them to be useful. However, the design and manufacture of soft robot parts that interact with living tissue or fragile objects is not as straightforward. Given that hyper-elasticity and conductivity are involved, conventional (subtractive) manufacturing can result in wasted materials (which are expensive), incompatible parts due to different physical properties, and high costs. In this work, additive manufacturing (3D printing) is used to produce a conductive, composite flexible sensor. Its electrical response was tested based on various physical conditions. Finite element analysis (FEA) was used to characterise its deformation and stress behaviour for optimisation to achieve functionality and durability. Also, a nonlinear regression model was developed for the sensor’s performance.
1. Introduction
As a specialised branch of robotics, soft robotics has a significant capability for revolutionising human–machine interaction and rehabilitation monitoring [1,2]. The advancement of flexible sensors is gaining prominence in soft robotics applications involving interaction with biological systems, such as during human rehabilitation [3]. Tactile and flexible sensors are, hence, key to the success of soft robotics for such applications [4]. Research into integrating soft sensors for machine–soft tissue interaction has been explored since the early 2000s [5], but with the explosion of additive manufacturing (3D printing) in the mid-2010s, more research into making 3D-printed conductive soft sensors mainstream is needed [6]. Coupled with advances in materials science, sensor technology, and machine vision, conductive/flexible sensor-enabled soft robots are needed for accurate, high-sensitivity interactions [7]. This means that soft robots can do delicate tasks and move in a variety of directions in varying conditions safely [8,9].
The pivotal contribution of the flexible carbon black filament as an essential element within the fabrication procedures [10] remained underappreciated within the earlier scrutinised literature [11,12]. The investigation employed a flexible carbon black filament as an overlay onto a conventional layered flexible filament to generate discernible conducting traces, widths, and thicknesses [13]. The sensor design and fabrication processes are completed considering the inherent qualities of these flexible filaments [14]. Additionally, the impediments imposed by certain obstacles, such as hysteresis and noise, especially when the sensor gets distorted, are still imminent [14]. Therefore, the degree of responsiveness of the sensors’ signals suffers data reading flux during experimentation [15]. However, as emphasised in the reviews, specific soft robotics structures are found to have restrictions in terms of their fundamental deprivation of repeatability, exactness, and certainty [16]. Soft robotics applications use additive manufacturing methods for flexible strain sensors, which is the purpose of this research—to design, fabricate, and test flexible strain sensors [17]. Four objectives will be pursued to accomplish these: 3D printing of flexible strain sensors with different thicknesses and numbers of tracks; the utilisation of a finite element analysis (FEA) approach in the Ansys Simulation Package to seamlessly deliver a simulation of the flexible strain sensor design models; the design and fabrication a data acquisition circuit [18]; and a nonlinear regression model will be developed from the data that will be acquired from the sensors. This established representation will portray the correlation between the sensors’ responses to the number and height of tracks and the curvature to which they are subjected.
This work employs the use of additive manufacturing (3D printing) to develop a conductive, flexible composite sensor. Its electrical performance was evaluated in a variety of physical situations based on conductor turns, its thickness, and the response based on the deflection it is subjected to. All these will have a significant impact on sensor resistance. Based on sensor resistance measurements, a nonlinear regression model was developed, which showed excellent agreement with the experimental values.
2. Materials and Methods
2.1. 3D Flexible Strain Sensor Design
2.1.1. Sensor Geometry
Three-dimensional sensor models are designed using computer-aided design (CAD) software (Ansys 2023 R2) for both simulation and fabrication using additive manufacturing. Flexible strain sensors are commonly designed in a hand-with-finger model, where the black conducting tracks represent the fingers. The output signal can be easily manipulated based on the level of deflection the sensor undergoes. The sensor model specifications are as stated in Table 1. As shown in the table, the model has a length of 50 mm and a width of 11 mm.

Table 1.
Experiment sensor’s base layer specifications.
Furthermore, the spacing between tracks measures 0.9 mm to 2 mm while the width of the conducting track measures between 0.9 mm to 2.5 mm, as indicated in Table 2. In addition, there is a conducting connector available for connecting the output signal during testing and future endeavours. The sensor comprises two conspicuous parts arranged one above the other—the bottom or base layer and the conductive tracks.

Table 2.
Experiment sensor’s conductive track specifications.
The underlying flat surface on which the tracks are positioned has identical dimensions of width, height, and length for all designs. The specifications were selected because the project primarily aims to create a flexible strain sensor for enhanced human–machine interaction and rehabilitation monitoring for a soft robot used in stroke hand rehabilitation for patients who have survived. The measurements of the soft finger are 50 mm in length and 11 mm in width. The dimensions of the sensor were established based on the sizes of a human hand’s fingers.
Each design varies from one another in height, width, spacing of the conductive tracks, and number of tracks. These models are done in such a way that there is a sequential follow-up of the number of turns, the increase in track height, and the spacing of the track width. Also, the idea is to give clear evidence of data collection from the result after sending the model to a static test of varying curvatures of different radii. Specifications for various designs are as follows:
In Table 2, the specifications concerning the parameters and turns, the width of the conductive tracks (mm), and the spacing between the conductive tracks (mm) are shown. Also, the designs and turns of the flexible strain sensors are shown in their respective measurements.
2.1.2. Flexible Strain Sensor Models
These models have the details of the respective features of the sensor model designs. Figure A1 (Appendix A) depicts the flexible sensor computer-aided design (CAD Ansys 2022 R1: Ansys Fluent) models of four sensor designs with one turn. Each design differs in terms of the height, width, and spacing of the conductive tracks. One turn is considered, and the track heights and the spacing of the track width are explored as well. Furthermore, as the objective is to acquire the resistances by manipulating the curvature, specifically by varying the bend radii, four curved platforms are 3D-printed with the radii as their curvatures [19].
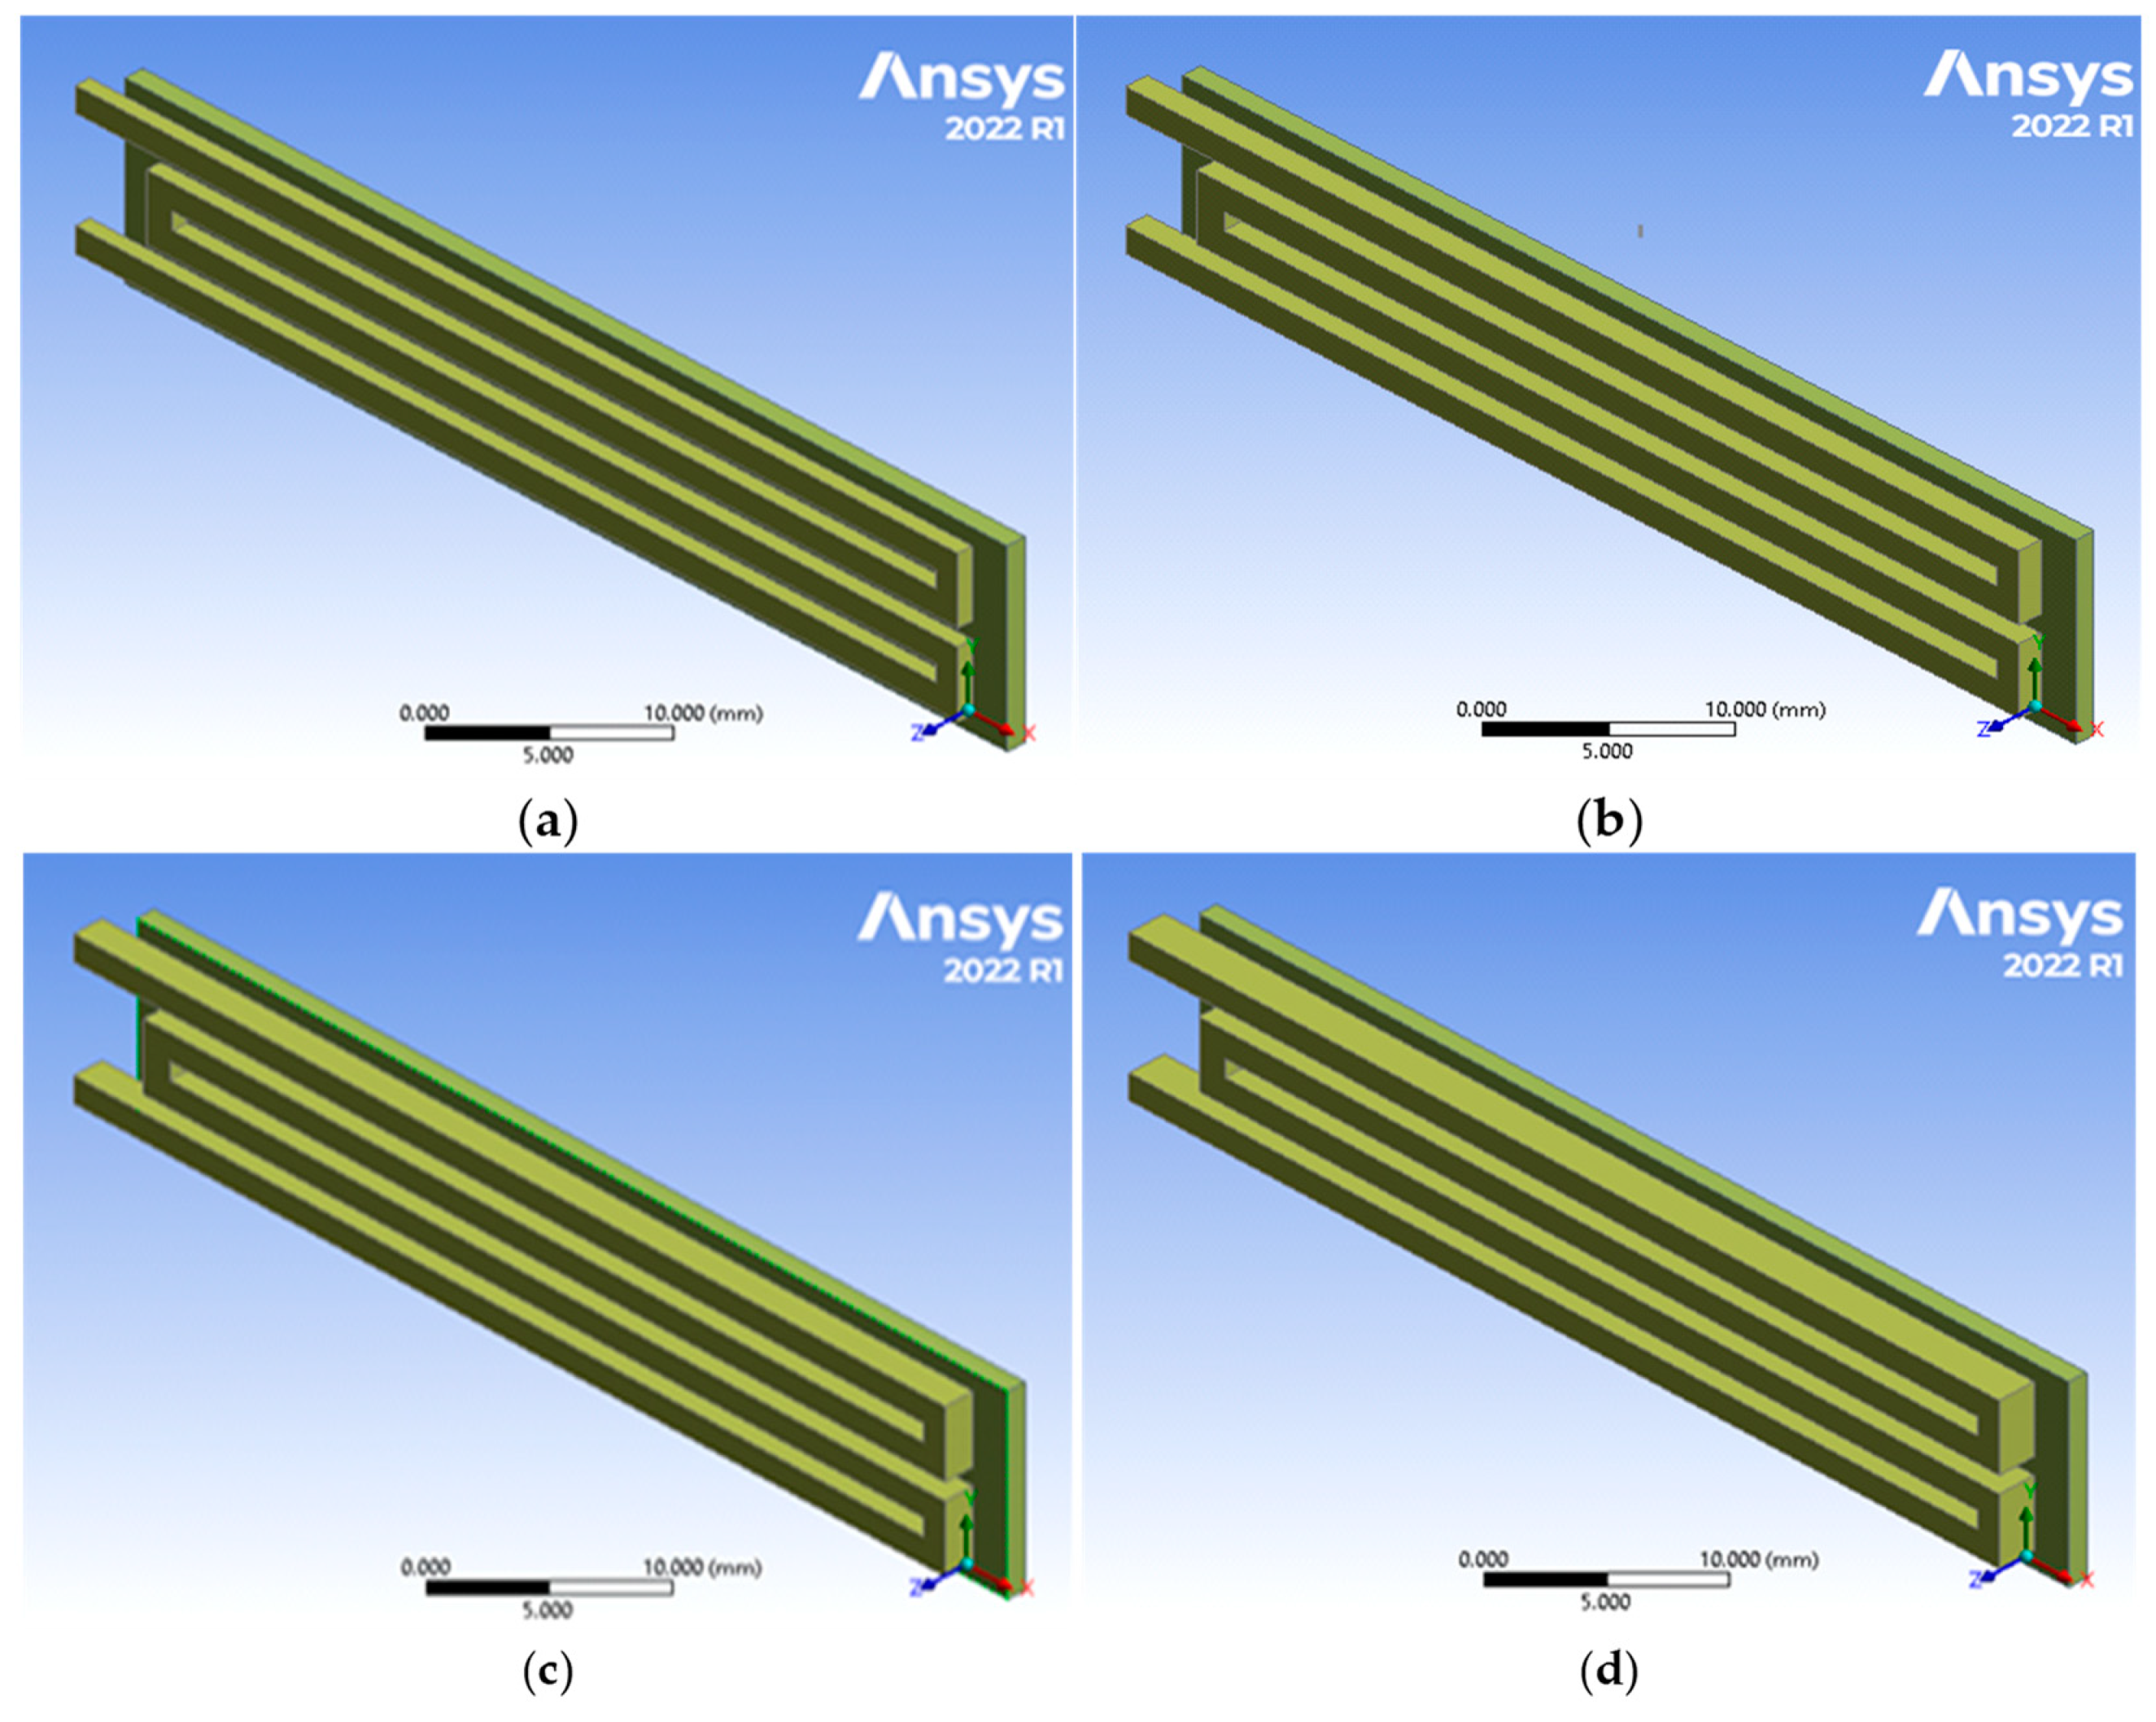
Figure 1 depicts the flexible sensor CAD models of the four sensor designs. Each design differs in terms of the height, width, and spacing of the conductive tracks. Two turns are considered, and the track height and the spacing of the track width are considered as well. Furthermore, as the objective is to acquire the resistances by manipulating the curvature, specifically by varying the bend radii, four curved platforms are 3D-printed with the radii as their curvatures [19].
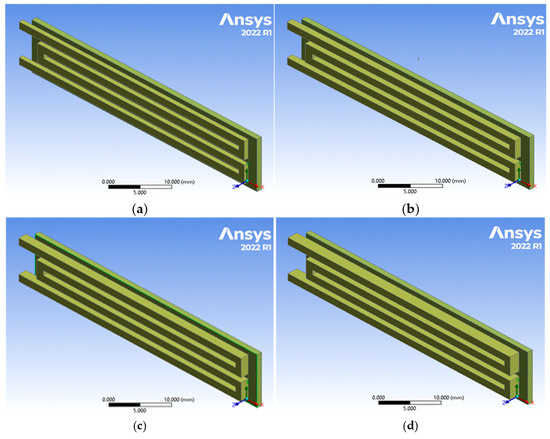
Figure 1.
Design 2, two turns: (a) track width = 1.5 mm; height = 0.8 mm; track spacing = 1 mm; (b) track width = 1.5 mm; height = 1.2 mm; track spacing = 1 mm; (c) track width = 1.5 mm; height = 1.6 mm; track spacing = 1 mm; (d) track width = 1.5 mm; height = 2.0 mm; track spacing = 1 mm.
Moreover, Figure A2 shows design 3 with three turns: (a) track width = 0.9 mm; height = 0.8 mm; track spacing = 0.9 mm; (b) track width = 0.9 mm; height = 1.2 mm; track spacing = 0.9 mm; (c) track width = 0.9 mm; height = 1.6 mm; track spacing = 0.9 mm; and (d) track width = 0.9 mm; height = 2.0 mm; track spacing = 0.9 mm. This also depicts the flexible sensor CAD models of the four sensor designs. Each design differs in terms of the height, width, and spacing of the conductive tracks. Three turns are considered, and the track height and the spacing of the track width are considered during the design. Furthermore, as the objective is to acquire the resistances by manipulating the curvature, specifically by varying the bend radii, four curved platforms are 3D-printed with the radii as their curvatures [19].
2.1.3. 3D-Printed Flexible Strain Sensors
Flexible strain sensors are fabricated using 3D printing technology with variations in thickness and track numbers. A total of twelve distinct flexible strain sensors are produced to meet the research objectives. Additionally, an industrial flexible strain sensor is employed as a comparator to evaluate the performance of the newly developed sensors. The fabrication process utilised two different 3D printers: the LulzBot Taz 6 (Fargo Additive Manufacturing Equipment 3D LLC (FAME 3D), Loveland, Colo.) and the Flashforge, each operating according to the filament and printer properties detailed in Table 3.

Table 3.
The 3D printer settings of filaments for the experiment [20,21].
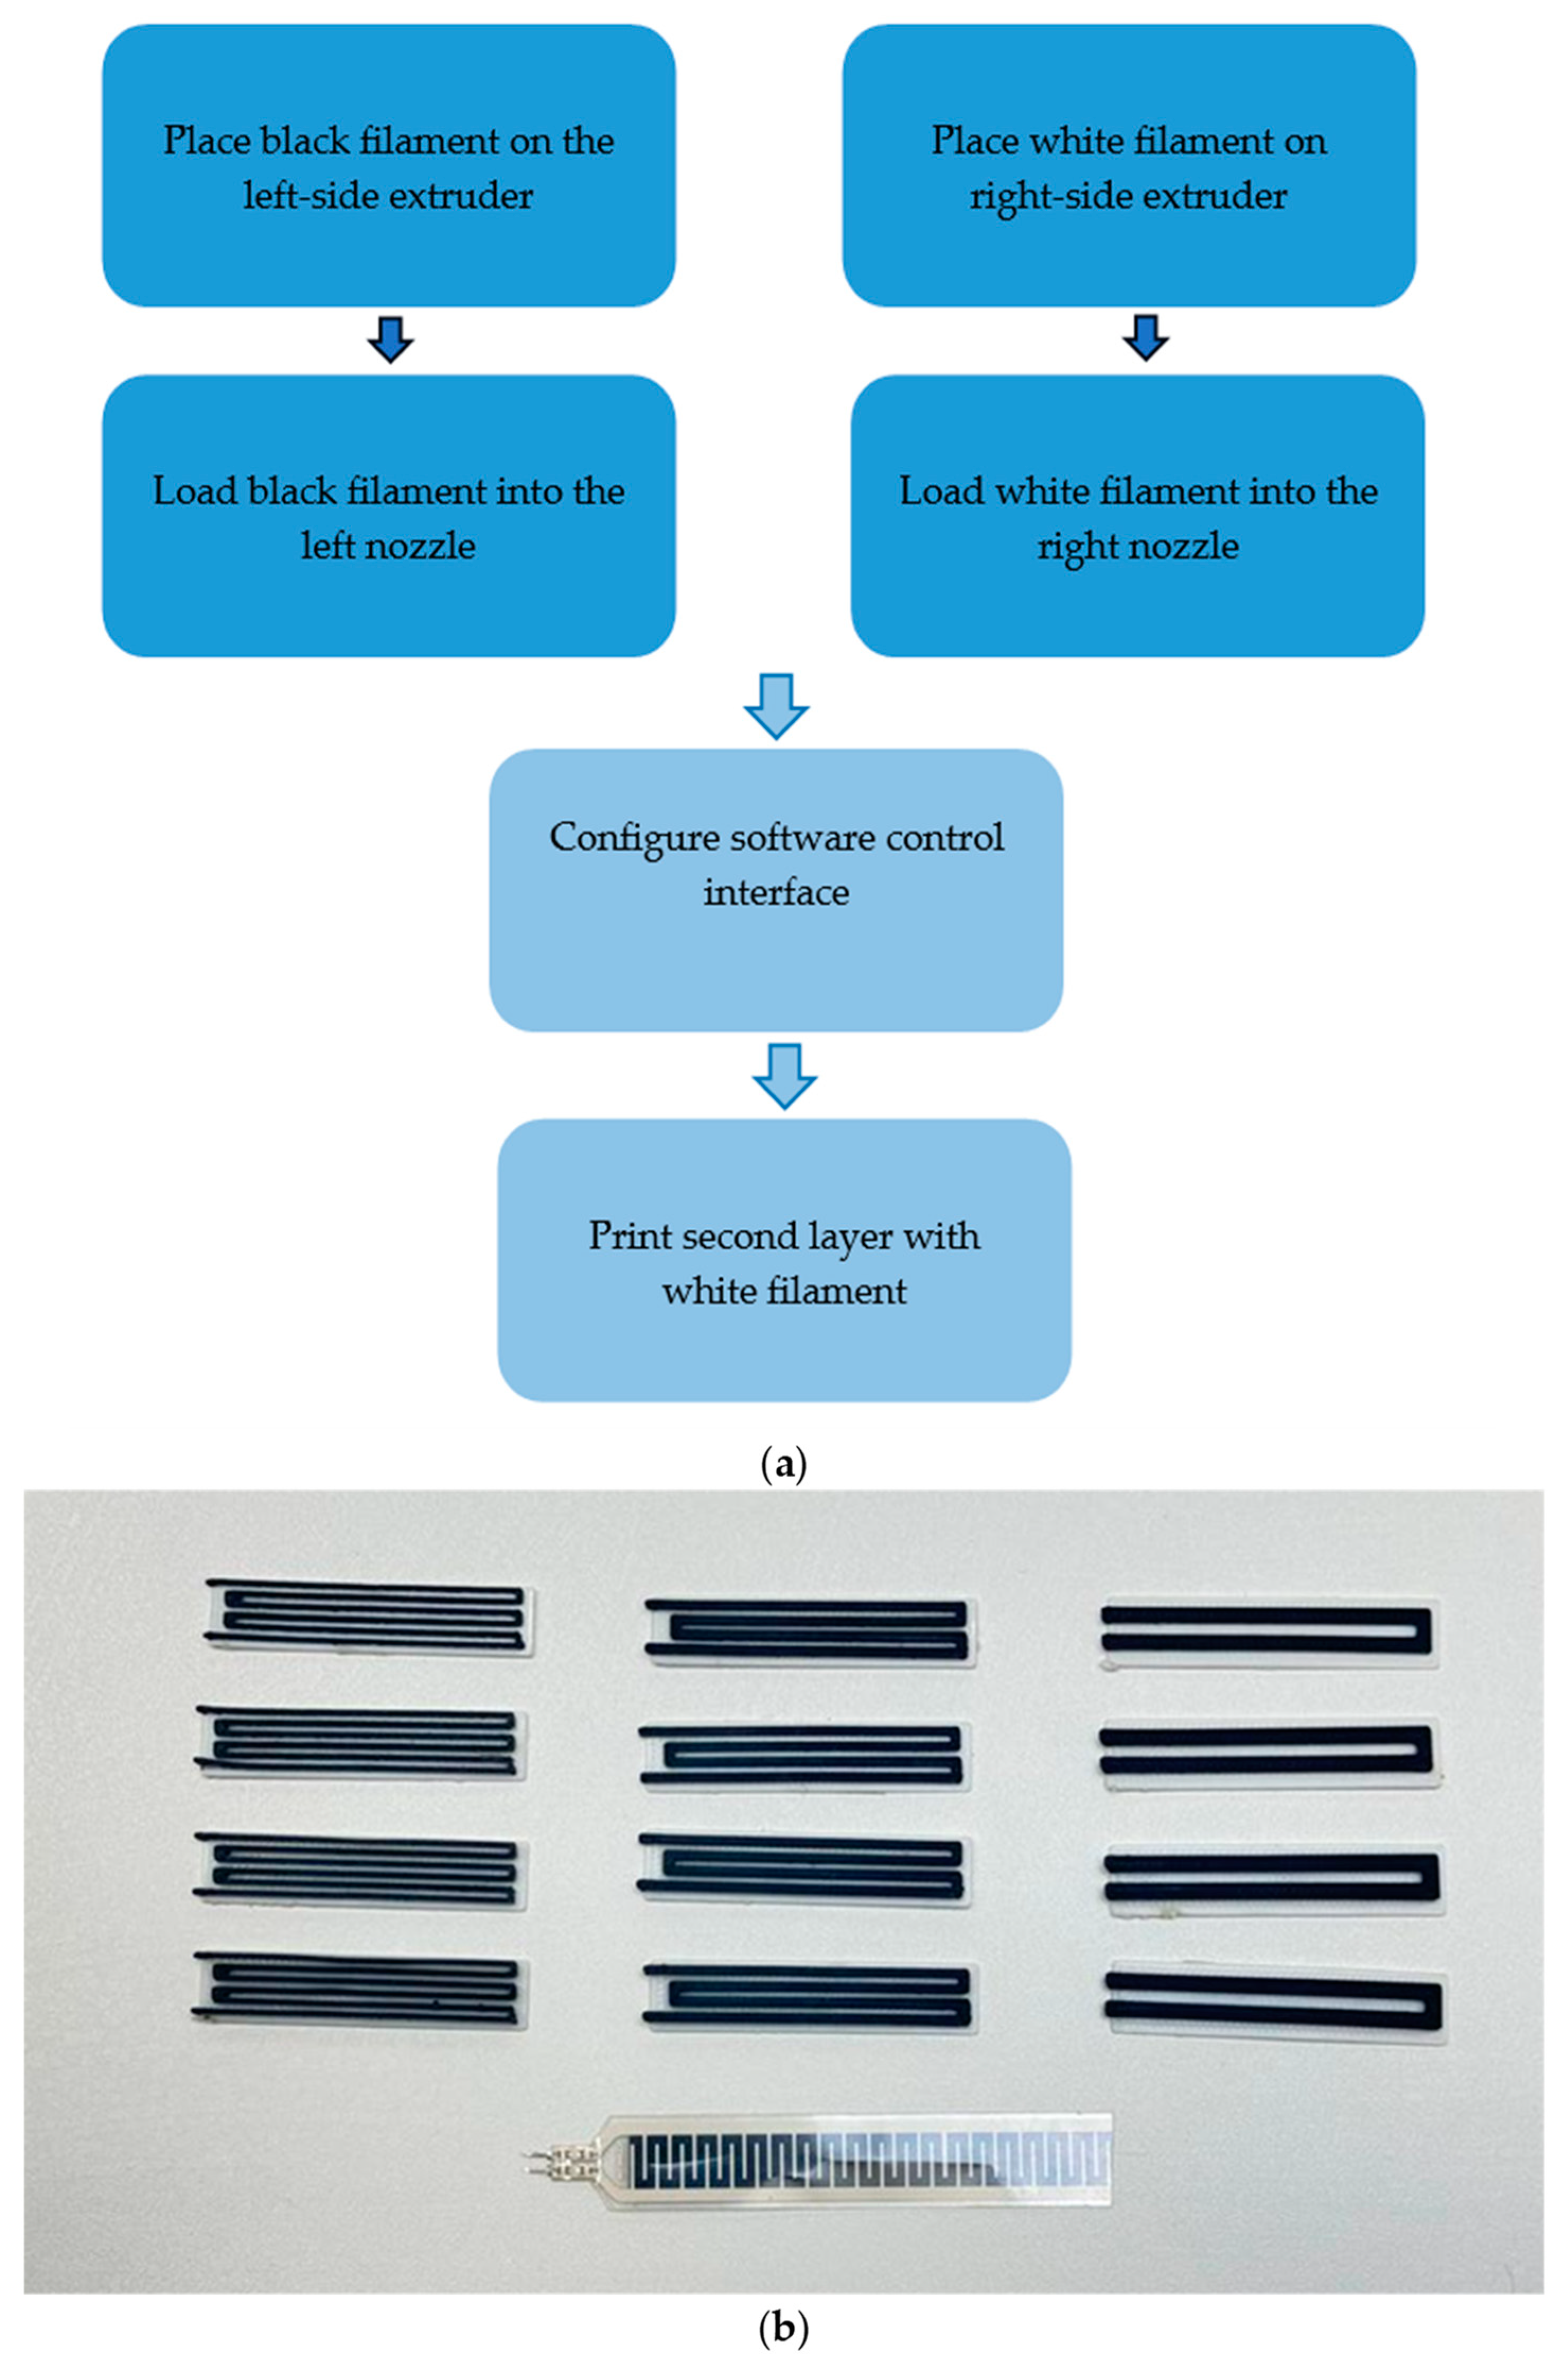
Table 3 illustrates the configuration of the 3D printer used for the flexible sensor and PLA for the curved platforms, as well as the properties of the three filament materials used. The provided values are parameters that are inputted into the printer’s settings to ensure its optimal performance. Ninja Flex is the trade name for the base layer filament, which is not conductive. For the conductive top layer, an Eel black carbon-infused flexible filament is used. Also, the PLA filament material is a hardened material that is non-flexible and non-conductive in nature. The diagram presented in Figure 2a illustrates the fabrication and printing procedure for a flexible strain sensor using a FlashForge 3D printer in the BMTech laboratory. This process employs two flexible filaments, one black and one white. Initially, the first layer is printed, followed by the subsequent layer. The software control interface is pre-configured, assigning each filament to its respective extruder to ensure accurate printing. The base layer flexible filament has a white or snow colour, whereas the flexible carbon conducting has a black colour, as depicted in Figure 2b. Figure 2b displays the 3D-printed flexible strain sensors of the twelve sensor designs. Each design differs in terms of the height, width, and spacing of the conductive tracks. One, two, and three turns, the track heights, and the spacing of the track widths are considered in the design. Furthermore, as the objective is to acquire the resistances by manipulating the curvature, specifically by varying the bend radii, four curved platforms are 3D-printed with the radii as their curvatures.
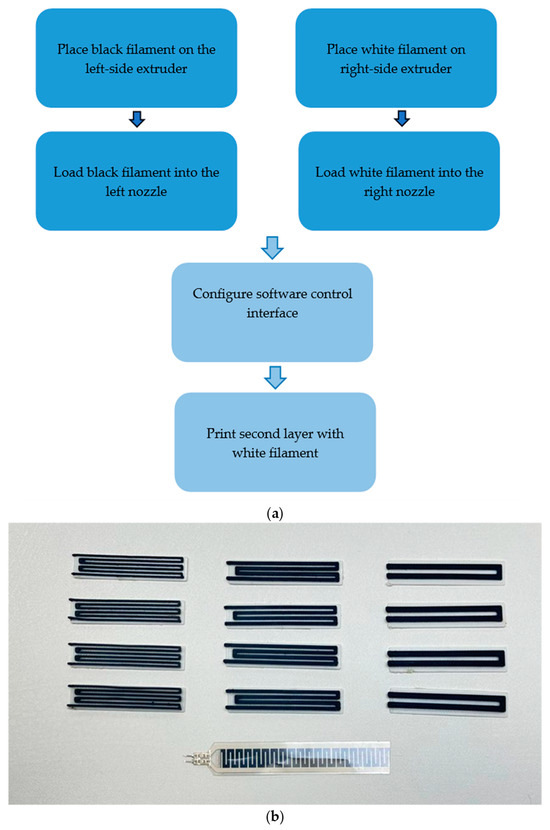
Figure 2.
(a) The fabrication and printing procedures for a flexible strain sensor; (b) 3D-printed flexible strain sensors with an industrial strain sensor for experiments [2].
Figure 2b illustrates the 3D-printed strain sensors and an industrial sensor that are flexible and capable of measuring static curvatures.
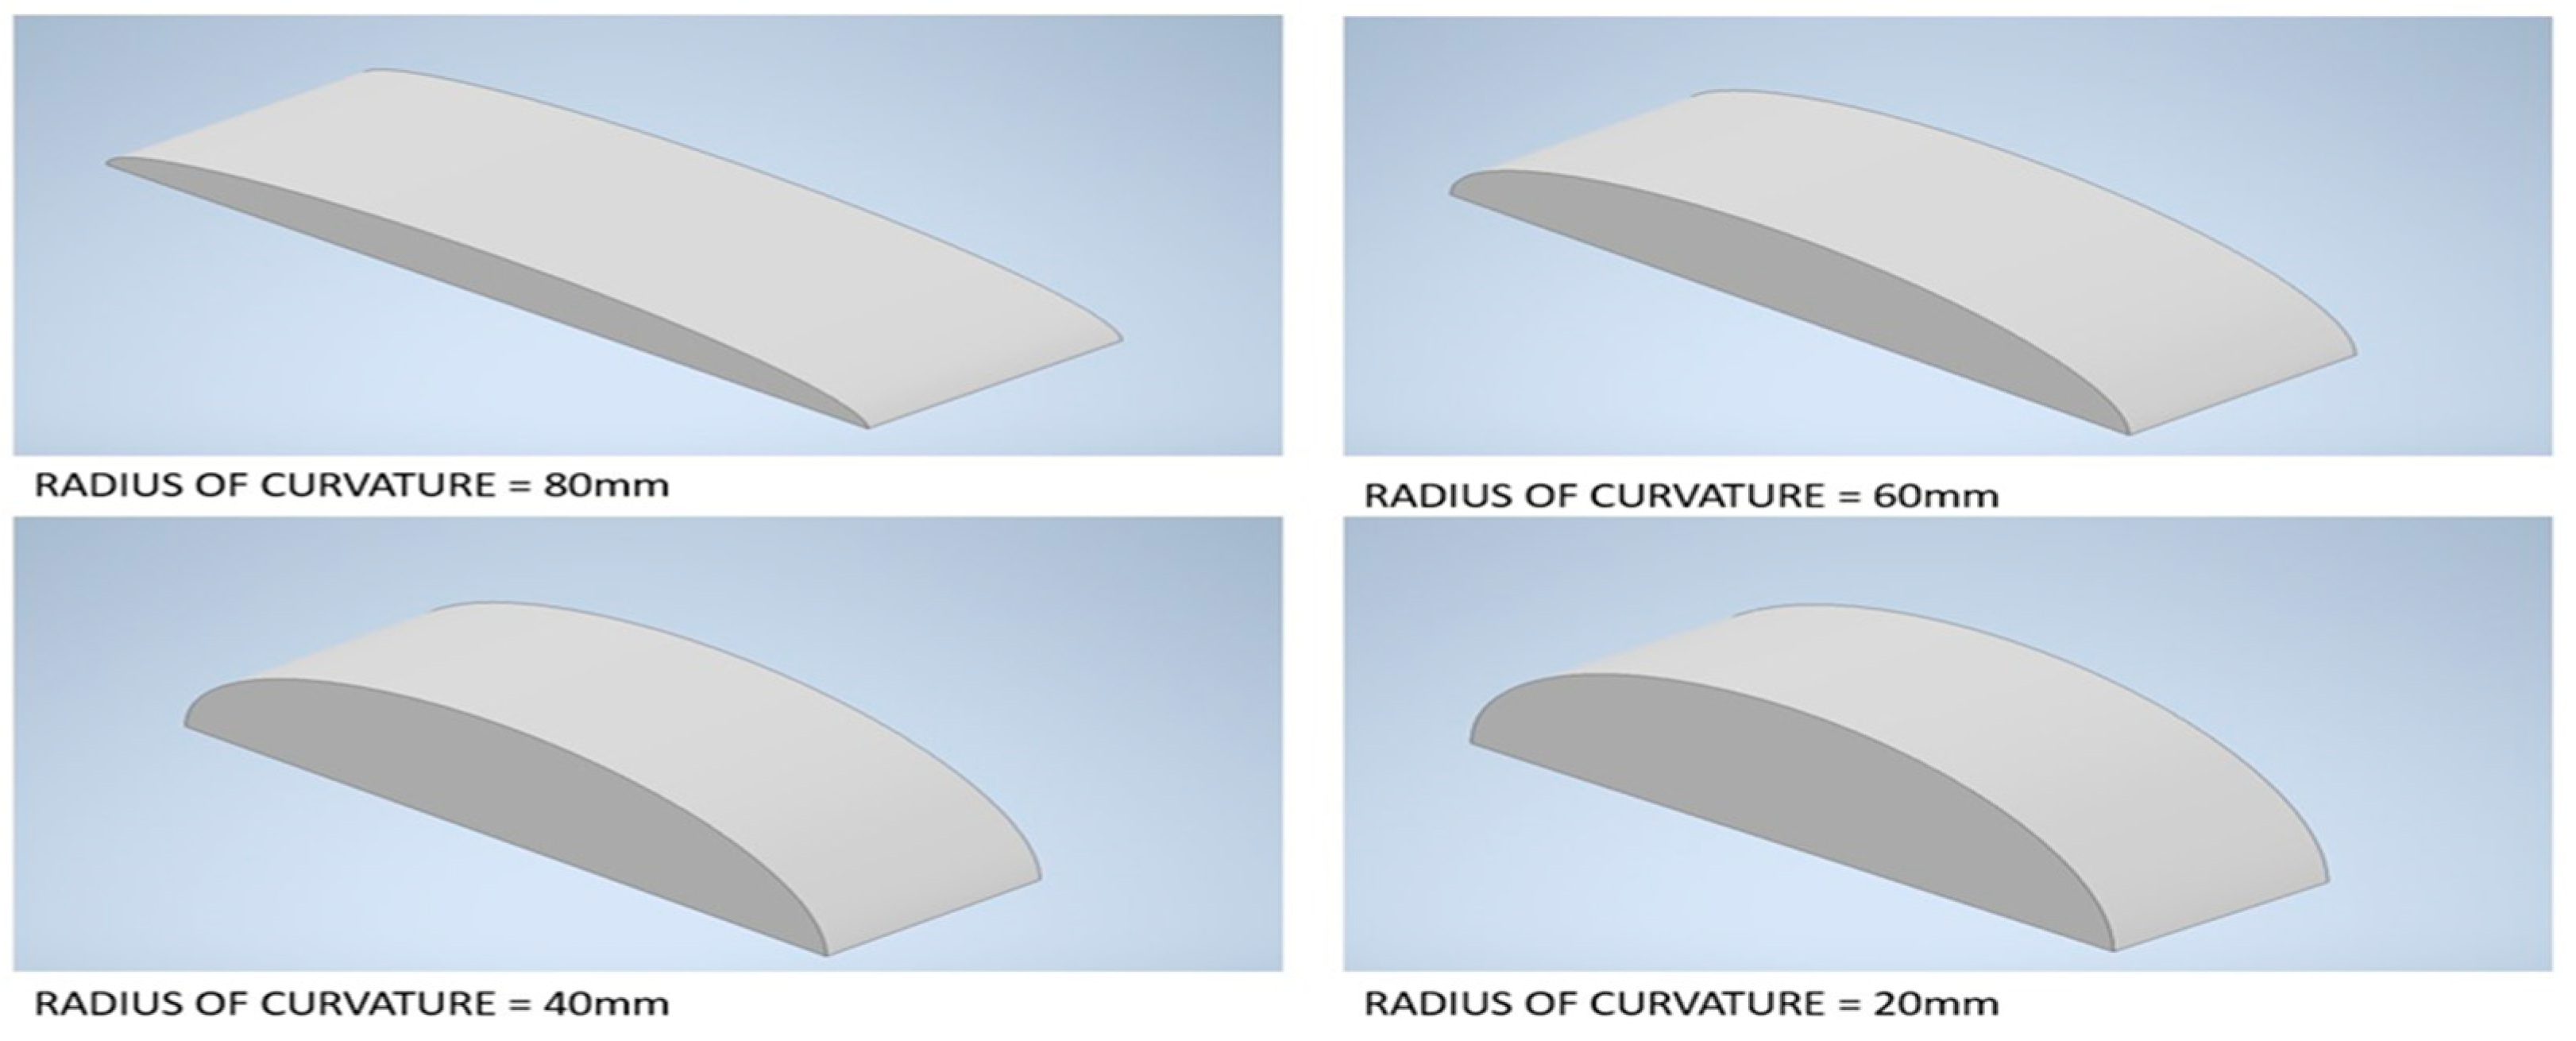
Figure 3 indicates the fixed curvature models are fabricated using a polylactic acid (PLA) filament in an Ultimaker 3D printer equipped with a single extruder tool head. This tool head is the basic and conventional tool head used for printing parts using commonly used filaments such as PLA and acrylonitrile butadiene styrene (ABS). The fixed curvature pieces are equipped with fillets at the corners to mitigate the presence of sharp edges, thereby minimising strain accumulation in the conductive tracks of the sensor at the ends and preventing damage to the sensor caused by repeated testing.
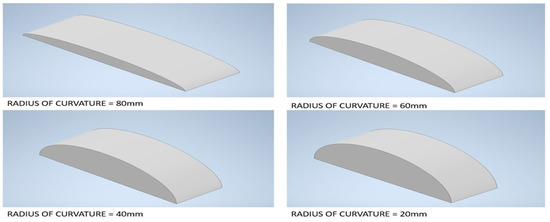
Figure 3.
The 3D models of fixed curvature testing pieces for the experiment.
2.2. Circuit Design
Acquisition Circuit and Measurements
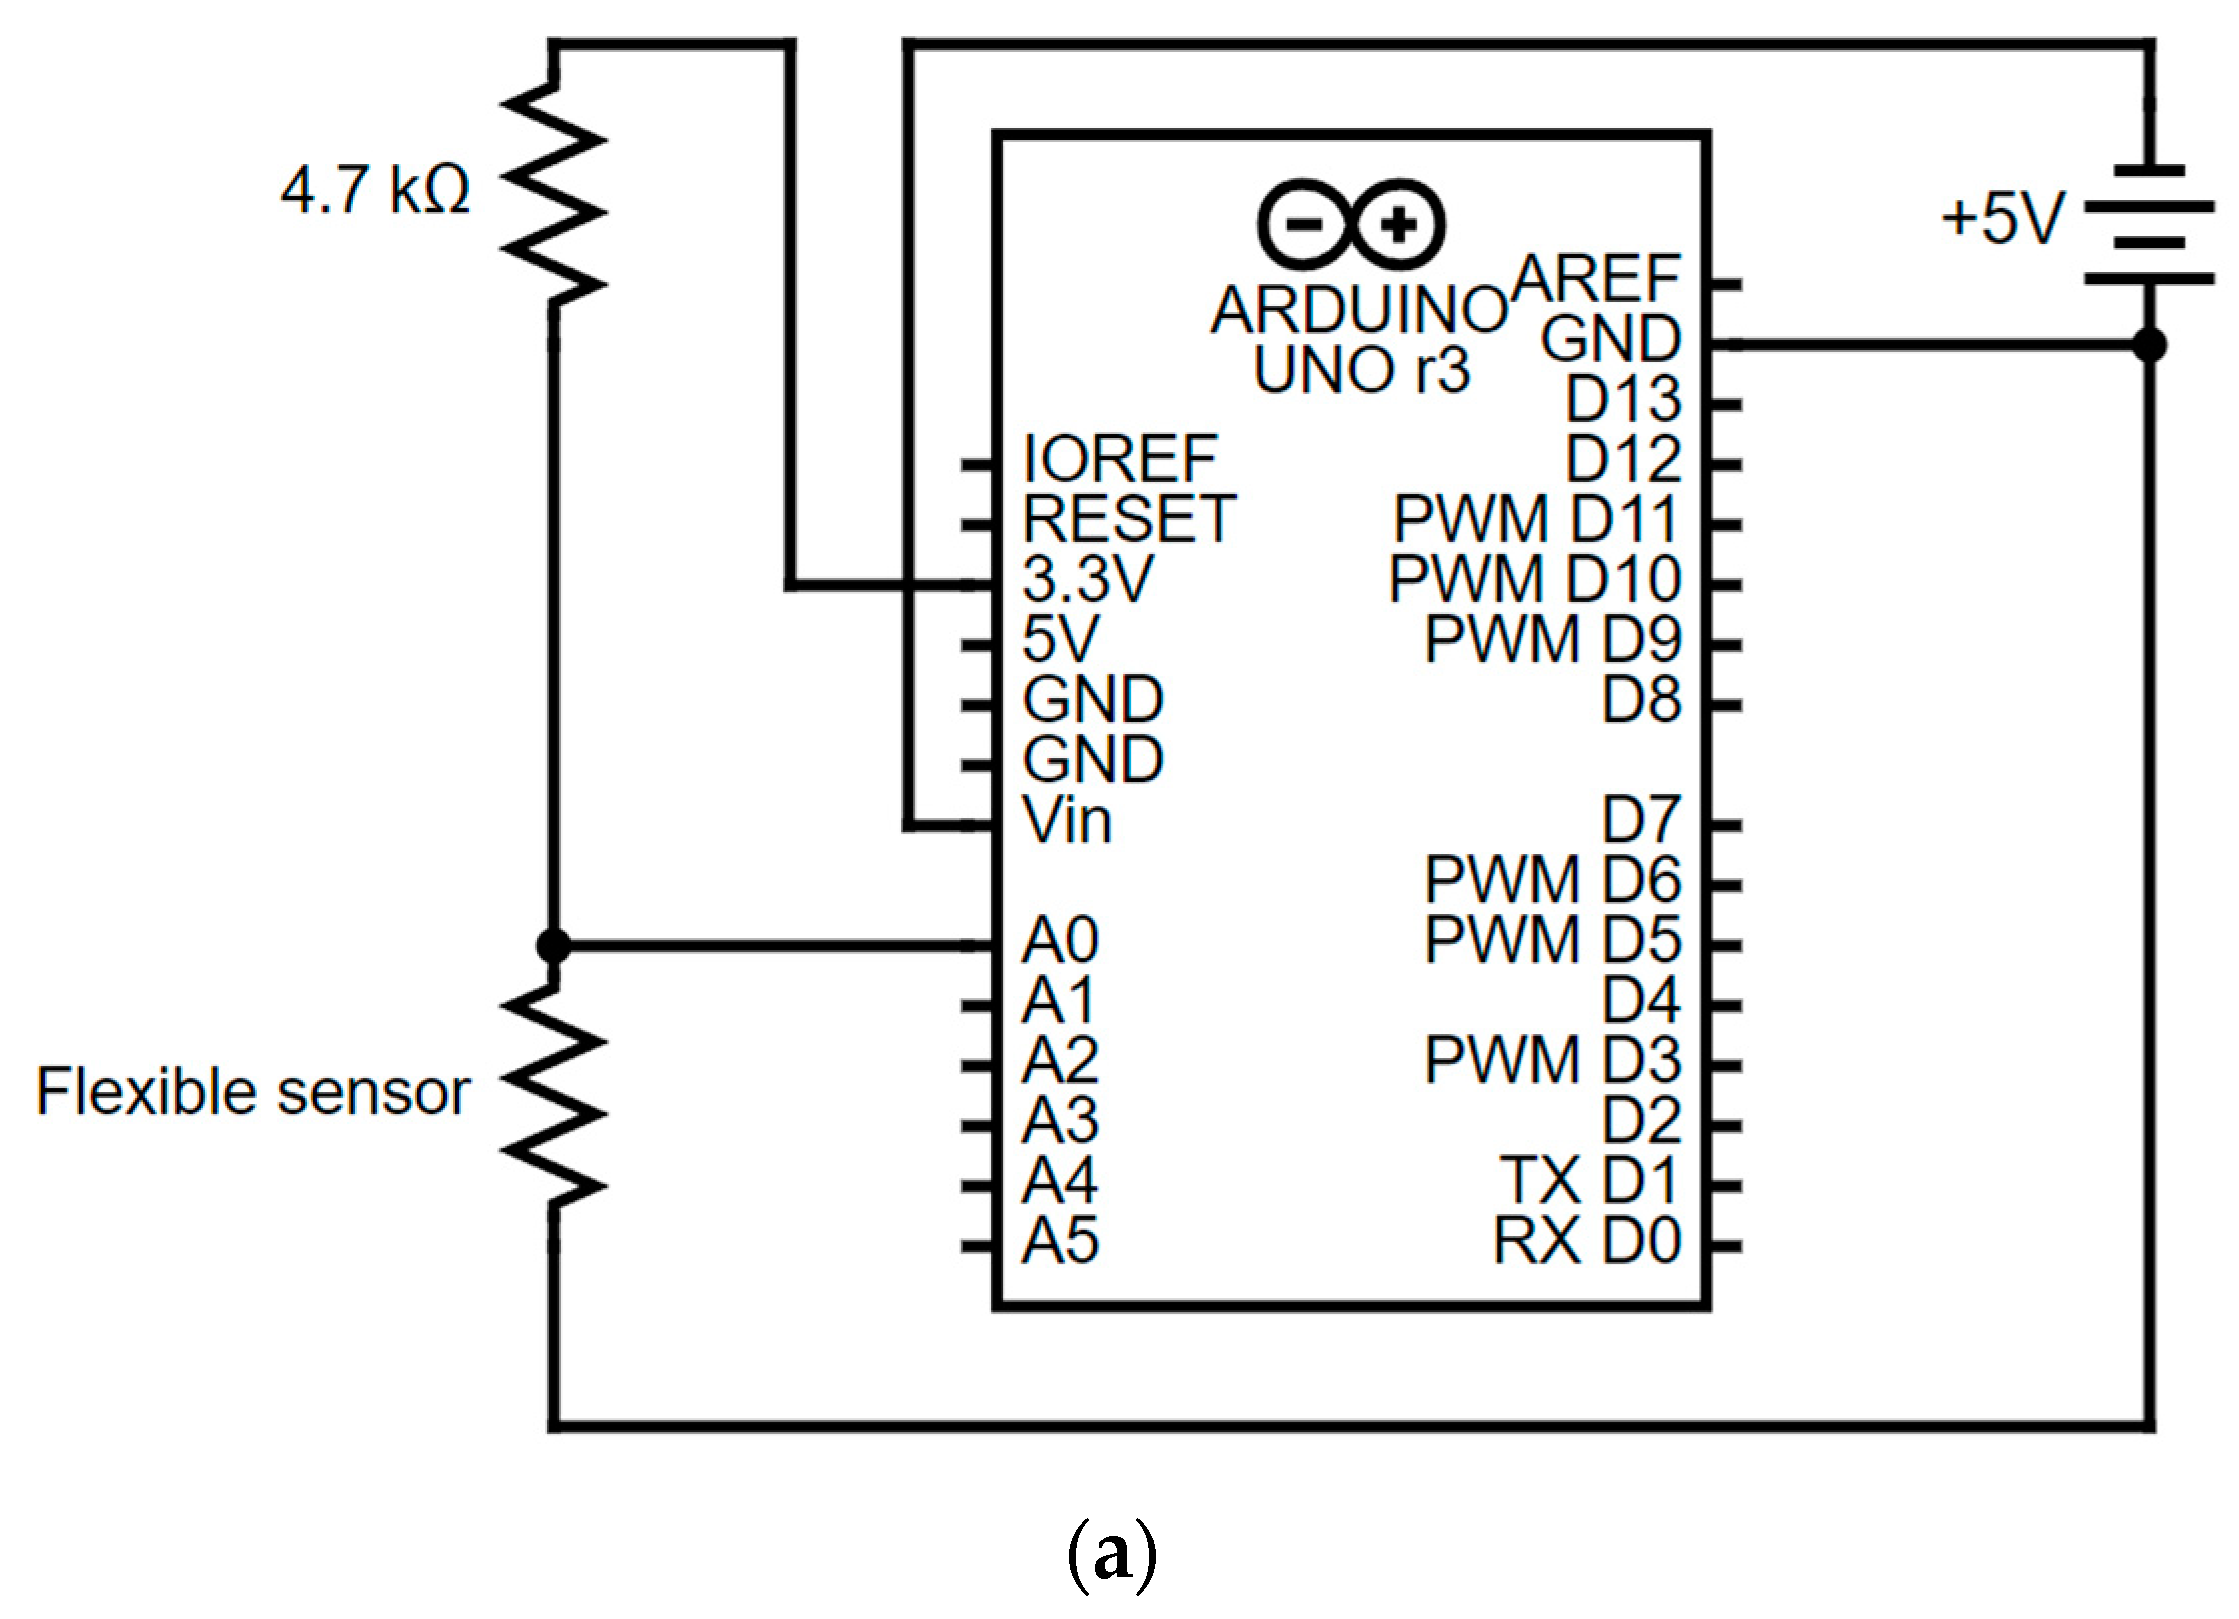
An acquisition circuit and system are designed and implemented. Also, accurate triplicate measurements are taken, which ensures the reliability of the data collected. The research entails the collection of real-time data, which must be measured by all the requisite systems in place. The components are chosen based on a meticulous analysis of the project’s model, with the flexible sensor having a resistance ranging from approximately 2000 Ω to 5000 Ω. The selection of the fixed resistor is based on its compatibility with the resistor range used in a voltage divider circuit. This circuit is connected to an Arduino module and powered by a laptop’s universal serial bus (USB) plug.
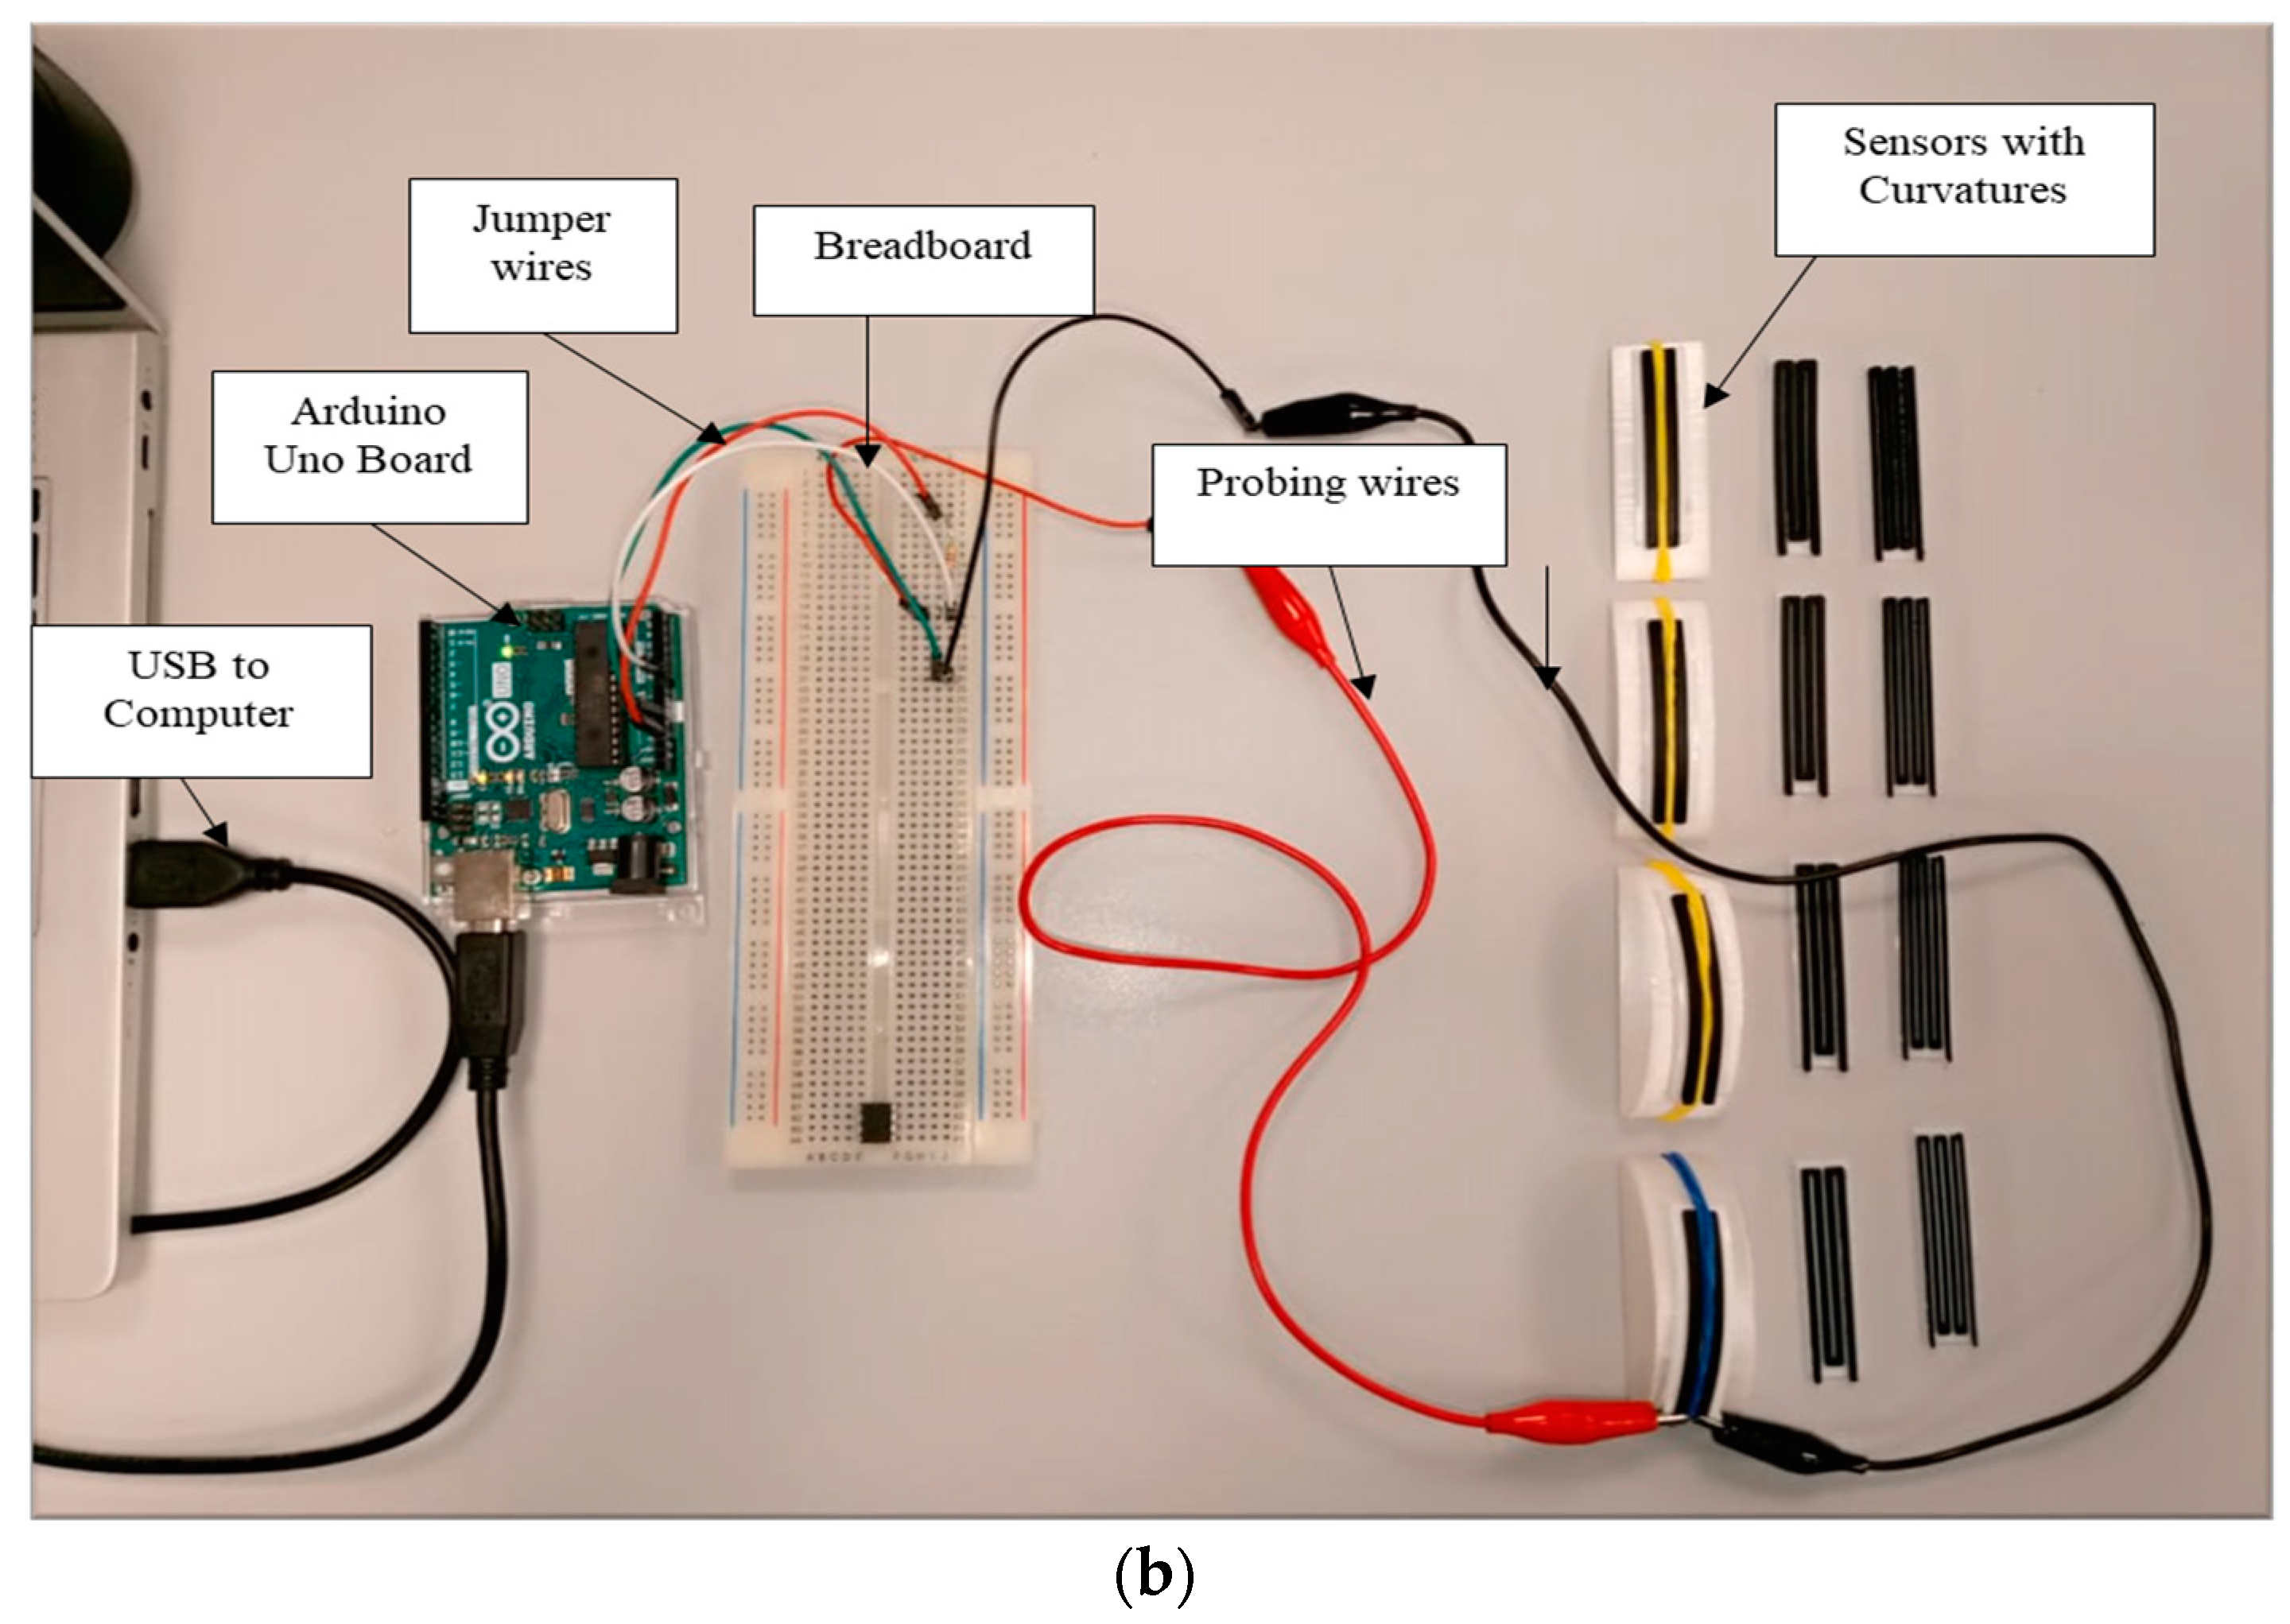
The circuit is programmed with the necessary code for operation. Figure 4 illustrates the circuit diagram used to acquire the resistances, which are responsive to the curvature the sensor is subjected to. The circuit is designed as a voltage divider due to the inherent electrical properties of the flexible strain sensor, which naturally opposes the flow of current. The degree of opposition to the flow of current is a direct replica of the output load of the flexible sensor.
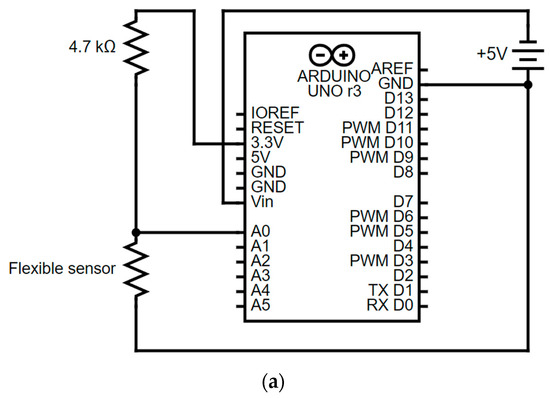

Figure 4.
(a) Circuit diagram of data acquisition circuit (DAQ) for experiments. (b) Sensor testing setup [22].
2.3. Experimental Procedure for Flexible Strain Sensor
The experiment was conducted in the Biomedical Laboratory located in the School of Engineering at the University of Lincoln. The activities encompass the fabrication of the sensor circuit, the production of the sensors using 3D printing, the integration of the flexible strain sensors, and the collection of data. Twelve sensors underwent static testing, where each sensor was tested by placing it at various fixed curvatures over some time. The data are collected using an Arduino UNO and then plotted using MATLAB and an Excel worksheet. These tests were conducted independently to complement another test performed on an industrial flexible sensor. Using the same conditions and steps, the experimental values are always compared to see how big the changes are in both a new flexible sensor and an industrial one. For the static testing, some time to evaluate sensor responsiveness is observed. Sampling is done at 100 ms (or 0.1 s) intervals, giving a sampling frequency of:
where Fs is the sampling frequency, and Ts is the sampling period. The experiments are conducted for a duration of ten minutes. This process is replicated for twelve distinct designs and five varying curvatures, including flat positions, and triplicates of measurements are taken and averaged to ensure that random experimental errors are minimised.
2.4. Finite Element Analysis (FEA)
2.4.1. Design and Simulation
The exploration of the complexities of thermoplastic polyurethane (TPU) as a hyper-elastic material for sensor design and the intrinsic properties of its structure is carried out. The simulation is achieved using the Ansys FEA simulation software (Ansys 2023 R2:Ansys Fluent). The required material properties of the TPU are pre-processed in the Ansys software before the simulation is carried out. The TPU materials—flexible Ninja Flex and Eel carbon black—are investigated to ascertain the degree of their durability and life span. During the thorough investigation of wear and tear, the complex relationship between deformation, stress, and strain is evaluated. Also, the optimisation of the operational mechanism of the sensor models to achieve maximum efficiency in real-life situations is developed. Furthermore, the usefulness of robotic appendages through their complex interactions with the surrounding world is demonstrated.
2.4.2. Material Properties
Table 4 depicts standard stress–strain information obtained from TPU experiments seamlessly incorporated into the customised material, NinjaFlex, within the software system’s “Engineering Data”. This integration involved importing the data-sensor model as “uniaxial test data” for the esteemed category of “hyperplastic experimental data”. We used a complex five-parameter Mooney–Rivlin hyper-elastic material model to accurately describe how TPU behaved. This model was chosen because it matches the TPU experimental data very well. In comparison to other models such as Neo-Hookean, Yeoh, and Ogden, the Mooney–Rivlin model demonstrated superior fitting. For further reference, the specific parameters governing this exceptional material model can be found in [19]. The alignment between the model and the experimental stress–strain data is skillfully achieved through the utilisation of advanced curve-fitting tools available within ANSYS (Ansys 2023 R2:Ansys Fluent).

Table 4.
TPU hyper-elastic material model constants [19].
Table 4 explains the material constants utilised in the hyper-elastic model for TPU. These invaluable constants are pivotal in aptly emulating the multifarious behaviour of TPU under diverse circumstances. The inclusion of negative and positive values adequately captures the material’s distinctive response to deformation, while the incompressibility parameter impeccably fine-tunes the model for a thorough analysis. These indispensable constants are fundamental to guaranteeing the authenticity of simulations and harmonising the model with the genuine behaviour of the material.
2.4.3. Meshing
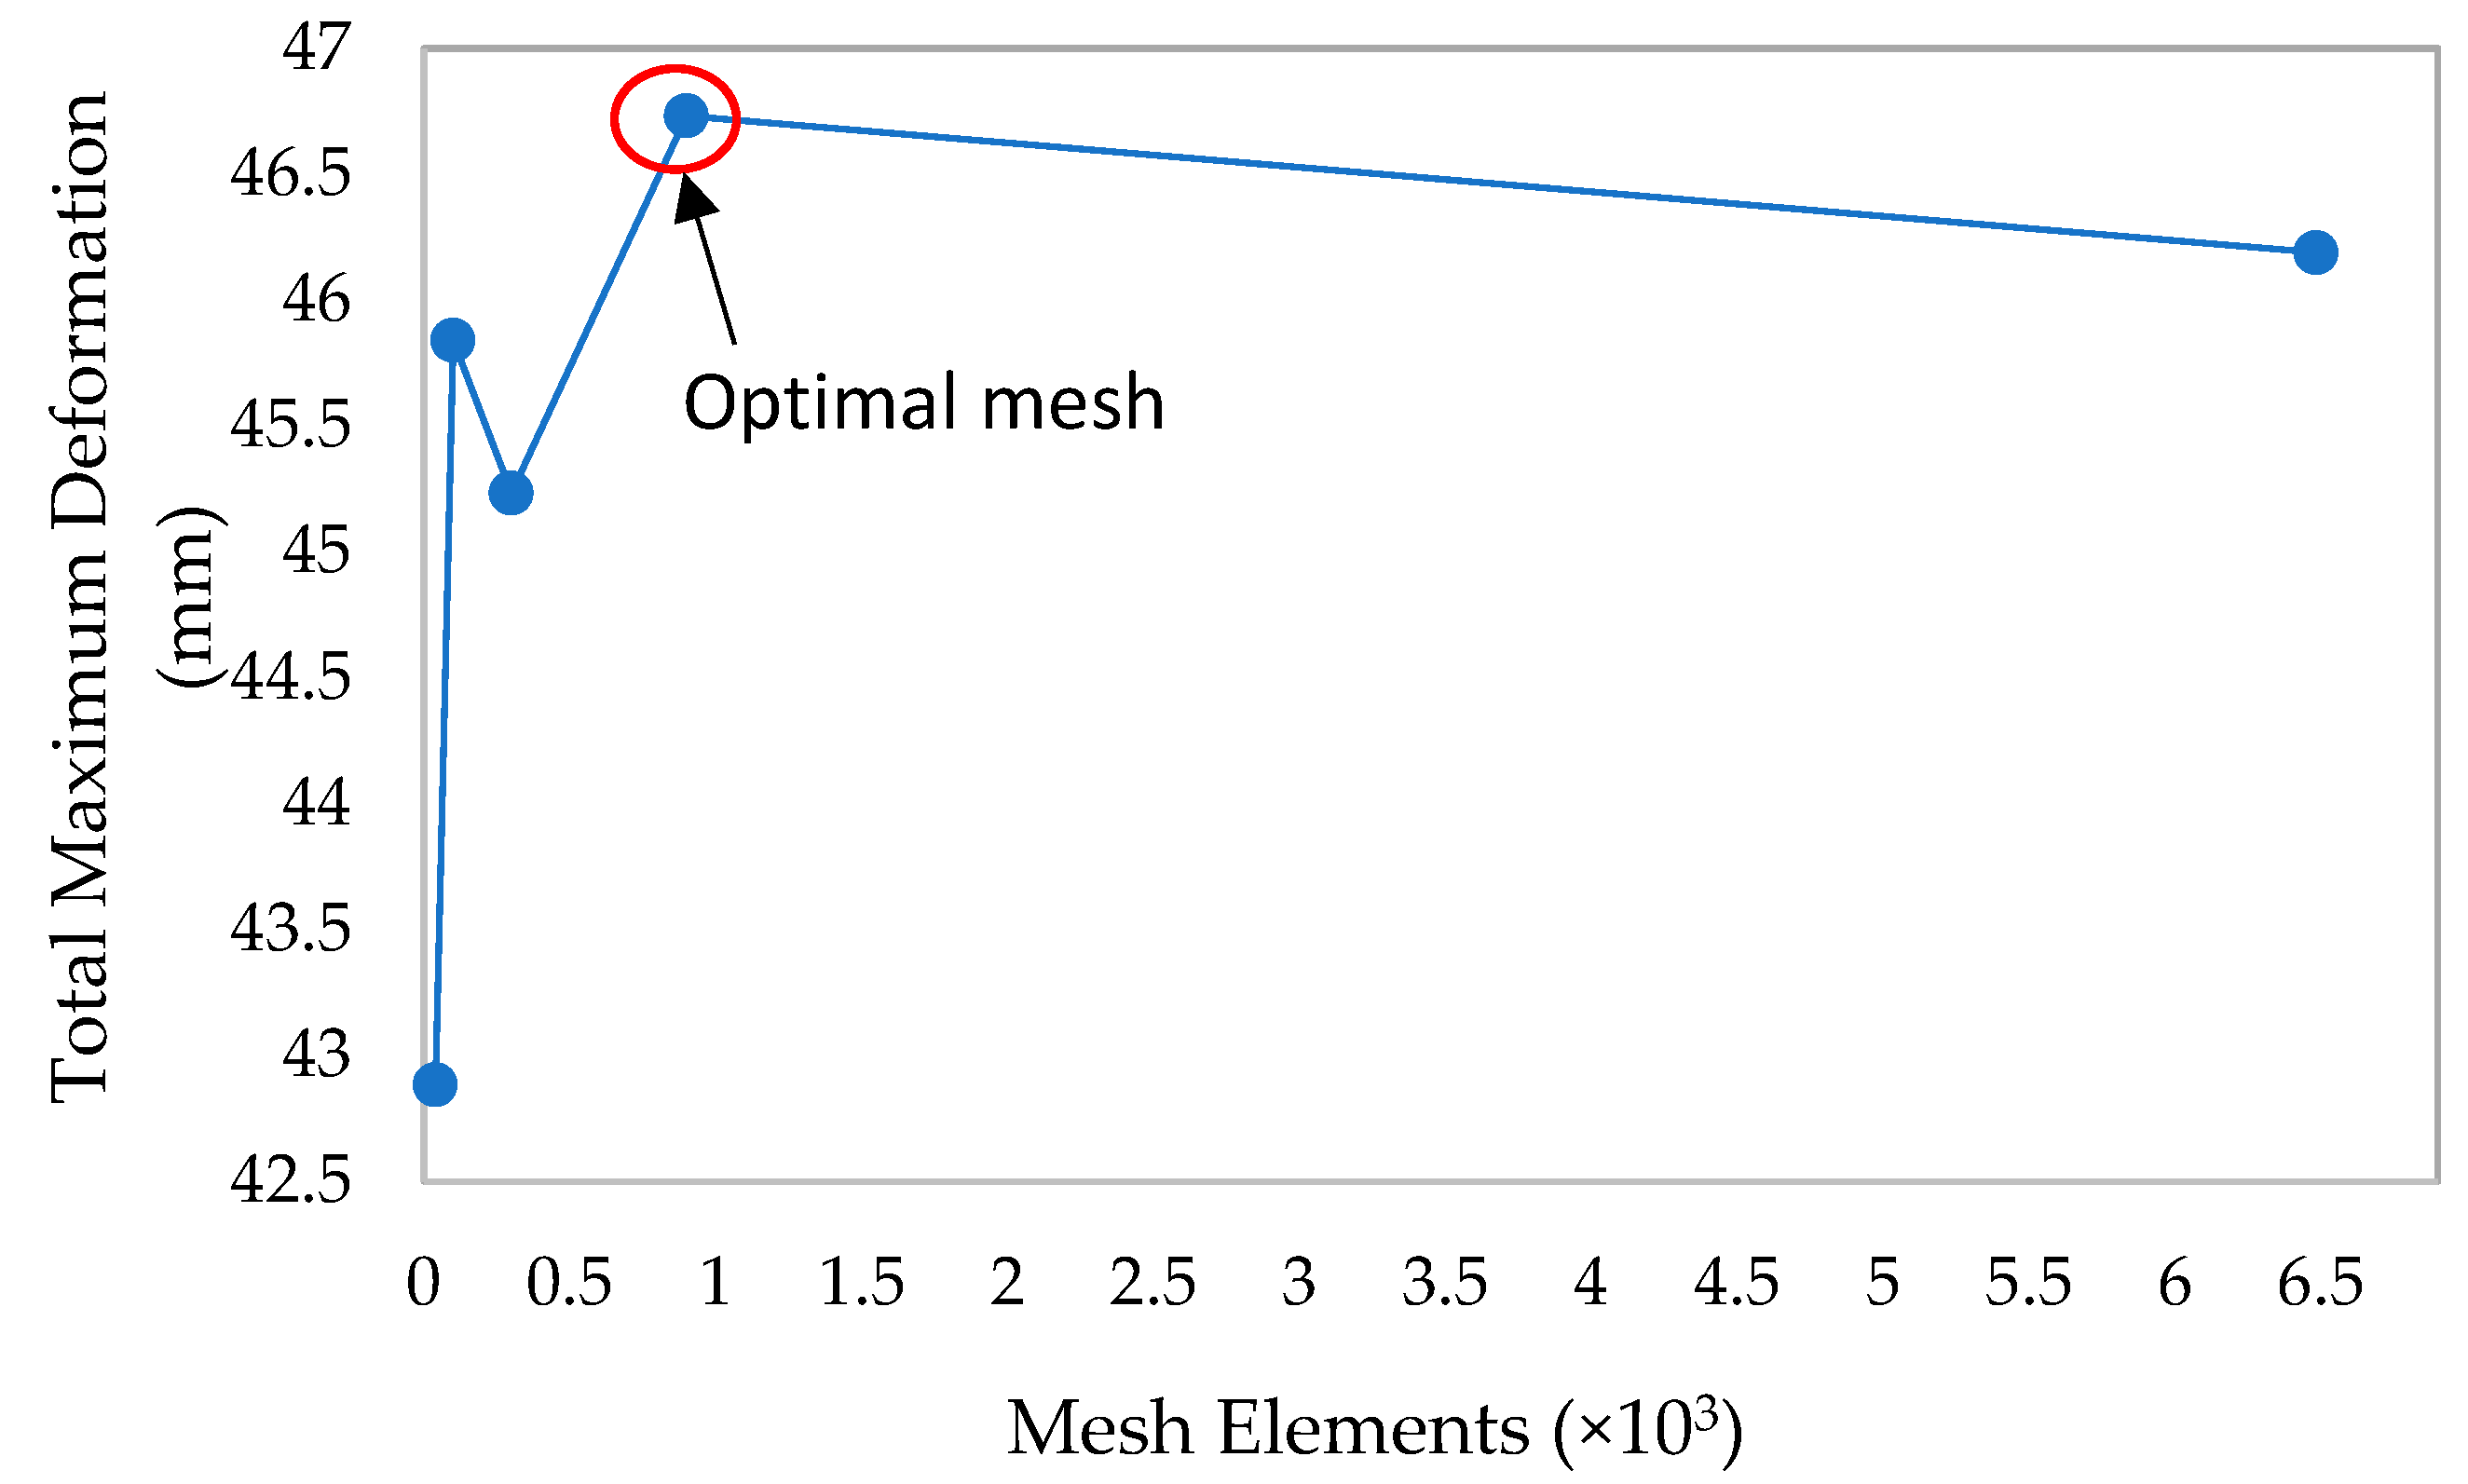
During the simulation, the sensors’ CAD models are converted into a mesh structure using an adaptive approach that incorporates advanced tetrahedral elements. A specific element size of 2 mm is achieved, which is accomplished by thoughtfully applying a sizing function, as demonstrated in the accompanying Figure 5. The chosen mesh design, which is suitable for hyper-elastic materials, is specifically tailored to accommodate significant deformations. It is essential to avoid an excessively refined mesh when dealing with hyper-elastic materials, as it may not yield optimal results. Instead, we employed a relatively coarse mesh that ensures convergence. A meticulous study was done to select the appropriate mesh size, guaranteeing that the solution remains independent of it. In this analysis, the influence of mesh size on physical behaviour is explored, unveiling models in terms of maximum deformation and equivalent stress. As the mesh size diminishes, the model approaches a uniform outcome, offering valuable perspectives on the ideal meshing approach for precise simulations. The optimal mesh is at a 2 mm mesh size and contains approximately 1200 elements. Figure 5 presents the mesh convergence trend, enabling the choice of an optimal mesh size to be made for the simulations.
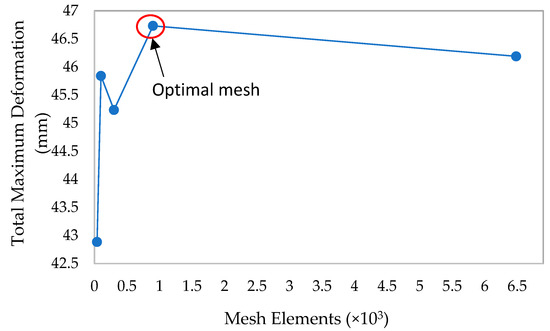
Figure 5.
Mesh convergence—maximum deformation vs. mesh elements.
2.4.4. Boundary Conditions
In order to establish a sense of equilibrium and accurately replicate authentic mechanical distortions within the simulation process, a “fixed support” is applied as a boundary condition, as shown in Figure 6, to firmly secure one side of the structure. Furthermore, on the opposite side in the YZ plane, a force is exerted in the Z-axis to imitate the gripping force. This deliberate application of force is strategically designed to facilitate mechanical distortions that correspond harmoniously with each distinct mode of deformation.

Figure 6.
Showing simulation boundary limits: (a) fixed support and (b) applied force.
The forces applied, as outlined in the provided table for different sensor designs, serve as essential elements in conveying the tale of sensor deformation, harmoniously matching the empirical deformation data. This methodology guarantees that the simulated circumstances faithfully mirror the actual behaviour of the sensors when subjected to specific forces, offering invaluable discernment into their structural reactions.
Figure 6 depicts the point at which fixed support is made in the model concerning the simulation of the applied force. This applied force is very considerate of the appropriate force of the human hand in normal formal exertion in carrying a load.
3. Results
3.1. Resistance Measurements
3.1.1. Flexible Strain Sensor Ideal Resistance Measurement
From Table 5 below, the resistances of the flexible sensors are tabulated against the four categories of design subjected to a flat position test for the different model designs. It is seen that sensor resistance is strongly and directly related to sensor thickness. Furthermore, there is a gradual decrease in resistance with an increase in the number of turns.

Table 5.
Flexible strain sensor in flat position.
Table 5 explains the typical raw test results of the twelve flexible strain sensors when tested with an ordinary electronic multimeter on a resistance test. This reveals that the resistance values increase with the increase in the conductive height track of the carbon black.
3.1.2. Time Series Data for the Flexible Strain Sensors
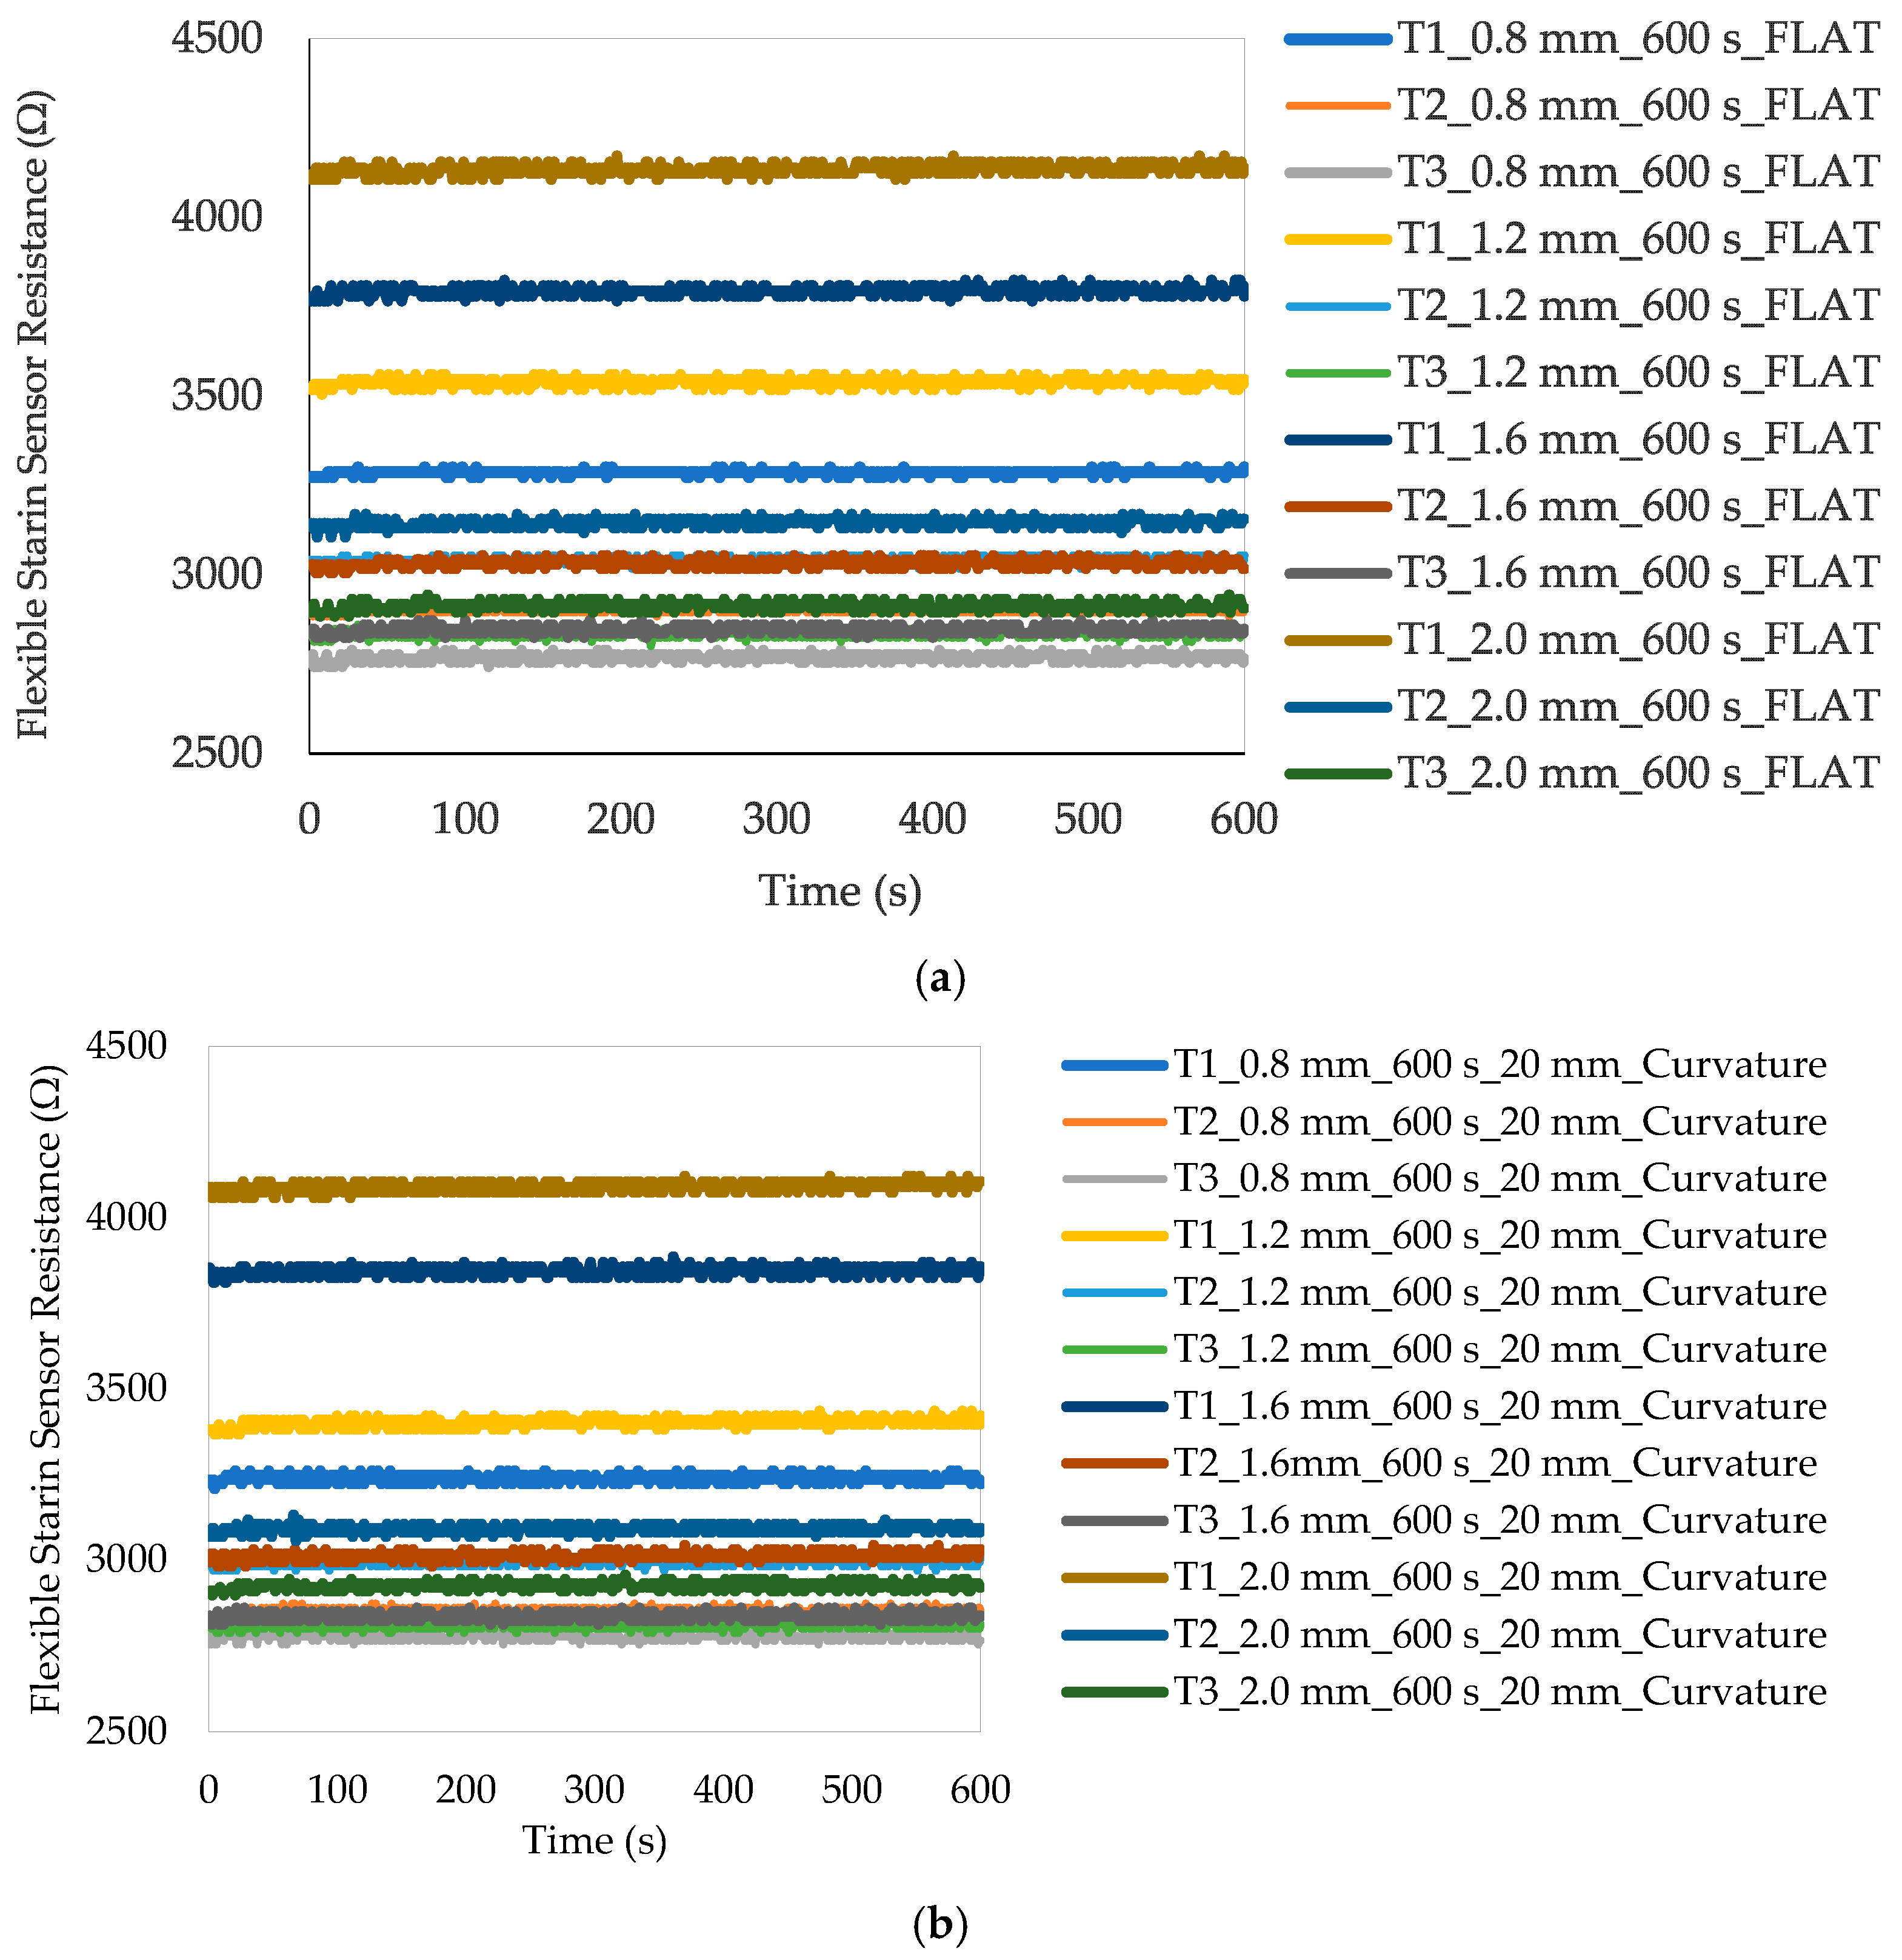
The 3D-printed flexible strain sensors underwent static testing in various modes, such as static curvature and flat position, for ten minutes. This experiment is conducted in three distinct scenarios, specifically referred to as scenario 1, scenario 2, and scenario 3. The data from scenarios 1, 2, and 3 are graphically represented and included in this report. The time traces of the flexible sensor resistances are recorded and plotted as shown in Figure 7a,b and Figure A3c–e.
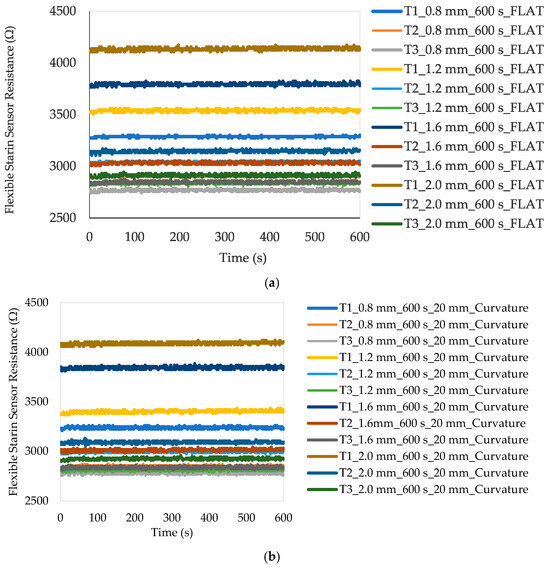
Figure 7.
All flexible strain sensor resistance measurements for (a) flat positions (b) 20 mm curvature.
Figure 7a,b demonstrate that resistances are variables that change over time. This is evident as the setup is powered and multiple resistance value signals are emitted from each flexible strain sensor. The resistance adheres to Ohm’s law of electricity, as previously explained in the initial narration of the methodology. The above response is seen and recorded when the twelve flexible strain sensors are put through a static curve with a flat position and radii of 20 mm and tested one after the other for ten minutes. It can be seen that the steady-state resistances of the sensors with thicknesses of 0.8 mm, 1.2 mm, 1.6 mm, and 2.0 mm are portrayed across the design models. This information will be used for further study. Further resistance data are presented in Figure A3 for the 40, 60, and 80 mm curvatures. They demonstrate that resistance is a variable that changes over time. This is evident as the setup is powered and multiple resistance value signals are emitted from each flexible strain sensor. The resistance adheres to Ohm’s law of electricity, as previously explained in the initial narration of the methodology. The above responses are seen and recorded when the twelve flexible strain sensors are put through a static curve with radii of 40 mm, 60 mm, and 80 mm and tested one after the other for ten minutes. These data will be used for further study.
3.2. Signal Conditioning and Processing of Time Series Data for the Flexible Strain Sensors
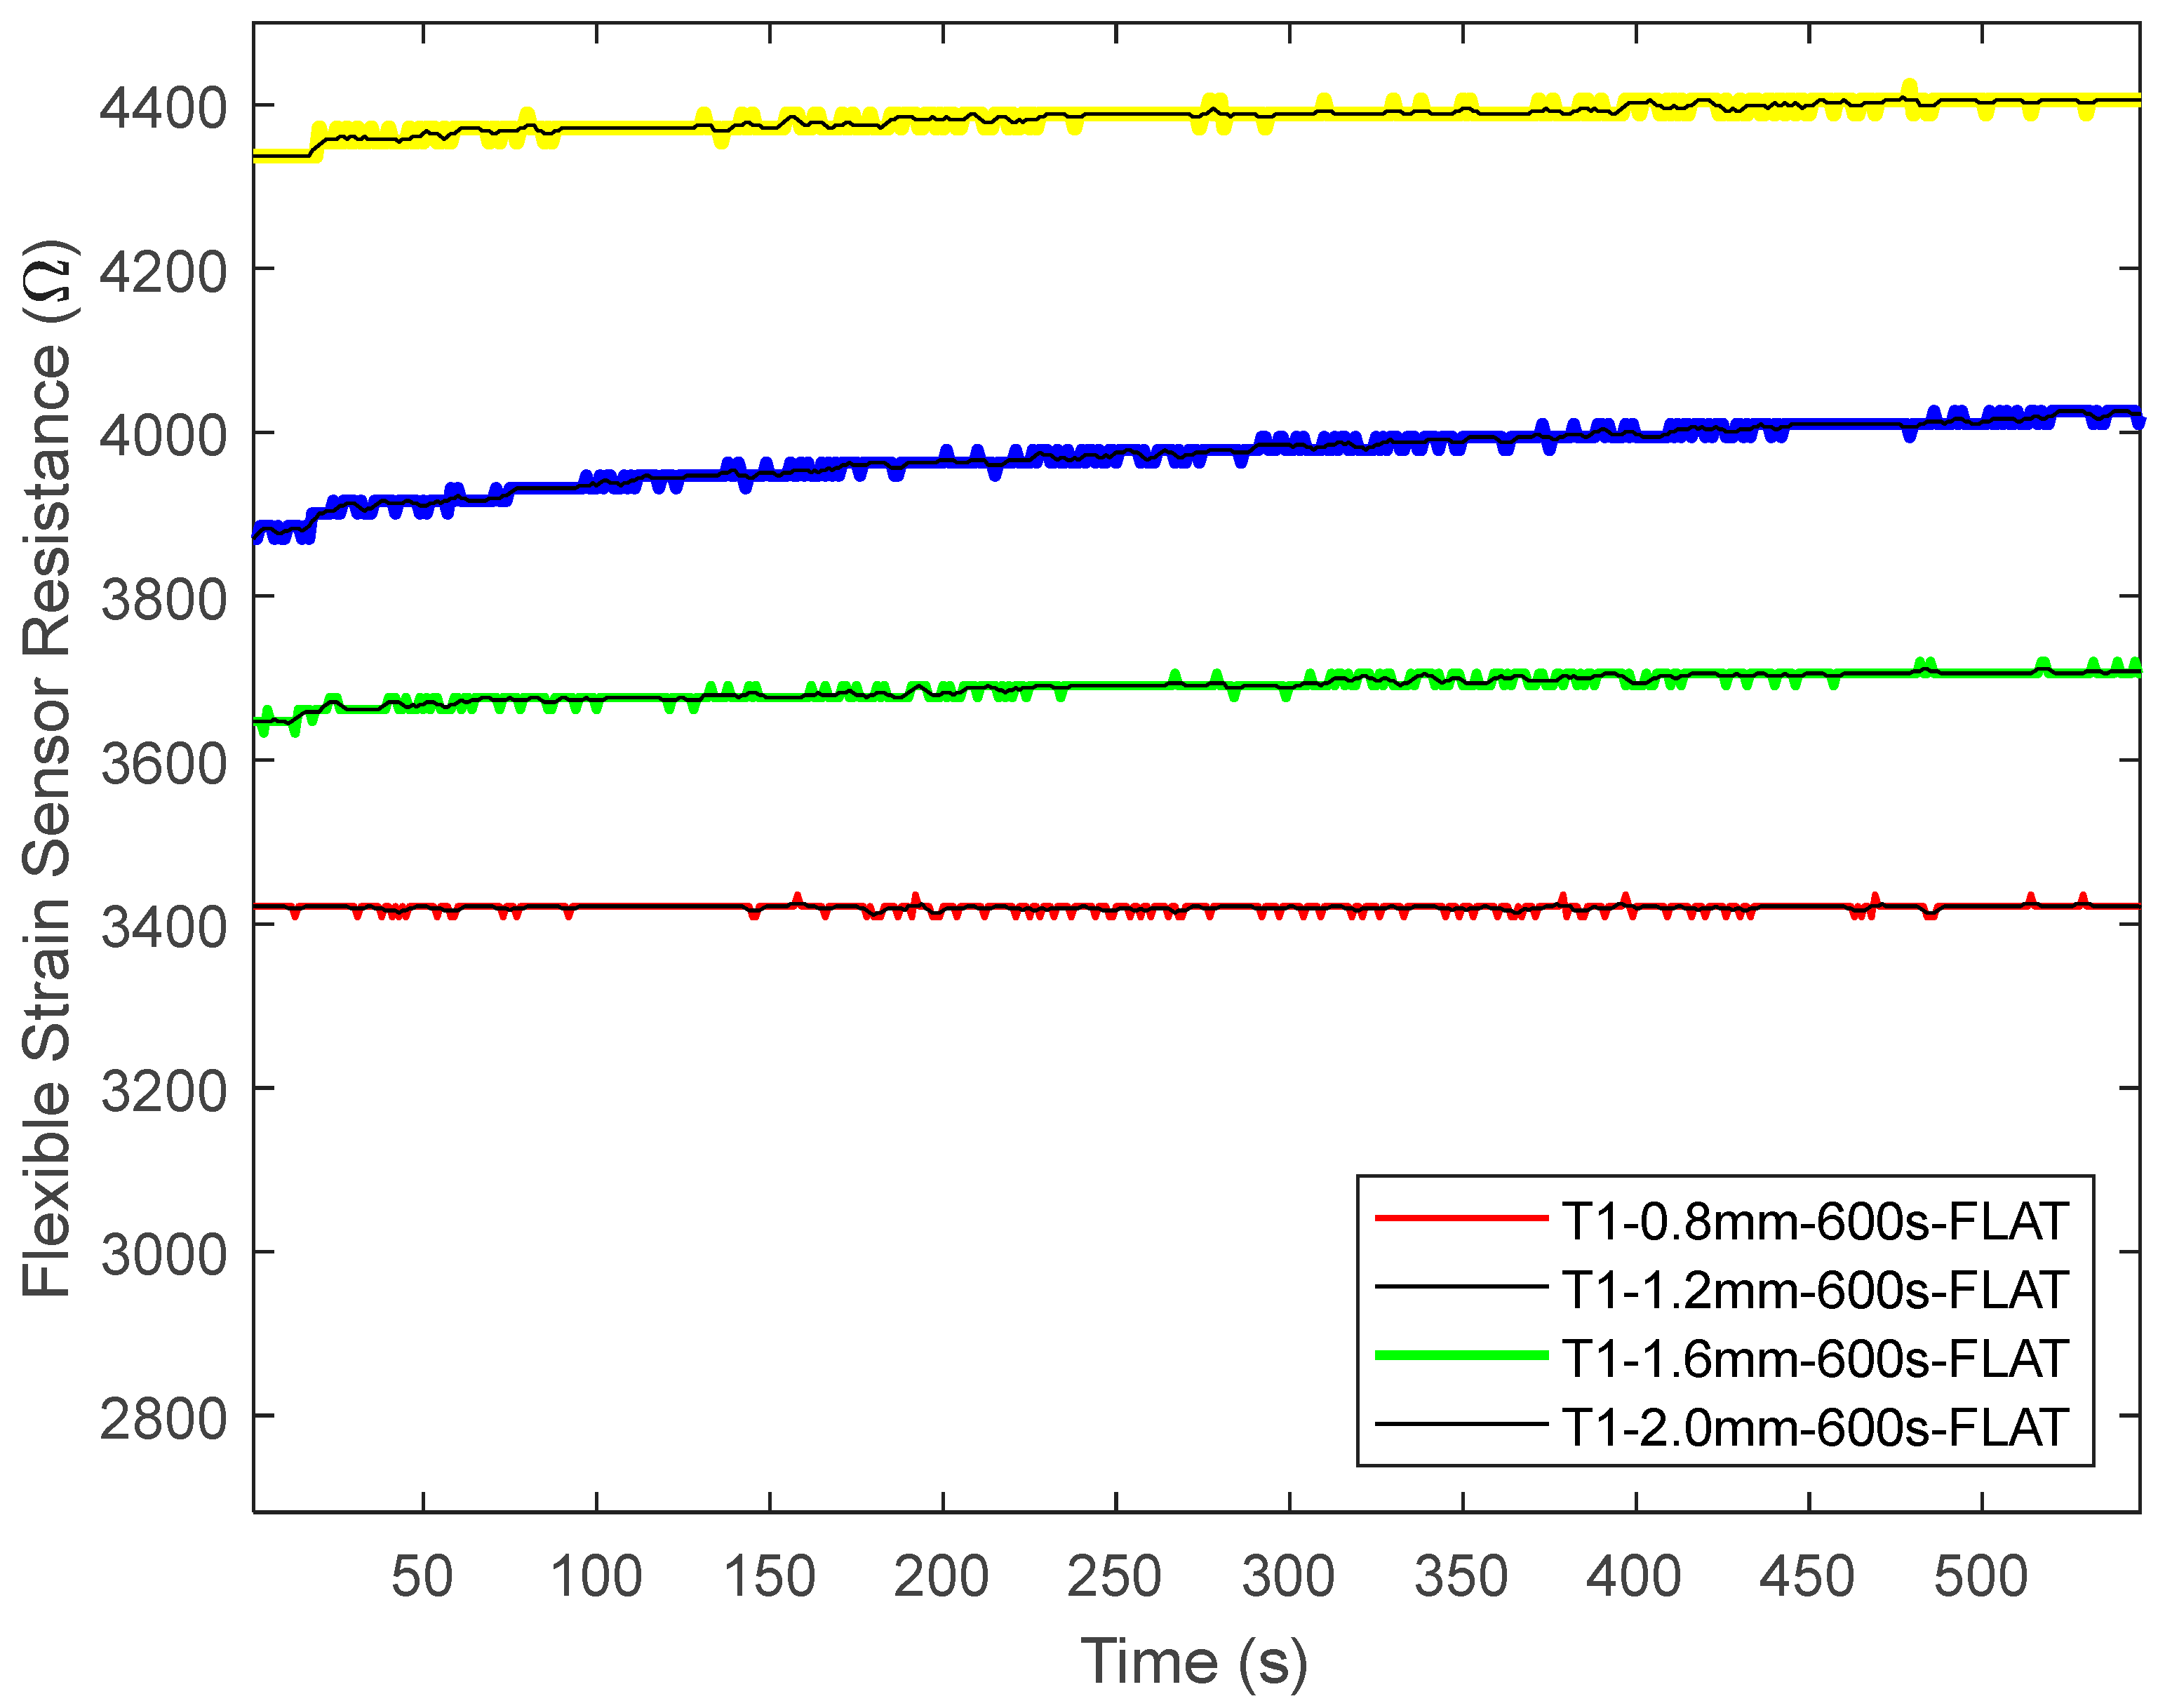
In the course of this research, it was found that the signals generated by measuring the resistances of the circuits contained a degree of noise. As a result, signal conditioning or filtering is carried out. This is implemented not with hardware but post-measurement using software techniques in MATLAB. The “smooth” function is used, which is a moving average filter. A window size of five samples for the moving average is used. Figure 8 indicates a sample of the results for the sensors in the flat state. The smoothed signals are shown in black for each sensor and overlaid over the original noisy signal. The percentage change in the scatter (measured by the standard deviation of each time series) of the smoothed data to that of the raw signals is found to be between one and five per cent. Hence, the conditioning process produced less noisy signals, which provide more consistent values when averaged and compared.
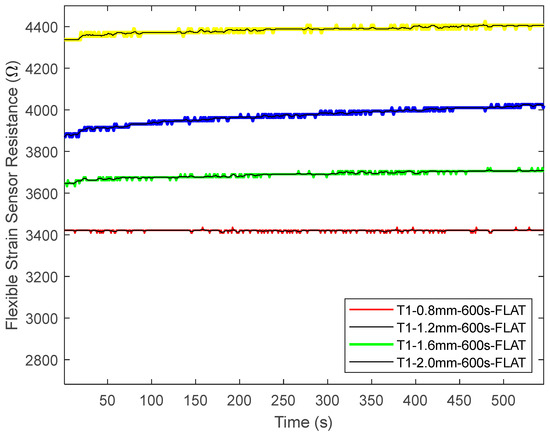
Figure 8.
Signal conditioning and processing of time series data for the flexible strain sensors.
3.3. Impact of Thicknesses, Turns, and Curvatures on Resistance
Static testing is a basic initial test conducted to gain insight into the electrical and mechanical properties of a new conductive material with the trade name Eel. This testing was done on twelve different sensor designs that were developed specifically for this experiment. The design here necessitates the incorporation of various modifications in the overall resistance of the 3D-printed flexible strain sensors. These adjustments include altering the number of flexible conductive tracks (number of turns of the carbon black), adjusting the thickness (height of the conductive track component), and manipulating the curvature during static tests. The average result of the three different scenarios, namely scenario 1, scenario 2, and scenario 3, is calculated by considering the resistance of the 3D-printed flexible strain sensors.
More of the resistances plotted as a function of thickness and curvature radius are presented in Figure A4. These resistance values are obtained as the average of a triplicate of measurements. The error bars are obtained as the maximum percentage standard deviation of the mean measured resistances. The 0.8 mm and 1.2 mm tested flexible strain sensors exhibited minimum resistances of 2878.5 Ω and 2957.6 Ω, respectively, at the different levels of curvatures. Similarly, the sensors displayed maximum and minimum resistances of 2957.62 Ω and 2779.69 Ω at the same curvature levels. This observation highlights a proportional increase in resistance with an increasing radius of curvature. In Figure A5, the oppositions plotted as a function of thickness and curvature radius are given. These resistance values are obtained as the average of a triplicate of measurements. The error bars are taken as the maximum percentage standard deviation of the mean measured resistances. The industrial flexible strain sensor that was tested exhibited a minimum resistance of 2664.6 Ω when measured in a flat position but displayed some varying resistances at the four levels of curvature of 20 mm, 40 mm, 60 mm, and 80 mm. Similarly, the sensors displayed maximum and minimum resistances of 3526.084 Ω and 2863.6 Ω at the same curvature levels. This observation highlights a proportional increase in resistance with an increasing radius of curvature.
3.4. Uncertainty of Resistance Measurements
In this research, the standard deviation of the mean resistance is calculated. This clearly points out that in the average data that resulted from the three raw resistances from the different test scenarios that were carried out, the statistical values of the overall results are validated based on the standard deviation calculations. Plots of these deviations are presented in Figure A6a; the standard deviation as a percentage mean resistance of the flexible strain sensors in the number of tracks of the flexible strain sensor (one turn) has its highest value of 0.08 and the lowest value of 0.01. From Figure A6b, the standard deviation as a percentage mean resistance of the flexible strain sensors in the number of tracks of the flexible strain sensor (two turns) has its highest value of 0.04 and the lowest value of 0. Furthermore, Figure A6c illustrates the standard deviation as a percentage mean resistance of the flexible strain sensors in the number of tracks of the flexible strain sensor (three turns), with the highest value of 0.2 and the lowest value of 0.01. This means that the range of deviation corresponds with the principle of standard deviation as an engineering statistical tool.
3.5. FEA Simulation Results of Sensors Showing Maximum Deflections and Equivalent Stresses
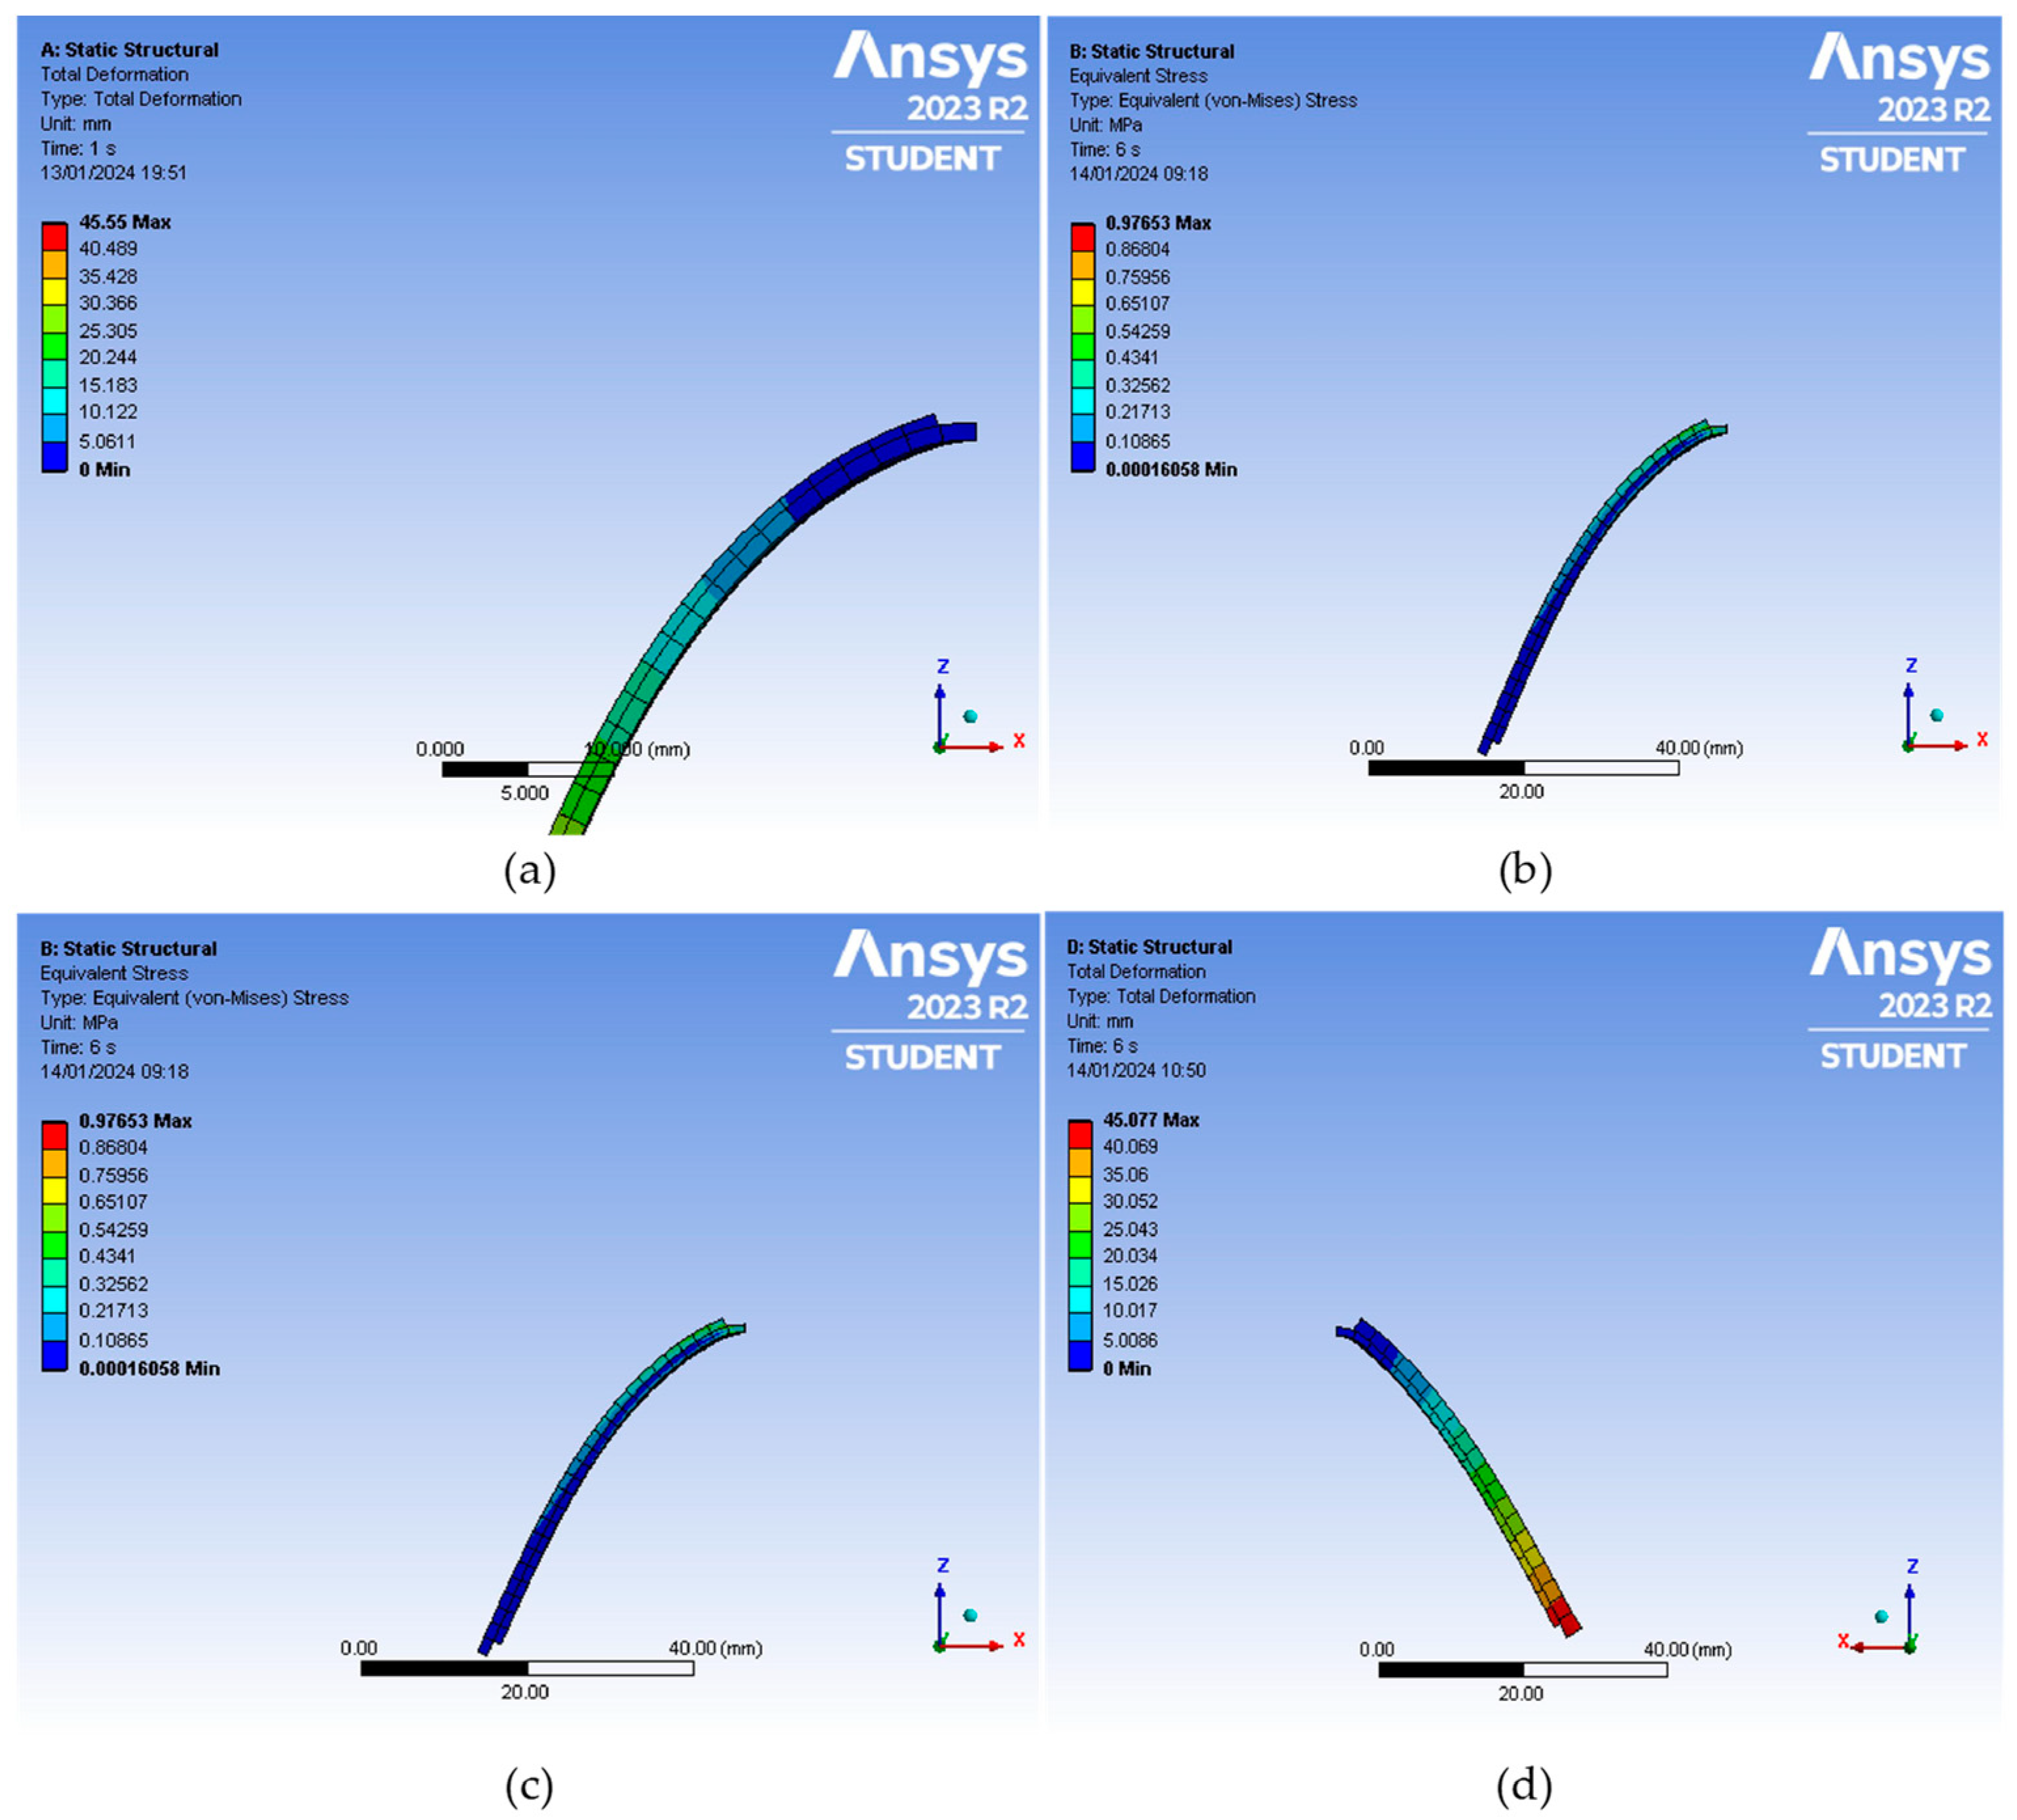
The sensor models are simulated and analysed for their durability and applications to the final printing of the flexible 3D sensors. In this investigation, the maximum deflection for one turn is carried out. Figure 9 demonstrates the respective highest level of deflection of the model sensors when the force is applied to the other free end of the sensor. Recall that one end of the sensor is initially fixed in a position to enable the application of the force, as in normal human palm-finger mimicking. It also explicitly depicts the maximum deformations for the different turns of model designs that are similar throughout the model designs, which indicates structural consistency.
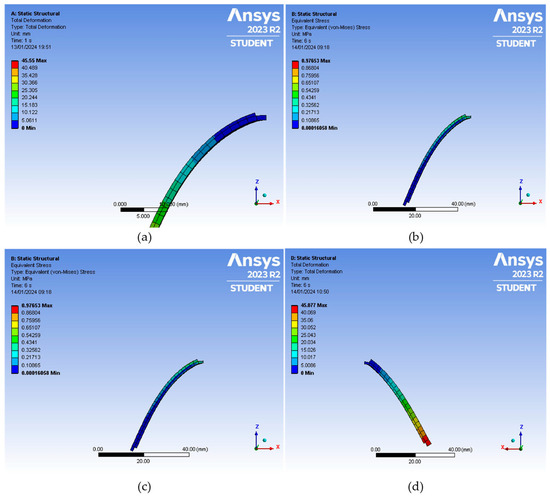
Figure 9.
Showing maximum deflections for one turn: (a) 0.8 mm; (b) 1.2 mm; (c) 1.6 mm; (d) 2.0 mm.
Further deflection results are presented in Figure A7 and Figure A8. Figure A7 demonstrates the respective highest level of deflection of the model sensors when the force is applied to the other free end of the sensor. It is seen from the figure that the maximum deflection for the different turns of model designs is similar throughout the model designs, which indicates structural consistency. As a result, the maximum deflection falls within 45.60 mm and 45.08 mm, which occur at the free end of the sensor model. Figure A8 indicates the respective highest level of deformation of the model sensors when the force is applied to the other free end of the sensor. It confirms that the maximum deformations (within 45.88 mm and 45.62 mm) for the different turns of model designs are similar throughout the model designs, which indicates structural consistency.
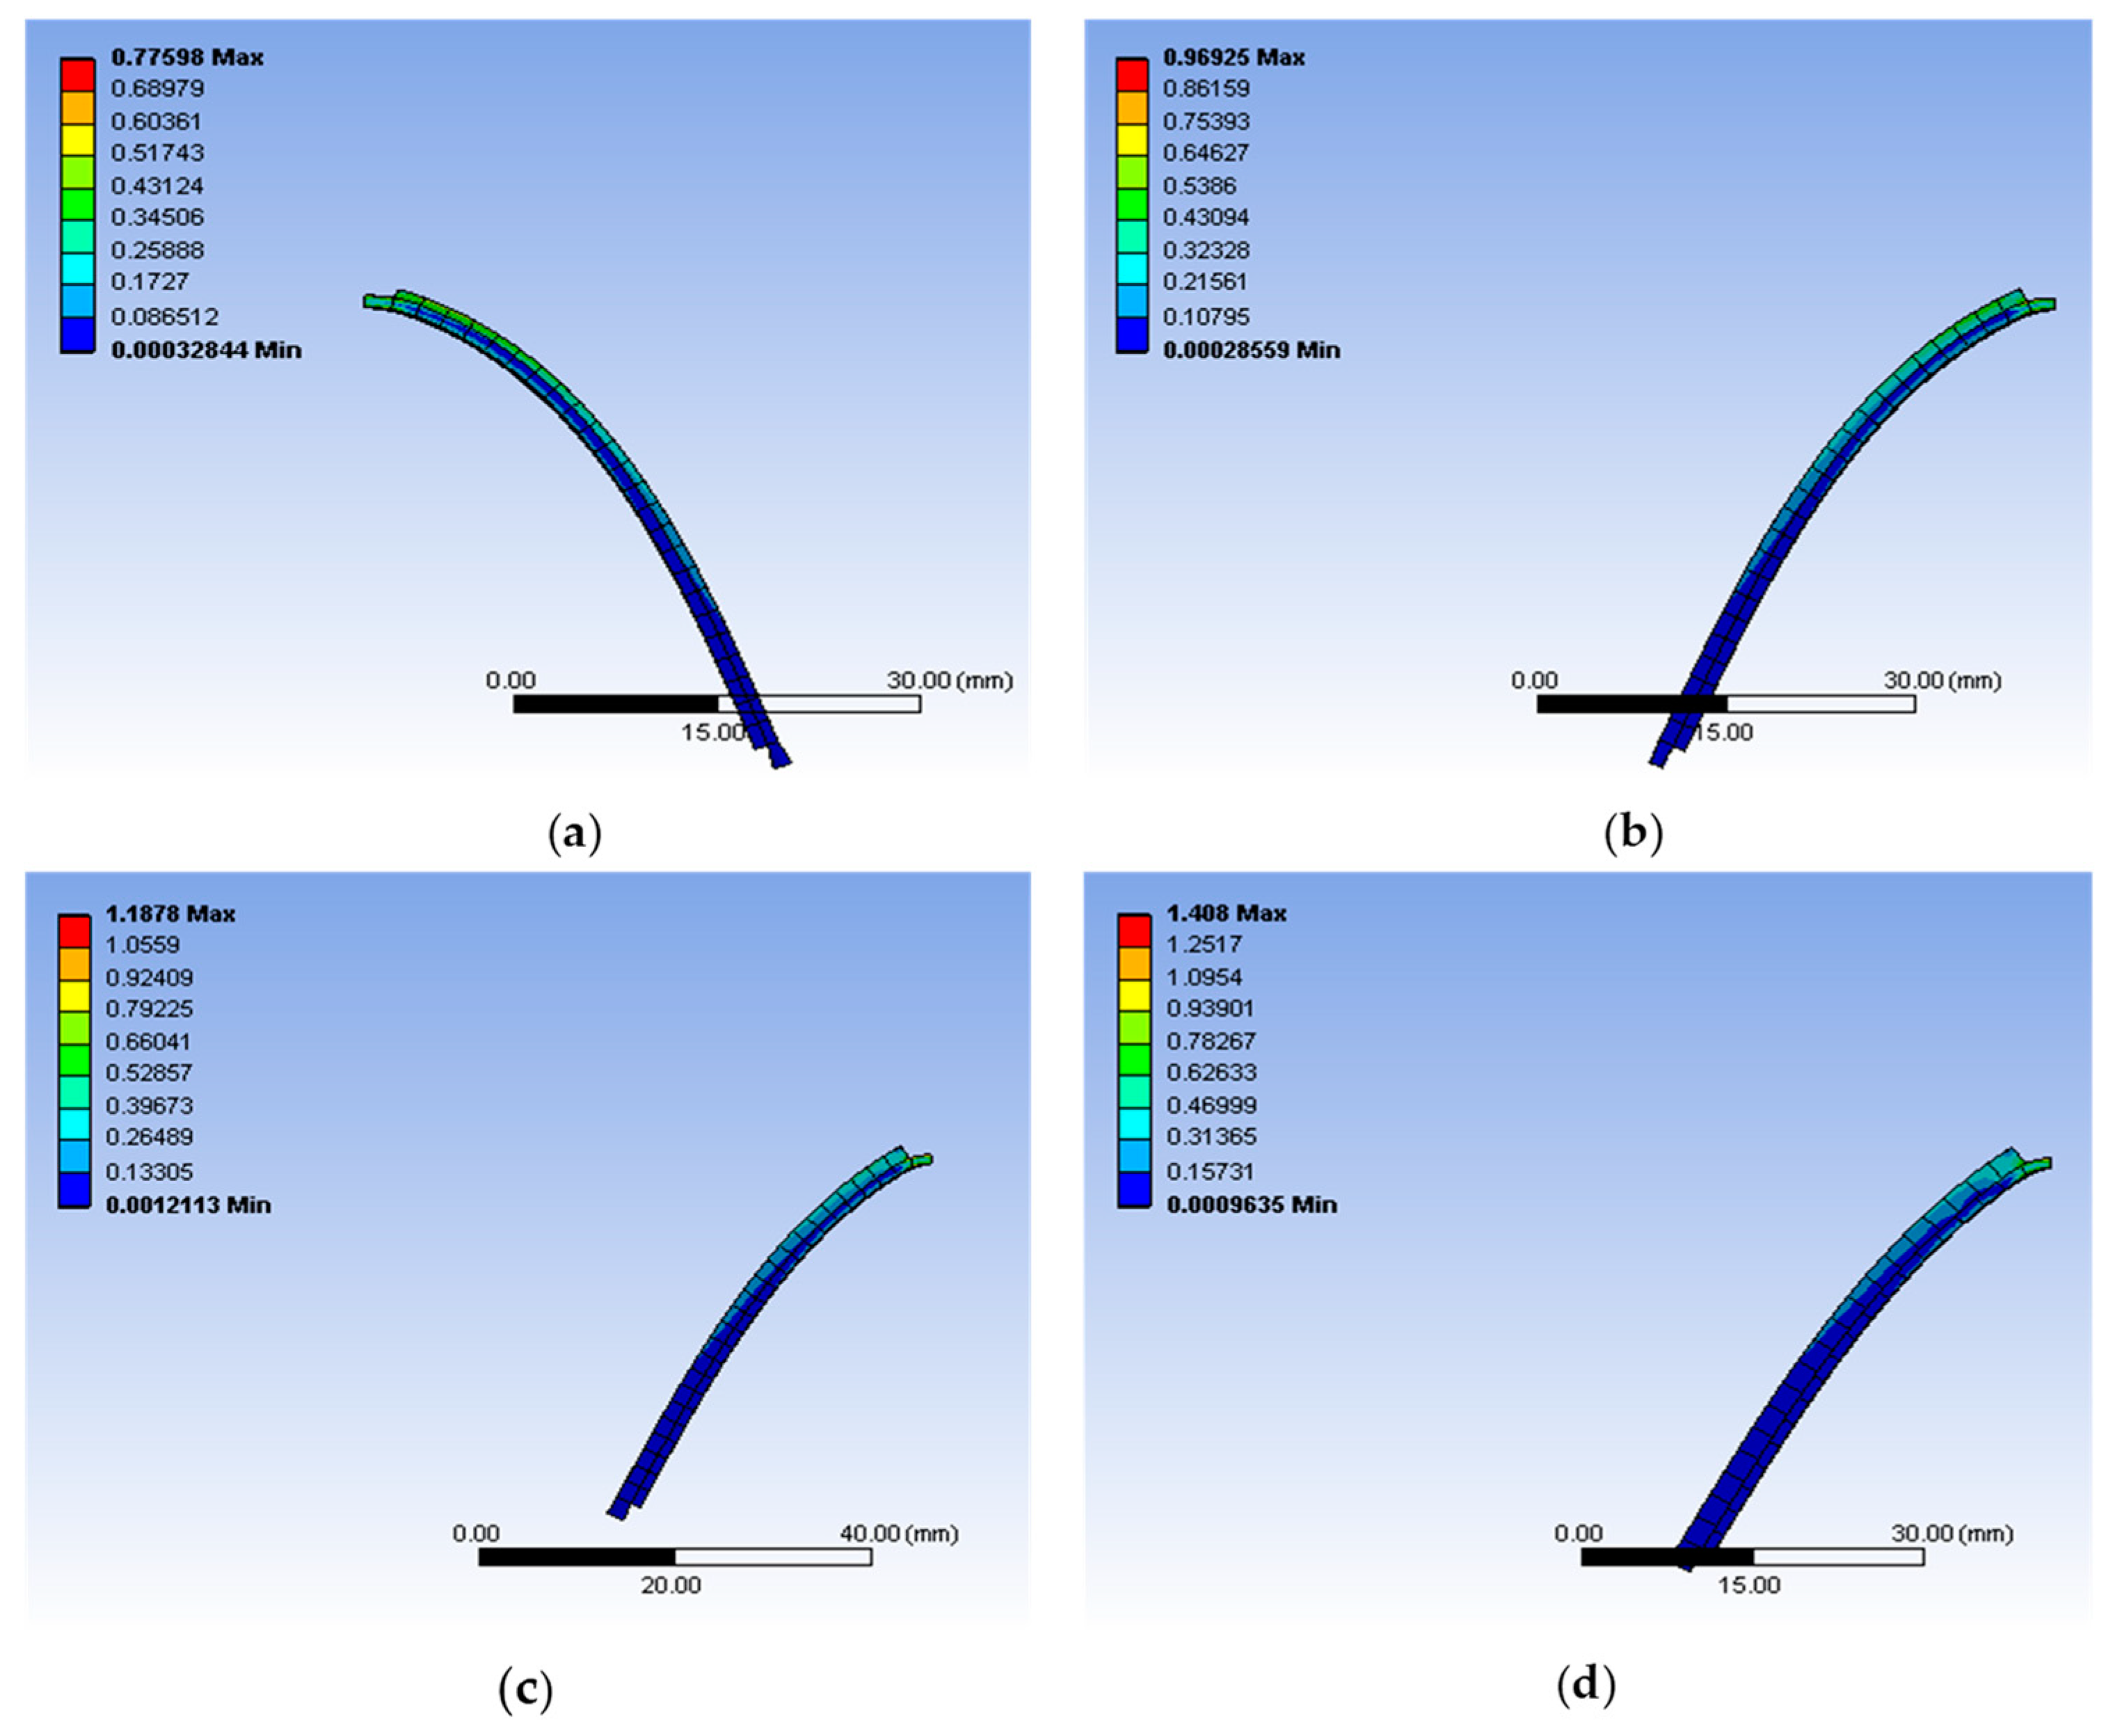
Images of the equivalent stress FEA results are given in Figure A9, Figure A10 and Figure A11. Figure A9 indicates the respective equivalent stress of the model sensors when a force is applied to the other free end of the sensor. Recall that one end of the sensor is initially fixed in a position to enable the application of the force, as in normal human palm-finger mimicking. It depicts the maximum equivalent stress for the different turns of model designs, whereby the maximum equivalent stress differs, respectively. Figure A10 confirms the respective equivalent stress of the model sensors when the force is applied to the other free end of the sensor. It can be seen that the maximum equivalent stress for the different turns of model designs, a maximum stress of 1.4142 MPa, occurs at the fixed end of the model sensor of 2.0 mm with two turns, which demonstrates a significant difference compared to the 1.6 mm two-turn model sensor and the one-turn model sensor. Figure A11 presents the respective equivalent stress of the model sensors when the force is applied to the other free end of the sensor. Recall that one end of the sensor is initially fixed in a position to enable the application of the force, as in normal human palm-finger mimicking. It depicts the maximum equivalent stress for the different turns of model designs, which varies between 0.77 MPa and 1.408 MPa.
As a result, the maximum deformation and equivalent stress for various turns and thicknesses of the model vary slightly. These imply that the number of turns and thickness of the model sensor influence the structural reaction (i.e., how the model sensor deforms and the stress when a force is applied, which mimics the movement of a human palm-finger) of the model sensor. Therefore, the number of turns concerning the thickness is a key factor influencing the deformation and stress when the examined force is applied to the model sensor.
In the dataset, the “Maximum Deflection (mm)” values for different turns with the same thickness vary slightly, as seen in Table 6. This proves that, within the studied force range, the number of rotations has no substantial influence on structural deformation. The consistent readings imply a stable structure that is critical for design and implementation, allowing for practical and cost-effective solutions with fewer turns while retaining the required deformation levels. Moreover, the structural response stays rather consistent, making turn count less important in the force range tested. From Table 6, it is seen that the force and deflection magnitude may be less sensitive to the structure than variations in equivalent maximum stresses. This understanding might help guide future research to better understand how force magnitude affects structural behaviour.

Table 6.
Maximum deflections and stresses from simulation results.
These results offer a detailed overview of the sensor’s simulated performance across numerous design parameters. The findings provide useful information for refining and optimising the sensor’s behaviour in response to various situations and setups. The result of the study is based on the dramatic influence of the hyper-elastic TPU sensor reinforced with carbon black. The sensor’s structural stability and adaptability make it an important component for future robotic systems. The meticulous study of wear-and-tear patterns, in conjunction with deformation analysis, gives vital insights for assuring the sensor’s long-term endurance. The established balance of sensitivity, adaptability, and affordability highlights the sensor’s applicability in a variety of applications. The study not only provides immediate answers for minimising deformation and wear, but it also sets the framework for future robotic system developments, promising robustness and flexibility.
3.6. Correlation Development
In this development, the relationship between the tested resistances, number of turns, thickness, and curvature is determined by applying the principle of correlation to the overall result data. Also, to achieve the purpose, a lot of assumptions are made for the calculations to be done. A nonlinear regression model is developed to understand the sensor’s resistance response. The model helped in predicting and interpreting the behaviour of the sensors under different conditions. The expression for the resistance of the flexible strain sensor can be correlated thusly: assume that resistance (R) is a function of the carbon black conducting number of tracks (turns), carbon black conducting height (thickness), and the curvature of the static test object (C). This suggests that the resistance (R) of a flexible strain sensor is a function of three variables: the number of turns (NT), the thickness (T), and the curvature (C). In other words, resistance is dependent on and influenced by these three factors. This mathematical representation is employed in this correlation because this research deals with complex systems: flexible strain sensors with hyper-elastic conductive material. Assuming a power law relationship holds:
where R is the resistance of the flexible strain sensor; NT is the number of turns of the carbon black conducting tracks; T is the thickness of the carbon black conducting tracks; and C is the static test curvature. Assuming the relationship between R and the input variables follows a power law form, Equation (2) now becomes:
where = non-dimensional resistance of the strain sensor; A = constant due to the effect of function of number of turns of the carbon black conducting tracks; NT; NT′ = non-dimensional number of turns of the carbon black conducting tracks; C′ = non-dimensional static test curvature; a = constant due to the applied function on the number of turns of the carbon black conducting tracks; b = constant due to the applied function on the thickness of the carbon black conducting track; and c = constant due to the applied function on the static test curvature. The quantities R′, T′, and C′ are non-dimensionalised ; ; and . The least squares method is used to find the line of best fit of the data using the generalised reduced gradient (GRG) nonlinear and evolutionary algorithms for minimisation. Upper and lower bounds for each variable are provided to constrain the indices and constant factor A to converge to realistic values. The lower limits for A, a, b, and c used are 0.001, −5, −5, and −5, respectively, while the upper limits are 100, 5, 5, and 5, respectively. All captured test data are used for the fitting. The resultant equation is:
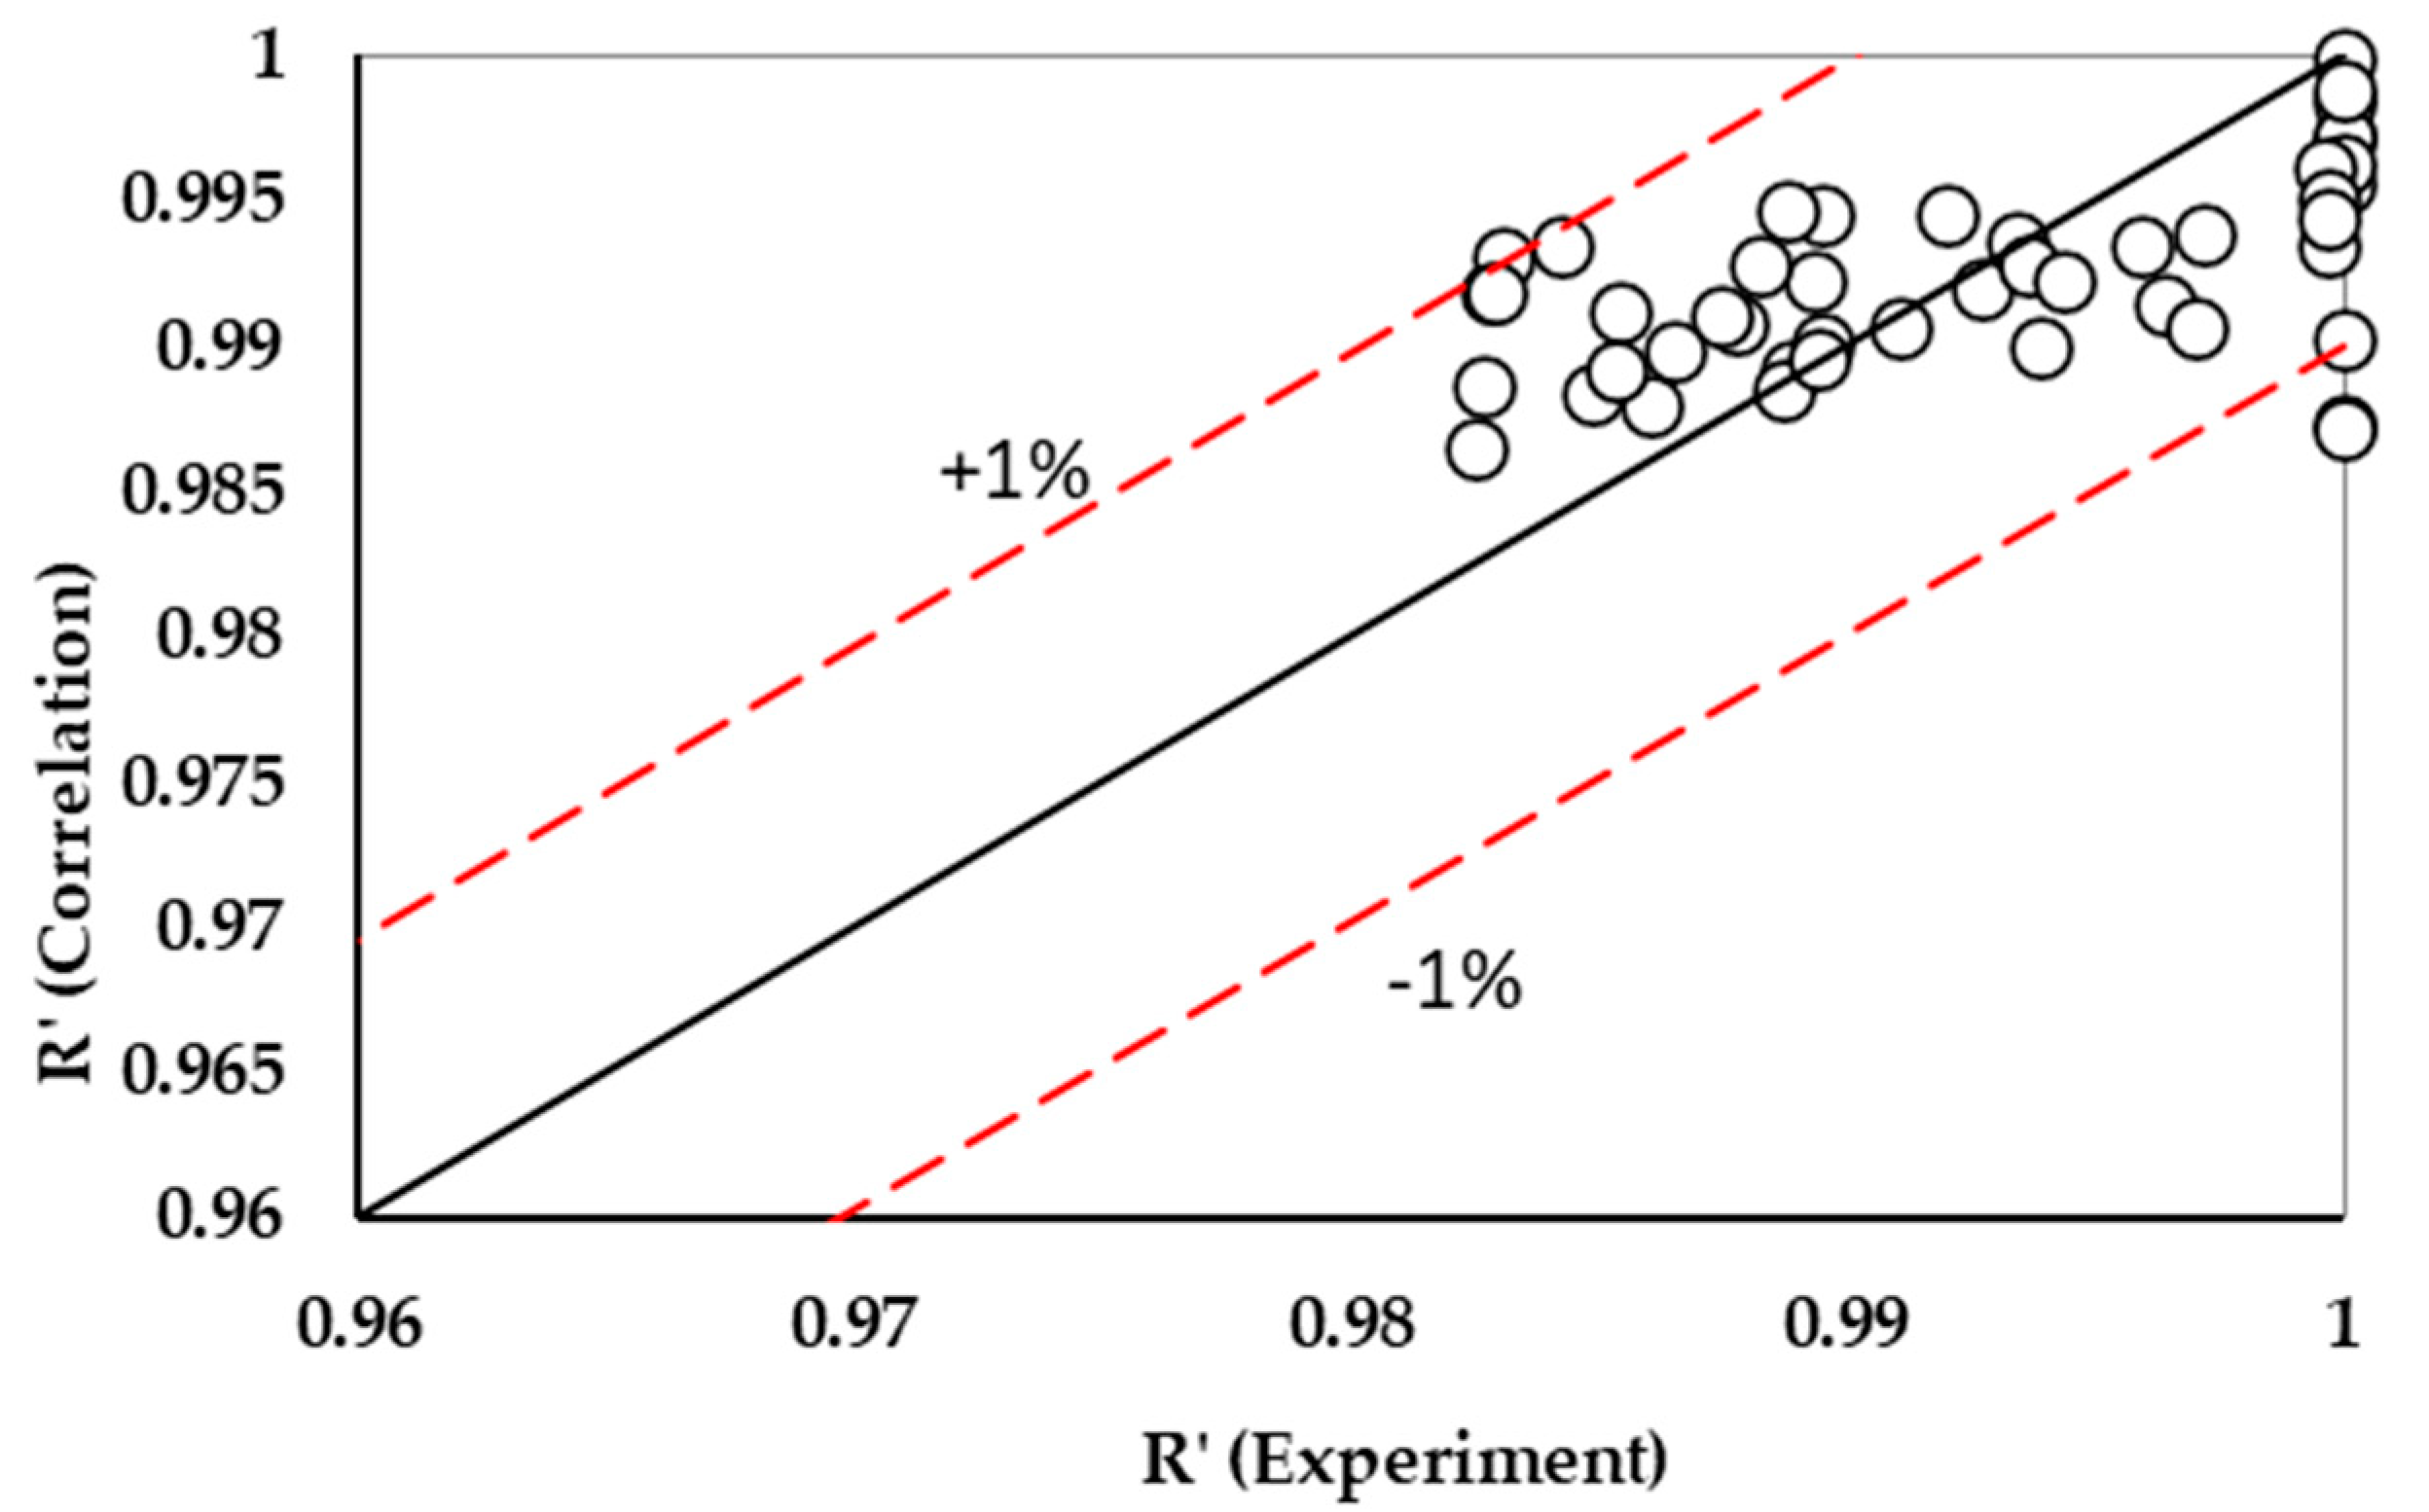
Equation (4) reveals the formula that is determined as a result of the least squares fitting. It also illustrates the lower and upper limits set to bound the initial guesses of each parameter. Figure 10 depicts a cross-plot comparing the correlation’s predictions with the underlying experimental data. It indicates that the correlated predicted resistance is plotted against the experimental resistance, showing fewer scattered points of the coordinates.

Figure 10.
Cross-plot of experimental and predicted dimensionless resistance analysis of the data.
All points fall in between the upper limit value of (+1%) and the lower limit value of (−1%), consistent with the low standard deviations demonstrated in the section on standard deviation above. This illustrates that the resultant correlation is an excellent representation of the sensor’s response when the curvature, number of turns, and thickness are changed.
4. Discussion
The scope of this research has been defined in the fore-contents of this writeup, which has to do with about four different objectives. These include and are limited to the following—3D printing of flexible strain sensors with different thicknesses and numbers of tracks; the utilisation of a finite element analysis (FEA) approach in the Ansys Simulation Package to seamlessly deliver a simulation of the flexible strain sensor design models; the design and fabrication a data acquisition circuit [18]; and a nonlinear regression model will be developed from the data that will be acquired from the sensors.
Subsequently, every other aspect of allied and related research topics will be looked into in other research, with full scope as further studies demand. These issues are entirely on a different scope than the current scope of this research. These include the following: analysis of the sensor’s electrical performance and exploring a wider range of physical conditions, including varying temperatures and humidity levels, to assess the sensor’s robustness in diverse environmental settings; and the long-term stability and durability of the sensors. Including data on how the sensors perform over extended periods and under repeated use would strengthen the findings and highlight their applicability in real-world scenarios; further work on signal conditioning to enhance the signal-to-noise ratio and reduce hysteresis is planned. Expanding on the methodologies for signal conditioning and data analysis could offer insights into overcoming the noted challenges and improving sensor performance.
When comparing flexible strain sensors for soft robot applications, several factors need to be considered, including performance, cost, and manufacturing complexity. Sensor sensitivity, which determines the sensor’s ability to accurately detect and measure strain, is crucial for enabling precise movements and control in soft robots. The response time, which affects how quickly the sensor can provide feedback, enhances the robot’s agility and responsiveness in real-time operations. Additionally, the durability of the sensor is essential, as it must withstand repeated deformations and various environmental conditions during the operation of a soft robot.
In terms of costs, the material costs employed in sensor fabrication, such as conductive carbon black and ordinary filament and the cost of 3D-printing machines, influence the overall sensor cost. Also, the manufacturing cost, which encompasses complex manufacturing processes, may require specialised equipment and skilled labour, contributing to higher production costs. The need to consider the effect of scalability, which deals with economies of scale, can lower unit costs for mass-produced sensors.
Regarding manufacturing complexity, various fabrication techniques exist for flexible sensors, each with its own level of accuracy. These techniques include screen printing, inkjet printing, and 3D printing, which are used to manufacture flexible strain sensors, each with its own complexity and setup requirements. The ease of integrating the sensor into soft robot structures also affects manufacturing complexity. Sensors designed for seamless integration simplify assembly and reduce manufacturing time. However, the customisation of sensors may require specialised fabrication processes to meet specific soft robot design requirements, thereby adding complexity to the manufacturing process.
In summary, the choice of flexible strain sensors for soft robot applications depends on balancing performance requirements with cost considerations and manufacturing complexity. High-performance sensors may justify higher costs and manufacturing complexity if they enable superior robot functionality and durability. However, cost-effective and easy-to-manufacture sensors may be preferred for simpler soft robot designs or large-scale production.
4.1. Future Work
4.1.1. Overview of Planned Integration into Rehabilitation Gloves
This will be done based on the findings made in this paper. Given that a reduction in width and height produced a sensor with a better response, this means that comfort will be enhanced as a result. To find out the influence of width and height on the response of sensors, one parameter is kept constant, and another parameter is changed. It is known that a change in space between conducting tracks without alteration in the number of tracks does not produce any significant effect, so the third key parameter is changed to the number of tracks. The width is fixed for all sensors, and the height of the conducting track and the number of tracks are altered. The sensor would be designed and printed for a detailed study of the parameters’ effect on the sensor’s characteristics, and the testing would be carried out in a dynamically varying curvature setup. For a dynamically varying curvature off-shelve hand glove, linear motion would be used to bend the sensor.
4.1.2. Designs of Sensors for Fitting into Rehabilitation Gloves
The experiment involves track heights of 0.8 mm, 1.2 mm, 1.6 mm, and 2.0 mm. To study the effect of increasing height, sensors with these four different conducting track heights will be printed (0.8 mm, 1.2 mm, 1.6 mm, and 2.0 mm). In the experiment, the number of tracks is not considered (kept constant at three turns), and these four different conducting tracks (0.8 mm, 1.2 mm, 1.6 mm, and 2.0 mm) will be designed. Considering the width and length of the sensor as constraints (focusing on the fact that the sensor should be compact and small), the number of tracks is restricted to three. The length and width will be maintained from the experiment to increase flexibility and provide space to hold three tracks.
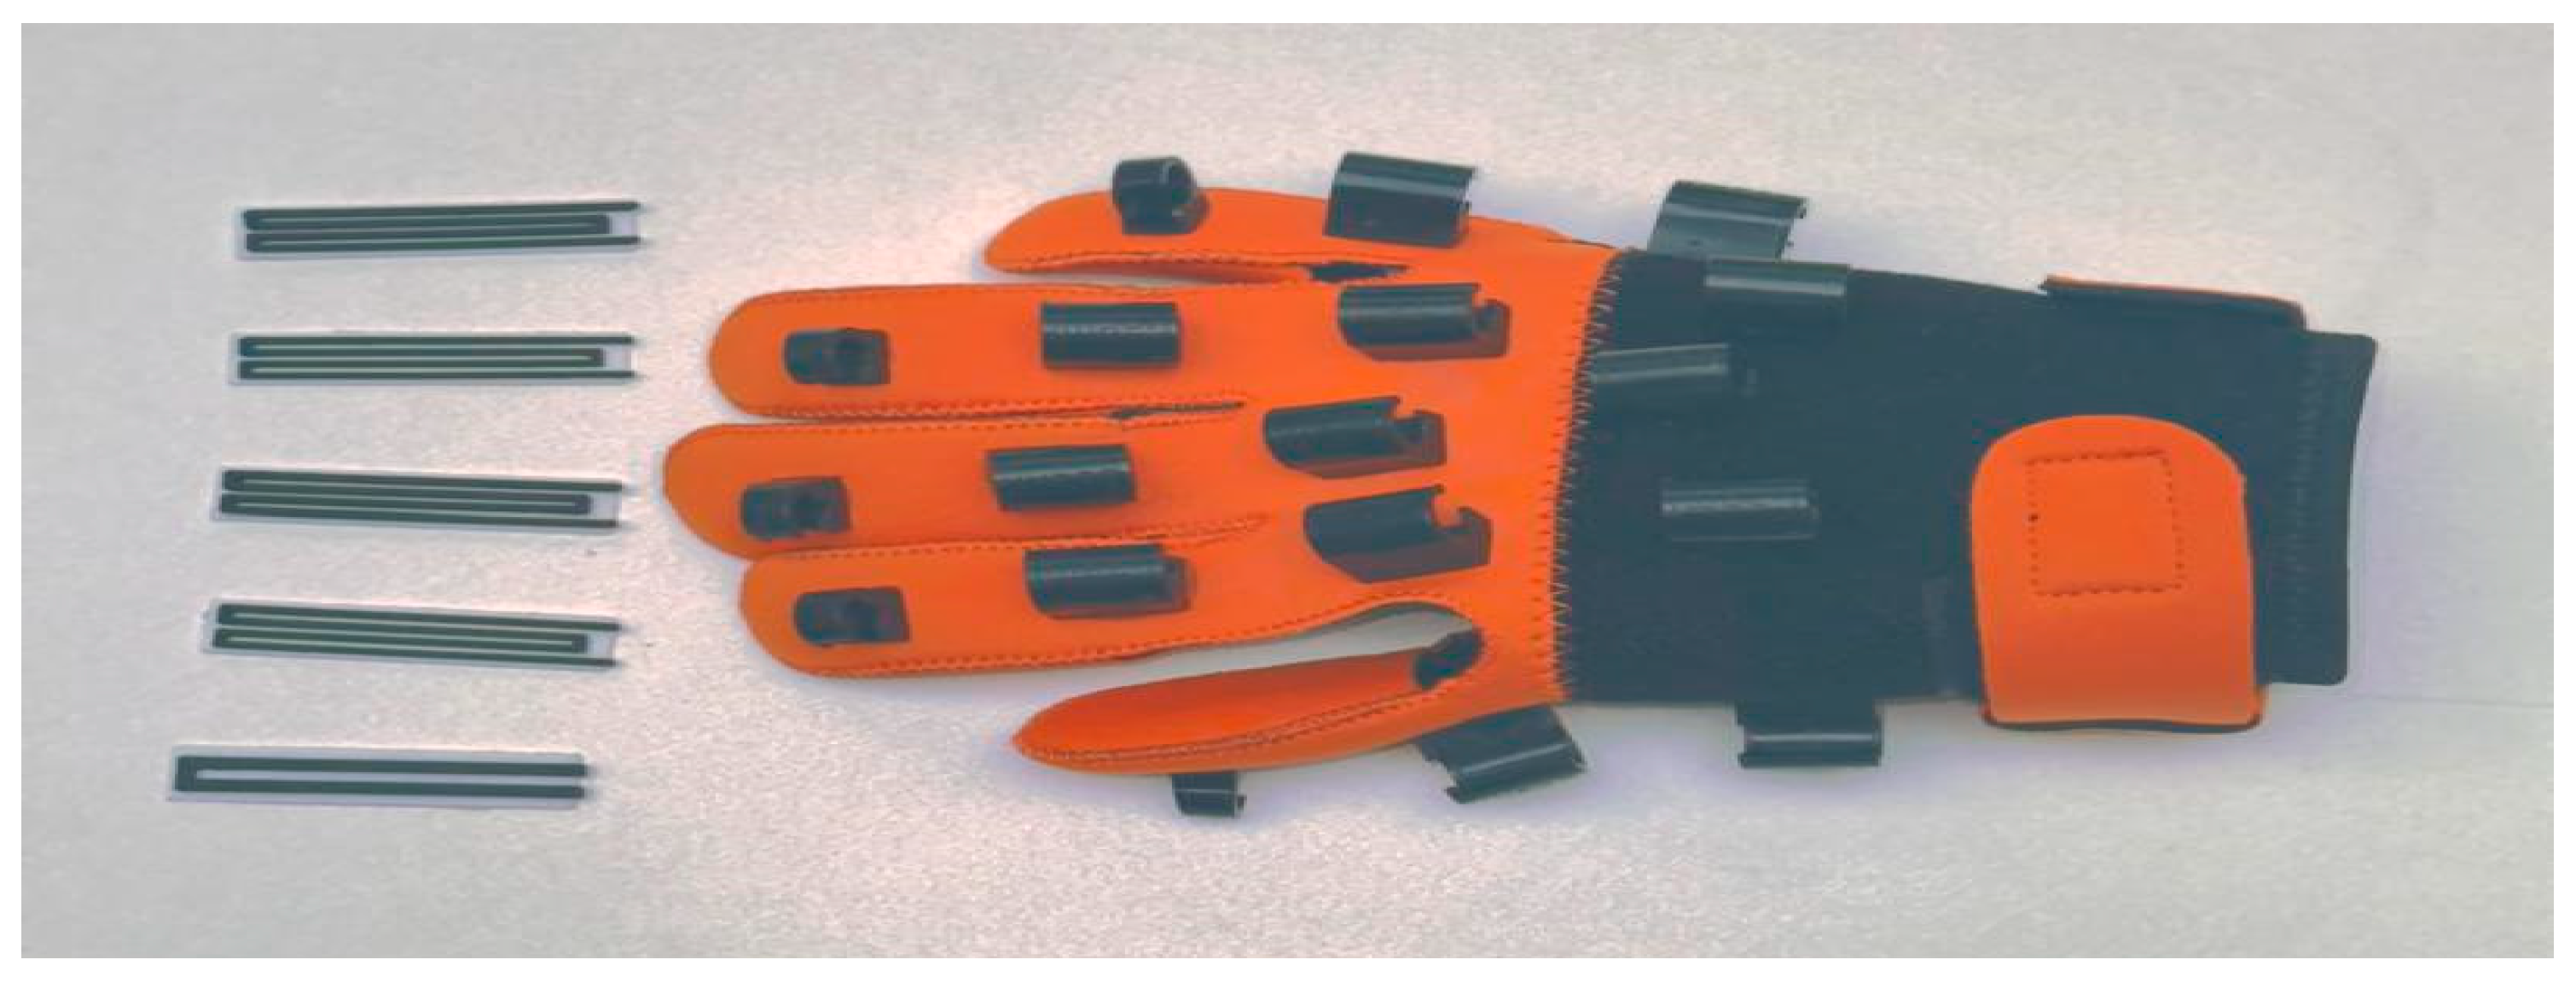
Figure 11 specifies the unique strain sensors with the rehabilitation hand glove.

Figure 11.
The novel strain sensors with the rehabilitation hand glove.
4.1.3. 3D-Sensor Interface
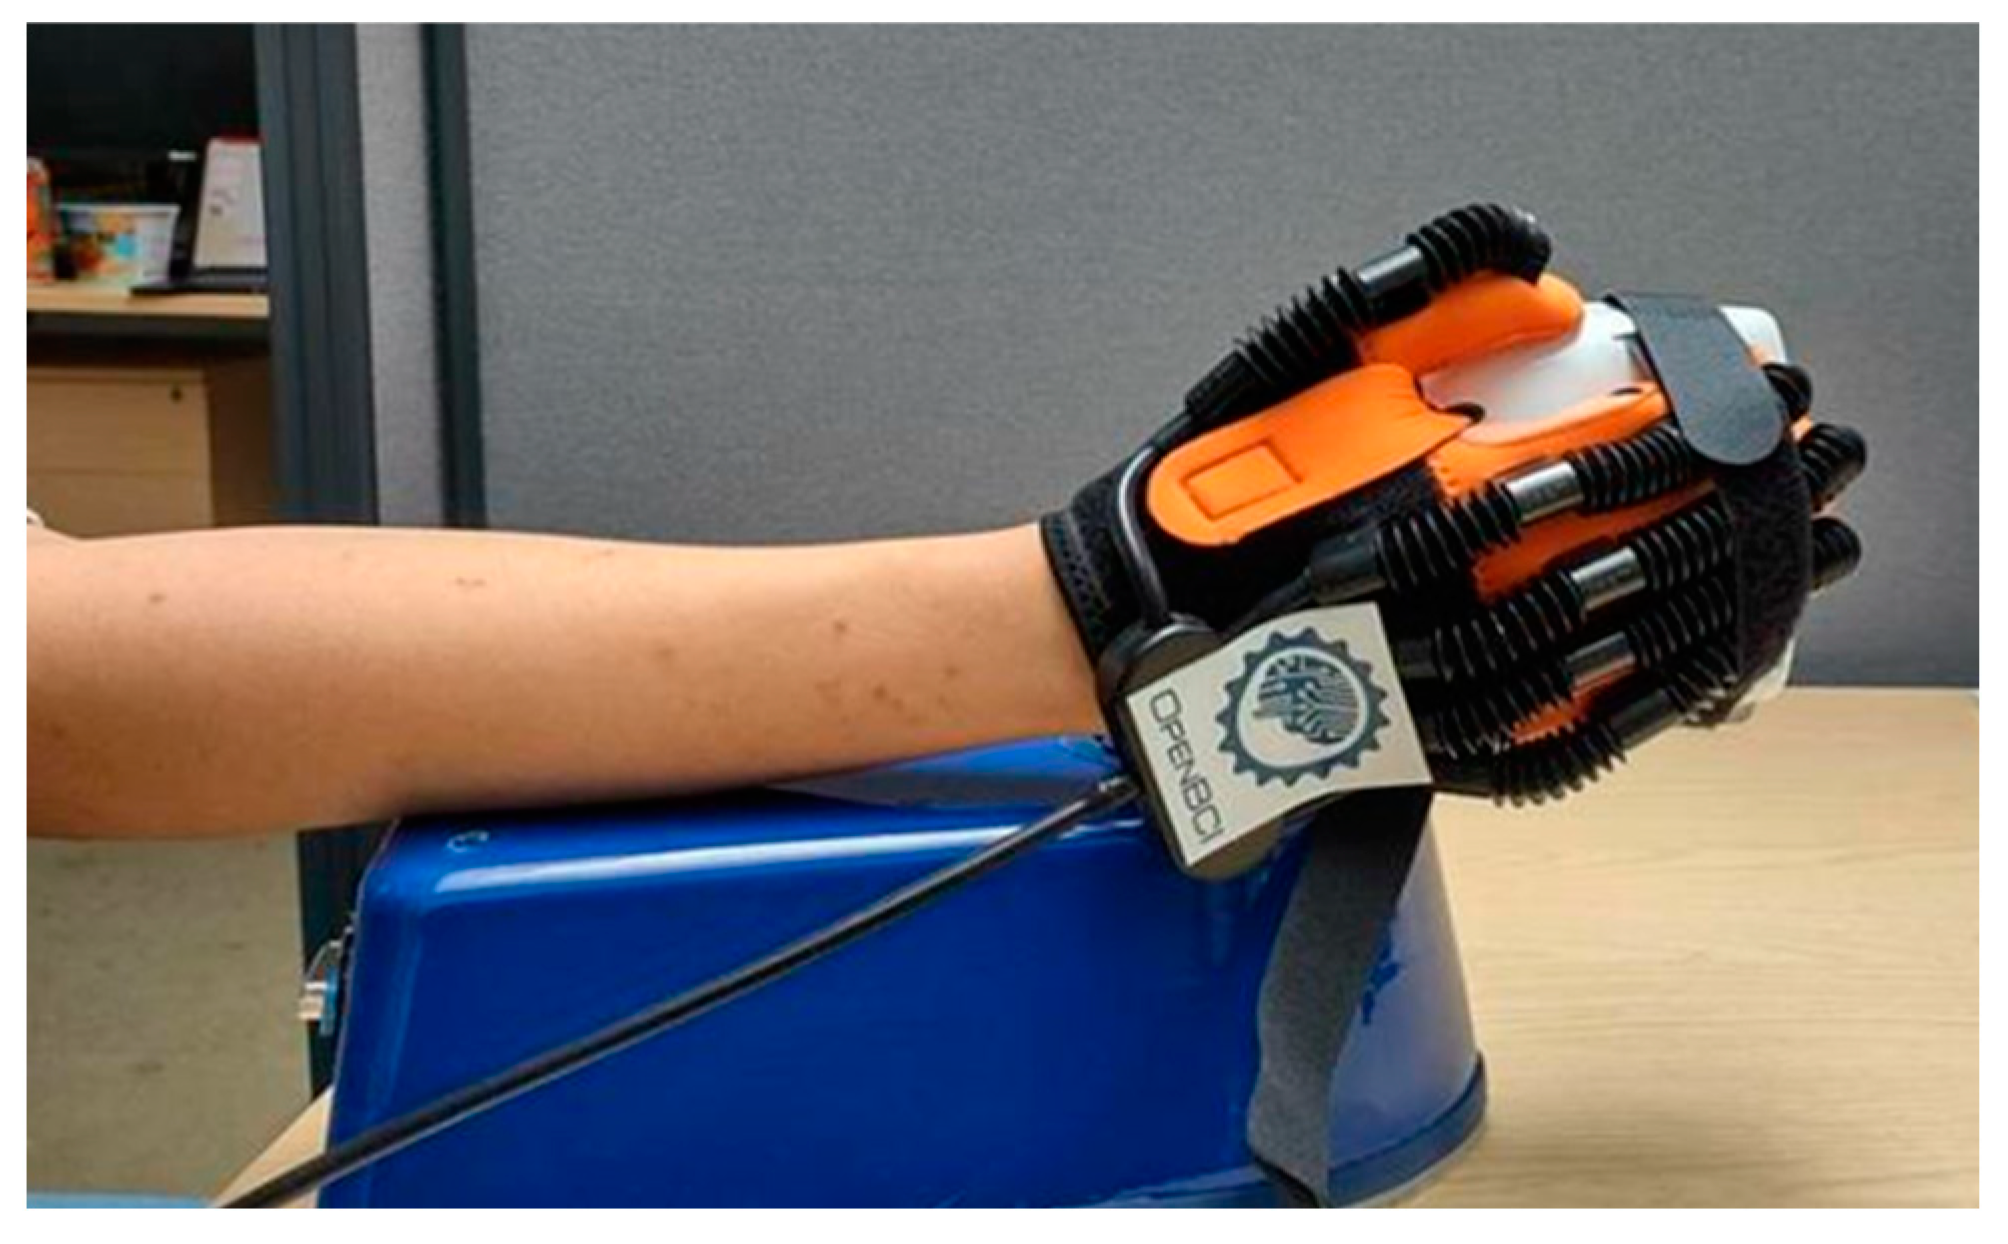
To prepare for mounting and integrating the flexible strain sensor into the rehabilitation hand glove, an interface must be designed that can be attached to the glove while accounting for the space required for both the sensor and the interface. A feedback controller component and an actuator will be implemented as discussed in a study by Zhou et al. [23], ensuring uniform curvature when bending the fingers through the palm [24]. This rehabilitation hand glove will be 3D-printed after design modelling, simulations, and testing for durability and accuracy. Fillets will be added at the slot areas to avoid sharp edges, providing a smoother interface for the sensor controller and actuators [25]. Figure 12 indicates the rehabilitation hand glove.

Figure 12.
Rehabilitation hand glove.
4.1.4. 3D Printer Settings for Sensors
This rehabilitation hand glove design will be printed on a Flashforge Creator Pro II printer (Zhejiang Flashforge 3D technology Co., LTD, Hangzhou, China) with a dual-tool head that has two 0.4 mm nozzles. Since the nozzle diameter is 0.4 mm, the width of the tracks is made in multiples of 0.4 mm to avoid over- or under-extrusion. The rehabilitation hand glove sensor design will be printed in a single stretch to prevent significant differences in the printed model between the base layer and the finger conductive track layers. Most properties are the same for both Ninja Flex and Eel filaments, and the filament extrusion will be done automatically by assigning each extruder to the appropriate filament as required. The infill will be maintained at 100%. The Eel filament requires a higher temperature, less flow, and a smaller z-offset for optimum printing.
4.1.5. Hand Glove Experimental Setup
The experimental setup consists of a rehabilitation hand glove with controller circuitry and an actuator mounted on it. The rehabilitation hand glove communicates with a PC through ROS coded in Python 3.8.5. The glove is connected to a 3D-printed interface that allows the sensor to be easily fitted and removed after testing. The sensor track ends are connected to the DAQ circuit using alligator clips. Arduino UNO circuits, the rehabilitation hand glove, and the actuator are all connected to the PC. In this experiment, the bending motion is made inward, compressing the tracks. Python is used to provide a common platform for both the Arduino and the rehabilitation hand glove, sending start and stop signals to both devices.
5. Conclusions
This paper has demonstrated that flexible strain sensors exhibit conductivity characteristics consistent with the stimuli to which they are subjected. The fabrication procedure involved the simultaneous additive manufacturing of a conductive flexible carbon black filament (Eel) and a non-conductive base layer filament (Ninja Flex). Various models are fabricated with distinct numbers of turns and thicknesses. Finite element analysis (FEA) of each sensor model was used to determine their stress distribution and deflection, hence their applicability for real-world implementation. It was found that no significant stress concentrations exist at deformations that can be considered normal for everyday use, say in a rehabilitation glove. Furthermore, experiments were conducted to determine the resistance responses of the sensors as a function of turns, thickness, and curvature. Based on these tests, it was found that the resistance is markedly affected by the deflection (or curvature) and its thickness. A regression model was developed to relate the deflection and thickness with the output resistance. While further work is planned to integrate signal conditioning to enhance the signal-to-noise ratio and reduce hysteresis, the authors conclude that the flexible sensor (as designed and implemented in this paper) may be applied to real-time sensing of stimuli, such as in hand glove wearables, for various applications such as rehabilitation monitoring.
To conclude, this study demonstrates that the electrical resistance offered by each sensor serves as a crucial input signal for the robotic system’s perception capabilities. By processing these resistance signals, the system can generate corresponding output signals that reflect the necessary actions or responses. From this work, the electrical resistance offered by each sensor is used as an input signal to make the necessary perception required from the robotics system, which, in turn, could be seen as an output signal. These output signals can then be applied as feedback to fine-tune and control the system’s operations, particularly when integrated with actuators in a closed-loop configuration. This output signal could be used as a feedback source to control the system in conjunction with an actuator, especially in a closed-loop system. This feedback mechanism ensures that the system can dynamically adjust to changing conditions and maintain optimal performance. The findings underscore the importance of sensor input and feedback in enhancing the precision and adaptability of robotic systems, paving the way for more sophisticated and responsive automation solutions.
Author Contributions
Author Contributions: Conceptualization, S.N.N., A.R., K.E., A.A. and B.S.; methodology, S.N.N., A.R., K.E. and B.S.; supervision, B.S.; validation, S.N.N., K.E., A.A. and B.S.; writing, original draft preparation, B.S., S.N.N., A.R., K.E. and A.A.; writing, review and editing, S.N.N., A.R., K.E., A.A., B.S. and A.M.; investigation, I.A., S.N.N., A.R., K.E., A.A. and B.S.; project administration, I.A. and S.N.N. All authors have read and agreed to the published version of the manuscript.
Funding
This research received no external funding.
Data Availability Statement
The original contributions presented in the study are included in the article, further inquiries can be directed to the corresponding author.
Conflicts of Interest
The authors declare no conflict of interest.
Appendix A

Figure A1.
Showing design 1, one turn: (a) track width = 2.5 mm; height = 0.8 mm; track spacing = 2 mm; (b) track width = 2.5 mm; height = 1.2 mm; track spacing = 2 mm; (c) track width = 2.5 mm; height = 0.8 mm; track spacing = 2 mm; (d) track width = 2.5 mm; height = 0.8 mm; track spacing = 2 mm.
Figure A1.
Showing design 1, one turn: (a) track width = 2.5 mm; height = 0.8 mm; track spacing = 2 mm; (b) track width = 2.5 mm; height = 1.2 mm; track spacing = 2 mm; (c) track width = 2.5 mm; height = 0.8 mm; track spacing = 2 mm; (d) track width = 2.5 mm; height = 0.8 mm; track spacing = 2 mm.
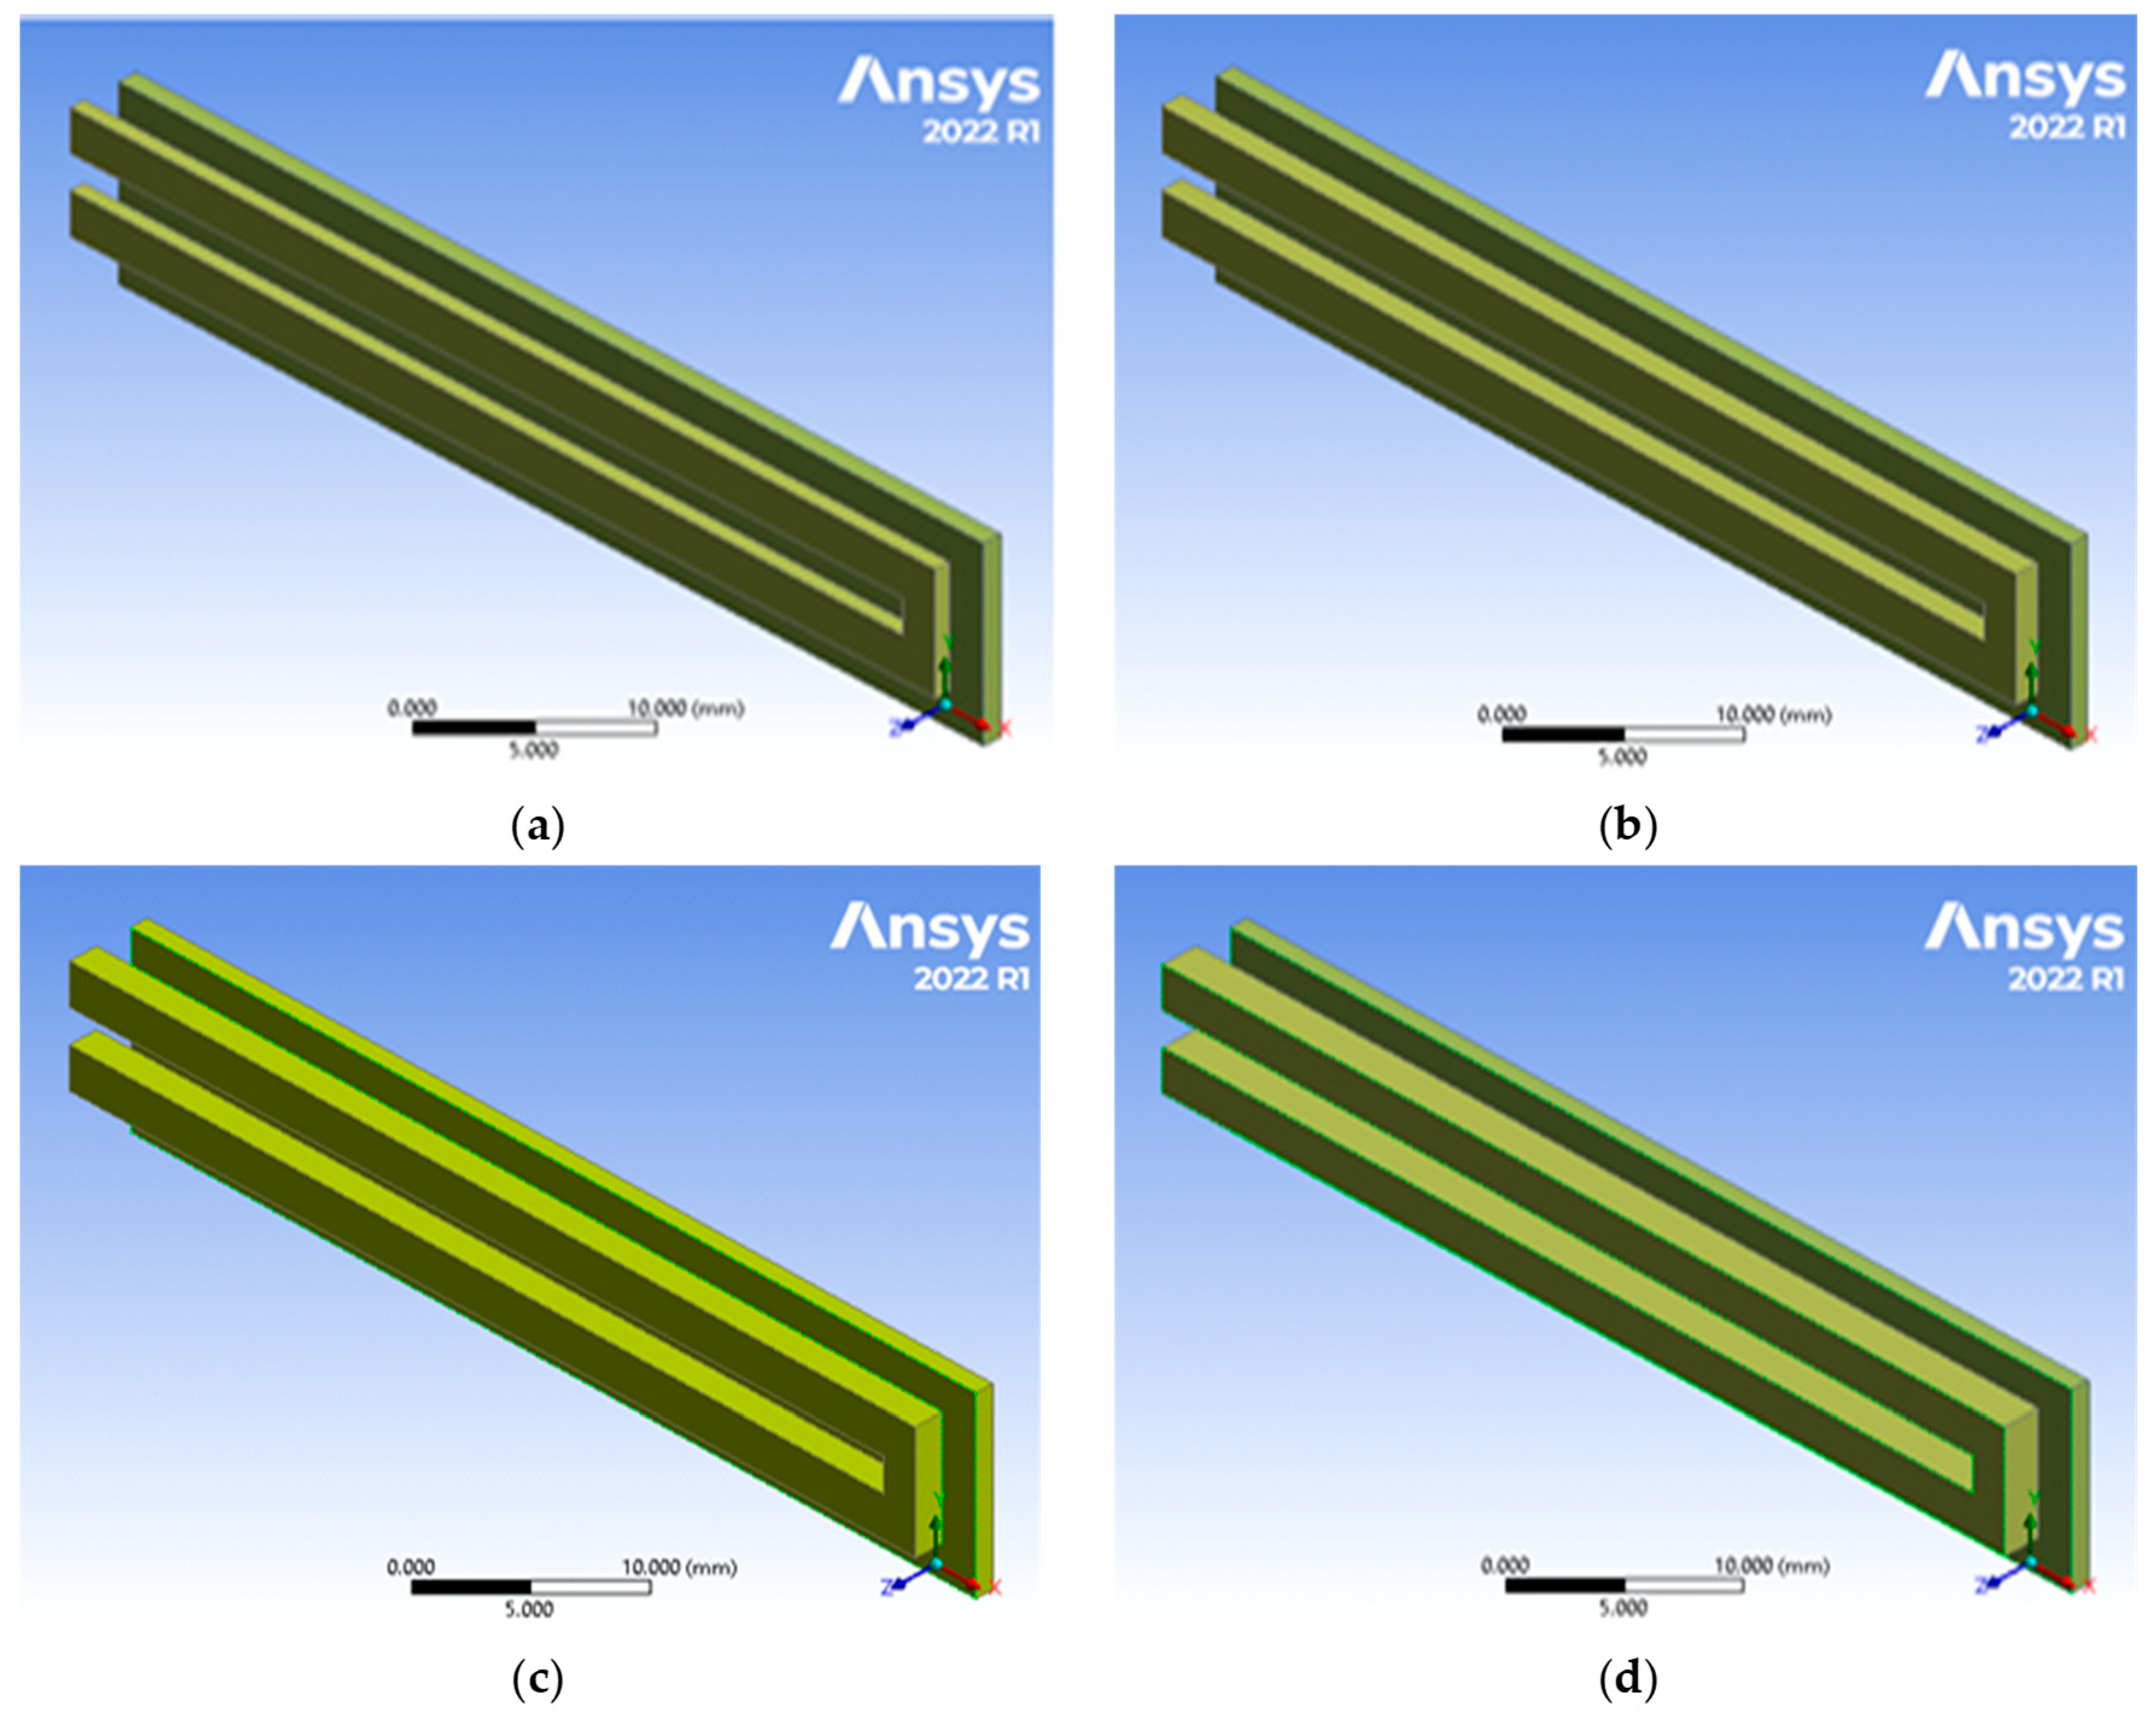

Figure A2.
Showing design 3, three turns: (a) track width = 0.9 mm; height = 0.8 mm; track spacing = 0.9 mm; (b) track width = 0.9 mm; height = 1.2 mm; track spacing = 0.9 mm; (c) track width = 0.9 mm; height = 1.6 mm; track spacing = 0.9 mm; (d) track width = 0.9 mm; height = 2.0 mm; track spacing = 0.9 mm.
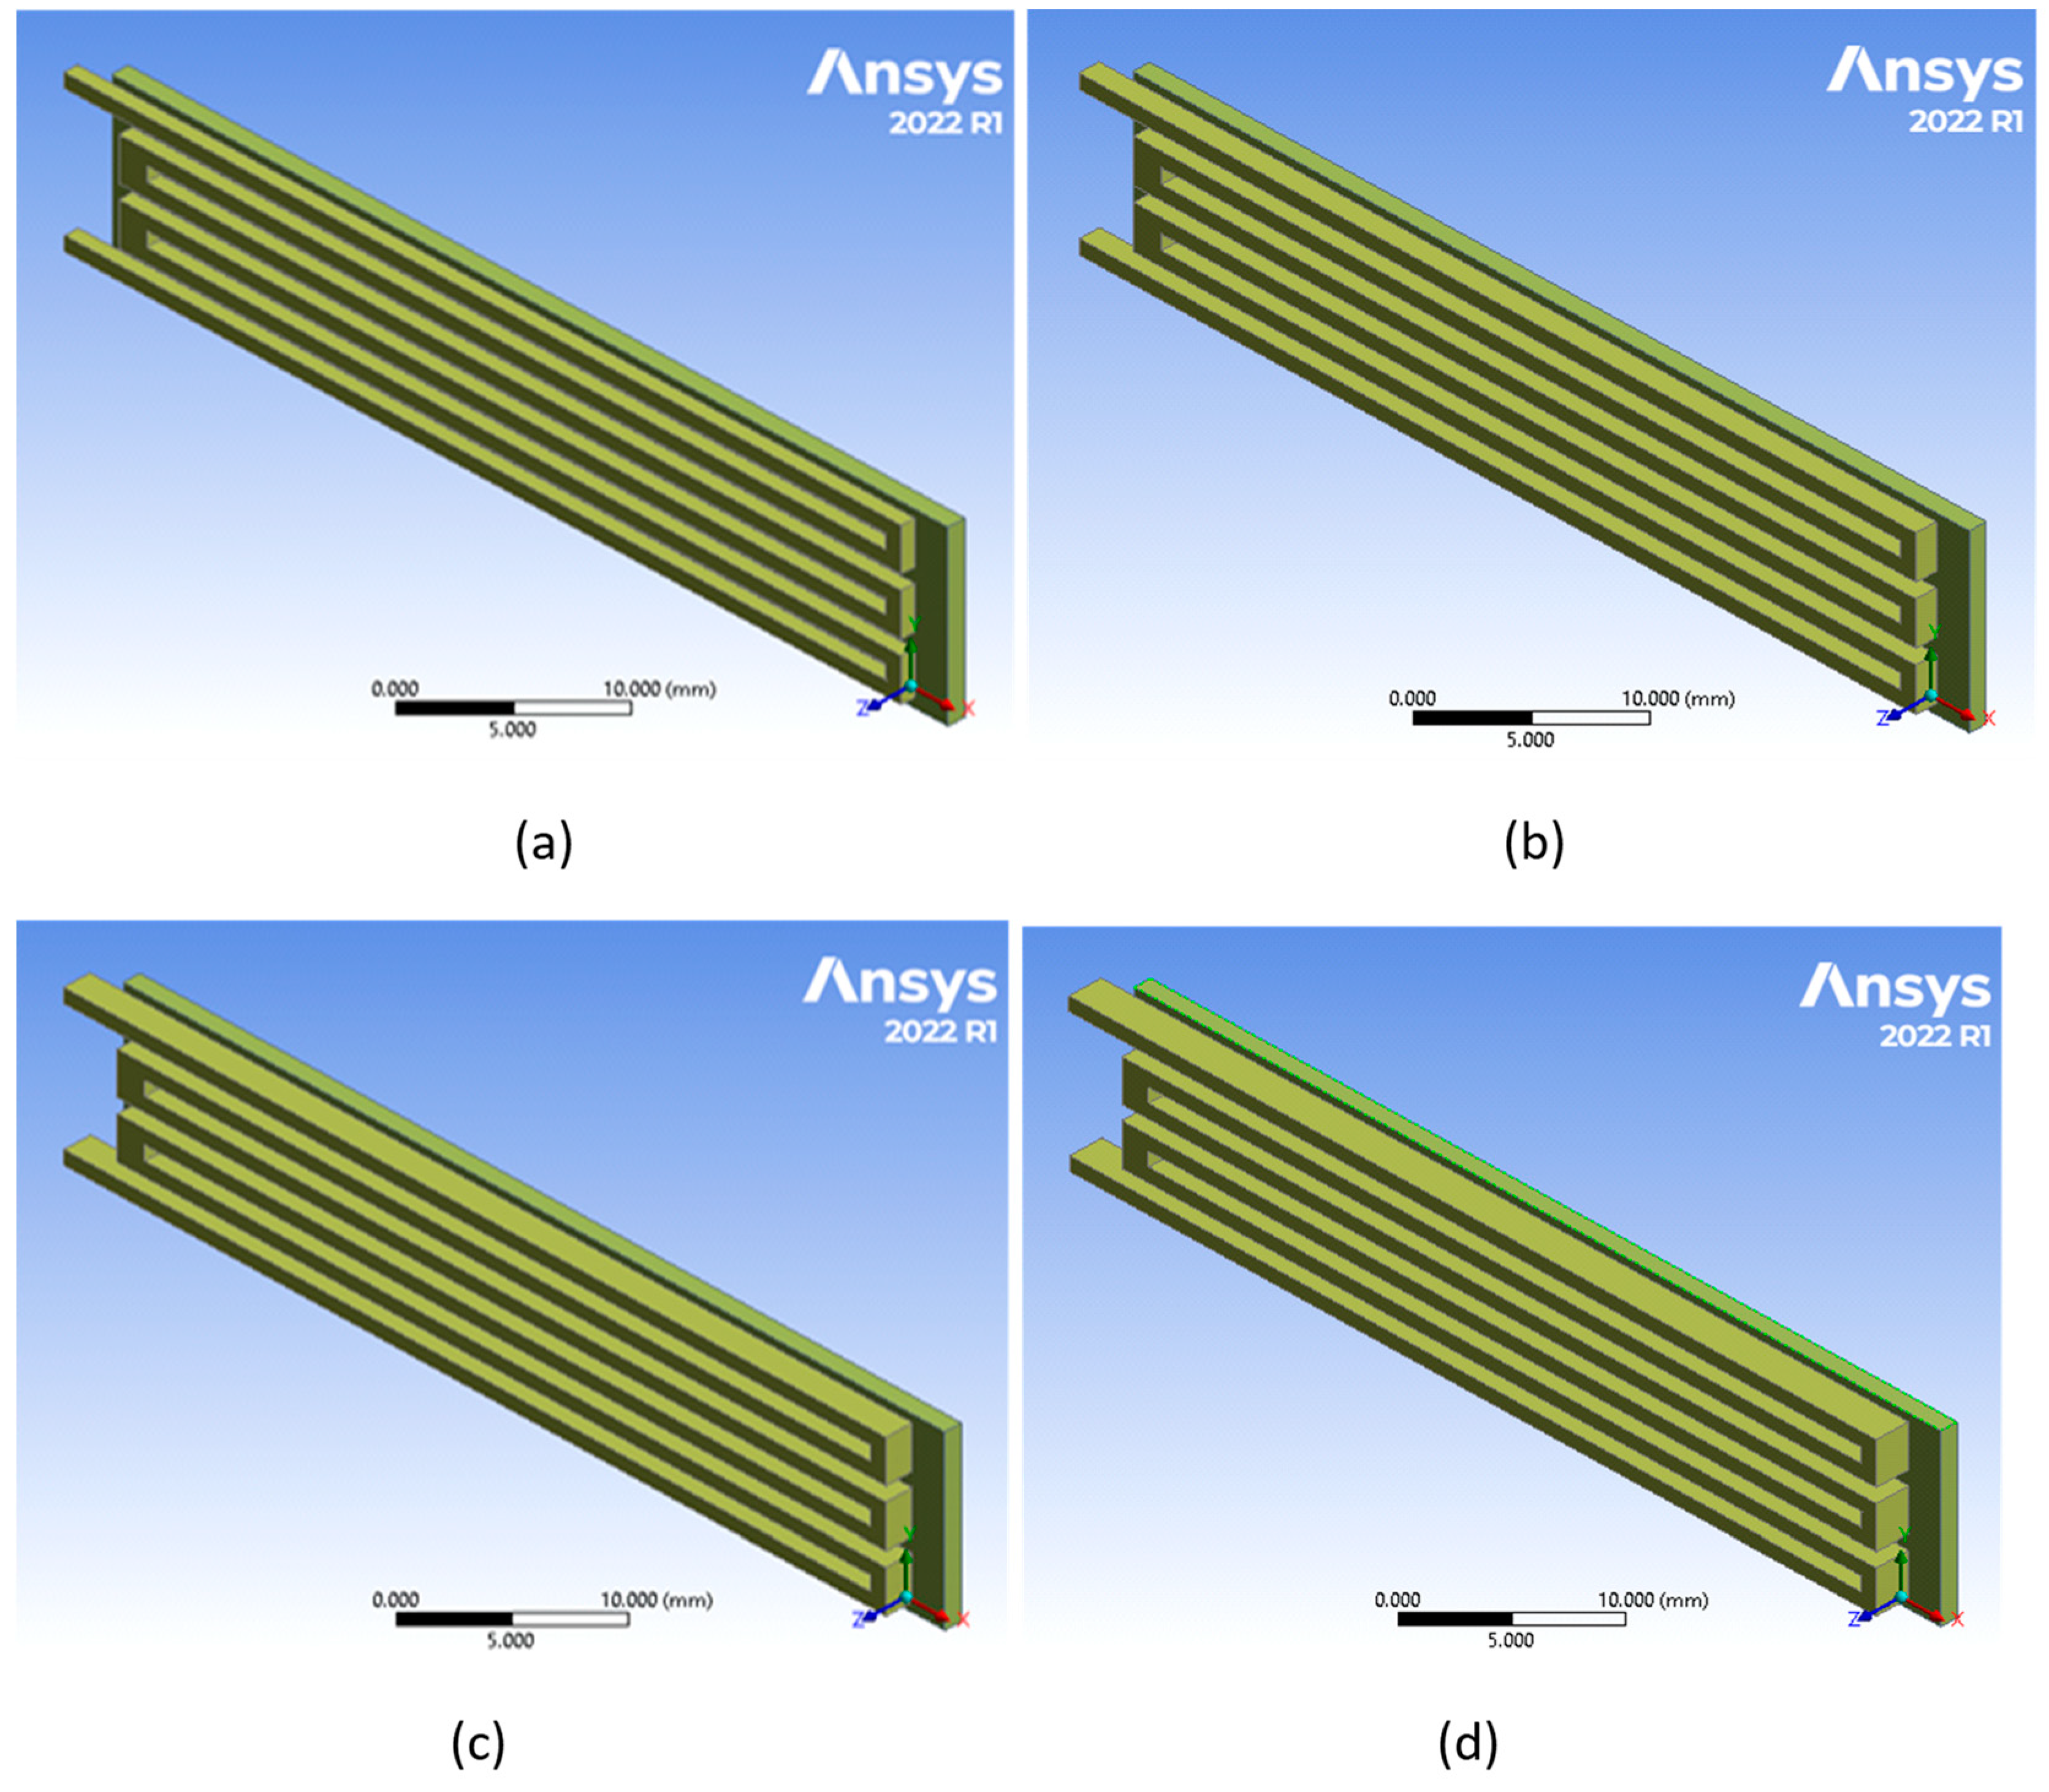
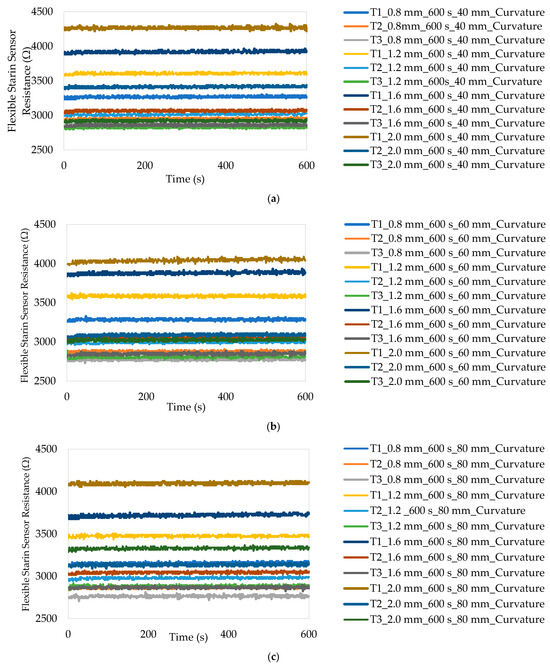
Figure A3.
All flexible strain sensors’ resistance measurements for (a) 40 mm curvature; (b) 60 mm curvature; and (c) 80 mm curvature.
Figure A3.
All flexible strain sensors’ resistance measurements for (a) 40 mm curvature; (b) 60 mm curvature; and (c) 80 mm curvature.
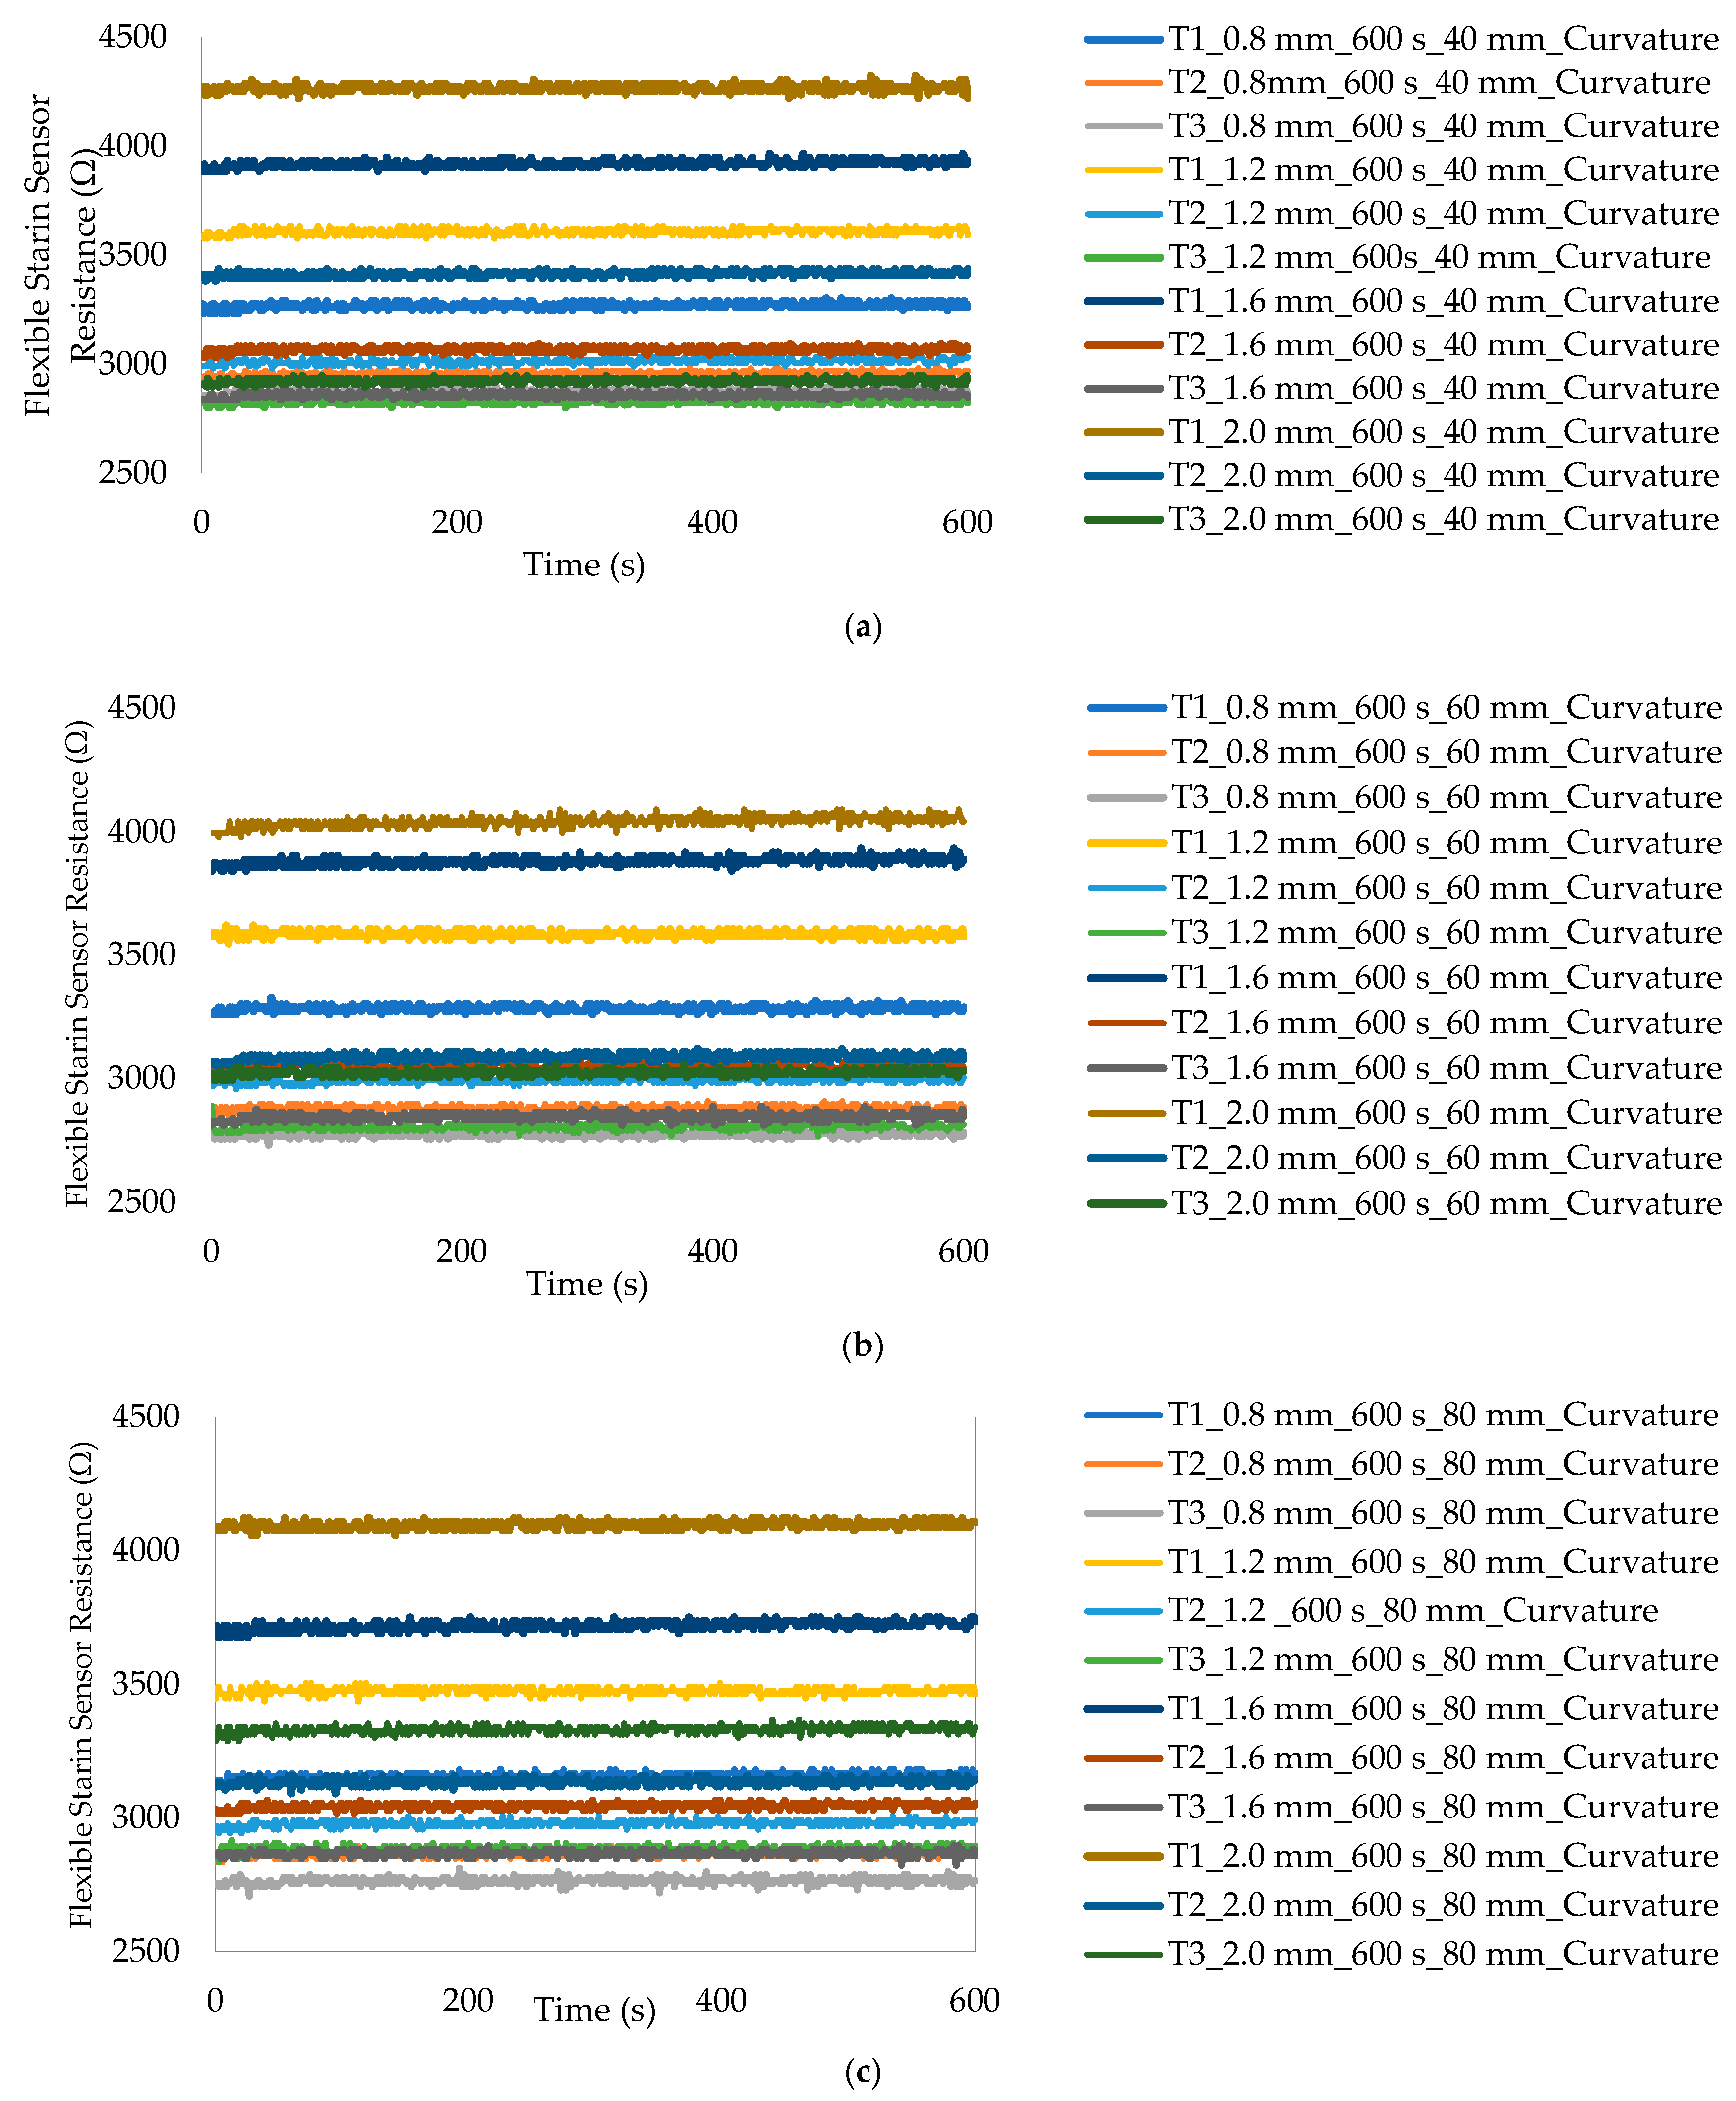
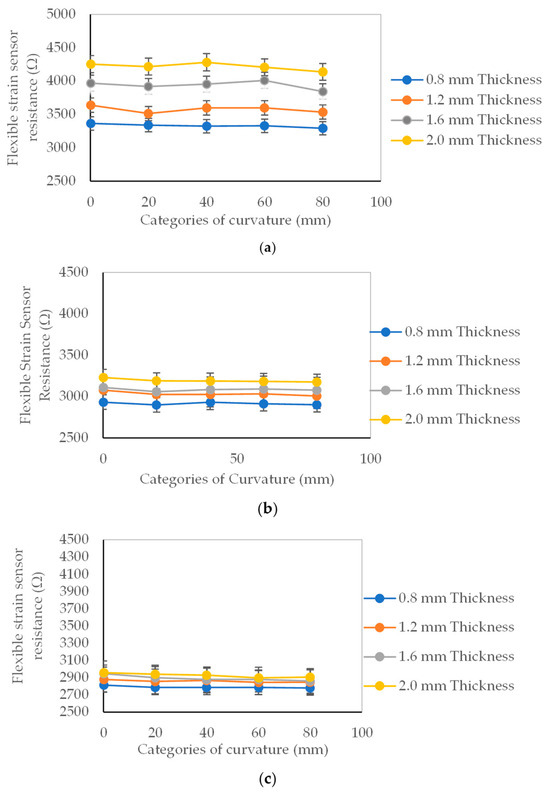
Figure A4.
(a) Impacts of thickness, one turn, and curvatures on resistance. (b) Impacts of thickness, two turns, and curvatures on resistance. (c) Impacts of thickness, three turns, and curvatures on resistance.
Figure A4.
(a) Impacts of thickness, one turn, and curvatures on resistance. (b) Impacts of thickness, two turns, and curvatures on resistance. (c) Impacts of thickness, three turns, and curvatures on resistance.
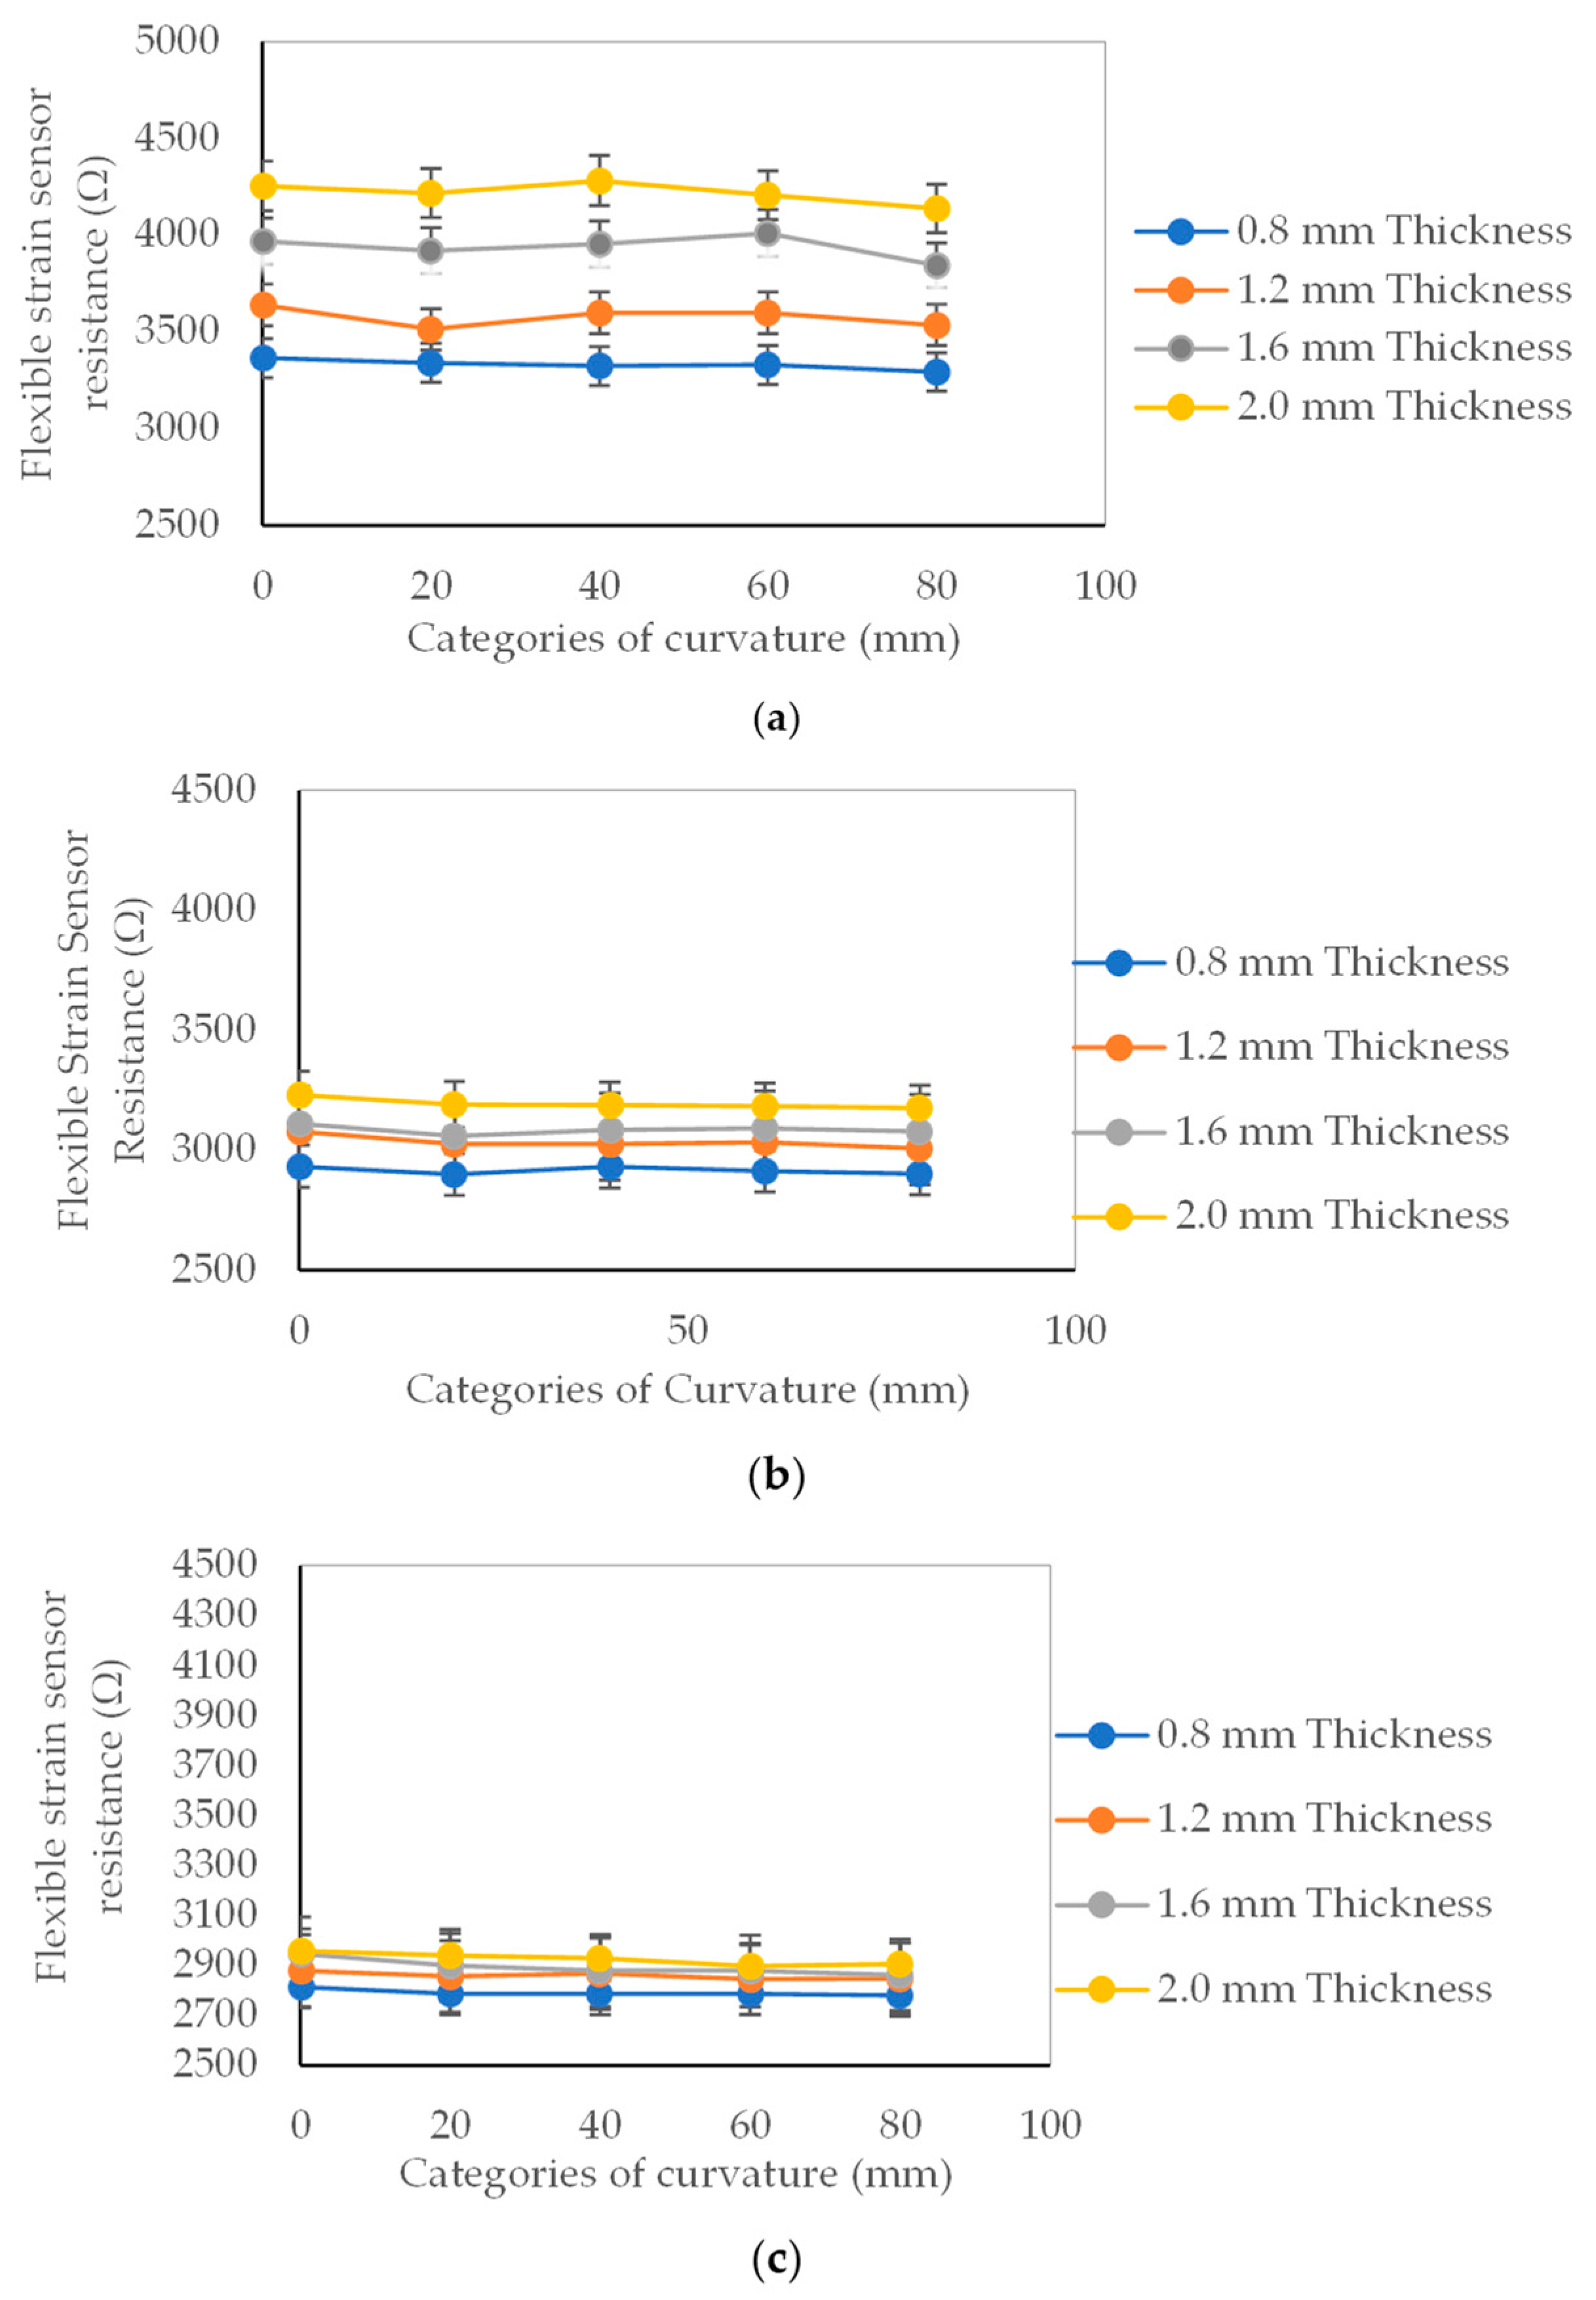
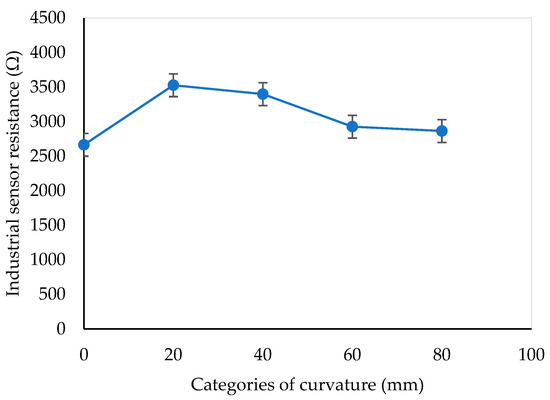
Figure A5.
Impacts of curvatures on resistance of the industrial sensor.
Figure A5.
Impacts of curvatures on resistance of the industrial sensor.
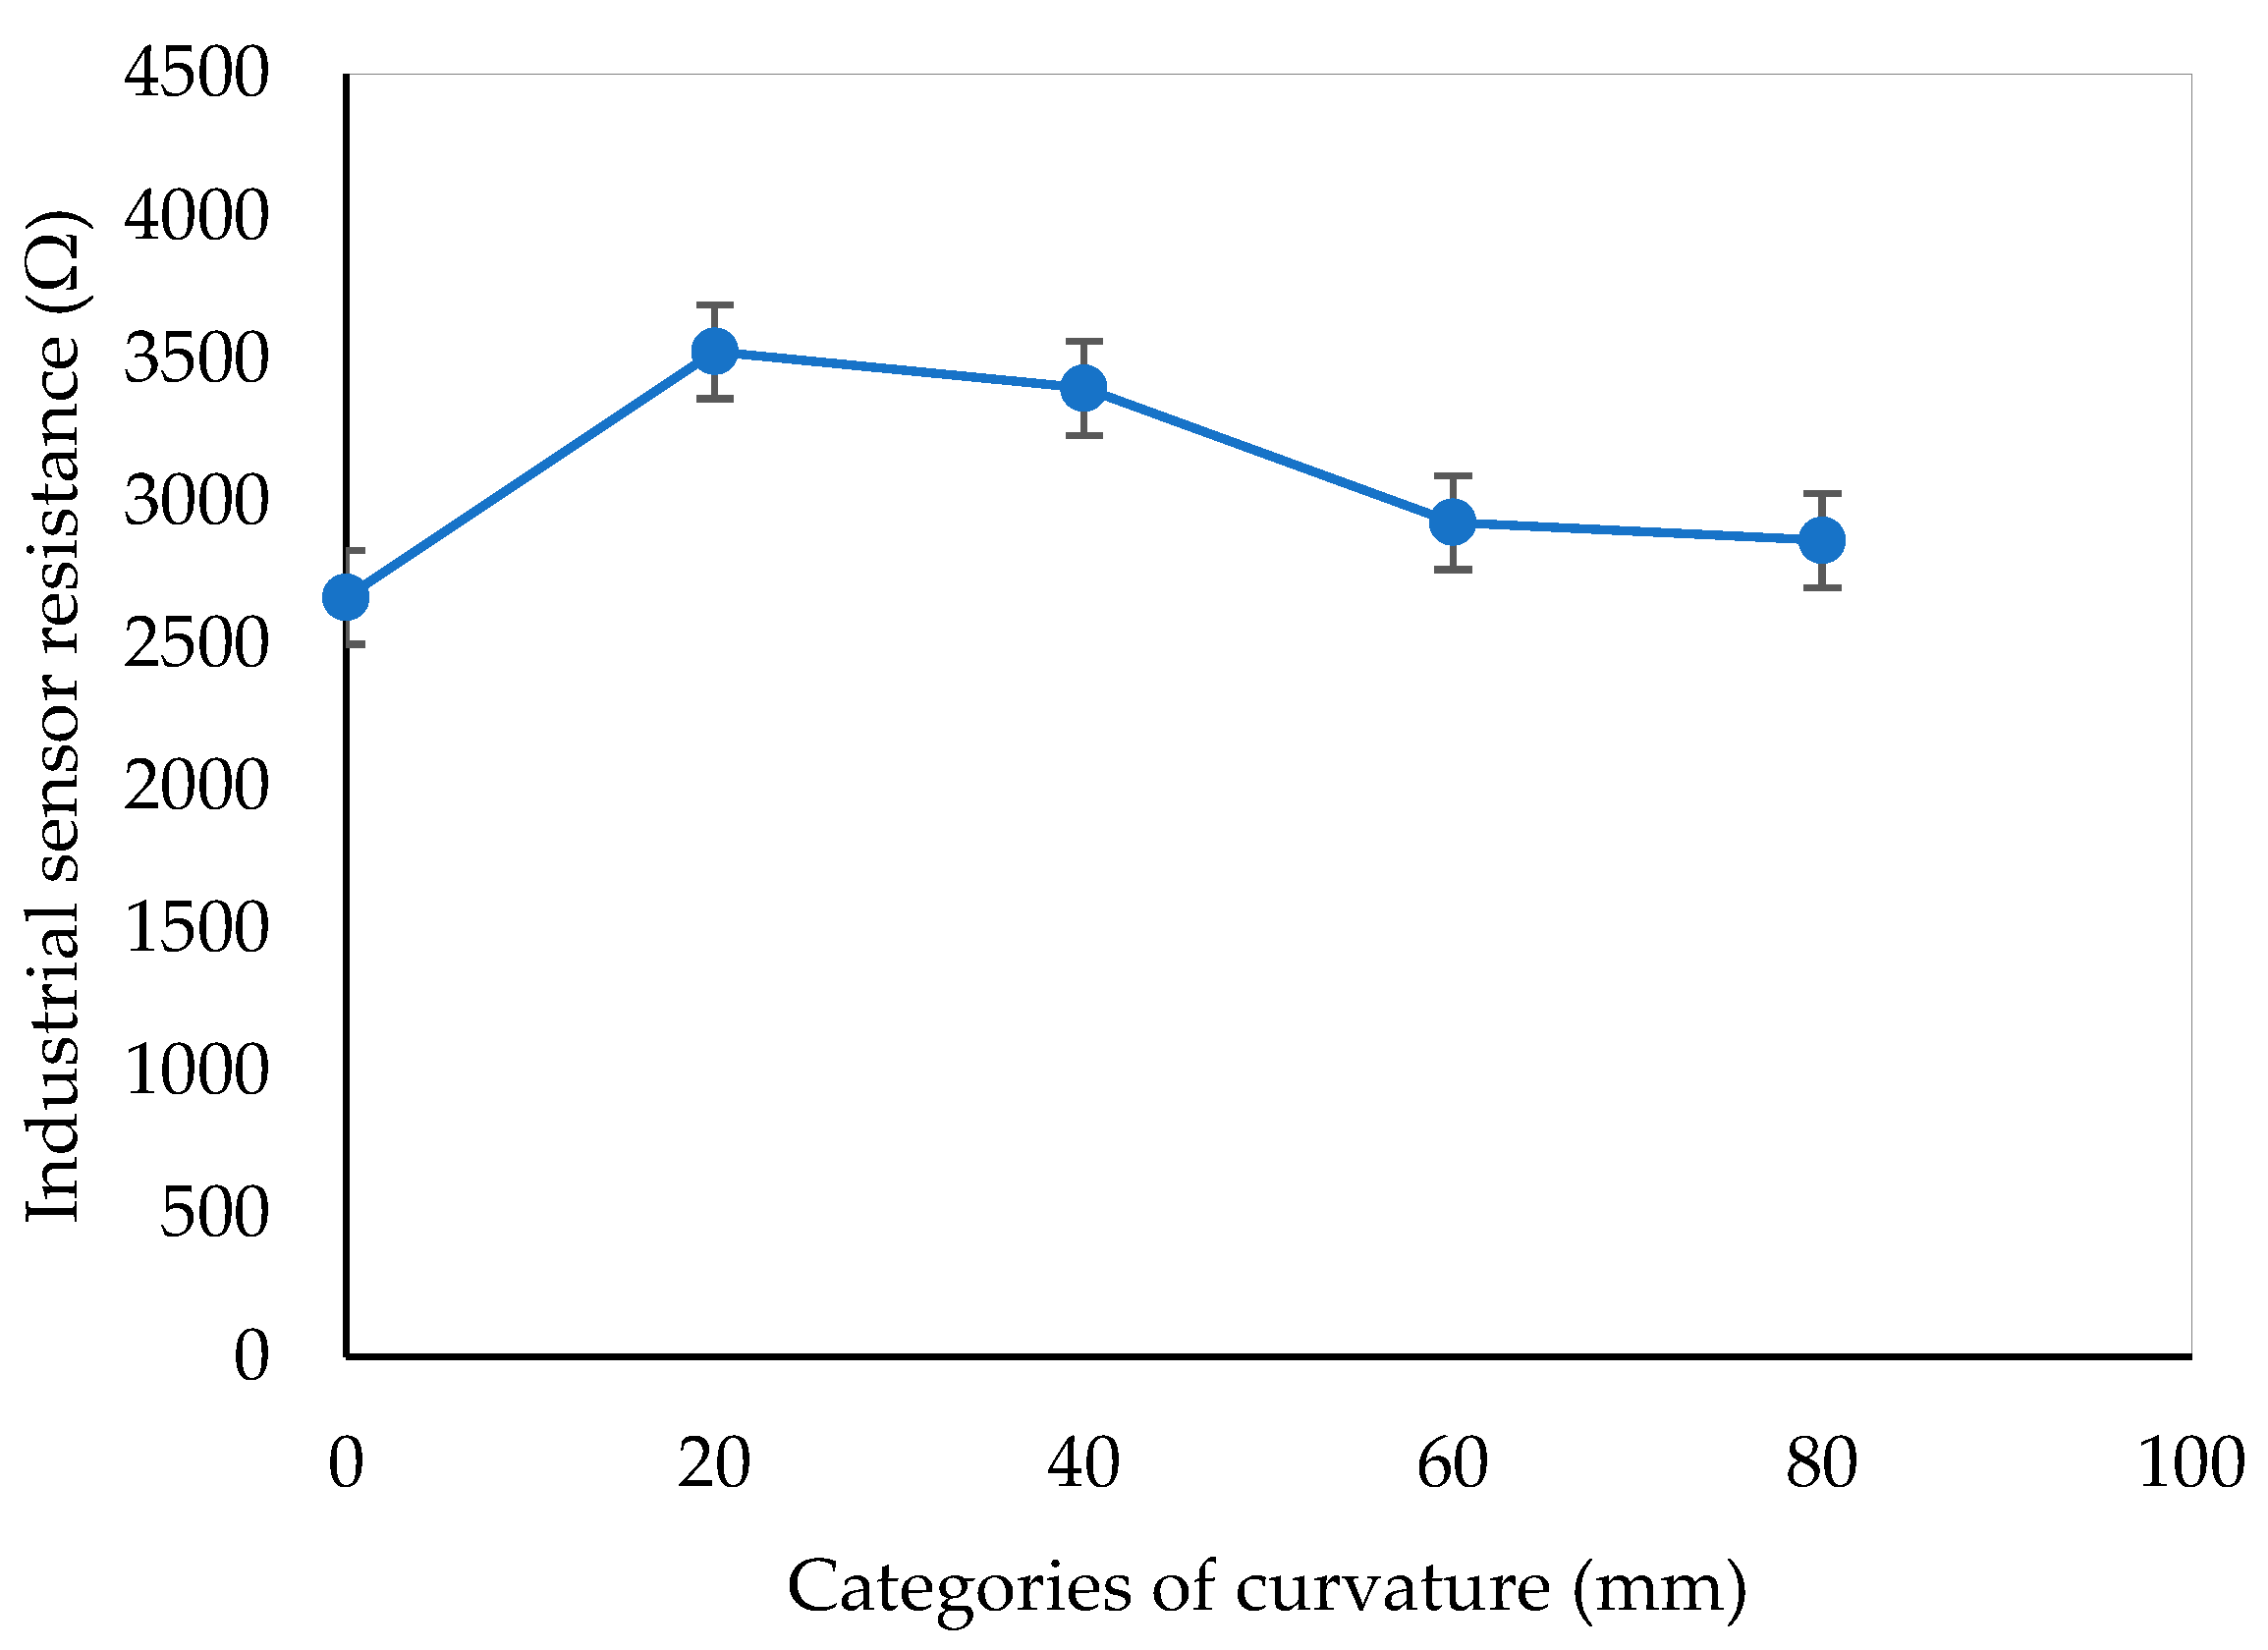
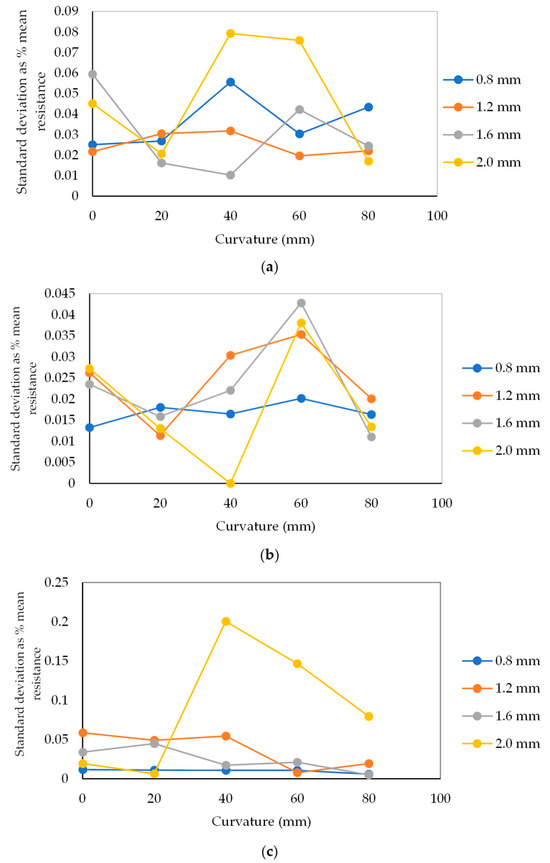
Figure A6.
(a) SD as a percentage of the mean resistance of flexible strain sensors in turn one. (b) SD as a percentage of the mean resistance of flexible strain sensors in turn two. (c) SD as a percentage of the mean resistance of flexible strain sensors in turn three.
Figure A6.
(a) SD as a percentage of the mean resistance of flexible strain sensors in turn one. (b) SD as a percentage of the mean resistance of flexible strain sensors in turn two. (c) SD as a percentage of the mean resistance of flexible strain sensors in turn three.
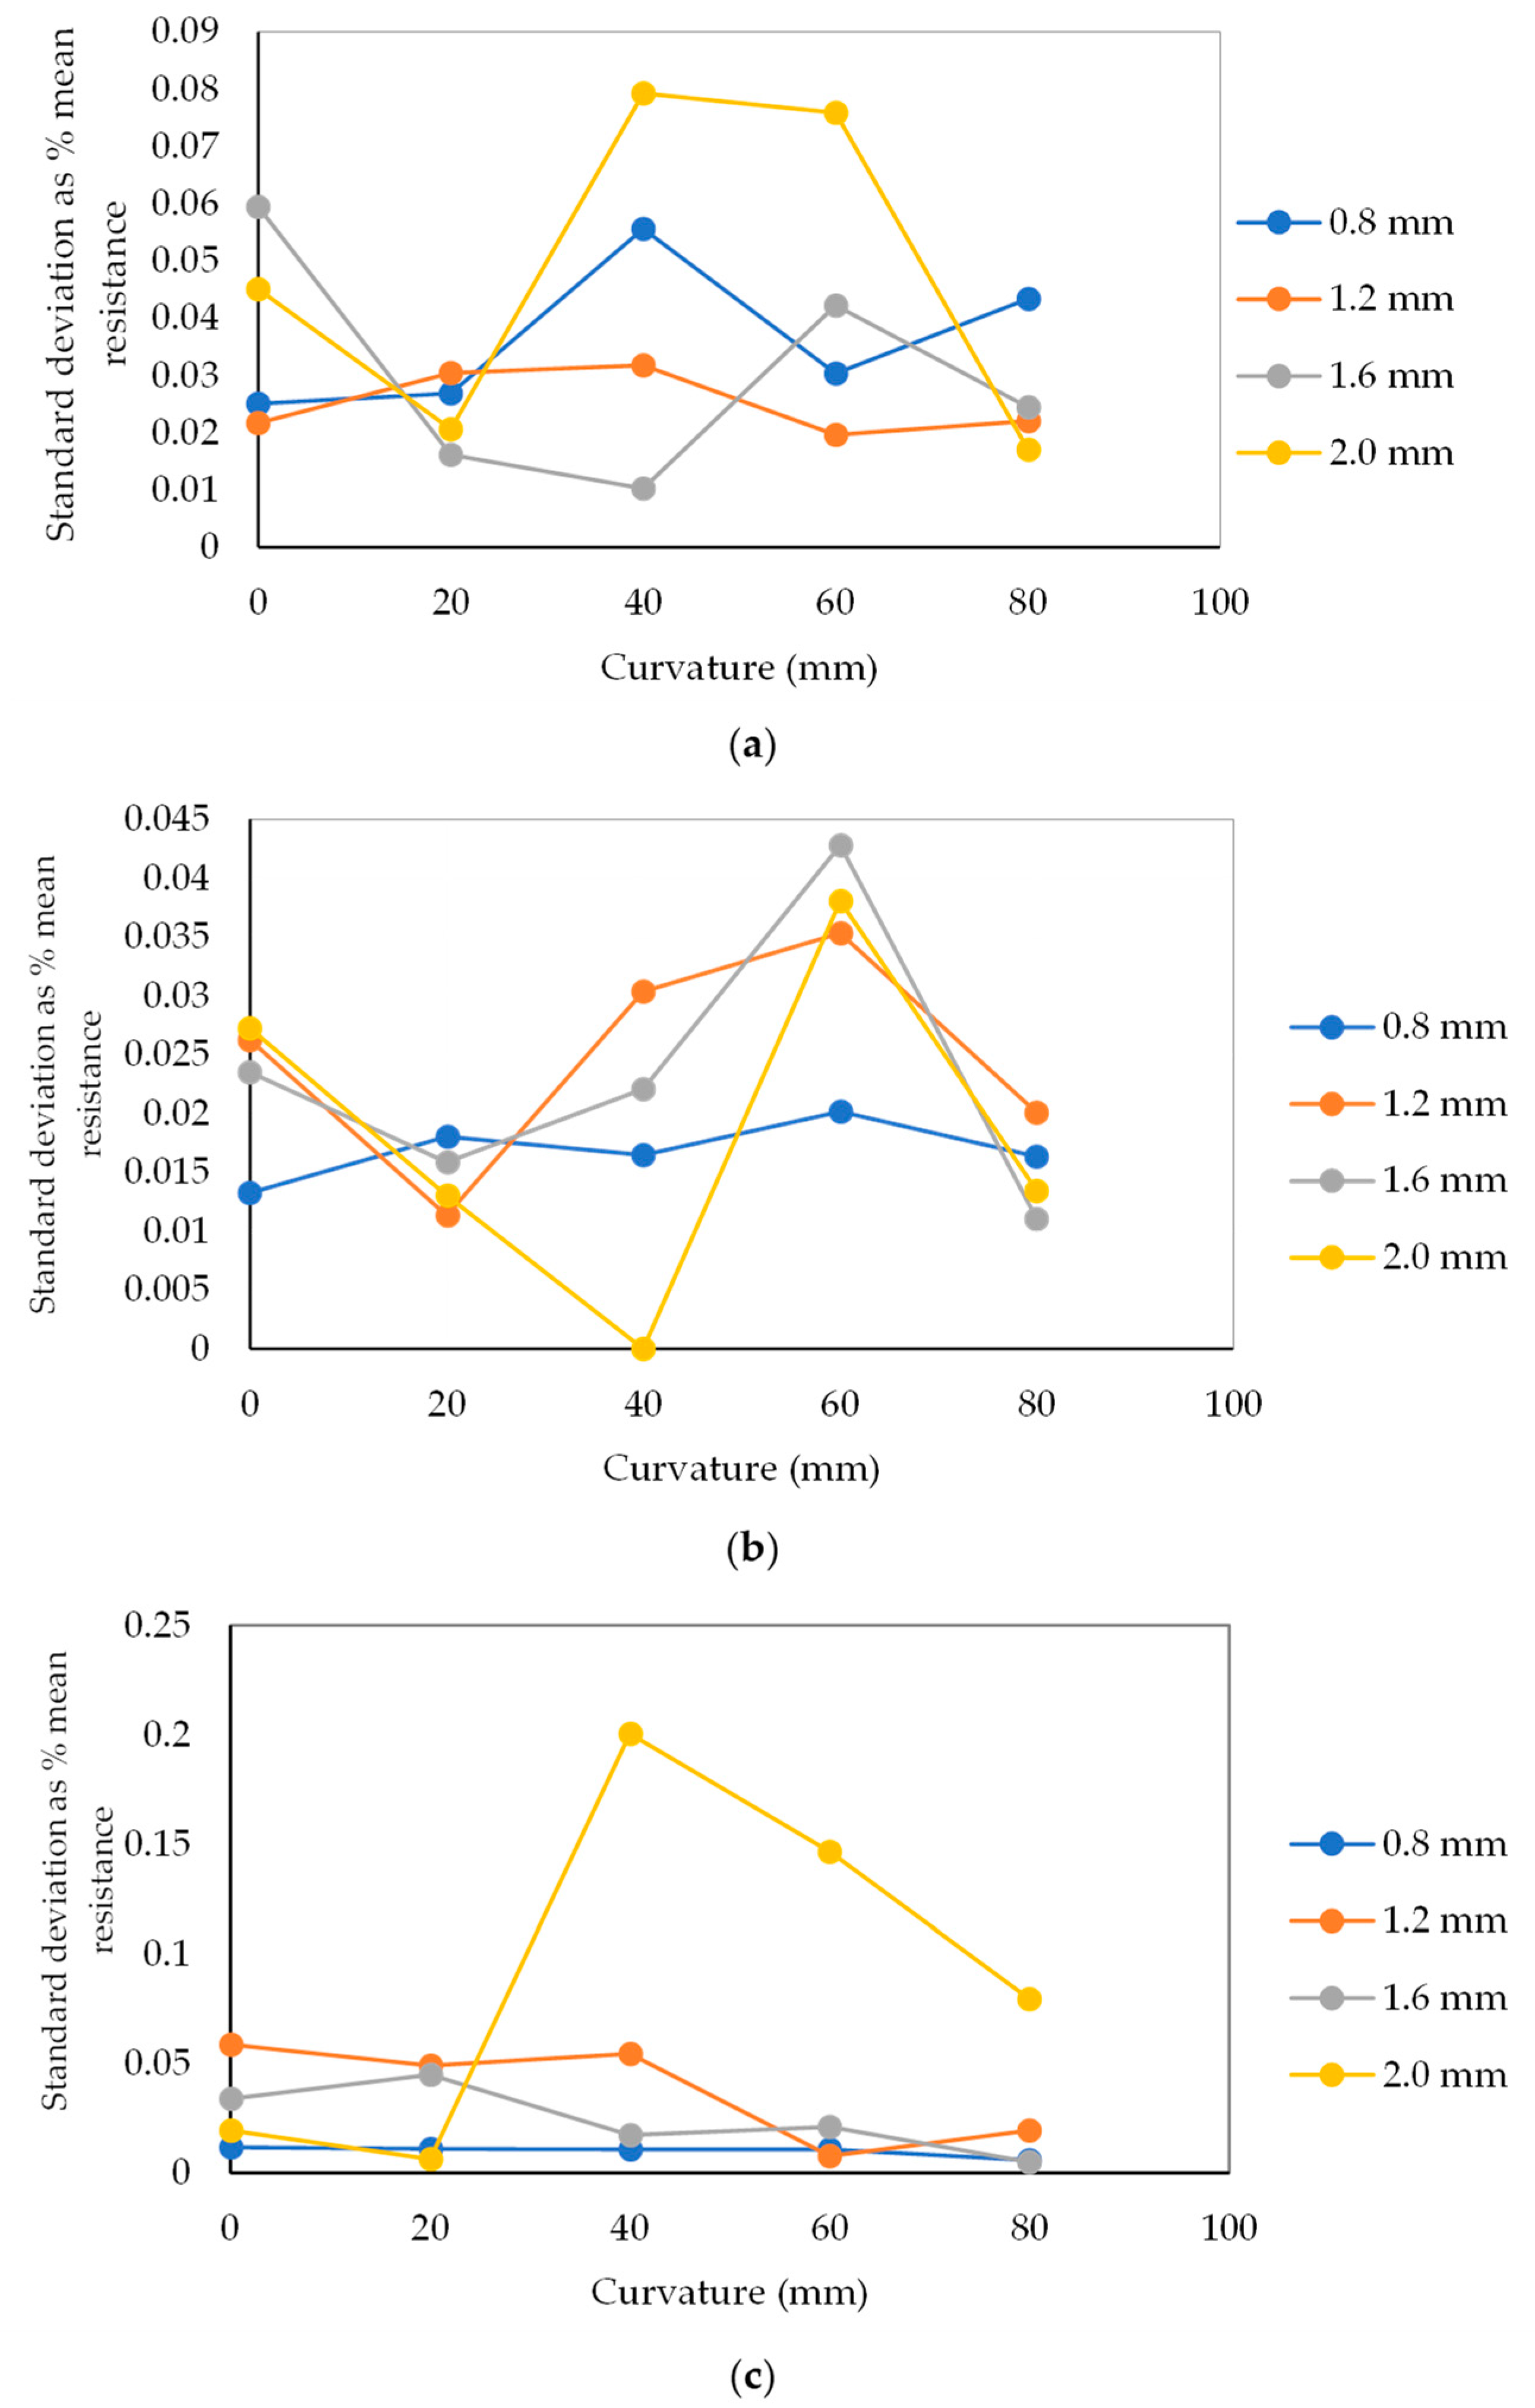
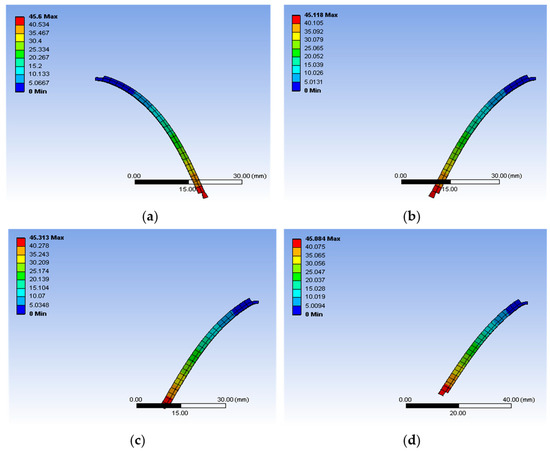
Figure A7.
Showing maximum deflections for two turns: (a) 0.8 mm; (b) 1.2 mm; (c) 1.6 mm; and (d) 2.0 mm.
Figure A7.
Showing maximum deflections for two turns: (a) 0.8 mm; (b) 1.2 mm; (c) 1.6 mm; and (d) 2.0 mm.
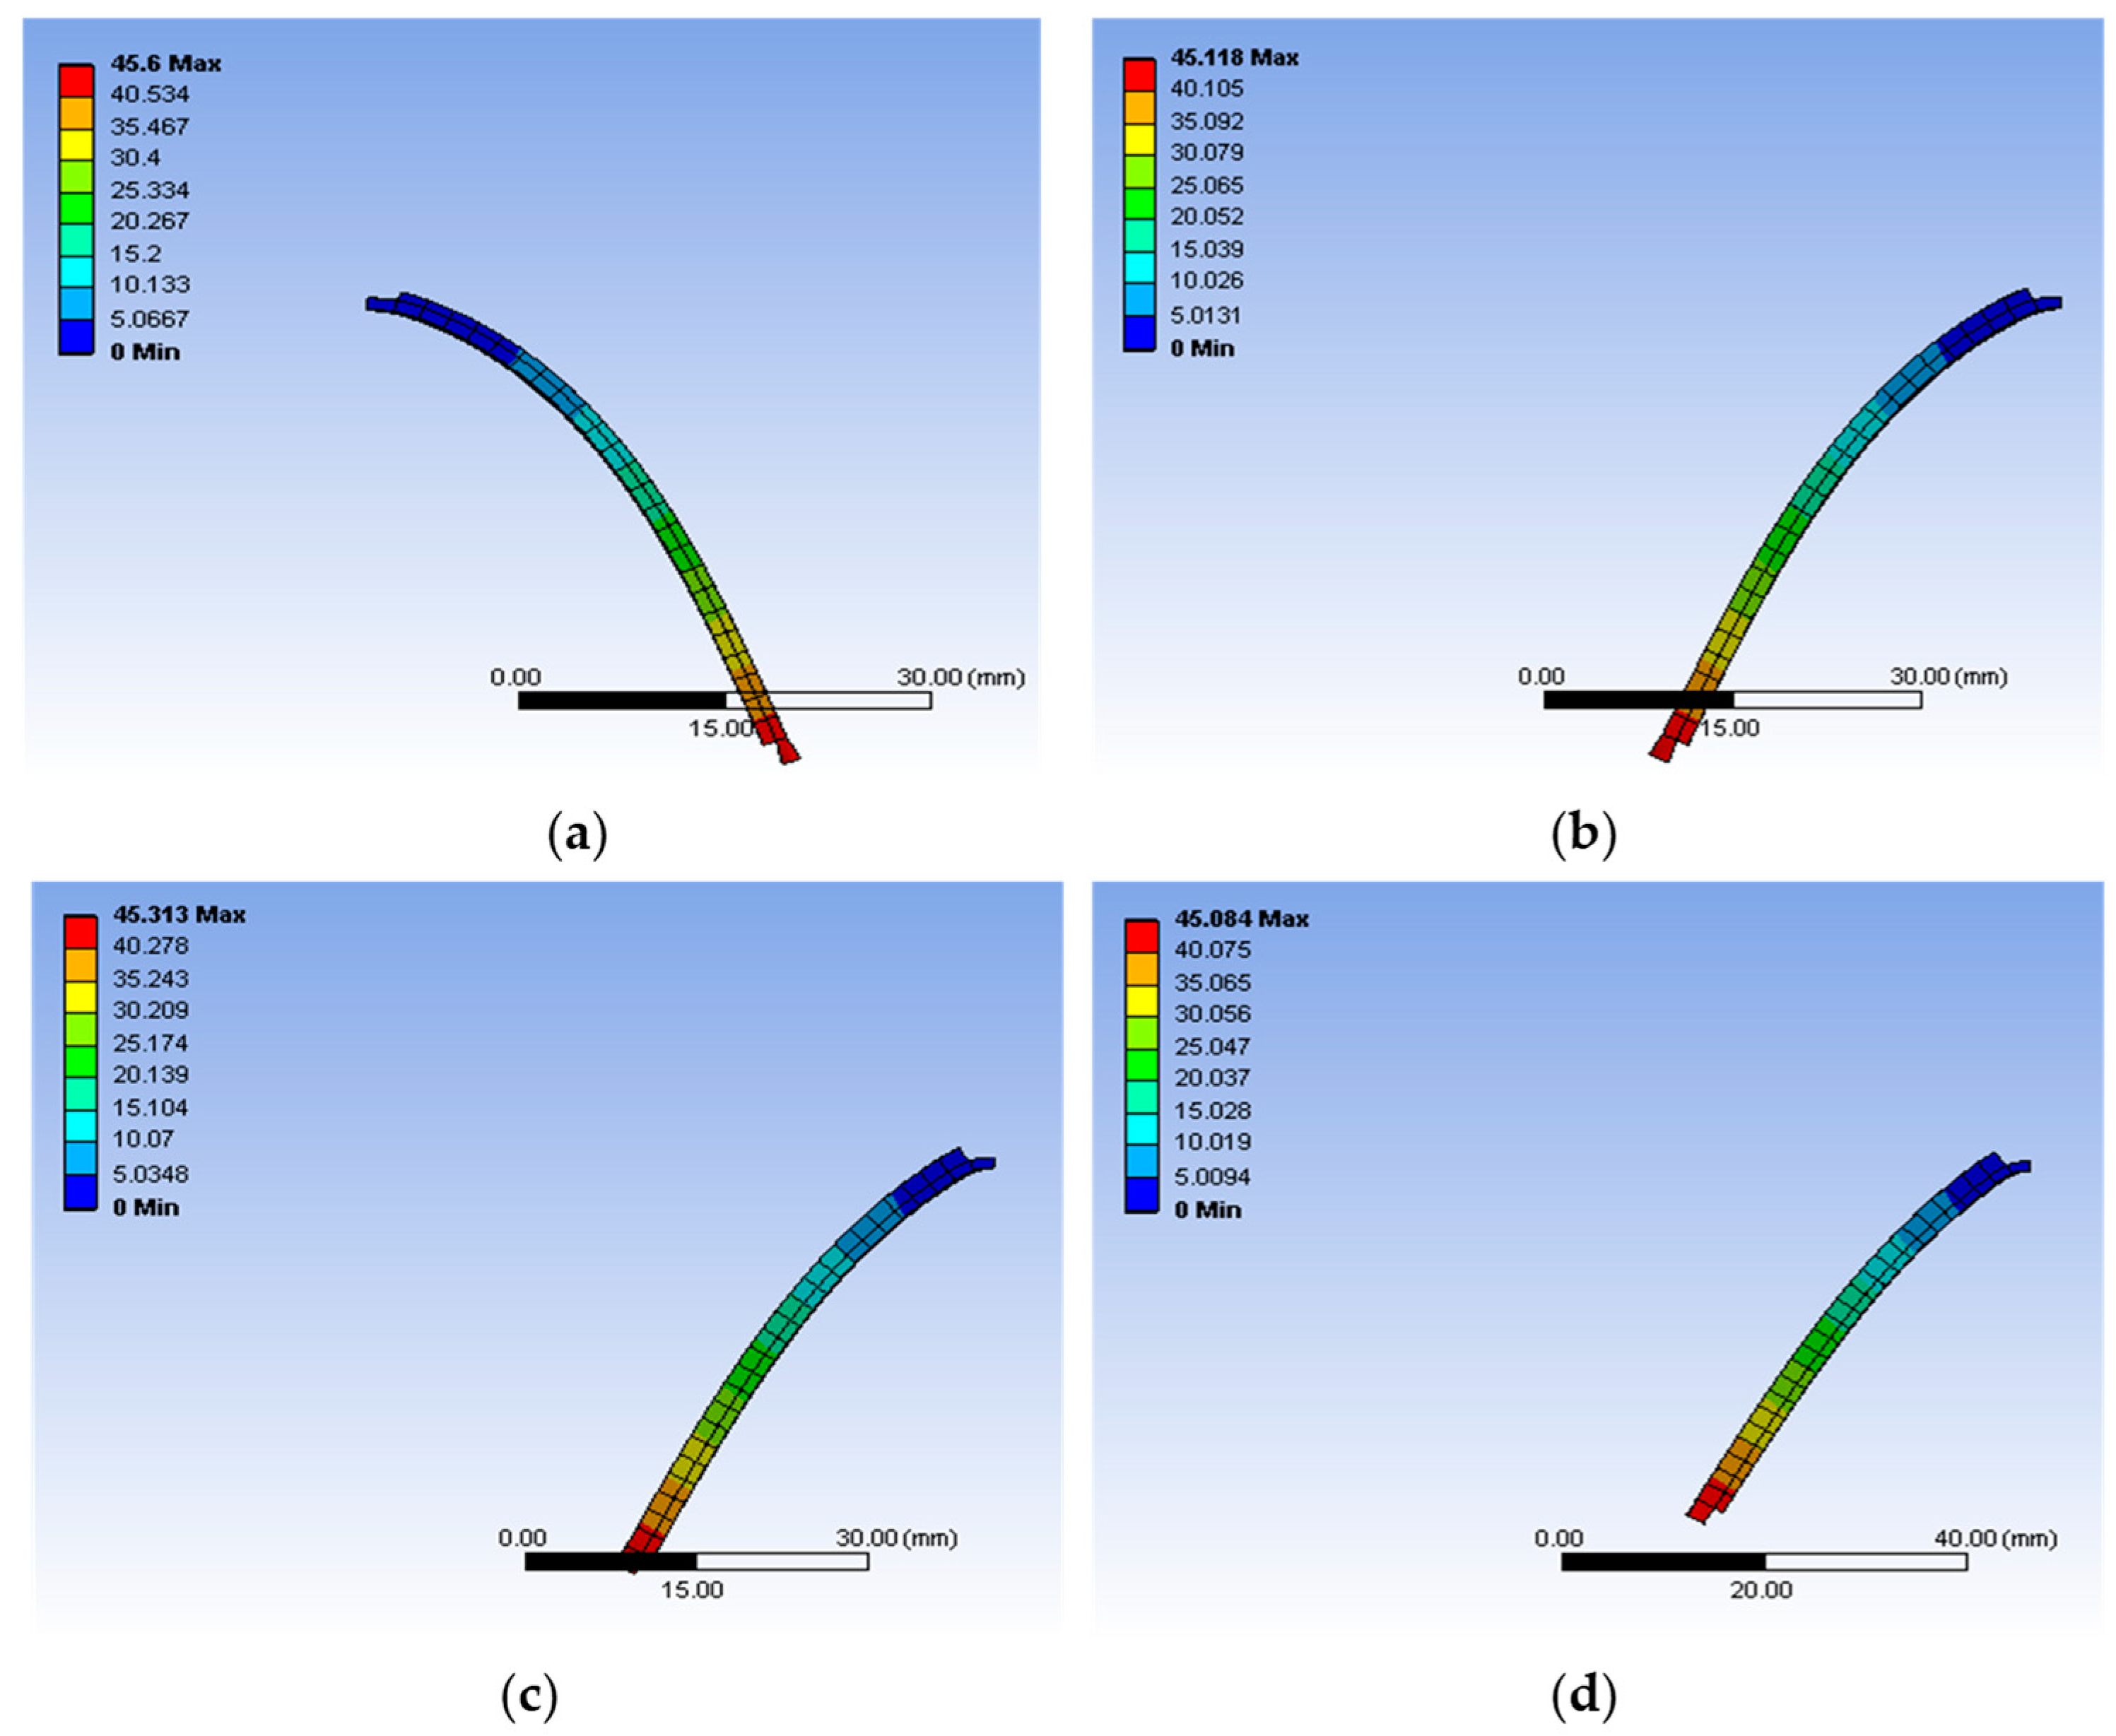
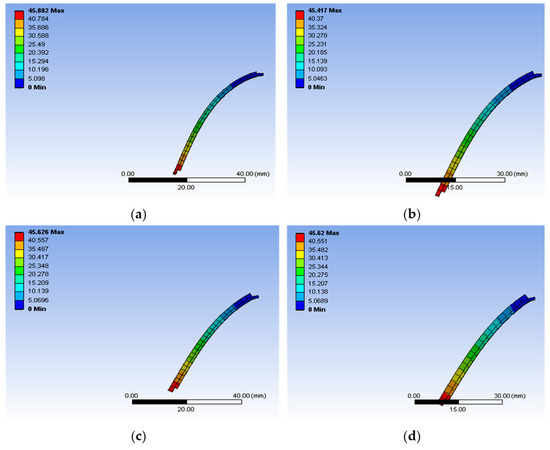
Figure A8.
Showing maximum deformations for three turns: (a) 0.8 mm; (b) 1.2 mm; (c) 1.6 mm; and (d) 2.0 mm.
Figure A8.
Showing maximum deformations for three turns: (a) 0.8 mm; (b) 1.2 mm; (c) 1.6 mm; and (d) 2.0 mm.
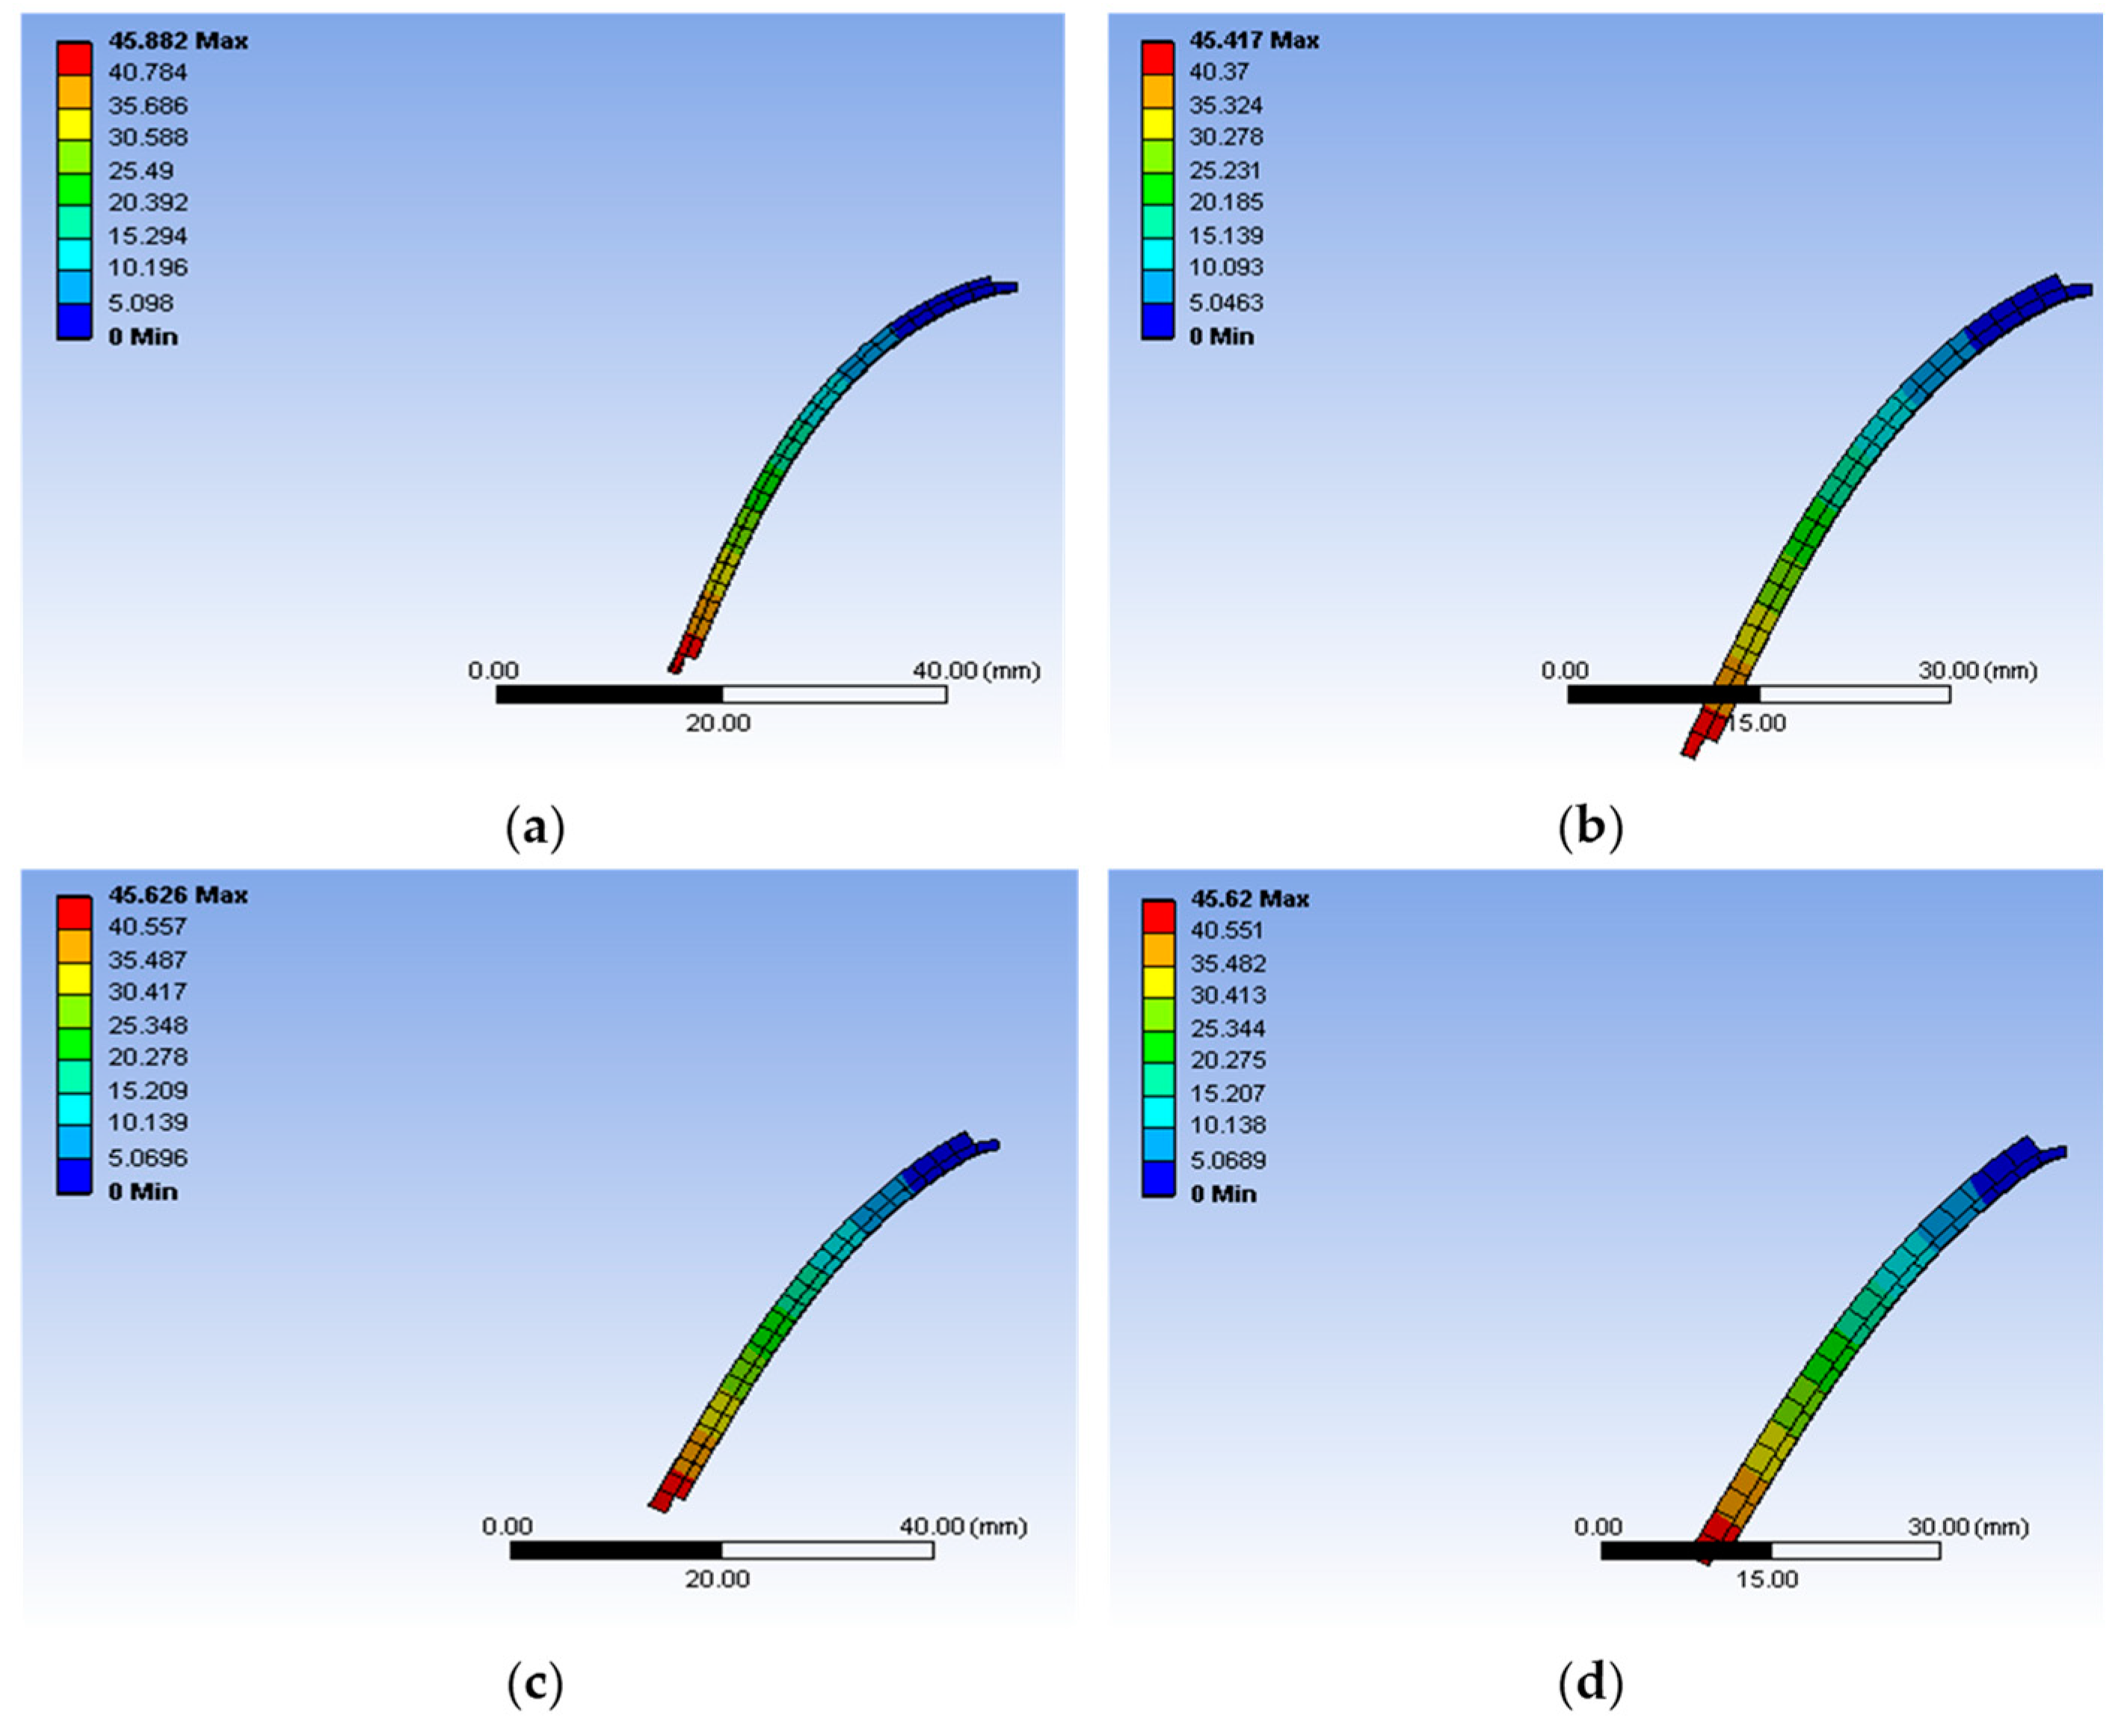
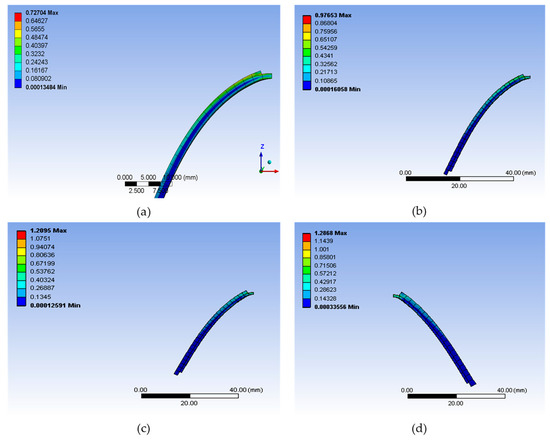
Figure A9.
Showing maximum equivalent stress for one turn: (a) 0.8 mm; (b) 1.2 mm; (c) 1.6 mm; and (d) 2.0 mm.
Figure A9.
Showing maximum equivalent stress for one turn: (a) 0.8 mm; (b) 1.2 mm; (c) 1.6 mm; and (d) 2.0 mm.

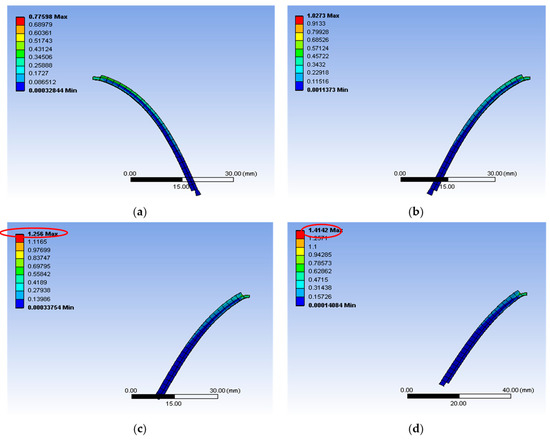
Figure A10.
Showing maximum equivalent stress for two turns: (a) 0.8 mm; (b) 1.2 mm; (c) 1.6 mm; and (d) 2.0 mm.
Figure A10.
Showing maximum equivalent stress for two turns: (a) 0.8 mm; (b) 1.2 mm; (c) 1.6 mm; and (d) 2.0 mm.
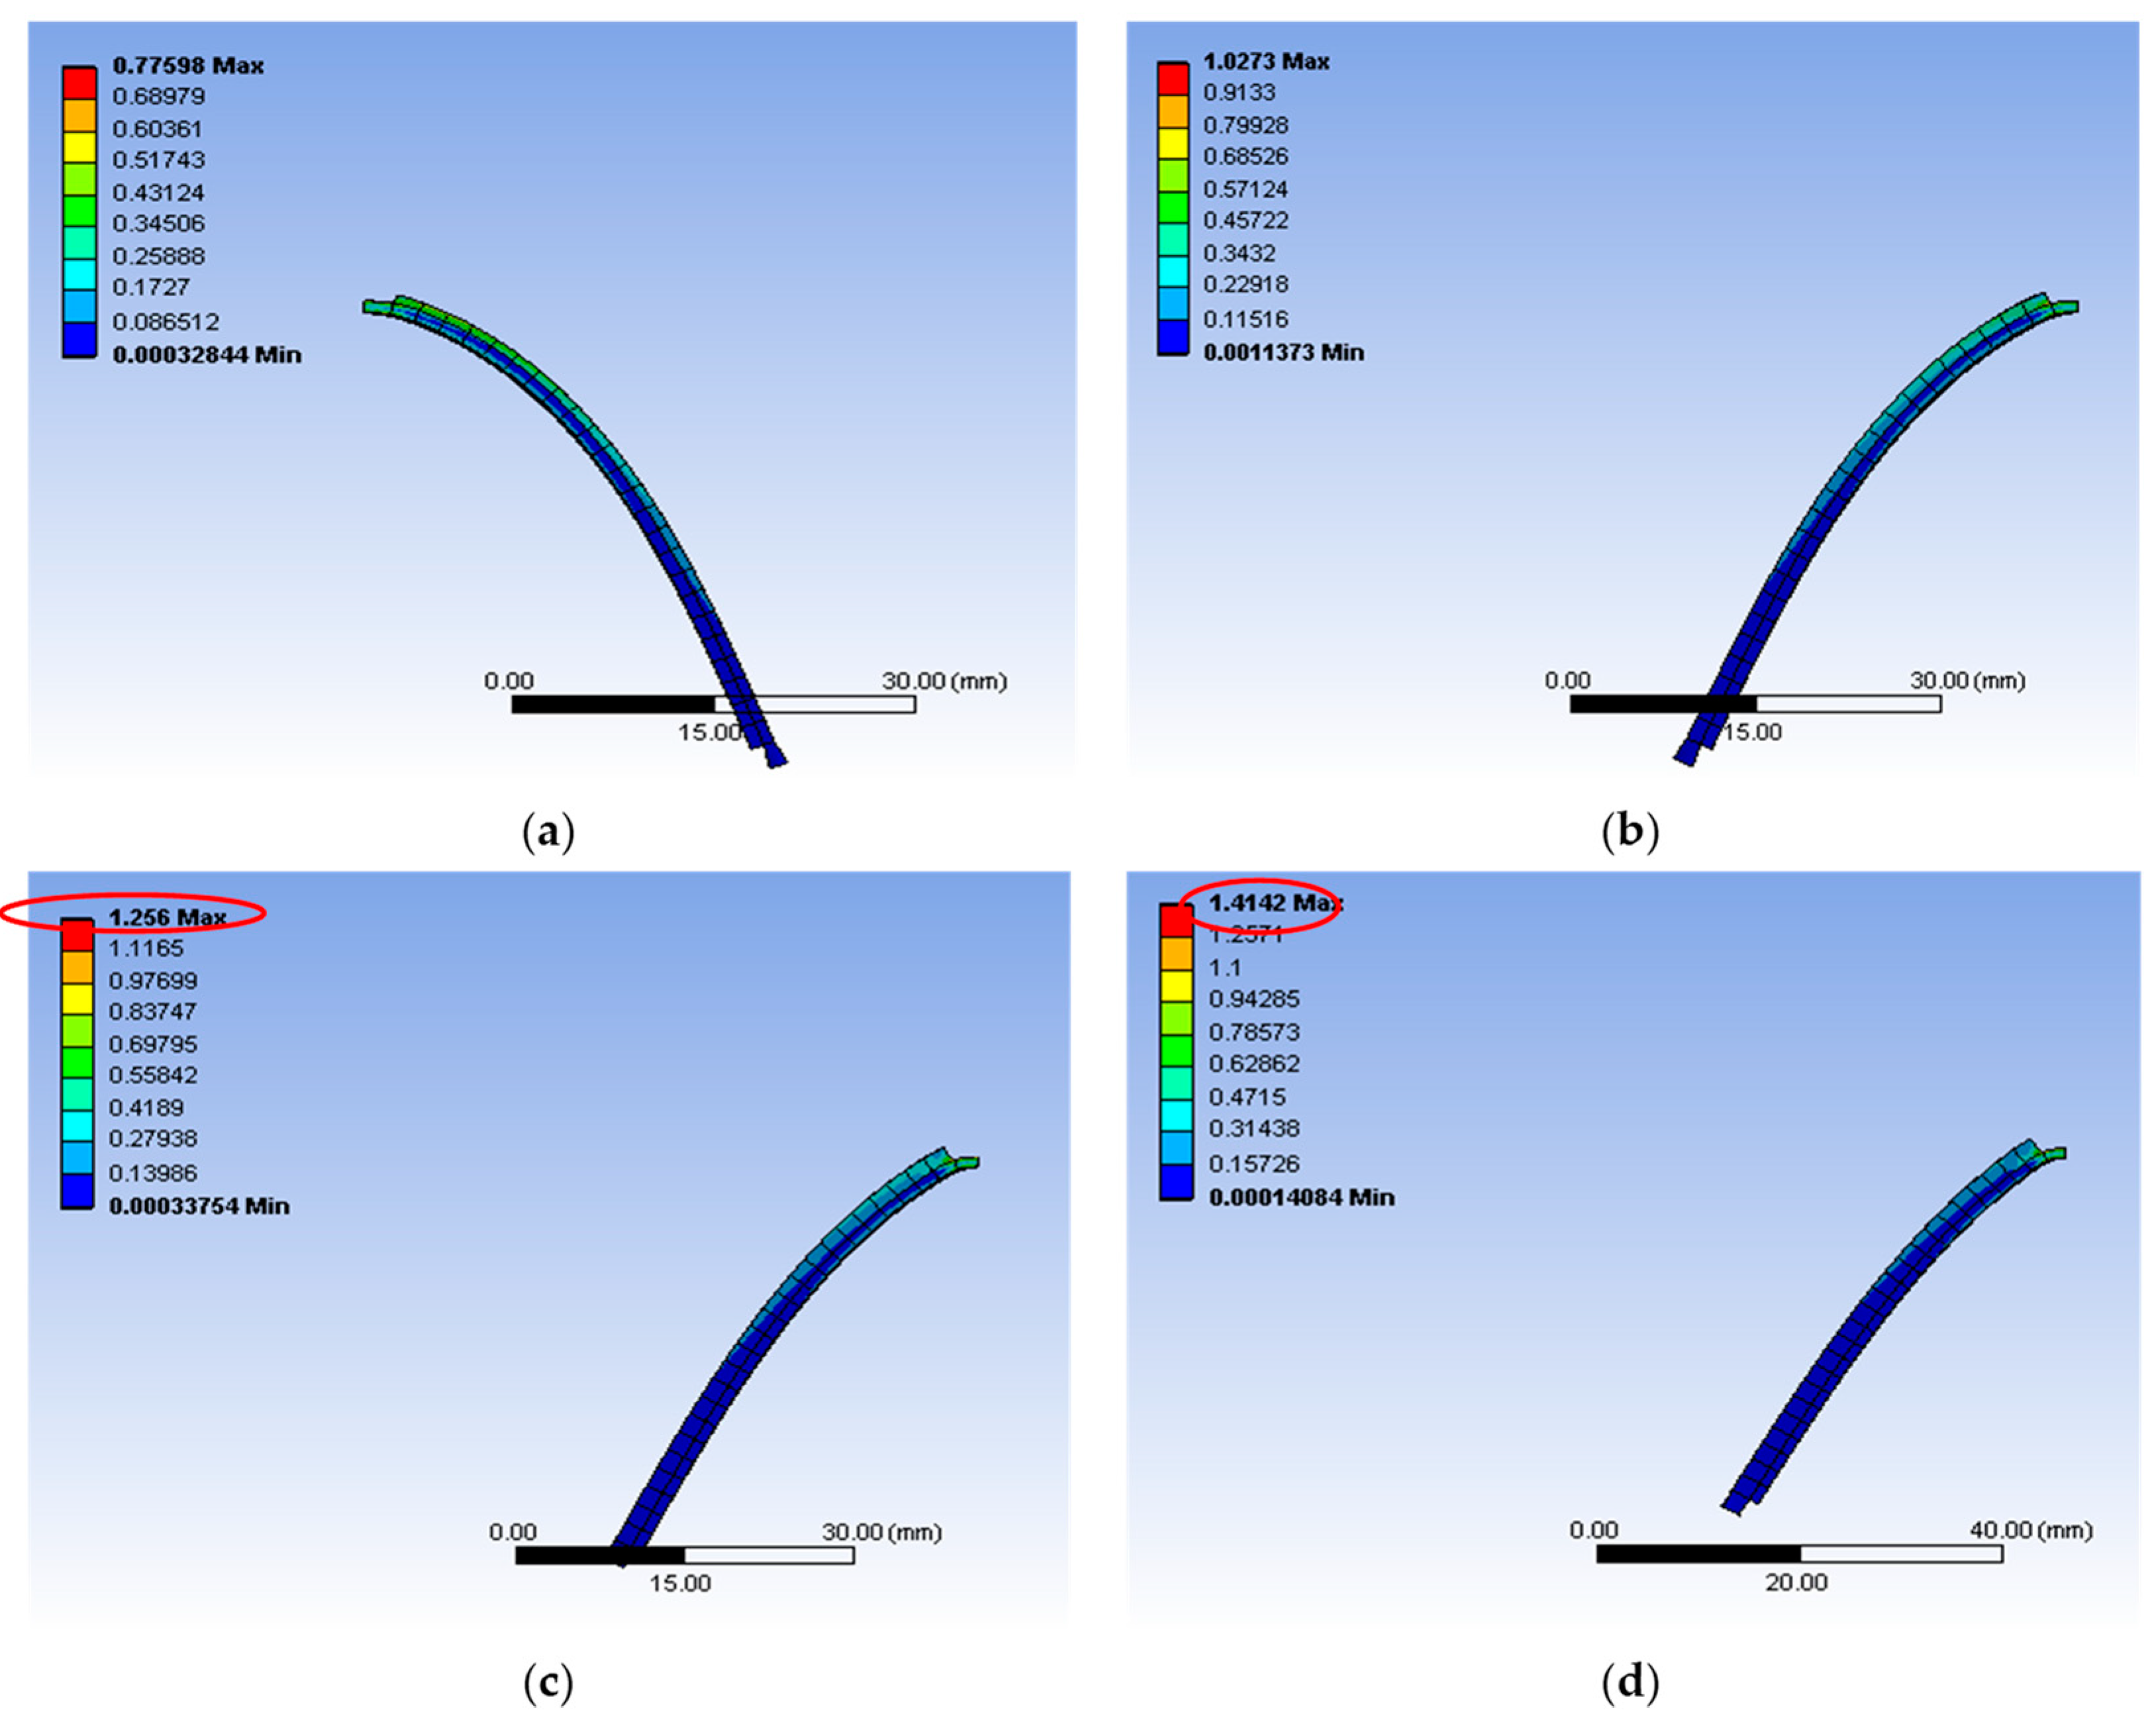

Figure A11.
Showing maximum equivalent stress for three turns: (a) 0.8 mm; (b) 1.2 mm; (c) 1.6 mm; and (d) 2.0 mm.
Figure A11.
Showing maximum equivalent stress for three turns: (a) 0.8 mm; (b) 1.2 mm; (c) 1.6 mm; and (d) 2.0 mm.
References
- Khalid, M.A.U.; Chang, S.H. Flexible strain sensors for wearable applications fabricated using novel functional nanocomposites: A review. Compos. Struct. 2022, 284, 115214. [Google Scholar] [CrossRef]
- Soft Robotics Toolkit 17. Available online: https://softroboticstoolkit.com/ (accessed on 7 July 2024).
- Elgeneidy, K.; Neumann, G.; Jackson, M.; Lohse, N. Directly Printable Flexible Strain Sensors for Bending and Contact Feedback of Soft Actuators. Front. Robot. AI 2018, 5, 2. [Google Scholar] [CrossRef] [PubMed]
- Zazoum, B.; Batoo, K.M.; Khan, M.A.A. Recent Advances in Flexible Sensors and Their Applications. Sensors 2022, 22, 4653. [Google Scholar] [CrossRef] [PubMed]
- Marchese, A.D.; Katzschmann, R.K.; Rus, D. A Recipe for Soft Fluidic Elastomer Robots. Soft Robot. 2015, 2, 7–25. [Google Scholar] [CrossRef] [PubMed]
- Tauber, F.; Desmulliez, M.; Piccin, O.; Stokes, A.A. Perspective for soft robotics: The field’s past and future. Bioinspiration Biomim. 2023, 18, 035001. [Google Scholar] [CrossRef] [PubMed]
- Joshi, J.; Manral, A.R.; Kumar, P. Technologies and Applications of Soft Robotics: A Review. J. Graph. Era Univ. 2023, 11, 239–260. [Google Scholar] [CrossRef]
- Wang, H.; Totaro, M.; Beccai, L. Toward Perceptive Soft Robots: Progress and Challenges. Adv. Sci. 2018, 5, 1800541. [Google Scholar] [CrossRef] [PubMed]
- Liu, W.; Duo, Y.; Liu, J.; Yuan, F.; Li, L.; Li, L.; Wang, G.; Chen, B.; Wang, S.; Yang, H.; et al. Touchless interactive teaching of soft robots through flexible bimodal sensory interfaces. Nat. Commun. 2022, 13, 5030. [Google Scholar] [CrossRef] [PubMed]
- Lu, N.; Kim, D.-H. Flexible and Stretchable Electronics Paving the Way for Soft Robotics. Soft Robot. 2014, 1, 53–62. [Google Scholar] [CrossRef]
- Hughes, J.; Culha, U.; Giardina, F.; Guenther, F.; Rosendo, A.; Iida, F. Soft Manipulators and Grippers: A Review. Front. Robot. AI 2016, 3, 69. [Google Scholar] [CrossRef]
- Kim, N.P. 3D-Printed Conductive Carbon-Infused Thermoplastic Polyurethane. Polymers 2020, 12, 1224. [Google Scholar] [CrossRef] [PubMed]
- Amjadi, M.; Kyung, K.; Park, I.; Sitti, M. Stretchable, Skin-Mountable, and Wearable Strain Sensors and Their Potential Applications: A Review. Adv. Funct. Mater. 2016, 26, 1678–1698. [Google Scholar] [CrossRef]
- Wu, H.; Zheng, B.; Wang, H.; Ye, J. New Flexible Tactile Sensor Based on Electrical Impedance Tomography. Micromachines 2022, 13, 185. [Google Scholar] [CrossRef] [PubMed]
- Hsu, T.-Y.; El-Ghazaly, A. In-Skin Pressure and Curvature Sensors for Soft Robots. In Proceedings of the 2021 IEEE Sensors, Sydney, Australia, 31 October–3 November 2021; pp. 1–4. [Google Scholar] [CrossRef]
- Laschi, C.; Cianchetti, M. Soft Robotics: New Perspectives for Robot Bodyware and Control. Front. Bioeng. Biotechnol. 2014, 2, 3. [Google Scholar] [CrossRef] [PubMed]
- Bao, G.; Fang, H.; Chen, L.; Wan, Y.; Xu, F.; Yang, Q.; Zhang, L. Soft Robotics: Academic Insights and Perspectives through Bibliometric Analysis. Soft Robot. 2018, 5, 229–241. [Google Scholar] [CrossRef]
- Banerjee, A. The Impact of Soft Robotics In Today’s World: Applications, Challenges Faced, And Future Outlook. In Proceedings of the 2022 International Conference on Smart Generation Computing, Communication and Networking (SMART GENCON), Bangalore, India, 23–25 December 2022; pp. 1–6. [Google Scholar] [CrossRef]
- Tawk, C.; Alici, G. Finite Element Modeling in the Design Process of 3D Printed Pneumatic Soft Actuators and Sensors. Robotics 2020, 9, 52. [Google Scholar] [CrossRef]
- Ninjaflex. Available online: https://www.idig3dprinting.co.uk/shop/3d-printer-filament/flexible-filament/midnight-black-ninjaflex/#:~:text=NinjaFlex%20is%20also%20a%20high,on%20the%20Shore%20Hardness%20Scale (accessed on 7 July 2024).
- Lulzbot. Available online: https://lulzbot.com/ (accessed on 7 July 2024).
- Arduino. Available online: https://www.arduino.cc/en/software (accessed on 11 October 2023).
- Zhou, S.; Li, Y.; Wang, Q.; Lyu, Z. Integrated Actuation and Sensing: Towards Intelligent Soft Robots. Cyborg Bionic Syst. 2024, 5, 0105. [Google Scholar] [CrossRef]
- Kuroda, Y.; Yamanoi, Y.; Togo, S.; Jiang, Y.; Yokoi, H. Coevolution of Myoelectric Hand Control under the Tactile Interaction among Fingers and Objects. Cyborg Bionic Syst. 2022, 2022, 9861875. [Google Scholar] [CrossRef]
- Li, R.; Peng, B. Implementing Monocular Visual-Tactile Sensors for Robust Manipulation. Cyborg Bionic Syst. 2022, 2022, 9797562. [Google Scholar] [CrossRef] [PubMed]
Disclaimer/Publisher’s Note: The statements, opinions and data contained in all publications are solely those of the individual author(s) and contributor(s) and not of MDPI and/or the editor(s). MDPI and/or the editor(s) disclaim responsibility for any injury to people or property resulting from any ideas, methods, instructions or products referred to in the content. |
© 2024 by the authors. Licensee MDPI, Basel, Switzerland. This article is an open access article distributed under the terms and conditions of the Creative Commons Attribution (CC BY) license (https://creativecommons.org/licenses/by/4.0/).

