Abstract
The building block computation system is constructed by stacking various chips three-dimensionally. The stacked chips incorporate the same TCI IP (Through Chip Interface Intellectual Property) but cannot provide identical characteristics, requiring adjustments in power supply and bias voltage. However, providing characteristics measurement hardware for all chips is difficult due to the limitation of chip area or pin numbers. To address this problem, we developed TCI Tester, a small chip to measure electric characteristics by stacking on TCI of every chip. By stacking two TCI Tester chips, it appears that the up-directional data transfer has a stricter condition than down directional one on power supply voltage and operational frequency. Also, the transfer performance is poorer than designed. Similar measurement results are obtained by stacking TCI Tester on other chips with TCI IP. To investigate the reason, we analyzed the power grid resistance of various chips with the TCI IP. Results also showed that the chips with higher resistance have a narrow operational condition and poorer performance. The results suggest that the power grid design is important for keeping the performance through the TCI channel.
1. Introduction
The demand for information and communication devices has increased in recent years, and their applications have diversified extensively. As a result, the required functions, performance, and power vary significantly depending on the application. On the other hand, considering the cost of large-scale LSIs using advanced processes, developing a single large-scale System-on-a-Chip (SoC) simultaneously meeting diverse requirements is challenging. On the other hand, considering the Non-Recurrent Engineering (NRE) costs, developing SoCs for each specific application is also challenging. Therefore, the SiP (System in Package) technology, which involves implementing smaller chips such as processor, memory, and accelerator chips, and combining only the necessary components, has gained attention.
The building block type computation system utilizing the chip-to-chip wireless communication technology [1,2,3,4,5] called Through Chip Interface (TCI) [6,7,8,9] offers the advantage of easy addition, replacement, and removal of stacked chips.TCI utilizes electromagnetic induction occurring between stacked coils (inductors) to enable chip-to-chip wireless communication. As a result, it offers greater flexibility in implementation compared to wired communication methods such as Through Silicon Vias (TSV) or wire bonding.
We designed the TCI (Through Chip Interface) IP (Intellectual Property) using the Renesas SOTB (Silicon On Thin Box) 65 nm process [10], and manufactured various chips incorporating this IP. We then stacked these chips together and conducted operational experiments. However, the results revealed that even when incorporating the same IP, the chips did not necessarily exhibit identical characteristics, indicating the need for adjustments in power supply and bias voltage [11]. The existing chips incorporating the TCI IP did not have measurement capabilities due to pin limitations and layout constraints, making it difficult to directly measure the characteristics of the stacked system. Although circuit-level TCI test methods have been investigated [12], chip-level test method has not been tried. Therefore, in this paper, we developed a verification chip called “TCI Tester” that allows the evaluation of the characteristics of the TCI IP by stacking it on the TCI-equipped chips. This paper describes the design and implementation of the TCI Tester and presents the results of operational verification by stacking it with other TCI-equipped chips, demonstrating its effectiveness. In Section 2, an overview of TCI and its associated issues are discussed. Section 3 introduces the TCI Tester, a chip designed for measuring TCI characteristics. In Section 4, the actual measurements using the TCI Tester are described. Section 5 is for the summary.
2. Wireless Interconnect through Chip Interface (TCI)
2.1. Overview of TCI
TCI is a technology that enables chip-to-chip communication by converting changes in magnetic flux between coils (inductors) built by using the chip’s wiring layers. TCI allows the formation of a three-dimensional wireless communication path by aligning and stacking the transmitting and receiving inductors. It is not limited to face-to-face stacking but allows the stacking of multiple chips through face-to-back stacking. Usually, two inductors for clock and data transfer are provided, and the clock sent from the transmitter is used to synchronize the data on the receiver. The transfer clock is typically generated by a ring oscillator using NOT gates, allowing high-speed transfers at frequencies ranging from 1 GHz to 8 GHz, depending on the chip’s performance [13]. The advantages of TCI are as follows: (1) No need to modify the standard CMOS (Complementary Metal-Oxide-Semiconductor) process. (2) Multiple stacking becomes possible if the chips’ power supply can be provided. (3) Once the transfer path is established, the transfer errors are rare and can be easily corrected with a simple error correction mechanism. (4) Although the size of the inductor is large, it can accommodate logic inside, reducing the really required area [14].
2.2. TCI IP
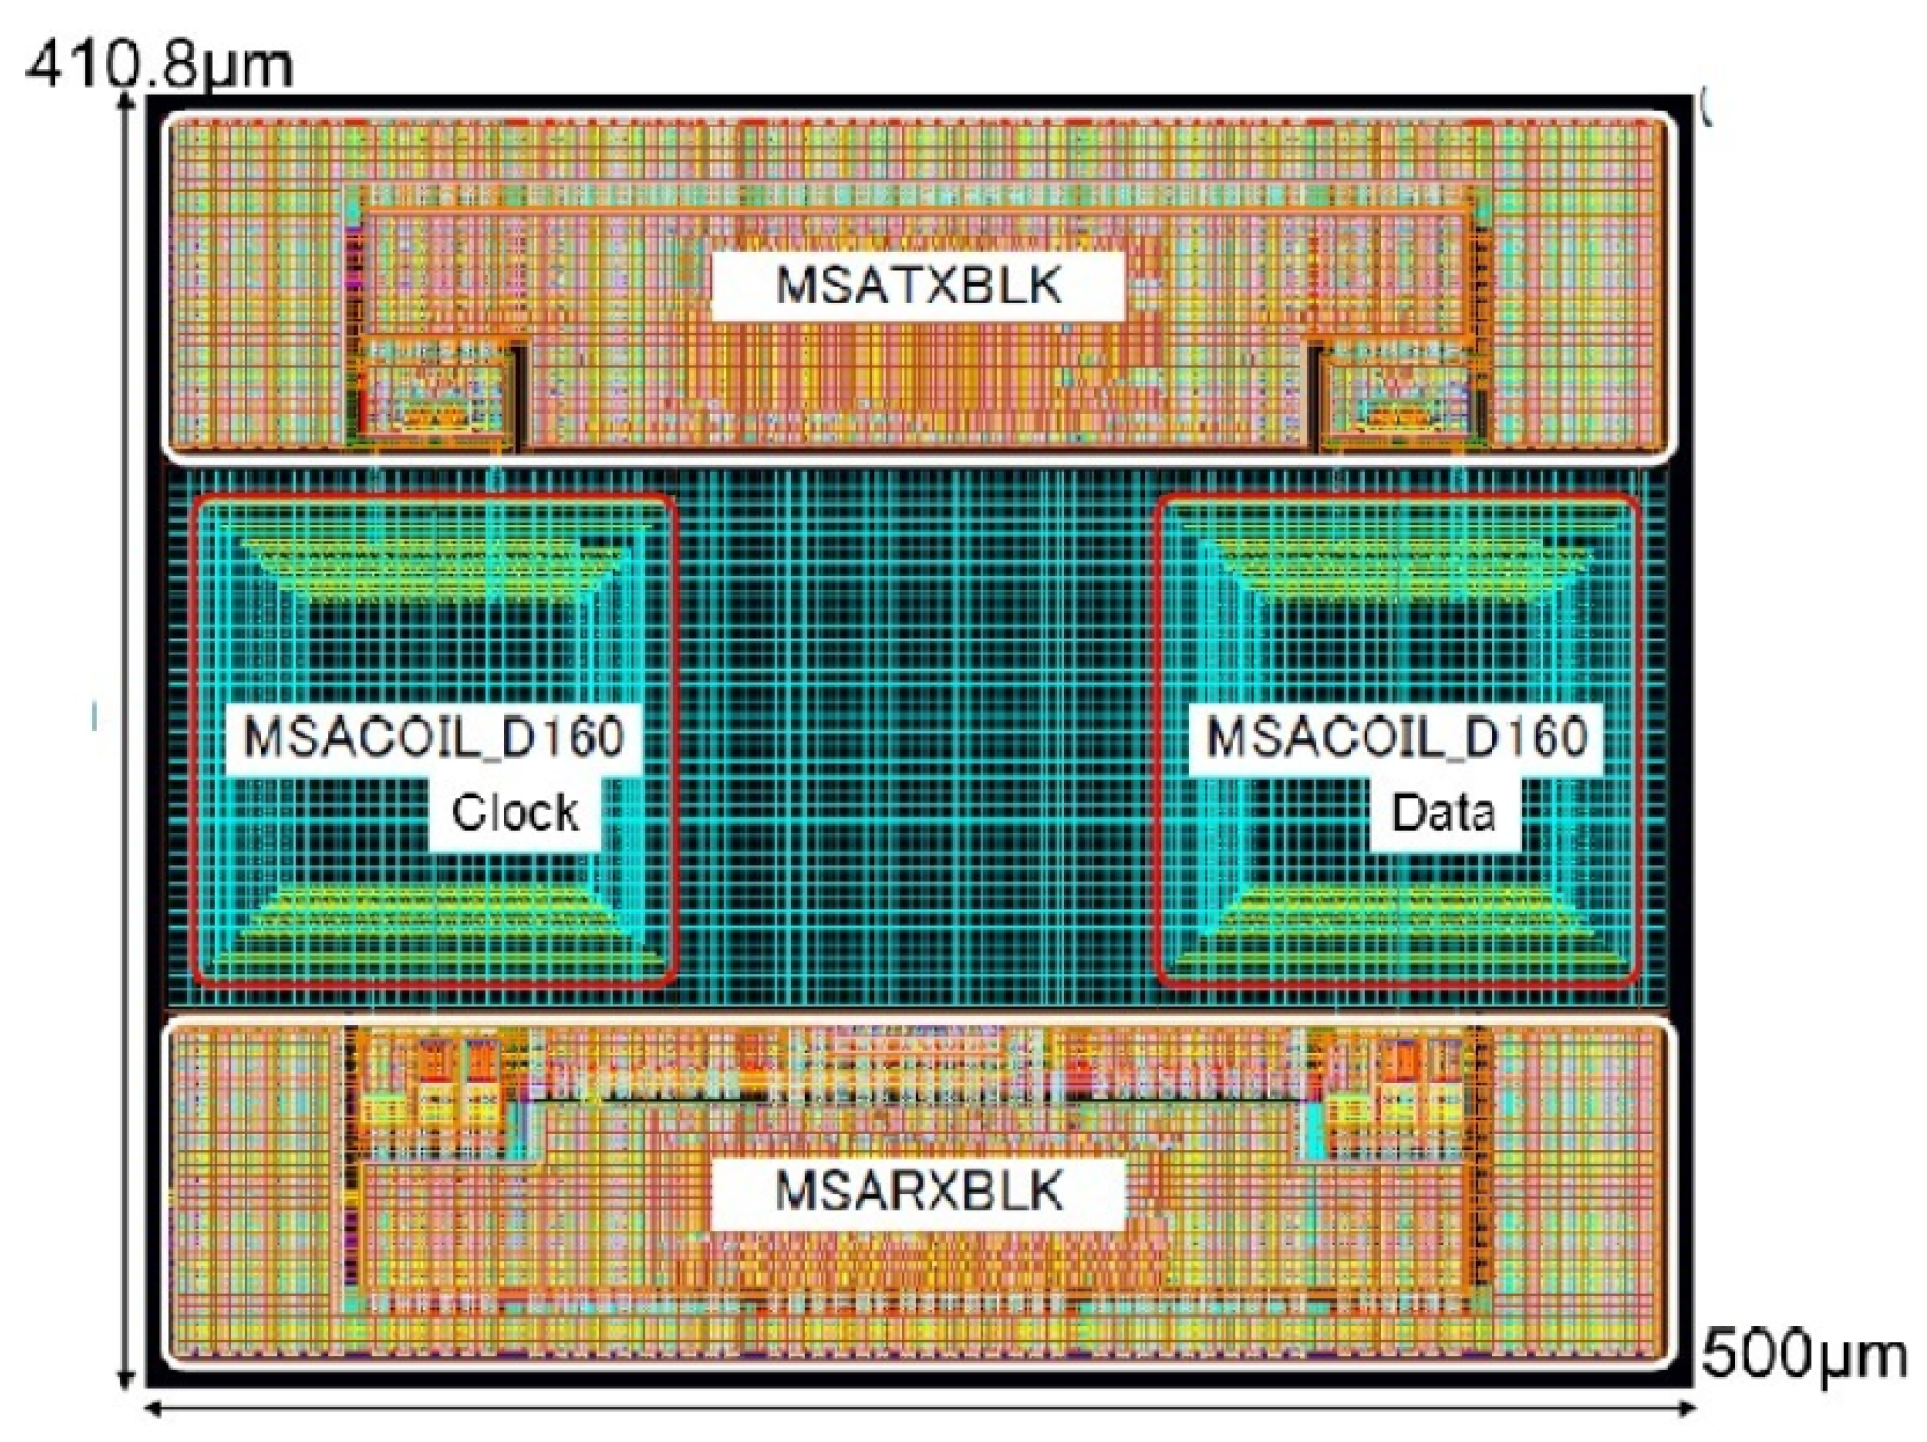
When incorporating the TCI into actual chips, it is convenient to package it as an IP (Intellectual Property) along with inductors, transceiver circuits, and SERDES (Serializer and Deserializer). We have implemented IP for Renesas’ 65 nm SOTB process [13]. The IP is constructed from the physical layer of hard IP, the link layer, and the router layer of soft IP. The link layer includes embedded flow control circuits. The router layer is parameterized and can generate routers with any number of inputs and outputs, each equipped with eight virtual channels. Stacking chips using this IP can build a linear bidirectional (escalator) network [15]. The hard IP includes inductors for clock transfer and data transfer, respective transceiver circuits, and a SERDES circuit for data. The hard IP layout is shown in Figure 1.
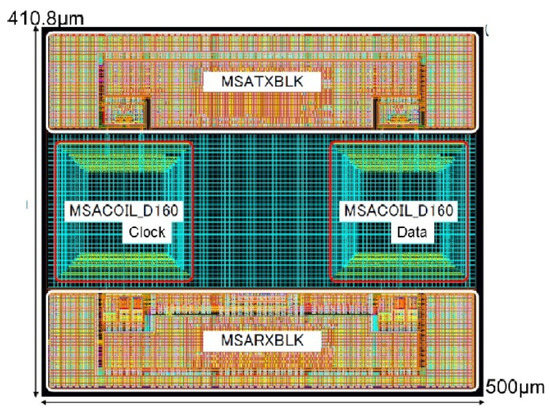
Figure 1.
The layout of the TCI hard IP.
In this layout, the clock transfer inductor is positioned on the left, while the data transfer inductor is placed on the right. The upper section, MSATXBLK, houses the transmission circuit and serializer, while the lower section, MSARXBLK, contains the receiving circuit and deserializer. In the TCI, it is necessary to use inductors with edges 2–3 times the wireless transmission distance for stable data transfer. When stacking chips, the required reach distance becomes approximately equal to the thickness of the chips [6]. Like other SiP (System-in-Package) solutions, TCI requires grinding the chips before stacking. However, if the chips become too thin, enough physical strength cannot be kept. Therefore, in this case, we assumed a thickness of 80 µm and used inductors with a 240 µm edge, three times that thickness [16]. By placing the transceiver circuits and SERDES above and below the inductors, the overall size of the IP becomes 410.8 µm × 500 µm. No digital circuits are implemented inside the inductors.
2.3. Transceiver Circuit
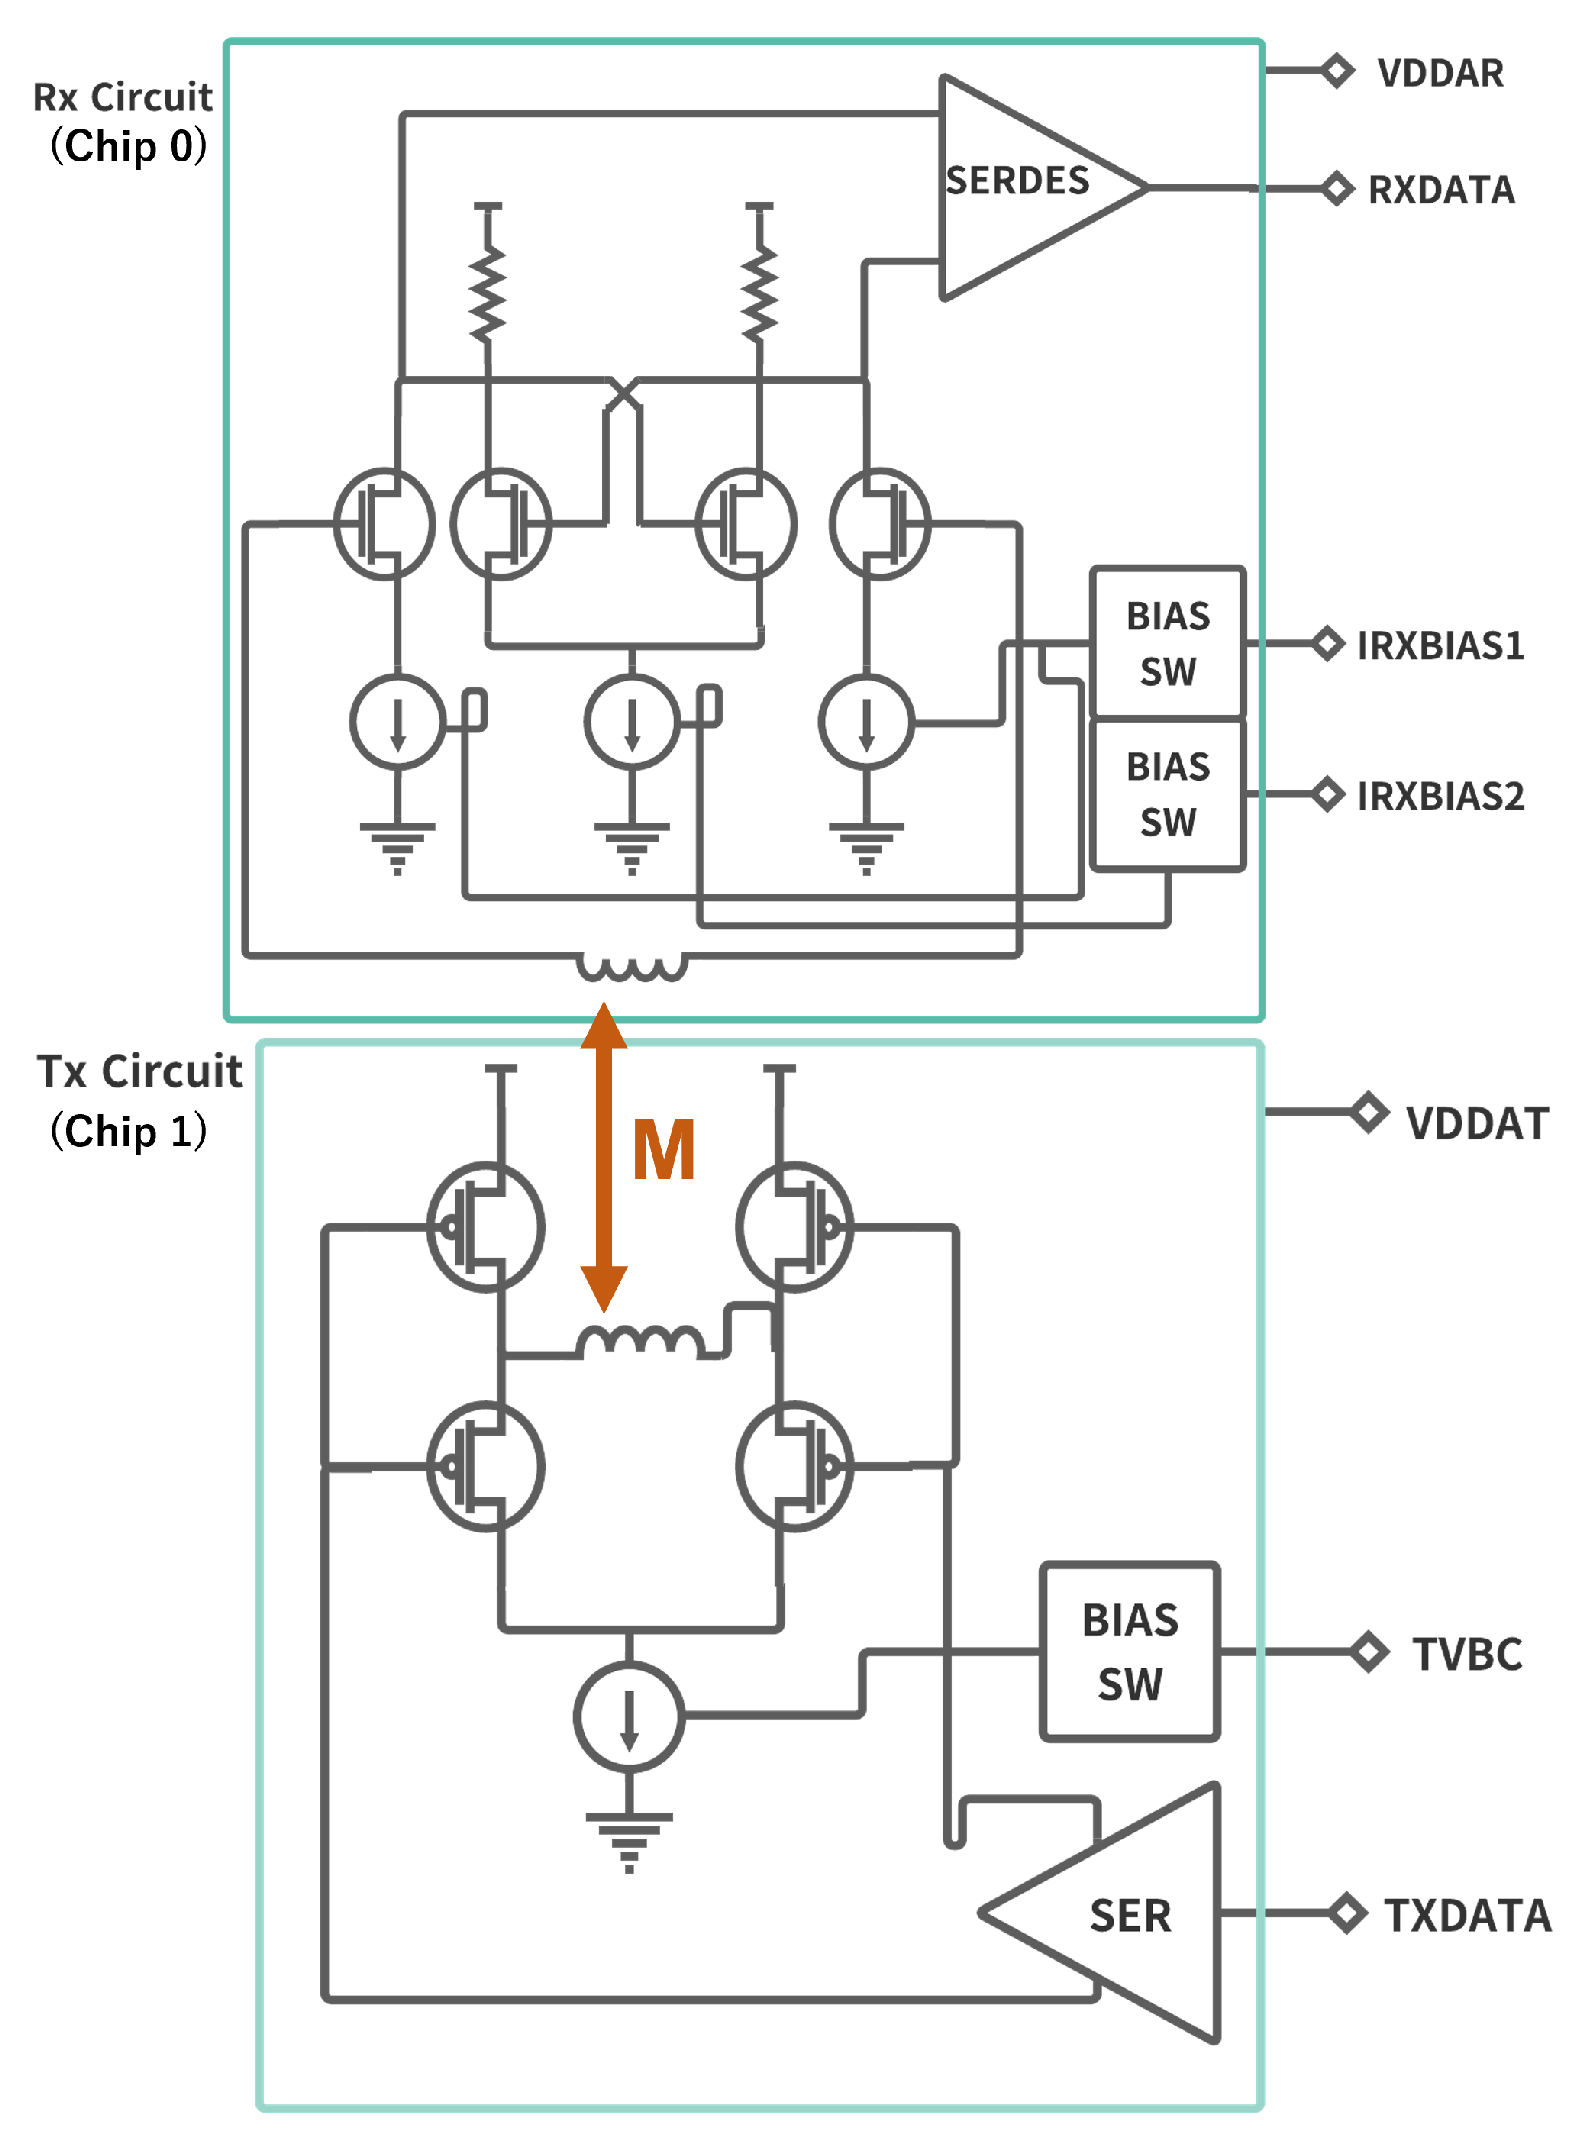
Figure 2 shows the transmission circuit of Chip0 and the receiving circuit of Chip1 when transmitting data from Chip0 to Chip1. Table 1 represents the power supply used in this transmission and receiving circuits.
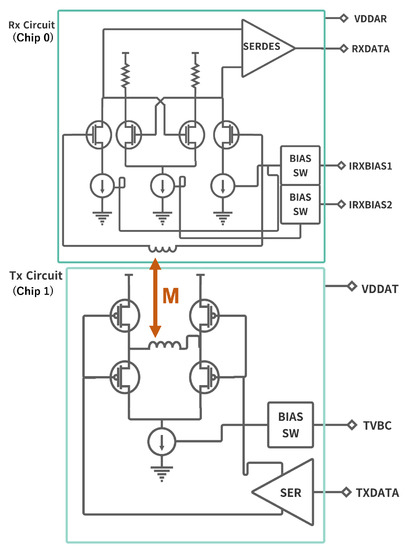
Figure 2.
Transmission and receiving circuit.

Table 1.
Supply Voltages for TCI IP.
The transmission circuit drives the inductor using balanced transmitters via serial data TXDATA, routed through SERDES. No special modulation is required. A ring oscillator generates the transmission clock, and its frequency is controlled by the transmission oscillator bias voltage (TVBC). The receiving circuit detects changes in the magnetic field using a balanced receiving circuit and sends the received data as RXDATA to SERDES. IRXBIAS1 and IRXBIAS2 adjust the sensitivity of this receiving circuit.
2.4. Signals for Data Transfer
Here signals for data transfer between two TCI-connected chips are shown. The following signals are used for data exchange between the digital part and transmitter TCI IP.
- TXDATA: Transmission data (35 bit)
- TXWRITE: Starting the transmission
- TXBUSY: Data transmission is on going.
Using them, the following signals are transmitted from the transmitter TCI IP to the receiver TCI IP.
- Serial Data: Serialized data of TXDATA
- TxCLK: Clock for data transfer generated in the transmitter TCI IP.
The following signals are exchanged between the digital logic and receiver TCI IP in the receiver.
- RXREADY: Data receiving is finished, and the data is ready to read.
- RXREAD: Reading the received data.
- RXDATA: Received data (35 bit)
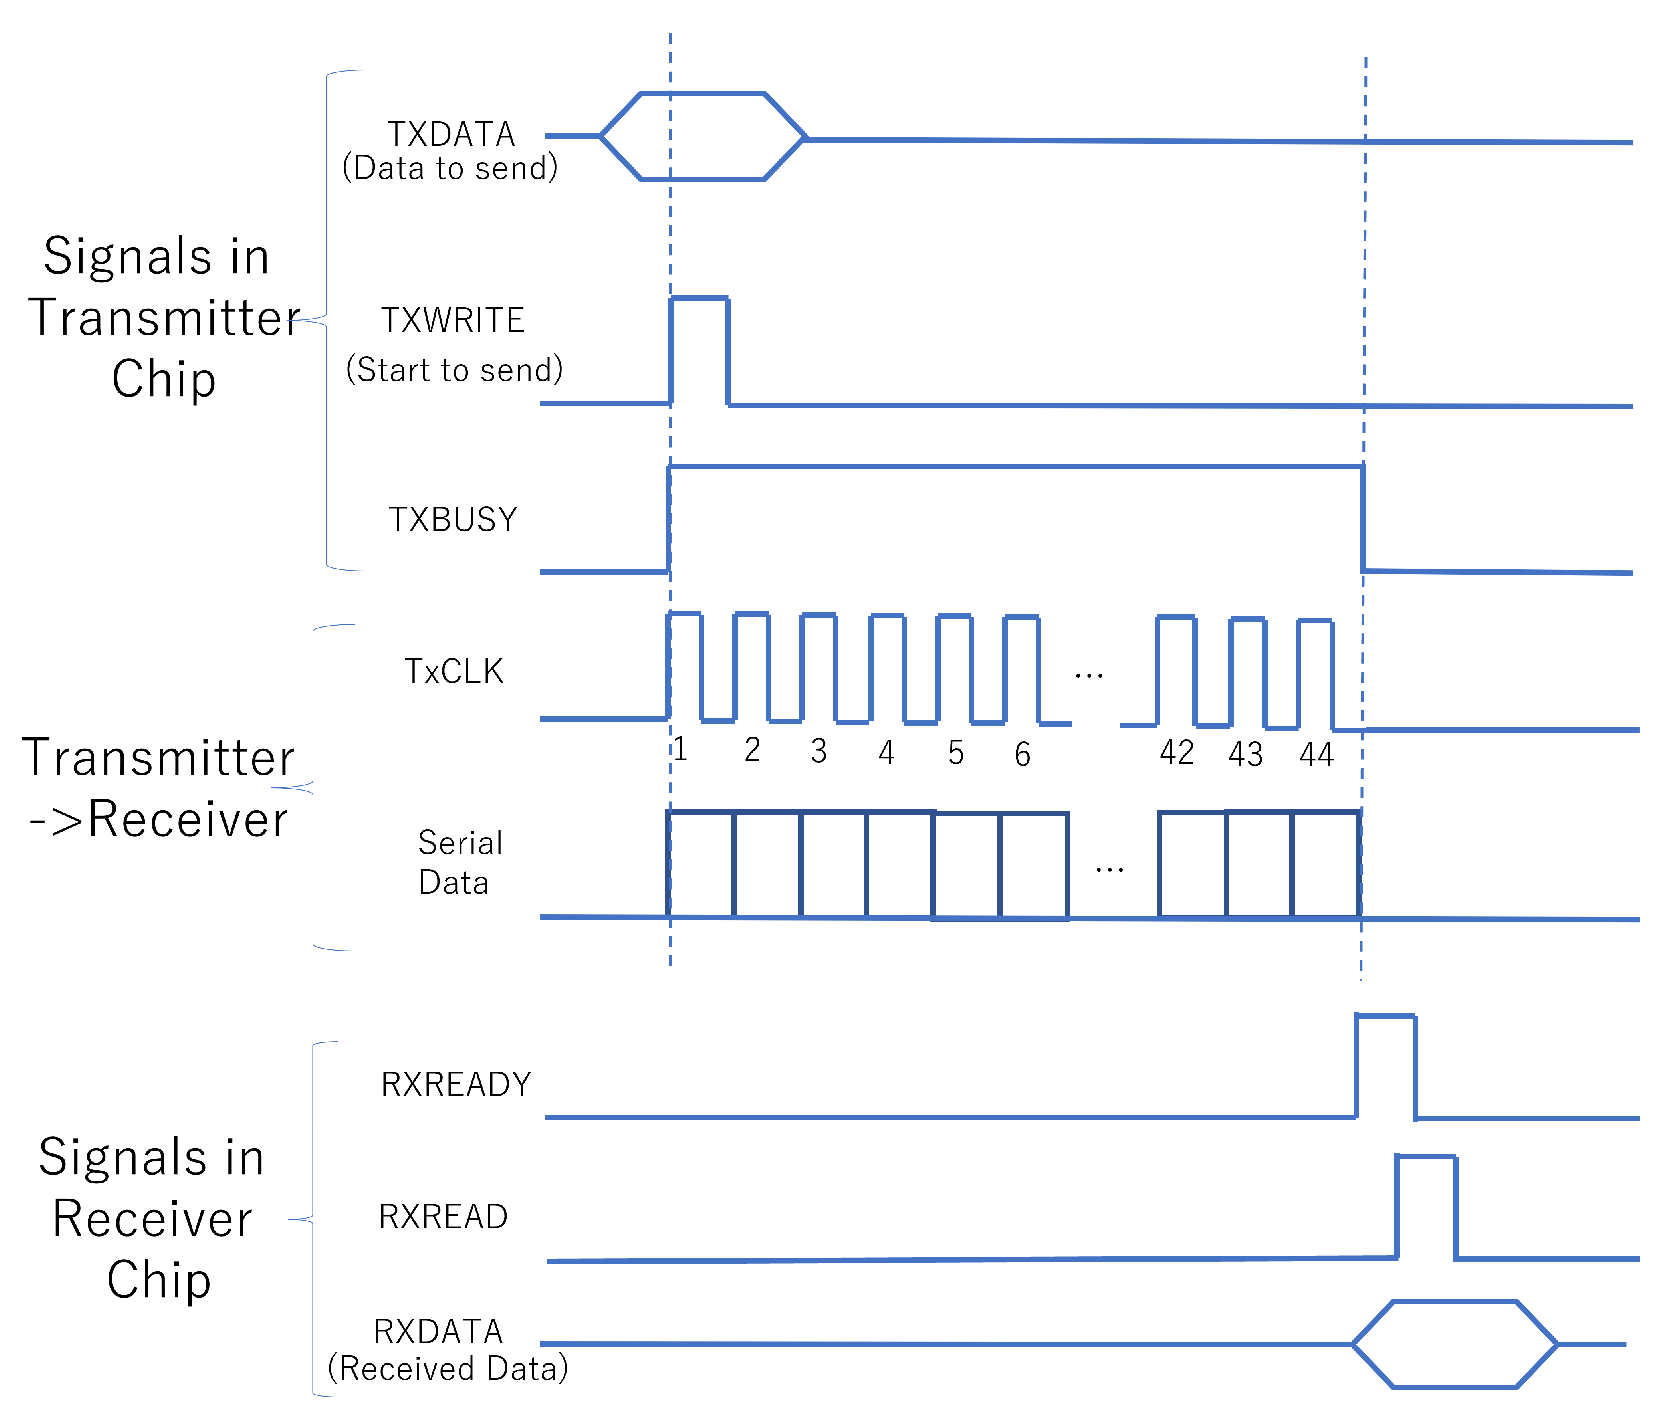
The data is transmitted according to the timing chart in Figure 3.
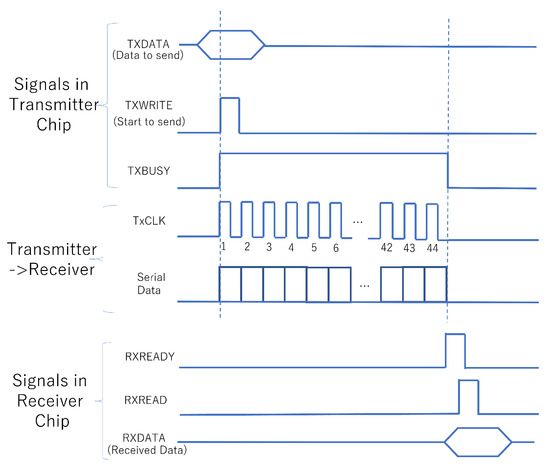
Figure 3.
The timing chart of data transfer.
The transmitting chip can transfer data when TXBUSY is at a low level. The transmitting digital section sends TXDATA to the TCI IP and asserts the TXWRITE signal. The transmitting TCI IP can receive TXDATA when TXBUSY is low, and when it receives it, it sets TXBUSY high. If TXBUSY is already high, it will not accept the next data transfer until it returns to a low level.
The transmitting TCI utilizes a ring oscillator to generate TxCLK, which is then sent to the receiving side through the clock inductor. Simultaneously, the Serial Data, obtained by splitting TXDATA into individual bits starting from the most significant bit at each clock cycle of TxCLK, is transmitted from the transmitting TCI to the receiving TCI through the data inductor, with each bit being sent one by one. In the receiving chip, the receiving TCI IP sets the RXREADY signal to high after receiving all 35 bits of Serial Data. Upon confirming this, the receiving chip’s digital section sets RXREAD to high and receives RXDATA from the receiving TCI IP. Immediately after the digital section reads the data and sets RXREAD to high, RXREADY turns to low. When transferring the 35-bit data along with the parity bit, it takes a total of 44 clock cycles of TxCLK. Immediately after that, TXBUSY goes to a low level. It takes an additional 22 clock cycles for the receiving side to receive this at the next falling edge of the digital clock and then capture it in the digital section at the subsequent rising edge. This entire process takes a total of 66 clock cycles, resulting in a digital transfer frequency of 1/66 of TxCLK.
2.5. Chip-to-Chip Communication by Stacking TCI IP
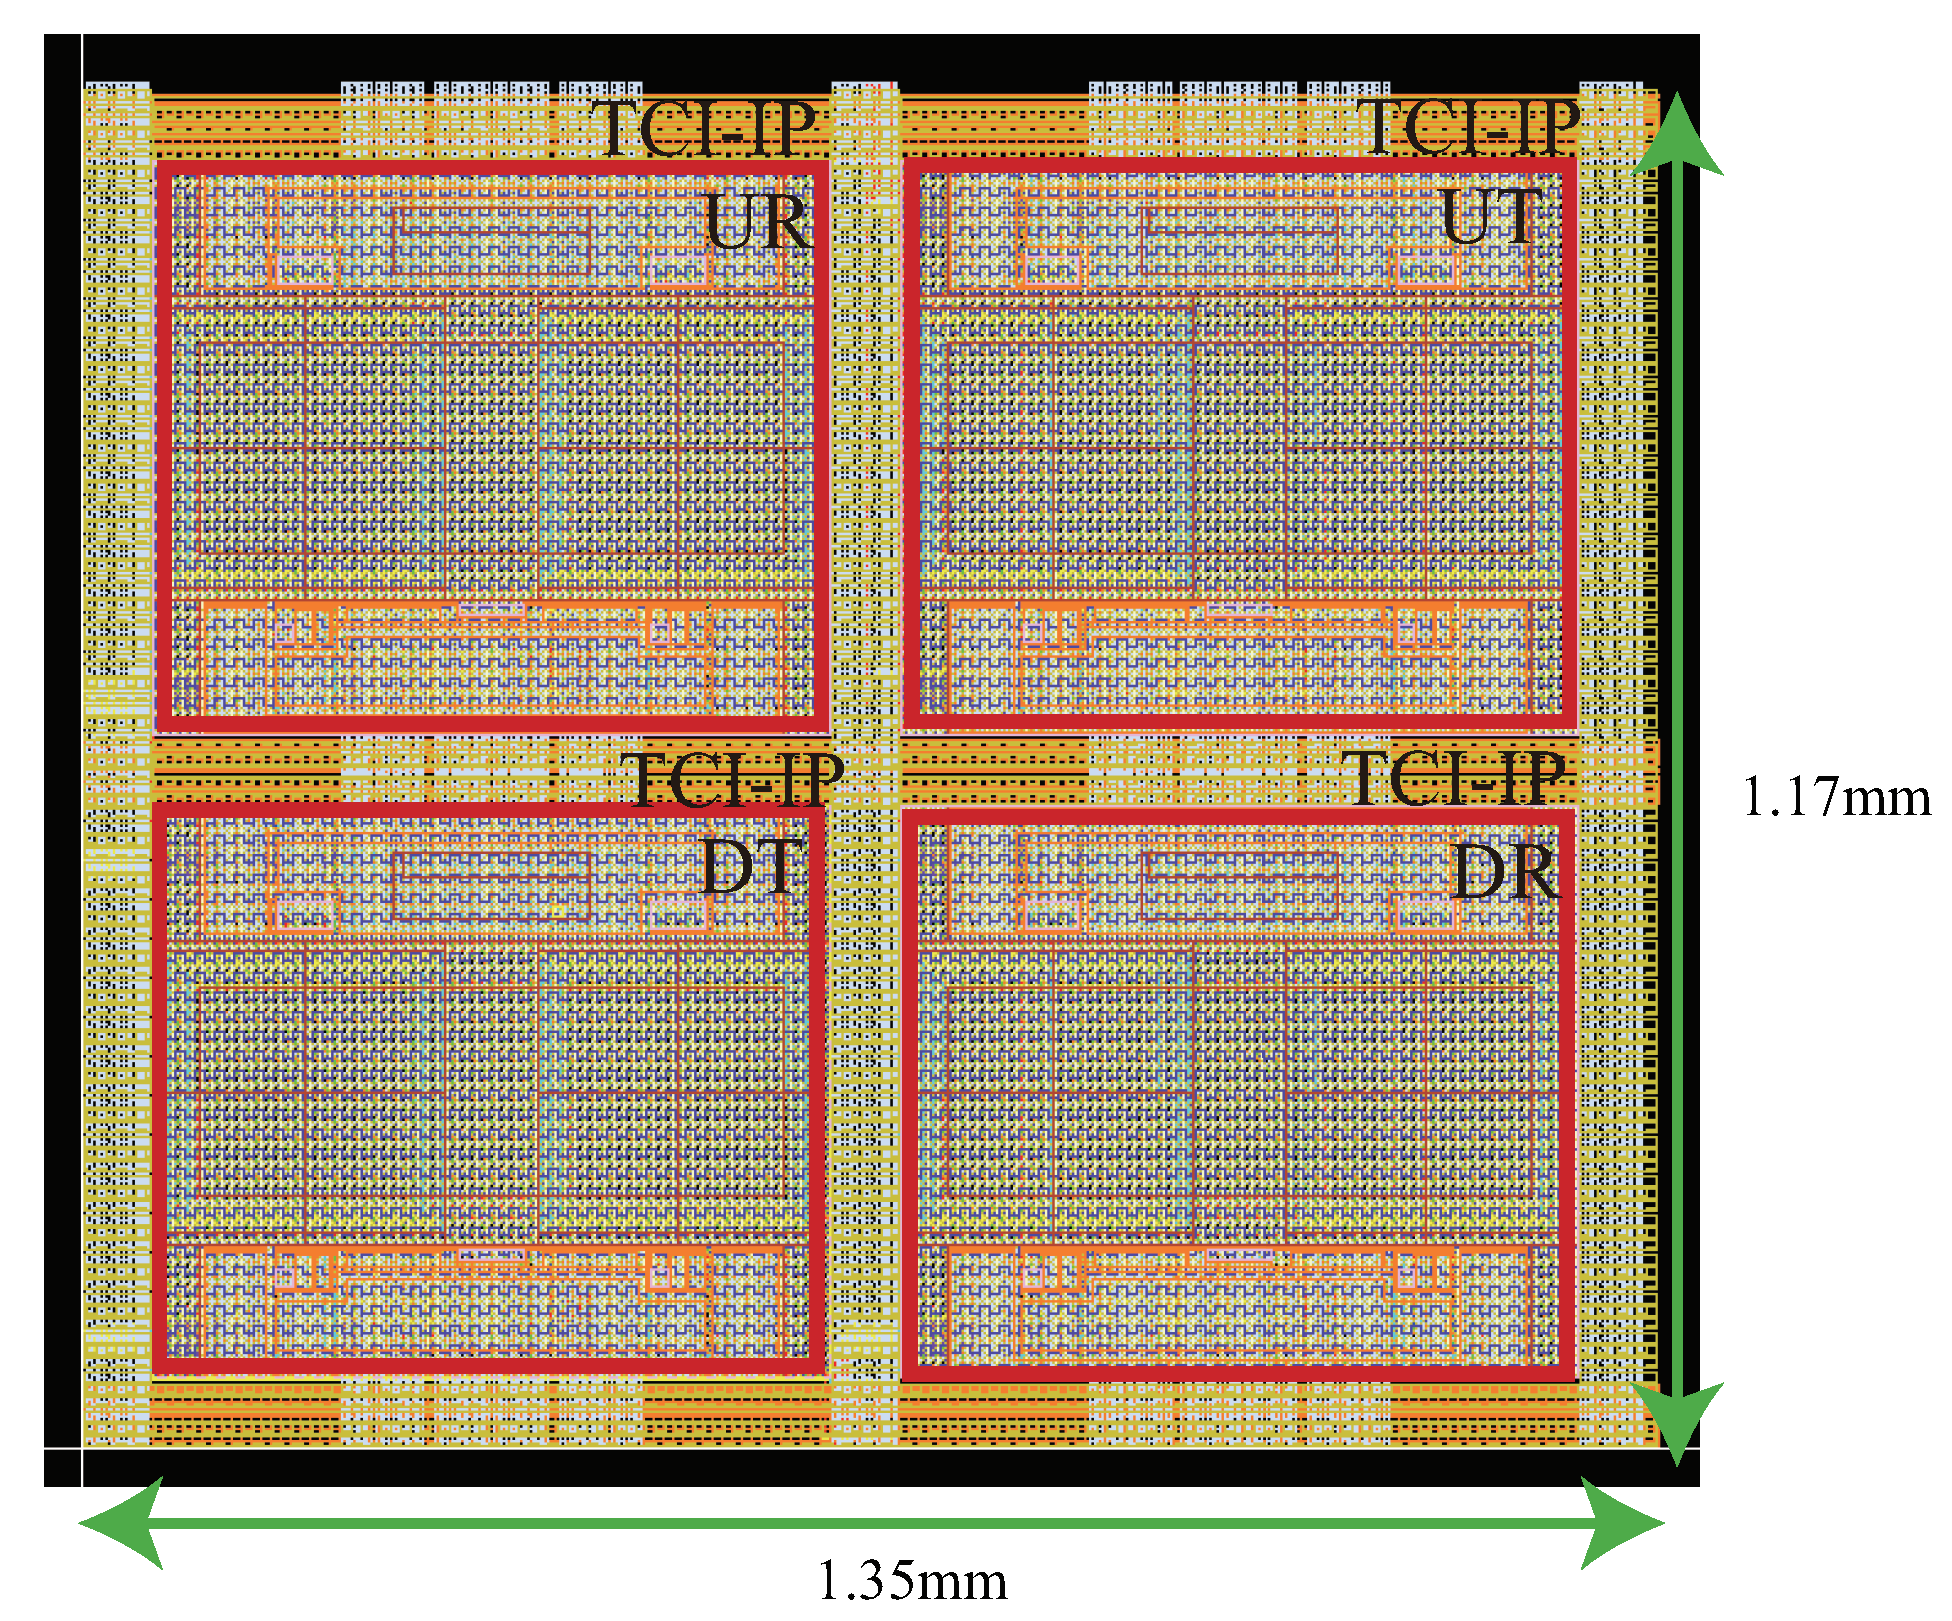
By combining four TCI IPs, we form a set of TCI for a data transfer unit for chip stacking. The role of each TCI IP in Figure 4 is as follows.
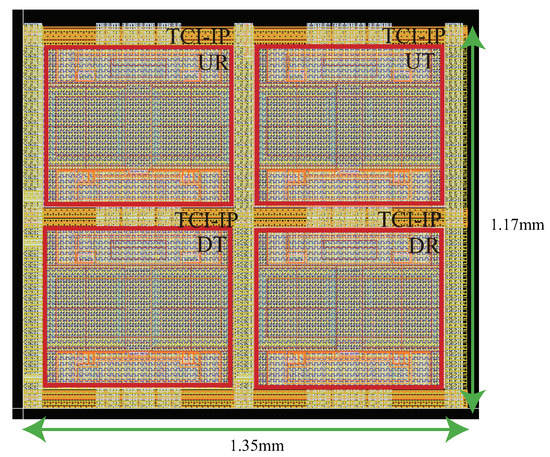
Figure 4.
The layout of combining four TCI IPs.
- UR: Receiving data from the upper stacked chip.
- UT: Transmitting data to the upper stacked chip.
- DT: Transmitting data to the lower stacked chip.
- UR: Receiving data from the lower stacked chip.
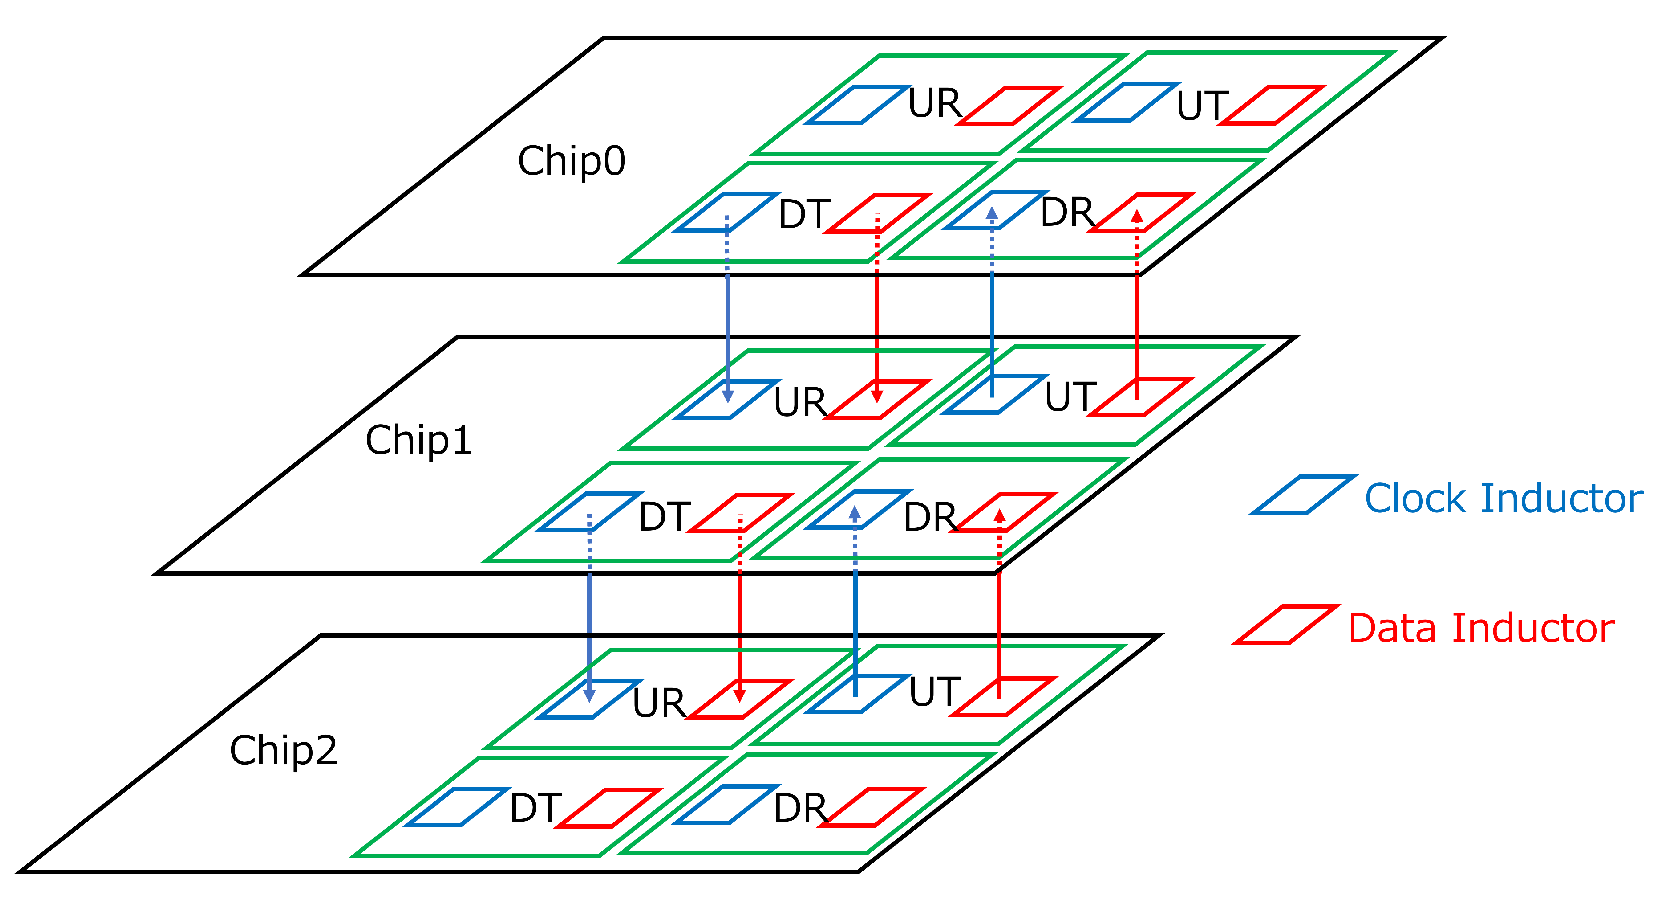
By stacking a group of chips equipped with the set of four TCI IPs as described above, with the upper chip’s DT aligned with the lower chip’s UR, and the upper chip’s DR aligned with the lower chip’s UT in the vertical direction, a data communication mechanism is established in the upward direction (UT→DR) and downward direction (UT→DR), creating a bidirectional linear network [15] (Figure 5). Additionally, the intermediate chip in the stack can have one side exposed on the surface, allowing for bonding. However, it is important to note that compared to regular chips, the number of I/O pins is limited in this stacking method, which is a limitation of this stacking technique.
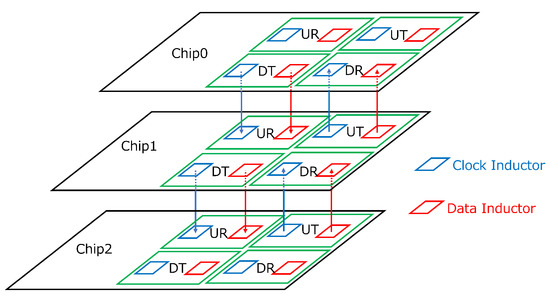
Figure 5.
Example of TCI Stacking.
2.6. TCI-Equipped Chips
The followings are chips embedding the TCI-IP mentioned before.
- Geyser-TT: MIPS R3000 compatible CPU [11]. It is supposed to be the top of the stack for using more I/O pins since it takes the system’s host role.
- SNACC: neural network accelerator [17]
- CC-SOTB2: coarse-grained reconfigurable accelerator. High-performance operation is possible with a low power budget [18].
- SMTT: The shared memory for the twin-chip tower [19]. Shared memory can be formed for two stacked towers.
- KVS: Key-Value Store accelerator [20]
Although these chips were individually verified to be operational, when stacked to prototype a building block-type system, it was discovered that despite using the same TCI IP, the operational characteristics varied, making it challenging to adjust the power supply voltage and oscillator bias voltage for transmission and receiving. However, due to the limitation on the number of I/O pins, each chip could not have dedicated observation terminals, making it difficult to perform operational verification and characteristic measurements. Therefore, a chip TCI Tester was necessary to measure and verify the characteristics by stacking the chips on top of it.
3. TCI Tester
3.1. TCI Tester Chip
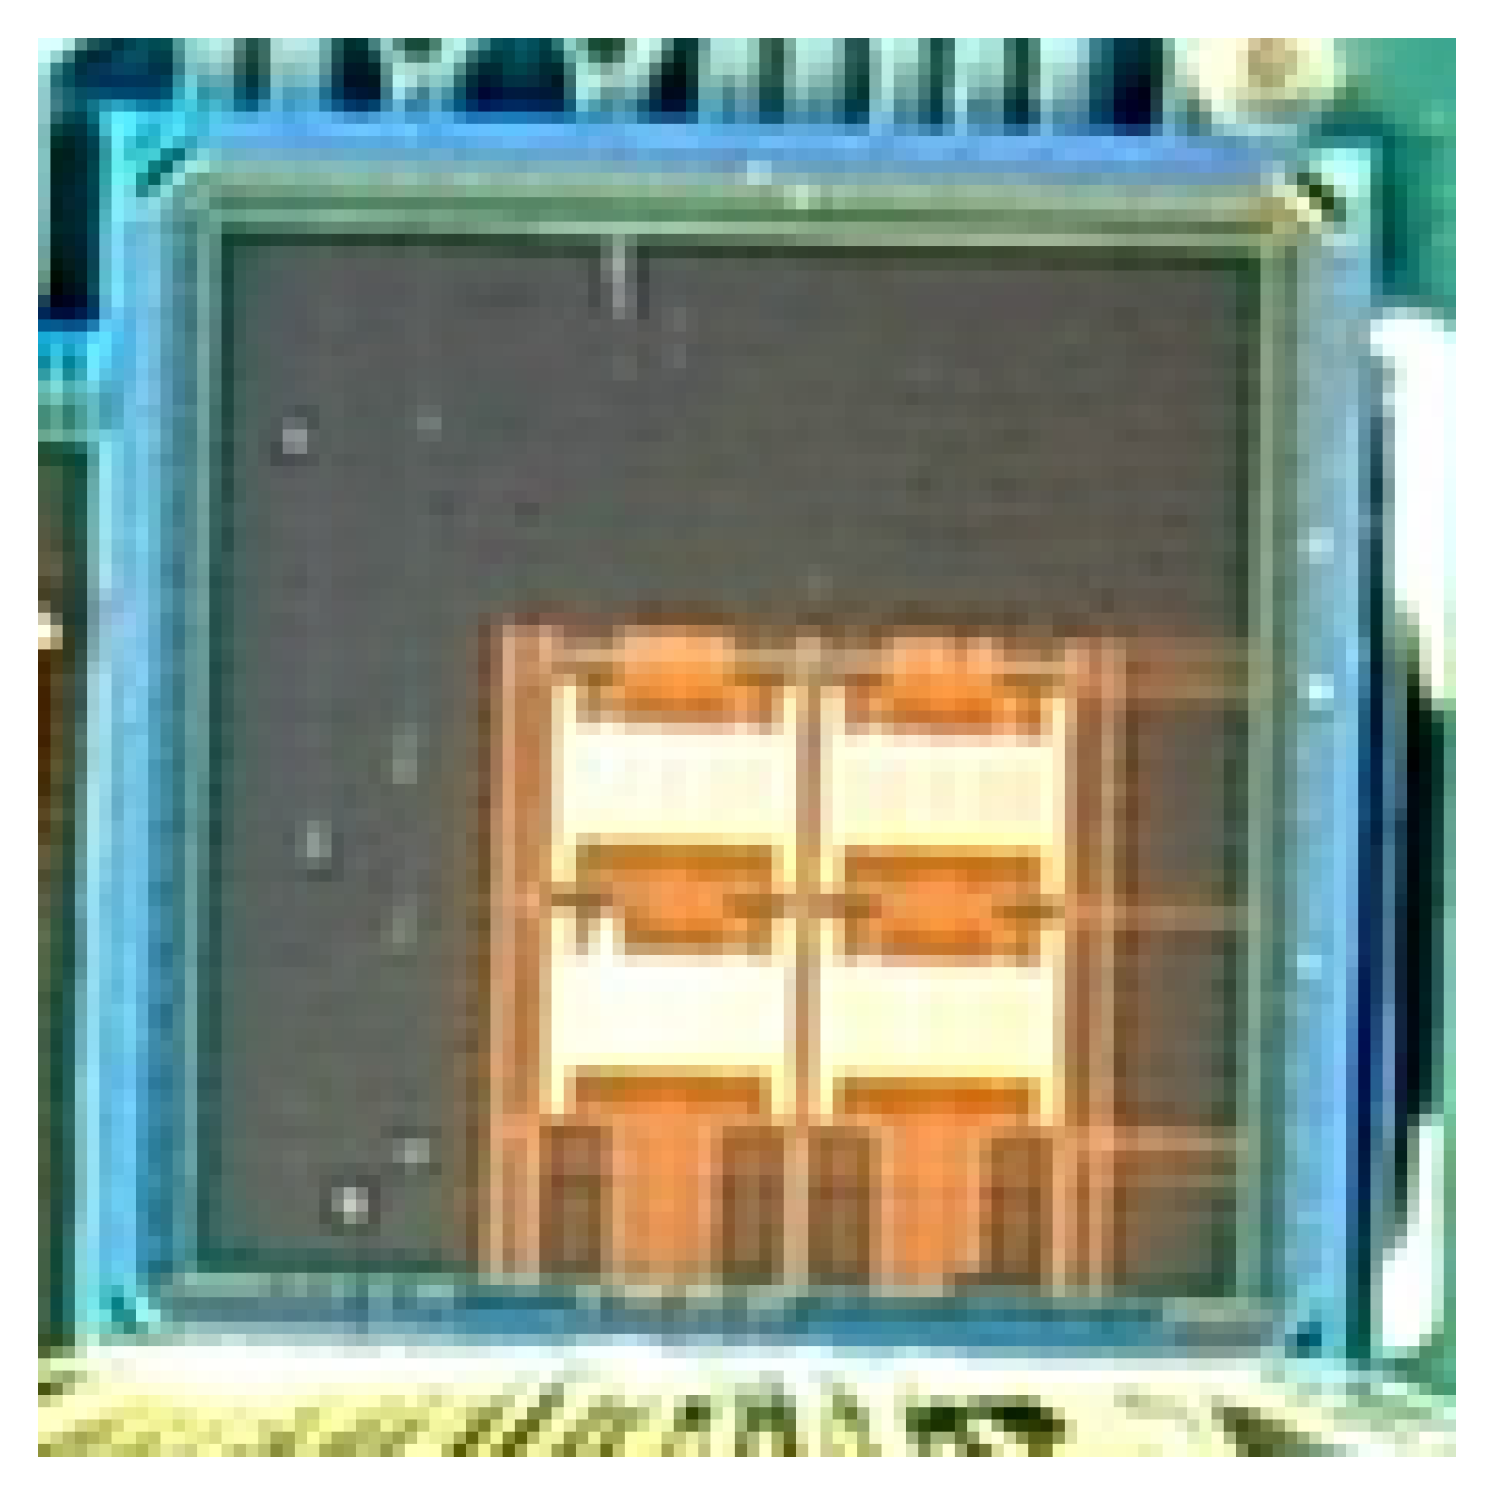
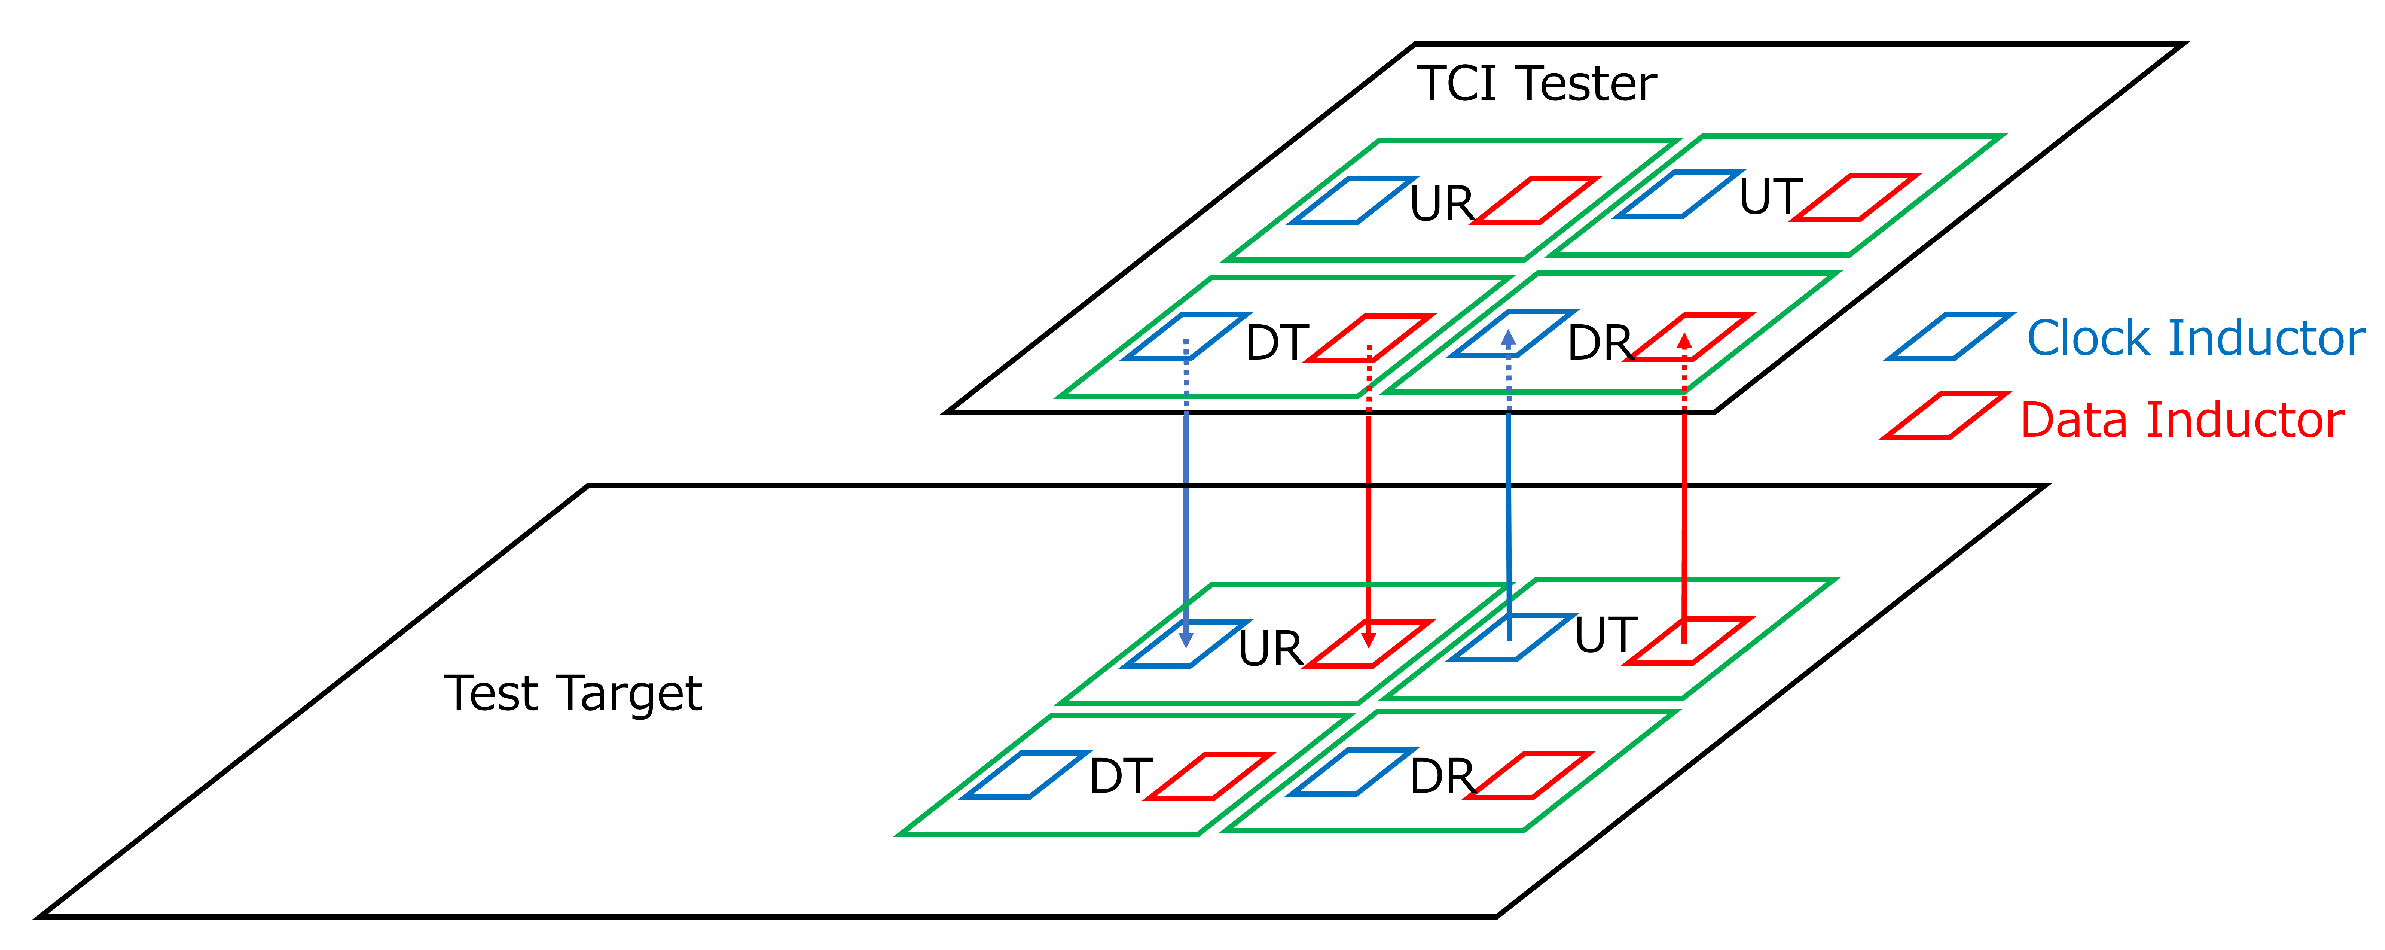
Although circuit-level TCI test methods have been investigated [12], the chip-level test method has not been tried. This is our motivation to develop TCI Tester. TCI Tester [21] is a chip for TCI operation verification and characteristic measurement. Figure 6 shows the photo of Real Chip of TCI Tester. This chip is used by stacking it on top of the TCI-equipped chips listed in Section 2.6. It is possible to perform data transfer between the TCI Tester and the underlying chip (Test Target), just like Figure 7, to see whether the data is transferred correctly. With this chip, we can know the voltage and operating frequency required to transfer data between chips. As shown in Table 2, it uses the Renesas SOTB 65 nm process like other chips that use TCI IP, but it is smaller than the others at 3 mm square. Although the main target of TCI Tester is a chip family listed in Section 2.6, the RAW mode introduced later can be used for checking other chips which use similar TCI IPs. The applicable transfer clock frequency is smaller than 2 GHz as shown in the evaluation.
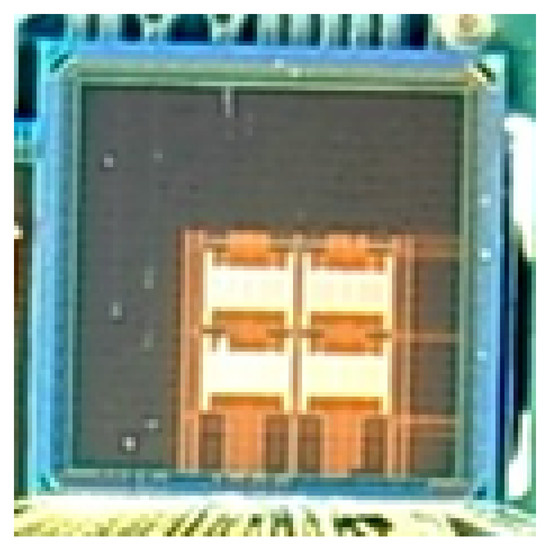
Figure 6.
Photo of TCI Tester Real Chip.
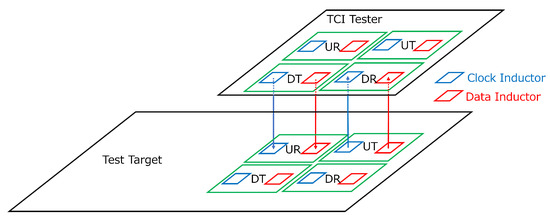
Figure 7.
TCI Tester layered on the Test Target.

Table 2.
Spec. of TCI Tester.
As shown in the photo of the TCI Tester chip in Figure 6, four sets of TCI IPs are arranged at the bottom right of the chip, and power and observation terminals are supplied by bonding wires from one side of the bottom. This layout is designed to facilitate stacking on other chips.
3.2. Configuration of TCI Tester
TCI Tester is layered on the Test Target, which does not have an observation function, to measure its characteristics (Figure 7). On the other hand, transferring packets using soft IP and performing long-term transfer tests should be possible. For this purpose, it is necessary to have a function of storing the contents of packets in memory and checking them later and a function of automatically sending and receiving packets to check that there is no error in data transfer. Therefore, to satisfy these requirements, we decided to switch between the RAW, CUBE, and LOOP mode.
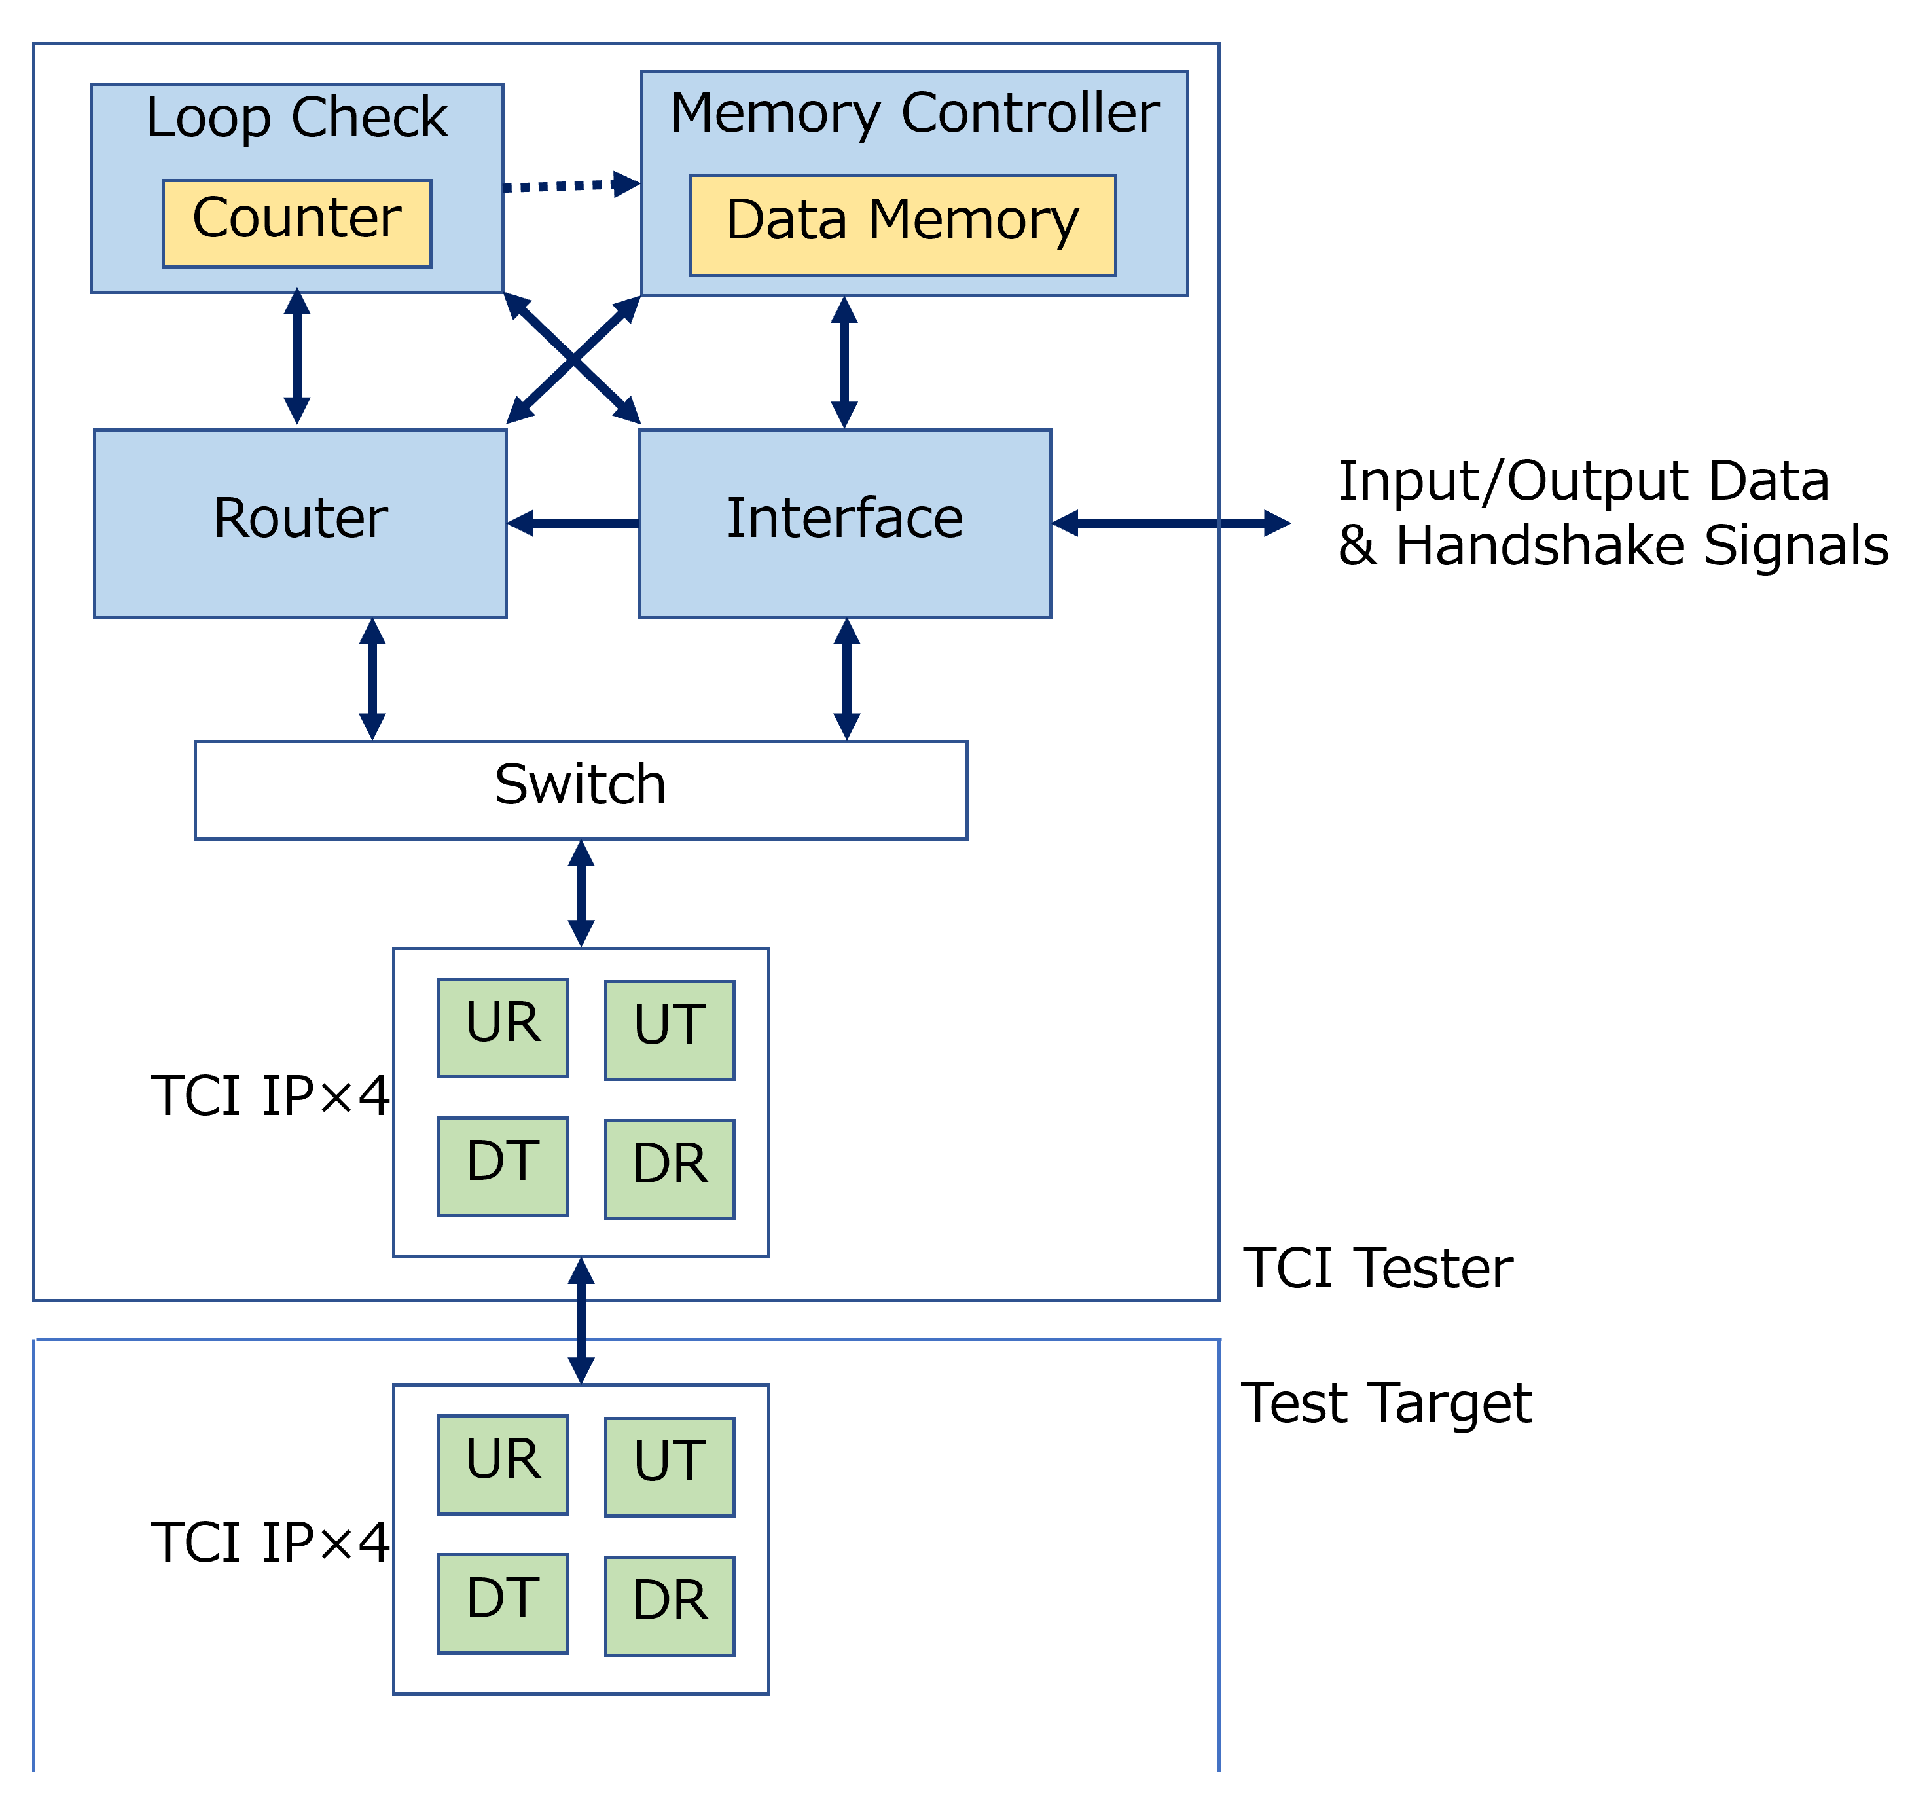
Figure 8 shows a block diagram of the TCI Tester. TCI Tester consists of TCI IP, direct interface from outside, on-chip router, memory, and Loop Check module. TCI IP shown in the figure corresponds to the layout shown in Figure 4 and each rectangular block is shown in Figure 1. The transceiver and receiver in each IP block are shown in Figure 2. The data are transferred between TCI Tester and the test target according to the timing diagram shown in Figure 3. The data flow between TCI tester and the test target is depending on the operational modes, and shown in Figure 9 and Figure 10. Digital modules of TCI Tester are laid out over the entire chip by an automatic placement and routing tool. Below are the functions of the three modes and the modules each mode uses.
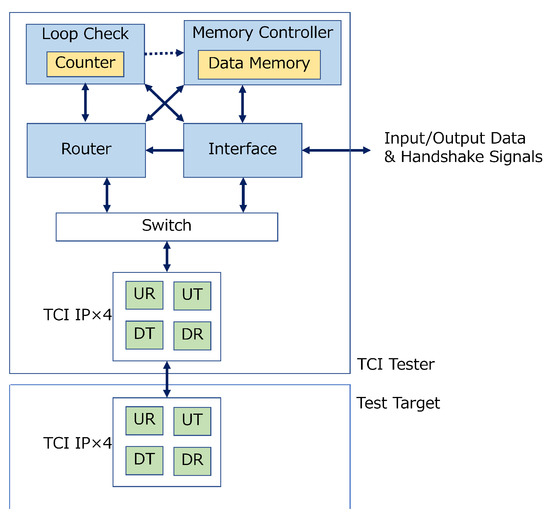
Figure 8.
Diagram of TCI Tester.
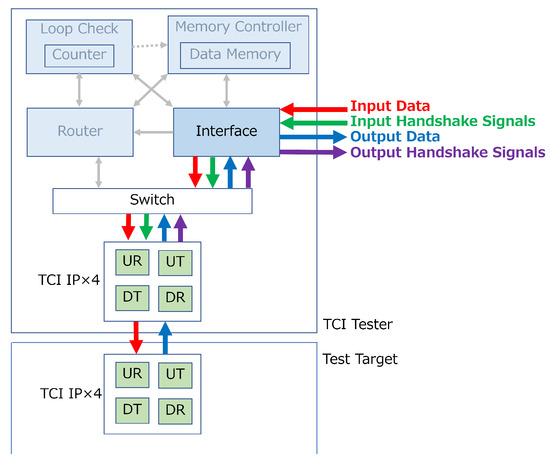
Figure 9.
Data Flow in RAW Mode.
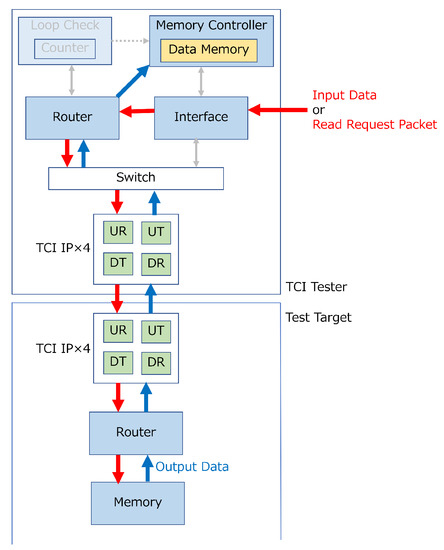
Figure 10.
Data Flow in CUBE Mode.
3.3. RAW Mode
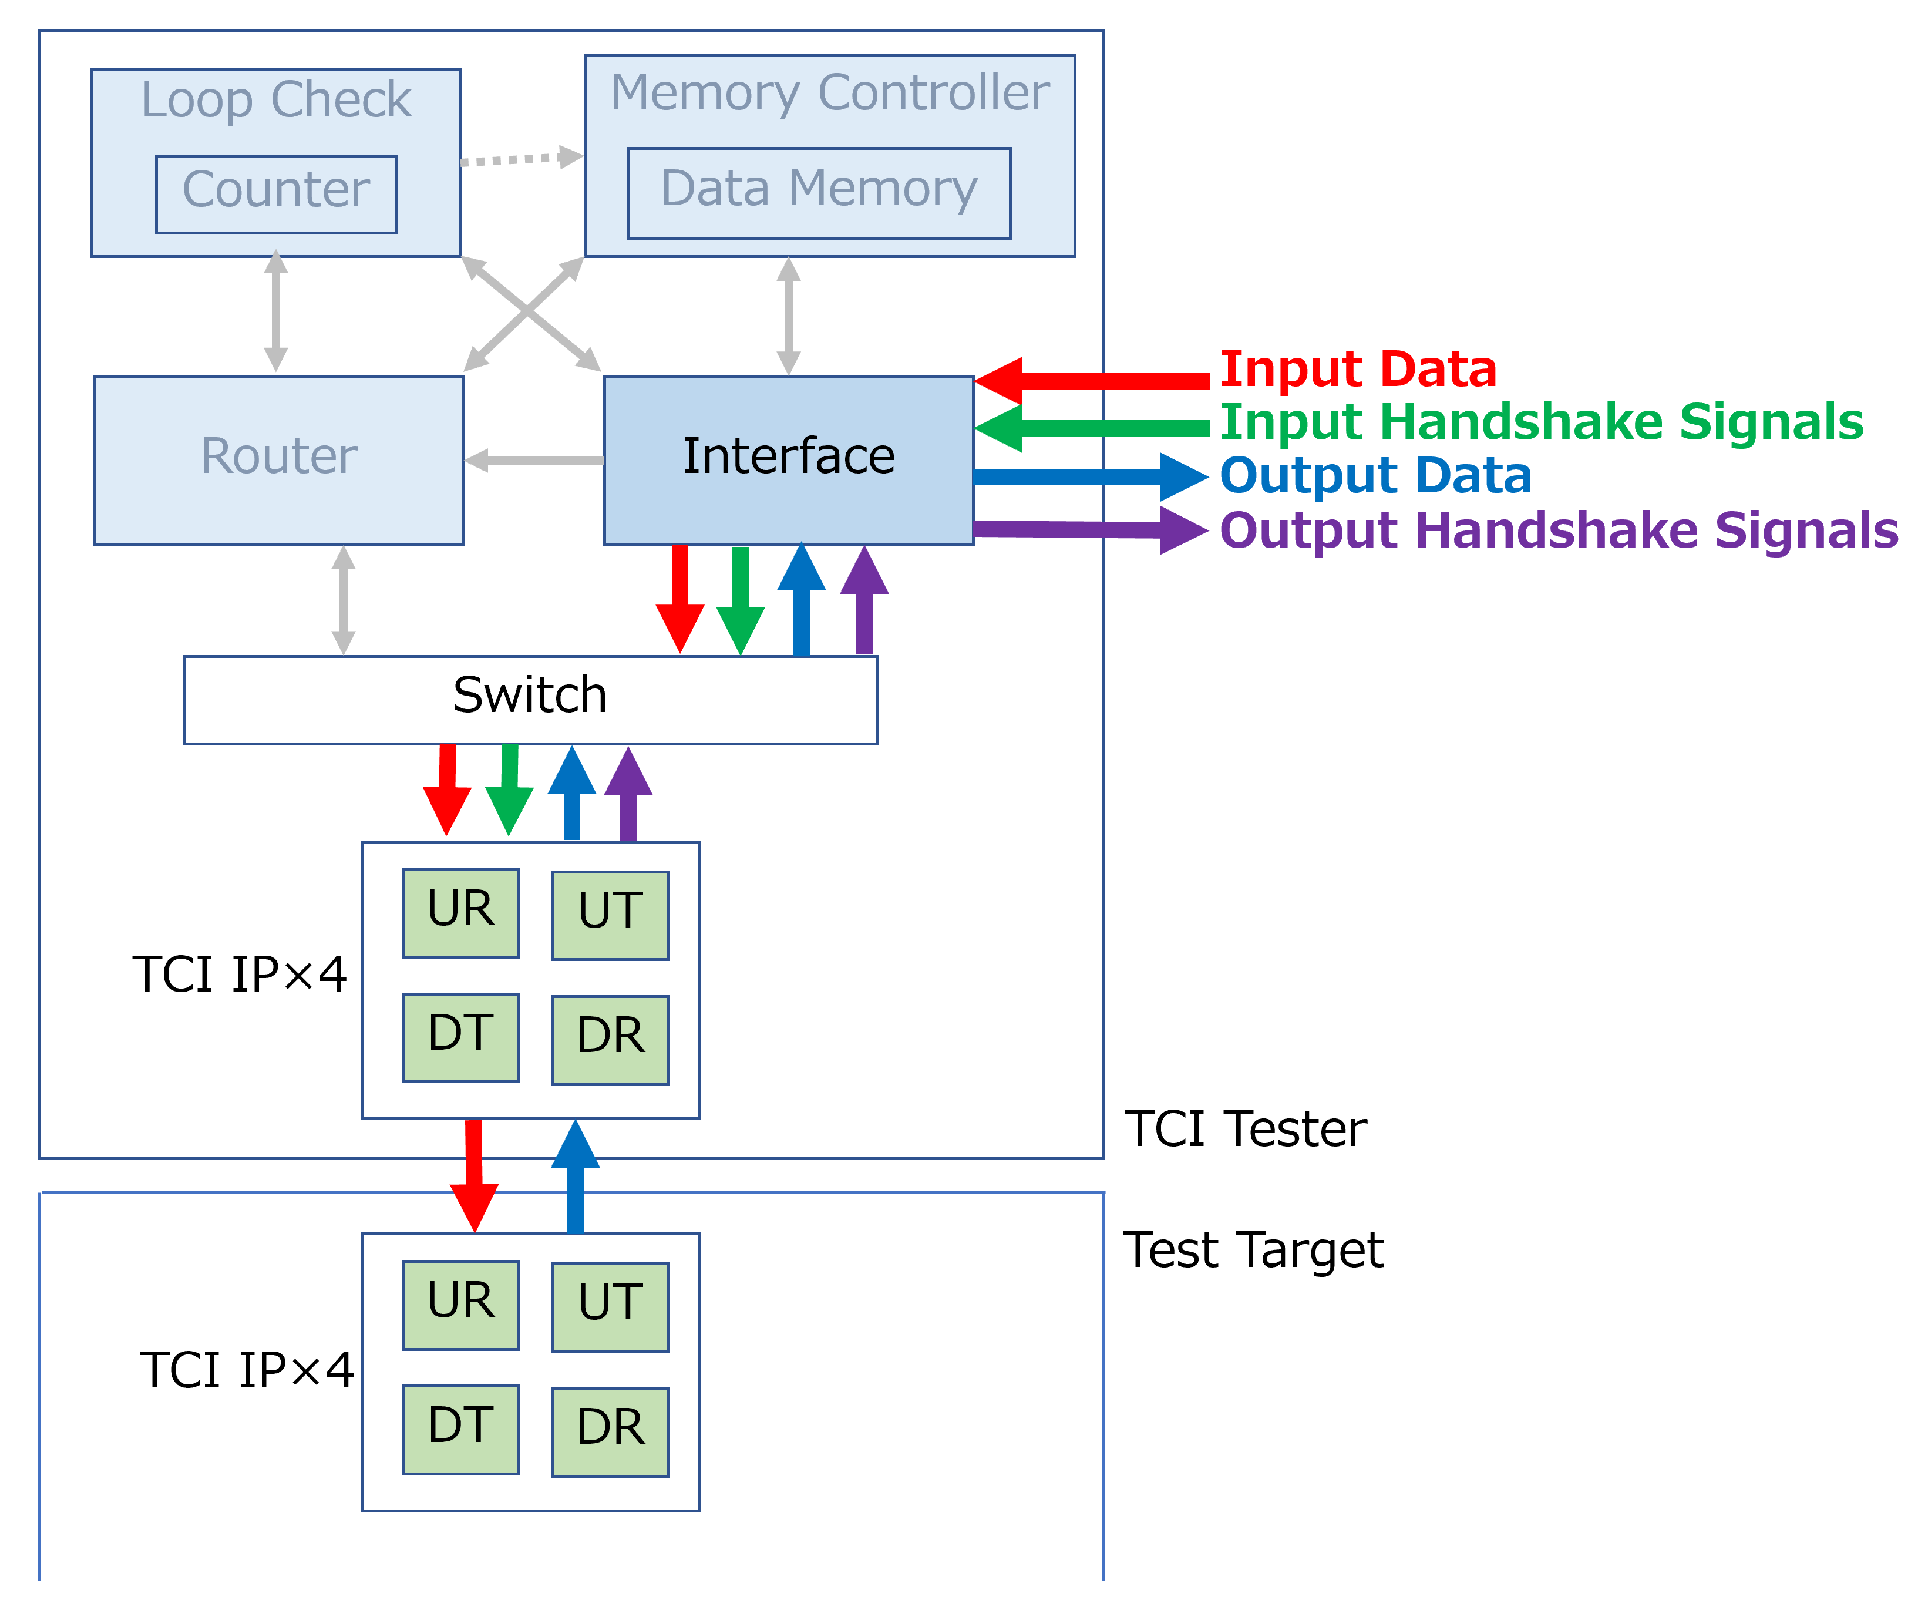
This is a mode for verifying the operation of the TCI itself. Verification is performed by directly controlling the handshake signals for TCI communication introduced in Section 2.4 and directly transferring data. Figure 9 shows the data flow in RAW mode. Red and green arrows represent incoming data and handshake signals, respectively. These are fed into each TCI IP directly from an external FPGA board or signal generator. The blue and purple arrows in Figure 9 represent the flow of data and handshake signals outputted from the TCI Tester, respectively. Observing and recording the signal sent by the TCI of the Test Target by FPGA or digital analyzer is possible.
3.4. CUBE Mode
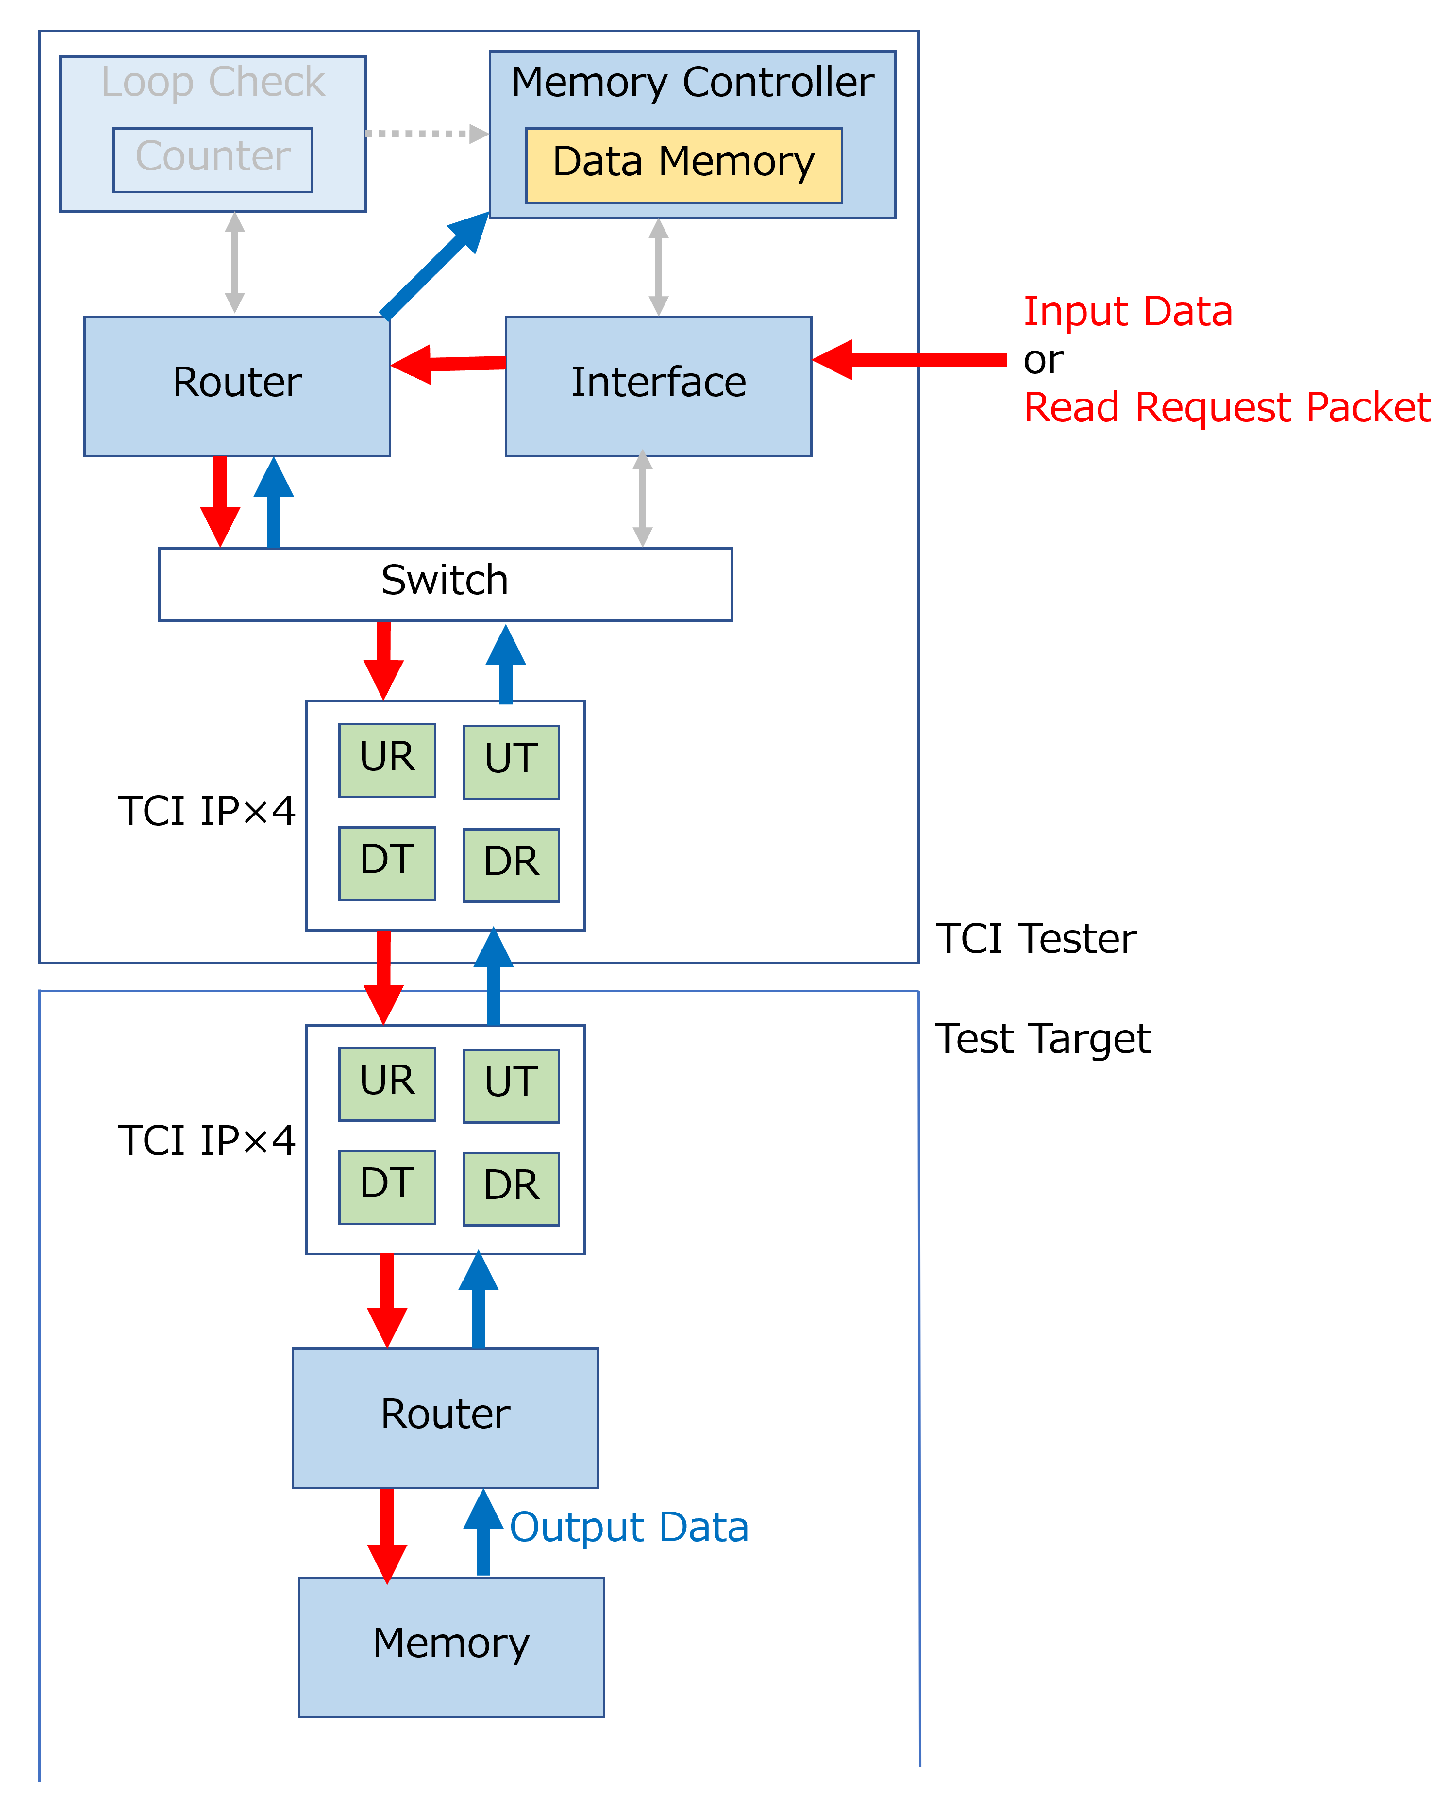
This is a mode for verifying data transfer using 35-bit packets using TCI’s soft IP. Figure 10 shows the data flow in CUBE mode. This figure shows the data flow within the chip when the data stored in the data memory of the Test Target is read from the TCI Tester. Red arrows represent the flow of input data or read request packets, and blue arrows represent the flow of output data. Data input from outside the chip via the interface is sent to the memory of the Test Target via the router and TCI. When reading data written in the memory of the Test Target, the TCI Tester sends a Read Request Packet to the Test Target. The Test Target that received this packet sends the data from its own memory to the memory of the TCI Tester. Since the chips tested here use a common IP, a memory-to-memory transfer is possible with the same protocol.
3.5. LOOP Mode
This is a mode for continuous data transfer tests. It repeats the same communication as the CUBE mode described above and records the number of times it succeeds. This mode uses the Loop Check module for data checking. When this mode is selected, the counter in the Loop Check module is first set to 0, and then the value is transferred to the Test Target through the router and TCI. In the Test Target, the data is transferred by the router to the internal memory controller and stored in local memory. In order to check whether the transferred data has reached the Test Target, the TCI Tester issues a read request, and in response, the data stored in the Test Target’s data memory is returned to the TCI Tester. Here, if it is confirmed that the returned data is the same as the data previously sent from TCI Tester, the counter in Loop Check is incremented.
4. Real Chip Evaluation
4.1. Stacked Two TCI Tester Chips
In the chip stacking introduced in this paper, after griding the target chip to a thickness of 80 µm, it was stacked on a small-scale daughter board, and the power supply, clock, and signals for observation were taken out with bonding wires. This daughter board and a small FPGA board (HumanData’s XCM208 with Xilinx Artix7) were connected on an independently developed motherboard to generate test signals and display signals from the TCI Tester. First, two chips of TCI Testers were stacked and the basic operating conditions were measured.
4.1.1. Operating Range Measurement
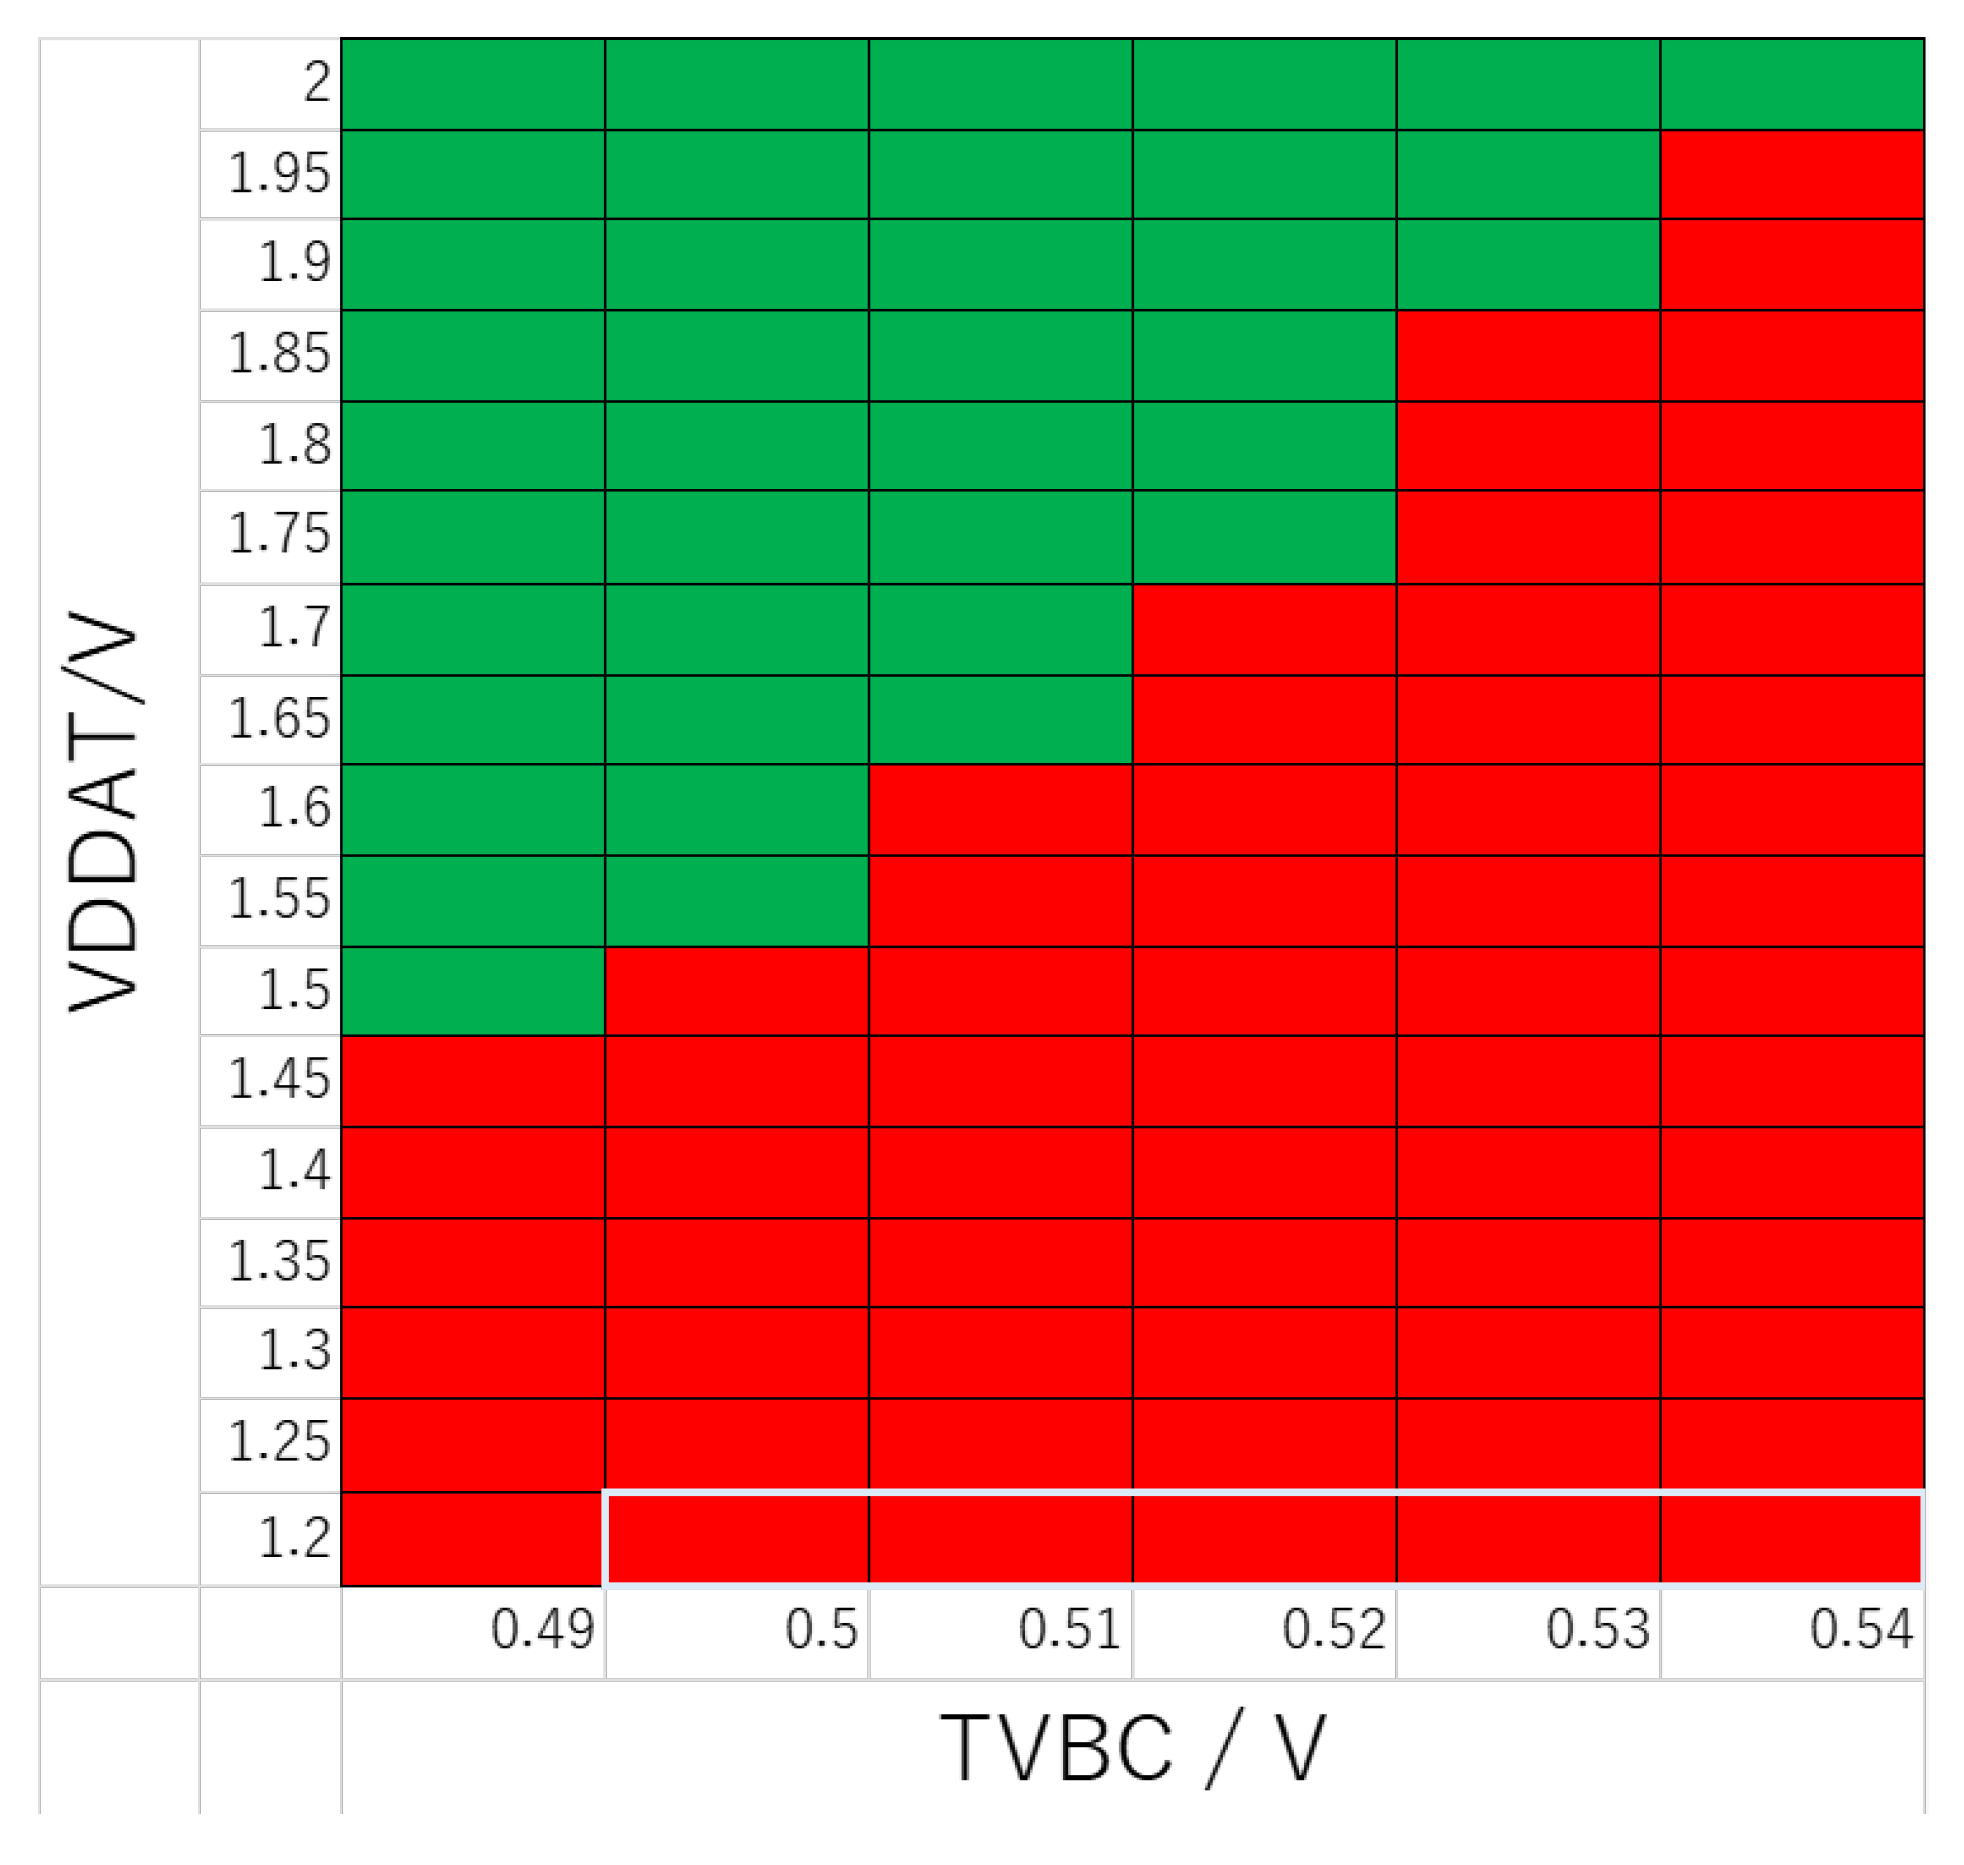
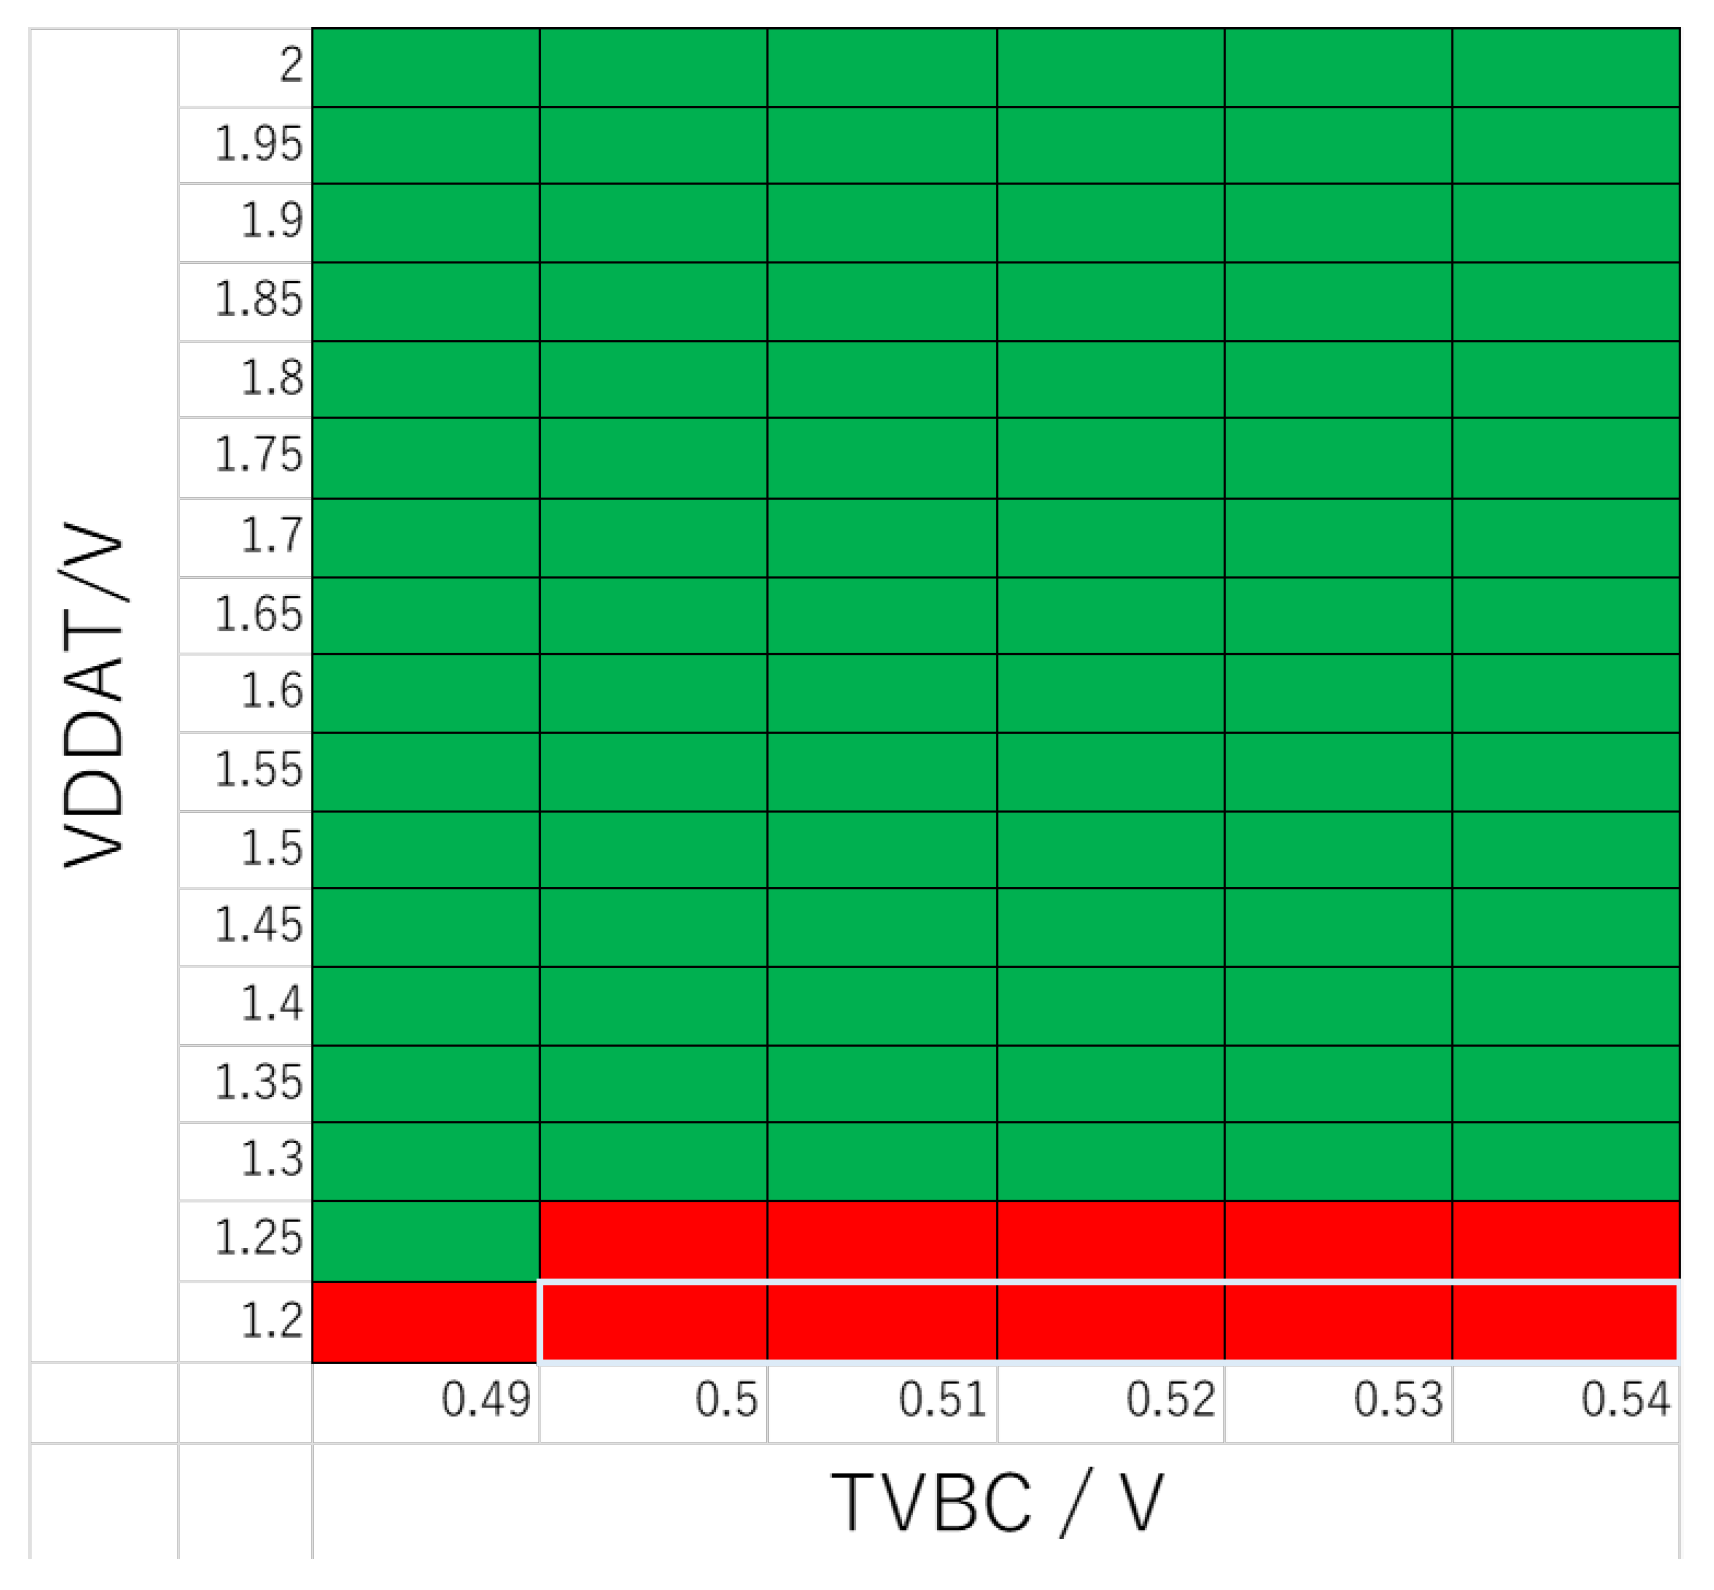
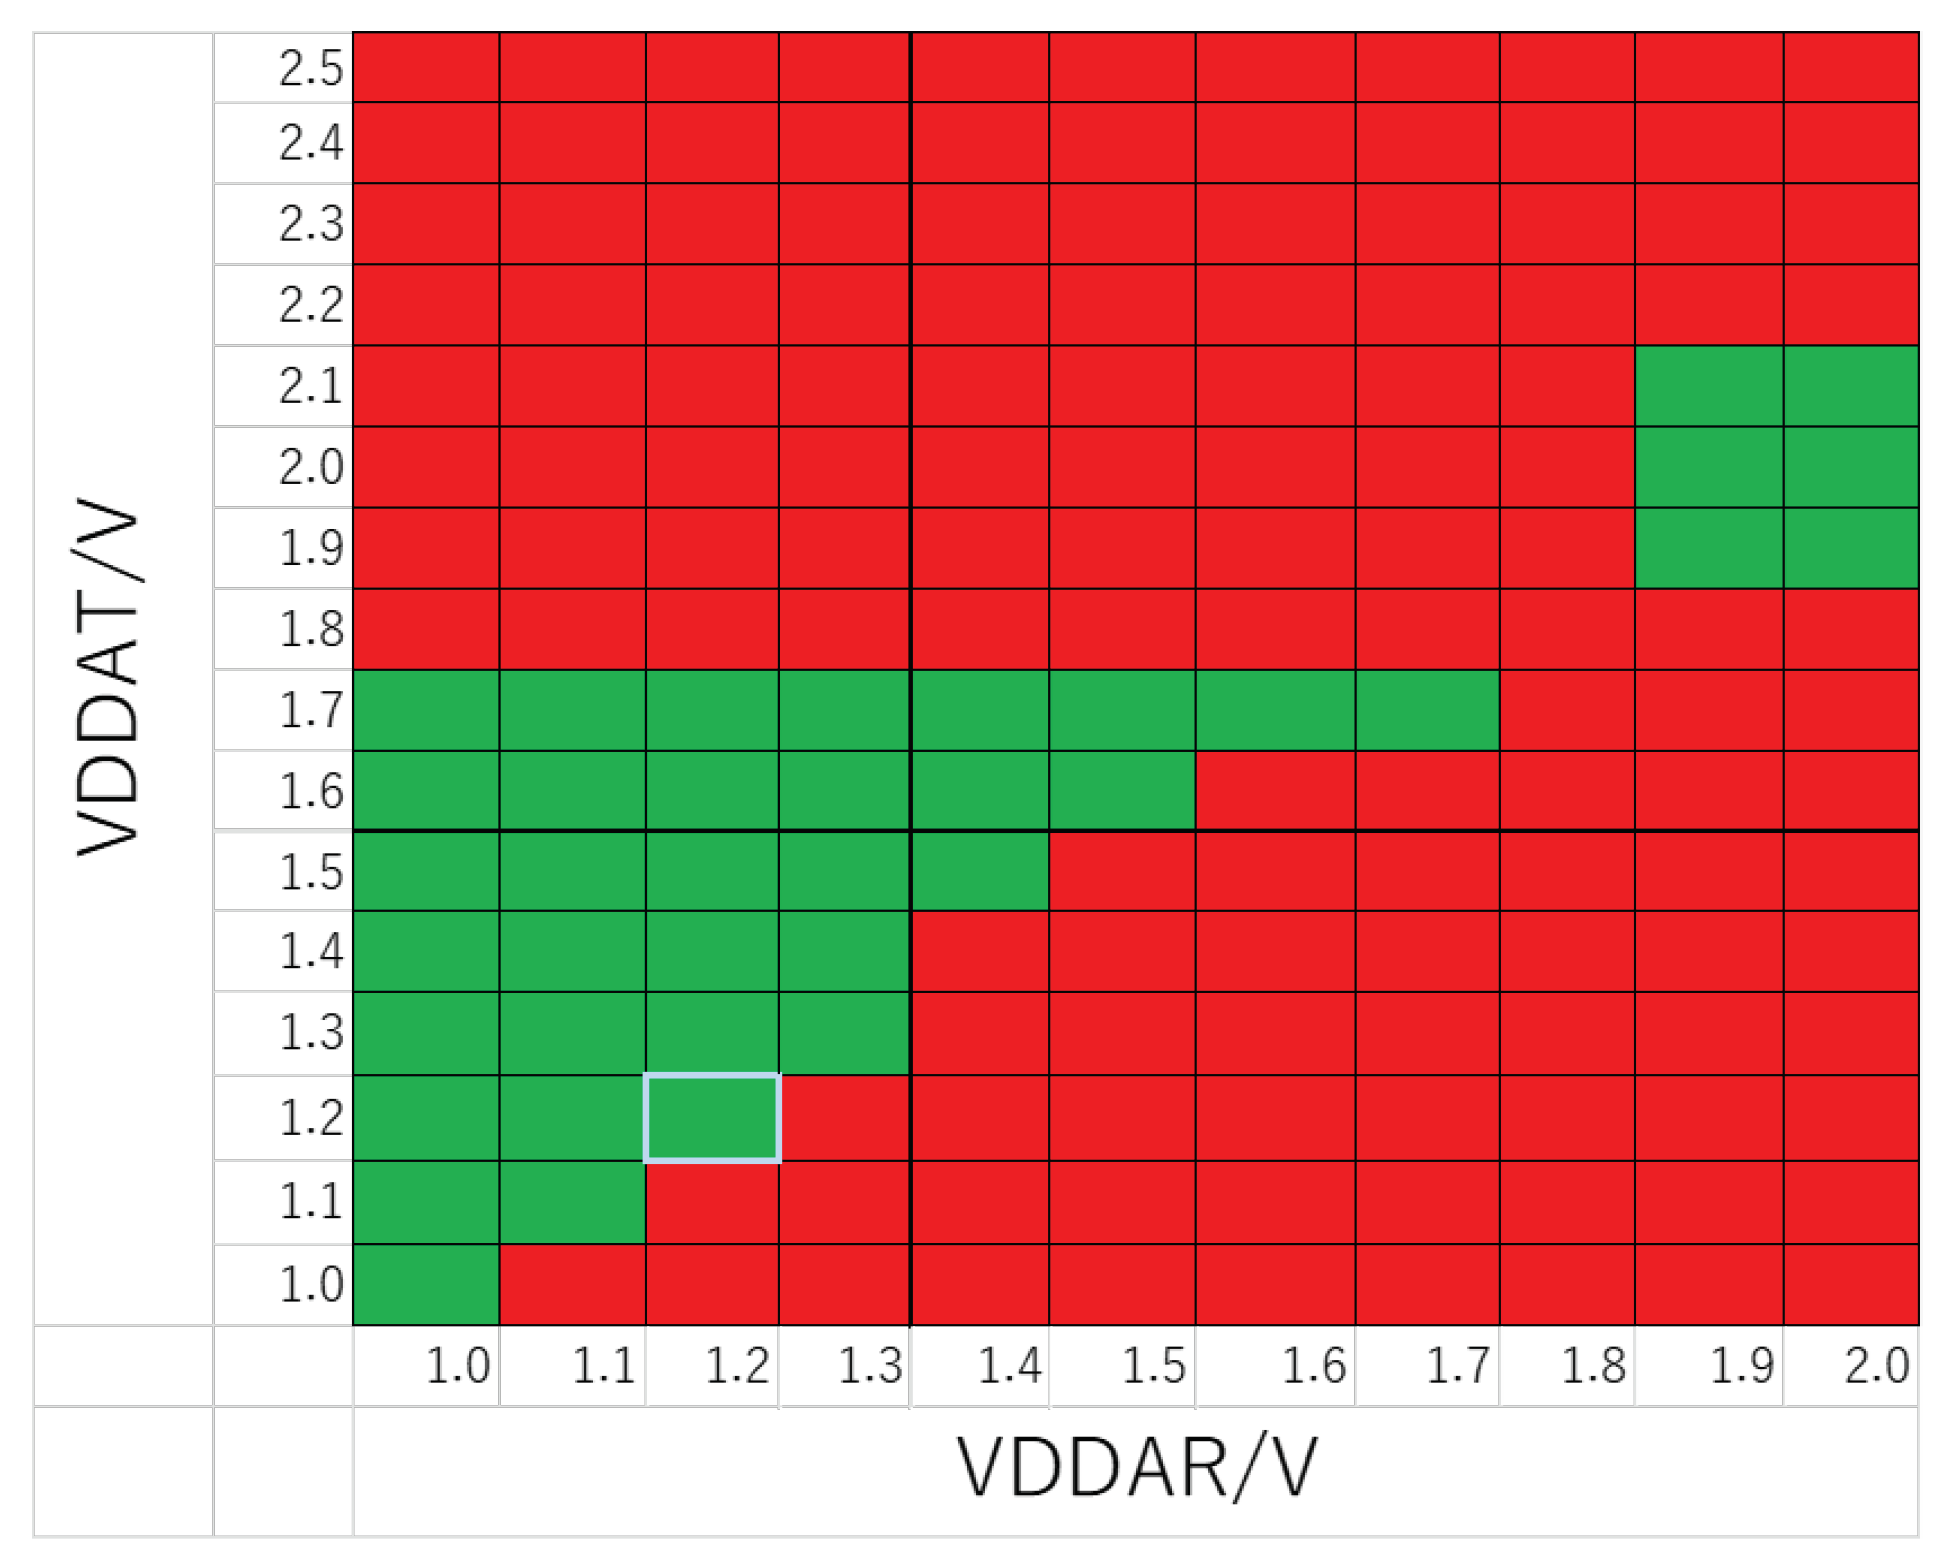
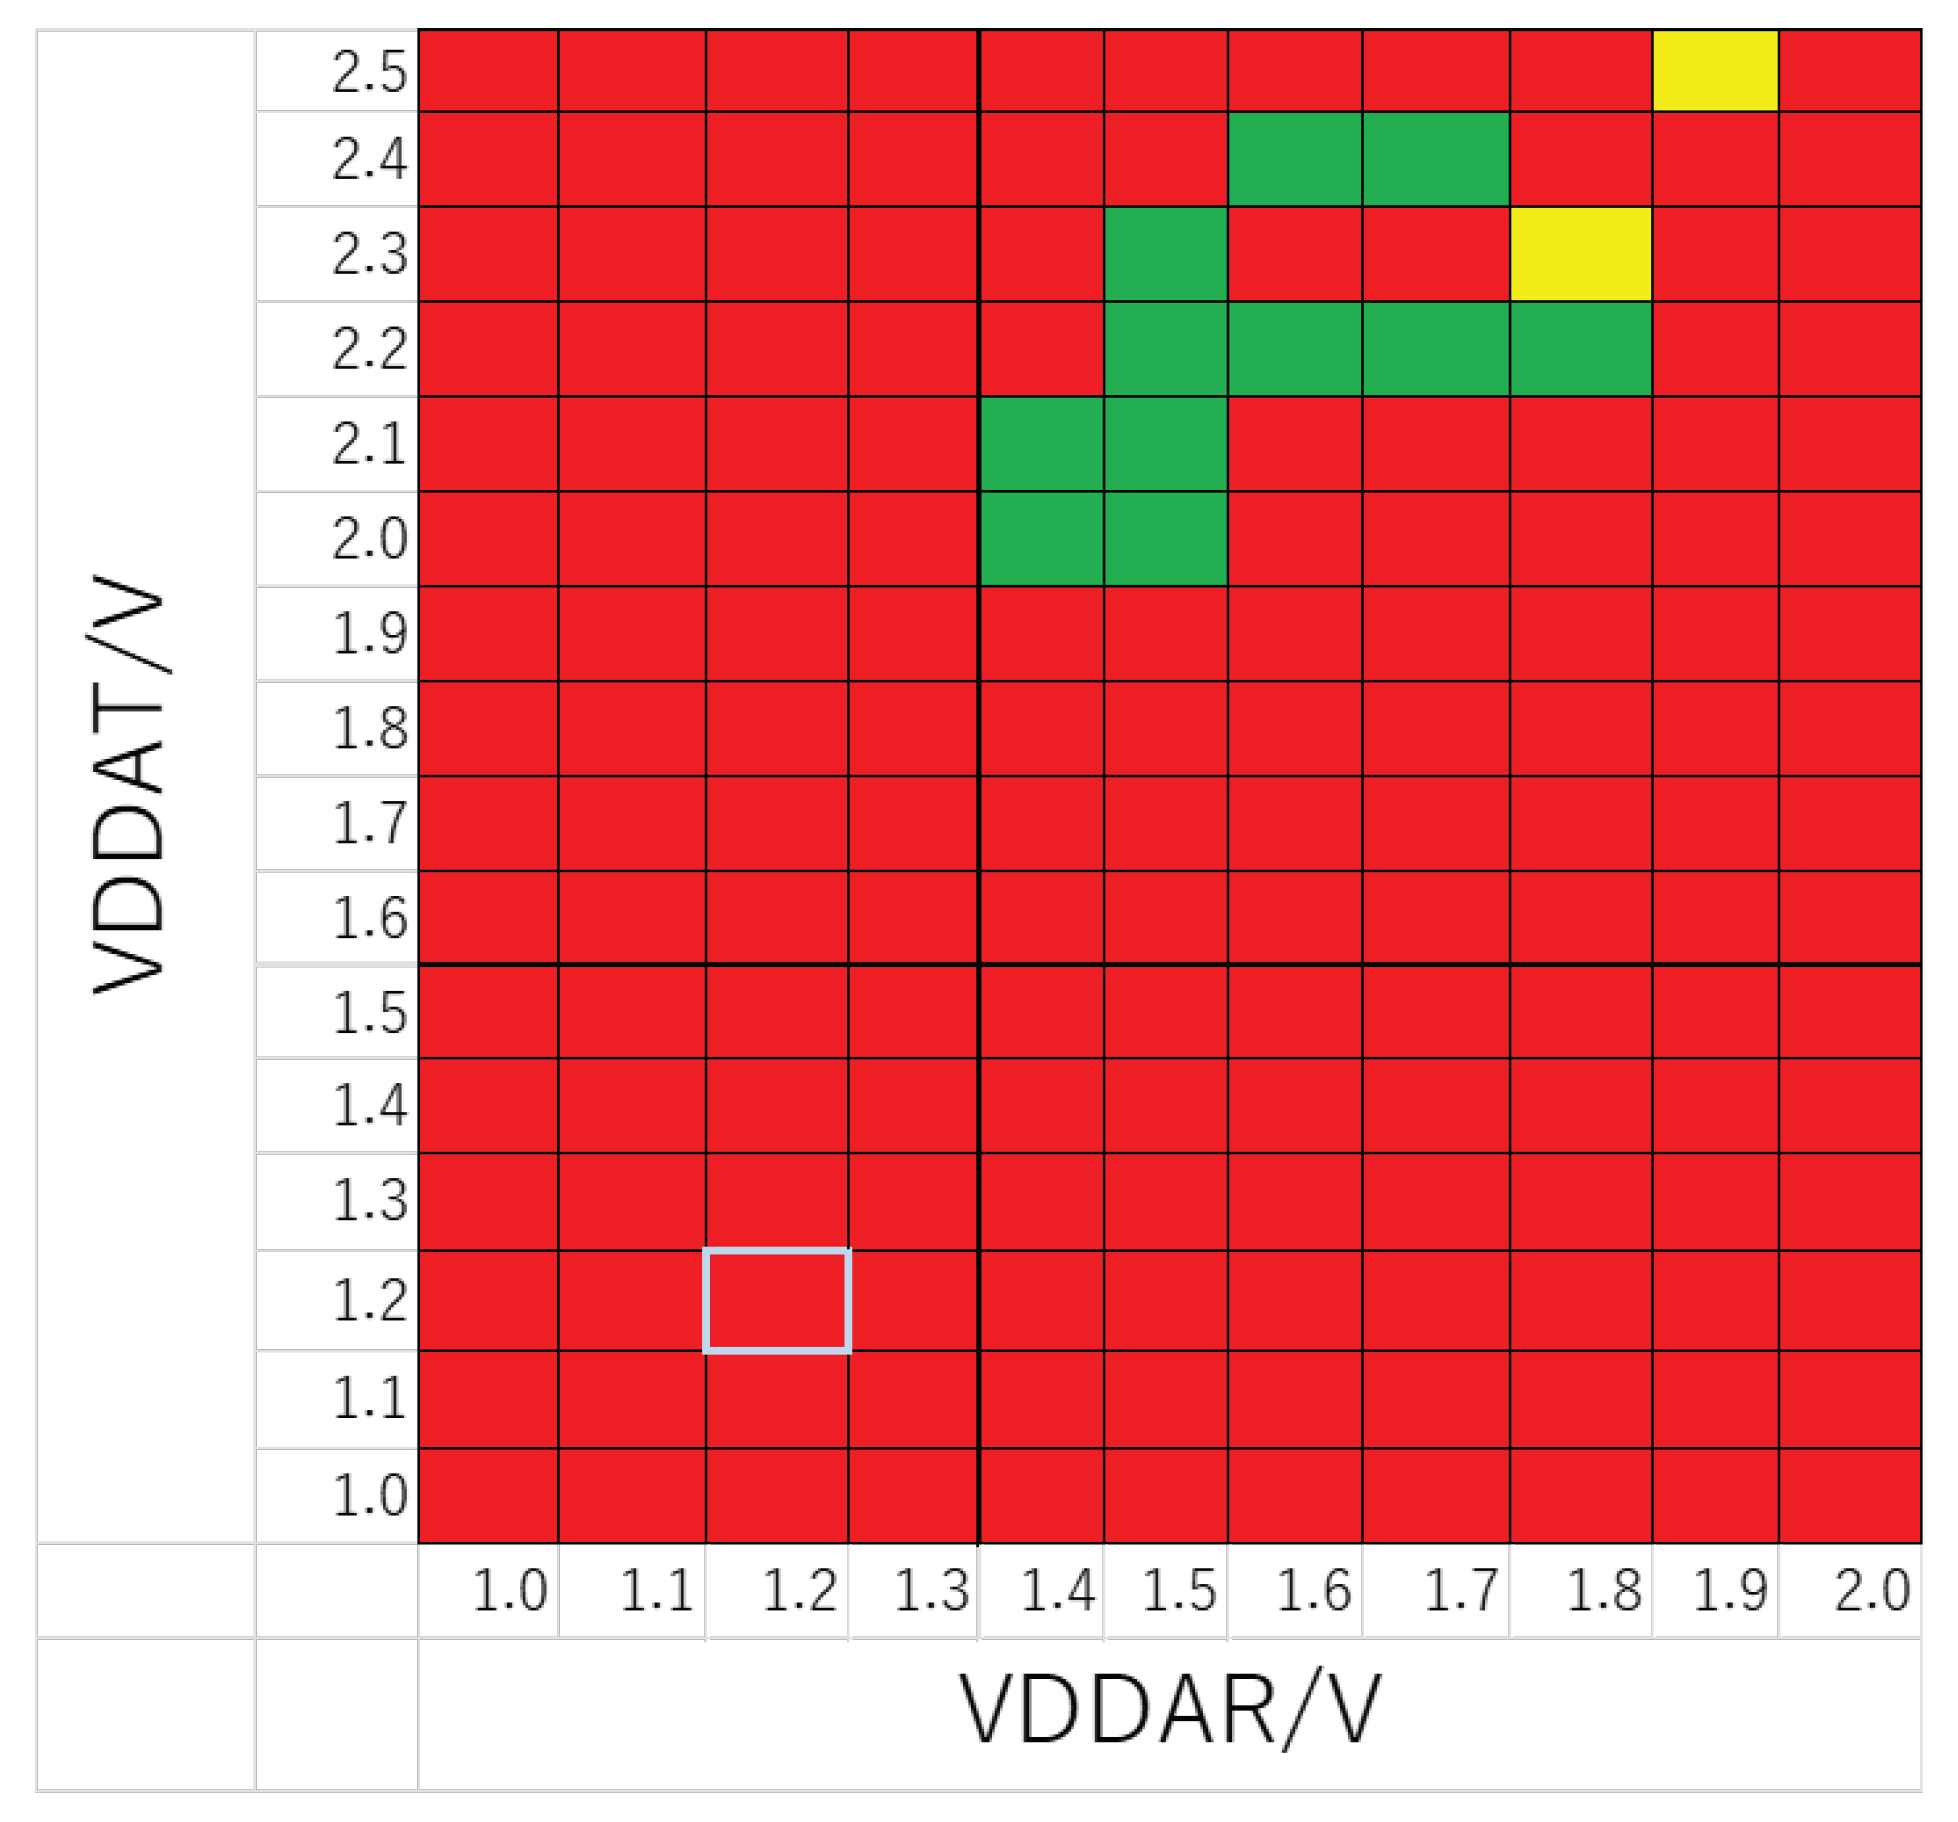
First, we changed VDDAT and TVBC, which have the greatest influence on TCI transfer, and measured the feasibility of transfer. VDDAT affects the strength of the magnetic field and the maximum operating frequency of the transmitter circuit, and TVBC controls the frequency of the transmission clock. For TCI to work, both must be at or above appropriate values. Table 3 shows the IRXBIAS1/2 current values and other power supply voltage values. Under these measurement conditions, the feasibility of transfer was measured using an FPGA ILA (Integrated Logic Analyzer) in RAW mode. This mode is a mode in which continuous transfer is not performed, and whether or not one transfer went well was measured 10 times under each condition to determine success or failure. The results are shown in Figure 11 and Figure 12. Figure 11 shows upward communication (transfer from the lower chip to the upper chip), and Figure 12 shows downward communication (transfer from the upper chip to the lower chip). In each figure, green cells represent locations where normal data transfer was possible, and red cells represent locations where data transfer could not be performed or data corruption occurred. Also, the light blue line encloses the range where VDDAT is the design standard voltage of 1.2 V and TVBC is the design standard voltage of 0.5 V to 1.2 V.

Table 3.
Various voltage and current values in the measurement experiment of two TCI Testers.
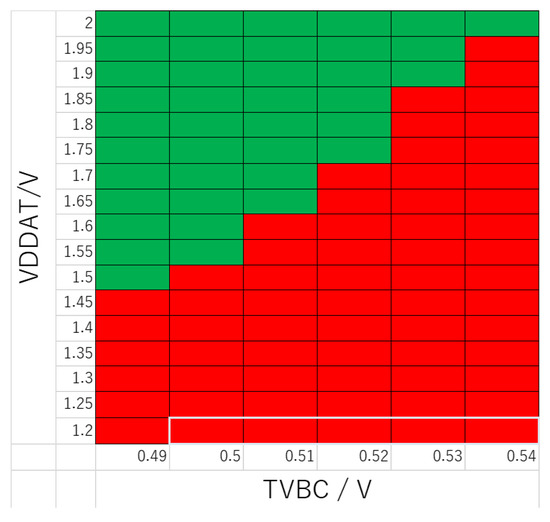
Figure 11.
Operating voltage range for two TCI Testers (upward).
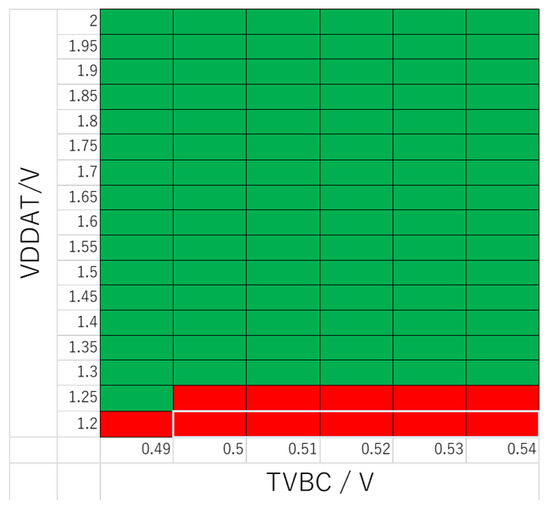
Figure 12.
Operating voltage range for two TCI Testers (downward).
It turns out that the range of green cells is smaller in upward communication than in downward communication, ie, the range of operable voltages is smaller. It was also found that the two-way communication does not work within the design standard voltage range, and works only when VDDAT is higher than the design standard voltage.
4.1.2. Oscillation Frequency Measurement
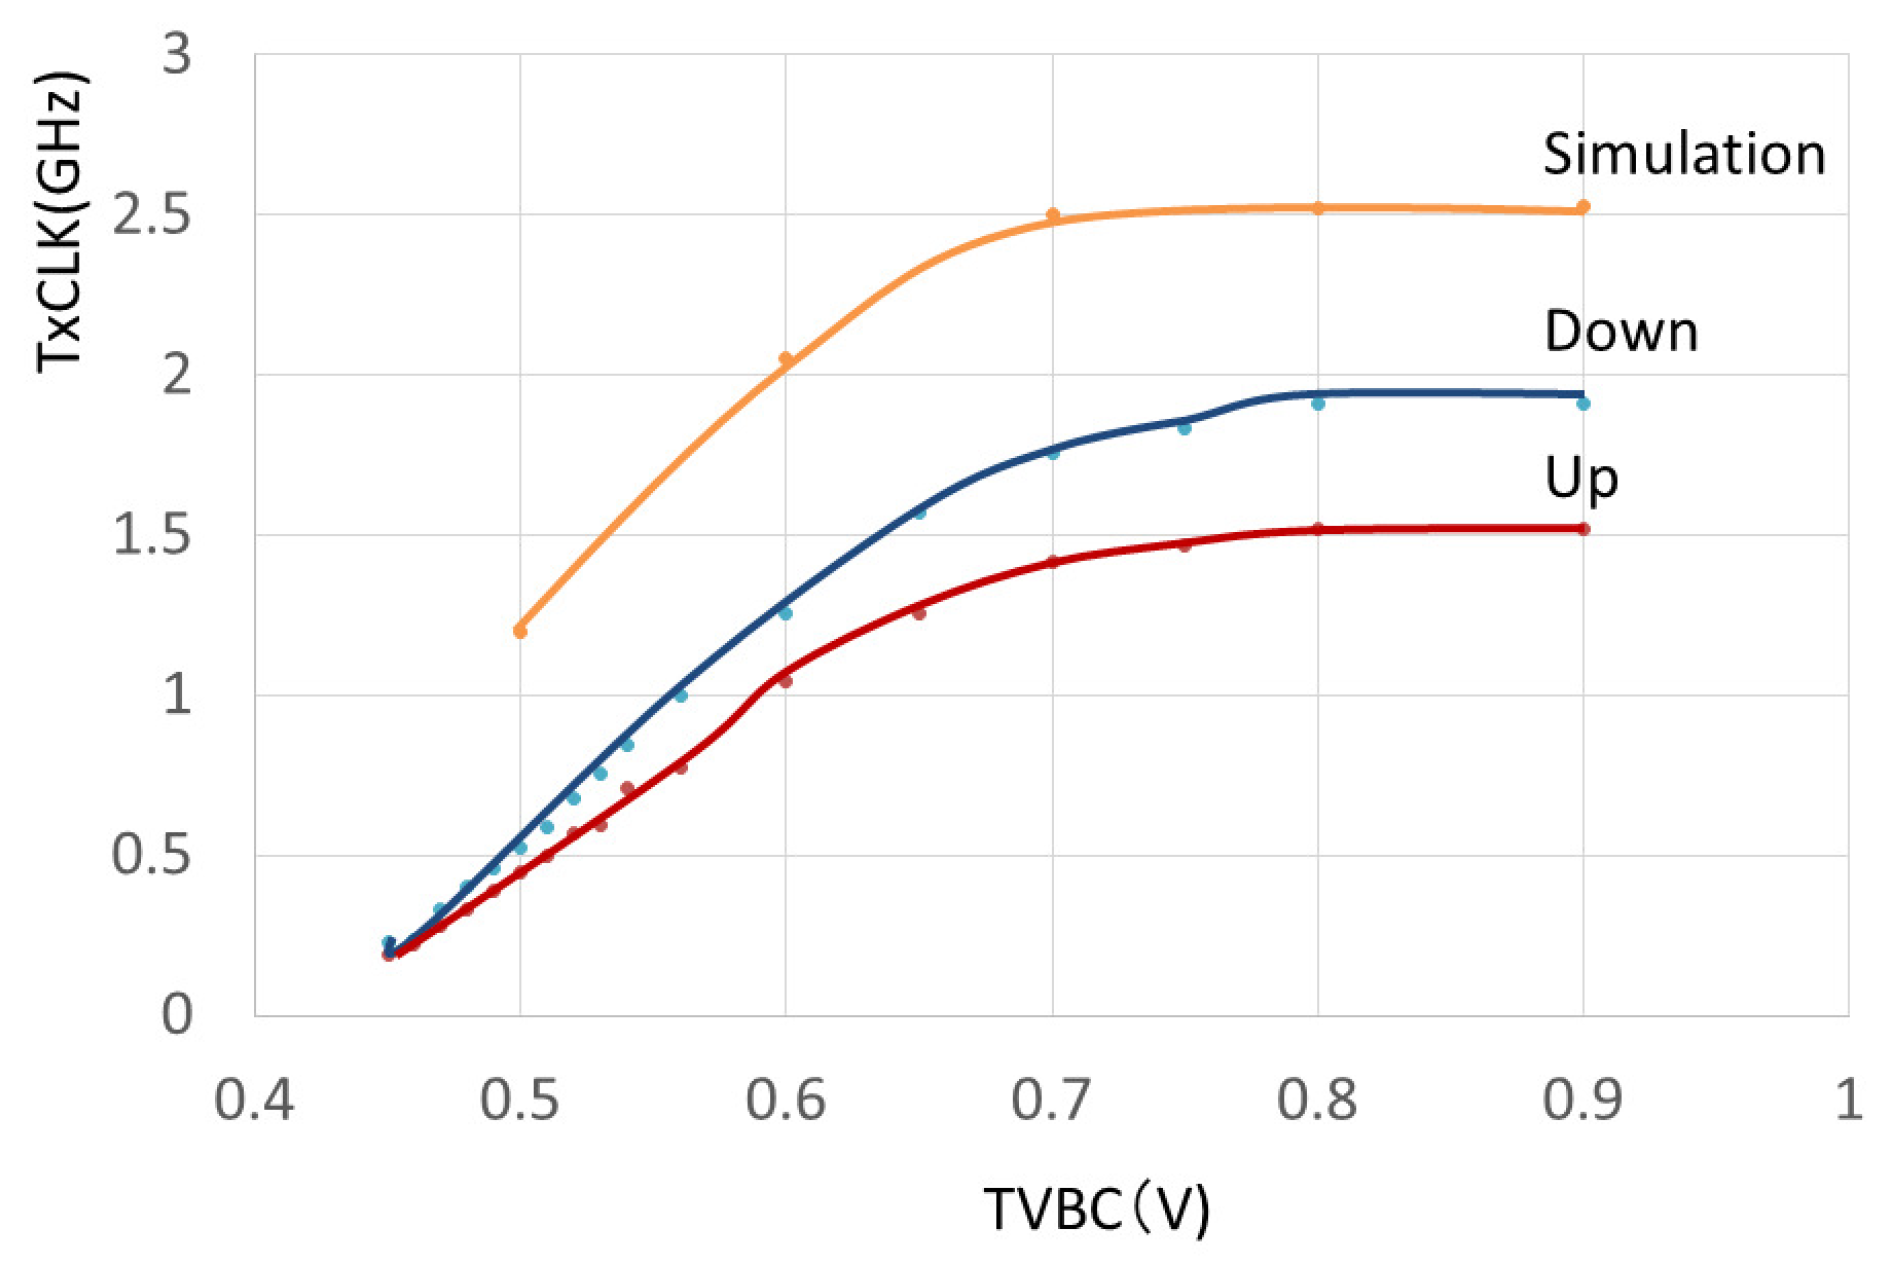
TxCLK cannot be measured directly because the frequency is much more than that allowed for I/O cells. However, it can be measured by measuring the TXBUSY signal with an oscilloscope. Figure 13 shows the results of measuring the frequency of TxCLK while changing TVBC, which is the bias voltage that controls the oscillation frequency. In this figure, “Down” represents downward communication (transfer from the upper chip to the lower chip), and “Up” represents upward communication (transfer from the lower chip to the upper chip). As reference data, SPICE simulation results by Renesas 65 nm PDK (DL-SOTB v02.02.00) are also shown. TxCLK saturates at about TVBC = 0.7 V, and the simulation results show that it reaches 2.5 GHz, 1.9 GHz for Down, and 1.5GHz for Up. As explained in Section 2.4, the digital transfer frequency is 1/66 of TxCLK, so the TCI Tester’s digital transfer frequency was 37.9 MHz in the simulation results, 28.8 MHz for Down, and 22.7 MHz for Up. From this result, it was found that the measurement result of the actual chip stack is lower than the simulation, and the Up direction is lower than the Down direction. One possible cause is as follows. The TCI IP for upward transmission and the TCI IP for downward transmission exists in the same chip and have the same mounting layout. However, the TCI IP for upward transmission (UT) and the TCI IP for downward transmission (DT) exist in separate locations within the chip as shown in Figure 5, and TxCLK for transmission is also oscillated by separate oscillation circuits. It is because the distance from the oscillator circuit of the IP for upward transmission to the power supply pin is longer than the distance from the oscillator circuit of the IP for downward transmission to the power supply pin, the resistance and voltage drop of the power supply net are also higher in the upward direction than in the downward direction. also increased, which is thought to have caused the difference in TxCLK.
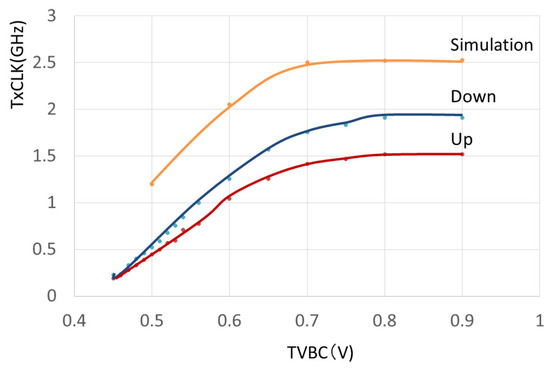
Figure 13.
Relationship between TVBC and TxCLK.
Next, based on Figure 11 and Figure 12, VDDAT = 1.55 V, TVBC = 0.49 V, other values are the same as Table 3, and the frequency at which continuous transfer is possible in CUBE mode was measured. In this experiment, in order to find the best operating point, that is, in order to find conditions for raising the frequency, VDDAT was changed from the value at the time of measurement in this figure. As a result, it was 13 MHz in the downward direction and 10 MHz in the upward direction, which is even lower than the oscillation frequency in this figure. In addition, when three sets of two TCI Tester substrates were manufactured and experiments were conducted, similar results were obtained, so the influence of individual differences could not be confirmed. Although 3 sets were originally insufficient, this was the limit due to the number of manufactured chips and the budget.
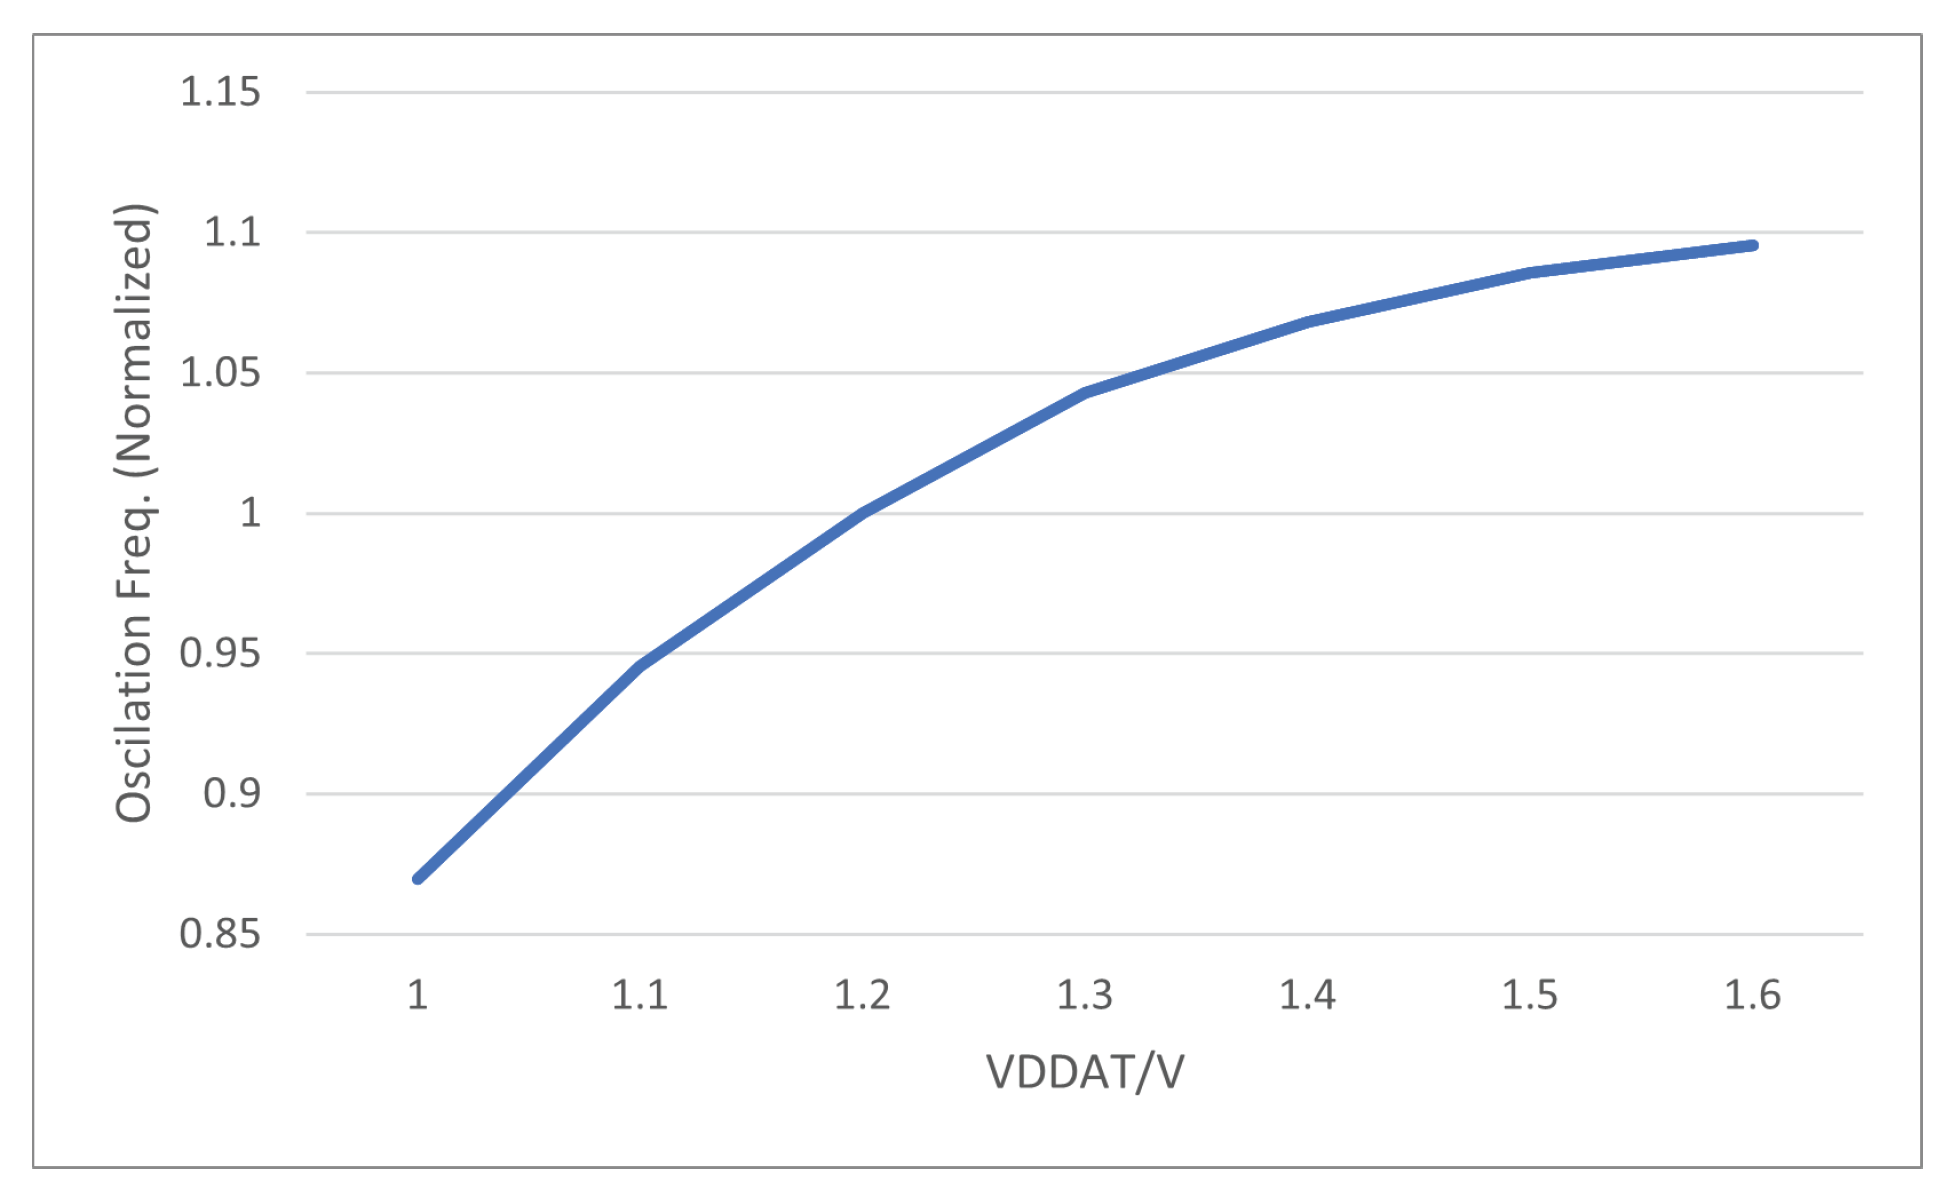
In order to investigate how the drop in VDDAT inside the chip due to the wiring resistance of the power supply net affects the oscillation frequency, we analyzed the dependence relationship between VDDAT and oscillation frequency by SPICE simulation. Figure 14 is the result. The oscillation frequency on the vertical axis is normalized with reference to the oscillation frequency at the standard voltage of 1.2 V. As VDDAT decreased, the oscillation frequency decreased, confirming the possibility that the decrease in VDDAT inside the chip affected the decrease in operating frequency.
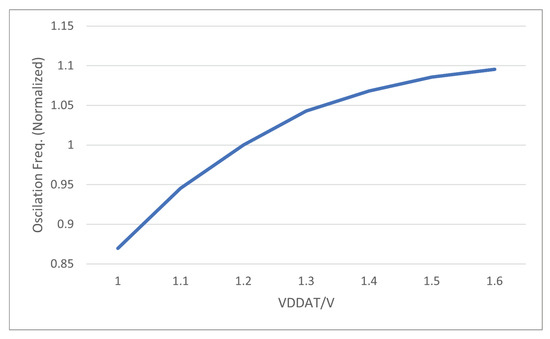
Figure 14.
Relationship between VDDAT and Oscillation Frequency.
Finally, as a result of a continuous transfer test in LOOP mode, continuous transfers were successfully performed at a frequency of 10MHz. It was found that sufficient reliability was obtained at low frequencies.
4.2. Stacking on Other Chips
TCI Tester (RAW mode) was stacked on other TCI-equipped chips to measure the characteristics and check the operation. Since TCI-equipped chips other than TCI Tester do not have a function to directly manipulate the handshake signal, TCI Tester created the packet format that the target chip accepts with an external FPGA and inserted it.
4.2.1. TCI Tester + CC-SOTB2
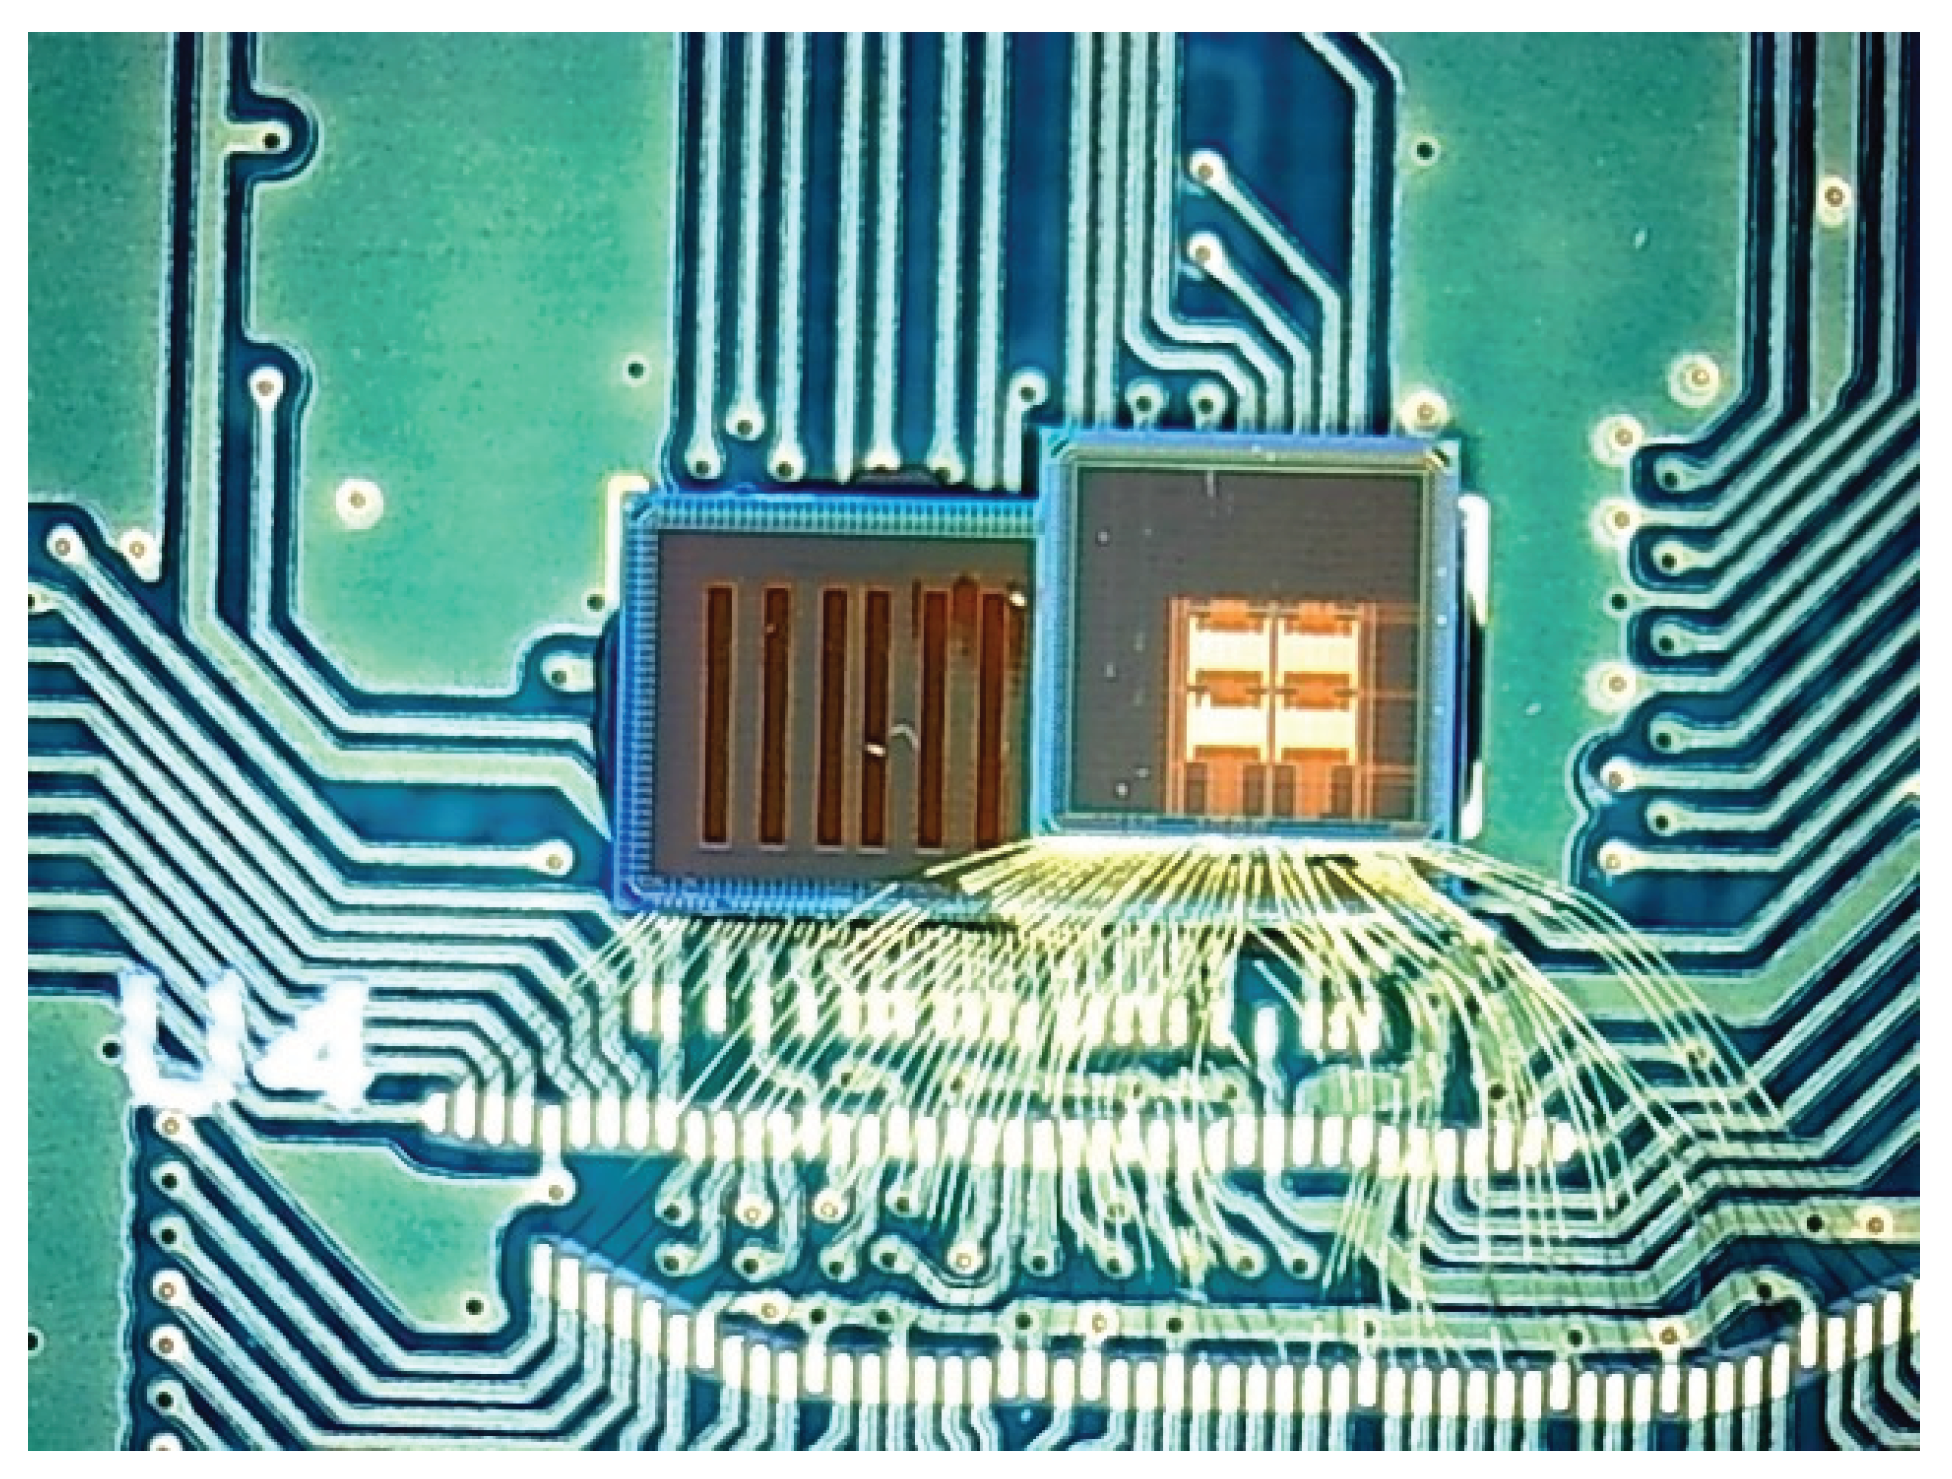
We stacked the TCI Tester on top of the coarse-grained reconfigurable accelerator CC-SOTB2 [18] and set the TCI Tester to RAW mode to verify the operating range. As for TVBC, the data transfer of the actual chip did not work unless it was 0.42 V, which is outside the standard voltage range. Therefore, the value of TVBC was fixed at 0.42 V, and the VDDAT and VDDAR of both chips were varied. As shown in Figure 15, CC-SOTB2 is a rectangle of 3 mm × 6 mm and has the same 2 × 2 IPs at the same positions as the TCI Tester and the IP positions match the TCI Tester. The bonding wires are removed from the chip stack’s bottom edge.
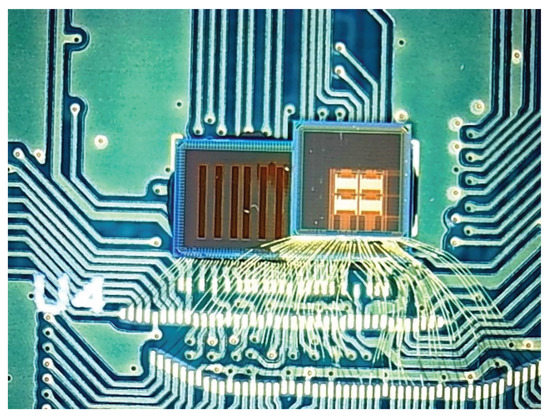
Figure 15.
TCI Tester + CC-SOTB2.
Table 4 shows various voltage values except for VDDAT and VDDAR in the experiment using TCI Tester and CC-SOTB2. The same current as in Table 3 is used for IRXBIAS1/2. Figure 16 shows the operating range when transferring data from TCI Tester to CC-SOTB2. Also, Figure 17 shows the operating range when transferring data from CC-SOTB2 to TCI Tester.

Table 4.
Various Voltage Values in TCI Tester + CC-SOTB2.
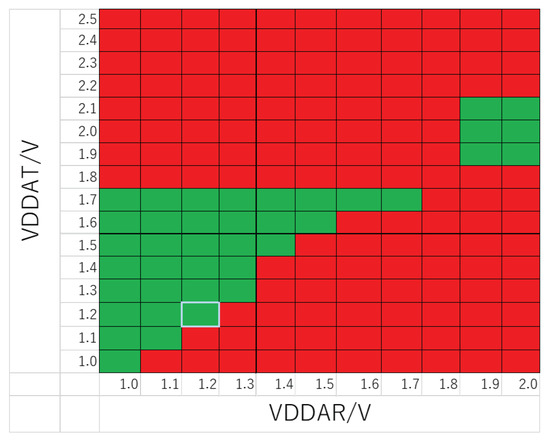
Figure 16.
Operating voltage range for data transfer from TCI Tester to CC-SOTB2.
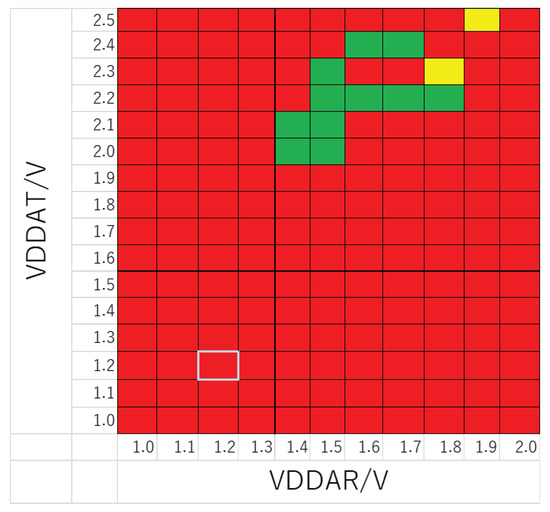
Figure 17.
Operating voltage range for data transfer from CC-SOTB2 to TCI Tester.
As in Figure 11, green cells represent locations where normal data transfer without data corruption occurred, and red cells represent locations where data could not be transferred or where data corruption occurred. Yellow cells indicate locations where normal data transfer is possible but sometimes not. The light blue line surrounds the cell when both VDDAT and VDDAR are the design voltage of 1.2 V.
When transferring data from CC-SOTB2 to TCI Tester, a higher voltage was required on both the sending and receiving sides than when transferring data from TCI Tester to CC-SOTB2. In particular, the operation range from CC-SOTB2 to TCI Tester is extremely narrow, and since VDDAT and VDDAR operate only in a range larger than the design standard voltage, it was found to be a serious problem in practice. We also experimented with other parameters such as VDD, VCCQ, VDDH, and IRXBIAS1/2, but there was no improvement over the values in this paper.
4.2.2. TCI Tester + SMTT
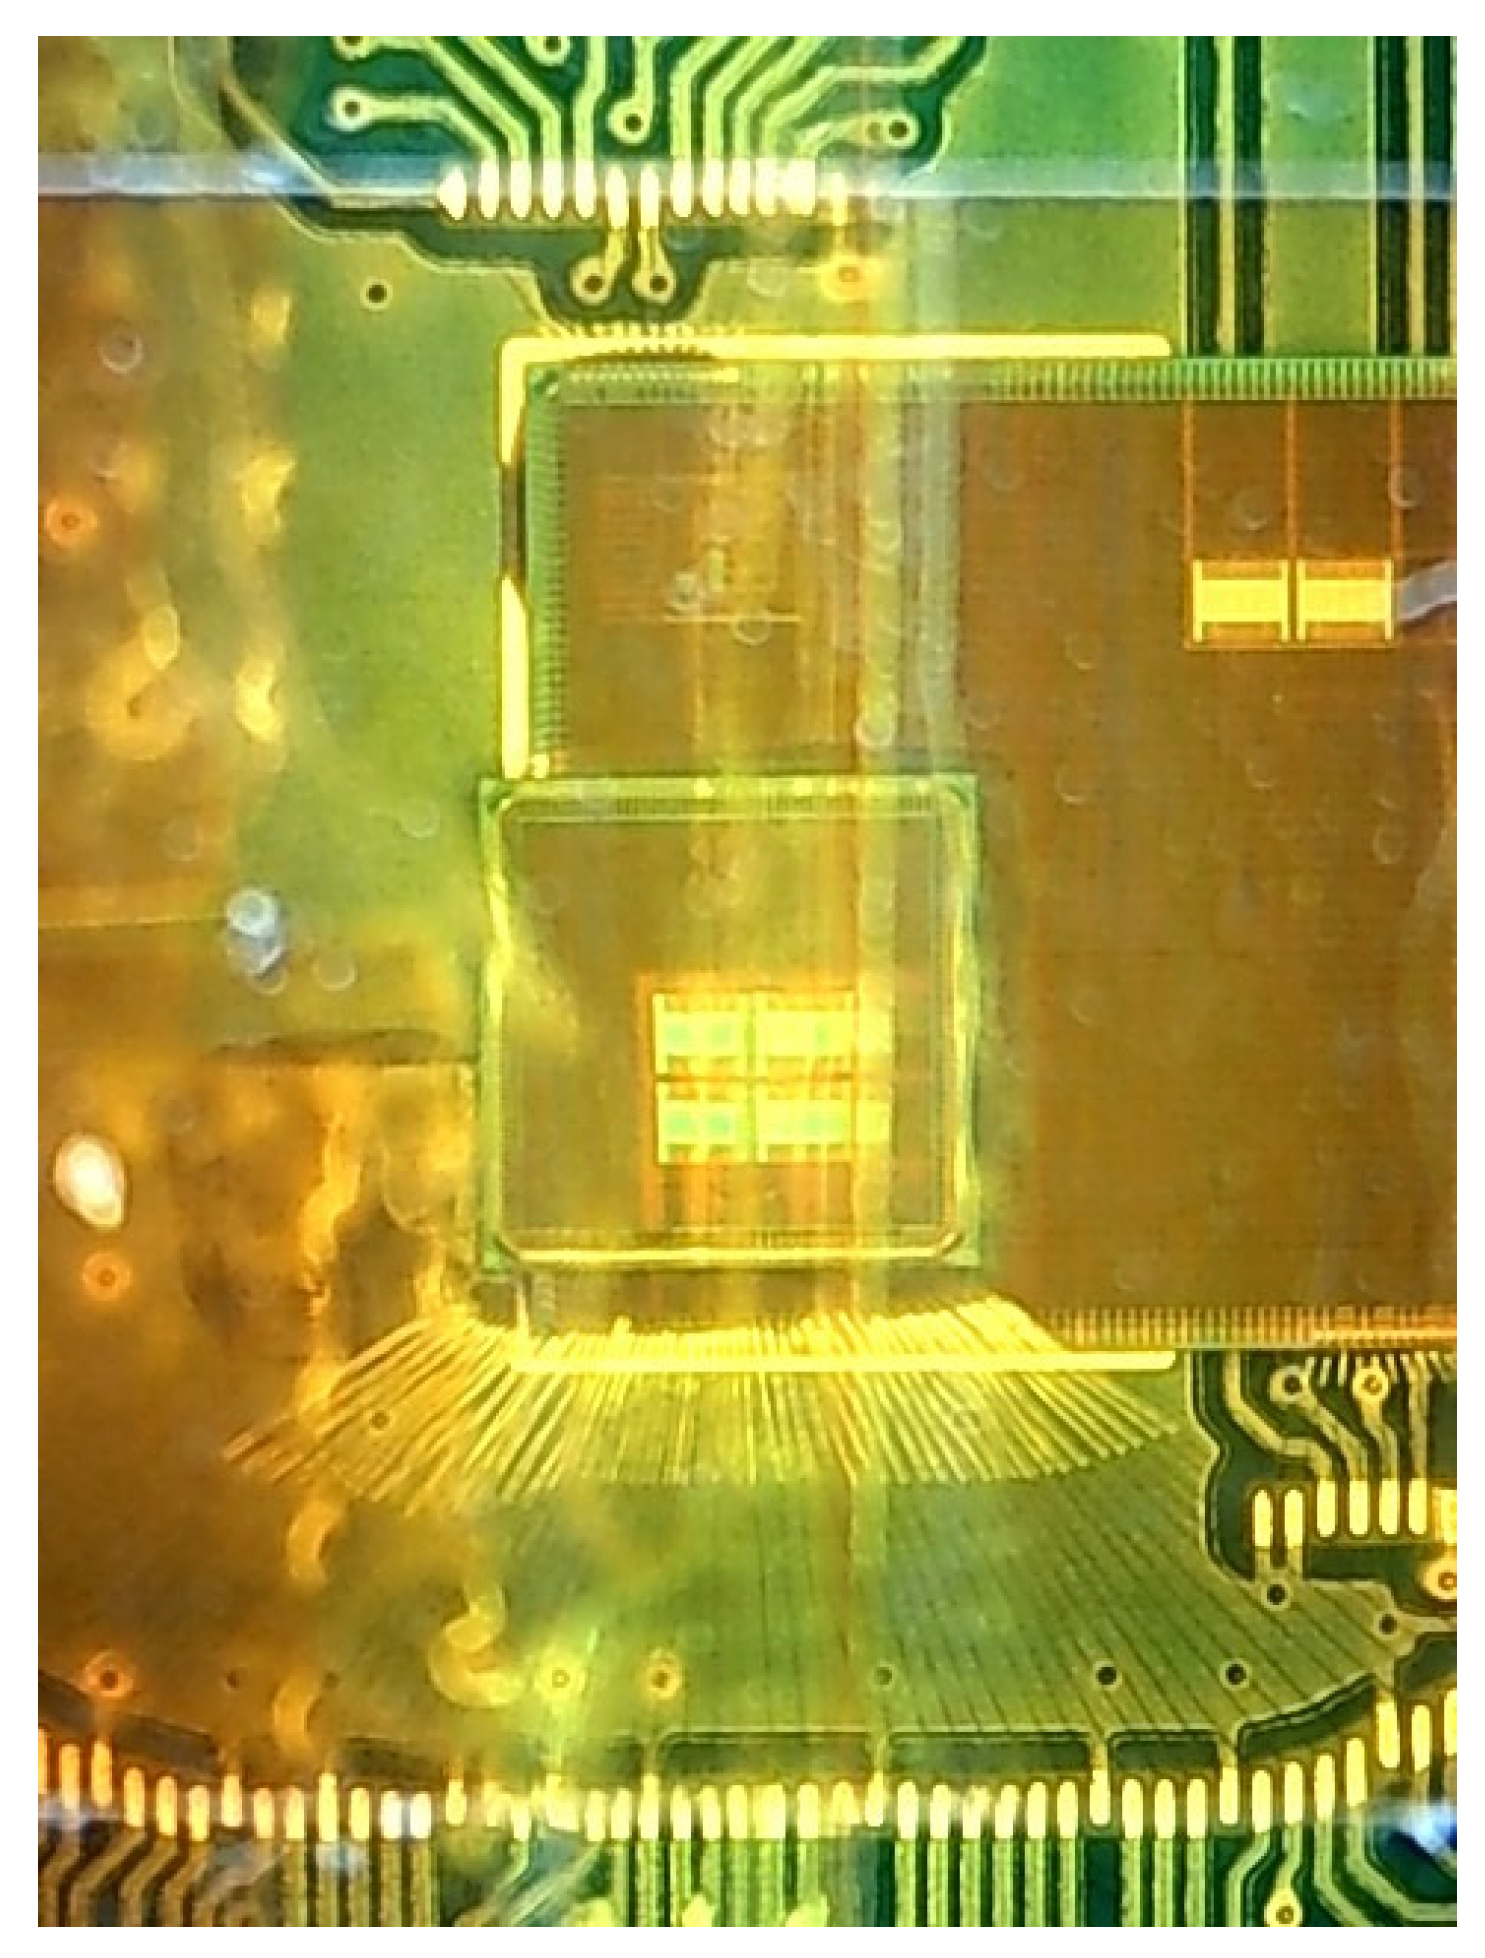
Next, we stacked the TCI Tester on the shared memory chip SMTT, set the TCI Tester to RAW mode, and performed the same verification as in Section 4.2.1. SMTT [19] had two TCI IPs on the lower left and two on the upper right, to allow two tower-like chip stacks on both sides. Since this chip is never stacked on top of another chip, there are only two sets of TCI IPs for the upper direction. This time, as shown in Figure 18, the TCI Tester was layered on the lower left IP.
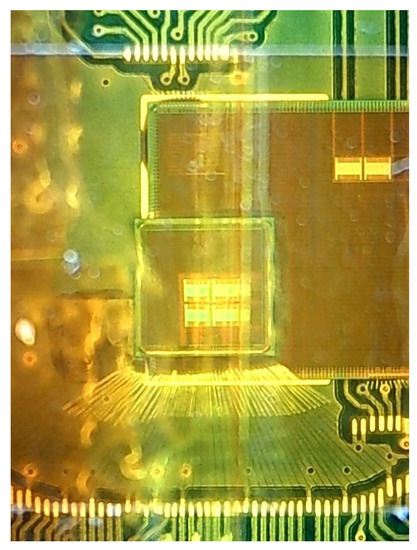
Figure 18.
TCI Tester + SMTT.
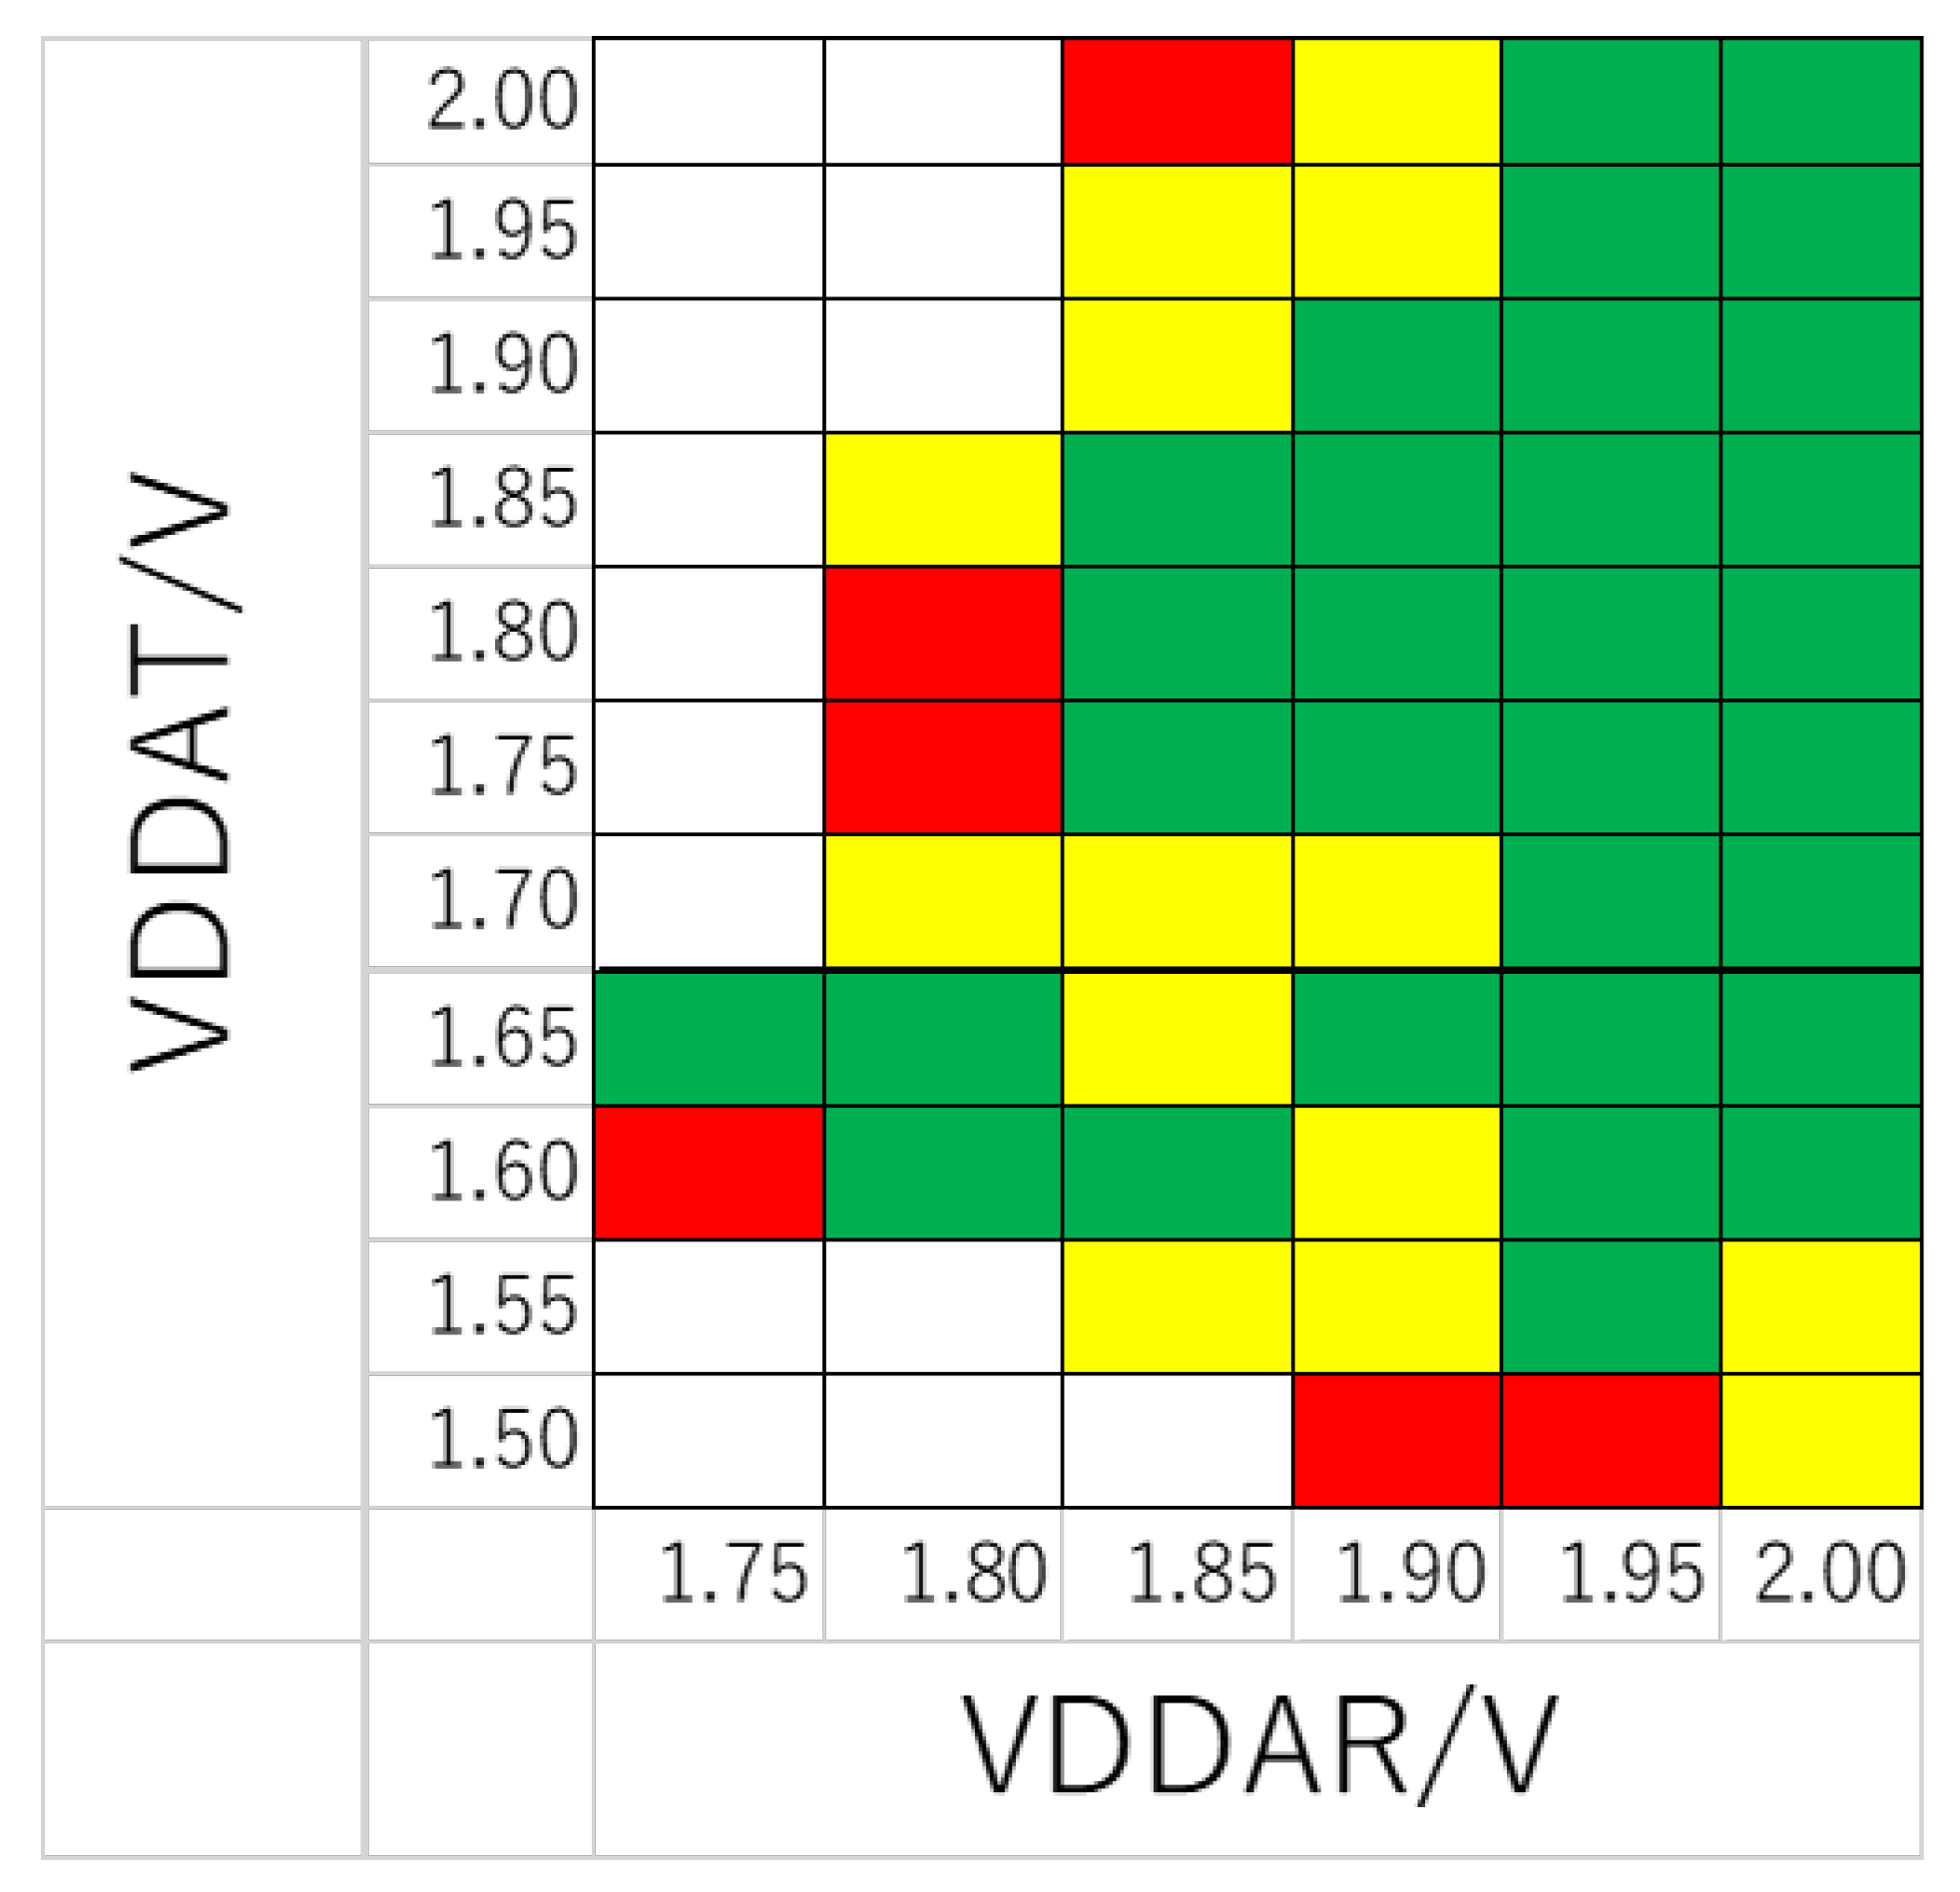
Table 5 shows various voltage values except for VDDAT and VDDAR in the experiment using TCI Tester and SMTT. For IRXBIAS1/2, the same current values as in Table 3 are used. As for TVBC, we should have experimented with the same voltage values as in Table 3 or Table 4, but when TVBC was moved from 0.7 V even a little, the data transfer of the actual chip did not work. Therefore, we fixed TVBC at 0.7 V and examined the operating range for VDDAT and VDDAR. Figure 19 shows the operating range for data transfer from TCI Tester to SMTT. The meanings of the green, red, and yellow cells are the same as in Figure 16. Transfer from TCI Tester to SMTT could be confirmed in the same voltage range as other chips, but data transfer from SMTT to TCI Tester could not be confirmed. This is because the two boards that were mounted did not work. As in Section 4.2.1, we experimented with other parameters such as VDD, VCCQ, VDDH, and IRXBIAS1/2, but there were no cases where the values in this paper were better.

Table 5.
Various Voltage Values in TCI Tester + SMTT.
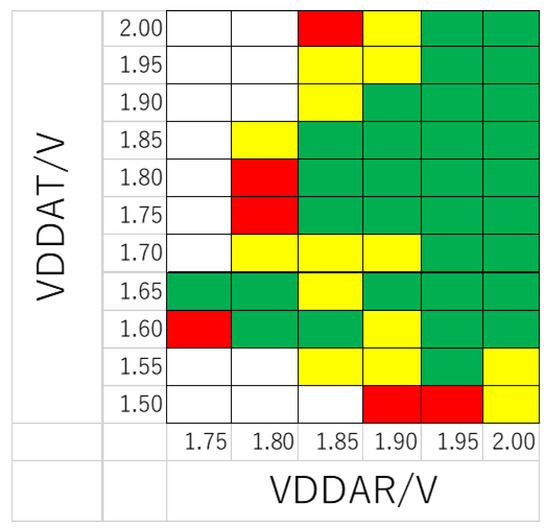
Figure 19.
Operating voltage range for data transfer from TCI Tester to SMTT.
4.3. Consideration of Observation Results by TCI Tester
As a result of the observation by the TCI Tester, the following facts were clarified.
- The performance of the TCI IP embedded in the actual chip is lower than the SPICE simulation data during design.
- In order to operate, it is necessary to set the power supply voltage on the transmission side high and adjust the bias voltage of the transfer clock.
- Upward communication has lower performance than downward communication, and some chips do not work.
- Even if conditions such as transmission and reception voltages are the same, an error may or may not occur in transfer. That is, operating conditions differ depending on the chip.
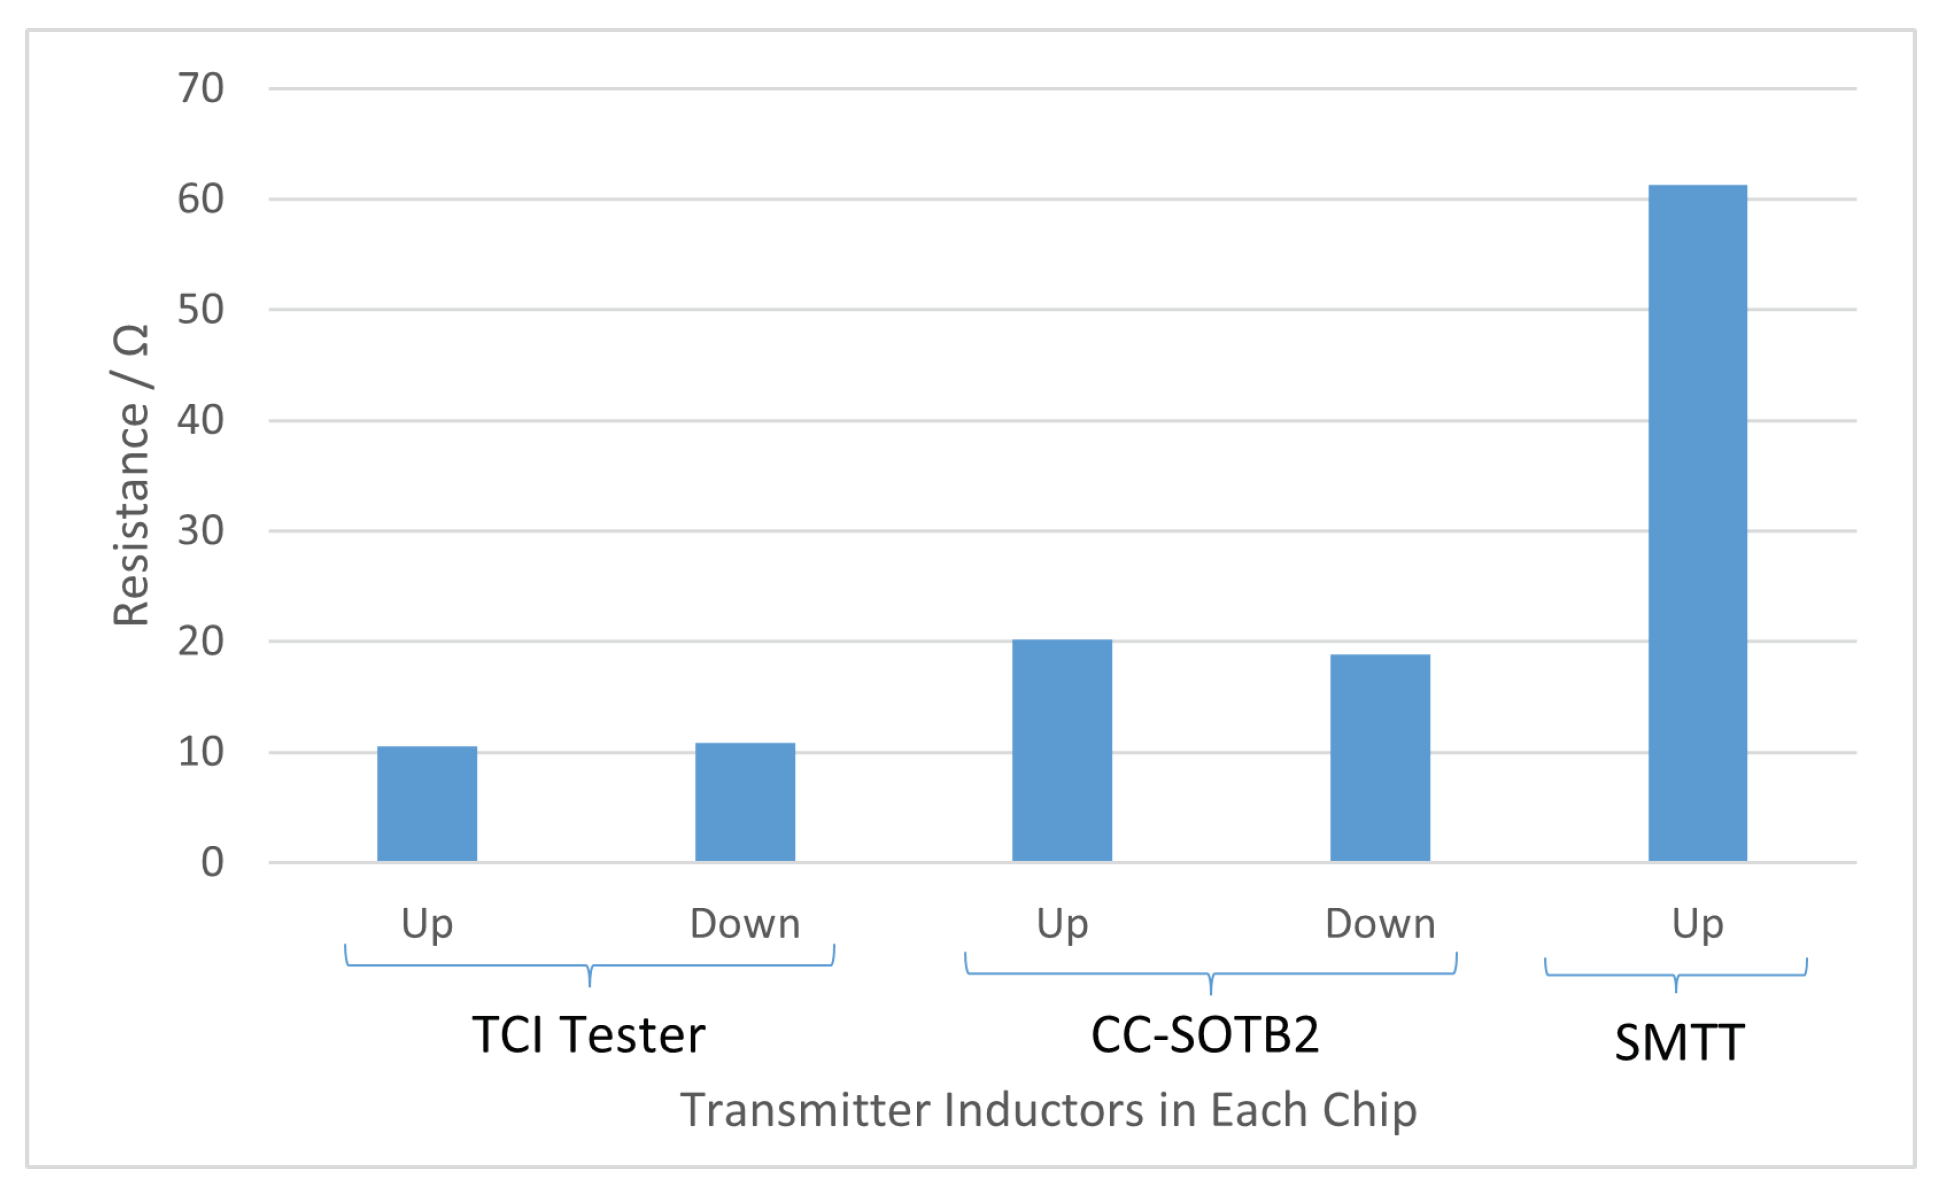
As mentioned earlier, the above cause is thought to be related to the position of the TCI IP power input pad. Figure 20 shows the results of analyzing the resistance of the power supply grid on the transmission side of each chip from the layout data. We used Silicon Frontline Technology’s P2P/RMAP [22] for the analysis. Resistance values are from each power pad to the IP power feed point. In this graph, for TCI Tester and CC-SOTB2, the wiring resistance values of the upward and downward transmission inductors are shown. Also, regarding the SMTT, the wiring resistance value is shown because it is the chip stacked at the bottom and the inductor exists only in the upward direction.
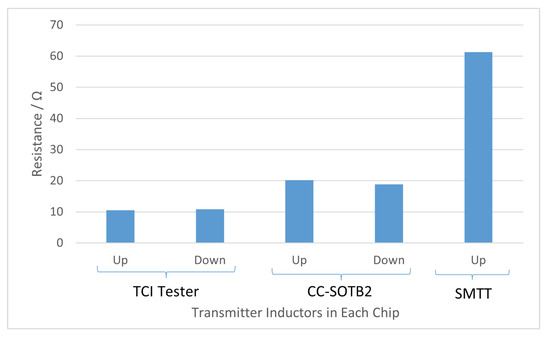
Figure 20.
Wiring resistance of transmitting inductor in each chip (transmitting side power supply net).
The results suggest that chips with higher wire resistance may be relevant because they have a narrower operating range and require higher voltages. The wiring resistance of the SMTT, which did not work in particular, was six times that of the TCI Tester. In lamination using TCI, bonding is limited to one side of the chip, which limits the number of power supply pins and increases wiring resistance, which is an essential problem. In the case of SMTT, the chip stacking was considered in two places, so the wiring resistance increased. It can be seen that the increase in the number of power supply pins, the position of the TCI IP, and the configuration method of the power supply net require special consideration. On the other hand, since the difference due to the position of the inductor is not so large and the wiring resistance to the transmitter inductor is large, it can be inferred that the power supply environment in the upward direction is worse than the power environment in the downward direction.
5. Conclusions
We developed a chip TCI Tester for TCI operation verification and characteristic measurement, stacked it on top of another TCI-equipped chip, and evaluated it by actual measurement. As a result, it became clear that the performance of the embedded IP was lower than the SPICE simulation results, that a higher power supply voltage was required to operate, and that upward operation was more problematic than downward operation. As a result of analyzing the wiring resistance of the layout based on this result, it was found that the wiring resistance is higher in chips with problems in operation, and improvement is necessary. On the other hand, from the connection between TCI Testers, it became clear that no error occurred even in the long-term transfer test within the operating range, and that it had high reliability.
In the future, we plan to improve the placement method of TCI IP inside the chip, the power supply net, and the I/O pin position, and port it to the USJC C55DDC process. If the chip can be made more flexible and detachable, its use as a chip for characteristic measurement will expand. In addition, since the current TCI Tester was designed with the assumption that it will be stacked on top of the target chip, it is difficult to stack it under the target chip. Investigation of a configuration that enables this is also a subject for the future.
Author Contributions
Conceptualization, H.A. and H.K.; methodology, H.A.; software, H.A.; validation, H.K. and H.A.; formal analysis, H.K.; investigation, H.K.; resources, H.A.; data curation, H.K.; writing—original draft preparation, H.K.; writing—review and editing, H.A.; visualization, H.K.; supervision, H.A.; project administration, H.A.; funding acquisition, H.A. All authors have read and agreed to the published version of the manuscript.
Funding
This research was funded by JSPS Kakenhi (B) 18H03215 and JST CREST JPMJCR19K1.
Data Availability Statement
Research data of this work are shared on https://drive.google.com/drive/u/1/folders/1GLTNgMHOiLky0Xc3VPbm-rxoKqSoTFJ9 (accessed on 5 June 2023).
Acknowledgments
This work is technically supported by VDEC (VLSI Design Education Center). We appreciate for it.
Conflicts of Interest
The authors declare no conflict of interest. The funders had no role in the design of the study; in the collection, analyses, or interpretation of data; in the writing of the manuscript; or in the decision to publish the results.
Abbreviations
The following abbreviations are used in this manuscript:
| TCI | Through Chip Interface |
| IP | Intellectual Property |
| TSV | Through Silicon Via |
| SOTB | Silicon On Thin Box |
| IP | Intellectual Property |
| SoC | System on a Chip |
| SiP | System in Package |
| ILA | Integrated Logic Analyzer |
References
- Lee, C.; Park, J.; Park, C. Zigzag-shaped coil array structure for wireless chip-to-chip communication applications. IEEE Trans. Electron. Devices 2014, 61, 3245–3251. [Google Scholar]
- Sun, X.; Pantano, N.; Kim, S.W.; Van der Plas, G.; Beyne, E. Inductive links for 3D stacked chip-to-chip communication. In Proceedings of the 2019 IEEE 69th Electronic Components and Technology Conference (ECTC), Las Vegas, NV, USA, 28–31 May 2019; pp. 1215–1220. [Google Scholar]
- Mizoguchi, D.; Yusof, Y.B.; Miura, N.; Sakura, T.; Kuroda, T. A 1.2 Gb/s/pin wireless superconnect based on inductive inter-chip signaling (IIS). In Proceedings of the 2004 IEEE International Solid-State Circuits Conference (IEEE Cat. No. 04CH37519), IEEE, San Francisco, CA, USA, 5–19 February 2004; pp. 142–517. [Google Scholar]
- Kim, Y.; Tam, S.W.; Chang, M.C.F. Millimeter-wave contactless connectors: From fundamental research to commercialization. IEEE Microw. Mag. 2022, 23, 55–70. [Google Scholar] [CrossRef]
- Lee, C.J.; Kim, S.H.; Son, H.S.; Kang, D.M.; Kim, J.H.; Byeon, C.W.; Park, C.S. A 120 GHz I/Q transmitter front-end in a 40 nm CMOS for wireless chip to chip communication. In Proceedings of the 2018 IEEE Radio Frequency Integrated Circuits Symposium (RFIC), Philadelphia, PA, USA, 10–12 June 2018; pp. 192–195. [Google Scholar]
- Kuroda, T. ThruChip Interface (TCI) for 3D Networks on Chip. In Proceedings of the 2011 IEEE/IFIP 19th International Conference on VLSI and System-on-Chip, Cuzco, Peru, 6–9 October 2019; pp. 238–241. [Google Scholar]
- Shiba, K.; Okada, M.; Kosuge, A.; Hamada, M.; Kuroda, T. A 12.8-Gb/s 0.5-pJ/b Encoding-Less Inductive Coupling Interface Achieving 111-GB/s/W 3D-Stacked SRAM in 7-nm FinFET. IEEE-Solid-State Circuits Lett. 2023, 6, 65–68. [Google Scholar] [CrossRef]
- Kosuge, A.; Kuroda, T. Proximity Wireless Communication Technologies: An Overview and Design Guidelines. IEEE Trans. Circuits Syst. Regul. Pap. 2022, 69, 4317–4330. [Google Scholar] [CrossRef]
- Shiba, K.; Okada, M.; Kosuge, A.; Hamada, M.; Kuroda, T. A 7-nm FinFET 1.2-TB/s/mm 2 3D-Stacked SRAM with an Inductive Coupling Interface Using Over-SRAM Coils and Manchester-Encoded Synchronous Transceivers. In Proceedings of the 2022 IEEE Hot Chips 34 Symposium (HCS), Cupertino, CA, USA, 21–23 August 2022; pp. 1–14. [Google Scholar]
- Tsuchiya, R.; Horiuchi, M.; Kimura, S.; Yamaoka, M.; Kawahara, T.; Maegawa, S.; Ipposhi, T.; Ohji, Y.; Matsuoka, H. Silicon on Thin BOX: A New Paradigm of the CMOSFET for Low-Power and High-Performance Application Featuring Wide-Range Back-Bias Control. In Proceedings of the IEEE International Electron Devices Meeting, San Francisco, CA, USA, 13–15 December 2004; pp. 631–634. [Google Scholar]
- Sayaka, T.; Takuya, K.; Hayate, O.; Kazusa, M.; Hideharu, A.; Ryuichi, S.; Masaaki, K.; Mitaro, N. A Preliminary Evaluation of Building Block Computing Systems. In Proceedings of the McSoC, Singapore, 1–4 October 2019; pp. 328–333. [Google Scholar]
- Yoshida, Y.; Nose, K.; Nakagawa, Y.; Noguchi, K.; Morita, Y.; Tago, M.; Kuroda, T.; Mizuno, M. Wireless DC voltage transmission using inductive-coupling channel for highly-parallel wafer-level testing. In Proceedings of the 2009 IEEE International Solid-State Circuits Conference-Digest of Technical Papers, San Francisco, CA, USA, 8–12 February 2009; pp. 470–471. [Google Scholar]
- Kadomoto, J.; Miura, T.; Amano, H.; Kuroda, T. An Inductive-Coupling Bus with Collision Detection Scheme Using Magnetic Field Variation for 3-D Network-on-Chips. In Proceedings of the 2016 IEEE Asian Solid-State Circuits Conference (A-SSCC), Toyama, Japan, 7–9 November 2016; pp. 41–44. [Google Scholar]
- Miura, N.; Ishikuro, H.; Sakurai, T.; Kuroda, T. A 0.14pJ/b Inductive-Coupling Inter-Chip Data Transceiver with Digitally-Controlled Precise Pulse Shaping. In Proceedings of the IEEE International Solid-State Circuits Conference, San Francisco, CA, USA, 11–15 February 2007; pp. 358–608. [Google Scholar]
- Nomura, A.; Matsushita, Y.; Kadomoto, J.; Matsutani, H.; Kuroda, T.; Amano, H. Escalator Network for a 3D Chip Stack with Inductive Coupling ThruChip Interface. Int. J. Netw. Comput. 2018, 8, 124–139. [Google Scholar] [CrossRef] [PubMed][Green Version]
- Take, Y.; Matsutani, H.; Sasaki, D.; Koibuchi, M.; Kuroda, T.; Amano, H. 3-D NoC with Inductive-Coupling Links for Building-Block SiPs. IEEE Trans. Comput. 2012, 63, 748–763. [Google Scholar]
- Sakamoto, R.; Takata, R.; Ishii, J.; Kondo, M.; Nakamura, H.; Ohkubo, T.; Kojima, T.; Amano, H. The Design and Implementation of Scalable Deep Neural Network Accelerator Cores. In Proceedings of the IEEE 11th International Symposium on Embedded Multicore/Many-Core Systems-on-Chip (MCSoC-17), Seoul, Republic of Korea, 18–20 September 2017; pp. 13–20. [Google Scholar]
- Kojima, T.; Ando, N.; Okuhara, H.; Doan, N.A.V.; Amano, H. Body Bias Optimization for Variable PipelinedCGRA. In Proceedings of the Field-Programmable Logic and Applications (FPL), Ghent, Belgium, 4–8 September 2017; pp. 1–4. [Google Scholar]
- Terashima, S.; Kojima, T.; Okuhara, H.; Matsushita, Y.; Ando, N.; Namiki, M.; Amano, H. A Shared Memory Chip for Twin-Tower of Chips. In Proceedings of the 21th Workshop on Synthesis And System Integration of Mixed Information Technologies (SASIMI2018), Matsue, Japan, 26–27 March 2018; pp. 353–358. [Google Scholar]
- Tokusashi, Y.; Matsutani, H. A Multilevel NOSQL Cache Design Combining In-NIC and In-Kernel Caches. In Proceedings of the IEEE International Symposium on High Performance Interconnects, Santa Clara, CA, USA, 24–26 August 2016; pp. 60–67. [Google Scholar]
- Kayashima, H.; Kojima, T.; Okuhara, H.; Shidei, T.; Amano, H. Real Chip Performance Evaluation on Through Chip Interface IP for Renesas SOTB 65nm Process. In Proceedings of the 2019 Seventh International Symposium on Computing and Networking Workshops (CANDARW), Nagasaki, Japan, 26–29 November 2019; pp. 269–274. [Google Scholar]
- Ershov, M.; Cadjan, M.; Feinberg, Y.; Jochum, T.; Ruth, S.; Etherton, M. P2P and Rmap—New software tool for quick and easy verification of power nets. In Proceedings of the 2015 37th Electrical Overstress/Electrostatic Discharge Symposium, Reno, NV, USA, 27 September–2 October 2015; pp. 1–8. [Google Scholar]
Disclaimer/Publisher’s Note: The statements, opinions and data contained in all publications are solely those of the individual author(s) and contributor(s) and not of MDPI and/or the editor(s). MDPI and/or the editor(s) disclaim responsibility for any injury to people or property resulting from any ideas, methods, instructions or products referred to in the content. |
© 2023 by the authors. Licensee MDPI, Basel, Switzerland. This article is an open access article distributed under the terms and conditions of the Creative Commons Attribution (CC BY) license (https://creativecommons.org/licenses/by/4.0/).

