Article

Effect of Interlayer Thickness on Nano-Multilayer Coating Performance during High Speed Dry Milling of H13 Tool Steel

1
Department of Mechanical Engineering, McMaster University, 1280 Main St. West, Hamilton, ON L8S4L7, Canada
2
Applied Physics Research Laboratory, Kobe Steel Ltd., 1-5-5 Takatsuda-dai, Nishi-ku, Kobe, Hyogo 651-2271, Japan
*
Author to whom correspondence should be addressed.
Coatings 2019, 9(11), 737; https://doi.org/10.3390/coatings9110737
Submission received: 2 October 2019 / Revised: 3 November 2019 / Accepted: 5 November 2019 / Published: 6 November 2019
(This article belongs to the Section Surface Characterization, Deposition and Modification)

Abstract

:
The TiAlCrSiYN-based family of physical vapor deposition (PVD) coatings were systematically designed through the incorporation of TiAlCrN interlayer to increase coating adhesion and consequently the tool life for extreme conditions that arise during dry high-speed milling of hardened tool steels. The investigation in the present paper intends to explain the effect of TiAlCrN interlayer thickness on the overall coating properties and cutting performance. A comprehensive characterization of the structure and properties of the coatings has been performed using focused ion beam (FIB), scanning electron microscope (SEM), X-ray powder diffraction (XRD), nanoindentation, ramped load scratch test, repetitive load wear test, and nano-impact test. The wear test at a subcritical load of 1.5 N showed that there was a gradual improvement in coating adhesion to the substrate as the interlayer thickness increased from 100 to 500 nm. However, the wear performance, being related to the ability of the coating layer to exhibit minimal surface damage under operation, was found to be associated with micro-mechanical characteristics (such as hardness, elastic modulus). Around a 40% increase in the cutting performance with 300 nm interlayer exhibited that a substantial increase in tool life can be achieved through interlayer thickness variation, by obtaining a balance between mechanical and tribological properties of the studied coatings.

1. Introduction

Over the years, concepts such as high speed machining [1] have been considered in an attempt to expand the application of milling of H13 tool steel (HRC 45-55) in their hardened state for dies and molds. This process benefits material removal rates, lead times, cutting forces, part precision, and surface finishes [2] during machining. However, excessive tool wear poses a major concern [3,4] due to poor low cycle fatigue performance [4,5] at these heavy loads/high temperatures during dry interrupted cutting [6]. Therefore, significant emphasis is put upon determining the best tool materials [3], machining strategies [7], and operating parameters [5] during H13 machining. An alternative approach is recommended to handle the corresponding situation by applying different physical vapor deposition (PVD) [8] coatings on the cutting tools.
In recent years, advancements in coating deposition techniques [9] enabled widespread usage of nano-crystalline PVD coatings such as TiAlN and AlTiN for the surface engineering of carbide tools used in alloy steel machining (42 HRC and over) [6]. This in turn enhances the protection of cutting tools from thermal and mechanical loads on the cutting zone. However, in a complex cutting environment such as interrupted cutting, the coating layer must achieve improved multi-functionality [10]. Thus, complex coatings with nano-columnar and nano-laminated structures (i.e., multilayer coatings) [11] were introduced to significantly improve the multi-functionality of the coating layer. This is accomplished by reducing the brittleness of hard coatings [12], and at the same time providing simultaneous frictional energy accumulation from the resistance to severe plastic deformation and dissipation via crack deflection [13,14]. In their work, Hovsepian et al. [15] have shown that CrAlYN/CrN nano-scale multilayer coated end mills outperform a range of TiAlN based PVD coatings during dry high-speed machining of hardened steel. In addition, previous investigations showed that the increased number of nano-layer interfaces which serve as sites for crack deflection [16] could consequently improve the impact fatigue resistance of coatings evaluated through nano-impact fracture resistance [17]. At the same time, it is very important to obtain a balance in optimum compressive residual stress to prevent excessive chipping under operating conditions [18].
Furthermore, coating architecture could be improved by incorporating an interlayer [19] with a potential to improve the coating’s adhesion to the substrate. The high plasma density during the coating deposition process results in high energy ions which could lead to a superficial deterioration of cemented carbide substrate properties during deposition [20]. As a result, local adhesion could diminish. Conversely, deposition of these high kinetic energy ions favors their superficial diffusion into the Co rich binding materials, thus promoting better adhesion. Therefore, an interlayer is considered to benefit the coating structure if the combined effect improves coating adhesion. Previous works found in literature [21,22] largely focus on improving monolayer coating adhesion through the incorporation of an interlayer. However, introducing an interlayer into a multilayer coating [23] can make the whole system very complex. For instance, according to the result of a previous work displayed in Figure 1, the TiAlCrSiYN/TiAlCrN multilayer coating with a TiAlCrN interlayer was shown to have improved adhesion than the multilayer coating [23]. This property was successfully determined by a micro-scratch test in terms of crack propagation resistance (CPRs) [24].
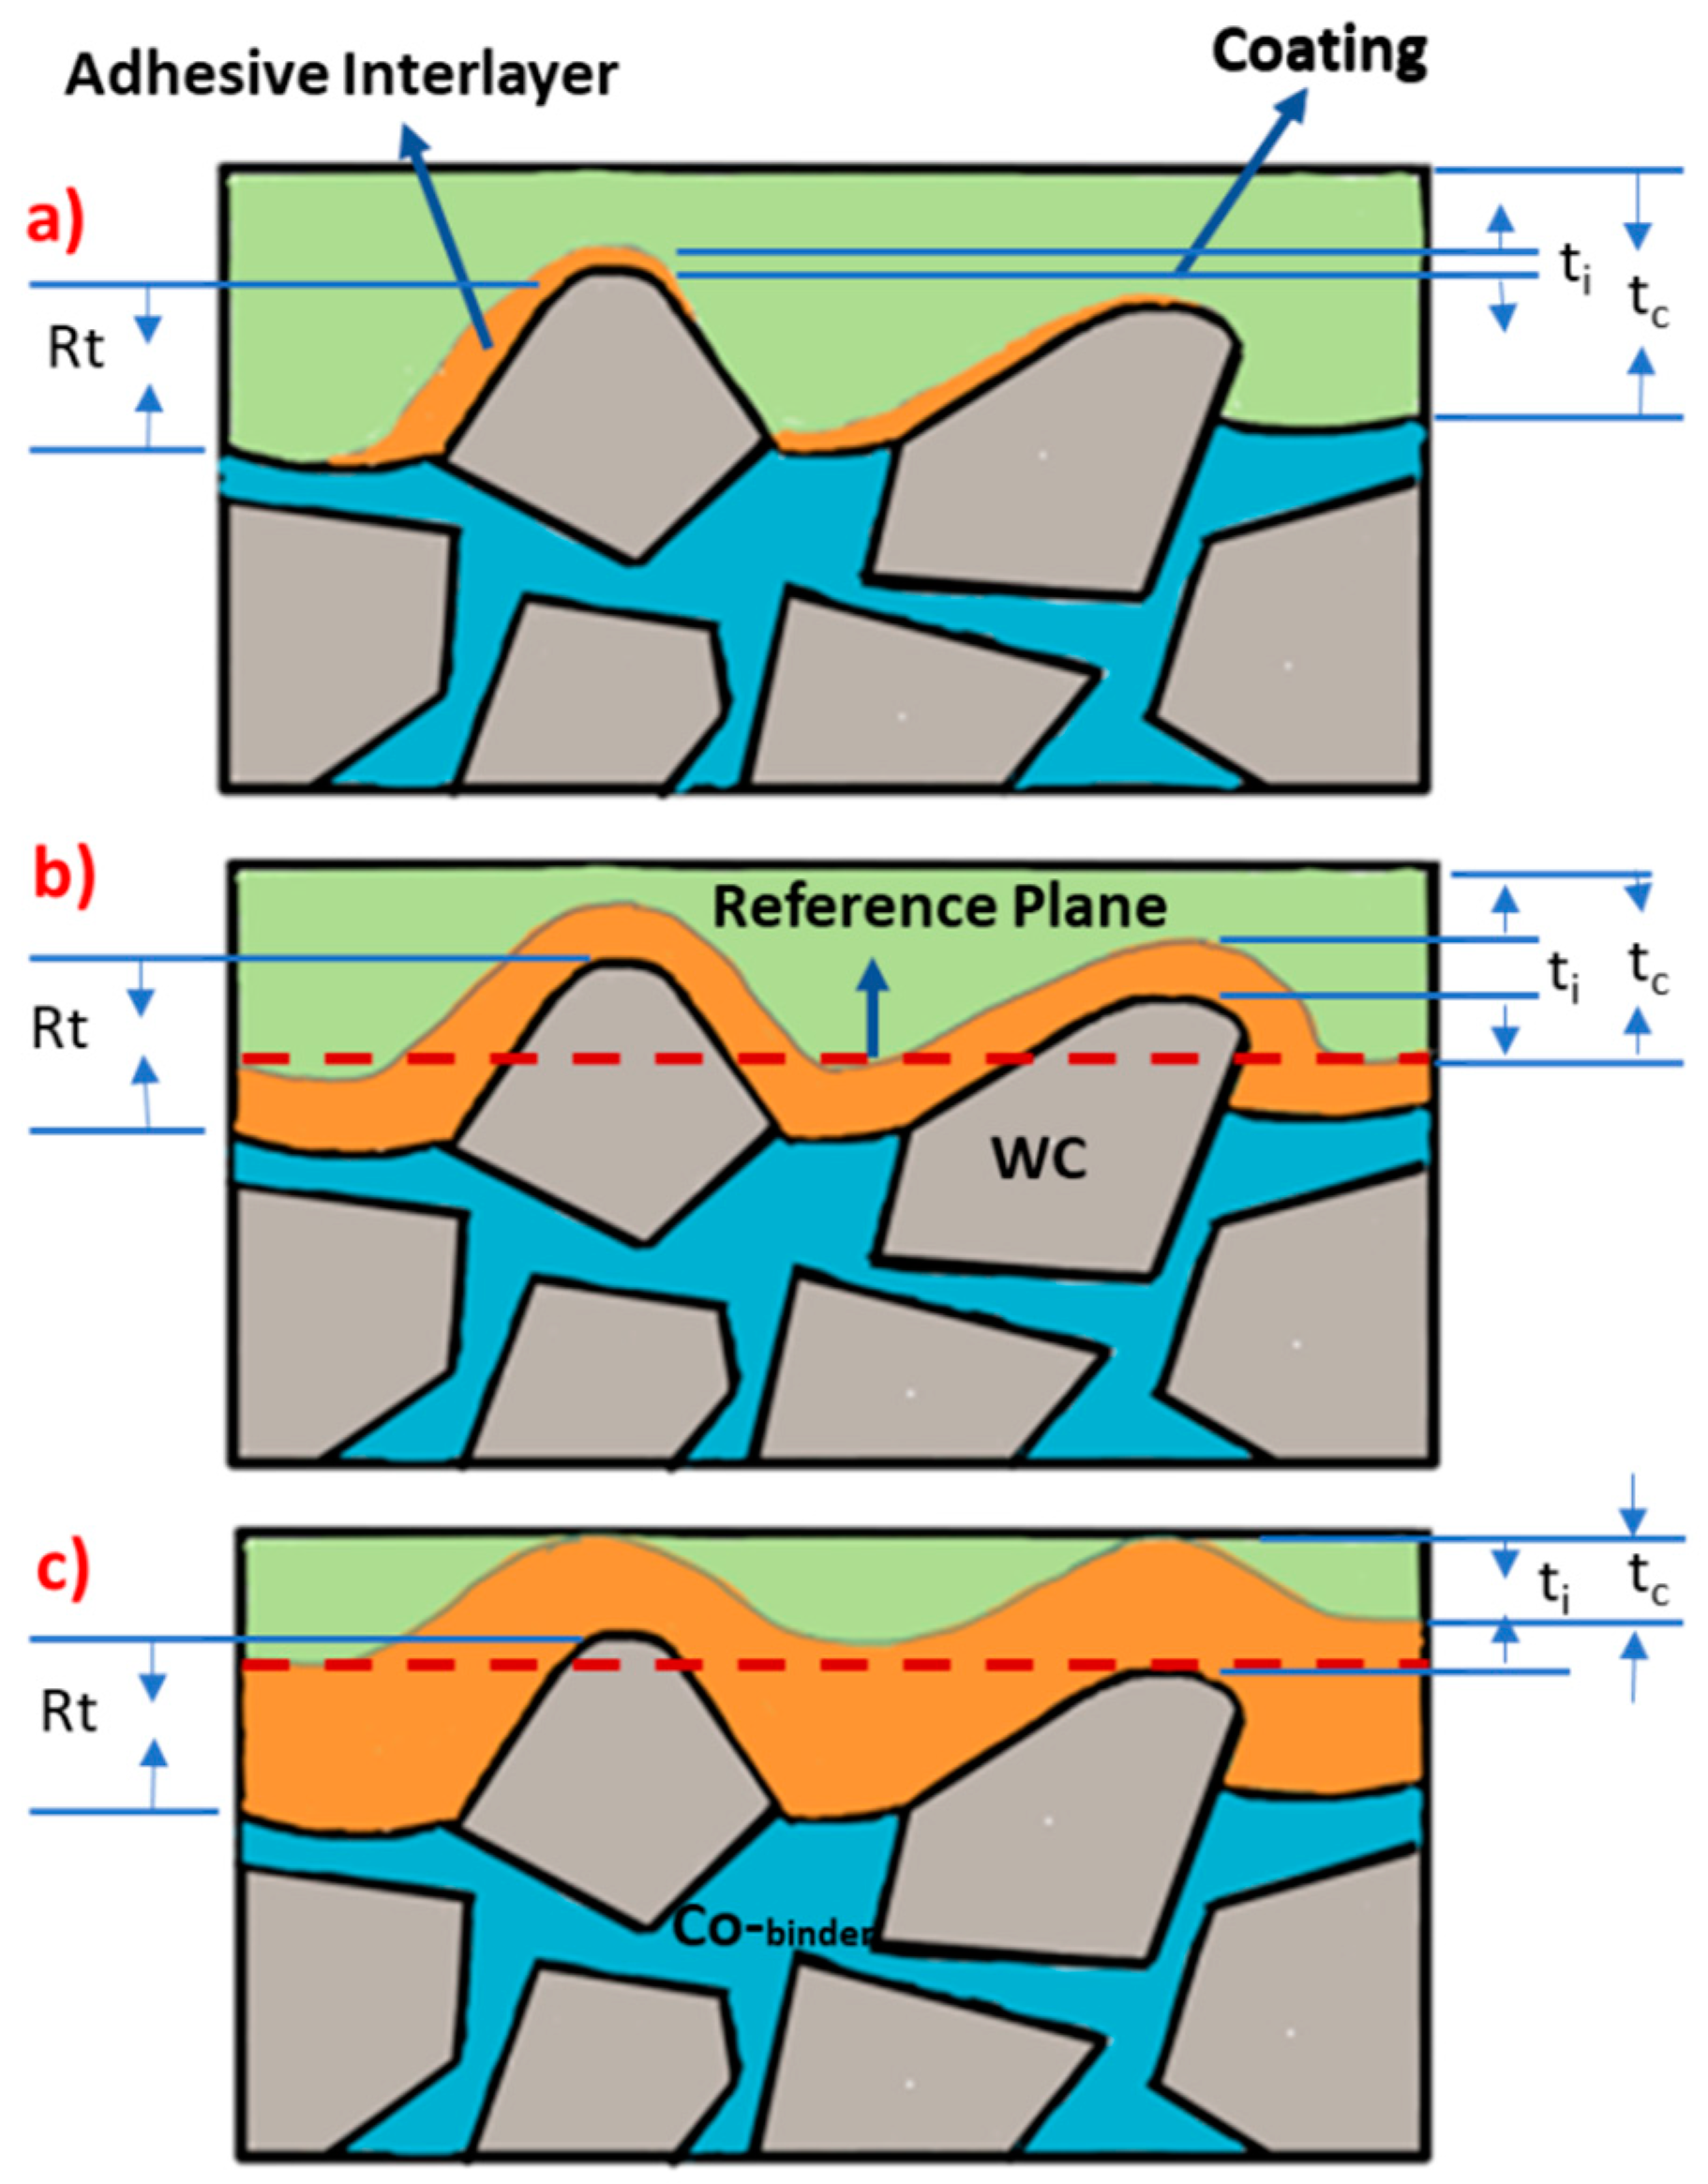
Moreover, recent research has shown that the thickness of the interlayer is equally crucial in achieving an overall coating structure strength and adhesion when adapted to the substrate roughness [25]. This could assure that the improved multifunctionality of the coating better serves the purpose of H13 dry milling. However, two opposing phenomena play an important role in deciding the thickness of the interlayer in a coating structure [22]. In the case of a very thin interlayer uncoated substrate regions may occur due to restricted substrate exposure to plasma flux caused by the reduction in deposition time as well as plasma flux shadowing effect. Thus, the coating deposited in these regions may possess a deteriorated adhesion as shown in Figure 2a. When the thickness of the interlayer is kept in the range of the substrate roughness Rt (Figure 2b), the average shear strain on the reference plane for an applied load is lower in comparison to the corresponding plane of a thicker interlayer. This is due to the fact that the reference plane in the first case includes both the coating and the substrate materials (Figure 2b), and thus contributes to a better shear stiffness on that plane. Again, as the adhesive interlayer thickness increases (Figure 2c), an interlayer fracture may develop due to the shear stress during operational load owing to the reduced mechanical properties of the interlayer.
Considering the aforementioned dependencies, the selection of nano-interlayer thickness has to be appropriate with regard to the substrate topography as well as the coatings’ overall mechanical and tribological properties. Therefore, the effect of TiAlCrN interlayer thickness on the overall coating properties was studied in this paper to optimize the coating performance in terms of its end application for high-speed H13 dry milling.

2. Experimental Details

2.1. Substrate Specification

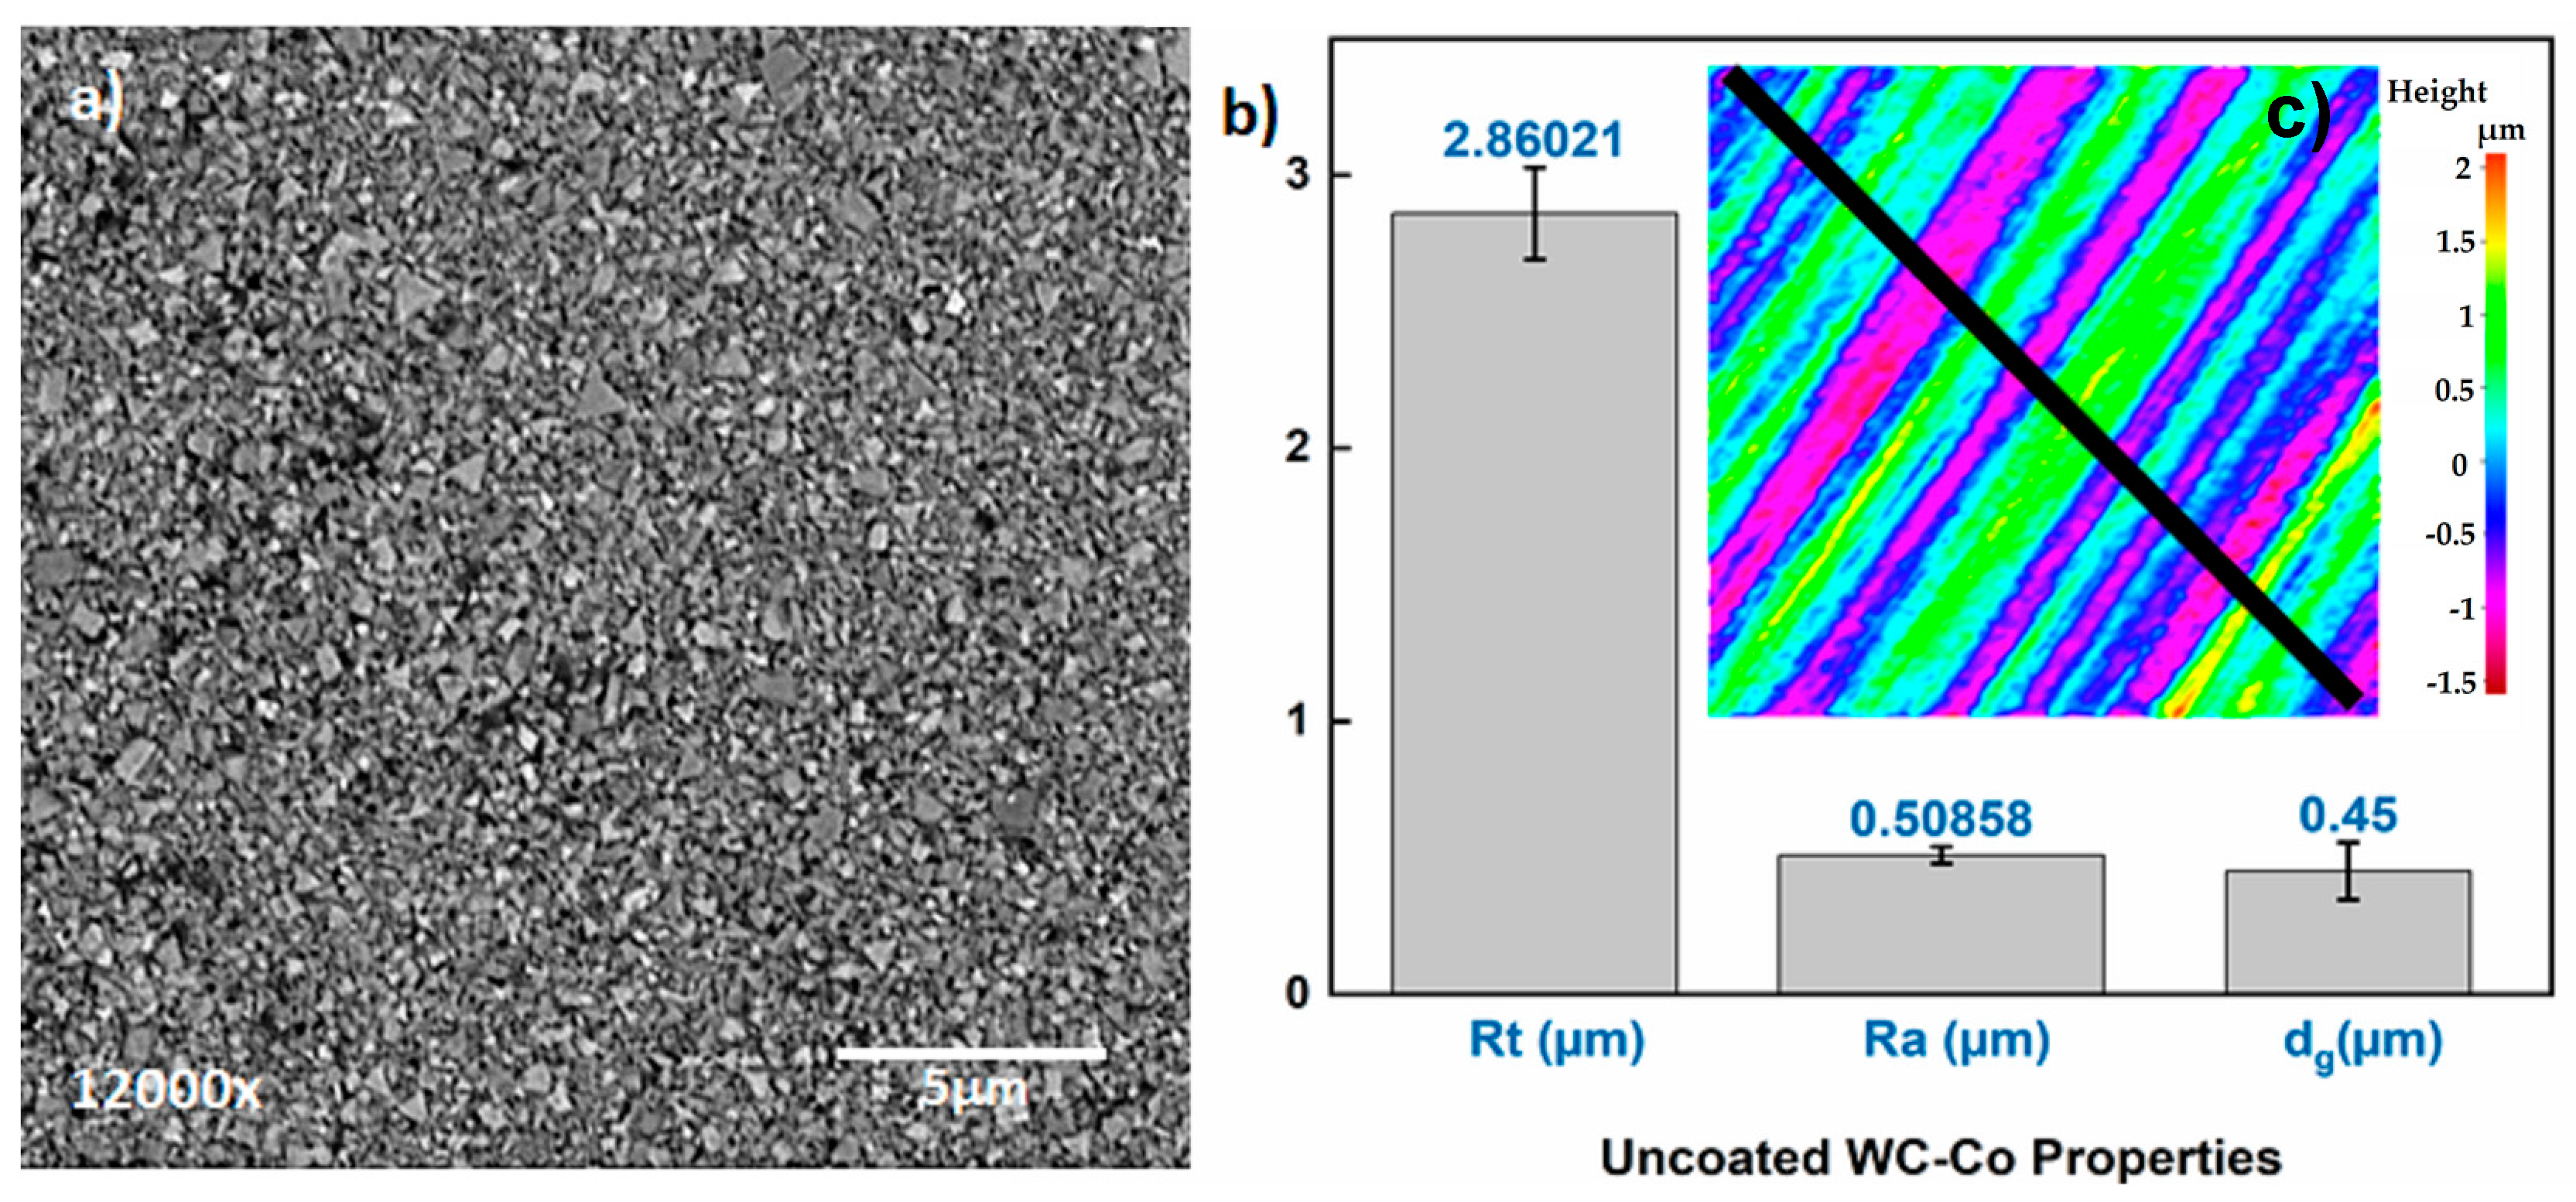
In this study, solid cemented carbide Mitsubishi ball nose end mill (type: C-2SB, 10 mm diameter and two flute) was chosen as the tool substrate. In Figure 3a, an SEM image with back-scattered electron (BSE) at 12,000× magnification exhibits the microstructure of the tool substrate (hardness HV 1950–2000) [26] with an average WC grain diameter dg (0.45 µm). Additionally, Figure 3b represents the surface profile of the tool substrate in terms of Rt (total height of the roughness profile) and Ra (arithmetical mean roughness value), which was measured by Alicona infinite focus at a roughness sampling length of 250 µm.

2.2. Coating Deposition

The interlayer (TiAlCrN) was included into nano-multilayered TiAlCrSiYN/TiAlCrN coating that has an architecture with modulating chemical composition but similar crystal structure. The initial thickness of the interlayer [21] was selected to be less than one third of WC grains’ average diameter in the cemented carbide substrate. A further variation in interlayer thickness was considered by varying the duration of coating deposition to understand its effect on machining. Different interlayer thickness within TiAlCrSiYN-based multilayer coatings investigated in this study are presented in Table 1.
Ti0.2Al0.55Cr0.2Si0.03Y0.02 and Ti0.25Al0.65Cr0.1 targets fabricated by a powdered metallurgical process were used for the deposition of a nano-multilayer Ti0.2Al0.55Cr0.2Si0.03Y0.02N/Ti0.25Al0.65Cr0.1N coating and an interlayer Ti0.25Al0.65Cr0.1N of different thickness using a cathodic arc source. Coatings were deposited in an R&D-type hybrid PVD coater (AIP-SS002, Kobe Steel Ltd., Kobe, Japan) where samples were heated up to about 500 °C and cleaned through an Ar ion etching process at a pressure of 1.33 Pa and a bias of 400 V for 7.5 min. N2 gas was fed into the chamber at a pressure of 4 Pa. The arc source was operated at 150 A for a 100 mm diameter × 16 mm thick target. The rotation speed of the substrate holder was 5 rpm and the substrate bias was fixed at 150 V for all the depositions.

2.3. Determination of Micro-Mechanical Properties of Coatings

The crystal structure and preferred orientation of the coatings were determined with X-ray diffraction (XRD, Rigaku ULTIMA-PC, Rigaku, Tokyo, Japan) using Cu Kα radiation. The residual stress was assessed by means of a conventional X-ray diffractometer, using the multiple hkl method [27,28]. In this method, Cu Kα radiation beam with glancing incidence angle of 5.0° was used, combined with a parallel beam geometry.
Nano-indentations on coatings were performed using a P-3 Micro Materials NanoTest system (Platform-3, Micro Materials Ltd., Wrexham, UK) in a load-controlled mode with a Berkovich diamond indenter. Initially a multiple load cycle experiment (depth profiling) with an increasing load from 5 to 100 mN was carried out to evaluate the depth dependent hardness variation within the studied coatings as well as to determine the appropriate load that ensures the indentation contact depth to be less than 1/10 of the film thickness during static indentation. Thus, a coating-only (load-invariant) hardness could be measured in combination with coating-dominated elastic modulus. Five depth profiles with 20 cycles in each sample were conducted at a loading rate of 25 mN/s with 50% unloading at each cycle of a particular indentation. Following this step, 40 indentation tests were performed on each coating at a peak load of 40 mN to diminish any effect of surface roughness on the data.
Ramped load micro-scratch testing to a peak load of 5 N was performed with an Anton Paar Revetest Micro Scratch Tester (Anton Paar, Peseux, Switzerland) using a 3-scan procedure with a 20 μm radius diamond probe to increase the sensitivity of the test to interfacial adhesion [29]. Three sequential scans were involved in this procedure, topography-scratch-topography at 0.78 mm/min: (i) a pre scan at low load (0.5 N) over a 500 μm track; (ii) a progressive load scratch: the load was ramped at a constant rate of 7.02 N/min until 5 N was reached just before the end of the scan; and (iii) a post-scan, at the same low load as the pre-scan. The scans were performed in the same direction and at least 3 scratch tests were carried out on each sample, with neighboring tracks separated by 200 μm. Depending on the results obtained from the ramped load scratch tests, a subcritical load of 1.5 N (explained in Section 3.2) was selected for multi-pass constant load repetitive wear tests on a track of 1000 μm. In these 15-scan tests, the progression of wear was assessed by changes in the depth measured under load (the on-load wear depth).
The fatigue properties of the desired coatings were encountered through nano-impact testing at an ambient temperature with a cube corner indenter serving as an impact probe. The indenter was accelerated from 12 µm above the coating surface with 25 mN coil force corresponding to the impact energy of 300 nJ to produce an impact every 4 s for a total test duration of 400 s. Ten repeat tests were performed at different locations on each sample. The coatings’ nano-impact fatigue fracture resistance was assessed by the final measured impact depth and confirmed by microscopic analysis of impact craters.

2.4. Cutting Performance of Coated Tools

Cutting-tool life was studied under the conditions outlined in Table 2. At least three cutting tests were performed for each kind of coating under the corresponding conditions on a three-axis vertical milling center (Matsuura FX-5, Matsuura Machinery Corporation1-1, Fukui-City, Japan) to ensure repeatability. The scatter of the tool-life measurements was approximately 10%. Cutting tests were carried out on hardened AISI H13 tool steel workpiece having a hardness of HRC 53–55. The coated tool wear was measured using an optical microscope (Mitutoyo model TM, Mitutoyo Corporation, Kawasaki, Japan). Additionally, a tool dynamometer (9255B, Kistler, Winterthur, Switzerland) was used to measure the cutting forces.

3. Results and Discussion

3.1. Structural Analysis

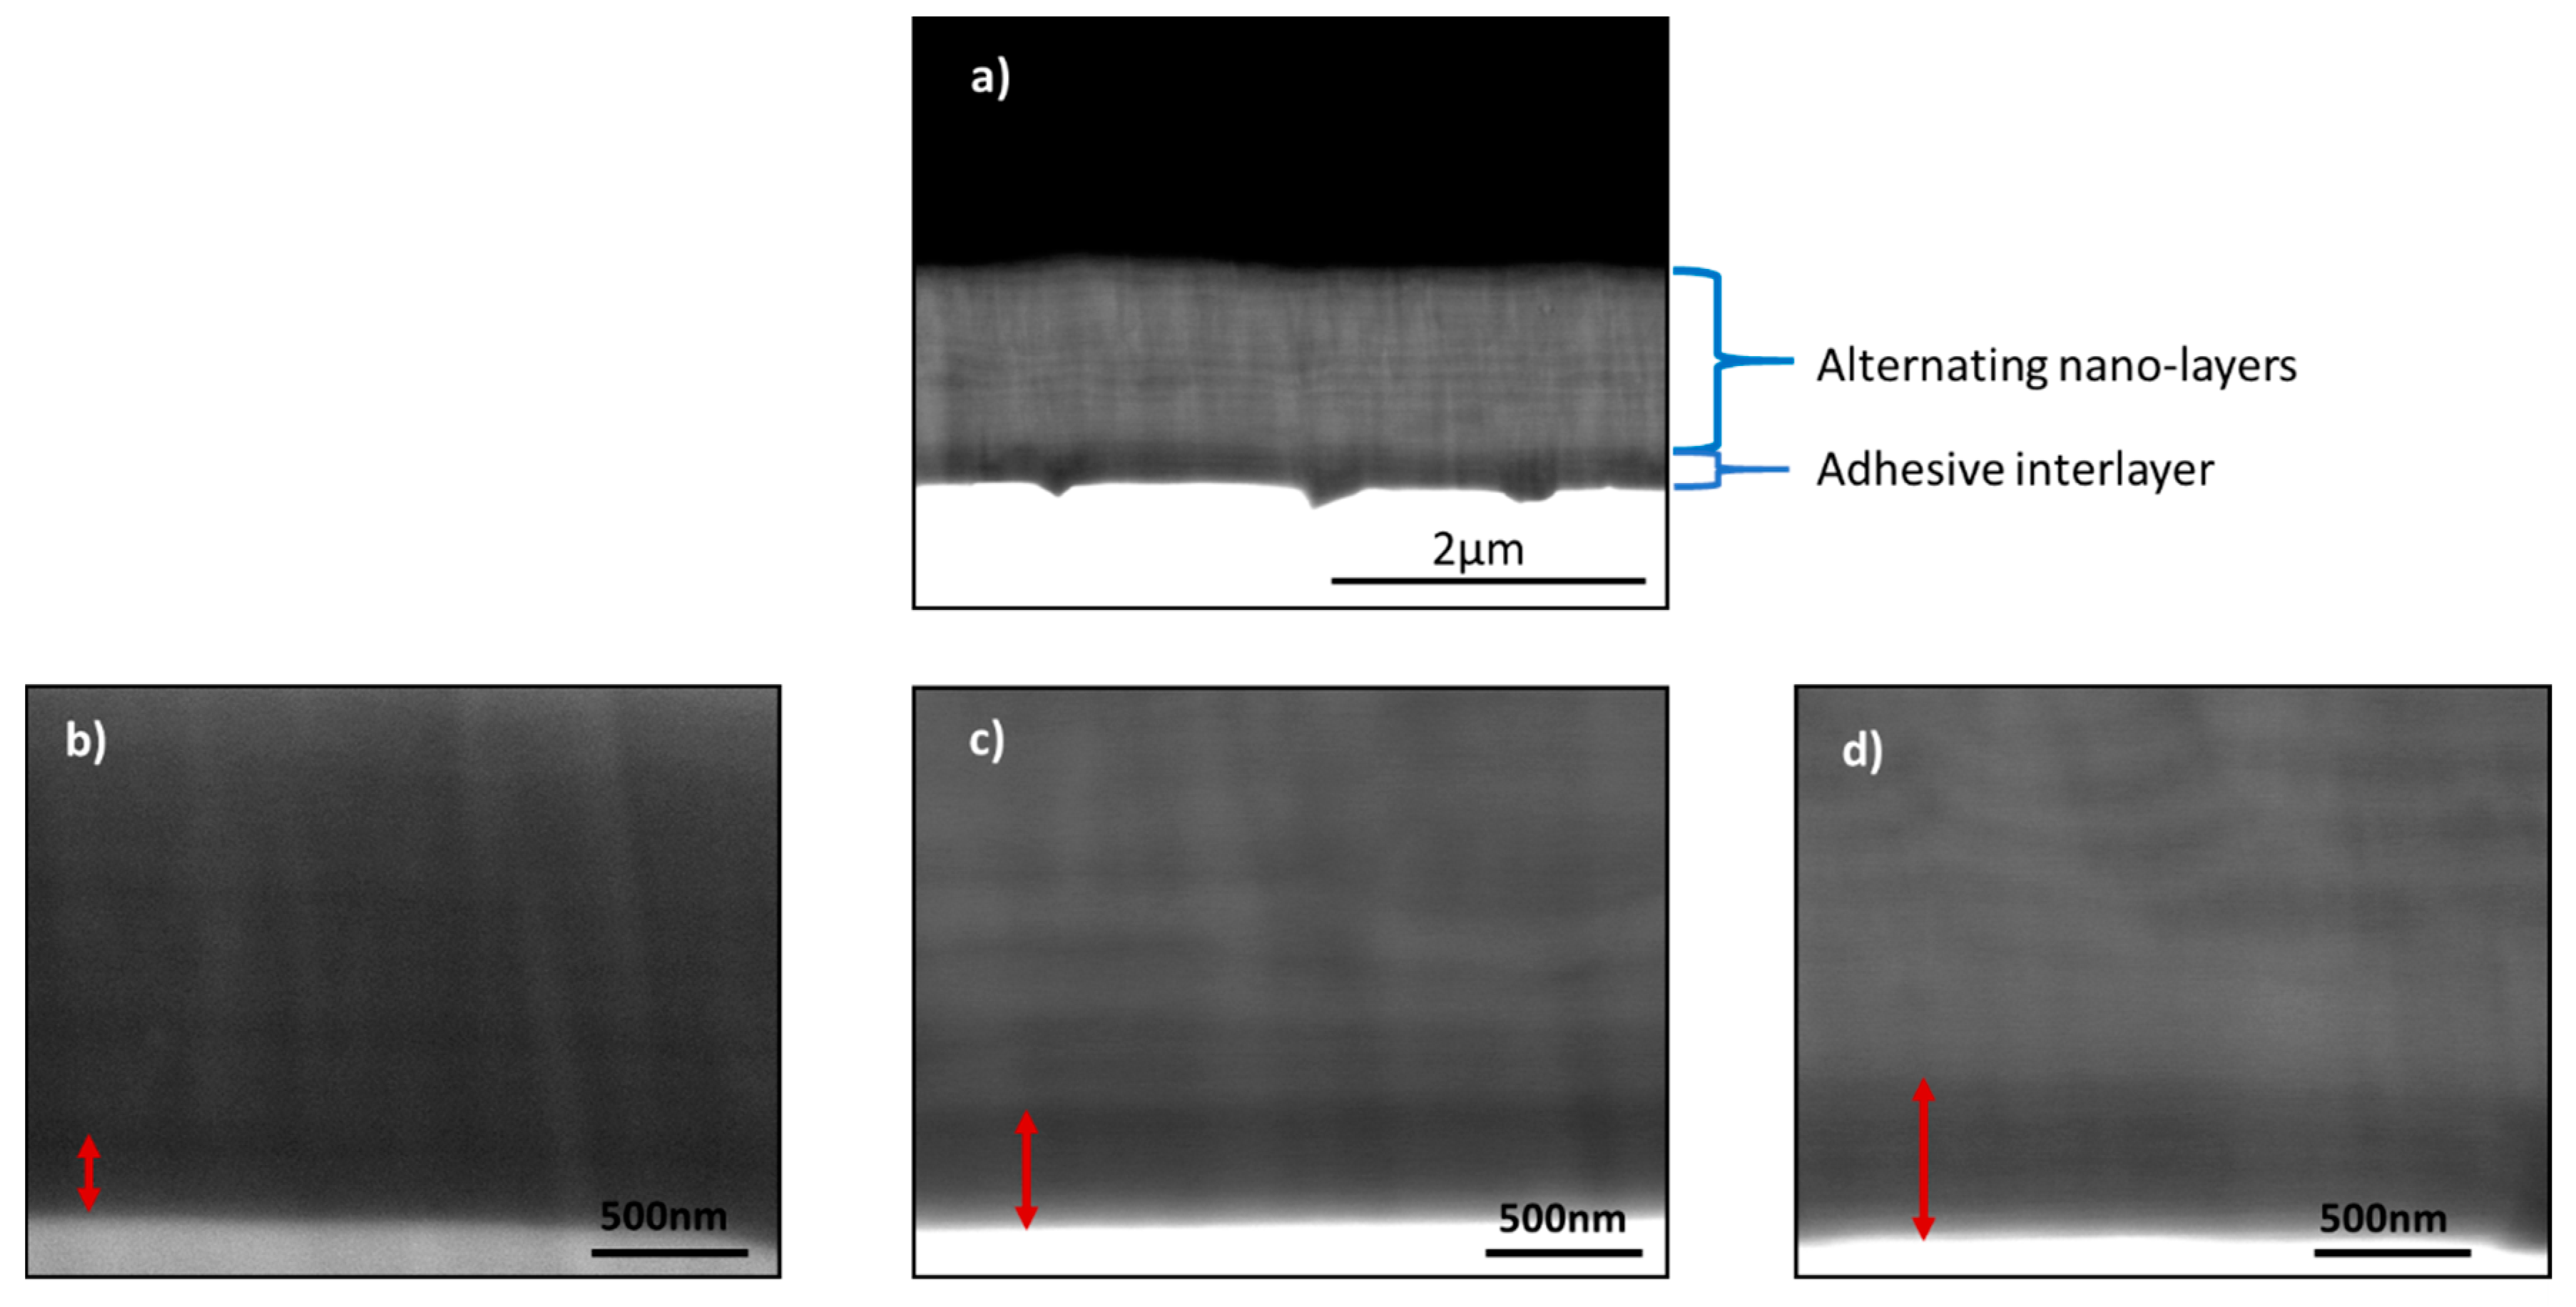
Comparative structural analysis of the nano-multilayer coatings with different interlayer thickness is presented in Figure 4. All nano-multilayered coatings have a columnar structure with alternating nano-layers of 20–40 nm [23] and the interlayer thicknesses are 100 nm (Figure 4a), 300 nm (Figure 4b), and 500 nm (Figure 4c). It was previously shown that the alternating nano-layers are TiAlCrSiYN and TiAlCrN [23].
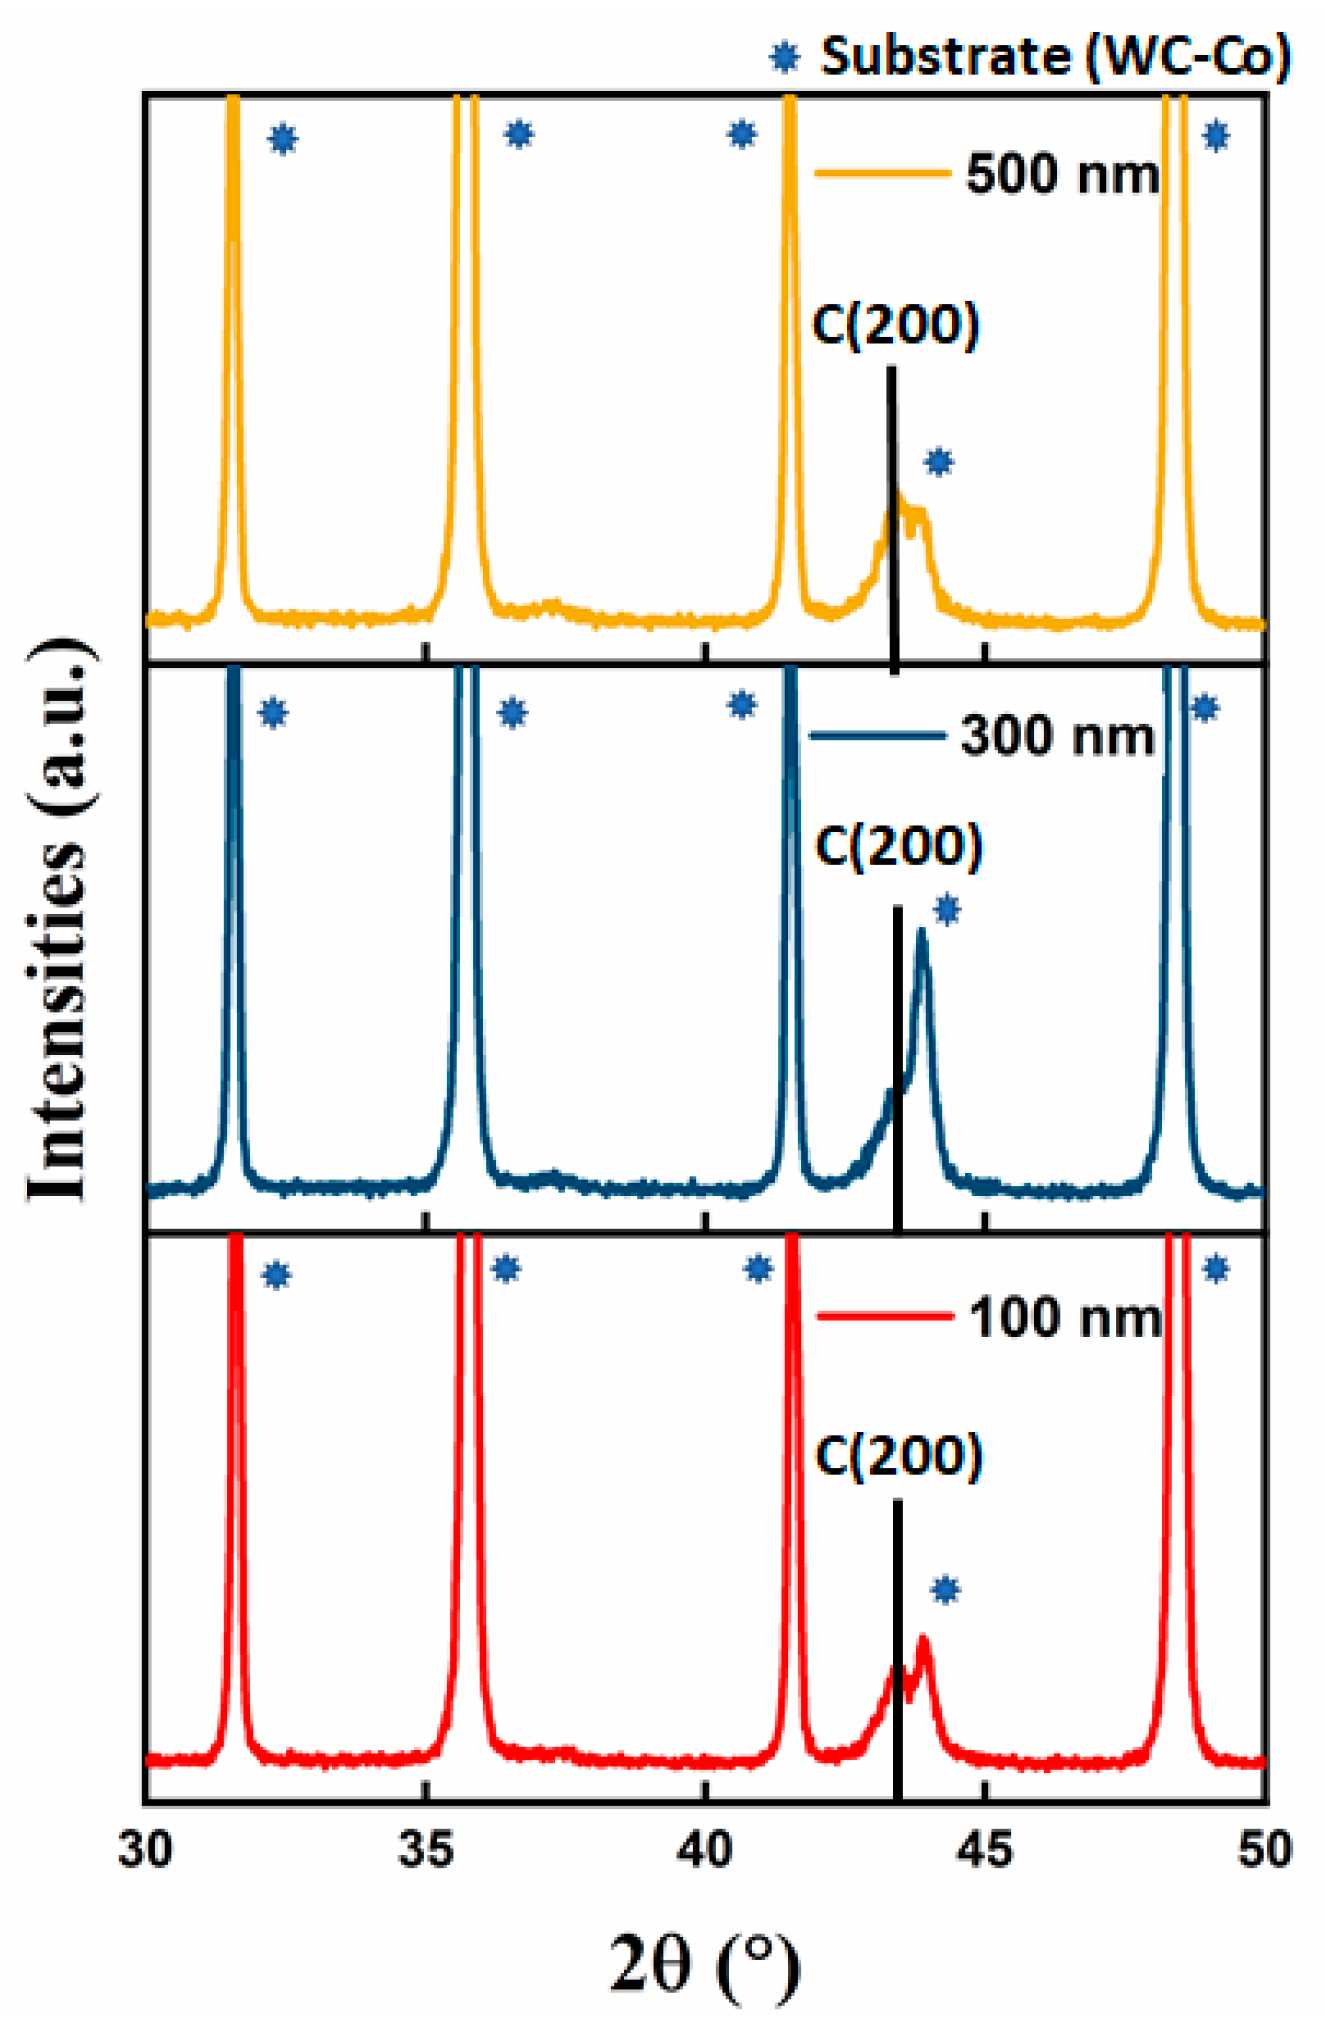
X-ray diffractograms of all the coatings studied are presented in Figure 5. It can be seen that all coatings exhibit a B1 crystal structure with the preferred orientation being C(200), which is a strong function of the substrate bias during coating deposition [30]. As previously seen, the introduction of TiAlCrN interlayer did not result in any evidence of microstructure changes such as peak position shifting and broadening [23]. No effect of the interlayer thickness on the diffraction peak intensity is observed in this study. Thus, the result indicates that the effect of TiAlCrN interlayer thickness variation on the microstructure of TiCrAlSiYN- based multilayer coatings is negligible. A similar kind of result was also observed elsewhere [19].

3.2. Micro-Mechanical Property Analysis

The residual stress in all the coatings are highly compressive as depicted in Table 3. For the coatings deposited under specified conditions, a similar range of residual stresses was observed elsewhere [31]. This high compressive residual stress is beneficial for avoiding excessive chipping of the cutting edge during the heavy loaded and high temperature conditions associated with dry milling.
The inclusion of Si and Y in TiAlCrN (Residual stress −5.65 ± 0.3 [19]) coating results in grain size refinement [32] and thus higher residual stress. Grain size refinement is also associated with the higher number of defects at the alternating nano-layer interface [33]. Hence, all multilayer coatings in this study possess a high compressive residual stress. It was previously observed that the incorporation of an interlayer within the coating [23] as well as an increase in overall coating thickness [34] can result in decreased compressive residual stress. The variation of residual stress with the coating thickness is related to the deposition time during the coating deposition process. Two opposing phenomenon decides the type and quantity of residual stress in the coating as such annealing at the temperature of the deposition process allows increase diffusion of atoms and thus relaxation of internal stress. On the other hand, the ion bombardment during the same process creates defects that diminish the diffusion kinetics and contribute to the internal stress. Thus, the factor playing the dominant role during coating deposition decides the type and quantity of residual stress. It is evident in the present study that the variation of interlayer thickness has a negligible effect on the overall residual stress of the coatings.
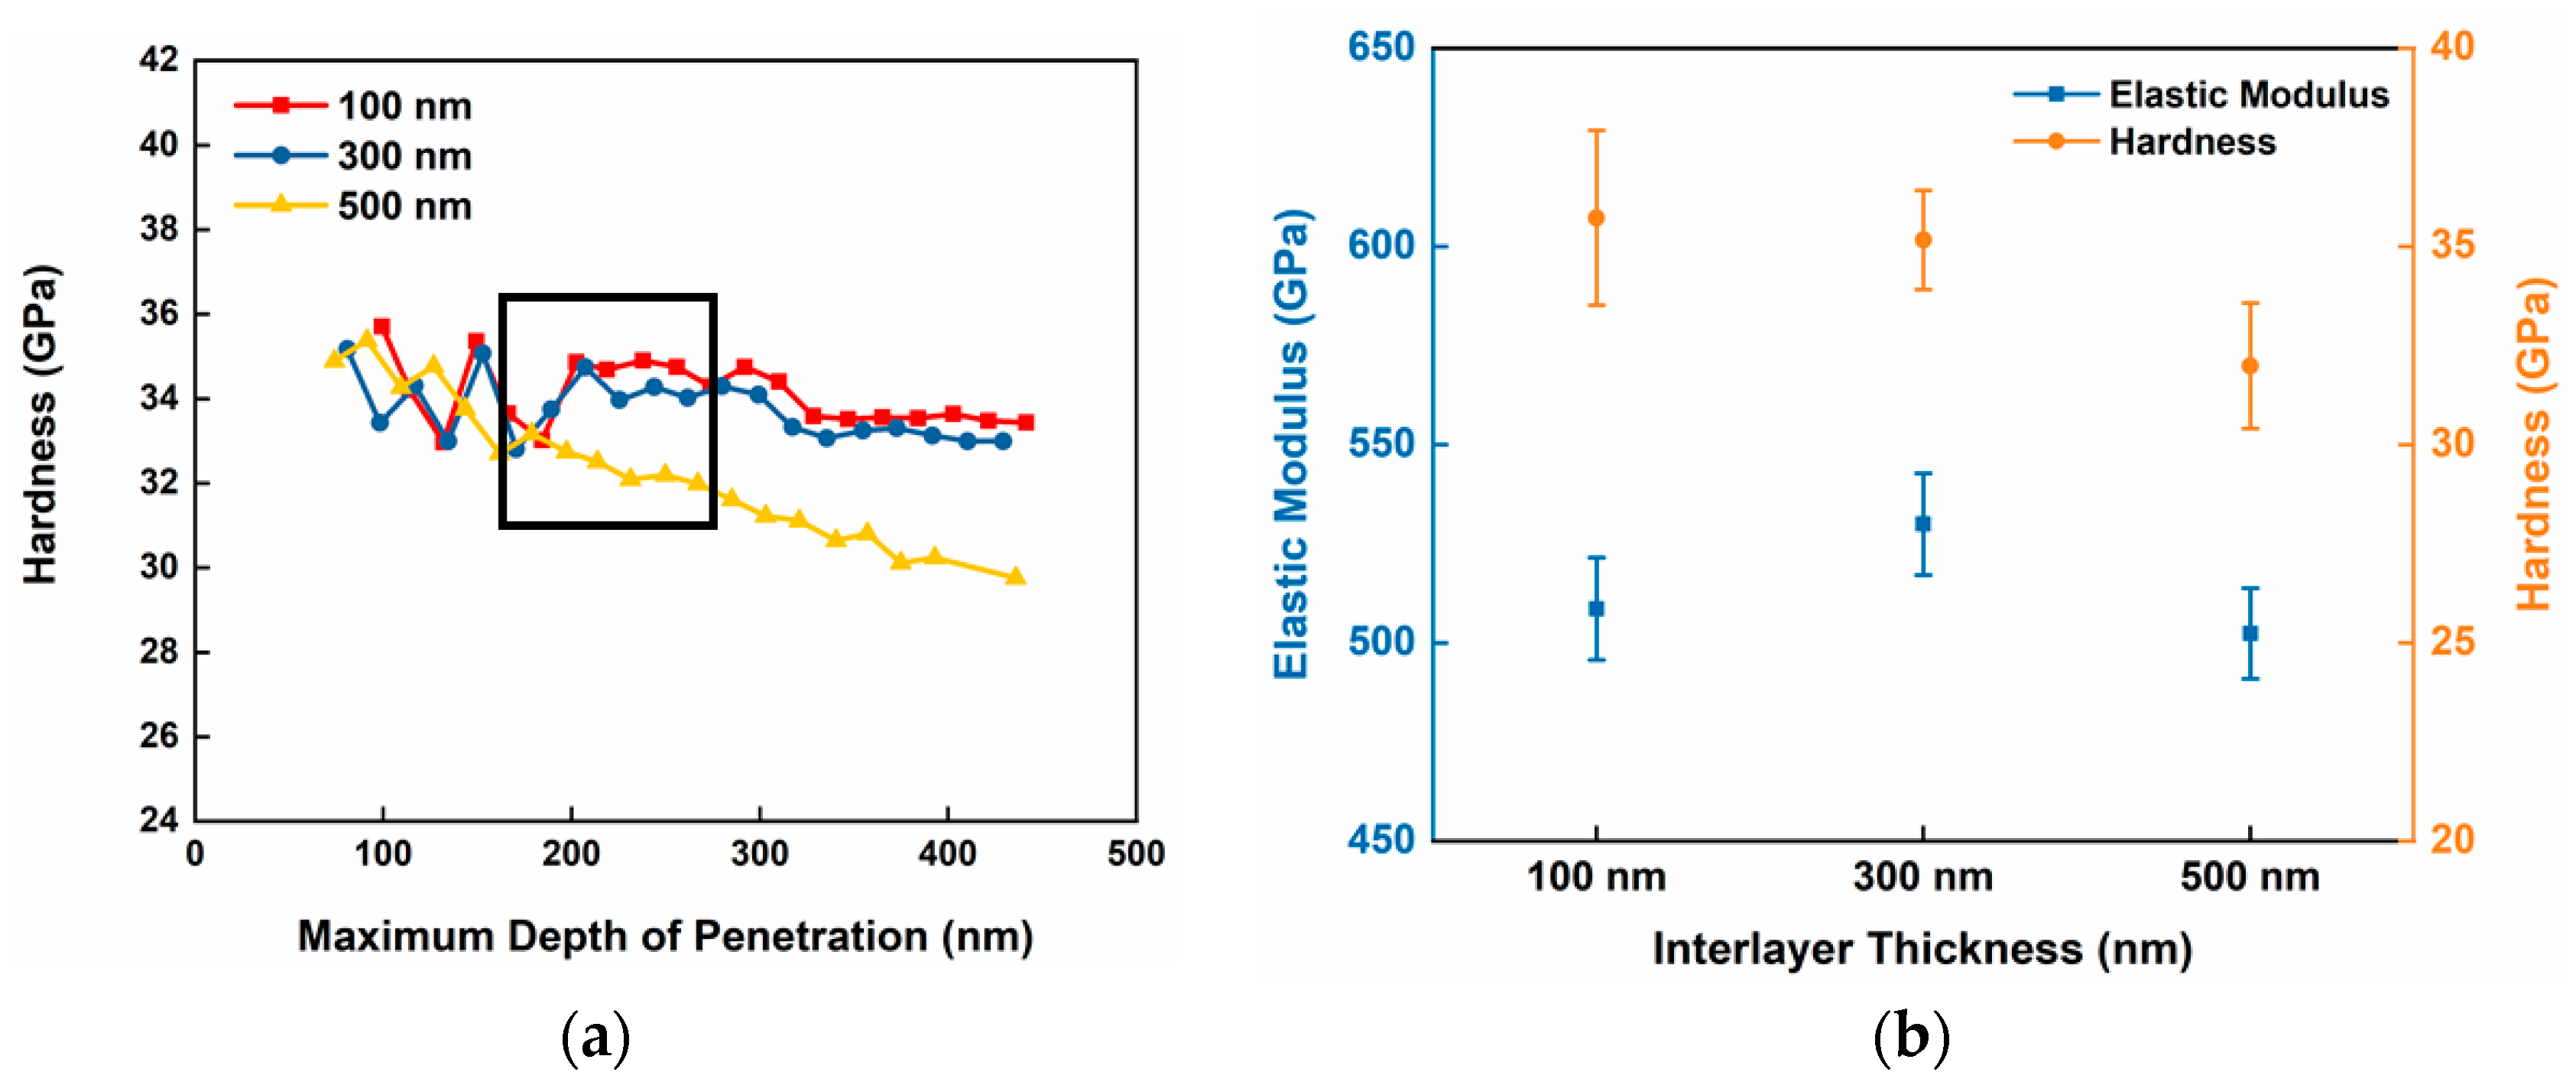
The depth dependent hardness of TiAlCrSiYN/TiAlCrN multilayer coatings with varying TiAlCrN interlayer thickness is shown in Figure 6a. Although the hardness of the coating systems at a lower penetration depth is similar, the multilayer coating with a 500 nm interlayer shows a steep decrease in its hardness value compared to the other two coatings at a penetration depth range of 200–300 nm. Static indentation hardness data in Figure 6b showed that the multilayer coating with a 500 nm interlayer has the lowest hardness of (31.99 ± 1.588) GPa. This gradual decrease in the hardness value, alongside increasing TiAlCrN interlayer thickness, can be attributed to the crucial role of the relatively soft TiAlCrN interlayer (25.9 ± 4.8 GPa [23]), in energy dissipation and cushioning, which accommodates plastic deformation during indentation testing. Hence, more significant cushioning activity is observed as the thickness of the TiAlCrN interlayer increases and the hardness of the coatings consequently decreases. In addition, a decrease in the hardness of multilayer coatings with similar elastic moduli (Figure 6b) resulted in the reduction of H3/E2 as TiAlCrN interlayer thickness increased, as shown in Table 4. H3/E2 parameter scales with greater load support (resistance to plastic deformation) [35], which indicates that a surface layer with better load support tends to be elastic for a longer period of time. The accompanying spatial localization of damage consequently mitigates the degradation of the structural and mechanical integrity of the entire surface engineered structure [36].
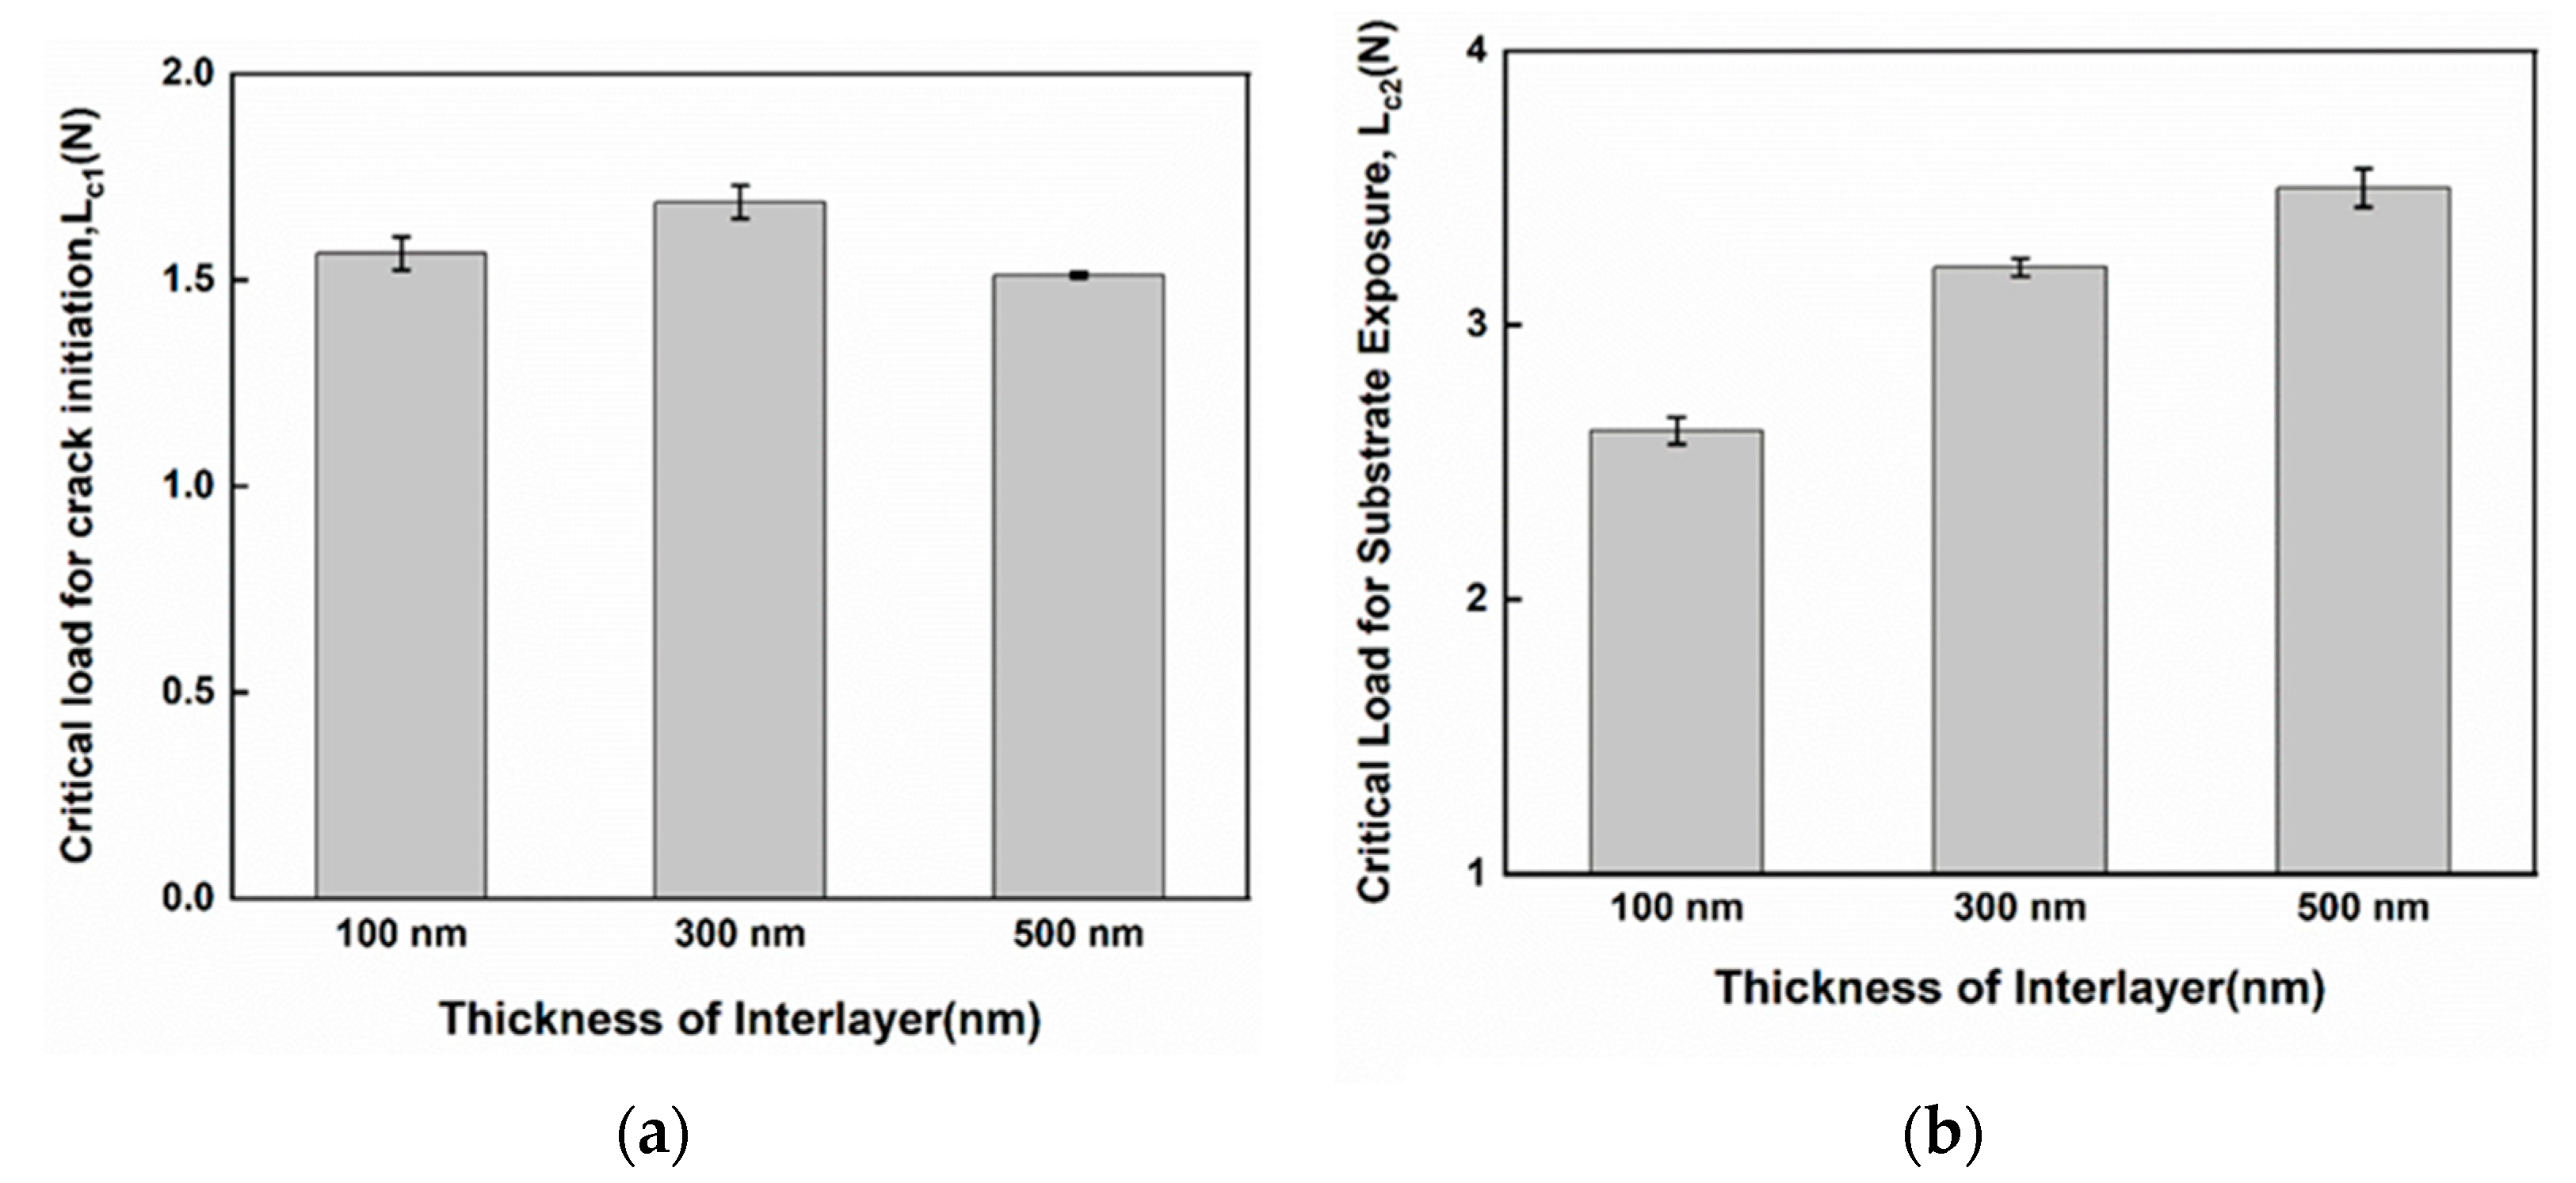
The ramped load micro-scratch test signifies two important characteristics: as load is increased to Lc1 there is an onset of cracking within the coating and a further increase of the load to Lc2 causes a well-defined failure event that represents coating detachment in front of the probe. It is shown in Figure 7a,b that the multilayer coating with a 300 nm interlayer has a slightly higher value of Lc1,whereas the coating with the 500 nm interlayer displays crack initiation at the lowest load of around 1.5 N among the coatings studied. Nonetheless, the load Lc2 at which the coatings undergo adhesive failure, shows an increasing trend from the 100 nm interlayer to the 500 nm interlayer. This kind of critical load data from ramped load micro-scratch tests have been previously reported elsewhere [37]. Additionally, Figure 8a–c presents the microscopic images of the scratch track, which is the same for all the coatings studied, suggesting a brittle fracture dominated process. In the process, arc tensile cracks opening in the direction of the scratch (Figure 8a), are formed behind the scratch probe. These tensile cracks are then followed by coating chipping that extends laterally from the edges of the scratch groove. This kind of failure has been previously observed for hard coatings (Figure 8b) on a hard substrate (cemented carbide) [38].
Previous works have shown that there is a correlation between the scratch test critical load Lc2 and the mechanical properties of the coatings, essentially hardness and the ratio of hardness to elasticity (H/E) [39,40]. The nano-indentation data in Figure 6b, shows that at room temperature, the multilayer coating with a 500 nm interlayer has the lowest hardness with elastic modulus of (502.35 ± 11.42092) GPa, which results in the lowest H/E ratio for this coating. Hence, in the case of brittle fracture failure of the coating in the scratch test, multilayer coating with the 500 nm interlayer having lower H/E (Table 4) can function better due to improved ductility with increased critical load Lc2.
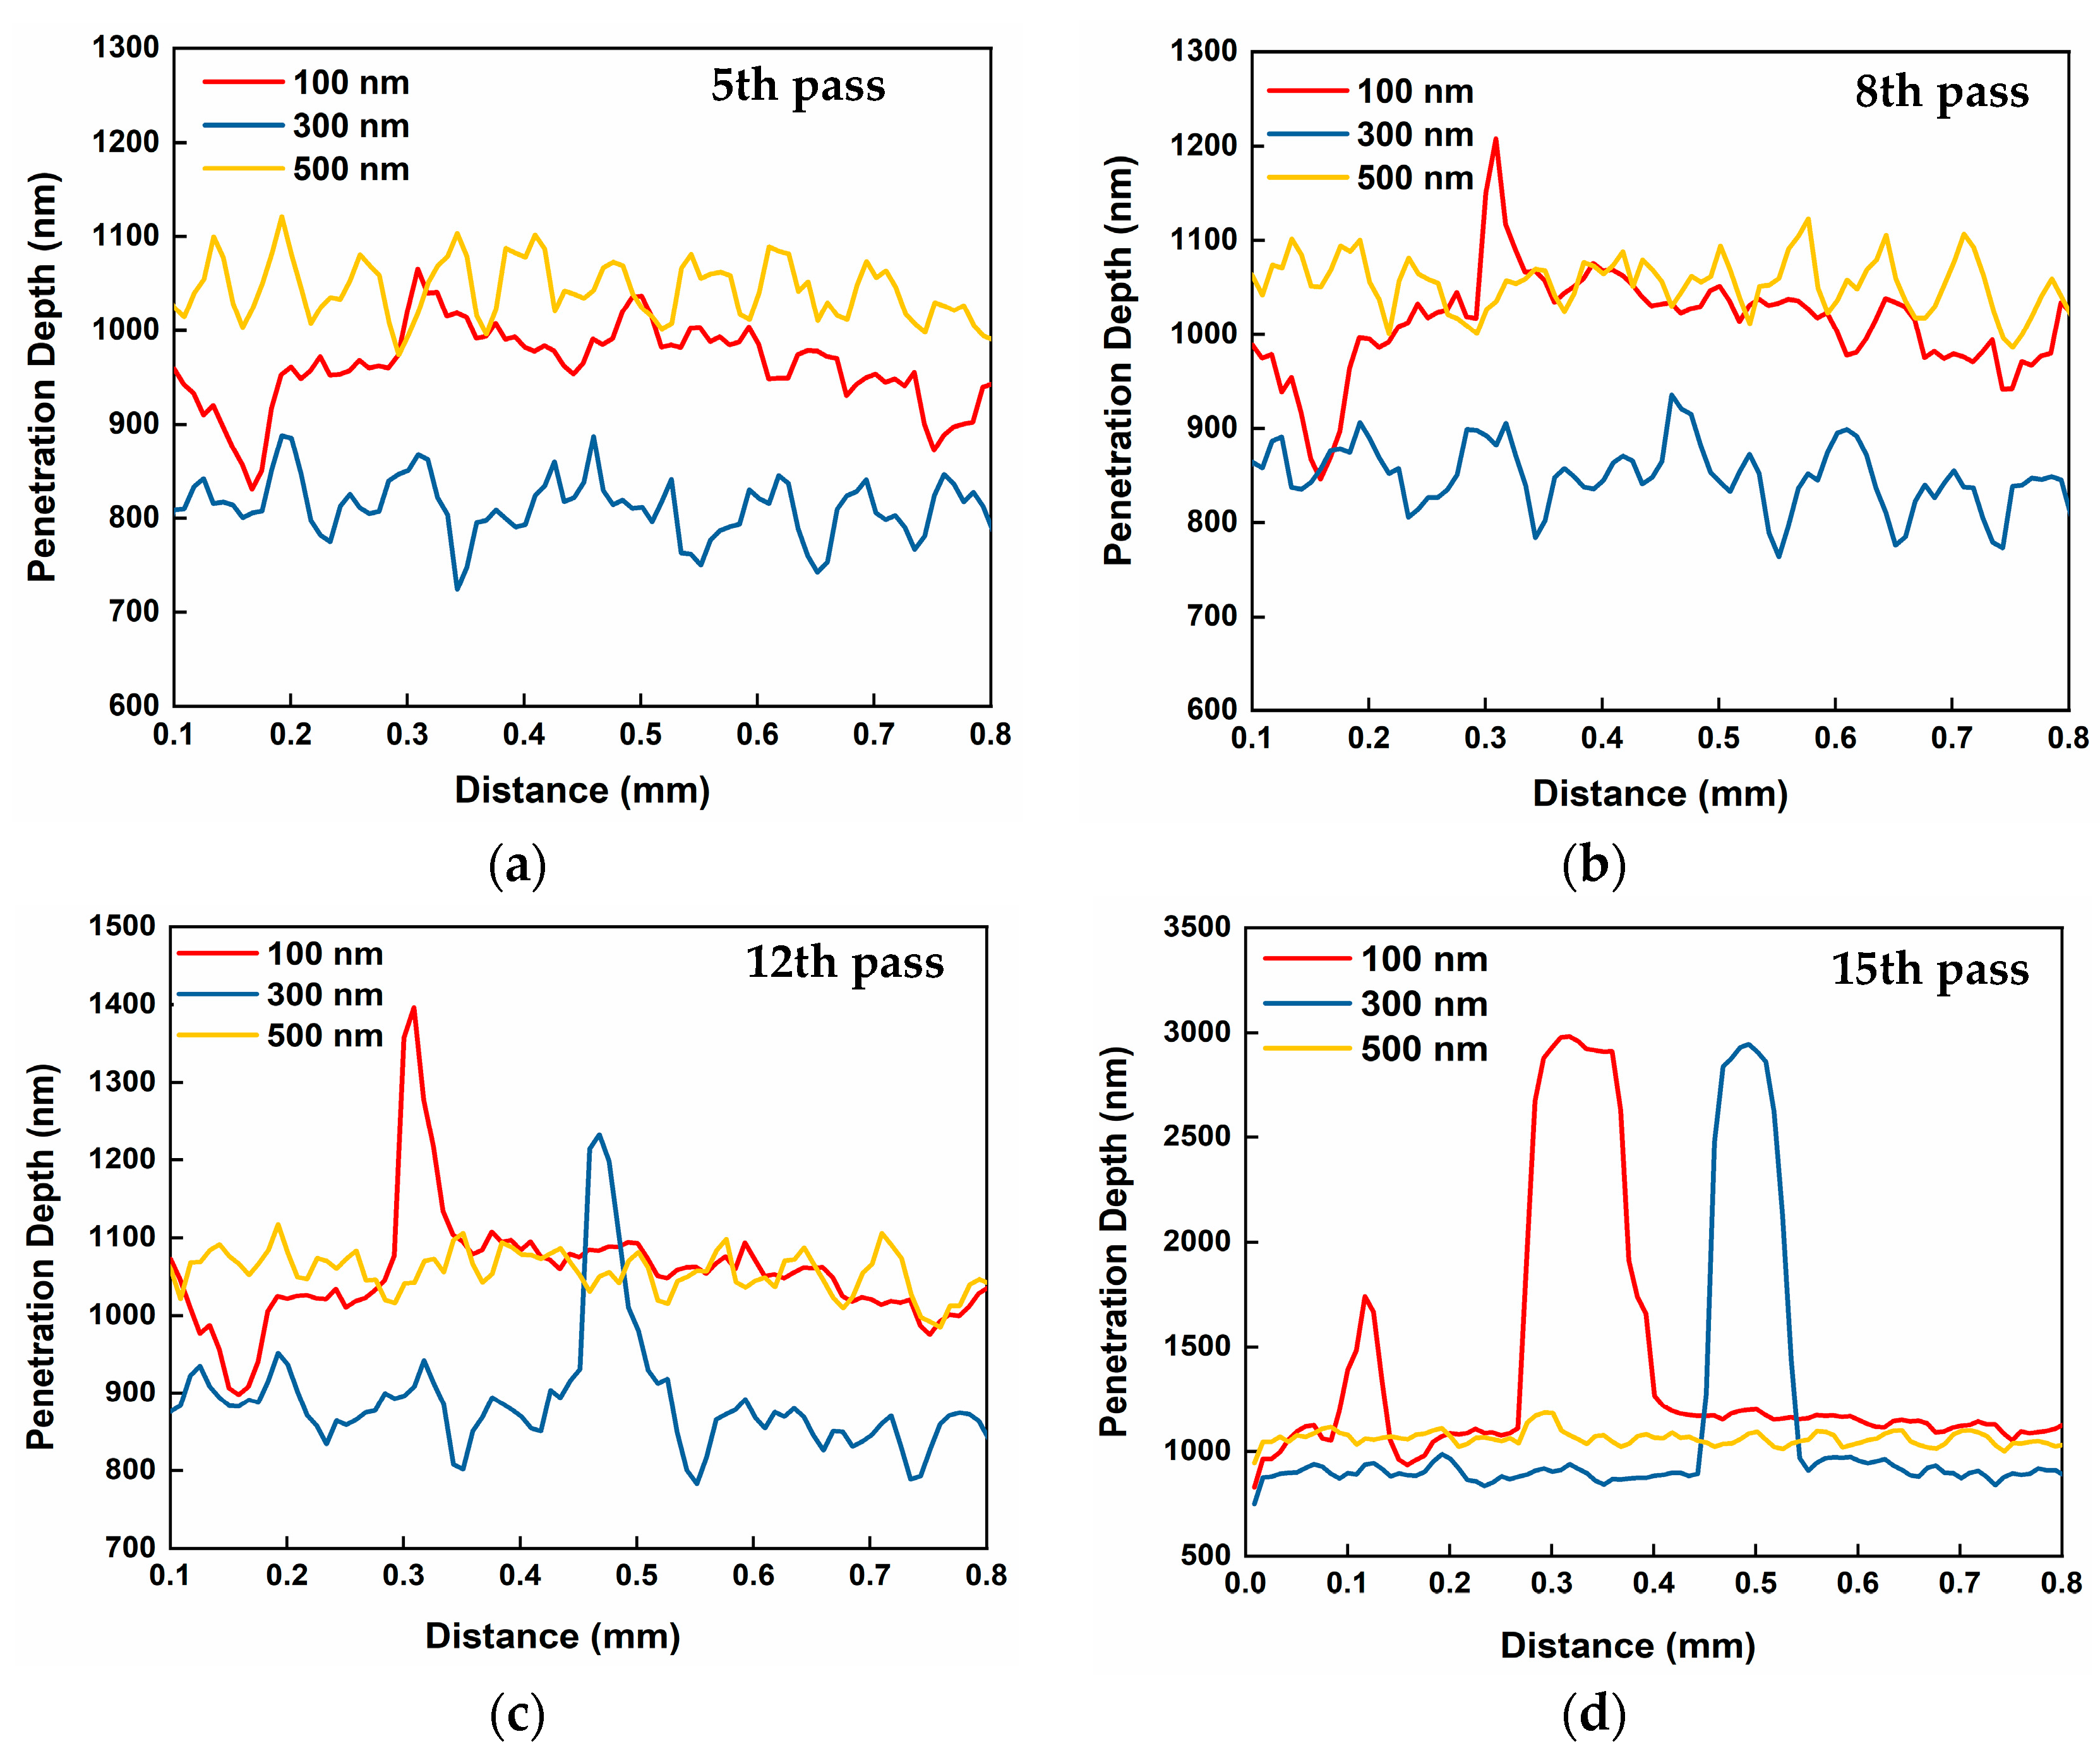
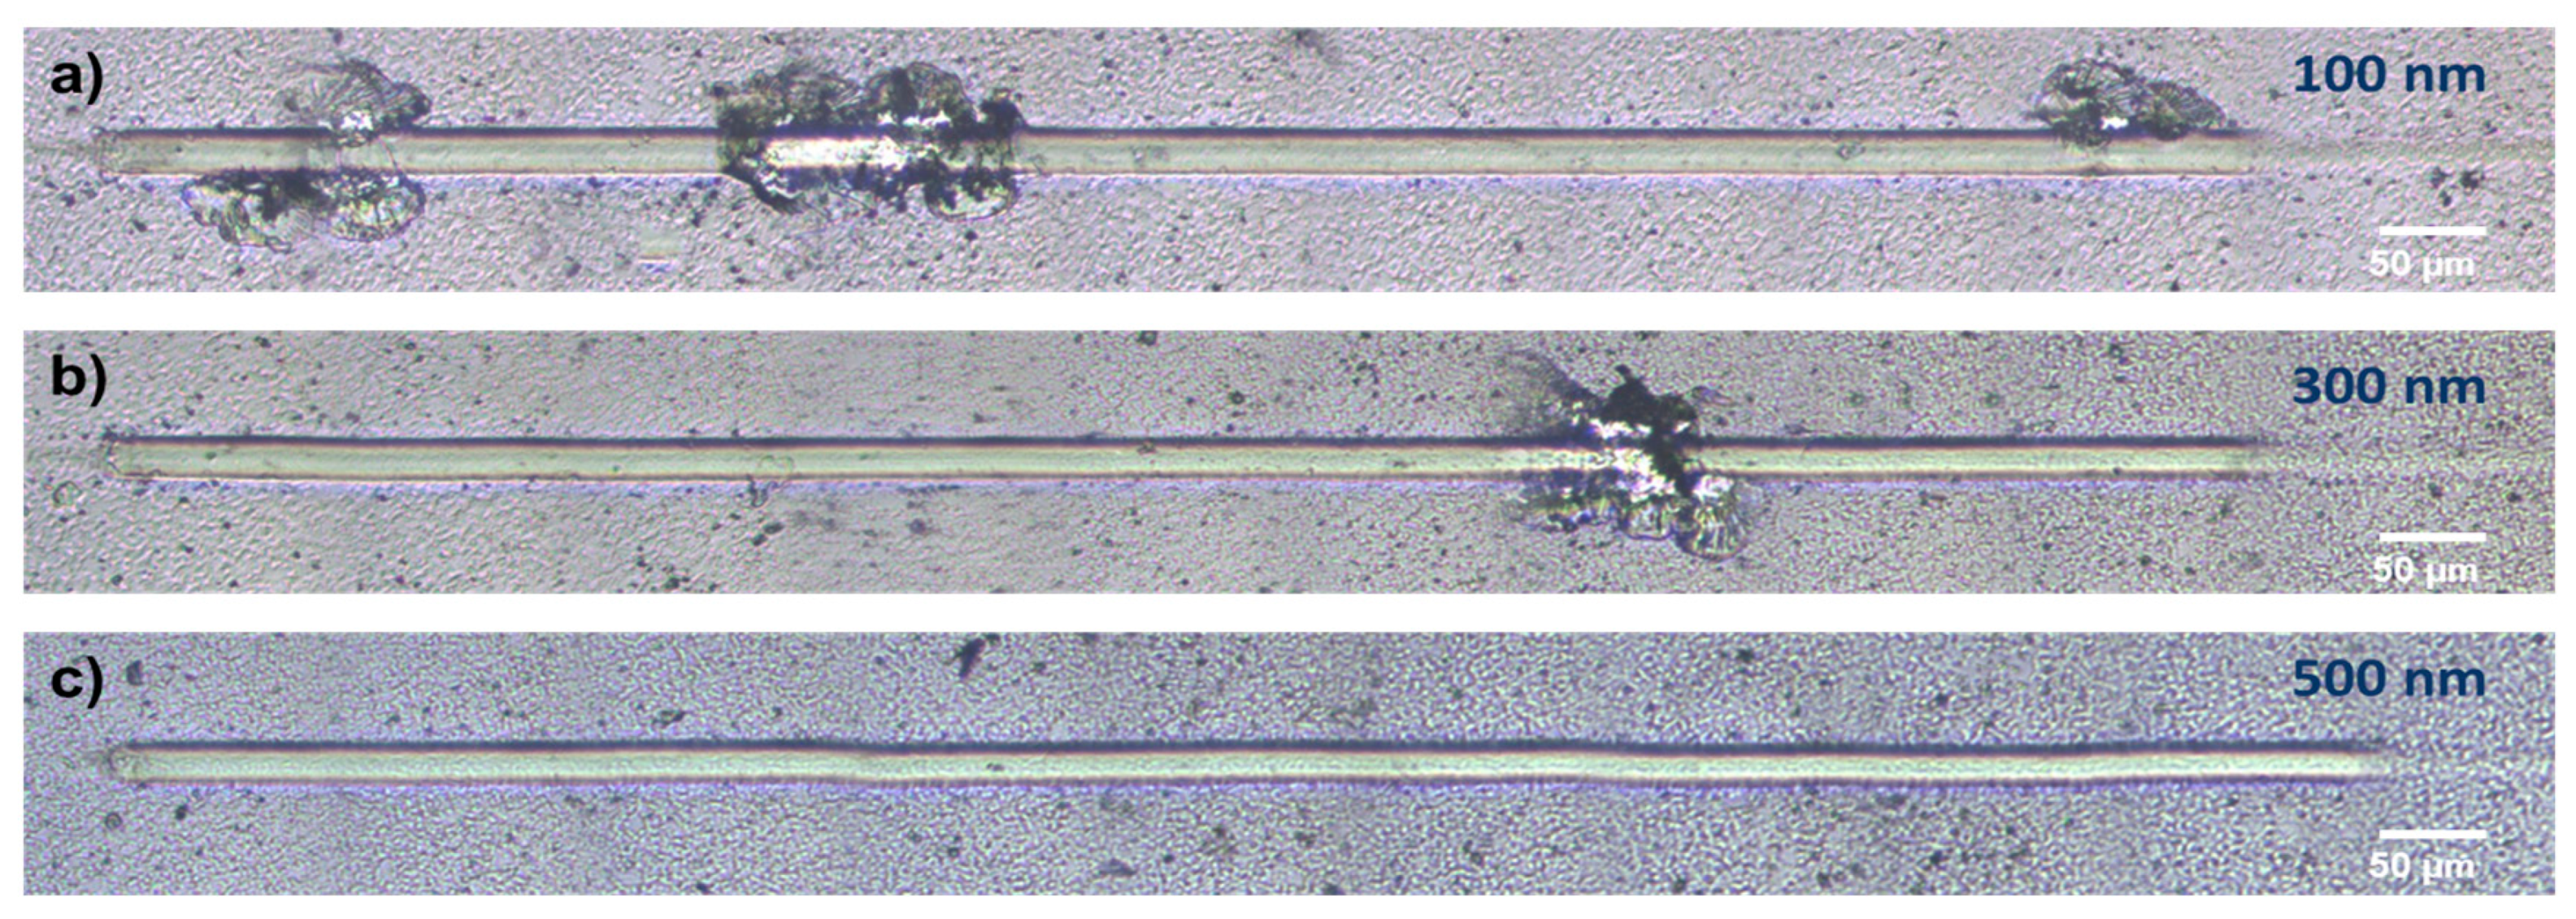
Furthermore, repetitive scratch tests performed at a subcritical load of 1.5 N (when all the studied coatings undergo crack initiation) are more sensitive to adhesion differences than the ramped load scratch test [41,42]. Hertzian analysis was applied on the ramped load test data for each coating and the position of maximum von Mises stress was found to occur at a depth of ~1.5 μm below the free surface in the vicinity of the coating surface interface at a load of 1.5 N. Thus, observations from the repetitive scratch test at this load are more predominantly influenced by the coating layer than the deformation of the substrate. The repetitive scratch on load depth along with the relative performance of the coatings is illustrated in Figure 9a–d. For simplicity, only the passes where a significant change in depth was observed among the coatings are presented. The on-load scratch depth, which combines both plastic and the elastic deformation is sufficient to interpret the wear progression with each consecutive pass. This is because the elastic contribution is anticipated to be relatively constant during the tests. As depicted in Figure 9a, the penetration depth of the coating with a 300 nm interlayer is the lowest (around 800 nm) at the fifth pass, and highest for the one with a 500 nm interlayer (around 1050 nm). However, after the next few passes, there is no significant change in the penetration depth for the coating with a 500 nm interlayer. The coating with a 100 nm interlayer shows the first sign of cohesive failure within the coating at the eighth pass (Figure 9b) in two of the three repeats. Evidence of cohesive failure in the coating with a 300 nm interlayer is found at the 11th pass (Figure 9c). At the 15th pass both coatings with the 100 and 300 nm interlayers exhibit adhesive failure at a scratch depth that exceeds the coating thickness, but with no noticeable change in the scratch depth for the coating with the 500 nm interlayer (only tensile cracks on the scratch track). Illustration of the scratch tracks of the studied coatings after the 15th pass is shown in Figure 10a–c. It can be observed that by the end of the 15th pass, the multilayer coating with 100 nm interlayer has a mixture of low wear areas and total coating failure at several positions within the track, whereas the coating with a 500 nm interlayer shows no sign of fracture for the given load along the scratch track.
The difference in wear resistance of the coating with a 500 nm interlayer that shows the highest initial penetration (consistent with its low near surface H/E and low Lc1 in the scratch test) but without failing after 15 cycles at 1.5 N can better explained in terms of the substrate roughness, Rt. It was previously observed [22] that a 50 nm Cr adhesive interlayer performed better than the 15 nm interlayer in the Pt–Ir coating on a cemented carbide substrate (precision glass molding tool material) of surface roughness Rt (60.1 ± 8) nm. Given the high surface roughness (Figure 1b) of cemented carbide substrate in the current study, the intense coating removal at an interlayer thickness of 100 nm (Figure 10a) compared to the 300 nm thick one (Figure 10b) can be explained by the non-uniform distribution of adhesive interlayer thickness on the substrate. The improvement of the coating’s adhesion with the 300 nm interlayer, (which is even further improved in the 500 nm one) can be attributed to the increase in shear stiffness of the reference plane passing through the soft TiAlCrN interlayer as well as the TiAlCrSiYN/TiAlCrN coating itself (Figure 2b). However, a further increase in interlayer thickness can lead to adhesion deterioration when the reference plane only passes through softer interlayer.
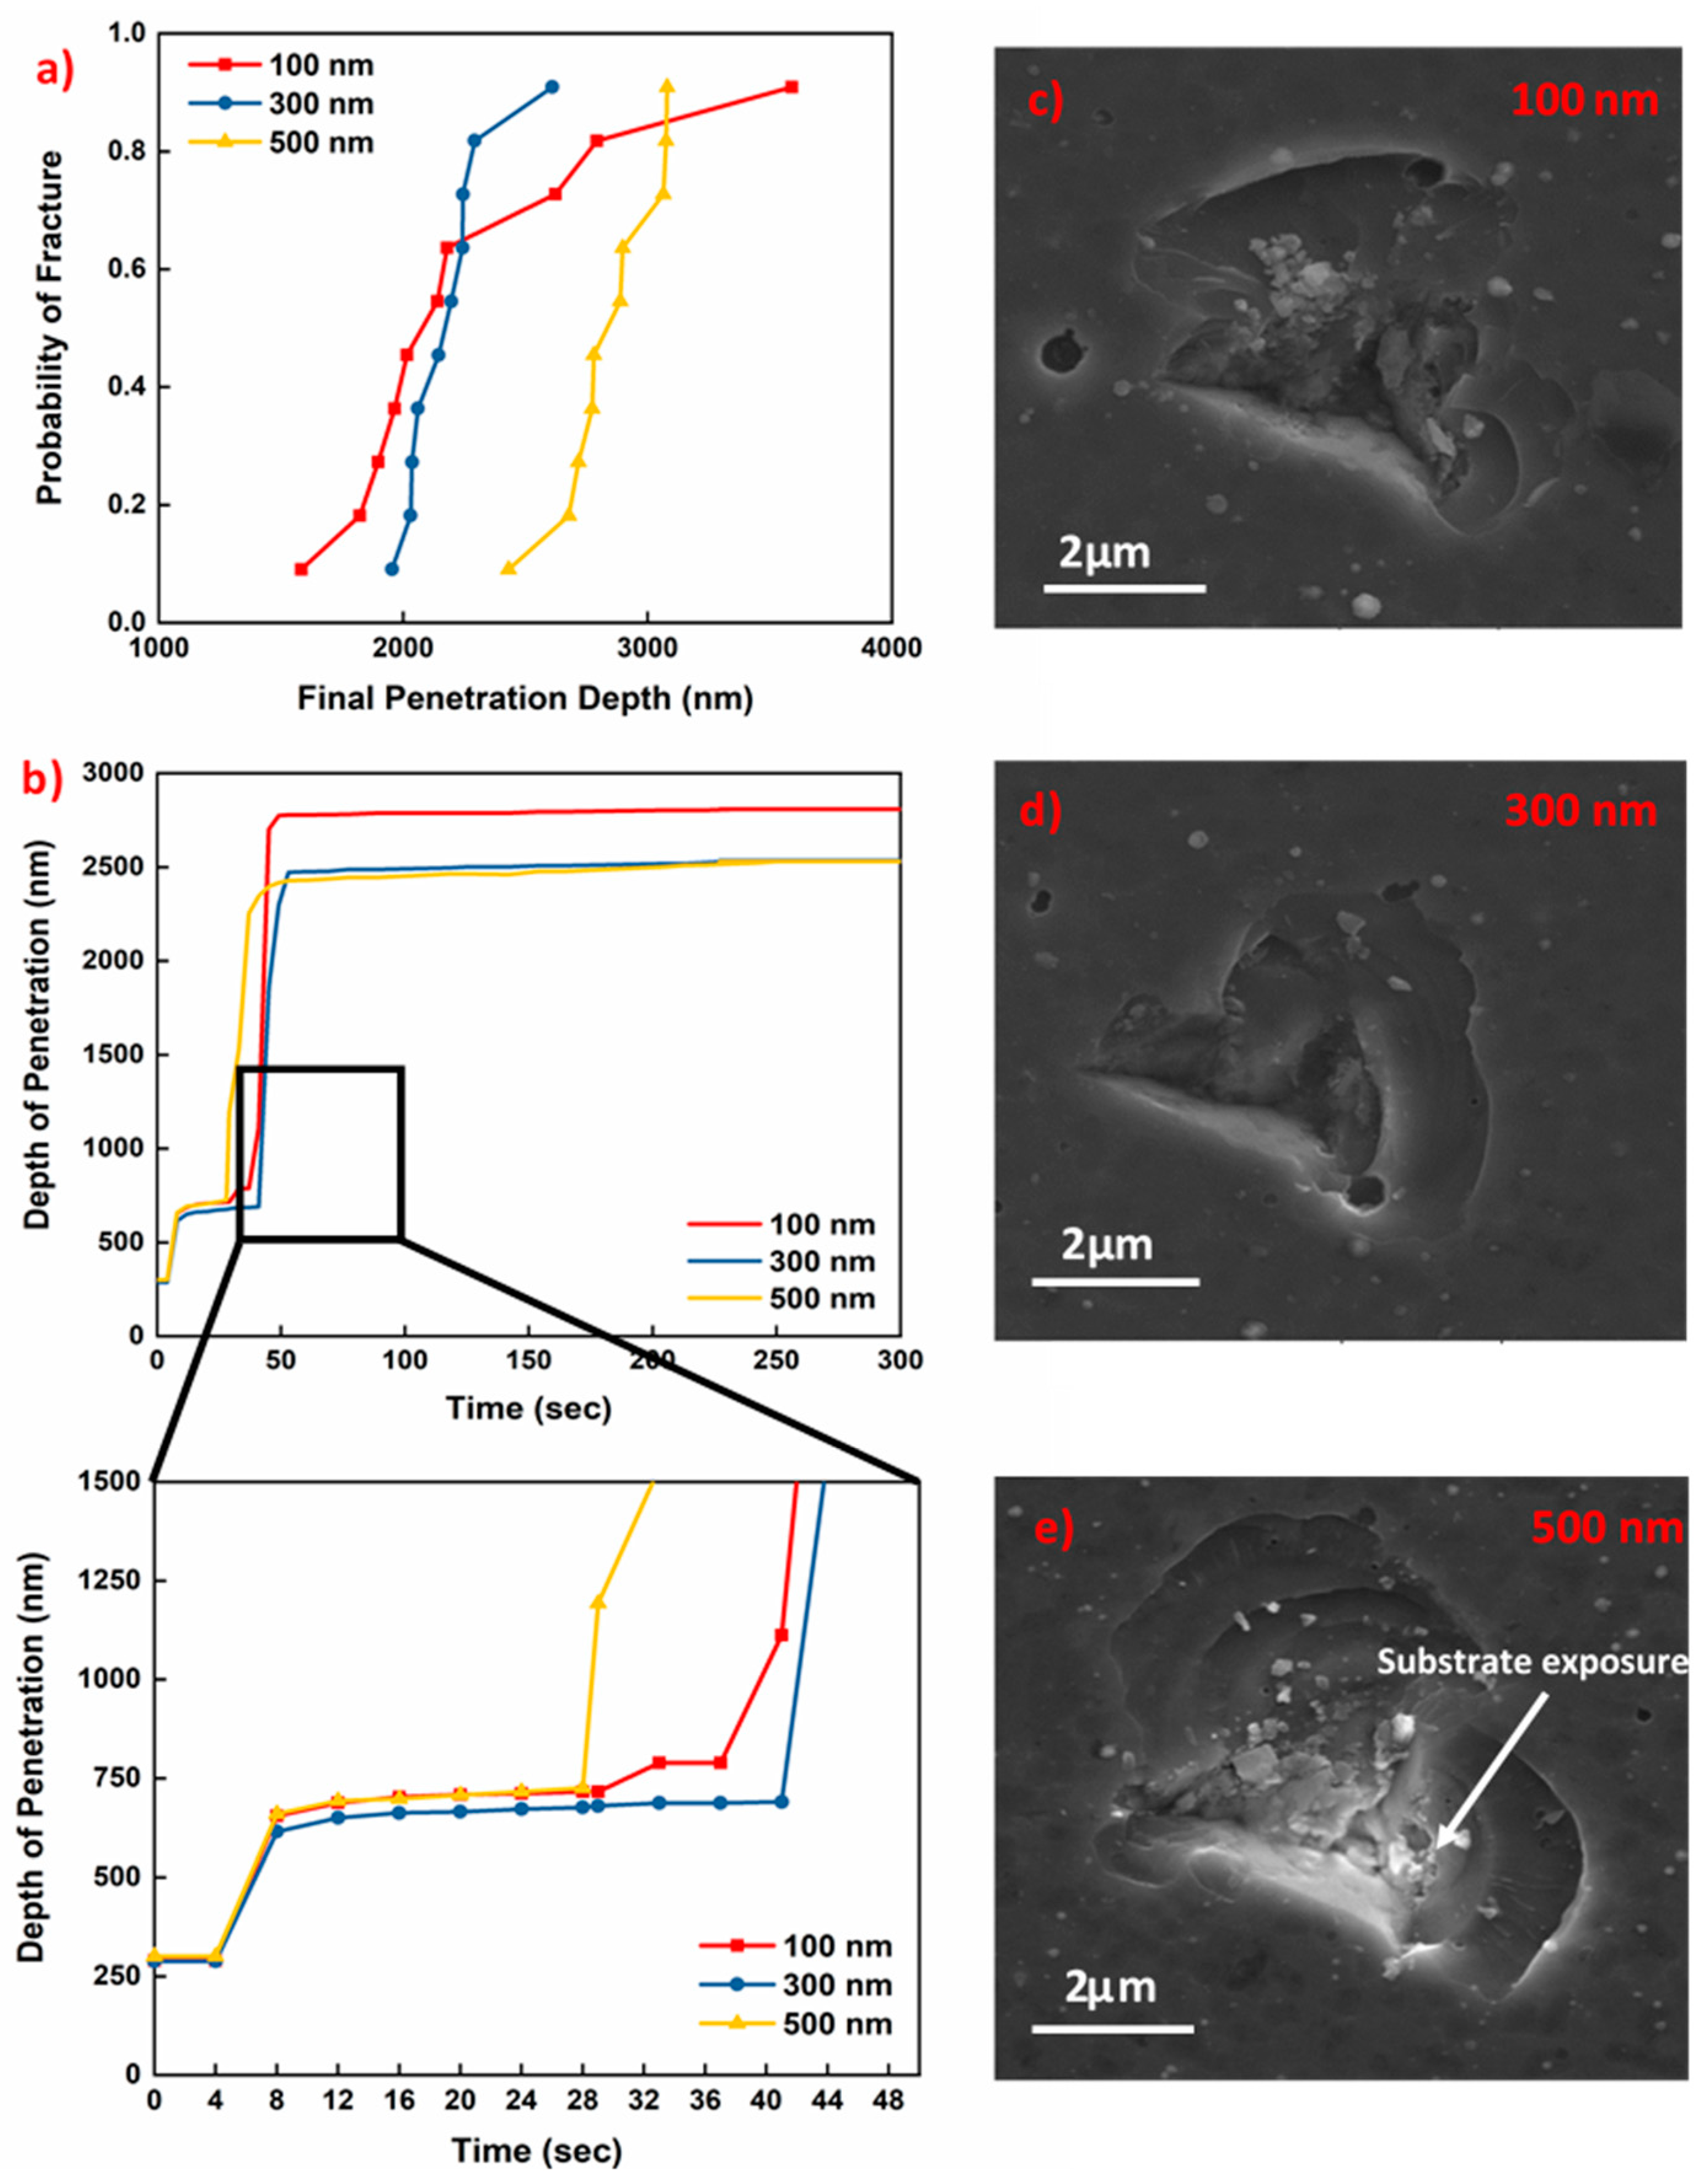
The nano-impact test performed at 25 mN is presented in Figure 11a in terms of fracture probability variation with final probe penetration depth. Fracture probability was predicted by ranking the final depth of penetration to fracture events in order of increasing fatigue resistance and then assigning a probability of fracture P(f) = n/(N + 1) to the nth-ranked fracture event in a total sample size of N (=10), as was done previously [43]. It can be seen that both multilayer coatings with a 100 and 300 nm interlayer with better load support (higher H3/E2 ratio) demonstrate the lowest final depths and only cohesive fractures. In addition, the spallation is more extensive in the 100 nm interlayer and much deeper (2.8 ± 0.2 µm) in the 500 nm interlayer (Figure 11e) than the multilayer coating with an interlayer thickness of 300 nm (2.1 ± 0.18 µm). It can be said that in the nano-impact test, the 300 nm works more effectively to stop the total coating failure and substrate exposure. A combination of multilayer structure and interlayer thickness prevent cracks from propagating to the substrate. A similar phenomenon was previously observed [21] in a TiAlN coating with a 200 nm Cr/CrN graded interlayer that sustained repetitive impact loads more competently than corresponding interlayers of 50 and 600 nm under an inclined impact test.
Furthermore, as shown in Figure 11b all the studied coatings exhibit abrupt fracture at the given load where the multilayer coating with a 500 nm interlayer fails sooner than the other two coatings. This can be related to the fact that both multilayer coatings with a 100 and 300 nm interlayer have better load support (higher H3/E2 ratio). Musil et al. [44] reported in a previous work that H3/E2 ratio and coating thickness are both determining factors for crack resistance in micro indentation with a Vickers indenter where thicker and higher H3/E2 ratio coatings have greater resistance. Additionally, data reported by Pei and co [45] shows that the onset critical load for indentation-induced radial cracking with a cube corner indenter correlates well with the H3/E2 ratio at a range of 1.5 µm nc-TiC/a-C: H film, ensuring that impact resistance of the coating is a combination of microstructural advantages as well as load support.

3.3. Tool Life Analysis

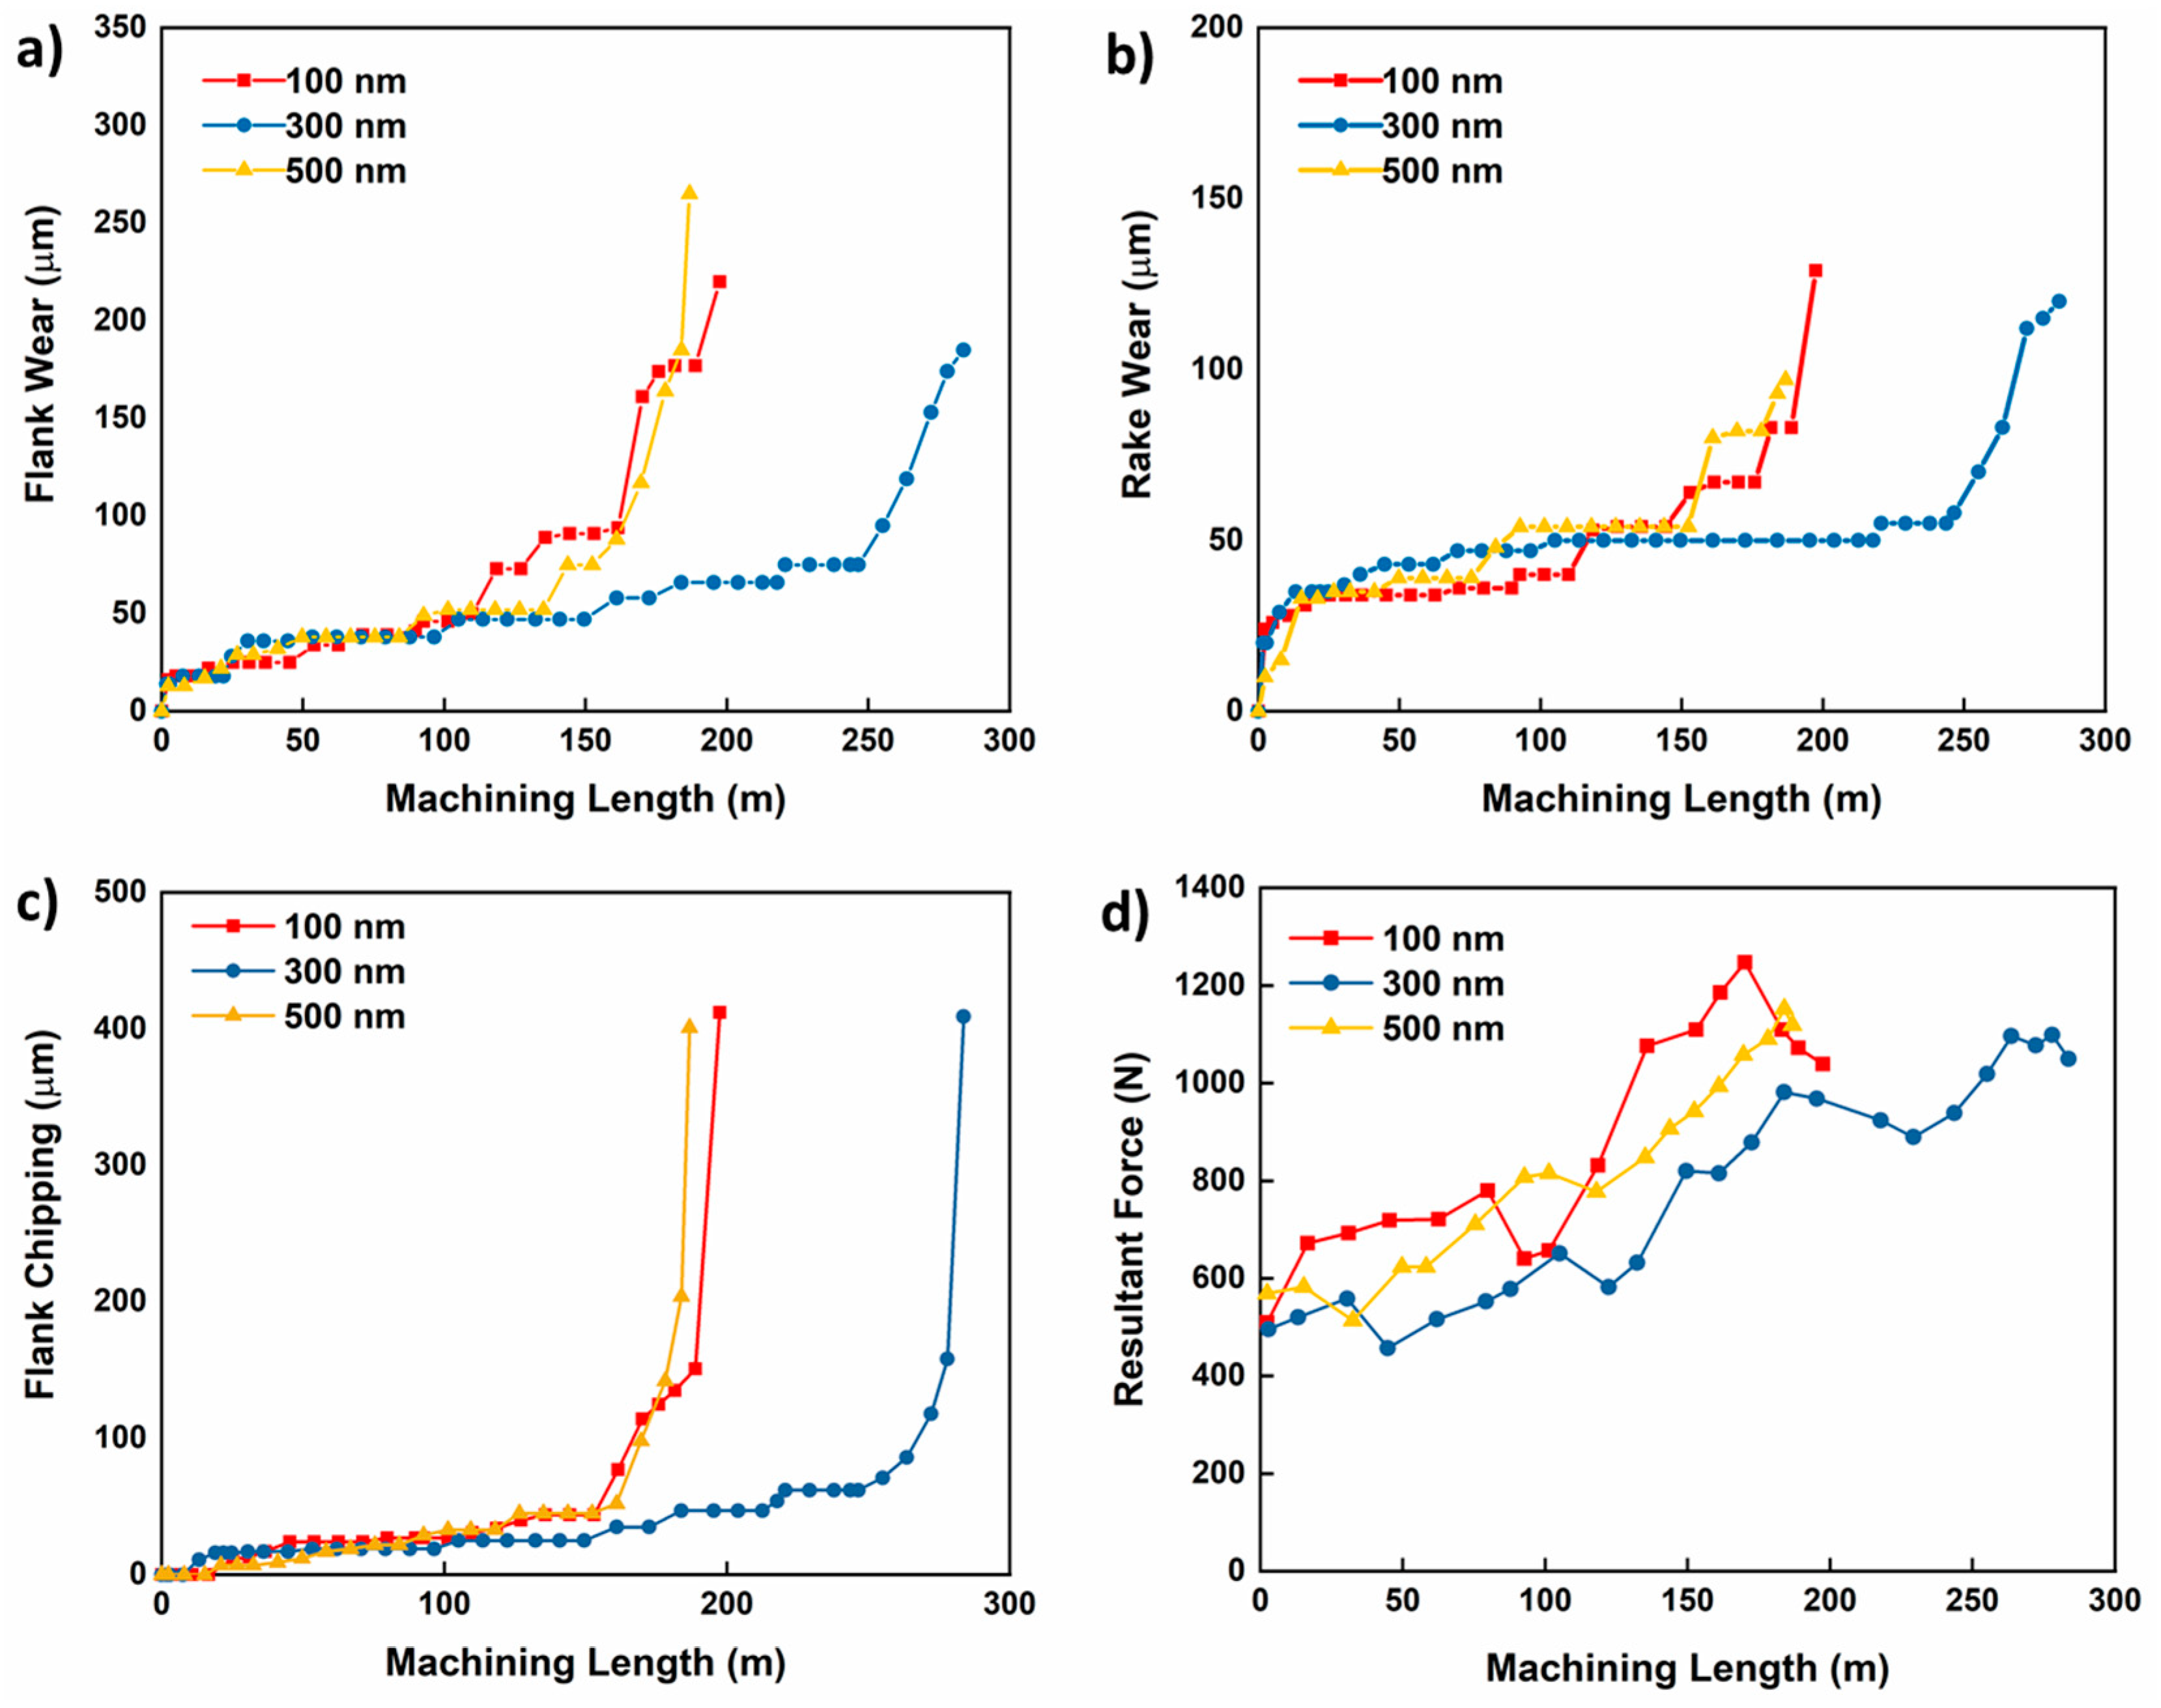
Tool life of the studied coatings investigated under extreme cutting conditions is presented in Figure 12. It can be observed that failure of the coated cutting tool is caused by flank wear (Figure 12a), rake wear (Figure 12b) (with minimal buildup edge formation), and predominantly, flank chipping (Figure 12c). This type of wear phenomenon was previously reported [11] under these severe cutting conditions where the machining temperature can reach as high as 1000–1100 °C with stresses around 1.5–2 GPa [46]. A more gradual wear evolution is exhibited by the multilayer coating with a 300 nm interlayer. A 40% and 50% increase in tool life is observed in comparison to the 100 and 500 nm interlayer, respectively. Resultant cutting forces are presented in Figure 12d. Both multilayer coatings with a 100 and 500 nm interlayer have higher resultant forces than the 300 nm interlayer due to the high force contribution in the feed direction (in the 500 nm interlayer) and high force perpendicular to it (in the 100 nm interlayer).
Better wear characteristics and chipping behavior are a combination of both tribological and micromechanical properties of the coatings. The ramped load scratch tests and more significantly, the wear tests outlined above, demonstrated that the multilayer coating with a 100 nm interlayer has the worst performance in terms of adhesion of the coating to the substrate. This confirms that the coating undergoes a briefer machining length prior to tool failure than the multilayer coating with a 300 nm interlayer. The superior performance of the multilayer coating with a 500 nm interlayer in terms of adhesion is not consistent with its behavior in the cutting test. Therefore, the importance of micromechanical properties come into play. A better load support achieved through high H3/E2 ratio for the multilayer coatings with 100 and 300 nm interlayer plays a crucial role in damage localization observed in nano-impact tests. This is more substantial for coatings with high brittleness as they are susceptible to radial cracking and catastrophic fracture as a leading failure mechanism typically seen in interrupted cutting conditions [47]. Thus, the multilayer coating with a 300 nm interlayer having improved micro-mechanical characteristics ensures lower intensity of surface damage compare to the 500 nm interlayer and a better surface protection [48,49]. Another important aspect to consider is the state of high temperatures during the milling process. Previous nanoindentation tests at temperature ranges between 25–600 °C on a TiAlCrSiYN/TiAlCrN multilayer coating [50] demonstrate that a drop-in hardness with no significant change in elastic modulus causes a steeper decrease in the H3/E2 ratio at a higher temperature. Additionally, Guiliani et al. reported a similarly significant hardness drop from 25 to 15 GPa occurring over a temperature range of 25–500 °C in AlN/CrN multilayered coatings on M2 tool steel, although the elastic modulus was virtually unchanged [51]. Cross-sectional TEM of the indentations showed that the drop in measured hardness with temperature was due to the softening of CrN layers and/or changes in residual stress with temperature causing substrate and coating deformation. A similar phenomenon may occur in the studied TiAlCrSiYN/TiAlCrN multilayer coating, especially with a 500 nm TiAlCrN interlayer, which is already softer than the 100 and 300 nm interlayer at room temperature. The absence of yttrium in the composition of the interlayer hinders grain coarsening at the elevated temperature [52] and probably increases phase stability [53], possibly resulting in further softening of the coating with a 500 nm (the thickest) interlayer. Therefore, increasing plastic deformation causes a decrease in hardness as well as H3/E2 ratio (already lowest at room temperature), which if too great, can be damaging to tool life.

4. Conclusions

In this paper, TiAlCrSiYN based multilayer coatings with varying interlayer thicknesses were systematically studied in terms of microstructure and micromechanical properties. A significant improvement in the wear performance of the TiAlCrSiYN-based coatings was achieved through the proper selection of the interlayer thickness within the multilayer coating structure. This result is attributed to the combination of the coating’s micro-mechanical and tribological characteristics that control the tool life under extreme cutting conditions during high speed dry milling of hardened tool steel. The multilayer coating with a 300 nm interlayer has a better repetitive wear resistance resulting in better adherence to the substrate considering its high roughness. The coating also has better load support, which can contribute to the localization of damage. This paper also suggests that a coating with good adhesion (500 nm interlayer) at room temperature can behave differently at a higher temperature during machining in terms of load support, which carries a significant importance during milling.

Author Contributions

Conceptualization, S.C.; Methodology, S.C.; Validation, S.C., B.B. and K.Y.; Investigation, S.C., K.Y.; Resources, B.B., K.Y. and S.C.V.; Data Curation, S.C. and K.Y.; Writing—Original Draft Preparation, S.C.; Writing—Review and Editing, B.B.; Visualization, S.C.; Supervision, B.B. and S.C.V.; Project Administration, S.C.V.; Funding Acquisition, S.C.V.

Funding

This research was funded by the financial support from the Natural Sciences and Engineering Research Council of Canada (NSERC) and the Canadian Network for Research and Innovation in Machining Technology (CANRIMT).

Acknowledgments

The authors also acknowledge the McMaster Manufacturing Research Institute(MMRI) for the use of its facilities.

Conflicts of Interest

The authors declare no conflicts of interest.

References

  1. Fallböhmer, P.; Rodríguez, C.; Özel, T.; Altan, T. High-speed machining of cast iron and alloy steels for die and mold manufacturing. J. Mater. Process. Technol. 2000, 98, 104–115. [Google Scholar] [CrossRef]
  2. Tönshoff, H.; Bussmann, W.; Stanske, C. Requirements on tools and machines when machining hard materials. In Proceedings of the Twenty-Sixth International Machine Tool Design and Research Conference, Manchester, UK, 17th–18th September 1986; pp. 349–357. [Google Scholar]
  3. Nelson, S.; Schueller, J.; Tlusty, J. Tool wear in milling hardened die steel. J. Manuf. Sci. Eng. 1998, 120, 669–673. [Google Scholar] [CrossRef]
  4. Cui, X.; Zhao, J.; Tian, X. Cutting forces, chip formation, and tool wear in high-speed face milling of AISI H13 steel with CBN tools. Int. J. Adv. Manuf. Technol. 2013, 64, 1737–1749. [Google Scholar] [CrossRef]
  5. Elbestawi, M.; Chen, L.; Becze, C.; El-Wardany, T. High-speed milling of dies and molds in their hardened state. CIRP Ann. 1997, 46, 57–62. [Google Scholar] [CrossRef]
  6. Beake, B.; Ning, L.; Gey, C.; Veldhuis, S.; Komarov, A.; Weaver, A.; Khanna, M.; Fox-Rabinovich, G. Wear performance of different PVD coatings during hard wet end milling of H13 tool steel. Surf. Coat. Technol. 2015, 279, 118–125. [Google Scholar] [CrossRef]
  7. Chinchanikar, S.; Choudhury, S. Machining of hardened steel—Experimental investigations, performance modeling and cooling techniques: A review. Int. J. Mach. Tools Manuf. 2015, 89, 95–109. [Google Scholar] [CrossRef]
  8. Mativenga, P.; Hon, K. A study of cutting forces and surface finish in high-speed machining of AISI H13 tool steel using carbide tools with TiAIN based coatings. Proc. Inst. Mech. Eng. B J. Eng. Manuf. 2003, 217, 143–151. [Google Scholar] [CrossRef]
  9. Bouzakis, K.-D.; Michailidis, N.; Skordaris, G.; Bouzakis, E.; Biermann, D.; M’Saoubi, R. Cutting with coated tools: Coating technologies, characterization methods and performance optimization. CIRP Ann. Manuf. Technol. 2012, 61, 703–723. [Google Scholar] [CrossRef]
  10. Fox-Rabinovich, G.S.; Yamamoto, K.; Beake, B.D.; Gershman, I.S.; Kovalev, A.I.; Veldhuis, S.C.; Aguirre, M.H.; Dosbaeva, G.; Endrino, J.L. Hierarchical adaptive nanostructured PVD coatings for extreme tribological applications: The quest for nonequilibrium states and emergent behavior. Sci. Technol. Adv. Mater. 2012, 13, 043001. [Google Scholar] [CrossRef]
  11. Fox-Rabinovich, G.; Beake, B.; Yamamoto, K.; Aguirre, M.; Veldhuis, S.; Dosbaeva, G.; Elfizy, A.; Biksa, A.; Shuster, L. Structure, properties and wear performance of nano-multilayered TiAlCrSiYN/TiAlCrN coatings during machining of Ni-based aerospace superalloys. Surf. Coat. Technol. 2010, 204, 3698–3706. [Google Scholar] [CrossRef]
  12. Voevodin, A.A.; Zabinski, J.S.; Muratore, C. Recent advances in hard, tough, and low friction nanocomposite coatings. Tsinghua Sci. Technol. 2005, 10, 665–679. [Google Scholar] [CrossRef]
  13. Chan, K.; He, M.; Hutchinson, J. Cracking and stress redistribution in ceramic layered composites. Mater. Sci. Eng. A 1993, 167, 57–64. [Google Scholar] [CrossRef]
  14. He, M.Y.; Evans, A.G.; Hutchinson, J.W. Crack deflection at an interface between dissimilar elastic materials: Role of residual stresses. Int. J. Solids Struct. 1994, 31, 3443–3455. [Google Scholar] [CrossRef] [Green Version]
  15. Hovsepian, P.E.; Reinhard, C.; Ehiasarian, A. CrAlYN/CrN superlattice coatings deposited by the combined high power impulse magnetron sputtering/unbalanced magnetron sputtering technique. Surf. Coat. Technol. 2006, 201, 4105–4110. [Google Scholar] [CrossRef]
  16. Chen, J.; Li, H.; Beake, B.D. Load sensitivity in repetitive nano-impact testing of TiN and AlTiN coatings. Surf. Coat. Technol. 2016, 308, 289–297. [Google Scholar] [CrossRef]
  17. Skordaris, G.; Bouzakis, K.-D.; Charalampous, P.; Bouzakis, E.; Paraskevopoulou, R.; Lemmer, O.; Bolz, S. Brittleness and fatigue effect of mono-and multi-layer PVD films on the cutting performance of coated cemented carbide inserts. CIRP Ann. Manuf. Technol. 2014, 63, 93–96. [Google Scholar] [CrossRef]
  18. Davim, J.P. Machining: Fundamentals and Recent Advances; Springer Science & Business Media: Berlin, Germany, 2008. [Google Scholar]
  19. Hong, Y.S.; Kwon, S.H.; Tiegang, W.; Doo-In, K.; Jihwan, C.; Kim, K.H. Effects of Cr interlayer on mechanical and tribological properties of Cr–Al–Si–N nanocomposite coating. Trans. Nonferr. Met. Soc. China 2011, 21, 62–67. [Google Scholar] [CrossRef]
  20. Fernandes, C.; Popovich, V.; Matos, M.; Senos, A.; Vieira, M. Carbide phases formed in WC–M (M = Fe/Ni/Cr) systems. Ceram. Int. 2009, 35, 369–372. [Google Scholar] [CrossRef]
  21. Bouzakis, K.-D.; Makrimallakis, S.; Katirtzoglou, G.; Skordaris, G.; Gerardis, S.; Bouzakis, E.; Leyendecker, T.; Bolz, S.; Koelker, W. Adaption of graded Cr/CrN-interlayer thickness to cemented carbide substrates’ roughness for improving the adhesion of HPPMS PVD films and the cutting performance. Surf. Coat. Technol. 2010, 205, 1564–1570. [Google Scholar] [CrossRef]
  22. Klocke, F.; Bouzakis, K.-D.; Georgiadis, K.; Gerardis, S.; Skordaris, G.; Pappa, M. Adhesive interlayers’ effect on the entire structure strength of glass molding tools’ Pt–Ir coatings by nano-tests determined. Surf. Coat. Technol. 2011, 206, 1867–1872. [Google Scholar] [CrossRef]
  23. Chowdhury, S.; Beake, B.; Yamamoto, K.; Bose, B.; Aguirre, M.; Fox-Rabinovich, G.; Veldhuis, S. Improvement of wear performance of nano-multilayer PVD coatings under dry hard end milling conditions based on their architectural development. Coatings 2018, 8, 59. [Google Scholar] [CrossRef]
  24. Bull, S.; Berasetegui, E. An overview of the potential of quantitative coating adhesion measurement by scratch testing. Tribol. Int. 2006, 39, 99–114. [Google Scholar] [CrossRef]
  25. Bouzakis, K.-D.; Skordaris, G.; Gerardis, S.; Katirtzoglou, G.; Makrimallakis, S.; Pappa, M.; Bolz, S.; Koelker, W. The effect of substrate pretreatments and HPPMS-deposited adhesive interlayers’ materials on the cutting performance of coated cemented carbide inserts. CIRP Ann. 2010, 59, 73–76. [Google Scholar] [CrossRef]
  26. Ning, L.; Veldhuis, S.; Yamamoto, K. Investigation of wear behavior and chip formation for cutting tools with nano-multilayered TiAlCrN/NbN PVD coating. Int. J. Mach. Tools Manuf. 2008, 48, 656–665. [Google Scholar] [CrossRef]
  27. Welzel, U.; Ligot, J.; Lamparter, P.; Vermeulen, A.; Mittemeijer, E. Stress analysis of polycrystalline thin films and surface regions by X-ray diffraction. J. Appl. Cryst. 2005, 38, 1–29. [Google Scholar] [CrossRef]
  28. Vermeulen, A.C. Accurate absolute peak positions for multiple {hkl} residual stress analysis by means of misalignment corrections. Z. Krist. Suppl. 2006, 23, 49–54. [Google Scholar] [CrossRef]
  29. Schwarzer, N.; Duong, Q.-H.; Bierwisch, N.; Favaro, G.; Fuchs, M.; Kempe, P.; Widrig, B.; Ramm, J. Optimization of the scratch test for specific coating designs. Surf. Coat. Technol. 2011, 206, 1327–1335. [Google Scholar] [CrossRef]
  30. Yamamoto, K.; Sato, T.; Takahara, K.; Hanaguri, K. Properties of (Ti, Cr, Al) N coatings with high Al content deposited by new plasma enhanced arc-cathode. Surf. Coat. Technol. 2003, 174, 620–626. [Google Scholar] [CrossRef]
  31. Carvalho, N.; Zoestbergen, E.; Kooi, B.; De Hosson, J.T.M. Stress analysis and microstructure of PVD monolayer TiN and multilayer TiN/(Ti, Al) N coatings. Thin Solid Film. 2003, 429, 179–189. [Google Scholar] [CrossRef]
  32. Yamamoto, K.; Kujime, S.; Fox-Rabinovich, G. Effect of alloying element (Si, Y) on properties of AIP deposited (Ti, Cr, Al) N coating. Surf. Coat. Technol. 2008, 203, 579–583. [Google Scholar] [CrossRef]
  33. Mayrhofer, P.H.; Mitterer, C.; Hultman, L.; Clemens, H. Microstructural design of hard coatings. Prog. Mater. Sci. 2006, 51, 1032–1114. [Google Scholar] [CrossRef]
  34. Bielawski, M. Residual stress control in TiN/Si coatings deposited by unbalanced magnetron sputtering. Surf. Coat. Technol. 2006, 200, 3987–3995. [Google Scholar] [CrossRef]
  35. Hassani, S.; Bielawski, M.; Beres, W.; Martinu, L.; Balazinski, M.; Klemberg-Sapieha, J. Predictive tools for the design of erosion resistant coatings. Surf. Coat. Technol. 2008, 203, 204–210. [Google Scholar] [CrossRef]
  36. Bruet, B.J.; Song, J.; Boyce, M.C.; Ortiz, C. Materials design principles of ancient fish armour. Nat. Mater. 2008, 7, 748–756. [Google Scholar] [CrossRef] [PubMed]
  37. Fox-Rabinovich, G.; Beake, B.; Endrino, J.; Veldhuis, S.; Parkinson, R.; Shuster, L.; Migranov, M. Effect of mechanical properties measured at room and elevated temperatures on the wear resistance of cutting tools with TiAlN and AlCrN coatings. Surf. Coat. Technol. 2006, 200, 5738–5742. [Google Scholar] [CrossRef]
  38. Bull, S. Failure mode maps in the thin film scratch adhesion test. Tribol. Int. 1997, 30, 491–498. [Google Scholar] [CrossRef]
  39. Zeng, X.; Zhang, S.; Ding, X.; Teer, D. Comparison of three types of carbon composite coatings with exceptional load-bearing capacity and high wear resistance. Thin Solid Film. 2002, 420, 366–370. [Google Scholar] [CrossRef]
  40. Beake, B.; Vishnyakov, V.; Harris, A. Nano-scratch testing of (Ti, Fe) Nxthin films on silicon. Surf. Coat. Technol. 2017, 309, 671–679. [Google Scholar] [CrossRef]
  41. Beake, B.; Shi, B.; Sullivan, J. Nanoscratch and nanowear testing of TiN coatings on M42 steel. Tribol. Mater. Surf. Interfaces 2011, 5, 141–147. [Google Scholar] [CrossRef]
  42. Beake, B.; Endrino, J.L.; Kimpton, C.; Fox-Rabinovich, G.; Veldhuis, S. Elevated temperature repetitive micro-scratch testing of AlCrN, TiAlN and AlTiN PVD coatings. Int. J. Refract. Met. Hard Mater. 2017, 69, 215–226. [Google Scholar] [CrossRef]
  43. Beake, B.D.; Smith, J.F. Nano-impact testing—An effective tool for assessing the resistance of advanced wear-resistant coatings to fatigue failure and delamination. Surf. Coat. Technol. 2004, 188, 594–598. [Google Scholar] [CrossRef]
  44. Musil, J.; Jirout, M. Toughness of hard nanostructured ceramic thin films. Surf. Coat. Technol. 2007, 201, 5148–5152. [Google Scholar] [CrossRef]
  45. Pei, Y.; Galvan, D.; De Hosson, J.T.M. Nanostructure and properties of TiC/aC: H composite coatings. Acta Mater. 2005, 53, 4505–4521. [Google Scholar] [CrossRef]
  46. Trent, E.M.; Wright, P.K. Metal. Cutting; Butterworth-Heinemann: Oxford, UK, 2000. [Google Scholar]
  47. Fox-Rabinovich, G.; Yamamoto, K.; Beake, B.; Kovalev, A.; Aguirre, M.; Veldhuis, S.; Dosbaeva, G.; Wainstein, D.; Biksa, A.; Rashkovskiy, A. Emergent behavior of nano-multilayered coatings during dry high-speed machining of hardened tool steels. Surf. Coat. Technol. 2010, 204, 3425–3435. [Google Scholar] [CrossRef]
  48. Fox-Rabinovich, G.; Kovalev, A.; Aguirre, M.; Yamamoto, K.; Veldhuis, S.; Gershman, I.; Rashkovskiy, A.; Endrino, J.; Beake, B.; Dosbaeva, G. Evolution of self-organization in nano-structured PVD coatings under extreme tribological conditions. Appl. Surf. Sci. 2014, 297, 22–32. [Google Scholar] [CrossRef]
  49. Fox-Rabinovich, G.; Kovalev, A.; Veldhuis, S.; Yamamoto, K.; Endrino, J.; Gershman, I.; Rashkovskiy, A.; Aguirre, M.; Wainstein, D. Spatio-temporal behaviour of atomic-scale tribo-ceramic films in adaptive surface engineered nano-materials. Sci. Rep. 2015, 5, 8780. [Google Scholar] [CrossRef]
  50. Fox-Rabinovich, G.; Endrino, J.; Aguirre, M.; Beake, B.; Veldhuis, S.; Kovalev, A.; Gershman, I.; Yamamoto, K.; Losset, Y.; Wainstein, D. Mechanism of adaptability for the nano-structured TiAlCrSiYN-based hard physical vapor deposition coatings under extreme frictional conditions. J. Appl. Phys. 2012, 111, 064306. [Google Scholar] [CrossRef] [Green Version]
  51. Giuliani, F.; Goruppa, A.; Lloyd, S.; Teer, D.; Clegg, W. Indentation of AlN/CrN Multilayers from Room Temperature to 400 °C. Mater. Sci. Forum 2005, 492–493, 335–340. [Google Scholar] [CrossRef]
  52. Fox-Rabinovich, G.; Veldhuis, S.; Dosbaeva, G.; Yamamoto, K.; Kovalev, A.; Wainstein, D.; Gershman, I.; Shuster, L.; Beake, B. Nanocrystalline coating design for extreme applications based on the concept of complex adaptive behavior. J. Appl. Phys. 2008, 103, 083510. [Google Scholar] [CrossRef]
  53. Rovere, F.; Music, D.; Schneider, J.; Mayrhofer, P. Experimental and computational study on the effect of yttrium on the phase stability of sputtered Cr–Al–Y–N hard coatings. Acta Mater. 2010, 58, 2708–2715. [Google Scholar] [CrossRef]
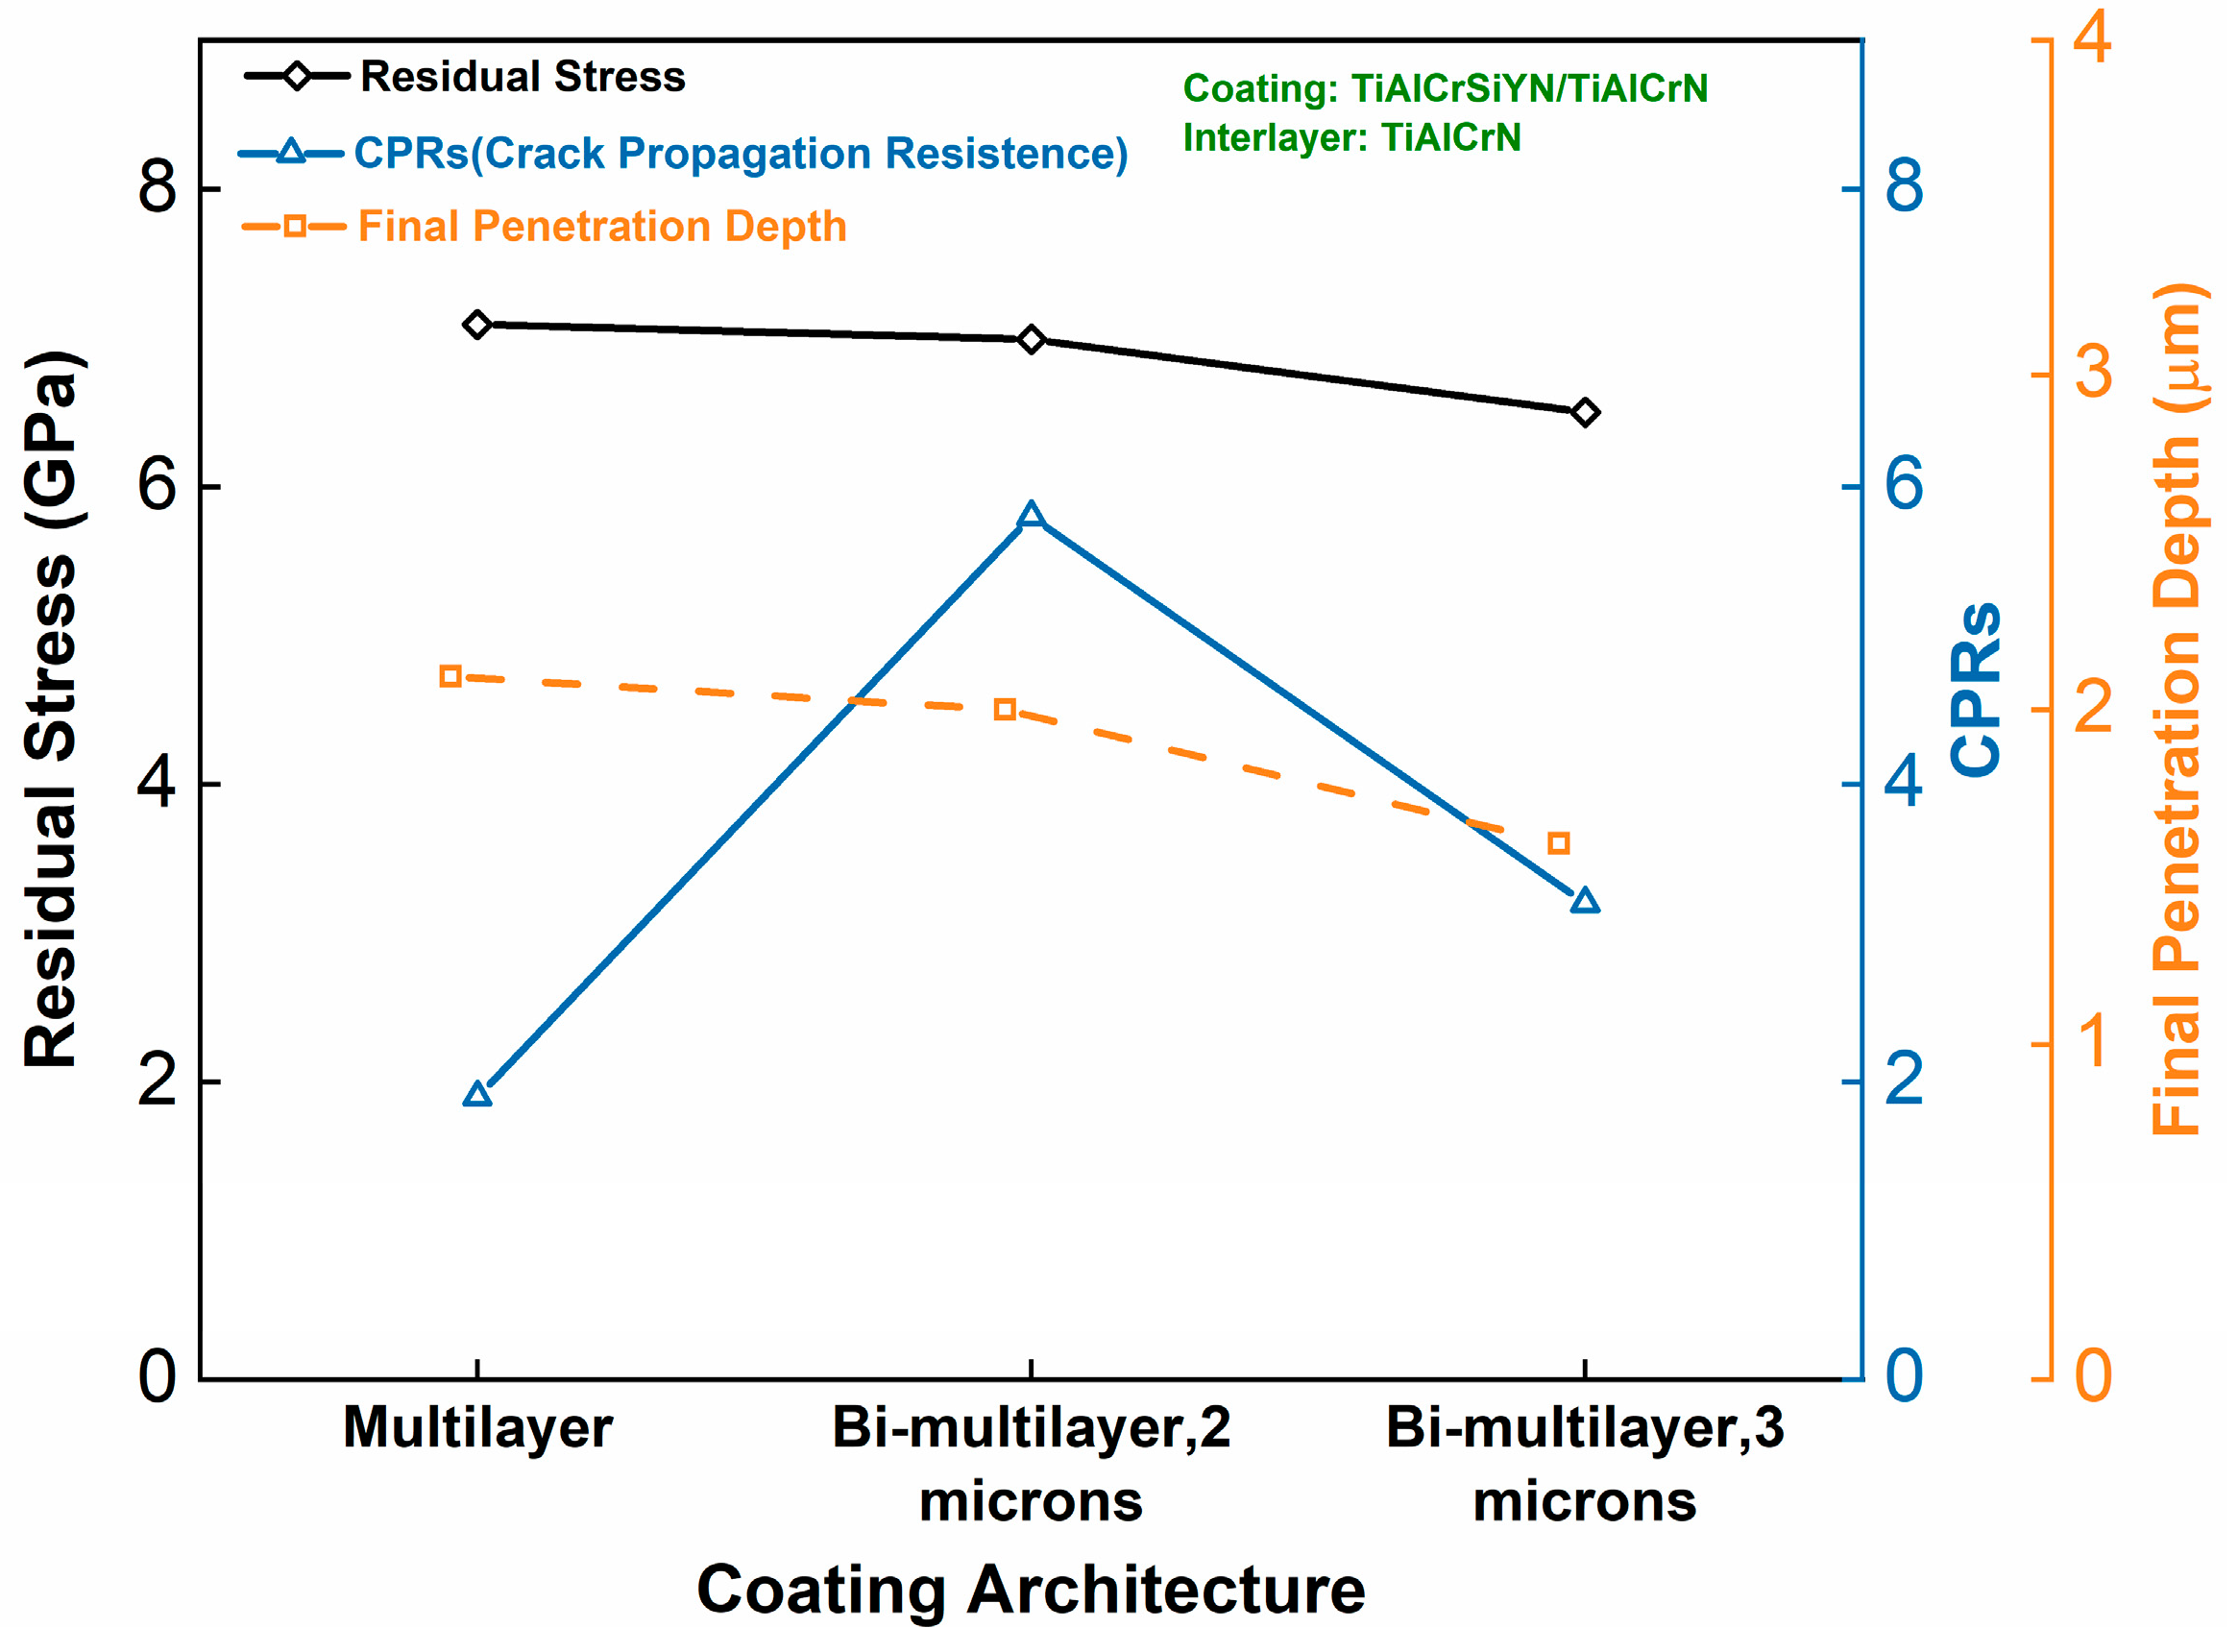
Figure 1. Comparison of micro-mechanical properties of a TiAlCrSiYN/TiAlCrN multilayer coating with a TiAlCrN interlayer [23].
Coatings 09 00737 g001
Figure 2. Schematic diagram of interlayer thickness effect on the coating substrate adhesion (a), and on the entire coating structure shear strength in a reference plane (b,c), with the same roughness of cemented carbide substrate [22], ti and tc represent interlayer and coating thicknesses respectively.
Coatings 09 00737 g002
Figure 3. (a) Microstructure with back-scattered electron (BSE) at 12,000× magnification; (b) surface profile (Rt and Ra) at a roughness sampling length of 250 µm and average WC grain diameter dg of the tool substrate; (c) surface profile of the substrate.
Coatings 09 00737 g003
Figure 4. SEM images of the focused ion beam (FIB) cross-section showing (a) alternating nano-layers, the interlayer in the studied multilayer coatings, and the variation of interlayer thickness (b) (100 ± 30 nm), (c) (300 ± 30 nm), and (d) (500 ± 30 nm).
Coatings 09 00737 g004
Figure 5. X-ray diffraction patterns of TiAlCrSiYN-based coatings with different interlayer thickness from 100 to 500 nm. Mark C represents the cubic (B1) phase.
Coatings 09 00737 g005
Figure 6. (a) Depth dependent hardness variation at a load range of 5–100 mN; (b) mechanical properties of the studied coatings obtained through nano-indentation tests (elasticity obtained by taking the Poisson’s ratio of all coatings to be 0.25).
Coatings 09 00737 g006
Figure 7. Comparison of (a) critical load for crack initiation in coating, Lc1 and (b) critical load for coating failure, Lc2 due to the variation of interlayer thickness within the bi-multilayer coatings.
Coatings 09 00737 g007
Figure 8. (ac) Microscopic images of the ramped load scratch test track showing the cohesive (a) and adhesive (c) failure within the studied coating (same failure mechanism for all the studied coatings).
Coatings 09 00737 g008
Figure 9. (ad) Evolution of penetration depth at different passes during repetitive wear test at 1.5 N.
Coatings 09 00737 g009
Figure 10. Microscopic images of the wear track after 15th pass at a repetitive load of 1.5 N, for coatings with interlayer thickness (a) 100 nm, (b) 300 nm, and (c) 500 nm.
Coatings 09 00737 g010
Figure 11. Nano-impact testing, (a) probability distribution vs final penetration depth; (b) penetration depth at a load of 25 mN; SEM image of the impact site for the coating with (c) 100 nm, (d) 300 nm, and (e) 500 nm interlayer.
Coatings 09 00737 g011
Figure 12. Tool-life data of the studied coatings vs. machining length (m): (a) flank wear; (b) rake wear; (c) chipping intensity; (d) resultant cutting forces.
Coatings 09 00737 g012
Table 1. Coatings studied for tool life and micro-mechanical property evaluation.
Overall ThicknessInterlayer ThicknessDeposition Time (Interlayer)
2 µm100 nm1 min
2 µm300 nm3 min
2 µm500 nm5 min
Table 2. Cutting parameters used for the tool-life evaluation.
Cutting Parameters
Speed, m/minFeed, mm/toothAxial Depth, mmRadial Depth, mmCoolant
6000.0650.6Dry condition
Table 3. Residual stress values in the studied coatings when E is 500 GPa for all crystal axis.
CoatingTiAlCrN Interlayer Thickness (nm)Residual Stress (GPa)
TiAlCrSiYN/TiAlCrN
multilayer
100−8.21 ± 1.39
300−8.64 ± 1.65
500−8.71 ± 1.47
Table 4. Variation of dimensionless parameter H3/E2 and H/E with the interlayer thickness.
CoatingMultilayerMultilayerMultilayer
Interlayer Thickness100 nm300 nm500 nm
H3/E2(Resistance to Plastic Deformation)0.17610.15470.1298
H/E0.0702230.06640.0636