Article

Research on the Forming, Microstructures, and Mechanical Properties of High-Speed Laser Cladding 1Cr17Ni2 Stainless Steel on 1Cr17Ni5 Thin-Walled Tube

1
Key Laboratory of Comprehensive Diagnosis and Maintenance of Aviation Equipment Anhui Provincial Joint Construction Discipline, State-Owned Wuhu Machinery Factory, Wuhu 241007, China
2
School of Metallurgical Engineering, Xi’an University of Architecture and Technology, Xi’an 710055, China
*
Author to whom correspondence should be addressed.
Coatings 2026, 16(2), 179; https://doi.org/10.3390/coatings16020179
Submission received: 6 January 2026 / Revised: 26 January 2026 / Accepted: 26 January 2026 / Published: 30 January 2026
(This article belongs to the Section Laser Coatings)

Abstract

To study the forming, microstructures, and mechanical properties of high-speed laser cladding thin-walled tube, 1Cr17Ni2 powder was used to perform high-speed laser cladding on a 1Cr17Ni5 stainless steel tube with a thickness of 1 mm. The effects of powder feeding rate, laser power, rotation speed, protective gas flow rate, powder defocusing amount, and powder feeding gas flow rate on the width, height, and penetration depth of the weld beads were investigated. Subsequently, the cladding of multi-pass was carried out, and the microstructures and microhardness of the cladding layer were studied. The results showed that laser power had the most significant effect on the width of the weld bead, and the width gradually increased with the increase in power. The powder feeding rate had the most significant effect on the height of the weld bead, and the height gradually increased with the increase in powder feeding speed. The powder feeding rate also had the most significant effect on the penetration depth, and the penetration depth gradually decreased with the increase in powder feeding speed. When multiple passes overlap, the microstructure of the cladding layer exhibits a distinct periodic distribution. Large-sized primary austenite columnar crystals exist in the cladding layer, and the main microstructure in the columnar crystals is martensite and possesses a small amount of residual austenite. The base material is composed of austenite and a small amount of martensite. The average microhardness of the substrate is 366 HV, and the microhardness of the cladding layer gradually decreases with increasing distance from the fusion line, from 562 HV to 532 HV. Due to the heat effect of the cladding on the substrate, the microhardness of the substance near the fusion line is only 239 HV. As the distance from the fusion line increases, the influence of heat effect decreases, and the microhardness gradually increases.

1. Introduction

The unique environments and severe service conditions in fields such as aerospace, energy extraction, and marine industries have led to significant losses caused by corrosion and wear of tube. These issues not only affect the operation of equipment but also constrain the development of related industries [1,2,3,4].
Laser cladding can achieve a metallurgical bond between the coating and the substrate, making it widely used in repairing damaged areas [5,6,7]. However, traditional laser cladding is limited by the mobility of the equipment, resulting in low processing efficiency. Furthermore, the high thermal input during the process can easily lead to additional thermal damage to the substrate and cause deformation in thin-walled or large-scale parts, thereby restricting the application of this technology in industrial fields.
To enhance cladding efficiency and reduce thermal input, the Fraunhofer ILT in Germany and RWTH Aachen University have proposed and investigated high-speed laser cladding technology. Compared to traditional laser cladding, high-speed laser cladding optimizes the optical path system and cladding head, allowing the powder to be exposed to the laser for a longer duration during its flight. This extended laser exposure heats and melts the powder, while the slow movement of the laser head during the cladding process and the high-speed rotation of the workpiece enable micro-melting of the substrate and forming of the cladding layer [8,9,10,11]. The high-speed laser cladding technology offers a significant improvement, achieving over 10 times the efficiency compared to traditional laser cladding. Moreover, during the process of high-speed laser cladding, the thermal input to the substrate is significantly reduced, enabling the dilution rate of the coating to be controlled at a lower level. Scholars have conducted extensive research on high-speed laser cladding technology. Bai et al. [12] have studied the influence of process parameters on the microstructure of high-speed cladding layers. They observed that as the cladding speed increases, the crystallization rate and cooling rate also increase, resulting in finer microstructures within the cladding layer. This effectively minimizes segregation of components within the coating, thereby significantly enhancing its corrosion resistance. Huang et al. [13] investigated the effect of laser power on the ultra-high-speed laser cladding of Cr–Fe–Co–Ni–Mo coatings. Their results indicated that the quality of the coating initially increased and then decreased with increasing laser power. This trend can be attributed primarily to the fact that at lower powers, the energy is insufficient to effectively melt the powder. As the laser power increases, the powder melts more thoroughly, leading to a gradual improvement in the coating’s density. However, when the power is further increased, excessive thermal input and residual stresses within the coating can cause surface cracking and other issues, ultimately reducing the coating’s density. Jian et al. [9] conducted a study on the influence of scanning speed on the microstructural properties of Fe-based powder cladding layers. Their findings revealed that as the cladding speed increases, the coating thickness gradually decreases while the cladding efficiency improves. However, the increase in cladding speed also leads to an increase in coating hardness, which the authors attribute to the enhanced dissolution of Cr into the dendrites. Nevertheless, they also noted that higher speeds can result in the formation of more austenite and ferrite phases, which in turn can lead to a decrease in hardness. Zhang et al. [14] investigated the effect of processing parameters on the convergence of powder in high-speed laser cladding. Their results showed that the powder feed gas flow rate significantly impacts the convergence of the powder stream. An increase in the gas flow rate leads to a decrease in the powder stream density at the focal point, thereby reducing its convergence. Additionally, the introduction of a central shielding gas alters the powder stream dynamics, further influencing the deposition efficiency.
Regarding high-speed laser cladding of Cr-Ni martensitic stainless steels, scholars have conducted corresponding research. Li et al. [15] performed cladding of AISI 431 stainless steel on a 100 mm diameter 27SiMn rod and comparatively studied the cladding layer characteristics between traditional and ultra-high-speed cladding methods. Their results demonstrated that the cladding layer obtained through ultra-high-speed cladding exhibits finer microstructures, more uniform composition distribution, and superior corrosion resistance compared to that obtained through traditional cladding. Ren et al. [16] conducted ultra-high-speed laser cladding of AISI 431 stainless steel on a 27SiMn steel rod and observed that the element distribution within the deposited layer was not uniform. Specifically, they found that the interdendritic regions were rich in Cr, while the dendrites were rich in Fe. Li et al. [17] conducted a comparative analysis of the microstructural and performance characteristics of Cr21Ni3 stainless steel coatings produced by ultra-high-speed laser cladding and conventional laser cladding. Their findings revealed that the coatings obtained through ultra-high-speed laser cladding exhibited superior corrosion resistance, achieving up to four times the resistance compared to coatings produced by conventional laser cladding. Bu et al. [18] investigated the effect of overlap ratio on the cladding layer in their study of cladding 431 stainless steel on a 15 mm thick 304 stainless steel tube. They observed that as the overlap ratio increased, the surface quality and microstructural density of the cladding layer improved. Specifically, they found that an overlap ratio of 80% resulted in the optimal wear and corrosion resistance properties for the coating. Xu et al. [19] performed ultra-high-speed laser cladding of Cr18Ni3 powder on a 10 mm thick 45 steel tube and further subjected the cladding layer to laser remelting. Their study focused on the microstructural and performance characteristics of the cladding layer. They found that the surface quality and corrosion resistance of the cladding layer were further enhanced after the remelting process.
From the aforementioned research conducted by scholars, it is evident that high-speed laser cladding technology possesses numerous advantages, including low dilution rates, high density, excellent bonding between the coating and substrate, versatility in terms of compatible cladding materials, and high efficiency. However, current research efforts primarily focus on cladding thicker components such as axles and thick-walled tube, with a notable lack of studies exploring the cladding formation of thinner parts, particularly the thin-walled tube. There are significant differences in heat dissipation and solidification conditions between thin-walled and thick-walled materials, resulting in differences in forming, microstructures, and mechanical properties. This study presents the first study on high-speed laser cladding of a 1 mm thick thin-walled tube made of 1Cr17Ni5 stainless steel, using 1Cr17Ni2 as the cladding material. Systematic investigation of the influence of processing parameters on the cladding formation of thin-walled tubes showcased the cladding process window for thin-walled 1Cr17Ni2/1Cr17Ni5 tube. Furthermore, using the optimized parameter, we perform multi-track cladding on the 1 mm thin-walled tube, analyzing and characterizing the microstructures and mechanical properties of the cladding layer. This study provides experimental support for high-speed cladding of 1 mm thick thin-walled tube.

2. Materials and Methods

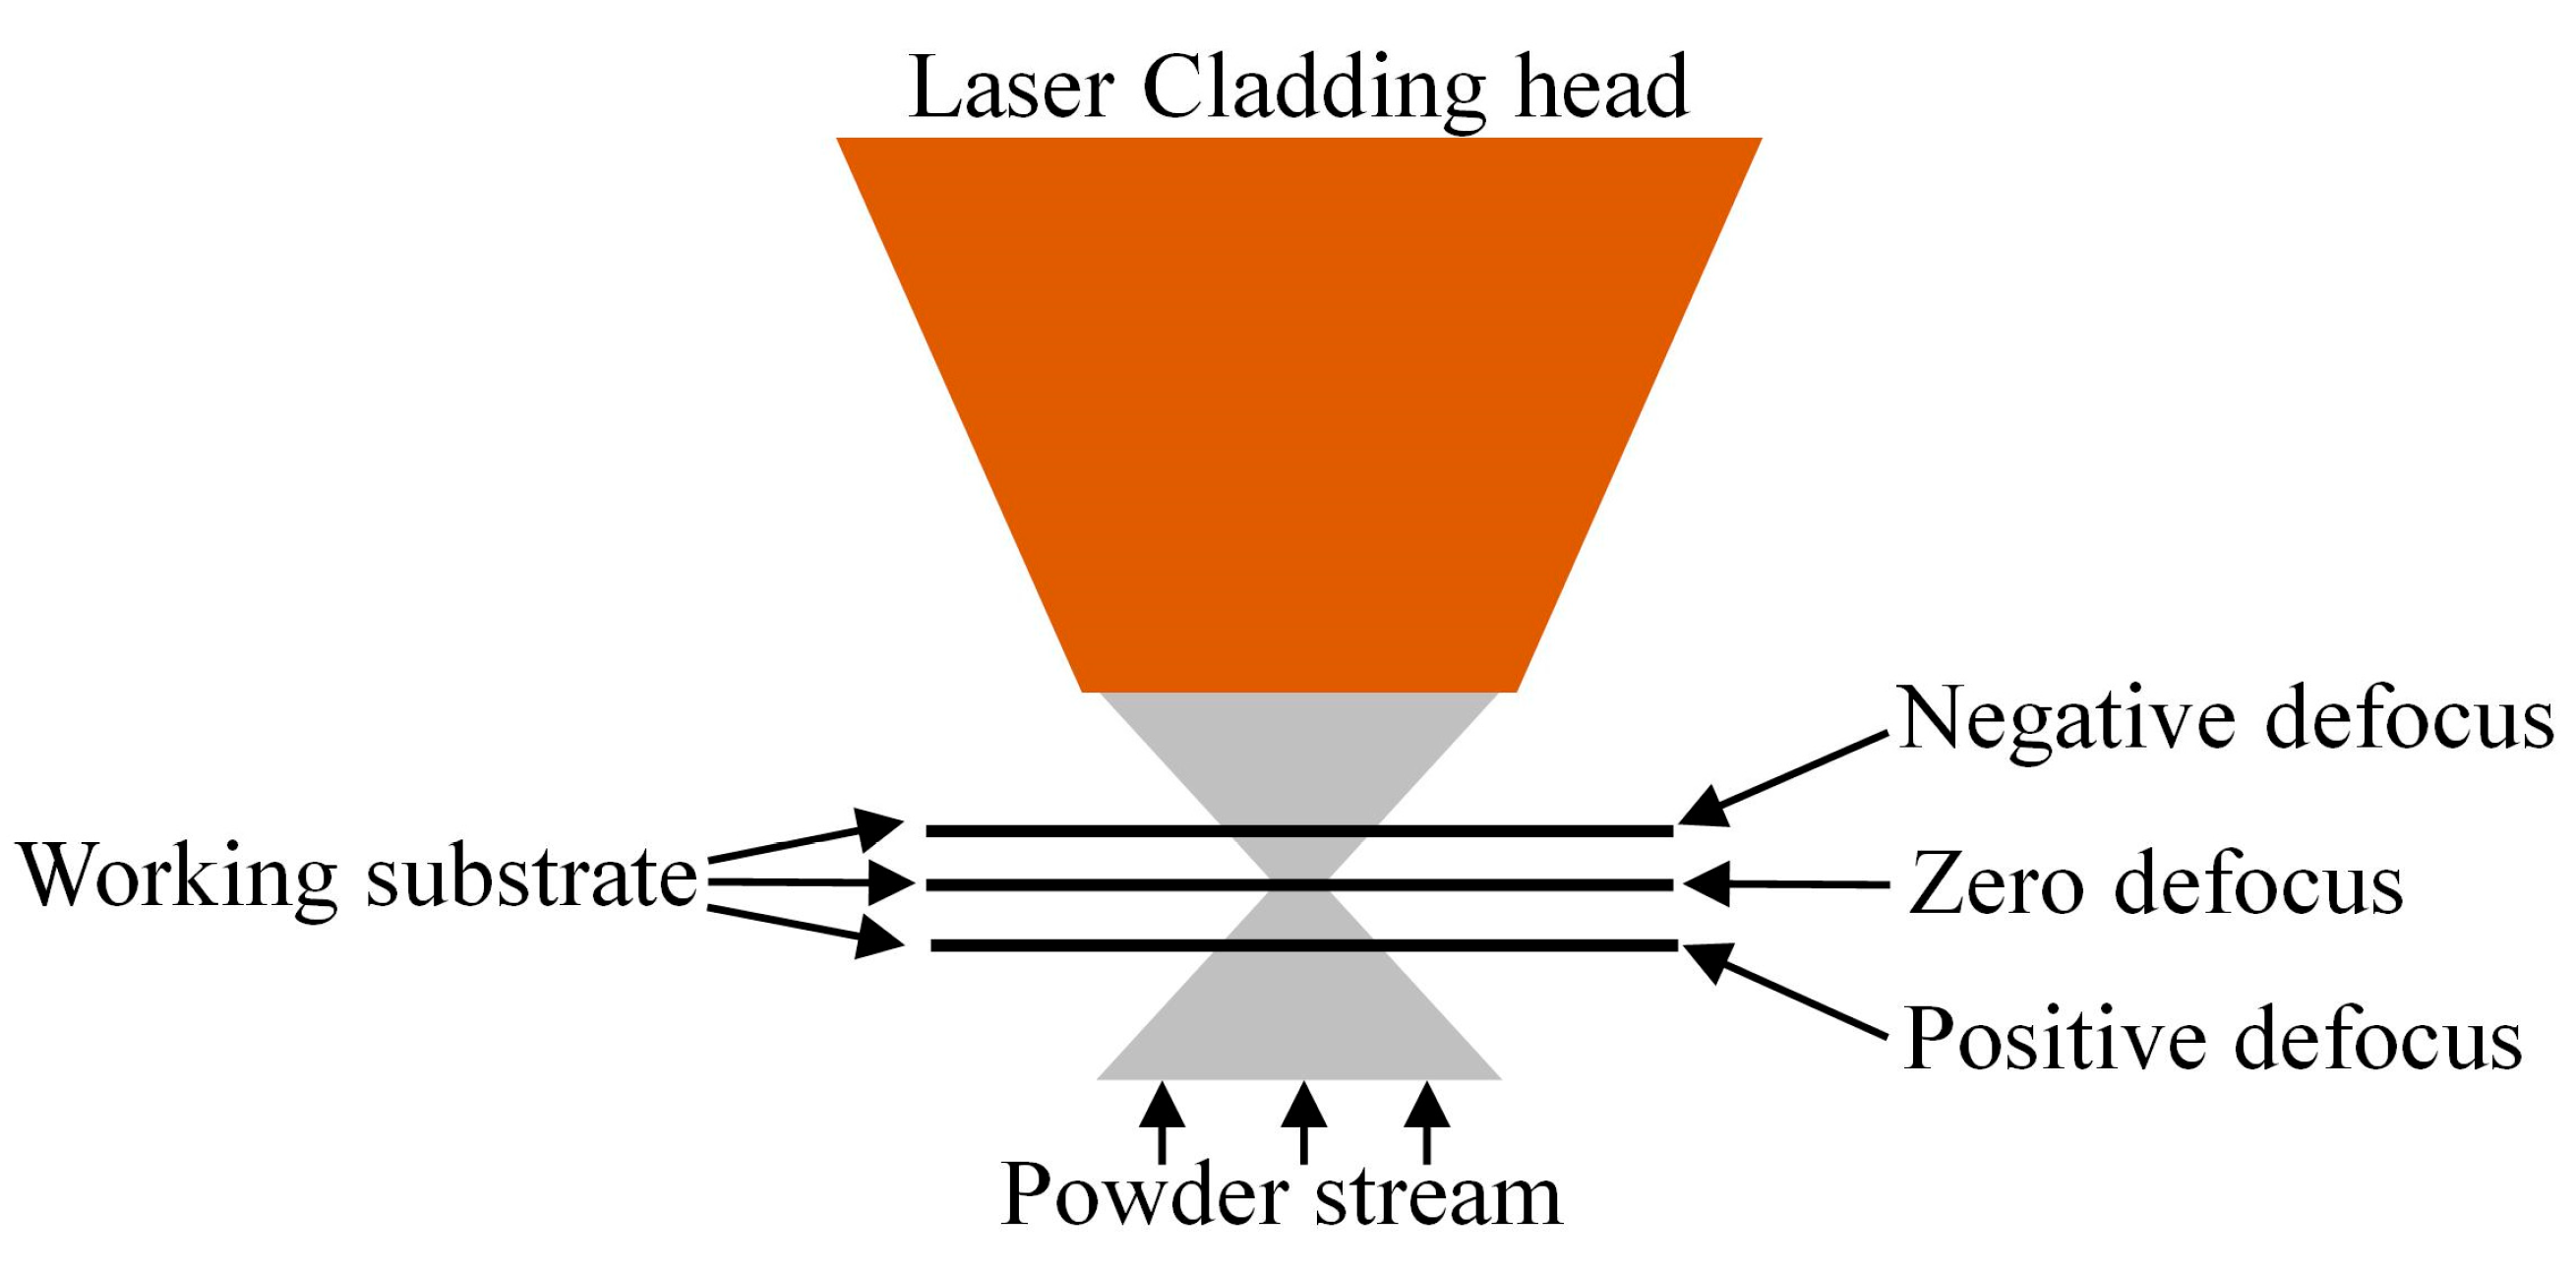
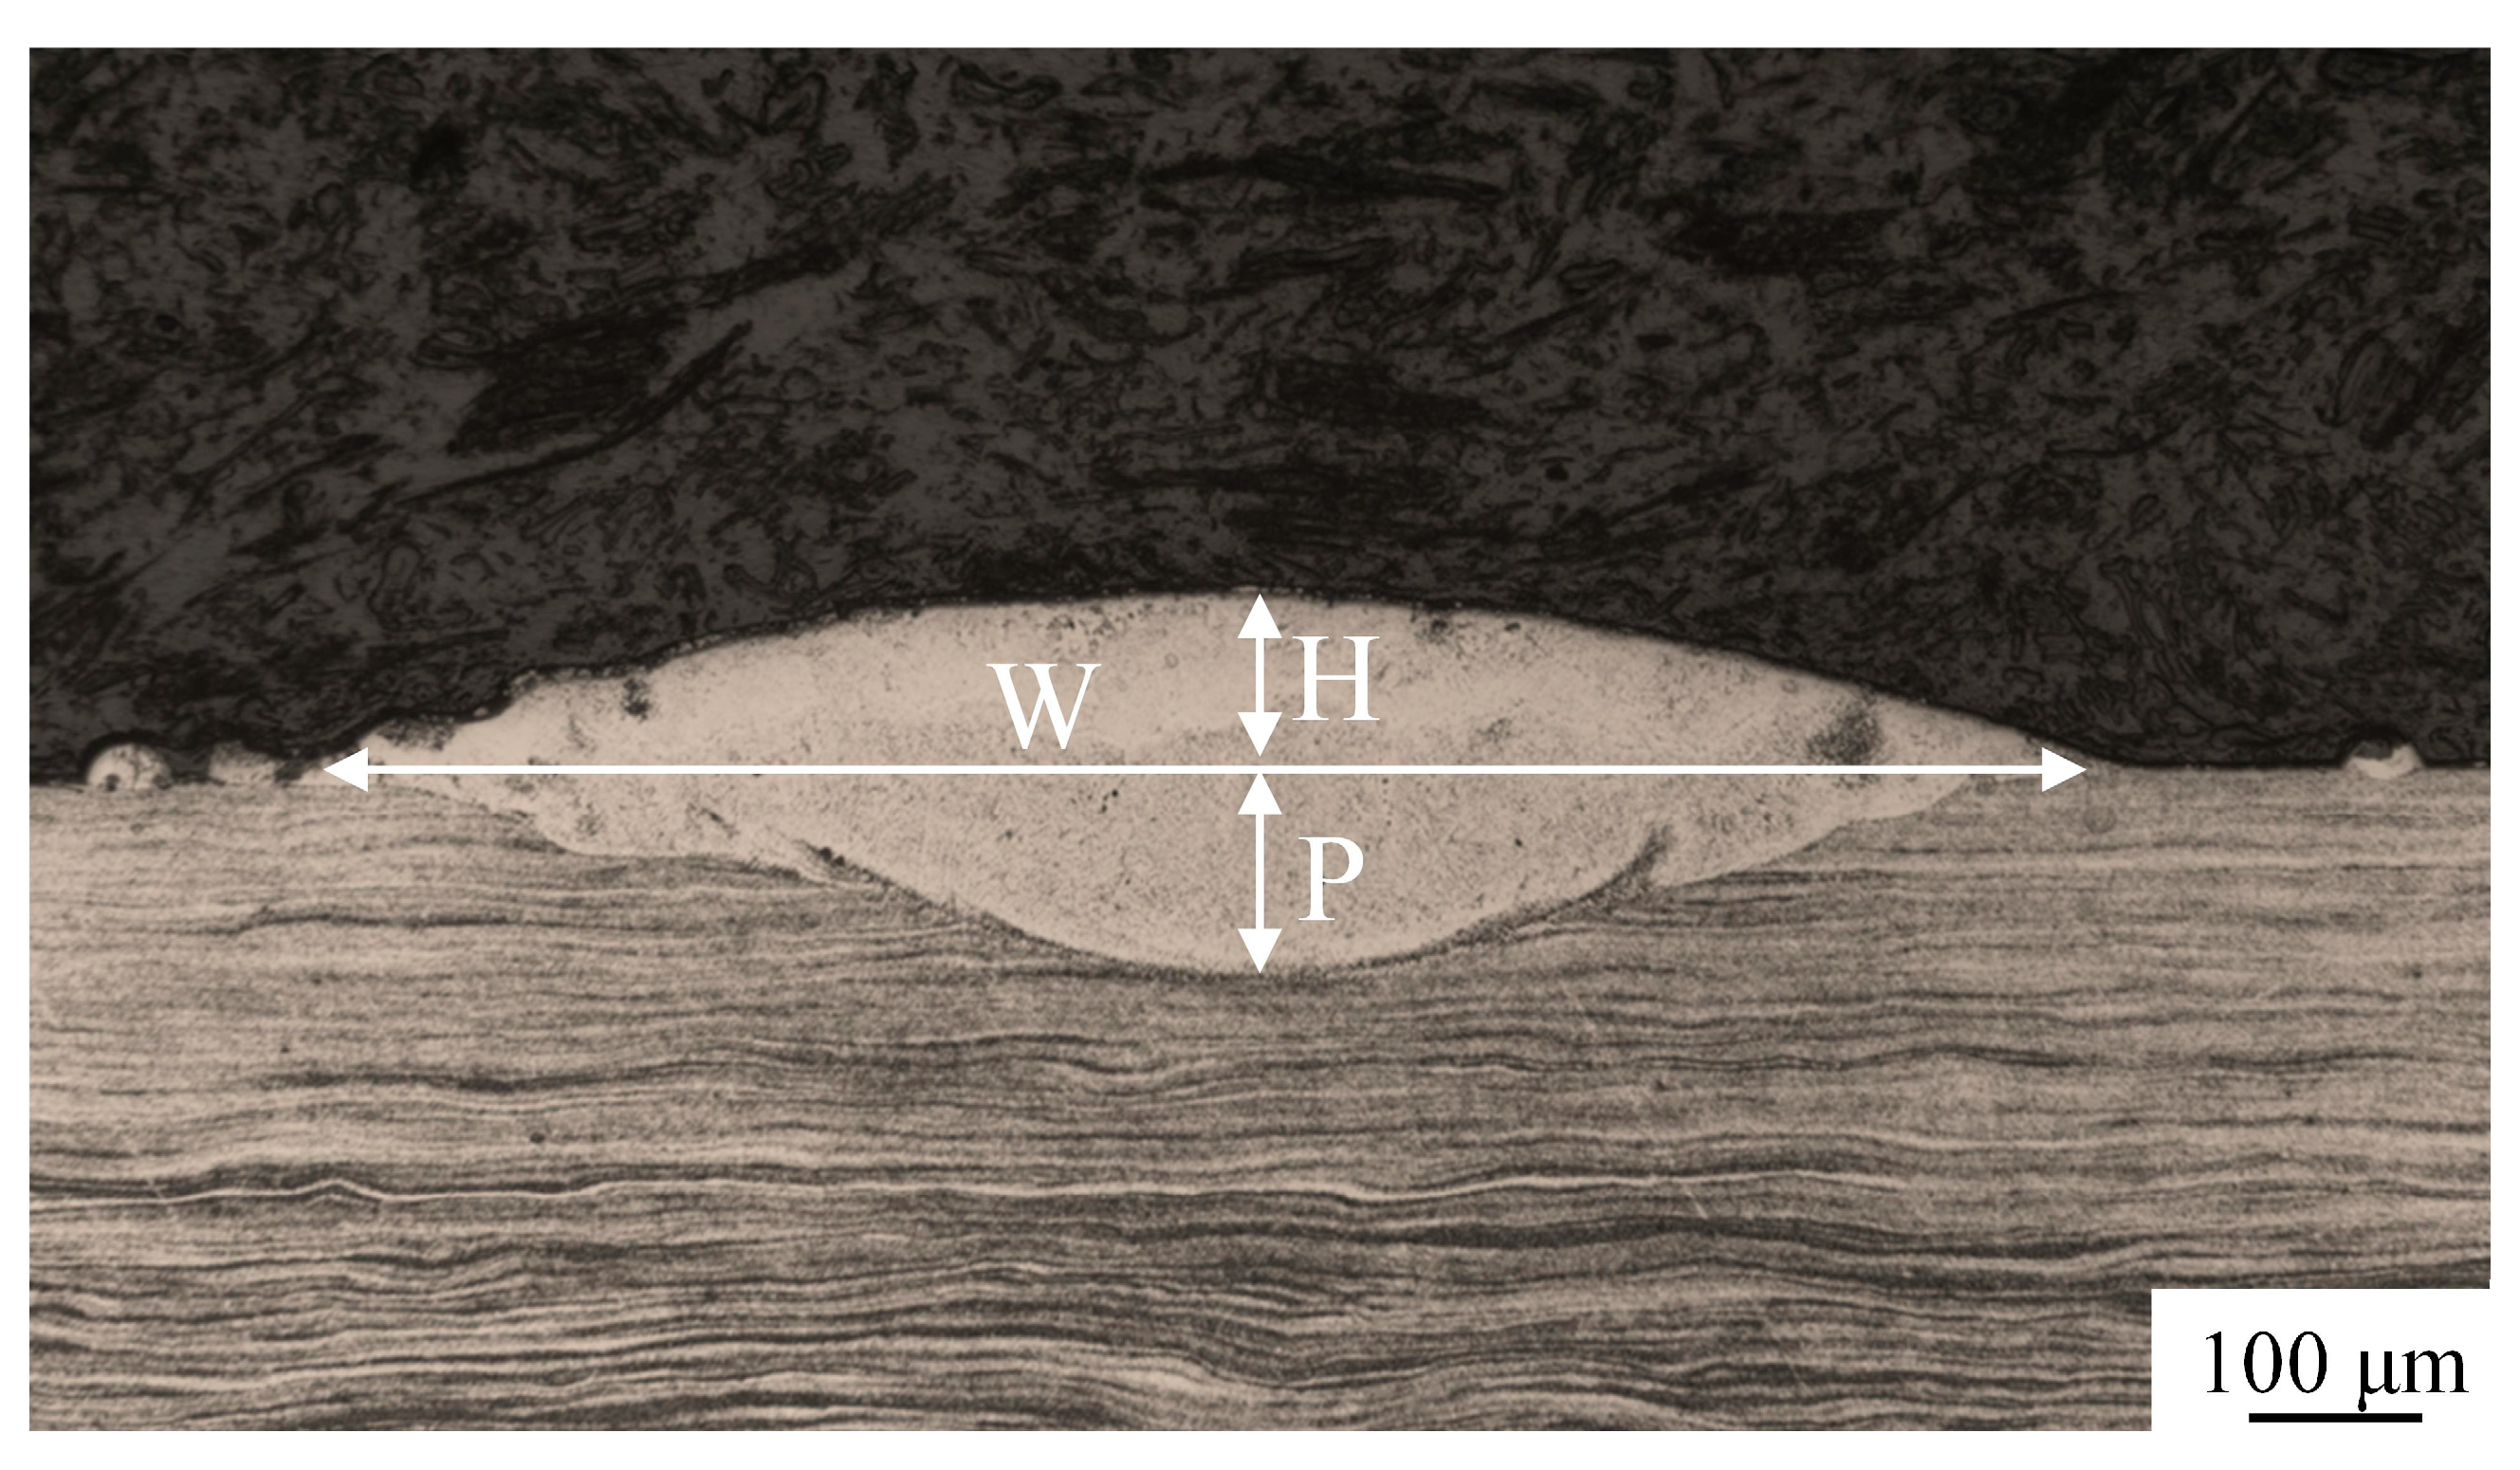
Laser cladding experiments were conducted using a laser cladding device manufactured by Nanjing Hui Rui (Nanjing, China), as shown in Figure 1. The powder focal length was 12 mm, and the powder focus diameter was 1.5 mm. The laser spot diameter was 1.2 mm. The laser is Laserline LDM 4500 (Mülheim-Kärlich, Germany) with a maximum power of 4.5 KW, and the robot is FANUC (Yamanashi, Japan). A rotating motor equipped with a three-jaw chuck was used to fix and rotate the tube during the laser cladding process. The maximum rotational speed of the equipment was 300 r/min, the minimum rotational speed was 1 r/min, and the minimum adjustment was 1 r/min. The tube material was 1Cr17Ni5, with a wall thickness of 1 mm, a length of 150 mm, and an outer diameter of 50 mm. The powder used was 20–53 μm spherical 1Cr17Ni2 powder (AVIMETAL, Beijing, China). An L25(65) orthogonal experiment was designed with factors such as powder feeding speed, laser power, tube rotation speed, protective gas flow rate, powder defocus amount, and powder feeding gas flow rate, as shown in Table 1. The powder defocus amount is defined as shown in Figure 2, where zero defocus is defined when the working surface is at the powder focus point, positive defocus is when the working surface is below the powder focus point, and negative defocus is when the working surface is above the powder focus point. Single-pass single-layer cladding experiments were performed on the tube according to the orthogonal test table, and then samples were cut, the cross-sectional morphology of the weld bead was tested, and characteristic dimensions such as bead width, height, and penetration depth were measured by a microscope with an accuracy of 1 μm. We measured one cross-section for each parameter. Each characteristic value was measured three times, and the average was calculated and reported in Table 2. The definitions of the weld bead characteristic dimensions are shown in Figure 3. Metallographic microstructure testing was performed using a ZEISS Axio Observer 3M (Oberkochen, Germany). SEM testing was performed using Zeiss Sigma 300 (Oberkochen, Germany). Micro Vickers hardness was tested using a Wilson VH3100 (Norwood, USA), with a test load of 300 gf and loading for 15 s. The etching solution was FeCl3 solution (20 g FeCl3 + 40 mL HCl + 120 mL H2O), and the etching time was 3–4 s. Based on the weld bead characteristic dimensions and linear energy density, the 12th group of parameters was selected for single-layer multi-pass overlap experiments. The formula for calculating linear energy density is E = 60·P/(π·D·n), where E (J·mm−1) is the linear energy density, P (W) is the laser power, D (mm) is the outer diameter of the tube, and n (r·min−1) is the rotation speed of the tube. During the overlap, the moving speed of the cladding head was 0.5 mm/s. The maximum and minimum diameters of the tube before and after laser cladding were measured using a vernier caliper. The ovality is defined as: O(%) = 100·(Dmax − Dmin)/D, Dmax is the maximum diameter of tube, Dmin is the minimum diameter of tube, and D is the nominal diameter of the tube (50 mm). The XRD test range for the tube before and after multi-pass overlap was 20–100°, with a test step size of 1°/min. Ion polishing was performed before EBSD testing, followed by EBSD testing. The test step size for low-magnification images was 1 μm, and the test step size for high-magnification images was 0.24 μm. The test results were post-processed using Channel 5 software (v.5.12).

3. Results and Discussions

3.1. Forming of Single-Pass Beads

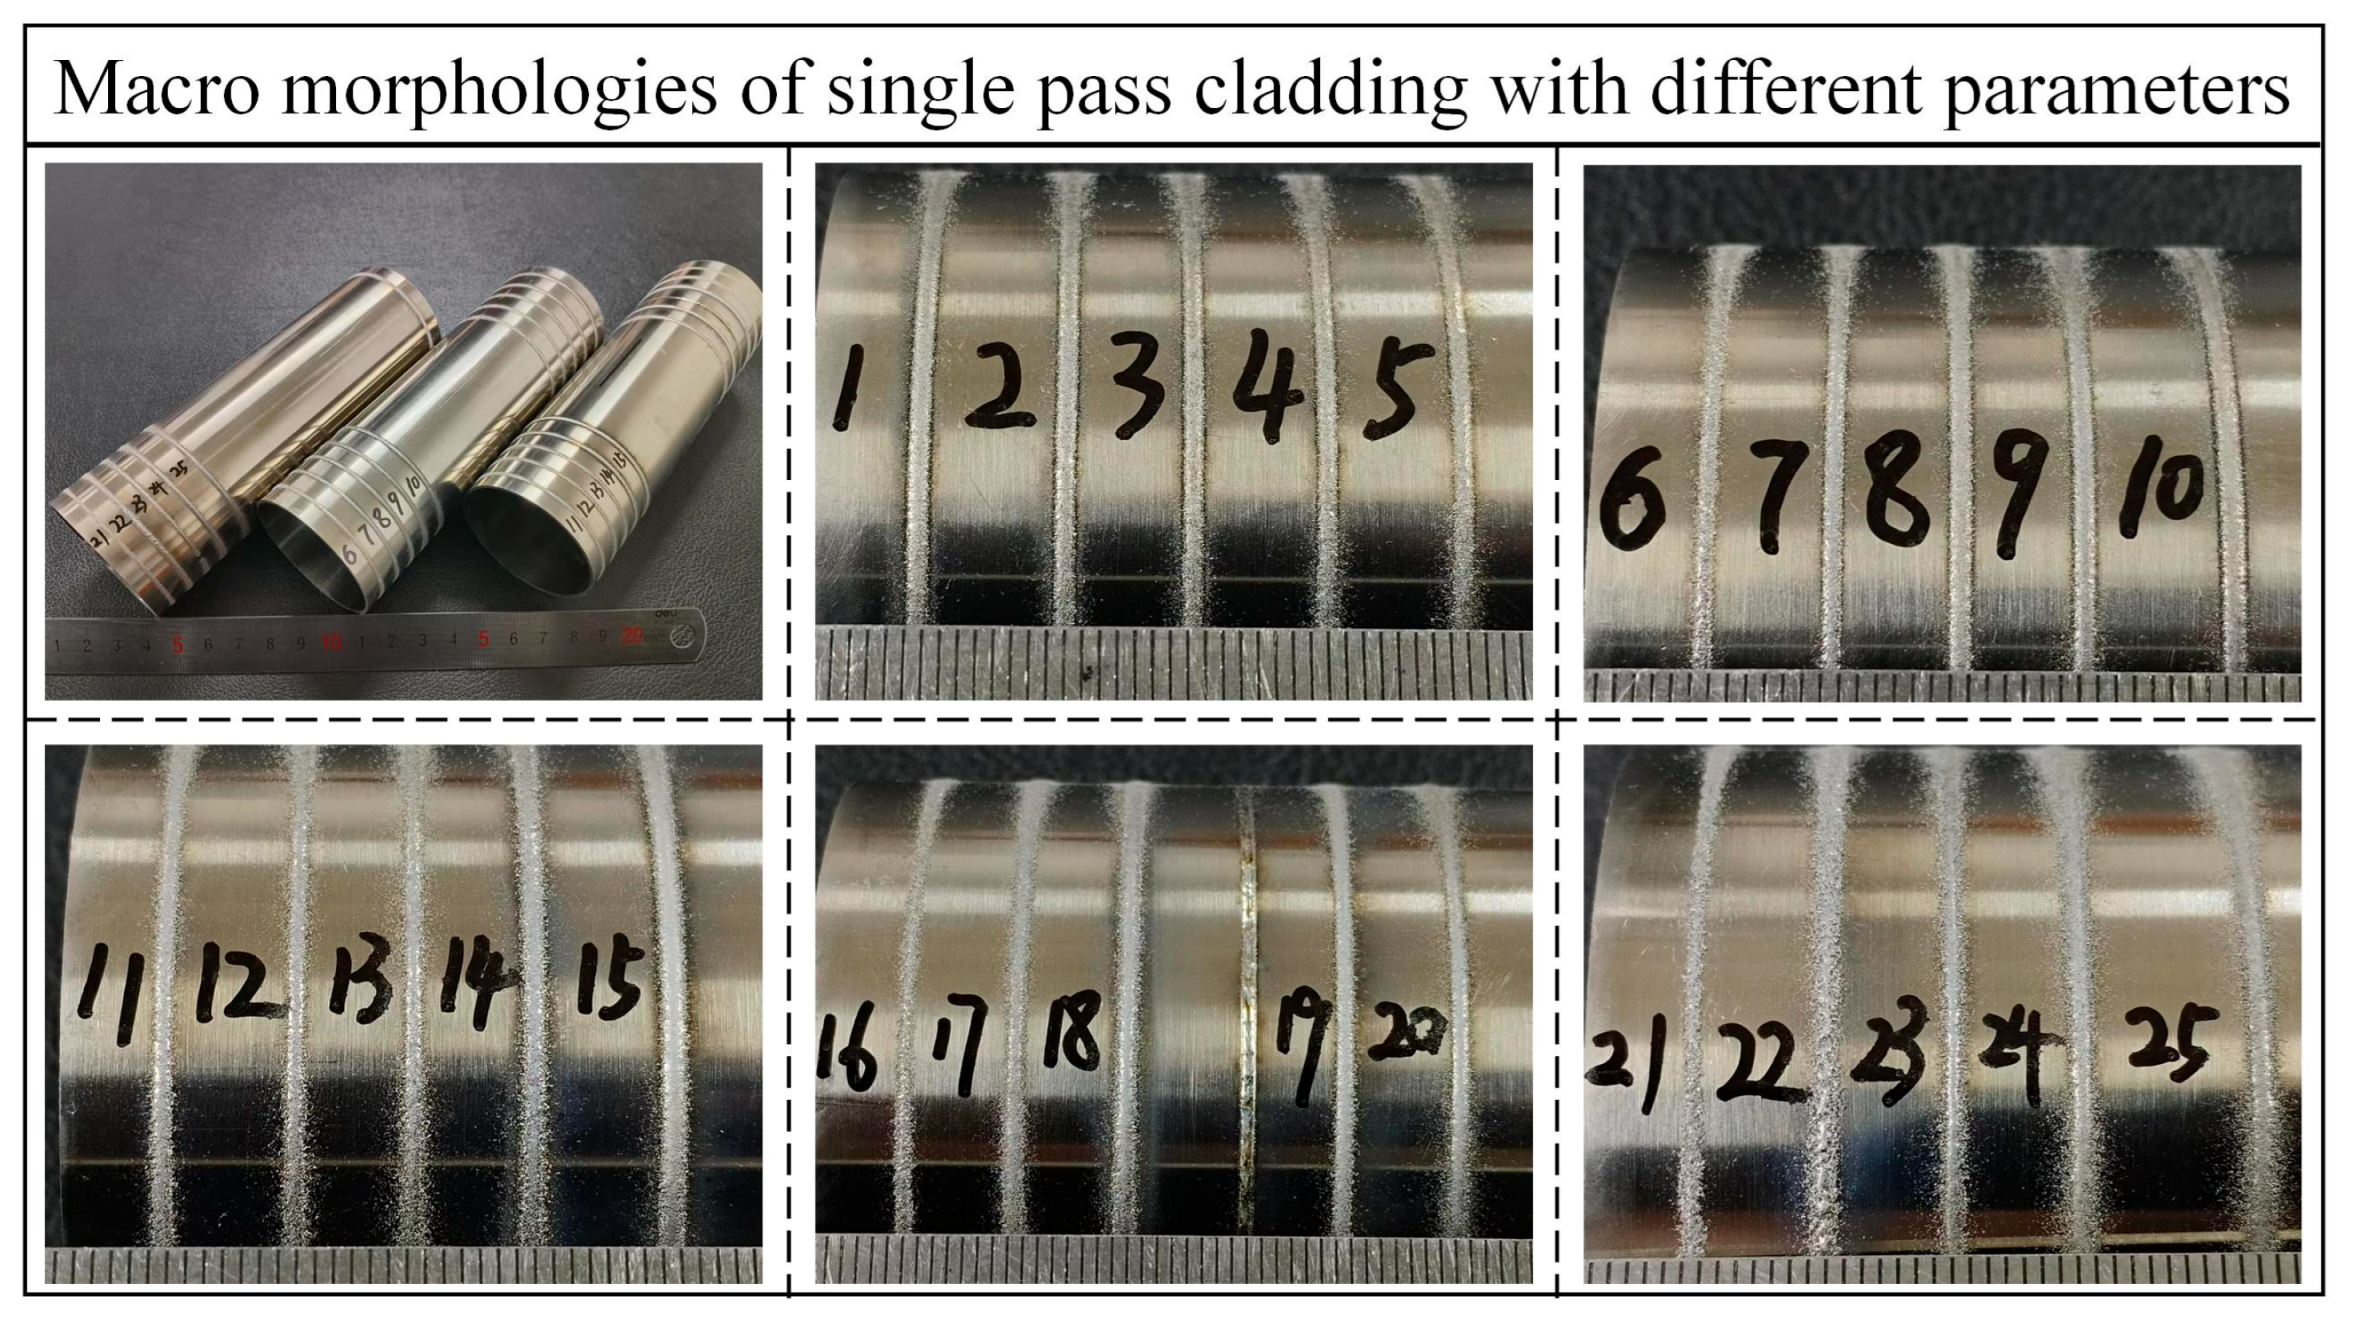
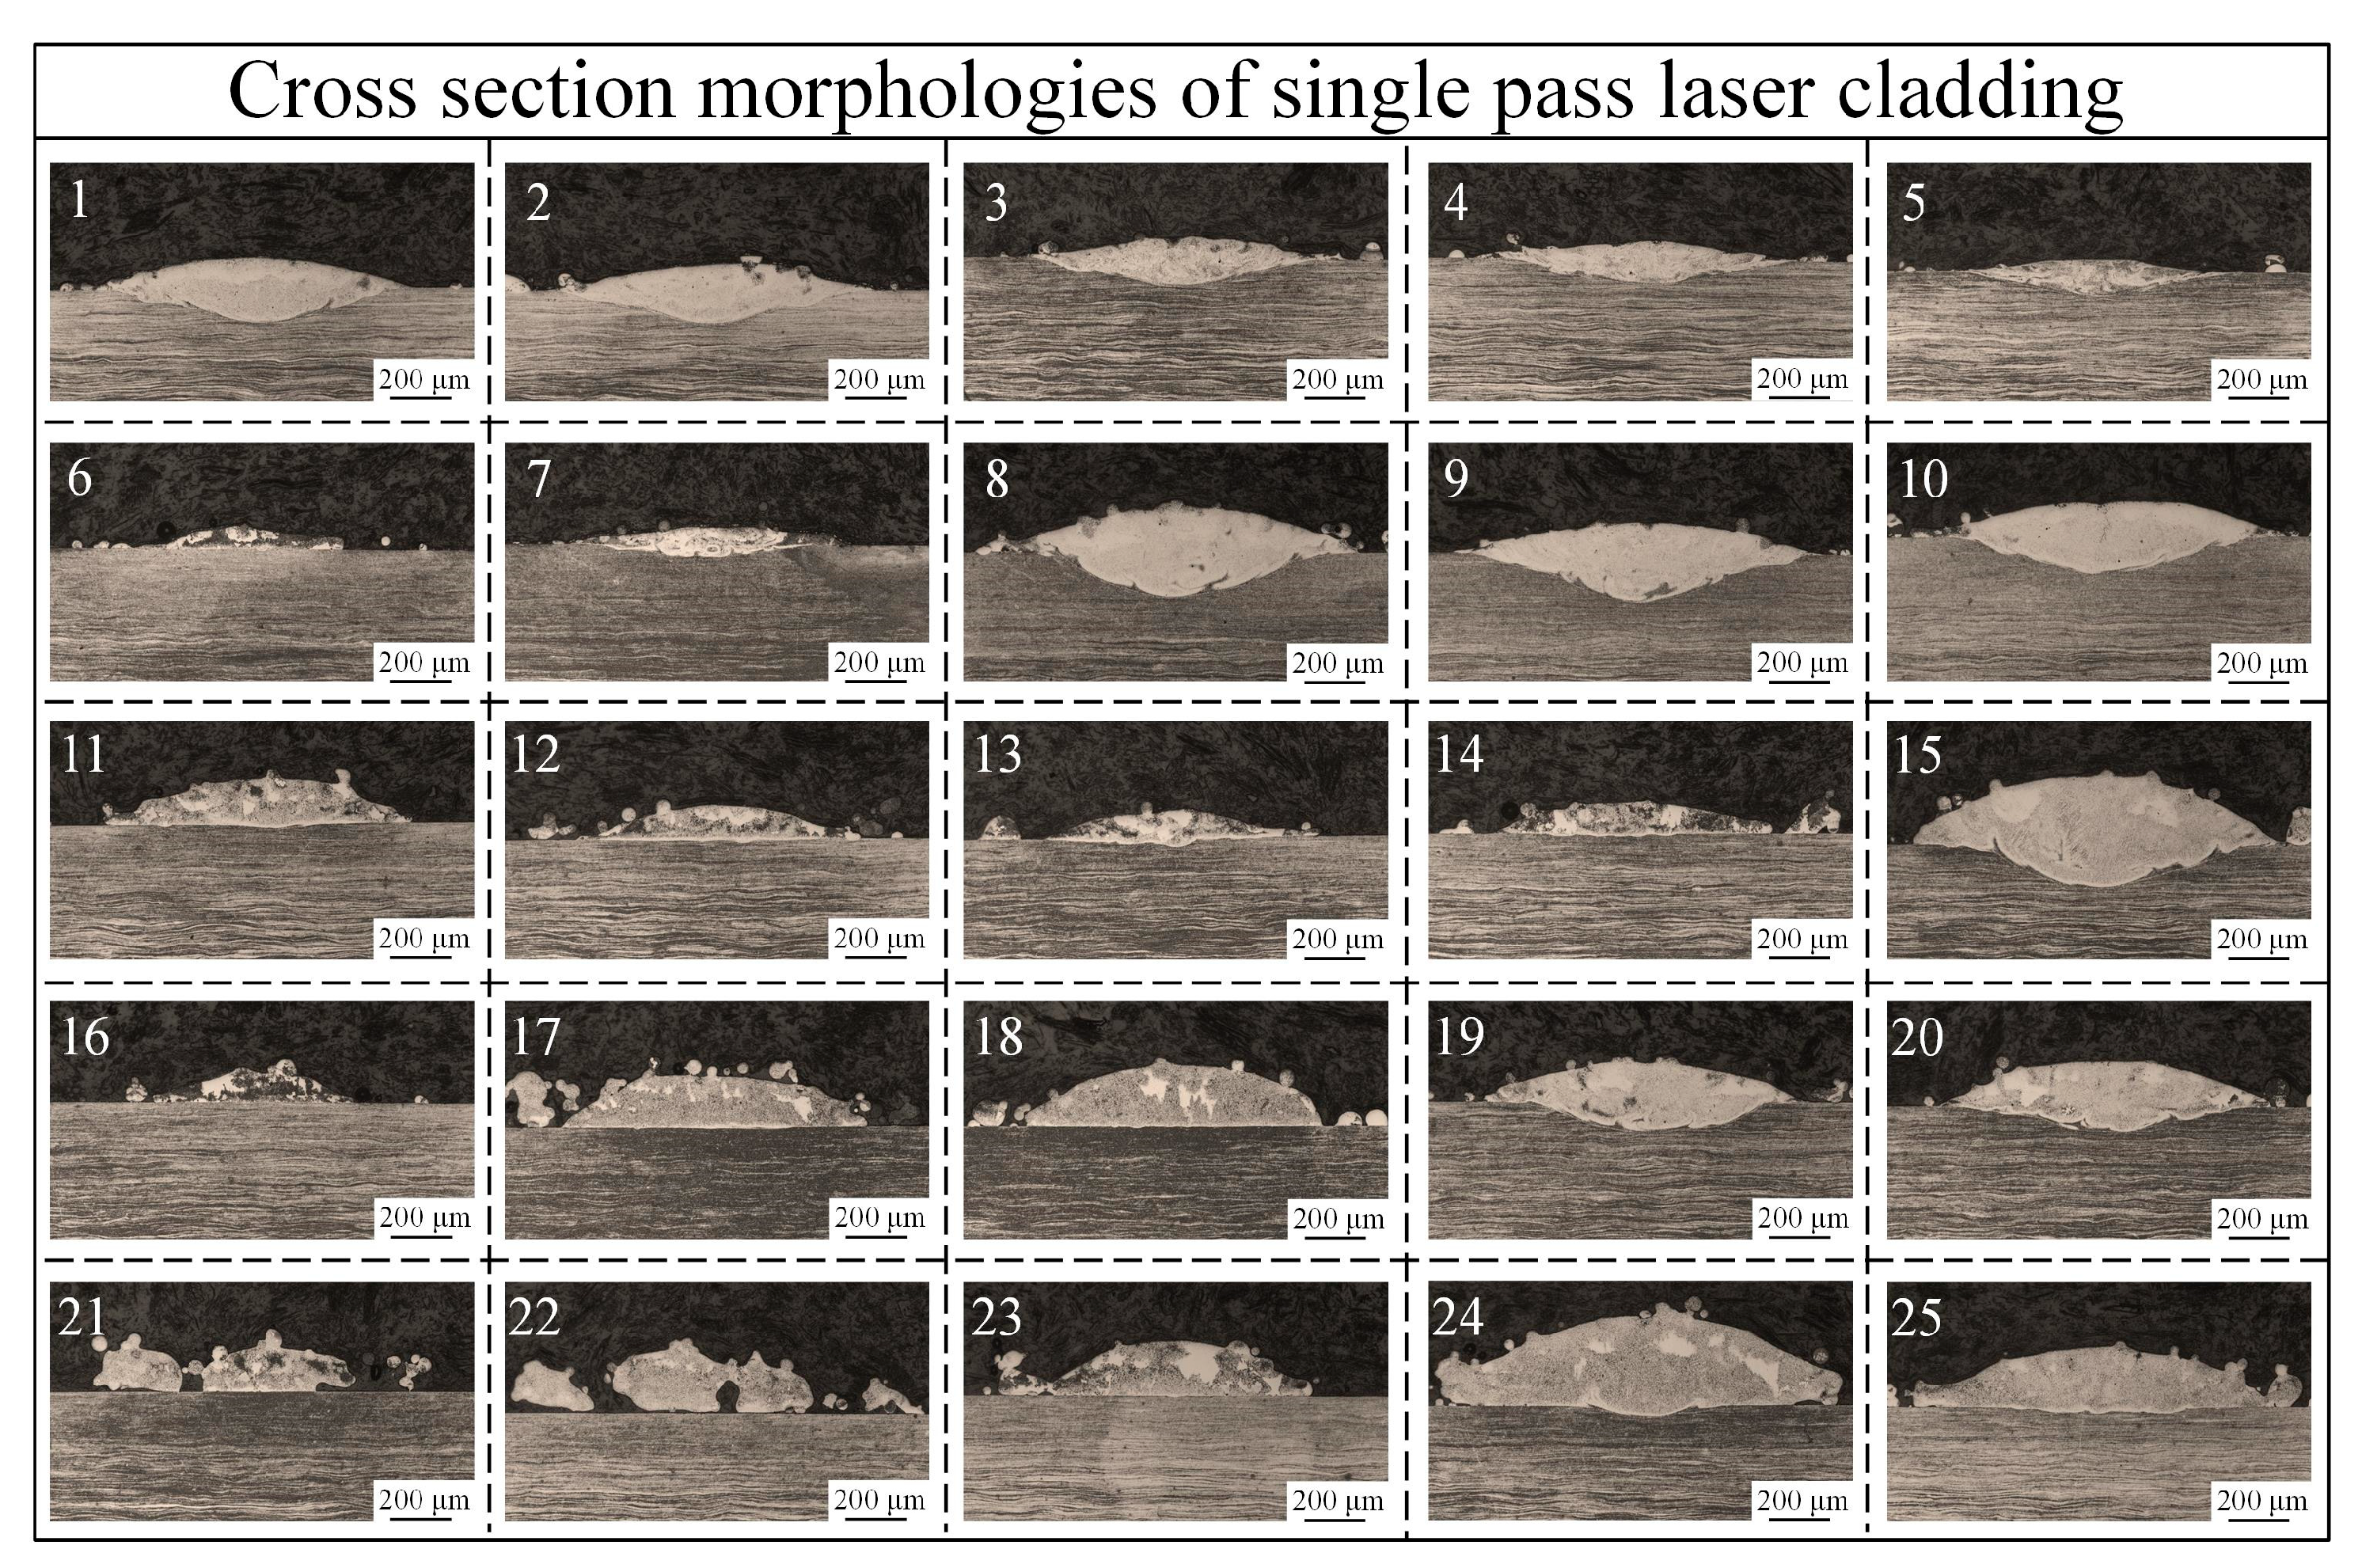
Figure 4 shows the surface morphologies of 25 sets of single-pass cladding beads. Except for parameters 16, 21, and 22, where the cladding failed to form a continuous bead due to the low power and high rotation speed, resulting in insufficient heat input during the cladding process and an inability to form a continuous and effective molten pool on the substrate surface, all other parameters formed continuous weld beads. Simultaneously, powder sticking was observed on the surface of all weld beads under different parameters, which is a typical characteristic of high-speed laser cladding. Many scholars have identified this phenomenon in their research [13,18,19,20,21], primarily attributed to the rapid formation and solidification of the molten pool caused by the high linear speed. The powder on the upper surface of the molten pool fails to melt effectively, and continuous powder delivery results in some powder adhering to the surface, leading to powder sticking on the beads surface. Figure 5 shown the cross-sectional morphologies of each beads. Based on the morphologies, the characteristic dimensions of the beads under different parameters were statistically and analyzed, and the results are presented in Table 2. It can be observed from Figure 5 that there are significant differences in the cross-sectional morphologies of the beads under different parameters. The fusion lines in the cross-sections under parameters 1, 2, 3, 4, 5, 7, 8, 9, 10, 15, 19, and 20 exhibit a shallow U-shape, while those under parameters 6, 11, 12, 13, 14, 17, 18, 23, 24, and 25 approximate a “—” shape. The differences in the fusion lines reflect variations in laser energy distribution during the laser cladding process. The main reasons for the formation of a shallow U-shaped fusion line are as follows: (1) Low powder feed rate. Due to the small amount of powder, less energy is required for powder melting, and more energy is used to melt the substrate. (2) High laser power and low linear speed. With a fixed energy required for powder melting, prolonged laser irradiation with higher power leads to more laser energy melting the substrate while the powder melts, thus forming a U-shaped fusion line. Conversely, the “—” shape is due to the opposite conditions: a large powder feed rate results in more energy being absorbed by the powder, leaving less energy for substrate melting; small power and high linear speed prevent the laser energy from accumulating on the substrate surface for a long time, achieving only a slight melting of the substrate surface. The combination of the slightly melted substrate and the molten powder forms a straight fusion line feature in the cross-section.
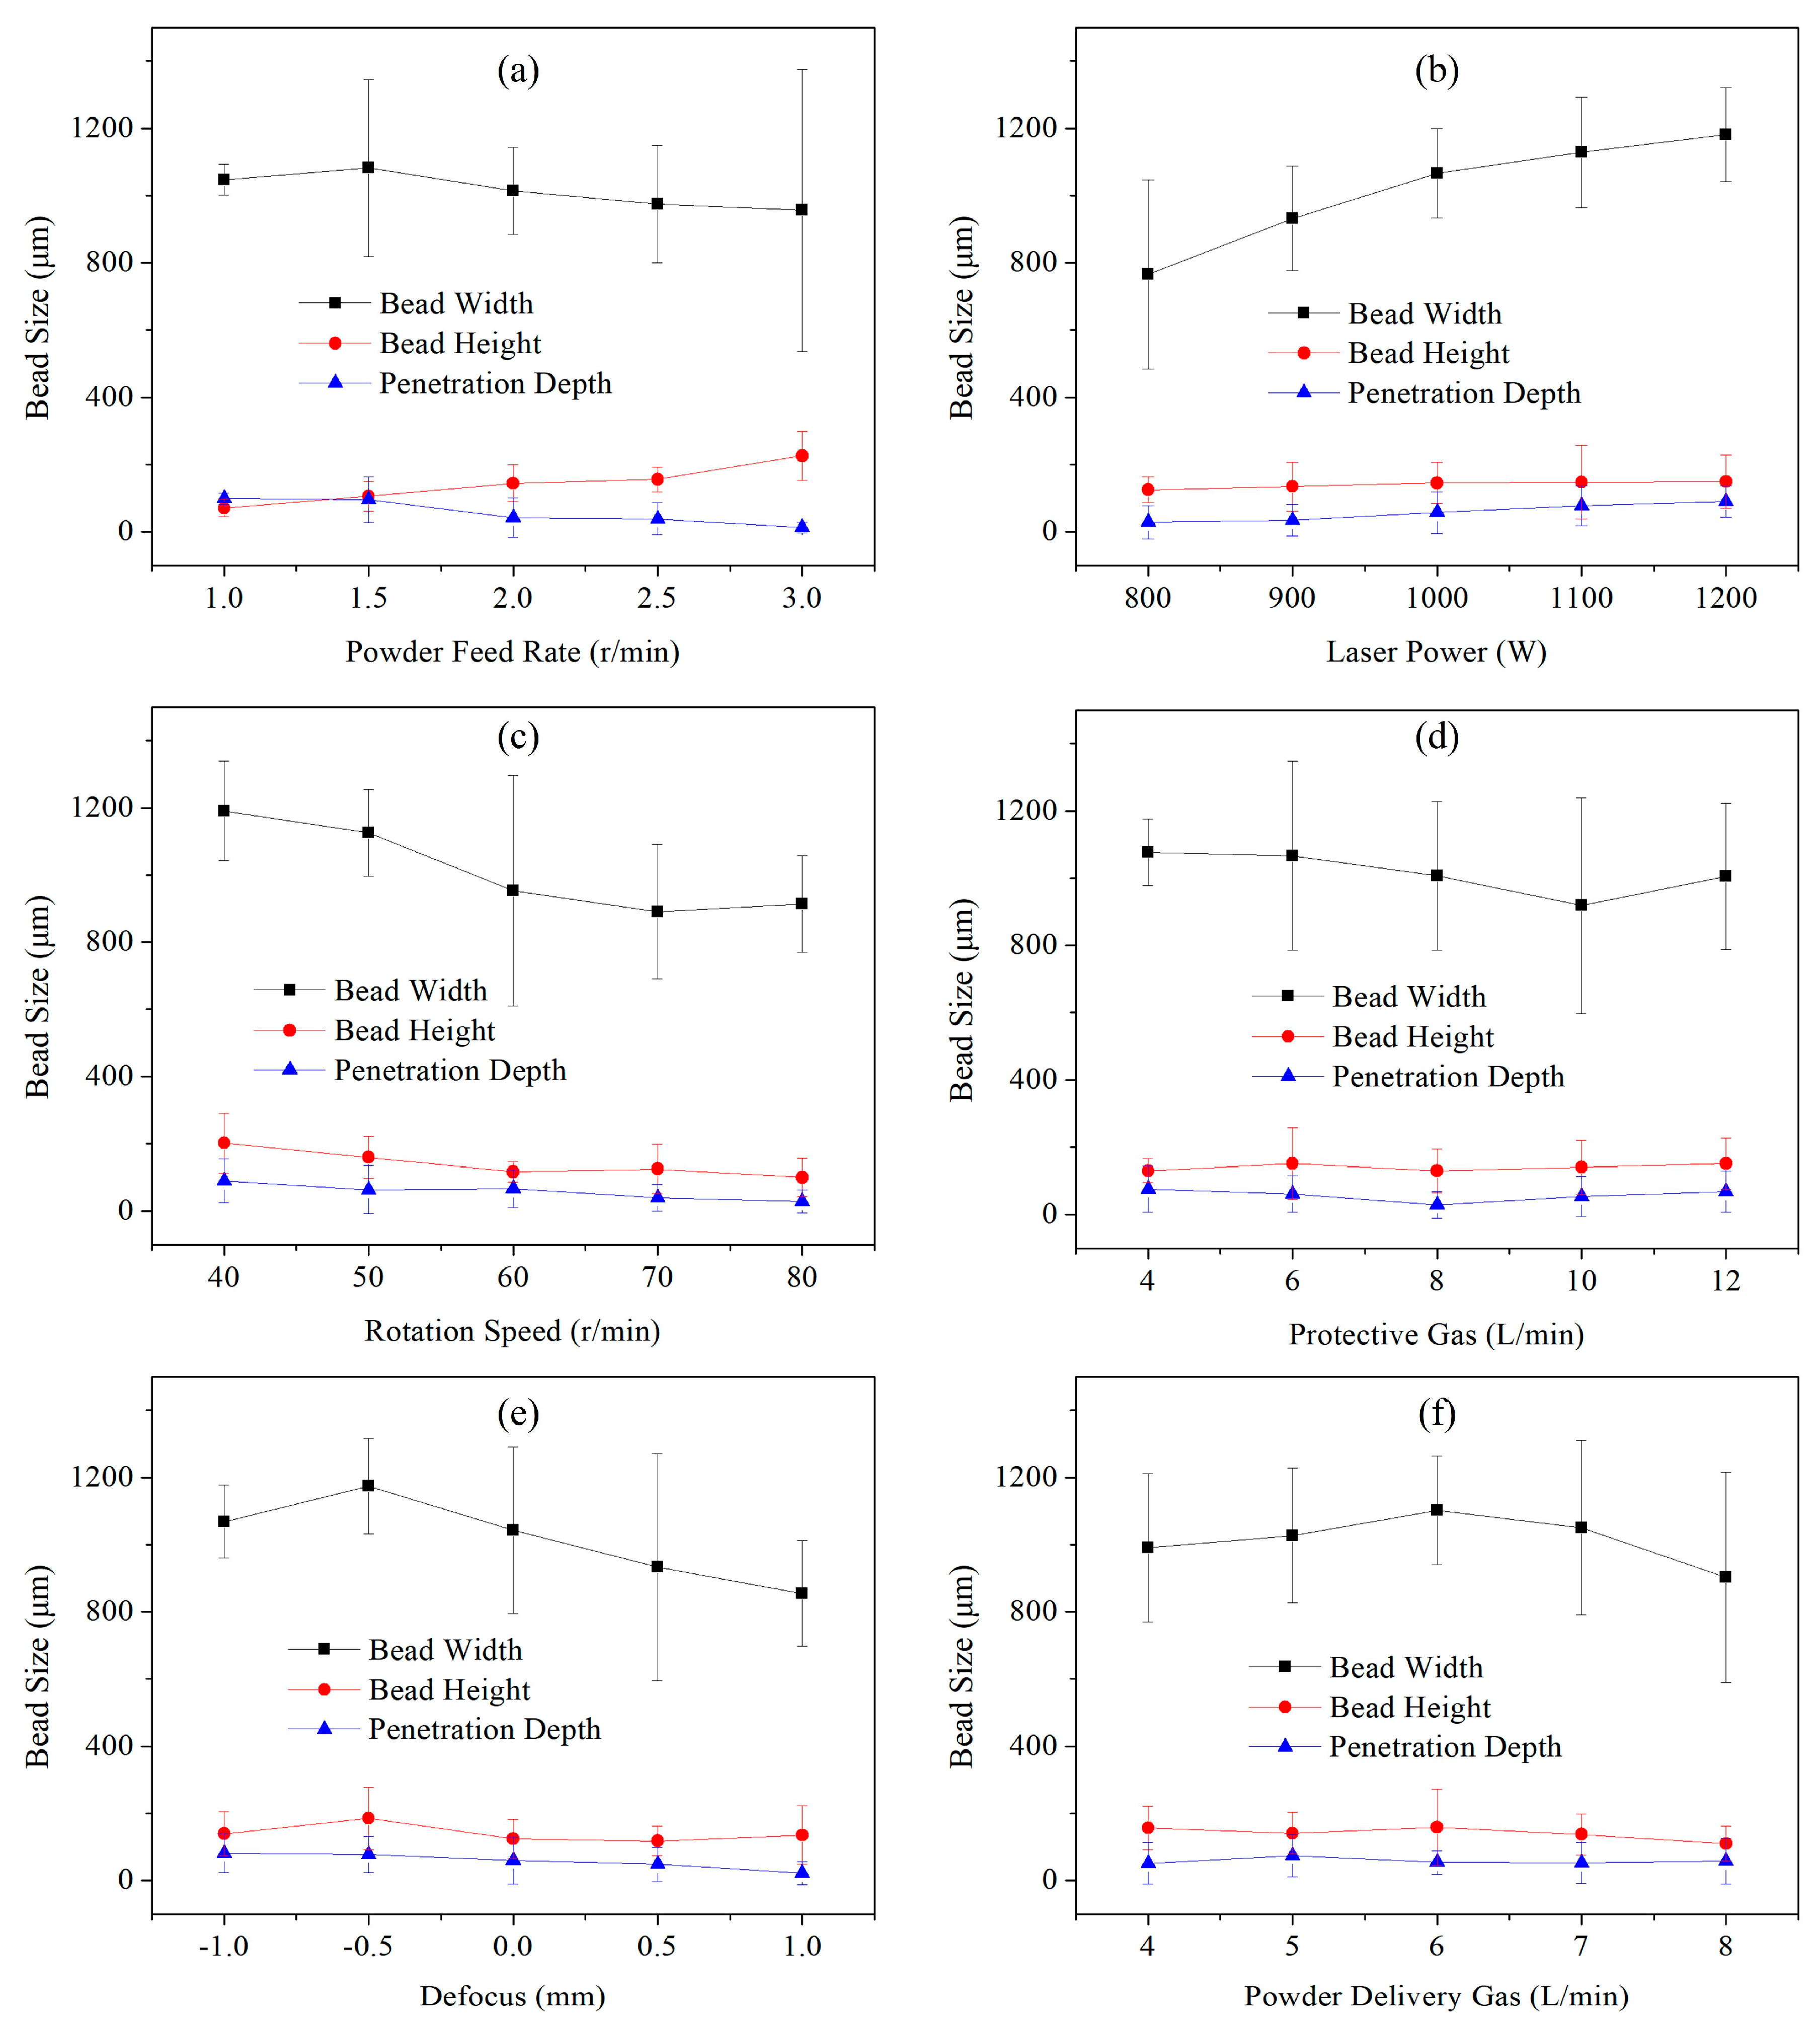
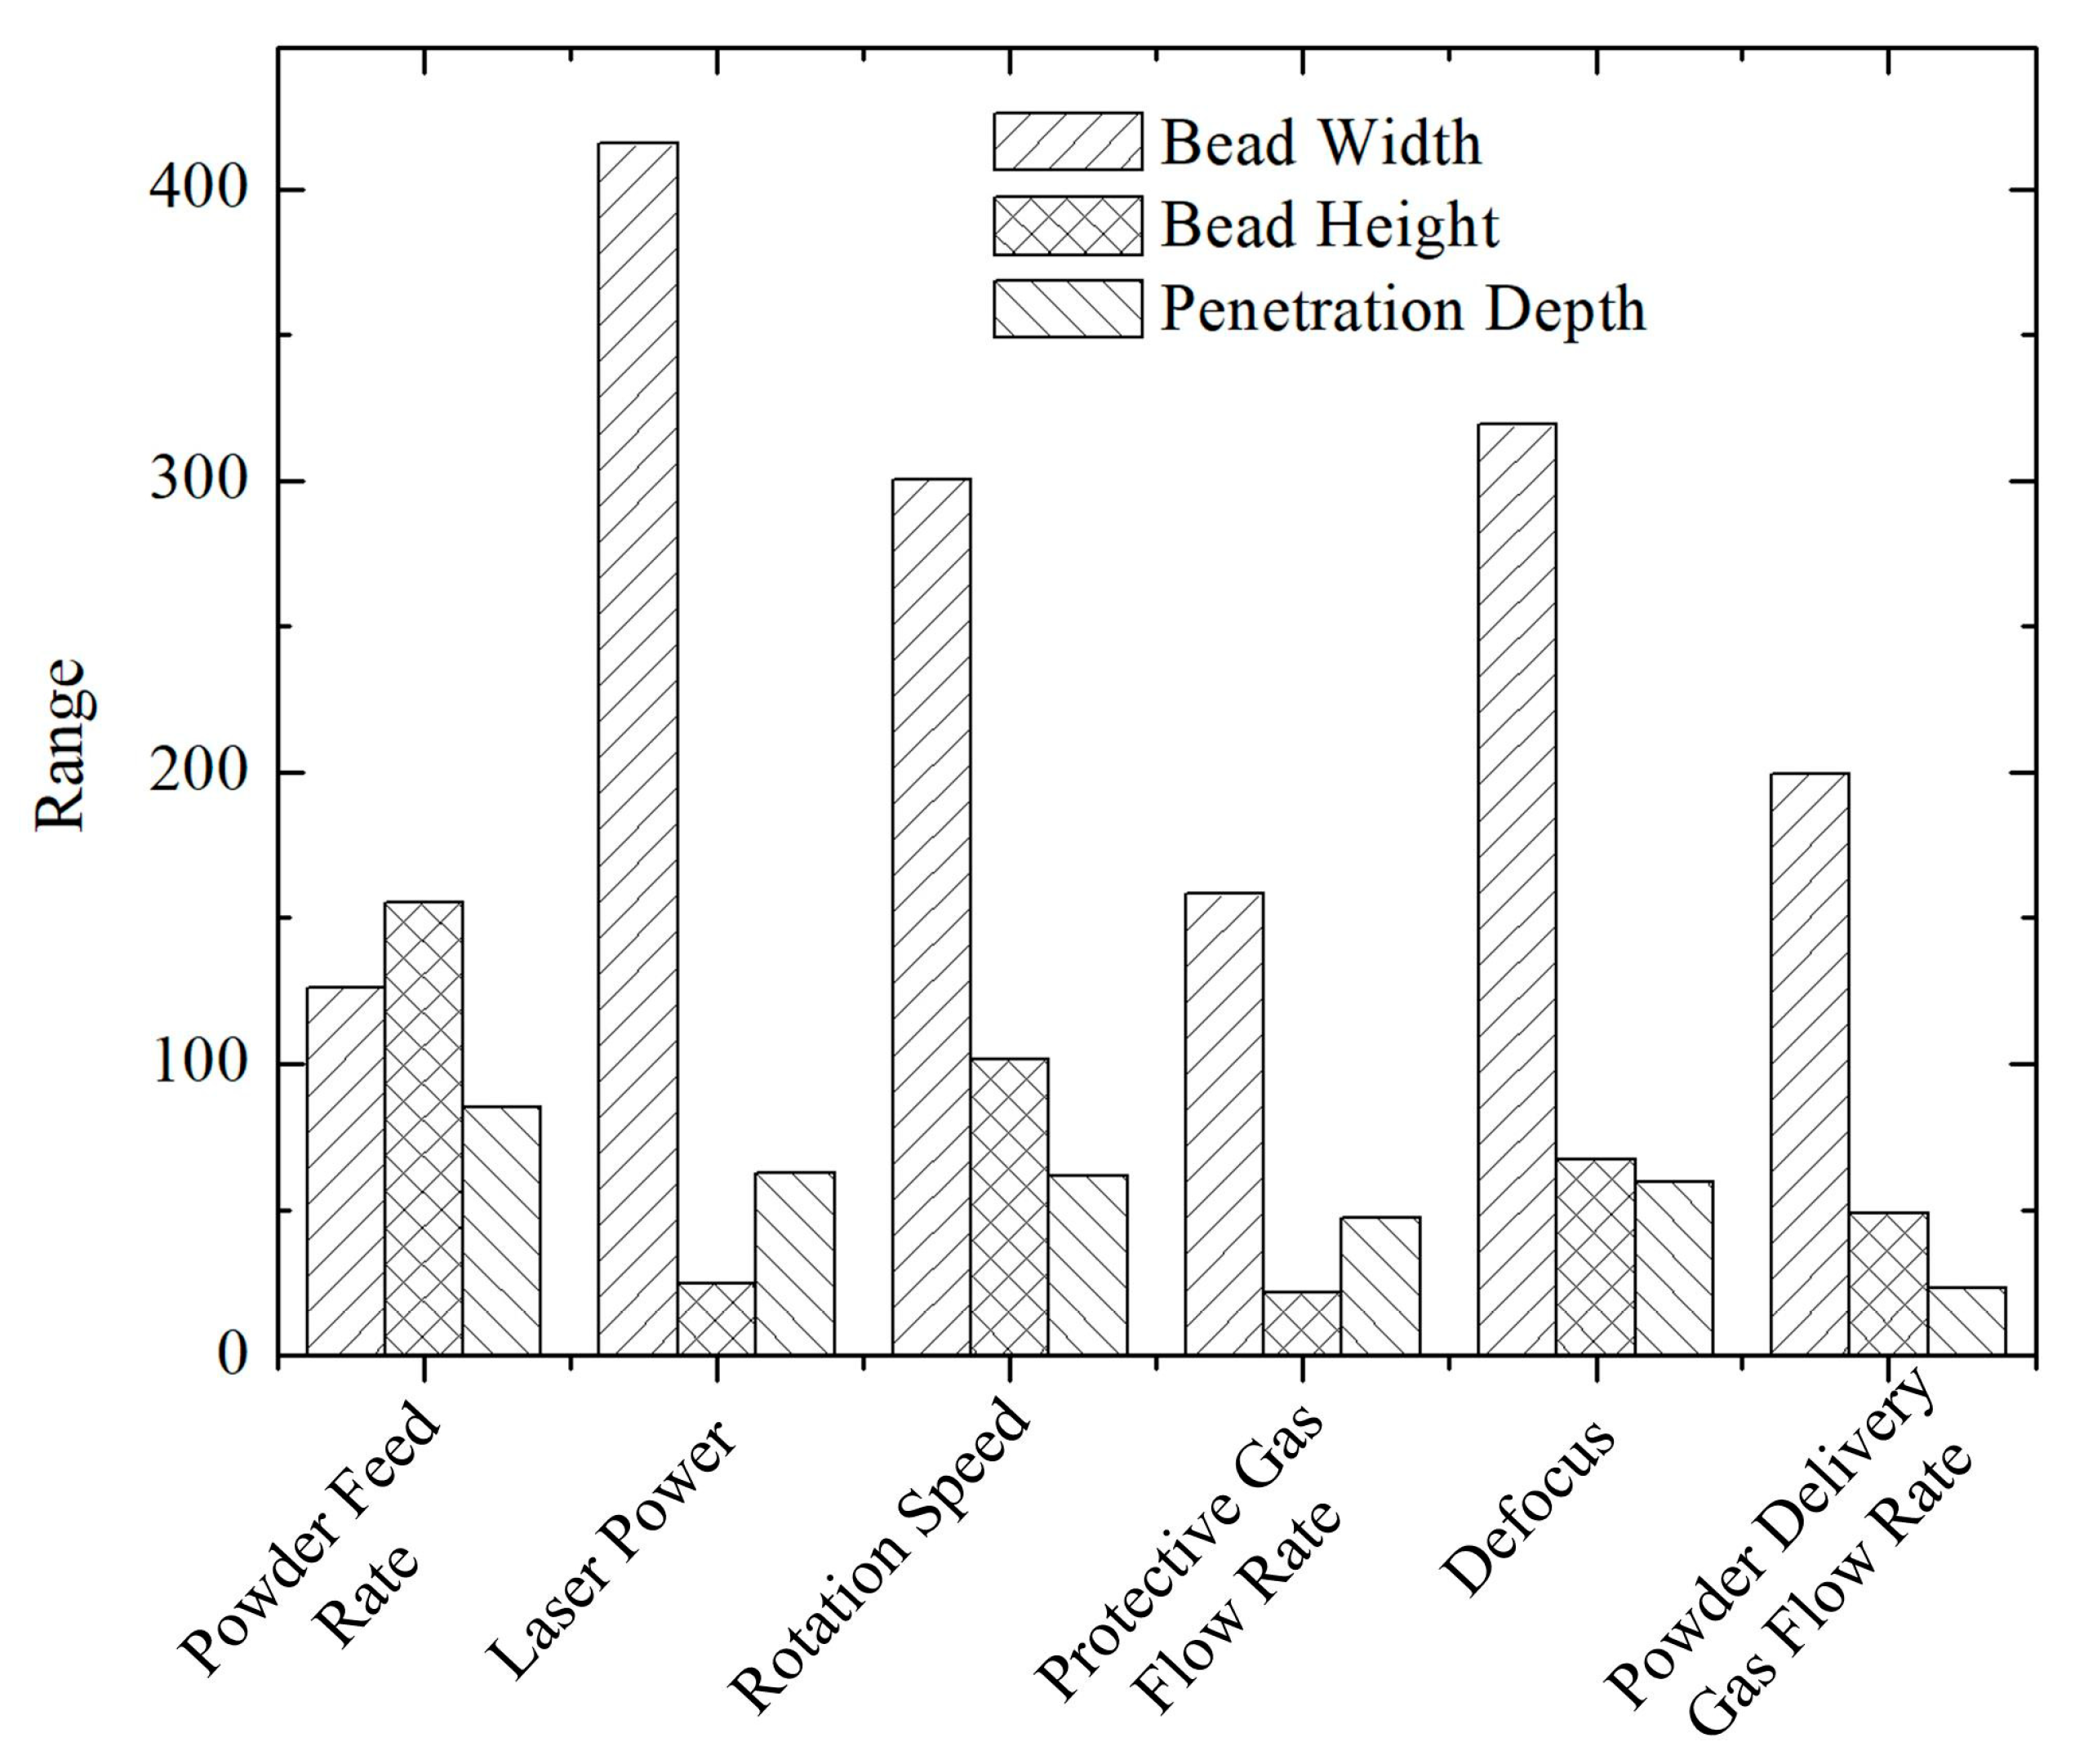
An orthogonal test was conducted to analyze the influence of various parameters on the characteristic dimensions of the beads, as shown in Figure 6. Figure 7 are the range analysis results. According to the range analysis, laser power has the most significant influence on the bead width, followed by defocusing amount, rotational speed, powder feeding gas flow rate, central shielding gas flow rate, and powder feeding rate. Among these parameters, powder feeding rate exhibits the most significant influence on the bead height, followed by rotational speed, defocusing amount, powder feeding gas flow rate, laser power, and shielding gas flow rate. Powder feed speed has a significant effect on the penetration depth, followed by laser power, rotational speed, defocusing amount, shielding gas flow rate, and powder feeding gas flow rate. As shown in Figure 6a, it can be seen that upon increasing powder feed rate from 1 to 3 r·min−1, the penetration depth gradually decreases from 98.6 to 13.3 μm while the bead height gradually increases from 70.9 to 226.1 μm. In contrast, the bead width initially increases and then decreases. The primary reason for this trend is that under the same conditions, as the powder feed rate increases, the amount of powder input into the molten pool gradually increases, leading to an increase in the bead height. The increase in powder feed rate necessitates more laser energy to melt the powder, resulting in a reduction in the energy distributed to the substrate, which in turn causes a gradual decrease in the penetration depth. Additionally, the increased powder feed rate leads to an increase in the amount of powder entering the molten pool, elevating its height. Excessive powder feed can prevent effective melting of the powder, further affecting the forming of beads, thereby causing a reduction in the bead width. With increasing laser power from 800 to 1200 W, the bead width, height, and penetration depth all show a gradual increase. The bead width increases from 765.5 to 1181.0 μm, the bead height increases from 125.1 to 149.8 μm, and the penetration depth gradually increases from 28.4 to 90.8 μm. This is attributed to the increased linear energy density resulting from higher laser power, which melts a greater amount of powder and substrate material, enlarging the molten pool and leading to an increase in bead width and height. Additionally, the increased energy input into the substrate results in a deeper penetration. As the rotational speed increases from 40 to 80 r/min−1, the bead width, height, and penetration depth all exhibit a gradual decrease. The bead width decreases from 1190.1 to 913.1 μm, the bead height decreases from 201.9 to 100.5 μm, and the penetration depth gradually decreases from 90.3 to 28.5 μm. This is mainly because the increased rotational speed leads to a reduction in linear energy density. Although the laser’s influence on the powder during flight is limited in this process, the lower linear energy density fails to form a larger molten pool on the substrate, resulting in a decrease in bead width and height. Additionally, the reduced heating time of the substrate leads to a corresponding decrease in penetration depth. As shown in Figure 6d, with increasing central shielding gas flow rate from 4 to 12 L/min−1, the bead width generally decreases from 1076.5 to 1005.2 μm, while no significant influence is observed on the bead height and penetration depth. The central shielding gas serves to protect the lens from contamination by flying powder and to protect the molten pool from oxidation. However, an increased shielding gas flow rate can both increase the powder’s flight speed and decrease its convergence, leading to a reduced energy absorption time and fewer powder particles reaching to the molten pool, ultimately resulting in a narrower bead. After ensuring adequate protection for the lens and molten pool, it is advisable to reduce the central shielding gas flow rate. Figure 6e indicates that as the defocusing amount increases from −1.0 to 1.0, the bead width and height first increase and then decrease, while the penetration depth decreases gradually from 81.5 to 21.9 μm. This is due to the combined effects of changes in powder convergence and laser spot size. As the defocusing amount changes from negative to positive, the powder convergence first increases and then decreases. Additionally, the laser spot size gradually increases during this process. These two factors contribute to the initial increase and subsequent decrease in bead width and height. The increased laser spot size leads to a decrease in energy density, resulting in a gradual decrease in penetration depth. Finally, Figure 6f reveals that as the powder feeding gas flow rate increases from 4 to 8 L/min−1, the bead width and height first increase and then decrease, while no significant pattern is observed in the effect on penetration depth. This is attributed to the increasing powder convergence and powder velocity resulting from the increased gas flow rate. The increased velocity reduces the time for powder particles to absorb laser energy during flight. These combined effects lead to the observed trend in bead width and height.

3.2. Multi-Pass Cladding Morphology and Deformation

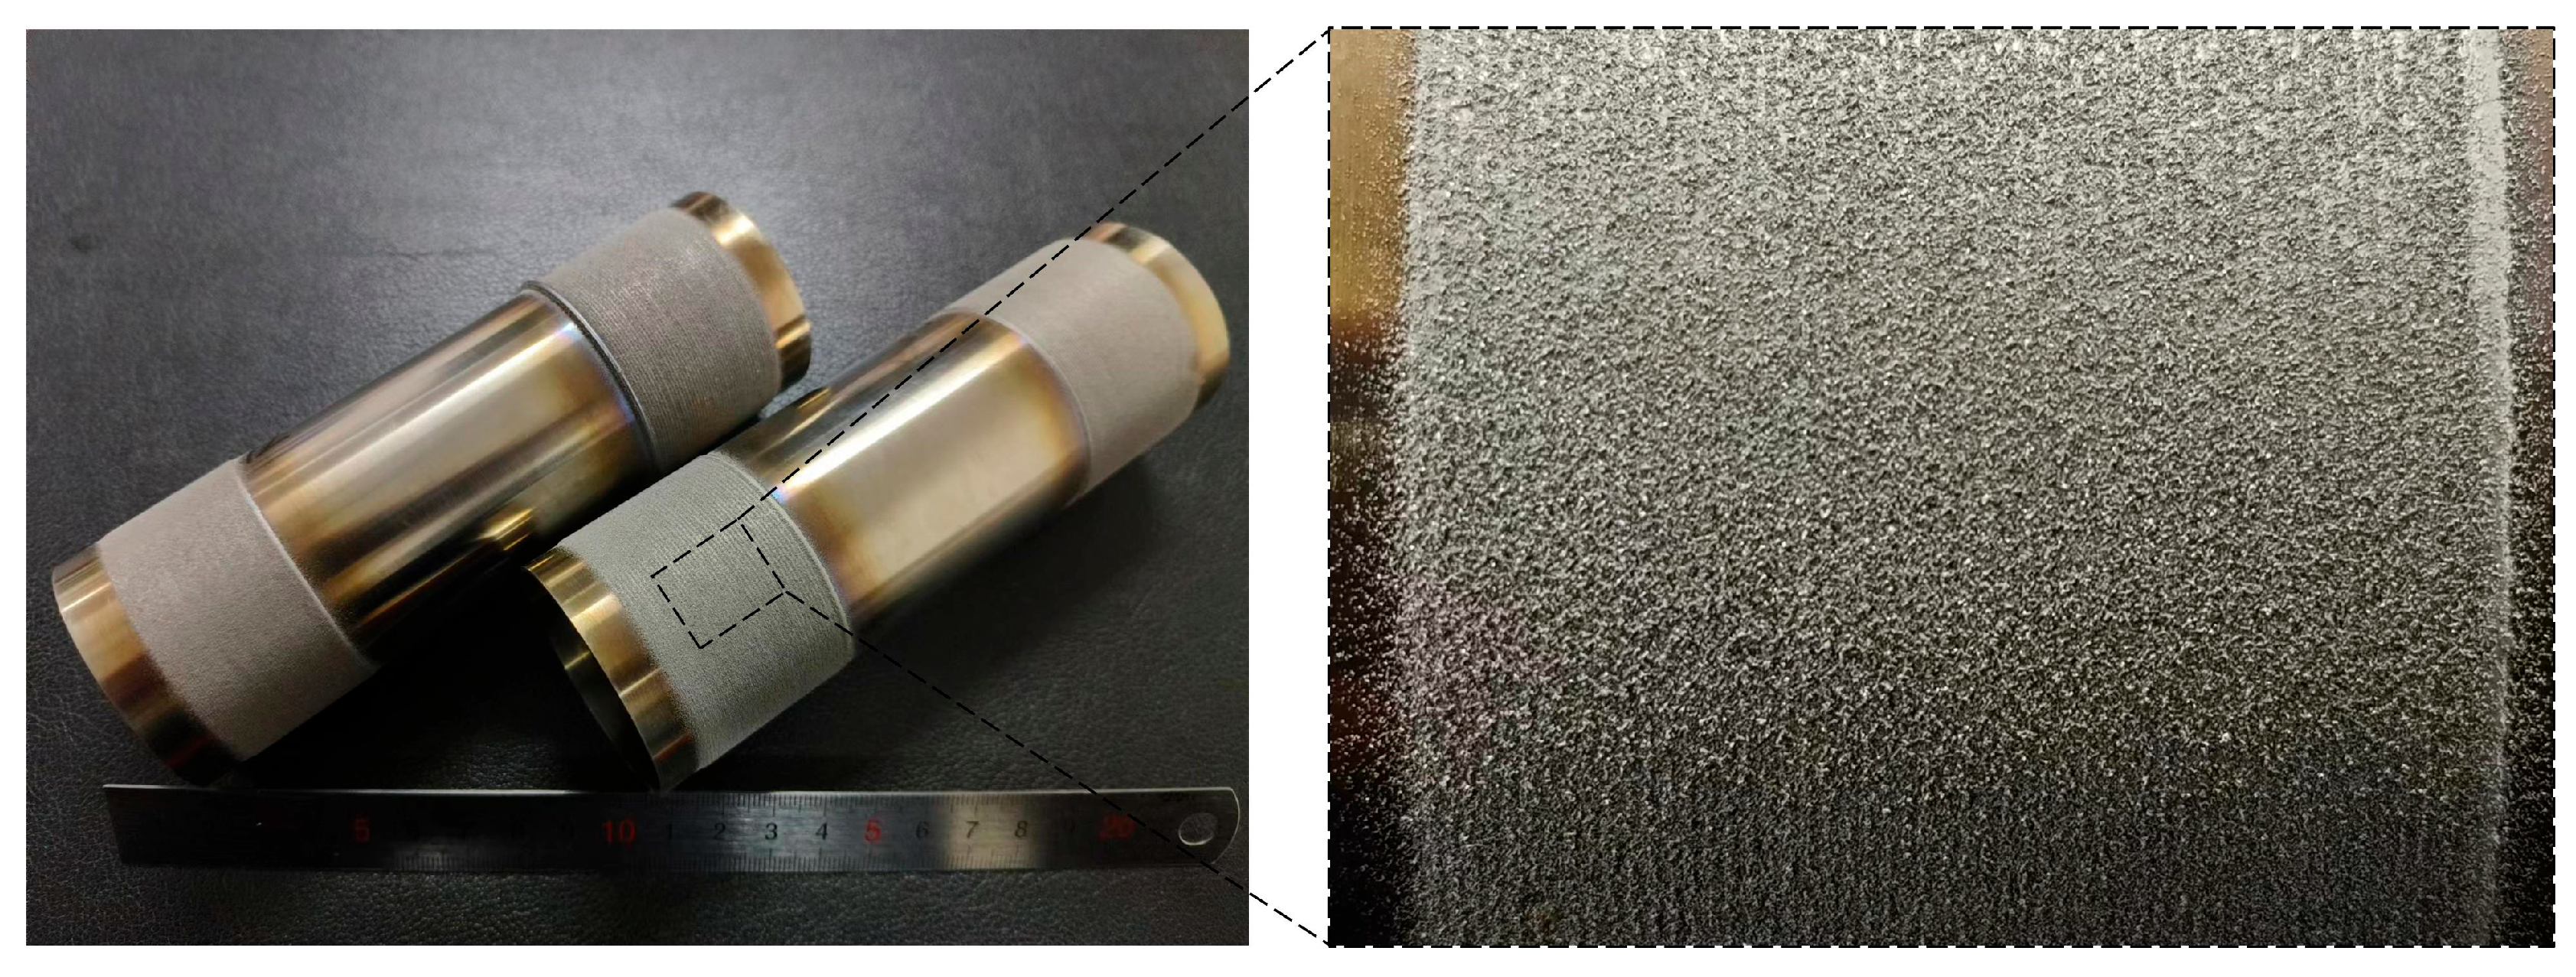
Based on the surface morphology, characteristic dimensions, and linear energy density of the beads, under parameter No. 12, the bead could achieve continuous formation with low linear energy density, and the fusion line exhibited a “—” shape, with minimal impact on the substrate. Therefore, this parameter was selected for subsequent multi-pass overlapping for large-area cladding of the tube. During the cladding process, the moving speed of the cladding head was 0.5 mm/s, and the cladding morphology is shown in Figure 8. It can be observed that the overlapping areas between passes on the tube surface are quite apparent, with a uniform surface morphology. Meanwhile, a significant powder adhesion phenomenon on the surface of the cladding layer is visible, presenting a distinct matte shape, similar to the reason for powder adhesion on the outer surface of a single bead. The maximum and minimum diameters of the tube before and after laser cladding are shown in Table 3. It can be seen that the diameter difference increased after laser cladding, and the tubes were slightly deformed. The rapid temperature rise and fall process during the cladding process leads to an increase in internal stress in the cladding layer, which in turn increases the ovality of the thin-walled tube from 0.14% to 0.24%, but compared to the tube diameter, the deformation still remained within a relatively small range. Multiple methods have the potential to reduce laser cladding deformation of the thin-walled tube. A cylindrical support fixture can be designed inside the tube, with its outer wall conforming to the tube’s inner wall. After laser cladding, both the tube and the fixture should undergo stress-relief heat treatment as an integrated unit to prevent deformation of the tube after fixture removal. Additionally, preheating before cladding to reduce the temperature gradient, along with employing low heat-input measures such as reducing the size of the laser spot and increasing rotation speed, show potential for reducing the deformation of thin-walled tube. Scholars are encouraged to conduct further research in this area to enrich the study of deformation control for the thin-walled tube. The deformation degree in this study has significance for thin-walled tubes with smaller diameters and longer length.

3.3. Microstructure and Phase Analysis

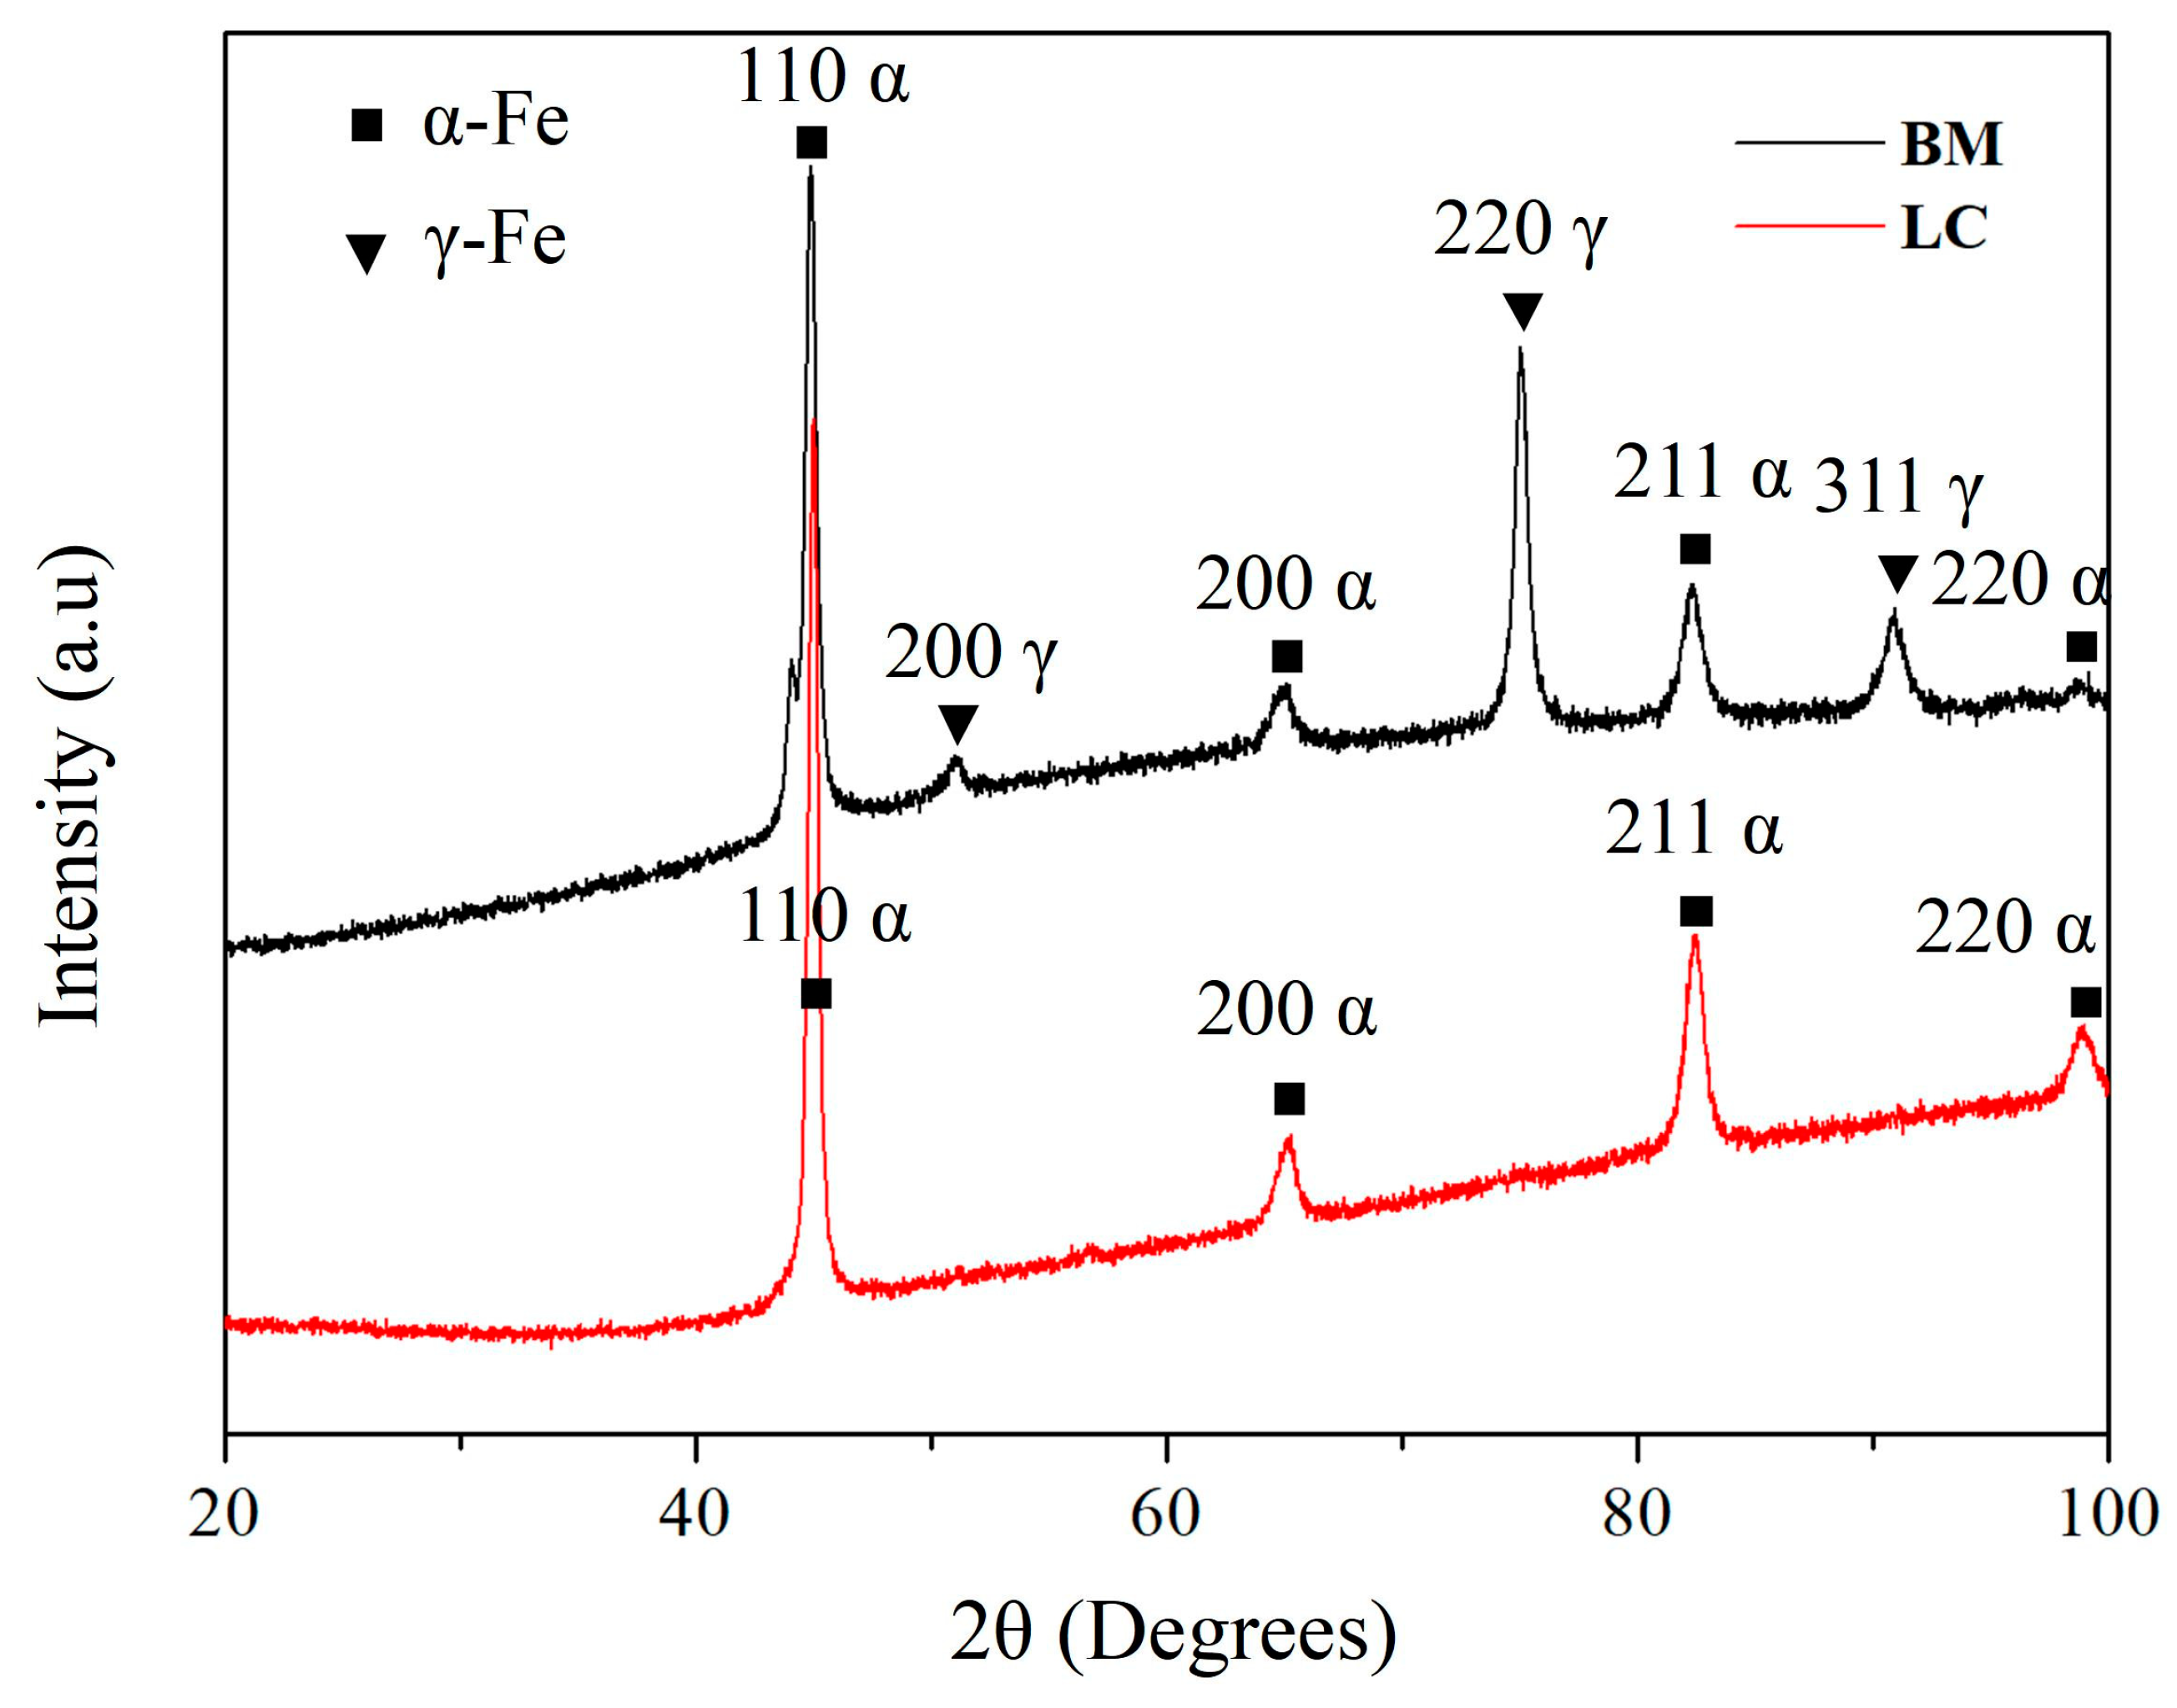
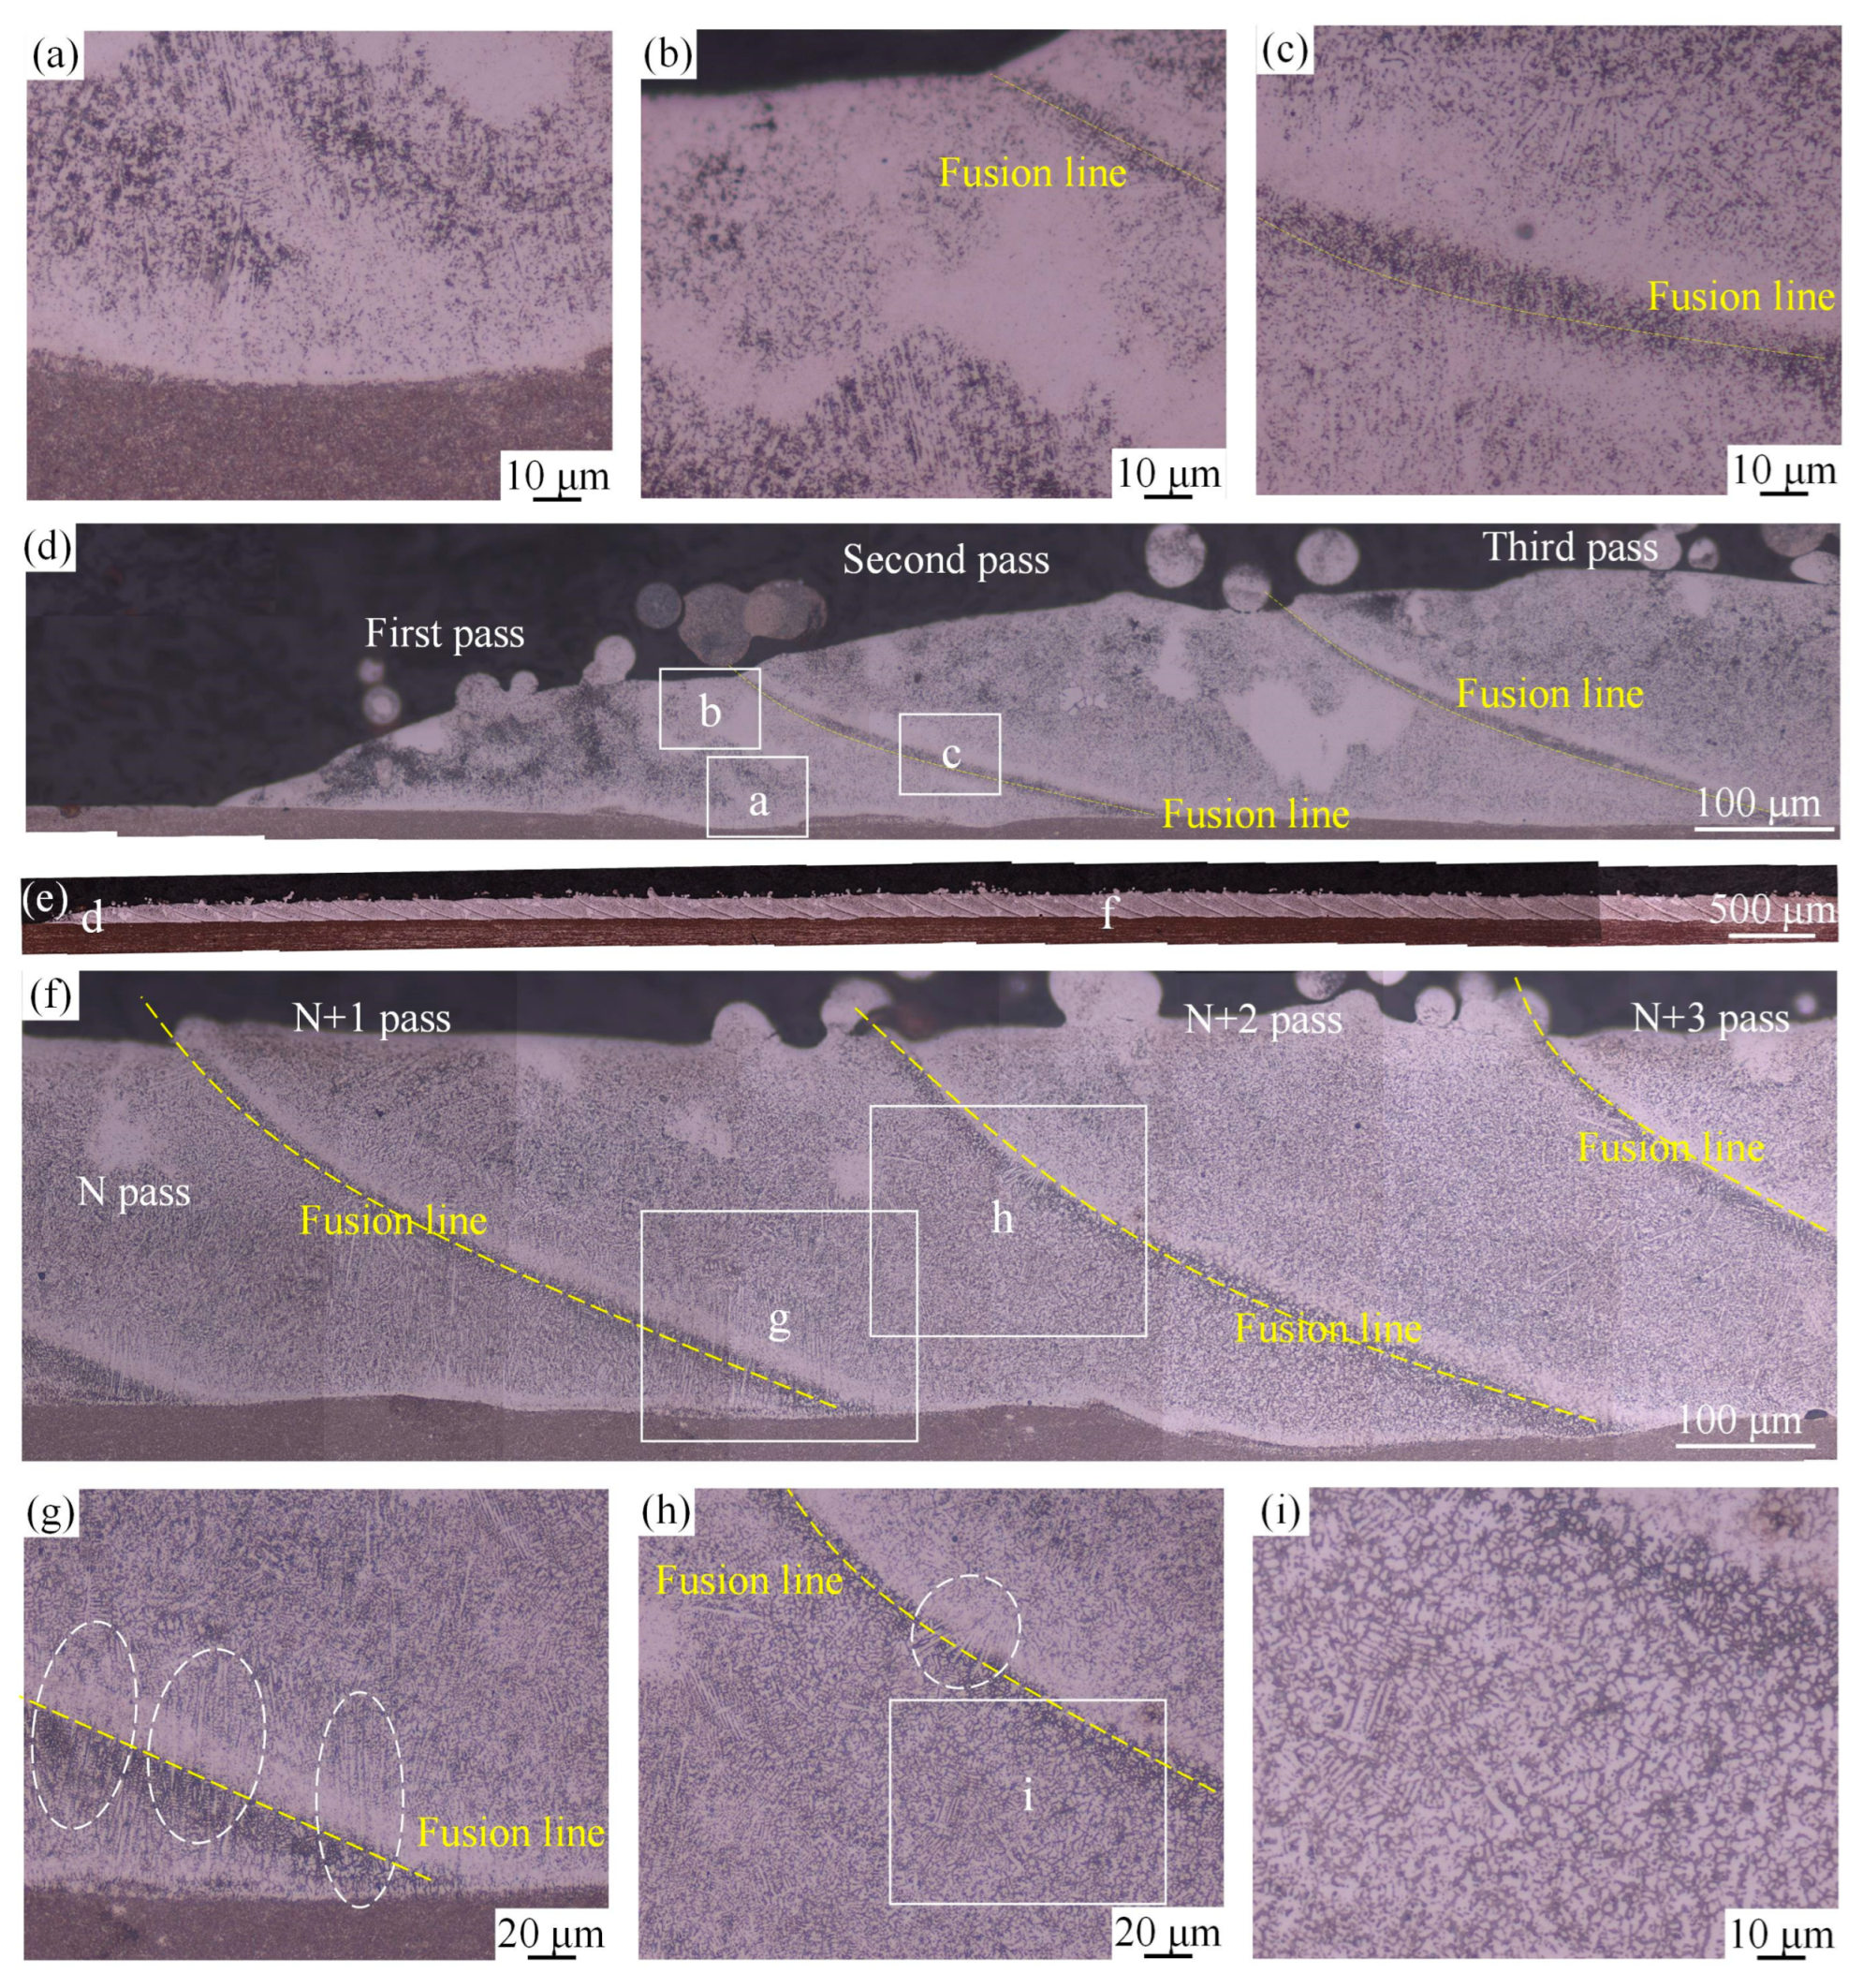
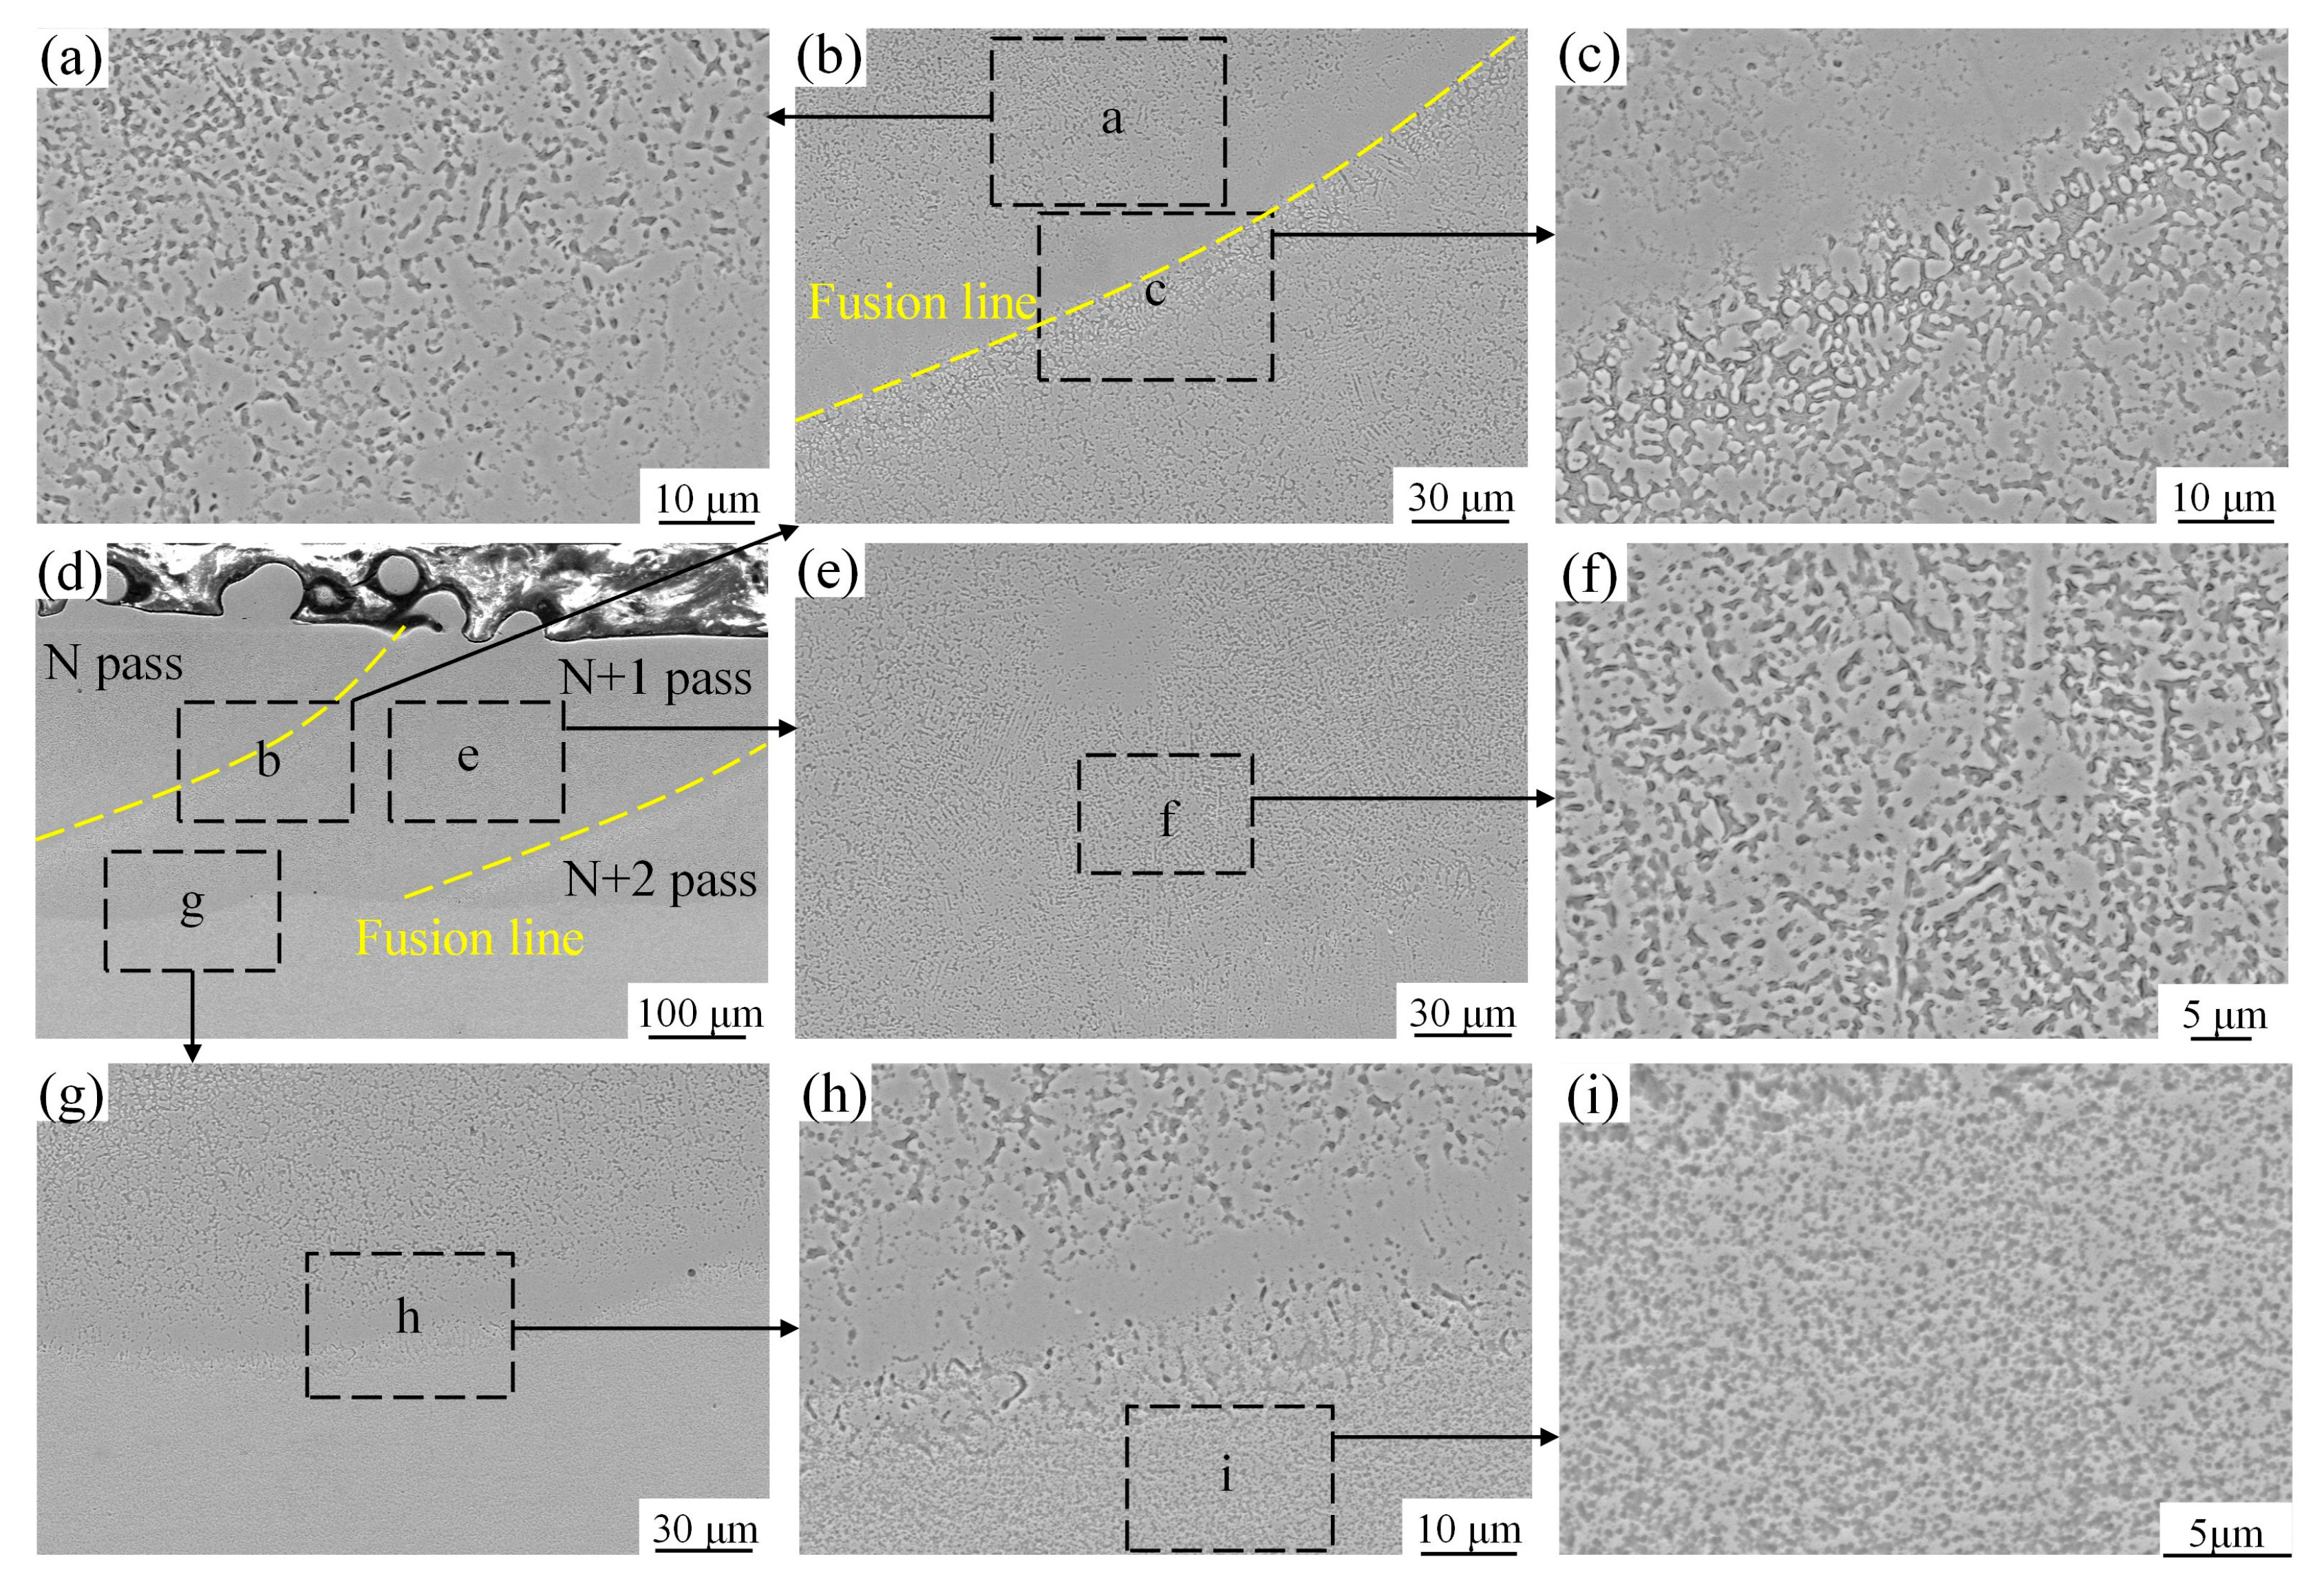
Subsequently, the microstructure of the multi-pass overlapping cladding layer was analyzed, and the XRD results are presented in Figure 9. It can be seen that the matrix structure is dominated by α-Fe and γ-Fe, while only α-Fe was detected in the laser cladding layer. For steel, γ-Fe (FCC) is considered austenite, while α-Fe (BCC) is considered ferrite or martensite [22,23]. Figure 10 shows the metallographic morphologies of the cladding layer, and Figure 11 shows the SEM morphologies. Figure 10e represents the cross-sectional morphology of the multi-pass cladding, revealing a good bond between the cladding layer and the substrate, with no cracks or large-sized pores. The cladding layer organization exhibits a periodic distribution with significant overlapping areas between passes, and the overall fusion line is linear. The thickness of the cladding layer is approximately 300 μm, representing a 156% increase compared to the height of a single-pass bead (117 μm). This is primarily attributed to the partial remelting of the previous pass during multi-pass overlapping, as the newly formed bead incorporates powder from the current and previous passes, resulting in a greater bead height. Additionally, the rapid solidification of the molten pool during single-pass cladding contrasts with the gradual heat accumulation during multi-pass cladding, providing preheating for subsequent passes and enabling a longer retention time for the molten pool. Consequently, more powder enters the molten pool, further increasing its height. Figure 10d,f illustrates the microstructure of the first and intermediate passes of the cladding layer, respectively. It can be observed that the bottom regions (b) and (g) of the cladding layers in both areas consist of columnar crystal structures. This is primarily due to the high speed of laser cladding, resulting in rapid solidification of the molten pool and the formation of columnar crystals that grow perpendicular to the fusion line for heat dissipation. Although columnar crystal structures also exist in the middle and upper regions of the cladding layer, the secondary dendritic arm spacing (SDAS) are significantly longer compared to the bottom region. The average SDAS was measured to be 1.22 μm in the bottom region, while it increased to 1.87 μm and 2.11 μm in the middle and top regions, respectively. Generally speaking, the secondary dendrite arm spacing is related to the cooling rate, and the faster the cooling rate is, the smaller the secondary dendrite arm spacing will be [24,25,26]. The poorer heat dissipation conditions and lower temperature gradient in the middle and upper regions of the molten pool, leading to slower solidification and longer SDAS. From the microstructure images in Figure 10g,h, it can be seen that near the fusion line, some columnar crystal structures span across two passes, with the columnar crystals growing through the fusion line. However, this phenomenon is not observed between the first and second passes, as shown in Figure 10e. This is primarily due to the rapid solidification and excellent heat dissipation conditions during the first pass cladding. When the second pass cladding is performed, the microstructure growth in the molten pool is unrelated to the first pass. In the intermediate passes, due to continuous heat input, the previous pass remains at a relatively high temperature. After the n + 1 layer was covered on the n layer, a new liquid/solid interface was generated on the columnar grain of the n layer. The microstructure in the molten pool continues to grow along the preferred growth direction of the previous pass’s grains, resulting in the formation of columnar crystal structures that span the fusion line. Similar phenomena have been observed by previous scholars during multi-pass overlapping cladding [27,28,29]. Additionally, it can be observed from the microstructure that there are no defects such as pores or microcracks in the cladding layer.
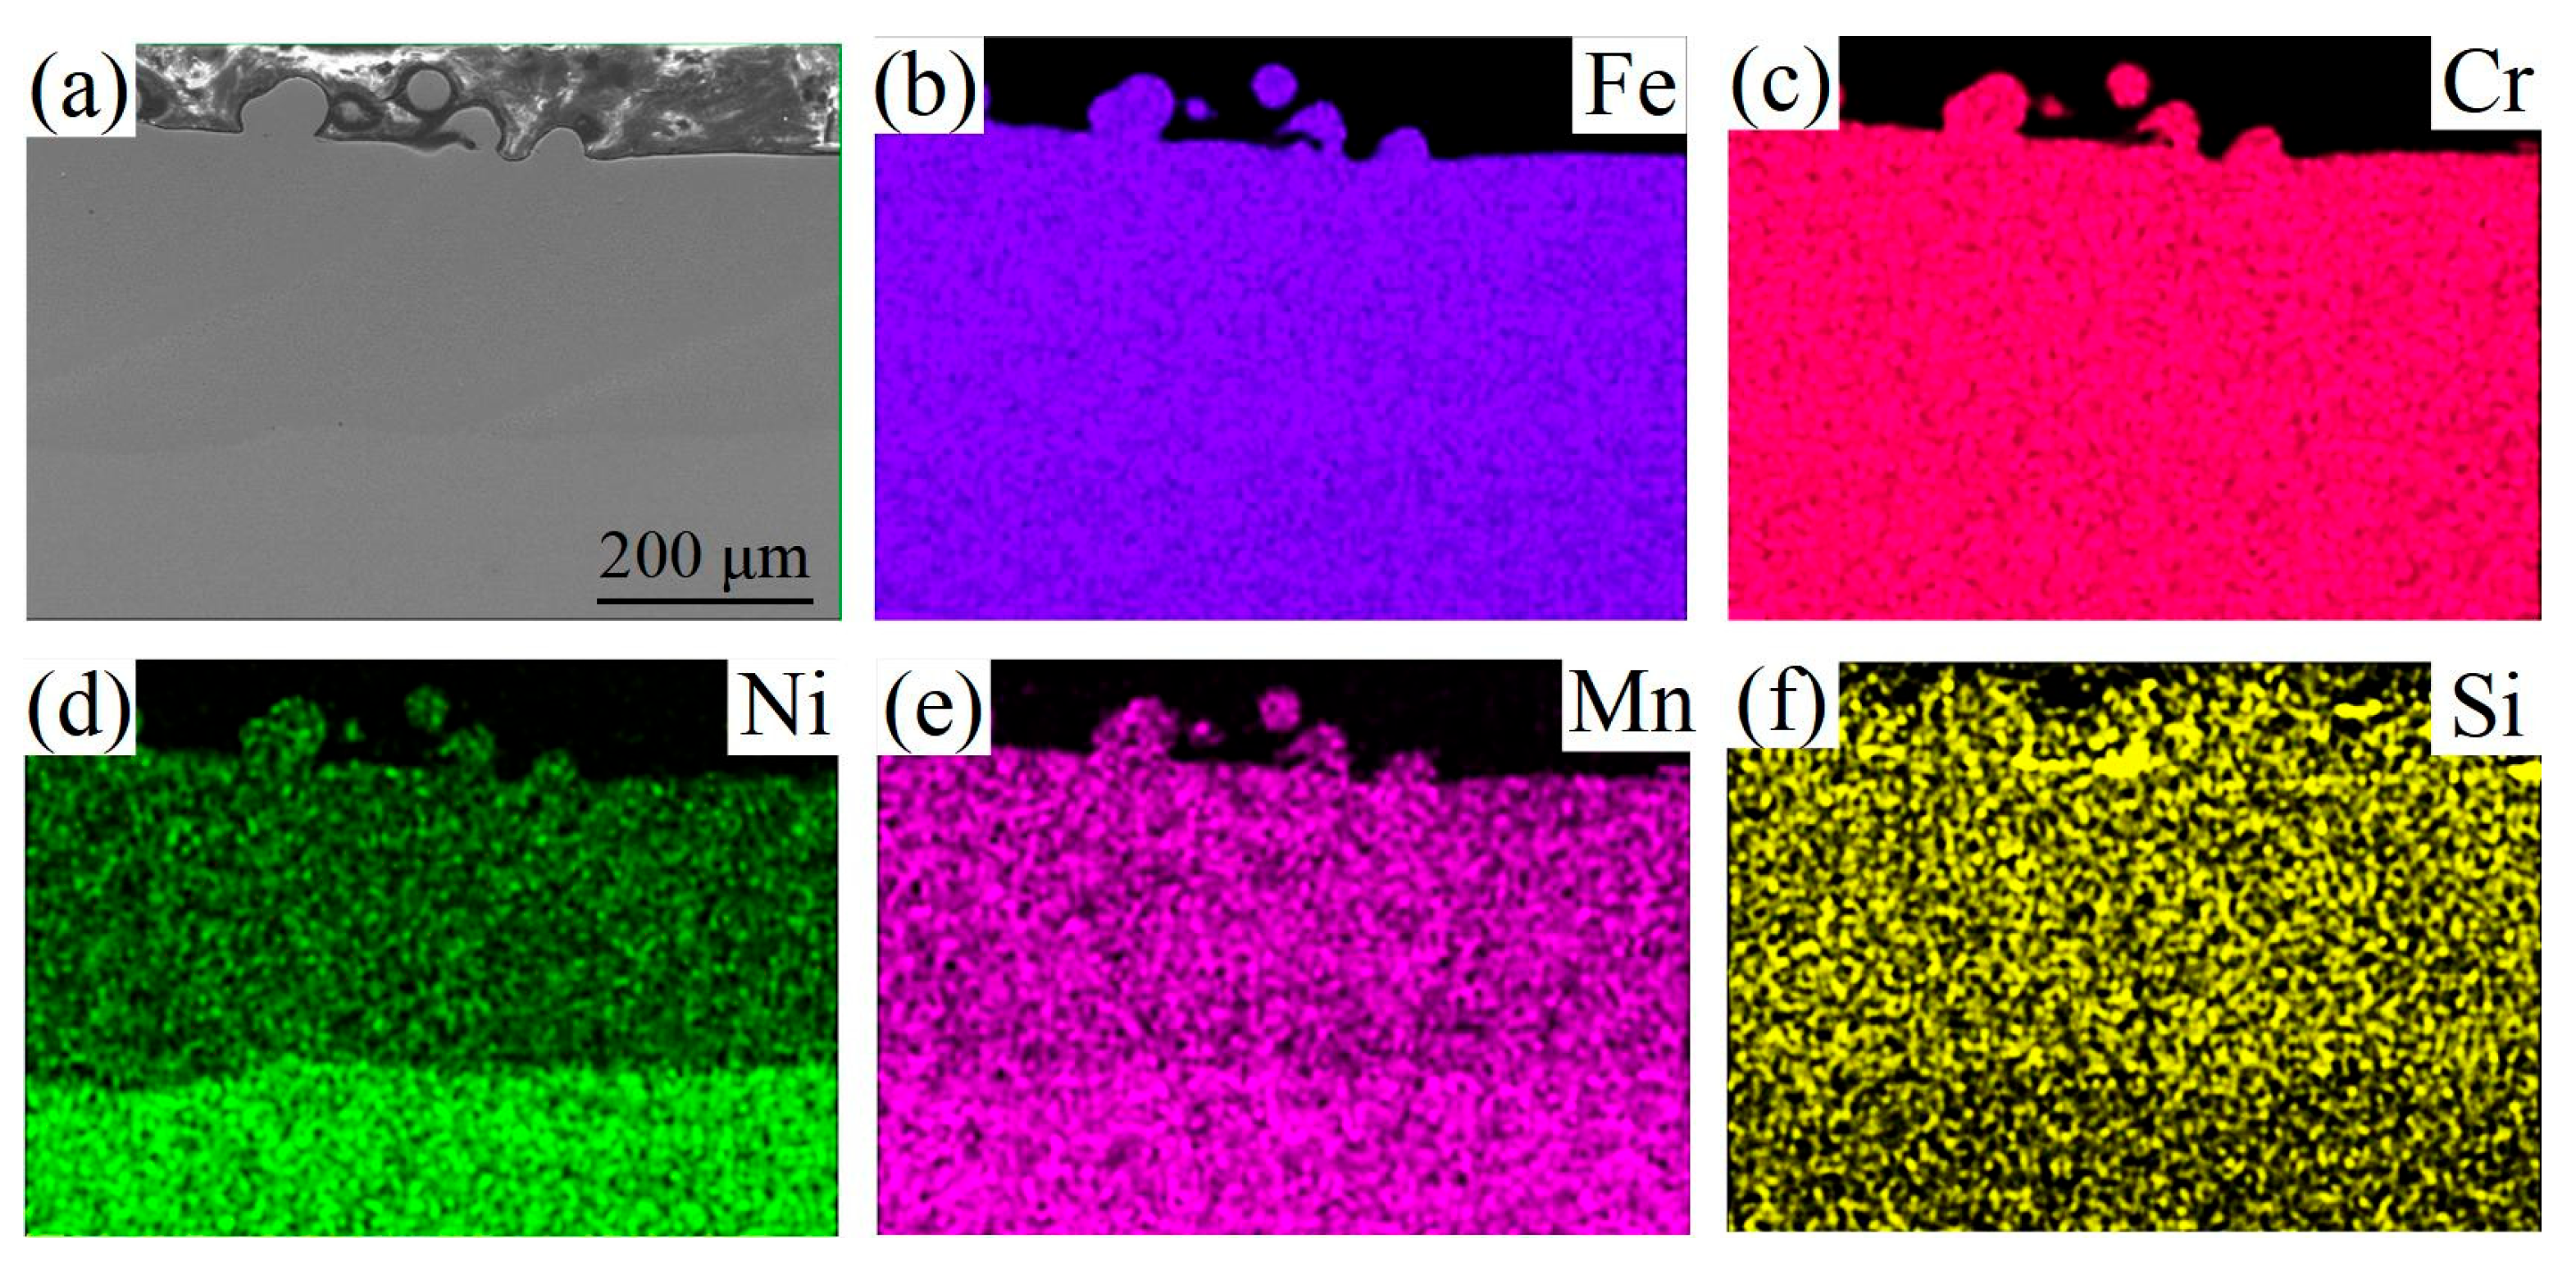
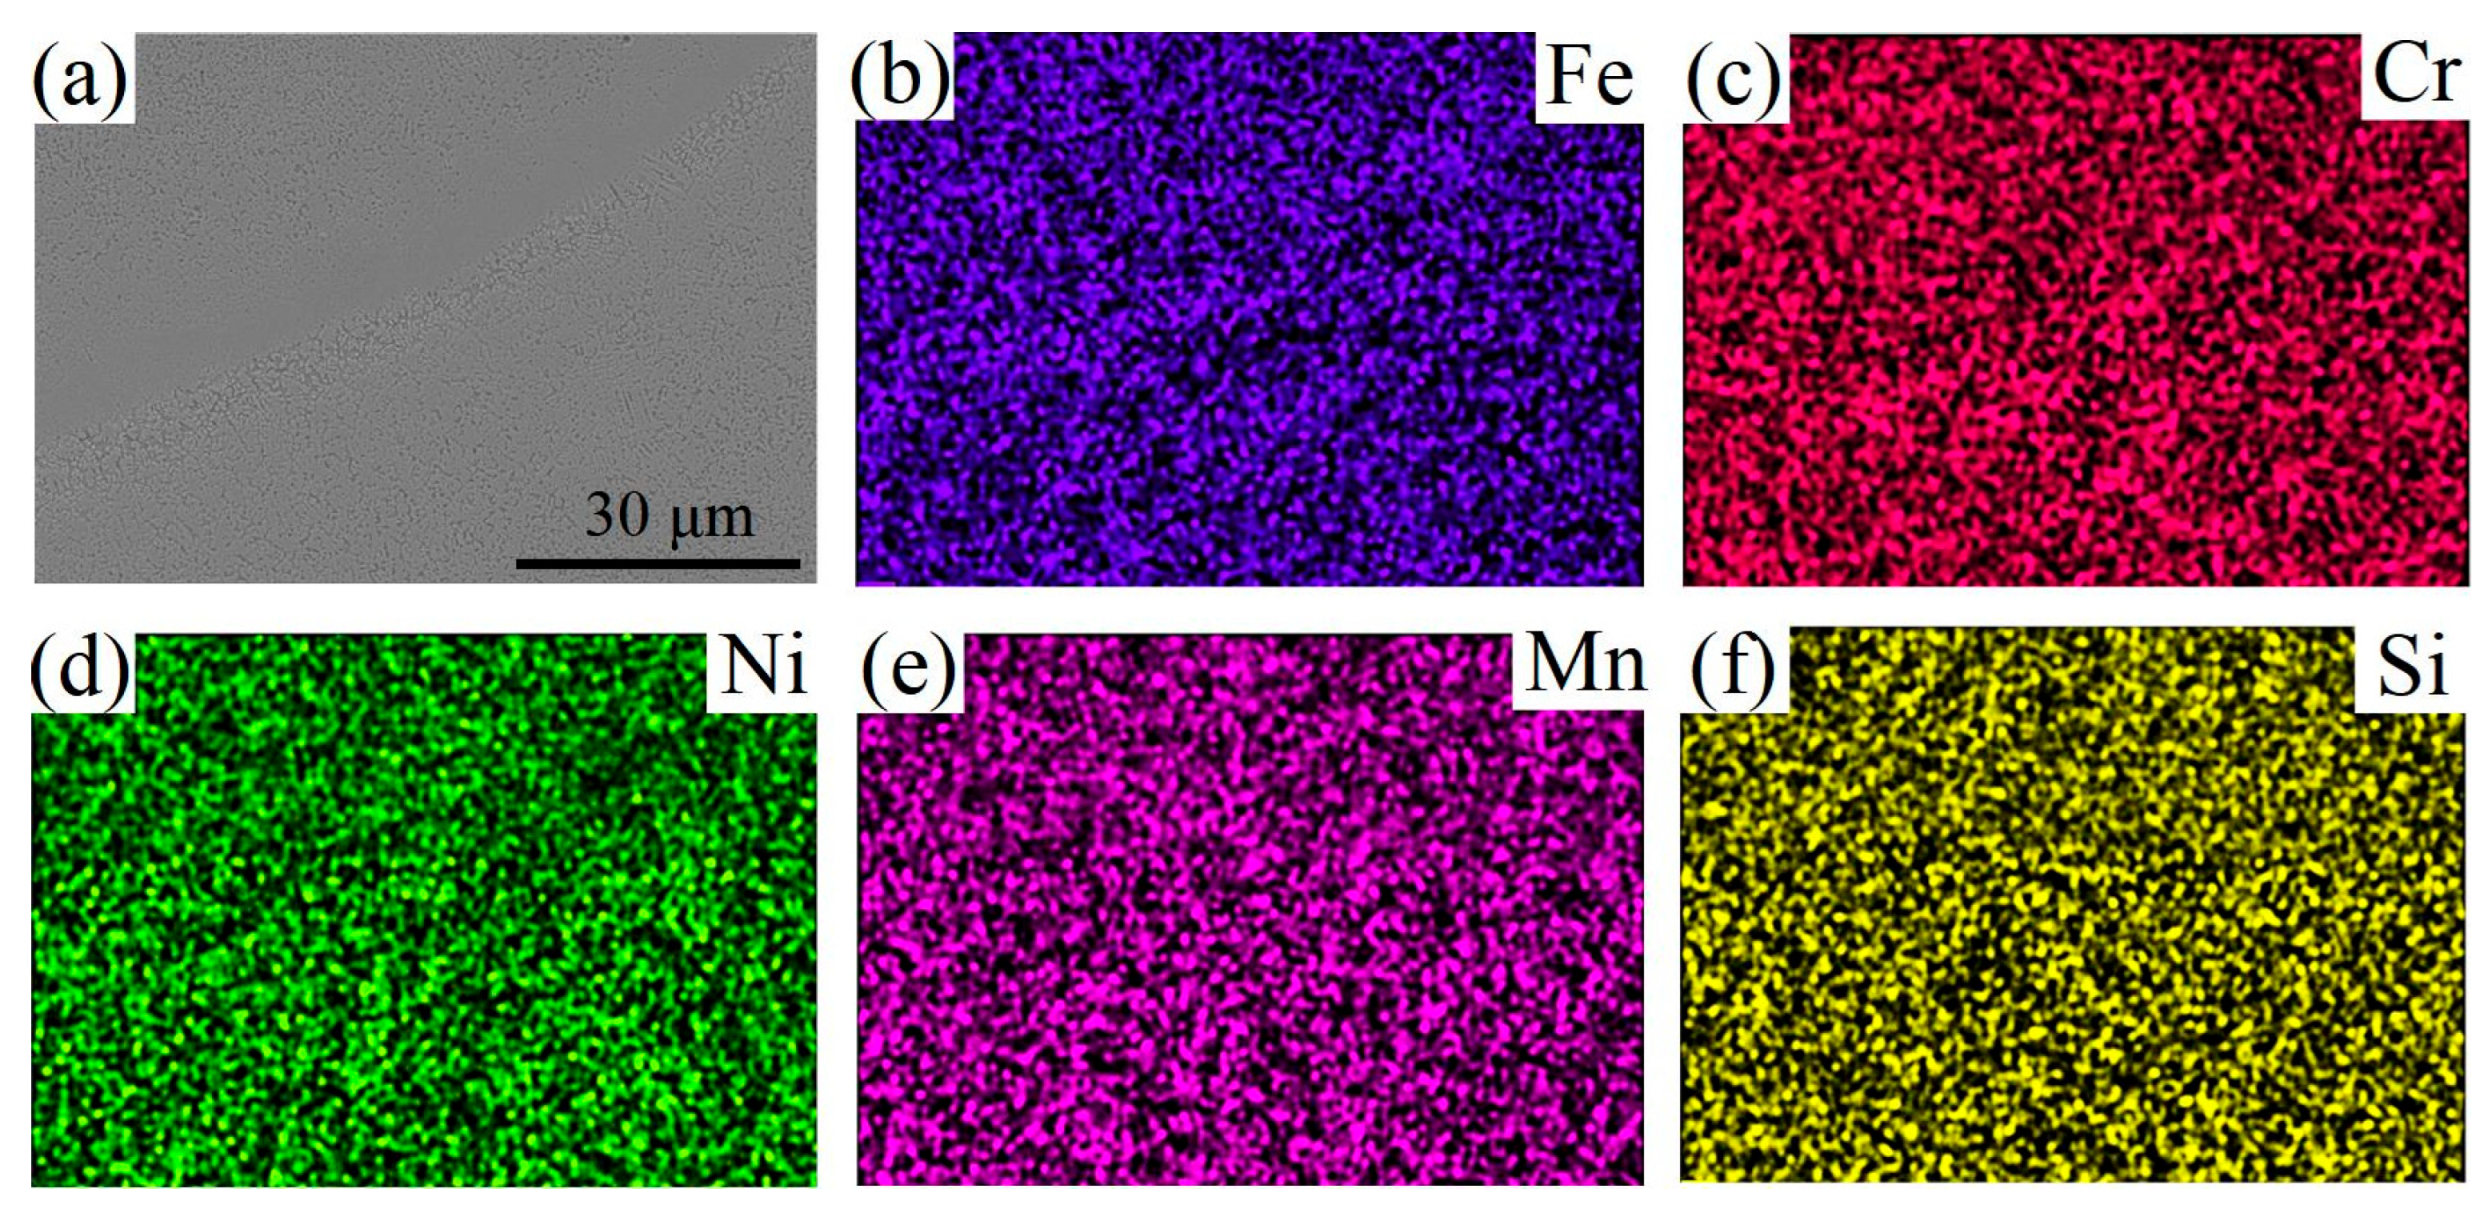
Figure 12 presents the EDS mapping results at the pass scale of the cladding layer. Since the substrate material is 1Cr17Ni5, and the cladding powder is 1Cr17Ni2, it is evident from the surface scanning results that there is a significant difference in Ni content between the cladding layer and the substrate, as shown in Figure 12d. The surface scanning results indicate that there is no compositional segregation phenomenon in the cladding layer at the macroscale, and the components on both sides of the fusion line are uniform. Similarly, the EDS mapping results of a single cladding layer are shown in Figure 13, indicating no unevenness in composition within the same cladding layer. However, it has been reported that during extreme-high-speed laser cladding of AISI 431 (at a cladding speed of 100 m/min) [16], researchers have observed compositional inhomogeneity within the coatings. The extremely high cladding speed inhibits sufficient elemental diffusion, resulting in a heterogeneous distribution. These findings collectively indicate that the cladding speeds significantly influence the compositional uniformity of the cladding layer. The cladding speed should be optimized based on the intended application and performance requirements.
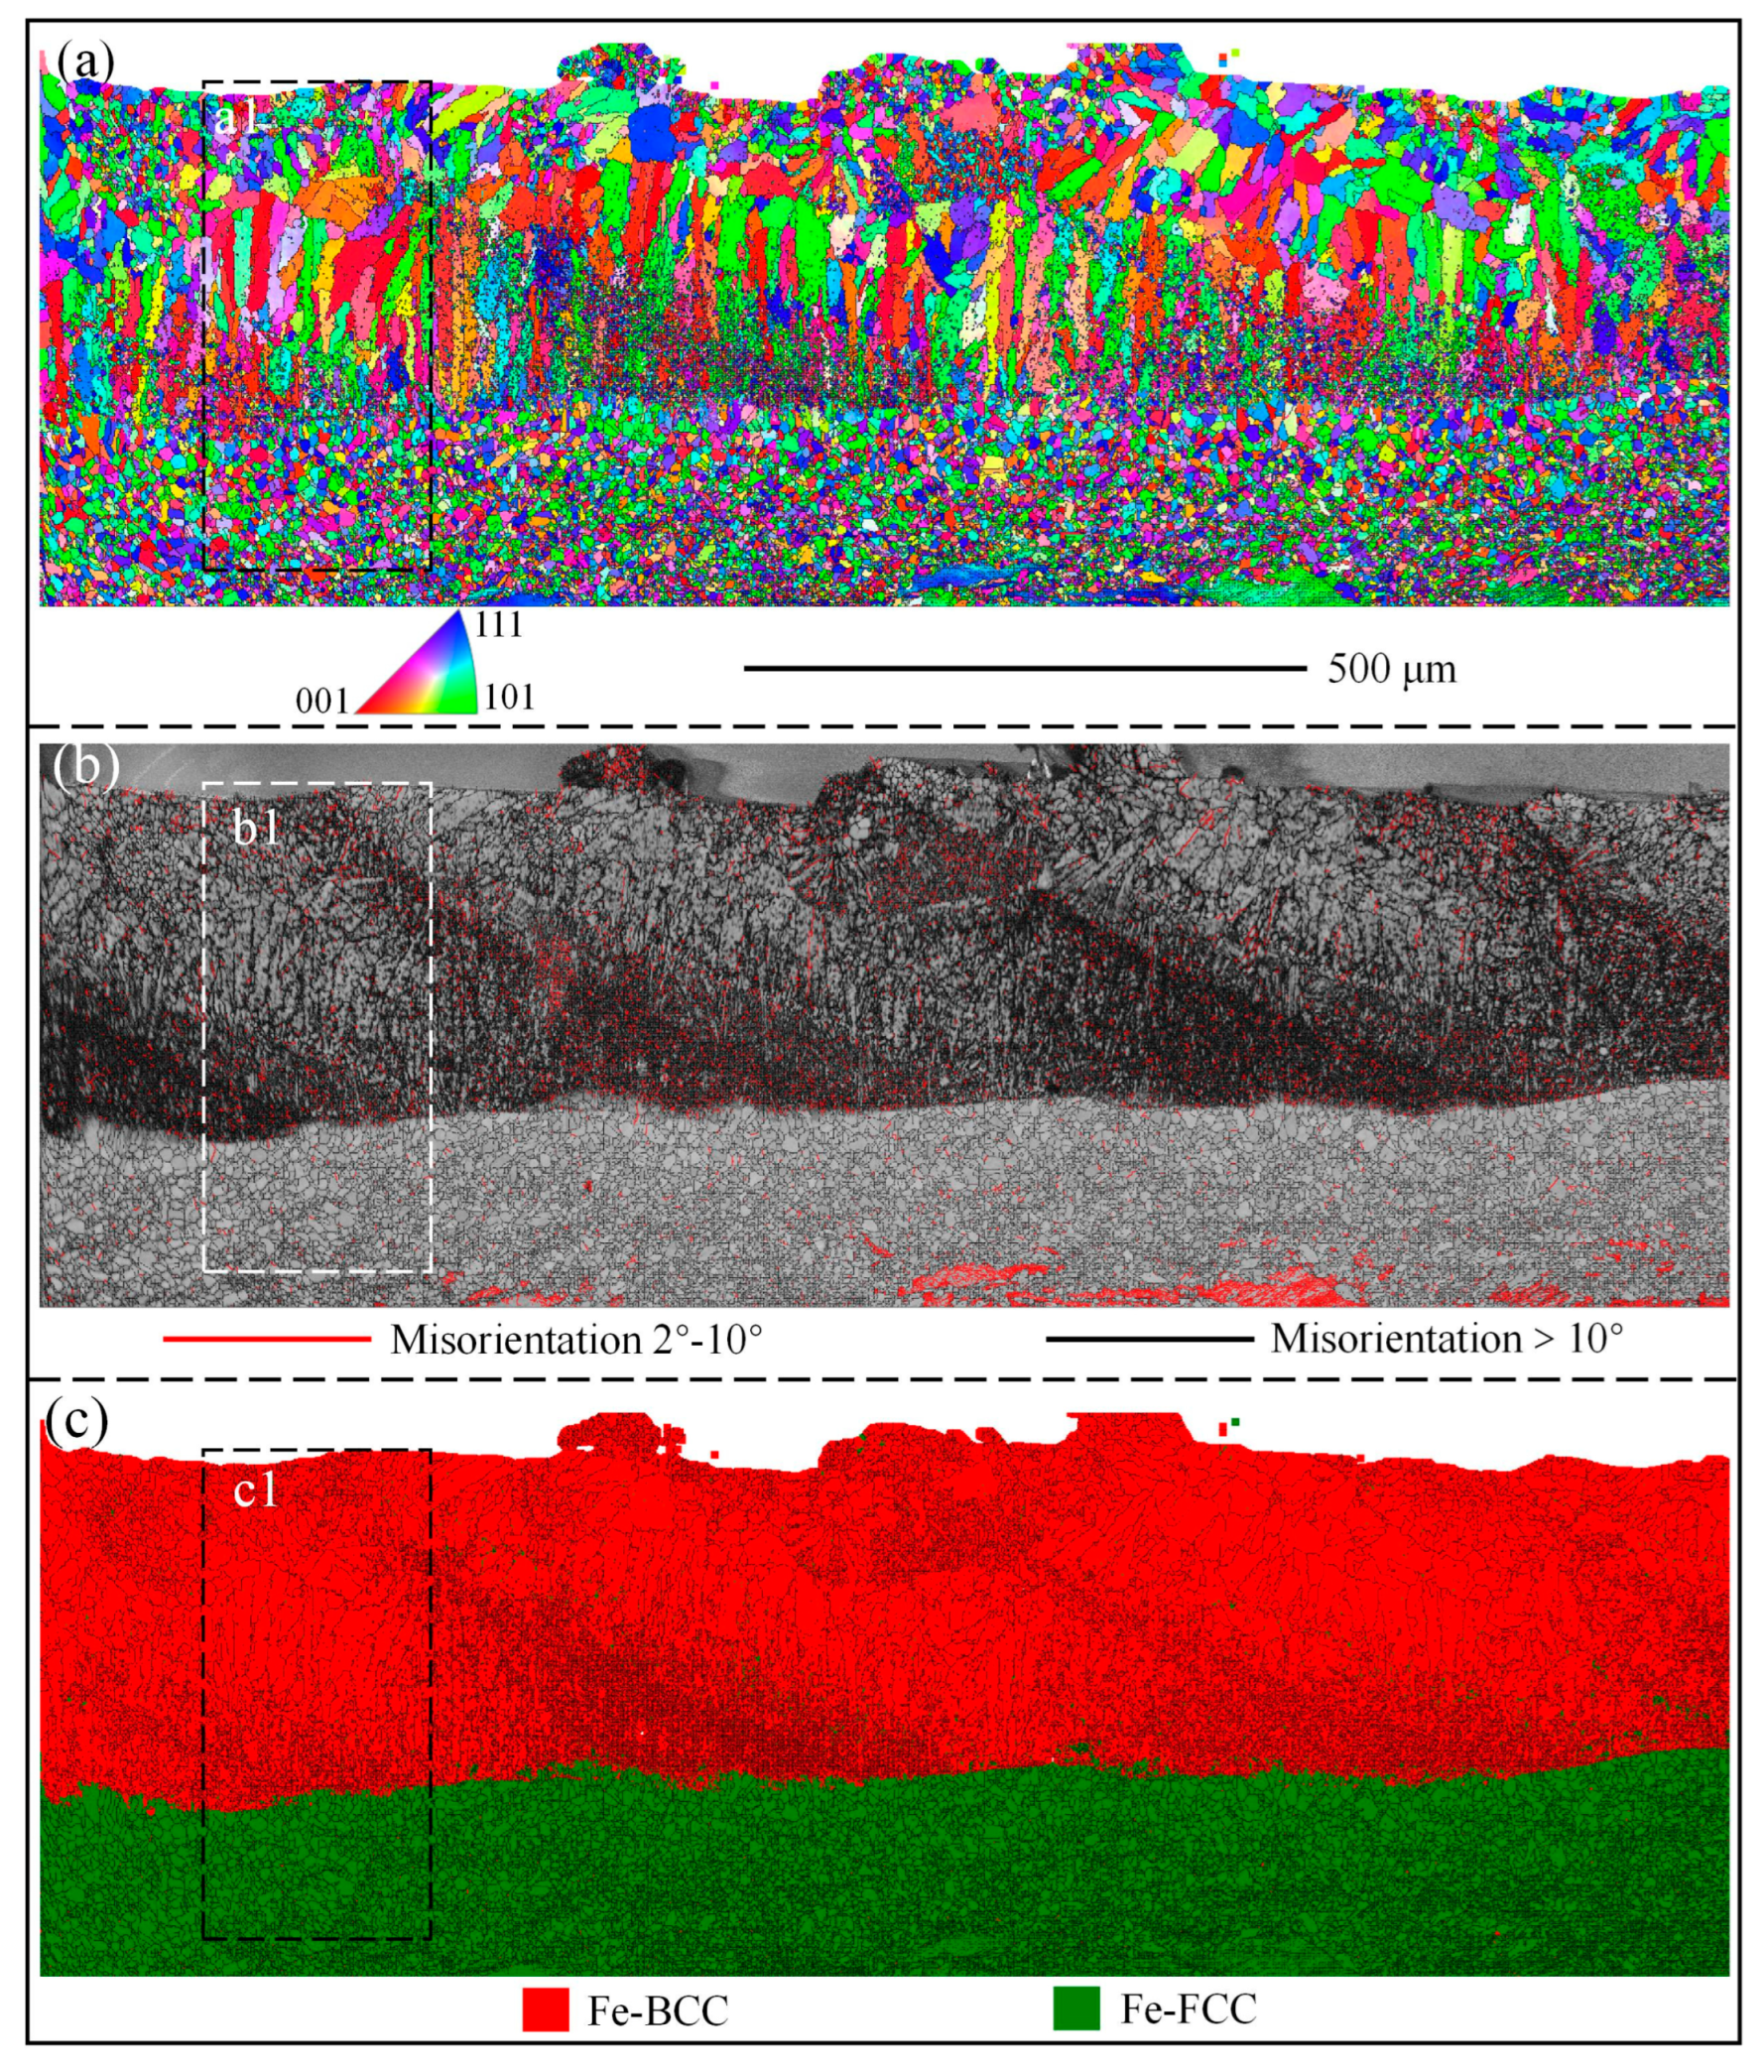
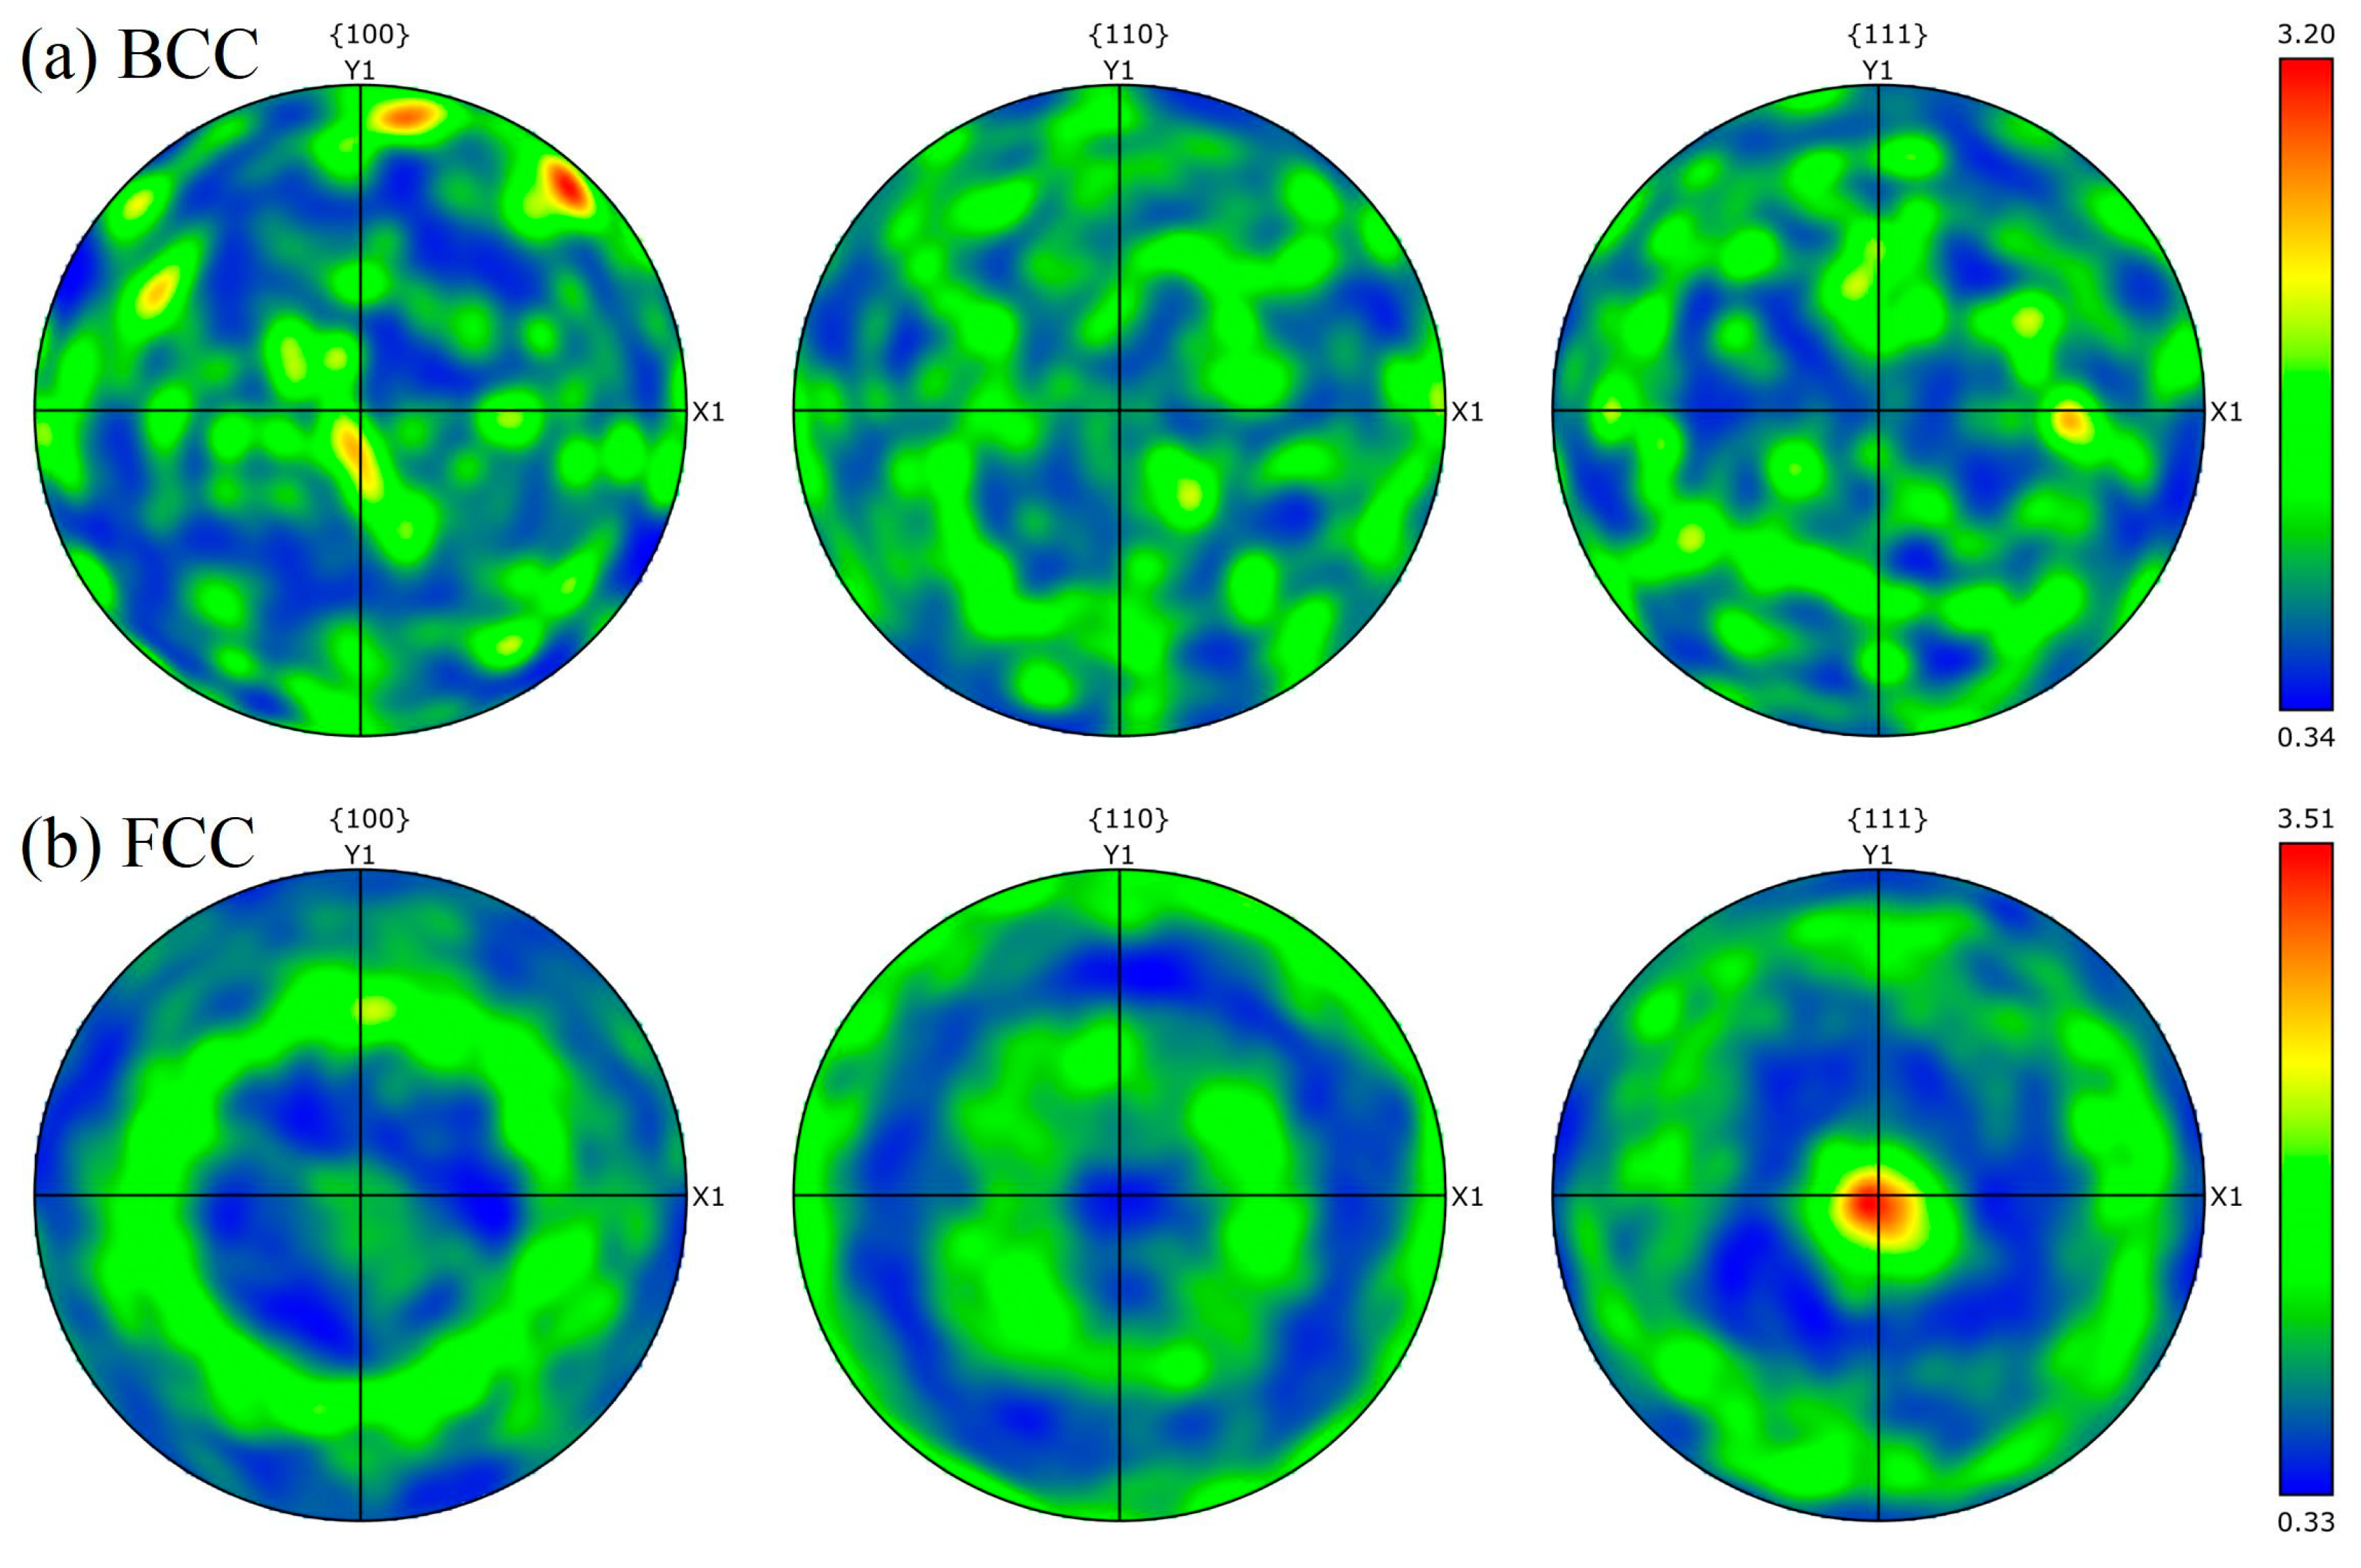
Figure 14 depicts the EBSD test results of the cladding layer, with (a), (b), and (c) representing the inverse pole figure (IPF), the grain boundary figure of large and small misorientation angles, and the phase distribution figure, respectively. Figure 15(a1)–(c1) are magnified views of the local regions a1, b1, and c1 in Figure 14a and Figure 14b, and Figure 14c, respectively. It can be visually observed from Figure 14a that the microstructure of the cladding layer exhibits a periodic distribution, where some columnar grains penetrate and grow through the fusion line near the fusion zone boundary, consistent with the microstructural characteristics shown in Figure 10. Figure 16(a11) presents the grain size distribution statistics for the region marked as a11 in Figure 15. It can be observed that grains with a size smaller than 5 μm account for 44%. The cladding layer contains a significant amount of fine-scale microstructures. Figure 17a,b shows the pole figures for the BCC and FCC phases from the region marked a11 in Figure 15, respectively. Both phases in the coating exhibit a highly preferred crystallographic orientation, with maximum intensities of 3.2 and 3.51 for the BCC and FCC phases, respectively. This can be attributed primarily to the competitive growth of columnar grains triggered by the extremely high temperature gradient during the laser cladding process, ultimately resulting in a pronounced texture. The coarse columnar grains at the bottom of the cladding layer grow perpendicularly to the fusion line, and the size of the columnar grains gradually decreases towards the top of the cladding layer, even exhibiting an equiaxed microstructure. These columnar grain microstructures are primary austenite grains that exhibit a columnar microstructure, and numerous dendritic microstructures are observed within the columnar grains. Previous scholars have suggested that the fine microstructures within these primary austenite grains are martensitic lath structures. The prior austenite grains take on a columnar shape, and an abundance of dendritic structures is observed within them. These prior austenite grains are further divided into several martensitic lath groups. Each lath group is composed of differently oriented martensitic lath bundles, and each bundle consists of martensitic laths oriented consistently [23]. Figure 14b presents the misorientation angle of the cladding layer, and Figure 15(b1) is a partial enlargement of Figure 14b. The results shown that the columnar grain boundaries are high-angle grain boundaries (HAGBs, >15°), while numerous low-angle grain boundaries (LAGBs, 2–15°) exist within the columnar grains. Figure 16(b11) presents the statistical distribution of LAGBs and HAGBs within the region marked as b11 in Figure 15. The proportion of LAGBs is 2.82%, while that of HAGBs is 97.17%. The fraction of HAGBs is significantly higher than that of LAGBs. Generally speaking, in martensitic steel, the austenite grain boundaries and the grain boundaries of martensitic lath packets tend to exhibit HAGBs, while the lath martensite grain boundaries are characterized by LAGBs [23]. These HAGBs in the cladding layer can effectively hinder the propagation of cracks, while the LAGBs, primarily composed of dislocations, can slow down the crack propagation to a certain extent [30,31]. As can be clearly observed in Figure 14c and Figure 15(c1), the upper portion of the fusion line comprises the BCC phase, whereas the matrix is primarily FCC. Figure 16(c11) shows the phase statistics for the region marked c11 in Figure 15, with the BCC phase (α-Fe) accounting for 89.1%. By combining the XRD test results and the microstructure diagrams, it is confirmed that the α-Fe in the coating is martensitic and the cladding layer primarily consists of martensite with a minor admixture of residual austenite [32]. The matrix, on the other hand, is primarily austenite. Additionally, in the heat-affected zone, it is noticeable that the matrix material undergoes only changes in grain morphology after being heated, without undergoing phase transformation, remaining as austenite.

3.4. Microhardness Characteristics

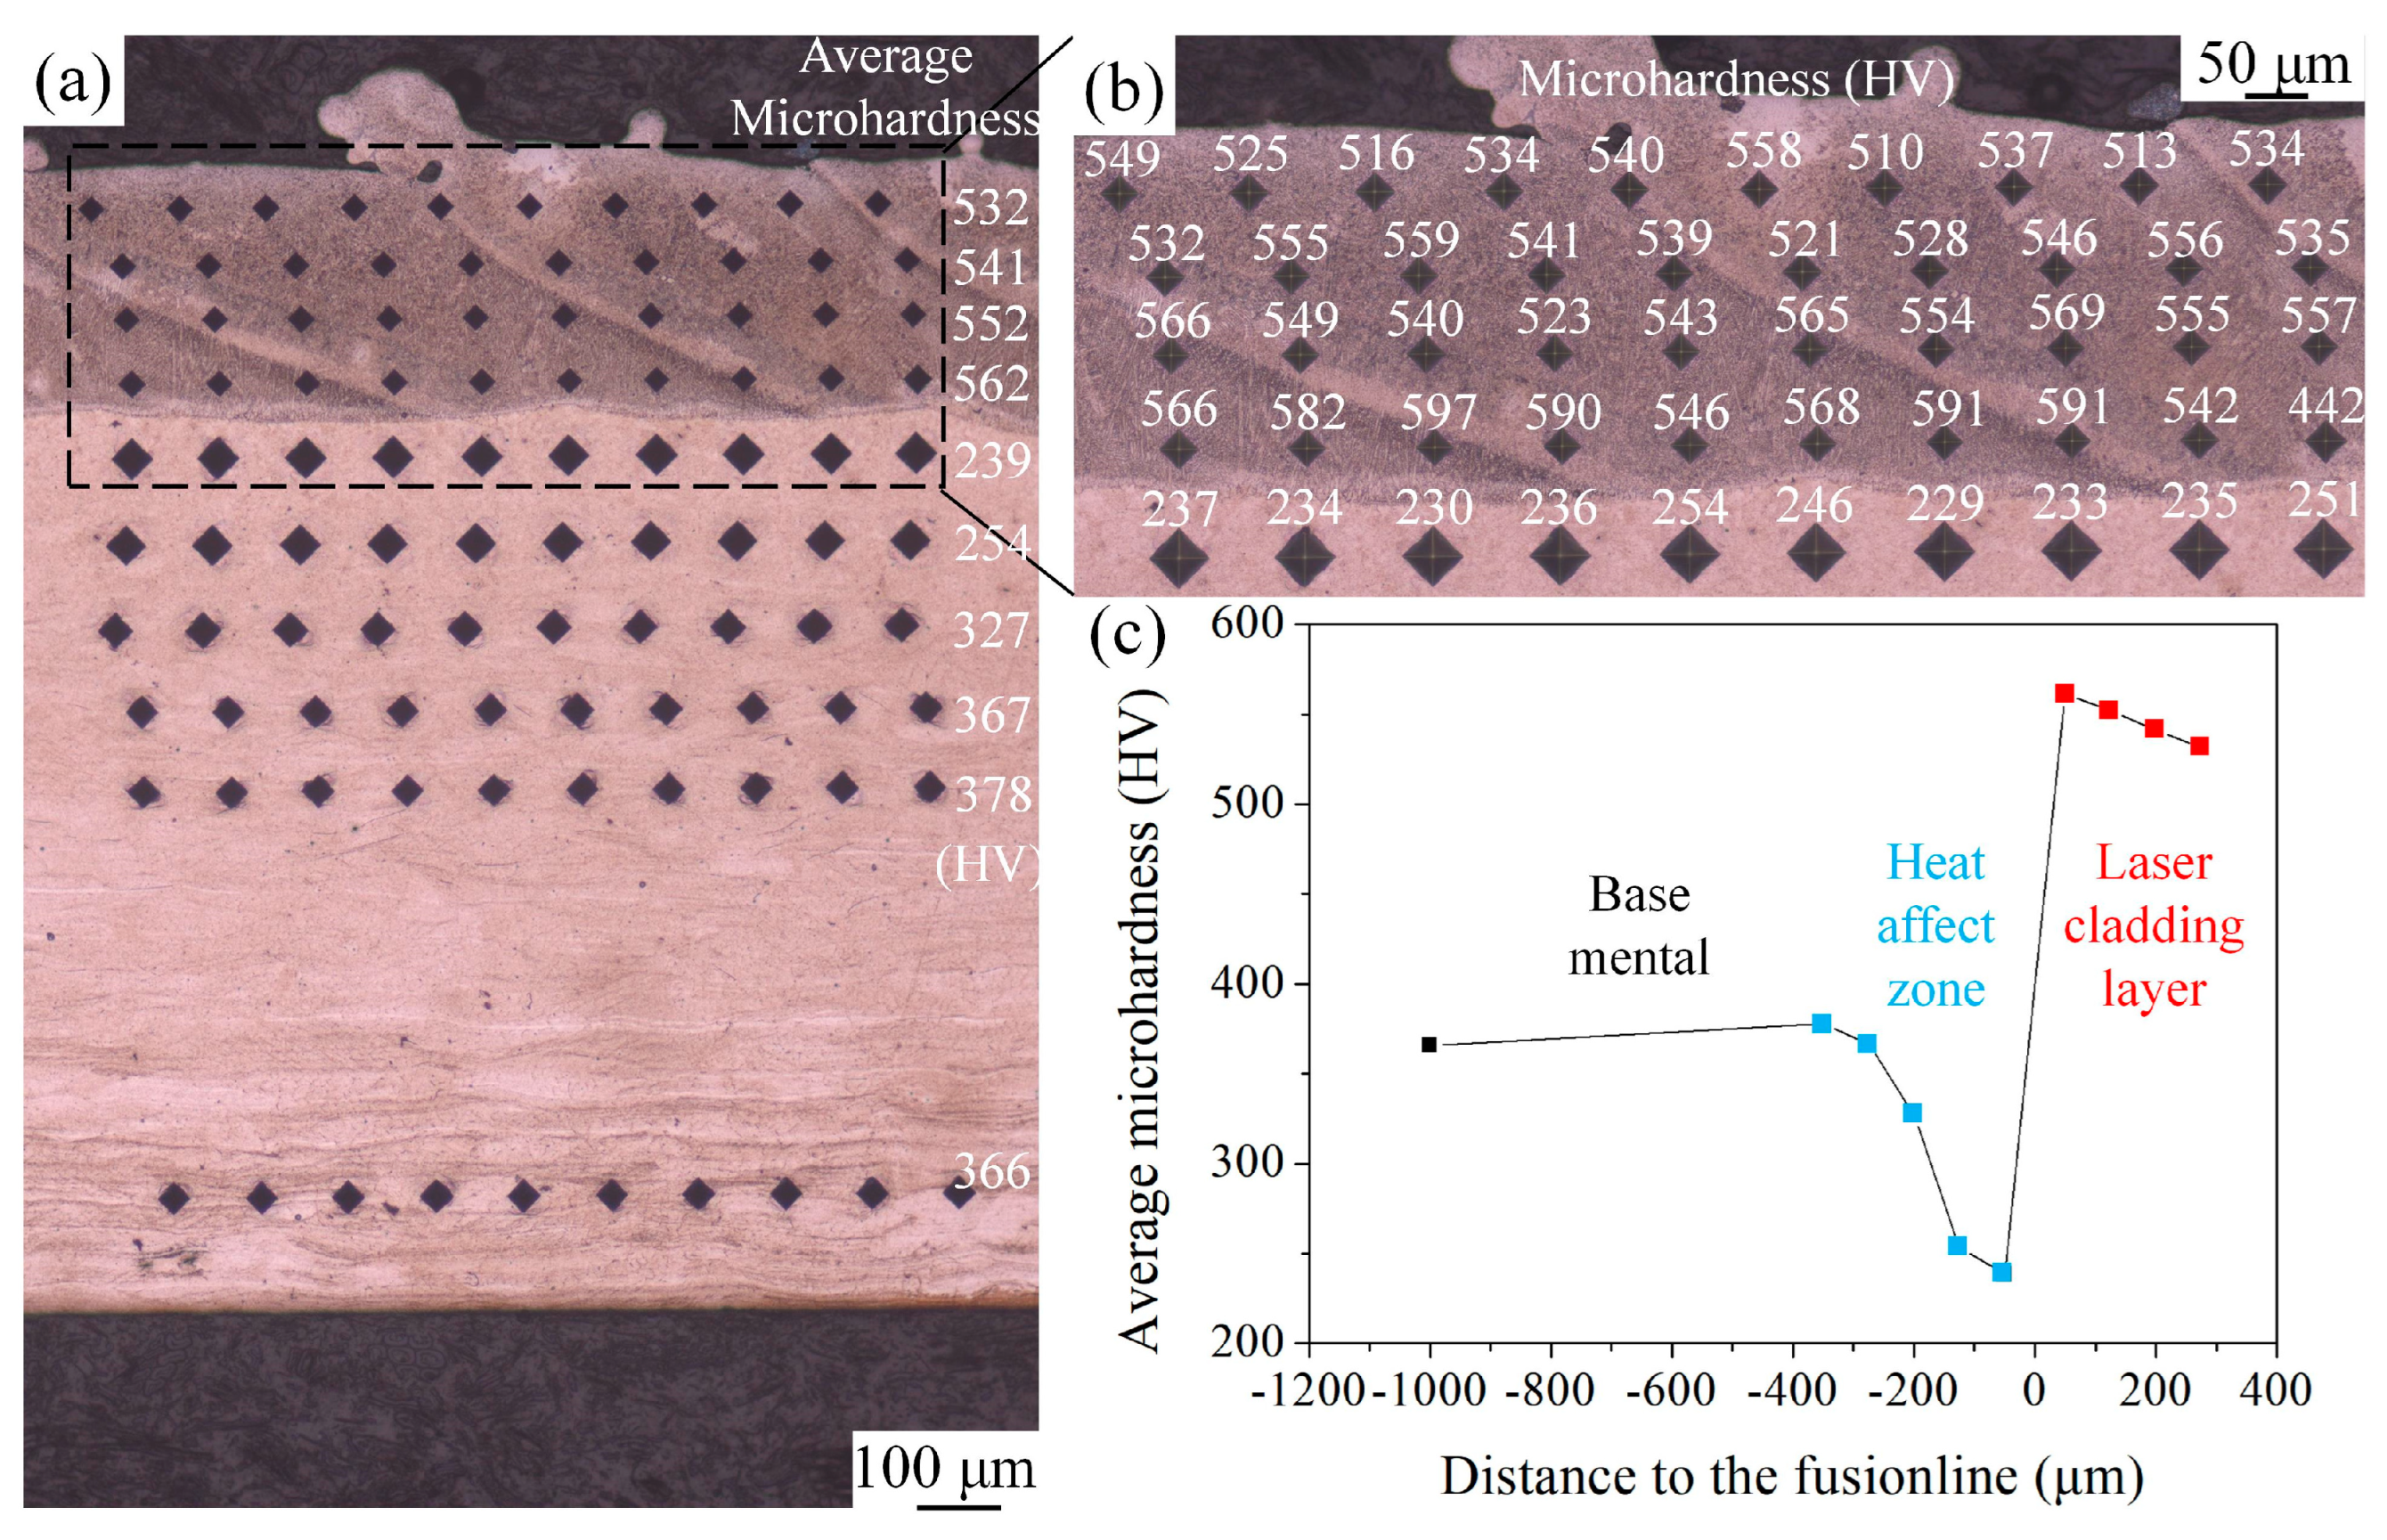
Figure 18 presents the results of the microhardness test. The average microhardness of the 1Cr17Ni5 substrate is 366 HV, while the microhardness of the cladding layer ranges from 532 to 562 HV. Notably, the microhardness of the cladding layer decreases from 562 HV to 532 HV as the distance from the substrate increases. This phenomenon is primarily attributed to the high linear velocity during the cladding process, which results in rapid cooling of the molten pool. Since the bottom of the cladding layer is closer to the substrate, its heat dissipation conditions are significantly better than the top, leading to a faster cooling rate at the bottom compared to the top. This was confirmed by the value of average SDAS. Consequently, the microstructure formed at the bottom is finer, as evidenced in the metallographic microstructure in Figure 10, which accounts for the higher microhardness at the bottom of the cladding layer. Hemmati et al. [33] clad 431 powder onto 304 stainless steel rods, achieving a coating hardness ranging from 525 to 625 HV. Jian et al. [9] conducted cladding using Cr19Ni3 powder on Q235 steel rods, with the resulting coating hardness between 540 and 610 HV. The elemental composition of these coatings is similar to that of 1Cr17Ni2 in the present study, and the hardness of the coatings in this study is close to theirs. The tube matrix material exhibits a rolled microstructure, evident in the bottom areas of Figure 10e and Figure 14a. Below the fusion line, the substrate microstructure undergoes changes due to heat effect, transforming from the original elongated rolled grains to equiaxed grains with further growth in size, as illustrated in Figure 14a and Figure 15(a1). This change in microstructure leads to a decrease in the microhardness of the heat-affected zone (HAZ), from the original 366 HV to 239 HV. As the distance from the fusion line increases, the heat effect on the substrate gradually decreases, resulting in less significant microstructural changes, as shown in Figure 14a and Figure 15(a1). Consequently, the microhardness variation in the HAZ decreases, gradually increasing from 239 HV to 254 HV and then to 327 HV, as depicted in Figure 18. When the distance from the fusion line reaches 320 μm, the substrate microhardness remains unchanged, indicating that the size of the HAZ is less than 320 μm. The decrease in microhardness observed in the HAZ indeed represents a critical risk area for the component during service. The pronounced hardness gradient at the interface between the HAZ and the cladding layer can easily initiate fatigue cracks under cyclic loading, thereby compromising the service life of the tube. Furthermore, the presence of this softened region reduces the overall load-bearing capacity of the tube, making it susceptible to failure under high loads. Consequently, this softening phenomenon detrimentally affects the tube’s service performance.
Some tube frequently experience wear and corrosion during routine service, making excellent wear and corrosion resistance particularly crucial. This study focused solely on the hardness characteristics of the coating, lacking investigation into its wear and corrosion performance. There are certain limitations to this work. Future work will include wear and corrosion resistance tests of the coating, along with shear testing to evaluate the interfacial bonding strength between the cladding layer and the substrate. These investigations are intended to offer critical data for supporting its engineering application.

4. Conclusions

For the first time, a 1 mm thick 1Cr17Ni5 thin-walled tube served as the substrate in this study, where 1Cr17Ni2 powder was employed for high-speed laser cladding. The influence of various process parameters on cladding bead forming was studied through an orthogonal experimental system. Moreover, the microstructure and microhardness characteristics of the multi-pass overlap cladding layers were analyzed. The conclusions are as follows:
(1)
Using high-speed laser cladding technology, excellent formation can be achieved on 1Cr17Ni5 tube with 1Cr17Ni2 powder. Orthogonal test results indicate that laser power has the most significant influence on the bead width, with an increase in laser power leading to a wider bead. The powder feed rate has the most significant effect on the bead height, resulting in a gradual increase in bead height with an increase in powder feed rate. Similarly, the powder feed rate has the most significant effect on the penetration depth, with an increase in powder feed rate leading to a gradual decrease in penetration depth.
(2)
In the multiple overlapping cladding layers, the microstructure exhibits a distinct periodic distribution, with a uniform distribution of elements both within and between layers. The cladding microstructure comprises α-Fe, numerous fine martensitic structures distributed within the columns grain. As the distance from the fusion line increases in the cladding layer, the size of the columnar crystals gradually decreases due to a reduction in cooling rate.
(3)
The substrate microstructure of the tube exhibits a distinct rolled state with flattened grains. After being thermally affected, the microstructure in the heat-affected zone transforms into equiaxed grains. The heat-affected zone undergoes only changes in grain morphology without phase transformation, primarily consisting of austenite.
(4)
The microhardness of the 1Cr17Ni2 cladding layer gradually decreases as the distance from the fusion line increases. The microhardness at the bottom is 562 HV, while the microhardness at the top is 532 HV. The substrate microhardness is 366 HV. However, due to the thermal influence of cladding, the microhardness in the heat-affected zone decreases to 239 HV. As the distance from the fusion line increases, the microhardness in the heat-affected zone gradually increases.

Author Contributions

S.L.: Conceptualization, Data curation, Investigation, Formal analysis, Writing, Language. L.-L.Z.: Resources, Formal analysis. S.-W.C.: Resources, Review. X.-Y.C.: Review. All authors have read and agreed to the published version of the manuscript.

Funding

This work was supported by the Key Research and Development Project of Shanxi Province (Grant No. 2024GX-YBXM-211, funded by the Department of Science and Technology of Shaanxi Province), Youth Program of National Natural Science Foundation of China (grant No. 52404351, funded by the government of the People’s Republic of China), and the Key Research and Development Project of Anhui Province (Grant No. 202304a05020067, funded by the Department of Science and Technology of Anhui Province).

Institutional Review Board Statement

Studies not involving humans or animals.

Informed Consent Statement

Not applicable.

Data Availability Statement

No new data were created or analyzed in this study.

Conflicts of Interest

The authors declare no conflict of interest.

References

  1. Wang, X.; Wang, G.; Wang, W.; Liu, X.; Liu, Y.; Jin, Y.; Zhang, Y. Enhancing corrosion resistance of nickel-based alloys: A review of alloying, surface treatments, and environmental effects. J. Alloys Compd. 2025, 1032, 181014. [Google Scholar] [CrossRef]
  2. Xiang, J.; Stöbener, D.; Stemmer, S.; Langenhorst, L.; Sölter, J.; Karpuschewski, B.; Fischer, A. Robot-assisted optical measurement method for the wear analysis of cutting tools. Wear 2026, 584–585, 206369. [Google Scholar] [CrossRef]
  3. Liang, J.; Hou, Z.; Babu, R.P.; Xu, X.; Liu, K.; Huang, X. Effect of surface nanocrystallization on microstructure, mechanical property and corrosion resistance of Mg and its alloys: A perspective review. J. Magnes. Alloys 2025, in press. [Google Scholar] [CrossRef]
  4. Munteanu, C.; Melnic, I.; Istrate, B.; Hardiman, M.; Gaiginschi, L.; Lupu, F.C.; Arsenoaia, V.N.; Chicet, D.L.; Zirnescu, C.; Badiul, V.A. Comprehensive Review of Improving the Durability Properties of Agricultural Harrow Discs by Atmospheric Plasma Spraying (APS). Coatings 2025, 15, 632. [Google Scholar] [CrossRef]
  5. Wu, Q.; Long, W.; Zhang, L.; Zhao, H. A review on ceramic coatings prepared by laser cladding technology. Opt. Laser Technol. 2024, 176, 110993. [Google Scholar] [CrossRef]
  6. Zhu, L.; Xue, P.; Lan, Q.; Meng, G.; Ren, Y.; Yang, Z.; Xu, P.; Liu, Z. Recent research and development status of laser cladding: A review. Opt. Laser Technol. 2021, 138, 106915. [Google Scholar] [CrossRef]
  7. Tan, Q.; Liu, K.; Li, J.; Geng, S.; Sun, L.; Skuratov, V. A review on cracking mechanism and suppression strategy of nickel-based superalloys during laser cladding. J. Alloys Compd. 2024, 1001, 175164. [Google Scholar] [CrossRef]
  8. Fu, K.; Zhong, C.; Zhang, L.; Wang, X.; Nie, B.; Xue, Y.; Gui, W.; Luan, B. Effect of multiple thermal cycling on the microstructure and microhardness of Inconel 625 by high-speed laser cladding. J. Mater. Res. Technol. 2023, 24, 1093–1107. [Google Scholar] [CrossRef]
  9. Jian, Y.; Liu, Y.; Qi, H.; He, P.; Huang, G.; Huang, Z. Effects of scanning speed on the microstructure, hardness and corrosion properties of high-speed laser cladding Fe-based stainless coatings. J. Mater. Res. Technol. 2024, 29, 3380–3392. [Google Scholar] [CrossRef]
  10. Schopphoven, T.; Gasser, A.; Wissenbach, K.; Poprawe, R. Investigations on ultra-high-speed laser material deposition as alternative for hard chrome plating and thermal spraying. J. Laser Appl. 2016, 28, 022501. [Google Scholar] [CrossRef]
  11. Schopphoven, T.; Gasser, A.; Backes, G. EHLA: Extreme High-Speed Laser Material Deposition: Economical and effective protection against corrosion and wear. Laser Tech. J. 2017, 14, 26–29. [Google Scholar] [CrossRef]
  12. Bai, Q.; Zhang, J.; Li, Q.; Wang, R.; Zhao, C. Microstructure and corrosion resistance of Fe-based coatings prepared using high-speed laser cladding and powerful spinning treatment. Mater. Lett. 2022, 310, 131429. [Google Scholar] [CrossRef]
  13. Huang, L.; Sun, Y.; Dong, P.; Yang, Q.; Ren, C.; Zhou, Y.; Zhou, Y.; Yang, X.; Li, C.; Wang, X.; et al. Rapid preparation of nanocrystalline high-entropy alloy coating with extremely low dilution rate and excellent corrosion resistance via ultra-high-speed laser cladding. Intermetallics 2024, 170, 108346. [Google Scholar] [CrossRef]
  14. Zhang, W.; Liu, Y.; Hu, D.; Lv, H.; Yang, Q. Experimental and numerical simulation studies of the flow characteristics and temperature field of Fe-based powders in extreme high-speed laser cladding. Opt. Laser Technol. 2024, 170, 110317. [Google Scholar] [CrossRef]
  15. Li, L.; Shen, F.; Zhou, Y.; Tao, W. Comparative study of stainless steel AISI 431 coatings prepared by extreme-high-speed and conventional laser cladding. J. Laser Appl. 2019, 31, 042009. [Google Scholar] [CrossRef]
  16. Ren, Y.; Chang, S.; Wu, Y.; Zhang, Z.; Shen, F.; Li, L. Effect of inhomogeneous composition on the passive film of AISI 431 coating fabricated by extreme-high-speed laser cladding. Surf. Coat. Technol. 2022, 440, 128496. [Google Scholar] [CrossRef]
  17. Li, C.; Liu, Z.; Huang, F.; Dong, J.; Wang, C.; Yuan, J.; Fu, Q. Experimental study of corrosion resistance of 431M2 stainless steel coatings in a CO2-saturated NaCl solution deposited by extreme high-speed laser cladding. Mater. Today Commun. 2024, 38, 108202. [Google Scholar] [CrossRef]
  18. Bu, X.; Xu, X.; Lu, H.; Liang, Y.; Bian, H.; Luo, K.; Lu, J. Effect of overlap rate on the microstructure and properties of Cr-rich stainless steel coatings prepared by extreme high-speed laser cladding. Surf. Coat. Technol. 2024, 487, 131025. [Google Scholar] [CrossRef]
  19. Xu, X.; Du, J.L.; Luo, K.Y.; Peng, M.X.; Xing, F.; Wu, L.J.; Lu, J.Z. Microstructural features and corrosion behavior of Fe-based coatings prepared by an integrated process of extreme high-speed laser additive manufacturing. Surf. Coat. Technol. 2021, 422, 127500. [Google Scholar] [CrossRef]
  20. Wang, X.; Ren, X.; Xue, Y.; Luan, B. Investigation on microstructure and high-temperature wear properties of high-speed laser cladding Inconel 625 alloy. J. Mater. Res. Technol. 2024, 30, 626–639. [Google Scholar] [CrossRef]
  21. Lin, F.; Wang, Z.; Xu, X.; Luo, K.; Lu, J. The effect of Y2O3 nanoparticle addition on the microstructure and high-temperature corrosion resistance of IN718 deposited by extreme high-speed laser cladding. Surf. Coat. Technol. 2024, 476, 130235. [Google Scholar] [CrossRef]
  22. Liu, Y.; Li, A.; Cheng, X.; Zhang, S.Q.; Wang, H.M. Effects of heat treatment on microstructure and tensile properties of laser melting deposited AISI 431 martensitic stainless steel. Mater. Sci. Eng. A 2016, 666, 27–33. [Google Scholar] [CrossRef]
  23. Dong, Y.; Lan, X.; Yang, S.; Lu, J.; Yan, S.; Wei, K.; Wang, Z. Effect of quenching and tempering treatments on microstructure and mechanical properties of 300M ultra-high strength steel fabricated by laser powder bed fusion. Mater. Charact. 2024, 212, 113935. [Google Scholar] [CrossRef]
  24. Yang, Z.Y.; Jian, Y.X.; Chen, Z.H.; Qi, H.J.; Huang, Z.F.; Huang, G.S.; Xing, J.D. Microstructure, hardness and slurry erosion-wear behaviors of high-speed laser cladding Stellite 6 coatings prepared by the inside-beam powder feeding method. J. Mater. Res. Technol. 2022, 19, 2596–2610. [Google Scholar] [CrossRef]
  25. Shao, J.Y.; Yu, G.; He, X.L.; Li, S.X.; Chen, R.; Zhao, Y. Grain size evolution under different cooling rate in laser additive manufacturing of superalloy. Opt. Laser Technol. 2019, 119, 105662. [Google Scholar] [CrossRef]
  26. Yin, H.; Felicelli, S.D. Dendrite growth simulation during solidification in the LENS process. Acta Mater. 2010, 58, 1455–1465. [Google Scholar] [CrossRef]
  27. Du, J.L.; Xu, X.; Zhang, H.M.; Lu, M.W.; Sun, J.F.; Luo, K.Y.; Lu, J.Z. Microstructure and wear resistance of CoCrFeNiMn coatings prepared byextreme-high-speed laser cladding. Surf. Coat. Technol. 2023, 470, 129821. [Google Scholar] [CrossRef]
  28. Meng, L.; Sheng, P.; Zeng, X. Comparative studies on the Ni60 coatings deposited by conventional and induction heating assisted extreme-high-speed laser cladding technology: Formability, microstructure and hardness. J. Mater. Res. Technol. 2022, 16, 1732–1746. [Google Scholar] [CrossRef]
  29. Du, C.; Hu, L.; Ren, X.; Li, Y.; Zhang, F.; Liu, P.; Li, Y. Cracking mechanism of brittle FeCoNiCrAl HEA coating using extreme high-speed laser cladding. Surf. Coat. Technol. 2021, 424, 127617. [Google Scholar] [CrossRef]
  30. Zhou, P.; Wang, B.; Wang, L.; Hue, Y.; Zhou, L. Effect of welding heat input on grain boundary evolution and toughness properties in CGHAZ of X90 tubeline steel. Mater. Sci. Eng. A 2018, 722, 112–121. [Google Scholar] [CrossRef]
  31. Lan, L.; Qiu, C.; Zhao, D.; Gao, X.; Du, L. Microstructural characteristics and toughness of the simulated coarse grained heat affected zone of high strength low carbon bainitic steel. Mater. Sci. Eng. A 2011, 529, 192–200. [Google Scholar] [CrossRef]
  32. Duan, Z.; Kim, M.-K.; Fang, Y.; Yuan, Q.; Zhang, Y.; Suhr, J. Investigation of laser-powder bed fusion driven controllable heterogeneous microstructure and its mechanical properties of martensitic stainless steel. Mater. Sci. Eng. A 2024, 891, 145917. [Google Scholar] [CrossRef]
  33. Hemmati, I.; Ocelík, V.; De Hosson, J.T.M. The effect of cladding speed on phase constitution and properties of AISI 431 stainless steel laser deposited coatings. Surf. Coat. Technol. 2011, 205, 5235–5239. [Google Scholar] [CrossRef]
Figure 1. High-speed laser cladding equipment.
Coatings 16 00179 g001
Figure 2. Definition of powder defocus.
Coatings 16 00179 g002
Figure 3. Definition of bead height (H), bead width (W), and penetration (P).
Coatings 16 00179 g003
Figure 4. Surface morphologies of single-pass laser cladding with different parameters.
Coatings 16 00179 g004
Figure 5. Cross section morphologies of single-pass laser cladding.
Coatings 16 00179 g005
Figure 6. Influence of processing parameter on the forming of high-speed laser cladding beads. (a) The influence of powder feed rate on bead size; (b) The influence of laser power on bead size; (c) The influence of rotation speed on bead size; (d) The influence of protective gas on bead size; (e) The influence of defocus on bead size; (f) The influence of powder delivery gas on bead size.
Coatings 16 00179 g006
Figure 7. Range analysis of orthogonal test.
Coatings 16 00179 g007
Figure 8. Macro-morphology of multi-pass laser cladding.
Coatings 16 00179 g008
Figure 9. XRD test results of base mental and cladding layer.
Coatings 16 00179 g009
Figure 10. Microscopic morphologies of multi-pass overlap laser cladding layer. (ac) are enlarged views of the local area in Figure (d); (d) is the initial pass of the cladding layer; (e) is the overall cross-sectional morphology of the cladding layer; (f) is the intermediate pass of the cladding layer; (g,h) are enlarged views of the local area in Figure (f); (i) is enlarged views of the local area in Figure (i).
Coatings 16 00179 g010
Figure 11. SEM morphologies of multi-pass overlap laser cladding layer. (a,c) are enlarged views of the local area in Figure (b); (b,e,g) are enlarged views of the local area in Figure (d); (d) is the intermediate pass of the cladding layer; (f) is enlarged views of the local area in Figure (e); (h) is enlarged views of the local area in Figure (g); (i) is enlarged views of the local area in Figure (h).
Coatings 16 00179 g011
Figure 12. Macro-scale EDS mapping results. (a) is the intermediate pass of the cladding layer; (bf) are the distribution diagrams of Fe, Cr, Ni, Mn and Si elements in Figure (a), respectively.
Coatings 16 00179 g012
Figure 13. Micro-scale EDS mapping results. (a) is the intermediate pass of the cladding layer; (bf) are the distribution diagrams of Fe, Cr, Ni, Mn and Si elements in Figure (a), respectively.
Coatings 16 00179 g013
Figure 14. EBSD test results. (a) Inverse pole figure (IPF); (b) orientation imaging microscopy (OIM) graphs; (c) phase distribution diagram. a1, b1, and c1 are EBSD test zone for Figure 15.
Coatings 16 00179 g014
Figure 15. Partially enlarged image of Figure 14. (a1) Partially enlarged image of area a1 in Figure 14; (b1) partially enlarged image of area b1 in Figure 14; (c1) partially enlarged image of area c1 in Figure 14. a11, b11 and c11 are the data statistical area in Figure 16 and Figure 17.
Coatings 16 00179 g015
Figure 16. (a11) Grain size statistics in area a11 of Figure 15; (b11) misorientation angle statistics in area b11 of Figure 15; (c11) phase proportional in area c11 of Figure 15.
Coatings 16 00179 g016
Figure 17. Textures of BCC and FCC phase in the area of Figure 15(a11).
Coatings 16 00179 g017
Figure 18. Microhardness test results of cladding layer. (a) Morphological image after Micro Vickers hardness test; (b) partially enlarged image of (a); (c) statistical results of average microhardness in different region.
Coatings 16 00179 g018
Table 1. Single-pass high-speed laser cladding orthogonal experimental table.
Case No.Powder Feed
Rate/r·min−1
Laser
Power/W
Rotation
Speed/r·min−1
Linear Energy
Density/J·mm−1
Protective
Gas/L·min−1
Powder
Defocus/mm
Powder Delivery
Gas/L·min−1
11800407.644−14
21900506.886−0.55
311000606.37806
411100706.00100.57
511200805.731218
61.5800704.37815
71.5900804.310−16
81.51000409.5512−0.57
91.51100508.40408
101.51200607.6460.54
112800506.1112−0.56
122900605.73407
1321000705.4660.58
1421100805.25814
15212004011.4610−15
162.5800803.82607
172.5900408.5980.58
182.51000507.641014
192.51100607.0012−15
202.51200706.554−0.56
213800605.09100.58
223900704.911214
2331000804.774−15
24311004010.506−0.56
2531200509.17807
Table 2. The average feature size of weld beads under different parameters.
Case No.Bead Width/μmBead Height/μmPenetration Depth/μm
11053.1102.7117.1
21084.588.2113.7
3107668.798.4
41051.459.480.6
5969.135.683.1
6691.679.88.5
7929.257.739.9
81280.4173.1145.900
91217.7100.1164.6
101290.6117.9122.2
111030.2176.513.6
12946.2117.111.9
13922.594.229.7
14939.4110.311.0
151233.8224.8145.1
16672.1117.91.7
171022.5170.56.8
18996.2210.46.8
191070.0130.798.4
201109.9150.281.4
21380.3148.51.1
22676.4241.80
231055.6181.26.8
241364.5338.536.5
251301.7220.622.1
Table 3. The maximum and minimum diameters of the tube before and after laser cladding.
Minimum Tube
Diameter/mm
Maximum Tube
Diameter/mm
Difference in Tube
Diameter/mm
Ovality (%)
Before laser cladding50.0250.080.070.14
After laser cladding49.9950.110.120.24
Disclaimer/Publisher’s Note: The statements, opinions and data contained in all publications are solely those of the individual author(s) and contributor(s) and not of MDPI and/or the editor(s). MDPI and/or the editor(s) disclaim responsibility for any injury to people or property resulting from any ideas, methods, instructions or products referred to in the content.