1. Introduction
Advanced manufacturing technology is essential for innovation in mold manufacturing, improving mold performance, and optimizing the manufacturing process [
1,
2,
3]. Electron beam modification technology is a cutting-edge method that enhances die steel properties, prolongs die life, and reduces production costs [
4,
5,
6]. The 45CrNiMoV mold steel, classified as a low-alloy ultra-high-strength steel, plays a crucial role in various industries such as die manufacturing, aerospace, and automotive sectors due to its exceptional overall properties [
7]. Noteworthy advantages of this steel include a high yield ratio, superior strength, good toughness, high-temperature strength, and the absence of temper brittleness [
8]. These characteristics make it particularly suitable for producing molds that are subjected to high loads and impacts, thereby ensuring prolonged service life and operational stability of the molds. However, 45CrNiMoV die steel manufactured by traditional processing methods has impurities that lead to accelerated surface wear and fatigue cracks, which will hinder the service life and efficiency of the die [
9,
10]. Electron beam modification technology emerges as an innovative surface treatment approach that addresses these issues. This treatment is performed in a vacuum environment, effectively preventing the introduction of external impurities during the process and significantly reducing the risk of surface contamination in mold steel [
11,
12]. Ensuring a clean surface is essential for maintaining stable performance and preventing localized corrosion and performance deterioration due to impurities. Electron beams are characterized by their high energy density and rapid heating and cooling rates [
13,
14]. The swift heating during treatment elevates the surface temperature quickly, while the subsequent fast cooling rate promotes rapid solidification, leading to the formation of a refined grain structure. This refined grain structure not only boosts the surface hardness of the die steel but also improves its wear resistance, effectively impeding fatigue crack propagation and enhancing the fatigue life of the dies. Findings demonstrate that electron beam modification can elevate the surface hardness of specific die steels by 20% to 30%, significantly augmenting their wear resistance during operational use [
15].
This study focuses on the electron beam modification of 45CrNiMoV die steel to examine the effects of electron beam irradiation on its microstructural changes and mechanical characteristics. By revealing the fundamental principles underlying the electron beam modification of 45CrNiMoV die steel, this research establishes a theoretical basis for optimizing the electron beam modification procedure. As a result, this optimization improves the performance of 45CrNiMoV die steel, promotes advancements in die manufacturing, and meets the requirements for high-performance dies in the high-end manufacturing sector.
2. Materials and Experiments
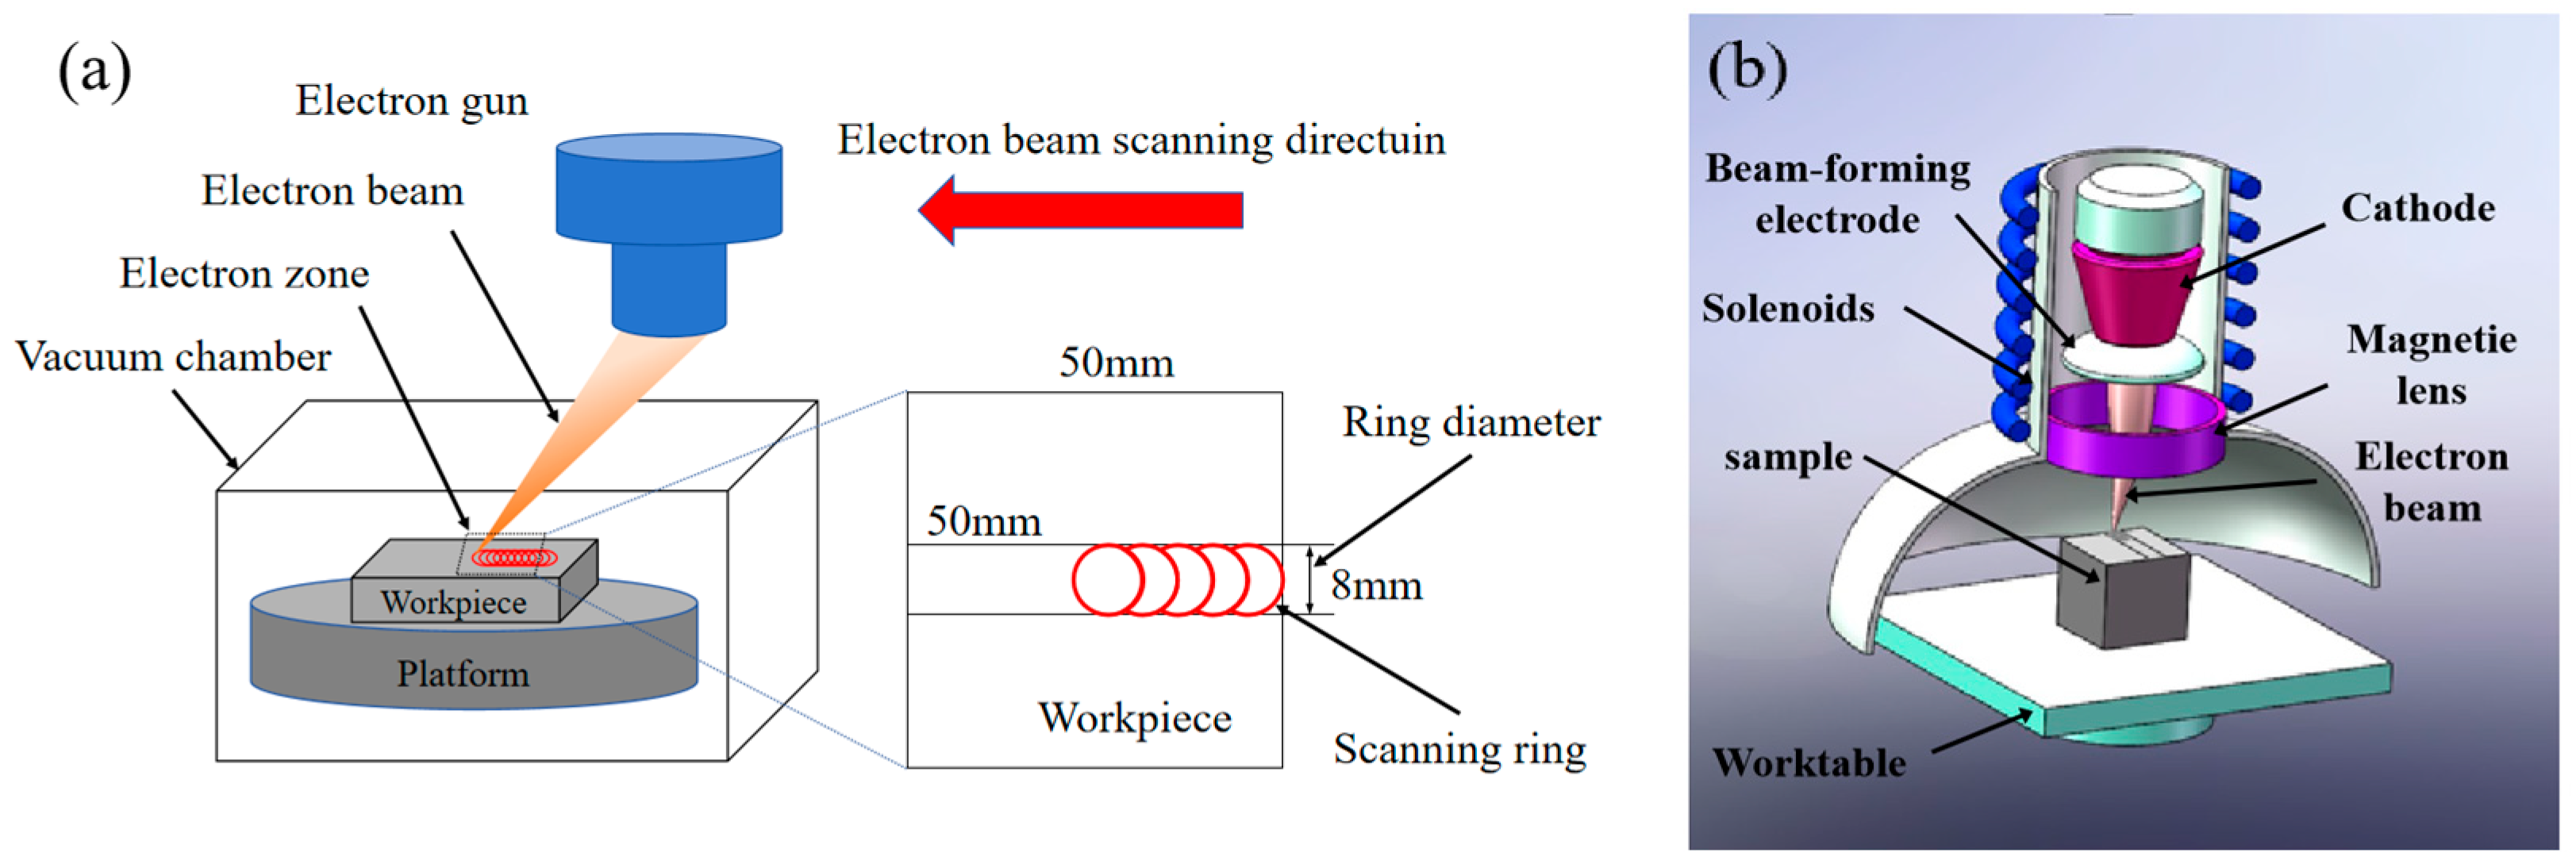
During the material preparation phase, rods with a diameter of 80 mm were precisely cut into samples measuring 50 mm × 50 mm × 50 mm. After undergoing mechanical polishing, the samples were exposed to vacuum irradiation using an HDZ-6F (Guangdong Zhongke Zhicheng Technology Co., Ltd., Guangzhou, China) high-voltage numerical control vacuum electron beam welding machine. The irradiation parameters were set as follows: the acceleration voltage (U) was adjusted to 60 kV, the beam current (I) to 18 mA, the electron gun moving speed (V) to 300 mm/min, the scanning frequency (F) to 300 Hz, and the ring diameter (d) to 8 mm, as illustrated in
Figure 1 Following treatment, the sample was cut into squares measuring 8 mm × 8 mm × 8 mm along the scanning area. The alloy composition was determined to be (wt.%): C 0.45, Si 0.25, Mn 0.62, S 0.01, P 0.01, Cr 1.01, Ni 1.56, Mo 0.25, with iron (Fe) making up the remainder. The samples were then polished with 1 μm diamond paste and etched for 3 s using a 4% nitric acid alcohol solution. Finally, the corroded surface was quickly rinsed with anhydrous ethanol to obtain the metallographic samples.
The cross-section microstructure of the 45CrNiMoV steel samples was observed using a Zeiss Gemini SEM 300 scanning electron microscope (SEM, Carl Zeiss (Shanghai) Management Co., Ltd., Shanghai, China). The phase structure was analyzed with a precision X-ray diffractometer (XRD, Rigaku Corporation, Tokyo, Japan). The morphology, microstructure were examined with a Quanta FG-450 scanning electron microscope (FEI, Hillsboro, OR, USA). Surface and cross-sectional microhardness tests were conducted using a Haiin HVS-1000A digital display microhardness tester (with a load of 1.961 N and a dwell time of 15 s, Laizhou Huayin Testing Instrument Co., Ltd., Laizhou, China). Surface wear resistance was evaluated using a CFT-I material surface performance comprehensive tester (at a load of 30 N, with a reciprocating length of 4 mm and a wear time of 20 min, Lanzhou Zhongke Kaihua Technology Development Co., Ltd., Lanzhou, China). The mass of the samples before and after wear was measured with an FA1104 N electronic balance (Shanghai Jinghai Instrument Co., Ltd., Shanghai, China).
3. Results and Discussions
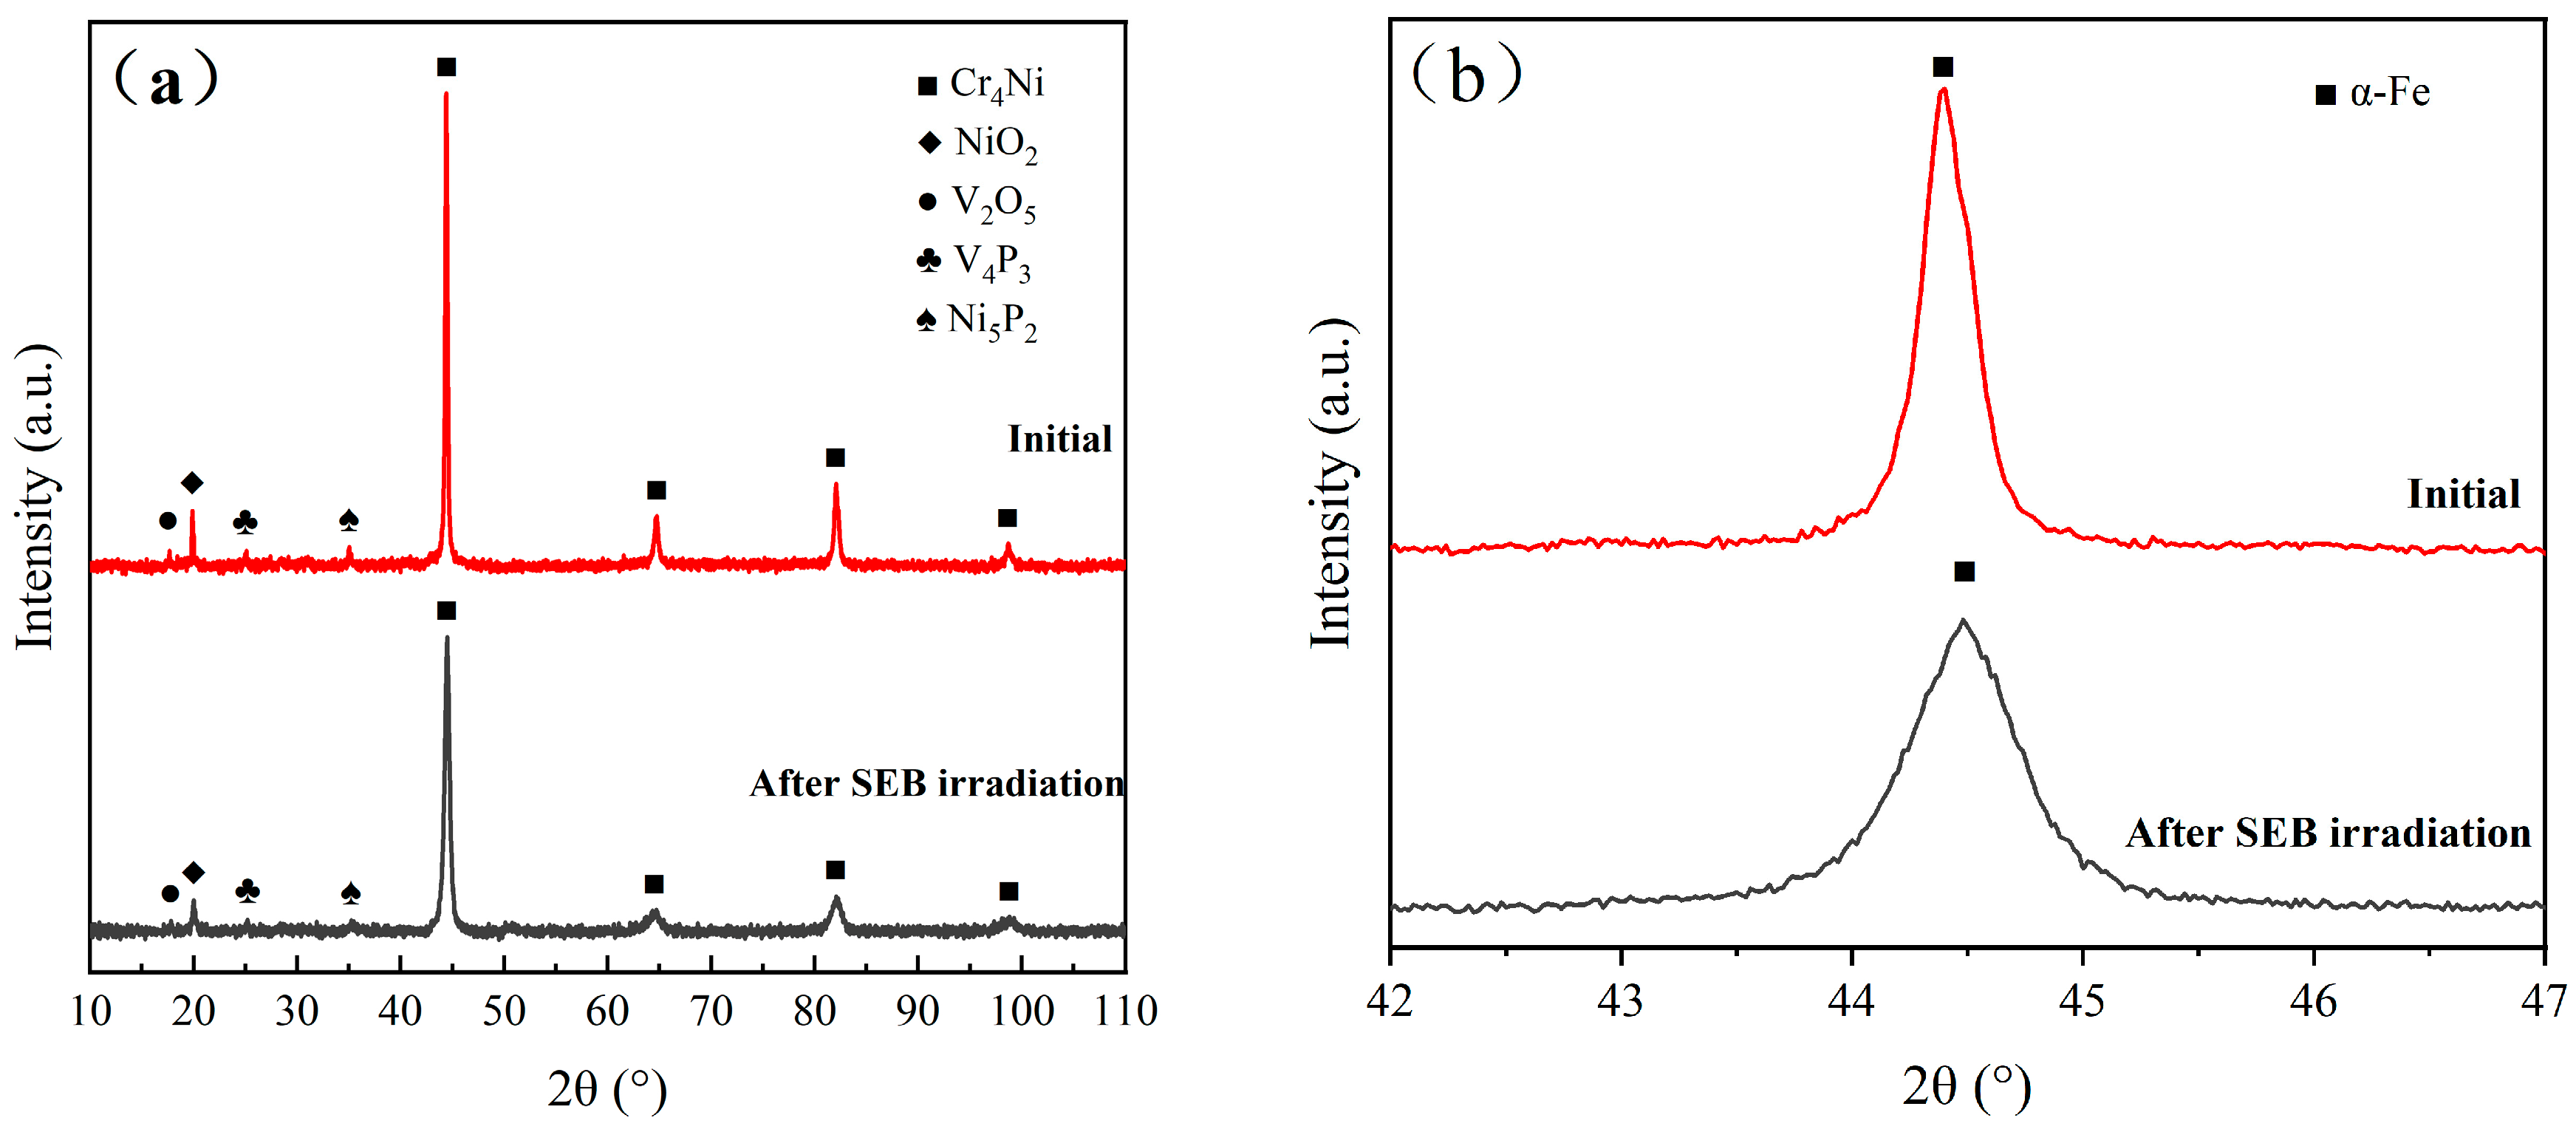
Figure 2 illustrates the X-ray diffraction patterns of the untreated sample and the sample exposed to scanning electron beams. Post-electron beam irradiation, significant alterations are observed in the surface microstructure density of the 45CrNiMoV steel, which offer profound insights into the material’s response to such treatment. Both sets of samples predominantly consist of α-Fe, NiO
2, V
2O
5, V
4P
3, and Ni
5P
2 phases. Notably, there is an evident increase in the peak intensity of the α-Fe phase after electron beam irradiation. This heightened intensity suggests a more ordered or refined arrangement of α-Fe crystals at the surface, potentially due to the thermal and kinetic effects induced by the electron beam [
16]. In the irradiated samples, the diffraction peaks of the α-Fe phase are distinctly visible at 2θ = 20.0°, 44.5°, 69.0°, and 86.0°. An enlargement of the main peaks is depicted in
Figure 2b, providing a clearer view of the peak shapes and positions. After electron beam irradiation, these diffraction peaks of the α-Fe phase are shifted to the right, towards higher 2θ angles. This shift is accompanied by a slight increase in peak width, which is a critical indicator of microstructural changes. The broadening of the peak signifies the refinement of grain size within the α-Fe phase. This refinement can be attributed to the instantaneous formation of a substantial quantity of nuclei at the surface layer, a phenomenon driven by the intense atomic vibration induced by the electron beam energy input. The high-energy electrons impart kinetic energy to the atoms, causing them to vibrate more vigorously and facilitating the formation of new crystal nuclei. Concurrently, the restricted atomic diffusion distance resulting from the transient electron beam interaction duration and accelerated cooling rate effectively suppresses nuclei growth. The short interaction time limits the extent to which atoms can migrate and coalesce into larger grains, while the rapid cooling rate further freezes the microstructure in a refined state. This suppression of grain growth leads to a reduction in interplanar spacing, as described by Bragg’s equation. According to Bragg’s law (
nλ = 2d sinθ), where
n is the order of diffraction, λ is the wavelength of the X-ray, d is the interplanar spacing, and θ is the diffraction angle, a decrease in interplanar spacing (d) induces an increase in diffraction angle (θ) [
17]. This manifests as a characteristic shift in diffraction peaks toward the high-angle region, as observed in our experiments. The rightward shift in the α-Fe peaks is a direct consequence of this reduced interplanar spacing, confirming the refinement of the grain structure.
Furthermore, the observed microstructural changes are likely to have a profound impact on the mechanical properties of the 45CrNiMoV steel. Refined grain sizes generally lead to increased strength and hardness due to the greater number of grain boundaries that impede dislocation motion. Additionally, the presence of a more ordered α-Fe phase may enhance the material’s ductility and toughness by providing a more homogeneous and stable crystal structure.
In summary, the X-ray diffraction results clearly demonstrate that electron beam irradiation induces significant microstructural changes in the 45CrNiMoV steel, particularly in terms of grain refinement and phase composition. These changes are reflected in the shift and broadening of the α-Fe diffraction peaks, providing compelling evidence for the effectiveness of electron beam treatment in modifying the surface properties of metallic materials. Future work could focus on quantifying the extent of grain refinement and correlating these microstructural changes with specific mechanical property improvements to further optimize the electron beam irradiation process.
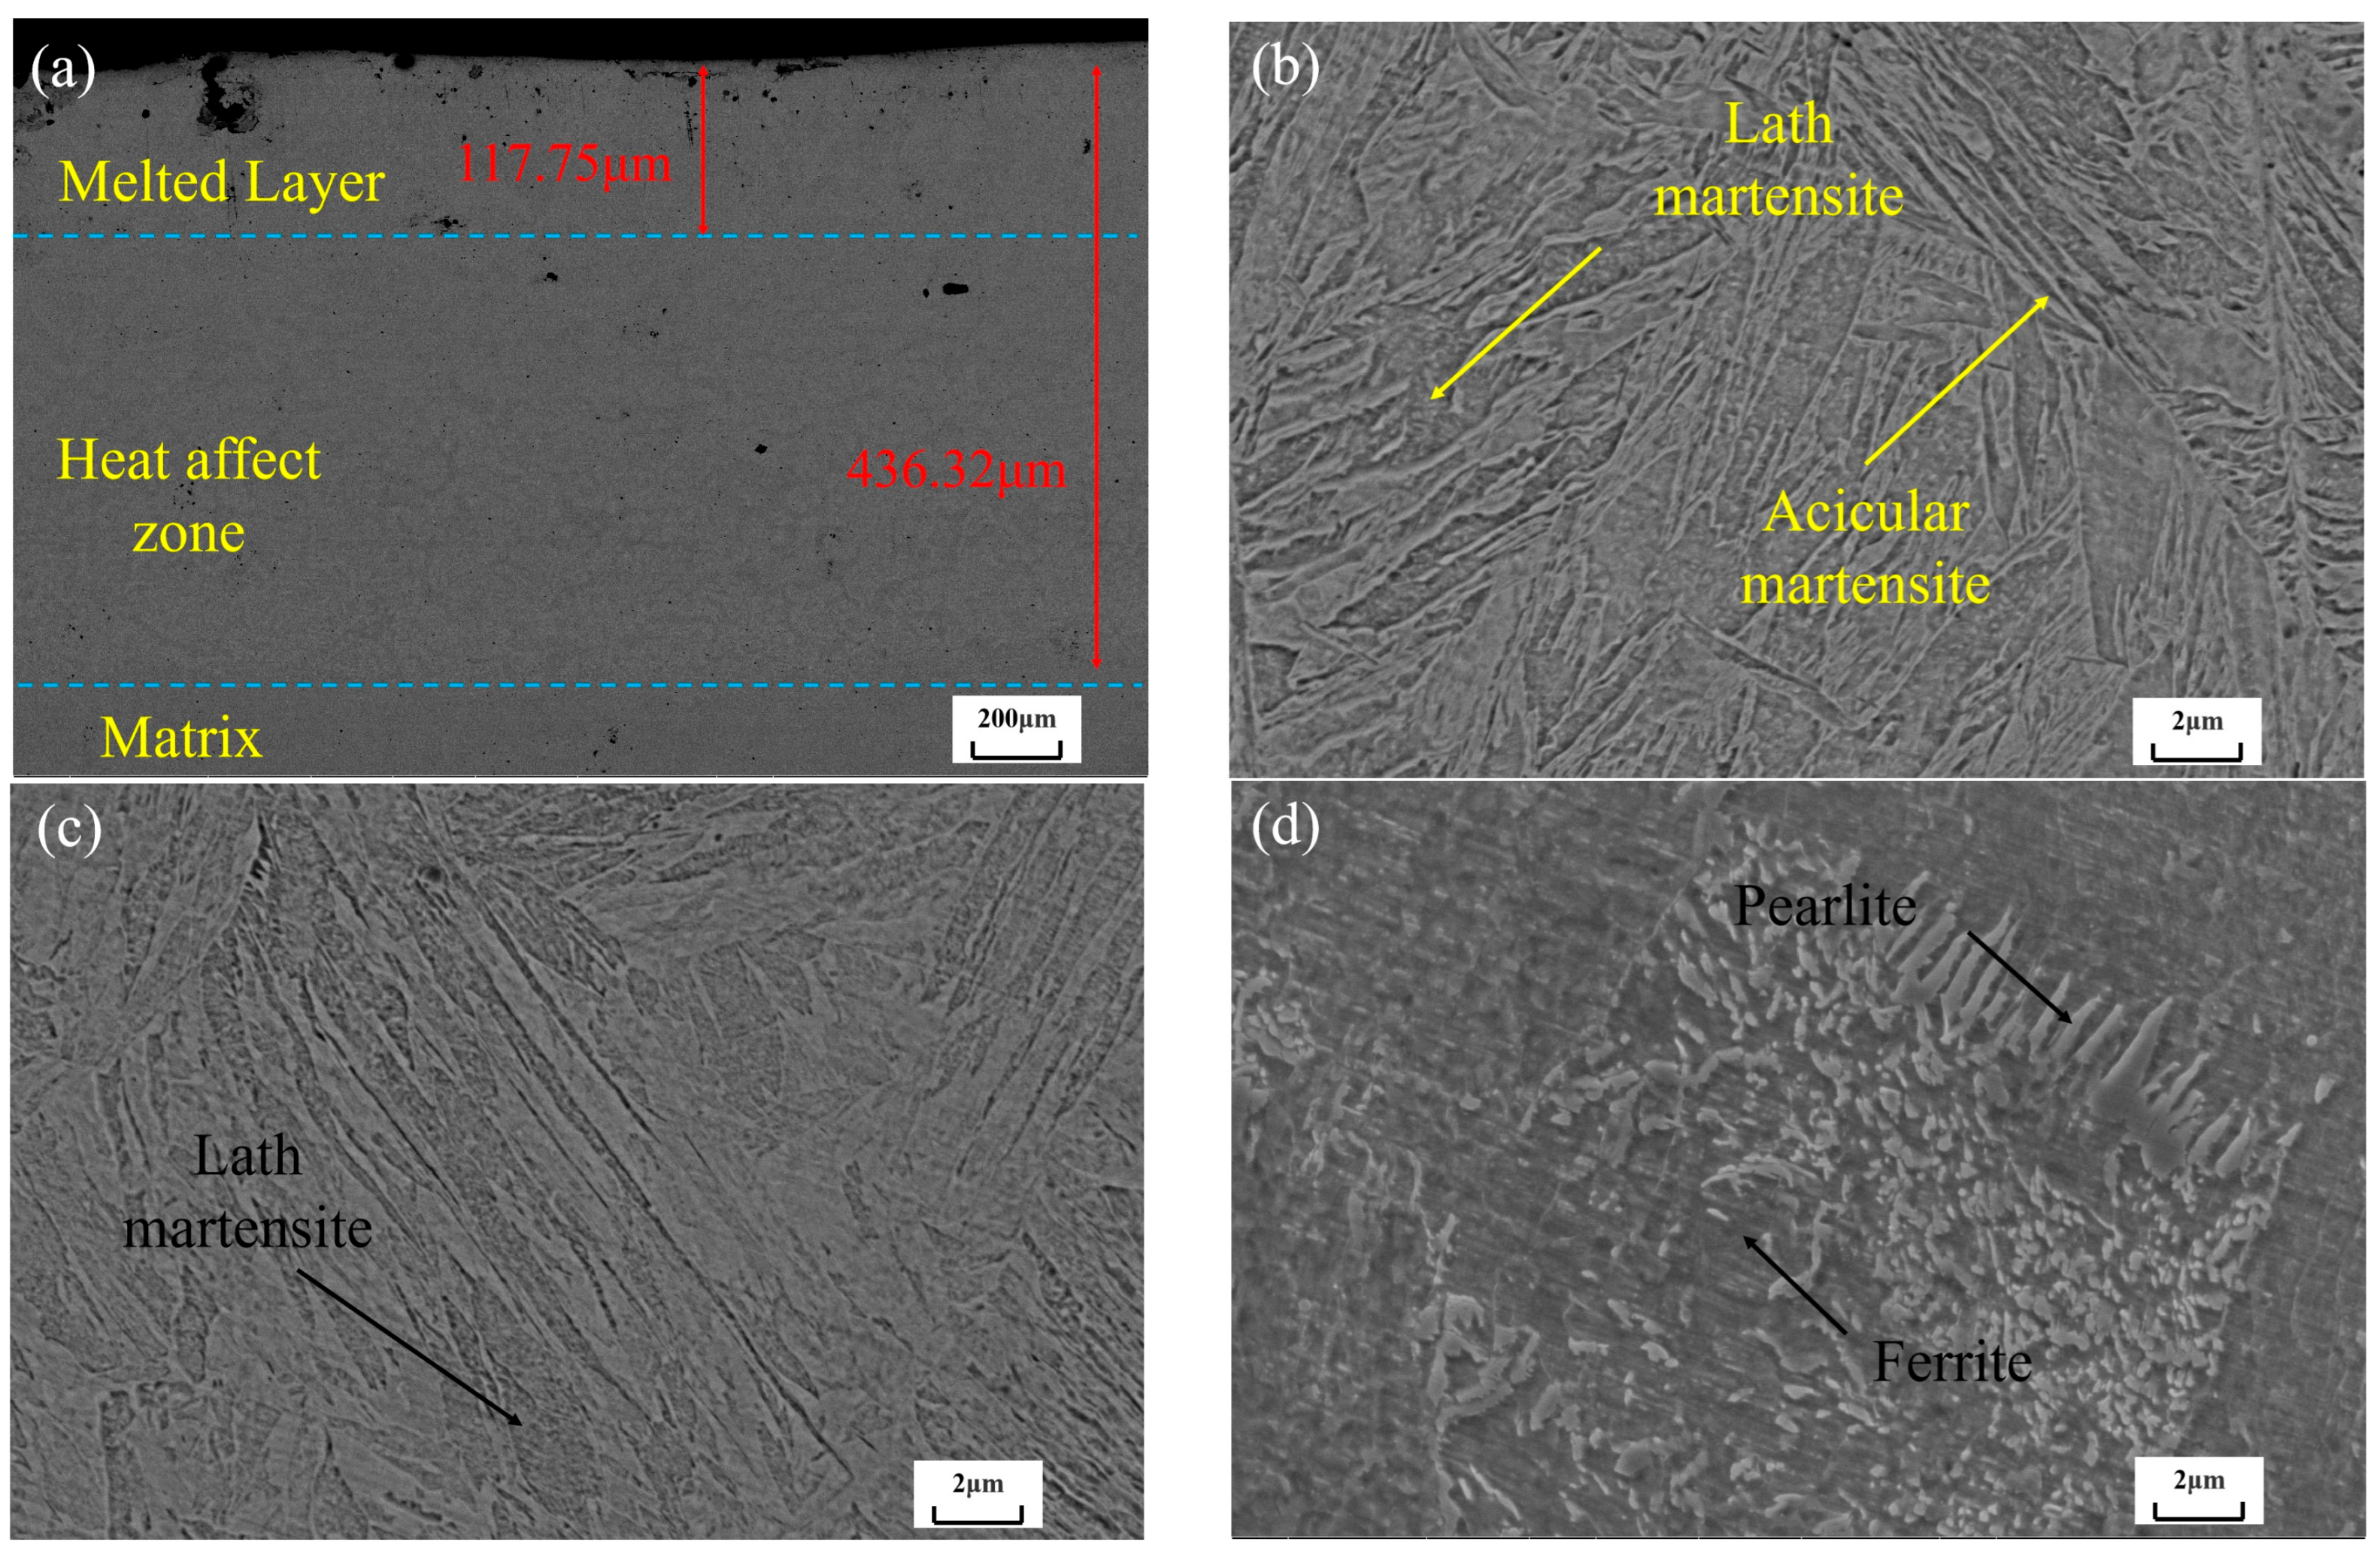
The microstructure of the cross-section of 45CrNiMoV steel, following scanning electron beam treatment, is depicted in
Figure 3a. It comprises a molten layer, a heat-affected zone, and a matrix, with clear partitioning within the melt pool. Through self-cooling and rapid solidification, a melting layer forms from front to back. As shown in
Figure 3b, the molten layer consists of slats and needle-like martensites, resulting from complete crystallization above the Ac3 line. This is primarily due to the complete austenitization of the molten layer under high-energy beam irradiation, with rapid heat dissipation satisfying the kinetic prerequisites for martensitic phase transformation [
18]. The fast conduction of heat to the matrix causes the martensite to transition to a coarser form, as seen in
Figure 3c. The larger martensitic grains on the surface of the heat-affected zone stem from varying thermal conduction at different depths in a vacuum. Additionally, the matrix, predominantly ferrite and pearlite as shown in
Figure 3d, remains below the Ac1 phase transition temperature. This distinct microstructure evolution implies that the scanning electron beam treatment can precisely tailor the microstructure at different regions of the steel, potentially optimizing its mechanical properties for specific applications by controlling the martensite formation and distribution.
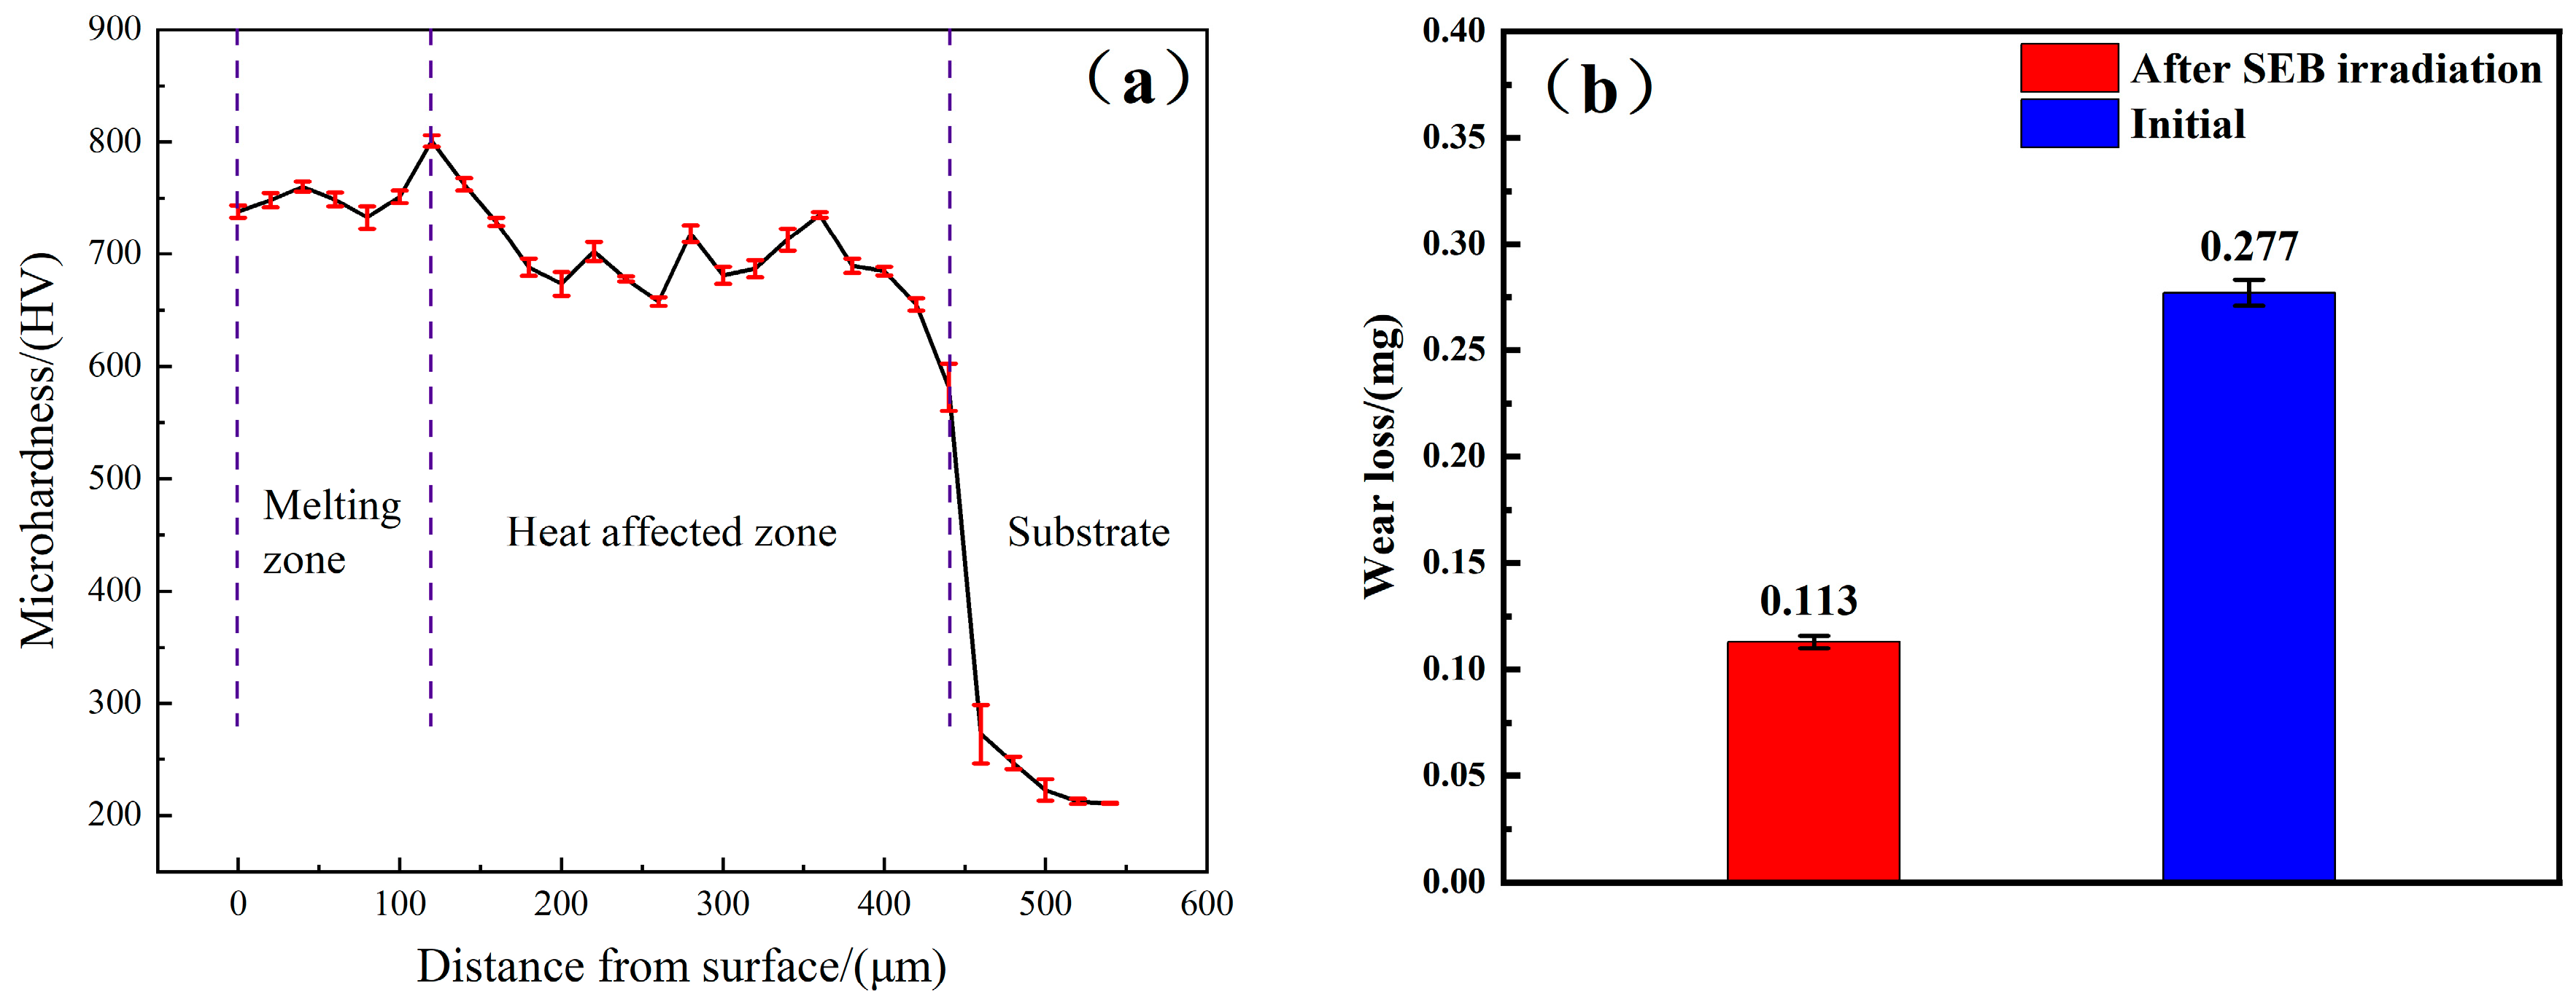
The microhardness distribution across the cross-section of the 45CrNiMoV steel is illustrated in
Figure 4a. The results reveal a non-linear variation in microhardness. When the depth surpasses 430 μm, microhardness drops sharply. This is because as the distance from the surface increases, the temperature gradient changes, causing partial austenitization near the matrix. During rapid cooling, insufficient martensitic phase transformation occurs, leading to a reduced martensite content. The surface attains the highest microhardness of 812.7 HV, with a general trend of decreasing microhardness as the depth increases, and the matrix measures 211.3 HV. The elevated microhardness of the molten layer is mainly due to the solid solution strengthening effect from carbon supersaturation in α-Fe martensite, which gives it superior hardness compared to other phases [
19].
Figure 4b presents the wear loss diagram. Utilizing a CFT-I friction and wear testing machine, it is found that the frictional loss weight of the 45CrNiMoV steel sample decreases from 0.28 mg to 0.11 mg. This significant improvement in wear resistance after scanning electron beam modification can be attributed to the refined microstructure and enhanced hardness of the modified layer. The hardened surface layer is better able to withstand abrasive forces during wear testing, reducing the amount of material removed and thus improving the overall wear resistance of the 45CrNiMoV steel.
Figure 5 systematically elucidates the hierarchical multiscale mechanisms underlying electron beam irradiation-mediated surface nanocrystalline strengthening in 45CrNiMoV high-strength alloy steel. Throughout the entire process of electron beam irradiation, the surface of the material is entirely melted. Due to the combined effects of surface tension and gravity, the molten metal flows from the peaks to the lower parts of the material surface, leading to the disappearance of surface traces and resulting in a smooth and flat surface [
20]. During irradiation, the elements Cr, Ni, and Mo dissolve into austenite, forming β-Fe(Fe-Cr-Ni-V). Additionally, orthorhombic distortion occurs within the BCC lattice, and the squareness of martensite increases continuously. Eventually, smaller acicular martensite, α-Fe (Fe–Cr), is formed. Moreover, during the ultra-high-speed cooling process, the solid-phase crystal growth of the metal is restricted, resulting in the formation of (Fe, Cr)C carbide nanocrystals. This synergistic enhancement results in a notable simultaneous increase in material hardness and wear resistance, offering a new approach for surface modification techniques to improve the long-term durability of mechanical engineering components in challenging environments.
4. Conclusions
The surface hardness of the 45CrNiMoV mold steel was enhanced through the application of an extremely high cooling rate during the irradiation of the scanning electron beam, resulting in the reconstitution of the surface grain post-irradiation. Consequently, the surface hardness achieved 812.7 HV, surpassing the substrate’s hardness value by more than double. Additionally, the abrasion resistance of the sample has doubled, with the wear loss reduced from 0.28 mg to 0.11 mg. This improvement is primarily attributed to the formation of alloy martensite and the strengthening effect of nano-grains during electron beam irradiation.
This study presents a significant advancement in the field of mold steel enhancement through the application of electron beam irradiation on 45CrNiMoV mold steel.
4.1. Unprecedented Surface Property Enhancement
The most striking scientific innovation lies in the unprecedented improvement of surface mechanical properties. By utilizing electron beam irradiation, the surface microhardness of 45CrNiMoV mold steel was elevated to 812.7 HV, more than doubling the original value. This remarkable increase is attributed to a series of complex and finely tuned microstructural changes induced by the electron beam. The refined grain structure, increased dislocation density, and potential formation of new phases work synergistically to impede dislocation motion and crack propagation. Such a substantial hardness enhancement is not commonly achieved through traditional surface treatment methods, marking a significant breakthrough in the quest for high-performance mold steel. Simultaneously, the wear resistance of the specimen witnessed a remarkable 2.5-fold increase, with wear loss plummeting from 0.28 mg to 0.11 mg under standardized testing conditions. In practical applications, this translates to a significantly extended mold service life, reduced maintenance frequency, and lower replacement costs. It addresses a long-standing challenge in the mold manufacturing industry, where surface wear and fatigue are major obstacles to the longevity and efficiency of molds.
4.2. Advanced Microstructural Control Mechanisms
The study delves deeply into the underlying microstructural control mechanisms, which is another area of scientific innovation. Through advanced characterization techniques such as scanning electron microscopy (SEM) and X-ray diffraction (XRD), we have uncovered the intricate relationship between electron beam parameters and microstructural evolution. During electron beam irradiation, the intense energy input induces rapid heating and cooling cycles. The swift heating elevates the surface temperature quickly, while the subsequent fast cooling rate promotes rapid solidification, leading to the formation of a refined grain structure. This refined grain structure is a key factor in enhancing the material’s mechanical properties. Additionally, the study reveals that the electron beam irradiation causes the dissolution of elements like Cr, Ni, and Mo into austenite, forming β-Fe(Fe-Cr-Ni-V) and orthorhombic distortion within the BCC lattice. These changes contribute to the formation of smaller acicular martensite, α-Fe (Fe–Cr), and (Fe, Cr)C carbide nanocrystals during the ultra-high-speed cooling process. The ability to precisely control and understand these microstructural changes at the nanoscale level is a significant scientific leap, enabling tailored design of mold steel properties.
In conclusion, this study’s scientific innovations in surface property enhancement, microstructural control mechanisms make it a significant contribution to the field of mold steel research and manufacturing. The findings have the potential to drive the advancement of mold development and meet the increasing demands for high-performance molds in various industries.


