Article

Effects of Nanosecond-Pulsed Laser Milling on the Surface Properties of Al2O3 Ceramics

1
Faculty of Mechanical & Material Engineering, Huaiyin Institute of Technology, Huaian 223003, China
2
School of Mechanical Engineering, Jiangsu University, Zhenjiang 212013, China
3
Department of Intelligent Equipment, Changzhou College of Information Technology, Changzhou 213164, China
4
Suzhou Leader Harmonious Drive Technology Limited, Suzhou 215101, China
*
Author to whom correspondence should be addressed.
Coatings 2022, 12(11), 1687; https://doi.org/10.3390/coatings12111687
Submission received: 19 September 2022 / Revised: 1 November 2022 / Accepted: 3 November 2022 / Published: 6 November 2022

Abstract

:
The effect of nanosecond-pulsed laser milling on the surficial microstructure of Al2O3 ceramics is studied in this work. The macrostructure, microstructure, surface roughness, and milling depth of the ceramics are analyzed via scanning electron microscopy and confocal laser scanning microscopy. The results reveal that the surface roughness and the milling depth of Al2O3 ceramics increase with increasing laser power, laser repetition rate, and scanning times. After nanosecond-pulsed laser milling, cavities as well as molten and granular solidified structures are observed on the Al2O3 ceramic surface, which indicate that the main mechanism of nanolaser milling is the melting and gasification caused by the interaction between the laser and the material.

1. Introduction

Al2O3 ceramics are a kind of industrial material with good wear resistance, high temperature resistance, and corrosion resistance, attributes which provide chemical stability under harsh conditions and allow their widespread use in the aerospace industry, chemical machinery, and biomedicine [1,2]. At the same time, Al2O3 is one of the most important materials for fusion technology [3]. However, the traditional processing methods such as mechanical grinding and polishing fail to meet stringent demands related to the dimensional accuracy, shape and position error, and processing quality of Al2O3 ceramics. In order to achieve good structural matching between the ceramic components, the latter requires post-treatment. In that regard, laser milling is a recently developed advanced manufacturing technology, enabling material to be removed instantly though melting or gasification under the laser thermal effect and thus providing a novel way of processing ceramics [4,5].
In recent years, various studies on the laser milling of ceramics have been performed in several countries. In one particularly relevant study, alumina and aluminum nitride were machined with nanosecond lasers by Preusch et al. [6]. Using high-pulse overlaps and fluence of 64 J/cm2, they were able to achieve material removal rates of up to 94 mm3/h and 135 mm3/h for alumina and aluminum nitride, respectively. Jian Li et al. [7] studied the impact of the short wavelength of 532 nm and the pulse width of 6 ns on the milling volume and quality of Y-TZP ceramics. The optimal milling quality of the ceramics could be attained at the blind hole diameter of 500 μm and with 200 μm wide and 100 μm high square grooves. Yinbo Zhu et al. [8] investigated the effect of single-pulse shock parameters on the milling surface quality at the laser (Nd: YAG) wavelength of 1.064 μm, observing a noticeable influence of the scanning speed on the surface roughness. Luo et al. [9] performed the milling of Y-TZP ceramics with an Nd: YAG laser, avoiding cracks. In particular, the best surface-processing quality and the largest material removal rate could be attained by establishing the optimal processing parameters (laser power of 11.3 W, laser repetition rate of 30 kHz, and milling speed of 50 mm/s). Muneer [10] studied ways to optimize multi-response problems associated with micro-milling of Al2O3 ceramics, finding that laser beam overlap and the use of a high-power laser beam significantly affected the milling depth. The milling surface roughness and the material removal rate were found to be predominantly influenced by the laser beam intensity and pulse repetition rate. A comparative analysis was performed by Parry et al. [11] using nano- and picosecond lasers while machining zirconia ceramics. They demonstrated that crack-free surfaces with good surface finish can be produced with picosecond lasers. Flexural strength was also found to be satisfactory using the four-point bend test. Yibas et al. [12] conducted an irradiation test of Al2O3 ceramics with a 2 kW laser power in a nitrogen environment, observing the formation of a molten layer on the material surface which resulted in a decrease in surface roughness and an increase in surface hardness. Kibria et al. [13] investigated laser microturning of cylindrical Al2O3 ceramics, focusing on the effect of continuous point overlap and circumferential overlap rates on surface roughness and the trend of turning depth with each process parameter. However, the effect of nanosecond laser parameters on the macrostructure and microstructure of Al2O3 ceramics remains unclear and requires a thorough investigation.
In the present work, we aimed to perform nanosecond-pulsed laser milling of Al2O3 ceramics to elucidate the influence of milling parameters on the macrostructure and microstructure of the ceramic surface. In this article, the surface formation mechanism is characterized via scanning electron microscopy (SEM) and confocal laser scanning microscopy. Special attention is paid to the impact of processing parameters on the surface roughness and milling depth of Al2O3 ceramics, thus providing new prospects for optimization of nanolaser milling.

2. Materials and Methods

2.1. Materials

The Al2O3 ceramic is a kind of multi-phase solid material which comprises metallic and nonmetallic elements. Prior to the experiments, the Al2O3 ceramic specimen was divided using a special cutting machine into pieces with the dimensions of 30 mm × 15 mm × 4 mm, as shown in Figure 1a. Their properties are shown in Table 1. The chemical composition of the specimen, obtained using an energy-dispersive spectrometer (EDS), is shown in Figure 1b.

2.2. Laser Milling

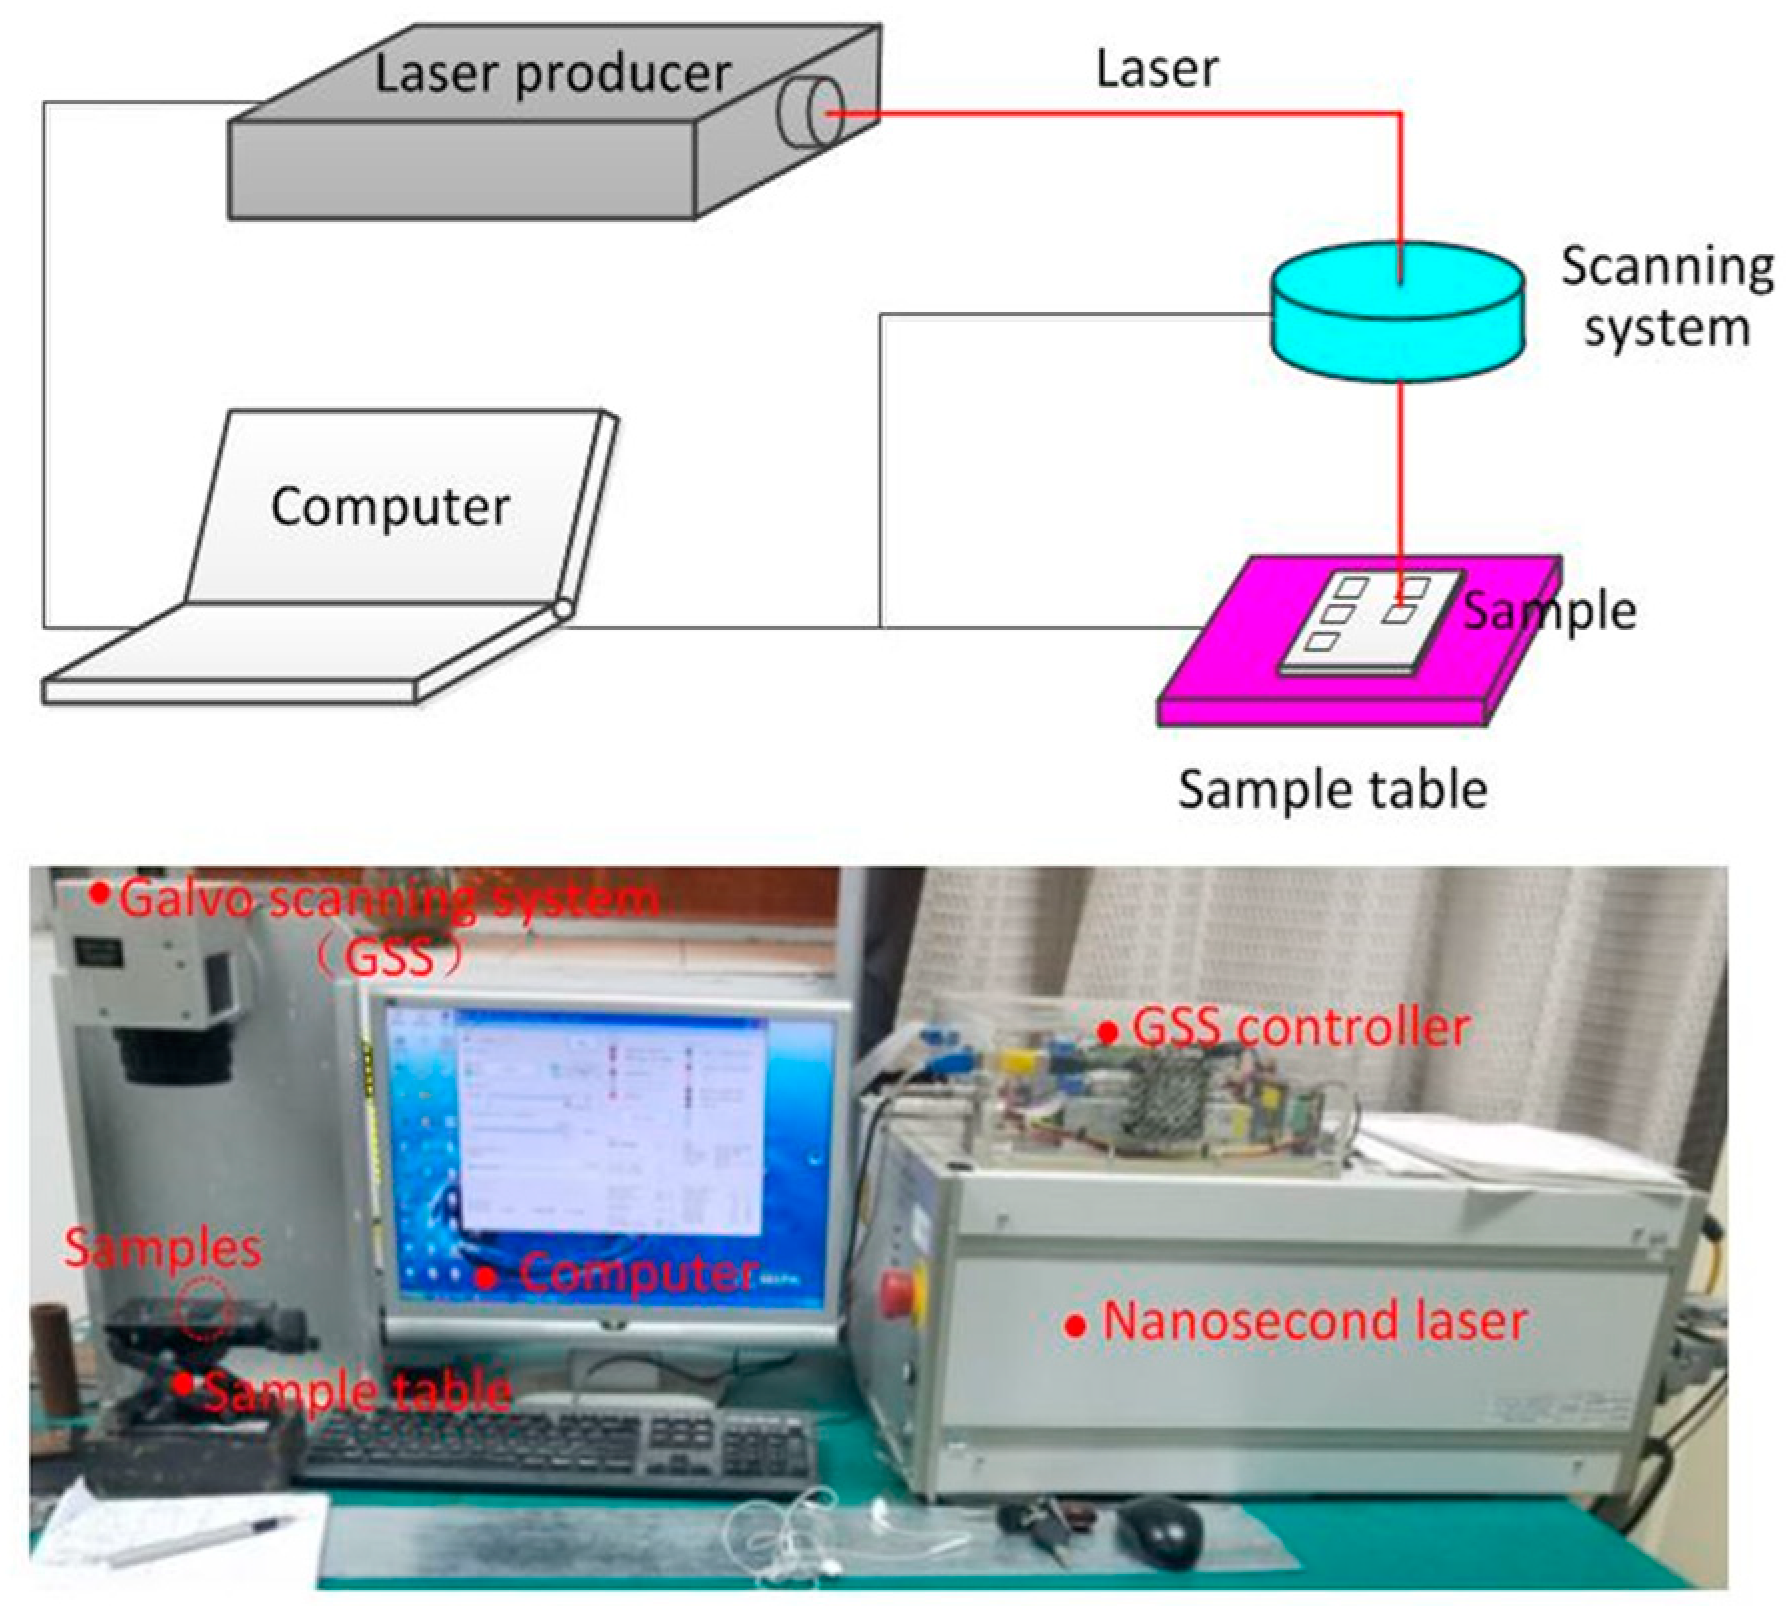
The milling of ceramics was performed using a YLP-HP100 nanosecond-pulsed fiber laser (Germany IPG company, Munich, Germany) at the laser power of 100 W, the pulse width of 100 ns, the wavelength of 1060 nm, the adjustable pulse repetition rate of 2~100 kHz, and the beam diameter of 50 µm. The milling setup consisted of a laser, a water-cooling system, a PC, a high-speed scanning galvanometer, a control system, and a sample table (see Figure 2). The milling path and milling speed were controlled by a high-speed galvanometer, allowing for milling speed adjustments in the range of 20–8000 mm/s.
The milling process was conducted with varying laser-processing parameters including laser power, pulse repetition rate, and milling time. According to multi-time and single-factor experimental results, the optimal milling parameters were as follows: between three and nine milling operations with a laser power of 20–40 W, a pulse repetition rate of 35–50 kHz, and a laser beam overlap of 75–90%.

2.3. Surface Morphology

After laser milling, the surface macrostructural characteristics of Al2O3 ceramics, in particular, the surface roughness (Sa) and the milling depth (Md), were measured using a VK-X160 confocal laser scanning microscope (Japan KEYENCE Company, Osaka, Japan). The surface microstructure of Al2O3 ceramics was studied by means of a Merlin Compact field-emission scanning electron microscope (FE-SEM, ZEISS, Jena, Germany).

2.4. XRD Experiment

XRD tests were carried out on the material using a D8 ADVANCE-type X-ray diffractometer (Bruker, Karlsruhe, Germany). The diffraction analysis process took place as follows. The cut specimens were first cleaned with anhydrous ethanol and then radiated on the X-ray diffractometer using Cu-Kα rays (λ = 0.15406 nm), scanning at a speed of 5°/min over the 20–90° range with a step width of 0.01°.

3. Results and Discussion

3.1. The Effect of Laser Power on Surface Roughness and Milling Depth

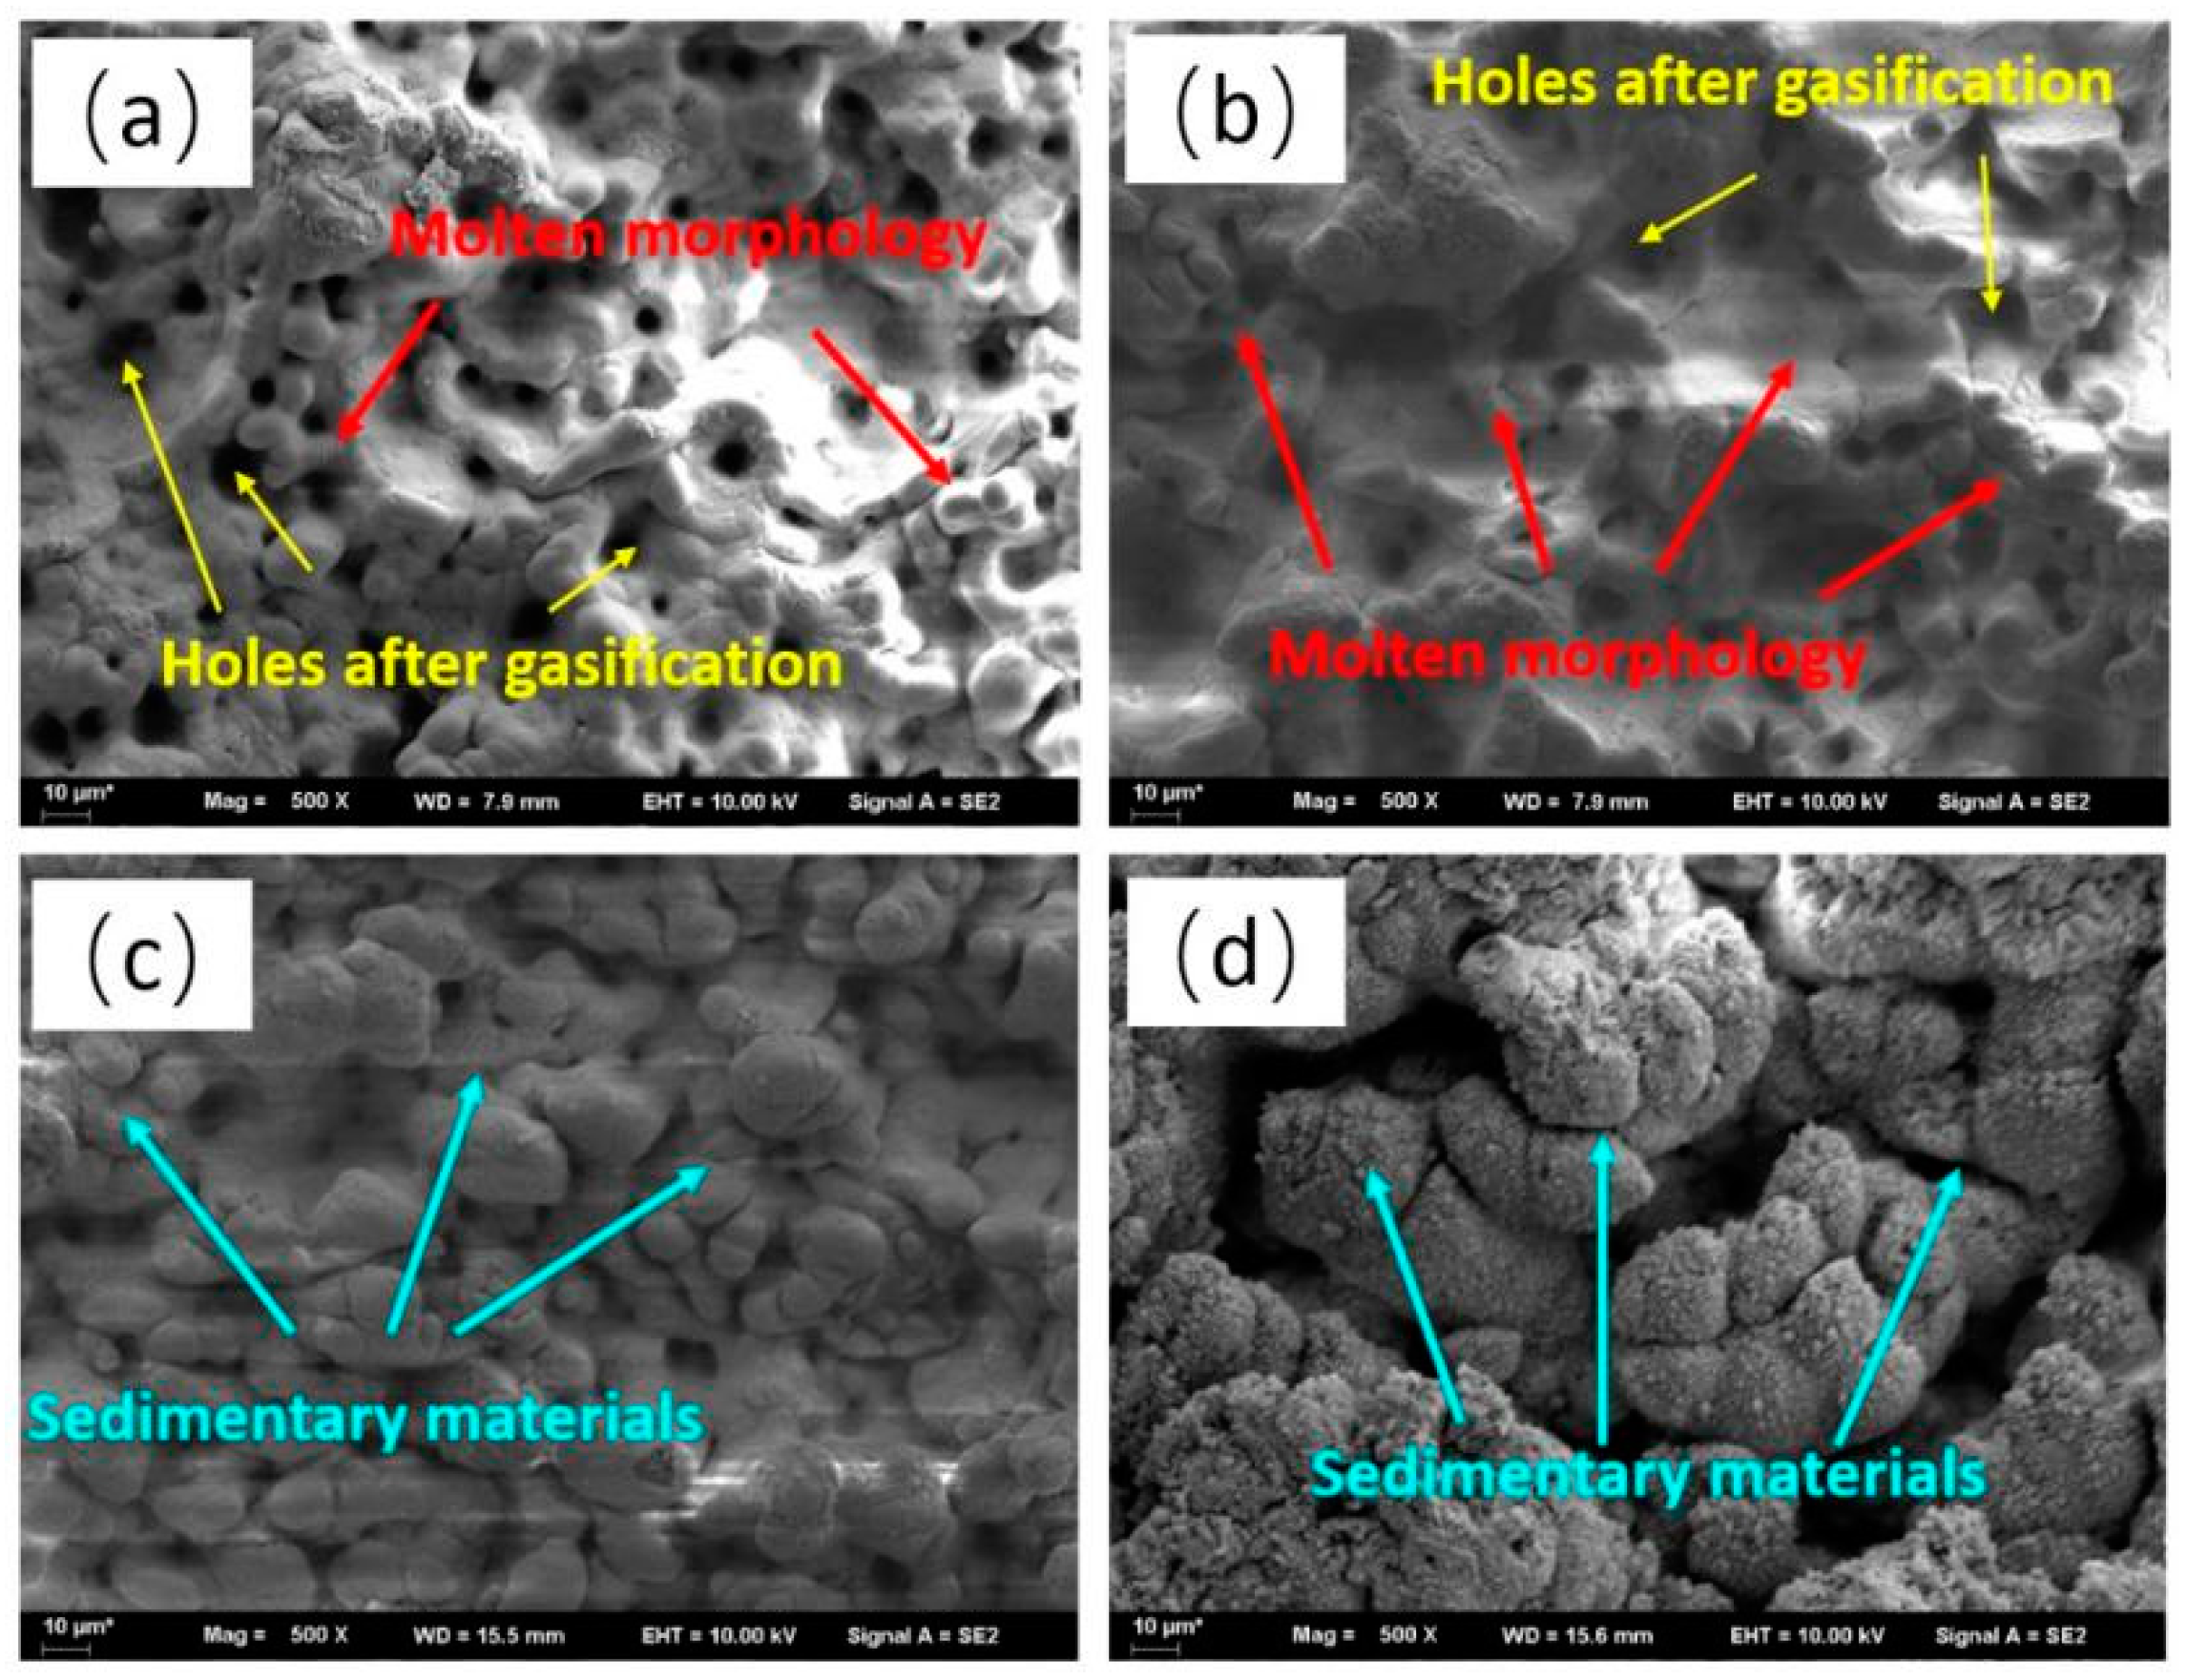
Figure 3 displays the microstructure of the Al2O3 ceramic’s surface after laser milling at different laser powers (here, the pulse repetition rate was 40 kHz and the number of milling operations was three). Plenty of cavities and melt were found on the surface treated at laser powers of 25 W and 30 W. Raising the laser power to 35 W and 40 W led to the emergence of some granular-like solidified structures the sizes of which increased with the increase in laser power. When the laser power increases, the laser milling surface temperature increases, material vaporization is evident, and the depth of the holes it causes increases significantly, worsening the surface roughness.
The laser power as one of the milling parameters could influence the surface quality prominently. The rise of temperature caused by a single-pulse laser beam with a single pulse width or single pulse time can be described as [14]:
Δ T = P γ π κ d 2 4 α τ π
where ∆T is the change in the temperature of the ceramic, γ is the laser absorption rate of the material surface, κ is the thermal conduction rate, α is the thermal diffusion rate of the ceramic, τ is the laser pulse width, P is the laser power, and d is the laser beam diameter. According to formula (1), the surface temperature of the material is proportional to the laser power. Therefore, at laser powers of 25 W and 30 W, the cavities on the surface during the laser milling are mainly caused by the partial gasification of the material, whereas the molten layer is the product of melting and solidification processes. In turn, increases in the laser power to 35 W and 40 W intensify the gasification. Under the action of a jet driving force caused by gasification, the melt spatters the treated surface, forming the granular solidified structure. Higher laser powers lead to increasingly stronger jet driving forces, which result in larger areas of spattered liquid substance and larger dimensions of solidified structures.
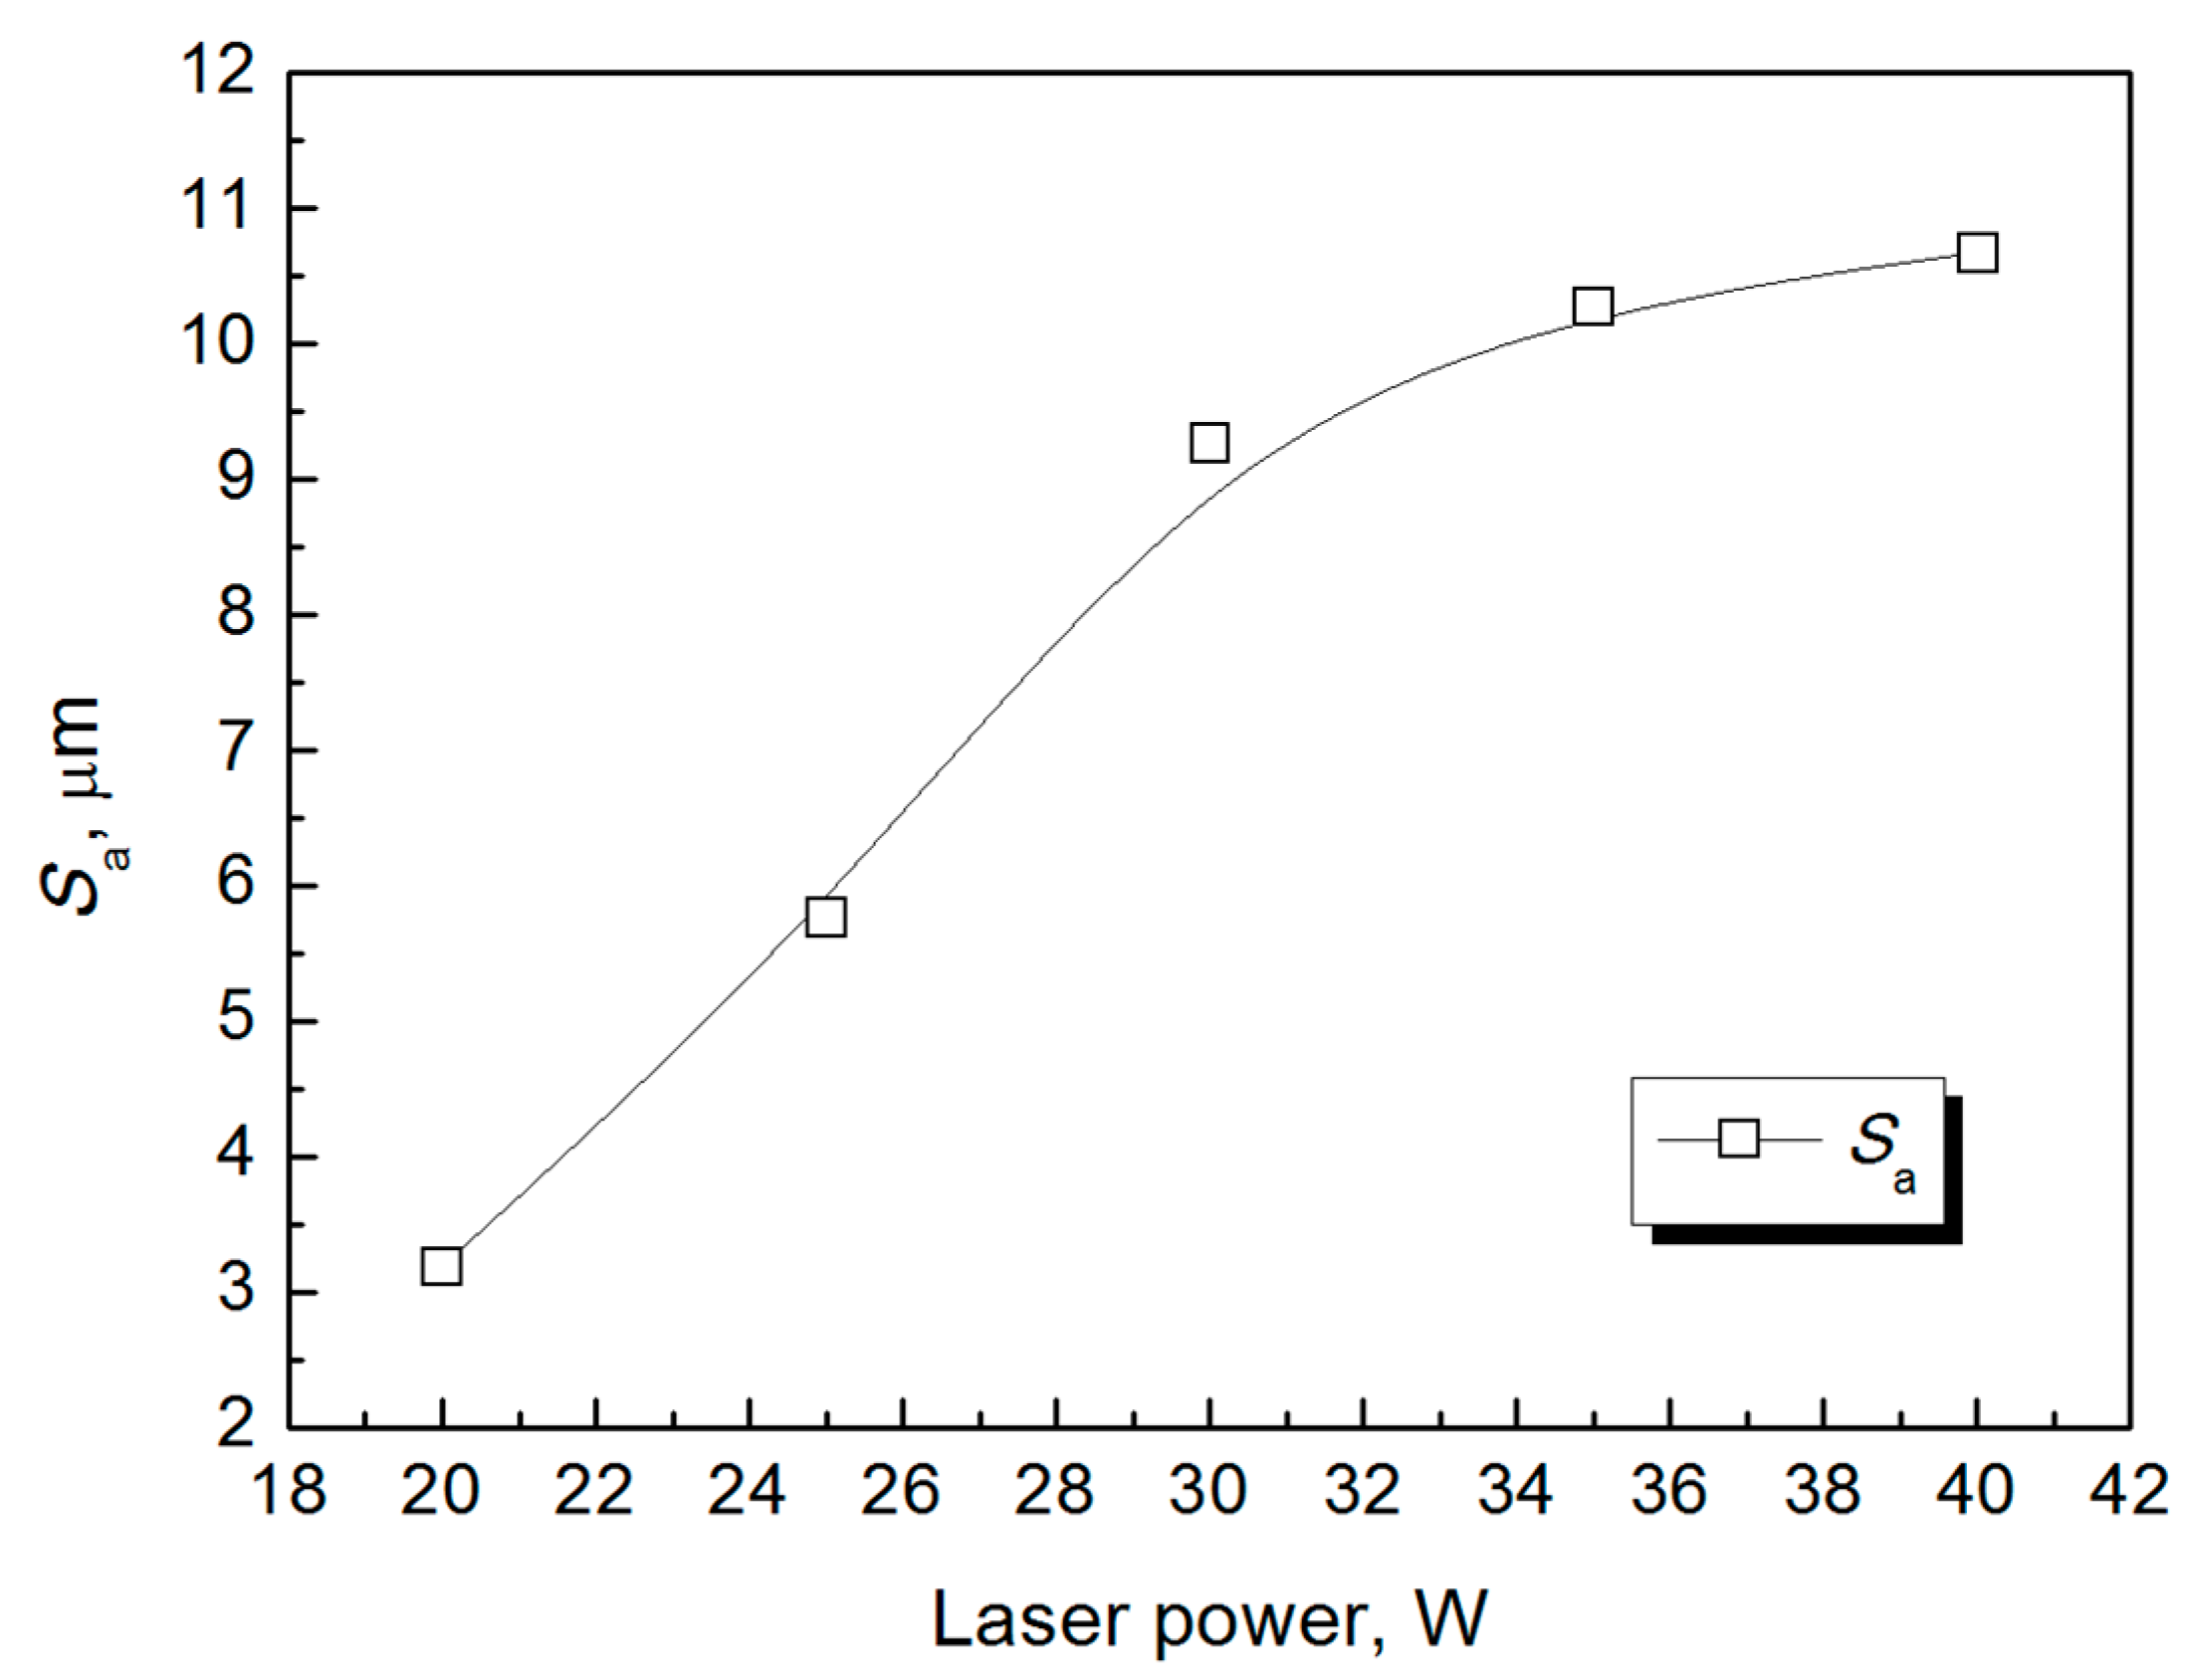
The surface roughness after milling at different laser powers (with a laser repetition rate of 40 kHz and three milling operations) is presented in Figure 4. The results show that the surface roughness after laser milling increases with higher laser power. The surface roughness after laser milling at the laser power of 40 W reaches 10.671 μm, which is about 2.35 times higher than that at the laser power of 20 W. This means that the surface roughness increases with the increase in laser power until it approaches saturation. This is because the surface temperature increases with the laser power, intensifying the gasification and augmenting the number of cavities and their depth. In turn, the splashed melt leads to the emergence of many solidified particles on the surface, thus dramatically increasing the surface roughness.
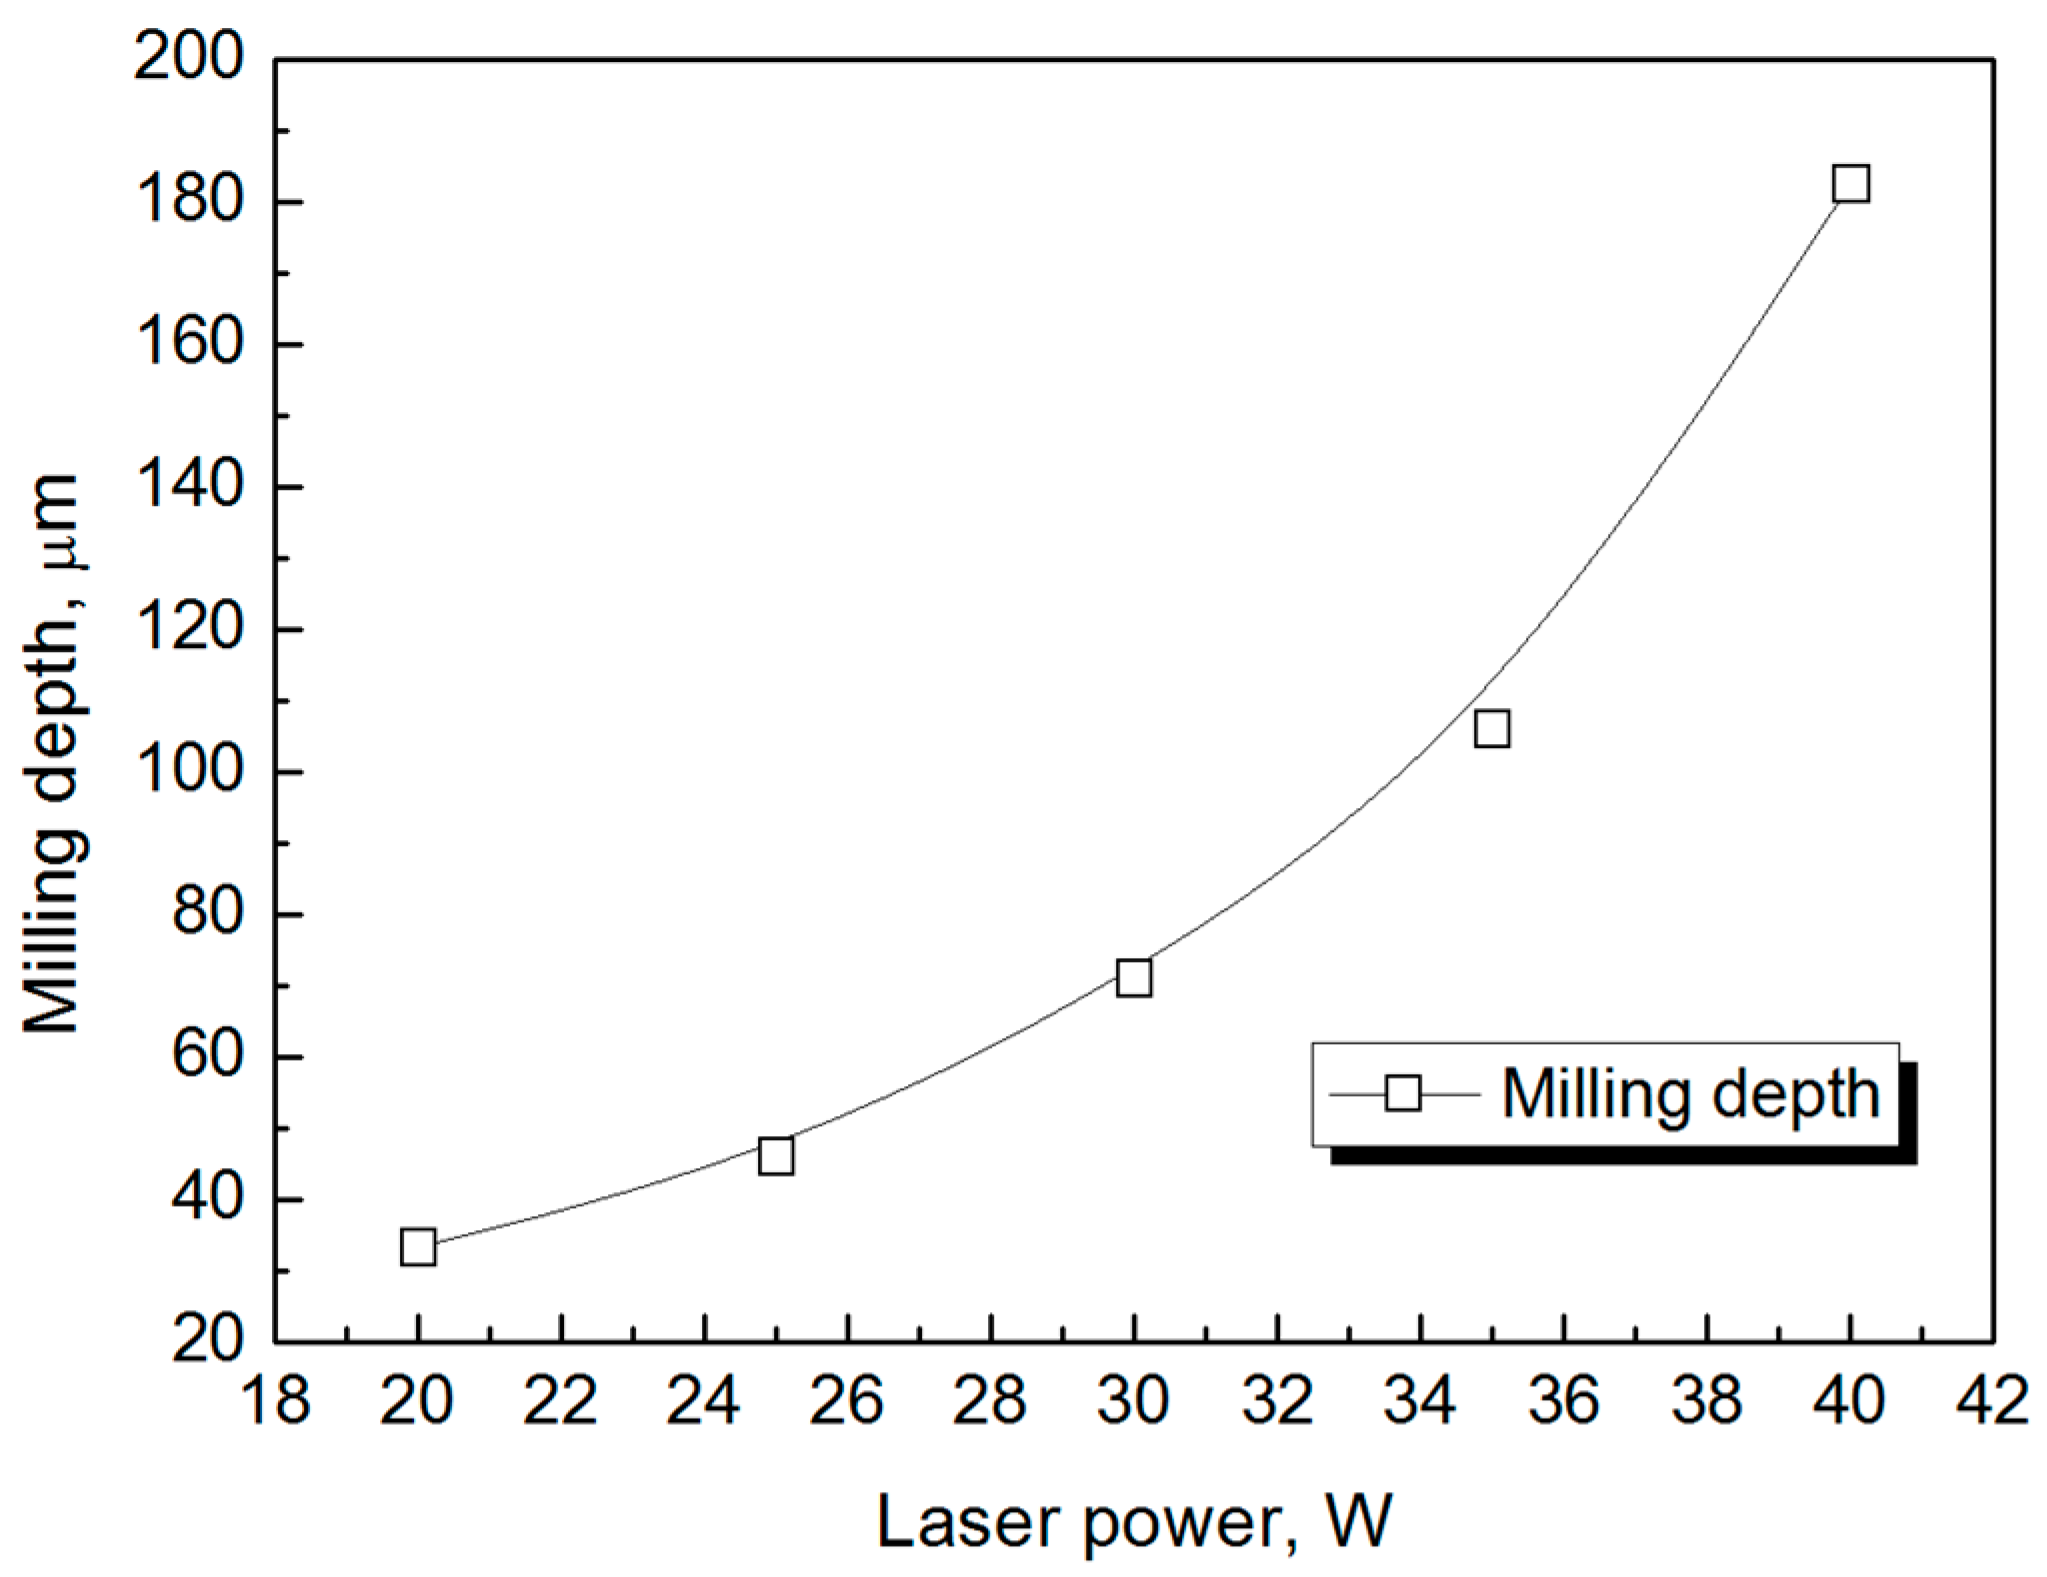
Figure 5 shows the milling depth evolving with the laser power (the laser repetition rate is 40 kHz and the number of milling processes is three). As seen in Figure 5, when the laser power is 20 W or 40 W, the average laser milling depth is found to be 33.277 μm or 182.653 μm, respectively, i.e., the higher the laser power, the larger the milling depth. The relationship between the laser processing depth of the material and the incident laser power is described as [15]:
h = 1 l ln ( 4 P I t h π d 2 f )
where h is the processing depth, l is the absorption rate, and Ith is the ablation threshold of the material. At a constant laser repetition rate, the laser processing depth is, therefore, proportional to the laser power, as can be seen from formula (2).

3.2. The Effect of the Laser Repetition Rate on Surface Roughness and Milling Depth

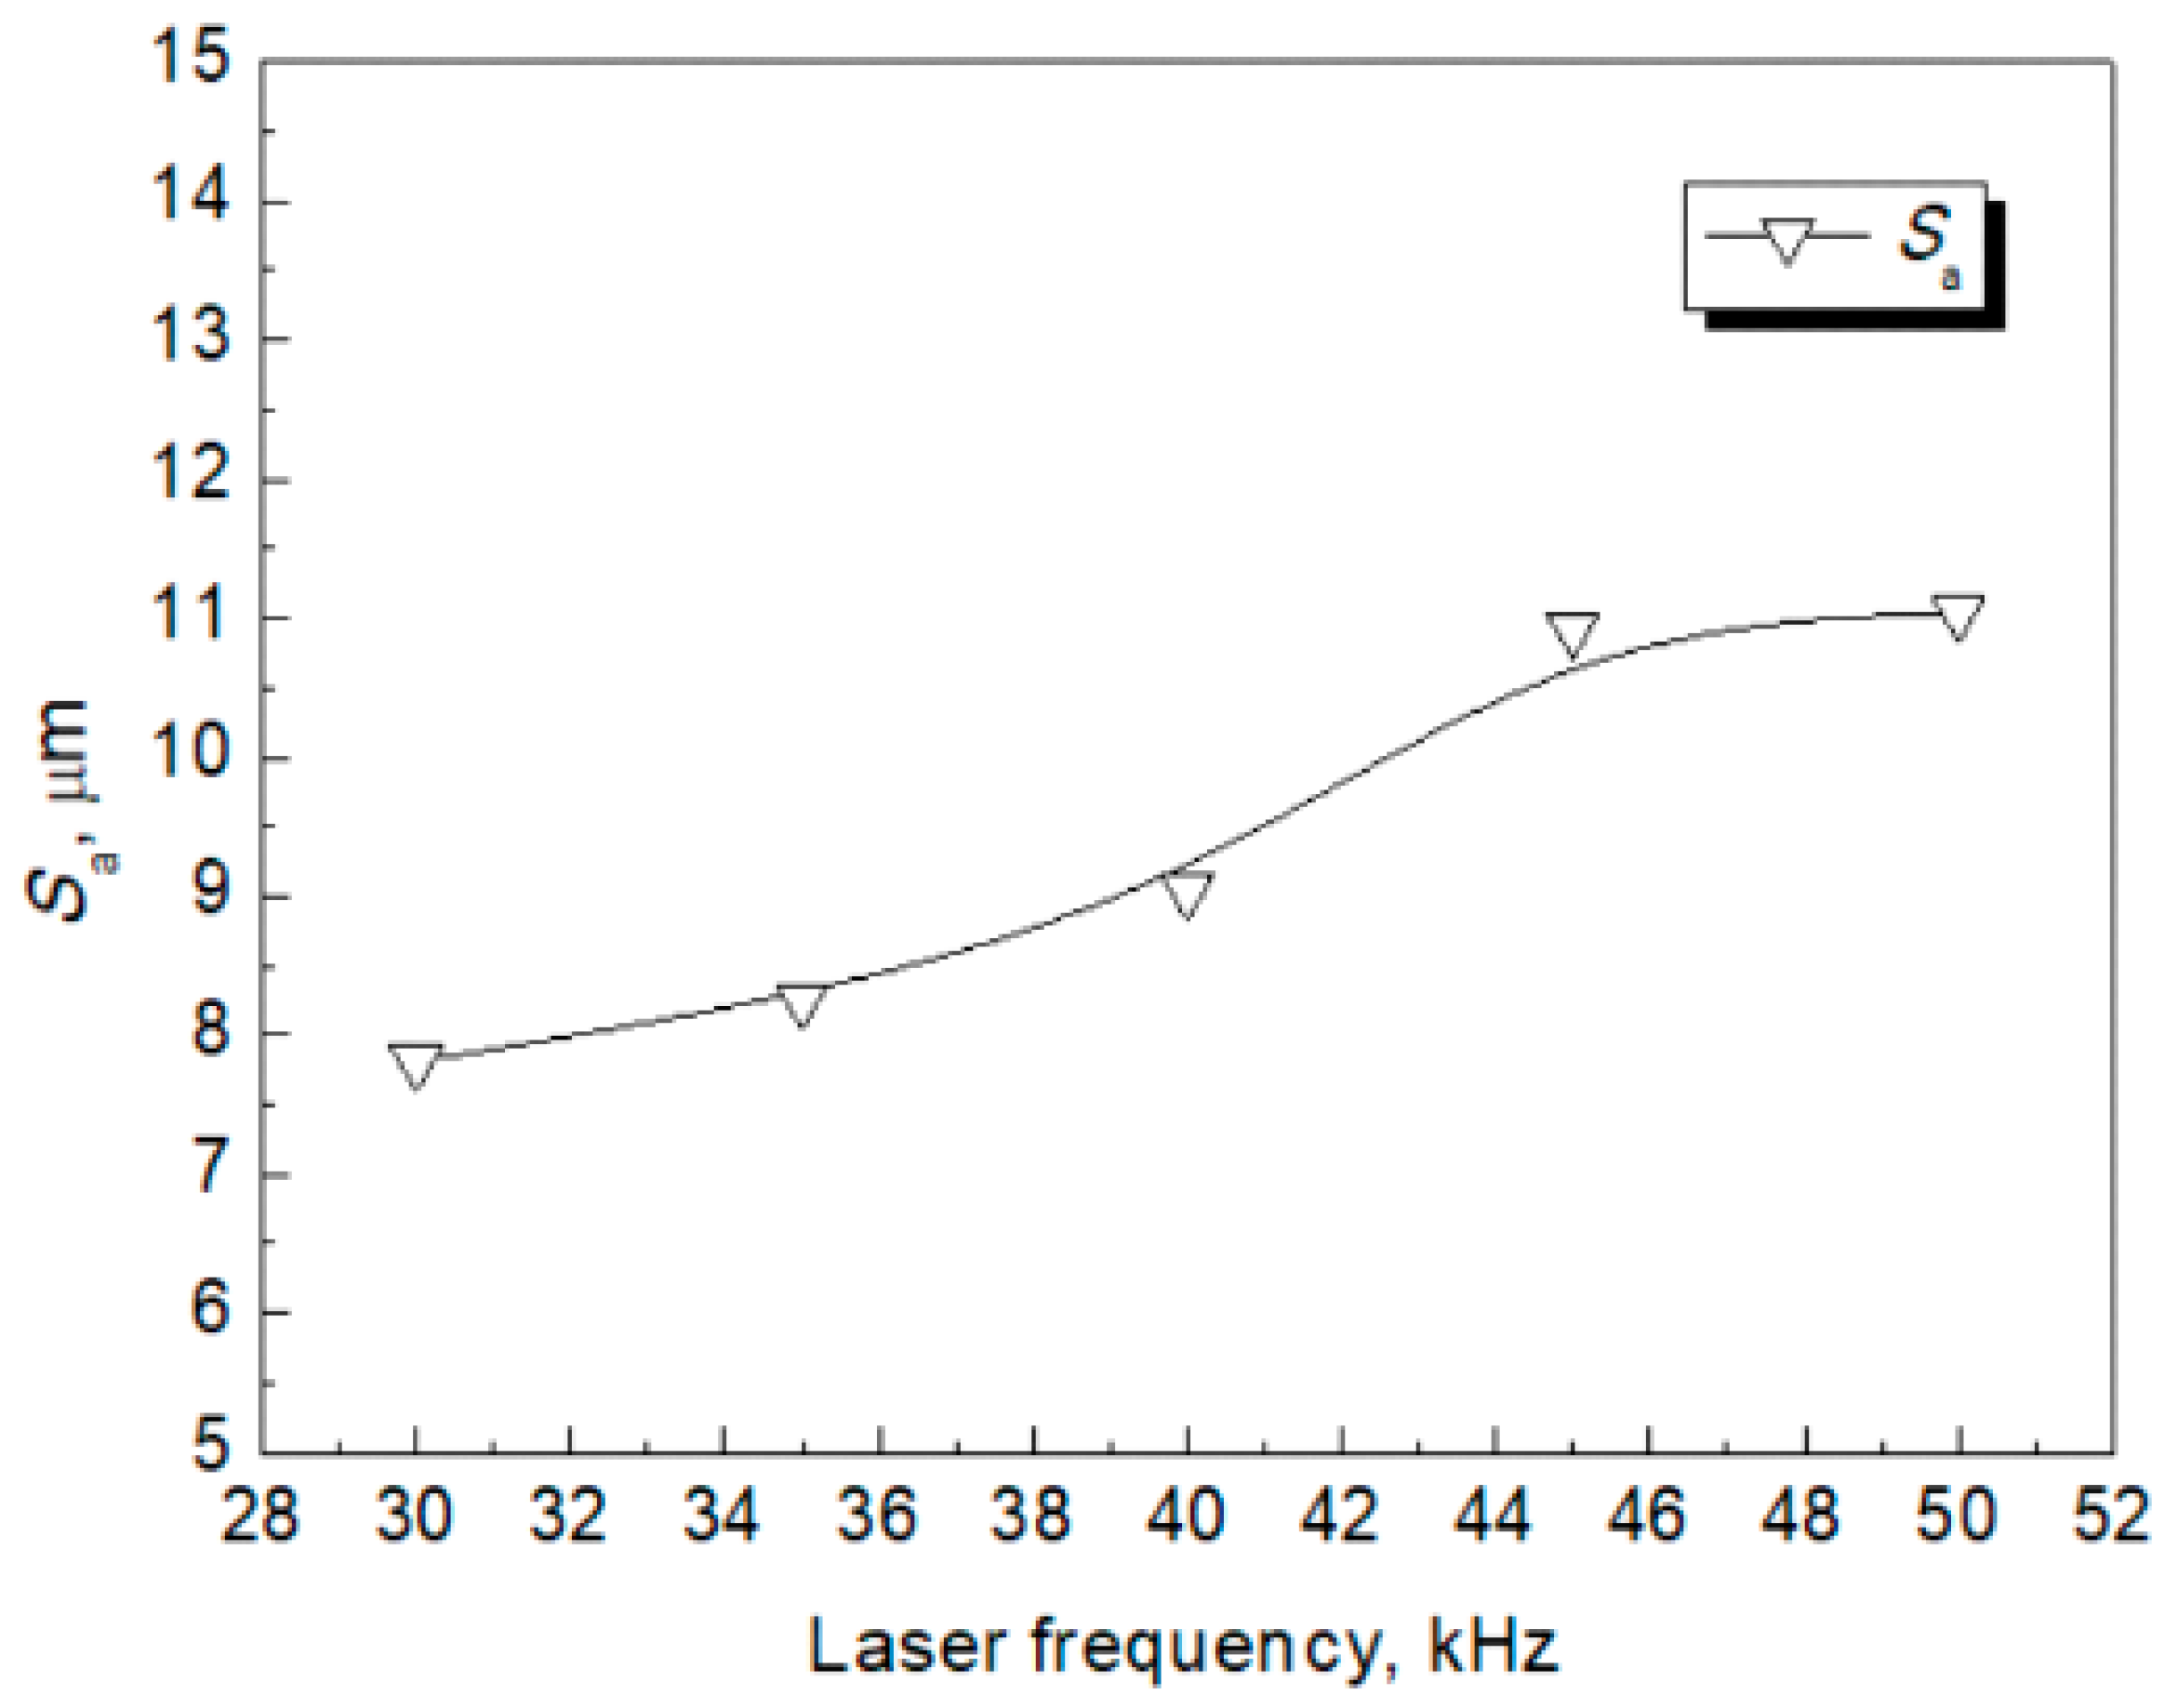
Figure 6 displays the surface roughness of the ceramic after laser milling at different laser repetition rates (here, the laser power is 30 W and the number of milling operations is three). As seen from the images, the surface roughness increases from 7.812 μm to 11.04 μm (i.e., by 41.3%) with an increasing laser repetition rate from 30 kHz to 50 kHz. It is worth noting that the laser repetition rate influences the pulse time distribution: higher rates of laser repetitions correspond with smaller time intervals, causing increases in temperature and, consequently, surface roughness. The laser processing provides the options of extreme cooling and fast heating thanks to changes of the laser repetition rate, which cause slight differences of the temperature caused by the overlapping of laser beams. There is no evidence of increases in the surface roughness due to such changes in the laser pulse rate.
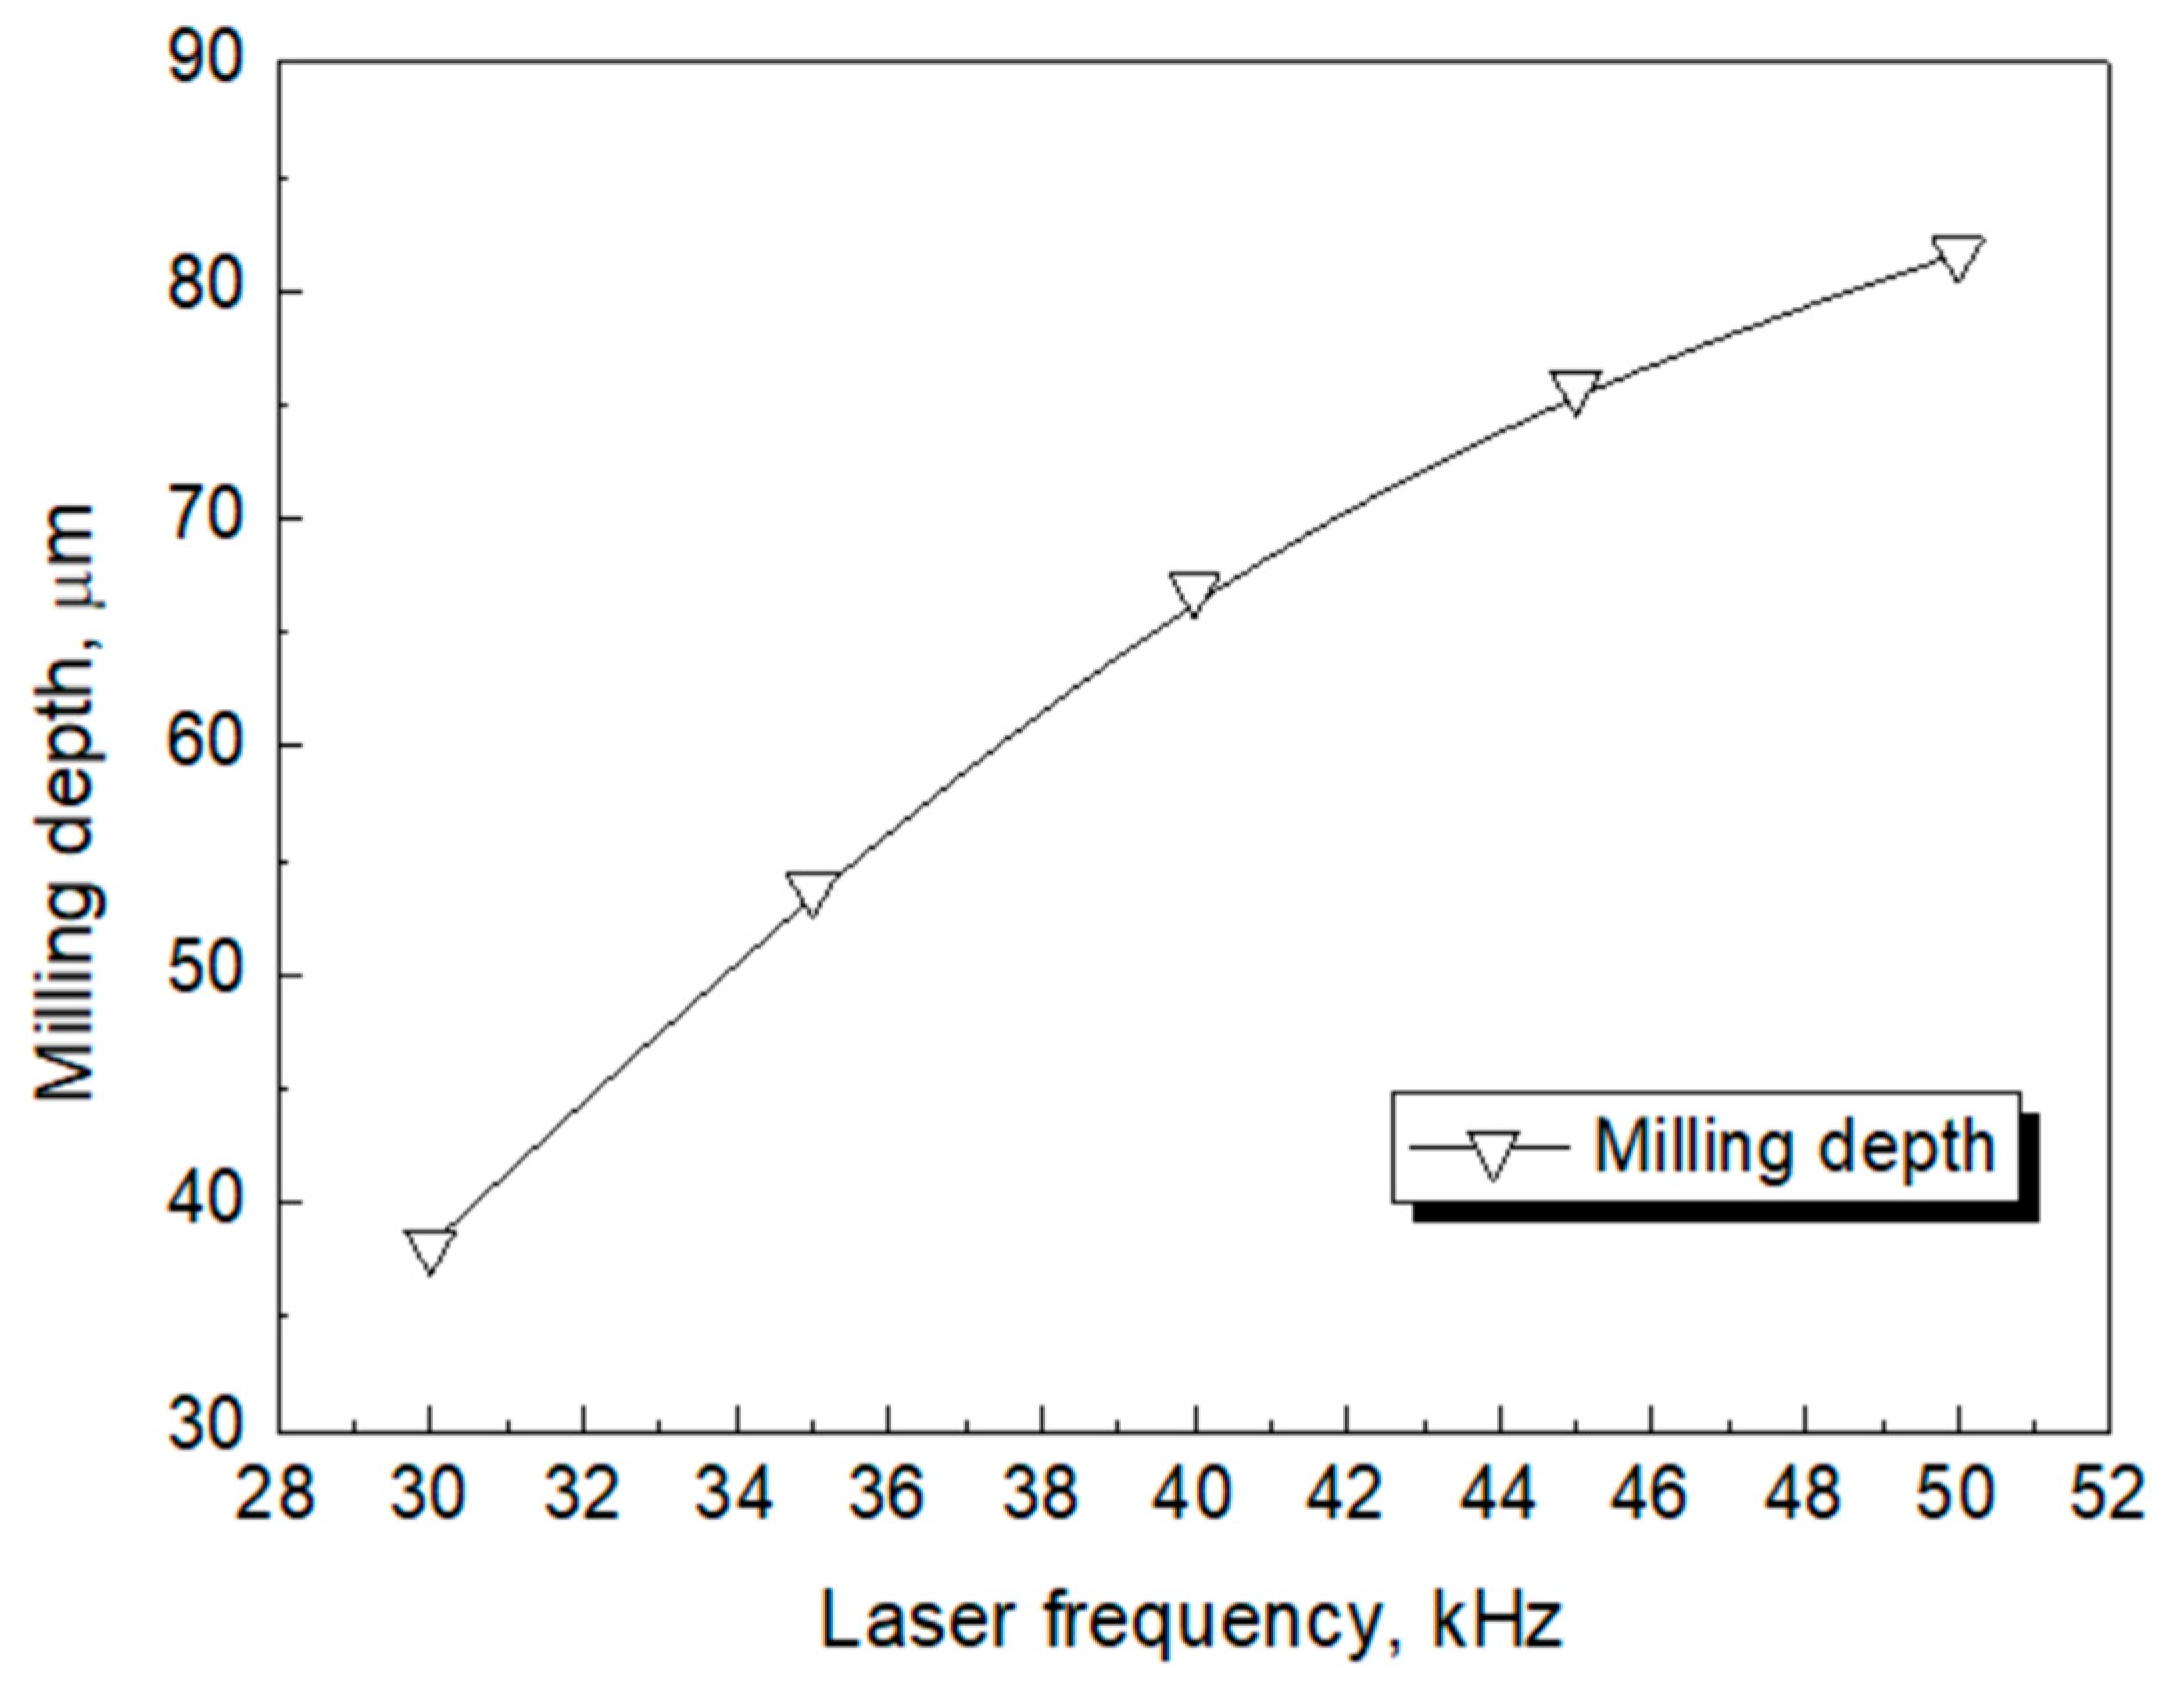
Figure 7 depicts the change in the milling depth at different pulse repetition rates (the laser power is 30 W and the number of milling operations is three). According to the results, the milling depth drastically increases from 38.141 μm to 81.63 μm as the pulse repetition rate rises from 30 kHz to 50 kHz.

3.3. The Influence of the Number of Milling Processes on Surface Roughness and Milling Depth

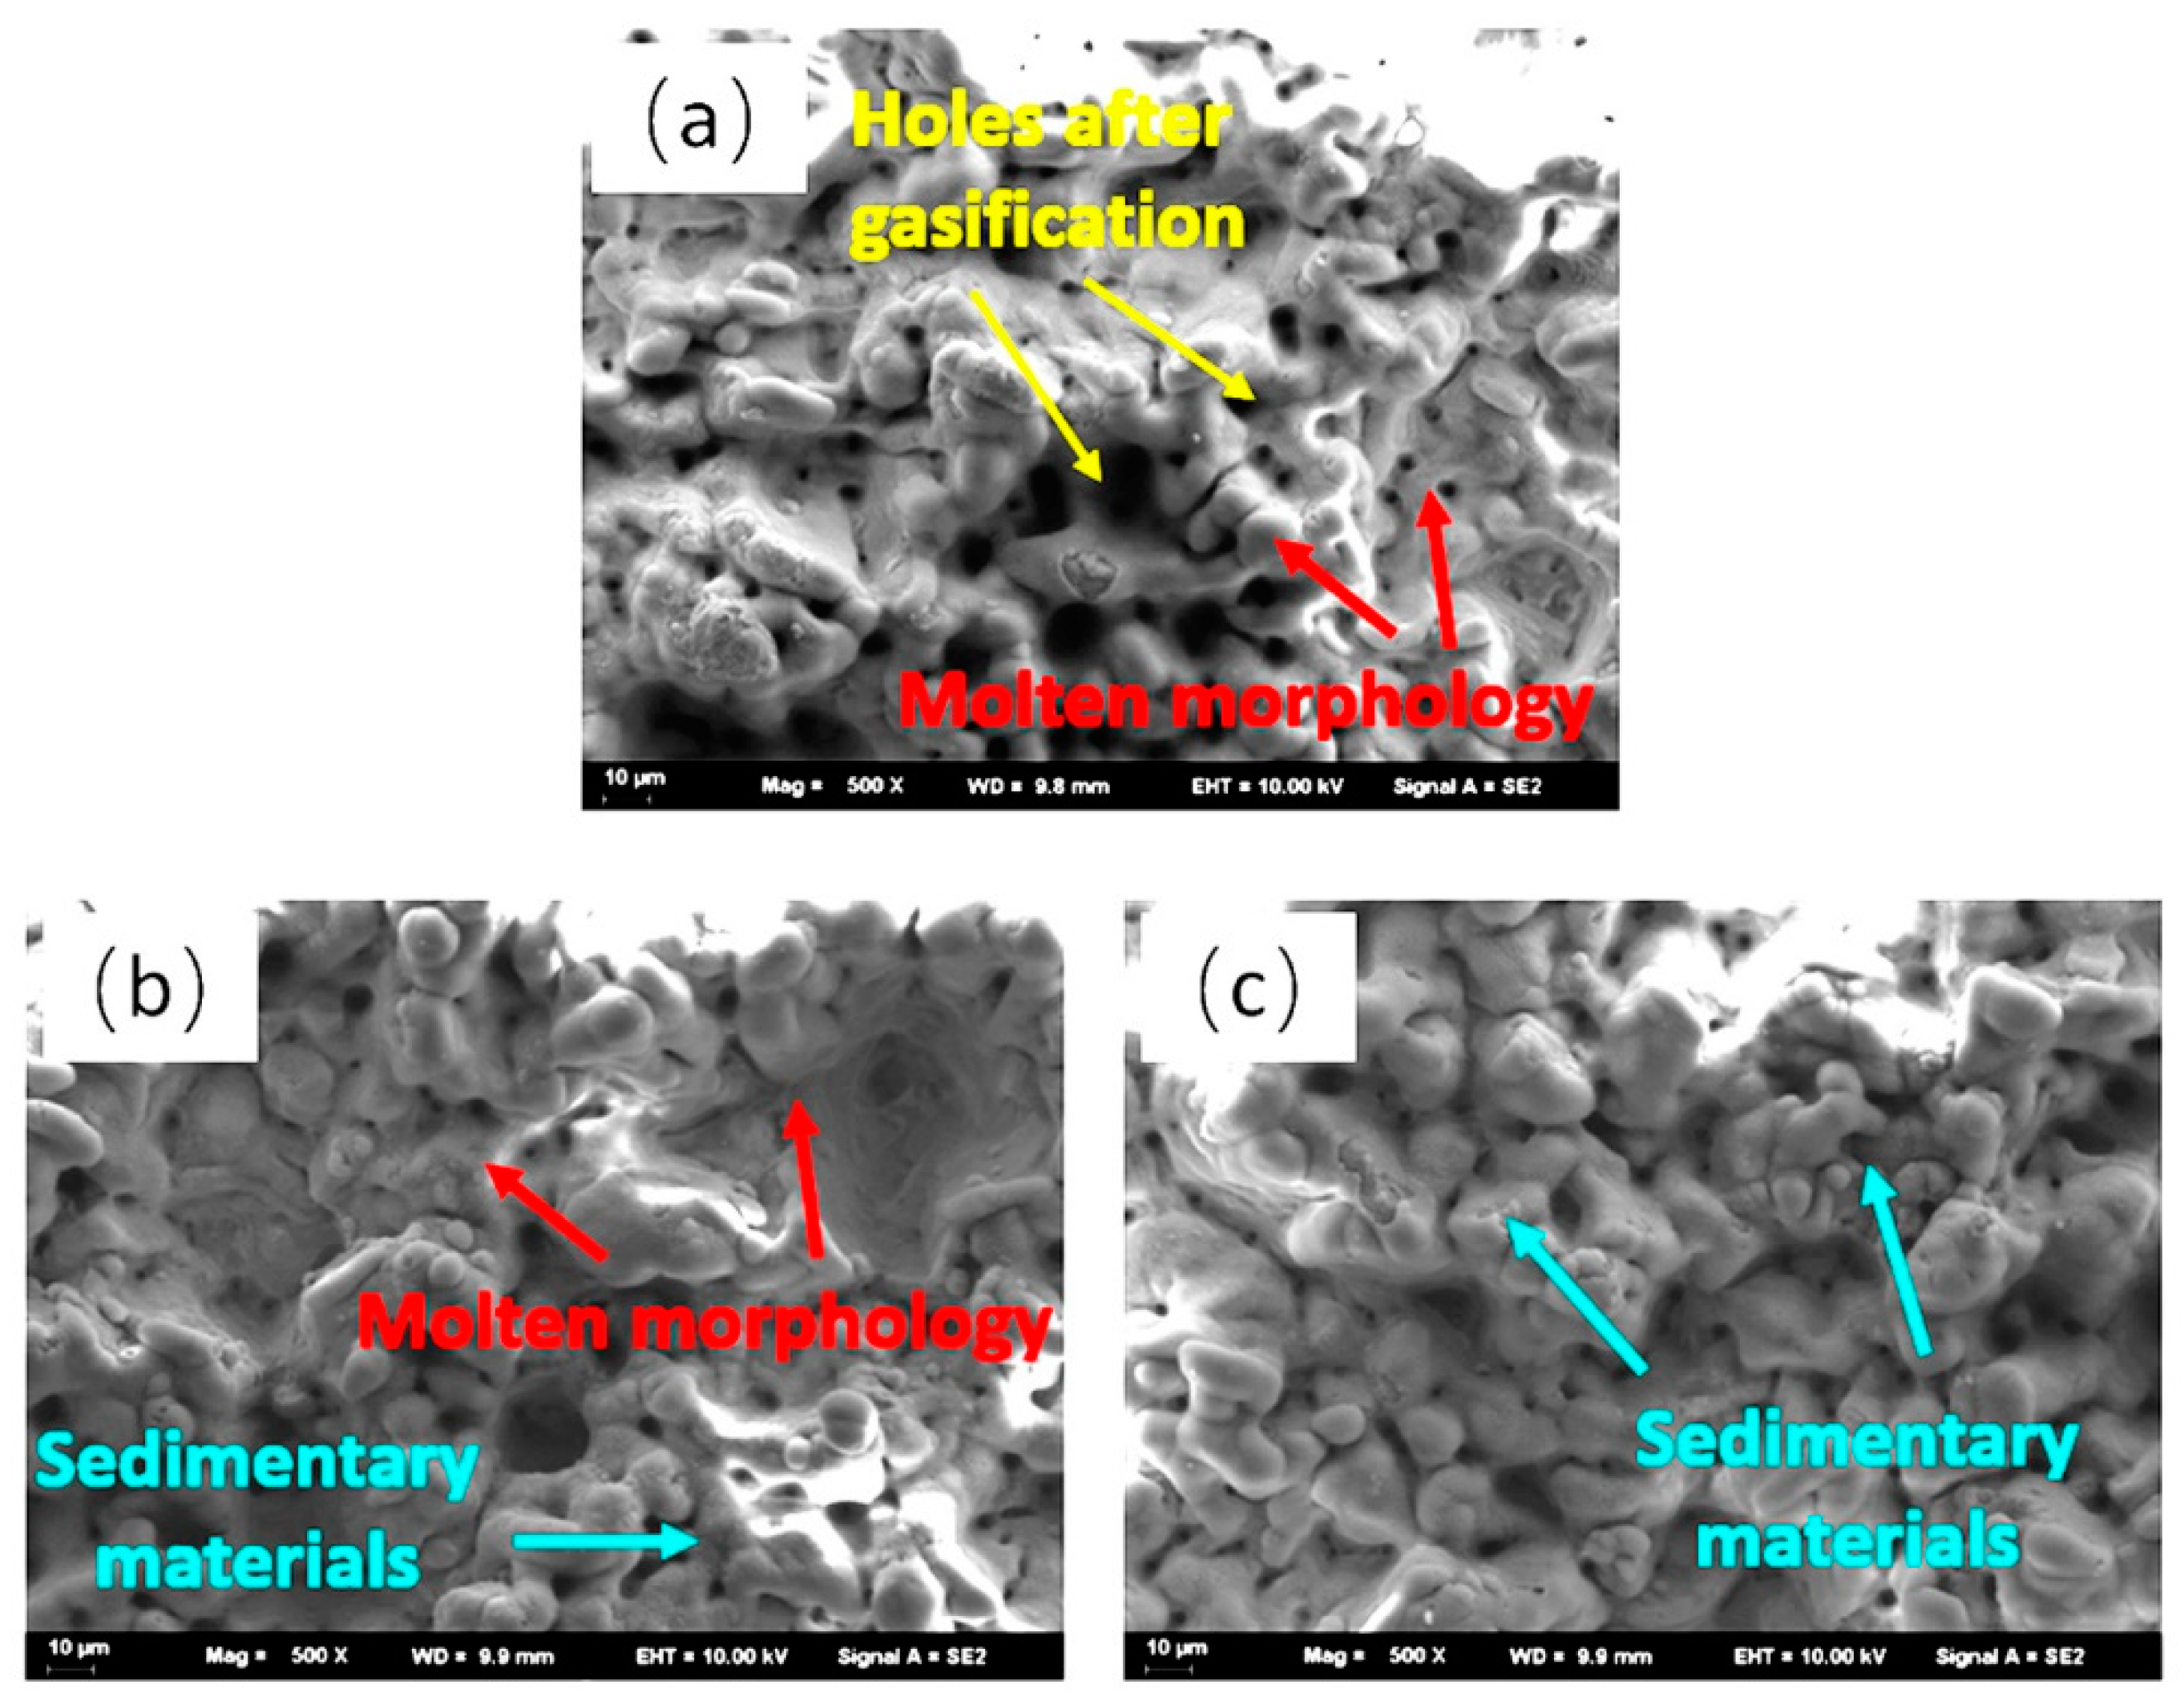
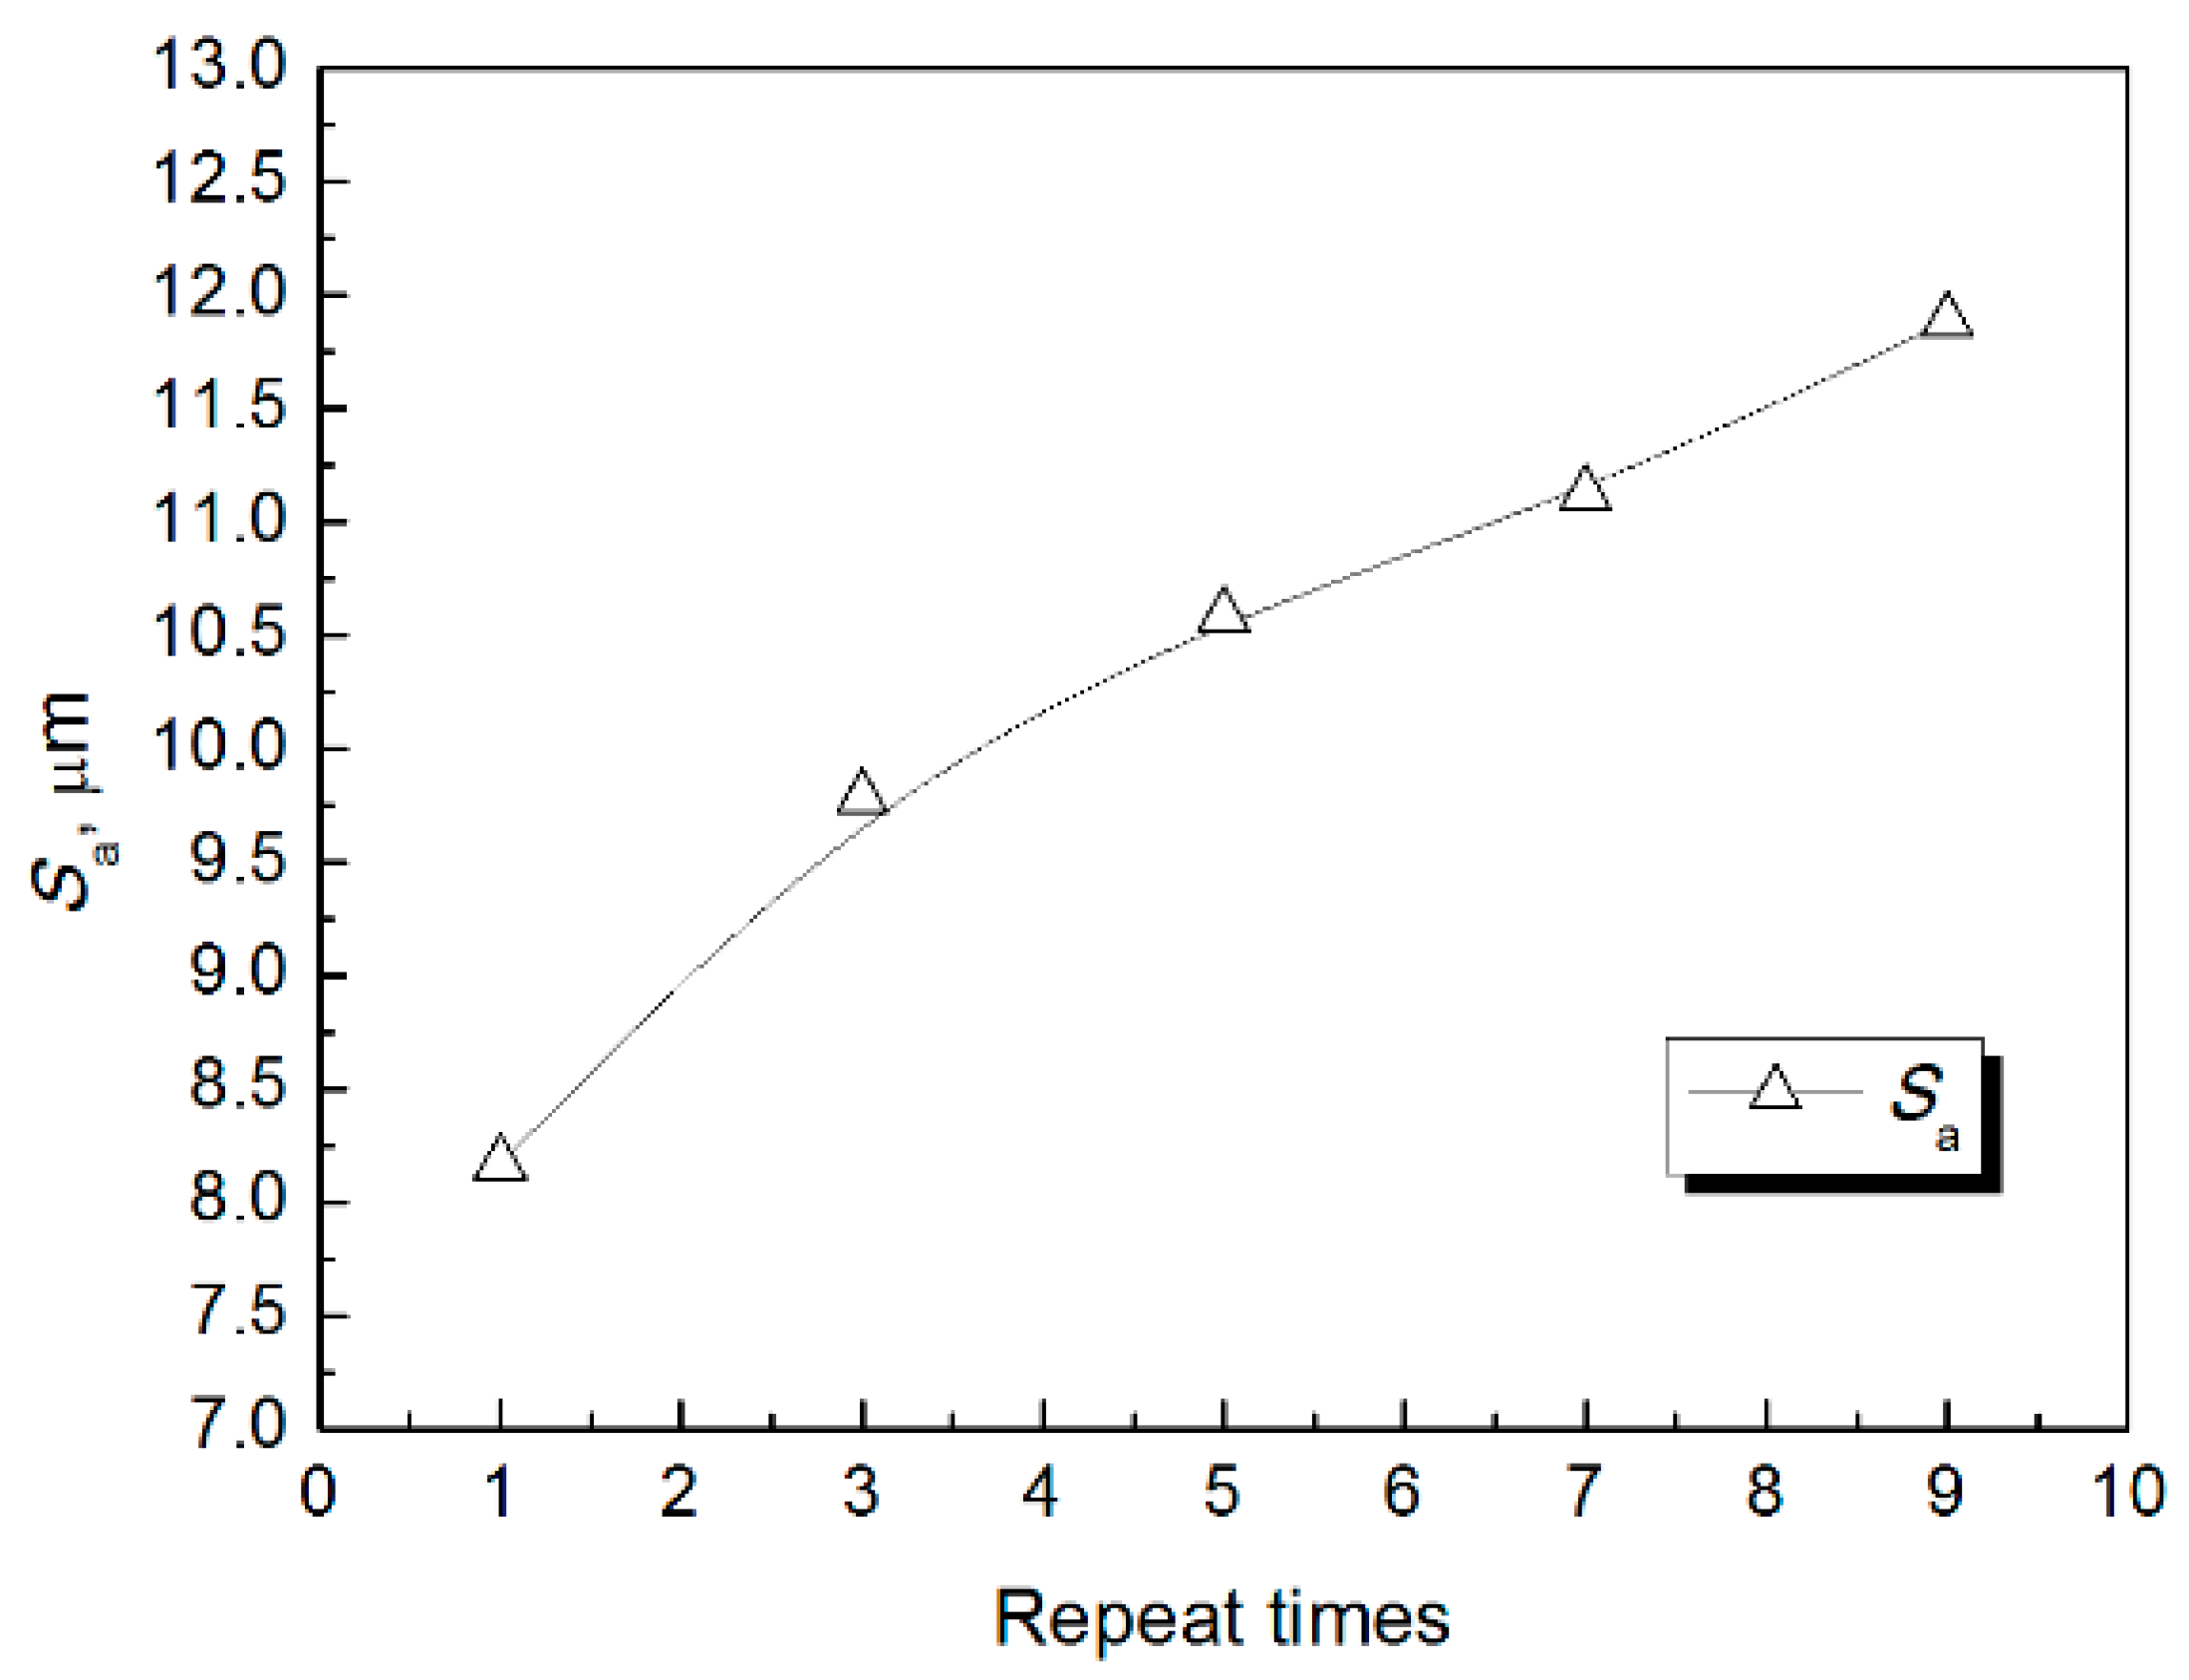
Figure 8 and Figure 9 depict the surface microstructure and the surface roughness after laser milling with various numbers of milling processes. After three milling treatments, the surface microstructure reveals mainly cavities and melt caused by gasification, whereas the surface roughness is as high as 9.78 µm. Applying five milling operations results in the emergence of a granular solidified structure on the surface, partially covering the cavities and melt. In turn, the surface roughness increases to 10.48 µm. Once the ceramic surface is exposed to nine milling operations, the grains which comprise part of the solidified structure become larger and the surface roughness rises to 11.88 µm.
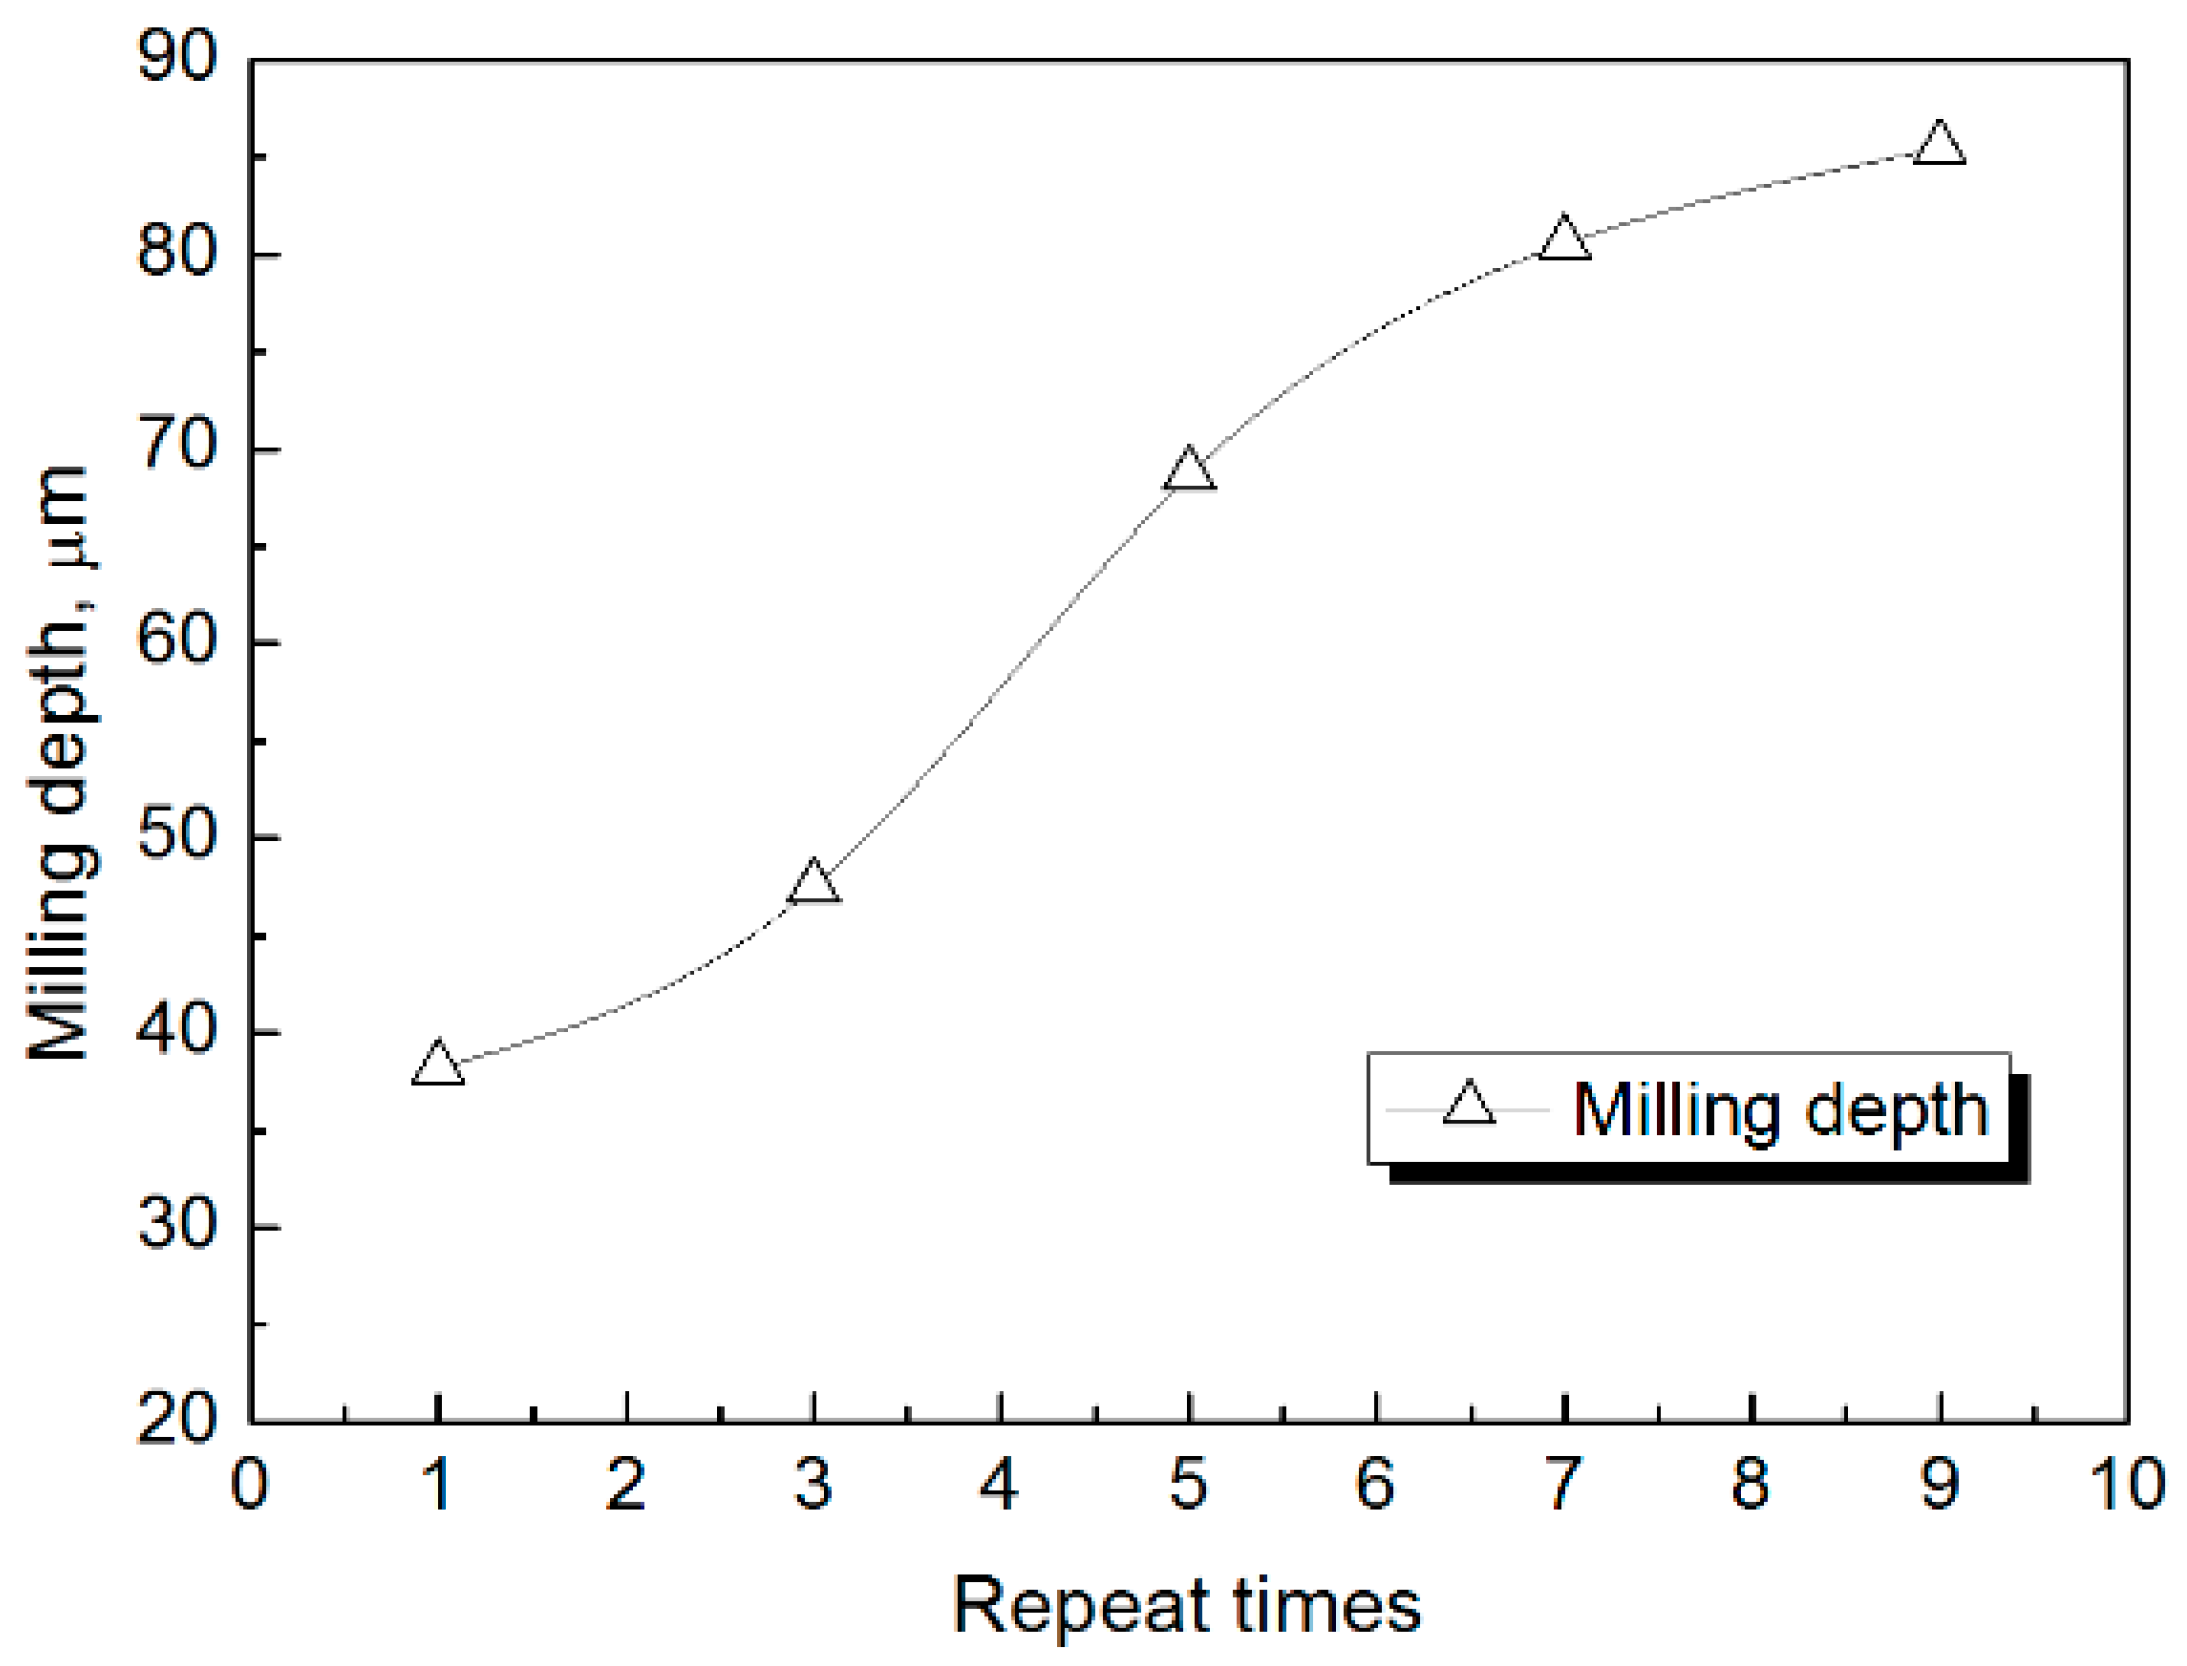
Figure 10 depicts the milling depth as a function of the number of milling operations. Even though the milling depth increases with additional milling processes, the extent of the increase gradually slows as the number of repetitions rises. For instance, the milling depth after three and five milling processes reaches 47.50 μm and 67.38 μm, respectively, thus increasing by 41.9%. In turn, after seven and nine treatments, the milling depth reaches 80.56 μm and 85.46 μm, respectively, i.e., an increase of only 6.1%. This is because the surface microstructure after three or fewer milling processes exhibits cavities and melt, which undergo gasification and are easily removed from the surface with subsequent milling. At the same time, an increase in the milling processes makes the granular-like solidified structure enlarge and raises the melting point, which weakens the impact of milling and, hence, slows the increases in the milling depth.

3.4. The Mechanism of Nanosecond-Pulsed Laser Milling

The XRD results of the Al2O3 specimens before and after laser milling are shown in Figure 11, from which it is evident that the diffraction peaks of the specimens did not change significantly during laser milling, so the composition and structure of the Al2O3 specimens did not change.
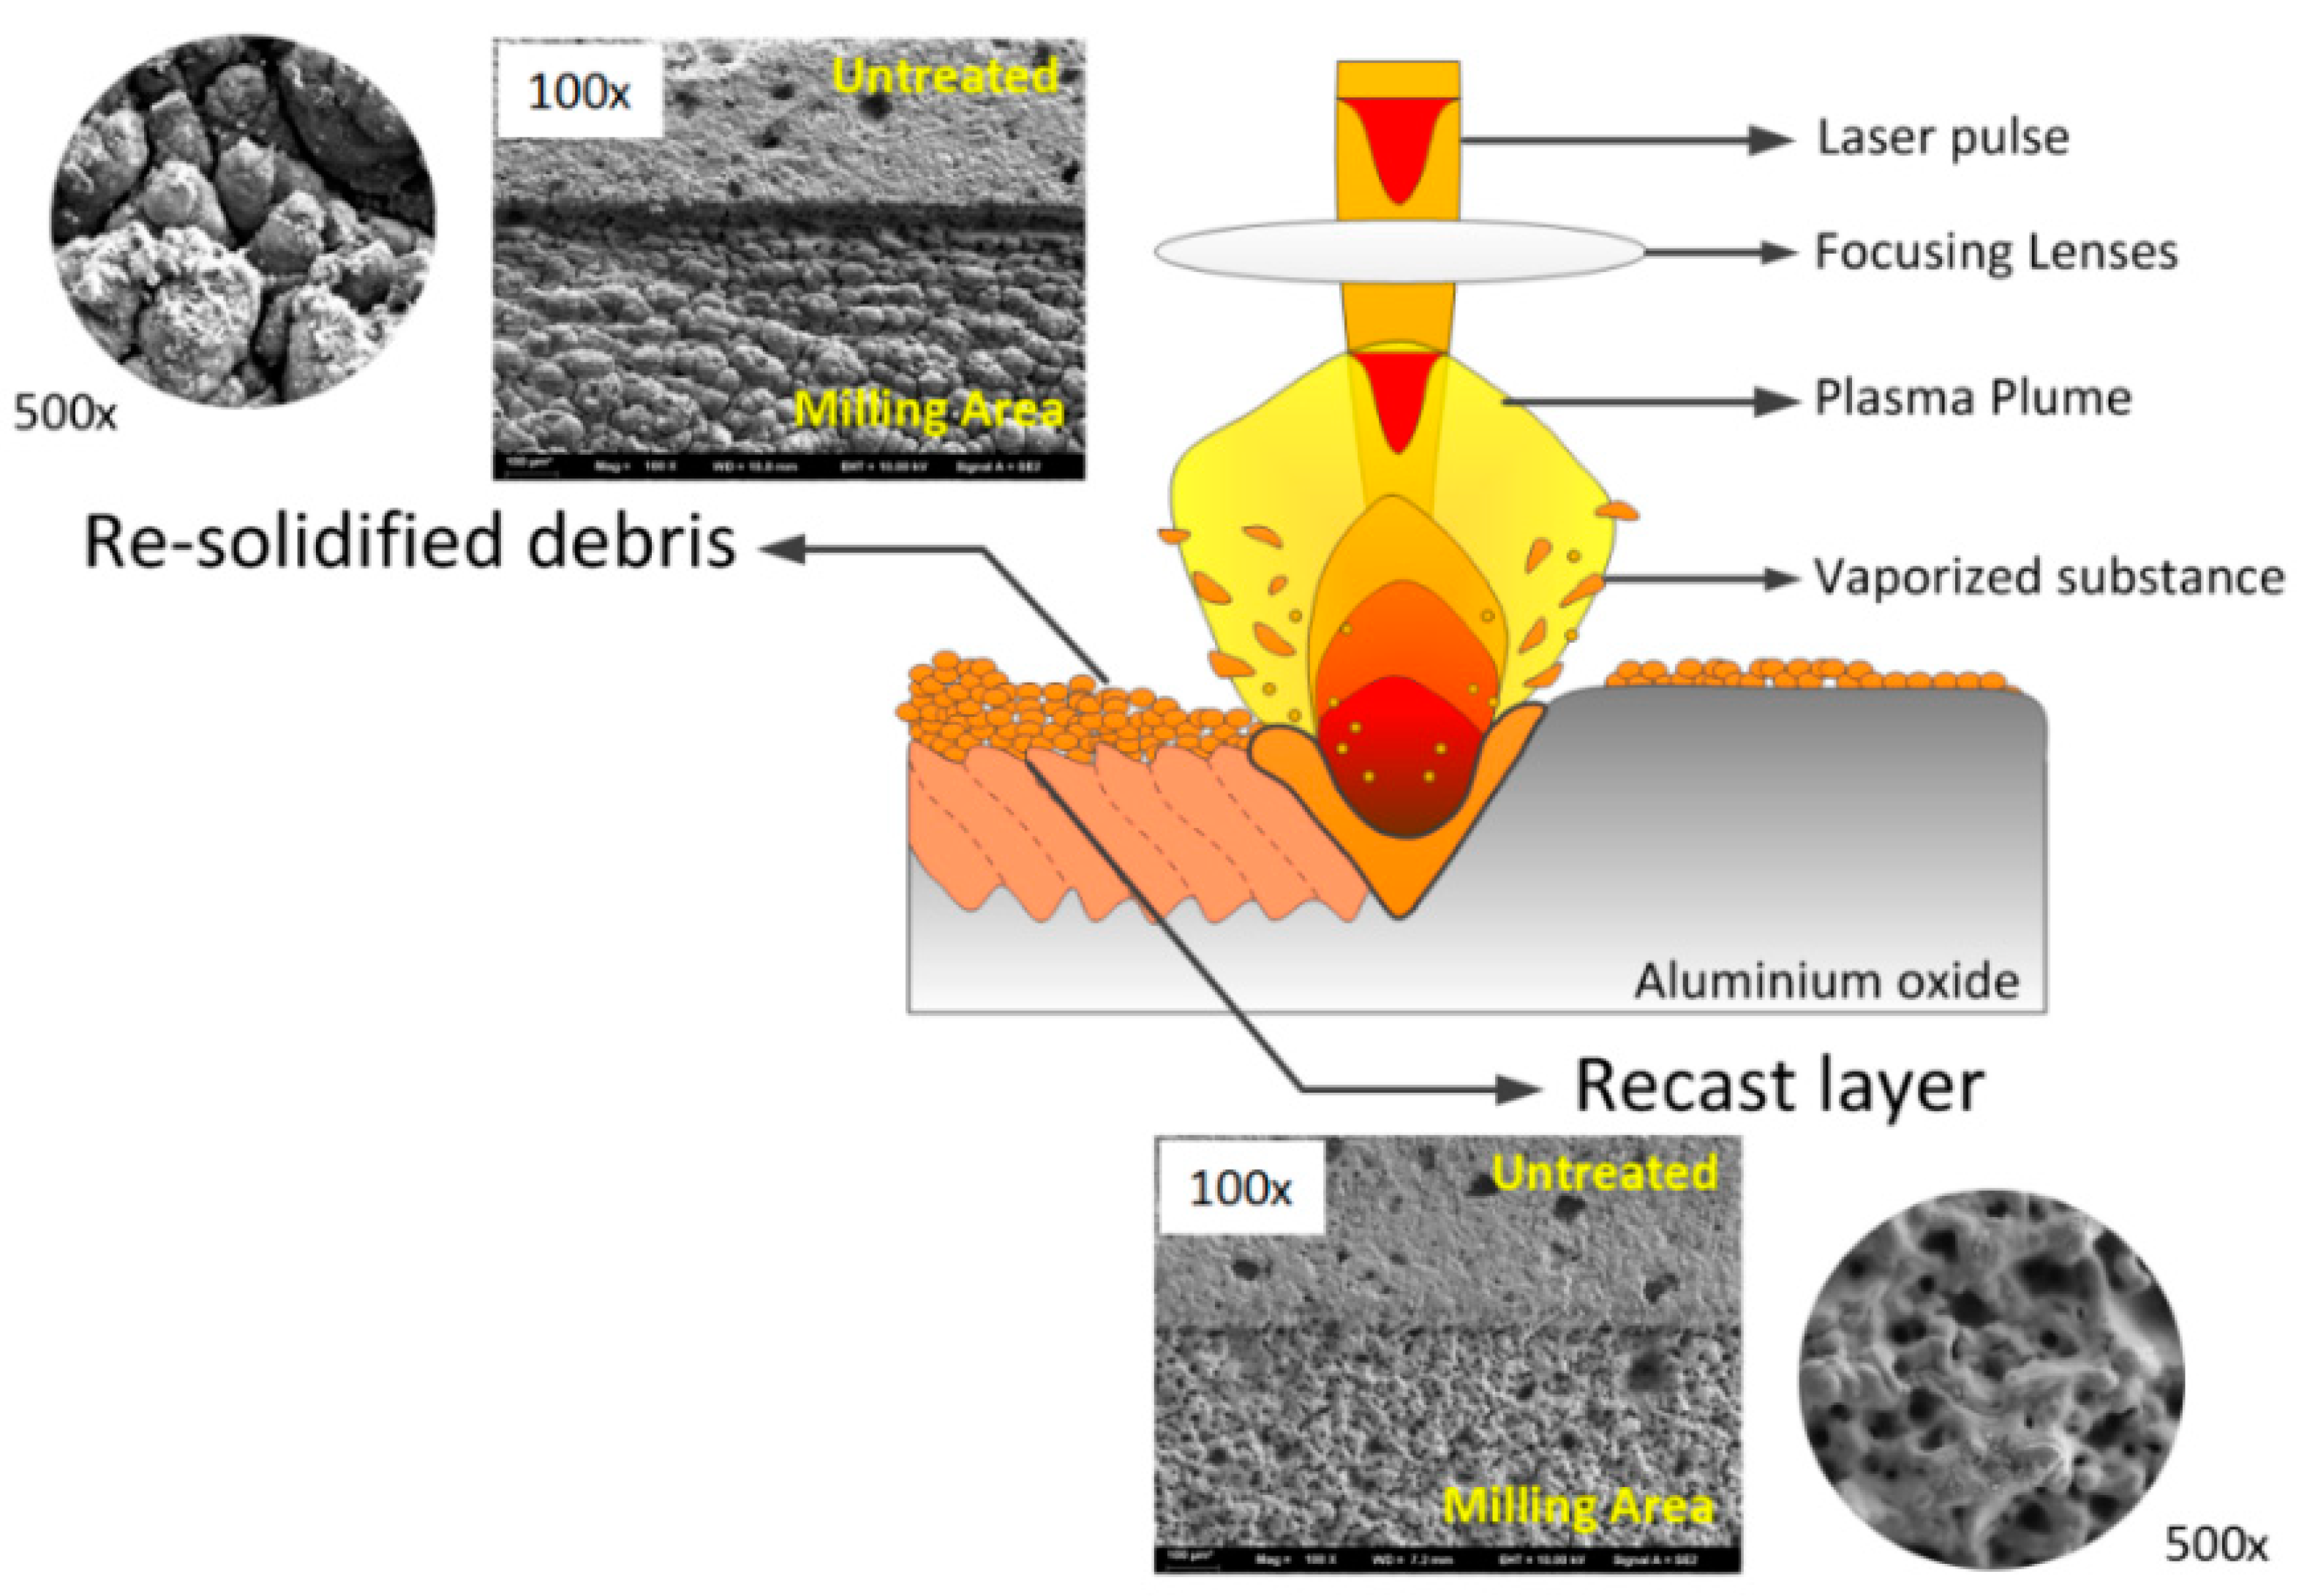
Based on the data from Figure 3 and Figure 8, the surface microstructure of Al2O3 ceramics takes a micron-grade granular structure, with submicron shrinkage cavities and molten structure. Furthermore, the interaction between the laser beam and the material induces the emergence of high-temperature ions. As the ions’ temperature increases to the material’s melting point, the ceramic begins to melt with the formation of the molten structure. When the ions’ temperature increases to the material’s boiling point, the ceramic surface undergoes gasification, causing the appearance of corrosion pits and cavities. A further increase in the temperature of the ions makes them blast and hit the ceramic surface at an extremely high speed, thereby generating a shock wave. Under the action of the latter, the droplets and the gasification material from the molten pool are deposited on the surface of the specimen and micron-grade granular-like structures form after solidification (see Figure 12). Therefore, the dominant mechanisms of nanosecond-pulsed laser milling of Al2O3 ceramics consist of melting and gasification of the material surface.

4. Conclusions

In this work, a nanosecond laser was used to mill Al2O3 ceramics, and the effect of laser milling on the surface microstructure, surface roughness, and milling depth was investigated. Based on the findings of the study, the following conclusions can be drawn:
(1)
The laser-induced temperature on the ceramic’s surface rose and the surface roughness increased with increases in laser power, pulse repetition rate, and number of milling operations. This was due to morphological peculiarities of the ceramic surface, associated with cavities, melt, and granular structure;
(2)
The increases in laser power, pulse repetition rate, and number of milling processes led to enhancement of the laser-induced gasification on the Al2O3 ceramic surface, which increased the volume of departed material and the milling depth;
(3)
After nanosecond-pulsed laser milling, the surface morphology of the Al2O3 ceramic exhibited cavities and melt caused by the material melting and the formation of the granular solidified structure as a result of gasification. Accordingly, we propose that melting and gasification were acting synchronously during the laser milling, thereby laying the foundation for the main mechanism of nanosecond-pulsed laser milling in the removal of the materials.
Therefore, the ability to elucidate processes occurring in ceramics under the impact of nanosecond pulses, shown in the present research, opens new prospects for optimization of nanosecond-pulsed laser milling of materials.

Author Contributions

Conceptualization and validation, Z.X.; writing—original draft preparation and visualization, Z.Z.; formal analysis and methodology, Q.S.; resources, J.X.; supervision, Z.M.; investigation, Y.L.; writing—review and editing, X.M. All authors have read and agreed to the published version of the manuscript.

Funding

This study was financially supported by the Jiangsu Province Advanced Manufacturing Technology Key Laboratory Open Fund (grant no. HGAMTL-1808), China Postdoctoral Science Foundation (grant No. 2021M691309), Jiangsu Province Postdoctoral Science Foundation (grant no. 2021K245B), Natural Science Research of the Jiangsu Higher Education Institutions of China (grant no. 20KJB460016), and Changzhou Sci and Tech Program (grant no. CJ20210034).

Institutional Review Board Statement

Not applicable.

Informed Consent Statement

Not applicable.

Data Availability Statement

Not applicable.

Acknowledgments

The authors are grateful to the Jiangsu University Analytical Testing Center for providing equipment support.

Conflicts of Interest

The authors declare no conflict of interest.

References

  1. Hu, M. Current status of advanced ceramics and its development trend. China Powder Ind. 2018, 5, 15–17. [Google Scholar]
  2. Hacker, J.; Motz, G.; Ziegler, G. Ceramic Materials and Components for Engines; World Scientific: Singapore, 2001. [Google Scholar]
  3. Popov, A.I.; Lushchik, A.; Shablonin, E.; Vasil’chenko, E.; Kotomin, E.A.; Moskina, A.M.; Kuzovkov, V.N. Comparison of the F-type center thermal annealing in heavy-ion and neutron irradiated Al2O3 single crystals. Nucl. Instrum. Methods Phys. Res. Sect. B 2018, 433, 93–97. [Google Scholar] [CrossRef]
  4. Samant, A.N.; Dahotre, N.B. Laser machining of structural ceramics—A review. J. Eur. Ceram. Soc. 2009, 29, 969–993. [Google Scholar] [CrossRef]
  5. Genna, S.; Leone, C.; Lopresto, V. An experimental study on the surface mechanisms formation during the laser milling of PMMA. Polym. Compos. 2015, 36, 1063–1071. [Google Scholar] [CrossRef]
  6. Preusch, F.; Adelmann, B.; Hellmann, R. Micromachining of AlN and Al2O3 using fiber laser. Micromachines 2014, 5, 1051–1060. [Google Scholar] [CrossRef] [Green Version]
  7. Jian, L.; Lingfei, J.; Yan, H. Experimental Study on Milling of Y-TZP Ceramic by 532 nm Laser. Chin. J. Lasers 2015, 42, 0806002. [Google Scholar] [CrossRef]
  8. Yinbo, Z. Numerical simulation and experimental investigation on laser milling of Al2O3 ceramic. China Mech. Eng. Soc. 2010, 3, 5502. [Google Scholar]
  9. Luo, Y.; Wang, X. Morphology investigation of removal particles during laser cutting of Al2 O3, ceramics based on vapor-to-melt ratio. J. Mater. Process. Technol. 2018, 255, 340–346. [Google Scholar] [CrossRef]
  10. Muneer, K.M.; Usama, U.; Abdulrahman, A. Optimization of laser micro milling of alumina ceramic using radial basis functions and MOGA-II. Int. J. Adv. Manuf. Technol. 2017, 91, 2017–2029. [Google Scholar]
  11. Parry, J.P.; Shephard, J.D.; Hand, D.P.; Moorhouse, C.; Jones, N.; Weston, N. Laser Micromachining of Zirconia (Y-TZP) Ceramics in the Picosecond Regime and the Impact on Material Strength. Int. J. Appl. Ceram. Technol. 2011, 8, 163–171. [Google Scholar] [CrossRef]
  12. Yilbas, B.S.; Ali, H.; Khaled, M. Laser gas assisted texturing of alumina surfaces and effects of environmental dry mud solution on surface characteristics. Ceram. Int. 2016, 42, 396–404. [Google Scholar] [CrossRef]
  13. Kibria, G.; Doloi, B.; Bhattacharyya, B. Investigation into the effect of overlap factors and process parameters on surface roughness and machined depth during micro-turning process with Nd: YAG laser. Opt. Laser Technol. 2014, 60, 90–98. [Google Scholar] [CrossRef]
  14. Watkins, K.G.; Curran, C.; Lee, J. Two new mechanisms for laser cleaning using Nd: YAG sources. J. Cult. Herit. 2003, 4, 59–64. [Google Scholar] [CrossRef]
  15. Lippert, T.; Hauer, M.; Phipps, C.R. Fundamentals and applications of polymers designed for laser ablation. Appl. Phys. A: Mater. Sci. Process. 2003, 77, 259–264. [Google Scholar] [CrossRef]
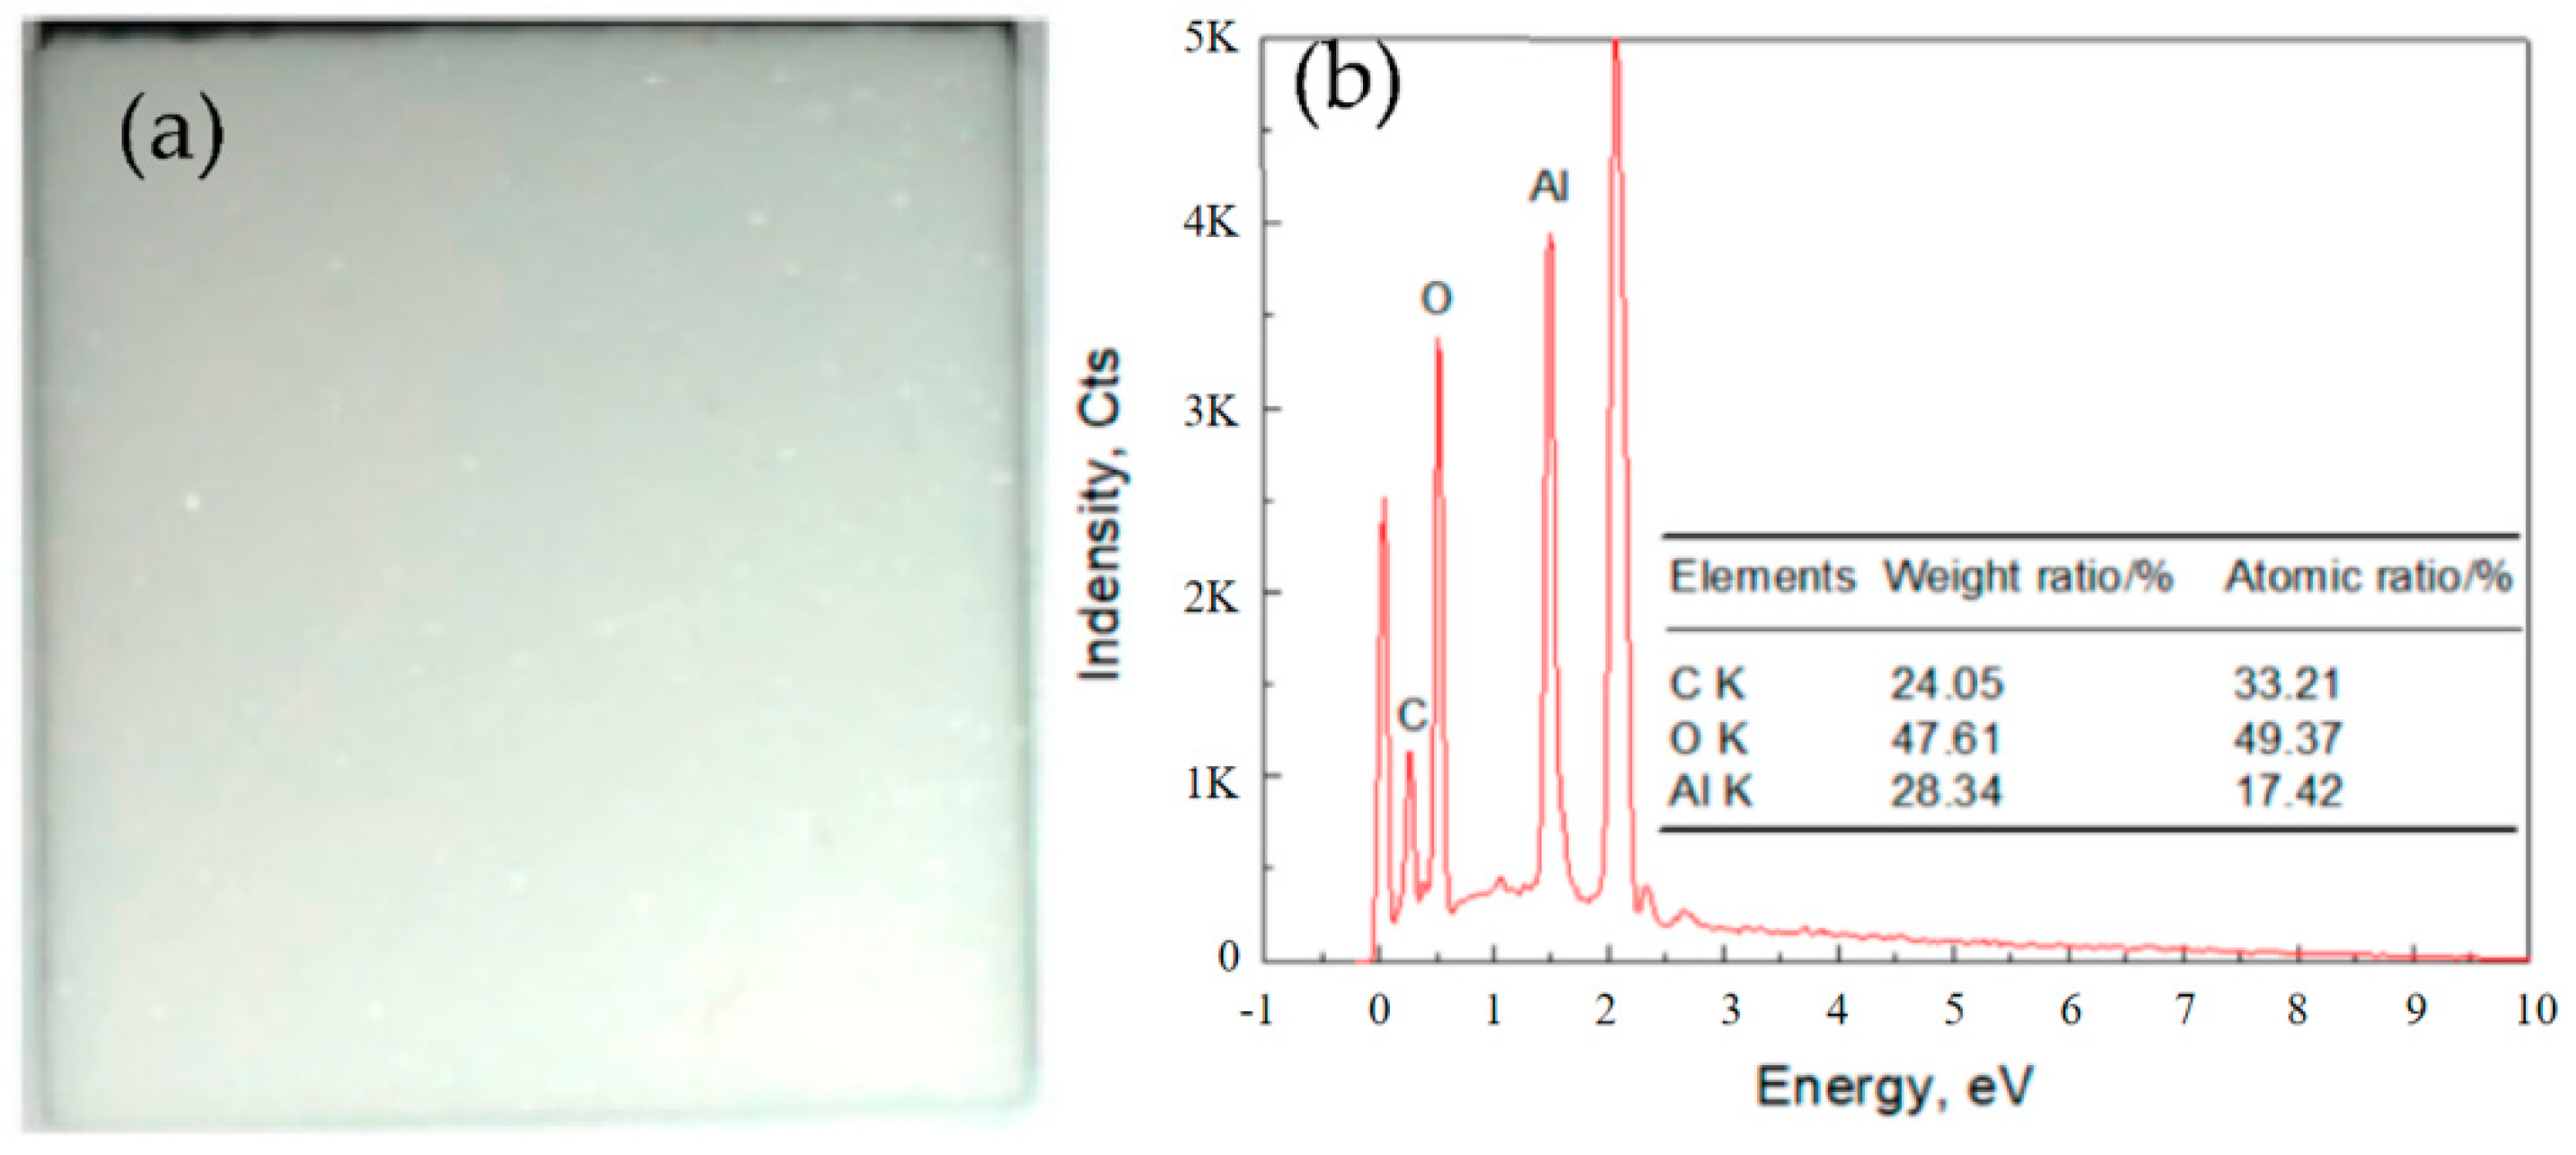
Figure 1. (a) Al2O3 ceramic and (b) its chemical composition.
Coatings 12 01687 g001
Figure 2. Schematic of a laser milling experimental system.
Coatings 12 01687 g002
Figure 3. Surface microstructure after laser milling at different laser powers: (a) 25 W; (b) 30 W; (c) 35 W; (d) 40 W.
Coatings 12 01687 g003
Figure 4. Surface roughness after laser milling at different laser powers.
Coatings 12 01687 g004
Figure 5. Milling depth at different laser powers.
Coatings 12 01687 g005
Figure 6. Surface roughness after laser milling at different pulse frequencies.
Coatings 12 01687 g006
Figure 7. Milling depth after laser milling at different pulse repetition rates.
Coatings 12 01687 g007
Figure 8. Surface microstructure after laser milling with different numbers of milling processes: (a) three; (b) five; (c) nine times.
Coatings 12 01687 g008
Figure 9. Surface roughness after laser milling with different numbers of milling processes.
Coatings 12 01687 g009
Figure 10. Milling depth after different numbers of milling operations.
Coatings 12 01687 g010
Figure 11. XRD results of specimens before and after laser milling.
Coatings 12 01687 g011
Figure 12. Formation mechanism of surface microstructure of Al2O3 ceramics after laser milling.
Coatings 12 01687 g012
Table 1. Al2O3 ceramic properties.
Density
(g/cm3)
Absorption
Coefficient
Index of RefractionReflectivityCoefficient of Thermal Expansion (×10−6/K)Thermal Conductivity
(W/m•K)
3.50.851.3~2.70.051~0.1537.224
Publisher’s Note: MDPI stays neutral with regard to jurisdictional claims in published maps and institutional affiliations.