Article

Optimisation of 3D Printing Parameters and Surface Modification for Porous Gyroid Structures in Beta Titanium Alloy Ti25Nb4Ta8Sn

1
Department of Physics, Faculty of Mechanical Engineering, Czech Technical University in Prague, Technická 4, 16000 Prague, Czech Republic
2
Department of Mechanics, Faculty of Civil Engineering, Czech Technical University in Prague, 16629 Prague, Czech Republic
3
Department of Metals and Corrosion Engineering, University of Chemistry and Technology, Technická 5, 16628 Prague, Czech Republic
*
Author to whom correspondence should be addressed.
J. Funct. Biomater. 2025, 16(11), 416; https://doi.org/10.3390/jfb16110416
Submission received: 25 September 2025 / Revised: 3 November 2025 / Accepted: 4 November 2025 / Published: 7 November 2025
(This article belongs to the Special Issue Three-Dimensional-Printable Biomaterials for Bone Regeneration)

Abstract

In recent years, 3D printing has become a key technology for producing intricate geometries with high precision. Beta titanium alloys (β-Ti), due to their excellent combination of strength, ductility, low elastic modulus, and biocompatibility, are widely used in the aerospace and medical industries. However, the unique microstructure formed during additive manufacturing characterised by porosity, residual stress, and anisotropy can significantly influence the mechanical performance and durability of these materials. This study examines how different printing parameters affect porosity, dimensional stability, and mechanical properties in the β-Ti alloy Ti25Nb4Ta8Sn. The investigation focuses on thin-walled samples and gyroid structures, which represent model geometries for porous biomedical components. These structures, defined by a periodic network of interconnected channels, provide a useful platform for studying the relationship between geometry and mechanical response. In addition, the effects of surface etching on the morphology and compressive behaviour of printed gyroid structures were evaluated. Compression testing was used to determine how etching alters load-bearing performance and to identify correlations between surface modification and mechanical response. The combined analysis enables optimisation of both printing and post-processing parameters for advanced biomedical applications.

1. Introduction

Research in the field of 3D printing of β-Ti alloys for biomedical applications focuses on the influence of printing parameters such as temperature, melting rate, cooling conditions, and post-processing heat treatments on the resulting microstructure and mechanical properties [1,2,3]. In particular, the fabrication of thin-walled samples presents specific challenges, especially due to deformation, thermal stresses, and insufficient substrate adhesion. Thin layers often suffer from excessive cooling, resulting in warping or cracking caused by differences in thermal expansion or rapid temperature gradients.
Selective Laser Melting (SLM) and Laser Powder Bed Fusion (LPBF) are among the most used technologies, as they allow precise control over the microstructure and can significantly enhance mechanical performance, including strength, hardness, ductility, and fatigue resistance [4,5]. For example, higher melting temperatures typically result in a finer grain structure, which translates to better fatigue behavior and mechanical strength.
The optimisation of process parameters is essential, as they directly affect the quality of the printed component. Melting rate influences grain size within the microstructure, which is directly linked to strength and ductility. A slower melting rate often allows more uniform cooling and finer grains, improving mechanical performance, whereas rapid cooling may lead to the development of internal stresses that compromise dimensional stability and long-term performance [6,7,8].
The microstructure formed during the printing process plays a critical role in defining the mechanical characteristics. Several studies have demonstrated that appropriate tuning of the printing parameters enables the development of high strength microstructures without sacrificing ductility [9,10].
An integral component of this optimisation is post processing, particularly chemical etching, which serves multiple roles in surface modification [11]. Etching enables precise adjustment of surface topography and geometric accuracy, alters surface chemical composition and bonding states, and can influence properties such as wettability and fatigue resistance [12,13,14]. Furthermore, controlled etching can assist in stress relief and improve the integration of printed parts in biological environments, making it especially important in biomedical applications.
Additionally, post print heat treatment is essential for the relief of residual stresses and for stabilising the β-phase [15,16], enabling further enhancement of mechanical properties and component lifetime, particularly in demanding applications such as implants or aerospace components.
Porous structures, including gyroids, represent a significant class of architected materials characterised by complex geometries that provide both mechanical robustness and functional advantages. These structures, often derived from mathematical models of triply periodic minimal surfaces, exhibit continuous topology and interconnected porosity [17]. Shapes such as gyroids, Schwarz surfaces, or diamond structures are widely employed in material design where a combination of low density and mechanical strength is required [18,19] such as in biomedical implants (supporting osseointegration and stress distribution), energy systems, aerospace, or filtration.
Additive manufacturing enables precise fabrication of such structures, yet it also introduces several challenges. Key issues include maintaining geometrical fidelity, especially when producing continuous curved surfaces, where limited resolution of the printing system may lead to geometrical deviations. Moreover, microstructural control remains critical due to its direct impact on mechanical performance. Advances in additive manufacturing have enabled the production of a wide variety of architectures, from strut based to shell like morphologies [20,21].
While trabecular designs are suitable for larger porous segments, in small implants the reduced strut diameter may approach the limits of printer resolution, increasing the risk of structural defects [22]. An alternative lies in gyroid based structures, first described by A.H. Schoen [23], whose geometry is mathematically defined by Equation (1):
F x , y , z = t = sin x ¯ · cos y ¯ + sin y ¯ · cos z ¯ + sin z ¯ · cos x ¯
where x ¯   y ¯   z ¯ are transformed spatial coordinates and t is a threshold parameter defining boundary curvature and thus the structure’s morphology. By adjusting t, the design can be tuned between strut like and shell-like configurations [24].
In metallic materials typically used for printing gyroid structures, thermal gradients during solidification can lead to internal stresses and deformations, adversely affecting strength, toughness, and long-term reliability [25,26].
In addition to β-Ti alloys, which are considered among the most promising materials for biomedical use due to their combination of low elastic modulus, high strength, and excellent biocompatibility, several other alloys and materials are employed for the 3D printing of porous structures. The most widely used system is Ti-6Al-4V, which has become a clinical standard in orthopaedics and dentistry, where it is extensively applied in hip and knee replacements as well as dental implants [27,28]. Cobalt-chromium alloys are commonly used for components requiring high strength and wear resistance, such as dental prostheses and joint replacements. Stainless steels, particularly 316L, are also utilised in implants and surgical instruments owing to their availability and corrosion resistance [29]. A specific category is represented by NiTi shapememory alloys, whose pseudoelastic behaviour and superelasticity make them especially attractive for dynamically loaded implants, including stents and guidewires. In the field of tissue engineering, ceramic materials such as hydroxyapatite and tricalcium phosphate are increasingly used, as they support osteointegration and new bone formation [30,31]; however, their limited mechanical strength restricts their application mainly to smaller or composite implants. A rapidly developing area is also represented by polymeric and composite systems, such as PEEK [32,33], which are frequently combined with bioactive additives to achieve the desired balance of mechanical performance and biological response.
Recent studies have also focused on how pore size and distribution affect both mechanical and biological functionality. While smaller pores often improve strength and density, larger pores enhance mass transport and tissue ingrowth [34]. The ability to customise porous architectures makes them highly adaptable for biomedical and engineering applications [35,36].
Practical biomedical applications of porous structures are primarily concentrated in orthopaedics, dentistry, and vascular surgery [37]. In orthopaedics, porous architectures are employed in large joint replacements, where porosity facilitates osteointegration and ensures more uniform stress distribution between the implant and surrounding bone. In dentistry, porous titanium and cobalt-chromium structures are used for lightweight yet strong dental implants with high levels of biological compatibility [38]. In tissue engineering, porous ceramic or polymeric scaffolds provide suitable matrices for the growth of bone and soft tissue, thereby broadening the possibilities of personalised medicine [39].
Despite the challenges, gyroid and other porous designs remain a subject of intense research due to their outstanding mechanical, transport, and biological properties, rendering them highly suitable for advanced biomedical and engineering systems.

2. Material and Methods

2.1. Material Preparation and Printing Parameters

For the experimental evaluation of the influence of 3D printing parameters on the quality of the printed samples, a β-titanium alloy Ti25Nb4Ta8Sn (supplied by Advanced Metal Powders s.r.o., Kravaře, Czech Republic) was used, whose chemical composition and properties are described in [40,41]. This alloy was selected primarily due to its stable β-matrix without toxic β-stabilisers and due to its favourable combination of mechanical properties suitable for biomedical use. Niobium, tantalum, and tin function as non-toxic β-stabilisers, enabling retention of the β-phase even after the additive manufacturing (AM) process and the thermal load associated with laser melting. The material exhibits a low elastic modulus (~55–65 GPa depending on the thermal history), which is significantly closer to cortical bone compared with commonly used implant alloys based on α/β titanium systems (for example Ti6Al4V~110 GPa). This helps to reduce the risk of stress shielding in clinical applications. At the same time, sufficient strength and ductility are preserved to ensure structural integrity [42]. The samples were fabricated on a Trumpf TruPrint 1000 (TRUMPF SE + Co., Stuttgart, Baden-Württemberg, Germany) machine at the Institute of Physics of the Czech Academy of Sciences. A total of 21 printing variants (T1–T21) were realized, each comprising three samples with dimensions of 10 × 0.5 mm (see Figure 1).
The baseline printing parameters were: infill laser power 180 W, infill melting rate 550 mm/s, layer thickness 50 μm, number of contours 2, contour laser power 140 W, and contour melting rate 1600 mm s−1. The process was carried out in an inert argon atmosphere with a flow rate of 4 L/min, and the oxygen concentration in the chamber did not exceed 0.1%.
The powder material used was analyzed with a Malvern Mastersizer instrument (Malvern Panalytical Ltd., Malvern, UK). The particle size distribution was characterized by values of Dv(10) = 40.9 μm, Dv(50) = 59.3 μm, and Dv(90) = 85.5 μm, with a span of 0.752 indicating a uniform granulometric distribution. The particles exhibited a spherical morphology suitable for the SLM process. Before printing commenced, a standard calibration of the laser system (spot size 55 μm) and a homogeneity check of the power output were performed. The samples were printed in a vertical orientation relative to the build plate to minimize the influence of orientation on dimensional stability and microstructure.
The main variables of the printing setup, summarized in Table 1, included the use/non-use of contour (sample edge), laser movement direction, beam compensation (beam accuracy), and hatch distance (beam width), allowing for systematic investigation of the influence of these parameters on the printing quality of thin samples and the identification of optimal settings to achieve the desired material properties, with potential applications in biomedicine and aerospace.

2.2. Gyroid Structure

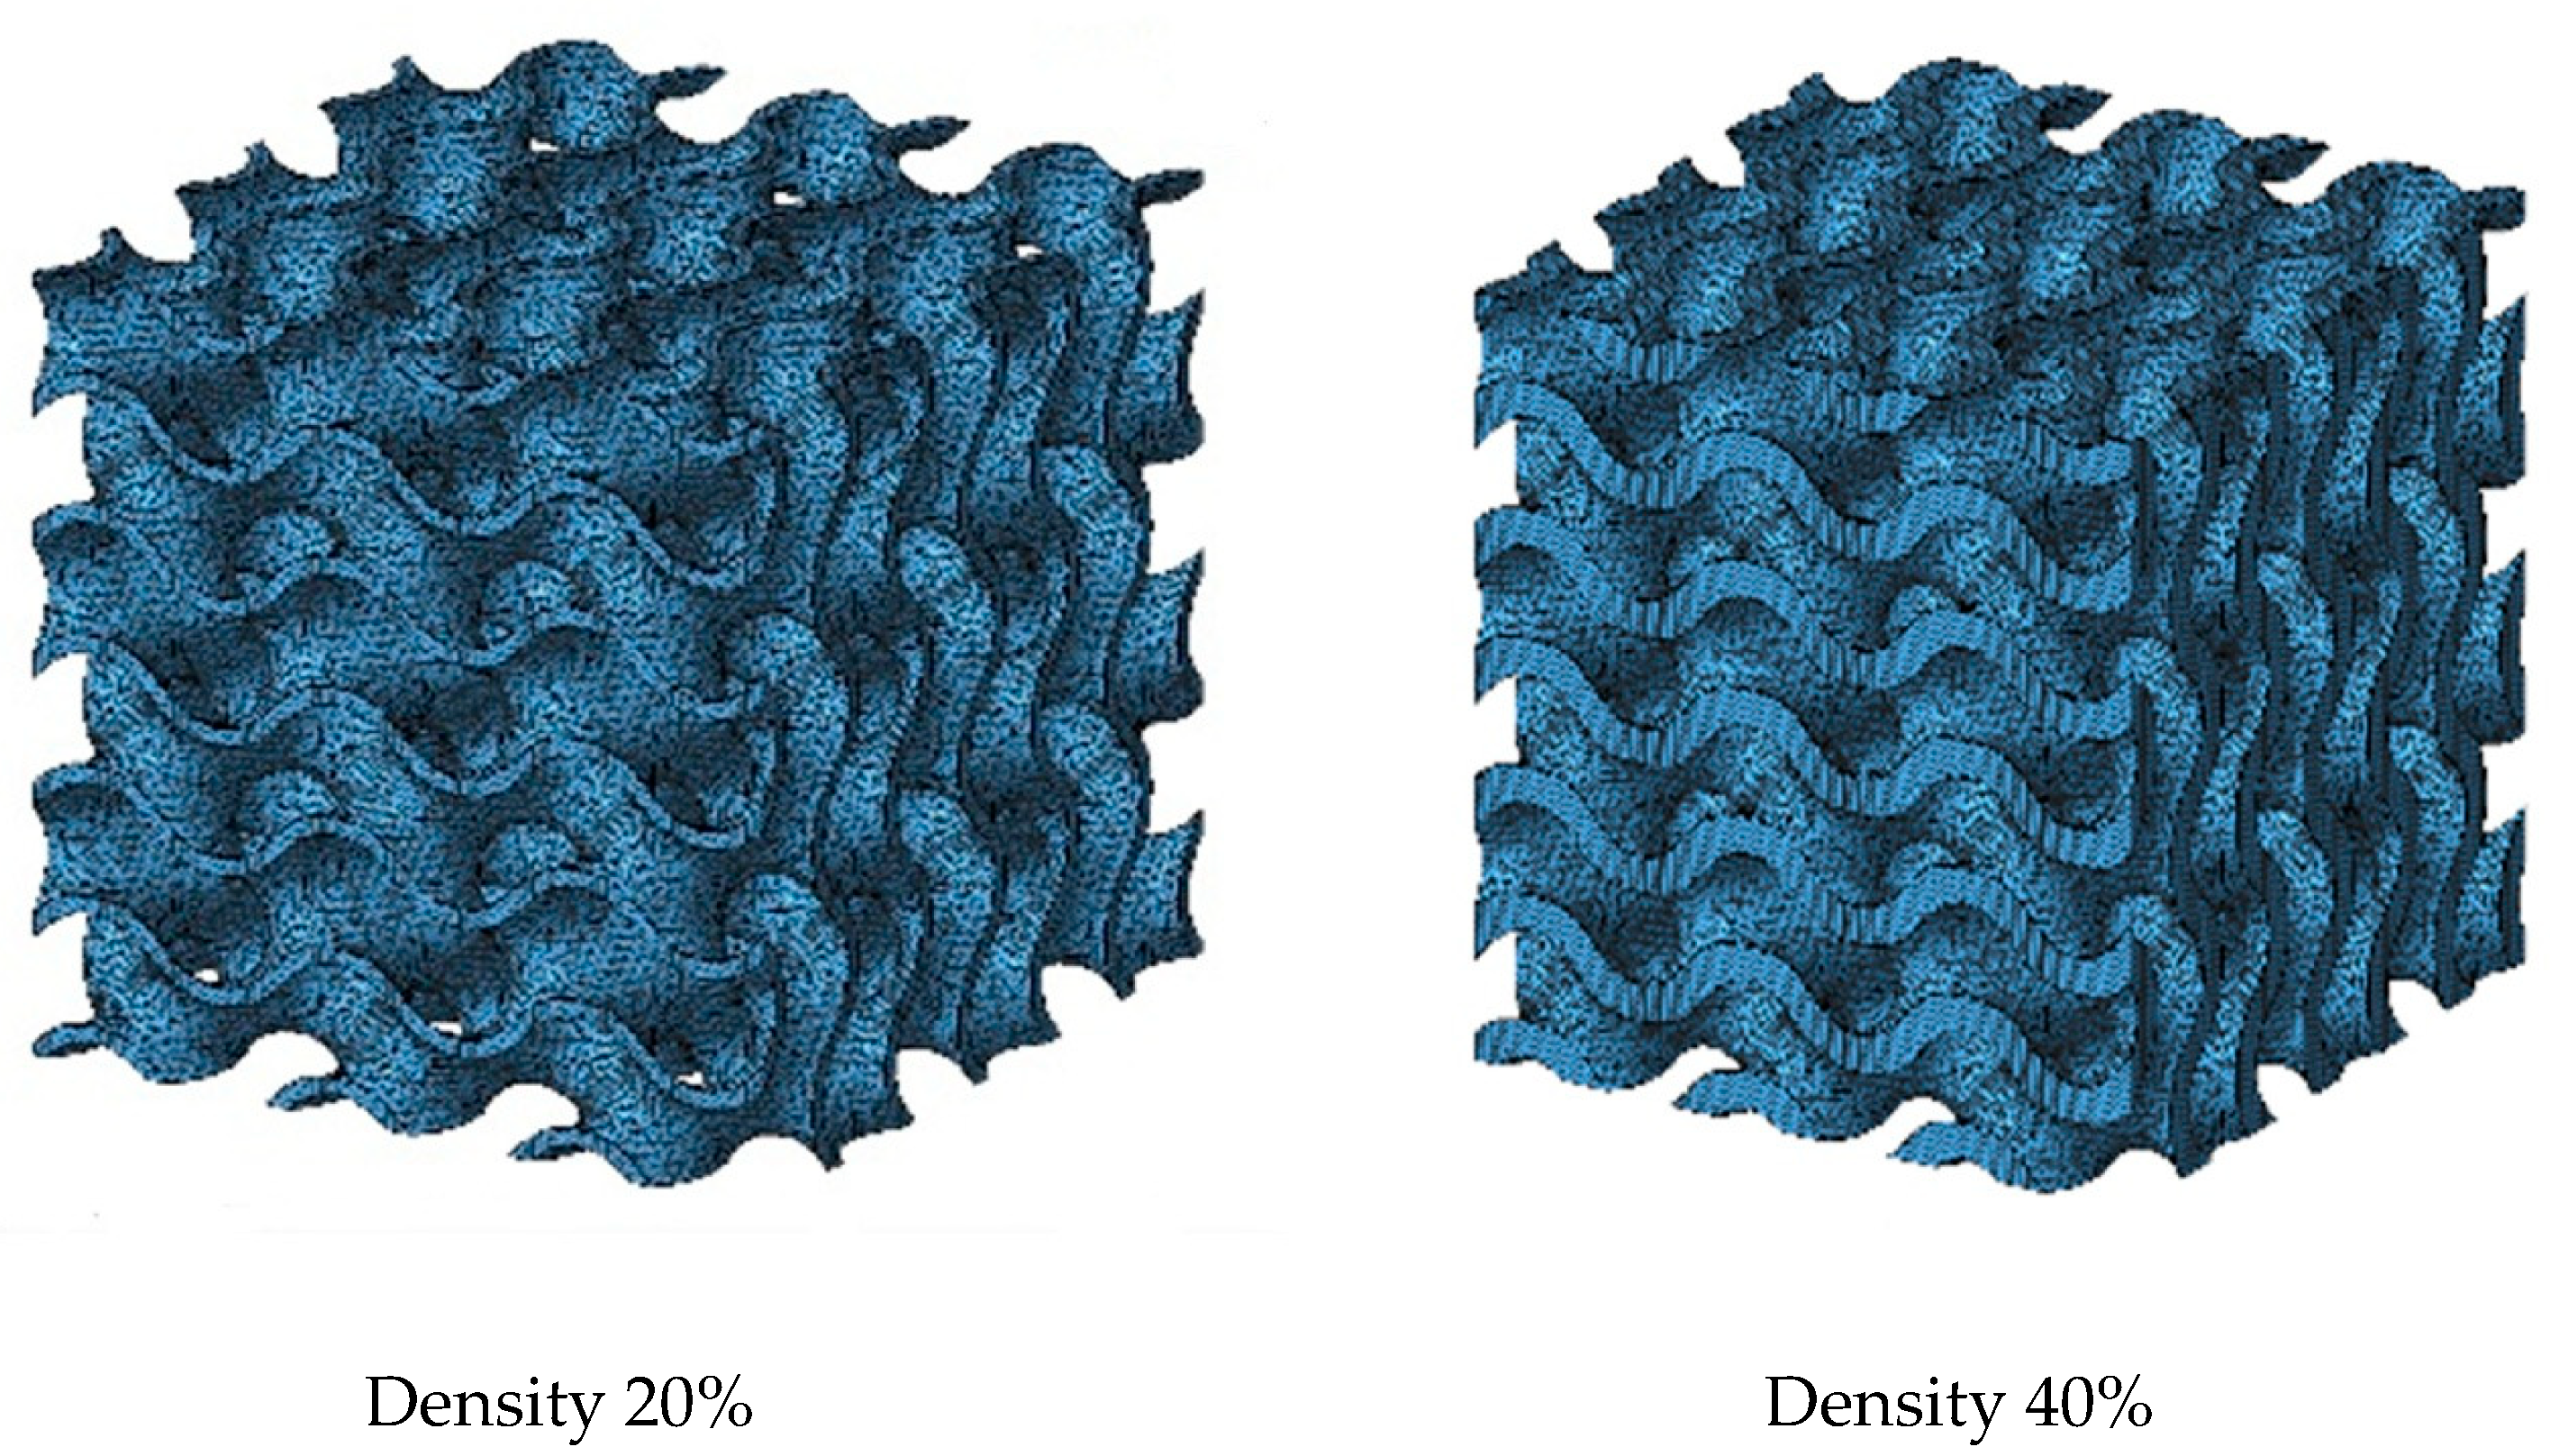
For the purposes of this study, a series of specimens based on a gyroid structure with a wall like character was prepared. The geometry of the gyroid was generated using MS Lattice software [43]. Each test specimen was designed as a cube with dimensions of 15 × 15 × 15 mm. The specimens were composed of 3 × 3 × 3 elementary gyroid cells, resulting in a total of 27 repeating units arranged in a regular grid.
In this study, the threshold parameter of the gyroid equation was kept constant (t = 0) for both variants in order to maintain identical surface topology. The relative densities of 20% and 40% were achieved by modifying the wall thickness, which was defined as an offset along the normal to the gyroid surface. The resulting wall thicknesses were 0.35 mm (20%) and 0.72 mm (40%), respectively. The 20% density variant therefore represented specimens with thinner walls and higher porosity, whereas the 40% variant corresponded to specimens with thicker walls and lower porosity. Both variants were fabricated with identical external dimensions, which enables a direct comparison of the influence of wall thickness and overall density on the mechanical response under compressive loading. The key geometrical parameters of both variants are summarised in Table 2. The specimens were subsequently used for mechanical testing, with their characteristic geometries illustrated in Figure 2 and Figure 3. For each density level, a set of cubic specimens was prepared for compression testing, which enabled not only a comparison of maximum load values and deformation behaviour but also an assessment of experimental repeatability within each series.

2.3. Evaluation Methods and Equipment Used

The samples were ground twice (in two levels) on a Bühler (Leinfelden-Echterdingen, Germany) metallographic grinder with abrasive paper grits P240, P320, P640, and P1000. Subsequently, both ground sections were photographed using a metallographic light microscope, as shown in Figure 4 To evaluate the porosity of the 3D-printed structure using image analysis, NIS Elements software (NICON Instruments, Tokyo, Japan) was used. ImageJ software (LOCI, University of Wisconsin, Madison, WI, USA) was used to assess volumetric stability (how much the printed sample area deviates from the specified model). Both measurements were performed on 3 printed samples and in two cutting planes.
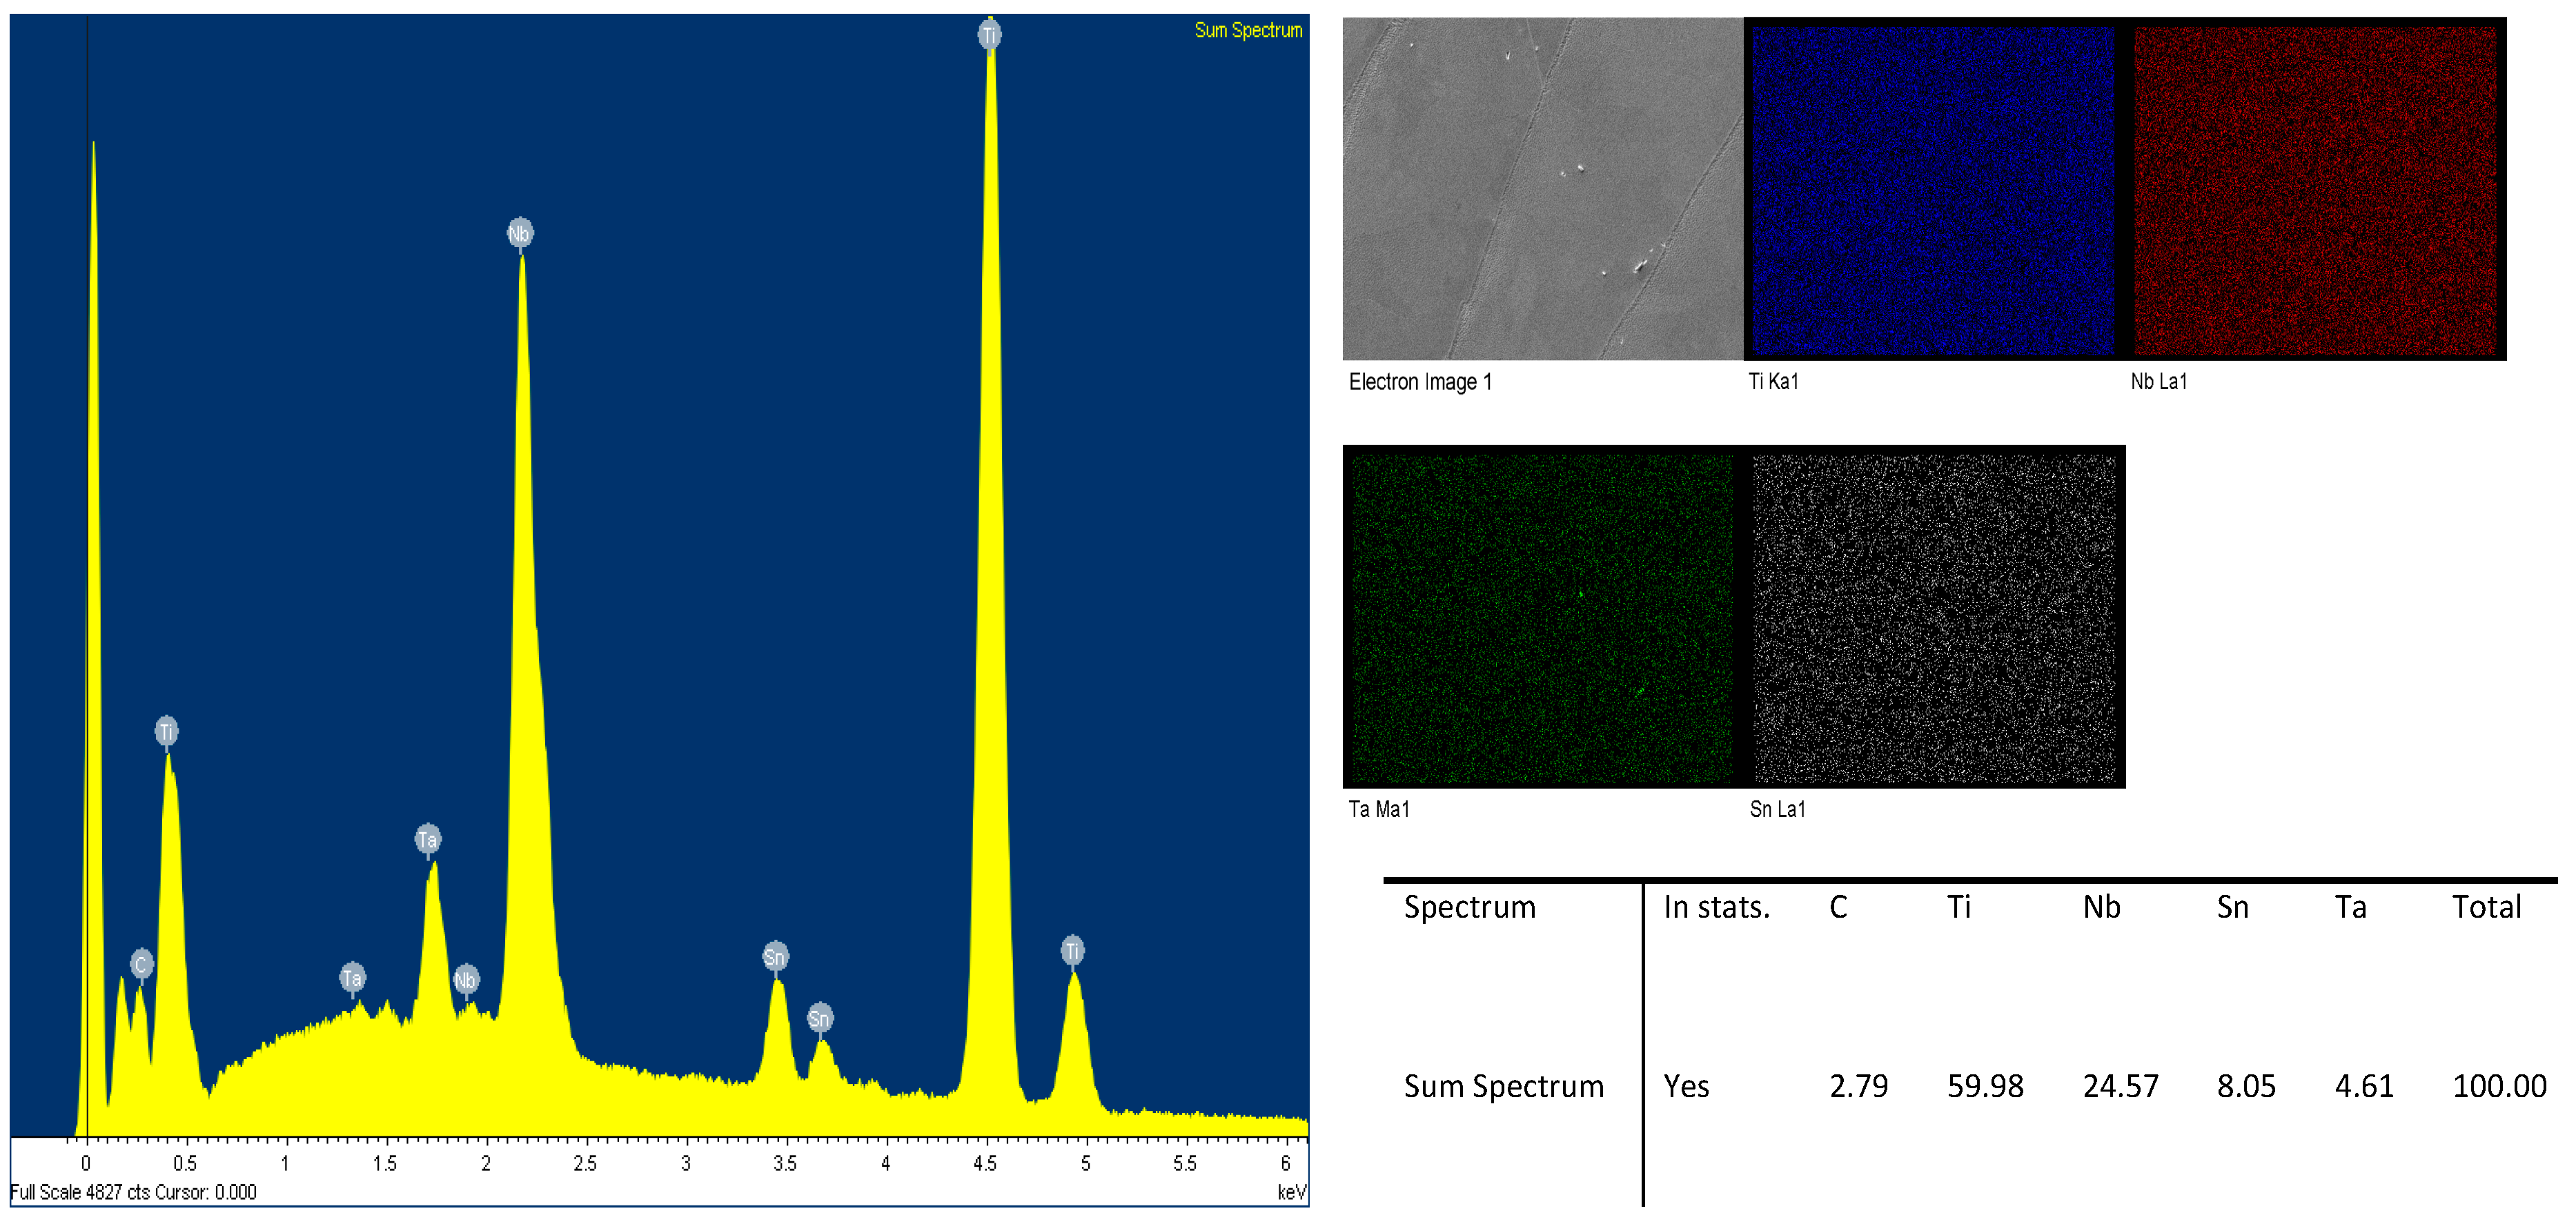
Samples with a gyroid structure were subjected to compression testing on an Instron device. Two sets of samples (3 each, labeled Sample 1–3) with varying wall thicknesses were loaded at a rate of 0.04 mm per second. For image analysis and verification of the chemical composition were performed using a JEOL JSM 7600-F scanning electron microscope (SEM; JEOL, Tokyo, Japan) equipped with energy-dispersive X-ray spectroscopy (EDS) and utilising secondary electron detectors (SEI, LEI) Figure 5.

2.4. Etching as a Post-Printing Surface Refinement Method

To improve the surface quality of the printed gyroid structures, chemical etching was employed, as alternative methods for modifying internal surfaces of such complex geometries are currently not feasible. The primary goal of etching was the removal of residual, partially sintered powder particles, which resulted in altered surface morphology and a reduction in wall thickness.
The etching process was carried out in a Grant XB2 ultrasonic bath. The etching solution was specifically developed for the Ti25Nb4Ta8Sn, β-Ti alloy and consisted of deionised water, nitric acid, and hydrofluoric acid in a volumetric ratio of 5:1:1, with the addition of oxalic acid at a concentration of 8.5 mg mL−1. Etching was performed in two cycles of 3 min each.
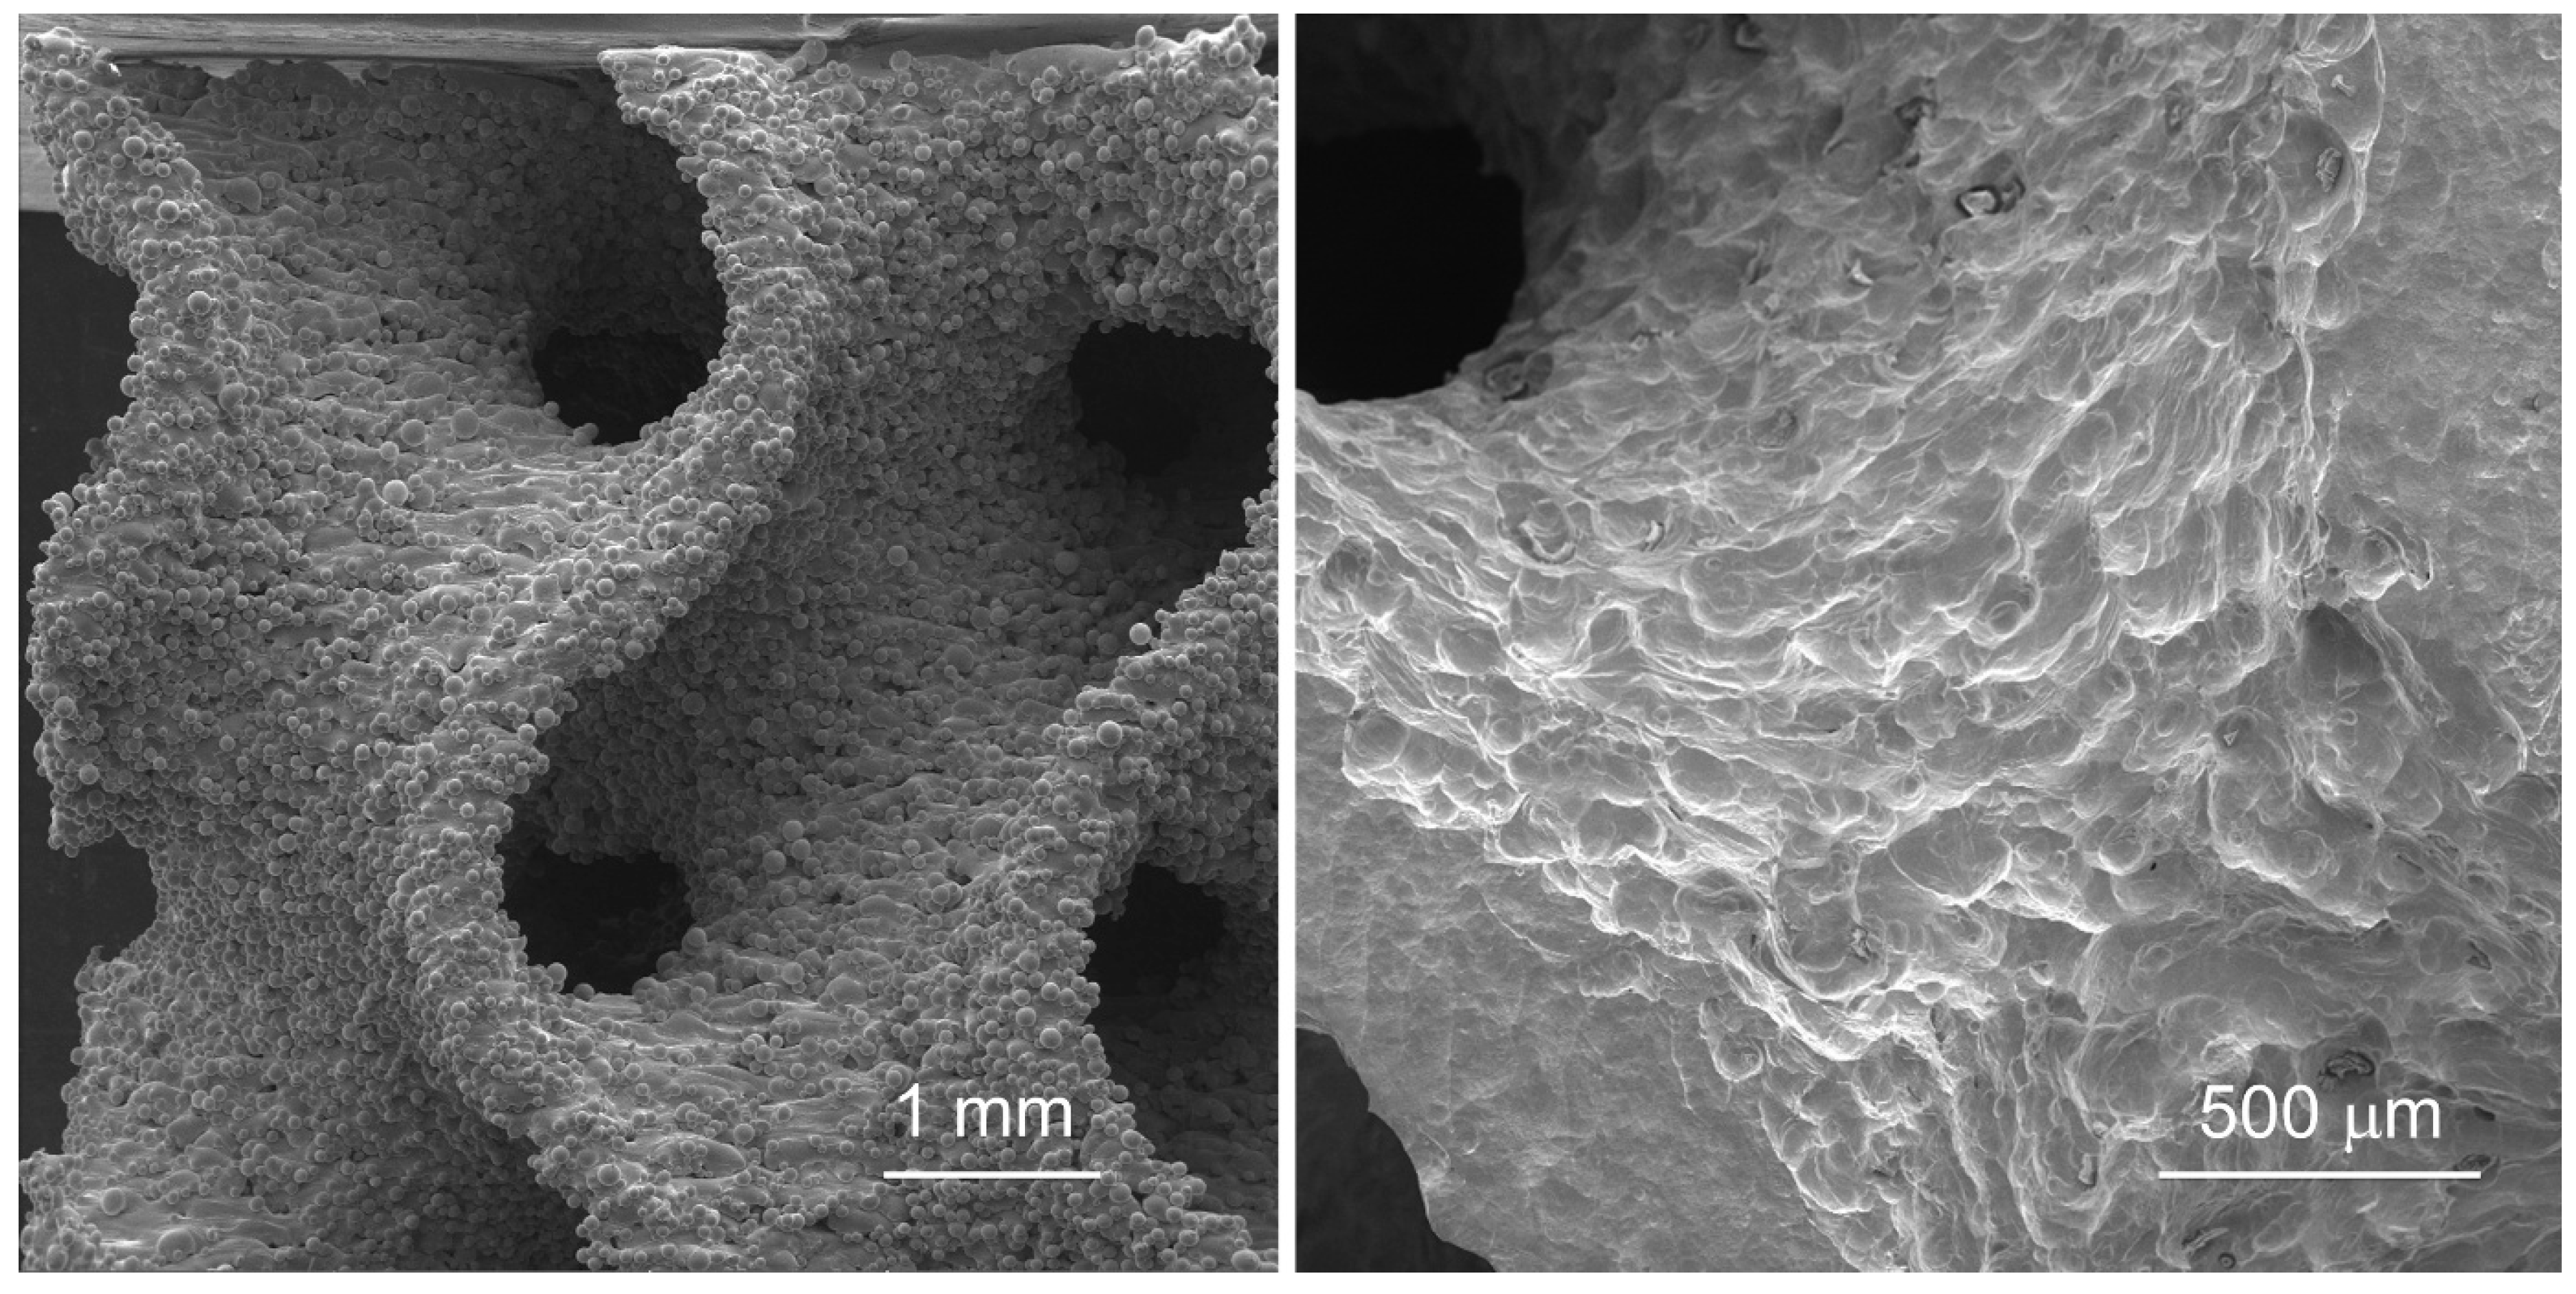
As shown in Figure 6, the left image illustrates the surface morphology of the gyroid structure prior to etching, with numerous adhered powder particles and partially melted agglomerates clearly visible on the surface. These attached particles increase surface roughness and create local heterogeneities, which may serve as potential initiation sites for material failure under cyclic or compressive loading. In contrast, the right image shows the surface after chemical etching, where most of the loosely bound particles have been removed. The etched surface appears smoother, with more clearly defined morphological features and significantly reduced contamination by unmelted powder. This modification not only refines the surface topography but also reduces the effective wall thickness of the structure, thereby influencing both the mechanical response and the biological performance of the material. Measuring the change in wall thickness within the gyroid structure using etching is challenging (due to variable parameters). Therefore, we utilised the weight differential as an indicator of this change. For the gyroid with 20% porosity, the change in weight resulted in a reduction from an initial mass of 3.06 g to 2.42 g, which represents a 21% difference. Conversely, for the gyroid with 40% porosity, the mass was reduced from 7.6 g to 6.51 g, which is a 14.4% difference. The greater the surface area-to-mass ratio, the higher the percentage of material removed by etching.

3. Results and Discussion

Following the 3D printing process of the Ti25Nb4Ta8Sn alloy, X-ray diffraction confirmed the presence of a predominantly β-phase with a body centred cubic (bcc) crystal structure. This phase is retained due to the high concentrations of niobium, tantalum, and tin, which suppress the β→α transformation and stabilise the β-phase even under the rapid cooling conditions characteristic of SLM processes. The steep thermal gradients and extremely high cooling rates result in a fine grained, locally textured microstructure without a significant transformation into the martensitic α″ phase. In some regions, minor segregation of tin or niobium may occur along melt pool boundaries, producing slight chemical inhomogeneities; however, these do not lead to any detectable change in phase composition.
After surface etching, no signs of phase transformation or precipitation of secondary phases were detected. Surface analyses indicate that etching selectively affects areas of higher grain boundary energy, where minor oxygen enrichment or local changes in crystallographic orientation may occur. These alterations are confined to the near surface regions and do not compromise the overall stability of the β-matrix. The retention of the β-phase after etching confirms the chemical and microstructural stability of the Ti25Nb4Ta8Sn alloy, which is essential for its long-term performance in biological environments.

3.1. Porosity Evaluation

Generally, the porosity in 3D printed products using the SLM method ranges between 0.1–0.4% by volume [44], depending on the setup and printing parameters. Specific porosity requirements can be established depending on the application and material, but these specifications are usually determined by internal standards or customer requirements, rather than a universal norm.
Table 3 summarises the results of the 2D pore area fraction determined from metallographic cross-sections after 3D printing. The values represent the proportion of pores in the analysed area and were evaluated separately after the first and second grinding steps to verify the homogeneity of the structure at different depths of the samples. This metric does not represent volumetric porosity, but a 2D area fraction of pores detected in optical microscopy images. The obtained data clearly confirm that the degree of porosity is strongly influenced by the selected printing parameters, as specified in Table 1. Samples printed with contour (T5–T6) exhibited relatively low porosity, ranging between 0.3–0.5%. However, these samples also showed larger deviations in dimensional stability, which may be related to local overheating and uneven energy distribution caused by multiple laser passes along the contour region.
In contrast, samples printed without contour (T7–T12) generally achieved lower pore area fractions, typically between 0.1% and 0.3%. The best performance was observed for sample T8, where porosity ranged from approximately 0.1–0.2%. This improved homogeneity can be attributed to a more uniform temperature distribution and reduced transition effects between the contour and infill regions. An exception was sample T12, where the use of the “Out to In” strategy resulted in less uniform melting and increased porosity of around 1%.
The next group of samples, T13–T16, focused on the influence of beam compensation. These specimens showed a slight improvement compared with the standard parameters, although the results were not fully consistent. A smaller compensation value (0.001 mm) helped to maintain porosity below 0.5%, whereas a larger compensation (0.12 mm) led to a mild increase in porosity due to local over melting and uneven overlap of adjacent scan tracks.
The highest variability was observed in samples T18–T21, where the combination of modified beam compensation and the “Out to In” strategy resulted in inconsistent behaviour in some cases, porosity decreased below 0.1%, while in others it exceeded 1.7%. This variability can be attributed to differences in local heat accumulation and changes in the melt pool dynamics during laser scanning transitions.
Overall, it can be concluded that the “no contour” strategy tends to yield better results in terms of minimising porosity. However, to achieve reproducible and mechanically stable properties, it is essential to simultaneously optimise beam compensation and scanning strategy, as their mutual interaction has a decisive impact on energy distribution in the melt zone and, consequently, on the overall material quality

3.2. Evaluation of the Area of a 3D Printed Sample

The assessment of the prescribed area serves as an indicator of the percentage deviation between the designed dimension of the printed specimen and its actual dimension after printing. Table 4 demonstrates how the selected printing strategies influence this 2D deviation from the nominal CAD geometry. This parameter does not represent true 3D volumetric change, but a 2D area-based deviation determined from microscopic images using ImageJ. No 3D plugins or 3D functionality of ImageJ were used; the analysis was performed exclusively on 2D image data.
The optimal value is the one that most closely approaches 100%. Values lower than 100% indicate undersized specimens relative to the design, whereas higher values reflect excessive melting and material overextension.
The results presented in Table 3 show that samples T1–T6, printed with a contour, exhibit values in the range of 82.9–119.7%, indicating considerable variability in dimensional stability. Most of these samples display a systematic under sizing relative to the design (e.g., T3 = 82.9%, T2 = 87.6%, T4 = 91.3%), whereas sample T6 (119.7%) shows clear over melting and dimensional expansion beyond the designed boundaries. This difference can be explained by the fact that the presence of a contour increases local heat accumulation near the edges of the model, leading to melt pool broadening and subsequent geometric distortion. In addition, multiple remelting passes may cause excessive shrinkage upon cooling when heat transfer is non-uniform.
Samples T7–T12, printed without contour, generally achieved better performance, with values between 95.2–111.9%. The highest dimensional accuracy was observed for sample T7 (98.0%), which closely matched the intended geometry. The absence of a contour helps to reduce local thermal gradients, thereby preventing overheating at the edges and ensuring more uniform heat distribution during the melting process. Conversely, samples T9 (110.4%), T10 (105.3%), and T11 (111.9%) show dimensional expansion caused by a higher effective energy input and the “Out to In” scanning strategy, which concentrates heat toward the centre of the sample and leads to over melting of the internal regions.
In the case of samples T13–T16, where beam compensation was investigated, the measured values range from 91.5–109.8%. Beam compensation modifies the effective laser path, thereby altering the width of the melted zone. Insufficient compensation can result in incomplete melting of the borders, whereas excessive compensation may produce overlapping tracks and overheating. Sample T14 (102.1%) represents an optimal balance between these effects, while T15 (59.1%) and T16 (66.9%) show evidence of significant distortion and melt pool overflow, likely caused by inadequate beam-width correction.
The group of samples T17–T21, which examined the influence of hatch spacing, shows values between 81.9–89.7%. Increasing hatch distance leads to insufficient overlap between melt tracks, which results in local shrinkage and poor inter-track bonding. Conversely, overly small hatch spacing may cause excessive heat accumulation, local expansion of the melt pool, and deformation. These effects directly account for the high variability observed among these samples.
Overall, the best dimensional accuracy was achieved for samples T7 (98.0%) and T14 (102.1%), which combine balanced thermal distribution with optimal beam compensation. The poorest outcome was found in sample T15 (59.1%), indicating severe over melting and thermal distortion, while samples T6 (119.7%) and T11 (111.9%) exhibited the most extensive material expansion.
These findings confirm that dimensional accuracy is governed by a combination of thermal management, melt-track overlap, and scanning strategy. Even minor variations in these parameters can lead to substantial geometric deviations, highlighting the necessity of precise machine calibration and validation of scanning parameters for each specific β-Ti alloy system.

3.3. Pressure Test

Compression tests of gyroid structures are used to experimentally characterise their mechanical behaviour under load. In these tests, the specimens are subjected to controlled compression, and the relationship between the applied force and the resulting deformation is recorded up to the point of failure. From these data, parameters such as maximum load capacity, behaviour within the elastic and plastic regions, and the mode of progressive collapse of the porous architecture can be determined.
The results make it possible to compare the influence of geometrical parameters, particularly network density, wall thickness, and pore size or shape, on the mechanical response of the structure. Testing variants with different densities provides information on how load bearing capacity and deformation behaviour change with modifications of gyroid geometry.
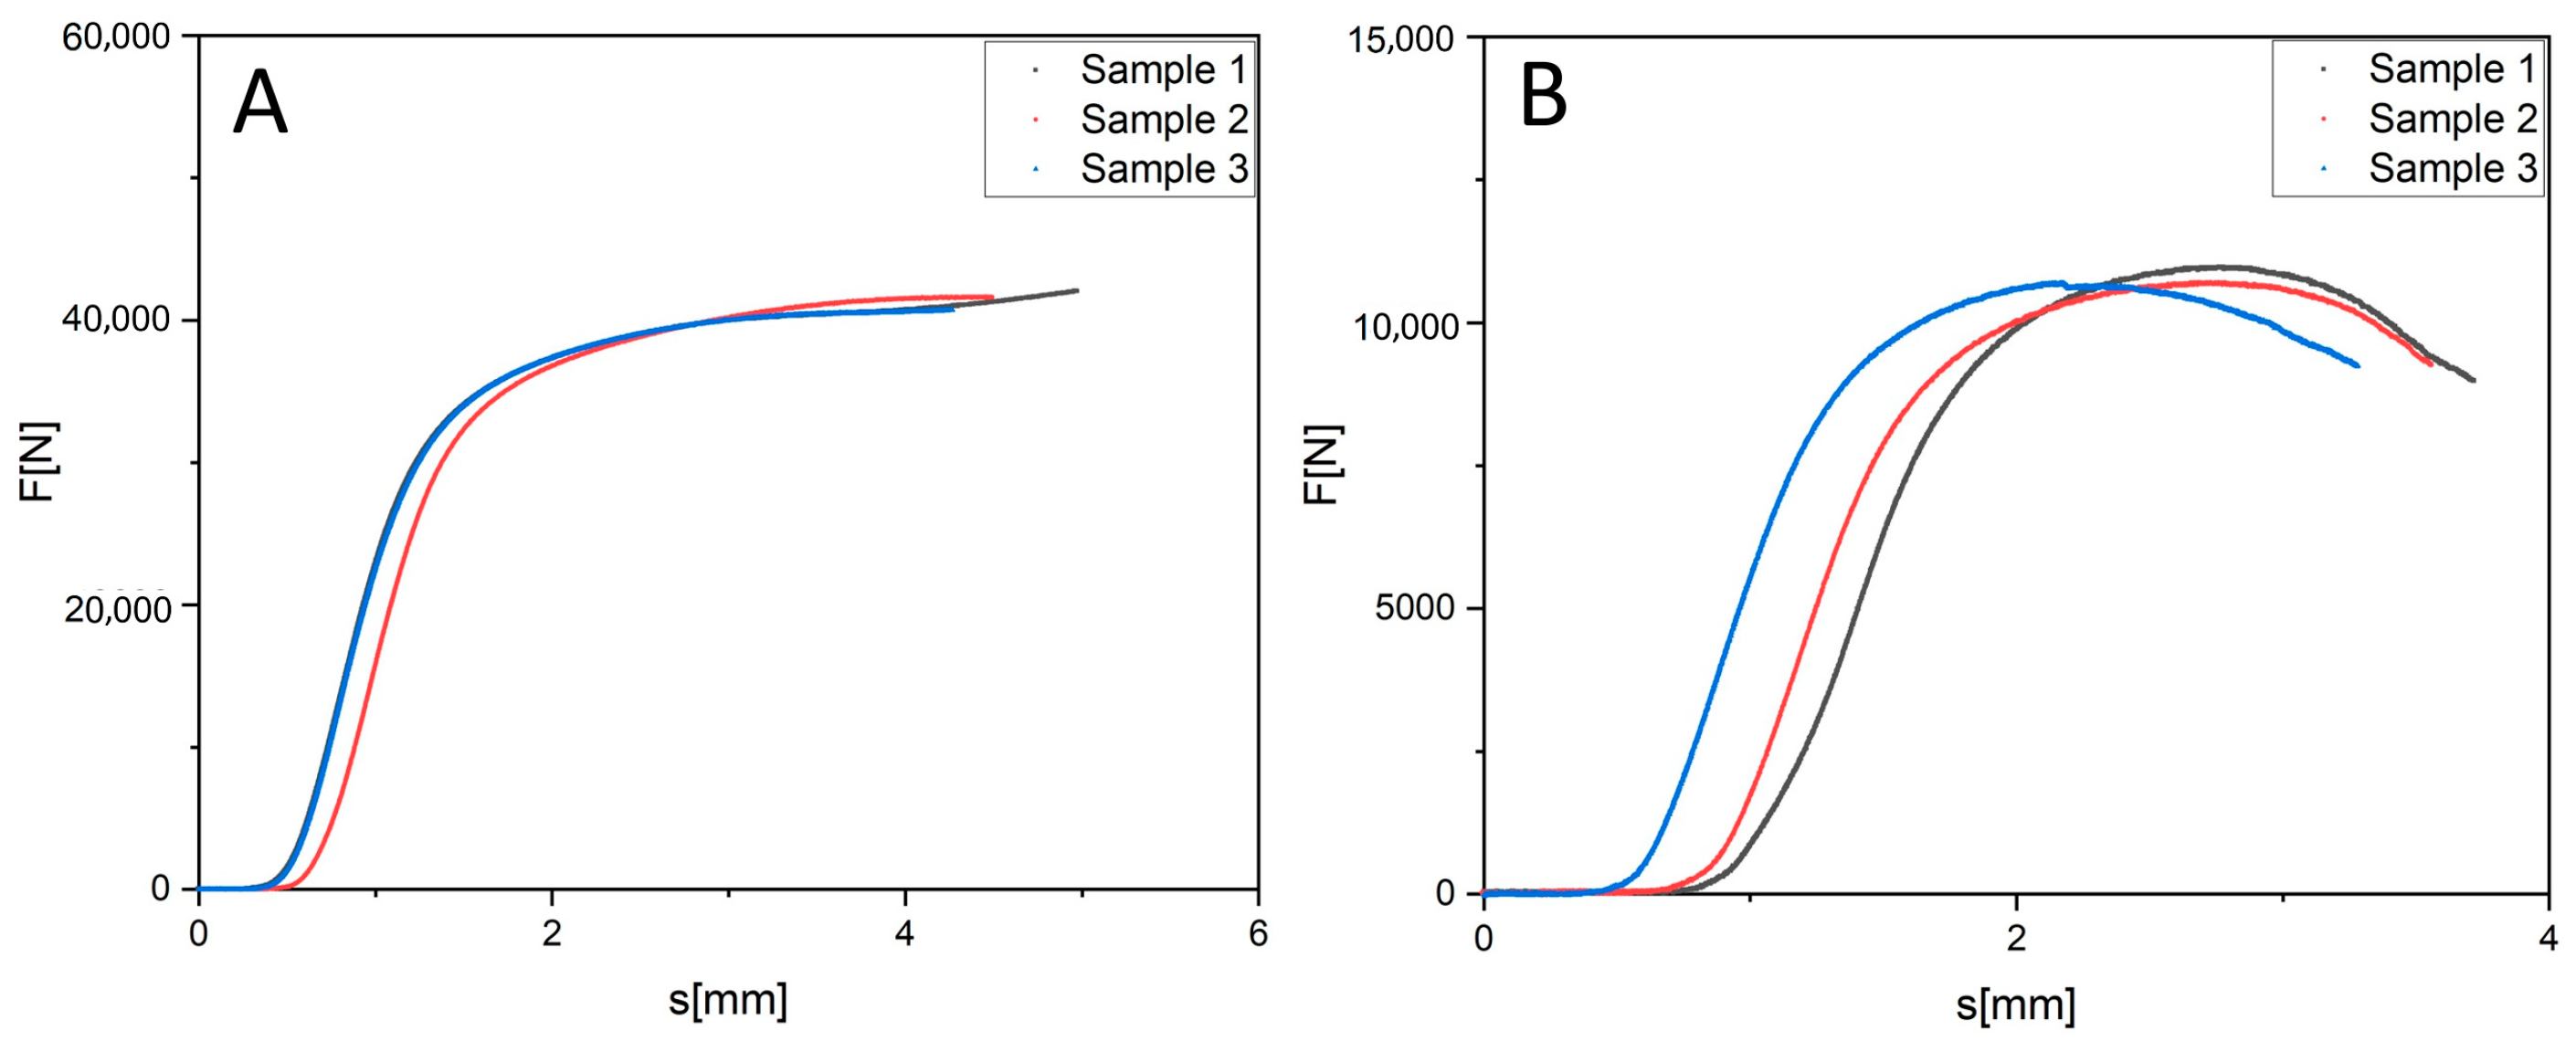
The test series also included specimens subjected to chemical etching. This process removes residual sintered powder particles from the surface and alters the morphology of the walls, which may affect the thickness of the load bearing elements as well as the surface homogeneity. Comparing etched and unetched specimens therefore allows assessment of how surface treatment influences the course of the loading curves and the overall mechanical response of the structures. Figure 7 illustrates the results of the compressive tests conducted on gyroid samples of two different relative densities, 40% and 20%. For the samples with a density of 40% (Figure 7A), the peak force achieved was approximately 45,000 N. The individual load displacement curves exhibit a high degree of similarity (the samples labelled 1–3 are three identically prepared gyroid cubes, as in Figure 8), which confirms the good repeatability of the measurements. The curve profiles display a characteristic non-linear shape: an initial elastic region is followed by plastic deformation, and then by a gradual collapse of the cellular architecture. In the region following the maximum, a relatively stable plateau phase is evident, which corresponds to the progressive failure of individual cells while maintaining the overall structural integrity of the sample.
The samples with a density of 20% (Figure 7B) reached a peak load bearing capacity of approximately 12,000 N, a value significantly lower than that of the 40% density variant. The overall shape of the load displacement curves remained similar; however, following the attainment of the peak force, more numerous irregularities and local force drops appeared. These deviations indicate an uneven failure mechanism, where the thinner walls and higher porosity lead to a less stable collapse. Nevertheless, all three characteristic phases the elastic, plastic, and collapse regions can still be distinguished.
Overall, it can be concluded that a higher relative density of the gyroid structure (40%) results in a substantially greater mechanical load bearing capacity and a more stable deformation progression, whereas the lower density (20%) exhibits lower maximum force values and a more complex failure mechanism.
Figure 8 presents the results of the compressive tests performed on etched gyroid samples with relative densities of 40% and 20%. For the 40% density samples (Figure 8A), the maximum load bearing capacity achieved was approximately 27,000 N, which is almost 40% less than that of the non-etched variant (Figure 7A). The curve profile was maintained the elastic region was followed by plastic deformation and a gradual structural collapse; however, the peak load capacity was substantially reduced. Nonetheless, the individual curves retained a similar trajectory, confirming the reproducibility of the results even following the chemical surface treatment.
For the etched samples with a density of 20% (Figure 8B), the maximum force reached was around 5500 N, less than half the value measured for the non-etched variant (Figure 7B). The deformation progression was accompanied by irregularities in the region following the maximum, which is associated with the wall weakening due to etching and local surface defects. An interesting phenomenon was also observed during the initial loading phase, where the peripheral sections of the sample were compromised the thin outer walls were significantly attenuated by the etching process and began to fail sooner than the central cells.
A comparison of the results from Figure 7 and Figure 8 indicates that while chemical etching effectively removes surface impurities and adhering powder, it simultaneously leads to a significant decrease in the mechanical resistance of the structures. While the reduction in load bearing capacity is substantial for the higher density samples (40%), still leaving the sample with a certain reserve, the lower density samples (20%) experience a dramatic reduction in maximum load bearing capacity to less than half of the original value. This confirms that etching does not act merely as a surface treatment but fundamentally affects the effective wall thickness and, consequently, the overall stability of the load bearing structure.
It is therefore necessary to consider that when designing porous structures intended for applications in loaded environments, etching cannot be viewed solely as a final cleaning step, but as a process that alters the fundamental mechanical properties of the entire component. In practice, this means it is advisable to account for an etching allowance, i.e., an increase in wall thickness during the geometric design, to achieve the required strength level after the chemical wall thinning. This approach allows the benefits of a clean and homogeneous surface after etching to be utilised without unacceptably compromising mechanical integrity.
Concurrently, it must be considered that the negative impact of etching on mechanical properties may vary depending on the specific setting of the printing process, the chemical composition of the alloy, and the etching conditions. Precise determination of the appropriate combination of these factors is therefore essential for optimising the design and manufacture of porous titanium structures intended for medical applications.

4. Conclusions

Based on a comprehensive analysis of the dimensional stability and porosity of 3D printed samples of the β-Ti alloy Ti25Nb4Ta8Sn, in relation to detailed printing parameters, it is possible to identify the most suitable processing conditions. Sample T14, with a beam compensation setting of 0.001 mm, demonstrated the most balanced results, achieving dimensional stability values close to 100% and low porosity. These findings indicate that satisfactory outcomes can be obtained through optimised beam compensation, even in the absence of a contour. In contrast, other sample sets exhibited deviations in dimensional stability or increased porosity, confirming the strong dependence of print quality on the interplay between contour, beam compensation, and hatch distance.
Compression tests of gyroid structures further emphasised the importance of these parameters in defining mechanical performance. While non etched structures with 40% and 20% density achieved maximum loads of approximately 45,000 N and 12,000 N respectively, etched structures showed a substantial decrease in load bearing capacity, with values reduced to roughly 27,000 N and 5500 N. Despite similar deformation patterns, the reduction in strength can be attributed to wall thinning and surface defects induced by the etching process.
In conclusion, achieving optimal properties of Ti25Nb4Ta8Sn structures requires not only careful adjustment of beam compensation, hatch distance, and contour use, but also consideration of post processing treatments. Although etching enhances surface activity and may improve biological responses such as osteointegration, it simultaneously reduces mechanical integrity. For this reason, the final application of these structures should be carefully matched to the balance between biological and mechanical requirements.

Author Contributions

Conceptualization: Z.T., A.J. and P.V.; Methodology: A.J., Z.T. and P.V.; Sample preparation: Z.T., J.J. and A.J.; Metallography: Z.T., V.S. and J.J.; Mechanical testing: Z.T. and A.J.; Etching: V.H.; Writing—original draft: Z.T. and A.J. All authors have read and agreed to the published version of the manuscript.

Funding

This research was funded by Czech Science Foundation, grant number: 23-04971S.

Institutional Review Board Statement

Not applicable.

Informed Consent Statement

Not applicable.

Data Availability Statement

The original contributions presented in this study are included in the article. Further inquiries can be directed to the corresponding author.

Conflicts of Interest

The authors declare no conflicts of interest.

References

  1. Liu, Y.; Xu, L.; Qiu, C. Development of an Additively Manufactured Metastable Beta Titanium Alloy with A Fully Equiaxed Grain Structure and Ultrahigh Yield Strength. Addit. Manuf. 2022, 60, 103208. [Google Scholar] [CrossRef]
  2. Vandrovcova, M.; Tolde, Z.; Vanek, P.; Nehasil, V.; Doubková, M.; Trávníčková, M.; Drahokoupil, J.; Buixaderas, E.; Borodavka, F.; Novakova, J.; et al. Beta-Titanium Alloy Covered by Ferroelectric Coating–Physicochemical Properties and Human Osteoblast-Like Cell Response. Coatings 2021, 11, 210. [Google Scholar] [CrossRef]
  3. Tolde, Z.; Smola, V.; Šebová, E.; Budinská, Z.; Bumba, J.; Vlčák, P. Characterization and Bioactivity Of Β-Tricalcium Phosphate Powder Sol–Gel Coatings on Titanium Substrates. J. Sol-Gel Sci. Technol. 2025. [Google Scholar] [CrossRef]
  4. Zhao, X.; Wang, T. Laser Powder Bed Fusion of Powder Material: A Review. 3D Print. Addit. Manuf. 2023, 10, 1439–1454. [Google Scholar] [CrossRef] [PubMed]
  5. Onder, M.E.; Culhaoglu, A.; Ozgul, O.; Tekin, U.; Atıl, F.; Taze, C.; Yasa, E. Biomimetic Dental Implant Production Using Selective Laser Powder Bed Fusion Melting: In-Vitro Results. J. Mech. Behav. Biomed. Mater. 2024, 151, 106360. [Google Scholar] [CrossRef]
  6. Salim, A.A.; Bakhtiar, H.; Ghoshal, S.K.; Aziz, M.S.A. 3D-Printed Titanium-Aluminum-Vanadium Alloy Produced at Various Laser Powers: Evaluation of Microstructures and Mechanical Characteristics. Int. J. Adv. Manuf. Technol. 2024, 132, 3671–3681. [Google Scholar] [CrossRef]
  7. Wang, Z.; Xiao, Z.; Tse, Y.; Huang, C.; Zhang, W. Optimization of Processing Parameters and Establishment of a Relationship Between Microstructure and Mechanical Properties of Slm Titanium Alloy. Opt. Laser Technol. 2019, 112, 159–167. [Google Scholar] [CrossRef]
  8. Cho, K.; Sakata, M.; Yasuda, H.Y.; Todai, M.; Ueda, M.; Takeyama, M.; Nakano, T. Effect of Scan Speed on Microstructure and Tensile Properties of Ti–48Al–2Cr–2Nb Alloys Fabricated Via Additive Manufacturing. Mater. Trans. 2023, 64, 1112–1118. [Google Scholar] [CrossRef]
  9. Tekumalla, S.; Chew, J.E.; Tan, S.W.; Krishnan, M.; Seita, M. Towards 3-D Texture Control in A Β Titanium Alloy Via Laser Powder Bed Fusion and Its Implications on Mechanical Properties. Addit. Manuf. 2022, 59, 103111. [Google Scholar] [CrossRef]
  10. Wu, Q.; Wang, X.; Li, K.; Zhou, Y.; Wen, S.; Shi, Y. Microstructure and Mechanical Properties of Ti6Al4V/W Bimetallic Structure Via Selective Laser Melting. Int. J. Refract. Met. Hard Mater. 2024, 121, 106683. [Google Scholar] [CrossRef]
  11. Abramczyk, I.; Ligaj, B. Influence of the Etching Time of Ti6Al4V Titanium Alloy with Selected Acid Solutions on Changes in Physical Parameters of the Element. In Proceedings of the Engineering Mechanics, Brno, Czech Republic, 16 May 2024; pp. 38–41. [Google Scholar]
  12. Sheng, X.; Wang, A.; Wang, Z.; Liu, H.; Wang, J.; Li, C. Advanced Surface Modification For 3D-Printed Titanium Alloy Implant Interface Functionalization. Front. Bioeng. Biotechnol. 2022, 10, 850110. [Google Scholar] [CrossRef] [PubMed]
  13. Xu, J.; Zhang, J.; Shi, Y.; Tang, J.; Huang, D.; Yan, M.; Dargusch, M.S. Surface Modification of Biomedical Ti and Ti Alloys: A Review on Current Advances. Materials 2022, 15, 1749. [Google Scholar] [CrossRef] [PubMed]
  14. Thenard, T.; Catapano, A.; Allena, R.; El May, M.; Saintier, N.; Mesnard, M. Topography and Wettability Characterization of Surfaces Manufactured by Slm and Treated by Chemical Etching. Mech. Adv. Mater. Struct. 2020, 29, 1674–1691. [Google Scholar] [CrossRef]
  15. Shaboldo, O.P.; Vitorskii, Y.M.; Sagaradze, V.V.; Pecherkina, N.L.; Skotnikova, M.A. Formation of the Structure and Properties of Β-Type Titanium Alloy Upon Thermomechanical Treatment. Phys. Met. Metallogr. 2017, 118, 75–80. [Google Scholar] [CrossRef]
  16. Takase, A.; Ishimoto, T.; Suganuma, R.; Nakano, T. Surface Residual Stress and Phase Stability in Unstable Β-Type Ti–15Mo–5Zr–3Al Alloy Manufactured by Laser and Electron Beam Powder Bed Fusion Technologies. Addit. Manuf. 2021, 47, 102257. [Google Scholar] [CrossRef]
  17. Yang, X.; Sun, Z.; Hu, Y.; Mi, C. Multi-Parameter Design of Triply Periodic Minimal Surface Scaffolds: From Geometry Optimization to Biomechanical Simulation. Biomed. Mater. 2024, 19, 055005. [Google Scholar] [CrossRef]
  18. Ziaie, B.; Velay, X.; Saleem, W. Exploring the Optimal Mechanical Properties of Triply Periodic Minimal Surface Structures for Biomedical Applications: A Numerical Analysis. J. Mech. Behav. Biomed. Mater. 2024, 160, 106757. [Google Scholar] [CrossRef]
  19. Lv, X.; Yang, X.; Liu, W.; Zhou, R.; Zhou, H.; Chen, Y.; Xing, Z.; Li, W. Gyroid Minimal Surface-Based Composite Porous Structure with Superior Mechanical Property Via Triangular Grid Design and Stress Distribution Optimization. Mater. Today Commun. 2022, 33, 104550. [Google Scholar] [CrossRef]
  20. Gawronska, E.; Dyja, R. A Numerical Study of Geometry’s Impact on the Thermal and Mechanical Properties of Periodic Surface Structures. Materials 2021, 14, 427. [Google Scholar] [CrossRef]
  21. Szymczyk, P.; Hoppe, V.; Ziółkowski, G.; Smolnicki, M.; Madeja, M. The Effect of Geometry on Mechanical Properties of Ti6Al4V Eli Scaffolds Manufactured Using Additive Manufacturing Technology. Arch. Civ. Mech. Eng. 2020, 20, 11. [Google Scholar] [CrossRef]
  22. Jíra, A.; Šejnoha, M.; Krejčí, T.; Vorel, J.; Řehounek, L.; Marseglia, G. Mechanical Properties of Porous Structures for Dental Implants: Experimental Study and Computational Homogenization. Materials 2021, 14, 4592. [Google Scholar] [CrossRef] [PubMed]
  23. Schoen, A.H. Infinite Periodic Minimal Surfaces Without Self-Intersections; NASA TN D—Svazek 5541; National Aeronautics and Space Administration: Washington, DC, USA, 1970.
  24. Araya-Calvo, M.; Järvenpää, A.; Rautio, T.; Morales-Sanchez, J.E.; Guillen-Girón, T. Comparative Fatigue Performance of As-Built vs. Etched Ti64 in Tpms-Gyroid and Stochastic Structures Fabricated Via Pbf-Lb for Biomedical Applications. Rapid Prototyp. J. 2024, 30, 217–230. [Google Scholar] [CrossRef]
  25. Ahmed, N.; Barsoum, I.; Abu Al-Rub, R.K. Numerical Investigation on the Effect of Residual Stresses on the Effective Mechanical Properties Of 3D-Printed Tpms Lattices. Metals 2022, 12, 1344. [Google Scholar] [CrossRef]
  26. Ali, B.; Heider, Y.; Markert, B. Modeling the Thermomechanical Processes and Residual Stresses in Additive Manufacturing of Metallic Components. Proc. Appl. Math. Mech. 2023, 22, e202200089. [Google Scholar] [CrossRef]
  27. Polley, C.; Radlof, W.; Hauschulz, F.; Benz, C.; Sander, M.; Seitz, H. Morphological and Mechanical Characterisation of Three-Dimensional Gyroid Structures Fabricated by Electron Beam Melting for the Use as a Porous Biomaterial. J. Mech. Behav. Biomed. Mater. 2022, 125, 104882. [Google Scholar] [CrossRef]
  28. Ren, J.; Huang, R.; Huang, L.; Yang, S.; Pan, C.; Sun, Y.; Tian, S.; Wu, X.; Wang, D.; Yang, Y. A Functionally Graded Gyroid-Type Three-Periodic Minimal Surface Framework Applied to Implant-Supported Fixed Complete Dentures. Int. J. Bioprinting 2024, 10, 3453. [Google Scholar] [CrossRef]
  29. Wang, N.; Meenashisundaram, G.K.; Chang, S.; Fuh, J.Y.H.; Dheen, S.T.; Senthil Kumar, A. A Comparative Investigation on the Mechanical Properties and Cytotoxicity of Cubic, Octet, and Tpms Gyroid Structures Fabricated by Selective Laser Melting of Stainless Steel 316L. J. Mech. Behav. Biomed. Mater. 2022, 129, 105151. [Google Scholar] [CrossRef]
  30. Isaacson, N.; Lopez-Ambrosio, K.; Chubb, L.; Waanders, N.; Hoffmann, E.; Witt, C.; James, S.; Prawel, D.A. Compressive Properties and Failure Behavior of Photocast Hydroxyapatite Gyroid Scaffolds Vary with Porosity. J. Biomater. Appl. 2022, 37, 55–76. [Google Scholar] [CrossRef]
  31. Baumer, V.; Gunn, E.; Riegle, V.; Bailey, C.; Shonkwiler, C.; Prawel, D. Robocasting of Ceramic Fischer–Koch S Scaffolds for Bone Tissue Engineering. J. Funct. Biomater. 2023, 14, 251. [Google Scholar] [CrossRef]
  32. Spece, H.; Yu, T.; Law, A.W.; Marcolongo, M.; Kurtz, S.M. 3D Printed Porous Peek Created Via Fused Filament Fabrication for Osteoconductive Orthopaedic Surfaces. J. Mech. Behav. Biomed. Mater. 2020, 109, 103850. [Google Scholar] [CrossRef]
  33. Sabahi, N.; Farajzadeh, E.; Roohani, I.; Wang, C.H.; Li, X. Material Extrusion 3D Printing of Polyether-Ether-Ketone Scaffolds Based on Triply Periodic Minimal Surface Designs: A Numerical and Experimental Investigation. Appl. Mater. Today 2024, 39, 102262. [Google Scholar] [CrossRef]
  34. Verma, R.; Kumar, J.; Singh, N.K.; Rai, S.K.; Saxena, K.K.; Xu, J. Design and Analysis of Biomedical Scaffolds Using Tpms-Based Porous Structures Inspired from Additive Manufacturing. Coatings 2022, 12, 839. [Google Scholar] [CrossRef]
  35. Naghavi, S.A.; Tamaddon, M.; Marghoub, A.; Wang, K.; Babamiri, B.B.; Hazeli, K.; Xu, W.; Lu, X.; Sun, C.; Wang, L.; et al. Mechanical Characterisation and Numerical Modelling of Tpms-Based Gyroid and Diamond Ti6Al4V Scaffolds for Bone Implants: An Integrated Approach for Translational Consideration. Bioengineering 2022, 9, 504. [Google Scholar] [CrossRef]
  36. Zaharin, H.A.; Abdul Rani, A.M.; Azam, F.I.; Ginta, T.L.; Sallih, N.; Ahmad, A.; Yunus, N.A.; Zulkifli, T.Z.A. Effect of Unit Cell Type and Pore Size on Porosity and Mechanical Behavior of Additively Manufactured Ti6Al4V Scaffolds. Materials 2018, 11, 2402. [Google Scholar] [CrossRef] [PubMed]
  37. Yapa, P.; Munaweera, I. Functionalized Nanoporous Architectures Derived from Sol–Gel Processes for Advanced Biomedical Applications. J. Mater. Chem. B 2025, 13, 10715–10742. [Google Scholar] [CrossRef] [PubMed]
  38. Liang, W.; Zhou, C.; Bai, J.; Zhang, H.; Long, H.; Jiang, B.; Wang, J.; Huang, X.; Zhang, H.; Zhao, J. Prospective Applications of Bioactive Materials in Orthopedic Therapies: A Review. Heliyon 2024, 10, e36152. [Google Scholar] [CrossRef] [PubMed]
  39. Sebastiani, S.; Buccino, F.; Qin, Z.; Vergani, L.M. Structural Influences on Bone Tissue Engineering: A Review and Perspective. Matter 2025, 8, 102252. [Google Scholar] [CrossRef]
  40. Krčil, J.; Mára, V.; Šimota, J. The Evaluation of Ti-24Nb-8Ta-4Sn Alloy Prepared By 3D Printing. Solid State Phenom. 2022, 334, 43–48. [Google Scholar] [CrossRef]
  41. Jíra, A.; Kruis, J.; Tolde, Z.; Krčil, J.; Jírů, J.; Fojt, J. Effect of Sample Thickness and Post-Processing on Mechanical Properties of 3D-Printed Titanium Alloy. Materials 2025, 18, 5008. [Google Scholar] [CrossRef]
  42. Bahl, S.; Das, S.; Suwas, S.; Chatterjee, K. Engineering the Next-Generation Tin Containing Β Titanium Alloys with High Strength and Low Modulus for Orthopedic Applications. J. Mech. Behav. Biomed. Mater. 2018, 78, 124–133. [Google Scholar] [CrossRef]
  43. Al-Ketan, O.; Abu Al-Rub, R.K. Mslattice: A Free Software for Generating Uniform and Graded Lattices Based on Triply Periodic Minimal Surfaces. Mater. Des. Process. Commun. 2020, 3, e205. [Google Scholar] [CrossRef]
  44. Nandhakumar, R.; Venkatesan, K. A Process Parameters Review on Selective Laser Melting-Based Additive Manufacturing of Single and Multi-Material: Microstructure, Physical Properties, Tribological, And Surface Roughness. Mater. Today Commun. 2023, 35, 105538. [Google Scholar] [CrossRef]
Figure 1. Print reports (samples T1–T21).
Jfb 16 00416 g001
Figure 2. Sample geometries generated in MS Latica and modified in Autodesk Netfabb for 3D printing.
Jfb 16 00416 g002
Figure 3. Gyroid 3D printed structure, specimens for compression test.
Jfb 16 00416 g003
Figure 4. Light microscopy of a T2 sample.
Jfb 16 00416 g004
Figure 5. EDS spectrum and elemental maps of the β-Ti25Nb4Ta8Sn alloy surface. The maps confirm a uniform spatial distribution of the elements Ti, Nb, Ta, and Sn. Quantitative results (in wt. %) are as follows: Ti 59.98, Nb 24.57, Sn 8.05 and Ta 4.61.
Jfb 16 00416 g005
Figure 6. Comparison of the gyroid surface in the as printed state (left) and after chemical etching (right).
Jfb 16 00416 g006
Figure 7. Courses of such a gyroid cube test with 40% density (A) and 20% density (B).
Jfb 16 00416 g007
Figure 8. Course of such a gyroid cube test with an etched surface with 40% density (A) and 20% density (B).
Jfb 16 00416 g008
Table 1. Used Print Reports and Parameters.
Sample IDModification TypeDescription of Printing Parameters/Strategy
T1Reference sampleDefault parameters: laser power 180 W, melting rate 550 mm/s (based on previous optimisation).
T2Scanning strategyChanged to chessboard scanning.
T3Scanning strategyOffset filling “In → Out” (from centre to edge).
T4Scanning strategyOffset filling “Out → In” (from edge to centre).
T5Scanning strategyStripe filling (“Zigzag—Connected”).
T6Border parametersMelting rate for border paths adjusted to 600 mm/s and laser power at 180 W.
T7Contour removalNo contour; border distance = 0 mm; other parameters as T1.
T8Contour removalNo contour; border distance = 0 mm; other parameters as T2.
T9Contour removalNo contour; border distance = 0 mm; other parameters as T3.
T10Contour removalNo contour; border distance = 0 mm; other parameters as T4.
T11Contour removalNo contour; border distance = 0 mm; other parameters as T5.
T12Contour removalNo contour; border distance = 0 mm; other parameters as T6.
T13Beam compensationBeam compensation = 0.001 mm; other parameters as T1.
T14Beam compensationBeam compensation = 0.001 mm; other parameters as T7.
T15Beam compensationBeam compensation = 0.12 mm; other parameters as T1.
T16Beam compensationBeam compensation = 0.12 mm; other parameters as T7.
T17Hatch distanceHatch distance = 0.08 mm; other parameters as T1.
T18Hatch distanceHatch distance = 0.12 mm; other parameters as T1.
T19Hatch distanceHatch distance = 0.06 mm; other parameters as T7.
T20Hatch distanceHatch distance = 0.08 mm; other parameters as T7.
T21Hatch distanceHatch distance = 0.12 mm; other parameters as T7.
Table 2. Specifications of 3D printed Ti25Nb4Ta8Sn alloy samples for single compression test.
DensitySize [mm]CellsWall Thickness [mm]
20%15 × 15 × 153 × 3 × 30.35
40%0.72
Table 3. Percentage of pore area determined from image analysis.
Sample (Percentage of Pores)
123456789101112131415161718192021
first grinding
11.81.44.31.11.60.10.70.30.915.90.40.21.20.11.60.20.420.200.2
20.60.72.90.21.50.10.300.712.90.60.12.10.210.10.32.10.20.30.2
30.40.40.30.20.800.200.17.90.50.11.70.20.90.10.40.80.200.3
Average0.90.82.50.51.30.10.40.10.612.20.50.11.70.21.20.10.41.60.20.10.2
SD±0.62±0.42±1.66±0.42±0.36±0.05±0.22±0.14±0.34±3.30±0.08±0.05±0.37±0.05±0.31±0.05±0.05±0.59±0.00±0.14±0.05
10.30.60.30.10.30.10.10.30.21.50.10.210.310.10.11.10.100.1
20.70.90.90.30.70.10.100.12.50.10.31.50.30.80.10.52.1000.3
310.50.60.70.90.100.40.11.40.10.21.20.41.80.10.42.30.10.10.1
Average0.70.70.60.40.60.10.10.20.11.80.10.21.20.31.20.10.31.80.100.2
SD±0.29±0.17±0.24±0.25±0.25±0.00±0.05±0.17±0.05±0.50±0.00±0.05±0.21±0.05±0.43±0.00±0.17±0.52±0.05±0.05±0.09
OverallAverage0.800.751.550.430.970.080.230.170.357.020.300.181.450.251.180.120.351.730.130.070.20
SD±0.1±0.05±0.95±0.05±0.35±0±0.15±0.05±0.25±5.2±0.2±0.05±0.25±0.05±0±0±0.05±0.1±0.05±0.05±0
Table 4. Percentage of compliance with the specified dimensional stability of the sample.
Sample
T1T2T3T4T5T6T7T8T9T10T11T12T13T14T15T16T17T18T19T20T21
First grinding—area after printing (image size 2560 × 1920 px) defined sample size is 182,667 px
px176,268158,677146,192169,162166,902212,628177,437171,482197,589190,472201,802167,009197,443167,134105,948124,022152,936158,706148110165,789164,297
Percentage Representation (%)96.586.98092.691.4116.497.193.9108.2104.3110.591.4108.191.55867.983.786.981.190.889.9
Second grinding area after printing (image size 2560 × 1920 px) defined sample size is 286,785 px
px258,586253,528245,797258,300265,992352,570283,770278,352323,231304,861324,914284,108320,053322,965172,380188,896243,935248,251237,097237,329256,766
Percentage Representation
(%)
90.288.485.790.192.7122.998.997.1112.7106.3113.399.1111.6112.660.165.985.186.682.782.889.5
Overall Average (%)93.387.682.991.392.1119.79895.5110.4105.3111.995.2109.8102.159.166.984.486.781.986.889.7
SD±3.15±0.75±2.85±1.25±0.65±3.25±0.9±1.6±2.25±1±1.4±3.85±1.75±10.55±1.05±1±0.7±0.15±0.8±4±0.2
Disclaimer/Publisher’s Note: The statements, opinions and data contained in all publications are solely those of the individual author(s) and contributor(s) and not of MDPI and/or the editor(s). MDPI and/or the editor(s) disclaim responsibility for any injury to people or property resulting from any ideas, methods, instructions or products referred to in the content.