1. Introduction and Motivation
The aim of this paper is to estimate the variability of outcomes obtained with different experimental techniques and procedures applied by a variety of laboratory operators and to assess the effectiveness of the results by referring to an apparently straightforward benchmark study on free vibrations of a small cantilever beam. The Technical Committee V.2 (Experimental Methods) of the 2021 International Ship and Offshore Structures Congress (ISSC) proposed such a typical experimentation, wishing to take advantage of the assorted members’ expertise and knowledge in performing an apparently unambiguous and consolidated test. In addition, test management, approaches, methodologies, and techniques were different among laboratories and researchers. The benchmark continued up to the ISSC 2025 Congress.
Round-robin procedures for numerical analyses are more common exercises to benchmark software or to learn more about certain physical phenomena, rather than those involving experiments carried out purposely for assessing test uncertainties. Commonly, variations in experimental results are considerable. When numerical or analytical exercises are compared with experimental results, it is often assumed that the experimental results are reliable and accurate. Several studies are available in the literature, such as the ones reported in the references [
1,
2], in which a benchmark has been made to validate numerical analyses by using experimental results. Sometimes, tests have been conducted by a single laboratory, while calculations have been performed by different teams. This is mainly the case of not easily repeatable tests; for example, when an underwater explosion experiment is performed (see, e.g., [
3]). It seems crucial for researchers to be confident about the accuracy of the experimental setup and practices. With this paper, we address the potential variation in experimental results and their laboratory-driven sources, which constitutes a future reference for groups performing round-robins to analyze experimental results.
Experimentation is intended here not only as the technical specifications of measurement procedures, but it involves all theoretical and practical aspects to obtain an experimental datum to encompass a sort of human-factor assessment within the benchmark results, involving all choices and issues that laboratory operators may introduce.
A clear final goal of the experiment was indeed identified for this benchmark, without limiting the test specification itself. Thus, leaving each participant free to define the test procedure in full detail, to select the instrumentation and other necessary equipment, to elaborate on measured data, and to present the test results, as usually happens when someone is tasked to undertake measurements either in laboratories or in situ. The choices made by seven different parties are presented in detail, underlying their influence on the obtained results. The seven research teams were entirely composed of selected experts who were part of the ISSC community with long-standing expertise in testing structural components. They were all independent, as they came from different institutions and nations and were either in charge or worked at large testing laboratories. We assessed the uncertainty of identified frequencies and checked if the results obtained by different parties fell into confidence bounds. An emerging experimental technique was assessed in detail to highlight the difficulties in preparing a complex setup and in defining adequate instrumentation settings, and when assessing the related influence on the results.
2. Problem Statement
The benchmark analysis is related to the study of free vibration of steel and composite cantilever beams. The goal of the tests is to estimate the first natural frequency of given specimens. It has been eventually agreed to estimate the natural vibration frequencies of small cantilever beams made up of mild steel and of fiberglass sandwich laminate, which are relatively straightforward measurements to be carried out but, at the same time, allow the application of different experimental techniques, testing instrumentation devices, and analysis procedures to obtain the required result, i.e., scatter due to laboratory application practices in the experiment.
While mild steel material is relatively common and the specimens can be easily obtained by each participant, composite specimens were cut from the same sandwich panel by one participant and sent to the involved laboratories to avoid introducing scatter related to material characterization and fabrication defects into the benchmark. Hence, the focus of the benchmark is on experimental methods and their implementation only.
The specimens’ nominal dimensions were defined as follows:
Mild steel, e.g., 550 × 30 × 5 mm
Composite sandwich: 560 × 30 × 12 mm
It was later decided to leave the steel specimen thickness somewhat free, specifically to allow some flexibility, and considering that what is significant for the benchmark is the scatter between the nominal and the actual size of the specimen, which can be included in the analysis. Indeed, scatter assessment of measured geometries should always be part of the result set. Therefore, this choice allowed a better understanding of how each participant faced the proposed problem. While the unsupported length of the cantilever specimen was defined to be 500 mm, other dimensions and choices were left to the judgment of the individual researchers, having in mind the final goal of the experimentation.
Nominal properties considered for materials are shown in
Table 1 and shared among benchmark participants, along with the stacking sequence of the laminates. Composite laminate details are reported in [
1]. Basically, the sandwich core is a 10 mm thick PVC foam (75 kg/m
3), while the skins’ stacking sequence includes one E-glass biaxial layer (±45°; 600 g/m
2) and one E-glass twill layer (0°/90°; 200 g/m
2) on each skin (see
Figure 1 and
Table 1 below).
3. Test Descriptions
A general description of the experimentation carried out within the benchmark is provided in this section of the paper. In the following, each participant is identified by a letter and the specimen by a number. For example, B2 means participant B and specimen no. 2 tested in the B laboratory.
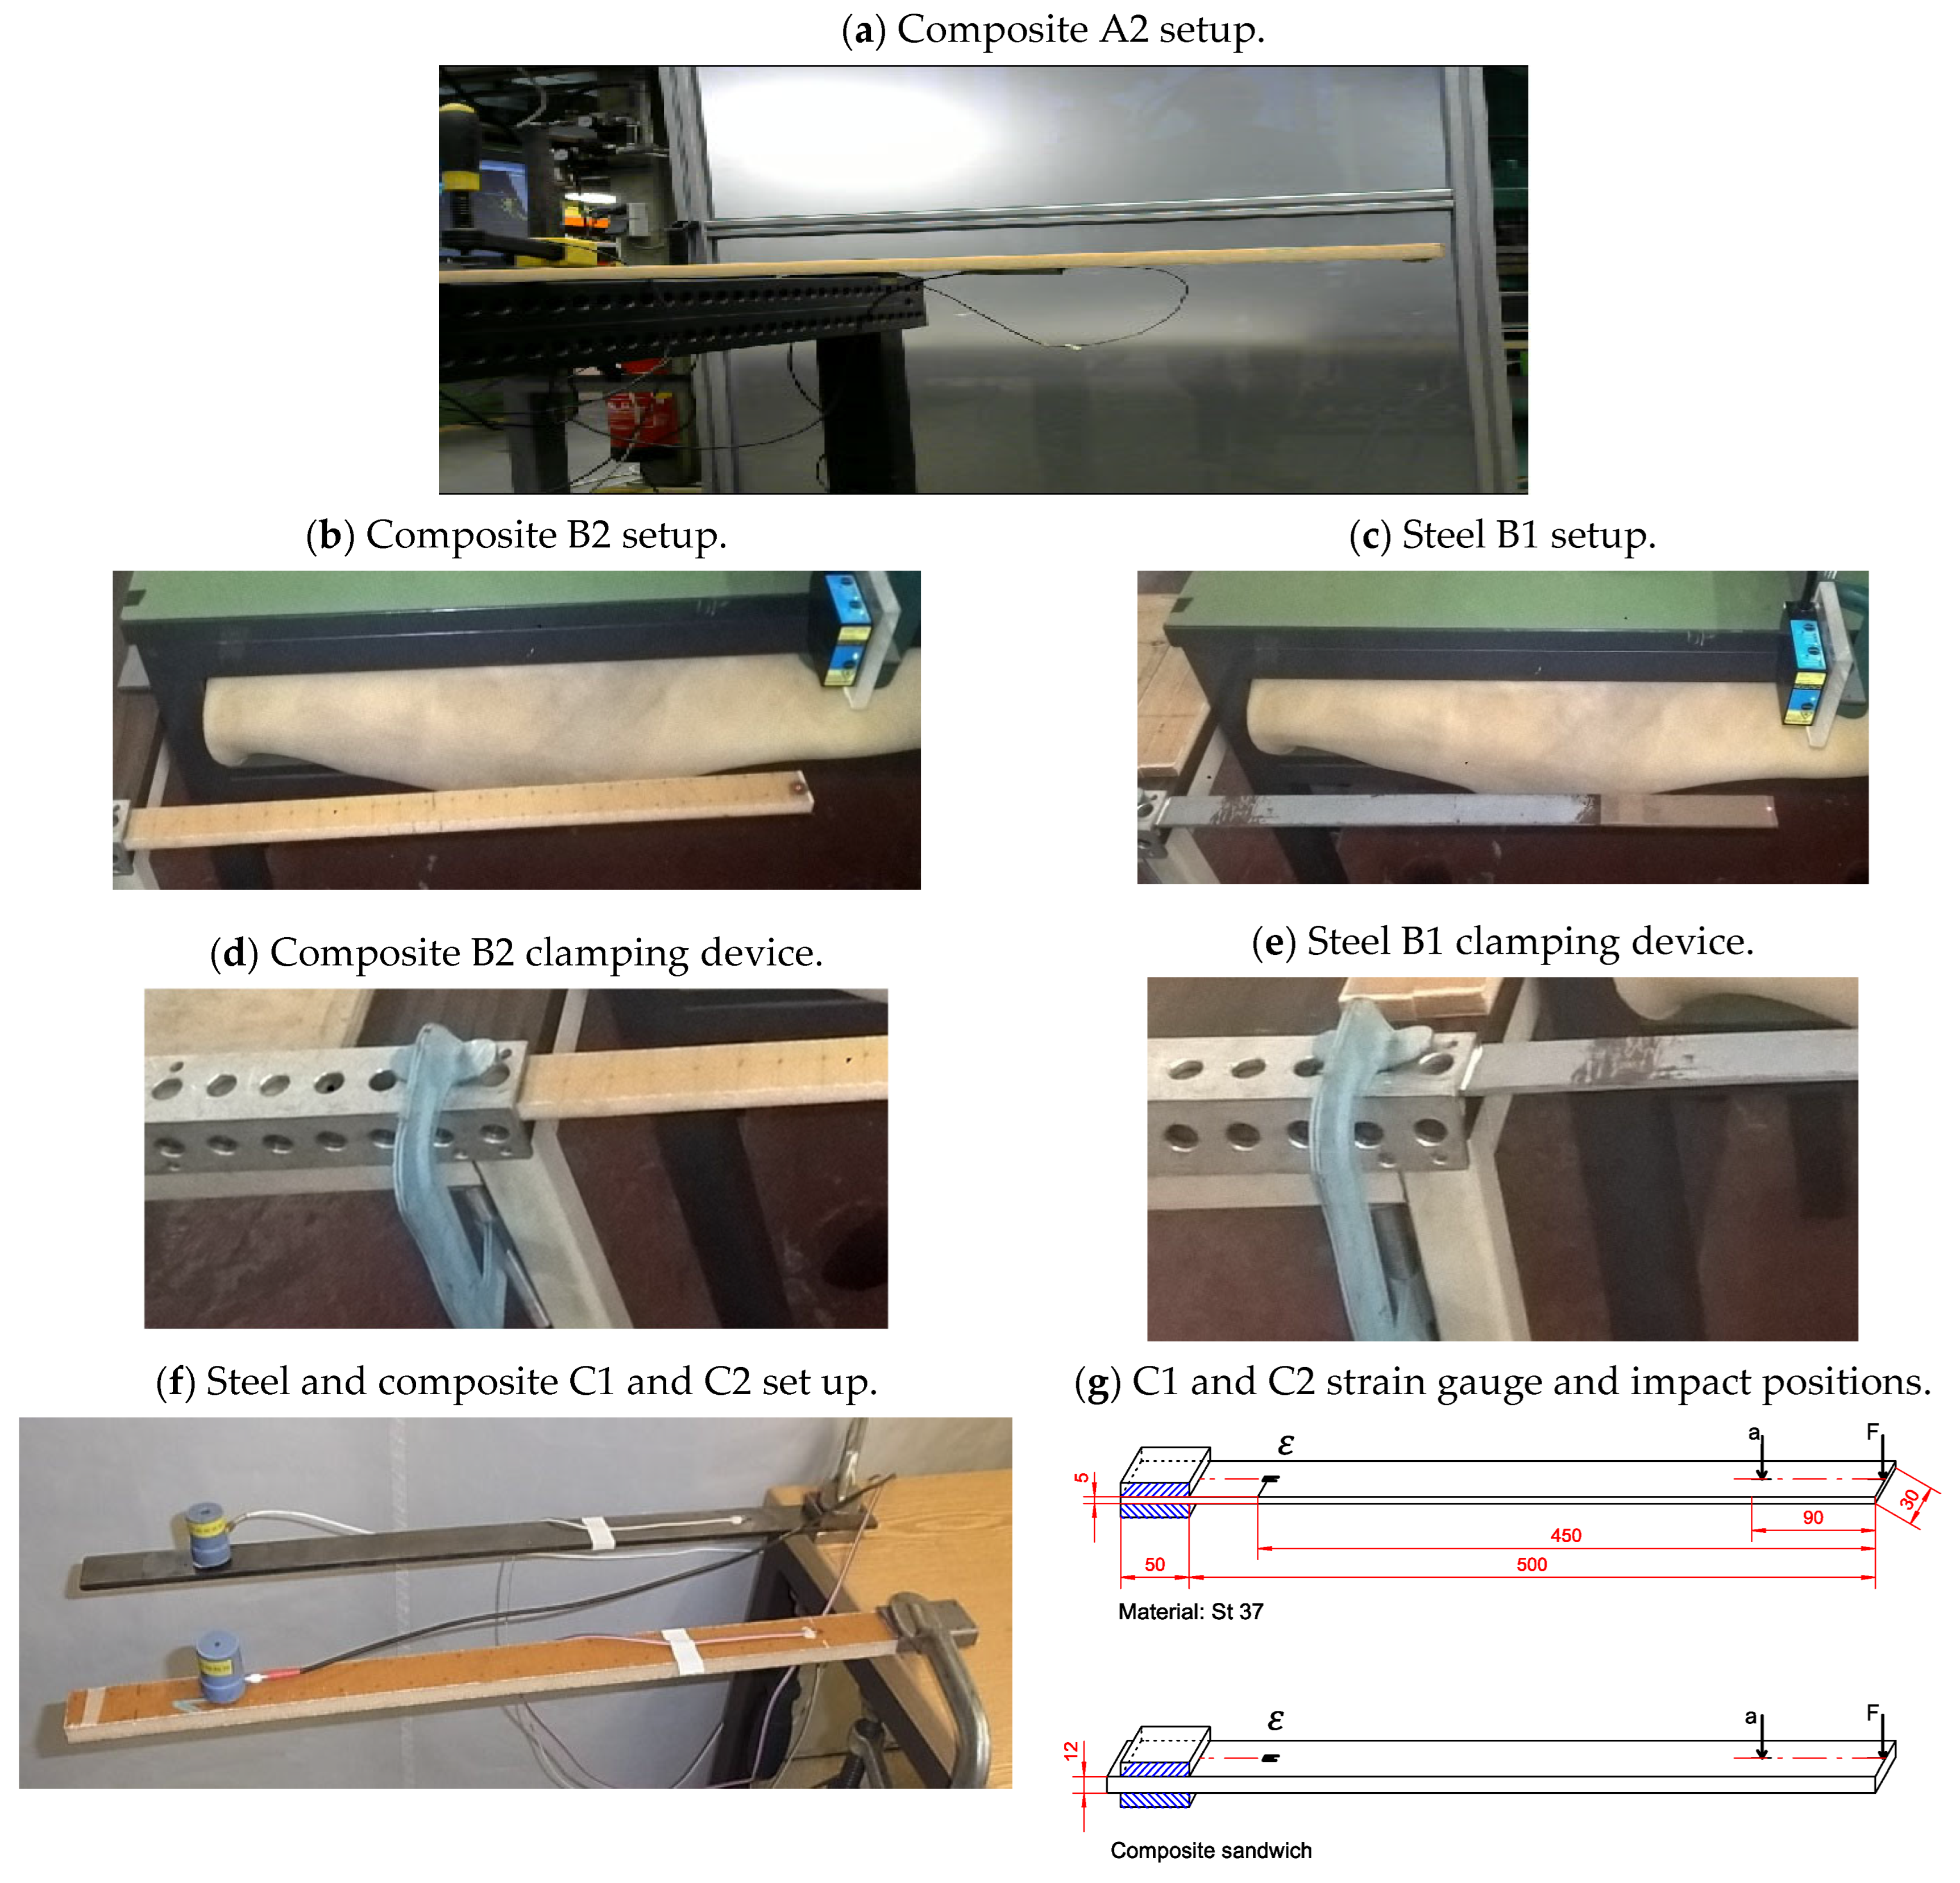
Most participants used a heavy table to clamp the specimens by a clamping device and to fix them such that the requested free span of the cantilever hung from the edge of the table to the end of the specimen, as shown in
Figure 2. Further choices in setup and instrumentation are shown in
Table 2 for steel specimens and in
Table 3 for the composite specimens. Naturally, the exact length of the free span depends on the accuracy in preparing the specimens and in clamping them, while boundary conditions are obviously related to the test setup, i.e., the table weight and fixity, as well as the effectiveness of the clamping device.
On top of the specimens, a few participants placed a steel block or an additional plate, which was firmly clamped to the table, together with the specimen. Participant F specifically dealt with the possibility of damaging the sandwich core by gluing a piece of wood to the clamped end of the composite specimens. Again, such choices are likely to influence the test results.
Participants A, C, and D used different accelerometers. In particular, they used transducers having different weights and placed in different positions along the specimen. The weight and position of accelerometers showed some influence on the obtained results, as expected. Participants B and E employed laser displacement sensors, while participants C and E used strain gauges. In addition, Participants B, F, and G used different Digital Image Correlation (DIC) systems.
Different approaches have been chosen for specimen excitation: by an instrumented hammer, a simple workshop hammer, a heavy object, or even by manually imposing a certain displacement and then suddenly releasing the end of the specimen. Indeed, only using an instrumented hammer allows the obtaining of damping and transfer values, besides natural frequencies, but only a few participants decided to implement techniques more complicated than necessary and to apply more advanced instrumentation.
Different approaches were followed to acquire and elaborate on the measured data to provide the requested measurement. The first natural frequencies were obtained in some cases using embedded data analysis offered by the used instrumentation, and in other cases were directly evaluated from the acquired time histories by computing the FFT (Fast Fourier Transform) using spreadsheet formulae developed specifically for this purpose. E.g., participant B used the FFT function available in Microsoft Excel to calculate the first natural frequency from the displacement time history obtained by the acquisition software of the laser displacement sensor.
Further details are provided in the following section about the measurements carried out by each participant. Weight and dimensions of each specimen were measured first: a few participants included such data, e.g., the weight of sensors (strain gauges) and arrangements for testing (glued wood), while others did not. In general, normal tape and calipers were adopted, implying an accuracy of the order of 0.05 mm, which, however, depends on the operator’s skill and ability, besides the instrumentation itself.
Experiments for both steel and composite specimens were performed as detailed below, where the comparison among all participants is summarized. Participant A, as reported in
Figure 2a, used an instrumented hammer, a lightweight accelerometer (Brüel & Kjær Type Number: 4375 with operational range of 5000 g and shock-peak resistance of 25,000 g, [
7]), and Dewetron data acquisition and processing software (Dewesoft, [
8]). For both steel and composite specimens, the same setup was adopted. A 1000 mm long strip was clamped on a heavy table, and a free span of 500 mm was created. Natural frequencies were derived using both the accelerometer placed at the free end and at the midpoint along the specimen’s free span. The hammer impact location was similar to the accelerometer position on the opposite side of the specimen. For each condition, hammer excitation was performed five times per position in order to increase the reliability of the input signals (see
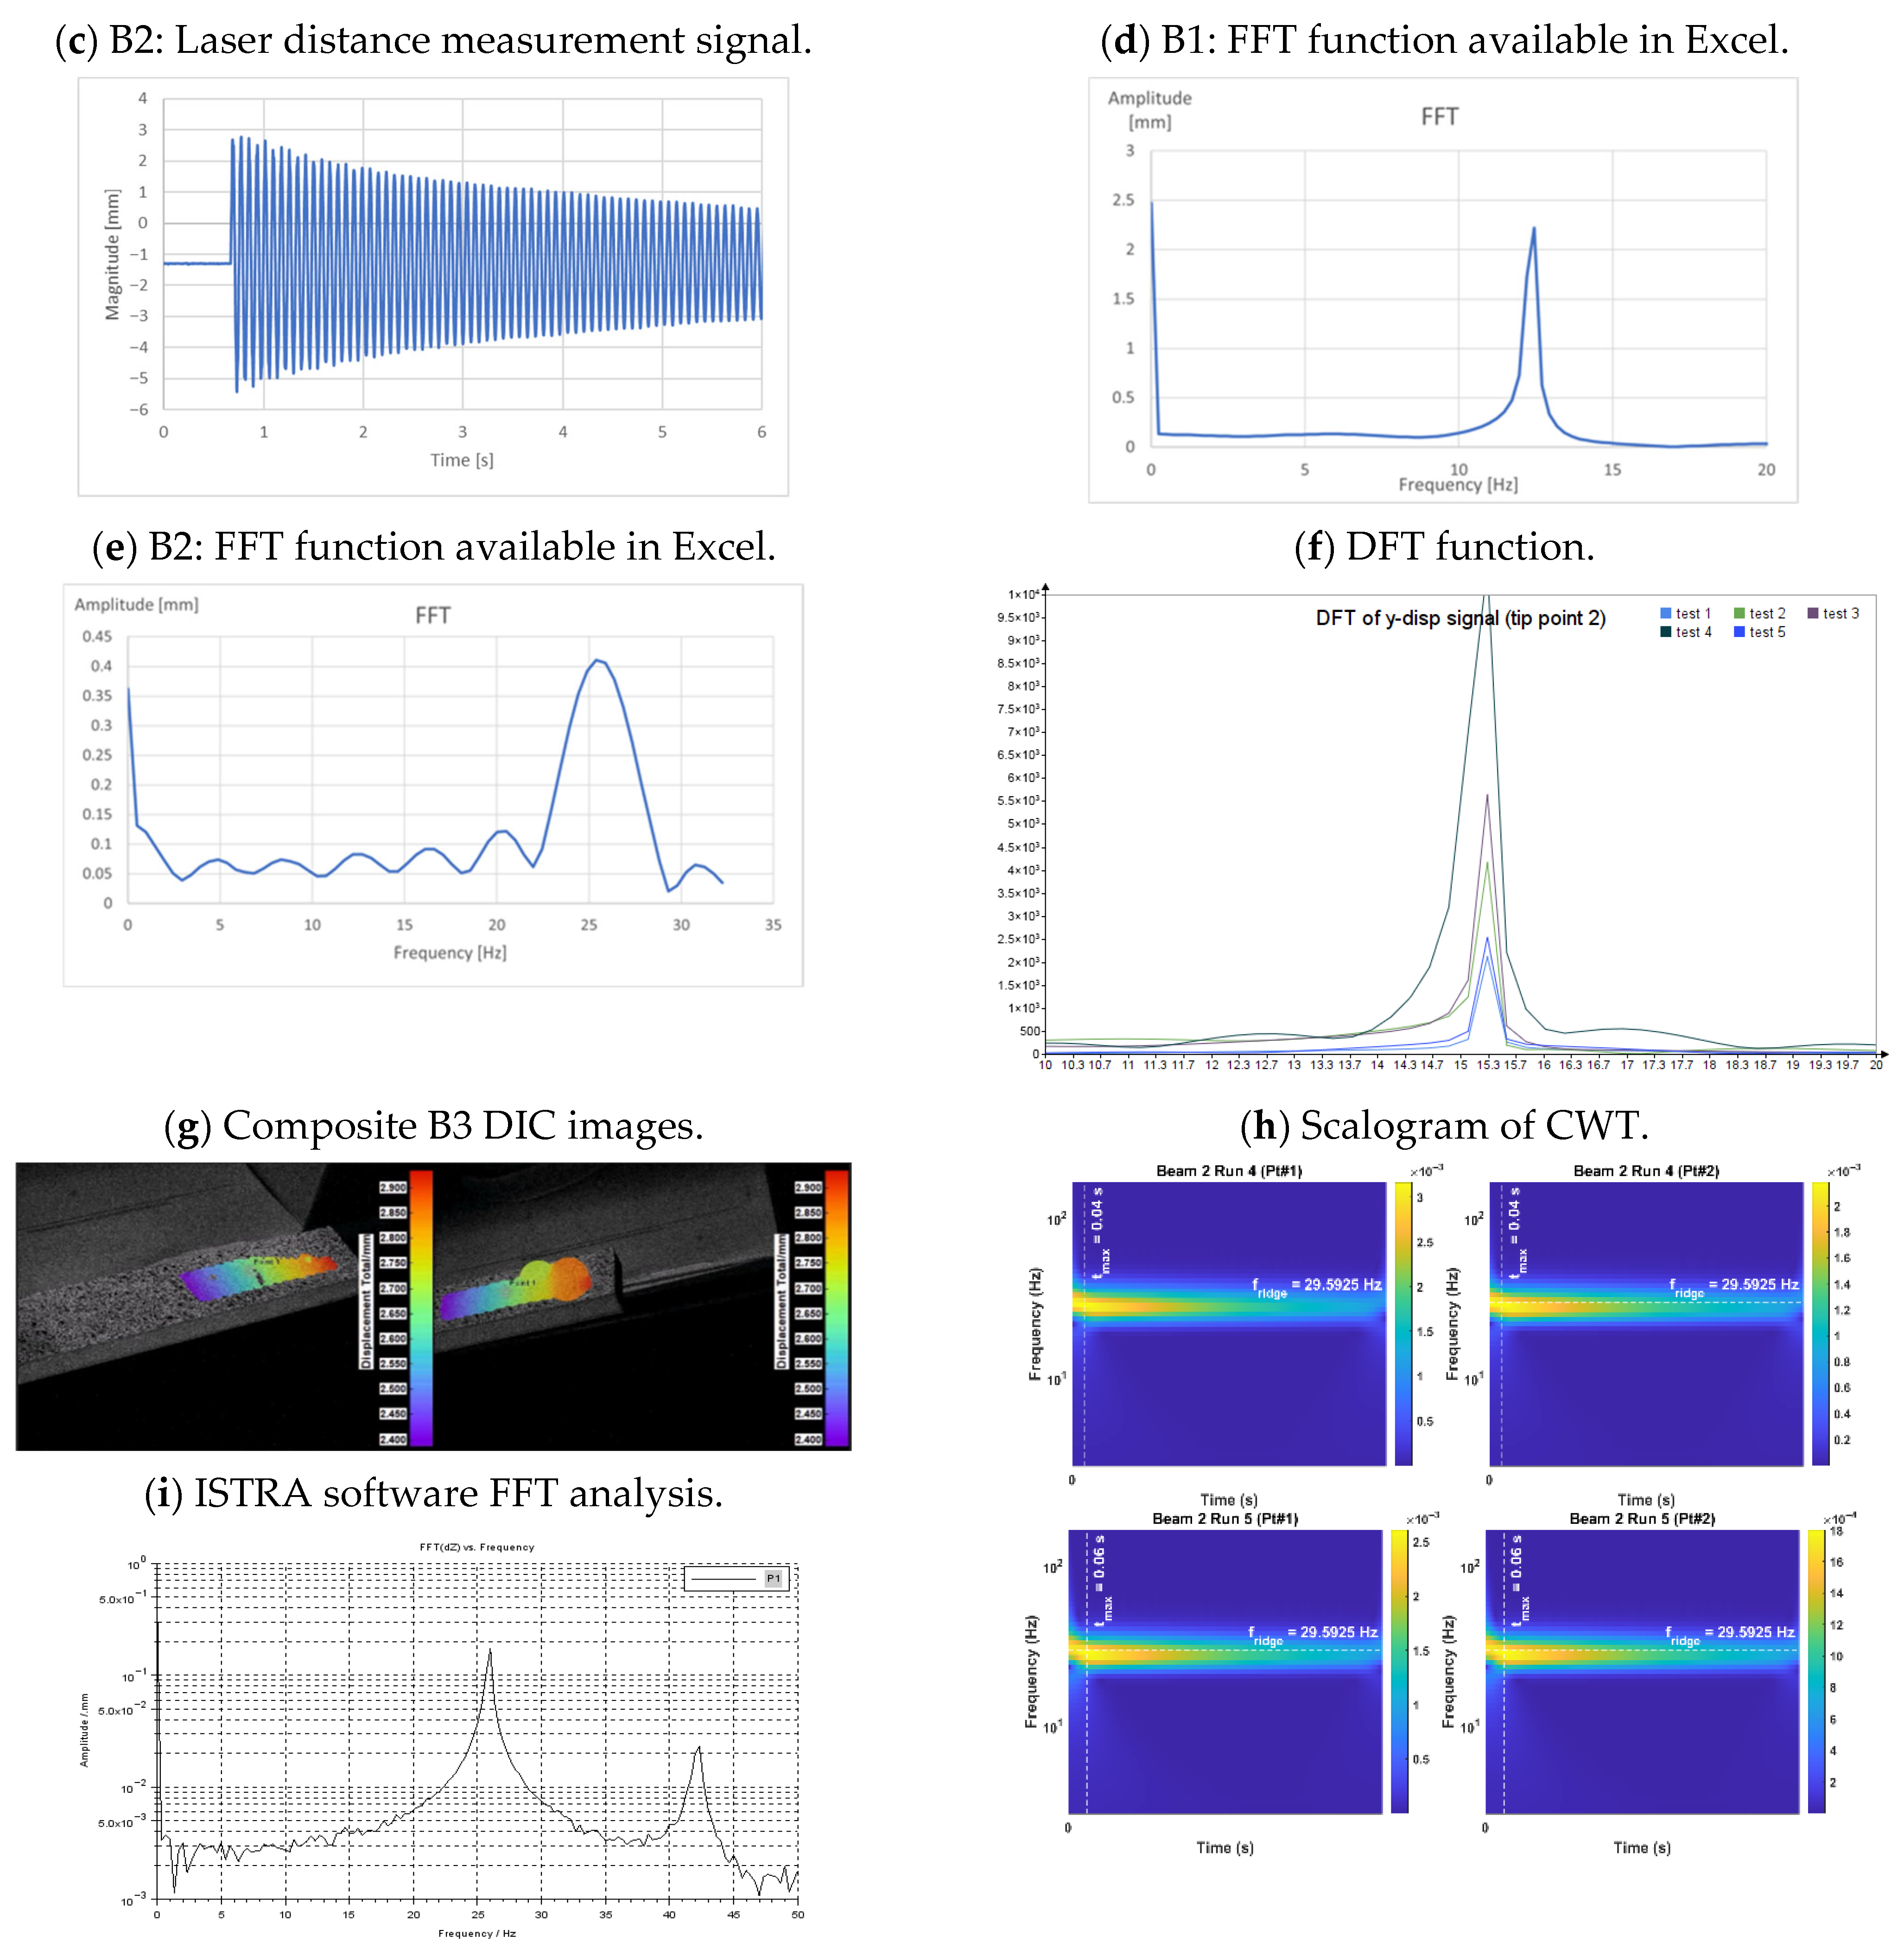
Figure 3a). The data processing was performed by the software, showing the FFT, the frequency transfer, and the clamping values. As far as steel specimens are concerned, the first natural frequency was found to be the same for both positions. Differences occurred in the higher-order modes, but these are not further discussed. For composite specimens, a small deviation was found in natural frequency depending on the impact location. The mass of the accelerometer closer to the free edge resulted in a lower natural frequency, which was expected. Compared to the weight of the composite specimen, the weight of the accelerometer was, in fact, not negligible.
Participant B performed free vibration tests, in which both steel and composite specimens were clamped on a table (see
Figure 2b–e), hitting their free end using a workshop hammer. Two composite samples of slightly different dimensions were tested. They were clamped on the table, packed with a 10 mm steel plate on top of the face, clamping the end part of the composite specimen in a bench vice. Utmost care was paid to avoid damaging the sandwich material, but no particular countermeasures were undertaken other than usual practices. A displacement laser sensor model, Acuity AR200-100 [
9], was set to measure the displacements at the free end. Data were exported and processed using the FFT function, as available in the Excel environment, to calculate the first natural frequency (see
Figure 3b–e). To obtain better accuracy, the specimens were hit five times, performing FFT calculation for each impact: the first average natural frequency values were then obtained by identifying the first peak in the averaged spectrum. In addition, the same tests were performed by Participant B, measuring displacements using the Dantec DIC Q400 System with two 3.1 MPix, USB3 cameras [
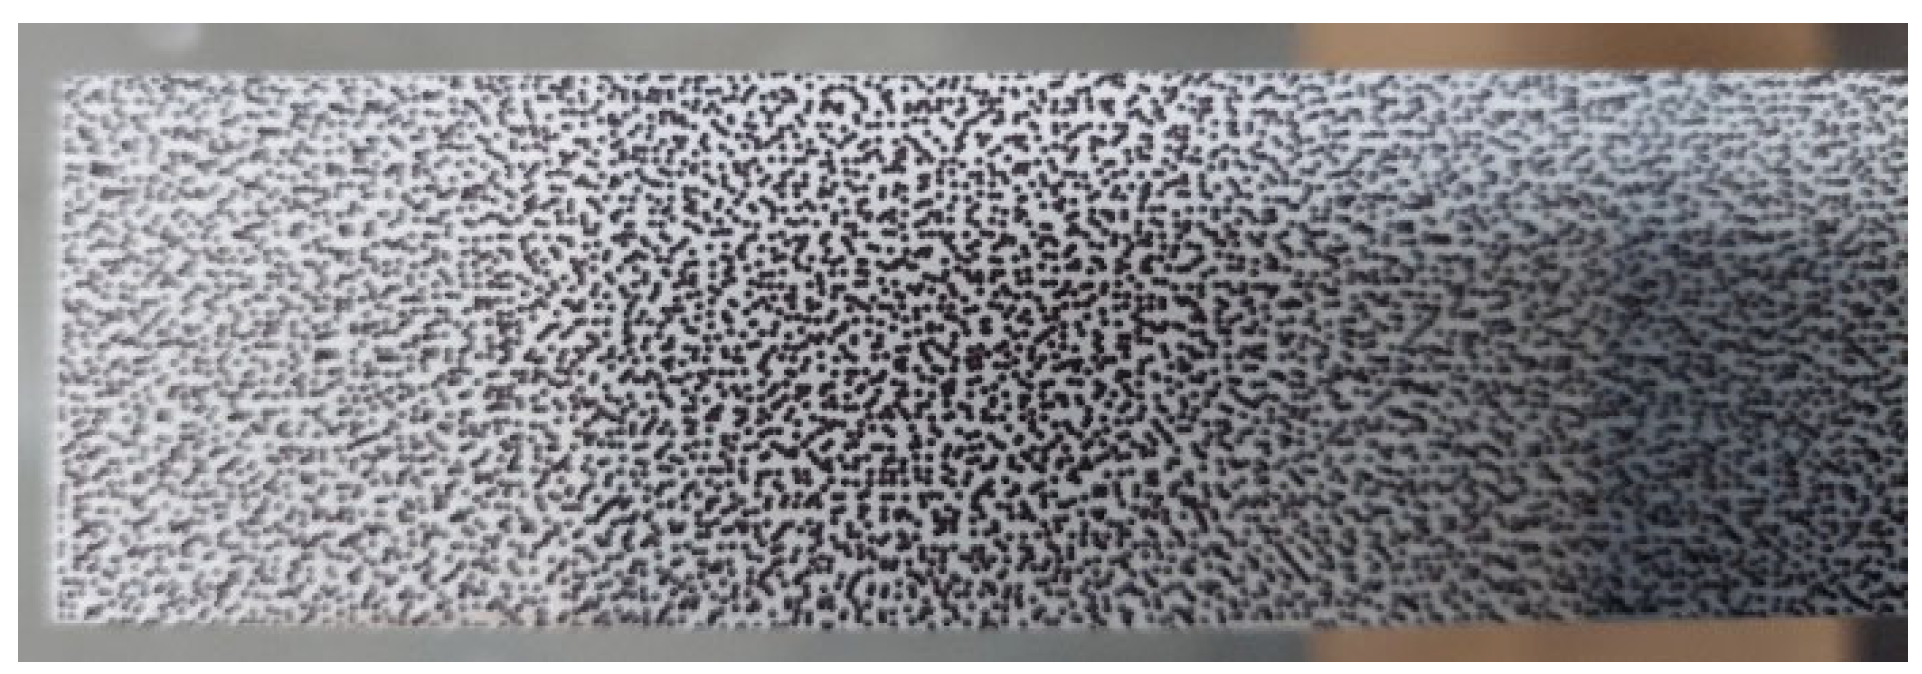
10]. The specimens’ surfaces were specially prepared using a can of spray paint in order to create a pattern of visible points in the digital images detected by the two cameras (see
Figure 3g). Numerous tests were carried out to obtain a pattern suitable for the purpose. The two cameras were set in the best position to acquire images according to the DIC instruction manual. Regulation of intensity and warmth/coolness of the light, the set of focus of the cameras, and calibration of instrumentation were the required preliminary operations useful to obtain suitable images. The displacement time histories were obtained by calculating the distance variation between at least two points from the camera’s reference system. The image correlation in Dantec ISTRA software was obtained by selecting the default image quality options in the software post-processing menu. The FFT function was available in Dantec ISTRA Software to determine the first natural frequency of the specimens (see
Figure 3i). A rough check of the obtained results was carried out by examining the time history signal of displacements at various points, as obtained by the DIC system, and evaluating the periods between successive peaks of the signal.
Participant C considered both materials for the location of measuring points, as shown in
Figure 2f,g. Therein, the strain gauge applied to each specimen at its longitudinal axis to obtain the response is also shown. The strain gauges are of type FLAB-3-11 from TML with a 3 mm grid length arranged in a quarter bridge circuit. Additionally, measurements with an accelerometer from PCB (series 308B) with a sensitivity of 100 mV/g, a frequency range of 1–3000 Hz, and a weight of 87 milligrams were used. The hardware for the data acquisition was a system Autolog 3000 from Peekel Instruments (Rotterdam, The Netherlands) with the SignaSoft software using a measuring rate of 1 kHz. The excitation of the natural frequency was obtained by hand, exciting the free end of the clamped beams to measure the decay of the vibration excited.
Participant D tested both specimens (steel and composite) using a similar procedure at their lab facility, such that the specimens were set up as a cantilever beam with a free span of 500 mm and clamped to a heavy table. A single DoF accelerometer (Tandem-Peizo acceleration sensor) was mounted on top of each specimen approximately 10 mm off the specimen’s free end. For the steel specimen, a magnetic sensor (57.5 g in mass) was used, whilst a threaded sensor (60.5 g in mass) was used for the composite specimen. The VIBXPERT DAQ system (PRUFTECHNIK, Ismaning, Germany) was used to acquire data at a sampling frequency of 65.536 kHz. Each specimen was excited several times by hand, and a series of approximately 5 s time histories of data was collected by the equipment. The DAQ system used had the capabilities to display data in both the time and frequency domains through the built-in FFT function. Further, the Matlab FFT function was applied to the time series of the measured acceleration to verify the obtained natural frequency for each specimen. One implication reported by the participant is that the accelerometer probe used for their experiment had a large mass in comparison with the specimen mass, in particular with the composite beam (60.5 g vs. 62 g), see
Table 3 (which resulted in a concentrated load on the beam with an initial deflection >> 0 at the free end). This should have affected the obtained results, as natural frequency is inversely proportional to the square root of the structural mass of the beam.
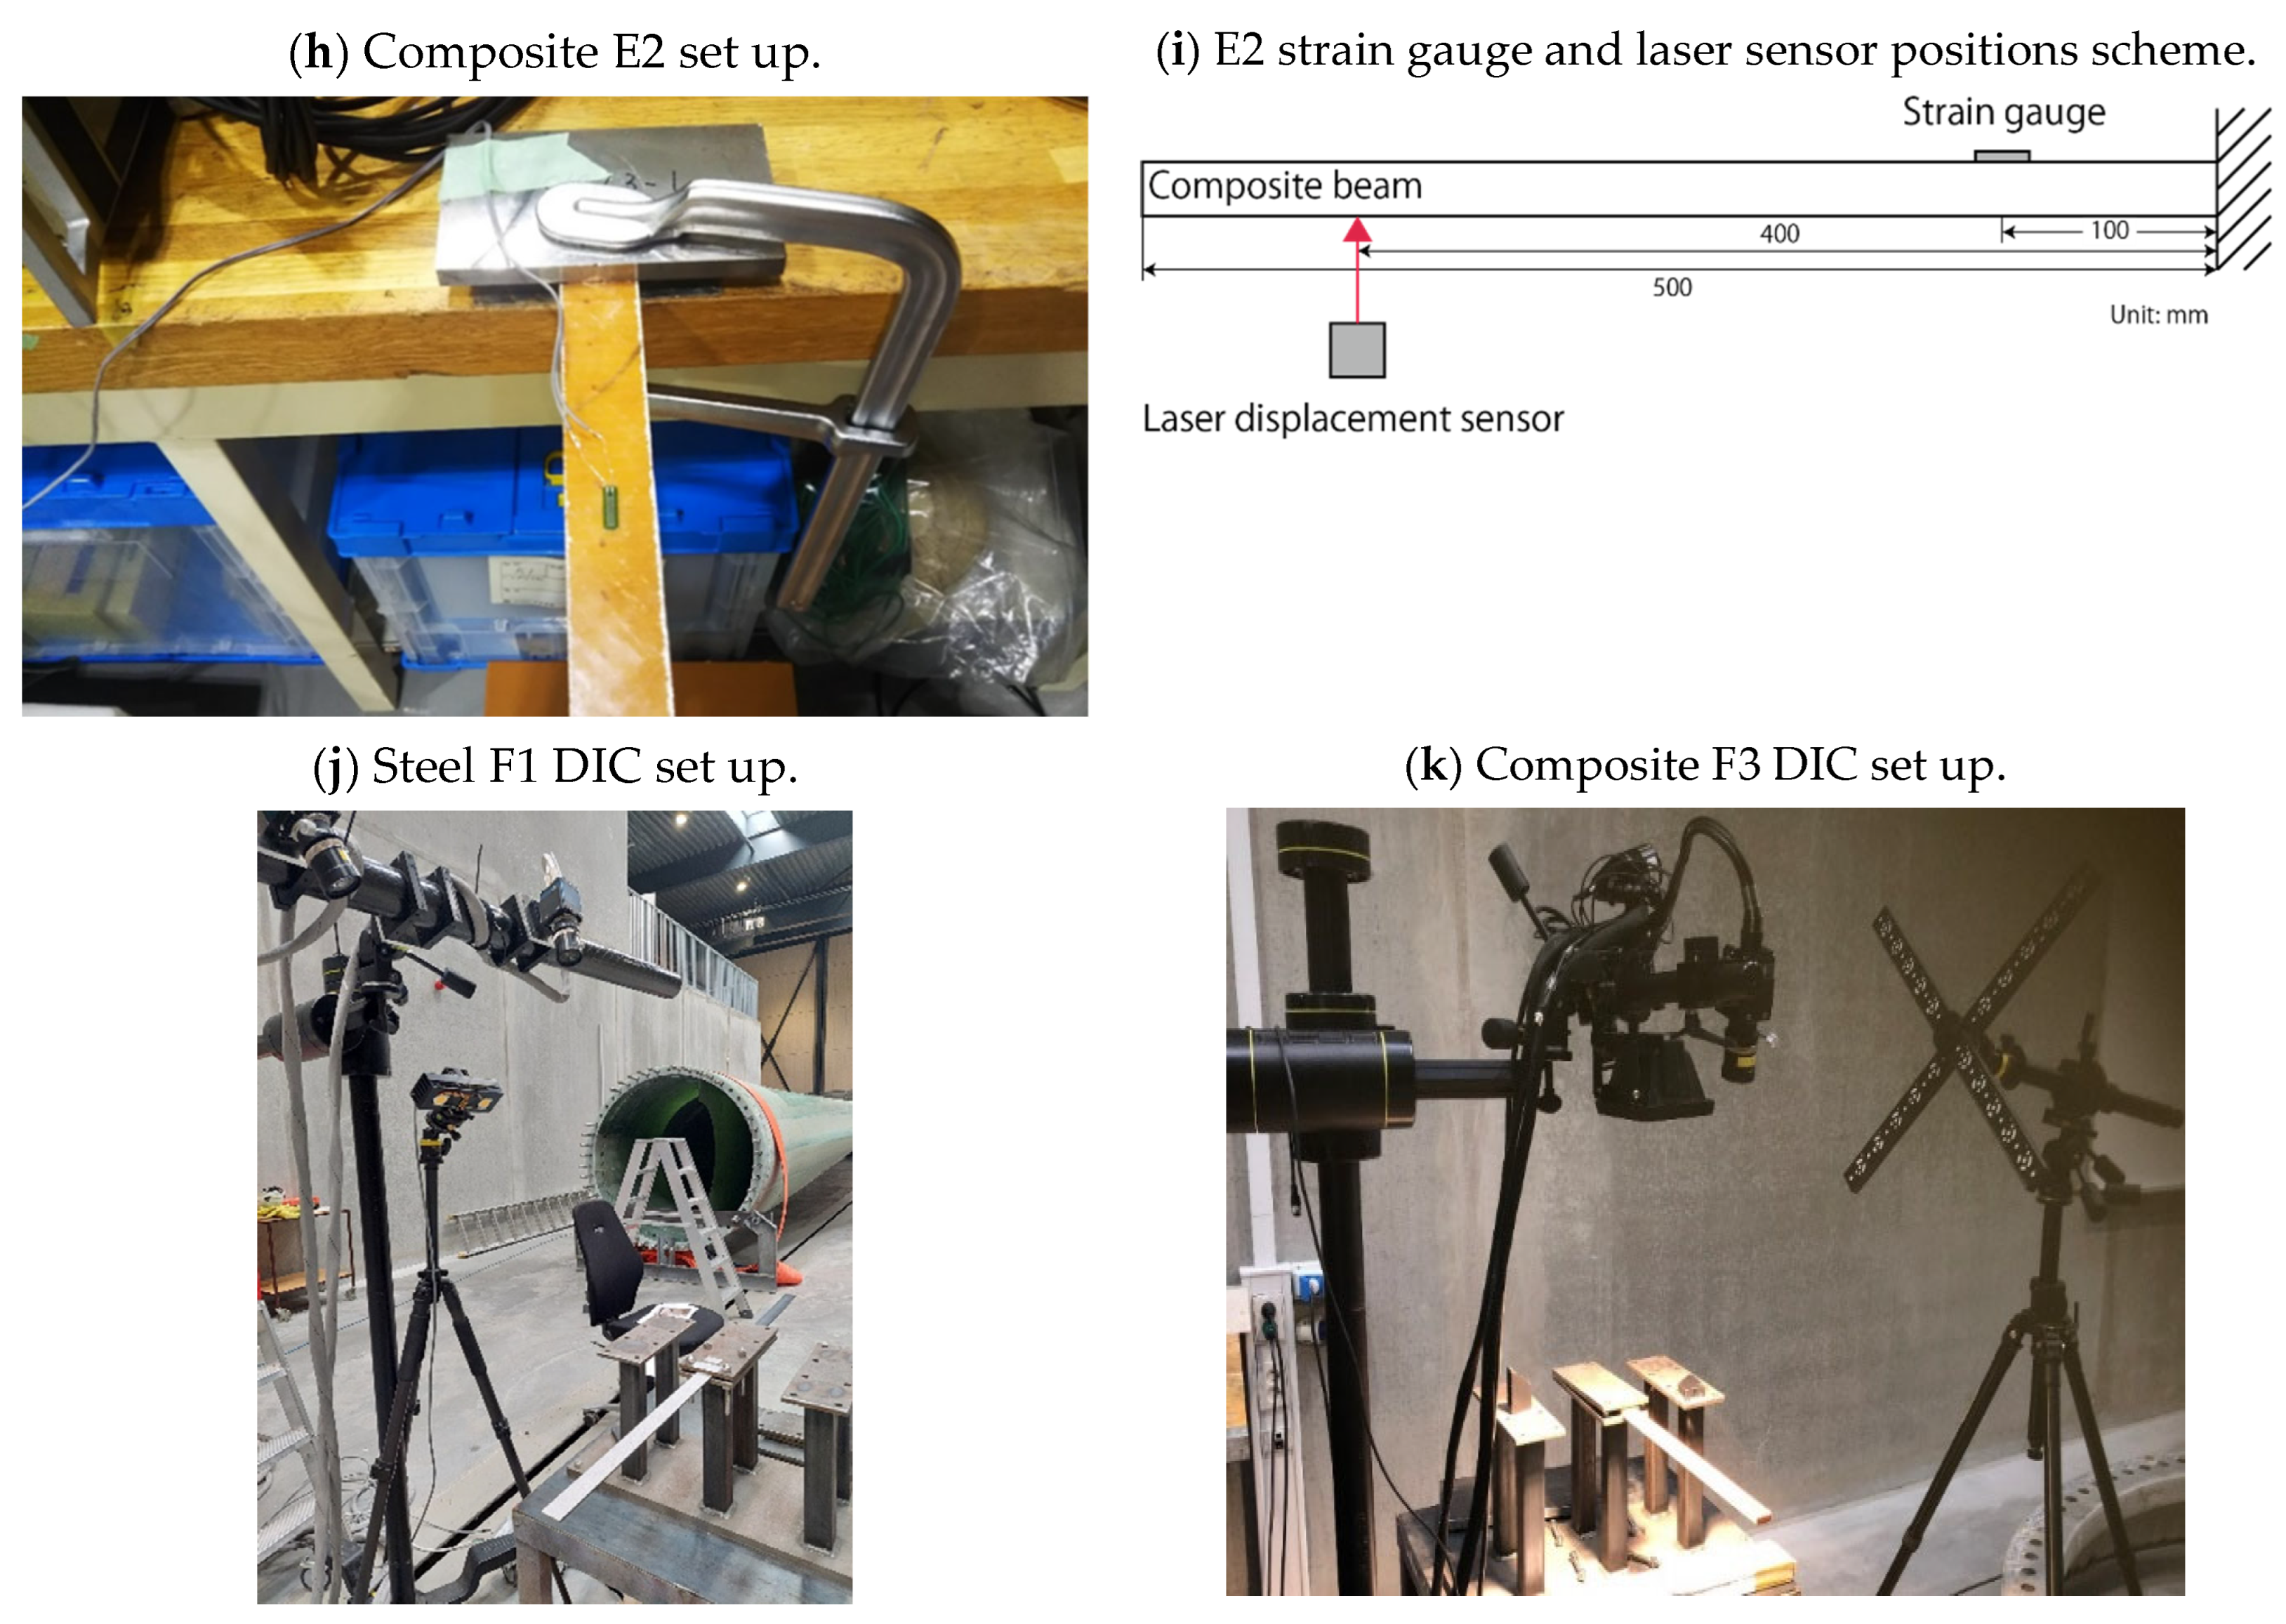
Participant E used, as shown in
Figure 2h,i, a strain gauge and a laser displacement sensor as contact and non-contact sensors, respectively. Both steel and composite specimens were clamped on a heavy table to form a cantilever with a 500 mm free length. There were thick plates between the fixed jaw of the clamp and the top surface of the specimens and between the top surface of the table and the bottom surface of the specimens, respectively. While the strain gauge (KYOWA) was 10 mm in length and bonded by a cyanoacrylate adhesive (KYOWA) 100 mm away from the fixity point, the laser displacement sensor, Keyence LK-G85 (sensor head) and LK-G3000 (controller) [
11], was set to aim the light beam 100 mm away from the free end on the bottom surface of the specimens. The specimens were excited ten times by hand, and data were acquired at 1 kHz and saved as .csv files. Then, frequency analysis by a LabVIEW
TM function was carried out to find the frequencies of the first mode. It was exactly the same for each measurement.
Participant F performed pull-and-release tests on two steel and two composite specimens clamped to a steel structure mounted on a table, as seen in
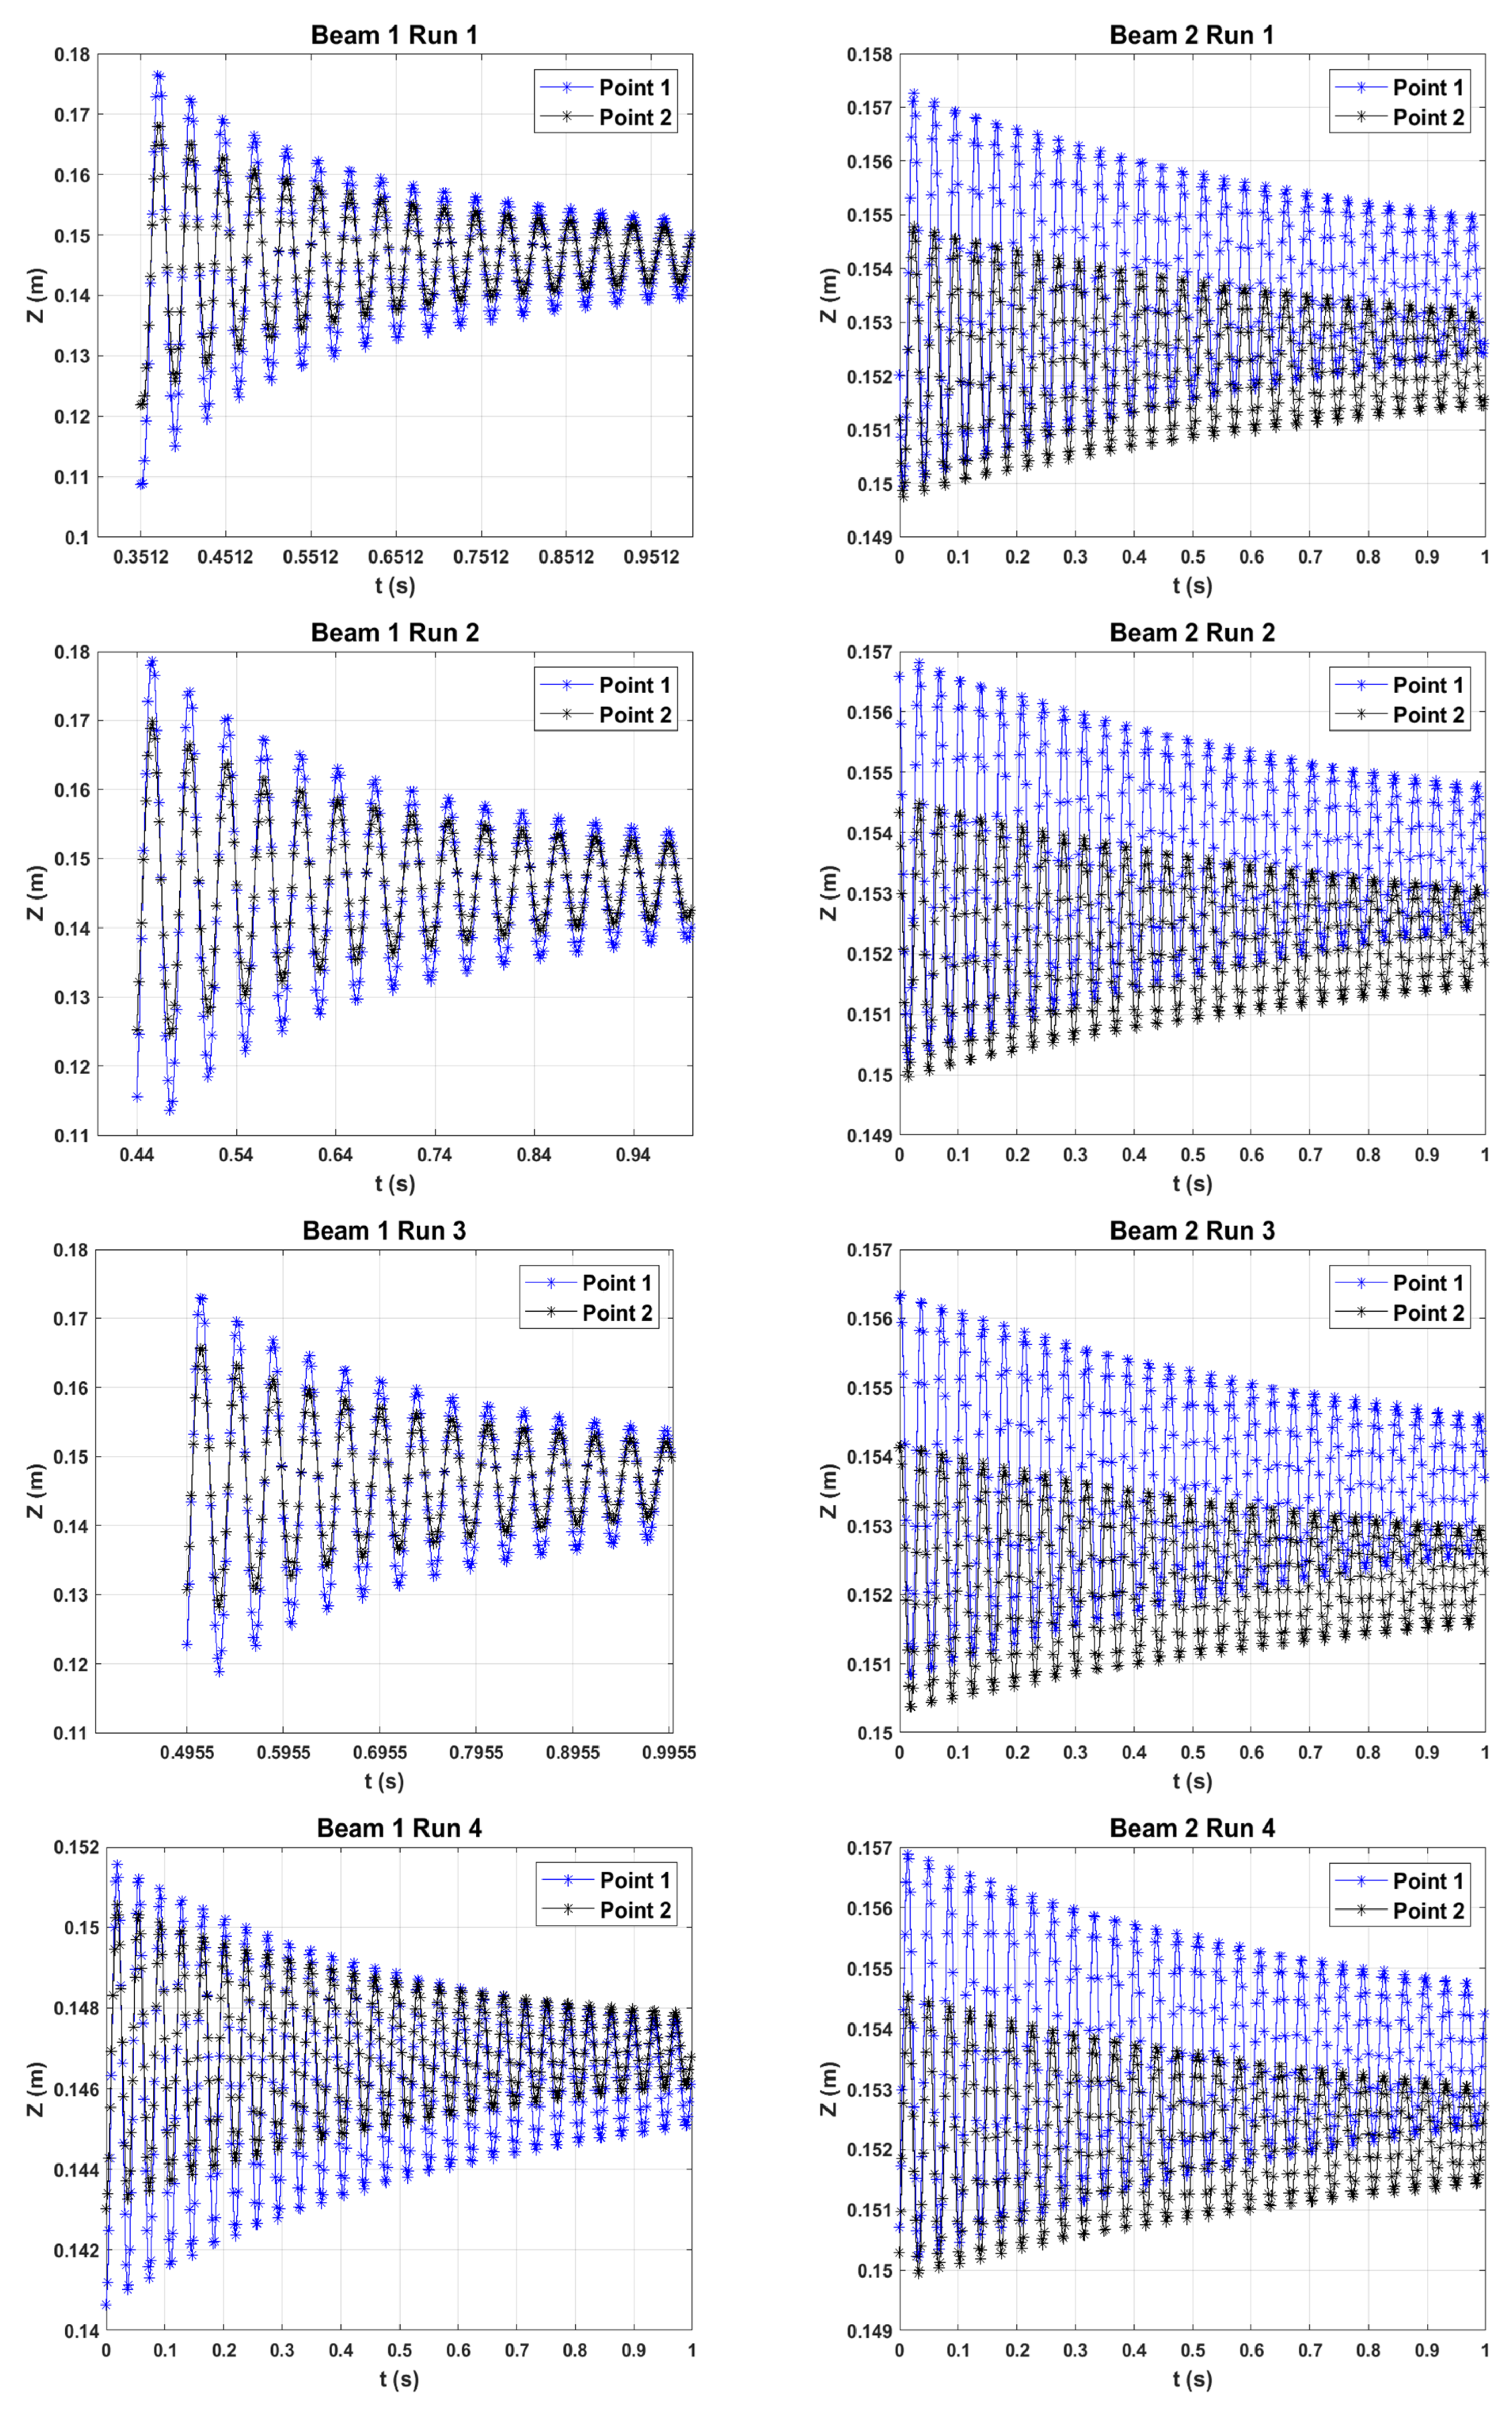
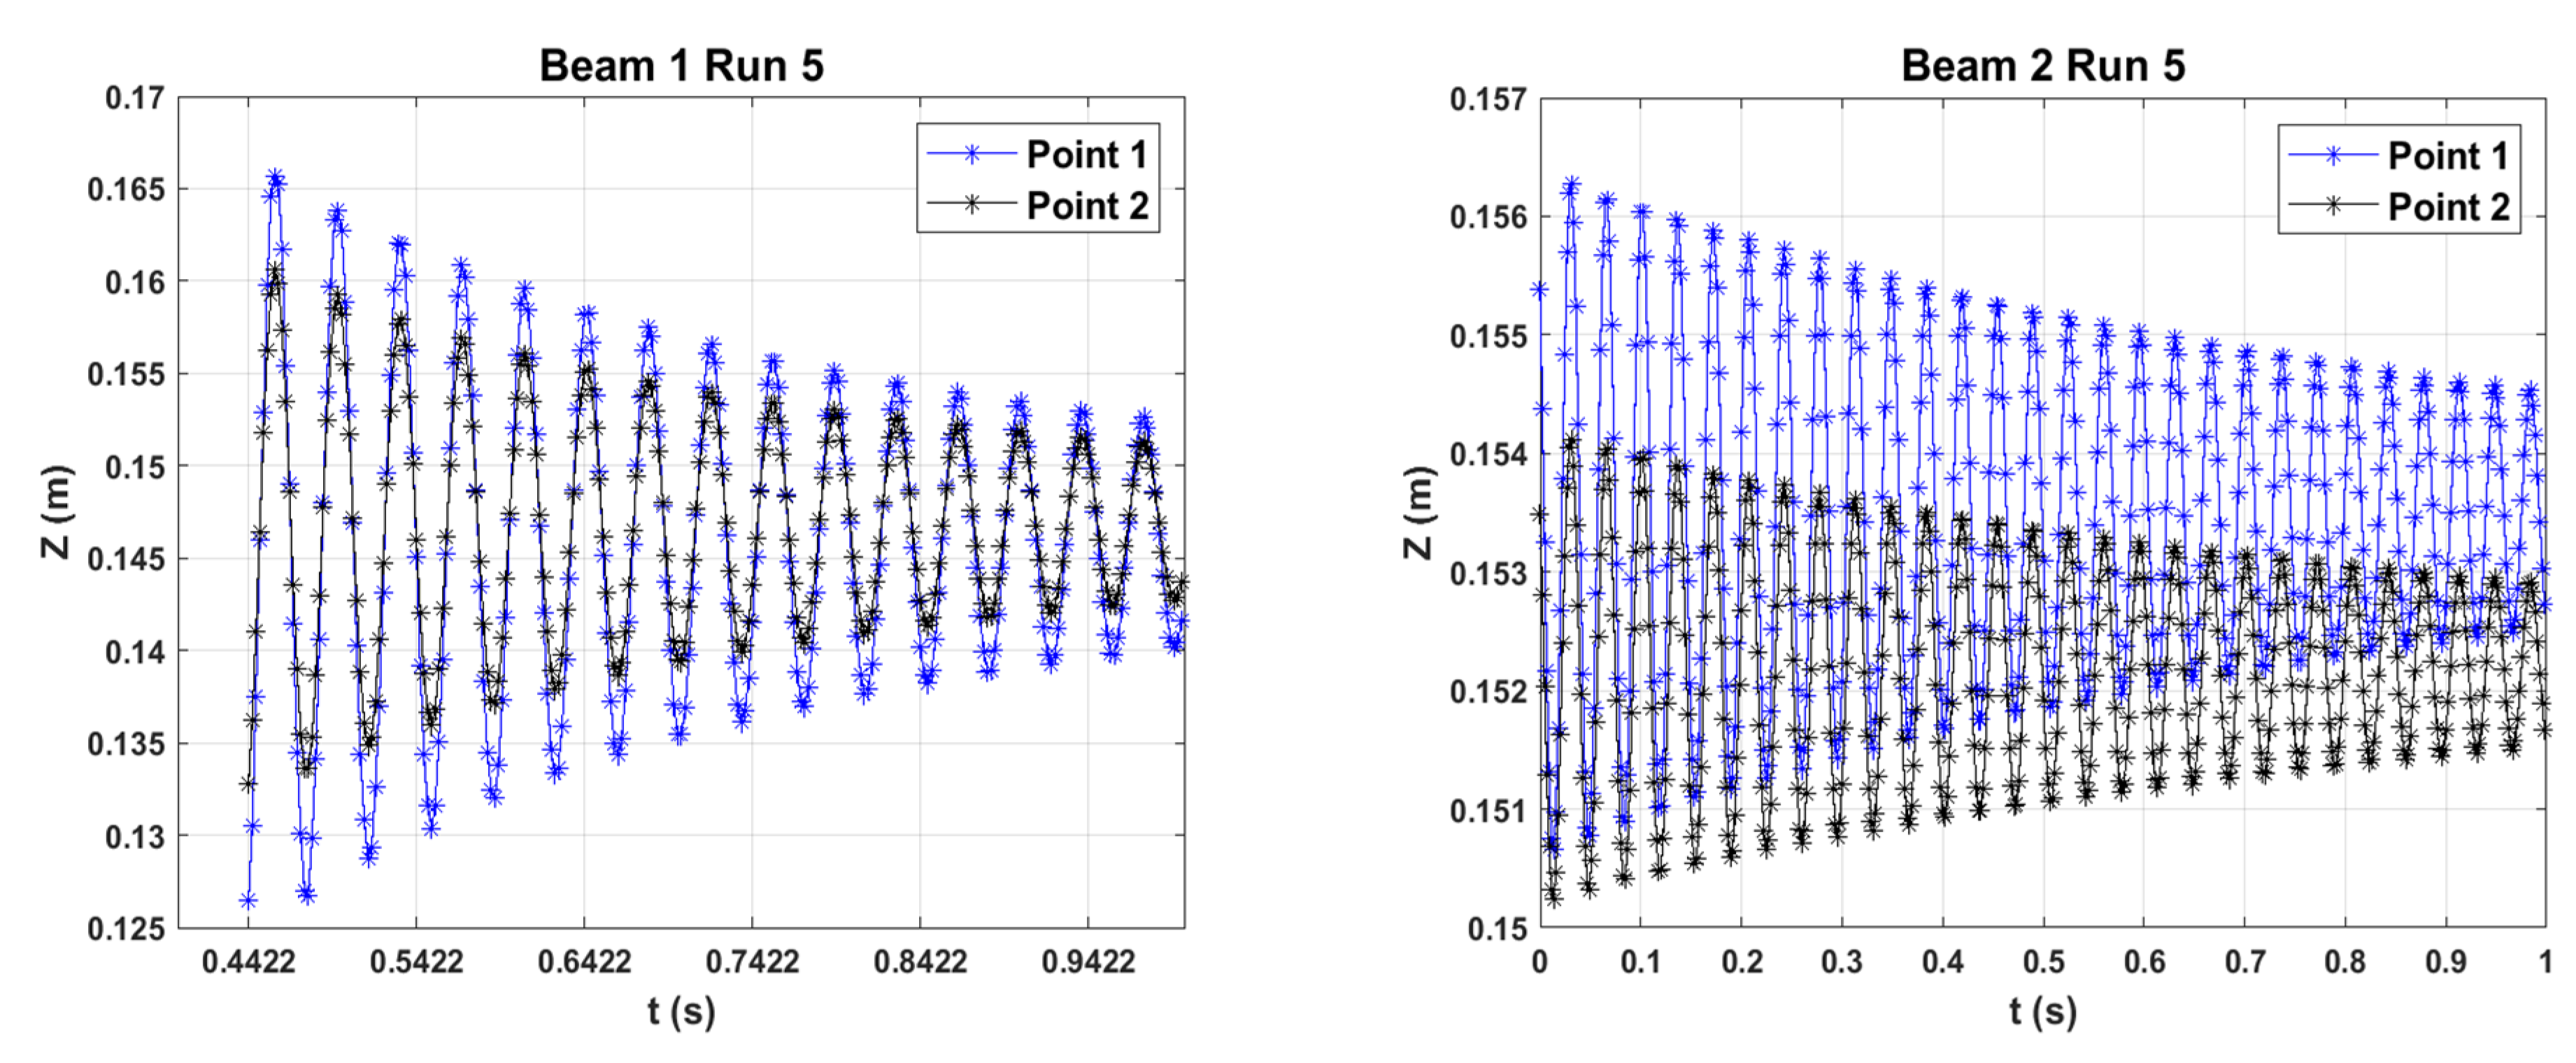
Figure 2j,k. Displacement was measured using the DIC technique only. The composite and steel specimens were mounted into the steel rig with the speckle pattern pointing towards the DIC system and tested with an identical free span (500 mm). However, for steel, 50 mm were clamped, while for composite, 60 mm of one end of the beams were clamped, and thin wooden inserts of dimensions 60 × 30 × 2 mm were glued on the top and bottom surface of each beam at one end to prevent the beam from being crushed during the clamping. A paper with a random speckle pattern for DIC measurements was glued to the top surface of each specimen. The basic setup consisted of two standard DIC cameras (Teledyne Dalsa 12 MP with a resolution of 4096 × 3072 pixels) recording the motion with 450 frames per second, with a basic function to measure the displacement of the speckle pattern points on the surface of the specimens. Shutter time was set to 0.5 ms. The specimens were illuminated with a headlight, and an exposure time was set to 1 ms. At first, the cameras were calibrated with a calibration cross set on a tripod, and the relative positioning of the cameras with respect to the specimen was adjusted accordingly. A total of 5 measurement runs were conducted for each beam, with a duration of 1 s for each run. For the steel specimens, DFT (Discrete Fourier Transform) was used to determine eigenvalues (frequencies) using the transversal x- and vertical y-displacement signals from a selected point on the specimen tip (see
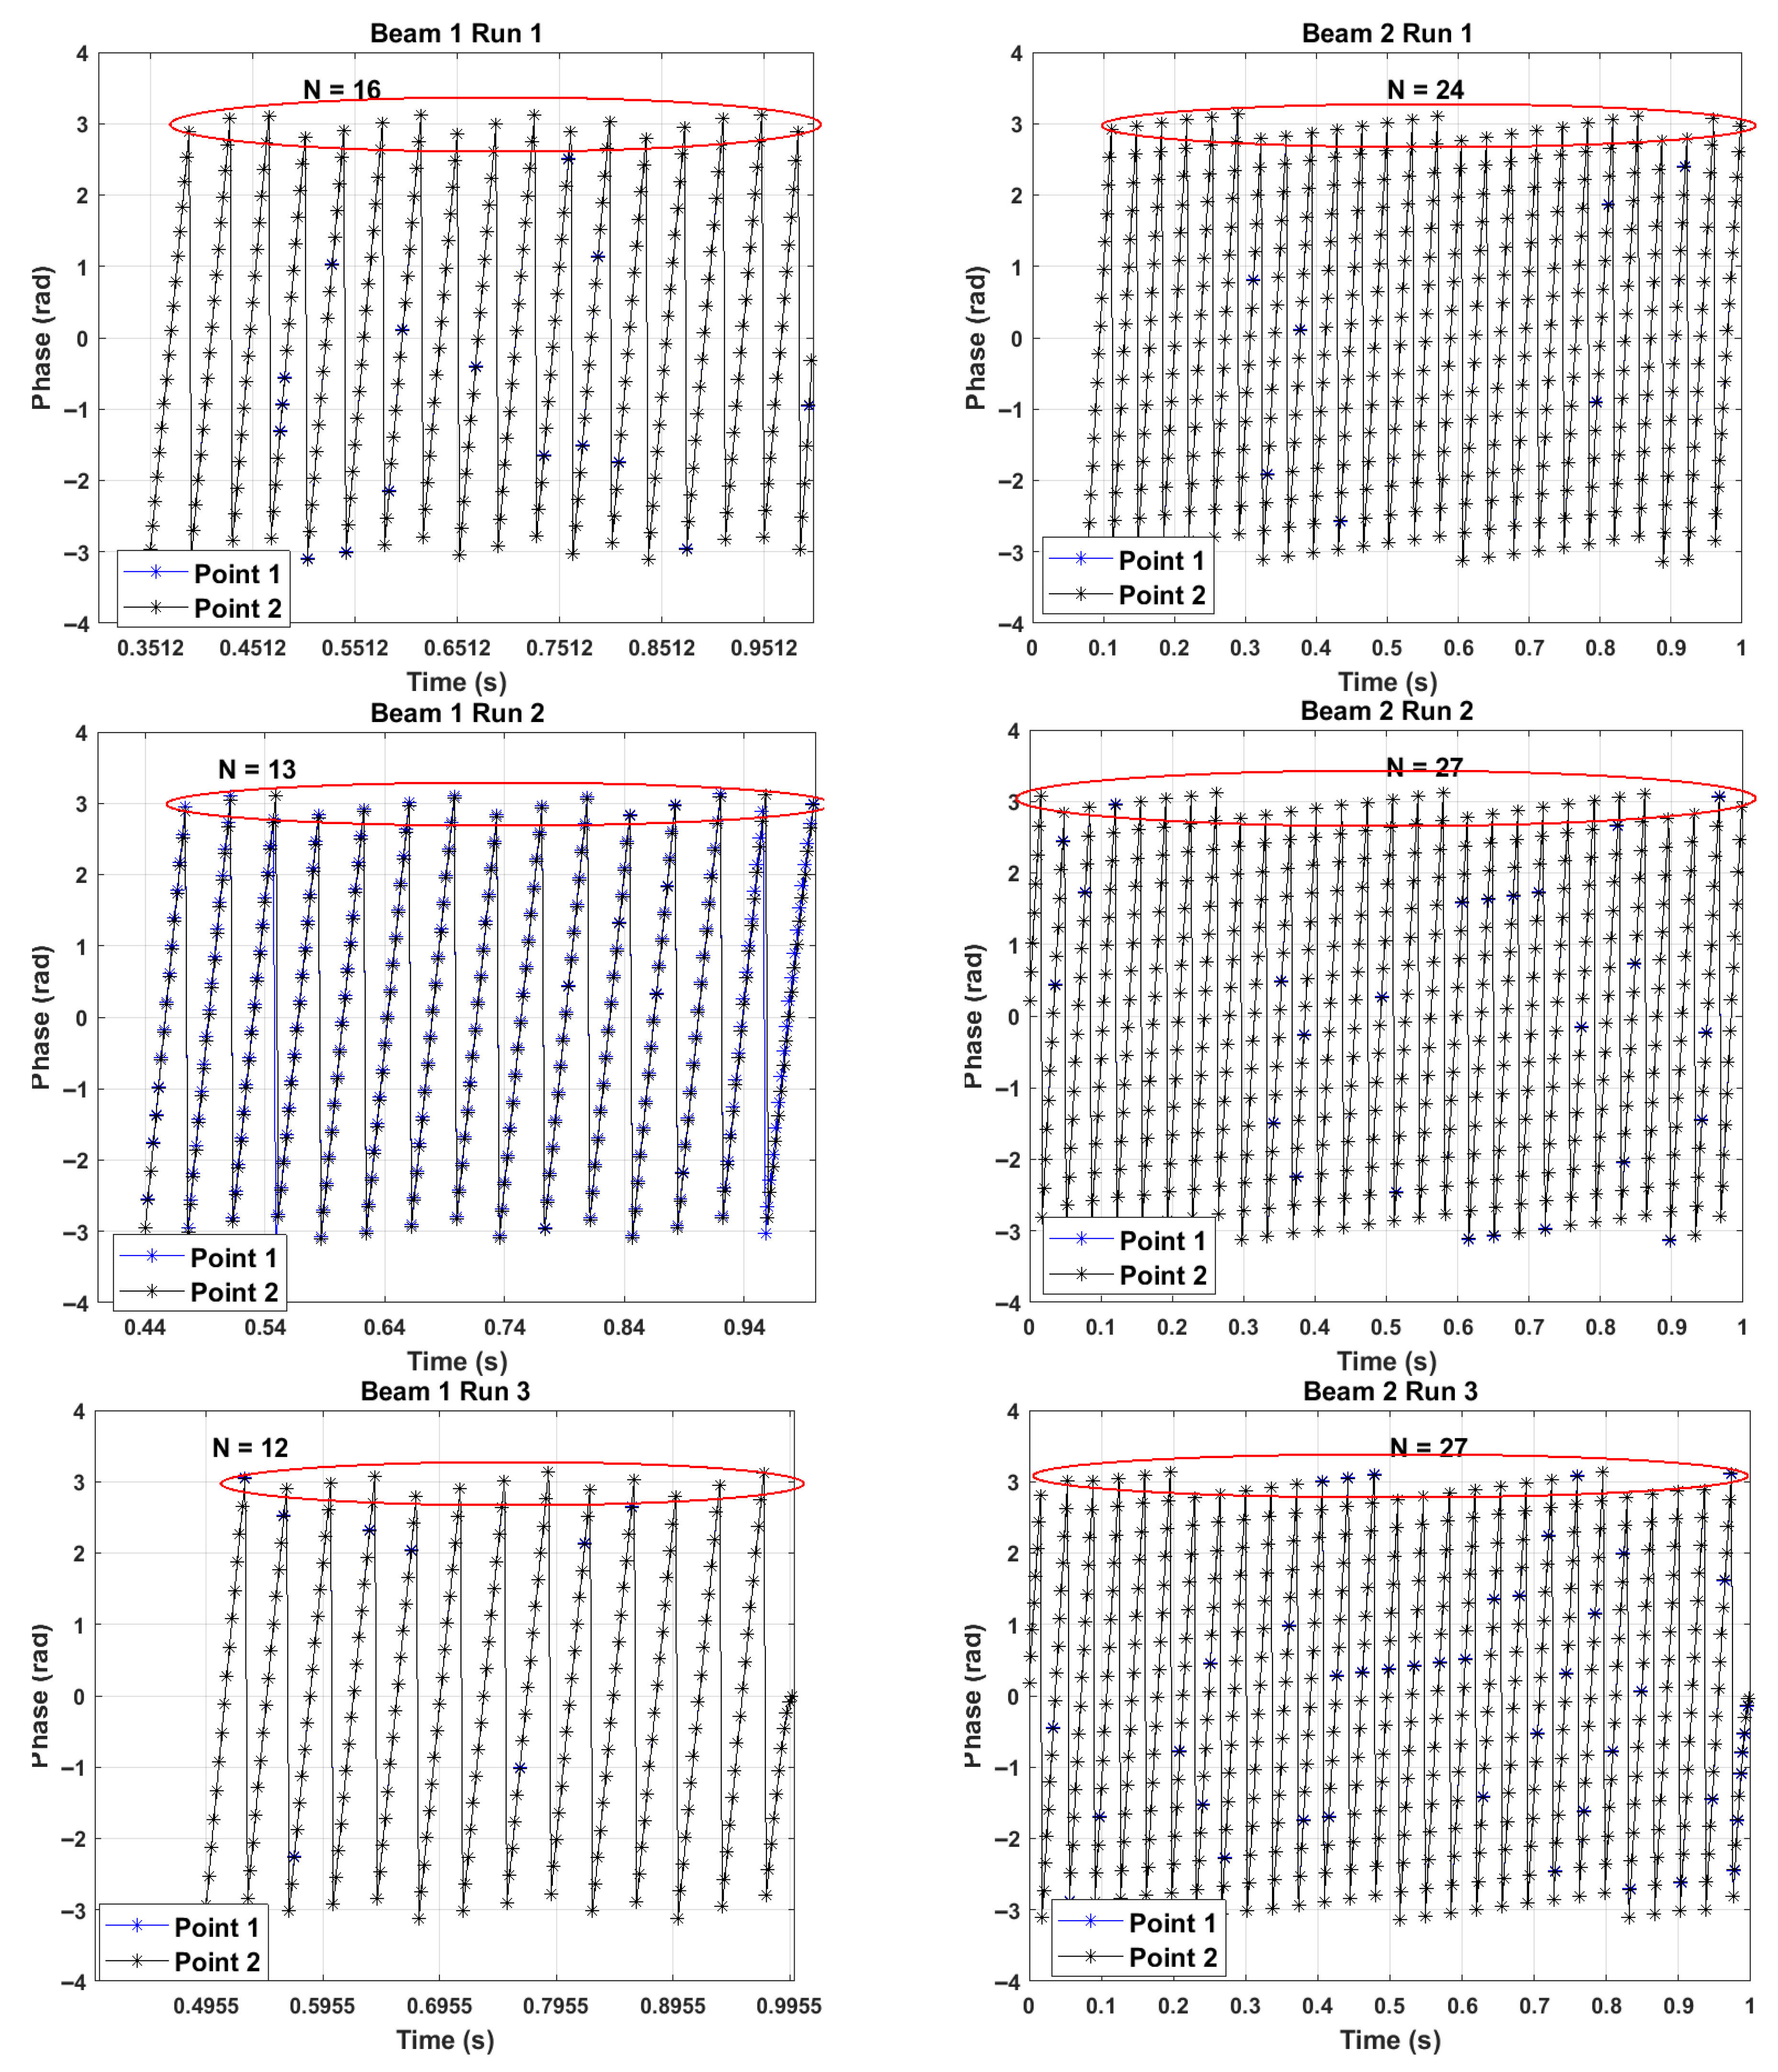
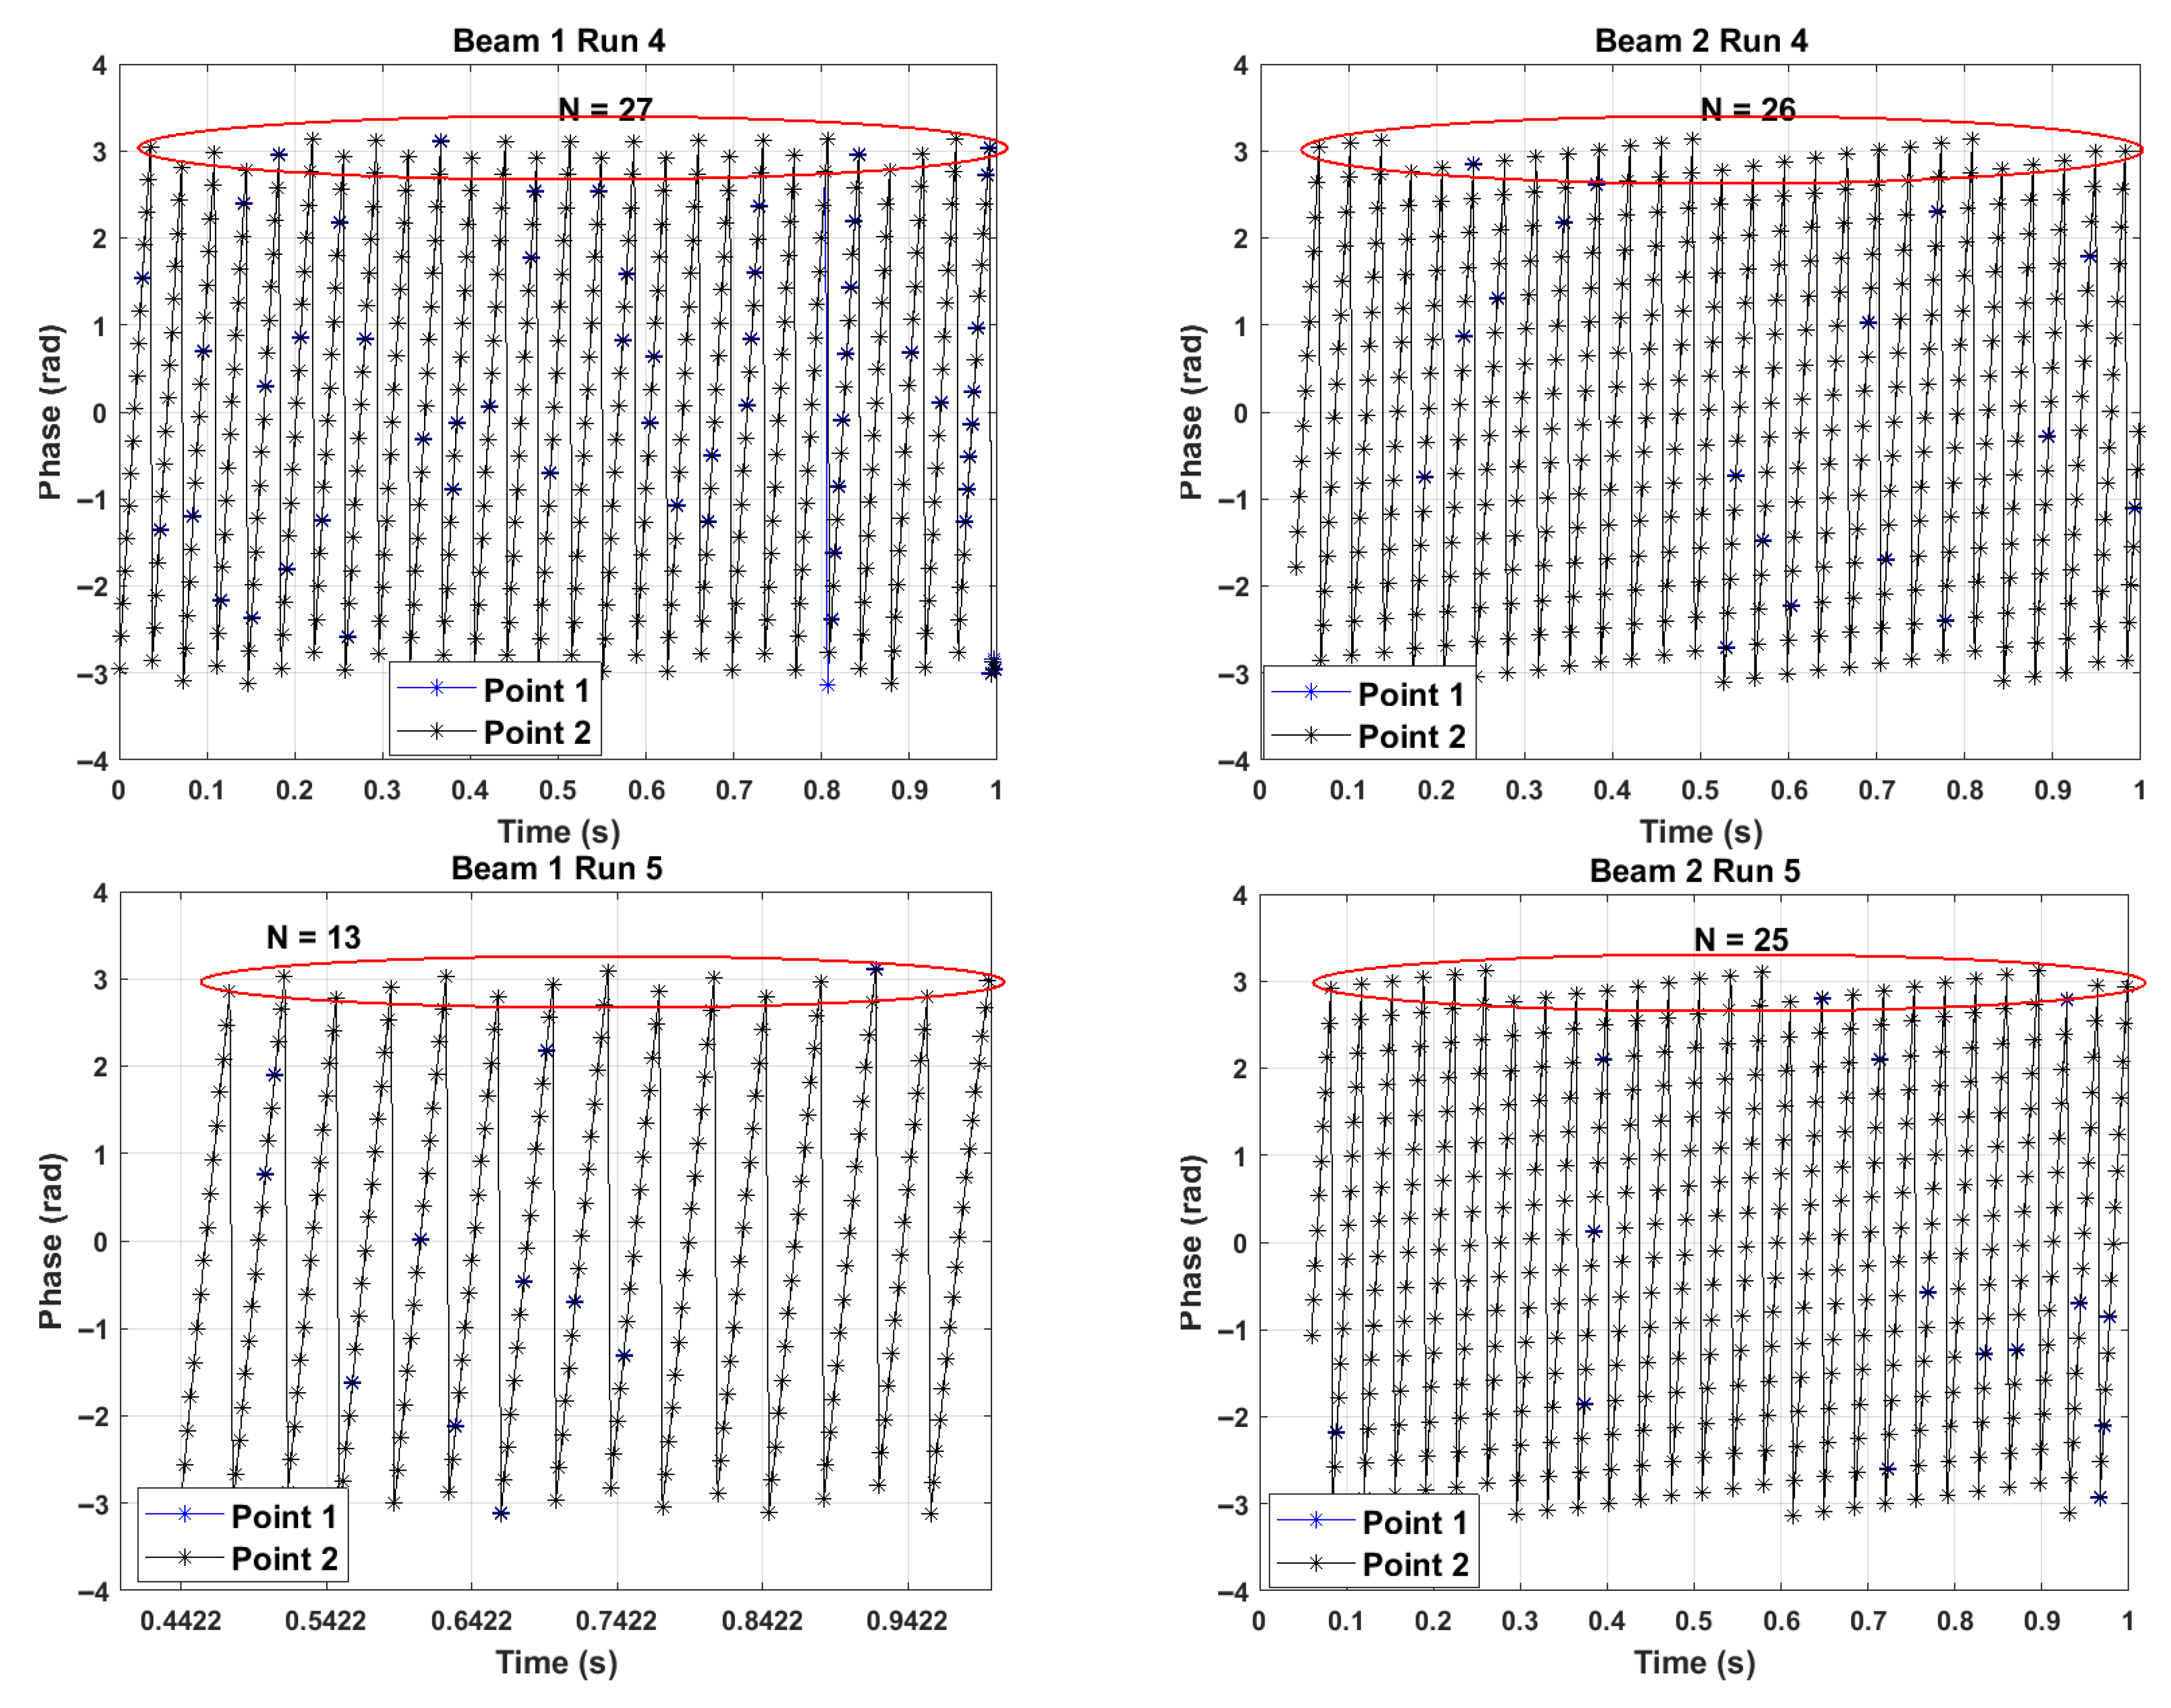
Figure 3f). Instead, in the case of composite materials, the natural frequency and damping ratios of the fundamental flexural mode were identified with continuous wavelet transform (CWT) from the displacement signals (see
Figure 3h).
Participant G was later involved in the benchmark targeting the composite specimens and the DIC technique. The specimen was clamped using hydraulic grips and aluminum spacers fabricated on purpose to obtain rigid clamping. An Allen key was used to apply and release the free end of the specimen. Details are reported in the following.
Table 2 and
Table 3 report a summary of the test specifications and their results for each participant and for each steel or composite specimen.
Figure 3 shows the various representations of the measurement results. Detailed descriptions of the tests carried out using the DIC techniques are outlined in the following
Section 4. To provide hints and insights on the effects involved in the preparation of the experimental setup when a rather novel and complex measurement approach is applied.
Noticeably, participants reported on the test setup and performance at different levels of detail; this actually highlights that there is a different perception of the significance of the laboratory practices on experiment outcomes.
4. Applications of DIC in Modal Analysis
The application of DIC techniques has recently come into play in many experimental evaluations, as this method allows interpreting the surface strain behavior of a component either in the laboratory or in the field. The method relies on applied patterns or speckles on a component surface, creating a reference image and then tracking their deformation on subsequent images, where the change in strain from the baseline is captured. Two- and three-dimensional approaches can be utilized not only to capture in-plane behavior but also out-of-plane strains.
However, the utilization of this capability comes with many details that need to be carefully applied; not only is the field of view important, but also the camera selection, DIC speckle or pattern size, lighting conditions, and the calibration pre-/during experiment. The extracted data has to be filtered and processed.
Participants B and F of this benchmark study initially used the DIC technique in their contributions.
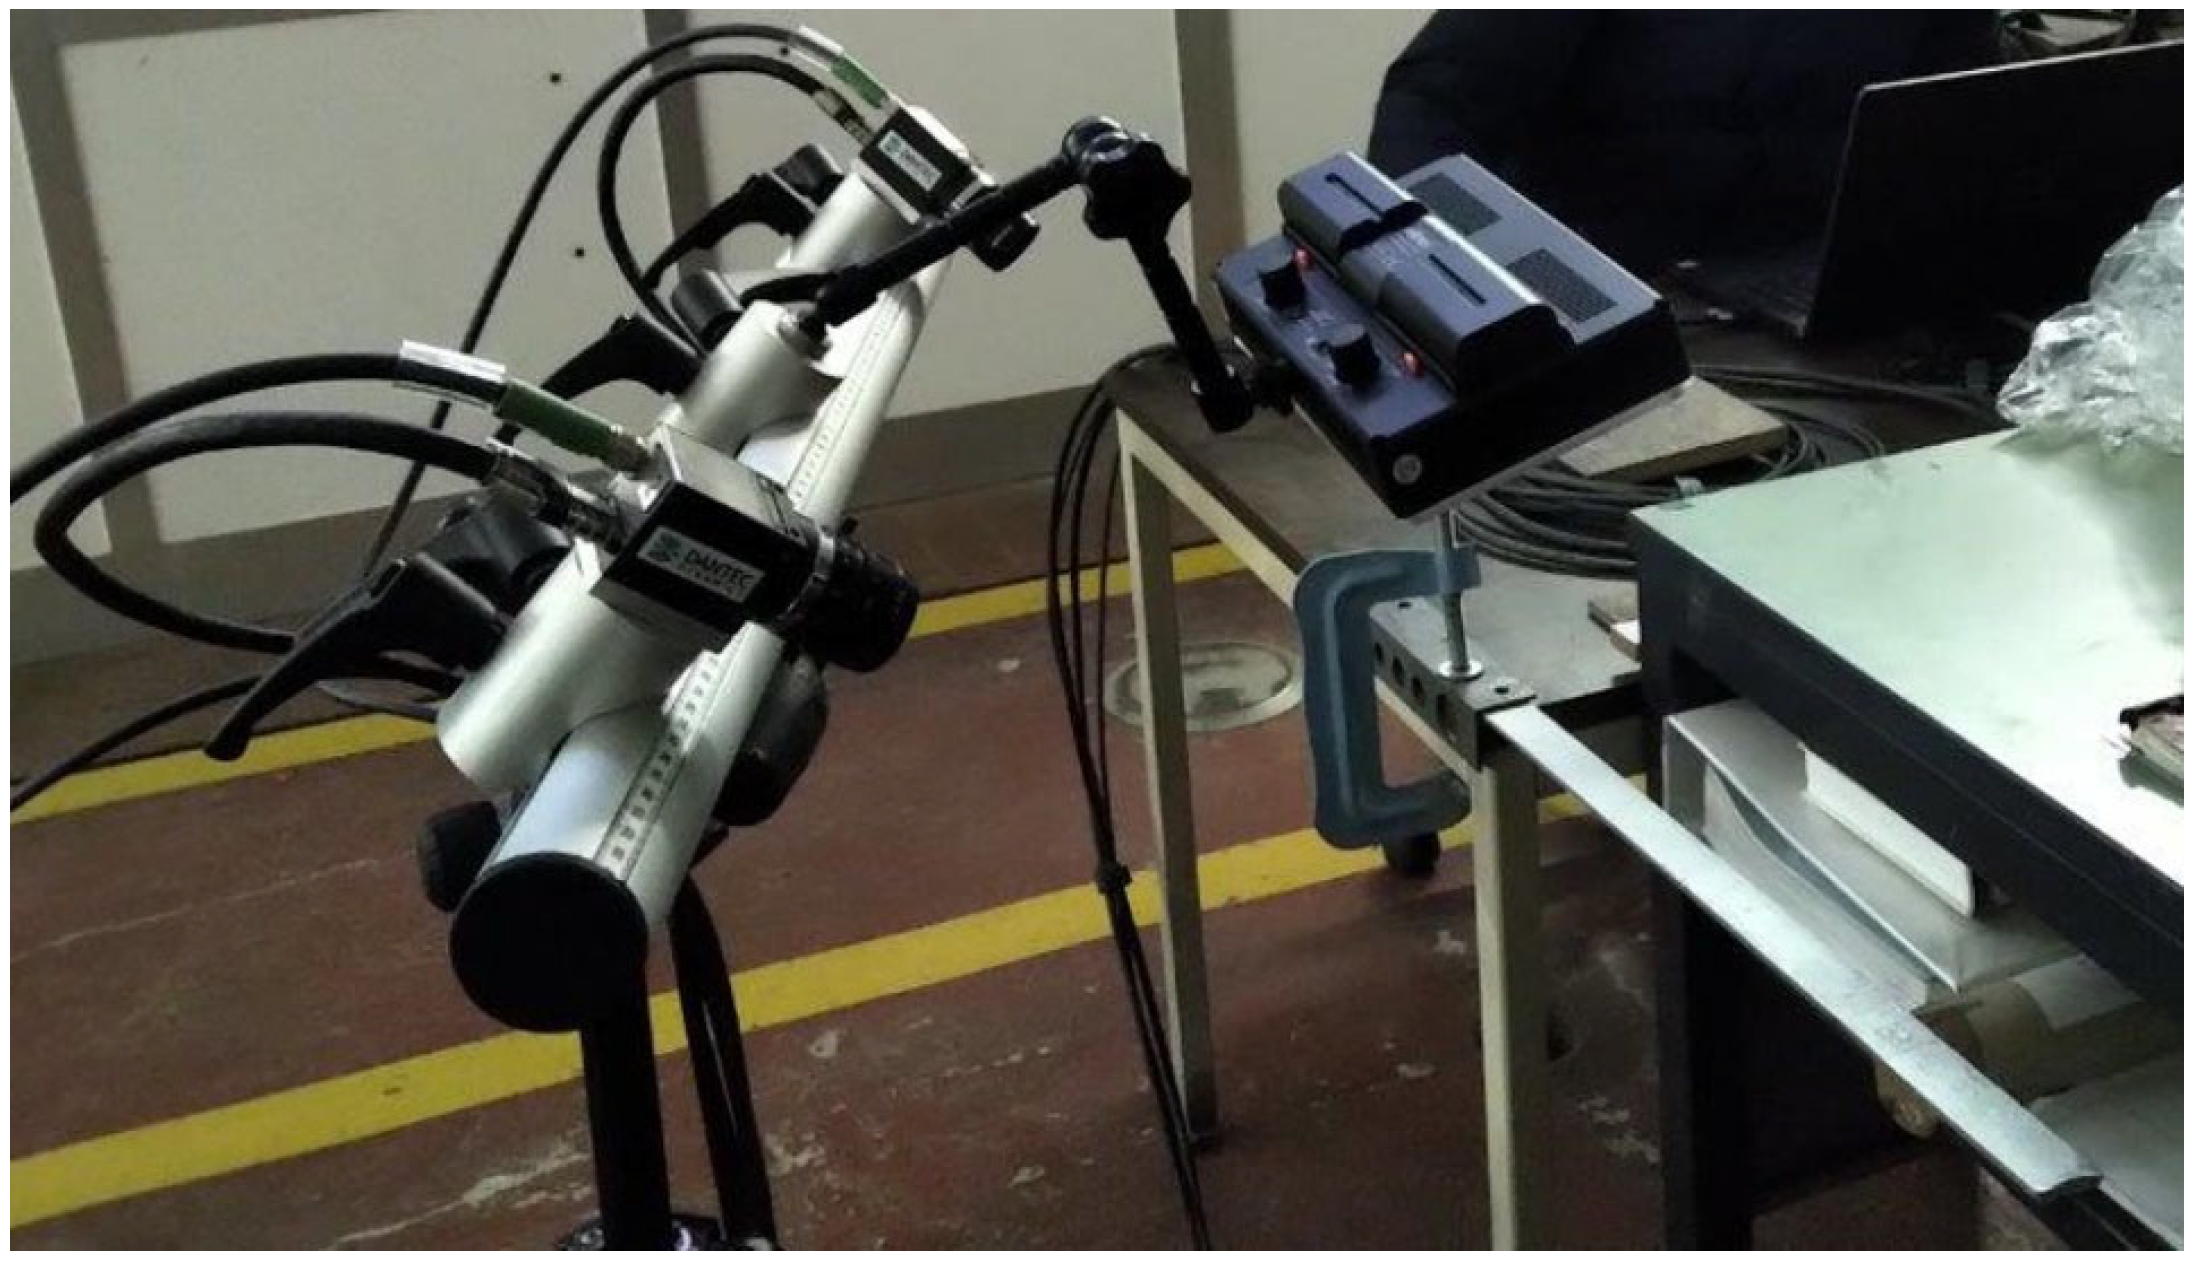
Participant B used the Dantec DIC Q400 System with two 3.1 MPix USB3 cameras. It was necessary to prepare the specimens’ surfaces using a spray painter to create a series of visible points in the digital images that could be detected by the two cameras. Numerous tests were carried out to obtain a suitable pattern. Finally, a white background and black speckles were created. It took some practice to obtain a suitable pattern whose speckles are sufficiently refined but well-separated from the background, allowing sufficient contrast. The beams were clamped on a heavy table, and the two cameras were set in the best position to acquire images, according to Dantec’s instruction manual (
Figure 4) [
10]. It is suggested to have a distance between them of about half a meter and a 90° angle, in such a way that the line of sight of each camera is approximately 45°.
Some preliminary operations (regulation of intensity and warmth/coolness of the light, focus setting of the cameras, and calibration of instrumentation) were required to obtain suitable images. When the images detected by the digital cameras of the instrumentation were judged appropriate for the purposes, it was possible to carry out measurements, taking pictures at a 100 Hz sampling frequency. The specimens were excited by a hammer at their free end. The displacement time histories were obtained by calculating the distance variation between at least two points from the camera reference system. The image correlation in Dantec ISTRA software was obtained by selecting the default image quality options in the software post-processing menu.
In
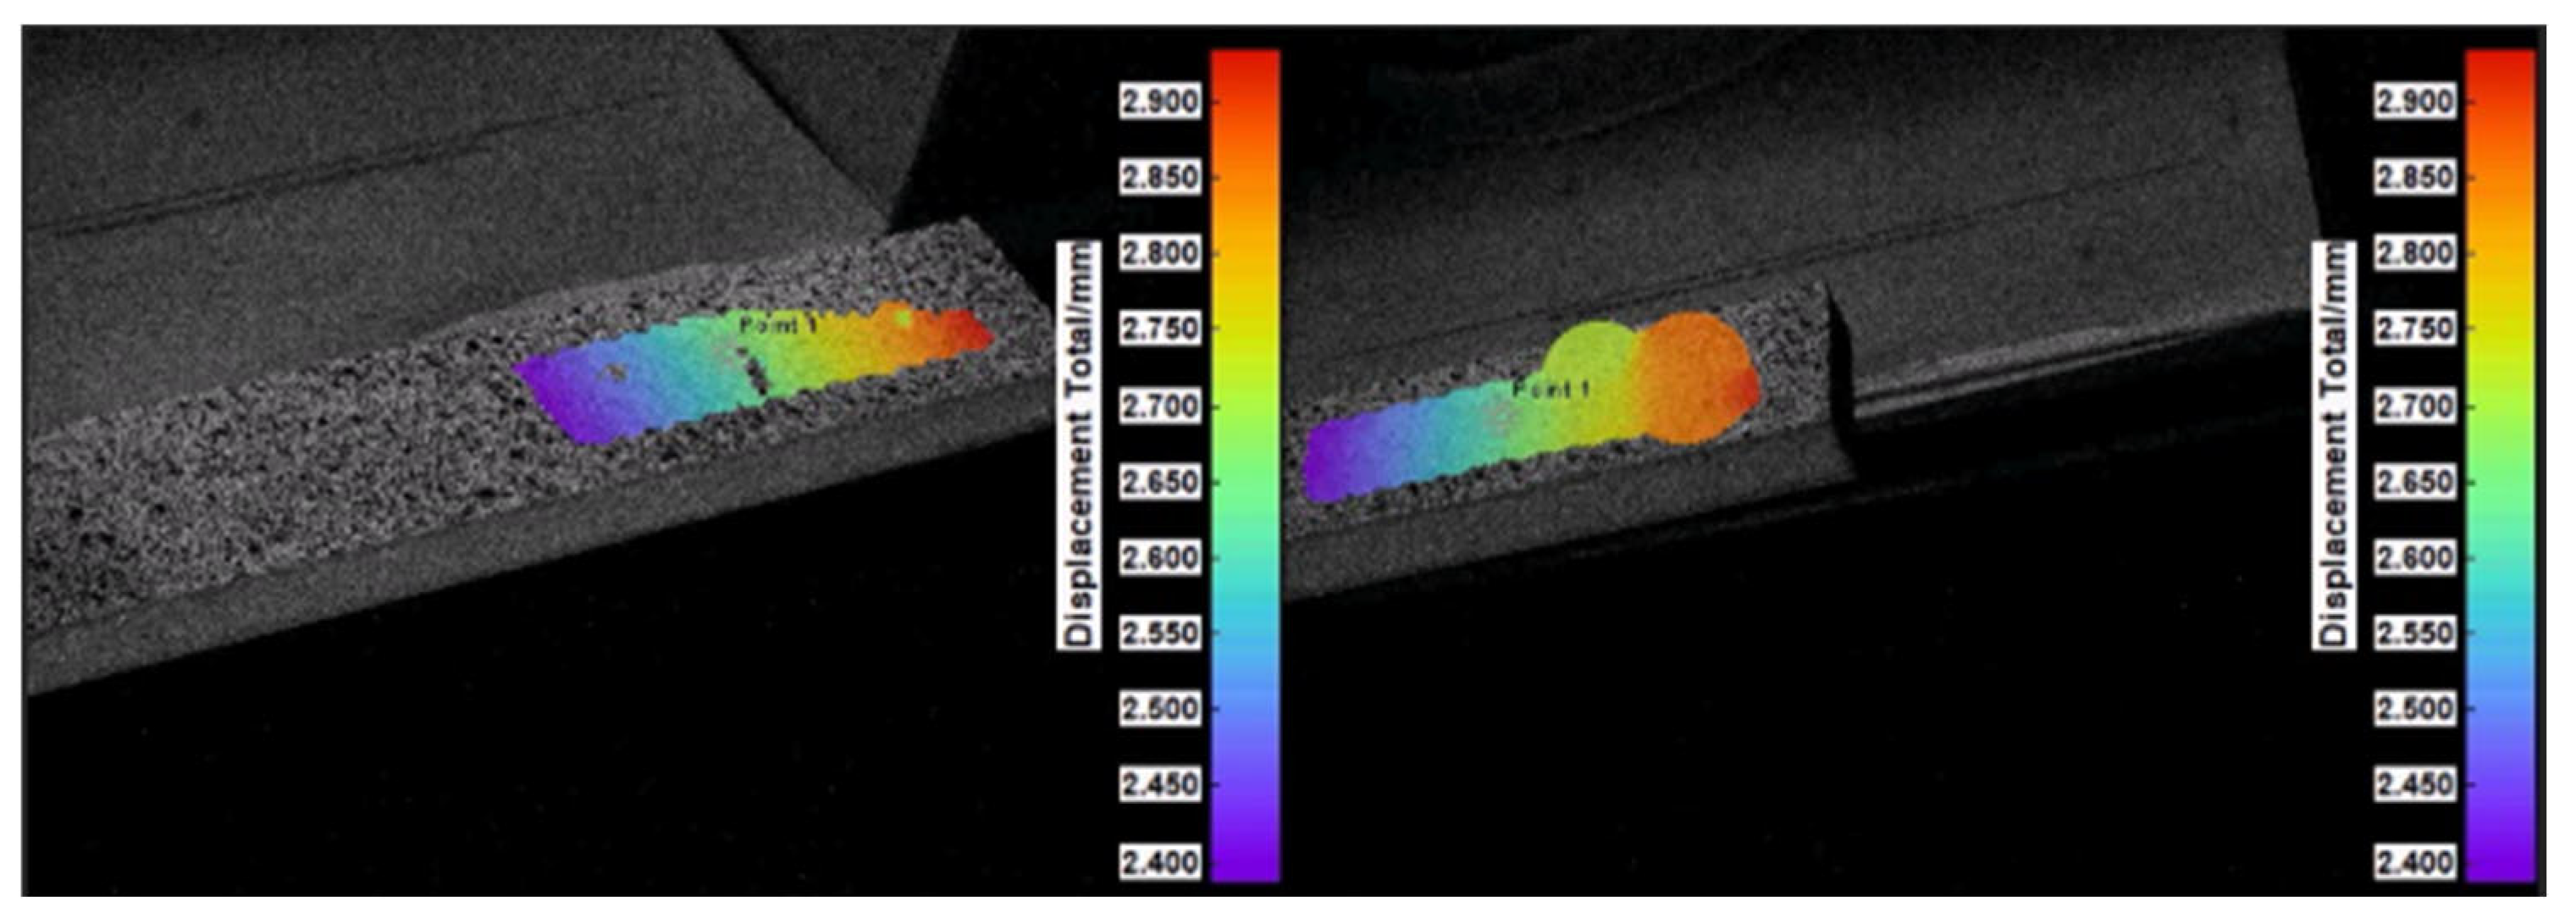
Figure 5, some examples of composite images taken by the two cameras of the Dantec ISTRA software analysis are reported. In
Figure 6, the composite and steel displacement time histories of a point measured by the Dantec ISTRA software analysis of participant B are shown. An example of the position of this measurement point for the sandwich is shown in
Figure 5. The Fast Fourier Transform (FFT) function performed on a time history measured at a point, available in Dantec ISTRA Software as well, is used to identify the first natural frequency of composite and steel specimens from the relevant amplitude spectra diagrams (
Figure 7). The first natural frequency results are 11.9 Hz for steel B1 and 25.4 Hz for the composite B2 specimen.
Participant F used the Aramis DIC System [
12] to measure the first natural frequency of no. 2 steel and no. 2 composite cantilever beams. An experimental setup with a DIC system for displacement measurement is shown in
Figure 8, consisting of two standard DIC cameras, as mentioned earlier, recording the motion with 450 frames per second and measuring the displacement of the speckle pattern points on the surface of the specimens (see
Figure 9) using the settings already outlined in the previous section. In particular, a cross calibration (no. 2 in
Figure 8) was set on a tripod, while a headlight (no. 4 in
Figure 8) and two cameras (no. 3 in
Figure 8) were directed to the specimen (no. 1 in
Figure 8).
Out-of-plane displacement of the beams was excited in a pull-and-release mode. For composites, the displacements were monitored at two facet points (in the following text referred to as simply Point 1 and Point 2) on the beams (
Figure 10). For steel specimens, the two facet points were set on the tip of the beam (see
Figure 11).
A total of 5 measurement runs were conducted for each beam, with a duration of 1 s for each run. The sampling frequency was chosen to be 454.5 Hz, corresponding to the maximum allowed frame rate for the system used. The recorded displacements were processed in Matlab
TM. For composite specimens, the modal parameters were estimated by applying the continuous wavelet transform (CWT) method, transforming the measured displacement signal to the time-frequency domain. Pulling and releasing a cantilevered structure at the tip induces sinusoidal displacement with an exponentially decaying profile. Such a response is transient in nature. As transient signals are not stationary, there is a localization of finite energy in both time and frequency domains. Thus, time-frequency analysis methods are proper to handle this type of structural response originating from short-duration force pulses. One of the most widespread methods of time-frequency analysis is the Wavelet Transform (WT) [
13,
14,
15]. Details of the analyses carried out are reported in
Appendix A.
Figure 12 illustrates the composite specimen subjected to testing and its measurement conducted using a basic measuring tape in the laboratory of Participant G, who was involved in the second stage of the benchmark a couple of years later than the others. Different from others, Participant G secured the specimen using a hydraulic wedge grip MTS 647.10A, maintaining a 500 mm length of unsupported span. To mitigate potential damage to the specimen due to excessive clamping force, aluminum spacers with a thickness of 11.55 mm were fabricated, thereby averting the risk of deformation under high pressure. The DIC system utilized for measurement comprised two cameras and two illumination sources as follows:
Cameras: Basler boost boA5328-100 cm.
Lenses: Schneider Kreuznach, JADE 2.8/35 C (focal length 35 mm).
Lights: Blue-X-Focus v3.
The data acquisition was performed using the Vic-Snap commercial software, and the subsequent analysis was conducted within the Vic-3D environment [
16].
A speckle pattern was applied to the tip of the specimen. The cameras and lighting sources were mounted on a tripod. The cameras were configured at an approximately 20-degree stereo angle, such that the sample was centrally positioned within the camera views, maintaining a distance of 55 cm from the cameras to the sample, as illustrated in
Figure 12. Following the alignment of the cameras, the lighting sources were oriented and adjusted accordingly. The focus of the cameras was manually adjusted directly from the lenses and subsequently locked after achieving the sharpest image. To facilitate an increased sampling frequency, the image was cropped to the area of interest, specifically an approximately 40 × 40 mm plane at the location of the speckle, as shown in
Figure 13. The frame rate was then configured to 500 Hz, with the exposure time set at 86 microseconds. Subsequent to these configurations, calibration was performed using a 14mm-10-dot calibration frame, adhering to the standard calibration procedure in which the calibration table is rotated and translated within the field of view of the cameras, approximately at the distance of the sample. Polarizing lenses were affixed to the cameras prior to measurements to mitigate local overexposure during the data acquisition process.
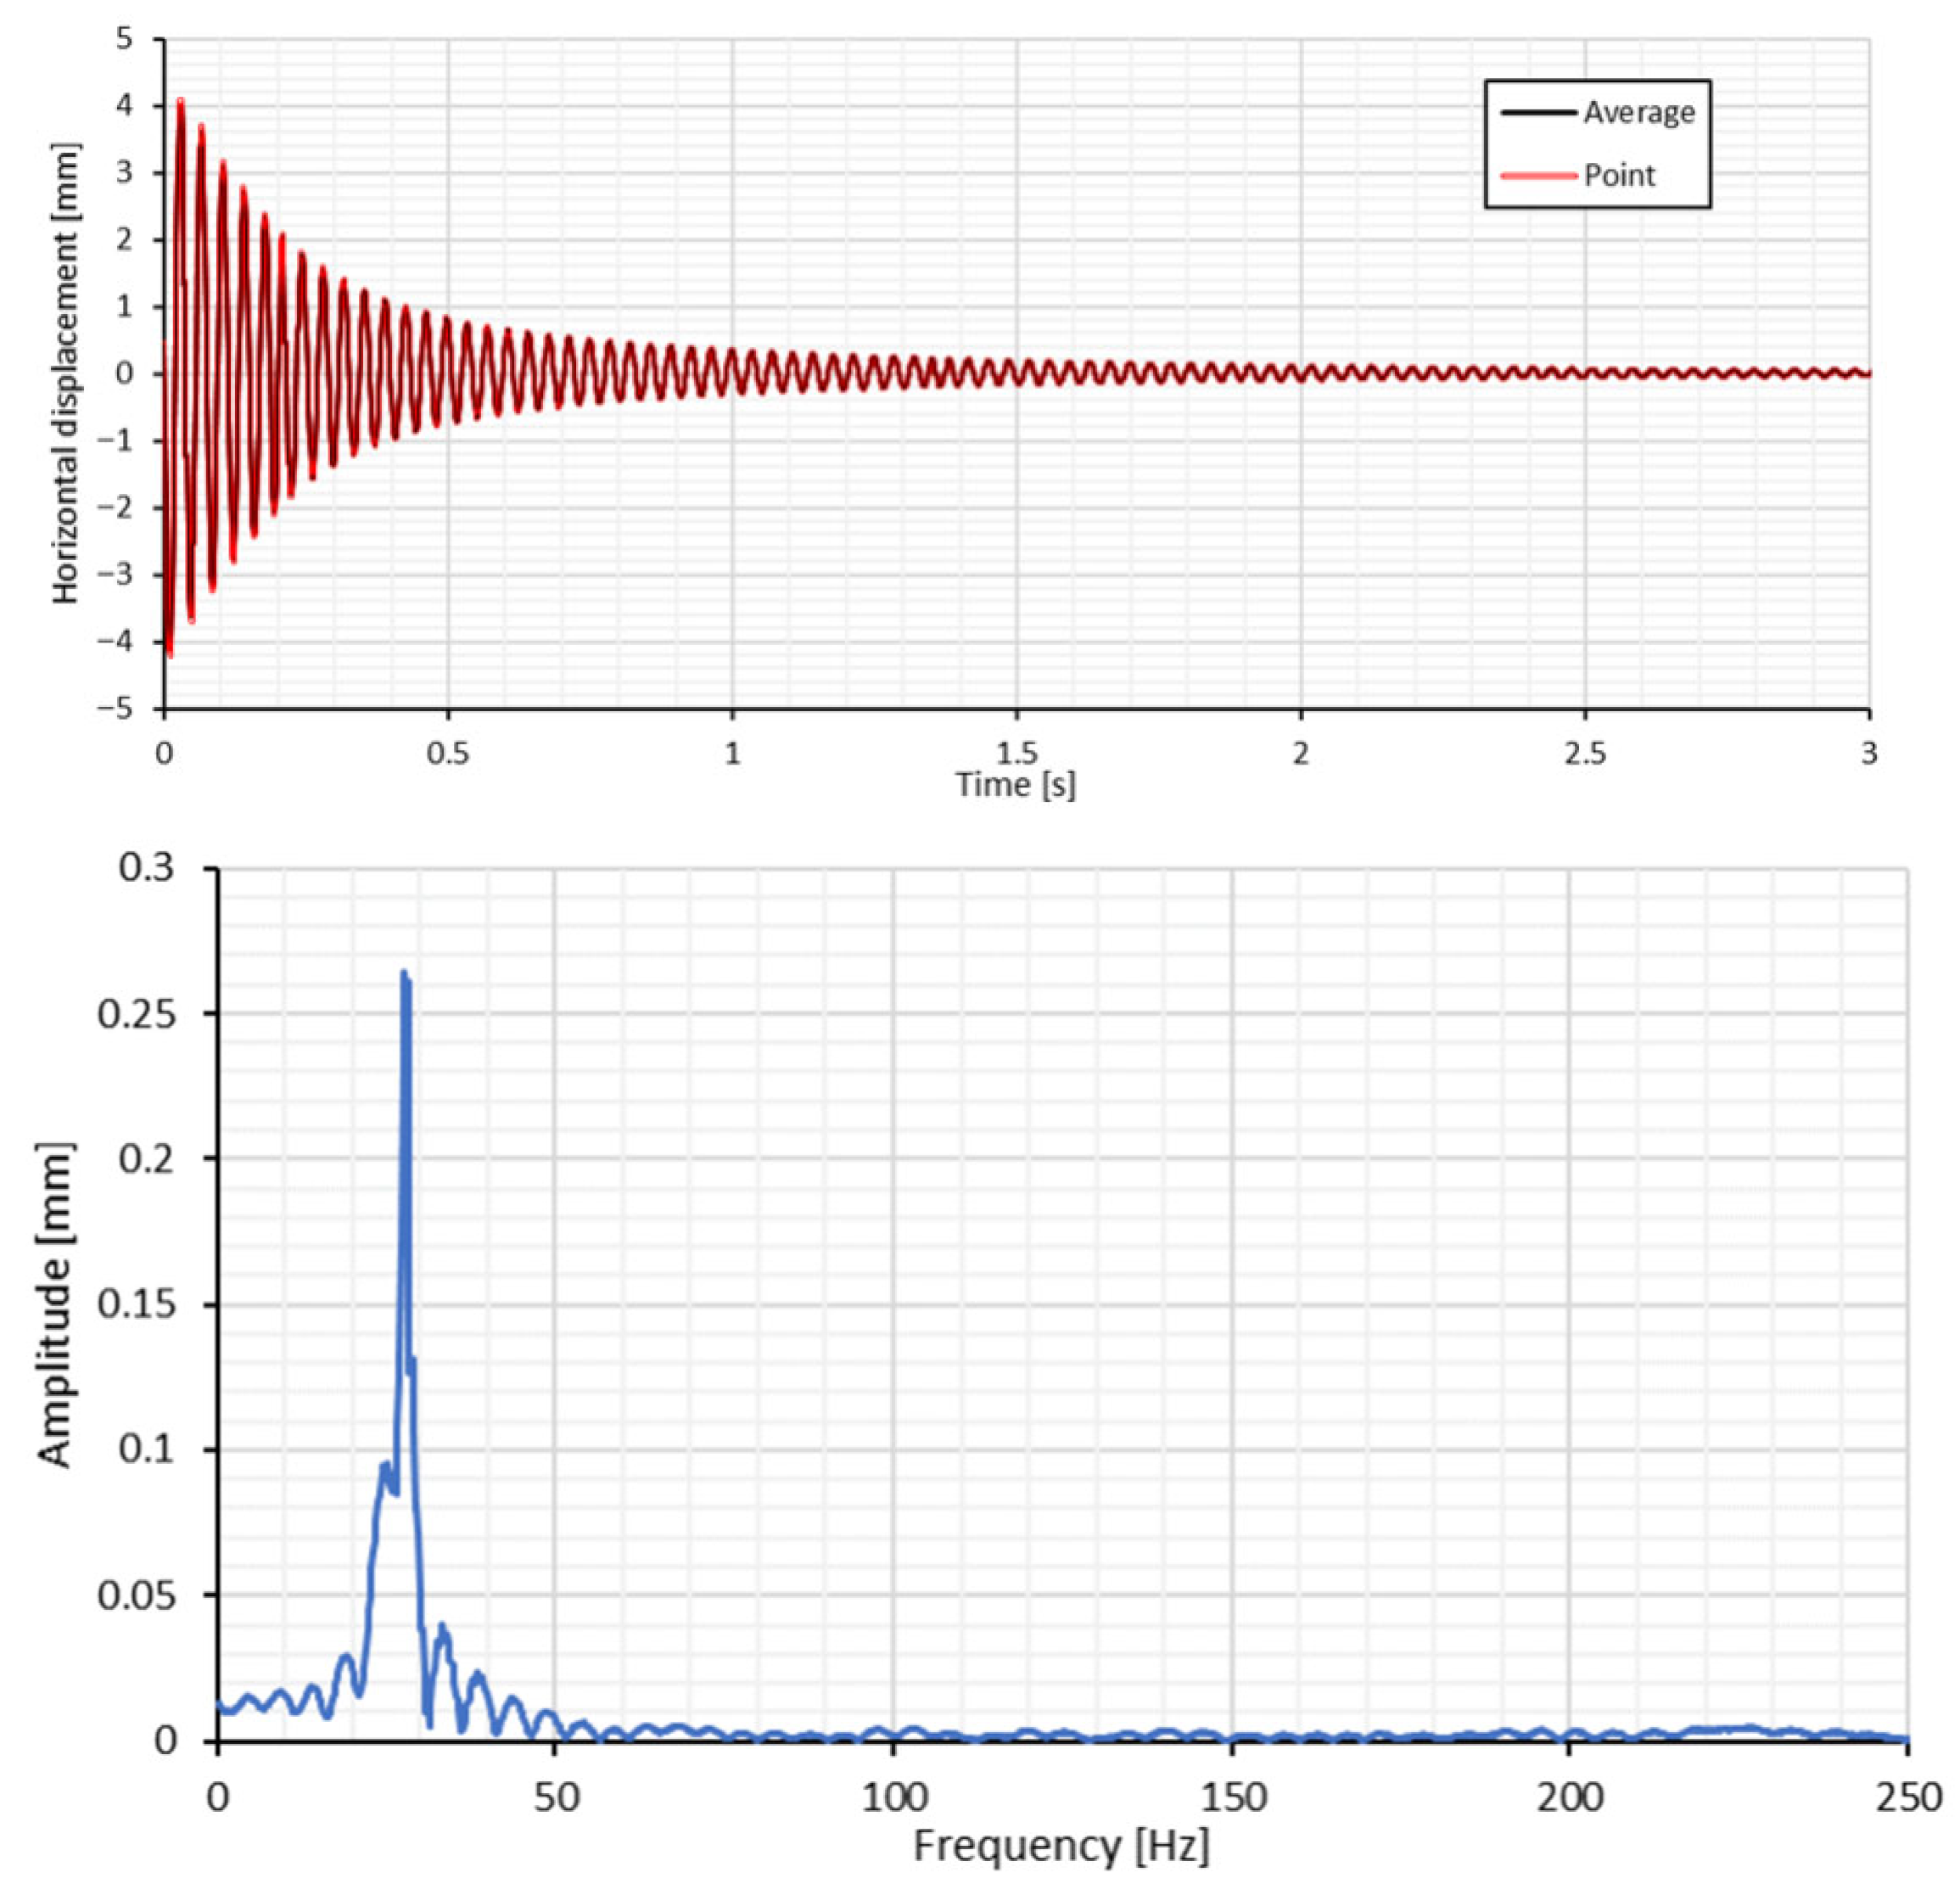
Calibration images and measurements were acquired utilizing Vic-snap software, too. The sample underwent excitation through horizontal force applied via an Allen key at its lowest corner, followed by its release to facilitate free vibration. Measurements spanning approximately 20 s were recorded. Subsequent to recording the vibrations, the gathered data underwent analysis using the Frequency Analyzer tool integrated into the Vic-3D software. A calibration routine was executed within the program to generate a calibrated database. To minimize projection error, the “Auto Correct Calibration” function was employed, successfully reducing the error to 0.05 mm. During data analysis, initial displacements were excluded from consideration. To determine the first eigenmode, horizontal displacements were calculated from the images, both as an average over the defined area of interest and from a specific point, as illustrated in
Figure 13.
Figure 14 displays a three-second excerpt from the measured time history, wherein the phase of average displacement over the area and displacement at the point closely correspond. Consequently, the Fast Fourier Transform (FFT) was applied exclusively to the average area using the tool. The FFT results indicated the highest amplitude, identifying the first natural frequency as 28 ± 0.2 Hz, which is approximately 10 percent higher but consistent with the DIC results reported in the earlier benchmark tests.
The preceding detailed descriptions elucidate that multiple instrumentation parameters require appropriate configuration by the user, while numerous other parameters remain unreported due to their integration within the proprietary software employed in this and other instances. Nevertheless, the measurements align with those documented in the initial phase of the benchmark with traditional techniques.
5. Analytical and Numerical Comparisons
When implementing an experimental campaign, both in advance when designing it and later on after its completion, some comparisons with analytical and numerical estimates are generally carried out for verification purposes. Nowadays, numerical analyses, especially finite element analyses (FEA), are rather common and widely applied in structural testing.
In this case, experimental results were assessed using both analytical formulas, provided by the approximated beam theory and finite element models (FEM) solving eigenvalue analyses. Participants A, B, and D used the following formula to estimate the cantilever’s first natural frequency [
17]:
where
ρ is the material density,
EI is the flexural stiffness of the cantilever,
A is its cross-sectional area, and
L is its free span. Participant B calculated Young’s modulus
E of the composite sandwich as the weighted mean of the longitudinal Young modulus of the skins
and core
(by applying the mixture rule):
where
represent the core, the skins, and the total volume, respectively. Glass layers’ mechanical properties were evaluated from the nominal fiber and matrix properties, using the Halpin-Tsai standard formulas for composite laminates (classical laminate theory). Biaxial properties were calculated considering the resulting mechanical features as the sum of those of two uniaxial layers with half fiber volume fraction in longitudinal and transversal directions. The Young modulus of biax ±45° layers in the longitudinal direction was evaluated using standard rotation formulas to carry out the reference axes transformation.
In the FEM frequency calculation, participant B used the “Enriched Subspace Iteration Method” in ADINA v.9.5 software [
18], using #600 MITC 9-nodes shell elements and 5 mm mesh element size. Steel material was characterized by considering nominal values of Young’s and Poisson’s modulus (see
Table 1). Composite sandwich, instead, was modeled using #600 MITC multilayer 9-nodes shell elements to simulate the orthotropic behavior of the skins and the isotropic property of the PVC core. In the ADINA software, also, the layer principal directions were also set according to the actual stacking sequence (biax ±45°; twill 0°/90°). Orthotropic skin properties used, calculated as reported in [
19], are shown in
Table 4. The dimensions of the free edge used were the ones measured and reported in
Table 2.
Participant D used ANSYS Mechanical software’s default mechanical properties for steel [
20]. The mesh element size chosen was, in this case, 4 mm.
Participant F calculated the first natural frequency of the steel specimen using the MSC Patran-Nastran software and applying the Timoshenko formulation. Material characteristics imposed were E = 2.07 × 10¹¹, Density = 7850 kg/m3, and Poisson’s ratio = 0.3. Numerically, #18 elements of nominal size of 27 mm were used. Dimensions of the free edge considered were 550 × 29.5 × 4.9 mm.
Participant G used FEMAP 12.0.1 as a pre-/post-processor and NX Nastran Solver to solve the problem, using #640 4-nodes quads shell elements with a size set to 4 mm in length. In detail, the dimensions of the free edge used were 500 × 32 × 5.8 mm, while the material parameters were E = 2.07 × 10¹¹, Density = 7850 kg/m3, Poisson’s ratio = 0.3.
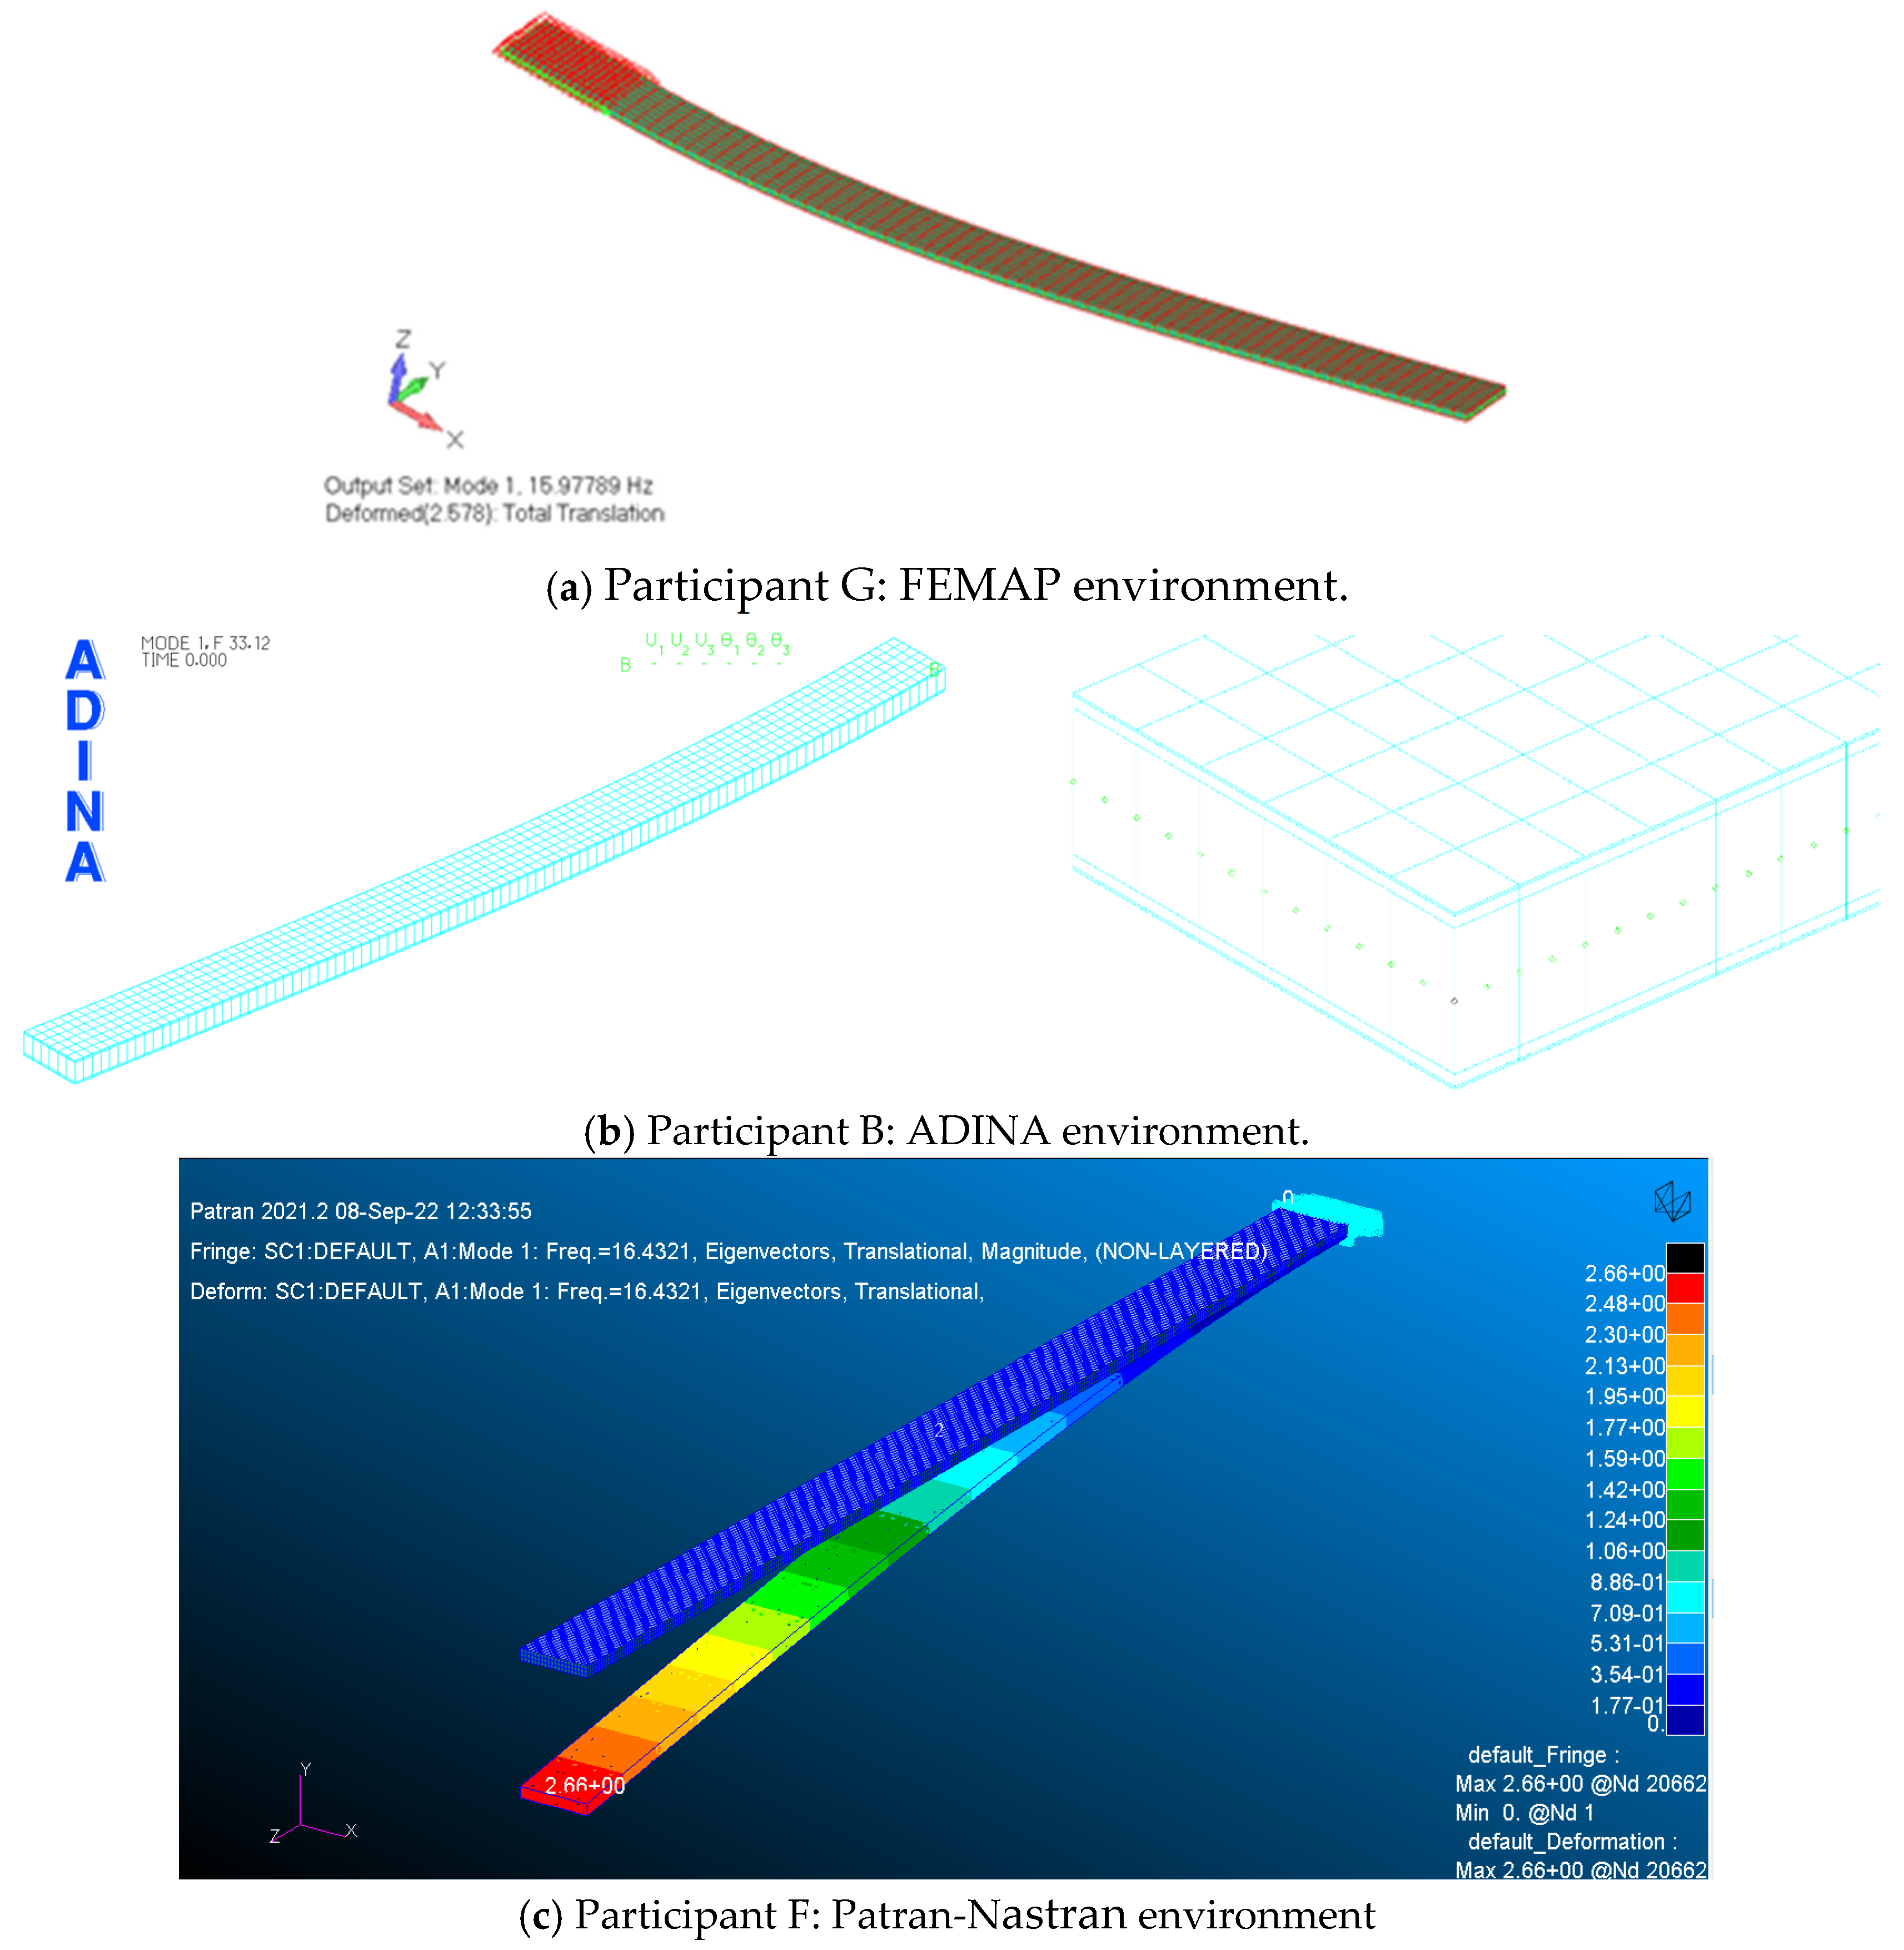
In
Table 5, the summary of analytical and numerical analyses are reported and in
Figure 15 analyses examples are shown.
6. Discussion
Measured specimens’ dimensions, weight, and material input properties used in calculations can be affected by uncertainties. In
Table 6, a rough uncertainty analysis is proposed to highlight their influence on the experiment outcomes. It is assumed that the scatter of specimen section dimensions deviates by ± 0.1 mm from the measured values, depending mainly on instrumentation accuracy, while material properties scatter is taken in a reasonable range.
This uncertainty of the specimen’s measurements and material property scatter can be taken as a minimum uncertainty, especially in the case of the composite, whose characteristics are strongly influenced by the type of fabrication process. The wide range of choices that can be, and are actually made in everyday practice, can affect the results significantly in addition to the a.m. figures. For steel, 2.5% shall be accounted for, whilst for composites, 5% is a fair estimate, based on the uncertainty assumptions used in
Table 6. So, understanding the effect of the accuracy of specimen measurement and property variations on the results is essential in a complete analysis of a particular phenomenon. Repetition of measurements is the first step to control the accuracy.
Uncertainty Quantification
In
Table 7 and
Figure 16, the descriptive statistics of mean frequency and the scatter of results (minimum, maximum, and range) obtained in experimental tests and by calculations carried out by participants are summarized. In addition, confidence intervals were calculated according to the following formula:
where
is the mean of the identified natural frequency,
is the sample standard deviation,
is the number of observations and,
is a critical value of Student’s t-distribution with
degrees of freedom and a significance level
. Confidence intervals are usually reported at a 95% confidence level. In that case,
. Confidence intervals are separately provided in
Table 7.
In uncertainty analysis, it is of interest to explore whether the means of different groups differ significantly. Hypothesis testing was employed, where the null hypothesis was that random samples drawn from two populations have the same distribution. We compared the means of identified natural frequencies in experimental setups versus numerical simulations for both beams. In our case, since the number of observations
was small and data normality could not be assumed, the nonparametric Mann–Whitney U-test was an appropriate tool for this purpose. The
U-statistic was calculated as
where indices 1 and 2 denote group “1” and “2”, which are experimental and numerical, respectively.
and
denote the sample sizes of both groups and
,
are the sums of ranks in group 1 and group 2, respectively.
is obtained in the following steps: (1) sorting the data from smallest to largest, (2) assigning ranks—rank 1 to the smallest and the largest rank to the largest value, and (3) summing up all the ranks. Afterwards, the
U-value was taken as the smallest of both the
and
:
The
p-value of the Mann–Whitney
U-test was obtained from statistical tables of this test. For a one-sided test, this
p-value represents the probability of observing a value of U or lower. The key findings from these
p-values lie in the fact that if
p < 0.05 (at 95% confidence level), the difference in means is statistically significant and vice versa. The obtained results are shown in
Figure 16, which illustrates three key results:
Mean values of all four groups of natural frequency datasets;
The 95% confidence intervals for these means;
p-values of the Mann–Whitney U-test for groups composite experimental versus composite numerical and steel experimental versus steel numerical.
First of all, the means of natural frequencies obtained in numerical simulations are higher than those obtained in experimental identification for both beams. Secondly, the 95% confidence intervals are wider for composite specimens compared to the steel specimens, which implies higher variability in results related to composite specimens, as expected. Nevertheless, the visual inspection of
Figure 16 suggests that the confidence intervals for experimental versus numerical groups overlap for both beams. This overlap might signal that there is no significant difference between the means of natural frequencies. A more thorough investigation on this matter, though, is achieved via the
p-values of the Mann–Whitney U-test. The
p-value = 0.0437 < 0.05 for the composite specimens indicates that there indeed is a statistically significant difference between experimental and numerical results. On the other hand, the
p-value = 0.0809 > 0.05 for the steel specimens shows that there are no significant differences between experimental and numerical results. Therefore, we must reject the null hypothesis that natural frequency values (experimental and numerical) are drawn from the same distribution in the case of composite specimens, while we cannot reject this null hypothesis for the steel specimens. Another means of uncertainty quantification is through the coefficient of variation, which is calculated by using the following equation, in which
is the standard deviation and
the mean:
The coefficient of variation describes the size of the standard deviation in relation to the mean, expressed as a percentage. Simply put, the larger the coefficient of variation, the larger the uncertainty. Coefficient of variation results are included in
Table 8 along with the confidence intervals and the
p-values of the Mann–Whitney U-test. The largest coefficient of variation is observed for experimentally identified natural frequencies of composite specimens. Numerically calculated frequencies show a smaller CoV, but it is still larger than the corresponding value for steel.
In the case of analytical and numerical calculations, the different choices of analytical formulas, software, and numerical models (i.e., mesh in FE) can provide a scatter of results. It is noted that the scatter in the results of numerical methods is as large as that of experimental methods for steel specimens. For the composite specimens, the range of experimental results is larger than that of the numerical results. This can be attributed to the setup choices, and therefore, one could argue that numerical and experimental methods have a similar level of uncertainty.
The variation in experimental results is partly contributed to by the selection of sensors and measurement techniques, as the chosen instrumentation influences the information one may gain from an experiment. For instance, the mass of an accelerometer compared to the weight of the specimen matters. Where the lightweight accelerometer did not influence the natural frequency measured on the steel beam (participant A), the same sensor influenced the natural frequency of the composite specimen. Moving it away from the largest excitation, and therefore reducing the modal mass, reduced the effect. It is noted that the modal mass depends on the excited mode and the position of the sensor. Therefore, the effect on the measurement is different for each mode. Thus, sensor placement location is of influence as well. Strain gauges, laser, and DIC do not influence the modal weight substantially and are therefore considered non-intrusive methods, thus not influencing the results. In practice, however, differences were found in two cases (participant B and participant E) because of the instrumentation settings as well as their practical application. Repetition is in itself a challenge, as can be seen with Participants B and F, where similar measurements gave dissimilar results despite all conditions, settings, implementation, and operators being the same. It does confirm, though, that repetitions are necessary to control the uncertainties or at least to assess them.
Only the first natural frequency was purposely aimed at in combination with manual excitation. Higher-order modes can be retrieved in a manual method, given that the sample rate is sufficiently high and sensors are not located at the node of a mode. Noticeably, the sample rate was set rather differently by the participants, likely on the basis of an approximate frequency estimated by engineering judgment and/or the capability of the data acquisition equipment.
When using an instrumented hammer, damping and amplification factors can be retrieved as well. These additional parameters can be used to judge the reliability of the test results, albeit that these parameters come with their own uncertainty as well.
When performing vibration measurements on a real structure, with inherently larger dimensions and possible complex joints, uncertainties will be generally larger. E.g., an error of length measurements in the order of ±0.1 mm can be relatively less relevant on a specimen in full scale. However, the final error can increase, for example, due to variation in material parameters, the damping coefficient of joints, and additional non-structural elements. Further, the location of sensors and the execution of measurements may be hampered. For instance, the direction of measurement may not be the desired one. Considering as an example the measurements using the DIC method of steel specimens F1 and F2 and looking only at the Discrete Fourier Transform results in the transversal direction (x-direction), it is not easy to extrapolate the first natural frequency, which seems to be covered by the frequencies of higher order. In space, this issue can become relevant, requiring more refined vibration analyses. In addition, uncertainties on Young’s modulus, caused by the spatial distribution of the imperfections in the material, can increase, especially in composites. Also, the sensor setup can become crucial to measure the requested vibration to avoid losing data. Finally, the constraints are surely not perfect. As an example, bolts could not be properly tightened. All these considerations should be taken into account in the preparation of tests, requiring an effort that can be significant for the designer in order to obtain good results.
7. Conclusions
In this benchmark study, a relatively simple but well-defined experiment performed by seven parties was established to better understand the impact of laboratory practices in the framework of experimental analysis of ship and offshore structures. It is clear that a vast range of choices can be made to carry out the tests. Besides the selection of the appropriate sensors and instrumentation, several additional aspects contribute to the total deviation of results obtained by each participant. Scatter is obviously related to the accuracy of the applied testing equipment, but there are many other sources of uncertainty, which are often not controlled or even known or considered, though they are more significant and influential. Sometimes, despite cutting-edge and expensive technologies, experimental results are not accurate because of inaccuracies in the setup of the tests, in adjusting instrumentation parameters, or in lacking/missing information about the boundary/loading conditions. Uncertainty indicators, such as CoV, extracted from the analyses of the experiments (see
Table 8), namely about 23% for the composite data and 12% from the steel ones, can be considered particularly significant if related to the fact that the type of test was very well known by the research teams involved in the benchmark. Similar considerations are valid with respect to the CoV calculated from the numerical results, even if their values are slightly lower (about 14% from the composite data and 9% from the steel ones).
Understanding the effect of the choices on the final result is indeed essential. For instance, the weight of a sensor compared to the weight of the test object influences the assessment of the natural frequency. Lightweight structures, such as the composite beam, would be better instrumented by non-intrusive devices, such as using strain measurements, lasers, or DIC techniques.
Also, the chosen instrumentation influences the information to be gained from an experiment. For example, only the first few natural frequencies are found by manual excitation, while also damping and higher-order modes are obtained when using an instrumented hammer. In order to understand the many experiments that are performed worldwide, sharing the results and being transparent about the methodologies of experimentation is very beneficial for making the most out of any experiment and subsequent comparisons with replications, either numerical or experimental.
It appears that the scatter of experimental data has a similar level to that of numerical analysis results, such as FEM comparisons, and one should consider them. This apparently unexpected result may be considered as a reference for groups that use round-robin procedures for numerical analyses. It implies that the experimentation, which involves technical, theoretical, and practical aspects, must be considered as a datum that should be carefully analyzed, even if made by the experts in the experimental sector, in a sort of human-factor assessment in which all choices and issues that laboratory technicians may apply are included. The important values of uncertainty found from the results of an apparently trivial test underline the importance of the assessment of human choices and practices in the complexity of the marine environment or similar ones, where larger dimensions, not easily repeatable loads, and other unknowns are involved.
Experimental data should be published as is in digital format and not only as a by-product in a publication, e.g., as figures, limiting its use. In general, digitalization should be regarded as the best opportunity to share and exploit experimental data. Data on the sensors, data acquisition, and boundary conditions are essential to discuss the differences that may arise from future comparisons.
