Article

Displacement Measurement Method Based on the Rotating Paraboloid Array

1
State Key Laboratory of Precision Measuring Technology and Instruments, School of Precision Instruments and Opto-electronics Engineering, Tianjin University, Tianjin 300072, China
2
Center of Micro/Nano Manufacturing Technology, University College Dublin, D04 V1W8 Dublin, Ireland
3
Key Laboratory of Advanced Transducers and Intelligent Control System, Ministry of Education, Taiyuan University of Technology, Taiyuan 030024, China
*
Authors to whom correspondence should be addressed.
These authors contributed equally to this work.
Appl. Sci. 2019, 9(16), 3315; https://doi.org/10.3390/app9163315
Submission received: 7 July 2019 / Revised: 5 August 2019 / Accepted: 9 August 2019 / Published: 13 August 2019
(This article belongs to the Special Issue Laser Acceleration Technology and Applications)

Abstract

:

Featured Application

In this study, a displacement measurement method based on the rotating paraboloid array with large range has been developed. The purposed system has potential applicability for detection of geometric errors, such as the position error and straightness error of multi-axis systems. According to the size of multi-axis systems, the number and size of rotating paraboloid in the array can be adjusted appropriately. Therefore, the presented method can be applied to a variety of occasions related to multi-axis systems.

Abstract

Using an optical freeform surface to realize the precision measurement of displacement has become a research focus in the present day. However, the measurement range of this method is limited by the size of the freeform surface processed. In order to overcome this difficulty, this paper presents a two-dimensional displacement measurement system with a large range, which is composed of a slope sensor and a rotating paraboloid array. The slope sensor utilizes the optical structure of an autocollimator with minor optimization, and the rotating paraboloid array expands the measurement range of the system in a discrete manner. The experimental results showed that the optimized optical system enhanced the measurement accuracy to ±0.4 μm within the range of 1500 μm and the overall measurement error was approximately ±2 μm when measured within the range of 450 mm. The developed measurement system has potential applicability for detection of errors, such as the position error and straightness error of multi-axis systems.

1. Introduction

Ultra-precision displacement measurement technology has become a research focus in the field of measurement technology [1,2,3]. Displacement measurement methods have a wide range of application requirements in different fields, such as structural health monitoring [4,5], civil engineering [6,7,8], and manufacturing industries [9,10]. In particular, with the development of science and technology, the demand for precision displacement measurement technology has increased in precision instrument manufacturing, precision machine tools, and precision movement platforms [11,12]. Displacement measurement technology is mainly divided into non-optical measurement technology and optical measurement technology. On the one hand, non-optical displacement measurement methods include capacitance measurement and inductance measurement [13,14]. On the other hand, laser triangulation [15], optical levers [16], grating displacement measurement [17], fiber displacement measurement [18], and laser interferometry [19] belong to the optical displacement measurement methods. The capacitance measurement method can achieve high measurement resolution, but its range is shorter, generally less than 1 mm [20]. The measurement accuracy of the inductance measurement method can be up to ±0.1 mm, but it has a poor dynamic response and the structure is more sophisticated [21]. Laser interferometry has been widely used in the field of precision displacement measurement [22,23]. It has the advantages of high measurement precision and large range. However, it is sensitive to environmental interference, high cost, and complex instrument adjustments. In addition, large volumes also make it difficult to integrate into an industrial system for automated online measurement. Grating measurement has high precision and is not sensitive to the environment, but it is restricted by its sophisticated manufacturing level [24]. The measurement of two-dimensional displacement requires the use of planar grating, however, the planar grating is difficult to manufacture and the cost is higher.
An optical freeform surface has a complex surface and more degrees to be controlled, so that it is capable of achieving optical mapping relationships [25]. Currently, optical freeform surfaces are widely applied in various fields. In particular, because of the large amount of geometric information in an optical freeform surface, it has broad application prospects in the area of displacement measurement [26,27]. For instance, Gao realized the nanometer scale measurement of two-dimensional displacement based on an optical freeform surface with a double sinusoidal surface [28,29]. The surface structure of the double sinusoidal optical freeform surface is made up of the superposition of a periodic sinusoid in the directions of x and y. The space wavelength of the sinusoid is 150 pm and the amplitude is 100 nm. However, the range of the periodic sinusoid in the x and y directions is only 50 mm. Similarly, the motion range of straightness error measurement using the 3D sinusoidal-groove linear reflective grating by Hsiu-An Tsai was also shorter than 100 mm. This measurement range could be suitable for the error detection of a small precise multi-axis system. As for the linear axis motion in a large space, the detection method is ineffective. Of course, in the measurement case, non-optical sensors, such as capacitive displacement sensors with high accuracy, also appear to be powerless because of their short measuring range [30,31]. In order to overcome this difficulty, we need to improve the measuring range of the instrument. Our laboratory has completed the measurement of 2D micro-displacement on a single rotating paraboloid. In this paper, a 2D displacement measurement method based on a rotating paraboloid array is introduced.
To improve the measuring range of the method based on a rotating paraboloid, this paper presents a two-dimensional displacement measurement system, which is composed of a slope sensor and a rotating paraboloid array. The slope sensor is based on the principle of the autocollimator and has been optimized to achieve higher precision measurement of two-dimensional displacement. The rotating paraboloid array is precisely calibrated for the purpose of rapid measurement, which expands the measurement range of the system in a discrete manner. To verify the feasibility and accuracy of the proposed method, a series of experiments were carried out. The experimental results show that the optimized optical system enhanced the measurement accuracy to ±0.4 μm within the range of 1500 μm and the overall measurement error was approximately ±2 μm when measured within the range of 450 mm. The system has the advantages of a non-contact, simple structure and a flexible range expansion, and is especially suitable for the detection of errors, such as the position error and straightness error of a multi-axis system.

2. System and Principle

2.1. Measurement Principle and Configuration

The structure of the optical freeform surface used in this paper is a rotating paraboloid. As shown in Figure 1, a 3D Cartesian coordinate system is established whose origin coincides with the center point of the rotating paraboloid. The equation of the rotating paraboloid can be expressed as:
x 2 + y 2 = 4 f r z
where f r is the focal length of the rotating paraboloid.
The derivatives of Equation (1) in the direction of x and y are calculated as following, respectively:
k x ( x ) = d z d x = x 2 f r
k y ( y ) = d z d y = y 2 f r
where k x ( x ) and k y ( y ) are the slopes of the point p ( x , y , z ) on the surface in the direction of the x-axis and y-axis, respectively. Equations (2) and (3) show that the slopes ( k x , k y ) of a point on the rotating paraboloid are linearly related to the position x and y of that point, respectively. In other words, the displacement from the center point of the rotating paraboloid in the x-y plane can be obtained from Equations (2) and (3) when the slopes ( k x , k y ) are detected by an optical slope sensor.
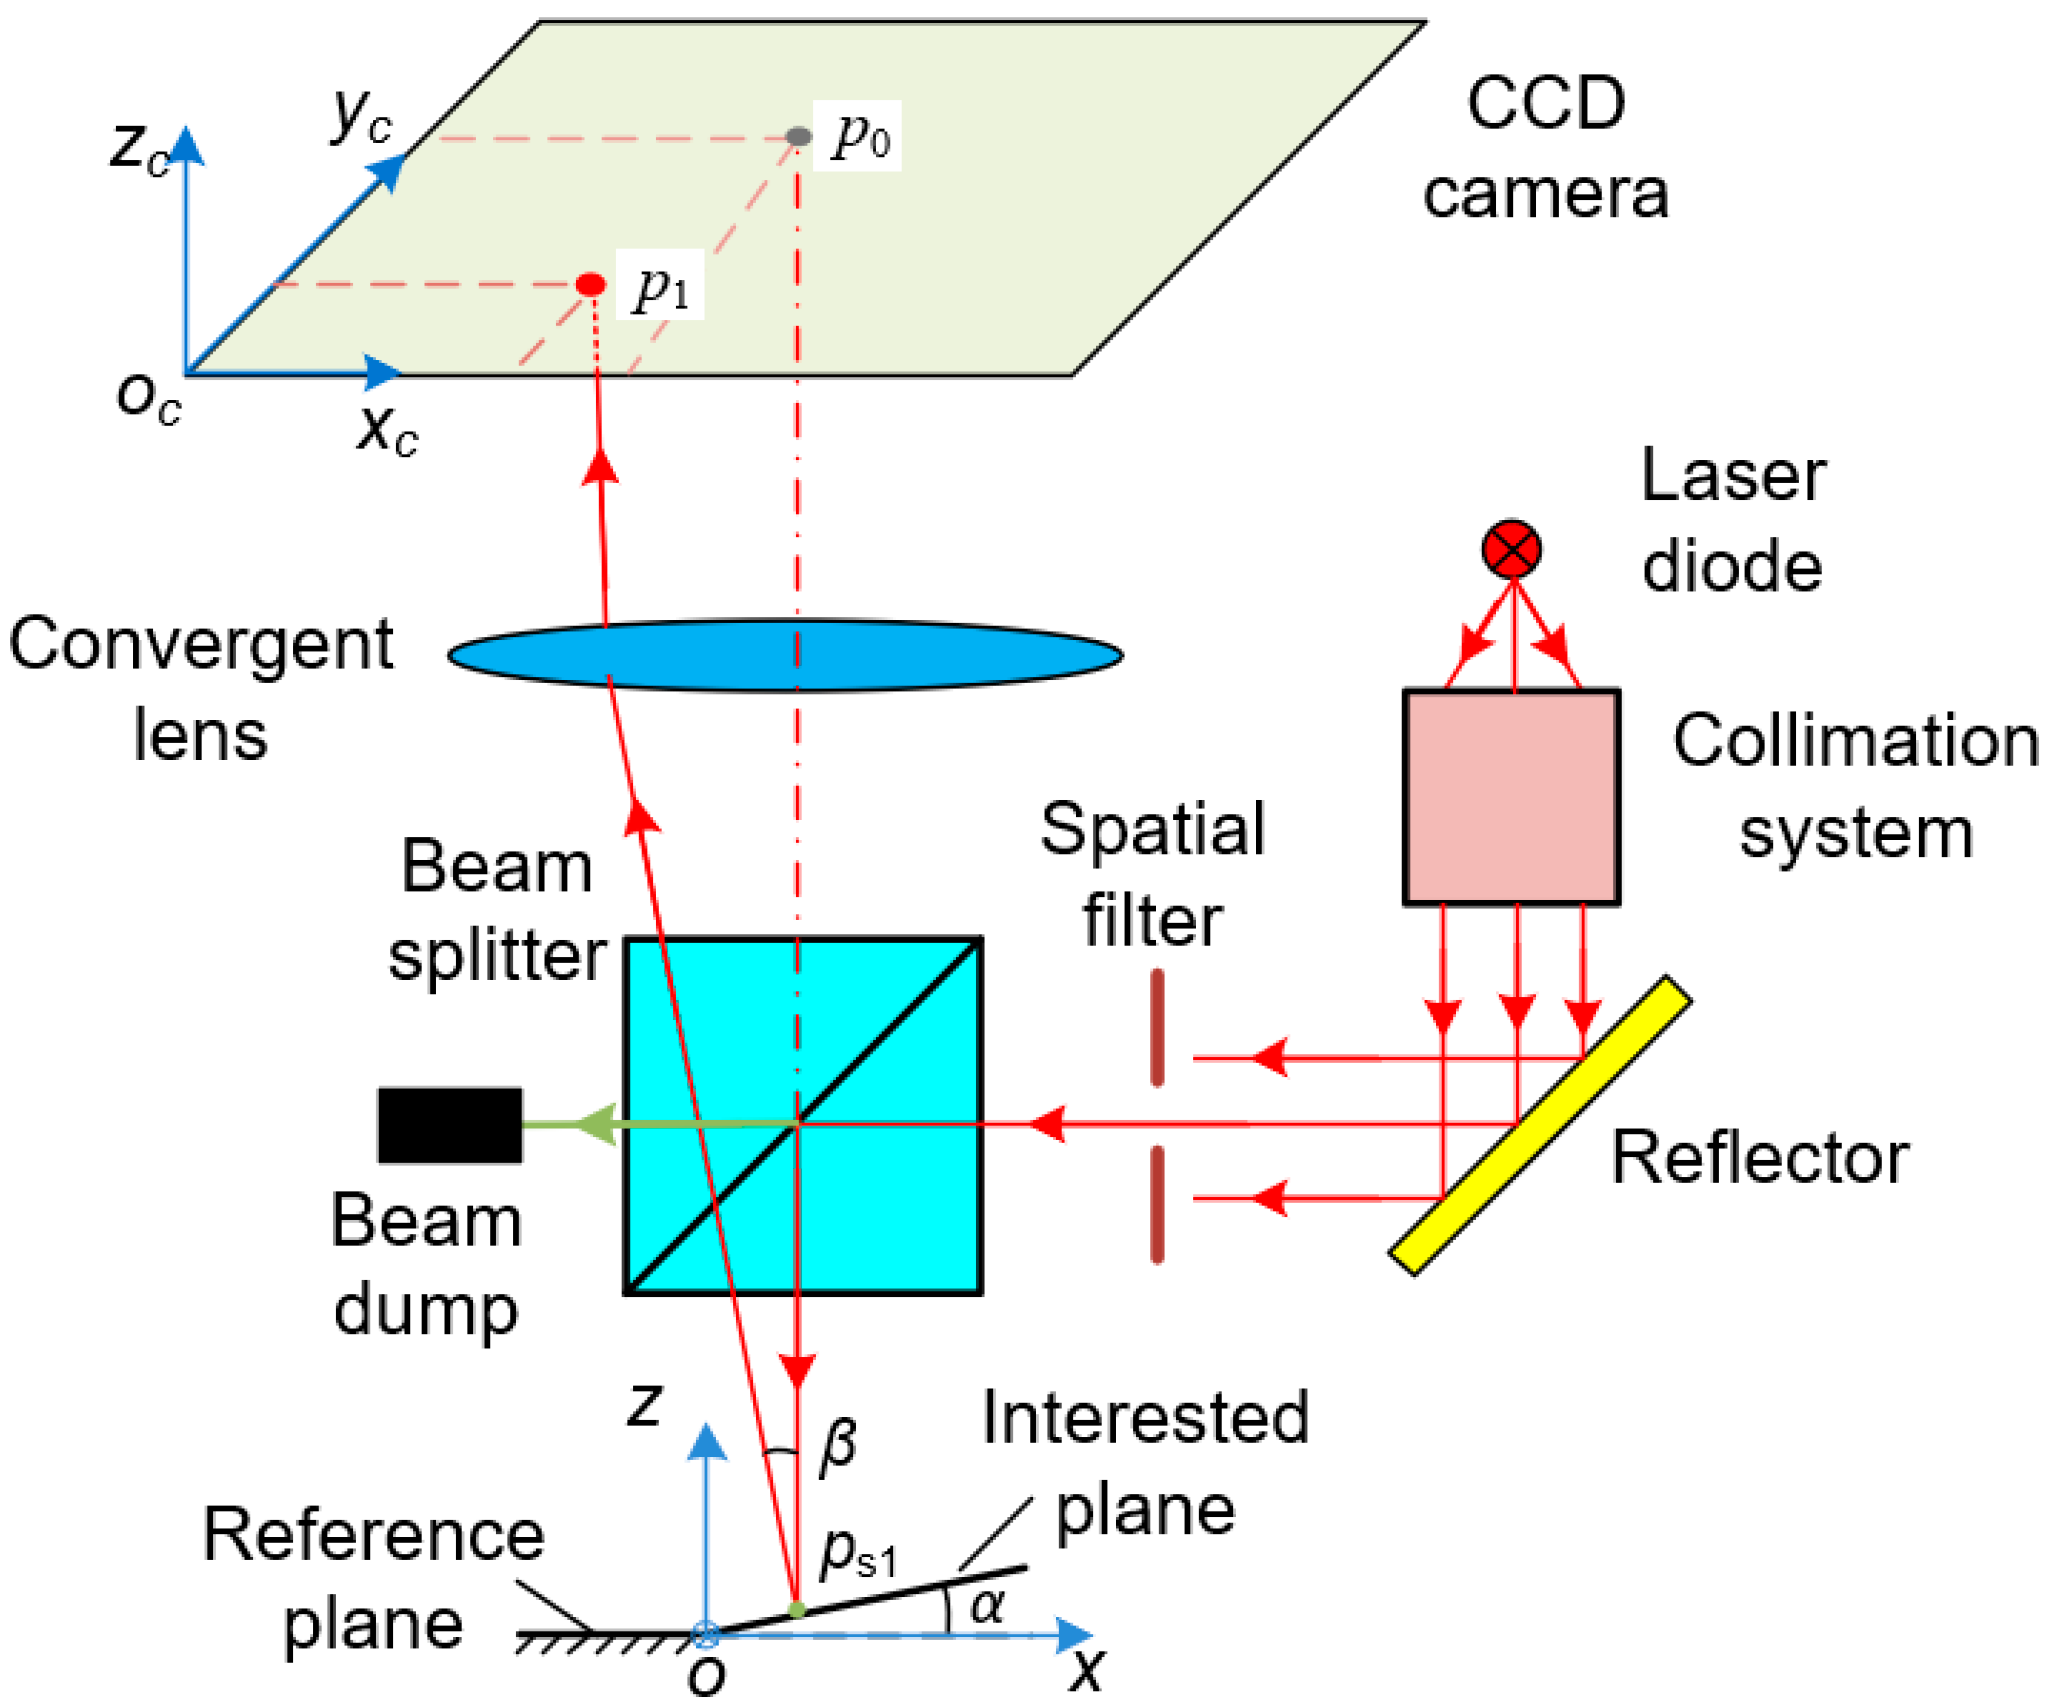
The measurement configuration used for detecting the slopes of a tangent line of a point on the surface is based on the optical structure of the autocollimator, which is shown in Figure 2.
Taking the angle measurement in the xoz plane as an example, α is the angle between the interested plane and the reference plane, β is the angle between the incident beam and the specular beam reflected from the interested plane. The laser spot p 0 ( x c 0 , y c 0 ) in the focal plane of a convergent lens is formed from the measuring beam reflected by the reference plane, while the laser spot p 1 ( x c 1 , y c 1 ) is generated from the measuring beam reflected by the interested plane. According to geometric optics, the following equations can be obtained by:
tan β = x c 1 x c 0 f c
α = β 2
where f c is the focal length of the convergent lens. The equation can be simplified when β is particularly small:
α = β 2 x c 1 x c 0 2 f c
Replacing the plane with the rotating paraboloid, the position of the beam spot on the surface can be obtained from Equations (7) and (8):
x = f r f c ( x c 1 x c 0 )
y = f r f c ( y c 1 y c 0 )
where x and y are the positions in the coordinate system ( x , y , z ) , as shown in Figure 2.
As can be seen in Figure 3, if the slope sensor moves in any direction, for instance, the measurement point on the reflecting surface shifts from p s 1 to p s 2 , then the position change of the slope sensor can be expressed as:
l x = x 1 x 2 = f r f c ( x c 1 x c 0 ) f r f c ( x c 2 x c 0 ) = f r f c ( x c 1 x c 2 )
l y = y 1 y 2 = f r f c ( y c 1 y c 0 ) f r f c ( x c 2 x c 0 ) = f r f c ( x c 1 x c 2 )
where ( x c 1 ,   y c 1 ) is the center position of the imaging spot while the measuring point p s 1 and ( x c 2 , y c 2 ) is the center position of the imaging spot, while measuring point p s 2 .

2.2. Optimization of Measurement Configuration

A charge-coupled device (CCD) camera (pixel number 2592 × 1944, pixel size 2.2 μm × 2.2 μm) was used as a laser receiver for the convenience of subsequent signal processing, in which the intensity of the spot image was represented by a pixel value (ranging from 0 to 255). However, the quality of the beam spot, which converged on the camera, was worse when it was formed by the rotating paraboloid rather than by a plane. If the measuring beam was reflected by a plane, the beam spot at the focal plane of the convergent lens converged to a point, as shown in Figure 4a. Unfortunately, when the measuring beam was reflected by the rotating paraboloid, the imaging light spot was dispersed, which caused difficulty in calculating the accurate position of the center point, as shown in Figure 4b. In order to clearly show the shape of the spot in Figure 4b, we showed the image near the spot, which caused the spot to seem bigger than its normal size.
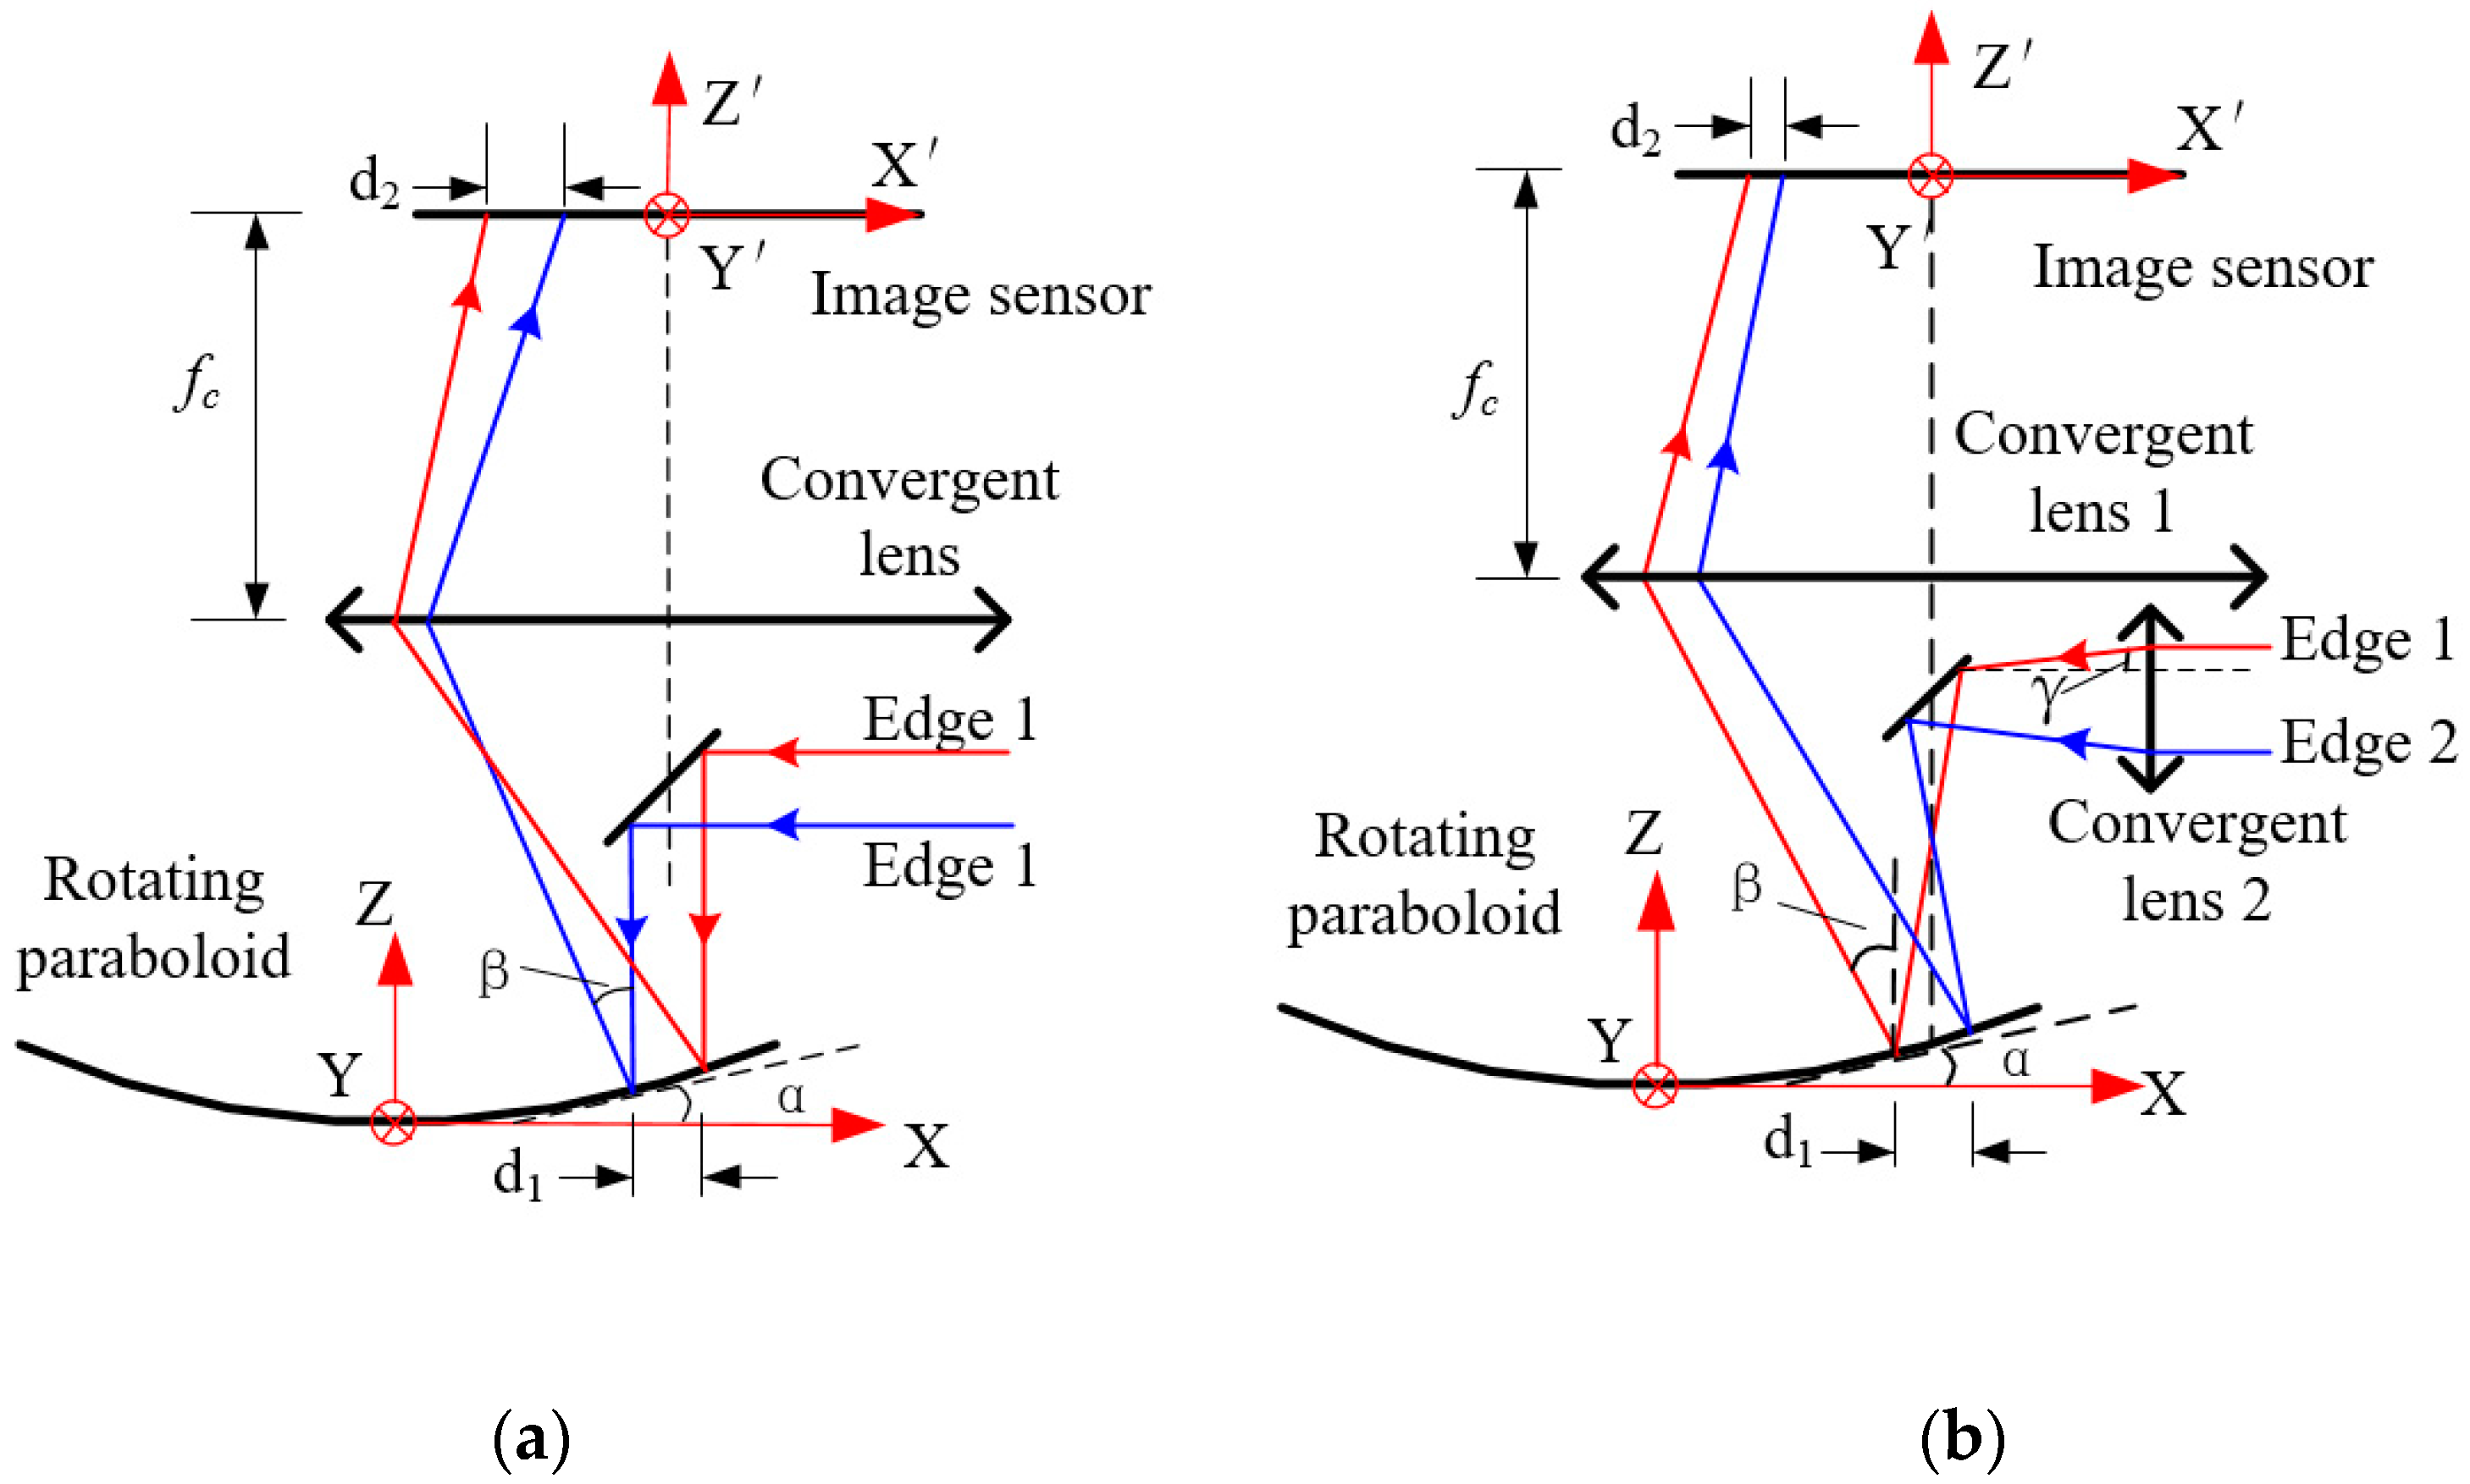
The relationship between the size of the imaging spot and the diameter of the light spot on the specimen is depicted in Figure 5a. The following equation can be obtained by analysing the edge position of the beam:
d 2 = s d 1
where d 1 and d 2 are the diameters of the measuring beam and imaging spot, respectively, and s is the sensitivity ( s = f c / f r ) of the measurement system. Equation (11) shows that the diameter of the imaging spot is linearly related to the diameter of the measuring beam. Generally, the accuracy of the system can be improved by increasing the sensitivity of the system appropriately, which means that the system sensitivity can be improved by increasing the focal length of the convergent lens or by reducing the focal length of the rotating paraboloid. However, the higher the sensitivity of the system, the larger the size of the imaging spot, which reduces the detecting accuracy of the spot center. In addition, the measuring range of the system will be reduced due to the reduction of the focal length of the rotating paraboloid. Therefore, there are several inadequacies when the collimated light beam is used as the measuring beam:
(1) The poor quality of the imaging spot will cause a reduction of measurement accuracy;
(2) Although the optimization of the imaging spot can be achieved by reducing the diameter of the measuring beam, the smaller the diameter of the measuring beam, the more sensitive the system is to interference factors, such as tiny scratches and dust on the surface of the rotating paraboloid;
(3) A larger imaging spot can reduce the effective working range of the slope sensor.
According to the above analysis, the quality of the imaging spot is poor when the collimated light beam is reflected by a rotating paraboloid. Therefore, the system has been optimized by using a focused light beam instead of a collimated light beam. The schematic of the optimized measurement system is shown in Figure 5b.
First of all, according to the geometrical principle of reflection, the relationship between angles can be obtained as:
β = 2 α + γ
where α is the inclination angle at the measuring point on the rotating paraboloid, β is the angle between the reflected beam at the measuring point and the z-axis, and γ is the divergence angle of the measuring beam.
In order to study the relationship between the divergence angle of the measured beam and the quality of the imaging spot, the imaging position of the beam edge on the image sensor is analyzed as follows:
d 2 = s d 1 2 f c γ
Therefore, the accuracy of spot position detection can be improved by reducing the diameter of the imaging spot and optimizing the distribution of the imaging spot energy while other parameters are invariable.
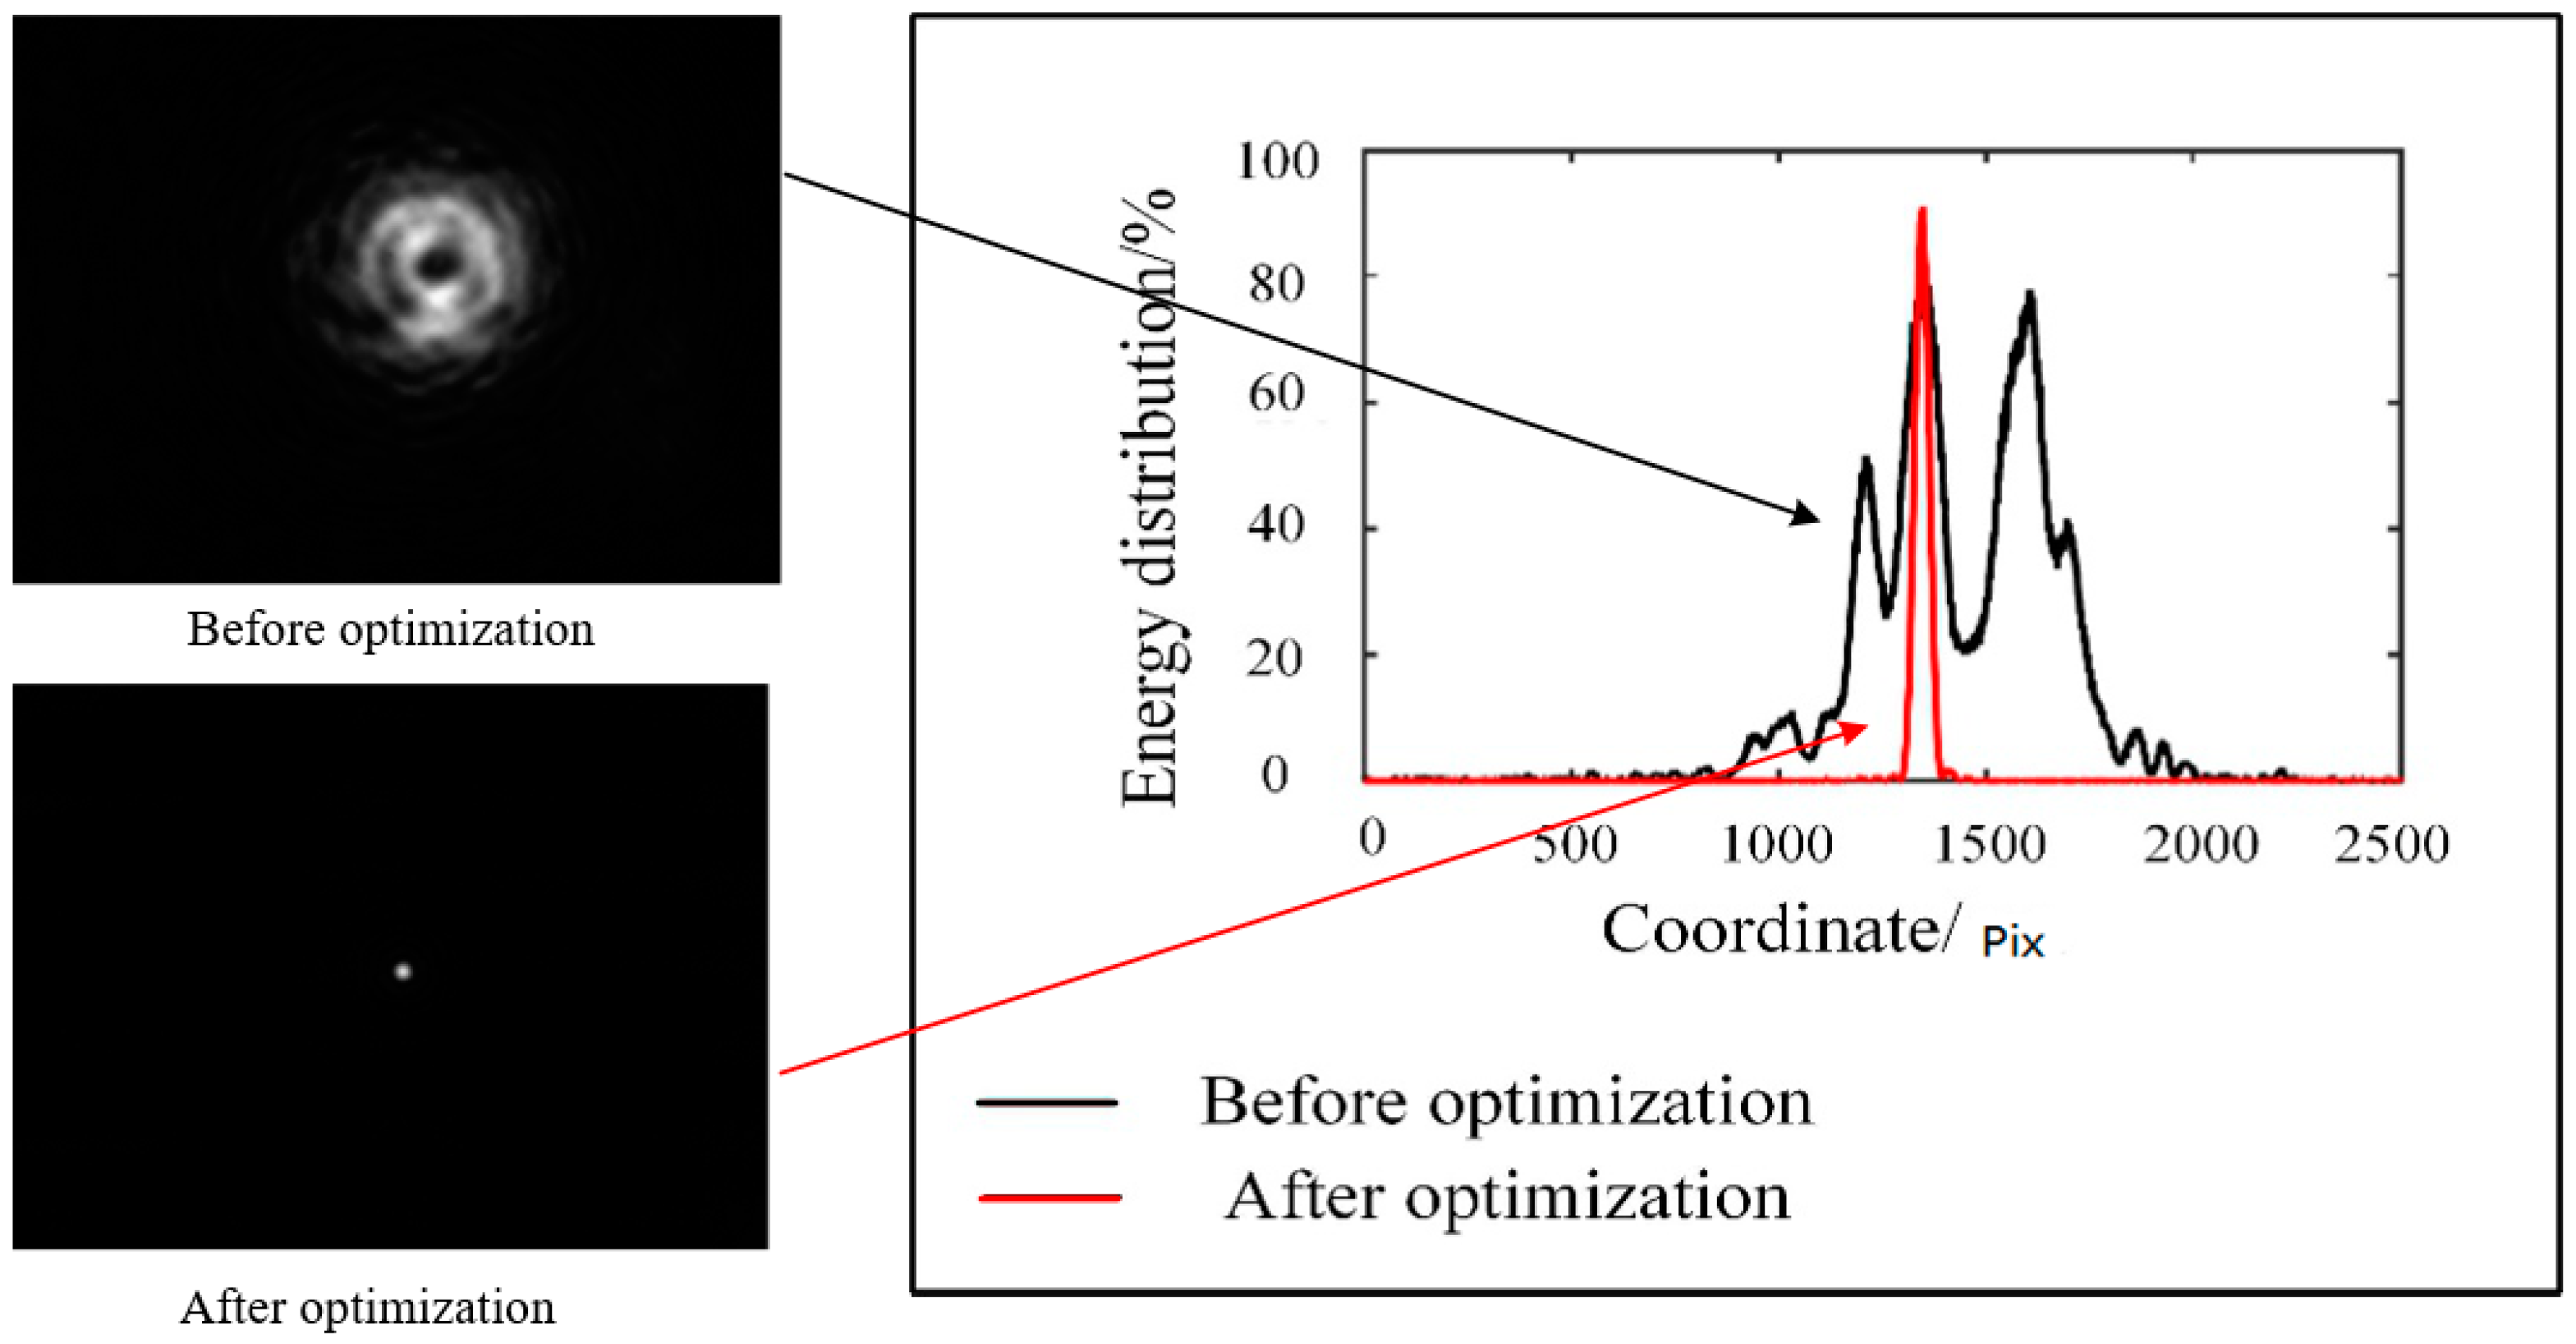
The energy distribution of imaging spots before and after system optimization is shown in Figure 6. According to Figure 6, the specific benefit of the optimization of the measurement system is to improve the energy distribution of the spot image. There were many peaks in the imaging spot before system optimization. In addition, the number of peaks and the intensity of the imaging spot changed greatly with different measuring positions. On the contrary, the imaging spot size after system optimization was sharp, showing a single peak, and the energy distribution was symmetrical, concentrated and similar to the Gaussian distribution. It is beneficial to realize the precise extraction of the imaging spot location. The size of the spot image obtained at different positions on the rotating paraboloid was approximately equal in the experiments.
After a series of digital image processing operations, including extraction of the region of interest (ROI) and filtering, the gray centroid algorithm was applied to the light spot on the image and can be expressed as:
x 0 = m = 1 M n = 1 N F ( x , y ) x m = 1 M n = 1 N F ( x , y ) , y 0 = m = 1 M n = 1 N F ( x , y ) y m = 1 M n = 1 N F ( x , y )
where ( x , y ) is the pixel coordinate, ( M , N ) is the image size, F ( x , y ) is the gray value of the pixel and ( x 0 , y 0 ) is the centroid coordinate to be used.
Experiments were performed to verify the accuracy of the optimized system, whose parameters are shown in Table 1.
The measurement beam images the camera under the action of converging lens 1. Therefore, in order to improve the quality of the imaging spot, the focal length of the converging lens needs to be consistent with the installation distance between the convergent lens and the camera. The size of the measured spot on the reflector can be reduced by convergence lens 2, and the focal length of converging lens 2 needs to be approximately equal to the optical distance of the measuring beam from converging lens 2 to the reflector. Then, by minor adjustment of the position between the sensor and the reflector, a better quality of the imaging spot can be achieved.
In these experiments, the optical freeform surface is composed of a plane and a rotating paraboloid, where the normal of the plane is parallel to the optical axis of the rotating paraboloid. Therefore, the position of the image spot reflected by the center point of the rotating paraboloid is the same as the position of the imaging point reflected by the plane. Therefore, it can be considered that the plane is the reference plane and the rotating paraboloid is the interested plane.

3. Experimental Results

3.1. Calibration Experiments

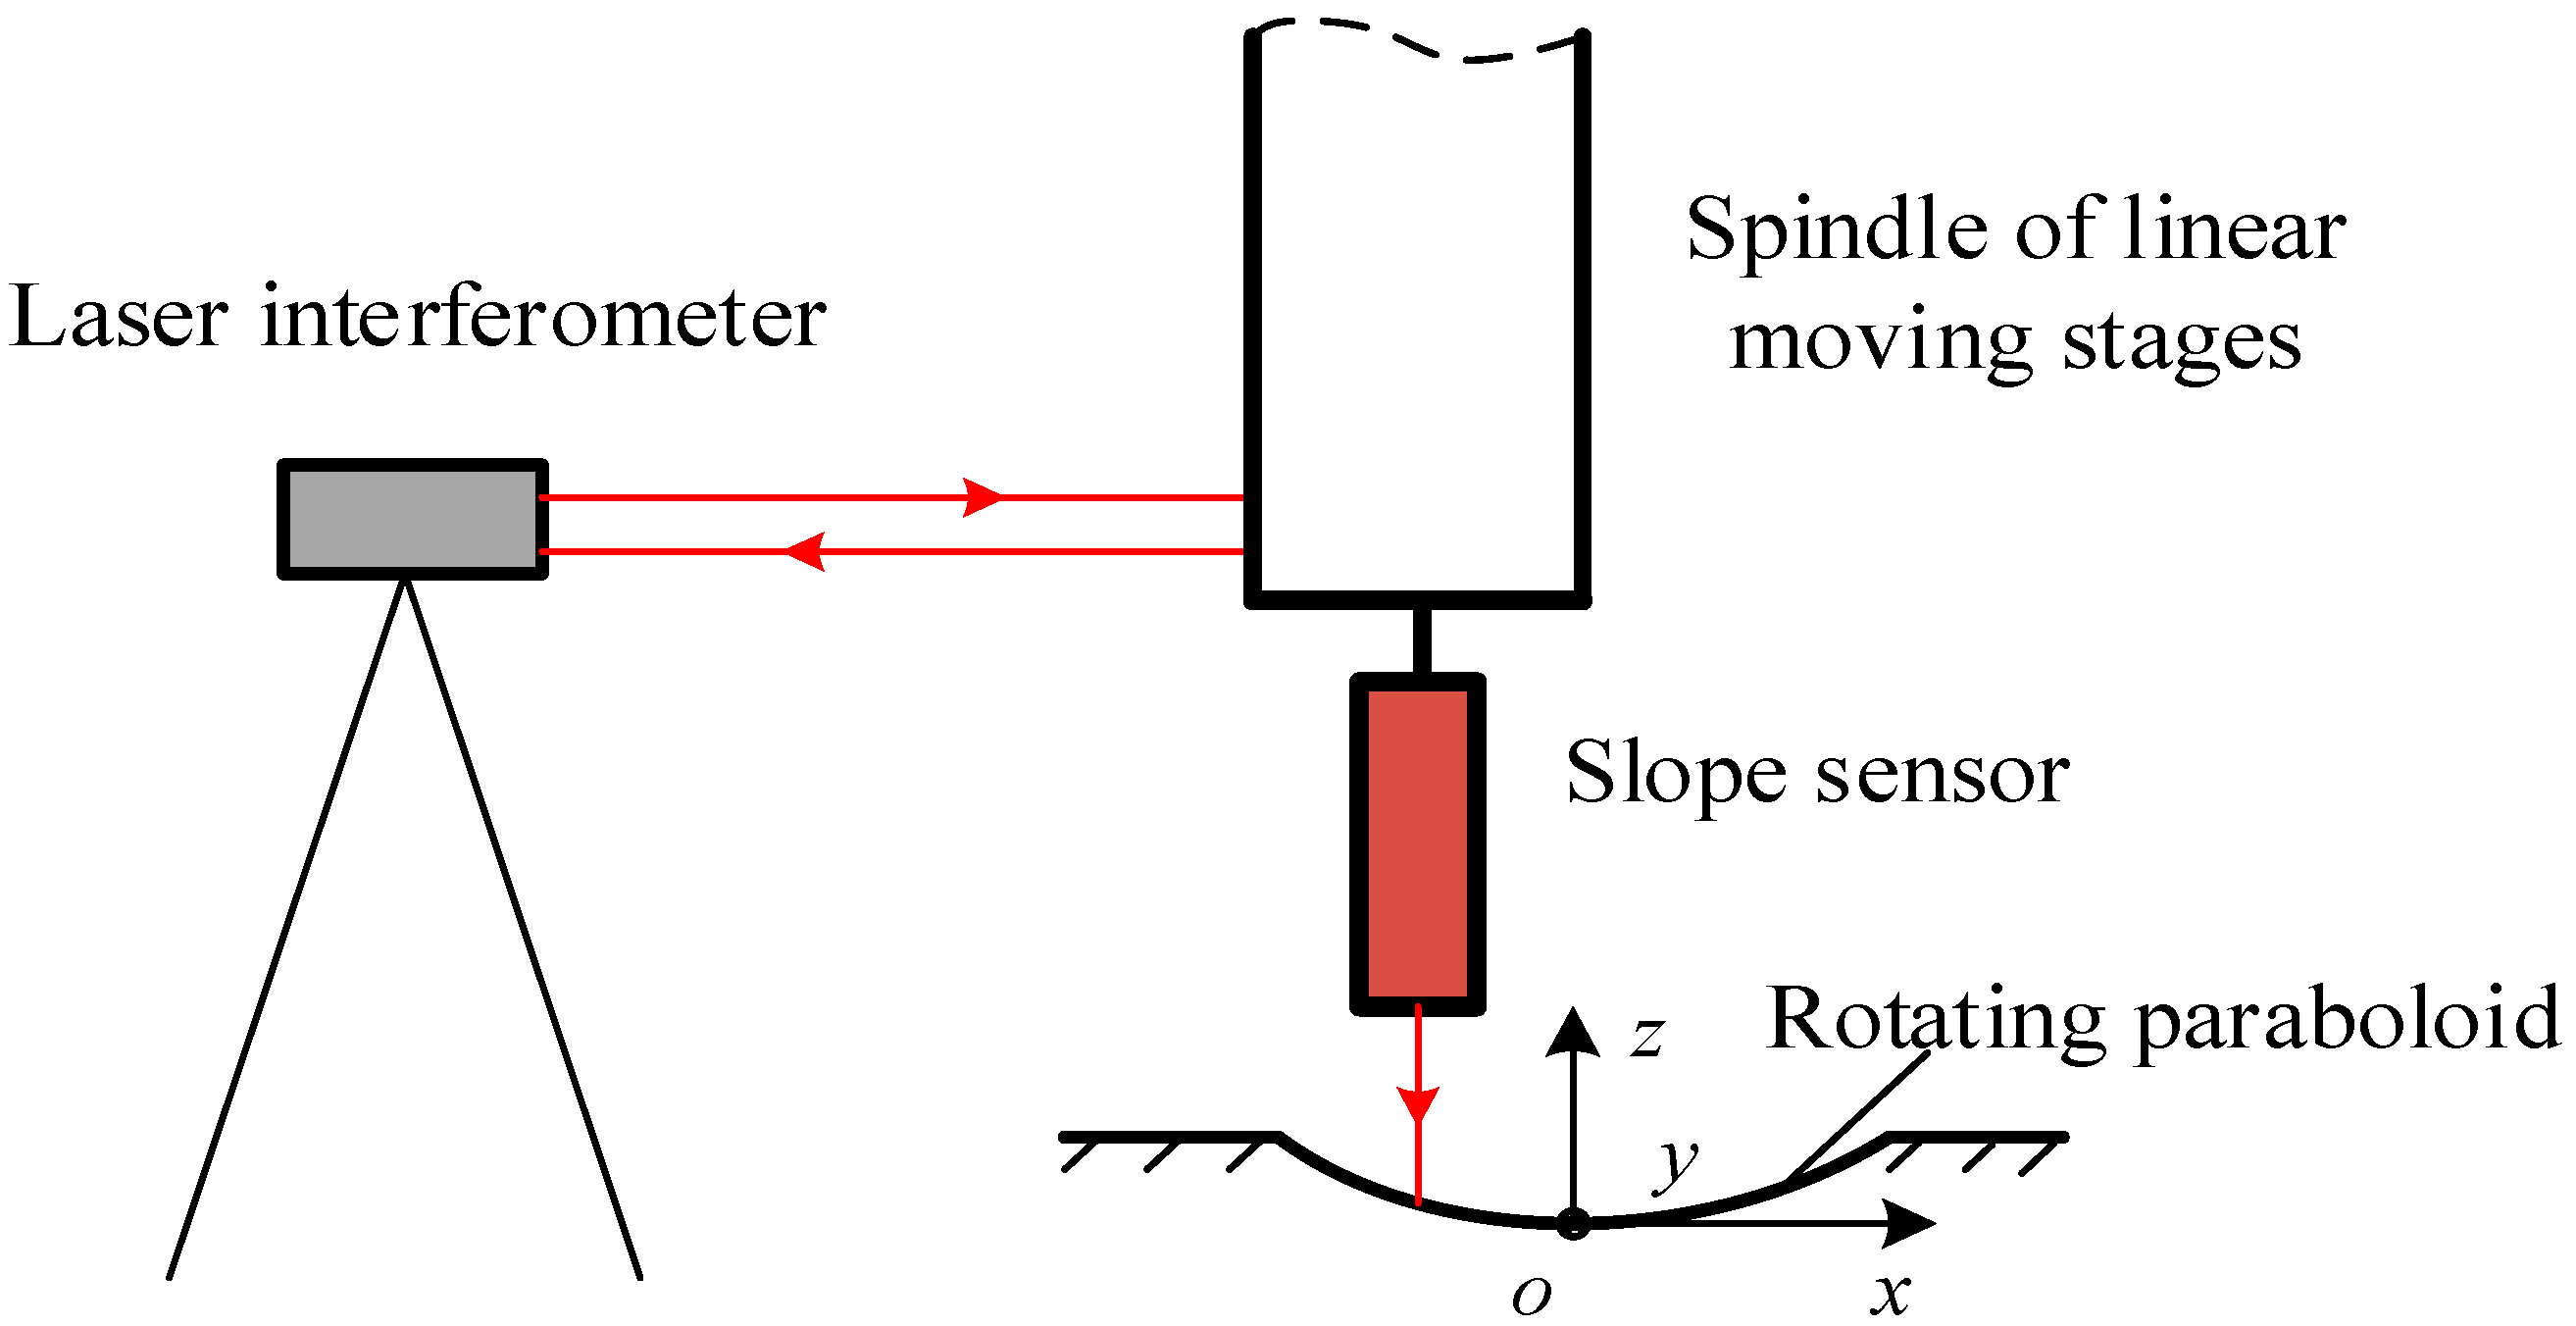
Figure 7 shows the experimental configuration used for calibration experiments. The optical freeform surface is fixed on a stationary platform and the slope sensor is fixed on the spindle of linear moving stages. The slope sensor moves along the x or y direction above the rotating paraboloid by the driving of the spindle, and the relative displacement is measured by a laser interferometer (Renishaw, Gloucestershire, UK) with linear measurement precision of ±0.05 ppm.
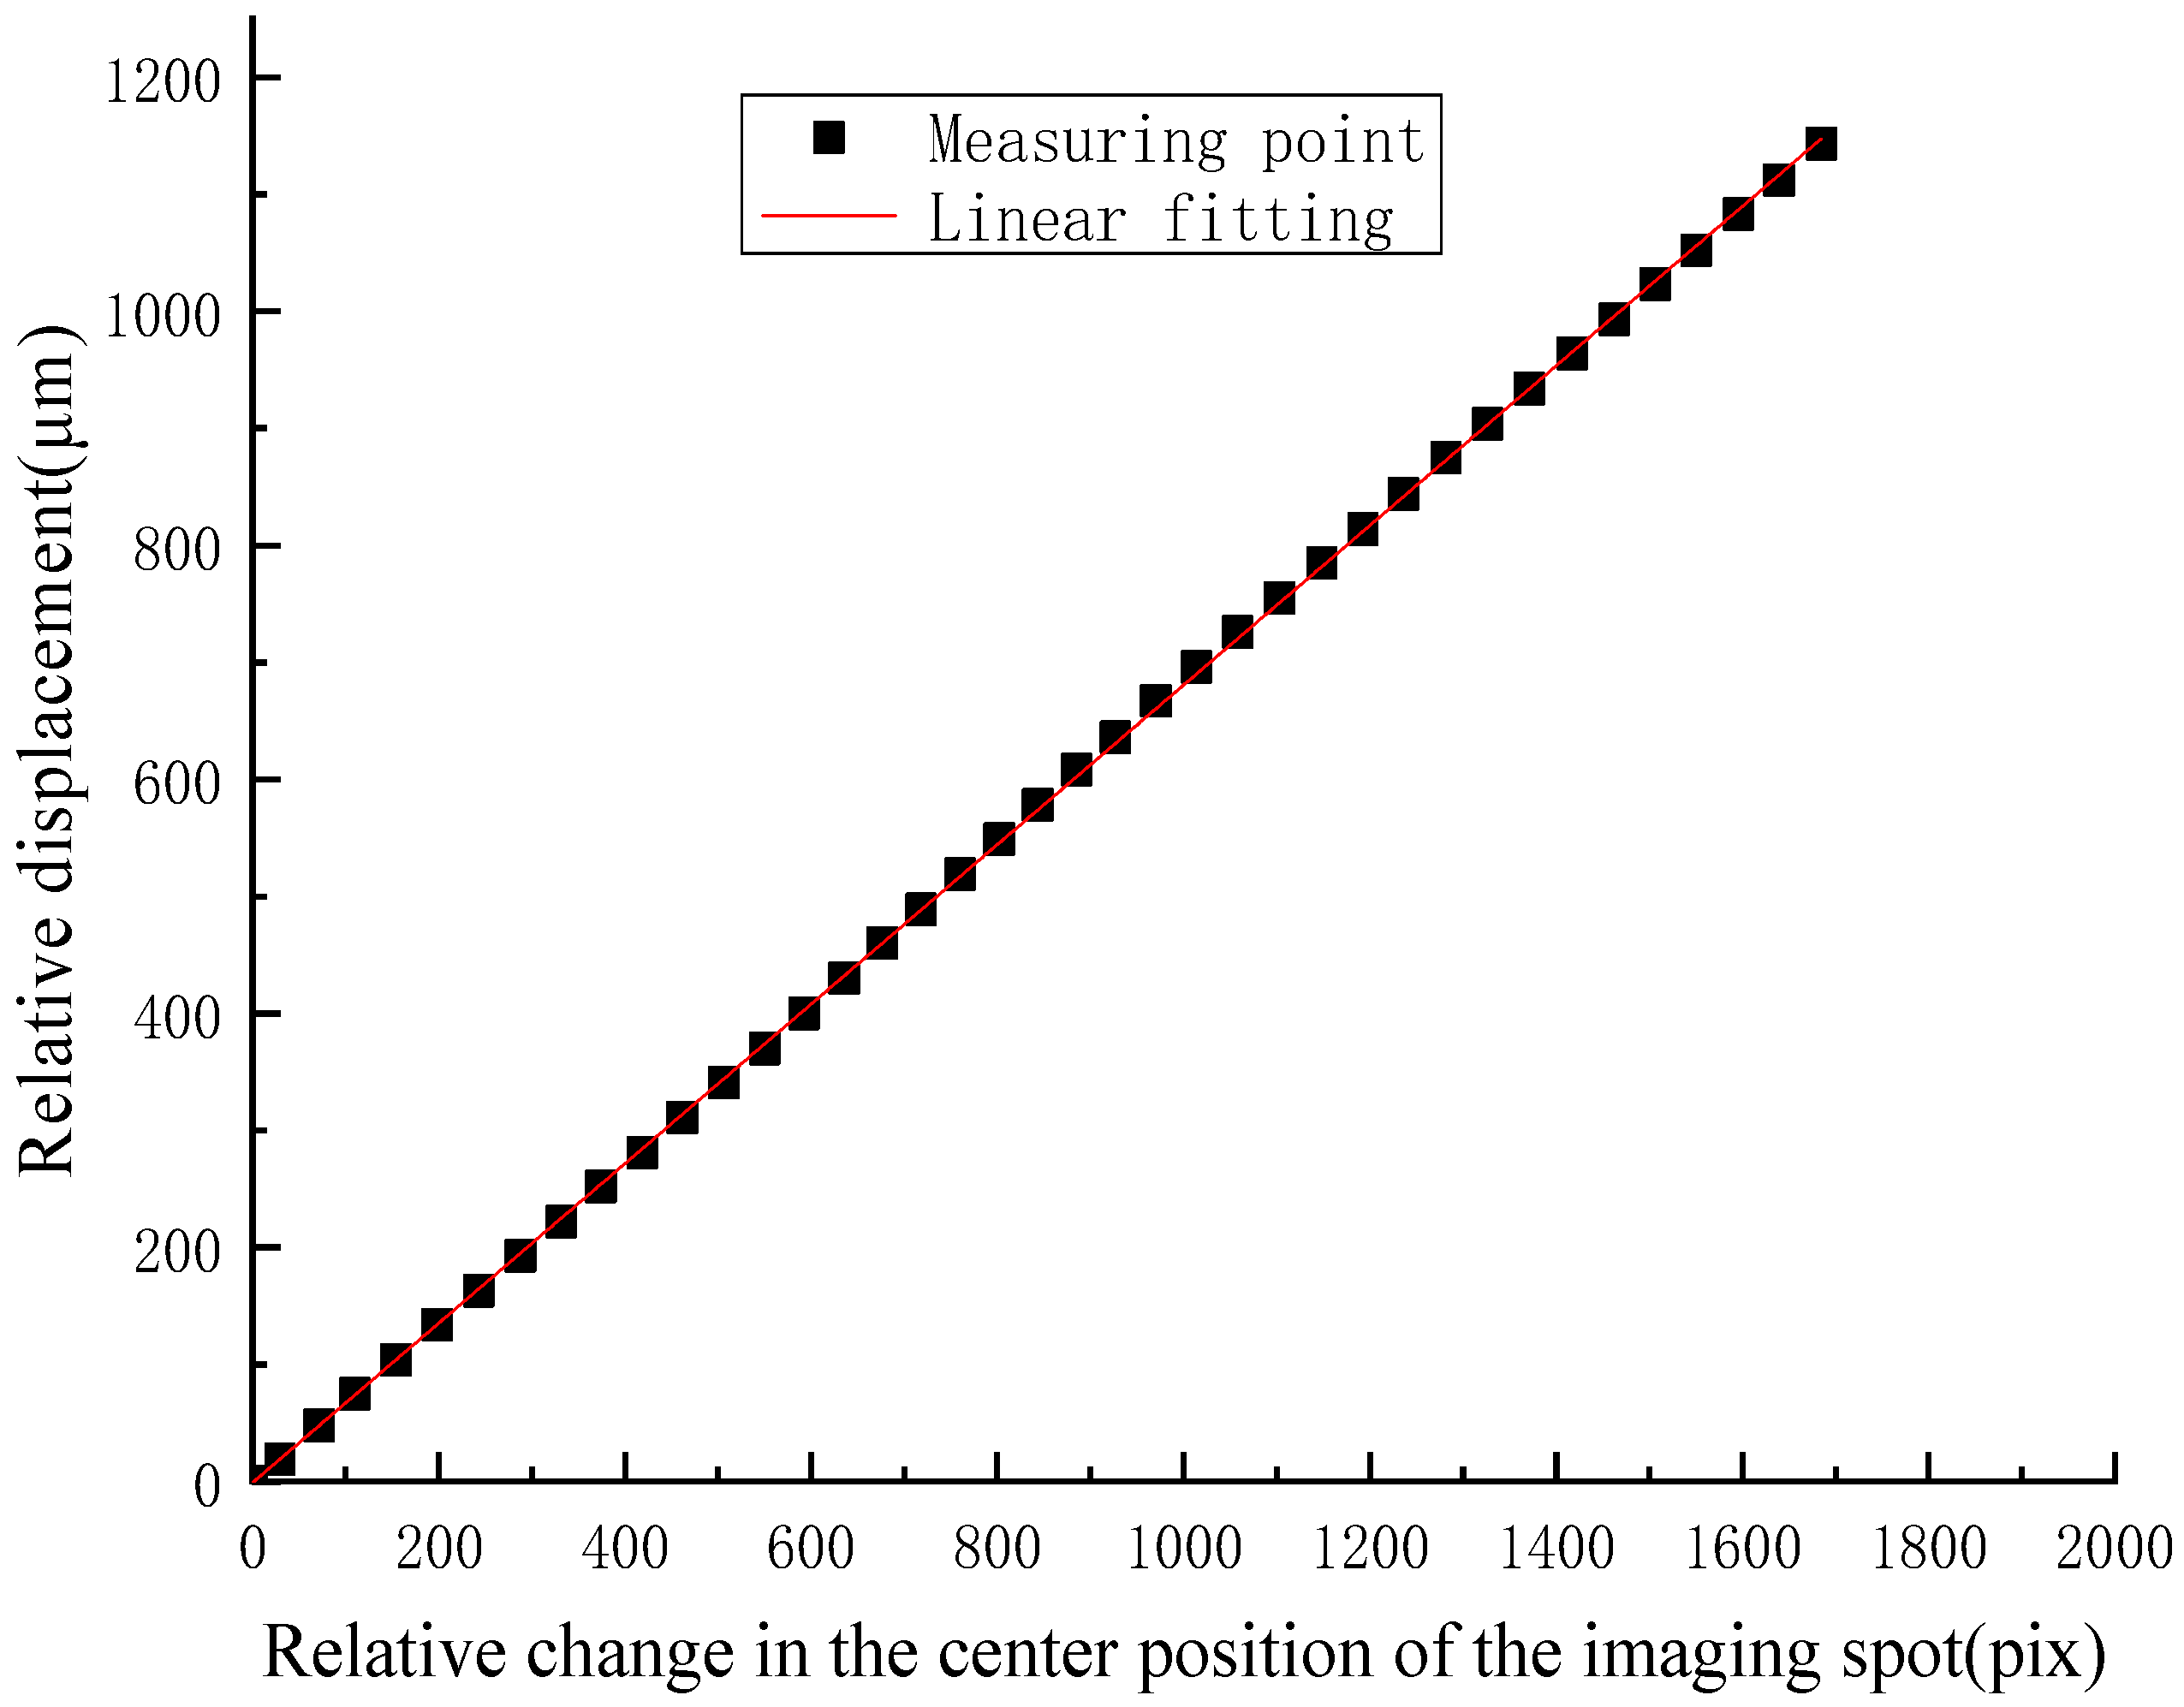
Because the freeform surface is rotationally symmetric, it can be calibrated in any direction along the freeform surface. The slope detector selects any point on the paraboloid as the starting point. Then, the spindle of linear moving stages drives the slope sensor to move along a fixed direction with a step size of 20 μm, and the relative displacement of the slope sensor is detected by a laser interferometer. Figure 8 shows the relationship between the relative displacements of the light spot detected by the image sensor and the values measured by the laser interferometer.
In actual experiments, the slope sensor was calibrated in four different directions on the rotating paraboloid. The experimental results show that the relative displacement of the center point of the imaging spot is linear with the relative displacement of the slope sensor. The relationship between the relative displacement value of the slope sensor and the relative displacement value of the center point of the imaging spot could be obtained by linear fitting of the measured data. The results of linear fitting are shown in Table 2.
This can be expressed as the following equation:
l = 0.68 l
where l is the relative displacement of the center point of the imaging spot and the unit in pixels, and l is the relative displacement of the slope sensor and the units are in micrometers.
Because the surface of the rotating paraboloid is rotationally symmetric, the ratio of the relative displacement of the slope sensor and the relative displacement of the spot in the image sensor is a fixed value along any direction. It can be said that the above calibration results can be used in any direction of the rotating paraboloid.

3.2. Stability Experiments

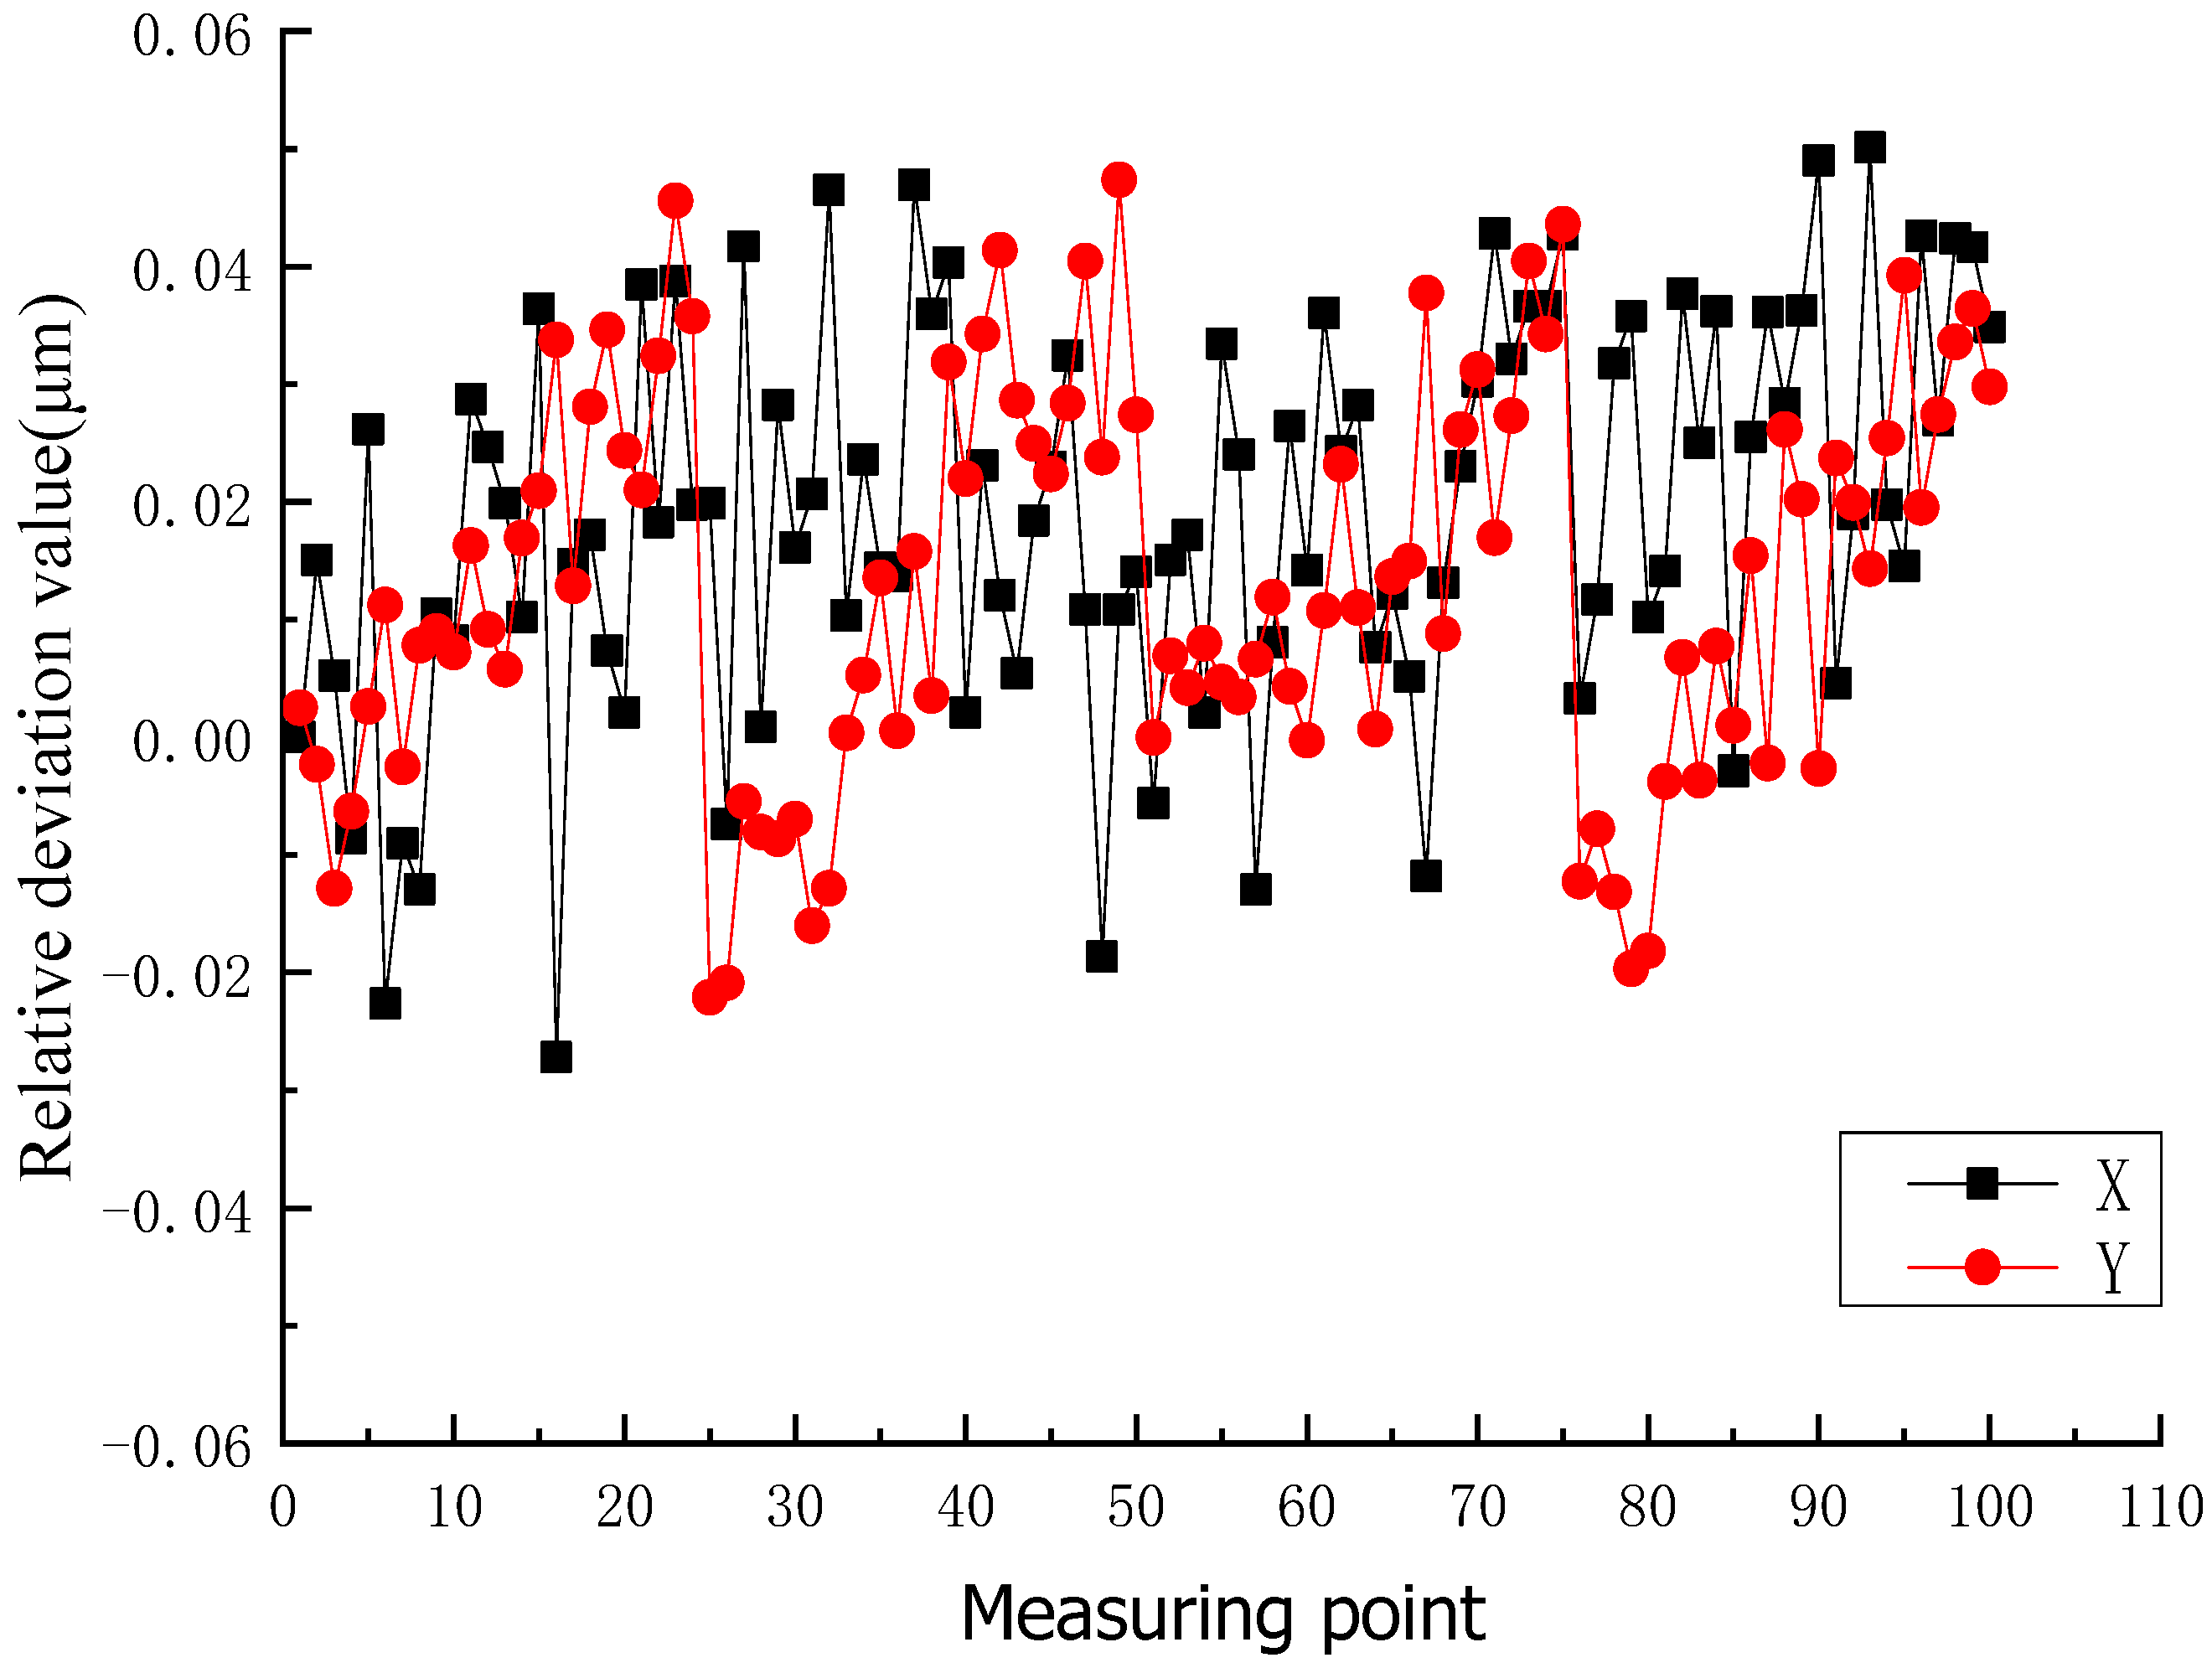
In order to evaluate the stability of the measurement system, experiments were continuously conducted on a single point of measurement. In the actual measurement experiment, the measurement within the range of a single rotating paraboloid could be completed in 4 h and the imaging spot position was sampled 100 times. The Figure 9 gives the deviation curve of the spot position relative to the starting position in the direction of X and Y.
It can be seen from the experimental results that the instability of the spot position in the measurement period was within ±0.05 μm, which had little effect on the total uncertainty of the system and could be ignored.

3.3. Comparison Experiments

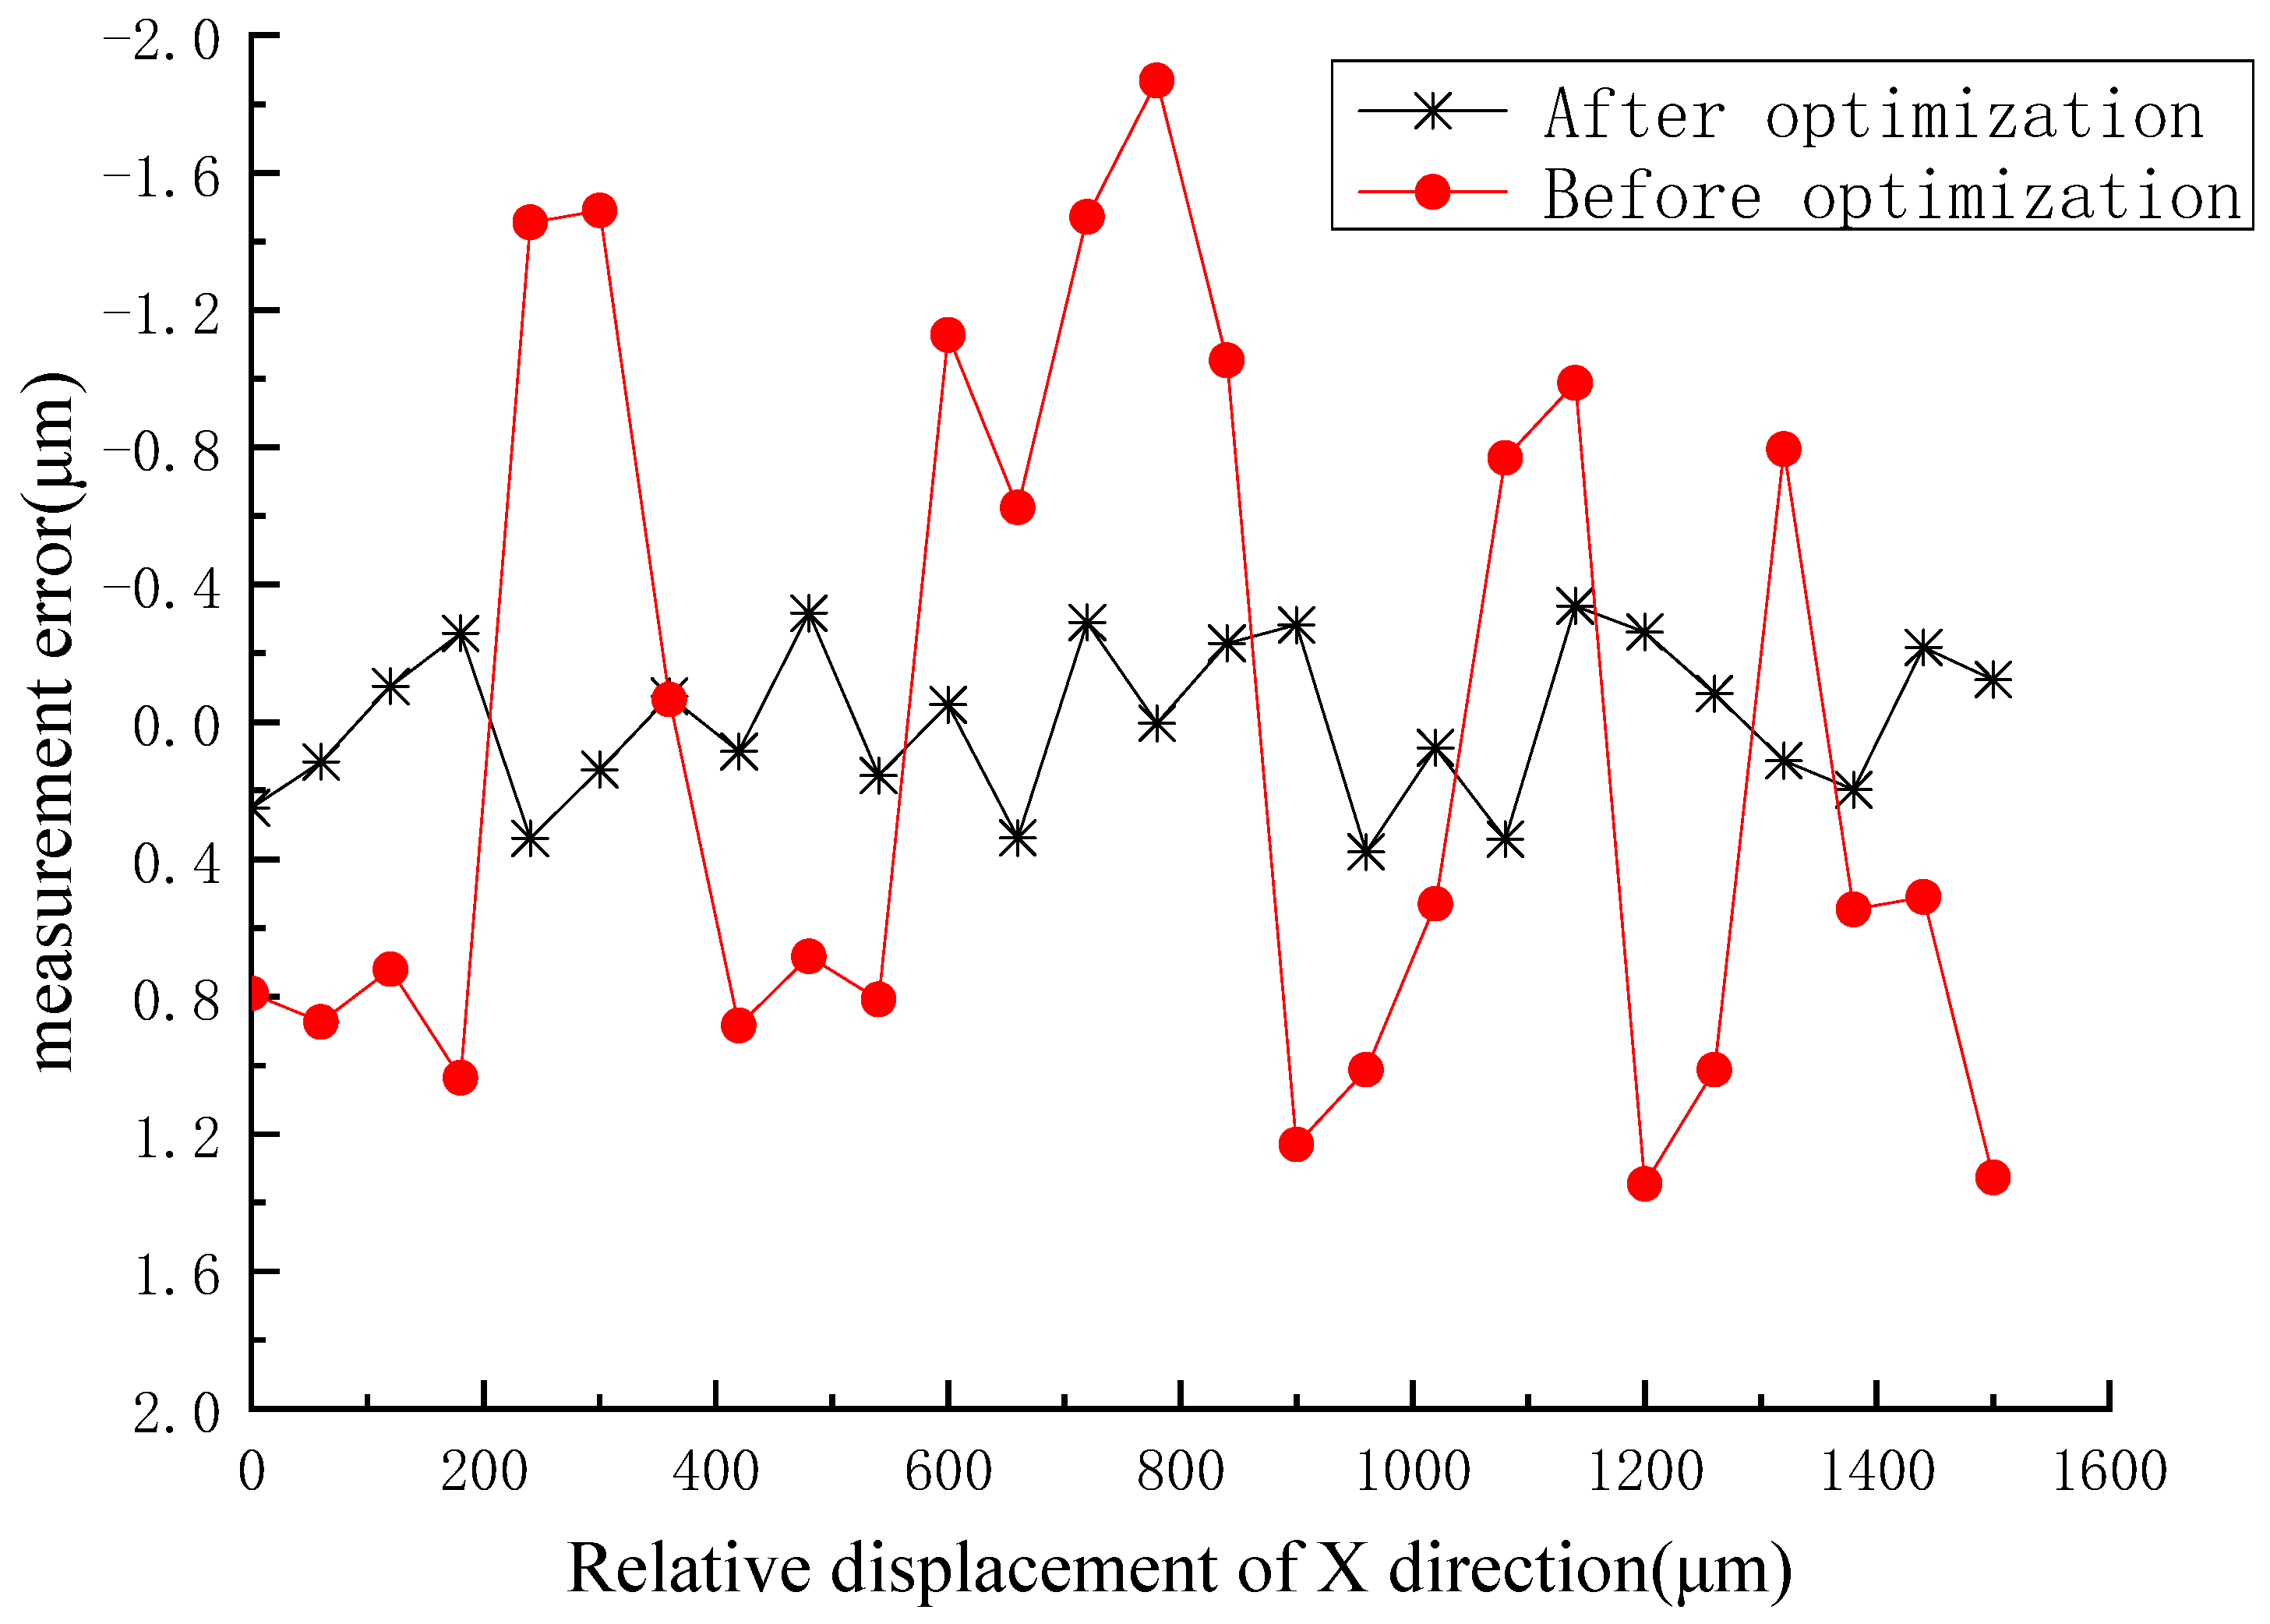
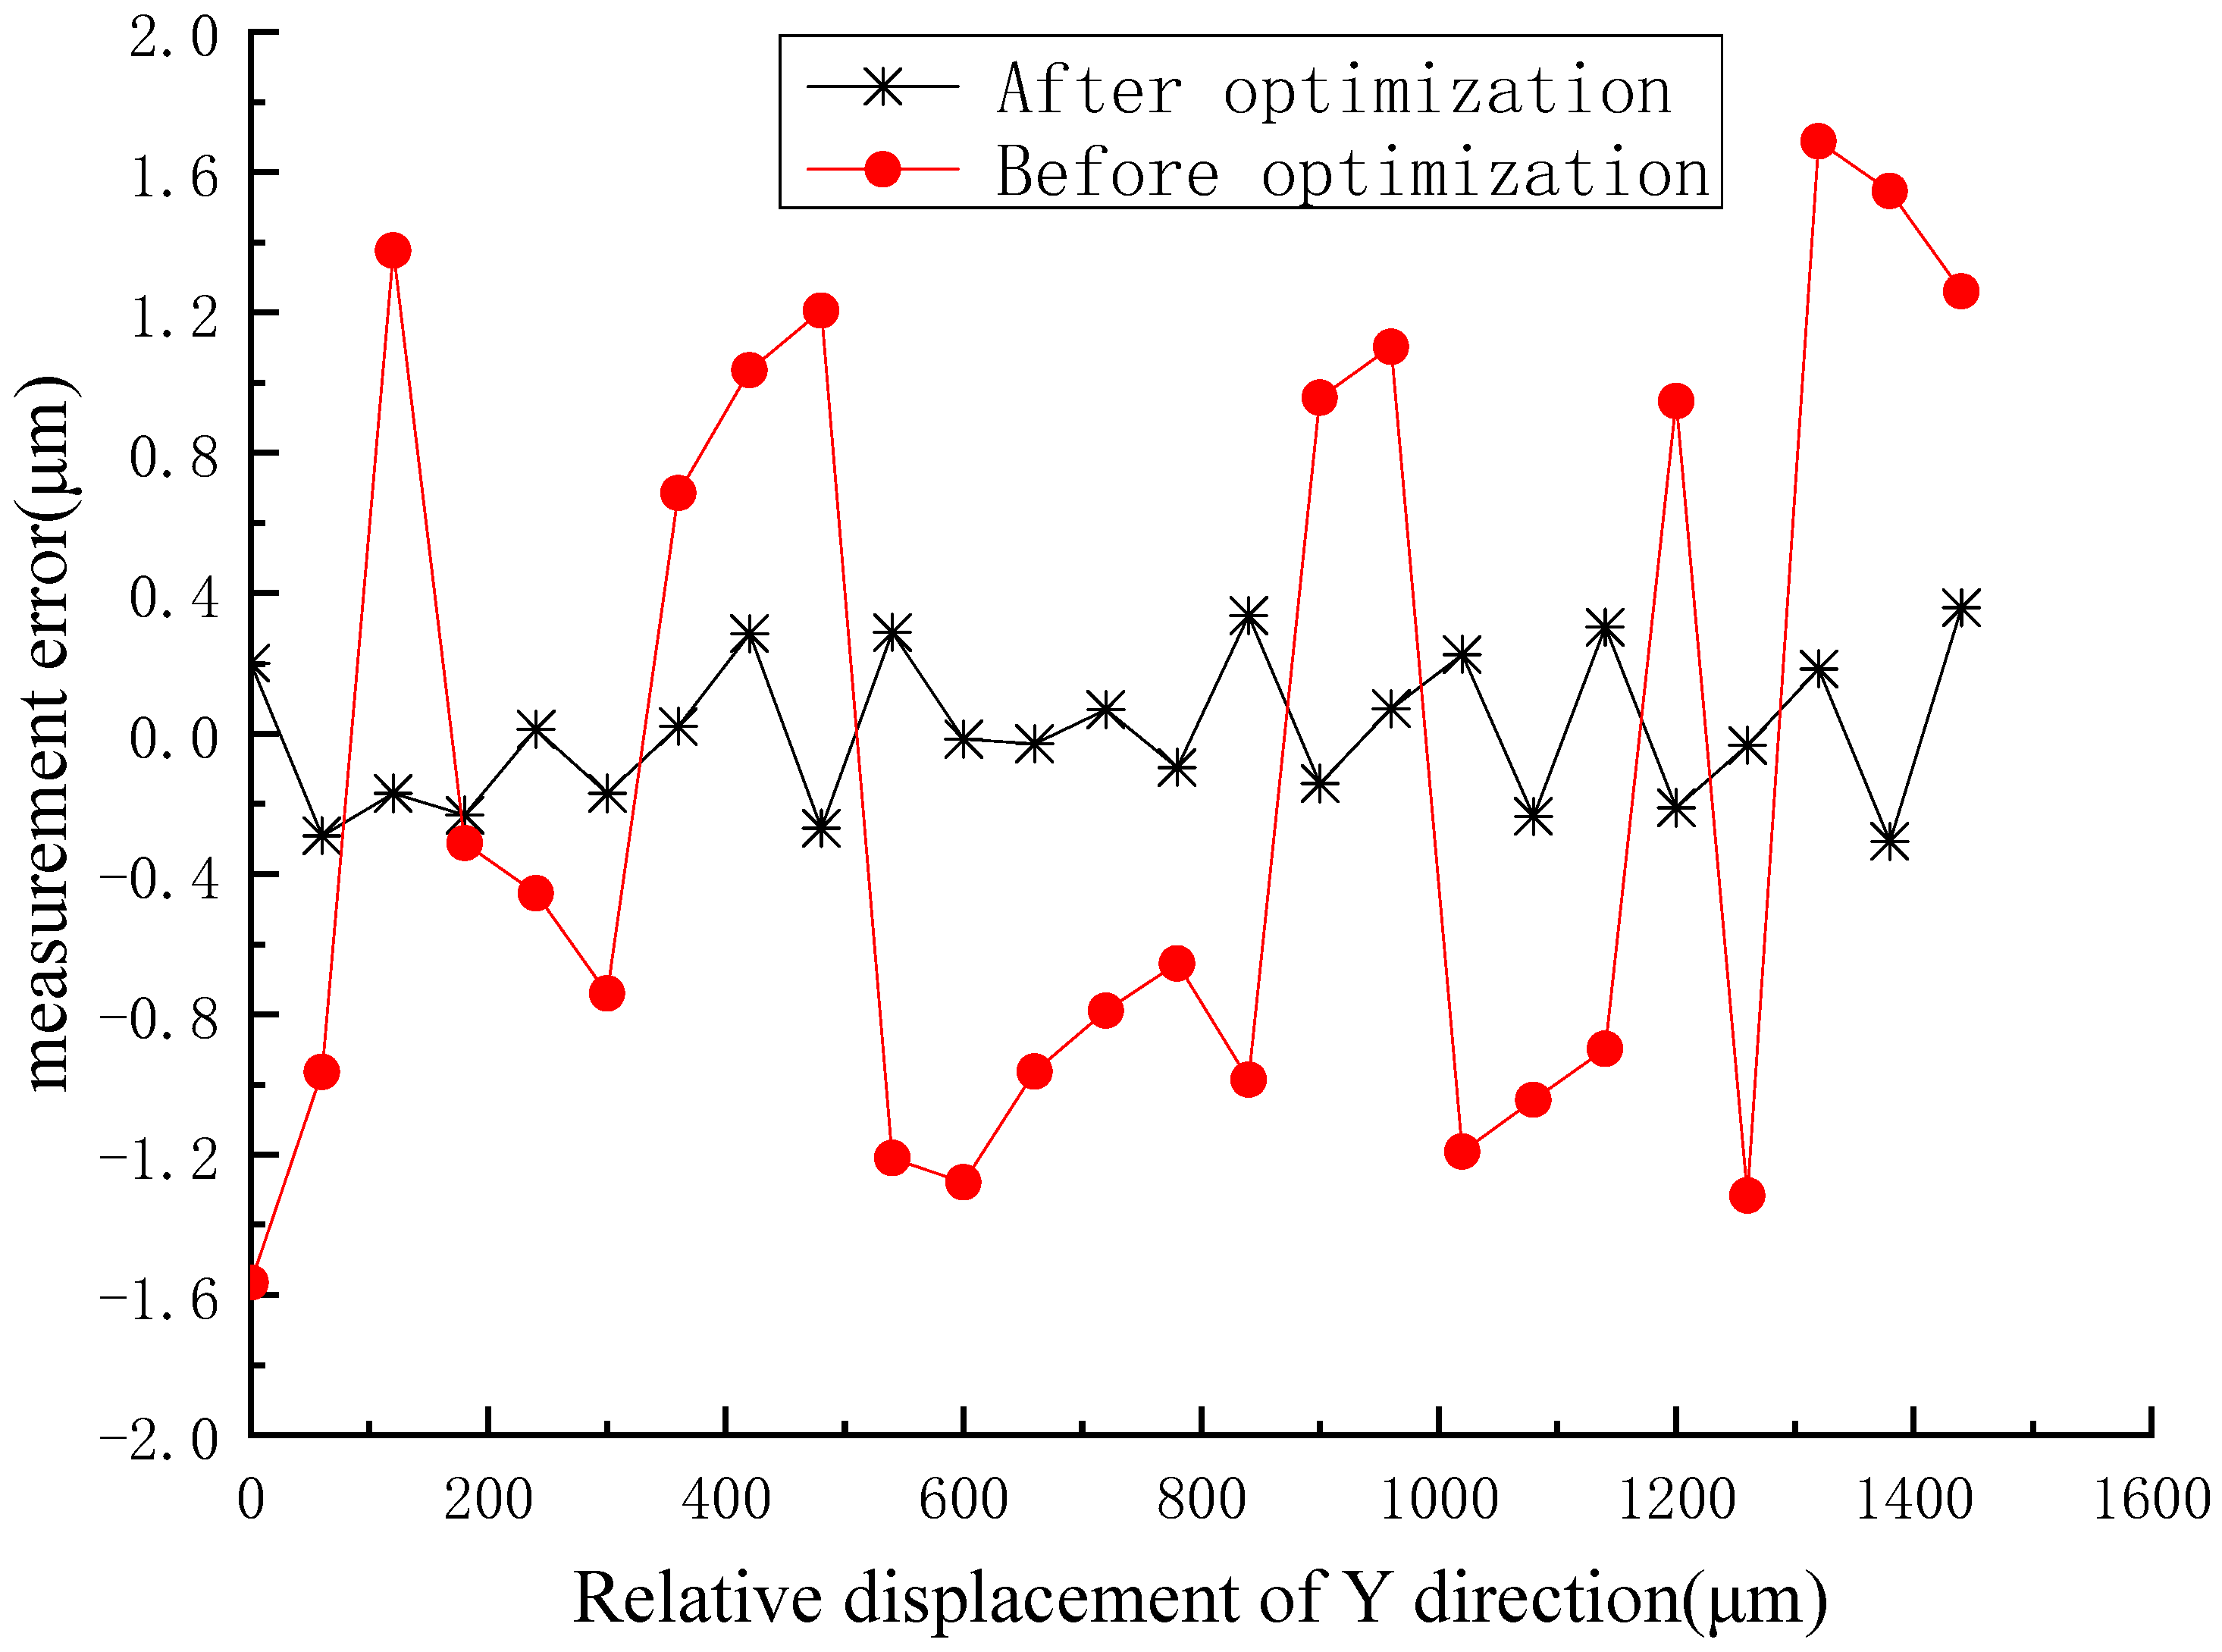
Comparison experiments of the system before and after optimization were performed. The two-dimensional moving stages driving the slope sensor moved along the X or Y direction on the rotating paraboloid with a step size of 50 μm. The relative displacement of the slope sensor was monitored by the laser interferometer. The experimental results are shown in Figure 10 and Figure 11.
It can be seen from the error curve that the error of the measurement system before optimization was within ±2.0 μm, however, the deviation of the optimized system was no more than ±0.4 μm within the range of the measurement of 1500 μm.

3.4. Experiments with Large Range

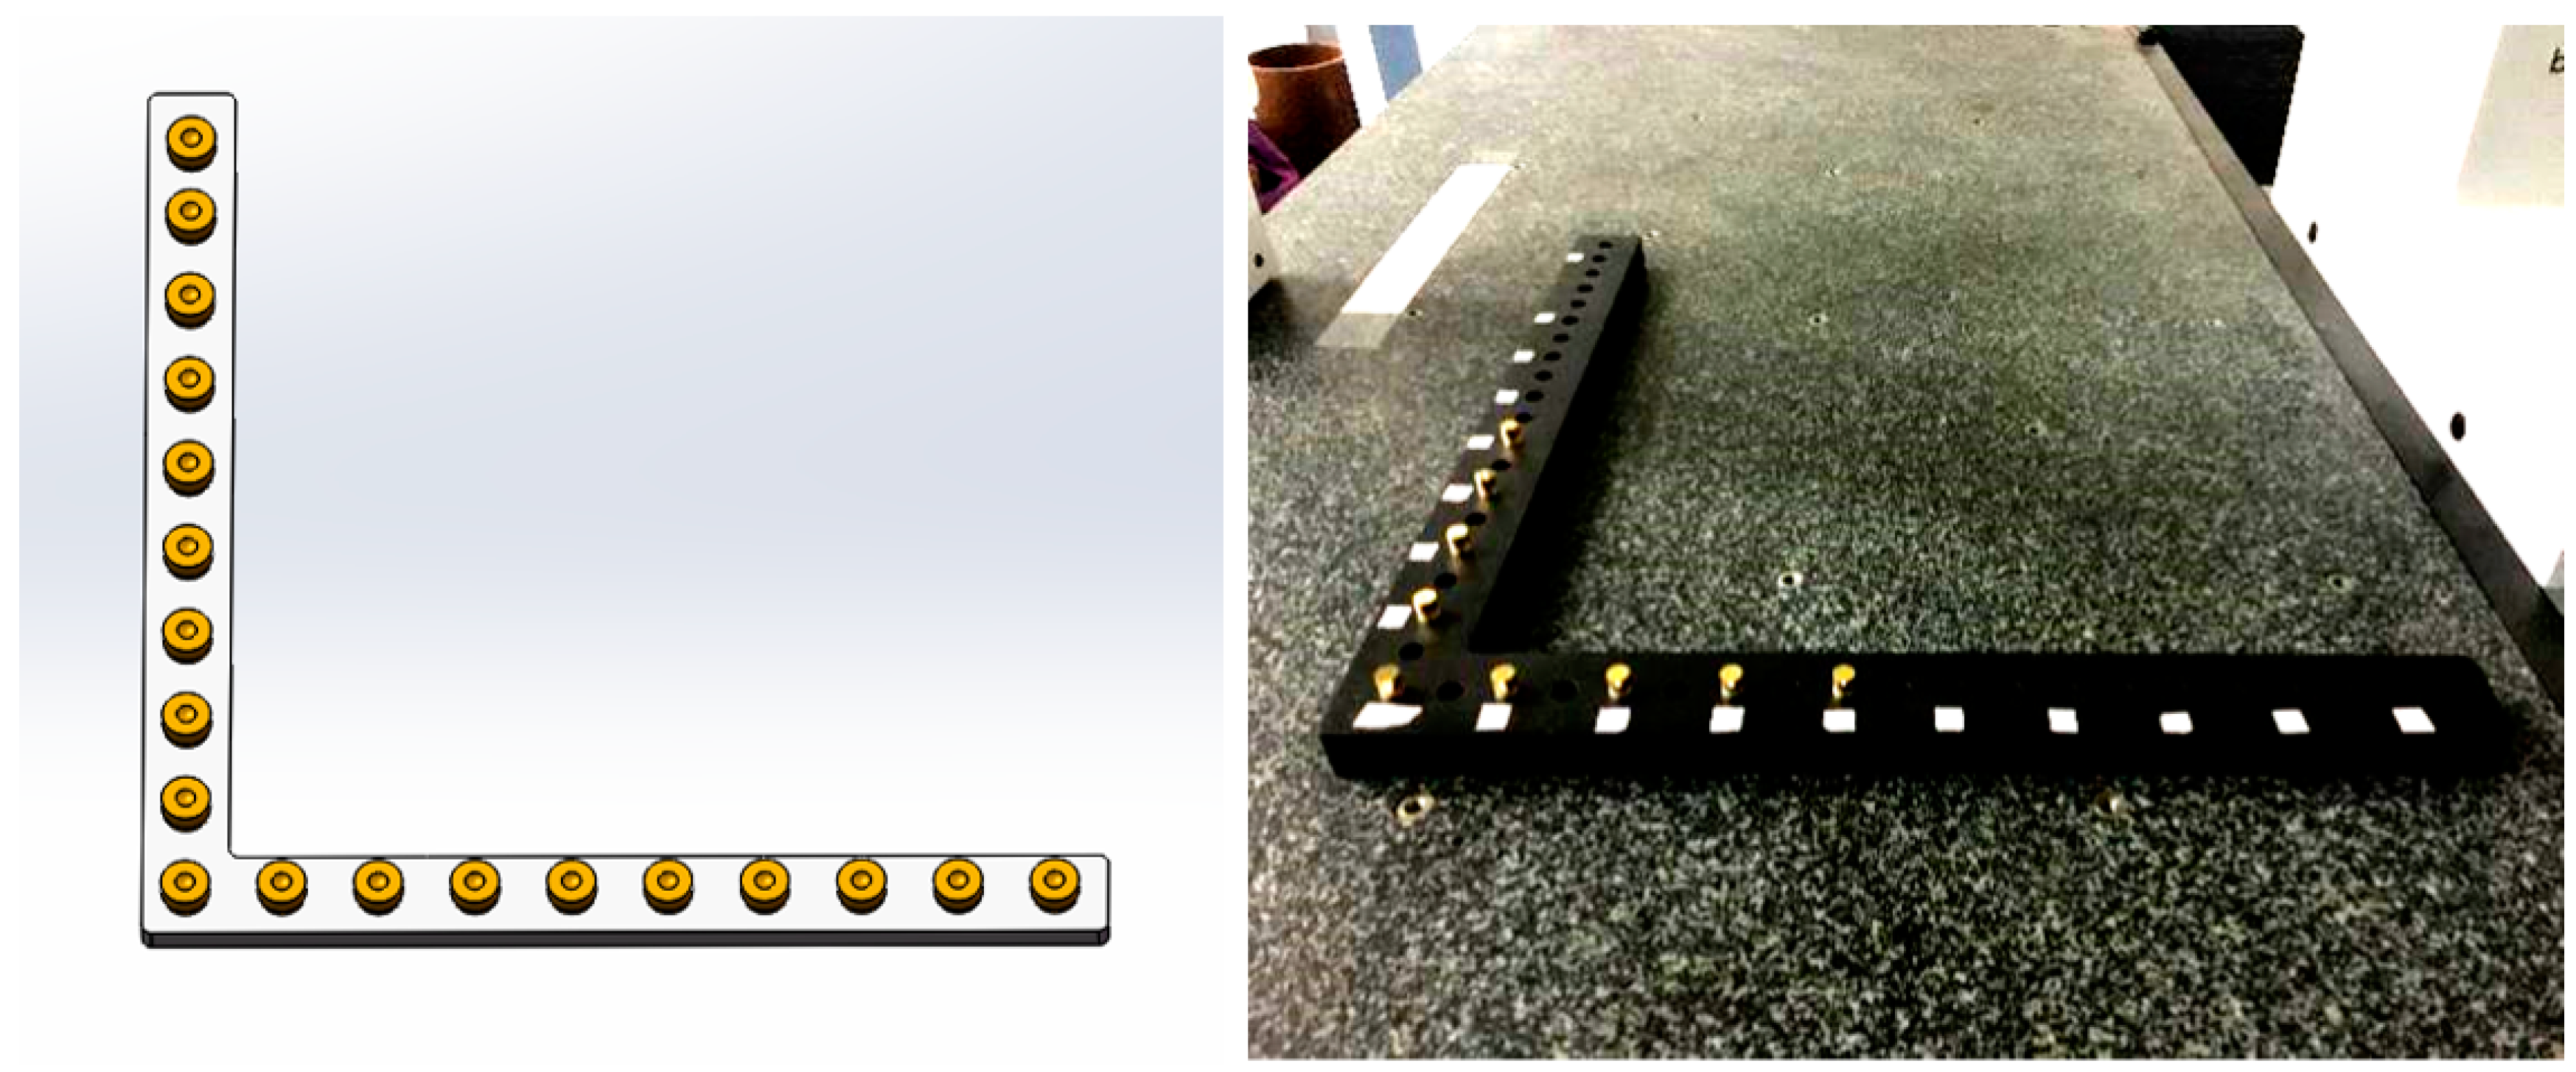
Although the range of a single rotating paraboloid is small, it cannot meet the demand of large-scale measurement in industry. A combined array composed of many rotating paraboloids was designed for large range applications, as shown in Figure 12.
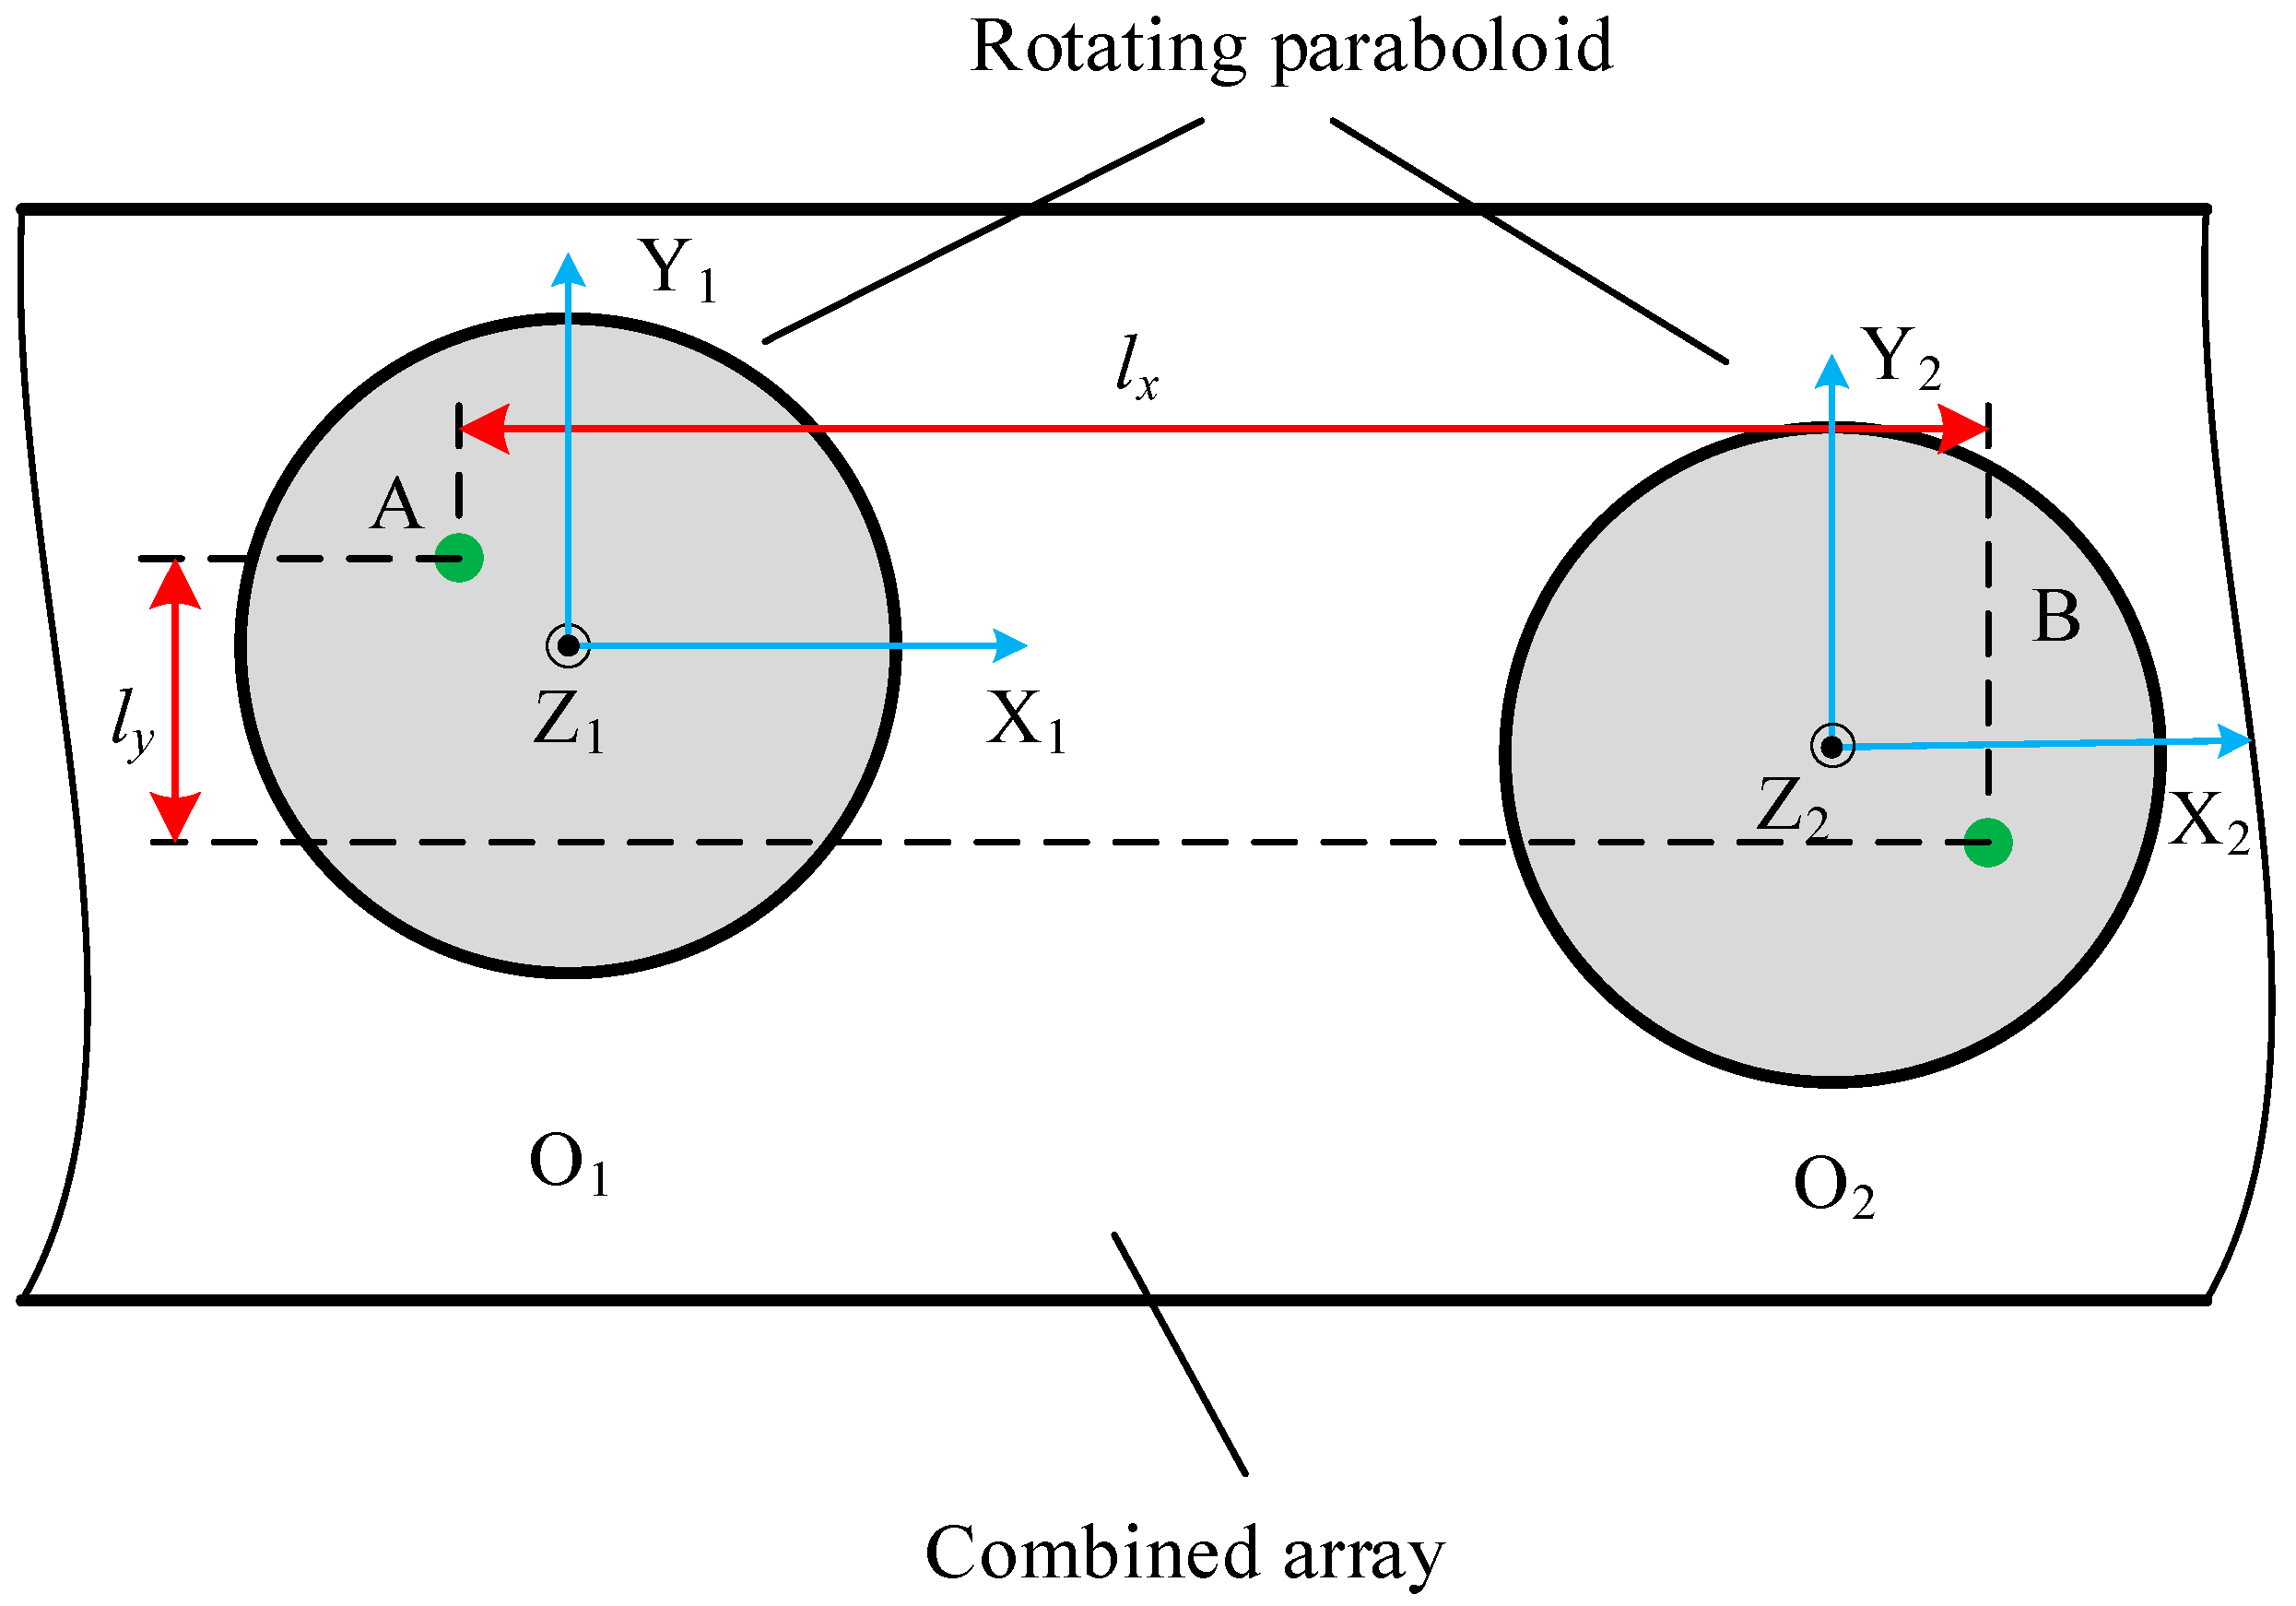
The measurement range of a combined array in this paper was 450 mm in the direction of X and Y. In particular, the distance between the center of adjacent rotating paraboloids was 50 mm. Of course, the precise distance and angle between each rotating paraboloid were calibrated before. The relative position of the center point of each rotating paraboloid on the combined array could be calibrated by laser interferometer and coordinate measuring machine (CMM) (Hexagon, Stockholm, Sweden). The schematic of detecting two positions on different rotating paraboloids is shown in Figure 13.
The distance between the measuring points A and B can be expressed as:
l x = ( x B x A ) 0.68 + ( x o 2 x o 1 )
l y = ( y B y A ) 0.68 + ( y o 2 y o 1 )
where (xo1, yo1) and (xo2, yo2) are the positions of the O1 and O2 center points on the calibrated L-type combined array.
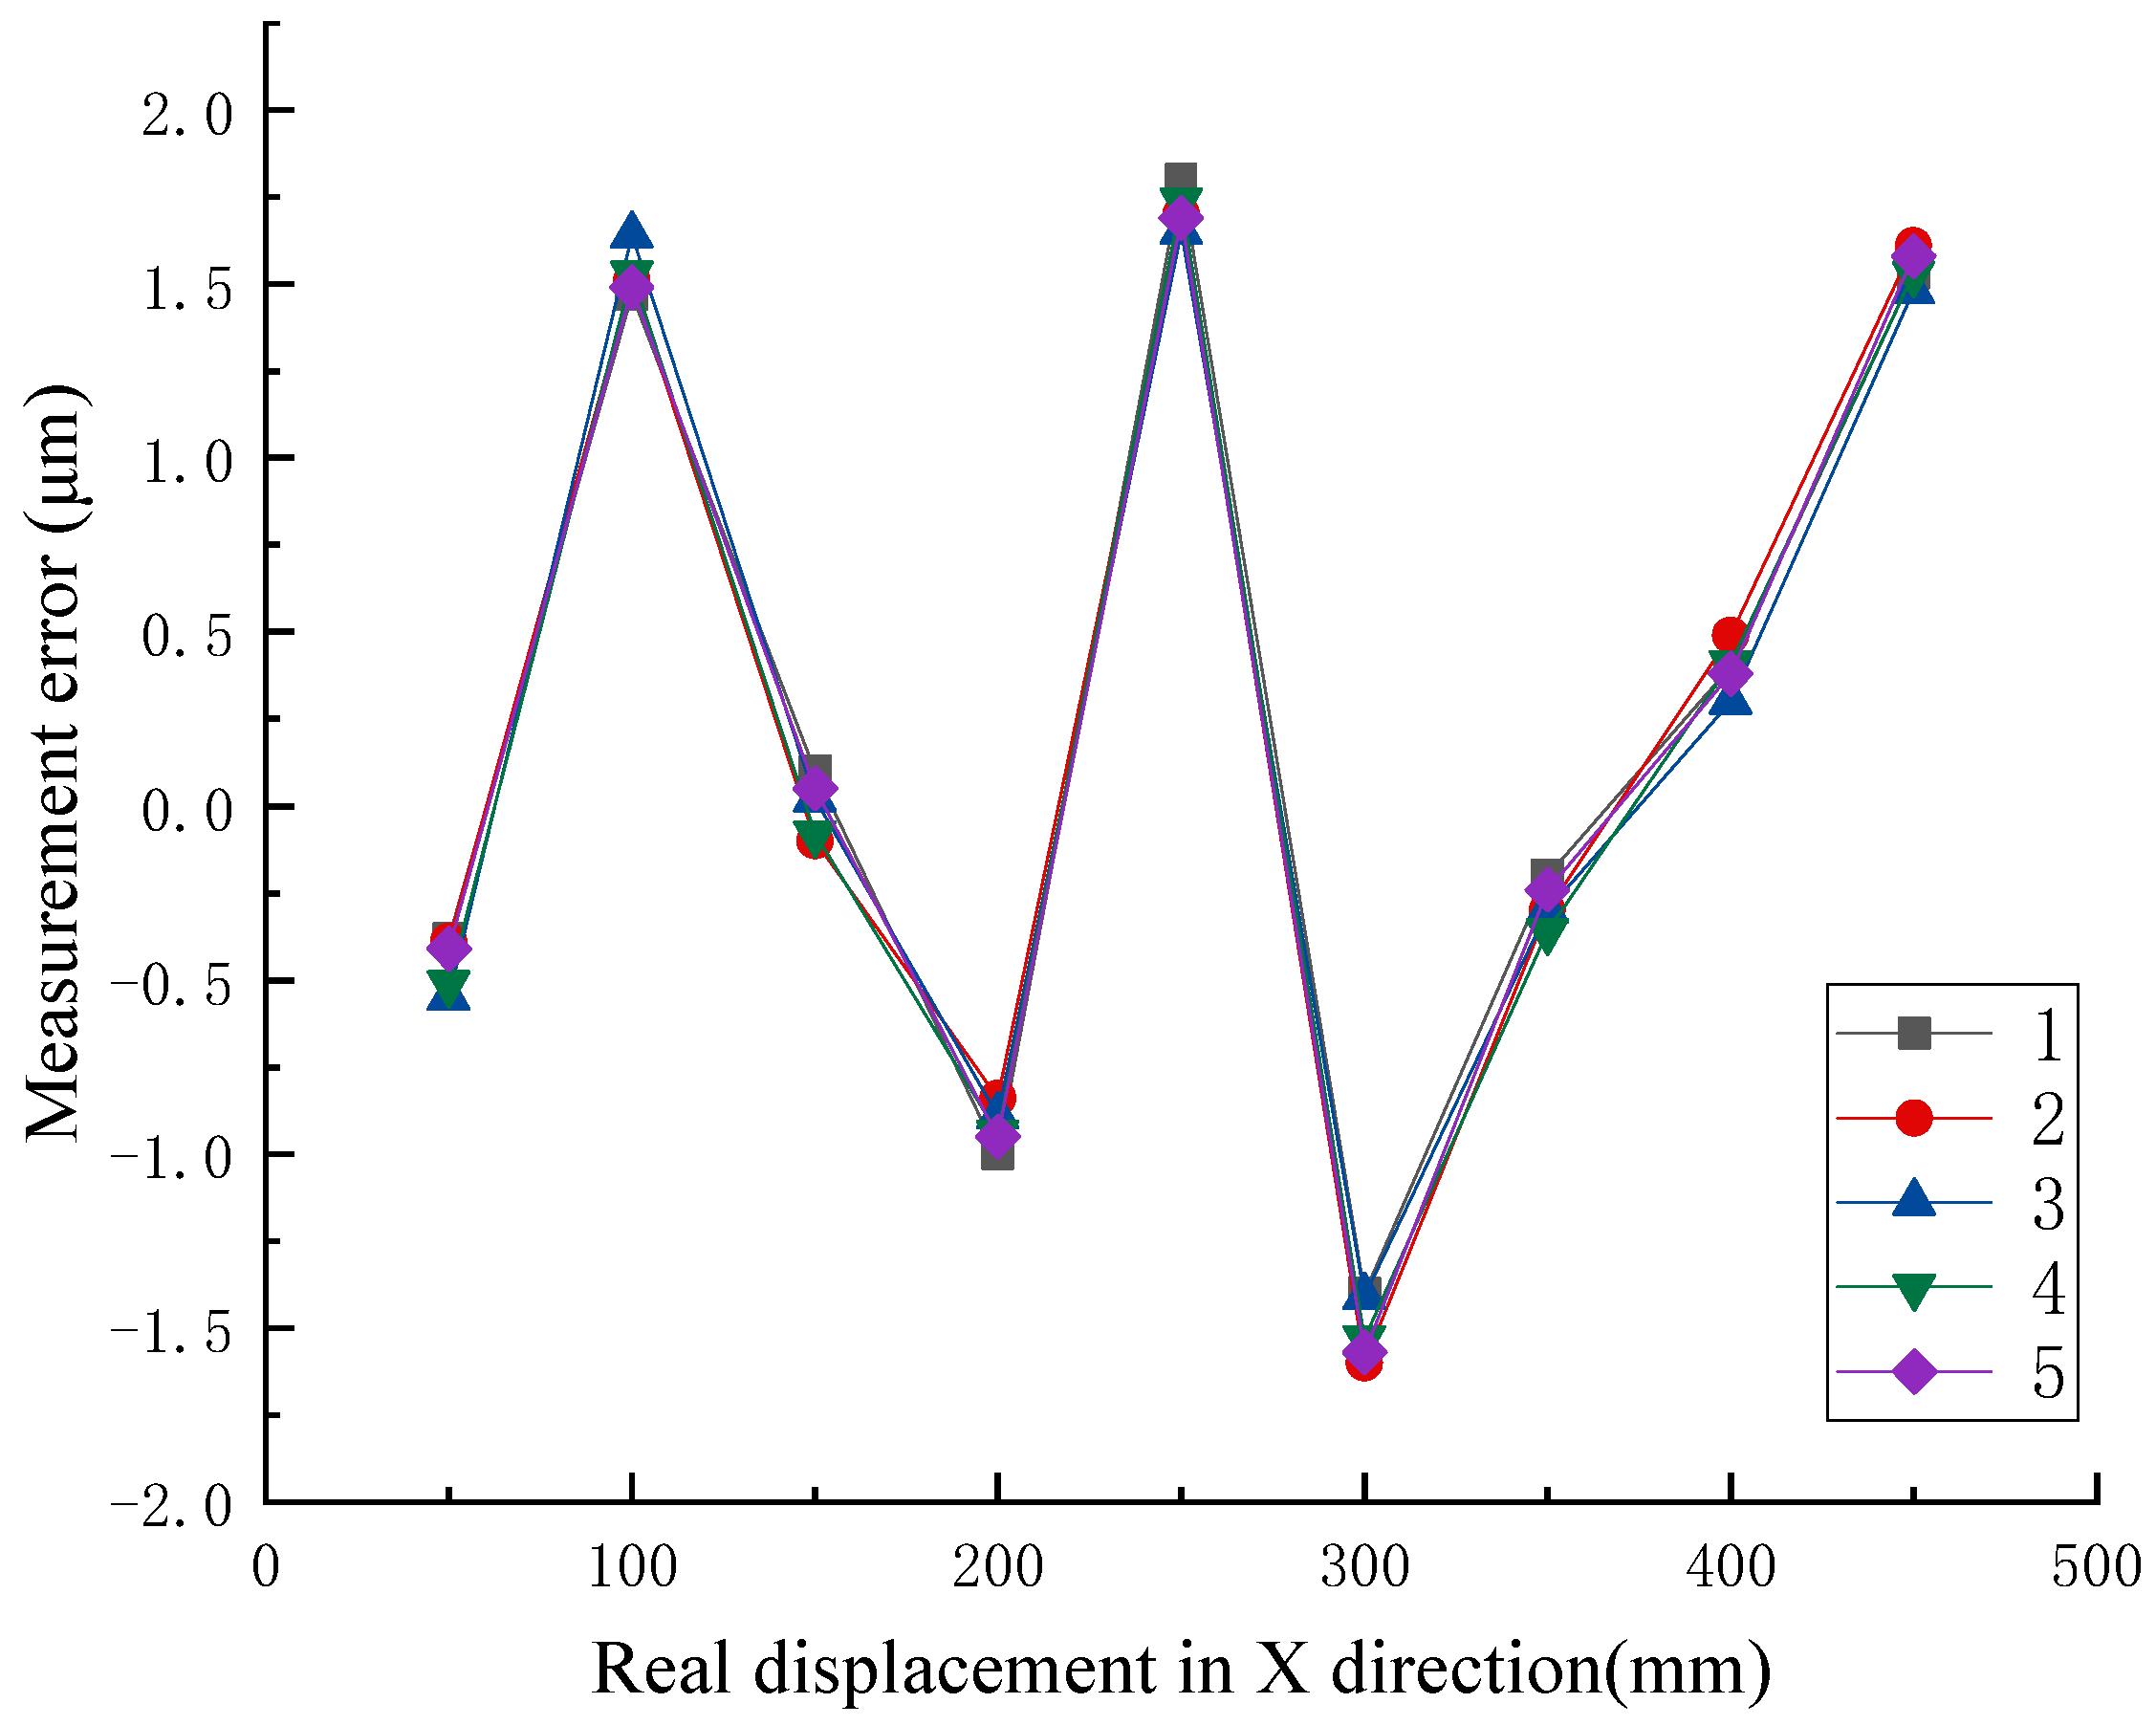
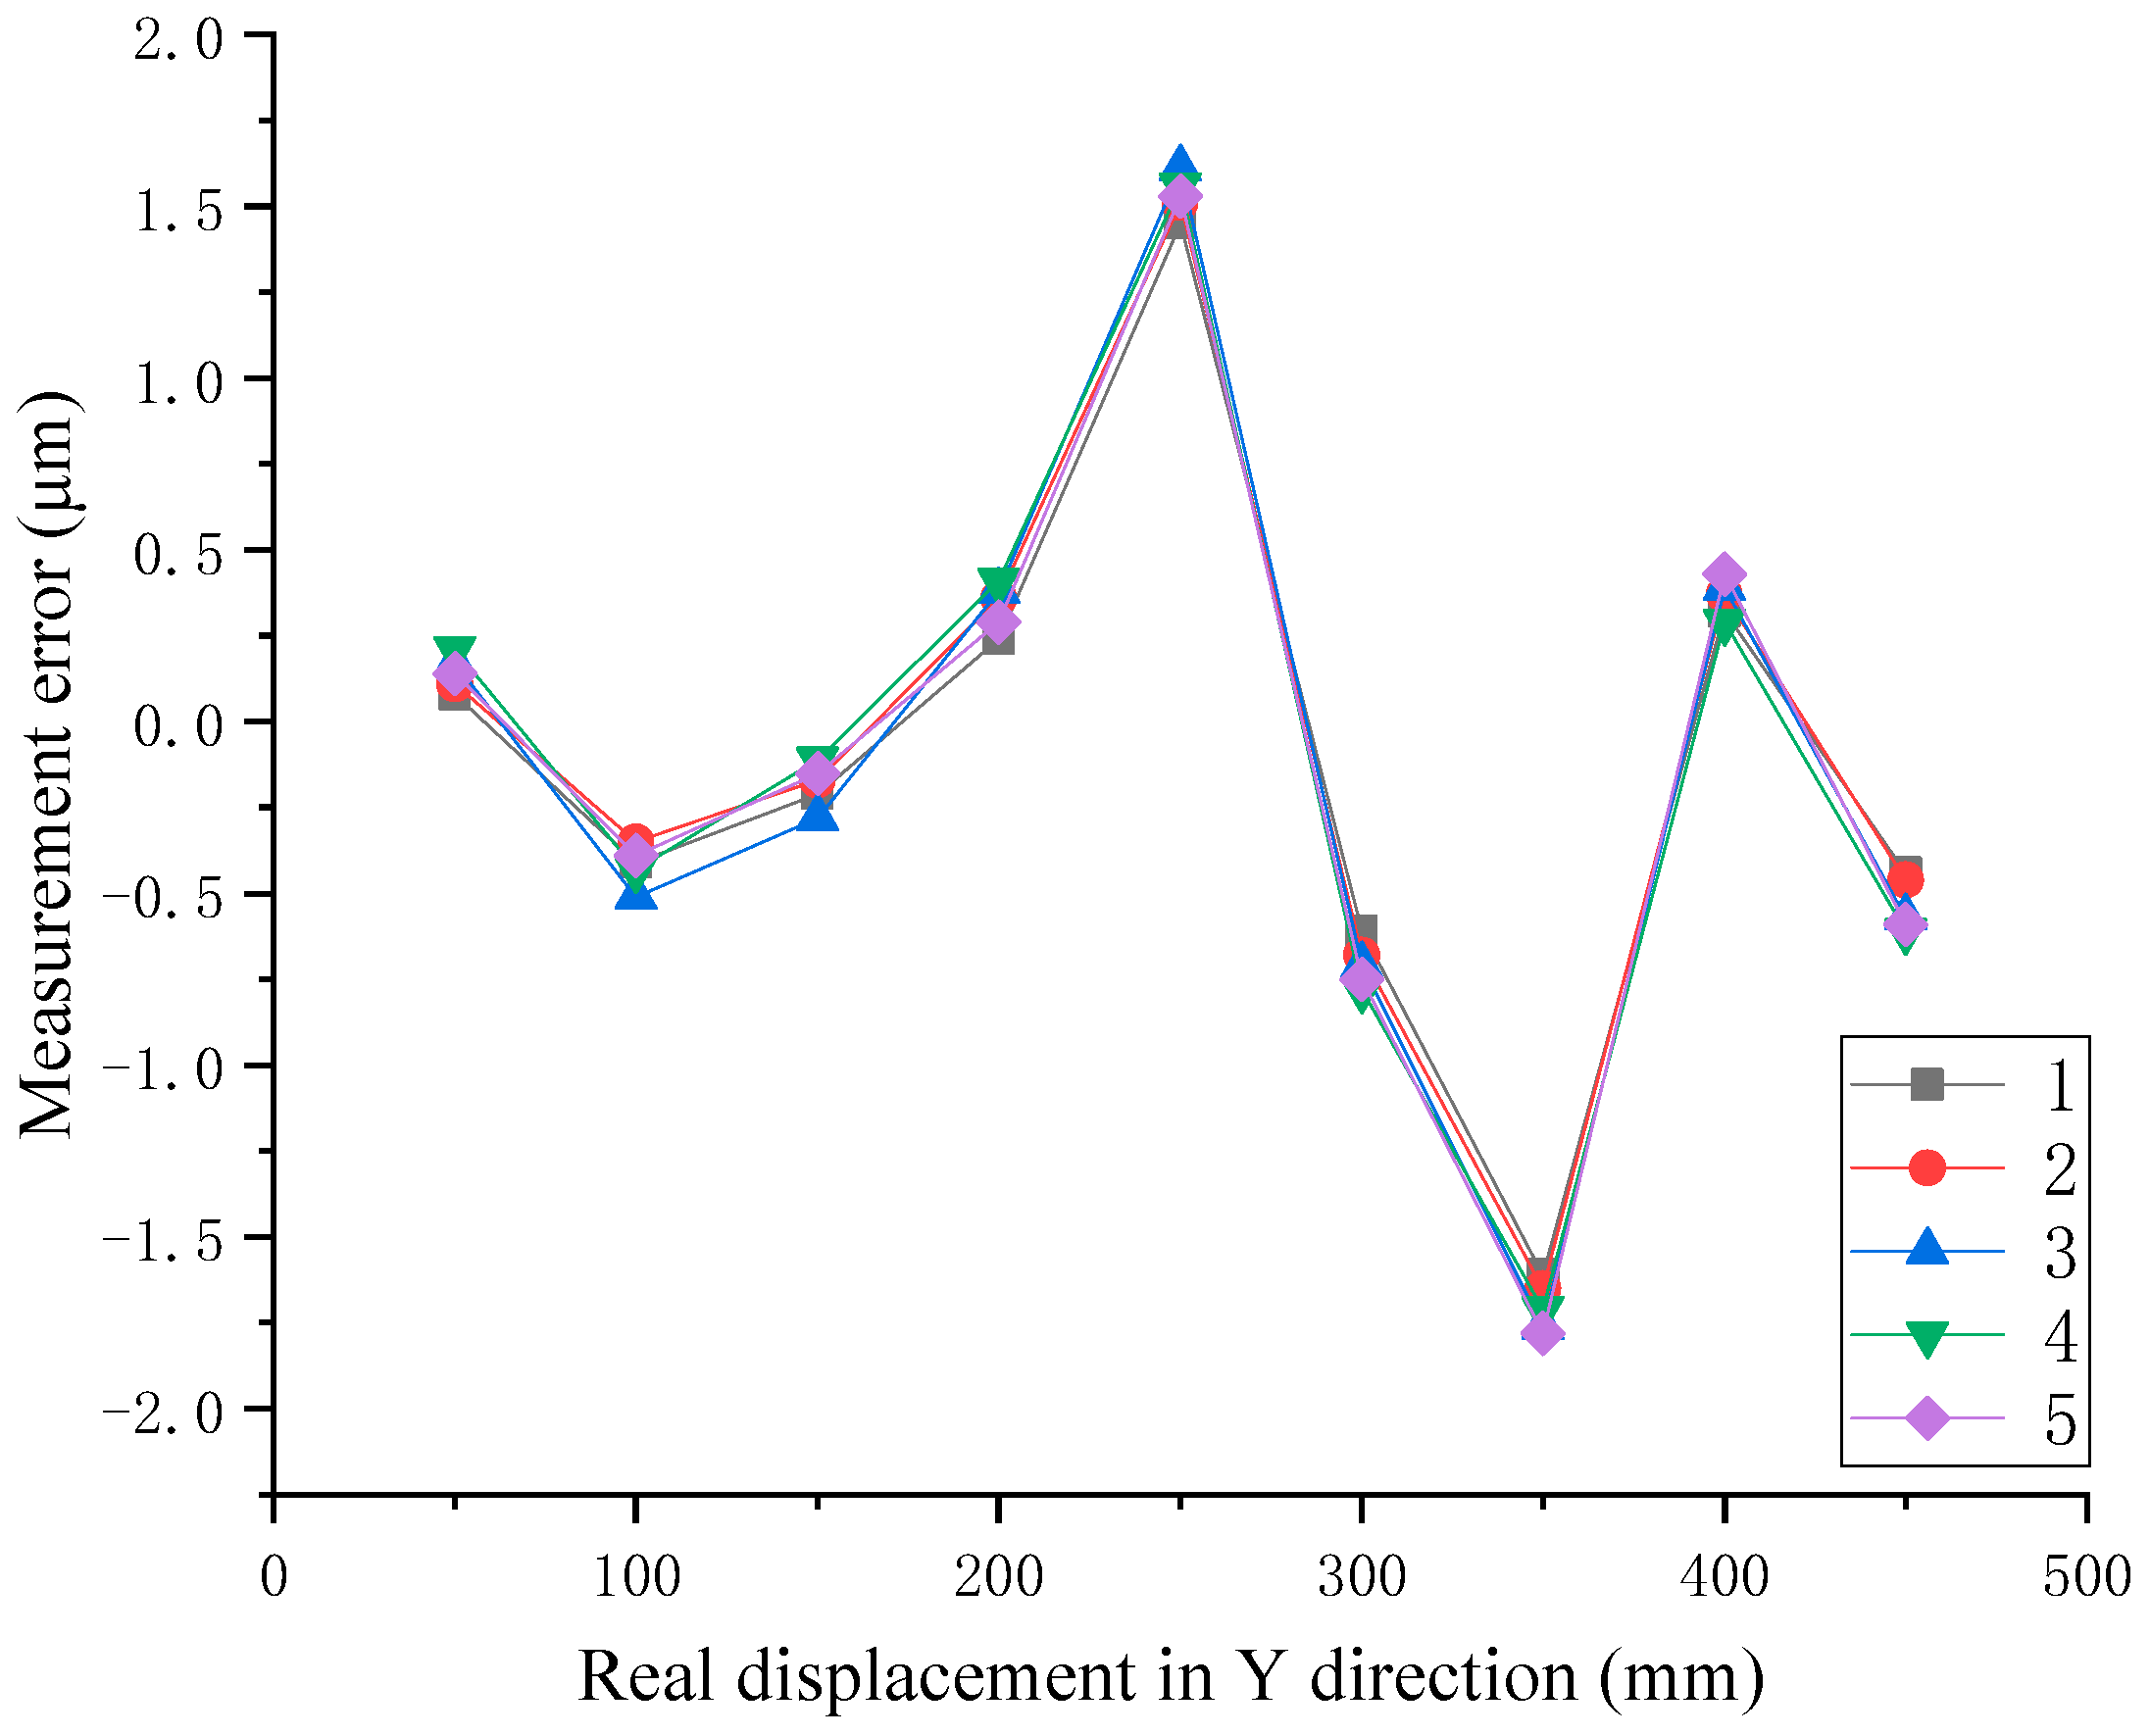
The L-type combined array was placed on a platform. The slope sensor was driven by two-dimensional moving stages and moved in the X or Y direction above a rotating paraboloid in a step of 0.2 mm. Similarly, the relative position of the slope sensor was monitored by a laser interferometer. Figure 14 shows the displacement measurement in the Y direction. The measurement errors could be obtained by comparing the detection values of the laser interferometer with the detection values of the slope sensor. Figure 15 and Figure 16 show the error values of every measurement point in the X and Y direction. The curves of five colors indicated that the experiment was repeated five times.
According to Figure 15 and Figure 16, it can be seen that the measurement error was approximately ±2 μm when measured within the range of 450 mm. The measurement error in each set of rotating paraboloids was still 0.4 μm, in contrast, the measurement error between the different rotating paraboloids was larger. The main cause of the larger error was due to the calibration error of the relative position of each free surface on the array. The accuracy of the system could be improved by improving the calibration accuracy of the L-type combined array.

4. Discussion

4.1. Approximate Error

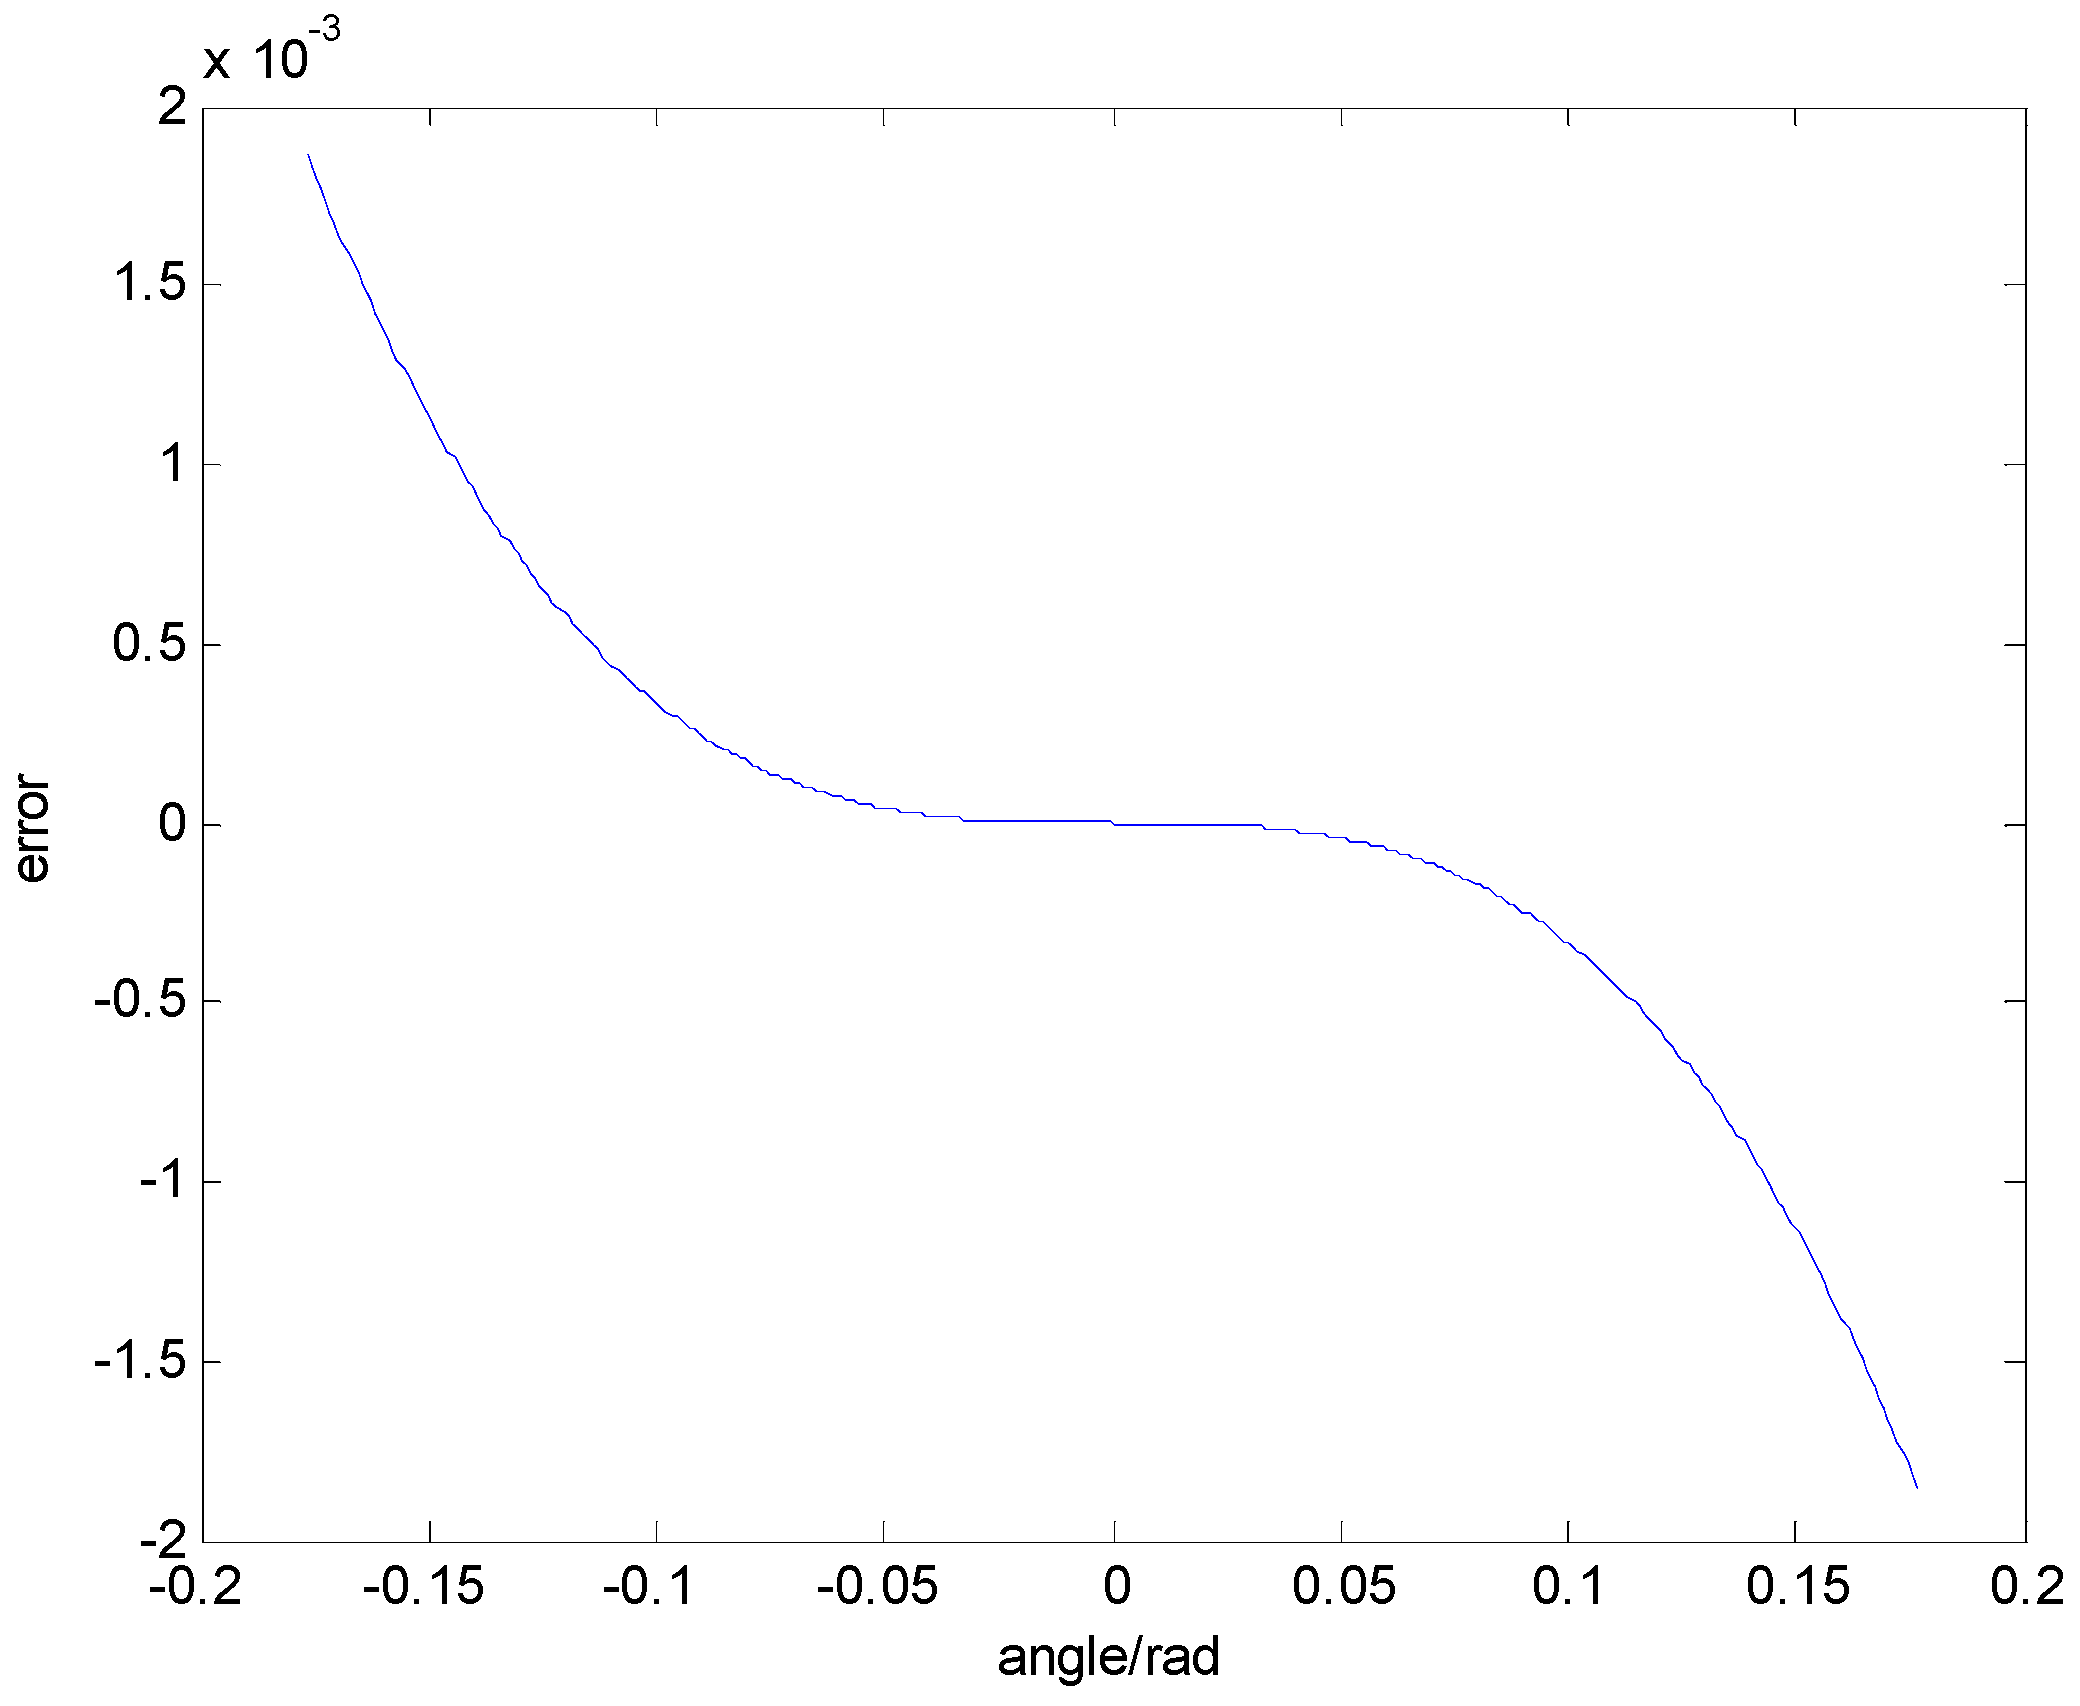
There is a mathematical approximation caused by the principle of autocollimation in an optical slope sensor due to Equation (6). When the opening size of the rotating paraboloid was 2 mm, the corresponding maximum slope was 0.1767 rad. Within this range, there were substitution errors caused by the formula, as shown in Figure 17. The results could be drawn from Figure 16, that the approximate error was particularly small ( 2 × 10 3 ) when the angle ranged from −0.1767 rad to 0.1767 rad. In addition, the error reduced when the focal length of the rotating paraboloid ( f c ) increased. Linear transformation of the angle and displacement could be achieved due to the rotating paraboloid. Therefore, it was able to accurately measure when the displacement was in a particularly small range. Nevertheless, it was obvious that the precise measurement range of the method of the rotating paraboloid array was discrete. However, the spacing and number of discrete points can be adjusted to suit different environments. In some occasions, such as the measurement of the machine positioning error, there is great scope for application.

4.2. Influence of Vibration of 2D Moving Stages

In reality, the vibration of the 2D moving stage had little influence on the displacement measurement. Through analysis, we found that the vibration of the 2D moving stage in different directions did not affect the measurement system completely. For example, only the vibration of the 2D moving stage in the same direction affected the measurement system when the measuring direction was along with X axis. Vibration in the other two directions will have a slight effect on the stability of the measurement system. To eliminate or reduce the influence, some measures might be taken in the experiment. Firstly, the 2D moving stage with high accuracy and stability has priority in applications to reduce vibration from the source. In addition, the optical slope sensor in the measurement system requires a vibration reduction design, such as precise mechanical design and a good vibration isolation material (like ultraviolet ray glue). Finally, multiple measurements and median filtering techniques are used in the image processing of light spots to improve stability.

4.3. Methods of Increasing Accuracy

There are some methods that could be taken out in the experiment to increase the accuracy of the system:
(1) The accuracy of the rotating paraboloid array required calibration before application, which contained two translations and two orientations. Calibration experiments with the help of a laser measurement system (Renishaw, Gloucestershire, UK) and coordinate-measuring machines (CMM) (Hexagon, Stockholm, Sweden) were carried out several times in the laboratory. After calibration, some deficiencies caused by installation errors could be reduced, although these errors were extremely small. The experimental accuracy could be improved by taking experiments repeatedly and selecting high-precision calibration devices.
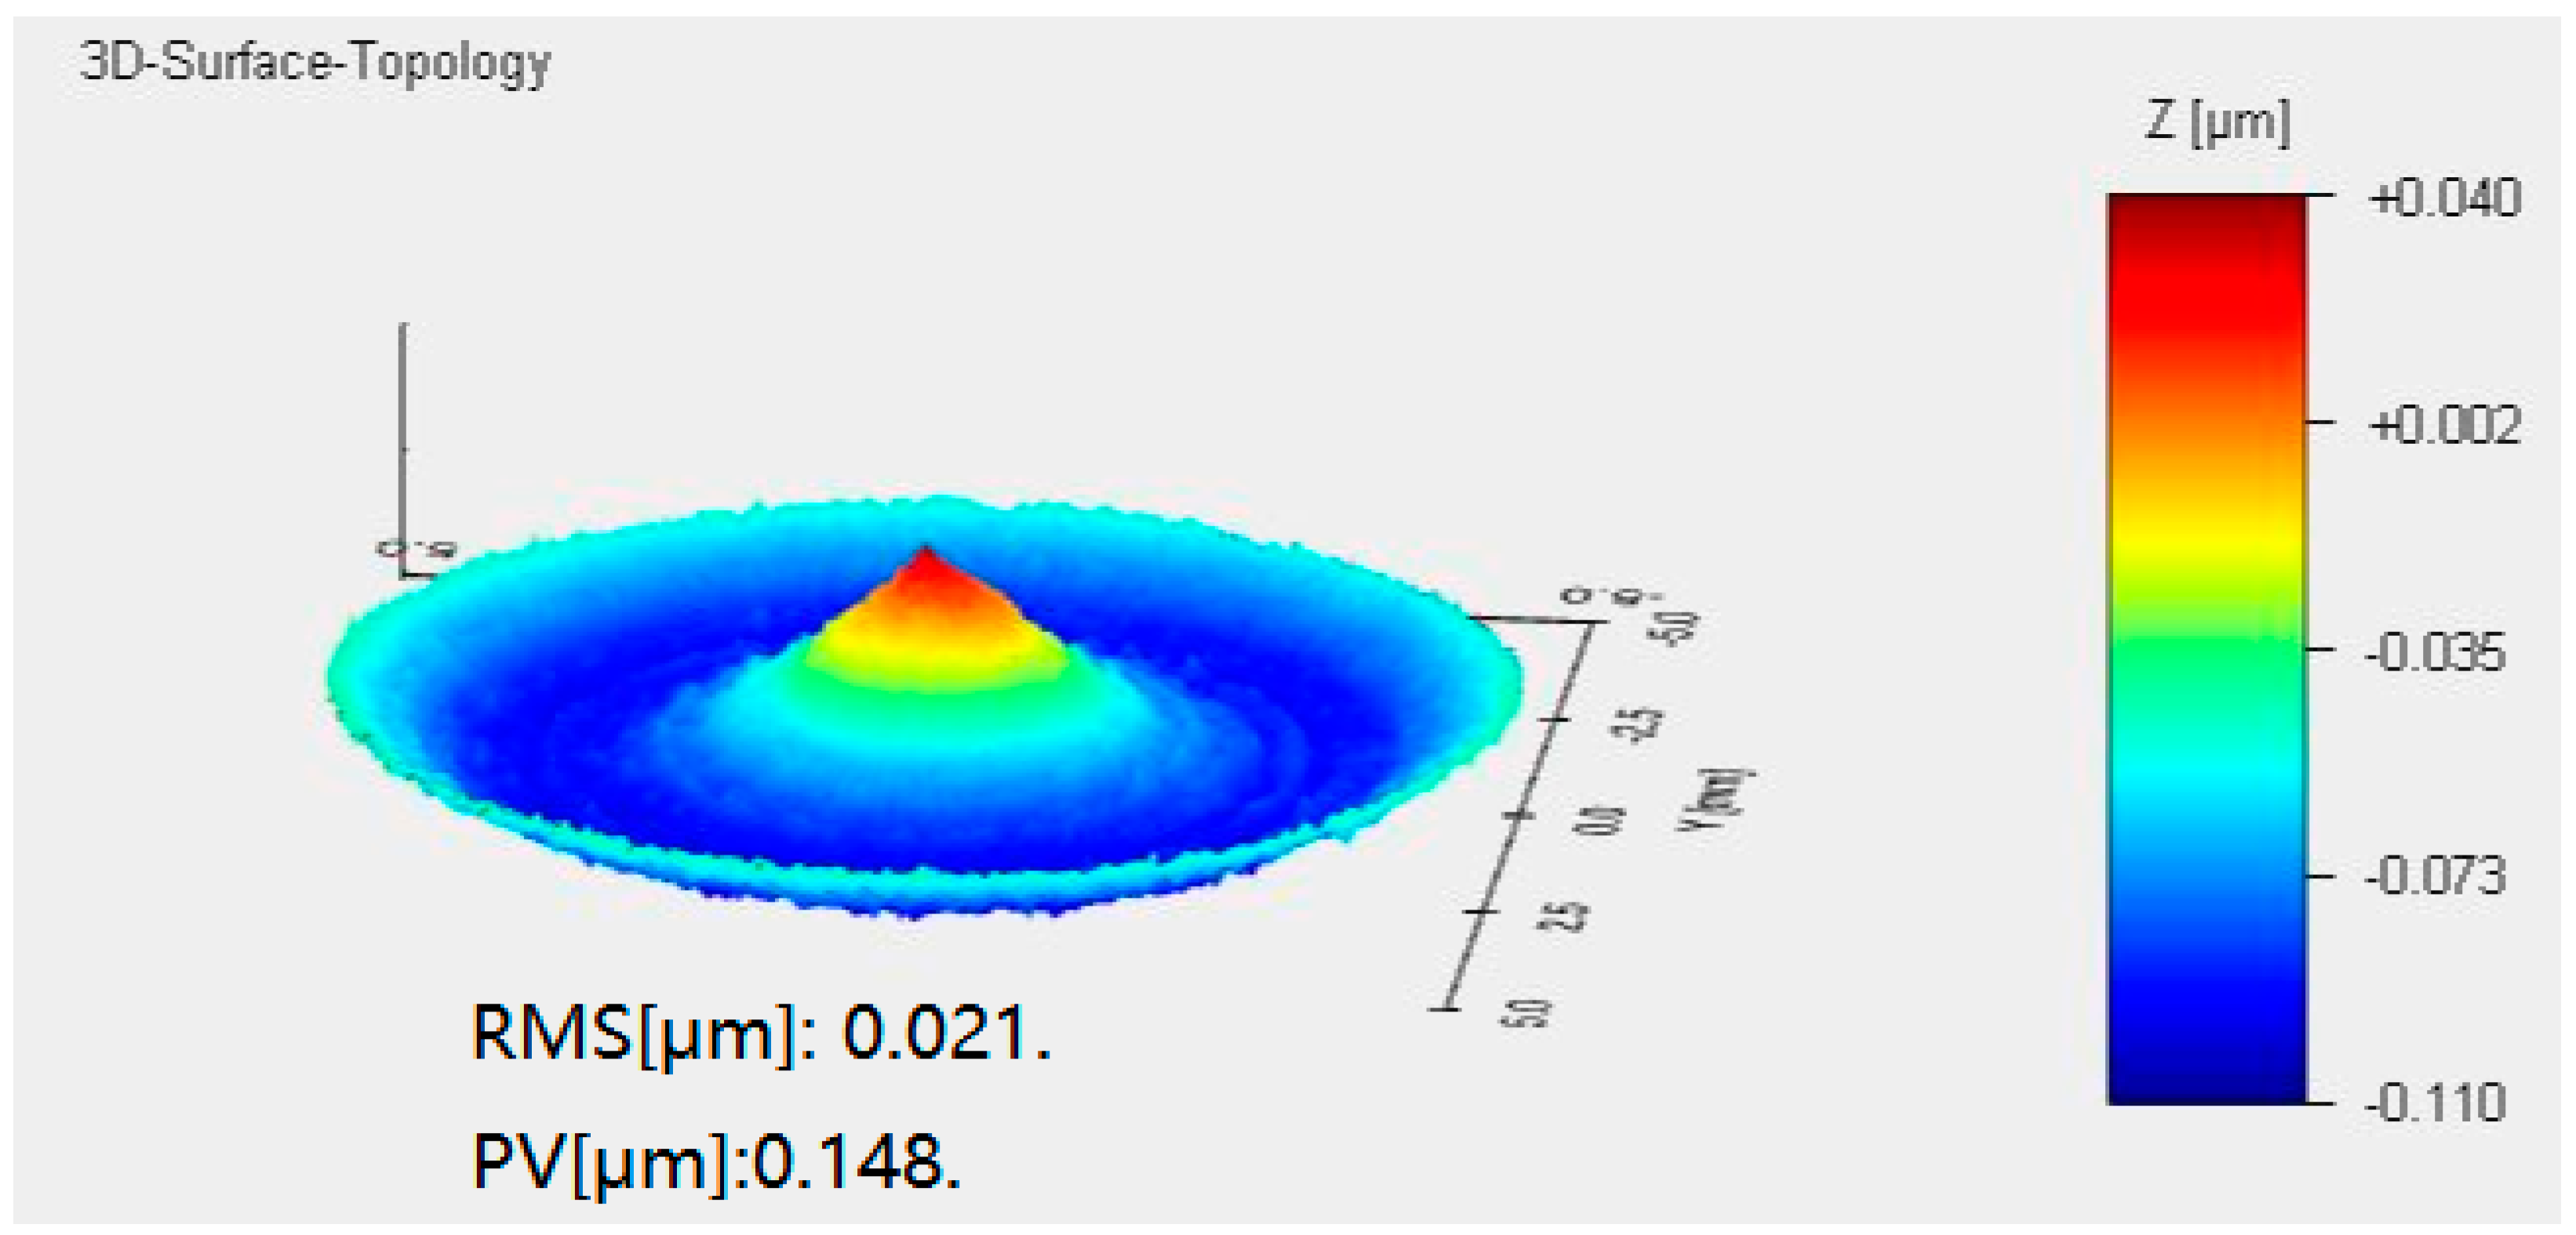
(2) Reducing the processing error of the rotating paraboloid is the basic requirement to ensure the accuracy of the system. At the same time, it is necessary to keep the surface of the rotating paraboloid clean. The surface profile of the rotating paraboloid in the experiment was measured by an optical 3D surface profiler and the testing result is shown in Figure 18. From Figure 18, we can see that the root mean square (RMS) of the surface was 0.021 μm and the value of peak value (PV) was 0.148 μm, which confirmed the manufacturing accuracy of the rotating paraboloid. In particular, a laser with low power (about 5 mW) should be selected and a laboratory environment with controlled temperature and humidity to protect the rotating paraboloid from damage should be used.
(3) Improving the manufacturing and installation accuracy of the rotating paraboloid array is also significant. To prevent loosening of the rotating paraboloid array, strict fixation of the array and caution of the experimenters are needed.

5. Conclusions

A two-dimensional displacement measurement system with a large range, based on a rotating paraboloid array, was designed by analyzing the main causes of error in the measurement system and optimizing it. The optimized system improved the imaging spot quality of the measurement system, improved the accuracy and stability of the spot extraction, and greatly improved the measurement accuracy of the system. It was identified that the precision of the optimized measurement system was up to ±0.4 μm within the effective range of the rotating paraboloid and that the relative error was 0.053%. The overall measurement error was approximately ±2 μm when measured within the range of 450 mm, which indicated that it was an accurate and reliable means to extend the range of the processing system by combined arrays. Overall, the measurement system has the advantages of low-cost, simple structure, easy implementation of range expansion and easy integration. It can be extended into a multi-degree-of-freedom measurement system according to the needs of the task. Finally, improving the measurement accuracy of the combined array and extending the application of the multi-degree-of-freedom measurement system will be of high priority in future work.

Author Contributions

X.L., F.F., and H.Z. proposed the method and modified the paper; Z.L. designed the experiments and wrote the paper; D.Z., X.Y. and J.L. developed the system software and processed the data; Z.S., X.W. and Z.Y. designed the mechanical and optical structure.

Funding

This research was financially supported by the National Natural Science Foundation of China (NSFC) (No: 51775378), the Science Foundation Ireland (SFI) (No. 15/RP/B3208), the National Key R&D Program of China (No.2017YFF0108102), and the Natural Science Foundation of Shanxi Province, China (Grant No. 201801D121180).

Conflicts of Interest

The authors declare no conflict of interest.

References

  1. Won, J.; Park, J.W.; Park, K.; Yoon, H.; Moon, D.-S. Non-Target Structural Displacement Measurement Using Reference Frame-Based Deepflow. Sensors 2019, 19, 2992. [Google Scholar] [CrossRef] [PubMed]
  2. Wei, Y.; Wu, P.; Zhu, Z.; Liu, L. Surface-Plasmon-Resonance-Based Optical-Fiber Micro-Displacement Sensor with Temperature Compensation. Sensors 2018, 18, 3210. [Google Scholar] [CrossRef] [PubMed]
  3. Wang, S.; Chiu, M.; Chen, W. Small-displacement sensing system based on multiple total internal reflections in heterodyne interferometry. Appl. Opt. 2009, 48, 2566–2573. [Google Scholar] [CrossRef] [PubMed]
  4. Li, J.; Hong, H.; Fan, K.; Brownjoho, J. Development and application of a relative displacement sensor for structural health monitoring of composite bridges. Struct. Control Health Monit. 2015, 22, 726–742. [Google Scholar] [CrossRef]
  5. Yang, C.; Oyadiji, S.O. Development of two-layer multiple transmitter fibre optic bundle displacement sensor and application in structural health monitoring. Sens. Actuators A Phys. 2016, 244, 1–14. [Google Scholar] [CrossRef]
  6. Giri, P.; Kharkovsky, S.; Samali, B. Inspection of metal and concrete specimens using imaging system with laser displacement sensor. Electronics 2017, 6, 36. [Google Scholar] [CrossRef]
  7. Giri, P.; Kharkovsky, S. Detection of surface crack in concrete using measurement technique with laser displacement sensor. IEEE Trans. Instrum. Meas. 2016, 65, 1951–1953. [Google Scholar] [CrossRef]
  8. Giri, P.; Kharkovsky, S. Dual-laser integrated microwave imaging system for nondestructive testing of construction materials and structures. IEEE Trans. Instrum. Meas. 2018, 67, 1329–1337. [Google Scholar] [CrossRef]
  9. Lu, M.; Wang, S.; Bilgeri, L. Online 3D Displacement Measurement Using Speckle Interferometer with a Single Illumination-Detection Path. Sensors 2018, 18, 1923. [Google Scholar] [CrossRef]
  10. Dong, Z.; Sun, X.; Chen, C.; Sun, M. A Fast and On-Machine Measuring System Using the Laser Displacement Sensor for the Contour Parameters of the Drill Pipe Thread. Sensors 2018, 18, 1192. [Google Scholar] [CrossRef]
  11. Jywe, W.Y.; Hsieh, T.H.; Chen, P.Y.; Wang, M.S. An Online Simultaneous Measurement of the Dual-Axis Straightness Error for Machine Tools. Appl. Sci. 2018, 8, 2130. [Google Scholar] [CrossRef]
  12. Gao, W.; Kimura, A. A Three-axis Displacement Sensor with Nanometric Resolution. CIRP Ann.-Manuf. Technol. 2007, 56, 529–532. [Google Scholar] [CrossRef]
  13. Bello, Z.A.; Tfwala, C.M.; van Rensburg, L.D. Evaluation of newly developed capacitance probes for continuous soil water measurement. Geoderma 2019, 345, 104–113. [Google Scholar] [CrossRef]
  14. Bonfitto, A.; Gabai, R.; Tonoli, A.; Castellanosa, L.M.; Amati, N. Resonant inductive displacement sensor for active magnetic bearings. Sens. Actuators A Phys. 2019, 287, 84–92. [Google Scholar] [CrossRef]
  15. Wu, C.; Chen, B.; Ye, C.; Yan, X. Modeling the Influence of Oil Film, Position and Orientation Parameters on the Accuracy of a Laser Triangulation Probe. Sensors 2019, 19, 1844. [Google Scholar] [CrossRef]
  16. Song, Y.; Wu, S.; Xu, L.; Fu, X. Accurate Calibration and Uncertainty Estimation of the Normal Spring Constant of Various AFM Cantilevers. Sensors 2015, 15, 5865–5883. [Google Scholar] [CrossRef] [Green Version]
  17. Ren, D.; Xi, J.; Li, Z.; Li, B.; Zhao, Z.; Zhao, H.; Cui, L.; Xu, H. The Alignment Method for Linear Scale Projection Lithography Based on CCD Image Analysis. Proceedings 2018, 2, 101. [Google Scholar] [CrossRef]
  18. Dong, H.; Liu, S.; Yang, L.; Peng, J.; Cheng, K. Optical Fiber Displacement Sensor Based on Microwave Photonics Interferometry. Sensors 2018, 18, 3702. [Google Scholar] [CrossRef]
  19. Martincek, I.; Kacik, D. A PDMS microfiber Mach-Zehnder interferometer and determination of nanometer displacements. Opt. Fiber Technol. 2018, 40, 13–17. [Google Scholar] [CrossRef]
  20. Fan, W.; Chen, M.; Jin, H.; Wang, Y. Multi-layer concentric ring differential capacitance displacement sensor. Measurement 2019, 136, 615–621. [Google Scholar] [CrossRef]
  21. Bonfitto, A.; Tonoli, A.; Silvagni, M. Sensorless active magnetic dampers for the control of rotors. Mechatronics 2016, 47, 195–207. [Google Scholar] [CrossRef]
  22. Lee, J.; Park, S.; Seo, D.H. Displacement measurement using an optoelectronic oscillator with an intra-loop Michelson interferometer. Opt. Express 2016, 24, 21910–21920. [Google Scholar] [CrossRef]
  23. Luis, A.; Sandra, V.; Arturo, G.; Rene, J.; Roque, A.; Ibrahim, S.; Eduardo, C. FPGA-Based Smart Sensor for Online Displacement Measurements Using a Heterodyne Interferometer. Sensors 2011, 11, 7710–7723. [Google Scholar] [Green Version]
  24. Lin, J.; Guan, J.; Wen, F.; Tan, J. High-resolution and wide range displacement measurement based on planar grating. Opt. Commun. 2017, 404, 132–138. [Google Scholar] [CrossRef]
  25. Fang, F.Z.; Zhang, X.D.; Weckenmann, A.; Zhang, G.X.; Evans, C. Manufacturing and Measurement of Freeform Optics. CIRP Ann.-Manuf. Technol. 2013, 62, 823–846. [Google Scholar] [CrossRef]
  26. Lv, Z.; Li, X.; Su, Z.; Zhang, D.; Yang, X.; Li, H.; Li, J.; Fang, F. A Novel 2D Micro-Displacement Measurement Method Based on the Elliptical Paraboloid. Appl. Sci. 2019, 9, 2517. [Google Scholar] [CrossRef]
  27. Tsai, H.A.; Lo, Y.L. An Approach to Measure Tilt Motion, Straightness and Position of Precision Linear Stage with a 3D Sinusoidal-Groove Linear Reflective Grating and Triangular Wave-Based Subdivision Method. Sensors 2019, 19, 2816. [Google Scholar] [CrossRef]
  28. Gao, W.; Araki, T.; Kiyono, S. Precision nano-fabrication and evaluation of a large area sinusoidal grid surface for a surface encoder. Precis. Eng. 2003, 27, 289–298. [Google Scholar] [CrossRef]
  29. Gao, W.; Dejima, S.; Shimizu, Y.; Kiyono, S. Precision Measurement of Two-Axis Position and Tilt Motions Using a Surface Encoder. CIRP Ann.-Manuf. Technol. 2013, 52, 435–438. [Google Scholar] [CrossRef]
  30. Kim, M.; Moon, W.; Yoon, E.; Lee, K.-R. A new capacitive displacement sensor with high accuracy and long-range. Sens. Actuators A Phys. 2006, 130, 135–141. [Google Scholar] [CrossRef]
  31. Yang, H.; Li, R.; Wei, Q.; Liu, J. The study of high accuracy capacitive displacement sensor used in non-contact precision displacement measurement. In Proceedings of the 2009 9th International Conference on Electronic Measurement & Instruments, Beijing, China, 16–19 August 2009; IEEE: Piscataway, NJ, USA, 2009. 10962820. [Google Scholar]
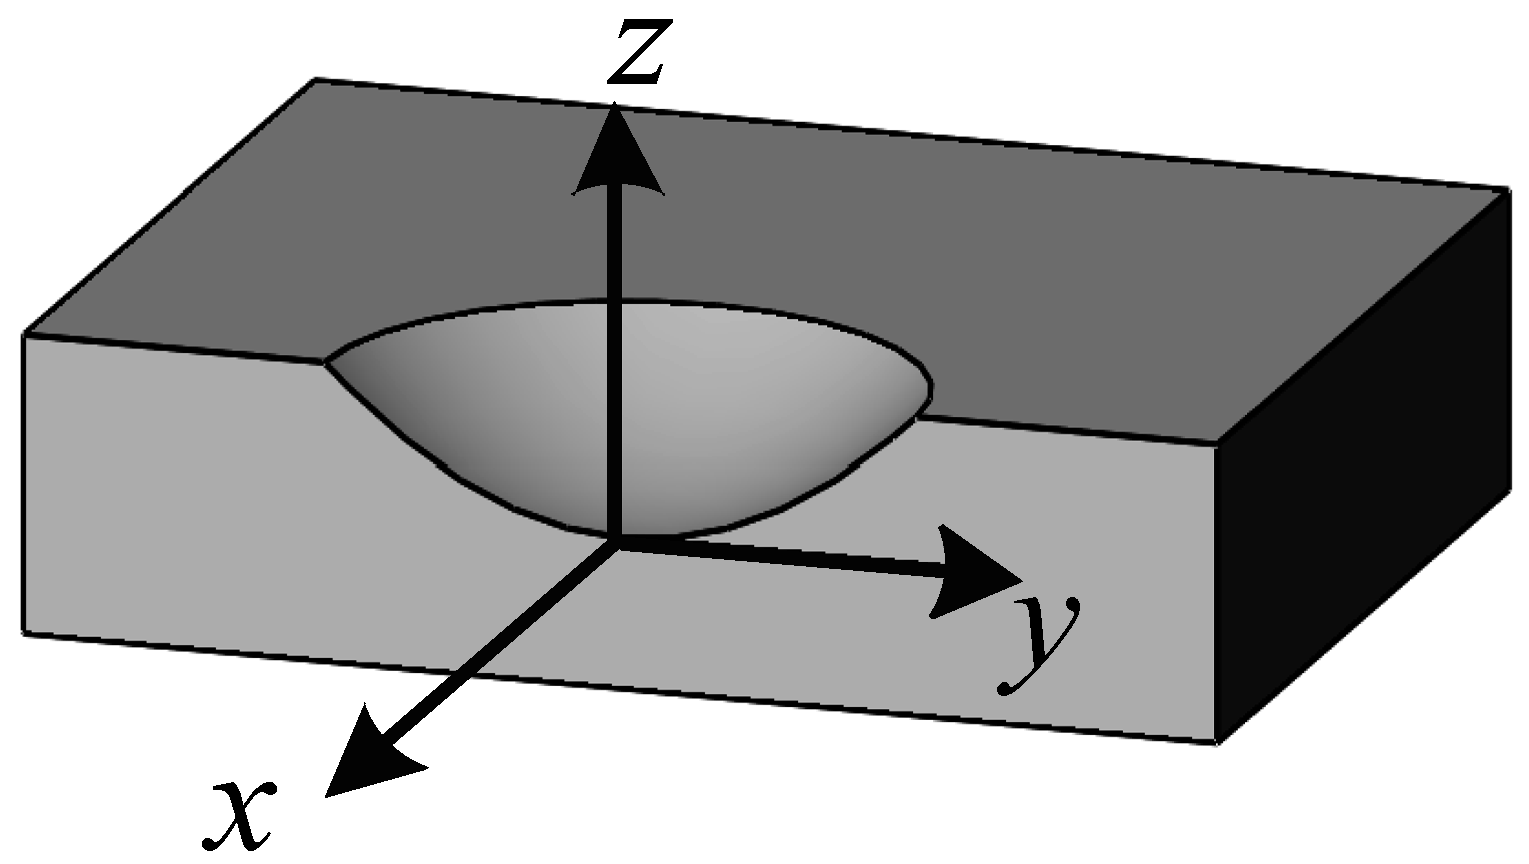
Figure 1. Three-dimensional model of rotating paraboloid.
Applsci 09 03315 g001
Figure 2. Schematic diagram of the slope sensor.
Applsci 09 03315 g002
Figure 3. Schematic diagram of relative measurement.
Applsci 09 03315 g003
Figure 4. The imaging light spot: (a) The imaging light spot reflected by a plane; (b) the imaging light spot reflected by a rotating paraboloid.
Applsci 09 03315 g004
Figure 5. Measurement system using different types of beam: (a) Measurement system using a collimated beam; (b) measurement system using a focused beam.
Applsci 09 03315 g005
Figure 6. Comparison of imaging spots before and after optimization.
Applsci 09 03315 g006
Figure 7. The experiment of displacement measurement.
Applsci 09 03315 g007
Figure 8. Parameter calibration.
Applsci 09 03315 g008
Figure 9. Stability of the spot position detection.
Applsci 09 03315 g009
Figure 10. Comparison experiments in X direction.
Applsci 09 03315 g010
Figure 11. Comparison experiments in Y direction.
Applsci 09 03315 g011
Figure 12. L-shaped rotating paraboloid checker.
Applsci 09 03315 g012
Figure 13. Schematic of large range measurement.
Applsci 09 03315 g013
Figure 14. Measurement of large range displacement in the Y direction.
Applsci 09 03315 g014
Figure 15. Measurement errors in the direction of X.
Applsci 09 03315 g015
Figure 16. Measurement errors in the direction of Y.
Applsci 09 03315 g016
Figure 17. Approximate error caused by Equation (6).
Applsci 09 03315 g017
Figure 18. Testing result of rotating paraboloid.
Applsci 09 03315 g018
Table 1. System design parameters.
Focal Length of Lens 1 fr/mmFocal Length of Lens 2 f3/mmFocal Length of the Rotating Parabola fc/mm
100302.8
Table 2. Linear fitting parameter.
Times1234
Value0.68170.68230.67990.6799
Standard Error0.001050.001070.000660.00069