Abstract
The application fields of friction stir welding technology, such as aerospace and transportation, has high safety requirements and fatigue is the dominant failure mode for weldments. It is of great significance to understand the fatigue properties of friction stir welded joints. This paper provides an overview of the fatigue mechanism, influencing factors, crack growth rate, and fatigue life assessment. It is found that the fatigue performance of friction stir welded joints can be affected by welding process parameters, test environment, stress ratio, residual stress, and weld defect. The optimized process parameters can produce high quality weld and increase the weld fatigue life. Laser peening is an effective post weld treatment to decrease fatigue crack growth rate and improve material fatigue life.
1. Introduction
Friction Stir Welding (FSW) is a solid-state welding technology invented by The Welding Institute (TWI), UK, in 1991. As shown in Figure 1, the FSW tool rotates at high speed and plunges into the workpiece. Heat generated by friction and material deformation softens the surrounding material, when the tool moves along the weld direction, the material is stirred and forced from advancing side to retreating side to fill the space behind the tool, consequently forming the weld. Compared with conventional fusion welding technologies, FSW can avoid defects such as porosity, lack of penetration, hot cracking, and distortion [1,2,3,4,5].
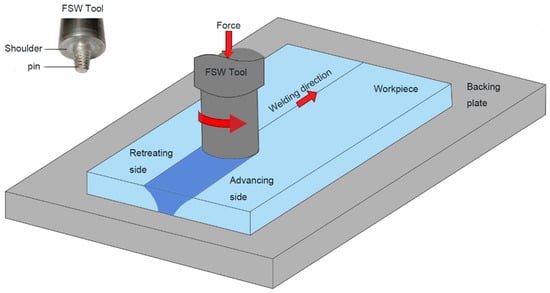
Figure 1.
Illustration of friction stir welding (FSW) process.
Aluminum alloy is widely used in aerospace, automotive and marine industries. [6] According to relevant data [7,8] fatigue failure of parts accounts for 50 to 90% of all failures in manufactured parts in general. The FSW method improved the fatigue performance by ~2.4 times in comparison with the single riveting method commonly used in aerospace, and reduced the overlap area in the double riveting method, while ensuring the fatigue strength and mechanical properties. [9,10,11,12,13,14,15] The main application fields of FSW such as aerospace and transportation have very high safety requirements, and fatigue resistance of a welded joint is of great significance in ensuring overall structural integrity. The International Institute of Welding (IIW) guideline [16], Eurocode 9 standards [17], and GB/T15248-94 [18] have provided procedures to assess the fatigue. The weld fatigue design curves given in these standards are relatively conservative and there is no in-depth description of the weak locations or defects that occur during the welding process [19,20].
In the literature, the research on fatigue performance of FSW joints was mainly focused on aspects of fatigue life, fractographic analysis, effects of weld defects, welding parameters, and test conditions. This paper provided a systematic review of the fatigue analysis of friction stir welded joints.
2. Fatigue Failure Mechanism of FSW Weld
FSW weld fatigue failure is a process of damage accumulation. The failure process can occur when the cyclic stress is much smaller than the static strength limit. It does not happen immediately, but takes a period of time, even a very long time. The material does not have significant deformation before fatigue failure. The failure mechanism was analyzed in the following in the aspects of weld zone characteristics and fracture surface analysis.
2.1. Characteristics of Weld Zones
Metallographic experiments using optical microscopy and scanning electron microscope found that the weld cross-section could be divided into nugget zone (NZ), thermomechanically affected zone (TMAZ) and heat affected zone (HAZ) [21,22], as shown in Figure 2. Analysis of each zone revealed that the material in NZ region underwent dynamic recrystallization process and redistribution of the strengthening phase. The transformation of the microstructure into finer equiaxed grains caused the preexisting cracks to disappear [23]. According to the Hall–Petch relationship, finer grains have better fatigue resistance, higher tensile properties, less misalignment, and better mechanical properties [24]. For the TMAZ on both sides of the friction stir welded joint material, TMAZ (advancing side) has obvious contour boundary, and the TMAZ (retreating side) contour boundary is relatively blurred. It is generally believed that this phenomenon is related to the material flow direction [22]. The heat affected zone (HAZ) is located between the base metal (BM) and the TMAZ. The HAZ is only affected by thermal cycling, leading to coarsening of the strengthening precipitates and decreased yield and ultimate strengths [25,26].
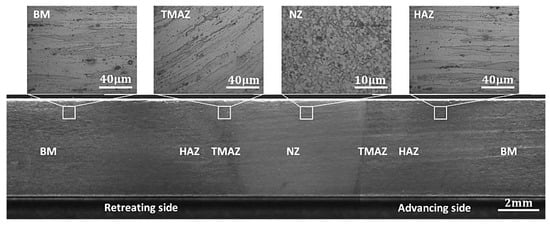
Figure 2.
Metallographic cross-section of the FSW weld [23].
2.2. Fractography
Specimens for fatigue test are usually sectioned and loaded perpendicular to the joint centerline [21,22,23,24,25,27,28,29,30,31]. Zhang [32] studied the fatigue fracture surface for a 6005 aluminum alloy FSW joint by Philips X130 SEM. The crack was found in the HAZ zone close to TMAZ. As shown in Figure 3, the fracture surface was divided into three regions. The crack initiation zone, which is located at the specimen surface, exhibited a relatively smooth microstructure. The crack propagation zone (Figure 3b) had prominent striation marks with a river-like appearance. The final failure zone of fatigue was the ultimate damage caused by void nucleation, coalescence, and crack growth, showing a rough and fine dimple structure [24,27,32]. He et al. [23] performed 22 tests in the very high cycle fatigue range, and found that only one specimen’s crack initiation site was located in the NZ zone at the subsurface rather than the surface. The crack initiation originated from the inclusions inside the material and was accompanied by the annular fracture surface with a fisheye morphology, as shown in Figure 4 [23].

Figure 3.
Fatigue fractography of 6005 aluminum alloys joint after stationary shoulder friction stir welding [32].
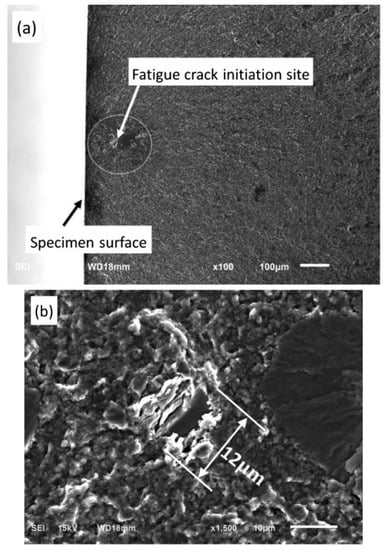
Figure 4.
Magnification of crack initiation position (a) The crack location with whole morphology; (b) detail of the crack initiation site [23].
Due to the high temperature and plastic deformation of the material, the fatigue crack initiation point was mainly located between the TMAZ region and the HAZ region. The crack initiation position was on the surface of the sample which was related to material flow, heat, and distribution of some intermetallic compounds [23,25]. In the NZ region, the dynamic recrystallization process reduced the residual stress, and hence improved fatigue performance [7,24,33]. In addition, the crack initiation area was affected by defects such as porosity and inclusions. When there are defects, the crack starts from the defect position. The crack in some defects did not fully expand to the fracture, but the fatigue life of the material was greatly reduced.
Wei et al. [34] found a relationship between hardness and fracture location. The hardness distribution diagram showed a “W” shape. The hardness of the NZ region was the highest, and the lowest point was between HAZ and TMAZ. The area with low hardness value and high hardness gradient value was easy to become the fracture position of the joint. Since the crack initiation point of single-phase materials or materials without impurities mostly occurs on the surface, shot peening can effectively increase the fatigue crack initiation time, and even close some cracks. As the crack initiation process accounts for 90% of the total life, a higher surface quality will increase material fatigue life [25,35].
3. Factors Affecting Fatigue Performance
3.1. Process Parameters
The rotation speed and welding speed of the stirring tool are the main factors affecting fatigue performance of FSW joints. Hrishikesh [24] achieved the best fatigue performance on 6061 aluminum alloy by controlling the tool rotation speed at 1000 rpm and tool travel speed at 80 mm/min, indicating that heat input was closely related to the fatigue performance of welded joints. For the parameter of tool tilt angle, high quality joint with better fatigue life can be produced between 2 and 5° [36,37,38]. Different process parameters for the same material lead to differences in fatigue crack growth factor. Unreasonable process parameters are likely to make defects. The summary of stress amplitude—half of the stress range corresponding to 95% survival rate—for Nf = 10 [6] with the optimal process parameters is shown in Table 1 [24,39,40,41,42,43,44,45,46,47,48,49,50,51,52,53,54,55,56].

Table 1.
A summary of fatigue test data obtained in the literature.
3.2. Stress Ratio
In fatigue analysis, the stress ratio, R, is the minimum stress experienced to the maximum stress experienced during a cycle, which can affect the crack growth rate and the fatigue life of materials. Wu [57] proposed an improved equation based on the Forman formula [58,59]:
where, Da/DN is the fatigue crack growth rate, is the material fracture toughness, ΔK is stress intensity factor range, and C and m are constants.
Li et al. [60] studied the effect on the crack propagation rate of 7075-T651 materials at different stress ratios, as shown in Figure 5. With the increment of stress ratio, the fatigue crack growth rate increased. Li et al. [61] analyzed the effect of different stress ratios for ultrahigh-strength steel AerMet100. The results showed that when the fatigue crack growth rate da/dN ≤ 1 × 10⁻⁵ mm/cycle, with the stress ratio R ≤ 0.5, the fatigue crack growth threshold ΔKth decreased as the stress ratio R increased. When the stress ratio R ≥ 0.5, the fatigue crack growth threshold value tends to be stable; when da/dN ≥ 1 × 10⁻⁵ mm/cycle, the fatigue crack growth rate was not affected by the stress ratio.
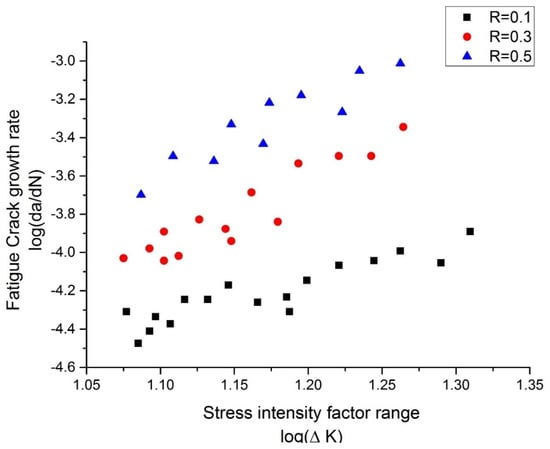
Figure 5.
Effect of different stress ratios on crack growth rate [60].
3.3. Test Environment
Czechowski et al.’s [62] research on 5083 aluminum alloy showed that under the low-cycle fatigue condition, the FSW joint has higher fatigue life in air than the artificial sea water (NaCl). Studies revealed that the decrease of fatigue life was related to the source of potential crack (corrosion pits) caused by electrochemical corrosion in the corrosive environment. Wang et al.’s [63] test on 2024 aluminum alloy showed that the 3.5% NaCl environment leaded to a sharp decline in fatigue life, which was about half of the life of the as-welded joint. The crack growth rate difference under corrosive solution and air environment became more obvious with the increase of crack strength factor range ∆K [64,65,66].
3.4. Residual Stress
Figure 6 shows the residual stress distribution for aluminum alloy AA5083 joints. The weld zone was in tension in both the longitudinal and transverse directions [67]. The longitudinal residual stress exhibited an M-shape; a similar trend was also observed by Carlone [49] for AA2024-T3 FSW joints. The peak longitudinal stresses increased with the welding speed due to steeper thermal gradients during welding and the reduced time for stress relaxation to occur. The NZ region has the highest residual stress in transverse direction for most cases [68]. The welding residual stress affects the fatigue life by affecting the stress ratio, as the stress ratio increases, the crack growth rate increases, but the residual stress influence decreases. For the same thickness of material, the influence of different residual stress fields on the crack growth rate can be judged by comparing the residual stress intensity factors. When the crack is 1 mm, the fatigue life of the joint by FSW was greater than the other two welding methods, TIG, and laser welding; when the crack length reached 5 mm, the fatigue life is similar to the laser welded component, but still greater than TIG method [69]. Residual stress can be reduced or removed by heat treatment aging, shot peening, ultrasonic shock strengthening, vibration aging, etc. [1,70].
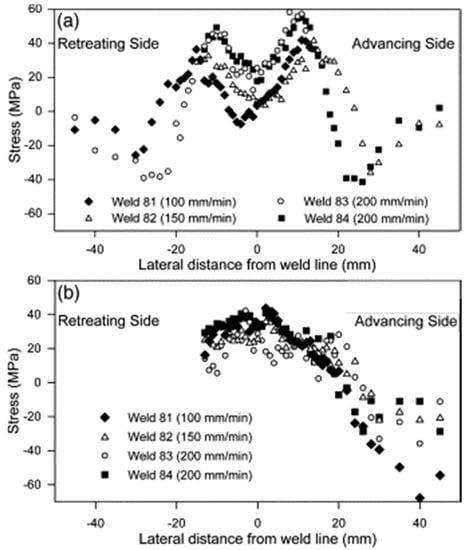
Figure 6.
(a) Longitudinal and (b) transverse residual stresses as a function of lateral distance from the weld line [67].
3.5. Weld Defects
The defects of FSW joints include flash, tunnel defects, surface defects, foreign bodies, porosities, kissing bond, zigzag curve, etc. [71,72]. The initiation process of fatigue cracks accounts for ~90% of the total life. Existence of defects greatly accelerates the crack initiation process, which is one of the main causes of the sudden decline in the life of welded joints [24]. Figure 7 and Figure 8 show the common welding defects.
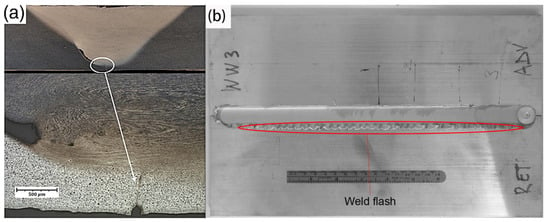
Figure 7.
(a) Weld root flaw and (b) flash flaw [72,73].
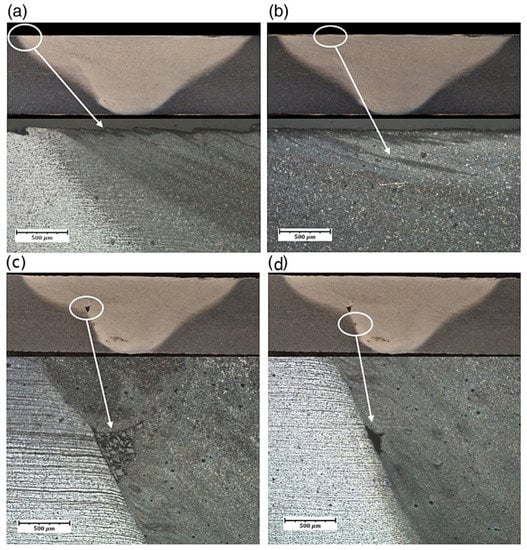
Figure 8.
Incomplete fusion paths in weld: (a) at the advancing side of the weldment; (b) towards the middle of the weldment; (c) upper embedded flaw; and (d) connectivity flaw [73].
During the welding process, the material undergoes severe plastic deformation. The rotating tool shoulder, in contact with the surface of the material, causes materials to overflow at the edge to form the flash. Due to the tilt angle of the tool, the tailing edge of the tool shoulder presses the material and forms a circle of corrugated friction surface defects. The use of a stationary tool shoulder can effectively solve the friction surface problem, but it will impose certain requirements on the welding conditions or the geometric design of the tool. After the welding is completed, the keyhole will be left. It can be removed by cutting off the material containing the keyhole or using the special welding tool. The keyhole has no direct influence on the initiation or propagation of the fatigue crack. The main influence is to reduce the effective welding length of the plate [74]. Zhu et al. [75] simulated the FSW process and found that the fluidity of the material was significantly reduced due to inadequate pressure between the rear side of the tool and workpiece material. It was difficult for the material to form a dense joint from the retreating side to the advancing side, resulting in a tunnel defect. Jolu et al. [76] studied the fatigue lives of sound and flaw welds of an Al–Cu–Li alloy. The fatigue strength of defect-free welds is reduced by 10 to 15% at the lifetime of 105 cycles in contrast with the base metal. For the kissing bond (KB) weld with the weld root polishing, a reduction in fatigue strength by 17% was found comparing with defect-free welds [24]. It can be seen from Figure 9 that the fatigue lives of the 2024-T6 welded joints were greatly reduced [55,77]. Some researchers found that the kiss defect has no significant effect on the fatigue strength of 5083-H321 [57,78].
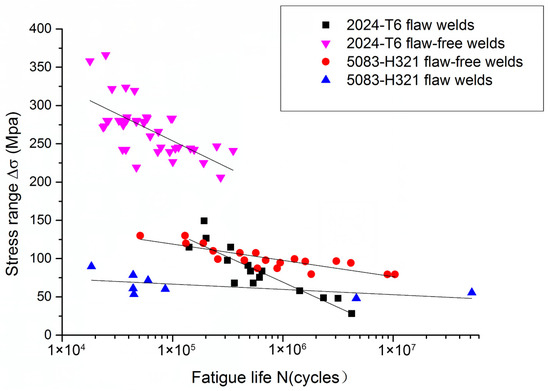
Figure 9.
Effect of kissing bond on material fatigue properties [70,71,77,78].
Joint Line Remnant (JLR) is a flaw in the nugget region which is caused by the natural oxide layer on the workpiece surfaces before welding [76,79], as shown in Figure 10. Joint Line Remnant (JLR) defect welds exhibited similar fatigue strength as defect-free welds and the Joint Line Remnant was not the crack initiation position [32,80]. The hook-like defects (Figure 11) similar to the JLR seriously affected the material fatigue properties [81]. The fatigue strength of the FSW lap joint was less than 5.6% of the tensile strength of base metal [82].
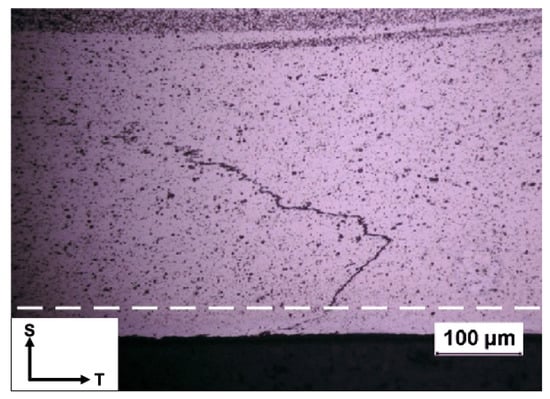
Figure 10.
Optical micrograph of a kissing bond (KB)-bearing weld, the dotted line indicates the part of the KB that is removed by grinding of the surface treated specimens [76].
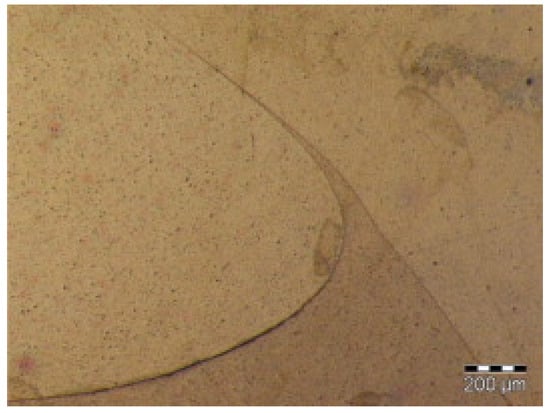
Figure 11.
Hook defect of the dissimilar joint (AA5754–AA6082) [82].
4. Crack Growth Rate
Linear elastic fracture mechanics has been applied to describe the fatigue crack growth behavior. The crack propagation is divided into three stages: initiation, crack growth, and crack failure. The crack does not expand when the crack tip stress intensity factor amplitude ΔK is less than a certain threshold ΔKth. When ΔK is larger than the threshold ΔKth, the cyclic crack gradually expands. The crack length gradually increases but the crack growth rate decreases to steady stage, before the fracture fails the crack expansion rate is accelerated. The Paris formula is used for calculating the crack growth rate:
where, C and m are related to the material, environment, frequency, temperature, and stress ratios.
The main factors affecting the crack propagation rate are the postweld treatment process, process parameters, and defects. Hatamleh et al. [83] studied the effects of shot peening and laser treatment on the fatigue properties of friction stir welded joints. At ambient and elevated temperature, shot peening treatment has similar fatigue crack growth resistance as the as-welded condition and crack growth rates were higher than the laser peened case. Li [84] found that single-layer laser peening had little effect on fatigue crack growth but multilayer laser peening greatly improved fatigue crack growth rate. Similar conclusion was also drawn by Hatamleh. [85] Shot peening did not result in a significant reduction to fatigue crack growth in FSW specimens. Samples treated with three layers of laser peening showed the highest improvement in fatigue life over the unpeened conditions and base unwelded material, as illustrated in Figure 12. At cryogenic temperature, Figure 13, the crack growth rate varied greatly, making it difficult to distinguish the trend between residual stress treatment and crack growth data [83,85]. Moghadam et al. [86] concluded that under the condition of lower stress intensity factor difference (ΔK ≤ 13 MPa∙m1/2), the fatigue crack growth rate of all welded samples is slower than that of the base alloy; however, at higher ΔK values, the fatigue crack growth rate of the welded sample is much faster than the fatigue crack growth rate of the base alloy. The compressive residual stress generated by laser peening decreased the average stress and closed the crack, which significantly reduced the crack growth rate, and the material fatigue life was improved. The influence of process parameters on the crack growth rate is mainly reflected in the unreasonable parameters which are prone to producing defects. The optimized process parameters can facilitate the material plastically movement, and break the hardened material precipitates and the surface oxide layer [7]. The existence of defects will reduce the crack initiation time and generate stress concentration to increase the crack growth rate. For material properties, fracture toughness can also affect the crack propagation, the higher material fracture toughness, the lower crack growth rate.
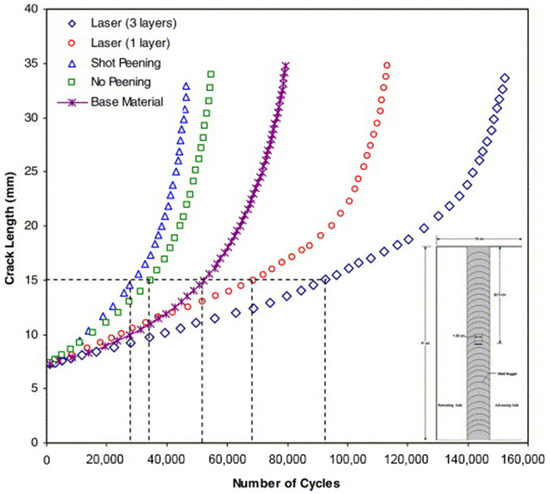
Figure 12.
Fatigue growth data for FSW 7075-T7351 [85].
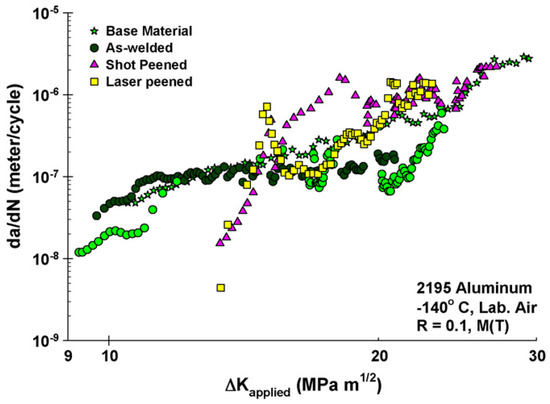
Figure 13.
da/dN versus applied stress intensity factor range, ΔK, for 2195 aluminum at −140 °C [83].
5. Fatigue Life of Friction Stir Welded Joints
5.1. The Stress Cycle (SN) Analysis
Miner’s Rule is a linear damage accumulation model used to compute damage caused by cyclic loading, as shown in Equation (3).
where, k is the number of different stress levels, is the fatigue life corresponding to the load level I, and D is the damage fraction, when damage is equal to “1”, failure occurs. However, Miner’s Rule ignores the influence of the cyclic loading sequence, the load interaction, and the small load below the fatigue limit [87].
The stress cycle (SN) analysis estimates the loading cycles to initiate and grow a crack until the material breaks into parts. The S–N curve is a plot of the alternating stress against the number of cycles to failure and is used to record the fatigue life of welded joints. Basquin formulated S–N data mathematically in a power law:
where, is stress range, Nf is the number of cycles to failure, and a and C are constants. Basquin is not valid in the low cycle fatigue region.
The majority of stress life investigations have been conducted on the aluminum alloys. The S–N data of common aluminum alloy materials in the literature were summarized in Figure 14 [23,25,32,55,65]; TH and R denote the thickness of the workpiece and stress ratio, respectively. There is no general trend found in the diagram, since the test condition and weld qualities were different for each experiment. This indicates the sensitivity of fatigue behavior to the influencing factors, such as the process parameter, tool geometry, weld thickness, microstructure, and postweld treatment.
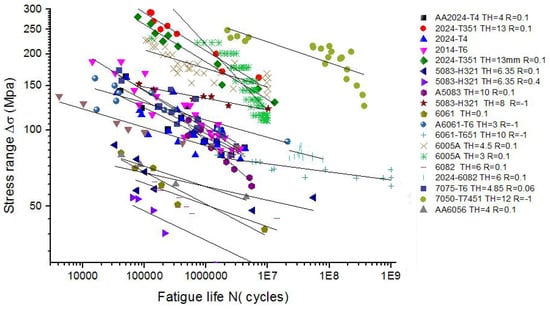
Figure 14.
S–N curve for some materials [23,25,32,55,65].
5.2. The Strain Cycle (EN) Analysis
The strain cycle (EN) analysis can also be used to estimate the number of cycles to failure. For lower cycle fatigue, the weld is subject to higher stress ranges and local plasticity. The strain life analysis is suitable for the lower cycle fatigue since it has an additional term account for the plastic fatigue properties. The equation used for the strain cycle method is derived from the Basquin–Coffin–Manson law:
where, is stain range, f is fatigue strength coefficient, E is young’s modulus, f is fatigue ductility coefficient, and b and c are strength and ductility exponent, respectively.
Compared to high cycle fatigue analysis, fewer studies on the low cycle fatigue properties of FSW joints were reported so far. Feng [88] carried out strain-controlled low-cycle fatigue experiments on a 6061Al-T651 weld with different welding parameters. A summary of the fatigue parameters for Basquin–Coffin–Manson’s equations is given in Table 2. Fatigue life was increased with greater welding speed, but was nearly not affected by the rotational rate [21,88,89]. In Feng’s work [89] on fatigue behavior of the Al 7075 weld, the energy per cycle and fatigue life were determined, as shown in Table 3. With the increment of total strain amplitude, the energy per cycle increased and the number of cycles decreased. Xu et al. [90] analyzed low-cycle fatigue performance for a friction stir welded 2219-T62 aluminum alloy with varying welding parameters and cooling conditions. Fatigue life slightly reduced with the increasing welding speed from 60 to 200 mm/min with air cooling. The friction stir welded joints with water cooling condition had greater stress amplitude and fatigue life. The Basquin–Coffin–Manson parameters of base metal and FSW welds with air and water cooling are tabulated in Table 2. Ni et al. [91] performed a low cycle fatigue test on a semisolid processed (thixomolded) Mg–9Al–1Zn magnesium alloy (AZ91D) FSW joint. The plot of strain amplitude against the number of cycles to failure for the base metal and friction stir welded joint is shown in Figure 15. The FSW joint exhibited a shorter fatigue life than the base material at strain amplitudes less than 1.2, at strain amplitude of 0.1% no fatigue failure was found for all specimens. The estimated fatigue life parameters from Basquin–Coffin–Manson are provided in Table 2. Rodriguez [21] investigated low-cycle fatigue behavior of dissimilar FSW of AA6061-to-AA7050. The fatigue life for various tool rotational speeds was given in Figure 16. The fatigue results showed a lower fatigue lives at high strain amplitudes (>0.3% strain) when compared to the results by Feng et al. [88] For low strain amplitudes (0.2% strain) the fatigue lives were all close to each other. A summary of the fatigue properties for the specimen is presented in Table 2.

Table 2.
Low cycle fatigue parameters for different aluminum alloys.

Table 3.
Summary of fatigue life and energy dissipated during cyclic deformation [89].
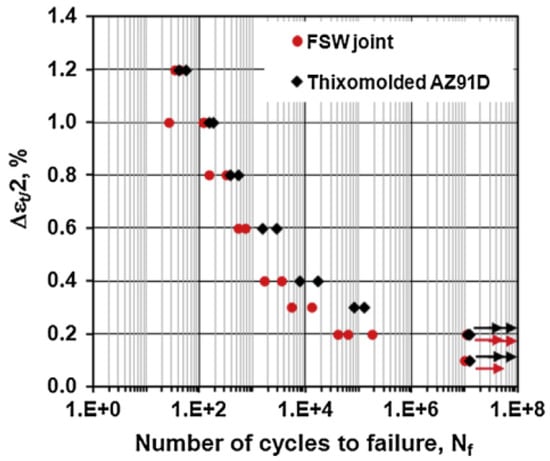
Figure 15.
The plot of strain amplitude against the number of cycles to failure for the base metal and friction stir welded joint [91].
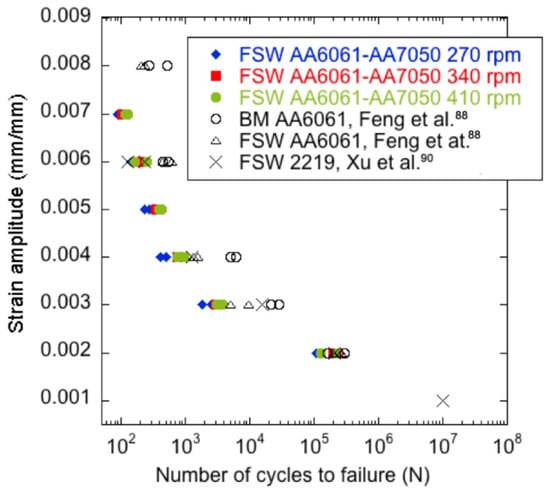
Figure 16.
Fatigue life for the dissimilar AA6061-to-AA7050 and comparison to results from literature [21].
6. Experimental Techniques
Since the process parameters play a key role in determining mechanical properties of the FSW weld, experimental techniques have been used to optimize the rotational speed and welding speed [92,93,94,95,96]. De Filippis et al. [57] used Response Surface Methodology [58,59] to correlate the process parameters to the quality of the 5754-H111 aluminum FSW joint. Thermographic technique has been demonstrated to monitor the FSW process with the maximum temperature and the heating rate, and to predict the tensile strength. Ugrasen et al. [60] adopted the Taguchi method of experimental design to optimize process parameters in FSW of Al6061-Al7075. Wakchaure et al. [61] performed multiresponse optimization of FSW process for an optimal parametric combination to yield favorable material strength using the Taguchi based Grey Relational Analysis and the Artificial Neural Network.
For fatigue test, a sinusoidal axial constant amplitude loading is commonly applied by servohydraulic fatigue test machine [53]. He et al. [23] used ultrasonic fatigue machine (USF-2000, Shimadzu) at a resonance frequency of 20 kHz in the very high cycle fatigue experiments. The fracture surface of specimens was measured by SEM and OM to reveal the fatigue crack initiation and propagation mechanisms [97,98]. In the fatigue crack growth tests, standard CT specimens were loaded on electrohydraulic machine and the crack length on the crack front was measured by a stereomicroscope [99]. To assess the location and the time of damage onset, thermographic methods have been used to achieve information about the damage [100,101,102,103,104]. Palumbo et al. [105] monitored the AA5754-H111 specimens by infrared detector during experiment and the thermal signal is related to the energy dissipated in the material plastic deformation zones. The fatigue strength was then computed by a graphical study of the location of damaged areas.
7. Conclusions
This paper provided a comprehensive review of fatigue of FSW aluminum alloy joints. From the literature reviewed herein, the following observations and conclusions can be drawn.
- The fatigue crack initiation generally started at the surface of the weld, due to the fact that FSW welds with optimized process parameters do not contain internal defects or flaws. In addition, the initiation site was mainly located between the TMAZ and the HAZ as a result of both high temperature and plastic deformation. The difference in hardness between the TMAZ and HAZ resulted in a weak zone, which is vulnerable to the formation of local slip bands.
- The fatigue performance of FSW joints is mainly affected by process parameters, stress ratio, environment, residual stress, defects, and so on. The process parameters can be optimized to increase the weld fatigue life. Residual stress has a large influence on the crack growth rate, and it is difficult to remove when the welds are complex. The effect of defects on the fatigue properties of materials is complicated and depends on the type of defects.
- Laser peening is recommended for the post weld treatment of friction stir welded joints. Multilayer laser peening can greatly decrease fatigue crack growth rate and improve material fatigue life. At ambient and elevated temperature, shot peening treatment has similar fatigue crack growth resistance as as-welded condition and crack growth rates were higher than the laser peened case.
- The fatigue life data in the literature are still limited. In the high cycle stress life analysis, more testing are required for different materials at various stress amplitude and mean stress combinations. For low cycle fatigue analysis where the plastic part dominates, considerable works such as dissimilar material joint assessment are needed in the future.
Author Contributions
Conceptualization, H.L. and Q.L.; methodology, H.L.; investigation, H.L. and J.G.; writing—original draft preparation, J.G.; writing—review and editing, H.E., J.G., and Q.L.; supervision, H.L.; project administration, H.L.; funding acquisition, H.L.
Funding
This research was supported by the National Natural Science Foundation of China under Grant No. 51605444 and No.51475431, Zhejiang Province Science and Technology Plan Project Grant No. 2017C34007, And The APC was funded by Zhejiang Sci-Tech University.
Conflicts of Interest
The authors declare no conflict of interest.
References
- Jesus, J.S.; Costa, J.M.; Loureiro, A.; Ferreira, J.M. Fatigue strength improvement of GMAW T-welds in AA 5083 by friction-stir processing. Int. J. Fatigue 2017, 97, 4–134. [Google Scholar] [CrossRef]
- Lin, P.C.; Lo, S.M.; Wu, S.P. Fatigue life estimations of alclad AA2024-T3 friction stir clinch joints. Int. J. Fatigue 2018, 107, 13–26. [Google Scholar] [CrossRef]
- Wang, Y.; Yu, L.; He, X.; Wang, C.; Yang, R.; Chen, H. Influence of current step on defect for high-speed train aluminum alloy with MIG welding. Electr. Weld. Mach. 2016, 46, 14–17. [Google Scholar]
- Sun, G.; Chen, Y.; Chen, S.; Shang, D. Fatigue modeling and life prediction for friction stir welded joint based on microstructure and mechanical characterization. Int. J. Fatigue 2017, 98, 131–141. [Google Scholar] [CrossRef]
- Ronevich, J.A.; Somerday, B.P.; Feng, Z. Hydrogen accelerated fatigue crack growth of friction stir welded X52 steel pipe. Int. J. Hydrog. Energy 2017, 42, 4259–4268. [Google Scholar] [CrossRef]
- Sharma, S.R.; Ma, Z.Y.; Mishra, R.S. Effect of friction stir processing on fatigue behavior of A356 alloy. Scr. Mater. 2004, 51, 237–241. [Google Scholar] [CrossRef]
- El-Morsy, A.W.; Ghanem, M.; Bahaitham, H. Effect of Friction Stir Welding Parameters on the Microstructure and Mechanical Properties of AA2024-T4 Aluminum Alloy. Eng. Technol. Appl. Sci. Res. 2018, 8, 2493–2498. [Google Scholar]
- Susmel, L.; Hattingh, D.G.; James, M.N.; Tovo, R. Multiaxial fatigue assessment of friction stir welded tubular joints of Al 6082-T6. Int. J. Fatigue 2017, 101, 282–296. [Google Scholar] [CrossRef]
- Suresh, S. Fatigue of Materials; Cambridge University Press: Cambridge, MA, USA, 1998. [Google Scholar]
- Sun, Y.; Voyiadjis, G.Z.; Hu, W.; Shen, F.; Meng, Q. Fatigue and fretting fatigue life prediction of double-lap bolted joints using continuum damage mechanics-based approach. Int. J. Damage Mech. 2017, 6, 162–188. [Google Scholar] [CrossRef]
- Shen, Z.; Ding, Y.; Chen, J.; Gerlich, A.P. Comparison of fatigue behavior in Mg/Mg similar and Mg/steel dissimilar refill friction stir spot welds. Int. J. Fatigue 2016, 92, 78–86. [Google Scholar] [CrossRef]
- Plaine, A.H.; Suhuddin, U.F.H.; Alcântara, N.G.; dos Santos, J.F. Fatigue behavior of friction spot welds in lap shear specimens of AA5754 and Ti6Al4V alloys. Int. J. Fatigue 2016, 91, 149–157. [Google Scholar] [CrossRef]
- Eslami, S.; Farahani, B.V.; Tavares, P.J.; Moreira, P.M.G.P. Fatigue behaviour evaluation of dissimilar polymer joints: Friction stir welded, single and double-rivets. Int. J. Fatigue 2018, 113, 351–358. [Google Scholar] [CrossRef]
- Cederqvist, L. Properties of friction stir welded aluminum lap joints. In Proceedings of the 2nd FSW Symposium 2000, Gothenburg, Sweden, 27–29 June 2000. [Google Scholar]
- Christner, B.; McCoury, J.; Higgins, S. Development and testing of friction stir welding (FSW) as a joining method for primary aircraft structure. In Proceedings of the 4th International Friction Stir Welding Symposium 2003, Park City, UT, USA, 14–16 May 2003. [Google Scholar]
- Fricke, W. Guideline for the Fatigue Assessment by Notch Stress Analysis for Welded Structures; International Institute of Welding: Roissy, France, 2008; Volume 13. [Google Scholar]
- Höglund, T.; Tindall, P. Designers’ Guide to Eurocode 9: Design of Aluminium Structures: EN 1999-1-1 AND-1-4; ICE Publishing: London, UK, 2012. [Google Scholar]
- Bai, L.; Wang, B. Variance analysis on axial fatigue test method for metal materials in common standards. Phys. Test. Chem. Anal. A Phys. Test. 2012, 48, 746–748. (In Chinese) [Google Scholar]
- Chen, S.; Zhu, Y.; Hu, J.; Qi, E. Research on selection method of S- N curve for hull structures. Ship Sci. Technol. 2014, 36, 22–26. (In Chinese) [Google Scholar]
- de Oliveira Miranda, A.C.; Gerlich, A.; Walbridge, S. Aluminum friction stir welds: Review of fatigue parameter data and probabilistic fracture mechanics analysis. Eng. Fract. Mech. 2015, 7, 243–260. [Google Scholar] [CrossRef]
- Rodriguez, R.I.; Jordon, J.B.; Allison, P.G.; Rushing, T.; Garcia, L. Low-cycle fatigue of dissimilar friction stir welded aluminum alloys. Mater. Sci. Eng. A 2016, 654, 236–248. [Google Scholar] [CrossRef]
- Besel, Y.; Besel, M.; Mercado, U.A.; Kakiuchi, T. Influence of local fatigue damage evolution on crack initiation behavior in a friction stir welded Al-Mg-Sc alloy. Int. J. Fatigue 2017, 99, 151–162. [Google Scholar] [CrossRef]
- He, C.; Liu, Y.; Dong, J.; Wang, Q.; Wagner, D.; Bathias, C. Fatigue crack initiation behaviors throughout friction stir welded joints in AA7075-T6 in ultrasonic fatigue. Int. J. Fatigue 2015, 81, 171–178. [Google Scholar] [CrossRef]
- Hrishikesh, D.A.S.; Chakraborty, D.; PAL, T.K. High-cycle fatigue behavior of friction stir butt welded 6061 aluminium alloy. Trans. Nonferrous Met. Soc. China 2014, 4, 648–656. [Google Scholar]
- Deng, C.; Gao, R.; Gong, B.; Yin, T.; Liu, Y. Correlation between micro-mechanical property and very high cycle fatigue (VHCF) crack initiation in friction stir welds of 7050 aluminum alloy. Int. J. Fatigue 2017, 104, 283–292. [Google Scholar] [CrossRef]
- Sonne, M.R.; Carlone, P.; Palazzo, G.S.; Hattel, J.H. Numerical Modeling of AA2024-T3 Friction Stir Welding Process for Residual Stress Evaluation, Including Softening Effects. Key Eng. Mater. 2014, 611–612, 1675–1682. [Google Scholar] [CrossRef]
- He, C.; Liu, Y.; Dong, J.; Wang, Q.; Wagner, D.; Bathias, C. Through thickness property variations in friction stir welded AA6061 joint fatigued in very high cycle fatigue regime. Int. J. Fatigue 2016, 82, 379–386. [Google Scholar] [CrossRef]
- Da Silva, J.; Costa, J.M.; Loureiro, A.; Ferreira, J.M. Fatigue behavior of AA6082-T6 MIG welded butt joints improved by friction stir processing. Mater. Des. 2013, 51, 315–322. [Google Scholar]
- Kathleen, M. ASM Handbook: Volume 12: Fractography; ASM International: Materials Park, OH, USA, 1998. [Google Scholar]
- Vidal, C.; Infante, V.; Vilaça, P. Characterisation of fatigue fracture surfaces of friction stir channelling specimens tested at different temperatures. Eng. Fail. Anal. 2015, 56, 204–215. [Google Scholar] [CrossRef]
- Edwards, P.; Ramulu, M. Fatigue performance of friction stir welded Ti–6Al–4V subjected to various post weld heat treatment temperatures. Int. J. Fatigue 2015, 75, 19–27. [Google Scholar] [CrossRef]
- Zhang, K.; Fang, Y.; Luan, G.; Zhang, J.; Hu, F. Mechanical and fatigue property of stationary shoulder friction stir welding AA6005. Trans. China Weld. Inst. 2017, 38, 25–28. (In Chinese) [Google Scholar]
- Sun, G.; Chen, Y.; Wei, X.; Shuang, D.; Chen, S. Crystal plastic modeling on fatigue properties for aluminum alloy friction stir welded joint. Mater. Sci. Eng. A 2018, 728, 165–174. [Google Scholar] [CrossRef]
- Wei, X.; Sun, G. Study on the relationship between hardness gradient and fracture location of friction stir welded joint. In Proceedings of the Beijing Mechanics Conference Annual Meeting, Beijing, China, 22 January 2018; pp. 50–51. (In Chinese). [Google Scholar]
- Effertz, P.S.; Infante, V.; Quintino, L.; Suhuddin, U.; Hanke, S.; dos Santos, J.F. Fatigue life assessment of friction spot welded 7050-T76 aluminium alloy using Weibull distribution. Int. J. Fatigue 2016, 87, 381–390. [Google Scholar] [CrossRef]
- Seighalani, K.R.; Givi, M.K.B.; Nasiri, A.M.; Bahemmat, P. Investigations on the effects of the tool material, geometry, and tilt angle on friction stir welding of pure titanium. J. Mater. Eng. Perform. 2010, 19, 955–962. [Google Scholar] [CrossRef]
- Costa, M.I.; Leitão, C.; Rodrigues, D.M. Influence of post-welding heat-treatment on the monotonic and fatigue strength of 6082-T6 friction stir lap welds. J. Mater. Process. Technol. 2017, 250, 289–296. [Google Scholar] [CrossRef]
- Shukla, S.; Komarasamy, M.; Mishra, R.S. Grain size dependence of fatigue properties of friction stir processed ultrafine-grained Al-5024 alloy. Int. J. Fatigue 2018, 109, 1–9. [Google Scholar] [CrossRef]
- Tajiri, A.; Uematsu, Y.; Kakiuchi, T.; Tozaki, Y.; Suzuki, Y.; Afrinaldi, A. Effect of friction stir processing conditions on fatigue behavior and texture development in A356-T6 cast aluminum alloy. Int. J. Fatigue 2015, 80, 192–202. [Google Scholar] [CrossRef]
- Tovo, R.; De Scisciolo, R.; Volpone, M. Proprieta’meccaniche e microstrutturali di giunti” friction stir welded” in lega d’alluminio. In Proceedings of the XXIX Convegno AIAS (AIAS 2000), Lucca, Italy, 6–8 September 2000; pp. 397–406. [Google Scholar]
- Threadgill, P.L.; Leonard, A.J.; Shercliff, H.R.; Withers, P.J. Friction stir welding of aluminium alloys. Int. Mater. Rev. 2009, 54, 49–93. [Google Scholar] [CrossRef]
- Biallas, G.; Dalle Donne, C.; Juricic, C. Monotonic and cyclic strength of friction stir welded aluminium joints. Advances in mechanical behaviour plasticity and damage. In Proceedings of the EUROMAT 2000, Munich, Germany, 27–30 September 2000; Volume 1, pp. 115–120. [Google Scholar]
- Magnusson, L.; Kallman, L. Mechanical properties of friction stir welds in thin sheet of aluminium 2024, 6013 and 7475. In Proceedings of the Second International Symposium on FSW, Gothenburg, Sweden, 27–29 June 2000. [Google Scholar]
- Kawasaki, T. Application of Friction Stir Welding to the Manufacturing of Next Generation “A-train” type Rolling Stock. In Proceedings of the 2nd International Symposium on FSW 2000, Gothenburg, Sweden, 27–29 June 2000. [Google Scholar]
- Ericsson, M.; Sandström, R. Influence of welding speed on the fatigue of friction stir welds and comparison with MIG and TIG. Int. J. Fatigue 2003, 25, 1379–1387. [Google Scholar] [CrossRef]
- James, M.N.; Bradley, G.R. Weld tool travel speed effects on fatigue life of friction stir welds in 5083 Aluminium. Int. J. Fatigue 2003, 25, 1389–1398. [Google Scholar] [CrossRef]
- Pocaterra, C.; Tovo, R. Proprieta Meccaniche di Giunti Testa a Testa FSW: Stato dell’Arte delle Leghe Leggere e Analisi Sperimentale su Leghe AA5xxx. Master’s Degree Thesis, University of Ferrara, Ferrara, Italy, 2002. [Google Scholar]
- Maddox, S.J. Review of fatigue assessment procedures for welded aluminium structures. Int. J. Fatigue 2003, 25, 1359–1378. [Google Scholar] [CrossRef]
- Carlone, P.; Citarella, R.; Sonne, M.R.; Hattel, J.H. Multiple Crack Growth Prediction in AA2024-T3 Friction Stir Welded Joints, Including Manufacturing Effects. Int. J. Fatigue 2016, 90, 69–77. [Google Scholar] [CrossRef]
- Besel, M.; Besel, Y.; Mercado, U.A.; Kakiuchi, T.; Uematsu, Y. Fatigue behavior of friction stir welded Al–Mg–Sc alloy. Int. J. Fatigue 2015, 77, 1–11. [Google Scholar] [CrossRef]
- Boni, L.; Lanciotti, A.; Polese, C. “Size effect” in the fatigue behavior of Friction Stir Welded plates. Int. J. Fatigue 2015, 80, 238–245. [Google Scholar] [CrossRef]
- Cavaliere, P.; De Santis, A.; Panella, F.; Squillace, A. Effect of anisotropy on fatigue properties of 2198 Al–Li plates joined by friction stir welding. Eng. Fail. Anal. 2009, 16, 1856–1865. [Google Scholar] [CrossRef]
- Costa, J.D.; Ferreira, J.A.M.; Borrego, L.P.; Abreu, L.P. Fatigue behaviour of AA6082 friction stir welds under variable loadings. Int. J. Fatigue 2012, 37, 8–16. [Google Scholar] [CrossRef]
- Deng, C.; Wang, H.; Gong, B.; Li, X.; Lei, Z. Effects of microstructural heterogeneity on very high cycle fatigue properties of 7050-T7451 aluminum alloy friction stir butt welds. Int. J. Fatigue 2016, 83, 100–108. [Google Scholar] [CrossRef]
- Di, S.; Yang, X.; Luan, G.; Jian, B. Comparative study on fatigue properties between AA2024-T4 friction stir welds and base materials. Mater. Sci. Eng. A 2006, 435, 389–395. [Google Scholar] [CrossRef]
- Lomolino, S.; Tovo, R.; Dos Santos, J. On the fatigue behaviour and design curves of friction stir butt-welded Al alloys. Int. J. Fatigue 2005, 27, 305–316. [Google Scholar] [CrossRef]
- Wu, Q.; Chen, X.; Fan, Z.; Niu, F.; Wei, Z. Improved formula for calculating fatigue crack growth rate and different stress ratios. J. Mech. Strength 2017, 39, 160–165. (In Chinese) [Google Scholar]
- Forman, R.G.; Kearney, V.E.; Engle, R.M. Numerical Analysis of Crack Propagation in Cyclic-Loaded Structure. Sen-ito Kogyo 1967, 49, 459–464. [Google Scholar] [CrossRef]
- Klusák, J.; Profant, T.; Knésl, Z.; Kotoul, M. The influence of discontinuity and orthotropy of fracture toughness on conditions of fracture initiation in singular stress concentrators. Eng. Fract. Mech. 2013, 110, 438–447. [Google Scholar] [CrossRef]
- Li, S. Aluminum Friction Stir Welding Head Fatigue Craek Growth Rate PILOT Study; Lanzhou University of Teehnology: Lanzhou, China, 2008. (In Chinese) [Google Scholar]
- Li, S.; Wu, L.; Liu, J.; Yu, M.; Wen, C. Effect of Load ratio and Corrosion on Fatigue Behavior of AerMet100 Ultrahigh Strength Steel. J. Aeronaut. Mater. 2014, 34, 74–80. (In Chinese) [Google Scholar]
- Czechowski, M. Low-cycle fatigue of friction stir welded Al–Mg alloys. J. Mater. Process. Technol. 2005, 164, 1001–1006. [Google Scholar] [CrossRef]
- Wang, L.; Hui, L.; Zhou, S.; Xu, L.; He, B. Effect of corrosive environment on fatigue property and crack propagation behavior of Al 2024 friction stir weld. Trans. Nonferrous Met. Soc. China 2016, 26, 2830–2837. [Google Scholar] [CrossRef]
- Meng, X.; Lin, Z.; Wang, F. Investigation on corrosion fatigue crack growth rate in 7075 aluminum alloy. Mater. Des. 2013, 51, 683–687. [Google Scholar] [CrossRef]
- Zhou, C.; Yang, X.; Luan, G. Fatigue properties of friction stir welds in Al 5083 alloy. Scr. Mater. 2005, 53, 1187–1191. [Google Scholar] [CrossRef]
- Dickerson, T.L.; Przydatek, J. Fatigue of friction stir welds in aluminium alloys that contain root flaws. Int. J. Fatigue 2003, 25, 1399–1409. [Google Scholar] [CrossRef]
- Peel, M.; Steuwer, A.; Preuss, M.; Withers, P.J. Microstructure, mechanical properties and residual stresses as a function of welding speed in aluminium AA5083 friction stir welds. Acta Mater. 2003, 51, 4791–4801. [Google Scholar] [CrossRef]
- Chi, Z.; Liu, Y.; Li, C.; Yang, X. Effects of FSW Parameters on Residual Stress and Deformation of 6082-T6 Aluminum Alloy. Hot Work. Technol. 2018, 47, 159–163. [Google Scholar]
- Zhang, Z.W.; Zhang, Z.; Zhang, H. Effect of residual stress on fatigue life of thin Al 2024 plates. Trans. China Weld. Inst. 2017, 35, 29–32. [Google Scholar]
- Huang, H.; Li, B.; Wei, S.; Wang, G. Cause analysis and elimination method of welding residual stress. Mech. Electr. Inf. 2018, 18, 115–116. (In Chinese) [Google Scholar]
- Moraes, J.F.C.; Rodriguez, R.I.; Jordon, J.B.; Su, X. Effect of overlap orientation on fatigue behavior in friction stir linear welds of magnesium alloy sheets. Int. J. Fatigue 2017, 100, 1–11. [Google Scholar] [CrossRef]
- Dialami, N.; Cervera, M.; Chiumenti, M.; Segatori, A. Prediction of joint line remnant defect in friction stir welding. Int. J. Mech. Sci. 2019, 151, 61–69. [Google Scholar] [CrossRef]
- Stevenson, R.; Toumpis, A.; Galloway, A. Defect tolerance of friction stir welds in DH36 steel. Mater. Des. 2015, 87, 701–711. [Google Scholar] [CrossRef]
- Rao, H.M.; Jordon, J.B.; Boorgu, S.K.; Kang, H.; Yuan, W.; Su, X. Influence of the key-hole on fatigue life in friction stir linear welded aluminum to magnesium. Int. J. Fatigue 2017, 105, 16–26. [Google Scholar] [CrossRef]
- Zhu, Y.; Chen, G.; Chen, Q.; Zhang, G.; Shi, Q. Simulation of material plastic flow driven by non-uniform friction force during friction stir welding and related defect prediction. Mater. Des. 2016, 108, 400–410. [Google Scholar] [CrossRef]
- Le Jolu, T.; Morgeneyer, T.F.; Denquin, A.; Gourgues-Lorenzon, A.F. Fatigue lifetime and tearing resistance of AA2198 Al–Cu–Li alloy friction stir welds: Effect of defects. Int. J. Fatigue 2015, 70, 463–472. [Google Scholar] [CrossRef]
- Zhou, C.; Yang, X.; Luan, G. Effect of root flaws on the fatigue property of friction stir welds in 2024-T3 aluminum alloys. Mater. Sci. Eng. A 2006, 418, 155–160. [Google Scholar] [CrossRef]
- Uematsu, Y.; Tokaji, K.; Shibata, H.; Tozaki, Y.; Ohmune, T. Fatigue behaviour of friction stir welds without neither welding flash nor flaw in several aluminium alloys. Int. J. Fatigue 2009, 31, 1443–1453. [Google Scholar] [CrossRef]
- Chen, H.B.; Wang, J.F.; Zhen, J.D.; Chen, S.B.; Lin, T. Effects of initial oxide on microstructural and mechanical properties of friction stir welded AA2219 alloy. Mater. Des. 2015, 86, 49–54. [Google Scholar] [CrossRef]
- He, Y.; Liu, J.; Li, Y.; Li, Y.; Chen, H. Study on Microstructure and Fatigue Properties of Double-side Friction Stir Welding Joint of A7N01S-T5 Aluminum Alloy Plates with Thickness of 42 mm. Hot Work. Technol. 2017, 46, 44–47. [Google Scholar]
- Yang, X.; Cui, L.; Xu, X.; Zhou, G. Weld Defects and Fatigue Properties of Friction Stir Overlap Joints for 6061-T6 Aluminum Alloy. J. Aeronaut. Mater. 2013, 33, 38–44. (In Chinese) [Google Scholar]
- Infante, V.; Braga, D.F.O.; Duarte, F.; Moreira, M.M.G.; Freitas, M.; de Castro, P.M.S.T. Study of the fatigue behaviour of dissimilar aluminium joints produced by friction stir welding. Int. J. Fatigue 2016, 82, 310–316. [Google Scholar] [CrossRef]
- Hatamleh, O.; Hill, M.; Forth, S.; Garcia, D. Fatigue crack growth performance of peened friction stir welded 2195 aluminum alloy joints at elevated and cryogenic temperatures. Mater. Sci. Eng. A 2009, 519, 61–69. [Google Scholar] [CrossRef]
- Jie, L. Effects of Laser Peen on 7075 Aluminum Alloy Friction Stir Welding Joints. Aerosp. Mater. Technol. 2010, 1, 16. [Google Scholar]
- Hatamleh, O.; Lyons, J.; Forman, R. Laser and shot peening effects on fatigue crack growth in friction stir welded 7075-T7351 aluminum alloy joints. Int. J. Fatigue 2007, 29, 421–434. [Google Scholar] [CrossRef]
- Moghadam, D.G.; Farhangdoost, K. Influence of welding parameters on fracture toughness and fatigue crack growth rate in friction stir welded nugget of 2024-T351 aluminum alloy joints. Trans. Nonferrous Met. Soc. China 2016, 26, 2567–2585. [Google Scholar] [CrossRef]
- Murakami, Y.; Harada, S.; Endo, T.; Tani-Ishi, H.; Fukushima, Y. Correlations among growth law of small cracks, low-cycle fatigue law and applicability of Miner’s rule. Eng. Fract. Mech. 1983, 18, 909–924. [Google Scholar] [CrossRef]
- Feng, A.H.; Chen, D.L.; Ma, Z.Y. Microstructure and low-cycle fatigue of a friction-stir-welded 6061 aluminum alloy. Metall. Mater. Trans. A 2010, 41, 2626–2641. [Google Scholar] [CrossRef]
- Feng, A.H.; Chen, D.L.; Ma, Z.Y. Microstructure and cyclic deformation behavior of a friction-stir-welded 7075 Al alloy. Metall. Mater. Trans. A 2010, 41, 957–971. [Google Scholar] [CrossRef]
- Xu, W.F.; Liu, J.H.; Chen, D.L.; Luan, G. Low-cycle fatigue of a friction stir welded 2219-T62 aluminum alloy at different welding parameters and cooling conditions. Int. J. Adv. Manuf. Technol. 2014, 74, 209–218. [Google Scholar] [CrossRef]
- Ni, D.R.; Chen, D.L.; Yang, J.; Ma, Z.Y. Low cycle fatigue properties of friction stir welded joints of a semi-solid processed AZ91D magnesium alloy. Mater. Des. (1980–2015) 2014, 56, 1–8. [Google Scholar] [CrossRef]
- Rambabu, G.; Naik, D.B.; Rao, C.H.V.; Rao, K.S.; Reddy, G.M. Optimization of friction stir welding parameters for improved corrosion resistance of AA2219 aluminum alloy joints. Def. Technol. 2015, 11, 330–337. [Google Scholar] [CrossRef]
- Elatharasan, G.; Kumar, V.S.S. Modelling and Optimization of Friction Stir Welding Parameters for Dissimilar Aluminium Alloys Using RSM. Procedia Eng. 2012, 38, 3477–3481. [Google Scholar] [CrossRef]
- De Filippis, L.A.C.; Serio, L.M.; Palumbo, D.; De Finis, R.; Galietti, U. Optimization and Characterization of the Friction Stir Welded Sheets of AA 5754-H111: Monitoring of the Quality of Joints with Thermographic Techniques. Materials 2017, 10, 1165. [Google Scholar] [CrossRef] [PubMed]
- Ugrasen, G.; Bharath, G.; Kumar, G.K.; Sagar, R.; Shivu, P.R.; Keshavamurthy, R. Optimization of Process Parameters for Al6061-Al7075 alloys in Friction Stir Welding using Taguchi’s Technique. Mater. Today Proc. 2018, 5, 3027–3035. [Google Scholar] [CrossRef]
- Wakchaure, K.N.; Thakur, A.G.; Gadakh, V.; Kumar, A. Multi-Objective Optimization of Friction Stir Welding of Aluminium Alloy 6082-T6 Using hybrid Taguchi-Grey Relation Analysis—ANN Method. Mater. Today Proc. 2018, 5, 7150–7159. [Google Scholar] [CrossRef]
- Han, L.; Blundell, N.; Lu, Z.; Shergold, M.; Chrisanthou, A. Fatigue Behaviour of Friction Stir Joined Aluminium Alloy NG5754 and AA6111; SAE Technical Papers 2007-01-1704; SAE International: Warrendale, PA, USA, 2007. [Google Scholar]
- Vadher, T.; Parmar, G.S. Fatigue behaviour of aluminium alloy plates joined by friction stir welding. Int. J. Technol. Res. Eng. 2017, 4, 984–987. [Google Scholar]
- Garware, M.; Kridli, G.T.; Mallick, P.K. Tensile and Fatigue Behavior of Friction-Stir Welded Tailor-Welded Blank of Aluminum Alloy 5754. J. Mater. Eng. Perform. 2010, 19, 1161–1171. [Google Scholar] [CrossRef]
- Lukács, J.; Meilinger, Á.; Pósalaky, D. High cycle fatigue and fatigue crack propagation design curves for 5754-H22 and 6082-T6 aluminium alloys and their friction stir welded joints. Weld. World 2018, 62, 737–749. [Google Scholar] [CrossRef]
- Enke, N.F.; Sandor, B.I. Cyclic plasticity analysis by differential infrared thermography. In Proceedings of the VI International Congress on Experimental Mechanics, Portland, OR, UAS, 6–10 June 1988; pp. 830–835. [Google Scholar]
- Shiozawa, D.; Inagawa, T.; Washio, T.; Sakagami, T. Fatigue limit estimation of stainless steels with new dissipated energy data analysis. Procedia Struct. Integr. 2016, 2, 2091–2096. [Google Scholar] [CrossRef]
- De Finis, R.; Palumbo, D.; Da Silva, M.M.; Galietti, U. Is the temperature plateau of a self-heating test a robust parameter to investigate the fatigue limit of steels with thermography? Fatigue Fract. Eng. Mater. Struct. 2018, 41, 917–934. [Google Scholar] [CrossRef]
- Munier, R.; Doudard, C.; Calloch, S.; Weber, B. Determination of high cycle fatigue properties of a wide range of steel sheet grades from self-heating measurements. Int. J. Fatigue 2014, 63, 46–61. [Google Scholar] [CrossRef]
- Palumbo, D.; De Finis, R.; Serio, L.M.; Galietti, U.; De Filippis, L.A.C. Thermographic signal analysis of friction stir welded AA 5754 H111 joints. Proc. SPIE Int. Soc. Opt. Eng. 2018, 10661, 106610Y. [Google Scholar]
© 2018 by the authors. Licensee MDPI, Basel, Switzerland. This article is an open access article distributed under the terms and conditions of the Creative Commons Attribution (CC BY) license (http://creativecommons.org/licenses/by/4.0/).