1. Introduction
During the rolling process, the wear of the rolls is unavoidable. Flatness and surface quality are important quality indexes of strip steel, and roll wear will significantly affect the product quality [
1,
2,
3]. The profile of the roll can be measured on a roll grinding machine, though this method requires the roll to be removed first and then measured offline [
4,
5]. The OPM (Online Roll Profile Meter) does not require roll replacement and enables real-time measurement on the rolling mill, offering unparalleled advantages over traditional roll profile measurement methods [
6]. OPM is the prerequisite for ORG (Online Roller Grinder). Only when the measurement accuracy is assured can a satisfactory roll profile be achieved following grinding. Moreover, even on hot tandem strip rolling mills without ORG, the application of OPM technology provides guidance for optimising roll change strategies.
The ORG system manufactured by Mitsubishi Corporation of Japan used the ultrasonic ranging method for online roll profile measurement. The ultrasonic displacement sensor was installed in the inner hole of the grinding wheel of the ORG. A high-pressure water jet was employed at the sensor probe to prevent the rapid attenuation of ultrasonic waves in air and to homogenise the medium between the sensor and the roll [
7]. Hayashi et al. [
8] employed ultrasonic displacement sensors to achieve online roll profile measurement, feeding the roll profile data back to the ORG to provide guidance for its process formulation. Hu et al. [
9,
10,
11,
12] conducted theoretical research on enhancing the measurement accuracy of roll profiles using ultrasonic ranging method, but they did not consider the influence of the propagation medium on the ultrasonic sensor, nor did they address the impact of factors such as bubbles and water flow rate on its measurement accuracy in practical applications. However, ultrasonic technology is highly sensitive to the transmission medium and exhibits poor resistance to interference. The practical application result of online roll profile measurement based on ultrasonic ranging method is not ideal.
The ORG systems manufactured by Hitachi Corporation and Mitsubishi Corporation both employed the contact force measurement method for online detection of the roll shape of the rolls. This device did not have an independent sensor for online roll profile measurement. Instead, it indirectly calculated the roll profile by measuring the contact pressure between the grinding wheel and the roll via a force sensor at the end of the grinding unit, combined with the displacement data from the axial and radial feed servo motors. Kinose et al. [
13] expounded the principle of online roll profile measurement by contact force method and presented the calculation model of the roll profile curve. Hu [
14] investigated online roll profile measurement technology based on the contact force measurement method, respectively, presented the roll profile calculation methods under constant feed and constant grinding force, and conducted the dynamic characteristic analysis of the OPM system. The measurement accuracy of the contact force measurement method is unaffected by cooling water in industrial environments, and it is also relatively cost-effective. However, the online roll profile measurement technology based on the contact force measurement method has exceptionally high requirements for the mechanical manufacturing accuracy of the entire device. Practical application has demonstrated that its ultimate measurement accuracy is not particularly high [
15].
Kobe Steel Company developed a machine vision system based on CCD image sensor technology. This system employed cameras to capture the surface images of the rolls online, processing and analysing them to determine the optimal roll replacement timing. This approach ensured product quality while improving production efficiency; however, it cannot obtain accurate online roll profile curves [
16].
Hoesch Steel Company first proposed the online roll profile measurement technology using the eddy current ranging method [
17], and the measurement accuracy of this method is not affected by the cooling water in the industrial environments. Hua [
18] established a roll profile online measurement system based on the eddy current ranging method, conducted experimental research, and proposed a straightness error separation method in theoretical research. However, eddy current sensors are highly sensitive to material, with different materials requiring distinct sensitivity coefficients [
19,
20]. Therefore, both the oxide scale on the rolls and the axial material inconsistencies in the rolls will cause interference to the measurement signals.
During the initial stages of proposing the OPM technology, scholars from various countries undertook extensive research and carried out several rounds of technical optimisation. However, as mentioned above, there is currently no satisfactory method for online roll profile measurement. Due to technical bottlenecks, there have been few relevant research reports in the past two decades.
Laser measurement technology has advanced rapidly in recent years, particularly laser triangulation method, which has found application in numerous scenarios. Wu et al. [
21] used the laser triangulation method to measure the surface defects of corrugated plates. The experimental results showed that this method was very effective for achieving non-destructive measurement of corrugated plates. Moreno et al. [
22] used laser triangulation to measure the vibration of wind turbine blades. Experimental results indicated that the relative error in measuring the first-order natural vibration frequency by this method was less than 1%. Hosek [
23] used a laser triangulation sensor to measure the side distance of slots or bores. Research showed that this method could measure the side distance at depths of more than 3.5 times the slit size. Usamentiaga et al. [
24] proposed a rail flatness measurement system based on double laser triangulation. Research showed that this measurement system had excellent performance and could accurately calculate the deviation in the rail surface from the intended shape. Wang et al. [
25] conducted research on the online monitoring technology of the surface morphology of laser cladding layers based on the laser triangulation method. The results showed that this method could accurately reflect the morphological characteristics of the cladding layer surface in real time.
Laser triangulation is a non-contact measurement technique capable of achieving measurement errors of less than 1 μm. However, water in the working environment can significantly reduce the measurement accuracy of laser triangulation. If water can be removed from the optical path during measurement, the laser triangulation method is more suitable for high-precision online roll profile measurement. This paper conducts research on laser measurement technology for online profile metre in strip rolling mills.
2. Fundamental Principles of Laser Displacement Sensors
Laser displacement sensors are generally based on the measurement principle of laser triangulation. In the measuring system, the incident ray, the reflected ray, the object and the image form two similar triangles. When the position of the measurement point changes, the corresponding image point on the photosensitive element will also shift accordingly. Based on trigonometric relationships, the displacement change in the measured object can be calculated according to the variation in the position of the image formed on the photosensitive element [
26].
2.1. Direct Laser Triangulation Method
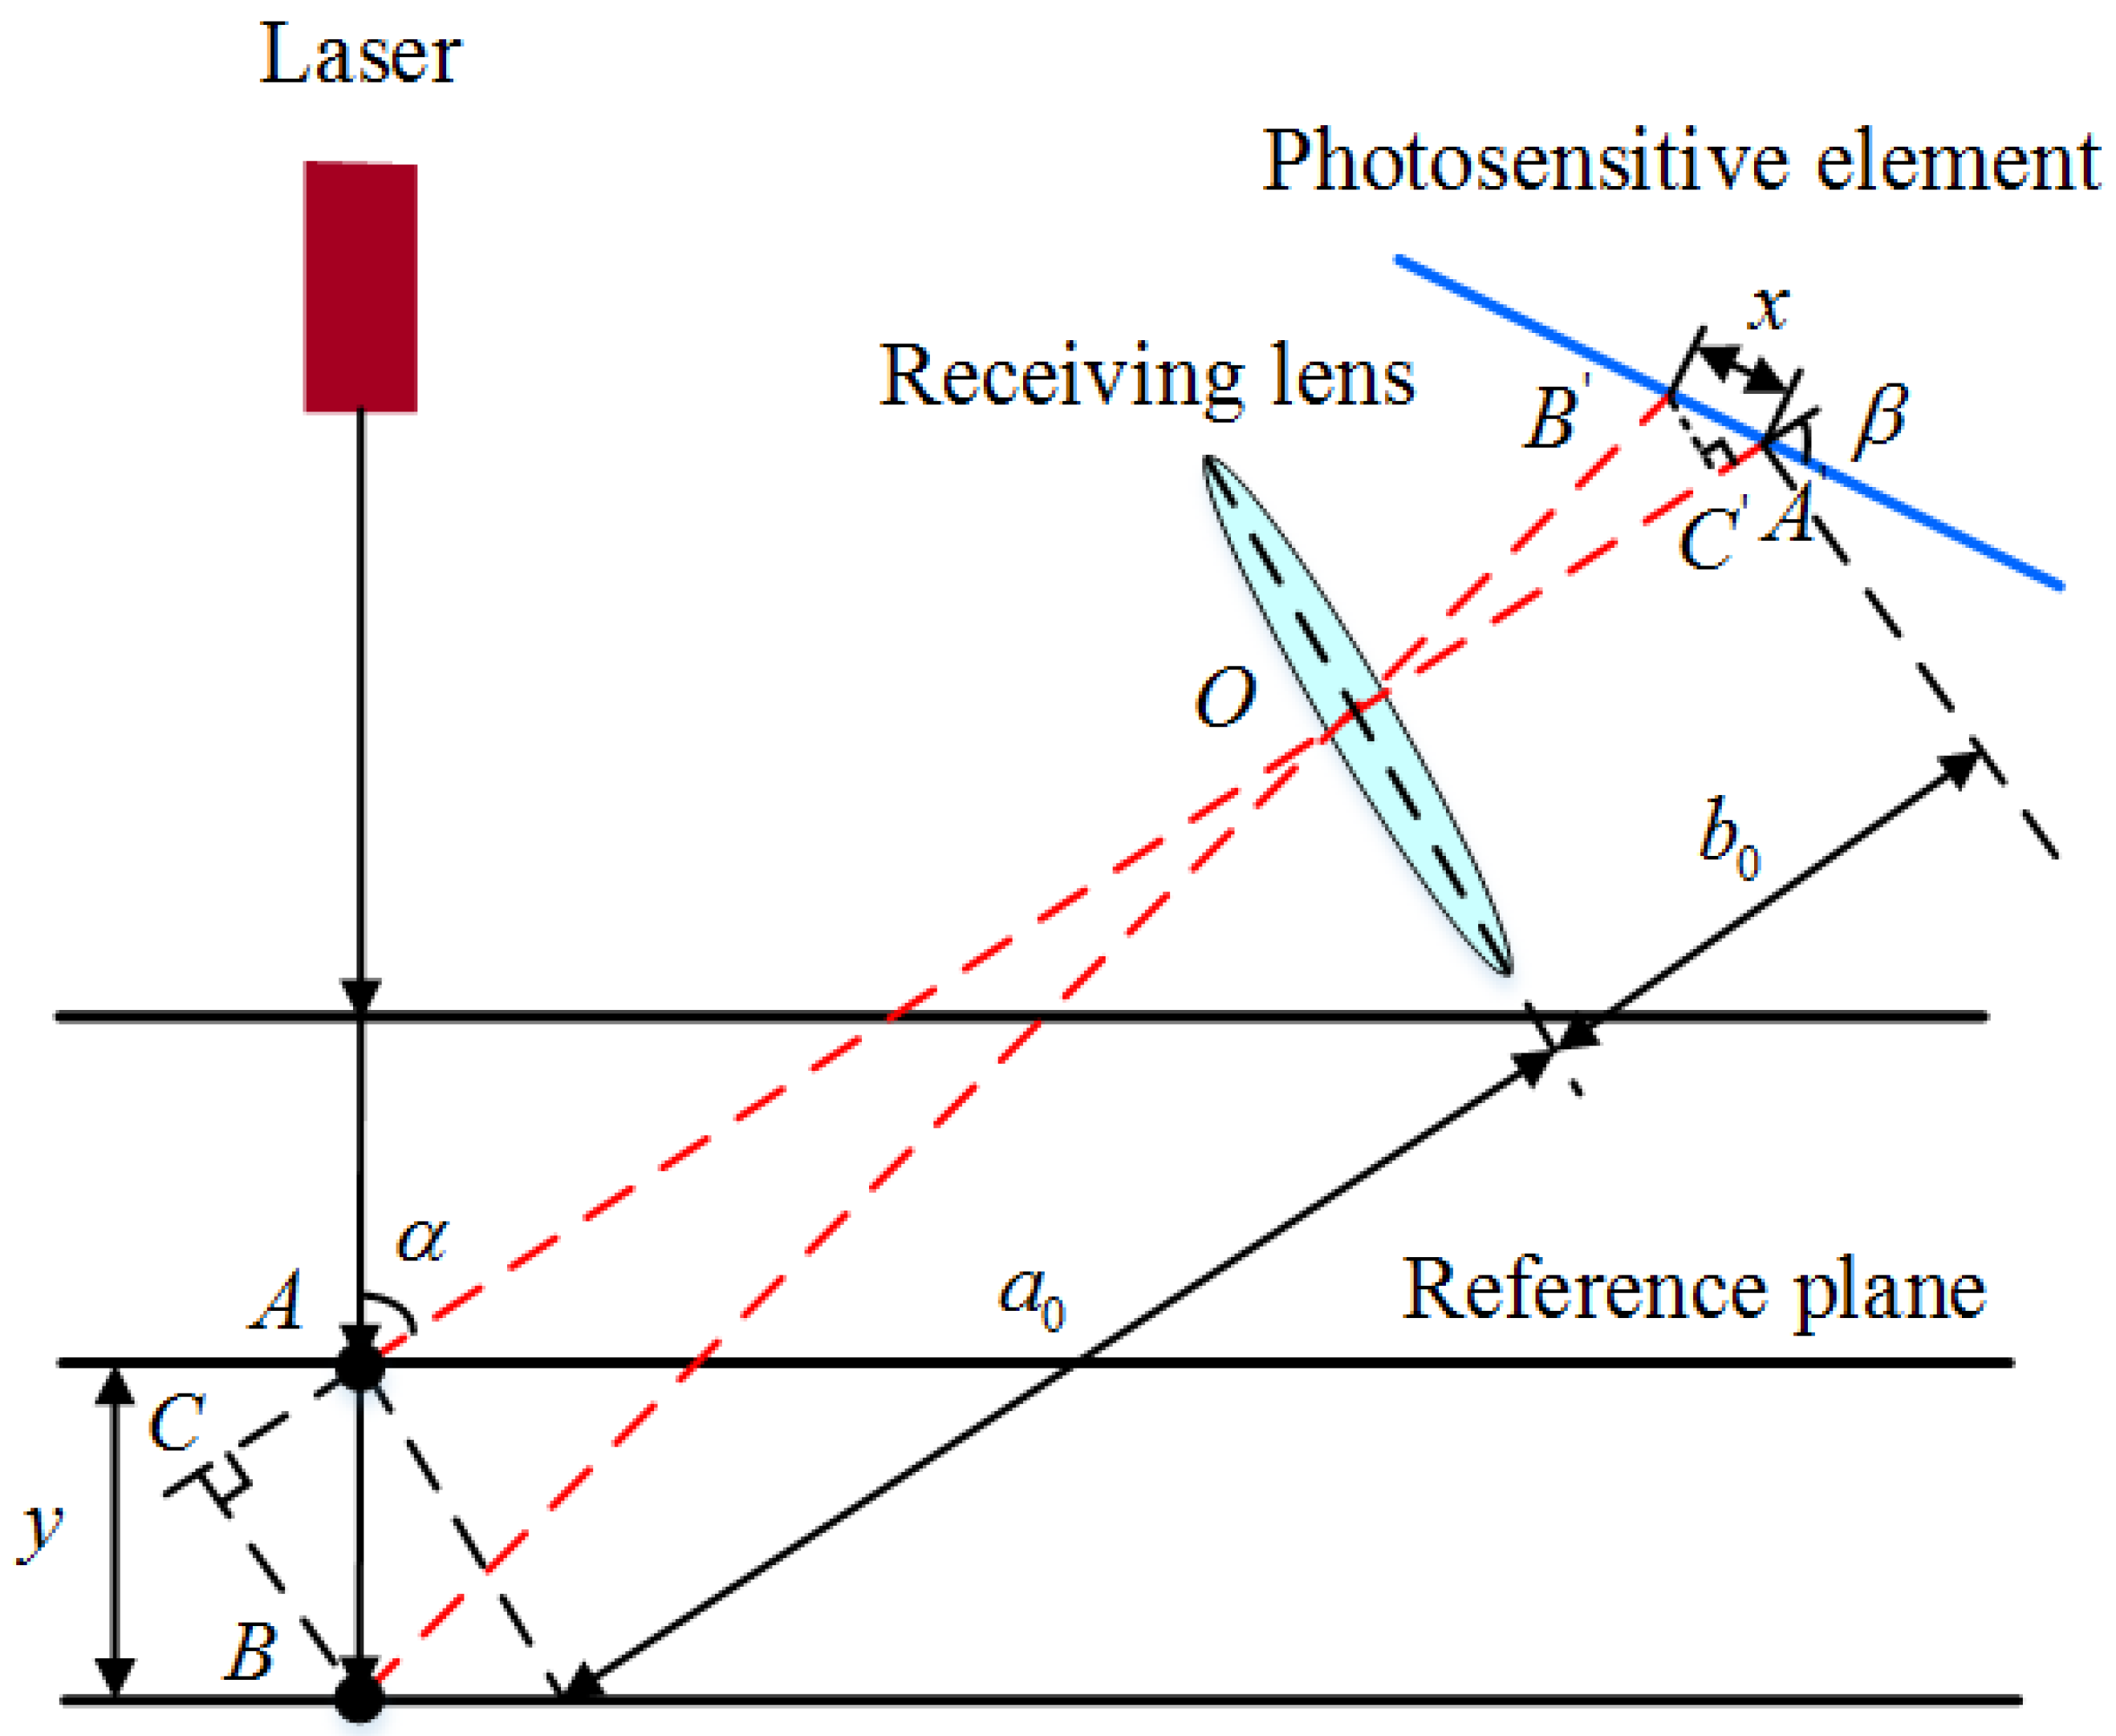
When the incident ray of the sensor is perpendicular to the measured surface, it is called the direct laser triangulation method, the working principle of which is illustrated in
Figure 1.
According to the geometric relationship between the similar triangles
and
in
Figure 1, the relationship between the displacement of the measured surface and the displacement of the image point on the photosensitive element can be expressed as follows [
27]:
When the measured surface moves towards the sensor, ‘
’ in the formula is taken as ‘+’; otherwise, it is taken as ‘−’.
2.2. Oblique Laser Triangulation Method
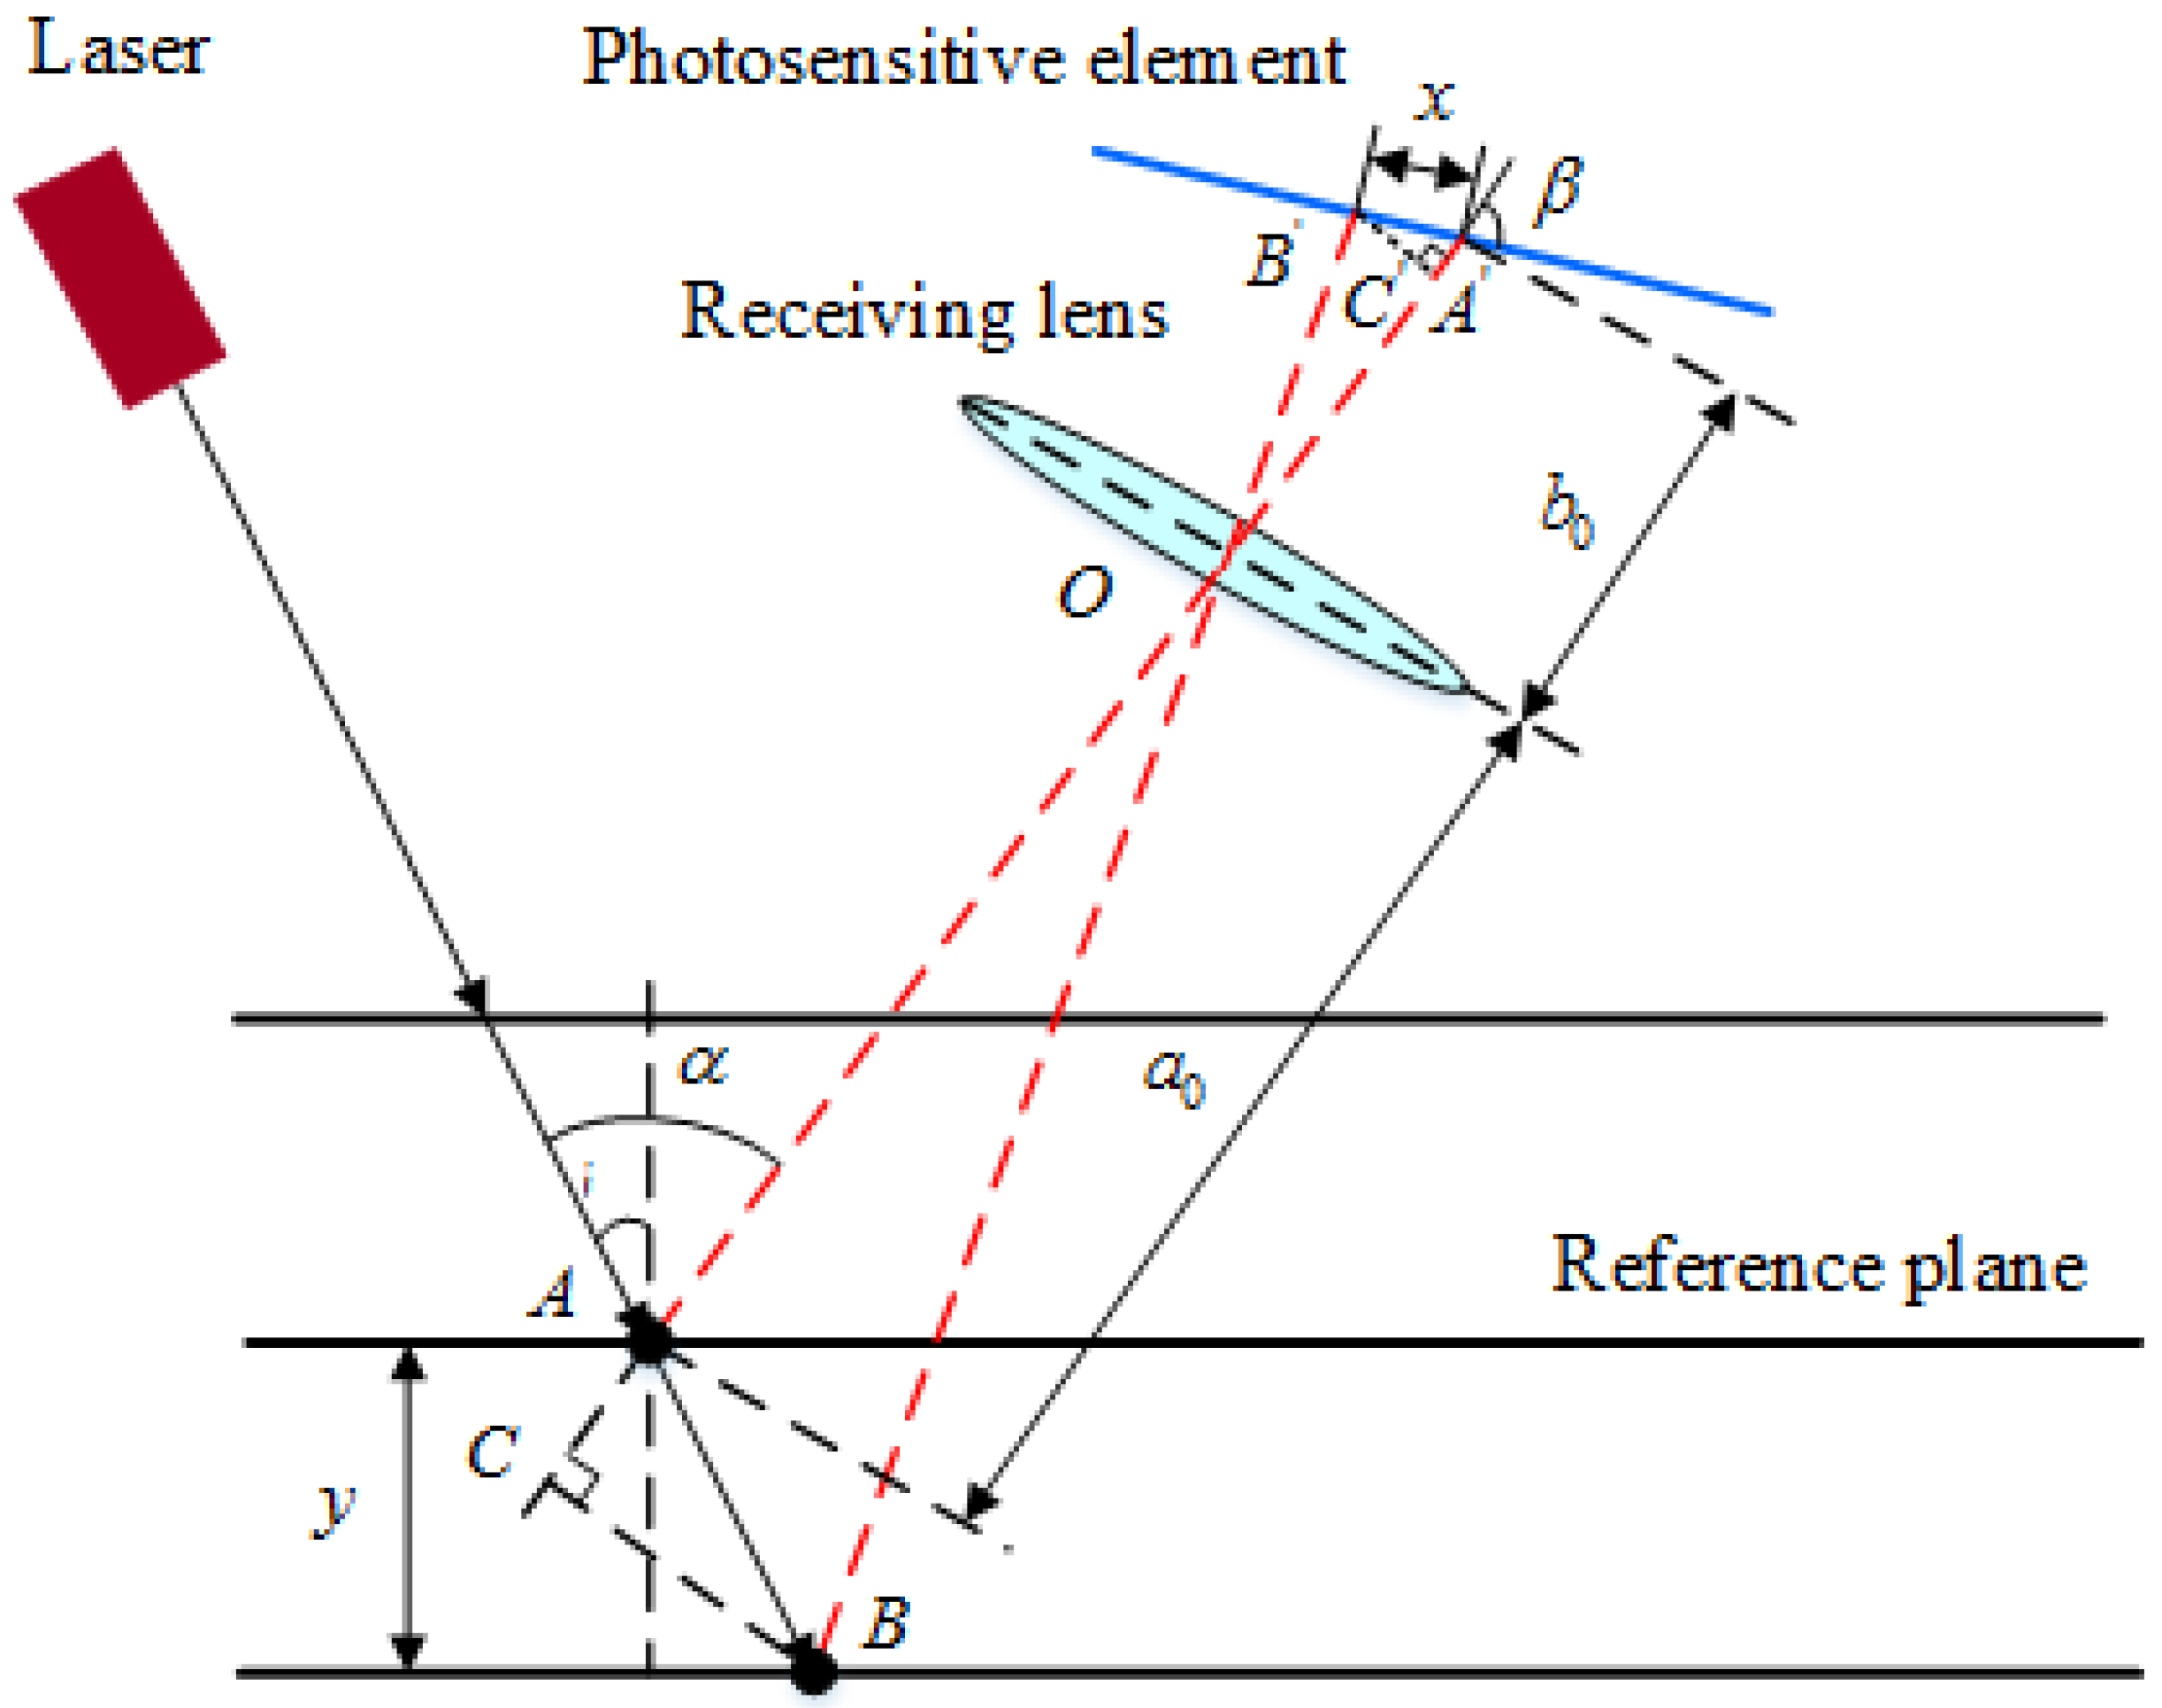
When the incident ray of the sensor does not coincide with the normal of the measured surface, it is called the oblique laser triangulation method, and its working principle is shown in
Figure 2.
According to the geometric relationship between the similar triangles
and
in
Figure 2, the relationship between the displacement of the measured surface and the displacement of the image point on the photosensitive element can be expressed as follows [
28]:
Similarly, when the measured surface moves towards the sensor, ‘’ in the formula is taken as ‘+’; otherwise, it is taken as ‘−’.
By comparing Formula (2) with Formula (1), the object image displacement formulas of the direct laser triangulation method and the oblique laser triangulation method only differ by the term. When , the two formulas are identical, meaning that direct laser triangulation method is a special case of the oblique laser triangulation method.
2.3. Comparative Analysis of Direct and Oblique Laser Triangulation Methods
Direct and oblique laser triangulation methods each possess distinct advantages and disadvantages in practical application, primarily manifested as follows:
- (1)
If the surface of the object being measured is mirror-like or nearly so, it primarily produces reflected light. The direct laser triangulation method may fail to perform measurements due to excessively weak light signals received by the sensor’s photodetector, caused by insufficient diffuse reflection. The oblique laser triangulation method can receive reflected light; therefore, it should be employed when the surface of the measured object is specular or near-specular.
- (2)
As can be seen from
Figure 1 and
Figure 2, when the object under measurement undergoes vertical displacement, the direct laser triangulation method consistently measures a fixed point on the object’s surface. However, in the oblique laser triangulation method, the position of the measurement point on the object’s surface is variable, so it cannot measure the real-time displacement of a specific point on the target object. In particular, when the surface of the measured object is uneven or curved, the oblique laser triangulation method will introduce additional measurement errors.
- (3)
The spot produced by the direct laser triangulation method is circular with a relatively small diameter, and the intensity of the light is relatively concentrated. The spot pattern of the oblique laser triangulation method is elliptical, and as the angle of incidence increases, the spot size also enlarges, thereby introducing additional measurement errors.
Therefore, the oblique laser triangulation method is more suitable for measuring mirror-like or near-mirror-like objects. Where the surface of the object being measured exhibits predominantly diffuse reflection, the direct laser triangulation method offers a distinct advantage. The surface of the rolls exhibits diffuse reflection as its predominant characteristic, and possesses a curved profile. Following wear, the roll surface becomes uneven and pitted. Therefore, when conducting online profile measurement, the direct laser triangulation method should be employed.
3. Methods
Roll wear is typically quantified in micrometres, and online roll profile measurement requires sensors with exceptionally high measurement accuracy. The operational conditions for online roll profile measurement are complex, involving factors such as high temperatures, cooling water, and water vapour, rendering the measurement environment exceptionally harsh. The accuracy of laser displacement sensors may be affected by factors such as temperature, water, or water vapour during the measurement process.
Therefore, a sensor protective housing was designed, an experimental platform was constructed in the laboratory, and the influencing factors of sensor measurement accuracy were studied on this platform.
3.1. Design of Sensor Protective Housing
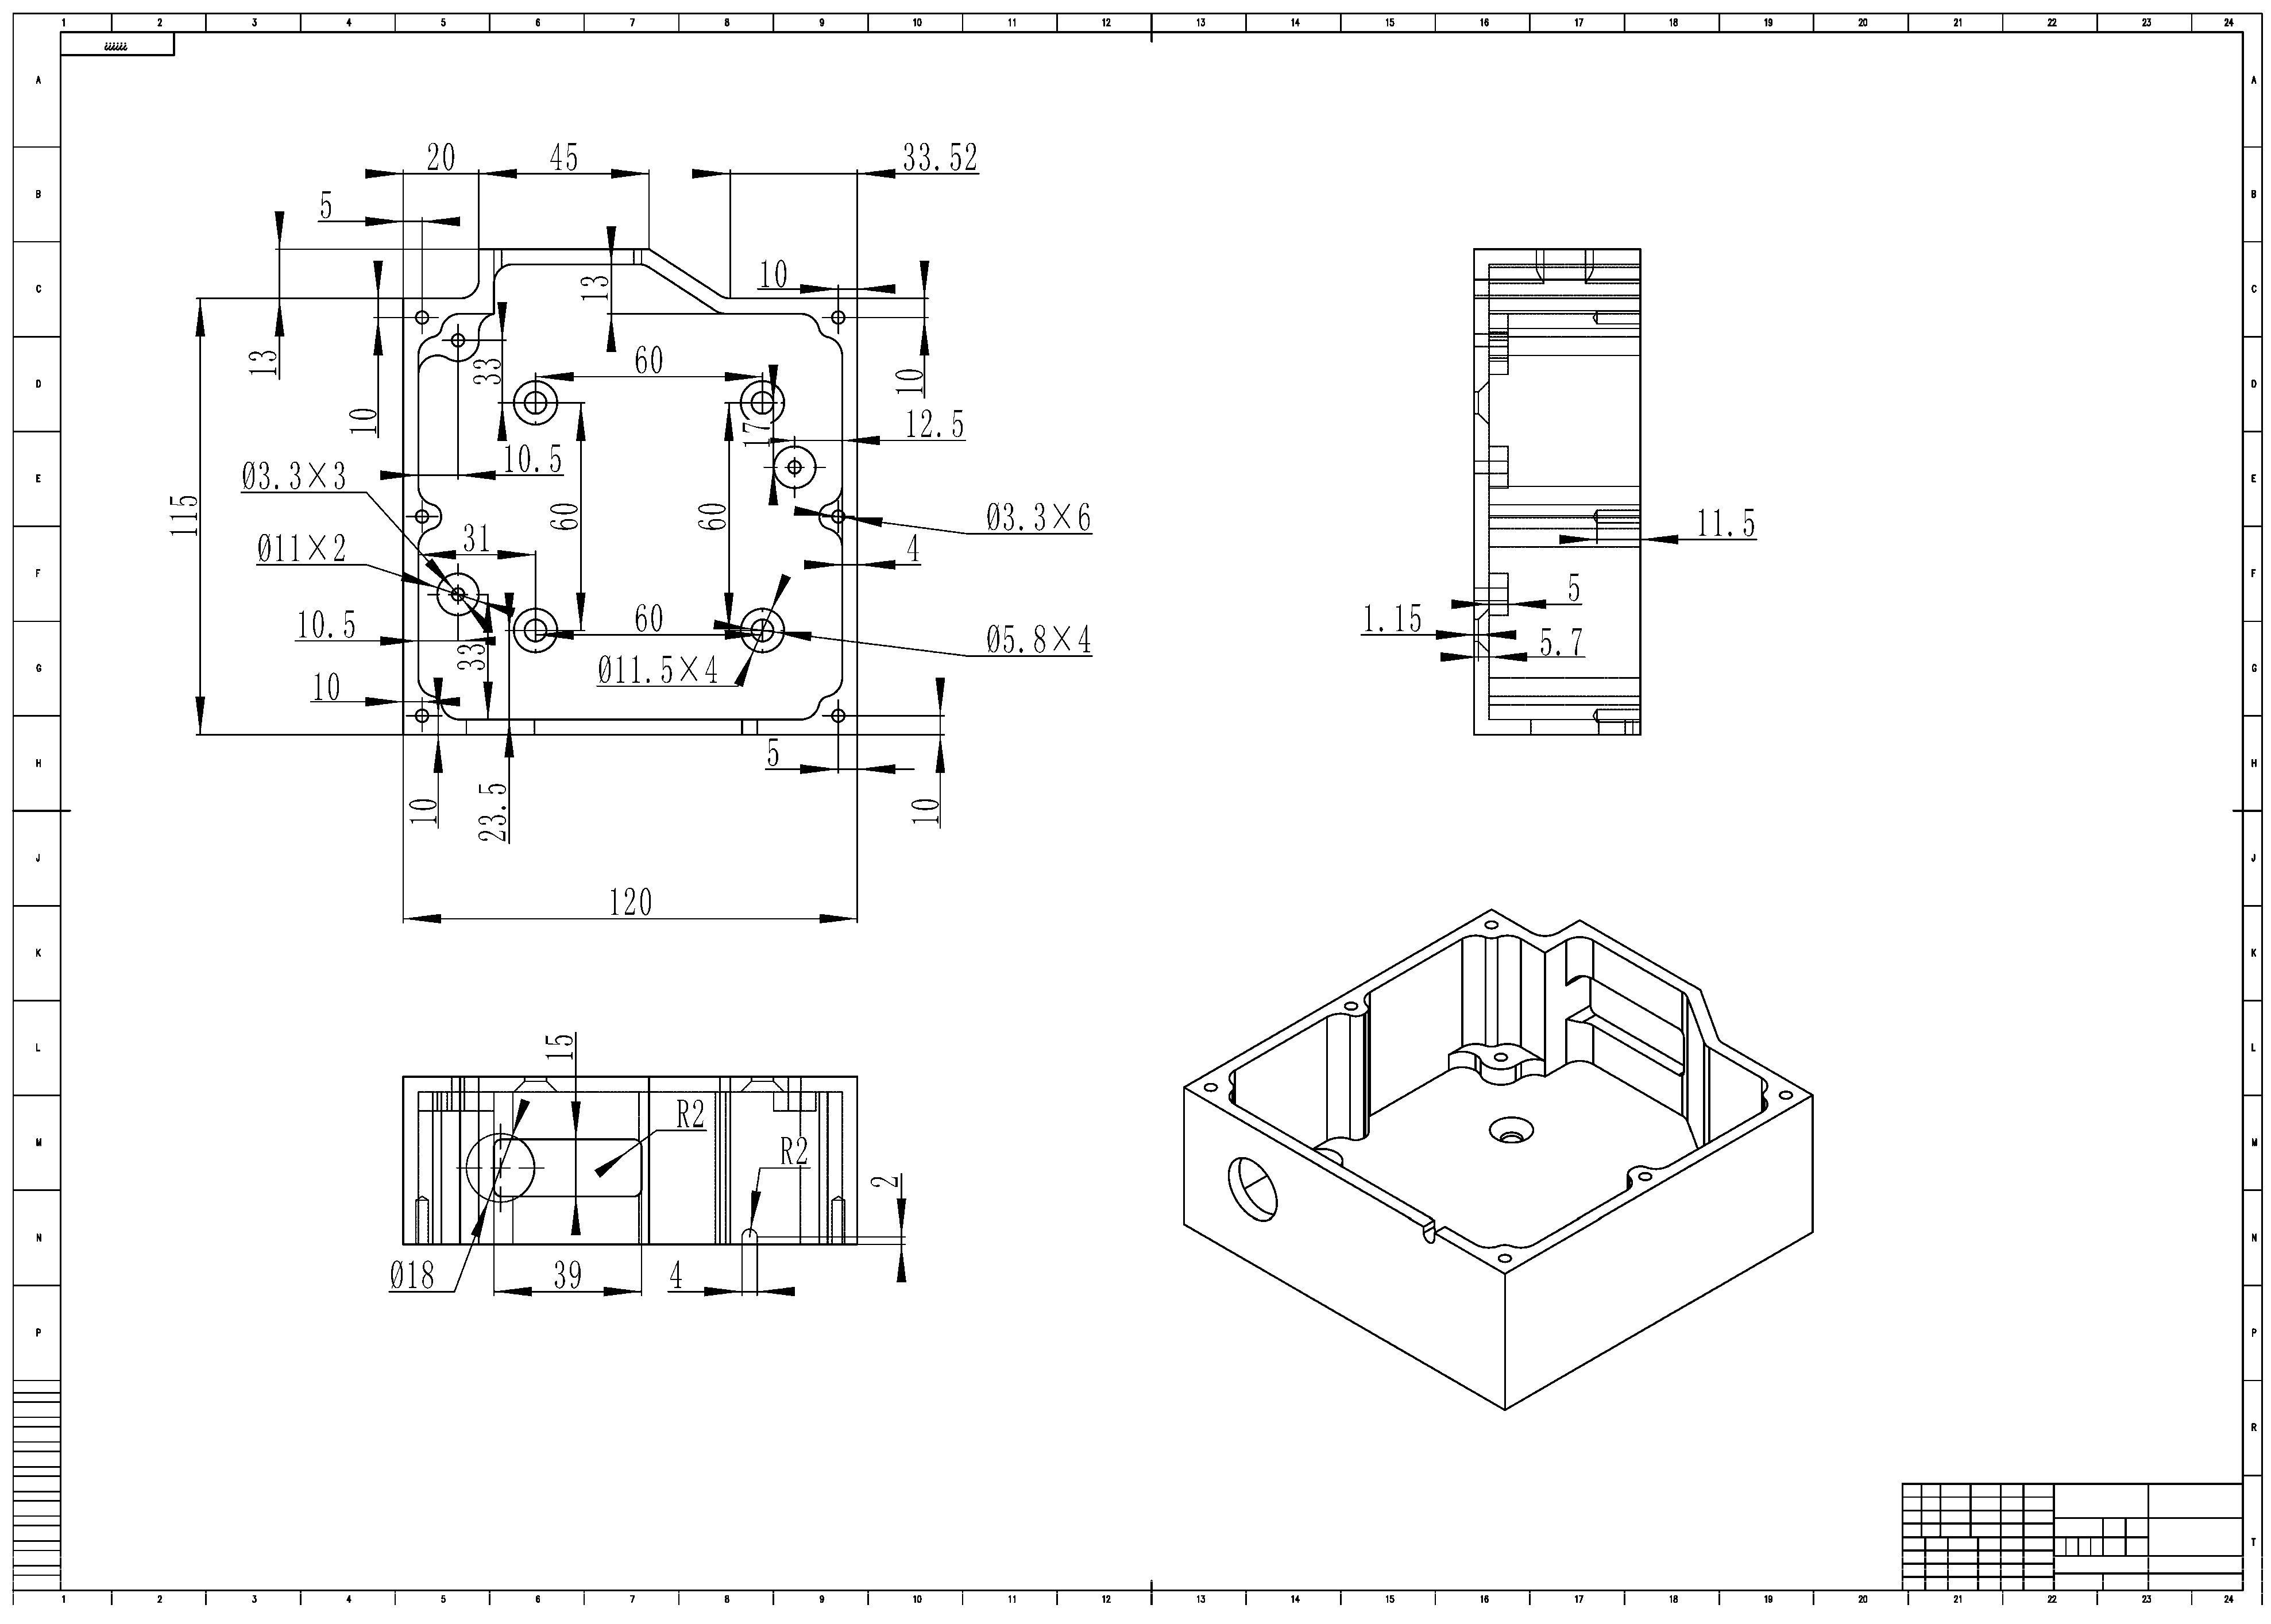
To ensure the measurement accuracy of the laser displacement sensor under operational conditions, a protective housing for the sensor was designed, as shown in
Figure 3.
The protective housing is of a box-type construction, made of 304 stainless steel, and the sensor is installed inside the protective housing. The air inlet of the protective housing is connected to compressed air for cooling the sensor, preventing fluctuations in its operating temperature caused by factors such as high-temperature steel plates. This reduces measurement errors resulting from temperature drift in the sensor. The positions of the sensor installation bolts inside the protective housing are designed as a convex configuration, which can separate the sensor from the inner bottom surface of the protective housing, avoiding the sensor from being in close contact with the inner bottom surface of the protective housing and affecting the heat dissipation of the sensor.
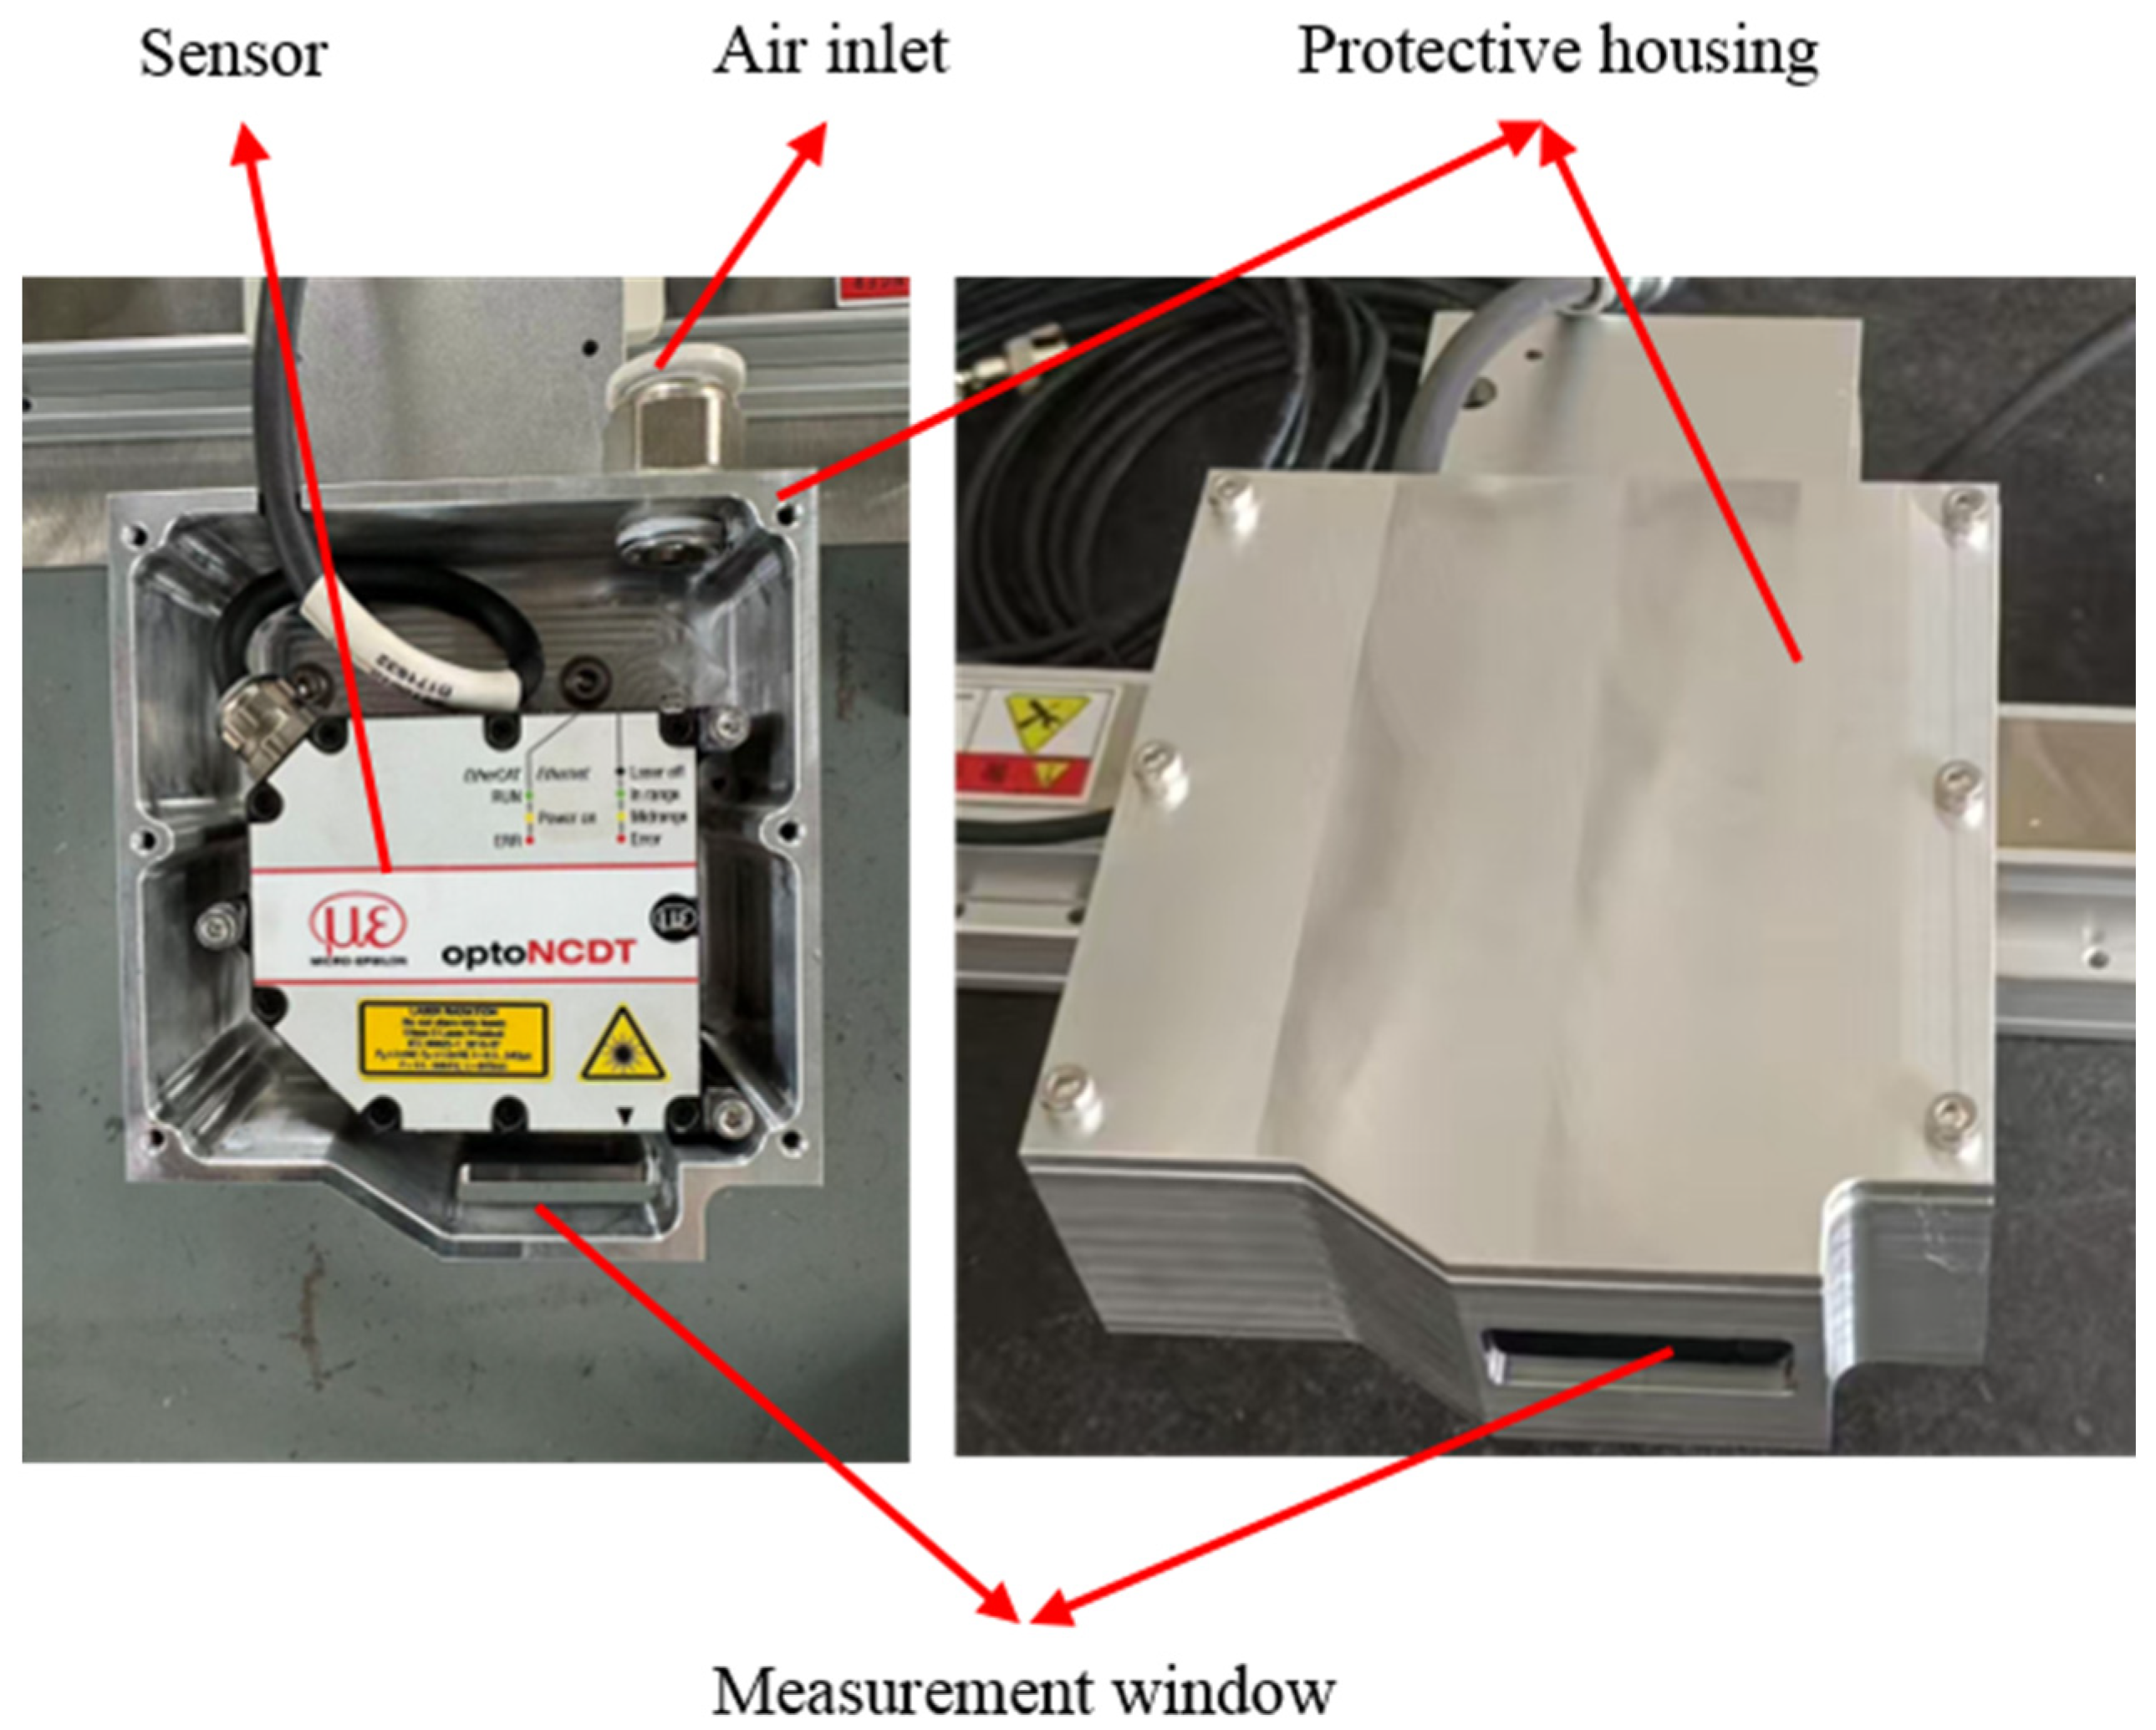
Compressed air enters the protective housing through the inlet port and is subsequently expelled through the housing’s measurement window. Consequently, while achieving sensor cooling, water and water vapour within the sensor’s measurement optical path can be removed, thereby preventing the negative impact of water in the measurement optical path on the sensor’s measurement accuracy. The distance from the midpoint of the sensor’s measurement range to the sensor surface is 25 mm. If this space be entirely exposed, a significant volume of cooling water would enter the optical path, complicating the process of purging the optical path. The measurement window of the protective housing is designed with a protruding form to minimise the ingress of cooling water into the sensor’s optical path, thereby safeguarding the optical system. Meanwhile, the measurement window of the protective housing is designed as a wedge shape, which can reduce the outlet area of the measurement window. This can prevent the large-diameter outlet from causing a significant reduction in the blow pressure of the compressed air, ensuring the purging effect of the sensor’s measurement optical path. The actual sensor protective housing (Manufactured by Yanshan University, Qinhuangdao, China) after machining is shown in
Figure 4.
To ensure the measurement accuracy of the sensor, the pressure and flow rate of the compressed air passing through the protective housing are critical. Conventional portable air compressors typically have a rated power of 0.5 to 2 kW, an operating pressure of 0.7 MPa, a storage tank capacity of 8 to 50 L, and an exhaust volume of 50 to 100 L/min. Tests were conducted using the Dongcheng Q1E-FF-1200/10Lportable air compressor (manufactured by Jiangsu Dongcheng Electric Tools Co., Ltd., Qidong, China). It was found that due to its small exhaust volume, although it can achieve the purging of water mist, the purging effect on slightly larger water droplets is less than satisfactory. Moreover, owing to its smaller storage tank capacity and lower rated power, the device experiences a rapid drop in air pressure after operating for 2–3 s, causing the purging effectiveness of the protective housing to deteriorate significantly.
To maximise the pursing effect of the protective housing, the experiments on the control of sensor measurement accuracy utilised the SCR10M-8/SKR/380/5/AW air compressor (manufactured by Shanghai Screw Compressor Co., Ltd., Shanghai, China) to supply compressed air to the protective housing. This air compressor has a rated power of 7.5 kW, an operating pressure of 0.83 MPa, a storage tank capacity of 180 L, and an exhaust volume of 1000 L/min.
3.2. Experimental Platform
It is well-known that the accuracy of the sensor determines the upper limit of the measurement system’s accuracy. The sensor employed in this paper is the ILD 2300-2 high-precision laser (manufactured by Micro-Epsilon Messtechnik GmbH&Co.KG, Ortenburg, Germany) displacement sensor from the Micro-Epsilon optoNCDT 2300 series, and its technical parameters are shown in
Table 1.
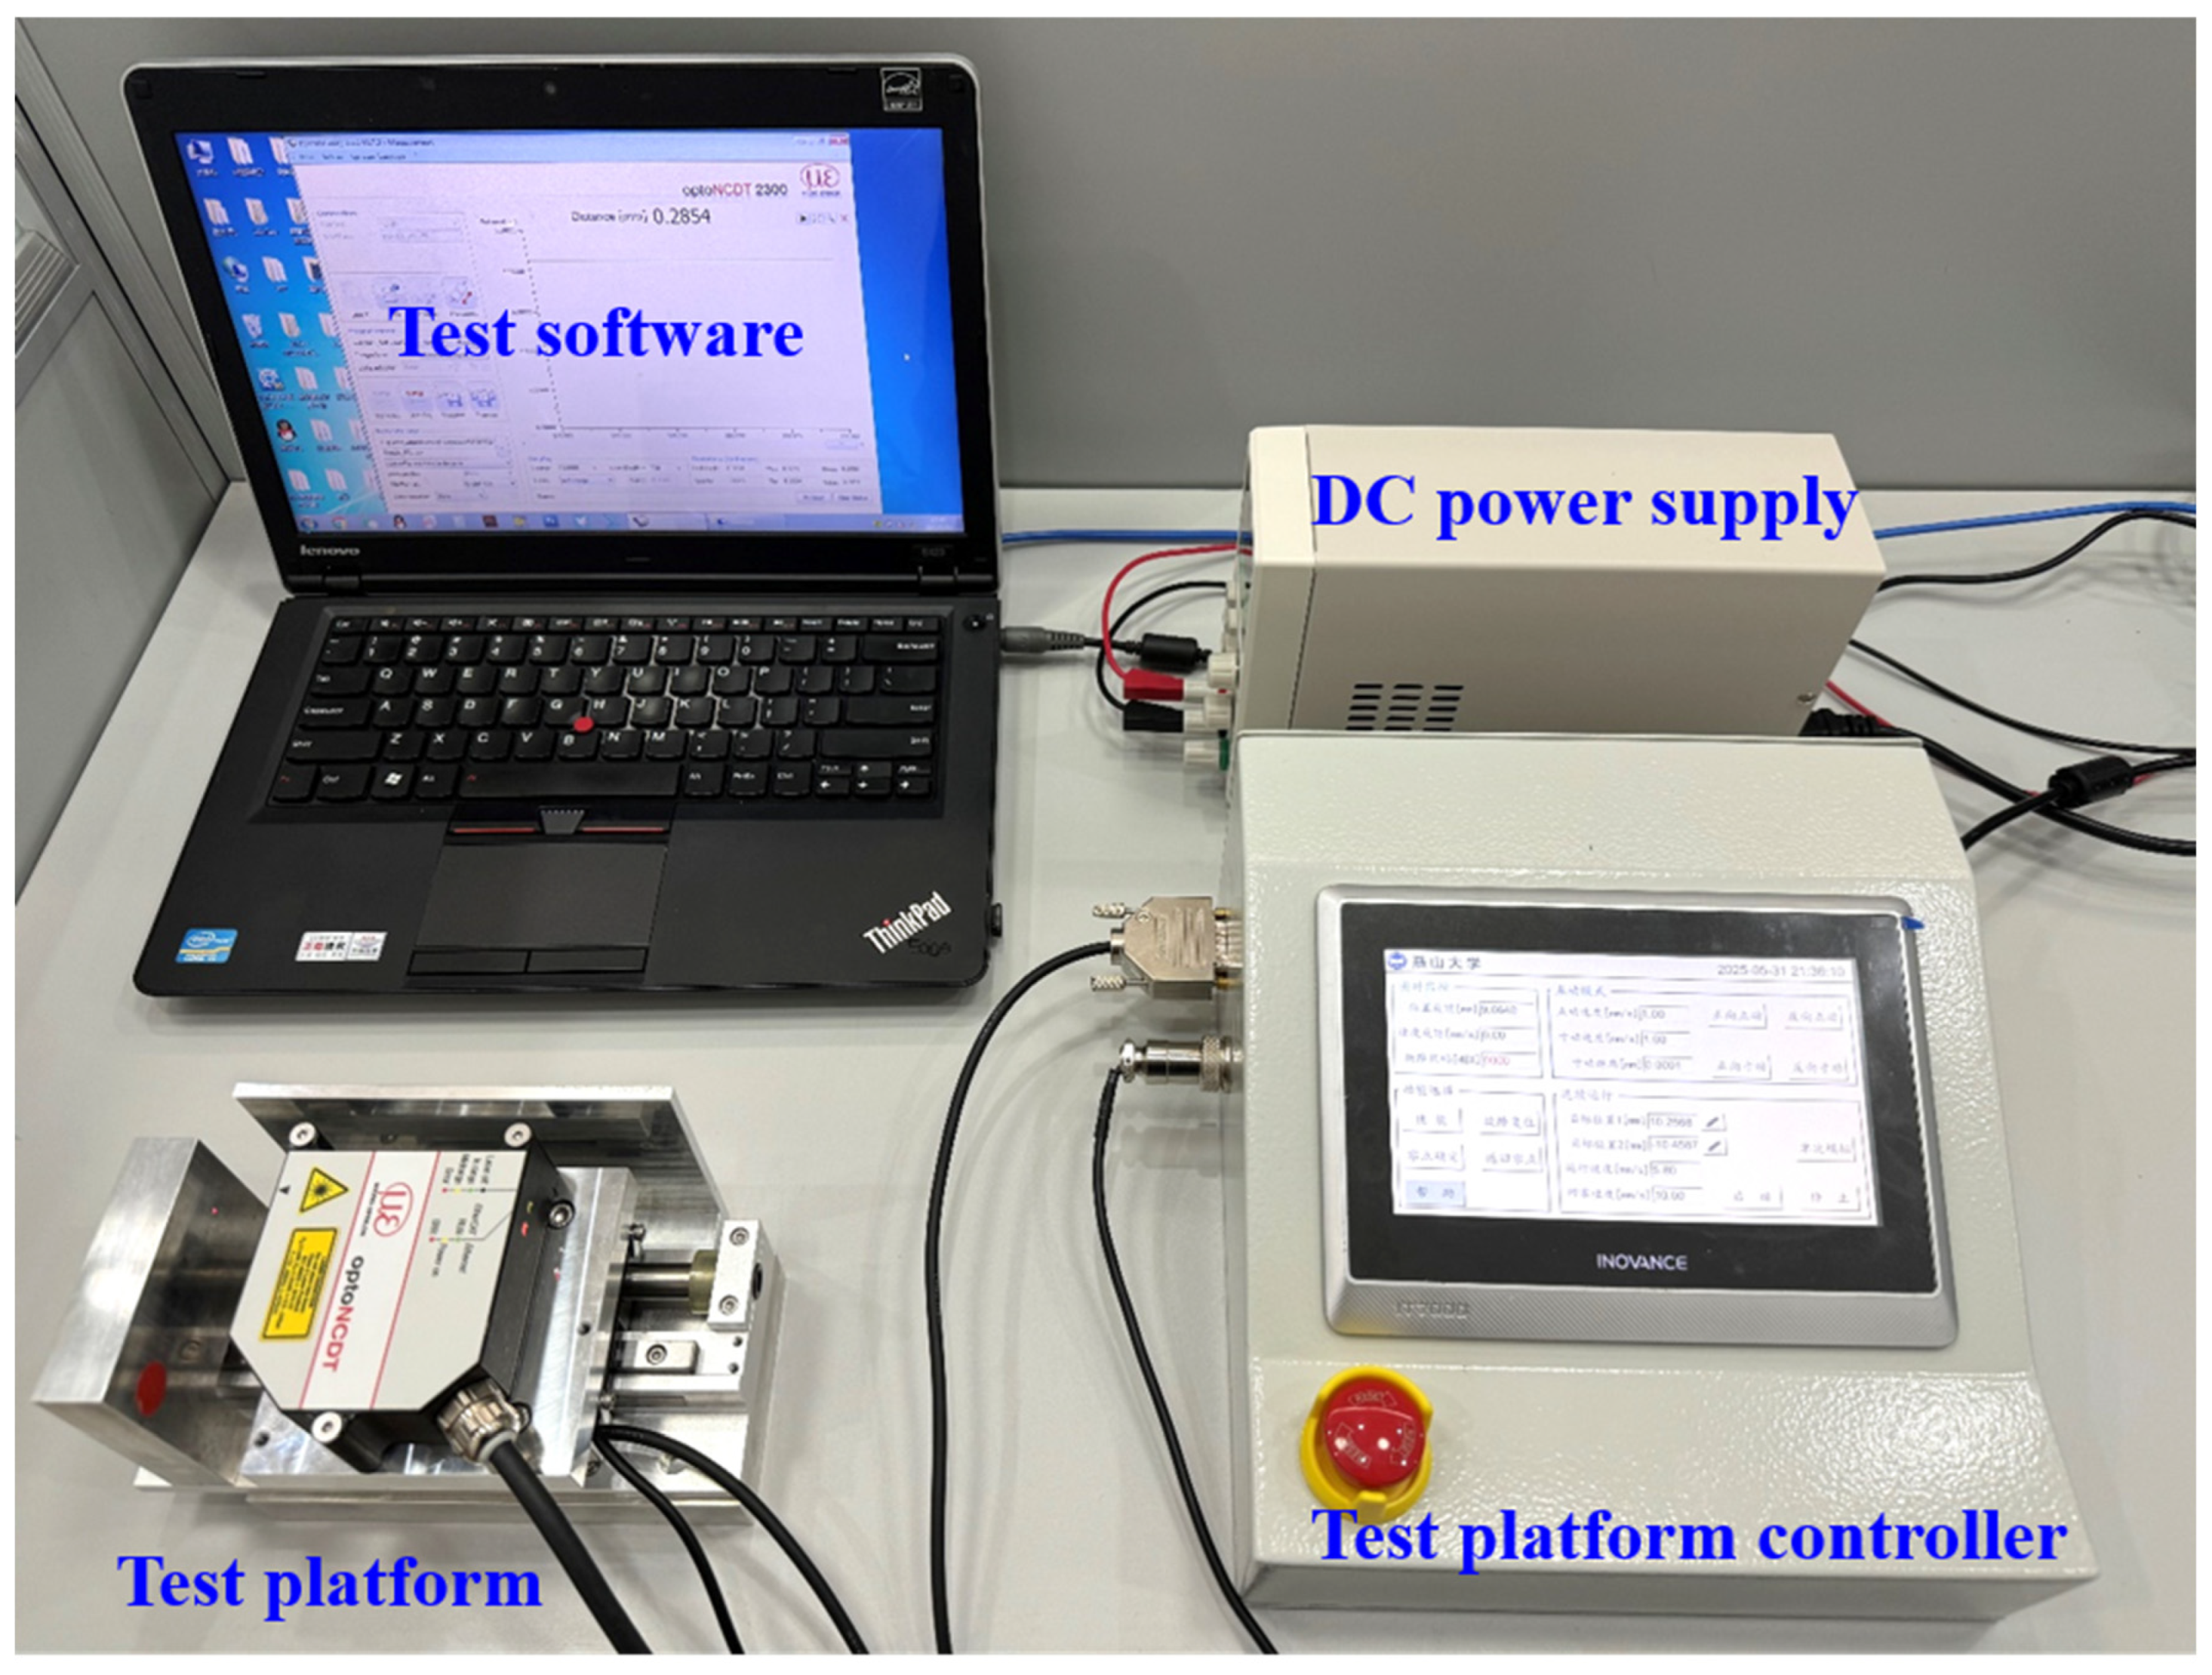
To investigate the influence of various factors on the measurement accuracy of laser displacement sensors, a dedicated experimental platform was designed and constructed in the laboratory, as shown in
Figure 5.
The experimental platform comprises a test platform, a test platform controller, a DC power supply, and a test software system. The test platform incorporates a linear motor equipped with a Micro-Epsilon ILD 2300-2 laser displacement sensor. The linear motor features a stroke of 50 mm and is equipped with a grating sensor offering a resolution of 0.5 μm. It is capable of performing jog or reciprocating motion, with displacement and speed controllable via the test platform controller. The DC power supply is used to power the laser displacement sensor, whilst the test software system enables real-time monitoring of the sensor’s displacement signal and facilitates signal acquisition and storage. The laser displacement sensor operated at a sampling frequency of 1.5 kHz. The laboratory environment maintained a temperature of 25 °C and an air humidity of 50%.
On this experimental platform, adjust the laser displacement sensor position so that the test object is situated near the midpoint of the laser displacement sensor’s measurement range, and calibrate the sensor using the grating sensor. The linear motor was controlled to move ±0.3 mm, ±0.6 mm, and ±0.9 mm, respectively. At each position, the measurement difference between the grating and the laser displacement sensor was less than 1 μm. Therefore, it can be considered that the measurement accuracy of the laser displacement sensor meets the requirements, and there is no need to compensate for its sensitivity.
3.3. Experimental Methods
Adjust the sensor’s position so that the object being measured is positioned near the midpoint of the sensor’s measurement range. Secure the sensor in position and ensure the experimental platform remains unaffected by external factors such as vibration. Turn on the DC power supply to activate the sensor, and immediately commence signal acquisition within the test software system to analyse the impact of sensor preheating on measurement accuracy.
Direct the hairdryer vertically downwards from a position 40 cm directly above the sensor. Employ a thermocouple to measure the temperature at the sensor’s location and recorded the sensor’s output signal. Subsequently, install the sensor within its protective housing and direct the hairdryer at the same position. Use the thermocouple to measure the temperature inside the protective housing. This experiment analyses the temperature drift of the sensor and investigates the effect of the protective housing in mitigating temperature fluctuations around the sensor.
The linear motor drove the laser displacement sensor to move at a constant velocity parallel to the surface of the object being measured, recording the sensor’s measurement data throughout the motion. This data was defined as the initial data. The sensor operated at a sampling frequency of 1.5 kHz, with the linear motor displacement rate set at 10 mm/s, meaning the sensor performs a reciprocating motion within a 30 mm range. Before and after installing the protective housing, water mist was sprayed between the sensor and the measured object, with measurement data recorded during sensor movement. This experiment analysed water’s impact on sensor measurement accuracy and investigated how the protective housing enhances measurement precision under water mist conditions.
Adjust the measurement direction of the sensor so that the incident light from the sensor forms a 15° angle with the normal of the surface of the object being measured. Since the motion relationship between the sensor and the object is relative, during the experiment, the object was kept stationary, and the sensor moved back and forth along the normal of the object’s surface. This process can be equivalent to the sensor remaining stationary while the object moved back and forth along its surface normal. The sensor readings and the actual displacement measured by the grating sensor were recorded separately. This experiment analysed the effect of the surface inclination angle on measurement accuracy.
4. Experimental Results and Analysis
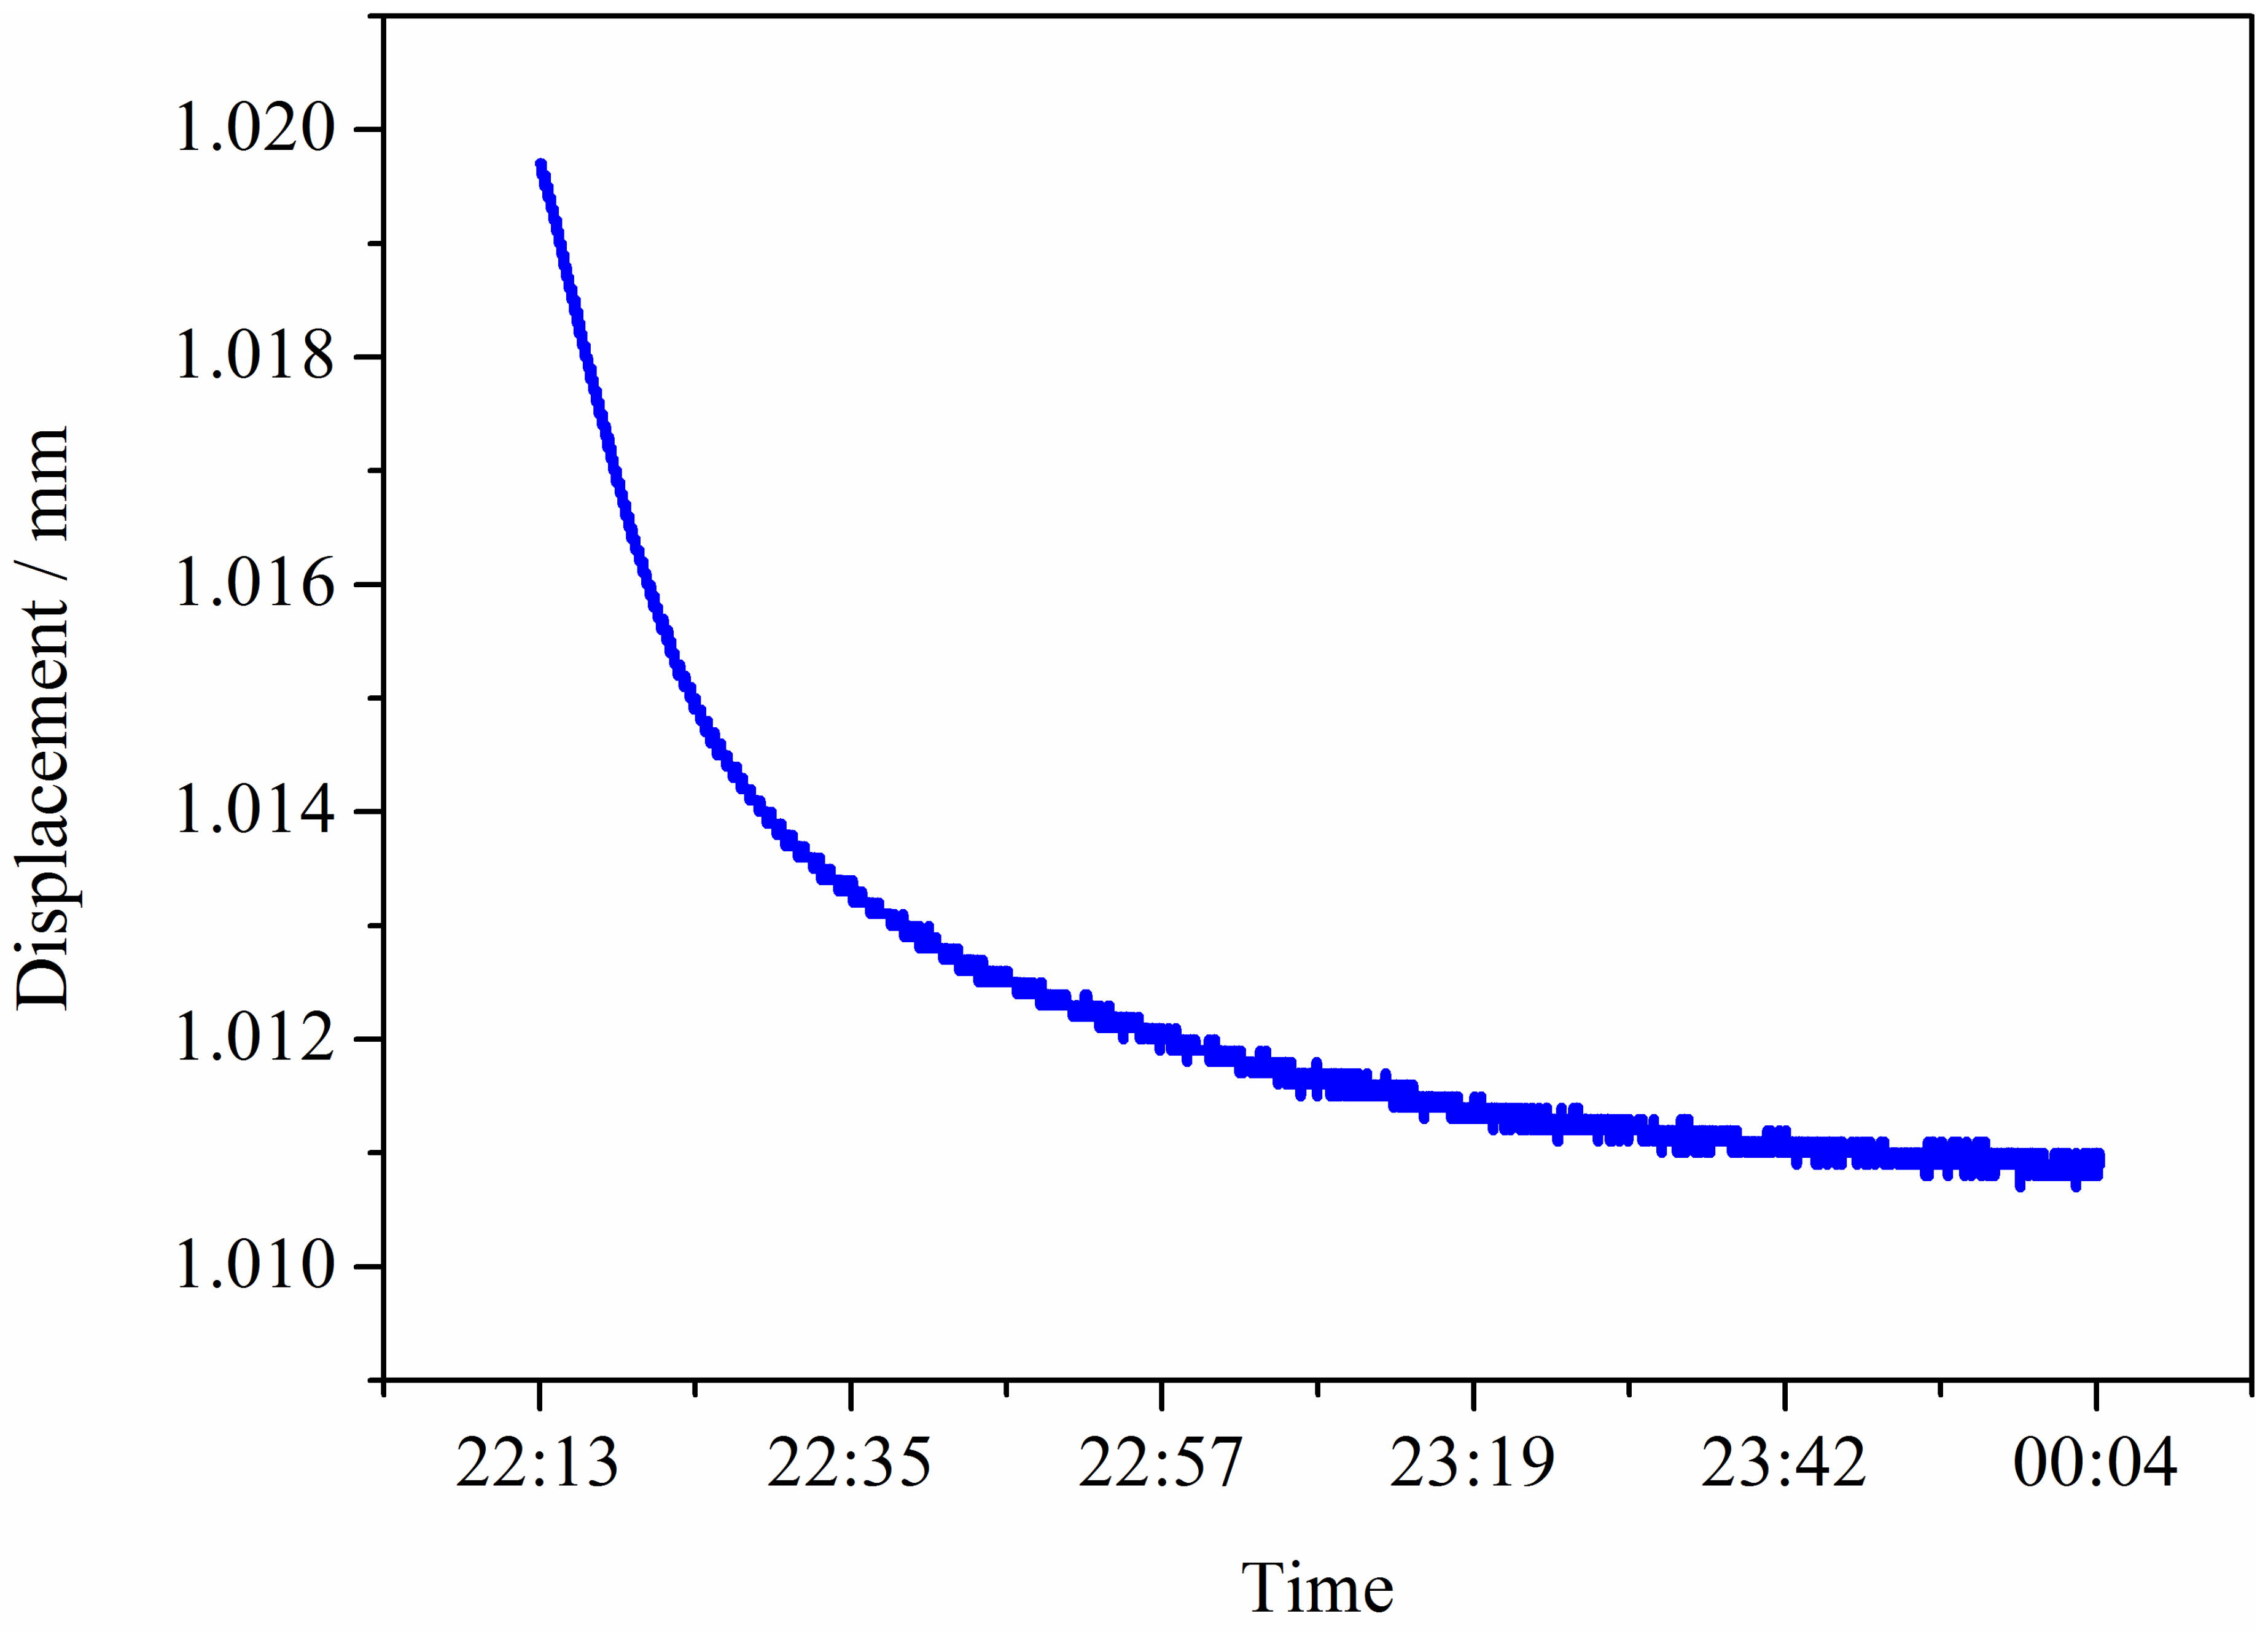
The preheating curve of the sensor is shown in
Figure 6. As can be seen from
Figure 6, although the sensor remained stationary relative to the object being measured throughout the testing process, the displacement data it recorded was not a constant value. The difference between the maximum and minimum displacement readings reached approximately 9 μm. The displacement progressively diminishes over the course of the test, with the displacement curve exhibiting a logarithmic function pattern. After about 40 min, the difference between the sensor output value and the final stable value is approximately 1 μm. At the commencement of the test, the measured displacement signal rapidly diminishes and then gradually stabilises. Therefore, to avoid the influence of temperature on measurement accuracy, the laser displacement sensor requires preheating prior to use, with a recommended preheating period of no less than one hour. At this point, the difference between the sensor output value and the final stable value is less than 0.5 μm. This error is acceptable, as the sensor exhibits a linearity error of ±0.6 μm across its full measurement range.
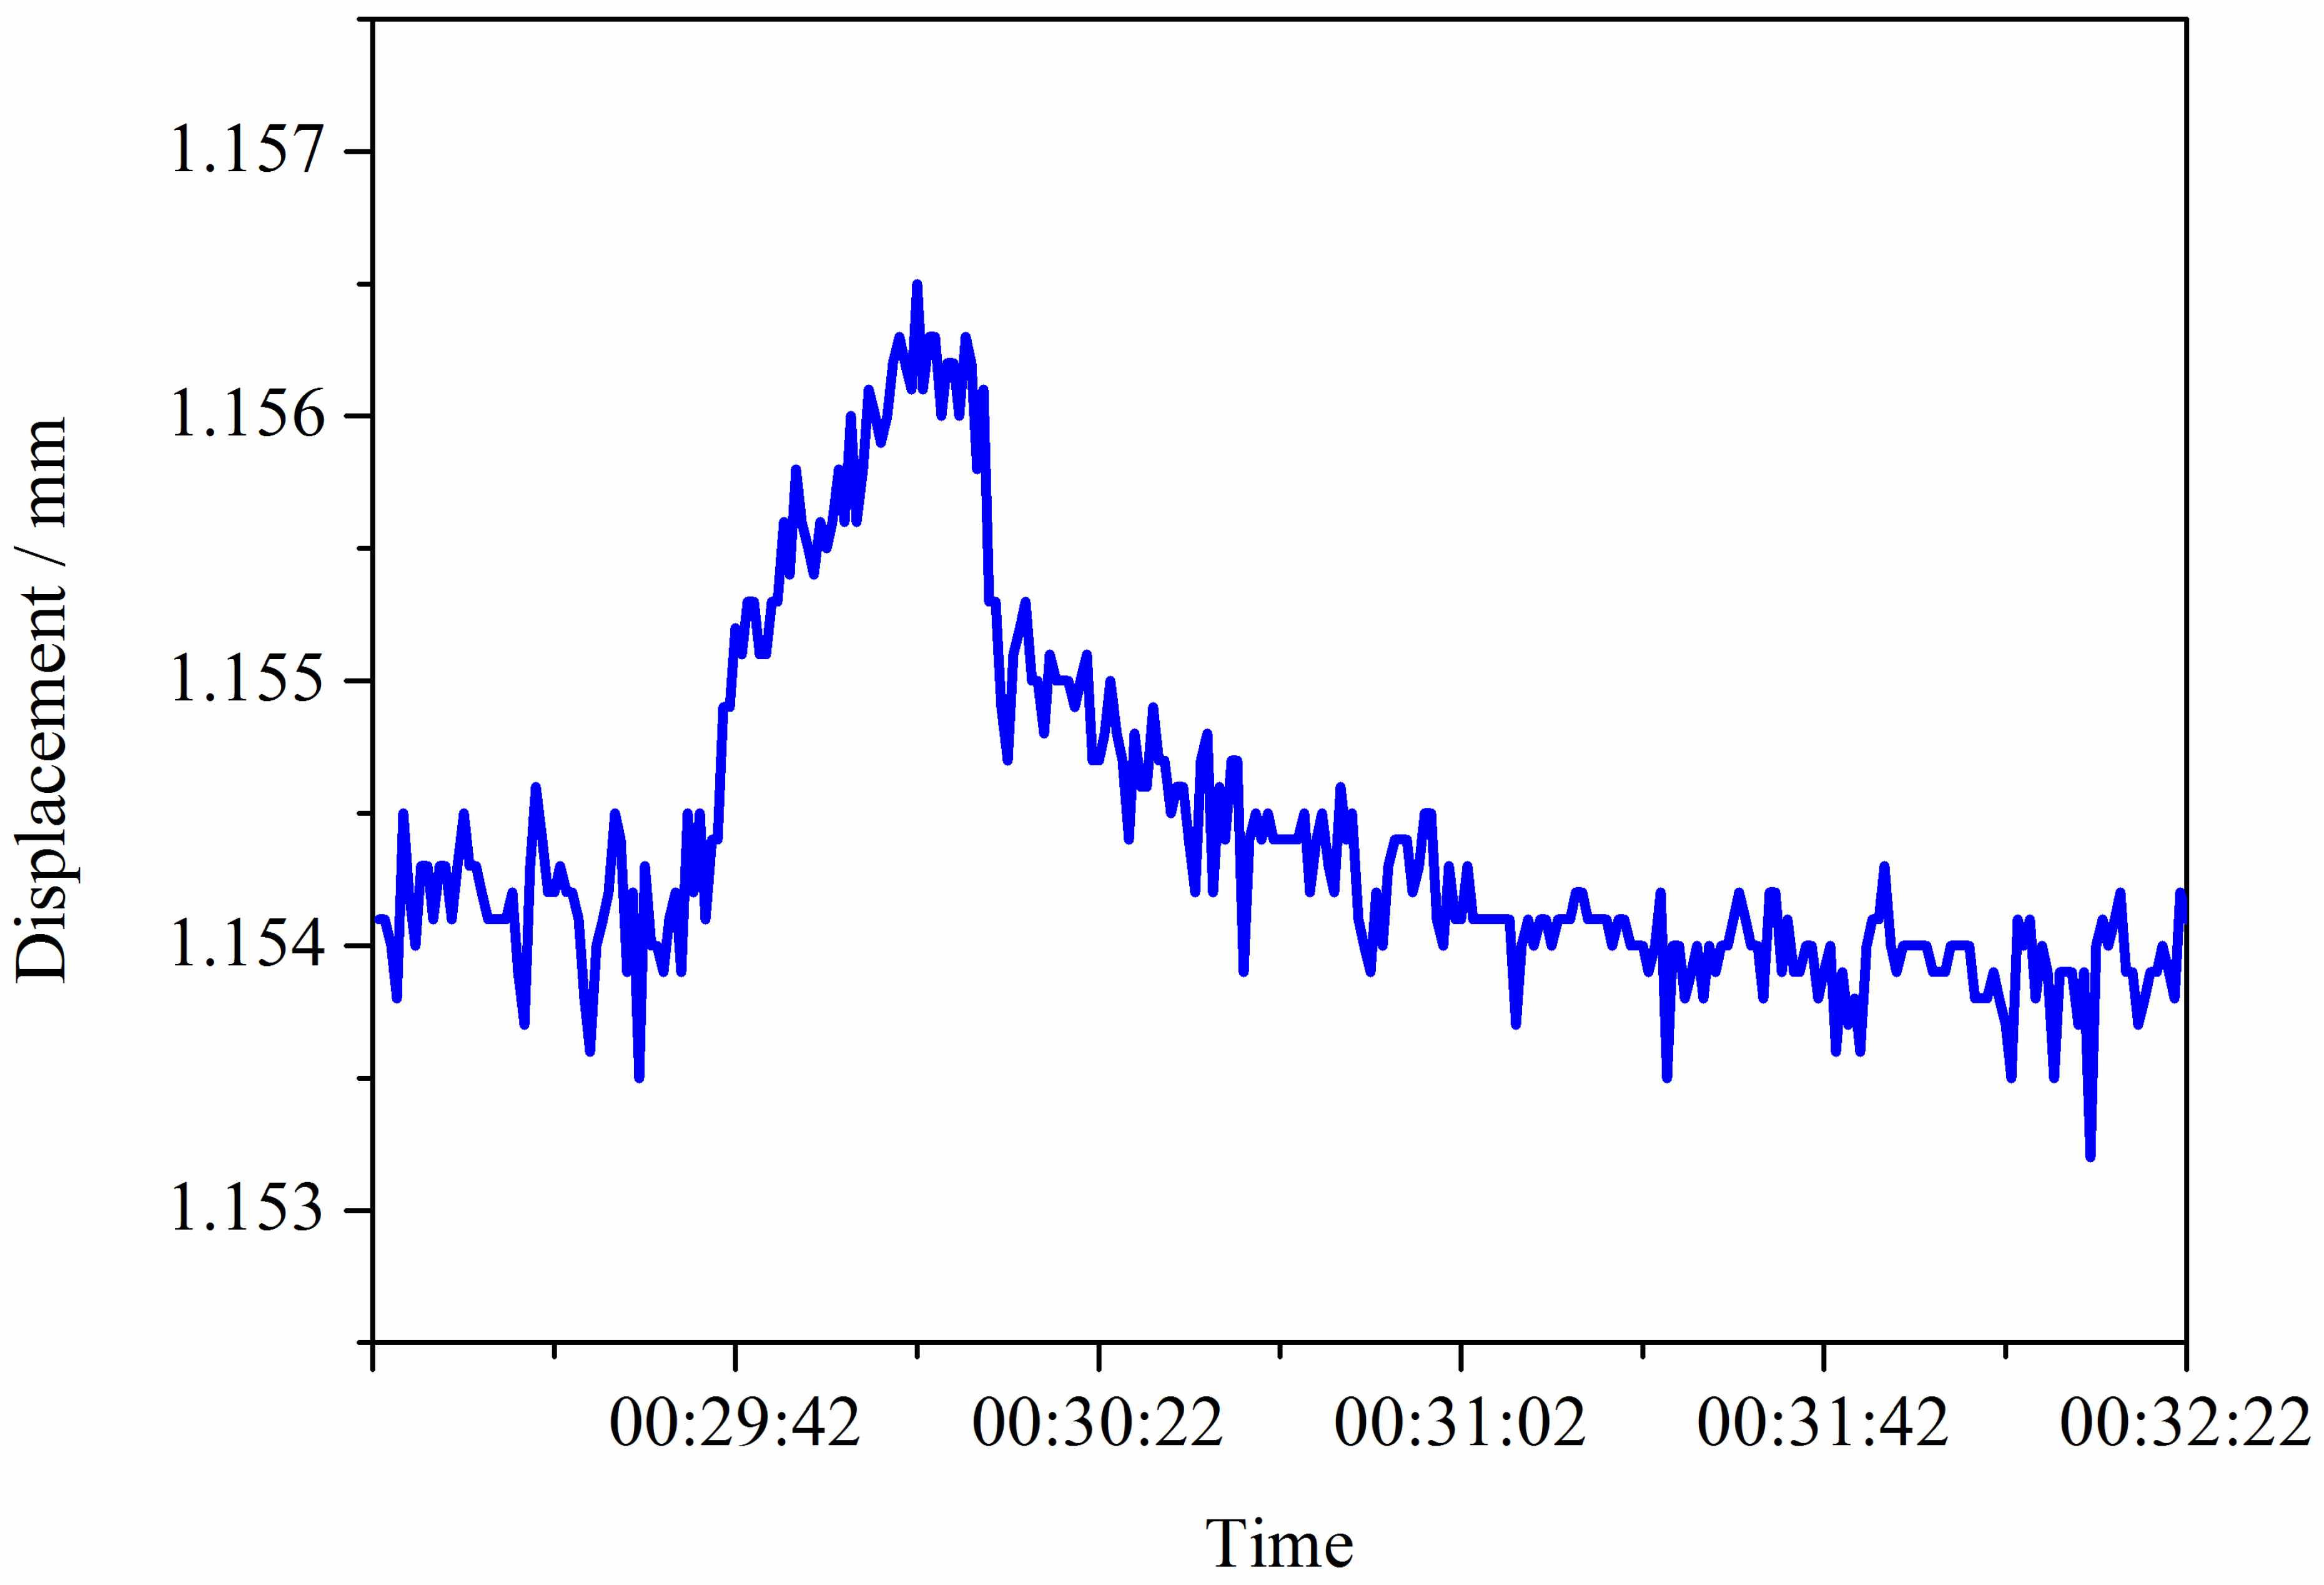
In the temperature drift experiment, the temperature drift curve of the sensor without a protective housing is shown in
Figure 7. As can be seen from
Figure 5, the initial displacement of the sensor was approximately 1.154 mm. After exposure to the hot air from the hairdryer, its displacement increased to over 1.156 mm. After ceasing the airflow, the displacement value of the sensor returned to approximately 1.154 mm. This indicates that the laser displacement sensor exhibits a pronounced temperature drift phenomenon, with environmental temperature variations exerting a significant influence on measurement results. Therefore, to avoid measurement errors caused by temperature variations, it is necessary to control the ambient temperature of the sensor to keep it always within the specified operating temperature range. Concurrently, compensate for its temperature drift. Typically, the parameter specifications for a laser displacement sensor will indicate its temperature drift characteristics. For sensors without specified temperature drift characteristics, their temperature drift parameters must be experimentally determined prior to use.
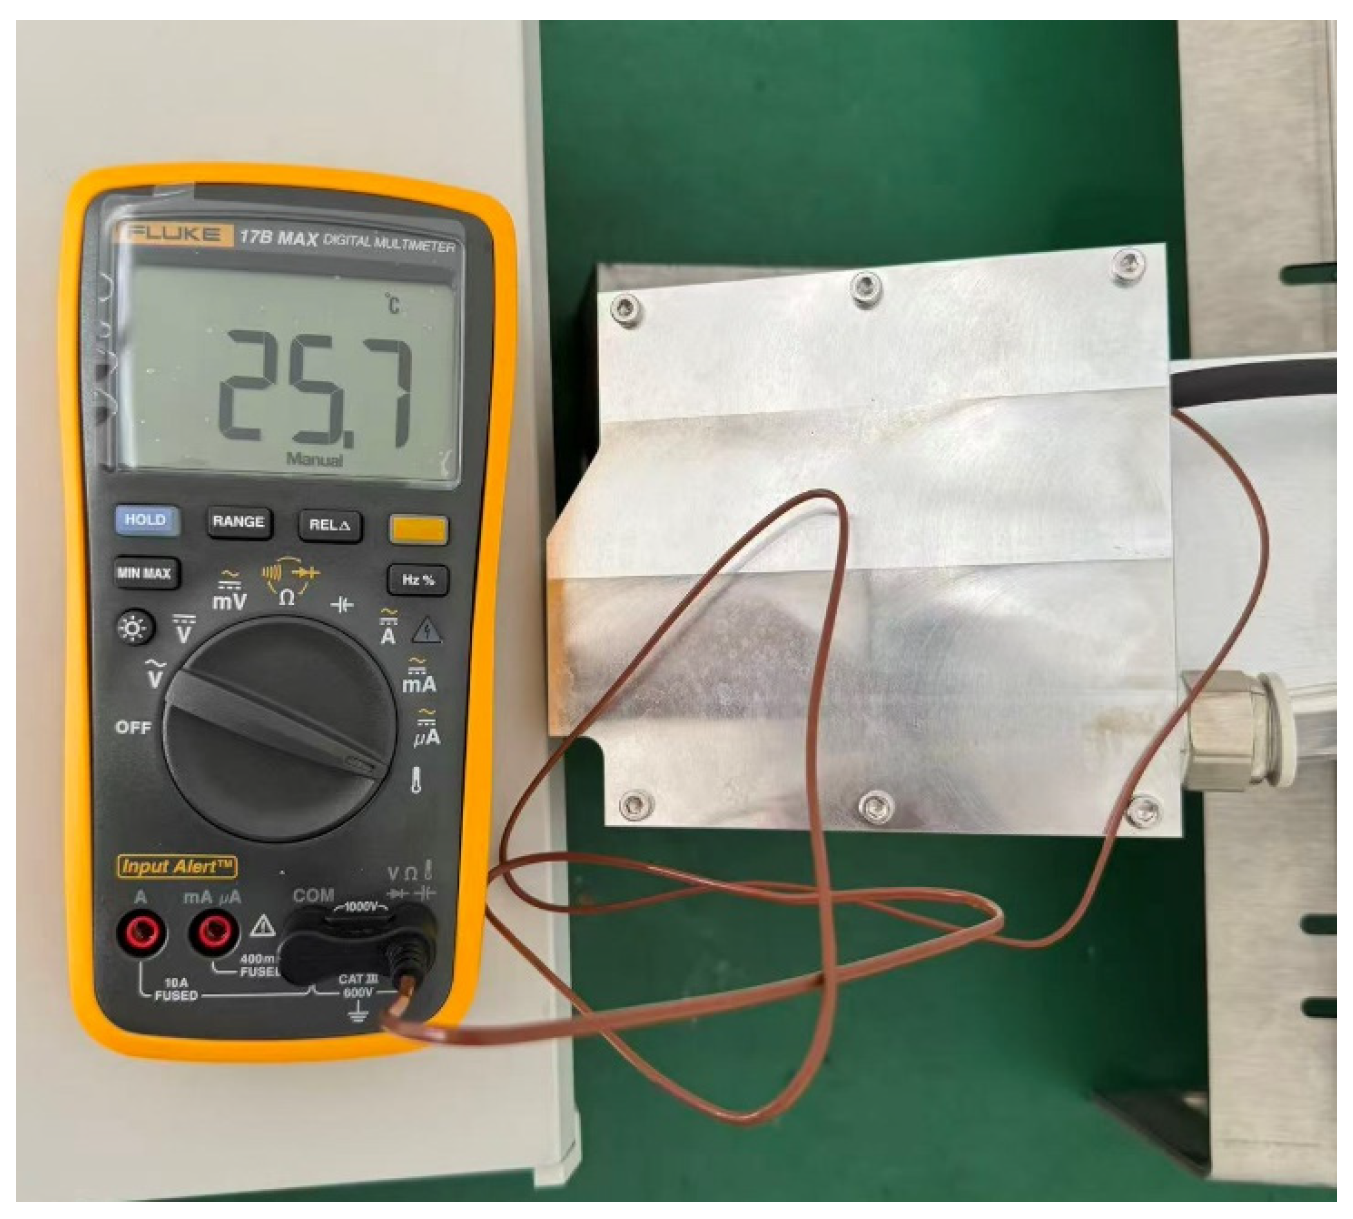
When a thermocouple was used to measure the temperature around the sensor without a protective housing, it was 43.1–45.4 °C. After the protective housing was adopted, the temperature inside the protective housing was 25.6–25.8 °C. The measurement process is shown in
Figure 8. The impact of this temperature fluctuation on the sensor’s measurement accuracy is negligible. Therefore, this protective housing can significantly reduce the impact of environmental temperature variations on the sensor, thereby minimising the measurement error of the sensor caused by temperature drift.
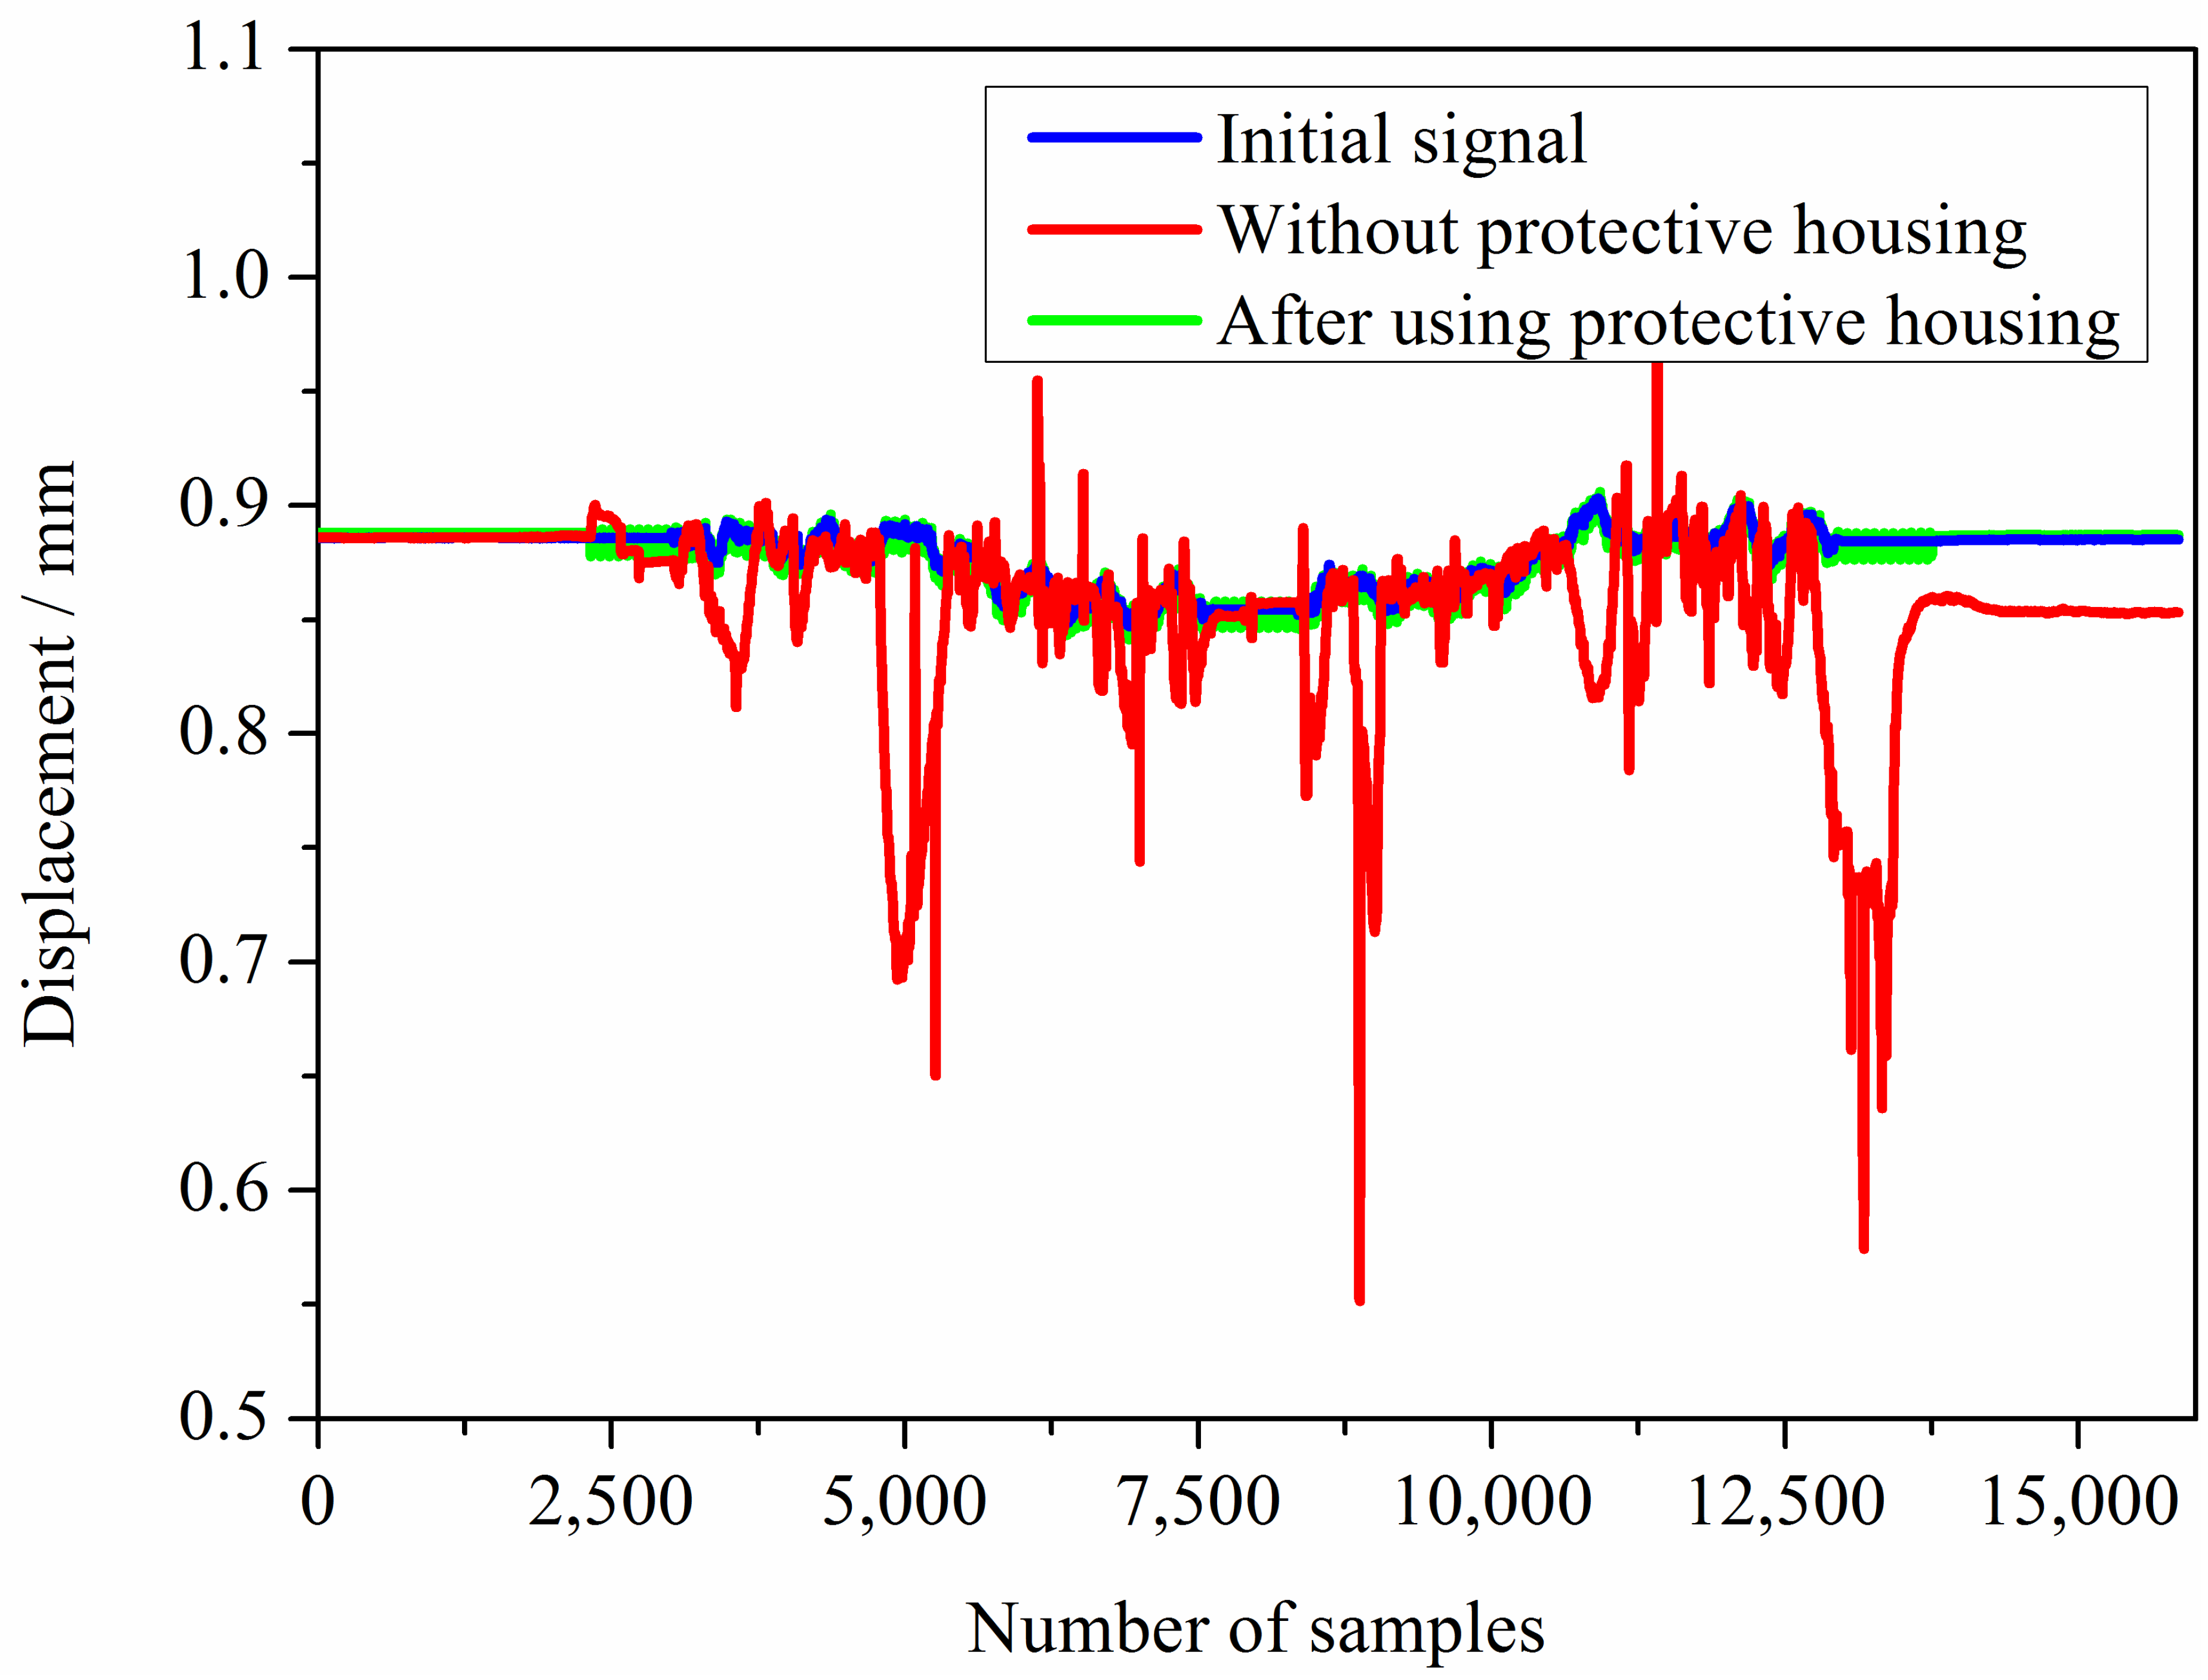
The effect of water on measurement accuracy is shown in
Figure 9. As can be seen from
Figure 9, when water mist was sprayed between the sensor and the object being measured under test without the protective housing, the sensor’s output signal becomes chaotic, exhibiting significant error compared to the initial measurement data obtained without interference. The difference between the measured value after adopting the protective housing and the initial data was less than 5 μm, resulting in a significant improvement in measurement accuracy.
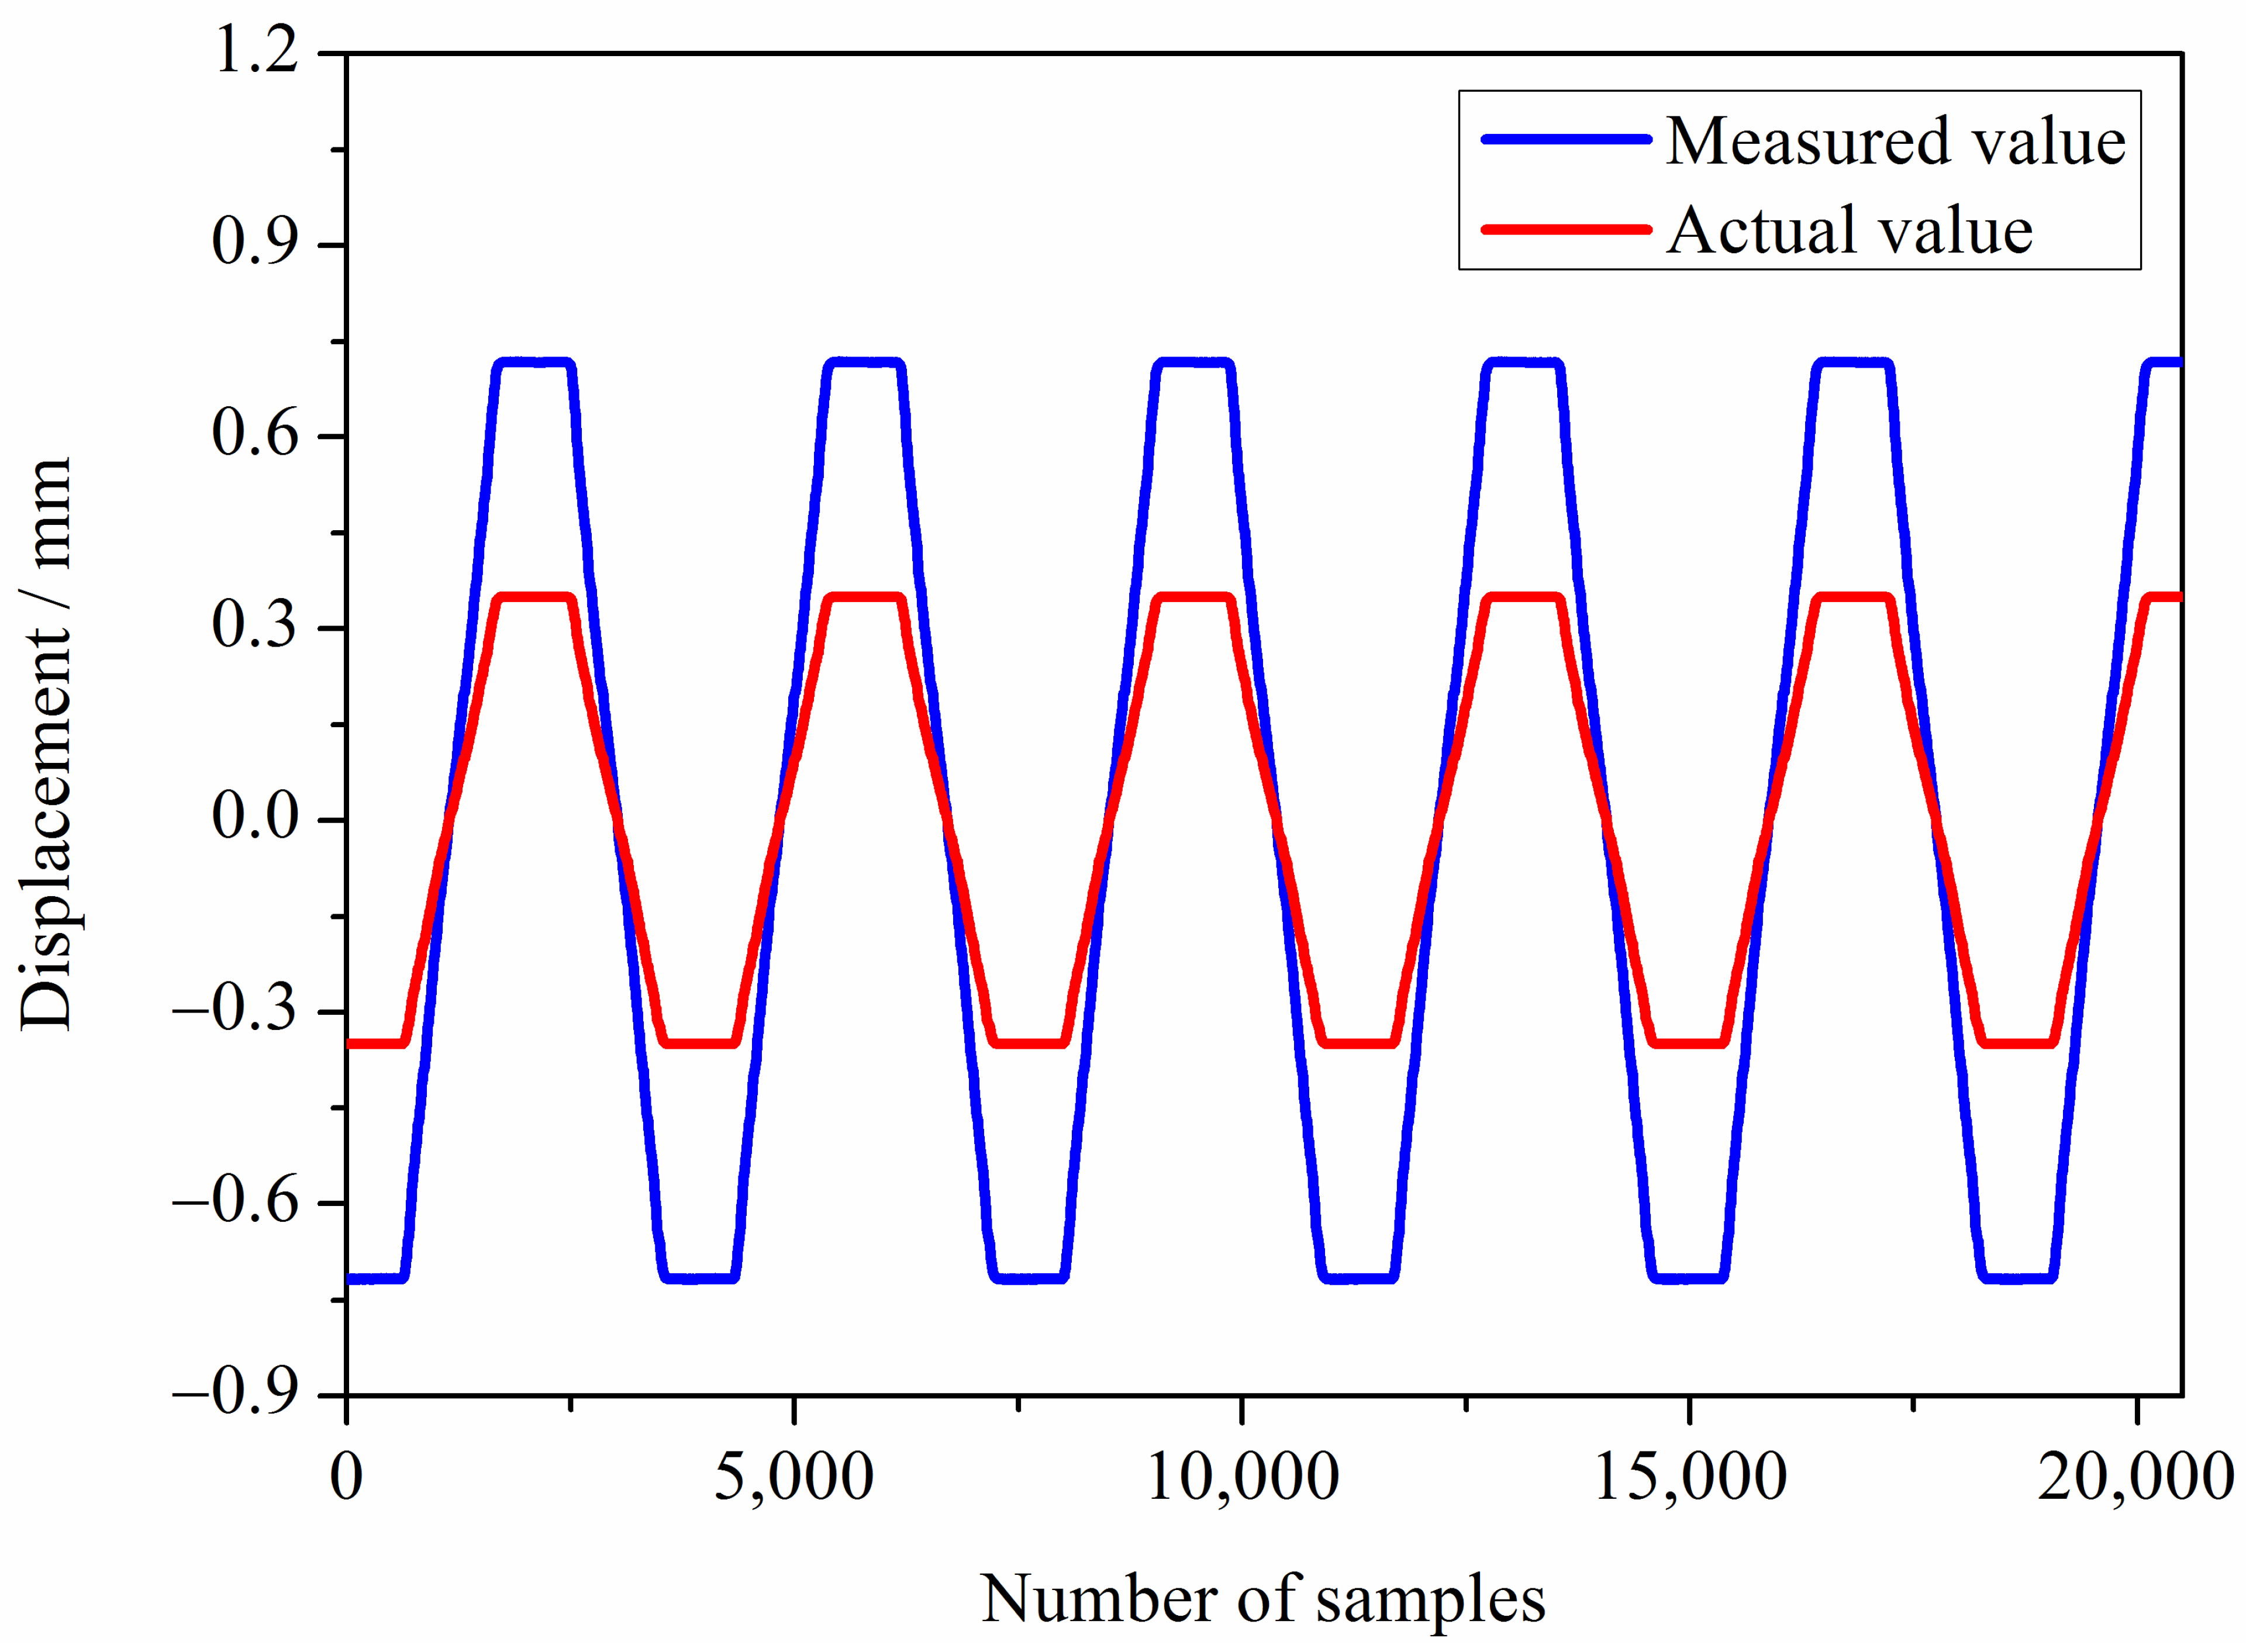
The results of the surface inclination experiment are shown in
Figure 10. As can be seen from
Figure 10, the laser displacement sensor performs a reciprocating motion centred on its midpoint of measurement range. The peak-to-peak value of the actual displacement curve measured by the grating sensor on the experimental platform was approximately 0.7 mm, whereas the peak-to-peak value of the displacement curve measured by the laser displacement sensor exceeded 1.4 mm. When the incident ray of the laser displacement sensor does not coincide with the normal at the measurement point of the object being measured, the sensor’s readings will not accurately reflect the actual displacement of the object.
Therefore, the inclination angle of the surface to be measured significantly affects the measurement accuracy of the laser displacement sensor, and the sensor’s mounting configuration is crucial for ensuring the measurement accuracy. To ensure the accuracy of online roll profile measurement, the incident light of the sensor should pass through the axis of the roll, that is, coincide with the normal of the measurement point on the surface of the roll.
5. Online Roll Profile Measurement Experiments
In the measurement system, it is difficult to ensure that the guide rail is absolutely parallel to the axis of the roll. If there is a straightness deviation in the guide rail, it will directly affect the accuracy of the online roll profile measurement. Therefore, it is necessary to analyse the straightness error of the measurement system.
Define the
-axis as the horizontal direction, with its positive direction pointing towards the drive side of the rolling mill. Define the
-axis as the vertical direction, with its positive direction pointing directly above the rolling mill. Define the
-axis as the horizontal direction, with its positive direction pointing towards the exit side of the rolling mill. Define the
-axis as the sensor detection direction, with its positive direction pointing towards the roll. When measuring the straightness error of the measurement system, a newly installed roll with profile curve of
is used, with the roll in a stationary state. Assuming the measurement value of the sensor at position
is
, then the measurement value
at any position
can be expressed as follows:
where
is the projection of the straightness error at
in
-axis.
Based on the geometric relationship,
can be expressed as follows:
where
is the projection of the straightness deviation at point
onto the
-axis;
is the projection of the straightness deviation at point x onto the
-axis;
is the diameter of the roll.
Formula (4) can be simplified as follows:
Select any four measurement points for calculation, which can be expressed as follows:
where
,
,
and
are the respective coordinates on the x-axis.
The relationship among
,
,
and
can be expressed as follows:
where
is the slope of the guide rail’s inclination in the
-axis.
Similarly, the relationship among
,
,
and
can be expressed as follows:
where
is the slope of the guide rail’s inclination in the
-axis.
By combining Equations (6)–(8), the straightness errors of the guide rails in the -axis and -axis directions, respectively, can be determined.
If the number of data points of the measurement signal is
, to improve the calculation accuracy of the straightness error of the measurement system, let
Assuming that the inclination gradients of the measuring system guide in the
-axis and
-axis directions are
and
when
, then the mean value method can be used to calculate
and
:
and
can reflect the straightness error of the measurement system.
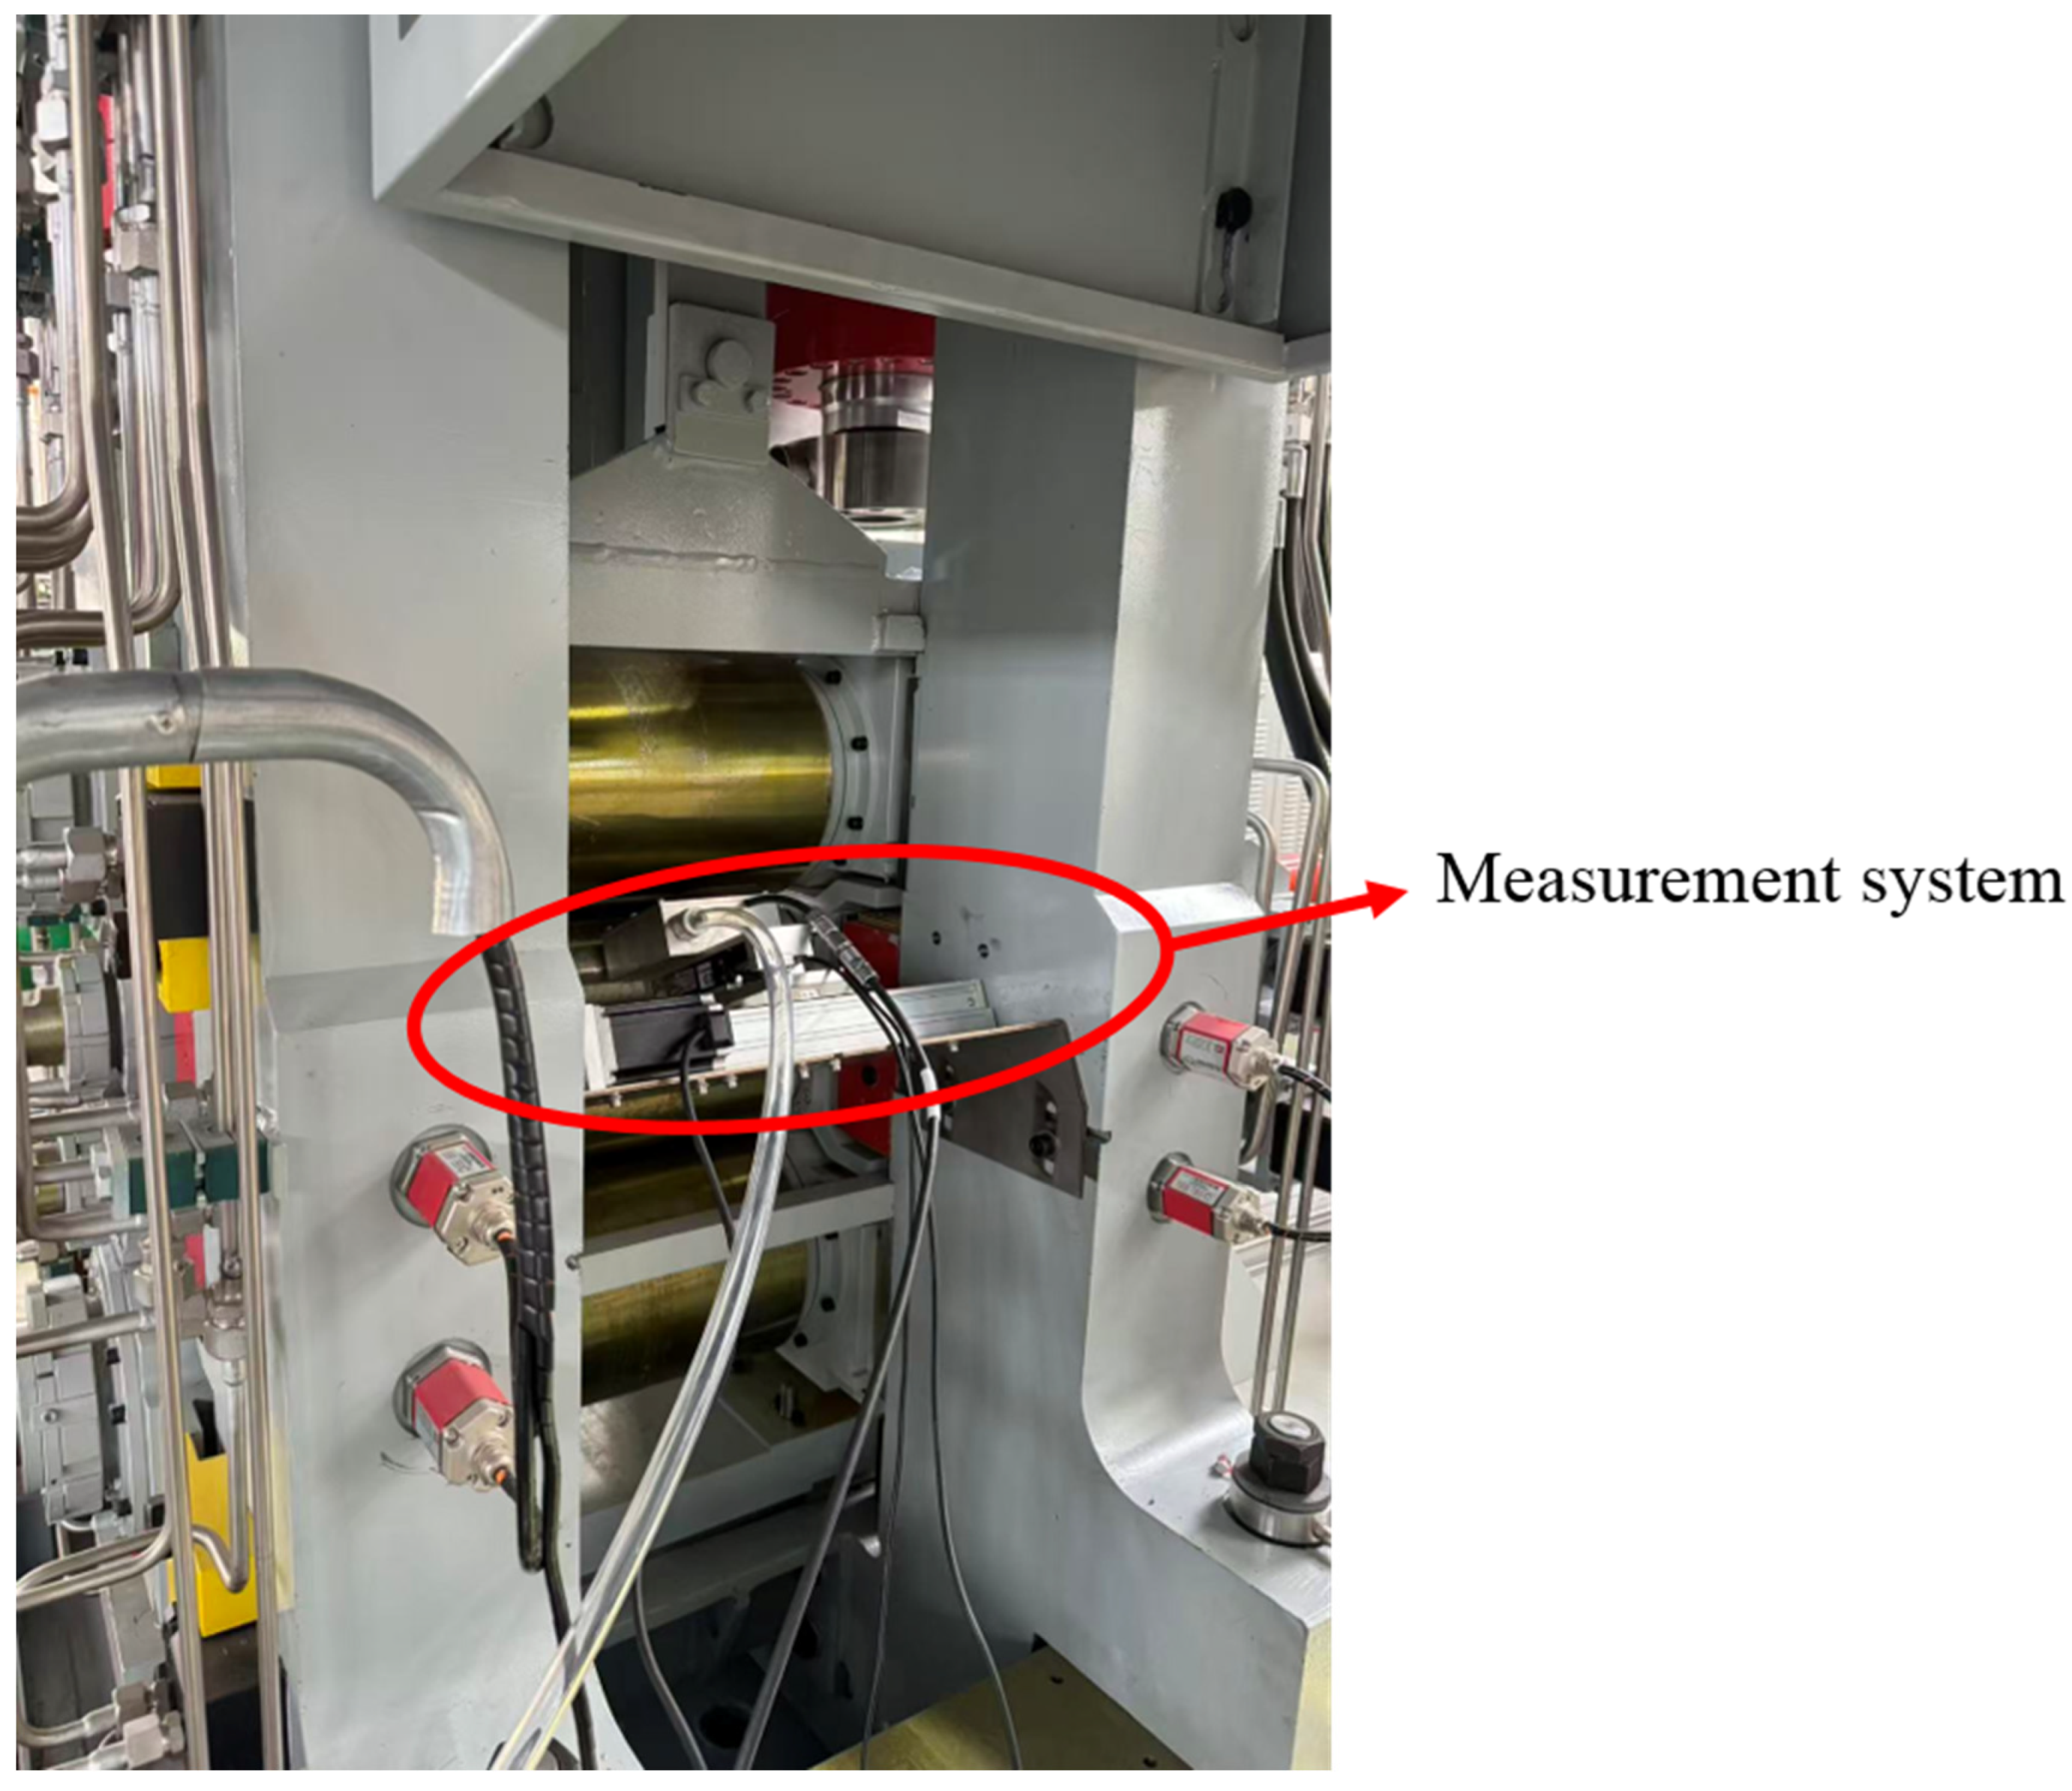
Online roll profile measurement experiments were conducted on a four-high rolling mill in laboratory, as shown in
Figure 11.
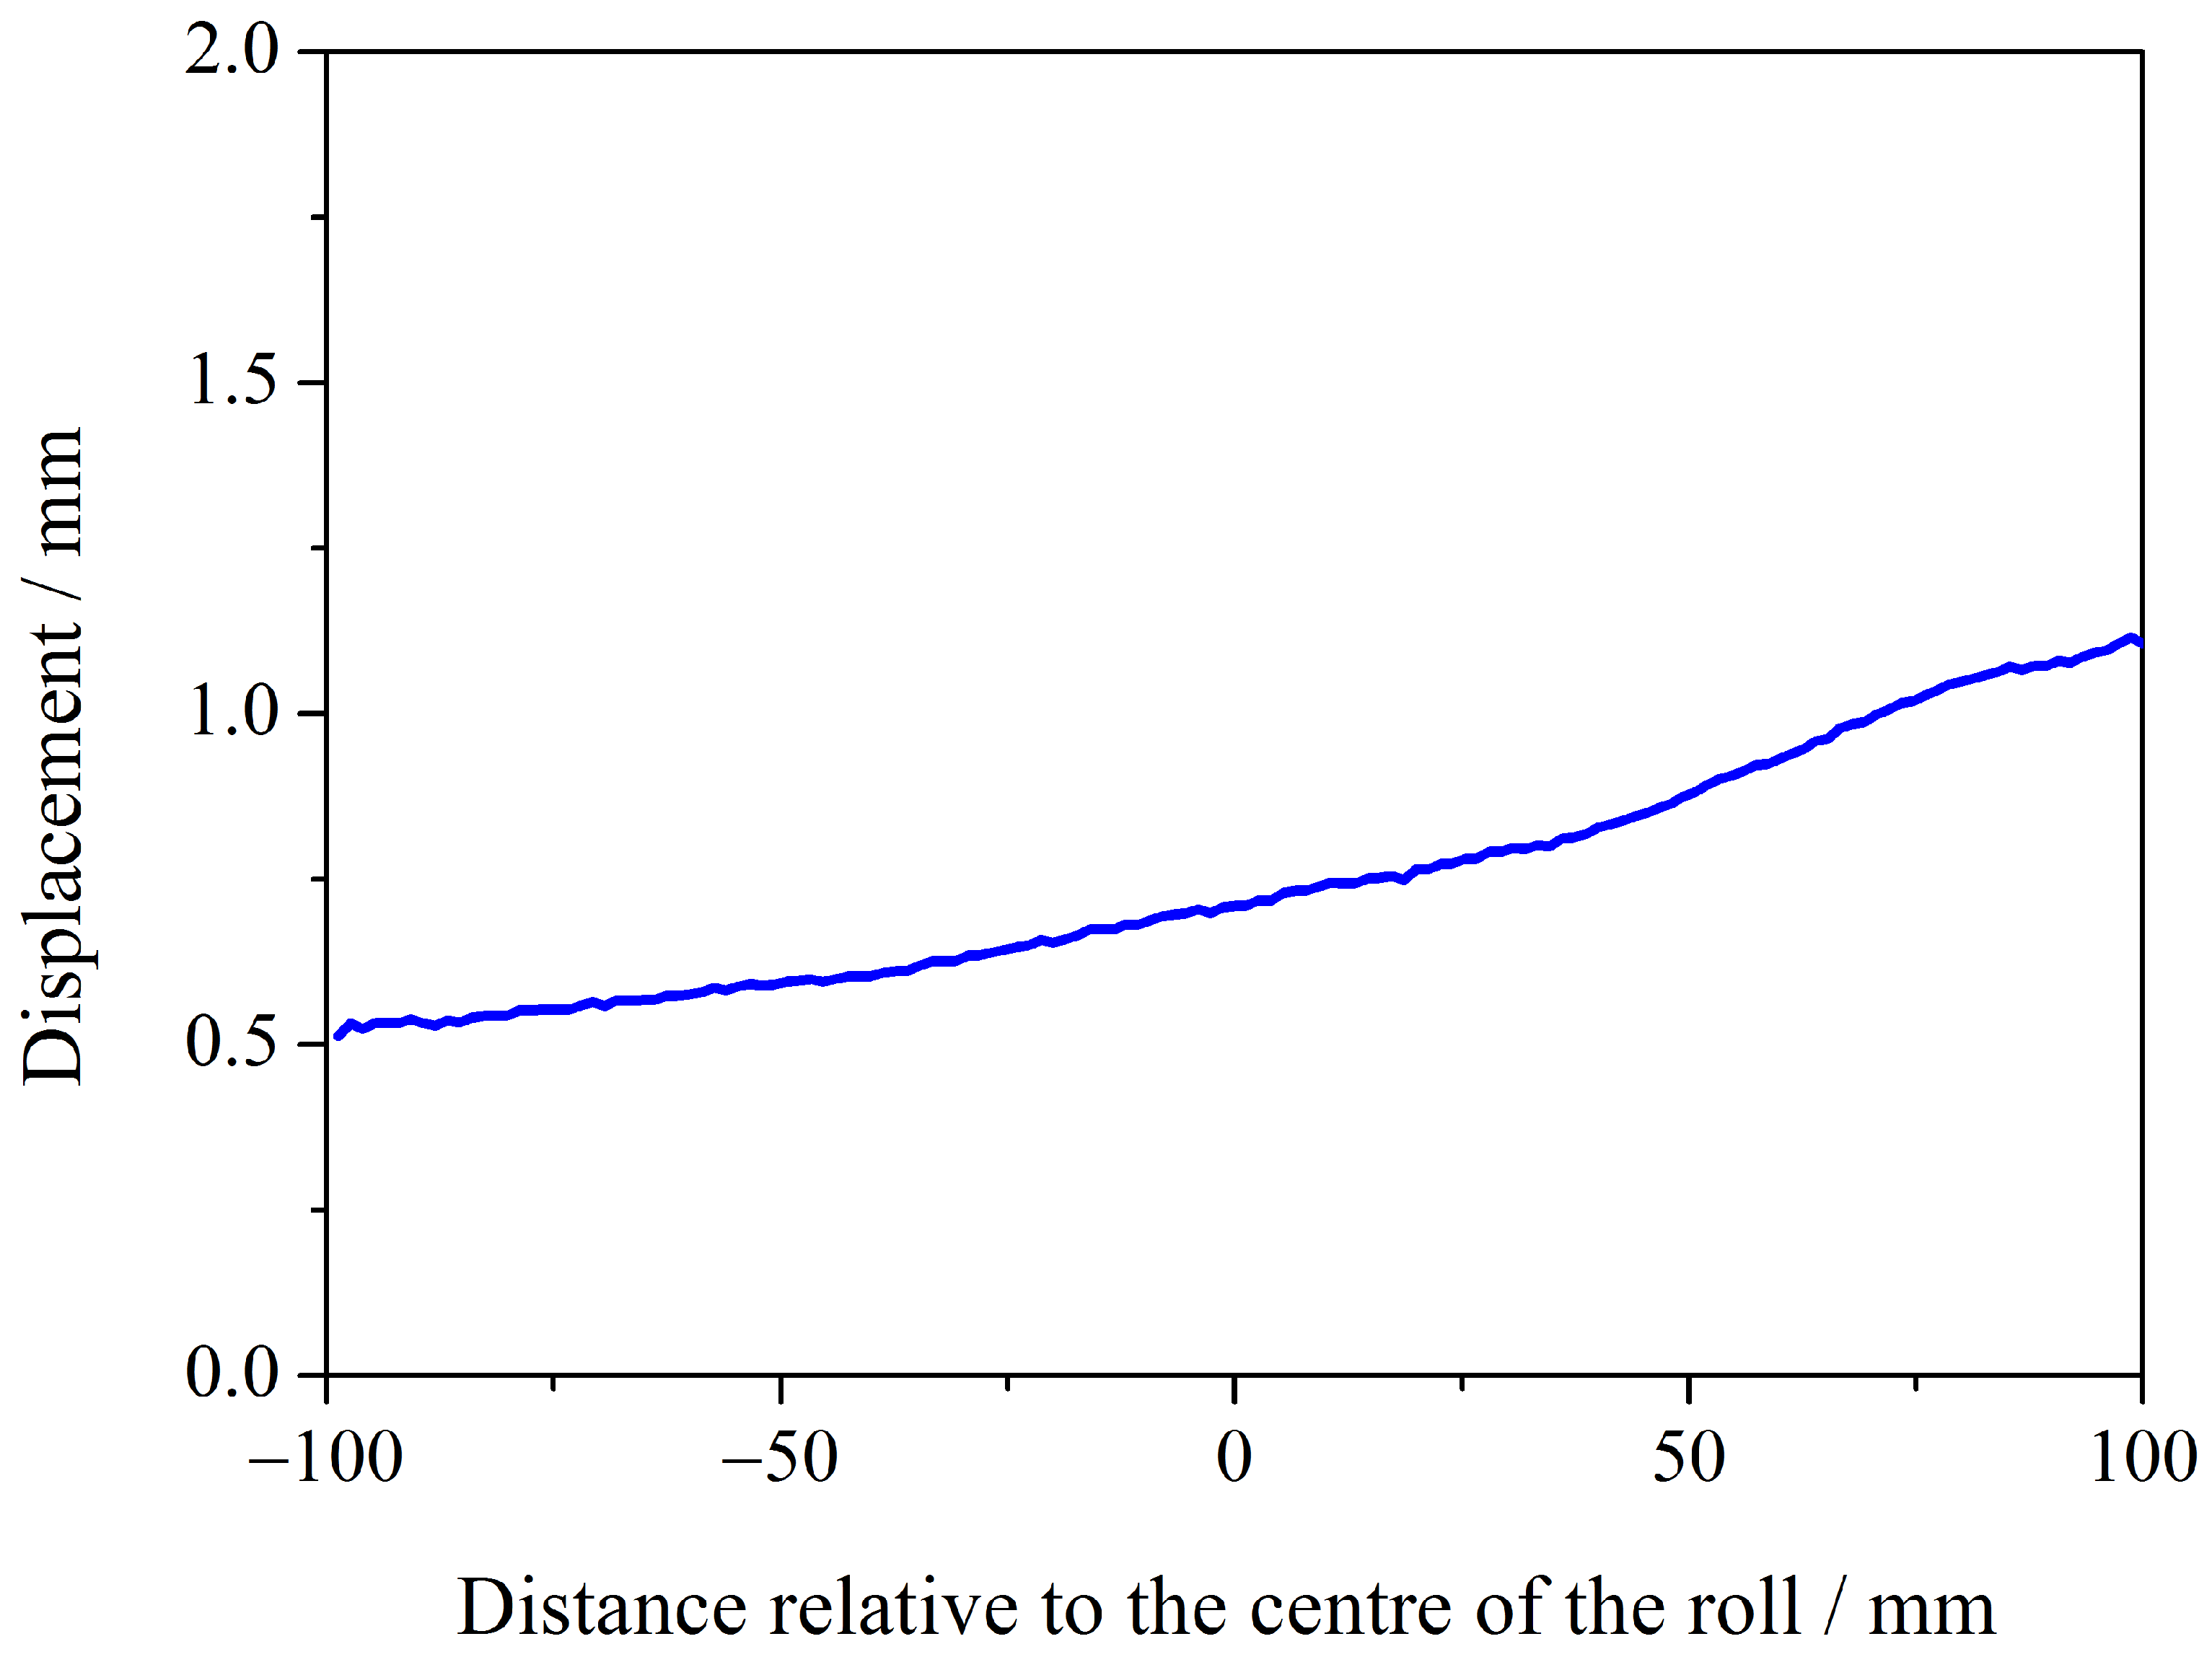
With the roll in a stationary state, adjusted the position of the online roll profile measurement device so that the incident light beam from the sensor passed through the roll’s axis. When the roll was positioned at 0°, 90°, 180° and 270°, the sensor measured the roll and performed averaging on the four sets of signals to obtain the static roll profile, as shown in
Figure 12.
As can be seen from
Figure 12, the installation of the roll profile measurement system exhibited straightness errors relative to the roll axis. Through straightness error compensation calculations, the inclination gradient of the measurement system along the
-axis was determined to be
, and along the
-axis was determined to be
.
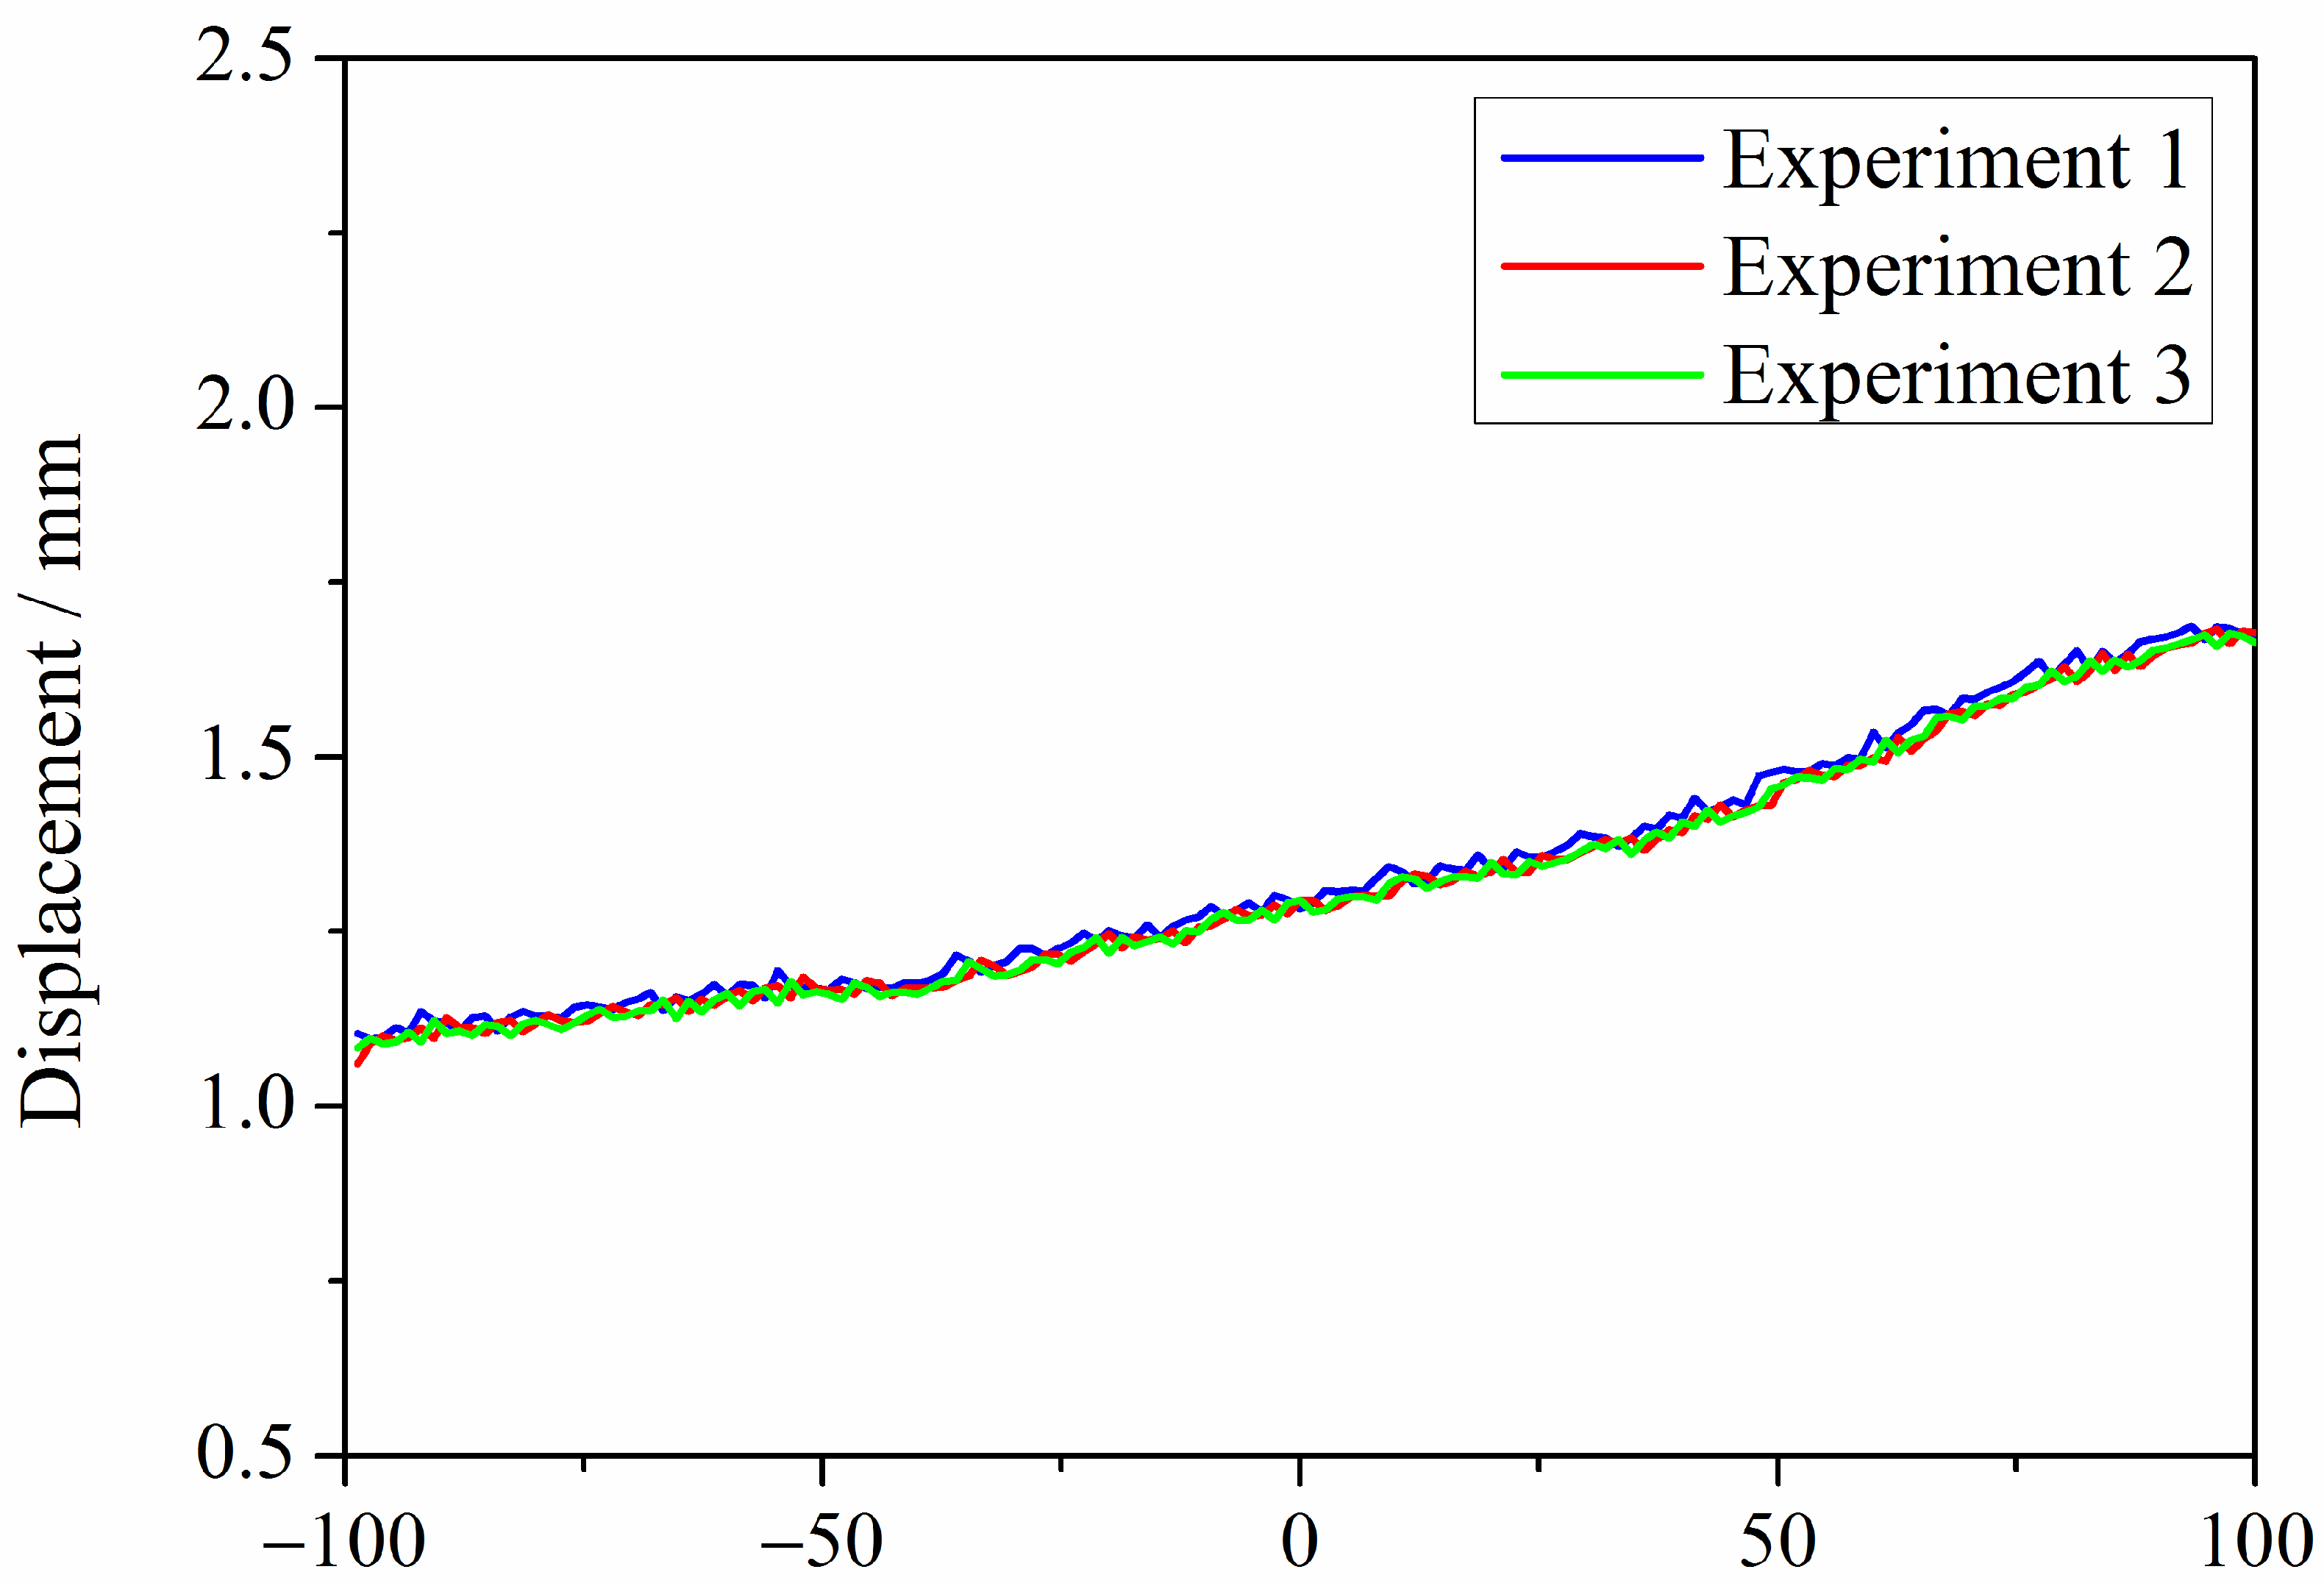
Three online roll profile measurement experiments were conducted during the no-load operation of the rolling mill. The measured roll profile curve under the no-load condition is shown in
Figure 13.
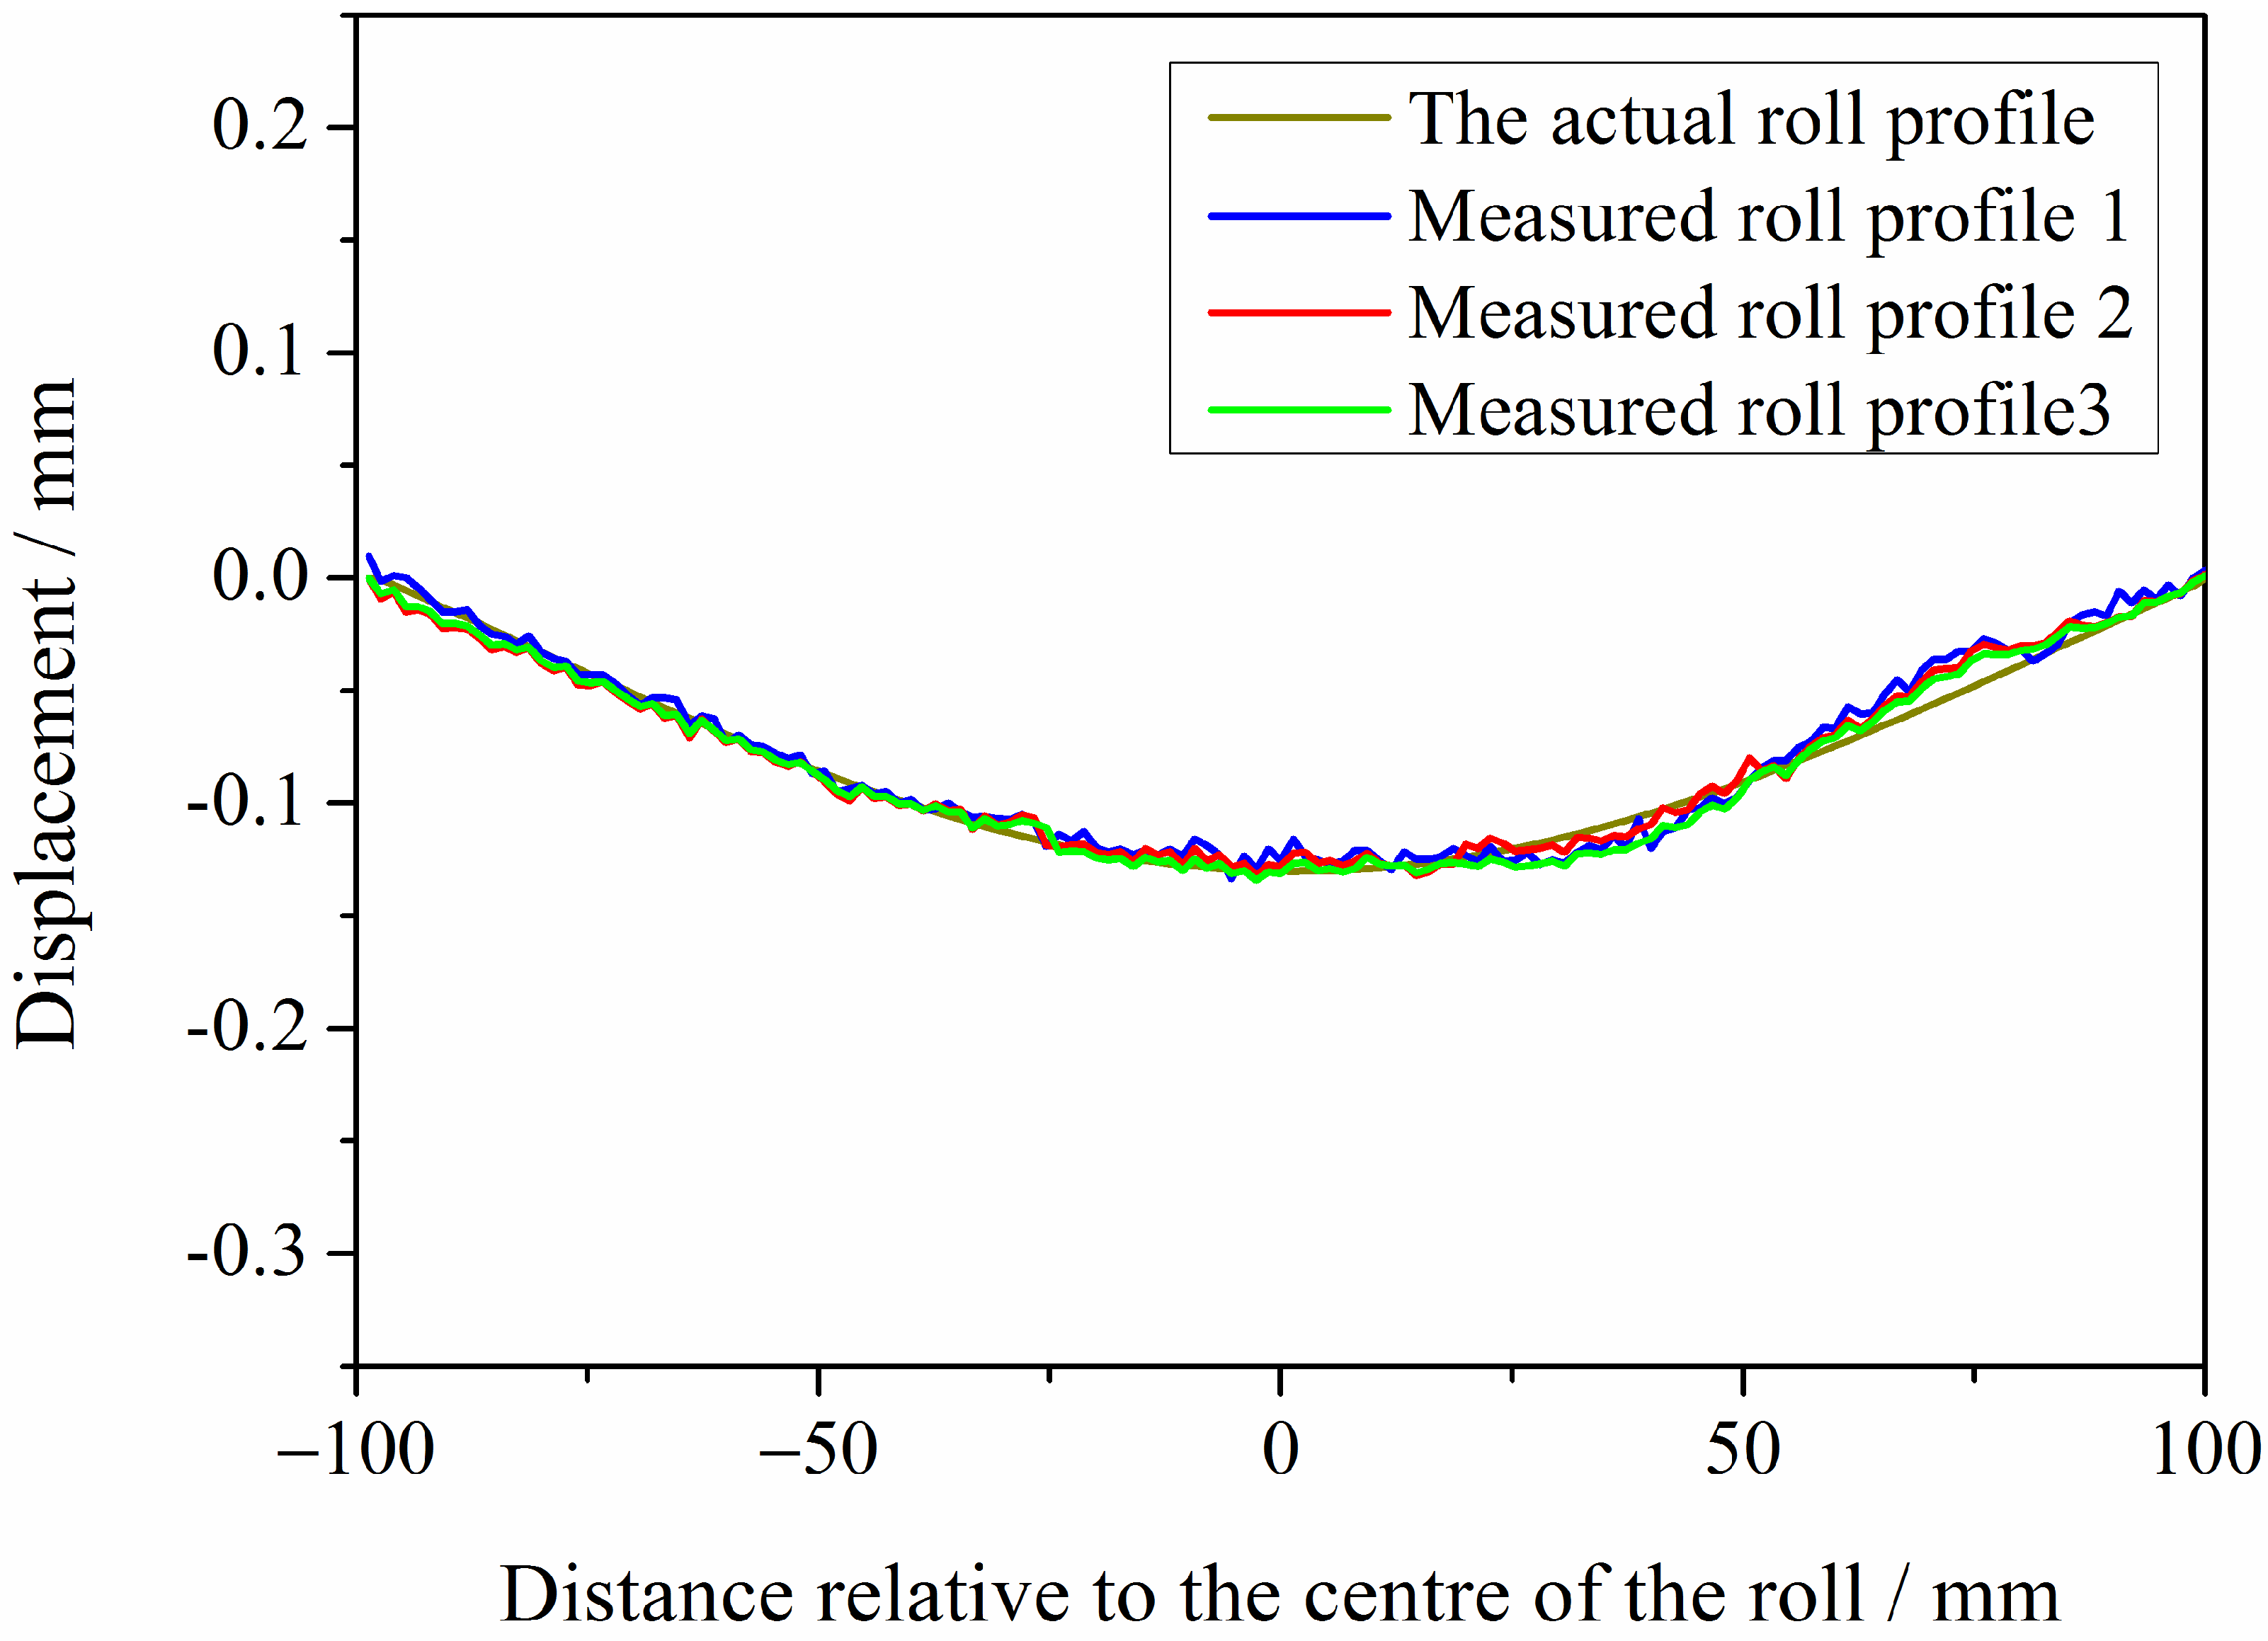
The straightness error of the roll profile signal was compensated; the methods proposed by the authors in reference [
6] were adopted to compensate for the roll swing error, and normalised with the actual roll profile curve, as shown in
Figure 14.
As can be seen from
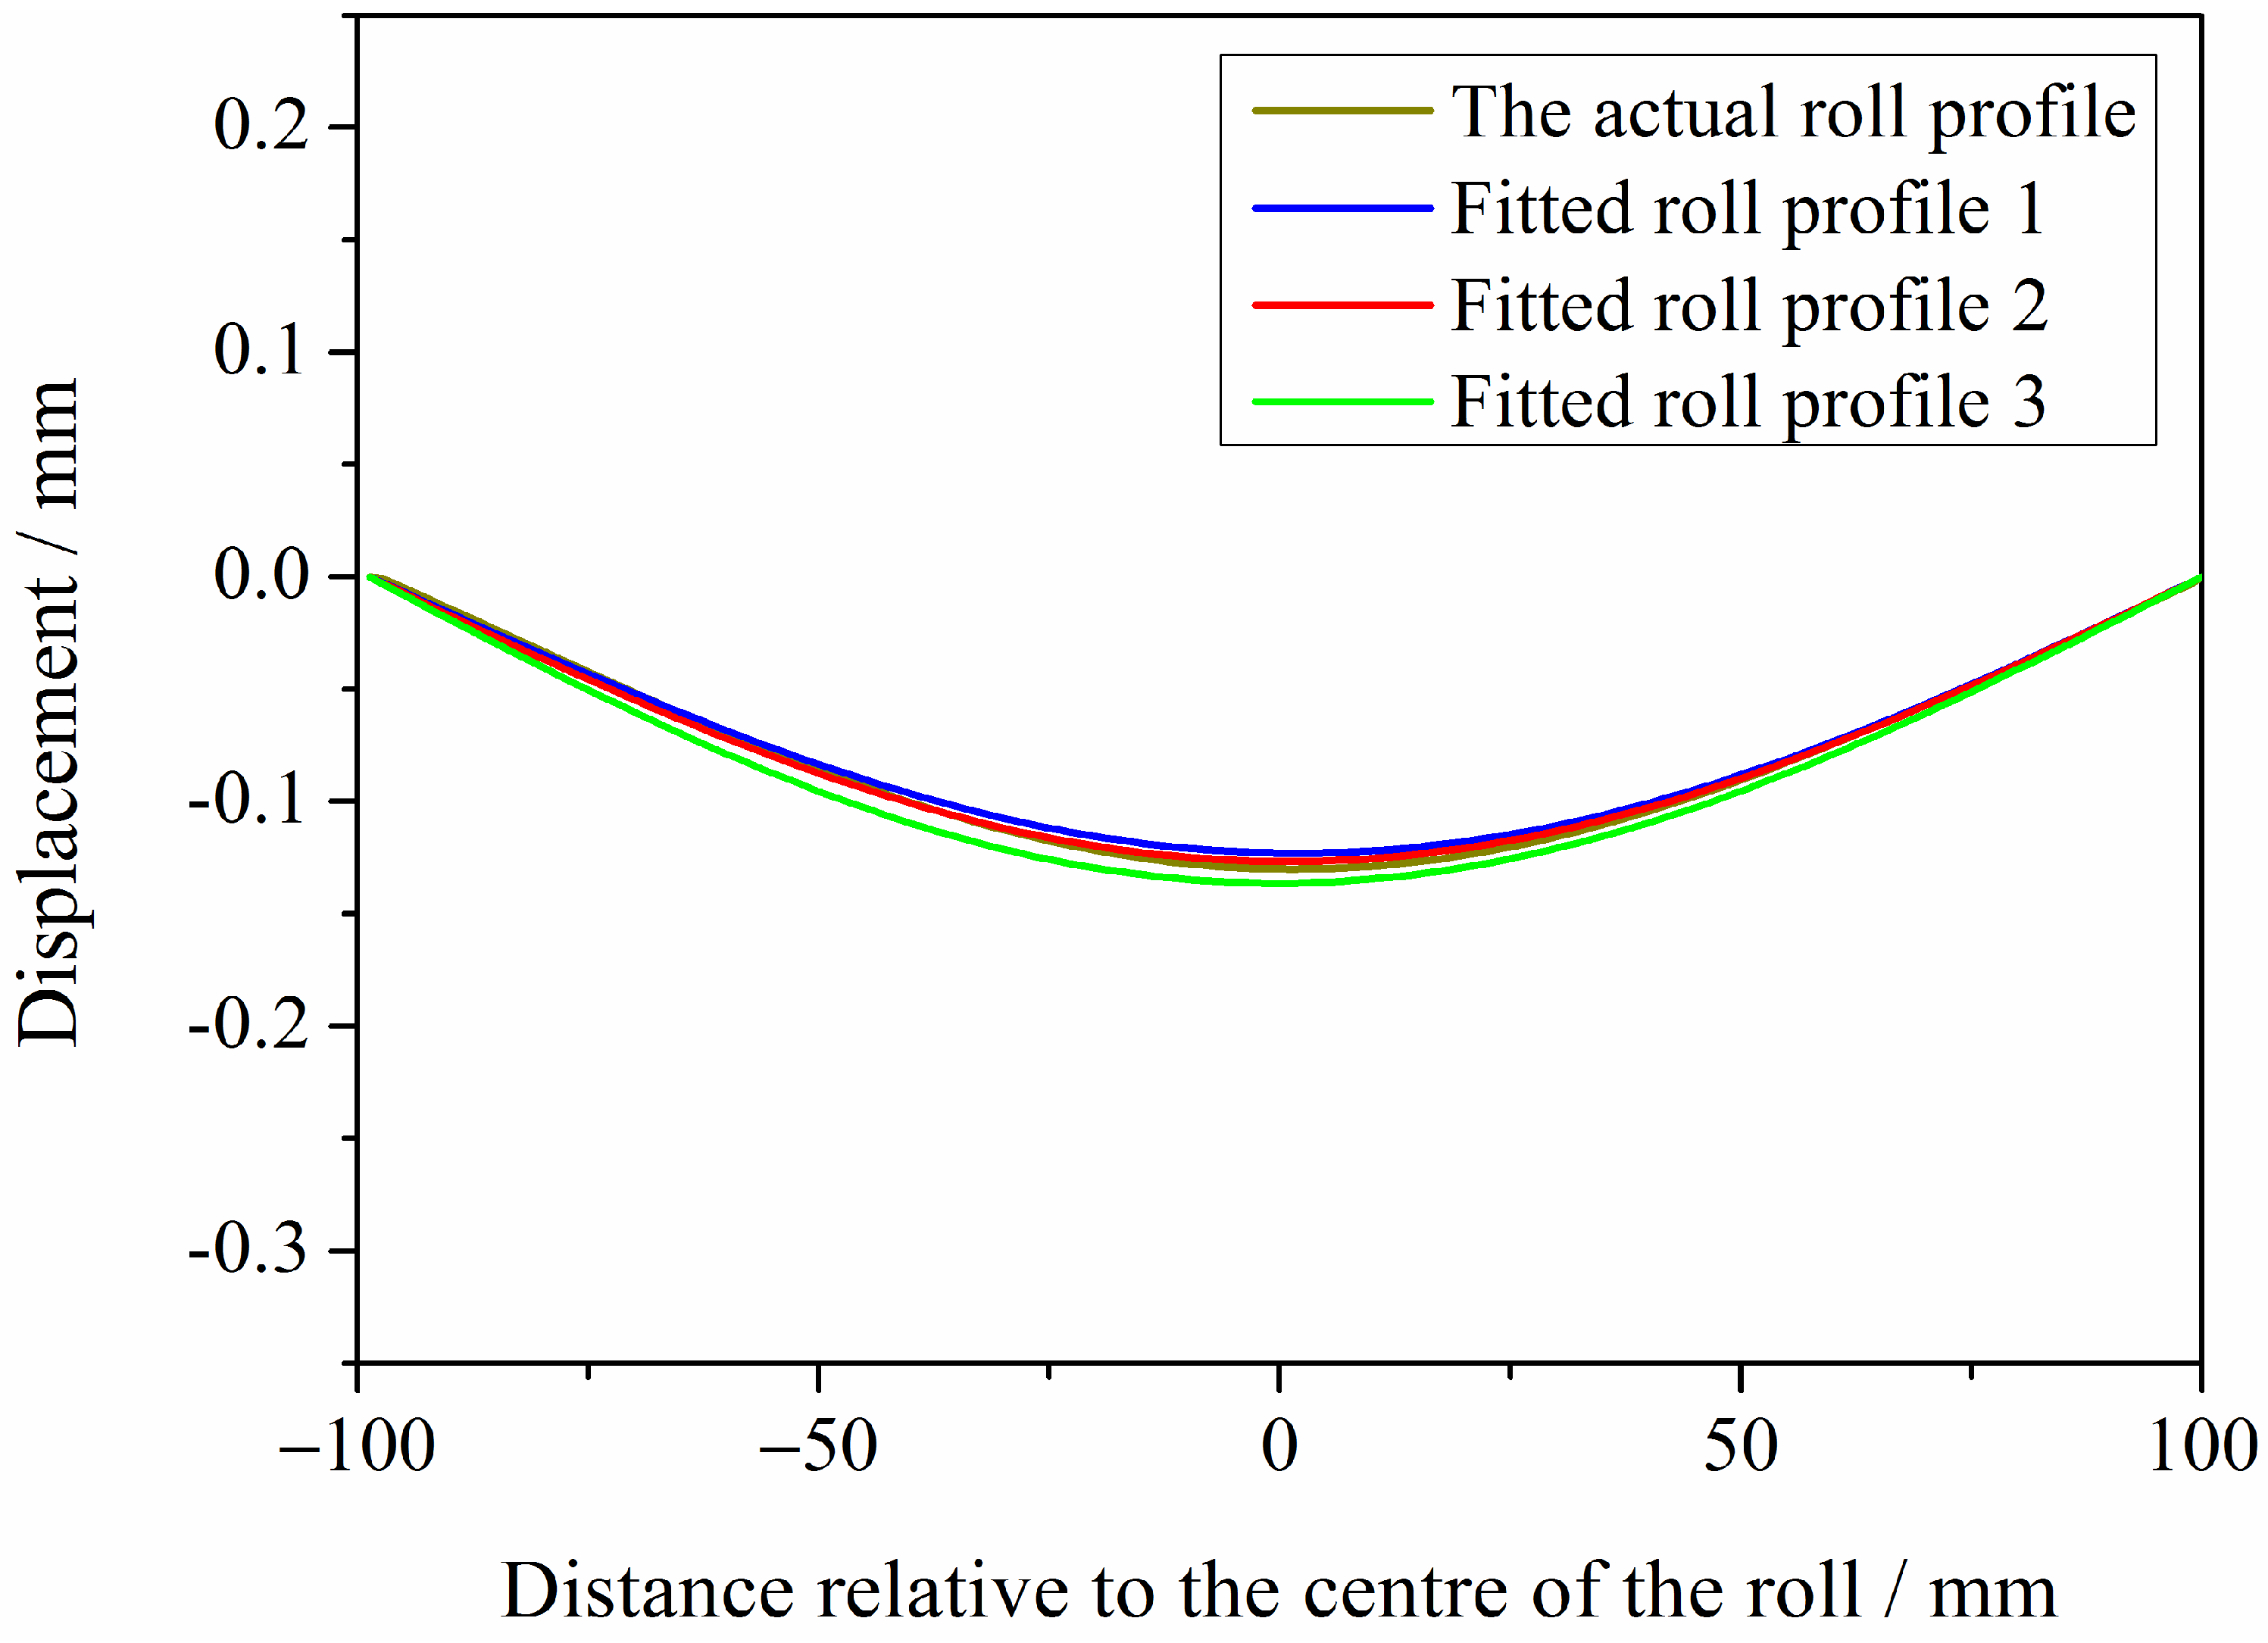
Figure 14, the contour of the error-compensated roll profile curve is basically consistent with that of the actual roller profile curve, though signal fluctuations remain evident. The error-compensated roll profile was fitted using Gaussian amplification, as shown in
Figure 15.
As can be seen from
Figure 15, the roll profile obtained after non-linear fitting more closely matches the actual roll profile, with an error of less than 6.3 μm. Currently, the only non-contact OPM in industrial application is the product based on ultrasonic ranging method manufactured by Mitsubishi, with a static measurement error of ±10 [
7]. Therefore, the dynamic measurement accuracy of this study has surpassed its static measurement accuracy.
This research is of great significance to improve the accuracy of online roll profile measurement, realise the fine management of mill roll in service, and improve the intelligence level of rolling mill system.
