Abstract
Currently, measurement points in bridge structural health monitoring are limited. Consequently, structural damage identification is challenging due to sparse monitoring data. Hence, a structural full-field displacement monitoring and damage identification method under natural texture conditions is proposed in this work. Firstly, the feature points of a structure were extracted via image scale-invariant feature transform. Then, the mathematical model was analyzed respecting the relative position change of the feature points before and after deformation, and a calculation theory was proposed for the structure’s full-field displacement vector (FFDV). Next, a test beam was constructed to obtain the FFDV calculation results for the beam under different damage conditions. Validation results showed that the maximum length error of the FFDV was 0.48 mm, while the maximum angle error was 0.82°. The FFDV monitoring results for the test beam showed that the rotation angle of the displacement vector at the damage location presented abnormal characteristics. Additionally, a damage identification index was proposed for the rotation-angle change rate. Based on the validation test, the index was proven to be sensitive to the damage location. Finally, a structural damage identification program was proposed based on the FFDV monitoring results. The obtained results will help to expand structural health monitoring data and fundamentally solve damage identification issues arising from sparse monitoring data. This study is the first to implement structural full-field displacement monitoring under natural texture conditions. The proposed method exhibits outstanding economic benefits, efficiency, and visualization advantages compared with the conventional single-point monitoring method.
1. Introduction
The number of measuring points arranged on a bridge structure is limited, which results in sparse monitoring data for the structure and hence difficulty in identifying structural damage.
Owing to the rapid development of computer technology and artificial intelligence, image-recognition technology has become the research highlight of structural health monitoring. Lee et al. [1] proposed a long-term displacement measurement system based on the self-motion compensation of computer vision, which solves the problem of long-term monitoring error accumulation in computer vision methods. Digital image correlation (DIC) is a method for processing images before and after deformation and obtaining full-field displacements. Ngeljaratan et al. [2] used DIC technology to measure the rotation and deformation of a bridge deck via a shaking table test. This method can be used to determine the three-dimensional (3D) dynamic response and modal characteristics (natural frequency, damping ratio, and modal shape) of bridges. Meng et al. [3] proposed a new close-range photogrammetry technology that uses a fixed camera with a tilt-compensation device and a close-range photogrammetric target to measure subsidence in local areas of a structure. The technology uses various image-processing algorithms to achieve real-time automatic measurements of structural subsidence. Dong et al. [4] proposed a full-field optical flow method based on deep learning to measure structural displacement. This method offers a higher level of accuracy than the classical optical flow algorithm, and the measurements are consistent with displacement sensor measurements. Chen et al. [5] proposed a bridge-vibration measurement method combining unmanned aerial vehicles (UAVs) and digital image correlation technology. The DIC method was used to analyze a bridge video captured by a UAV, to monitor the displacement of a measuring point, by which the frequency and vibration mode were extracted from the time-variant displacement of the target point. The experimental results proved the feasibility of UAVs in bridge-vibration measurements. Compared with the method of Ngeljaratan [2], the later method offers a 35% increase in monitoring efficiency, a 26% decrease in monitoring costs, and a 7% increase in monitoring accuracy. Tian et al. [6] proposed a cable force estimation method based on UAV and computer vision technology. The test results indicated that the cable force calculated using this technique was consistent with the value measured using an accelerometer. Yu et al. [7] proposed two remote-detection methods for long-span bridges based on computer vision: in the first method, structural deformation is obtained by detecting the movement of a bridge target light source via a camera under a bridge; the second method is used for bridges that cross rivers or deep canyons and involves the use of cameras on a bridge deck to monitor deformations. The two methods are applicable in safety assessments of various bridges and large engineering structures. Lee et al. [8] used a fiber Bragg grating (FBG) differential settlement measurement (DSM) system to monitor the vertical displacement of a prestressed concrete box girder bridge that had been damaged in an earthquake for more than two years. This system is based on the hydrostatic liquid leveling of the connected vessels, buoyancy, force equilibrium, and photo-elasticity of FBGs [9,10,11]. The results showed that the FBG–DSM liquid-level system is promising for inexpensive long-term monitoring of bridges over long distances as it does not require specific environmental conditions, in situ visibility, or intensive labor.
For structural damage identification based on computer vision, Quqa et al. [12] proposed a digital image crack-recognition method based on neural networks and image processing. This method requires a high-resolution camera to capture images of welded joints in large-span steel bridges. By training with a dataset constructed using crack pixels, accurate crack recognition was achieved. Moreover, the method is highly robust against noise. Li et al. [13] proposed a fine crack segmentation network (FCS-Net), which combines ResNet-50 with a full convolutional network. A test was performed using steel beam images with complex backgrounds, and the results showed that the MIoU of the FCS-Net was 0.7408, which is better than those of benchmark algorithms, such as LinkNet, DeepLab V3, and CrackSegNet. Peng et al. [14] proposed a crack-recognition method that combines an R-FCN and Haar AdaBoost, which is suitable for UAV-based image recognition. This method relies on UAV-based computer vision and uses feature learning to recognize bridge cracks. Feroz et al. [15] proposed a bridge safety state assessment method based on a UAV, which combines visual image sensing technology with UAVs for crack image acquisition. As a result, it promotes the development of UAV detection and bridge-surface crack detection. Dan et al. [16] proposed an automatic identification method for bridge-surface cracks based on two-dimensional amplitude and phase estimation (2D-APES) and mobile computer vision. As suggested by the name, 2D amplitude and phase estimation is performed to obtain a high-precision 2D spectral estimation of the crack image. Subsequently, low-frequency information is filtered to enhance the crack information to realize automatic crack identification. Khayatazad et al. [17] proposed a steel structural surface corrosion detection technology that combines image roughness and color information. Huang [18] and Jin [19] proposed a new method for identifying the corrosion of steel structures. This method combines the fully convolutional neural network U-Net with a newly developed image semantic segmentation model to achieve pixel-level corrosion defect identification of steel bridges. Rahman [20] proposed a semantic segmentation deep learning method and an efficient image marking tool that allows the rapid preparation of large training datasets and serves as a foundation for the effective detection, segmentation, and evaluation of corrosion status in images. Prasanna et al. [21] investigated the automatic detection of concrete bridge cracks. Firstly, an image was filtered with increasing structural elements to smoothen the image and remove noise. Subsequently, the edges of the bridge cracks were accurately extracted using a multiscale morphological edge detector. Sarvestani et al. [22] developed a robot image-acquisition system based on computer vision. The system uses a vision-based remote-control robot to obtain images. It identifies the sizes of the cracks obtained using digital image-processing software, resulting in a rapid, safe, reliable, and low-cost detection process. Yeum et al. [23] proposed a vision-based inspection technique that automatically processes and analyzes acquired images. The images used in this technique are captured without controlling the angles and positions of cameras, and a preliminary calibration is not required. Using images from many different angles and prior knowledge regarding typical appearances, the proposed technique can successfully detect cracks near bolts. Morgenthal et al. [24] used a UAV equipped with a camera to acquire high-definition image data for bridge structures. Its trajectory was automatically calculated via a 3D model, and typical bridge damage was identified using the machine learning method. Zhong et al. [25] proposed a crack-shaped intelligent extraction model based on a support vector machine. They used UAVs to obtain images of a bridge structure, which were then used to realize the intelligent recognition of bridge-crack width. Liang et al. [26] designed a bridge monitoring scheme using a UAV equipped with a high-definition pan–tilt–zoom camera. The scheme can efficiently acquire images of bridge cables based on their structural characteristics and the distribution form of bridge cables, extract useful information via image processing, and comprehensively evaluate the health status of bridge cables based on relevant specifications. Lin et al. [27] designed an automatic bridge-crack detection system using a real-time image-processing method. The system, which is assembled on a UAV, can realize real-time data acquisition and processing. Additionally, it can effectively detect bridge cracks with higher precision and speed compared with other detection methods. La et al. [28] developed a method that uses a climbing robot to inspect damage in steel bridges. This method applies a steel-surface mosaic image and 3D reconstruction technology to demonstrate the apparent state of the structure. Li et al. [29] developed a visual inspection system comprising a climbing robot, an image-processing platform, and four fixed cameras. Based on the scale-invariant feature transformation (SIFT) algorithm, the system realizes bridge-surface continuous image sequence automatic stitching and the intelligent recognition of bridge defects using image-processing technology. Cha et al. [30] proposed a vision-based bolt-looseness detection method using the Hough transform and a support vector machine. Subsequently, a structural damage location method was proposed based on a density peak fast clustering algorithm.
The aforementioned structural health monitoring methods are computer-vision-based and thus require the arrangement of target points on a structure [31]. The monitoring object is the same as that in conventional monitoring, which targets local structural measurement points [32]. Hence, structural damage identification difficulties arising from sparse monitoring data are not well solved [33]. The feature-extraction method can be used to obtain natural texture feature points on a bridge surface. In this study, the mathematical model was analyzed regarding the relative position change of the feature points on a bridge before and after deformation. Then, a displacement field calculation theory was proposed for the feature points. In addition, a full-field displacement monitoring method was established for the structure under natural texture conditions. Finally, a damage identification method was proposed combined with full-field displacement monitoring. The results can be used to monitor the deformation of the bridge structure in a non-contact manner, which improves the completeness of bridge structural monitoring data, and visualizes structural damage. Compared with conventional single-point monitoring, the proposed method offers outstanding economic, efficiency, and visualization advantages. In fact, the proposed method can automatically yield images of a bridge, provide structural full-field displacement analysis results in real time, and automatically output the damage location. The results presented herein can be applied extensively to small- and medium-span bridges.
2. Full-Field Displacement Monitoring of a Structure Based on Natural Texture Feature Monitoring
2.1. Full-Field Displacement Vector (FFDV) Point Source Generation Method
In practical applications, an appropriate descriptor that represents homonymous image points on a structural surface must be identified. The natural texture features of a bridge surface are consistent before and after deformation and can be used to form natural homonymous points. Under photogrammetry, these natural texture features can be detected as extreme points in the scale space of an image. Currently, the most typically used method to detect extreme points in an image scale space is scale-invariant feature transform (SIFT) [34,35,36,37,38,39]. The SIFT algorithm can detect image feature points in a multiscale space. The extracted feature points exhibit invariable scales, positions, and directions, which can be matched by the generated feature vector descriptor.
To validate that the image feature points on a bridge can represent homonymous points, we used a chessboard pattern to perform a validation test. Figure 1 shows the feature-point extraction results for two chessboard images at different positions. In the image shown in Figure 1, the position of the chessboard was shifted, whereas the position of the camera was fixed.
Figure 1.
Expression of feature points in two images.
The feature points extracted (as shown in Figure 1) were matched, as shown in Figure 2. The number of feature points extracted from Figure 1 was 2117. To intuitively show the matching results for the feature points, only the matching results for the first 40 feature points are presented in Figure 2. As shown in the figure, the feature points extracted from the chessboard at different positions matched accurately, which verified that the feature points could represent the image’s homonymous points.
Figure 2.
Registration of feature points.
2.2. Calculation Method of the Structure’s FFDV
The feature points obtained using the SIFT feature-extraction method constitute the source data of the structural FFDV. The matching of feature points only completes the connection between homonymous points on the structural surface, while the relative spatial position change at the homonymous points before and after deformation cannot be determined. We established a standard reference system under different operating conditions to determine the relative positions of the feature points before and after deformation. We used fixed points to simplify the spatial geometric transformation of the feature points.
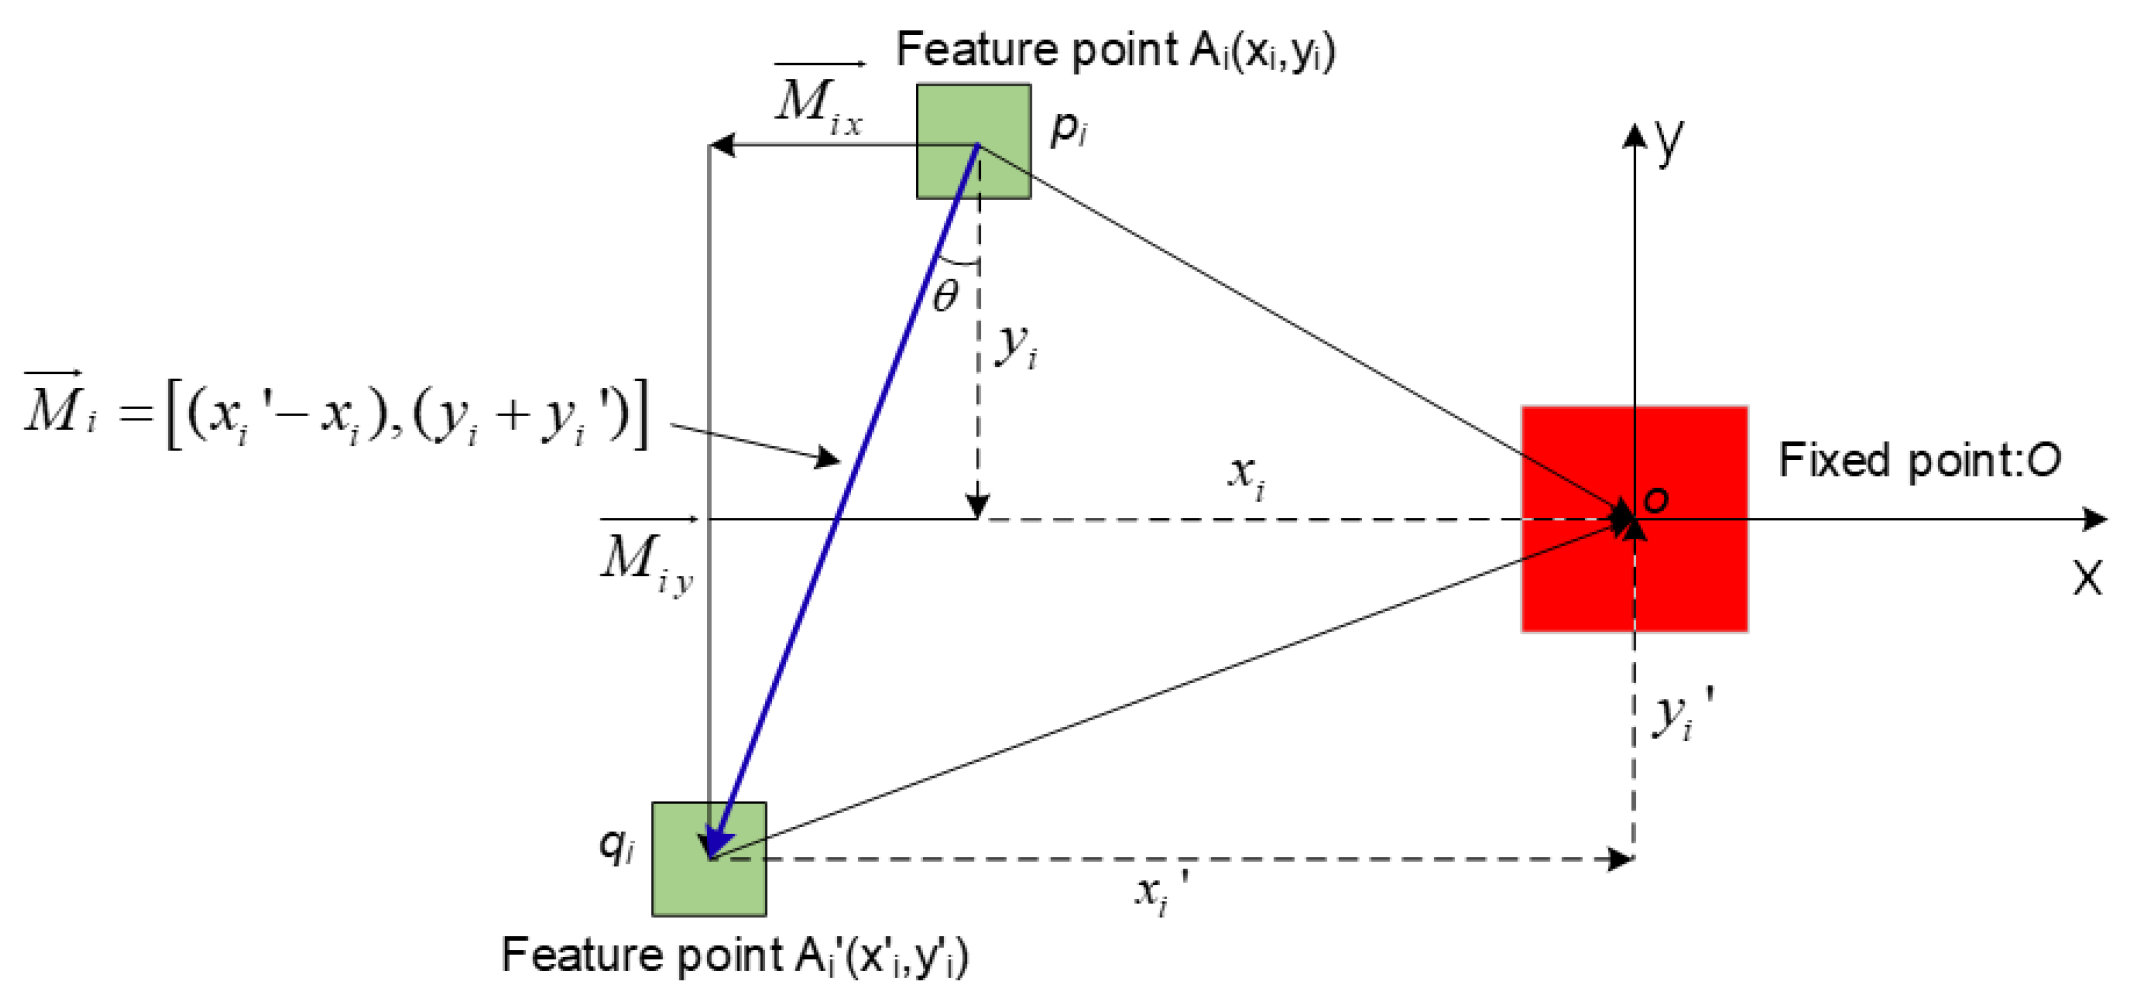
Establishing a fixed point provides a location basis for the feature points of the structure before and after deformation. To accurately calculate the displacement value of the feature points of the structure before and after deformation, we propose a mathematical model of the relative position change of the feature points, as shown in Figure 3.
Figure 3.
Mathematical model of the relative position change of the feature points.
In Figure 3, the red squares represent fixed points. Theoretically, a fixed point O can represent any feature point on the chessboard. The center of the chessboard was selected as the fixed point. As shown in Figure 3, the displacement vector AiA′i is composed of starting point Ai before deformation and ending point A′i after deformation. This displacement vector is the basic element of the structure’s FFDV, as shown by the blue vector in Figure 3, where Mi represents the feature points before and after deformation, which are generated based on the following algorithm: For bridge images (i1 and i2) before and after deformation, the feature points are first extracted from the images and expressed as Ai and A′i, respectively; subsequently, the initial matching for C = {(Ai, A′i):i = 1, 2, …, n} is obtained, where Ai∈i1 and A′i∈i2. Feature points Ai and A′i are projected to the fixed point O to obtain feature-point coordinates, Ai(xi,yi) and A′i(x′i,y′i), respectively, and coordinate values (xi,yi) and (x′i,y′i) are extracted between fixed point O and each of the feature points Ai and A′i. Next, Mi = [(x′i − xi),(y′i − yi)]i is obtained. Mi is a displacement vector with two parameters, i.e., length L and angle θ, which can be obtained from the known feature-point coordinates Ai(xi,yi) and A′i(x′i,y′i). Set M = {Mi:I = 1, 2, …, n} is composed of Mi as the initial calculated full-field displacement of the structure. The FFDV of the structure surface can be extracted using the method described above by solving vector set M.
2.3. Full-Field Displacement Monitoring Test of the Structure
Figure 4 shows the size and structure of the beam used in the current test. Figure 5 shows a photograph of the test beam.
Figure 4.
Illustration of the test beam with dimensions (units: mm).
Figure 5.
Photograph of the test beam.
The appropriate monitoring camera was selected by analyzing the measurement accuracy, field angle, focal length, and other aspects. Finally, the Fuji GFX 100 ordinary civilian camera and the Fuji GF 32-64/4 RLM WR lens were selected.
The camera was placed 5 m from the center of the test beam during the test, as shown in Figure 6. Dial indicators were used to measure the structural deformation to provide validation data. Figure 7 shows the layout of the dial indicators; as shown, 13 dial indicators were arranged uniformly in the lower section of the test beam.
Figure 6.
Position of measuring camera.
Figure 7.
Layout of dial indicators.
To validate the FFDV extracted from the structure, a Leica scan station (P50 high-speed 3D laser scanner) was used to scan the structure. The scanning resolution was 0.8 mm/10 m, the target acquisition accuracy was 2 mm/50 m, and the noise accuracy was 0.4 mm/10 m. Code marks with a width of 20 mm on the upper and lower gusset plates of the test beam were arranged to validate the accuracy. Figure 8 shows the location and number of the code marks. Figure 9 shows the scanned scene.
Figure 8.
Layout diagram of test beam’s code marks.
Figure 9.
Three-dimensional laser scanning validation test.
Subsequently, the damaged member of the test beam was simulated by cutting. Table 1 lists the damage conditions for the test beams. Figure 10 shows the number and positions of the damaged members, whereas Figure 11 shows the damage to the members of the test beam.
Table 1.
Damage conditions.
Figure 10.
Location of damaged members.
Figure 11.
Photographs of damaged test beam and member.
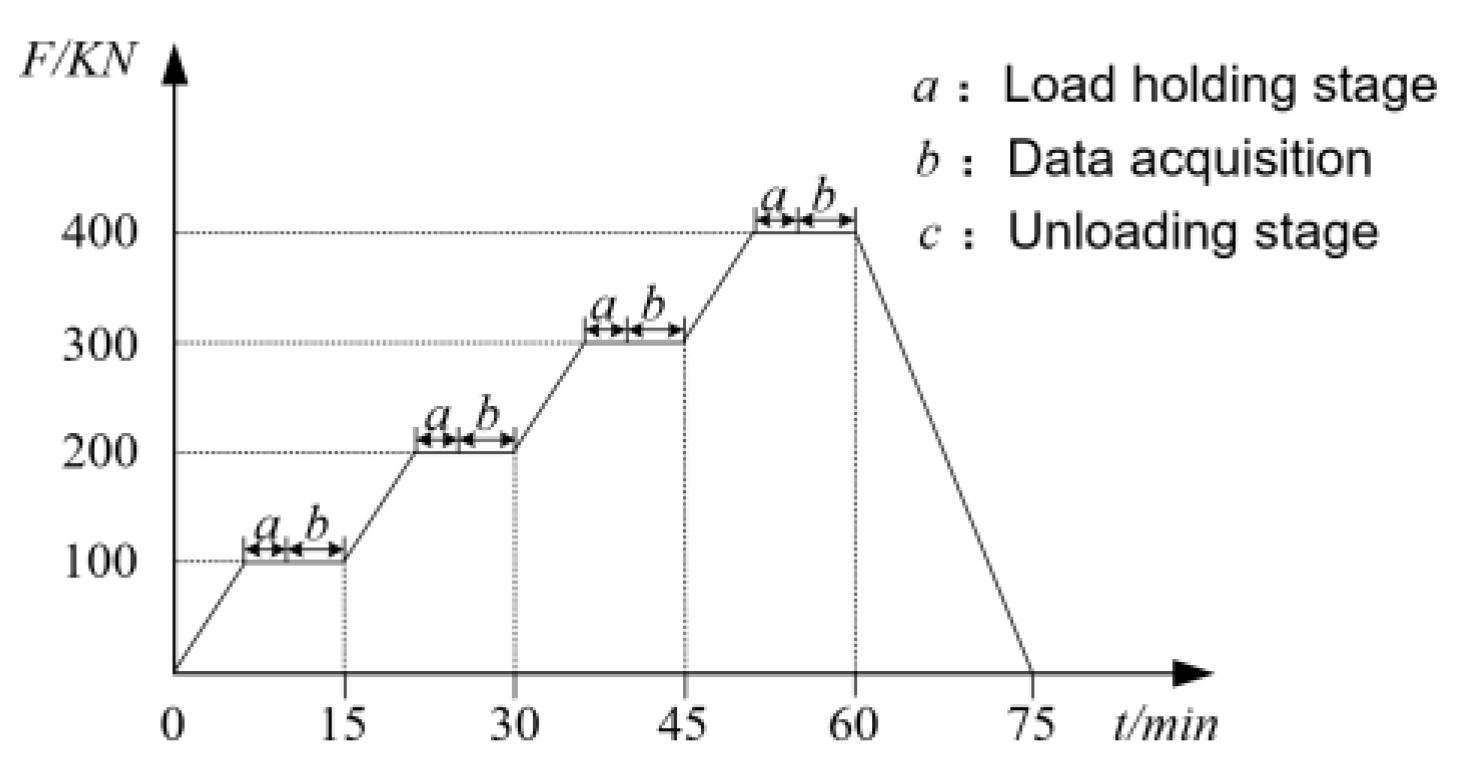
The loading point of the test beam was located at the middle of the span, as shown in Figure 12. The load was varied from 0 to 400 kN in 100 kN increments. Each load level was sustained for 2 min to ensure that the test beam was fully deformed, the test beam images were captured, the dial indicator data were obtained, and the 3D laser scanning of the test beam was performed. Figure 13 shows the loading system of the test beam. In the load-holding stage, images were captured every 30 s, dial indicator data were obtained every 30 s, and 3D laser scanning was conducted every 5 min.
Figure 12.
Diagram of test beam’s loading point.
Figure 13.
Loading details of static load test.
In the test, strong features on the chessboard were used as fixed points. Theoretically, any feature point on the chessboard can be used as a fixed point O. In this study, the feature point at the center of the chessboard was selected as a fixed point. The layout of the chessboard is illustrated in Figure 14. The position of the chessboard was fixed throughout the test.
Figure 14.
Layout position of chessboard used in current study.
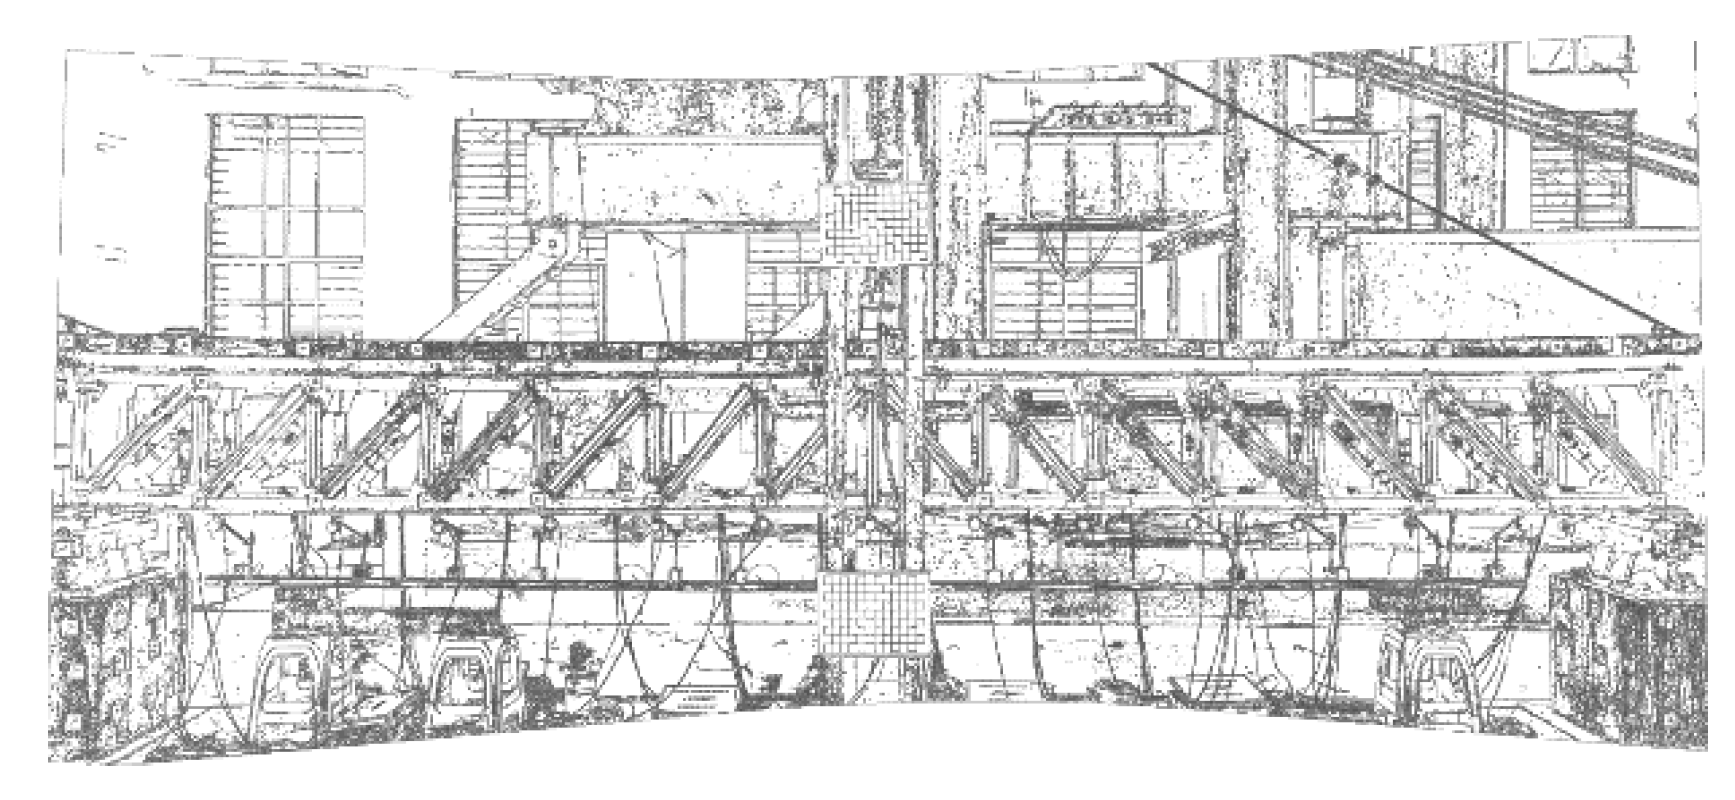
The SIFT feature-point extraction method was used to extract the feature points of the test beam under various operating conditions. Figure 15 shows the feature-point extraction results for the test beam. The feature-extraction results for the D01 operating condition were simplified, unnecessary environmental feature points were deleted, and the main features of the structure were highlighted, as shown in Figure 16.
Figure 15.
Feature points of test beam.
Figure 16.
Distribution of feature points on test beam’s surface.
2.4. Calibration of Test Beam’s Image Monitoring Resolution
The yellow calibration line in the web member, as shown in Figure 17a, corresponds to a series of pixel matrix arrangements in the image. The actual physical size of each pixel was the monitoring resolution, and Figure 17b shows the calibration model. Yellow calibration lines were drawn in the middle of each vertical bar. The exact length of each calibration line was measured, and the number of pixels represented by the corresponding calibration line was counted. Subsequently, the monitoring resolution was calculated as R = L/n (mm/pixel), and the results are listed in Table 2.
Figure 17.
Calibration of test beam’s image monitoring resolution.
Table 2.
Resolution calibration.
The monitoring resolution of the bridge image, which converts the pixel scale of the bridge image to a deformation monitoring scale, was obtained by calibrating the pixel size. Subsequently, the deformation value of the structure was obtained by changing the pixel position.
2.5. The Structure’s Full-Field Displacement Monitoring Results under Natural Texture Conditions
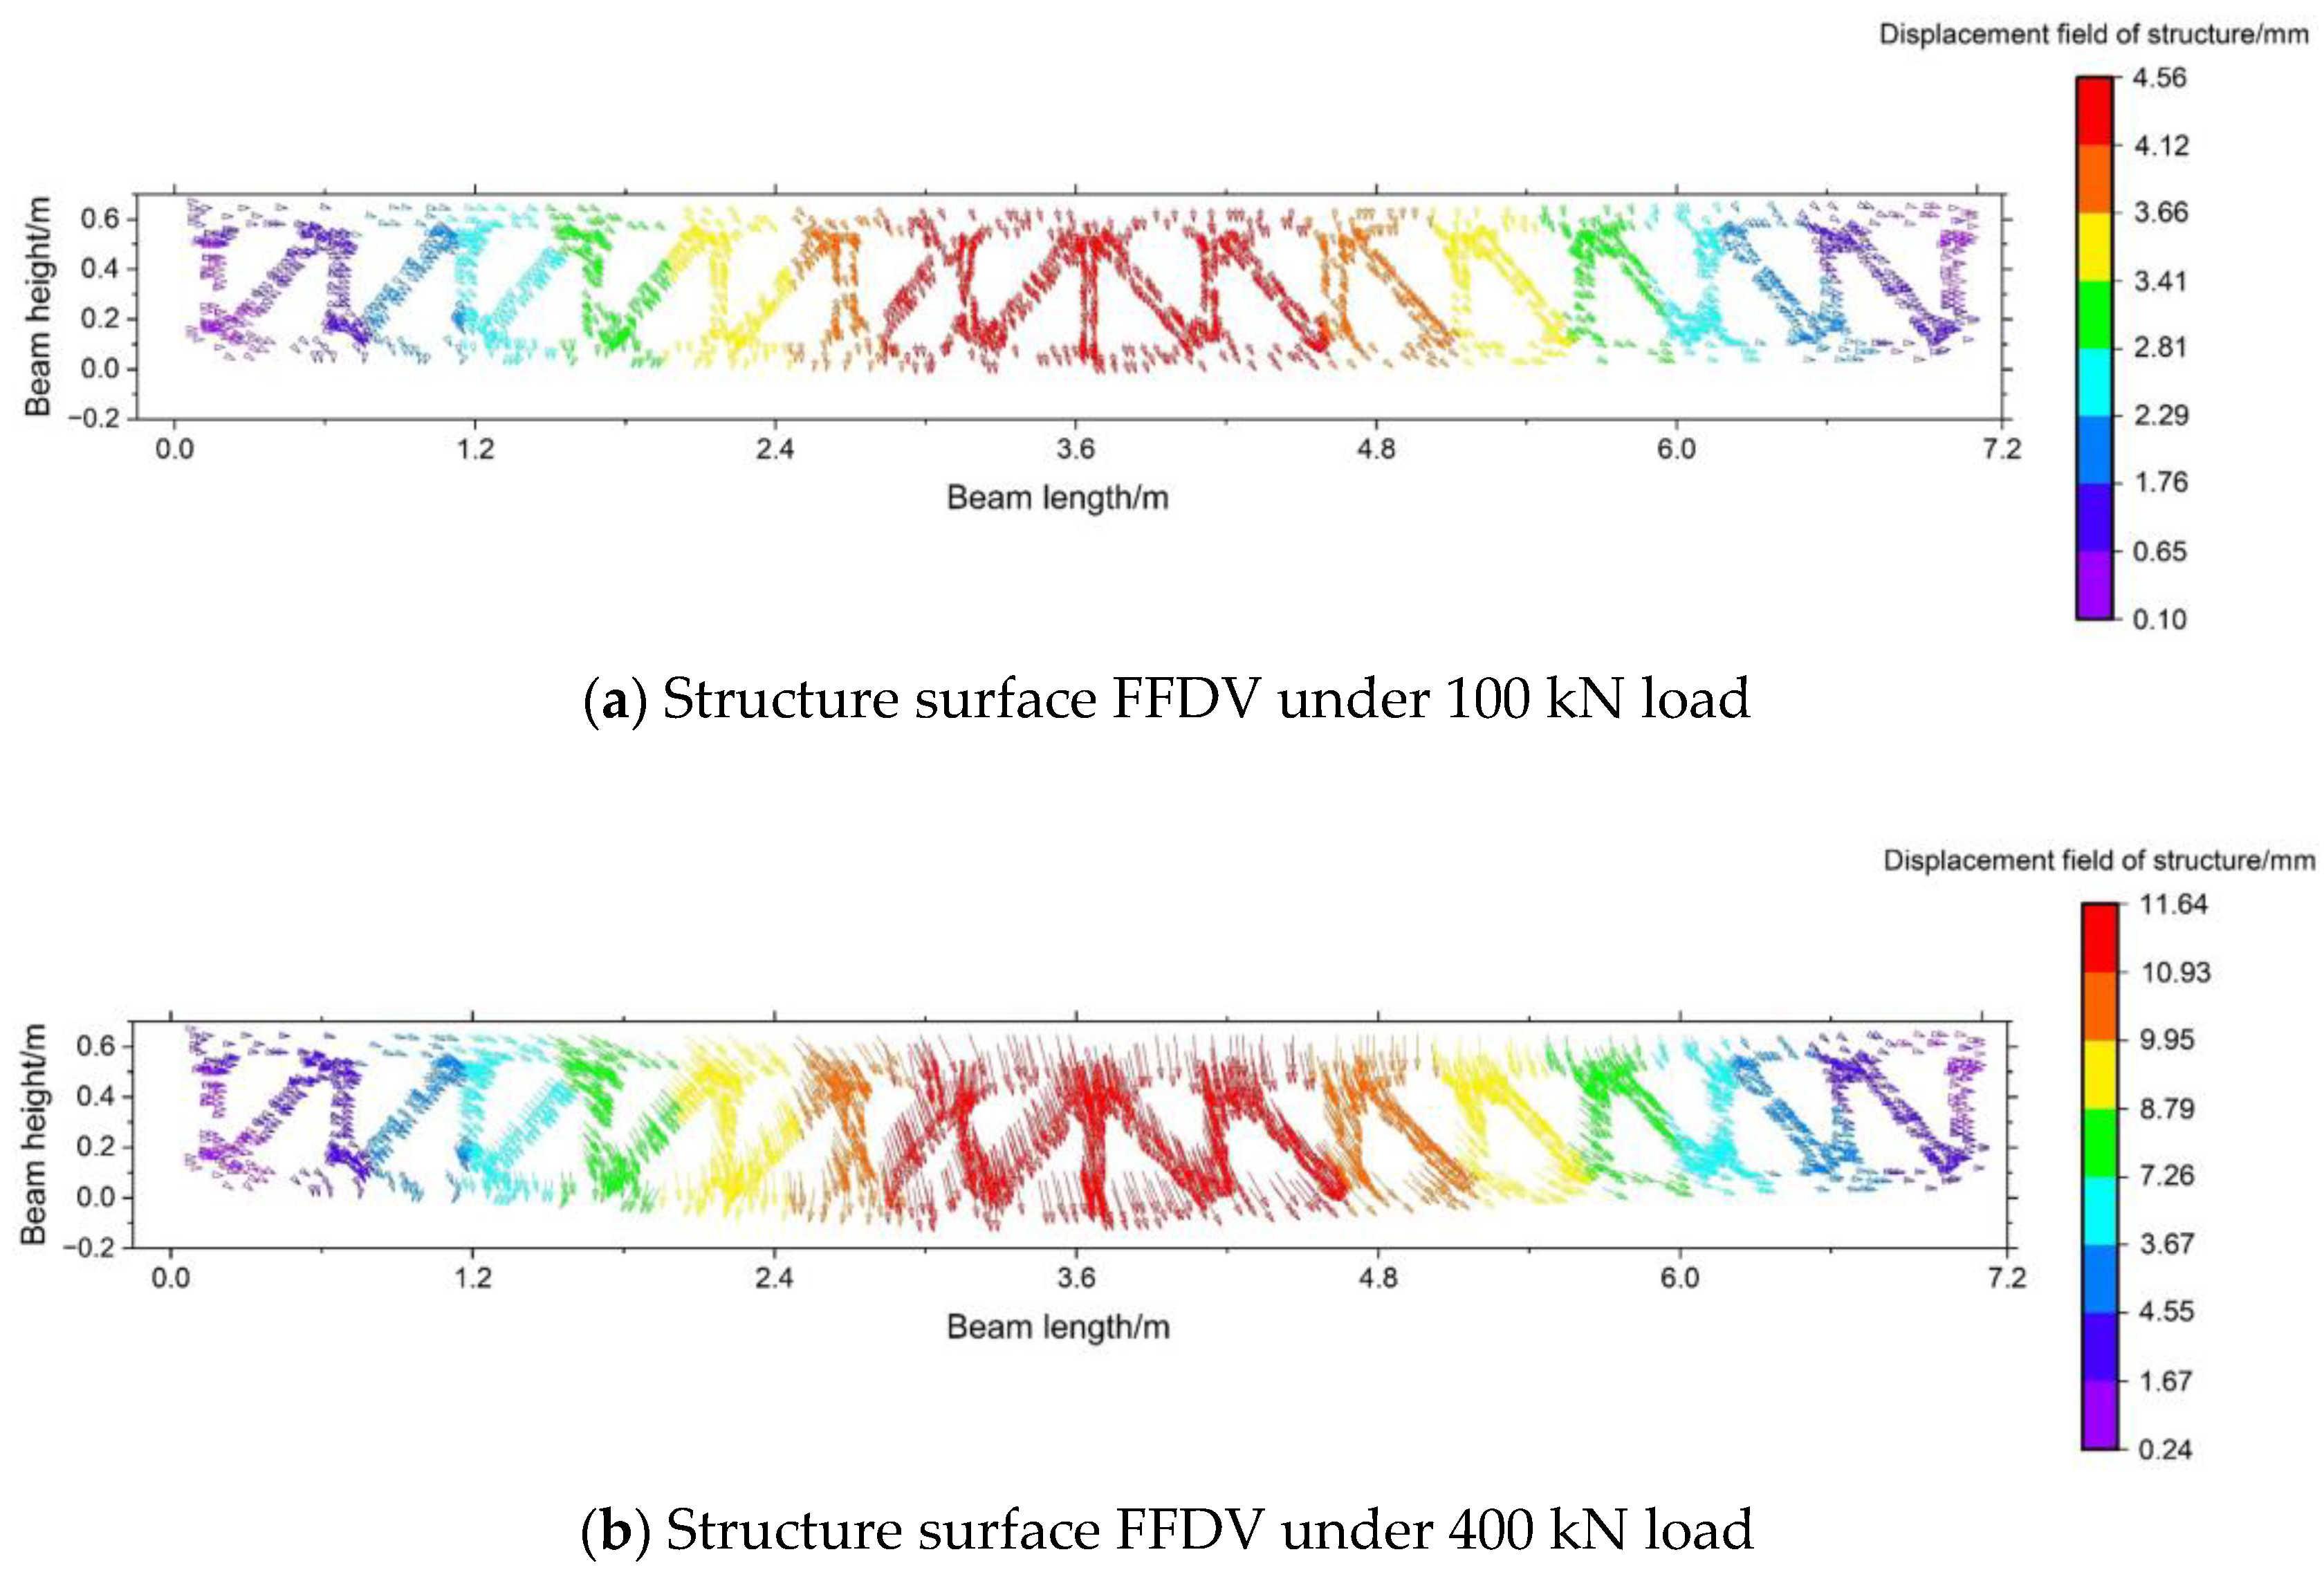
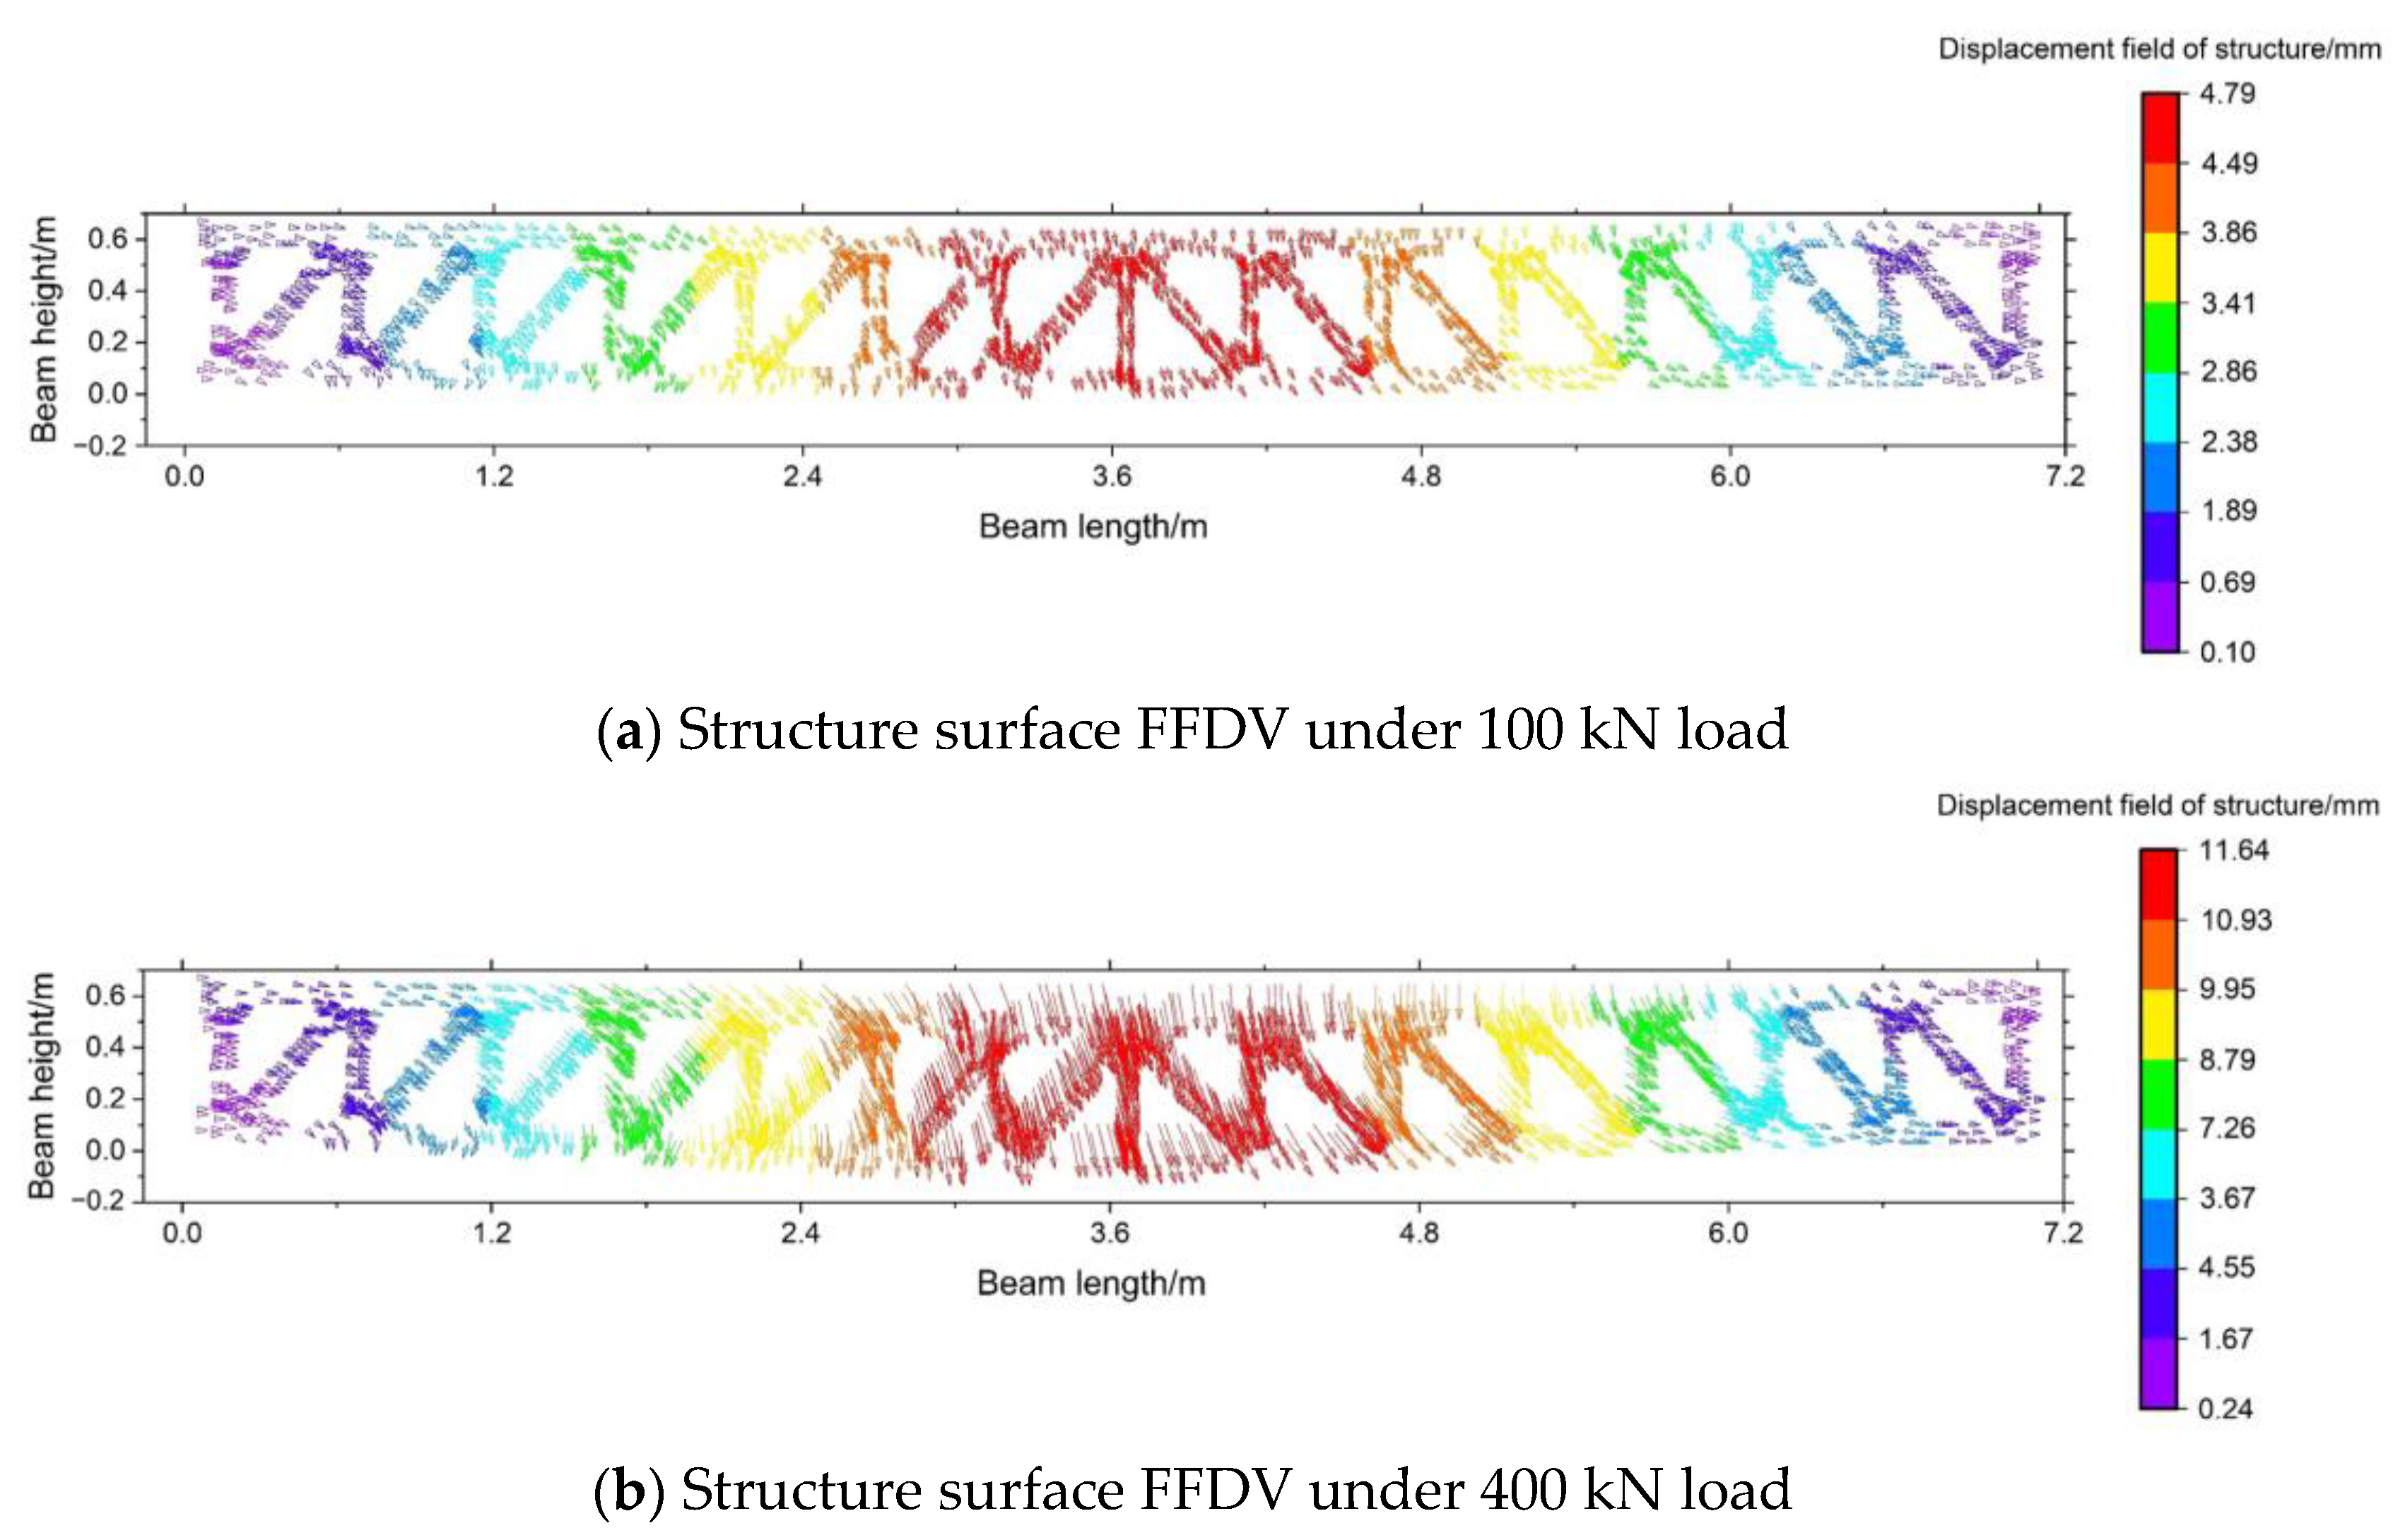
Using the method described above, the FFDV of the structure surface was calculated under each load condition and chromatographic assignment was performed based on vector size. Figure 18, Figure 19 and Figure 20 show the FFDV of the structure surface under various operating conditions. Owing to space limitations, only two load levels, i.e., 100 and 400 kN, are shown under operating conditions D01–D03.
Figure 18.
Structure surface FFDV under D01 condition.
Figure 19.
Structure surface FFDV under D02 condition.
Figure 20.
Structure surface FFDV under D03 condition.
The FFDV distribution presented in Figure 18, Figure 19 and Figure 20 shows that the displacement vector of the top chord steel plate of the test beam is directed toward the mid-span. Meanwhile, the displacement vector of the bottom chord steel plate is directed toward the support, indicating that the top chord steel plate of the test beam is under pressure and that the bottom chord steel plate is under tension. This vector distribution is consistent with the stress characteristics of the test beam under load. In addition, the test beam’s deformation increases with the load. Taking the undamaged condition as an example, the maximum displacement of the test beam under the load of 100kN is 3.82 mm, and the maximum displacement under the load of 400kN is 9.57 mm. This is consistent with the deformation law of the structure under load.
Figure 20 shows the structural deformation characteristics under a load. The full-field displacement monitoring method significantly expands the structural deformation monitoring data and extends the measurement of structural points to full-field displacement measurement.
2.6. Validation of the Structure’s FFDV Accuracy
First, the structural lower-edge deformation values were validated. The extracted deformation values were compared with values measured using the dial gauge, as shown in Table 3 (owing to space limitations, only data for operating condition D01 are shown). Table 3 shows that the maximum error of the edge deformation of the structure was 4.41% and that the deformation of the extracted structure was consistent with the actual deformation.
Table 3.
Accuracy validation of deformation measurement.
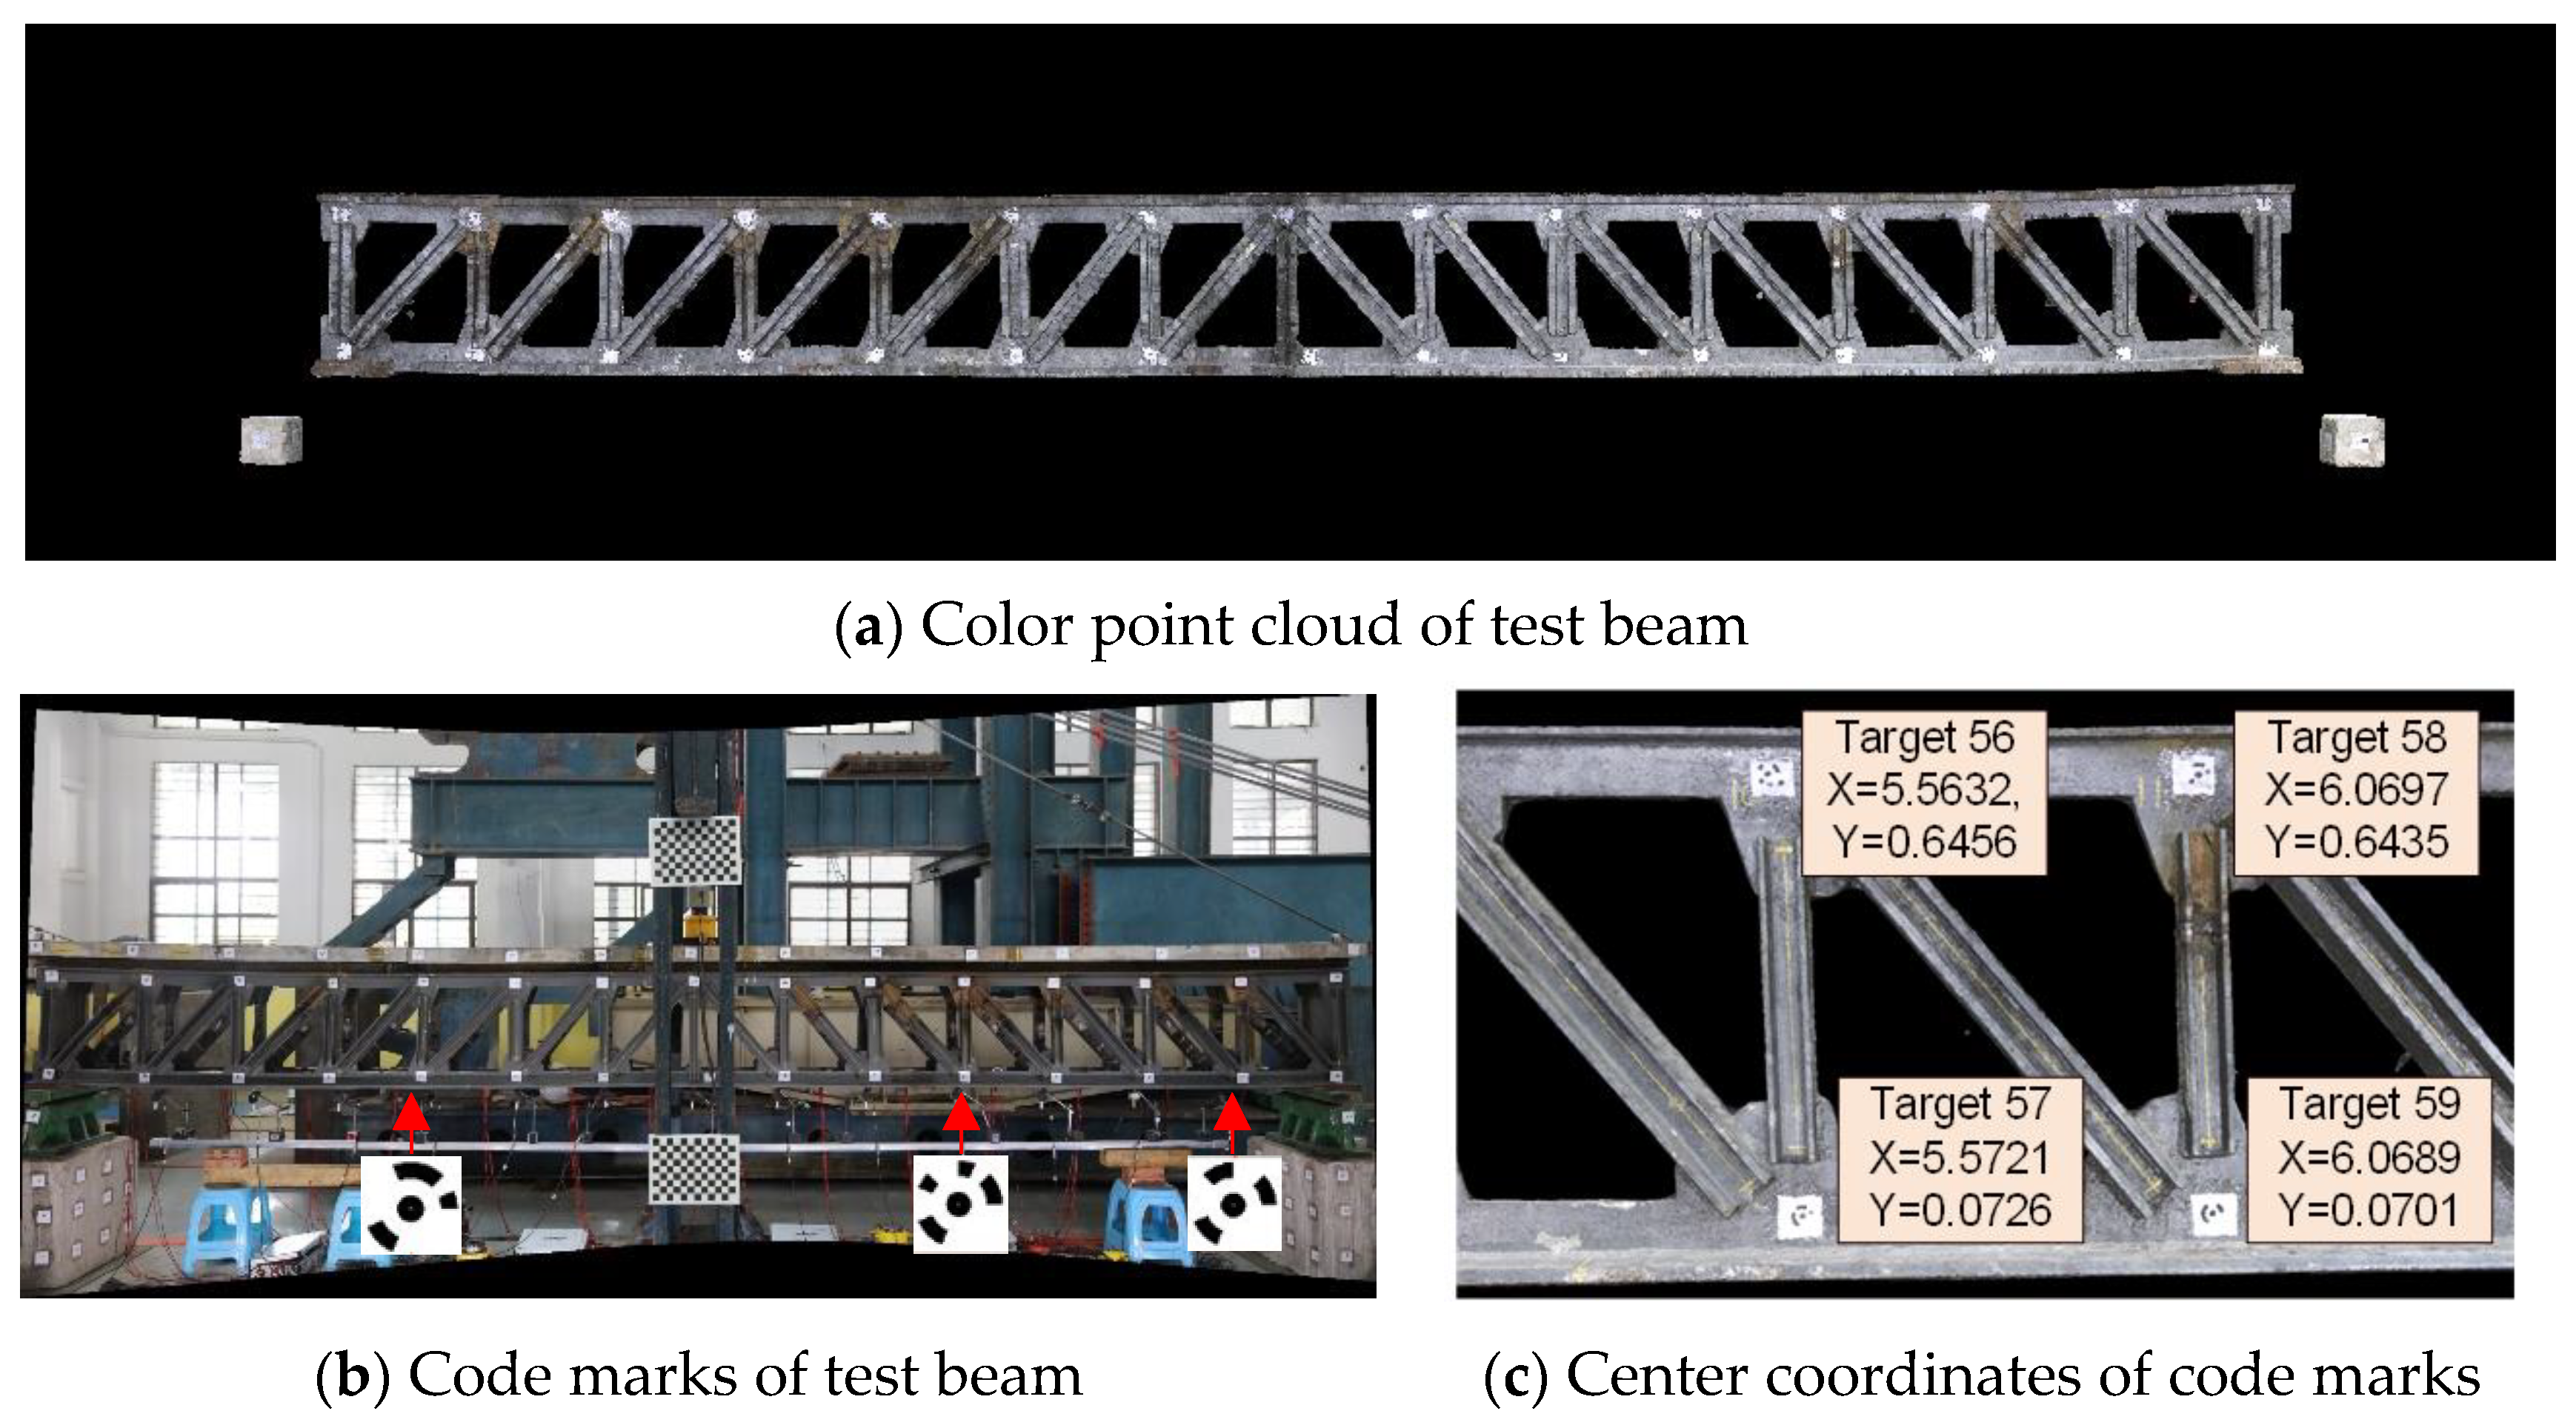
Subsequently, we validated the displacement vector in the plane. Under each operating condition, a Leica ScanStation P50 3D laser scanner was used to scan the test beam. During the scanning, a built-in coaxial camera was used to perform synchronous shooting, and the color point cloud of the test beam was obtained, as shown in Figure 21a. The Leica Cyclone point-cloud processing software was used to automatically extract the center coordinates of the code marks, as shown in Figure 21c.
Figure 21.
Location coordinate extraction of code marks.
The same code-mark position coordinates were used before and after deformation for the displacement calculation. The code marks of the center displacement vector are shown in Figure 22 (based on the D01 400 kN condition).
Figure 22.
Code-mark displacement calculation results.
The displacement vector near the code marks was compared with that shown in Figure 22, based on the D01 400 kN condition (see Figure 23).
Figure 23.
Validation of monitoring results.
As shown in Figure 23, the vector length error of the code-mark position was within 0.5 mm, and the angle error was within 1°, indicating that the extracted FFDV can accurately reflect the full-field displacement characteristics of the structure.
2.7. Monitoring Steps of Structural Full-Field Displacement
The steps of the structural FFDV monitoring are summarized based on the results above (see Figure 24).
Figure 24.
Steps of structural full-field displacement monitoring.
3. Damage Identification Method Based on FFDV Monitoring
3.1. Analysis of Damage Identification Index Applicable to FFDV Monitoring
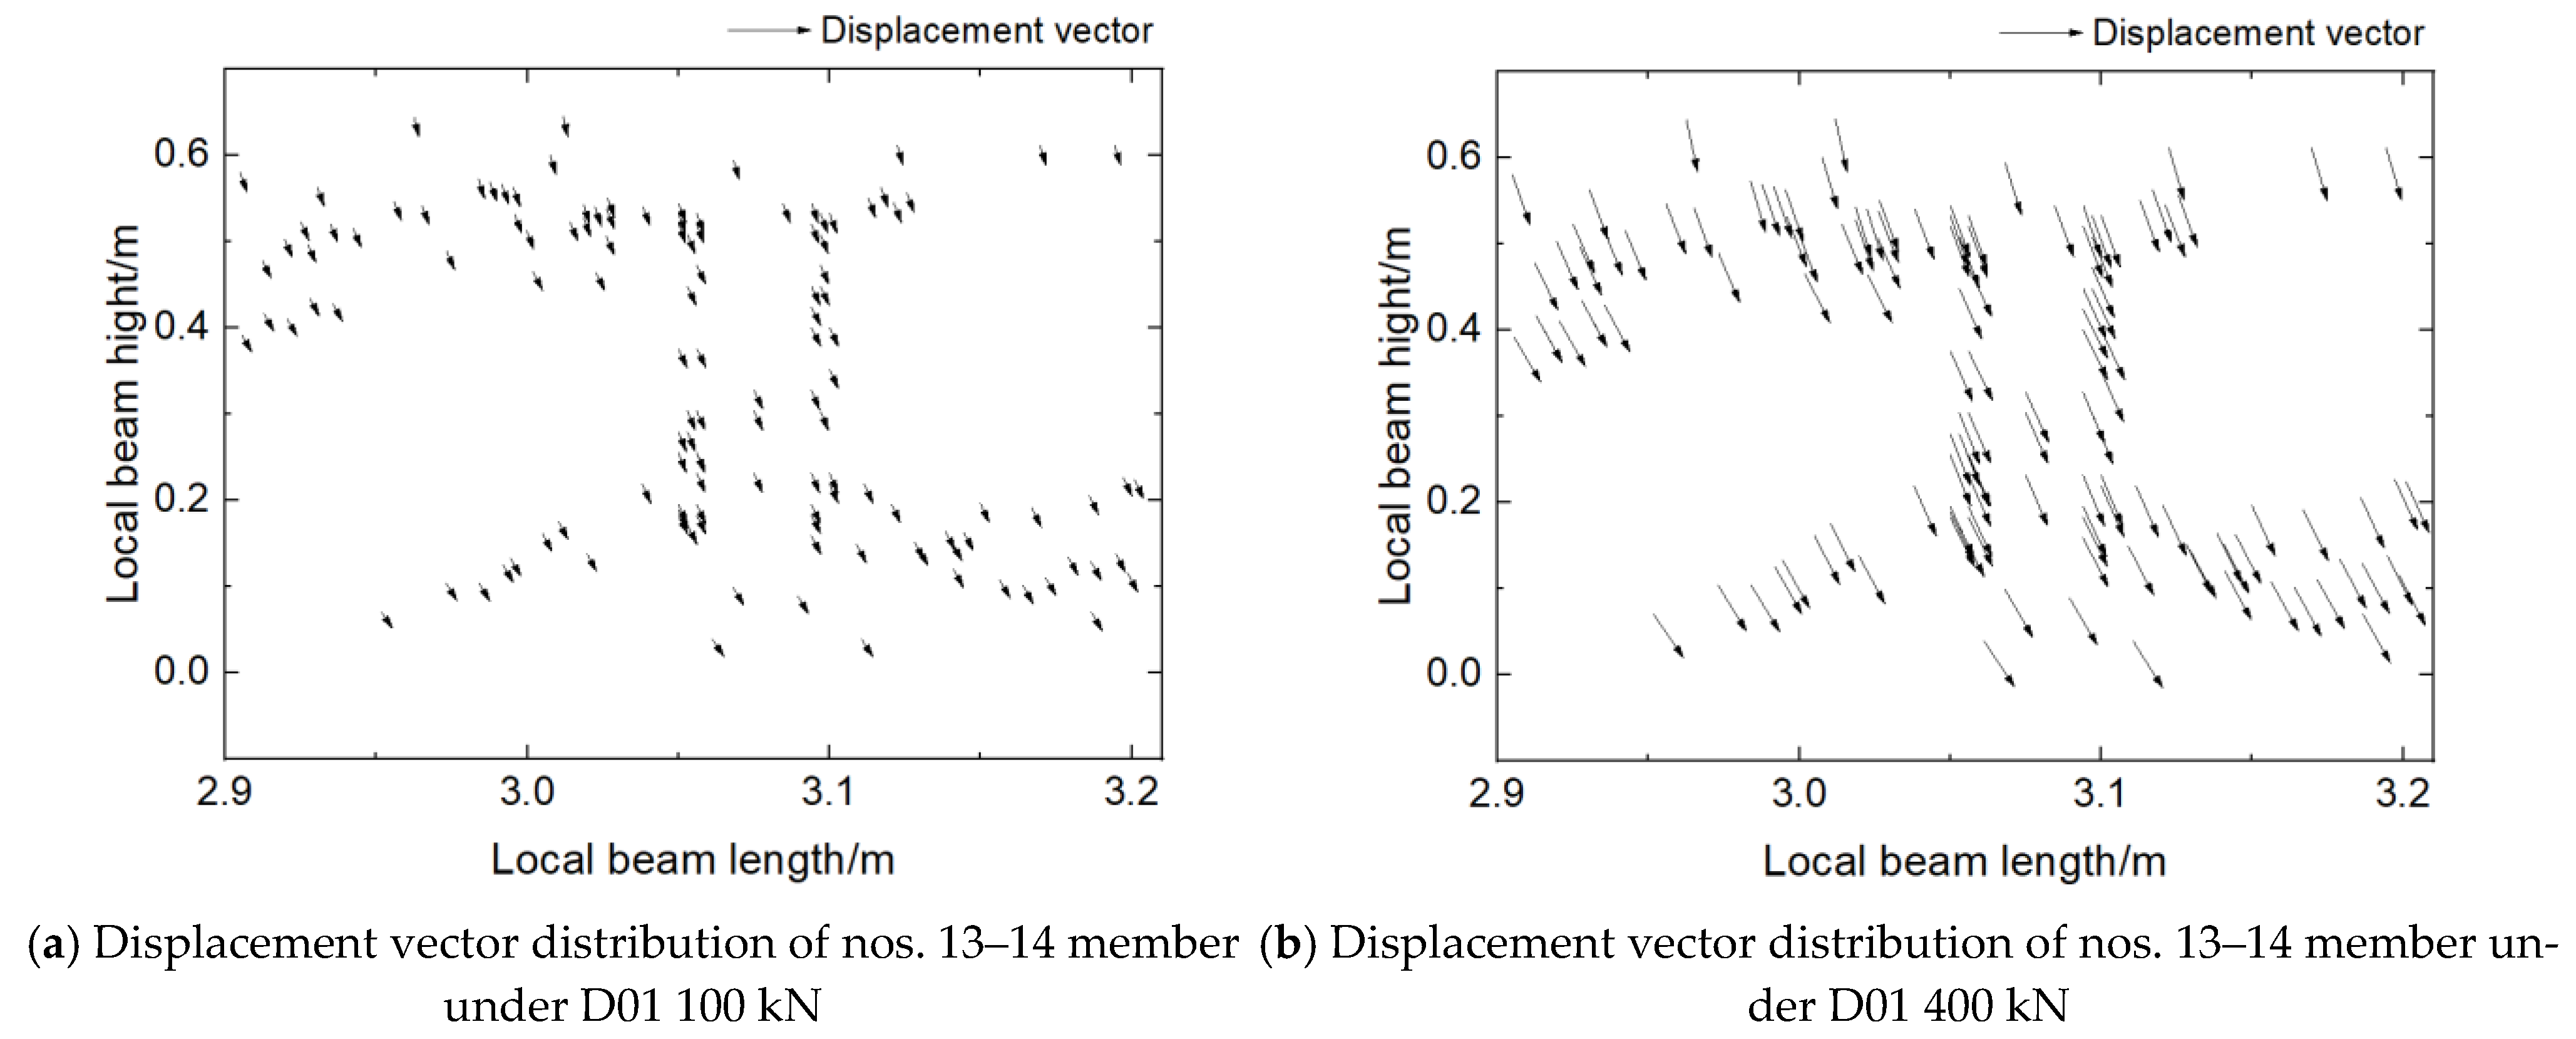
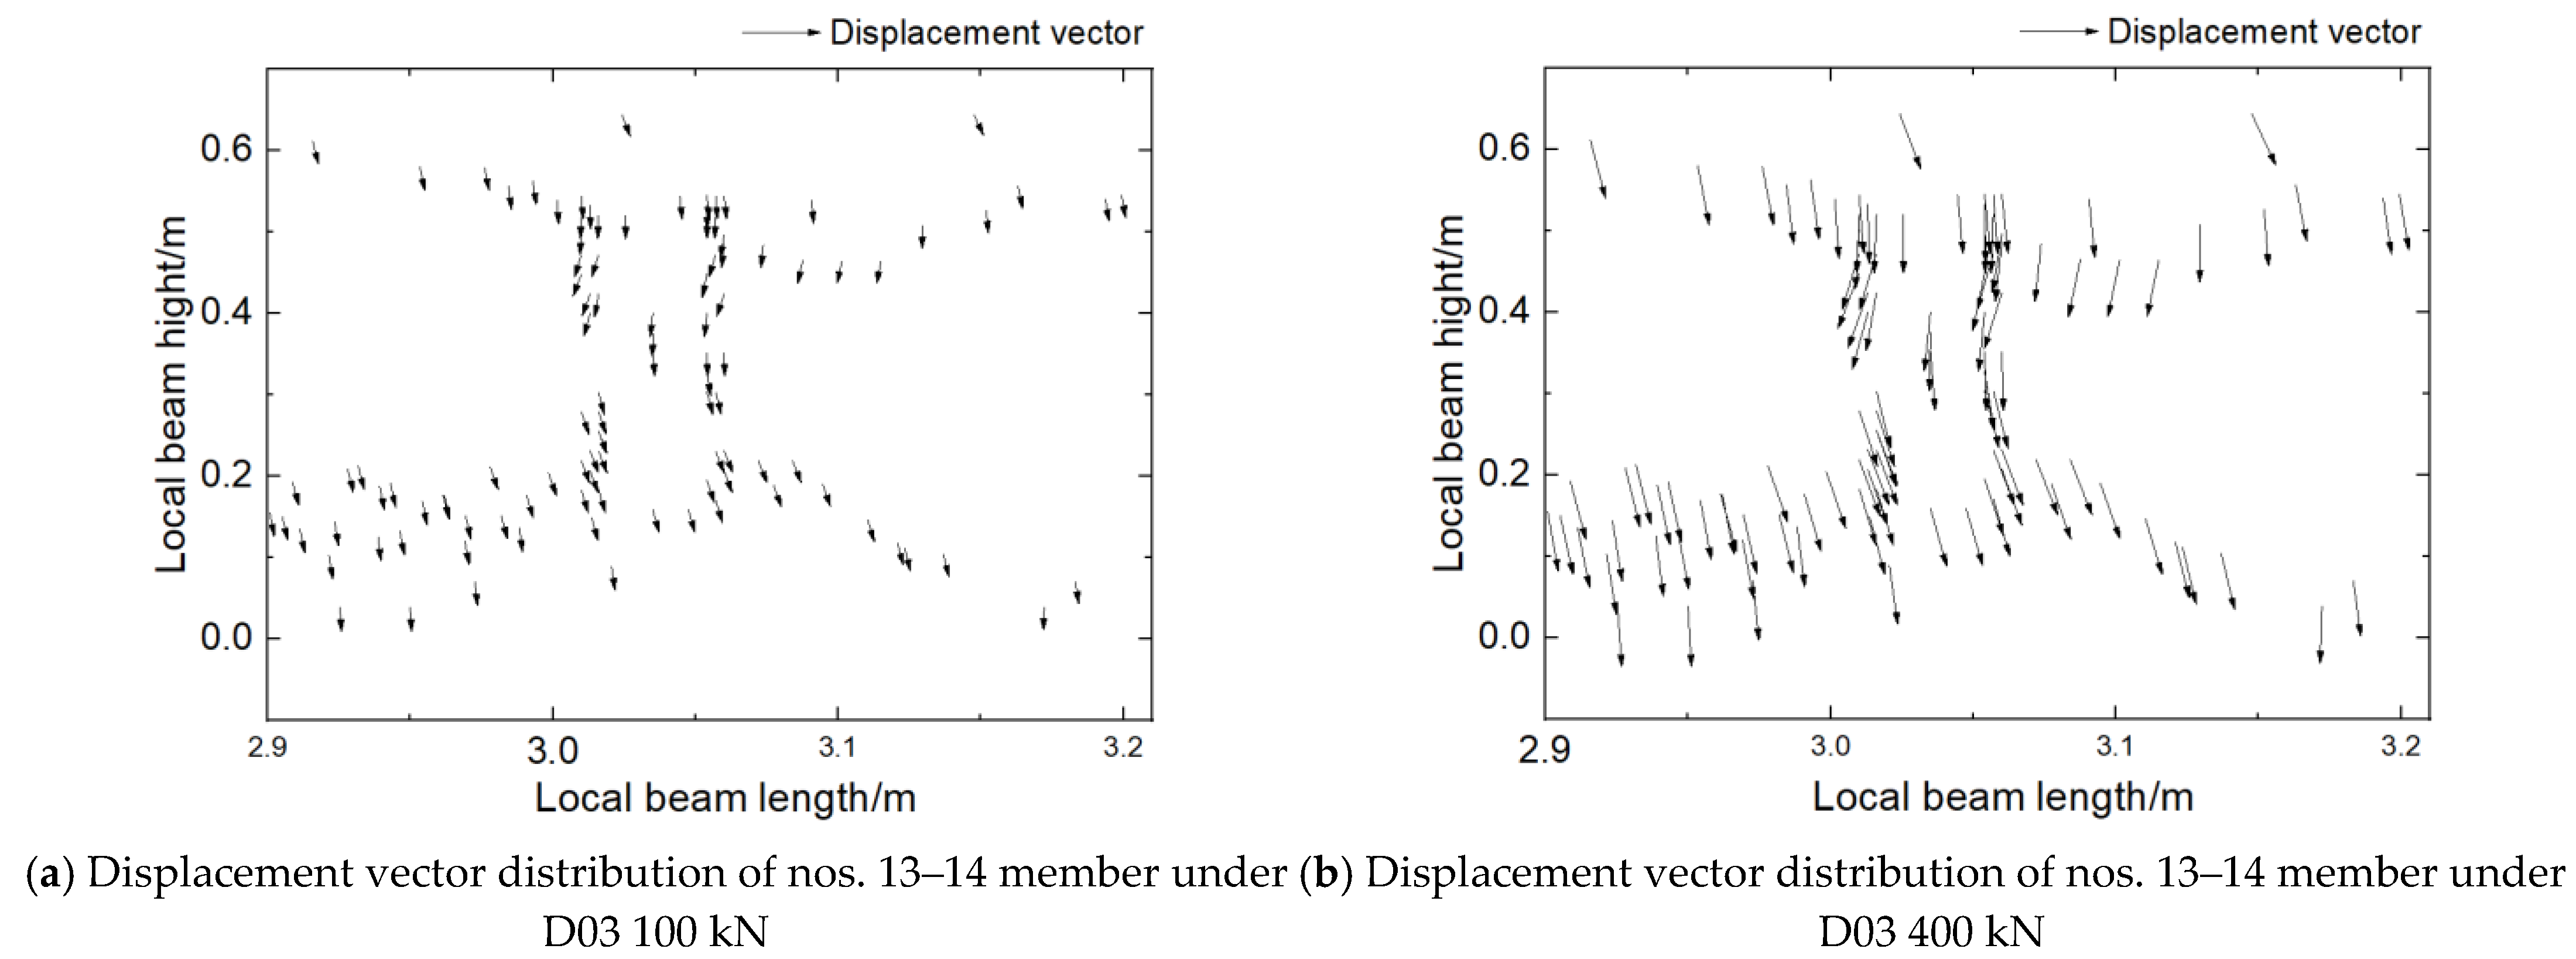
The displacement vectors for the nos. 13–14 damaged vertical member are shown in Figure 25, Figure 26 and Figure 27. Owing to space limitations, only two load levels, i.e., 100 and 400 kN, are shown under operating conditions D01–D03.
Figure 25.
Displacement vector distribution of nos. 13–14 damaged member under condition D01.
Figure 26.
Displacement vector distribution of nos. 13–14 damaged member under condition D02.
Figure 27.
Displacement vector distribution of nos. 13–14 damaged member under condition D03.
Figure 25, Figure 26 and Figure 27 show that the displacement vector distribution of the nos. 13–14 member changed significantly after damage and that the vector rotation angle was abnormal above and below the damaged section. This is because the nos. 13–14 vertical member could not form a complete structural system with the main structure due to damage, and the sections above and below the damaged section shifted freely with the gusset plate, as shown in Figure 28.
Figure 28.
Relative displacement of nos. 13–14 damaged member under load condition D03.
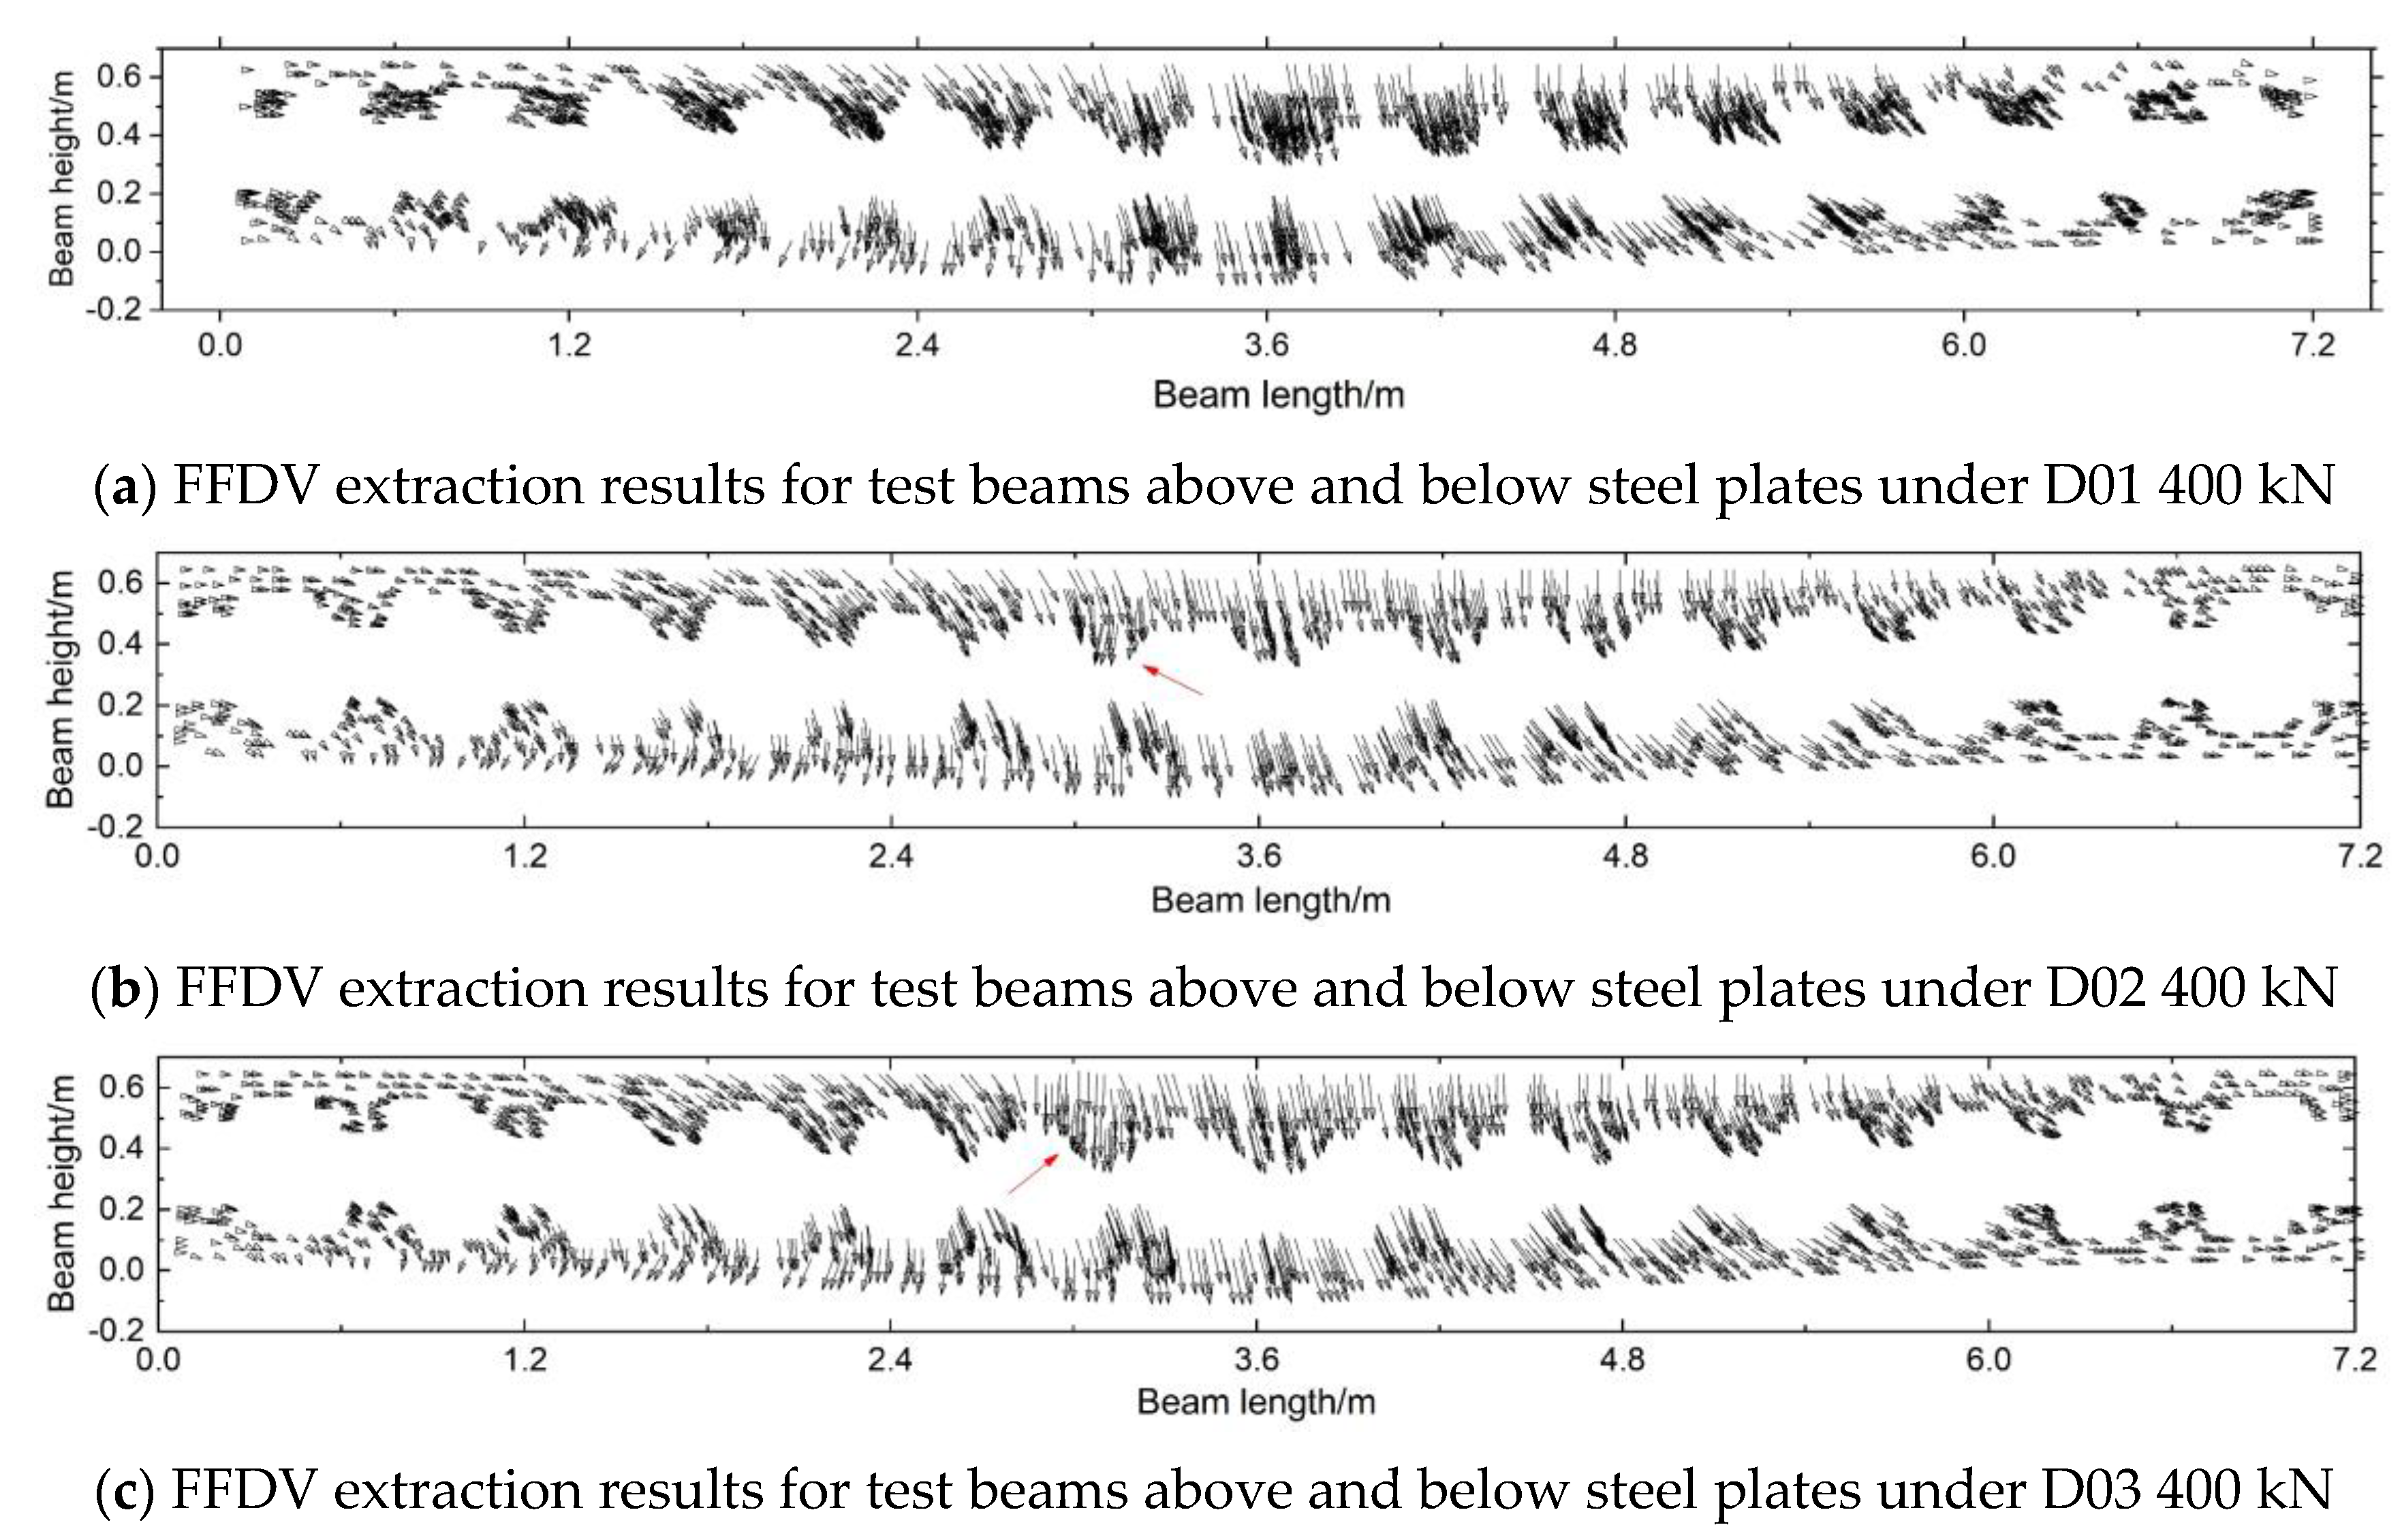
The result shows that the vector rotation angle of the damaged member was abnormally distributed; as such, the rotation angle can be used as the damage identification index for the structure’s FFDV. The FFDV above and below the steel plates was extracted based on 400 kN as an example, as shown in Figure 29.
Figure 29.
FFDV extraction results for test beams above and below steel plates.
3.2. Damage Identification Index for the FFDV of the Structure
As shown in Figure 29a, before damage occurred, the structural system was complete, and the rotation angle of the structure’s FFDV changed only slightly, thus satisfying the structure’s deformation coordination under load conditions. After the nos. 13–14 vertical member was damaged (Figure 29b), the rotation angle of the no. 13 gusset plate (as shown by the red arrow in Figure 29b) changed significantly. Since the lower section of gusset plate no. 13 could not maintain its vertical support under the load conditions, gusset plate no. 13 flipped abnormally under the inclined member (nos. 12–13) support, resulting in an abnormal rotation angle of the displacement vector on gusset plate no. 13. The nos. 12–13 inclined member was subjected to further damage (Figure 29c); consequently, gusset plate no. 13 could not maintain its support. At this time, the rotation of gusset plate no. 13 was restrained only by the transverse steel plates at both ends. Compared with the gusset plate, the transverse steel plate features a smaller section, lower stiffness, and limited restraint capacity. Therefore, gusset plate no. 13 cannot effectively coordinate with the main structure during deformation. Under load conditions, it only deformed downward, showing an abnormal displacement vector distribution under the deformation law of the structure system (as indicated by the red arrow in Figure 29c).
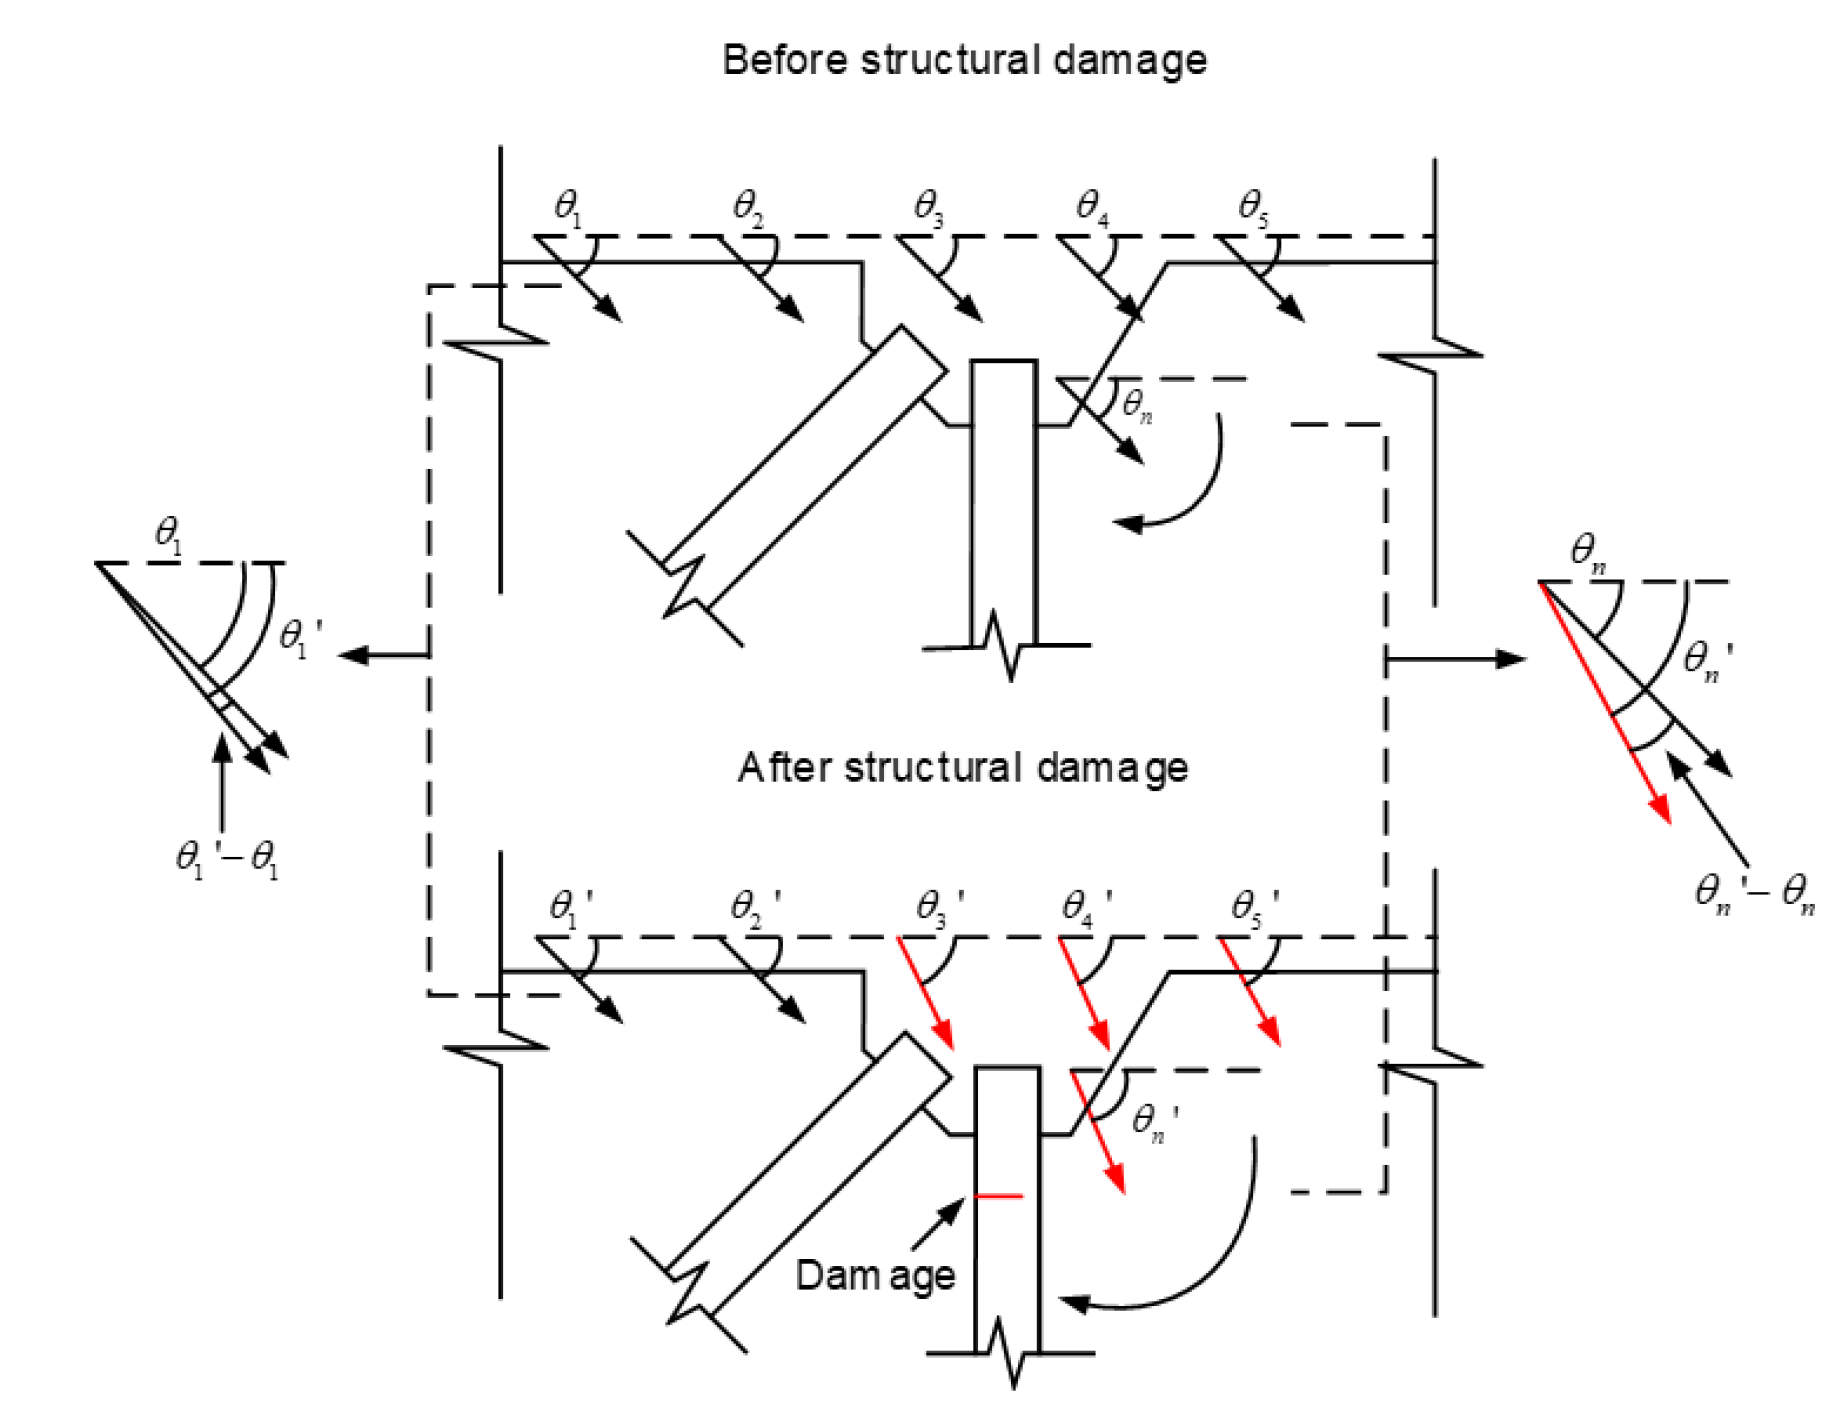
The essence of the structure’s FFDV abnormal angle, as shown in Figure 29, is that damage destroys the structure’s deformation coordination and expresses damage information via the FFDV’s abnormal rotation angle. This property can be used to analyze the FFDV’s rotation-angle change rate before and after damage. Figure 30 shows the solution model for the vector’s rotation-angle change rate, and Equation (1) shows the equation to calculate the vector’s rotation-angle change rate.
Figure 30.
Schematic diagram of displacement vector’s rotation-angle change rate.
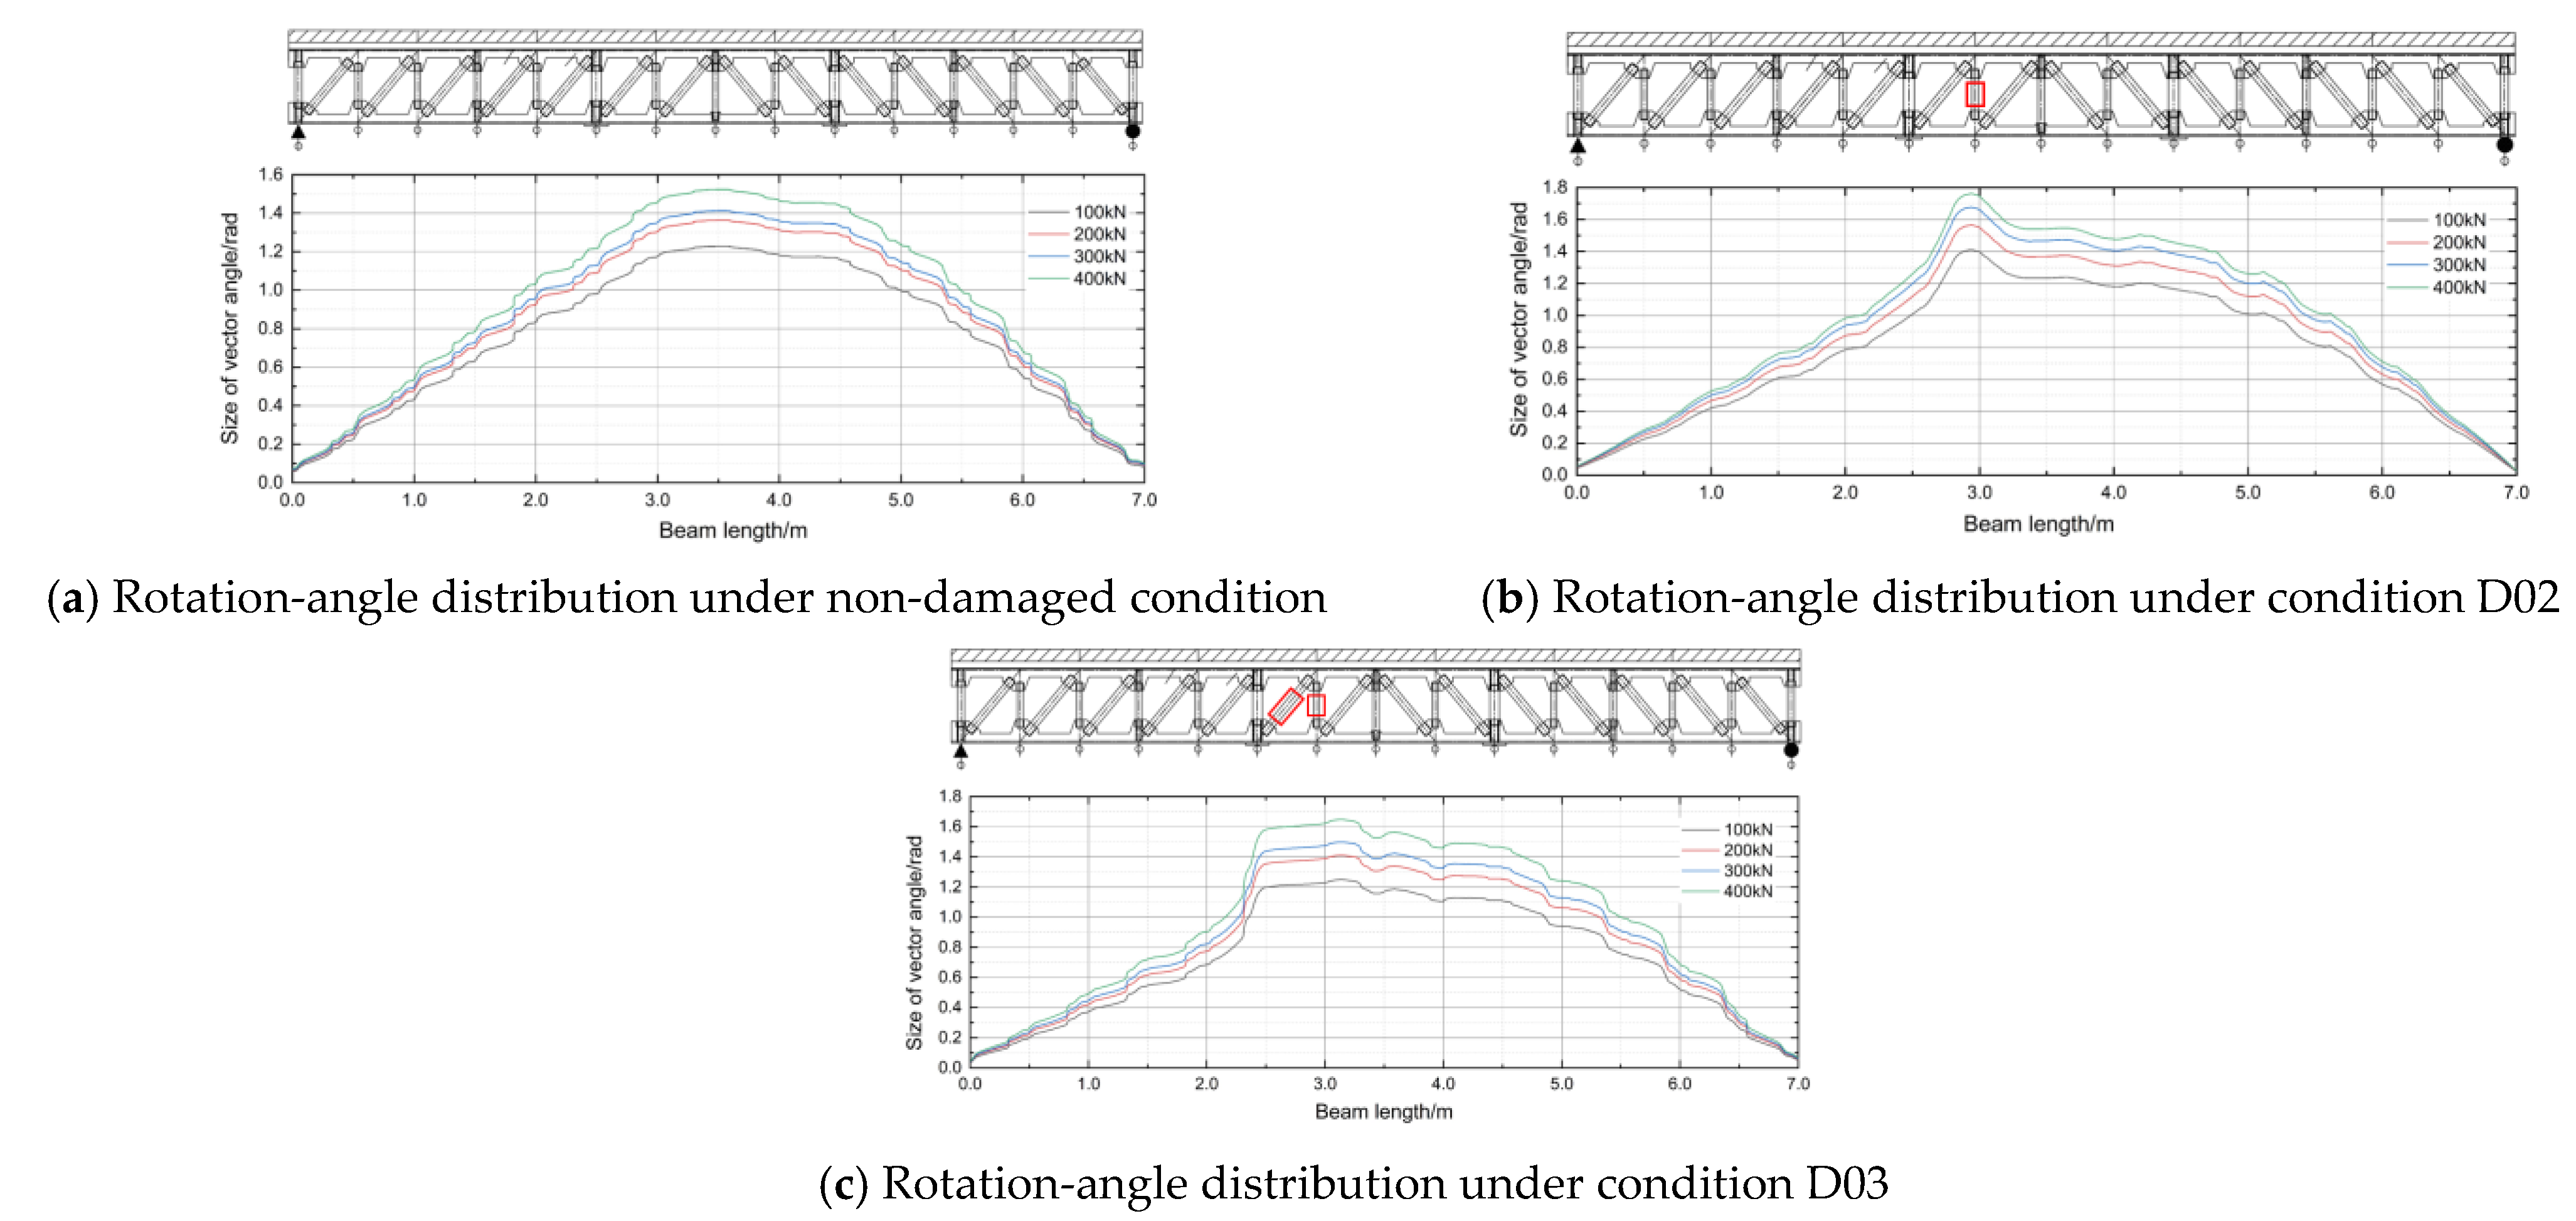
To validate the proposed damage identification index, the rotation-angle distribution of the upper chord steel plate edge was extracted. Figure 31 shows the rotation-angle distribution curve of the upper chord steel plate edge.
Figure 31.
Upper chord steel plate edge’s rotation-angle distribution under conditions D01–D03.
Subsequently, the K value for the two damage conditions was calculated, as shown in Figure 32.
Figure 32.
Rotation-angle change rate curves under two damage conditions.
Figure 32a shows the peak value of the rotation-angle change rate under condition D02 on the no. 13 gusset plate, which was situated above the nos. 13–14 damaged member. Figure 32b shows that the abnormal distribution area of the rotation-angle change rate under condition D03 was wider than that under condition D02. The peak value was near the no. 12 gusset plate, and the abnormal distribution area of the rotation-angle change rate was consistent with the position of the two damaged members, i.e., the nos. 12–13 and 13–14 members.
3.3. Validation of FFDV’s Rotation-Angle Change Rate Damage Identification Index
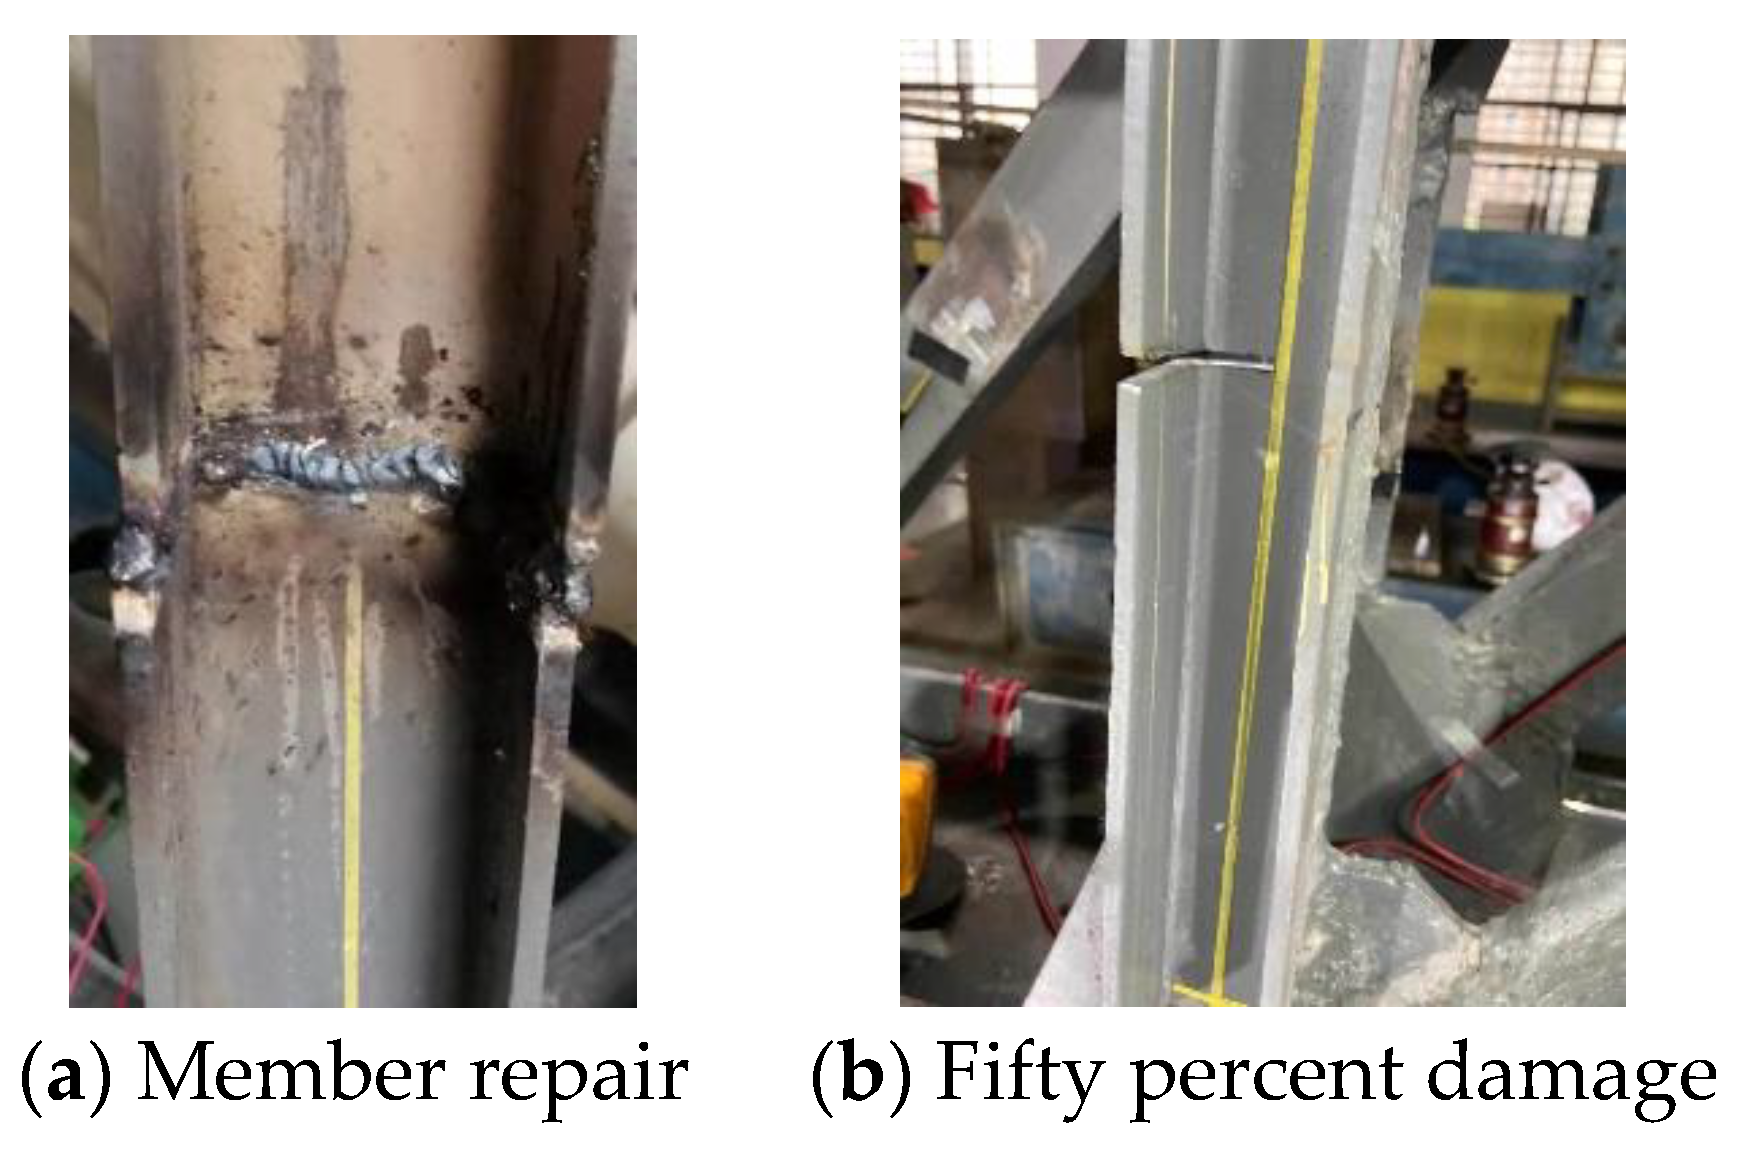
Further tests were conducted to validate the applicability of the damage identification index. The damaged members were repaired under conditions D02 and D03. After repair, the nos. 9–10, 11–12, and 13–14 vertical members were used to damage the local section. After completing a single damage condition, the damaged member was repaired prior to the next damage test. Please refer to Table 4 for the new damage conditions, Figure 33 for the location of the damaged members, and Figure 34 for the member repair and damage.
Table 4.
New damage conditions.
Figure 33.
Schematic diagram of new damaged members.
Figure 34.
Photograph of member repair and damage.
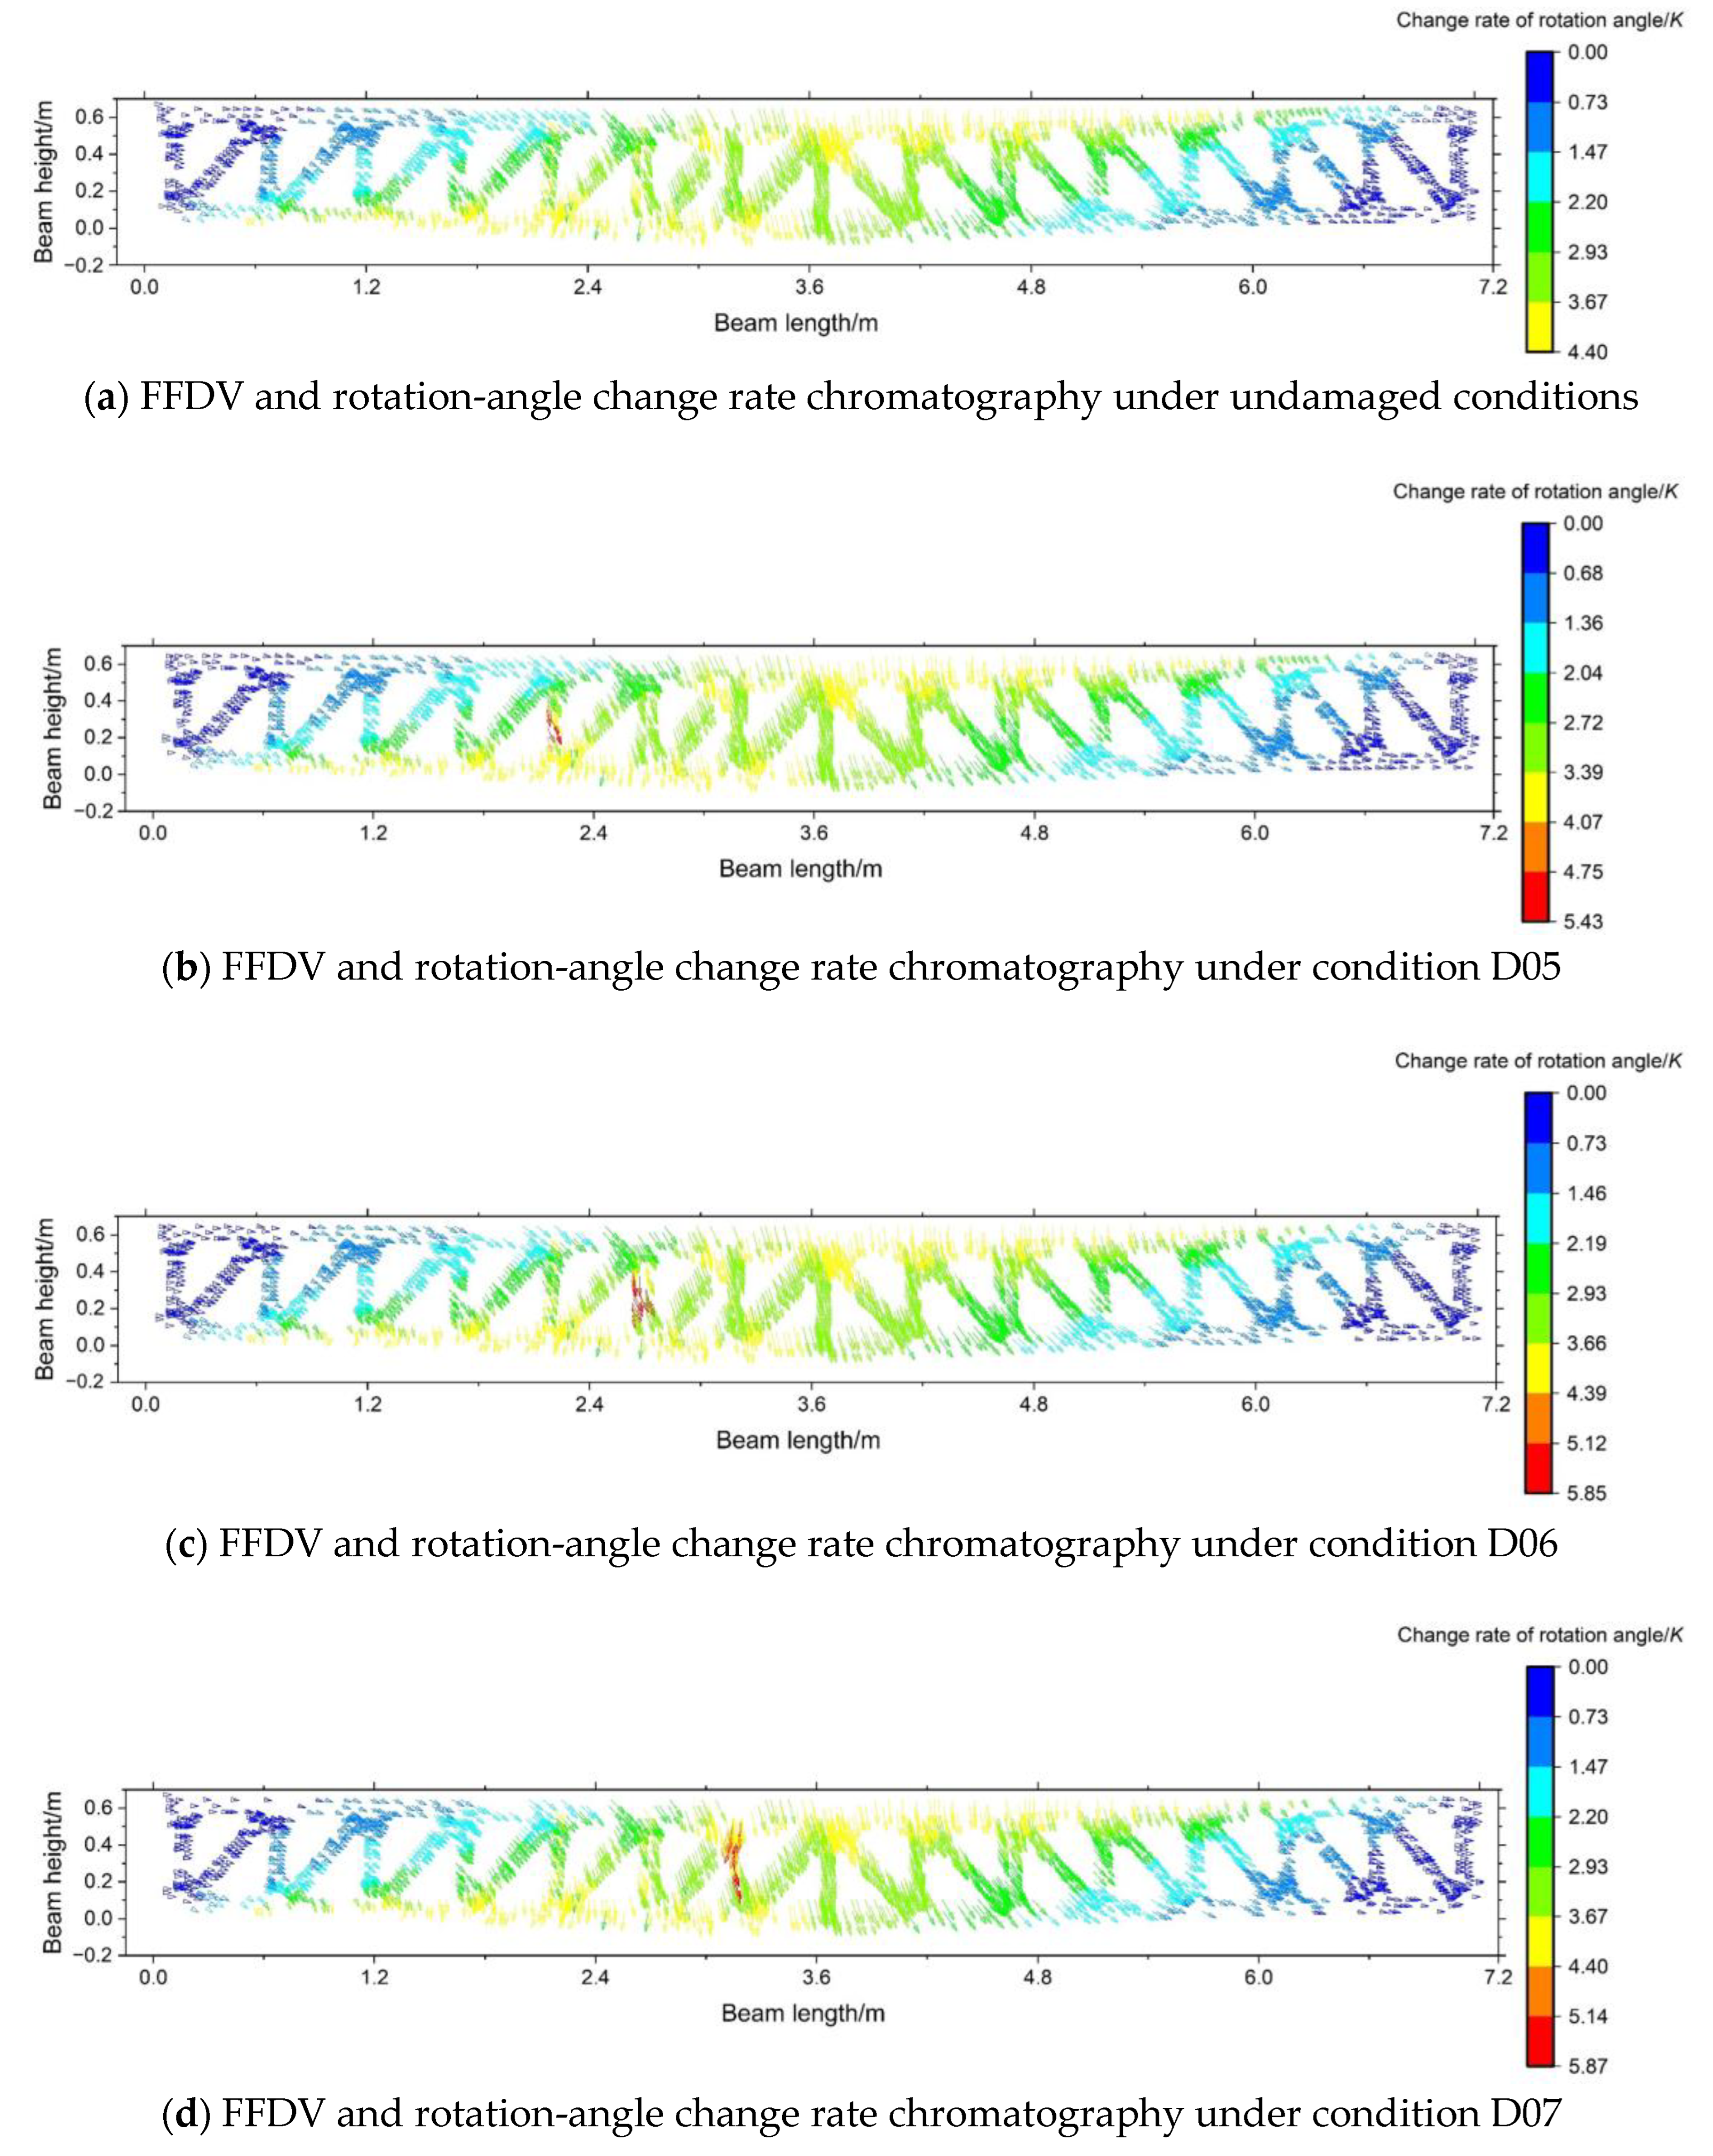
Using the method for calculating the FFDV of the structure, the FFDV of the test beam was obtained under various conditions. FFDV chromatography was performed on the rotation-angle change rate, as shown in Figure 35.
Figure 35.
Diagram of FFDV and rotation-angle change rate chromatography.
Based on Figure 35, when the structure was undamaged, the structural rotation angle changed continuously with the typical structural deformation coordination characteristics, and no abnormal rotation-angle change was observed. After the damage, the overall rotation-angle change characteristics of the structure’s FFDV showed no significant change. However, an abnormal rotation-angle change rate was observed in the damaged member. The peak value of the rotation-angle change rate was significantly higher than the average rotation-angle change rate of the structure, and the abnormal characteristics of the rotation-angle change rate of the damaged member were prominent. This verifies that the rotation-angle change rate index is highly sensitive to damage location.
3.4. Damage Identification Program for the Structure Based on the Rotation-Angle Change Rate of the FFDV
With the results presented above, an FFDV monitoring method based on the natural texture features of the structure is proposed. Furthermore, a damage identification index applicable to the structure’s FFDV is proposed. This index exhibits a peak response to the damage location. We summarize the methods detailed above to form a damage identification program based on the FFDV of the structure, as shown in Figure 36.
Figure 36.
Damage identification program.
4. Conclusions
In this study, a full-field displacement monitoring method based on natural texture features was proposed, and the abnormal characterization mechanism of the displacement vector in damaged sections was investigated. Additionally, a damage identification index was proposed for full-field displacement monitoring of the structure. The main conclusions are as follows:
- The image scale-invariant feature transform (SIFT) algorithm can be used to extract the natural texture features of a structure surface. Arranging a fixed point can constrain the positions of the feature points on the structure surface before and after deformation. The FFDV of the structure surface can be extracted by calculating the relative positional relationships between the feature points and the fixed point before and after deformation.
- A method to calibrate the monitoring resolution of structural images was proposed. The method calibrates the monitoring resolution by using the length of the feature line and the number of pixels represented by the feature line. The calibration results showed that the monitoring resolution of the test beam image in this study was 0.1771 mm.
- Results obtained with 3D laser scanning validated the accuracy of the FFDV of the structure. The validation results showed that the maximum absolute error of the full-field vector length was 0.48 mm and that the maximum absolute error of the rotation angle was 0.82°, indicating that the extracted displacement vector can accurately reflect the full-field displacement characteristics of a structure.
- The displacement vector of a structurally damaged section has been shown to indicate an abnormal rotation angle. Based on this finding, a damage identification index was proposed considering changes in rotation-angle rate. The index was proven to be applicable in the full-field displacement monitoring of the structure. Furthermore, the identification effect of this index was validated via various tests. The validation results showed that the identification index indicated an abnormal peak response at the damage location, validating the accuracy of the index in damage location identification.
- The structural FFDV extraction method expands conventional structural deformation monitoring data. Improving monitoring data dimensions renders the damage signal more intuitive, which is beneficial in solving the damage identification challenges caused by sparse monitoring data.
- The full-field displacement monitoring method proposed in this work demonstrated favorable results in the laboratory. However, actual bridge structural environments are more complicated than the laboratory environment. In particular, the noise in images is more significant. Therefore, the noise-interference problem associated with this method is recommended as a subject for future studies.
Author Contributions
X.D.: Conceptualization, Methodology, Investigation, Writing—Original Draft Preparation, Data Curation. X.C.: Conceptualization, Supervision, Project Administration, Funding Acquisition. W.Z.: Investigation, Data Curation, Validation, Software. Z.Z.: Conceptualization, Methodology, Investigation. R.L.: Writing—Review and Editing. J.M.: Writing—Review and Editing. All authors have read and agreed to the published version of the manuscript.
Funding
This work has been supported by the National Natural Science Foundation of China (grant numbers 51778094, 51708068, and 52208182); Natural Science Foundation of Shenzhen (grant number JCYJ20220531101010020).
Institutional Review Board Statement
Not applicable.
Informed Consent Statement
Not applicable.
Data Availability Statement
Data will be made available on request.
Acknowledgments
The authors would like to thank the department of the State Key Laboratory of Mountain Bridge and Tunnel Engineering at Chongqing Jiaotong University for their help in this investigation.
Conflicts of Interest
The authors declare no conflict of interest.
References
- Lee, J.; Lee, K.-C.; Jeong, S.; Lee, Y.-J.; Sim, S.-H. Long-term displacement measurement of full-scale bridges using camera ego-motion compensation. Mech. Syst. Signal Process. 2020, 140, 106651. [Google Scholar] [CrossRef]
- Ngeljaratan, L.; Moustafa, M.A. Structural health monitoring and seismic response assessment of bridge structures using target-tracking digital image correlation. Eng. Struct. 2020, 213, 110551. [Google Scholar] [CrossRef]
- Meng, L.; Zou, J.; Liu, G. Research on the Design and Automatic Recognition Algorithm of Subsidence Marks for Close-Range Photogrammetry. Sensors 2020, 20, 544. [Google Scholar] [CrossRef] [PubMed]
- Dong, C.Z.; Celik, O.; Catbas, F.N.; O’Brien, E.J.; Taylor, S. Structural displacement monitoring using deep learning-based full field optical flow methods. Struct. Infrastruct. Eng. 2020, 16, 51–71. [Google Scholar] [CrossRef]
- Chen, G.; Liang, Q.; Zhong, W.; Gao, X.; Cui, F. Homography-based measurement of bridge vibration using UAV and DIC method. Measurement 2020, 170, 108683. [Google Scholar] [CrossRef]
- Tian, Y.; Zhang, C.; Jiang, S.; Zhang, J.; Duan, W.H. Noncontact cable force estimation with unmanned aerial vehicle and computer vision. Comput. Civ. Infrastruct. Eng. 2020, 36, 73–88. [Google Scholar] [CrossRef]
- Yu, S.; Xu, Z.; Su, Z.; Zhang, J. Two flexible vision-based methods for remote deflection monitoring of a long-span bridge. Measurement 2021, 181, 109658. [Google Scholar] [CrossRef]
- Lee, Z.-K.; Bonopera, M.; Hsu, C.-C.; Lee, B.-H.; Yeh, F.-Y. Long-term deflection monitoring of a box girder bridge with an optical-fiber, liquid-level system. Structures 2022, 44, 904–919. [Google Scholar] [CrossRef]
- Lee, Z.K. Bridge Safety Monitoring Integrated System with Full Optical Fiber and the Method for Sensing Thereof. Japanese Patent No. 5, 542, 980, 21 March 2014. [Google Scholar]
- Lee, Z.K. Bridge Safety Monitoring Integrated System with Full Optical Fiber and the Method for Sensing Thereof. US Patent No. 9, 183, 739, 16 August 2015. [Google Scholar]
- Lee, Z.K. Optical Fiber Sensing Method. Unitary Patent No. EP3457105, 21 December 2020. [Google Scholar]
- Quqa, S.; Martakis, P.; Movsessian, A.; Pai, S.; Reuland, Y.; Chatzi, E. Two-step approach for fatigue crack detection in steel bridges using convolutional neural networks. J. Civ. Struct. Health Monit. 2021, 12, 127–140. [Google Scholar] [CrossRef]
- Li, Z.; Zhu, H.; Huang, M. A deep learning-based fine crack segmentation network on full-scale steel bridge images with complicated backgrounds. IEEE Access 2021, 9, 114989–114997. [Google Scholar] [CrossRef]
- Peng, X.; Zhong, X.; Zhao, C.; Chen, A.; Zhang, T. A UAV-based machine vision method for bridge crack recognition and width quantification through hybrid feature learning. Constr. Build. Mater. 2021, 299, 123896. [Google Scholar] [CrossRef]
- Feroz, S.; Dabous, S.A. UAV-Based Remote Sensing Applications for Bridge Condition Assessment. Remote Sens. 2021, 13, 1809. [Google Scholar] [CrossRef]
- Dan, D.H.; Dan, Q. Automatic recognition of surface cracks in bridges based on 2D-APES and mobile machine vision. Measurement 2021, 168, 108429. [Google Scholar] [CrossRef]
- Khayatazad, M.; De Pue, L.; De Waele, W. Detection of corrosion on steel structures using automated image processing. Dev. Built Environ. 2020, 3, 100022. [Google Scholar] [CrossRef]
- Huang, I.; Chen, P.; Chen, S. Automated bridge coating defect recognition using U-net fully convolutional neural networks. J. Chin. Inst. Civ. Hydraul. Eng. 2021, 33, 605–617. [Google Scholar]
- Jin Lim, H.; Hwang, S.; Kim, H.; Sohn, H. Steel bridge corrosion inspection with combined vision and thermographic images. Struct. Health Monit. 2021, 20, 3424–3435. [Google Scholar] [CrossRef]
- Rahman, A.; Wu, Z.Y.; Kalfarisi, R. Semantic Deep Learning Integrated with RGB Feature-Based Rule Optimization for Facility Surface Corrosion Detection and Evaluation. J. Comput. Civ. Eng. 2021, 35, 04021018. [Google Scholar] [CrossRef]
- Prasanna, P.; Dana, K.J.; Gucunski, N. Automated Crack Detection on Concrete Bridges. IEEE Trans. Autom. Sci. Eng. 2016, 13, 591–599. [Google Scholar] [CrossRef]
- Sarvestani, A.A.; Eghtesad, M.; Fazlollahi, F.; Goshtasbi, A.; Mokhtari, K. Dynamic Modeling of an Out-Pipe Inspection Robot and Experimental Validation of the Proposed Model using Image Processing Technique. Iran. J. Sci. Technol. Trans. Mech. Eng. 2016, 40, 77–85. [Google Scholar] [CrossRef]
- Yeum, C.M.; Dyke, S.J. Vision-Based Automated Crack Detection for Bridge Inspection. Comput. Aided Civ. Infrastruct. Eng. 2015, 30, 759–770. [Google Scholar] [CrossRef]
- Morgenthal, G.; Hallermann, N.; Kersten, J. Framework for automated UAS-based structural condition assessment of bridges. Autom. Constr. 2019, 97, 77–95. [Google Scholar] [CrossRef]
- Zhong, X.; Peng, X.; Shen, M. Study on the feasibility of identifying concrete crack width with images acquired by unmanned aerial vehicles. China Civ. Eng. J. 2019, 52, 56–65. [Google Scholar]
- Liang, Y.; Cai, S.; Feng, Q.P.E. appearance inspection technology of Wuhan Tianxingzhou Yangtze River Bridge Cable Based on UAV aerial photography. J. Geod. Geodyn. 2019, 39, 1207–1210. [Google Scholar]
- Lin, W.; Sun, Y.; Yang, Q.; Lin, Y. Real-time comprehensive image processing system for detecting concrete bridges crack. Comput. Concr. 2019, 23, 445–457. [Google Scholar]
- La, H.M.; Dinh, T.H.; Pham, N.H. Automated robotic monitoring and inspection of steel structures and bridges. Robotica 2019, 37, 947–967. [Google Scholar] [CrossRef]
- Li, X.K.; Gao, C.; Guo, Y.C. Cable surface damage detection in cable-stayed bridges using optical techniques and image mosaicking. Opt. Laser Technol. 2019, 110, 36–43. [Google Scholar] [CrossRef]
- Cha, Y.J.; You, K.; Choi, W. Vision-based detection of loosened bolts using the Hough transform and support vector machines. Autom. Constr. 2016, 71, 181–188. [Google Scholar] [CrossRef]
- Huang, J.; Liu, J.; Gong, H.; Deng, X. A comprehensive review of loosening detection methods for threaded fasteners. Mech. Syst. Signal Process. 2021, 168, 108652. [Google Scholar] [CrossRef]
- Chen, L.; Xiong, H.; Yang, Z.; Long, Y.; Ding, Y.; Kong, Q. Preload measurement of steel-to-timber bolted joint using piezoceramic-based electromechanical impedance method. Measurement 2022, 190, 110725. [Google Scholar] [CrossRef]
- Tang, Z.F.; Sui, X.D.; Duan, Y.F.; Zhang, P.F.; Yun, C.B. Guided wave-based cable damage detection using wave energy transmission and reflection. Struct. Control. Health Monit. 2021, 28, e2688. [Google Scholar] [CrossRef]
- Cao, J.L.; Xu, L.; Guo, S.S.; Ding, D.X. A New Automatic Seamless Image Stitching Algorithm Based on the Gray Value of Edges. Appl. Mech. Mater. 2014, 496–500, 2241–2245. [Google Scholar] [CrossRef]
- Yan, W.; Liu, C. Three projective transformations for image stitching. Opt. Precis. Eng. 2015, 23, 2724–2731. [Google Scholar] [CrossRef]
- Song, F.; Lu, B. An Automatic Video Image Mosaic Algorithm Based on SIFT Feature Matching. Adv. Intell. Syst. Comput. 2013, 181, 879–886. [Google Scholar]
- Qiang, D.; Jinghong, L.; Chao, W. Image Mosaic Algorithm Based on Improved BRISK. J. Electron. Inf. Technol. 2017, 39, 444–450. [Google Scholar]
- Li, Y.; Li, G.; Gu, S.; Long, K. Image mosaic algorithm based on area blocking and SIFT. Opt. Precis. Eng. 2016, 24, 1197–1205. [Google Scholar]
- Ma, Y.; Ren, Z. Image Mosaic Method Based on Improved SIFT Feature Detection Algorithm. Lect. Notes Electr. Eng. 2014, 270, 771–779. [Google Scholar]
Disclaimer/Publisher’s Note: The statements, opinions and data contained in all publications are solely those of the individual author(s) and contributor(s) and not of MDPI and/or the editor(s). MDPI and/or the editor(s) disclaim responsibility for any injury to people or property resulting from any ideas, methods, instructions or products referred to in the content. |
© 2023 by the authors. Licensee MDPI, Basel, Switzerland. This article is an open access article distributed under the terms and conditions of the Creative Commons Attribution (CC BY) license (https://creativecommons.org/licenses/by/4.0/).