Article

A Method for Correcting Endoscopic Images to Measure the Size of Defects on the Inner Surface of a Hole

College of Mechanical & Electrical Engineering, Shaanxi University of Science & Technology, Xi’an 710021, China
*
Author to whom correspondence should be addressed.
Appl. Sci. 2023, 13(15), 8597; https://doi.org/10.3390/app13158597
Submission received: 22 June 2023 / Revised: 19 July 2023 / Accepted: 25 July 2023 / Published: 26 July 2023
(This article belongs to the Section Optics and Lasers)

Abstract

:
A method is proposed for correcting endoscopic images to enable the measurement of inner surface defects in holes. The distortion is decomposed into circumferential and axial components based on imaging principles, and geometric constraints are added to simplify the correction model parameters to a central coordinate and nonlinear parameter, improving accuracy at the edge of endoscopic images. Experimental results demonstrate good universality with an average error rate of 5.35% in defect measurements, making it applicable for automatic and intelligent detection of hole parts and pipelines.

1. Introduction

For a long time, detecting and measuring the quality of hole parts, especially inner surface defects, have been a challenging issue for enterprises [1]. Based on principles, detection methods for inner surface defects can be divided into three categories: contact-based detection [2,3], acousto-optic electro-thermal magnetic detection [4,5,6,7,8] and visual image-based detection [9,10,11]. From an efficiency and cost perspective, visual image-based detection will be the primary direction for future development. Endoscopes have been widely used in medical and industrial detection due to their ability to extend vision and expand visual range. When using the endoscope to detect the inner surface defects of a hole, the actual inner surface is parallel to the main optical axis of the lens and presents as a circular scattering distribution on the imaging plane, which hinders identification of the contour and size of these defects. Figure 1 shows the inner surface of the hole captured by the endoscope, with (a) representing a φ18 mm hole part with four grooves on the inner wall, (b) depicting the inner surface of the M20 thread, and (c) displaying an endoscopic image of a φ20 mm hole with a square transparent calibration plate attached to its inner wall. As seen in Figure 1, the distortion of each pixel in the image is primarily influenced by its distance from the image center. Taking Figure 1c as an example, circular spots of the same size are imaged as ellipses with different shapes, and the rectangular outline of the calibration board is imaged as a part of a circular ring. In order to realize the measurement and detection of hole internal surface defects based on endoscopic images, the distortion correction of endoscopic images has become a difficult problem that must be overcome.
The structure of the endoscopic imaging system results in varying degrees of pixel distortion at different positions within the endoscopic image. The key to measuring surface defects on a hole is to correct this distortion in the image. The distortion correction methods for endoscopic images can be divided into calibration-based and projection-based corrections, depending on whether calibration is required. The calibration-based correction method obtains the lens parameters and corrects the imaging results by using a calibration board, such as a chessboard or dot matrix. For example, Zhang [12] calculated the internal and external camera parameters based on multiple images of the same target from different angles and the imaging principle in an inverse manner; Hartley [13] proposed a non-iterative method that can simultaneously obtain distortion function and camera parameters through multiple images with varying angles. However, it is difficult to ensure the consistency between the calibration environment and the application environment, making it impossible to obtain accurate calibration and measurement results.
The correction method for projection transformation involves establishing a mathematical model based on the principle of perspective projection and restoring distorted image to a projected image that conforms to human visual habits. Reference [14] and Smith [15] established a polynomial mathematical model to reflect the nonlinear distortion of the endoscopic image, obtaining polynomial parameters by fitting pixel coordinate data while ignoring high-order terms. Building upon Smith’s work, Vijayan [16] uses the least squares method to obtain parameters of the polynomial model; Ahmed [17] established a distortion model using the difference method and iteratively obtained its parameters through nonlinear search technology. In the aforementioned literature, polynomial expressions are used to describe the distortion of endoscopic images. While the correction effect is good, it requires significant resources, and errors in the algorithm increase rapidly as pixels move away from the image center. As a result, since most of the imaging area for inner surface defects is located far from the center, this method does not meet detection requirements. Mundhenk [18] expressed the image distortion as a longitude and latitude model, uniformly mapping the abscissa to the corrected position while keeping the ordinate of each pixel on the longitude unchanged; Wang [19] decomposed endoscopic image distortion into radial distortion and rigid transformation from an ideal image plane to sensor array plane, simplifying the model parameters to two angle parameters and two linear parameters. The above research has simplified the distortion model in different ways, achieving ideal correction effects while reducing resource occupation. However, there is also an issue that the accuracy of image center correction is the highest, and the error increases rapidly with the pixels away from the image center.
To detect surface defects in holes based on endoscopic images, a mapping relationship between spatial coordinates and phase plane coordinates is established according to the principle of endoscopic imaging. The distortion of endoscopic images is decomposed into circumferential and axial distortion. Circumferential distortion correction is achieved through center detection and difference expansion, while axial distortion correction is accomplished using size calibration and nonlinear stretching. By adding geometric constraints in the application scene, the parameters in the correction model are simplified to a central coordinate and a nonlinear parameter, which also ensures accuracy edge region correction of the endoscopic images. Experiments verify both the validity of this correction method as well as its accuracy in defect measurement.

2. Endoscope Imaging and Correction Principle

2.1. Endoscope Imaging Principle

The industrial endoscope generally adopts an imaging system consisting of a lens and multiple-point light sources. When the main optical axis of the lens completely coincides with the hole axis, the center of the endoscope lens is set as the origin point O (0,0,0) for the spatial coordinate. Multiple point light sources are symmetrically distributed at a distance Δ from the center of the lens. Since Δ is generally 1–2 mm less than both the depth of field and aperture of the measured object, it can be approximately assumed that their spatial coordinates are also (0,0,0).
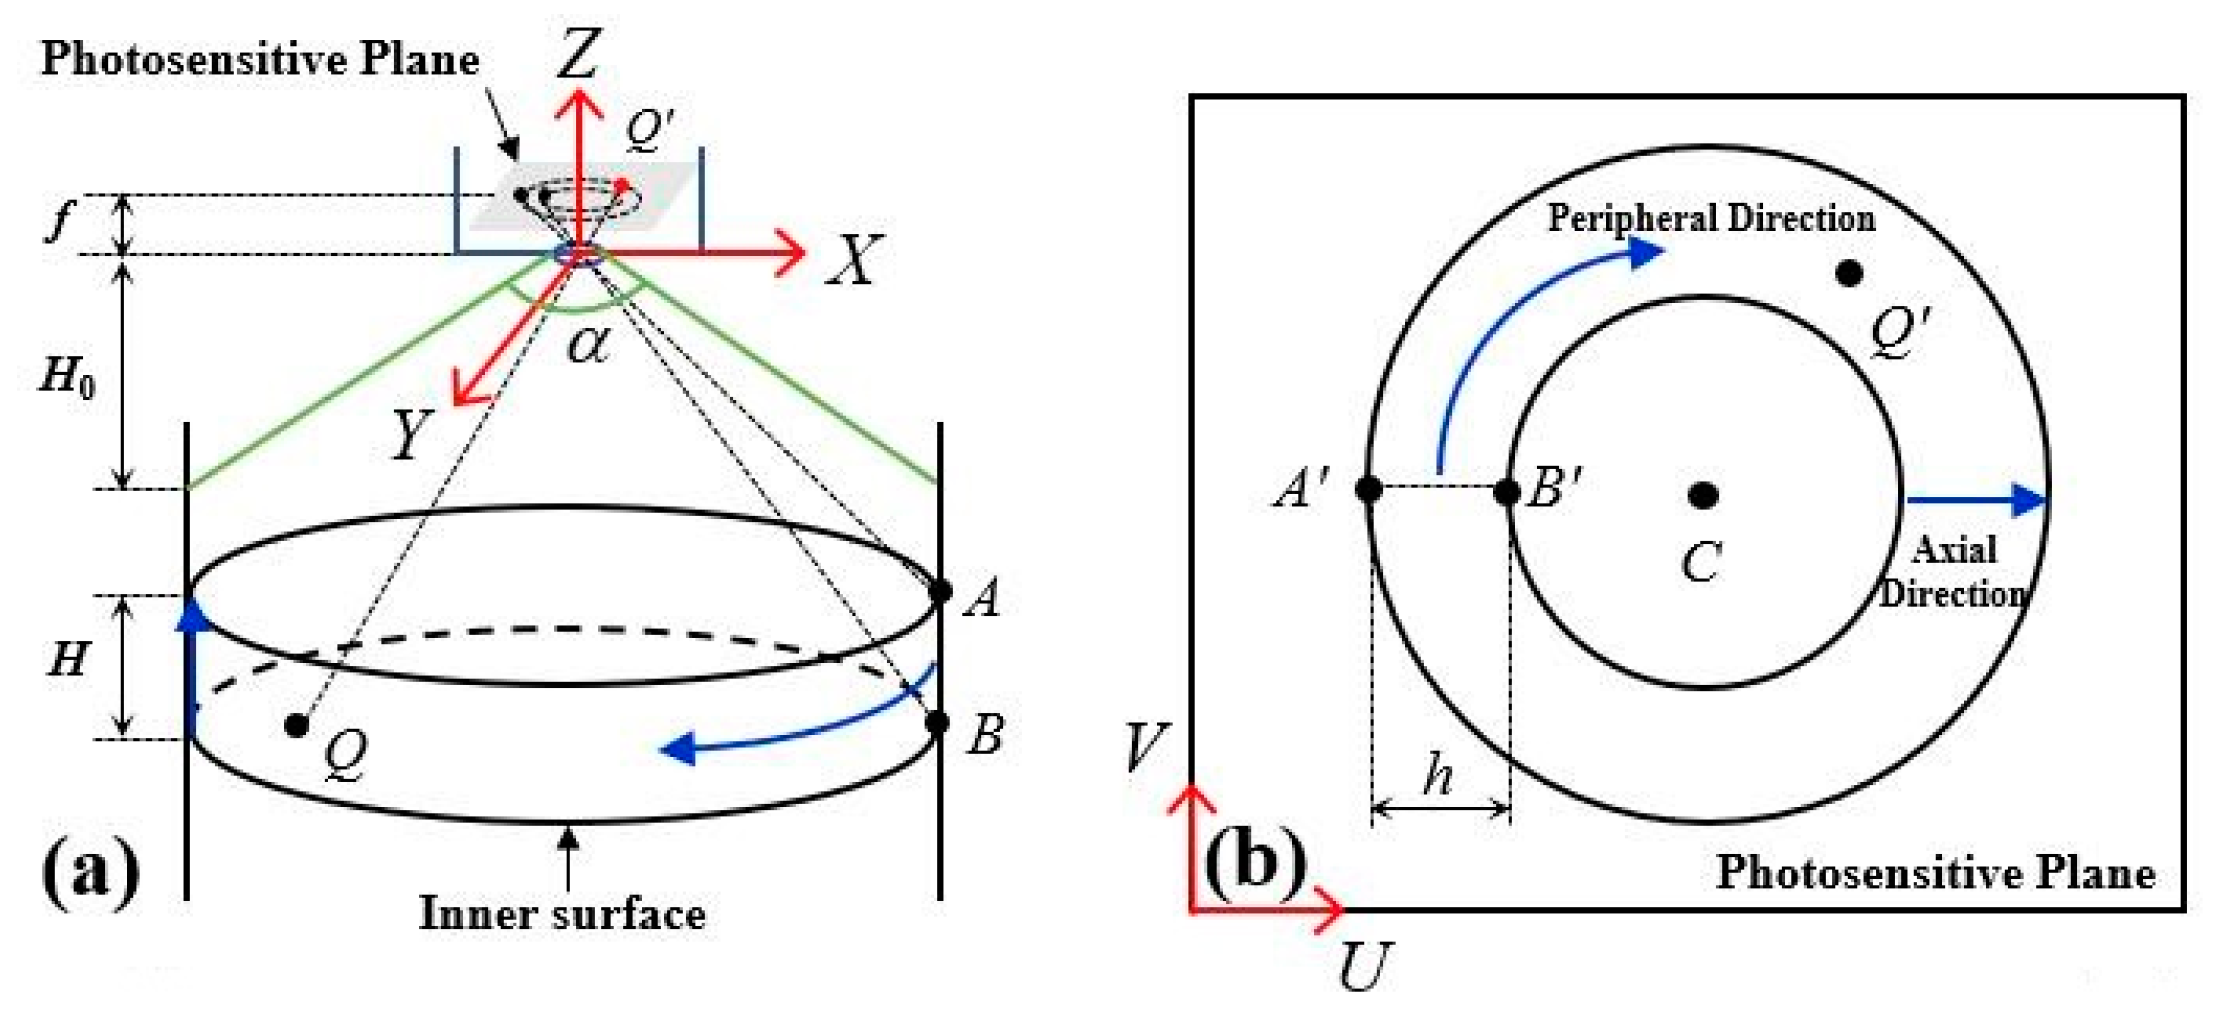
A certain point Q on the inner surface of the hole receives light and reflects the received energy as a secondary light source. However, due to limitations in the endoscope structure, only the diffuse reflection part in the direction of the lens can enter and be imaged as point Q′ on the photosensitive plane. Eventually, this is converted into digital brightness information through photoelectric sensors [20]. The essence of defect measurement based on endoscopic images is to establish a mapping relationship between the Q in the spatial coordinate system X-Y-Z and the Q′ in the phase plane coordinate system U-V. The specific imaging principle is shown in Figure 2, where (a) represents the spatial coordinate system, and (b) represents the phase plane coordinate system.
In Figure 2a, A, B and Q are points on the inner surface of the hole with AB parallel to the axis of the hole, H represents the axial distance between two points of A and B, f is the focal length of the endoscope, α is its angle of view, and H0 is its minimum depth of field. In Figure 2b, A′, B′ and Q′ represent the image points corresponding to A, B and Q points. C denotes the projection of the lens center in the phase plane and can also be understood as the image center. h refers to pixel ring width that corresponds to axial distance H on the inner surface in the phase plane. The blue arrows indicate circumferential direction and axial direction, respectively.

2.2. Image Correction Principle

The distortion in the endoscopic image results in serious deformation of the inner surface defect contour, which cannot accurately reflect quantitative information about the defect. To achieve precise measurement of internal surface defects, the image distortion is divided into orthogonal circumferential and axial distortion based on endoscopic imaging principles. The corrected image plane is established as the M-N corrected coordinate system, as shown in Figure 3.
Where A″, B″ and Q″ represent the corrected positions of A′, B′ and Q′ in Figure 2b, respectively. The blue arrow indicates the axial and circumferential directions of the hole. The core of endoscopic image distortion correction is to establish a mapping relationship between Q′ in the phase plane coordinate system U-V and Q″ in the corrected coordinate system M-N.
Let the spatial coordinates of Q point be (x, y, z) and its image point be Q′ (x′, y′, f). According to the pin-hole camera imaging model, the position of image point Q′ (u, v) in the phase plane coordinate can be expressed as Equation (1).
[ u v ] = [ f x x z + u c f y y z + v c ]
where fx = f/dx, fy = f/dy, dx represents the physical size of each pixel on the U-axis, and dy represents the physical size on V-axis. The unit of dx and dy are mm/pixel, and C (uc, vc) denotes the center coordinates of the image. According to the triangular relationship, z in Equation (1) is related to both aperture and the position of the image point in the image, and the relationship can be expressed as Equation (2).
z = f R δ ( u u c ) 2 + ( v v c ) 2
where R (in mm) represents the radius of the hole part, and δ represents the axial distance represented by each pixel on the inner surface of the hole. As a result of imaging, a ring with equal spacing on the inner surface of the hole appears as an uneven diffusion ring in endoscopic images. This can be understood as a nonlinear growth function determined by δ = G ( r ) , which is the axial distance growth function based on r = ( u u c ) 2 + ( v v c ) 2 or the distance between each pixel and center of image.
Since points at the same height on the inner surface of the hole should have identical N-axis coordinates after correction, the pixel ring with C (uc, vc) as its center in the endoscopic image should be corrected to a horizontal line in the N-M coordinate system. Assuming that the outer radius of the annulus is R and the inner radius is r, a ray starting from point O along the positive X-axis intersects with the inner circle at point a and with the outer circle at point A when the center of the known endoscopic image is C (uc, vc). The circular ring is bisected along line segment OA, with ray OA serving as the Y-axis of the unfolding coordinate system. Counterclockwise unfolding of the circular ring yields the X-axis of unfolded coordinates. Figure 4 illustrates how circumferential correction for endoscopic images works.
Assuming that the coordinate of Q″ is (m, n), according to the position mapping relationship, we can obtain
{ u = ( m U A ) cos φ + u c v = ( n V A ) sin φ + v c
where φ = arctan 2 π ( u u c ) 2 + ( v v c ) 2 u c u A , (UA′, VA′) represents the coordinates of the leftmost point A′ in the phase plane. The circumferentially corrected image has a height of h pixels and a width of 2 π ( u c u A ) pixels. The central coordinates (uc, vc) of endoscopic images can be obtained through Hough center detection method.
Any axial contour line on the inner surface of the hole is projected as a ray emitted from the image center in the endoscope image. The axial distance represented by each pixel on the ray differs in reality, and pixels closer to the center of the image correspond to greater actual distance. The objective of axial correction is to equalize the axial distance for each pixel. This is achieved by performing nonlinear stretching on the circumferential corrected images along the n-axis direction. The key lies in determining δ = G ( r ) , which represents an axial distance growth function that can be obtained through function fitting based on surface background information within the hole. Figure 5 illustrates the principle of axial correction for endoscopic images.

3. Image Acquisition and Distortion Correction

3.1. Image Acquisition Scheme

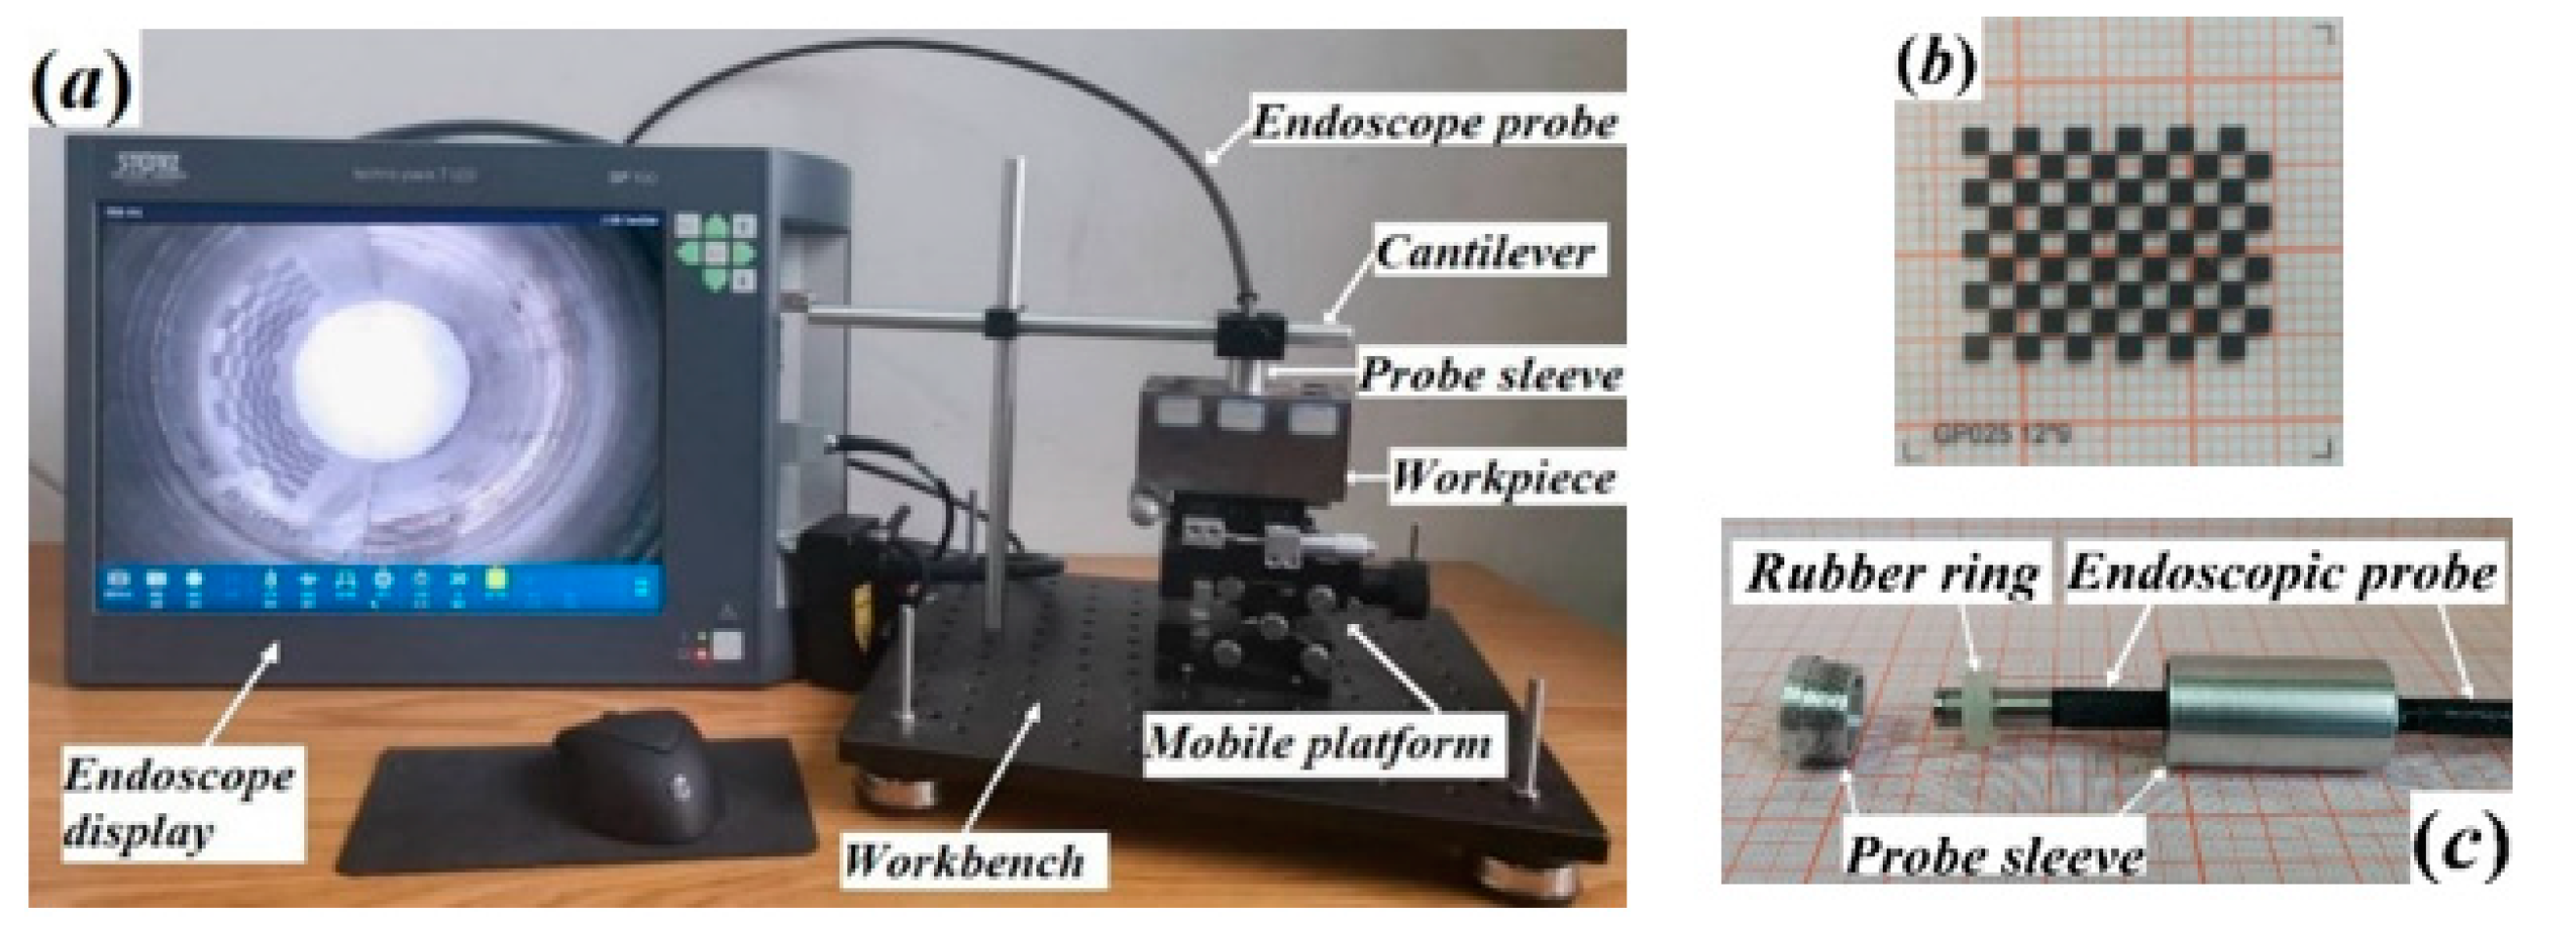
The image acquisition setup is depicted in Figure 6a. The hole part should be placed on a workbench that can move along the X, Y and Z direction. The endoscope probe should be fixed downward at the front end of the workbench cantilever. The diameter of the hole is 20 mm, and its depth is 80 mm. The calibration paper close to the inner wall of the hole serves as the shooting target. This paper has transparent standard paper with 9 × 12 black squares measuring 1.5 mm × 1.5 mm (as shown in Figure 6b). To ensure that the main optical axis of the lens always coincides with the hole axis, a self-made endoscopic probe sleeve with an external diameter of 19.5 mm is used to fix its position, as shown in Figure 6c.
The STORZ SP100 endoscope from Germany was used for photography, with an outer diameter of 6 mm and a V0507WAHMV lens model providing an 80° shooting angle and depth of field ranging from 7–80 mm. We determined the lens focal length at 41.6 mm by taking the ratio of foreground depth to back depth of field as 0.9 due to the small dispersion circle compared to shooting distance. Additionally, we found that there is a distance of 1.5 mm between the lens center and point light source emitting less than 5 nm luminous power at precisely 639 nm wavelength.
When acquiring the image, position the workpiece vertically on the movable platform and align the thread entry point with the aperture’s rightmost end. Adjust both X and Y axes to align the endoscope probe sleeve with the workpiece aperture, then adjust the Z axis for smooth insertion of the probe sleeve into the threaded hole while using a magnet to secure the workpiece. Capture the initial image when the threaded mouth reaches the frame edge by the lowering platform; gradually raise it and capture subsequent images at each height adjustment until selecting an ideal image exhibiting uniform illumination and distinct brightness variation while recording its corresponding platform elevation. The shooting results are shown in Figure 7a.

3.2. Circumferential Distortion Correction

Before correction, the collected images of the inner surface of the holes need to undergo preprocessing [21], which includes gray conversion, median filtering and Laplacian sharpening. The gray conversion process uses a weighted average method that considers human sensitivity to three-channel colors. Each component is assigned a weight of 0.299, 0.587 and 0.114, respectively, to derive the corresponding gray value. Median filtering involves using the median gray value of a 3 × 3 neighborhood surrounding each pixel as its own gray value, while Laplacian sharpening utilizes second-order differentiation in eight directions within a 3 × 3 neighborhood to reflect abrupt changes in pixel grayscale values. Image sharpening can be achieved by adding this result to the original pixel. The results are shown in Figure 7b.
Since the tool path is circular during hole machining process, Hough transform [22] is used to detect the center of the background texture in the peep image and consider it as the image center (uc, vc). Firstly, the edge information is detected based on the discontinuity of the gray value of the image. Then, edges with a circular arc feature are identified using the Hough transform algorithm. By searching for maximum circle center overlap in the parameter space, contour and center coordinates that best match arc characteristics are obtained.
The essence of the Hough circle detection algorithm lies in converting image plane coordinates into Hough space coordinates. A circle can be expressed in Cartesian coordinates as (x − a)2 + (y − b)2 = R2, where a point (xi − a) + (yi − b)2 = R2 is substituted. This equation represents a cone in Hough space with three parameters: a, b, and R. When this cone is projected onto the a-b plane, it becomes a circle. All circles with equal radii in Cartesian coordinates correspond to intersecting circles on the a-b plane in Hough space that share one common point. By identifying the most frequently occurring overlapping points in Hough space and subsequently converting them back to Cartesian coordinates on the image plane, a circle can be obtained with its center serving as the focal point of the image.
The process of image preprocessing and circle center detection is shown in Figure 7, where (a) represents the original image, (b) shows the result of preprocessing, (c) displays the edge detection result, and (d) demonstrates the image center detection outcome. All image sizes are 980 × 720 pixels, and the endoscopic image’s center coordinates are (492, 348). Based on these coordinates, Figure 8 illustrates the circumferential correction results obtained using the difference expansion algorithm.
The goal of circumferential correction is to ensure the points with equal circumferential spacing on the inner surface of the hole maintain equal spacing after correction, while also ensuring that any circumference of the inner surface of the hole has consistent horizontal coordinates in the corrected image. As shown in Figure 6, the width of each calibration block is consistently maintained after circumferential correction. The pixel width was calculated by reading pixel coordinates and had an average of 44.76 pixels with a standard deviation of 1.53, indicating ideal correction effects. After correction, each pixel represented an actual circumferential arc length of i = 0.0335 mm/pixel. The N-axis coordinates of nine lines’ calibration block centroids were counted, and their standard deviation was calculated as shown in Table 1.
In Table 1, the minimum standard deviation in Row 6 is only 1.506. The pixels with large deviation are mainly concentrated at the top and bottom of the image due to inaccurate centering of the endoscopic image, causing horizontal pixel fluctuations. Additionally, there is a certain error in the imaging process itself because the top and bottom of the calibration paper are located in the edge region of the depth of field.

3.3. Axial Distortion Correction

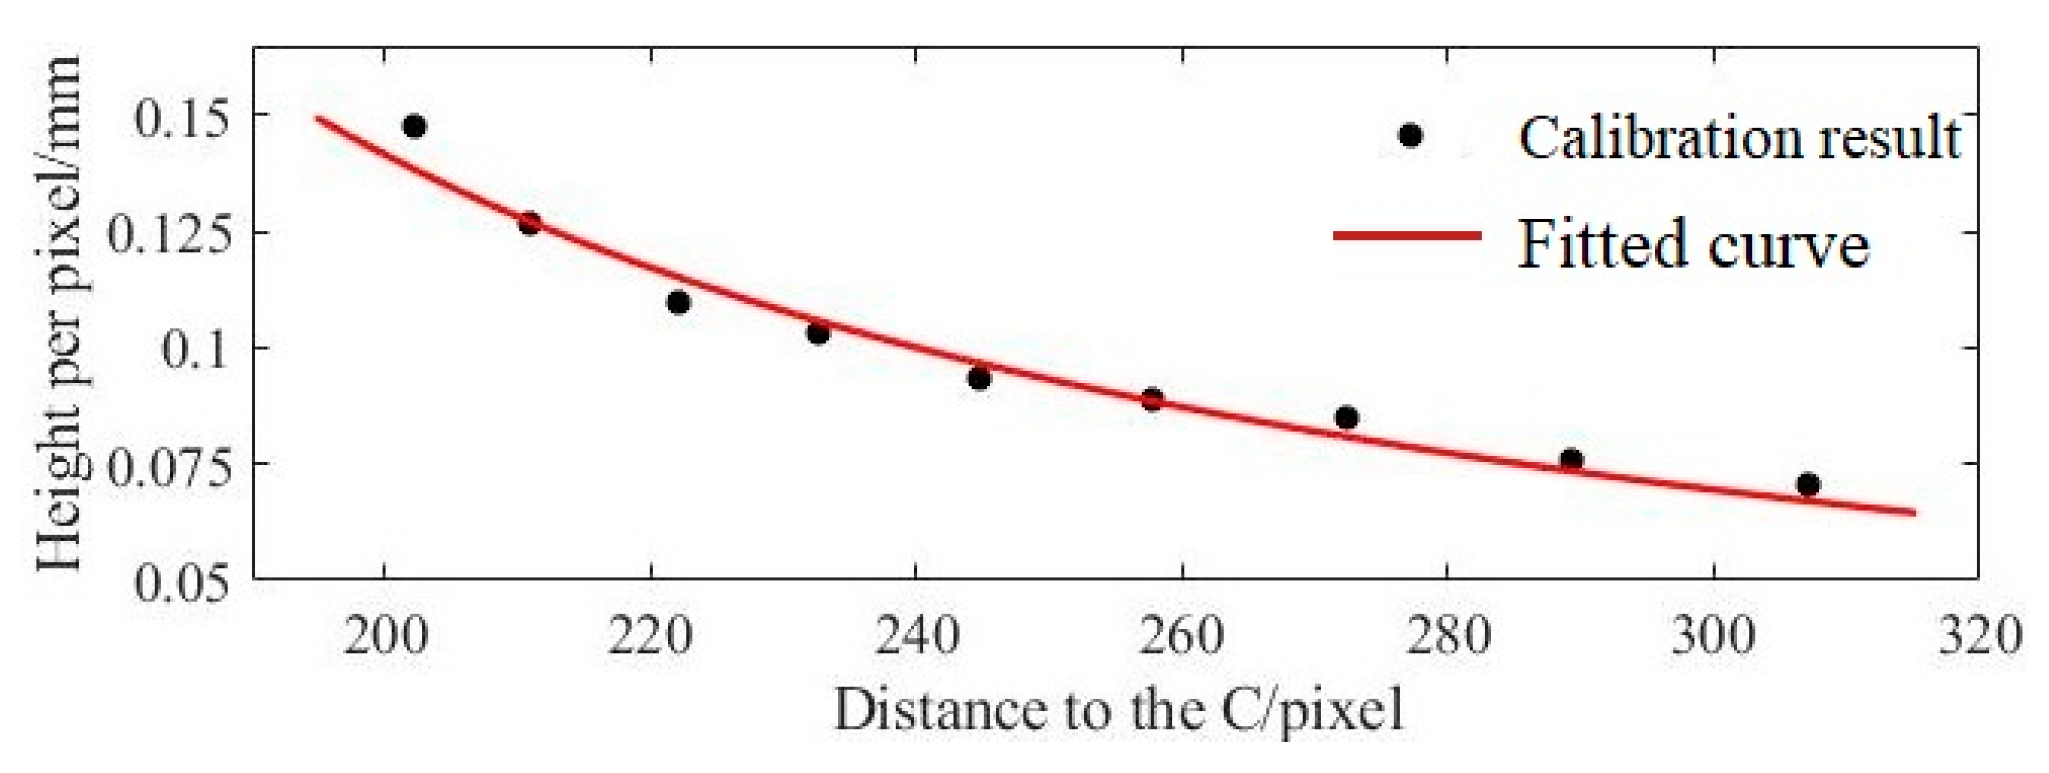
The purpose of axial correction is to ensure that all calibration blocks have the same height. This is achieved by fitting a function δ = G ( r ) based on the n-axis coordinates of the mass center of the calibration block and the known axial distance in the hole and then non-linearly stretching the image according to this function. When fitting, either the maximum radius rmax of the image at the minimum depth of field or the bottom circle rmin at the maximum depth of field can be selected as a benchmark for intercepting the image.
When selecting rmax as the reference, it is necessary to determine the minimum depth of field of the endoscope H 0 = R cot ( α / 2 ) using the lens wide angle α and aperture R, as shown in Figure 3a. If rmin is used as the reference, the distance between the bottom end of the hole part and the lens must be known. In this paper, since we know the height of hole parts, calibration results are presented in Figure 9. Where the X-axis represents the distance r from the pixel to the image center (in pixel), and the Y-axis represents the height (in mm) of the inner surface of each pixel at the centroid position of the calibration block. The fitting result is δ ( r ) = 13.65 / ( r 107.2 ) with goodness-of-fit R2 = 0.968 and RMSE = 0.0046, which indicates satisfactory results.
Based on the fitting results, nonlinear stretching was performed in the vertical direction (N-axis) of Figure 6, and the outcomes are presented in Figure 10.
By observing Figure 10, it can be seen that the height of each calibration block remains consistent after circumferential correction. The pixel height of all calibration blocks was calculated and found to have a mean value of 13.02 pixels with a standard deviation of 1.25, indicating an ideal correction effect. After correction, each pixel represents an actual circumferential arc length of j = 0.1152 mm/pixel. The mean and standard deviation were calculated in behavioral units and are shown in Table 2.
Table 2 shows that the maximum standard deviation is only 1.169, and the average of the nine standard deviations is 0.95, indicating good consistency in representing axial distance with pixels of the same height in the hole. By calculating the deviation between the row mean and the total mean, it was found that there are certain inter-group differences as indicated by a distribution range of approximately 20%. The main reason is that the fitting data for δ = G ( r ) comes from the axial correction results, and there are inevitable errors in the process of detecting the image center.

4. Influencing Factors and Error Analysis

4.1. Effect of Aperture on Correction Error

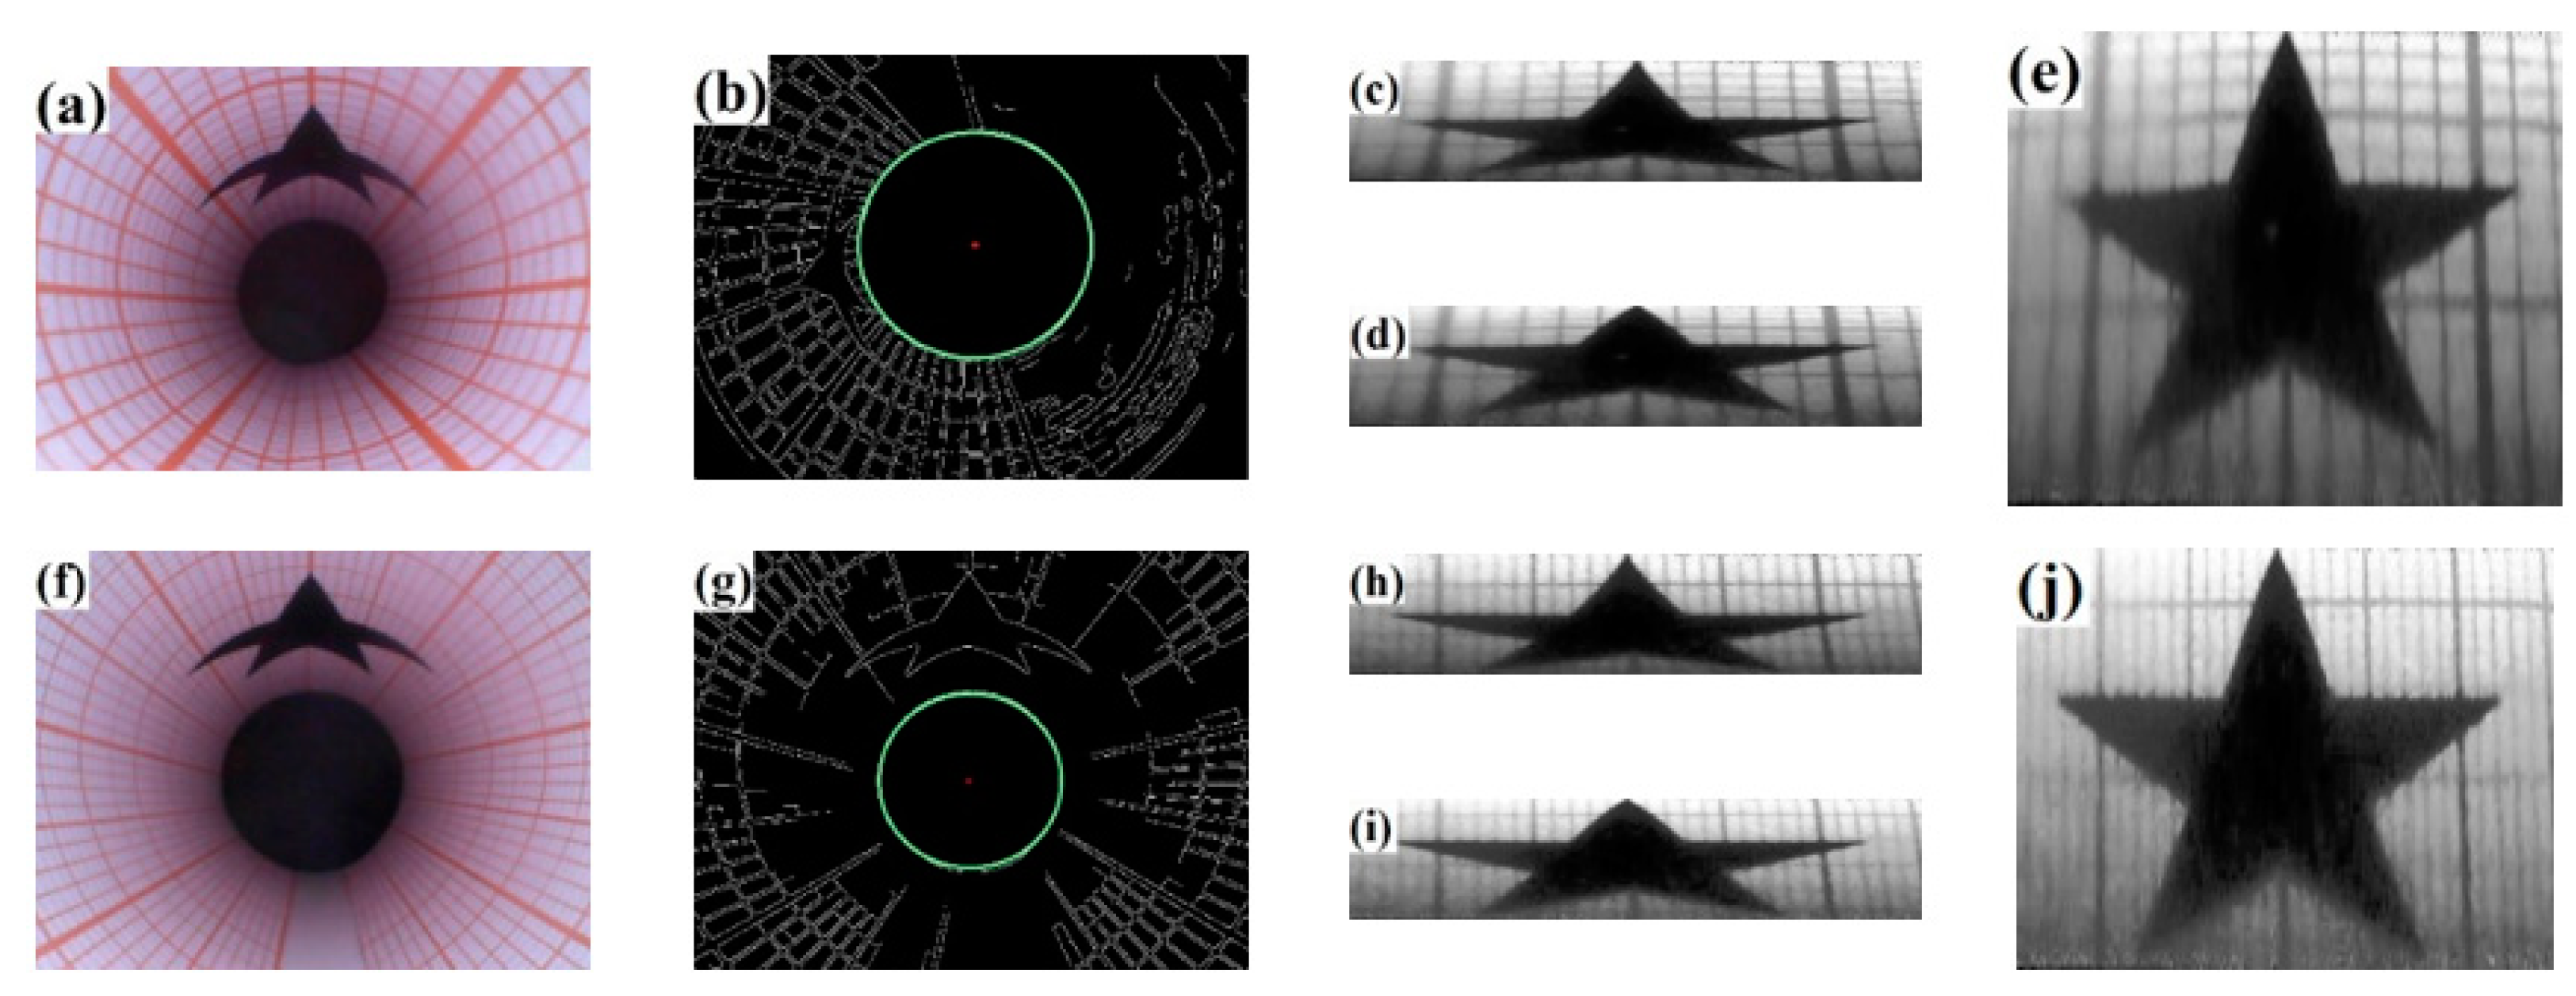
To verify the applicability of the correction method and analyze the error source further, experiments were conducted using φ12 mm and φ28 mm holes as examples. Internal surface defects were simulated by pentagonal stars with known sizes. Endoscopic images were obtained and corrected under the same conditions and methods. The correction process and results are shown in Figure 11. Where (a)–(e) represent 12 mm holes, and (f)–(j) represent 28 mm holes; (a) and (f) show the original images, (b) and (g) display image center detection results, (c) and (h) display the circumferential correction results, (d) and (i) represent the axial correction results, and (e) and (j) represent the final correction results. The image centers of 12 mm is (305, 386) and the 28 mm is (318, 378).
As shown in Figure 11, the pentagonal star in the corrected image has been restored to its original positive five-pointed star. To verify the accuracy of the correction algorithm, we extracted the vertex coordinates of the pentagonal star, calculated its edge length in pixel distance and the measurement error based on unit pixel size. The results are presented in Table 3.
Table 3 shows that the deviation range of the experimental measurement results has been reduced from nearly 20% to less than 5%, indicating that the correction method is suitable for correcting distortion in inner surface images with different apertures. The decrease in the deviation range demonstrates that the correction and measurement accuracy of the experiment have shown a significant improvement in both correction and measurement accuracy. One reason for this improvement is that the verification experiment used a larger area of calibration paper as background, and the grid on the calibration paper improved the accuracy of the image center detection algorithm.

4.2. Effect of Image Center on Correction Error

To analyze the influence of image center on the correction error, the center detection results were adjusted based on the above experiments. Then, the same method was used for correction and statistical measurement error. The image center of the φ12 mm hole endoscopic image was adjusted to (295, 386) and (315, 386), while that of the φ28 mm hole endoscopic image was adjusted to (318, 368) and (318, 388). The correction results are shown in Figure 12 where (a) and (b) represent φ12 mm holes, while (c) and (d) represent φ28 mm holes.
Figure 12 shows that the center detection results have a relatively significant impact on the image correction results. When the image center shifts horizontally, there will be convex and concave deformation in the correction results, while vertical shifts will cause tilt deformation. The measurement error of the pentagonal side length is calculated after adjusting for image center, and the results are presented in Table 4.
Table 5 shows that the standard deviation and deviation range of the side length increase significantly when adjusting the image center horizontally, but even more so when adjusted vertically. This indicates that the accuracy of correction is greatly affected by the detection result of the image center. As most imaging planes have an aspect ratio greater than 1, it is recommended that internal surface defects are captured in a vertical direction by rotating the endoscopic probe during shooting, which can reduce correction errors and improve contrast group results.

4.3. Effect of Unit Pixel Size on Measurement Error

The measurement result for defects is obtained by multiplying the pixel distance in the corrected image by the real distance represented by a unit pixel. Therefore, factors that affect the measurement error include both the circumferential arc length i and the axial distance j, which are represented by a single pixel. I is determined by the aperture size R and the maximum image radius rmax of the phase plane image, where i = R/rmax. j is determined by the true height of the calibration object and number of pixels in the vertical direction before axial correction, with the vertical pixel number being determined by an axial distance growth function δ = G ( r ) .
To study the influence of the unit pixel circumferential arc length i on the correction accuracy, local images of the same size are intercepted and corrected based on different maximum radii rmax using φ12 mm image as an example. The results are shown in Figure 13, where (a) rmax1 = 253 pixels, (b) rmax2 = 258 pixels, (c) rmax3 = 263 pixels, and all image size are 125 × 125 pixels.
The pixel distance of the pentagon’s side length in the corrected image is measured, and the measurement error is calculated as shown in Table 5.
It can be observed from Table 5 that as the outer diameter rmax of the endoscopic image increases while keeping the aperture fixed, the spatial size represented by each unit pixel decreases, resulting in improved measurement accuracy. The range of deviation in the measurement results also reduces from 5.11% to 2.24%. Therefore, it is recommended the depth of the endoscope probe is adjusted so that any inner surface defects are close to the minimum depth of field of the lens. This will ensure that any inner surface defects lie closer to either edge of the image plane and effectively improve measurement accuracy.
The accuracy of the unit pixel axial distance j is mainly affected by the fitting error of the axial distance growth function, and its accuracy can be improved by increasing the number of calibration points. It is suggested that a calibration paper with hollowed-out area should be rolled and placed on the inner surface of the hole. When detecting and measuring a large number of holes with fixed specifications at an engineering site, it may be helpful to add an extension head with calibration texture on the inner surface and partial hollowing out on the front end of the endoscopic probe sleeve to improve the image correction and measurement accuracy.

5. Experimental Verification and Result Analysis

5.1. Experimental Scheme

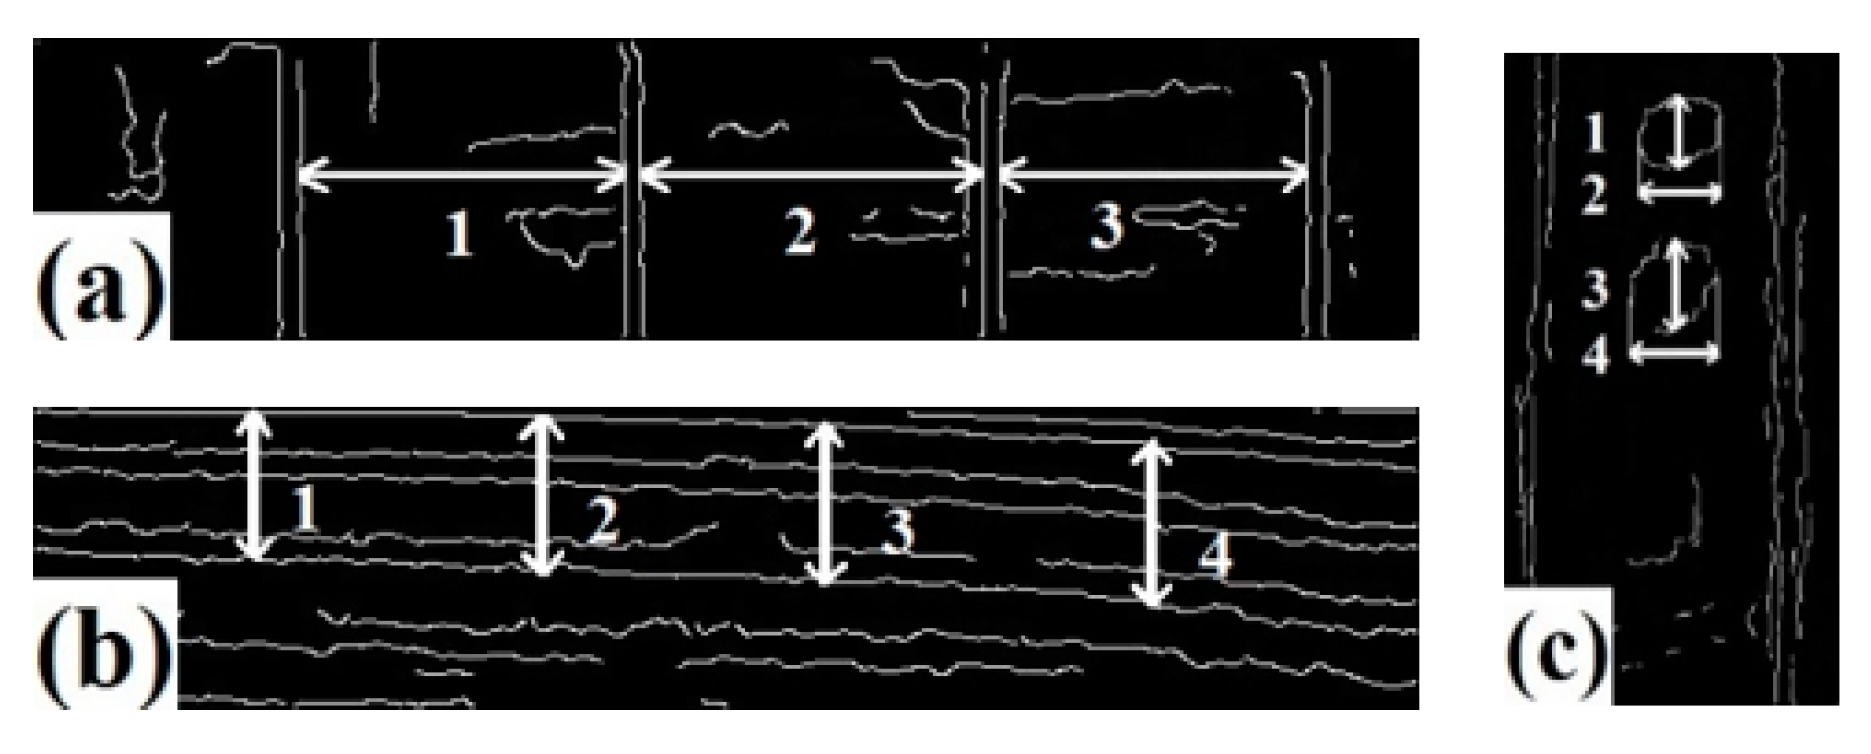
To verify the effectiveness and accuracy of the measurement method, three groups of experiments were designed. The first group photographed the inner surface of the φ18 mm hole with four evenly distributed 1 mm deep grooves (as shown in Figure 1a), verifying the circumferential correction ability and measurement error through groove position and distance in the corrected image. The second set photographed the inner surface of an M18 stainless steel thread hole (as shown in Figure 1b), verifying axial correction ability and measurement error through bright and dark band width in the corrected image.
In the third group, a real φ18 mm hole inner surface was photographed. Firstly, the side wall of the hole was cut using wire cutting, and then round spots were painted on the inner surface of the cut hole using a carbon pen to simulate rust spots caused by oxidation. Before shooting, the cut side wall was put back in its original position and aligned properly. A calibration paper with a 10 × 30 mm hollow area was placed inside the hole. The experimental process and shooting results are shown in Figure 14. Specifically, (a) shows a top view outside the hole, (b) shows the cut part of the hole wall with simulated defects, and (c) displays endoscope shooting results.

5.2. Experimental Results and Analysis

The three groups of endoscopic images were corrected individually, and the results are presented in Figure 15. Specifically, (a) shows the correction result of Figure 1a, (b) displays the correction result for Figure 1b, (c) exhibits the correction result for Figure 14c, (d) presents the local enlarged view of Figure 14b.
It can be observed that the correction effect is generally good. In Figure 15a, the grooves are parallel to each other and perpendicular to the bottom edge of the image. In Figure 15b, the light and dark bands of the thread are clearly distinguished and basically parallel in an oblique distribution. The position distribution of three simulated rust spots in Figure 15c is consistent with the reality. The edge detection algorithm is used to extract the image contour, measure the pixel distance, and calculate the inner surface size of the hole. The results of edge detection and measurement positions are shown in Figure 16, while measured values compared with true values are presented in Table 6.
According to Table 6, the average error of the three experimental groups is 5.35%, with an absolute error of less than 1 mm. This indicates that the proposed endoscope image correction method can effectively measure surface defects in holes.

6. Conclusions

In this paper, a method based on endoscopic imaging principles is proposed for distortion correction and measurement of in-hole images. The circumferential correction and axial correction are used to restore the endoscopic image to an orthographic image that conforms to the visual habit and enables accurate size measurements. The feasibility of the method is verified through experiments, and factors affecting detection accuracy are discussed. Specific conclusions include: (1) Image processing-based methods can effectively correct endoscopic image and achieve defect measurement the goals with high accuracy; the average deviation of three groups of measurement results is 5.35%, with absolute error less than 1 mm; (2) The measurement method is not affected by the aperture, and the accuracy is not influenced by the test object, making it highly applicable; (3) The image center offset has a direct impact on both image correction and measurement accuracy, especially in the vertical direction; (4) Both the fitting accuracy of the axial distance growth function and the outer diameter of the truncated circle affect correction errors and measurement accuracy. As the ring outer diameter increases, the measurement error gradually decreases while measurement accuracy improves.
The correction and measurement method proposed in this paper aims to restore the internal surface defect morphology through image processing. Experiments have shown that the correction effect is ideal, and the overall accuracy is high. However, shooting errors can cause variations in the correction effect of images taken from different directions. To improve accuracy and reduce error, attention should be paid to the following aspects during shooting: (1) Ensuring that the main optical axis of the lens coincides with the hole axis by designing an endoscopic probe sleeve for this purpose; (2) The internal surface calibration substance should be added, and the calibration paper drum with hollow can be inserted into the hole in the industrial field application. Alternatively, a tubular structure with internal texture and a hollow area can be designed and installed in front of the probe sleeve; (3) It is necessary to adjust the endoscope probe so that inner surface defects are imaging within a small depth of field area, ensuring they are located at the edge of the vertical direction of the endoscopic image as much as possible.
The image correction method proposed in this article has the potential to be extended to a variety of wide-angle lenses, including surveillance cameras and fish-eye lenses. It can also be applied for target object size estimation and measurement. Furthermore, the internal surface defect measurement method presented here offers a solution for measuring parts with holes or cavities, which can be utilized in machine vision-based quality inspection of hole inner surfaces.

Author Contributions

Conceptualization, P.S. and Q.S.; methodology, Z.T. and Q.S.; validation, P.L. and Q.S.; resources, P.S.; data curation, Z.T.; writing—original draft preparation, Z.T.; writing—review and editing, Q.S; visualization, P.S. and Z.T.; supervision, P.L.; funding acquisition, P.S. All authors have read and agreed to the published version of the manuscript.

Funding

This research was funded by the Key R&D Plan of Shaanxi Province in the Agricultural Field, China. Grant number 2021NY-129.

Institutional Review Board Statement

Not applicable.

Informed Consent Statement

Not applicable.

Data Availability Statement

Not applicable.

Acknowledgments

The authors would like to thank the Editor-in-Chief for reading the manuscript and providing valuable comments. The authors would also like to thank the anonymous reviewers for their valuable comments and suggestions, which helped improve this paper greatly.

Conflicts of Interest

The authors declare no conflict of interest.

References

  1. Shang, H.; Gao, J. Theories and industrial applications of optical interferometric NDT techniques: A review. Insight 2009, 51, 240–251. [Google Scholar] [CrossRef]
  2. Erwin, P.; Michael, B.; Lutz, D. Slender Tactile Sensor for Contour and Roughness Measurements within Deep and Narrow Holes. IEEE Sens. J. 2008, 8, 1960–1967. [Google Scholar]
  3. Lebrasseur, E.; Pourciel, J.P.; Bourouina, T.; Masuzawa, T.; Fujita, H. A new characterization tool for vertical profile measurement of high-aspect-ratio microstructures. J. Micromech. Microeng. 2002, 12, 280–285. [Google Scholar] [CrossRef]
  4. Prager, J.; Kitze, J.; Acheroy, C.; Brackrock, D.; Brekow, G.; Kreutzbruck, M. SAFT and TOFD-A Comparative Study of Two Defect Sizing Techniques on a Reactor Pressure Vessel Mock-up. J. Nondestruct. Eval. 2013, 32, 1–13. [Google Scholar] [CrossRef]
  5. Marcio, B.S.; Nienhaysen, P.; Haboe, D.; Flesch, R.C.C. Quality Assessment and Deviation Analysis of Three-dimensional Geometrical Characterization of a Metal Pipeline by Pulse-echo Ultrasonic and Laser Scanning Techniques. Measurement 2019, 145, 30–37. [Google Scholar] [CrossRef]
  6. Xie, S.J.; Duan, Z.R.; Li, J.; Tong, Z.; Tian, M.; Chen, Z. A novel magnetic force transmission eddy current array probe and its application for nondestructive testing of defects in pipeline structures. Sens. Actuators A Phys. 2020, 309, 112030. [Google Scholar] [CrossRef]
  7. Yu, S.; Chung, W.W.S.; Lau, T.C.W.; Lai, W.W.L.; Sham, J.F.C.; Ho, C.Y. Laboratory validation of in-pipe pulsed thermography in the rapid assessment of external pipe wall thinning in buried metallic utilities. NDT E Int. 2023, 135, 102791. [Google Scholar] [CrossRef]
  8. Chesnokova, A.A.; Kalayeva, S.Z.; Ivanova, V.A. Development of a flaw detection material for the magnetic particle method. J. Phys. Conf. Ser. 2017, 881, 012022. [Google Scholar] [CrossRef]
  9. Safar, S.; Shoorehdeli, M.A. Detection and Isolation of Interior Defects Based on Image Processing and Neural Networks: HDPE Pipeline Case Study. J. Pipeline Syst. Eng. Pract. 2018, 9, 05018001. [Google Scholar] [CrossRef]
  10. Liu, W.; Zhang, X.; Liu, S.I.; Jia, Z. A Roughness Measurement Method based on Genetic Algorithm and Neural Network for Micro Heterogeneous Surface in Deep-hole part. J. Circuits Syst. Comput. 2012, 21, 1250005. [Google Scholar] [CrossRef]
  11. Bergen, T.; Wittenberg, T. Stitching and Surface Reconstruction from Endoscopic Image Sequences: A Review of Applications and Methods. IEEE J. Biomed. Health Inform. 2016, 20, 304–321. [Google Scholar] [CrossRef] [PubMed]
  12. Zhang, Z.Y. A Flexible New Technique for Camera Calibration. IEEE Trans. Pattern Anal. Mach. Intell. 2020, 22, 1330–1334. [Google Scholar] [CrossRef] [Green Version]
  13. Hartley, R.; Kang, S.B. Parameter-free radial distortion correction with center of distortion estimation. IEEE Trans. Pattern Anal. Mach. Intell. 2007, 29, 1309–1321. [Google Scholar] [CrossRef] [Green Version]
  14. Horn, B.K.P. Robot Vision; Wang, L., Jiang, X.L., Eds.; China Youth Press: Beijing, China, 1986; pp. 424–427. [Google Scholar]
  15. Smith, W.E.; Vakil, N.; Maislin, S.A. Correction of distortion in endoscope images. IEEE Trans. Med. Imaging 1992, 11, 117–122. [Google Scholar] [CrossRef] [PubMed]
  16. Vijayan, A.K.; Kumar, S.; Radhakrishnan, D. A new approach for nonlinear distortion correction in endoscopic images based on least squares estimation. IEEE Trans. Med. Imaging 1999, 18, 345–354. [Google Scholar] [CrossRef] [PubMed] [Green Version]
  17. Ahmed, M.; Farag, A. Nonmetric calibration of camera lens distortion: Differential methods and robust estimation. IEEE Trans. Image Process. 2005, 14, 1215–1230. [Google Scholar] [CrossRef] [PubMed]
  18. Mundhenk, T.N.; Rivett, M.J.; Liao, X.; Hall, E.L. Techniques for fisheye lens calibration using a minimal number of measurements. In Intelligent Robots and Computer Vision XIX: Algorithms, Techniques, and Active Vision; SPIE: Bellingham, WA, USA, 2000; Volume 4197, pp. 181–190. [Google Scholar]
  19. Wang, J.H.; Shi, F.H.; Zhang, J.; Liu, Y. A new calibration model of camera lens distortion. Pattern Recognit. 2008, 41, 607–615. [Google Scholar] [CrossRef]
  20. Sheng, Q.; Zheng, J.M.; Shi, W.C.; Zhao, R.F.; Liu, J.S.; Li, H.T. Measurement and modeling of reflection characteristics of hole inner surface based on endoscopic image. Measurement 2022, 190, 110742. [Google Scholar] [CrossRef]
  21. Liedlgruber, M.; Uhl, A. Endoscopic image processing—An overview. In Proceedings of the 6th International Symposium on Image and Signal Processing and Analysis, Salzburg, Austria, 16–18 September 2009; pp. 707–712. [Google Scholar]
  22. Sun, F.R.; Liu, J.R. Fast Hough transform algorithm. Chin. J. Comput. 2001, 24, 1102–1109. [Google Scholar]
Figure 1. Inner surface peep image of hole. (a) φ18 hole with grooves, (b) M20 thread hole, (c) φ20 hole with calibration plate.
Applsci 13 08597 g001
Figure 2. Endoscopic imaging principle. (a) the spatial coordinate system, (b) the phase plane coordinate system.
Applsci 13 08597 g002
Figure 3. Coordinate system of corrected image.
Applsci 13 08597 g003
Figure 4. Principles of circumferential correction of endoscopic images.
Applsci 13 08597 g004
Figure 5. Principles of Circumferential Correction of Endoscopic Images.
Applsci 13 08597 g005
Figure 6. Image Acquisition Scheme and Equipment. (a) experimental scheme, (b) calibration plate, (c) endoscopic probe sleeve.
Applsci 13 08597 g006
Figure 7. Preprocessing and center detection. (a) original image, (b) pre-processing results, (c) edge detection results, (d) center detection results.
Applsci 13 08597 g007
Figure 8. Circumferential correction results.
Applsci 13 08597 g008
Figure 9. Fitting results of axial distance growth function.
Applsci 13 08597 g009
Figure 10. Axial correction results.
Applsci 13 08597 g010
Figure 11. Correction process and results. (a) φ12 endoscopic image (b) φ12 image center (c) φ12 circumferential correction (d) φ12 axial correction (e) φ12 final correction result (f) φ28 endoscopic image (g) φ28 image center (h) φ28 circumferential correction (i) φ28 axial correction (j) φ28 final correction result.
Applsci 13 08597 g011
Figure 12. Correction process and results. (a) φ12 & image center (295, 386) (b) φ12 & image center (315, 386) (c) φ28 & image center (318, 368) (d) φ28 & image center (318, 388).
Applsci 13 08597 g012
Figure 13. Correction results in different rmax. (a) rmax1 = 253 Pixel (b) rmax2 = 258 Pixel (c) rmax3 = 263 Pixel.
Applsci 13 08597 g013
Figure 14. Experiment process and shooting results. (a) The third group of experiment (b) simulated defects (c) endoscopic image.
Applsci 13 08597 g014
Figure 15. Correction results and comparison images. (a) Experiment I (b) Experiment II (c) Experiment III (d) Comparison group.
Applsci 13 08597 g015
Figure 16. Edge detection results and measurement position. (a) Experiment I (b) Experiment II (c) Experiment III.
Applsci 13 08597 g016
Table 1. Calibration block centroid coordinate statistics (N axis)/pixel.
Column NumberMean ValueStandard Deviation
123456
Row
Number
1138139137132130122133.006.450
2116119119116112109115.203.971
310010210099979298.333.502
483858684848183.831.722
571727272706770.671.966
656585960605958.671.506
746474950494748.001.549
834353638393936.832.137
924262830313028.172.714
Table 2. Statistics of the calibration block height/pixel.
Column NumberMean ValueStandard DeviationTotal
Deviation
123456
Row
Number
111121212111111.500.548−11.66%
211121312101211.671.033−10.38%
314141213131313.170.7531.14%
413151413121413.501.0493.70%
514161413131313.831.1696.26%
614161514131314.171.1698.82%
714151413131213.501.0493.70%
812151313131313.170.9831.14%
912131213141212.670.816−2.70%
Table 3. Pixel position and measurement error statistics.
Pixel Distance
/Pixel
Mean
/Pixel
Standard
Deviation
Unit Pixel
Size/mm2
Maximum
Positive
Deviation
Maximum
Negative
Deviation
Deviation
Range
φ12494.96; 513.58; 496.19; 502.56; 499.14501.296.690.0233 × 0.02332.45%1.26%3.71%
φ28471.88; 490.67; 487.20; 492.49; 490.03482.458.460.0513 × 0.05132.08%2.19%4.27%
Table 4. Measurement error statistics after center adjustment.
Image CenterMean/PixelStandard
Deviation
Maximum
Positive
Deviation
Maximum Negative
Deviation
Deviation
Range
φ12(295, 386)503.6812.754.10%3.11%7.21%
(305, 386)501.296.692.45%1.26%3.71%
(315, 386)505.2910.563.59%2.46%6.05%
φ28(318, 368)468.1728.877.94%8.50%16.44%
(318, 378)482.458.462.08%2.19%4.27%
(318, 388)467.1118.605.09%5.93%11.02%
Table 5. Pixel Position and Measurement Error Statistics.
rmaxPixel Distance
/Pixel
Mean/PixelStandard
Deviation
Unit Pixel Size/mm2Maximum
Positive
Deviation
Maximum Negative
Deviation
Deviation
Range
253469.22; 493.71; 479.55;
472.97; 483.12
479.728.520.0237 × 0.02372.92%2.19%5.11%
258494.86; 513.59; 496.19;
502.56; 499.14
501.296.690.0233 × 0.02332.45%1.26%3.71%
263520.20; 513.95; 505.94;
517.42;508.10
513.125.410.0228 × 0.02280.84%1.40%2.24%
Table 6. Pixel Position and Measurement Error Statistics.
Pixel Distance/PixelMean ValueStandard DeviationMeasurement Result/ mmTrue Size/mmError
1234
Figure 14a146153158-152.330.084312.8413.645.85%
Figure 14b6064666864.500.08435.445.008.75%
Figure 14c2527293027.750.07532.092.121.44%
Disclaimer/Publisher’s Note: The statements, opinions and data contained in all publications are solely those of the individual author(s) and contributor(s) and not of MDPI and/or the editor(s). MDPI and/or the editor(s) disclaim responsibility for any injury to people or property resulting from any ideas, methods, instructions or products referred to in the content.