Article

Through-Thickness Inhomogeneity of Microstructures and Mechanical Properties in an As-Quenched Thin Specification High Strength NM450TP Steel Plate

1
Technical Center, Handan Iron and Steel Group Co., Ltd., Handan 056015, China
2
College of Materials Science and Engineering, Chongqing University, Chongqing 400044, China
*
Author to whom correspondence should be addressed.
Appl. Sci. 2023, 13(12), 7017; https://doi.org/10.3390/app13127017
Submission received: 13 May 2023 / Revised: 3 June 2023 / Accepted: 8 June 2023 / Published: 10 June 2023
(This article belongs to the Special Issue Metals and Materials: Science, Processes and Applications)

Abstract

:
The inhomogeneity of microstructures and mechanical properties in an as-quenched thin specification NM450TP wear-resistant steel plate were quantitatively investigated. The results show that the microstructures exhibit inhomogeneous distribution through the thickness and the area percentage of martensite and ferrite grains varies regularly through the thickness, and the content of ferrite on the top surface of the plate is found to be two times that of ferrite at the core location and more than that of ferrite at the bottom surface. In addition, the steel plate exhibits the obvious anisotropy of tensile properties, the tensile strength paralleling to the rolling direction is lower than that along the transverse direction while the elongation paralleling to the rolling direction is better than that along the transverse direction. The result indicates that the deformation degree of prior austenite grains during hot rolling and the content of martensite after quenching dominate the mechanical properties while the ferrite content is not the main factor affecting the plasticity. The findings provide experimental evidences and lay a theoretical foundation for analyzing the subsequent processing.

1. Introduction

With increasing demand for energy saving and reducing weight of commercial vehicles such as dump and cargo trucks in the transportation sector, high-strength wear-resistant steels have drawn more and more attention in the box materials of the trucks due to their thin specification and good processability [1,2,3]. The yield strength of the steels used in the box materials of some engineering dump trucks is increasing to 1100–1300 MPa [3]. Thin specification products with high strength by direct quenching process will meet the requirements for weight reduction of commercial vehicles and environmental protection and will be demanded in the future [4,5,6]. The thin specification NM450TP wear-resistant steel produced by direct quenching process is a type of ferrite and martensite dual phase steel. The direct quenching process has significant advantages in lowering manufacture cost, simplifying processes and obtaining thin specification and high-strength wear resistant steels [7,8].
NM450TP wear-resistant steel needs to undergo bending and welding processes before it is used as the box material of trucks. It is well known that the microstructures and mechanical properties of the steels have great influence on the formability and weldability during bending and welding processes, the outer arc of the bending plate sustains tension stress during the bending processing, and the initial state of the steel also has great effect on the microstructure evolution during the welding process [9]. Local imperfections such as structure inhomogeneity through the thickness of the steel plate would result in poor quality and the uncertainty of bending and welding processing. Understanding the effect of local material microstructure and property fluctuation on the bending and welding properties is not only important for more effective processing, but also critical for parameter optimizing during fabrication of the material. However, due to the limited understanding of the microstructural inhomogeneity of the NM450TP wear-resistant steel, the microstructures are regarded as a uniform state and as a solely martensite state during the previous bending and welding investigation [9,10]. Detailed study investigating the relationship between the microstructure and mechanical behavior of the NM450TP steel is needed.
Comparing to the traditional ferritic and martensitic dual phase steels which consist of soft ferrite and hard martensite matrix [11,12,13], NM450TP wear-resistant steel otherwise consists of majorities of martensite structures by direct quenching, their morphologies through the thickness are easily affected by the rolling process parameters and quenching cooling conditions [14,15,16]. At the same time, because as-quenched steel plates are directly used in the subsequent bending and welding process, the microstructure inhomogeneity of NM450TP steel plate does not have a chance to be modified by the process such as annealing and tempering [17,18]. Due to the inhomogeneity of martensite through the thickness of the plate retained after direct quenching, this eventually leads to different mechanical behavior through the thickness and finally affects the formability and weldability of the steel plates. However, there has been limited study on the relationship between microstructure inhomogeneity and mechanical behavior of the steels.
The objectives of this work are to, through a quantitative characterization of the microstructures and mechanical properties in an as-quenched NM450TP steel plate, to investigate the factors influencing microstructure distribution and analyze the relationship between microstructure and mechanical properties. The results will have a significant effect on the subsequent investigation and application of the bending and welding process, and further improve the fundamental understanding and optimization of fabricating parameters of this high-strength steel.

2. Materials and Methods

An industrial product of ferrite-martensite NM450TP steel plate with a thickness of 5 mm was investigated in this work. The main chemical composition of the steel is shown in Table 1.
The dynamic continuous cooling transformation (CCT) curve of the tested steel was obtained through the thermal simulated test by Gleeble 3500 as shown in Figure 1 [19]. According to the CCT curve, the main parameters of the controlled rolling and cooling process of the tested steel were determined as follows: first, continuous casting slab with a thickness of 236 mm was heated at 1200 °C for 250 min, then the slab was rolled to 33 mm thickness by 8 rough rolling passes and 5 mm plate by 7 finishing rolling passes. During rolling process, initial rolling and finishing temperature was set at 1000 °C and 905 °C, respectively. A three-stage cooling process was conducted followed by the controlled rolling process, i.e., the steel plate was water-quenched to 670 °C with a cooling rate of ≥50 °C/s in the first cooling stage, and then air-cooled for 4.5 s to form a small amount of ferrite, and finally the plate was water-quenched with a cooling rate of ≥50 °C/s to reach 100 °C for the curing process; martensite transformation occurs during this cooling stage.
The samples for the microstructures and mechanical properties analysis were cut from the center position of the steel plate. The structure and morphologies at three typical locations, that is the top surface (rolling side), the core position and the bottom surface of the samples, were analyzed by scanning electron microscopy (SEM) and electron backscatter diffraction (EBSD), respectively (Figure 2a). The same sample was used for X-ray diffraction (XRD) analysis. The XRD with Cu-kα radiation experiments were conducted on the rolling direction-normal direction (RD-ND) plane by using a Rigaku D/max 2500PC X diffractometer. Operating parameters of the X-ray tube were: accelerating voltage of 40 kV, current of 150 mA, and Cu as a target material. The 2θ angle scanning range was 10–105° with scanning speed of 1 deg/min and step of 0.02°. The main diffraction peaks of (200), (220), and (311) planes of gamma phase and (110), (200), and (211) planes of alpha phase in the diffraction patterns were concerned. The results were processed by using X’Pert Texture and Textools software.
SEM and EBSD analyses were conducted on the RD-ND plane of the samples by using a field emission FEI NOVA 400FEG SEM. The samples for SEM observation were ground and polished, then etched in the ethanol solution of 4 vol.% nitric acid for 15 s. The samples for EBSD analysis were ground and polished following the standard metallographic preparation procedure, and the samples were electrochemically etched in a 10 vol.% perchloric acid to reveal the structure. Electrochemical polishing of the EBSD samples were operated at room temperature with the following polishing parameters: voltage 20 V and time 10–15 s.
EBSD measurements were operated at an acceleration voltage of 20 kV, sample tilt angle of 70°, working distance of 15 mm, 0.3 μm scan step, and 100 × 100 μm test area; the coordinates chosen for EBSD were X0 for the rolling direction (RD), Y0 for the transverse direction (TD), and Z0 for the normal direction (ND). HKL Technology Channel 5 and MTEX software were used to analyze the EBSD data and microstructural features such as crystallographic orientation, grain boundary, grains size, band contrast (BC) distribution of the Kikuchi, kernel average misorientation (KAM), recrystallization fraction, and texture are studied with different tools employed in EBSD analysis, where the proportions of phases were calculated using Image Pro software.
In order to assess the effect of microstructure inhomogeneity on mechanical properties, the tensile property test through the thickness of the plate was conducted to evaluate the influence of the variation of inhomogeneity of microstructures on the mechanical properties. The tensile specimens were prepared along the RD and TD, respectively, on the RD-TD plane using electrical cutting (Figure 2b). Four test specimens were cut in sequence through the thickness, i.e., top surface, core location-1, core location-2, and bottom surface. The surfaces of the specimens were polished using a polishing machine before testing. The tensile test was performed using an AG-50KN machine, with tensile rate set at 1 mm/min.

3. Results and Discussion

3.1. Structure and Morphology of NM450TP Steel

According to the CCT curves of NM450TP steel, decomposition of undercooling austenite would not occur during the first cooling stage because of fast cooling rate, small amounts of ferrite phases may form during air cooling, and the formation of martensite may happen in the third cooling stage. The related studies showed that the volume fractions of residual austenite in steel is related to the diffusion of carbon during the cooling process, the carbon element in supersaturated martensite will diffuse to the austenite when cooling rate is slow, this led the stability of austenite being improved and the residual austenite being retained at room temperature [20]. NM450TP steel contains relatively higher contents of carbon and manganese, and if the cooling rate is not fast enough during the third stage, the diffusion of carbon elements will not be inhibited, and residual austenite would possibly remain in NM450TP steel.
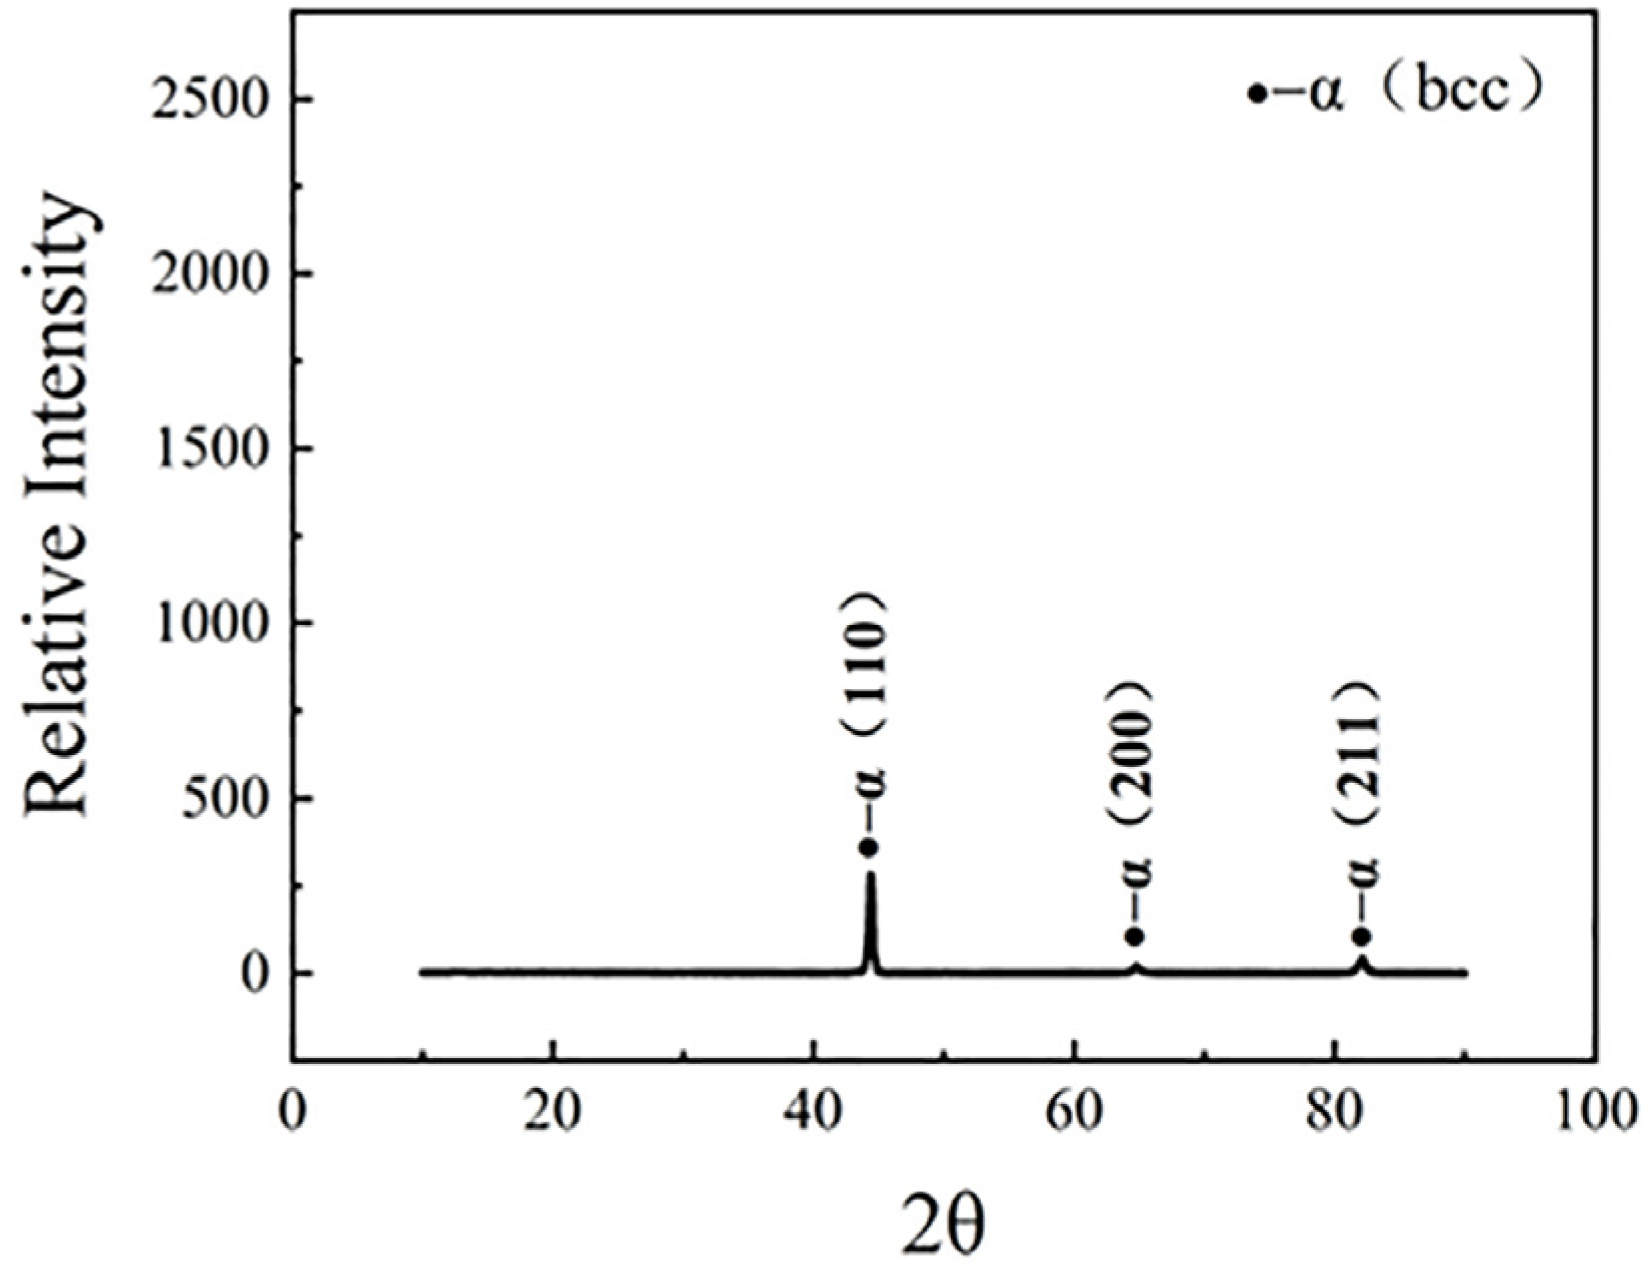
The XRD phase analysis shows that only the diffraction peak of body-centered cubic structures was found in the specimen, no austenite diffraction peak was detected (Figure 3). This result indicates that during the third cooling stage, the cooling rate was fast for obstructing the diffusion of carbon elements, undercooling austenite became unstable and completely transformed into martensite.
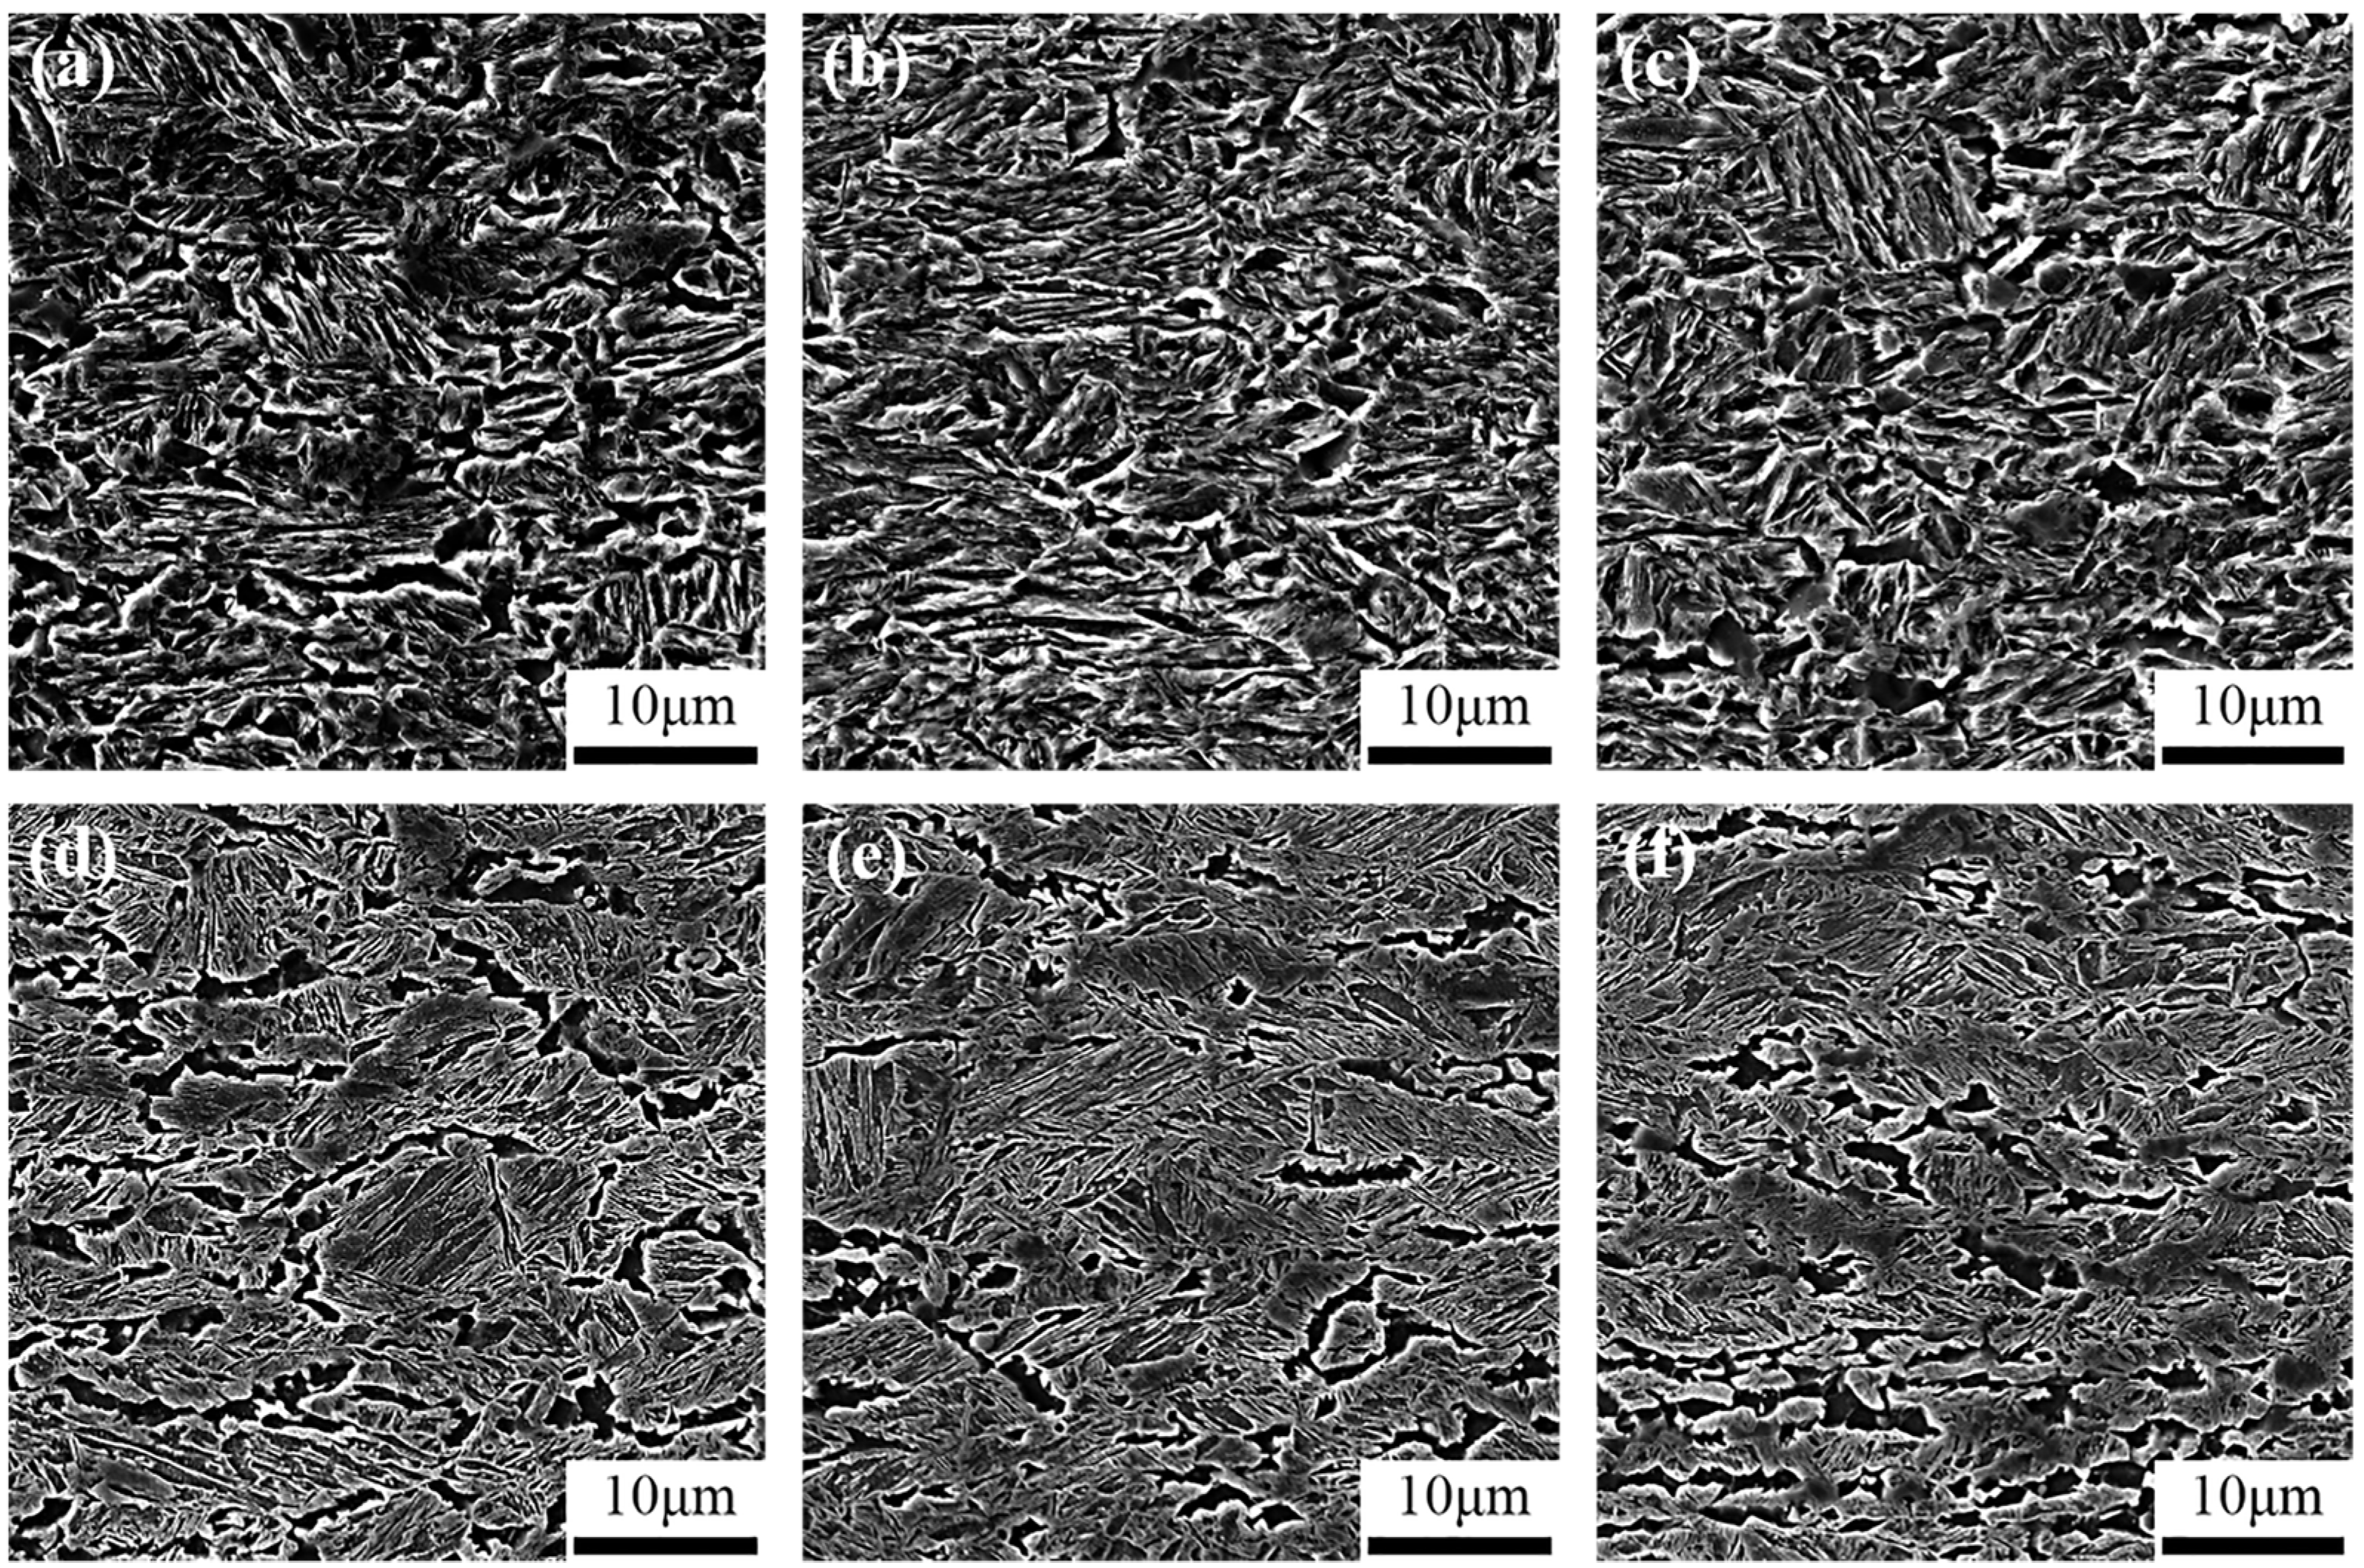
During the controlled rolling and cooling process, austenite grains will undergo complex dynamic deformation and recrystallization, their transformation procedure and morphologies will be affected by these factors. Figure 4 displays that the microstructure at three typical locations consists of soft ferrite and hard martensite matrix. Ferrite grains are mainly distributed around martensite grains, and a number of small ferrite islands are dispersed in the martensite matrix. Meanwhile, the martensite and ferrite grains are found to exhibit directional features at the longitudinal cross-section of the plate (Figure 4d–f), this means that the spatial morphology of martensite and ferrite grains are supposed to be platy grained. The observed results prove that the prior austenite grains after finishing rolling have a certain degree of deformation due to rolling occurring in the temperature range of incompletely dynamic recrystallization, and austenite grain size or defectiveness have certain effects on the formation of ferrite and martensite. Usually, the grain boundary is in an unstable state because of chemical composition and structure, and ferrite is easily nucleated at the grain boundary. From the observation of the morphologies of these grains in Figure 4, ferrite grain was formed around the martensite grain with the quasi-polygonal equiaxed state during the air-cooling stage. Their sizes and shape in different sites vary greatly. The rest of the austenite is finally transformed into lath martensite during the third stage of water cooling.
It is suggested that because austenite grains are elongated along the rolling direction and their dynamic recrystallization is prohibited to some extent during the rolling process, the transformed ferrite and martensite grains keep some deformation characteristics of deformed austenite. In addition, it is also observed in Figure 4 that the amounts of martensite on both surfaces are less than that of martensite at 1/2 position, i.e., ferrite contents at 1/2 position are less than that at both surfaces. This distribution of martensite and ferrite is in contrast to the distribution of martensite in the steel upon quenching [21]; this result indicates that rolling within incompletely dynamic recrystallization and multi-stage cooling will affect transformation procedures and decomposition morphologies of austenite. In order to obtain deep understanding on the microstructures of the steel, a series of detailed microstructure characterizations were conducted based on the EBSD analysis.

3.2. Microstructure of Ferrite and Martensite

3.2.1. Grain Boundary Feature and Effective Grain Size

Generally, due to consisting of packets, blocks, and laths [22], lath martensite grains have many high-angle grain boundaries (HAGBs) and low-angle grain boundaries (LAGBs). The ferrite grains otherwise only have HAGBs because they form at elevated temperature. By means of EBSD techniques, types and propositions of grain boundary in two phases will be accurately detected, and quantities and distribution of both phases can be obtained. Furthermore, effective grain size can be calculated according to the distribution of HAGBs.
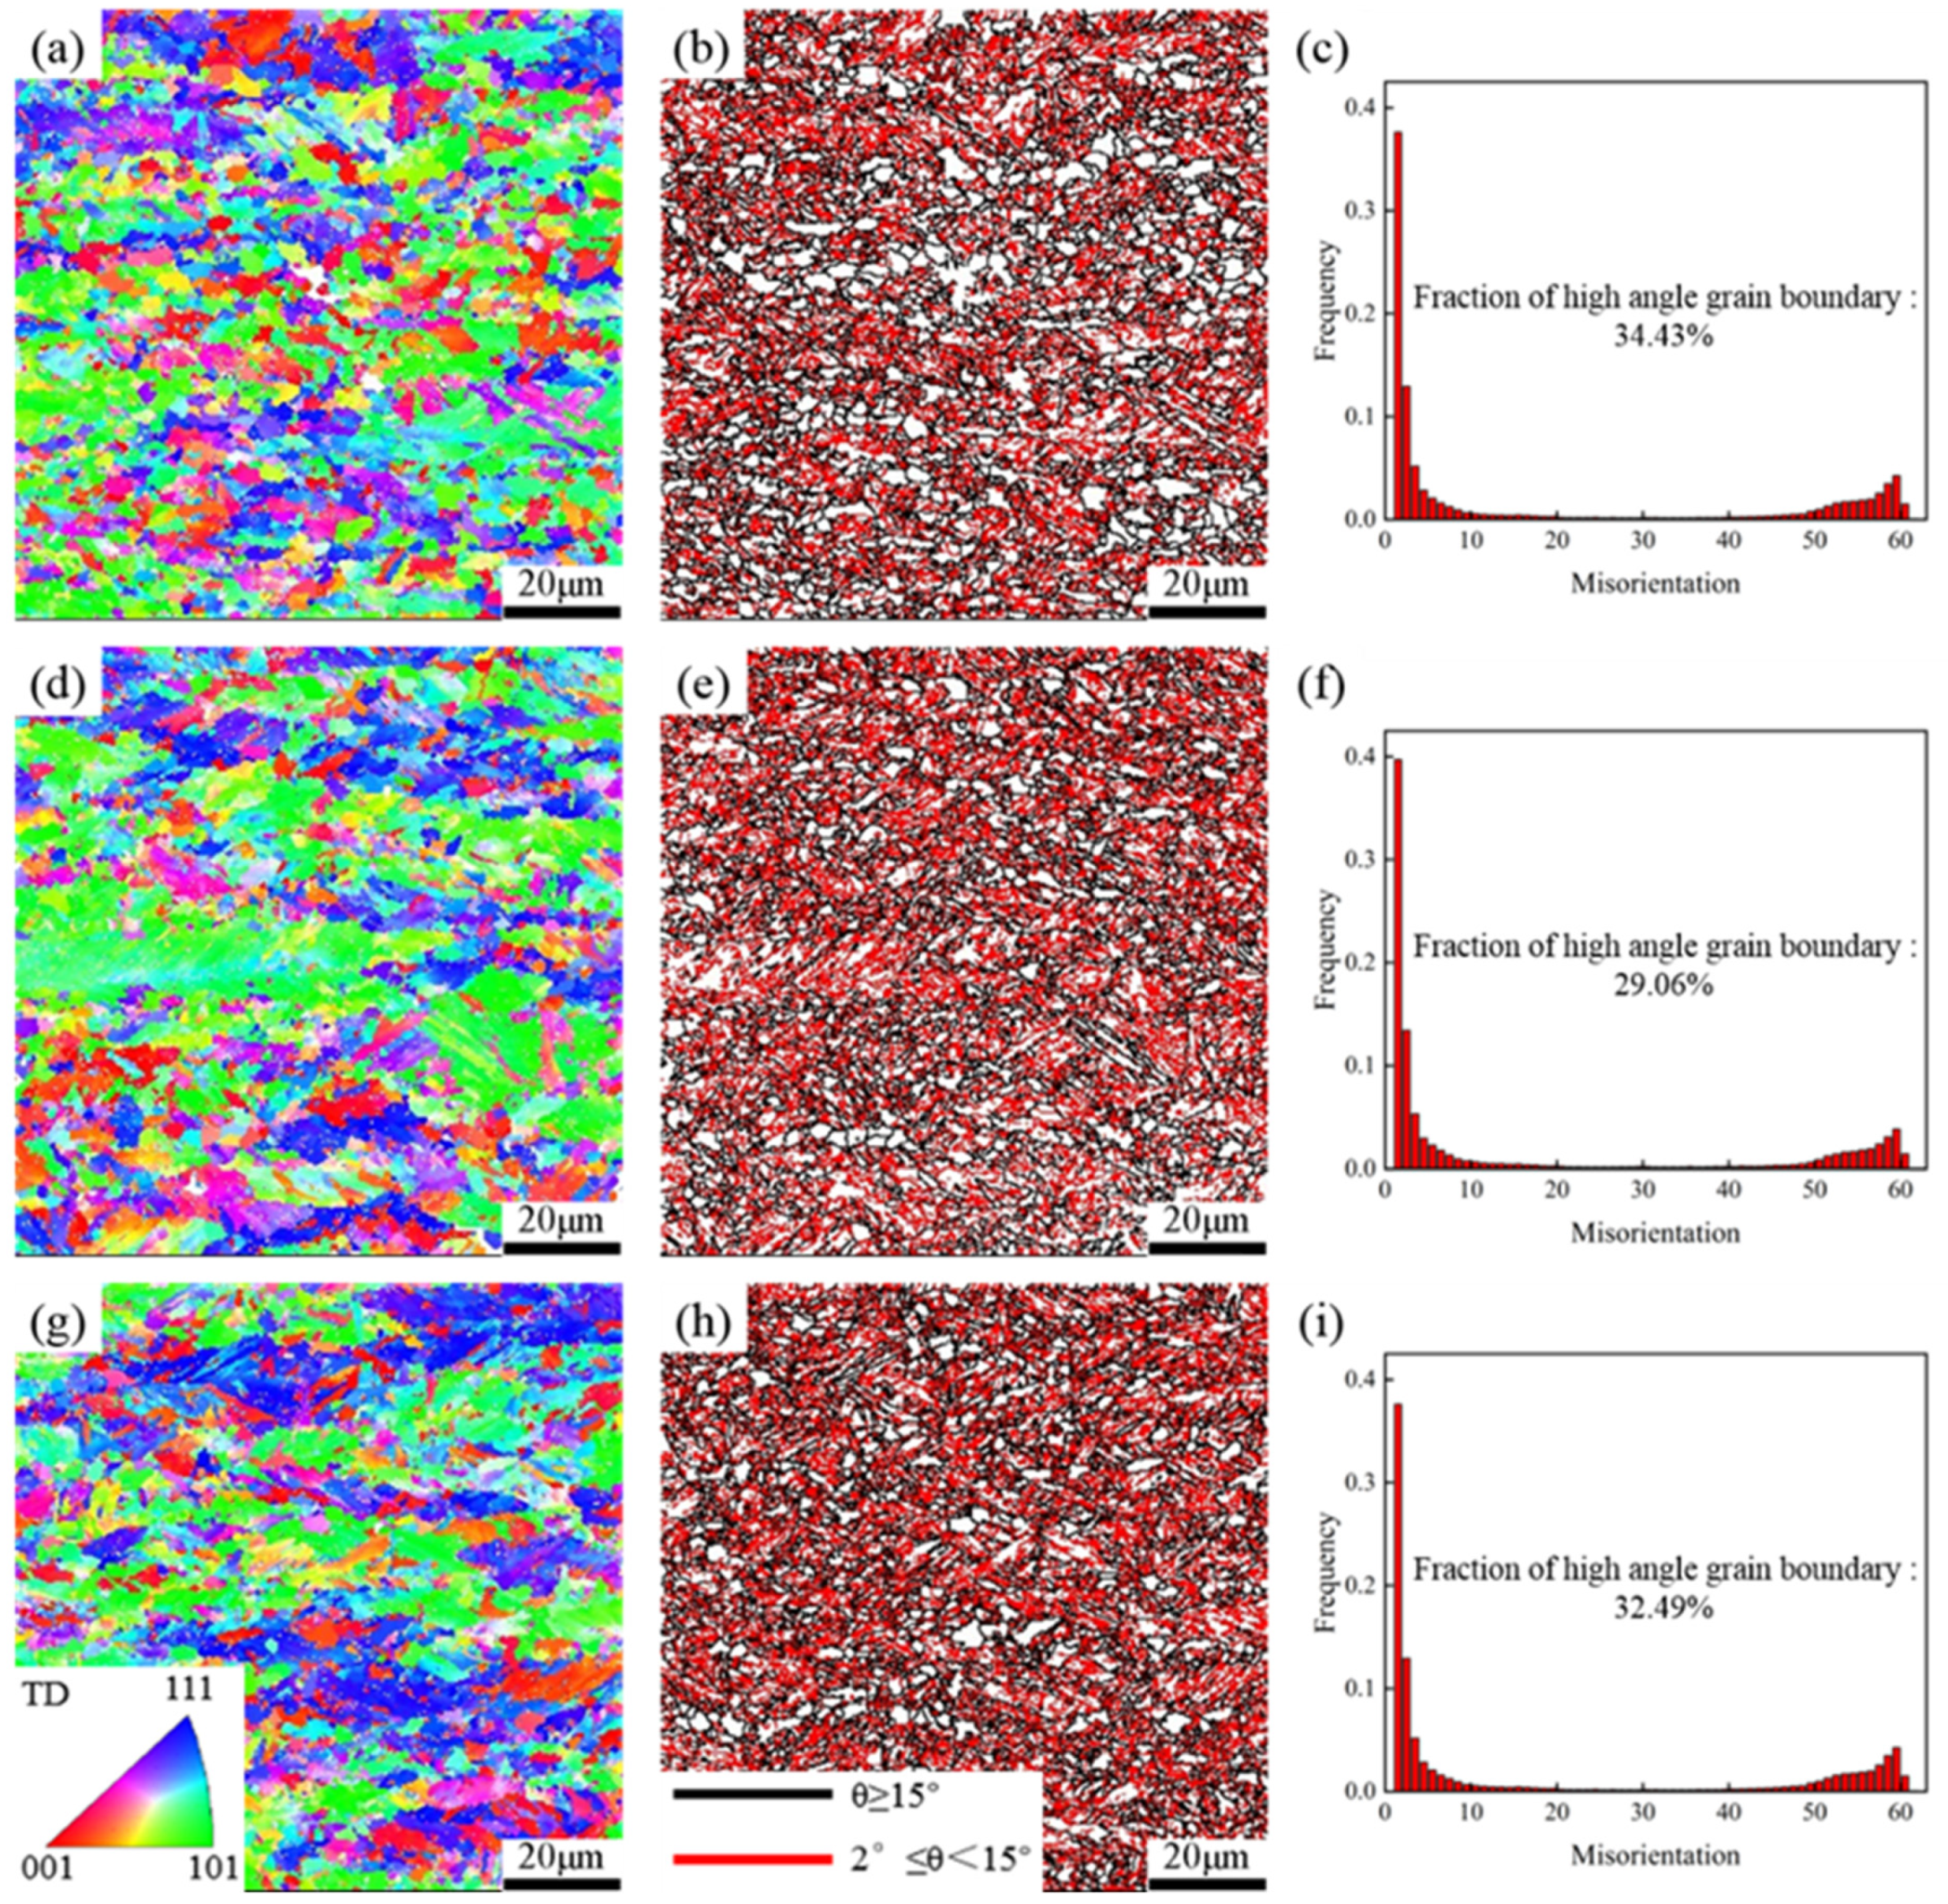
The grain misorientation and distribution of grain boundaries are shown in Figure 5. The red lines represent the LAGBs with misorientation lying between 2 and 15°, and the HAGBs with misorientation larger than 15° are described by black lines. Grain orientation distribution as shown in Figure 5a,d,g proves that the morphologies of martensite and ferrite do show obvious directional features. From Figure 5c,f,i, the distribution pattern of the misorientation angles between neighboring grains have a bimodal-type. Distribution is found with the peak appearing at low angles (smaller than 20 deg) and high angles (from 50 to 61 deg). This distribution contributed to the packet and block characteristics of lath martensite. The results reveal that the distribution pattern of misorientation angles at three typical locations have the same features. Comparing with the LAGBs, the density of HAGBs only take a few proportions. The density of the HAGBs at three typical locations are calculated in Figure 5c,f,i, and it is found that the smallest density of the HAGBs exist at the core location while higher density of the HAGBs appear at the top and bottom surfaces.
It is difficult to figure out martensite and ferrite phases in Figure 5b,e,h, but because of the absence of LAGBs in the ferrite grains, the ferrite grains appear white in Figure 5b,e,h. In the figures, it is evidence that the amounts of ferrite grains at the top and bottom location are more than that of the ferrite grains at the core location. It is concluded that the distribution of ferrite and martensite grains is non-unform through the thickness.
The grains of the prior austenite are broken severely during the rolling. Grain boundaries were not revealed completely through the traditional chemical erosion method, and the statistics for grain size of the prior austenite by this means are not accurate. In martensite grains, many HAGBs of packets and blocks in the martensite will affect the accuracy of the test. Thus, the effective grain size is measured by using EBSD. In addition, in order to quantitatively understand the variation of effective grain size in each area, the average effective grain size in the horizontal and vertical directions at three typical locations was calculated based on the distribution data of HAGBs, as shown in Table 2. The calculated values show that the ratios of grain size at three typical locations are greater than 1, which further proves that primary austenite has characteristics of deformation. Meanwhile, the grain size ratios of two surfaces are found to be larger than that of the core location. The reasons for these may be attributed to the effect of deformation degree and cooling rate. The slower cooling rate at the core location allows prior deformed austenite grains to have enough time to be recrystallized and they tend to become equiaxed during the cooling process. On the contrary, both surfaces sustain more deformation and rapid cooling, and the deformation state is easily maintained, thus transformed products have larger grain size ratios.

3.2.2. Constituent Phase, Substructure and Recrystallization

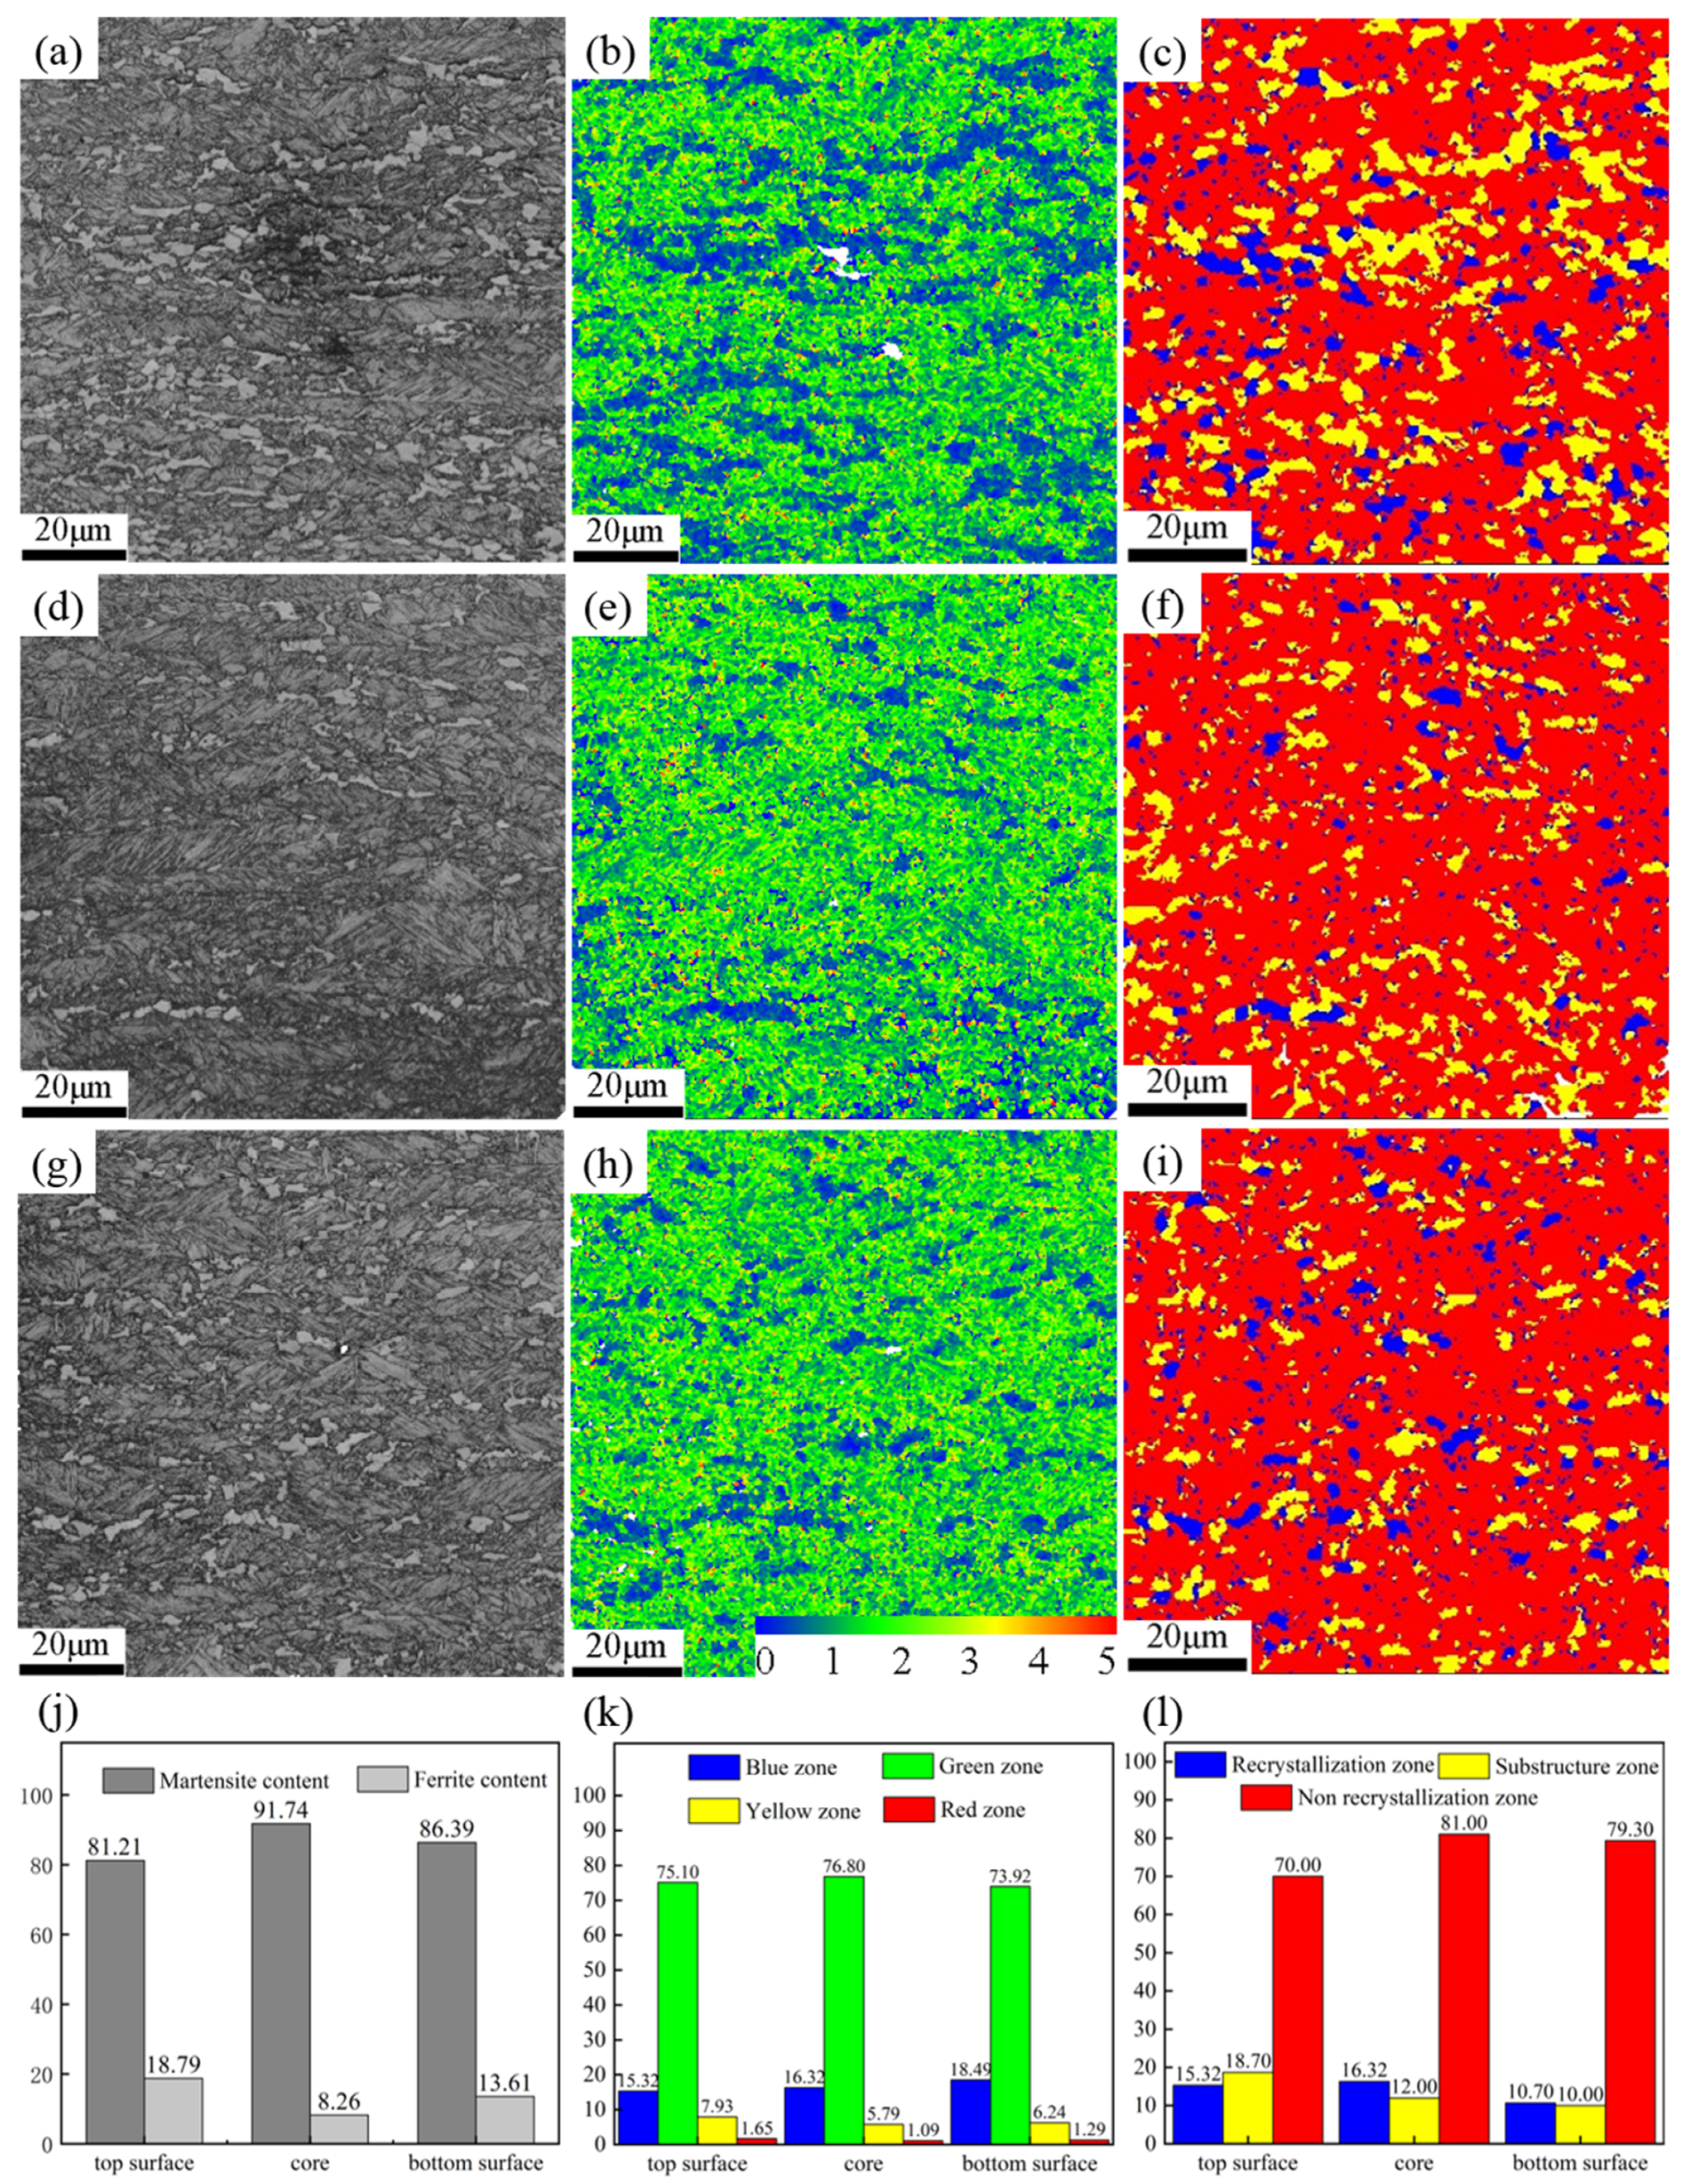
The martensite and ferrite have a similarity in crystal structure. Due to the lower carbon content in ferrite, their crystallography is affected by the carbon content. The BC of ferrite are relatively clear and sharp, thus the BC of ferrite shows as grey-white in the BC diagram. Therefore, the BC distribution of the Kikuchi is an effective technique to analyze these two phases [23]. The area fractions of ferrite and martensite phase at three locations (Figure 6j) was calculated by the BC distribution of the Kikuchi (Figure 6). Figure 6a,d,g shows that the small amount of ferrite phases (grey-white area) exists at the core location, while more ferrites are at the top and bottom surfaces. The calculated results show that the area fractions of ferrite phase at the top and bottom surfaces and core are about 20%, 13%, and 9%, respectively (Figure 6j). This result illustrates that the microstructure distribution shows an inhomogeneity state even in such a thin specification plate, and during rapid cooling condition, it will have an influence on the mechanical behavior of the steel. These distribution patterns of ferrite grains at three typical locations correspond to the distribution pattern of ferrite grains by microstructure examination (Figure 4d–f) and the grain boundary type diagram (Figure 5b,e,h). These indicate that the smaller the amounts of ferrites, the lower the proportions of high-angle grain boundaries.
Both SEM and BC investigation confirms that the distribution inhomogeneity of martensite and ferrite phases formed by multi-stage cooling is more obvious, and the content of ferrite on the top surface is even found to be two times higher than that of ferrite at the core location and more than that of ferrite at the bottom surface. It is considered that the surfaces of the steel have more rapid cooling rates to reach the initial transformation temperature of ferrite and suffer more severe strain, of which both factors can improve nucleation and growth of ferrite [24,25,26,27,28,29]. Meanwhile, the microstructure difference existing between two surfaces can be attributed to cooling rate differences. This microstructure difference through the thickness should not be neglected in the application of the steel, the effect of microstructure inhomogeneity on the mechanical properties must be considered in the subsequent processing of the materials.
The KAM diagram can qualitatively describe the level of accumulated dislocation density within the grains by calculating the average misorientation between neighboring sites, the magnitude of the KAM value in the KAM diagram are represented by coloring, the smaller the KAM values, the lower the level of accumulated dislocation density. It can be seen in Figure 6b,e,h that the martensite area has green color with higher KAM values. A comparative analysis between the BC diagram (Figure 6a,d,g) and the KAM diagram (Figure 6b,e,h) shows that dislocation density within the ferrite grains is lower because the KAM values corresponding to the ferrite grains in the BC diagram are less than 1, while the KAM values in the martensite region are mainly at the range of 1 to 2, indicating that dislocation density in the martensite region is higher than that inside the ferrite grains.
According to the KAM diagram (Figure 6b,e,h), the dislocation density distribution at three typical locations is statistically listed in Figure 6k. The results reveal that the fraction of areas with high KAM values at two surfaces (Figure 6b,h) are fewer than that of high KAM values at the core location, this indicates that relatively fewer areas of martensite and a higher ferrite content are present at the two surfaces while higher percentage of areas with KAM values greater than 1 exist at the core location. The results from the KAM plots (Figure 6k) also confirm that the variation of proportions of the ferrite phase and martensite phase at three typical locations is consistent with the statistical results by high-angle grain boundary distribution (Figure 5c,f,i) and BC (Figure 6j).
Figure 6c,f,i is the recrystallization diagram at three locations on the RD-ND plane. Blue, yellow, and red areas represent recrystallization, substructure, and non-recrystallization regions, respectively. By comparing the recrystallization diagram (Figure 6c,f,i) with the BC diagram (Figure 6a,d,g), it is discovered that the martensitic phase area mainly corresponds to the incompletely recrystallized region and the ferrite area mainly belongs to the substructure region. It is also found that recrystallization mainly exists within the ferrite grains while only a few scattered, small-sized recrystallized, and substructured regions are dispersed in the martensitic phase, no large recrystallized and substructured regions were found within the martensite grains. Meanwhile, by careful observation, only a few parts of ferrite grains were found to be subjected to the recrystallization process, more recrystallization regions within the ferrite grains appeared at the top and bottom surfaces, and the least recrystallized areas are at the core position.
It is discovered that the formed martensite do not recrystallize due to their formation at rapid cooling rate and lower temperature, and ferrite grains can be recrystallized because they are formed at elevated temperature. The more ferrite, the greater the recrystallization region. This is the reason why the recrystallization region is only found within the ferrite grains. It is interesting that some of the formed ferrites still do not become recrystallized after air cooling. This result infers that there is stress concentration within ferrite grains. These findings also correspond closely to analysis results of accumulated dislocation density in the KAM diagrams (Figure 6b,e,h).
It is concluded from the above EBSD analysis that the austenite grains at two surfaces undergo more deformation than that in the core position during the rolling process, leading to the higher deformation storage energy within the austenite grains at the surfaces, meanwhile, the cooling rate of two surfaces is faster than that of the core area, both factors cause the austenite grains to start the phase transformation earlier and form more ferrite phases and thereafter induce recrystallization of some ferrite grains after the air-cooling stage [24,30]. Usually, the cooling rate of the top surface is faster than that of the bottom surface during the rolling process of steel plate, so the top surface has higher percentage of ferrite grains area and higher recrystallization area in the ferrite grains.

3.2.3. Texture and Crystallographic Orientation

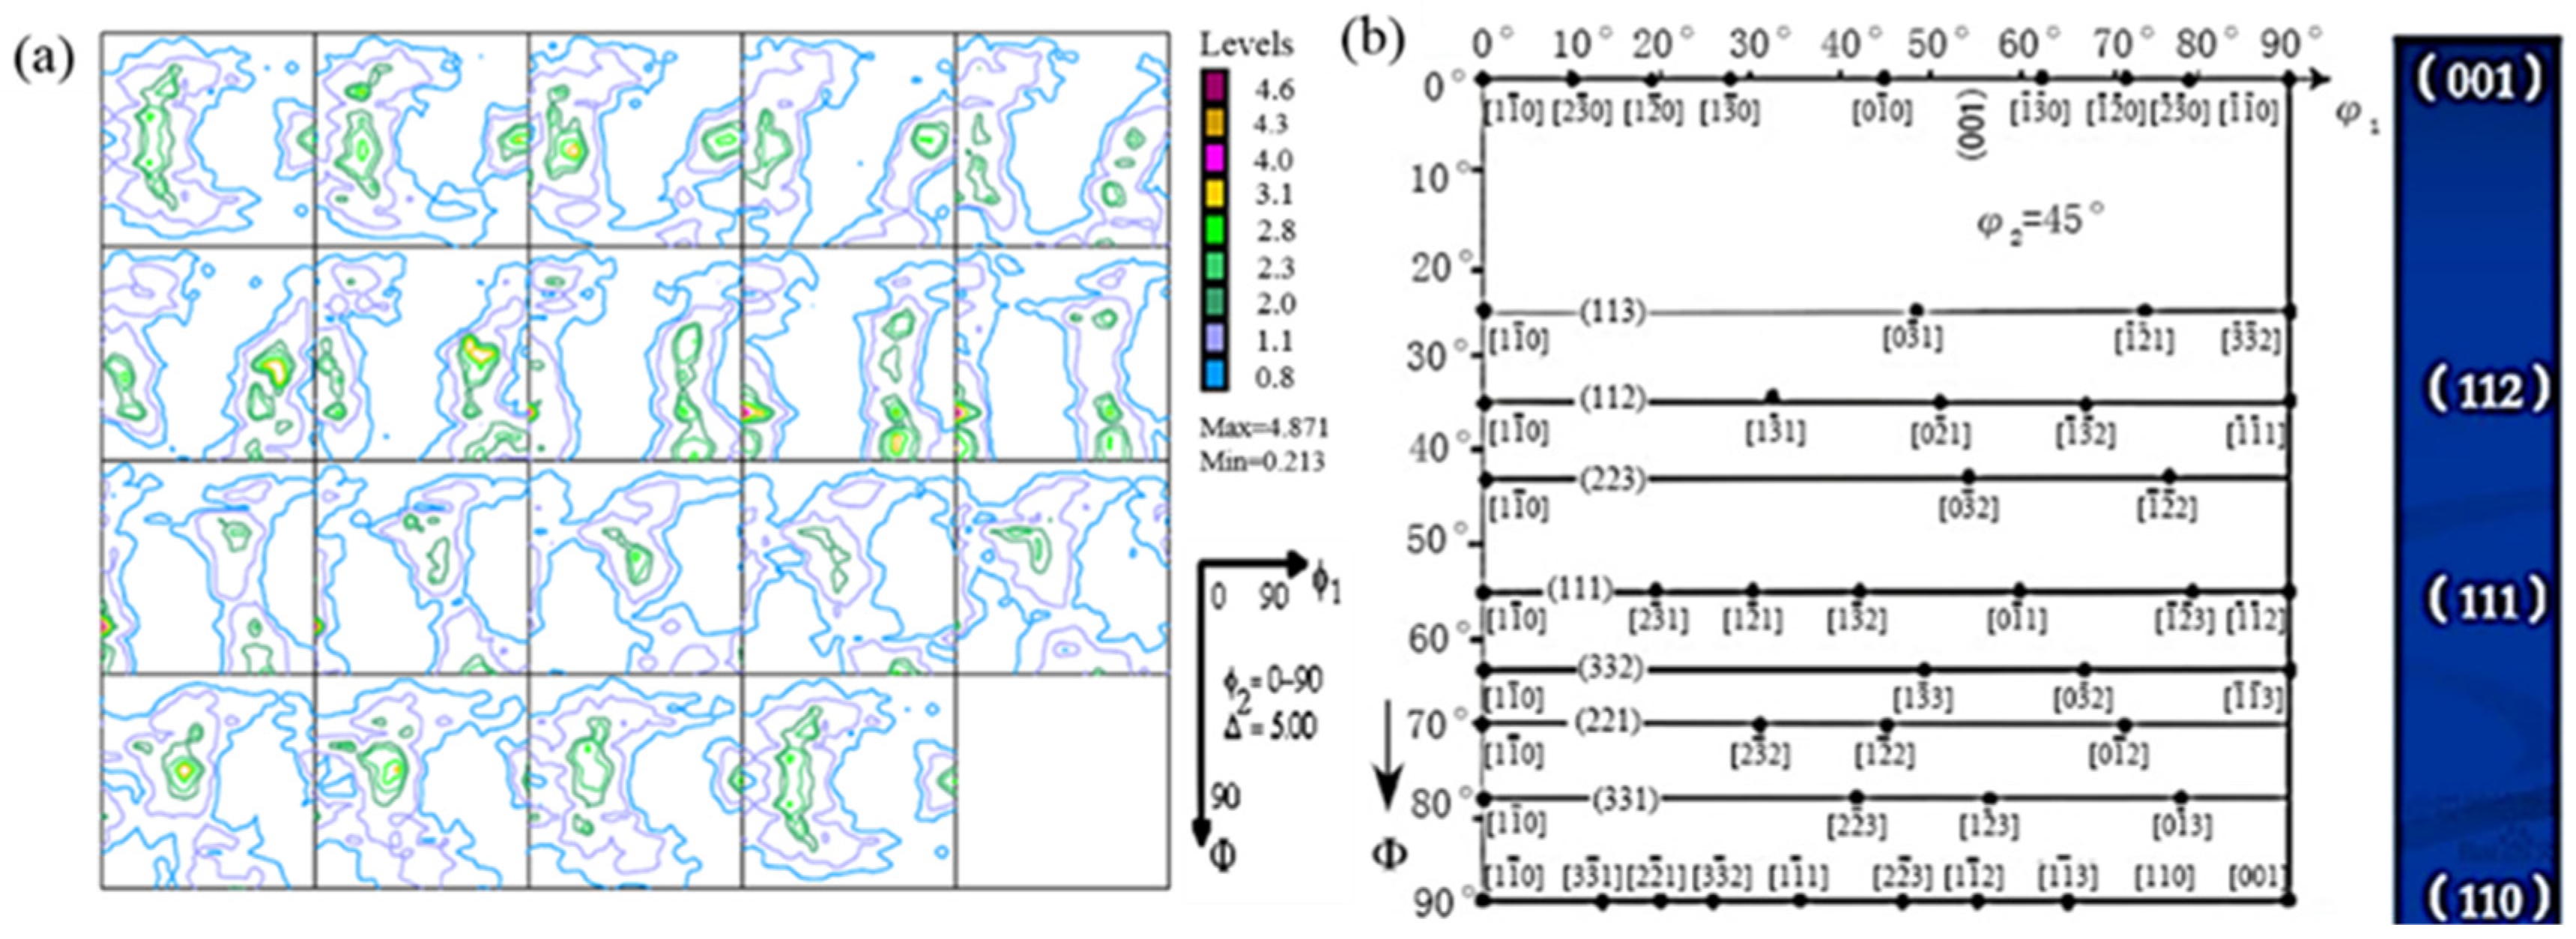
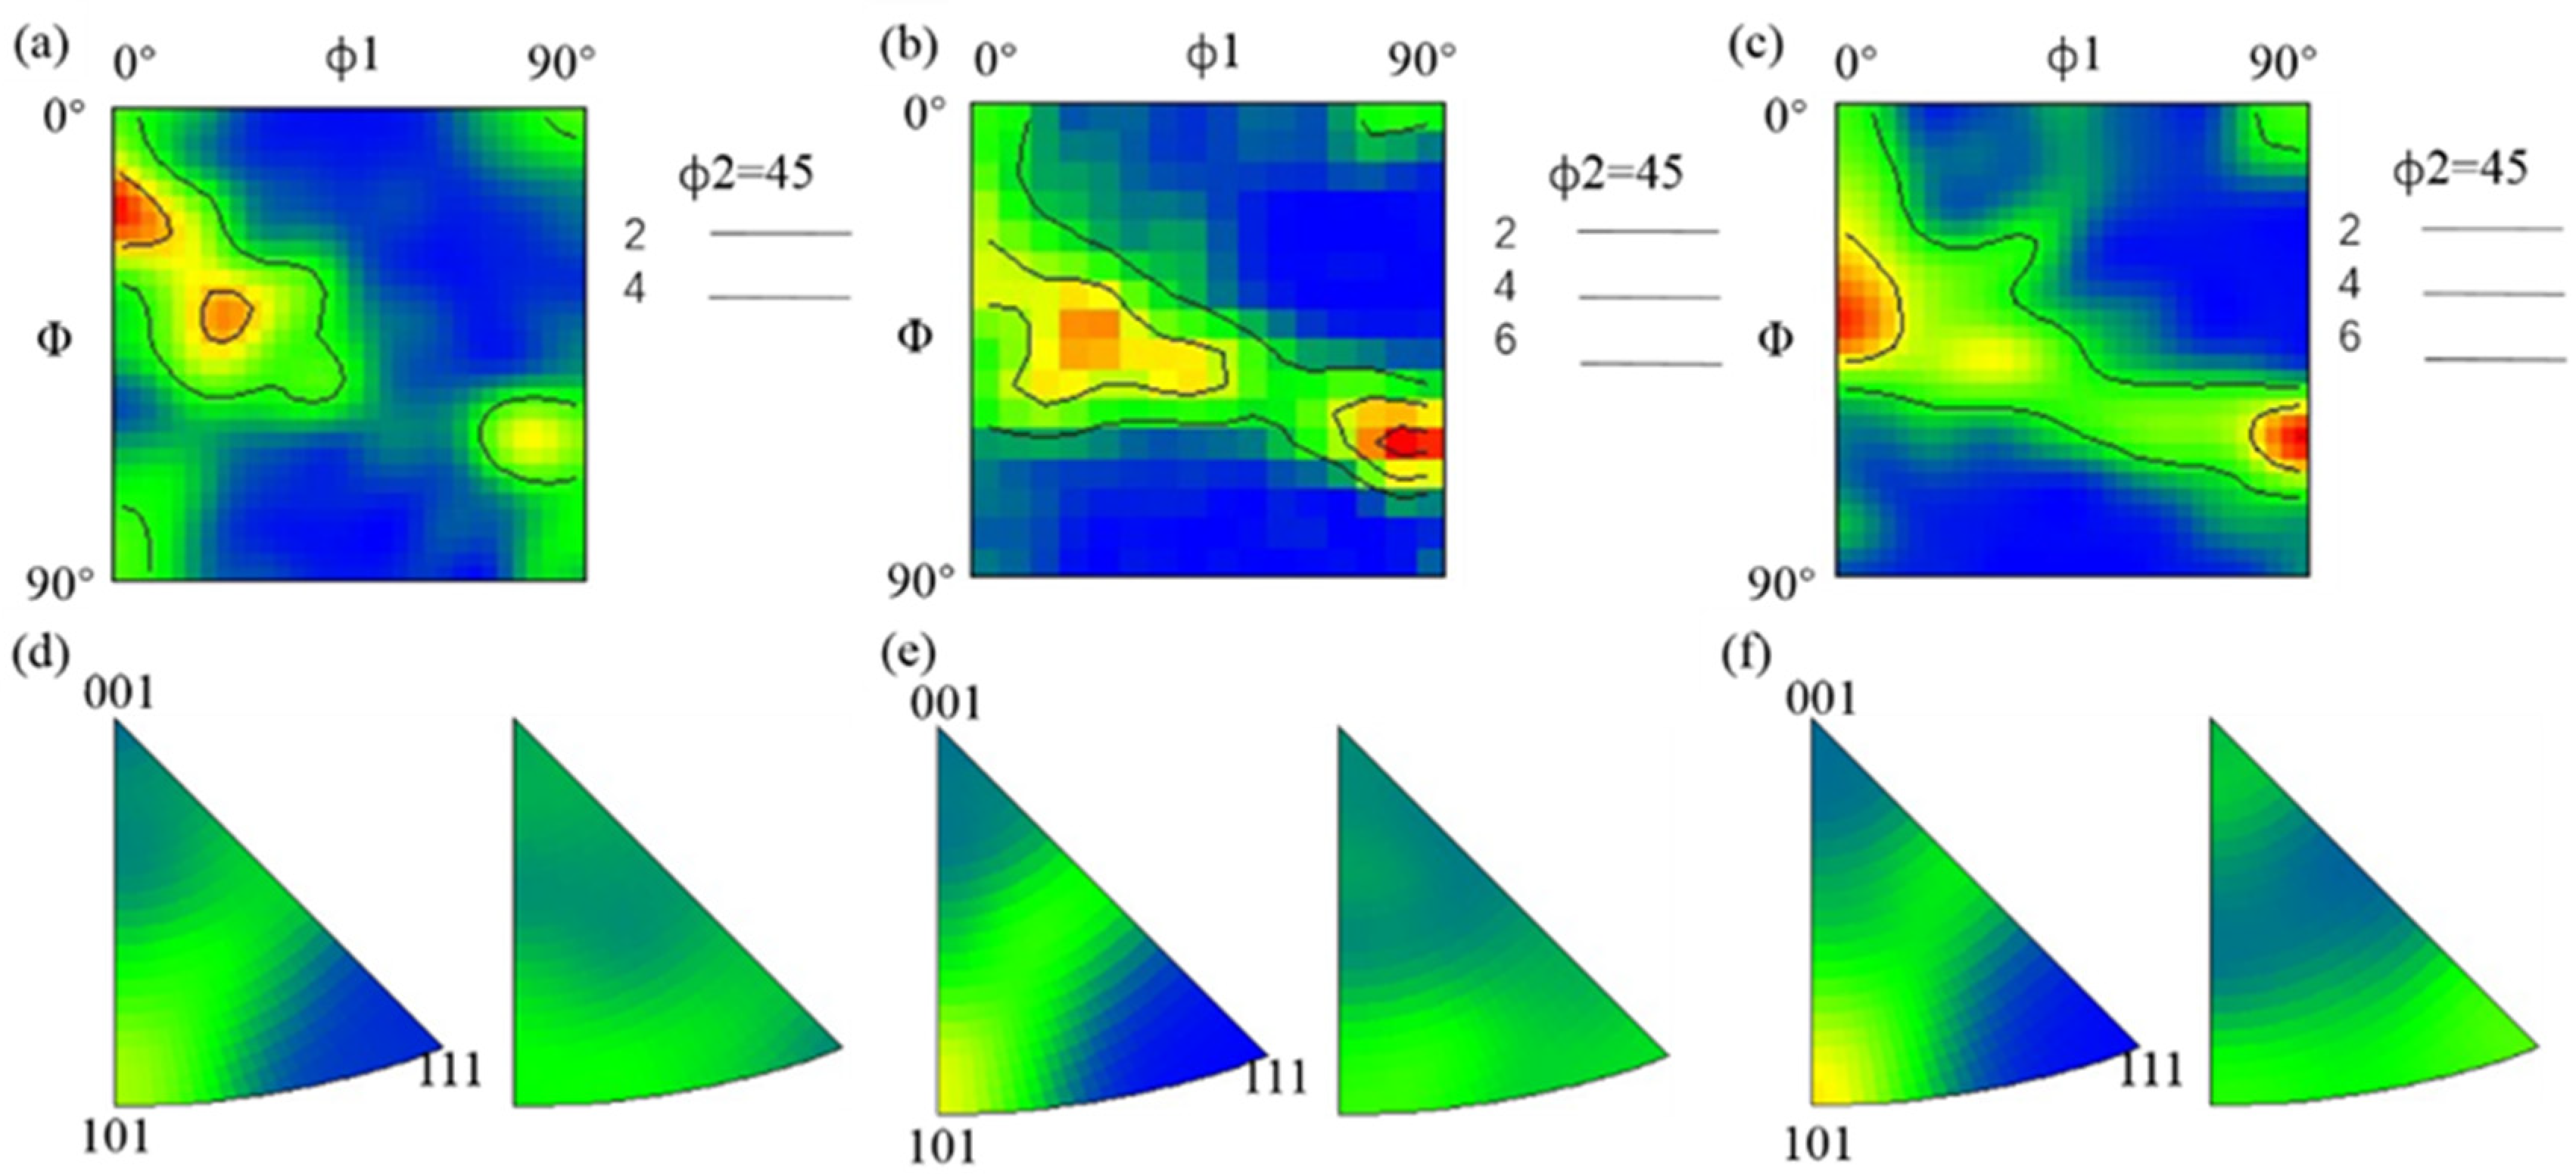
Figure 7 shows a comparison between the macroscopic textures of the orientation distribution function (ODF) map on the RD-ND plane and the standard ODF. The results show that the main texture types contained throughout the thickness of the samples are {223}<110>, {113}<110>, {112}<110>, {332}<113>, and {001}<110>. Figure 8 shows the ODF and inverse pole figure (IPF) maps based on EBSD data at typical locations on the RD-ND plane. The quantitative statistics for texture types and contents at three positions on the RD-ND plane are listed in Table 3. It is discovered that the main types of micro-texture structures are basically the same as the macrotexture structures of Figure 7.
According to the results of quantitative statistics (Table 3), it is observed that the content of ({223}<110>, {113}<110>, and {112}<110>) of α-fiber texture gradually increases from the top surface to the bottom surface, the content of {001}<110> and {110}<110> of austenite recrystallization phase transformation texture remain relatively low and have nearly the same values at three typical positions, the content of the {332}<113> texture at the core position is significantly higher than those at both surfaces, while the content of {332}<113> texture at the top and bottom surfaces have almost the same values.

3.3. Relationship between Microstructure and Mechanical Property

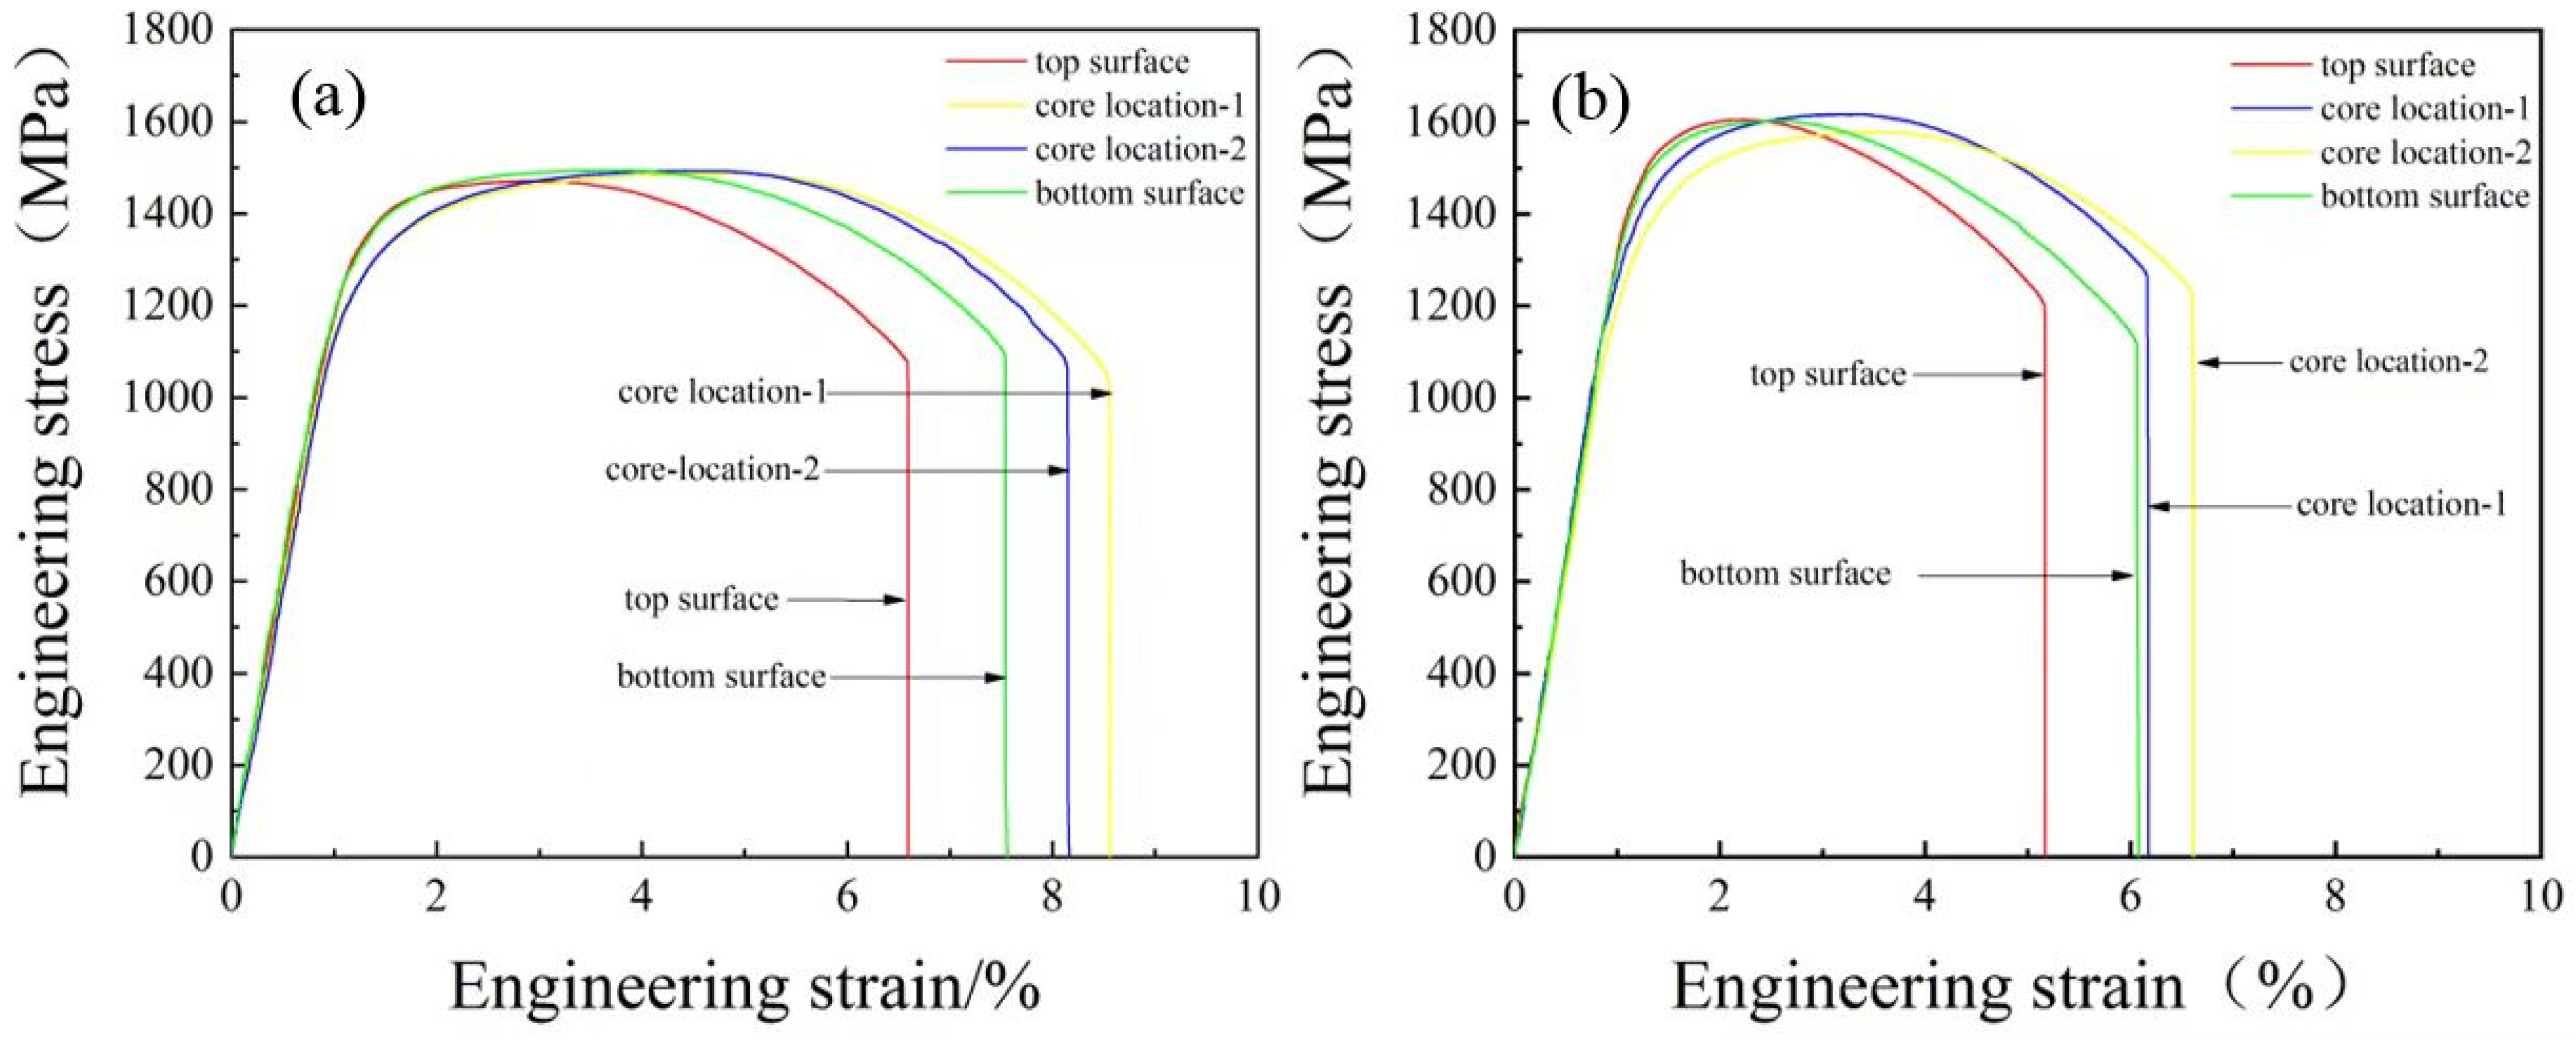
From the investigation of the microstructure inhomogeneity, the content of ferrite at the core area is the lowest. However, it is obvious that whether the test was conducted along the RD or along the TD, the elongation values of the core are always higher than that of both surfaces while the content of ferrite at the top surface is more than that of ferrite at the bottom surface (Figure 9). The result means that the content of ferrite is not the main factor affecting the elongation of the steel, whereas the content of martensite is one of the main factors affecting elongation of the steel. The variation of the amounts of martensite zone with high KAM values (Figure 6k) is highly consistent with the variation of elongation at typical locations (Figure 9).
In addition, the results of tensile tests at typical locations (Figure 9, where the stress–strain curves of “core location-1” and “core location-2” are representatives of mechanical behavior of the core area) show that the tensile strength of the specimens along the RD and the TD exhibit obvious anisotropic features, which are about 1500 MPa and 1600 MPa, respectively, whereas the elongation in the RD direction is greater than that in the TD direction (Figure 9).
The quantitative results of the strength and elongation values for both the rolling direction and the transverse direction are listed in Table 4. Based on the data in Table 2 and Table 4, it is found that grain size ratio is closely related to variation of the mechanical properties at three positions, smaller grain size ratios, higher elongation, higher grain ratios, and lower elongation. The results mean that the higher content of martensite improves the elongation of the steel.
Therefore, it is confirmed that the deformation degree of prior austenite grains during hot rolling and the martensite content after quenching dominate the mechanical properties. Theoretically, in addition to the content of martensite, the plasticity may be related to the grain size, grain orientation, and texture. Firstly, the grain size data in Table 2 show that the grain size in the core area is the largest, thus the grain size is not the main reason for its higher elongation value. Secondly, the plasticity level highly coincides with the variation regulation of the grain size ratio at three typical locations (Table 2), where the smaller the grain size ratio, the better the plasticity, and the larger the grain size ratio, the lower the plasticity. The results mean that grain size ratio has a dominate role in affecting mechanical properties, while the grain size ratio is closely related to the deformation degree of grains, it is reasonable to consider that these deformed martensite and ferrite grains inherit the deformation characteristics of prior austenite. These results also indicate that the orientation and textures caused by deformation have great influence on the mechanical properties.
As shown in Table 3, the proportions of α-fiber texture ({223}<110>, {113}<110>, and {112}<110>) and near γ-fiber texture {332}<113> components, have higher values at three typical positions; they are the main factors affecting the mechanical properties of the steel. The content of austenitic recrystallized phase transition textures {001}<110> and {110}<110> at three typical positions remain nearly the same and have relatively low values, respectively, this infers that it is not the main factor affecting the plasticity.
According to the IPFs (Figure 8d–f), hard orientation [111] along the TD direction is stronger than that along the RD direction at three positions, all μ values are higher in the regions of [100] to [110], which is called soft orientation, this results in higher strength and lower plasticity along the TD direction and lower strength and higher plasticity along the RD direction [31].
The soft orientation of the RD increases gradually in sequence of top surface, core position, and bottom surface, as shown in Figure 8d–f, while the plasticity of the top surfaces in the RD direction is lower than that of the bottom surface and core position (Table 4). This indicates that the soft orientation of RD has a certain influence on the plasticity. It is reported that γ texture orientation offers advantages in improving the plasticity [32,33]. It can be seen in Table 3 that the contents of the {332}<113> near γ texture have higher levels, thus, although the soft orientation at the core is weaker than that of the bottom surface, the higher contents of the near γ texture orientation at the core will improve the elongation of the steel. Meanwhile, the texture of {223}<110>, {113}<110>, and {112}<110> leads to an increase in the strength in the TD direction, which results in the strength of TD being higher than that of the RD direction [33].
The analysis of the above results shows that the distribution inhomogeneity of the varieties of texture types exist in the thickness direction of steel plate. The distribution inhomogeneity of the varieties of texture types exists through the thickness of the steel plate. The hard orientation [111] along the TD direction is stronger than that along the RD direction resulting in higher strength and lower plasticity along the TD direction and lower strength and higher plasticity along the RD direction. The higher contents of α-fiber texture and near γ-fiber texture play a great role in the mechanical properties.
It is interpreted that the surface layer of the steel plate sustains a more severe shear stress from the friction between the rolls and the steel plate during the hot rolling process, with the increase in the detected position away from the surface layer, the core area will be involved in a plane strain state, and the level of shear force decreases, this leads to the differences in texture strength between surface and the core area [34]. Meanwhile, accompanied by the phase change during the cooling process after hot rolling, the steel plate eventually presents inhomogeneity of microstructures and mechanical properties in the thickness direction [35,36,37].
In this work, the microstructure’s inhomogeneity and its effects on mechanical properties in an as-quenched thin specification and high-strength NM450TP wear-resistant steel was investigated and discussed based on systematic quantitative characterization. The results show that NM450TP steels are only composed of ferrite and martensite, no residual austenite was found because of the fast cooling rate. Martensite and ferrite grains show directional features due to a certain degree of deformation of prior austenite rolled in the temperature range of incompletely dynamic recrystallization, meanwhile, cooling rate and deformation of prior austenite through the thickness of the steel cause the microstructures’ inhomogeneity and the anisotropic mechanical properties. Although the content of martensite and ferrite phases were found to have inhomogeneous distribution through the thickness, the steel still has high strength and good ductility, this is because NM450TP steel has lower carbon content, and the formed lath martensite is a phase with high strength and good ductility due to its high density of dislocations. In addition, silicon manganese and chromium elements offer the benefit of strengthening the ferrite phase, and extra carbon expelled by the formed ferrite will increase the strength of lath martensite.
The results will be helpful for understanding and modifying parameters in the fabricating process of the dual-phase steels and their subsequent processing such as bending and welding processing. The texture examination indicates that NM450TP steel with high strength might have good formability because of its higher content of the near γ texture, while the anisotropic features of this steel should be concerned in the case of bending, the result will improve the understanding of the subsequent bending investigation and application of the steel. The inhomogeneous morphology of the dual phases can influence the microstructure evolution in the heat affected zone and mechanical properties of the welded joints.

4. Conclusions

In this paper, the microstructures and mechanical properties of an as-quenched NM450TP wear-resistant steel were quantitatively investigated. The main conclusions are summarized as follows:
XRD and SEM results indicate that the microstructures in the tested steel are only composed of ferrite and martensite, no residual austenite was found. The formed martensite and ferrite grains show directional features at the longitudinal cross-section of the plate due to a certain degree of deformation of prior austenite rolled in the temperature range of incompletely dynamic recrystallization.
Based on EBSD analysis, the obvious inhomogeneous distribution of ferrite phase and martensite phase was discovered throughout the thickness of the steel plate. The content of ferrite on the two surfaces is more than that of ferrite at the core location. The highest content of ferrite on the top surface is found to be two times that of ferrite at the core location. Both the higher deformation storage energy and faster cooling rate at the two surfaces cause the austenite grains to start the phase transformation earlier and form more ferrite phases.
The content of martensite and the deformation degree of prior austenite grains dominate the tensile properties, while the amounts of ferrite are not the main factor affecting the plasticity. Meanwhile, the steel plate exhibits obvious anisotropic effects of tensile properties in the steel plate. The tensile strengths along the rolling direction (RD) and along the transversal direction (TD) at typical locations are about 1500 MPa and 1600 MPa, respectively.
The distribution inhomogeneity of the varieties of texture types exists throughout the thickness of the steel plate. The hard orientation [111] along the TD direction is stronger than that along the RD direction results in higher strength and lower plasticity along TD direction and lower strength and higher plasticity along RD direction. The higher contents of α-fiber texture and near γ-fiber texture play a great role in the mechanical property.
The inhomogeneity of microstructures and the anisotropic tensile property have an influence on subsequent processing and the practical implication. The bending process should consider anisotropic factors and avoid bending along the TD, while in the case of welding, the microstructure evolution in the heat-affected zone and mechanical property of the welding joints would be greatly affected by this inhomogeneous distribution of the dual phases. The results indicate that NM450TP steel has some disadvantages in its microstructure and mechanical properties, although it has high strength and good formability. In order to improve its application, the effects of inhomogeneity microstructures on the bending mechanical property and microstructures evolution of welding joints should be addressed in future research.

Author Contributions

Conceptualization, G.L. and Z.Z.; methodology, G.L., S.L., J.R. and Z.Z.; writing—original draft preparation, G.L.; acquisition, analysis and interpretation, G.L., S.L., J.R. and Z.Z.; writing—review and editing, G.L. and Z.Z. All authors have read and agreed to the published version of the manuscript.

Funding

This research was sponsored by the key scientific project of Hebei Iron and Steel Group Co., Ltd.; grant number HG2021221.

Institutional Review Board Statement

Not applicable.

Informed Consent Statement

Not applicable.

Data Availability Statement

Not applicable.

Conflicts of Interest

The authors declare no conflict of interest.

References

  1. Liu, Q.; Feng, J. Development and current situation of advanced high-strength steel under the condition of automobile light weight. Steel Roll. 2020, 37, 65–70+90. [Google Scholar]
  2. Li, C.M. Effect of quenching on microstructure and properties of wear-resistant steel NM400. Heat Treat. Met. 2021, 45, 69–73. [Google Scholar]
  3. Su, C.; Feng, G.H.; Yuan, X.M.; Wang, S.B.; Li, Z. Development of low alloy NM400 wear-resistant steel strip based on 2250 mm hot continuous rolling mill. Iron Steel 2021, 56, 126–131. [Google Scholar]
  4. Miernik, K.; Pytel, S. Microstructure and mechanical properties of dual-phase steel. Arch. Metall. Mater. 2014, 59, 1257–1261. [Google Scholar] [CrossRef]
  5. Chen, X.; Xu, G.; Yao, Z. Static CCT curve of martensite wear-resistant steel NM 400. Spec. Steel 2021, 42, 63–66. [Google Scholar]
  6. Wang, X.; Li, H.; Tang, W.; Liu, D.; Liu, D.; Li, Y.; Peng, N.; Xiong, X. Determination and analysis of CCT curve of a high strength steel. J. Cent. South Univ. (Sci. Technol.) 2021, 52, 1090–1098. [Google Scholar]
  7. Xue, J. Study on Microstructure Control and Hole Expansion Performance of 800 Mpa Grade Hot-Rolled Complex Phase Steel. Ph.D. Thesis, University of Science and Technology Beijing, Beijing, China, 2020. [Google Scholar]
  8. Isfahani, T.D.; Shafyei, A.; Sharifi, H. Impact and tensile properties of ferrite-martensite dual-phase steels. Fatigue Fract. Eng. Mater. Struct. 2009, 32, 141–147. [Google Scholar] [CrossRef]
  9. José, R.; Mikael, O. Abrasive wear resistance of some commercial abrasion resistant steels evaluated by laboratory test methods. Wear 2009, 267, 2055–2061. [Google Scholar]
  10. Li, G.; Feng, G.; Wang, C.; Hu, L.; Li, T.; Deng, D. Prediction of residual stress distribution in NM450TP wear-resistant steel Welded Joints. Crystals 2022, 12, 1093. [Google Scholar] [CrossRef]
  11. Zhou, Y.; Li, G.; Wen, T.; Zhang, L.; Zheng, Y.; Yang, F.; Wang, X. Fracture prediction of NM450TP wear-resistant steel plates during air bending using a mesoscopic heterogeneous model. Theor. Appl. Fract. Mech. 2022, 123, 103711. [Google Scholar] [CrossRef]
  12. Das, D.; Chattopadhyay, P.P. Influence of martensite morphology on the work-hardening behavior of high strength ferrite–martensite dual-phase steel. J. Mater. Sci. 2009, 44, 2957–2965. [Google Scholar] [CrossRef]
  13. Saai, A.; Hopperstad, O.S.; Granbom, Y.; Ladem, O.G. Influence of volume fraction and distribution of martensite phase on the strain localization in dual phase steels. Proc. Mater. Sci. 2014, 3, 900–905. [Google Scholar] [CrossRef] [Green Version]
  14. Pushkareva, I.; Allain, S.; Collin, S.; Rbdelkrim, A.; Moulin, A. Relationship between microstructure, mechanical properties and damage mechanisms in high martensite fraction dual phase steels. ISIJ Int. 2015, 55, 2237–2246. [Google Scholar] [CrossRef] [Green Version]
  15. Zhang, J.; Di, H.; Deng, Y.; Misra, R.D.K. Effect of martensite morphology and volume fraction on strain hardening and fracture behavior of martensite–ferrite dual phase steel. Mater. Sci. Eng. A 2015, 627, 230–240. [Google Scholar] [CrossRef]
  16. Lai, Q.; Bouaziz, O.; Goune, M.; Brassart, l.; Verdier, M.; Parry, G.; Perlade, A.; Brechet, Y.; Pardoen, T. Damage and fracture of dual-phase steels: Influence of martensite volume fraction. Mater. Sci. Eng. A 2015, 646, 322–331. [Google Scholar] [CrossRef]
  17. Mansouri, T.; Zidekmek, S.; Allaoui, O. Effect of the tempering temperature on microstructure and mechanical properties X70 dual phase steel. Metall. Mater. Eng. 2022, 28, 351–358. [Google Scholar]
  18. Nouri, A.; Badkoobeh, F.; Rabiei, N.; Hassannejad, H. Evolutions of microstructural and mechanical properties of tempered dual-phase steels influenced by silicon content and the intercritical annealing temperature. J. Mater. Eng. Perform. 2022, 31, 5441–5457. [Google Scholar] [CrossRef]
  19. Li, G.; Lei, M.; Chen, H.; Lü, D. Phase transformation behavior of non-quenched and tempered NM400 multiphase wear-resistant steel. Heat Treat. Met. 2022, 47, 228–233. [Google Scholar]
  20. Li, Y.; Kang, J.; Zhang, W.; Liu, D.; Wang, X.; Yuan, G.; Misra, R.; Wang, G. A novel phase transition behavior during dynamic partitioning and analysis of retained austenite in quenched and partitioned steels. Mater. Sci. Eng. A 2018, 710, 181–191. [Google Scholar] [CrossRef]
  21. Ye, Q.; Wang, Q.; Wang, H. Industrial production and application of high-strength high-toughness ultra-heavy rack steel. J. Iron Steel Res. 2022, 34, 1476–1484. [Google Scholar]
  22. Shi, Z.; Liu, K.; Wang, M.; Shi, J.; Dong, H.; Pu, J.; Chi, B.; Zhang, Y.; Jian, L. Effect of tensile deformation of austenite on the morphology and strength of lath martensite. Met. Mater. Int. 2012, 18, 317–320. [Google Scholar] [CrossRef]
  23. Shen, W. Study and Development of the New Expandable Tubular Ferrite/Martensite Dual Phase Steels. Ph.D. Thesis, Southwest Petroleum University, Chengdu, China, 2013. [Google Scholar]
  24. Yang, P.; Fu, Y.; Cui, F.; Sun, Z. Dynamic aspects of strain enhanced transformation in Q235 plain carbon steel. Acta Metall. Sin. 2001, 37, 617–624. [Google Scholar]
  25. Yang, P.; Cui, F.; Wang, F. Microstructural features during strain induced ferrite transformation in 08 and 20Mn steels. Int. J. Miner. 2001, 8, 105–110. [Google Scholar]
  26. Song, R.; Ponge, D.; Raabe, D.; Speer, J.; Madock, D. Overview of processing, microstructure and mechanical properties of ultrafine grained bcc Steels. Mater. Sci. Eng. A 2006, 441, 1–17. [Google Scholar]
  27. Zhang, J.; Liu, Z.; Sun, J.; Zhao, H.; Shi, Q.; Ma, D. Microstructure and mechanical property of electropulsing tempered ultrafine grained 42CrMo steel. Mater. Sci. Eng. A 2020, 782, 139213. [Google Scholar] [CrossRef]
  28. Lin, X.; Zou, X.; An, D.; Krakauer, B.; Zhu, M. Multi-scale modeling of microstructure evolution during multi-pass hot-rolling and cooling process. Materials 2021, 14, 2947. [Google Scholar] [CrossRef]
  29. Paria, S.; Reza, M.; Alireza Sabour, R. Temperature effect of hot rolling process on microstructure, strength and fracture toughness of X65 pipeline steel. Trans. Indian Inst. Met. 2018, 71, 1531–1541. [Google Scholar]
  30. Li, S.; Guo, C.; Hao, L.; Kang, Y.; An, Y. In-situ EBSD study of deformation behaviour of 600 MPa grade dual phase steel during uniaxial tensile tests. Mater. Sci. Eng. A 2019, 759, 624–632. [Google Scholar] [CrossRef]
  31. Patra, S.; Kumar, V.; Haldar, A.; Chakrabarti, D. Effect of hot-deformation on micro-texture in ultra-fine grained HSLA steel. In Proceedings of the 16th International Conference on the Textures of Materials (ICOTOM 16), Indian Institute of Technology Bombay, Mumbai, India, 17 December 2011; pp. 439–442. [Google Scholar]
  32. Zhang, Y.; Yuan, Q.; Ye, J.; Weng, X.; Wang, Z. Effect of cold rolling reduction on microstructure, mechanical properties, and texture of deep drawing dual-phase (DP) steel. Mater. Res. Express 2019, 6, 125802. [Google Scholar] [CrossRef]
  33. Venkatsurya, P.; Zhang, Y.; Raja Devesh Kumar, M.; Michael, M.; Murali, M.; Hartmann, J. Understanding mechanical property anisotropy in high strength niobium-microalloyed linepipe steels. Mater. Sci. Eng. A 2012, 556, 194–210. [Google Scholar] [CrossRef]
  34. Kang, H.; Huh, M.; Park, S.; Engler, O. Effect of lubrication during hot rolling on the evolution of through-thickness textures in 18%Cr ferritic stainless steel sheet. Steel Res. Int. 2008, 79, 489–496. [Google Scholar] [CrossRef]
  35. Szeliga, D.; Chang, Y.; Madej, L.; Bzowski, K.; Perzynski, K.; Haase, C.; Bleck, W.; Pietrzyk, M. Correlating the microstructural heterogeneity with local formability of cold-rolled dual-phase and complex-phase steels through hardness gradients. Steel Res. Int. 2022, 93, 2200130. [Google Scholar] [CrossRef]
  36. Zeng, W.; Zhou, M.; Yang, M.; Qiu, R. Effect of Zr on the microstructure and mechanical properties of 12Cr ferritic/martensitic steels. Fusion Eng. Des. 2021, 177, 113084. [Google Scholar] [CrossRef]
  37. Hu, C.; Chen, L.; Zhao, Z.; Gong, A.; Shi, W. Effects of controlled cooling-induced ferrite–pearlite microstructure on the cold forgeability of XC45 steel. J. Mater. Eng. Perform. 2018, 27, 2772–2781. [Google Scholar] [CrossRef]
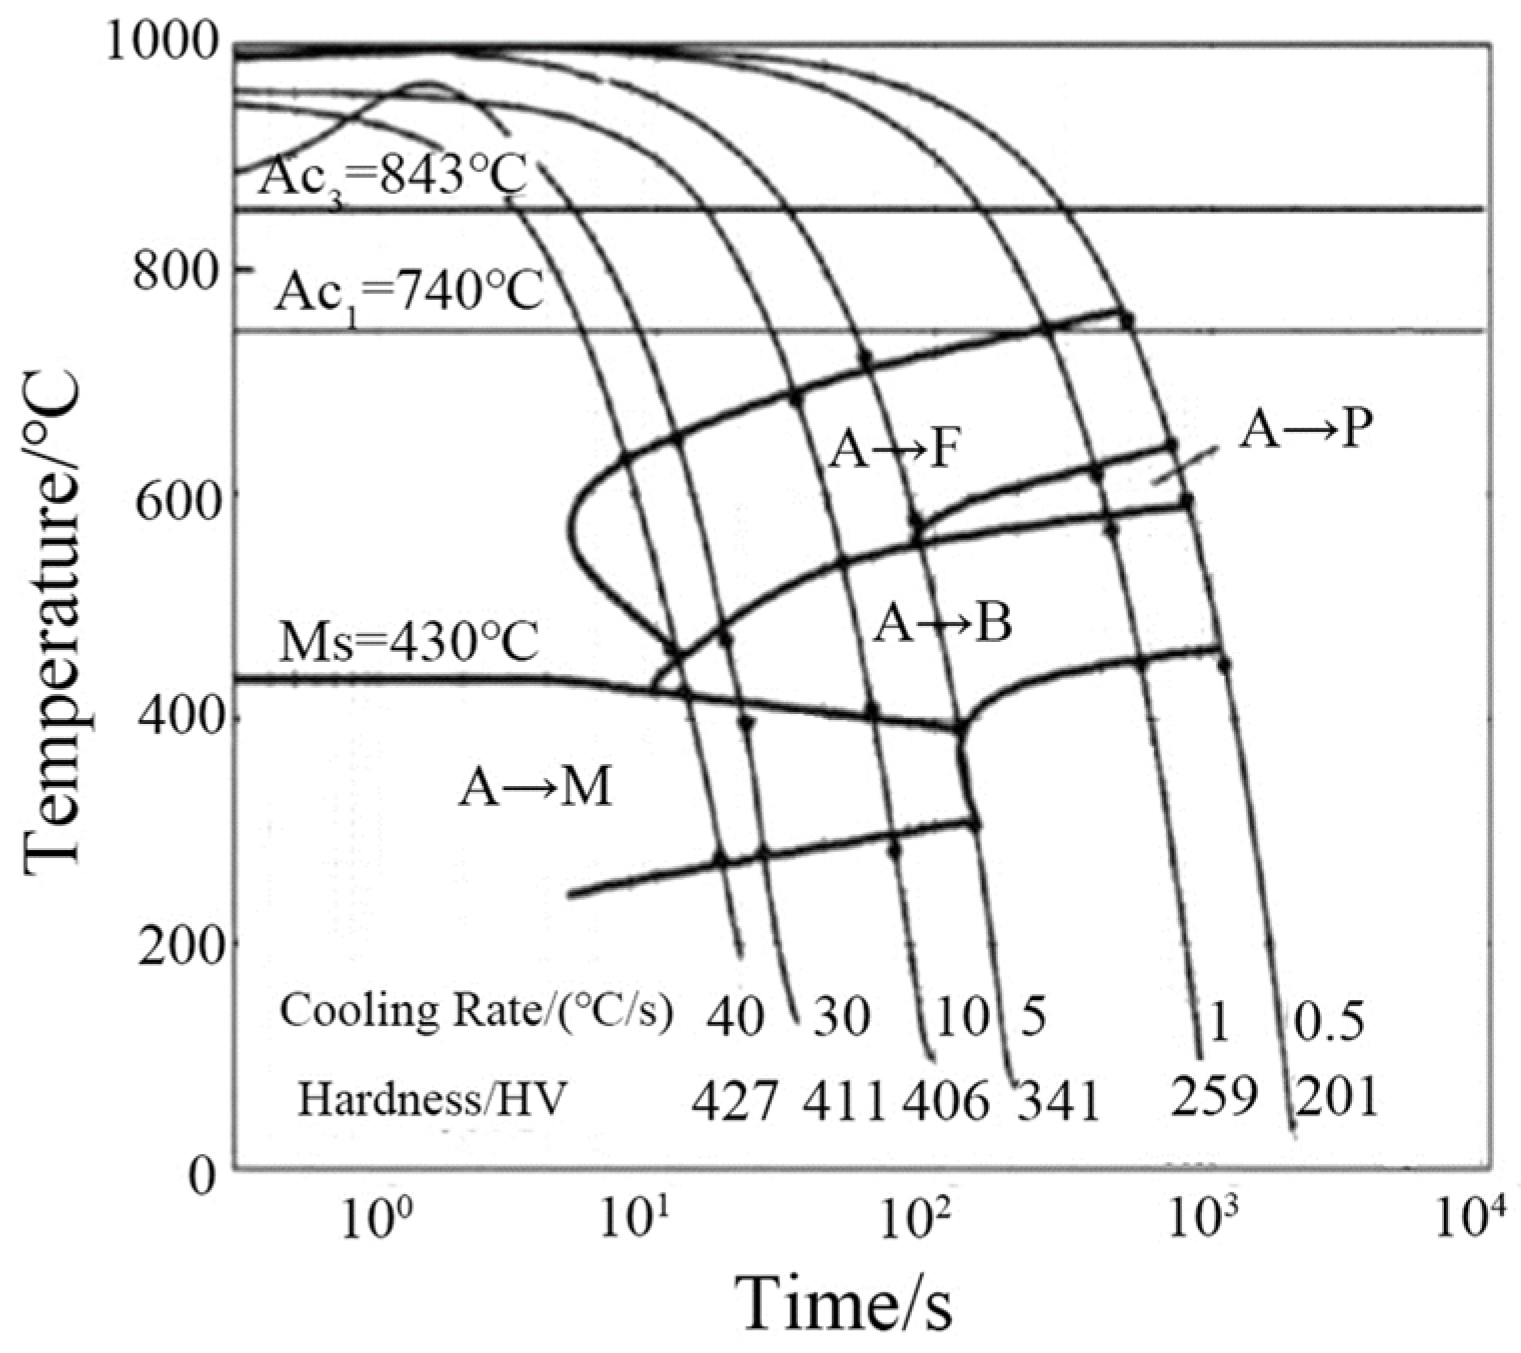
Figure 1. Dynamic continuous cooling transformation (CCT) curves of the tested steel [19].
Applsci 13 07017 g001
Figure 2. Schematic of microstructural analysis and tensile test: (a) position for microstructural analysis; (b) specimen geometry used in tensile test.
Applsci 13 07017 g002
Figure 3. Phase analysis on the RD-ND plane by XRD.
Applsci 13 07017 g003
Figure 4. Microstructure morphology of typical locations: (a,d) top surface; (b,e) core location; (c,f) bottom surface; (ac) transverse cross-section (TD-ND plane); (df) transverse longitudinal section (RD-ND plane).
Applsci 13 07017 g004
Figure 5. Distribution of grain orientation and grain boundary types at typical locations on the RD-ND plane: (a,d,g) grain orientation distribution; (b,e,h) grain boundary type distribution; (c,f,i) grain boundary content statistics; (ac) top surface; (df) core position; (gi) bottom surface.
Applsci 13 07017 g005
Figure 6. BC, KAM, and recrystallization diagrams at typical locations on the RD-ND plane: (a,e,i) top surface; (b,f,j) core location; (c,g,k) bottom surface; (ac) band contrast diagram; (eg) KAM diagram; (ik) recrystallization diagram; (d,h,l) quantitative statistics.
Applsci 13 07017 g006
Figure 7. The macrotextures of the ODF map on the RD-ND plane: (a) texture distribution on RD-ND plane; (b) common texture distribution of φ2 = 45° cubic crystal system.
Applsci 13 07017 g007
Figure 8. ODF and IPF maps at typical locations on RD-ND plane by EBSD statistical analysis: (a,d) top surface; (b,e) core location; (c,f) bottom surface; (ac) ODF maps; (df) IPF maps.
Applsci 13 07017 g008
Figure 9. Stress–strain curves at typical positions by tensile test: (a) RD; (b) TD.
Applsci 13 07017 g009
Table 1. The main chemical compositions of NM450TP steel (wt.%).
ElementCMnSiCrTiNbSP
content0.171.781.200.500.0150.030.0030.010
Table 2. Statistics of average effective grain size at typical locations.
Direction\PositionTop SurfaceCore PositionBottom Surface
Grain sizes in horizontal direction/μm1.48051.48561.3048
Grain sizes in vertical direction/μm1.23561.37441.1638
Grain size ratios1.19821.08091.1212
Table 3. Types and contents of textures on the RD-ND plane by EBSD.
Texture Percentage\Type{223}
<110>
{113}
<110>
{112}
<110>
{001}
<110>
{110}
<110>
{332}
<113>
Top surface14.3%21.4%19.9%8.85%8.46%22.2%
Core position23.2%20.9%22.2%8.48%3.9%30.8%
Bottom surface25.9%25.4%28.6%9.16%4.15%22.6%
Table 4. Mean values of mechanical properties of NM450TP steel along RD and TD.
PositionsYield Strength/MPaTensile Strength/MPaElongation/%
RDTop surface122014676.6
Core location-1113314878.6
Core location-2113614908.2
Bottom surface118914927.6
TDTop surface131516045.2
Core location-1125916216.2
Core location-2120315786.6
Bottom surface132816066.1
Disclaimer/Publisher’s Note: The statements, opinions and data contained in all publications are solely those of the individual author(s) and contributor(s) and not of MDPI and/or the editor(s). MDPI and/or the editor(s) disclaim responsibility for any injury to people or property resulting from any ideas, methods, instructions or products referred to in the content.