Article

Investigations on Factors Affecting 3D-Printed Holes Dimensional Accuracy and Repeatability

by
Diana Popescu
1,*,
Cătălin Gheorghe Amza
2,
Rodica Marinescu
3,
Mariana Cristiana Iacob
1,* and
Nicoleta Luminiţa Căruţaşu
1
1
Faculty of Industrial Engineering and Robotics, Department of Robotics and Production Systems, University Politehnica of Bucharest, 060042 Bucharest, Romania
2
Faculty of Industrial Engineering and Robotics, Department of Quality Engineering and Industrial Technologies, University Politehnica of Bucharest, 060042 Bucharest, Romania
3
Department of Orthopedics, Carol Davila University of Medicine and Pharmacy, 050474 Bucharest, Romania
*
Authors to whom correspondence should be addressed.
Appl. Sci. 2023, 13(1), 41; https://doi.org/10.3390/app13010041
Submission received: 25 November 2022 / Revised: 15 December 2022 / Accepted: 17 December 2022 / Published: 21 December 2022

Abstract

:

Featured Application

The investigations presented in this paper support the engineers in setting the nominal values of the diameters of directly 3D-printed holes, and in establishing the values of the 3D printing process parameter. The analysis of the factors which could impact the dimensional accuracy and repeatability of the holes provides practical information related to the 3D printing production delocalization which presupposes the use of different 3D printers, slicers, and materials.

Abstract

This paper investigates the impact of several factors related to manufacturing, design, and post-processing on the dimensional accuracy of holes built in the additively manufactured parts obtained by material extrusion process (MEX). Directly fabricated holes in the 3D prints are commonly used for joining with other parts by means of mechanical fasteners, thus producing assemblies or larger parts, or have other functional purposes such as guiding the drill in the case of patient-personalized surgical guides. However, despite their spread use and importance, the relationship between the 3D-printed holes’ accuracy and printing settings is not well documented in the literature. Therefore, in this research, test parts were manufactured by varying the number of shells, printing speed, layer thickness, and axis orientation angles for evaluating their effect on the dimensional accuracy of holes of different diameters. In the same context of limited existing information, the influence of material, 3D printer, and slicing software is also investigated for determining the dimensional accuracy of hole-type features across different manufacturing sites, a highly relevant aspect when using MEX to produce spare or end-use parts in a delocalized production paradigm. The results of this study indicated that the layer thickness is the most relevant influence factor for the diameter accuracy, followed by the number of shells around the holes. Considering the tested values, the optimal set of values found as optimizing the accuracy and printing time was 0.2 mm layer thickness, two shells, and 50 mm/s printing speed for the straight holes. Data on the prints manufactured on different MEX equipment and slicers indicated no statistically significant difference between the diameters of the holes. The evaluation of 3D-printed polylactic acid test parts mimicking a surgical template device with inclined holes showed that the medical decontamination process had more impact on the holes’ dimensional variability than on their dimensional accuracy.

1. Introduction

The ability to produce parts that meet the quality standards in terms of form and dimensional accuracy, stability, and repeatability is a critical aspect for any manufacturing technology. In this sense, additive manufacturing (AM) is not an exception considering the current trend towards using AM as a cost-effective, complementary solution to the traditional manufacturing technologies when it comes to mass customization production [1,2]. A shorter and less complex supply chain is another advantage of the AM technology [3], the implementation of the on-demand and delocalized production strategies by means of material extrusion-based AM process (MEX) recently proving its benefits [4,5]. However, there remain aspects related to the use of MEX for functional applications that require more investigation as the 3D prints mechanical properties, surfaces quality and accuracy strongly depend on parts design and process parameters settings [6]. Hence, researchers remain interested in analyzing by experimental and numerical methods, the influence of MEX parameters on different characteristics of prints, as well as in optimizing the manufacturing settings for different uses and work conditions [7,8,9]. In this regard, one of the aims of the current research is to investigate the dependency between the accuracy and repeatability of hole-type features and MEX process parameters, a topic not commonly addressed in the literature. This aspect is relevant as many 3D-printed parts include directly manufactured holes for accommodating mechanical fasteners or bushings that allow joining with other parts for producing assemblies or larger parts [10]. Moreover, the directly fabricated thru-holes are a common functional feature of the 3D-printed surgical guides [11,12], with their dimensional accuracy and stability after medical decontamination also being important.
The accuracy and repeatability of geometrical features in the AM field are assessed by benchmarking between processes [11,13,14], and by varying the process parameters values and evaluating their effect on the dimensional error of test parts manufactured using diverse AM processes [15,16,17,18]. However, not many studies have addressed the effect of MEX parameter settings and axis orientation angles on the holes accuracy, despite these features seeing extended use across various domains. Zhu et al. [19] studied the extrusion and platform temperatures, layer thickness, and print speed for a polylactic acid (PLA) cylindrical test part with a hole, optimizing the manufacturing settings from the perspective of the part shrinkage. Herath et al. [20] noted the difficulty of finding an optimal parameters combination that allow obtaining accurate prints (test part included both holes and rectangular features) when printing with relatively thick layers (0.3 mm). Holes with diameters of 13 and 25 mm were considered in [20], where analyzed parameters were the number of shells, infill pattern, cooling rate, extrusion temperature and printing speed. Hernandez et al. [21] experimentally showed that the shell thickness, part size and printing speed correlates with the dimensional error, for instance, the smaller the hole’ size the larger the mean dimensional deviation. Knoop et al. [22] noted that the holes with diameters less than 18 mm are 3D-printed undersized, and that the air gap parameter is not significantly influencing the holes dimensional error. Further analysis of the literature in the field showed limited existing knowledge on the effect of process parameters on the accuracy of directly 3D-printed holes of different diameters and axis orientations—in all the aforementioned research the holes were built with vertical axes. Layer thickness, printing speed, number of shells, and hole axis orientations were the parameters selected in the current study as having the potential of influencing the dimensional accuracy, at the same time affecting the printing time; with a tradeoff between the dimensional accuracy and manufacturing time and cost being often required. The most influential of these factors was searched for. Moreover, as no research was found on the dimensional accuracy of holes across different materials, 3D printers, and slicers, this aspect was also investigated as being meaningful for the delocalized production approach where the same stl file of a part is sent for 3D printing in different manufacturing sites that are using diverse equipment and slicing software, raising the question if the achieved accuracies are comparable. Another objective of the research was to understand if the medical decontamination process had influenced the accuracy on the directly 3D-printed holes. Thus, 3D printing points-of-care (3DP-POCs), space, or other remote zones can be some of the beneficiaries of the results of this research, as locations in which the production of customized parts, spare parts, or low-volume parts takes place [5,23], with the manufacturing accuracy-related knowledge being relevant for obtaining reliable products.

2. Materials and Methods

Two sets of experiments were conducted, for which two types of test parts were manufactured (Figure 1).
The first experiment focused on evaluating the influence of three 3DP process parameters on the straight thru-holes dimensional accuracy, and on determining the most influential factor and the optimal set of parameters. The test parts were built in different manufacturing sites using two PLA materials from different producers (denoted PLA 1 from Devil Design Sp. J., PL, and PLA 2 from Formfutura BV, NL) and ABS material (Stratasys Inc., Austin, TX, USA) on five 3D printers by using four slicing software (Prusa Replica/Prusa extruder/Prusa slicer/PLA 1; Original Prusa i3mk3s+/direct drive extruder/Prusa slicer/PLA 1; Creality CR10/MK8 extruder/Cura Ultimaker slicer/PLA 1; Creality Ender 3/BIQU H2 extruder/Simplify3d slicer/PLA 2; Mojo 3D printer/Print Wizard slicer/ABS). The purpose was to investigate if the selection of a certain material, equipment or slicer is influencing the dimensional accuracy of 3D-printed straight holes. Thus, the first experiment was meant to answer two research questions: What is the most influential process parameter for the 3D-printed straight holes dimensional accuracy? Does the use of different 3D printers, materials and slicers impact the holes dimensional accuracy?
The results of the first experiment were used in the second one in which 3D-printed PLA test parts mimicking a surgical drill guide with inclined holes were manufactured. The dimensional accuracies of the guide’s holes before and after a post-processing process typical for the medical applications (i.e., decontamination by cleaning, washing and cold plasma sterilization) were compared. This experiment answered the following question: Are the accuracy and repeatability of the directly 3D-printed holes preserved after the medical decontamination process?

2.1. Experiment 1: The Influence of 3DP Parameters, Equipment and Slicer on Holes’ Dimensional Accuracy

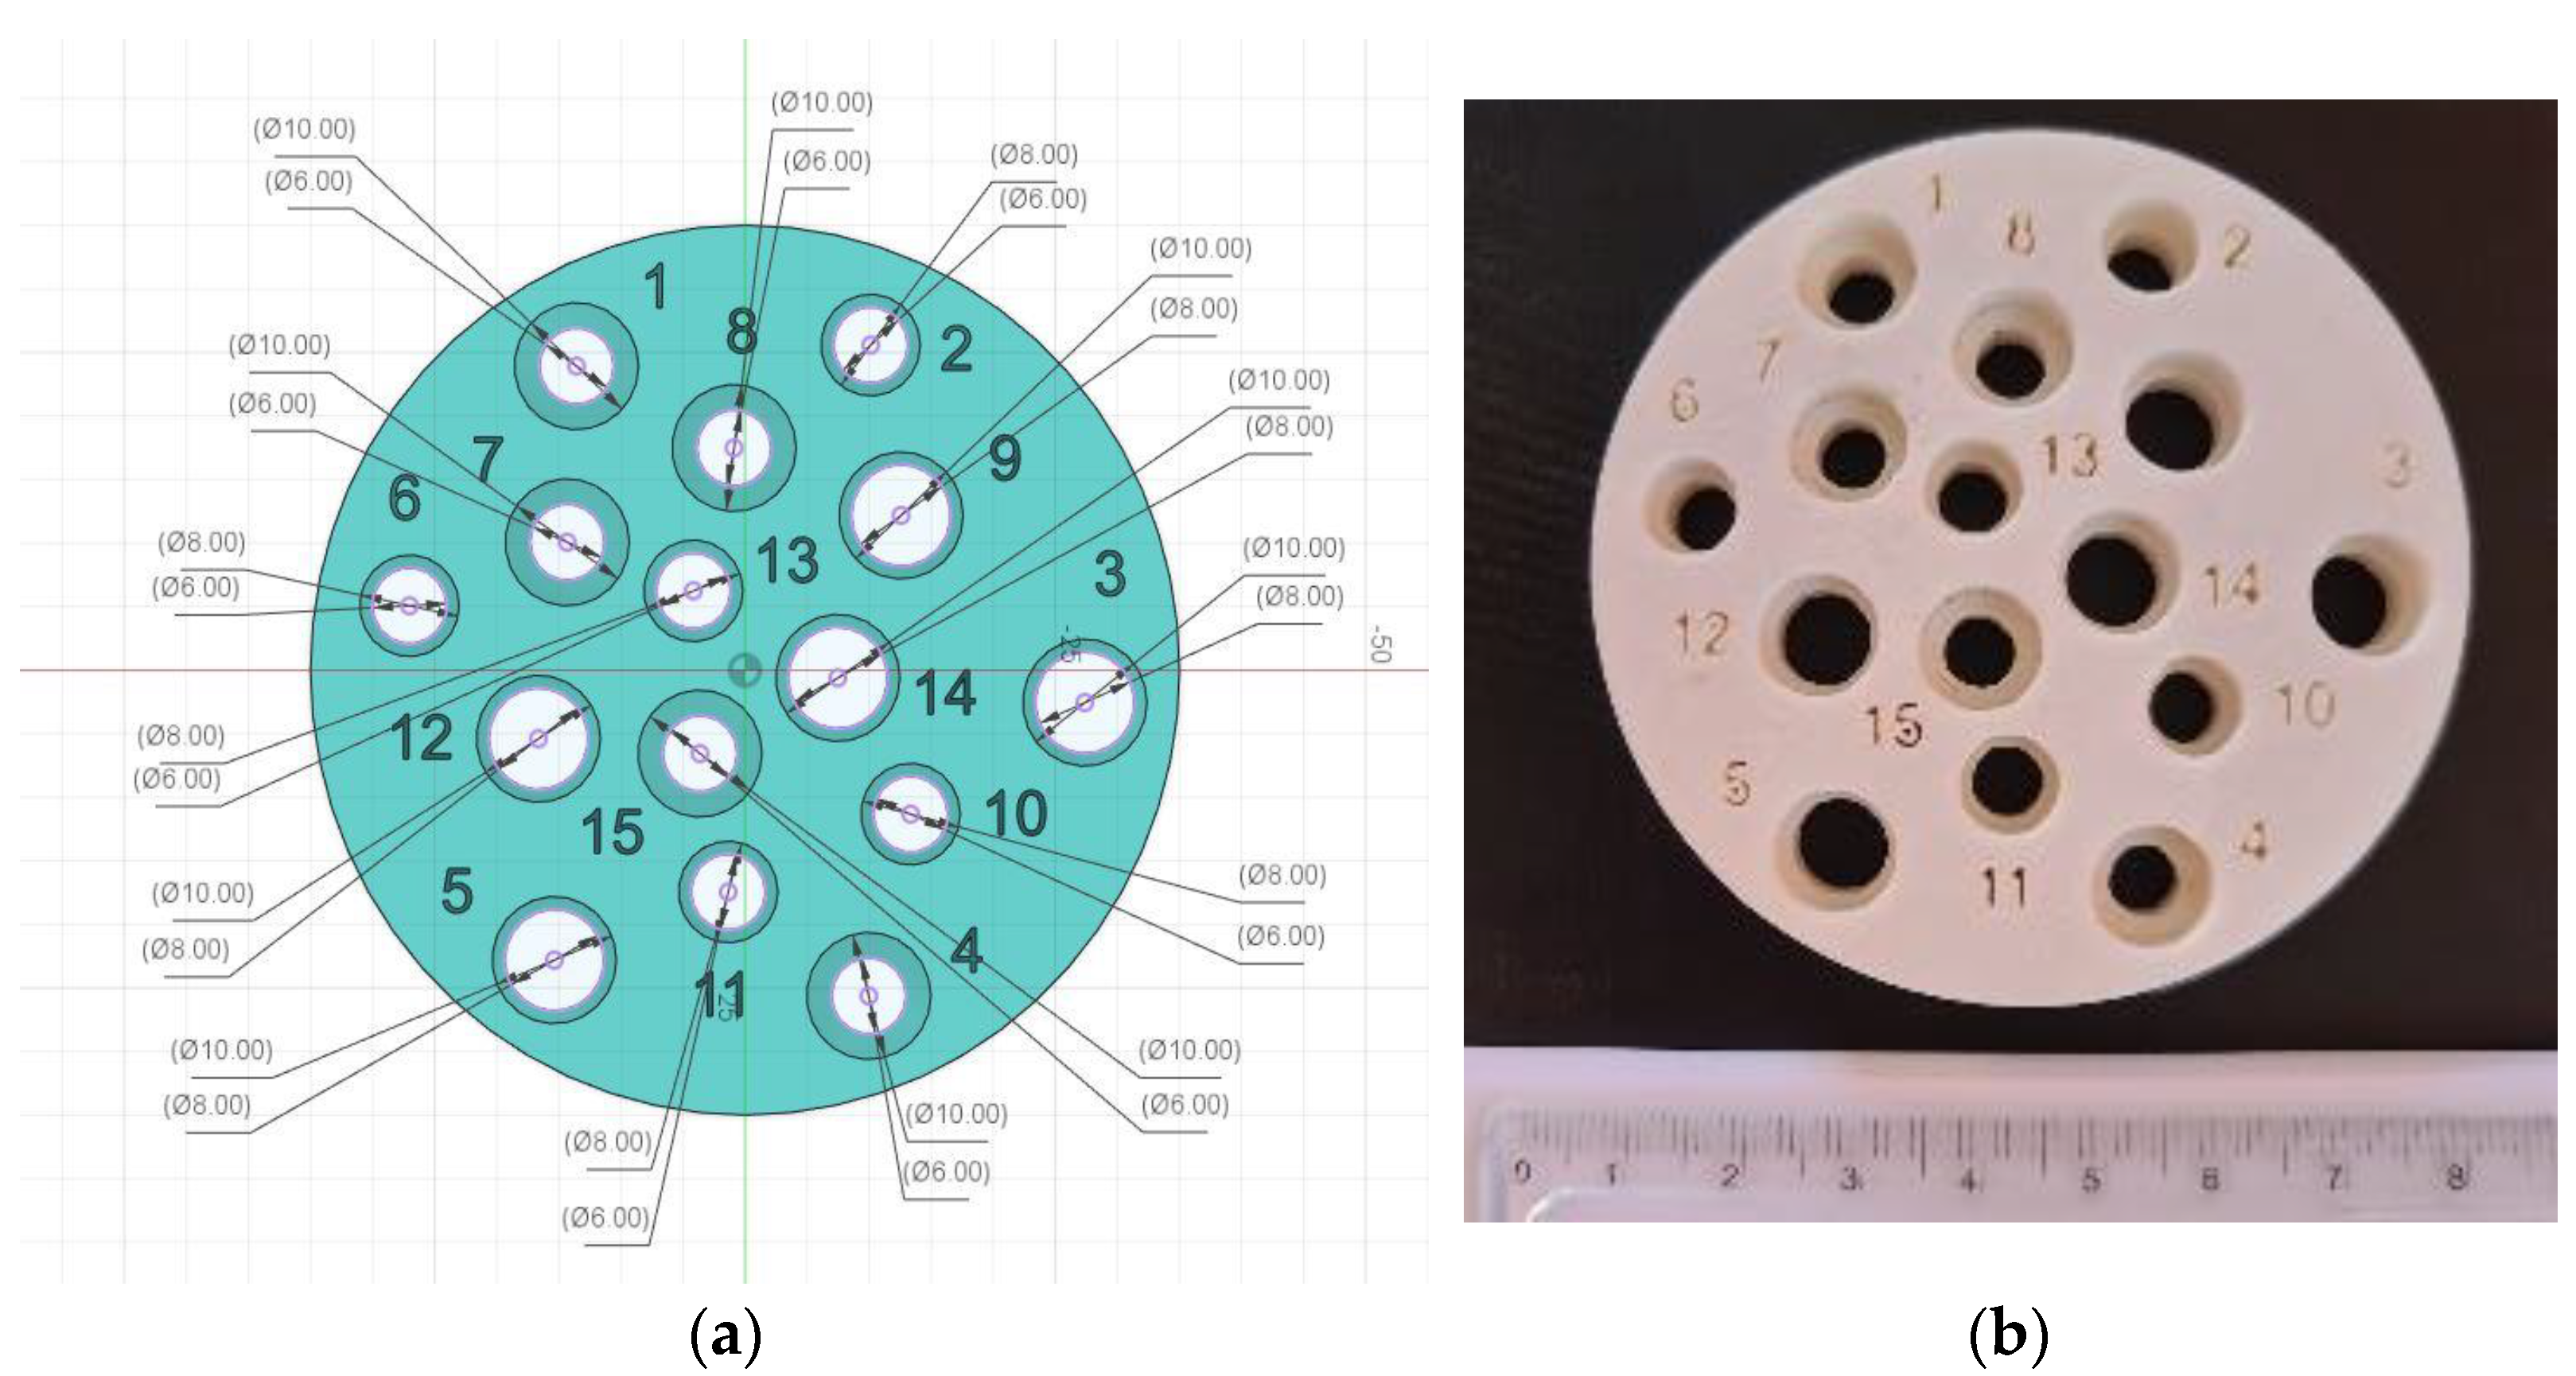
The test part for experiment 1 included fifteen straight counterbore holes with diameters of 6 mm, 8 mm, and 10 mm (ten of each) in different combinations (Figure 2).
Table 1 lists the values of the process parameters used in the full factorial design of experiment, as well as the main 3DP parameters kept constant during the specimens manufacturing (all the other parameters had their default values set in the above-mentioned slicers). The levels selected for the printing parameters were based on the default values in Cura for those parameters, and then by taking into account the printing time simulated in the slicer for each parameter combination. As mentioned, a compromise between accuracy and printing time is usually considered by the designers.
Firstly, twelve specimens were built, in a random order, on Prusa Replica 3D printer using Prusa Slicer (manufacturing site 1) and PLA 1 material, and each hole diameter was measured two times using an inside micrometer (see the Supplementary Material) on one side of the part (15 diameters) and then on the other side (15 diameters). Then, the combination of parameter levels that provided the best accuracy was used for manufacturing three more similar tests parts from PLA 1 and PLA 2 in three other manufacturing sites. Before 3DP the test parts, the first four mentioned printers were calibrated using a calibration cube. Additionally, the same test part 1 was also manufactured on a Mojo 3D printer (Stratasys Inc., Austin, TX, USA) using the Print Wizard slicer, ABS material, and the default settings and spare infill density set in this proprietary slicing software; manufacturing site 5 (specimen 16, Figure 2). In total, sixteen test parts with 30 holes each were built for the experiment 1 (summarized in Table 2).

2.2. Experiment 2: Surgical Drill Guide Holes’ Dimensional Accuracy and Repeatability

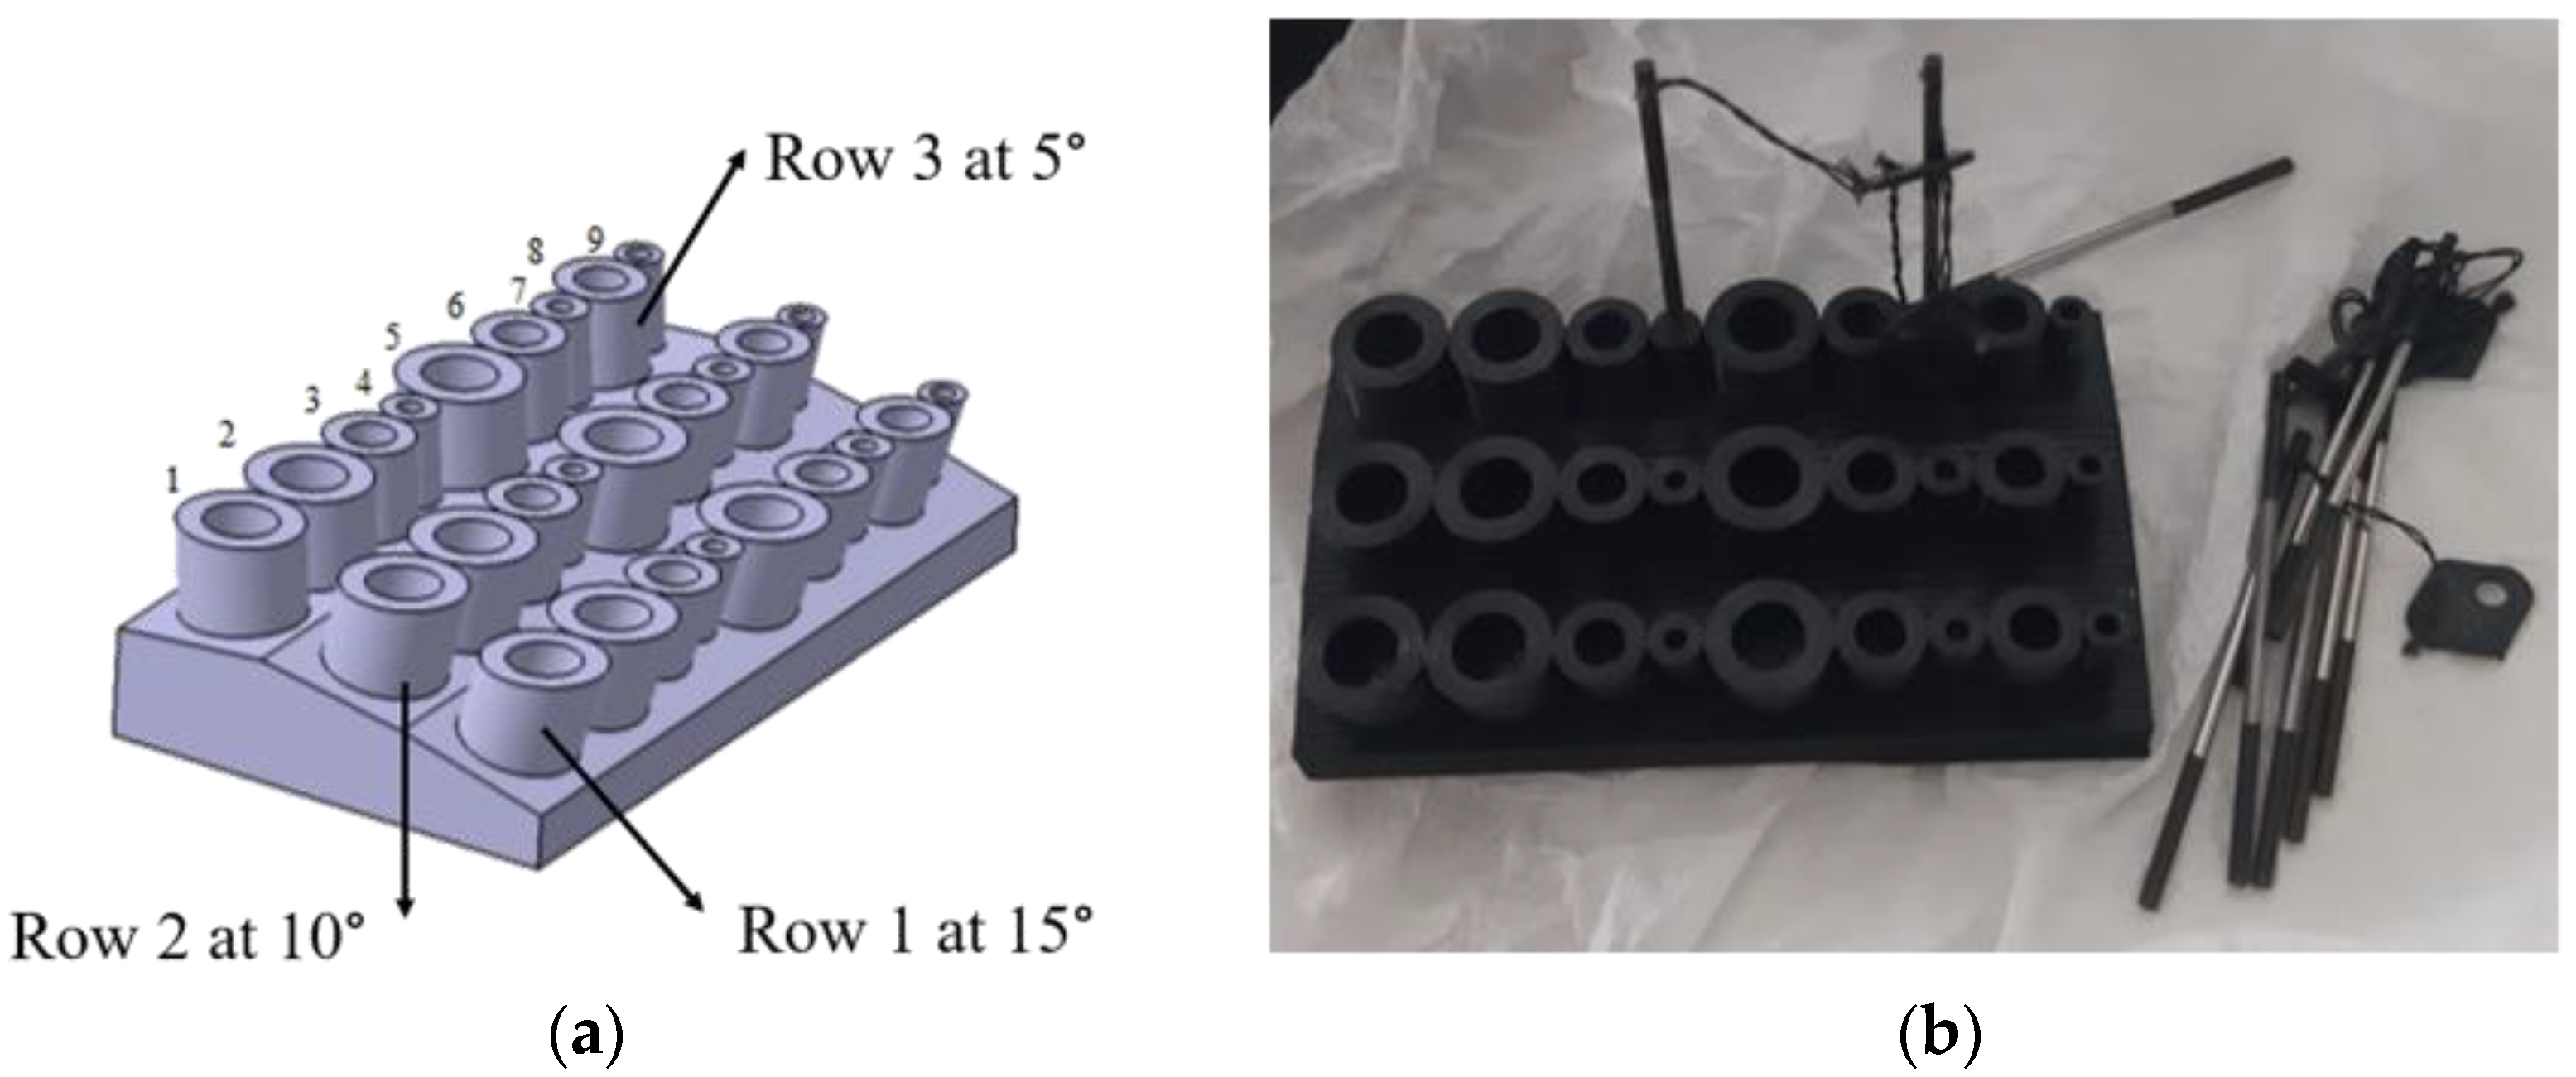
The second test part mimicked an orthopedic surgical drill guide included three rows of cylinders with axes oriented at 5°, 10°, and 15° relative to the horizontal plane, and with holes of 2.3 mm (for the K-wires), 4.5 mm, and 6.5 mm diameter (Figure 3a). Such guides are used by the orthopedic surgeons to pre-drill the screws holes before performing an osteotomy [24], the range of diameters selected for this test part being typical for such an application. These parts were 3D-printed in the manufacturing site 2 which provided the best dimensional accuracy according to the outcomes of experiment 1.
As the results of the experiment 1 also offered information on the less significant influence factor (meaning the printing speed), the levels for this factor were removed in experiment 2, and four specimens were 3D-printed by setting two values for the layer thickness and two values for number of shells (Table 3). As the layer thickness was found as correlating with the holes’ diameter accuracy, a smaller layer thickness (0.1 mm) was added as a level in the design of experiments. At the same time, the selected values were in accordance with previous research on MEX settings to provide the best sealing against disinfectants infiltration [8]. For the test part 2, the infill density was set to 70%, a value that provides the required strength for the drill guiding cylinders [25]. The printing speed was set to 50 mm/s. This experiment purpose was to evaluate the combined influence of process parameter settings and medical decontamination process on the dimensional accuracy and repeatability of the test part with inclined holes.
The medical decontamination process consisted in soaking the test parts into Aniosyme XL3 (Ecolab, Saint Paul, MN, USA) for 15 min, followed by rinsing with water and immersion in Sekusept (Laboratories Lezennes, Lezennes, France, Fr) for another 15 min, followed by rinsing with water, drying, and hydrogen peroxide gas plasma sterilization using Sterrad equipment for 45 min cycle program at 134 °C and 0.223 MPa (2.2 atm) [8]. Only one cycle of decontamination was set as the 3D-printed surgical guides are patient-customized, and therefore they are used one time for one patient.
For measuring the holes diameters, sets of calibration pin gauges with increments of 0.001 mm (Figure 3b) were used before and after the medical decontamination.

3. Results and Discussion

3.1. Results of the Experiment 1

Table 4 presents the mean values of the straight holes’ diameters, as well as information on the printing time for each specimen (provided by the Prusa slicer). The mean diameter for each group of diameters (6 mm, 8 mm, and 10 mm) was calculated based on the caliper measurements for each of the twelve test parts. The dimensional errors were calculated as the difference between the nominal values of the holes and the means of their measured values, for each test part.
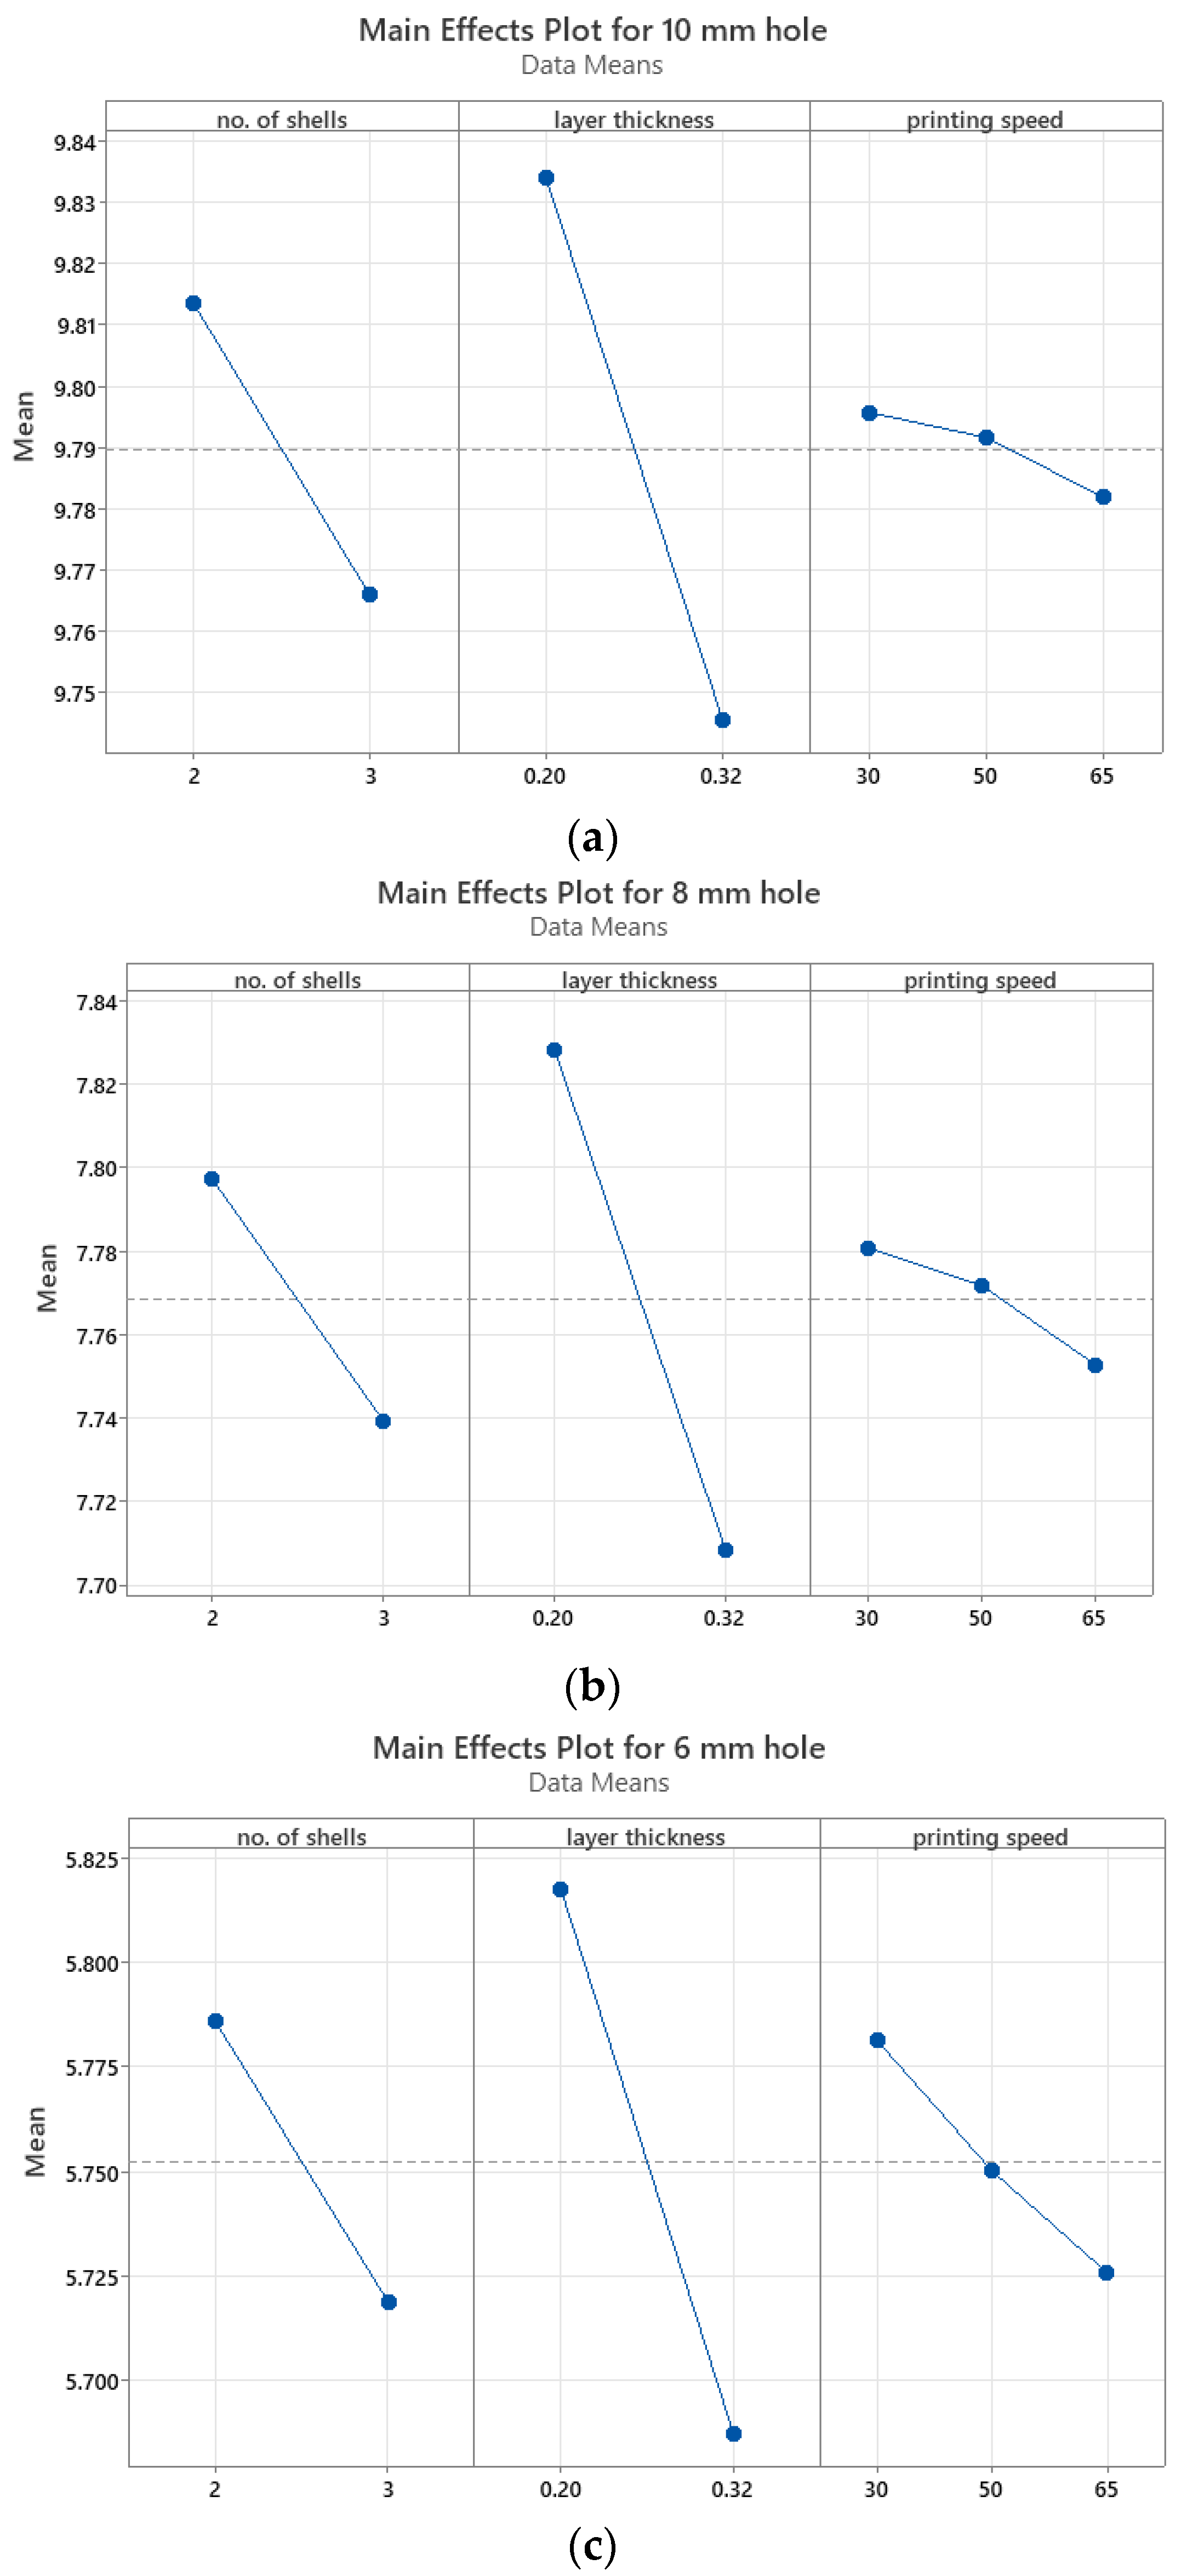
For investigating the statistical significance of the effects of process parameters on each analyzed diameter, balanced analysis of variance (ANOVA) was performed. The results presented in Table 5 showed that for each group of diameters. The most important factor of influence is the layer thickness, followed by the number of shells and the printing speed. The confidence interval was 95%. Regarding the latter parameter, the p-value for the largest diameter indicated that printing speed does not significantly influence the 10 mm holes accuracy. However, the printing speed does influence the accuracy of the 8 mm and 6 mm diameter holes, despite being less relevant than the layer thickness and number of shells.
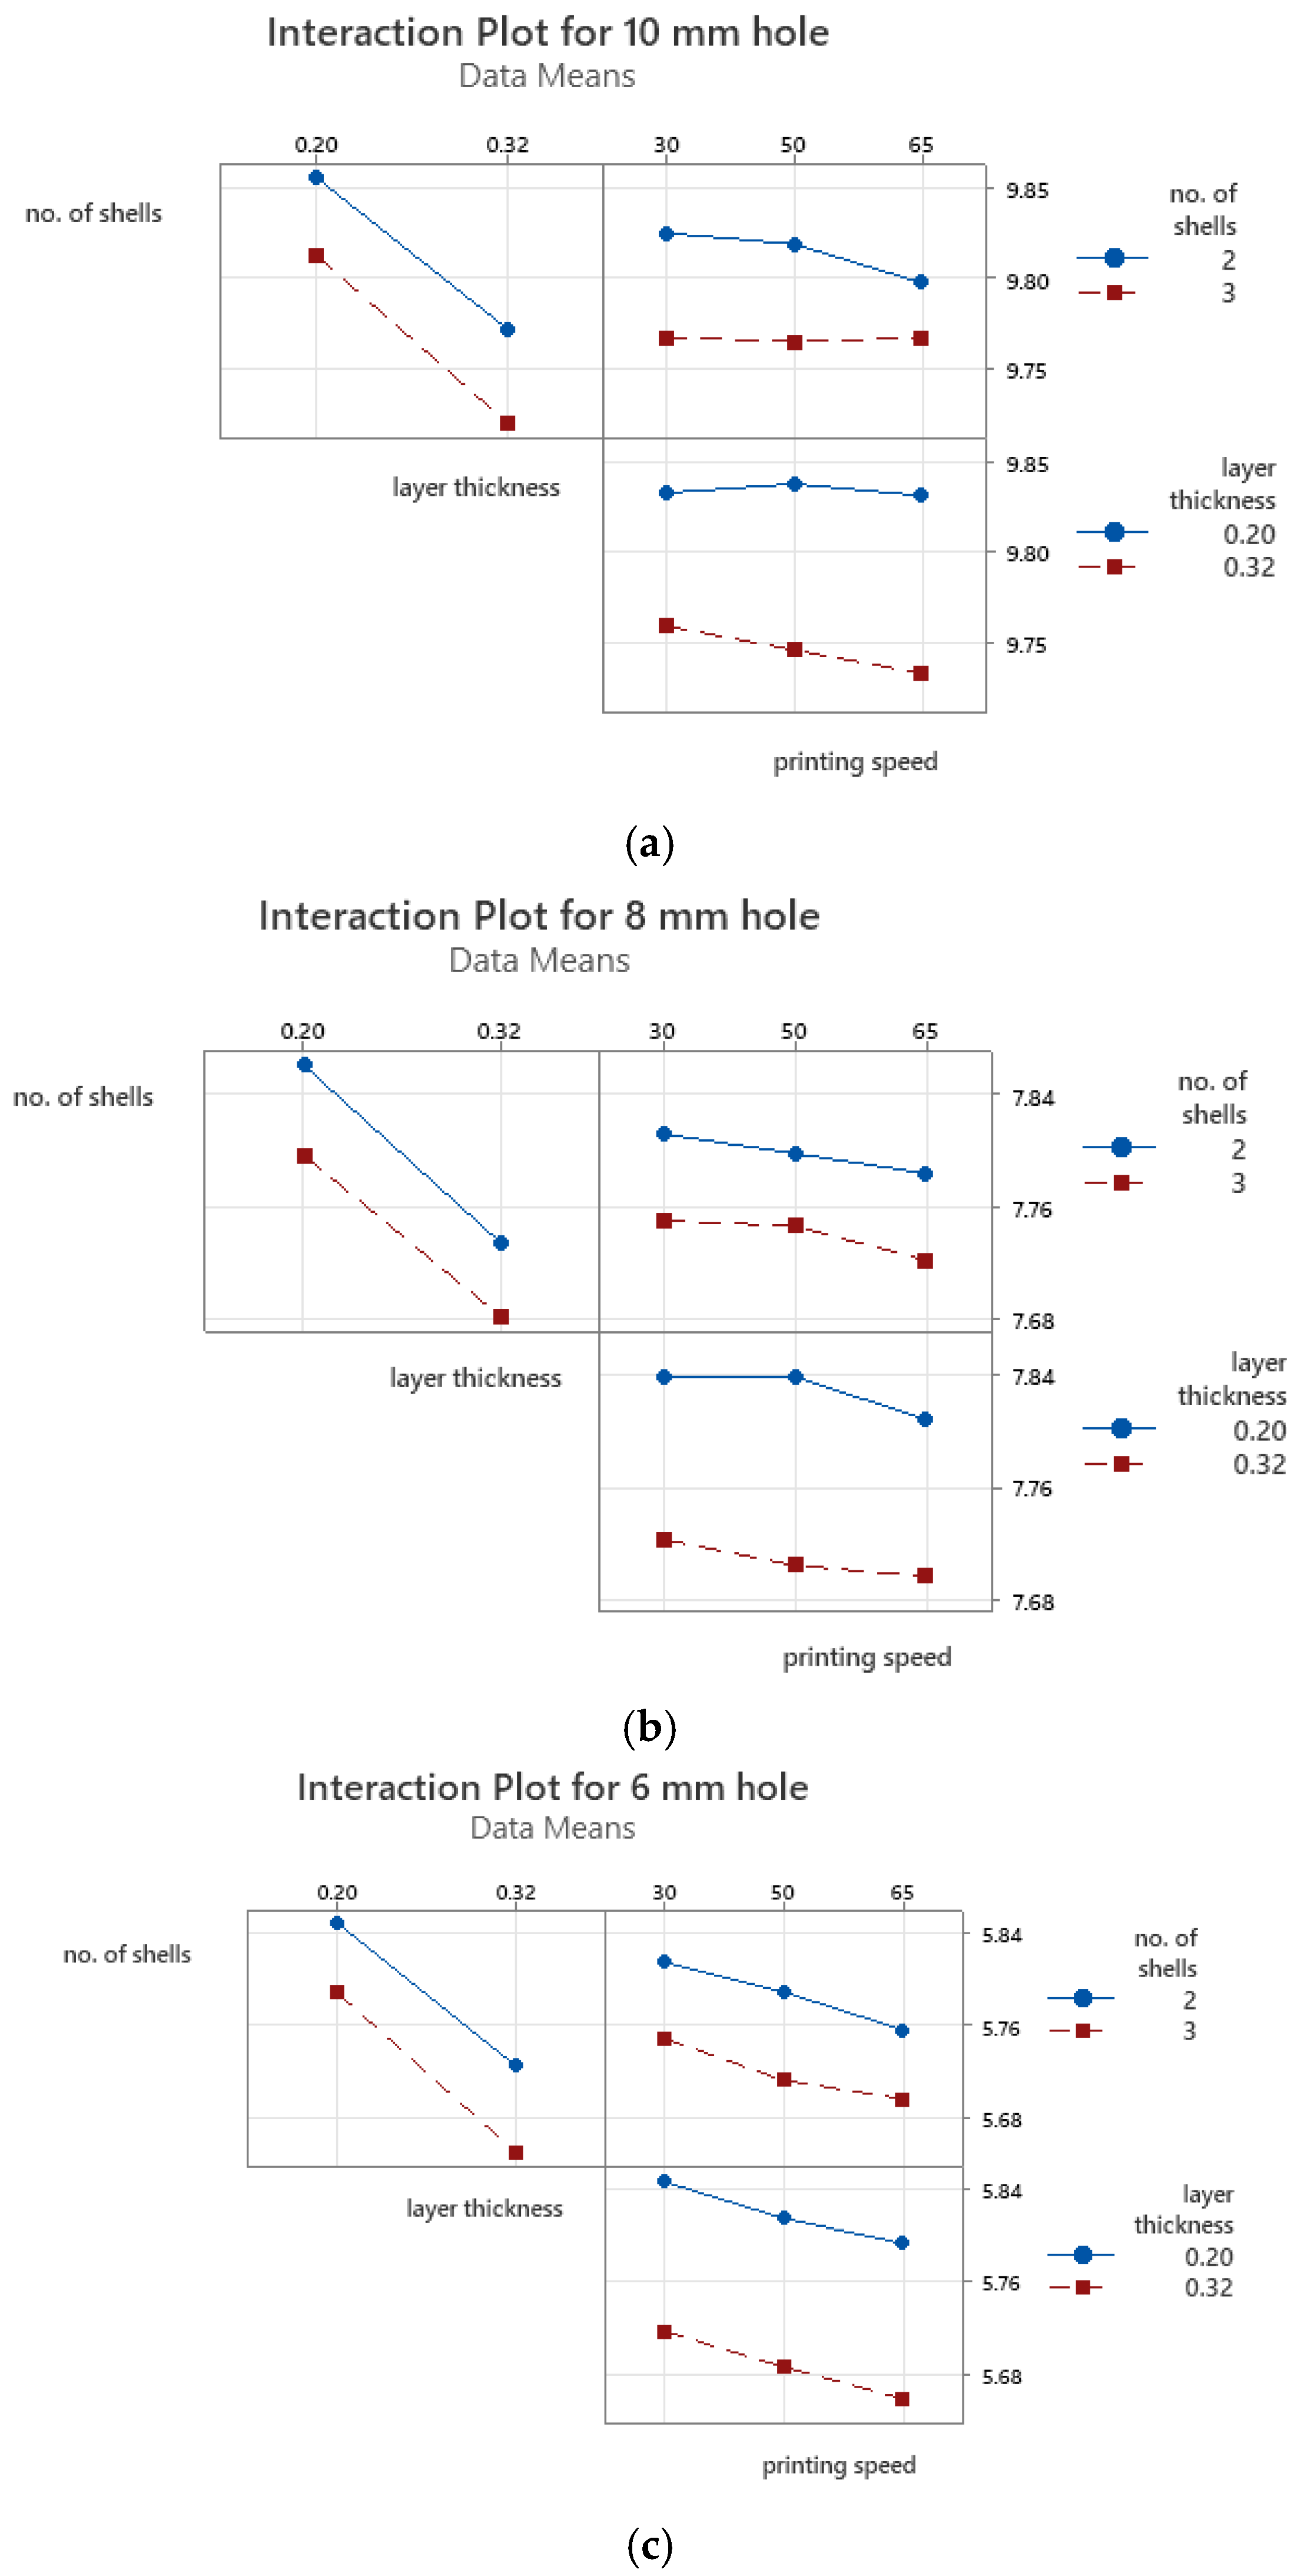
Figure 4 presents the main effects plots (Minitab, Minitab UK) for the analyzed diameters, while in Figure 5 are represented the interaction plots between the layer thickness, number of shells and printing speed for each diameter value (6 mm, 8 mm, and 10 mm). The lines which connect the points corresponding to each parameter illustrate the magnitude of the effect. A horizontal line or closer to horizontal means that there is no main effect present (or the parameter effect is not statistically significant).
It can be noted that for all diameters, the set of parameters providing the best accuracy was 0.2 mm layer thickness (the smallest tested layer thickness), two shells, and 30 mm/s printing speed, which correspond to the specimen 1. However, if this information is corroborated with the results in the Table 4, it can be seen that the dimensional errors for the first two specimens are almost similar while the difference in the manufacturing times is 18 min (which represent about 11% of the specimen 1 printing time). Therefore, when also considering the printing time as optimization criterion, the best settings correspond to those of the specimen 2. Another observation was that the printing speed was more relevant for the 6 mm diameter hole.
As one can observe from Figure 5, no interaction between the studied parameters could be inferred for any value of the diameters.
Experiment 1 outcomes confirmed the conclusions of Hernandez et al. [21] who studied 0.4 mm and 1.6 mm shell thickness and observed that the larger the thickness, the larger the mean dimensional deviation for a 65 mm diameter hole, with the same observation applying to the printing speed. The current correlation trend between the layer height and the dimensional accuracy was also in agreement with the results of Herath et al. [20] for the 8 mm vertical axis hole, and Zhu et al. [19] for the 10 mm hole with vertical axis. In the current research, the influence trends were confirmed for three different holes diameters and three process parameters. Moreover, the most influential factors were determined, with the printing speed being the least important. This is considered relevant information as the printing speed is directly related to the printing time and cost.
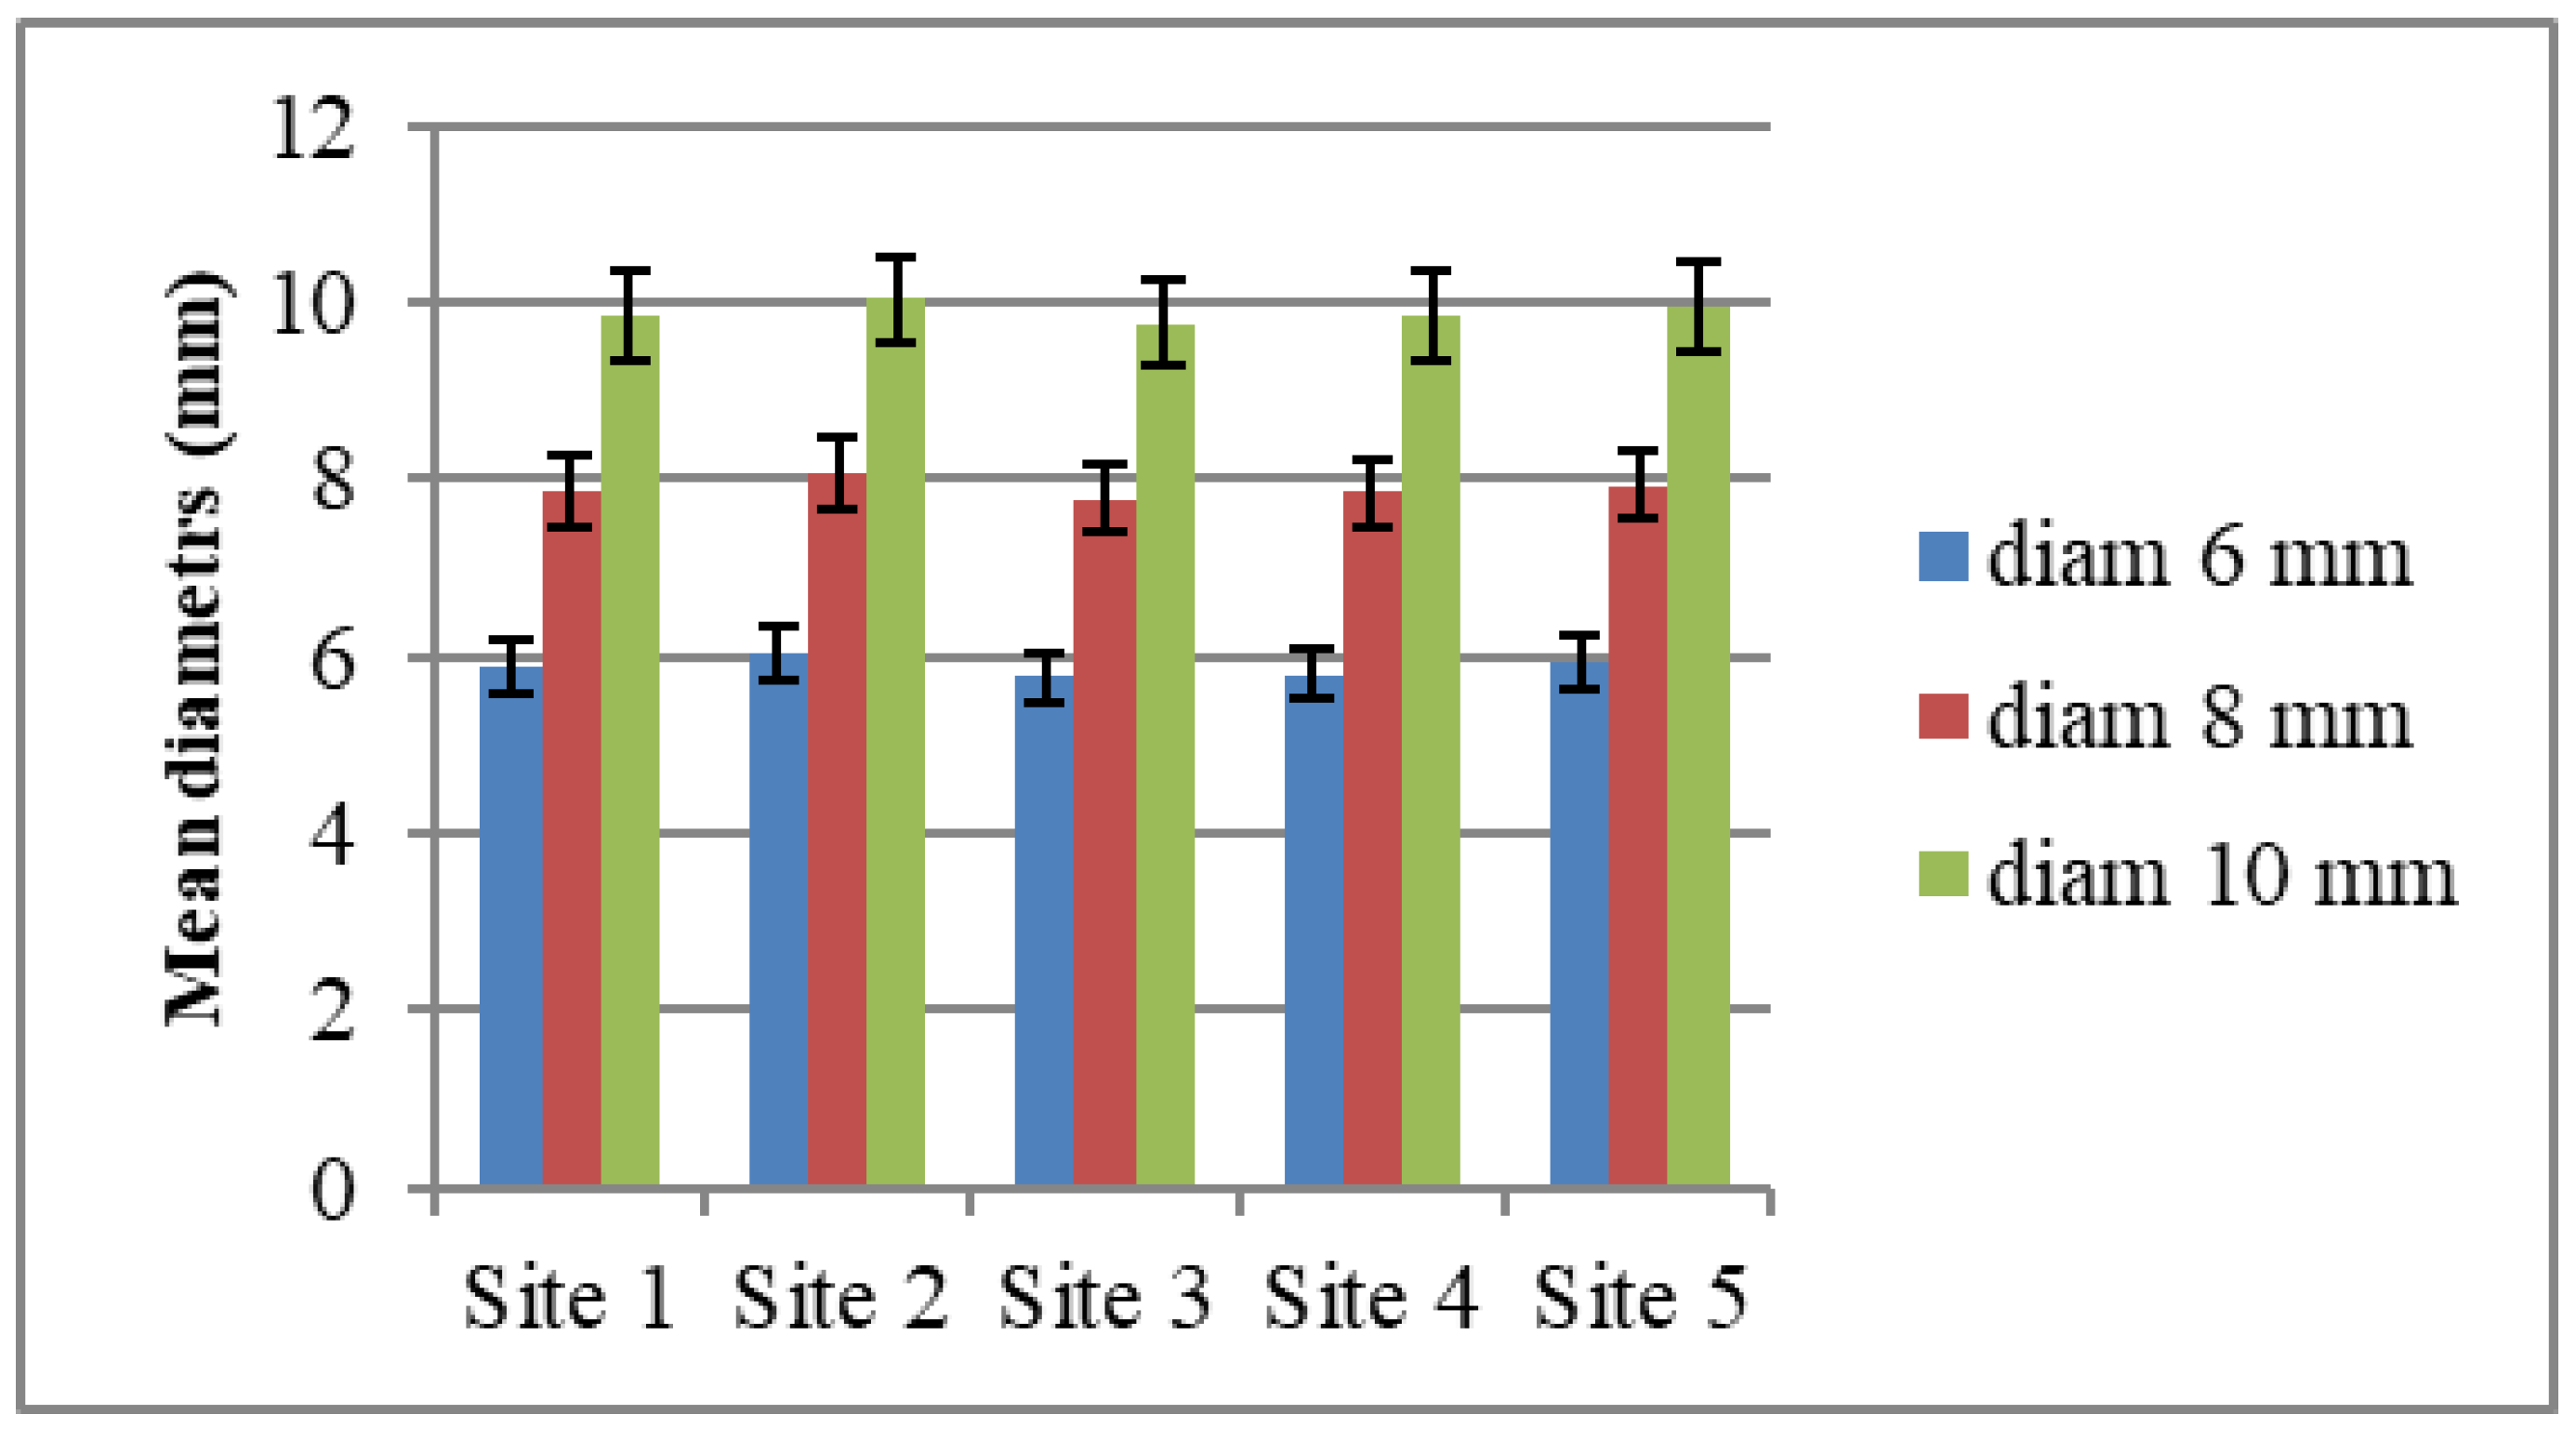
Using the best combination of parameters from the dimensional accuracy standpoint, three more prints were built in the manufacturing sites 2–5. Figure 6 presents a comparison between the mean diameter values obtained in the second stage of the experiment 1 (see also the Supplementary Material).
The calculated p-value of 0.98 (one-way ANOVA) for the data on diameters (see Supplementary Material) showed that there are no statistically significant differences between the hole accuracies in the test parts manufactured across materials, equipment, and slicers, and that the holes diameter dimensional repeatability is assured in each case/manufacturing site. This is beneficial for the 3DP delocalized mass production and for 3DP-POCs.

3.2. Results of the Experiment 2

Table 6 presents the measurement data on the 3D-printed test parts 2 before and after the medical decontamination process, as well as the printing time for each test part. The smallest diameter of a calibration pin that completely passed through a hole with press fit (see also the Supplementary Material) is listed. As an example, in specimen 18, there were three 2.3 mm holes oriented at 5° (no. 4, 7, 9, Figure 3a) and the 1.883 mm pin passed through all the holes. This type of measurement approach offers information on the diameter values along the entire length of the hole.
All the holes were built undersized in the test parts 2, irrespective of the number of shells and layer thickness, which was not the case of some of the holes of the test parts 1, some of which were manufactured oversized.
The specimens manufactured with 0.2 mm layer thickness presented more dimensional variability, although for the specimens 19 and 20 the deviations from the nominal value were smaller than for the specimens 17 and 18 which were 3D printed with 0.1 mm layer thickness. The specimen 20 with 0.2 mm layer thickness and three shells was the most accurate. The dimensional repeatability was better for the test parts 3D-printed with 0.1 mm layer thickness, irrespective of the number of shells or hole’s axis orientations. Although, in general, the 0.1 mm layer thickness slightly improved the dimensional repeatability, the printing time was double. It should also be mentioned for the surgical drill guides for orthopedic surgery that, where the accuracy is relevant, but not in terms of two significant digits, the process parameters should be set by also considering other criteria, such as printing time or mechanical strength.
As mentioned, the results in Table 6 showed that the medical decontamination process produced a larger variability of the holes diameters. If for the 2 mm holes, the diameters have smaller sizes after decontamination, caused by the holes deformation as noticed during the measurement process, for most of the other diameters, the dimensions increased. However, for answering the research question formulated for experiment 2, a quantitative analysis (one-way ANOVA) was conducted. Based on the experimental results, there is no statistically significant difference between the holes’ accuracy before and after the part medical decontamination, regardless of the holes’ diameters (Table 7). The significance level was 0.05.
Many studies addressed the accuracy of 3D-printed surgical guide made of different materials and subjected to sterilization [26,27,28,29]. The rationale of these studies relates to the practical observations that some sterilization techniques can determine deformations of the surgical guides with critical impact on accuracy and the functionality of the device [13]. In the current research, by comparing the test parts before and after the medical decontamination, one could notice that this post-processing had no statistically significant impact on the dimensional accuracy of holes. The outcomes of the experiment 2 confirmed the observations of Zhang et al. [12] that sterilization by ethylene oxide determined some micro-deformations of the 3D-printed PLA surgical guides, but not that the test parts deformed more when manufactured with a smaller layer thickness. Here, it should be mentioned that the test parts in experiment 2 were subjected not only to sterilization, but also to cleaning and disinfection. The influence of other types of sterilization methods (such as UV-C [30]) on the accuracy of prints needs to be investigated in further research.
For evaluating the printing parameters’ effect on the holes accuracy in test part 2, p-values and F-values were calculated using the analysis of variance (Table 8). The confidence interval was 95%. The results indicated that some process parameters have an influence on the 4.5-mm diameter holes, however there was no consistency in the data. A large variability was recorded which can be attributed to the intrinsic variability of the manufacturing process and to the fact the directly 3D-printed holes were manufactured at inclined angles.

4. Conclusions

Several practical conclusions can be drawn from this research in which the dimensional accuracy and repeatability of 3D-printed holes were studied in relationship to different factors, such as layer thickness, number of shells around the holes, printing speed, hole axis orientation angles, slicers, 3D printers and materials, as well as post-processing by medical decontamination.
The most useful finding was that there was no significant difference in the dimensional accuracy of the straight 3D-printed holes between parts manufactured in different sites. This is a relevant aspect as the production delocalization is an advantage of 3DP, and the users of 3D-printed products (end-use parts, spare parts, etc.) have to be sure that the technology and equipment deliver reliable outcomes in terms of dimensional accuracy and repeatability regardless of the printer producers or slicing software used.
Experiment 1 showed that the layer thickness is the most relevant process parameter affecting the holes dimensional accuracy, followed by the number of shells around the holes. However, in experiment 2, no correlation was found between the analyzed factors (layer thickness, number of shells, and holes axis angles) and the diameters’ accuracy. Moreover, the results indicated a large variability of the diameter dimensions, which is assumed to a mixt of causes: the holes axis inclination, the additive approach to building the part, and medical decontamination. More research is needed and currently underway for explaining the phenomenon, but another important and practical piece of advice can be formulated here, which is the necessity to drill the holes after the 3D printing process. The inclined holes are built undersized and enlarging them by drilling allows obtaining accurate diameters along the entire length of the hole.
The medical decontamination process produced micro-deformations of the smallest diameter holes, but not with a critical influence on their dimensional accuracy, having a more negative impact on the holes diameter dimensional repeatability/variability.
Another important conclusion is that attention should be paid to establishing a trade-off between the accuracy and the printing time as in many applications very tight tolerances (such as two significant digits) might not be a requirement for 3D prints. Reducing the layer thickness by a factor of 2 (from 0.2 mm to 0.1 mm) proved not to have a large impact on the dimensional accuracy, but it doubled the printing time.

Supplementary Materials

The following supporting information can be downloaded at: https://data.mendeley.com/datasets/4h6ttzh9bf/1 (accessed on 17 August 2022).

Author Contributions

Conceptualization, D.P.; data curation, R.M. and N.L.C.; formal analysis, R.M. and M.C.I.; funding acquisition, D.P.; investigation, D.P., R.M. and M.C.I.; methodology, D.P., C.G.A., M.C.I. and N.L.C.; software, C.G.A.; validation, D.P. and C.G.A.; writing—original draft, D.P., M.C.I. and N.L.C.; writing—review & editing, D.P. and C.G.A. All authors have read and agreed to the published version of the manuscript.

Funding

This work was supported by a grant of the Ministry of Research, Innovation and Digitization, CNCS—UEFISCDI, project number PN-III-P4-PCE-2021-0070, within PNCDI III.

Institutional Review Board Statement

Not applicable.

Informed Consent Statement

Not applicable.

Conflicts of Interest

On behalf of all authors, the corresponding author states that there is no conflict of interest.

References

  1. Rachel, L.; Ralf, W.S.; Anna, T.F. Benefiting from additive manufacturing for mass customization across the product life cycle. Oper. Res. Perspect. 2021, 8, 100201. [Google Scholar] [CrossRef]
  2. Sun, H.; Zheng, H.; Sun, X.; Li, W. Customized Investment Decisions for New and Remanufactured Products Supply Chain Based on 3D Printing Technology. Sustainability 2022, 14, 2502. [Google Scholar] [CrossRef]
  3. Varsha, S.M.; Dhinakaran, V.; Rajkumar, V.; Bupathi, R.P.M.; Vijayakumar, M.D.; Sathish, T. Effect of 3D printing on supply chain management. Mater. Today Proc. 2020, 21, 958–963. [Google Scholar] [CrossRef]
  4. Perez-Mañanes, R.; José, S.G.S.; Desco-Menéndez, M. Application of 3D printing and distributed manufacturing during the first-wave of COVID-19 pandemic. Our experience at a third-level university hospital. 3D Print. Med. 2021, 7, 7. [Google Scholar] [CrossRef] [PubMed]
  5. Willemsen, K.; Magré, J.; Mol, J.; Noordmans, H.J.; Weinans, H.; Hekman, E.E.G.; Kruyt, M.C. Vital Role of In-House 3D Lab to Create Unprecedented Solutions for Challenges in Spinal Surgery, Practical Guidelines and Clinical Case Series. J. Pers. Med. 2022, 12, 395. [Google Scholar] [CrossRef] [PubMed]
  6. Dey, A.; Yodo, N. A Systematic Survey of FDM Process Parameter Optimization and Their Influence on Part Characteristics. J. Manuf. Mater. Process. 2019, 3, 64. [Google Scholar] [CrossRef] [Green Version]
  7. Parpala, R.C.; Popescu, D.; Pupaza, C. Infill parameters influence over the natural frequencies of ABS specimens obtained by extrusion-based 3D printing. Rapid Prototyp. J. 2021, 27, 1273–1285. [Google Scholar] [CrossRef]
  8. Popescu, D.; Baciu, F.; Amza, C.G.; Cotrut, C.M.; Marinescu, R. The Effect of Disinfectants Absorption and Medical Decontamination on the Mechanical Performance of 3D-Printed ABS Parts. Polymers 2021, 13, 4249. [Google Scholar] [CrossRef]
  9. Provaggi, E.; Capelli, C.; Rahmani, B.; Burriesci, G.; Kalaskar, D.M. 3D printing assisted finite element analysis for optimising the manufacturing parameters of a lumbar fusion cage. Mater. Des. 2019, 163, 107540. [Google Scholar] [CrossRef]
  10. Tiwary, V.K.; Arunkumar, P.; Vinayak, R.M. An overview on joining/welding as post-processing technique to circumvent the build volume limitation of an FDM-3D printer. Rapid Prototyp. J. 2021, 27, 808–821. [Google Scholar] [CrossRef]
  11. Kim, T.; Lee, S.; Kim, G.K.; Hong, D.; Kwon, J.; Park, J.W.; Kim, N. Accuracy of a simplified 3D-printed implant surgical guide. J. Prosthet. Dent. 2020, 124, 195–201. [Google Scholar] [CrossRef] [PubMed]
  12. Zhang, W.; Lin, X.; Jiang, J. Dimensional accuracy of 3D printing navigation templates of chemical-based sterilisation. Scienfic Rep. 2022, 12, 1253. [Google Scholar] [CrossRef] [PubMed]
  13. Moylan, S.; Cooke, A.; Jurrens, K.; Slotwinski, J.; Alkan, D.M. A Review of Test Artifacts for Additive Manufacturing. NISTIR 2012, 7858. [Google Scholar] [CrossRef] [Green Version]
  14. Rebaioli, L.; Fassi, I. A review on benchmark artifacts for evaluating the geometrical performance of additive manufacturing processes. Int. J. Adv. Manuf. Technol. 2017, 93, 2571–2598. [Google Scholar] [CrossRef]
  15. Pilipović, A.; Baršić, G.; Katić, M.; Havstad, M.R. Repeatability and Reproducibility Assessment of a PolyJet Technology Using X-ray Computed Tomography. Appl. Sci. 2020, 10, 7040. [Google Scholar] [CrossRef]
  16. Muammel, M.H.; László, Z.; Quanjin, M. Accuracy investigation of 3D printed PLA with various process parameters and different colors. Mater. Today Proc. 2021, 42, 3089–3096. [Google Scholar] [CrossRef]
  17. Nuez, P.J.; Rivas, A.; García, P.E.; Beamud, E.; Sanz, L.A. Dimensional and Surface Texture Characterization in Fused Deposition Modelling (FDM) with ABS Plus. Procedia Eng. 2015, 132, 856–863. [Google Scholar] [CrossRef]
  18. Górski, F.; Kuczko, W.; Wichniarek, R. Influence of process parameters on dimensional accuracy of parts manufactured using fused deposition modelling technology. Adv. Sci. Technol. Res. J. 2013, 7, 27–35. [Google Scholar] [CrossRef]
  19. Zhu, Q.; Liu, Y.; Cai, Y.; Wu, M. Research on the Shrinkage of Model with Hole in PLA Material Based on the FDM 3D Printing. Adv. Intell. Syst. Res. 2017, 154, 547–551. [Google Scholar] [CrossRef] [Green Version]
  20. Herath, H.M.D.B.; Thalagala, S.; Gamage, P. Enhancing the Dimensional Accuracy of Components Fabricated Using Rapid Prototyping Technique by Optimizing Machine Parameters of a 3D Printer. In Proceedings of the 2019 IEEE International Conference on Industrial Engineering and Engineering Management (IEEM), Macao, China, 15–18 December 2019; pp. 1379–1383. [Google Scholar] [CrossRef]
  21. Hernandez, D.D. Factors Affecting Dimensional Precision of Consumer 3D Printing. Int. J. Aviat. Aeronaut. Aerosp. 2015, 2, 2. [Google Scholar] [CrossRef] [Green Version]
  22. Knoop, F.; Schoeppner, V. Geometrical accuracy of holes and cylinders manufactured with fused deposition modeling. In Proceedings of the 2017 International Solid Freeform Fabrication Symposium, Austin, TX, USA, 7–9 August 2017; pp. 2757–2776. [Google Scholar]
  23. Bram, W.; Basten, J.I.R.; Jelmar, B.; Geert, J.H. Printing Spare Parts at Remote Locations: Fulfilling the Promise of Additive Manufacturing. Prod. Oper. Manag. 2020, 30, 1615–1632. [Google Scholar] [CrossRef]
  24. Corin, B.; Wilson, A.; Khakha, R.; Kley, K.; Parratte, S.; Ollivier, M. Posteromedial Opening-Wedge Tibial Osteotomy for Metaphyseal Varus and Abnormal Posterior Slope Correction in Failed Anterior Cruciate Ligament Reconstructions Using a Custom Cutting Guide. Arthrosc. Tech. 2020, 9, 1101–1108. [Google Scholar] [CrossRef] [PubMed]
  25. Bhatiata, S.K.; Ramadurai, K.W. 3-Dimensional Printing of Medical Devices and Supplies. In 3D Printing and Bio-Based Materials in Global Health; Springer: Cham, Switzerland, 2017; pp. 63–93. [Google Scholar] [CrossRef]
  26. Frizziero, L.; Santi, G.M.; Leon-Cardenas, C.; Ferretti, P.; Sali, M.; Gianese, F.; Crescentini, N.; Donnici, G.; Liverani, A.; Trisolino, G.; et al. Heat Sterilization Effects on Polymeric, FDM-Optimized Orthopedic Cutting Guide for Surgical Procedures. J. Funct. Biomater. 2021, 12, 63. [Google Scholar] [CrossRef] [PubMed]
  27. Török, G.; Gombocz, P.; Bognár, E. Effects of disinfection and sterilization on the dimensional changes and mechanical properties of 3D printed surgical guides for implant therapy–pilot study. BMC Oral Health 2020, 20, 19. [Google Scholar] [CrossRef] [Green Version]
  28. Shaheen, E.; Alhelwani, A.; Van, C.E.; Politis, C.; Jacobs, R. Evaluation of Dimensional Changes of 3D Printed Models after Sterilization: A Pilot Study. Open Dent. J. 2018, 12, 72–79. [Google Scholar] [CrossRef] [PubMed]
  29. Toro, M.; Cardona, A.; Restrepo, D. Does vaporized hydrogen peroxide sterilization affect the geometrical properties of anatomic models and guides 3D printed from computed tomography images? 3D Print. Med. 2021, 7, 29. [Google Scholar] [CrossRef]
  30. Amza, C.G.; Zapciu, A.; Baciu, F.; Vasile, M.I.; Popescu, D. Aging of 3D Printed Polymers under Sterilizing UV-C Radiation. Polymers 2021, 13, 4467. [Google Scholar] [CrossRef]
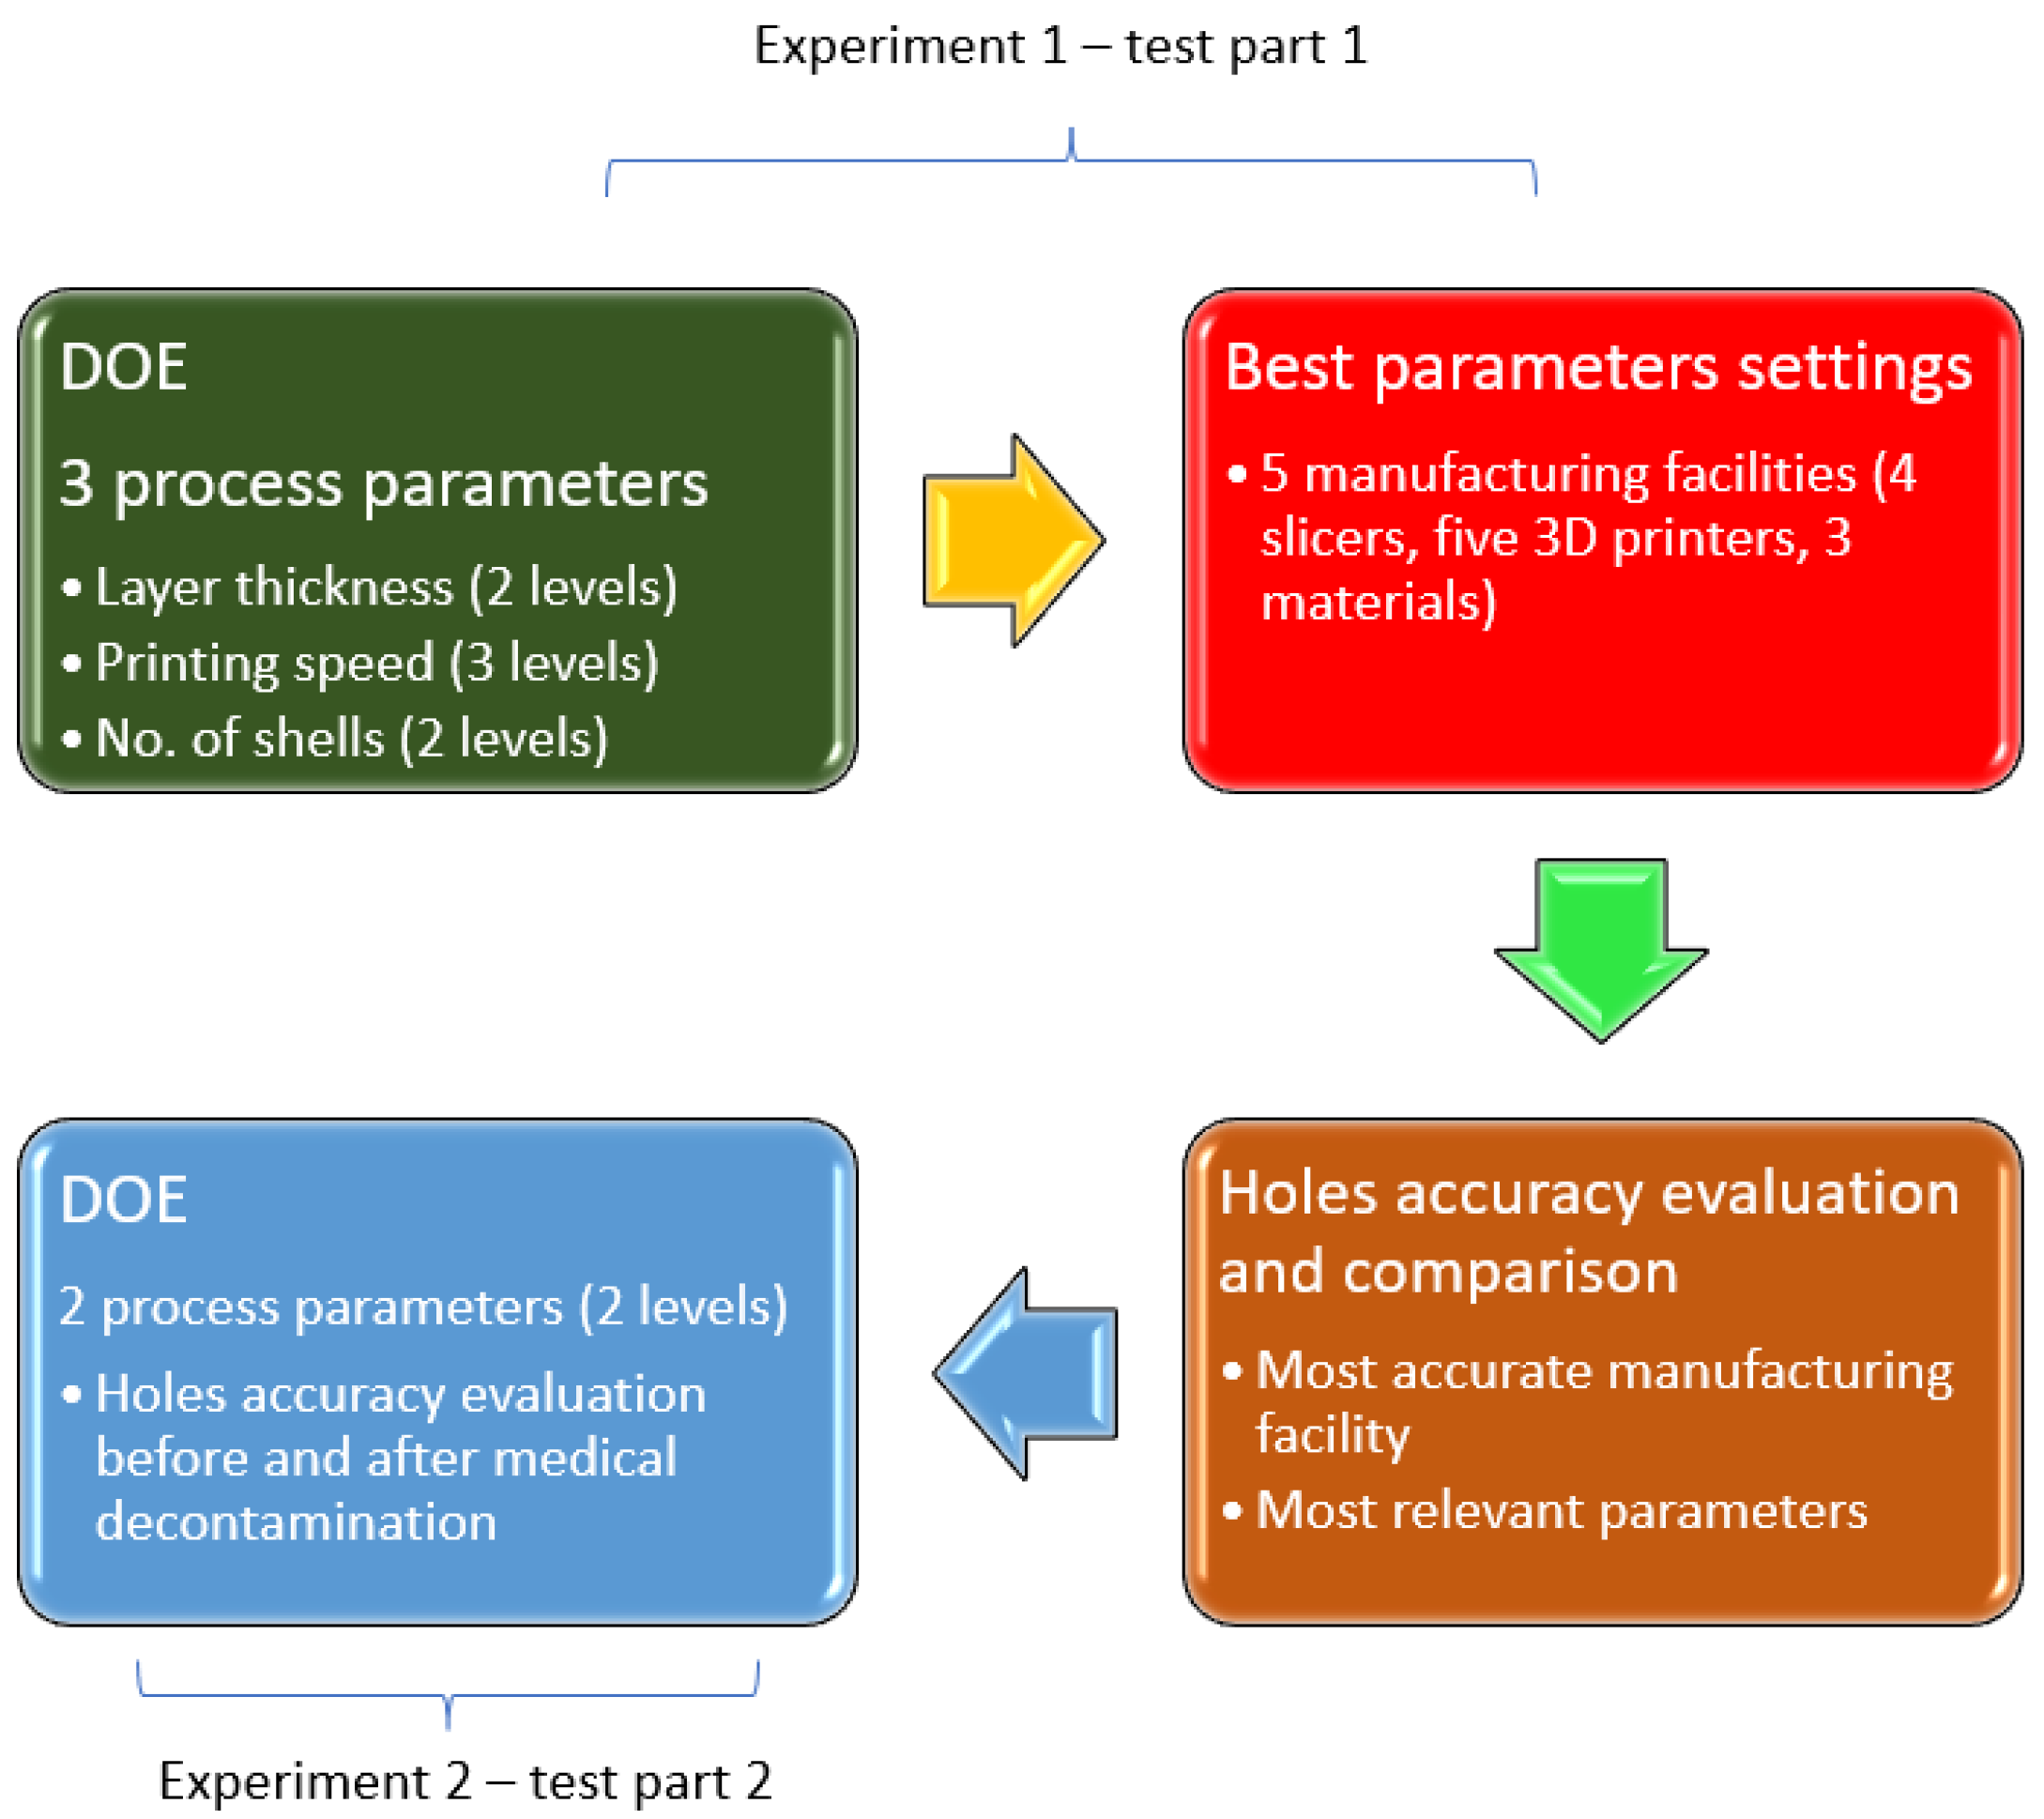
Figure 1. Schematic representation of the research methodology.
Applsci 13 00041 g001
Figure 2. 3D CAD model of test part 1 (a); Example of a test part with counterbore vertical axis holes for the experiment 1 (specimen 16) (b).
Applsci 13 00041 g002
Figure 3. Test part 2 with holes of 2.3 mm, 4.5 mm, and 6.5 mm in diameter (holes axes angles of 5°, 10° and 15°): (a) virtual model, (b) pass-no pass test on the physical model.
Applsci 13 00041 g003
Figure 4. Main effect plots for the holes dimensional accuracy: (a) 10 mm holes; (b) 6 mm holes; (c) 8 mm holes.
Applsci 13 00041 g004
Figure 5. Interaction plots for the holes dimensional accuracy (a) 10 mm holes; (b) 8 mm holes; (c) 6 mm holes.
Applsci 13 00041 g005
Figure 6. Mean diameter values for tests parts built using different 3D printers, materials and slicing software.
Applsci 13 00041 g006
Table 1. 3DP parameter settings for the specimens built in experiment 1.
SpecimenVariable 3DP ParametersFixed 3DP Parameters
No. of ShellsLayer Thickness (mm)Printing Speed (mm/s)
120.230Diameter of filament: 1.75 mm
Extrusion temperature: 215 °C
Bed temperature: 60 °C
Infill density: 15%
Infill pattern: gyroid
No adhesion
Flow rate: 100%
Fan speed: 100%
Top/bottom: 2 layers
Line width: 0.45 mm
220.250
320.265
430.230
530.250
630.265
720.3230
820.3250
920.3265
1030.3230
1130.3250
1230.3265
Table 2. Test parts built in different manufacturing sites.
Manufacturing Site3D PrinterSlicerMaterialNo. of Test Parts
1Prusa ReplicaPrusaPLA 112
2Original Prusa i3PrusaPLA 11 (specimen 13)
3Creality CR10CuraPLA 11 (specimen 14)
4Ender 3Simplify3dPLA 21 (specimen 15)
5MojoPrint WizardABS1 (specimen 16)
Table 3. 3DP process parameters in experiment 2.
SpecimenLayer Thickness (mm)No. of Shells
170.12
180.13
190.22
200.23
Table 4. Results of the experiment 1: diameters’ mean values and printing times.
Specimen10 mm Holes—Mean Diameter8 mm Holes—Mean Diameter6 mm Holes—Mean DiameterPrinting TimeDimensional Error (mm)
19.8667.8735.8762 h 44 min0.134
29.8647.8685.8442 h 26 min0.136
39.8377.8405.8242 h 25 min0.163
49.8007.8035.8163 h 7 min0.200
59.8127.8095.7852 h 42 min0.188
69.8267.7785.7622 h 36 min0.174
79.7847.7505.7532 h 0.216
89.7747.7275.7341 h 51 min0.226
99.7587.7285.6881 h 48 min0.242
109.7347.6985.6812 h 12 min0.266
119.7187.6835.6391 h 58 min0.282
129.7087.6675.6301 h 54 min0.292
Table 5. ANOVA results for holes’ mean diameters response.
SourceDFSSMSF-Valuep-Value
Analysis of Variance for 10 mm diameter
Shells10.0067690.00676939.10
Layer thickness10.023320.02332134.70
Speed20.00040.00021.160.368
Error70.0012120.000173
Total110.031701
R2: 96.18%Adjusted R2: 93.99%
Analysis of Variance for 8 mm diameter
Shells10.0100920.010092143.830
Layer thickness10.042960.04296612.260
Speed20.0015970.00079911.380.006
Error70.0004910.00007
Total110.055141
R2: 99.11%Adjusted R2: 98.60%
Analysis of Variance for 6 mm diameter
Shells10.0137360.013736180.290
Layer thickness10.050960.05096668.850
Speed20.0061890.00309440.610
Error70.0005330.000076
Total110.071419
R2: 99.25%Adjusted R2: 98.83%
(DF: degrees of freedom; SS: sum of squares; MS: mean square error).
Table 6. Test part measurement data for experiment 2 before and after the medical decontamination.
SpecimenHole Axis Angle2.3 mm Diameter 4.5 mm Diameter6.5 mm DiameterPrinting Time
Before (mm)After (mm)Before (mm)After (mm)Before (mm)After (mm)
17
0.1/2
2.052.0314.1414.1346.2126.2878 h 12 min
10°2.052.0314.1414.1876.2126.265
15°2.052.0314.1414.3346.2126.287
18
0.1/3
1.8331.8334.1414.1306.2125.9978 h 26 min
10°1.8331.8274.1414.3156.2126.203
15°1.8331.8274.1414.3206.0366.202
19
0.2/2
1.8831.8274.2604.1306.2126.0604 h 21 min
10°1.8831.8274.2164.2206.2126.253
15°1.8831.8274.1414.2306.0656.253
20
0.2/3
2.052.0434.3504.3416.3506.2084 h 28 min
10°2.052.0434.3504.3446.2206.281
15°2.052.0884.2954.3446.2126.360
Table 7. One-way ANOVA results for holes diameter before and after the medical decontamination.
SourceF-Valuep-Value
2.3 mm holes0.160.692
4.5 mm holes0.160.692
6.5 mm holes0.4210.523
Table 8. ANOVA results on parameters effects on holes diameter in test part 2.
Hole DiameterSourceF-Valuep-Value
2.3 mm before Layer thickness0.120.741
Number of shells0.120.741
Angle01
2.3 mm after Layer thickness0.020.883
Number of shells0.030.865
Angle0.010.993
4. 5 mm beforeLayer thickness20.050.03
Number of shells4.880.063
Angle0.840.471
4.5 mm afterLayer thickness0.720.425
Number of shells6.290.041
Angle3.810.076
6.5 mm beforeLayer thickness0.480.510
Number of shells0.210.657
Angle2.660.138
6.5 mm afterLayer thickness0.270.619
Number of shells0.210.659
Angle2.310.170
Disclaimer/Publisher’s Note: The statements, opinions and data contained in all publications are solely those of the individual author(s) and contributor(s) and not of MDPI and/or the editor(s). MDPI and/or the editor(s) disclaim responsibility for any injury to people or property resulting from any ideas, methods, instructions or products referred to in the content.