Article

Influence of Laser Additive Manufacturing and Laser Polishing on Microstructures and Mechanical Properties of High-Strength Maraging Steel Metal Materials

1
Intelligent Manufacturing and Equipment School, Shenzhen Institute of Information Technology, Shenzhen 518172, China
2
Key Laboratory of Advanced Optical Precision Manufacturing Technology of Guangdong Higher Education Institutes, Shenzhen Technology University, Shenzhen 518060, China
*
Author to whom correspondence should be addressed.
Appl. Sci. 2022, 12(20), 10340; https://doi.org/10.3390/app122010340
Submission received: 29 August 2022 / Revised: 5 October 2022 / Accepted: 8 October 2022 / Published: 14 October 2022

Abstract

:
To increase the surface quality of the high-strength maraging steel metal materials, a new method of executing the additive manufacturing process and subtraction polishing process of maraging steel metal materials was studied. The mechanical properties of maraging steel metal materials before and after laser powder bed fusion (LPBF) polishing were compared and analyzed. The influence of laser parameters on the formability of high-strength MS metal materials was studied, with MS additive parts successfully prepared. The initial surfaces had roughness values of 6.198–7.92 μm. The metal additive manufacturing parts were polished with double laser beams. Confocal microscopy, scanning electron microscopy, and X-ray diffraction were used to obtain the microstructure and phase composition of the microstructures. The microhardness of high-strength maraging forming parts by using a microhardness tester and the mechanical properties were analyzed. The results showed that the surface roughness was considerably reduced to lengthen the service life of the high-strength MS metal materials from an initial roughness of Sa = 6.3 μm to Sa = 0.98 μm, with the surface hardness increased and the martensite content decreased after using double-laser-beam polishing.

1. Introduction

Metal laser additive manufacturing (AM), commonly known as metal 3D printing, combines design, laser material processing, and forming technology. It is based on digital model files and uses software and numerical control systems to construct specialized metal materials layer by layer via extrusion, sintering, melting, light curing, and spraying. Metal additive manufacturing has the advantages of being highly integrated, having a complex geometric design, and saving time in the aerospace, machine building, automotive, and energy industries [1,2,3,4]. In contrast with other conventional subtractive manufacturing or formative manufacturing processes, AM is a process in which the feedstocks are stacked layer by layer based on 3D trajectory data [5,6,7]. Metal 3D printing has become the focus of researchers because of its considerable advantages in processing high-strength steel materials such as rapid prototyping, the possibility of adjusting phase structure, flexibility, and extending possible uses of high-strength steel materials [8,9,10]. Though metal 3D printing has been extensively studied and substantial progress has been made in material flexibility and mechanical performances, many defects still exist in the fabricated parts. These defects, including porosity, cracking, laser spatter, shape distortion, open pores on the surface, and poor surface finish, affect the performance of the parts and limited their scope of application [11,12]. In recent years, several research groups have aimed to investigate the factors that lead to the poor surface quality of the parts fabricated by AM and have made efforts to enhance their performance. Laser polishing, electrochemical polishing, abrasive flow machining, and chemical polishing are commonly used to reduce surface roughness [13,14,15,16]. Compared with conventional abrasive or chemical techniques, laser polishing based on melting materials has the advantages of being a non-contact process, highly repeatable, environmentally friendly, and having low labor costs and a convenient operation [17]. Furthermore, the AM process using laser technology allows for the in situ polishing of the initially formed parts using the same machine [18]. In 2013, Strano et al. [19] studied the surface roughness and topography of 316L steel alloy parts made with selective laser melting. The results demonstrated that the particles that stuck along the step edges affected the surface roughness by filling in the gaps between the consecutive layers. A previous study [20,21,22] summarized recent findings on the quality of LPBF parts from maraging steel and other materials. Some studies [23,24] involving the tune of multi-material additive manufacturing laser powder bed fusion (LPBF) manufactured have been conducted. Mower et al. [25] systematically studied the mechanical behavior of metallic alloys fabricated using different AM and other methods.
Some authors have investigated laser polishing SLM surfaces, but mostly for titanium alloys, with some for 316L thin section parts [26], SLM fabricated Ti-6Al-4V components [27], or additive-manufactured Ti-based alloys [28]. To our best knowledge, laser polishing has been explored by many authors, including a recent study by Yung et al. [29], who have been developing a new polishing method in order to polish the additive manufactured CoCr alloy components with complex surface shape. The resulting surface roughness was reduced by up to 93% and the mechanical hardness of the laser-polished samples was enhanced by 8%. Li et al. [30] demonstrated that the performance of Ti alloys prepared by LPBF could be observably enhanced via a laser polishing technique, with the surface roughness effectively reduced from 6.53 to 0.32 µm. In 2021, Bhaduri et al. [31] proposed a novel laser polishing strategy to reduce the average roughness of aluminum alloy parts. When processing with a nanosecond-pulsed laser, a sub-micron surface roughness was achieved. Parvez et al. [32] proposed a novel laser-aided machining and polishing process approach to remarkably increase the surface quality of deposited parts.. Rosa et al. [33,34] studied the methods and techniques for laser polishing additive laser manufacturing surfaces. Yao [35] studied the process optimization concept of combining additive manufacturing and surface polishing processes. Temmler et al. [36], from Tsinghua University, the Fraunhofer Institute, and RWTH Aachen University, studied the effect of laser polishing on the surface roughness and properties of the remelting surface of H11 tool steel. Willenborg [37], a world-famous laser polishing expert, proposed a new method including a top-hat scanning strategy for the laser polishing of additively manufactured polymer parts. Experiments on laser processing polishing of LPBF maraging steel were conducted to increase the quality of LPBF maraging steel [38].
In previous research, laser metal additive for high-strength steel materials has been studied. There is an expected impact on fatigue and fracture strength of these materials, as cracks generally initiate at steel’s surface irregularities [39,40]. The methods researchers use to improve the surface mechanical properties and reduce the surface roughness of metal additive manufacturing parts is a key aspect needing to be considered in laser manufacturing technology. At present, the laser polishing metal additive manufacturing of high-strength maraging steel metal material can be used to create high-strength metal parts, generally reducing their roughness to 2–3 μm. In this work, we established a new process for the additive and subtractive metal manufacturing of high-strength steel using double-laser-beam polishing. The influence of laser additive manufacturing and laser polishing on the microstructures and mechanical properties of high-strength MS metal materials are revealed.

2. Principle of Additive and Subtractive Manufacturing of High-Strength Metal Materials

Laser power bed fusion (LPBF) uses laser irradiation on pre-laid metal powder. Specifically, after forming metal parts, the lasers are completely covered with powder and a finely focused light spot is used to quickly melt the preset powder, meaning that functional parts based on the metallurgical combination of almost any shape can be obtained. For these, the density can reach 100%, the dimensional accuracy can reach 20–50 μm, and the surface roughness can reach 20–30 μm. The metal laser additive manufacturing process of high-strength metal materials based on selective melting is shown in Figure 1 [11,35].
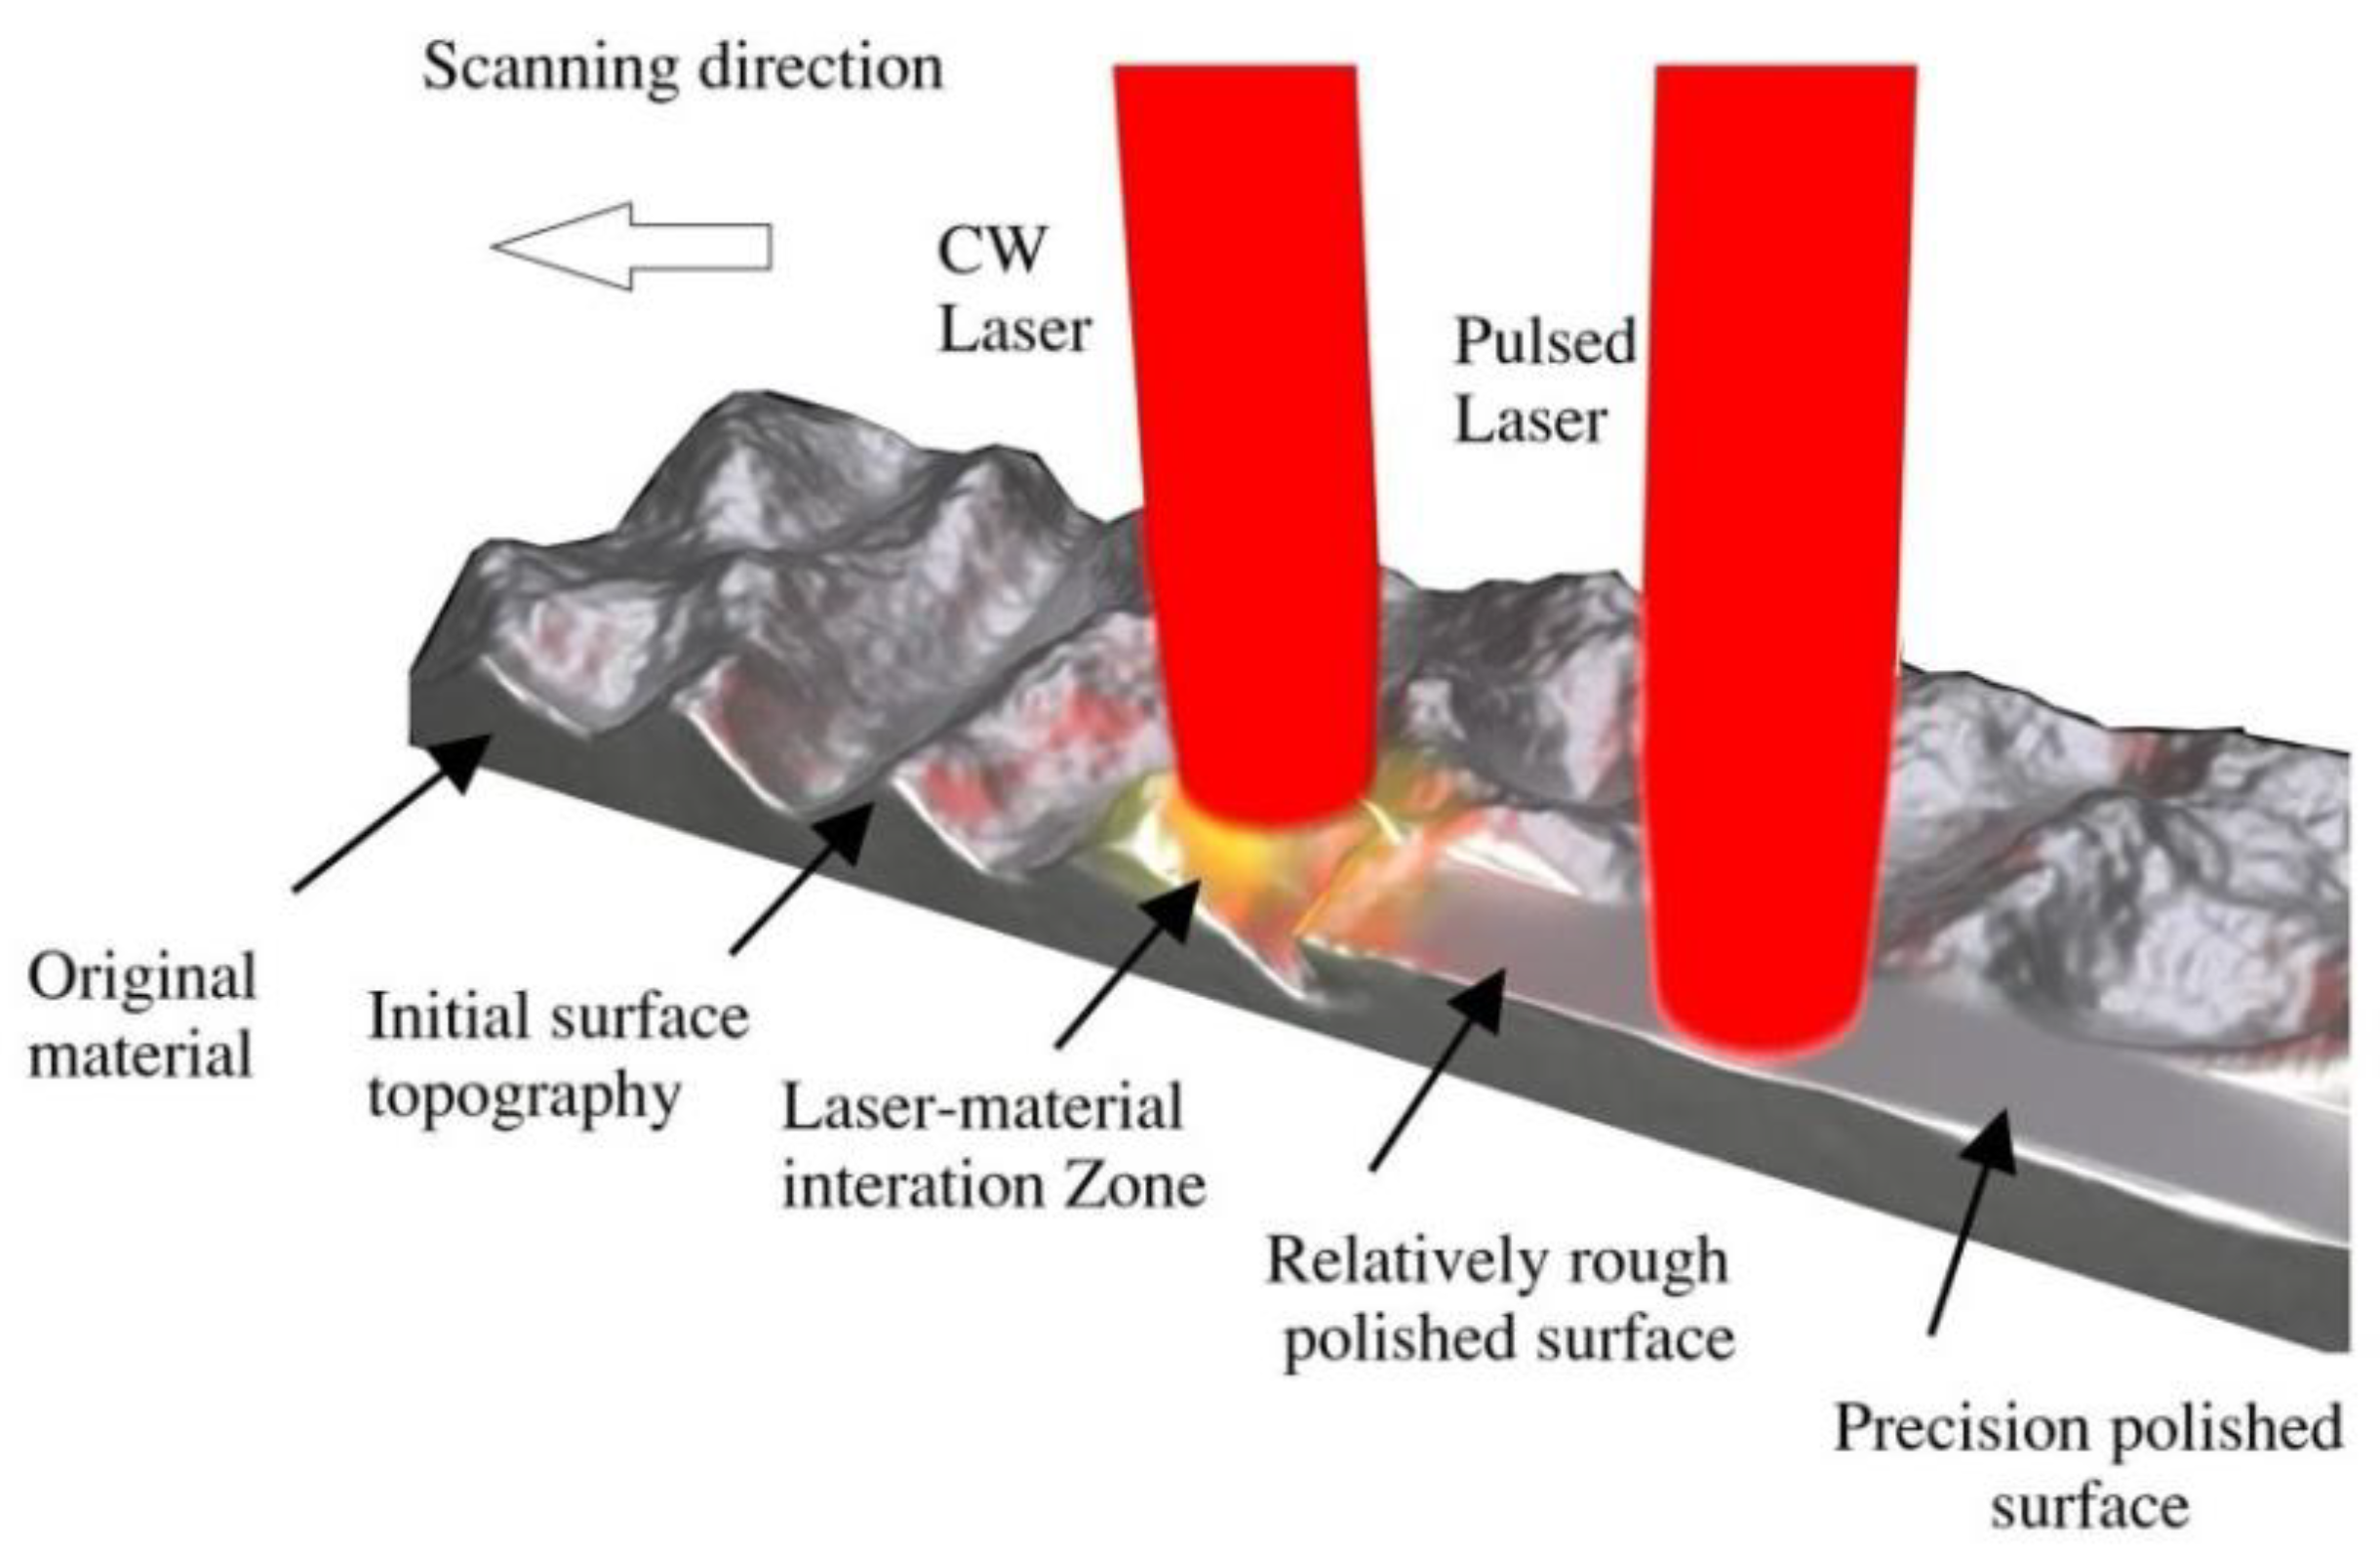
The surface of the metal additive manufacturing samples is rough and they are difficult to directly use; thus, we propose the use of a double-laser-beam polishing method for microsubtraction manufacturing. The dual-beam laser polishing method for metal additive manufacturing parts is shown in Figure 2. The illustration reveals the overall scheme for polishing high-strength steel equipment with dual-laser beams.
Taking a polishing cavity as an example, its working principle is as follows: Under the protection of an inert gas sealing chamber, a continuous laser (power 300–800 W, top-hat flat-top beam) acts on the special-shaped surface of metal additive manufacturing samples through the front-focusing three-dimensional galvanometer to achieve the purpose of preheating and rough polishing. A pulsed laser, appearing through a front-focusing 3D vibrator, then rapidly melts the microsurface crest of the irregular curved surface in a small local area with an appropriate pulse peak energy and fills in the troughs (commonly known as the “melting peak filling valleys”), thus reducing the surface roughness. The existing laser polishing technique uses the melting peak filling valleys technology principle to achieve a flat surface, and this is called micro material reduction manufacturing. In the double-laser-beam technique, a high-power continuous laser is first used for rough polishing, followed by a low-power pulse laser for fine polishing. We used composite path double-laser-beam polishing and double-laser-beam composite path scanning, so that the molten pool was uniformly distributed and to reduce the molten pool temperature gradient. The energy required by a continuous laser, to achieve turbulent metal and to achieve a complete “peak”, is larger; therefore, an overflow phenomenon will occur in the molten pool (reported in [41]). There are many process factors in dual-beam laser polishing.

3. Materials and Methods

3.1. EOS M290 Metal Additive Manufacturing

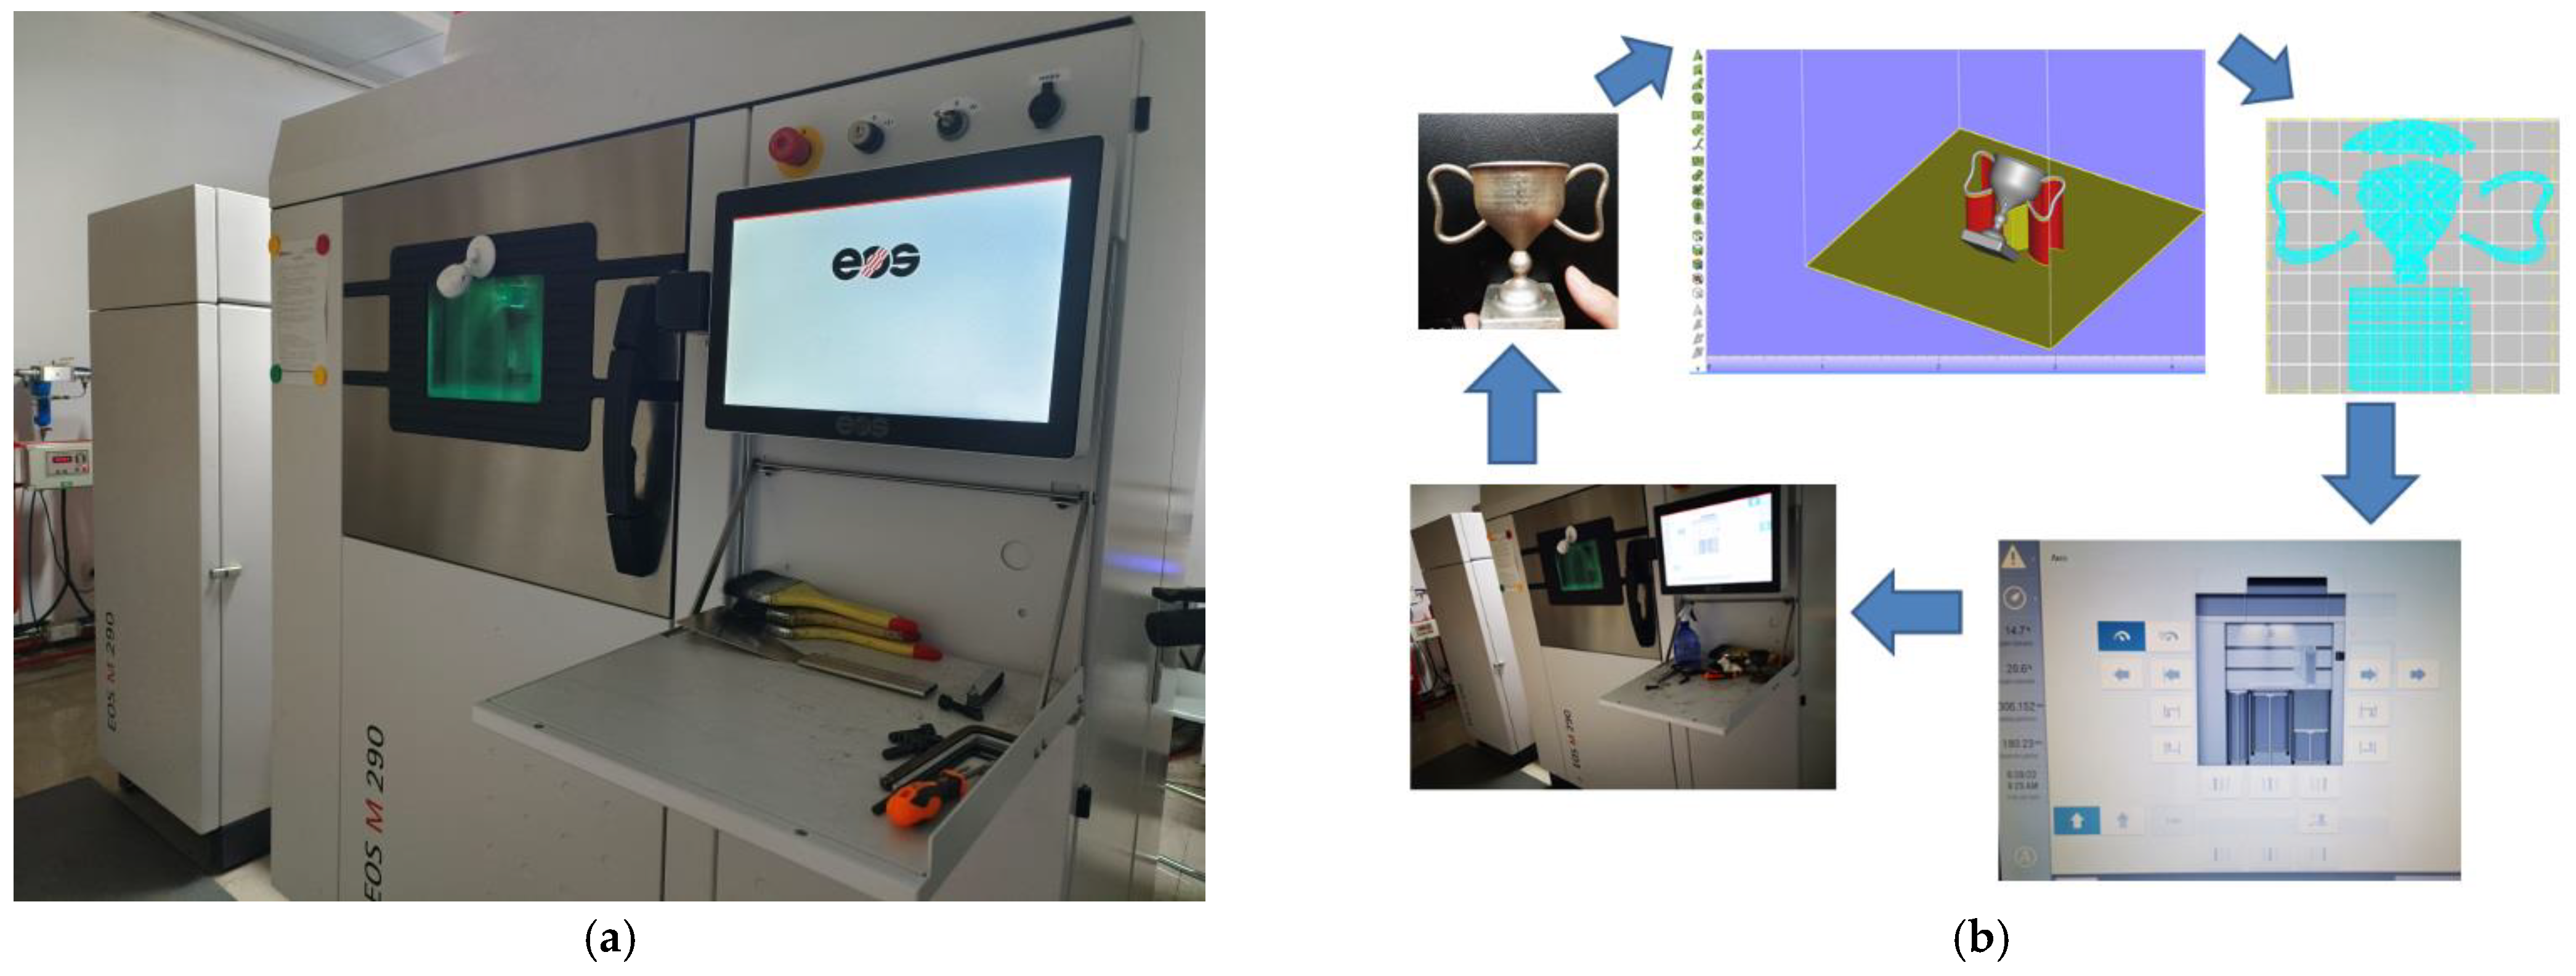
The EOS M290 laser metal additive manufacturing system used was equipped with a 400W fiber laser to provide a high-performance laser light source. The EOS M290 LPBF system is shown in Figure 3a; it consists of a new modules EOS powder bed, an EOSTATE base, and an EOSTATE laser monitoring to meet industry needs and improve quality management. Figure 3b depicts flow diagrams showing the LPBF processes. The EOS M290 metal additive manufacturing system, which has been updated three times, is installed in the forming chamber to detect the powdering of each layer and to take pictures. The EOSTATE base provides real-time monitoring of the Z-axis position, laser power, scanning accuracy, forming chamber temperature, forming chamber humidity, pressure, and other parameters. EOS laser monitoring is a laser monitoring module that monitors the laser power in real time throughout the entire production process. It is equipped with a nitrogen generating and nitrogen and argon automatic switching device, gas protection system, gas advection dust recovery system, gas filtration system, automatic induction protective gas filtration system, and temperature detection system in the warehouse, with full-width active scanning detection, depowder system, and liquid vacuum depowder system.
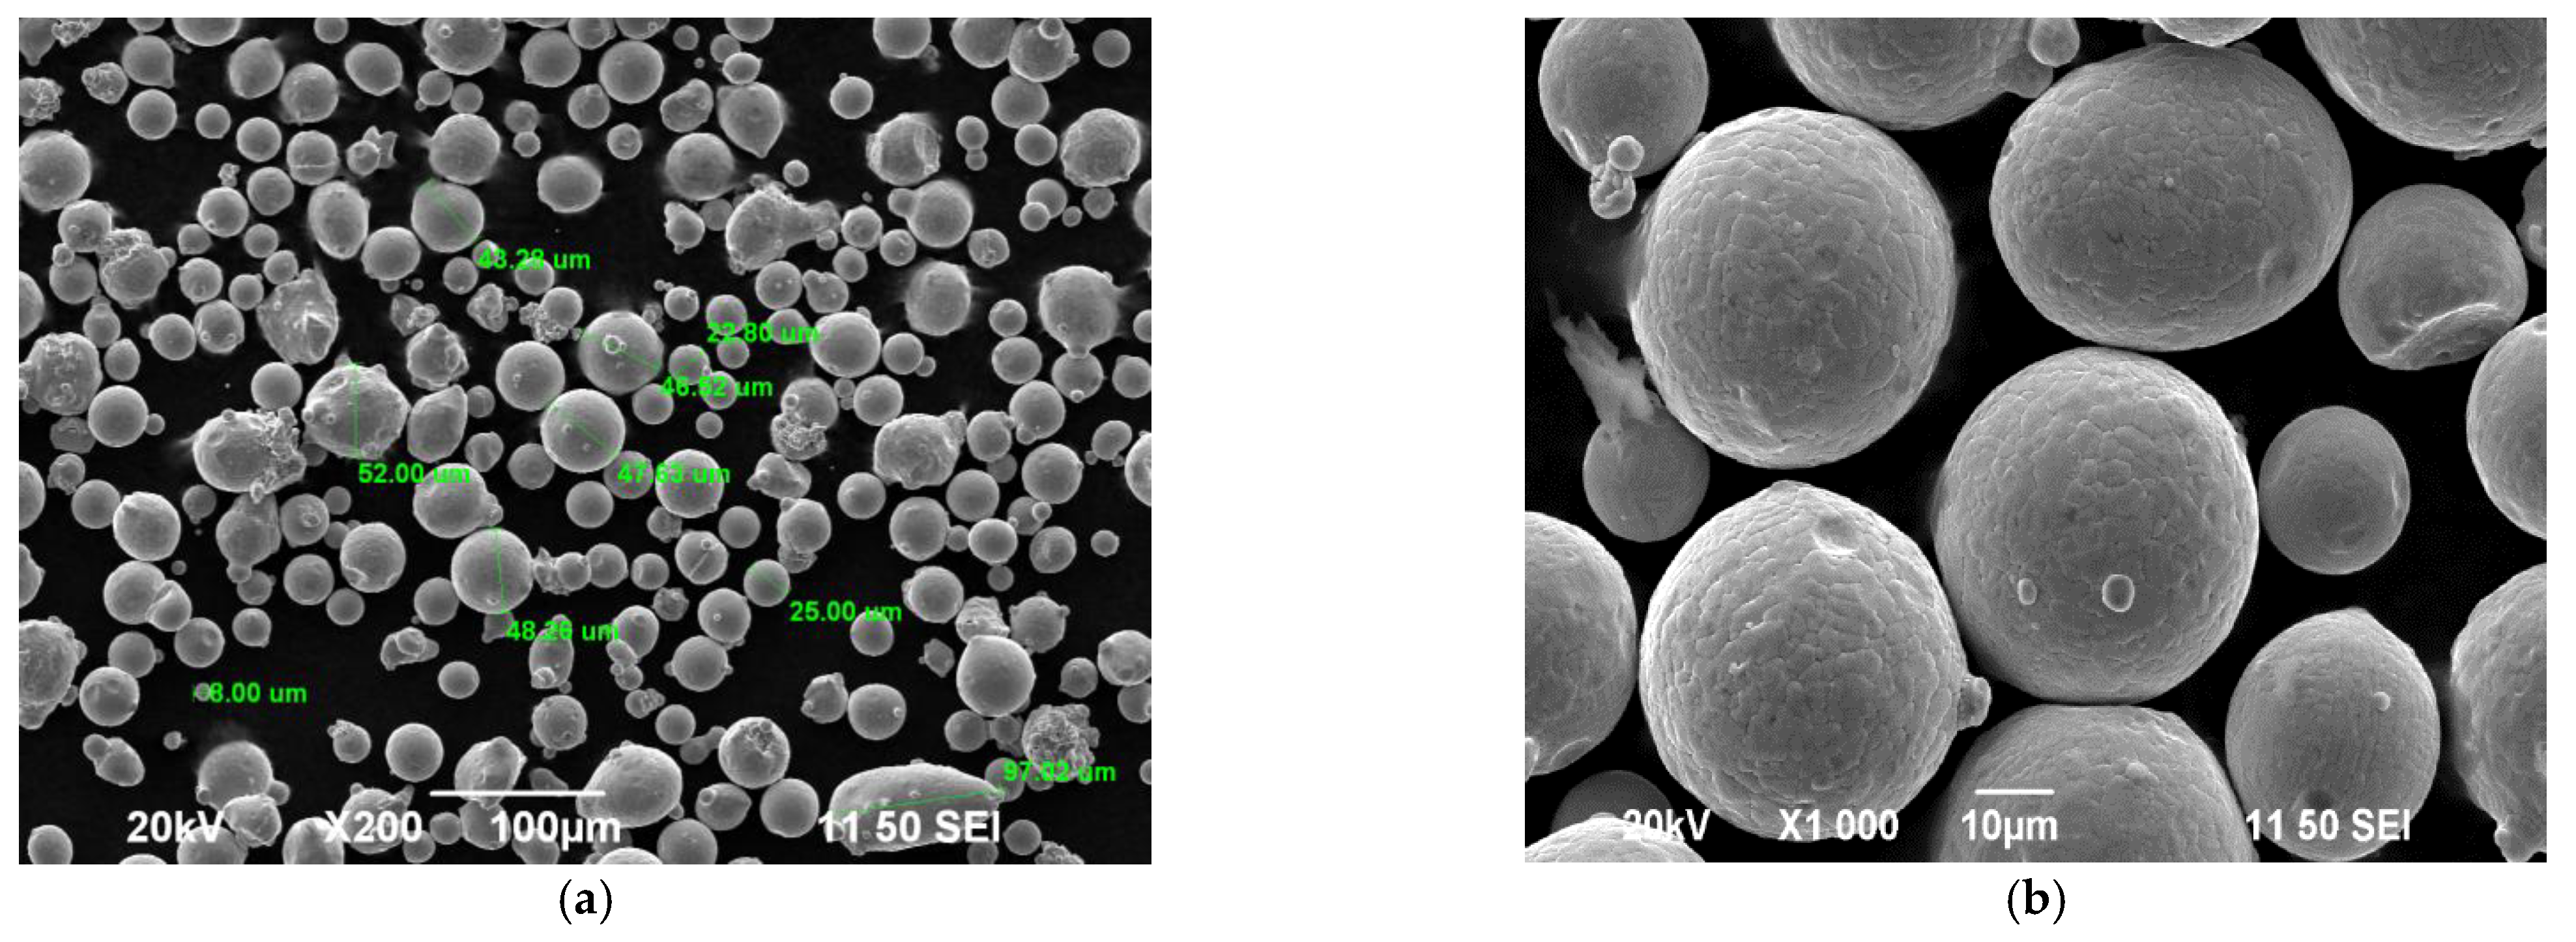
The parameters of the EOS M290 metal additive manufacturing system are shown in Table 1. EOS maraging steel MS1 is suitable for injection mold and engineering parts. SEM morphology of EOS maraging steel MS1 is shown in Figure 4. Figure 4a is the SEM photo magnified 100 times and Figure 4b is the SEM photo magnified 1000 times. The powder particles morphology was investigated in a prior study [19], while the chemical composition and weight (wt.%) of EOS maraging steel MS1 is shown in Table 2 [42].

3.2. Parameters of Dual-Beam Laser Polishing

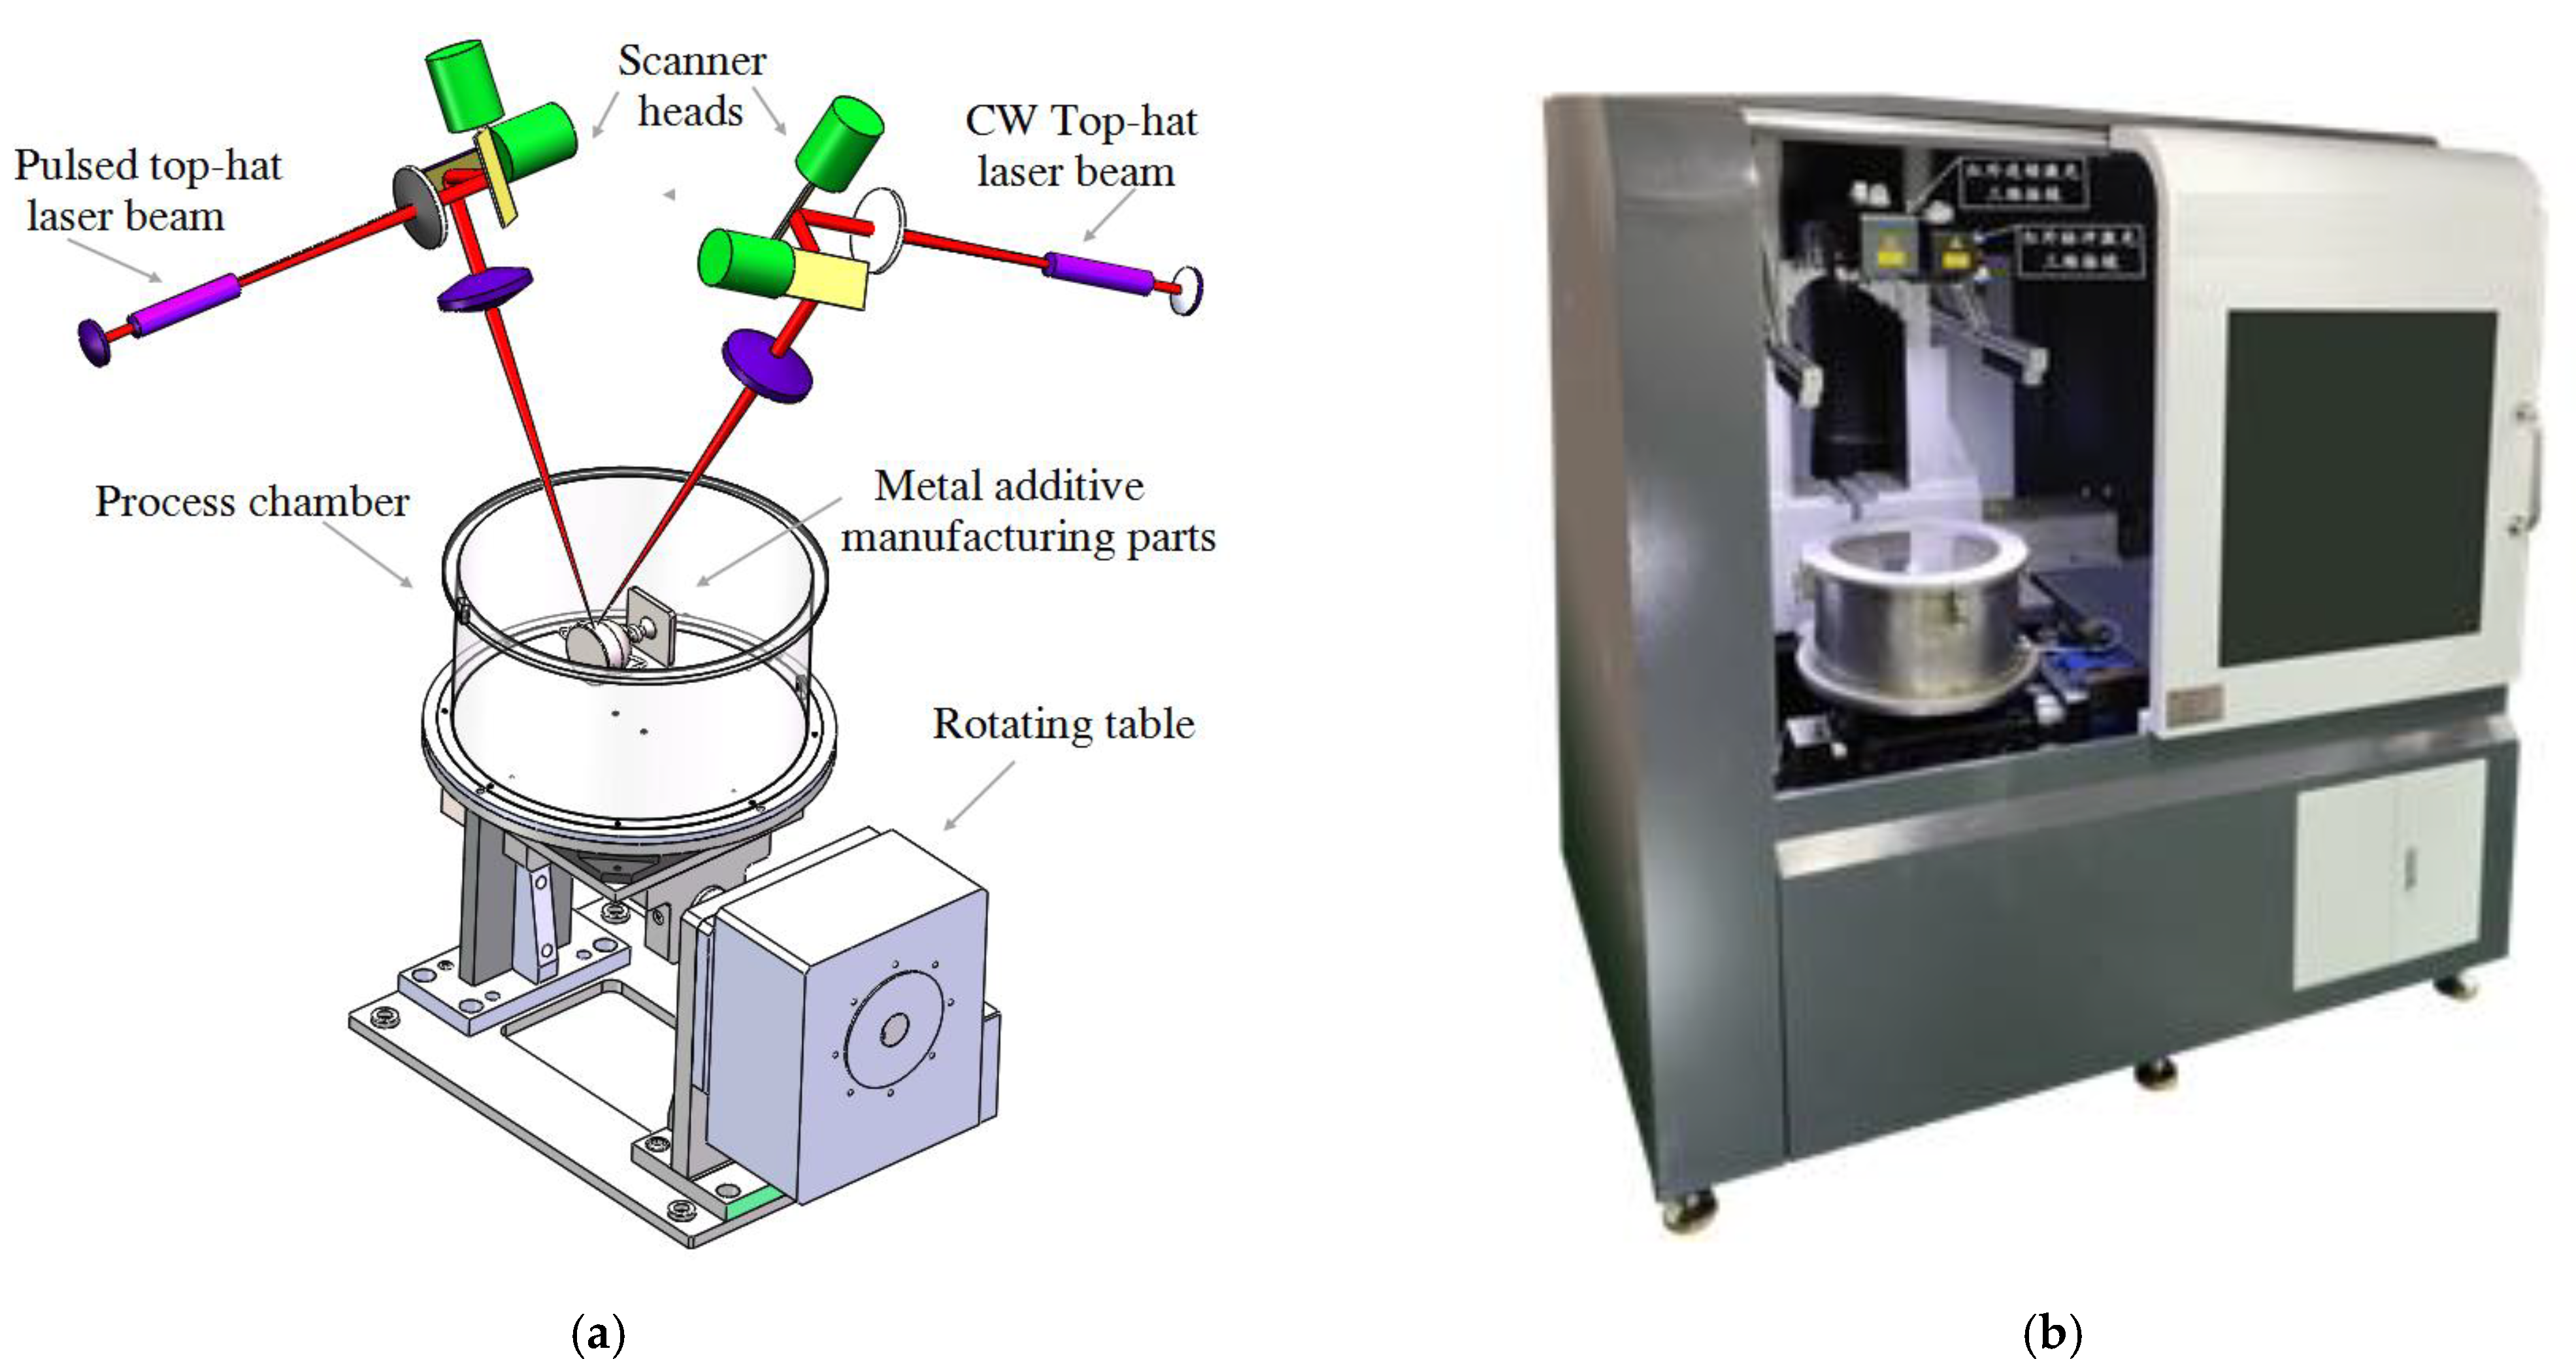
Based on the preliminary research of our team [43], a dual-laser-beam five-axis polishing test platform (Figure 5) consisting of a dual-laser 3D galvanometer and a two-axis CNC rotary table was used. Using the polishing of the MS additive manufacturing part shown in Figure 1 as an example, the infrared continuous laser and pulsed laser with top-hat characteristics entered the 3D galvanometer of their respective front-focusing system. The movement of the focused laser spot on the surface of the three-dimensional cavity of the mold can be controlled by the Z-axis moving lens and the X-axis and Y-axis rotating lens. On the two axes, the rotation of the NC rotary table and mold cavity laser processing blind area, in the range of the 3D vibrating mirror machining, can be exposed. In this way, the galvanometer of the three movements in the X, Y, Z, and NC rotary table two axes linkage can be used to realize laser spot scanning in the mold cavity arbitrary area of the polishing processing. Parameters of the dual-beam laser polishing are shown in Table 3.

3.3. Methods for Microstructures and Mechanical Properties

A continuous laser and pulsed laser were used for multi-step polishing, remarkably reducing the surface roughness [27,43]. The filter values (S and L filter) from the roughness measurements are used to test roughness. The filtering parameters used for the surface analysis are Gaussian (ISO 16610-61). X-ray diffraction technology is used for before and after polishing surface characterization. The polishing layer was characterized by the roughness measurement tool (Mahr MarSurf CM mobile and Bruker), XRD (AD8 Advance), SEM (Zeiss Gemini SEM 300), and nano hardness tester (TI 950 Triboindentor). For quantitative XRD analysis, with 20 wt.% as the internal standard, the measurements were performed by D8 Advance X-ray diffractometer from Bruker Corp., at 40 mA and 40 KV with an angular scan of 5–65°.

4. Experiment and Analysis

4.1. Parameters of Dual-Beam Laser Polishing

The EOS M290 laser metal additive manufacturing system is a direct metal sintering system for the mass production of molds, metal parts, and fast-forming parts. The DMLS direct metal sintering system uses a laser beam to sinter ultrafine metal powder in layers, enabling complex designs such as complex surfaces, bending deep grooves, and three-dimensional channel designs to be realized. Except for the scanning speed, the surface metal additive manufacturing method is similar to that used in previous works [44,45], with the MS1 metal additive manufacturing parameters optimized and shown in Table 4.
The optimized process parameters of powder laser additive manufacturing were as follows: laser power, 300 W; laser scanning speed, 720 mm/s; pulse width, 2.0 ms to 4.0 ms; and scanning interval, 0.1 mm. Three sample parts formed by LPBF and which underwent high-strength additive manufacturing are shown in Figure 6. Figure 6a shows the high-strength steel additive manufacturing plane parts, Figure 6b shows the high-strength steel additive manufacturing small amplitude curved part, and Figure 6c shows the three-dimensional sample with large curvature. As can be seen from Figure 6, under this combination of optimized process parameters, the formed parts by laser additive manufacturing had essentially smooth surfaces and a high formability. Area A’, B’, C’ are scale representative of Parts A, B and C respectively, representing different molding angles.
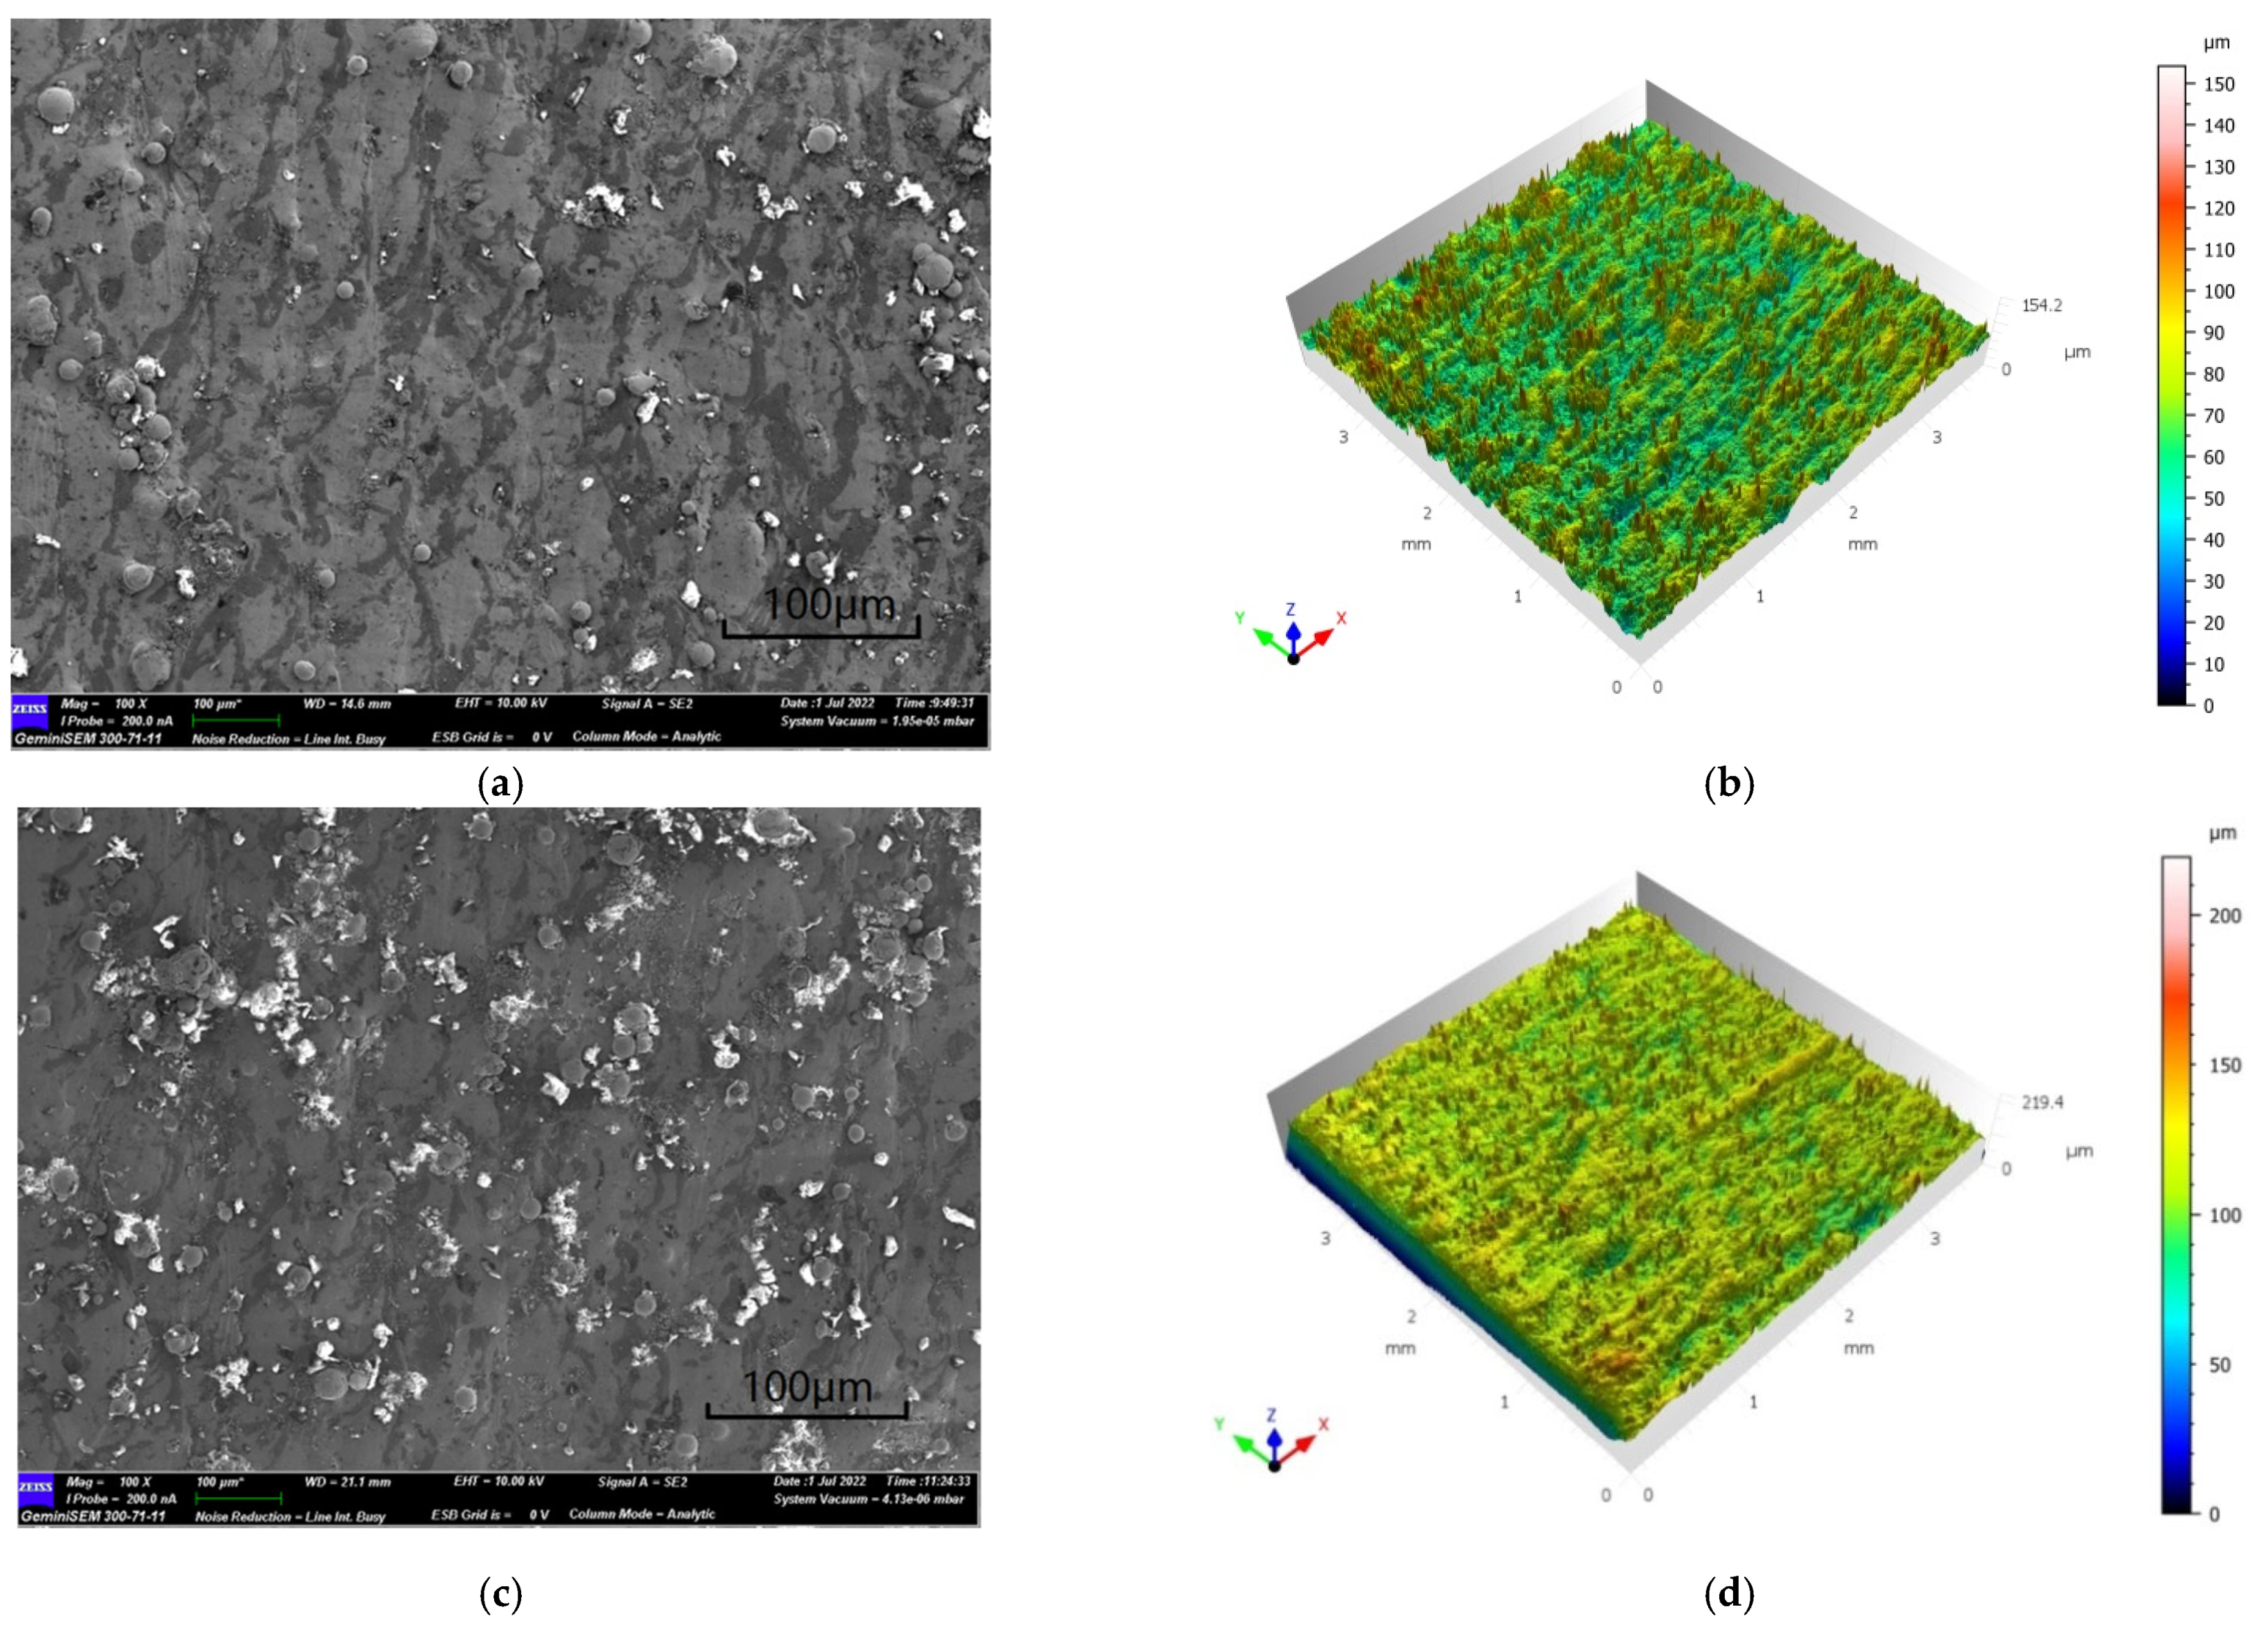
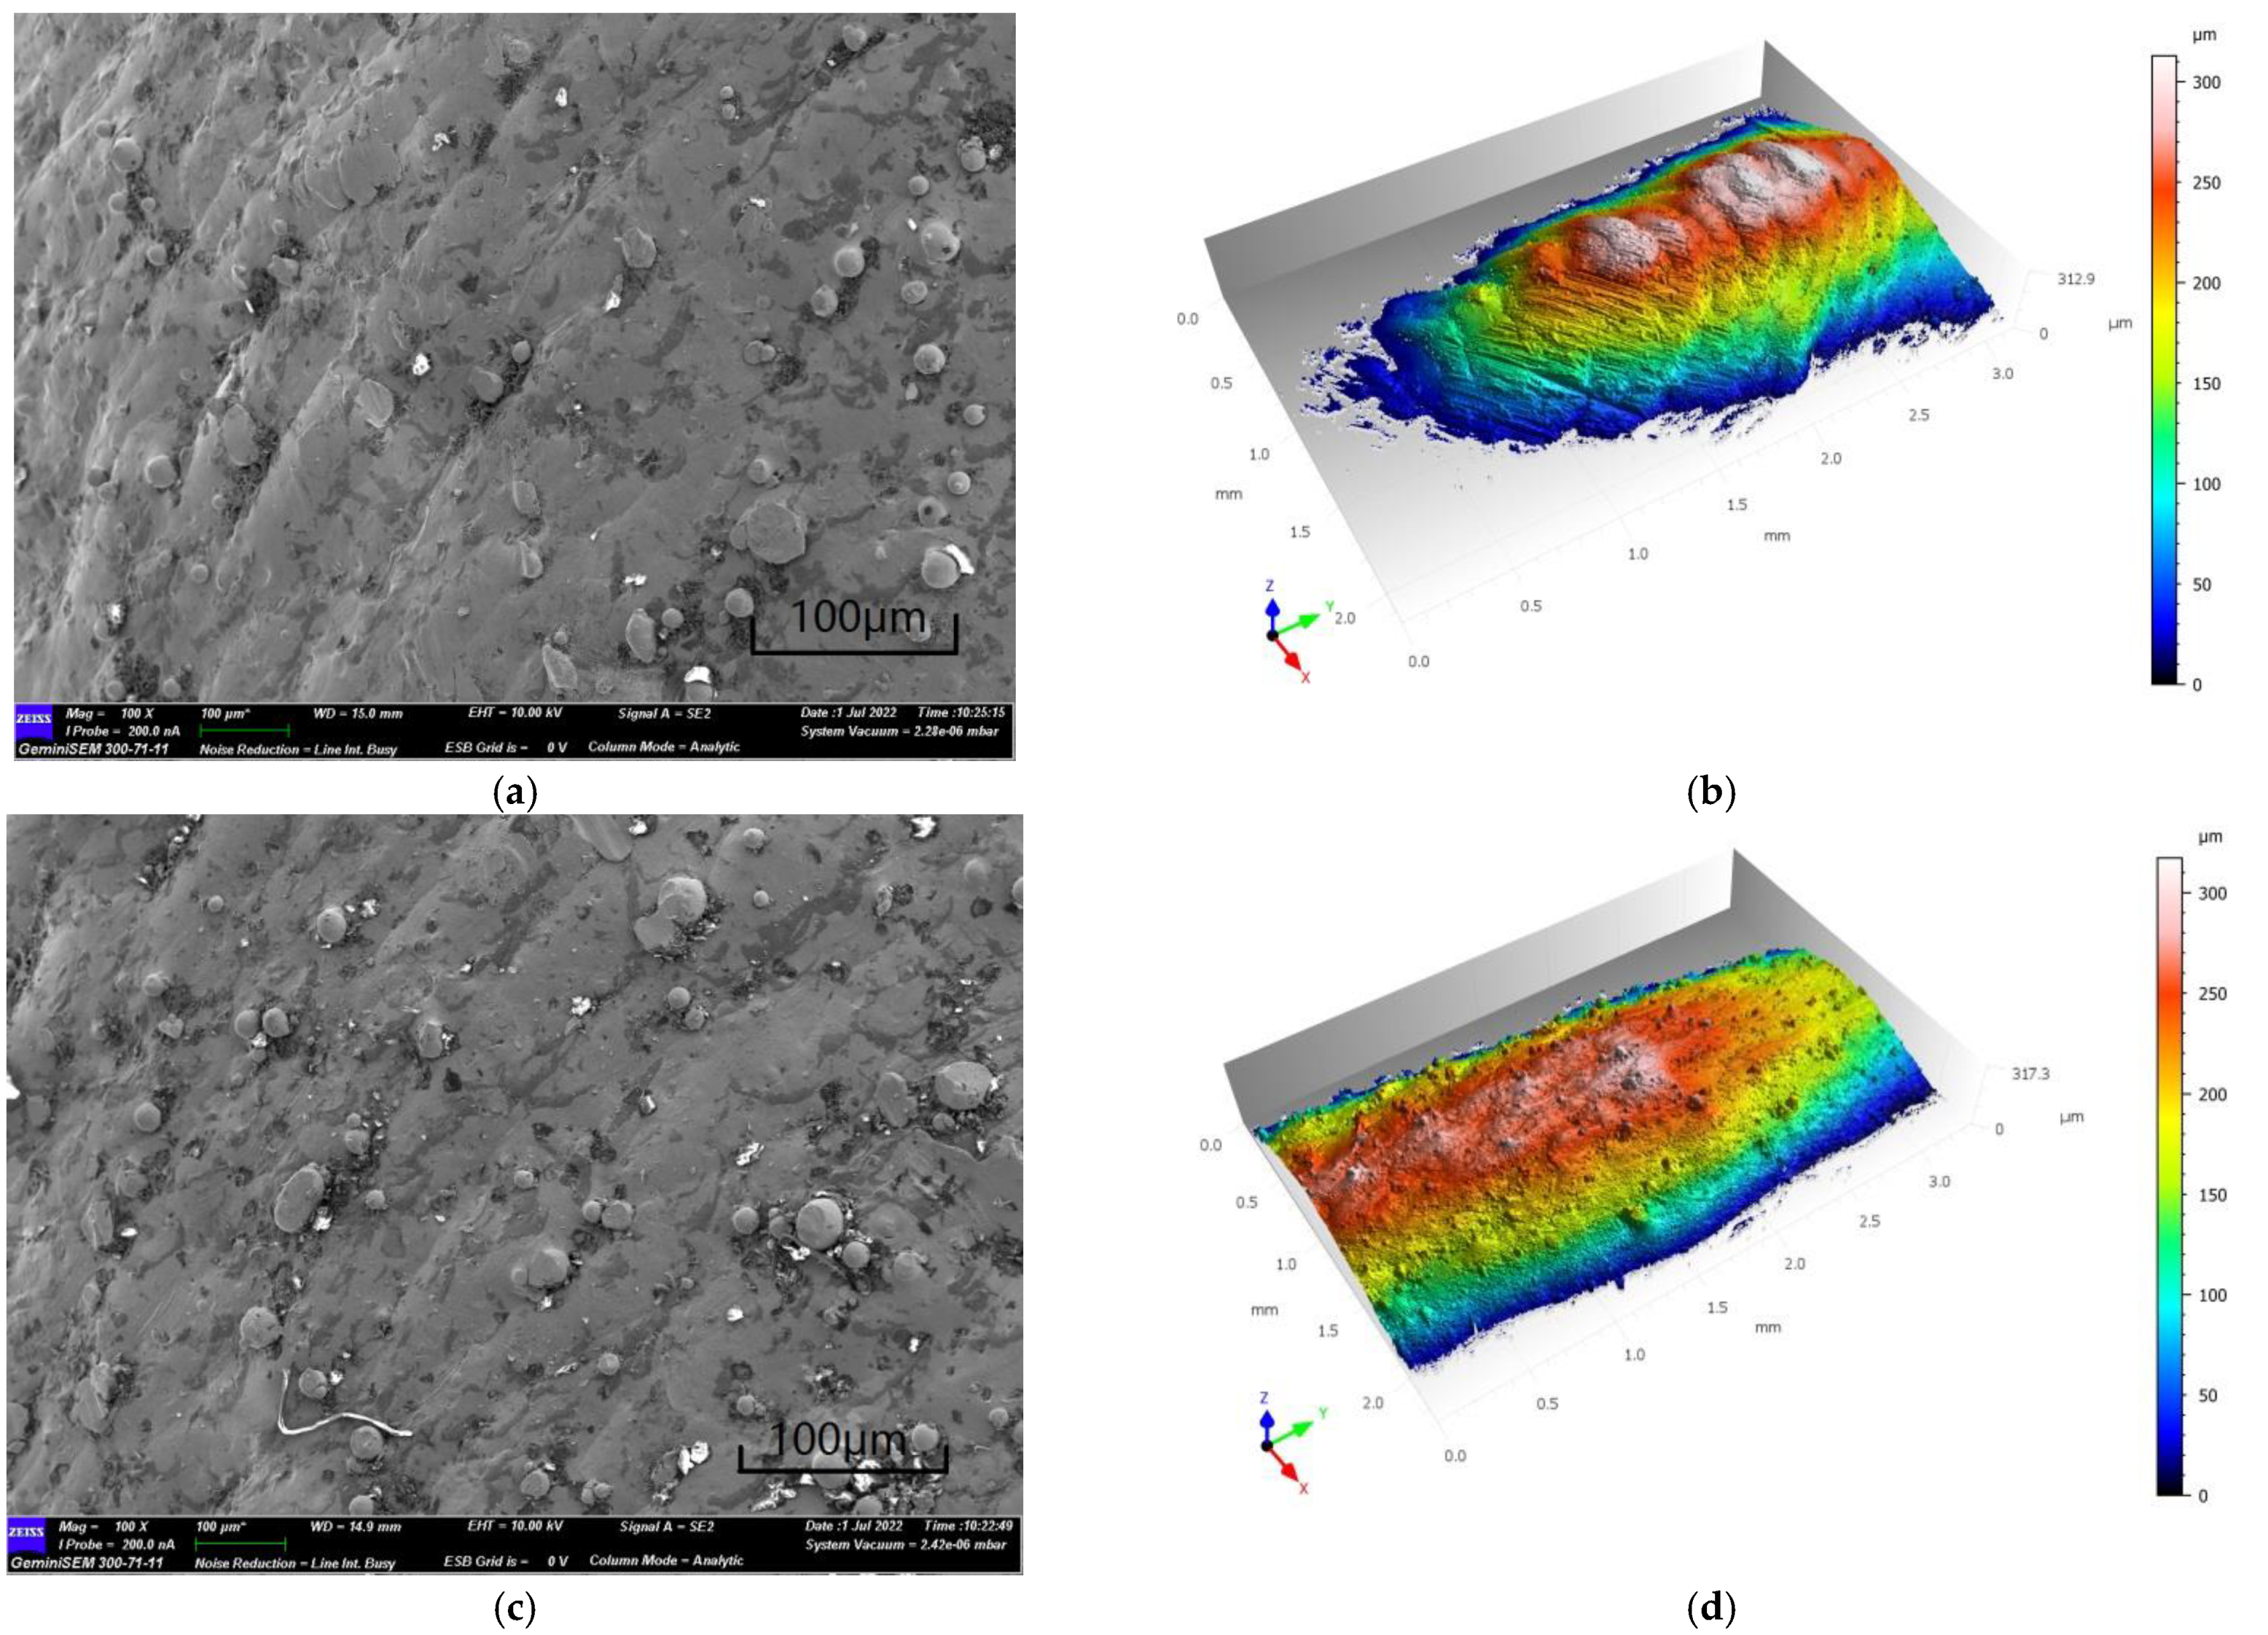
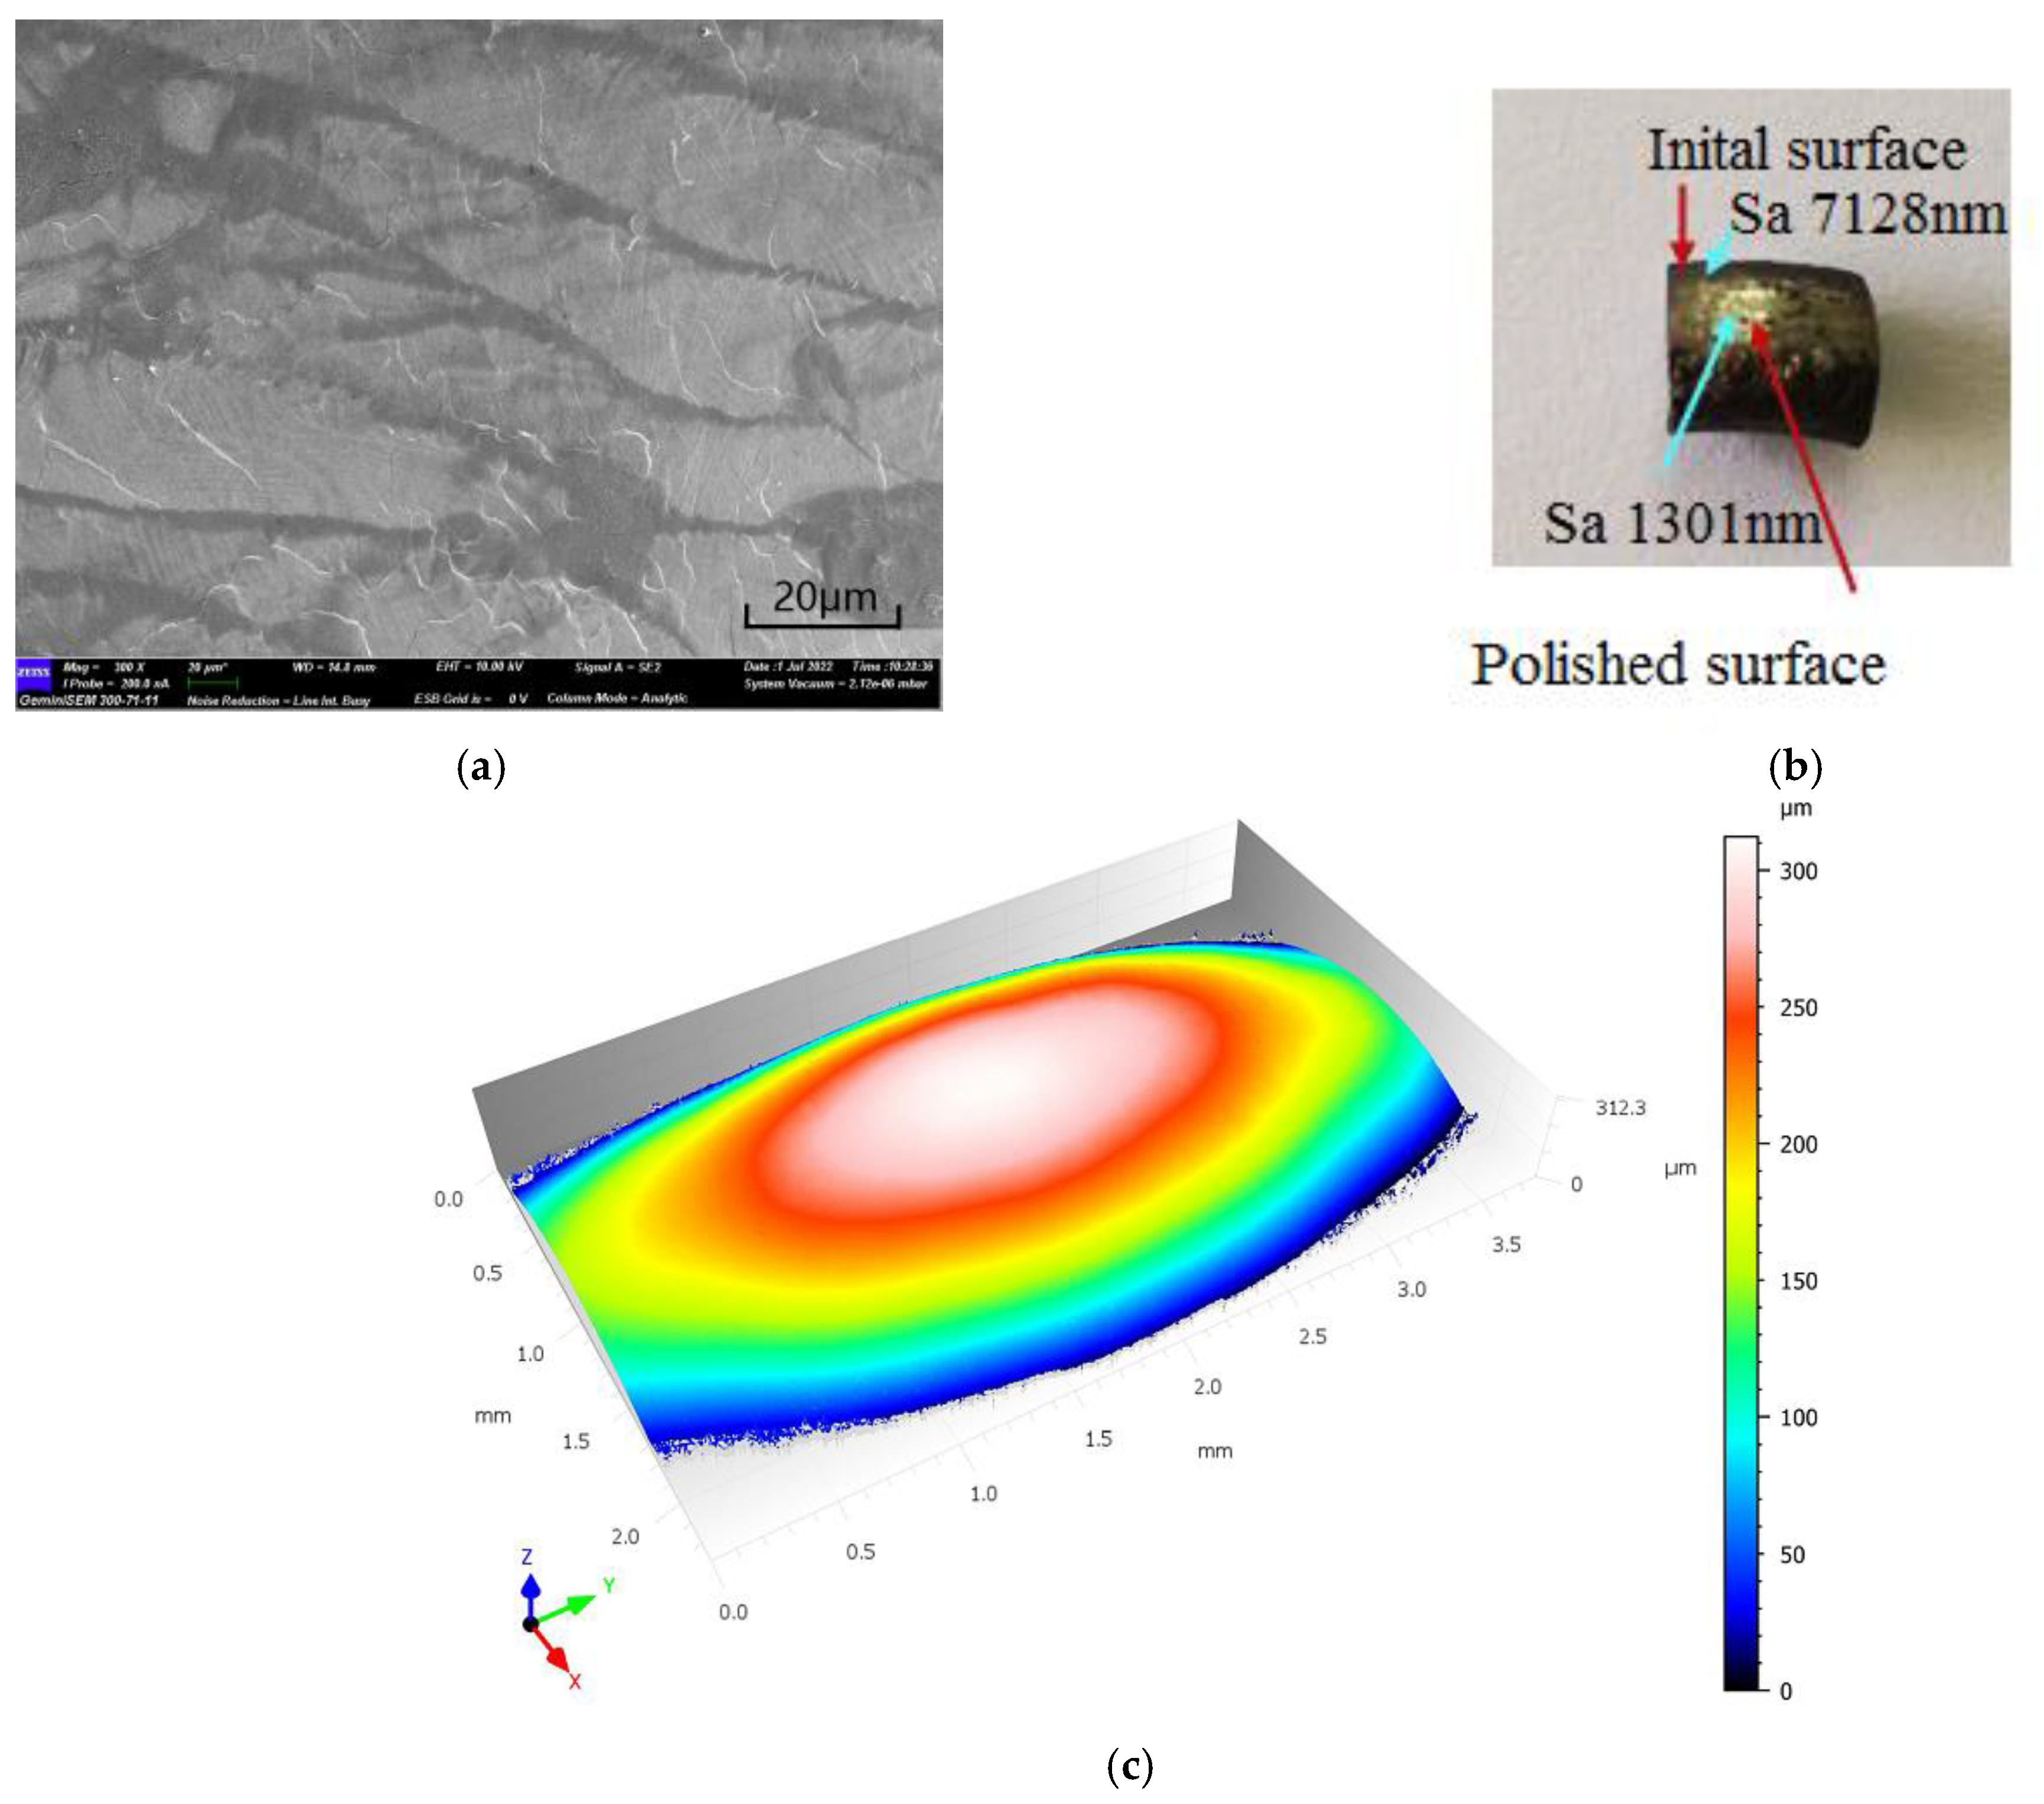
Figure 7, Figure 8 and Figure 9 show the SEM images and 3D profiles of Parts A’, Part B’, and Part C’. The microstructures of the formed parts were dense, without macroscopic cracks and cavities, and their cell structures were at the submicron level, as can be seen from images taken by a high-power microscope. The additive manufacturing process parameters, properties of the materials, and geometry and shape of the parts all affected their surface morphology after forming. The initial Part A’ surfaces had roughness values of 6.198 μm to 6.635 μm, the initial Part B’ surfaces had roughness values of 6.888 μm to 6.922 μm, and the initial Part C’ surfaces had roughness values of 7.128 μm to 7.92 μm. Therefore, it can see that with different forming structures and angles, the surface roughness is different.

4.2. Optimized Parameters of Dual-Beam Laser Polishing

In the parts created by laser metal additive manufacturing, the surface roughness is not always ideal. A surface roughness (Sa) of less than 5 μm for laser-selective melting martensitic aging die steel is currently considered to be relatively low level [17,46,47,48]. Both of the laser beams that are used in these processes are flat-topped beams. The power of the infrared continuous laser is strong and it is mainly used for rough polishing. Additionally, the power of the infrared pulse laser is weak and it is mainly used for sub-mirror or mirror polishing after rough polishing. In this process, firstly, the free-form surfaces of the high-strength parts formed by metal additive manufacturing are polished to a roughness of Ra < 4 µm by an infrared continuous laser. The free-form surface is then polished to Ra < 2 µm by an infrared pulse laser, to sub-specular or specular degree. Optimizing the laser polishing process parameters to ensure the peaks fill valley is difficult. The tension of the molten pool will be too large or too small, meaning that the peak cannot “just” fill the trough, and further reducing the surface roughness is difficult. When using Gaussian laser-beam polishing, the energy density in the center of the spot is too large, directly leading to metal gasification and leaving many pits on the polished surface. Using a flat-topped beam instead of a Gaussian beam ensures that the microscopic crest is only melted and avoids vaporization. Optimized parameters of dual-beam laser polishing are shown in Table 5.
The polished roughness value relative to the initial roughness value is shown in Figure 10. The graph shows the roughness of the double-laser-beam polished surfaces corresponding to each initial rough ground surface with a double-laser-beam polishing power varying from 200 W to 600 W by a single factor test method experiment. The surface roughness after polishing is not only related to the polishing process parameters, but also to the original roughness. Figure 10 shows that after a double-laser-beam polishing with the optimal parameters (CW 400 W + 60 W, v = 800 mm/s), the surface roughness was significantly reduced to improve the service life of the high-strength MS metal materials from an initial roughness of Sa = 6.198 μm to Sa = 0.98 μm and from an initial roughness of Sa = 7.92 μm to Sa = 1.37 μm, with a CW laser power of 400 W and a pulsed laser power of 60 W. Scale Point C’s error bar with scale is shown in Figure 10, which reveals the difference in the roughness measured by polishing in different regions of three samples of high-intensity MS laser additive manufacturing.
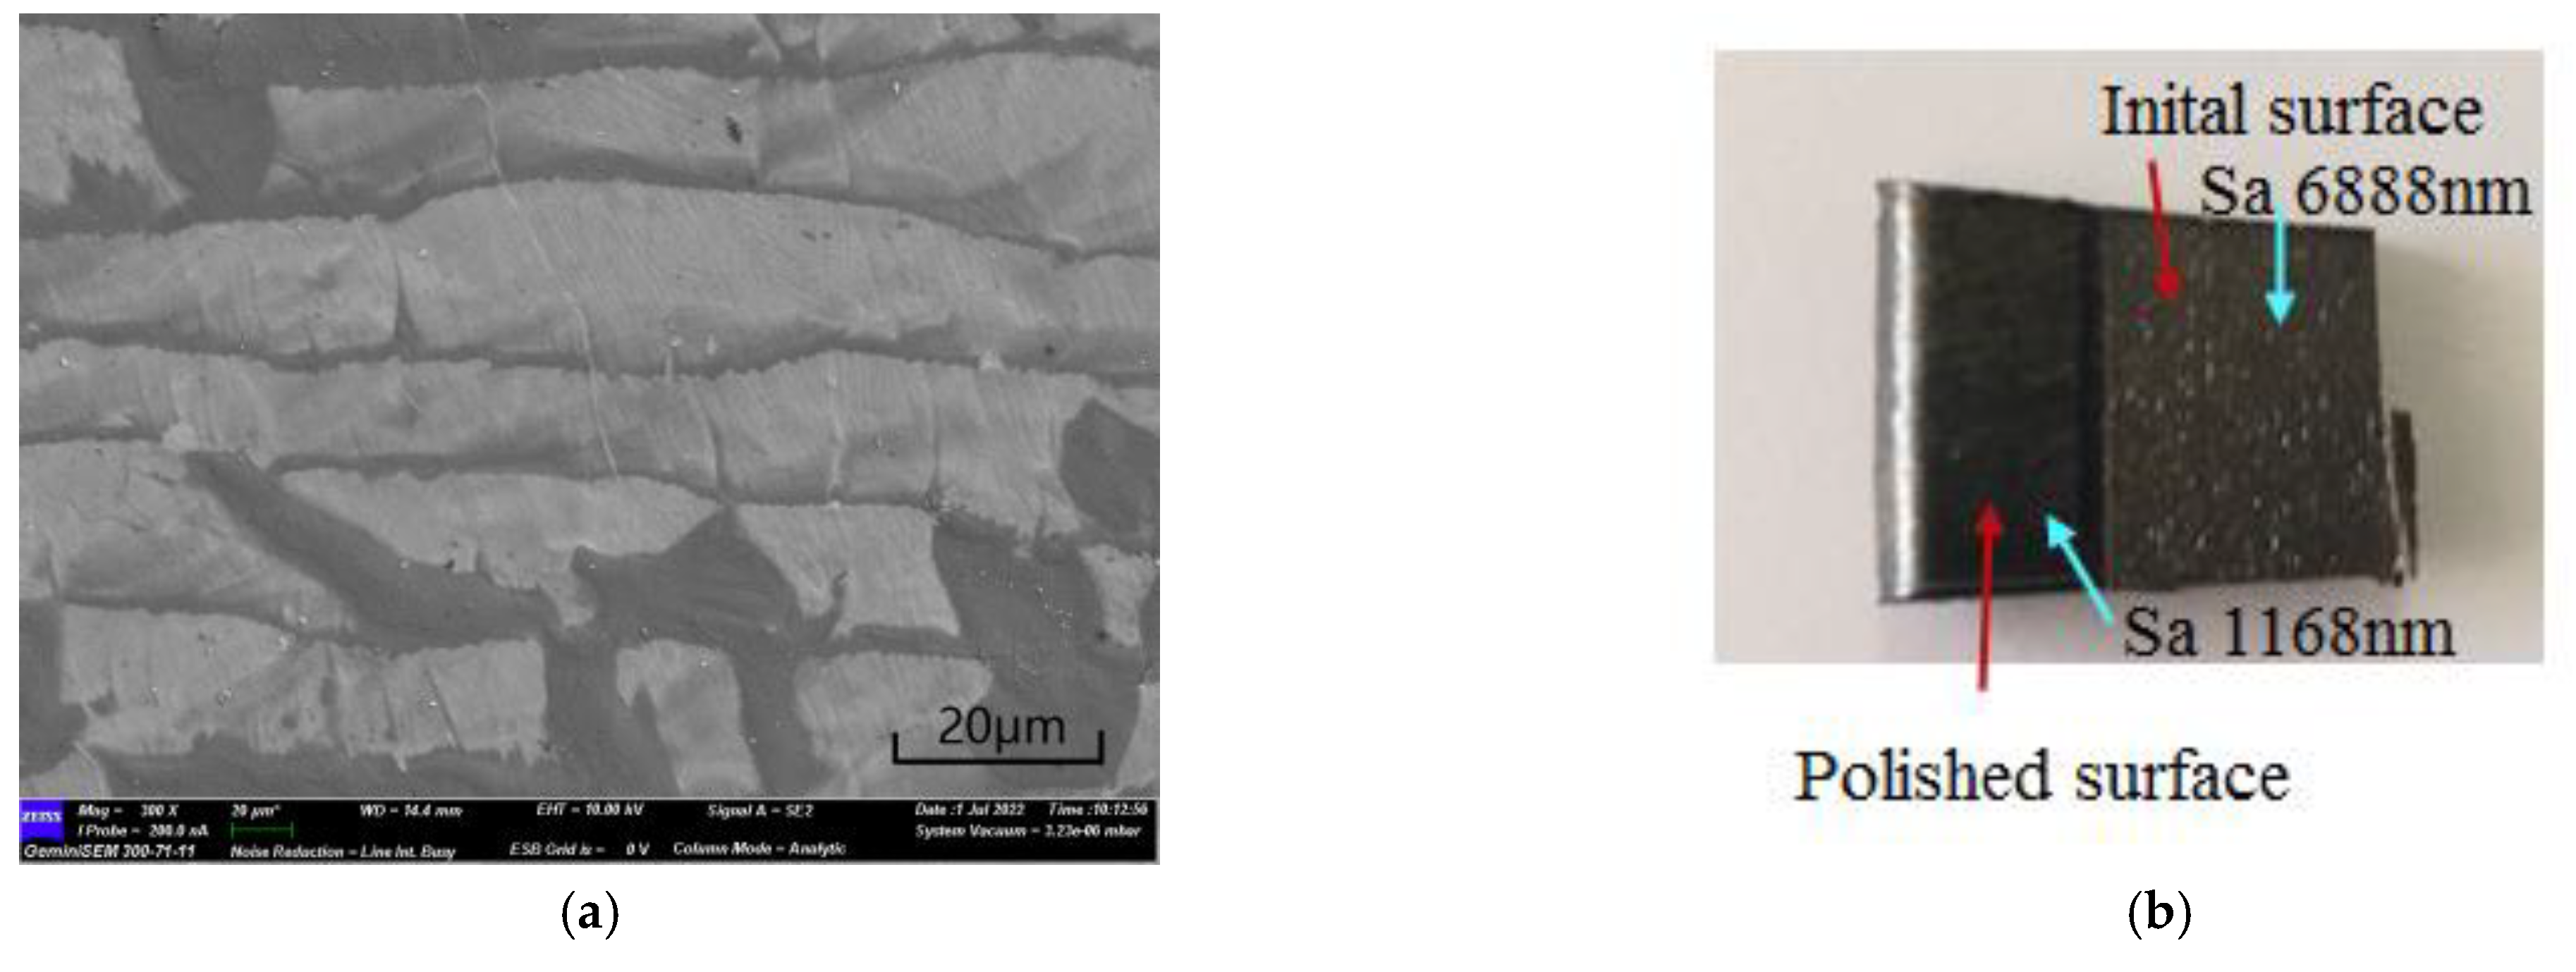
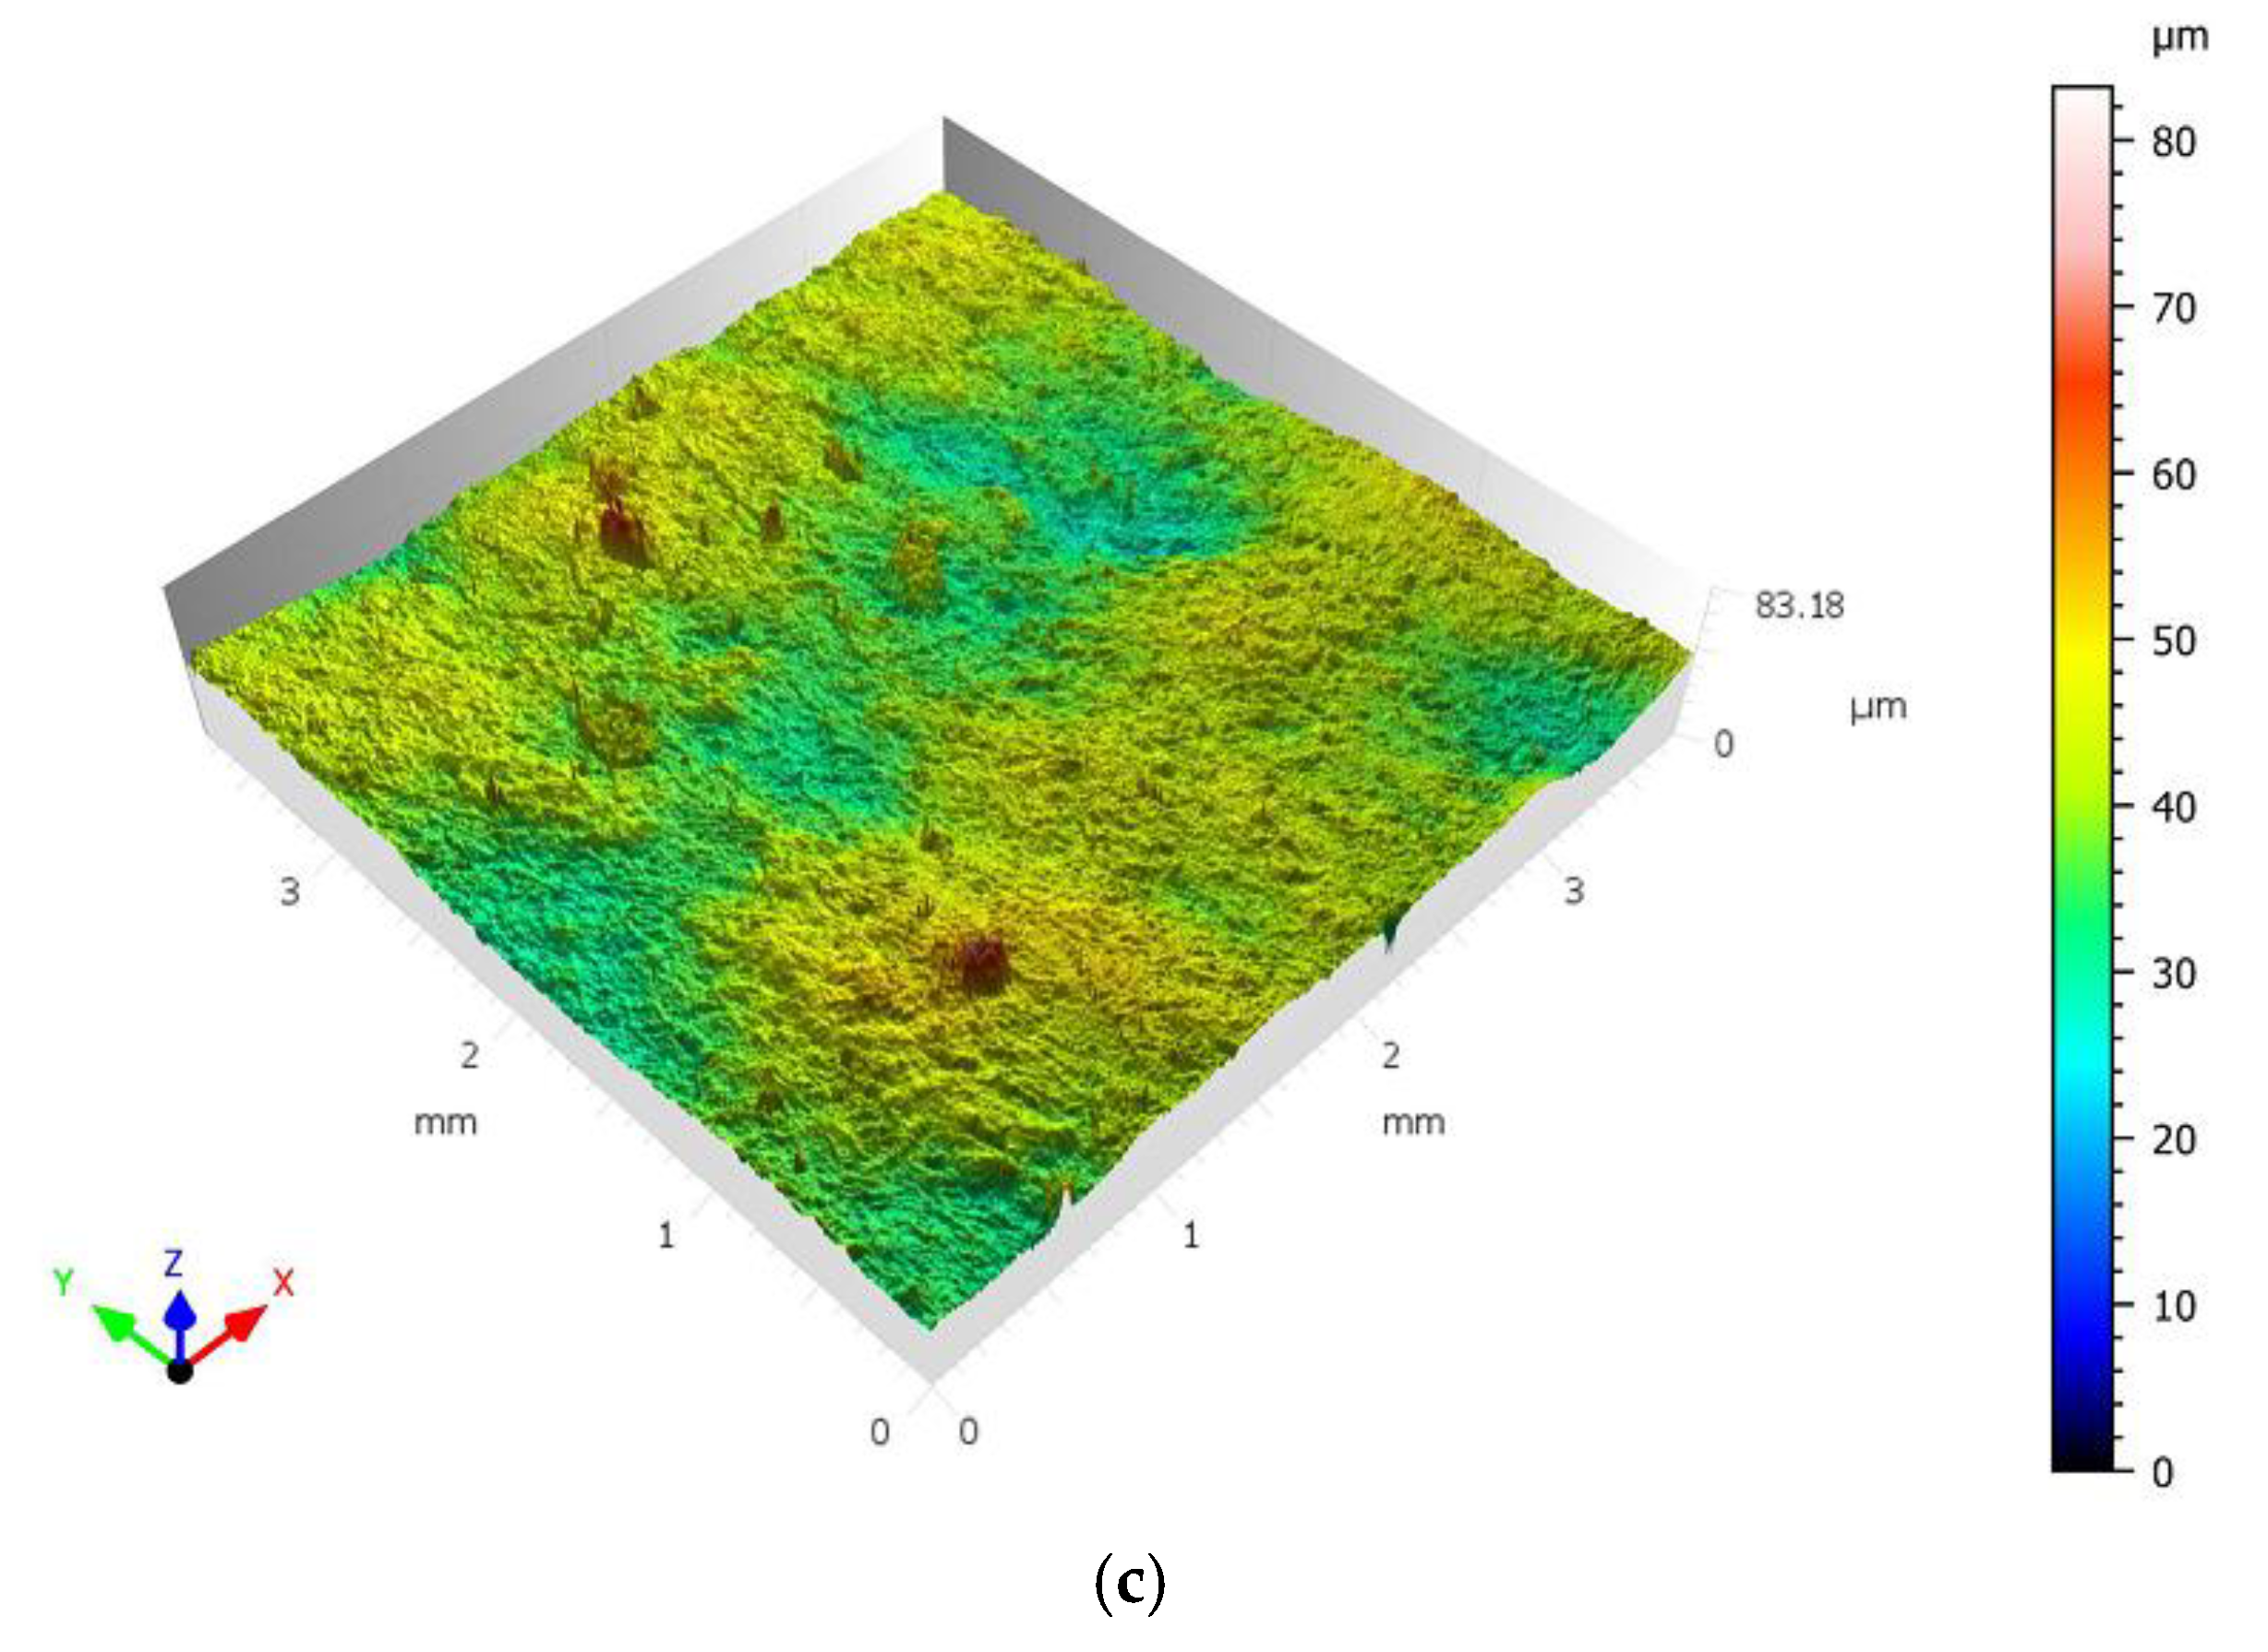
Current studies focus on the horizontal and vertical building orientations considering different LPBF modes [49,50,51,52]. In LPBF, we distinguish the surfaces “horizontal” and “vertical” with respect to the building direction. Figure 11, Figure 12 and Figure 13 shows that three samples formed LPBF after horizontal polishing. Figure 11a shows a flat polished sample, Figure 11b shows a freeform surface of a high-strength metal additive formed in Part B’, and Figure 11c shows a freeform surface of a high-strength metal additive formed in Part C’. We used a continuous laser and a pulsed laser for multi-step polishing, which remarkably reduced the surface roughness. Additionally, the surface morphology was tested with confocal microscopy.
The lateral upper surface hardness value was higher than the original hardness value, indicating that the influence range on the surface roughness after polishing with a double laser beam was 1–2 mm; thus, the longitudinal surface hardness value was smaller. After double-laser-beam polishing metal additive manufacturing, the grain size of the material subject decreased and the lattice arrangement became neater. The surface structure of the MS metal additive steel was strengthened and improved by double-laser-beam polishing. The surface roughness in the transverse direction was obviously higher than the original hardness, indicating that the surface hardness of the laser-polished high-strength maraging steel metal material increased. The influence of the surface roughness in the longitudinal direction was 5 mm, indicating that the mechanical properties of the MS steel polished with a double laser beam had little influence in the longitudinal direction.
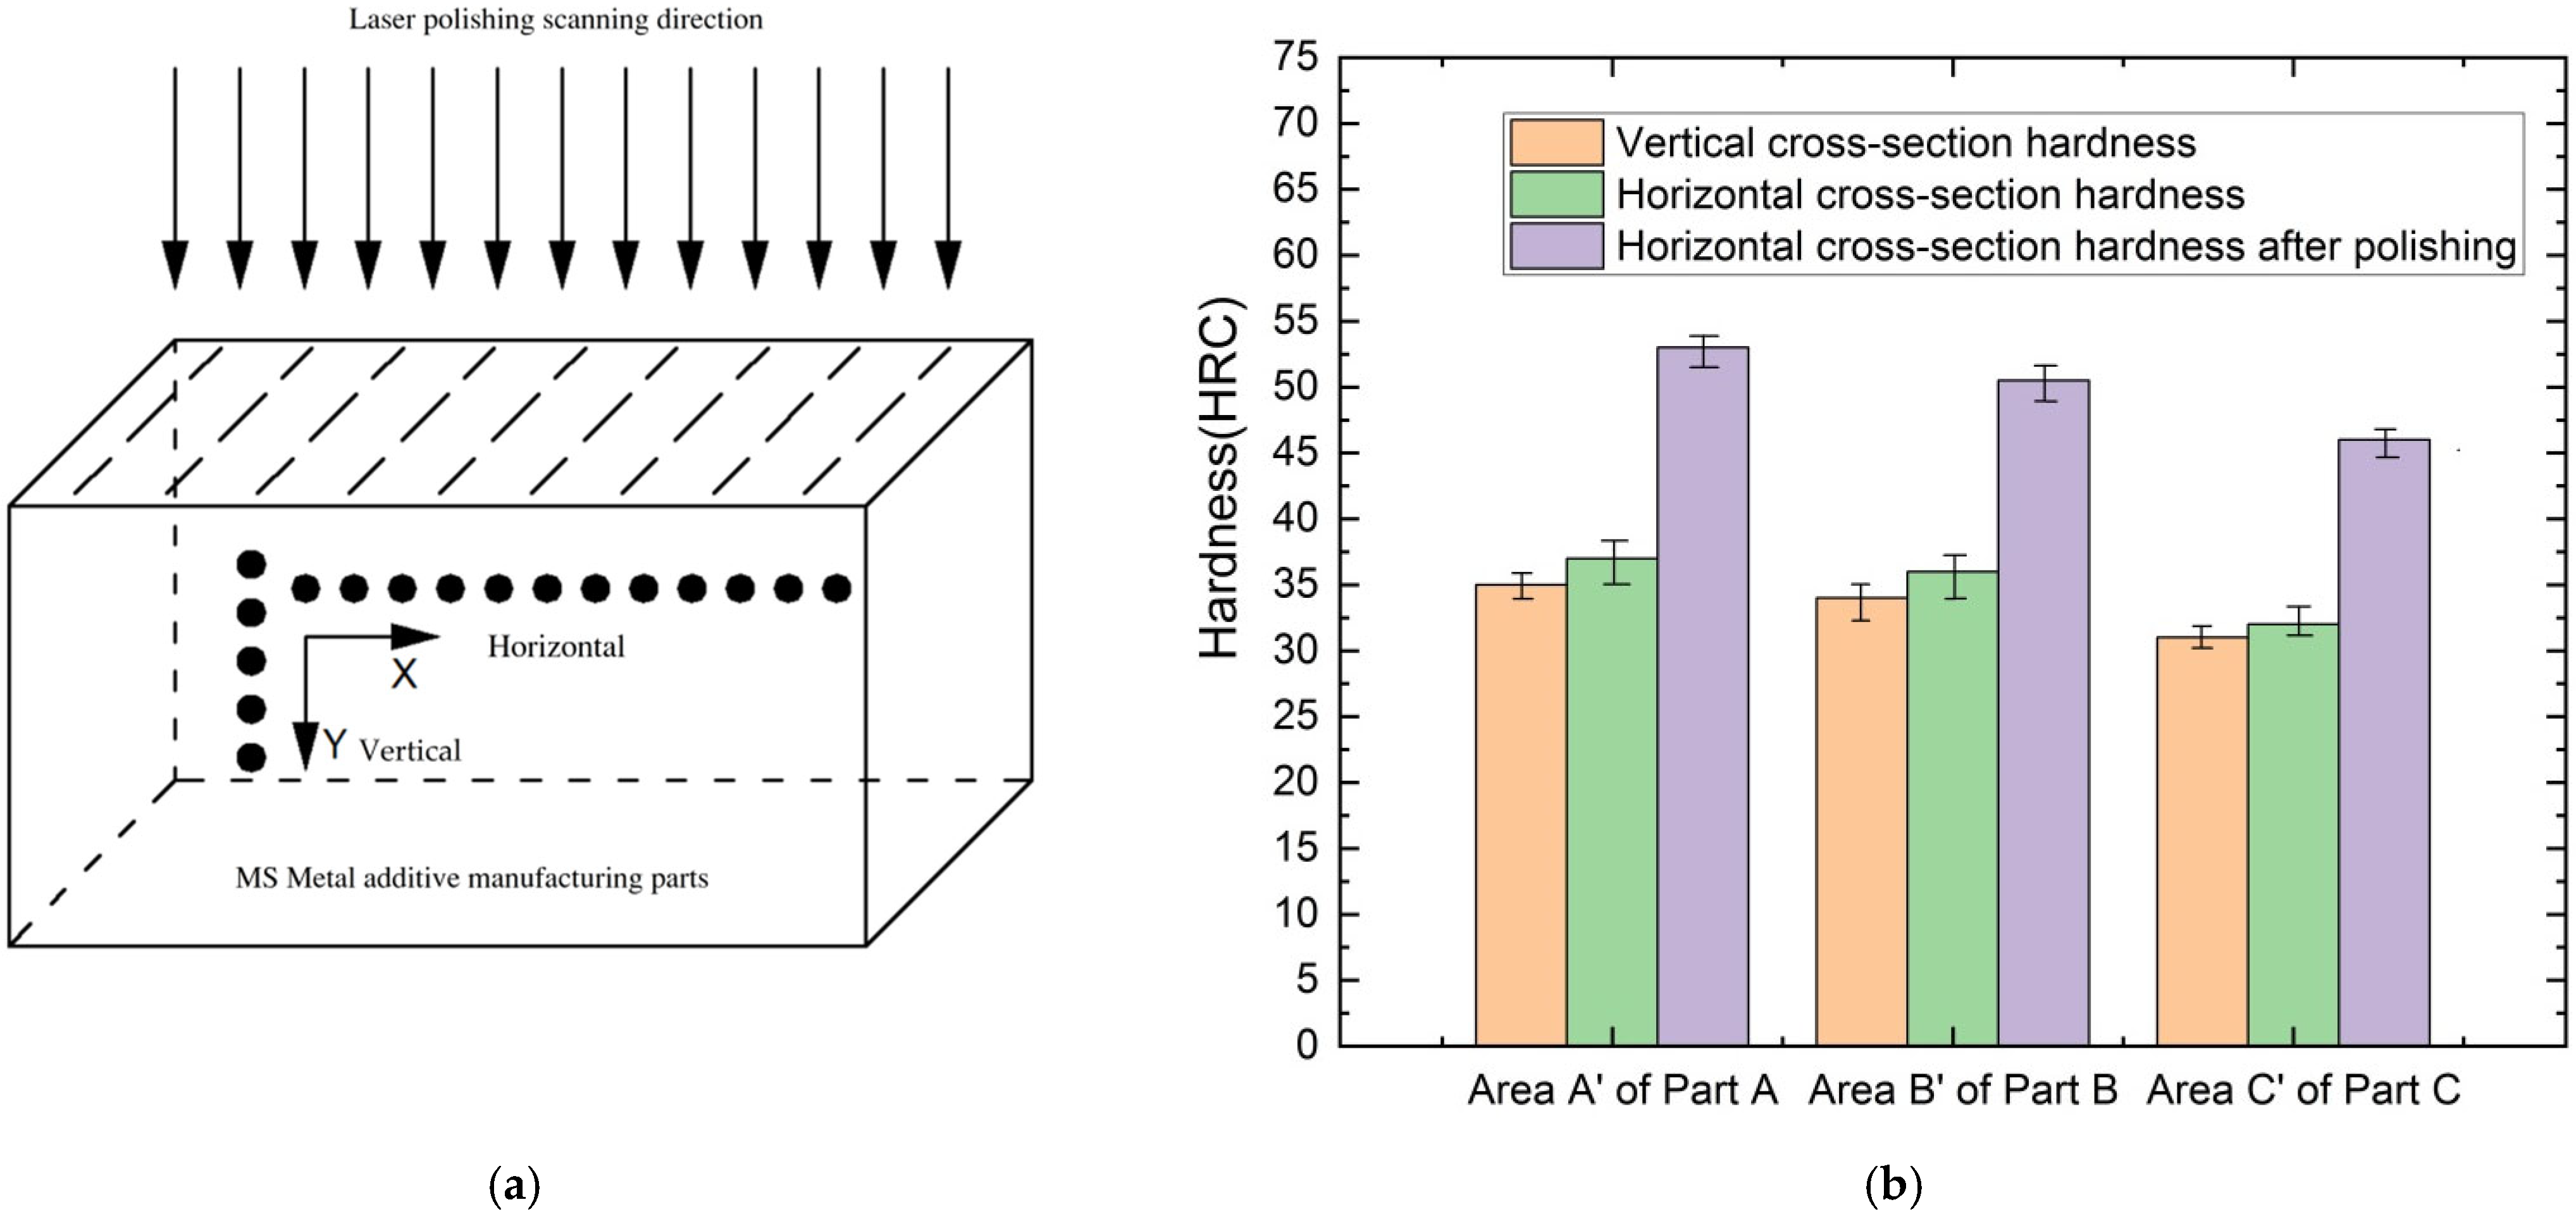
In the laser additive manufacturing process, the surface morphology of the parts is restricted by the process parameters used, creating unique morphology characteristics. The cross-section of the LPBF outer surface is similar to those reported in the literature [53]. The hardness test results and a comparison of laser-polished MS additive parts are shown in Figure 14. Figure 14a shows a diagram of a polishing hardness test and Figure 14b shows the hardness of the as-fabricated and MS products polished by LPBF. The hardness in the horizontal direction was slightly higher than that in the vertical direction, at about 35 HRC. The horizontal cross-section hardness after polishing was much harder than the original surface, whereas the vertical cross-section hardness, with a decreased maximal surface hardness and high residual tensile stresses from 34 HRC up to about 53 HRC, can be introduced with double-laser-beam polishing. Additionally, measurement errors are noted in Figure 14b.
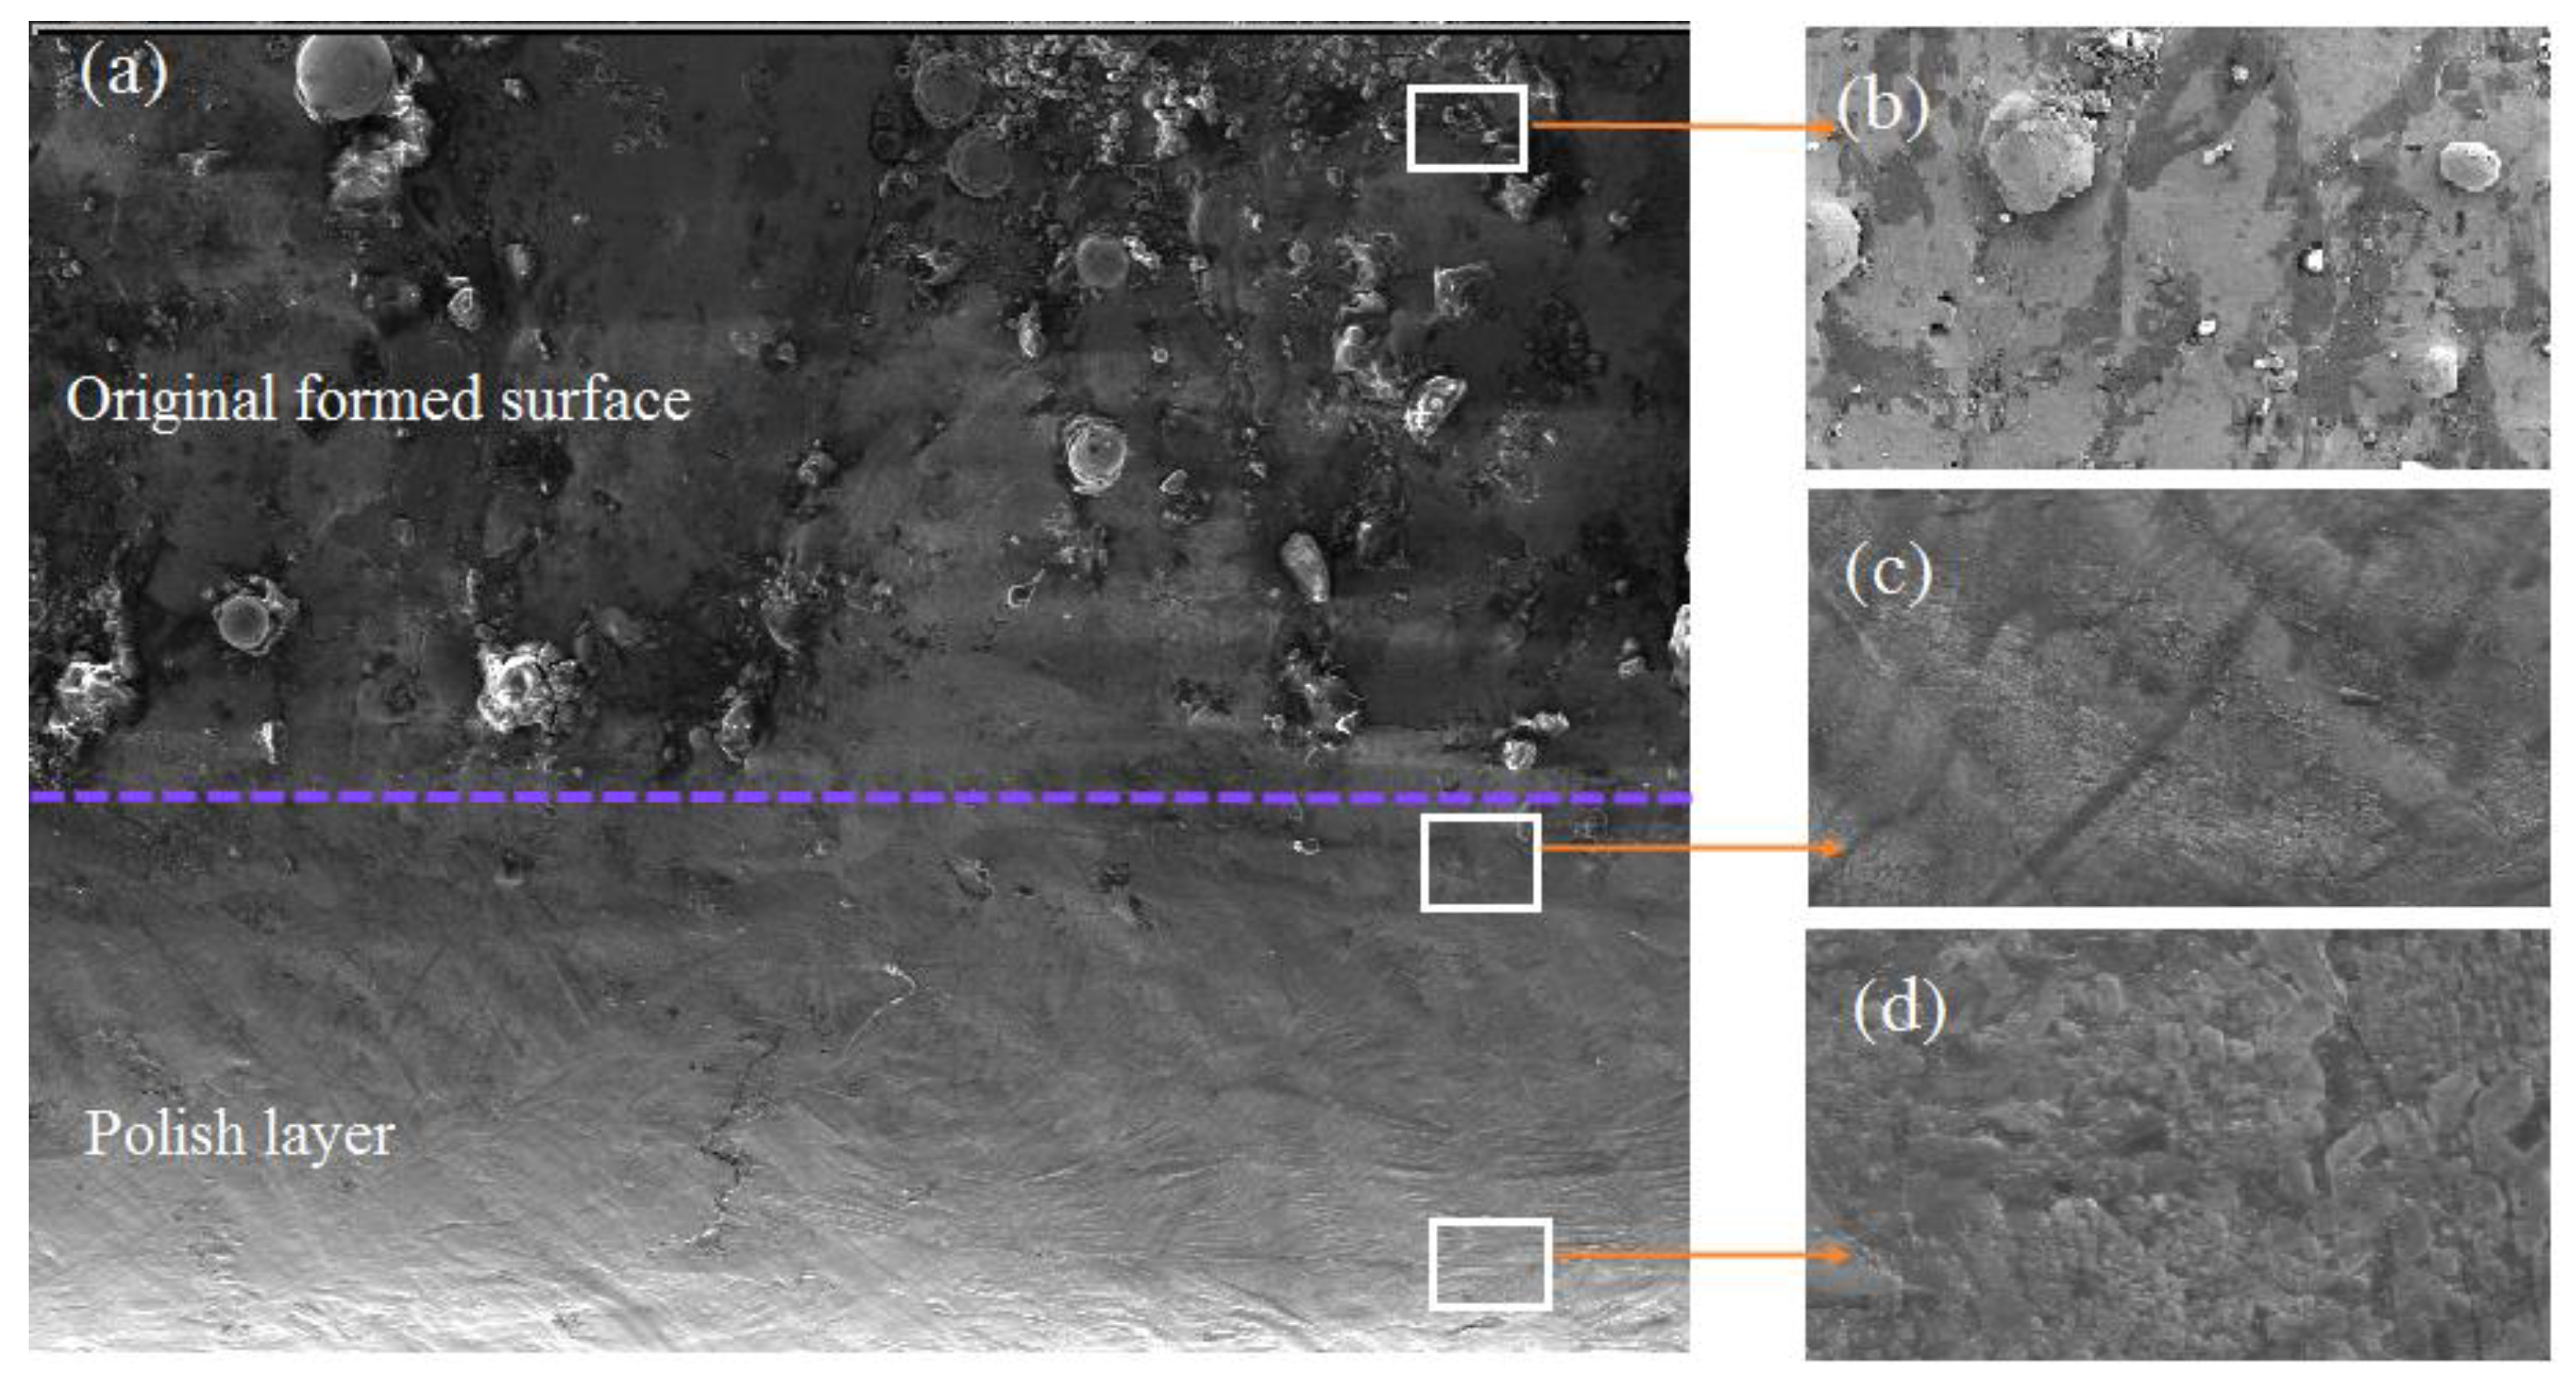
SEM images of the original formed surface and the polished layer are shown in Figure 15. Figure 15a shows the original formed surface and the polished layer. On higher magnification, the original formed surface of LPBF reveals distinctive segregation patterns in Figure 15b,c, which shows the melt zone and the heat-affected zone, the area where the microstructure and properties of the polishing layer change significantly during laser polishing. The austenite grains grow, from martensite to austenite during this peak temperature. In the top region of the polished layer, the grain size further decreases for the high cooling rate, as shown in Figure 15d on higher magnification, which shows the polished layer grain transformation. After the double-laser-beam polishing process, different grain refinement structures and a re-oriented texture are presented. In addition, it also led to a considerable change in microhardness, for the transformation of martensite to austenite, grain size, morphology, and composition.
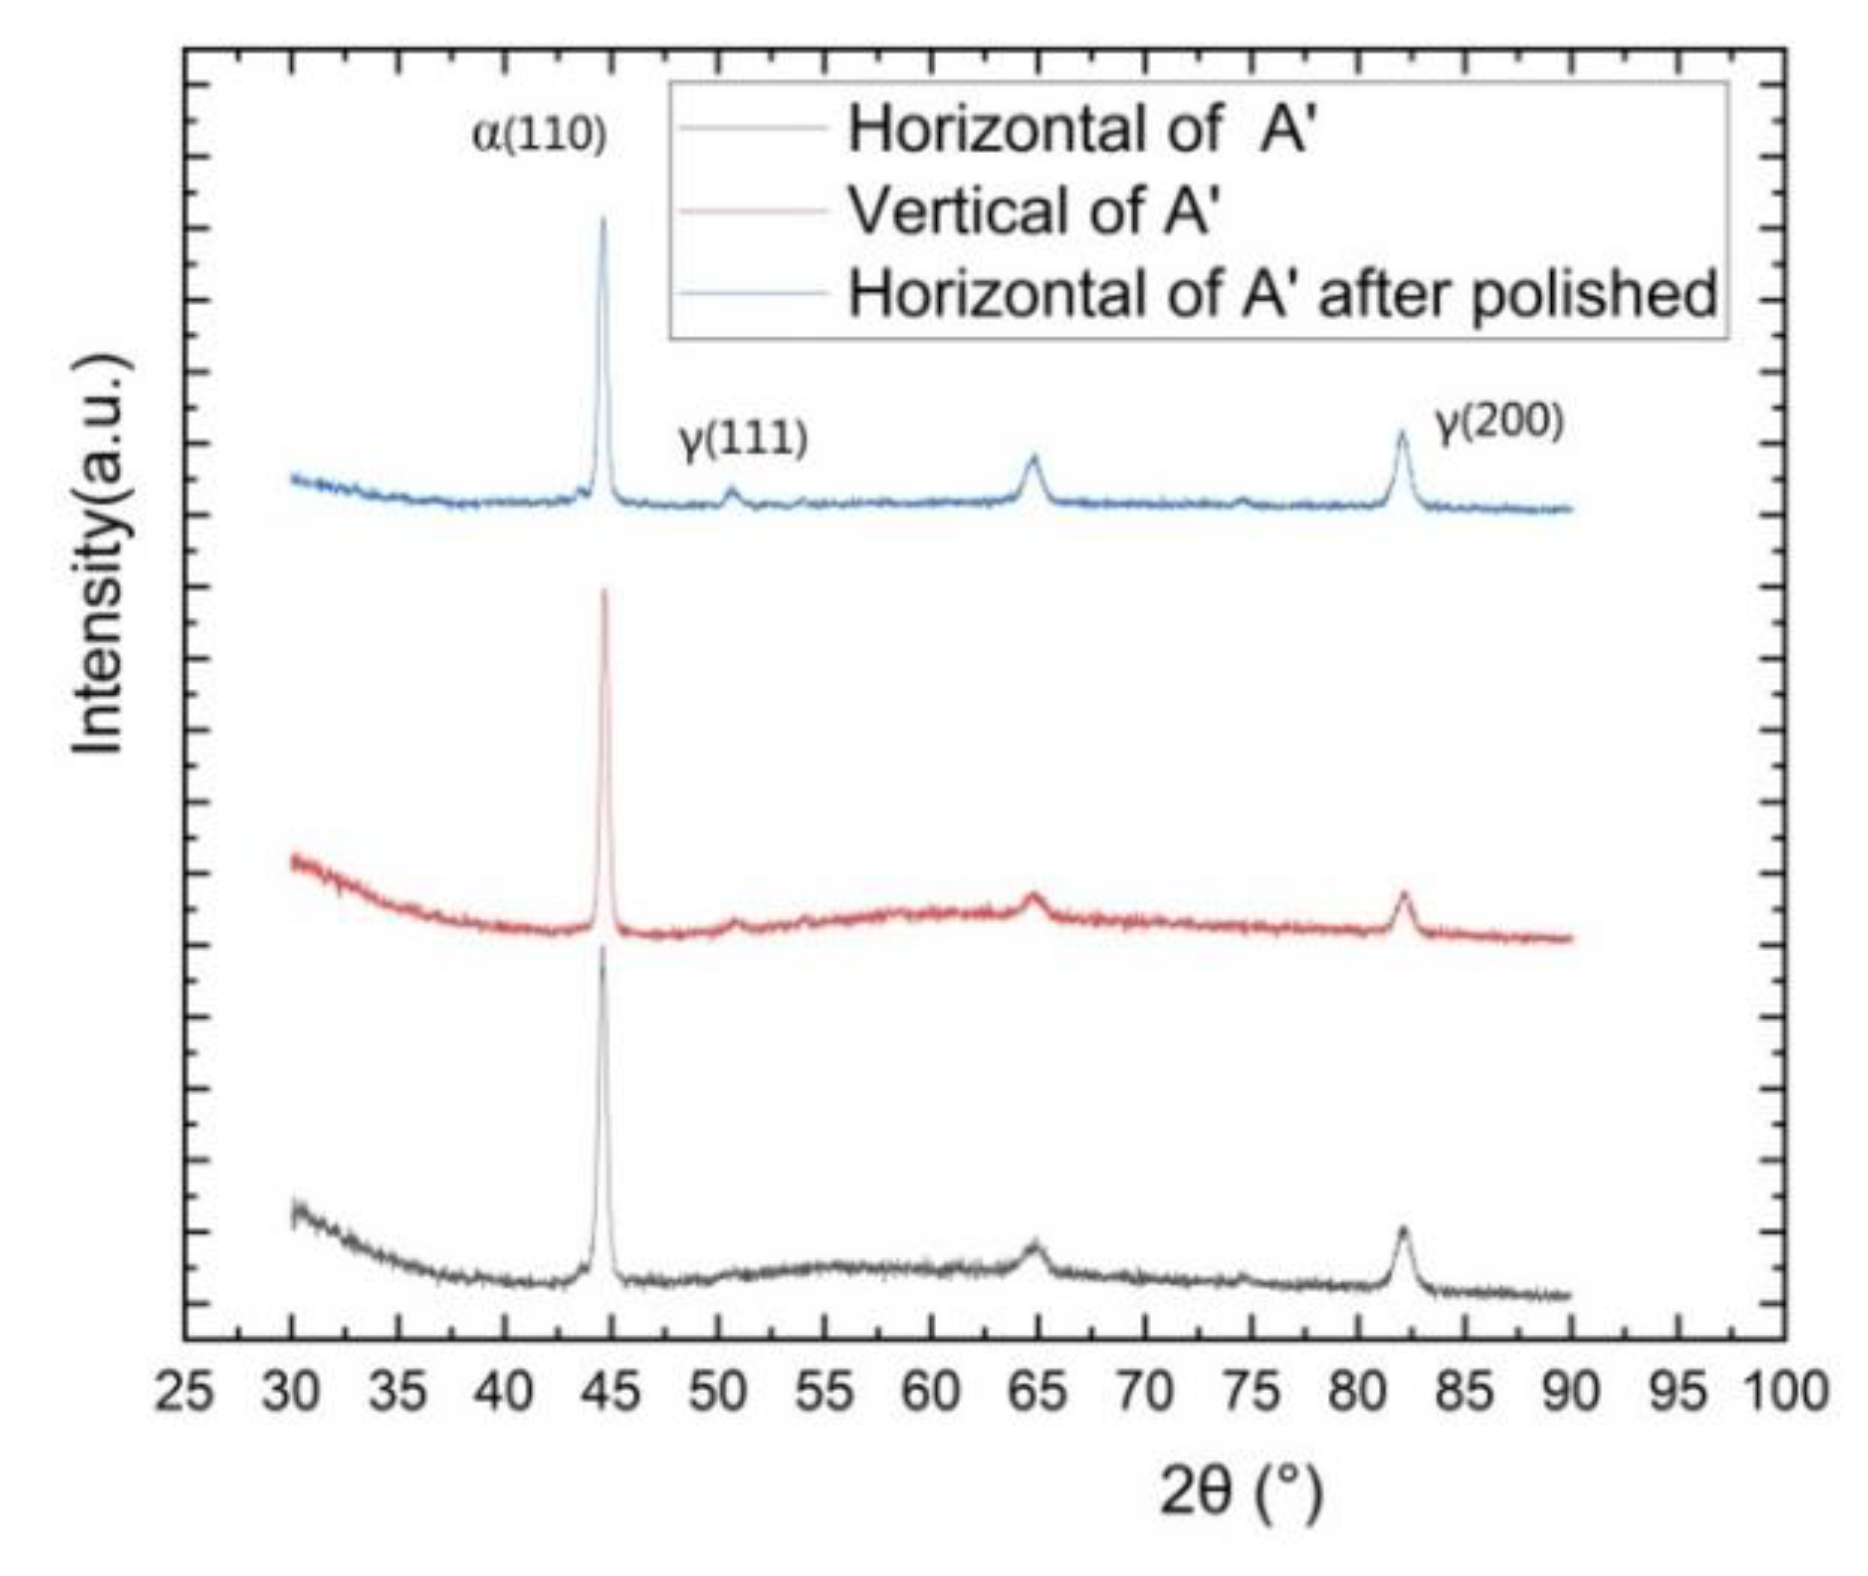
Previous works adopt an effective XRD detection method and have demonstrated the reason for the grain transformation on the polished layer caused by the formation of the martensitic phase after rapid melting and cooling during laser polishing [32,54]. The polished layer of the MS parts was characterized using quantitative XRD analysis with HighScore plus 3.0 software (Xpert Highscore 3.0, Philips Analytical Instruments, Almelo city, Netherlands). Figure 16 shows the grain content of the XRD peak area. The original LPBF MS parts mainly consisted of martensite (α) and a small amount of austenite (γ) phases. Figure 16 shows that the XRD patterns obtained by the diffractometer were characterized by narrow “spikes” that were generally independent of each other. Before polishing, the XRD test result in the horizontal direction of the sample is similar to that in the longitudinal direction. After polishing, the XRD test results of the horizontal direction of the sample showed notable changes. The peak narrowness (γ111 and γ200) relatively increased after polishing, while at the same time, the content of martensite (α110) decreased. In the same substance, this means that the crystallization was stronger. After polishing, the martensite content in the horizontal plane decreased from 97.5% to 90.2%. The X-ray diffraction (XRD) analysis results obtained for the samples before and after polishing are shown in Figure 16. Compared with the initial surface, the peak value of the martensite on the laser-polished surface decreased, but the peak value of the austenite phase increased, indicating that the microstructure of the laser-polished layer changed with the occurrence of grain refinement during the rapid melting process of the workpiece surface, and that the microstructure was different from that of the matrix.

5. Conclusions

In summary, the properties of the maraging steel metal materials before and after LPBF polishing were compared and analyzed. A continuous laser and a pulsed laser were used to polish the surface with double laser beams, which remarkably reduced the surface roughness. LPBF polishing roughness reduction is an important factor affecting the LPBF component performance. The polished layer was characterized by a surface roughness measurement instrument, XRD, SEM, and nano hardness tester. We studied the microstructure and mechanical properties of the surface that had undergone laser surface polishing for the metal additive manufacturing of high-strength maraging steel metal material. Compared with the initial surface, the peak value of martensite on the laser-polished surface decreased, but the peak value of the austenite phase increased, indicating that the microstructure of the laser-polished layers changes with the occurrence of grain refinement during the rapid melting of the workpiece surface, and that the microstructure was different from that of the matrix. After polishing, the martensite content in the horizontal plane decreased, with the differences in both processes influencing the composition, morphology. and content of the martensite and austenite. This study is a part of ongoing research for improving the surface quality of the high-strength maraging steel metal materials.

Author Contributions

Conceptualization, H.X. and W.Z.; methodology, Y.Z. and M.L.; investigation, C.D. and H.X.; writing—original draft preparation, H.X. and Y.C.; writing—review and editing, Y.Z., C.D. and W.Z.; supervision, M.L. and Y.Z. All authors have read and agreed to the published version of the manuscript.

Funding

This work was financially supported by the Science and Technology Project of Guangdong Province (grant no. 2021A0505030013), the Scientific Research Project of General Universities in Guangdong Province (grant nos. 2021KCXTD058, 2022ZDZX3073), the Shenzhen Science and Technology Plan (grant nos.JSGG20191230162001814, JSGG20210420091802007), and the School-Enterprise Collaborative Project of Shenzhen Institute of Information Technology (grant no. SZIIT2022KJ075).

Institutional Review Board Statement

Not applicable.

Informed Consent Statement

Not applicable.

Data Availability Statement

Data underlying the results presented in this paper are available upon request from the corresponding author.

Acknowledgments

We would like to acknowledge the contributions to the theory of metal additive manufacturing and double-laser-beam polishing described in this paper. We acknowledge Lijun Wang and Huayi Gong for their help with the supervision and investigation.

Conflicts of Interest

The authors declare no conflict of interest.

References

  1. Frazier, W.E. Metal additive manufacturing: A review. J. Mater. Eng. Perform. 2014, 23, 1917–1928. [Google Scholar] [CrossRef]
  2. Zhang, Y.; Wu, L.; Guo, X.; Kane, S.; Deng, Y.; Jung, Y.G.; Lee, J.H.; Zhang, J. Additive manufacturing of metallic materials: A review. J. Mater. Eng. Perform. 2018, 27, 1–13. [Google Scholar] [CrossRef] [Green Version]
  3. Herzog, D.; Seyda, V.; Wycisk, E.; Emmelmann, C. Additive manufacturing of metals. Acta Mater. 2016, 117, 371–392. [Google Scholar] [CrossRef]
  4. Blakey-Milner, B.; Gradl, P. Metal additive manufacturing in aerospace: A review. Mater. Des. 2021, 209, 110008. [Google Scholar] [CrossRef]
  5. Li, M.; Du, W. Metal Binder Jetting Additive Manufacturing: A Literature Review. J. Manuf. Sci. Eng. Trans. ASME 2020, 142, 090801. [Google Scholar] [CrossRef]
  6. Liu, S.Y.; Shin, Y.C. Additive manufacturing of Ti6Al4V alloy: A review. Mater. Des. 2019, 164, 107552. [Google Scholar] [CrossRef]
  7. DebRoy, T.; Wei, H.L. Additive manufacturing of metallic components—Process, structure and properties. Prog. Mater. Sci. 2018, 92, 112–224. [Google Scholar] [CrossRef]
  8. Sames, W.J.; List, F.A. The metallurgy and processing science of metal additive manufacturing. Int. Mater. Rev. 2016, 61, 315–360. [Google Scholar] [CrossRef]
  9. Lewandowski, J.J.; Seifi, M. Metal Additive Manufacturing: A Review of Mechanical Properties. Ann. Rev. Mater. Res. 2016, 46, 151–186. [Google Scholar] [CrossRef] [Green Version]
  10. Kok, Y.; Tan, X.P.; Wang, P.; Nai, M.L.S. Anisotropy and heterogeneity of microstructure and mechanical properties in metal additive manufacturing: A critical review. Mater. Des. 2018, 139, 565–586. [Google Scholar] [CrossRef]
  11. Lee, J.; Park, H.J.; Chai, S.; Kim, G.R.; Yong, H.; Bae, S.J.; Kwon, D. Review on Quality Control Methods in Metal Additive Manufacturing. Appl. Sci. 2021, 11, 1966. [Google Scholar] [CrossRef]
  12. Aboulkhair, N.T.; Simonelli, M.; Parry, L.; Ashcroft, I.; Tuck, C. 3D printing of Aluminium alloys: Additive Manufacturing of Aluminium alloys using selective laser melting. Prog. Mater. Sci. 2019, 106, 100578. [Google Scholar] [CrossRef]
  13. Garcia-Blanco, M.B.; Diaz-Fuentes, M. Comparative study of different surface treatments applied to Ti6Al4V parts produced by Selective Laser Melting. Trans. Inst. Metal Finish. 2021, 99, 274–280. [Google Scholar] [CrossRef]
  14. Demir, A.G.; Previtali, B. Additive manufacturing of cardiovascular CoCr stents by selective laser melting. Mater. Des. 2017, 119, 338–350. [Google Scholar] [CrossRef] [Green Version]
  15. Sarkar, S.; Kumar, C.S.; Nath, A.K. Effects of different surface modifications on the fatigue life of selective laser melted 15–5 PH stainless steel. Mater. Sci. Eng. A 2019, 762, 138109. [Google Scholar] [CrossRef]
  16. Guo, J.; Song, C.P.; Fu, Y.Z.; Au, K.H. Internal Surface Quality Enhancement of Selective Laser Melted Inconel 718 by Abrasive Flow Machining. J. Manuf. Sci. E 2020, 142, 101003. [Google Scholar] [CrossRef]
  17. Bhaduri, D.; Penchev, P.; Batal, A.; Dimov, S.; Soo, S.L.; Sten, S.; Harrysson, U.; Zhang, Z.; Dong, H. Laser polishing of 3D printed mesoscale components. Appl. Surf. Sci. 2017, 405, 29–46. [Google Scholar] [CrossRef]
  18. Zhang, D.Q. Investigation of Laser Polishing of Four Selective Laser Melting Alloy Samples. Appl. Sci. 2020, 10, 760. [Google Scholar] [CrossRef] [Green Version]
  19. Strano, G.; Hao, L.; Everson, R.M.; Evans, K.E. Surface roughness analysis, modelling and prediction in selective laser melting. J. Mater. Process. Technol. 2013, 213, 589–597. [Google Scholar] [CrossRef]
  20. Metelkova, J.; Vanmunster, L.; Haitjema, H.; Van Hooreweder, B. Texture of inclined up-facing surfaces in laser powder bed fusion of metals. Addit. Manuf. 2021, 42, 101970. [Google Scholar] [CrossRef]
  21. Mooney, B.; Kourousis, K.I. A Review of Factors Affecting the Mechanical Properties of Maraging Steel 300 Fabricated via Laser Powder Bed Fusion. Metals 2020, 10, 1273. [Google Scholar] [CrossRef]
  22. Wüst, P.; Edelmann, A.; Hellmann, R. Areal Surface Roughness Optimization of Maraging Steel Parts Produced by Hybrid Additive Manufacturing. Materials 2020, 13, 418. [Google Scholar] [CrossRef] [PubMed] [Green Version]
  23. Huang, S.; Narayan, R.L.; Tan, J.H.K.; Sing, S.L.; Yeong, W.Y. Resolving the porosity-unmelted inclusion dilemma during in-situ alloying of Ti34Nb via Laser Powder Bed Fusion. Acta Mater. 2020, 204, 116522. [Google Scholar] [CrossRef]
  24. Wen, Y.; Zhang, B.; Narayan, R.L.; Wang, P.; Song, X.; Zhao, H.; Ramamurty, U.; Qu, X. Laser powder bed fusion of compositionally graded CoCrMo-Inconel 718. Addit. Manuf. 2021, 40, 101926. [Google Scholar] [CrossRef]
  25. Mower, T.M.; Long, M.J. Mechanical behavior of additive manufactured, powder-bed laser-fused materials. Mater. Sci. Eng. A 2016, 651, 198–213. [Google Scholar] [CrossRef]
  26. Rosa, B.; Mognol, P.; Hascoet, J.Y. Laser polishing of additive laser manufacturing surfaces. J. Laser Appl. 2015, 27, S29102. [Google Scholar] [CrossRef] [Green Version]
  27. Marimuthu, S.; Triantaphyllou, A. Laser polishing of selective laser melted components. Int. J. Mach. Tools Manuf. 2015, 95, 97–104. [Google Scholar] [CrossRef] [Green Version]
  28. Ma, C.P.; Guan, Y.C.; Zhou, W. Laser polishing of additive manufactured Ti alloys. Opt. Lasers Eng. 2017, 93, 171–177. [Google Scholar] [CrossRef]
  29. Yung, K.C.; Xiao, T.Y.; Choy, H.S.; Wang, W.J.; Cai, Z.X. Laser polishing of additive manufactured CoCr alloy components with complex surface geometry. J. Mater. Process. Tech. 2018, 262, 53–64. [Google Scholar] [CrossRef]
  30. Li, Y.H.; Wang, B.; Ma, C.P. Material Characterization, Thermal Analysis and Mechanical Performance of a Laser-Polished Ti Alloy Prepared by Selective Laser Melting. Metals 2019, 9, 112. [Google Scholar] [CrossRef]
  31. Bhaduri, D.; Bhaduri, D. Pulsed laser polishing of selective laser melted aluminium alloy parts. Appl. Surf. Sci. 2021, 558, 149887. [Google Scholar] [CrossRef]
  32. Parvez, M.M.; Patel, S.; Isanaka, S.P.; Liou, F. A Novel Laser-Aided Machining and Polishing Process for Additive Manufacturing Materials with Multiple Endmill Emulating Scan Patterns. Appl. Sci. Basel 2021, 11, 9428. [Google Scholar] [CrossRef]
  33. Rosa, B.; Mognol, P.; Hascoet, J.Y. Modelling and optimization of laser polishing of additive laser manufacturing surfaces. Rapid Prototyp. J. 2016, 22, 956–964. [Google Scholar] [CrossRef]
  34. Rosa, B.; Hascoët, J.Y.; Mognol, P. Laser polishing of additive laser manufacturing surfaces: Methodology for parameter setting determination. Int. J. Manuf. Res. 2020, 15, 181. [Google Scholar] [CrossRef]
  35. Yao, Y.; Zhou, R.; Zhang, C.; Mei, T.; Wu, M. Surface polishing technology for additive manufacturing of complex metal components. Acta Aeronaut. Astronaut. Sin. 2022, 43, 525202. [Google Scholar]
  36. Temmler, A.; Liu, D.; Preußner, J.; Oeser, S.; Luo, J.; Poprawe, R.; Schleifenbaum, J.H. Influence of laser polishing on surface roughness and microstructural properties of the remelted surface boundary layer of tool steel H11—ScienceDirect. Mater. Des. 2020, 192, 108689. [Google Scholar] [CrossRef]
  37. Braun, K.; Willenborg, E.; Schleifenbaum, J.H. Laser polishing as a new post process for 3D-printed polymer parts. Procedia CIRP 2020, 94, 134–138. [Google Scholar] [CrossRef]
  38. Metelkova, J.; Vanmunster, L.; Haitjema, H.; Ordnung, D.; Kruth, J.P.; Van Hooreweder, B. Hybrid dual laser processing for improved quality of inclined up-facing surfaces in laser powder bed fusion of metals. J. Mater. Process. Technol. 2021, 298, 117263. [Google Scholar] [CrossRef]
  39. Kumar, A.; Jayabalan, B.; Singh, C.; Jain, J.; Mukherjee, S.; Biswas, K.; Singh, S.S. Processing and properties of yttria and lanthana dispersed ODS duplex stainless steels. Mater. Sci. Eng. A 2022, 837, 142746. [Google Scholar] [CrossRef]
  40. Kumar, P.; Zhu, Z.; Nai, S.M.; Narayan, R.L.; Ramamurty, U. Fracture toughness of 304L austenitic stainless steel produced by laser powder bed fusion. Scr. Mater. 2021, 202, 114002. [Google Scholar] [CrossRef]
  41. Xiao, H.; Zhou, Y.; Liu, M.; Xu, X. Laser polishing of tool steel using a continuous-wave laser assisted by a steady magnetic field. Aip Adv. 2020, 10, 5116686. [Google Scholar] [CrossRef]
  42. Sarafan, S.; Wanjara, P.; Gholipour, J.; Bernier, F.; Osman, M.; Sikan, F.; Molavi-Zarandi, M.; Soost, J.; Brochu, M. Evaluation of Maraging Steel Produced Using Hybrid Additive/Subtractive Manufacturing. J. Manuf. Mater. Process. 2021, 5, 107. [Google Scholar] [CrossRef]
  43. Zhou, Y.Q.; Zhao, Z.Y.; Zhang, W.; Xiao, H.B.; Xu, X.M. Experiment Study of Rapid Laser Polishing of Freeform Steel Surface by Dual-Beam. Coating 2019, 9, 9050324. [Google Scholar] [CrossRef] [Green Version]
  44. Bai, Y.; Yang, Y.; Wang, D.; Zhang, M. Influence mechanism of parameters process and mechanical properties evolution mechanism of maraging steel 300 by selective laser melting. Mater. Sci. Eng. A 2017, 703, 116–123. [Google Scholar] [CrossRef]
  45. Chaolin, T.; Kesong, Z.; Wenyou, M.; Panpan, Z.; Min, L.; Tongchun, K. Microstructural evolution, nanoprecipitation behavior and mechanical properties of selective laser melted high-performance grade 300 maraging steel. Mater. Des. 2017, 134, 23–34. [Google Scholar]
  46. Chaolin, T.; Kesong, Z.; Min, K.; Wenyou, M.; Tongchun, K. Microstructural characterization and properties of selective laser melted maraging steel with different build directions. Sci. Technol. Adv. Mater. 2018, 19, 746–758. [Google Scholar]
  47. Cui, M.; Lu, L.; Zhang, Z.; Guan, Y. A Laser Scanner-Stage Synchronized System Supporting the Large-Area Precision Polishing of Additive-Manufactured Metallic Surfaces. Engineering 2021, 7, 1732–1740. [Google Scholar] [CrossRef]
  48. Yung, K.C.; Zhang, S.S.; Duan, L.; Choy, H.S.; Cai, Z.X. Laser polishing of additive manufactured tool steel components using pulsed or continuous-wave lasers. Int. J. Adv. Manuf. Technol. 2019, 105, 425–440. [Google Scholar] [CrossRef]
  49. Tridello, A.; Fiocchi, J.; Biffi, C.A.; Rossetto, M.; Tuissi, A.; Paolino, D.S. Size-effects affecting the fatigue response up to 109 cycles (VHCF) of SLM AlSi10Mg specimens produced in horizontal and vertical directions. Int. J. Fatigue 2022, 160, 106825. [Google Scholar] [CrossRef]
  50. Cai, W.; Song, Q.; Ji, H.; Gupta, M.K. Multi-Perspective Analysis of Building Orientation Effects on Microstructure, Mechanical and Surface Properties of SLM Ti6Al4V with Specific Geometry. Materials 2021, 14, 4392. [Google Scholar] [CrossRef]
  51. Wu, S.Q.; Lu, Y.J.; Gan, Y.L.; Huang, T.T.; Zhao, C.Q.; Lin, J.J.; Guo, S.; Lin, J.X. Microstructural evolution and microhardness of a selective-laser-melted Ti-6Al-4V alloy after post heat treatments. J. Alloy. Compd. 2016, 672, 643–652. [Google Scholar] [CrossRef]
  52. Kasperovich, G.; Becker, R.; Artzt, K.; Barriobero-Vila, P.; Requena, G.; Haubrich, J. The effect of build direction and geometric optimization in laser powder bed fusion of Inconel 718 structures with internal channels. Mater. Des. 2021, 207, 109858. [Google Scholar] [CrossRef]
  53. Musekamp, J.; Hoche, H. Specific Characteristics of Materials Produced by Additive Manufacturing as Compared to Those Produced by Established Manufacturing Methods taking the Example of Alloy 718. Prakt. Metallogr. 2020, 57, 228–249. [Google Scholar] [CrossRef]
  54. Zhihao, F.; Libin, L.; Longfei, C.; Yingchun, G. Laser polishing of additive manufactured superalloy. Procedia CIRP 2018, 71, 150–154. [Google Scholar] [CrossRef]
Figure 1. Metal additive manufacturing of high-strength metal material based on selective melting.
Applsci 12 10340 g001
Figure 2. Method of dual-beam laser polishing metal additive manufacturing parts.
Applsci 12 10340 g002
Figure 3. (a) Photograph of the EOS M290 LPBF system and (b) flow diagram showing the LPBF processes.
Applsci 12 10340 g003
Figure 4. SEM morphology of EOS maraging steel MS1: (a) 100×, (b) 1000×.
Applsci 12 10340 g004
Figure 5. Dual-beam laser polishing system: (a) schematic diagram of the EOS M290 LPBF system, (b) photograph of dual-beam laser polishing system.
Applsci 12 10340 g005
Figure 6. Three samples of high-intensity MS laser additive manufacturing. (a) High-strength steel additive manufacturing plane in Part A, (b) high-strength steel additive manufacturing small amplitude curved in Part B, and (c) three-dimensional sample with large curvature in Part C.
Applsci 12 10340 g006
Figure 7. SEM images and 3D profiles of Part A’: (a,b) horizontal plane; (c,d) vertical surface.
Applsci 12 10340 g007
Figure 8. SEM images and 3D profiles of Part B’: (a,b) horizontal plane; (c,d) vertical surface.
Applsci 12 10340 g008aApplsci 12 10340 g008b
Figure 9. SEM images and 3D profiles of Part C’: (a,b) horizontal plane; (c,d) vertical surface.
Applsci 12 10340 g009
Figure 10. Polished roughness related to initial roughness.
Applsci 12 10340 g010
Figure 11. Polished specimen A’ and surface morphology of area A’. (a) SEM images of Part A’; (b) Polished specimen A’; (c) 3D profiles of A’.
Applsci 12 10340 g011
Figure 12. Polished specimen B’ and surface morphology of area B’. (a) SEM images of Part B’; (b) Polished specimen B’; (c) 3D profiles of B’.
Applsci 12 10340 g012aApplsci 12 10340 g012b
Figure 13. Polished specimen C’ and surface morphology of area C’. (a) SEM images of Part C’; (b) Polished specimen C’; (c) 3D profiles of C’.
Applsci 12 10340 g013
Figure 14. Hardness test and comparison of laser-polished MS additive parts. (a) diagram of polishing hardness test; (b) hardness of the as-fabricated and polished MS parts.
Applsci 12 10340 g014
Figure 15. SEM images of the original formed surface and the polished layer. (a) Total of the original formed surface and the polished layer, (b) original formed surface, (c) melt zone and heat-affected zone, and (d) polished layer crystal.
Applsci 12 10340 g015
Figure 16. XRD analysis of the as-fabricated and polished MS specimens.
Applsci 12 10340 g016
Table 1. Parameters of the EOS M290 metal additive manufacturing system.
Parameters of the CategoryNumerical ValueParameters of the CategoryNumerical Value
Maximum molding size250 mm × 250 mm × 325 mmOptical scanning systemF-theta
Type of laserYb-fiberScanning speedHighest 7.0 m/s
Laser power400 WPowerMaximum 8.5 kW
3D printing speed5–20 cm3/hThickness20–100 μm
Laser spot diameter100–500 μmOverall dimensions2500 × 1300 × 2190 mm
Scanning systemSCANLAB galvanometer scanning systemSpread direction of powderHorizontal, one-way powder
XY-axes laser accuracy≤±6 μmZ-axis powder accuracy≤±10 μm
Table 2. Chemical composition and weight (wt.%) of EOS maraging steel MS1 [42].
FeNiCoMoTiCAlTi
67.55217.599.24.860.640.050.0790.64
Table 3. Parameters of the dual-beam laser polishing.
Set-Up Laser ParametersCW LaserPulsed Laser
Power600 W80 W
Wavelength1080 nm1064 nm
Pulse durationN/A1.3 µs
Spot diameter0.47 mm0.32 mm
Scanning speed800 mm/s2000 mm/s
Step-over0.1 mm0.1 mm
Scanning routezigzagZigzag-square wave
Table 4. MS1 laser additive process parameters and metal laser additive process parameters.
Laser Power (W)Scanning Speed (mm/s)Scanning Interval (mm)Powder Thickness (μm)Energy Density (J/mm3)
3007500.125569.4
Table 5. Optimized parameters of dual-beam laser polishing.
Factor NameOptimized Value or Feature
Roughness of initial state (nm)619863656888692271287920
Scanning speed (mm/s)1000900850800750650
CW power200 W, 400 W, 600 W
Pulsed laser (PW)60 W
Top-hat beam profileBetween medium and ideal
Polishing parametersWavelength: 1080 nm; step-over: 0.1 mm
Publisher’s Note: MDPI stays neutral with regard to jurisdictional claims in published maps and institutional affiliations.