Article

Cold Forging Effect on the Microstructure of Motorbike Shock Absorbers Fabricated by Tube Forming in a Closed Die

School of Mechanical Engineering, Hanoi University of Science and Technology, No.1 Dai Co Viet Rd., Hanoi 100000, Vietnam
*
Author to whom correspondence should be addressed.
Appl. Sci. 2021, 11(5), 2142; https://doi.org/10.3390/app11052142
Submission received: 30 January 2021 / Revised: 23 February 2021 / Accepted: 24 February 2021 / Published: 28 February 2021
(This article belongs to the Section Mechanical Engineering)

Abstract

:
Motorbike shock absorbers made with a closed die employ a tube-forming process that is more sensitive than that of a solid billet, because the tube is usually too thin-walled to conserve material. During tube forming, defects such as folding and cracking occur due to unstable tube forming and abnormal material flow. It is therefore essential to understand the relationship between the appearance of defects and the number of forming steps to optimize technological parameters. Based on both finite element method (FEM) simulations and microstructural observations, we demonstrate the important role of the number and methodology of the forming steps on the material flow, defects, and metal fiber anisotropy of motorbike shock absorbers formed from a thin-walled tube. We find limits of the thickness and height ratios of the tube that must be held in order to avoid defects. Our study provides an important guide to workpiece and processing design that can improve the forming quality of products using tube forming.

1. Introduction

Tube forming in a closed die is a shaping method aimed at limiting highly unstable tube forming that produces folding defects in workpieces. This method of forming from a tubular workpiece has many advantages such as conservation of material, minimization of manufacturing labor, and, especially, the creation of metal fibers in parts that promote the mechanical properties of the product [1]. However, this method faces several challenges; while the level of deformation of the parts is not large, managing tube instability in the forming process is much more difficult than deforming with a normal workpiece. Instability in the forming process causes internal defects such as concave, groove, and fold defects. Several studies on tube deformation, which mainly report on hot deformation using numerical simulation methods, have been presented [2,3,4]. The forming devices are chiefly specialized horizontal machines with a die-integrated induction heating system on the machine [5]. Other studies on tube forming techniques such as gas-forming have been presented by Anaraki et al. [6,7]. The authors carried out an experimental and numerical investigation on the influence of pulsating pressure on hot tube gas forming heating by an oscillating heating mechanism [6]. The influences of the internal pressure and axial feeding on the expansion and wall-thickness distribution during hot tube gas forming were also investigated. The authors proposed that this method is effective for forming aluminum alloy tubes, and that the axial feeding is a vital parameter to prevent reductions in wall thickness [7].
Numerical simulations have been widely applied to technical problem-solving, as they can reduce the number of experimental trials, thereby reducing time and cost in the product development cycle. In 2012, Reddy et al. presented a review on finite element simulations in metal forming. The authors showed the advantages of simulations in comparison with practical tests [8]. For example, the concept of a forming limit diagram was proposed by Wang et al. for the cold upsetting–extruding process of a tube flange based on finite element method (FEM) simulations [9]. In an analysis and numerical simulation of the upsetting process of a metal pipe, by Su et al., they authors suggested that there are similarities between experiment and simulation results [10]. Numerical simulations have also been used to predict defects in metal-forming processes [4,11,12]. From there, it is possible to adjust the shape parameters and friction conditions, to avoid defects during forming [4].
In 2019, Gronostajski et al. presented current trends in both experimental and numerical studies of metal forming for several common products in the field [13]. Moreover, Dixit presented a review of modeling in metal forming where the author proposed that the finite element method is the most preferred, after comparison with other modeling techniques, such as the slab and slip-line field methods [14]. In 2007, Strano proposed a finite element analysis of the uncertainty in sheet- and tube-metal-forming processes, to estimate the variance of the material’s properties that addresses the difficulties during the design phase [15]. Tisza presented the new development in both applied materials and innovative forming processes, concerning the automotive industry [16]. In addition, an elastomer material used for tube forming was also investigated through finite element analyses and experiments to find feasible parameters for the forming process [17,18]. Alavizadeh et al. presented an experimental and numerical investigation of metal tube forming with a new reconfigurable hydroforming die. The authors stated that the forming process was valuable to the small batch production of tubes due to the low cost of this new die. Moreover, the effects of pin diameter and polyurethane layer thickness on the characteristics of products were also demonstrated through numerical simulations [19]. A plasto-dynamic analysis and numerical model of a high-strain-rate metal-tube-forming process was developed by Ghadami et al. The authors presented some parameters and conditions for achieving a high-performance forming process [20]. Liu et al. presented a theoretical model of the shrinking of metal tubes with various parameters, such as friction, dynamic effect, unsteady deformation stages, and conical angle, and validated these results with published experimental data [21]. While these works focused mainly on the shaping mechanism, the flow and fiber structure were not studied.
We present, here, the first systematic study of the metal flow and fiber formation during the deformation of tubes in a cold state. In this work, a numerical simulation is combined with experimental observations, to analyze the metal flow and identify the causes of defects in the parts. The experimental observations are used to identify the anisotropy of the metal fibers developed during the forming process, at specific deformed regions of the tube. We demonstrate that the two-step process is more advantageous, compared to the one-step process, for forming the tubes. This study would provide a crucial guide to the workpiece and processing design, allowing for improvement of the forming quality of products, using tube forming.

2. Materials and Methods

Motorbike shock absorbers are mainly manufactured by two methods, including cutting or forming by a pressure machining process. However, with current technology, the designed part can be fabricated by stamping heads in closed dies, to conserve material. Figure 1 shows a technical drawing of the motorbike shock absorber.
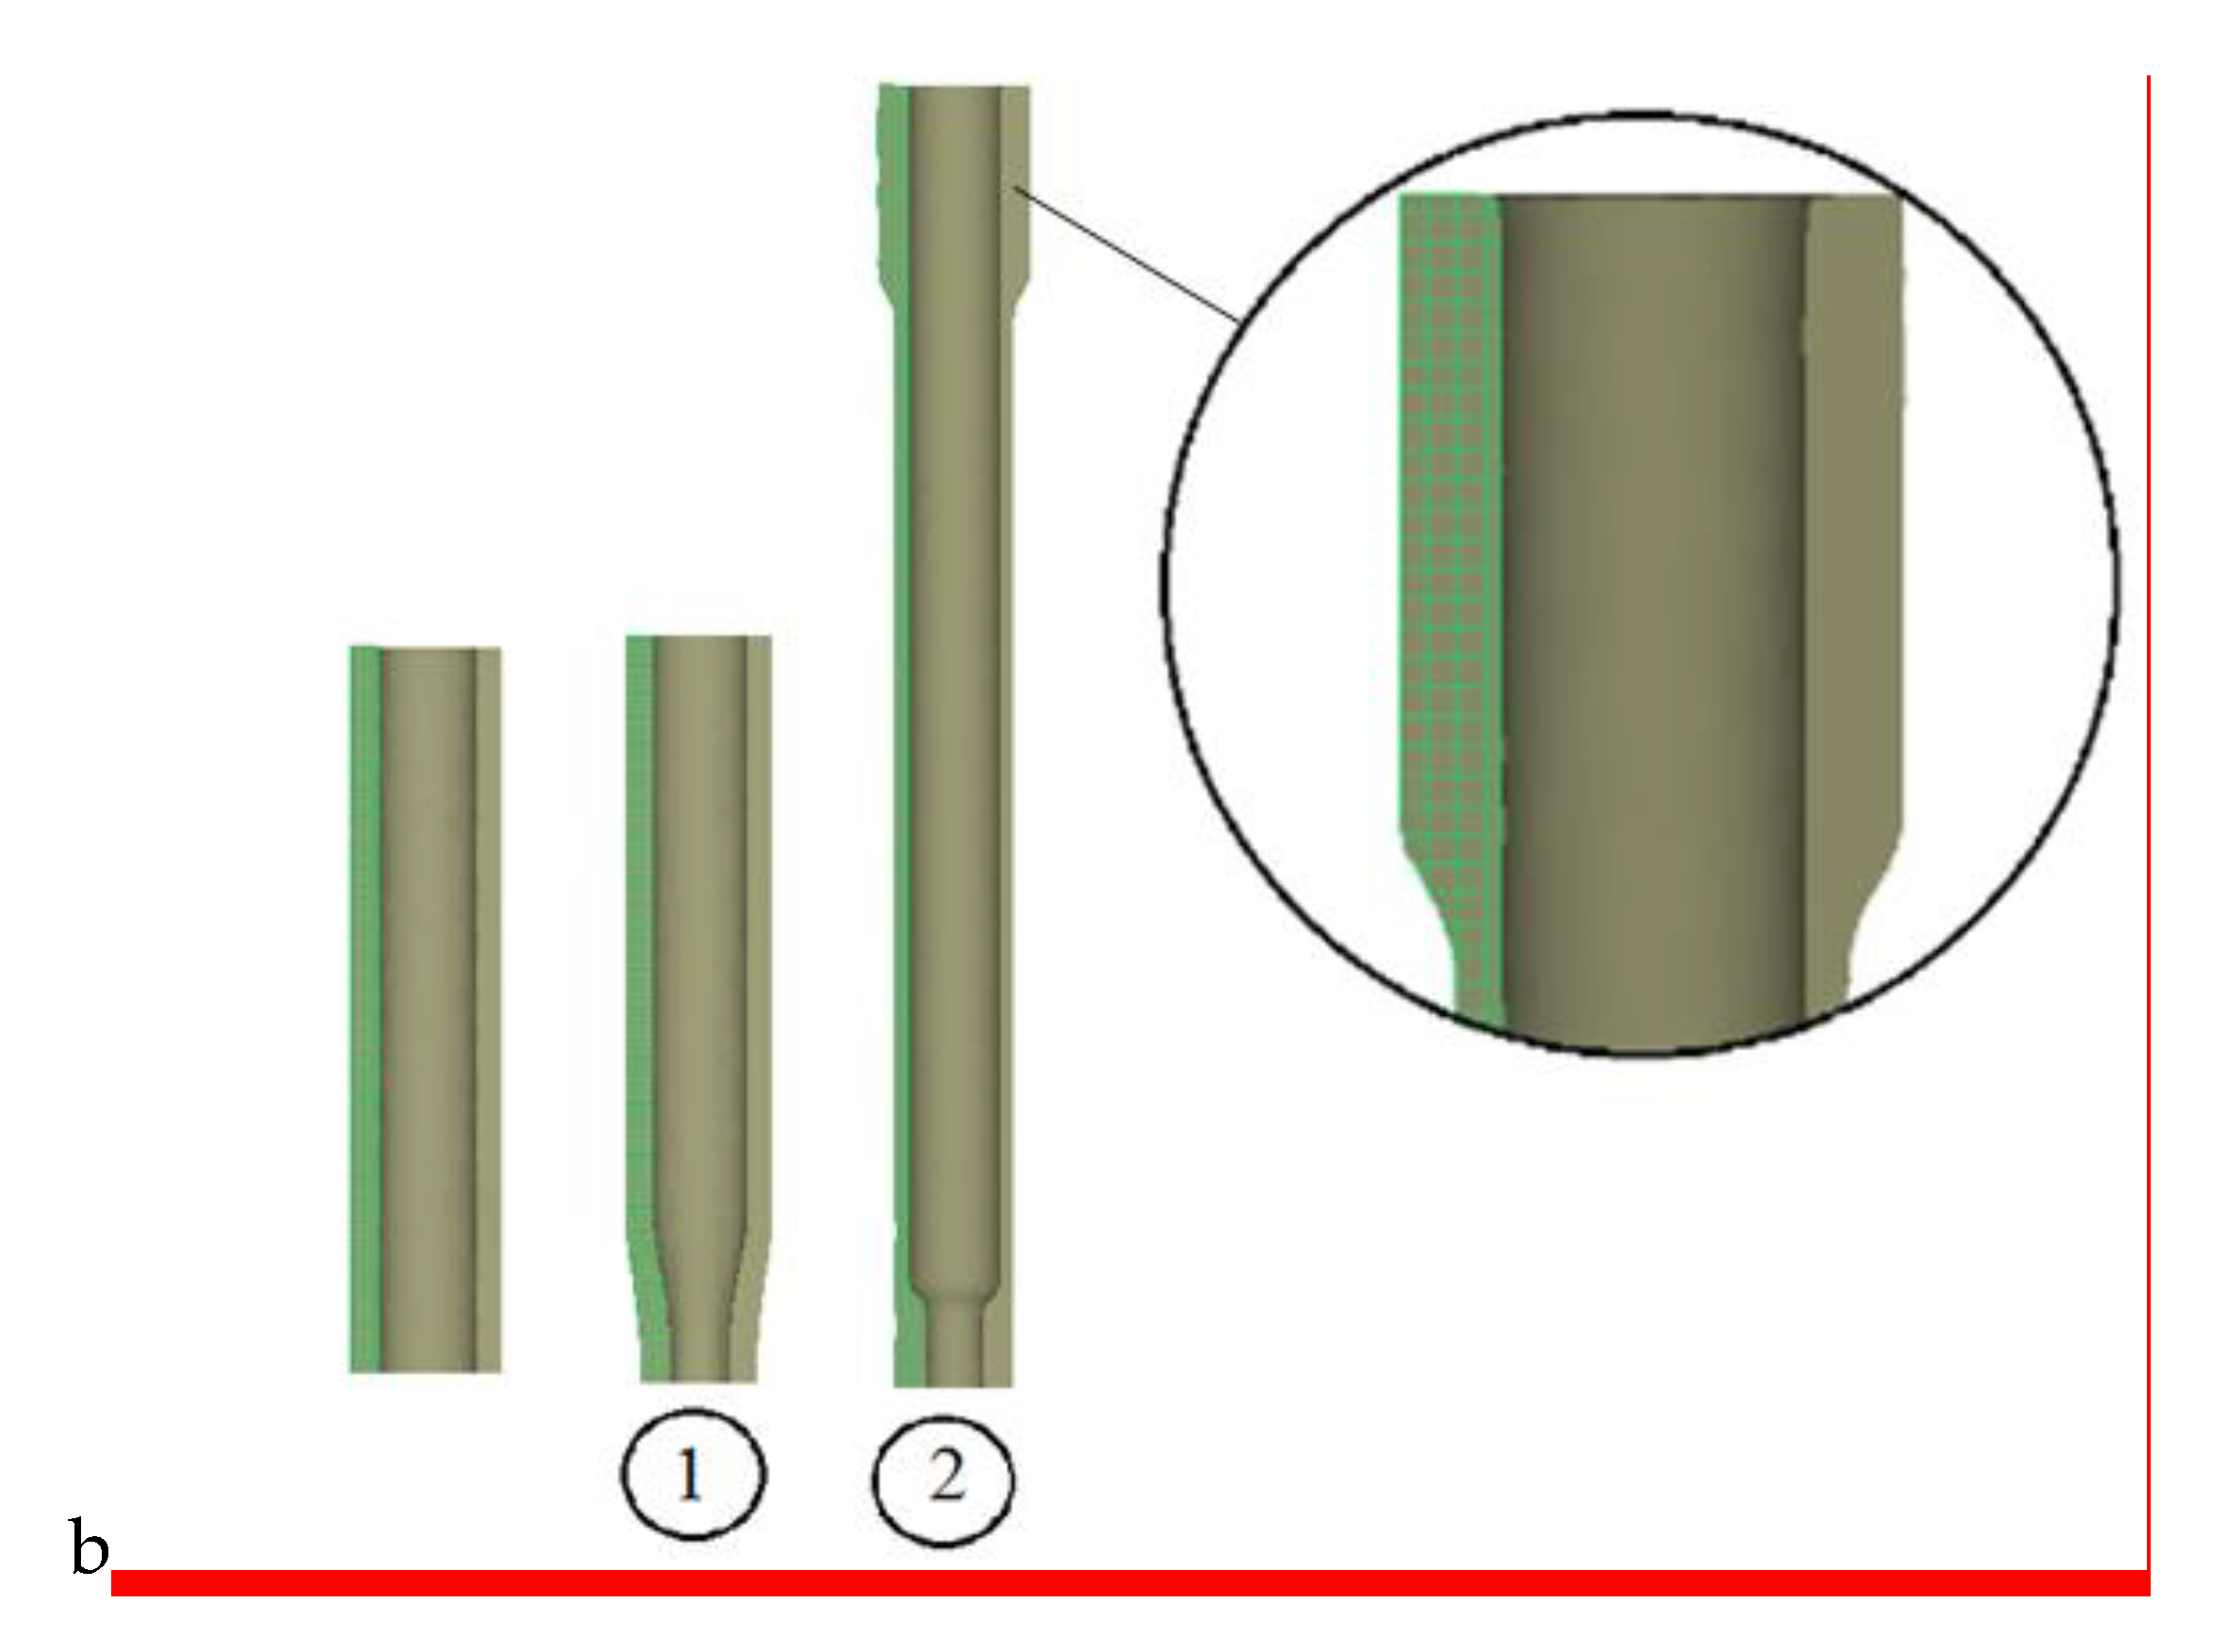
Figure 2 shows a technological process for the initial workpiece for the forming task in a closed die. From the tube billet, after the narrowing step, it is stroked on a barrel, to distribute the material closest to the part shape. After stroking on barrel No. 2, the problem is to form in a closed die with the appropriate technological parameters and number of steps to have the highest metal structure and mechanical properties, so that the parts do not get cracked and are not unstable.
The dimensions of the intermediate workpiece and the product after forming in a closed die are shown in Figure 3. The technological process and manufacturing steps of the parts begin with a workpiece of diameter ∅ 18/12.5 mm. After narrowing and flow forming with a mandrel, the workpiece reached an outside tube diameter of D0 = 14 mm and was then formed in a closed die with an outer diameter of D1 = 23.8 mm. Thus, the manufacturing process of the part includes several steps, such as (1) cutting the pipe into sections, (2) narrowing of the head, (3) flow forming on a mandrel, (4) forming in a closed die, (5) groove turning, and (6) combined machining. The narrowing and flow forming (on a mandrel) are completed as shown in Figure 2. Flow forming on the mandrel ensures a diameter ∅14, without mechanical processing after forming. The next operations are to form the tops of the tubes with the deformation simulation within a closed die and outline the steps to ensure zero defects. However, to ensure stability during the forming process, one must determine if Step 4 should include one or two steps (i.e., forming tasks). Some conditions during forming must be guaranteed, in order to ensure the stability of the parts and that no defects, such as folding, wrinkling, and concaving, occur. These conditions include preventing the length of the formed parts from exceeding 2.5 times the thickness of the tube wall [22] and maintaining the ratio of the last thickness of the tube (S1) to the initial thickness (S0) during the forming process to be less than 1.5 [23]. Through numerical simulations, the geometrical parameters of the workpiece and part (see Figure 3), including the aforementioned height and thickness ratios, are maintained, as their influence on instability is quite significant. If the H0/H1 ratio is too large, a large level of vertical deformation can occur. Another cause of instability is large ratios of H0/D0 and H0/S0, which will produce a large horizontal deformation. Therefore, by selecting the appropriate ratio and number of shaping steps and comparing these values with theory, feasible geometric parameters H0, H1,... Hn and S0, S1... Sn for the forming steps can be determined and applied in practice.
The material used for tube forming in this study was carbon steel STKM11A with the following composition: C < 0.12%; Si < 0.35%; Mn < 0.6%; p < 0.04%; and S < 0.04%. At a temperature of 20 °C, the mechanical properties of the STKM11A were systematically investigated, showing the tensile strength of 290 N/mm2, the elastic modulus of 200–215 GPa, the elongation of 20–35%, the Poisson’s ratio of 0.29, and the shear modulus of 75–80 GPa [24]. The numerical model was based on QFORM3D software. The execution sequence includes the main steps of selecting a deforming method for the part head with different levels of deformation, scripting the steps, and considering the effect of friction between workpiece–punch–die that causes defects in the forming process. The friction coefficient between the parts and die is 0.25, and between the parts and punch, it is 0.15 [23]. An elastic–plastic material model was adopted for the workpiece (STKM11A), while the punch and die were assumed as rigid bodies, since the deformations of die and punch are generally infinitesimal. The equivalent stress–equivalent plastic strain of STKM11A can be described according to the Swift’s law, as σ ¯ = k ( ε 0 + ε ¯ ) n , where σ ¯ and ε ¯ are equivalent stress and equivalent strain, respectively; ε 0 = 0.0071 is yielding strain, n = 0.226, and k = 642 MPa [25].

3. Results

The Qform V8.0.5 software was used for simulating the cold-forging effect on the microstructure of the motorbike shock absorber fabricated by tube forming in a closed die. The tests were carried out on a 200-ton hydraulic press machine with a two-position punch I and II, corresponding to the two head-stamping steps in the closed die, as shown in Supplementary Materials Figure S1. One-step stamping was performed on position I. When using the two-step stamping, positions I and II were used sequentially. The tasks of narrowing the tube tip and broaching on a mandrel were also carried out on a hydraulic press machine. The metal particle structure at the two positions, i.e., the head (stamping deformation area in the closed die) and the body (deformation area when being broached on a mandrel), were also analyzed and compared.

3.1. Simulated Deformation When Tube Forming in a Closed Die

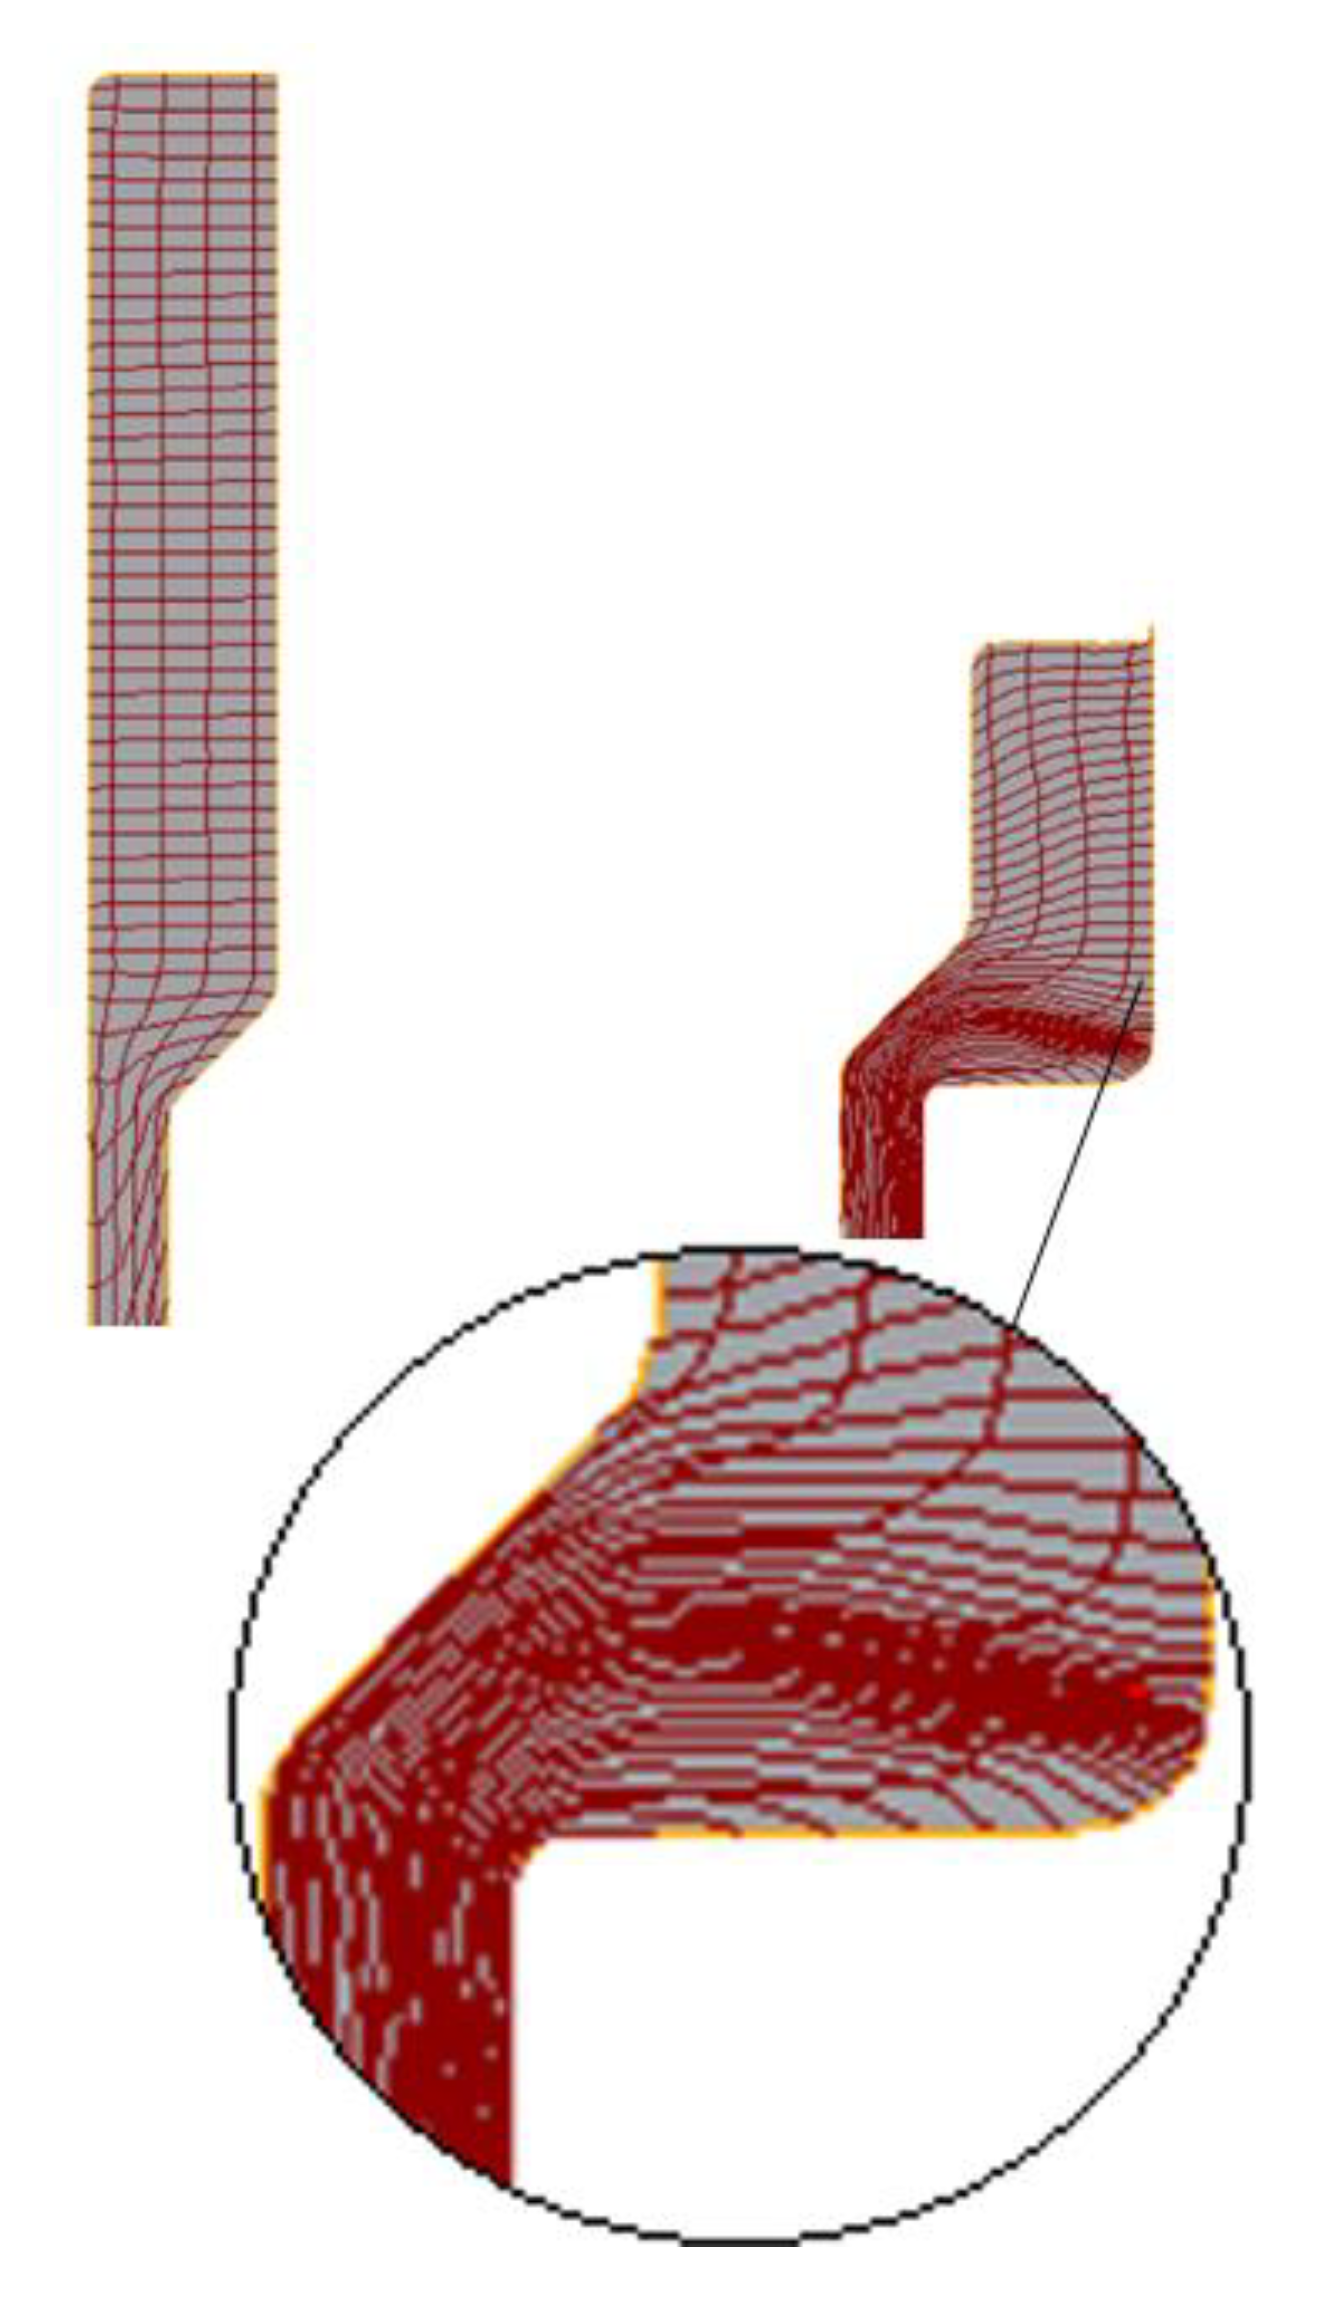
The simulation results are used to select the optimum technological step for the part. When the upsetting is done in one step, the part becomes folded at its top, due to instability of the workpiece, as shown in Figure 4. The deformed mesh begins to overlap, and eventually the parts are folded into the wall of the tube due to this instability. The process of deformation shows the workpiece starting to lose stability at the transition region between the head and body of the part. After the forming of the tube head, the final thickness of the shaped part is S1 = 3.65 mm. The thickness of the mold after flow forming is S0 = 1.95 mm, and the ratio S1/S0 = 1.871. If the technological steps of forming are divided into two steps, each step can be split, as shown in Table 1.
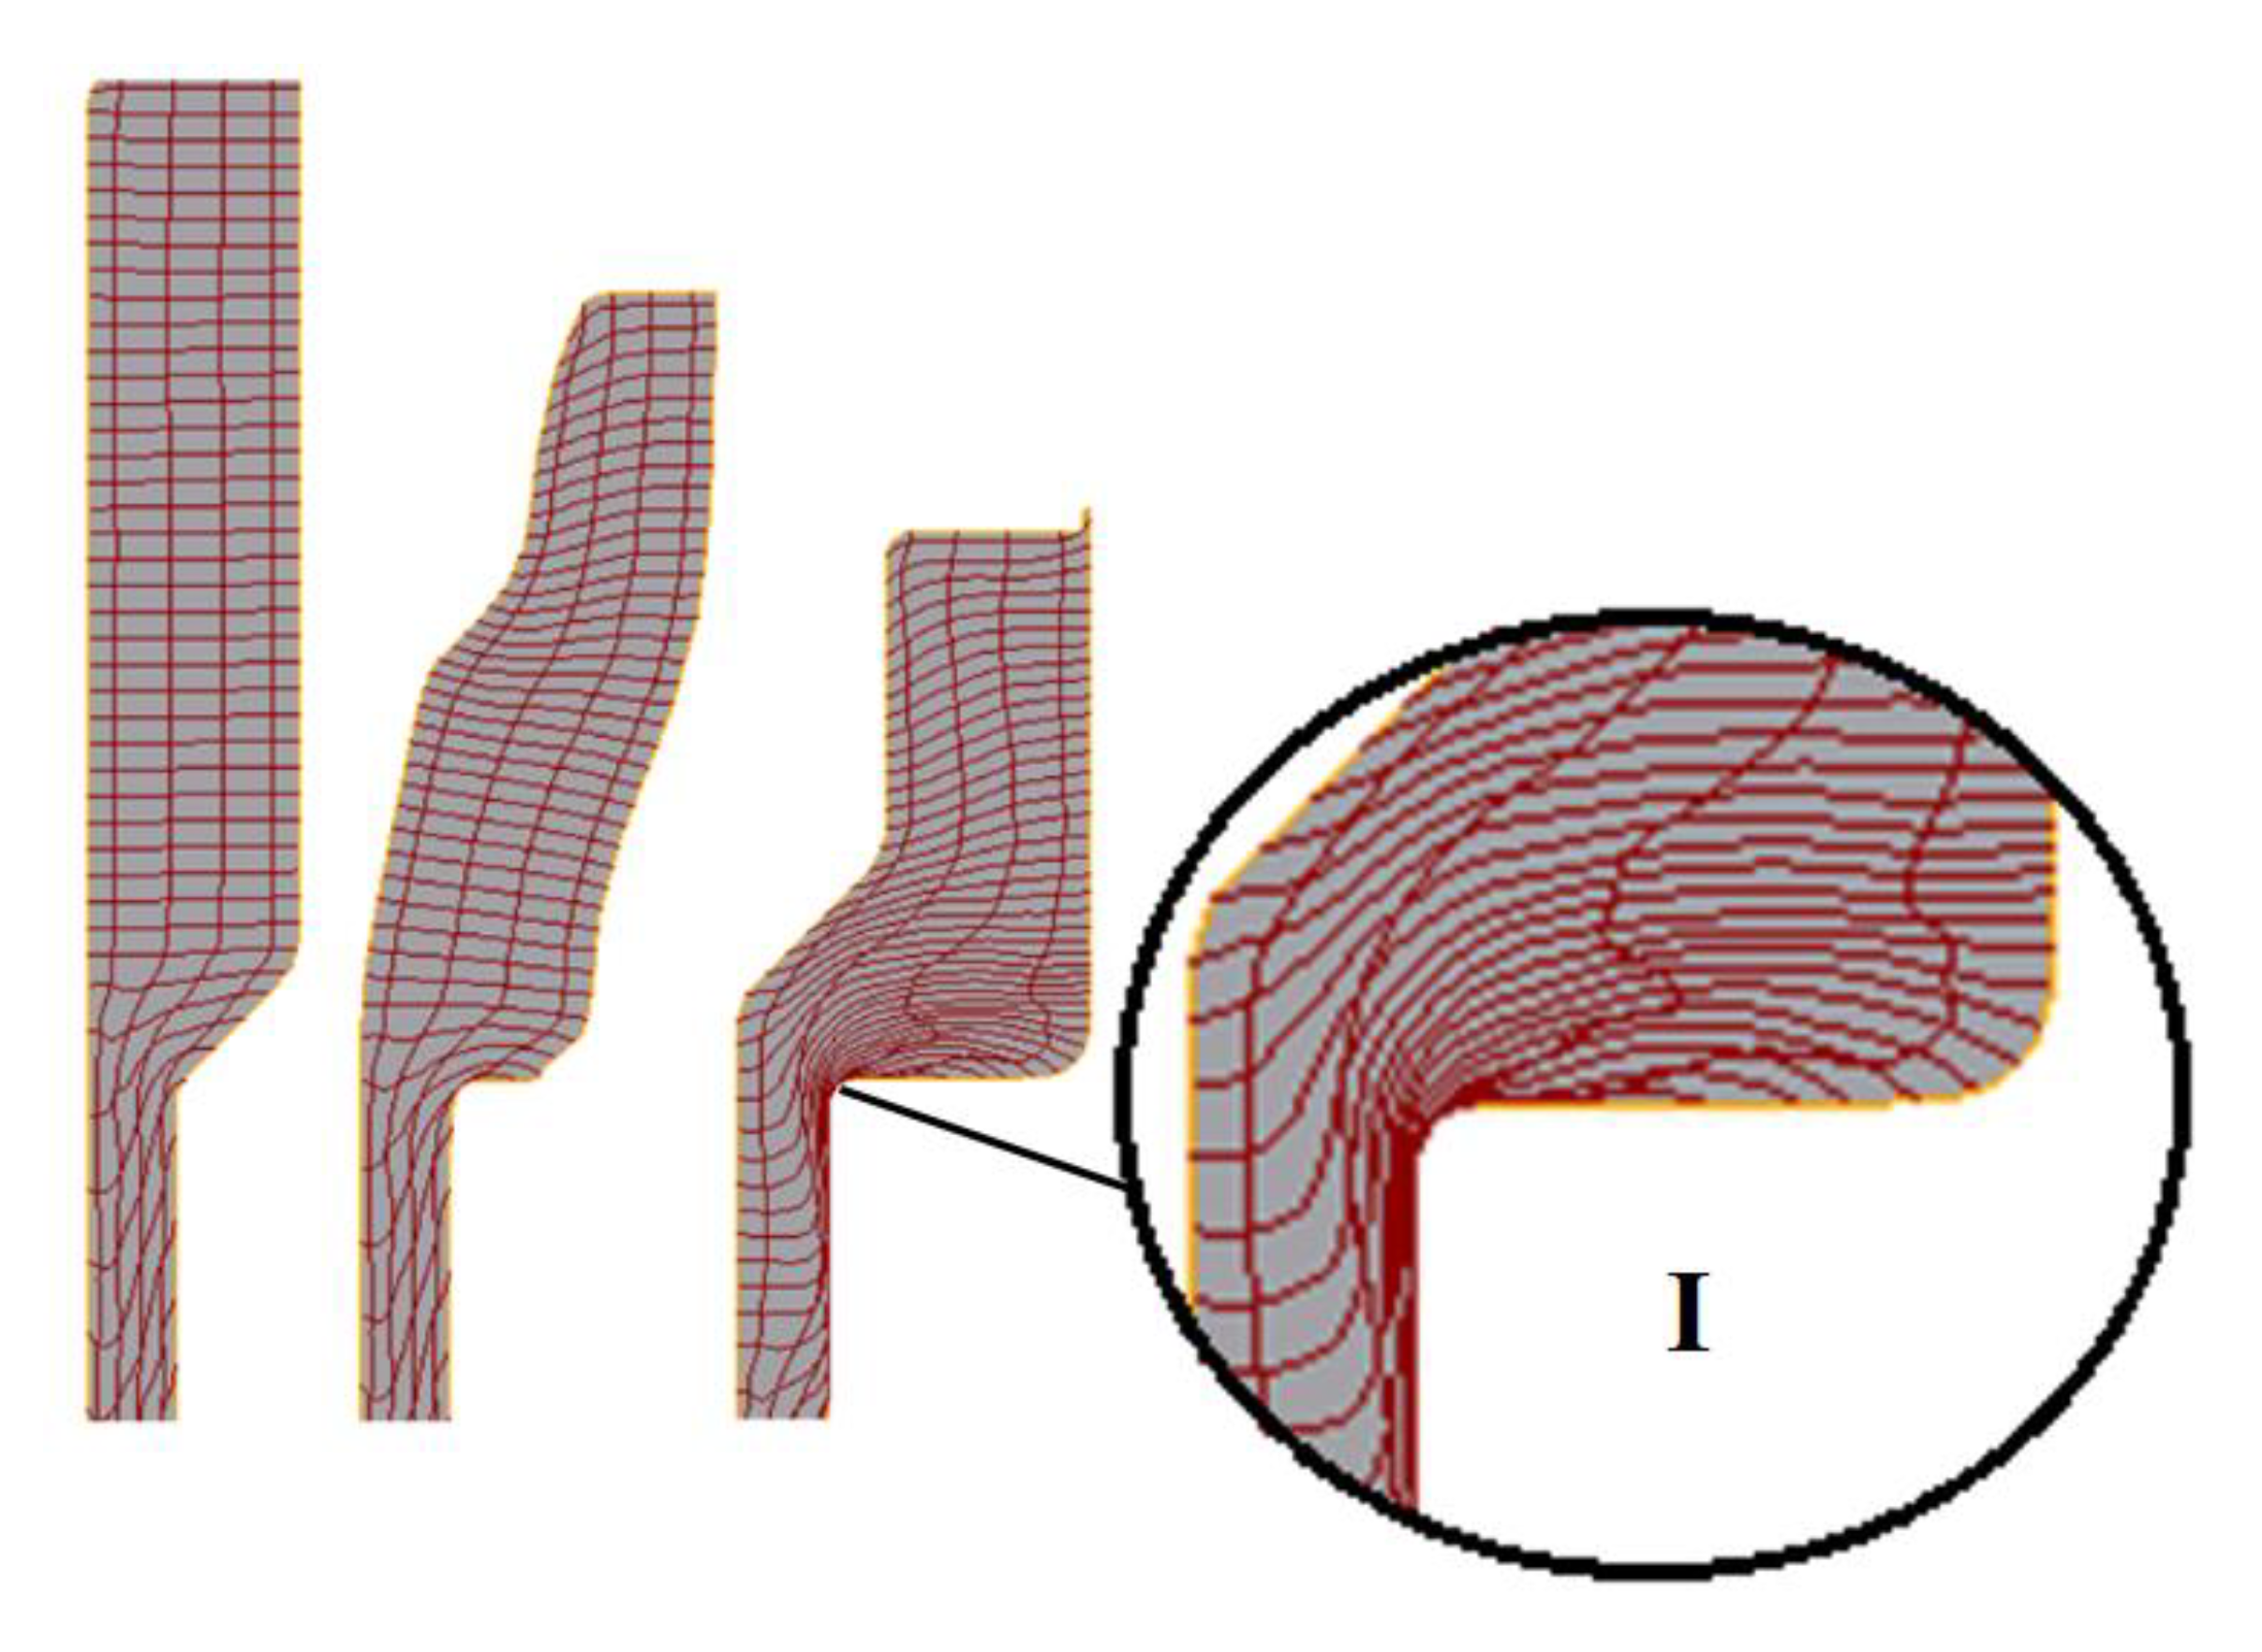
Figure 4 shows the simulation of the part-forming process by one step, on a die, from the dimensions D0, S0, and H0 to those (D1, S1, and H1) shown in Figure 3. The simulation shows that mesh folding starts happening due to instability; then overlapping mesh causes errors during the simulation. Hence, the deformed mesh is folded, which will obviously cause defects in the fabrication process. However, the deformed mesh shown in Figure 5 is uniform, without deflection, and contains no folding defects. When forming with two steps, the parts meet production requirements, i.e., the products are free from defects, and the deformed mesh is not overlapped or cracked.
By numerical simulation, the number of stamping steps to change the workpiece dimensions (D0, S0, H0) to the part dimensions (D1, S1, H1) is determined. It is therefore necessary to take a two-step process with the ratio S1/S0, as shown in Table 1. Figure 5 shows that it will not cause defects between non-overlapping mesh steps. At the corners of the parts, the metal flow through region I (shown in Figure 5) is very difficult, especially for the thin-walled tubular parts. This consideration of the non-overlapping mesh ensures the conditions to avoid forming instability. The remaining issue to consider is whether the values of stress and deformation during forming process exceed the allowable values so that defects do not occur. A comparison of the stress, strain, and material flow values in two cases is performed, including (1) single-step stamping and (2) two-step stamping for the part head forming tasks.
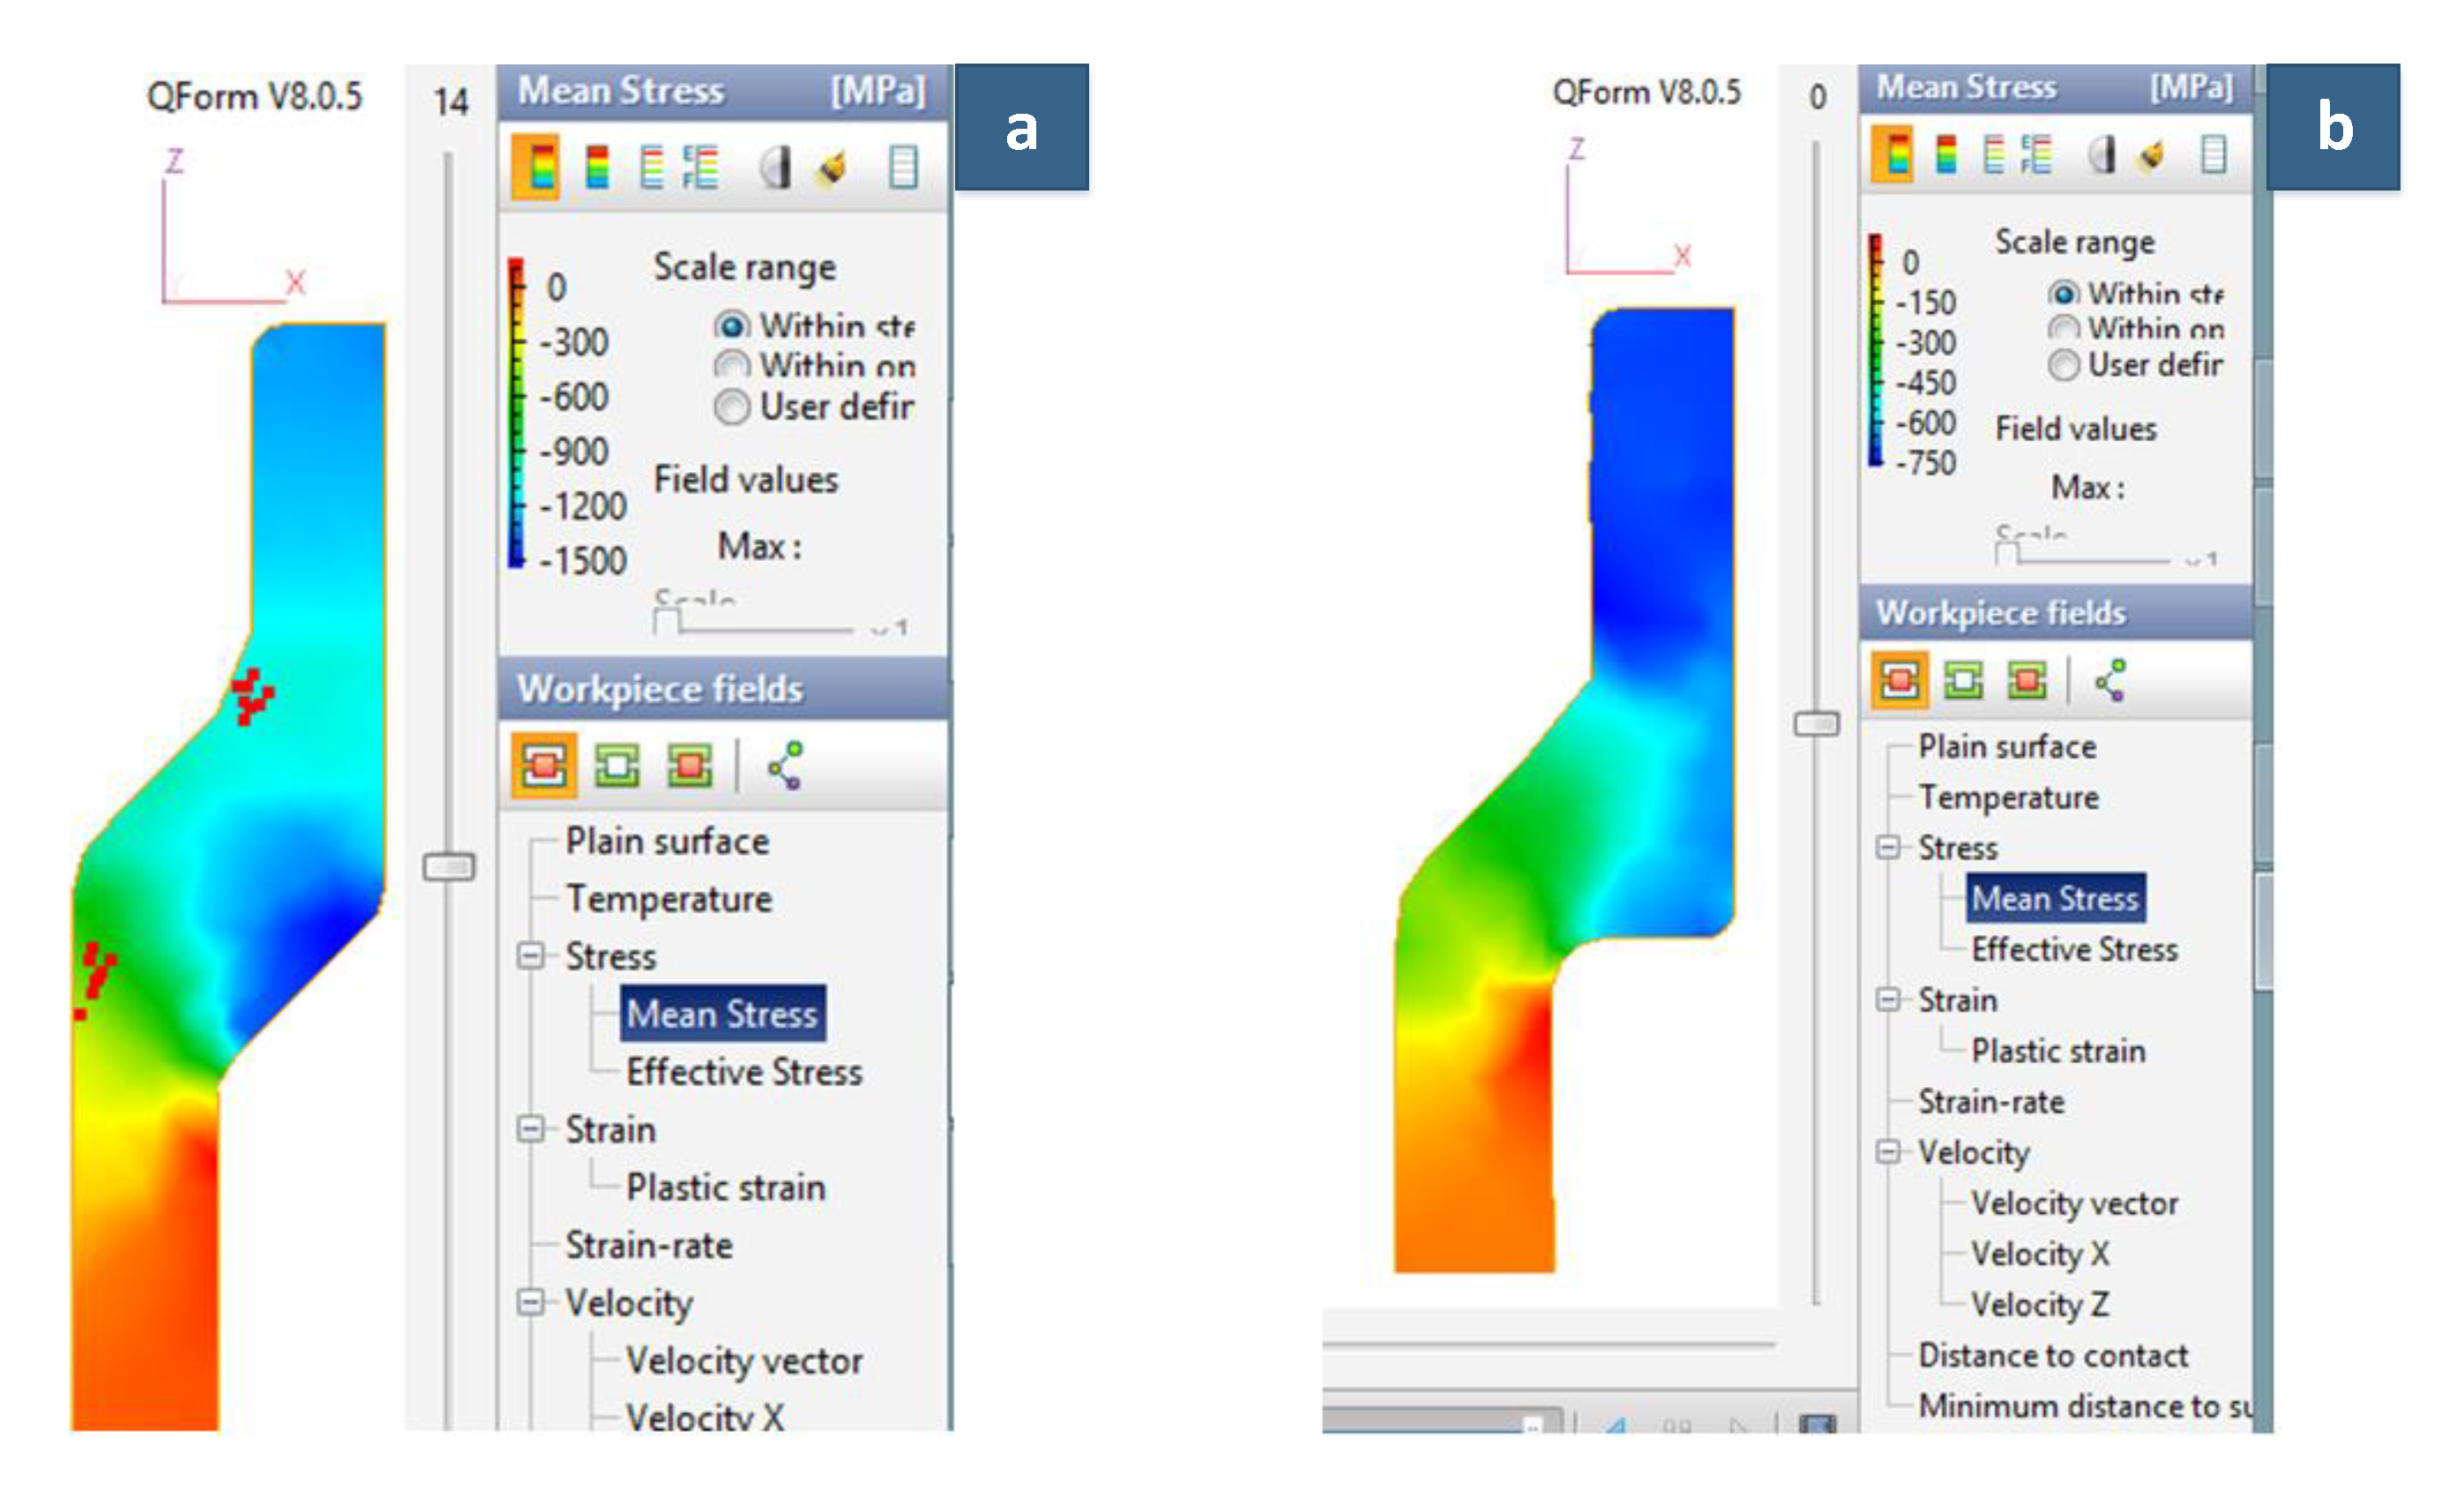
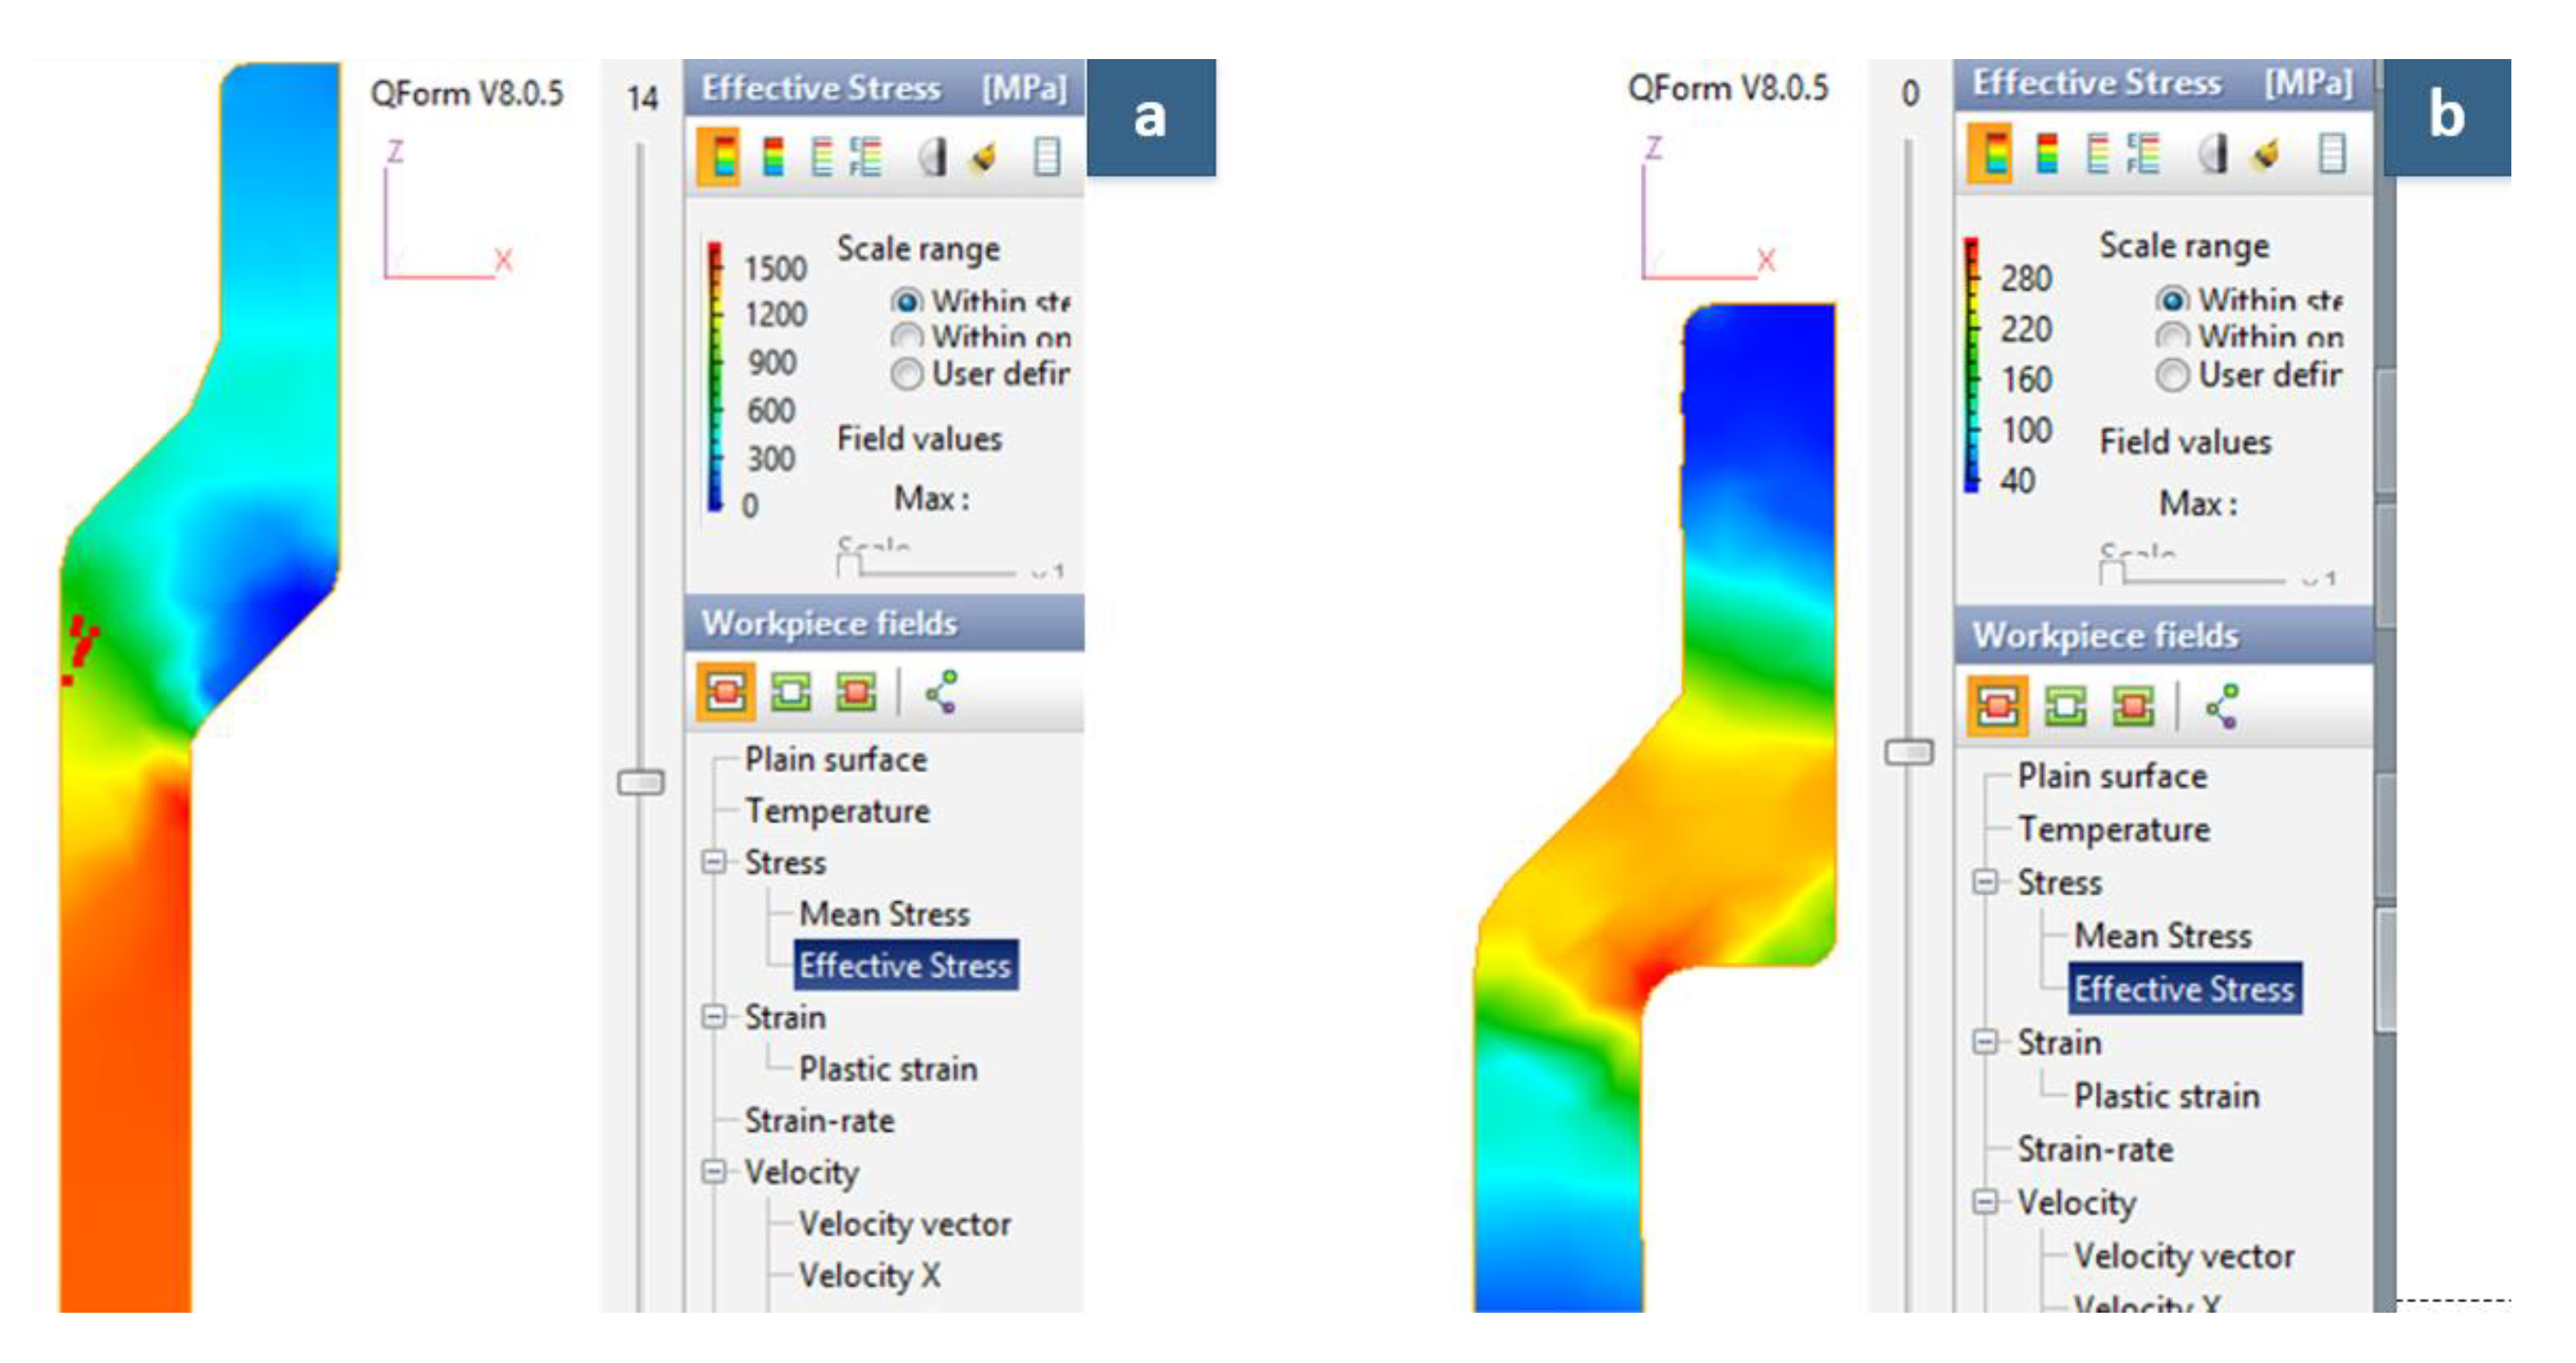
Numerical simulations are performed, and a comparison of the principal stress values in the z-direction and the equivalent stresses, respectively, for one- and two-step stamping, is shown in Figure 6 and Figure 7. It can be seen that the high-stress area in Figure 6a and Figure 7a occurs at the defect location, and, although these stresses do not reach a value that causes material destruction, they create a non-uniform stress distribution. Figure 6b and Figure 7b show uniform stress where the maximum stress does not reach a destruction value and, thus, no defect is found in the parts.
In Figure 8a, irregular plastic strain is observed between the points in the angular region and the straight wall inside the tube. The differences in plastic strain between these points are so great that the material no longer satisfies the continuity condition. Moreover, the plastic strain distribution with two steps, as seen in Figure 8b, shows that no defects appear in the part.
For defects to not occur in the part, the flow of material during forming should not experience turbulence. Figure 9a shows that turbulent flow occurs at two locations, namely the angular position in the lumen and the wall position. Based on these flow characteristics, it can be asserted that folding defects appear on the straight wall of the pipe. In addition, Figure 9b shows that the metal flow is a completely laminar and uniform flow without a surge in the velocity gradient—a condition that ensures defects do not appear. Therefore, the above simulation analysis demonstrates that the workpiece can meet production requirements when using stamping for forming the head of the part with two steps. No defects are found in the simulated products, and the deformed meshes do not overlap or break.

3.2. Schemes Metal Fibers’ Structural Characterization in a Tube Forming Process

Experiments on shaping tubular parts were carried out with both one- and two-step forming processes (Supplementary Materials Figure S1). Supplementary Materials Figure S2 shows a photo when stamping the head of the part was done in the one-step process. As seen in the figure, a folded defect is found in the transition region of the pipe thickness near the top of the part, which is predicted by the simulation results previously mentioned. While folded defects can be observed visually, cracks can be found when the deformed region is magnified 30 to 50 times.
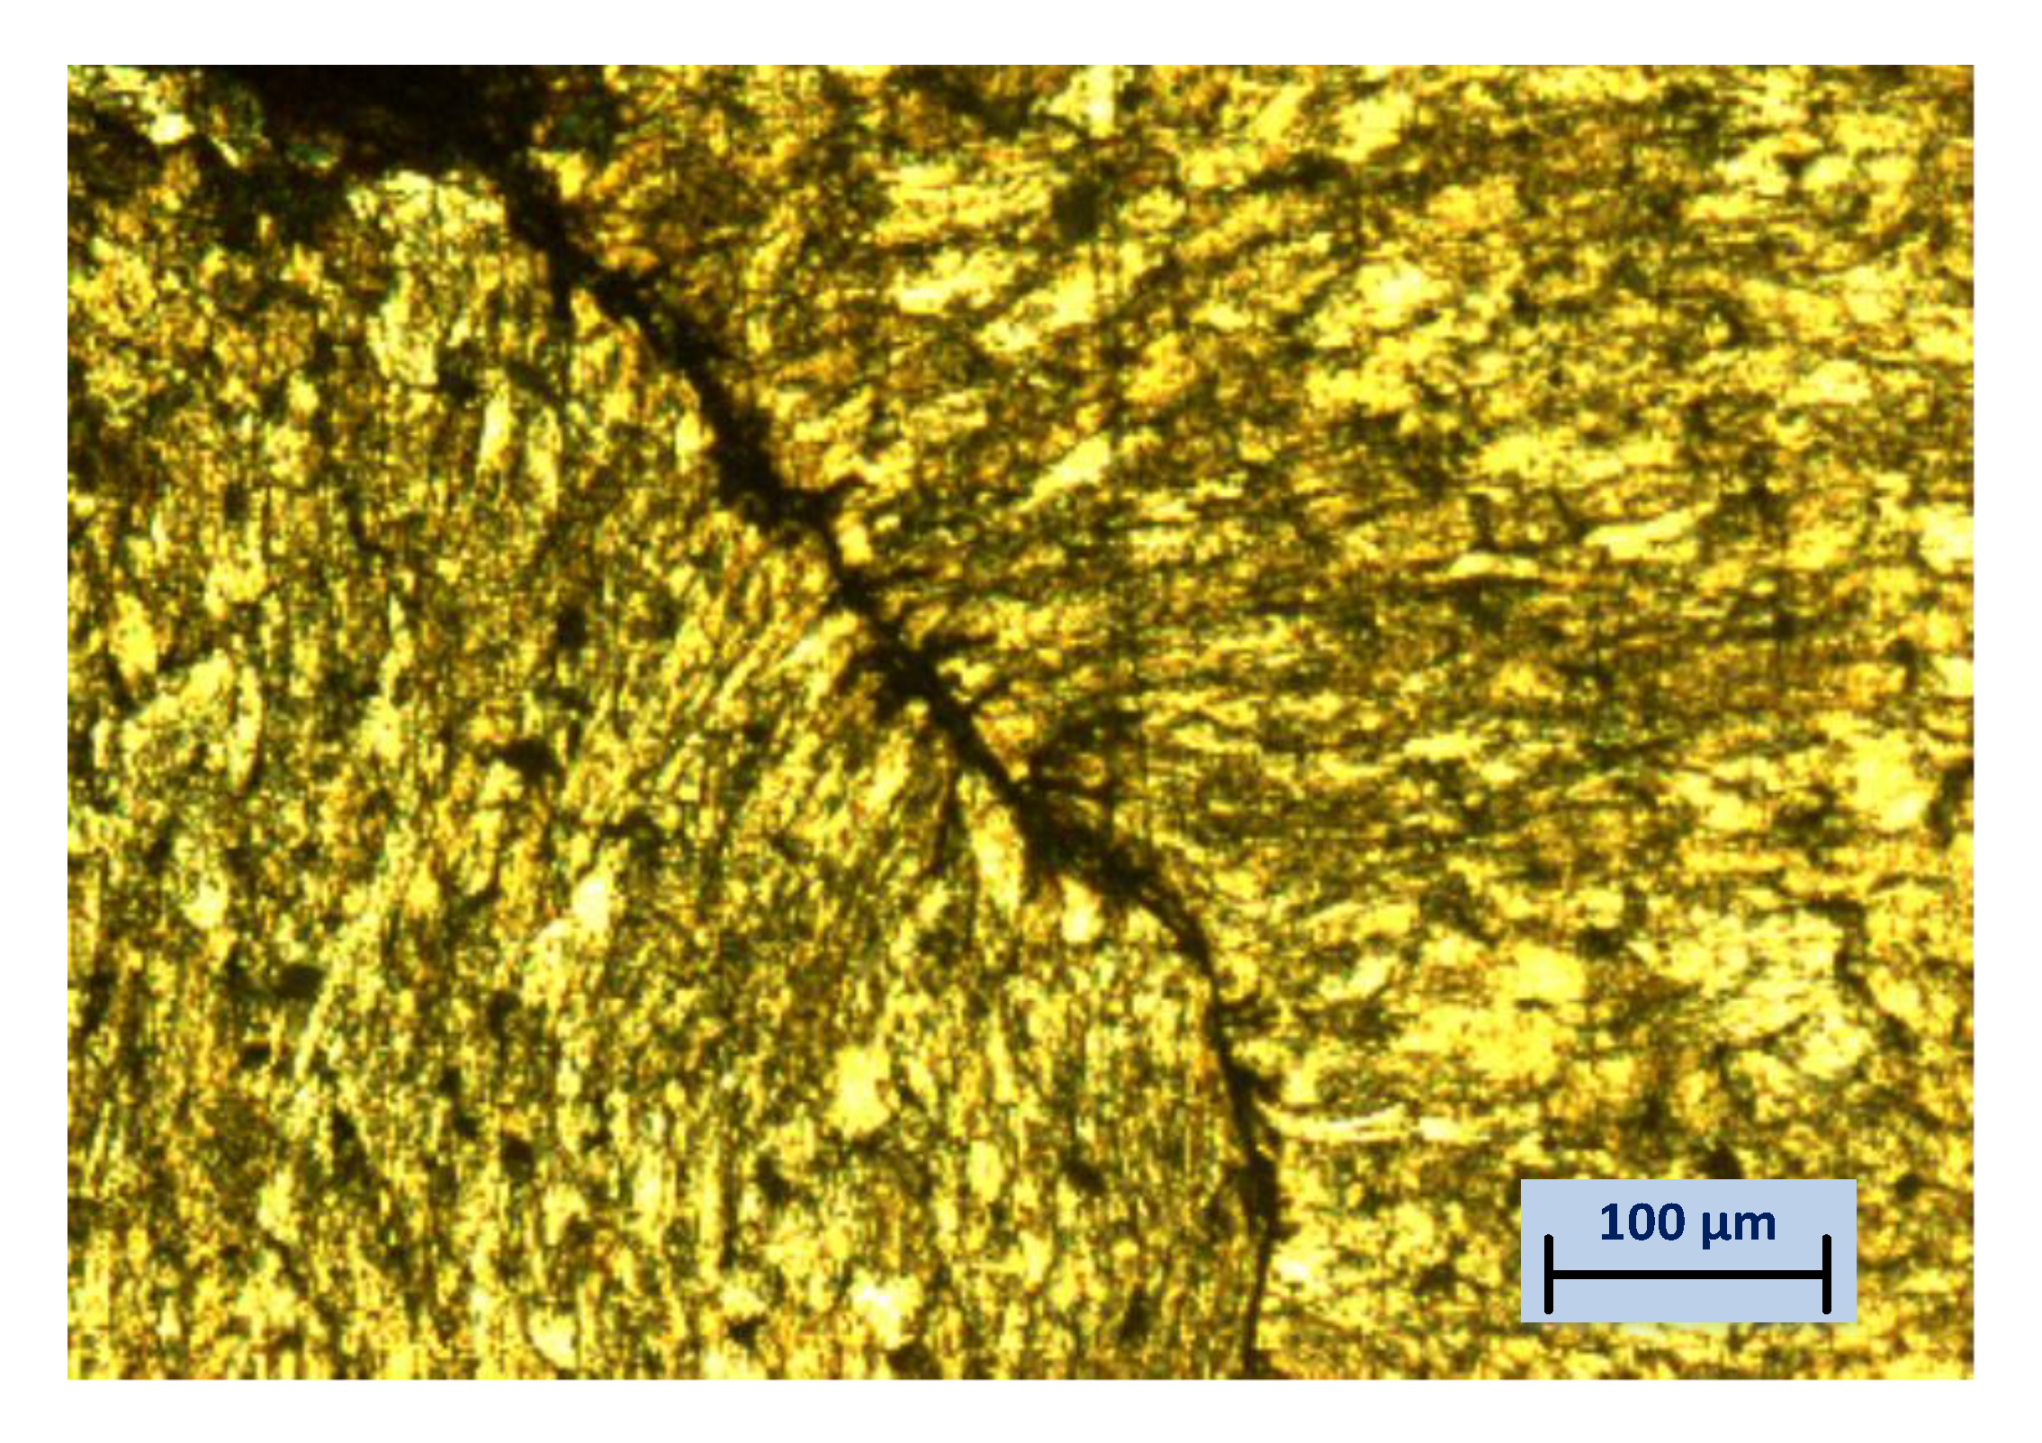
Figure 10 shows a crack that formed at the bottom of the part. This is also the region with a large level of deformation, large stresses, and where the flow direction of the metal changed abruptly. These observations are entirely consistent with the simulation results (as shown in Figure 4). Moreover, when the process of forming the head of the tube was done in two steps (specifically, the tube is fabricated on a mold block and simultaneously formed on a stroke of a 200-ton hydraulic press machine), the part was produced without defects, due to the reduced level of deformation in each forming step. The result was a metal flow that did not abruptly change due to a change in the cross-section of the part. The experimental results of the tube-forming process with two steps are shown in Supplementary Materials Figure S3. No defects were found in the fabricated products after stamping in a closed die with two steps. The metal structure was not overlapped or broken like the part made through a one-step stamping process in a closed die (as shown in Supplementary Materials Figure S2).
The product was cut in half, to measure the diameter and thickness of the tube. The dimensions were found to be satisfactory, considering the requirements from the design drawings. The microstructure of the specimen was observed by using an Axio Observer D1M metallographic microscope. A metallographic structure survey in the deformation region was conducted, to examine the formation of the metal fibers. Accordingly, the test sample was cut and magnified on a microscope, at three locations that corresponded to the following positions: (1) the pre-deformation region, (2) the region after being broached on a mandrel, and (3) the metal after forming on a closed die, as seen in Supplementary Materials Figure S4. An examination of the workpiece’s cross-section in the deformation area showed no folded defects. The metal was deformed, compressed, enlarged, and gradually filled the cavity. There was no evidence of turbulent metal flow that could lead to the creation of folds in the material.
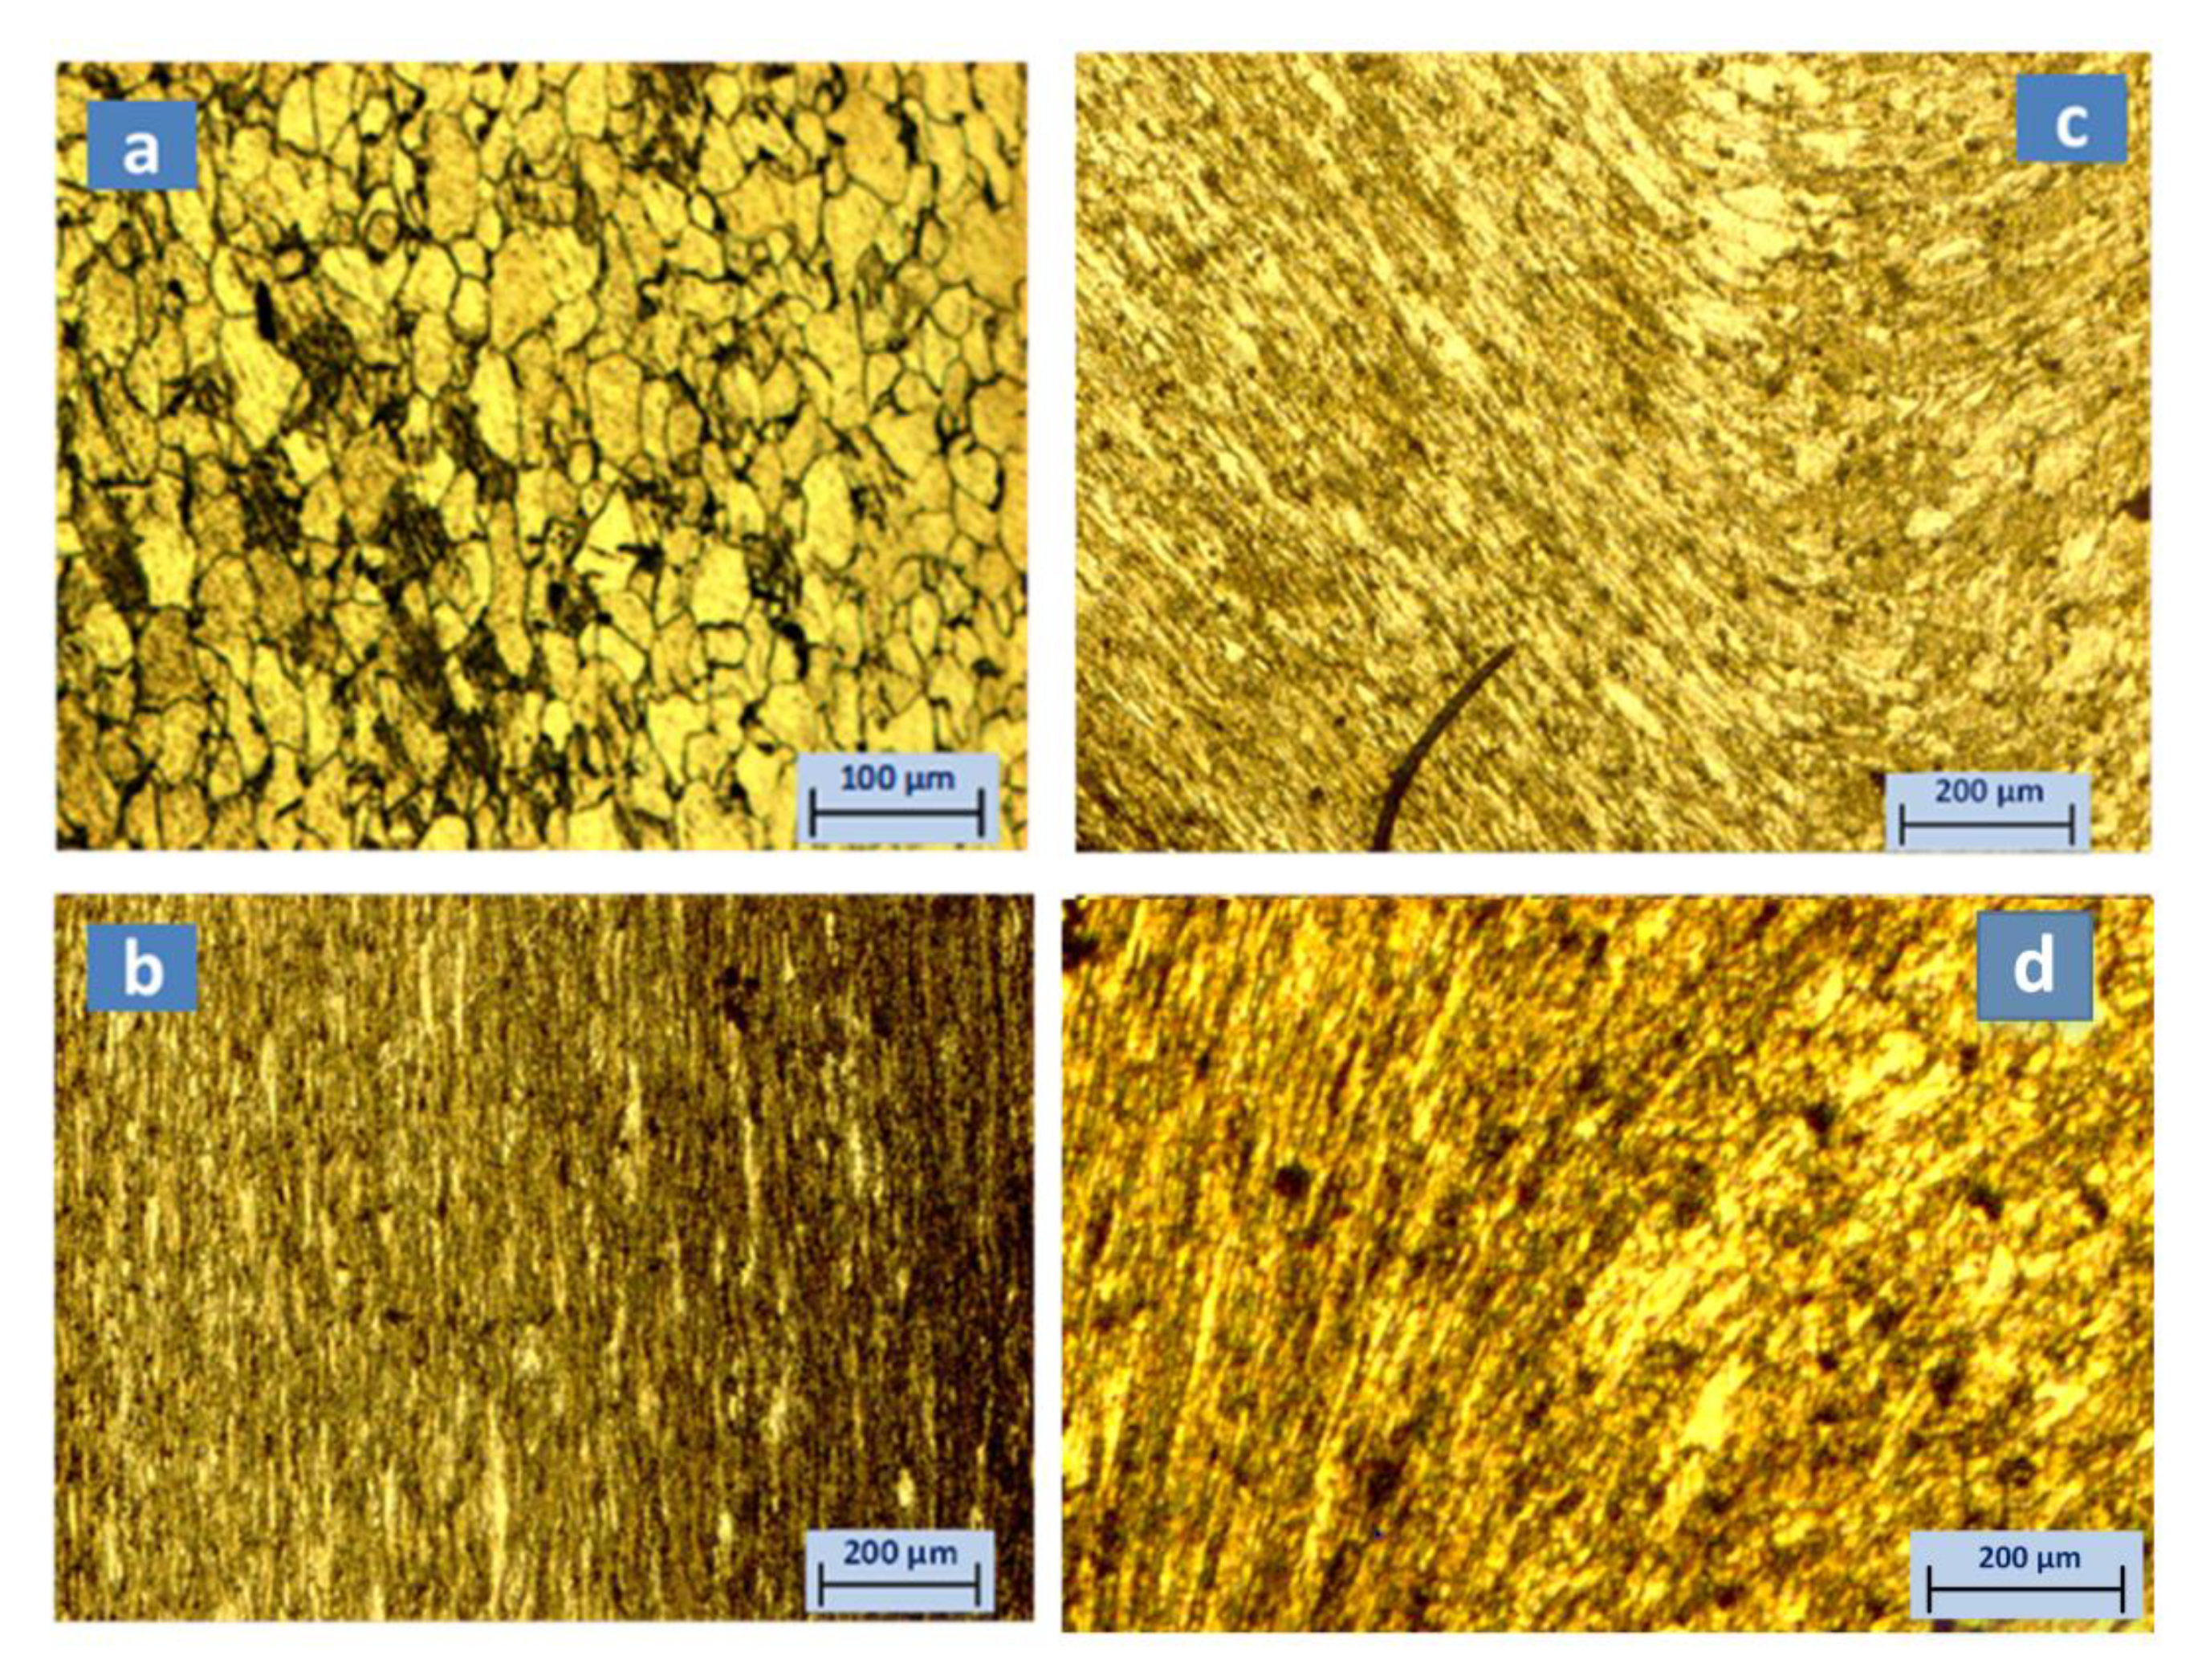
Figure 11a shows an image of the metal microstructure before deformation that shows a coarse grain structure of metal and no indication of a preferred direction of the metal fibers. Moreover, the structure of the metal changed after the sample was broached on a mandrel. Then, the particles deformed and were pulled along the longitudinal direction of the body, to produce a fiber direction along the tube, as shown in Figure 11b. In addition, Figure 11c,d shows magnified images at the head position after deformation through the two-step stamping operation in a closed die. These images reveal the microstructure of the fibers in an arc along the shape of the tool in both positions A and B (Supplementary Materials Figure S4). The formation of this fiber structure may improve the mechanical properties of the material and refine the original coarse grain structure. Thus, the part will not experience stresses at locations where the horizontal section changes under loading. After the second-step forming position, the directions of the metal fibers are distributed along the longitudinal axis of the tube, without the occurrence of folding defects.
In summary, the application of the stamping technology to form hollow parts from a tube workpiece has shown several advantages, compared to cutting machining, such as conservation of material, increase in productivity, reduction of machining time, and, especially, the creation of an anisotropy in the direction of the metal fiber that follows the load conditions of the parts. On the other hand, folding defects and microscopic cracks in the material often appear during the stamping process of the tube workpiece. Because of the tube’s thin walls, it is easy to reach instability during the deformation process. Based on the numerical simulation results that evaluate the flow of the metal, the optimization and selection of reasonable shaping steps to avoid defects is accomplished. These defects may be caused by instability, as well as an improper design of the die. Thus, this stepwise process does not cause sudden changes in flow or areas of excessive deformation. The results of metal flow research applied to the working part of motorbike shock absorbers made through a two-step shaping process show that (1) there is no defect in the part and (2) the formation of anisotropy in the direction of metal fibers, which is continuous over the entire body of the part. This fiber direction is significant, as it improves the part’s strength when it is under a dynamic load.

4. Conclusions

The application of stamping technology to form hollow parts from a tube workpiece has shown several advantages, compared to cutting machining, such as conservation of material, increase in productivity, reduction of machining time, and, especially, the creation of an anisotropy in the direction of the metal fiber that follows the load conditions of the parts. On the other hand, folding defects and microscopic cracks in the material often appear during the stamping process of the tube workpiece. Because of the tube’s thin walls, it is easy to reach instability during the deformation process. Based on the numerical simulation results that evaluated the flow of the metal, the optimization and selection of reasonable shaping steps to avoid defects was accomplished. These defects may be caused by instability, as well as an improper design of the die. Thus, this stepwise process does not cause sudden changes in flow or areas of excessive deformation. The results of metal flow research applied to the working part of motorbike shock absorbers made through a two-step shaping process show that (1) there is no defect in the part and (2) the formation of anisotropy in the direction of metal fibers, which is continuous over the entire body of the part. This fiber direction is significant, as it improves the part’s strength when it is under a dynamic load.

Supplementary Materials

Supplementary materials can be found at https://www.mdpi.com/2076-3417/11/5/2142/s1. Figure S1: Experiment of the part head deformation in a closed die. Figure S2: Experimental forming of the first part with one-step. Figure S3: Forming process in two steps. Figure S4: Images of an experimental fiber-structured sample before (a) and after (b) deformation.

Author Contributions

T.-K.L. designed the study and performed simulations. T.-A.B. performed the experiments. All authors discussed the results. T.-K.L. and T.-A.B. wrote the manuscript. T.-K.L. led the research project. All authors have read and agreed to the published version of the manuscript.

Funding

The work was funded by the Hanoi University of Science and Technology (HUST), under project number T2020-PC-202. The APC was funded by T2020-PC-202.

Acknowledgments

The work was funded by the Hanoi University of Science and Technology (HUST), under project number T2020-PC-202.

Conflicts of Interest

The authors declare no conflict of interest. The funders had no role in the design of the study; in the collection, analyses, or interpretation of data; in the writing of the manuscript; or in the decision to publish the results.

References

  1. Wang, Z.; Dong, S.; Li, F. FEM-Based Analysis on the Process of Tube Stamping. Adv. Mater. Res. 2013, 690–693, 2315–2321. [Google Scholar] [CrossRef]
  2. Tüzün, A. Analysis of Tube Upsetting. Master’s Thesis, Middle East Technical University, Dumlupınar Bulvarı No. 1, 06800 Çankaya/Ankara. 2004. Available online: https://etd.lib.metu.edu.tr/upload/12605660/index.pdf (accessed on 10 August 2020).
  3. Jamil, M.S.C.; Sheikh, M.A.; Li, L. A Finite Element Study of Buckling and Upsetting Mechanisms in Laser Forming of Plates and Tubes. Int. J. Manuf. Mater. Mech. Eng. 2011, 1, 1–17. [Google Scholar] [CrossRef]
  4. Poursina, M.; Parvizian, J. Simulation Of Folding Defect In Forging. AIP Conf. Proc. 2004, 712, 486–491. [Google Scholar] [CrossRef]
  5. Hoffman Machinery Corporation. Available online: http://www.hoffmanmachinery.com (accessed on 9 March 2020).
  6. Talebi Anaraki, A.; Loh-Mousavi, M.; Wang, L.-L. Experimental and numerical investigation of the influence of pulsating pressure on hot tube gas forming using oscillating heating. Int. J. Adv. Manuf. Technol. 2018, 97, 3839–3848. [Google Scholar] [CrossRef]
  7. Talebi-Anaraki, A.; Chougan, M.; Loh-Mousavi, M.; Maeno, T. Hot Gas Forming of Aluminum Alloy Tubes Using Flame Heating. J. Manuf. Mater. Process. 2020, 4, 56. [Google Scholar]
  8. Reddy, P.; Reddy, G.; Prasad, P. A Review on Finite Element Simulations in Metal Forming. Int. J. Mod. Eng. Res. 2012, 2, 2326–2330. [Google Scholar]
  9. Wang, Z.; Lu, J.; Wang, Z.R. Numerical and experimental research of the cold upsetting–extruding of tube flanges. J. Mater. Process. Technol. 2001, 110, 28–35. [Google Scholar] [CrossRef]
  10. Su, Y.L.; Yang, W.Z.; Wang, C.P. Upsetting Process Analysis and Numerical Simulation of Metal Pipe’s End. Appl. Mech. Mater. 2013, 364, 488–492. [Google Scholar] [CrossRef]
  11. Gao, P.F.; Fei, M.Y.; Yan, X.G.; Wang, S.B.; Li, Y.K.; Xing, L.; Wei, K.; Zhan, M.; Zhou, Z.T.; Keyim, Z. Prediction of the folding defect in die forging: A versatile approach for three typical types of folding defects. J. Manuf. Process. 2019, 39, 181–191. [Google Scholar] [CrossRef]
  12. Gao, P.; Yan, X.; Fei, M.; Zhan, M.; Li, Y. Formation mechanisms and rules of typical types of folding defects during die forging. Int. J. Adv. Manuf. Technol. 2019, 104, 1603–1612. [Google Scholar] [CrossRef]
  13. Gronostajski, Z.; Pater, Z.; Madej, Ł.; Surdacki, P.; Lisiecki, L.; Lukaszek-Solek, A.; Łuksza, J.; Mróz, S.; Muskalski, Z.; Muzykiewicz, W.; et al. Recent development trends in metal forming. Arch. Civ. Mech. Eng. 2019, 19, 898–941. [Google Scholar] [CrossRef]
  14. Dixit, U.S. 1—Modeling of metal forming: A review. In Mechanics of Materials in Modern Manufacturing Methods and Processing Techniques; Silberschmidt, V.V., Ed.; Elsevier: Amsterdam, Netherlands, 2020; pp. 1–30. [Google Scholar] [CrossRef]
  15. Strano, M. A Simplified Methodology for Estimating the Variance of Material Properties, in FE Analysis under Uncertainty of Sheet and Tube Metal Forming Processes. AIP Conf. Proc. 2007, 908, 499–504. [Google Scholar] [CrossRef]
  16. Tisza, M. Metal Forming in the Automotive Industry; University of Miskolc: Miskolc, Hungary, 2020. [Google Scholar]
  17. La, W.; Lee, H.; Choi, S.; Lim, S.J.; Woo, C.S.; Lee, G.A. Analysis of Cylindrical Tube Forming Process Using Polyurethane. Trans. Mater. Process. 2006, 15, 354–359. [Google Scholar] [CrossRef] [Green Version]
  18. Kim, K.T.; Lee, G.A.; Choi, S.; Lee, H.; Lee, Y.S. Prediction of Shape Accuracy in Elastomer-Forming of a Cylindrical Tube by a Response Surface Method. Trans. Mater. Process. 2008, 17, 218–224. [Google Scholar] [CrossRef]
  19. Alavizadeh, S.M.; Karami, J. Experimental and numerical investigation on metal tubes forming with a novel reconfigurable hydroforming die based on multi-point forming. Prod. Eng. 2019, 13. [Google Scholar] [CrossRef]
  20. Ghadami, S.; Dariani, B.M. Analytical and numerical modeling of high-strain rate metal-tube forming. Int. J. Adv. Manuf. Technol. 2019, 103, 4147–4160. [Google Scholar] [CrossRef]
  21. Liu, Y.; Qiu, X. A theoretical model of the shrinking metal tubes. Int. J. Mech. Sci. 2018, 144, 564–575. [Google Scholar] [CrossRef]
  22. ASM Handbook, Metalworking: Bulk Forming; ASM International: Novelty, OH, USA, 2005; Volume 14A.
  23. Tang, H.; Hao, C.; Jiang, Y. Forming process and numerical simulation of making upset on oil drill pipe. Acta Metall. Sin. 2010, 23, 72–80. [Google Scholar] [CrossRef]
  24. Steel Grade STKM11A Chemical Information, Mechanical Properties. Available online: http://www.steel-grades.com/Steel-Grades/Structure-Steel/STKM11A.html (accessed on 9 March 2020).
  25. Yoshida, K.; Kuwabara, T. Effect of strain hardening behavior on forming limit stresses of steel tube subjected to nonproportional loading paths. Int. J. Plast. 2007, 23, 1260–1284. [Google Scholar] [CrossRef]
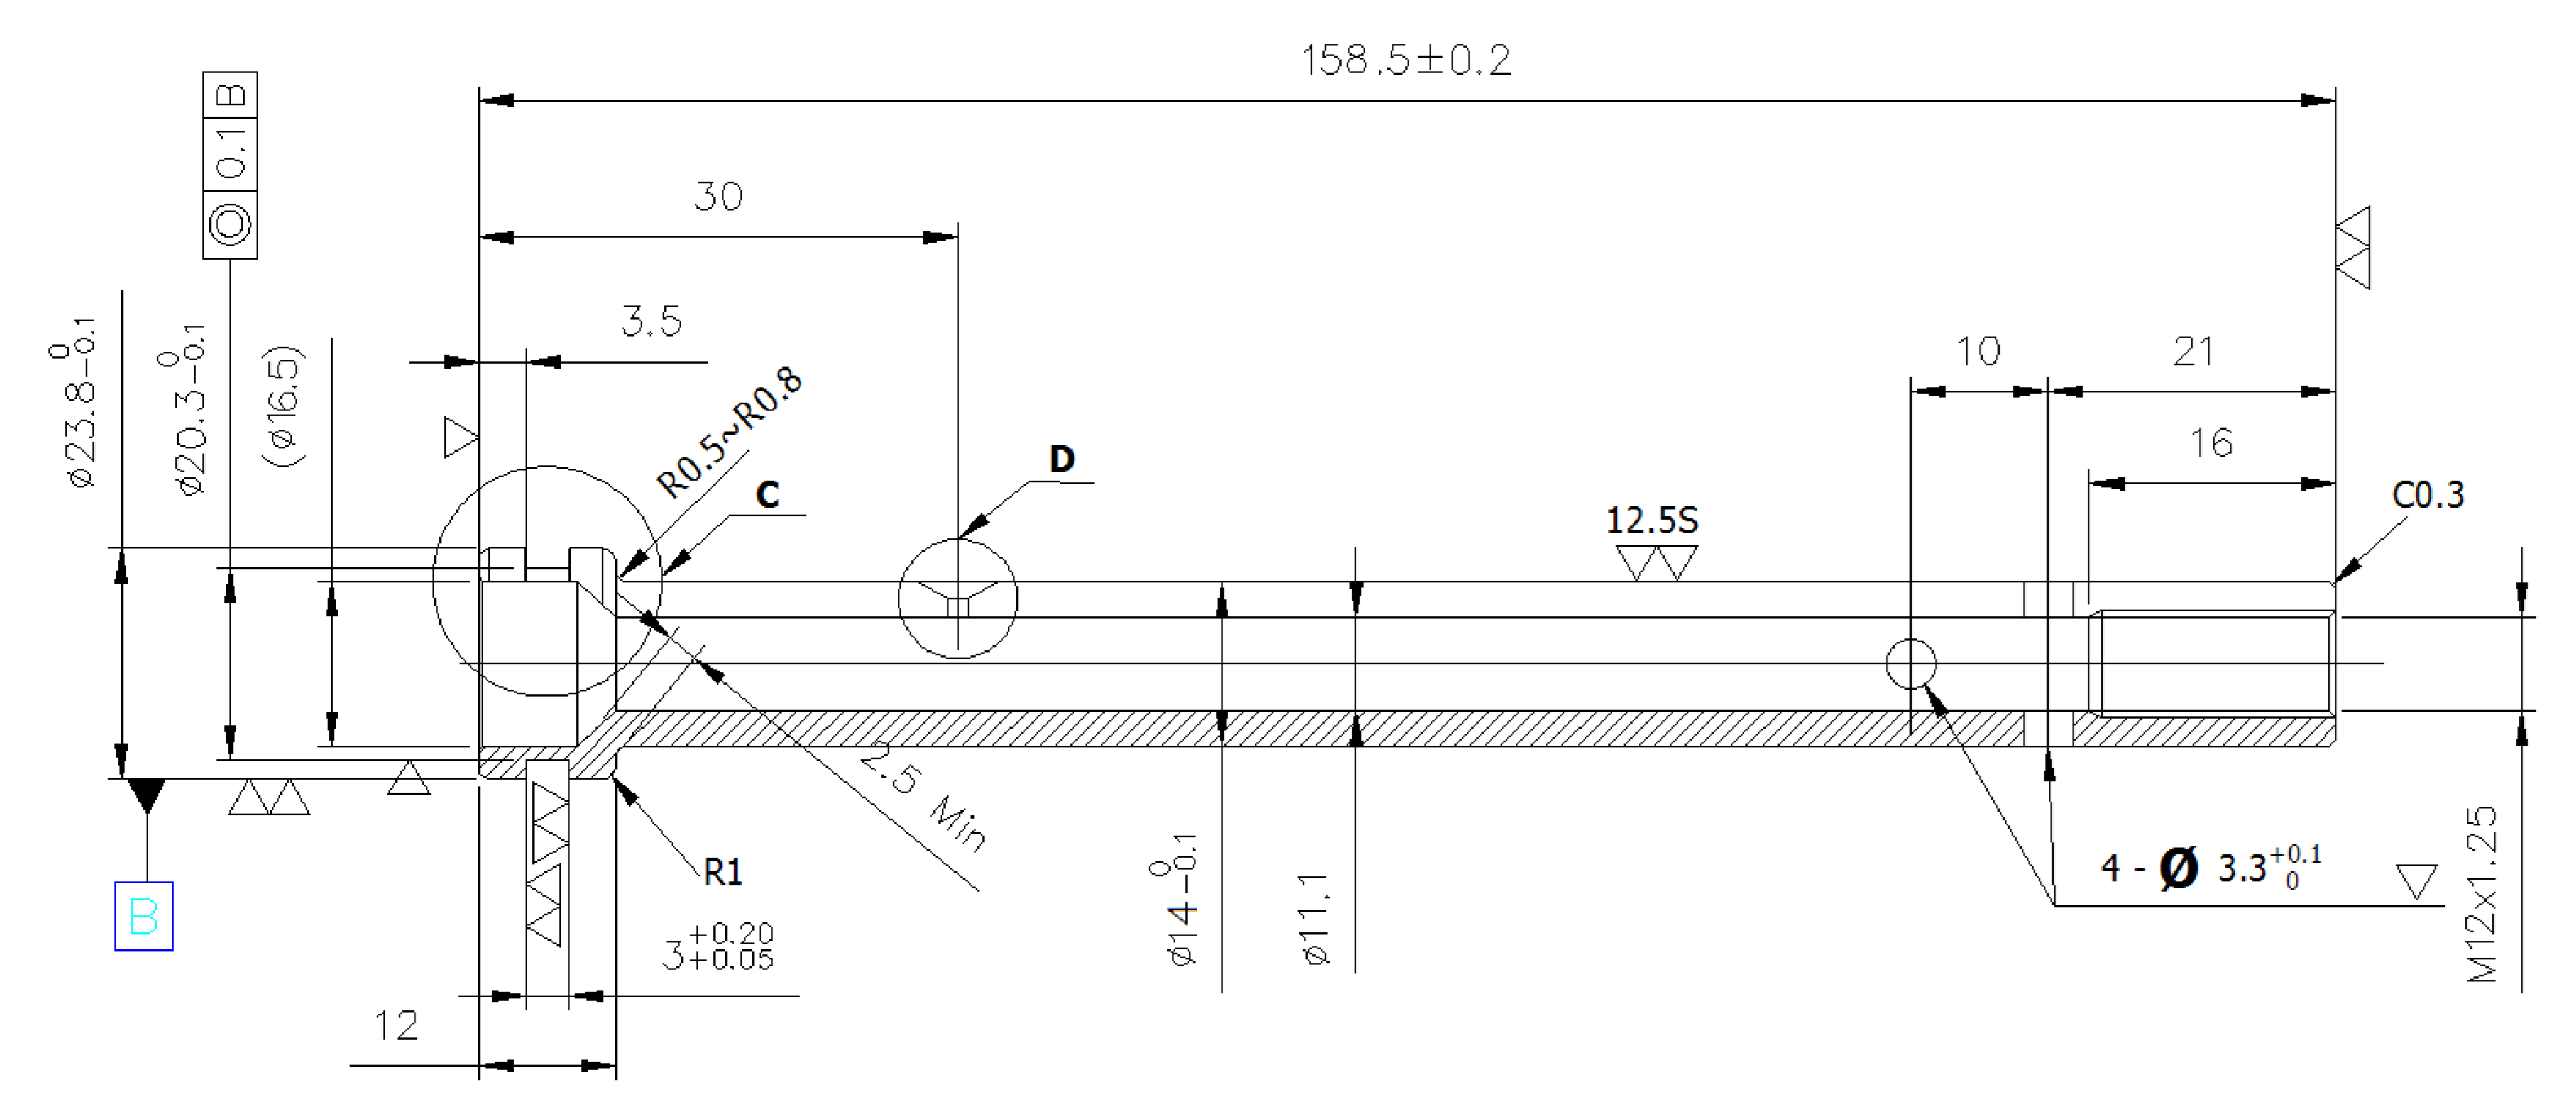
Figure 1. Technical drawing of a motorbike shock absorber.
Applsci 11 02142 g001
Figure 2. Forming with narrowing operations and flow forming.
Applsci 11 02142 g002
Figure 3. Geometric parameters of the workpiece and part after tube forming.
Applsci 11 02142 g003
Figure 4. Simulation of the forming process via one step.
Applsci 11 02142 g004
Figure 5. Simulation of the forming process via two steps.
Applsci 11 02142 g005
Figure 6. Mean stress distributions in the z-direction with (a) one-step stamping and (b) two-step stamping.
Applsci 11 02142 g006
Figure 7. Equivalent stress distributions (von Mises stress) with (a) one-step stamping and (b) two-step stamping.
Applsci 11 02142 g007
Figure 8. Plastic strain distribution with (a) one-step stamping and (b) two-step stamping.
Applsci 11 02142 g008
Figure 9. Metal flow with (a) one-step stamping and (b) two-step stamping.
Applsci 11 02142 g009
Figure 10. Microstructure of the folded defects when stamping the head of the sample in the one-step process.
Applsci 11 02142 g010
Figure 11. (a) Microstructure of the sample before deformation. (b) Microstructure of the body sample after flow forming with mandrel. Microstructure of the head sample after being deformed through two steps: (c) the fiber structure at position A and (d) the fiber structure at position B (shown in Supplementary Materials Figure S4).
Applsci 11 02142 g011
Table 1. Thickness distribution of the forming steps.
StepThickness of
Next Steps (mm)
Thickness of
Previous Step (mm)
Ratio
S1/S0
11.952.701.386
22.773.651.352
Publisher’s Note: MDPI stays neutral with regard to jurisdictional claims in published maps and institutional affiliations.