Abstract
Industry 4.0 represents a new paradigm which creates new requirements in the area of manufacturing and manufacturing metrology such as to reduce the cost of product, flexibility, mass customization, quality of product, high level of digitalization, optimization, etc., all of which contribute to smart manufacturing and smart metrology systems. This paper presents a developed inspection planning system based on CMM as support of the smart metrology within Industry 4.0 or manufacturing metrology 4.0 (MM4.0). The system is based on the application of three AI techniques such as engineering ontology (EO), GA and ants colony optimization (ACO). The developed system consists of: the ontological knowledge base; the mathematical model for generating strategy of initial MP; the model of analysis and optimization of workpiece setups and probe configuration; the path simulation model in MatLab, PTC Creo and STEP-NC Machine software, and the model of optimization MP by applying ACO. The advantage of the model is its suitability for monitoring of the measurement process and digitalization of the measurement process planning, simulation carried out and measurement verification based on CMM, reduction of the preparatory measurement time as early as in the inspection planning phase and minimizing human involvement or human errors through intelligent planning, which directly influences increased production efficiency, competitiveness, and productivity of enterprises. The measuring experiment was performed using a machined prismatic workpiece (PW).
    1. Introduction
Industry 4.0, as a strategic initiative, aims to create smart factories where manufacturing technologies are upgraded and transformed into Internet of Things and cloud computing [,]. “The manufacturing industry is on the top of Industry 4.0, because it brings with it advanced technologies and techniques capable of rapidly and efficiently changing the products, processes and supply chains involved in every aspect of industry” []. The original definitions of Industry 4.0 are proposed in [,]. The definition contains several key words, such as advanced manufacturing and advanced metrology. This means that advanced manufacturing, or metrology, is the basis for the fourth industrial revolution. In the same context, the following terms are used worldwide: a smart factory (metrology), and intelligent manufacturing (metrology) []. “Industry 4.0 is also the digital transformation of manufacturing and related industries and value chain creation processes, based on intelligence of machines and processes for industry by information and communication technology” []. An evolution of production systems from Industry 2.0 through Industry 4.0 is presented in [].
Within Industry 4.0, smart manufacturing systems are designed to respond in real-time for catering to the rapidly changing demands and conditions in the factory, the supply network, and customer needs. “Smart manufacturing is arriving and promises a future of mass-producing highly personalized products via responsive autonomous manufacturing operations at a competitive cost” []. “With the rapid growth of integrating ITs and operation technologies in the industry, significant efforts have been made to make manufacturing smart” []. Some key advantages of using smart manufacturing include higher quality products, improved productivity, safer plant floors, and improved energy efficiency. Those systems include machines, smart sensors, and robotic platforms, as well as the data necessary for monitoring, maintenance, and control of the production and measuring process.
If we perform a comparison between the development of technological systems and manufacturing metrology, according to [,], we can define the following facts: (i) a holistic measurement model applied as a smart system, and (ii) a CMM as a multi sensor system and CPS, making up today the basic framework of smart metrology model for Industry 4.0. “Based on cyber-physical system CPS and IoT technology, the flexible transformation of the manufacturing process to suit diverse customer manufacturing requirements is very possible, by make-to-order services” []. According to [] “smart metrology is the implementation of a revised metrological function to make relevant decisions using AI techniques”. The paper [] discusses how the Industry 4.0 infrastructure can be used to collect and process data to obtain useful information about the in-line metrology process.
The basis of the “factory operating system for extending existing factories to Industry 4.0” [] is the application of industrial innovations, primarily in the field of IT, with online communication and collaboration of manufacturers, customers and suppliers. From the standpoint of SMEs, according to [], “flexibility, cost, efficiency, quality and competitive advantage” are found to be the key benefits to Industry 4.0 adoption. The outcome of research presented in [] is a developed platform that will be referred to Industry 4.0 HUB for SMEs.
The paper [] provides manufacturing execution system (MES) functionalities from I4.0-related requirements standpoint and an overview of development methods for those purposes. Today’s trends for development and implementation, as well as the functions of MES in the context of Industry 4.0 are given in [,].
When it comes to measurement strategies applicable for Industry 4.0 purposes, only strategies that offer automatic distribution of measurement points can be applied. All manual distribution strategies and non-analytical strategies are not applicable for this purpose. A very important element in choosing a strategy is also measurement uncertainty. In this paper, a modified Hammersley strategy was chosen precisely because of measurement uncertainty.
The contribution of this paper refers to the development of the manufacturing metrology 4.0 model as a support of the I4.0 concept based on the existing CP3M presented in [,,] and the application of AI techniques such as EO, ACO, and GA to optimize the MP, the number of PW setups, as well as the configuration of the measuring head and probes. Testing of the developed model in a laboratory environment was performed on PW manufactured on machine tool LOLA HMC 500 and measured on CMM ZEISS UMM 500. The advantage of the model is its suitability for monitoring of the measurement process and digitalization of the measurement process planning, simulation carried out in MatLab, PTC Creo and STEP-NC Machine software and measurement verification based on virtual and real CMM UMM 500, reduction of the preparatory measurement time as early as in the inspection planning phase and minimizing human involvement or human errors through intelligent planning, which directly influences increased production efficiency, competitiveness, and productivity of enterprises. The novelty of the model mirrors in the overcoming of interoperability between different software for CMM programming by automatically generating a point-to-point path that can be used for any CMM software by further post-processing.
The paper is organized through the following main sections: (i) smart metrology and Industry I4.0, (ii) inspection features and ontology knowledge base, (iii) inspection planning model with mathematical model of initial MP, (iv) optimization models and (v) simulation of MP.
2. Outline of the Concept
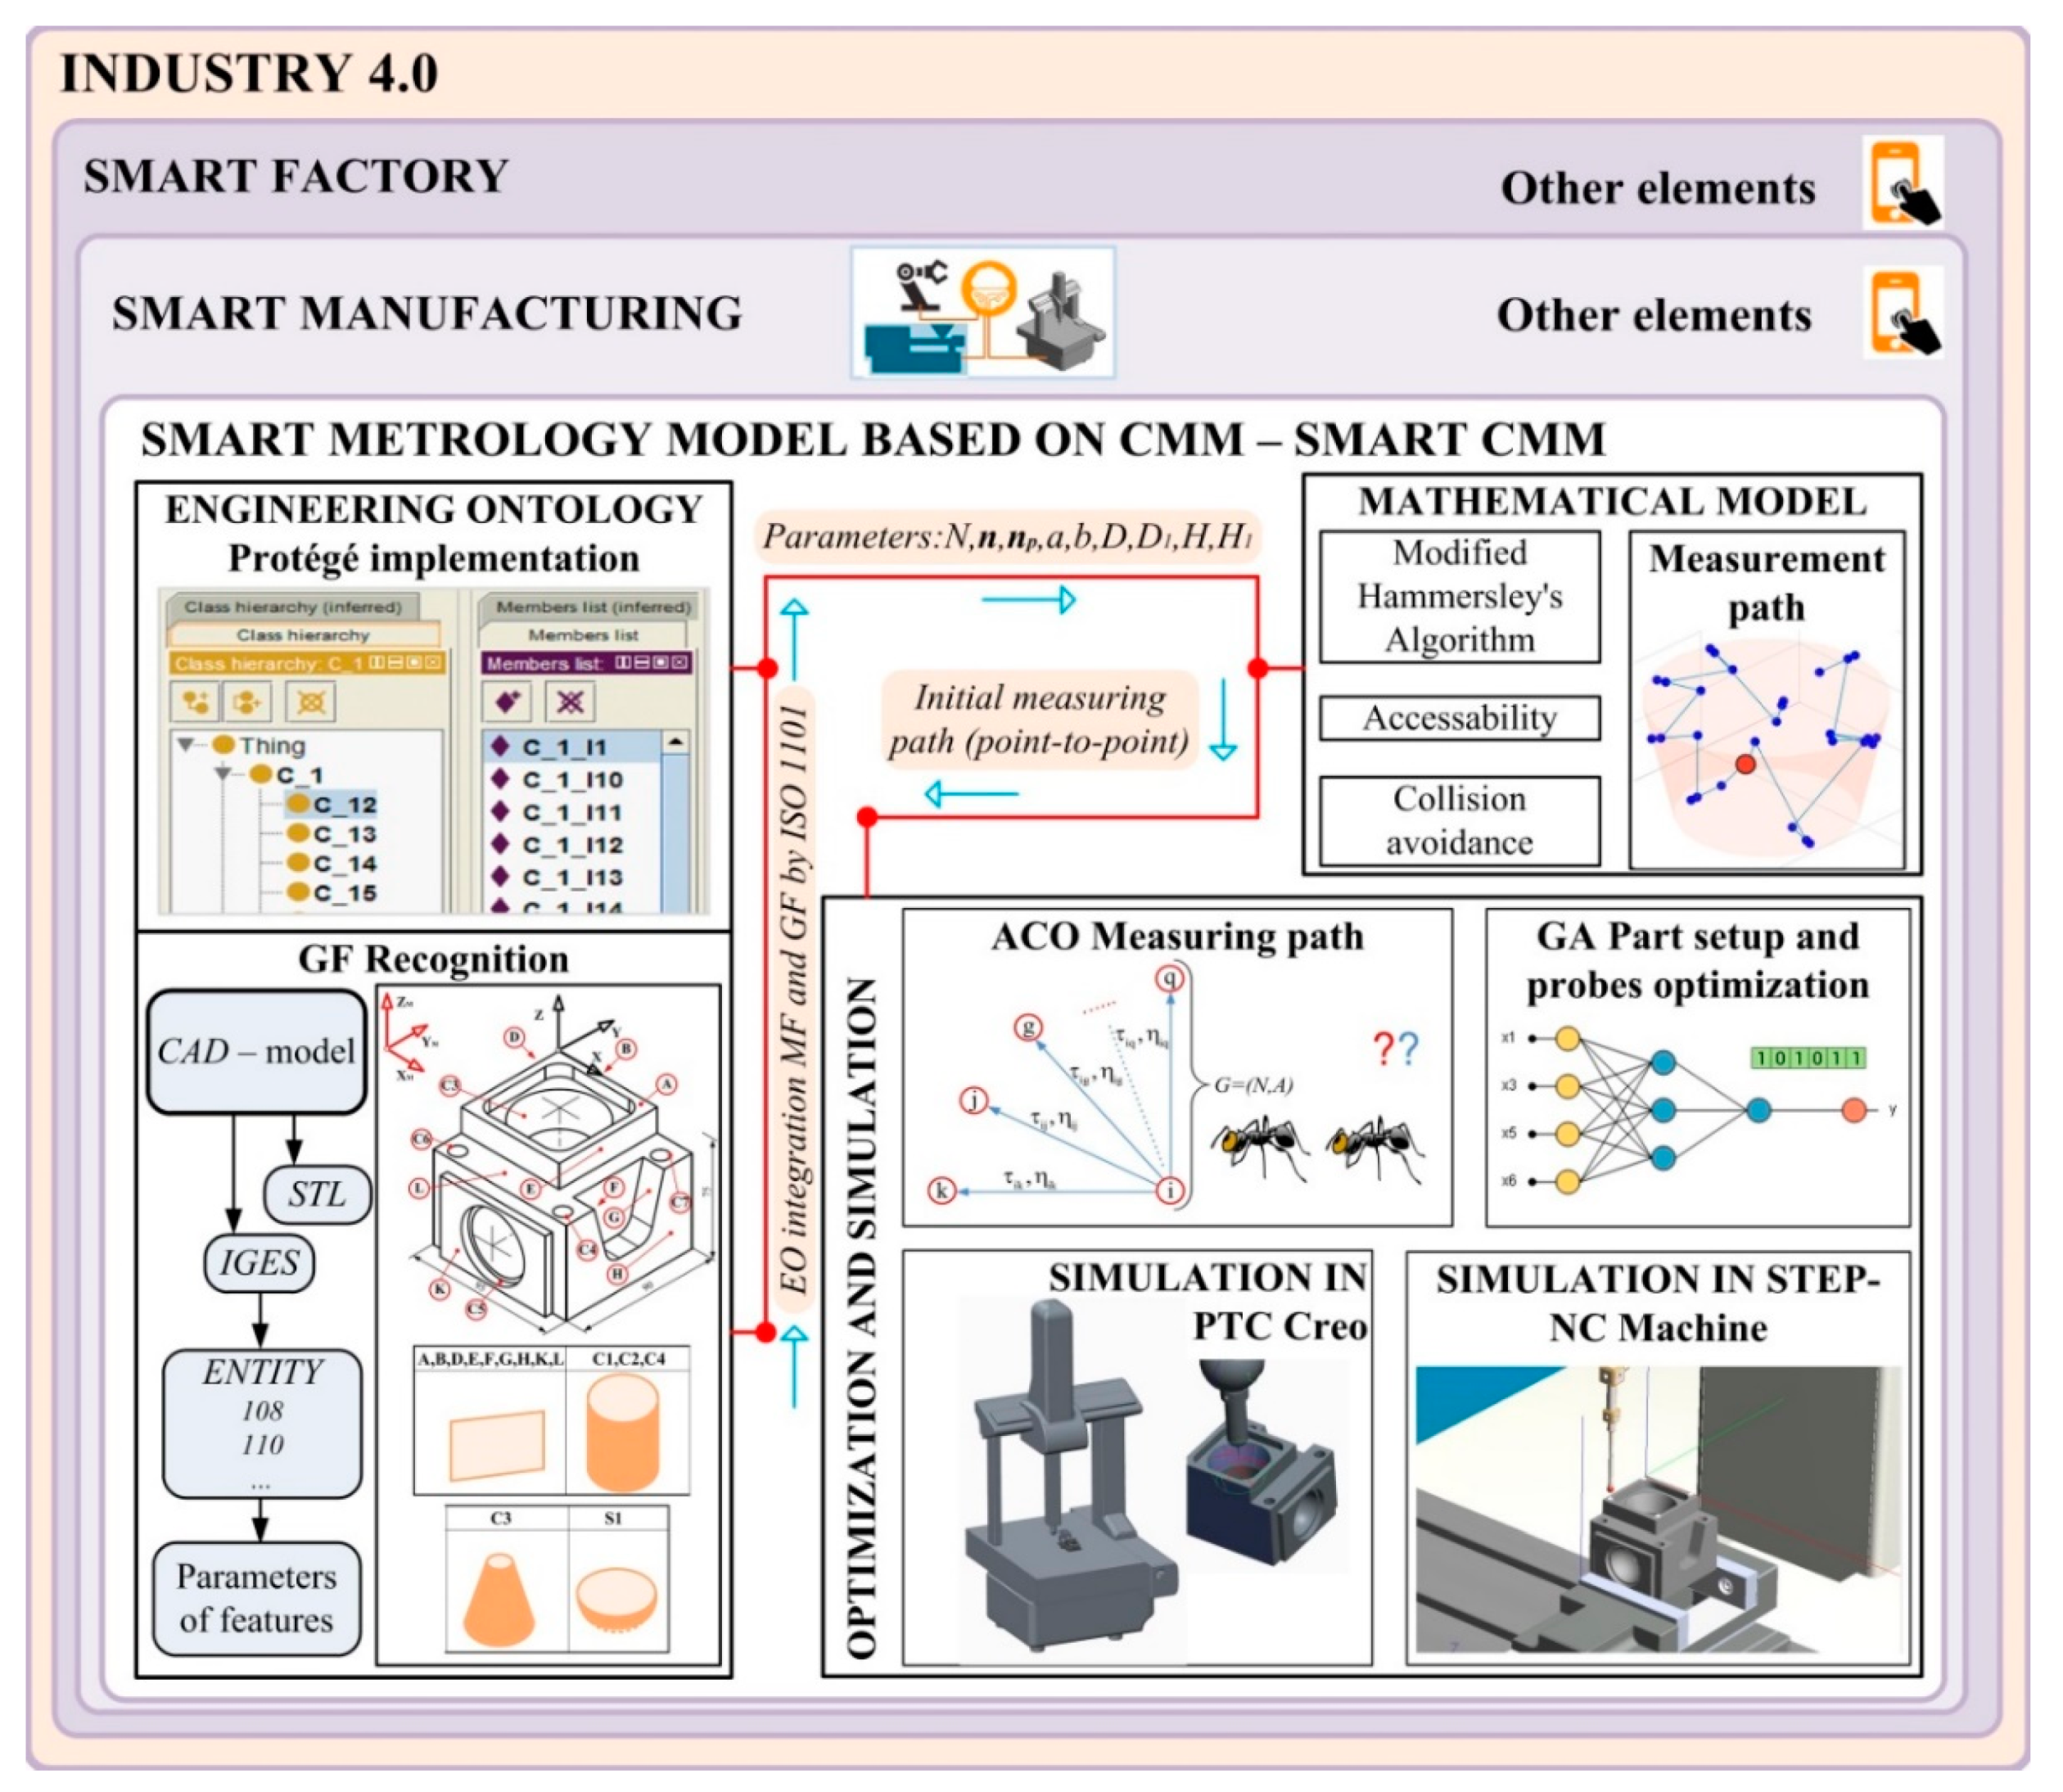
The inspection planning system as a support of manufacturing metrology 4.0 (IP2SM4.0) covers all elements of planning execution of parts inspection on CMM, using the models and connections between them according to Figure 1:
      
    
    Figure 1.
      Outline of the concept.
  
- EO model for extraction of geometric features from IGES and STL file and define GD&T of metrological feature of the PWs and integration by ontology knowledge base;
 - ACO model for design of MP optimization as a first main part of IP2SM4.0;
 - GA model for optimal part setup and probes optimization, as a second main part of IP2SM4.0;
 - Mathematical model integrates distribution of the measurement points, accessibility and collision avoidance analysis;
 - Simulation in MatLab (shown as a measurement path on Figure 1), PTC Creo and STEP-NC Machine and generation of an appropriate output file.
 
Overall output IP2SM4.0 is an optimal MP for real CMM and elimination of human errors through intelligent planning and optimization of probe configuration and PW setup, which directly influences increased production efficiency, competitiveness, and productivity of enterprises.
According to [], manufacturing metrology consists of the following types of measurements: (i) shape, (ii) material, (iii) function, and (iv) electricity. It can conclude that Industry 4.0 model has all types of measurements, with the first component as the most represented for manufacturing. For that reason, the main focus in this paper is tolerance of these types of measurements and tolerance according to standard ISO 1101.
3. Inspection Features and Engineering Ontology
3.1. Inspection Feature Modeling
Inspection feature (IF) consists of one or more geometric features (GFs) and they represent a link between a standard type of tolerances and GFs that PWs consists of. A standard type of GFs such as planes, circles, cylinders, cones, truncated cones, hemispheres and truncated hemispheres are used for the generation and description of all IF types. Each GF is absolutely determined by the parameters in relation to the CS OFXFYFZF. Parameters can be of the following type: coordinates (X,Y,Z), diameter (D,D1) height (H,H1), width (a), length (b), vector of a primitive (n), parameter of the fullness of a feature (np). Extraction of the GFs parameters from IGES file is possible based on the knowledge of its structure and is given in [].
3.2. Ontology Knowledge Base
Assuming that GFs can be represented as EO classes and parameters of the IFs as properties of the classes, this chapter provides an ontological description of IFs and ontology knowledge base. EO components are defined as:
- Classes: represent GFs such as: point C_1, line C_2, circle C_3, ellipse C_4, plane C_5, sphere C_6, cylinder C_7, cone C_8 and torus C_9.
 - Subclasses: GFs that participate in creating other primitives are EO subclasses: C_11, C_12, C_13, …, C_19; C_52, C_53, C_54, C_57, C_58, C_59). e.g., C_52 represents the plane that participates in creating a line.
 - Individuals: represent GFs defined by mentioned parameters. The example of individuals for class point is labeled as C_12_I1 and represents the point obtained as an intersection of straight lines.
 - Properties: individual parameters represent EO properties as four types of properties: coordinates of points, normal vectors, diameter, and angle.
 
Implementation of the developed ontological description was carried out in software Protégé—OWL editor. OWL ontology includes description of classes, properties and individuals. Software Protégé is a free, open source ontology editor based on Java. Protégé implements a set of knowledge-modeling structures and actions that support the creation, visualization, and manipulation of ontologies in various representations of data formats [].
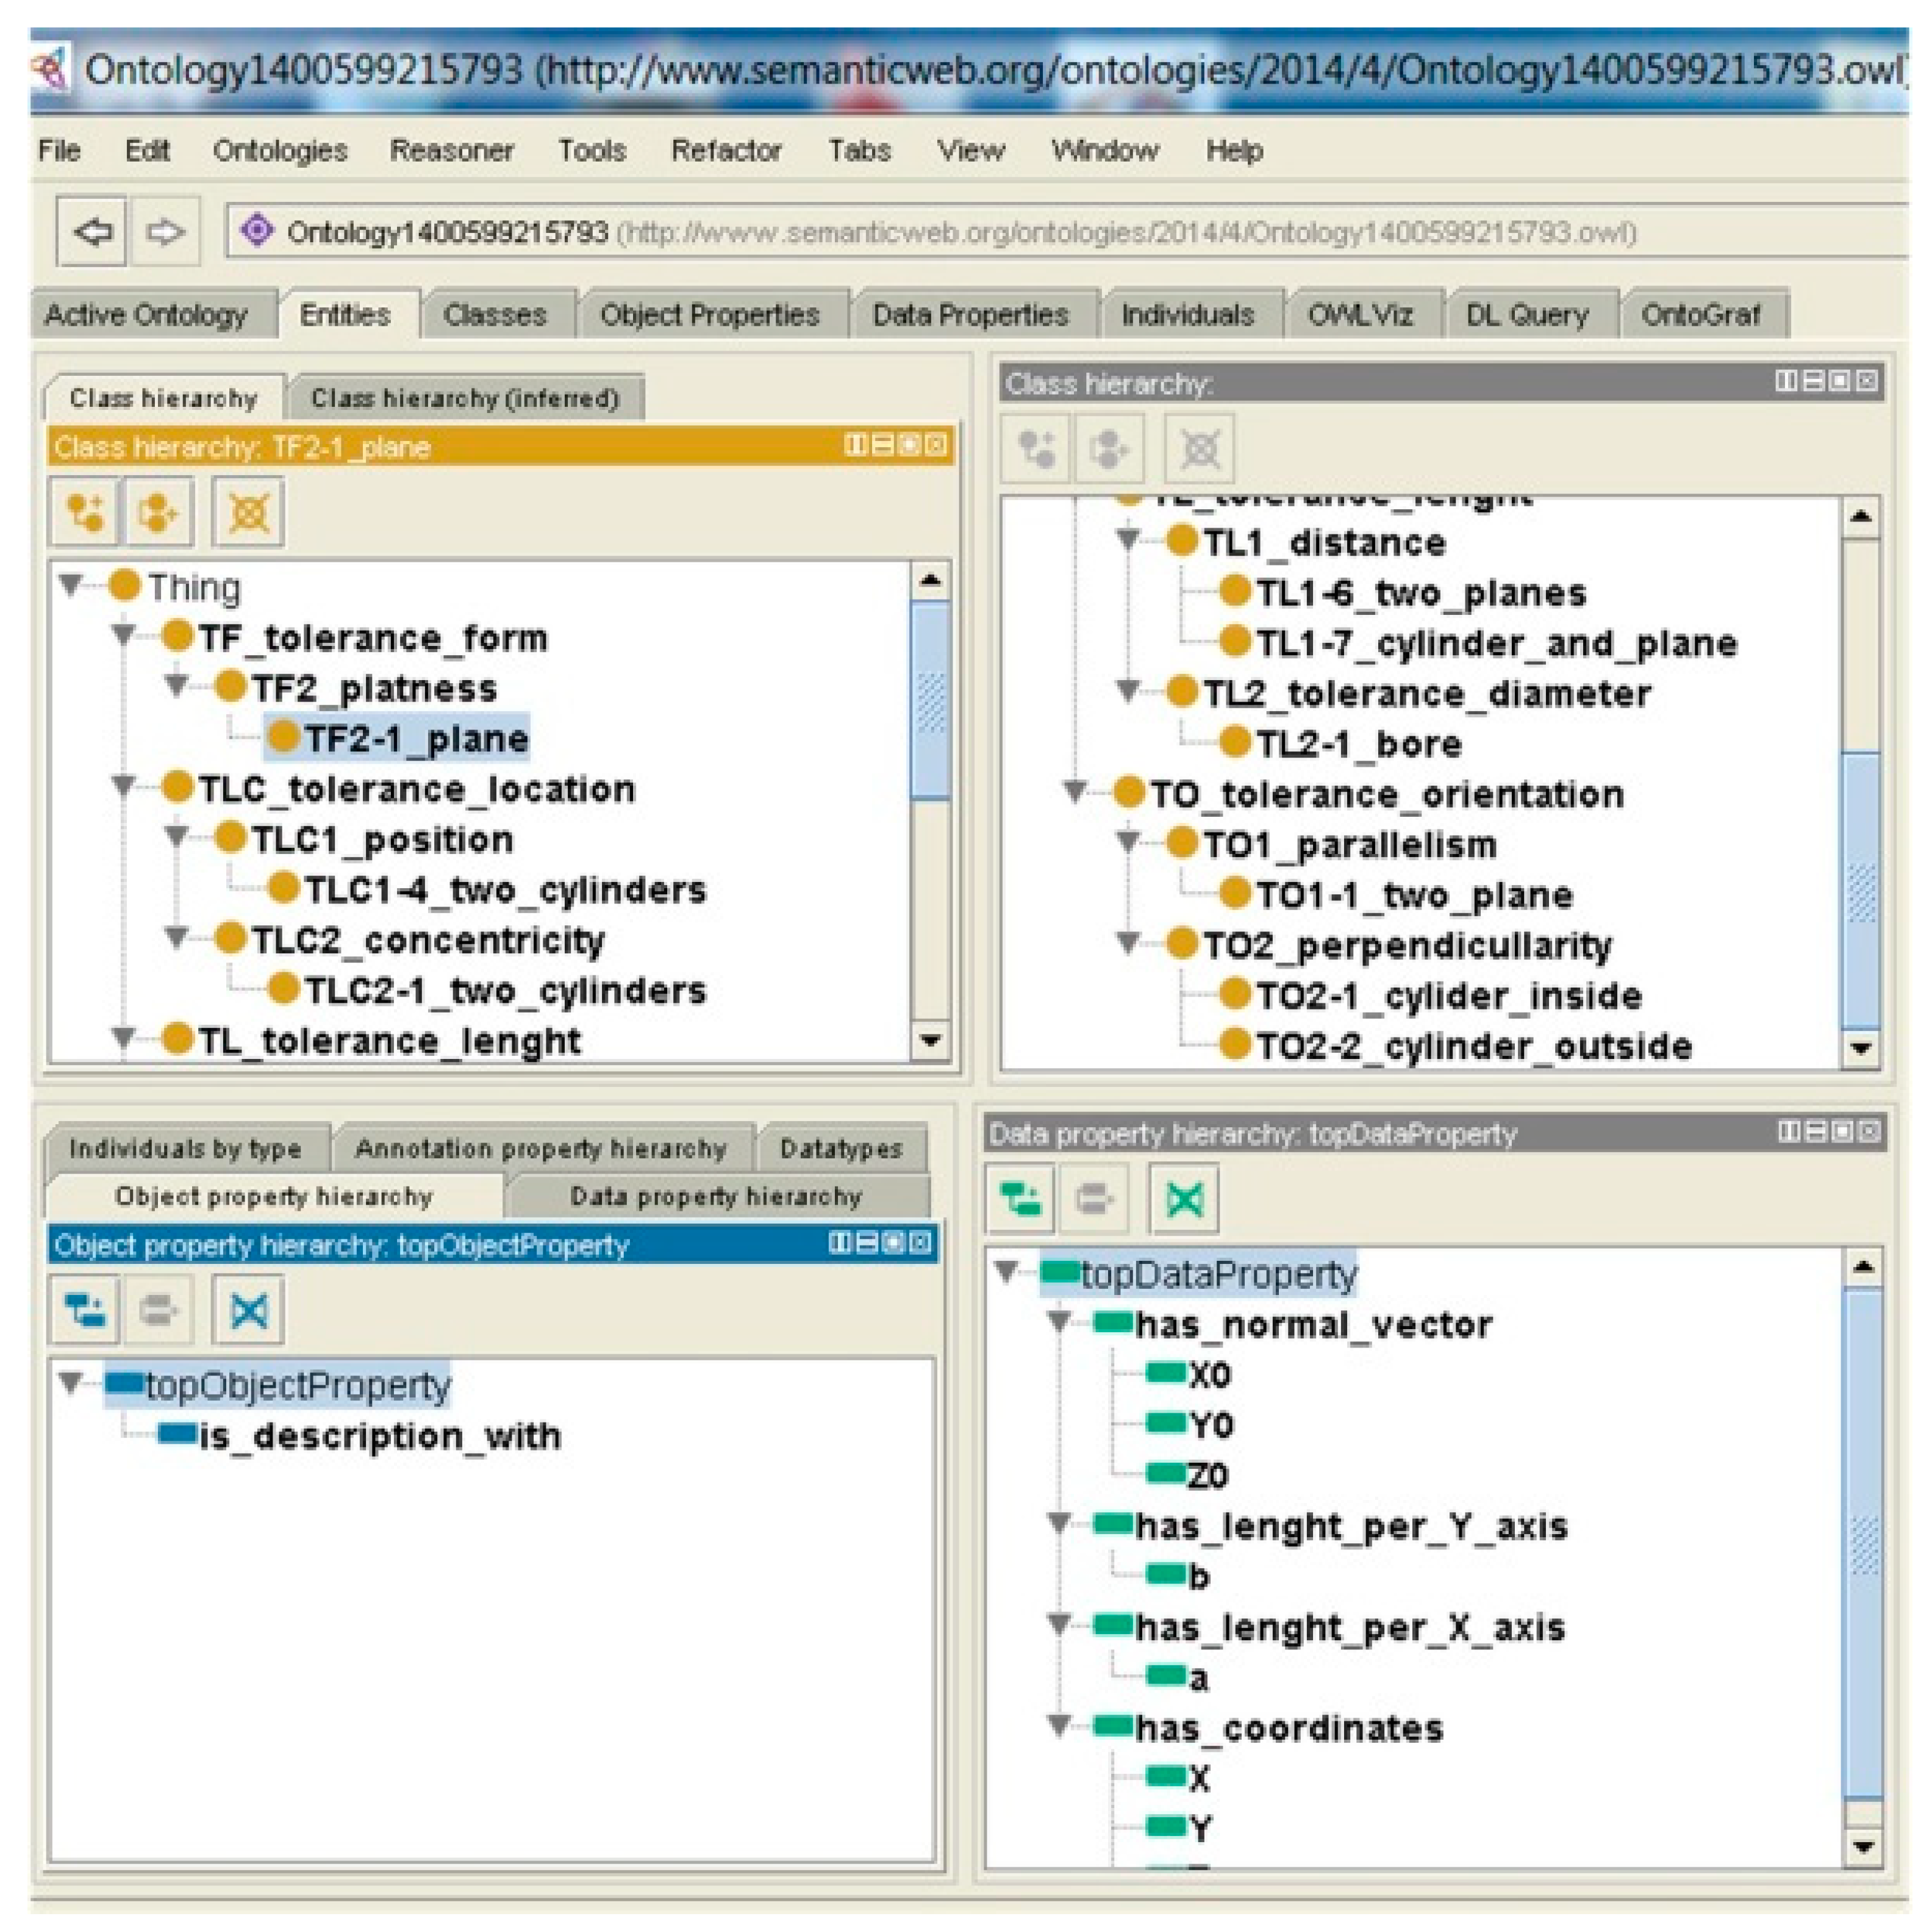
According to [,,], the implementation of IFs in Protégé consists of modeling: (i) classes, (ii) class hierarchy, (iii) individuals, and (iv) classes and individuals’ properties. Figure 2 shows part of the PW ontological structure decomposition (hierarchy of classes, hierarchy of object properties and hierarchy of data properties) into geometric features. Initially, the workpiece was decomposed into standard types of tolerances as defined by ISO 1101.
      
    
    Figure 2.
      Ontology implementation in Protégé—OWL editor.
  
In this case, those are the tolerances of: length (TL), form (TF), orientation (TO) and location (TLC). These types of tolerances are downwards decomposed into specific types of tolerances defined by a standard as well. Adhering to this procedure is necessary because of linking specific tolerance types with tolerances that occur in practice. The next iteration is related to decomposition into upper-level types of tolerances—the types encountered in the technical drawing of the part.
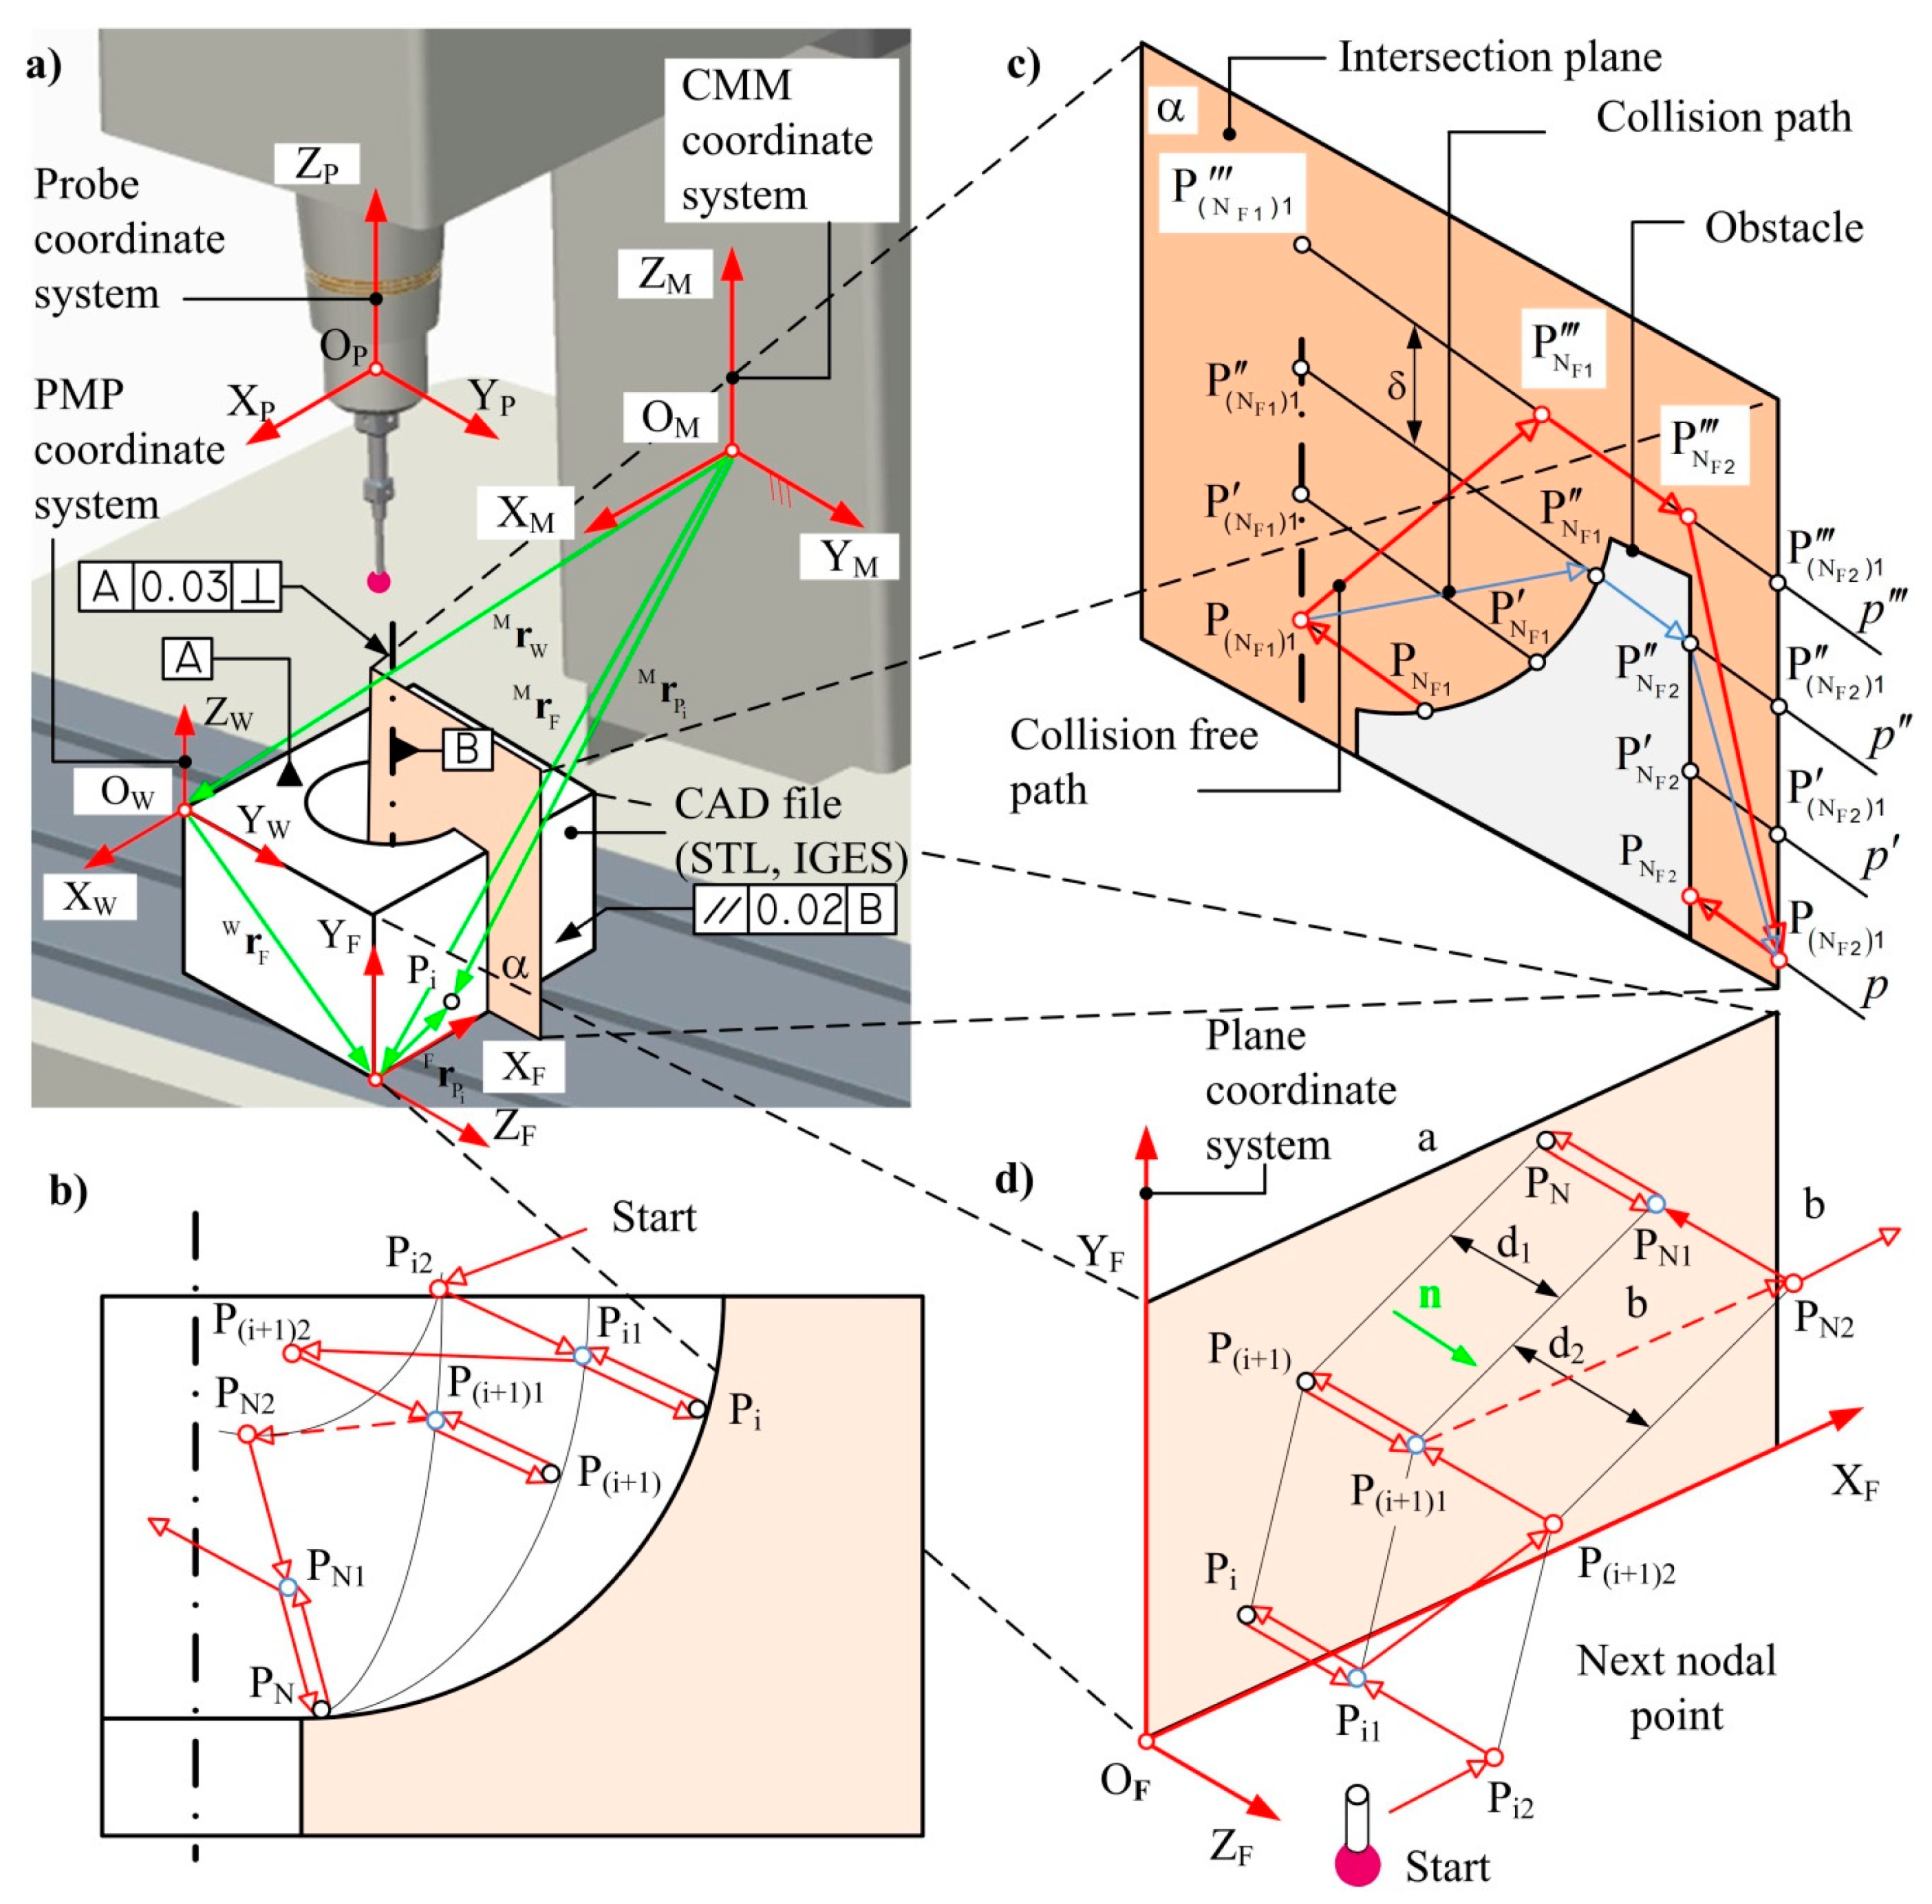
According to the previously described model of the knowledge base, the tolerances of demo PW are reduced to GFs. In that case, all metrological features taking part in the creation of the part tolerance were included: TL, TF, TO and TLC (Figure 3). The TL according to ISO 1101 consists of four basic types of length tolerance (TL-1-61, TL-1-62, TL-1-62 and TL-1-7) and five diameter tolerances (TL-2-11, TL-2-12 TL-2-13 TL-2-14 and TL-2-15). The tolerance of form is TF-2-1, whereas the tolerances of orientation are denoted by TO-2-11, TO-2-12, TO-2-13, TO-2-14, TO-2-11 and TO-2-12. The tolerance of location is indicated by TLC1-4.
      
    
    Figure 3.
      Mathematical model: (a) a PW and its tolerances, (b) initial MP for truncated sphere, (c) collision free path, (d) initial MP for plane.
  
The ontological base integrates tolerances and geometry in compliance with ISO 1101, and concretely for a specific PW it determines uniquely the values of IFs parameters.
4. Inspection Planning Model
The inspection planning model consists of the method of initial MP generating and analysis of PW setups and the configuration of sensors.
4.1. Initial Measuring Path Generating
The initial MP generating starts from the mathematical model presented in [,]. The model is adapted to the needs of the I4.0 concept that is basically related to the aspect of automatic generation of the MP. Primary benefit of the mathematical model is to create connections between CSs (Figure 3a) such as probe (OPXPYPZP), PW (OWXWYWZW), features (OFXFYFZF), and CMM (OMXMYMZM), as well as to generate an initial MP for each IF. According to Figure 3a, the basic Equation (1) of the model is:


        where: —GF system’s position vector in the PW CS, —probe point’s position vector in the GF CS, —PW system’s position vector in the CMM CS, —GF (plane) system’s position vector in the CMM CS.
As aforementioned, the role of a mathematical model is automatic distribution of measuring points per IF and generation of initial MP. Two sets of points generating of the initial path: (i) the measuring points and (ii) nodal points. Sampling strategy of those points for different GFs that make up a single IF is obtained by modifying Hamersley sequences presented in []. An example of equations of measuring points coordinates  in Cartesian CS for a plane and truncated hemisphere, according to [,], is given as follows:
Plane:


        where: —distance per axis x; —distance per axis y
Truncated hemisphere:


        where  is the radius and  is the height of a truncated hemisphere. The set of nodal points implies two sub-sets  and , where is  and N—number of sampling points. The points  presents points for the transition from fast to slow feed. The distance between points  and  is presented (Figure 3d) by —slow feed probe path, and the distance between points  and  is —rapid feed probe path.
According to [,], coordinates of the nodal points  and  are defined from:


        where coordinates  are actually coordinates of the measuring point , while other unknown coordinates are determined from the expression:


        where  is the vector of fullness of GF.
Based on the STL file for the representation of PW shape, the tolerances of PW, the coordinates of the end point  of a feature truncated hemisphere and the coordinates of the start point  of a feature plane, the simplified principle of collision free path between PW and probe for example parallelism tolerance inspection is shown in Figure 3c. An obstacle to be overcome by the principle of collision avoidance is represented in the intersection plane α and refers to parallelism tolerance designated in Figure 3a. As can be seen, in this case, IF is the parallelism tolerance and is composed of two GFs (plane and truncated hemisphere).
The principle is iterative and consists of moving line p for distance δ until the line became collision free (line segment p).
Overall travelled path [] by a measuring probe in the inspection in N measuring points represents an initial MP of a measuring sensor and can be calculated as


        where: P—number of obstacles (transitions from one feature to another),  rapid feed rate and  double travelled slow feed rate for the i-th point, and  length of distance in probe’s transition from previous i-th point to the next (i + 1) nodal point. Calculated coordinates of distributed points (N = 10) for two unit GFs for parallelism tolerance, according to this methodology, are given in Table 1.
       
    
    Table 1.
    Coordinates of distributed measuring and nodal points.
  
4.2. Analysis of PW Setups and Configuration of Sensors
Inspection on a three-axis CMM such as ZEISS UMM 500 can be done from three orthogonal directions corresponding to the axes X, Y and Z. Thus, six directions can be derived corresponding to the axes of the machine +X, −X, +Y, −Y, +Z and −Z. From the standpoint of access to the GF the term feature approach direction (FAD) is presented, while from the standpoint of probes the probe approach direction (PAD) is introduced []. The FADs, as shown in Figure 4a, define possible directions of access to the GF.
      
    
    Figure 4.
      FADs and PADs for PW: (a) FADs for an example PW, (b) possible part setups per some FADs, (c) probe head, (d) PADs for star configuration of probes.
  
FADs are used to analyze the setup of the measuring part as it shown in Figure 4b. On the other side, PADs, as shown in Figure 4c,d, define the possible directions of the probe access. Due to the setup of the PW on the working table of CMM, one of the PADs is lost, so that the maximum number of PADs can be 5.
5. Optimization Models
5.1. Optimization of PW Setups and Probe Configuration
Applying of the model GA is posibile if define the Boolean matrices of PW setup S and probe configuration C. The elements of the matrix S are linked to the FADs and can be 0 or 1. For example, according to Figure 4a, the element of the matrix takes the value because the truncated sphere can be accessed from FAD#1. Similarly, the element of the matrix takes the value because the truncated sphere cannot be accessed from FAD # 4.
Analogous to the matrix S, according to [], the configuration matrix C is also filled to use the PADs. The number of rows of both matrices is equal to the number of GFs which are design IFs. In this case study, they are two types of tolerance (parallelism and perpendicularity) and three GFs, so the matrix C is as follows:


Optimal solutions for the case of PW setup are obtained by GA model [,] and are represented by the zero-columns. Optimal solutions for the case of probe configuring (measuring heads) are also obtained by mentioned GA model and are represented by the one-columns. According to [,], GA consists of three main sections, as follows:
- initial population,
 - fitness function,
 - selection.
 
5.1.1. Initial Population
If introduce a new matrix P, which represents the matrix of randomly defined rows of matrix C or S, it can be defined as the GA initial population, and modified optimization algorithm [,] can be applied, which has Boolean matrix for the initial population and optimal solution.
5.1.2. Fitness Function
According to [], the principle of defining the fitness function has physical meaning that can read like this: possible approach directions (probe configuration) for a single PW setup become ultimate (optimal) only along the most represented directions. Thus, a new fitness function in the matrix form is


          where:


The first condition (F1) is to take from each row of the initial population P matrix at least 1 unit and at most 5 units each. The second condition (F2) is that this unit is taken from the column, whose sum is maximum. This way, priority columns or columns whose sum is maximum, and less important columns or non-priority columns are extracted.
5.1.3. Selection
The selection matrix W in this method is modified and given in [] by the expression (17)


Algorithm was tested for the following parameters: (1) N = m = 16—population size, or the number of features for inspection, (2) G = 5—genome size, (3) S = 100—tournament size, (4) G = 1000—number of used genes and (5) pper = 0.02—value of permutation probability.
5.2. Optimization of Initial Measuring Path
As aforementioned, this planning system considered a model for optimizing the MP based on ants colony. The application of ACO in a coordinate metrology is based on the defining collision zones (Figure 5a,c) and solution of travelling salesmen problem (TSP), where the set of cities corresponds to the set of points of a minimal MP length.
      
    
    Figure 5.
      Collision zone and simulation paths: (a) truncated sphere collision zone, (b) simulation path for truncated sphere, (c) plane collision zone, (d) simulation path for plane. In order to solve Equation (18) and thus obtain the optimal path, it is necessary to solve TSP.
  
According to [], ACO is based on Equation (18) for calculation of the point-to-point measuring probe path during measurement on N points:


        where  represents a constant lengths of MP,  and  as presented in the fourth chapter.
According to [,,], “TSP can be represented by a complete weighted graph  with N being the set of nodes representing the cities, and A being the set of arcs. Each arc  is assigned a value (length) , which is the distance between cities i and j, with . “The goal in TSP is to find a minimum length of Hamiltonian circuit of the graph where a Hamiltonian circuit is a closed path visiting each of the  nodes of G exactly once” [,], so that an optimal solution to the TSP is a permutation  of the node indices .
The decision on which path is the shortest is obtained based on the criteria of the maximum amount of ants colony evaporated pheromones. For that it use the values of the weight coefficients τij and ηij. Coefficient ηij represents the influence of the distance between two nodes of a graph, while τij is the probability that an ant leaving the node i visits the node j as the next one.
The results of comparison based on this optimization model for three paths and two GFs (Figure 5b,d) is given in Table 2 (Section 6.4). The value of optimal path saving is shown in rows 4 (IC—impact) and 5 (IS—impakt). DC is distance PTC Creo MP and DS—distance STEP-NC Machine generated MP.
6. Simulation of Measuring Path
Simulation of the MP is based on [,,] and carried out in order to configure the virtual CMM environment for programming and program verification, as well as to avoid collision. Thus, the goal of simulation is to visually inspect the MP in terms of collision for a PW and its tolerance. It is partially based on above mentioned model developed for inspection planning, and at the output it gives a measurement protocol or a list of control data that contains data about coordinates of the measuring points and interposition points. The other part is based on the application of existing software programs for simulation such as PTC Creo and STEP-NC Machine to perform comparison of the MPs lengths.
6.1. MatLab Simulation
For verification of the IP2SM4.0 and path simulation, for visual inspection of collision between a measuring sensor and PW, a program was written in MatLab environment. The major goals of the written program is generation of the measurement protocol and the list of control data at the output [], which are used afterwards in the experiment process planning and as the input for experimental measurements.
The MatLab Simulation was developed using three algorithms, presented in [], as follows:
- measuring points distribution,
 - collision free pat generation, and
 - measuring path planning.
 
As the examples for the verification of MPs on virtual CMM, IFs of plane and cylinder are selected from PW. For both features the unique parameters are defined by ontology knowledge base, e.g., for plane these parameters are a, b, and n as well as the homogenous transformation matrix  that defined the position and orientation of CS of the GF, , in accordance with the coordinate frame of PW . Those parameters are used as input data for simulation in a MatLab environment.
The examples of generated initial MPs for plane and cylinder are shown in Figure 6a. Thus generated points are sorted in unique sequences—MP for each IFs. This unique sequence was first visualized in Matlab and then saved in file for loading in CAD/CAM system—PTC Creo.
      
    
    Figure 6.
      Simulation of measiring path: (a) MatLab simulation, (b) PTC Creo simulation, (c) STEP-NC Machine simulation.
  
6.2. PTC Creo Simulation
The PTC Creo software and the Manufacturing module within it were used to design the MP. According to [], for creating a MP, the following activities need to be performed: (i) loading of CAD PW; (ii) modeling of CMM; (iii) creating of measurement operation and selecting of task’s CS; (iv) choosing of measuring probes; (v) selection of IFs according to tolerance of PW; (vi) choosing of measuring parameters; (vii) import of measurement points, given as a result of the output of the MatLab visualization code; (viii) generation and simulation of a MP on configured VCMM, including a probe.
A model of VCMM is shown in []. A detailed VCMM model in PTC Creo software with assembly and kinematic links is presented in []. Moving kinematic links (sliders per X, Y, Z axis) allow the movement of CMM components within the permissible limits for each axis and realize the programmed path.
According to [], to perform simulation it is necessary to define the CS of:
- CMM granite table (MACH_ZERO),
 - PW (MACH_ZERO),
 - probe holder (TOOL_POINT), and
 - probe tip (TOOL).
 
Matching the MACH_ZERO CS of PW with the MACH_ZERO granite table CS enables the PW setup on the granite table of configured VCMM during simulation. The same procedure is applied for matching of CSs TOOL and TOOL_POINT for probe setting in a probe holder.
The simulation of MPis applied on a configured VCMM UMM 500 in manufacturing module of PTC Creo software as it shown in Figure 6b. Simulated MP was verified and saved in a CL file (DMIS program) for the purpose of executing the measurement program on real CMM such as UMM 500.
6.3. STEP-NC Machine Simulation
The STEP-NC Machine software is used to create a visual measuring system which can include virtual CMM and simulation of the measuring process for generation, verification and monitoring of a MP.
According to [], STEP-NC Machine simulation based on CMM in this paper consists of the next main steps: (i) creating CAD model of the PW in available CAD system; (ii) defining the CS on the PW (ii) export of this CAD model as a STEP file according to defined coordinate system; (iii) setting up the defined unit before loading of prepared STEP file for inspection into STEP-NC Machine as a PW; (iv) choose the option Probing and Create probing operation; (v) setting of measuring parameters for selected step such as: max. number of probe points, probe clearance, probe along (surface normal or Z-axis), moving between probes, and probe delta distances; (vi) generation of MP and save STEP-NC file; (vii) simulation of MP including head and probe, and (viii) MP simulation on configured Virtual machine UMM500 in STEP-NC Machine, Figure 6c; (ix) export of DMIS file. If STEP-NC file contains machining features or geometric tolerances, STEP-NC Machine can display them.
Based on STEP-NC Machine simulation, the output can generate the DMIS file.
6.4. Results of Comparison
The experiment was performed by simulating three types of measurements. The first measurement simulation was performed in PTC Creo software, the second in STEP-NC Machine software and the third measurement in MatLab software according to the ACO model, presented in Section 5.2. The results of the comparison according to the criterion of the minimum path of the measuring sensor, for individual GFs, are given in Table 2. In this case, as mentioned earlier, the required variables are marked as: DC is the measuring path length obtained by PTC Creo; DS is the measuring path length obtained by STEP-NC Machine; DO is the optimized measuring path length obtained with ACO simulated in MatLab software; IC is percentage of saving of the measuring path length DO in relation to DC; IS is percentage of saving of the measuring path length DO in relation to DS.
       
    
    Table 2.
    Results of comparison of the three measuring paths for basic GFs.
  
A realistic comparison is assured by the basic postulate that the measuring process is the same in all three cases (methods), which can be adjusted so that the parameters have the same value in all three methods. The influence of the start and end points is minimised using such a setting that the parameters of measuring process are the same in all three methods.
The length of the software measuring paths length DC and DS are taken from the corresponding CL or DMIS file generated by PTC Creo and STEP-NC Machine, while the optimized path length DO is the shortest path obtained with the ACO—based model. The software path is obtained by analysing the CL file that shows points used for construction of the measuring path.
Table 2 shows the values of measuring path lengths (DC, DS and DO) obtained with three simulation methods, as well as the results of comparison. For the observed GFs, the impact IC = 100 − (DO/DC [%]) are in the interval 30.11–12.81%, which presents reduction (save) of the measuring path obtained with ACO by at least 12.81%. The impact IS = 100 − (DO/DS [%]) are in the interval 15.16–3.71%, which presents reduction (save) of the measuring path obtained with ACO by at least 3.71%. In accordance with MPE, the results of comparisons were rounded to 2 μm.
7. Conclusions
This paper presents an IP2SM4.0 for Industry 4.0. The described system is based on a digital (towards smart) CMM suitable for accomplishing smart metrological processes in accordance with metrological tasks of the concept Industry 4.0. Generally, metrological tasks depend on geometrical and metrological complexity of PW and it is very important to verify the smart measuring process before the execution of measurement and MP on CMM. The CMMs are recognized as a flexible element of production metrology, and they are applicable for a wide range of metrological tasks. It is for this reason that CMM is used in this paper as a measuring device.
In the present paper, the verification of MP, based on IP2SM4.0, is first visualized in MatLab, then through simulations in the STEP-NC and CMM modules of PTC Creo. The simulation of the MP was realized on the configured VCMM UMM 500. Output from the simulation on virtual CMM generated MP was saved in the CL file (DMIS program). When this file is generated, the developing of a postprocessor leaves the possibility for creating a control data list for different CMMs.
A comparison of three types of simulated measurement paths on VCMMs was performed. The optimal measuring path was compared with (i) the PTC Creo programmed measuring path, and (ii) the automatically generated measuring path in the STEP-NC Machine software for a specially designed PW for this purposes. The optimal measuring path is compared with the PTC Creo measuring path on a CMM and with the automatically generated measuring path in the STEP-NC Machine, for the observed PW. A comparison between the optimal path obtained by ACO and the PTC Creo programmed path shows improvement, i.e., reduction of the measuring path length per GFs in the interval from 12.81% to 30.11%. Also, the optimal path obtained by ACO is shorter per GFs from 3.71% to 15.16%, that the path obtained with STEP-NC Machine software, using the same parameter settings for both methods.
The advantage of this approach is to reduce the measurement time by optimization of the measurement path for measurement of complex PWs. If it is known that in measurements on a CMM the measuring path length given in Table 2 is directly proportional to time, mentioned optimizations reduce length of measuring path and thus reduce measuring time and raising work productivity on a CMM in the inspection planning phase and later in the measurements execution phase. Also, the advantages of IP2SM4.0 involve open architecture, flexibility and adaptability to various measurement strategies, from conventional to the latest, such as the STEP-NC Machine software strategy. On the other hand, commercial software packages do not have a completely open architecture. IP2SM4.0 automatically generates the measuring path, eliminating operator’s intuition and experience to a large extent, which is in the context of Industry 4.0 one of the prerequisites for its successful application.
Conducted research in this paper is an answer to the industry’s requirement as its maintenance of the permanent, required level of inspection by modeling and simulation of the part of activity performed by an inspection planner. On the basis of proposed methodology, directions of future research would embrace extension to non-prismatic machine parts (parts with free-form measuring surfaces) and towards the development of a digital twin for measurements on a CMM.
Author Contributions
S.M.S.: conceptualization, methodology, software, validation, investigation, resources, writing—original draft preparation, visualization; V.D.M.: conceptualization, methodology, investigation, resources, writing—review and editing, visualization, supervision; A.G.: conceptualization, methodology, software, validation, investigation, resources, writing—original draft preparation, visualization; J.S.: conceptualization, methodology, investigation, resources, writing—review and editing, visualization, supervision. N.M.D.: conceptualization, methodology, investigation, resources, writing—review and editing, visualization, supervision. All authors have read and agreed to the published version of the manuscript.
Funding
This research received no external funding.
Institutional Review Board Statement
Not applicable.
Informed Consent Statement
Not applicable.
Data Availability Statement
The data presented in this study is available within this article.
Acknowledgments
The presented research was supported by the Ministry of Education, Science and Technological Development of the Republic of Serbia under Grant No. 451-03-9/2021-14/200105.
Conflicts of Interest
The authors declare no conflict of interest.
Abbreviations
The following abbreviations are used in this manuscript:
      
| AI | artificial intelligence | 
| ACO | ants colony optimization | 
| AP | application protocols | 
| BDA | big data analytics | 
| CAI | computer aided inspection | 
| CAD | computer aided design | 
| CAM | computer aided manufacturing | 
| CMM | coordinate measuring machine | 
| CPS | cyber physical system | 
| CP2M | cyber physical manufacturing metrology | 
| CP3M | cyber physical manufacturing metrology model | 
| CL | cutter location | 
| CS | coordinate system | 
| DMIS | dimensional measuring interface standard | 
| DML | dimensional markup language | 
| ERP | enterprise resource planning | 
| EO | engineering ontology | 
| FAD | feature approach direction | 
| GA | genetic algorithm | 
| GF | geometric feature | 
| IoT | Internet of Things | 
| IT | information technology | 
| IIoT | industrial internet of things | 
| IP2SM4.0 | inspection planning system as a support of manufacturing metrology 4.0 | 
| IGES | initial graphics exchange specification | 
| MES | manufacturing execution system | 
| MM4.0 | manufacturing metrology | 
| MP | measuring path | 
| OWL | web ontology language | 
| PAD | probe approach direction | 
| PW | prismatic workpiece | 
| STEP | standard for the exchange of product model data | 
| STL | standard triangle language | 
| SaaS | software as a service | 
| SMEs | small and medium-sized enterprises | 
| TSP | traveling salesman problem | 
| TL | tolerances of length | 
| TF | tolerances of form | 
| TO | tolerances of orientation | 
| TLC | tolerances of location | 
| VCMM | virtual coordinate measuring machine | 
References
- Zhong, R.Y.; Xu, X.; Klotz, E.; Newman, S.T. Intelligent manufacturing in the context of industry 4.0: A review. Engineering 2017, 3, 616–630. [Google Scholar] [CrossRef]
 - Lee, J.; Bagheri, B.; Kao, H.-A. A Cyber-Physical Systems architecture for Industry 4.0-based manufacturing systems. Manuf. Lett. 2015, 3, 18–23. [Google Scholar] [CrossRef]
 - Stojadinovic, S.M.; Majstorovic, V.D.; Durakbasa, N.M. Toward a cyber-physical manufacturing metrology model for industry 4.0. Artif. Intell. Eng. Des. Anal. Manuf. 2021, 35, 20–36. [Google Scholar] [CrossRef]
 - RWTH Aachen Campus. Available online: https://i40mc.de/en (accessed on 20 April 2020).
 - Industry 4.0 and the Fourth Industrial Revolution Explained. Available online: https://www.i-scoop.eu/industry-4-0 (accessed on 20 April 2020).
 - Majstorovic, V.D.; Durakbasa, N.; Takaya, Y.; Stojadinovic, S. Advanced Manufacturing Metrology in Context of Industry 4.0 Model. In Proceedings of the Recent Advances in Computational Mechanics and Simulations, Belgrade, Serbia, 4–7 June 2019; pp. 1–11. [Google Scholar]
 - Majstorovic, D.V.; Stojadinovic, S. Cyber Physical Manufacturing Metrology NEWTECH 2020 IOP Conf. 2020 Series: Materials Science and Engineering; IOP Publishing: Bristol, UK, 2020. [Google Scholar]
 - Yong, Y.; Kathryn, E.S.; Dongni, L. The evolution of production systems from Industry 2.0 through Industry 4.0. Int. J. Prod. Res. 2018, 56, 848–861. [Google Scholar]
 - Lu, Y.; Xu, X.; Wang, L. Smart manufacturing process and system automation–A critical review of the standards and envi-sioned scenarios. J. Manuf. Syst. 2020, 56, 312–325. [Google Scholar] [CrossRef]
 - Lu, Y.; Huang, H.; Liu, C.; Xu, X. Standards for Smart Manufacturing: A review. In Proceedings of the 2019 IEEE 15th International Conference on Automation Science and Engineering (CASE), Vancouver, BC, Canada, 22–26 August 2019; pp. 73–78. [Google Scholar]
 - Takaya, Y. Strategic Vision for Smart Machining Tool and Measuring Instrument. NTN Tech. Rev. 2018, 86, 20–41. [Google Scholar]
 - Lee, C.-H.; Chen, C.-H.; Lin, C.; Li, F.; Zhao, X. Developing a Quick Response Product Configuration System under Industry 4.0 Based on Customer Requirement Modelling and Optimization Method. Appl. Sci. 2019, 9, 5004. [Google Scholar] [CrossRef]
 - Lazzari, A.; Pou, J.-M.; Dubois, C.; Leblond, L. Smart metrology: The importance of metrology of decisions in the big data era. IEEE Instrum. Meas. Mag. 2017, 20, 22–29. [Google Scholar] [CrossRef]
 - Ana, P.C.-M.; Horacio, A.-G.; Darío, G.-L.; Maria, F.M.-A.; Pedro, D.U.C.; Pedro, A.O.C.; Thomas, R.K.; Emilio, G.C. Connectivity as a Design Feature for Industry 4.0 Production Equipment: Application for the Development of an In-Line Metrology System. Appl. Sci. 2021, 11, 1312. [Google Scholar]
 - Sander, L.; Norbert, G. A factory operating system for extending existing factories to Industry 4.0. Comput. Ind. 2020, 115, 103128. [Google Scholar]
 - Tariq, M.; Paul, S. Industry 4.0: Adoption challenges and benefits for SMEs. Comput. Ind. 2020, 121, 103261. [Google Scholar]
 - Alberto, C.; Miguel, A.S.; Cristina, G.G. Industry 4.0 HUB: A Collaborative Knowledge Transfer Platform for Small and Me-dium-Sized Enterprises. Appl. Sci. 2021, 11, 5548. [Google Scholar]
 - Szilárd, J.; Adrienn, S.; Tibor, H.; Tibor, C.; János, A. Development of manufacturing execution systems in accordance with Industry 4.0 requirements: A review of standard- and ontology-based methodologies and tools. Comput. Ind. 2020, 123, 103300. [Google Scholar]
 - Sameer, M.; Muztoba, K.; David, R.; Thorsten, W. A critical review of smart manufacturing & Industry 4.0 maturity models: Implications for small and medium-sized enterprises (SMEs). J. Manuf. Syst. 2019, 49, 194–214. [Google Scholar]
 - Dan, L.; Asa, F.-B.; Dan, P. Current and future Industry 4.0 capabilities for information and knowledge sharing-Case of two Swedish SMEs. Int. J. Adv. Manuf. Technol. 2019, 105, 3951–3963. [Google Scholar]
 - Majstorović, V.; Mačužić, J.; Šibalija, T.; Živković, S. Cyber-Physical Manufacturing Systems–Manufacturing Metrology Aspects. J. Proc. Manuf. Syst. 2015, 10, 9–14. [Google Scholar]
 - Berthold, J.; Imkamp, D. Looking at the future of manufacturing metrology: Roadmap document of the German VDI/VDE Society for Measurement and Automatic Control. J. Sens. Sens. Syst. 2013, 2, 1–7. [Google Scholar] [CrossRef][Green Version]
 - Majstorovic, V.D.; Stojadinovic, S.M.; Sibalija, T.V. Development of a knowledge base for the planning of prismatic parts inspection on CMM. Acta IMEKO 2015, 4, 10. [Google Scholar] [CrossRef]
 - Stanford University, Protégé. Available online: http://protege.stanford.edu/ (accessed on 5 April 2012).
 - Stojadinović, S.M.; Majstorovic, V. Developing engineering ontology for domain coordinate metrology. FME Trans. 2014, 42, 249–255. [Google Scholar] [CrossRef]
 - Stojadinovic, S.; Majstorovic, V. Towards the Development of Feature–Based Ontology for Inspection Planning System on CMM. J. Mach. Eng. 2012, 12, 89–98. [Google Scholar]
 - Stojadinović, S.M.; Majstorović, V.D. An Intelligent Inspection Planning System for Prismatic Parts on CMMs; Springer Science and Business Media LLC: Berlin, Germany, 2019. [Google Scholar]
 - Stojadinovic, S.M.; Majstorovic, V.D.; Durakbasa, N.M.; Sibalija, T.V. Towards an intelligent approach for CMM inspection planning of prismatic parts. Measurement 2016, 92, 326–339. [Google Scholar] [CrossRef]
 - Rice, O.; Nyman, R. Efficiently Vectorized Code for Population Based Optimization Algorithms; UCL Department of Computer Science: London, UK, 2013. [Google Scholar]
 - Stojadinovic, S.; Majstorovic, V.; Durakbasa, N.; Sibalija, T. Ants Colony Optimization of the Measuring Path of Prismatic Parts on a CMM. Metrol. Meas. Syst. 2016, 23, 119–132. [Google Scholar] [CrossRef]
 - Dorigo, M.; Stützle, T. Ant Colony Optimization; The MIT Press: Cambridge, MA, USA, 2004. [Google Scholar]
 - Dorigo, M.; Blum, C. Ant colony optimization theory: A survey. Theor. Comput. Sci. 2005, 344, 243–278. [Google Scholar] [CrossRef]
 - Stojadinovic, M.S.; Zivanovic, S.; Slavkovic, N. Verification of the CMM Measurement Path Based on the Modified Ham-mersly’s Algorithm. In Proceedings of the 12th International Conference on Measurement and Quality Control–Cyber Physical Issue, Belgrade, Serbia, 4–7 June 2019; pp. 25–38. [Google Scholar]
 - Sładek, J.; Gąska, A.; Olszewska, M.; Kupiec, R.; Krawczyk, M. Virtual coordinate measuring machine built using Laser Tracer system and spherical standard. Metrol. Meas. Syst. 2013, 1, 77–86. [Google Scholar] [CrossRef]
 - STEP Tools. Available online: https://www.steptools.com (accessed on 11 February 2021).
 
Publisher’s Note: MDPI stays neutral with regard to jurisdictional claims in published maps and institutional affiliations.  | 
© 2021 by the authors. Licensee MDPI, Basel, Switzerland. This article is an open access article distributed under the terms and conditions of the Creative Commons Attribution (CC BY) license (https://creativecommons.org/licenses/by/4.0/).